

Page 1

BEDIENUNGSANLEITUNG
OPERATING INSTRUCTIONS
NOTICE D’UTILISATION
MCS-D 202
Dolmetscherpult
Interpreter Station
Pupitre d’interprète
Page 2

MCS-D 202 – Contents
17
english
1. Controls and Indicators . . . . . . . . . . . . . . . . . . . . . . . . . . . . . . . . . . . . . . . . . . . . . . . . . . . . . . . . . . . . . . . . . . . . . . . . 18
2. How to connect the MCS-D 202 . . . . . . . . . . . . . . . . . . . . . . . . . . . . . . . . . . . . . . . . . . . . . . . . . . . . . . . . . . . . . . . . . 19
3. How to program the Relay Channel Buttons 1-3 . . . . . . . . . . . . . . . . . . . . . . . . . . . . . . . . . . . . . . . . . . . . . . . . . . . . . 20
4. Output Channels A and B . . . . . . . . . . . . . . . . . . . . . . . . . . . . . . . . . . . . . . . . . . . . . . . . . . . . . . . . . . . . . . . . . . . . . . 21
4.1 How to program the Output Channels A and B . . . . . . . . . . . . . . . . . . . . . . . . . . . . . . . . . . . . . . . . . . . . . . . . . 21
5. Call Buttons . . . . . . . . . . . . . . . . . . . . . . . . . . . . . . . . . . . . . . . . . . . . . . . . . . . . . . . . . . . . . . . . . . . . . . . . . . . . . . . . . 22
6. How to assign the Interpreter ID. . . . . . . . . . . . . . . . . . . . . . . . . . . . . . . . . . . . . . . . . . . . . . . . . . . . . . . . . . . . . . . . . . 24
7. List of Language Codes . . . . . . . . . . . . . . . . . . . . . . . . . . . . . . . . . . . . . . . . . . . . . . . . . . . . . . . . . . . . . . . . . . . . . . . . 26
8. Technical Specifications . . . . . . . . . . . . . . . . . . . . . . . . . . . . . . . . . . . . . . . . . . . . . . . . . . . . . . . . . . . . . . . . . . . . . . . . 28
Page 3
MCS-D 202 – Controls and Indicators
18
Thank you for selecting the MCS-D 202 interpreter station from beyerdynamic.
Please take some time to read carefully through this manual before using the product.
The MCS-D 202 interpreter station can directly be integrated into a conference network. The MCS-D 202 does not need a separate control
unit and like all other microphone units in the network, it can be connected to the MCS-D 200 control or a CA 4146 power supply unit.
The access to the audio channels can be configured according to the application. The interpreter station can be operated with a gooseneck
microphone or headset connected to the 8-pin connection (DIN 45326).
Safety Information
• Conference microphone stations with metal casings are heavy, so always position them on a secure surface.
• If the microphone stations have a gooseneck microphone take care that you do not injure yourself on this e.g. poke it into your eye.
• If you use earphones or headphones with the microphone station, please do not set the volume too high, it could permanently damage
your hearing.
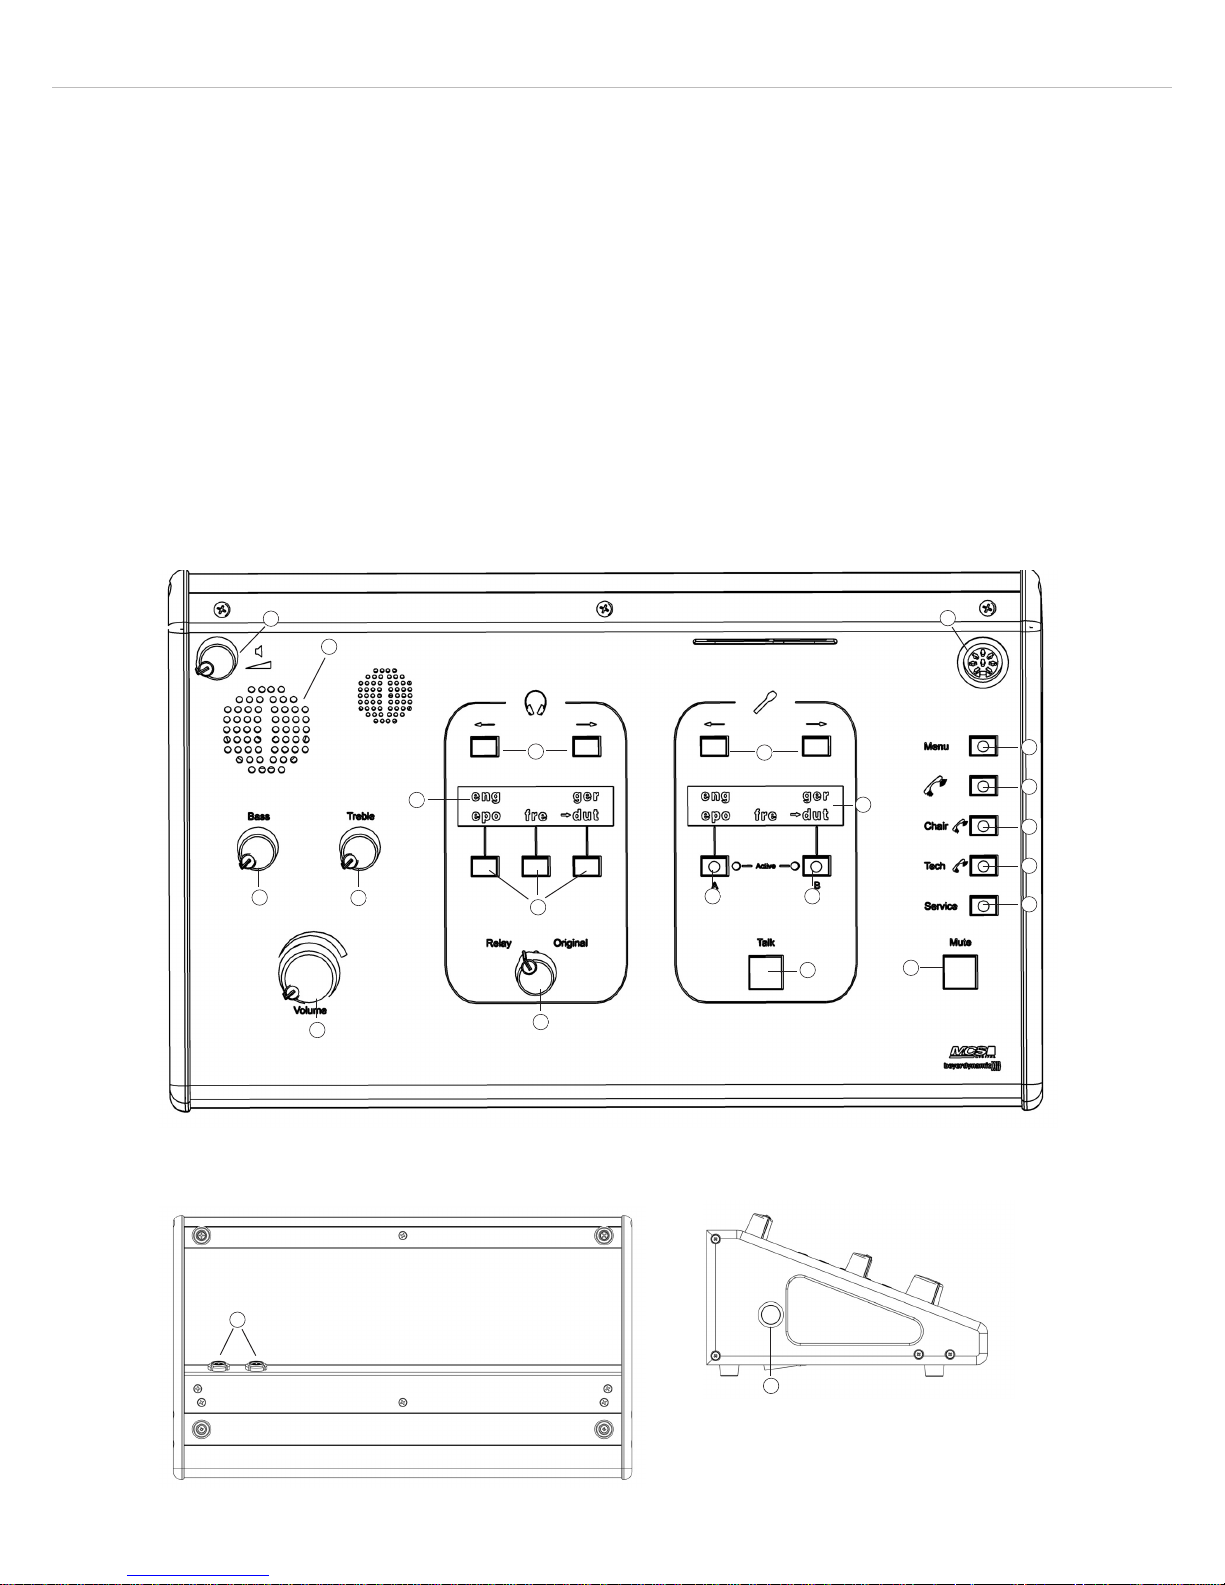
1. Controls and Indicators
Top view
Bottom view Left hand side
1
2
3
4
5
6
7
8
9
10
11
12
13 14
15
16
17
18
19
20
21
22
23
Page 4

MCS-D 202 – Controls and Indicators
19
english
2. How to connect the MCS-D 202
Connect one of the conference sockets of the MCS-D 202 interpreter station to the NetRateBus socket of the MCS-D 200 control unit
or the CA 4146 power supply unit. Several interpreter stations are connected in a daisy chain, i.e. the first station is connected to the
MCS-D 200 control unit or the CA 4146 power supply unit; one conference socket of the second MCS-D 202 interpreter station is
connected to the other conference socket of the first station. Repeat these steps until all interpreter stations are connected.
8-pin socket (DIN 45326) to connect a headset or gooseneck microphone.
Monitoring loudspeaker (2-way-loudspeaker system) reproduces the original signal. The loudspeaker is automatically muted as soon as
the microphone is activated.
Volume control for the monitoring loudspeaker
Bass control to set the low frequencies for the headphones
Treble control to set the high frequencies for the headphones
Volume control for the headphones
Change-over switch RELAY/ORIGINAL. The headphone signal may directly be changed over from the ORIGINAL channel to the RELAY
channel.
Relay channel PRE-SELECT buttons (left/right)
Display (16 characters / 2 lines)
Relay channel buttons (1-3) to change directly from one selected relay channel to another one.
Output channel PRE-SELECT buttons (left/right)
Display (16 characters / 2 lines)
Output channel button A
Output channel button B
Microphone button “TALK”. Press the microphone button to turn the microphone on or off.
Cough button “MUTE”. Hold down the cough button when you have to interrupt the connection from the interpreter microphone to
the output channel briefly.
SERVICE button - without any function
TECH button (technician). By pressing the TECH button the interpreter can contact the technician.
CHAIR button (chairman). By pressing the CHAIR button the interpreter can contact the chairman.
Telephone button - without any function
MENU button to activate special functions
Conference sockets as push-pull version
Headphone socket, 6.35 mm stereo jack, to connect a headphone if you use a microphone connected to the microphone socket instead
of a headset. The headphone can also be used in addition to the headset.
1
2
3
4
5
6
7
8
9
10
11
12
13
14
15
16
17
18
19
20
21
22
22
22
22
23
Important:
• Excessive sound pressure from earphones and headphones can cause hearing loss.
Page 5
MCS-D 202 – Programming
20
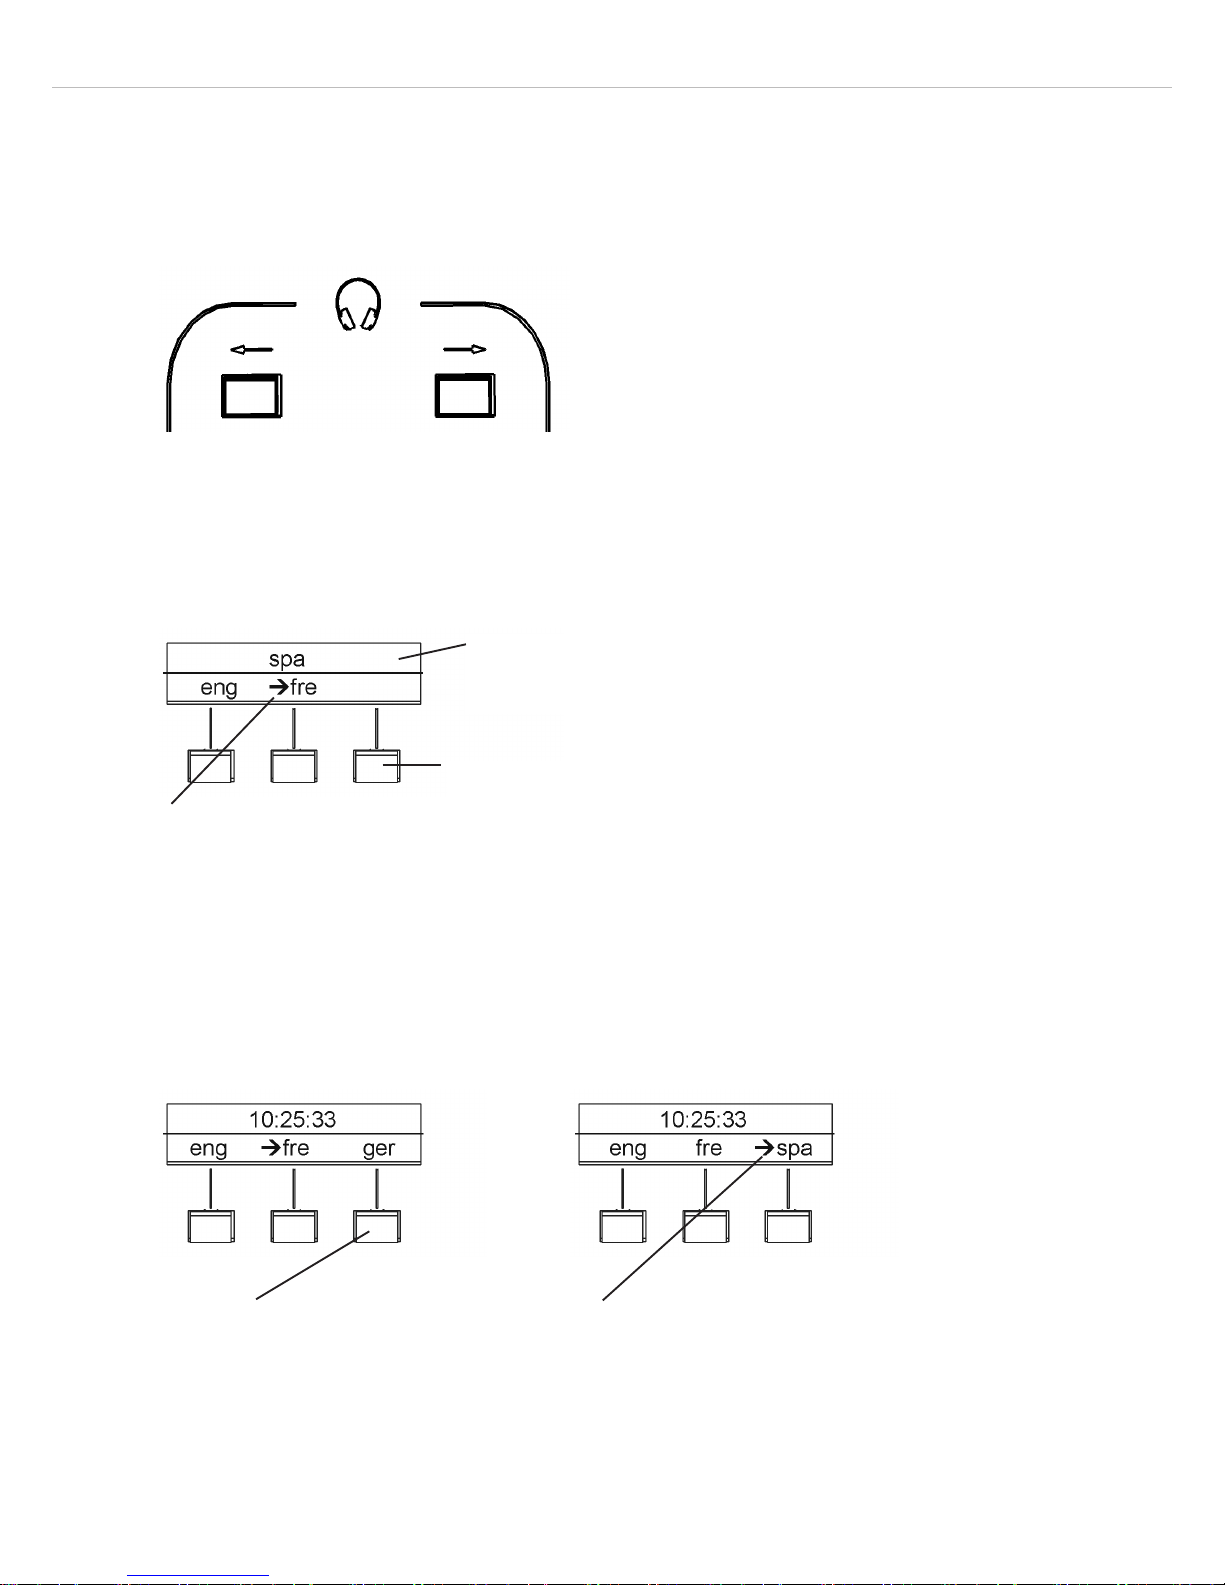
3. How to program the Relay Channel Buttons 1-3
How to select the relay language channel (PRE-SELECT)
Press the left or right hand PRE-SELECT button to scroll through a list of all available relay channels without changing the pre-selected
channels! The list is displayed in the top line. The language channels are coded according to the international language codes. When the
PRE-SELECT button is released, the system time is displayed in the top line of the display.
How to assign a relay channel (1-3)
Press the button and hold it down for assigning the pre-selected relay channel which is displayed in the top line. In this example the Spanish
channel (spa) is assigned to the third relay language button.
How to switch from relay channel button 2 (fre) to 3 (ger)
Using the PRE-SELECT buttons, you may scroll through the list without
changing the pre-selected channels.
Assign the Spanish channel (spa) to the relay
channel button 3: Press the relay channel
button and hold it down until the channel is
displayed in the bottom line.
The arrow marks the language that
is transmitted via headphones
whenever the REL/OR switch is
switched to the REL position.
Press button number 3 and hold it
down until the arrow marks the
German channel (ger).
The arrow marks the selected language which is
transmitted via headphone when the change-over
switch RELAY/ORIGINAL is switched to the RELAY
position.
Page 6

MCS-D 202 – Programming
21
english
4. Output Channels A and B
Each interpreter station has two buttons for the output channels A and B. The interpreter can directly switch from output A to B, and vice
versa. Both channels may be pre-selected. With the PRE-SELECT buttons you can select a free output channel. “A” is the default output
channel which is automatically defined when the system is started. Press the appropriate output channel button to select channel A or B; the
appropriate LED will illuminate. An output channel will be occupied when the microphone is opened!
Whenever a language channel is not occupied, the original signal is automatically transmitted to this channel! If the “LOCK” function has
been selected with the iCNS software, occupied output channels of the interpreter stations of different booths are “locked” to avoid double
seizure.
Scroll through the list of all available channels:
Press the PRE-SELECT buttons to select a channel.
Assign the French channel (fre) to the B output
channel button by holding down the B button until
the channel is shown in the bottom line of the
display.
The arrow indicates the selected output channel.
A channel is not regarded as “in use” until the
microphone is switched on.
Hold down button B until the arrow
switches to the French channel (fre).
The arrow will indicate the selected
output channel which will be
occupied when the microphone is
switched on.
4.1 How to program the Output Channels A and B
How to select an output channel
Press the left or right PRE-SELECT button to scroll through a list of all available output channels. The list is shown in the top line of the display.
The language channels are coded according to the international MARC language codes. You may then select and assign a channel out of all
available channels.
How to assign an output channel
Hold down the output channel button for a moment to transmit the pre-selected output channel which will be shown in the top line of the
display. In the example above the French channel (fre) is assigned to the output channel button B.
How to change from channel A to B
Page 7

MCS-D 202 – Call Buttons
22
The ID number of the technician station will appear when pressing the TECH
button, provided the technician is available.
The technician is talking to another interpreter.
Try again!
Booth number of the interpreter, who is calling.
ID number of the interpreter, who is calling.
5. Call Buttons
TECH button
Use the TECH button to contact the technician.
Hold down the button while speaking or listening to the technician.
Note: Only the interpreter can contact the technician, not vice versa.
During the connection the following message will be shown on the right hand side of the display of the MCS-D 202 interpreter station:
The connection will be interrupted when the TECH button is released.
In the case of no connection when the technician is talking to another interpreter, the following message will be displayed:
During the connection the technician station will display:
The connection is interrupted when the interpreter releases the TECH button of his MCS-D 202 interpreter station.
Warning:
When the technician turns on his microphone, the connection is terminated.
Page 8

MCS-D 202 – Call Buttons
23
english
The ID number of the chairman station will appear when pressing the CHAIR
button, provided the chairman is available.
The chairman is talking to another interpreter.
Try again!
Booth number of the interpreter, who is calling.
ID number of the interpreter, who is calling.
CHAIR button
Use the CHAIR button of the MCS-D 202 interpreter station to contact the chairman.
Hold down the button while speaking or listening to the chairman.
Note: Only the interpreter can contact the chairman, not vice versa.
During the connection the following message will be shown on the right hand side of the display of the MCS-D 202 interpreter station:
The connection will be interrupted when the CHAIR button is released.
In the case of no connection when the chairman is talking to another interpreter, the following message will be displayed:
During the connection the chairman station will display:
The connection is interrupted when the interpreter releases the CHAIR button of his MCS-D 202 interpreter station.
Warning:
When the chairman turns on his microphone, the connection is terminated.
Page 9

MCS-D 202 – Interpreter ID
24
01-0001= MICROPHONE STATION ID
01 = BOOTH
0002 = DEVICE-ID
1. Press right relay channel PRE-SELECT button
2. Press right output channel PRE-SELECT button
3. Press MENU button
6. How to assign the Interpreter ID
Each interpreter station should be specified with an identification number (ID) in order to render an address. This may be done via the
INTERPRETER IDs menu of the MCS-D 200 control unit.
Optional, the identification numbers may directly be assigned at each interpreter station one after the other. This way, you will always have
an overview of the system, especially of large systems.
An interpreter station ID (identification number) is composed of the BOOTH ID and the DEVICE ID. Please make sure that every identification
number is only assigned once in order to avoid conflicts. Interpreter stations of different booths may have the same DEVICE ID.
For example:
Booth 1: MCS-D 202 microphone station (1): 01-0001
MCS-D 202 microphone station (2): 01-0002
Booth 2: MCS-D 202 microphone station (1): 02-0001
MCS-D 202 microphone station (2): 02-0002
Activate SET ID mode
Press the following three buttons one after the other:
1. Right relay channel PRE-SELECT button
2. Right output channel PRE-SELECT button
3. Press MENU button
The “SET ID” line appears on the left display.
Page 10

MCS-D 202 – Interpreter ID
25
english
Station ID= BOOTH-ID + DEVICE-ID
1. Change BOOTH-ID 2. Change DEVICE-ID EXIT
SAVE
How to set the ID
The “SET ID” line is displayed.
By using the PRE-SELECT buttons you can change the BOOTH ID and the DEVICE ID as described below:
1. BOOTH ID: press left/right relay channel PRE-SELECT button
2. DEVICE ID: press left/right output channel PRE-SELECT button
How to save the ID
Press the MUTE button. The interpreter station ID is saved. The ID is shown on the left display.
How to exit the ID mode
Press the MENU button to exit the mode. The ID of the intepreter station is not displayed any more.
Page 11

MCS-D 202 – Language Codes
26
7. List of Language Codes
This is a list of language codes. You will find the web version under: http://lcweb.loc.gov/marc/languages/.
Refer also to: http://www.ethnologue.com/iso639/codes.asp:
aar Afar
abk Abkhaz
ace Achinese
ach Acoli
ada Adangme
afa Afroasiatic (Other)
afh Afrihili (Artificial language)
afr Afrikaans
-ajm Aljamía
aka Akan
akk Akkadian
alb Albanian
ale Aleut
alg Algonquian (Other)
amh Amharic
apa Apache languages
ara Arabic
arc Aramaic
arm Armenian
arn Mapuche
arp Arapaho
art Artificial (Other)
arw Arawak
asm Assamese
ath Athapascan (Other)
aus Australian languages
ava Avaric
ave Avestan
awa Awadhi
aym Aymara
aze Azerbaijani
bad Banda
bai Bamileke languages
bak Bashkir
bal Baluchi
bam Bambara
ban Balinese
baq Basque
bas Basa
bat Baltic (Other)
bej Beja
bel Belarusian
bem Bemba
ben Bengali
ber Berber (Other)
bho Bhojpuri
bih Bihari
bik Bikol
bin Bini
bis Bislama
bla Siksika
bnt Bantu (Other)
bos Bosnian
bra Braj
bre Breton
btk Batak
bua Buriat
bug Bugis
bul Bulgarian
bur Burmese
cad Caddo
cai Central American
Indian (Other)
-cam Khmer
car Carib
cat Catalan
cau Caucasian (Other)
ceb Cebuano
cel Celtic (Other)
cha Chamorro
chb Chibcha
che Chechen
chg Chagatai
chi Chinese
chk Truk
chm Mari
chn Chinook jargon
cho Choctaw
chp Chipewyan
chr Cherokee
chu Church Slavic
chv Chuvash
chy Cheyenne
cmc Chamic languages
cop Coptic
cor Cornish
cos Corsican
cpe Creoles and Pidgins,
English-based (Other)
cpf Creoles and Pidgins,
French-based (Other)
cpp Creoles and Pidgins,
Portuguese-based
(Other)
cre Cree
crp Creoles and Pidgins
(Other)
cus Cushitic (Other)
cze Czech
dak Dakota
dan Danish
day Dayak
del Delaware
den Slave
dgr Dogrib
din Dinka
div Divehi
doi Dogri
dra Dravidian (Other)
dua Duala
dut Dutch
dyu Dyula
dzo Dzongkha
efi Efik
egy Egyptian
eka Ekajuk
elx Elamite
eng English
epo Esperanto
-esk Eskimo languages
-esp Esperanto
est Estonian
-eth Ethiopic
ewe Ewe
ewo Ewondo
fan Fang
fao Faroese
-far Faroese
fat Fanti
fij Fijian
fin Finnish
fiu Finno-Ugrian (Other)
fon Fon
fre French
-fri Frisian
fry Frisian
ful Fula
fur Friulian
gaa Gã
-gae Scottish Gaelic
-gag Galician
-gal Oromo
gay Gayo
gba Gbaya
gem Germanic (Other)
geo Georgian
ger German
gez Ethiopic
gil Gilbertese
gla Scottish Gaelic
gle Irish
glg Galician
glv Manx
gon Gondi
gor Gorontalo
got Gothic
grb Grebo
grn Guarani
-gua Guarani
guj Gujarati
gwi Gwich'in
hai Haida
hau Hausa
haw Hawaiian
heb Hebrew
her Herero
hil Hiligaynon
him Himachali
hin Hindi
hit Hittite
hmn Hmong
hmo Hiri Motu
hun Hungarian
hup Hupa
iba Iban
ibo Igbo
ice Icelandic
ijo Ijo
iku Inuktitut
ile Interlingue
ilo Iloko
inc Indic (Other)
ind Indonesian
ine Indo-European (Other)
ipk Inupiaq
ira Iranian (Other)
-iri Irish
iro Iroquoian (Other)
ita Italian
jav Javanese
jpn Japanese
jpr Judeo-Persian
jrb Judeo-Arabic
kaa Kara-Kalpak
Page 12

MCS-D 202 – Language Codes
27
english
kab Kabyle
kac Kachin
kal Kalâtdlisut
kam Kamba
kan Kannada
kar Karen
kas Kashmiri
kau Kanuri
kaw Kawi
kaz Kazakh
kha Khasi
khi Khoisan (Other)
khm Khmer
kho Khotanese
kik Kikuyu
kin Kinyarwanda
kir Kyrgyz
kmb Kimbundu
kok Konkani
kom Komi
kon Kongo
kor orean
kos Kusaie
kpe Kpelle
kro Kru
kru Kurukh
kua Kuanyama
kum Kumyk
kur Kurdish
-kus Kusaie
kut Kutenai
lad Ladino
lah Lahnda
lam Lamba
lao Lao
-lap Sami
lat Latin
lav Latvian
lez Lezgian
lin Lingala
lit Lithuanian
lol Mongo-Nkundu
loz Lozi
ltz Letzeburgesch
lua Luba-Lulua
lub Luba-Katanga
lug Ganda
lui Luiseño
lun Lunda
luo Luo (Kenya and Tanzania)
lus Lushai
mac Macedonian
mad Madurese
mag Magahi
mah Marshall
mai Maithili
mak Makasar
mal Malayalam
man Mandingo
mao Maori
map Austronesian (Other)
mar Marathi
mas Masai
-max Manx
may Malay
mdr Mandar
men Mende
mic Micmac
min Minangkabau
mis Miscellaneous languages
mkh Mon-Khmer (Other)
-mla Malagasy
mlg Malagasy
mlt Maltese
mnc Manchu
mni Manipuri
mno Manobo languages
moh Mohawk
mol Moldavian
mon Mongolian
mos Mooré
mul Multiple languages
mun Munda (Other)
mus Creek
mwr Marwari
myn Mayan languages
nah Nahuatl
nai North American Indian Other)
nau Nauru
nav Navajo
nbl Ndebele (South Africa)
nde Ndebele (Zimbabwe)
ndo Ndonga
nep Nepali
new Newari
nia Nias
nic Niger-Kordofanian (Other)
niu Niuean
non Old Norse
nor Norwegian
nso Northern Sotho
nub Nubian languages
nya Nyanja
nym Nyamwezi
nyn Nyankole
nyo Nyoro
nzi Nzima
oji Ojibwa
ori Oriya
orm Oromo
osa Osage
oss Ossetic
ota Turkish, Ottoman
oto Otomian languages
paa Papuan (Other)
pag Pangasinan
pal Pahlavi
pam Pampanga
pan Panjabi
pap Papiamento
pau Palauan
per Persian
phi Philippine (Other)
phn Phoenician
pli Pali
pol Polish
pon Ponape
por Portuguese
pra Prakrit languages
pus Pushto
que Quechua
raj Rajasthani
rap Rapanui
rar Rarotongan
roa Romance (Other)
roh Raeto-Romance
rom Romany
rum Romanian
run Rundi
rus Russian
sad Sandawe
sag Sango
sah Yakut
sai South American Indian (Other)
sal Salishan languages
sam Samaritan Aramaic
san Sanskrit
-sao Samoan
sas Sasak
sat Santali
scc Serbian
sco Scots
scr Croatian
sel Selkup
sem Semitic (Other)
sgn Sign languages
shn Shan
-sho Shona
sid Sidamo
sin Sinhalese
sio Siouan (Other)
sit Sino-Tibetan (Other)
sla Slavic (Other)
slo Slovak
slv Slovenian
sme Northern Sami
smi Sami
smo Samoan
sna Shona
snd Sindhi
-snh Sinhalese
snk Soninke
sog Sogdian
som Somali
son Songhai
sot Sotho
spa Spanish
srd Sardinian
srr Serer
ssa Nilo-Saharan (Other)
-sso Sotho
ssw Swazi
suk Sukuma
sun Sundanese
sus Susu
sux Sumerian
swa Swahili
swe Swedish
-swz Swazi
syr Syriac
-tag Tagalog
tah Tahitian
tai Tai (Other)
-taj Tajik
tam Tamil
-tar Tatar
tat Tatar
tel Telugu
tem Temne
ter Terena
tet Tetum
tgk Tajik
tgl Tagalog
tha Thai
tib Tibetan
tig Tigré
tir Tigrinya
tiv Tiv
tkl Tokelauan
tli Tlingit
tmh Tamashek
tog Tonga (Nyasa)
ton Tongan
tpi Tok Pisin
-tru Truk
tsi Tsimshian
Page 13

MCS-D 202 – Technical Specifications
28
tsn Tswana
tso Tsonga
-tsw Tswana
tuk Turkmen
tum Tumbuka
tur Turkish
tut Altaic (Other)
tvl Tuvaluan
twi Twi
tyv Tuvinian
uga Ugaritic
uig Uighur
ukr Ukrainian
umb Umbundu
und Undetermined
urd Urdu
uzb Uzbek
vai Vai
ven Venda
vie Vietnamese
vol Volapük
vot Votic
wak Wakashan languages
wal Walamo
war Waray
was Washo
wel Welsh
wen Sorbian languages
wol Wolof
xho Xhosa
yao Yao
yap Yapese
yid Yiddish
yor Yoruba
ypk Yupik languages
zap Zapotec
zen Zenaga
zha Zhuang
znd Zande
zul Zulu
8. Technical Specifications
Frequency response . . . . . . . . . . . . . . . . . . . . . . . . . . . . . -6 dB: 70 Hz - 24 kHz
-3 dB: 100 Hz - 22 kHz
Current consumption . . . . . . . . . . . . . . . . . . . . . . . . . . . . max. 130 mA
T.H.D.. . . . . . . . . . . . . . . . . . . . . . . . . . . . . . . . . . . . . . . . < 0.1%
Headphone connection . . . . . . . . . . . . . . . . . . . . . . . . . . 1/4" mono jack socket (6.35 mm)
Volume control headphone . . . . . . . . . . . . . . . . . . . . . . . rotary know, range: -49 dB - +4.4 dB
Signal-to-noise ratio headphone connection. . . . . . . . . . . -60.7 dB
System connections . . . . . . . . . . . . . . . . . . . . . . . . . . . . . 2 x push-pull
Minimum impedance . . . . . . . . . . . . . . . . . . . . . . . . . . . . 120 Ω
Temperature range . . . . . . . . . . . . . . . . . . . . . . . . . . . . . . 0 °C to +40 °C
Dimensions . . . . . . . . . . . . . . . . . . . . . . . . . . . . . . . . . . . 342.00 x 197.40 x 102.19 mm
Weight with MIC 23 microphone . . . . . . . . . . . . . . . . . . . 2.450 kg
Page 14

D2/BA MCS-D 202 (10.11)/Hoh./601.934 •
Änderungen und Irrtümer vorbehalten • Subject to change without notice. • Illustrations non contractuelles.
Sous réserve de modifications.
beyerdynamic GmbH & Co. KG
Theresienstr. 8 | 74072 Heilbronn – Germany
Tel. +49 (0) 7131 / 617 - 0 | Fax +49 (0) 7131 / 617 - 204
info@beyerdynamic.de | www.beyerdynamic.com
Weitere Vertriebspartner weltweit finden Sie unter www.beyerdynamic.com
For further distributors worldwide, please go to www.beyerdynamic.com
 Loading...