

Page 1

KE 800
Kameraempfänger
Camera Receiver
Récepteur pour caméra
Bedienungsanleitung
Operating Instructions
Notice d’utilisation
Page 2

Page 3

3
BEDIENUNGSANLEITUNG KE 800
OPERATING INSTRUCTIONS KE 800
NOTICE D’UTILISATION KE 800
deutschenglishfrançais
INHALT / CONTENTS / SOMMAIRE
Sicherheitsinformationen . . . . . . . . . . . . . . . . . . . . . . . . . . Seite 4
Bedienelemente . . . . . . . . . . . . . . . . . . . . . . . . . . . . . . . . . Seite 5
Bedienhinweise . . . . . . . . . . . . . . . . . . . . . . . . . . . . . . . . . Seite 6
ACT-Funktion - Automatische Frequenzübertragung. . . . . . . Seite 9
Anwendungen . . . . . . . . . . . . . . . . . . . . . . . . . . . . . . . . . . Seite 10
Service. . . . . . . . . . . . . . . . . . . . . . . . . . . . . . . . . . . . . . . . Seite 12
Zulassung und Anmeldepflicht . . . . . . . . . . . . . . . . . . . . . . Seite 12
Komponente . . . . . . . . . . . . . . . . . . . . . . . . . . . . . . . . . . . Seite 12
Zubehör. . . . . . . . . . . . . . . . . . . . . . . . . . . . . . . . . . . . . . . Seite 12
Technische Daten . . . . . . . . . . . . . . . . . . . . . . . . . . . . . . . . Seite 13
Konformitätserklärung . . . . . . . . . . . . . . . . . . . . . . . . . . . . Seite 34
Safety Information . . . . . . . . . . . . . . . . . . . . . . . . . . . . . . . Page 14
Controls and Indicators. . . . . . . . . . . . . . . . . . . . . . . . . . . . Page 15
How to operate the Receiver. . . . . . . . . . . . . . . . . . . . . . . . Page 16
ACT Function - Automatic Frequency Transmission . . . . . . . . Page 19
Applications. . . . . . . . . . . . . . . . . . . . . . . . . . . . . . . . . . . . Page 20
Service. . . . . . . . . . . . . . . . . . . . . . . . . . . . . . . . . . . . . . . . Page 22
Licensing . . . . . . . . . . . . . . . . . . . . . . . . . . . . . . . . . . . . . . Page 22
Component . . . . . . . . . . . . . . . . . . . . . . . . . . . . . . . . . . . . Page 22
Accessories . . . . . . . . . . . . . . . . . . . . . . . . . . . . . . . . . . . . Page 22
Technical Specifications. . . . . . . . . . . . . . . . . . . . . . . . . . . . Page 23
EC Declaration of Conformity . . . . . . . . . . . . . . . . . . . . . . . Page 34
Conseils de sécurité . . . . . . . . . . . . . . . . . . . . . . . . . . . . . . Page 24
Éléments de commande . . . . . . . . . . . . . . . . . . . . . . . . . . . Page 25
Indications d’utilisation . . . . . . . . . . . . . . . . . . . . . . . . . . . . Page 26
Fonction ACT. Transmission automatique de fréquence. . . . . Page 29
Applications. . . . . . . . . . . . . . . . . . . . . . . . . . . . . . . . . . . . Page 30
Dépannage . . . . . . . . . . . . . . . . . . . . . . . . . . . . . . . . . . . . Page 32
Autorisation et obligation de déclarer . . . . . . . . . . . . . . . . . Page 32
Composantes. . . . . . . . . . . . . . . . . . . . . . . . . . . . . . . . . . . Page 32
Accessoires . . . . . . . . . . . . . . . . . . . . . . . . . . . . . . . . . . . . Page 32
Spécifications techniques . . . . . . . . . . . . . . . . . . . . . . . . . . Page 33
Déclaration de conformité . . . . . . . . . . . . . . . . . . . . . . . . . Page 34
Page 4

4
BEDIENUNGSANLEITUNG KE 800
Sie haben sich für den Kameraempfänger KE 800 von beyerdynamic entschieden. Wir danken für Ihr Vertrauen. Nehmen Sie sich bitte einige Minuten Zeit
und lesen Sie diese Bedienungsanleitung vor Inbetriebnahme aufmerksam
durch.
Der robuste, portable Empfänger KE 800 wurde speziell für professionelle
Kameraanwendungen entwickelt.
An die Sony Betacam® kann der KE 800 direkt angeschlossen werden. Mit
entsprechendem Zubehör wie z.B. einer externen Adapterplatte oder einem
Aufsteck-Batteriefach kann der KE 800 auch an andere Kameratypen oder
Aktivlautsprecher angeschlossen werden.
Merkmale
• Kompaktes, robustes Aluminiumgehäuse
• Direktanschluss für Sony Betacam®
• Anschluss an andere Camcorder, Aktivlautsprecher und andere
Audiogeräte mit entsprechendem Zubehör möglich
• UHF-Bereich, PLL-Synthesizer-Technologie, True-Diversity-Prinzip mit zwei
Antennen
• Scan- und Frequenzeinstellungsfunktion
• 16 voreingestellte Frequenzen
• LC-Display zur Anzeige von HF- und NF-Signalstärke, Funktion, Diversity
und Batteriekapazität für Sender und Empfänger
• Tasten im Bedienfeld zur Einstellung von SCAN, ACT, SQUELCH und LOCK.
• Symmetrischer Audio-Ausgang
• Geringer Stromverbrauch (< 70 mA)
• SMA-Antennenanschlüsse (schraubbar) mit abnehmbaren Soft-Antennen
• Abnehmbares Batteriefach für 2 x 1,5 V Batterien (AA)
Sicherheitsinformationen
• Schützen Sie den Empfänger vor Feuchtigkeit, Herunterfallen und Schlag.
Sie könnten sich oder andere verletzen bzw. den Empfänger beschädigen.
• Setzen Sie den Empfänger mit dem aufsteckbaren Batteriefach ein, werfen
Sie verbrauchte Akkus/Batterien nicht in den Hausmüll, sondern geben Sie
diese an den örtlichen Sammelstellen ab.
• Die handelsüblichen Alkalinebatterien und Akkus können Längentoleranzen
von 2-3 mm haben. Achten Sie daher beim Austausch der Batterie auf
guten Kontakt.
• Von Zeit zu Zeit sollten Sie die Batteriekontakte mit einem mit Spiritus oder
Alkohol befeuchtetem, weichem Tuch reinigen.
• Wenn Sie das Gerät für Wochen oder Monate nicht benutzen, entfernen
Sie bitte Akku/Batterie. Akkus/Batterien können nach längerem
Nichtgebrauch auslaufen und Leiterbahnen und Bauteile zerfressen. Eine
Reparatur ist dann nicht mehr möglich. In diesem Fall entfallen alle
Garantieansprüche. Auch die Bezeichnung „Leak proof“ auf
Akkus/Batterien ist keine Garantie gegen Auslaufen.
Page 5
deutsch
5
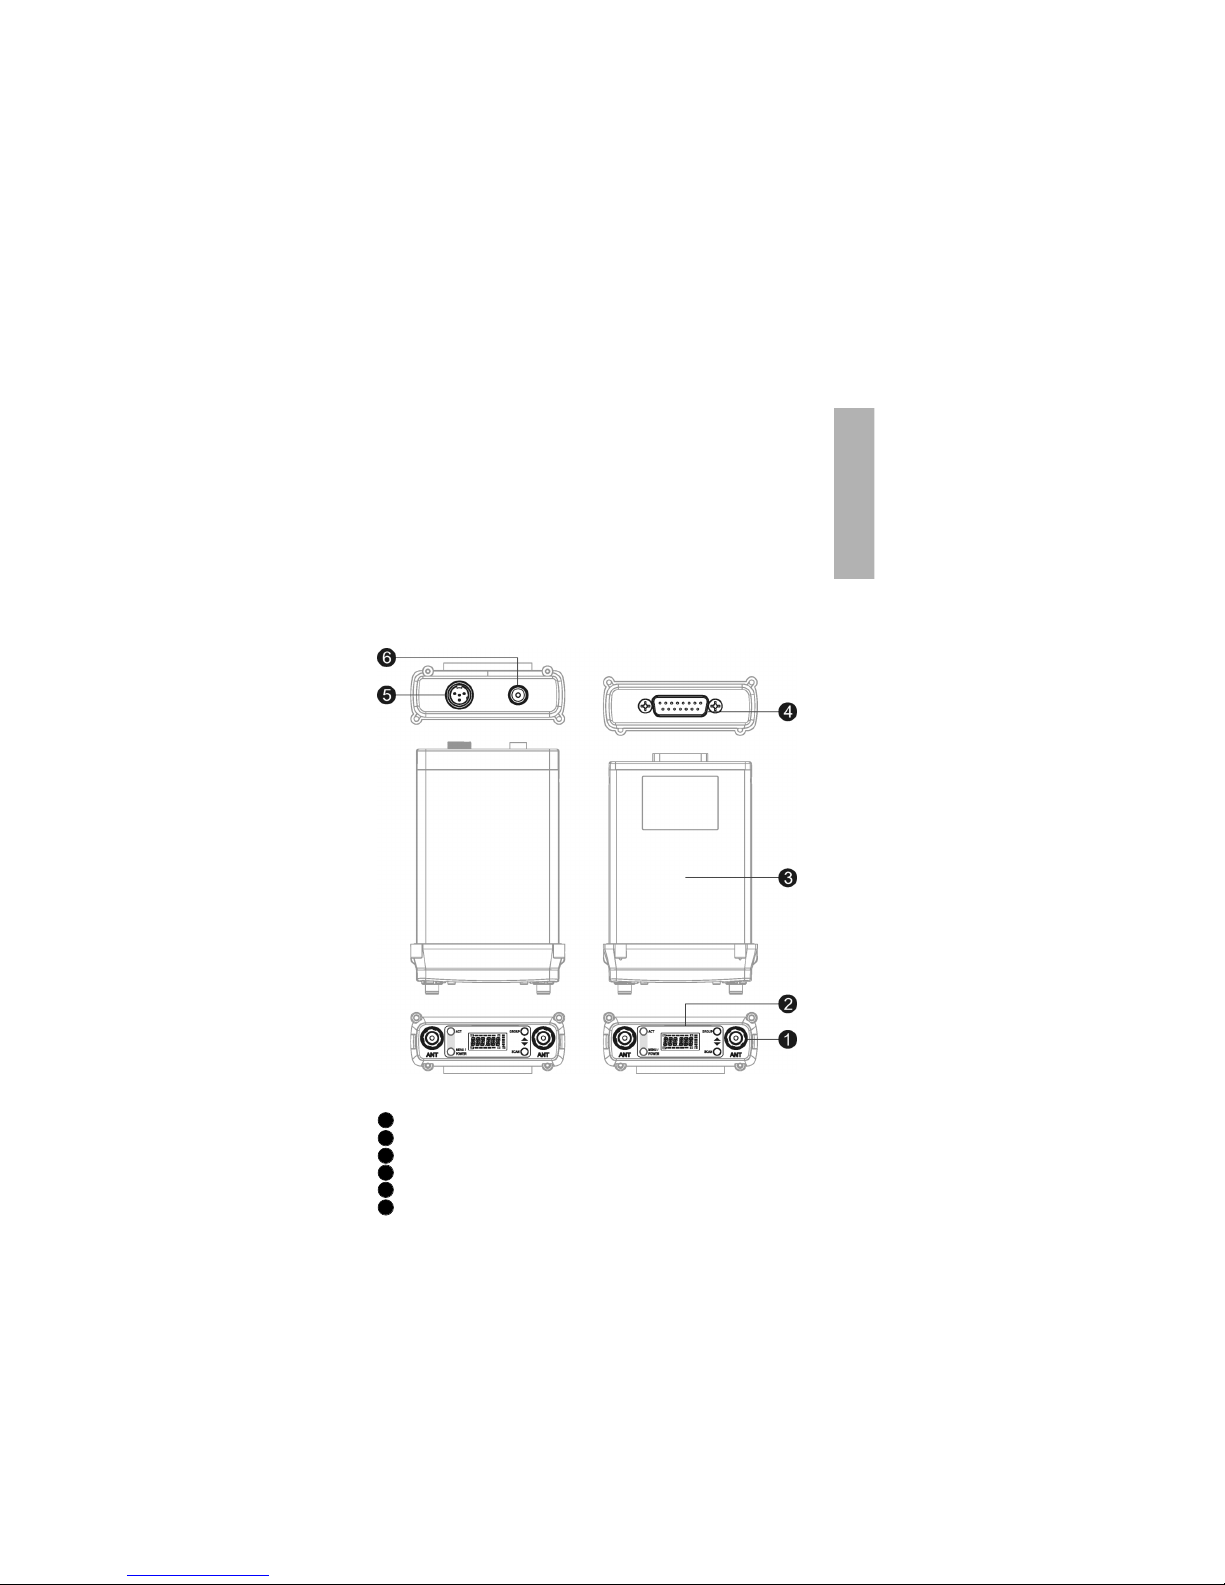
1. Kameraempfänger KE 800
Der kompakte Empfänger KE 800 arbeitet im UHF-Bereich mit PLLSynthesizer-Technologie und True-Diversity-Technik. Der KE 800 verfügt über
100 vorprogrammierte Frequenzen und passt ideal zu den Sendern der
Drahtlos-Systeme Opus 800 und Opus 500 Mk II. Mit der ACT-Funktion kann
die passende Frequenz schnell und automatisch auf den Sender übertragen
werden. Das True-Diversity-Prinzip mit zwei Antennen bietet einen klaren und
stabilen Empfang ohne Aussetzer. Auf einem LC-Display können alle
Einstellungen abgelesen werden.
SMA Antennenanschlüsse
LC-Display
Wetterfestes Gehäuse
15-pol. Sub-D-Buchse: Kompatibel mit Sony Betacam®
4-pol. Mini-XLR-Anschluss: Audioausgang
Netzanschluss 12 VDC
2. Bedienelemente
Für Camcorder und Aktivlautsprecher Für Sony Betacam® Camcorder
1
2
3
4
5
6
Page 6
6
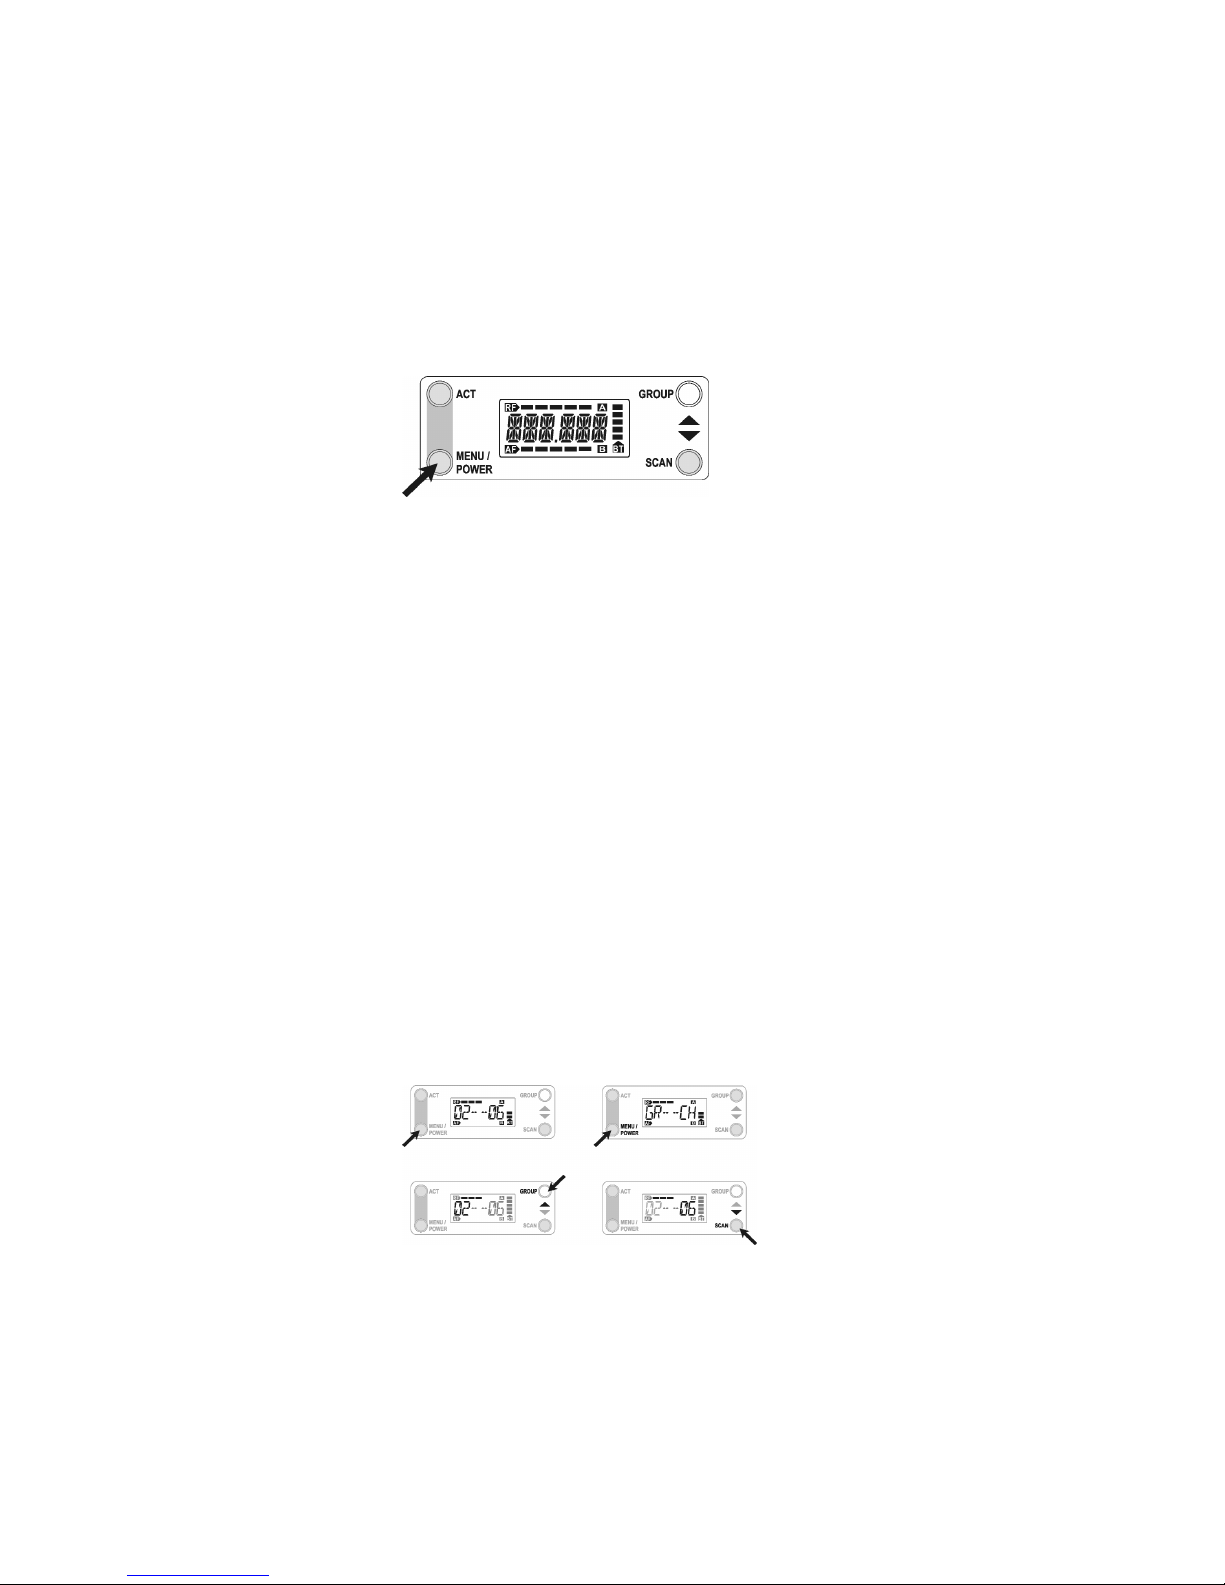
3. Bedienhinweise
Zum Einschalten drücken Sie einmal die Taste „Menu/Power“. Zum
Ausschalten halten Sie die Taste „Menu/Power“ gedrückt. Die nachfolgend
aufgeführten Funktionen werden durch kurzen Druck der Taste
„Menu/Power“ aufgerufen und im LC-Display angezeigt.
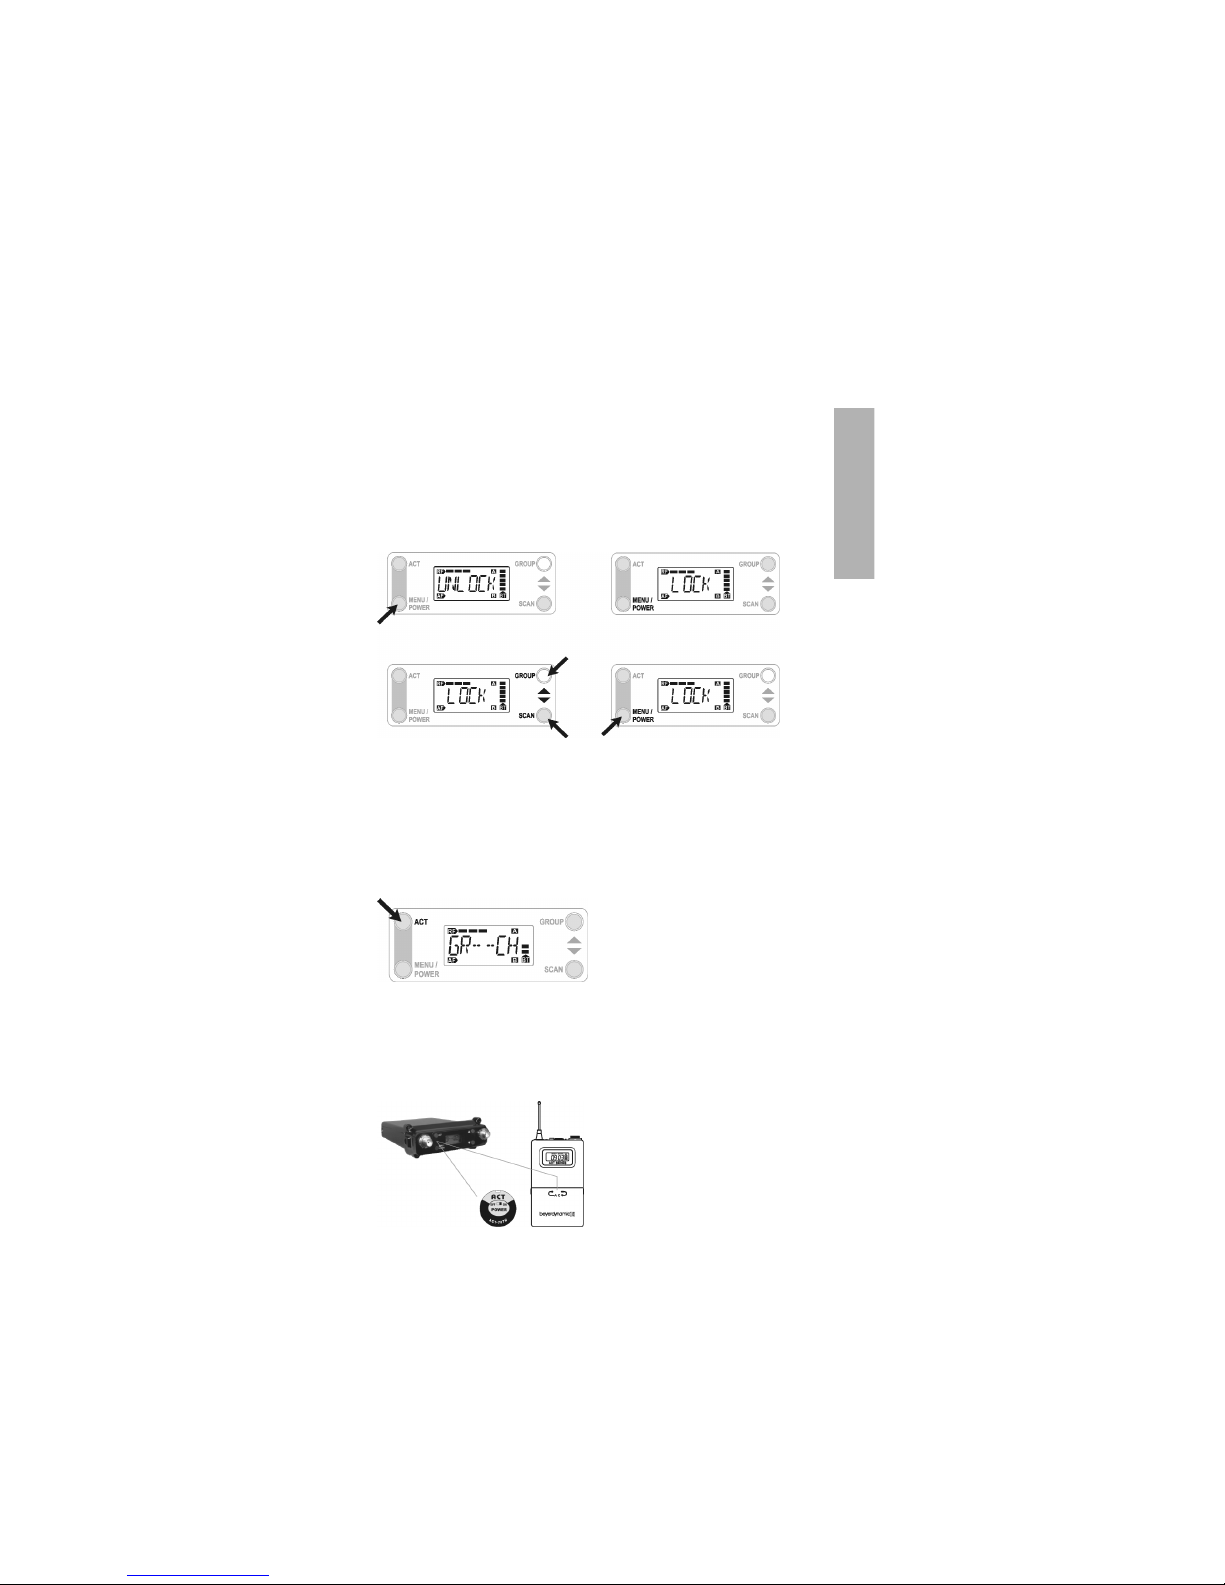
3.1 GR - - CH: Frequenzgruppe und Kanal anzeigen/wechseln
• Nach dem Einschalten werden im LC-Display die aktuelle Frequenzgruppe
und der Kanal angezeigt.
Frequenzgruppe einstellen
• Drücken Sie kurz auf die Taste „Menu/Power“. Im LC-Display erscheint
„GR - - CH“. Zwei blinkende Zahlen zeigen die Gruppe an.
• Drücken Sie kurz auf die Taste „Group“, um die Gruppe zu wechseln bzw.
halten Sie die Taste „Group“ gedrückt, um durch die Gruppen zu „scrollen“, wobei der letzte Kanal der Gruppe angezeigt wird. Zum Speichern
der Eingabe halten Sie die Taste „Menu/Power“ gedrückt bis das Display
zweimal blinkt.
Kanal einstellen
• Drücken Sie kurz auf die Taste „Menu/Power“ bis im LC-Display
„GR - - CH“ angezeigt wird.
• Drücken Sie auf die Taste „Scan“. Die zweistellige Kanalzahl fängt an zu
blinken. Drücken Sie die Taste „Scan“ noch einmal. Der Empfänger sucht
den Frequenzbereich ab und wählt automatisch eine störungsfreie
Frequenz. Wenn der Empfänger nicht aufhört, den Frequenzbereich abzusuchen, sollten Sie eine andere Gruppe auswählen. Wenn Sie die Taste
„Scan“ noch einmal drücken bzw. gedrückt halten, wird die Suche fortgesetzt, bis die Taste „Scan“ losgelassen wird. Zum Speichern der Eingabe
halten Sie die Taste „Menu/Power“ gedrückt bis das Display zweimal
blinkt.
Page 7

deutsch
7
3.2 FREQ: Anzeige der aktuellen Frequenz
• Drücken Sie die Taste „Menu/Power“ so oft, bis im Display „FREQ“ angezeigt wird. Die aktuelle Frequenz blinkt im Display. Drücken Sie die Taste
„Group“ oder „Scan“, damit die Anzeige aufhört zu blinken.
• Mit dieser Funktion kann die Frequenz nur angezeigt, nicht geändert werden.
3.3 SQUELCH: Rauschsperre anzeigen / ändern
• Drücken Sie die Taste „Menu/power“ so oft, bis „SQUELC“ angezeigt wird.
• Der vorprogrammierte Squelchwert liegt zwischen 05 und 40.
• Drücken Sie die Taste „Group“ oder „Scan“, wenn Sie den eingestellten
Squelchwert verändern möchten. Drücken Sie „Group“, um den Wert um
5 zu erhöhen bzw. „Scan“, um den Wert um 5 zu verringern.
• Zum Speichern der Eingabe halten Sie die Taste „Menu/Power“ gedrückt.
• Je höher der eingestellte Wert, desto niedriger ist die
Empfängerempfindlichkeit.
Page 8
8
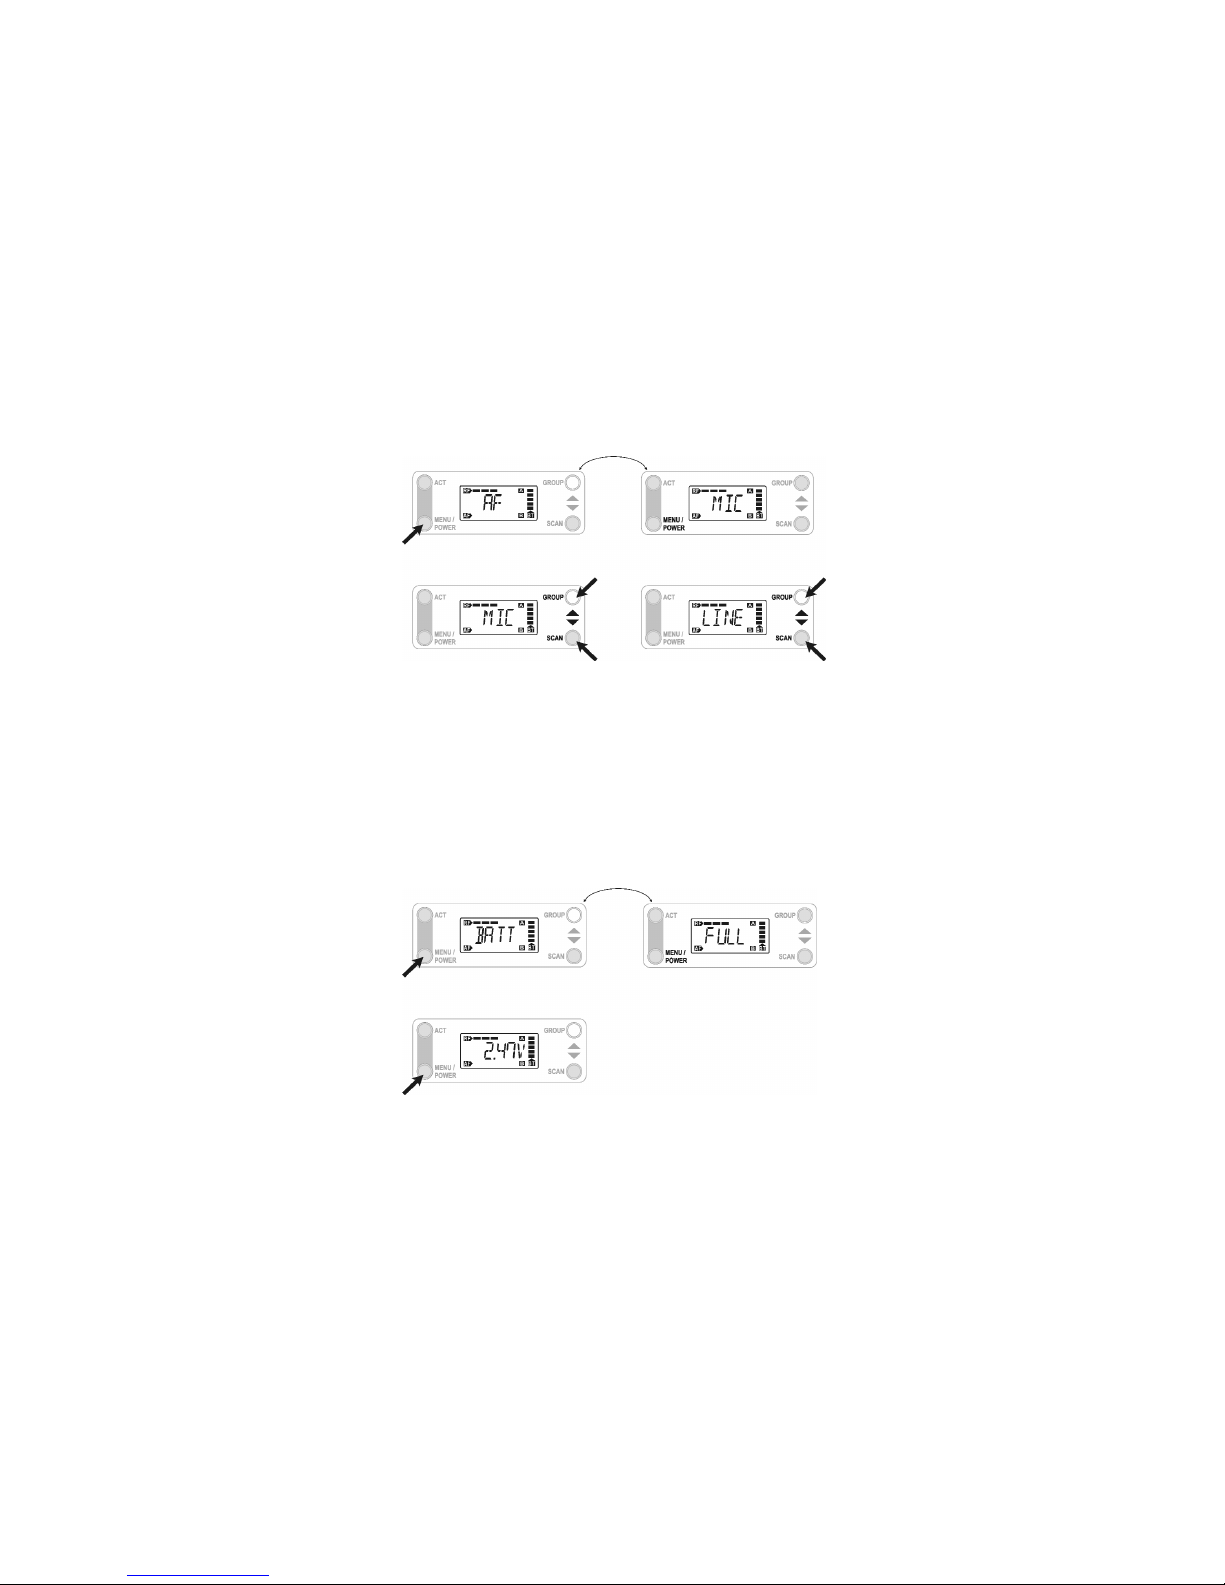
3.4 AF: Umschaltung zwischen MIC oder LINE
• Drücken Sie die Taste „Menu/Power“ so oft bis im LC-Display „AF“ angezeigt wird.
• Mit den Tasten „Group“ und „Scan“ können Sie dann zwischen „MIC“
und „LINE“ umschalten.
3.5 BATT: Anzeige Batteriekapazität
• Drücken Sie die Taste „Menu/Power“ so oft bis im LC-Display „BATT“
angezeigt wird.
• Die aktuelle Batteriespannung des Senders (z.B. vom Drahtlos-System
Opus 800 oder Opus 500 Mk II) wird angezeigt.
Page 9
deutsch
9
3.6 LOCK: Sperren und Entsperren
• Mit der LOCK-Funktion können Sie die Bedientasten sperren, um ein versehentliches Verstellen zu verhindern.
• Drücken Sie die Taste „Menu/Power“ bis im LC-Display „LOCK“ erscheint.
• Mit den Tasten „Group“ oder „Scan“ können Sie die Einstellung speichern.
Es funktioniert nun nur noch die Taste „ACT“; alle anderen Tasten sind
gesperrt.
• Drücken Sie die Taste „Menu/Power“ bis „UNLOCK“ auf dem Display
erscheint. Mit den Tasten „Group“ bzw. „Scan“ können Sie die Einstellung
speichern. Im Display erscheint die Standardanzeige und die Tasten können
wieder bedient werden.
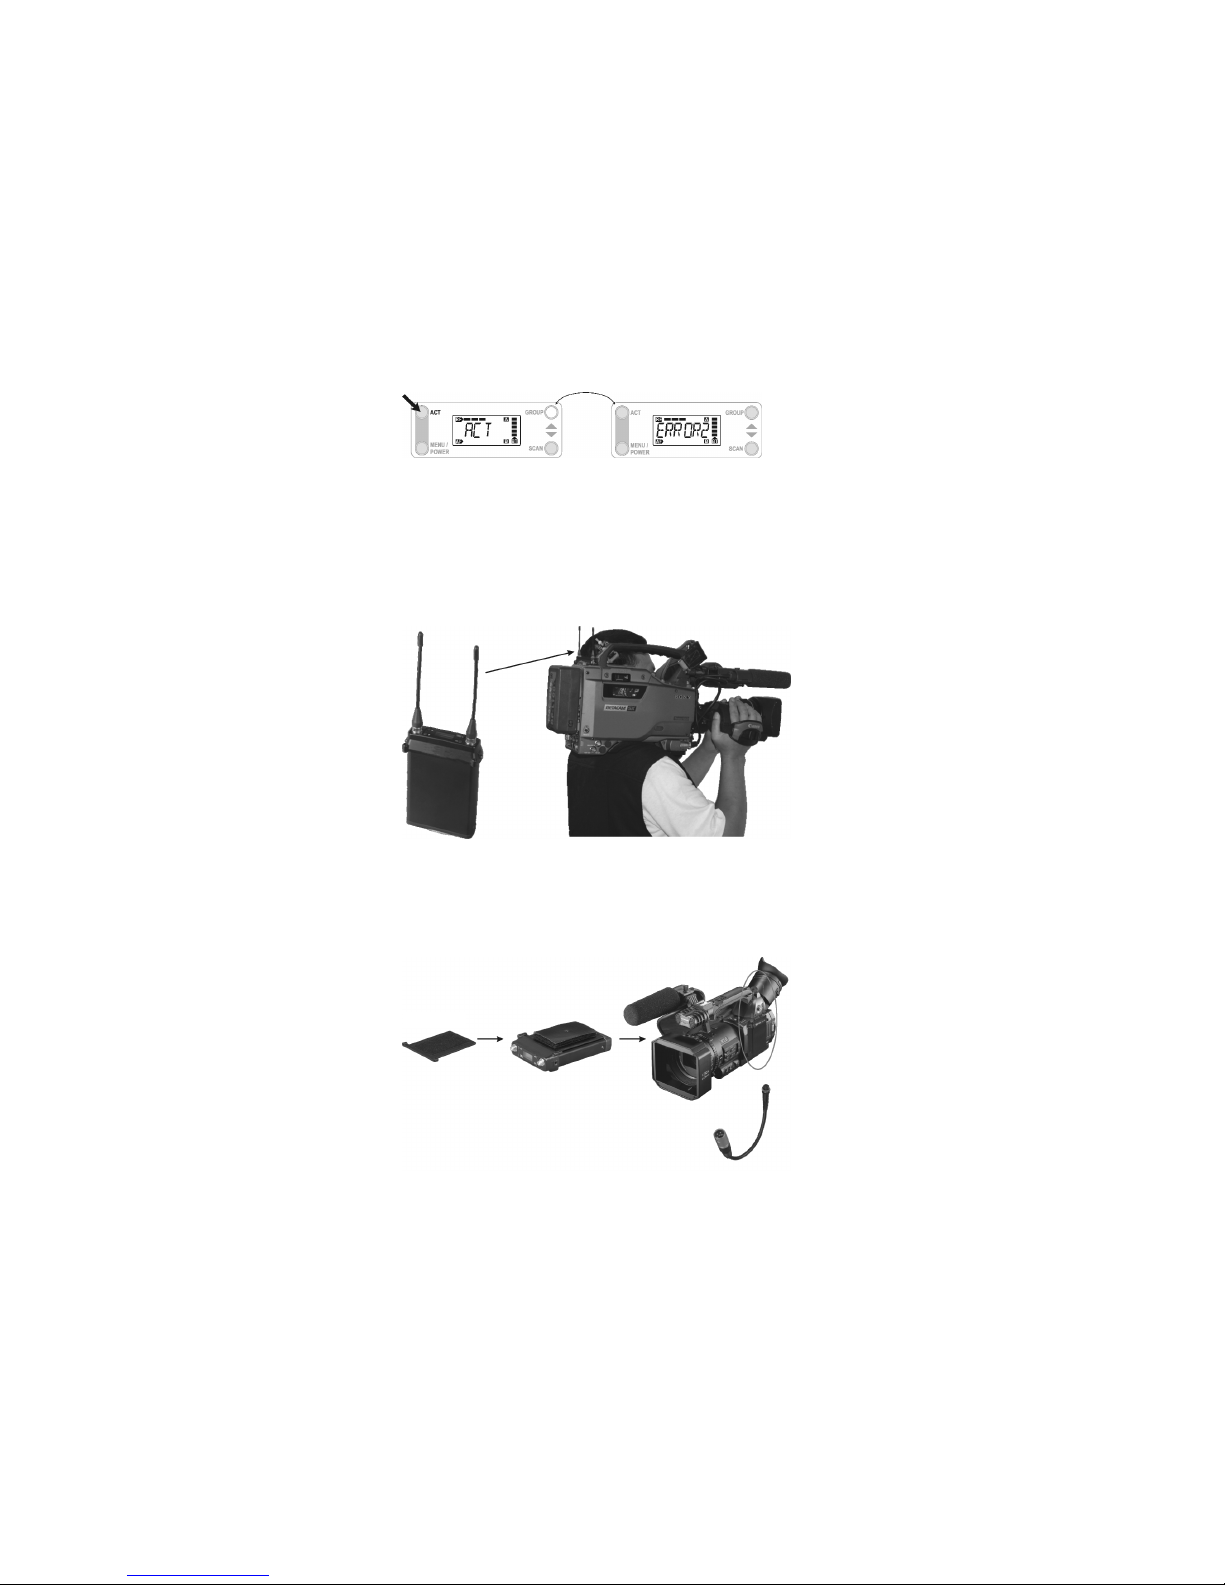
4. ACT-Funktion - Automatische Frequenzübertragung
• Mit der ACT-Funktion können Sie automatisch die Frequenz des
Empfängers auf einen Sender übertragen.
• Drücken Sie kurz die Taste „ACT“, um die Funktion zu aktivieren. Auf dem
Display blinkt „ACT“.
• Halten Sie den eingeschalteten Sender mit dem Infrarotpunkt ca. 20 - 30 cm
vor die Infrarotsendediode der ACT-Taste des Empfängers KE 800.
• Sobald der verwendete Sender die gleiche Frequenz (Anzeige im Display)
wie der Empfänger hat, ist die Übertragung automatisch beendet.
Page 10
10
• Wenn im Display die Anzeige „ACT“ blinkt bzw. die Meldung „Error“ erscheint, war die Übertragung nicht erfolgreich und muss wiederholt werden.
5. Anwendungen
• Direkter Anschluss an die SONY Betacam®
• Montage an andere Camcorder mit optionalem Zubehör
Klettverschluss
Klettverschluss am
KE 800 befestigt
KE 800 am
Camcorder
befestigt
Anschluss an Empfänger
Anschluss an Camcorder
Anschlusskabel
Page 11

deutsch
11
• Montage an Aktiv-Lautsprecher mit optionalem Zubehör
Anschluss an Empfänger
Anschluss an Camcorder
Anschlusskabel
Netzteil
Netzkabel
Page 12

12
6. Service
Im Servicefall wenden Sie sich bitte an autorisiertes Fachpersonal. Öffnen Sie
das Gerät auf keinen Fall selbst, Sie könnten sonst alle Garantieansprüche verlieren.
8. Komponente
KE 800 Kameraempfänger (798 - 822 MHz) . . . . . . . . Best.-Nr. 480.568
9. Zubehör
Lieferumfang
2 Antennen
2 Schutzkappen für Antennenanschlüsse
2 Audiokabel (4-pol. Mini-XLR-Anschlusskupplung auf 3-pol. XLR-Stecker;
1 x 14 cm, 1 x 95 cm)
1 externes Schaltnetzteil zur Stromversorgung
1 Stromversorgungskabel, offene Enden
Optional
KE 800-S 15
Adapterplatte 15-pol. Sub-D, zum direkten Anschluss
des KE 800 an SONY Betacam® Kamera-Slots.
Es wird keine externe Stromversorgung und
kein Audio-Kabel mehr benötigt. . . . . . . . . . . Best.-Nr. 480.576
KE 800-S 25
Adapterplatte 25-pol. Sub-D, zum direkten Anschluss
des KE 800 an IKEGAMI Kamera-Slots.
Es wird keine externe Stromversorgung und
kein Audio-Kabel mehr benötigt. . . . . . . . . . . Best.-Nr. 480.584
7. Zulassung und Anmeldepflicht
In fast allen Ländern muss der Betrieb typengeprüfter Sender und Empfänger
drahtloser Systeme durch die jeweiligen Telekommunikationsbehörden genehmigt werden. Vor Inbetriebnahme sollten die entsprechenden Informationen
bei den zuständigen Behörden bzw. der dortigen beyerdynamic-Vertretung
eingeholt werden, da der unerlaubte Einsatz drahtloser Systeme zum Teil mit
empfindlichen Strafen geahndet wird.
Hinweis für die Bundesrepublik Deutschland:
Genehmigungen zum Betreiben eines drahtlosen Mikrofonsystems erteilt die
örtliche Außenstelle der Bundesnetzagentur (www.bundesnetzagentur.de).
Die Empfänger KE 800 ist gemäß Richtlinie R&TTE99/5/EEC
unter der Kennzeichnung CE 0681 ! zugelassen.
Page 13

deutsch
13
10. Technische Daten
Funktionsprinzip . . . . . . . . . . . . . . . True-Diversity-Empfänger (UHF)
Frequenzbereiche . . . . . . . . . . . . . . 798 - 822 MHz; weitere
Frequenzbereiche auf Anfrage
Frequenzen . . . . . . . . . . . . . . . . . . . 100 vorprogrammierte Frequenzen pro
Frequenzbereich
Übertragungsbereich . . . . . . . . . . . . 50 - 18.000 Hz
Stabilität . . . . . . . . . . . . . . . . . . . . . ± 0,005%
Nennhub . . . . . . . . . . . . . . . . . . . . ± 70 kHz
Klirrfaktor . . . . . . . . . . . . . . . . . . . . < 0,15%
Rauschsperre. . . . . . . . . . . . . . . . . . einstellbar, 6 dBuV - 45 dBuV
(in 5 dB-Schritten)
Signal-/Rauschabstand . . . . . . . . . . . 107 dBA (max.)
Max. Ausgangsspannung. . . . . . . . . symmetrisch, 2,2 V RMS
(ohne Lastimpedanz)
Spannungsversorgung . . . . . . . . . . . 6 - 18 V
Stromverbrauch. . . . . . . . . . . . . . . . 70 mA
Arbeitsumfeld . . . . . . . . . . . . . . . . . -10 bis +60°C
Abmessungen (L x B x H) . . . . . . . . . 145 x 83 x 35 mm
Gewicht . . . . . . . . . . . . . . . . . . . . . 220 g
KE 800-SB
Aufsteck-Batteriefach für KE 800;
2 x 1,5 V Batterien (AA). Ersetzt die externe
Stromversorgung mit Kabel. Ideal für alle anderen
Kameratypen oder Aktivlautsprecher . . . . . . . Best.-Nr. 480.592
KE 800-SC
Für die Montage des KE 800 auf den Kamer-
blitzschuh von Camcordern . . . . . . . . . . . . . . Best.-Nr. 480.606
Page 14

14
OPERATING INSTRUCTIONS KE 800
Thank you for selecting the KE 800 camera receiver from beyerdynamic.
Please take some time to read carefully through this manual before using the
product.
The rugged, portable KE 800 receiver has been developed for professional
camera applications.
The KE 800 can be connected to the Sony Betacam
®
directly. Using appropriate
accessories such as an external adapter plate or battery compartment, the
KE 800 can be connected to other camcorders or active loudspeakers.
Features
• Compact, rugged aluminium housing
• Can be connected to Sony Betacam® directly
• Connection to other camcorders, active loudspeakers and other audio
devices by using appropriate accessories
• UHF band, PLL synthesised technology, true diversity reception with two
antennae
• Scan function to adjust frequencies
• 16 preset frequencies
• LC-display to indicate RF and AF signal strength, function, diversity and
battery capacity for receiver and transmitter
• Buttons to set SCAN, ACT, SQUELCH and LOCK functions
• Balanced audio output
• Low power consumption (< 70 mA)
• SMA antenna connections (screw-type) with removable antennae
• Detachable battery compartment for 2 x 1.5 V batteries (AA)
Safety information
• Protect the receiver from moisture and sudden impacts. You could
either injure yourself or others or damage the receiver.
• If you use the receiver with the detachable battery compartment, do not
throw used batteries into the domestic rubbish, but hand them in to local
collection points.
• The normal commercial alkaline batteries or rechargeable batteries can have a
length tolerance of 2 - 3 mm. When changing the battery always ensure
good contact.
• From time to time the battery contacts should be cleaned with a soft cloth
moistened with spirits or alcohol.
• If the receiver is not being used for a long period of time, then please
remove the batteries. Batteries can run-out when not being used for a long
time and corrode the conductor strips and components. Repair is not
possible then. In this case all warranty claims are null and void. The
description “leak proof” on batteries is no guarantee that they will not run
out.
Page 15

english
15
1. KE 800 Camera Receiver
The compact KE 800 receiver operates in the UHF range with PLL synthesised
technology and true diversity technique. The KE 800 has 100 pre-programmed
frequencies and is ideal for use with the transmitters of the wireless Opus 800
and Opus 500 Mk II systems. With the ACT function the receiver searches for
an appropriate frequency to transmit it via infra red to the transmitter. The
true diversity technique with two antennae provides a safe reception free
from any noise or dropouts. All settings are indicated on an LC-display.
SMA antenna connections
LC-display
Weatherproof case
15-pin Sub-D socket: compatible with Sony Betacam®
4-pin mini XLR connection: audio output
12 VDC power socket
2. Controls and Indicators
For camcorders and active loudspeakers For Sony Betacam® camcorder
1
2
3
4
5
6
Page 16

16
3. How to operate the Receiver
Press the “Menu/Power” button once to switch on. Press and hold down the
“Menu/Power” button to switch off. The following functions are accessed
and displayed with the LC-display when pressing the “Menu/Power” button
briefly.
3.1 GR - - CH: Display / change the Group and Channel
• Switch on the receiver. The current frequency group and channel are
displayed.
How to select the frequency group
• Press the “Menu/Power” button briefly. “GR - - CH” will be displayed. Two
flashing numbers indicate the group.
• Press the “Group” button briefly, to change the group or hold down the
“Group” button to scroll through the groups. The last channel of the
group will be displayed. To store the setting hold down the “Menu/Power”
button until the display will flash twice.
How to select the channel
• Press the “Menu/Power” button briefly. “GR - - CH” will be displayed.
• Press the “Scan” button. Two flashing numbers indicate the channel. Press
the “Scan” button once again. The receiver will search the frequency
range and select an interference-free frequency automatically. If the
receiver does not stop to search the frequency range, you should select
another group. If you hold down or press the button “Scan” once again,
the search will be continued until you release the “Scan” button. To save
the entry hold down the “Menu/Power” button until the display will flash
twice.
Page 17

english
17
3.2 FREQ: Display of the current Frequency
• Press the “Menu/Power” button several times, until “FREQ” is displayed.
The current frequency is flashing. Press the “Group” or “Scan” button and
the flashing will stop.
• By using this function the frequency can only be displayed, but not
changed.
3.3 SQUELCH: Display / change Squelch
• Press the “Menu/Power” button several times, until “SQUELC” is displayed.
• The pre-programmed squelch is between 05 and 40.
• If you want to change the selected squelch, press the “Group” or “Scan”
button. Press the “Group” button to increase the squelch by 5 or press the
“Scan” button to reduce the squelch by 5.
• To save the entry hold down the “Menu/Power” button.
• The higher the squelch setting, the lower is the receiver sensitivity.
Page 18

18
3.4 AF: Switching between MIC or LINE
• Press the “Menu/Power” button several times until “AF” is displayed.
• With the buttons “Group” and “Scan” you can switch between “MIC”
and “LINE”.
3.5 BATT: How to display the Battery Capacity
• Press the “Menu/Power” button several times, until “BATT” is displayed.
• The current battery voltage of the transmitter (e.g. of the Opus 800 or
Opus 500 Mk II system) is displayed.
Page 19

english
19
3.6 LOCK: How to lock and unlock
• The receiver has a “Lock” function to avoid the setting of the receiver
configuration to be changed accidentally with the buttons.
• Press the “Menu/Power” button, until “LOCK” is displayed.
• With the “Group” or “Scan” button you can save the setting. Apart from
the “ACT” button, all other buttons are locked now.
• Press the “Menu/Power” button, until “UNLOCK” is displayed. With the
“Group” or “Scan” button you can save the setting. The default setting is
displayed and the buttons can be operated again.
4. ACT Function - Automatic Frequency Transmission
• With the “ACT” function you can transmit the frequency of the receiver to
a transmitter automatically.
• Press the “ACT” button briefly to activate the function. “ACT” flashes on
the display.
• Hold the switched on transmitter with the infra red diode about 20 to 30 cm
in front of the infra red diode of the ACT button of the KE 800 receiver.
• As soon as the transmitter has the same frequency as the receiving module
(see display) the transmission is finished.
Page 20

20
• If the displayed “ACT” is still flashing or “Error” is displayed, the transmission
failed and has to be repeated.
5. Applications
• Direct connection to the SONY Betacam®
• Connection to other Camcorders with optional Accessories
Velcro fastener
Velcro fastener
mounted to KE 800
KE 800
mounted on
camcorder
Connects to receiver
Connects to camcorder
Connecting cable
Page 21

english
21
• Installation to active Loudspeakers with optional Accessories
Connects to receiver
Connects to camcorder
Connecting cable
Power supply unit
Power cable
Page 22

22
6. Service
In the unlikely event of equipment failure, the product should be returned to
your beyerdynamic dealer. Unauthorised attempts at repair may invalidate the
warranty.
8. Component
KE 800 Camera receiver (798 - 822 MHz). . . . . . . . . . Order # 480.568
9. Accessories
Supplied Accessories
2 Antennae
2 Protective caps for antenna connections
2 Audio cables (4-pin mini XLR connection, female to 3-pin XLR, male;
1 x 14 cm, 1 x 95 cm)
1 External power supply unit
1 Power cable
Optional
KE 800-S 15
Adapter plate 15-pin Sub-D, to connect the KE 800
to the SONY Betacam
®
camera slots directly.
There is no external power supply unit and no
audio cable needed. . . . . . . . . . . . . . . . . . . . Order # 480.576
KE 800-S 25
Adapter plate 25-pin Sub-D, to connect the KE 800
to the IKEGAMI camera slots directly.
There is no external power supply unit and no
audio cable needed. . . . . . . . . . . . . . . . . . . . Order # 480.584
KE 800-SB
Battery compartment for KE 800;
2 x 1.5 V batteries (AA). Replaces the external
power supply by cable. Ideal for all other
camera types or active loudspeakers. . . . . . . . Order # 480.592
KE 800-SC
For mounting the KE 800 onto the flash
holder of camcorders. . . . . . . . . . . . . . . . . . . Order # 480.606
7. Licensing
In most countries around the world, wireless systems must be approved for
use by the authorities and it may be necessary to obtain a licence to use it
legally. Your local beyerdynamic dealer will be able to give you details on
wireless system regulations for your area.
The KE 800 receiver is approved according to the directive 99/5/EEC under the
CE 0681 ! identification.
Page 23

english
23
10. Technical Specifications
Operating principle . . . . . . . . . . . . . True diversity receiver (UHF)
Frequency range . . . . . . . . . . . . . . . 798 - 822 MHz; more frequencies
on request
Frequencies. . . . . . . . . . . . . . . . . . . 100 pre-programmed frequencies per
frequency range
Frequency response . . . . . . . . . . . . . 50 - 18,000 Hz
Stability. . . . . . . . . . . . . . . . . . . . . . ± 0.005%
Nominal deviation . . . . . . . . . . . . . . ± 70 kHz
T.H.D. . . . . . . . . . . . . . . . . . . . . . . . < 0.15%
Squelch. . . . . . . . . . . . . . . . . . . . . . adjustable, 6 dBuV - 45 dBuV
(in 5 dB steps)
Signal-to-noise ratio. . . . . . . . . . . . . 107 dBA (max.)
Max. output voltage . . . . . . . . . . . . balanced, 2.2 V RMS
(without load impedance)
Power supply. . . . . . . . . . . . . . . . . . 6 - 18 V
Current consumption. . . . . . . . . . . . 70 mA
Ambient temperature . . . . . . . . . . . -10 to +60°C
Dimensions (L x W x H) . . . . . . . . . . 145 x 83 x 35 mm
Weight . . . . . . . . . . . . . . . . . . . . . . 220 g
Page 24

24
NOTICE D’UTILISATION KE 800
Vous avez opté pour le récepteur pour caméra KE 800 de la marque
beyerdynamic. Nous vous remercions pour la confiance que vous nous
accordez. Veuillez prendre le temps de lire attentivement cette notice d’utilisation avant la mise en service du récepteur.
Le récepteur portable robuste KE 800 a spécialement été conçu pour les
applications caméra professionnelles.
Il se prête au raccordement direct de la Betacam
®
de Sony. A l’aide des accessoires correspondants tels que p. ex. une plaque d’adaptation externe ou un
compartiment à piles emboîtable, KE 800 peut également être raccordé à
d’autres types de caméra ou à des haut-parleurs actifs.
Caractéristiques
• Boîtier aluminium compact robuste
• Raccordement direct pour Betacam® Sony
• Raccordement à d’autres caméscopes, haut-parleurs actifs et autres appa-
reils audio possible à l’aide de l’équipement correspondant
• Gamme UHF, technologie de synthétiseur PPL, principe True Diversity à
deux antennes
• Fonction de réglage automatique Scan et fréquences
• 16 fréquences préréglées
• Ecran LC pour affichage de la force de signal HF et NF, de la fonction,
Diversity ainsi que de la capacité restante des piles de l’émetteur et du
récepteur
• Touches de réglage SCAN, ACT, SQUELCH et LOCK sur le tableau de com-
mande
• Sortie audio symétrique
• Faible consommation d’électricité (< 70 mA)
• Connecteurs d’antenne SMA (vissables) avec antennes souples amovibles
• Compartiment à piles amovible pour 2 piles 1,5 V (AA)
Conseils de sécurité
• Protégez le récepteur contre l’humidité, les chutes et les chocs. Vous pour-
riez vous blesser ou blesser d’autres personnes ou encore endommager le
récepteur.
• Si vous utilisez le récepteur avec le compartiment à piles emboîtable, ne
jetez pas les piles/accus usagés avec les ordures ménagères, déposez-les à
un point de recyclage.
• Les piles alcalines disponibles ordinairement dans le commerce et les accus
peuvent avoir des tolérances de longueur de 2-3 mm. Lors d’un remplacement de pile, veuillez donc veiller à un bon contact.
• Il est recommandé de nettoyer de temps à autre les contacts de piles à
l’aide d’un chiffon doux imprégné d’alcool dénaturé.
• En cas de non-utilisation prolongée de l’appareil durant des semaines ou
des mois, retirer les accus/piles. Ces derniers peuvent en effet fuir et attaquer les pistes conductives et éléments constituants de l’appareil. Une
réparation n’est ensuite plus possible. Dans ce cas également, l’utilisateur
perd tous ses droits de garantie. L’indication «Leak proof» figurant sur les
accus/piles ne constitue pas de garantie contre les fuites.
Page 25

français
25
1. Récepteur pour caméra KE 800
Le récepteur compact KE 800 opère sur la bande UHF avec technologie de
synthétiseur PPL et technique True Diversity. KE 800 dispose de 100 fréquences préréglées et convient parfaitement aux émetteurs des systèmes sans fil
Opus 800 et Opus 500 Mk II. Grâce à la fonction ACT, la fréquence appropriée peut être rapidement et automatiquement transmise à l’émetteur. Le
principe True Diversity à deux antennes offre une réception stable et claire
sans trous de modulation. Un écran LC permet l’affichage de toutes les fonctions.
Connecteurs d’antenne SMA
Ecran LC
Boîtier résistant aux intempéries
Prise Sub-D 15 pôles: compatible avec Betacam® de Sony
Mini prise XLR 4 pôles: sortie audio
Raccordement secteur 12 VCC
2. Éléments de commande
Pour caméscopes et haut-parleurs actifs Pour caméscope Sony Betacam®
1
2
3
4
5
6
Page 26

26
3. Indications d’utilisation
Pour allumer le récepteur, presser une fois la touche «Menu/Power». Pour
éteindre le récepteur, appuyer sur la touche «Menu/Power» et maintenir la
pression. Les fonctions présentées ci-dessous sont appelées par une courte
pression sur la touche «Menu/Power» et affichées sur l’écran LC.
3.1 GR - - CH: affichage/changement du groupe de fréquence et du canal
• Une fois l’appareil allumé, le groupe de fréquence actuel et le canal sont
affichés sur l’écran.
Réglage du groupe de fréquence
• Presser brièvement la touche «Menu/Power». Sur l’écran s’affiche
«GR - - CH». Deux nombres clignotants indiquent le groupe.
• Presser brièvement la touche «Group» pour changer de groupe, ou maintenir
la pression sur la touche «Group» pour faire «défiler» les groupes. A cet effet,
le dernier canal du groupe est respectivement affiché. Pour mémoriser la donnée affichée, maintenir la pression sur la touche «Menu/Power» jusqu’à ce
que l’écran clignote deux fois.
Réglage du canal
• Presser brièvement la touche «Menu/Power» jusqu’à ce que
«GR - - CH» s’affiche sur l’écran.
• Presser la touche «Scan». Les deux chiffres du canal se mettent à clignoter.
Presser de nouveau la touche «Scan». Le récepteur parcoure la plage de
fréquence et sélectionne automatiquement une fréquence sans parasites.
Si récepteur parcoure la plage de fréquence sans s’arrêter à une fréquence
appropriée, il est recommandé de changer de groupe. Sur une pression
nouvelle de la touche «Scan», la recherche se poursuit et n’est interrompue qu’après relâchement de la touche. Pour mémoriser la donnée affichée, maintenir la pression sur la touche «Menu/Power» jusqu’à ce que
l’écran clignote deux fois.
Page 27

français
27
3.2 FREQ: affichage de la fréquence actuelle
• Presser la touche «Menu/Power», répéter l’opération jusqu’à ce que
«FREQ» apparaisse sur l’écran. La fréquence actuelle clignote sur l’écran.
Presser la touche «Group» ou «Scan» afin que l’affichage cesse de
clignoter.
• Grâce à cette fonction, la fréquence peut être affichée, et non pas modifiée.
3.3 SQUELCH: affichage / modification du circuit d’assourdissement
• Presser la touche «Menu/Power», répéter l’opération jusqu’à ce que
«SQUELCH» apparaisse sur l’écran.
• Le seuil squelch préprogrammé se situe entre 05 et 40.
• Presser la touche «Group» ou «Scan» pour modifier le seuil squelch
préréglé. Presser la touche «Group» pour augmenter le seuil de 5 ou
«Scan» pour le réduire de 5.
• Pour mémoriser la donnée affichée, appuyer sur la touche «Menu/Power»
et maintenir la pression.
• Plus la valeur réglée est élevée, plus la sensibilité du récepteur est faible.
Page 28

28
3.4 AF: commutation entre MIC et LINE
• Presser la touche «Menu/Power» jusqu’à ce que «AF» apparaisse sur
l’écran.
• Les touches «Group» ou «Scan» permettent ensuite de commuter entre
«MIC» et «LINE».
3.5 BATT: affichage de la capacité des piles
• Presser la touche «Menu/Power» jusqu’à ce que «BATT» apparaisse sur
l’écran.
• La tension actuelle des piles de l’émetteur (p. ex. des systèmes sans fil
Opus 800 ou Opus 500 Mk II) est affichée.
Page 29

français
29
3.6 LOCK: verrouillage et déverrouillage
• La fonction LOCK permet le verrouillage des touches de commande afin
d’éviter un déréglage par inadvertance.
• Presser la touche «Menu/Power» jusqu’à ce que «LOCK» apparaisse sur
l’écran.
• Les touches «Group» ou «Scan» permettent de mémoriser le réglage.
Seule la touche «ACT» fonctionne encore, l’ensemble des autres touches
est verrouillé.
• Presser la touche «Menu/Power» jusqu’à ce que «UNLOCK» apparaisse sur
l’écran. Les touches «Group» ou «Scan» permettent de mémoriser le réglage. L’affichage standard apparaît et les touches peuvent de nouveau fonctionner.
4. Fonction ACT. Transmission automatique de
fréquence.
• Grâce à la fonction ACT, la fréquence du récepteur peut être automatiquement transmise à un émetteur.
• Presser brièvement la touche «ACT» pour activer la fonction. Sur l’écran
clignote «ACT».
• Tenir l’émetteur allumé avec le point infrarouge à 20 - 30 cm env. devant
la diode d’émission infrarouge de la touche ACT du récepteur KE 800.
• Dès que l’émetteur utilisé a la même fréquence (affichage sur écran) que le
récepteur, le transmission est automatiquement terminée.
Page 30

30
• Si l’affichage «ACT» clignote ou qu’apparaît le message «Error», la transmission a échoué et l’opération doit être répétée.
5. Applications
• Raccordement direct à la Betacam® de Sony
• Montage sur d’autres caméscopes avec accessoires en option
Fermeture velcro
Fermeture velcro
fixée sur KE 800
KE 800 fixé sur
caméscope
Connexion sur récepteur
Connexion sur caméscope
Câble de
raccordement
Page 31

français
31
• Montage sur haut-parleur actif avec accessoires en option
Connexion sur récepteur
Connexion sur caméscope
Câble de raccordement
Alimentation
Câble secteur
Page 32

32
6. Dépannage
En cas de panne, veuillez vous adresser à un technicien agréé. N’ouvrez en
aucun cas l’appareil, vous risqueriez de perdre vos droits de garantie.
8. Composantes
KE 800 Récepteur pour caméra (798 - 822 MHz) . . . . Art. n° 480.568
9. Accessoires
Compris dans la livraison
2 antennes
2 capuchons de protection pour les raccordements d’antenne
2 câbles audio (Mini prise XLR 4 pôles sur connecteur XLR 3 pôles ;
1 x 14 cm, 1 x 95 cm)
1 alimentation externe pour alimentation en courant électrique
1 câble d’alimentation, extrémités ouvertes
En option
KE 800-S 15
Plaque d’adaptation Sub-D 15 pôles pour le raccordement
direct de KE 800 aux slots de caméra SONY Betacam®.
Une alimentation externe et un câble audio
sont superflus. . . . . . . . . . . . . . . . . . . . . . . . Art. n° 480.576
KE 800-S 25
Plaque d’adaptation Sub-D 25 pôles pour le
raccordement direct de KE 800 aux slots de
caméra IKEGAMI. Une alimentation externe et
un câble audio sont superflus. . . . . . . . . . . . . Art. n° 480.584
KE 800-SB
Compartiment à piles emboîtable pour KE 800;
2 piles à 1,5 V (AA). Remplace l’alimentation externe
avec câble. Idéal pour tous les autres types
de caméras ou de haut-parleurs actifs. . . . . . . Art. n° 480.592
7. Autorisation et obligation de déclarer
Dans la quasi-totalité des pays, l’utilisation d’émetteurs et de récepteurs
homologués de systèmes sans fil doit être autorisée par les autorités de télécommunication respectives. Avant la mise en service de l’appareil, il est
recommandé de recueillir les informations correspondantes auprès des autorités compétentes ou du distributeur beyerdynamic le plus proche : l’utilisation
non autorisée de systèmes sans fil peut en effet le cas échéant être sanctionnée d’amendes lourdes.
Le récepteur KE 800 est homologué selon la directive R&TTE99/5/EEC
et marqué CE 0681 !
Page 33

français
33
10. Spécifications techniques
Principe de fonctionnement . . . . . . . Récepteur True Diversity (UHF)
Gammes de fréquence. . . . . . . . . . . 798 - 822 MHz ; autres
plages disponibles sur demande
Fréquences . . . . . . . . . . . . . . . . . . . 100 fréquences préréglées par
gamme de fréquence
Bande de transmission . . . . . . . . . . . 50 - 18.000 Hz
Stabilité . . . . . . . . . . . . . . . . . . . . . ± 0,005%
Ecart nominal . . . . . . . . . . . . . . . . . ± 70 kHz
Taux de distorsion totale . . . . . . . . . < 0,15%
Squelch. . . . . . . . . . . . . . . . . . . . . . réglable, 6 dBuV - 45 dBuV
(par pas de 5 dB)
Rapport signal/bruit . . . . . . . . . . . . . 107 dBA (max.)
Tension de sortie maximale. . . . . . . . symétrique, 2,2 V RMS
(sans impédance de charge)
Tension d’alimentation . . . . . . . . . . 6 - 18 V
Consommation . . . . . . . . . . . . . . . . 70 mA
Température de fonctionnement. . . . -10 à +60°C
Dimensions (L x l x H). . . . . . . . . . . . 145 x 83 x 35 mm
Poids . . . . . . . . . . . . . . . . . . . . . . . 220 g
KE 800-SC
Pour le montage de KE 800 sur le
sabot de flash de caméscopes. . . . . . . . . . . . . Art. n° 480.606
Page 34

34
EC-DECLARATION
OF
CONFORMITY
Application of
Council directive: 99/5/EEC R&TTE Directive
73/23/EEC
Low Voltage Directive
Standards to which
Conformity is Declared: EN 301 489-1/-9:2000
EN 60065:1998
Manufacturer’s Name: beyerdynamic GmbH & Co. KG
Manufacturer’s Address: Theresienstrasse 8, 74072 Heilbronn,
Germany
Type of Equipment: Receiver for Wireless Microphone
System Opus 800
Model Numbers: KE 800
I, the undersigned, as an employee of beyerdynamic, hereby declare
that the equipment specified conforms to the above Directive and
Standards.
Manufacturer’s Signature:
Date: October 1, 2005
Full Name: Ulrich Roth
Position: Director of R&D
0681 !
Page 35

35
NOTIZEN • NOTES
Page 36

DEF 1/BA KE 800 (09.05)/579.335/ · Änderungen und Irrtümer vorbehalten · Subject to change without notice · Sous réserve de modifications
beyerdynamic GmbH & Co. KG
Theresienstr. 8
D-74072 Heilbronn
Tel. +49 (0) 71 31 / 617-0
Fax +49 (0) 71 31 / 617-224
info@beyerdynamic.de
www.beyerdynamic.de
beyerdynamic Inc. USA
56 Central Ave.
Farmingdale, NY 11735
Tel. +1 (631) 293-3200
Fax +1 (631) 293-3288
salesUSA@beyerdynamic.com
www.beyerdynamic.com
beyerdynamic U.K. Ltd.
17 Albert Drive
Burgess Hill RH15 9TN
Tel. +44 (0)1444 / 258258
Fax +44 (0)1444 / 258444
sales@beyerdynamic.co.uk
www.beyerdynamic.co.uk
 Loading...