

Page 1
iDX 120 iE
iDX 160 iE
IN-EAR HEADPHONE
IN-EAR-KOPFHÖRER
ÉCOUTEURS INTRA-AURICULAIRES
INTRA-AURICULARES
ВСТАВНЫЕ НАУШНИКИ
入耳式耳机
인-이어 이어폰
インイヤーヘッドホン
User Manual
Bedienungsanleitung
Mode d'emploi
Instrucciones de uso
Руководство по эксплуатации
使用说明书
사용 설명서
取扱説明
Page 2

Page 3

iDX 120 iE | iDX 160 iE
English . . . . . . . . . . . . . . . . . . . . . . . . . . . . . . . . . . . . . . . . . . . . . . . . . . . 4
Deutsch . . . . . . . . . . . . . . . . . . . . . . . . . . . . . . . . . . . . . . . . . . . . . . . . . . 12
Français. . . . . . . . . . . . . . . . . . . . . . . . . . . . . . . . . . . . . . . . . . . . . . . . . . 20
Español . . . . . . . . . . . . . . . . . . . . . . . . . . . . . . . . . . . . . . . . . . . . . . . . . . 28
Русский
. . . . . . . . . . . . . . . . . . . . . . . . . . . . . . . . . . . . . . . . . . . . . . . . . . 36
中文 . . . . . . . . . . . . . . . . . . . . . . . . . . . . . . . . . . . . . . . . . . . . . . . . . . . . 44
한국어. . . . . . . . . . . . . . . . . . . . . . . . . . . . . . . . . . . . . . . . . . . . . . . . . . . 52
日本語. . . . . . . . . . . . . . . . . . . . . . . . . . . . . . . . . . . . . . . . . . . . . . . . . . . 60
Page 4

Thank you for selecting the iDX 120 iE | iDX 160 iE in-ear headphone. Please take
a few minutes to read these instructions carefully before using the product.
1. Safety Instructions
Warning: When connecting the in-ear headphone, make sure that you have
turned the volume down to the minimum. Adjust the volume only
after the in-ear headphone are in place. To avoid any potential
damage to your hearing, do not use the in-ear headphones at loud
volumes for extended periods of time. As a rule of thumb, when you
have the in-ear headphones on, set the volume to a level at which
you can still hear your own voice when you speak at a normal volume
while listening.
We would like to point out that listening at high volumes over a long
period of time may damage your hearing irreversibly.
Make sure that the set volume is not too high. Rule of thumb: The higher the
volume, the shorter the time of listening. According to employer’s regulations for
safety and health the noise exposure should not exceed 85 dB (low volume) when
working with an allowed time of listening of 8 hours at maximum. If the volume is
increased by 3 dB, the allowed time of listening is halved, i.e. with 88 dB the time
of listening is 4 hours, with 91 dB 2 hours and so on.
Danger!
In-ear headphones dramatically reduce your ability to hear ambient noise. Using
the in-ear headphones while in road traffic is potentially very dangerous and is
therefore prohibited by law. Also, please make sure that you do not use your in-ear
headphones when in the vicinity of possibly dangerous machines and tools.
Risk of injury!
When wearing wired in-ear headphones, avoid any sudden movements. You could
seriously injure yourself, especially if you have any piercings or wear earrings or
glasses, etc. that can get caught in the wire.
Page 5

english
4 | 5
Altered auditory perception
Many people need some time to get used to wearing in-ear headphones. Your auditory perception of your own voice and body, and even the sounds in your inner ear
while walking, are different from “normal” situations when you are not wearing an
in-ear headphone. This strange sensation will usually abate after wearing in-ear
headphones for a while.
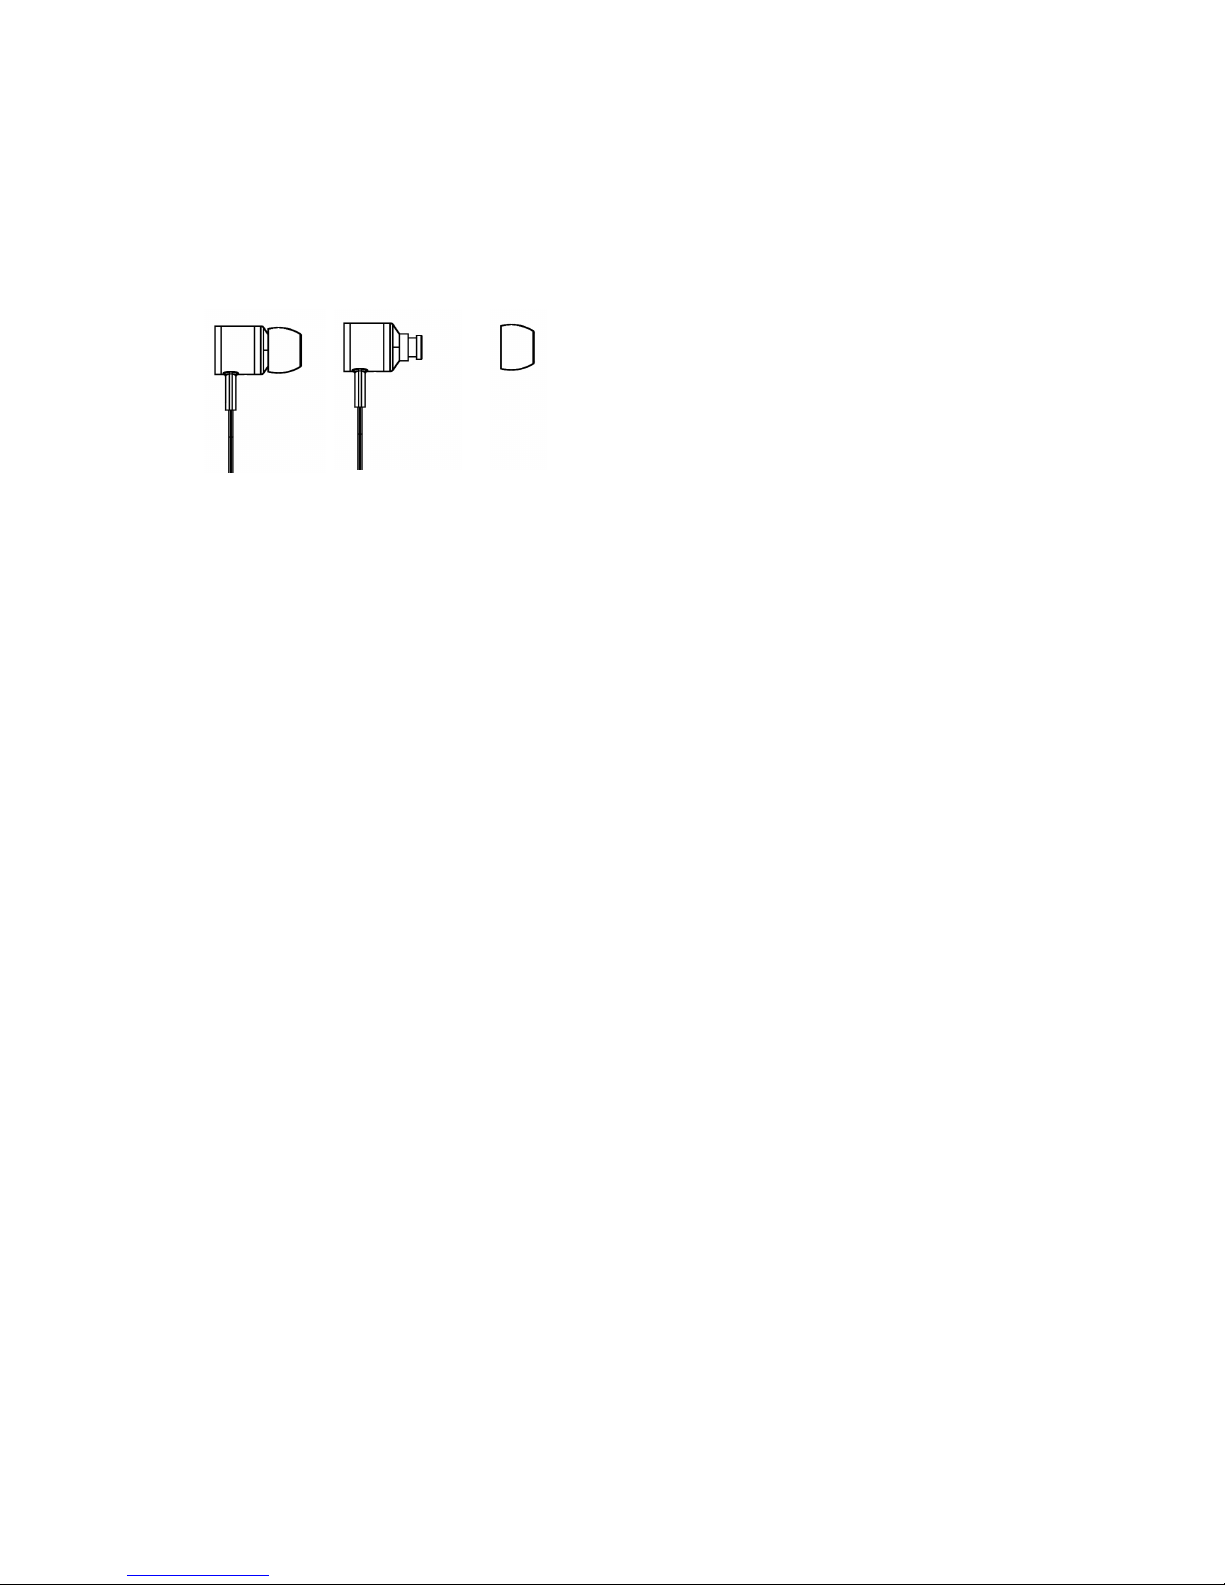
2. Eartips
Selecting the right eartips
Your in-ear headphone is supplied with different sets of eartips made of silicone or
foamed material.
Select the right size of eartips before using the in-ear headphone. You can find out
which eartips fit best by trying on each of the different eartips one after another
with the headphones, placing the eartips carefully inside your ear. The eartips are
the right size if they do not fall out when you move your head moderately quickly
and you can hear the low-frequency bass sounds clearly and ambient noises only
slightly.
iDX 160 iE: When using the T-400 foam eartips from Comply™
• Roll the eartip attached to the in-ear headphone between your fingers into a
tight cylinder.
• Pull the ear slightly upward with one hand and insert the rolled eartip deep into
the ear canal with the other.
• Use a finger to hold the in-ear headphone in place until the eartip has expanded
and in place until it has expanded and is in a secure and comfortable position.
Maintenance of the eartips
• Use a soft, damp cloth to clean the eartips of your in-ear phones regularly,
drying them afterwards with a soft cloth.
• Never use chemical agents, such as solvent-based cleaner, to clean your eartips.
Such agents can corrode the eartips.
• When you are not using the in-ear headphones, store them in the case provided.
Page 6
How to change the eartips
• Remove the eartip from the in-ear headphone.
• Clean the nozzle of the in-ear headphone of any debris by using a soft, damp cloth.
Make sure that no liquid will enter the nozzle. Use a soft cloth to dry the nozzle.
• Attach the new eartip to the in-ear headphone.
• We recommend replacing the eartips after 3 months of regular use.
• For replacement of silicone eartips, please visit the spare parts store on the
beyerdynamic website.
Visit us at http://shop.beyerdynamic.de/ersatzteile. Select your model from the
list and complete your purchase online.
• iDX 160 iE: For replacement of foam eartips from Comply™, please visit
www.complyfoam.com, where shops will be listed to order the eartips.
Used types of the eartips: T-400
fi
Page 7
english
6 | 7
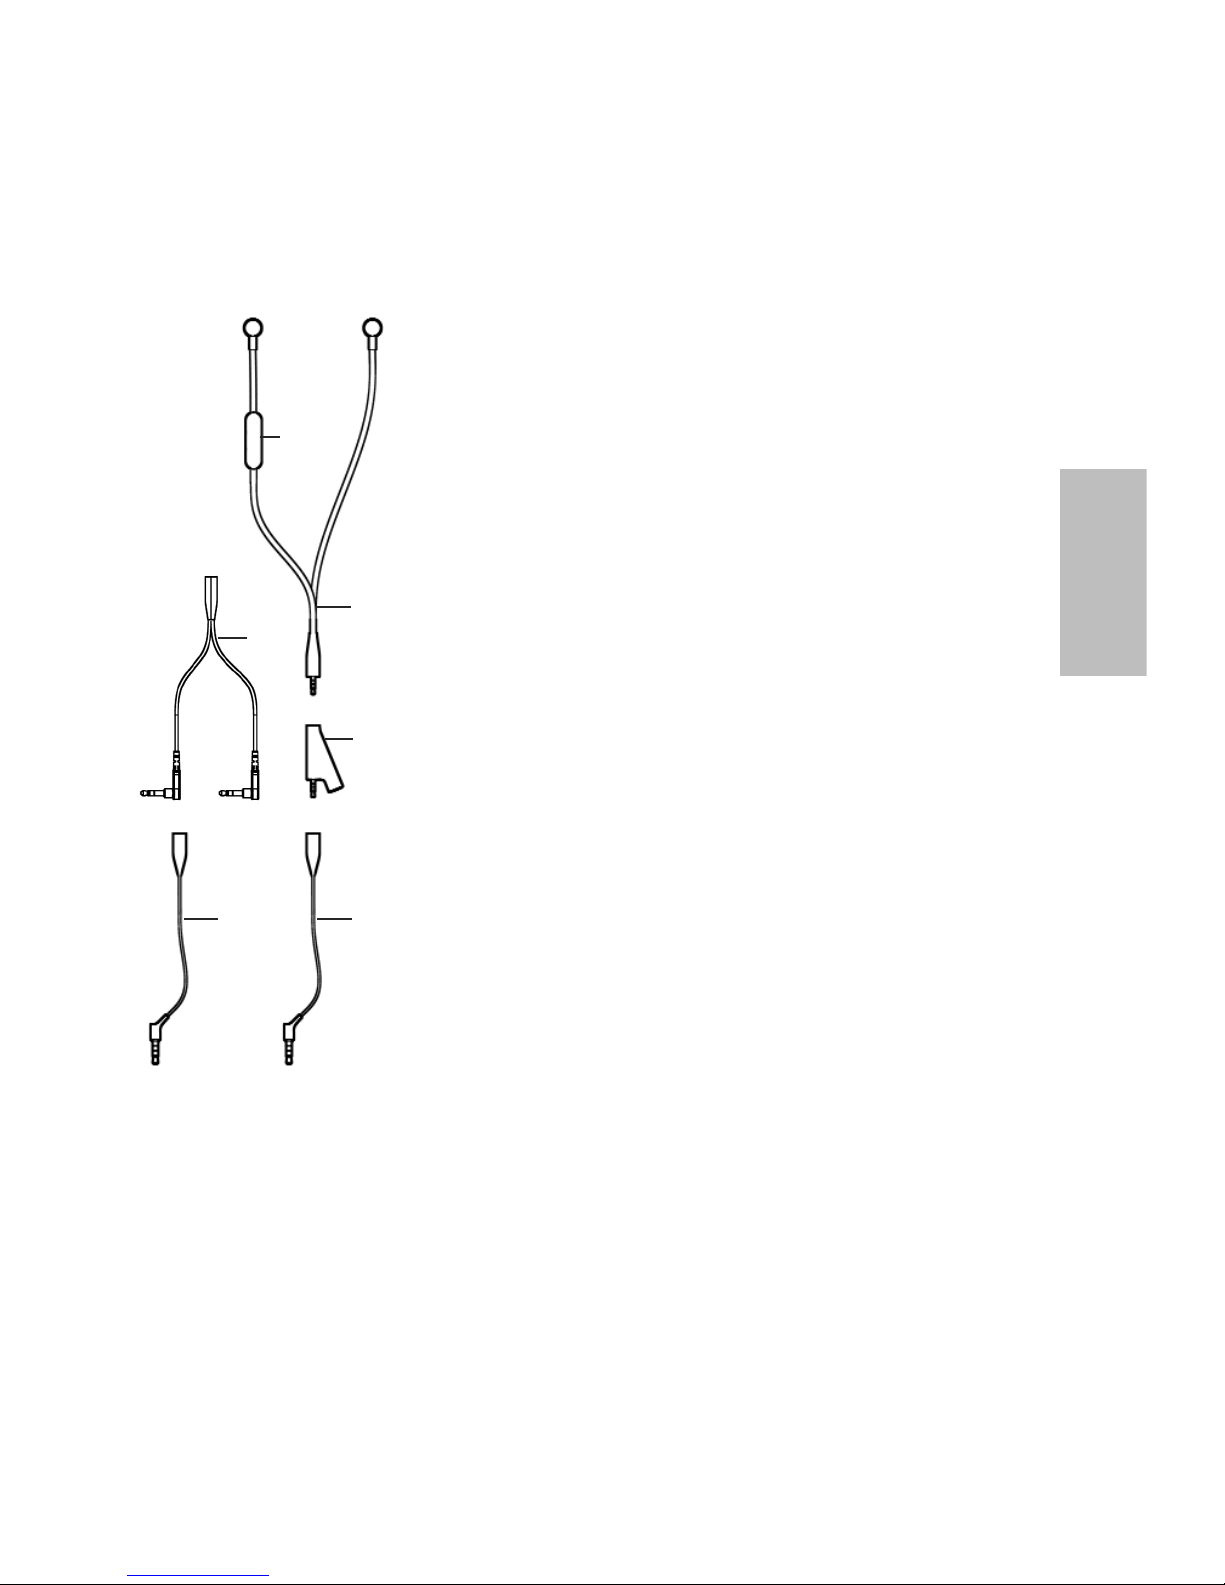
3. Connection
How to connect to Apple and other compatible devices
The connecting cable 2 of the in-ear headphone has a
mini stereo jack plug to connect directly to your iPod,
iPhone, iPad or compatible devices.
• If you would like to extend the connecting cable,
connect the jack plug of the in-ear headphone to
the jack socket of the supplied extension cable 4
for Apple devices (jack plug with white isolation
rings).
How to connect to devices incompatible to Apple
Depending on the device, use the extension cable 4
or 5 for a proper function. You can simply try out the
cables without worrying that the player could be
damaged.
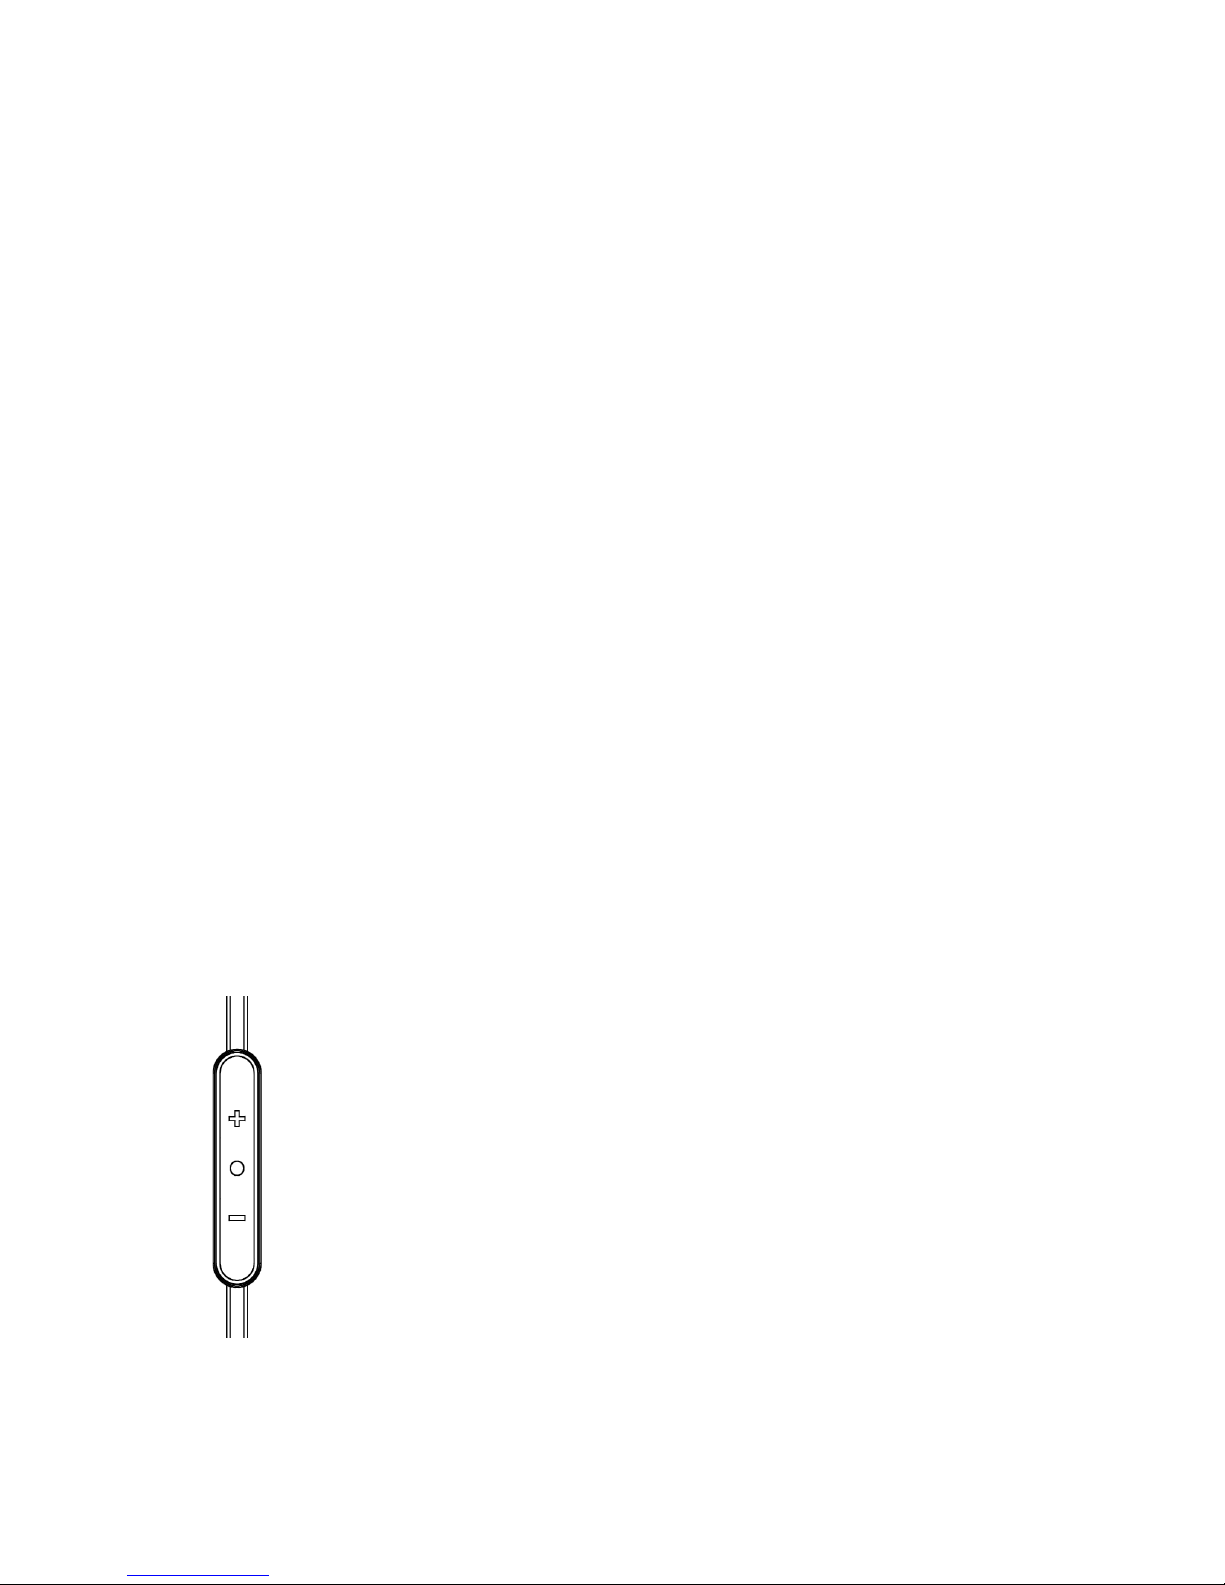
1 3-button controller
2 Connecting cable with jack plug
3 Adapter plug with jack sockets
(top and bottom) and jack plug
4 Extension cable for Apple and compatible devices
with jack socket (top) and jack plug with white
isolation rings (bottom)
5 Extension cable for devices incompatible to Apple
with jack socket (top) and jack plug with black
isolation rings (bottom)
6 VoIP adapter with jack socket (top) and two jack
plugs (bottom)
1
2
3
45
6
Page 8
How to connect the adapter plug for two in-ear headphones
By using the adapter plug 3 you can connect two in-ear headphones to one device.
• Connect the jack plug of the in-ear headphone to the upper jack socket of the
adapter plug 3.
• Connect the appropriate extension cable 4 or 5 to the jack plug of the
adapter plug 3.
• Connect another headphone to the lower jack socket of the adapter plug 3.
How to connect the VoIP adapter
If you would like to connect the in-ear headphone to a PC or laptop for phone calls
over the internet, please use the supplied VoIP adapter 6.
• Connect the jack plug of the in-ear headphone to the jack socket of the supplied
extension cable 4.
• Connect the jack plug of the extension cable 4 to the jack socket of the VoIP
adapter 6.
• Connect the two jack plugs of the VoIP adapter 6 directly to your PC or laptop.
The plugs for microphone and headphone are marked accordingly.
4. How to operate the 3-button controller with Apple devices
Via a 3-button controller with integrated microphone incorporated in the cable you
can jump to selected titles or make phone calls with your Apple device while
listening to music.
Music playback
• Press the middle button to stop the music. Press the middle button
again to start the music.
• Press the middle button twice quickly to track forward.
• Press the middle button once quickly and hold it to fast forward.
• Press the middle button three times quickly to jump to the beginning
of the title or to track backward.
• Press the middle button twice quickly and hold it to fast backward.
Page 9

english
8 | 9
Incoming calls
• Press the middle button once quickly to answer an incoming call. Press the
middle button once again to end the call.
• Press and hold the middle button for about 2 seconds to reject an incoming call.
• Press the middle button once to accept another incoming call. Press the middle
button once again to return to the original call.
Increase volume
• Press the + button to increase the volume.
Reduce volume
• Press the - button to reduce the volume.
Note
• The remote and mic are supported only by iPhone 3GS or later, iPad, iPod touch
(2nd generation or later), iPod classic (120GB, 160 GB), and iPod nano (4th
generation or later). The remote is supported by iPod shuffle (3rd generation or
later). Audio is supported by all iPad and iPod models.
5. How to operate the 3-button controller with devices incompatible to Apple
• For the function of the microphone select the appropriate extension cable 4 or 5.
• The functionality of the middle button depends on the device you are using.
• The + button and - button do not work.
6. Service
If you require service, please contact qualified service personnel or directly:
beyerdynamic Service- und Logistik Center
E-mail: service@beyerdynamic.de
Dismantling the in-ear headphone yourself will invalidate the guarantee.
Page 10
7. Supplied accessories
• 2 x extension cables
• 1 x adapter for VoIP
• 1 x cable clip
• 1 x adapter plug for two in-ear headphones
• iDX 120 iE: Soft carry bag
• iDX 160 iE: Hard carry case
• 7 pairs of silicone eartips in different sizes
• iDX 160 iE: 1 pair of Comply™ T-400 foam eartips, size M, black
8. Spare parts
Adapter for VoIP. . . . . . . . . . . . . . . . . . . . . . . . . . . Order # 908.452
Adapter plug for two in-ear headphones . . . . . . . . . . Order # 912.786
Set of 2 extension cables . . . . . . . . . . . . . . . . . . . . Order # 912.638
iDX 120 iE: Soft carry bag . . . . . . . . . . . . . . . . . . . Order # 914.045
iDX 160 iE: Hard carry case . . . . . . . . . . . . . . . . . . Order # 914.207
Set of 7 pairs of silicone eartips and cable clip . . . . . Order # 912.611
Comply™ T-400 eartips . . . . . . . . . . . . . . . . . . . . . www.complyfoam.com
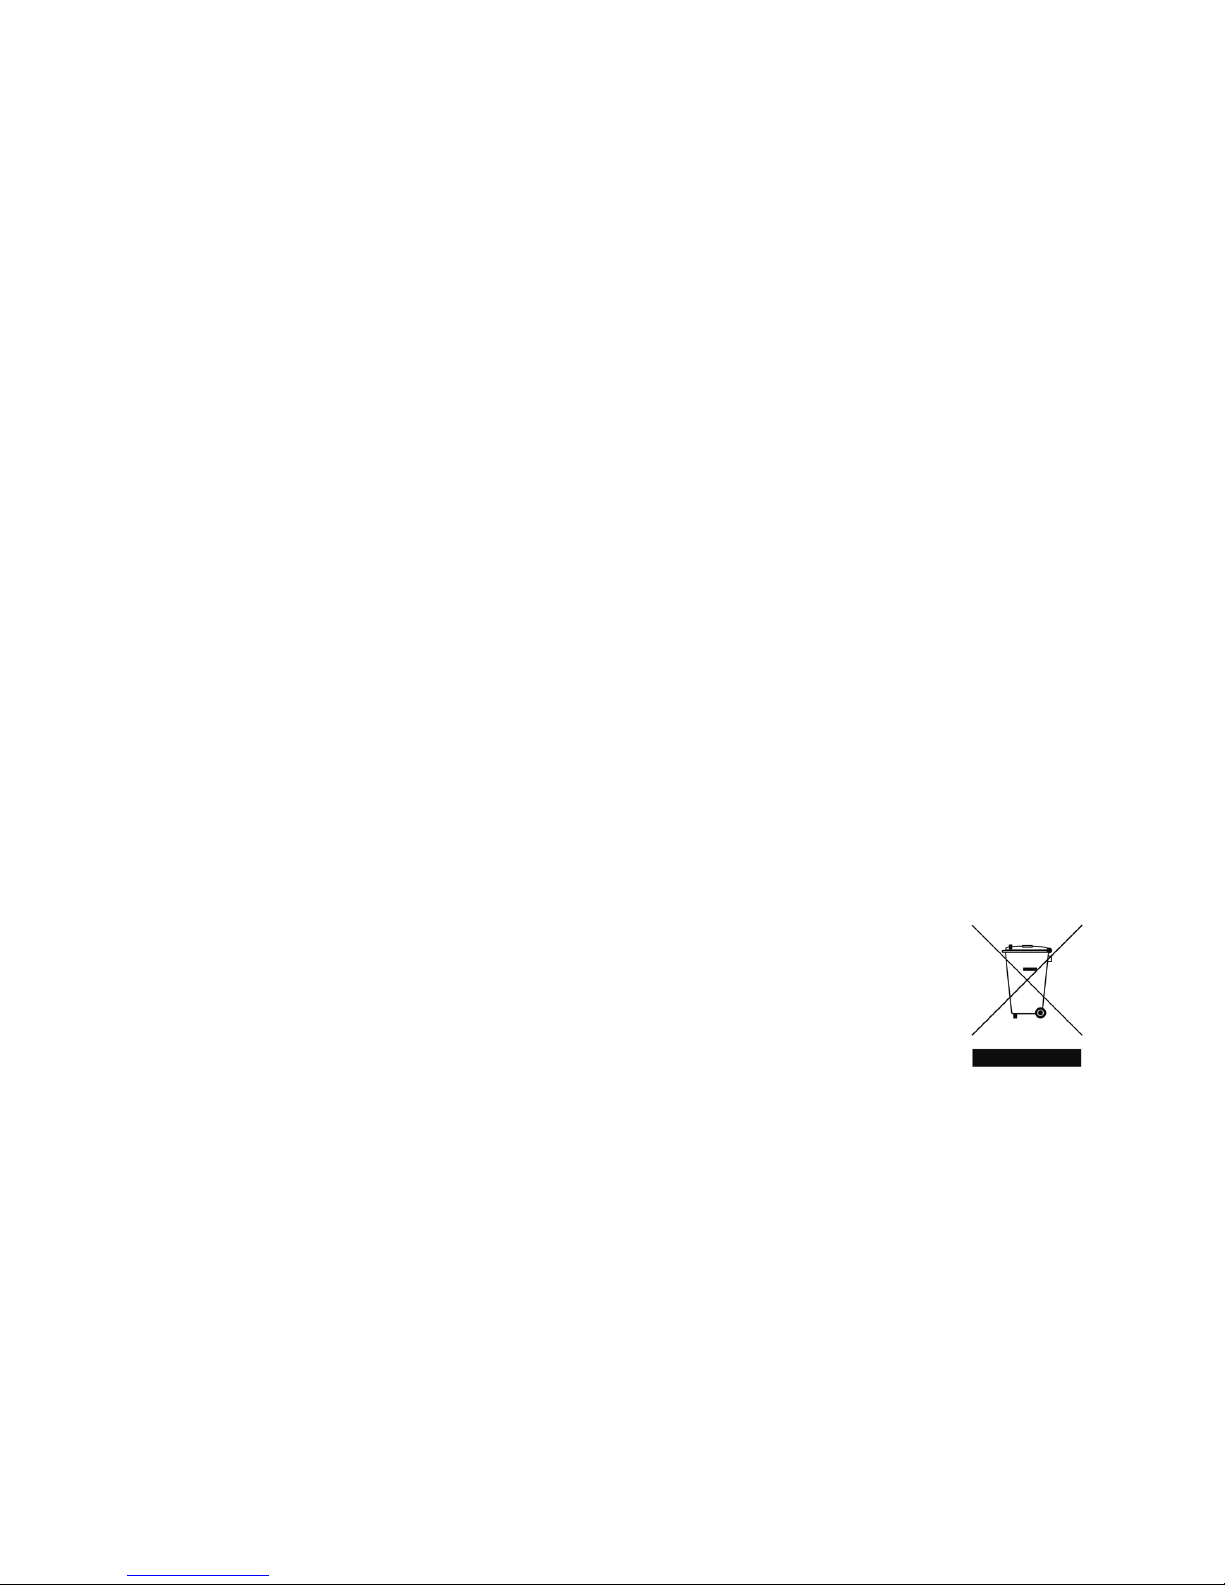
9. Disposal
This symbol on the product, in the instructions or on the packaging
means that your electrical and electronic equipment should be
disposed at the end of its life separately from your household waste.
There are separate collection systems for recycling in the EU. For
more information, please contact the local authority or your retailer
where you purchased the product.
10. Technical specifications
You will find the technical specifications for this product on the packaging or internet
at www.beyerdynamic.com.
Page 11

english
10 | 11
Page 12
Sie haben sich für den In-Ear-Kopfhörer iDX 120 iE | iDX 160 iE von beyerdynamic
entschieden. Vielen Dank für Ihr Vertrauen. Nehmen Sie sich bitte etwas Zeit undlesen
Sie diese Bedienungsanleitung vor Inbetriebnahme aufmerksam durch.
1. Sicherheitshinweise
Vorsicht: Wenn Sie den In-Ear-Kopfhörer anschließen, achten Sie darauf, dass
die Lautstärke auf Minimum eingestellt ist. Regeln Sie die Lautstärke
erst nach Einsetzen des Hörers. Zur Vermeidung eines möglichen
Gehörschadens, sollten Sie Ihren In-Ear-Kopfhörer nicht für längere
Zeit bei hoher Lautstärke benutzen. Als Maß für die Einstellung der
Lautstärke dient die Prüfung, ob Sie beim Hören und gewöhnlichem
Sprechen mit In-Ear-Kopfhörer noch Ihre eigene Stimme wahrnehmen
können.
Wir möchten Sie darauf hinweisen, dass zu hohe Lautstärken und zu lange Hörzeiten das Gehör schädigen können. Hörschäden stellen immer eine irreversible Beeinträchtigung des Hörvermögens dar.
Achten Sie stets auf eine angemessene Lautstärke. Als Faustformel gilt: je höher
die Lautstärke, desto kürzer die Hörzeit. Gemäß der Berufsgenossenschaftlichen
Vorschrift für Sicherheit und Gesundheit bei der Arbeit BGV B3 darf die Lärmbelastung z.B. am Arbeitsplatz 85 dB (Zimmerlautstärke) nicht überschreiten bei
einer maximal zulässigen Hörzeit von 8 Stunden. Wird die Lautstärke jeweils um
3 dB erhöht, halbiert sich die zulässige Hörzeit, d.h. bei 88 dB beträgt die Hörzeit
4 Stunden, bei 91 dB 2 Stunden usw.
Lebensgefahr!
In-Ear-Kopfhörer reduzieren die akustische Außenwahrnehmung drastisch. Die
Verwendung von In-Ear-Kopfhörern im Straßenverkehr birgt großes Gefährdungspotenzial und ist daher gesetzlich untersagt. Bitte achten Sie zudem darauf, dass
Sie die In-Ear-Kopfhörer nicht im Aktionsbereich von möglicherweise gefährlichen
Maschinen und Arbeitsgeräten verwenden.
Verletzungsgefahr!
Bei kabelgebundenen In-Ear-Kopfhörern sollten Sie heftige Bewegungen vermeiden. Sie könnten sich ernsthaft verletzen, insbesondere, wenn Sie Piercings, Ohrringe, Brille usw. tragen, an denen das Kabel sich verfangen kann.
Page 13

deutsch
12 | 13
Veränderte akustische Wahrnehmung
Für viele Menschen ist das Tragen von In-Ear-Kopfhörern gewöhnungsbedürftig, da
sich die akustische Wahrnehmung der eigenen Stimme und des Körpers sowie auftretende Innenohrgeräusche beim Laufen von der „normalen“ Situation ohne InEar-Kopfhörer unterscheiden. Diese zunächst fremdartige Empfindung verringert
sich jedoch gewöhnlich nach einiger Zeit des Tragens.
2. Ohrpassstücke
Auswahl der richtigen Ohrpassstücke
Ihr In-Ear-Kopfhörer wird mit verschiedenen Sets von Ohrpassstücken aus Silikon
und Schaumstoff geliefert.
Wählen Sie vor Gebrauch Ihres In-Ear-Kopfhörers die richtige Größe der Ohrpassstücke. Die passende Größe ermitteln Sie, indem Sie den In-Ear-Kopfhörer nacheinander mit verschiedenen Passstücken vorsichtig in Ihren Gehörgang einsetzen.
Die In-Ear-Kopfhörer sitzen dann richtig, wenn sie auch bei mittelstarken Kopfbewegungen nicht herausfallen, die tieffrequenten Bässe sauber wiedergegeben werden, und Sie Außengeräusche nur noch sehr leise wahrnehmen können.
iDX 160 iE: Wenn Sie Ohrpassstücke aus Schaumstoff T-400 von Comply™ einsetzen
• Rollen Sie das am In-Ear-Kopfhörer befestigte Ohrpassstück zwischen den Fingern der Länge nach fest zusammen.
• Ziehen Sie das Ohr mit einer Hand etwas nach oben, führen Sie mit der anderen Hand das gerollte Ohrpassstück vorsichtig in den Gehörgang ein.
• Halten Sie den In-Ear-Kopfhörer so lange mit dem Finger fest, bis sich das Ohrpassstück ausgedehnt hat und angenehm sitzt.
Pflege der Ohrpassstücke
• Die Ohrpassstücke des In-Ear-Kopfhörers sollten regelmäßig mit einem
weichen, feuchten Tuch gereinigt und anschließend mit einem weichen Tuch
getrocknet werden.
• Verwenden Sie zum Reinigen nur milde Reiniger, auf keinen Fall chemische
Mittel wie z.B. lösungsmittelhaltige Reiniger, da diese die Ohrpassstücke angreifen können.
• Wenn Sie den In-Ear-Kopfhörer nicht benutzen, bewahren Sie ihn in dem beiliegenden Etui auf.
Page 14
Austausch der Ohrpassstücke
• Ziehen Sie das Ohrpassstück vom Ohrhörer ab.
• Reinigen Sie die Schallöffnung des Ohrhörers von Rückständen mit einem
weichen, feuchten Tuch. Achten Sie darauf, dass keine Flüssigkeit in die Schallöffnung läuft.
• Befestigen Sie das neue Ohrpassstück am Ohrhörer.
• Bei regelmäßigem Gebrauch empfehlen wir, die Ohrpassstücke alle 3 Monate zu
wechseln.
• Die Ersatz-Ohrpassstücke aus Silikon können Sie über den Ersatzteil-Shop von
beyerdynamic bestellen.
Bitte gehen Sie auf http://shop.beyerdynamic.de/ersatzteile, wählen Sie Ihren
Hörertyp aus der Liste, und gehen Sie Schritt für Schritt durch die Kaufabwicklung des Shopsystems.
• iDX 160 iE: Ersatz-Ohrpassstücke aus Schaumstoff von Comply™ sowie Händ-
ler, bei denen Sie die entsprechenden Ohrpassstücke bestellen können, finden
Sie im Internet unter www.complyfoam.com.
Verwendete Typen der Ohrpassstücke: T-400
fi
Page 15
deutsch
14 | 15
3. Anschluss
1
2
3
45
1 3-Tasten-Controller
2 Anschlusskabel mit Klinkenstecker
3 Adapterstecker mit Klinkenbuchsen
(oben und unten) sowie Klinkenstecker
4 Verlängerungskabel für Apple- und kompatible Ge-
räte mit Klinkenbuchse (oben) und Klinkenstecker
mit weißen Isolationsringen (unten)
5 Verlängerungskabel für nicht Apple-kompatible Ge-
räte mit Klinkenbuchse (oben) und Klinkenstecker
mit schwarzen Isolationsringen (unten)
6 VoIP-Adapter mit Klinkenbuchse (oben) und zwei
Klinkenstecker (unten)
Anschluss an Apple-Geräte (und kompatible)
Das Anschlusskabel 2 des In-Ear-Kopfhörers verfügt über
einen Mini-Stereoklinkenstecker zum direkten An-
schluss an iPod, iPhone, iPad oder kompatible Geräte.
• Möchten Sie das Anschlusskabel verlängern, verwenden Sie hierzu das mitgelieferte Verlängerungs-
kabel 4 für Apple-Geräte (Klinkenstecker mit weißen
Isolationsringen).
Anschluss an nicht Apple-kompatible Geräte
Je nach Ausführung des Gerätes verwenden Sie für eine
einwandfreie Funktion das Verlängerungskabel 4 oder
5. Dies können Sie einfach ausprobieren. Das Abspiel-
gerät kann dabei nicht beschädigt werden.
6
Page 16
Adapterstecker für zwei In-Ear-Kopfhörer
Mit dem Adapterstecker 3 können Sie zwei In-Ear-Kopfhörer an ein Gerät anschließen.
• Schließen Sie den Klinkenstecker des In-Ear-Kopfhörers an die obere Klinkenbuchse des Adaptersteckers 3 an.
• An den Klinkenstecker des Adaptersteckers 3 schließen Sie das entsprechende
Verlängerungskabel 4 oder 5 an.
• An die untere Klinkenbuchse des Adaptersteckers 3 schließen Sie einen weiteren Kopfhörer an.
Anschluss VoIP-Adapter
Wenn Sie den In-Ear-Kopfhörer an einen PC oder Laptop anschließen möchten, um
über das Internet zu telefonieren, verwenden Sie den mitgelieferten VoIP-Adapter 6.
• Schließen Sie den Klinkenstecker des In-Ear-Kopfhörers an die Klinkenbuchse
des mitgelieferten Verlängerungskabels 4 an.
• Schließen Sie den Klinkenstecker des Verlängerungskabels 4 an die Klinkenbuchse des VoIP-Adapters 6 an.
• Schließen Sie die beiden Stecker des VoIP-Adapters 6 direkt an Ihren PC oder Lap-
top an. Die Stecker für Mikrofon und Kopfhörer sind entsprechend gekennzeichnet.
4. Bedienhinweise 3-Tasten-Controller für Apple-Geräte
Mit einem im Kabel eingearbeiteten 3-Tasten Controller und dem darin integrierten
Mikrofon können Sie zu bestimmten Titeln springen oder mit Ihrem Apple-Gerät
telefonieren, während Sie Musik hören.
Musikwiedergabe
• Drücken Sie die mittlere Taste, um die Musikwiedergabe zu stoppen.
Drücken Sie die mittlere Taste erneut, um die Musikwiedergabe zu starten.
• Drücken Sie die mittlere Taste zweimal kurz hintereinander, um zum
folgenden Titel zu springen.
• Zum Vorspulen drücken Sie die mittlere Taste einmal kurz und halten
Sie sie gedrückt.
• Drücken Sie die mittlere Taste dreimal kurz hintereinander, um zum
Titelanfang bzw. vorherigen Titel zu springen.
• Zum Zurückspulen drücken Sie die mittlere Taste zweimal kurz und
halten Sie sie gedrückt.
Page 17

deutsch
16 | 17
Anrufe
• Drücken Sie einmal auf die mittlere Taste, um das eingehende Gespräch anzunehmen. Drücken Sie noch einmal auf die mittlere Taste, um das Gespräch zu
beenden.
• Halten Sie die mittlere Taste für ca. 2 Sekunden gedrückt, um ein eingehendes
Gespräch abzulehnen.
• Drücken Sie die mittlere Taste einmal, um bei Anklopfen eines anderen Teilnehmers das Gespräch anzunehmen. Drücken Sie die mittlere Taste noch einmal, um wieder zum ursprünglichen Gespräch umzuschalten.
Lautstärke erhöhen
• Drücken Sie auf die + Taste, um die Lautstärke zu erhöhen.
Lautstärke reduzieren
• Drücken Sie auf die - Taste, um die Lautstärke zu reduzieren.
Hinweis
• Controller und Mikrofon werden nur vom iPhone 3GS oder neuer, iPad, iPod
touch (2. Generation oder neuer), iPod classic (120GB, 160GB) und iPod nano
(4. Generation oder neuer) unterstützt. Der Controller wird vom iPod shuffle (3.
Generation oder neuer) unterstützt. Audio wird von allen iPad und iPod Modellen unterstützt.
5. Bedienhinweise 3-Tasten-Controller für nicht Apple-kompatible Geräte
• Für die Funktion des Mikrofons wählen Sie das entsprechende Verlängerungskabel 4 oder 5 aus.
• Die Funktionsweise der mittleren Taste hängt vom jeweiligen Gerät ab.
• Die + Taste und - Taste können nicht verwendet werden.
Page 18

6. Service
Im Servicefall wenden Sie sich bitte an autorisiertes Fachpersonal oder direkt an:
beyerdynamic Service- und Logistik Center
E-Mail: service@beyerdynamic.de
Öffnen Sie den In-Ear-Kopfhörer auf keinen Fall selbst, Sie könnten sonst alle Gewährleistungsansprüche verlieren.
7. Zubehör – Lieferumfang
• 2 x Verlängerungskabel
• 1 x Adapter für VoIP (Skype-Adapter)
• 1 x Kabelclip
• 1 x Adapterstecker für zwei In-Ear-Kopfhörer
• iDX 120 iE: Weiches Etui
• iDX 160 iE: Hardcase
• 7 Paar Ohrpassstücke Silikon in verschiedenen Größen
• iDX 160 iE: 1 Paar Ohrpassstücke Schaumstoff Comply™ T-400 Größe M,
schwarz
8. Ersatzteile
Adapter für VoIP . . . . . . . . . . . . . . . . . . . . . . . . . . . . . . Best.-Nr. 908.452
Adapterstecker für zwei In-Ear-Kopfhörer . . . . . . . . . . . . . Best.-Nr. 912.786
Verlängerungskabel-Set mit 2 Kabeln. . . . . . . . . . . . . . . . Best.-Nr. 912.638
iDX 120 iE: Weiches Etui . . . . . . . . . . . . . . . . . . . . . . . . Best.-Nr. 914.045
iDX 160 iE: Hardcase . . . . . . . . . . . . . . . . . . . . . . . . . . . Best.-Nr. 914.207
Set mit 7 Paar Ohrpassstücken Silikon und
Kabelclip . . . . . . . . . . . . . . . . . . . . . . . . . . . . . . . . . . . Best.-Nr. 912.611
Ohrpassstücke Comply™ T-400 . . . . . . . . . . . . . . . . . . . www.complyfoam.com
Page 19

9. Entsorgung
Dieses Produkt darf am Ende seiner Lebensdauer nicht über den normalen Haushaltsabfall entsorgt werden, sondern muss an einem Sammelpunkt für das Recycling von elektrischen und elektronischen
Geräten abgegeben werden. Das Symbol auf dem Produkt, der Gebrauchsanweisung oder der Verpackung weist darauf hin.
10. Technische Daten
Die technischen Daten finden Sie auf der Verpackung oder im Internet unter
www.beyerdynamic.com.
deutsch
18 | 19
Page 20
Vous avez opté pour les écouteurs intra-auriculaires iDX 120 iE | iDX 160 iE de
beyerdynamic. Nous vous remercions de votre confiance. Veuillez prendre le temps
de lire attentivement ce mode d'emploi avant la mise en service des écouteurs
intra-auriculaires.
1. Consignes de sécurité
Prudence : Veillez à ce que le volume sonore soit réglé au minimum au moment
de brancher les écouteurs intra-auriculaires. Ne réglez le volume so-
nore qu'après avoir introduit les écouteurs intra-auriculaires dans le
conduit auditif. Pour éviter toute lésion auditive éventuelle, vous ne
devriez pas utiliser vos écouteurs intra-auriculaires pendant un cer-
tain temps à un volume sonore élevé. Comme degré pour le réglage
du volume sonore, il est possible de vérifier si vous pouvez encore en-
tendre votre propre voix lorsque vous écoutez de la musique avec les
écouteurs intra-auriculaires et lorsque vous parlez à voix normale.
Nous souhaitons vous avertir qu'une écoute à volume sonore trop élevé pendant
trop longtemps peut endommager l'ouïe. Des lésions auditives représentent toujours une diminution irréversible de la capacité auditive.
Veillez à régler systématiquement un niveau sonore approprié. En règle générale,
plus le volume sonore est élevé, plus la durée d'écoute est courte. Selon les règles
professionnelles en matière de sécurité et de santé sur le lieu de travail BGV B3,
les nuisances sonores par ex. sur le lieu de travail ne doivent pas dépasser 85 dB
(volume réduit) à une durée d'écoute maximale admissible de 8 heures. Si le volume sonore est augmenté respectivement de 3 dB, la durée d'écoute est réduite
de moitié, c'est-à-dire la durée d'écoute est de 4 heures à un volume sonore de 88
dB et de 2 heures à un volume sonore de 91 dB, etc..
Danger de mort !
Les écouteurs intra-auriculaires diminuent énormément la perception acoustique
des bruits ambiants. Le port d'écouteurs intra-auriculaires lors des déplacements
sur la voie publique présente un gros risque potentiel et est donc interdit par la loi.
Veuillez, en outre, veiller à ne pas utiliser les écouteurs intra-auriculaires dans le
rayon d'action de machines et d'outils potentiellement dangereux.
Page 21

français
20 | 21
Risque de blessures !
Évitez tout mouvement brusque lorsque vous portez les écouteurs intra-auriculaires
à câbles. Vous risqueriez de vous blesser sérieusement, en particulier si vous portez des piercings, des boucles d'oreilles, des lunettes, etc. qui s'empêtreraient
dans le câble.
Perception acoustique modifiée
Pour beaucoup de personnes, le port d'écouteurs intra-auriculaires nécessite un
temps d'adaptation, la perception acoustique de la propre voix et du corps ainsi que
les bruits de l'oreille interne se produisant pendant la marche divergeant du cas de
figure "normal" sans écouteur intra-auriculaire. Cette perception au début étrange
diminue cependant normalement au fil du temps avec les écouteurs intra-auriculaires dans les oreilles.
2. Embouts auriculaires
Choix des embouts auriculaires adaptés
Vos écouteurs intra-auriculaires sont fournis avec différents jeux d'embouts auriculaires en silicone ou en mousse.
Veuillez choisir des embouts auriculaires de taille adaptée avant d'utiliser vos écouteurs intra-auriculaires. Vous trouverez la taille adaptée en introduisant avec précaution les différents embouts auriculaires, les uns après les autres, dans votre
conduit auditif. Les écouteurs intra-auriculaires sont parfaitement adaptés à vos
oreilles lorsqu'ils ne tombent pas des oreilles lorsque vous bougez moyennement
la tête, lorsque les basses de basse fréquence sont correctement transmises et
lorsque vous ne pouvez percevoir que très légèrement les bruits extérieurs.
iDX 160 iE : Si vous utilisez les embouts auriculaires en mousse
T-400 de Comply™
• Roulez l'embout auriculaire fixé sur l'écouteur intra-auriculaire en le comprimant entre les doigts dans le sens de la longueur.
• Tirez légèrement d'une main l'oreille vers le haut, puis introduisez avec l'autre
main et avec précaution l'embout auriculaire enroulé dans le conduit auditif.
• Maintenez l'écouteur intra-auriculaire avec le doigt jusqu'à ce que l'embout auriculaire se soit dilaté et agréablement placé dans l'oreille.
Page 22

Entretien des embouts auriculaires
• Nettoyez régulièrement les embouts des écouteurs intra-auriculaires avec un
chiffon humide et doux, puis séchez-les avec un chiffon doux.
• N'utilisez que des nettoyants doux et, en aucun cas, des produits chimiques tels
que des nettoyants contenant des solvants qui risqueraient d'attaquer les embouts auriculaires.
• Rangez les écouteurs intra-auriculaires dans l'étui prévu à cet effet fourni avec
l'appareil lorsque vous ne les utilisez pas.
Remplacement des embouts auriculaires
• Retirez l'embout auriculaire de l'écouteur intra-auriculaire.
• Nettoyez l'ouverture de passage du son de l'écouteur intra-auriculaire pour éliminer les résidus avec un chiffon humide et doux. Veillez à ce qu'aucun liquide
ne s'infiltre dans l'ouverture de passage du son. Séchez l'ouverture de passage
du son avec un chiffon doux.
• Fixez le nouvel embout auriculaire sur l'écouteur intra-auriculaire.
• Nous vous conseillons de remplacer tous les trois mois les embouts auriculaires
en cas d'utilisation régulière de vos écouteurs intra-auriculaires.
• Vous pouvez commander les embouts auriculaires de remplacement en silicone
via la boutique des pièces de rechange beyerdynamic.
Allez sur http://shop.beyerdynamic.de/pièces_de_rechange, sélectionnez le type
d'écouteurs intra-auriculaires utilisé dans la liste, puis suivez les étapes vous
permettant de passer commande dans la boutique en ligne.
• iDX 160 iE : Consultez le site Internet www.complyfoam.com pour commander
les embouts auriculaires en mousse de Comply™ et pour connaître les revendeurs commercialisant les embouts auriculaires correspondants.
Types d'embouts auriculaires utilisés : T-400
fi
Page 23

français
22 | 23
3. Branchement
1
2
3
45
1 Contrôleur à 3 touches
2 Câble de raccordement avec fiche jack
3 Fiche d'adaptateur avec prises jack (en haut et en
bas) et une fiche jack
4 Rallonge pour les appareils Apple et compatibles
avec Apple avec prise jack (en haut) et fiche jack
avec des bagues isolantes blanches (en bas)
5 Rallonge pour les appareils non compatibles avec
Apple avec prise jack (en haut) et fiche jack avec
des bagues isolantes noires (en bas)
6 Adaptateur VoIP avec prise jack (en haut) et deux
fiches jack (en bas)
Branchement sur des appareils Apple
(et compatibles avec Apple)
Le câble de raccordement 2 des écouteurs intra-auricu-
laires est équipé d'une fiche mini-jack stéréo pour le branchement direct à un iPod, iPhone, iPad ou des appareils
compatibles.
• Si vous souhaitez rallonger le câble de raccordement,
veuillez alors utiliser la rallonge 4 fournie avec l'appareil pour les appareils Apple (la fiche jack avec les
bagues isolantes blanches).
Branchement sur des appareils non compatibles avec
Apple
En fonction de la version de l'appareil, utilisez la rallonge 4 ou 5 afin de garantir un parfait fonctionnement. Essayez tout simplement. Cela ne risque pas
d'endommager le lecteur.
6
Page 24

Fiche d'adaptateur pour deux paires d'écouteurs intra-auriculaires
La fiche d'adaptateur 3 vous permet de brancher deux paires d'écouteurs intra-auriculaires sur un appareil.
• Branchez la fiche jack des écouteurs intra-auriculaires sur la prise jack supérieure de la fiche d'adaptateur 3.
• Raccordez la rallonge correspondante 4 ou 5 à la fiche jack de la fiche d'adap-
tateur 3.
• Raccordez une autre paire d'écouteurs intra-auriculaires à la prise jack 3 de la
fiche d'adaptateur
Raccordement de l'adaptateur VoIP
Si vous souhaitez raccorder une paire d'écouteurs intra-auriculaires à un ordinateur
personnel ou à un ordinateur portable afin de pouvoir téléphoner via la connexion In-
ternet, veuillez utiliser l'adaptateur VoIP 6.
• Branchez la fiche jack des écouteurs intra-auriculaires sur la prise jack de la rallonge 4 fournie avec l'appareil.
• Branchez la fiche jack de la rallonge 4 sur la prise jack de l'adaptateur VoIP
6.
• Raccordez les deux fiches de l'adaptateur VoIP 6 à votre ordinateur personnel
ou à votre ordinateur portable. Les fiches pour le microphone et la paire d'écouteurs intra-auriculaires sont marquées en conséquence.
4. Remarques concernant l'utilisation du contrôleur à 3 touches pour les appa-
reils compatibles avec Apple
Le contrôleur à trois touches intégré au câble et le microphone intégré vous permettent de sauter des morceaux de musique particuliers ou de téléphoner avec votre
appareil Apple tandis que vous écoutez de la musique.
Page 25

français
24 | 25
Écouter de la musique
• Appuyez sur la touche centrale pour arrêter d'écouter de la musique.
Réappuyez sur la touche centrale pour écouter de la musique.
• Appuyez deux fois de suite brièvement sur la touche centrale pour
passer au morceau de musique suivant.
• Pour avancer, appuyez une fois brièvement sur la touche centrale et
maintenez-la enfoncée.
• Appuyez trois fois de suite brièvement sur la touche centrale pour
passer au début du titre ou au morceau de musique précédent.
• Pour revenir en arrière, appuyez deux fois brièvement sur la touche
centrale et maintenez-la enfoncée.
Appels téléphoniques
• Appuyez une fois sur la touche centrale pour prendre l'appel entrant. Réappuyez sur la touche centrale pour terminer l'appel.
• Maintenez la touche centrale enfoncée pendant env. 2 secondes pour refuser
un appel entrant.
• Appuyez une fois sur la touche centrale pour répondre à un nouvel appel entrant
pendant que vous êtes engagé(e) dans une conversation téléphonique. Réappuyez sur la touche centrale pour revenir au premier appel mis en attente.
Augmentation du volume sonore
• Appuyez sur la touche + pour augmenter le volume sonore.
Baisse du volume sonore
• Appuyez sur la touche - pour réduire le volume sonore.
Remarque
• Uniquement l'iPhone 3GS ou plus récent, l'iPad, l'iPod touch (2e génération ou
plus récent), l'iPod classic (120Go, 160Go) et l'iPod nano (4e génération ou
plus récent) prennent le contrôleur en charge. L'iPod shuffle (3e génération ou
plus récent) prend le contrôleur en charge. Tous les modèles d'iPad et d'iPod
prennent les signaux audio en charge.
Page 26

5. Remarques concernant l'utilisation du contrôleur à 3 touches pour les appareils non compatibles avec Apple
• Choisissez la rallonge correspondante 4 ou 5 pour la fonction Microphone.
• Le mode de fonctionnement de la touche centrale dépend de l'appareil corres-
pondant.
• Il n'est pas possible d'utiliser les touches + et -.
6. Service après-vente
Si besoin est, veuillez contacter un technicien spécialisé agréé ou directement le :
centre de service après-vente et de logistique beyerdynamic
Adresse e-mail : service@beyerdynamic.de
N'ouvrez en aucun cas vous-même les écouteurs intra-auriculaires, vous risqueriez
sinon de perdre vos droits de garantie.
7. Accessoires fournis avec les écouteurs intra-auriculaires
• 2 rallonges
• 1 adaptateur pour VoIP (adaptateur pour Skype)
• 1 clip de fixation du câble
• 1 fiche d'adaptateur pour deux paires d'écouteurs intra-auriculaires
• iDX 120 iE : étui souple
• iDX 160 iE : étui rigide
• 7 paires d'embouts auriculaires en silicone de différentes tailles
• iDX 160 iE : 1 paire d'embouts auriculaires en mousse Comply™ T-400, taille
M de couleur noire
Page 27

français
26 | 27
8. Pièces de rechange
Adaptateur pour VoIP . . . . . . . . . . . . . . . . . . . . . . . . . . . . . . . Réf. 908.452
Fiche d'adaptateur pour deux paires
d'écouteurs intra-auriculaires . . . . . . . . . . . . . . . . . . . . . . . . . Réf. 912.786
Kit de rallonges avec 2 rallonges . . . . . . . . . . . . . . . . . . . . . . . Réf. 912.638
iDX 120 iE : étui souple . . . . . . . . . . . . . . . . . . . . . . . . . . . . . . Réf. 914.045
iDX 160 iE : étui rigide . . . . . . . . . . . . . . . . . . . . . . . . . . . . . . Réf. 914.207
Kit avec 7 embouts auriculaires en silicone et
clip de fixation du câble . . . . . . . . . . . . . . . . . . . . . . . . . . . . . Réf. 912.611
Embouts auriculaires Comply™ T-400 . . . . . . . . . . . . . . www.complyfoam.com
9. Mise au rebut
Le symbole représentant une poubelle barrée que l'on retrouve sur le
produit, dans la notice d'utilisation ou sur l'emballage signifie que
votre appareil arrivé en fin de vie ne doit pas être jeté avec les ordures ménagères ordinaires. Il doit être confié à un centre de collecte
spécialisé dans le recyclage des appareils électriques et électroniques.
10. Caractéristiques techniques
Vous trouverez les caractéristiques techniques du produit sur l'emballage ou sur
notre site Internet www.beyerdynamic.com.
Page 28

Ha adquirido un intra-auricular iDX 120 iE | iDX 160 iE beyerdynamic. Le recomendamos que se tome un poco de tiempo para leer estas instrucciones de uso
antes de ponerlos en marcha.
1. Instrucciones de seguridad
Atención: Cuando conecte unos intra-auriculares, compruebe que el volumen
está al mínimo y ajuste el volumen una vez los tenga puestos. Para
evitar posibles lesiones auditivas, no utilice los auriculares durante
mucho tiempo a un volumen alto. Como referencia para regularlos,
cuando tenga los auriculares puestos, ajústelos a un volumen en el
que pueda oír su propia voz al hablar mientas escucha la música.
Le recordamos que escuchar la música a volumen demasiado alto du-
rante largo espacio de tiempo puede dañar los oídos de manera irre-
versible.
Procure que el volumen sea el adecuado siempre. Regla de oro: a mayor volumen,
audición más breve. Según la norma de prevención de riesgos laborales alemana
BGV B3, la exposición a ruido durante el trabajo no debería exceder los 85 dB (volumen medio) en un tiempo de escucha máximo de 8 horas. Por cada aumento de
3 dB, el tiempo de audición permitido se reduce a la mitad; es decir, a 88 dB el
tiempo de audición máxima son 4 horas, a 91 dB 2 horas, y así sucesivamente.
Peligro de muerte
Los intra-auriculares reducen drásticamente la percepción acústica exterior. Utilizar intra-auriculares en un entorno de tráfico conlleva un gran potencial de riesgo
y por ello está prohibida. Tenga en cuenta que los auriculares no deben ponerse en
un entorno de máquinas potencialmente peligrosas o maquinaria de trabajo.
Peligro de lesiones
Si sus auriculares tienen hilo, evite movimientos bruscos. Puede sufrir lesiones
graves especialmente si lleva piercings, pendientes, gafas, etc. ya que pueden engancharse en el hilo.
Page 29

español
28 | 29
Cambio de la percepción acústica
Muchas personas precisan cierto tiempo para habituarse a los intra-auriculares ya
que estos alteran la percepción acústica de la propia voz, el sonido inherente al
andar y cambian de las situaciones "normales". No obstante esta sensación extraña
suele desaparecer después de llevar los auriculares un rato.
2. Almohadillas
Elección de las almohadillas adecuadas
Los auriculares intra-auriculares se entregan con diferentes juegos de almohadillas
de silicona y espuma.
Antes de utilizar su auricular, elija el tamaño de la almohadilla que le resulte más
cómodo. Para averiguar qué almohadillas le van mejor pruébelas todas seguidas.
Cuando el tamaño es el correcto, los auriculares no se caen al sacudir ligeramente
la cabeza y permiten oír claramente los sonidos graves de baja frecuencia y levemente los ruidos ambientales.
iDX 160 iE: Si utiliza almohadillas de espuma T-400 de Comply™
• Enrolle con los dedos las almohadillas de los auriculares hasta hacer un cilindro.
• Empuje la oreja ligeramente hacia arriba con una mano e introduzca la almohadilla enrollada en el interior del conducto auditivo con la otra.
• Sujete el auricular con el dedo mientras se expande la almohadilla y se amolda
al conducto.
Mantenimiento de las almohadillas
• Las almohadillas de los auriculares deben limpiarse con regularidad con un
paño suave y húmedo, y a continuación secarse con un paño seco.
• La limpieza debe realizarse sólo con limpiadores suaves, sin productos químicos, por ej., limpiadores con disolventes ya que podrían dañar las almohadillas.
• Guarde los auriculares en la bolsita mientras no los utilice.
Page 30

Cambio de las almohadillas
• Retire las almohadillas de los auriculares.
• Limpie los restos de suciedad de la salida de sonido de los auriculares con un
paño suave y húmedo. Procure que no penetre líquido en la salida de sonido.
Limpie la salida de sonido con un paño suave.
• Coloque la nueva almohadilla en el auricular.
• Si usa los auriculares habitualmente, le recomendamos que cambie las almohadillas cada 3 meses.
• Puede encargar las almohadillas en la tienda de repuestos de beyerdynamic.
Vaya http://shop.beyerdynamic.de/ersatzteile y seleccione el tipo de auricular de
la lista y siga los pasos de la tienda online para efectuar la compra.
• iDX 160 iE: En www.complyfoam.com encontrará las almohadillas de repuesto
de espuma Comply™ y los comercios en los que puede comprarlas.
Tipos de almohadillas utilizadas: T-400
fi
Page 31

español
30 | 31
3. Conexión
1
2
3
45
1 Controlador de 3 botones
2 Cable de conexión con conector jack
3 Adaptador con clavija (arriba y abajo) y conector
jack
4 Alargador para Apple y dispositivos compatibles
con clavija (arriba) y conector jack con anillos aislantes blancos (abajo)
5 Alargador para dispositivos no compatibles con
Apple con clavija (arriba) y conector jack con anillos aislantes negros (abajo)
6 Adaptador para VoIP con clavija (arriba) y dos co-
nectores jack (abajo)
Conexión a dispositivos Apple
(y otros dispositivos compatibles)
El cable de conexión 2 del intra-auricular dispone de un
mini conector jack estéreo para conectar directamente al
iPod, iPhone, iPad o dispositivos compatibles.
• Si desea alargar su cable de conexión, utilice para ello
el alargador 4 suministrado para dispositivos Apple
(conector jack con anillos aislantes blancos).
Conexión a dispositivos no compatibles con Apple
En función del modelo de dispositivo, puede utilizar el
alargador 4 o 5 para obtener excelentes resultados.
Pruébelo; es muy sencillo. No puede dañar el disposi-
tivo.
6
Page 32

Adaptador para dos auriculares internos
Con el adaptador 3 puede conectar dos intra-auriculares a un único dispositivo.
• Conecte el conector jack del auricular a la clavija superior del adaptador 3.
• Conecte el correspondiente alargador 4 o 5 al conector jack del adaptador 3.
• Conecte el otro auricular a la clavija inferior del adaptador 3.
Conexión del adaptador para VoIP
Si desea conectar el intra-auricular a un PC o portátil para realizar llamadas por Internet, coloque el adaptador para VoIP 6 suministrado.
• Inserte el conector jack del auricular a la clavija del alargador 4 suministrado.
• Inserte el conector jack del alargador 4 a la clavija del adaptador para VoIP 6.
• Inserte los dos conectores del adaptador para VoIP 6 directamente a su PC o
portátil. Los conectores para el micrófono y los auriculares tienen el símbolo correspondiente.
4. Instrucciones de manejo del controlador de 3 botones para dispositivos Apple
Con el controlador de tres botones con micrófono integrado en el cable puede pasar
de una canción a otra o realizar llamadas con el
dispositivo Apple mientras escucha música.
Reproducción de música
• Presione el botón central para interrumpir la reproducción. Al pulsarlo de nuevo, continuará la reproducción.
• Para pasar a la siguiente canción, pulse el botón central dos veces.
• Para avanzar pulse el botón central brevemente y manténgalo pulsado.
• Para saltar al inicio de la canción o al título anterior, pulse el botón
central tres veces seguidas.
• Para retroceder pulse el botón central dos veces y manténgalo pulsado.
Page 33

español
32 | 33
LLamadas
• Pulse una vez el botón central para contestar la llamada entrante. Pulse de
nuevo el botón central para colgar.
• Mantenga pulsado el botón central durante dos segundos para rechazar la llamada entrante.
• Pulse el botón central una vez para aceptar otra llamada entrante. Pulsándolo
de nuevo recuperará la llamada inicial.
Subir el volumen
• Presione el botón + para subir el volumen.
Bajar el volumen
• Presione el botón - para bajar el volumen.
Nota
• El controlador y el micrófono sólo son compatibles con iPhone 3GS o superior,
iPad, iPod touch (2ª generación o superior), iPod classic (120GB, 160GB) y
iPod nano (4ª generación o superior). El controlador es compatible con iPod
shuffle (3ª generación o superior). El sistema de audio es compatible con todos
los modelos de iPad y iPod.
5. Instrucciones de manejo del controlador de 3 botones para dispositivos no
compatibles con Apple
• Para utilizar el micrófono, elija el alargador que corresponda, 4 o 5.
• El modo de funcionamiento del botón central dependerá de cada dispositivo.
• No se pueden utilizar los botones + y -.
Page 34

6. Servicio técnico
En caso de avería, acuda al servicio técnico autorizado o contacte directamente con
el
Centro de servicio técnico y logística de beyerdynamic
E-Mail: service@beyerdynamic.de
No desmonte los intra-auriculares. En ese caso, perdería el derecho a la garantía.
7. Accesorios incluidos
• 2 x alargador
• 1 x adaptador para VoIP (Skype)
• 1 x pinza sujetacables
• 1 x adaptador para dos intra-auriculares
• iDX 120 iE: Estuche blanco
• iDX 160 iE: Caja
• 7 pares de almohadillas de silicona de diferentes tamaños
• iDX 160 iE: 1 par de almohadillas de espuma Comply™ T-400 tamaño M, negro
8. Piezas de repuesto
Adaptador para VoIP . . . . . . . . . . . . . . . . . . . . . . . . . . . Nº pedido 908.452
Adaptador para dos auriculares internos . . . . . . . . . . . . . Nº pedido 912.786
Juego de alargadores con dos cables . . . . . . . . . . . . . . . . Nº pedido 912.638
iDX 120 iE: Estuche blando . . . . . . . . . . . . . . . . . . . . . . Nº pedido 914.045
iDX 160 iE: Caja . . . . . . . . . . . . . . . . . . . . . . . . . . . . . . Nº pedido 914.207
Un juego de 7 pares de almohadillas de silicona y
pinza sujetacables . . . . . . . . . . . . . . . . . . . . . . . . . . . . Nº pedido 912.611
Almohadillas Comply™ T-400. . . . . . . . . . . . . . . . . . . . . www.complyfoam.com
Page 35

español
34 | 35
9. Eliminación
Este producto no se puede tirar a la basura normal al final de su vida
útil; se debe entregar en un punto de recogida para el reciclaje de
dispositivos eléctricos y electrónicos. El símbolo que aparece en el
producto, las instrucciones de uso o el embalaje así lo recomiendan.
10. Datos técnicos
En el embalaje o en internet encontrará los datos técnicos.
www.beyerdynamic.com.
Page 36

Вы приобрели вставные наушники iDX 120 iE | iDX 160 iE фирмы beyerdynamic. Большое
спасибо за ваше доверие. Перед тем, как начать использование устройства, посвятите некоторое время тому, чтобы внимательно прочесть данное руководство по эксплуатации.
1. Правила техники безопасности
Осторожно: Следите за тем, чтобы в момент подключения громкость была установ-
лена на минимальное значение. Начинайте регулировать громкость
только после того, как вставите наушник в ухо. Чтобы предотвратить возможное повреждение органов слуха, следует избегать длительного прослушивания музыки через наушники при большой громкости. Для
ориентации при настройке громкости используется следующая проверка:
при прослушивании музыки через вставные наушники вы должны разли-
чать звуки собственного голоса, если говорите с обычной громкостью.
Мы обращаем ваше внимание на то, что прослушивание музыки на большой громкости
в течение слишком долгого времени может быть вредно для слуха. Поражение слуха
всегда необратимо.
Необходимо постоянно следить за тем, чтобы громкость звука оставалась на умеренном
уровне. Общее правило: чем выше громкость, тем меньше должна быть продолжительность прослушивания. Согласно предписанию Института техники безопасности и охраны
труда BGV B3 шумовая нагрузка (напр., на рабочем месте) не должна превышать
85 дБ (умер енная громко сть) при максимальной продолжительности воздействия,
равной 8 часам. Если громкость повышается на 3 дБ, допустимая продолжительность
прослушивания сокращается вдвое, т.е. при 88 дБ она равняется 4 часам, а при 91 дБ —
2 часам и т.д.
Опасность для жизни!
При ношении вставных наушников резко снижается способность воспринимать внешние
раздражи тели. Ношение вставных наушников участниками дорожного движения таит
в себе значительную опасность и потому запрещено законодательством. Кроме того,
просим обратить внимание на то, что вставные наушники не следует носить при нахождении в зоне действия потенциально опасных механизмов и рабочего оборудования.
Page 37

Русский
36 | 37
Опасность травм!
При ношении проводных вставных нау шников следует избегать резких движений. Вы
можете нанести себе серьезные травмы, в особенности, если вы носите пирсинг, серьги,
очки и т.п. и кабель может зацепиться за эти предметы.
Измененное слуховое восприятие
Для многих людей ношение вставных наушников требует привыкания, поскольку акустическое восприятие собственного голоса и тела, а также проявление шумов в ухе при
беге отл ичается от «нормальной» ситуации при отсутствии вставных наушни ков. Это
ощущение, которое сначала производит необычное впечатление, обычно проходит, если
носить наушники некоторое время.
2. Ушные вкладыши
Выбор подходящих ушных вкладышей
Вставные наушники поставляются с различными комплектами ушных вкладышей из силикона и вспененного полимера.
Перед использованием вставных наушников выберите подходящий размер вкладышей.
Подходящий размер можно выбрать, по очереди осторожно вставляя вставные наушники
с разными вкладышами в слуховой проход. Вставные наушники установлены правильно,
если они не выпадают при движениях головой со средней интенсивностью, обеспечивают чистую передачу низкочастотных басов и позволяют воспринимать внешние звуки
только как очень тихие.
iDX 160 iE: если вы используете вкладыши из вспененного
полимера T-400 от Comply™
• Плотно скатайте пальцами закрепленный на вставном наушнике вкладыш в продольном направлении.
• Слегка потяните ухо одной рукой вверх, а другой рукой осторожно вставьте скатанный вкладыш в слуховой проход.
• Удерживайте вставные наушники пальцами до тех пор, пока вкладыш не расширится
и не начнет удобно помещаться в ухе.
Page 38

Уход за вкладышами
• Вкладыши вставных наушников следует регулярно протирать мягкой влажной салфеткой, просушивая их после очистки мягкой салфеткой.
• Используйте для очистки мягкие средства; ни в коем случае не следует применять,
например, химические средства, содержащие растворители, так как они могут разрушить вкладыши.
• Когда вставные наушники не используются, их следует хранить в прилагаемом футляре.
Замена вкладышей
• Потянув, снимите вкладыш с наушника.
• Очистите отверстие наушника от загрязнений мягкой влажной салфеткой. Следите за
тем, чтобы вода не проникла в отверстие. Просушите отверстие мягкой салфеткой.
• Закрепите новый вкладыш на наушнике.
• При регулярном использовании мы рекомендуем менять вкладыши каждые 3 месяца.
• Сменные вкладыши из силикона можно заказать в магазине запасных частей beyerdynamic.
Перейдите на страницу http://shop.beyerdynamic.de/ersatzteile, выберите из списка
тип ваших наушников и последовательно выполните все предлагаемые системой
шаги, необходимые для покупки.
• iDX 160 iE: Сменные вкладыши из вспененного полимера от Comply™ и торговые
предприятия, у которых можно заказать соответствующие вкладыши, можно найти в
сети Интернет по адресу www.complyfoam.com.
Использованные типы вкладышей: T-400
fi
Page 39

Русский
38 | 39
3. Подключение
1
2
3
45
1
3-х кнопочный выключатель
2
Кабель подключения со штекером
3
Штекер-переходник с гильзами гнезд (вверху и внизу)
и штекер
4
Удлинитель для устройств Apple и совместимых с
ними с гильзой гнезда (вверху) и штекером с белыми
изоляционными кольцами (внизу)
5
Удлинитель для несовместимых с Apple уст ройств с
гильзой гнезда (вверху) и штекером с черными изоляционными кольцами (внизу)
6
Адаптер VoIP с гильзой гнезда (вверху) и двумя штекерами (внизу)
Подключение к устройствам Apple
(и совместимым с ними)
Кабель подключения 2вставных наушников снабжен разъемом мини-джек для непосредственного подключения к
iPod, iPhone, iPad или совместимым с ними устройствам.
• Чтобы удлинить кабель подключения, используется вхо-
дящий в комплект поставки удлинитель 4для устройств
Apple (штекер с белыми изоляционными кольцами).
Подключение к устройствам, несовместимым
с устройствами Apple
В зависимости от модели устройства для обеспечения исправной работы используется удлинитель 4или 5. Для
выбора просто воспользуйтесь каждым. Повреждение
устройства воспроизведения при этом невозможно.
6
Page 40

Штекер-переходник для двух вставных наушников
С помощью штекера-переходника 3к одному устройству можно подключить двое вставных
наушников.
• Подключите штекер вставных наушников к верхней гильзе гнезда штекера-переходника 3.
• К штекеру штекера-переходника 3подключите соответствующий удлинитель (
4
или 5).
• К нижней гильзе гнезда штекера-переходника 3подключите еще одни наушники.
Подключение адаптера VoIP
Если вставные наушники необходимо подключить к компьютеру или ноутбуку, чтобы воспользоваться интернет-телефонией, воспользуйтесь входящим в комплект поставки адаптером VoIP 6.
• Подключите штекер вставных наушников к гильзе гнезда входящего в комплект поставки удлинителя 4.
• Подключите штекер удлинителя 4к гильзе гнезда адаптера VoIP 6.
• Подключите оба штекера адаптера VoIP 6непосредственно к своему компьютеру или
ноутбуку. Штекеры для микрофона и наушников имеют соответствующую маркировку.
4. Указания по использованию 3-х кнопочного выключателя для устройств Apple
Интегрированный в кабель трехкнопочный выключатель и встроенный в него микрофон
позволяют переходить к определенным композициям или совершать звонки с помощью
устройства Apple во время прослушивания музыки.
Воспроизведение музыкальных произведений
• Нажмите центральную кнопку, чтобы остановить воспроизведение. Повторно нажмите центральную кнопку, чтобы возобновить воспроизведение.
• Дважды нажмите центральную кнопку, не удерживая ее, чтобы перейти к
следующей композиции.
• Для прокручивания вперед один раз быстро нажмите центральную кнопку
и удерживайте ее нажатой.
• Трижды быстр о нажмите центральную кнопку, чтобы перейти к начал у
проигрываемой или к предыдущей композиции.
• Для прокручивания назад дважды быстро нажмите центральную кнопку и
удерживайте ее нажатой.
Page 41

Русский
40 | 41
Вызовы
• Нажмите центральную кнопку, чтобы принять входящий вызов. Повторно нажмите
центральную кнопку, чтобы завершить вызов.
• Удерживайте центральную кнопку нажатой в течение прим. 2 секунд, чтобы отклонить входящий вызов.
• Нажмите центральную кнопку один раз, чтобы при входящем вызове другого участника принять его. Повторно нажмите центральную кнопку, чтобы переключиться и
продолжить первый разговор.
Увеличение громкости
• Нажмите кнопку «+», чтобы увеличить громкость.
Уменьшение громкости
• Нажмите кнопку «–», чтобы уменьшить громкость.
Указание
• Переключатель и микрофон поддерживаются только iPhone 3GS или более поздними
версиями, iPad, iPod touch (2 поколение или бо лее поздние версии), iPod classic
(120GB, 160GB) и iPod nano (4 поколение или более поздние версии). Переключатель
поддерживается iPod shuffle (3 поколение или более поздние версии). Функции аудио
поддерживаются всеми моделями iPad и iPod.
5. Указания по использованию 3-х кнопочного выключателя для устройств, не-
совместимых с Apple
• Для использования микрофона выберите соответствующий удлинитель 4или 5.
• Назначение центральной кнопки зависит от соответствующего устройства.
• Кнопки «+» и «−» не используются.
Page 42

6. Обслуживание
При необходимости технического обслуживания следует обращаться к авторизированному техническому специалисту или непосредственно в:
«Центр технического обслуживания и логистики beyerdynamic»
Эл. почта: service@beyerdynamic.de
Ни в коем случае не вскрывайте вставные наушники самостоятельно, так как в этом случае вы теряете право на гарантийное обслуживание.
7. Принадлежности — комплект поставки
• 2 x удлинителя
• 1 x адаптер VoIP (адаптер Skype)
• 1 x кабельный зажим
• 1 x штекер-переходник для двух вставных наушников
• iDX 120 iE: мягкий футляр
• iDX 160 iE: твердый футляр
• 7 пар силиконовых вкладышей различного размера
• iDX 160 iE: 1 пара вкладышей из вспененного материала Comply™ T-400 размер M,
черный цвет
8. Запасные части
Адаптер для VoIP . . . . . . . . . . . . . . . . . . . . . . . . . . . . . . . . . . . . . № заказа 908.452
Штекер-переходник для двух вставных наушников . . . . . . . . . № заказа 912.786
Набор удлинителей с 2 кабелями . . . . . . . . . . . . . . . . . . . . . . . . № заказа 912.638
iDX 120 iE: мягкий футляр. . . . . . . . . . . . . . . . . . . . . . . . . . . . . . . № заказа 914.045
iDX 160 iE: твердый футляр . . . . . . . . . . . . . . . . . . . . . . . . . . . . . № заказа 914.207
Комплект из 7 пар силиконовых вкладышей и
кабельного зажима . . . . . . . . . . . . . . . . . . . . . . . . . . . . . . . . . . . № заказа 912.611
Вкладыши Comply™ T-400 . . . . . . . . . . . . . . . . . . . . . . . . . . . . . www.complyfoam.com
Page 43

Русский
42 | 43
9. Утилизация
По завершении эксплуатации это изделие не утилизируется вместе с обычным бытовым мусором, а сдается через пункт сбора отслужившего электрического и электронного оборудования для вторичного использования.
На это указывает символ на изделии, руковод стве по эксплуатации или
упаковке.
10. Технические данные
Технические данные приведены на упаковке; их также можно найти в сети Интернет по
адресу:
www.beyerdynamic.com.
Page 44

您已选择了拜亚动力 (beyerdynamic) iDX 120 iE | iDX 160 iE 入耳式耳机。
非常感谢您给予我们的信任。
请您在使用前花些时间仔细阅读本使用说明书。
1. 安全注意事项
注意: 请注意,当连接入耳式耳机时音量已调节至最低。
仅在插入耳机后调节音量。
为了避免可能损伤听力,不应在高音量下长时间使用入耳式耳机。
音量调节的标准是,检查是否可以在听或轻声说话时仍能听到自己的
声音。
请您注意,音量过高和收听时间过长可能对听力造成损害。
听力损害往往表现为不可恢复的听觉障碍。
请您始终注意保持适度的音量。
经验法则:音量越高,收听时间应越短。
根据同业工伤事故保险联合会针对工作安全和健康的规定 (BGV B3),
在最长允许收听时间为 8 小时的情况下,噪音干扰(例如在工位上)
不得超过 85 dB(室内音量)。音量每提高 3 dB,
最大允许的收听时间将减半,即在 88 dB 时,
最大允许的收听时间为 4 小时,在 91 dB 时为 2 小时,依此类推。
生命危险!
佩戴入耳式耳机会大大降低人对外界声音的感知能力。
在道路交通中使用入耳式耳机存在极大的安全隐患,因此是法律所禁止的。
为此,请您注意切勿在存在危险隐患的机器和工具的作用范围内使用入耳
式耳机。
受伤危险!
在佩戴有线入耳式耳机时,请您避免任何突然的动作。
尤其当您佩戴有可能被耳机线缠住的镂雕、耳环、
眼镜等物品时,可能导致您严重受伤。
Page 45

中文
44 | 45
变化的声音感知程度
与不佩戴入耳式耳机的“正常”情况下相比,佩戴入耳式耳机时对自我声音、
耳机以及所出现内部噪音的声音感知程度是不同的。
对于许多人来说,已经习惯佩戴入耳式耳机了。
佩戴一段时间后,这种奇怪的感觉通常会降低。
2. 耳筒套
选择正确的耳筒套
入耳式耳机将在供货时随附不同规格的硅脂和海绵材质耳筒套。
请在使用入耳式耳机前选择正确的耳筒套规格。
请分别将入耳式耳机搭配不同规格的耳筒套小心插入您的耳道,
以选择最舒适的规格。
当入耳式耳机即便在中等强度的头部运动时不会脱落、
低频低音能够无任何杂乱地输出以及您仍能够非常安静地感知到外界噪音时,
入耳式耳机才是正确设置的。
iDX 160 iE:当使用 Comply™ 的 T-400 系列海绵耳筒套时,
• 用手指捏搓固定在入耳式耳机上的耳筒套,直至张紧。
• 用手稍稍向上拉耳廓,用另一只手将滚动的耳筒套小心进入耳道。
• 用手指远远地固定住入耳式耳机,直到耳筒套拉长并舒服地就位。
维护耳筒套
• 入耳式耳机的耳筒套应定期用湿润柔软的抹布清洁,
然后用柔软的抹布干燥。
• 清洁时仅适用温和的清洁剂,切勿使用化学制剂,
例如溶剂性清洁剂。否则,可能侵蚀耳筒套。
• 不使用入耳式耳机时应将其存放在随附的保护套中。
Page 46

更换耳筒套
• 从耳机中拉出耳筒套。
• 使用柔软湿润的抹布清洁您的拜亚动力 (beyerdynamic) 耳机的声孔。
请注意,须防止水进入声孔。使用柔软的抹布干燥声孔。
• 将新的耳筒套固定在耳机上。
• 定期使用时,我们推荐每 3 个月更换一次耳筒套。
• 可通过拜亚动力 (beyerdynamic) 的配件商店订购硅脂耳筒套备件。
请点击 http://www.beyerdynamic.biz/index.html/在线商店,
选择列表中的耳机类型,然后一步一步地完成订购。
• iDX 160 iE: 若要订购 Comply™ 的海绵耳筒套备件或了解经销商联系信息,
请访问 www.complyfoam.com。
耳筒套的适用类型:T-400
fi
Page 47

中文
46 | 47
3. 接线
1
2
3
45
1 三键式控制器
2 带插头的连接线
3 带插口(上、下)和插头的插接头
4 带插口(上)和套有白色绝缘环的插头(下)的适
用于 Apple 设备以及其它与 Apple 兼容的设备的
延长线
5 带插口(上)和套有黑色绝缘环的插头(下)的适
用于与 Apple 不兼容的设备的延长线
6 带插口(上)和两个插头(下)的 VoIP 适配器
如何连接 Apple 设备
(以及其它与 Apple 兼容的设备)
入耳式耳机的连接线 2 具备一个立体声迷你插头,可
直接连接 iPod、iPhone、iPad 或其它与 Apple 兼容
的设备。
• 如果需要将该连接线延长,则请使用随附的 Apple
设备专用延长线 4(套有白色绝缘环的插头)。
如何连接与 Apple 不兼容的设备
根据不同的设备型号,使用延长线 4 或 5, 以确保
功能完全正常。可直接进行尝试。该尝试不会对播放
设备造成损坏。
6
Page 48

适用于两个入耳式耳机的接插头
可通过插接头 3 将两个入耳式耳机连接到一台设备上。
• 将入耳式耳机的插头插入接插头 3 的上插口。
• 将相应的延长线 4 或 5 连接到接插头 3 的插头上。
• 将另外一个耳机连接到接插头 3 的下插口上
如何连接 VoIP 适配器
如果需要将入耳式耳机连接在计算机或笔记本上,以通过互联网拨打电话,则请
使用随附的 VoIP 适配器 6。
• 将入耳式耳机的插头插入随附延长线 4 的插口。
• 将延长线 4 的插头插入 VoIP 适配器 6 的插口。
• 将 VoIP 适配器 6 的两个插头直接连接在您的计算机或笔记本上。麦克风插头
和耳机插头带有相应的标识。
4. Apple 设备专用三键式控制器的操作说明
借助并入耳机线的 3 键控制器和集成在控制器内的麦克风,可以在听音乐时跳转
到特定曲目或打电话(通过 Apple 设备)。
音乐播放
• 按动中间键:停止播放音乐。再次按动中间键:开始播放音乐。
• 快速连续按动两次中间键: 跳转至下一曲目。
• 快速按动中间键并按住不放: 快进。
• 快速连续按动三次中间键: 跳转至曲首或上一曲目。
• 快速按动两次中间键并(在第二次按下时)按住不放: 快退。
Page 49

中文
48 | 49
来电
• 按动中间键:接听来电。再次按动中间键:结束通话。
• 按住中间键约 2 秒:拒接来电。
• 按动中间键:接听另一个来电。再次按动中间键,切换回原来电通话。
提高音量
• 按动 + 键:提高音量。
降低音量
• 按动 - 键:降低音量。
提示
• 仅 iPhone 3GS 或更新版本、iPad、iPod touch(第 2 代或更新版本)、iPod
classic (120GB, 160GB) 和 iPod nano (第 4 代或更新版本)支持控制器和麦
克风功能。iPod shuffle(第 3 代或更新版本)支持控制器功能。所有 iPad 和
iPod 型号支持音频功能。
5. 与 Apple 不兼容的设备专用的三键式控制器的操作说明
• 针对麦克风功能选择相应的延长线 4 或 5。
• 中间按键的功能取决于不同的设备。
• + 键和 - 键无法使用。
Page 50

6. 服务
在需要提供相关服务时,请联系经授权的专业人员或直接联系:
拜亚动力 (beyerdynamic) 服务和物流中心
电子邮件:service@beyerdynamic.de
切勿自行打开入耳式耳机,否则可能失去质保权。
7. 配件 - 供货范围
• 2 条延长线
• 1 个 VoIP 适配器(Skype 适配器)
• 1 个线缆夹
• 1 个适用于两个入耳式耳机的接插头
• iDX 120 iE:软盒
• iDX 160 iE:硬盒
• 7 对不同规格的硅脂耳筒套
• iDX 160 iE:1 对 Comply™ 的 T-400 规格 M 黑色 海绵耳筒套
8. 备件
VoIP 适配器 . . . . . . . . . . . . . . . . . . . . . . . . . . . . . . . . . . 订购编号 908.452
适用于两个入耳式耳机的接插头 . . . . . . . . . . . . . . . . . 订购编号 912.786
带有两根线的延长线套件. . . . . . . . . . . . . . . . . . . . . . . . 订购编号 912.638
iDX 120 iE:软盒. . . . . . . . . . . . . . . . . . . . . . . . . . . . . . . 订购编号 914.045
iDX 160 iE:硬盒. . . . . . . . . . . . . . . . . . . . . . . . . . . . . . . 订购编号 914.207
带 7 对硅脂耳筒套和线缆夹的套件 . . . . . . . . . . . . . . . . 订购编号 912.611
Comply™ T-400 耳筒套 . . . . . . . . . . . . . . . . . . . . . . . . www.complyfoam.com
Page 51

中文
50 | 51
9. 废弃处理
该产品在其使用寿命结束后不得作为普通生活垃圾进行废
弃处理,而必须投放到电气和电子设备回收中心。
产品、使用说明书或包装上的标记符号对此作出相应的提示。
10. 技术指标
技术指标参见包装或网站:
www.beyerdynamic.com。
Page 52

고객님은 beyerdynamic의 인이어 이어폰 iDX 120 iE | iDX 160 iE를 구매하셨습
니다. 귀하의 신뢰에 감사드립니다. 처음 사용 전에 잠시 시간을 내어 본 사용 설
명서를 세심하게 숙지하시기 바랍니다.
1. 안전상의 주의사항
주의: 인-이어 이어폰을 연결할 때에는 볼륨이 최소로 조정되어 있도록 유
의합니다. 이어폰을 삽입한 후에만 볼륨을 조절합니다. 청각 손상을
방지하기 위해 높은 볼륨으로 오랫동안 인-이어 이어폰을 사용하면
안 됩니다. 볼륨 조정을 위한 기준으로 인-이어 이어폰을 삽입한 채
청취할 때와 일상적으로 말을 할 때 자신의 목소리를 인지할 수 있
는지 검사합니다.
볼륨이 너무 높고 장시간 청취할 경우 청각이 손상될 수 있음을 염
두하시기 바랍니다. 청각 손상으로 인해 회복되지 않는 손상이 청력
에 발생합니다.
볼륨을 항상 적절하게 유지하도록 합니다. 유의사항: 볼륨이 높을수록 청취 시간
을 줄인다. BGV B3 작업 시 안전 및 건강과 관련한 동종업계 규정에 따르면 예를
들어, 최대 허용 청취 시간이 8시간일 때 작업장에서 소음 세기가 85dB(실내 음
량)을 초과하면 안 됩니다. 볼륨이 각 3dB 크기로 높아지면, 허용 청취 시간은 절
반이 되기 때문에 88dB에서는 청취 시간이 4시간이고, 91dB에서는 2시간입니
다.
생명의 위험!
인-이어 이어폰은 외부 음향의 인지력을 급격하게 감소시킵니다. 인-이어 이어폰
을 도로 교통 중 사용하면 심각한 위험 잠재력에 노출되기 때문에 법으로 금지되
어 있습니다. 이 밖에도 위험 가능성이 있는 기계 및 작업장치가 작동하는 작동
영역에서 인-이어 이어폰을 사용하지 않도록 유의합니다.
상해 위험!
인-이어 이어폰이 케이블과 연결된 경우 급작스럽게 움직이지 말아야 합니다. 케
이블이 꼬일 수 있기 때문에 특히, 피어싱, 귀걸이, 안경 등을 착용한 경우 심각한
부상을 당할 수 있습니다.
Page 53

한국어
52 | 53
변경된 음향 인지
인-이어 이어폰의 착용은 많은 사람에게 적응이 필요한데, 걸을 때 자신의 목소
리와 신체 및 내이에서 발생하는 소리의 인지가 인-이어 이어폰이 없는 "일반적
인" 상황과 다르기 때문입니다. 이런 낯선 처음의 느낌은 착용 후 어느 정도의 시
간이 지나면 감소합니다.
2. 귀꽂이
올바른 귀꽂이 선택
인-이어 이어폰은 실리콘과 스폰지 재질의 여러 가지 귀꽂이 세트와 함께 공급됩
니다.
인-이어 이어폰을 사용하기 전에 올바른 크기의 귀꽂이를 선택합니다. 인-이어
이어폰을 서로 다른 귀꽂이와 함께 연이어 조심스럽게 이도에 삽입하면서 적합한
크기를 확인할 수 있습니다. 중간 세기의 머리 움직임에도 인-이어 이어폰이 떨
어지지 않고, 저음의 베이스가 깨끗하게 출력되며 외부 소음을 아주 작게 인지할
수 있으면 인-이어 이어폰이 올바로 위치하는 것입니다.
iDX 160 iE: 고객님이 Comply™의 스폰지 T-400 재질의 귀꽂이를 사용하는 경우
• 인-이어 이어폰에 고정된 귀꽂이를 손가락 사이에서 길이 방향으로 단단히 감
으십시오.
• 한 손으로 귀를 약간 위로 당기고, 다른 손으로 감겨진 귀꽂이를 조심스럽게 이
도 안으로 넣으십시오.
• 귀꽂이가 팽창되어 편안하게 위치할 때까지 인-이어 이어폰을 계속 손가락으
로 잡고 계십시오.
귀꽂이 관리
• 인-이어 이어폰의 귀꽂이를 정기적으로 부드럽고 물에 적신 헝겊으로 청소한
후 부드러운 헝겊으로 건조해야 합니다.
• 청소를 위해 부드러운 세척제만을 사용하고, 절대로 솔벤트가 포함된 세척제
와 같은 화학 물질을 사용하면 안 되는데, 이런 물질은 귀꽂이를 손상할 수 있
기 때문입니다.
• 인-이어 이어폰을 사용하지 않는 경우 함께 공급된 케이스에 보관하십시오.
Page 54

귀꽂이 교환
• 귀꽂이를 이어폰에서 당겨 분리합니다.
• 이어폰의 노즐에 있는 잔여물을 부드럽고 물을 적신 헝겊으로 청소합니다. 액
체가 노즐 안으로 흐르지 않도록 유의합니다. 노즐을 부드러운 헝겊으로 건조
합니다.
• 새로운 귀꽂이를 이어폰에 고정합니다.
• 정기적으로 사용하는 경우 3개월마다 귀꽂이를 교환할 것을 권장합니다.
• 실리콘 재질의 교체용 귀꽂이는 beyerdynamic의 부품 샵에서 주문할 수 있습
니다.
http://shop.beyerdynamic.de/ersatzteile에 접속 후 목록에서 귀하의 이어폰
모델을 선택하고 단계적으로 샵 시스템의 구매 과정을 진행하면 됩니다.
• iDX 160 iE: Comply에서 생산한 스폰지 재질의 교체용 귀꽂이 및 해당 귀꽂
이를 주문할 수 있는 딜러의 목록은 인터넷의 www.complyfoam.com에 있습
니다.
사용된 귀꽂이 모델: T-400
fi
Page 55

한국어
54 | 55
3. 연결
1
2
3
45
1 3버튼 조작부
2 연결 케이블(잭 플러그 장착)
3 어댑터 플러그(잭 소켓(상단과 하단에) 및 잭 플
러그 장착)
4 Apple 및 기타 호환기기용 이어폰 연장 케이블(잭
소켓(상단) 및 절연링이 흰색인 잭 플러그(하단)
장착)
5 Apple 비호환 기기용 이어폰 연장 케이블(잭 소켓
(상단) 및 절연링이 검은색인 잭 플러그(하단) 장
착)
6 VoIP 어댑터(잭 소켓(상단) 및 잭 플러그 2개(하
단) 장착)
Apple 및 기타 호환기기에 연결
인이어 이어폰 케이블(그림 2)에는 iPod, iPhone, iPad
또는 기타 호환기기에 직접 연결 가능한 미니 스테레오
잭 플러그가 장착되어 있습니다.
• 이어폰 케이블을 연장하고 싶을 경우에는, 제품에
포함된 Apple 기기용 이어폰 연장 케이블(그림 4,
잭 플러그의 절연링이 흰색)을 사용하십시오.
Apple과 호환되지 않는 기기에 연결
두 종류의 이어폰 연장 케이블(그림 4 또는 5) 중 사
용하는 기기에 적합한 제품을 선택하여 사용하십시
오. 어떤 제품이 적합한지 번갈아 시험해도 좋습니다.
플레이어가 손상될 위험은 없습니다.
6
Page 56

2개의 인이어 이어폰을 사용할 수 있는 어댑터 플러그
어댑터 플러그(그림 3)를 사용하면, 2개의 인이어 이어폰을 한 기기에 동시에 연결
할 수 있습니다.
• 인이어 이어폰의 잭 플러그를 어댑터 플러그(그림 3) 상단 잭 소켓에 연결합
니다.
• 적합한 이어폰 연장 케이블(그림 4 또는 5)을 선택하여, 어댑터 플러그(그
림 3)의 잭 플러그에 연결합니다.
• 또 다른 이어폰을 어댑터 플러그(그림 3) 하단 잭 소켓에 연결합니다.
VoIP 어댑터 연결
인터넷 전화 등을 위해 인이어 이어폰을 PC 또는 노트북에 연결하기 원한다면, 제
품에 포함된 VoIP 어댑터(그림 6)를 사용하십시오.
• 인이어 이어폰의 잭 플러그를 제품에 포함된 이어폰 연장 케이블(그림 4)의
잭 소켓에 연결합니다.
• 이어폰 연장 케이블(그림 4)의 잭 플러그를 VoIP 어댑터(그림 6)의 잭 소켓
에 연결합니다.
• VoIP 어댑터(그림 6)에 있는 2개의 플러그를 PC 또는 노트북에 바로 연결합
니다. 플러그에는 해당 기능에 맞게 마이크 및 이어폰 표시가 되어 있습니다.
4. Apple 기기용 3버튼 조작부 사용 방법
케이블에 결합된 3버튼 조작부와 내장 마이크를 이용하여, 음악을 듣는 동안 특정
노래로 건너 뛰거나 사용자의 Apple 기기로 통화할 수 있습니다.
Page 57

음악 재생
• 음악 재생을 중지하려면 가운데 버튼을 누르십시오. 음악 재생을 시
작하려면 가운데 버튼을 다시 누르십시오.
• 다음 노래로 건너 뛰려면 가운데 버튼을 2회 짧게 연이어 누르십시오.
• 앞으로 빨리 감으려면 가운데 버튼을 1회 짧게 누르고 누른 상태를
유지하십시오.
• 재생 중인 노래 처음으로 돌아가거나 이전 노래로 다시 돌아가려면
가운데 버튼을 3회 짧게 누르십시오.
• 뒤로 빨리 감으려면 가운데 버튼을 2회 짧게 누르고 누른 상태를 유
지하십시오.
전화
• 걸려오는 통화를 받으려면 가운데 버튼을 1회 누르십시오. 통화를 종료하려
면 가운데 버튼을 한 번 더 누르십시오.
• 걸려오는 통화를 거부하려면 가운데 버튼을 약 2초간 누르고 계십시오.
• 대기 중인 다른 발신자로 통화를 전환하려면 가운데 버튼을 1회 누르십시오.
전환하기 전의 통화로 다시 돌아가려면 가운데 버튼을 한 번 더 누르십시오.
볼륨 높임
• 볼륨을 높이려면 + 버튼을 누르십시오.
볼륨 낮춤
• 볼륨을 낮추려면 - 버튼을 누르십시오.
안내사항
• 조작부와 마이크는 iPhone 3GS 또는 신형, iPad, iPod touch(2 세대 또는 신
형), iPod classic(120GB, 160GB) 및 iPod nano(4 세대 또는 신형)에서 사
용할 수 있습니다. 조작부는 iPod shuffle(3 세대 또는 신형)에서 사용할 수 있
습니다. 모든 iPad 및 iPod 모델이 오디오 기능을 지원합니다.
한국어
56 | 57
Page 58

5. Apple 비호환 기기용 3버튼 조작부 사용 방법
• 마이크의 작동을 위해서는 적합한 이어폰 연장 케이블(그림 4 또는 5)을 선
택해야 합니다.
• 가운데 버튼의 기능은 각 기기에 따라 달라집니다.
• + 및 - 버튼은 작동하지 않습니다.
6. 서비스
서비스가 필요한 경우에는 공인된 전문 작업자 또는 beyerdynamic 서비스- 및 물
류 센터로 직접 연락하십시오.
전자우편: service@beyerdynamic.de
인-이어 이어폰을 절대로 직접 분해하지 마십시오. 이 경우에는 모든 보증 청구
가 소멸됩니다.
7. 액세서리 – 공급범위
• 이어폰 연장 케이블 2개
• VoIP 어댑터(스카이프 어댑터) 1개
• 케이블 클립 1개
• 2개의 인이어 이어폰을 연결할 수 있는 어댑터 플러그 1개
• iDX 120 iE: 소프트 케이스
• iDX 160 iE: 하드 케이스
• 서로 다른 크기의 실리콘 이어캡 7쌍
• iDX 160 iE: Comply T-400 폼 이어캡 1쌍, M 크기, 검은색
Page 59

한국어
58 | 59
8. 예비부품
VoIP 어댑터 ...........................................................주문번호 908.452
2개의 인이어 이어폰을 사용할 수 있는 어댑터 플러그 .....주문번호 912.786
2개의 케이블로 구성된 이어폰 연장 케이블 세트.............주문번호 912.638
iDX 120 iE: 소프트 케이스.........................................주문번호 914.045
iDX 160 iE: 하드 케이스............................................주문번호 914.207
실리콘 이어캡 7쌍 세트 및 케이블 클립 ........................주문번호 912.611
Comply T-400 이어캡 ....................................www.complyfoam.com
9. 폐기
본 제품은 수명이 다했을 때 일반 가정 쓰레기로 폐기하면 안 되고
전기 및 전자 기기의 재활용을 위한 반납처에 전달해야 합니다. 제품
, 사용 설명서 또는 포장에 표시된 기호는 이와 같은 폐기 방법을 표
시합니다.
10. 기술 자료
기술 자료는 제품 포장 또는 인터넷의 다음 주소에 있습니다:
www.beyerdynamic.com.
Page 60

beyerdynamicのインイヤーヘッドホンiDX120iE|iDX160iEをお買い上
げいただきありがとうございます。
製品をご使用になる前に、本取り扱い説明書をよくお読みください。
1. 安全に関する注意
注意:
ヘッドフォンは音量が最低レベルに設定されていることを確認してか
ら挿入してください。音量はヘッドフォンを挿入後に調節してくださ
い。聴覚の損傷を避けるために、インイヤーヘッドフォンは大音量で
長時間使用しないでください。音量設定の目安として、インイヤーヘ
ッドフォンをした状態で話したりご自身の声を認識することができる
かどうかを確認してください。
大音量で長時間使用すると、聴覚を損傷する可能性があるのでご注意
ください。聴覚障害とは、常に取り戻すことの出来ないような聴力障
害を意味します。
そのため、常に適切な音量に設定するようご注意ください。原則として大音量
であるほど鑑賞時間を短くしてください。勤務中の安全と健康に関する同業者
保険組合の規則BGV B3では、職場などでは許容時間を最大8時間とし、騒音
が85 dB (室内音量)を超えてはならないことが規定されています。音量が約
3 dB 高くなると、許容鑑賞時間は 半分に 短縮され ます (88 dB では 4
時間、91dB では2時間になります)。
生命に関わる危険!
インイヤーヘッドフォンによって外音の感知が大幅に妨げられます。路上でイン
イヤーヘッドフォンを使用することにより、大変危険な状況が発生することが
あるため、これは法律で禁じられています。また、危険を及ぼす可能性のある
機械や作業機付近ではインイヤーヘッドフォンを使用しないでください。
怪我の危険!
ケーブルで接続されているインイヤーヘッドフォンを着用して、激しい動作を行
わないようにしてください。特に、ピアス、イヤリング、眼鏡などを身に付けて
いる場合は、これらがケーブルに引っかかり、大怪我の原因となる場合があり
ます。
Page 61

日本語
60 | 61
音響感知の変化
インイヤーヘッドフォンの使用時は、自分自身の声や体の音響知覚、また歩い
ているときに聞こえる音がインイヤーヘッドフォンを着用しない『日常的』な
状況と異なるため、違和感が感じられることが多々あります。しかしながら、
この最初の不慣れな感覚は、通常着用してしばらくするとなくなります。
2. イヤーピース
正しいイヤーピースの選択
インイヤーヘッドフォンの納品内容にはシリコン製、ウレタン製の異なるイヤ
ーピースのセットが含まれます。
インイヤーヘッドフォンの使用前に正しいイヤーピースをお選びください。正し
いサイズのイヤーピースを見つけるには、異なるサイズのイヤーピースを続けて
交互に着用してみてください。普通に頭を動かしてイヤーピースが外れることな
く、また外の音がわずかに感知できるのであれば、イヤーピースは正しいサイズ
です。
iDX160iE:Comply™ウレタンイヤーピースT-400の使用について
• インイヤーヘッドフォンに取り付けたイヤーピースを縦方向にしっかりと丸
めます。
• 片方の手で耳を上方向に向かって引っ張り、もう一方の手で丸めたイヤーピ
ースを耳の中にそっと挿入します。
• イヤーピースが元にもどり、心地よく安定するまでインイヤーヘッドフォン
を指でしっかり押さえてください。
イヤーピースのケアについて
• インイヤーヘッドフォンのイヤーピースは定期的にやわらかい布を湿らせて
清掃し、最後に柔らかい布でしっかりと水気を拭き取ってください。
• 洗浄には中性洗剤を使用してください。イヤーピースが変形する恐れがある
ため溶剤を含む洗剤などの化学品は一切使用しないでください。
• インイヤーヘッドフォンを使用しないときは、専用のケースに保管してくだ
さい。
Page 62

イヤーピースの交換
• インイヤーヘッドフォンからイヤーピースを取り外します。
• ヘッドフォンの音筒部に詰まった汚れを柔らかい布を湿らせて清掃してくだ
さい。音筒部に水が入らないように注意してください。やわらかい布を使っ
て音筒部の水気を拭き取ってください。
• 新しいイヤーピースをに取り付けます。
• インイヤーヘッドフォンを規則的に使用する場合は、イヤーピースを3ヵ月
ごとに交換することをおすすめします。
• シリコン製イヤーピースのスペアはbeyerdynamicのショップでお買い求め
いただけます。
http://shop.beyerdynamic.de/ersatzteileでヘッドフォンのタイプをリス
トから選択し、オンライン購入システムでご注文ください。
• iDX160iE: ウレタン式イヤーピースComply™および適切なイヤーピースの
販売店についてはインターネットサイトwww.complyfoam.com をご覧く
ださい。
ご使用のイヤーピースのタイプ:T-400
fi
Page 63

日本語
62 | 63
3. 接続
1
2
3
45
1 3つのボタンのコントローラー
2 ミニプラグ装備の接続ケーブル
3 ジャックおよびミニプラグ装備のアダプタープラ
グ(上部および下部)
4 Apple機器および互換性のある機器用の、白い
絶縁リングを持つジャック(上部)およびミニプ
ラグ(下部)を装備した延長ケーブル
5 Appleと互換性のない機器用の、黒い絶縁リン
グを持つジャック(上部)およびミニプラグ
(下部)を装備した延長ケーブル
6 ジャック(上部)および2つのミニプラグ(下部)
を装備したVoIPアダプター
Apple機器および互換性のある機器との接続
インイヤーヘッドホンの接続ケーブル2
には、iPod、iPhone、iPad、および他の互換性のあ
る機器と直接接続することができるミニステレオプラ
グが装備されています。
• 接続ケーブルを延長するには、同梱のApple機器
用の延長ケーブル4 (白い絶縁リングを持つミニ
プラグ)を使用してください。
Appleと互換性のない機器との接続
すべての機能を利用するためには、機器のタイプに
従って、延長ケーブル4 または5 をご使用いただ
けます。どちらのケーブルが適しているかを判断する
ためには、両方のケーブルを試してみてください。
再生機器がこれにより破損することはありません。
6
Page 64

2つのインイヤーヘッドホン用アダプタープラグ
アダプタープラグ3 を使用すると、2 つのインイヤーヘッドホンを1台の機器に
接続できます。
• インイヤーヘッドホンのミニプラグをアダプタープラグ3 のジャックの上部
に接続します。
• アダプタープラグ3 のミニプラグに、対応する延長ケーブル4 または5 を
接続します。
• アダプタープラグ3 の下部ジャックにもう一つのヘッドホンを接続します。
VoIP アダプターの接続
インターネットを使用して電話をするためにインイヤーヘッドフォンをPC また
はノートパソコンに接続する場合は、同梱のVoIP アダプター6 を使用してくだ
さい。
• インイヤーヘッドホンのミニプラグを同梱の延長ケーブル4 のジャックに接
続します。
• 延長ケーブル4 のミニプラグをVoIP アダプター6 のジャックに接続
します。
• VoIP アダプター6 の両方のミニプラグをPC またはノートパソコンに直接
接続します。ミニプラグにはそれぞれ、マイクとヘッドホンを示す表記があ
ります。
4. Apple 機器用の3つのボタンを持つコントローラーの使用方法
ケーブルに組み込まれている、3つのボタンを持つコントローラーと、コントロ
ーラーに統合されたマイクを使用して、特定の曲を選択したり、Apple機器で音
楽を聴きながら通話したりすることができます。
Page 65

音楽の再生
• 音楽の再生を停止する場合は、中央のボタンを押します。音楽の再
生を再開する場合は、もう一度中央のボタンを押します。
•次の曲にスキップするには、中央のボタンを続けて2回すばやく
押します。
•早送りする場合は、中央のボタンを1回短く押して、ボタンを押
したままにします。
•曲のはじまりまたは前の曲にスキップするには、中央のボタンを続
けて3回すばやく押します。
•巻き戻しする場合は、中央のボタンを2回短く押して、ボタンを
押したままにします。
通話
• かかってきた電話に応答するには、中央のボタンを1回押します。通話を終
える場合は、中央のボタンをもう1度押します。
• かかってきた電話に応答しない場合は、中央のボタンを約2秒間押したまま
にします。
• 通話中にかかってきた他の電話に応答する場合は、中央のボタンを1回押し
ます。保留にしていた元の電話にもう1度出るには、中央のボタンをもう
1度押します。
音量を上げる
• 音量を上げるには、+ボタンを押します。
音量を下げる
• 音量を上げるには、-ボタンを押します。
注意
• コントローラーとマイクは、iPhone3GSまたはそれ以降のiPad、iPod
touch(第2世代またはそれ以降)、iPodclassic(120GB、160GB)、iPod
nano(第4世代またはそれ以降)でサポートされています。コントローラー
はiPodshuffle(第3世代またはそれ以降)によりサポートされています。
オーディオは、すべてのモデルのiPadおよびiPodによりサポートされてい
ます。
日本語
64 | 65
Page 66

5. Appleと互換性がない機器用の3つのボタンを持つコントローラーの使
用方法
• マイクの機能を使用するためには、対応する延長ケーブル4 または5 を選
択してください。
• 中央ボタンの機能は、機器によって異なります。
• +ボタンと-ボタンは使用できません。
6. 点検
修理が必要な場合は認可される技師またはbeyerdynamicサービス・ロジ
スティックセンターまでご連絡ください。
E-メール:service@beyerdynamic.de
ヘッドフォンをーご自分で分解しないでください。分解・改造を行った場合、
当社は一切の責任を負いかねます。
7. 同梱アクセサリー
• 2x延長ケーブル
• 1xVoIP用アダプター(スカイプ用アダプター)
• 1xケーブルクリップ
• 1x2つのインイヤーヘッドホン用アダプタープラグ
• iDX120iE:ソフトケース
• iDX160iE:ハードケース
• さまざまなサイズのシリコン製イヤホンカバー7セット
• iDX160iE:Comply™T-400サイズM、ブラック、ポリウレタン製イヤ
ホンチップ
Page 67

日本語
66 | 67
8. 交換部品
VoIPアダプター...............................................................................注文番号 908.452
2つのインイヤーヘッドホン用アダプタープラグ..................注文番号 912.786
2本のケーブルからなる延長ケーブルセット ...........................注文番号 912.638
iDX120iE:ソフトケース ...............................................................注文番号 914.045
iDX160iE:ハードケース................................................................注文番号 914.207
シリコン製イヤホンカバー7セットと
ケーブルクリップ............................................................................注文番号 912.611
Comply™T-400イヤホンチップ.....................................www.complyfoam.com
9. 廃棄
本製品は使用期限終了後、通常の家庭ごみとして廃棄することはで
きません。
電気および電子機器のリサイクル収集所までお持ちください。
製品、取扱説明書、梱包材に記載される次のシンボルは、
本製品がリサイクル対象品であることを示しています。
10. 技術データ
技術データについては梱包材または以下のインターネットサイトをご覧ください。
www.beyerdynamic.com.
Page 68

A1/BA iDX120iE/160iE (03.14)/ • Änderungen vorbehalten • Subject to change without notice
beyerdynamic GmbH & Co. KG
Theresienstr. 8 | 74072 Heilbronn – Germany
Tel. +49 (0) 7131 / 617 - 0 | Fax +49 (0) 7131 / 617 - 204
info@beyerdynamic.de | www.beyerdynamic.com
For further distributors worldwide, please go to www.beyerdynamic.com
iPad, iPhone, iPod, iPod classic, iPod nano, iPod shuffle, and
iPod touch are trademarks of Apple Inc., registered in the U.S.
and other countries.
 Loading...