

Bevles PICA70-32-A Service Manual
Innovative Foodservice Equipment
Designed for Performance, Service and Value.
INSTALLATION
OPERATING INSTRUCTIONS
TM
AND
Cinnabon Proofing Cabinet
PICA70-32-A (ED)
INTENDED FOR OTHER THAN HOUSEHOLD USE
RETAIN THIS MANUAL FOR FUTURE REFERENCE
UNIT MUST BE KEPT CLEAR OF COMBUSTIBLES AT ALL TIMES
WARNING: For your safety do not store or use gasoline or other flammable
vapors or liquids in the vicinity of this or any other appliance. Keep the area
!
!
This equipment has been engineered to provide you with year round dependable service when used
according to the instructions in this manual and standard commercial kitchen practices.
Phone: +1 (214) 421-7366
Fax: +1 (214) 565-0976
Toll Free: +1 (800) 441-1601
Website: www.BevLes.com
E-mail: sales@BevLes.com
free and clear of combustibles. (See ANZI Z83.14B, 1991)
WARNING:Improper installation, adjustment, alteration, service or
maintenance can cause property damage, injury or death. Read the
Installation, Operating and Maintenance Instructions thoroughly before
installing or servicing this equipment.
!
!
P/N 780089 10/08
BevLes
729 Third Avenue
Dallas, TX 75226
1

IMMEDIATELY INSPECT FOR SHIPPING DAMAGE
All containers should be examined for damage before and during unloading. The freight carrier has
assumed responsibility for its safe transit and delivery. If equipment is received damaged, either apparent
or concealed, a claim must be made with the delivering carrier.
A) Apparent damage or loss must be noted on the freight bill at the time of delivery. It must then be signed
by the carrier representative (Driver). If this is not done, the carrier may refuse the claim. The carrier can
supply the necessary forms.
B) Concealed damage or loss if not apparent until after equipment is uncrated, a request for inspection
must be made to the carrier within 15 days. The carrier should arrange an inspection. Be certain to hold
all contents and packaging material.
BevLes Company takes pride in the design and quality of our products. When used as intended and with
proper care and maintenance, you will experience years of reliable operation from this equipment. To
ensure best results, it is important that you read and follow the instructions in this manual carefully.
Installation and start-up should be performed by a qualified installer who has thoroughly read, understands
and follows these instruction.
If you have questions concerning the installation, operation, maintenance or service of this product, write
Technical Service Department BevLes Company, Inc., 729 Third Avenue, Dallas, TX 75226.
1. SAFETY PRECAUTIONS
Before installing and operating this equipment be sure everyone involved in its operation is fully trained and
aware of all precautions. Accidents and problems can result by a failure to follow fundamental rules and
precautions.
The following words and symbols, found in this manual, alert you to hazards to the operator, service
personnel or the equipment. The words are defined as follows:
DANGER: This symbol warns of imminent hazard which may result in serious injury or death.
!
WARNING: This symbol refers to a potential hazard or unsafe practice, which could result in
!
serious injury or death.
CAUTION: This symbol refers to a potential hazard or unsafe practice, which may result in minor or
moderate injury or product or property damage.
!
NOTICE: This symbol refers to information that needs special attention or must be fully understood
even though not dangerous.
!
!
!
!
!
2. GENERAL INFORMATION
THIS MANUAL SHOULD BE RETAINED FOR FUTURE REFERENCE
WARNING: Check the data plate on this unit before installation. Connect the unit only to the voltage
!
and frequency listed on the data plate. Connect only to 1 phase as listed on the data plate.
!
WARNING: Electrical and grounding connections must comply with the applicable portions of the
!
national electrical code and/or other local electrical codes.
NOTICE: The unit when installed, must be electrically grounded and comply with local codes, or in
the absence of local codes, with the national electrical code ANSI/NFPA70 latest edition. Canadian
!
installation must comply with CSA-STANDARD C.22.2 Number 0 M1982 General RequirementsCanadian Electrical Code Part II, 109-M1981- Commercial Cooking Appliances.
2
!
!
WARNING: In Europe, appliance must be connected by an earthing cable to all other units
in the complete installation and thence to an independent earth connection in compliance
!
with EN 60335-1 and/or local codes.
!
NOTICE: This equipment has been engineered to provide you with year round dependable service
!
when used according to the instructions in this manual and standard commercial kitchen practices.
WARNING: Do not use oven cleaners, caustic solutions or mechanical means to clean the
appliance as they will damage the interior/exterior surface.
!
WARNING: This appliance must be serviced by an Authorized Service Technician only.
Disconnect the power supply before cleaning or servicing the proofer.
Regular and thorough cleaning will help to keep the proofer operating properly. If service is
!
required, contact an Authorized Service Agency, your dealer or the factory to obtain a qualified
technician for the required maintenance/service.
WARNING: Disconnect device from electrical power supply and place a Tag Out-Lockout on the
!
power plug, indicating that you are working on the circuit.
IMPORTANT FOR FUTURE REFERENCE
Please complete this information and retain this manual for the life of the equipment. For
Warranty Service and/or Parts, this information is required.
Model Number Serial Number Date Purchased
!
!
!
!
TABLE OF CONTENTS
SECTION ITEM PAGE
1 Safety Precautions 2
2 General Information 2
3 Setting-Up 4
4 Operation 4
5 Maintenance 5
6 Troubleshooting Tips 6
7 Replacing Electrical Components 8
8 Dimensions
9 Wiring Diagram 11
10 Parts List w/Exploded Views 12
11 Warranty 19
9
3
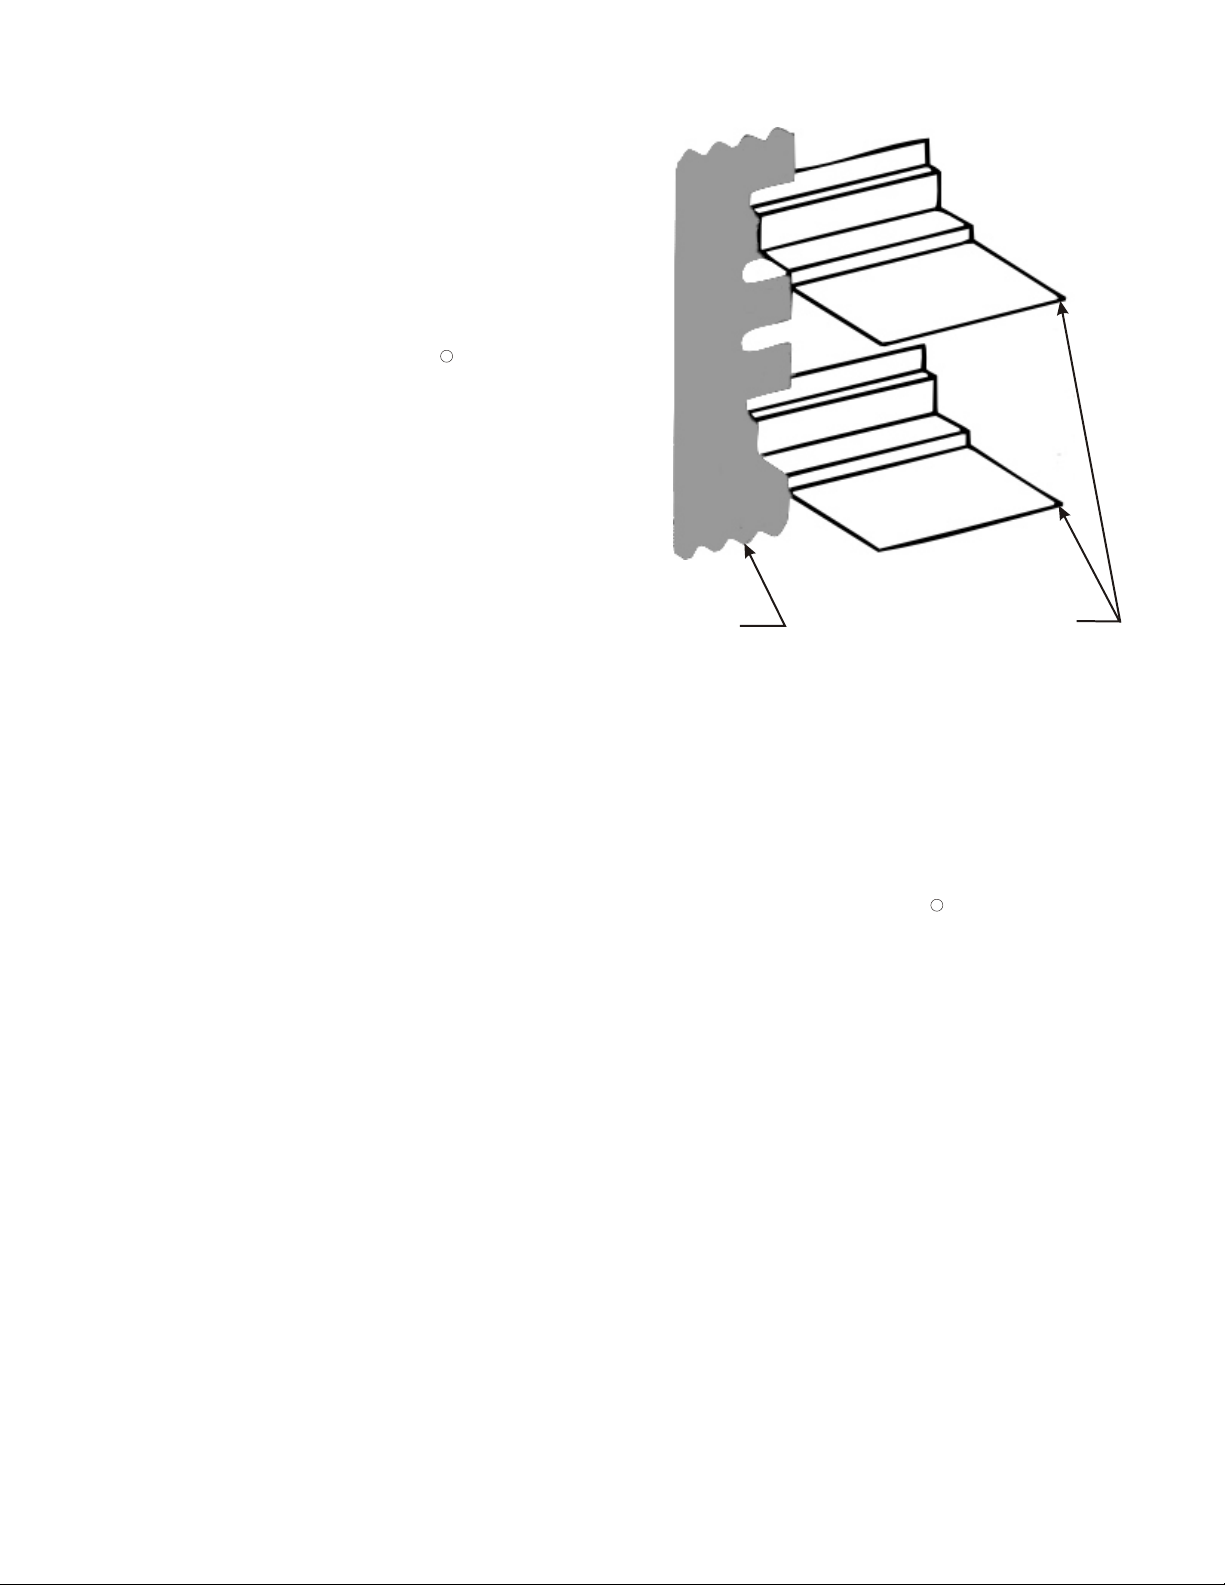
3. SETTING-UP
1. Open the carton containing the pan supports
and install all supports in cabinet. Install the
pan supports from the bottom up. Skip 2 slots
between each pan support to achieve a 4.5"
spacing.
2. Install eleven (11) 23” x 32” chrome plated wire
shelves on the pan supports.
3. Make certain that the Lexan water pan cover is
R
properly installed over the cast water pan and
over the louvers in front of the pan.
4. Insert a standard 18"x 26" sheet pan (not
provided with proofer) in the slides under the
base of the cabinet. This will serve as a drip
pan when cabinet is in use.
5. Place the cabinet in the location where it will be
operated. When in position secure the brakes
on the front two wheels. These brakes should
Upright
Pan Supports
always be locked when the cabinet is in use.
4. OPERATION
1. Make certain that your unit is properly plugged into the correct power source as specified on the
data plate. (Cord should be guided to the back of the unit through the cord guide. To install
or remove cord from guide, pull out inner guide channel.)
2. Verify that wheel brakes are in locked position (front two casters).
3. Inspect humidity pan for proper water level (1/2 to 3/4 full) and verify the Lexan water pan cover is
properly in place. (Filling humidity pan at the beginning or end of each day will usually ensure
continued humidity throughout the proofing process in most applications).
R
Refer to picture of control panel on page 5 for the following steps.
4. Push the power switch to the "ON" Position. Always use this switch to turn the unit "ON" or "OFF".
5. Set the temperature control to the desired cabinet temperature. 90°F to 110°F is recommended as a
starting position. Increase or decrease the cabinet temperature as needed to best suit your
application.
To select desired cabinet temperature:
A. Press SET key under cabinet temperature display. .
B. Press INCREASE key or DECREASE key to adjust cabinet temperature.
C. Press SET key to lock-in desired cabinet temperature. (If you don't press the SET key
the temperature setting will revert back to previous setting).
6. Set the humidity control to the #3 or #4 position. This can be increased if necessary to suit your
specific application.
7. Make certain that a standard 18" x 26" sheet pan (not provided with proofer) has been inserted as a
drip pan in the slides on the bottom "outside" of the cabinet.
8. Verify that the doors are closed and latched.
4
9. Allow approximately 30 - 45 minutes for the cabinet to achieve the necessary temperature and
humidity that you desire.
10. The cabinet is now ready for product placement and the start of the proofing process.
Note: Different product, or even different batches of the same product may require different cabinet
temperature and humidity settings. This may result in longer, or possibly even shorter proofing times.
OPERATING TIPS
Always inspect wheel brakes before attempting to move the cabinet. Make certain that brakes are in the
locked position before placing cabinet into operation.
During "cold" start-up you may want to add hot tap water and set the Humidity Control to the HI setting for 10
to 15 minutes to accelerate the humidity process. Remember to re-set the Humidity Control back to the
desired setting before beginning the proofing process. Once the cabinet has been loaded with product
and the proofing process has started, the proofer doors should not be opened until proofing has been
completed.
The 18" x 26" sheet pan (not provided with proofer) that serves as a drip pan under the cabinet base should
be checked, and if necessary, emptied at the end of each day.
The cabinet should be cleaned whenever necessary. It should be thoroughly cleaned at least once a week.
Note: It is recommended that humidity be kept at the minimum level that is practical for your operation.
Excessive humidity with condensation on the walls and/or base of the cabinet is not considered desirable.
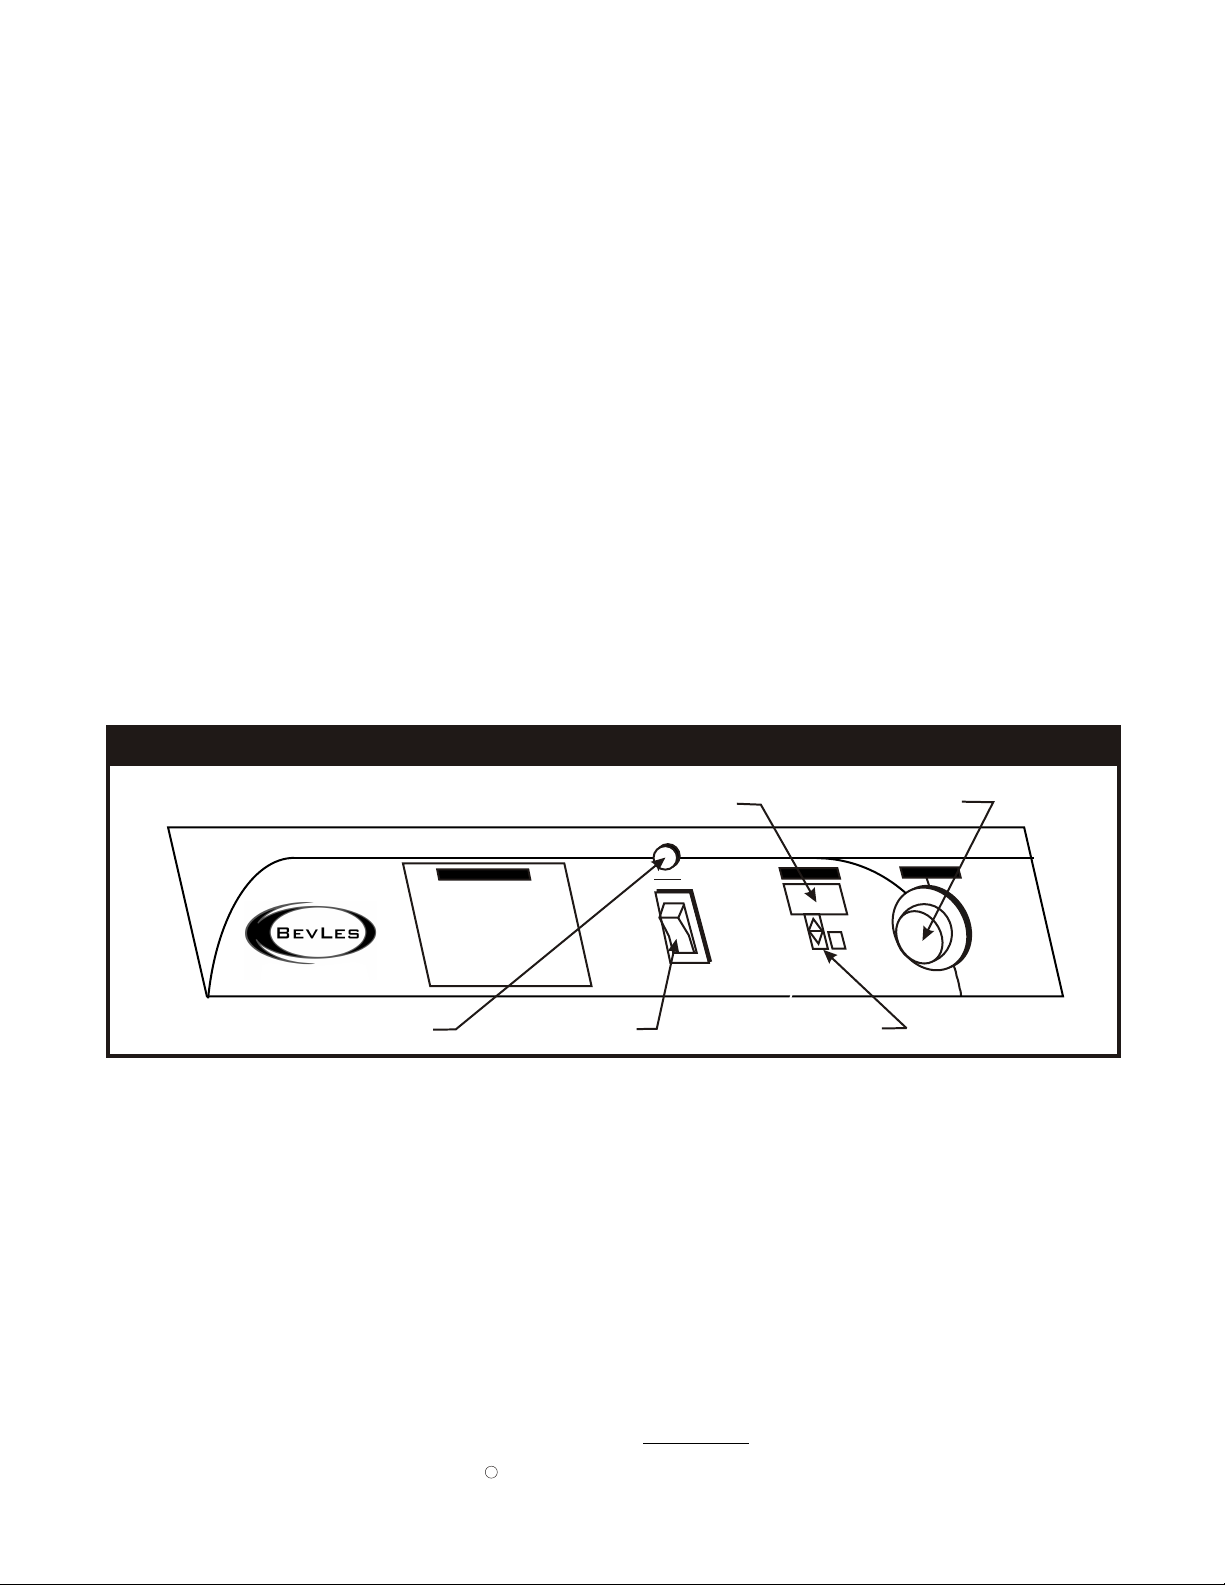
Proofer Control Panel
Green Pilot Light
Cabinet Temperature Display
Operating Instructions
Xxx xx xxx xxxx xxx
Xx xxx xxxxx xx xxx
Xxxx xxx xxxxx xxx
Power Switch
XXXXX
ON
OFF
Temperature Control
Humidity Control
xxx
5. MAINTENANCE
SAFETY AND HEALTH
BevLes Proofing Cabinets meet all cUL and NSF requirements. Always operate this proofer in accordance
with the operating instructions found in this manual. Never remove the humidity-heating module without first
disconnecting (unplugging) the unit from its power source. The cabinet is designed and built for easy
cleaning. It should be cleaned frequently as described in the maintenance section.
MAINTENANCE
Cleaning: This cabinet was designed and built for maximum sanitation. It is not self cleaning, so it should be
cleaned frequently with soap and water.
1. NEVER USE STEEL WOOL OR CAUSTIC CLEANING COMPOUNDS.
2. Make sure that the unit is turned OFF and unplugged from the electrical service.
3. Remove the clear Lexan water pan cover and the louvered side covers from the humidity-
R
heating module.
5

4. Remove the wire shelves, pan supports and vertical uprights.
5. Remove the vent from the rear wall.
6. Clean inside of cabinet with soap and water. Clean clear Lexan water pan cover and
Lexan doors with soft sponge, soap and water.
R
R
NEVER USE HARSH CLEANING SUBSTANCES OR ABRASIVES TO CLEAN LEXAN
SURFACES, OR ANY OTHER CABINET SURFACES INCLUDING THE CAST ALUMINUM
WATER PAN.
7. Remove and clean the 18" x 26" drip pan (not provided with proofer) from under the cabinet
base.
We suggest that you clean the water pan at least every two weeks with a solution of white vinegar
and hot water. Allow white vinegar to remain in water pan overnight. Then use a soft cloth to wipe
away any mineral buildup. If necessary, the humidity-heating module can be removed by loosening the
two (2) black knurled knobs (one located at each side on the module on the exterior of the cabinet). The
module can be pulled out of cabinet for additional cleaning.
IF REPLACEMENT PARTS ARE EVER REQUIRED, ONLY USE PARTS THAT HAVE BEEN
APPROVED BY BEVLES COMPANY, INC.
ASSISTANCE / SERVICE
Should you ever require assistance or service contact the BevLes manufacturing facilities at (800) 4411601 or (214) 421-7366. When you phone please have the model number and serial number of the proofer.
This will assist our service technicians in providing you with immediate assistance. You may want to briefly
review the Troubleshooting Tips before you contact our factory.
R
6. TROUBLESHOOTING TIPS
No Power
If your proofer fails to start when the power is applied via power switch:
1. Check to see if the unit is properly plugged into correct power source as specified on the
data plate.
2. Check to see that your power source (wall receptacle) has power - inspect circuit breaker.
3. Disconnect power cord and visually inspect for any damage.
4. Contact the BevLes Technical Service Department for assistance.
Excessive Humidity
If your proofer is producing excessive humidity:
1. Check the setting on the humidity control (white knob) to see if it is set where you normally
operate at.
2. Check the base of the cabinet to see if the excess humidity is draining through the drain hole
in the center of the base.
3. Contact the BevLes Technical Service Department for assistance.
No Humidity
If your proofer is producing no humidity, or considerably less than normally achieved:
1. Inspect water level in the water pan.
6
 Loading...