

Page 1

WL 90
D
Lichtwecker
Gebrauchsanweisung .................. 2
G
Wake-up light
Instructions for use ...................... 9
F
Lumière de réveil
Mode d'emploi ............................ 16
E
Luz para despertar
Instrucciones de uso ................. 23
BEURER GmbH • Söflinger Str. 218 • 89077 Ulm (Germany)
Tel.: +49 (0) 731 / 39 89-144 • Fax: +49 (0) 731 / 39 89-255
www.beurer.com • Mail: kd@beurer.de
I
Luce sveglia
Istruzioni per l'uso ...................... 30
T
Işıklı Çalar Saat
Kullanım kılavuzu ....................... 37
r
Световой будильник
Инструкция по применению ... 44
Q
Zastosowanie światła
podczas budzenia
Instrukcja obsługi ....................... 52
Page 2

DEUTSCH
Lesen Sie diese Gebrauchsanweisung sorgfältig durch, bewahren Sie sie
für den späteren Gebrauch auf, machen Sie sie anderen Benutzern zugänglich und beachten Sie die Hinweise.
Inhaltsverzeichnis
1. Zum Kennenlernen ............................................................................ 3
2. Zeichenerklärung............................................................................... 3
3. Bestimmungsgemäßer Gebrauch .................................................... 3
4. Warn-/ Sicherheitshinweise.............................................................. 4
5. Gerätebeschreibung .......................................................................... 4
6. Inbetriebnahme Gerät ....................................................................... 5
7. Inbetriebnahme App .......................................................................... 5
7.1 „Beurer LightUp“-App ................................................................. 5
7.2 Bluetooth
7.3 Sonnenuntergang-Funktion ......................................................... 6
8. Bedienung Gerät ................................................................................ 6
8.1 Uhrzeit und Datum einstellen ....................................................... 6
8.2 Alarm aktivieren /deaktivieren ...................................................... 6
8.3 Alarm-Zeit einstellen .................................................................... 6
8.4 Alarm ausschalten ....................................................................... 7
8.5 Displayhelligkeit einstellen ........................................................... 7
8.6 Radio-Modus ............................................................................... 7
8.7 Gute-Nacht-Funktion (Radio Sleep-Timer) .................................. 7
8.8 Licht-Funktion .............................................................................. 7
8.9 Stimmungslicht-Funktion ............................................................. 7
9. Was tun bei Problemen? ................................................................... 8
10. Reinigung/Aufbewahrung ............................................................... 8
11. Entsorgung ....................................................................................... 8
12. Technische Daten ............................................................................ 8
13. Garantie ............................................................................................ 8
®
Lautsprecher ............................................................ 5
Lieferumfang
•
Lichtwecker mit Wurfantenne
•
Netzadapter
•
Gebrauchsanweisung
•
Kurzanleitung
2
Page 3
Sehr geehrte Kundin, sehr geehrter Kunde,
wir freuen uns, dass Sie sich für ein Produkt unseres
Sortimentes entschieden haben. Unser Name steht für
hochwertige und eingehend geprüfte Qualitätsprodukte
aus den Bereichen Wärme, Gewicht, Blutdruck, Körpertemperatur, Puls, Sanfte Therapie, Massage, Luft und
Beauty.
Mit freundlicher Empfehlung
Ihr beurer-Team
1. Zum Kennenlernen
Der Beurer Lichtwecker WL 90 ermöglicht Ihnen ein sanftes und natürliches Erwachen aus Ihrem Schlaf. Duch das
langsam heller werdende LED-Licht wird ein Sonnenaufgang simuliert. Auf diese Weise können Sie sich langsam
an die Lichtverhältnisse gewöhnen und Ihr Körper bereitet
sich behutsam auf das Aufwachen vor. Sie können zusätzlich einen Weckton einstellen, der nach dem simulierten Sonnenaufgang ertönt und Sie beim Aufwachen akustisch unterstützt. Als Weckton stehen Ihnen sowohl das
Radio als auch verschiedene Klänge zur Verfügung. Mit
Hilfe der „Beurer LightUp“-App können Sie alle Gerätefunktionen auch bequem über das Smartphone bedienen.
Der Beurer Lichtwecker WL 90 verhilft Ihnen zu einem
ausgeruhten und zufriedenen Start in den Tag.
Funktionen:
•
Bedienung der Gerätefunktionen über Smartphone mit
„Beurer LightUp“-App
•
Simulierter Sonnenuntergang (Lichtwecker wird in
einem eingestellten Zeitraum langsam dunkler)
•
Licht-Funktion (weißes Licht / Leselampe)
•
Stimmungslicht mit individueller Farbfixierung (10x verschiedene Szenen auswählbar)
•
Uhrzeitanzeige auf dem Display
•
Verwendung als Lautsprecher über Bluetooth
•
UKW-Radio
•
Alarm über Radio oder Klänge
•
Gute-Nacht-Funktion (Lichtwecker schaltet sich nach
voreingestellter Zeit automatisch aus)
Hinweis
Der Lichtwecker WL 90 lässt sich nur mit der „Beurer
LightUp“-App in vollem Umfang verwenden. Basisfunktionen können zusätzlich direkt am Gerät eingestellt werden.
Folgende Funktionen können ausschließlich über die App
bedient werden:
•
Bluetooth® Lautsprecher
•
Auswahl von 10 definierten Stimmungslicht-Szenen
•
Direkte Farbauswahl des Stimmungslichts
®
•
Ein- und Ausschalten des Alarms für jeden Tag
•
Einstellen von speziellen Alarmeinstellungen
•
Ein- und Ausschalten des Tastentons
•
Aktivieren des Sonnenuntergangs
Systemvoraussetzungen:
•
Bluetooth® 4.0, iOS ab Version 7.1, Android™-Geräte
ab Version 4.3 mit Bluetooth
Für eine Auflistung aller kompatiblen mobilen Geräte,
scannen Sie bitte den folgenden QR-Code:
®
Smart Ready
2. Zeichenerklärung
Warnhinweis auf Verletzungs-
WARNUNG
ACHTUNG
Hinweis
3. Bestimmungsgemäßer Gebrauch
WARNUNG
Das Gerät darf nur für den Zweck verwendet werden, für
den es entwickelt wurde, und auf die in der Gebrauchs
anweisung angegebene Art und Weise. Jeder unsachgemäße Gebrauch kann gefährlich sein. Der Hersteller
haftet nicht für Schäden, die durch unsachgemäßen oder
falschen Gebrauch verursacht wurden.
gefahren oder Gefahren für Ihre
Gesundheit.
Sicherheitshinweis auf mögliche
Schäden am Gerät/Zubehör.
Hinweis auf wichtige Informati
onen.
Entsorgung gemäß Elektro- und
Elektronik-Altgeräte EG-Richtlinie –WEEE (Waste Electrical and
Electronic Equipment
Hersteller
Dieses Produkt erfüllt die Anforderungen der geltenden europäischen und nationalen Richtlinien.
-
-
3
Page 4

4. Warn-/ Sicherheitshinweise
5. Gerätebeschreibung
WARNUNG
•
Betreiben Sie das Gerät nur mit dem mitgelieferten
Netzadapter und nur mit der auf dem Netzadapter notierten Netzspannung.
•
Überprüfen Sie vor dem Gebrauch das Gerät und Zubehör auf sichtbare Schäden. Benutzen Sie es im Zweifelsfall nicht und wenden Sie sich an Ihren Händler oder
an die angegebene Kundendienstadresse.
•
Das Gerät ist nur für den Einsatz im häuslichen/privaten Umfeld bestimmt, nicht im gewerblichen Bereich.
•
Dieses Gerät kann von Kindern ab 8 Jahren und darüber sowie von Personen mit verringerten physischen,
sensorischen oder mentalen Fähigkeiten oder Mangel
an Erfahrung und Wissen benutzt werden, wenn sie
beaufsichtigt oder bezüglich des sicheren Gebrauchs
des Gerätes unterwiesen wurden und die daraus resultierenden Gefahren verstehen.
•
Kinder dürfen nicht mit dem Gerät spielen.
•
Reinigung und Benutzer-Wartung dürfen nicht von Kindern ohne Beaufsichtigung durchgeführt werden.
•
Schalten Sie das Gerät im Falle von Defekten oder Betriebsstörungen sofort aus und trennen Sie das Gerät
vom Stromanschluss.
•
Stecken Sie den Netzadapter niemals ein oder aus,
wenn Sie feuchte Hände haben.
•
Halten Sie Kinder vom Verpackungsmaterial fern
( Erstickungsgefahr).
•
Verlegen Sie das Stromkabel so, dass niemand darüber stolpern kann.
•
Halten Sie das Gerät, den Netzadapter und das Stromkabel von Wasser fern!
ACHTUNG
•
Schützen Sie das Gerät vor Stößen, Feuchtigkeit,
Schmutz, starken Temperaturschwankungen und direkter Sonneneinstrahlung.
•
Lassen Sie das Gerät nicht fallen.
2
1
5
6
7
8
9
10
1 Display 6 MODE / ENTER-Taste
2 Lichtfläche 7 ALARM-Taste
3 Snooze-Funktion
(Vibration des Geräts)
4 Lautsprecher 9 Netzanschluss
5 SET-Tasten p / q
8 USB-Anschluss (nur
zum Aufladen, keine
Musik wiedergabe)
10 + / - Tasten
3
4
4
Page 5
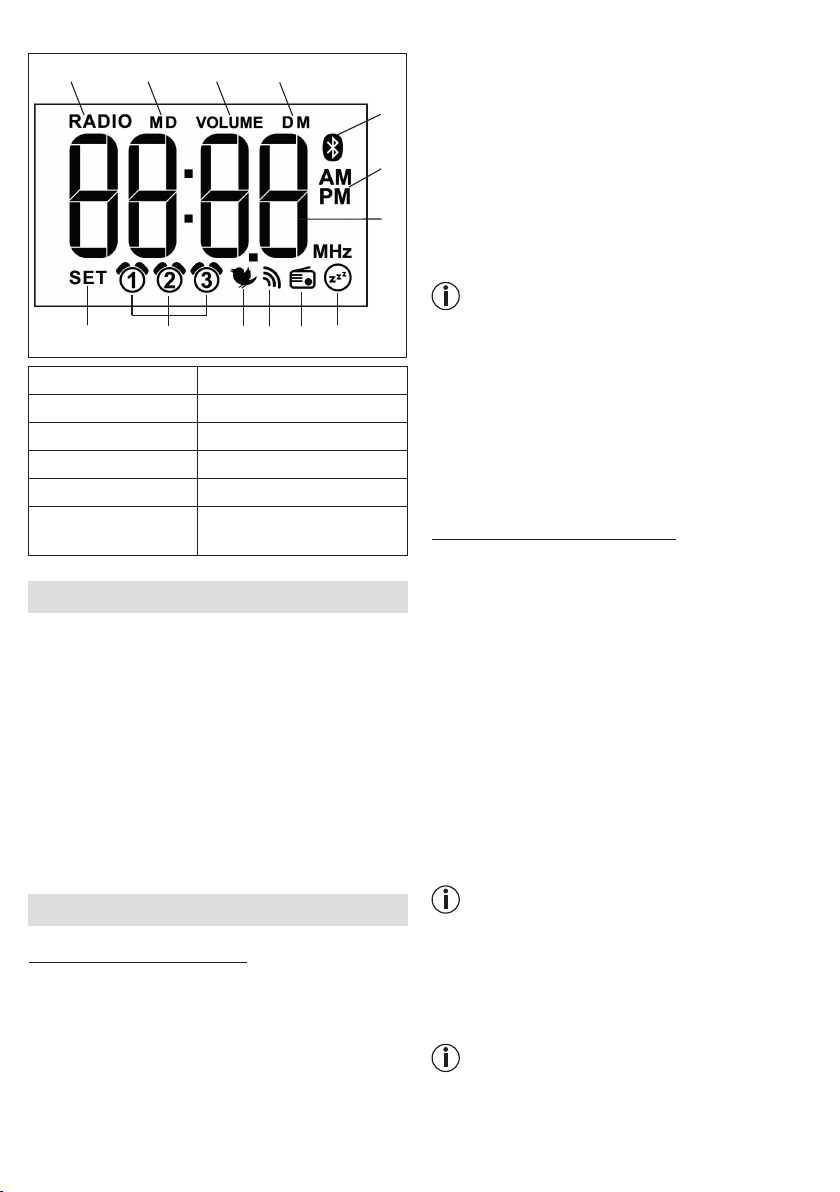
Display
1
2 3
2
4
5
6
12
1 Radio-Modus 7 Gute-Nacht-Funktion
2 Monat (M) / Tag (D) 8 Radio-Modus
3 Lautstärke 9 Piepton
4 Bluetooth
5 Uhrzeitmodus 11 Alarm-Speicherplatz 1-3
6 Uhrzeit / Datum /
Radio frequenz
®
1011
9
10 Aufwachmelodie
12 Einstellung aktiv
78
6. Inbetriebnahme Gerät
•
Entfernen Sie das Verpackungsmaterial.
•
Überprüfen Sie, ob alle Teile im Lieferumfang enthalten sind.
•
Überprüfen Sie Gerät, Netzadapter und Stromkabel auf
Beschädigungen.
•
Stellen Sie das Gerät auf eine ebene und feste Fläche.
•
Stecken Sie den Netzadapteranschluss in die Netzadapterbuchse auf der Rückseite des Geräts.
•
Stecken Sie den Netzadapter in eine geeignete Steckdose.
•
Auf dem Display des Geräts erscheint die Uhrzeit.
•
Legen Sie die Wurfantenne des Geräts nach hinten.
7. Inbetriebnahme App
7.1 „Beurer LightUp“-App
Sobald Sie die App „Beurer LightUp“ heruntergeladen
haben und der Lichtwecker über Bluetooth® mit einem
Smartphone verbunden ist, können Sie alle Funktionen
des Lichtweckers bequem über die App am Smartphone steuern.
Wir empfehlen Ihnen die Funktionen des Lichtweckers
über die App am Smartphone zu bedienen, da dies komfortabler ist, als über die Tasten am Gerät.
Um die Funktionen des Geräts über die App am Smartphone bedienen zu können, gehen Sie wie folgt vor:
1.
Vergewissern Sie sich, dass ihr Smartphone mit dem
Internet verbunden ist.
2. Aktivieren Sie Bluetooth
3.
Laden Sie die App „Beurer LightUp“ im Apple App Store
(iOS) oder bei Google Play (Android) herunter.
4.
Önen Sie die App „Beurer LightUp“ und fügen Sie den
Lichtwecker in der App hinzu.
5.
Sie können nun über die App sämtliche Funktionen des
Lichtweckers bedienen.
Hinweis
Folgende Funktionen können ausschließlich über die App
bedient werden:
•
Bluetooth® Lautsprecher
•
Auswahl von 10 definierten Stimmungslicht-Szenen
•
Direkte Farbauswahl des Stimmungslichts
•
Ein- und Ausschalten des Alarms für jeden Tag
•
Einstellen von speziellen Alarmeinstellungen
•
Ein- und Ausschalten des Tastentons
•
Aktivieren des Sonnenuntergangs
®
auf Ihrem Smartphone.
7.2 Bluetooth® Lautsprecher
Zum Aktivieren des Bluetooth®-Lautsprechers muss mindestens einmalig wie folgt gekoppelt werden:
1.
Schließen Sie die „Beurer LightUp“-App, falls diese bereits geönet ist.
2.
MODE / ENTER-Taste 2x drücken, bis im Display „bt“
angezeigt wird. Bluetooth®-Suche ist gestartet.
3. Wählen Sie in den Bluetooth
triebssystems (iOS / Android Einstellungen) aus der Geräteliste „WL 90 Speaker“ aus, um dies zu koppeln.
4. Sobald der Lichtwecker mit dem Smartphone verbun
den ist, erscheint dauerhaft das blaue Bluetooth® Logo
auf dem Display des Lichtweckers.
5.
Wählen Sie die Musik-Funktion im Menü der LightUp-App.
6. Drücken Sie zweimal die Mode-Taste um den Lautsprecher auszuschalten. Schalten Sie hierfür die App aus.
Hinweis
Bei Verwendung des gleichen Smartphones mit dem
gleichen Lichtwecker wird die Kopplung gespeichert.
Somit kann diese Bluetooth® -Verbindung beim Starten
der Musikfunktion in der LightUp-App automatisch gekoppelt werden. Dieser Automatismus kann sich je nach
Smartphone-Modell unterschiedlich verhalten.
Hinweis
Grundsätzlich wird Bluetooth®Smart (low energy) verwendet, um z.B. die Licht- und Alarmfunktionen zu
steuern. Für die Musikübertragung wird das zusätzliche
5
®
-Einstellungen Ihres Be-
-
Page 6

Classic Bluetooth® verwendet. Nur hier wird im Display
des Lichtweckers das Bluetooth®-Symbol angezeigt
(Bluetooth®-Verbindung ist aktiv oder wird gesucht).
7.3 Sonnenuntergang-Funktion
Sie können mit dem Lichtwecker auch einen Sonnenuntergang simulieren. Hierbei wird das Licht in einem eingestellten Zeitraum langsam dunkler.
Sie können die Sonnenuntergang-Funktion ausschließlich über das Menü der „Beurer LightUp“-App einstellen.
8. Bedienung Gerät
Die folgenden Basisfunktionen können Sie auch ohne
App über die Gerätetasten direkt bedienen, allerdings
nur, wenn die App auf Ihrem Smartphone geschlossen
ist. Der Lichtwecker ist nur in Verbindung mit der „Beurer
LightUp“-App in vollem Umfang verwendbar.
8.1 Uhrzeit und Datum einstellen
Hinweis
Wenn Sie die „Beurer LightUp“-App verwenden sind die
Uhrzeit und das Datum bereits eingestellt, da diese bei
jeder App-Verwendung automatisch mit dem Smartphone
synchronisiert werden.
1. MODE / ENTER-Taste drei Sekunden gedrückt halten.
2.
Stunden-Modus 24 hr blinkt im Display. StundenModus mit SET-Tasten p / q einstellen (24-Stunden-
Modus oder 12-Stunden-Modus). Mit MODE / ENTERTaste bestätigen.
3.
Stundenanzeige blinkt im Display. Die Stunden mit
SET-Tasten p / q einstellen. Mit MODE / ENTER- Taste
bestätigen.
4.
Minutenanzeige blinkt im Display. Die Minuten mit
SET-Tasten p / q einstellen. Mit MODE / ENTER- Taste
bestätigen.
5.
Das Jahr 2015 blinkt im Display. Das Jahr mit SETTasten p / q einstellen. Mit MODE / ENTER-Taste
bestätigen.
6.
Der Monat (M) 1 blinkt im Display. Den Monat mit
SET-Tasten p / q einstellen. Mit MODE / ENTER- Taste
bestätigen.
7.
Der Tag (D) 1 blinkt im Display. Den Tag mit SETTastenp / q einstellen. Mit MODE / ENTER-Taste
bestätigen. Es erscheint die eingestellte Uhrzeit.
8.2 Alarm aktivieren /deaktivieren
Alarm aktivieren
Bevor Sie einen Alarm einstellen, aktivieren Sie zunächst
den Alarm-Speicherplatz, dessen Alarm Sie einstellen
möchten.
Der Lichtwecker besitzt drei Alarm-Speicherplätze
( , , ), die Sie jeweils unterschiedlich einstellen
können. Sie können sich mit einem der 10 Aufwachmelodien, einem Weckton oder per Radio wecken lassen.
Um einen Alarm-Speicherplatz auszuwählen , gehen Sie
wie folgt vor:
1.
Durch Drücken der ALARM-Taste den gewünschten
Alarm-Speicherplatz auswählen, der im Display erscheint (es können auch mehrere Alarm-Speicherplätze
gleichzeitig ausgewählt werden).
2. Um einen Alarm zu deaktivieren, ALARM-Taste so oft
drücken, bis das zugehörige Weckersymbol im Display
verschwindet.
8.3 Alarm-Zeit einstellen
Alarm-Zeit einstellen am Lichtwecker
Um für den ausgewählten Alarm-Speicherplatz eine
Alarm-Zeit einzustellen, gehen Sie wie folgt vor:
1.
Bei einem aktivierten Alarm, die ALARM-Taste für zwei
Sekunden gedrückt halten.
2.
Alarmstunde blinkt im Display. Die Alarmstunde mit
SET-Tasten p / q einstellen. Mit ALARM-Taste bestä-
tigen.
3.
Alarmminute blinkt im Display. Die Alarmminute mit
SET-Tasten p / q einstellen. Mit ALARM-Taste bestä-
tigen.
4.
Weckton blinkt im Display. Den gewünschten Weckton mit den SET-Tasten p / q einstellen (Aufwach-
melodie1-10
ALARM-Taste bestätigen.
5.
Alarmlautstärke (VOLUME) blinkt im Display. Die Alarmlautstärke mit SET-Tasten p / q einstellen. Mit ALARM-
Taste bestätigen.
6. Snoozedauer (Sn) blinkt im Display. Die Snoozedauer
(1, 2, 5, 10, 20 oder 30 Minuten) mit SET-Tasten p / q
einstellen. Mit ALARM-Taste bestätigen.
Hinweis
Alarm-Zeit einstellen über Smartphone
Um die Alarmzeit über die App einzustellen und geweckt zu werden, genügt es wenn das Smartphone zum
Zeitpunkt des Einstellens via Bluetooth® mit dem Lichtwecker verbunden ist. Nachdem Sie Weckzeit und Weckton eingestellt haben, können Sie an Ihrem Smartphone
Bluetooth® deaktivieren oder Ihr Smartphone ausschalten.
Eine dauerhafte Bluetooth® Verbindung über Nacht ist
nicht notwendig.
6
, Piepton oder Radio ). Mit
Page 7

8.4 Alarm ausschalten
Während Sonnenaufgang
Sie können diesen Sonnenaufgang durch Drücken einer
beliebigen Taste ausschalten. Der Weckton wird nicht
ertönen. Das Licht wird 2 Minuten leicht gedimmt. Wenn
Sie erneut eine beliebige Taste drücken, schaltet sich
das Licht aus.
Schlummermodus (Snooze) bei Alarm
Das Gerät besitzt einen Schlummermodus (Snooze).
Wenn der Alarm angeht und Sie die Snooze-Funktion
drücken (antippen der Lichtfläche), wird der Alarm nach
der eingestellten Snooze-Dauer erneut ertönen.
Alarm ausschalten bei Weckton
Wenn der Alarm ertönt, beliebige Taste außer Snooze drücken. Der Alarm ist nun ausgeschaltet und wird erst wieder zur eingestellten Alarmzeit ertönen. Das Licht bleibt
weitere 2 Min an, um Ihnen die Möglichkeit zu geben
aufzustehen, danach stellt sich das Licht automatisch
aus. Um das Licht wieder anzuschalten, siehe Kapitel 8.8.
8.5 Displayhelligkeit einstellen
Der Lichtwecker besitzt vier Helligkeitsstufen für das
Display (
( Automatisch) passt sich die Displayhelligkeit automatisch an die Umgebung an. Um die Displayhelligkeit einzustellen, gehen Sie wie folgt vor:
1.
2.
0, 1, 2, 3, A
+ / - Tasten beide gleichtzeitig drücken. „
im Display. Mit MODE-Taste gewünschte Displayhelligkeit einstellen (
Um Displayhelligkeit zu bestätigen, + / - Tasten beide
gleichtzeitig drücken.
). Auf der Helligkeitsstufe „A“
0, 1, 2, 3
oder A).
BL:
“ erscheint
8.6 Radio-Modus
Um das Radio einzuschalten, gehen Sie wie folgt vor:
1.
MODE / ENTER-Taste so oft drücken, bis im Display
RADIO
angezeigt wird.
2. Mit + / - Tasten Radiolautstärke einstellen.
3. Speicherplatz mit SET-Taste p wechseln.
4.
Um einen automatischen Sendersuchlauf zu starten, SET-Taste p drei Sekunden gedrückt halten, Um
die Radiofrequenz in 0,1 MHz Schritten zu ändern,
SET-Tasten p / q kurz drücken.
5.
Um einen Radiosender auf diese Programmnummer zu
speichern, MODE / ENTER-Taste drücken. Die zugehö-
rige Programmnummer (z.B. P1) erscheint im Display.
8.7
Gute-Nacht-Funktion (Radio Sleep-Timer)
Wenn der Radio-Modus oder der
eingeschaltet ist, können Sie zusätzlich eine Gute-NachtFunktion ( ) hinzuschalten. Mit der Gute-Nacht-Funktion
können Sie einstellen, nach wie vielen Minuten sich das
Radio oder der
schalten soll.
Wenn Sie die Gute-Nacht-Funktion nutzen möchten,
gehen Sie wie folgt vor:
1.
Im Radio-Modus oder Bluetooth®-Lautsprecher-Modus
die SET-Tasten p / q gleichzeitig kurz drücken.
2.
Timeranzeige blinkt im Display. Mit ALARM-Taste die
gewünschte Timerdauer wählen (2, 5, 10, 15, 30, 45
oder 60 Minuten).
3.
Zum Bestätigen SET-Tasten p / q gleichzeitig kurz
drücken.
Bluetooth
Bluetooth®-Lautsprecher
®
Lautsprecher automatisch aus-
8.8 Licht-Funktion
1. Mit der Hand seitlich auf den Lichtwecker klopfen, so
dass der Lichtwecker leicht vibriert. Die Displaybeleuchtung wird heller.
2.
Klopfen Sie innerhalb von drei Sekunden erneut seitlich
auf den Lichtwecker. Das weiße Licht der Leselampe
geht an.
8.9 Stimmungslicht-Funktion
1. Mit der Hand seitlich auf den Lichtwecker klopfen, so
dass der Lichtwecker leicht vibriert. Die Displaybeleuchtung wird heller.
2.
Klopfen Sie innerhalb von drei Sekunden erneut seitlich
auf den Lichtwecker. Das weiße Licht der Leselampe
geht an.
3.
Um nun das Stimmungslicht mit Farbwechsel einzuschalten, erneut auf die Lichtfläche des Lichtweckers
klopfen.
4. Um während des Farbwechsels ein Farblicht dauerhaft
anzeigen zu lassen, erneut auf die Lichtfläche des Lichtweckers klopfen.
5.
Um die Lichtfunktion auszuschalten, erneut auf die
Lichtfläche des Lichtweckers klopfen.
7
Page 8
9. Was tun bei Problemen?
Unter www.beurer.com finden Sie weitere Informationen und eine Auflistung mit häufig gestellten Fragen
(FAQs) zu diesem Produkt.
10. Reinigung/Aufbewahrung
•
Reinigen Sie das Gerät mit einem trockenen Tuch.
•
Verwenden Sie keine scheuernden Reinigungsmittel.
•
Achten Sie darauf, dass kein Wasser in das Gerät eindringt. Falls dies doch einmal der Fall sein sollte, dann
verwenden Sie bitte das Gerät erst dann wieder, wenn
es völlig trocken ist.
•
Gerät und Steckernetzteil keinesfalls in Wasser oder
andere Flüssigkeiten tauchen.
•
Schützen Sie das Gerät vor Stößen, Feuchtigkeit, Staub,
Chemikalien, starken Temperaturschwankungen und zu
nahen Wärmequellen (Öfen, Heizungskörper).
11. Entsorgung
Im Interesse des Umweltschutzes darf das Gerät am Ende seiner Lebensdauer nicht mit dem Hausmüll entfernt
werden. Die Entsorgung kann über entsprechende Sammelstellen in Ihrem Land erfolgen. Befolgen Sie die örtlichen Vorschriften bei der Entsorgung der Materialien. Entsorgen Sie das Gerät
gemäß der Elektro- und Elektronik Altgeräte EG-Richtlinie
– WEEE (Waste Electrical and Electronic Equipment). Bei
Rückfragen wenden Sie sich an die für die Entsorgung
zuständige kommunale Behörde.
12. Technische Daten
Beleuchtungsstärke
Licht
Lichtstufen Stufenlos über App einstellbar
Stimmungslicht
Lichtweckerfunktion
SonnenaufgangsFunktion
Snooze-Dauer 1, 2, 5, 10, 20, 30 Minuten
Sonnenuntergang-
Funktion
Maximal ca. 2500 Lux
(bei 15 cm Abstand)
LED Technologie (Lebensdauer
der LED: > 50 000 Stunden, LED
kann nicht ausgetauscht werden)
Automatischer RGB Farbwechsel
mit individueller Farbfixierung
Aus 2, 5, 10, 15, 20, 30, 45,
60Minuten vor Alarm
Maximale Lichtstärke bis zum
Alarm: Lichtstufe 5, 10, 15, 20
2, 5, 10, 15, 20, 30, 45,
60 Minuten
8
Gute-Nacht-Funktion (Sleep Radio)
LCD-Hintergrundbeleuchtung
Uhrzeit 12h / 24h Umstellbar
Alarm
Tastenton Aus, An
USB
Radio
Musik-Streaming Bluetooth
Lautsprecher 2 x 3 Watt
Netzteil
Spannungsversorgung
Netzteil
Schutzklasse
Technische Änderungen vorbehalten.
Wir garantieren hiermit, dass dieses Produkt der europä-
ischen R&TTE Richtlinie 1999/5/EC entspricht.
Kontaktieren Sie bitte die genannte Serviceadresse, um
detaillierte Angaben - wie zum Beispiel die CE - Konformitätserklärung - zu erhalten.
2, 5, 10, 15, 20, 30, 45,
60 Minuten
Auto, Aus, 1, 2, 3
3 Alarmzeiten (Aus, An, Tag)
Weckton, 10 Klänge, Radio
USB-Ladefunktion für Smartphone mit 5 V / 500 mA (Tablets
werden nicht unterstützt).
Frequenzbereich UKW 87,0 -
108 MHz, 10 Speicherplätze
®
Eingang: 110-240 V, AC,
50/60 Hz, 0,5 A
Ausgang: 5 V, DC, 3000mA
Schutzklasse II
13. Garantie
Sie erhalten 3 Jahre Garantie ab Kaufdatum auf Material
und Fabrikationsfehler des Produktes.
Die Garantie gilt nicht:
•
im Falle von Schäden, die auf unsachgemäßer Bedienung beruhen,
•
für Verschleißteile,
•
für Mängel, die dem Kunden bereits bei Kauf bekannt
waren,
•
bei Eigenverschulden des Kunden.
Die gesetzlichen Gewährleistungen des Kunden bleiben
durch die Garantie unberührt. Für Geltendmachung ei
nes Garantiefalles innerhalb der Garantiezeit ist durch
den Kunden der Nachweis des Kaufes zu führen. Die
Garantie ist innerhalb eines Zeitraumes von 3 Jahren
ab Kauf datum gegenüber der Beurer GmbH, Söflinger Straße218, 89077 Ulm, Germany geltend zu machen. Der Kunde hat im Garantiefall das Recht zur
Reparatur der Ware bei unserem eigenen oder bei
von uns autorisierten Werkstätten. Weitergehende
Rechte werden dem Kunden (aufgrund der Garantie)
nicht eingeräumt.
-
Irrtum und Änderungen vorbehalten
Page 9

ENGLISH
Read these instructions for use carefully and keep them for later use, be
sure to make them accessible to other users and observe the information
they contain.
Table of contents
1. Getting to know your device........................................................... 10
2. Signs and symbols .......................................................................... 10
3. Intended use .................................................................................... 10
4. Warning notices/safety notes ......................................................... 11
5. Device description ........................................................................... 11
6. Device start-up ................................................................................ 12
7. App start-up ..................................................................................... 12
7.1 "Beurer LightUp" app ................................................................ 12
7.2 Bluetooth
7.3 Sunset function .......................................................................... 13
8. Device operation.............................................................................. 13
8.1 Setting the time and date .......................................................... 13
8.2 Activating/deactivating the alarm .............................................. 13
8.3 Setting the alarm time ................................................................ 13
8.4 Switching o the alarm .............................................................. 13
8.5 Setting the display brightness ................................................... 14
8.6 Radio mode ............................................................................... 14
8.7 Goodnight function (radio sleep timer) ...................................... 14
8.8 Light function ............................................................................. 14
8.9 Mood light function .................................................................... 14
9. What if there are problems? ........................................................... 14
10. Cleaning and storage .................................................................... 14
11. Disposal .......................................................................................... 14
12. Technical data ................................................................................ 15
®
loudspeaker ........................................................... 12
Included in delivery
•
Wake-up light with cable antenna
•
Mains adapter
•
Instructions for use
•
Brief instructions
9
Page 10

Dear customer,
Thank you for choosing one of our products. Our name
stands for high-quality, thoroughly tested products for
applications related to heating, weight, blood pressure,
body temperature, pulse, gentle therapy, massage, air
and beauty.
With kind regards,
Your beurer team
1. Getting to know your device
System requirements:
•
Bluetooth® 4.0, iOS from version 7.1, Android™ devices
from version 4.3 with Bluetooth®Smart Ready
For a list of all compatible mobile devices, please scan
the following QR code:
The Beurer WL 90 wake-up light wakes you from sleep
in a gentle and natural manner. The LED light gradually
becomes brighter like a rising sun, allowing you to slowly
become accustomed to the light conditions and your
body to gently prepare itself for waking up. You can also
set an alarm tone that is sounded following the simulated
sunrise and provides an acoustic aid to help you wake
up. For the alarm tone, you can choose between the radio
or various sounds. Thanks to the "Beurer LightUp" app,
it is also easy to control all device functions from your
smartphone.
The beurer WL 90 wake-up light provides a rested and
pleasant start to your day.
Functions:
•
Control of the device functions via smartphone with the
"Beurer LightUp" app
•
Simulated sunset (wake-up light slowly turns darker
over a set period of time)
•
Light function (white light/reading lamp)
•
Mood light with individual colour setting (choice of
10dierent settings)
•
Time shown on the display
•
Can be used as a loudspeaker via Bluetooth
•
VHF radio
•
Alarm via radio or sounds
•
Goodnight function (wake-up light switches off
automatically after a preset time)
Note
The WL 90 wake-up light can only be used with its full
functionality together with the "Beurer LightUp" app.
Basic functions can also be set directly on the device.
The following functions can only be controlled via the
app:
•
Bluetooth® loudspeaker
•
Choice of 10 defined mood light settings
•
Direct choice of mood light colour
•
Alarm can be switched on/o for each day
•
Adjustment of special alarm settings
•
Button tone can be switched on/o
•
Activation of sunset function
®
2. Signs and symbols
Warning notice indicating a risk
WARNING
IMPORTANT
Note
3. Intended use
WARNING
The device may only be used for the purpose for
which it is designed and in the manner specified in the
instructions for use. Improper use can be dangerous.
The manufacturer is not liable for damage resulting from
improper or careless use.
10
of injury or damage to health.
Safety note indicating possible
damage to the unit/accessory.
Note on important information.
Disposal in accordance with the
Waste Electrical and Electronic
Equipment EC Directive – WEEE
Manufacturer
This product satisfies the requirements of the applicable European and national directives.
Page 11

4. Warning notices/safety notes
5. Device description
WARNING
•
Only operate the device with the mains adapter
provided and at the mains voltage specified on the
mains adapter.
•
Before use, inspect the device and accessories for
visible damage. If you have any doubts, do not use
the device and contact your retailer or the specified
Customer Services address.
•
The device is only intended for domestic/private use,
not for commercial use.
•
This device may be used by children over the age of
eight and by people with reduced physical, sensory
or mental skills or a lack of experience or knowledge,
provided that they are supervised or have been
instructed on how to use the device safely and are fully
aware of the consequent risks of use.
•
Children must not play with the device.
•
Cleaning and user maintenance must not be performed
by children unless supervised.
•
In the event of defects or operational faults, switch the
device o immediately and disconnect it from the mains
socket.
•
Never plug in or unplug the mains adapter when you
have wet hands.
•
Keep packaging material away from children (risk of
suocation).
•
Arrange the mains cable so that it is not a trip hazard.
•
Keep the device, mains adapter and mains cable away
from water.
IMPORTANT
•
Protect the device from impacts, humidity, dirt, marked
temperature fluctuations and direct sunlight.
•
Do not drop the device.
2
1
5
6
7
8
9
10
1 Display 6 MODE / ENTER button
2 Light area 7 ALARM button
3 Snooze function
(device vibrates)
4 Loudspeaker 9 Mains connector
5 SET buttons p / q
8 USB connection
(forcharging only,
nomusic playback)
10 + / - buttons
3
4
11
Page 12

Display
1
12
1 Radio mode 7 Goodnight function
2 Month (M) / Day (D) 8 Radio mode
3 Volume 9 Beep
4 Bluetooth
5 Clock mode 11 Alarm memory space 1-3
6 Time / Date /
Radio frequency
2 3
®
2
1011
9
10 Wake-up melody
12 Setting active
78
6. Device start-up
•
Remove the packaging material.
•
Check that all parts listed are present.
•
Check the device, mains adapter and mains cable for
damage.
•
Place the device on a firm, even surface.
•
Insert the mains adapter connector into the mains
adapter socket on the rear of the device.
•
Insert the mains adapter into a suitable socket.
•
The time is shown on the device display.
•
Route the cable antenna of the device to the rear.
To control the device's functions with the app on your
smartphone, proceed as follows:
1.
Ensure that your smartphone is connected to the
4
5
6
Internet.
2. Activate Bluetooth
3.
Download the "Beurer LightUp" app from the Apple App
Store (iOS) or Google Play (Android).
4. Open up the "Beurer LightUp" app and add the wakeup light.
5. You can now control all functions of the wake-up light
via the app.
Note
The following functions can only be controlled via the
app:
•
Bluetooth® loudspeaker
•
Choice of 10 defined mood light settings
•
Direct choice of mood light colour
•
Alarm can be switched on/o for each day
•
Adjustment of special alarm settings
•
Button tone can be switched on/o
•
Activation of sunset function
®
on your smartphone.
7.2 Bluetooth® loudspeaker
To activate the Bluetooth® loudspeaker, a connection
must be established at least once as follows:
1. Close the "Beurer LightUp" app if it is open.
2.
Press the MODE / ENTER button twice until "bt" is
displayed. This begins the Bluetooth® search.
3.
In the Bluetooth® settings of your operating system
(iOS/Android settings), select "WL 90 Speaker" from
the device list in order to connect to this.
4.
Once the wake-up light is connected to the smartphone,
the blue Bluetooth® logo will appear on the display.
5.
Select the music function in the menu of the LightUp app.
6. Press the MODE / ENTER button twice to deactivate
the loudspeaker. Close the app for this.
7. App start-up
7.1 "Beurer LightUp" app
Once you have downloaded the "Beurer LightUp" app
and the wake-up light is connected to a smartphone via
Bluetooth®, you can control all of the functions of the
wake-up light with ease via the smartphone app.
For your convenience, instead of using the buttons on the
device, we recommend that you control the functions of
the wake-up light via the smartphone app.
Note
The connection is saved for this combination of
smartphone and wake-up light device. The Bluetooth®
connection is then established automatically when you
start the music function in the LightUp app. This automatic
function may vary depending on the smartphone model.
Note
Bluetooth®Smart (low energy) is generally used, for
example to control the light and alarm functions. For the
music playback, Classic Bluetooth® is also used. It is only
here that the Bluetooth® symbol appears in the display
of the wake-up light (Bluetooth® connection is active or
searching for connection).
12
Page 13
7.3 Sunset function
The wake-up light can also be used to simulate a sunset,
whereby the light slowly turns darker after a set period
of time.
The sunset function can only be adjusted via the menu
in the "Beurer LightUp" app.
8. Device operation
The following basic functions can also be controlled
directly without the app using the buttons on the
device, however this is only possible if the app is
closed on your smartphone. The wake-up light can
only be used with its full functionality together with the
"Beurer LightUp" app.
8.1 Setting the time and date
Note
When using the "Beurer LightUp" app, the time and date
are already set as these are automatically synchronised
with the smartphone every time the app is used.
1.
Press and hold the MODE / ENTER button for three
seconds.
2. Hour mode 24 hr flashes in the display. Set the hour
mode using the SET buttons p / q (24-hour mode
or 12-hour mode). Confirm with the MODE / ENTER
button.
3.
The hour display flashes in the display. Set the
hours using the SET buttons p / q. Confirm with the
MODE / ENTER button.
4.
The minute display flashes in the display. Set the
minutes using the SET buttons p / q. Confirm with
the MODE / ENTER button.
5.
The year 2015 flashes in the display. Set the year
using the SET buttons p / q . Confirm with the
MODE / ENTER button.
6. The month (M) 1 flashes in the display. Set the month
using the SET buttons p / q . Confirm with the
MODE / ENTER button.
7.
The day (D) 1 flashes in the display. Set the day using the
SET buttons p / q. Confirm with the MODE / ENTER
button. The set time appears.
8.2 Activating/deactivating the alarm
Activating the alarm
Before setting an alarm, first activate the alarm memory
space for which you would like to set the alarm.
The wake-up light features three alarm memory spaces
( , , ) that can be configured individually.
Youcanchoose to be woken up by one of the ten wakeup melodies, an alarm tone or the radio.
To select an alarm memory space, proceed as follows:
1.
Select the desired alarm memory space by pressing
the ALARM button. This appears in the display (several
alarm memory spaces may be selected at the same
time).
2.
To deactivate an alarm, keep pressing the ALARM
button until the corresponding alarm clock symbol
disappears from the display.
8.3 Setting the alarm time
Setting the alarm time on the wake-up light
To set an alarm time for the selected alarm memory
space, proceed as follows:
1.
For an already activated alarm, press and hold the
ALARM button for two seconds.
2.
The alarm hour flashes in the display. Set the alarm
hour using the SET buttons p / q. Confirm with the
ALARM button.
3. The alarm minute flashes in the display. Set the alarm
minute using the SET buttons p / q. Confirm with the
ALARM button.
4. The alarm tone flashes in the display. Set the desired
alarm tone using the SET buttons p / q (wake-up
melody 1-10 , beep or radio ). Confirm with
the ALARM button.
5. The alarm volume (VOLUME) flashes in the display. Set
the alarm volume using the SET buttons p / q. Confirm
with the ALARM button.
6.
The snooze time (Sn) flashes in the display. Set the
snooze time (1, 2, 5, 10, 20 or 30 minutes) using the
SET buttons p / q. Confirm with the ALARM button.
Note
Setting the alarm time via smartphone
To be woken at an alarm time set using the app, the
smartphone simply needs to be connected to the wakeup light via Bluetooth® when making the settings. Once
you have set the alarm time and alarm tone, you can
deactivate Bluetooth® on your smartphone or switch off
your smartphone altogether. A continuous overnight
Bluetooth® connection is not necessary.
8.4 Switching o the alarm
Switching o the alarm during sunrise
You can switch o this sunrise by pressing any button.
The alarm tone does not sound. The light is slightly
dimmed for 2 minutes. If you press any button again, the
light switches o.
Snooze mode (Snooze) for the alarm
The device features a snooze mode (Snooze). If the alarm
sounds and you press the Snooze function (by tapping
13
Page 14
the light area), the alarm will sound again once the set
snooze duration has elapsed.
8.8 Light function
1.
Switching o the alarm when the alarm tone sounds
When the alarm sounds, press any button apart from
Snooze. The alarm is now switched o and will only
sound again at the set alarm time. The light stays on for
a further 2 minutes to allow you to get up, before then
switching o automatically. To switch on the light again,
see section 8.8.
2.
8.9 Mood light function
1.
8.5 Setting the display brightness
The wake-up light features four brightness levels
for the display (
(automatic) automatically adjusts the display brightness
to the surrounding light conditions. To set the display
brightness, proceed as follows:
1.
Press both + / - buttons at the same time. "
in the display. Set the desired display brightness using
the MODE button (
2.
To confirm the display brightness, press both + / -
buttons at the same time.
0, 1, 2, 3, A
). Brightness level "A"
0, 1, 2, 3 or A
BL:
" appears
).
2.
3.
4. To have a coloured light permanently displayed during
5.
Using your hand, tap on the side of the wake-up light to
make it vibrate lightly. The illuminated display becomes
brighter.
Tap on the side of the wake-up light again within three
seconds. The white light of the reading lamp will come on.
Using your hand, tap on the side of the wake-up light to
make it vibrate lightly. The illuminated display becomes
brighter.
Tap on the side of the wake-up light again within three
seconds. The white light of the reading lamp will come on.
To activate the mood light with change of colour, tap
again on the light area of the wake-up light.
the colour change, tap again on the light area of the
wake-up light.
To deactivate the light function, tap again on the light
area of the wake-up light.
8.6 Radio mode
To turn on the radio, proceed as follows:
1.
Keep pressing the MODE / ENTER button until
appears in the display.
2. Set the radio volume using the + / - buttons.
3. Change the memory space using the SET button p.
4.
To start an automatic station search, press and hold
the SET button p for three seconds. Briefly press the
SETbuttons p / q to adjust the radio frequency by
0.1MHz at a time.
5.
To save a radio station to this programme number,
press the MODE / ENTER button. The corresponding
programme number (e.g. P1) appears in the display.
RADIO
8.7 Goodnight function (radio sleep timer)
If radio mode or the
you can also enable a goodnight function ( ). You can
use the goodnight function to set the number of minutes
after which the radio or the
should automatically switch o.
If you would like to use the goodnight function, proceed
as follows:
1.
In radio mode or Bluetooth® loudspeaker mode, briefly
press the SET buttons p / q at the same time.
2.
The timer display flashes in the display. Select the
desired timer duration using the ALARM button
(2, 5, 10, 15, 30, 45 or 60 minutes).
3. To confirm, briefly press the SET buttons p / q at the
same time.
Bluetooth® loudspeaker is activated,
Bluetooth®
loudspeaker
9. What if there are problems?
You can find further information and a list of frequently
asked questions (FAQs) about this product at
www.beurer.com.
10. Cleaning and storage
•
Clean the device with a dry cloth.
•
Do not use any abrasive cleaning products.
•
Ensure that no water enters the device. If this should
happen, only reuse the device once it has fully dried out.
•
Never immerse the device or mains part plug in water
or other liquids.
•
Protect the device from knocks, damp, dust, chemicals,
marked temperature fluctuations, and nearby sources
of heat (ovens, heaters).
11. Disposal
For environmental reasons, do not dispose of the device
in the household waste at the end of its useful life.
Dispose of the device at a suitable local collection
or recycling point. Observe the local regulations
for material disposal. Dispose of the device in
accordance with EC Directive – WEEE (Waste
Electrical and Electronic Equipment). If you have any
questions, please contact the local authorities responsible
for waste disposal.
14
Page 15

12. Technical data
Illuminance
Max. approx. 2500 lux
(atdistance of 15 cm)
LED technology (LED service life:
Light
> 50,000 hours, LED cannot be
replaced)
Light levels Continuously adjustable via app
Mood light
Wake-up light
function
Sunrise function
Automatic RGB colour change,
option of setting individual colour
O, 2, 5, 10, 15, 20, 30, 45,
60minutes prior to alarm
Maximum light intensity up to
alarm: Light level 5, 10, 15, 20
Snooze time 1, 2, 5, 10, 20, 30 minutes
Sunset function
2, 5, 10, 15, 20, 30, 45, 60 minutes
Goodnight
function
2, 5, 10, 15, 20, 30, 45, 60 minutes
(sleepradio)
LCD backlighting Auto, o, 1, 2, 3
Time Toggle 12h/24h mode
Alarm
3 alarm times (O, On, Day)
Alarm tone, 10 sounds, radio
Button tone O, On
USB charging function for
USB
smartphone with 5V/500mA
(tablets are not supported).
Radio
Music streaming Bluetooth
Frequency range VHF 87.0108MHz, 10 memory spaces
®
Loudspeaker 2 x 3 W
Mains part
voltagesupply
Mains part
protection class
Input: 110-240 V, AC,
50/60 Hz, 0.5 A
Output: 5 V, DC, 3000mA
Protection class II
Subject to technical changes.
We hereby guarantee that this product complies with the
European R&TTE Directive 1999/5/EC.
Please contact the specified service address to obtain
further information, such as the CE Declaration of
Conformity.
15
Subject to errors and changes
Page 16

FRANÇAIS
Lisez attentivement cette notice, conservez-la pour un usage ultérieur,
mettez-la à disposition des autres utilisateurs et suivez les consignes qui y
figurent.
Table des matières
1. Familiarisation avec l'appareil ........................................................ 17
2. Symboles utilisés ............................................................................. 17
3. Utilisation conforme aux recommandations ................................. 17
4. Consignes de sécurité .................................................................... 18
5. Description de l'appareil ................................................................. 18
6. Mise en service de l'appareil .......................................................... 19
7. Mise en service de l'application ..................................................... 19
7.1 Application Beurer LightUp........................................................ 19
7.2 Haut-parleur Bluetooth
7.3 Fonction coucher de soleil ......................................................... 20
8. Utilisation de l'appareil ................................................................... 20
8.1 Régler l'heure et la date ............................................................. 20
8.2 Activer/désactiver l'alarme ........................................................ 20
8.3 Réglage de l'heure de l'alarme .................................................. 20
8.4 Désactivation de l'alarme .......................................................... 21
8.5 Réglage de la luminosité de l'écran ........................................... 21
8.6 Mode radio ................................................................................. 21
8.7 Fonction bonne nuit (radio sleep timer) ..................................... 21
8.8 Fonction lumière ........................................................................ 21
8.9 Fonction lumière d'ambiance..................................................... 21
9. Que faire en cas de problèmes? ................................................... 21
10. Nettoyage/stockage ...................................................................... 21
11. Élimination ..................................................................................... 22
12. Données techniques ..................................................................... 22
®
............................................................ 19
Contenu
•
Lumière de réveil avec antenne volante
•
Adaptateur secteur
•
Mode d'emploi
•
Manuel Abrégé
16
Page 17

Chère cliente, cher client,
Nous vous remercions d'avoir choisi l'un de nos produits.
Notre société est réputée pour l'excellence de ses produits
et les contrôles de qualité auxquels ils sont soumis. Nos
produits couvrent les domaines de la chaleur, du poids,
de la pression sanguine, de la température corporelle,
de la thérapie douce, des massages, de l’amélioration
de l’air et de la beauté.
Sincères salutations,
Votre équipe Beurer
1. Familiarisation avec l'appareil
La lumière de réveil Beurer WL 90 vous ore un réveil en
douceur et naturel. La lumière LED, s'intensifiant progressivement, permet de simuler un lever de soleil. Vous
pouvez alors tranquillement vous habituer aux conditions
lumineuses et votre corps se préparer doucement au
réveil. En plus de la simulation de lever de soleil, vous
pouvez paramétrer une sonnerie qui vous accompagne
lors de votre réveil. Pour la sonnerie, vous pouvez choisir
entre la radio et plusieurs sonorités. Avec l'application
Beurer LightUp, vous pouvez commander toutes les
fonctions en toute simplicité depuis votre smartphone.
La lumière de réveil WL 90 de Beurer vous permet de
débuter la journée reposé et du bon pied.
Fonctions:
•
Commande des fonctions via smartphone grâce à
l'application Beurer LightUp
•
Simulation de coucher de soleil (la lumière de réveil perd
progressivement en intensité sur une période choisie)
•
Fonction lumière (lumière blanche/lampe de lecture)
•
Lumière d'ambiance avec fixation de couleur indivi
duelle (10ambiances lumineuses sélectionnables)
•
Achage de l'heure à l'écran
•
Utilisation comme haut-parleur via Bluetooth
•
Radio FM
•
Réveil par radio ou sonnerie
•
Fonction bonne nuit (la lumière de réveil s'éteint
automatiquement après une durée définie)
-
®
•
Réglage d'une alarme spéciale
•
Activation ou désactivation du bip des touches
•
Activation du coucher de soleil
Configuration requise:
•
Bluetooth® 4.0, iOS à partir de la version 7.1, appareils
Android™ à partir de la version 4.3 avec Bluetooth
Smart Ready
Pour obtenir la liste des appareils mobiles compatibles,
veuillez scanner le code QR suivant:
®
2. Symboles utilisés
Ce symbole vous avertit des
AVERTIS-
SEMENT
ATTENTION
Remarque
risques de blessures ou des
dangers pour votre santé.
Ce symbole vous avertit des
éventuels dommages au niveau
de l’appareil ou d’un accessoire.
Ce symbole indique des informations importantes.
Élimination conformément àla
directive européenne WEEE
(Waste Electrical and Electronic
Equipment) relative aux déchets
d'équipements électriques et
électroniques
Fabricant
Ce produit répond aux exigences
des directives européennes et
nationales en vigueur.
Remarque
La lumière de réveil WL 90 n'est pleinement exploitable
qu'avec l'application Beurer LightUp. Les fonctions
de base peuvent être réglées directement depuis
l'appareil.
Les fonctions suivantes peuvent être commandées exclusivement depuis l'application:
•
Haut-parleurBluetooth
•
Sélection parmi 10ambiances lumineuses prédéfinies
•
Sélection de couleur directe pour la lumière d'ambiance
•
Activation ou désactivation de l'alarme pour chaque
jour
®
3. Utilisation conforme
aux recommandations
AVERTISSEMENT
L'appareil ne doit être utilisé qu'aux fins pour lesquelles
il a été conçu et conformément aux indications données
par ce mode d'emploi. Toute utilisation inappropriée peut
être dangereuse. Le fabricant ne peut être tenu pour
responsable des dommages causés par une utilisation
inappropriée ou non conforme.
17
Page 18

4. Consignes de sécurité
5. Description de l'appareil
AVERTISSEMENT
•
Utilisez l'appareil uniquement avec l’adaptateur secteur
fourni et à la tension indiquée sur l'adaptateur secteur.
•
Avant l'utilisation, vérifiez si l'appareil et les accessoires
présentent des dégâts visibles. En cas de doute, ne
l'utilisez pas et adressez-vous à votre revendeur ou au
service client indiqué.
•
L’appareil ne doit être utilisé que dans un environnement
domestique/privé et pas dans un cadre professionnel.
•
Cet appareil peut être utilisé par les enfants à partir de
8ans ainsi que les déficients physiques, sensoriels ou
mentaux et les personnes ayant peu de connaissances
ou d'expérience à la condition qu'ils soient surveillés
ou sachent comment l'utiliser en toute sécurité et en
comprennent les risques.
•
Les enfants ne doivent pas jouer avec cet appareil.
•
Le nettoyage et l'entretien ne doivent pas être eectués
par des enfants sans surveillance.
•
En cas de défaut ou de panne, éteignez immédiatement
l'appareil et débranchez l'alimentation.
•
Ne branchez ou débranchez jamais l'adaptateur secteur
si vous avez les mains humides.
•
Conservez l'emballage hors de portée des enfants
(risque d’étouement).
•
Placez le câble d'alimentation de manière à ce que
personne ne puisse trébucher dessus.
•
Tenez l'appareil, l'adaptateur secteur et le câble à l'écart
de l'eau!
2
3
4
1
ATTENTION
•
Protégez l'appareil contre les chocs, l'humidité, les
saletés, les fortes variations de température et l'ensoleillement direct.
•
Ne laissez pas tomber l'appareil.
5
6
7
8
9
10
1 Écran 6 Touche MODE/ENTER
2 Surface lumineuse 7 Touche ALARM
3 Fonction Snooze
(vibration de
l'appareil)
4 Haut-parleur 9 Connexion au secteur
5 Touche SET p / q
18
8 Prise USB (unique-
ment pour recharger
l'appareil, pas pour la
lecture de musique)
10 Touche +/-
Page 19

Écran
1
2 3
2
4
5
6
12
1 Mode radio 7 Fonction bonne nuit
2 Mois (M)/Jour (D) 8 Mode radio
3 Haut-parleur 9 Bip sonore
4 Bluetooth
5 Mode d'achage
de l'heure
6 Heure/Date/
Fréquence radio
®
1011
9
10 Mélodie de réveil
11 Emplacement de
l'alarme 1-3
12 Fonction réglages active
78
6. Mise en service de l'appareil
•
Retirez le matériel d'emballage.
•
Vérifiez que toutes les pièces sont présentes lors de
la livraison.
•
Vérifiez que l'appareil, l'adaptateur secteur et le câble
ne sont pas endommagés.
•
Posez l'appareil sur une surface stable et plane.
•
Branchez la fiche de l'adaptateur secteur dans la prise
de l'adaptateur secteur à l'arrière de l'appareil.
•
Branchez l'adaptateur secteur sur une prise secteur
adaptée.
•
L'heure s'ache sur l'écran de l'appareil.
•
Placez l'antenne volante de l'appareil vers l'arrière.
7. Mise en service de l'application
7.1 Application Beurer LightUp
Dès que vous avez téléchargé l'application Beurer
LightUp et connecté la lumière de réveil à un smartphone
via Bluetooth®, vous pouvez commander l'ensemble des
fonctions en toute simplicité depuis l'application sur votre
smartphone.
Nous vous recommandons de commander les fonctions
de la lumière de réveil depuis l'application sur votre
smartphone car elles sont plus confortables que les
touches de l'appareil.
19
Pour pouvoir commander les fonctionnalités de l'appareil
via l'application sur smartphone, procédez comme suit:
1.
Assurez-vous que votre smartphone est connecté à
Internet.
2. Activez le Bluetooth
3.
Téléchargez l'application Beurer LightUp sur l'App Store
(iOS) ou sur Google Play (Android).
4.
Ouvrez l'application Beurer LightUp et ajoutez la lumière
de réveil dans l'application.
5. Vous pouvez alors commander toutes les fonctions de
la lumière de réveil via l'application.
Remarque
Les fonctions suivantes peuvent être commandées exclusivement depuis l'application:
•
Haut-parleur Bluetooth
•
Sélection parmi 10ambiances lumineuses prédéfinies
•
Sélection de couleur directe pour la lumière d'ambiance
•
Activation ou désactivation de l'alarme pour chaque
jour
•
Réglage d'une alarme spéciale
•
Activation ou désactivation des bips des touches
•
Activation du coucher de soleil
7.2 Haut-parleur Bluetooth
Pour activer le haut-parleur Bluetooth®, la lumière de
réveil doit avoir été couplée au moins une fois comme
suit:
1.
Fermez l'application Beurer LightUp si celle-ci est
ouverte.
2.
Appuyez 2fois sur la touche MODE/ENTER jusqu'à ce
que «bt» s'ache à l'écran. La recherche Bluetooth®
est lancée.
3.
Dans les réglages Bluetooth® de votre système
d'exploitation (iOS/Android), sélectionnez «WL90
speaker» dans la liste des appareils pour le coupler.
4.
Dès que la lumière de réveil est connectée au
smartphone, le logo Bluetooth® bleu s'allume sur
l'écran de la lumière de réveil.
5.
Sélectionnez la fonction musique dans le menu de
l'app
lication LightUp.
6.
Appuyez deux fois sur la touche
éteindre le haut-parleur. Fermer l'application.
Remarque
Si vous utilisez le même smartphone et la même lumière
de réveil, le couplage est enregistré. Cette connexion
Bluetooth® est automatiquement établie lors du
lancement de la fonction musique dans l'application
LightUp. Cet automatisme peut se comporter diéremment selon le modèle de smartphone.
®
sur votre smartphone.
®
®
MODE/ENTER
pour
Page 20

Remarque
En principe, la technologie Bluetooth®Smart (Low Energy)
est utilisée pour commander les fonctions de lumière et
de réveil. Pour le transfert de musique, la technologie
Classic Bluetooth
s'ache à l'écran (la connexion Bluetooth® est active ou
est recherchée).
®
est utilisée. Là, le symbole Bluetooth®
7.3 Fonction coucher de soleil
Cette lumière de réveil vous permet de simuler le coucher
du soleil. La lumière perd progressivement en intensité
pendant une période choisie.
Vous ne pouvez régler la fonction coucher de soleil que
depuis le menu de l'application Beurer LightUp.
8. Utilisation de l'appareil
Les fonctions de base suivantes peuvent être
commandées directement sur l'appareil, sans passer
par l'application, mais uniquement si celle-ci n'est
pas ouverte sur votre smartphone. La lumière de réveil
n'est pleinement exploitable qu'avec l'application Beurer
LightUp.
8.1 Régler l'heure et la date
Remarque
Lorsque vous utilisez l'application Beurer LightUp,
l'heure et la date sont déjà réglées car à chaque fois
que vous utilisez l'application, elle se synchronise avec
le smartphone.
1. Maintenir la touche MODE/ENTER enfoncée pendant
trois secondes.
2.
Le format 24 h clignote à l'écran. Régler le format
del'heure à l'aide des touches SET p /q (format
24h ou format 12h). Confirmer à l'aide de la touche
MODE/ENTER.
L'achage de l'heure clignote à l'écran. Régler les
3.
heures à l'aide des touches SET p /q. Confirmer à
l'aide de la touche MODE/ENTER.
L'achage des minutes clignote à l'écran. Régler les
4.
minutes à l'aide des touches SET p /q. Confirmer à
l'aide de la touche MODE/ENTER.
L'année 2015 clignote à l'écran. Régler l'année
5.
à l'aide des touches SET p /q. Confirmer à l'aide de
la touche MODE/ENTER.
6. Le mois (M) 1 clignote à l'écran. Régler le mois à l'aide
des touches SET p /q. Confirmer à l'aide de la touche
MODE/ENTER.
Le jour (D) 1 clignote à l'écran. Régler le jour à l'aide
7.
des touches SET p /q. Confirmer à l'aide de la touche
MODE/ENTER. L'heure réglée s'ache.
20
8.2 Activer/désactiver l'alarme
Activation de l'alarme
Avant de régler l'alarme, activez l'emplacement de
l'alarme que vous souhaitez régler.
La lumière de réveil propose trois alarmes diérentes
( , , ) qui peuvent être réglées indépendamment
l'une de l'autre. Vous pouvez choisir d'être réveillé(e) par
l'une des 10mélodies de réveil, une sonnerie ou la radio.
Procédez comme suit pour sélectionner un emplacement
d'alarme:
1.
Appuyer sur la touche ALARM pour sélectionner
l'emplacement d'alarme souhaité, qui s'achera alors
à l'écran (il est également possible de sélectionner
plusieurs emplacements d'alarme à la fois).
2. Pour désactiver une alarme, appuyer plusieurs fois sur
la touche ALARM jusqu'à ce que le symbole de réveil
ne soit plus aché à l'écran.
8.3 Réglage de l'heure de l'alarme
Réglage de l'heure de l'alarme sur la lumière de réveil
Pour régler l'heure de l'alarme pour l'emplacement
d'alarme sélectionné, procédez comme suit:
1.
Lorsque l'alarme est activée, maintenir la touche
ALARM enfoncée pendant deux secondes.
2.
L'heure de l'alarme clignote à l'écran. Régler l'heure de
l'alarme à l'aide des touches SET p /q. Confirmer à
l'aide de la touche ALARM.
3. Les minutes de l'alarme clignotent à l'écran. Régler les
minutes de l'alarme à l'aide des touches SET p /q.
Confirmer à l'aide de la touche ALARM.
4.
La sonnerie clignote à l'écran. Régler la sonnerie
souhaitée à l'aide des touches SET p /q (mélodie à
réveil 1 à 10 , bip ou radio ). Confirmer à l'aide
de la touche ALARM.
5.
Le volume de l'alarme (VOLUME) clignote à l'écran.
Régler le volume de l'alarme à l'aide des touches
SETp /q. Confirmer à l'aide de la touche ALARM.
6.
La durée du rappel (Sn) clignote à l'écran. Régler la
durée du rappel (1, 2, 5, 10, 20 ou 30minutes) à l'aide
des touches SET p /q. Confirmer à l'aide de la touche
ALARM.
Remarque
Réglage de l'heure de l'alarme via smartphone
Pour régler l'heure de l'alarme et se faire réveiller par
l'application, il sut de connecter le smartphone à la
lumière de réveil via Bluetooth® au moment du réglage.
Après avoir réglé l'heure et l'alarme, vous pouvez
désactiver la fonction Bluetooth® sur votre smartphone
ou éteindre le smartphone. Il n'est pas nécessaire de
garder la connexion Bluetooth® activée toute la nuit.
Page 21

8.4 Désactivation de l'alarme
Désactivation de l'alarme pendant un lever de soleil
Vous pouvez désactiver le lever de soleil en appuyant
sur n'importe quelle touche. La sonnerie ne retentit pas.
Après 2minutes, la lumière diminue légèrement. Lorsque
vous appuyez à nouveau sur une touche, la lumière se
rallume.
Fonction de rappel d'alarme (Snooze)
L'appareil propose la fonction de rappel d'alarme
(Snooze). Si, lorsque l'alarme se déclenche, vous appuyez
sur Snooze (sur la surface lumineuse), l'alarme sonne à
nouveau après la durée de la fonction snooze définie.
Désactivation de l'alarme
Lorsque l'alarme sonne, appuyez sur n'importe quelle
touche sauf Snooze. L'alarme est alors désactivée et ne
sonnera à nouveau qu'à l'heure réglée. La lumière reste
allumée pendant 2minutes pour vous laisser la possibilité
de vous lever, puis elle s'éteint automatiquement. Pour
l'allumer à nouveau, voir le chapitre 8.8.
8.5 Réglage de la luminosité de l'écran
La lumière de réveil propose quatre niveaux de luminosité pour l'écran (
«A» (automatique) ajuste la luminosité de l'écran selon
la luminosité de l'environnement. Procédez comme suit
pour régler la luminosité:
1.
Maintenir les touches +/- enfoncées simultanément.
«
BL:
» s'ache à l'écran. À l'aide de la touche MODE,
régler la luminosité de l'écran souhaitée (
ou A).
2.
Pour confirmer ce choix, appuyer sur les touches +/-
simultanément.
0, 1, 2, 3, A
). Le niveau de luminosité
0, 1, 2, 3
8.6 Mode radio
Si vous souhaitez utiliser le mode radio, veuillez procéder
comme suit:
1.
Appuyer plusieurs fois sur la touche MODE/ENTER
jusqu'à ce que
2. Réglez la radio à l'aide des touches +/-.
3. Changer d'emplacement de sauvegarde à l'aide de la
touche SET p.
4.
Pour lancer une recherche automatique de stations,
maintenir la touche SET p enfoncée pendant
3secondes. Pour changer les fréquences radio par
pas de 0,1MHz, appuyer brièvement sur les touches
SET p /q.
5.
Pour enregistrer une station sur un numéro de
programme, appuyer sur la touche MODE/ENTER.
Le numéro de programme correspondant (par ex. P1)
s'ache à l'écran.
RADIO
s'ache à l'écran.
8.7 Fonction bonne nuit (radio sleep timer)
Lorsque le mode radio ou le haut-parleur
activé, vous pouvez également activer la fonction bonne
nuit ( ). Avec cette fonction, vous pouvez paramétrer
l’arrêt automatique après une durée choisie de la radio
ou du haut-parleur
Si vous souhaitez utiliser la fonction bonne nuit, procédez
comme suit:
1.
En mode radio ou haut-parleur Bluetooth®, appuyer
brièvement et simultanément sur les touche SET p /q.
2. L'achage du minuteur clignote à l'écran. À l'aide de
la touche ALARM, sélectionner la durée du minuteur
souhaitée (2, 5, 10, 15, 30, 45 ou 60minutes).
3.
Pour confirmer, appuyer brièvement sur les touches
SET p /q.
Bluetooth®.
Bluetooth® est
8.8 Fonction lumière
1. Avec la main, tapoter sur le côté de la lumière de réveil
jusqu'à ce que celle-ci vibre légèrement. L'éclairage de
l'écran devient plus lumineux.
2. Dans les trois secondes, tapoter à nouveau sur le côté
de la lumière de réveil. La lumière blanche de la lampe
de lecture s'allume.
8.9 Fonction lumière d'ambiance
1. Avec la main, tapoter sur le côté de la lumière de réveil
jusqu'à ce que celle-ci vibre légèrement. L'éclairage de
l'écran devient plus lumineux.
2. Dans les trois secondes, tapoter à nouveau sur le côté
de la lumière de réveil. La lumière blanche de la lampe
de lecture s'allume.
3.
Pour activer alors le changement de couleur sur la
lumière d'ambiance, tapoter à nouveau sur la surface
de la lumière de réveil.
4.
Pendant le changement de couleur, pour fixer une
couleur, tapoter à nouveau sur la surface de la lumière
de réveil.
5. Pour activer la fonction lumière, tapoter à nouveau sur
la surface de la lumière de réveil.
9. Que faire en cas de problèmes?
Sur le site www.beurer.com, vous trouverez davantage
d'informations et une liste des questions fréquentes
(FAQ) concernant ce produit.
10. Nettoyage/stockage
•
Nettoyez l'appareil à l'aide d'un chion sec.
•
N'utilisez pas de produits nettoyants abrasifs.
21
Page 22

•
Assurez-vous que l'eau ne s'infiltre pas à l'intérieur. Si
cela devait se produire, utilisez de nouveau l'appareil
uniquement lorsqu'il est complètement sec.
•
Ne jamais plonger l'appareil et l'adaptateur secteur
dans de l'eau ou d'autres liquides.
•
Protégez l'appareil contre les coups, l’humidité, la
poussière, les produits chimiques, les fortes variations
de température et les sources de chaleur trop proches
(four, radiateur).
11. Élimination
Dans l'intérêt de la protection de l'environnement,
l'appareil ne doit pas être jeté avec les ordures ménagères
à la fin de sa durée de service. L'élimination doit
se faire par le biais des points de collecte
compétents dans votre pays. Respectez les réglementations locales en matière d’élimination des
matériaux. Veuillez éliminer l'appareil conformément
àla directive européenne – WEEE (Waste Electrical
and Electronic Equipment) relative aux appareils
électriques et électroniques usagés. Pour toute question,
adressez-vous aux collectivités locales responsables de
l'élimination et du recyclage de ces produits.
12. Données techniques
Intensité lumineuse
Lumière
Niveau d'intensité
lumineuse
Lumière d'ambiance
Fonction de lumière
de réveil
Fonction lever
desoleil
Durée de la fonction
Snooze
Fonction coucher
desoleil
Fonction bonne nuit
(Sleep/radio)
env. 2500lux max.
(pour 15cm de distance)
Technologie LED (durée de vie
de la LED: > 50000heures, la
LED ne peut pas être changée)
Réglable en continu via l'appli
cation
Changement de couleur RVB
automatique avec fixation de
couleur individuelle
2, 5, 10, 15, 20, 30, 45,
60minutes avant la sonnerie
Intensité lumineuse maximale
jusqu'à l'alarme: intensité
lumineuse 5, 10, 15, 20
1, 2, 5, 10, 20, 30minutes
2, 5, 10, 15, 20, 30, 45,
60minutes
2, 5, 10, 15, 20, 30, 45,
60minutes
-
Rétroéclairage
del'écran LCD
Heure À choisir entre 12h et 24h
Alarme
Bip des touches Désactivé, activé
USB
Radio
Diusion de
musique
Haut-parleur 2 x 3watts
Alimentation élec-
trique de l'adaptateur secteur
Classe de sécurité
de l'adaptateur
secteur
Sous réserve de modifications techniques.
Nous garantissons par la présente que ce produit est
conforme à la directive européenne R&TTE 1999/5/CE.
Veuillez contacter l’adresse du SAV indiquée afin
d’obtenir de plus amples détails, comme par exemple la
déclaration de conformité CE.
Auto, éteint, 1, 2, 3
Alarme réglable sur 3heures
diérentes (désactivée, activée,
jour)
Alarme, 10sonneries, radio
Fonction de charge USB pour
smartphone avec 5V/500mA
(les tablettes ne sont pas prises
en charge).
Plage de fréquences FM 87,0108MHz, 10 emplacements de
sauvegarde
Bluetooth
Entrée: AC
110-240V/50~60Hz/0,5A
Sortie: 5 V, DC/3000mA
Classe de sécurité II
®
22
Sous réserve d'erreurs et de modifications
Page 23

ESPAÑOL
Lea atentamente estas instrucciones de uso, consérvelas para su futura
utilización, póngalas a disposición de otros usuarios y respete las indicaciones.
Índice
1. Información general ........................................................................ 24
2. Símbolos ........................................................................................... 24
3. Uso correcto .................................................................................... 24
4. Indicaciones de seguridad yadvertencias .................................... 25
5. Descripción del aparato .................................................................. 25
6. Puesta en servicio del aparato ....................................................... 26
7. Puesta en servicio delaaplicación ............................................... 26
7.1 Aplicación "Beurer LightUp" ...................................................... 26
7.2 Altavoz Bluetooth
7.3 Función de puesta de sol ........................................................... 27
8. Manejo del aparato.......................................................................... 27
8.1 Ajustar hora y fecha ................................................................... 27
8.2 Activar/desactivar alarma .......................................................... 27
8.3 Ajustar hora de alarma ............................................................... 27
8.4 Desactivación de la alarma ........................................................ 28
8.5 Ajustar luminosidad de la pantalla ............................................. 28
8.6 Modo radio ................................................................................ 28
8.7 Función de buenas noches ............................................................
(Radio Sleep-Timer) ....................................................................28
8.8 Función de luz ............................................................................ 28
8.9 Función de luz ambiente ............................................................ 28
9. Solución de problemas ................................................................... 28
10. Limpieza/conservación ................................................................. 28
11. Eliminación ..................................................................................... 29
12. Datos técnicos ............................................................................... 29
®
.................................................................... 26
Artículos suministrados
•
Luz para despertar con antena flexible
•
Adaptador de red
•
Instrucciones de uso
•
Guía rápida
23
Page 24

Estimada clienta, estimado cliente:
Nos alegramos de que haya elegido un producto de
nuestra colección. Nuestro nombre es sinónimo de
productos de alta y comprobada calidad en los sectores
de energía térmica, peso, tensión sanguínea, temperatura
corporal, pulso, tratamiento suave, masaje, aire y belleza.
Atentamente,
El equipo de Beurer
1. Información general
La luz para despertar Beurer WL 90 proporciona un
despertar suave y natural. Con una luz LED que ilumina
la habitación lentamente se simula el amanecer. De esta
forma, usted puede acostumbrarse poco a poco a la luz y
su cuerpo se prepara para un plácido despertar. Además
de la simulación del amanecer, puede ajustar una alarma
de despertador que complemente el despertar con
sonido. Como tono de alarma puede elegir entre la radio
o distintos sonidos. La aplicación "Beurer LightUp" le
permite manejar todas las funciones del aparato cómodamente a través del smartphone.
La luz para despertar WL 90 de Beurer le ayuda a
comenzar el día de forma relajada y agradable.
Funciones:
•
Manejo de las funciones del aparato a través del smartphone con la aplicación "Beurer LightUp"
•
Simulación de la puesta de sol (la luz para despertar va
atenuándose lentamente durante el tiempo ajustado)
•
Función de luz (luz blanca/lámpara de lectura)
•
Luz ambiente con fijación individual del color (se puede
elegir entre 10 escenas diferentes)
•
Indicación de la hora en la pantalla
•
Uso como altavoz por Bluetooth
•
Radio FM
•
Alarma por radio o sonidos
•
Función de buenas noches (la luz para despertar se
apaga automáticamente tras el tiempo preajustado)
Nota
Solo es posible utilizar todas las funciones de la
luz para despertar WL 90 con la aplicación "Beurer
LightUp". Las funciones básicas también pueden
ajustarse directamente en el aparato.
Las siguientes funciones pueden manejarse únicamente
a través de la aplicación:
•
Altavoz Bluetooth
•
Selección de 10 escenas definidas de luz ambiente
•
Selección directa del color de la luz ambiente
•
Activación y desactivación de la alarma cada día
®
®
•
Configuración de ajustes de alarma especiales
•
Activación y desactivación del sonido de las teclas
•
Activación de la puesta del sol
Requisitos del sistema:
•
Bluetooth® 4.0, iOS a partir de la versión 7.1, dispo-
sitivos Android™ a partir de la versión 4.3 con
Bluetooth®Smart Ready
Para obtener una lista de todos los dispositivos móviles
compatibles, escanee el siguiente código QR:
2. Símbolos
ADVER-
TENCIA
ATENCIÓN
Nota
3. Uso correcto
ADVERTENCIA
Solo podrá usarse para el fin para el que ha sido diseñado
y del modo indicado en las instrucciones de uso. Todo
uso inadecuado puede ser peligroso. Por lo tanto, el fabricante declinará toda responsabilidad por daños y perjuicios debidos a un uso inadecuado o incorrecto.
Aviso sobre riesgos de lesiones
u otros peligros para la salud.
Indicación de seguridad sobre
posibles desperfectos del
aparato o de los accesorios.
Indicación de información
importante.
Eliminación según la Directiva
europea sobre residuos de
aparatos eléctricos y electrónicos (RAEE)
Fabricante
Este producto cumple los requisitos de las directrices europeas
y nacionales vigentes.
24
Page 25

4. Indicaciones de seguridad
yadvertencias
ADVERTENCIA
•
No utilice el aparato con un adaptador de red distinto
del suministrado ni con una tensión de red distinta de
la indicada en el mismo.
•
Antes de utilizar el equipo, compruebe si el equipo o
los accesorios presentan defectos visibles. En caso de
duda no lo use y póngase en contacto con su distribuidor o con la dirección de atención al cliente indicada.
•
Este aparato está diseñado exclusivamente para su uso
privado o en el hogar y no para uso industrial.
•
Este aparato puede ser utilizado por niños mayores de
8 años, así como por personas con facultades físicas,
sensoriales o mentales limitadas, o con poca experiencia o conocimientos, siempre que estén vigiladas o
se les indique cómo usarlo de forma segura y entiendan
los peligros que conlleva.
•
Los niños no deberán jugar nunca con el aparato.
•
Las tareas de limpieza y de mantenimiento ordinario
no deberán ser realizadas por niños sin supervisión.
•
Apague el aparato inmediatamente en caso de detectar
defectos o fallos de funcionamiento y desenchúfelo de
la toma de corriente.
•
No enchufe o desenchufe el adaptador de red con las
manos húmedas.
•
Mantenga a los niños alejados del material de embalaje
(peligro de asfixia).
•
Tienda el cable de corriente de modo que nadie pueda
tropezar con él.
•
Mantenga el aparato, el adaptador de red y el cable de
corriente lejos del agua.
ATENCIÓN
•
Proteja el aparato de impactos, humedad, suciedad,
grandes oscilaciones térmicas y exposición directa a
la luz solar.
•
Evite que el aparato se caiga.
5. Descripción del aparato
2
1
5
6
7
8
9
10
1 Pantalla 6 Tecla MODE/ENTER
2 Superficie luminosa 7 Tecla ALARM
3 Función de repetición
(vibración del aparato)
4 Altavoz 9 Toma de conexión
5 Teclas SET p / q
8 Puerto USB (solo para
recargar, no se puede
reproducir música)
alared
10 Teclas +/-
3
4
25
Page 26

Pantalla
1
12
1 Modo radio 7 Función de buenas
2 Mes (M)/día (D) 8 Modo radio
3 Volumen 9 Pitido
4 Bluetooth
5 Modo de hora 11 Posiciones de memoria
6 Hora/fecha/
radiofrecuencia
2 3
®
2
1011
9
noches
10 Melodía para despertar
de alarma 1-3
12 Ajuste activo
78
Le recomendamos manejar las funciones de la luz para
despertar en el smartphone a través de la aplicación,
ya que es más cómodo hacerlo así que a través de las
teclas del aparato.
4
Para poder manejar las funciones del aparato en el smartphone a través de la aplicación, proceda del siguiente
modo:
5
1.
Asegúrese de que su smartphone está conectado a
6
Internet.
2. Active Bluetooth
3.
Descárguese la aplicación "Beurer LightUp" en el Apple
App Store (iOS) o en Google Play (Android).
4.
Abra la aplicación "Beurer LightUp" y agregue la luz
para despertar en la aplicación.
5.
Ahora podrá manejar todas las funciones de la luz para
despertar a través de la aplicación.
Nota
Las siguientes funciones pueden manejarse únicamente
a través de la aplicación:
•
Altavoz Bluetooth
•
Selección de 10 escenas definidas de luz ambiente
•
Selección directa del color de la luz ambiente
•
Activación y desactivación de la alarma cada día
•
Configuración de ajustes de alarma especiales
•
Activación y desactivación del sonido de las teclas
•
Activación de la puesta del sol
®
en su smartphone.
®
6. Puesta en servicio del aparato
•
Desempaquete el aparato.
•
Compruebe que estén todas las piezas incluidas en el
volumen de suministro.
•
Compruebe que el aparato, el adaptador de red y el
cable de corriente no presenten daños.
•
Coloque el aparato sobre una superficie plana y estable.
•
Enchufe el conector del adaptador de red en la toma
para el adaptador de red de la parte posterior del equipo.
•
Enchufe el adaptador de red a una toma de corriente
apta.
•
En la pantalla del aparato aparece la hora.
•
Coloque la antena flexible del aparato hacia atrás.
7. Puesta en servicio
delaaplicación
7.1 Aplicación "Beurer LightUp"
En cuanto haya descargado la aplicación "Beurer
LightUp" y la luz para despertar esté conectada por
Bluetooth® con un smartphone, podrá controlar todas
las funciones de la luz para despertar cómodamente en
el smartphone a través de la aplicación.
7.2 Altavoz Bluetooth
Para activar el altavoz Bluetooth®, debe acoplarse al
menos una vez del siguiente modo:
1.
Cierre la aplicación "Beurer LightUp" si ya está abierta.
2.
Pulse la tecla MODE/ENTER 2 veces hasta que se
visualice en la pantalla "bt". Se inicia la búsqueda de
Bluetooth®.
3.
Seleccione en los ajustes Bluetooth® de su sistema
operativo (ajustes iOS/Android) de la lista de aparatos
"WL 90 Speaker" para acoplarlo.
4. En cuanto la luz para despertar está conectada con el
smartphone, aparece el logotipo azul Bluetooth
pantalla de la luz para despertar.
5. Seleccione la función de música en el menú de la apli
cación
LightUp.
6.
Pulse dos veces la tecla
el altavoz. Cierre para ello la aplicación.
Nota
Si se utiliza el mismo smartphone con la misma luz para
despertar el acoplamiento se guarda. Así, esta conexión
Bluetooth
la función de música en la aplicación LightUp. Que lo
26
®
puede acoplarse automáticamente al iniciar
®
MODE/ENTER
®
en la
para desactivar
-
Page 27

haga automáticamente o no puede variar en función del
modelo de smartphone.
Nota
Básicamente, Bluetooth®Smart (low energy) se utiliza
para controlar p.ej. las funciones de luz y alarma. Para
la transmisión de música se utiliza la función adicional
Classic Bluetooth®. Aquí solo se visualiza en la pantalla de
la luz para despertar el símbolo Bluetooth® (laconexión
Bluetooth® está activa o se está buscando).
7.3 Función de puesta de sol
Con la luz para despertar puede simular también una
puesta de sol. Con esta función, la luz va atenuándose
lentamente durante el tiempo ajustado.
Puede ajustar la función de puesta de sol exclusivamente
a través del menú de la aplicación "Beurer LightUp".
8. Manejo del aparato
Las siguientes funciones básicas pueden manejarse
también directamente sin aplicación a través de las
teclas del aparato, pero solo si la aplicación está
cerrada en el smartphone. Solo se pueden utilizar todas
las funciones de la luz para despertar en combinación
con la aplicación "Beurer LightUp".
8.1 Ajustar hora y fecha
Nota
Si utiliza la aplicación "Beurer LightUp", la hora y la fecha
están ya ajustadas, ya que ambas se sincronizan automáticamente con el smartphone cada vez que se utiliza
la aplicación.
1.
Mantenga pulsada la tecla MODE/ENTER durante
tressegundos.
2.
El modo de hora 24 hr parpadea en la pantalla.
Ajuste el modo de hora con las teclas SET p /q
(modo24horas o modo 12 horas). Confirme con la
tecla MODE/ENTER.
3. La indicación de hora parpadea en la pantalla. Ajuste
las horas con las teclas SET p /q. Confirme con la
tecla MODE/ENTER.
4.
La indicación de minutos parpadea en la pantalla.
Ajuste los minutos con las teclas SET p /q. Confirme
con la tecla MODE/ENTER.
5.
El año 2015 parpadea en la pantalla. Ajuste el año
con las teclas SET p /q. Confirme con la tecla
MODE/ENTER.
6.
El mes (M) 1 parpadea en la pantalla. Ajuste el mes
con las teclas SET p /q. Confirme con la tecla
MODE/ENTER.
27
7.
El día (D) 1 parpadea en la pantalla. Ajuste el día con las
teclas SET p /q. Confirme con la tecla MODE/ENTER.
Aparece la hora ajustada.
8.2 Activar/desactivar alarma
Activar alarma
Antes de ajustar una alarma, active la posición de
memoria cuya alarma desea ajustar.
La luz para despertar tiene tres posiciones de memoria
de alarma ( , , ) que pueden configurarse de
formas diferentes. Puede despertarse con una de las
10melodías, un tono de alarma o con la radio.
Para seleccionar una posición de memoria de alarma,
proceda del siguiente modo:
1.
Pulsando la tecla ALARM, seleccione la posición de
memoria de alarma deseada que aparece en la pantalla
(también pueden seleccionarse varias posiciones de
memoria a la vez).
2.
Para desactivar una alarma, pulse la tecla ALARM
repetidamente hasta que el símbolo de despertador
correspondiente desaparezca de la pantalla.
8.3 Ajustar hora de alarma
Ajustar hora de alarma en la luz para despertar
Para ajustar una hora de alarma para la posición
dememoria seleccionada, proceda del siguiente modo:
1.
Con una alarma activada, mantenga pulsada la tecla
ALARM durante dos segundos.
2. La hora de la alarma parpadea en la pantalla. Ajuste la
hora de la alarma con las teclas SET p /q. Confirme
con la tecla ALARM.
3. El minuto de la alarma parpadea en la pantalla. Ajuste
el minuto con las teclas SET p /q. Confirme con la
tecla ALARM.
4.
El tono de alarma parpadea en la pantalla. Ajuste el
tonode alarma deseado con las teclas SET p /q
(melodías 1-10 , pitido o radio ). Confirme
con la tecla ALARM.
5.
El volumen de la alarma (VOLUME) parpadea en la
pantalla. Ajuste el volumen de la alarma con las teclas
SET p /q. Confirme con la tecla ALARM.
6.
La duración de la repetición de la alarma (Sn) parpadea
en la pantalla. Ajuste la duración de la repetición de
la alarma (1, 2, 5, 10, 20 o 30 minutos) con las teclas
SETp /q. Confirme con la tecla ALARM.
Nota
Ajustar hora de alarma con el smartphone
Para ajustar la hora de la alarma con la aplicación y ser
despertado, basta con que el smartphone esté conectado con la luz para despertar en el momento del ajuste
Page 28

por Bluetooth®. Tras haber ajustado la hora y el tono de
alarma, podrá desactivar en su smartphone Bluetooth
o apagar el smartphone. No se requiere una conexión
Bluetooth
®
durante toda la noche.
®
8.4 Desactivación de la alarma
j Desactivación de la alarma durante el amanecer:
Puede desactivar el amanecer pulsando cualquier tecla.
El tono de alarma no sonará. La luz se atenuará suavemente durante 2 minutos. Si vuelve a pulsar una tecla
cualquiera, la luz se apagará.
Modo de repetición de la alarma (Snooze)
El aparato cuenta con un modo de repetición de la alarma
(Snooze). Cuando suena la alarma y se pulsa la función
Snooze (tocando la superficie luminosa), la alarma vuelve
a sonar después del tiempo de repetición.
Desactivación de la alarma cuando suena el tono
de alarma
Cuando suena la alarma, pulse una tecla cualquiera,
excepto "Snooze". Ahora la alarma está desactivada y
no volverá a sonar nuevamente hasta la hora ajustada. La
luz permanece encendida durante 2 minutos para darle
la oportunidad de levantarse, después la luz se apaga
automáticamente. Para volver a encender la luz, véase
el capítulo 8.8.
8.5 Ajustar luminosidad de la pantalla
La luz para despertar dispone de cuatro niveles de
luminosidad para la pantalla (
luminosidad "A" (automático) la luminosidad de la pantalla se adapta automáticamente al entorno. Para ajustar la luminosidad de la pantalla, proceda del siguiente
modo:
1.
Pulse simultáneamente las teclas + / -. En la pantalla se
visualiza "
sidad de la pantalla que desee (
2.
Para confirmar la luminosidad de la pantalla, mantenga
pulsadas simultáneamente las teclas + / -.
BL:
". Ajuste con la tecla MODE la lumino-
0, 1, 2, 3, A
0, 1, 2, 3 o A
). En el nivel de
).
8.6 Modo radio
Para encender la radio, proceda del siguiente modo:
1.
Pulse la tecla MODE/ENTER repetidamente hasta que
se visualice
2. Ajuste con las teclas + / - el volumen de la radio.
3. Cambie la posición de memoria con la tecla SET p.
4.
Para iniciar una búsqueda automática de emisoras,
mantenga pulsada la tecla SET p durante tres
segundos. Para modificar la radiofrecuencia en pasos
de 0,1 MHz, pulse brevemente las teclas SET p /q.
5. Para guardar una emisora de radio en este número de
programa, pulse la tecla MODE/ENTER. El número
RADIO
en la pantalla.
28
de programa correspondiente (p.ej. P1) aparece en
la pantalla.
8.7
Función de buenas noches
(Radio Sleep-Timer)
Si ha activado el modo radio o el altavoz
podrá activar además una función de buenas noches
( ). Con la función de buenas noches podrá ajustar tras
cuántos minutos se apagará automáticamente la radio o
el altavoz
Si desea utilizar la función de buenas noches, proceda
del siguiente modo:
1. En el modo radio o en el modo de altavoz Bluetooth
2.
3.
Bluetooth®.
mantenga pulsadas brevemente a la vez las dos teclas
SET p /q.
La indicación de temporizador parpadea en la pantalla.
Con la tecla ALARM seleccione la duración del temporizador que desee (2, 5, 10, 15, 30, 45 o 60 minutos).
Para confirmar, mantenga pulsadas brevemente las dos
teclas SET p /q.
Bluetooth®,
®
8.8 Función de luz
1.
Dé suaves toques con la mano en el lateral de la luz
para despertar; la luz vibrará ligeramente. La iluminación de la pantalla se hará más intensa.
2. Vuelva a dar suaves toques durante tres segundos en
el lateral de la luz para despertar. La luz blanca de la
lámpara de lectura se enciende.
8.9 Función de luz ambiente
1.
Dé suaves toques con la mano en el lateral de la luz
para despertar; la luz vibrará ligeramente. La iluminación de la pantalla se hará más intensa.
2. Vuelva a dar suaves toques durante tres segundos en
el lateral de la luz para despertar. La luz blanca de la
lámpara de lectura se enciende.
3.
Para encender ahora la luz ambiente con cambio de
color, vuelva a dar suaves toques en la superficie
luminosa de la luz para despertar.
4.
Para ver continuamente una luz de color durante el
cambio de color, vuelva a dar suaves toques en la superficie luminosa de la luz para despertar.
5. Para desactivar la función de luz, vuelva a dar suaves
toques en la superficie luminosa de la luz para despertar.
9. Solución de problemas
En www.beurer.com encontrará más información y una
lista con preguntas frecuentes sobre este producto.
Page 29

10. Limpieza/conservación
•
Limpie el aparato con un trapo seco.
•
No use productos abrasivos.
•
Evite que entre agua en el aparato. Si penetrara agua en
el interior, no vuelva a utilizarlo hasta que esté completamente seco.
•
No sumerja nunca el aparato ni el bloque de alimentación en agua ni en ningún otro líquido.
•
Proteja el aparato de golpes, humedad, polvo, sustancias químicas, fuertes cambios de temperatura y de
la cercanía de fuentes de calor (hornos o radiadores).
11. Eliminación
Para proteger el medio ambiente, no se debe desechar
el aparato al final de su vida útil junto con la basura
doméstica. Se puede desechar en los puntos de
recogida adecuados disponibles en su zona.
Respete las normas locales referentes a la eliminación de residuos. Deseche el aparato según la
Directiva europea sobre residuos de aparatos eléctricos
y electrónicos (RAEE). Para más información, póngase
en contacto con la autoridad municipal competente en
materia de eliminación de residuos.
12. Datos técnicos
Iluminancia
Luz
Niveles de luz
Luz ambiente
Función de luz
para despertar
Función de
amanecer
Duración de repe
tición de la alarma
Función de puesta
de sol
Función de
buenas noches
(Sleep Radio)
Retroiluminación
LCD
Aprox. 2500 lux como máximo
(a15 cm de distancia)
Tecnología LED (vida útil del
LED: > 50 000 horas, el LED
nose puede cambiar)
Ajustable de forma continua a
través de la aplicación
Cambio de color RGB automáti
co con fijación de color individual
Apagado 2, 5, 10, 15, 20, 30, 45
o 60 minutos antes de la alarma
Luminosidad máxima
hasta la alarma:
niveles de luz 5, 10, 15, 20
1, 2, 5, 10, 20 o 30 minutos
2, 5, 10, 15, 20, 30, 45
o 60 minutos
2, 5, 10, 15, 20, 30, 45
o 60 minutos
Automática, apagada, 1, 2, 3
-
29
Hora Conmutable entre 12h/24h
3 tiempos de alarma
Alarma
Sonido de
las teclas
USB
Radio
Música en
streaming
Altavoz 2 x 3 vatios
Alimentación de
tensión de lafuen
te de alimentación
Clase de protec
ción de la fuente
de alimentación
Salvo modificaciones técnicas.
Garantizamos que este producto cumple con la Directiva
europea 1999/5/CE sobre equipos radioeléctricos
yequipos terminales de telecomunicación (R&TTE).
Póngase en contacto con el servicio técnico pertinente
para obtener más información al respecto, como la declaración de conformidad CE.
(apagado, encendido, día)
Tono de alarma, 10 melodías,
radio
Encendido, apagado
Función de carga USB para
smartphone con 5 V/500 mA
(lastablets no son compatibles).
Rango de frecuencias FM 87,0108 MHz, 10 posiciones de
memoria
Bluetooth
Entrada: 110-240 V, AC,
-
50/60 Hz, 0,5 A
Salida: 5 V, DC, 3000mA
Clase de protección II
®
Salvo errores y modificaciones
Page 30

ITALIANO
Leggere attentamente le presenti istruzioni per l'uso, conservarle per impieghi futuri, renderle accessibili ad altri utenti e attenersi alle indicazioni.
Sommario
1. Introduzione ..................................................................................... 31
2. Spiegazione dei simboli .................................................................. 31
3. Uso conforme .................................................................................. 31
4. Segnalazioni di rischi e indicazioni di sicurezza........................... 32
5. Descrizione dell'apparecchio ......................................................... 32
6. Messa in funzione dell'apparecchio .............................................. 33
7. Messa in funzione dell'app ............................................................. 33
7.1 App "Beurer LightUp" ................................................................ 33
7.2 Altoparlante Bluetooth
7.3 Funzione di simulazione del tramonto del sole .......................... 34
8. Controllo dell'apparecchio ............................................................. 34
8.1 Impostazione di data e ora ........................................................ 34
8.2 Attivazione/disattivazione dell'allarme ....................................... 34
8.3 Impostazione dell'ora dell'allarme ............................................. 34
8.4 Spegnimento della sveglia ......................................................... 34
8.5 Impostazione della luminosità del display ................................. 35
8.6 Modalità Radio ........................................................................... 35
8.7 Funzione "buona notte" (Radio Sleep Timer) ............................. 35
8.8 Funzione luce ............................................................................. 35
8.9 Funzione luce d'atmosfera ......................................................... 35
9. Che cosa fare in caso diproblemi? ............................................... 35
10. Pulizia/Conservazione .................................................................. 36
11. Smaltimento ................................................................................... 36
12. Dati tecnici ..................................................................................... 36
®
............................................................. 33
Fornitura
•
Luce sveglia con antenna filare
•
Adattatore
•
Istruzioni per l'uso
•
Guida rapida
30
Page 31

Gentile cliente,
siamo lieti che Lei abbia scelto un prodotto del nostro
assortimento. Il nostro marchio è garanzia di prodotti di
elevata qualità, controllati nei dettagli, relativi ai settori
calore, peso, pressione, temperatura corporea, pulsazioni, terapia dolce, massaggio, aria e bellezza.
Cordiali saluti
Team Beurer
1. Introduzione
La luce sveglia WL 90 di Beurer consente un risveglio dolce e naturale. Una luce a LED con intensità
che aumenta gradualmente simula il sorgere del sole.
In questo modo gli occhi si abituano lentamente alle
condizioni di luce e il corpo si prepara gradualmente al
risveglio. È possibile inoltre impostare una sveglia che
suona dopo la simulazione del sorgere del sole in modo
da facilitare il risveglio. Come toni sveglia è possibile
scegliere fra la radio e diverse suonerie. Grazie all'app
"Beurer LightUp", è possibile controllare tutte le funzioni
dell'apparecchio anche comodamente dallo smartphone.
La luce sveglia WL 90 di Beurer aiuta a svegliarsi riposati
e in perfetta forma per arontare al meglio la giornata.
Funzioni:
•
Controllo delle funzioni dell'apparecchio tramite smartphone con l'app "Beurer LightUp"
•
Simulazione del tramonto del sole (nel periodo di tempo
impostato la luce sveglia si scurisce sempre più)
•
Funzione luce (luce bianca/lampada da lettura)
•
Luce d'atmosfera con impostazione dei colori individuale (10 diversi scenari selezionabili)
•
Indicazione dell'ora sul display
•
Uso come altoparlante via Bluetooth
•
Radio a onde ultracorte
•
Allarme tramite radio o suonerie
•
Funzione "buona notte" (la luce sveglia si spegne automaticamente dopo il periodo di tempo preimpostato)
Nota
La luce sveglia WL 90 può essere utilizzata a piena
funzionalità solo con l'app "Beurer LightUp". Le
funzioni di base possono essere anche impostate
direttamente sull'apparecchio.
Le seguenti funzioni sono controllabili esclusivamente
tramite l'app:
•
Altoparlante Bluetooth
•
Selezione di 10 scenari luminosi definiti
•
Selezione diretta del colore della luce d'atmosfera
•
Accensione e spegnimento dell'allarme per tutti i giorni
•
Configurazione di speciali impostazioni allarme
®
®
•
Attivazione e disattivazione del tono pulsanti
•
Attivazione del tramonto del sole
Requisiti del sistema:
•
Bluetooth® 4.0, iOS dalla versione 7.1, Android™ dalla
versione 4.3 con Bluetooth
Per un elenco di tutti i dispositivi mobili compatibili, eettuare la scansione del seguente QR Code:
®
Smart Ready
2. Spiegazione dei simboli
Segnalazione di rischio di
AVVERTENZA
ATTENZIONE
Nota
3. Uso conforme
AVVERTENZA
L'apparecchio può essere utilizzato solo per lo scopo per
il quale è stato concepito e come descritto nelle presenti
istruzioni per l'uso. Qualsiasi uso non conforme comporta
un pericolo. Il produttore non risponde di danni causati
da un uso inappropriato o non conforme.
lesioni o pericoli per la salute
Segnalazione di rischi di possi-
bili danni all'apparecchio/agli
accessori
Nota che fornisce informazioni
importanti
Smaltimento secondo le norme
previste dalla Direttiva CE sui
rifiuti di apparecchiature elettriche ed elettroniche (RAEE)
Produttore
Il presente prodotto soddisfa i
requisiti delle direttive europee
e nazionali vigenti.
31
Page 32

4. Segnalazioni di rischi e indicazioni
di sicurezza
AVVERTENZA
•
Utilizzare l'apparecchio esclusivamente con l'adattatore in dotazione e con la tensione di rete indicata
sull'adattatore.
•
Prima dell'utilizzo, verificare che l'apparecchio e gli
accessori non siano danneggiati. In caso di dubbio non
utilizzare l'apparecchio e consultare il proprio rivenditore o contattare il Servizio clienti indicato.
•
L'apparecchio è destinato solo a uso domestico/privato
e non commerciale.
•
Questo apparecchio può essere utilizzato da ragazzi di
età superiore a 8 anni e da persone con ridotte capacità
fisiche, percettive o mentali o non in possesso della
necessaria esperienza e conoscenza, esclusivamente
sotto supervisione oppure se sono stati istruiti in merito
alle misure di sicurezza e comprendono i rischi ad esse
correlati.
•
I bambini non devono giocare con l'apparecchio.
•
La pulizia e la manutenzione a cura dell'utente non
devono essere eseguite da bambini, a meno che non
siano sorvegliati.
•
In caso di difetti o malfunzionamenti, spegnere immediatamente l'apparecchio e staccarlo dalla corrente.
•
Non collegare o scollegare l'alimentatore con le mani
umide.
•
Tenere lontani i bambini dal materiale d'imballaggio
(pericolo di soocamento).
•
Posare il cavo di alimentazione in modo tale che
nessuno possa inciamparvi.
•
Tenere l'apparecchio, l'adattatore e il cavo di alimentazione lontani dall'acqua!
ATTENZIONE
•
Non esporre l'apparecchio a urti, umidità, sporcizia, forti
sbalzi di temperatura e direttamente alla luce solare.
•
Non far cadere l'apparecchio.
5. Descrizione dell'apparecchio
2
3
1
5
6
7
8
9
10
1 Display 6 Pulsante MODE/ENTER
2 Superficie luminosa 7 Pulsante ALARM
3 Funzione snooze
(vibrazione
dell'apparecchio)
4 Altoparlante 9 Collegamento alla rete
5 Pulsanti SET p / q
8 Porta USB (solo per la
carica, nessuna riproduzione di musica)
10 Pulsanti + / -
4
32
Page 33

Display
1
2 3
2
4
5
6
12
1 Modalità Radio 7 Funzione "buona notte"
2 Mese (M) / Giorno (D) 8 Modalità Radio
3 Volume 9 Segnale acustico
4 Bluetooth
5 Modalità ora 11 Posizione di memoria
6 Ora/data/
radiofrequenza
®
1011
9
10 Suoneria sveglia
sveglia 1-3
12 Impostazione attiva
6. Messa in funzione
dell'apparecchio
•
Rimuovere il materiale d'imballaggio.
•
Verificare che tutti i componenti siano compresi nella
fornitura.
•
Controllare la presenza di danni sull'apparecchio,
l'adattatore e il cavo.
•
Posizionare l'apparecchio su una superficie piana e
stabile.
•
Inserire l'attacco dell'adattatore nella presa corrispondente sul retro dell'apparecchio.
•
Inserire l'adattatore di rete in una presa di corrente
adeguata.
•
Sul display dell'apparecchio compare l'ora.
•
Posizionare l'antenna filare sul retro dell'apparecchio.
78
7. Messa in funzione dell'app
7.1 App "Beurer LightUp"
Dopo aver scaricato l'app "Beurer LightUp" e aver
connesso la luce sveglia a uno smartphone via
Bluetooth®, è possibile controllare comodamente tutte
le funzioni della luce sveglia dallo smartphone.
Si consiglia di utilizzare la luce sveglia tramite l'app sullo
smartphone, in quanto è più pratica rispetto ai pulsanti
dell'apparecchio. A tale scopo, procedere come segue:
1. Accertarsi che lo smartphone sia connesso a Internet.
®
2. Attivare il Bluetooth
3. Scaricare l'app "Beurer LightUp" dall'Apple App Store
(iOS) oppure da Google Play (Android).
4.
Aprire l'app "Beurer LightUp" e aggiungere la luce
sveglia nell'app.
Ora è possibile controllare tutte le funzioni della luce
5.
sveglia tramite l'app.
Nota
Le seguenti funzioni sono controllabili esclusivamente
tramite l'app:
•
Altoparlante Bluetooth
•
Selezione di 10 scenari luminosi definiti
•
Selezione diretta del colore della luce d'atmosfera
•
Accensione e spegnimento dell'allarme per tutti i giorni
•
Configurazione di speciali impostazioni allarme
•
Attivazione e disattivazione del tono pulsanti
•
Attivazione del tramonto del sole
7.2 Altoparlante Bluetooth
Per attivare l'altoparlante Bluetooth®, è necessario eettuare almeno una volta l'accoppiamento seguente:
Chiudere l'app "Beurer LightUp", nel caso sia già aperta.
1.
2. Premere 2 volte il pulsante MODE/ENTER, finché sul
display non compare "bt". La ricerca Bluetooth® viene
avviata.
Nelle impostazioni Bluetooth® del sistema opera-
3.
tivo (impostazioni iOS/Android) selezionare "WL 90
Speaker" dall'elenco dei dispositivi per eettuare
l'accoppiamento.
Quando la luce sveglia è connessa allo smartphone,
4.
viene visualizzato il logo Bluetooth® blu sul display della
luce sveglia.
Selezionare la funzione musica nel menu dell'app
5.
6.
Premere due volte il pulsante
vare l'altoparlante. A tale scopo disattivare la app.
Nota
Se si utilizza lo stesso smartphone con la stessa luce
sveglia, l'accoppiamento viene memorizzato. In questo
modo, la connessione Bluetooth® viene stabilita automaticamente all'avvio della funzione musica. Questo automatismo può comportarsi in modo diverso a seconda del
modello dello smartphone.
Nota
Sostanzialmente viene utilizzata la tecnologia
Bluetooth®Smart (low energy), ad esempio per controllare
le funzioni luce e allarme. Per la trasmissione della musica
33
sul proprio smartphone.
®
®
MODE/ENTER
per disatti-
LightUp.
Page 34

viene utilizzata anche Classic Bluetooth®. In questo caso
viene visualizzata l'icona Bluetooth® sul display della luce
sveglia (connessione Bluetooth® attiva o in corso).
7.3 Funzione di simulazione
del tramonto del sole
La luce sveglia consente di simulare anche il tramonto
del sole. La luce si scurisce sempre più in un intervallo
di tempo impostato.
La funzione di tramonto del sole può essere impostata
esclusivamente tramite il menu dell'app "Beurer LightUp".
8. Controllo dell'apparecchio
Le seguenti funzioni di base possono essere controllate anche direttamente con i pulsanti dell'apparecchio senza app, tuttavia solo se l'app sullo smartphone è chiusa. La luce sveglia può essere utilizzata a
piena funzionalità solo con l'app "Beurer LightUp".
8.1 Impostazione di data e ora
Nota
Quando si utilizza l'app "Beurer LightUp", data e ora sono
già impostate, in quanto a ogni utilizzo dell'app vengono
sincronizzate automaticamente con lo smartphone.
1.
Tenere premuto il pulsante MODE/ENTER per tre
secondi.
2.
La modalità ora 24 hr lampeggia sul display. Impostare
la modalità ora con i pulsanti SET p /q (modalità 24
o 12 ore). Confermare con il pulsante MODE/ENTER.
3.
L'ora lampeggia sul display. Impostare l'ora con
i pulsanti SET p /q. Confermare con il pulsante
MODE/ENTER.
4.
I minuti lampeggiano sul display. Impostare i minuti
con i pulsanti SET p /q. Confermare con il pulsante
MODE/ENTER.
5.
L'anno 2015 lampeggia sul display. Impostare l'anno
con i pulsanti SET p /q. Confermare con il pulsante
MODE/ENTER.
6. Il mese (M) 1 lampeggia sul display. Impostare il mese
con i pulsanti SET p /q. Confermare con il pulsante
MODE/ENTER.
7.
Il giorno (D) 1 lampeggia sul display. Impostare il giorno
con i pulsanti SET p / q. Confermare con il pulsante
MODE/ENTER. Viene visualizzata l'ora impostata.
8.2 Attivazione/disattivazione dell'allarme
Attivazione dell'allarme
Prima di impostare un allarme, attivare la posizione di
memoria allarme di cui si desidera impostare l'allarme.
La luce sveglia è dotata di tre posizioni di memoria,
( , , ), che possono essere impostate diversamente. Èpossibile scegliere di svegliarsi con una delle
10suonerie, un tono sveglia oppure tramite la radio.
Per selezionare una posizione di memoria, procedere
come segue:
1. Premendo il pulsante ALARM selezionare la posizione
di memoria desiderata, che viene visualizzata sul
display (possono essere selezionate contemporaneamente più posizioni di memoria).
2.
Per disattivare l'allarme, premere il pulsante ALARM
finché la relativa icona sveglia sul display non scompare.
8.3 Impostazione dell'ora dell'allarme
Impostazione dell'ora dell'allarme sulla luce sveglia
Per impostare un'ora per l'allarme per la posizione di
memoria selezionata, procedere come segue:
1.
Con un allarme attivato, tenere premuto il pulsante
ALARM per due secondi.
2.
L'ora allarme lampeggia sul display. Impostare l'ora
allarme con i pulsanti SET p /q. Confermare con il
pulsante ALARM.
3.
I minuti allarme lampeggiano sul display. Impostare i
minuti allarme con i pulsanti SET p /q. Confermare
con il pulsante ALARM.
4.
Il tono sveglia lampeggia sul display. Impostare il
tono sveglia desiderato con i pulsanti SET p / q
(suoneria1-10 , segnale acustico o radio ).
Confermare con il pulsante ALARM.
5.
Il volume dell'allarme (VOLUME) lampeggia sul
display. Impostare il volume dell'allarme con i pulsanti
SET p /q. Confermare con il pulsante ALARM.
6.
La durata dello snooze (Sn) lampeggia sul display.
Impostare la durata dello snooze (1, 2, 5, 10, 20 o
30minuti) con i pulsanti SET p /q. Confermare con
il pulsante ALARM.
Nota
Impostazione dell'ora dell'allarme tramite smartphone
Per impostare l'ora dell'allarme ed essere svegliati tramite
app, è suciente che lo smartphone sia connesso alla
luce sveglia via Bluetooth® al momento dell'impostazione. Dopo aver impostato l'ora sveglia e il tono
sveglia, è possibile disattivare il Bluetooth® sullo smartphone oppure spegnere lo smartphone. Una connes-
sione Bluetooth® continua per tutta la notte non è
necessaria.
34
Page 35

8.4 Spegnimento della sveglia
Spegnimento della sveglia durante la simulazione del
sorgere del sole
La simulazione del sorgere del sole può essere disattivata premendo un pulsante qualsiasi. Il tono sveglia non
sarà emesso. La luminosità viene ridotta leggermente
per 2 minuti. Premendo nuovamente un tasto qualsiasi,
la luce si spegne.
Modalità snooze quando suona la sveglia
L'apparecchio è dotato di una modalità snooze. Se suona
la sveglia e si preme la funzione snooze (leggera pressione sulla superficie luminosa), la sveglia suona di nuovo
dopo la durata dello snooze impostata.
Spegnimento della sveglia mentre suona
Quando suona la sveglia, premere un pulsante qualsiasi
tranne snooze. La sveglia è spenta e suona di nuovo
all'ora impostata. La luce rimane accesa altri due minuti
per consentire alla persona di alzarsi, quindi si spegne
automaticamente. Per riaccendere la luce, vedere il capitolo 8.8.
8.5 Impostazione della luminosità del display
La luce sveglia dispone di quattro livelli di luminosità
per il display (
co) la luminosità del display si adatta automaticamente
all'ambiente.
Per impostare la luminosità del display, procedere come
segue:
1.
Premere contemporaneamente i pulsanti + / -. Sul
display compare "
stare la luminosità del display (
2.
Per confermare la luminosità del display, premere
contemporaneamente i pulsanti + / -.
0, 1, 2, 3, A
BL:
". Con il pulsante MODE impo-
). Nel livello "A" (Automati-
0, 1, 2, 3
oppure A).
8.7
Quando sono attivi la modalità radio o l'altoparlante
Bluetooth®, è possibile attivare anche la funzione
"buona notte".( ). La funzione "buona notte" consente
di impostare dopo quanti minuti la radio o
Bluetooth
Per utilizzare la funzione "buona notte", procedere come
segue:
1.
2. Il timer lampeggia sul display. Con il pulsante ALARM
3.
8.8 Funzione luce
1.
2.
8.9 Funzione luce d'atmosfera
1.
2.
3. Per attivare la luce d'atmosfera con variazione croma-
8.6 Modalità Radio
Per accendere la radio, procedere come segue:
1.
Premere il pulsante MODE/ENTER finché sul display
non compare
2. Impostare il volume della radio con i pulsanti + / -.
3.
Cambiare la posizione di memoria con il pulsante
SETp.
4.
Per avviare la ricerca automatica delle emittenti, tenere
premuto il pulsante SET p per tre secondi. Per modificare la radiofrequenza in intervalli di 0,1 MHz, premere
brevemente i pulsanti SET p /q.
5.
Per memorizzare un canale su questo numero di
programma, premere il pulsante MODE / ENTER.
Ilnumero di programma corrispondente (ad es. P1)
viene visualizzato sul display.
RADIO
.
4.
5.
Sul sito www.beurer.com sono disponibili ulteriori informazioni e un elenco delle domande più frequenti (FAQ)
relative a questo prodotto.
Funzione "buona notte" (Radio Sleep Timer)
®
si deve spegnere automaticamente.
Nella modalità Radio o Altoparlante Bluetooth®
premere brevemente e contemporaneamente i pulsanti
SETp /q.
selezionare la durata del timer desiderata (2, 5, 10, 15,
30, 45 o 60 minuti).
Per confermare, premere brevemente e contemporaneamente i pulsanti SET p /q.
Battere con la mano il lato della luce sveglia, in modo da
far vibrare leggermente l'apparecchio. L'illuminazione
del display diventa più chiara.
Battere di nuovo entro tre secondi il lato della luce
sveglia. Si accende la luce bianca della lampada da
lettura.
Battere con la mano il lato della luce sveglia, in modo da
far vibrare leggermente l'apparecchio. L'illuminazione
del display diventa più chiara.
Battere di nuovo entro tre secondi il lato della luce
sveglia. Si accende la luce bianca della lampada da
lettura.
tica, battere di nuovo la superficie luminosa della luce
sveglia.
Per visualizzare permanentemente una luce colorata
durante la variazione cromatica, battere di nuovo la
superficie luminosa della luce sveglia.
Per disattivare la funzione luce, battere di nuovo la
superficie luminosa della luce sveglia.
l'altoparlante
9. Che cosa fare in caso
diproblemi?
35
Page 36

10. Pulizia/Conservazione
•
Pulire l'apparecchio con un panno asciutto.
•
Non utilizzare detergenti abrasivi.
•
Accertarsi che non penetri acqua nell'apparecchio.
Sedovesse succedere, utilizzare nuovamente l'apparecchio solo quando è completamente asciutto.
•
Non immergere l'apparecchio e l'alimentatore in acqua
o altri liquidi.
•
Non esporre l'apparecchio a urti, umidità, polvere,
prodotti chimici, forti sbalzi di temperatura e fonti di
calore troppo vicine (forni, caloriferi).
11. Smaltimento
A tutela dell'ambiente, al termine del suo utilizzo l'apparecchio non deve essere smaltito nei rifiuti domestici. Lo
smaltimento deve essere eettuato negli appositi
centri di raccolta. Attenersi alle norme locali
vigenti per lo smaltimento dei materiali. Smaltire
l'apparecchio secondo la direttiva europea sui
rifiuti di apparecchiature elettriche ed elettroniche (RAEE).
Per eventuali chiarimenti, rivolgersi alle autorità comunali
competenti per lo smaltimento.
12. Dati tecnici
Allarme
Tono pulsanti O, On
USB
Radio
Streaming musi
cale
Altoparlanti 2 x 3 Watt
Alimentatore
tensione di
alimentazione
Classe di
protezione
alimentatore
Salvo modifiche tecniche.
Con la presente garantiamo che il prodotto è conforme
alla direttiva europea R&TTE 1999/5/CE.
Per ulteriori informazioni, ad esempio per richiedere la
dichiarazione di conformità CE, rivolgersi al servizio di
assistenza indicato.
3 orari sveglia (O, On, Giorno)
Tono sveglia, 10 suonerie, radio
Funzione di carica USB per smartphone da 5 V/500 mA (itablet non
sono supportati).
Range di frequenze a onde
ultracorte da 87,0 a 108 MHz,
10posizioni di memoria
-
Bluetooth
Ingresso: 110-240 V, AC,
50/60 Hz, 0,5 A
Uscita: 5 V, DC, 3000 mA
Classe di protezione II
®
Intensità luce
Luce
Livelli di luminosità Regolazione continua tramite app
Luce d'atmosfera
Funzione di luce
sveglia
Funzione di
simulazione del
sorgere del sole
Durata dello
snooze
Funzione di
simulazione del
tramonto del sole
Funzione
"buonanotte"
(Sleep Radio)
Display LCD
retroilluminato
Ora 12h/24h commutabile
Massimo circa 2500 Lux
(conuna distanza di 15 cm)
Tecnologia LED (ciclo di vita del
LED: > 50.000 ore, il LED non può
essere sostituito)
Variazione cromatica automatica
e impostazione dei colori indivi
duale
O, 2, 5, 10, 15, 20, 30 e
60minuti prima della sveglia
Intensità luminosa massima fino
alla sveglia: livello di luminosità
5,10, 15, 20
1, 2, 5, 10, 20, 30 minuti
2, 5, 10, 15, 20, 30, 45, 60 minuti
2, 5, 10, 15, 20, 30, 45, 60 minuti
Auto, O, 1, 2, 3
-
36
Salvo errori e modifiche
Page 37

TÜRKÇE
Lütfen bu kullanım kılavuzunu dikkatle okuyun, ileride kullanmak üzere saklayın, diğer kullanıcıların
erişebilmesini sağlayın ve içindeki yönergelere uyun.
İçindekiler
1. Ürün özellikleri ................................................................................. 38
2. İşaretlerin açıklaması ...................................................................... 38
3. Amacına uygun kullanım ................................................................. 38
4. Uyarı/güvenlik açıklamaları ............................................................ 39
5. Cihaz açıklaması .............................................................................. 39
6. Cihazı çalıştırma .............................................................................. 40
7. Uygulamayı çalıştırma ..................................................................... 40
7.1 “Beurer LightUp” uygulaması .................................................... 40
7.2 Bluetooth
7.3 Gün batımı fonksiyonu ............................................................... 41
8. Cihazın kullanımı ............................................................................. 41
8.1 Saatin ve tarihin ayarlanması ..................................................... 41
8.2 Alarmı etkinleştirme/devre dışı bırakma ..................................... 41
8.3 Alarm zamanının ayarlanması .................................................... 41
8.4 Alarmın kapatılması .................................................................... 41
8.5 Ekran aydınlığının ayarlanması ................................................... 42
8.6 Radyo modu .............................................................................. 42
8.7 İyi geceler özelliği (Radio Sleep-Timer) ...................................... 42
8.8 Işık fonksiyonu ........................................................................... 42
8.9 Ortam ışığı fonksiyonu ............................................................... 42
9. Sorunların giderilmesi ..................................................................... 42
10. Temizlik/Saklama ........................................................................... 42
11. Bertaraf etme ................................................................................. 42
12. Teknik veriler .................................................................................. 43
®
hoparlör ................................................................. 40
Teslimat kapsamı
•
Antenli ışıklı çalar saat
•
Elektrik adaptörü
•
Kullanım kılavuzu
•
Kısa kılavuz
37
Page 38

Sayın müşterimiz,
Ürünlerimizden birini seçtiğiniz için teşekkür ederiz. Isı,
ağırlık, kan basıncı, vücut sıcaklığı, nabız, yumuşak terapi, masaj, hava ve güzellik konularında değerli ve titizlikle test edilmiş kaliteli ürünlerimiz, dünyanın her tarafında
tercih edilmektedir.
Yeni cihazınızı iyi günlerde kullanmanızı dileriz.
Beurer Ekibiniz
1. Ürün özellikleri
Beurer ışıklı çalar saat WL 90, uykunuzdan yavaş ve doğal
bir şekilde uyanmanızı sağlar. Yavaşça artan LED ışığı ile
gün doğumu simüle edilir. Bu şekilde siz ışık koşullarına
yavaşça alışırken vücudunuz nazikçe uyanmaya hazırlanır.
Ayrıca gün doğumu simülasyonundan sonra duyulacak
ve uyanırken size akustik olarak yardımcı olacak bir alarm
sesi ayarlayabilirsiniz. Alarm sesi olarak hem radyo, hem
de farklı melodiler arasından seçim yapabilirsiniz. “Beurer
LightUp” uygulaması ile cihaz fonksiyonlarının tümünü
akıllı telefonunuzdan da rahatça kullanabilirsiniz.
Beurer WL 90 ışıklı çalar saat ile güne dinlenmiş ve huzurlu bir şekilde başlayabilirsiniz.
Fonksiyonlar:
•
Cihaz fonksiyonları “Beurer LightUp” uygulamasıyla
akıllı telefon üzerinden kullanılabilir
•
Gün batımı simülasyonu (ışıklı çalar saat ayarlanan bir
süre içinde yavaşça kararır)
•
Işık fonksiyonu (beyaz ışık/okuma lambası)
•
Bireysel renk sabitlemeli ortam ışığı (10 farklı senaryo
seçilebilir)
•
Ekran üzerinde saat göstergesi
•
Bluetooth® üzerinden hoparlör olarak kullanılabilir
•
FM radyo
•
Radyolu veya melodili alarm
•
İyi geceler fonksiyonu (ışıklı çalar saat önceden ayarlanan bir saatten sonra otomatik olarak kapanır)
Not
WL 90 ışıklı çalar saatin tüm özellikleri yalnızca “Beurer
LightUp” uygulamasıyla kullanılabilir. Temel fonksiyonlar ek olarak doğrudan cihaz üzerinden ayarlanabilir.
Aşağıdaki fonksiyonları yalnızca uygulama üzerinden kullanabilirsiniz:
•
Bluetooth® hoparlör
•
Tanımlanmış 10 farklı ortam ışığı seçeneği
•
Doğrudan ortam ışığı renk seçimi
•
Alarmın günlük olarak açılıp kapatılması
•
Özel alarm ayarlarının yapılması
•
Düğme seslerinin açılıp kapatılması
•
Gün batımının etkinleştirilmesi
Sistem gereksinimleri:
•
Bluetooth® 4.0, iOS sürüm 7.1 ve üzeri, Bluetooth®-
Smart Ready özellikli ve sürüm 4.3 ve üzeri Android™
cihazlar
Tüm uyumlu cihazların listesini görmek için lütfen aşağı
daki QR kodunu taratın:
-
2. İşaretlerin açıklaması
Yaralanma tehlikelerine veya
UYARI
DİKKAT
Not
3. Amacına uygun kullanım
UYARI
Bu cihaz sadece geliştirilme amacına uygun olarak ve
bu kullanma talimatında belirtilen şekilde kullanılmalıdır.
Amacına uygun olmayan her türlü kullanım tehlikeli olabilir. Amacına uygun olmayan ve yanlış kullanımdan ötürü
oluşacak hasarlardan üretici firma sorumlu değildir.
sağlığınızla ilgili tehlikelere yönelik uyarı.
Cihaz ve aksesuarlarındaki olası hasarlar için güvenlik uyarısı.
Önemli bilgilere yönelik not.
AB Elektrikli ve Elektronik Ekipman Atık Direktifi (WEEE - Waste
Electrical and Electronic Equipment) uyarınca bertaraf edilir.
Üretici
Bu ürün geçerli Avrupa Birliği
yönergelerinin ve ulusal yönergelerin gereklerini yerine getirmektedir.
38
Page 39

4. Uyarı/güvenlik açıklamaları
5. Cihaz açıklaması
UYARI
•
Cihazı sadece birlikte verilen elektrik adaptörü ile ve
adaptörün üzerinde belirtilen elektrik voltajı ile çalıştırın.
•
Kullanmadan önce, cihazda ve aksesuarlarında gözle
görülür hasarlar olmadığından emin olun. Şüpheli durumlarda kullanmayın ve satıcınıza veya belirtilen müşteri hizmetleri adresine başvurun.
•
Cihaz ticari kullanım için değil, yalnızca evde/kişisel
amaçlarla kullanılmak üzere tasarlanmıştır.
•
Bu cihaz, 8 yaş ve üzeri çocuklar ve fiziksel, algısal ve
akli becerileri kısıtlı veya tecrübesi ve bilgisi yetersiz olan
kişiler tarafından ancak gözetim altında veya cihazın
emniyetli kullanımı hakkında bilgilendirilmiş olmaları ve
cihazın kullanımı sonucu ortaya çıkabilecek tehlikelerin
bilincinde olmaları koşuluyla kullanılabilir.
•
Çocuklar cihazla oynamamalıdır.
•
Temizlik ve kullanıcı bakımı, gözetim altında olmadıkları
sürece çocuklar tarafından yapılmamalıdır.
•
Arıza veya fonksiyon bozukluğu durumunda cihazı hemen kapatın ve cihazın fişini prizden çekin.
•
Elektrik adaptörünü asla ıslak elle çıkarıp takmayın.
•
Çocukları ambalaj malzemesinden uzak tutun (boğulma tehlikesi).
•
Elektrik kablosunu kimse takılıp düşmeyecek şekilde
döşeyin.
•
Cihazı, elektrik adaptörünü ve elektrik kablosunu sudan uzak tutun!
DİKKAT
•
Cihazı darbelerden, nemden, kirden, aşırı sıcaklık değişikliklerinden ve doğrudan güneş ışığından koruyun.
•
Cihazı düşürmeyin.
2
1
5
6
7
8
9
10
1 Ekran 6 MODE / ENTER
düğmesi
2 Işıklı yüzey 7 ALARM düğmesi
3 Erteleme
(Snooze) fonksiyonu
(cihaz titreşir)
4 Hoparlör 9 Elektrik bağlantısı
5 SET düğmeleri p / q
8 USB bağlantısı (müzik
çalmak için değil, sadece şarj etmek için)
10 +/- düğmeleri
3
4
39
Page 40

Ekran
1
2 3
2
4
5
6
12
1 Radyo modu 7 İyi geceler fonksiyonu
2 Ay (M) / Gün (D) 8 Radyo modu
3 Ses seviyesi 9 Bip sesi
4 Bluetooth
5 Saat modu 11 Alarm kayıt yeri 1-3
6 Saat / tarih /
radyo frekansı
®
1011
9
10 Uyandırma melodisi
12 Ayar aktif
78
6. Cihazı çalıştırma
•
Ambalajı açın.
•
Teslimat kapsamındaki tüm parçaların mevcut olup olmadığını kontrol edin.
•
Cihazda, elektrik adaptöründe ve elektrik kablosunda
hasar olup olmadığını kontrol edin.
•
Cihazı düz ve sağlam bir yüzeyin üzerine koyun.
•
Elektrik adaptörü bağlantı soketini cihazın arka tarafındaki elektrik adaptörü girişine takın.
•
Elektrik adaptörünü uygun bir prize takın.
•
Cihaz ekranında saat görünür.
•
Cihazın anten kablosunu arkaya doğru yerleştirin.
7. Uygulamayı çalıştırma
7.1 “Beurer LightUp” uygulaması
“Beurer LightUp” uygulamasını indirdikten ve ışıklı çalar saati Bluetooth® üzerinden akıllı telefona bağladıktan
sonra ışıklı çalar saatin tüm fonksiyonlarını rahatça akıllı
telefondaki uygulama üzerinden yönetebilirsiniz.
Işıklı çalar saatin fonksiyonlarını akıllı telefondaki uygula
ma üzerinden yönetmenizi öneririz, çünkü bu, cihaz üzerindeki düğmelerden çok daha rahattır.
-
Cihaz fonksiyonlarını akıllı telefondaki uygulamayla kullanabilmek için aşağıdakileri yapın:
1.
Akıllı telefonunuzun Internet'e bağlı olduğundan emin
olun.
2. Akıllı telefonunuzda Bluetooth
3. Apple App Store (iOS) veya Google Play'dan (Android)
“Beurer LightUp” uygulamasını indirin.
4. “Beurer LightUp” uygulamasını açın ve ışıklı çalar saati
uygulamaya ekleyin.
5. Şimdi uygulama üzerinden ışıklı çalar saatin tüm fonk
siyonlarını kullanabilirsiniz.
Not
Aşağıdaki fonksiyonları yalnızca uygulama üzerinden kullanabilirsiniz:
•
Bluetooth® hoparlör
•
Tanımlanmış 10 farklı ortam ışığı seçeneği
•
Doğrudan ortam ışığı renk seçimi
•
Alarmın günlük olarak açılıp kapatılması
•
Özel alarm ayarlarının yapılması
•
Düğme seslerinin açılıp kapatılması
•
Gün batımının etkinleştirilmesi
®
özelliğini etkinleştirin.
-
7.2 Bluetooth® hoparlör
Bluetooth® hoparlörü etkinleştirmek için en az bir kez
aşağıdaki gibi bağlantı kurulmalıdır:
1. Eğer açıksa “Beurer LightUp” uygulamasını kapatın.
2.
MODE / ENTER düğmesine ekranda “bt” gösterilin-
ceye kadar 2 kez basın. Bluetooth® arama fonksiyonu
başlatılır.
3.
İşletim sisteminizin (iOS / Android ayarlar) Bluetoo-
th® ayarlarında, bağlantı kurmak için cihaz listesinden
“WL90 Speaker” cihazını seçin.
4. Işıklı çalar saat akıllı telefona bağlandığında ışıklı çalar
saatin ekranında mavi renkli Bluetooth
5. LightUp uygulamasının menüsünden müzik fonksiyonunu seçin.
6. Hoparlörü kapatmak için
kez basın. Bunun için uygulamayı kapatın.
Not
Aynı akıllı telefon aynı ışıklı çalar saatle kullanıldığında
bu bağlantı kaydedilir. Böylece bu Bluetooth® bağlantısı
LightUp uygulamasındaki müzik fonksiyonu açıldığında
otomatik olarak kurulur. Bu otomatik özellik akıllı telefon
modeline göre farklılık gösterebilir.
Not
Işık ve alarm fonksiyonlarını yönetmek için genelde Blu
etooth®Smart (low energy) kullanılır. Müzik aktarmak için
ek olarak Classic Bluetooth® kullanılır. Işıklı çalar saatin
MODE / ENTER
®
logosu belirir.
düğmesine iki
-
40
Page 41

ekranında sadece bu durumda Bluetooth® simgesi gösterilir (Bluetooth® bağlantısı aktif veya aranıyor).
7.3 Gün batımı fonksiyonu
Işıklı çalar saatle gün batımını da simüle edebilirsiniz.
Buözellikte ışık, ayarlanan bir sürede yavaşça azalır.
Gün batımı fonksiyonunu yalnızca “Beurer LightUp” uygulamasındaki menüden ayarlayabilirsiniz.
8. Cihazın kullanımı
Aşağıdaki temel fonksiyonları uygulama olmadan da
doğrudan cihaz düğmeleri üzerinden, ancak yalnızca
akıllı telefonunuzdaki uygulama kapalıysa kullanabilirsiniz. Işıklı çalar saatin tüm fonksiyonları sadece “Beurer
LightUp” uygulamasıyla kullanılabilir.
8.1 Saatin ve tarihin ayarlanması
Not
“Beurer LightUp” uygulamasını kullanıyorsanız, saat ve
tarih zaten ayarlanmıştır, çünkü uygulama her açıldığında
akıllı telefonla otomatik olarak senkronize edilir.
1. MODE / ENTER düğmesini üç saniye basılı tutun.
2. Ekranda saat modu 24 hr yanıp söner. Saat modunu
SET düğmeleriyle p / q ayarlayın (24 saat modu veya
12 saat modu). MODE / ENTER düğmesiyle onaylayın.
3.
Ekranda saat göstergesi yanıp söner. Saati SET düğmeleriyle p / q ayarlayın. MODE / ENTER düğmesiyle
onaylayın.
4.
Ekranda dakika göstergesi yanıp söner. Dakikayı SET
düğmeleriyle p / q ayarlayın. MODE / ENTER düğme-
siyle onaylayın.
Ekranda yıl 2015 yanıp söner. Dakikayı SET düğme-
5.
leriyle p / q ayarlayın. MODE / ENTER düğmesiyle
onaylayın.
Ekranda ay (M) 1 yanıp söner. Ayı SET düğmeleriyle
6.
p / q ayarlayın. MODE / ENTER düğmesiyle onaylayın.
7.
Ekranda Gün (D) 1 yanıp söner. Günü SET düğmeleriyle
p / q ayarlayın. MODE / ENTER düğmesiyle onaylayın.
Ayarlanan saat gösterilir.
8.2 Alarmı etkinleştirme/devre dışı bırakma
Alarmı etkinleştirme
Bir alarmı ayarlamadan önce, ayarlamak istediğiniz alarm
kayıt yerini etkinleştirin.
Işıklı çalar saatin farklı şekillerde ayarlanabilen üç alarm
kayıt yeri ( , , ) vardır. 10 uyandırma melodisinden biriyle, alarm sesiyle veya radyoyla uyanabilirsiniz.
Bir alarm kayıt yerini seçmek için yapmanız gerekenler:
1.
ALARM düğmesine basarak ekranda gösterilen istediği
niz alarm kayıt yerini seçin (aynı anda birden çok alarm
kayıt yeri de seçilebilir).
2. Alarmı devre dışı bırakmak için ekrandaki ilgili çalar sa
at simgesi kayboluncaya kadar ALARM düğmesine art
arda basın.
-
-
8.3 Alarm zamanının ayarlanması
Işıklı çalar saat üzerinden alarm zamanının ayarlanması
Seçilen alarm kayıt yerinde bir alam zamanı ayarlamak
için aşağıdakileri yapın:
1. Alarm etkinleştirilmiş haldeyken ALARM düğmesini iki
saniye basılı tutun.
2.
Ekranda alarmın saati yanıp söner. Alarm saatini SET
düğmeleriyle p / q ayarlayın. ALARM düğmesiyle
onaylayın.
3.
Ekranda alarmın dakikası yanıp söner. Alarm dakikasını
SET düğmeleriyle p / q ayarlayın. ALARM düğmesiyle
onaylayın.
4.
Ekranda alarm sesi yanıp söner. İstenen alarm sesini
SET düğmeleriyle p / q ayarlayın (uyandırma melodisi
1-10 , bip sesi veya radyo ). ALARM düğmesiyle onaylayın.
5.
Ekranda alarm ses seviyesi (VOLUME) yanıp söner. Alarmın ses seviyesini SET düğmeleriyle p / q ayarlayın.
ALARM düğmesiyle onaylayın.
6.
Ekranda erteleme süresi (Sn) yanıp söner. Erteleme süresini (1, 2, 5, 10, 20 veya 30 dakika) SET düğmeleriyle
p / q ayarlayın. ALARM düğmesiyle onaylayın.
Not
Akıllı telefon üzerinden alarm zamanının ayarlanması
Alarm zamanını uygulama üzerinden ayarlamak ve uyandırılmak için ayarlama sırasında akıllı telefonun Bluetooth
üzerinden ışıklı çalar saate bağlı olması yeterlidir. Alarm
zamanını ve alarm sesini ayarladıktan sonra akıllı telefonunuzda Bluetooth® 'u kapatabilirsiniz veya akıllı telefonunuzu kapatabilirsiniz. Bluetooth® bağlantısının gece
boyunca açık kalması gerekli değildir.
®
8.4 Alarmın kapatılması
Güneşin doğuşu sırasında alarmın kapatılması:
Bu güneşin doğuşunu herhangi bir tuşa basarak kapatabilirsiniz. Alarm sesi duyulmaz. Işık 2 dakika hafifçe kısılır. Tekrar herhangi bir düğmeye bastığınızda ışık söner.
Alarm sırasında erteleme (Snooze) modu
Cihaz erteleme moduna (Snooze) sahiptir. Alarm çalmaya
başladığında Snooze işlevine basarsanız (ışık yüzeyine
41
Page 42

dokunarak), ayarlanmış olan erteleme süresinin ardından
alarm yeniden çalacaktır.
Uyandırma sesi sırasında alarmın kapatılması
Alarm çalmaya başladığında Snooze (erteleme) dışındaki
herhangi bir tuşa basın. Alarm kapatılır ve ancak ayarlanmış olan alarm zamanı geldiğinde yeniden çalacaktır.
Kalkmanıza olanak vermek için ışık 2 dakika daha yanmaya devam eder ve sonra otomatik olarak söner. Işığı
tekrar yakmak için bkz. Bölüm 8.8.
8.5 Ekran aydınlığının ayarlanması
Işıklı çalar saatin ekran için dört aydınlık kademesi vardır
(
0, 1, 2, 3, A
ekran aydınlığı ortama otomatik olarak uyum sağlar. Ekranın aydınlığını ayarlamak için aşağıdakileri yapın:
1. + / - düğmelerine aynı anda basın. Ekranda “
terilir. İstediğiniz ekran aydınlığını MODE düğmesiyle
ayarlayın (
2. Ekran aydınlığını onaylamak için + / - düğmelerine aynı
anda basın.
). Aydınlık kademesi “A” (otomatik) iken
BL:
0, 1, 2, 3
veya A).
” gös-
8.6 Radyo modu
Radyoyu açmak için aşağıdakileri yapın:
1. Ekranda
düğmesine basın.
2. + / - düğmeleriyle radyonun ses seviyesini ayarlayın.
3. Kayıt yerini SET düğmesiyle p değiştirin.
4. Otomatik istasyon arama fonksiyonunu başlatmak için
SET düğmesini p üç saniye basılı tutun. Radyo frekansını 0,1 MHz adımlarla değiştirmek için SET düğmelerine
p / q kısaca basın.
5. Bir radyo istasyonunu bu kayıt numarasına kaydetmek
için MODE / ENTER düğmesine basın. ekranda buna
ait kayıt yeri numarası (örn. P1) gösterilir.
RADIO
gösterilinceye kadar MODE / ENTER
8.7 İyi geceler özelliği (Radio Sleep-Timer)
Radyo modunu veya
rak iyi geceler modunu ( ) etkinleştirebilirsiniz. İyi geceler
özelliğiyle radyonun veya
ka sonra otomatik olarak kapanacağını ayarlayabilirsiniz.
İyi geceler özelliğini kullanmak istiyorsanız aşağıdakileri yapın:
1.
Radyo modunda veya Bluetooth® hoparlör modunda
SET düğmelerine p / q aynı zamanda kısaca basın.
2.
Ekranda zamanlama göstergesi yanıp söner. ALARM
düğmesiyle istenen zamanlama süresini seçin (2, 5, 10,
15, 30, 45 veya 60 dakika).
3.
Onaylamak için SET düğmelerinep / q aynı anda kı-
saca basın.
Bluetooth® hoparlör açıkken ek ola-
Bluetooth®
hoparlörün kaç daki-
8.8 Işık fonksiyonu
1.
Işıklı çalar saat hafifçe titreyecek şekilde elinizle ışıklı çalar saatin yanına vurun. Ekran aydınlatması daha
aydınlık olur.
2.
Üç saniye içinde yeniden ışıklı çalar saatin yanına vurun.
Okuma lambasının beyaz ışığı yanar.
8.9 Ortam ışığı fonksiyonu
1.
Işıklı çalar saat hafifçe titreyecek şekilde elinizle ışıklı çalar saatin yanına vurun. Ekran aydınlatması daha
aydınlık olur.
2.
Üç saniye içinde yeniden ışıklı çalar saatin yanına vurun.
Okuma lambasının beyaz ışığı yanar.
3.
Ortam ışığının renk değişimini etkinleştirmek için ışıklı
çalar saatin ışık yüzeyine yeniden vurun.
4. Işık değişimi sırasında bir renkli ışığın sürekli yanmasını
sağlamak için ışıklı çalar saatin ışık yüzeyine yeniden
vurun.
5.
Işık fonksiyonunu devreden çıkarmak için ışıklı çalar saatin ışık yüzeyine yeniden vurun.
9. Sorunların giderilmesi
www.beurer.com adresinde bu ürüne ait ayrıntılı bilgileri ve sıkça sorulan soruların (SSS) bir listesini bulabilirsiniz.
10. Temizlik/Saklama
•
Cihazı kuru bir bezle temizleyin.
•
Aşındırıcı temizlik maddesi kullanmayın.
•
Cihazın içine su kaçmamasına dikkat edin. Yine de içine
su kaçacak olursa cihazı ancak, tamamen kuruduğunda
yeniden kullanın.
•
Cihazı ve fişli elektrik adaptörünü asla su veya başka
sıvılara daldırmayın.
•
Cihazı darbelerden, nemden, tozdan, kimyasallardan,
aşırı sıcaklık değişikliklerinden ve çok yakın ısı kaynaklarından (soba, kalorifer radyatörü) koruyun.
11. Bertaraf etme
Kullanım ömrü sona eren cihazlar, çevrenin korunması
amacıyla evsel atıklar ile birlikte atılmamalıdır. Cihaz,
ülkenizdeki uygun atık toplama merkezleri aracılığıyla bertaraf edilmelidir. Malzemelerin bertaraf
edilmesi sırasında yerel yönetmeliklere uyun. Cihazı AB Elektrikli ve Elektronik Ekipman Atık Direktifine (WEEE - Waste Electrical and Electronic Equipment) uygun olarak bertaraf edin. Bertaraf etme ile ilgili
sorularınızı, ilgili yerel makamlara iletebilirsiniz.
42
Page 43

12. Teknik veriler
Aydınlatma gücü
Maksimum yakl. 2500 Lux
(15cm mesafe için)
LED teknolojisi (LED'in kullanım
Işık
ömrü: > 50 000 saat, LED değiş
-
tirilemez)
Işık kademeleri
Ortam ışığı
Işıklı çalar saat
fonksiyonu
Gün doğumu
fonksiyonu
Uygulama üzerinden kademesi
olarak ayarlanabilir
Otomatik RGB renk değişimi ve
bireysel renk sabitleme
Kapalı, alarmdan önce 2, 5, 10,
15, 20, 30, 45, 60 dakika
Alarma kadar maksimum ışık se
-
viyesi: Işık kademesi 5, 10, 15, 20
Snooze süresi 1, 2, 5, 10, 20, 30 dakika
Gün batımı
fonksiyonu
İyi geceler fonksi-
yonu (Sleep Radio)
LCD arka plan
aydınlatması
2, 5, 10, 15, 20, 30, 45, 60 dakika
2, 5, 10, 15, 20, 30, 45, 60 dakika
Otomatik, kapalı, 1, 2, 3
Saat 12h / 24h seçilebilir
Alarm
3 alarm zamanı
(Kapalı, Açık, Gün)
Alarm sesi, 10 melodi, radyo
Tuş sesi Kapalı, Açık
Akıllı telefon için 5 V / 500 mA ile
USB
şarj fonksiyonu (tabletler desteklenmemektedir).
Radyo
Müzik yayını Bluetooth
Frekans aralığı FM 87,0 108MHz, 10 istasyon kayıt yeri
®
Hoparlör 2 x 3 Watt
Güç kaynağı
elektrik adaptörü
Elektrik adaptörü
koruma sınıfı
Giriş: 110-240 V, AC,
50/60 Hz, 0,5 A
Çıkış: 5 V, DC, 3000mA
Koruma Sınıfı II
Teknik değişiklik hakkı saklıdır.
Bu ürünün Avrupa R&TTE Yönetmeliği 1999/5/EC’ye
uygun olduğunu garanti ederiz.
Detaylı bilgilere (örneğin CE – Uygunluk Beyanı) ulaşmak
için lütfen belirtilen servis adresine başvurun.
43
Hata ve değişiklik hakkı saklıdır
Page 44

РУССКИЙ
Внимательно прочтите данную инструкцию по применению, сохраните ее для последую щего
использования, храните ее вместе, доступном для других пользователей, иследуйте ее
указаниям.
Содержание
1. Для ознакомления ......................................................................... 45
2. Пояснения к символам ................................................................. 45
3. Использование поназначению ................................................... 46
4. Предостережения и указания потехнике безопасности ....... 46
5. Описание прибора ......................................................................... 46
6. Подготовка прибора к работе ..................................................... 47
7. Подготовка к работе приложения .............................................. 47
7.1 Приложение Beurer LightUp .................................................... 47
7.2 Динамик через Bluetooth
7.3 Функция захода солнца ........................................................... 48
8. Управление прибором ................................................................... 48
8.1 Настройка времени/даты ........................................................ 48
8.2 Включение/выключение
сигнала будильника ................................................................. 48
8.3 Настройка времени сигнала ................................................... 48
8.4 Выключение будильника ......................................................... 49
8.5 Настройка яркости дисплея ................................................... 49
8.6 Режим радио ............................................................................ 49
8.7 Функция «Спокойной ночи»
(таймер для радио)................................................................... 49
8.8 Функция светильника .............................................................. 49
8.9 Функция лампы со сменой цветов .......................................... 49
9. Что делать при возникновении проблем? ................................. 50
10. Очистка/Хранение ....................................................................... 50
11. Утилизация .................................................................................... 50
12. Технические характеристики ..................................................... 50
13. Гарантия ......................................................................................... 51
®
....................................................... 47
Комплект поставки
•
Световой будильник с гибкой антенной
•
Сетевой адаптер
•
Инструкция по применению
•
Краткое руководство
44
Page 45

Уважаемый покупатель!
Благодарим Вас завыбор продукции нашей фирмы.
Мы производим современные, тщательно протестированные, высококачественные изделия для обогрева,
измерения массы, артериального давления, температуры тела, пульса, для мягкой терапии, массажа,
очистки воздуха и косметического ухода.
Снаилучшими пожеланиями,
компания Beurer
1. Для ознакомления
Световой будильник Beurer WL90 делает процесс
пробуждения приятным и естественным. Постепенно
возрастающая интенсивность светодиодного осве
щения имитирует восход солнца. Это дает глазам
возможность медленно привыкнуть к возрастающей
яркости, иврезультате организм неподвергается
стрессу от резкого пробуждения. Вы можете дополнительно установить сигнал будильника, который
зазвучит после симуляции восхода солнца. В качестве сигнала будильника можно выбрать радио
или различные звуки. Приложение Beurer LightUp
позволит Вам удобно управлять всеми функциями
прибора спомощью смартфона.
Световой будильник Beurer WL90 поможет начать
новый день в бодром, отдохнувшем состоянии.
Функции
•
Управление функциями прибора спомощью приложения для смартфона BeurerLightUp
•
Имитация захода солнца (световой будильник
медленно гаснет втечение заданного периода
времени)
•
Функция светильника (белый свет/лампа для чтения)
•
Лампа со сменой цветов свозможностью фиксации
выбранного цвета (10различных световых сценариев навыбор)
•
Индикация времени на дисплее
•
Использование в качестве динамика через
Bluetooth
•
УКВ-радио
•
Будильник с использованием радио или различных
звуков
•
Функция «Спокойной ночи» (световой будильник
автоматически отключается по истечении установленного времени)
Все функции светового будильника WL90 вполном
объеме доступны только сприложением LightUp
от компании Beurer. Базовые функции могут быть
дополнительно настроены прямо на приборе.
®
Указание
-
45
Следующие функции могут использоваться исключительно через приложение.
•
Динамик через Bluetooth
•
Выбор из 10 предварительно настроенных световых
сценариев
•
Прямой выбор цвета подсветки лампы со сменой
цветов
•
Включение и выключение будильника на каждый
день
•
Настройка специальных функций будильника
•
Включение и выключение тона клавиатуры
•
Включение имитации захода солнца
Системные требования
•
Bluetooth® 4.0, iOS начиная с версии7.1, устрой-
ства на базе Android™ начиная с версии 4.3
сBluetooth®Smart Ready.
Для просмотра всех совместимых мобильных
устройств сосканируйте следующий QR-код:
®
2. Пояснения к символам
Предупреждает об опасности
ПРЕДОСТЕ-
РЕЖЕНИЕ
ВНИМАНИЕ
Указание
травмирования или ущерба
для здоровья.
Указывает на возможность повреждения прибора/деталей.
Отмечает важную информацию.
Утилизация прибора в соответствии с Директивой ЕС
по отходам электрического
и электронного оборудова
ния— WEEE (Waste Electrical
and Electronic Equipment).
Производитель
Это изделие соответствует
требованиям действующих
европейских инациональных
директив.
-
Page 46

3. Использование поназначению
ПРЕДОСТЕРЕЖЕНИЕ
Прибор разрешается использовать исключительно
вцелях, для которых он был разработан, атакже в соответствии с указаниями, приведенными винструкции
по применению. Любое применение не по назначению
может быть опасным. Изготовитель не несет ответственности за ущерб, вызванный неквалифицированным или ненадлежащим использованием прибора.
ВНИМАНИЕ
•
Защищайте прибор от ударов, влажности, загрязнения, сильных колебаний температуры и прямых
солнечных лучей.
•
Не роняйте прибор.
5. Описание прибора
2
4. Предостережения и указания
потехнике безопасности
ПРЕДОСТЕРЕЖЕНИЕ
•
Используйте прибор только с входящим в комплект
поставки сетевым адаптером и только с напряжением, указанным на адаптере.
•
Перед использованием проверьте прибор иего
принадлежности наналичие видимых повреждений.
При наличии сомнений не используйте прибор
иобратитесь кпродавцу или всервисную службу
поуказанному адресу.
•
Прибор предназначен для домашнего/частного
использования, использование прибора вкоммерческих целях запрещено.
•
Данный прибор может использоваться детьми
старше 8лет, а также лицами с ограниченными физическими, сенсорными или умственными способностями или с недостаточными знаниями и опытом
втом случае, если они находятся под присмотром
взрослых или проинструктированы о безопасном
применении прибора и возможных опасностях.
•
Непозволяйте детям играть сприбором.
•
Очистку и техническое обслуживание детям
разрешается выполнять только под присмотром
взрослых.
•
Вслучае появления дефектов инеполадок вработе
немедленно отключите прибор иотсоедините его
отсети.
•
Не подсоединяйте сетевой адаптер к сети и не отсоединяйте его от сети влажными руками.
•
Не давайте упаковочный материал детям (опасность
удушения).
•
Разместите кабель таким образом, чтобы об него
нельзя было споткнуться.
•
Не допускайте попадания воды на прибор, сетевой
адаптер и электрический кабель!
1
5
6
7
8
9
10
1 Дисплей 6 Кнопка MODE/ENTER
2 Светящаяся
поверхность
3 Функция повтора
сигнала
(вибрация прибора)
4 Динамик 9 Сетевой кабель
5 Кнопки SET p / q
7 Кнопка ALARM
8 Подключение USB
(только для загрузки,
не для воспроизведения музыки)
10 Кнопки +/-
3
4
46
Page 47

Дисплей
1
12
1 Режим радио 7 Функция
2 Месяц (M) / день (D) 8 Режим радио
3 Громкость 9 Звуковой сигнал
4 Bluetooth
5 Режим отобра-
жения времени
6 Время/дата
Радиочастота
2 3
®
2
1011
9
«Спокойнойночи»
10 Мелодия для
пробуждения
11 Ячейка памяти
будильника 1–3
12 Настройка активна
Мы рекомендуем настраивать все функции светового
будильника через приложение на смартфоне, таккак
это удобнее, чем спомощью кнопок на приборе.
Для управления функциями прибора спомощью
4
приложения насмартфоне действуйте следующим
образом.
1. Убедитесь, что смартфон подключен кИнтернету.
5
2. Включите Bluetooth
3.
6
78
Загрузите мобильное приложение Beurer LightUp
вApple App Store (iOS) или Google Play (Android).
4.
Откройте приложение Beurer LightUp идобавьте
световой будильник вприложение.
5.
Теперь Вы сможете управлять всеми функциями
светового будильника спомощью приложения.
Указание
Следующие функции могут использоваться исключительно через приложение.
•
Динамик через Bluetooth
•
Выбор из 10 предварительно настроенных световых
сценариев
•
Прямой выбор цвета подсветки лампы со сменой
цветов
•
Включение и выключение будильника на каждый
день
•
Настройка специальных функций будильника
•
Включение и выключение тона клавиатуры
•
Включение имитации захода солнца
®
на своем смартфоне.
®
6. Подготовка прибора к работе
•
Удалите упаковку.
•
Проверьте комплектность поставки.
•
Убедитесь, что прибор, сетевой адаптер и электрический кабель не повреждены.
•
Установите прибор на устойчивую ровную поверхность.
•
Вставьте разъем сетевого адаптера в гнездо
внижней части прибора.
•
Вставьте сетевой адаптер вподходящую розетку.
•
На дисплее прибора отобразится время.
•
Сложите гибкую антенну прибора назад.
7. Подготовка к работе
приложения
7.1 Приложение Beurer LightUp
Сразу после загрузки приложения Beurer LightUp и
подключения светового будильника через Bluetooth®
ксмартфону Вы можете комфортно управлять всеми
функциями светового будильника спомощью приложения на смартфоне.
7.2 Динамик через Bluetooth
Для активации динамика Bluetooth® необходимо
по крайней мере один раз выполнить подключение
следующим образом.
1.
Закройте приложение Beurer LightUp, если оно уже
открыто.
2.
Нажмите кнопку MODE/ENTER 2 раза, пока
на дисплее не появится «bt». Начнется поиск
устройств Bluetooth®.
3.
Выберите из списка приборов в настройках
Bluetooth® Вашей операционной системы (настройки
iOS/Android) устройство «WL90 Speaker», чтобы
подключить его.
4.
Как только соединение светового будильника со
смартфоном будет установлено, на дисплее светового будильника появится синий логотип Bluetooth®.
5.
Выберите функцию музыки вменю п
LightUp.
6. Для выключения динамика нажмите два раза кнопку
MODE/ENTER
приложение.
47
(«Режим»). Для этого выключите
®
риложения
Page 48

Указание
При использовании одного итого же смартфона
содним итемже световым будильником соединение
будет сохранено. Это значит, что при запуске функции
проигрывания музыки вприложении LightUp соединение Bluetooth® будет устанавливаться автоматически. Порядок такого автоматического подключения
зависит от модели смартфона.
Указание
Принципиально Bluetooth®Smart (lowenergy) применяется, например, для управления функциями света
и сигнала будильника. Для передачи музыки используется дополнительно Classic Bluetooth®. Только для
него на дисплее светового будильника будет отображаться символ Bluetooth® (соединение Bluetooth
активно или выполняется его поиск).
®
7.3 Функция захода солнца
Еще одна возможность светового будильника —
имитация захода солнца. Это значит, что через установленное время яркость света начнет уменьшаться.
Функцию захода солнца можно настроить только
вменю приложения Beurer LightUp.
8. Управление прибором
Следующие базовые функции могут быть
настроены и без приложения, напрямую
спомощью кнопок прибора, вэтом случае приложение на смартфоне должно быть закрыто. Все
функции светового будильника вполном объеме
доступны только сприложением LightUp откомпании
Beurer.
8.1 Настройка времени/даты
Указание
Если Вы используете приложение Beurer LightUp, то
время и дата уже настроены, таккак прикаждом
запуске приложения они автоматически синхронизируются со смартфоном.
1.
Нажмите и удерживайте кнопку MODE / ENTER
втечение трех секунд.
2.
Часовой режим 24 hr начнет мигать на дисплее.
Выберите часовой режим отображения времени
кнопками SET p / q (24-часовой или 12-часовой
режим). Подтвердите нажатием кнопки
MODE/ENTER.
3.
На дисплее начнет мигать индикатор часов. Установите часы с помощью кнопок SET p / q. Подтвер-
дите нажатием кнопки MODE/ENTER.
4.
На дисплее начнет мигать индикатор минут. Установите минуты с помощью кнопок SET p / q. Подтвер-
дите нажатием кнопки MODE/ENTER.
5.
На дисплее мигает год 2015. Установите год
спомощью кнопок SET p / q. Подтвердите нажа-
тием кнопки MODE/ENTER.
6.
На дисплее мигает месяц (М) 1. Установите месяц
спомощью кнопок SET p / q. Подтвердите нажа-
тием кнопки MODE/ENTER.
7.
На дисплее мигает день (D) 1. Установите день
спомощью кнопок SET p / q. Подтвердите нажа-
тием кнопки MODE/ENTER. Отобразится настроенное время.
8.2 Включение/выключение
сигнала будильника
Включение сигнала будильника
Перед настройкой сигнала будильника сначала необходимо активировать ячейку памяти настраиваемого
сигнала.
Прибор имеет три ячейки памяти для будильника
( , , ), которые можно настраивать по Вашему
желанию. Вы можете просыпаться от звуков одной из
10 мелодий для пробуждения, от звукового сигнала
или от включения радио.
Для выбора ячейки памяти выполните следующие
действия.
1.
Нажатием кнопки ALARM выберите нужную ячейку
памяти сигнала, которая появится на дисплее (одновременно могут быть выбраны несколько ячеек
памяти сигнала будильника).
2.
Для деактивации сигнала нажимайте кнопку ALARM
несколько раз, пока соответствующий символ
будильника неисчезнет сдисплея.
8.3 Настройка времени сигнала
Настройка времени сигнала светового будильника
Для настройки времени сигнала для выбранной
ячейки памяти сигнала действуйте следующим
образом.
1.
При активированном сигнале нажать кнопку ALARM
и удерживать нажатой втечение двух секунд.
2.
На дисплее замигает час сигнала будильника. Установите час сигнала будильника с помощью кнопок
SET p / q. Подтвердите нажатием кнопки ALARM.
3. На дисплее замигают минуты сигнала будильника.
Установите минуты сигнала будильника с помощью
кнопок SET p / q. Подтвердите нажатием кнопки
ALARM.
4.
На дисплее начнет мигать сигнал будильника. Выберите нужный сигнал с помощью кнопок SET p / q
48
Page 49

(мелодия для пробуждения 1–10 , звуковой
сигнал или радио ). Подтвердите нажатием
кнопки ALARM.
5. На дисплее замигает громкость сигнала (VOLUME).
Установите громкость звука сигнала с помощью
кнопок SET p / q. Подтвердите нажатием кнопки
ALARM.
6.
На дисплее замигает продолжительность повтора
сигнала (Sn). Установите продолжительность
повтора сигнала (1, 2, 5, 10, 20 или 30 минут)
спомощью кнопок SET p / q. Подтвердите нажа-
тием кнопки ALARM.
Указание
Настройка времени сигнала светового будильника спомощью смартфона
Для настройки времени сигнала достаточно, чтобы
во время настройки было установлено соединение
светового будильника со смартфоном по Bluetooth®.
После окончания настройки типа и времени сигнала
будильника можно отключить Bluetooth® на смартфоне или выключить сам смартфон. Постоянное
соединение Bluetooth® в течение всей ночи
нетребуется.
(«автоматически») яркость дисплея автоматически
адаптируется кокружению. Для настройки яркости
дисплея выполните следующие действия.
1.
2.
8.6 Режим радио
Для настройки радио выполните следующие действия.
1.
2.
3. Измените ячейку памяти кнопкой SET p.
4.
5.
8.4 Выключение будильника
Выключение будильника во время восхода солнца
Вы можете отключить этот «восход солнца» активацией функции короткого сна Snooze. Сигнал не
прозвучит. Свет в течение 2 минут будет медленно
гаснуть. Если Вы снова нажмете любую кнопку, свет
отключится.
Функция повтора сигнала (Snooze) при срабатывании будильника
Прибор имеет функцию повтора сигнала (Snooze).
Если Вы включите функцию Snooze (дотронетесь
до светящейся поверхности) после срабатывания
будильника, он вновь сработает спустя установленное
время для функции Snooze.
Выключение будильника при срабатывании звуко
вого сигнала
При срабатывании будильника нажмите любую
кнопку, кроме Snooze. Будильник выключится и
сработает вновь только в заданное время. В течение
следующих 2 минут свет остается включенным,
чтобы дать Вам возможность встать, затем он автоматически отключается. Как включить свет, описано
вглаве8.8.
8.5 Настройка яркости дисплея
Световой будильник имеет четыре уровня яркости
дисплея (
0, 1, 2, 3, A
). При уровне яркости «A»
8.7 Функция «Спокойной ночи»
При включенном режиме радио или динамика
Bluetooth® Вы дополнительно можете подключить
функцию «Спокойной ночи» ( ). Функция «Спокойной
ночи» позволяет выбрать, через сколько минут радио
или динамик
читься.
Для подключения функции «Спокойной ночи»
действуйте следующим образом.
1.
2.
-
3.
8.8 Функция светильника
1.
2.
49
Нажмите одновременно обе кнопки +/-. На дисплее
появится «
вите нужную яркость дисплея (
Для подтверждения одновременно нажмите две
кнопки +/-.
Нажимайте кнопку MODE/ENTER несколько раз,
пока на дисплее не появится
С помощью кнопок +/- настройте громкость радио.
Для запуска автоматического поиска радиостанции
нажмите кнопку SET p и удерживайте в течение
трех секунд; для изменения радиочастоты с шагом
в 0,1МГц, необходимо недолго нажимать кнопки
SETp / q.
Для сохранения радиостанции на этом номере
программы нажмите кнопку MODE/ENTER. Соответствующий номер программы (например, P1)
появится на дисплее.
BL:
». С помощью кнопки MODE устано-
0, 1, 2, 3
RADIO
.
или A).
(таймер для радио)
Bluetooth®
В режиме радио или динамика Bluetooth® одновременно кратко нажмите кнопки SET p / q.
На дисплее начнет мигать индикатор таймера.
Спомощью кнопки ALARM выберите нужное время
для таймера (2, 5, 10, 15, 30, 45 или 60минут).
Для подтверждения кратко одновременно p / q
нажмите обе кнопки SET.
Похлопайте рукой по боковой части светового
будильника, чтобы световой будильник слегка завибрировал. Подсветка дисплея станет ярче.
Еще раз похлопайте в течение трех секунд по
боковой части светового будильника. Включится
белый свет лампы для чтения.
должны автоматически отклю-
Page 50

8.9 Функция лампы со сменой цветов
1.
Похлопайте рукой по боковой части светового
будильника, чтобы световой будильник слегка завибрировал. Подсветка дисплея станет ярче.
2.
Еще раз похлопайте в течение трех секунд по
боковой части светового будильника. Включится
белый свет лампы для чтения.
3. Для выключения функции лампы со сменой цветов
снова дотроньтесь до световой поверхности будильника.
4.
Для выбора длительного просмотра одного цвета
во время смены цветов необходимо дотронуться до
световой поверхности будильника.
5. Для выключения функции света снова дотроньтесь
до световой поверхности будильника.
9.
Что делать при
возникновении проблем?
На странице www.beurer.com Вы найдете дополнительную информацию и перечень часто задаваемых
вопросов (FAQ) по данному изделию.
10. Очистка/Хранение
•
Очищайте прибор влажной салфеткой.
•
Неиспользуйте абразивные чистящие средства.
•
Следите за тем, чтобы в прибор не попала вода.
Вслучае попадания в прибор воды используйте его
только после полного высыхания.
•
Ни в коем случае не погружайте прибор и сетевой
адаптер в воду или другие жидкости.
•
Прибор следует предохранять отударов, влажности, пыли, химикатов, сильных колебаний температуры ине помещать его вблизи источников тепла
(печей, радиаторов отопления).
11. Утилизация
Винтересах защиты окружающей среды поокончании срока службы следует утилизировать прибор
отдельно отбытового мусора. Утилизация
должна производиться через соответствующие пункты сбора вВашей стране. Соблюдайте местные законодательные нормы по
утилизации отходов. Прибор следует утилизировать
согласно Директиве ЕС поотходам электрического
и электронного оборудования — WEEE (Waste
Electrical and Electronic Equipment). Припоявлении
вопросов обращайтесь вместную коммунальную
службу, ответственную заутилизацию отходов.
50
12. Технические характеристики
Освещенность
Свет
Уровни света
Лампа со сменой
цветов
Функция свето
вого будильника
Функция восхода
солнца
Время для функ
ции повтора
сигнала
Функция захода
солнца
Функция
« Спокойной
ночи» (таймер
длярадио)
Подсветка
ЖК-дисплея
Время
Будильник
Звук при нажа
тии кнопок
USB
Радио
Потоковая пе
редача музыки
Динамик 2 x 3Вт
макс. 2500лк
(на расстоянии 15см)
Светодиодная технология
( продолжительность работы
светодиода: > 50000часов,
светодиод не заменяется)
Плавная настройка через
приложение
Автоматическая смена цветов
(красный, зеленый синий) своз
можностью фиксации цвета
Выкл., за 2, 5, 10, 15, 20, 30, 45,
60минут до момента срабаты-
вания сигнала будильника
Максимальная сила све
та досрабатывания сигнала
будильника: уровень света —
5,10, 15 и 20
1, 2, 5, 10, 20 и 30 минут
2, 5, 10, 15, 20, 30, 45 и 60минут
2, 5, 10, 15, 20, 30, 45 и 60минут
Авто, выкл., 1, 2, 3
Переключение форматов
12ч/24ч
3 времени срабатывания
будиль ника (выключено,
включено, день)
Сигнал будильника, 10 звуков,
радио
Выключен, включен
Функция загрузки на USB для
смартфонов с5В/500мА (планшеты не поддерживаются).
Диапазон частот УКВ: 87,0—
108МГц, 10ячеек памяти
-
Bluetooth
®
-
-
Page 51

Питающее напряжение блока
питания
Класс защиты
блока питания
Возможны технические изменения.
Настоящим мы гарантируем, что данное изделие
соответствует европейской директиве R&TTE (Дирек
тива ЕС по средствам радиосвязи и телекоммуникационному оконечному оборудованию) 1999/5/EC.
Обратитесь в сервисный центр по указанному адресу
для получения подробных сведений — например,
осоответствии директивам CE.
Вход: 110–240В перем. тока,
50/60Гц, 0,5A
Выход: 5В пост.тока, 3000мА
Класс защиты II
-
13. Гарантия
Мы предоставляем гарантию на дефекты материалов и изготовления этого прибора на срок 24
месяца со дня продажи через розничную сеть.
Гарантия не распространяется:
– на случаи ущерба, вызванного неправильным
использованием,
– на быстроизнашивающиеся части ( блок питания),
– на дефекты, о которых покупатель
знал в момент покупки,
– на случаи собственной вины
покупателя.
Товар сертифицирован: световой
будильник –
ООО «Гарант Плюс» № ТС RU C-DE.АЛ 16.B.02733,
Серия RU № 0228616. срок действия с 25.12.2014
по 24.12.2017 гг.
Срок эксплуатации изделия: мин. 5 лет
Фирма-изготовитель: Бойрер Гмбх,
Софлингер штрассе 218,
89077-УЛМ, Германия
Фирма-импортер: OOO Бойрер,
109451 г. Москва, ул.
Перерва 62, корп. 2, офис 3
Сервисный центр: 109451 г. Москва, ул.,
Перерва 62, корп. 2
Тел(факс) 495—658 54 90,
bts-service@ctdz.ru
Дата продажи
Подпись продавца
Штамп магазина
Подпись покупателя
51
Возможны ошибки и изменения
Page 52

POLSKI
Należy dokładnie przeczytać i zachować niniejszą instrukcję obsługi, przechowywać ją w miejscu
dostępnym dla innych użytkowników i przestrzegać podanych w niej wskazówek.
Spis treści
1. Informacje ogólne ........................................................................... 53
2. Objaśnienie symboli ........................................................................ 53
3. Użytkowanie zgodne
zprzeznaczeniem ............................................................................ 53
4. Ostrzeżenia i wskazówki dotyczące bezpieczeństwa ................. 54
5. Opis urządzenia ............................................................................... 54
6. Uruchomienie urządzenia ............................................................... 55
7. Uruchomienie aplikacji ................................................................... 55
7.1 Aplikacja „Beurer LightUp” ........................................................ 55
7.2 Głośnik Bluetooth
7.3 Funkcja zachodu słońca ............................................................ 56
8. Obsługa urządzenia ......................................................................... 56
8.1 Ustawianie godziny i daty .......................................................... 56
8.2 Włączanie / wyłączanie alarmu .................................................. 56
8.3 Ustawianie alarmu ..................................................................... 56
8.4 Wyłączanie alarmu ..................................................................... 56
8.5 Ustawienie jasności wyświetlacza ............................................. 57
8.6 Tryb radiowy............................................................................... 57
8.7 Funkcja Dobranoc (Radio Sleep-Timer) ..................................... 57
8.8 Funkcja oświetlenia .................................................................... 57
8.9 Funkcja światła nastrojowego .................................................... 57
9. Co należy zrobić w przypadku problemów? ................................. 57
10. Czyszczenie/przechowywanie ..................................................... 57
11. Utylizacja ........................................................................................ 57
12. Dane techniczne ............................................................................ 58
® ..........................................................................................
55
Zawartość opakowania
•
Zastosowanie światła podczas budzenia z elastyczną anteną kablową
•
Zasilacz
•
Instrukcja obsługi
•
Skrócona instrukcja obsługi
52
Page 53

Szanowna Klientko, szanowny Kliencie!
Cieszymy się, że wybrali Państwo nasz produkt. Firma
Beurer oferuje dokładnie przetestowane produkty wysokiej jakości przeznaczone do pomiaru ciężaru, ciśnienia,
temperatury i tętna, a także przyrządy do łagodnej terapii,
masażu, zabiegów upiększających, inhalacji i ogrzewania.
Z poważaniem,
Zespół Beurer
1. Informacje ogólne
Urządzenie WL 90 firmy Beurer umożliwia delikatną, naturalną pobudkę. Powolne rozjaśnianie diod LED symuluje
wschód słońca. W ten sposób można się powoli przyzwyczaić do warunków świetlnych, a ciało przygotowuje
się w tym czasie do przebudzenia. Dodatkowo można
ustawić dźwięk, który rozlega się po symulacji wschodu
słońca i pomaga w budzeniu poprzez sygnał akustyczny.
Jako sygnał dźwiękowy można wybrać zarówno radio,
jak i różne dźwięki. Z aplikacją „Beurer LightUp” można
wygodnie obsługiwać wszystkie funkcje urządzenia także
przez smartfon.
Zastosowanie światła podczas budzenia WL 90 firmy
Beurer ułatwia delikatną i radosną pobudkę.
Funkcje:
•
Obsługa funkcji urządzenia przez smartfon z aplikacją
„Beurer LightUp”
•
Symulowany zachód słońca (w ustawionym okresie
światło podczas budzenia staje się powoli ciemniejsze)
•
Funkcja światła (białe światło / lampka do czytania)
•
Nastrojowe światło z indywidualną konfiguracją kolorów
(możliwość wyboru 10 różnych ustawień)
•
Wskazanie godziny na wyświetlaczu
•
Zastosowanie jako głośnik przez Bluetooth
•
Radio UKW
•
Alarm przez radio lub dźwięki
•
Funkcja Dobranoc (urządzenie automatycznie wyłącza
się po ustawionym czasie)
®
•
Włączanie i wyłączanie dźwięków przycisków
•
Aktywacja zachodu słońca
Wymagania systemowe:
•
Bluetooth® 4.0, iOS od wersji 7.1, urządzenia
z systemem Android™ od wersji 4.3 z technologią
Bluetooth®Smart Ready
W celu otrzymania zestawienia wszystkich kompatybilnych urządzeń mobilnych należy zeskanować następujący kod QR:
2. Objaśnienie symboli
OSTRZE-
ŻENIE
UWAGA
Wskazówka
Ostrzeżenie przed niebezpieczeństwem obrażeń ciała lub
utraty zdrowia.
Ostrzeżenie przed niebezpieczeństwem uszkodzenia urządzenia lub akcesoriów.
Wskazówka z ważnymi informacjami.
Utylizacja zgodnie z dyrektywą
WE w sprawie zużytego sprzętu elektrycznego i elektronicznego– WEEE (Waste Electrical
and Electronic Equipment)
Producent
Niniejszy produkt spełnia wymagania obowiązujących dyrektyw
europejskich i krajowych.
Wskazówka
Zastosowanie światła podczas budzenia WL 90 można
stosować w pełnym zakresie tylko z aplikacją „Beurer
LightUp”. Funkcje bazowe można dodatkowo ustawiać
bezpośrednio na urządzeniu.
Wymienione funkcje można obsługiwać wyłącznie przez
aplikację:
•
Głośnik Bluetooth
•
Wybór 10 zdefiniowanych ustawień nastrojowego
światła
•
Bezpośredni wybór kolorów nastrojowego światła
•
Włączanie i wyłączanie alarmu dla każdego dnia
•
Definiowanie specjalnych ustawień alarmu
®
3. Użytkowanie zgodne
zprzeznaczeniem
OSTRZEŻENIE
Urządzenie może być używane wyłącznie do celu w jakim
zostało zaprojektowane i w sposób określony w niniejszej
instrukcji obsługi. Każde niewłaściwe użycie może być
niebezpieczne. Producent nie ponosi odpowiedzialności
za szkody wynikające z niewłaściwego użycia urządzenia.
53
Page 54

4. Ostrzeżenia i wskazówki
dotyczące bezpieczeństwa
OSTRZEŻENIE
•
Urządzenie należy podłączać do napięcia sieciowego wyłącznie za pomocą dostarczonego zasilacza.
Napięcie musi być zgodne z napięciem sieciowym
podanym na zasilaczu.
•
Przed użyciem należy sprawdzić urządzenie i akcesoria
pod kątem widocznych uszkodzeń. W razie wątpli wości
należy przestać korzystać z urządzenia oraz zwrócić się
do przedstawiciela handlowego lub serwisu na podany
adres.
•
Urządzenie jest przeznaczone do stosowania
tylko wstrefie domowej/prywatnej, a nie do celów
komercyjnych.
•
Urządzenie może być obsługiwane przez dzieci od
8 roku życia oraz osoby z ograniczoną sprawnością
fizyczną, ruchową i umysłową lub brakiem doświadczenia iwiedzy tylko wtedy, gdy znajdują się one pod
nadzorem lub otrzymały instrukcje dotyczące bezpiecznego korzystania z urządzenia i są świadome zagrożeń
wynikających z jego użytkowania.
•
Dzieciom nie wolno bawić się urządzeniem.
•
Czyszczenie i konserwacja urządzenia nie mogą być
przeprowadzane przez dzieci, chyba że znajdują się
one pod opieką osoby dorosłej.
•
W razie uszkodzeń lub niewłaściwego działania urządzenie należy natychmiast wyłączyć i odłączyć od
zasilania.
•
Nie wkładać ani nie wyjmować zasilacza wilgotnymi
rękami.
•
Opakowanie należy przechowywać w miejscu niedostępnym dla dzieci (niebezpieczeństwo uduszenia).
•
Kabel sieciowy należy położyć tak, aby uniemożliwić
ewentualne potknięcie się o niego.
•
Urządzenie, zasilacz i przewód zasilający nie mogą mieć
kontaktu z wodą!
UWAGA
•
Urządzenie należy chronić przed wstrząsami, wilgocią,
zanieczyszczeniem, dużymi wahaniami temperatury
ibezpośrednim nasłonecznieniem.
•
Przyrząd należy chronić przed upadkiem.
5. Opis urządzenia
2
1
5
6
7
8
9
10
1 Wyświetlacz 6 Przycisk MODE / ENTER
2 Powierzchnia
świetlna
3 Funkcja Snooze
(wibracja urządzenia)
4 Głośnik 9 Zasilanie sieciowe
5 Przyciski SET p / q
7 Przycisk ALARM
8 Przyłącze USB
(tylkodoładowania, bez
odtwarzania muzyki)
10 Przyciski +/-
3
4
54
Page 55

Wyświetlacz
1
2 3
2
4
5
6
12
1 Tryb radiowy 7 Funkcja Dobranoc
2 Miesiąc (M) / Dzień (D) 8 Tryb radiowy
3 Głośność 9 Dźwięk „beep”
4 Bluetooth
5 Tryb godziny 11 Miejsca zapisu
6 Godzina / Data /
Częstotliwość radiowa
®
1011
9
10 Melodia budzenia
alarmu1-3
12 Ustawienie aktywne
78
6. Uruchomienie urządzenia
•
Zdejmij opakowanie.
•
Sprawdź, czy nie brakuje żadnych elementów.
•
Sprawdź, czy urządzenie, zasilacz i kabel nie zostały
uszkodzone.
•
Ustaw urządzenie na równej i twardej powierzchni.
•
Podłącz złącze zasilacza do gniazda zasilacza z tyłu
urządzenia.
•
Podłączyć wtyczkę sieciową do odpowiedniego
gniazdka.
•
Na wyświetlaczu urządzenia pojawi się godzina.
•
Przełóż antenę kablową urządzenia do tyłu.
7. Uruchomienie aplikacji
7.1 Aplikacja „Beurer LightUp”
Po pobraniu aplikacji „Beurer LightUp” i połączeniu
zastosowania światła podczas budzenia przez Bluetooth®
ze smartfonem, można wygodnie sterować wszystkimi
funkcjami urządzenia z poziomu aplikacji.
Rekomendujemy obsługę funkcji zastosowania światła
podczas budzenia przez aplikację w smartfonie, ponieważ
jest to bardziej wygodne niż z użyciem przycisków na
urządzeniu.
Aby obsługiwać funkcje urządzenia przez aplikację
wsmartfonie, należy wykonać następujące czynności:
Upewnić się, że smartfon jest podłączony do Internetu.
1.
2. Aktywować funkcję Bluetooth® na swoim smartfonie.
Pobrać aplikację „Beurer LightUp” ze sklepu Apple App
3.
Store (iOS) lub Google Play (Android).
4. Otworzyć aplikację „Beurer LightUp” i dodać zastoso
wanie światła podczas budzenia do aplikacji.
Następnie można obsługiwać aplikacją wszystkie
5.
funkcje urządzenia.
Wskazówka
Wymienione funkcje można obsługiwać wyłącznie przez
aplikację:
•
Głośnik Bluetooth
•
Wybór 10 zdefiniowanych ustawień nastrojowego światła
•
Bezpośredni wybór kolorów nastrojowego światła
•
Włączanie i wyłączanie alarmu dla każdego dnia
•
Definiowanie specjalnych ustawień alarmu
•
Włączanie i wyłączanie dźwięków przycisków
•
Aktywacja zachodu słońca
7.2 Głośnik Bluetooth
W celu aktywowania głośnika Bluetooth® należy wykonać
co najmniej jednorazowo następujące połączenie:
Zamknij aplikację „Beurer LightUp”, jeśli jest ona otwarta.
1.
2.
Naciśnij przycisk MODE / ENTER 2 razy, aż na wyświetlaczu wyświetli się „bt”. Rozpocznie się wyszukiwanie
Bluetooth®.
W ustawieniach Bluetooth® swojego systemu operacyj-
3.
nego (iOS / ustawienia Android) wybierz z listy urządzeń
„WL 90 Speaker”, aby wykonać połączenie.
Kiedy urządzenie zostanie połączone ze smartfonem,
4.
wyświetli się niebieskie logo Bluetooth® na wyświetlaczu zastosowania światła podczas budzenia.
5. Wybierz funkcję muzyki w menu aplikacji
W celu wyłączenia głośnika nacisnąć dwukrotnie przycisk
6.
MODE / ENTER
Wskazówka
Przy stosowaniu takiego samego smartfona z tym samym
urządzeniem połączenie zostaje zapisane. Dzięki temu
można automatycznie utworzyć to połączenie Bluetooth®
przy uruchamianiu funkcji muzyki w aplikacji LightUp.
Taka automatyka może działać w różny sposób w zależności od modelu smartfona.
Wskazówka
Zasadniczo stosuje się Bluetooth®Smart (low energy),
aby np. sterować funkcjami światła i alarmu. Do przesyłania muzyki stosuje się dodatkowo Classic Bluetooth®.
Wówczas na wyświetlaczu urządzenia wyświetla się
®
®
LightUp.
. W tym celu należy wyłączyć aplikację.
-
55
Page 56

symbol Bluetooth® (połączenieBluetooth®jest aktywne
lub jest wyszukiwane).
7.3 Funkcja zachodu słońca
Za pomocą urządzenia można przedstawić także symulację zachodu słońca. W tym przypadku światło w ustawionym czasie będzie powoli ściemniać się.
Funkcję zachodu słońca można ustawić wyłącznie
poprzez menu aplikacji „Beurer LightUp”.
8. Obsługa urządzenia
Wymienione funkcje podstawowe można bezpośrednio obsługiwać także bez aplikacji, jednak tylko
wówczas, kiedy aplikacja na smartfonie zostanie
zamknięta. Urządzenie można stosować w pełnym
zakresie tylko w połączeniu z aplikacją „Beurer LightUp”.
8.1 Ustawianie godziny i daty
Wskazówka
Jeśli stosujesz aplikację „Beurer LightUp”, godzina idata
są już ustawione, ponieważ przy każdym zastosowaniu
aplikacji są one automatycznie synchronizowane ze
smartfonem.
Przytrzymaj wciśnięty przycisk MODE / ENTER przez
1.
trzy sekundy.
Na wyświetlaczu zacznie migać tryb godzinowy
2.
24 hr. Ustaw tryb godzinowy za pomocą przyci
sków SETp / q (tryb 24-godzinny lub 12-godzinny).
Potwierdź przyciskiem MODE / ENTER.
Na wyświetlaczu zacznie migać wskazanie godziny.
3.
Ustaw godziny przyciskami SET p / q. Potwierdź przy-
ciskiem MODE / ENTER.
Na wyświetlaczu zacznie migać wskazanie minut.
4.
Ustaw minuty przyciskami SET p / q. Potwierdź przy-
ciskiem MODE / ENTER.
Na wyświetlaczu miga rok 2015. Ustaw rok przyciskami
5.
SET p / q. Potwierdź przyciskiem MODE / ENTER.
Na wyświetlaczu miga miesiąc (M) 1. Ustaw miesiąc
6.
przyciskami SET p / q . Potwierdź przyciskiem
MODE / ENTER.
Na wyświetlaczu miga dzień (D) 1 . Ustaw dzień
7.
przyciskami SET p / q . Potwierdź przyciskiem
MODE / ENTER. Wyświetli się ustawiona godzina.
8.2 Włączanie / wyłączanie alarmu
Włączanie alarmu
Przed ustawieniem alarmu należy aktywować miejsce
zapisu alarmu, w którym ma zostać ustawiony alarm.
Urządzenie dysponuje trzema miejscami pamięci alarmów
( , , ), które można ustawiać w różny sposób.
-
Można wybrać budzenie za pomocą jednej z 10 melodii
budzenia, sygnału dźwiękowego lub radia.
Aby wybrać miejsca pamięci alarmów, należy wykonać
następujące czynności:
1.
Naciskając przycisk ALARMU, wybierz żądane miejsce
pamięci alarmów, które wyświetla się na wyświetlaczu
(można też równocześnie wybrać kilka miejsc pamięci
alarmów).
2.
Aby wyłączyć alarm, naciśnij ALARM tak często, aż
powiązany symbol budzika na wyświetlaczu zniknie.
8.3 Ustawianie alarmu
Ustawianie alarmu w urządzeniu
Aby ustawić wybrane miejsce pamięci alarmu, należy
wykonać następujące czynności:
1.
Przy aktywowanym alarmie, przytrzymać wciśnięty
przycisk ALARM przez dwie sekundy.
2.
Na wyświetlaczu zacznie migać godzina alarmu. Ustaw
godzinę alarmu przyciskami SET p / q. Potwierdź przy-
ciskiem ALARM.
3. Na wyświetlaczu zacznie migać minuta alarmu. Ustaw
minutę alarmu przyciskami SET p / q. Potwierdź przy-
ciskiem ALARM.
4.
Na wyświetlaczu zacznie migać symbol dźwięku
budzika. Ustaw żądany dźwięk budzika przyciskami
SET p / q (melodia budzenia 1-10 , dźwięk „beep”
lub radio ). Potwierdź przyciskiem ALARM.
5.
Na wyświetlaczu miga głośność alarmu (VOLUME).
Ustaw głośność alarmu przyciskami SET p / q .
Potwierdź przyciskiem ALARM.
6. Na wyświetlaczu miga czas drzemki (Sn). Ustaw czas
drzemki (1, 2, 5, 10, 20 lub 30 minut) przyciskami
SETp / q. Potwierdź przyciskiem ALARM.
Wskazówka
Ustawianie czasu alarmu przez smartfon
Aby ustawić czas alarmu przez aplikację i aktywować
budzenie, wystarczające jest, kiedy smartfon w momencie
ustawiania jest połączony przez Bluetooth® z urządze
niem. Po ustawieniu czasu budzenia i dźwięku budzenia
można wyłączyć na smartfonie Bluetooth® lub wyłączyć
smartfon. Ciągłe połączenie Bluetooth® przez noc nie
jest konieczne.
8.4 Wyłączanie alarmu
Podczas symulacji wschodu słońca
Symulację wschodu słońca można wyłączyć poprzez
aktywację funkcji drzemki. Nie rozlega się sygnał budzika. Światło świeci w sposób lekko przyciemniony przez
2minuty. Ponowne naciśnięcie dowolnego przycisku wy
łącza światło.
56
-
-
Page 57

Trym drzemki (snooze) przy alarmie
Urządzenie jest wyposażone w tryb drzemki (snooze).
Kiedy rozlegnie się alarm i wciśnięta zostanie funkcja
Snooze (dotknięcie powierzchni świetlnej), po upływie
ustawionej długości drzemki alarm zabrzmi ponownie.
Wyłączanie alarmu przy sygnale dźwiękowym
Kiedy rozlegnie się alarm, wciśnij dowolny przycisk
oprócz Snooze. Alarm zostanie wówczas wyłączony i
rozlegnie się ponownie dopiero w ustawionym czasie
alarmu. Światło pozostaje włączone przez 2 minuty, aby
można było wstać; potem światło automatycznie się wyłącza. Aby ponownie włączyć światło, patrz rozdział 8.8.
8.5 Ustawienie jasności wyświetlacza
Urządzenie umożliwia cztery stopnie jasności wyświetlacza (
0, 1, 2, 3, A
(automatyczny) jasność wyświetlacza automatycznie dopasowuje się do otoczenia.
Aby ustawić jasność, należy wykonać następujące czynności:
1.
Równocześnie nacisnąć przyciski + / -. Na wyświetlaczu
wyświetli się „
jasność wyświetlacza (
2.
Aby potwierdzić jasność wyświetlacza, równocześnie
nacisnąć obydwa przyciski + / -.
). W przypadku stopnia jasności „A”
BL:
”. Przyciskiem MODE ustawić żądaną
0, 1, 2, 3
lub A).
2.
Na wyświetlaczu zacznie migać wskazanie timera.
Przyciskiem ALARM ustaw żądany czas trwania timera
(2, 5, 10, 15, 30, 45 lub 60 minut).
3.
Dla potwierdzenia równocześnie krótko naciśnij przyciski SET p / q.
8.8 Funkcja oświetlenia
1. Stuknij ręką z boku w urządzenie, tak by lekko wibrowało. Oświetlenie wyświetlacza stanie się jaśniejsze.
2. W ciągu trzech sekund ponownie stuknij w bok urzą
dzenia. Włączy się białe światło lampki do czytania.
8.9 Funkcja światła nastrojowego
1. Stuknij ręką z boku w urządzenie, tak by lekko wibrowało. Oświetlenie wyświetlacza stanie się jaśniejsze.
2. W ciągu trzech sekund ponownie stuknij w bok urzą
dzenia. Włączy się białe światło lampki do czytania.
3.
Aby włączyć światło nastrojowe ze zmianą kolorów,
ponownie stuknij w powierzchnię świetlną urządzenia.
4.
Aby podczas zmiany kolorów światło wyświetlało się
w sposób ciągły, ponownie stuknij w powierzchnię
świetlną urządzenia.
5.
Aby wyłączyć funkcję światła, ponownie stuknij
wpowierzchnię świetlną urządzenia.
-
-
8.6 Tryb radiowy
Aby włączyć radio, należy wykonać następujące
czynności:
1.
Naciskać przycisk MODE / ENTER tak często, aż na
wyświetlaczu wyświetli się
2. Przyciskami + / - ustaw głośność radia.
3. Zmień miejsce zapisu przyciskiem SET p.
4.
Aby uruchomić automatyczne wyszukiwanie nadajnika, przytrzymać wciśnięty przycisk SET p przez trzy
sekundy. Aby zmienić częstotliwość radia w krokach po
0,1 MHz, krótko nacisnąć przyciski SET p / q.
5.
Aby zapisać nadajnik radiowy pod danym numerem
programu, naciśnij przycisk MODE / ENTER. Powiązany
numer programu (np. P1) wyświetli się na wyświetlaczu.
RADIO
.
8.7 Funkcja Dobranoc (Radio Sleep-Timer)
Jeśli włączony jest tryb radia lub głośnik
można dodatkowo aktywować funkcję Dobranoc ( ).
Za pomocą funkcji Dobranoc można ustawić, po ilu
minutach radio lub głośnik
automatycznie.
Jeśli chcesz użyć funkcji Dobranoc, postępuj zgodnie
zponiższymi wskazówkami:
1.
W trybie radia lub trybie głośnika Bluetooth® równocześnie krótko naciśnij przyciski SET p / q.
Bluetooth®
Bluetooth®,
ma wyłączać się
9. Co należy zrobić w przypadku
problemów?
Na stronie www.beurer.com zawarte są dodatkowe
informacje i zestawienie często zadawanych pytań
(FAQ) dotyczących produktu.
10. Czyszczenie/przechowywanie
•
Urządzenie należy czyścić suchą ściereczką.
•
Nie należy używać środków czyszczących do
szorowania.
•
Nie wolno dopuścić, aby woda dostała się do wnętrza
urządzenia. Wrazie zmoczenia urządzenia można go
użyć ponownie dopiero po całkowitym osuszeniu.
•
Nie zanurzać urządzenia ani zasilacza w wodzie lub
innych cieczach.
•
Chronić urządzenie przed wstrząsami, wilgocią,
kurzem, chemikaliami, dużymi wahaniami temperatury
i zbyt blisko znajdującymi się źródłami ciepła (np. piec,
grzejnik).
57
Page 58

11. Utylizacja
W związku z wymogami w zakresie ochrony środowiska
urządzenia po zakończeniu eksploatacji nie należy
wyrzucać wraz z odpadami domowymi. Utylizację
należy zlecić w odpowiednim punkcie zbiórki
wdanym kraju. Podczas utylizacji należy przestrzegać lokalnych przepisów dotyczących utylizacji materiałów. Urządzenie należy zutylizować zgodnie
z dyrektywą o zużytych urządzeniach elektrycznych
ielektronicznych – WEEE (Waste Electrical and Electronic
Equipment). W razie pytań należy zwrócić się do odpowiedniej instytucji odpowiedzialnej za utylizację.
12. Dane techniczne
Streaming muzyki Bluetooth
Głośnik 2 x 3 waty
Napięcie zasilania
zasilacza
Klasa ochron
ności zasilacza
Prawo do zmian technicznych zastrzeżone.
Gwarantujemy, że ten produkt jest zgodny z dyrektywą
europejską R&TTE 1999/5/WE.
Aby uzyskać szczegółowe dane, np. otrzymać certyfikat
zgodności CE, należy skontaktować się z punktem serwisowym pod podanym adresem.
Wejście: 110-240 V, AC,
50/60 Hz, 0,5 A
Wyjście: 5 V, DC, 3000mA
Klasa ochronności II
®
Natężenie
oświetlenia
Światło
Poziomy światła
Oświetlenie
nastrojowe
Funkcja zasto
sowania światła
podczas budzenia
Funkcja wschodu
słońca
Długość drzemki 1, 2, 5, 10, 20, 30 minut
Funkcja zachodu
słońca
Funkcja Dobranoc
(Sleep Radio)
Oświetlenie LCD
w tle
Godzina Przestawiane 12h / 24h
Alarm
Dźwięk
przycisków
USB
Radio
Maksymalnie ok. 2500 luksów
(przy 15 cm odległości)
Technologia LED (trwałość LED:
> 50 000 godzin, nie można
wymienić LED)
Ustawiane bezstopniowo przez
aplikację
Automatyczna zmiana kolorów
RGB z indywidualnym ustawie
niem koloru
Wył., 2, 5, 10, 15, 20, 30, 45,
60minut przed alarmem
Maksymalna siła światła
do chwili alarmu:
Poziom światła 5, 10, 15, 20
2, 5, 10, 15, 20, 30, 45, 60 minut
2, 5, 10, 15, 20, 30, 45, 60 minut
Auto, Wył., 1, 2, 3
3 czasy alarmu (Wył., Wł., Dzień)
Dźwięk budzika, 10 tonów, radio
Wył., Wł.
Funkcja ładowania USB
do smartfona z 5 V / 500 mA
(tablety nie są obsługiwane).
Zakres częstotliwości
UKW87,0–108 MHz,
10 miejsc pamięci
-
58
Prawo do pomyłek i zmian zastrzeżone
Page 59

59
Page 60

60
751.871 - 0116
 Loading...