

Page 1
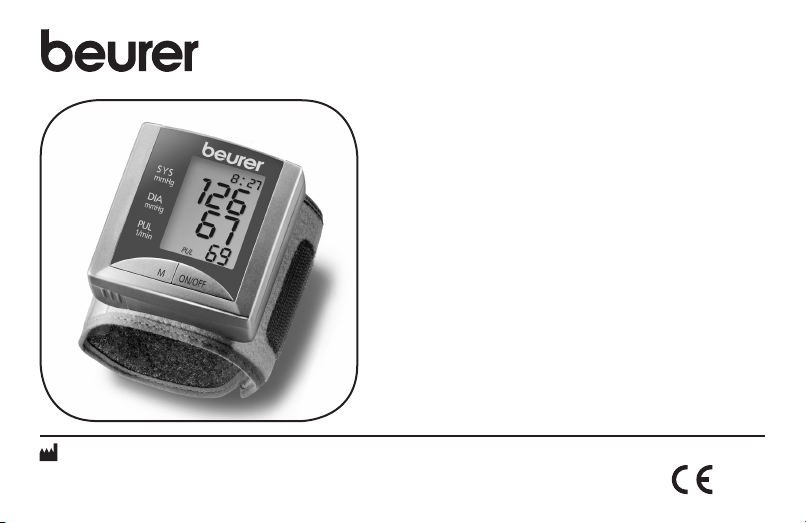
BC 20
D
Gebrauchsanleitung
Blutdruckmessgerät ........................................ (2 – 9)
G
Instruction for Use
Blood pressure monitor ................................(10 –16)
F
Mode d’emploi
Tensiométre ...................................................(17– 24)
E
Instrucciones para el uso
Tensiómetro .................................................. (25 – 32)
I
Instruzioni per l’uso
Misuratore di pressione ............................... (33 – 40)
T
Kullanma Talimatı
Tansiyon Ölçma Aleti ....................................(41– 47)
r
Инструкция по применению
Прибор для измерения артериального
давления на запястье ................................ (48 – 56)
Q
Instrukcja obsługi
Ciśnieniomierz ...............................................(57– 64)
BEURER GmbH • Söfl inger Str. 218 • 89077 Ulm (Germany)
Tel.: +49 (0)731 / 39 89-144 • Fax: +49 (0)731 / 39 89-255
www.beurer.de • Mail: kd@beurer.de
0483
Page 2

DEUTSCH
Sehr geehrte Kundin, sehr geehrter Kunde,
wir freuen uns, dass Sie sich für ein Produkt unseres
Sortimentes entschieden haben. Unser Name steht für
hochwertige und eingehend geprüfte Qualitätsprodukte
aus den Bereichen Wärme, Gewicht, Blutdruck, Körpertemperatur, Puls, Sanfte Therapie, Massage und Luft.
Bitte lesen Sie diese Gebrauchsanleitung aufmerksam
durch, bewahren Sie sie für späteren Gebrauch auf, machen Sie sie anderen Benutzern zugänglich und beachten Sie die Hinweise.
Mit freundlicher Empfehlung
Ihr Beurer-Team
1. Kennenlernen
Das Handgelenk-Blutdruckmessgerät dient zur
nichtinva siven Messung und Überwachung arterieller
Blutdruckwerte von erwachsenen Menschen.
Sie können damit schnell und einfach Ihren Blutdruck
messen, die Messwerte abspeichern und sich den Verlauf und Durchschnitt der Messwerte anzeigen lassen.
2. Wichtige Hinweise
Hinweise zur Anwendung
•
Messen Sie Ihren Blutdruck immer zu gleichen Tages-
zeiten, um eine Vergleichbarkeit der Werte zu gewährleisten.
• Ruhen Sie sich vor jeder Messung ca. 5 Minuten aus!
• Zwischen zwei Messungen sollten Sie 5 Minuten warten!
•
Die von Ihnen selbst ermittelten Messwerte können
nur zu Ihrer Information dienen – sie ersetzen keine
ärztliche Untersuchung! Besprechen Sie Ihre Messwerte mit dem Arzt, begründen Sie daraus auf keinen
Fall eigene medizinische Entscheidungen (z.B. Medikamente und deren Dosierungen)!
• Bei Einschränkungen der Durchblutung an einem Arm
aufgrund chronischer oder akuter Gefäß erkrankungen
(unter anderem Gefäßverengungen), ist die Genauigkeit der Handgelenksmessung eingeschränkt. Weichen
Sie in diesem Fall auf ein am Oberarm messendes
Blutdruckmessgerät aus.
•
Es kann zu Fehlmessungen bei Erkrankungen des
Herz-Kreislaufsystems kommen, ebenso bei sehr
2
Page 3

niedrigem Blutdruck, Durchblutungs- und Rhythmusstörungen sowie bei weiteren Vorerkrankungen.
•
Verwenden Sie das Gerät nur bei Personen mit dem
für das Gerät angegebenen Umfangbereich des
Handgelenks.
•
Sie können das Blutdruckmessgerät ausschließlich
mit Batterien betreiben. Beachten Sie, dass eine
Daten speicherung nur möglich ist, wenn Ihr Blutdruckmessgerät Strom erhält. Sobald die Batterien
verbraucht sind, verliert das Blutdruckmessgerät
Datum, Uhrzeit und gespeicherte Messwerte.
•
Die Abschaltautomatik schaltet das Blutdruckmess-
gerät zur Schonung der Batterien aus, wenn innerhalb
einer Minute keine Taste betätigt wird.
Hinweise zur Aufbewahrung und Pflege
•
Das Blutdruckmessgerät besteht aus Präzisions- und
Elektronik-Bauteilen. Die Genauigkeit der Messwerte
und Lebensdauer des Gerätes hängt ab vom sorgfältigen Umgang:
– Schützen Sie das Gerät vor Stößen, Feuchtigkeit,
Schmutz, starken Temperaturschwankungen und
direkter Sonneneinstrahlung.
– Lassen Sie das Gerät nicht fallen.
– Benutzen Sie das Gerät nicht in der Nähe von star-
ken elektromagnetischen Feldern, halten Sie es fern
von Funkanlagen oder Mobiltelefonen.
– Verwenden Sie nur die mitgelieferte oder originale
Ersatz-Manschetten. Ansonsten werden falsche
Messwerte ermittelt.
•
Drücken Sie nicht auf Tasten, solange die Manschette
nicht angelegt ist.
• Falls das Gerät über einen längeren Zeitraum nicht benutzt wird, wird empfohlen die Batterien zu entfernen.
Hinweise zu Batterien
•
Batterien können bei Verschlucken lebensgefährlich
sein. Bewahren Sie deshalb Batterien und Produkte
für Kleinkinder unerreichbar auf. Wurde eine Batterie
verschluckt, muss sofort medizinische Hilfe in Anspruch genommen werden.
•
Batterien dürfen nicht geladen oder mit anderen Mit-
teln reaktiviert, nicht auseinandergenommen, in Feuer
geworfen oder kurzgeschlossen werden.
•
Nehmen Sie die Batterien aus dem Gerät heraus,
wenn diese verbraucht sind oder Sie das Gerät länger
nicht benutzen. So vermeiden Sie Schäden, die durch
Auslaufen entstehen können. Ersetzen Sie immer alle
Batterien gleichzeitig.
3
Page 4
•
Benutzen Sie keine verschiedenen Batterie-Typen,
Batterie-Marken oder Batterien mit unterschiedlicher
Kapazität. Verwenden Sie vorzugsweise Alkaline-Batterien.
Hinweise zu Reparatur und Entsorgung
•
Batterien gehören nicht in den Hausmüll. Bitte entsor-
gen Sie die verbrauchten Batterien an den dafür vorgesehenen Sammelstellen.
•
Öffnen Sie nicht das Gerät. Bei nicht Beachten erlischt
die Garantie.
•
Das Gerät darf nicht selbst repariert oder justiert
werden. Eine einwandfreie Funktion ist in diesem Fall
nicht mehr gewährleistet.
•
Reparaturen dürfen nur vom Beurer Kundenservice
oder autorisierten Händlern durchgeführt werden.
Prüfen Sie jedoch vor jeder Reklama tion zuerst die
Batterien und tauschen Sie diese gegebenenfalls aus.
•
Bitte entsorgen Sie das Gerät gemäß der
Elektro- und Elektronik-Altgeräte-EG-Richtlinie
2002/96/EC – WEEE (Waste Electrical and Electronic Equipment). Bei Rückfragen wenden Sie sich
bitte an die für die Entsorgung zuständige kommunale
Behörde.
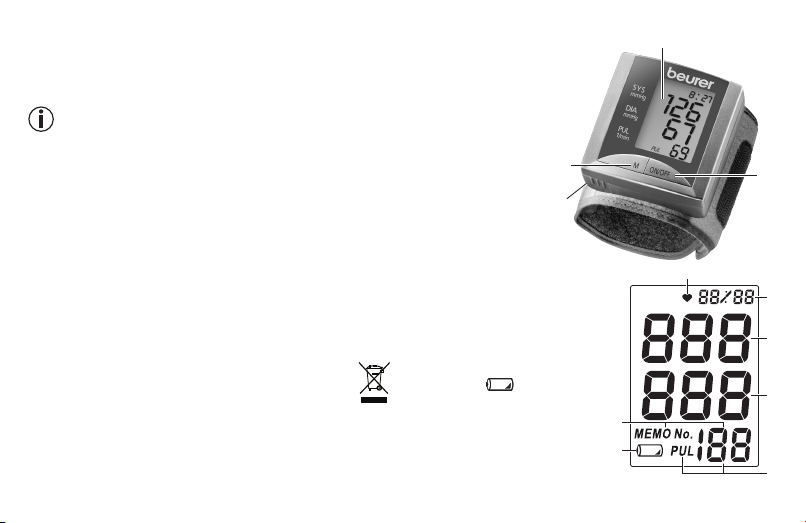
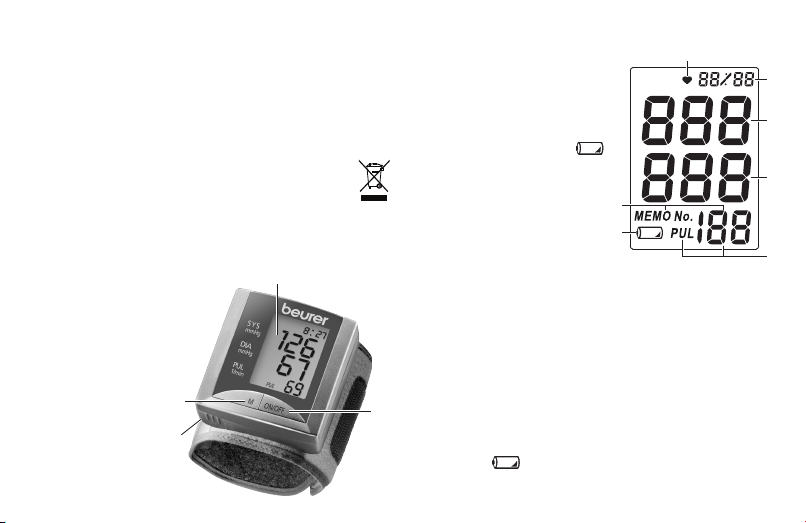
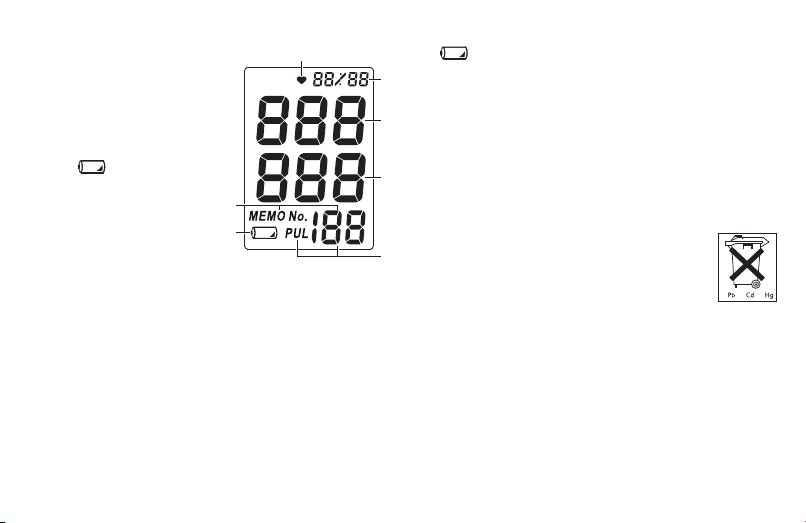
3. Gerätebeschreibung
Display
Batteriefach-
deckel
Speicher- Taste M
Start /Stopp-Taste
Anzeigen auf dem
Display:
1. Symbol Puls
2. Uhrzeit und Datum
3. Systolischer Druck
4. Diastolischer Druck
5. Ermittelter Pulswert
6. Symbol Batterie-
wechsel
7. Speicherplatznummer
4
1
2
3
4
7
6
5
Page 5

4. Batterien einsetzen/wechseln
•
Entfernen Sie den Batteriefachdeckel .
•
Verwenden Sie ausschließlich Markenbatterien vom
Typ: 2 x 1,5 V Micro (Alkaline Typ LR03). Achten Sie
unbedingt darauf, dass die Batterien entsprechend
der Kennzeichnung mit korrekter Polung eingelegt
werden. Es dürfen keine wiederaufladbaren Akkus
verwendet werden.
•
Schließen Sie anschließend das Batteriefach, indem
Sie den Deckel aufsetzen und einrasten lassen.
Sind die Batterien fast verbraucht, erscheint das Symbol
einer leeren Batterie
die Batterien müssen ausgetauscht werden.
Sobald die Batterien aus dem Gerät entfernt werden,
müssen das Datum und die Uhrzeit neu eingestellt werden. Die gespeicherten Messergebnisse gehen verloren.
Verbrauchte Batterien gehören nicht in den Hausmüll.
Entsorgen Sie diese über Ihren Elektro fachhändler oder
Ihre örtliche Wertstoff-Sammelstelle. Dazu sind Sie
gesetzlich verpflichtet.
Hinweis: Diese Zeichen finden Sie auf schadstoffhaltigen Batterien: Pb: Batterie enthält
Blei, Cd: Batterie enthält Cadmium,
Hg: Batterie enthält Quecksilber.
unten links im Display und
5. Datum, Uhrzeit einstellen
Die Einstellung von Datum/Uhrzeit ist notwendig, um
Ihre Messwerte korrekt mit Datum und Uhrzeit zu speichern und später wieder abzurufen.
Zur Einstellung von Datum und Uhrzeit gehen Sie wie
folgt vor:
•
Nach dem Einlegen der Batterien drücken Sie die
Start /Stopp-Taste
Stellen Sie mit der Speicher-Taste M
und bestätigen Sie mit der Start /Stopp-Taste
•
Stellen Sie danach Monat, Tag, Stunde und Minute ein
und bestätigen Sie jeweils mit der Start /Stopp-Taste
.
. Das Jahr beginnt zu blinken.
das Jahr ein
.
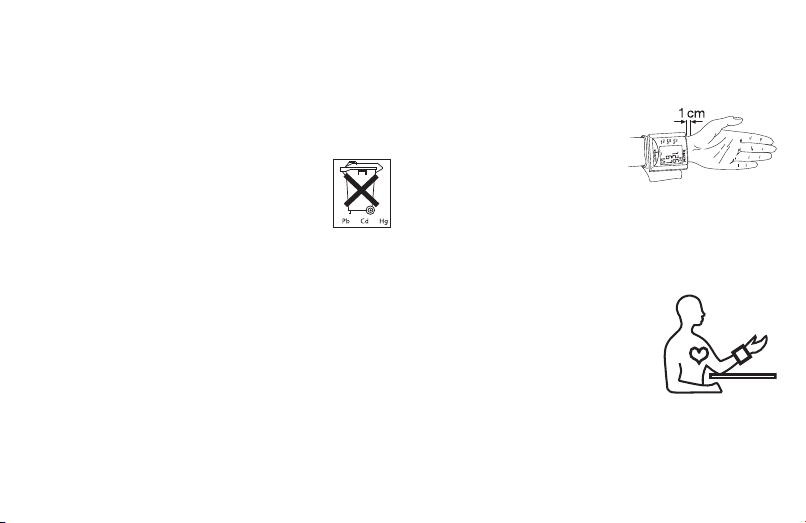
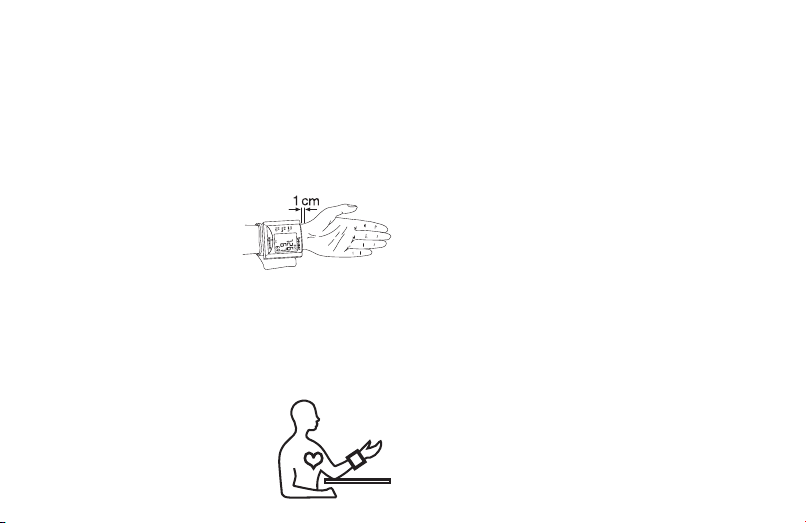
6. Anlegen des Gerätes
•
Legen Sie den Blutdruckcomputer am linken Hand-
gelenk auf der Innenseite an.
• Achten Sie darauf, dass das Handgelenk unbekleidet ist.
• Schließen Sie die Manschette
mit dem Klettverschluss,
sodass die Oberkante des
Gerätes ca. 10 mm unter dem
Handballen sitzt (siehe Abb.).
•
Die Manschette muss eng um das Handgelenk anlie-
gen, darf aber nicht einschnüren.
5
Page 6

7. Blutdruck messen
• • • • • • • • • • • • •
•
Setzen Sie sich ruhig hin.
•
Stützen Sie Ihren Arm unbedingt ab
und winkeln ihn an, sodass sich
das Gerät auf Herzhöhe befindet
(siehe Abb.).
•
Halten Sie vor der Messung
eine ausreichende Ruhezeit von
3 – 5 Minuten ein.
•
Drücken Sie nun die Start /Stopp-Taste um die
Messung zu starten.
•
Nach dem Prüfen des Displays, wobei alle Ziffern
leuchten, wird die Manschette automatisch auf
180 mmHg aufgepumpt.
•
Nach Erreichen der 180 mmHg wird automatisch der
Druck aus der Manschette abgelassen und auf dem
Display erscheint ein pochendes Herz.
•
Anschließend erscheinen auf dem Display Ihre Blut-
druckwerte und ihr Pulswert.
•
Zum Abschalten und Druck ablassen drücken Sie er-
neut die Start /Stopp-Taste
•
Sollten Sie vergessen das Gerät abzuschalten, schal-
tet sich dieses automatisch nach 3 Minuten ab.
•
Sie können die Messung jederzeit durch das Drücken
der Start /Stopp-Taste
.
abbrechen.
8. Anzeige der gespeicherten Werte
Das Gerät speichert automatisch die Blutdruckwerte
von den letzten 60 Messungen ab.
Werden die 60 Speicherplätze überschritten, wird der
jeweils älteste Wert gelöscht.
Der Speicher kann wie folgt abgerufen werden:
• Drücken Sie in ausgeschaltetem Zustand die SpeicherTaste
M
•
• Sie erkennen im Display unten rechts die Speicherplatz-
•
• Nach dem letzten belegten Speicherplatz zeigt das
•
•
6
, es erscheint der letzte gemessene Wert.
Durch weiteres Drücken der Speicher-Taste M können
Sie alle gespeicherten Werte einzeln abrufen.
nummer. Das Datum und die Uhrzeit der einzelnen Messung werden im oberen Teil des Displays angezeigt.
Der zuletzt ermittelte Wert wird auf Speicherplatz 1
abgespeichert. Sobald ein neuer Wert gemessen wird,
kommt dieser auf Speicherplatz 1 und der ältere Wert
rutscht einen Speicherplatz weiter.
Gerät durch erneutes Drücken der Speicher-Taste M
den Durchschnitt aller gespeicherten Messwerte an.
Zum Abschalten drücken Sie erneut die Start /Stopp-
Taste .
Sollten Sie vergessen das Gerät abzuschalten, schal-
tet sich dieses automatisch nach 3 Minuten ab.
Page 7
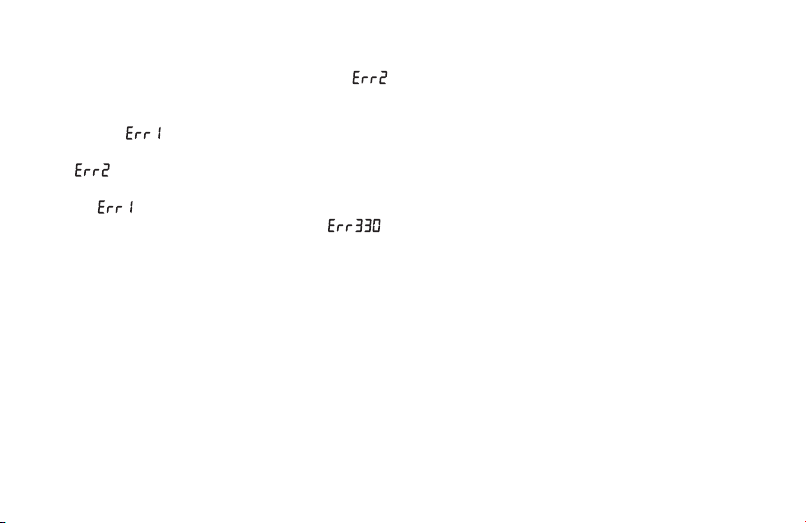
9. Fehler beheben
Fehlermeldungen können auftreten, wenn
•
das Aufpumpen länger als 25 Sekunden dauert (
erscheint im Display),
•
Sie sich während der Messung bewegen und nicht
ruhig halten (
•
nicht genügend aufgepumpt wurde, trotz Nachpum-
pen (
•
die Blutdruckwerte außergewöhnlich hoch oder nied-
rig sind (
•
der Aufpumpdruck höher als 300 mmHg ist (
erscheint im Display),
•
die Batterien fast verbraucht sind, die Batterien müs-
sen ausgetauscht werden.
Wiederholen Sie in diesen Fällen die Messung. Setzen
Sie gegebenfalls die Batterien neu ein oder ersetzen Sie
diese.
erscheint im Display),
erscheint im Display),
erscheint im Display),
10. Reinigung und Pflege
•
Reinigen Sie Ihr Blutdruckmessgerät vorsichtig nur mit
einem leicht angefeuchteten Tuch.
•
Verwenden Sie keine Reinigungs- oder Lösungsmittel.
•
Sie dürfen das Gerät auf keinen Fall unter Wasser
halten, da sonst Flüssigkeit eindringen kann und das
Gerät beschädigt.
•
Stellen Sie keine schweren Gegenstände auf das Gerät.
7
Page 8

11. Tabelle zur Klassifikation von Blutdruckwerten (Maßeinheit mmHg) für Erwachsene:
Bereich Systole Diastole Maßnahme
Hypotonie
(erniedrigter Blutdruck) niedriger als 105 niedriger als 60 Kontrolle beim Arzt
Normalbereich zwischen 105 und 120 zwischen 60 und 80 Selbstkontrolle
Prähypertensiver
Blutdruckbereich (*) zwischen 120 und 140 zwischen 80 und 90 Kontrolle beim Arzt
Hypertonie –
Bluthochdruck Grad I zwischen 140 und 160 zwischen 90 und 100 Konsultation Ihres Arztes
Hypertonie –
Bluthochdruck Grad II höher als 160 höher als 100 Konsultation Ihres Arztes
(*) Blutdruckbereich der in einen Bluthochdruck übergehen kann Adapted from JNC 2003
12. Technische Daten
Typ: BC 20
Mess methode:
Anzeige berreich: 0 – 300 mmHg
Mess bereich: systolisch: 50 – 250 mmHg /
nicht invasive, oszillometrische Blutdruckmessung am Handgelenk, für
Handgelenksumfang 12,5 cm – 20,5 cm
diastolisch: 40 –180 mmHg /
Puls: 40 –160 /min
Genauigkeit der
Druckanzeige:
Messunsicherheit:
Stromversorgung: 2 x 1,5 V Micro (Alkaline Typ LR03)
Klassifikation: Anwendungsteil Typ BF
8
systolisch: ± 3 mmHg /
diastolisch: ± 3 mmHg /
Puls: ± 5% des angezeigten Wertes
(max. zulässige Standardabweichung
gemäß klinischer Prüfung):
systolisch: 8 mmHg /
diastolisch: 8 mmHg
Page 9
Umgebungsbedingungen:
Lagerung/
Transport:
Zeichenerklärung:
•
Dieses Gerät entspricht der europäischen Norm
EN60601-1-2 und unterliegt besonderen Vorsichtsmaßnahmen hinsichtlich der elektromagnetischen
Verträglichkeit. Bitte beachten Sie dabei, dass tragbare und mobile HF-Kommunikationseinrichtungen
dieses Gerät beeinflussen können. Genauere Angaben
können Sie unter der angegebenen KundenserviceAdresse anfordern oder am Ende der Gebrauchsanleitung nachlesen.
•
Das Gerät entspricht der EU-Richtlinie für Medizinpro-
dukte 93/42/EC, dem Medizinproduktegesetz und den
europäischen Normen EN1060-1 (nicht invasive Blutdruckmessgeräte Teil 1: Allgemeine Anforderungen)
und EN1060-3 (nicht invasive Blutdruckmessgeräte
Teil 3: Ergänzende Anforderungen für elektromechanische Blutdruckmesssysteme).
+10 °C – +40 °C max. 85% Luftfeuchtigkeit
-5 °C – +50 °C max. 85% Luftfeuchtigkeit
Anwendungsteil Typ BF
Achtung!
Gebrauchsanleitung lesen!
13. Garantie
Wir leisten 3 Jahre Garantie für Material- und Fabrikationsfehler des Produktes. Die Garantie gilt nicht:
•
im Falle von Schäden, die auf unsachgemäßer Bedie-
nung beruhen,
•
für Verschleißteile,
•
für Mängel, die dem Kunden bereits beim Kauf be-
kannt waren,
•
bei Eigenverschulden des Kunden.
Die gesetzlichen Gewährleistungen des Kunden bleiben durch die Garantie unberührt. Für Geltendmachung
eines Garantiefalles innerhalb der Garantiezeit ist durch
den Kunden der Nachweis des Kaufes zu führen. Die
Garantie ist innerhalb eines Zeitraumes von 3 Jahren
ab Kaufdatum gegenüber der Beurer GmbH, Söflinger
Straße 218, 89077 Ulm, Germany geltend zu machen.
Der Kunde hat im Garantiefall das Recht zur Reparatur
der Ware bei unseren eigenen oder bei von uns autorisierten Werkstätten. Weitergehende Rechte werden dem
Kunden (aufgrund der Garantie) nicht eingeräumt.
9
Page 10

ENGLISH
Dear Customer,
Thank you for choosing one of our products. Our name
stands for high-quality, thoroughly tested products for
the applications in the areas of heat, weight, blood pressure, body temperature, pulse, gentle therapy, massage
and air.
Please read these instructions for use carefully and keep
them for later use, be sure to make them accessible to
other users and observe the information they contain.
Best regards,
Your Beurer Team
1. Familiarization
The wrist blood pressure monitor is used for noninvasive measurement and monitoring of adults’ arterial
blood pressure.
You can use it to measure your blood pressure quickly
and easily, storing the results and displaying the progression of readings together with the average.
2. Important information
Advice on use
•
Always measure your blood pressure at the same time
of day, in order to ensure that values are comparable.
• Relax for approx. 5 minutes before each measurement.
•
You should wait five minutes before measuring a sec-
ond time.
•
The readings that you take may only be used for in-
formation purposes – they are not a substitute for a
medical examination! Discuss your results with the
doctor. Never use them to make medical decisions
independently (e.g. regarding medication and dosage
thereof).
•
If circulation on one arm is restricted as a result of
chronic or acute vascular disease (including vasoconstriction), the precision of any wrist measurement is
impaired. In this case, use a blood pressure monitor
for the upper arm.
•
There may be incorrect measurements where there
is cardiocirculatory disease, as well as with very low
blood pressure, circulatory disorders, dysrhythmia
and other preexisting diseases.
10
Page 11
•
Only use the instrument on persons whose wrist has
the right circumference for the instrument.
•
You may only operate the blood pressure monitor with
batteries. Note that it is only possible to save data
when your blood pressure monitor is receiving power.
As soon as the batteries wear out, the blood-pressure
instrument loses the date, time and the values that
have been stored.
•
The automatic switch-off function switches off the
blood pressure monitor in order to preserve the batteries, if no button is pressed within one minute.
Storage and Care
• The blood pressure monitor is made up of precision
electronic components. Accuracy of readings and the
instrument’s service life depend on careful handling.
– You should protect the device from impact, moisture,
dirt, major temperature fluctuations and direct exposure to the sun’s rays.
– Never drop the device.
Do not use near strong electromagnetic fields, i.e. keep
–
it away from any radio systems and mobile phones.
– Only ever use the cuffs provided with the monitor or
original replacement cuffs. Otherwise erroneous results will be recorded.
•
Do not press any buttons until the cuff is in position.
•
If the instrument is not used for any length of time, we
recommend removing the batteries.
Advice on batteries
•
Batteries can be fatal if swallowed. You should there-
fore store the batteries and products where they are
inaccessible to small children. If a battery has been
swallowed, call a doctor immediately.
•
Batteries should not be charged or reactivated with
any other means, nor should they be taken apart,
thrown in the fire or short-circuited.
•
Remove the batteries from the instrument if they are
worn out or if you are not going to use the instrument
for any length of time. This prevents any damage as
a result of leakage. Always replace all the batteries at
the same time.
•
Never use different types of battery, battery brands or
batteries with different capacities. You should preferably use alkaline batteries.
Repair and disposal
•
Batteries do not belong in domestic refuse. Used bat-
teries should be disposed of at the collection points
provided.
•
Never open the instrument. If these instructions are
not heeded, the warranty will be null and void.
11
Page 12
• Never attempt to repair the instrument or adjust it yourself. We can no longer guarantee perfect functioning if
you do.
•
Repairs may only be performed by Beurer Customer
Service or authorized dealers. However, always check
the batteries and replace them if necessary prior to
making any complaint.
•
The appliance should be disposed of accord-
ing to Regulation 2002/96/EC-WEEE (Waste
Electrical and Electronic Equipment). In case of
queries, please contact the municipal authorities responsible for waste disposal in your area.
3. Unit description
Display
Battery compart-
ment cover
Memory button M
Start /Stop button
Icons in the display:
1. Pulse symbol
2. Time and date
3. Systolic pressure
4. Diastolic pressure
5. Measured pulse
6. „Change battery“ icon
7. Memory space number
7
6
1
4. Inserting/changing batteries
•
Remove the battery compartment cover .
•
Use exclusively brand-name batteries of the type:
2 x 1.5 V Micro (Alkaline Type LR03). Making absolutely sure that you insert them with the correct polarity as marked. Do not use rechargeable batteries.
•
Then close the battery compartment by fitting the
cover and clicking it in position.
When the batteries are almost exhausted, an empty battery symbol
and the batteries must then be exchanged.
12
appears at bottom left in the display
2
3
4
5
Page 13
Once the batteries have been removed from the device,
• • • • • • • • • • • • •
the date and time must be set again. The saved measurements are lost.
They are considered to be toxic waste and, as such,
should be disposed of in special containers, toxic waste
collection points or brought to electrical goods dealers.
You are legally obliged to dispose of the batteries.
Note: You will find these markings on batteries
containing harmful substances: Pb = battery
containing lead, Cd = battery containing cadmium, Hg = battery containing mercury.
5. Setting date/time
The date/time setting is necessary, so that you can save
your readings correctly with the date and time and call
them up again later.
To set the date and time, proceed as follows:
•
After inserting the batteries, press the Start /Stop
button
the memory button M
using the Start /Stop button
•
Then set the month, day, hour and minutes and con-
firm each setting with the Start /Stop button
. The year display will start to flash. Use
to set the year and confirm
.
.
6. Applying the blood pressure computer
•
Apply the blood pressure computer to the inside of
the left wrist.
•
Ensure that the wrist is unclothed.
•
Close the cuff with the Velcro
fastener, so that the top
margin of the computer is
about 10 mm below the ball
of the thumb (see illustration).
•
The cuff must be placed tightly around the wrist but
must not constrict.
7. Measuring blood pressure
•
Sit in a relaxed position.
•
Ensure that your arm is supported
and bend it so that it is at the level
of your heart (see illustration).
•
Before measurement allow an
adequate relaxation time of
3 – 5 minutes.
•
Now press the Start /Stop button to start the meas-
urement.
•
Following the display check, during which all num-
bers light up, the cuff automatically pumps up to
180 mmHg.
13
Page 14

•
When the 180 mmHg pressure is reached, the pres-
sure is automatically released from the cuff and a
beating heart appears in the display.
•
Your blood pressure readings and pulse rate will then
appear in the display.
•
To switch off and release the pressure, press the
Start /Stop button
•
If you forget to switch off the computer, it will switch
off automatically after 3 minutes.
•
You can interrupt measurement at any time by press-
ing the Start /Stop button
again.
.
8. Display of the readings saved
The computer automatically saves the blood pressure
readings of the last 60 measurements.
When the 60 memory locations are exceeded, the current oldest value is deleted.
You can display the memory as follows:
•
Press the memory button M with the computer
switched off. The last reading measured appears.
•
You can call up all individual readings saved by press-
ing the memory button M repeatedly.
•
The memory location number is shown in the display
at bottom right. The date and time of the individual
measurement are shown in the top part of the display.
•
The last result obtained is stored in the first memory
location. As soon as a new result is obtained, this appears in the first memory location and the older result
moves down to the next location.
•
After the last memory location occupied, the com-
puter shows the average of all readings saved on
pressing the memory button M
•
To switch off, press the Start /Stop button again.
•
If you forget to switch off the computer, it will switch
off automatically after 3 minutes.
again.
9. Rectifying faults
Error messages can occur when
•
cuff inflation takes longer than 25 seconds ( ap-
pears in the display),
•
you move during the measurement instead of relaxing
quietly (
•
insufficient pressure is reached despite extra inflation
(
•
the blood pressure readings are extremely high or low
(
•
the inflation pressure is higher than 300 mmHg (error
message
•
the batteries are almost exhausted, the batteries must
then be exchanged.
14
appears in the display),
appears in the display),
appears in the display),
),
Page 15

In the about cases, you must repeat the measurement.
Put the batteries back in if necessary, or else replace
them.
•
Do not use any detergents or solvents.
•
Never hold the instrument under water as otherwise
liquid can penetrate and damage the instrument.
•
Never place any heavy objects on the instrument.
10. Cleaning and Care
•
Clean your blood pressure monitor carefully using a
slightly damp cloth only.
11. Table for classification of blood pressure values (unit of measurement mmHg) for
adults:
Range Systolic Diastolic Action
Hypotonia (degraded blood pressure) lower than 105 lower than 60 Check with doctor
Normal range between 105 and 120 between 60 and 80 Self check
Pre-hypertensive blood pressure range* between 120 and 140 between 80 and 90 Check with doctor
High blood pressure – degree I between 140 and 160 between 90 and 100 Consult your doctor
High blood pressure – degree II higher than 160 higher than 100 Consult your doctor
(*) Blood pressure range that might transfer to high blood pressure Adapted from JNC 2003
15
Page 16

12. Technical data
Type: BC 20
Measuring
method:
Display range: 0 – 300 mmHg
Measuring range: systolic: 50 – 250 mmHg /
Accuracy of the
pressure reading:
Measuring uncertainty:
Power supply: 2 x 1.5 V Micro (Alkaline Type LR03)
Classification Application part Type BF
Ambient conditions:
Storage/
transport:
non-invasive, oscillometric blood
pressure measurement at the wrist,
for wrist circumferences of
12.5 – 20.5 cm
diastolic: 40 –180 mmHg /
pulse: 40 –160/min
systolic: ± 3 mmHg /
diastolic: ± 3 mmHg /
pulse: ± 5% of the displayed value
(max. permissible standard deviation
according to clinical testing in accordance): systolic: 8 mmHg /
diastolic: 8 mmHg
+10 °C – + 40 °C max. 85% atmospheric humidity
-5 °C – + 50 °C max. 85% atmospheric
humidity
Key to symbols: Application part Type BF
Important!
Read the operating instructions!
•
This unit is in line with European Standard
EN60601-1-2 and is subject to particular precautions
with regard to electromagnetic compatibility (EMC).
Please note that portable and mobile HF communication systems may interfere with this instrument. More
details can be requested from the stated Customer
Service address or found at the end of the instructions for use.
•
The instrument is in line with the EU Medical Products
Directive 93/42/EC, the German medical products
act and European standards EN1060-1 (non-invasive
blood pressure monitors, Part 1: General Requirements) and EN1060-3 (non-invasive blood pressure
monitors, Part 3: Supplementary Requirements for
Electromechanical Blood Pressure Measurement Systems).
16
Page 17

FRANÇAIS
Chère cliente, cher client,
Nous sommes heureux que vous ayez choisi un produit
de notre assortiment. Notre nom est synonyme de produits de qualité haut de gamme ayant subi des vérifications approfondies, ils trouvent leur application dans le
domaine de la chaleur, du contrôle du poids, de la pression artérielle, de la mesure de température du corps et
du pouls, des thérapies douces, des massages et de l’air.
Lisez attentivement ce mode d’emploi, conservez-le
pour un usage ultérieur, mettez-le à la disposition des
autres utilisateurs et suivez les consignes.
Avec nos sentiments dévoués
Beurer et son équipe
1. Présentation
Le lecteur de tension artérielle au poignet sert à la mesure non invasive et au contrôle des valeurs de tension
artérielle d’individus adultes.
Vous pouvez ainsi mesurer votre tension artérielle de manière simple et rapide, enregistrer les valeurs mesurées
et afficher la courbe et la moyenne des valeurs mesurées.
2. Remarques importantes
Remarques relatives à l’utilisation
•
Afin d’obtenir des valeurs comparables, mesurez tou-
jours votre tension artérielle au même moment de la
journée.
•
Avant chaque mesure, reposez-vous pendant env.
5 minutes!
•
Patientez 5 minutes entre deux mesures!
•
Les valeurs mesurées par vos soins sont purement
informatives. Elles ne sauraient remplacer une consultation médicale! Discutez des valeurs mesurées avec
votre médecin. Ne prenez aucune décision médicale
individuelle à partir de ces valeurs (par exemple automédication)!
•
En cas de circulation sanguine limitée sur un bras du
fait de maladies circulatoires chroniques ou aiguës
(entre autres des vasoconstrictions), la précision de la
mesure au poignet est limitée. Le cas échéant, optez
plutôt pour un appareil de mesure de la tension artérielle à appliquer sur le bras.
•
En cas de maladies du cœur et de la circulation
mais aussi en cas de tension artérielle très basse,
17
Page 18

de troubles de l’irrigation sanguine, d’arythmie et
d’autres antécédents pathologiques, des erreurs de
mesure peuvent se produire.
•
N’utilisez l’appareil que pour des personnes présen-
tant un tour de poignet adapté.
•
L’appareil de mesure de la tension artérielle ne fonc-
tionne que sur piles. Notez que l’enregistrement
des données n’est possible que si votre appareil de
mesure de la tension artérielle est alimenté en énergie.
Dès que les piles sont usées, la date, l’heure et les
valeurs mesurées enregistrées s’effacent du lecteur
de tension artérielle.
•
Afin de ménager les piles, si aucune touche n’est ac-
tionnée durant une minute, le système automatique de
désactivation arrête l’appareil de mesure de la tension
artérielle.
Remarques relatives à la conservation et à
l’entretien
•
L’appareil de mesure de la tension artérielle est
constitué de pièces électroniques, de grande précision. L’appareil doit être conservé dans un environnement approprié afin de garantir la précision des
valeurs et d’optimiser la durée de vie du produit:
– Protégez l’appareil des chocs et conservez-le à
l’abri de l’humidité, de la poussière, des variations
thermiques et d’une exposition directe au soleil.
– Ne laissez pas tomber l’appareil.
– N’utilisez pas l’appareil à proximité de forts champs
électromagnétique. Eloignez-le des radios ou des
téléphones mobiles.
– Utilisez uniquement les brassards de rechange four-
nis ou d’origine. Dans le cas contraire, vous obtien-
drez des valeurs mesurées erronées.
•
N’appuyez pas sur les touches tant que vous n’avez
pas mis le brassard.
•
Au cas où vous ne vous servez pas de l’appareil pen-
dant une longue période, nous vous recommandons
de retirer les piles.
Remarques relatives aux piles
•
L’ingestion de piles peut se révéler mortelle. Laissez
par conséquent les piles et les produits hors de portée des jeunes enfants. Au cas où une pile a été avalée, faites immédiatement appel à un médecin.
•
Les piles ne doivent être ni rechargées ni réactivées
par d’autres méthodes ni démontées ni jetées dans le
feu ni court-circuitées.
18
Page 19

• Lorsqu’elles sont usagées ou si l’appareil ne doit pas
être utilisé avant longtemps, retirez les piles de l’appareil. Vous éviterez ainsi les dommages liés aux fuites.
Remplacez toujours toutes les piles en même temps.
•
N’utilisez pas des types ou des marques de piles dif-
férents et n’utilisez pas des piles d’une capacité différente. Utilisez de préférence des piles alcalines.
Remarques relatives à la réparation et à la mise
au rebut
•
Les piles ne sont pas des ordures ménagères. Veuillez
jeter les piles usagées dans les conteneurs prévus à
cet effet.
•
N’ouvrez pas l’appareil. Le non-respect de cette
consigne annulera la garantie.
•
Vous ne devez en aucun cas réparer ou ajuster l’appa-
reil vous-même. Le cas contraire, aucun fonctionnement irréprochable n’est garanti.
•
Les réparations doivent être effectuées uniquement
par le service après-vente de Beurer ou des
revendeurs agréés. Cependant avant de faire une
réclamation, contrôlez d’abord les piles et
changez-les, le cas échéant.
•
Pour éliminer l’appareil, conformez-vous à la
directive sur les appareils électriques et électroniques 2002/96/CE – WEEE (Waste Electri-
cal and Electronic Equipment). Pour toute question,
adressez-vous aux collectivités locales responsables
de l’élimination de ces déchets.
3. Description de l’appareil
Affichage
Couvercle du
compartiment
des piles
Touche M de la
mémoire
Touche
Marche /Arrêt
19
Page 20
Affichages à l’écran:
1. Symbole Pouls
2. Heure et date
3. Pression systolique
4. Pression diastolique
5. Pouls obtenu
6. Symbole changement de
piles
7. Numéro de mémoire
7
6
1
4. Mise en place et remplacement des
piles
•
Retirez le couvercle du compartiment des piles .
•
Utilisez exclusivement des piles de marque de type :
2 x 1,5 V micro (alcaline, type LR03). Respectez impérativement la polarité marquée dans leur logement
(pôles + et pôles -). Il ne faut pas utiliser de piles
rechargeables.
•
Refermez le compartiment des piles: remettez le cou-
vercle en place et encliquetez-le.
Lorsque les piles sont presque usées, le symbole d’une
vide apparaît en bas à gauche de l’écran ; il
pile
signifie qu’il faut changer les piles.
2
Dès que les piles sont retirées de l'appareil, l'heure doit
être de nouveau réglée. Les résultats de mesures enre-
3
gistrés sont perdus.
Les piles et les accus usagés et complètement
déchargés doivent être mis au rebut dans des conteneurs
4
spéciaux ou aux points de collecte réservés à cet usage,
ou bien déposés chez un revendeur d’appareils
électro-ménagers. La loi vous oblige d’eliminer les piles.
Remarque: Ces marquages figurent sur les
5
piles contenant des substances toxiques:
Pb = pile contenant du plomb, Cd = pile
contenant du cadmium, Hg = pile contenant
du mercure.
5. Réglage de la date et de l’heure
Le réglage de la date et de l’heure est nécessaire pour
que la date et l’heure de l’enregistrement des mesures
soient correctes et que vous puissiez les appeler ultérieurement.
Procédez comme suit pour régler la date et l’heure:
• Après avoir replacé les piles, appuyez sur la touche
Marche /Arrêt
20
. L’année commence à clignoter. Ré-
Page 21
glez l’année avec la touche Mémoire M et confirmez
• • • • • • • • • • • • •
avec la touche Marche /Arrêt
• Réglez ensuite le mois, le jour, l’heure et les minutes et
confirmez à chaque fois avec la touche Marche /Arrêt
.
6. Pose de l’appareil
•
Mettez le tensiomètre en place sur votre poignet
gauche, à l’intérieur du bras.
•
Veillez à ce que le poignet soit dénudé.
•
Fermez la manchette avec la
fermeture Velcro, de sorte
que le bord supérieur de
l’appareil soit à environ 1 cm
de distance des éminences
thénar et hypothénar (voir fig.).
•
La manchette doit être placée étroitement autour du
poignet, toutefois sans serrer.
7. Mesure de la tension
•
Asseyez-vous et détendez-vous.
•
Posez votre bras sur un appui
quelconque et pliez-le afin que
l’appareil se trouve à hauteur du
cœur (voir fig.).
•
Avant toute mesure, laissez s’écouler un temps de
repos suffisant: 3 à 5 minutes.
•
Appuyez alors sur la touche Marche /Arrêt pour
démarrer la mesure.
.
•
Après le contrôle de l’écran, au cours duquel tous les
chiffres clignotent, la manchette se gonfle automatiquement à 180mmHg.
•
Après obtention d’une pression de 180 mmHg, la
pression est automatiquement purgée de la manchette; l’écran affiche un cœur battant.
•
Votre tension et votre fréquence de pouls s’affichent
alors.
• Pour mettre l’appareil hors circuit et relâcher la pression, appuyez à nouveau sur la touche Marche /Arrêt
•
Si vous oubliez d’éteindre l’appareil, celui-ci s’éteindra
automatiquement au bout de 3 minutes.
•
Pour interrompre la mesure à tout moment, appuyez
sur le bouton Marche /Arrêt
21
.
.
Page 22

8. Affichage des valeurs mémorisées
L’appareil enregistre automatiquement les valeurs de
tension des 60 dernières mesures.
Si la capacité des 60 positions est dépassée, la plus
ancienne valeur est effacée de la mémoire.
Pour appeler la mémoire, procédez ainsi:
•
À l’arrêt, appuyez sur la touche M de la mémoire ;
la valeur mesurée en dernier s’affiche.
•
En continuant à appuyer sur la touche M, vous pou-
vez appeler individuellement toutes les valeurs mémorisées.
•
Vous reconnaissez dans l’écran en bas à droite le
numéro de la position mémoire. La date et l’heure des
mesures individuelles s’affichent en haut de l’écran.
•
La valeur calculée en dernier est mémorisée en posi-
tion mémoire 1. Dès qu’une nouvelle valeur est mesurée, elle est enregistrée et occupe la position mémoire
1 de la valeur existante, ce qui fait reculer celle-ci
d’une position.
•
Après la dernière position mémoire occupée, le fait de
rappuyer sur la touche M entraîne l’affichage de la
moyenne de toutes les valeurs mémorisées.
•
Pour mettre l’appareil hors circuit, appuyez à nouveau
sur la touche Marche /Arrêt
.
•
Si vous oubliez d’éteindre l’appareil, celui-ci s’étein-
dra automatiquement au bout de 3 minutes.
9. Suppression des erreurs
Des messages d’erreurs peuvent s’afficher dans les cas
suivants :
•
Le gonflage dure plus de 25 secondes ( est affi-
ché).
•
Vous bougez et êtes dans un état d’agitation pendant
la mesure (
•
Si le gonflage a été insuffisant, malgré le regonflage
est affiché).
(
•
Les valeurs de la tension artérielle sont exceptionnel-
lement hautes ou basses (
•
La pression de gonflage est supérieure à 300 mmHg
(message d’erreur
•
Les piles sont presque usées, les piles doivent être
remplacées.
Dans ces cas, répétez la mesure. Le cas échéant, réintroduisez les piles ou remplacez-les.
22
est affiché).
est affiché).
).
Page 23

10. Nettoyage et entretien
•
Nettoyez soigneusement le tensiomètre, uniquement
à l’aide d’un chiffon légèrement humide.
•
N’utilisez pas de produit nettoyant ou de solvant.
•
Ne mettez en aucun cas l’appareil sous l’eau car
celle-ci pourrait pénétrer à l’intérieur de l’appareil et
l’endommager.
•
Ne posez pas d’objets lourds sur l’appareil.
11. Tableau de classification des valeurs de la tension artérielle (unité de mesure, mmHg)
pour adultes:
Plage Systolique Diastolique Mesure
Hypotension (tension dégradée) inférieure à 105 inférieure à 60 Contrôle médical
Plage normale entre 105 et 120 entre 60 et 80 Auto-contrôle
Secteur de tension pre-hypertensive* entre 120 et 140 entre 80 et 90 Contrôle médical
Hypertension – degree I entre 140 et 160 entre 90 et 100 Consultation chez le médecin
Hypertension – degree II supérieure à 160 supérieure à 100 Consultation chez le médecin
(*) Secteur de tension que pourait transférer en hypertension Adapted from JNC 2003
23
Page 24

12. Données techniques
Type: BC 20
Méthode de
mesure:
Plage d’affichage:
Plage de mesure: systolique: 50 – 250 mmHg /
Exactitude de
l’affichage de la
tension:
Incertitude de la
mesure:
Alimentation en
courant: 2 x 1,5 V micro (alcaline, type LR03)
Classification: appareil de type BF
Conditions environnementales:
Stockage/
transport:
mesure de la tension artérielle non
invasive, oscillométrique et prise au
poignet. Pour un tour de poignet de
12,5 à 20,5 cm
0 à 300 mmHg
diastolique: 40 –180 mmHg /
pouls: 40 –160/min
systolique: ± 3 mmHg /
diastolique: ± 3 mmHg /
pouls: ± 5% de la valeur affichée
(écart type maximum autorisé conformément à un contrôle clinique effectué selon): systolique: 8 mmHg /
diastolique: 8 mmHg
+10 °C – + 40 °C, humidité de l’air
max. de 85%
- 5 °C – + 50 °C, humidité de l’air max.
de 85%
Explication du
symbole:
•
Cet appareil est en conformité avec la norme euro-
péenne EN60601-1-2 et répond aux exigences de
sécurité spéciales relatives à la compatibilité électromagnétique. Veuillez noter que les dispositifs de communication HF portables et mobiles sont susceptibles
d’influer sur cet appareil. Pour des détails plus précis,
veuillez contacter le service après-vente à l’adresse
mentionnée ou vous reporter à la fin du mode d’emploi.
•
L’appareil correspond à la directive européenne
sur les produits médicaux 93/42/EC, à la loi sur
les produits médicaux et aux normes européennes
EN1060-1 (appareils de mesure non invasive de la
tension artérielle partie 1: exigences générales) et
EN1060-3 (appareils de mesure non invasive de la
tension artérielle partie 3: exigences complémentaires
pour systèmes électro mécaniques de mesure de la
tension artérielle).
24
appareil de type BF
Attention ! Lire le mode d’emploi!
Page 25

ESPAÑOL
Estimados clientes:
Es un placer para nosotros que usted haya decidido adquirir un producto de nuestra colección. Nuestro nombre es sinónimo de productos de alta y calidad estrictamente controlada en los campos de energía térmica,
peso, presión sanguínea, temperatura del cuerpo, pulso,
terapias suaves, masaje y aire.
Sírvase leer las presentes instrucciones para el uso
detenidamente; guarde el manual para usarlo ulteriormente; póngalo a disposición de otros usuarios y observe las instrucciones.
Les saluda cordialmente
Su equipo Beurer
1. Presentación
El tonómetro de muñeca se usa para la medición y
control no invasivos de la presión sanguínea arterial de
personas adultas.
Este aparato permite medir rápida y fácilmente la presión sanguínea, siendo posible almacenar los valores de
medición y visualizar luego la curva de valores de medición y el valor medio.
2. Indicaciones importantes
Indicaciones para la aplicación
•
Mida Vd. su presión sanguínea siempre a la misma
hora del día, para asegurar la comparabilidad de los
valores.
•
Repose unos 5 minutos antes de iniciar la medición.
•
Es recomendable esperar 5 minutos entre dos medi-
ciones.
•
Los valores medidos por Vd. sirven solamente para
su información; ellos no sustituyen los exámenes médicos. Nunca tome Vd. propias decisiones médicas
basadas en los valores medidos (por ejemplo, medicamentos a tomar y sus dosificaciones); consulte previamente a su médico respecto a los valores medidos.
•
Si la irrigación sanguínea en un brazo se encuentra
reducida a causa de angiopatías crónicas o agudas
(entre otras vasoconstricción), se restringe la exactitud de la medición en la muñeca. En estos casos se
recomienda utilizar preferentemente un tonómetro
para el brazo.
•
Es posible que los valores medidos sean erróneos en
casos de trastorno del sistema cardiovas-cular así
25
Page 26

como una presión sanguínea muy baja, trastorno de
la irrigación sanguínea y del ritmo cardíaco.
•
Aplicar el aparato solamente en personas cuyo ta-
maño de muñeca se encuentre dentro de la gama de
circunferencias especificada para el aparato.
•
El tonómetro trabaja exclusivamente con pilas. Ob-
serve que el almacenamiento de datos es posible solamente, si su tonómetro recibe corriente. Tan pronto
como se agoten las pilas, el tonómetro perderá la
fecha, la hora y los valores de medición almacenados.
•
Para reducir el consumo de las pilas, el sistema de
desconexión automática desconecta el tonómetro, si
dentro de un minuto no se acciona botón alguno.
Indicaciones para el almacenamiento y limpieza
•
El tonómetro consta de componentes de precisión y
componentes electrónicos. La exactitud de los valores de medición y la vida útil del aparato dependen de
su cuidadoso manejo:
– Proteja el aparato contra la humedad, suciedad,
fuertes fluctuaciones de temperatura y radiación
solar directa.
– No deje caer el aparato.
– No utilice el aparato en la cercanía de fuertes cam-
pos magnéticos, manténgalo alejado de equipos de
radiotransmisión o teléfonos móviles celulares.
– Utilice exclusivamente los brazaletes de repuesto
originales adjuntos. De lo contrario los valores medidos serán erróneos.
•
No presionar los botones mientras el brazalete no
esté colocado.
• Si usted no necesita usar el aparato durante un período mayor de tiempo, recomendamos sacar las pilas.
Indicaciones sobre las pilas
•
Las pilas pueden significar peligro mortal, si se tra-
gan. Por esta razón, guarde las pilas y productos en
lugares inaccesibles para los niños. Si se ha tragado
una pila, será necesario consultar inmediatamente a
un médico.
•
Las pilas no deben recargarse ni reactivarse mediante
otros medios; no deben desarmarse ni echarse al
fuego, ni deben ser cortocircuitadas.
•
Saque las pilas del aparato, si están agotadas o si el
aparato no se va a usar durante un espacio de tiempo
mayor. De esta manera se evitan daños que podrían
ser causados por fugas en la pilas. Cambiar siempre
todas las pilas al mismo tiempo.
26
Page 27

•
No usar pilas de diferentes tipos o marcas ni pilas de
diferentes capacidades. Use de preferencia pilas de
tipo alcalino.
Indicaciones sobre la reparación y eliminación
de desechos
•
Las pilas no deben ser desechadas en la basura do-
méstica. Sírvase desechar las pilas agotadas en los
lugares de recogida previstos para este efecto.
•
No abrir el aparato. Si se abre el aparato, caducará la
garantía.
•
El usuario no debe reparar ni ajustar por sí mismo el
aparato. De lo contrario no se podrá garantizar el correcto funcionamiento del aparato.
•
Las reparaciones deben ser llevadas a cabo
exclusivamente por el servicio postventa de Beurer o
bien por sus agentes autorizados. Antes de gestionar
cualquier reclamación, controle en primer lugar las
pilas y cámbielas en caso dado.
•
Elimine el aparato de acuerdo con la Directiva
2002/96/CE sobre Residuos de aparatos eléctricos y electrónicos (WEEE = Waste Electrical
and Electronic Equipment). Si tiene alguna duda diríjase a las autoridades comunales competentes para la
eliminación de desechos.
3. Descripción del aparato
Display
Tapa del com-
partimiento de
batería
Tecla de
memoria M
Tecla Start /Stop
Indicaciones en la pantalla:
1. Símbolo de pulso
2. Hora y fecha
3. Presión sistólica
4. Presión diastólica
5. Valor determinado del pulso
6. Símbolo de cambio de
pilas
7. Posición de grabación en la
memoria
27
1
2
3
4
7
6
5
Page 28

4. Colocar baterías /cambio de baterías
•
Retire la tapa del compartimiento de baterías .
•
Utilice sólo baterías de marca del tipo: 2 x 1,5 V Micro
(Alkaline tipo LR03). Es absolutamente imprescindible
observar que las pilas sean colocadas correctamente
de acuerdo con la polaridad indicada. No se deben
utilizar pilas recargables.
•
A continuación cierre la tapa del compartimiento de
baterías, colocando la tapa y haciéndola enclavar.
Si las baterías están casi agotadas, aparece el símbolo
de una batería
del display
En cuanto se retiran las pilas del aparato, se debe volver
a ajustar la fecha y la hora. Los resultados de medición
se pierden.
Las pilas normales y las pilas recargables agotadas y
completamente descargadas deben ser eliminadas en
los depósitos especialmente marcados para este efecto,
en los puntos de recepción de basura especial o bien
en las tiendas de artículos eléctricos. Conforme a la ley,
usted está obligado a desechar las pilas en una de las
formas anteriormente descritas.
vacía en la parte inferior izquierda
y las baterías deben ser reemplazadas.
Nota: Los siguientes símbolos se encuentran
en las pilas que contienen substancias
tóxicas: Pb = esta pila contiene plomo,
Cd = esta pila contiene cadmio,
Hg = esta pila contiene mercurio.
5. Ajuste de fecha / hora
D El ajuste fecha/hora es necesario, para almacenar correctamente sus valores de medición con fecha y hora y
posteriormente poder localizarlos de nuevo.
Siga estas indicaciones para ajustar la fecha y la hora
del aparato:
•
•
6. Colocación del equipo
•
•
28
Después de poner las pilas, pulse el botón de Start /
. La opción “Año” comenzará a parpadear.
Stop
Ajuste el año con la tecla de memorización M
confírmelo con el botón de Start /Stop
A continuación, ajuste el mes, el día, la hora y el mi-
nuto y confirme cada uno de ellos con el botón de
Start /Stop
Coloque la computadora de medición de presión de
sangre en la muñeca del brazo izquierdo en el lado
interior.
Asegurar que la muñeca no esté vestida.
.
y
.
Page 29

•
• • • • • • • • • • • • •
Cierre el puño con el cierre
velcro, de manera que el
borde superior del equipo
quede aprox. 10 mm por
debajo del pulpejo (ver
figura).
•
El puño debe juntarse bien a la muñeca, pero sin
apretarla.
7. Medición de la presión de sangre
•
Siéntese quieto.
•
Es imprescindible que apoye el
brazo y que lo doble de manera
que el equipo quede a la altura del
corazón (ver figura).
•
Antes de la medición, mantenga
un tiempo de reposo suficiente de
3 a 5 minutos.
•
Pulse ahora la tecla Start /Stop para comenzar la
medición.
•
Después de comprobar la pantalla iluminando todas
las cifras, se infla automáticamente el brazalete a
180 mmHg.
•
Una vez alcanzados los 180 mmHg sale automática-
mente la presión y en el display aparece un símbolo
de un corazón centelleante.
•
A continuación aparecen en el display sus valores de
presión de sangre y el valor de pulso.
•
Para desconectar y dejar salir la presión pulse nueva-
mente la tecla Start /Stop
•
Si olvida desconectar el equipo, éste se desconecta
automáticamente después de 3 minutos.
•
Vd. puede interrumpir en cualquier momento la medi-
ción con el botón Start /Stop
.
.
8. Visualización de los valores
memorizados
El equipo memoriza automáticamente los valores de la
presión de sangre de las últimas 60 mediciones.
Una vez alcanzados los 60 puestos de memoria, se
borra el valor más antiguo.
La memoria puede visualizarse de la siguiente manera:
•
Pulse en estado desconectado la tecla de memoria
M , aparece el último valor medido.
•
Pulsando nuevamente la tecla memoria M puede vi-
sualizar todos los valores medidos individualmente.
•
Ud. reconoce en el display el número de puesto de
memoria en el lado inferior derecho. La fecha y la hora
29
Page 30

de las mediciones individuales aparecen en la parte
superior del display.
•
El último valor determinado se guarda en la posición
de memoria 1. Cuando se efectúa una nueva medición, el nuevo valor pasa a la posición 1, y los valores
anteriores corren una posición.
•
Después del último puesto de memoria ocupado,
el equipo muestra pulsando nuevamente la tecla
memoria-M
medición memorizados.
•
Para desconectar pulse nuevamente la tecla Start /
Stop
•
Si olvida desconectar el equipo, este se desconecta
automáticamente después de 3 minutos.
el promedio de todos los valores de
.
9. Eliminar fallas
Es posible que se indique un aviso de falla cuando
•
el inflado dura más de 25 segundos (aparece en
la pantalla),
•
Ud. se mueve durante la medición y no permanece
tranquilo (aparece
•
no se infló lo suficiente a pesar de volver a inflarse
posteriormente (aparece
•
los valores de presión de sangre son extraordinaria-
mente altos o bajos (aparece
en la pantalla),
en la pantalla),
en la pantalla),
•
la presión de inflado es mayor que 300 mmHg (aviso
de error
•
las baterías están casi agotadas, las baterías deben
reemplazarse.
En estos casos, repetir la medición. En caso dado coloque las pilas nuevamente o reemplácelas por nuevas.
),
10. Limpieza y cuidado
•
Limpie con cuidado el tensiómetro solo con un paño
ligeramente humedecido.
•
Nunca utilizar detergentes o diluyentes.
•
Nunca lavar el aparato bajo agua, de lo contrario po-
dría penetrar líquido, pudiendo destruirse el aparato.
•
No depositar objetos pesados sobre el aparato.
30
Page 31

11. Tabla para la clasificación de los valores de la presión de sangre (unidad mmHg)
para adultos:
Zona Sistólica Diastólica Medida
Hipotensión (tensión deteriorada) menos que 105 menos que 60 Control con su médico
Gama normal entre 105 y 120 entre 60 y 80 Autocontrol
Sector de tensión pre-hypertensivo* entre 120 y 140 entre 80 y 90 Control con el médico
Alta tensión – grado I entre 140 y 160 entre 90 y 100 Consulta con su médico
Alta tensión – grado II mayor que 160 mayor que 100 Consulta con su médico
(*) Sector de tensión que puede transformar en alta tensión Adapted from JNC 2003
12. Datos técnicos
Tipo: BC 20
Método de
medición:
Gama de
indicación: 0 – 300 mmHg
Gama de
medición:
Medición no invasiva oscilométrica
de la presión de sangre por la muñeca, para circunferencia de muñeca
12,5 – 20,5 cm
sistólico: 50 – 250 mmHg /
diastólico: 40 –180 mmHg /
pulso: 40 –160/min
Exactitud: sistólico: ± 3 mmHg /
Divergencia de
medición:
Abastecimiento
de corriente: 2 x 1,5 V Micro (Alkaline tipo LR03)
Clasificación: Parte de empleo tipo BF
Condiciones del
ambiente:
Almacenaje/
transporte:
31
diastólico: ± 3 mmHg /
pulso: ± 5% del valor mostrado
(divergencia máx. admitida según el
examen clínico según):
sistólico: 8 mmHg / diastólico: 8 mmHg
+10 °C – + 40 °C máx. 85% humedad
de aire
- 5 °C – + 50 °C máx. 85% humedad
de aire
Page 32

Explicación de
los símbolos:
Parte de empleo tipo BF
¡Atención! Leer las
instrucciones para el uso!
•
Este aparato cumple con la norma europea
EN60601-1-2 y está sometido a medidas de precaución especiales respecto a la compatibilidad electromagnética. Para este efecto sírvase considerar que
los equipos de comunicación HF portátiles y móviles
pueden influir en la función de este aparato. Puede
solicitar información más precisa al servicio de atención al cliente en la dirección indicada en este documento o leer el final de las instrucciones de uso.
•
El aparato cumple con los requerimientos estipulados
en la Directriz CE para productos médicos 93/42/EC,
en la Ley de Productos Médicos y en las norma europeas EN1060-1 (tonómetros no invasivos Parte 1: Requerimientos Generales) y EN1060-3 (tonómetros no
invasivos Parte 3: Requerimientos complementarios a
cumplir por sistemas tonométricos electromecánicos).
32
Page 33

ITALIANO
Gentile cliente,
siamo lieti che abbia scelto un prodotto della nostra
gamma. Il nostro nome è sinonimo di prodotti di alta
qualità continuamente sottoposti a controlli nei settori
del calore, del peso, della pressione sanguigna, della
temperatura corporea, delle pulsazioni, della terapia
dolce, del massaggio e dell’aria.
La preghiamo di leggere attentamente le presenti istruzioni, di conservarle per un’eventuale consultazione
successiva, di metterle a disposizione di altri utenti e di
osservare le avvertenze ivi riportate.
Cordiali saluti
Il Suo team Beurer
1. Primo approccio
Lo sfigmomanometro da polso serve per la misurazione
non invasiva e il monitoraggio della pressione sanguigna
di persone adulte.
Esso consente di misurare la pressione sanguigna rapidamente e facilmente, nonché di salvare e visualizzare
l’andamento e la media dei valori misurati.
2. Avvertenze importanti
Indicazioni sulla modalità d’uso
•
Misurare la pressione sanguigna sempre alle stesse
ore del giorno per ottenere dati attendibili per la comparazione.
•
Riposare per circa 5 minuti prima di ogni misurazione!
•
Mantenere un intervallo di circa 5 minuti fra due misu-
razioni!
•
I valori misurati dall’utente possono servire solo a
titolo informativo – essi non sostituiscono le visite mediche! Analizzare i valori misurati con il proprio medico
e non prendere in nessun caso decisioni mediche (ad
es. farmaci e il loro dosaggio).
•
In caso di disturbi dell’irrorazione sanguigna in un
braccio, dovuti a malattie vascolari croniche o acute
(tra cui stenosi), la precisione della misurazione al
polso è limitata. In questo caso utilizzare uno sfigmomanometro da braccio.
•
Possibilità di misurazioni errate in presenza di malattie
del sistema cardiocircolatorio, ed egualmente in caso
di pressione sanguigna estremamente bassa, disturbi
33
Page 34

dell’irrorazione sanguigna, aritmie cardiache e altre
malattie preesistenti.
•
Utilizzare lo sfigmomanometro solo su persone che
possiedono una circonferenza di polso compresa nel
campo indicato per l’apparecchio.
•
Lo sfigmomanometro può essere utilizzato esclusi-
vamente a batteria. Tener presente che il salvataggio dei dati è possibile solo se lo sfigmomanometro
riceve corrente. Lo sfigmomanometro perde la data,
l’ora e i dati memorizzati non appena le batterie sono
scariche.
•
Se entro un minuto non viene azionato nessun tasto,
lo spegnimento automatico disinserisce lo sfigmomanometro per risparmiare le batterie.
Indicazioni sulla custodia e sulla cura
•
Lo sfigmomanometro è formato da componenti di
precisione ed elettronici. La precisione dei valori misurati e la durata in servizio dell’apparecchio dipendono
dall’accuratezza con la quale viene usato.
– Proteggere l’apparecchio da urti, umidità, polvere e
sporcizia, forti variazioni della temperatura e raggi
diretti del sole.
– Non far cadere l’apparecchio.
– Non utilizzare l’apparecchio in vicinanza di forti
campi elettromagnetici e tenerlo lontano da impianti
radiofonici o telefoni cellulari.
– Usare esclusivamente i bracciali forniti in dotazione
o ricambi originali. In caso contrario saranno rilevati
valori errati.
•
Non premere pulsanti finché il bracciale non è ben al-
lacciato al polso.
•
Si consiglia di rimuovere le batterie quando l’apparec-
chio non viene usato per un lungo periodo.
Indicazioni sulle batterie
•
L’inghiottimento delle batterie può essere mortale.
Conservare quindi le batterie e i prodotti fuori della
portata dei bambini piccoli. In caso d’inghiottimento
di una batteria, contattare immediata-mente un medico.
•
Non ricaricare o riattivare le batterie con altri mezzi,
non scomporle, non gettarle nel fuoco, non cortocircuitarle.
•
Rimuovere le batterie quando sono scariche o l’appa-
recchio non viene usato per un lungo periodo. In questo modo si evitano danni causati da una eventuale
fuoriuscita del liquido dalle batterie. Sostituire sempre
contemporaneamente tutte le batterie.
34
Page 35

•
Non utilizzare batterie di tipo e marca diversi oppure
batterie con differenti capacità. Utilizzare preferibilmente batterie alcaline.
Indicazioni sulla riparazione e sullo smaltimento
•
Non gettare le batterie nei rifiuti casalinghi. Smaltire le
batterie scariche negli appositi centri di raccolta dei
materiali inquinanti.
•
Non aprire l’apparecchio. La non osservanza di que-
sta prescrizione invalida la garanzia.
•
Non riparare o regolare da soli l’apparecchio. In que-
sto caso non è più garantito un funzionamento corretto.
•
Le riparazioni devono essere eseguite esclusivamente
dal servizio assistenza di Beurer o da ri-venditori
autorizzati. Prima di ogni reclamo verificare in primo
luogo lo stato delle batterie e sosti-tuirle, se
necessario.
•
Smaltire l’apparecchio conformemente alla di-
rettiva sui vecchi apparecchi elettrici ed elettronici 2002/96/CEE WEEE (Waste Electrical and
Electronic Equipment). Per domande specifiche su
questo argomento rivolgersi all’ufficio comunale competente per lo smaltimento ecologico.
3. Descrizione dell’apparecchio
Display
Coperchio allog-
giamento batterie
Tasto memoria M
Tasto Start /Stop
35
Page 36

Indicazioni sul display:
1. Icona battito cardiaco
2. Tubo flessibile del bracciale
3. Bracciale
4. Spina del bracciale
5. Valore del battito
cardiaco rilevato
6. Simbolo di cambio batterie
7. Numero di posizione
7
6
1
2
3
4
5
4. Inserimento /sostituzione delle batterie
•
Rimuovere il coperchio dell’alloggiamento batterie .
•
Utilizzare esclusivamente batterie di marca del tipo:
2 x 1,5 V Micro (tipo alcalino LR03). Controllare assolutamente che le batterie vengano inserite con i poli
corretti secondo le indicazioni. Non utilizzare batterie
ricaricabili.
•
Chiudere il coperchio dell’alloggiamento, appoggian-
dovi sopra il coperchio e spingendo fino allo scatto di
chiusura.
Se le batterie sono in via d’esaurimento, a sinistra in
basso sul display compare il simbolo di una batteria
vuota e le batterie devono essere sostituite.
Quando le batterie vengono rimosse dall’apparecchio,
è necessario reimpostare la data e l’ora. Le misurazioni
memorizzate vanno perse.
Le batterie e gli accumulatori usati, completamente
scarichi, devono essere smaltiti nei contenitori di
raccolta appositamente contrassegnati, tramite i centri
di raccolta differenziata dei rifiuti speciali oppure tramite
il rivenditore di prodotti elettrici. La legge impone
all’utente lo smaltimento ecologico delle batterie.
Avvertenza: queste indicazioni sono riportate
sulle batterie contenenti sostanze tossiche:
Pb = la batteria contiene piombo, Cd = la batteria contiene cadmio, Hg = la batteria contiene mercurio.
5. Regolazione data e ora
La regolazione di data /ora è necessaria per memorizzare correttamente le misurazioni complete di ora e data
per poterle recuperare in seguito.
Per impostare data e ora, procedere come segue:
•
Dopo aver inserito le batterie, premere il pulsante
Start /Stop
36
. Inizia a lampeggiare l’indicazione
Page 37

dell’anno. Impostare l’anno con il pulsante per la me-
• • • • • • • • • • • • •
morizzazione M
pulsante Start /Stop
•
Impostare quindi il mese, il giorno, le ore e i minuti
e confermare ogni immissione con il pulsante Start /
Stop
e confermare l’immissione con il
.
.
6. Applicazione dell’apparecchio
•
Applicare lo sfigmocomputer sul lato interno del polso
sinistro.
•
Attenzione che il polso non sia ricoperto da indumenti.
•
Chiudere il polsino col velcro
in modo che il bordo
superiore dell’apparecchio
rimanga circa 10 mm sotto
l’attacco del palmo della
mano (vedere figura).
•
Il polsino deve aderire strettamente al polso, ma
senza stringere eccessivamente.
7. Misurazione della pressione
•
Sedersi comodamente e rilassarsi.
•
Appoggiare il braccio su un comodo
sostegno e piegarlo in modo che
l’apparecchio si trovi all’altezza del
cuore (vedere figura).
•
Prima di ogni misurazione riposare
per 3 – 5 minuti.
•
Premere il tasto Start /Stop per iniziare la misura-
zione.
•
Dopo una verifica del display, durante la quale si ac-
cendono tutti i numeri, il manicotto si gonfia automaticamente fino a 180 mmHg.
•
Raggiunti i 180 mmHg, la pressione viene scaricata
automaticamente dal polsino e sul display compare
un cuore che batte.
•
Successivamente compaiono sul display il valore della
pressione sanguigna e la frequenza delle pulsazioni.
•
Per spegnere e scaricare la pressione premere nuova-
mente il tasto Start /Stop
•
Se ci si dimentica di spegnere l’apparecchio, questo
si spegne automaticamente dopo 3 minuti.
•
È possibile interrompere la misurazione in qualunque
momento premendo il pulsante Start /Stop
37
.
.
Page 38

8. Visualizzazione dei valori memorizzati
L’apparecchio memorizza automaticamente i valori di
pressione delle ultime 60 misurazioni.
Superati i 60 posti disponibili, viene cancellato di volta in
volta il valore più vecchio.
La memoria può essere richiamata come segue:
•
Ad apparecchio spento, premere il tasto memoria M
, compare l’ultimo valore misurato.
•
Premendo nuovamente il tasto memoria M si possono
richiamare singolarmente tutti i valori memorizzati.
•
Sul display in basso a destra compare il numero
dell’area di memoria. La data e l’ora della misurazione
singola sono visualizzate nella parte alta del display.
•
L’ultimo valore misurato viene memorizzato nel posto
1. Alla misurazione di un nuovo valore, quest’ultimo va
ad occupare il posto di memoria 1 e il vecchio valore
passa in un posto di memoria successivo.
•
Occupata l’ultima posizione in memoria, premendo
nuovamente il tasto memoria M l’apparecchio visua-
lizza
•
•
la media di tutti i valori memorizzati.
Per spegnere l’apparecchio premere nuovamente il
tasto Start /Stop
Se ci si dimentica di spegnere l’apparecchio, questo
si spegne automaticamente dopo 3 minuti.
.
9. Eliminazione dei guasti
Possono essere visualizzate segnalazioni di anomalia se
•
il gonfiaggio dura più di 25 secondi (sul display
compare
•
durante la misurazione ci si muove e non ci si man-
tiene tranquilli (sul display compare
•
il gonfiaggio non è sufficiente, nonostante la sua ri-
presa (sul display compare
•
i valori della pressione sanguigna sono eccezional-
mente elevati o bassi (sul display compare
•
la pressione di gonfiaggio è superiore a 300 mmHg
(messaggio d’errore
•
le batterie sono quasi esaurite, le batterie devono es-
sere sostituite.
In questi casi ripetere la misurazione. Se necessario, inserire le nuove batterie o sostituirle.
38
),
),
),
),
),
Page 39

10. Pulizia e cura
•
Pulire con attenzione il misuratore della pressione uti-
lizzando solo un panno leggermente inumidito.
•
Non utilizzare mai detergenti o solventi.
•
Non immergere mai l’apparecchio nell’acqua, altri-
menti può penetrare liquido all’interno e danneggiare
lo sfigmomanometro.
•
Non posare oggetti pesanti sull’apparecchio.
11. Tabella per la classificazione dei valori della pressione sanguigna (unità di misura
mmHg) per adulti:
Campo Pressione sistolica Pressione diastolica Provvedimento
Ipotonia (Pressione sanguigna ridotta) inferiore a 105 inferiore a 60 Controllo dal medico
Campo normale tra 105 e 120 tra 60 e 80 Autocontrollo
Intervallo della pressione sanguigna
pre-ipertensiva* tra 120 e 140 tra 80 e 90 Controllo dal medico
Ipertonia lieve Ipertensione grado I tra 140 e 160 tra 90 e 100 Consultare il medico
Ipertonia media Ipertensione grado II superiore a 160 superiore a 100 Consultare il medico
(*) Intervallo della pressione che può trasformarsi in ipertensione Adapted from JNC 2003
39
Page 40

12. Dati tecnici
Tipo: BC 20
Metodo: misurazione oscillometrica non in-
Campo
visualizzato: 0 – 300 mmHg
Campo misurato
della pressione:
Precisione del
valore visualizzato:
Imprecisione di
misurazione:
Batterie di
alimentazione: 2 x 1,5 V micro (tipo alcalino LR03)
Classificazione elemento applicativo tipo BF
Condizioni
ambientali:
Conservazione/
trasporto:
vasiva della pressione sanguigna al
polso, per polsi della circonferenza di
12,5 cm – 20,5 cm
sistolica: 50 – 250 mmHg /
diastolica: 40 –180 mmHg /
polso: 40 –160/min
sistolica: ± 3 mmHg /
diastolica: ± 3mmHg /
polso: ± 5% del valore visualizzato
(max. deviazione standard ammessa
secondo esame clinico):
sistolica: 8 mmHg / diastolica: 8 mmHg
+10 °C – + 40 °C umidità atmosferica
max. 85%
- 5 °C – + 50 °C umidità atmosferica
max. 85%
Simbologia: elemento applicativo tipo BF
Attenzione! Leggere attentamente
le istruzioni per l’uso!
•
Questo apparecchio è conforme alla norma europea
EN60601-1-2 ed è sottoposto a misure speciali concernenti la compatibilità elettromagnetica 93/42/EC.
Tener presente che dispositivi di comunicazione portatili e mobili ad alta frequenza possono influenzare
questo apparecchio. Per informazioni più dettagliate,
rivolgersi all’Assistenza clienti oppure consultare la
parte finale delle istruzioni per l’uso.
•
L’apparecchio è conforme alla direttiva EU concer-
nente i prodotti medicali, alla legge sui prodotti medicali e alle norme EN1060-1 (sfigmomanometri non
invasivi, parte 1: Requisiti generali) e EN1060-3 (sfigmomanometri non invasivi, parte 3: Requisiti complementari per sistemi elettromeccanici di misurazione
della pressione sanguigna).
40
Page 41

TÜRKÇE
Sayın Müşterimiz,
İmalatımız olan bir ürünü tercih etmenizden dolayı memnuniyetimizi belirtmek isteriz. Adımız, Isı, Ağırlık, Kan Basıncı, Vücut Isısı, Nabız, Yumuşak Terapi, Masaj ve Hava
alanlarında ayrıntılı olarak kontrolden geçirilmiş yüksek
kaliteli ürünlerin simgesidir. Lütfen bu kullanma talimatını
dikkatle okuyup sonrakı kullanımlar için saklayınız, diğer
kullanıcıların da okumasına olanak tanıyınız ve belirtilen
açıklamalara uyunuz.
Dostane tavsiyelerimizle
Beurer Müessesesi
1. Tanıtım
El bileği üzerinden tansiyon ölçme cihazı, yetişkin insanlarda atardamar üzerinden tansiyon değerlerinin diştan
ölçülmesi ve denetlenmesi için kullanılır.
Bu cihaz ile tansiyonunuzu çabuk ve kolay ölçebilir, ölçülen değerleri belleğe kaydedebilir ve ölçüm değerlerinin zamanla gelișmesinin yanı sıra, ortalama değerlerini
de görebilirsiniz.
41
2. Önemli bilgiler
Kullanım ile ilgili bilgiler
•
Tansiyonunuzu daima günün aynı saatinde ölçerek,
ölçülen değerlerin birbiriyle kıyaslanabilir olmasını sağlayınız.
•
Her ölçümden önce yakl. 5 dakika dinleniniz!
•
İki ölçüm arasında 5 dakika beklemeniz gerekir!
•
Kendi ölçtüğünüz değerler sadece sizin bilgi edin-
menize yarar; bir doktor kontrolünün yerini tutmaz!
Ölçüm değerlerinizi doktorunuzla gözden geçiriniz, bu
değerlere istinaden kesinlikle herhangi bir tıbbi karara
varmayınız (örn. ilaçlar ve ilaçların dozu)!
•
Bir kolda söz konusu olan kronik veya akut bir damar
rahatsızlığından (damar daralmasi da olabilir) kaynaklanan kan dolaşım bozuklukları varsa, el bileği üzerinden tansiyon ölçme işleminin hassaslığı ve doğruluğu
sınırlı olur. Böyle bir durumda, üst kol üzerinden ölçen
bir tansiyon ölçme cihazı kullanınız.
•
Kalp ve kan dolaşım sistemi rahatsızsa, hatalı ölçüm
söz konusu olabilir; bu durum çok düşük tansiyon, kan
dolaşım bozuklukları, ritmik bozukluklar ve diğer mevcut hastalıklar için de geçerlidir.
Page 42

•
Cihazı sadece, el bileğinin çevresi bildirilen aralık dahi-
linde olan kişiler için kullanınız.
•
Tansiyon ölçme cihazını sadece pil ile kullanabilirsi-
niz. Verilerin belleğe kaydedilmesinin ancak, tansiyon
ölçme cihazınızın elektrik akımı ile beslenmesi durumunda mümkün olacağına dikkat ediniz. Pillerin şarjı
biter bitmez, tansiyon aletinin tarih, saat ve kayıtlı
ölçüm değerleri kaybolur.
•
Otomatik kapatma fonksiyonu, cihazın herhangi bir
tuşuna bir dakika boyunca basılmadığı zaman, pilleri
korumak amacıyla tansiyon cihazını kapatır.
Muhafaza, bakım ve koruma ile ilgili bilgiler
•
Tansiyon cihazı, hassas ve elektronik ünitelerden oluş-
maktadır. Ölçüm değerlerinin doğruluğunun ve hassaslığının yanı sıra, cihazın ömrü de itinali kullanıma
bağlıdır:
– Cihazı, darbelere, neme, toz ve pisliğe, aşırı ısı de-
ğişimlerine ve doğrudan etki eden güneş ışınlarına
karşı koruyunuz.
– Cihazı yere düşürmeyiniz.
– Cihazı güçlü elektromanyetik alanların yakınında kul-
lanmayınız, telsiz tesislerinden ve mobil telefonlar-
dan uzak tutunuz.
42
– Sadece cihaz ile birlikte teslim edilmiş veya orijinal
yedek manşetleri kullanınız. Aksi halde, yanlış ölçüm
değerleri ortaya çıkar.
•
Manşet el bileğine takılı olmadığı sürece, tuşlara bas-
mayınız.
•
Eğer cihaz uzun bir süre kullanmayacaksa, pillerin çı-
karılması tavsiye edilir.
Piller ile ilgili bilgiler
•
Pillerin yutulması halinde, ölüm tehlikesi söz konusu
olabilir. Bu nedenle, pilleri ve ürünleri çocukların ulaşamayacakları şekilde saklayınız. Bir pil yutulmuşsa,
derhal tıbbi yardıma başvurulmalıdır.
•
Piller, şarj edilmemeli veya başka araçlarla yeniden
aktifleştirilmemeli, parçalarına ayrılmamalı, ateşe atılmamalı veya kısa devre (kontak) yapılmamalıdır.
•
Piller deşarj olmuşsa veya cihazı uzun süre kullanma-
yacaksanız, pilleri cihazdan çıkarınız.
Böylelikle, pillerden akan sıvı maddelerin sebep olabi-
leceği zararları önlemiş olursunuz. Bütün pilleri daima
aynı zamanda değiştiriniz.
•
Farklı tipte piller, farklı marka piller veya farklı kapasi-
telere sahip piller kullanmayınız. Öncelikle alkalin piller
kullanmayı tercih ediniz.
Page 43

Onarım ve giderme bilgileri
•
Piller normal ev çöpüne atılmamalıdır. Eskimiş pilleri,
özellikle bu işlem için ön görülmüş toplama merkezleri
üzerinden gideriniz.
•
Cihazın gövdesini veya kasasını açmayınız. Bu kurala
uyulmaması halinde, garanti geçersiz olur.
•
Cihaz, kendiniz tarafından onarılmamalı veya kalibre
edilmemeli, yani ayarlanmamalıdır. Aksi halde cihazın
kusursuz çalışması garanti edilemez.
•
Onarımlar sadece Beurer yetkili servisi veya yetkili
satıcılar tarafından yapılmalıdır. Fakat her reklamasyondan önce, yine de ilk olarak pilleri kontrol ediniz ve
gerekirse bunları değiştiriniz.
•
Cihazı lütfen 2002/96/EC – WEEE (Waste Elec-
trical and Elektronik Equipment – Elektrikli ve
elektronik donanım atıkları) numaralı elektro ve
elektronik eski cihazlar yönetmeliğine uygun şekilde
gideriniz. Konuyla ilgili sorularınız olması halinde, ilgili
yerel idarelerin yetkili birimlerine başvurunuz.
3. Cihazın tarifi
Ekran
Pil bölmesi
kapağı
M Hafıza
düğmesi
Start /Stop
düğmesi
Ekrandaki görüntüler:
1. Nabız sembolü
1. Manşet hortumu
3. Manşet
4. Manşet fişi
5. Tespit edilen nabız değeri
6. Pil değiştirme sembolü
7. Kayıt yeri numarası
43
1
2
3
4
7
6
5
Page 44

4. Pil takılması /değiştirilmesi
•
Pil bölmesi kapağını çıkarınız .
•
Sadece şu marka tip pil kullanınız: 2 x 1,5 V Micro
(Alkaline Typ LR03). Bunu yaparken, pillerin + ve - kutuplarının doğru yerleştirilmiş olmasına dikkat ediniz.
Tekrar şarj edilebilir aküler kesinlikte kullanılmamalıdır.
Şarj edilebilir piller kullanılamaz.
•
Sonra kapağı yerine koyup yerleştirerek pil bölmesini
kapatınız.
Pillerin bitmesine az kala, ekranın sol alt tarafında bir
boş pil
gerekir.
Piller cihazdan çıkartıldığında tarih ve saat yeniden ayarlanmalıdır. Kaydedilen ölçüm sonuçları kaybolur.
Kullanılmış ve tamamen boşalmış piller ve aküler, özel
olarak işaretlenmiş toplama kaplarına atılarak, özel çöp
alım yerlerine veya Elektronik Eşya Saticilarina verilerek
imha edilmelidir. Yasal olarak, pilleri imha etmekle
yükümlüsünüz.
Uyarı: Aşağıda belirtilen işaretleri zararlı madde
içeren pillerde görürsünüz: Pb = Kurşun içeren
pil, Cd = Kadmiyum içeren pil, Hg = Civa içeren pil.
sembolü görünür ve pillerin değiştirilmesi
5. Tarih, Saat ayarı
Ölçme değerlerinizi doğru olarak saati ve tarihi ile hafızalayabilmek ve sonradan bunları hafızadan tekrar okuyabilmek için, Tarih/Saat ayarının yapılması gerekir.
Tarih ve saati ayarlamak için aşağıdakileri uygulayın:
•
Pilleri taktıktan sonra Start /Stop düğmesine basın.
Yıl yanıp sönmeye başlar. Kayıt düğmesiyle M
ayarlayın ve Start /Stop düğmesiyle
•
Ardından ayı, günü, saati ve dakikayı ayarlayın ve her
defasında Start /Stop düğmesiyle
onaylayın.
onaylayın.
6. Aletin takılması
•
Tansiyon Bilgisayarını sol bileğin iç tarafına koyunuz.
•
Bileğinizin çıplak olmasına dikkat ediniz.
•
Aletin üst köşesi, baş parmak
şamihasının 10 mm kadar
altına gelecek şekilde,
kendiliğinden yapışan bantlı
manşeti kapatınız (şekle
bakınız).
•
Manşet bileği dar bir şekilde kavramalı ama çok sık-
mamalıdır.
44
yılı
Page 45

7. Tansiyonun ölçülmesi
• • • • • • • • • • • • •
• Rahat bir şekilde bir yere oturunuz.
• Kolunuzu mutlaka bir yere dayayınız
ve alet kalp hizasına gelecek şekilde
kolunuzu bükünüz (şekle bakınız).
• Ölçmeden önce 3 – 5 dakika kadar
yeterli derecede dinleniniz.
•
Sonra ölçmeyi başlatmak için
Start /Stop düğmesine
•
Tüm rakamların yandığı ekran kontrol edildikten sonra
manşet otomatik olarak 180 mmHg basınçla şişer.
•
Basınç 180 mmHg değerine ulaşınca, otomatikman
manşetten basınç düşmeye başlar ve ekranda çarpan
bir kalp görünür.
•
Sonra ekranda kendi tansiyon değerleriniz ve daki-
kada kalp atış frekansınız görünür.
•
Aleti kapatmak ve basınç düşürmek için yeniden
Start /Stop düğmesine
•
Şayet aleti kapatmayı unutursanız, o kendiliğinden
3 dakika sonra kapanır.
•
Ölçme işlemini Start /Stop tuşuna basarak, her an
durdurabilirsiniz, yani iptal edebilirsiniz.
basınız.
basınız.
8. Hafızalanan değerlerin gösterilmesi
Alet otomatikman son 60 ölçmenin tansiyon değerlerini
hafızalar.
60 hafıza yeri aşıldığı takdirde, daima en eski değer hafızadan silinir.
Hafıza şu şekilde ekrana çağrılabilir:
•
Alet kapalıyken M hafıza düğmesine basarsanız , en
son ölçülen değer ekranda görünür.
•
Tekrar M hafıza düğmesine basarak hafızalanan bütün
değerleri teker teker ekrana çağırabilirsiniz.
•
Ekranın sağ alt tarafında hafıza yeri numarasını gö-
rürsünüz. Her bir ölçmenin tarih ve saati, ekranın üst
tarafında gösterilir.
•
İlk saptanan değer, Hafıza 1 de hafızalanır. Yeni bir
ölçme değeri saptanır saptanmaz, bu hafıza 1 yerine
hafızalanır, ve bir önceki değer bir sonraki aşağıdaki
hafıza yerine kaydırılır.
•
En son doldurulan hafıza yerinden sonra yeniden M
hafıza düğmesine basılırsa
değerlerin ortalama değerini gösterir.
•
Kapatmak için yeniden Start /Stop düğmesine bası-
nız.
•
Aleti kapatmayı unutursanız, alet kendiliğinden otoma-
tikman 3 dakika sonra kapanır.
45
alet hafızalanan bütün
Page 46

9. Hata giderilmesi
Hata duyurusu şu durumlarda ortaya çıkabilir:
•
Pompalama 25 saniyeden uzun sürerse ( sem-
bolü göstergede belirir).
•
Ölçme esnasında hareket ederseniz ve rahat durmaz-
sanız (
•
Ek pompalamaya rağmen yeterli pompalama olma-
mışsa (
•
Tansiyon değerleri alışılmadık derecede yüksek veya
düşük ise (
•
Pompalama basıncı 300 mmHg den yüksekse (Hata
bildirimi
•
Pillerin bitmesine yakın; o takdirde pillerin değiştiril-
mesi gerekir.
sembolü göstergede belirir).
sembolü göstergede belirir).
sembolü göstergede belirir).
).
Bu durumlarda ölçümü tekrarlayınız. Gerekirse pilleri yeniden takınız veya bunları değiştiriniz.
10. Temizlenmesi ve bakımı
•
Tansiyon ölçme aletinizi dikkatli bir şekilde, sadece
hafif nemlendirilmiş bir bezle temizleyin.
•
Temizleme maddeleri veya çözücü (solvent) madde
kullanmayınız.
•
Cihazı kesinlikle su altına tutmayınız, çünkü cihaz su
girebilir ve cihazın zarar görmesine neden olur.
•
Cihazın üzerine ağır cisimler yerleştirmeyiniz.
11. Yetişkinler için tansiyon değerleri (ölçü birimi mmHg) sınıflama tabelası:
Alan Sistolik tansiyon Diyastolik tansiyon Önlem
Hipotoni (düşük Tansiyon) 105 den az 60 tan az Doktorunuzda kontrol
Normal alan 105 ile 120 arası 60 ile 80 arası Kişisel kontrol
Yüksek tansiyon öncesiyle
ilgili kan basıncı alanı (*) 120 ve 140 arası 80 ve 90 arası Doktorda kontrol
Hipertoni – I. Derece Yüksek Tansiyon 140 ve 160 90 ve 100 arası Doktorunuza başvurunuz
Hipertoni – II. Derece Yüksek Tansiyon 160 tan yüksek 100 tan yüksek Doktorunuza başvurunuz
(*) Bir yüksek tansiyona geçebilecek kan basıncı alanı Adapted from JNC 2003
46
Page 47

12. Teknik Bilgiler
Tip: BC 20
Ölçme Metodu: bilekten, vücuda giriş olma-
Gösterge alanı: 0 – 300 mmHg
Ölçme alanı: sistolik: 50 – 250 mmHg /
Basınç göstergesi hassasiyeti:
Ölçme hata toleransı:
Elektrik ihtiyacı: 2 x 1,5 V Micro (Alkaline Typ LR03)
Sınıflama: BF tipi kullanım parçası
Isı ve nem şartları:
Muhafaza/
Taşıma:
İşaret açıklaması: BF tipi kullanım parçası
dan osilometrik tansiyon ölçme,
12,5 cm – 20,5 cm bilek kalınlığı için
diyastolik: 40 –180 mmHg /
Kalp atışı: 40 –160 /dakika
sistolik: ± 3 mmHg /
diyastolik: ± 3 mmHg /
Kalp atışı: gösterilen değerin ± % 5
(göre klinik kontrolu standart değerden azami sapma sınırı):
sistolik: 8 mmHg / diyastolik: 8 mmHg
+10 °C – + 40 °C azami % 85 hava
nem oranı
- 5 °C – + 50 °C azami % 85 hava nem
oranı
Dikkat! Kullanma talimatını oku!
•
Bu cihaz, EN60601-1-2 Avrupa standartına uygundur
ve elektromanyetik uyumluluk bakımından özel güvenlik önlemlerine tabidir 93/42/EC. Lütfen bu hususta,
taşınabilir ve mobil HF iletişim düzeneklerinin bu cihazı
etkileyebileceğini dikkate alınız. Ayrıntılı bilgileri belirtilen müşteri servisi adresinden talep edebilir veya
kullanım kılavuzunun son kısmında bulabilirsiniz.
•
Bu cihaz, tıbbi ürünler AB direktifine, tıbbi ürün ya-
sasına ve EN1060-1 Avupa standartlarına (vücudun
dışından uygulanan tansiyon ölçme cihazları bölüm 1:
Genel talepler) ve EN1060-3 Avrupa standartlarına
(vücudun dışından uygulanan tansiyon ölçme cihazları
bölüm 3: Elektromekanik tansiyon ölçme sistemleri
için genişletilmiş talepler) uygundur.
47
Page 48

РУССКИЙ
Многоуважаемый покупатель!
Мы рады тому, что Вы выбрали товар из нашего ассортимента. Изделия нашей компании являются продуктами высочайшего качества, используемые для
измерения веса, артериального давления, температуры тела, частоты пульса, в области мягкой терапии
и массажа.
Внимательно прочтите данную инструкцию по эксплуатации, сохраняйте ее для дальнейшего использования, дайте ее прочитать и другим пользователям
и строго следуйте приведенным в ней указаниям.
С дружескими пожеланиями сотрудники компании
Beurer
1. Ознакомление
Аппарат для измерения кровяного давления на запястье служит для неинвазивного измерения и контроля
артериального давления у взрослых пациентов.
С его помощью Вы можете быстро и просто измерять Ваше кровяное давление, вводить в память
результаты измерений и показывать изменения и
средние значения давления.
2. Важные указания
Указания по применению
•
Всегда измеряйте кровяное давление в одно и то
же время суток, чтобы обеспечить сравнимость
результатов.
•
Перед каждым измерением расслабляйтесь в те-
чение около 5 минут!
•
Между двумя измерениями рекомендуется подо-
ждать около 5 минут!
•
Полученные Вами результаты измерений могут
служить только для информации – они не заменяют медицинское обследование! Обсудите результаты измерений с врачом, не принимайте на их
основании никаких медицинских решений (например, выбор медикаментов и их дозировки)!
• При ограничении кровообращения в руке в связи с
хроническими или острыми заболеваниями сосудов
(в т. ч. сужением сосудов) точность измерений ограничена. В этом случае перейдите на аппарат, измеряющий кровяное давление в плечевой артерии.
•
Неверные измерения могут возникать при заболе-
ваниях сердечно-сосудистой системы, а также при
48
Page 49

очень низком артериальном давлении, нарушениях кровообращения и сердечного ритма и других предболезнях.
•
Использовать аппарат только для людей, у кото-
рых объем запястья соответствует указанному
диапазону.
•
Аппарат может работать только от батареек. Уч-
тите, что сохранение данных возможно только
в том случае, если аппарат получает электрический ток. После полного разряда батареек даты,
времени и все сохраненные в памяти аппарата
результаты измерений исчезают.
• Автоматика отключения выключает аппарат в целях
экономного использования батареек, если в течение одной минуты не нажимать ни одну из кнопок.
Указания по хранению и уходу
•
Аппарат состоит из прецизионных и электронных
узлов. Точность результатов измерений и срок
службы аппарата зависят от тщательности
обращения:
– Предохраняйте прибор от ударов, действия
влаги, грязи, сильных колебаний температуры и
прямых солнечных лучей.
– Не допускайте падений прибора.
– Не используйте прибор вблизи сильных электро-
магнитных полей, например, вблизи радиоаппаратуры или мобильных телефонов
– Используйте только входящие в объем поставки
или оригинальные запасные манжеты. В противном случае получаются неверные результаты
измерений.
•
Не нажимать на кнопки, пока не надета манжета.
•
Если Вы длительное время не пользуетесь прибо-
ром, рекомендуется вынуть батарейки.
Указания в отношении батареек
•
Проглатывание батареек может приводить к опас-
ности для жизни. Поэтому храните батарейки и
изделия в недоступном для детей месте. В случае
проглатывания батарейки незамедлительно обратитесь к врачу.
•
Запрещается заряжать или реактивировать бата-
рейки иными способами, разбирать их, бросать в
огонь или замыкать накоротко.
•
Вытащите батарейки из аппарата, если они раз-
ряжены или если Вы длительное время не пользуетесь прибором. Таким образом Вы предотвращаете ущерб, который может быть вызван
вылившимся электролитом. Всегда заменяйте все
батарейки одновременно.
49
Page 50

•
Не используйте батарейки различных типов, марок
или батарейки с различной емкостью. Преимущественно используйте щелочные батарейки.
Указания по ремонту и утилизации
•
Батарейки запрещается выбрасывать в бытовой
мусор. Утилизируйте использованные батарейки
через соответствующий пункт сбора отходов.
•
Не открывайте прибор. Несоблюдение ведет к по-
тере гарантии.
•
Запрещается самостоятельно ремонтировать или
регулировать прибор. В этом случае больше не гарантируется безупречность работы.
•
Ремонт разрешается выполнять только службе
технического обеспечения фирмы Beurer или
авторизированным сервисным организациям. Но
перед любыми рекламациями вначале проверьте
батарейки и, при необходимости,замените их.
•
Утилизируйте прибор согласно требованиям
Положения об утилизации электрического
и электронного оборудования 2002/96/EC –
WEEE (Waste Electrical and Electronic Equipment).
По всем вопросам по утилизации обращайтесь в
соответствующую коммунальную службу.
3. Описание прибора
Дисплей
Крышка отсека
для батареек
Кнопка
памяти M
Кнопка
вкл. /выкл.
Индикация на дисплее:
1. Символ «Пульс»
2. Время и дата
3. Систолическое давление
4. Диастолическое давление
5. Показания пульса
6. Пиктограмма замены
батареек
7. Номер ячейки памяти
50
1
2
3
4
7
6
5
Page 51

4. Установка/замена батареек
•
Снимите крышку батарейного отсека .
•
Пользуйтесь исключительно фирменными алкали-
новыми батарейками типа: 2 х 1,5 В Micro, (Alkaline
Typ LR03). Следите за тем, чтобы батарейки были
вставлены с соблюдением полярности. Заряжаемые аккумуляторные батареи использовать
нельзя. Нельзя использовать повторно заряжаемые аккумуляторы.
•
В завершение процедуры закройте батарейный
отсек, вставив крышку и защелкнув ее.
Когда батарейки почти разрядились, внизу слева на
дисплее
разряженную батарейку; это означает, что батарейки
следует заменить.
После извлечения батареек из прибора дату и время
необходимо устанавливать заново. Сохраненные результаты измерений теряются.
Использованные, полностью разряженные батарейки и аккумуляторы должны утилизироваться
помещением в специально обозначенные контейнеры, пункты сбора специальных отходов или через
торговцев электротоварами. Вы обязаны по закону
утилизировать батарейки.
появляется символ , изображающий
51
Информация: Эти обозначения ставятся
на батарейках, содержащих вредные
материалы: Pb = в батарейке содержится
свинец, Cd = в батарейке содержится
кадмий, Hg = в батарейке содержится ртуть.
5. Установка даты и времени суток
Установка даты/времени суток нужна для того,
чтобы величины измерений давления хранились в
памяти аппарата привязанными к определенной дате
и времени; при последующем вызове они будут выводиться на дисплей вместе.
Для настройки даты и времени действуйте следующим образом:
•
После установки батареек нажмите кнопку вкл. /
. Позиции для индикации года начнут
выкл.
мигать. С помощью кнопки сохранения M
стройте год и подтвердите кнопкой вкл. /выкл.
•
После этого установите месяц, день, час и минуту,
каждый раз подтверждая настройку нажатием
кнопки вкл. /выкл.
.
на-
.
Page 52

6. Надевание аппарата
• • • • • • • • • • • • •
•
Наложите электронный тонометр на левое запя-
стье, с внутренней его стороны.
•
Запястье должно быть обнажено.
•
Закрепите манжету с
помощью застежки-липучки, так, чтобы верхний
край аппарата располагался на расстоянии
примерно 10 мм от возвышения большого пальца
руки (см. рисунок).
•
Манжета должна плотно прилегать к запястью, но
не слишком сильно его сжимать.
7. Измерение давления
•
Сядьте спокойно.
•
Обопритесь предплечьем на
надежную опору и согните руку
в локте, чтобы аппарат оказался
на уровне сердца (см. рисунок).
•
Перед измерением давления по-
сидите достаточное время
(3 – 5 минут) в покое.
•
Теперь, чтобы начать измерение, нажмите на
кнопку вкл. /выкл
.
•
После проверки дисплея, во время которой
должны гореть все цифры, манжета автоматически накачивается до давления 180 ммрт.ст.
•
После того, как давление в манжете составит
180 мм рт. ст., воздух из манжеты автоматически
начнет выходить и давление падать, а на дисплее
покажется бьющееся сердце.
•
Наконец, на дисплее покажутся величины Вашего
артериального давления и частота пульса.
•
Чтобы выключить аппарат и выпустить воздух из
манжеты, снова нажмите на кнопку вкл. /выкл.
•
Если Вы забудете выключить аппарат, через 3 ми-
нуты он автоматически отключится сам.
•
Вы можете в любой момент прервать измерение
нажатием кнопки вкл. /выкл.
.
8. Просмотр сохраненных в памяти
результатов измерений
Аппарат автоматически запоминает показатели артериального давления, полученные в результате последних 60 измерений.
После того, как все 60 ячеек памяти окажутся заполненными, каждый раз из памяти будет удаляться
самое старое показание. Хранящиеся в памяти дан-
52
.
Page 53

ные можно в случае необходимости вызвать следующим образом:
•
Нажмите в выключенном состоянии на кнопку па-
мяти M , на дисплее появится результат последнего измерения.
•
При последующих нажатиях на кнопку памяти M
можно просмотреть все хранящиеся в памяти результаты измерений по одному.
•
На дисплее внизу справа можно видеть номер
ячейки памяти. В верхней части дисплея показывается дата и время суток, когда было выполнено
данное измерение.
•
Последнее выполненное измерение заносится в
ячейку памяти 1. Когда будет выполнено новое измерение, оно займет эту ячейку, а прежнее значение переместится в следующую ячейку памяти.
•
После того, как будет показан результат измере-
ния, хранящийся в последней ячейке, аппарат при
последующем нажатии на кнопку памяти M
ведет на дисплей результаты всех хранящихся в
памяти результатов измерений одновременно.
•
Для отключения снова нажмите на кнопку вкл. /
.
выкл
•
Если Вы забыли выключить аппарат, он отклю-
чится автоматически через 3 минуты.
вы-
9. Устранение неисправностей
Сигнал об ошибке выдается, если:
•
нагнетание давления в манжете длится долее
25 секунд (на экране высвечивается
• в процессе измерения давления Вы двигаетесь и не
сидите спокойно (на экране высвечивается
•
при недостаточном уровне исходного давления в
манжете, несмотря на дополнительное нагнетание
воздуха (на экране высвечивается
•
при необычайно высокой или низкой величине ар-
териального давления (на экране высвечивается
),
•
в манжете достигается давление выше 300 мм рт. ст.
(появляется сообщение об ошибке
•
батарейки почти разрядились (в таком случае ба-
тарейки следует заменить).
В подобных случаях измерение следует повторить.
При необходимости переустановите батарейки или
замените их.
53
),
),
),
),
Page 54

•
10. Уход за аппаратом
•
При очистке прибора для измерения артериаль-
ного давления действуйте осторожно и используйте только слегка влажную салфетку.
•
Категорически запрещается использовать чистя-
щие средства или растворители.
Категорически запрещается погружать аппарат в
воду, т. к. в аппарат может попасть жидкость и повредить его.
•
НЕ ставьте на прибор тяжелые предметы.
11. Таблица оценки величин артериального давления (единица измерения – мм рт. ст.)
для взрослых:
Область (определяемый Систолическое Диастолическое Диапазон значений
показатель) артериальное артериальное
давление давление
Гипотония (Пониженное
кровяное давление) ниже 105 ниже 60 необходимо наблюдение врача
Диапазон нормальных значений от 105 до 120 от 60 до 80 самостоятельное наблюдение
Предгипертонический
диапазон кровяного давления (*) от 120 до 140 от 80 до 90 необходимо наблюдение врача
Гипертензия – Повышенное необходима консуль тация
кровяное давление степени I от 140 до 160 от 90 до 100 врача
Гипертензия – Повышенное выше 160 выше 100 необходима консуль тация
кровяное давление степени II врача
(*) Диапазон кровяного давления, который может перейти в повышенное кровяное давление Adapted from JNC 2003
54
Page 55

12. Технические данные
Тип: BC 20
Метод
измерения:
Область определяемых величин: 0 – 300 мм рт. cт
Диапазон
измерения:
Точность указываемой величины
давления:
Надежность
измерений:
неивазивный (бескровный) осциллометрический метод измерения
кровяного давления на запястье
Обхват запястья должен быть в
пределах 12,5 см – 20,5 см
50 – 250 мм рт. ст. для систолического давления, 40 –180 мм рт. ст.
для диастолического
Пульс: 40 –160 ударов в минуту
систолического: ± 3 мм рт. ст. /
диастолический: ± 3 мм рт. ст. /
пульс ± 5% от указываемой величины
(максимальное допустимое стандартное отклонение по результатам клинических испытаний в
соответствии с европейскими): систолическое давление: 8 мм рт. ст. /
диастолическое 8 мм рт. ст.
Параметры электропитания:
Классификация: раздел применения Тип ВF
Необходимые
условия окружающей среды:
Условия хранения / транспортировки:
Примечание: раздел применения Тип ВF
• Данный прибор соответствует европейскому стандарту EN60601-1-2 и является предметом особых
мер предосторожности в отношении электромагнитной совместимости. При этом учитывайте, что переносные и мобильные средства ВЧ-связи могут влиять на данный прибор. Более точные данные можно
запросить по указанному адресу сервисной службы
или найти в конце инструкции по применению.
•
Аппарат соответствует требованиям европейского
нормативного акта по медицинским изделиям,
93/42/EC Закона о медицинских изделиях, а также
европейских стандартов EN1060-1 («Неинвазивные
55
алкалиновая батарейка 2 х 1,5 В
Micro (Alkaline Typ LR03)
+10 °C – + 40 °C, макс. относительная влажность воздуха 85%
- 5 °C – + 50 °C, макс. относительная влажность воздуха 85%
Внимание: Прочитайте
инструкцию по применению!
Page 56

аппараты для измерения кровяного давления»,
часть 1: «Общие требования») и EN1060-3 («Неинвазивные аппараты для измерения кровяного
давления», часть 3: «Дополнительные требования
к электромеханическим системам для измерения
кровяного давления»).
13. Гарантия:
Мы предоставляем гарантию на дефекты материалов и изготовления этого прибора на срок 36 месяцев со дня продажи через розничную сеть.
Гарантия не распространяется:
-
на случаи ущерба, вызванного неправильным ис-
пользованием
-
на быстроизнашивающиеся части (батарейки, ман-
жета)
-
на дефекты, о которых покупатель знал в момент
покупки
-
на случаи собственной вины покупателя.
Товар сертифицирован: измерители артериального давления и частоты пульса
(тонометры)
Ростест Москва № РОСС DE. АЯ46.
B07217 срок действия с 14.04.2010 г. по 23.03.2013 г.
Регистрационное удостоверение ФС № 2006/ 2607 от
28.12.2006 г. по 28.12.2016 г.
Сертификат об утверждении типа средств измерения
DE.C.39.003.A № 29079 от 21.09.2007 по 01.10.2012
Срок эксплуатации изделия: от 3 до 5 лет
Фирма изготовитель: Бойрер Гмбх,
Софлингер штрассе 218,
89077-УЛМ, Германия
Фирма-импортер: OOO БОЙРЕР,
109451 г. Москва,
ул. Перерва 62, корп. 2, офис 3
Сервисный центр: 109451 г. Москва, ул.
Перерва 62 , корп.2
Тел(факс) 495–658 54 90
Дата продажи
Подпись продавца
Штамп магазина
Подпись покупателя
56
Page 57

POLSKI
Szanowni Klienci,
bardzo dziękujemy za wybór jednego z naszych wyrobów. Nazwa naszej firmy oznacza wysokiej jakości wyroby, dokładnie sprawdzone w zakresie zastosowań w
obszarach nagrzewania, pomiarów masy ciała, ciśnienia
krwi, temperatury ciała, tętna, łagodnej terapii, masażu
i powietrza.
Prosimy o dokładne przeczytanie niniejszej instrukcji
obsługi oraz o zatrzymanie jej do późniejszego użytku,
udostępniając ją innym użytkownikom oraz przestrzegając zawartych w niej informacji.
Z poważaniem,
Zespół firmy Beurer
1. Uwagi wstepne
Nadgarstkowy aparat do mierzenia ciśnienia krwi służy
do nieinwazyjnego pomiaru i kontroli tętniczych wartości
ciśnienia krwi dorosłych ludzi.
Możliwy jest szybki i dokładny pomiar ciśnienia krwi,
zapis wartości do pamięci oraz wyświetlenie przebiegu i
wartości średnich na wyświetlaczu.
2. Ważne wskazówki
Wskazówki do zastosowania
•
Mierzyć ciśnienie zawsze o tej samej porze dnia, aby
pomiary były porównywalne
•
Przed każdym pomiarem odpocząć ok. 5 minut!
•
Pomiędzy pomiarami odczekać 5 minut!
•
Uzyskane wartości służą wyłącznie do własnej infor-
macji – w żadnym wypadku nie zastępują badania
lekarskiego! Wyniki należy omówić z lekarzem, nie
uzasadniać nimi w żadnym wypadku własnych decyzji
w leczeniu (np.: leków i ich dozowania)!
•
W przypadku ograniczenia krążenia krwi ze względu
na chroniczne lub ostre stany chorobowe naczyń
krwionośnych (w tym zwężenie żył), dokładność pomiaru urządzenia nadgarstkowego jest ograniczona.
W takim przypadku zaleca się kupno urządzenia mierzącego ciśnienie krwi na ramieniu.
•
Możliwe są błędne pomiary w przypadku zachoro-
wań systemu krążeniowo-naczyniowego, także w
przypadku niskiego ciśnienia, zaburzeń dopływu krwi i
zaburzeń rytmu, a także innych schorzeń poprzedzających.
57
Page 58

•
Używać urządzenia tylko u osób, które mają właściwy
dla opaski obwód nadgarstka.
•
Urządzenie można eksploatować wyłącznie z zasila-
niem bateryjnym. Należy pamiętać, że zapis danych
do pamięci jest możliwy tylko wtedy, gdy urządzenie
jest zasilane przez prąd. Jeśli więc baterie są wyczerpane, urządzenie straci możliwość pamiętania daty,
czasu zegarowego oraz zapisanych wartości pomiarowych.
•
Automatyka wyłączania wyłącza urządzenie w celu
oszczędności baterii, jeśli w ciągu minuty nie zostanie
użyty żaden przycisk.
Wskazówki do przechowywania i pielęgnacji
•
Aparat do mierzenia ciśnienia krwi składa się z pod-
zespołów precyzyjnych i elektronicznych. Dokładność
wartości pomiarowych i żywotność urządzenia zależy
o troskliwego obchodzenia się z urządzeniem:
– Chronić urządzenie przed uderzeniami, wilgocią,
brudem, silnymi wahaniami temperatury i bezpo-
średnim nasłonecznieniem.
– Nie upuszczać urządzenia.
– Nie stosować urządzenia w pobliżu silnych pól elek-
tromagnetycznych, trzymać je z dala od instalacji
radiowych i telefonów komórkowych.
– Używać jedynie dostarczonej lub orginalnej opaski
nadgarstkowej. W innym przypadku uzyskuje się
błędne dane pomiarowe.
•
Nie naciskać na przycisk, jeśli opaska nie jest nało-
żona.
•
Jeśli urządzenie nie będzie przez dłuższy czas uży-
wane, zaleca się wyciągnięcie baterii.
Wskazówki do baterii
•
Baterie mogą być przy połknięciu niebezpieczne dla
życia. Przechowywać z tego powodu baterie i produkt
w miejscach niedostępnych dla małych dzieci. Jeśli
nastąpiło już połknięcie baterii, należy zgłosić się natychmiast po pomoc medyczną.
•
Baterii nie wolno ładować lub reaktywować innymi
środkami, nie rozbierać, nie wrzucać do ognia ani nie
robić zwarcia.
•
Wyciągnąć baterie z urządzenia, kiedy są wyczerpane
lub kiedy urządzenie nie będzie przez dłuższy czas
używane. W ten sposób unika się szkód, powstających w wyniku wylania baterii. Wymieniać zawsze
wszystkie baterie jednocześnie.
•
Nie używać różnych typów baterii, marek lub baterii z
różnymi pojemnościami. Stosować zalecane baterie
alkaliczne.
58
Page 59

Wskazówki do napraw i utylizacji
•
Baterii nie wyrzucać do zwykłych śmieci. Utylizować
baterie tylko w miejscach do tego przewidzianych.
•
Nigdy nie otwierać urządzenia. W przypadku niestoso-
wania się do wskazówek gwarancja wygaśnie.
•
Urządzenia nie naprawiać ani nie justować samodziel-
nie. W przeciwnym razie niemożliwe jest zagwarantowanie niezawodności funkcjonowania urządzenia.
•
Naprawy mogą być przeprowadzane jedynie przez
serwis firmy Beurer lub autoryzowany serwis
dystrybutora sprzętu. Przed złożeniem reklamacji
sprawdzić najpierw baterie i w razie potrzeby
wymienić je na nowe.
•
Urządzenie utylizować zgodnie z zaleceniem
dot. urządzeń elektroniki użytkowej 2002/96/EC
– WEEE (Waste Electrical and Electronic Equipment). W razie pytań lub wątpliwości należy się zwrócić do właściwego działu komunalnego, zajmującego
się utylizacją.
3. Opis urządzenia
Wyswietlacz
Pokrywa pojem-
nika na baterie
Przycisk zapisu M
Przycisk
Start /Stop
Wskazania na wyświetlaczu:
1. Symbol tętna
2. Czas i data
3. Ciśnienie skurczowe
4. Ciśnienie rozkurczowe
5. Zmierzona wartość pulsu
6. Symbol wymiany baterii
7. Numer miejsca w pamięci
59
1
2
3
4
7
6
5
Page 60

4. Wkladanie /wymiana baterii
•
Wyjmij pokrywe pojemnika na baterie .
•
Nalezy stosowac wylacznie markowe baterie typu
2 x 1,5 V Micro (alkaliczne LR03).
Zwrócić uwagę na poprawne ustawienie biegunów
baterii zgodnie z oznaczeniem. Nie wolno stosować
baterii ładowanych (akumulatorków).
•
Nastepnie zamknij pojemnik na baterie, nakladajac
pokrywe i zatrzaskujac ja.
Jezeli baterie sa prawie zuzyte, w lewej dolnej czesci
wyswietlacza
a wtedy nalezy wymienic baterie.
Po wyjęciu baterii z urządzenia konieczne jest ponowne
ustawienie daty i godziny. Zapisane wyniki pomiarów
zostaną utracone.
Zużyte, całkowicie rozładowane baterie i akumulatory
muszą być wyrzucane do specjalnie oznakowanych
pojemników, oddawane do punktów przyjmowania
odpadów specjalnych lub sprzedawcom sprzętu
elektrycznego. Są Państwo prawnie zobowiązani do
usunięcia baterii.
Wskazówka: Symbole te znajdują się na bateriach zawierających substancje szkodliwe:
Pb = bateria zawiera ołów, Cd = bateria zawiera kadm, Hg = bateria zawiera rtęć.
pojawi sie symbol pustej baterii ,
5. Ustawianie daty i godziny
Ustawienie daty / godziny jest konieczne w celu prawidlowego zapisu i ponownego odczytu pomiaru z data i
godzina.
Aby ustawić datę i godzinę, należy wykonać następujące czynności:
•
Po włożeniu baterii nacisnąć przycisk Start /Stop .
Wskazanie roku zacznie migać. Za pomocą przycisku
pamięci M
Start /Stop
•
Następnie ustawić miesiąc, dzień, godzinę i minuty,
potwierdzając każde ustawienie przyciskiem Start /
Stop
ustawić rok i potwierdzić przyciskiem
.
.
6. Zalozenie urzadzenia
•
Przylóz urzadzenie do wewnetrznej strony lewego
nadgarstka.
•
Uwaga: na nadgarstku nie powinno byc odziezy.
•
Zapnij mankiet za pomoca
rzepa, tak aby górna krawedz
urzadzenia znajdowala sie
ok. 10 mm pod wnetrzem
dloni (patrz rys.).
•
Mankiet musi przylegac scisle do nadgarstka, jednak
nie moze go uciskac.
60
Page 61

7. Pomiar cisnienia krwi
• • • • • • • • • • • • •
•
Usiadz wygodnie.
•
Podeprzyj ramie i zegnij je, tak aby
urzadzenie znalazlo sie na
wysokosci serca (patrz rys.).
•
Przed dokonaniem pomiaru pa-
mietaj o przestrzeganiu odpowiedniego czasu odpoczynku rzedu
3 – 5 minut.
•
Teraz nacisnij przycisk Start /Stop w celu rozpocze-
cia pomiaru.
•
Po kontroli wyświetlacza, podczas której wyświetlą się
wszystkie cyfry, nastąpi automatyczne napompowanie mankietu do ciśnienia 180 mmHg.
•
Po osiagnieciu 180 mmHg cisnienie z mankietu zo-
stanie automatycznie spuszczone, a na wyswietlaczu
ukaze sie bijace serce.
•
Nastepnie na wyswietlaczu ukazuje sie wynik pomiaru
cisnienia krwi i pulsu.
•
W celu wylaczenia i spuszczenia cisnienia nalezy po-
nownie nacisnac przycisk Start /Stop
•
Jesli zapomnisz wylaczyc urzadzenie, wylaczy sie ono
automatycznie po uplywie 3 minut.
•
Każdy pomiar można przerwać, naciskają przycisk
Start /Stop
.
.
8. Wskazanie zapisanego wyniku
Urzadzenie zapisuje automatycznie wynik ostatnich 60
pomiarów cisnienia krwi.
Jezeli dojdzie do przepelnienia 60 miejsc pamieci, nastepuje skasowanie najstarszego zapisu.
Odczytu zapisu mozna dokonac w nastepujacy sposób:
•
Przy wylaczonym urzadzeniu nacisnij przycisk zapisu
: wyswietli sie wynik ostatniego pomiaru.
M
•
Dalsze naciskanie przycisku zapisu M mozna dokony-
wac kolejno odczytu wszystkich zapisanych wartosci.
•
W dolnej prawej czesci wyswietlacza ukaze sie numer
miejsca zapisu. Data i godzina danego pomiaru ukazane sa w górnej czesci wyswietlacza.
•
Ostatnio ustalona wartość pomiaru jest zapamięty-
wana w pamięci pod numerem 1. Po pomiarze nowej
wartości, zajmuje ona to miejsce w pamięci, a starsza
wartość przechodzi na dalsze miejsce.
•
Po ostatnim zajetym miejscu w pamieci po ponownym
nacisnieciu przycisku zapisu M
zuje srednia wartosc wszystkich zapisanych wyników.
•
W celu wylaczenia nacisnij ponownie przycisk Start /
.
Stop
•
Jesli zapomnisz wylaczyc urzadzenie, wylaczy sie ono
automatycznie po uplywie 3 minut.
61
urzadzenie wska-
Page 62

9. Usuwanie błędów
Pojawiające się informacje o usterkach mogą być
spowo-dowane następującymi przyczynami:
•
gdy napompowanie trwa ponad 25 sekund (na wy-
świetlaczu pojawi się
•
podczas dokonywania pomiaru nie zachowujesz
spokoju lub wykonujesz ruchy (na wyświetlaczu
pojawi się
•
mimo dodatkowego pompowania urzadzenie nie zo-
stalo napompowane w wystarczajacym stopniu (na
wyświetlaczu pojawi się
•
cisnienie krwi jest wyjatkowo wysokie lub niskie (na
wyświetlaczu pojawi się
•
cisnienie pompowania jest wyzsze niz 300 mmHg (ko-
munikat
•
baterie sa prawie wyczerpane – nalezy dokonac wy-
miany baterii.
W takich przypadkach należy powtórzyć mierzenie. W
razie potrzeby wyciągnąć i ponownie włożyć baterie lub
je wymienić.
),
),
),
),
),
10. Czyszczenie i konserwacja
•
Ciśnieniomierz należy czyścić ostrożnie wyłącznie za
pomocą lekko zwilżonej ściereczki.
•
Nie używać środków czyszczących i rozpuszczalni-
ków.
•
Nie zanurzać w żadnym przypadku urządzenia w wo-
dzie, bo może ona przedostać się do środka i uszkodzić urządzenie.
•
Nie stawiać żadnych ciężkich przedmiotów na
urządzeniu.
62
Page 63

11. Tabela do klasyfikacji wartosci cisnienia krwi (jednostka miary mmHg) dla osób
doroslych:
Zakres Cisnienie systoliczne Cisnienie diastoliczne Srodek
Niskie cisnienie (obniżone ciśnienie krwi) ponizej 105 ponizej 60 Kontrola lekarska
Normalny zakres pomiedzy 105 a 120 pomiedzy 60 a 80 Kontrola samodzielna
Wartości ciśnienia krwi
w przedziale przed nadciśnieniem (*) pomiedzy 120 a 140 pomiedzy 80 a 90 Kontrola lekarska
Niskie cisnienie – Nadciśnienie stopnia I pomiedzy 140 a 160 pomiedzy 90 a 100 Konsultacja z lekarzem
Niskie cisnienie – Nadciśnienie stopnia II powyzej 160 powyzej 100 Konsultacja z lekarzem
(*) Przedział ciśnień krwi, które można zaliczyć do nadciśnienia Adapted from JNC 2003
12. Dane techniczne
Typ: BC 20
Metoda pomiaru:
Zakres
wskazania: 0 – 300 mmHg
Zakres pomiaru: systoliczne: 50 – 250 mmHg /
nieinwazyjny, oscylometryczny pomiar
cisnienia krwi na nadgarstku przy obwodzie nadgarstka 12,5 cm – 20,5 cm
diastoliczne: 40 –180 mmHg /
Puls: 40 –160/min
Dokladnosc
wskazania
cisnienia:
Odchylenia
pomiaru:
Pobór energii: 2 x 1,5 V Micro (Alkaline Typ LR03)
Klasyfikacja: Czesc typu BF
Warunki
otoczenia:
63
systoliczne: ± 3 mmHg /
diastoliczne: ± 3 mmHg /
Puls: ± 5% wskazanej wartosci
(maks. dopuszczalne standardowe
odchylenia zgodnie z badaniem
klinicznym): systoliczne: 8 mmHg /
diastoliczne: 8 mmHg
+10 °C – + 40 °C maks. wilgotnosc
powietrza 85%
Page 64

Przechowywanie /
transport:
Objasnienie
oznaczen:
- 5 °C – + 50 °C maks. wilgotnosc
powietrza 85%
Czesc typu BF
Uwaga! Nalezy
przeczytac instrukcje obslugi!
•
To urządzenie jest zgodne z normą europejską
EN60601-1-2 i podlega szczególnym środkom ostrożności w aspekcie kompatybilności elektromagnetycznej. Należy pamiętać, że urządzenia przenośne i telefony komórkowe mogą mieć wpływ na to urządzenie.
Dokładniejsze dane można uzyskać po skontaktowaniu się z działem obsługi klienta pod podanym poniżej
adresem. Dane znajdują się także na końcu instrukcji
obsługi.
•
Urządzenie odpowiada wytycznym europejskim dla
produktów medycznych 93/42/EC, prawu o urządzeniach medycznych, a także normom europejskim
EN1060-1 (urządzenia do nie inwazyjnego pomiaru
ciśnienia krwi część 1: Wymogi ogólne) i EN1060-3
(urządzenia do nieinwazyjnego pomiaru ciśnienia krwi
część 3: Uzupełniające wymogi dla elektromechanicznych systemów pomiaru ciśnienia krwi).
64
Page 65

Electromagnetic Compatibility Information
Guidance and manufacturer’s declaration – electromagnetic emissions – for all EQUIPMENT and SYSTEMS
Guidance and manufacturer’s declaration – electromagnetic emission
The BC 20 Blood Pressure Monitor is intended for use in the electromagnetic environment specifi ed below. The customer of the user of
the BC 20 Blood Pressure Monitor should assure that it is used in such and environment.
Emissions test Compliance Electromagnetic environment – guidance
RF emissions CISPR 11 Group 1 The BC 20 Blood Pressure Monitor uses RF energy only for its internal function.
RF emission CISPR 11 Class B The BC 20 Blood Pressure Monitor is suitable for use in all establishments,
Harmonic emissions IEC 61000-3-2 N/A
Voltage fl uctuations/fl icker emissions
IEC 61000-3-3
N/A
Guidance and manufacture’s declaration – electromagnetic immunity – for all EQUIPMENT and SYSTEMS
Guidance and manufacture’s declaration – electromagnetic immunity
The BC 20 Blood Pressure Monitor is intended for use in the electromagnetic environment specifi ed below. The customer or the user of
BC 20 Blood Pressure Monitor should assure that it is used in such an environment.
Immunity test IEC 60601 test level Compliance level Electromagnetic environment – guidance
Electrostatic discharge (ESD)
IEC 61000-4-2
Power frequency (50/60Hz)
magnetic fi eld IEC61000-4-8
NOTE: U
is the a.c. mains voltage prior to application of the test level.
T
± 6 kV contact
± 8 kV air
3 A/m 3 A/m
Therefore, its RF emissions are very low and are not likely to cause any interference in nearby electronic equipment.
including domestic establishments and those directly connected to the public
low-voltage power supply network that supplies buildings used for domestic
purposes.
± 6 kV contact
± 8 kV air
Floors should be wood, concrete or ceramic tile. If fl oor are
covered with synthetic material, the relative humidity should
be at least 30 %.
Power frequency magnetic fi elds Should be at levels characteristic of a typical location in a typical commercial or hospital environment.
65
Page 66

Guidance and manufacturer’s declaration – electromagnetic immunity – for EQUIPMENT and SYSTEMS that are not LIFE-SUPPORTING
Guidance and manufacturer’s declaration – electromagnetic immunity
The BC 20 Blood Pressure Monitor is intended for use in the electromagnetic environment specifi ed below. The customer or the user of
BC 20 Blood Pressure Monitor should assure that it is used in such an environment.
Immunity test IEC 60601
Radiated RF
IEC 61000-4-3
NOTE 1 At 80 MHz and 800 MHz, the higher frequency range applies.
NOTE 2 These guidelines may not apply in all situations. Electromagnetic propagation is a ected by absorption and refl ection from
a. Field strengths from fi xed transmitters, such as base stations for radio (cellular/cordless) telephones and land mobile radios, amateur
radio, AM and FM radio broadcast and TV broadcast cannot be predicted theoretically with accuracy. To assess the electromagnetic
environment due to fi xed RF transmitters, an electromagnetic site survey should be considered. If the measured fi eld strength in the
location in which the BC 20 Blood Pressure Monitor is used exceeds the applicable RF compliance level above, the BC 20 Blood Pressure Monitor should be observed to verify normal operation. If abnormal per formance is observed, additional measures may be necessary, such as reorienting or relocating the BC 20 Blood Pressure Monitor.
test level
3 V/m
80 MHz to
2.5 GHz
structures, objects and people.
Compliance
level
3 V/m
Electromagnetic environment – guidance
Portable and mobile RF communications equipment should be used no closer to any part
of the BC 20 Blood Pressure Monitor, including cables, than the recommended separation
distance calculated from the equation applicable to the frequency of the transmitter.
Recommended separation distance:
d =
d = 80 MHz to 800 MHz
d = 800 MHz to 2.5 GHz
Where P is the maximum output power rating of the transmitter in watts (W) according to
the transmitter manufacturer and d is the recommended separation distance in metres (m).
Field strengths from fi xed RF transmitters, as determined by an electromagnetic site
survey, a should be less than the compliance level in each frequency range.
b Interference may occur in the vicinity of equipment marked with the following symbol:
66
Page 67

Recommended separation distances between portable and mobile RF communications equipment and the EQUIPMENT or SYSTEM –
for EQUIPMENT or SYSTEM that are not LIFE-SUPPORTING
Recommended separation distances between portable and mobile RF communications equipment and the CMS50I PULSE OXIMETER
The BC 20 Blood Pressure Monitor is intended for use in an electromagnetic environment in which radiated RF disturbances are controlled.
The customer or the user of the BC 20 Blood Pressure Monitor can help prevent electromagnetic interference by maintaining a minimum
distance between portable and mobile RF communications equipment (transmitters) and the BC 20 Blood Pressure Monitor as recommended below, according to the maximum output power of the communications equipment.
Rated maximum output
power of transmitter
(W)
0.01 0.12 0.23
0.1 0.37 0.74
11.172.33
10 3.69 7.38
For transmitters rated at a maximum output power not listed above, the recommended separation distance d in metres (m) can be estimated using the equation applicable to the frequency of the transmitter, where P is the maximum output power rating of the transmitter in
watts (W) according to the transmitter manufacturer.
NOTE 1 At 80 MHz and 800 MHz, the separation distance for the higher frequency range applies.
NOTE 2 These guidelines may not apply in all situations. Electromagnetic propagation is a ected by absorption and refl ection from
100 11.67 23.33
structures, objects and people.
Separation distance according to frequency of transmitter
(m)
80 MHz to 800 MHz
d =
800 MHz to 2.5 GHz
d =
67
Page 68

68
752.941 - 0112 · Irrtum und Änderungen vorbehalten
 Loading...