

Page 1

BEUMER stretch hood® S
Operating instructions
Machine type
BEUMER stretch hood® S
Machine no.
6090103.10 - 210
Project
BECTON DICKINSON
Document no.
BA-6090103-EN
BA-6090103-EN
19.08.09
1
Page 2

Page 3

BEUMER stretch hood® S
Table of Contents
Introduction ..................................................................................7
Where can I find what I am looking for?..................................................... 8
Addresses.....................................................................................9
Germany..................................................................................................... 9
America...................................................................................................... 9
Declaration by the manufacturer ..............................................11
Table of Contents
1 Intended use
Use........................................................................................................... 13
Danger zone............................................................................................. 13
Access area ........................................................................................ 13
Working area....................................................................................... 13
Maintenance area ............................................................................... 13
Owner's responsibility .............................................................................. 14
Qualification of personnel......................................................................... 14
Operating personnel............................................................................ 14
Skilled personnel................................................................................. 14
Skilled electrician ................................................................................ 14
Unauthorised use..................................................................................... 15
.......................................................................13
2 Technical data....................................................................17
Requirements on the place of installation................................................ 17
Building ............................................................................................... 17
Foundation.......................................................................................... 17
Lighting................................................................................................ 17
Power supply............................................................................................ 17
Electrical energy.................................................................................. 17
Pneumatic energy............................................................................... 18
Material/items transported........................................................................ 18
Pallets ................................................................................................. 18
Film specification................................................................................. 19
Performance data..................................................................................... 19
BA-6090103-EN
19.08.09
3 Technical description........................................................21
System description................................................................................... 21
BEUMER stretch hood®...................................................................... 21
Description of modules............................................................................. 22
BEUMER stretch hood®...................................................................... 22
Hood applicator head.......................................................................... 23
Hoist with stretch frame....................................................................... 24
Crimping and stretching unit............................................................... 25
3
Page 4

Table of Contents
BEUMER stretch hood® S
Maintenance platform.......................................................................... 26
Chain conveyor................................................................................... 27
Pallet positioning device ..................................................................... 28
Pallet roller conveyor........................................................................... 29
4 Safety..................................................................................31
Safety instructions.................................................................................... 31
Safety devices.......................................................................................... 31
Protective structure............................................................................. 31
5 Installation..........................................................................33
Safety instructions.................................................................................... 33
Lifting equipment................................................................................. 33
Welding work....................................................................................... 33
Preparation of installation......................................................................... 34
Foundation.......................................................................................... 34
Tools ................................................................................................... 34
Torque list ........................................................................................... 35
Preassembly............................................................................................. 36
Transport route.................................................................................... 36
Final installation........................................................................................ 36
How to install the BEUMER stretch hood®.......................................... 36
Hoist.................................................................................................... 37
Maintenance platform.......................................................................... 38
Hood applicator head.......................................................................... 41
Film releasing trestle........................................................................... 42
Pallet transport system........................................................................ 43
Check of installation................................................................................. 44
How to check screw and bolt connections.......................................... 44
6 Commissioning..................................................................45
Safety instructions.................................................................................... 45
First start-up............................................................................................. 45
Basic requirements ............................................................................. 45
How to switch on the power supply..................................................... 46
Electrical energy ............................................................................ 46
Pneumatic energy.......................................................................... 46
7 Operation............................................................................47
Safety instructions.................................................................................... 47
Emergency stop.................................................................................. 48
General information.................................................................................. 49
Safety photocell and CPSET-M12 muting device............................... 50
Control unit..................................................................................... 50
Restart or reset.............................................................................. 51
Safety photocell CPSET M13 for protection against access .............. 52
Control unit..................................................................................... 52
Control cabinet.................................................................................... 53
Control elements............................................................................ 53
4 BA-6090103-EN
19.08.09
Page 5

BEUMER stretch hood® S
Table of Contents
Display elements............................................................................ 53
Visualisation............................................................................................. 54
Functions in the visual display system................................................ 55
Structure of the user interfaces........................................................... 55
Function keys which are not related to a certain display.................... 56
Function keys which are related to a certain display.......................... 56
How to enter parameters .................................................................... 57
Input keys....................................................................................... 57
Password protection............................................................................ 59
Access authorisation........................................................................... 59
User log in........................................................................................... 59
How to assign a password.................................................................. 61
User log out......................................................................................... 61
Operation of system................................................................................. 62
Basic screen........................................................................................ 62
Structure of the operator functions...................................................... 63
List of all icons for the F keys.............................................................. 64
Presets................................................................................................ 65
Modes of operation ............................................................................. 66
Automatic return to starting position (starting position)....................... 69
Interrupt pallet..................................................................................... 69
Film insertion plan............................................................................... 70
How to insert the film........................................................................... 70
Parameters.......................................................................................... 71
Parameters for the operating personnel ............................................. 72
Parameters for service personnel....................................................... 74
Status display...................................................................................... 82
Display of operation sequences.......................................................... 83
Error messages................................................................................... 84
Fault messages.............................................................................. 84
Fault buffer..................................................................................... 85
Reset of fault buffer........................................................................ 86
System messages.......................................................................... 86
Identifier system....................................................................................... 87
Equipment identifier ............................................................................ 87
Numbering of the terminal boxes/terminal strips ................................ 87
BA-6090103-EN
19.08.09
8 Trouble shooting................................................................89
Safety instructions.................................................................................... 89
Malfunctions............................................................................................. 89
What to do if ............................................................................................ 90
Before start-up .................................................................................... 90
Failures ............................................................................................... 90
Malfunctions........................................................................................ 93
9 Maintenance.......................................................................95
Safety instructions.................................................................................... 95
Inspection................................................................................................. 96
Maintenance............................................................................................. 99
General maintenance instructions ...................................................... 99
5
Page 6

Table of Contents
BEUMER stretch hood® S
How to maintain motors ...................................................................... 99
How to maintain gear units ................................................................. 99
How to order spare parts .................................................................... 99
Chain drive.......................................................................................... 99
How to maintain the sealing rail........................................................ 100
Lubrication.............................................................................................. 101
Change of lubricant of geared motors............................................... 101
Anti-friction bearings.................................................................... 101
How to lubricate the chain drive........................................................ 102
How to lubricate the linear guide....................................................... 102
Table of lubricants............................................................................. 103
10 De-commissioning...........................................................105
Safety instructions.................................................................................. 105
Disassembly........................................................................................... 105
Waste disposal....................................................................................... 105
Lubricant ........................................................................................... 105
Motors and gear units ....................................................................... 106
Machine actuators............................................................................. 106
Pneumatic parts................................................................................ 106
Electric parts ..................................................................................... 106
11 Transport..........................................................................107
Safety instructions.................................................................................. 107
Transport instructions............................................................................. 108
Packaging ......................................................................................... 108
Means of transport............................................................................ 108
Storage.............................................................................................. 109
Transport units ....................................................................................... 109
Long-term storage.................................................................................. 110
General information........................................................................... 110
Anti-friction bearings ......................................................................... 110
12 Index .................................................................................111
13 Annex
Spare parts lists...................................................................................... 117
Annexes ................................................................................................. 117
Drawings ................................................................................................ 117
................................................................................117
6 BA-6090103-EN
19.08.09
Page 7

BEUMER stretch hood® S
Introduction
Introduction
These operating instructions help you to familiarise yourself with the machine/system and to make use of its designated applications. They contain important information on how to operate the machine/system safely, correctly and
most efficiently.
The operating instructions are subdivided into chapters so as to facilitate finding
the information desired. The order of chapters and subject areas can be seen
from the list of chapters. The introduction of these operating instructions contains the following notes:
• Table of contents
• Introduction
• Where can I find what I am looking for?
• Addresses
• EC declaration by the manufacturer
BA-6090103-EN
19.08.09
7
Page 8
Introduction
Where can I find what I am looking for?
The following aids facilitate finding the information desired:
Search for chapters
• Selecting the desired chapter in the list of chapters
Table of contents
• Complete table of contents at the beginning of the operating instructions
Index
• Index at the end of the operating instructions
BEUMER stretch hood® S
enable us to help you.
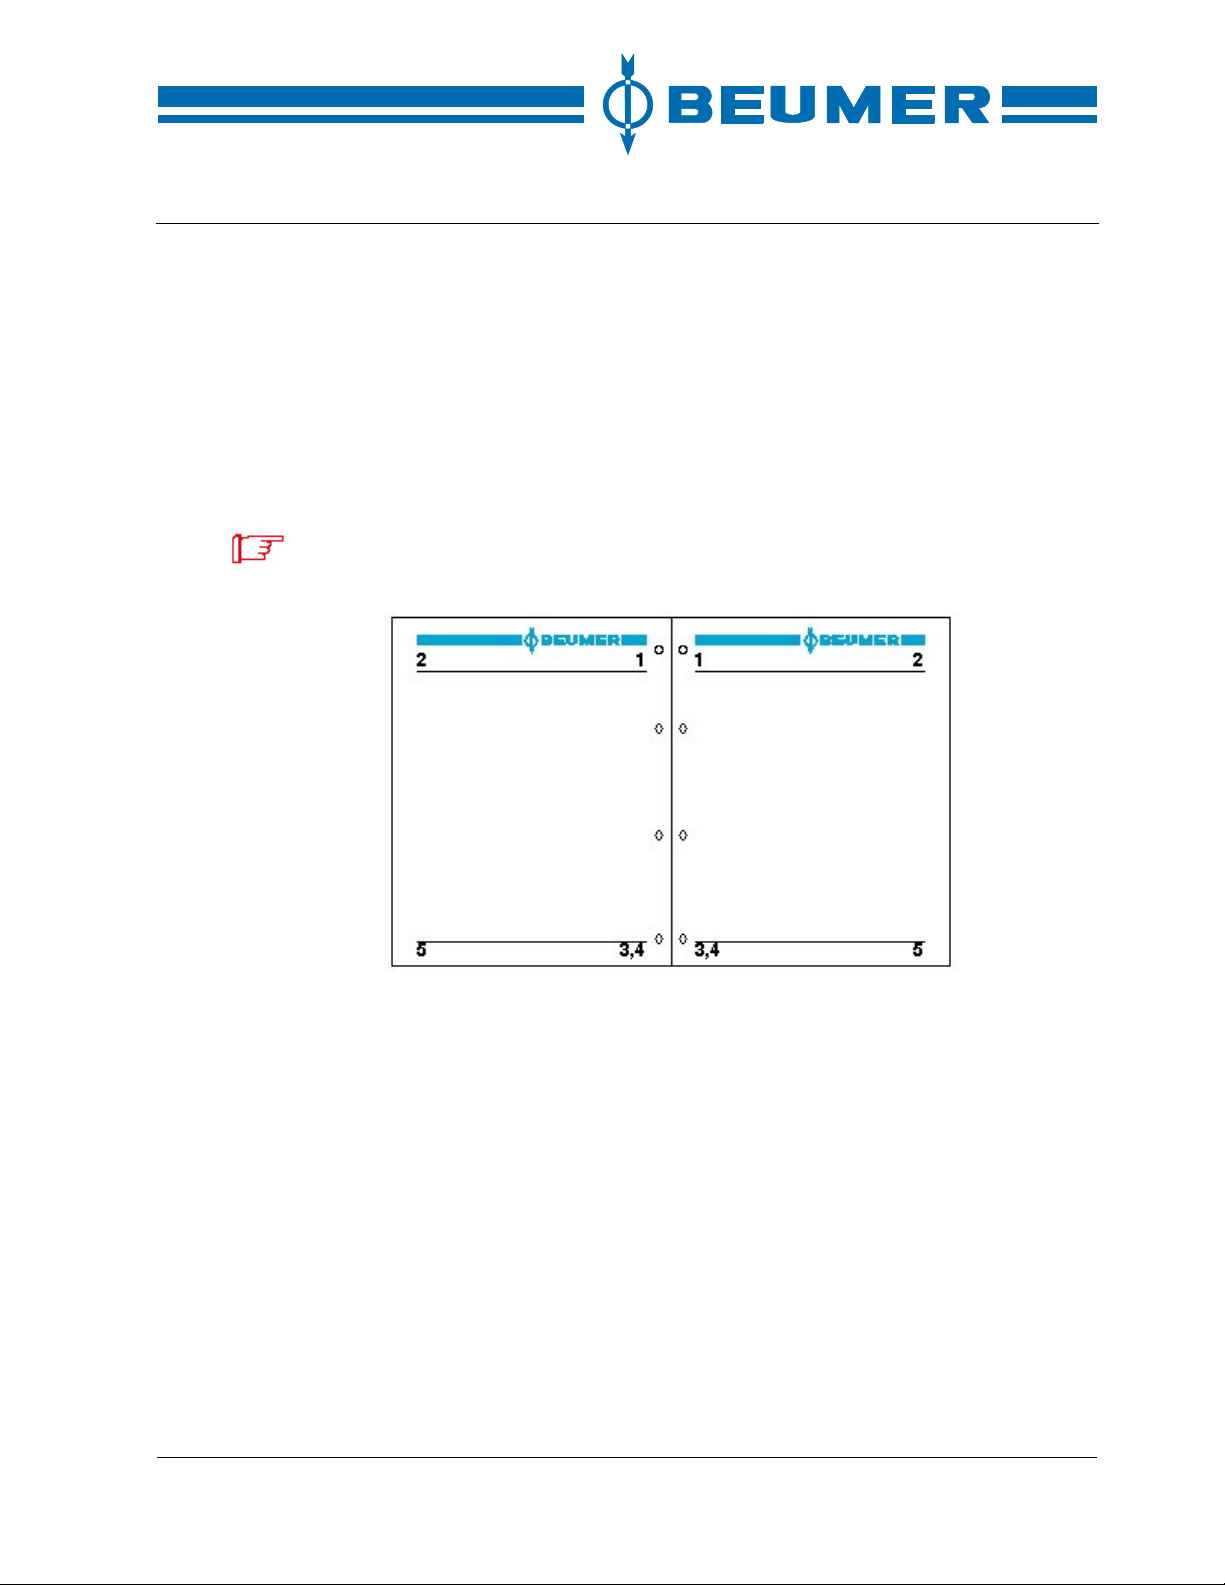
1 Machine type
2 Title of chapter
3 Date of issue
4 Document number
5 Page number
Should you have any questions, please indicate the document number so as to
Header
The header is located in the upper section of the page. The machine type is
indicated in the inside margin of the header, the relevant chapter of the operating instructions in the outside margin.
Footer
The footer is located in the lower section of the page. The document number is
indicated in the inside margin of the footer. The document number consists of
the letters BA, the order number and the language identifier. The date of issue is
indicated below the document number. The page number is indicated in the
outside margin of the footer. It consists of the number of the chapter and a consecutive number.
8 BA-6090103-EN
19.08.09
Page 9

BEUMER stretch hood® S
Addresses
Germany
BEUMER Maschinenfabrik GmbH & Co. KG
Postfach 12 54 · D - 59267 Beckum
Oelder Str. 40 · D - 59269 Beckum
Phone:
+49 (25 21) 24 0
Addresses
America
Fax:
E-Mail:
Internet:
+49 (25 21) 24 280
[email protected]
www.BEUMER.com
Technical After-Sales Service
Phone: +49 (25 21) 24 444
Spare Parts Department
Phone: +49 (25 21) 24 343
BEUMER Corporation
191Chambers Brook Rd.
Branchburg, NJ 08876
USA
Phone:
Fax:
+1 732 5608222
+1 732 5630905
BA-6090103-EN
19.08.09
E-Mail:
Internet:
[email protected]
www.BEUMER.com
9
Page 10

Page 11

BEUMER stretch hood® S
Declaration by the manufacturer
Declaration by the manufacturer
as defined by the EC Machine Directive 98/37/EC, Annex II B
Manufacturer:
The design and construction of the machine mentioned below - up to the interfaces and as far as possible
regarding the scope of supply - correspond to the fundamental requirements with regard to safety and
health according to Annex I of the EC Machine Directive as well as to the requirements laid down in the
EC directives listed below.
BEUMER Maschinenfabrik GmbH & Co. KG
Oelder Str. 40 D-59269 Beckum
Machine:
Number:
Packaging system
6090103.10 - 210
EC directives complied with:
98/37/EC
Directive of the European Parliament and of the Council of 22 June 1998 on the approximation of the laws of the Member States relating to machinery
2006/95/EC
Directive 2006/95/EC of the European Parliament and of the Council of 12 December
2006 on the harmonisation of the laws of Member States relating to electrical equipment designed for use within certain voltage limits
2004/108/EC
Directive 2004/108/EC of the European Parliament and of the Council of 15 December 2004 on the approximation of the laws of the Member States relating to electromagnetic compatibility and repealing Directive 89/336/EEC Text with EEA relevance
Harmonised standards applied:
EN ISO 12100-1 EN ISO 12100-2 EN ISO 13850 EN ISO 13857 EN ISO 14121-1
EN 619 EN 953 EN 954 EN 983 EN 60204-1
This machine is designed for being mounted on other machines. Commissioning this machine is prohibited unless it has been established that the machine to which it is to be mounted complies with the requirements of the directive.
Beckum, 4 August, 2009
BEUMER Maschinenfabrik
BA-6090103-EN
19.08.09
11
Page 12

Page 13

BEUMER stretch hood® S
1 Intended use
Use
The packaging system comprising the BEUMER stretch hood® prepares stretch
hoods which are pulled over palletised load units for the purpose of securing
loads. The stretch hoods are formed from a gusseted film tube. The palletised
load units are transported by roller conveyors and/or chain conveyors. Using the
packaging system for other purposes than those mentioned above is considered
as unauthorised use.
Operate the machine/system only in technically perfect working order in accordance with its intended use. The safe operation requires awareness of possible
risks and observing the operating instructions. Eliminate immediately any functional disorders, especially those affecting safety!
As regards the electromagnetic compatibility, the machine/system has been
designed for the use in industrial environment. If the machine/system is used in
other environments, a special permit issued by the relevant authorities of the
country of use is required.
An intended use also involves observing the operating instructions. Special attention is to be paid to the inspection and maintenance instructions.
Intended use
Danger zone
Access area
Working area
Maintenance area
Any modifications, additions or conversions to the machine/system which could
affect safety must not be carried out without the manufacturer's approval. This
also applies to the installation and adjustment of safety devices and valves as
well as to welding work on load-bearing elements.
According to the level of hazards involved when operating the machine/system,
three different areas are distinguished. Only persons authorised by the owner
have access to the individual areas.
The access area, which is defined by the manufacturer, may be entered or
reached by any persons without opening guards, activating protective devices
with sensors or using additional tools.
The working area, which is defined by the manufacturer, is the area where persons work on the machine/system or operate it in normal operation (inspection,
maintenance and cleaning are excluded).
The maintenance area, which is defined by the manufacturer, may only be entered by authorised personnel for carrying out maintenance work. Since health
and safety of the personnel are at risk in this area, it may be entered only if the
machine/system is switched off and secured against unintentional re-start.
BA-6090103-EN
19.08.09
13
Page 14

Intended use
Owner's responsibility
The user has to ensure the following:
• Any work on and with the machine/system is carried out by authorised personnel only.
• Work on the electrical equipment of the machine/system are carried out only
by skilled electricians in accordance with the electrical engineering rules and
regulations.
• Only trained or instructed personnel is employed! Set out clearly the individual responsibilities of the personnel for operation, set-up, maintenance and
servicing!
Qualification of personnel
Operating personnel
Operating personnel includes all persons who have been employed by the
owner to operate the machine/system. In order to be able to carry out work with
the machine/system without further assistance, the operating personnel must
have completed the theoretical and practical training.
Training measures are offered to familiarise the operating personnel with special
features of the machine.
BEUMER stretch hood® S
Skilled personnel
Skilled electrician
Skilled personnel includes all persons who have been employed by the owner of
the machine/system to perform special tasks such as maintenance or trouble
shooting. In order to be able to fulfil these tasks without further assistance, the
skilled personnel must have completed the theoretical and practical training.
The skilled personnel has to fulfil the following requirements:
• Completed vocational training in the mechanical engineering or metal trade
• Six-month experience of maintaining conveying systems
• Supplementary training for work to be carried out on hydraulic or pneumatic
systems
Skilled electricians are persons having an adequate technical education, knowledge and experience to recognise and avoid risks which may be caused by electricity. A skilled electrician has to fulfil the following requirements:
• Electrotechnical education
• Knowledge and experience
• Knowledge of the relevant standards
• Ability to assess entrusted tasks
• Ability to recognise risks
14 BA-6090103-EN
19.08.09
Page 15
BEUMER stretch hood® S
Unauthorised use
An unauthorised use of the machine includes:
• Transport of materials which are not laid down in the contract and in these
• Non-compliance with the permissible parameters of the material/items trans-
• Use of materials, e.g. operating resources, films, pallets etc., which are not
• Maintenance work on a machine which is not secured.
• Non-observance of the operating instructions.
• Non-utilisation of genuine spare parts
We explicitly point out that only spare parts which have been released by us are
to be used. This also applies analogously to subassemblies by our subsuppliers.
In addition, the stipulations agreed by contract are valid.
Danger!
An unauthorised use of the machine/system could result in severe personal injury or death and damage to the system.
The machine/system must not be switched on if defects jeopardise the operational reliability.
Intended use
operating instructions.
ported.
specified.
BA-6090103-EN
19.08.09
15
Page 16

Page 17
BEUMER stretch hood® S
2 Technical data
Requirements on the place of installation
Designation Data
Installation height < 1,000 m
Ambient temperature 0 °C to +40 °C
Building
For a trouble-free operation of the system, the following conditions have to be
fulfilled:
• minimum ambient temperature -5 °C
• max. wind velocity 15 m/min.
Foundation
The foundation must be designed as monolithic foundation without expansion
joints. The permissible tolerance in the evenness of the surface is +/- 7.5 mm.
Mounting holes for straddling dowels with a diameter of 21 mm and a depth of
150 mm must be possible. When using compound anchors, mounting holes with
a diameter of 32 mm and a depth of 250 mm must be possible. The quality of
concrete must be at least BN 1045 according to DIN 25
Technical data
Lighting
Power supply
Electrical energy
Arrange for sufficient lighting around the machine. Avoid glaring light, stroboscopic effects, reflections, flashing or other harmful influences.
Designation Data
Rated voltage for the system 3/N/PE AC 460 V 60 Hz
Rated voltage for the control DC 24 V
Rated voltage for the emergency stop circuit DC 24 V
Rated voltage for emergency stop contactors AC 115 V
Rated voltage for motor contactors DC 24 V
Rated voltage for valves DC 24 V
Permissible voltage fluctuation ± 10 %
For a safe and trouble-free operation, a stable power supply has to be provided.
BA-6090103-EN
19.08.09
17
Page 18
Technical data
f
Pneumatic energy
BEUMER stretch hood® S
Designation Data
Compressed-air connection required 6 bar
Permissible input pressure max. 10 bar
Compressed-air connection R 3/8 "
Air volume required per package 180 NL
In order to achieve a safe and trouble-free operation, a stable compressed-air
supply system has to be provided. The compressed air used should be filtered
and dried; it should be oil-free and have an input pressure of 6 bar.
• Solid particles:
class 4; max. permissible particle size 40 my.
• Water content:
class 4; dew point +10 °C = 9.356 g/m³ water content.
• Oil content:
class 4; max. permissible content 5 mg/m³.
Pneumatic cylinders are provided with a basic lubrication in the workshop.
Therefore, the cylinders can be used with either oiled compressed air (0.5 to 5
drops of oil / 1000 litres of air) or oil-free compressed air.
Once used with oiled compressed air, the cylinders should always be used with
oiled compressed air (oil content > 10 mg/m³, about 5 drops of oil / 1000 litres o
air). Oiled compressed air eliminates the basic lubrication.
Material/items transported
Designation Data
Product medical products
Product packing cardboard boxes
Items transported palletised load units
Weight max. 2,000 kg
Temperature max. 80 °C
Pallets
The pallets must correspond to the dimensions indicated in the installation drawing. The tolerances for length, width and height may amount to ± 3 mm.
All boards of the lower and upper side must be in place and in perfect condition.
Any edges, nails etc. protruding must be removed beforehand. Only then the
pallets can be transported properly.
18 BA-6090103-EN
19.08.09
Page 19
BEUMER stretch hood® S
Film specification
Technical data
The film used must correspond to the film specification. Only then a perfect functioning of the system can be ensured.
functional test:
• Change of film manufacturer or supplier
• Change of film dimensions
• Change of film thickness
If the test has been successful, larger quantities of film can be ordered.
The current film specification is indicated on the specification sheet included in
The following changes require that a film roll is ordered first as sample for a
the annex.
Performance data
Designation Data
BEUMER stretch hood®
Packaging capacity 40 packages/h
Maximum package length 1,219 mm
Maximum package width 1,016 mm
Maximum package height 2,750 mm
Height of platform 4,500 mm
Max. weight of full pallet 2,000 kg
Installed power approx. 6.7 kW
Field of application, ambient temperature +5 °C to +40 °C
Noise emission < 70 dB(A)
Pallet transport system
6090103.50 - 130
6090103.10 - 40
BA-6090103-EN
19.08.09
6090103.160 - 190
Height of transport system 700 mm
Maximum bearing capacity per roller conveyor 2,000 kg
Conveying speed, transport system 0.23 m/s
Installed power approx. 5.6 kW
Field of application, ambient temperature +5 °C to +40 °C
Noise emission < 75 dB(A)
19
Page 20

Page 21
BEUMER stretch hood® S
3 Technical description
System description
Technical description
The packaging system consists of the BEUMER stretch hood® and a transport
system. The BEUMER stretch hood
tube. These stretch hoods are pulled over the palletised load units for the purpose of securing them. The transport system is adapted to the particular application and consists of rollers conveyors and/or chain conveyors.
BEUMER stretch hood®
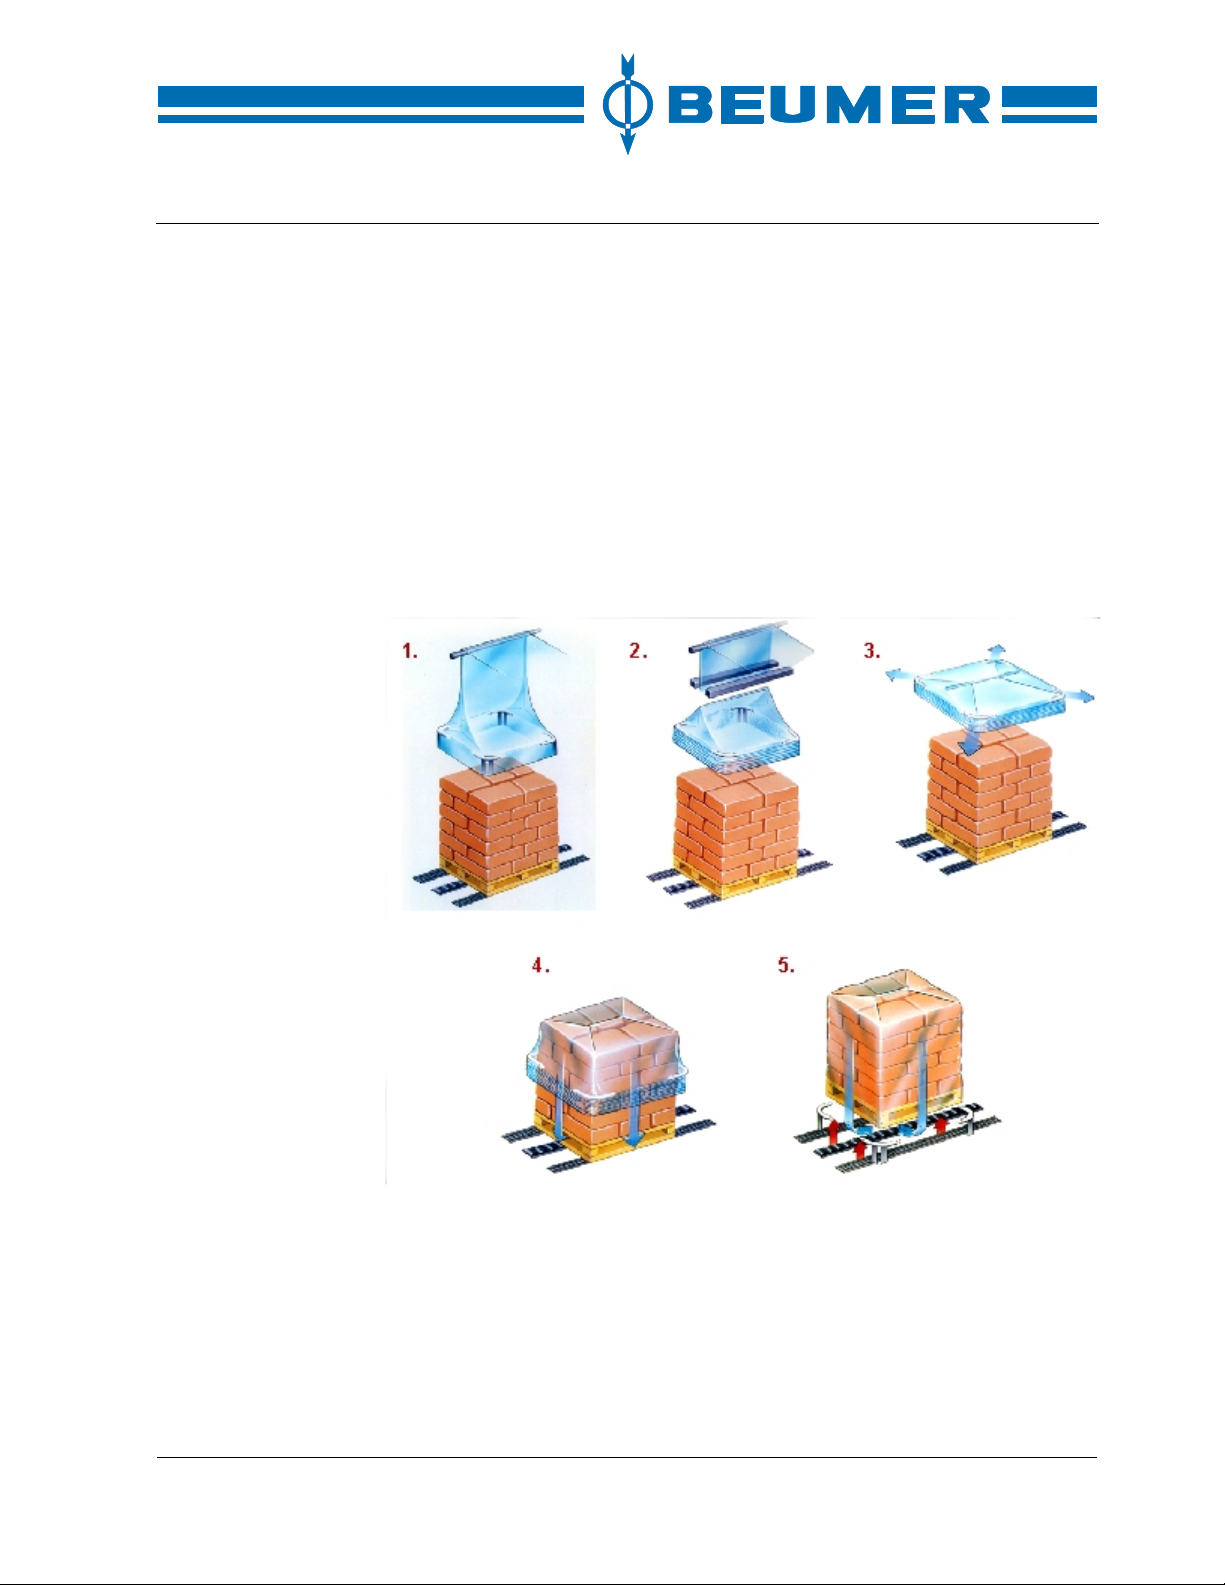
The stretch hood is formed, crimped and pulled over the palletised load unit
automatically. The individual working steps are shown in the diagram.
®
forms stretch hoods from a gusseted film
Functional sequence
BA-6090103-EN
19.08.09
1. The stretch hood is opened and transferred to the crimping device.
2. The stretch hood is evenly crimped, sealed and cut to the length required.
3. The film hood is stretched.The degree of stretch depends on stack dimen-
sions, film elasticity and film dimensions.
4. The film is stretched in vertical direction while the crimping bows are lowered.
5. The stack is lifted and the understretch is formed.
21
Page 22
Technical description
Description of modules
BEUMER stretch hood®
BEUMER stretch hood® S
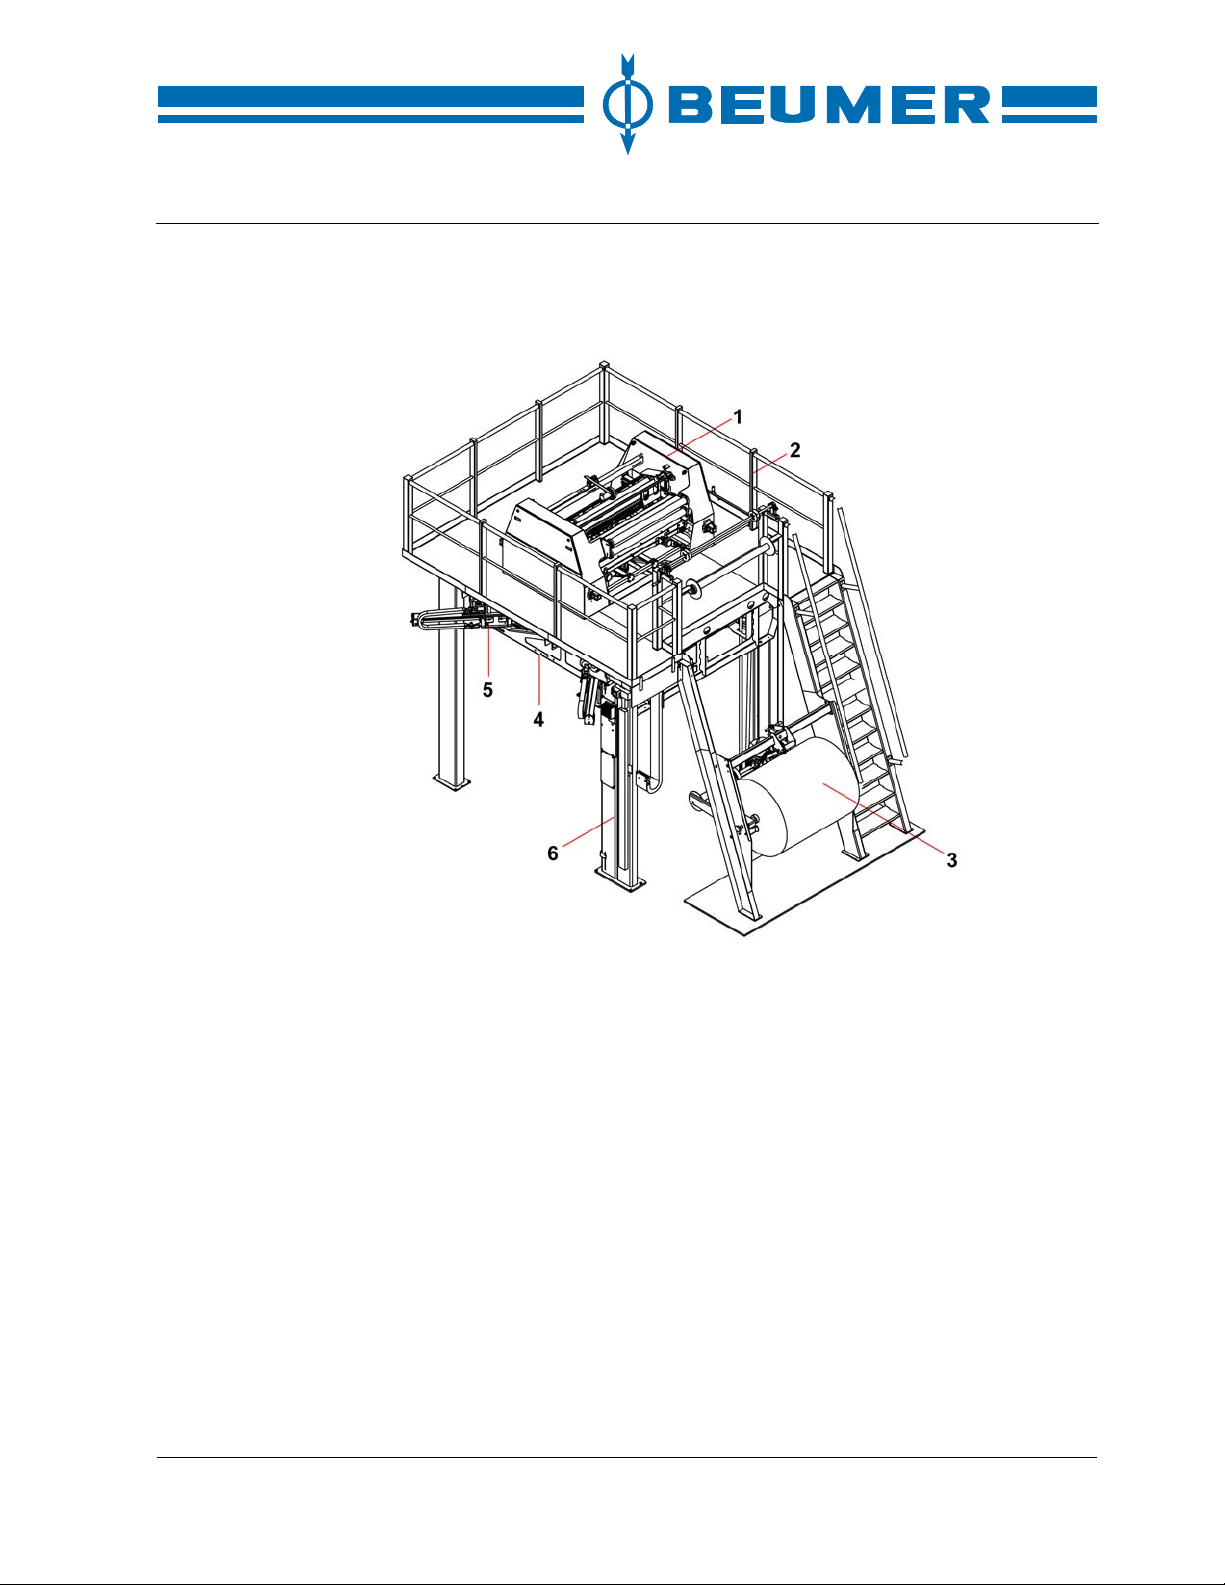
1 Hood applicator head
2 Maintenance platform
3 Film releasing trestle
4 Stretch frame
5 Crimping and stretching unit
6 Hoist
The BEUMER stretch hood® consists of different components. Constructional
size and version are adapted to the palletised load units. The method of operation of the individual components is described in the following paragraphs.
22 BA-6090103-EN
19.08.09
Page 23
BEUMER stretch hood® S
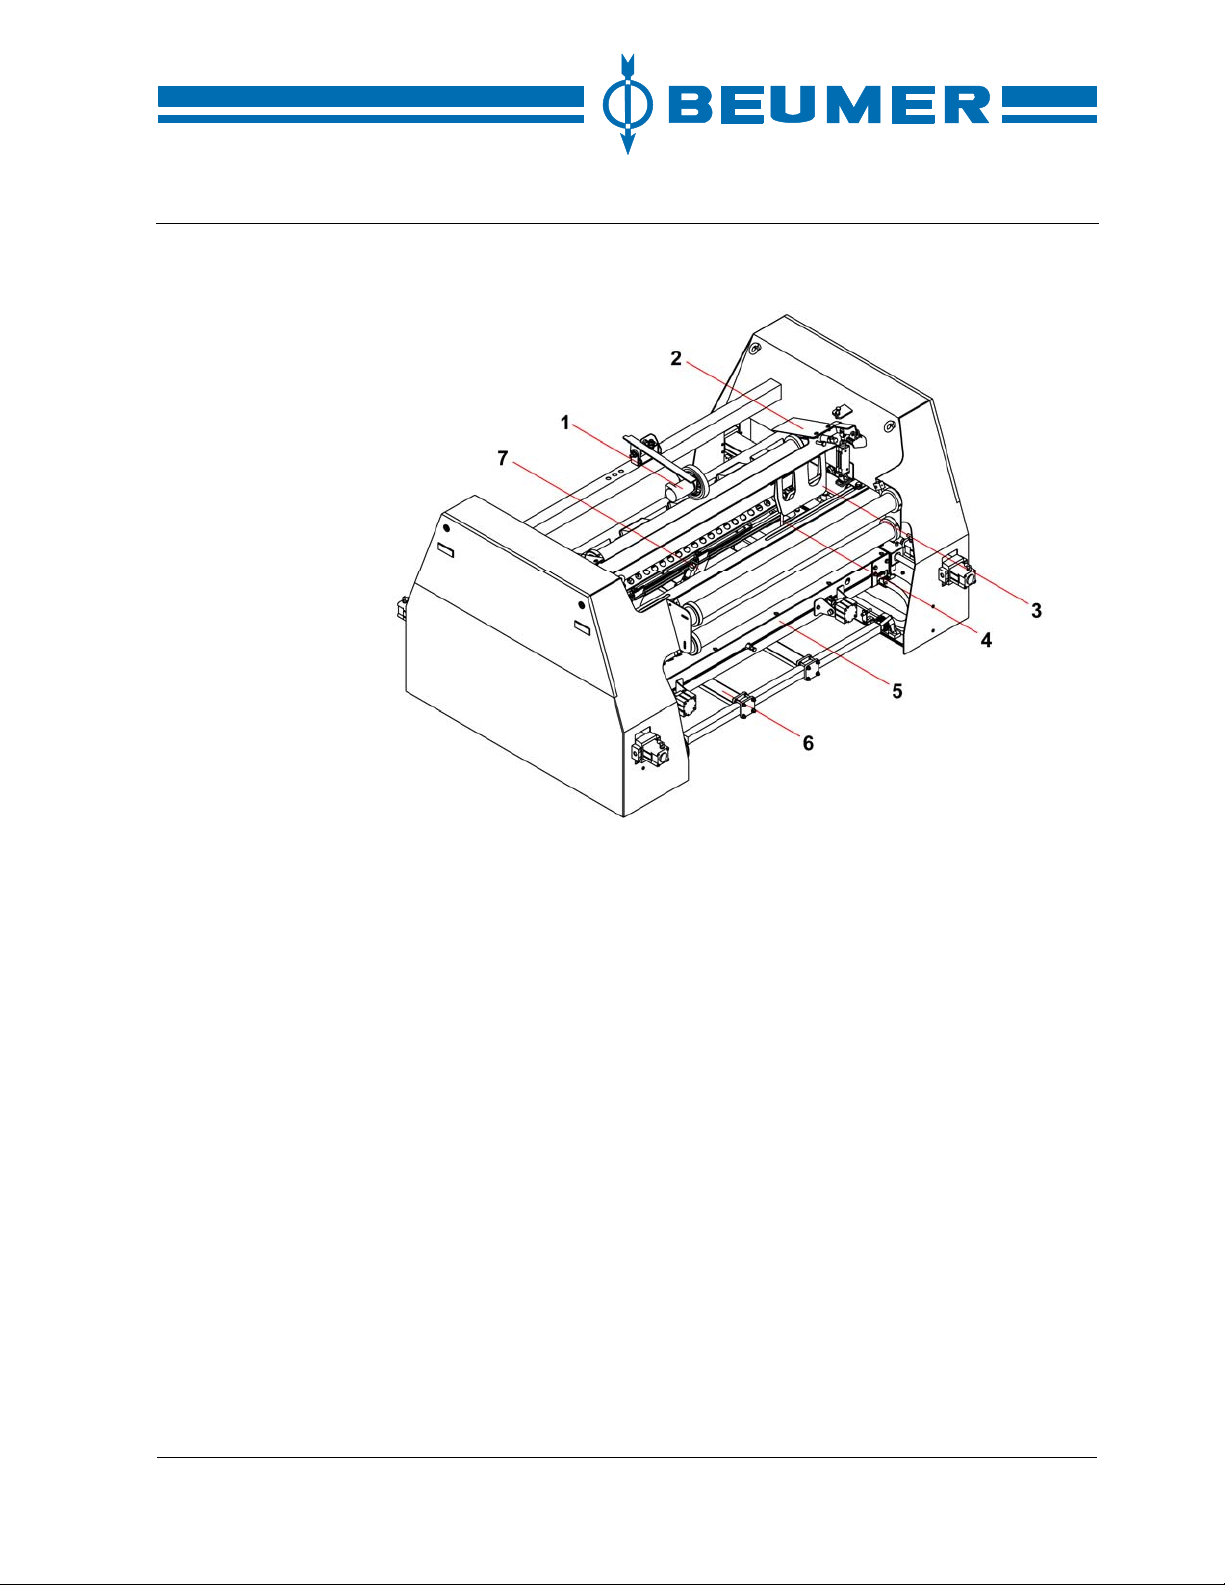
Hood applicator head
Technical description
1 Film length measuring device
2 Film retriever
3 Side fold guiding plate
4 Film tensioner
5 Sealing bar
6 Gripper arms
7 Film grippers
The hood applicator head prepares the gusseted film tube for the stretch hood
formation. The subassemblies for the individual working sequences are integrated into the frame of the hood applicator head.
The film tensioners stretch the gusseted film tube. For this, the four side fold
clamps take the gusseted film tube at its edges, and the film tensioners move
apart. The film grippers of the four gripper arms grip the gusseted film tube. The
gripper arms swivel downwards, thus opening the gusseted film tube. The side
fold guiding plates help to open the gussets. The side fold pins hold the gussets
while the gusseted film tube is stretched and sealed.
The two sealing rails and the knife are mounted on the sealing bar. The sealing
rails seal the open gusseted film tube into a film hood closed at the top. Then the
knife cuts the film hood off the gusseted film tube.
After the film has been cut, the film retriever pulls the gusseted film tube back
into a defined position. The film brake prevents the cut gusseted film tube from
BA-6090103-EN
19.08.09
23
Page 24
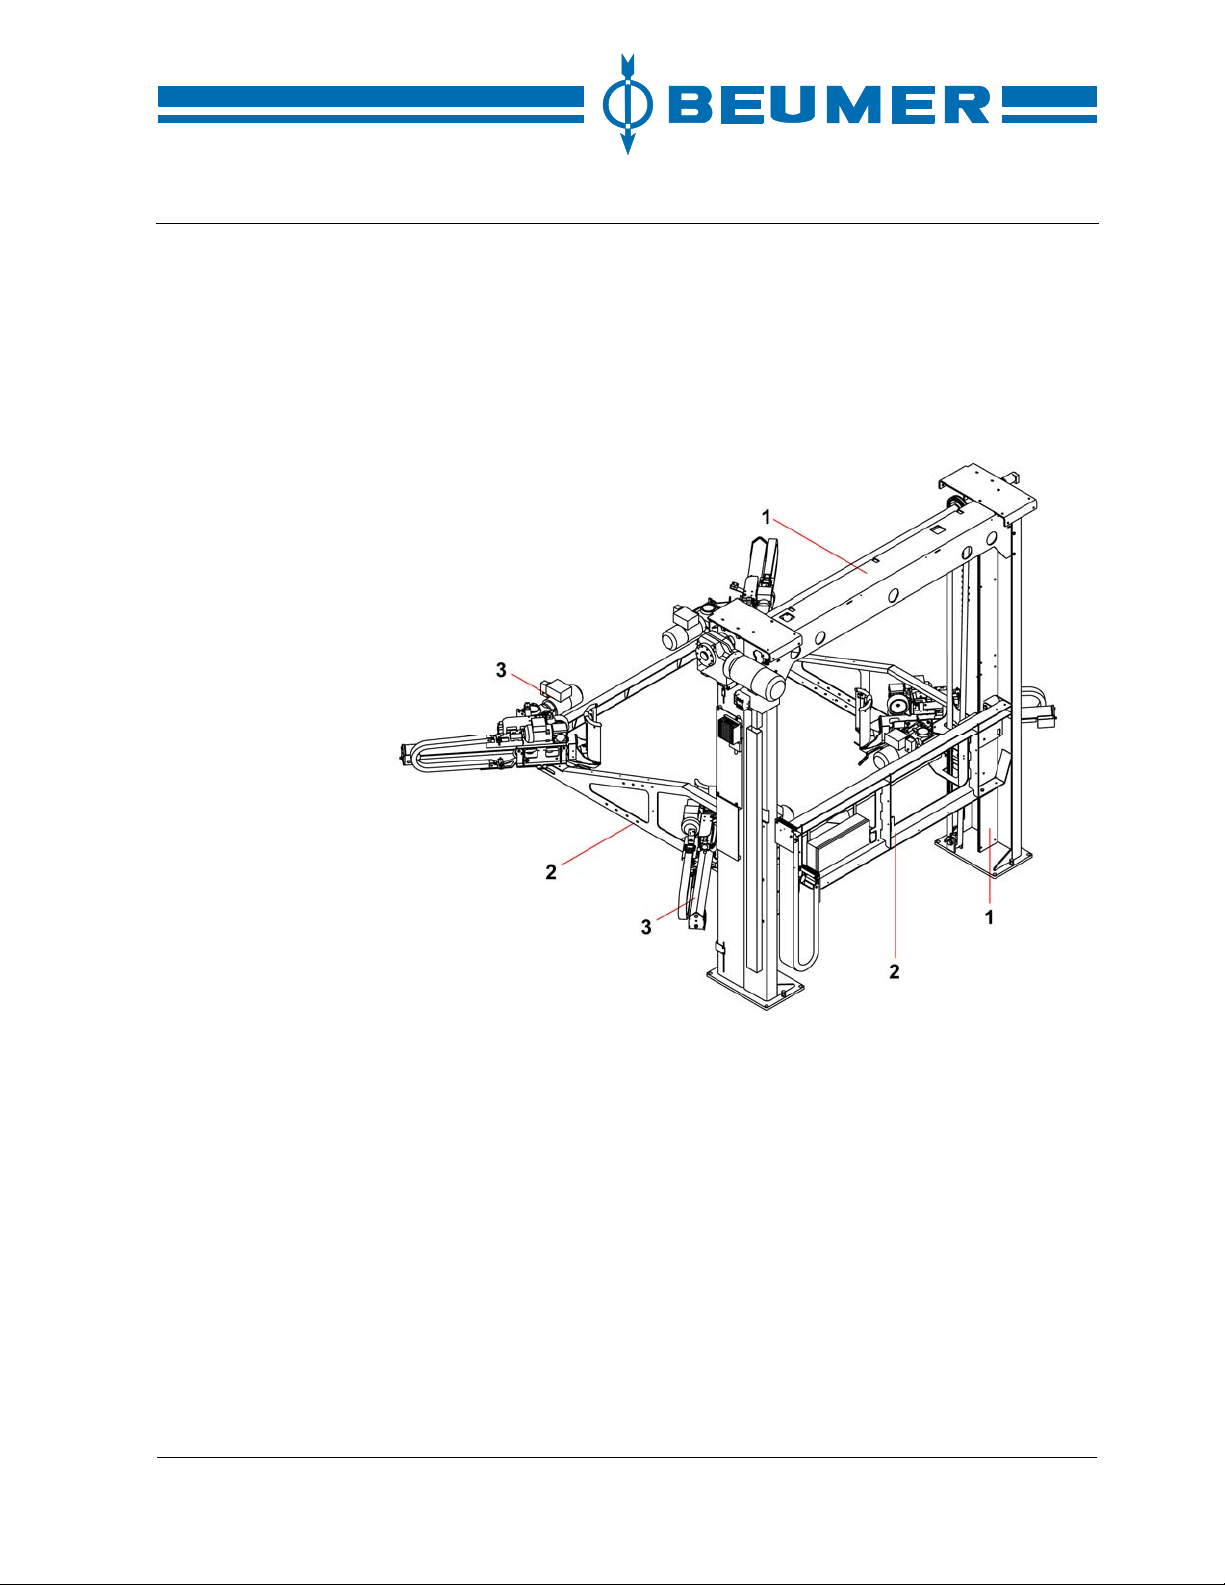
Technical description
slipping out of the hood applicator head. The film length measuring device determines the released length of the gusseted film tube.
The individual components are driven pneumatically or by an electric motor.
When a new gusseted film tube is to be inserted in the hood applicator head, the
film brake on the hood applicator head can be activated manually.
Hoist with stretch frame
BEUMER stretch hood® S
1 Hoist
2 Stretch frame
3 Crimping and stretching unit
The hoist is part of the supporting structure for the hood applicator head and the
platform. A drive motor with countershaft and chain drive for lifting and lowering
the stretch frame is fastened to the hoist. The hoist is equipped with a pneumatic
hoist safety device. This safety device secures the hoist during maintenance
work.
The stretch frame is fastened to the hoist chains. The stretch frame is moved
vertically in the hoist. The four crimping and stretching units are fastened to the
stretch frame.
24 BA-6090103-EN
19.08.09
Page 25

BEUMER stretch hood® S
Crimping and stretching unit
1 Touch-down bow
2 Crimping bow
3 Crimping bow support
4 Guide frame
For crimping the film hood, the crimping motors approach the crimping bows and
then the film is pulled over the bows. The length of the film to be crimped is determined by the film length measuring device in the hood applicator head.
Technical description
BA-6090103-EN
19.08.09
After the film hood has been prepared, its upper part is crimped as well. Then
the crimping bow supports are moved to the stretch position. In this position the
film hood is pulled over the load.
A diffuse scan on each crimping bow support detects whether the film has torn
apart during stretching or pulling over the film hood. Besides, there must not be
any film on one of the crimping bows any more when the stretch frame is raised.
If the film tears apart or if it is still on one of the crimping bows during raising, the
malfunction "film tear" is indicated. The system is automatically switched off and
the corresponding fault message is displayed on the control terminal.
The four touch-down switches under the crimping bows are used as safety
switches. They prevent the crimping bows from landing on an obstacle during
the lowering process.
25
Page 26
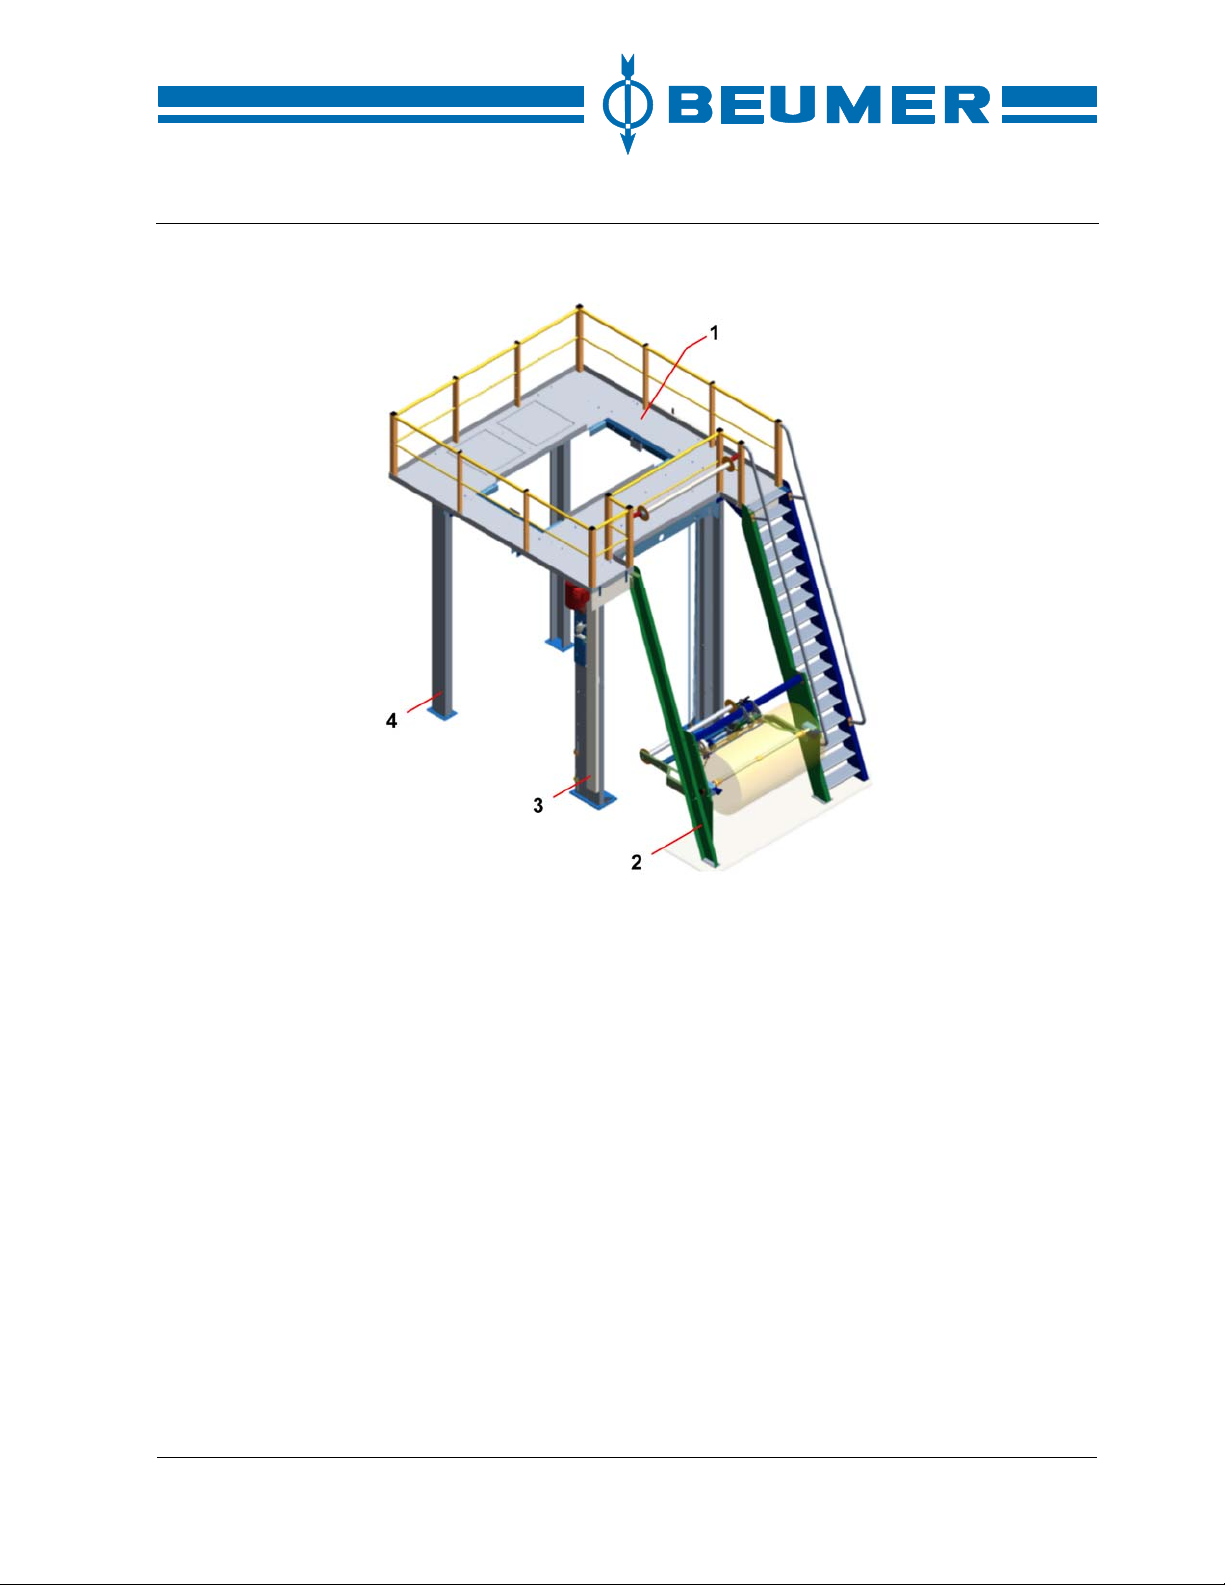
Technical description
Maintenance platform
BEUMER stretch hood® S
1 Platform
2 Film releasing trestle
3 Hoist
4 Support
The maintenance platform is positioned above the hoist. The hood applicator
head is mounted on the platform. The hood applicator head is reached by stairs.
A safety photocell monitors the access. The film releasing trestle is mounted on
the side where the hoist is located.
The film roll is supported in the film releasing trestle. Film is released from the
film roll as long as the film monitoring switch remains activated or until the
maximum operating time of the drive has run out. The film roll drive is switched
on and off by the film monitoring switch. As soon as the end of the film is
reached, the film monitoring switch transmits a signal to the control.
26 BA-6090103-EN
19.08.09
Page 27
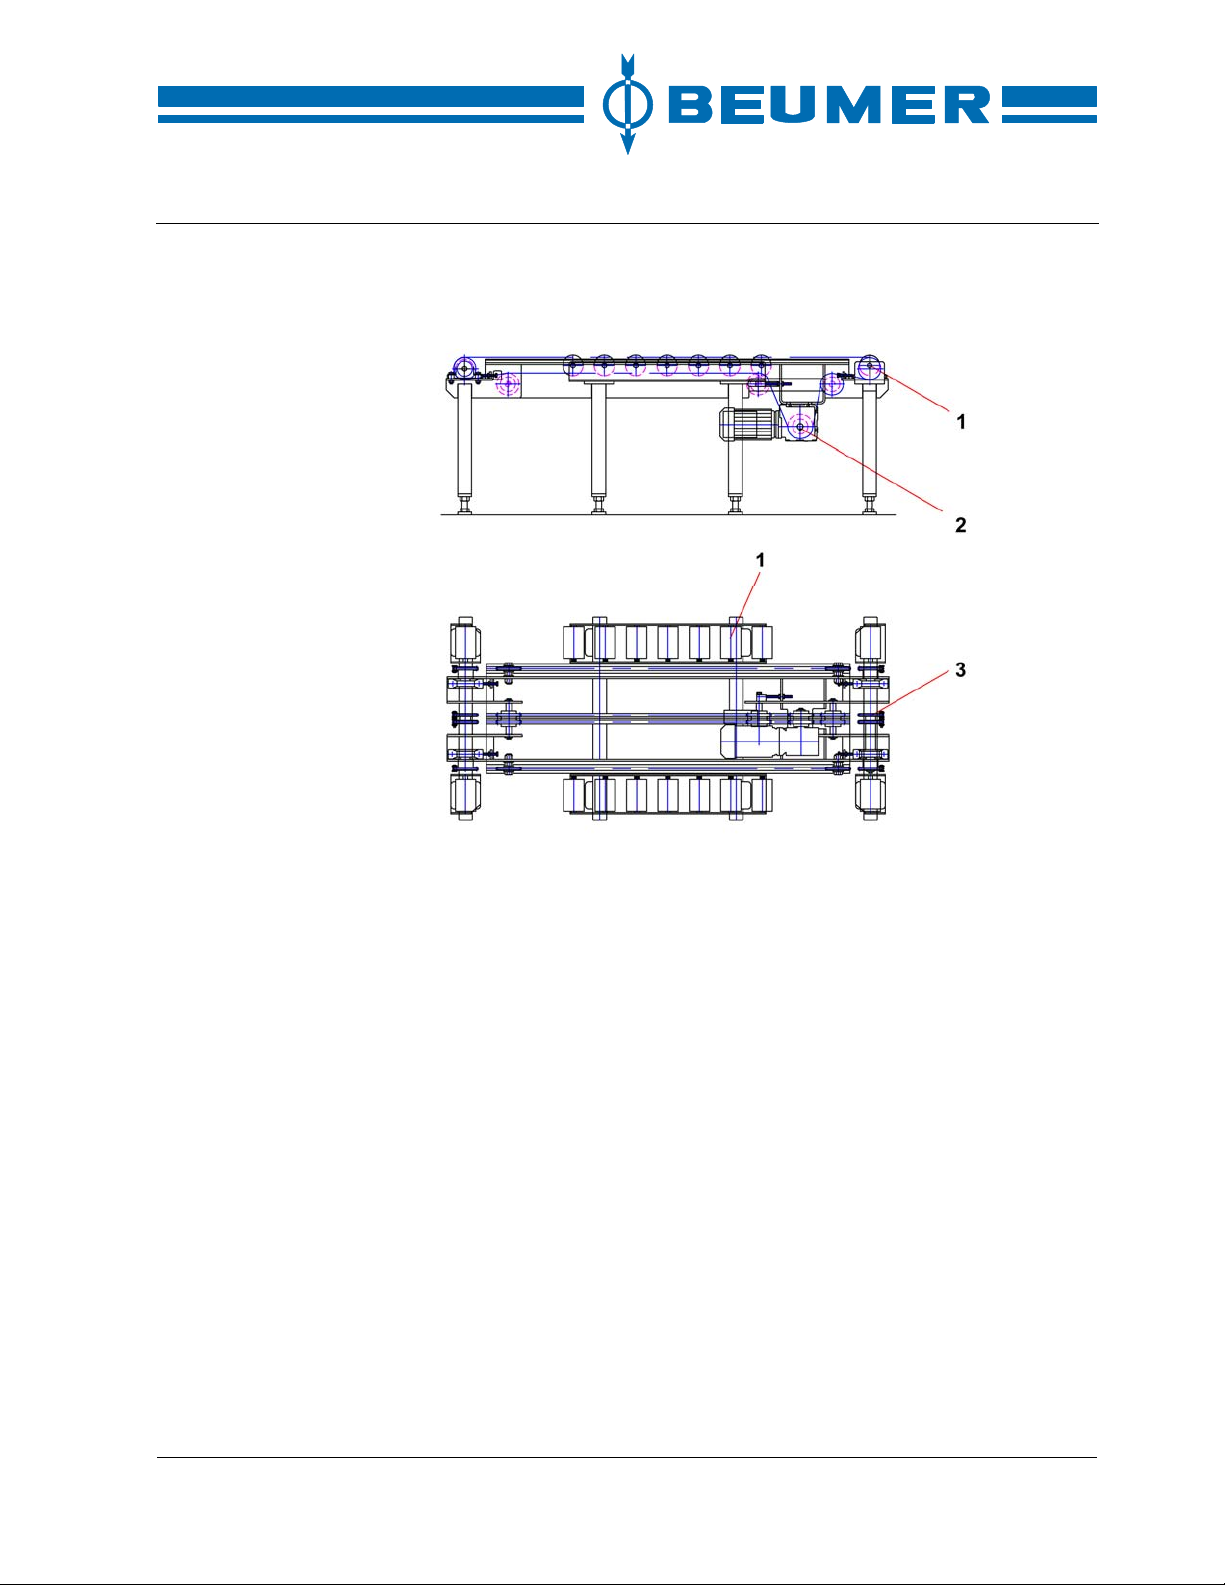
BEUMER stretch hood® S
Chain conveyor
Technical description
1 Idlers
2 Drive unit
3 Chain strands
The chain conveyor positions the palletised load unit centrally below the packaging system. The pallet is transported by the chain strands. The idlers which are
located on both sides serve to support the pallet. A geared brake motor drives
the chain strands.
BA-6090103-EN
19.08.09
27
Page 28
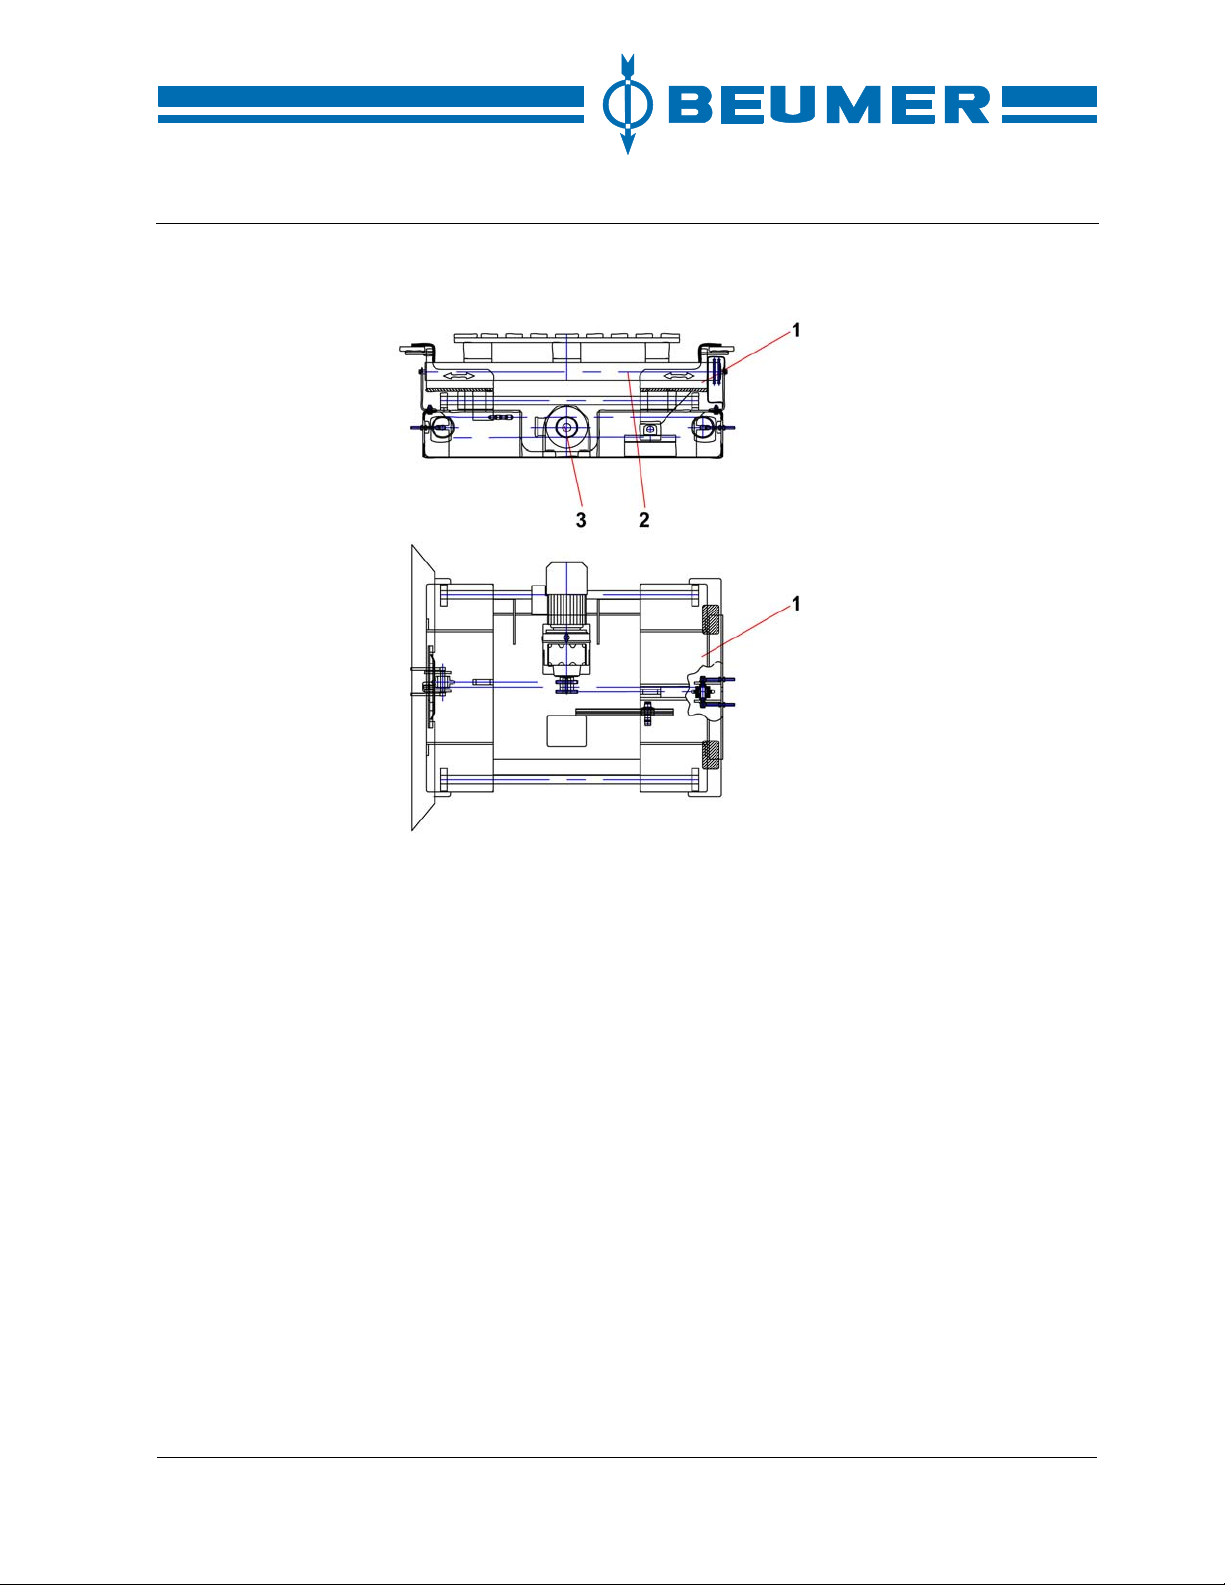
Technical description
Pallet positioning device
BEUMER stretch hood® S
1 Pallet slide plate
2 Roller conveyor
3 Drive unit for pallet slide plate
The pallet positioning device aligns the palletised load unit in conveying direction. The palletised load unit is shifted on the roller conveyor at right angles to
the conveying direction. The displacement unit is integrated into the roller conveyor. The pallet slide plate is driven by a geared motor and a chain drive.
28 BA-6090103-EN
19.08.09
Page 29
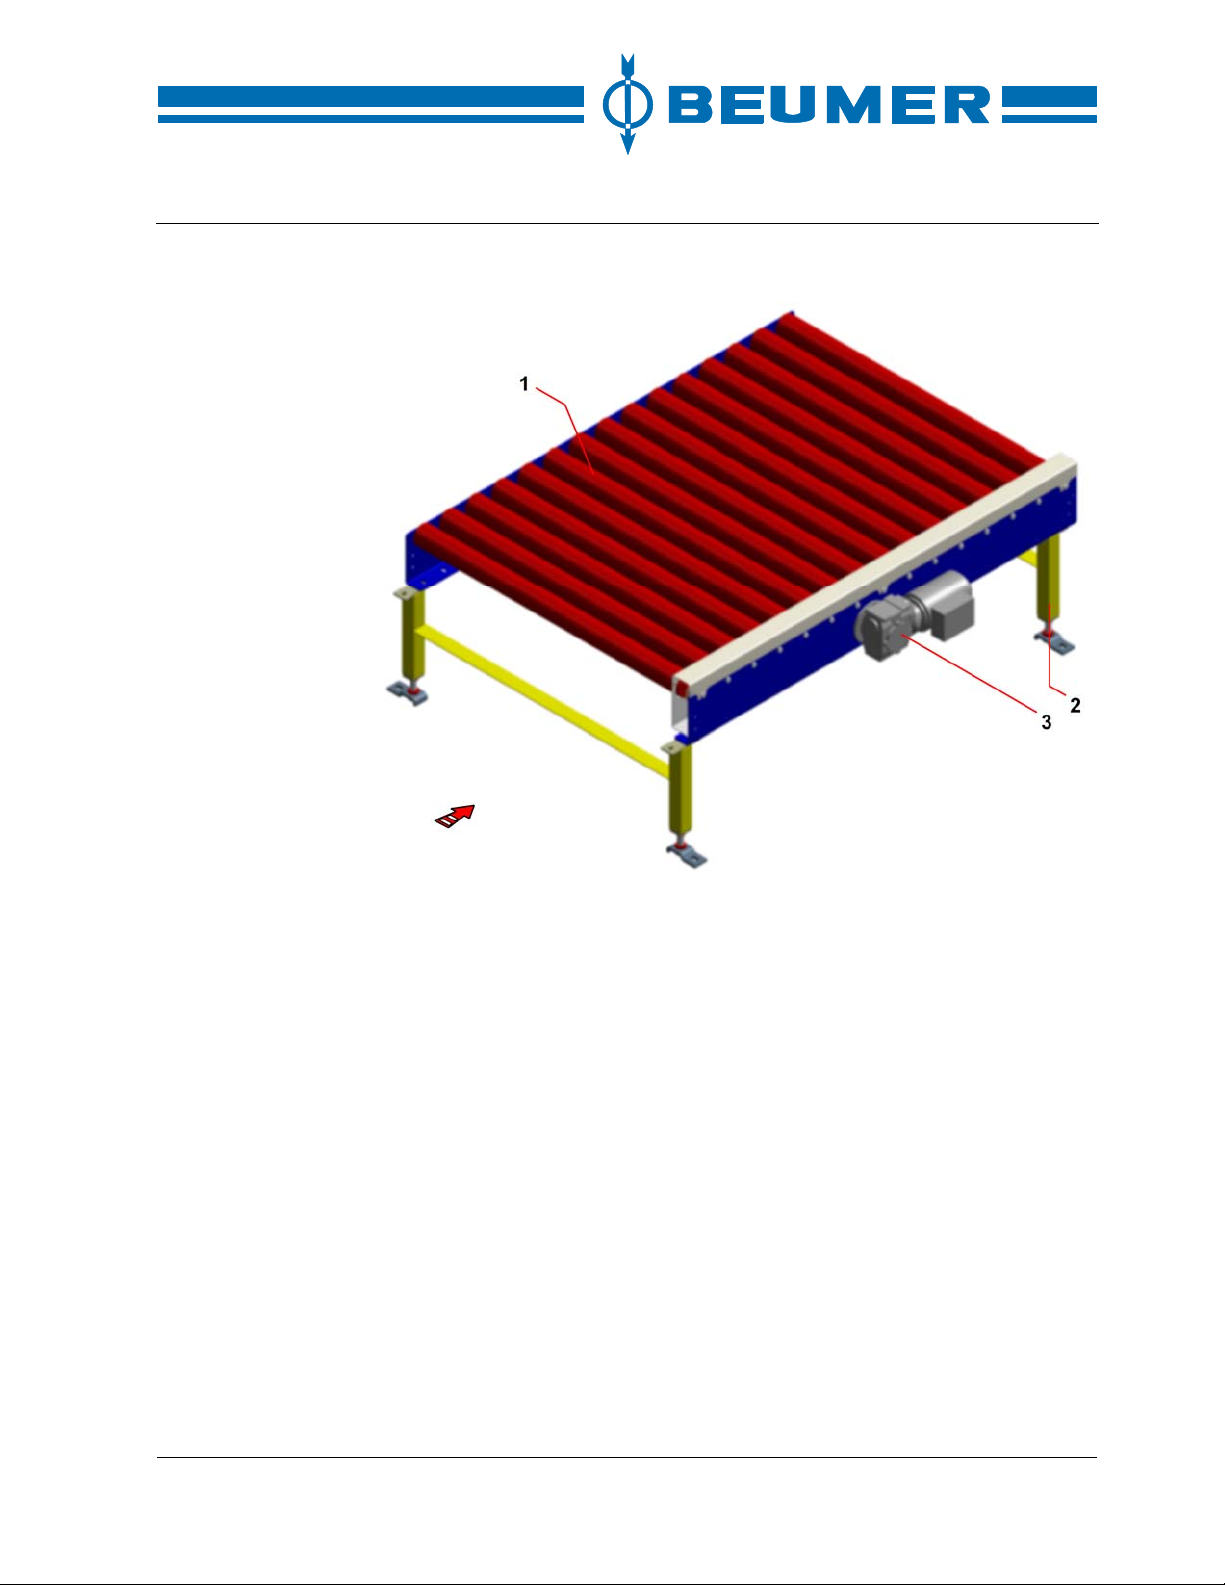
BEUMER stretch hood® S
Pallet roller conveyor
Technical description
1 Idlers
2 Support
3 Drive unit
The pallet roller conveyor transports and stores pallets. Length and width of the
pallet roller conveyor, roller pitch, drive power and conveying speed are adapted
to the particular application. The idlers with welded-on chain sprocket disks are
driven by staggered chains. The chain drive is covered with a protective hood.
BA-6090103-EN
19.08.09
29
Page 30

Page 31
BEUMER stretch hood® S
4 Safety
Safety instructions
The safety instructions included in these operating instructions are subdivided
into three hazard levels depending on the seriousness of the possible damage.
As example, the three different safety instructions are shown in the icon for g eneral risks:
Danger!
Keyword "Risk":Immediate hazards which, with high probability, may lead
to serious physical injury or death.
Description of danger prevention
Warning!
Keyword "Warning":Hazards or dangerous practices which, with some
probability, may lead to serious physical injury or death.
Description of danger prevention
Caution!
Safety
Safety devices
Protective structure
Keyword "Caution":Hazards or dangerous practices which could lead to
minor personal injury or damage to product or property.
Description of danger prevention
You will find this sign in the operating instructions whenever special attention is required. Only when the instructions are followed, can the directives, regulations and working sequences be observed and damage to or
destruction of the machine and/or other system parts be avoided.
This sign marks hints for work facilitation.
Guards are located in the danger zones at the safety distances required. The
design of the protective devices corresponds to the respective EN standards.
BA-6090103-EN
19.08.09
31
Page 32

Page 33
BEUMER stretch hood® S
5 Installation
Safety instructions
Before starting installation, the personnel working in the area where the installation is carried out has to be informed about the installation work. The whole area
is to be protected against unauthorised access. The barriers have to be provided
with reference plates forbidding unauthorised persons to enter.
Do not permit unauthorised persons to enter! Attach reference plates!
Lifting equipment
Wear protective clothing when carrying out this work!
The lifting equipment is to be selected according to the particular local conditions. The rated load of the lifting equipment must be sufficient.
Installation
Welding work
Warning!
Loads which are incorrectly fastened or components may fall down and
cause serious physical injury or property damage.
Never work or stand under suspended loads! Use only suitable and correctly
functioning lifting equipment and load carrying attachments of sufficient rated
load!
If any welding, flame-cutting and separating work is necessary - also on the
building itself - the electric parts have to be protected adequately. If welding,
flame-cutting and separating work is necessary on the machine itself, check
whether there are any installations attached to the reverse side of the surfaces
to be worked on. During welding work, the lenses of the photocells have to be
covered by a protective band in order to avoid burnt spots on the glass. The
temperature occurring during welding must not exceed 55 °C in the area of the
electric parts.
During welding work, the earthing of the welding machine must be
mounted to a component to be welded so that the current can flow well.
Remove paint or other insulating layers from this point.
BA-6090103-EN
19.08.09
33
Page 34

Installation
Preparation of installation
The final installation requires the presence of a BEUMER supervisor for supervising the installation and aligning the machine. On site, the supervisor will decide on the way and sequence of installation. The installation sequence depends
on the space available on site and the state of the civil engineering work. Therefore, the following installation description can only serve as an aid and not as an
obligatory instruction.
It is advisable to have the installation carried out by BEUMER personnel.
We do not assume any liability for damage caused by improper work!
Foundation
The place of installation must be appropriate for the static and dynamic loads
and must be free from vibrations. During project planning, sufficient space
around the machine must be ensured in order to facilitate installation and maintenance work.
The positions of the supporting points should be measured and recorded before
installation. This way, the material for backing can be assigned to the respective
supports.
BEUMER stretch hood® S
Tools
The necessary dimensions are indicated in the installation drawing included in
the annex to these operating instructions.
The following tools are required for installing the machine:
• Ring spanner (size 8 - 55)
• Open-end spanner (size 8 - 55)
• Torque wrench
• Welding machine
• Cutting torch
• Right-angle grinder
• Drilling machine, percussion drill
• Measuring instruments: Water level, plummet, measuring tape
• Lifting equipment: crane, fork-lift truck, mechanical winch (5 t), ropes, chains,
fastening devices
Further special tools are not required for installation.
34 BA-6090103-EN
19.08.09
Page 35
BEUMER stretch hood® S
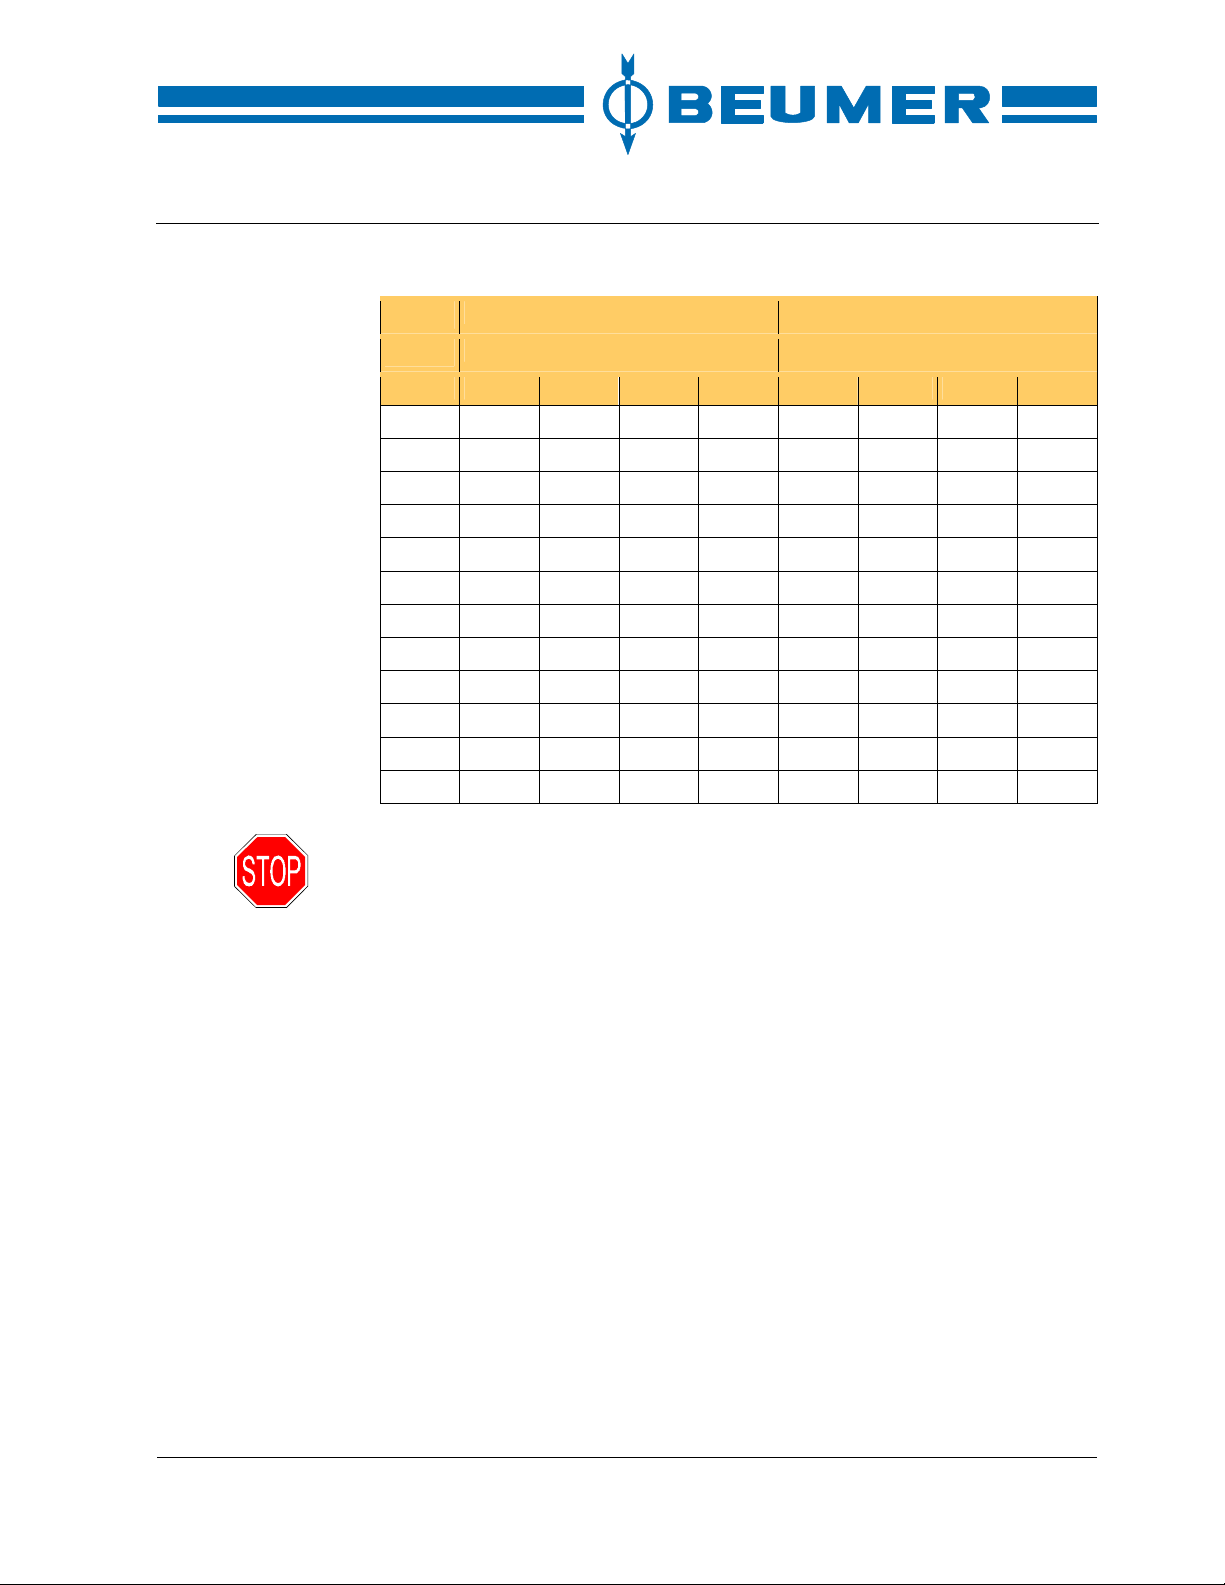
Torque list
Installation
Galvanised screws Black, untreated screws
Tightening torque (Nm) Tightening torque (Nm)
d 5.6 8.8 10.9 12.9 5.6 8.8 10.9 12.9
M 6 4,5 9,5 13 16 4,8 10 14 17
M 8 11 23 32 39 12 25 35 41
M 10 22 46 64 77 23 49 69 83
M 12 38 80 110 135 40 86 120 145
M 14 60 125 180 215 64 135 190 230
M 16 92 195 275 330 98 210 295 355
M 20 180 385 540 650 190 410 580 690
M 24 305 660 930 1100 330 710 1000 1200
M 30 620 1350 1850 2250 660 1450 2000 2400
M 36 1050 2300 3200 3850 1150 2450 3450 4150
M 42 1700 3650 5150 6200 1850 3950 5550 6650
M 48 2600 5550 7800 9350 2800 5950 8400 10100
Observe the indicated tightening torque for screw and bolt connections!
Use only torque wrenches for this kind of connections!
BA-6090103-EN
19.08.09
35
Page 36
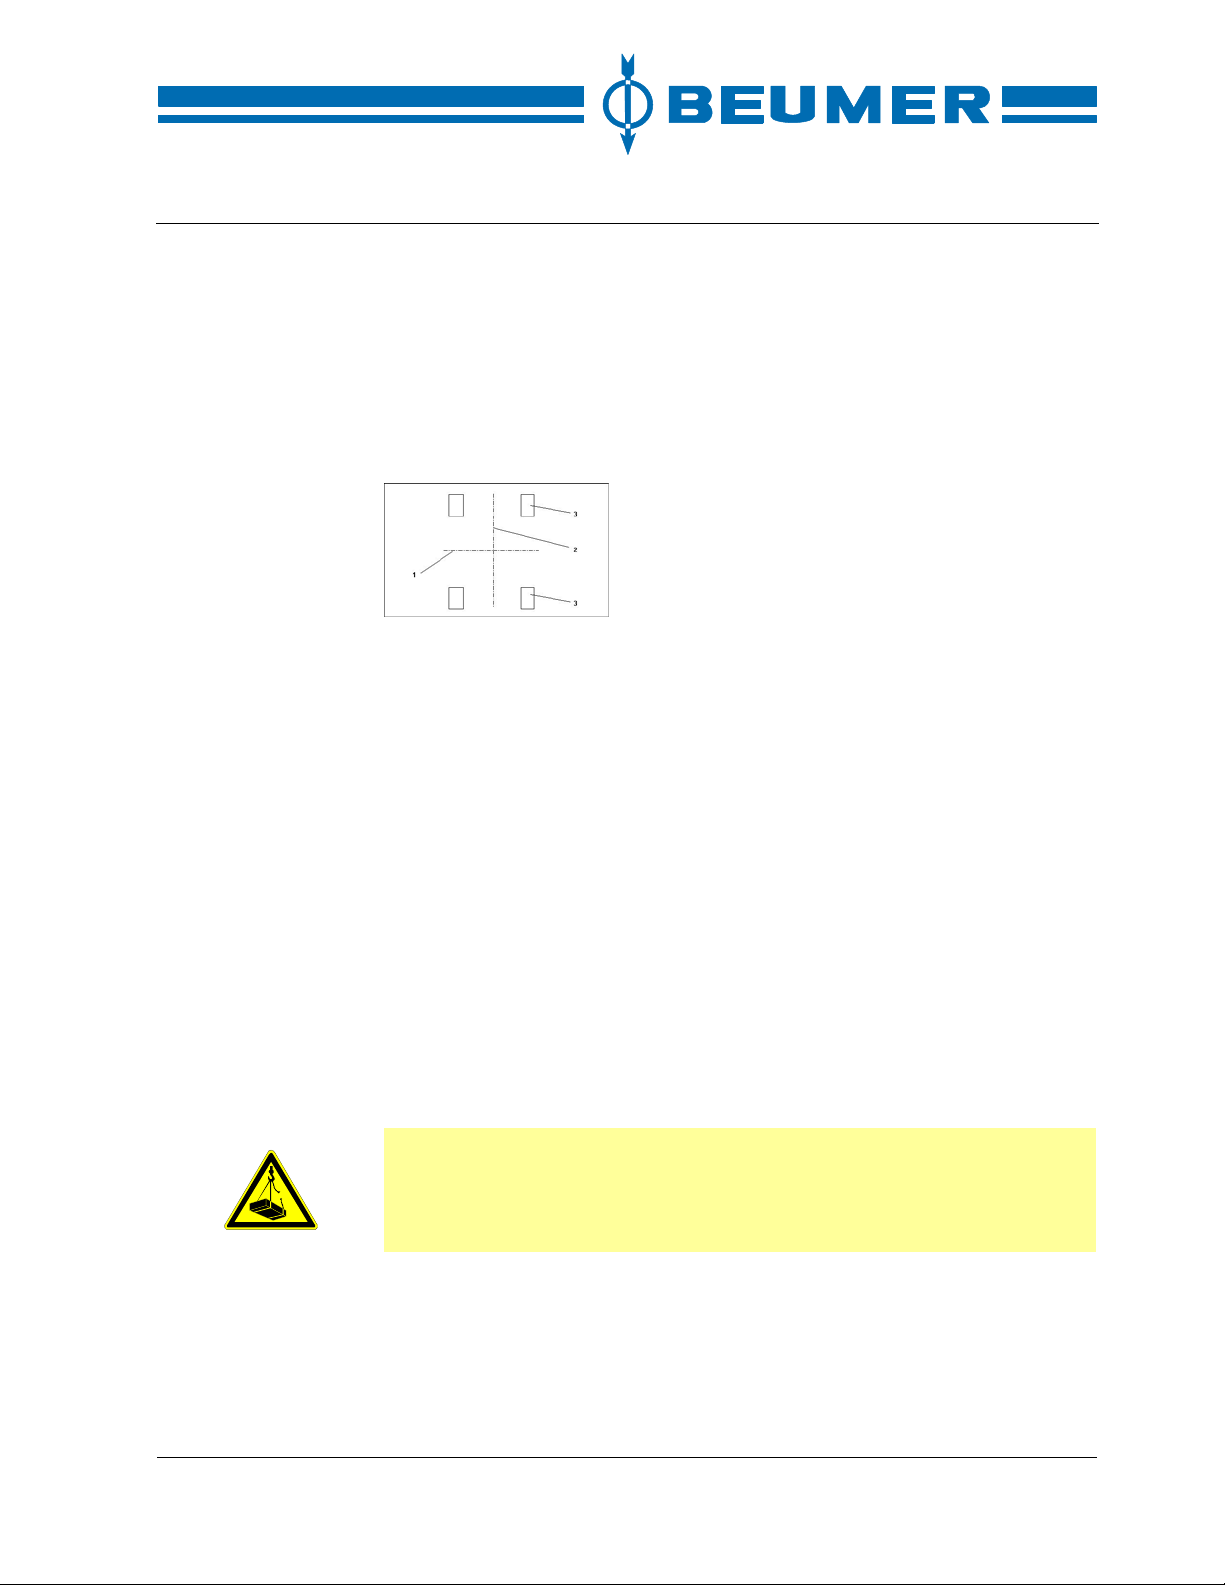
Installation
Preassembly
Transport route
BEUMER stretch hood® S
Before installation of the individual subassemblies, the transport routes are
marked on the floor. Then the supporting points of the hoist are marked on the
floor. Please see the dimensions required from the installation drawing. The
supporting points of the other subassemblies are not marked as they result from
the position of the subassemblies to each other.
1 Transport route of the pallet transport system
2 Central axis of the BEUMER stretch hood
3 Supporting points of the hoist
How to mark the
transport route
1. Mark the transport route of the pallet transport system on the floor.
2. Mark the central axis of the BEUMER stretch hood
floor.
3. Mark the outline of the four base plates of the hoist on the floor.
Final installation
How to install the BEUMER stretch hood®
First, the part of the pallet transport system located under the BEUMER stretch
®
is mounted. Then the hoist is set up, aligned and fastened. The mainte-
hood
nance platform can be pre-mounted on the floor if the lifting equipment is sufficiently dimensioned. Before mounting the railing, place the hood applicator head
on the maintenance platform.
Warning!
Components which are lying on the floor may oscillate against the lifting
direction if they are lifted on one side.
Never stand in the area where components are set up!
®
®
at right angles to it on the
36 BA-6090103-EN
19.08.09
Page 37
BEUMER stretch hood® S
Hoist
Installation
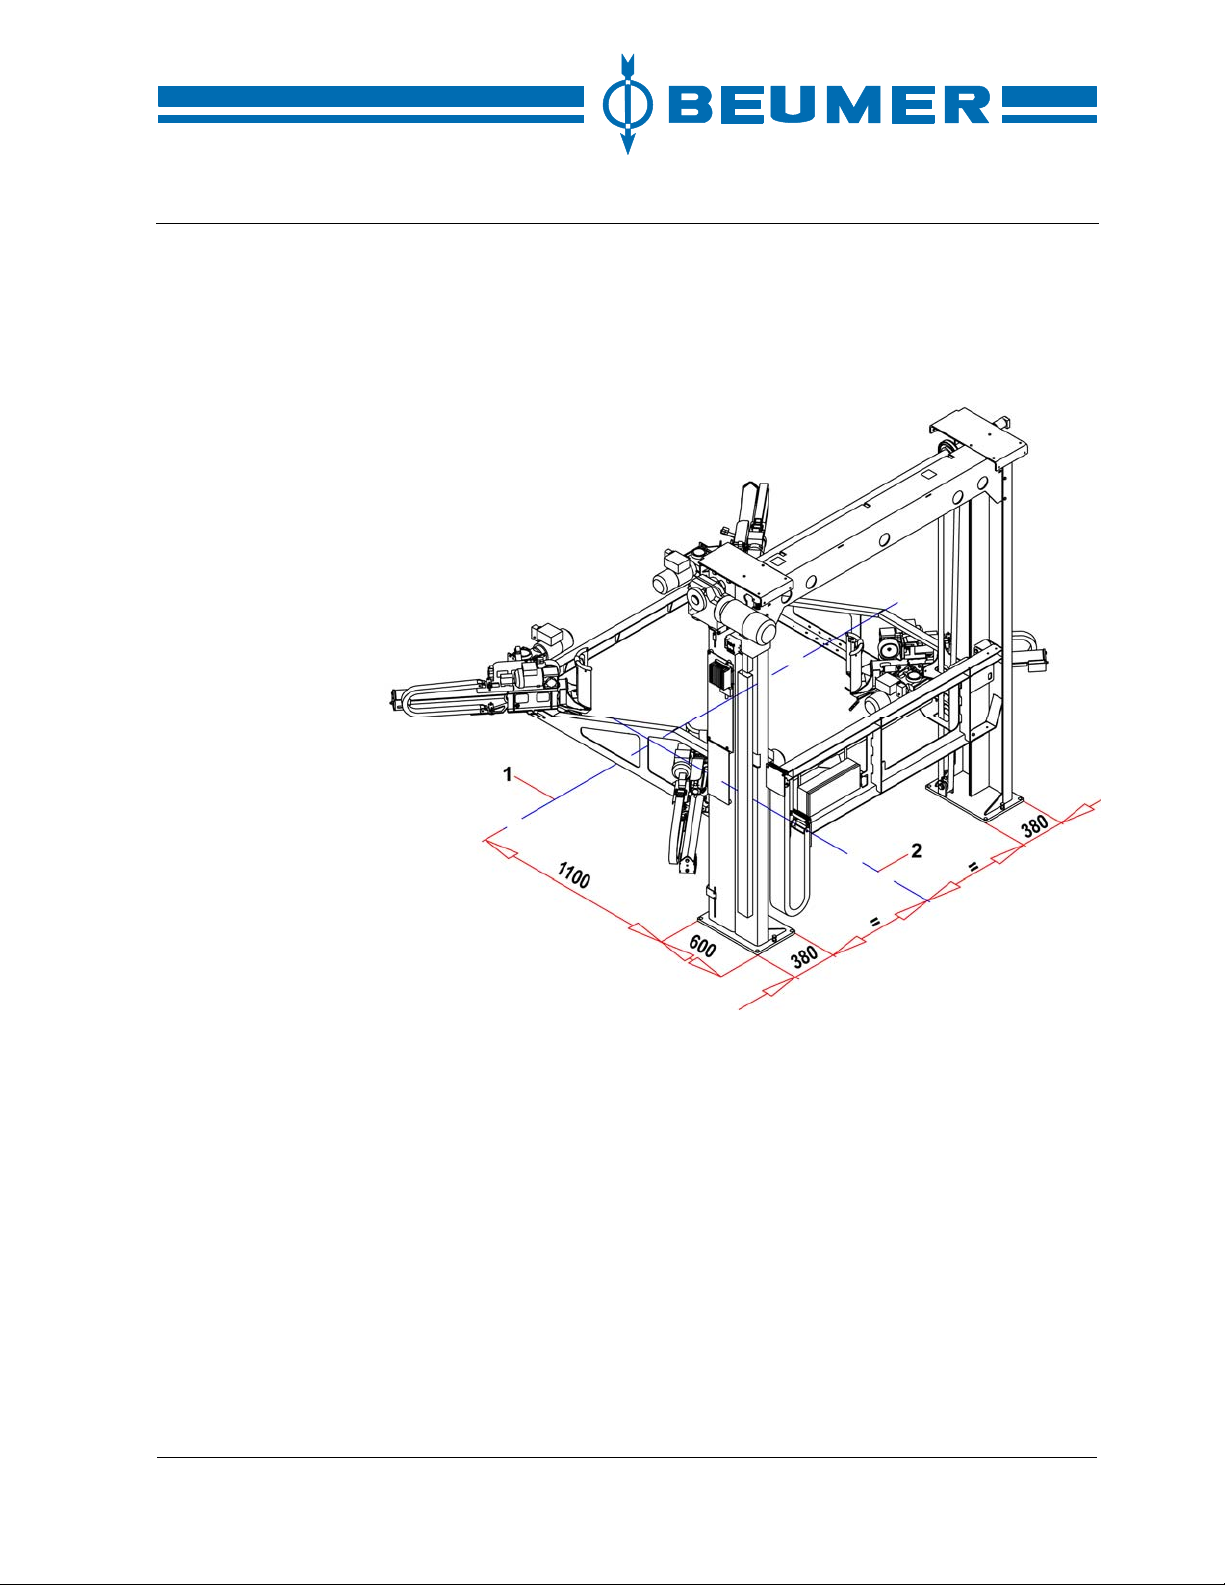
First, the transport safety devices are loosened or removed. The hoist is set up
carefully and placed on the marked supporting points. The hoist is to be fastened with at least two dowels so as to prevent it from tipping over. The other
dowels are to be fastened after installation of the platform.
How to mount the
hoist
BA-6090103-EN
19.08.09
1 Transport route
2 Central axis of the hoist
1. Fasten adequate load carrying attachments to the diagonal bracing.
2. Remove the transport safety device.
3. Lift the hoist, place it on the marked supporting points and align it.
4. Fasten the hoist with dowels.
37
Page 38
Installation
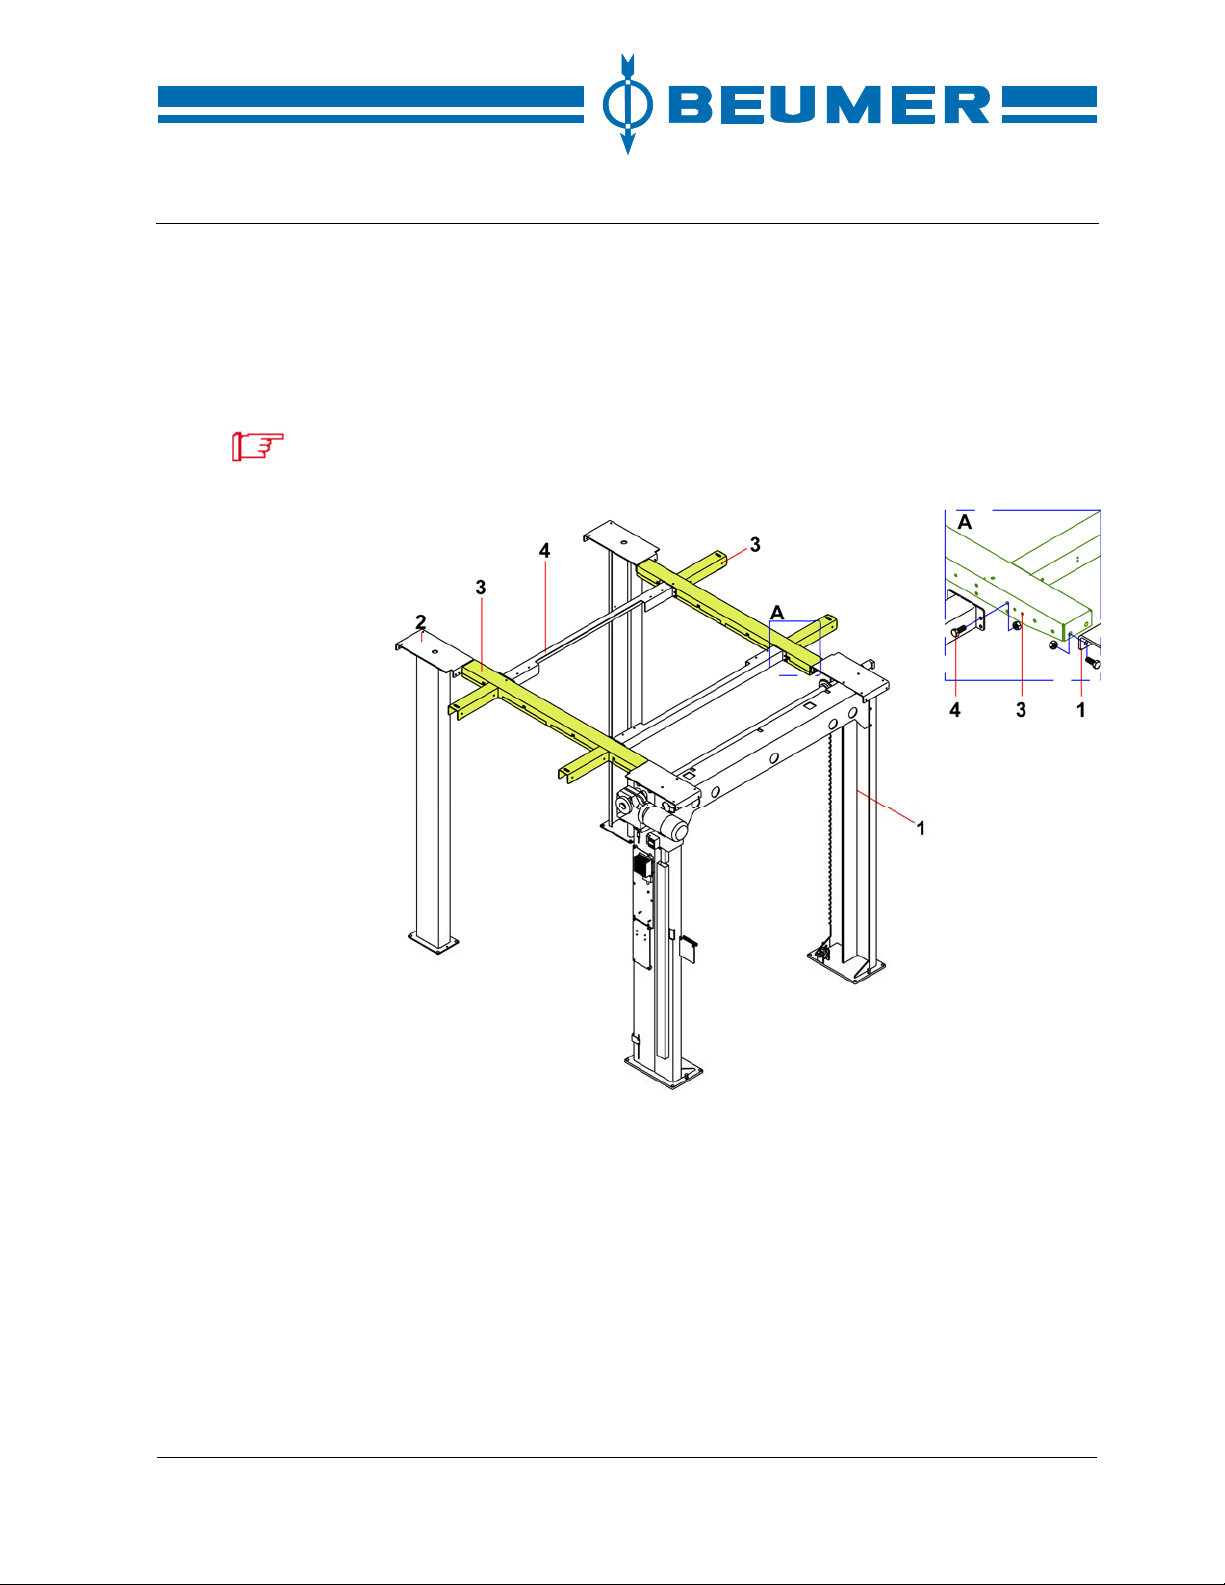
Maintenance platform
The hoist is connected to the platform parts and both supports. The mode of
installation depends on the place of installation and the available lifting equipment. Another possibility is to pre-assemble the platform parts and then place
them on the hoist. The film releasing trestle and the stairs form a unit. The parts
are screwed to the hoist and the platform.
BEUMER stretch hood® S
platform.
Before mounting the railing, the hood applicator head should be placed on the
1 Hoist
2 Support
3 Cross bar
4 Spacer
How to mount the
maintenance platform
1. Set up both supports opposite the hoist.
2. Bolt both cross bars between the supports and the hoist.
3. Bolt both spacers between the cross bars.
4. Align the supports and the hoist and fasten them on the floor.
38 BA-6090103-EN
19.08.09
Page 39
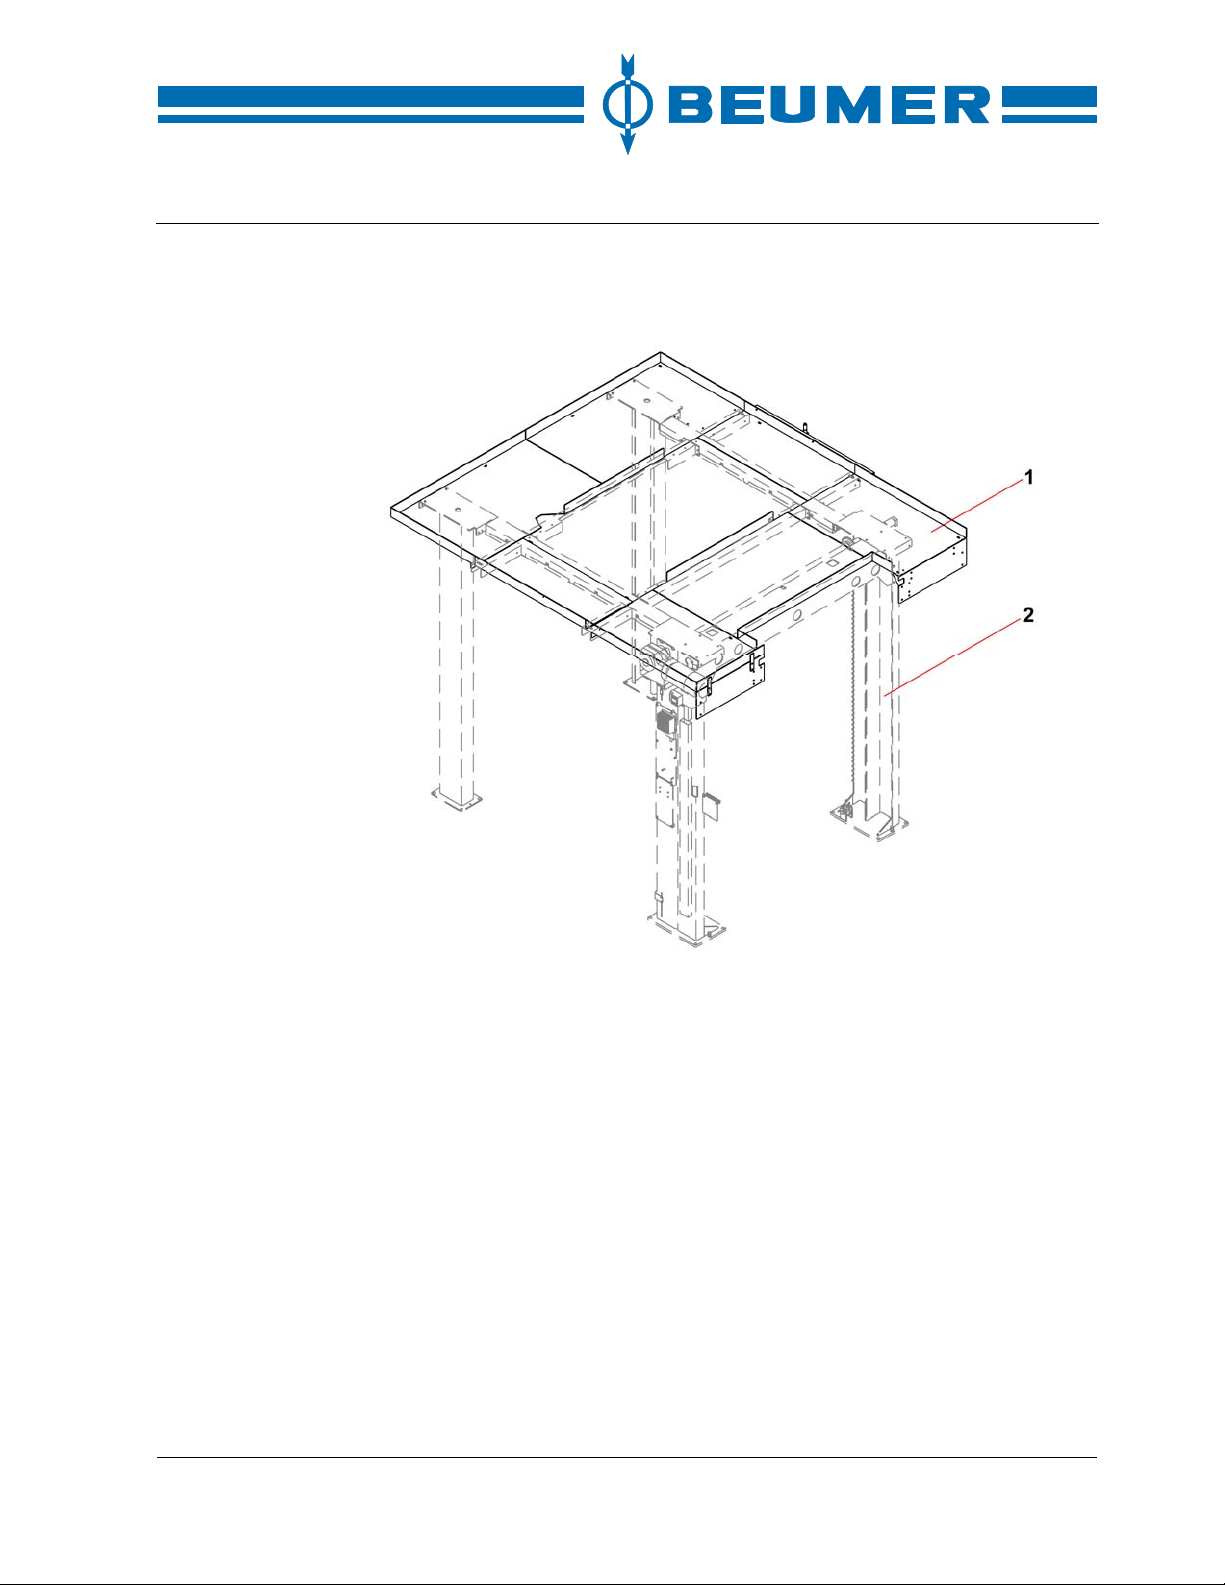
BEUMER stretch hood® S
The plates for the platform are supplied separately. The arrangement of the
plates is shown on the illustration. The individual plates are bolted to the substructure and with one another.
Installation
How to mount the
platform
BA-6090103-EN
19.08.09
1 Plates
2 Hoist
1. Place the plates on the substructure and fasten them slightly by bolts.
2. As soon as all plates have been placed on the substructure, bolt them with
one another.
3. Align the plates and tighten all screw and bolt connections.
39
Page 40
Installation
r
BEUMER stretch hood® S
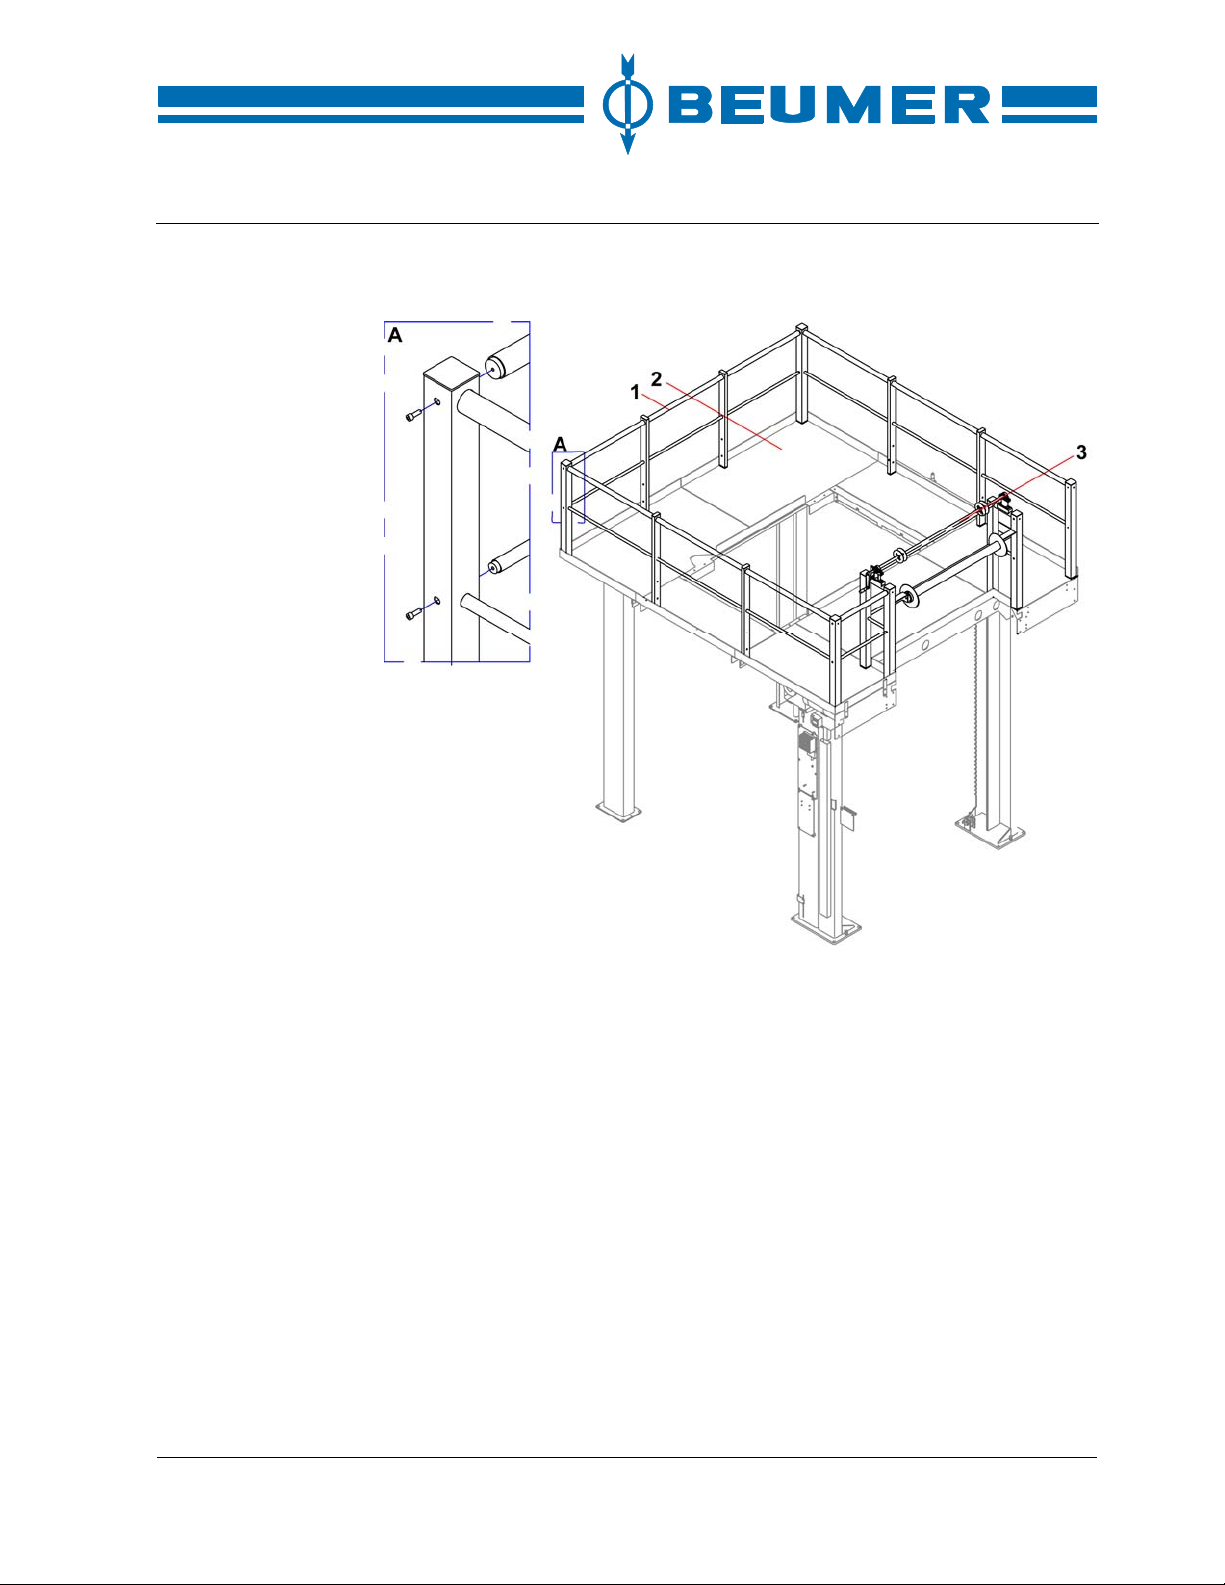
The railing is supplied in individual components. These components of the railing
are connected by Allen screws.
1 Railing
2 Platform
3 Idler with crank (option)
How to mount the
railing
1. Place the railing parts on the platform and bolt them to the platform.
2. Bolt the individual components of the railing with one another at the corne
posts.
3. Mount the idler or the idler with the crank, if available.
40 BA-6090103-EN
19.08.09
Page 41
BEUMER stretch hood® S
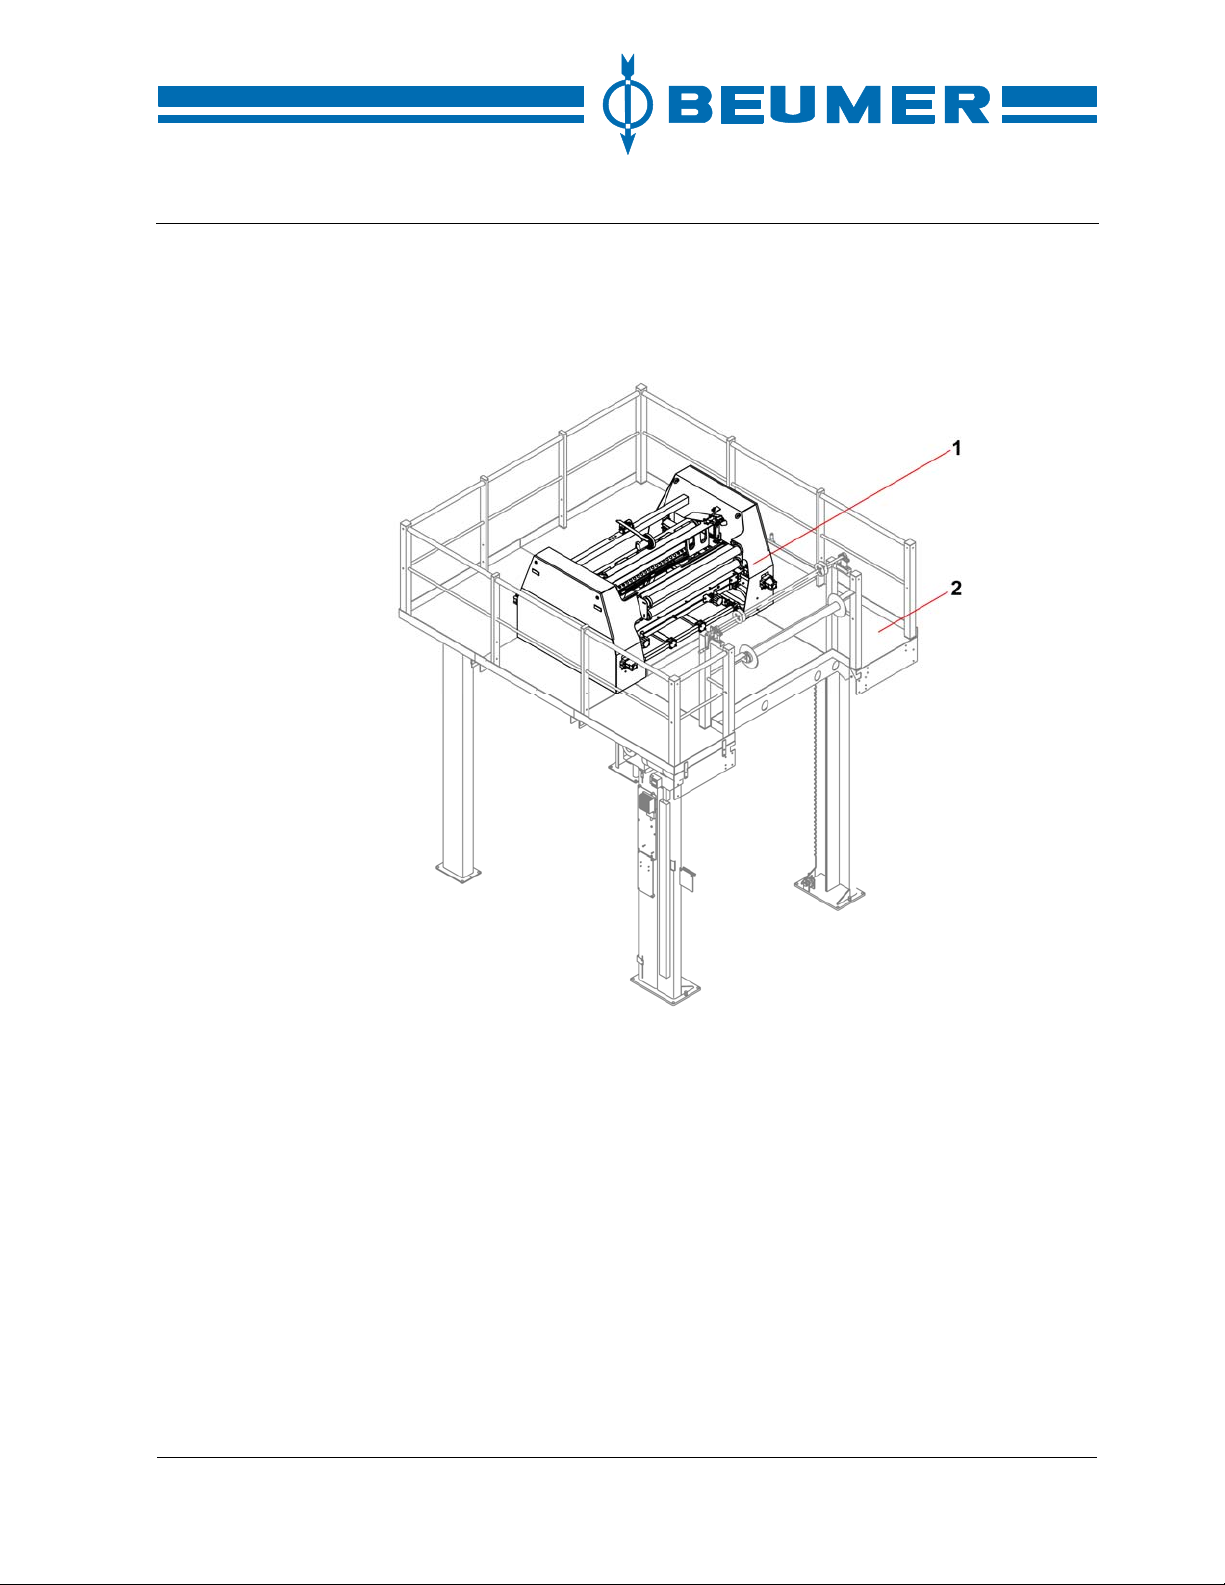
Hood applicator head
The hood applicator head is dispatched pre-assembled. The idlers for the film
must be positioned parallel to the film releasing trestle. The railing is fastened
after installation of the hood applicator head.
Installation
How to install the
hood applicator head
BA-6090103-EN
19.08.09
1 Hood applicator head
2 Platform
1. Place the hood applicator head on the platform as shown and align it.
2. Align the hoist and the hood applicator head on the transport route using a
plummet.
3. Bolt the hood applicator head to the platform.
41
Page 42
Installation
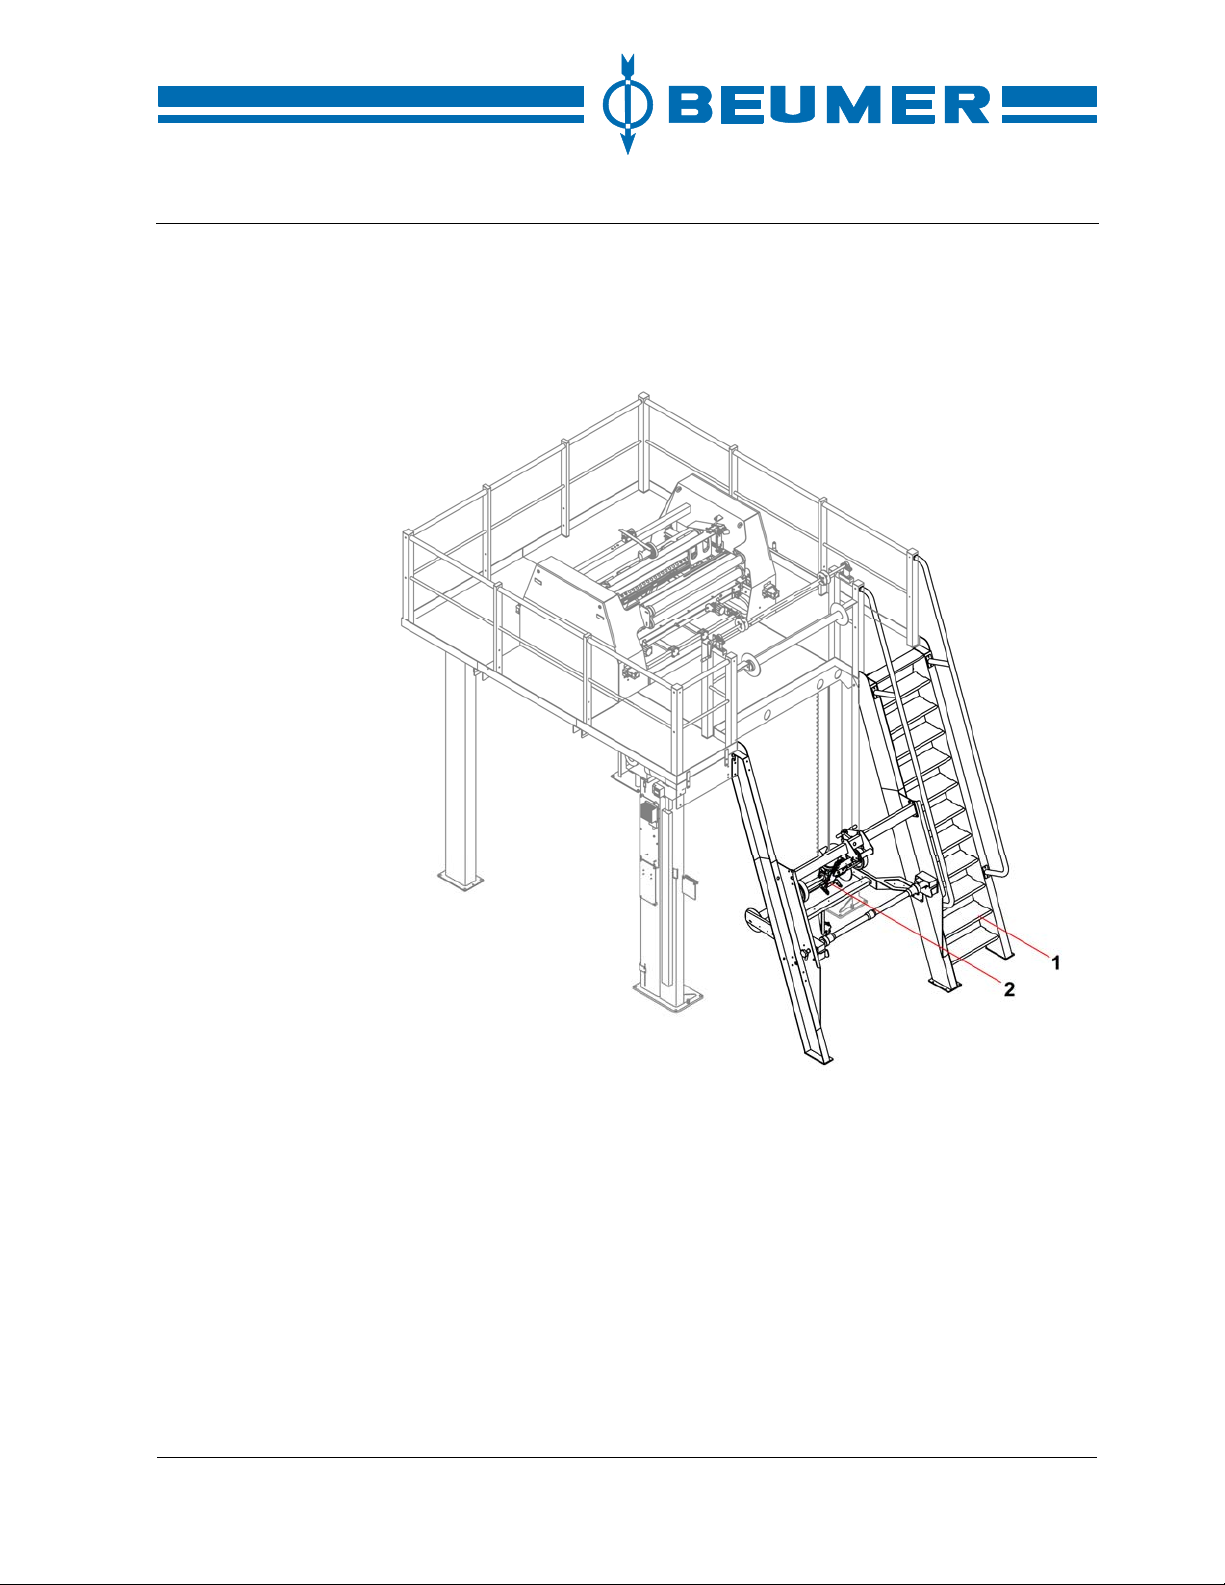
Film releasing trestle
The film releasing trestle is supplied together with the ladder. The film releasing
trestle is bolted to platform on the side where the hoist is located. The position of
the ladder is shown in the installation drawing.
BEUMER stretch hood® S
1 Film releasing trestle
2 Ladder
How to install the film
releasing trestle
1. Set up the film releasing trestle and bolt it to the platform.
2. Align the film releasing trestle.
3. Fasten the film releasing trestle on the floor.
42 BA-6090103-EN
19.08.09
Page 43
BEUMER stretch hood® S
Pallet transport system
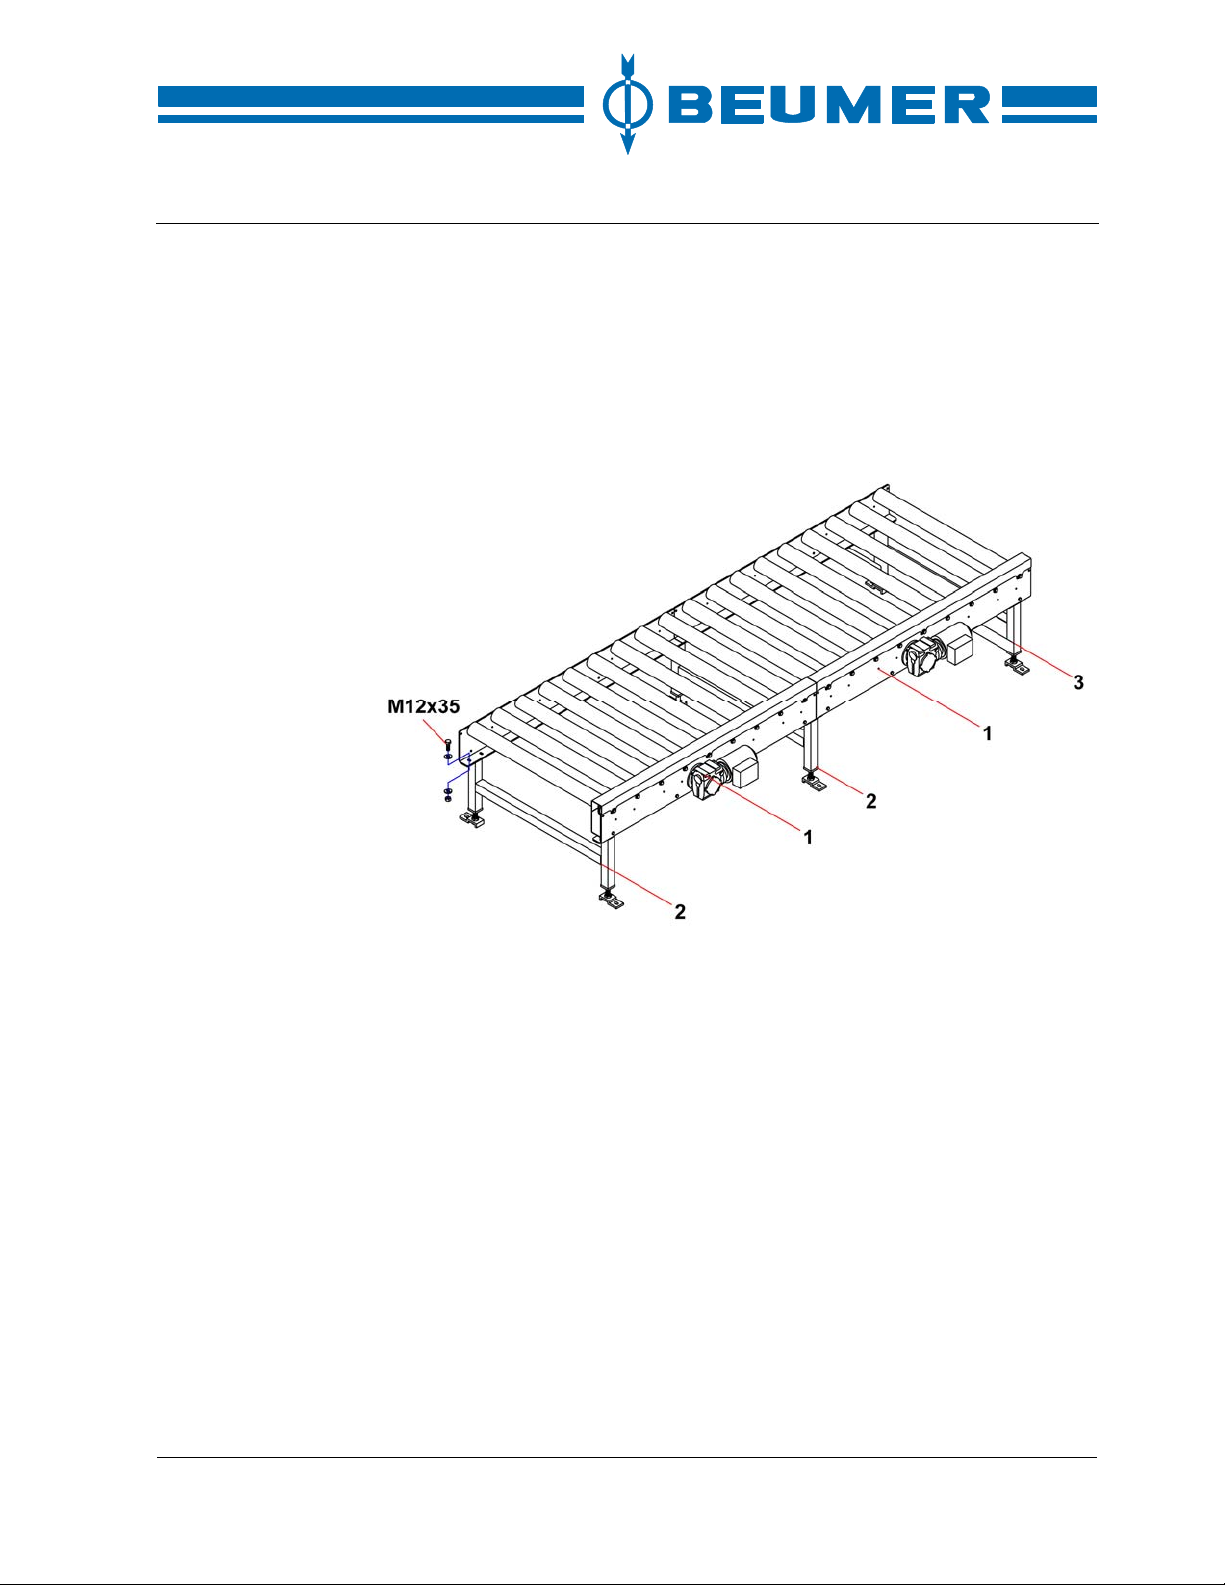
The installation of the pallet transport system starts with the hoist. The individual
pallet roller conveyors are positioned centrally to the transport route. Then the
pallet roller conveyors are to be aligned horizontally in order to ensure a straight
movement of the pallets. The drive end can be seen from the installation drawing. The supports of the pallet roller conveyors are vertically adjustable. After
alignment, the adjusting screws are to be fixed by locknuts. The pallet roller conveyors are fastened on the floor by dowels.
Installation
How to mount the
pallet roller conveyors
BA-6090103-EN
19.08.09
1 Pallet roller conveyor
2 Support
3 Support with brace
1. Screw the pallet roller conveyors to the supports.
2. Mount the support with brace on the last pallet roller conveyor.
3. Align the pallet roller conveyors in conveying direction on the transport route.
4. Align the pallet roller conveyors horizontally.
5. Fasten the supports on the floor by dowels.
43
Page 44

Installation
Check of installation
How to check screw and bolt connections
Check the screw and bolt connections for interference fit. Special attention is to
be paid to the screw and bolt connections which have not been tightened during
installation as they may have loosened due to vibrations during transport.
It is imperative to check the screw and bolt connections on supporting elements
for interference fit. These include:
• Screws, nuts and locknuts which are used for suspending components.
• Locking pieces and tensioning elements on hoist chains.
BEUMER stretch hood® S
44 BA-6090103-EN
19.08.09
Page 45
BEUMER stretch hood® S
6 Commissioning
Safety instructions
The machine/system must be operated by trained or instructed personnel only.
Danger!
An unauthorised use of the machine/system could result in severe personal injury or death and damage to the system.
First start-up
Basic requirements
The machine/system must not be switched on if defects jeopardise the operational reliability.
Before starting the machine/system, check the following points:
• The installation has been carried out according to the operating instructions.
• There is no foreign matter (tools, auxiliary material etc.) in the system.
• The bearings have been correctly mounted, aligned and filled with lubricant
according to the lubrication list.
• The drive unit (motor, gear unit, coupling, chain drive, belt drive etc.) has
been correctly mounted, aligned and filled with lubricant according to the lubrication list.
• The operating voltage corresponds to the voltage indicated on the motor
rating plate.
• The sense of rotation of the individual drive components corresponds to the
conveying direction.
• The intended safety devices have been mounted and are fully functional.
Commissioning
BA-6090103-EN
19.08.09
Before start-up, ensure that nobody is endangered by the starting machine/system.
Warning!
There is risk of injury when the machine/system is switched on while the
protective devices are not mounted.
Operate the machine/system only if all protective and safety devices are in
place and fully functional!
45
Page 46

Commissioning
How to switch on the power supply
Electrical energy
Switch on the power supply with the main switch on the outside of the control
cabinet. This procedure is described in the Operation chapter.
Pneumatic energy
The compressed-air system and the air service unit have been connected. The
input pressure required must be at least 1 bar higher than the output pressure.
The system should be ventilated slowly in order to protect the machine parts.
Switch on the compressed-air supply including the shut-off valve at the air service unit.
BEUMER stretch hood® S
How to set the operating pressure
1. Pull up the pressure setting button for release.
2. Turn the pressure setting button until the desired pressure is indicated.
3. For interlocking, press down the pressure setting button.
The pressure switch is set by the commissioning engineer.
46 BA-6090103-EN
19.08.09
Page 47
BEUMER stretch hood® S
7 Operation
Safety instructions
The machine/system must only be operated by trained or instructed personnel.
Danger!
An unauthorised use of the machine/system could result in severe personal injury or death and damage to the system.
The machine/system must not be switched on if defects jeopardise the operational reliability.
Before starting the machine/system, check the following points:
• Check the functioning of all safety devices, e.g. door limit switches, safety
• Ensure that there are no persons in the machine/system. Also remove foreign
• Carry out a visual check of the machine parts for obvious defects.
• Remove dirt from the machine/system.
• All safety instructions and warnings attached to the machine/system must be
• Always keep the escape routes clear.
Operation
photocells, operation stop pushbuttons and emergency stop pushbuttons.
objects left there for purpose or not, e.g. brushes or ladders.
complete and perfectly legible.
Warning!
There is a risk of physical injury when the machine/system is running.
Entering the maintenance area is only permitted when the machine is disconnected and secured against re-start. The machine operator bears the responsibility for this.
Danger!
Any contact with energised parts may immediately lead to death!
Disconnect electrical systems from the power supply and secure them against
re-start.
BA-6090103-EN
19.08.09
47
Page 48
Operation
Emergency stop
BEUMER stretch hood® S
The arrangement of the emergency stop controls permits an easy access and a
safe operation. In situations of danger, one of the emergency stop controls is to
be activated immediately.
Function Note
Emergency stop Emergency stop switches, pull wire, key-operated
switches, safety doors, safety photocells etc.
The emergency shutdown has priority over all other commands. As soon as one
of the emergency stop controls is activated, all motion sequences of the machine/system are stopped. Some of the pneumatic drive units only stop when
they have reached the final position. The data required for the motion sequences
of the machine/system are stored by the programmable logic control (named
PLC in the following chapters).
In case of an emergency shutdown, the machine/system remains energised. In
order to de-energise the machine/system, disconnect the main switch.
Danger!
In case of an emergency shutdown, the film brake and the film roll drive
still remain functional.
Do not reach into the area between film brake and idler!
How to re-activate the
emergency stop circuit
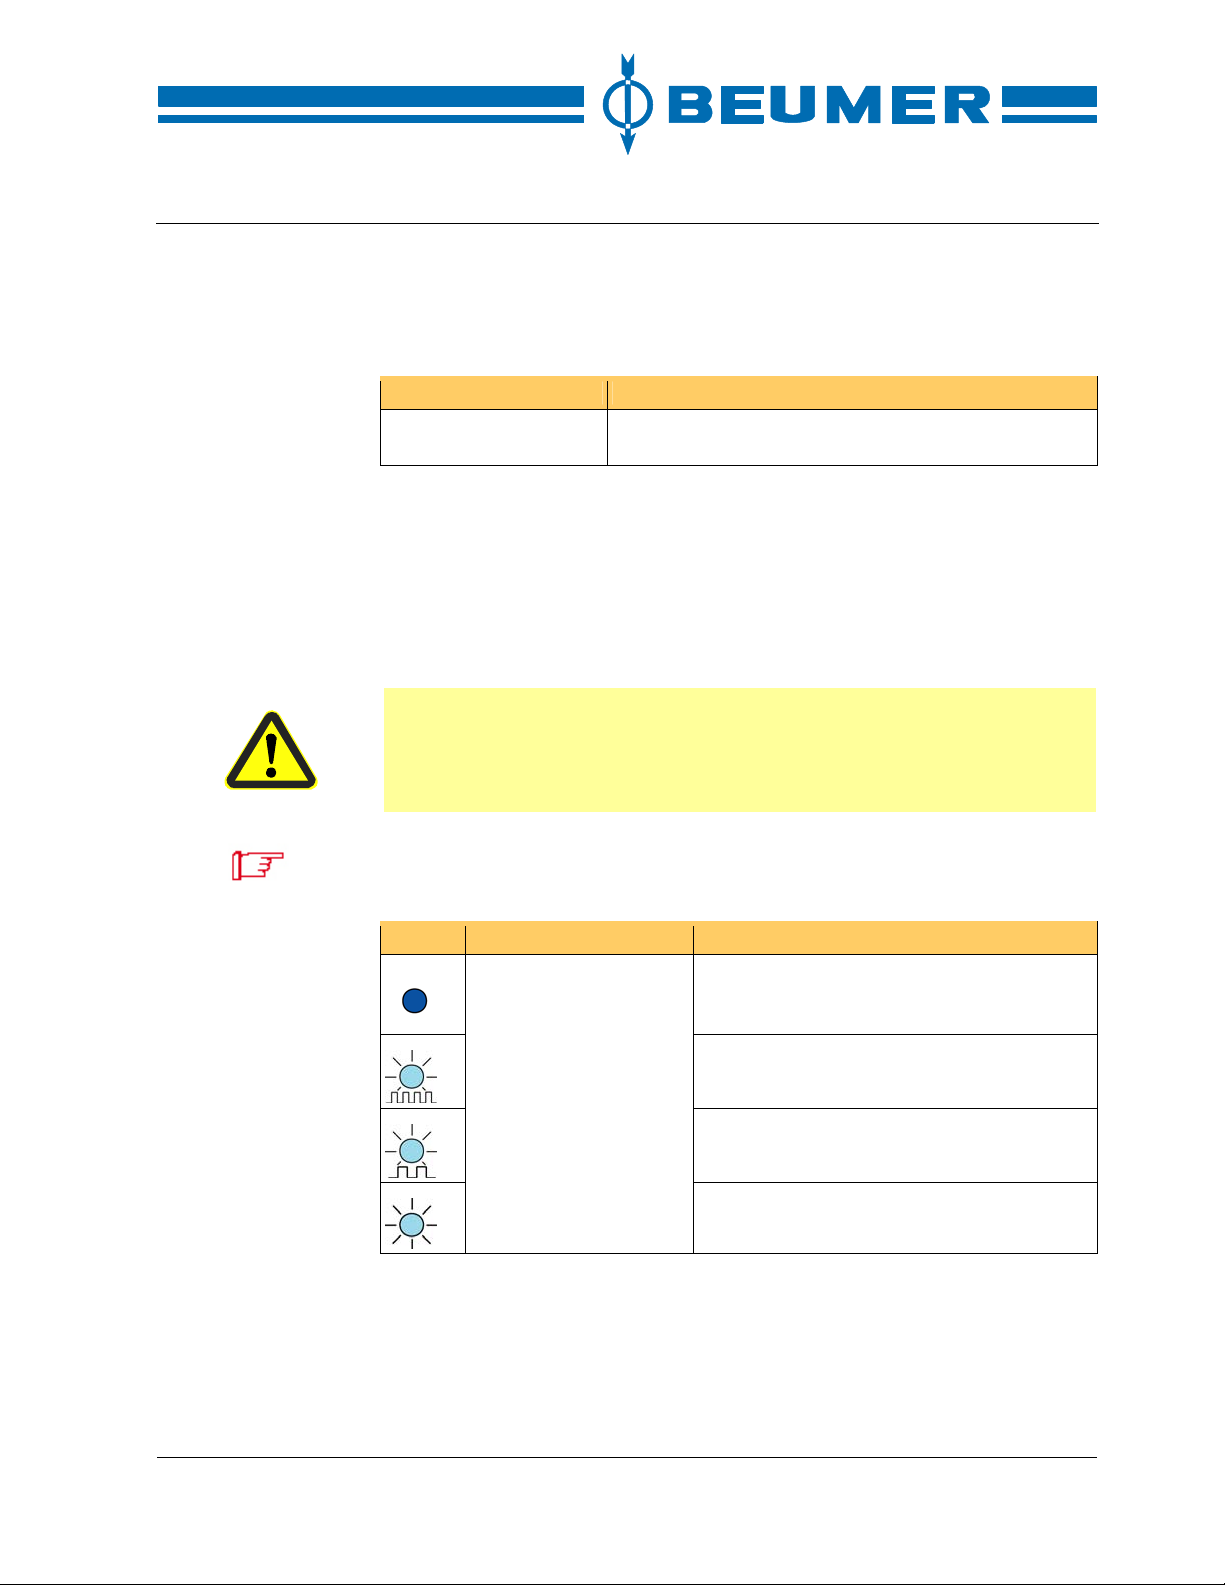
The "Reset emergency stop" illuminated pushbutton in the control cabinet/control terminal of the machine/system indicates the different states.
Symbol Function Note
"Reset emergency stop"
illuminated pushbutton
The machine/system is de-energised or the
lamp is defective.
An emergency stop control of the machine/system is still activated.
The emergency stop circuit is ready for closing.
The emergency stop circuit is activated.
1. Eliminate the cause of the emergency shutdown.
2. If a pull-wire switch has been actuated, check the whole pull wire. Determine
the cause of the emergency shutdown.
3. Ensure that there are no persons in the danger zone of the machine/system.
4. Unlock the emergency stop controls.
48 BA-6090103-EN
19.08.09
Page 49
BEUMER stretch hood® S
5. Reset the fault message.
6. Start machine/system.
Danger!
Any contact with energised parts may immediately lead to death! In case
of an emergency stop, all moving parts of the system are stopped. The
machine/system is not de-energised!
Disconnect electrical systems from the power supply and secure them against
re-start.
General information
An operator controls the machine/system from a central place. He starts and
stops the machine/system. Malfunctions (accumulation, emergency stop etc.)
are to be eliminated by the operator or under his supervision and then to be
reset. If a malfunction cannot be reset by the operator, he must inform the maintenance staff.
Employ only trained personnel for the operation of the machine/system.
Set out clearly the individual responsibilities of the personnel for operation, set-up and maintenance!
Operation
How to switch on the
machine/system
How to disconnect
the machine/system
Danger!
An unauthorised use of the machine/system could result in severe personal injury or death and damage to the system.
The machine/system must not be switched on if defects jeopardise the operational reliability.
Proceed as follows to switch the machine/system on and off.
1. Switch on the main switch on the control cabinet.
2. Reset safety devices such as safety photocells with the local pushbutton.
3. Reset the emergency stop/operation stop with the respective illuminated
pushbutton on the control terminal.
4. After a certain start-up time of the visual display system, reset all fault mes-
sages displayed.
As soon as no more fault messages are displayed, the machine/system is ready
for start-up.
1. Terminate the automatic operation.
2. Once the machine/system has completely stopped, the main switch on the
control cabinet must be actuated.
BA-6090103-EN
19.08.09
49
Page 50
Operation
Safety photocell and CPSET-M12 muting device
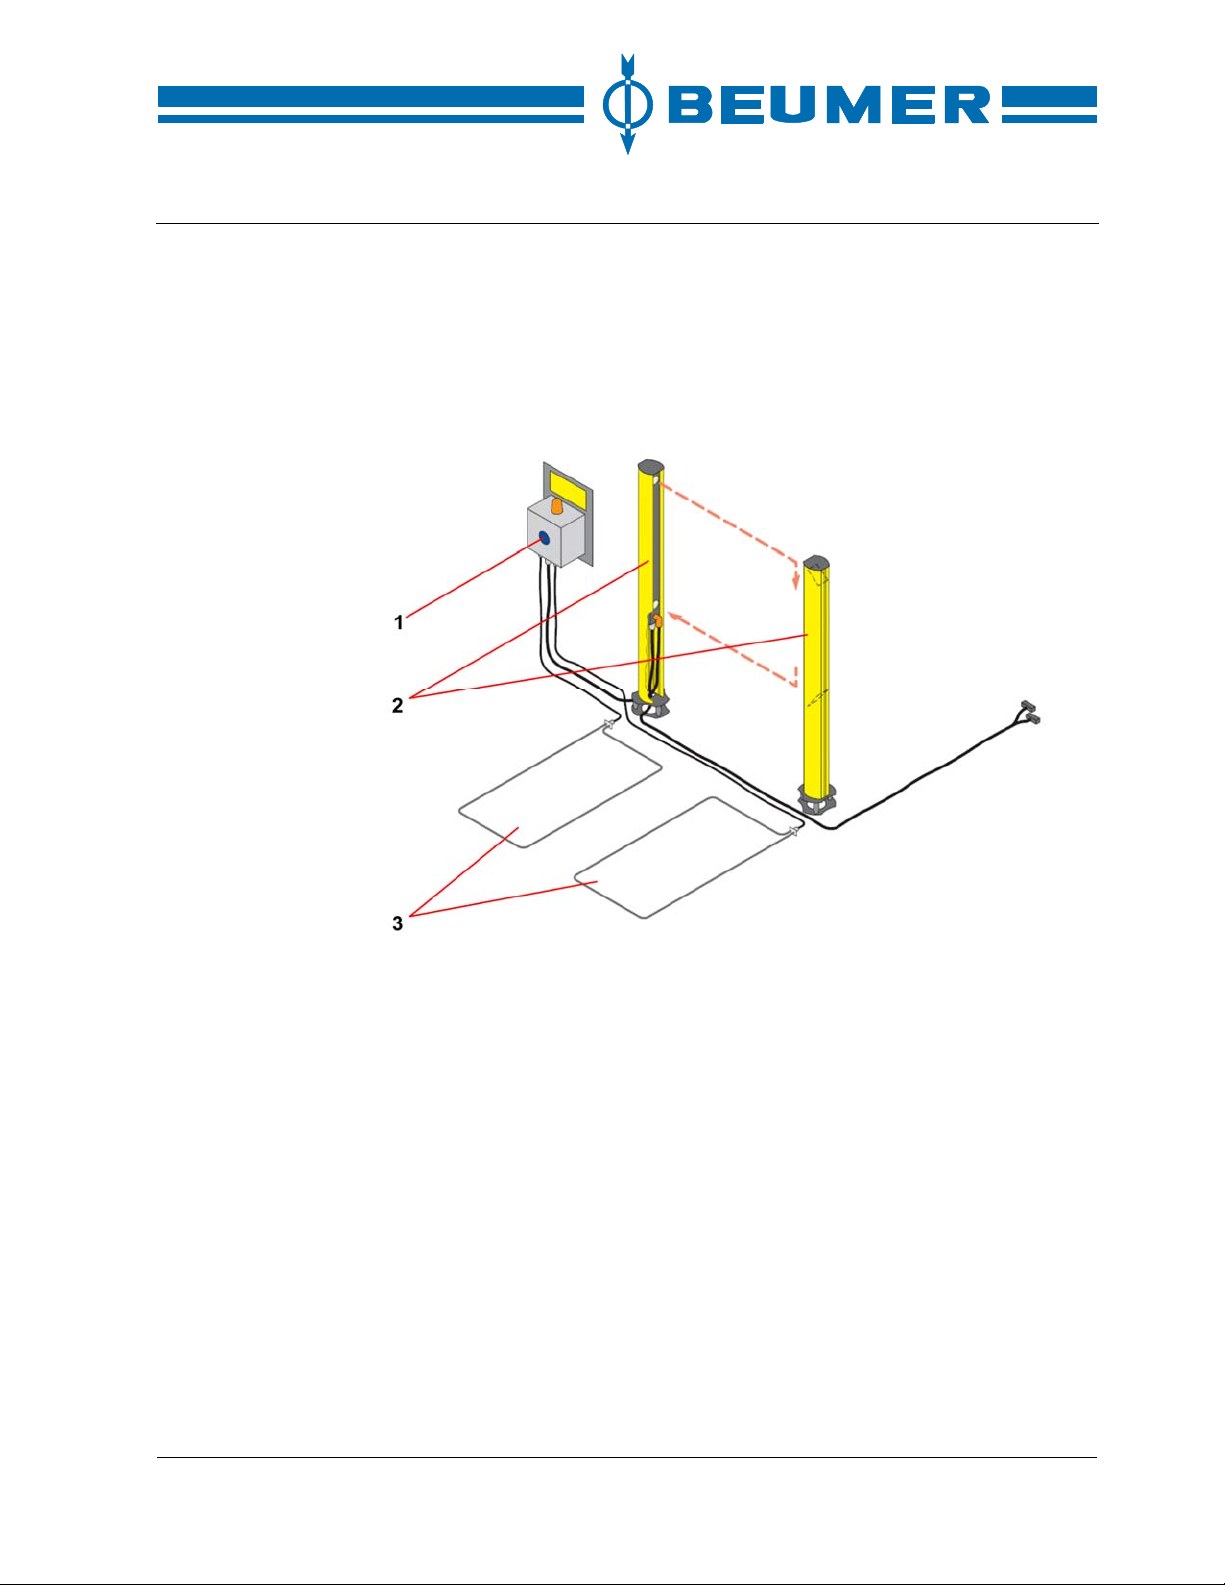
The CPSET-M12 muting device offers the possibility of suppressing the protection effect of an opto-electronic safeguard (AOPD), e.g. when pallets are taken
off the conveyor. The safety function is bypassed by induction loops (muting)
while the pallets are taken off.
BEUMER stretch hood® S
1 Control unit
2 Protected area (photocell curtain)
3 Induction loop
Control unit
A blue illuminated pushbutton which serves as reset pushbutton is installed in
the control unit. The reset pushbutton signalises the control state of the safeguard. When the system has been started, the reset pushbutton is not illuminated. When the protected area is free and the reset pushbutton has been
pressed and released, the safeguard is activated. The reset pushbutton is illuminated in blue. The reset pushbutton can also be used to carry out a restart if the
muting sequence has been interrupted and the system has been disconn ected.
A muting indicator light on the top of the muting box indicates that the safety
device is being bypassed.
50 BA-6090103-EN
19.08.09
Page 51
BEUMER stretch hood® S
Restart or reset
Operation
A restart or reset of the muting device is required if any of the following situations arise:
• The system is activated.
• An incorrect muting function has occurred.
• There is an object in the protected area.
If the fork-lift truck occupies only one of the induction loops but does not interrupt
the area protected by the safety photocell to be muted, the safety device can be
activated by pressing the reset pushbutton once. The muting function is not activated. As soon as the fork-lift truck interrupts the area protected by the safety
photocell, the safety device changes to the OFF state. The muting indicator light
starts flashing. Now it is possible to restart the muting device.
If the fork-lift truck occupies at least one induction loop and, at the same time,
the area protected by the safety photocell to be muted is interrupted during connection, the safety device remains in the OFF state. In this case the muting indicator light immediately starts flashing. Then a complete restart of the muting
device is immediately possible. The reset pushbutton must be pressed twice
within 4 seconds for restarting the muting device. When the reset pushbutton is
pressed for the second time, the safety circuit is activated immediately. As soon
as the reset pushbutton has been released for the second time, the safety device checks the signals of the induction loops for a valid occupation. If a valid
occupation is detected, the safety device remains in the ON state. The system
starts operating in the normal mode again. If an invalid occupation is detected,
the safety device remains in the OFF state.
Danger!
An unauthorised release could result in severe personal injury or death.
Before releasing the start/restart interlock, the operator has to ensure that no
persons are within the danger zone
BA-6090103-EN
19.08.09
51
Page 52
Operation
Safety photocell CPSET M13 for protection against access
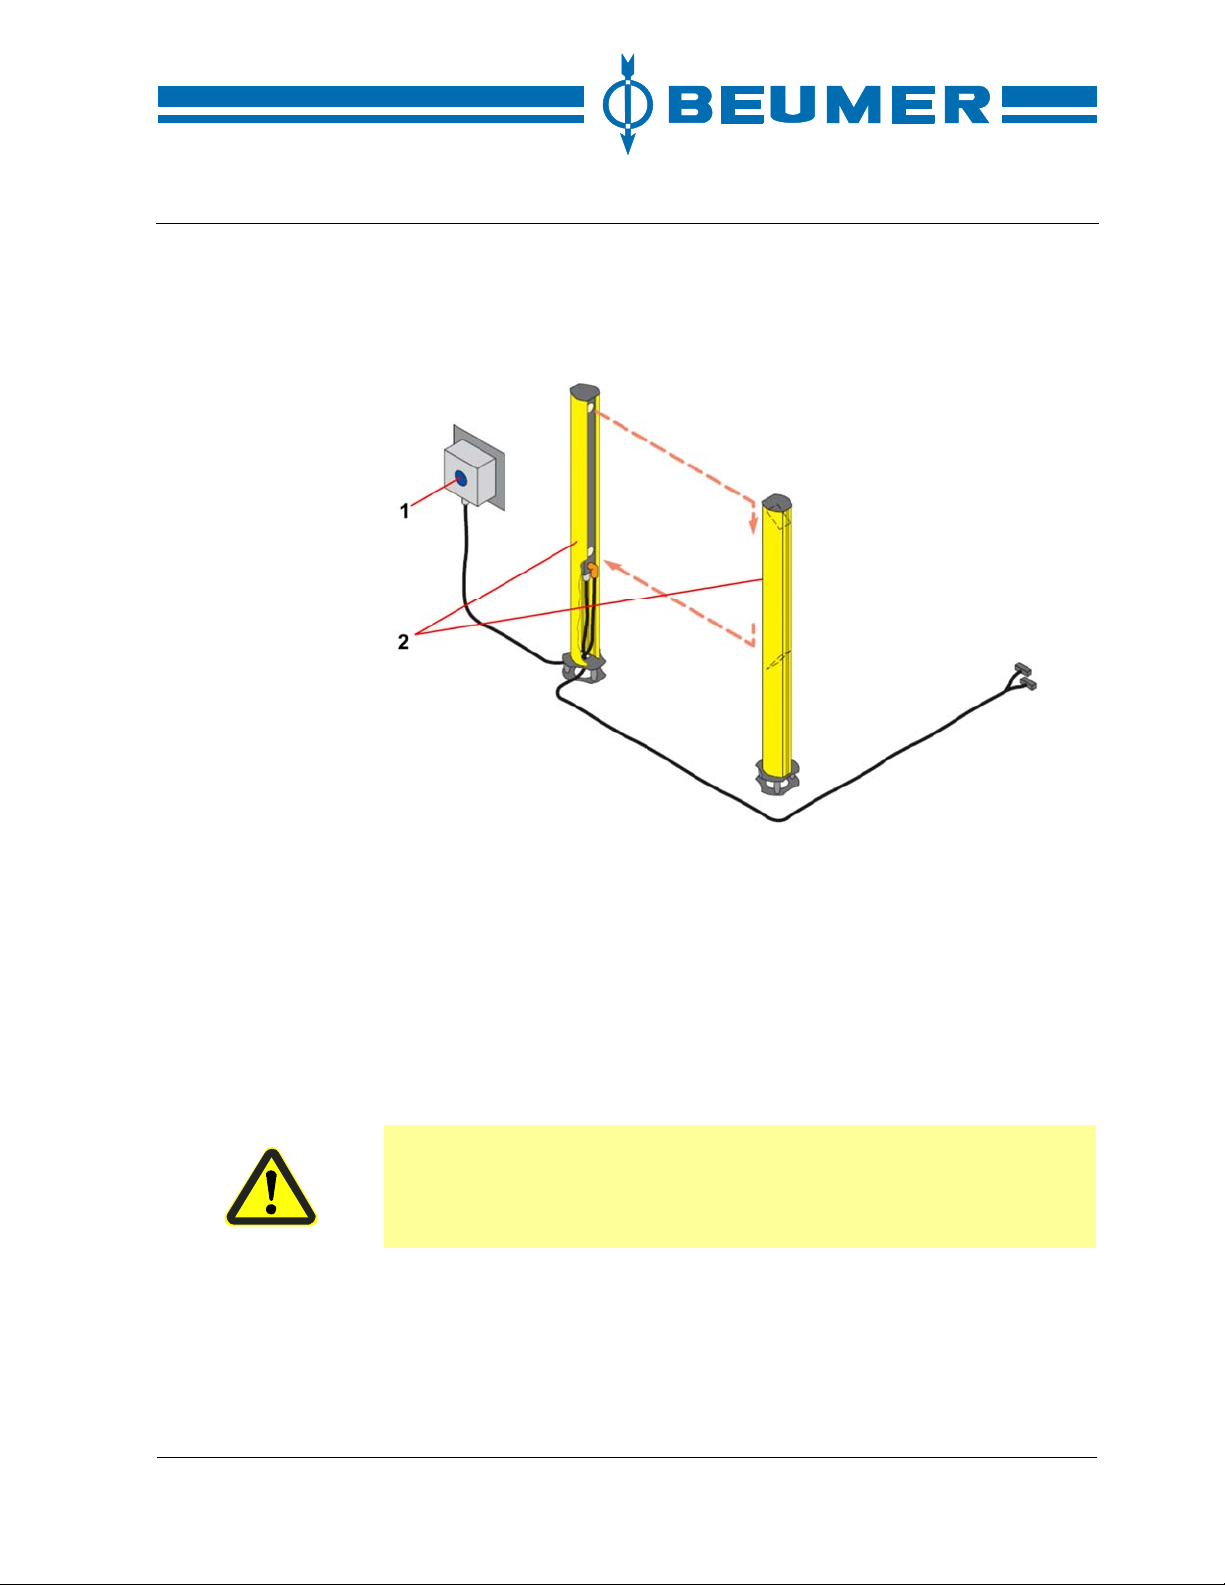
The safety photocell CPSET-M13 is used as contactless acting safeguard for
protection against access without muting function.
BEUMER stretch hood® S
Control unit
1 Control unit
2 Protected area (photocell curtain)
A blue illuminated pushbutton which serves as reset pushbutton is installed in
the control unit. The reset pushbutton signalises the control state of the safeguard. When the system has been started, the reset pushbutton is not illuminated. When the protected area is free and the reset pushbutton has been
pressed and released, the safeguard is activated. The reset pushbutton is illuminated in blue.
Danger!
An unauthorised release could result in severe personal injury or death.
Before releasing the start/restart interlock, the operator has to ensure that no
persons are within the danger zone.
52 BA-6090103-EN
19.08.09
Page 53
BEUMER stretch hood® S
Control cabinet
Control elements
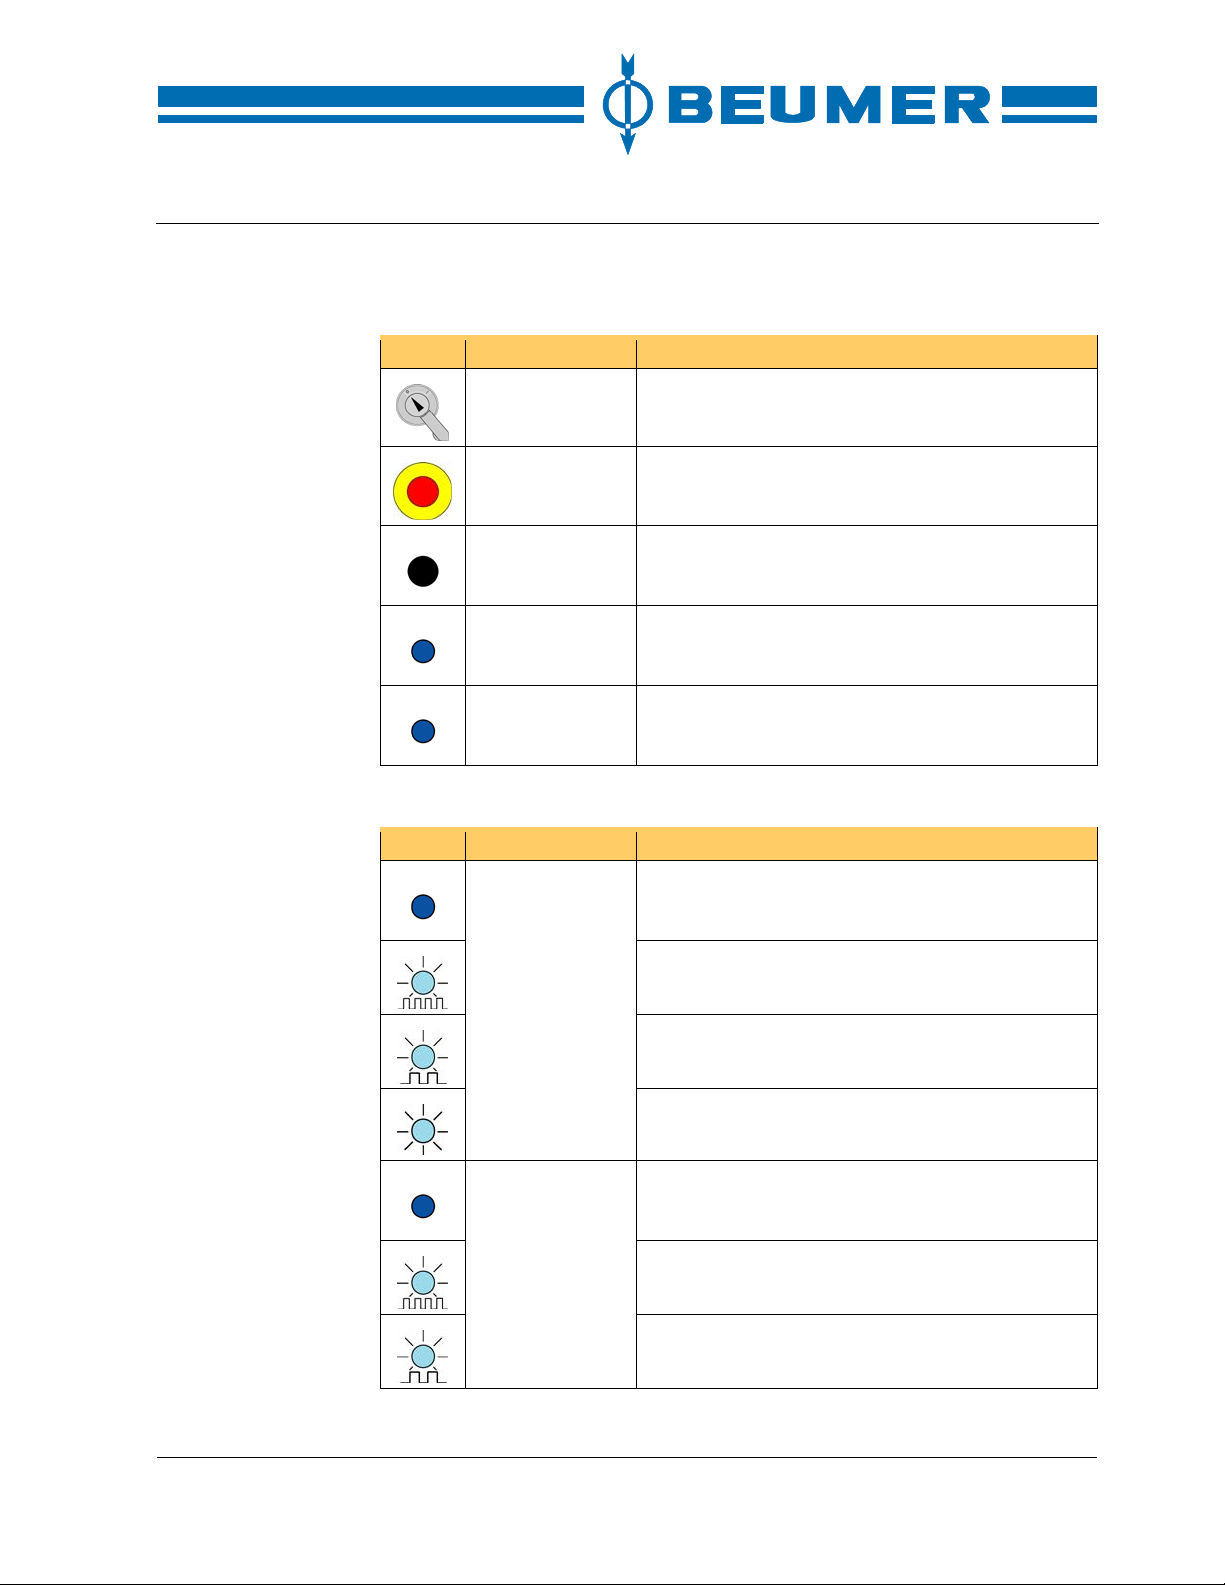
Symbol Function Note
Main switch Switch the whole po wer supply of the ma-
chine/system on and off.
Emergency stop
pushbutton
Operation stop
pushbutton (if
available)
Reset emergency
stop
Reset operation
stop (if available)
Stop the machine and the systems incorporated in
the emergency stop circuit immediately.
Stop the respective machine or a section of the
system immediately.
Activate the relay of the emergency stop circuit.
Activate the relay of the operation stop circuit.
Operation
Display elements
Symbol Function Note
"Reset emergency stop" illuminated pushbutton
"Reset operation
stop" illuminated
pushbutton (if
available)
The illuminated pushbutton indicates the condition
of the emergency stop circuit.
An emergency stop control of the machine/system
is still activated.
The emergency stop circuit is ready for closing.
The emergency stop circuit is activated.
The illuminated pushbutton indicates the condition
of the operation stop circuit.
A control actuator of the operation stop circuit of
the machine/system is still activated.
The operation stop circuit is ready for closing.
BA-6090103-EN
19.08.09
53
Page 54
Operation
Visualisation
BEUMER stretch hood® S
Symbol Function Note
The operation stop circuit is activated.
Danger!
The main switch does not separate the control cabinet illumination, heating and ventilation from the power supply. Lines with core colour orange
can still be energised after disconnection.
Any contact with energised parts may immediately lead to death!
All information required for the operation of the system is displayed to the operator in displays and message windows. The message windows are pinned on top
of the respective display as the system messages shown there have priority over
all other information. The visual display system and the machine/system are
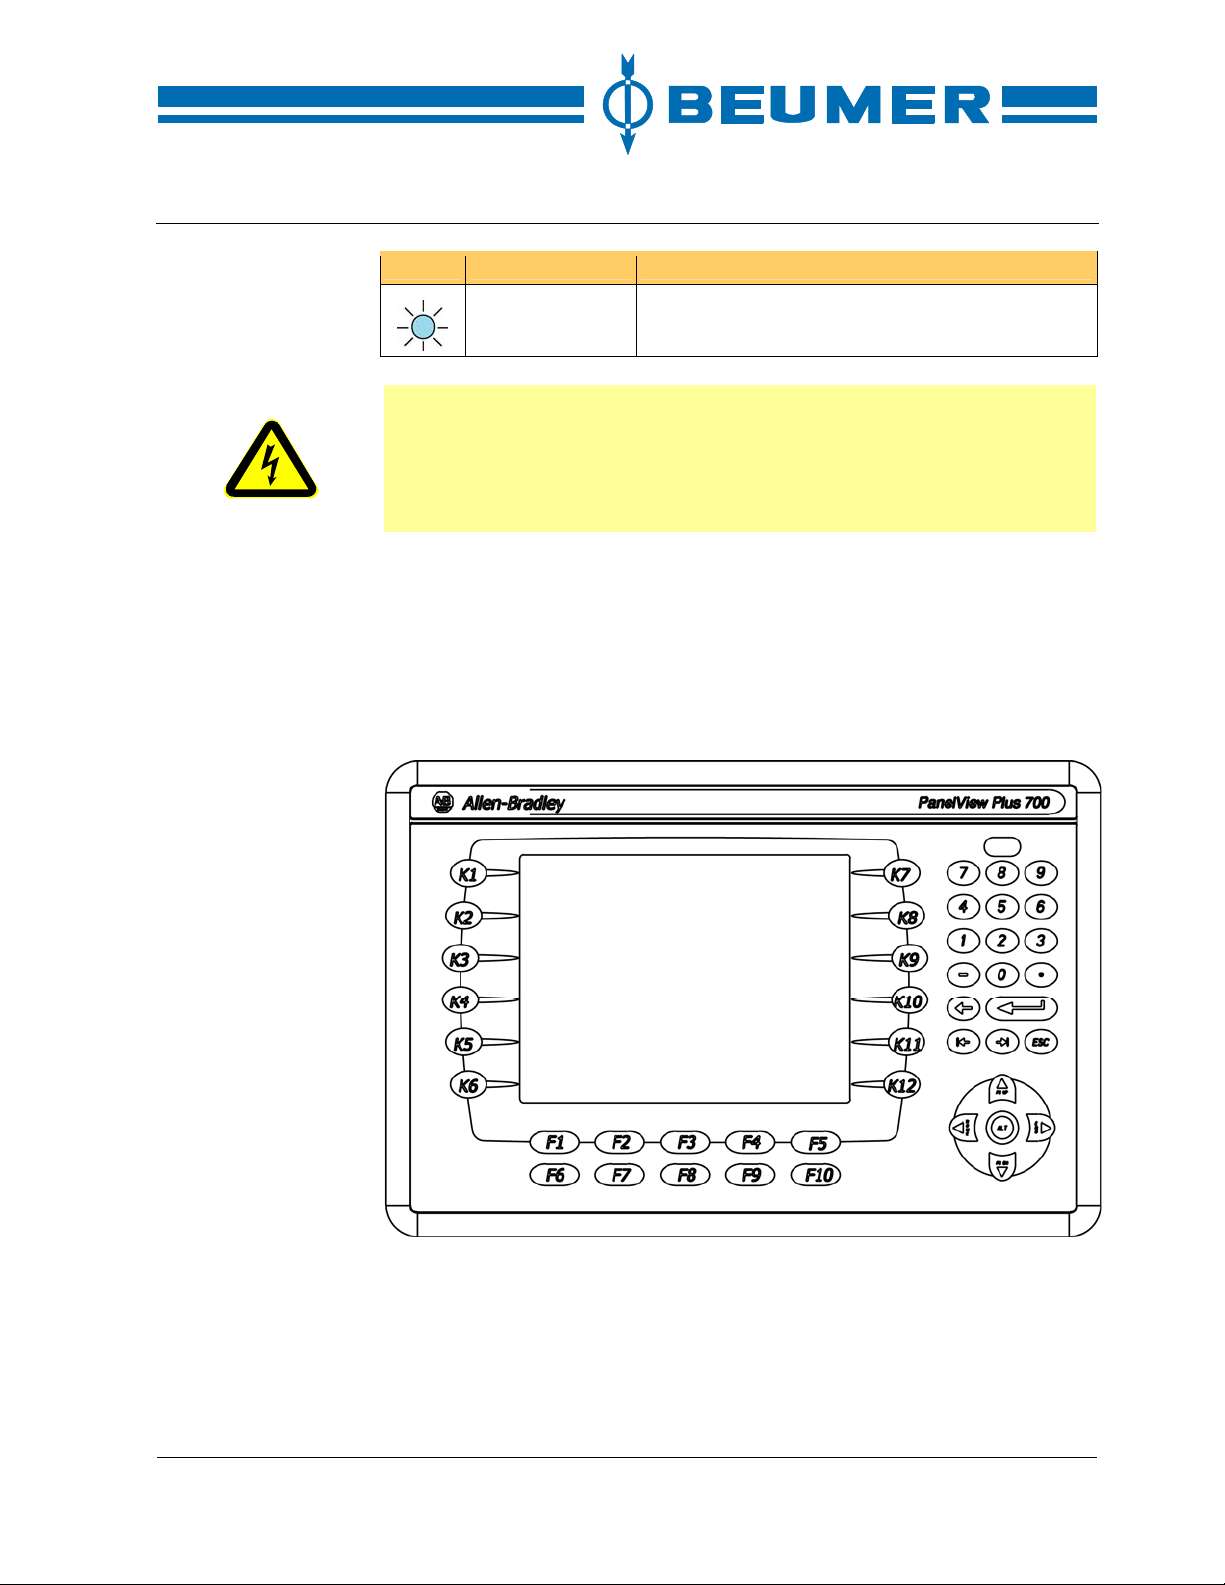
operated with an integrated keyboard.
54 BA-6090103-EN
19.08.09
Page 55

BEUMER stretch hood® S
Functions in the visual display system
The functions which can be carried out with the visual display system are listed
below:
• Start and stop the machine/system.
• Carry out manual functions.
• Display current and previous fault messages.
• Enter parameters for setting and optimisation of the functional sequence.
• Display information on the status of the machine/system.
• Carry out system settings.
Structure of the user interfaces
The user interfaces are subdivided into different sections:
• Information area
The operating conditions of the machine/system are displayed in the information area. In addition, further information can be displayed.
• Display space
All information and message windows required for the operation of the machine/system are displayed in the display space. This information is shown
on different displays which can be called up with the corresponding function
keys. The selected functional area may comprise one or several displays.
The individual displays are called up with the "Scroll up" and "Scroll down"
keys.
• Message line
Start-up conditions of the machine/system which have not been fulfilled and
faults are displayed in the message line. The last message is displayed in
each case. All current fault messages are displayed by pressing the "Interrogation of faults" key.
• Message window
System messages are triggered by the visual display system. These messages are displayed in a message window. The message windows are
pinned on top of the respective display as the system messages shown there
have priority over all other information. A system message consists of a message number and a message text. The message window is closed by pressing the "CLOSE" key.
• Keyboard
The integrated keyboard of the visual display system comprises four key
types with different functions: Function keys not related to a certain display,
function keys related to a certain display, system keys and input keys.
Operation
BA-6090103-EN
19.08.09
55
Page 56
Operation
Function keys which are not related to a certain display
Function keys which are not related to a certain display always activate the
same function on the operator panel or in the control independently of the shown
display.
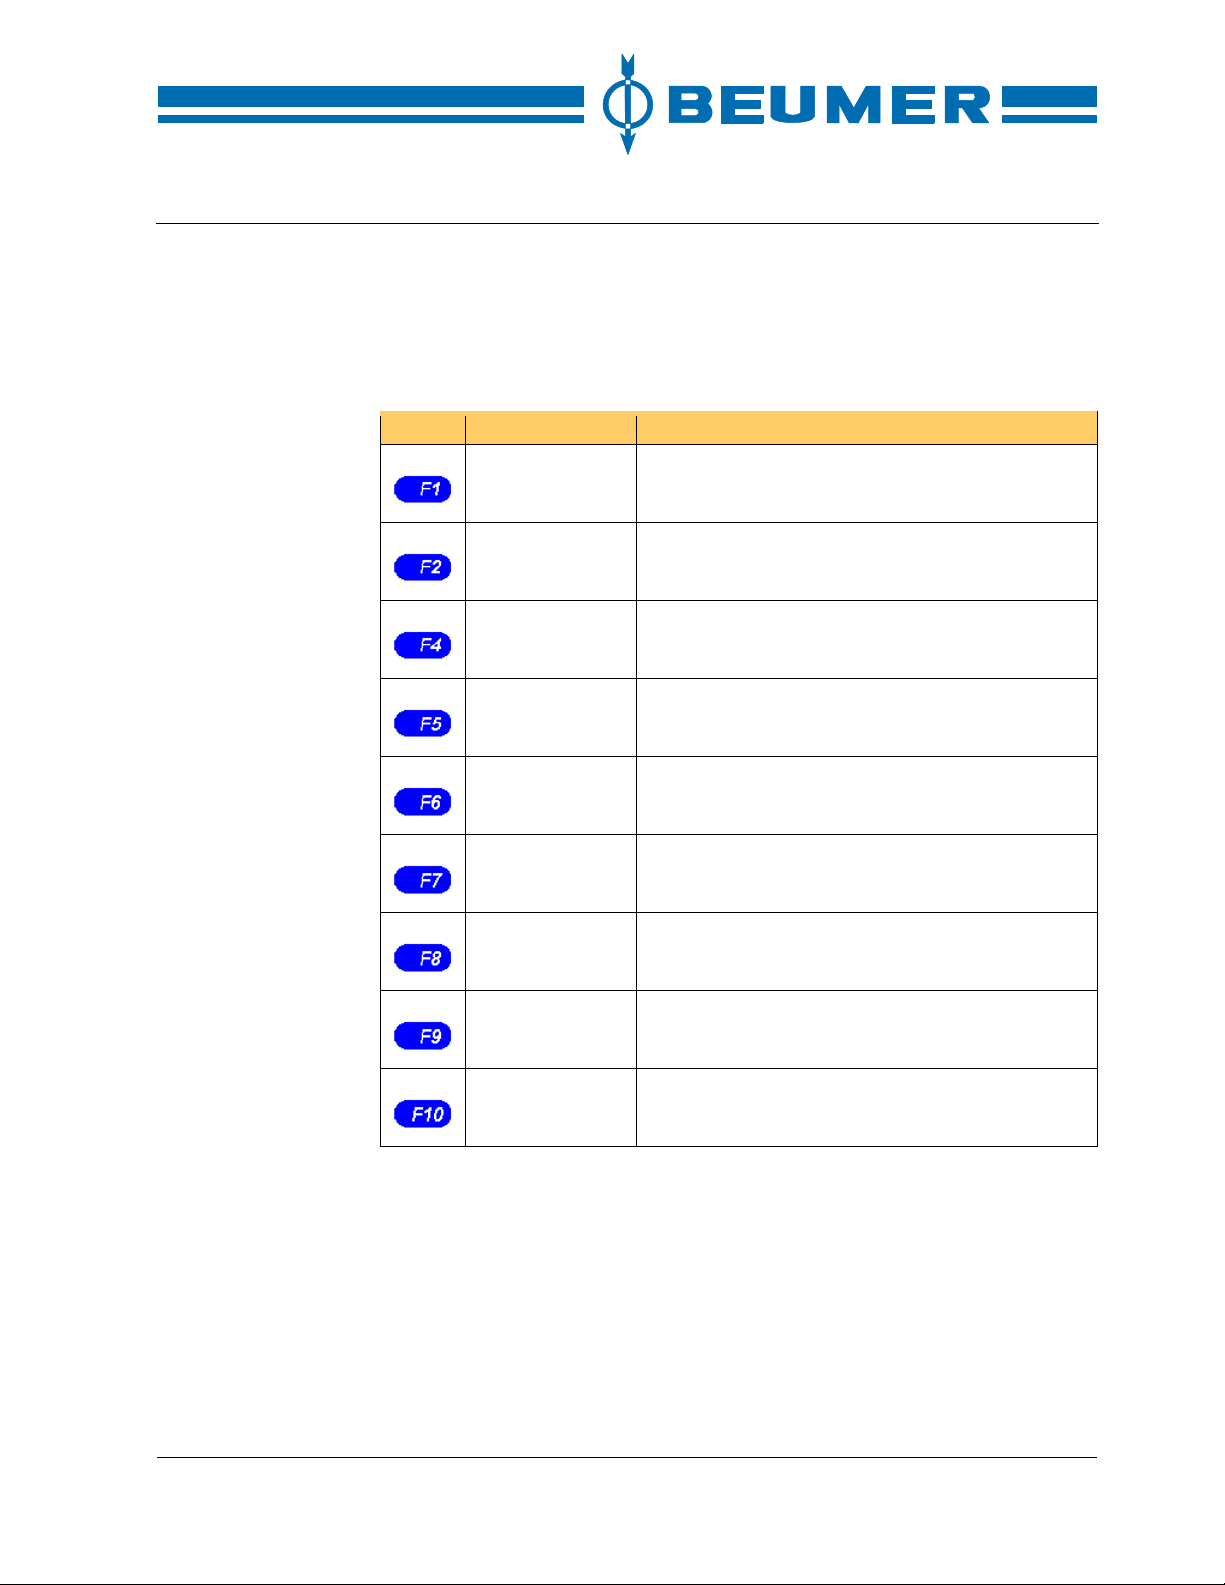
Functions of the function keys not related to a certain display
Key Function Note
STOP Stop machine/system.
stretch hood
manual/automatic
Starting position Approach the starting position automatically.
Display malfunctions
START Start machine/system.
Preselect the mode of operation for the stretch
hood.
Display all malfunctions which have not been reset.
BEUMER stretch hood® S
Transport
ON/OFF
Finish stretching
process
Cut film Cut the film as long as the "Starting position" func-
ACK Reset fault messages.
Switch the full pallet transport system on or off
separately.
Finish the stretching process immediately and
discharge the pallet.
tion is carried out.
Function keys which are related to a certain display
Function keys which are related to a certain display activate a function on the
operator panel or in the control depending on the respective display.
The function keys related to a certain display are on the left and/or right edge of
the display.
56 BA-6090103-EN
19.08.09
Page 57
BEUMER stretch hood® S
How to enter parameters
In the visual display system there are various ways to enter parameters.
• Numeric input
• Alphanumeric input
• Input by selection field
Icon Function Note
Input keys
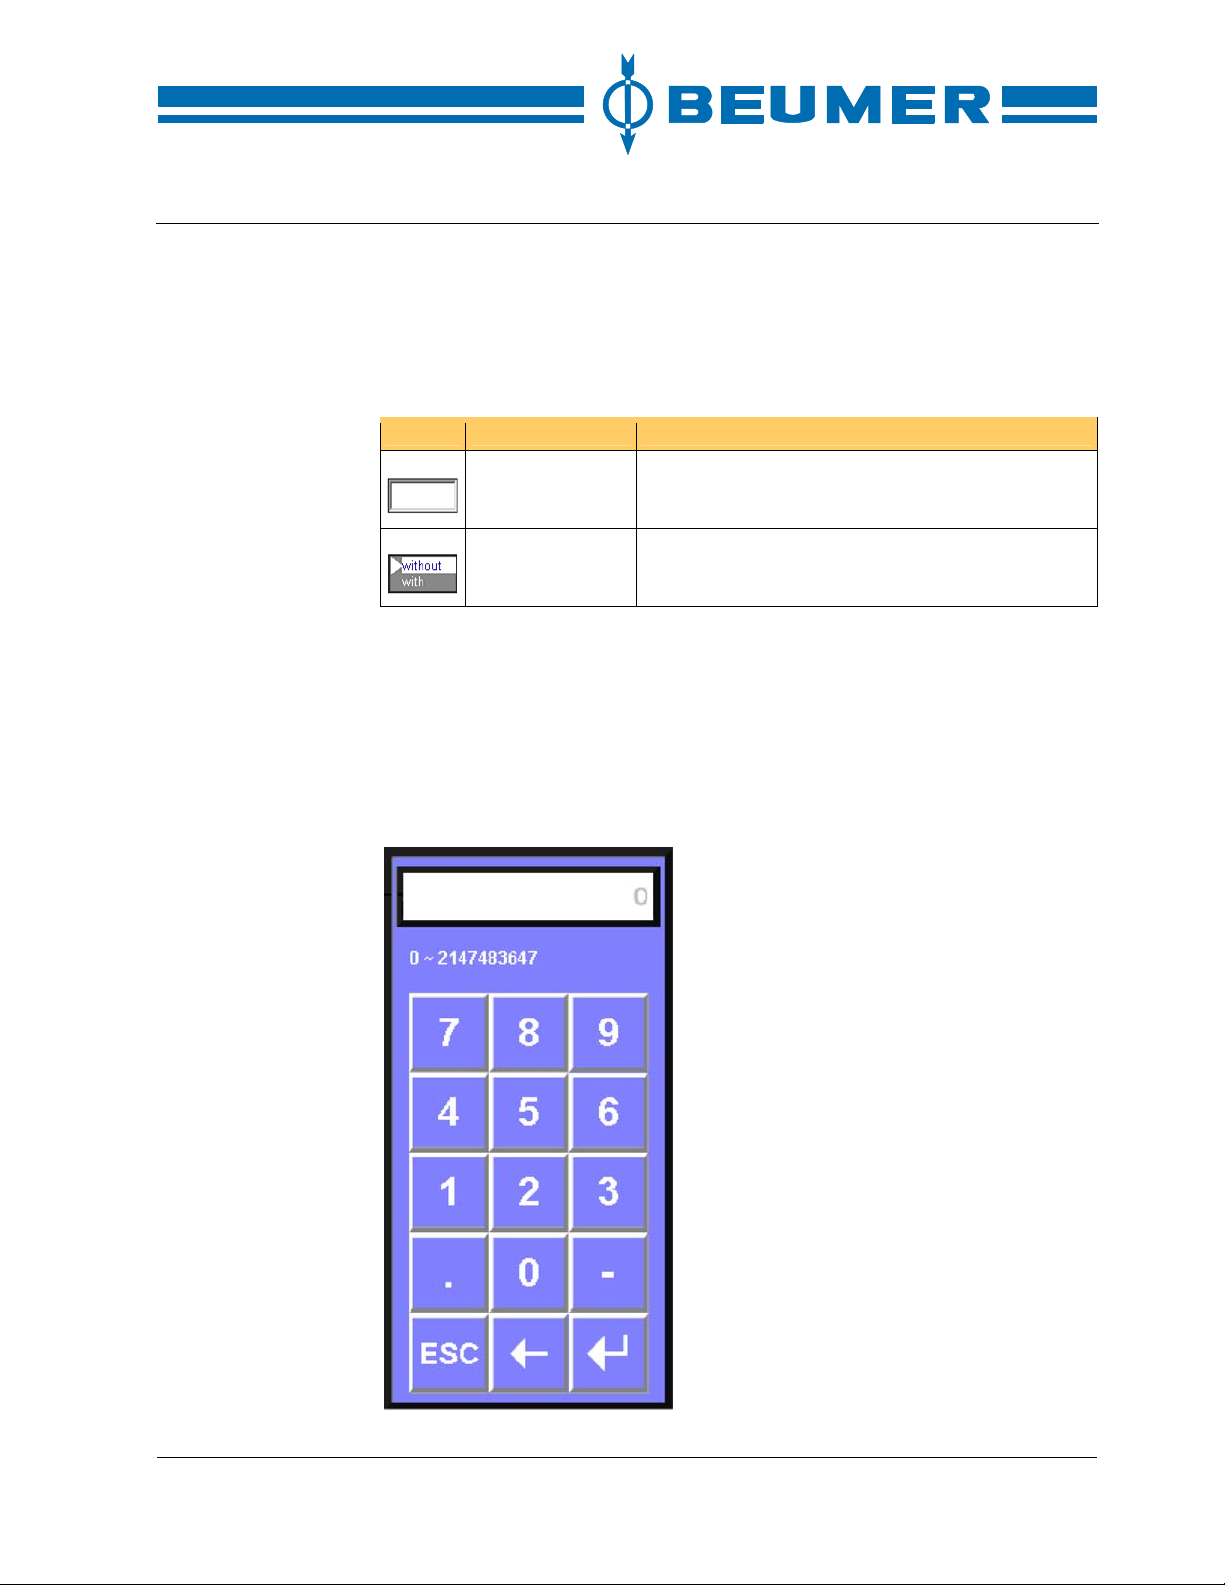
Numbers are entered with the numerical keyboard. Either the numerical keyboard of the visual display system or the numerical keaboard indicated in the
display may be used for input.
When an input field is open, it is not possible to open other displays or input
fields.
Operation
Input field Numerical and alphanumerical characters are
entered in an input field.
Selection field The preselection desired is selected from a list.
Numeric keyboard
BA-6090103-EN
19.08.09
57
Page 58
Operation
BEUMER stretch hood® S
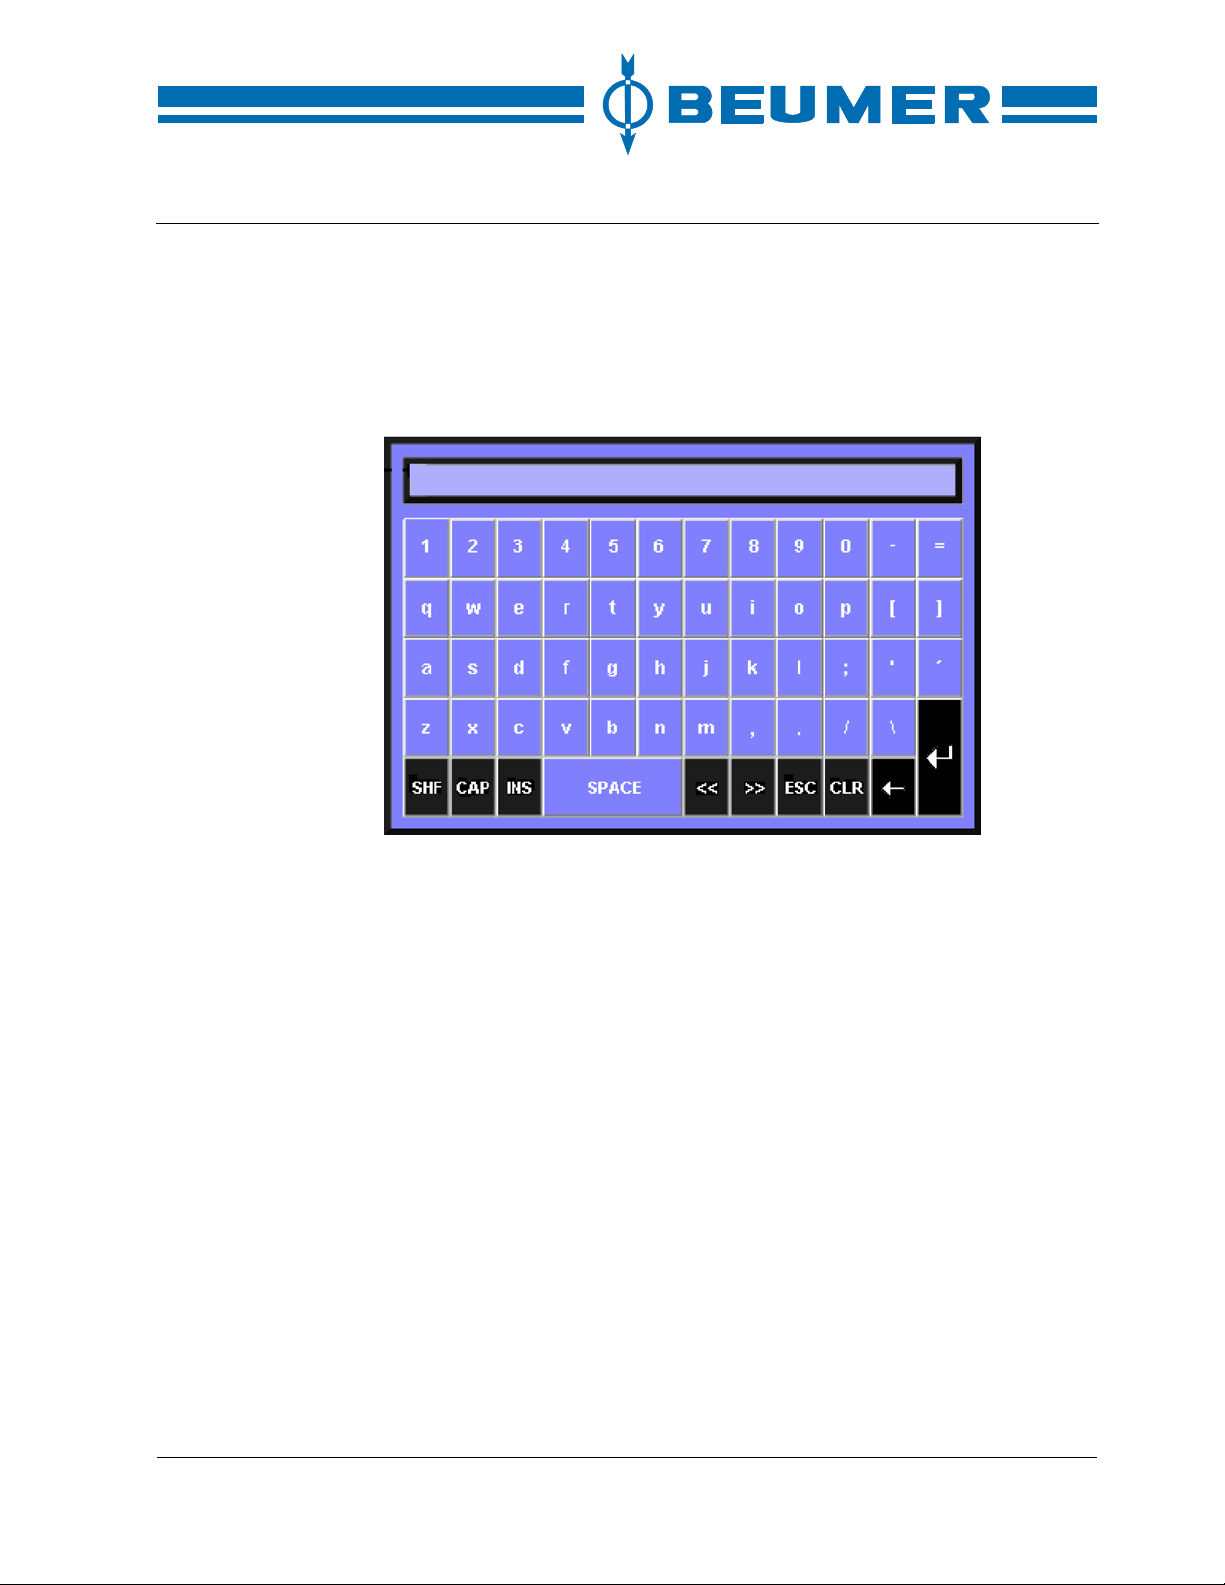
Numbers and letters are entered with the alphanumeric keys. The alphanumerical keyboard is displayed if required. The modifications in the input fields can be
carried out by this keyboard.
When an input field is open, it is not possible to open other displays or input
fields.
Alphanumeric keyboard
Numeric input
Alphanumeric input
Input by selection
field
1. Select the input field for the parameter desired with the tab keys. The se-
lected input field is marked.
2. Press the "ENTER" key. The numeric keyboard appears.
3. Enter the value with the numeric keyboard.
4. Confirm the input by pressing the "ENTER" key. If the input is incorrect, press
the "ESC" key. The original value is retained.
1. Select the input field for the parameter desired with the tab keys.
2. Press the "ENTER" key. The alphanumeric keyboard appears.
3. Select the desired character with the tab keys.
4. Confirm the selected character with the F1 key.
5. Repeat the procedure until all inputs required have been made.
6. Confirm the input by pressing the "ENTER" key. If the input is incorrect, press
the "ESC" key. The original value is retained.
1. Select the desired selection field with the tab keys and confirm it with the
"ENTER" key.
2. Mark the corresponding preselection with the cursor keys and confirm it with
the "ENTER" key.
58 BA-6090103-EN
19.08.09
Page 59
BEUMER stretch hood® S
Password protection
To avoid an unauthorised operation of the machine/system, the visual display
system is equipped with a password protection. The passwords are subdivided
into different password levels. If a particular password is assigned to a user, this
also includes the authorisation for performing the functions related to the corresponding password level. If a user for example belongs to password level C, he
is authorised to perform functions of the password levels A to C. One or several
passwords can be assigned to the password levels A to P.
Access authorisation
Password level DEFAULT
In order to carry out functions of the DEFAULT password level, no password
must be entered. All displays which are not attributed to a password can be displayed in this password level. All input fields (parameters) which do not have a
password protection can also be edited.
Password levels A to P
Depending on their significance, the functions are assigned to the password
levels A to P. Before a function with password protection can be carried out, the
corresponding password level is to be activated. If the entered password is not
sufficient, the display or the input field cannot be opened.
Operation
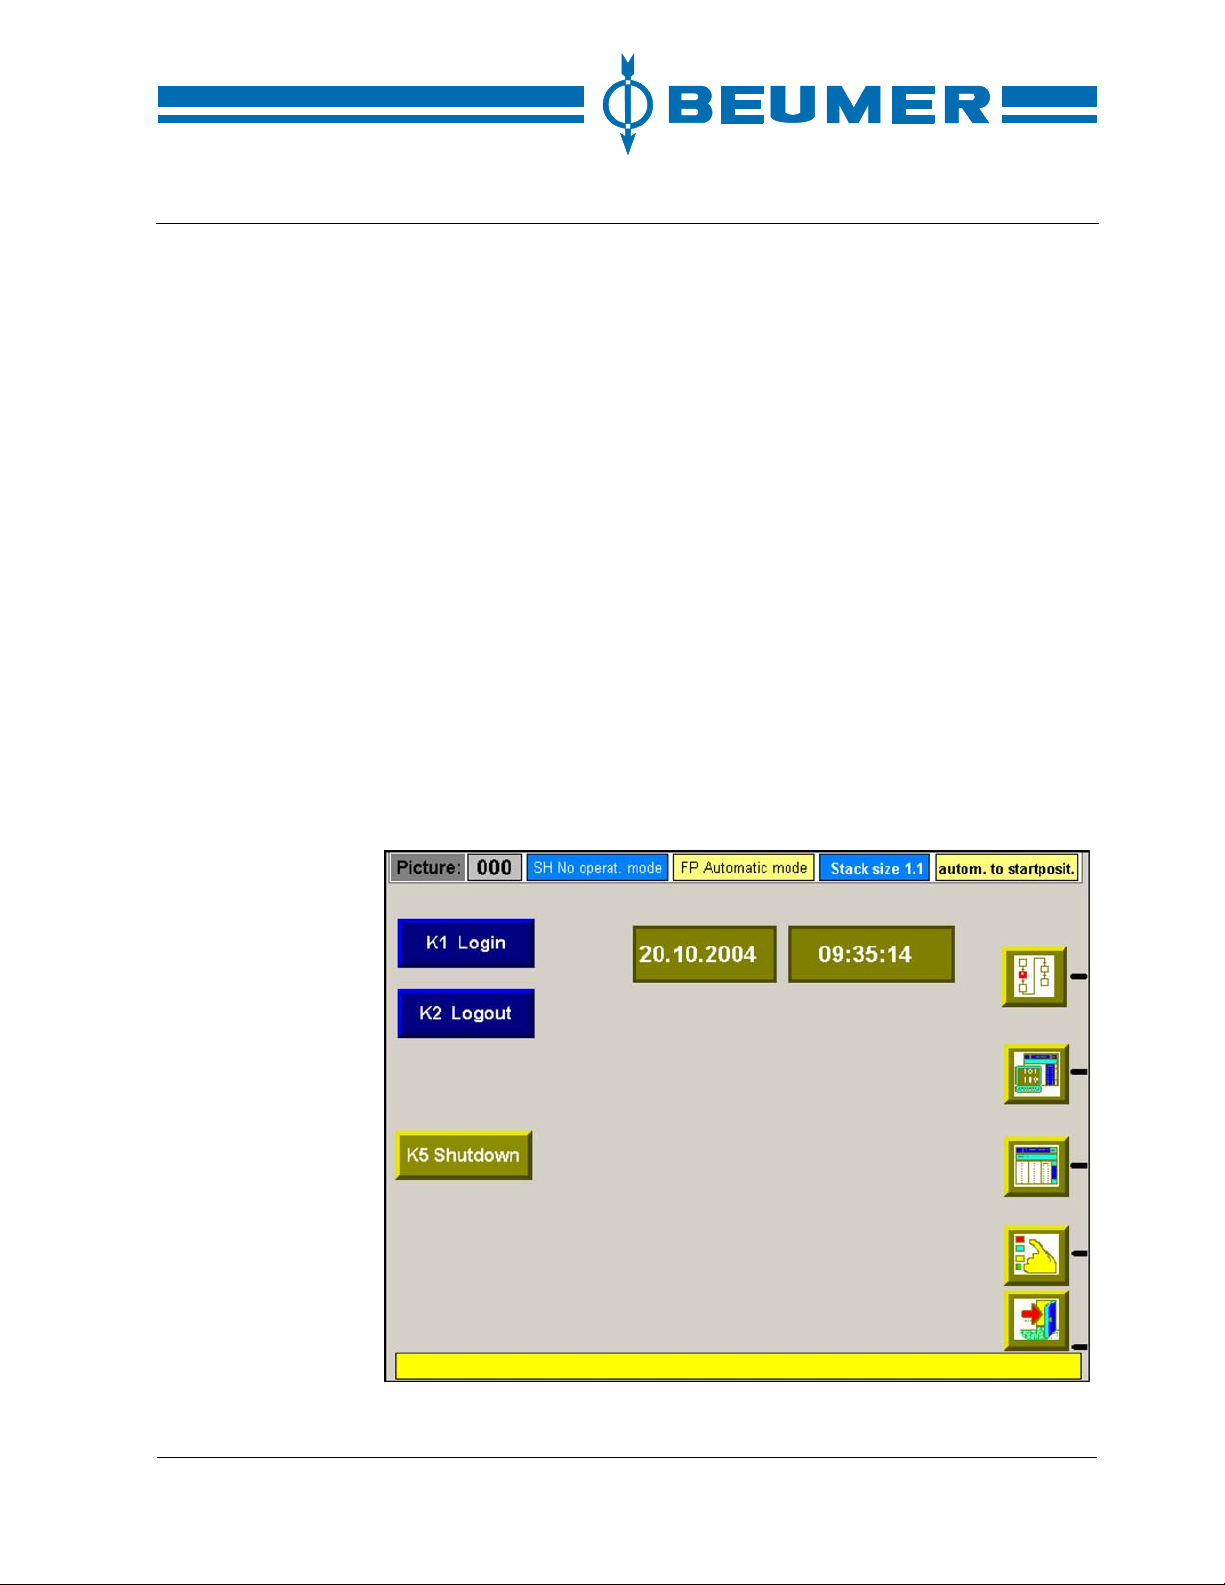
User log in
The user can log in with his password in the system window. For this, proceed
as follows:
BA-6090103-EN
19.08.09
59
Page 60
Operation
How to enter a password
BEUMER stretch hood® S
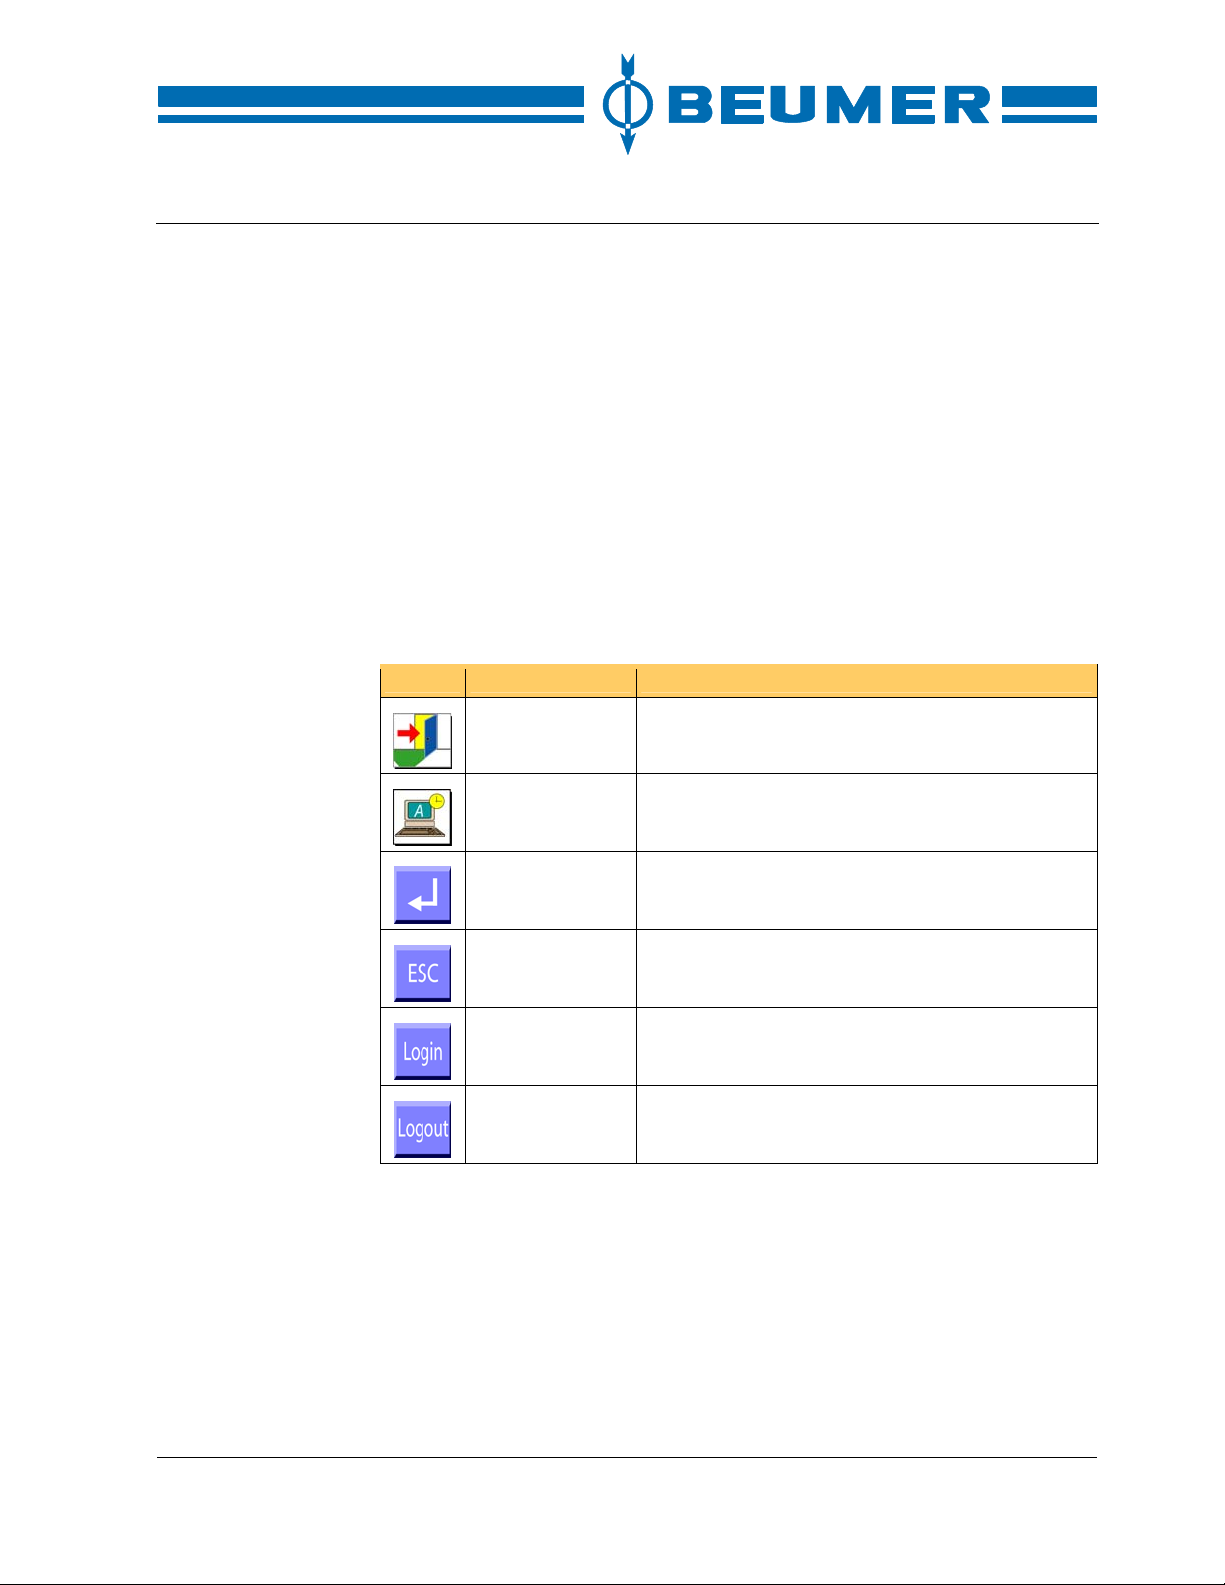
1. If the system window is not displayed, press the "EXIT" key.
2. Press the "System settings" key.
3. Press the "LOGIN" key.
4. An input field for the password appears.
5. Press the "USER" key. The alphanumeric keyboard appears.
6. Enter the user name with the alphanumeric keyboard.
7. Confirm the input by pressing the "ENTER" key.
8. Press the "Password" key.
9. Enter the password with the numeric keyboard.
10. Confirm the input by pressing the "ENTER" key.
11. When both inputs have been carried out, press the "ENTER" key.
The input can be interrupted at any time with the "ESC" key and the input field
can be quitted.
Icon Function Note
EXIT Return to the basic screen.
System settings Call up the user interface for setting the system
parameters.
ENTER Confirm an input.
Abort Interrupt an input without applying it.
Log in Call up the user interface for the log-in by pass-
word.
Log off Log off user.
60 BA-6090103-EN
19.08.09
Page 61
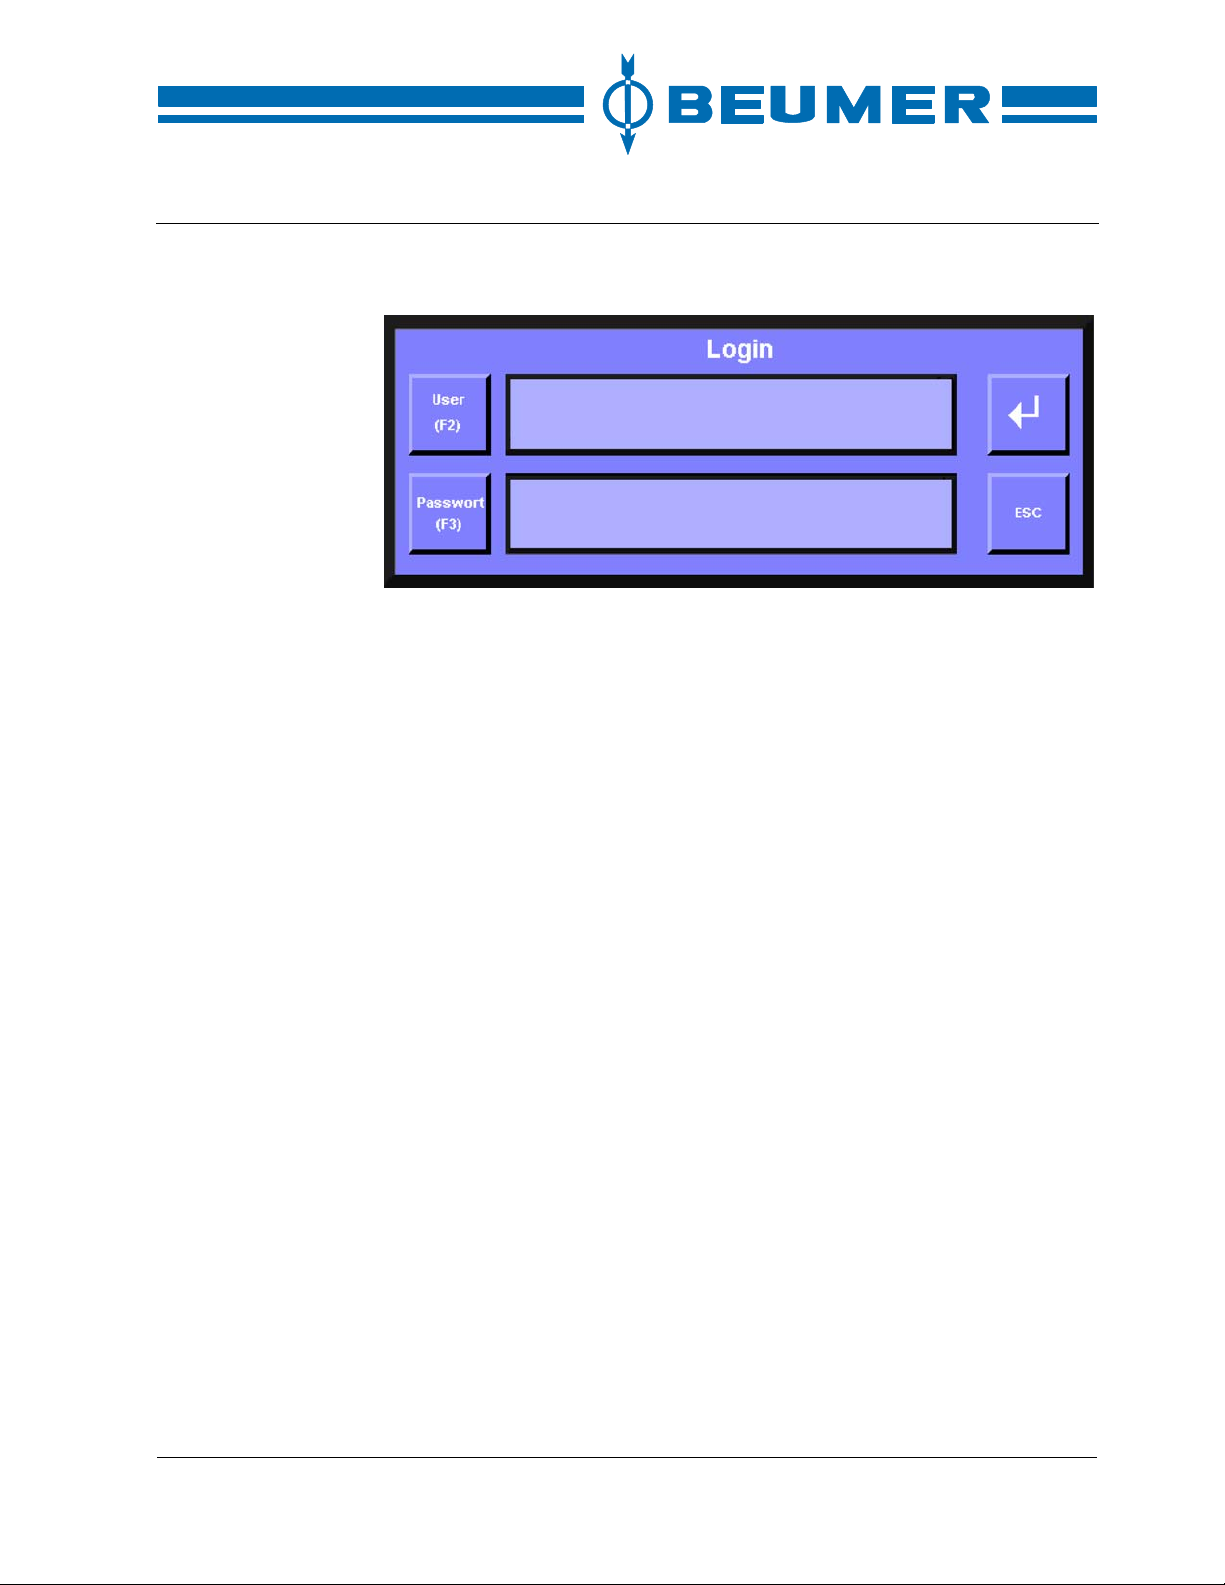
BEUMER stretch hood® S
LOGIN:
How to assign a password
The passwords and access authorisations are fixed during commissioning. They
can only be modified by BEUMER.
User log out
A password level should not be activated for a longer period in order to rule out
the possibility that unauthorised persons operate the system. The password is to
be de-activated as follows:
Operation
How to de-activate a
password
1. If the system window is not displayed, press the "EXIT" key.
2. Press the "System settings" key.
3. Press the "LOGOUT" key.
BA-6090103-EN
19.08.09
61
Page 62
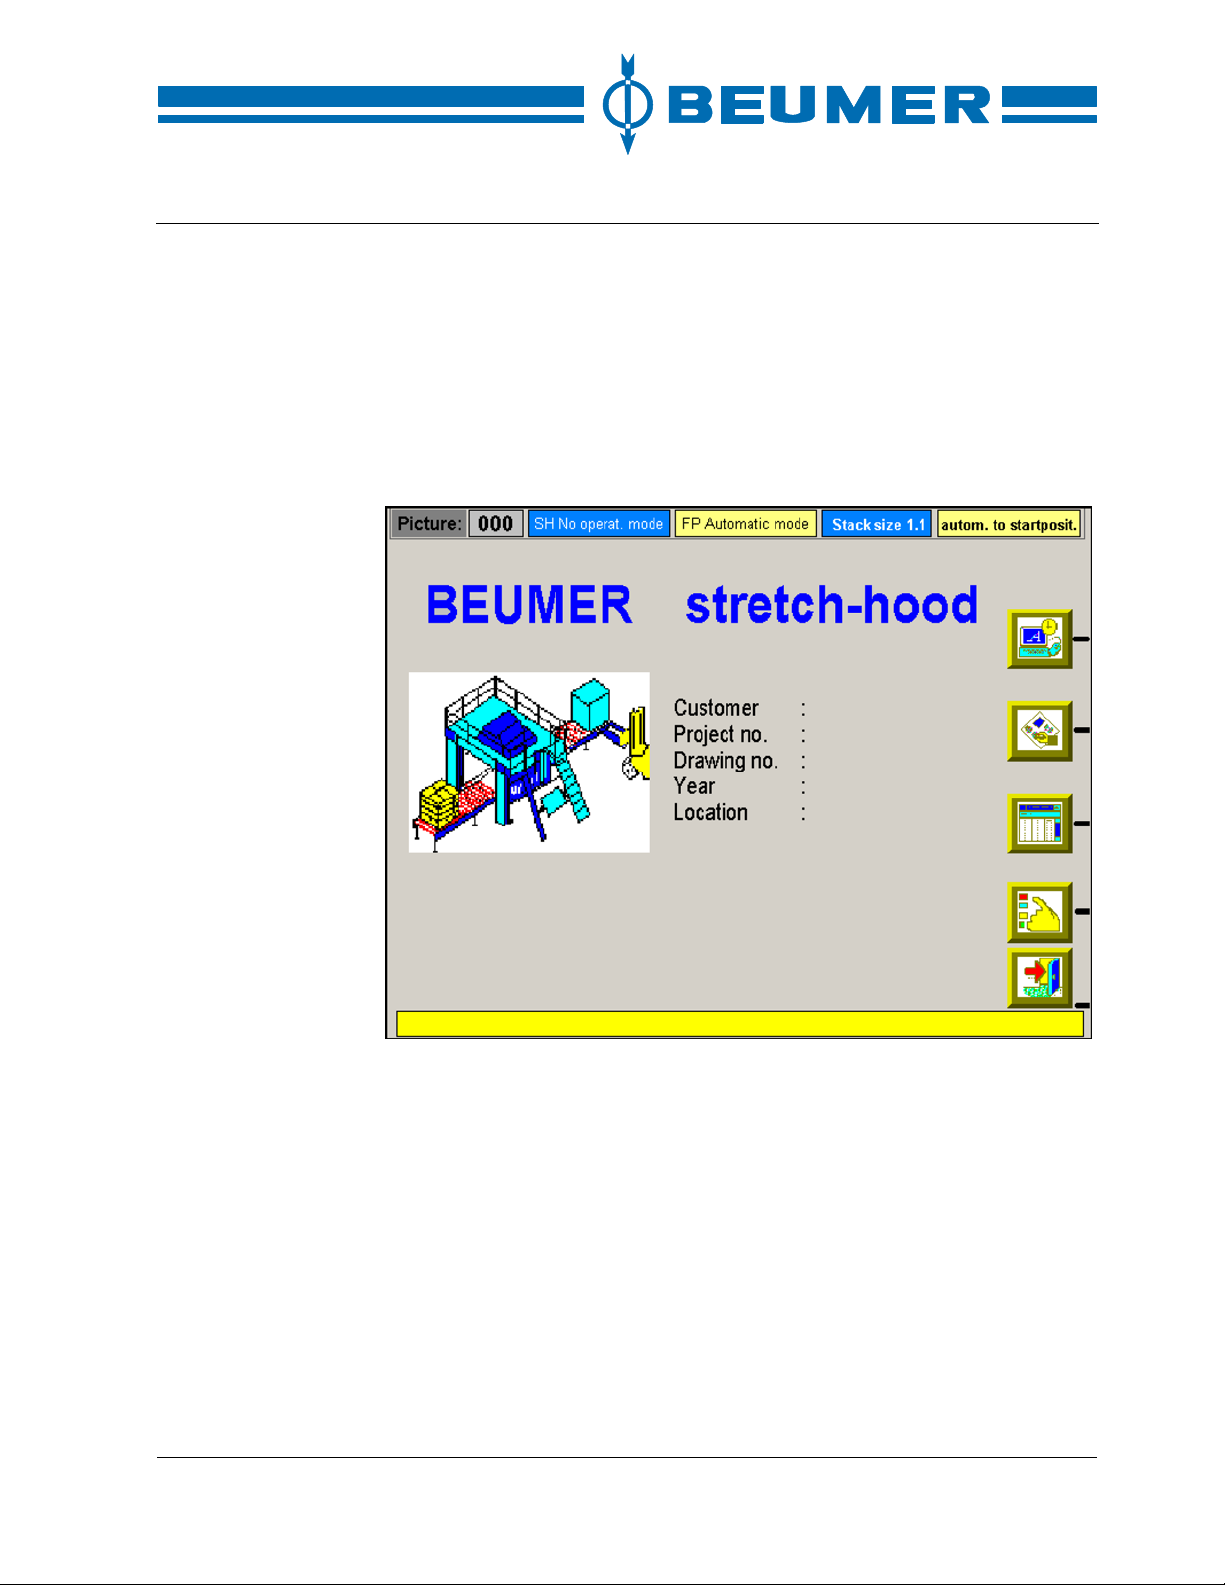
Operation
Operation of system
For the operation of the system, the so-called function keys related to a certain
display and those not related to a certain display are used. All functions of the
system can be carried out with these keys.
The individual functions are detailed in the following chapters.
Basic screen
Example
BEUMER stretch hood® S
Information on the order, e.g. machine type and order number, are displayed in
the basic screen of the visual display system. Should you have any questions to
BEUMER, always state this information. The functions required for operation can
be selected in the basic screen.
62 BA-6090103-EN
19.08.09
Page 63
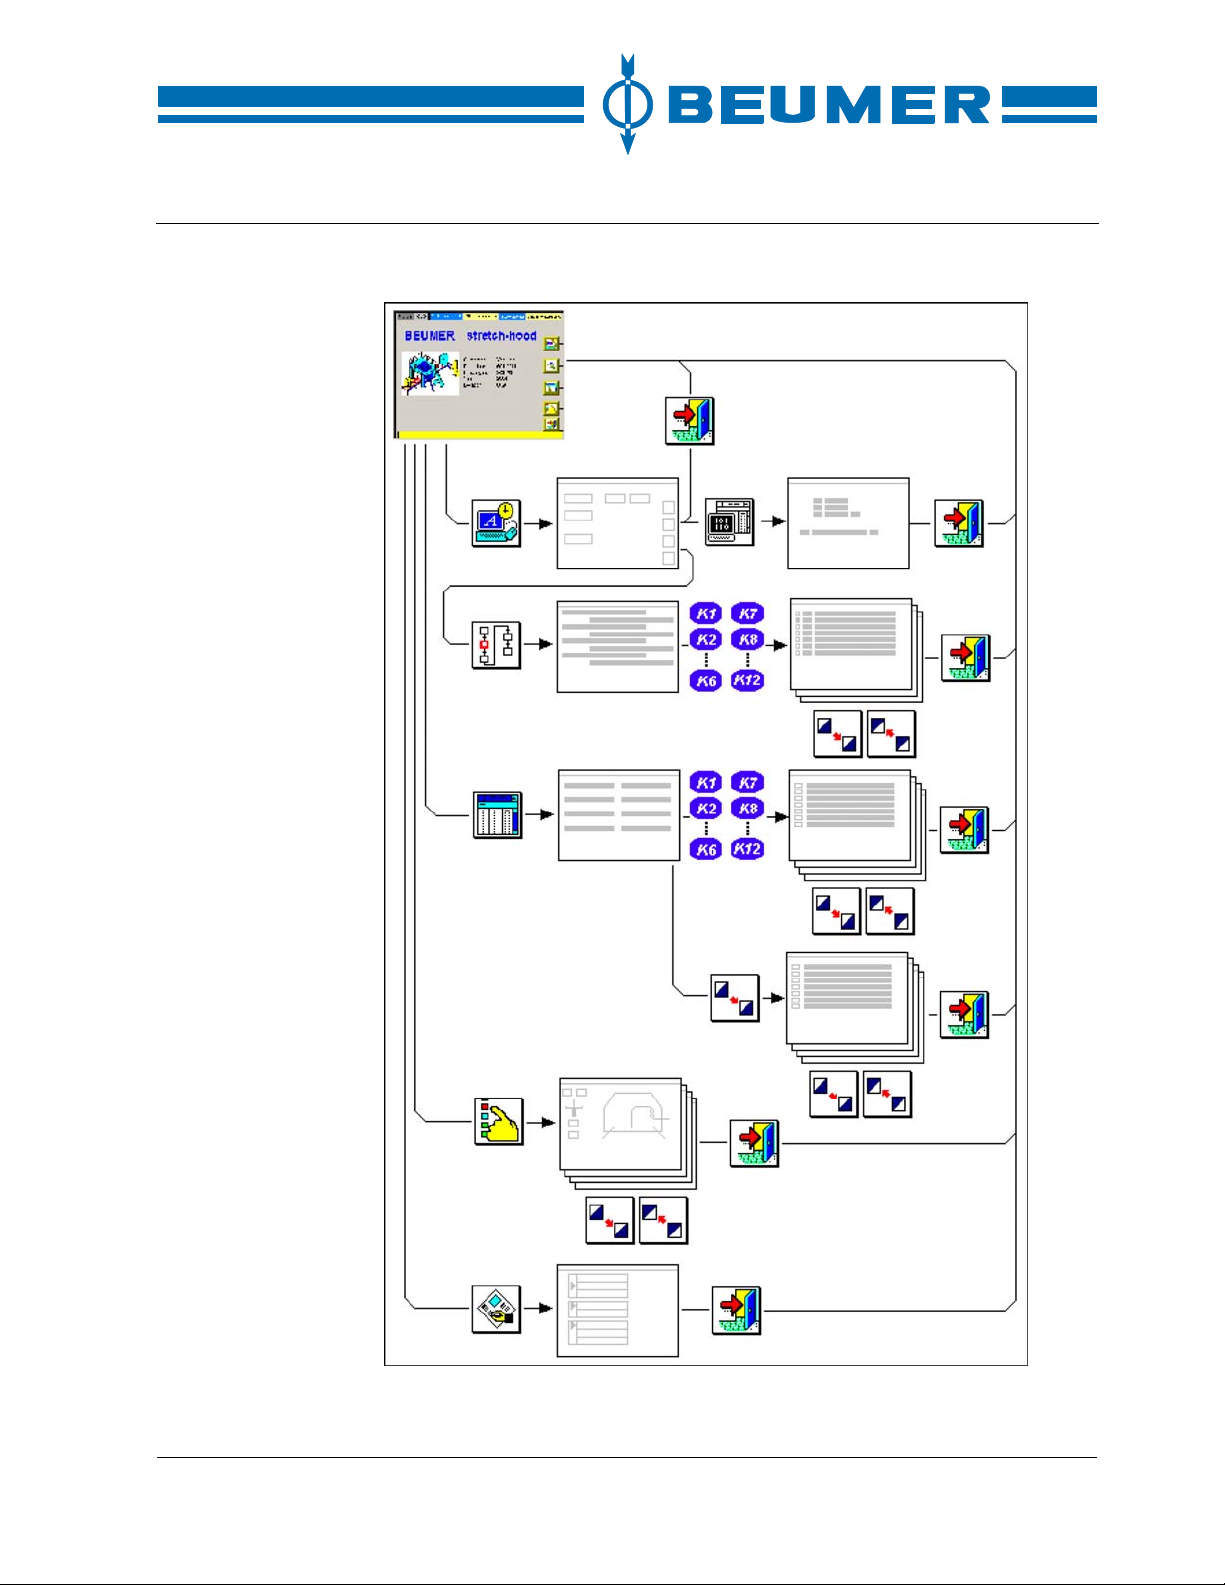
BEUMER stretch hood® S
Structure of the operator functions
Operation
BA-6090103-EN
19.08.09
The corresponding user interfaces are called up by the function keys. Due to the
large amount of information, some user interfaces are subdivided into further
displays. It is possible to shift from one display to another with the scroll up and
63
Page 64
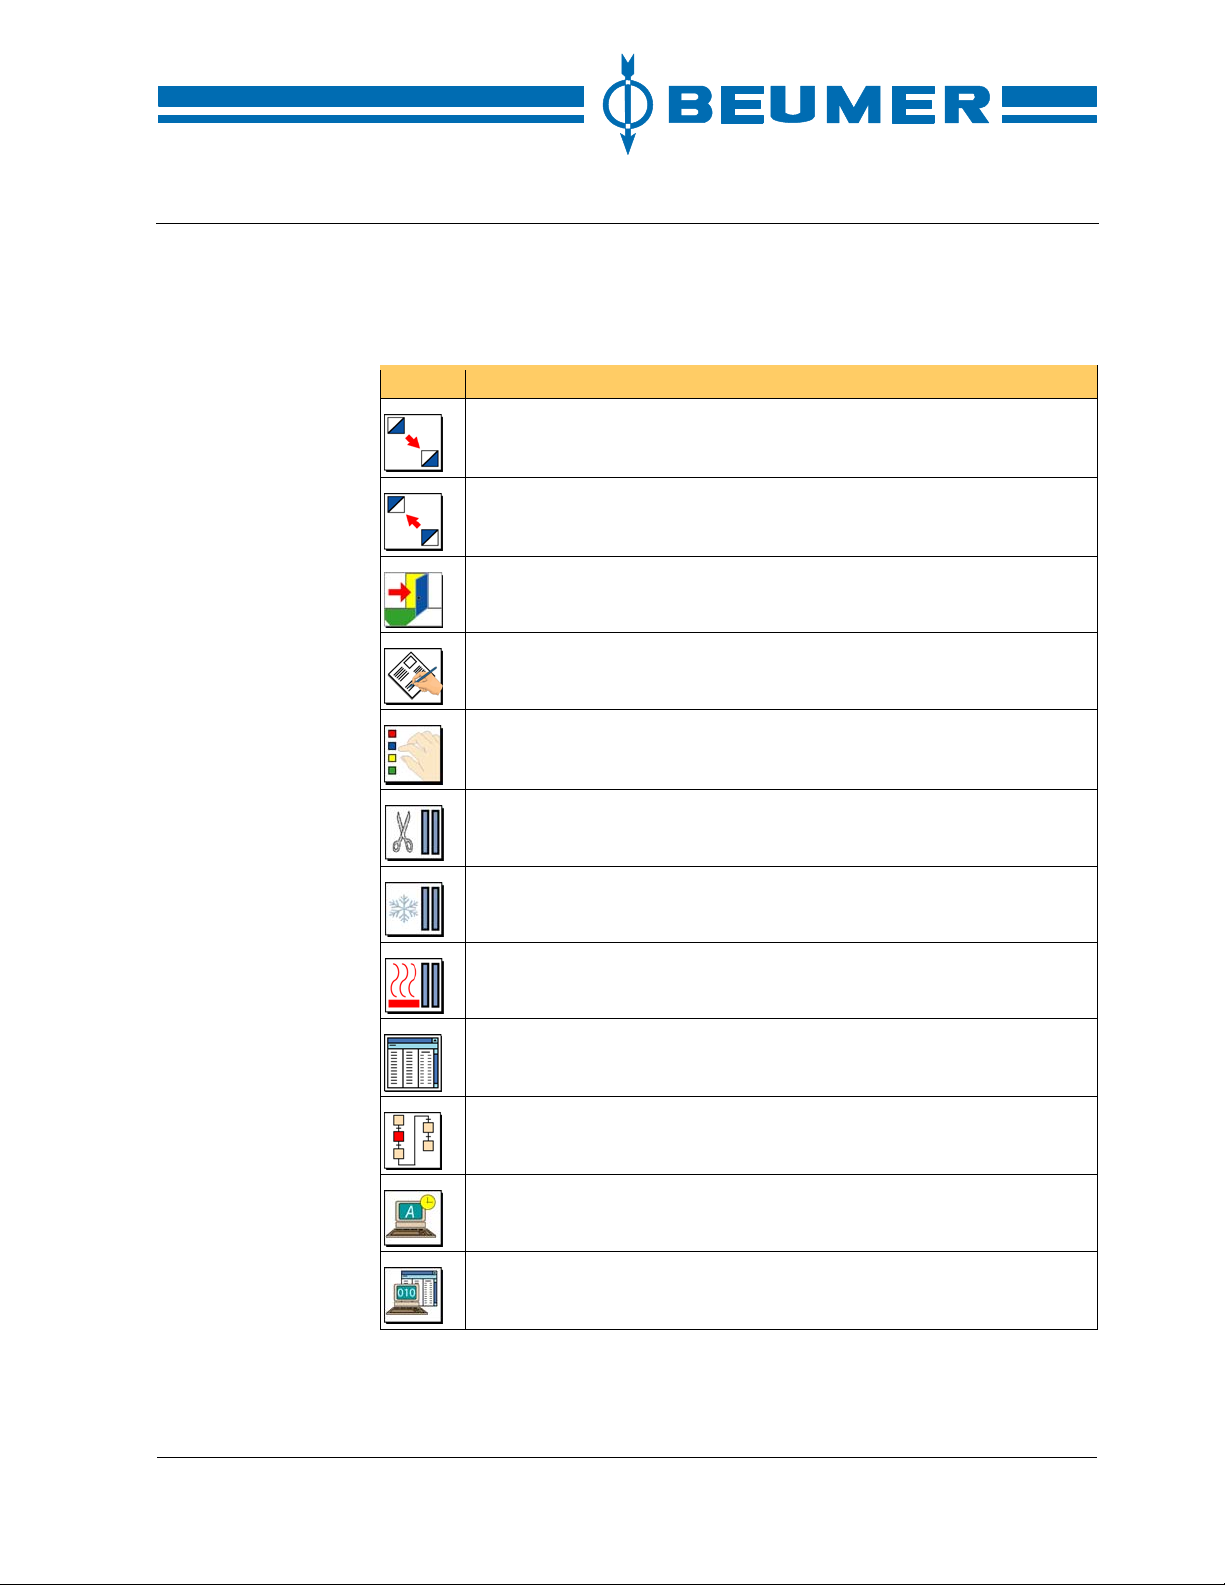
Operation
scroll down functions. The selection of user interfaces may be protected with a
password to avoid unauthorised handling.
List of all icons for the F keys
Key Note
Switch over to the next display.
Switch over to the previous display.
Return to the basic screen.
Call up the user interface for presetting the functional sequence.
Call up the user interface for the manual functions.
Manual function "Cut film"
BEUMER stretch hood® S
Manual function "Cool sealing seam"
Manual function "Seal film"
Call up the user interface for the input of parameters.
Display the operation sequence (the current working step is marked).
Call up the user interface for setting the system parameters.
Display the status of the PLC. Inputs, outputs, flags and parameters
are displayed.
64 BA-6090103-EN
19.08.09
Page 65
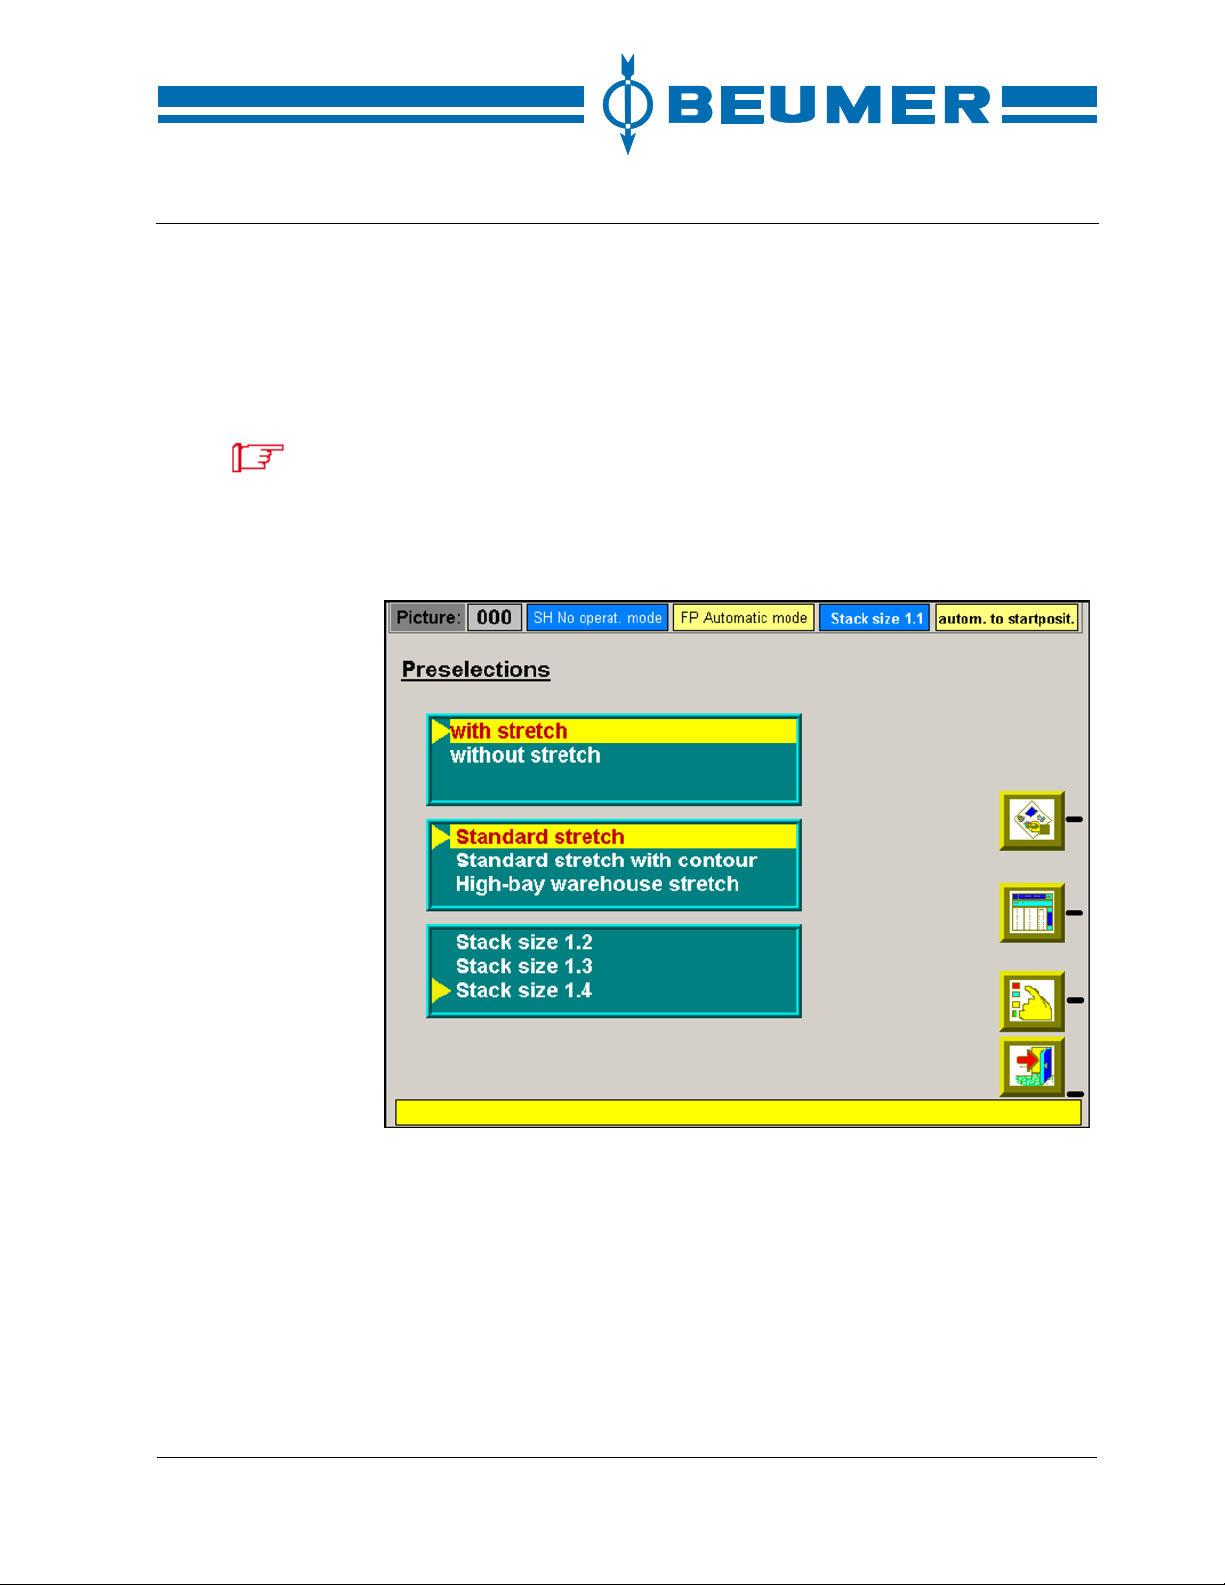
BEUMER stretch hood® S
A
f
Presets
Operation
The preselections required for the functional sequence are set in the preset displays.
Input fields and selection fields are available for the presets.
If the input/display field already contains a value, this value is overwritten during
the input. The input field can only be quitted when the input has been confirmed
or interrupted. The entry in the fields starts flush right. Numbers which have
been entered are shifted to the left (pocket calculator display). The input is
checked for a limiting value. The entered values are only applied if they are
within these limiting values.
Example:
The presets can be allocated to several displays. Proceed as follows to set the
preselections.
How to set the preselections
1. Press the key for the "Presets" in the basic screen.
2. Select the desired field with the tab keys and confirm it with the "ENTER" key.
3. Mark the corresponding preselection with the cursor keys and confirm it with
the "ENTER" key.
4. Repeat the procedure until all preselections required have been made.
5.
s soon as all preselections in a display have been taken, the other displays
for the presets can be called up with the "Scroll up" and "Scroll down" keys. I
no further presets are required, quit the display by pressing the "EXIT" key.
BA-6090103-EN
65
19.08.09
Page 66
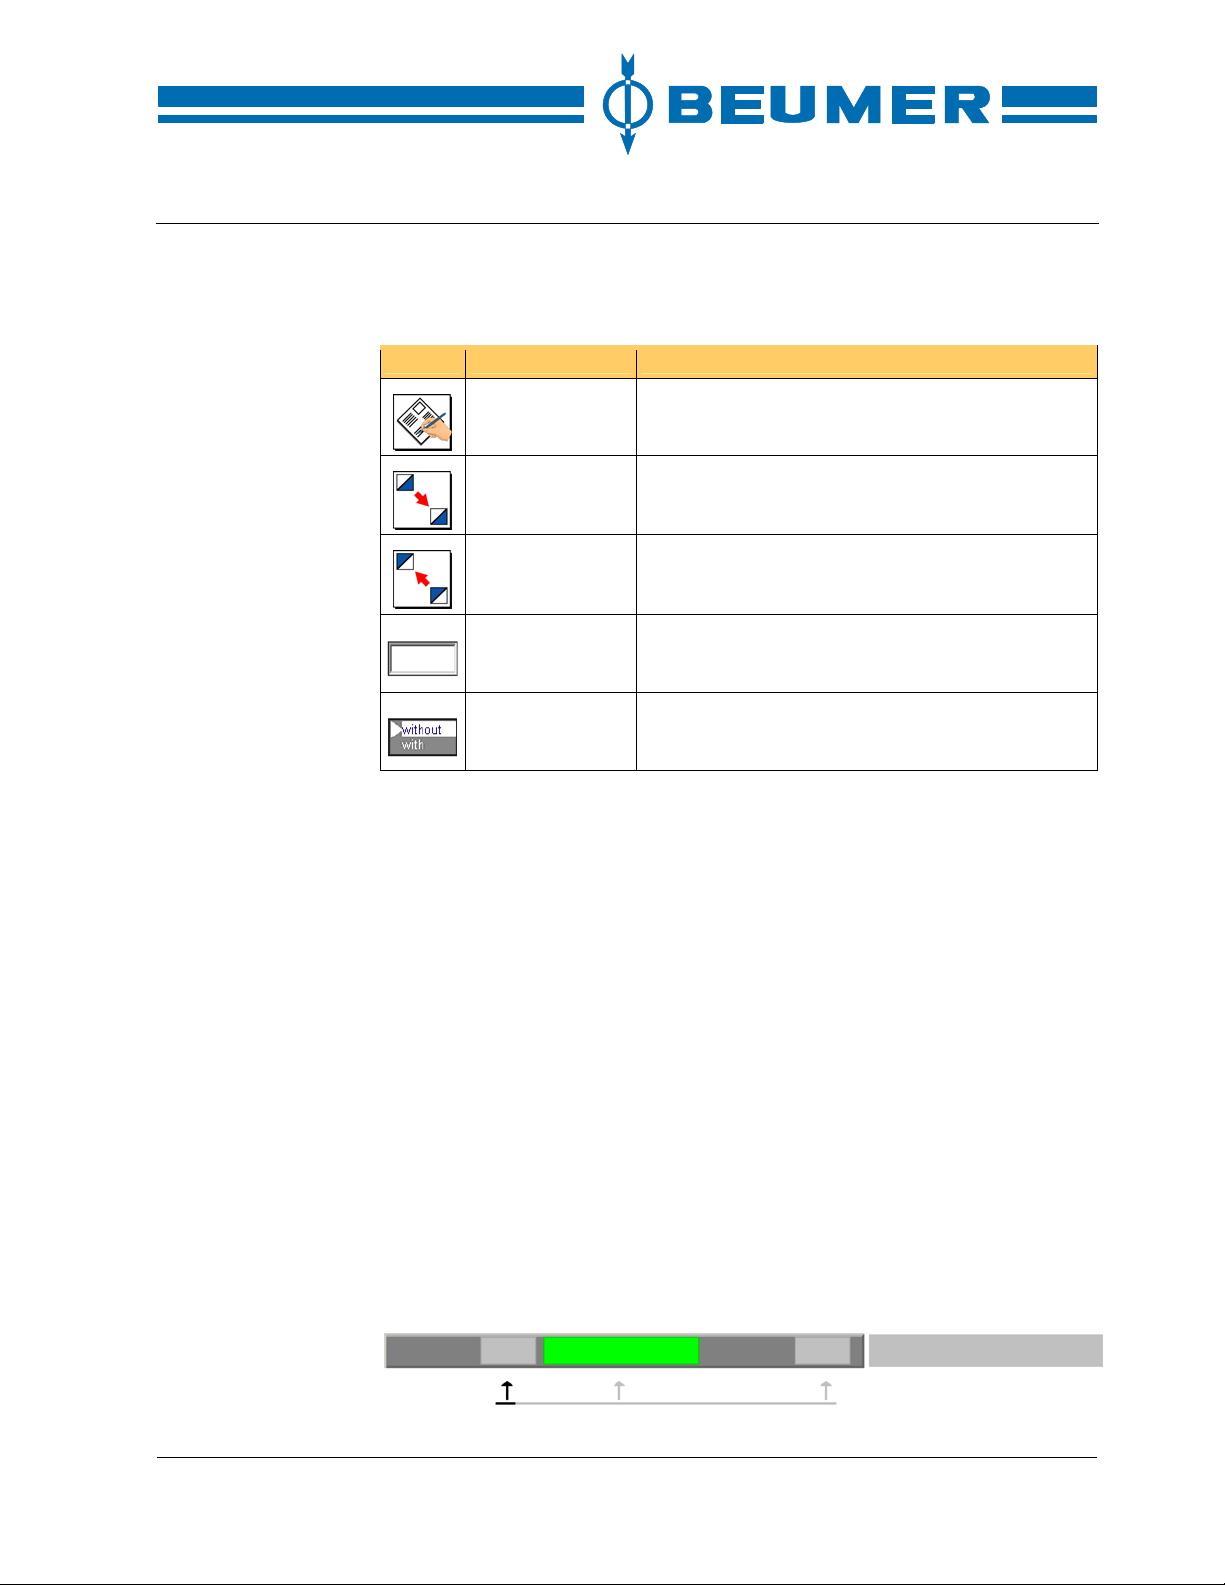
Operation
BEUMER stretch hood® S
The presets are saved automatically when the stretch hood is started. Some
presets can only be modified when the stretching process is terminated.
Icon Function Note
Presets Call up the user interface to preset the functional
sequence.
Scroll down Switch over to the next display.
Scroll up Switch over to the previous display.
Input field Numerical characters are entered in the input field.
Selection field The preselection desired is selected from a list.
How to set numerical
preselections
Modes of operation
1. Press the key for the "Presets" in the basic screen.
2. Select the desired field with the tab keys and confirm it with the "ENTER" key.
3. Enter the value with the numeric keyboard.
4. Confirm the input by pressing the "ENTER" key.
There are two modes of operation: manual operation and automatic operation.
The modes of operation can be changed for the complete machine/system or for
individual functional areas.
The BEUMER stretch hood is subdivided into two functional areas. All functional
areas can be switched on and off simultaneously with the "Start" and "Stop"
keys.
The functional areas can also be connected and disconne cted individually.
Another mode of operation, the repair mode, is available to choice.
The permanent head line in the visual display system gives information on the
active modes of operation within the system and the illustration number at any
time.
66 BA-6090103-EN
19.08.09
Page 67
BEUMER stretch hood® S
A
r
f
Functional areas
There are the following functional areas:
Designation Location
stretch hood All modules of the stretch hood
Transport
Automatic operation
No faults must be displayed for the automatic operation. When the starting con-
ditions have not been fulfilled, the stretch hood is to be moved to its starting
position. The "Starting position" function enables this in an easy way. This function is described in the next chapter.
Operation
ll conveying elements required for transporting
the pallets
How to start the
automatic operation
How to stop the
automatic operation
How to select manual
functions
1. Press the "Start" key.
2. The automatic operation is displayed in the head line.
3. The "Manual/automatic" selector switch for this functional area switches ove
automatically.
1. Press the "Stop" key. This way, all functional areas are stopped.
2. Actuate the "Manual/automatic" or the "Off/On" selector switch of the corresponding functional area. The functional area is stopped.
Manual operation
No faults must be displayed for the manual operation.
1. Select the manual operation with the "Manual/automatic" selector switch o
the corresponding functional area. The manual operation is displayed in the
head line.
2. Press the key for the manual functions in the basic screen.
3. Select the display of the manual function desired with the "Scroll up" and
"Scroll down" keys.
4. Carry out the manual functions with the function keys.
BA-6090103-EN
67
19.08.09
Page 68
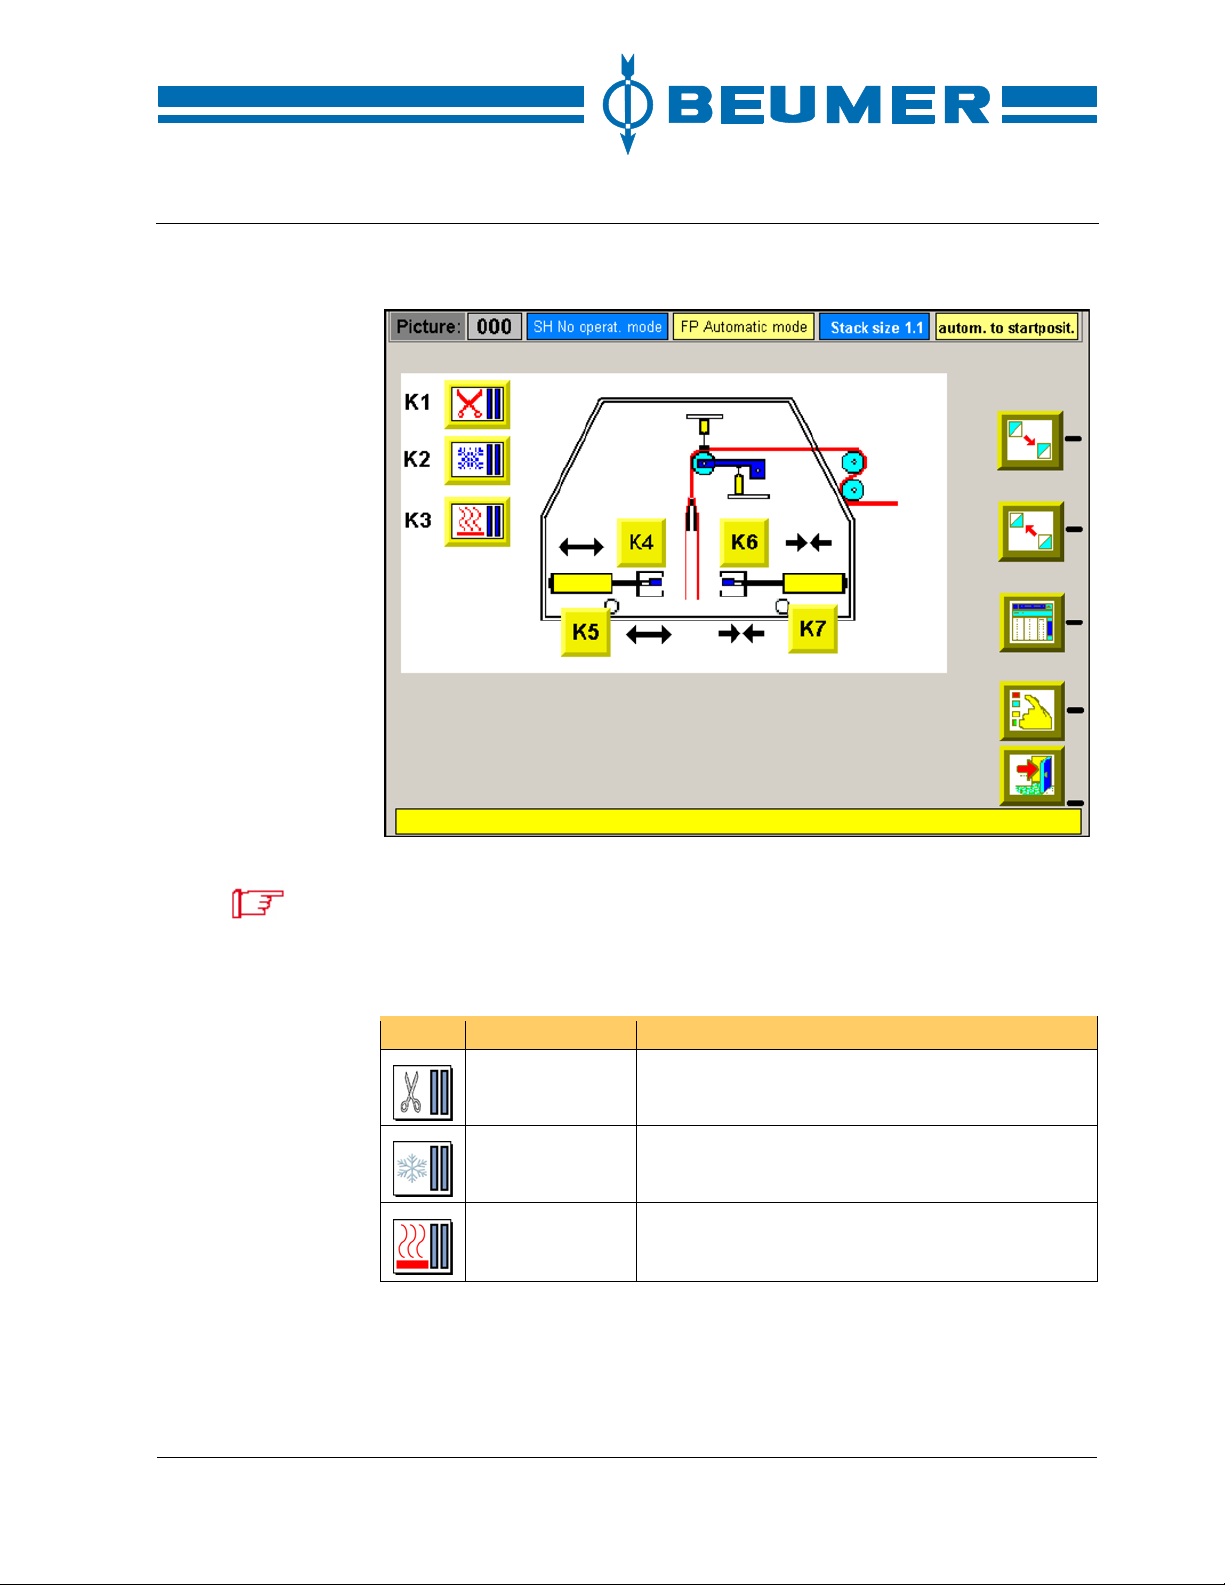
Operation
A
BEUMER stretch hood® S
Example:
When the manual functions have been carried out on the stretch hood, it must
be moved to its starting position. Once the starting position has been reached,
the stretch hood can be re-started. Information on how to move the stretch hood
to its starting position is included in the "Starting position" chapter.
Additional icons are shown in the "Seal film" manual function display.
Icon Function Note
Cut film The sealing bars must be closed while the film is
being cut.
Cool sealing
The sealing seam is cooled with blast air.
seam
Seal film
fter the sealing bars have been closed and the
sealing rails have been pressed on, the film is
sealed.
68 BA-6090103-EN
19.08.09
Page 69

BEUMER stretch hood® S
A
Automatic return to starting position (starting position)
The "Starting position" function is used for moving the stretch hood to its starting
position. The return to the starting position is a semi-automatic function.
ctivate the "stretch hood manual/automatic" key for selecting the manual
How to carry out the
"Starting position"
function
1.
operation.
2. The manual operation must be displayed in the head line.
3. Press the "Starting position" key.
4. Wait until the text "Cut film" is flashing in the head line.
5. Press the "Cut film" key. If no film must be cut, press the "Starting position"
key again.
6. Once the text "starting position" is displayed, the function is terminated.
7. If necessary, remove the film when the stretch hood has reached its starting
position.
If the "Starting position" function is carried out during stretching, the complete
stretching process is repeated in case of a restart.
Interrupt pallet
The "Interrupt pallet" function is used for discharging the package which is still in
the stretch hood. This is necessary if a pallet is damaged or has not been loaded
correctly. The "Interrupt pallet" function is a semiautomatic function.
Operation
How to execute the
"Interrupt pallet"
function
To carry out the "Interrupt pallet" function, it may be necessary to execute the
"Starting position" function first.
1. Ensure that the full pallet transport system is switched on.
2. Press the "Interrupt pallet" key.
3. Carry out the "Starting position" function, if required.
4. As soon as the pallet has been discharged, remove the cut film, if required.
Information on how to approach the starting position is included in the "Automatic return to starting position (starting position)" chapter.
BA-6090103-EN
69
19.08.09
Page 70
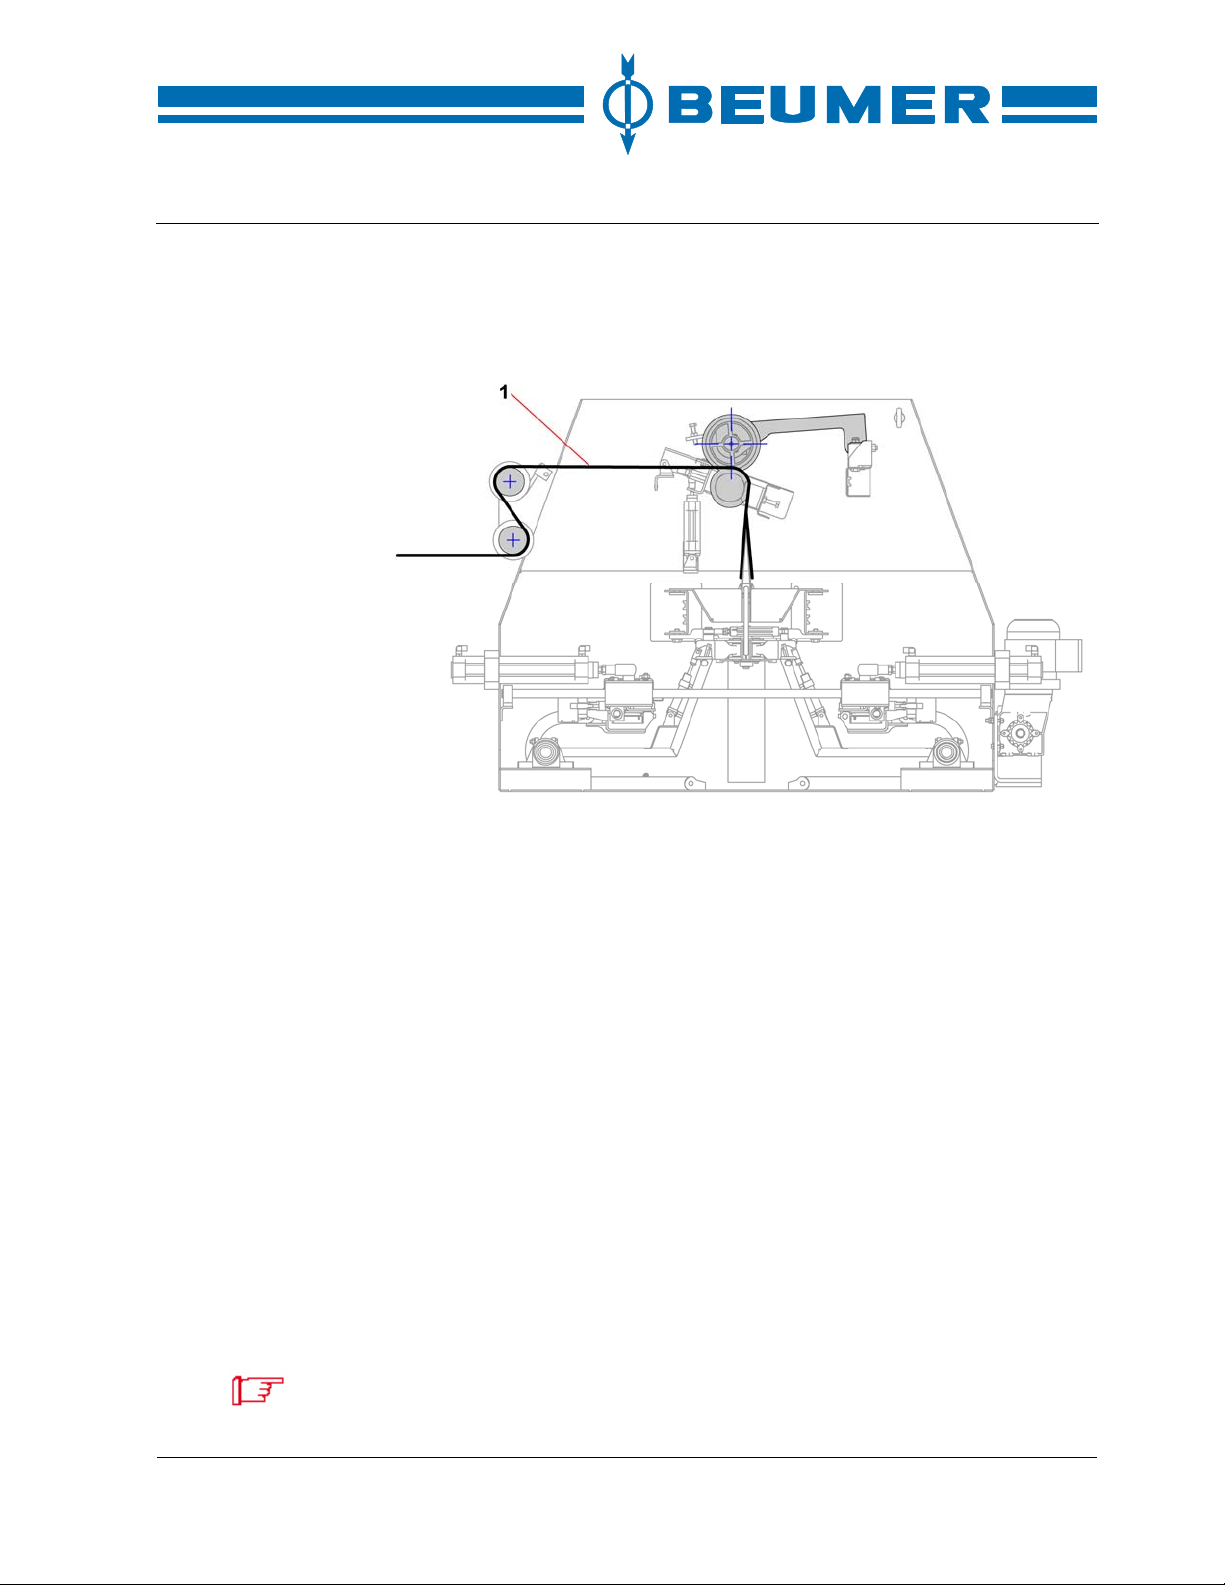
Operation
Film insertion plan
BEUMER stretch hood® S
The course of the film is shown in the following illustration.
How to insert the film
The "Starting position" function enables an easy insertion of the film. For this,
proceed as follows:
How to insert the film
1. Activate the "stretch hood manual/automatic" key for selecting the manual
2. The manual operation must be displayed in the head line.
3. Press the "Starting position" key.
4. Wait until the text "Cut film" is flashing in the head line.
5. Open the film brake with the pushbutton on the hood applicator head.
6. Insert the film tube manually according to the film insertion plan. The side fold
7. Guide the film tube up to the bottom edge of the sealing bars.
8. Close the film brake with the pushbutton on the hood applicator head.
9. Press the "Cut film" key on the control terminal.
10. If necessary, remove the film when the stretch hood has reached its starting
The new film must correspond to the same specification as the film to be replaced. A change of the film width, the depth of the lateral folds or the characteristics of the film results in faults on the machine. If the new film dimensions are
different from the old ones, the machine must be re-adjusted.
operation.
guiding plates must be in the gussets of the film tube.
position.
70 BA-6090103-EN
19.08.09
Page 71
BEUMER stretch hood® S
Parameters
Operation
It is possible to enter or modify parameters in the parameter input windows. The
parameters are subdivided into two groups, i. e. for the operating personnel and
the service personnel. The group for the operating personnel only includes parameters which influence the result of the formation of packing patterns. This
group is protected with password level A. The group for the service personnel
includes all other parameters. This group is protected with password level B.
Parameters must only be modified by skilled personnel.
How to select the
parameters
1. Enter password. Please refer to the "User log in" section in the "Visualisation"
chapter.
2. Press the "EXIT" key to return to the basic screen.
3. Press the key for the parameter input in the basic screen.
4. The list of the parameter domains is displayed.
5. Select the parameter domain desired by activating the function keys shown in
the display.
6. Then the parameters can be modified.
The graphic display for the "EXIT", "Parameter input" and "Scroll down" keys is
shown in the "List of all keys which are not related to a display".
Select the desired input field with the tab keys. The selected input field is
marked. The parameter can now be modified with a numeric input.
If a value has already been entered in the input/display field, it is completely
deleted with the input of the first character. Once the input has been started, the
input field cannot be quitted until the entry has been confirmed or interrupted.
The entry in the fields starts flush right. Digits which have been entered are
shifted to the left, similar to the pocket calculator display.
BA-6090103-EN
19.08.09
71
Page 72
Operation
Parameters for the operating personnel
The upper parameter of the corresponding display is modified by pressing the
function keys which are assigned to (+) or (-). However, this parameter can also
be modified with a numeric input as all other parameters. The other displays of
this groups are selected by pressing the "Scroll up/scroll down" keys.
Parameters Function Note
032 Stretch carriages -
crimp film
034 Stretch sleds - crimp
film
052 Correction value of the
hood length for standard
stretch
054 Correction value of the
hood length for highrack stretch
058 Crimp sleeve Once the film has been cut, the excess
060 Speed of stretch car-
riages during stretching
062 Move back crimping
motors during stretching
064 Press on crimping mo-
tors during stretching
066 Speed of stretch sleds
during stretching
070 Stretch carriages,
stretch position 1
BEUMER stretch hood® S
This parameter defines the position of
the stretch carriages for crimping the
film. The film must be slightly tensioned
on all sides.
This parameter defines the position of
the stretch sleds for crimping the film.
The film must be slightly tensioned on
all sides.
The parameter value is added to the
measured package height. The result
corresponds to the hood length.
The parameter value is added to the
measured package height. The result
corresponds to the hood length.
film is pulled over the crimping bows.
This parameter defines the speed of the
stretch carriages when the film hood is
stretched.
During the stretching process, the
crimping motors are moved back for a
short time once this position is reached.
The crimping motors, which have been
moved back for a short time during the
stretching process, are advanced once
this position is reached.
This parameter defines the speed of the
stretch sleds when the film hood is
stretched.
This parameter defines the position of
the stretch carriages for pulling the film
hood over the package. Set the value so
as to prevent the crimping bows from
touching the package when they are
lowered.
72 BA-6090103-EN
19.08.09
Page 73
BEUMER stretch hood® S
Parameters Function Note
072 Stretch sleds, stretch
074 Stretch carriages,
076 Stretch sleds, stretch
082 Hoist carts, stretch posi-
084 Move back crimping
098 Advance crimping mo-
118 Transfer of film, high-
position 1
stretch position 2
position 2
tion 2
motors at top edge of
package
tors at package base
rack stretch
Operation
This parameter defines the position of
the stretch sleds for pulling the film hood
over the package. Set the value so as to
prevent the crimping bows from touching the package when they are lowered.
The stretch carriages are moved to the
second stretch position while the film
hood is being pulled over the package.
Set the value so as to prevent the crimping bows from touching the package or
the pallet when they are lowered.
The stretch sleds are moved to the second stretch position while the film hood
is being pulled over the package. Set
the value so as to prevent the crimping
bows from touching the package or the
pallet when they are lowered.
The hoist carts are moved to the second
stretch position while the film hood is
being pulled over the package. The
parameter determines the starting position of this function depending on the
package height.
This parameter defines the position
where the crimping motors move back
for releasing the film. This position depends on the package height. When
entering the value "0", the crimping motors move back directly at the level of
the top edge of the package. If a greater
value is entered, the crimping motors
move back at a lower level.
This parameter defines the position
where the crimping motors advance for
clamping the film for the understretch.
For the high-rack stretch, the film is not
pulled over the pallet. When the hoist
carts have reached the position for
transferring the film, the crimping bows
must be moved close to the package.
This way, a well-directed transfer of the
film which is still on the crimping bows to
the package is enabled. This value determines the position of the crimping
bows close to the package.
BA-6090103-EN
19.08.09
73
Page 74
Operation
Parameters Function Note
120 Stretch carriages close
to package
122 Stretch sleds close to
package
124 Transfer of the sleeve
on the package
126 Transfer of the sleeve
on the package base
138 Lifting for edge protec-
tion
For the high-rack stretch, the film is not
pulled over the pallet. When the hoist
carts have reached the position for
transferring the film, the stretch carriages must be moved close to the
package. This way, a well-directed
transfer of the film which is still on the
crimping bows to the package is enabled. This value determines the position of the stretch carriages close to the
package.
For the high-rack stretch, the film is not
pulled over the pallet. When the hoist
carts have reached the position for
transferring the film, the stretch sleds
must be moved close to the package.
This way, a well-directed transfer of the
film which is still on the crimping bows to
the package is enabled. This value determines the position of the stretch sleds
close to the package.
The value determines the position
where the hoist carts stop during lowering for the transfer of the sleeve.
This value determines the starting position of the crimping motors for the transfer of the sleeve to the package. The
hoist carts move downwards while the
sleeve is being transferred.
The parameter value determines how
far the hoist carts are lifted for the edge
protection of the pallet.
BEUMER stretch hood® S
Parameters for service personnel
Parameters Function Note
002 Stretching process
with/without film
004 Package counter The stretched packages are displayed
74 BA-6090103-EN
When entering the value "0", the
stretching process is simulated without
film. This function is required for commissioning. When entering the value
"1", the packages are stretched.
in this parameter. The value can be
modified when the cursor is moved
onto the field.
19.08.09
Page 75
BEUMER stretch hood® S
Parameters Function Note
016 With/without film surface
020 Last film length The last film length is displayed in this
024 Pallet under stretch hood This parameter defines the position
026 Gripper arms - transfer
028 Stretch carriages - take
030 Stretch sleds - take film This parameter defines the position of
032 Stretch carriages - crimp
034 Stretch sleds - crimp film This parameter defines the position of
036 Lift hoist carts to relieve
040 Sealing time of the seal-
042 Cool-down time of the
monitoring device
film
film
film
the film
ing seam
sealing seam
Operation
When entering the value "0", the film
surface monitoring device is deactivated. When entering the value "1",
the film surface monitoring device is
activated.
parameter.
where the pallet stops in conveying
direction.
This parameter defines the position of
the gripper arms for the transfer of the
film to the crimping bows. The film
must be slightly tensioned on all sides.
This parameter defines the position of
the stretch carriages for taking the film
from the gripper arms. In this position
the crimping bows must be able to
move into the opened film tube without
any problems.
the stretch sleds for taking the film from
the gripper arms. In this position the
crimping bows must be able to move
into the opened film tube without any
problems.
This parameter defines the position of
the stretch carriages for crimping the
film. The film must be slightly tensioned
on all sides.
the stretch sleds for crimping the film.
The film must be slightly tensioned on
all sides.
Once the film has been crimped, the
hoist carts are lifted. The value is to be
set so that the film can be sealed without folds and tensile load.
The sealing time is calculated from the
parameter value multiplied by the factor
0.01 s.
The cool-down time for the sealing
seam is entered in this parameter immediately after sealing.
BA-6090103-EN
19.08.09
75
Page 76
Operation
A
BEUMER stretch hood® S
Parameters Function Note
044 Waiting time - lower hoist
carts, standard stretch
046 Waiting time - lower hoist
carts, high-rack stretch
048 Waiting time - lower hoist
carts, sleeve
052 Correction value of the
hood length for standard
stretch
054 Correction value of the
hood length for high-rack
stretch
056 Crimp film hood
058 Crimp sleeve Once the film has been cut, the excess
060 Speed of stretch car-
riages during stretching
062 Move back crimping mo-
tors during stretching
064 Press on crimping mo-
tors during stretching
066 Speed of stretch sleds
during stretching
068 Speed of hoist carts for
second stretching process
This parameter defines the waiting time
of the hoist carts after the film hood has
been stretched (standard stretch). The
waiting time is calculated from the parameter value multiplied by the factor
0.1 s.
This parameter defines the waiting time
of the hoist carts after the film hood has
been stretched (high-rack stretch). The
waiting time is calculated from the parameter value multiplied by the factor
0.1 s.
This parameter defines the waiting time
of the hoist carts after the film hood has
been stretched (sleeve). The waiting
time is calculated from the parameter
value multiplied by the factor 0.1 s.
The parameter value is added to the
measured package height. The result
corresponds to the hood length.
The parameter value is added to the
measured package height. The result
corresponds to the hood length.
fter sealing, the excess film in the
upper area of the film hood is crimped.
film is pulled over the crimping bows.
This parameter defines the speed of
the stretch carriages when the film
hood is stretched.
During the stretching process, the
crimping motors are moved back for a
short time once this position is
reached.
The crimping motors, which have been
moved back for a short time during the
stretching process, are advanced once
this position is reached.
This parameter defines the speed of
the stretch s leds when the film hood is
stretched.
This parameter defines the speed of
the hoist carts in the central area of the
package.
76 BA-6090103-EN
19.08.09
Page 77
BEUMER stretch hood® S
Parameters Function Note
070 Stretch carriages, stretch
072 Stretch sleds, stretch
074 Stretch carriages, stretch
076 Stretch sleds, stretch
080 Hoist carts - crimp film This parameter defines the position of
082 Hoist carts, stretch posi-
084 Move back crimping mo-
086 Speed of hoist carts in
position 1
position 1
position 2
position 2
tion 2
tors at top edge of package
the area of the package
top
Operation
This parameter defines the position of
the stretch carriages for pulling the film
hood over the package. Set the value
so as to prevent the crimping bows
from touching the package when they
are lowered.
This parameter defines the position of
the stretch sleds for pulling the film
hood over the package. Set the value
so as to prevent the crimping bows
from touching the package when they
are lowered.
The stretch carriages are moved to the
second stretch position while the film
hood is being pulled over the package.
Set the value so as to prevent the
crimping bows from touching the package or the pallet when they are lowered.
The stretch sleds are moved to the
second stretch position while the film
hood is being pulled over the package.
Set the value so as to prevent the
crimping bows from touching the package or the pallet when they are lowered.
the hoist carts for crimping the film.
The hoist carts are moved to the sec-
ond stretch position while the film hood
is being pulled over the package. The
parameter determines the starting position of this function depending on the
package height.
This parameter defines the position
where the crimping motors move back
for releasing the film. This position
depends on the package height. When
entering the value "0", the crimping
motors move back directly at the level
of the top edge of the package. If a
greater value is entered, the crimping
motors move back at a lower level.
This parameter defines the speed of
the hoist carts in the upper area of the
package.
BA-6090103-EN
19.08.09
77
Page 78
Operation
BEUMER stretch hood® S
Parameters Function Note
088 Limit between package
top and package centre
090 Speed of hoist carts in
the area of the package
centre
092 Total film length The total film length is displayed in this
098 Advance crimping motors
at package base
102 Speed of hoist carts in
the area of the package
base
104 Limit between package
centre and package base
106 Move crimping bows
under package
108 Stretch carriages - posi-
tion below pallet
112 Length of sleeve The parameter value presets the length
114 Maximum package
height
116 Minimum package height The parameter defines the minimum
The parameter defines the limit between package top and package centre. This limit is required for changing
the speed.
This parameter defines the speed of
the hoist carts in the central area of the
package.
parameter. The value can be modified
when the cursor is moved onto the
field.
This parameter defines the position
where the crimping motors advance for
clamping the film for the understretch.
This parameter defines the speed of
the hoist carts in the lower area of the
package.
The parameter defines the limit between package centre and package
base. This limit is required for changing
the speed.
This parameter defines the position
where the crimping bows are moved
under the pallet to form the understretch.
This parameter defines the position
where the crimping bows are moved
under the pallet to form the understretch.
of the sleeve.
The parameter defines the maximum
package height to be stretched. If the
package height exceeds this value, the
package is not stretched but transferred to the subsequent conveyor.
package height to be stretched. If the
package height falls below this value,
the package is not stretched but transferred to the subsequent conveyor.
78 BA-6090103-EN
19.08.09
Page 79
BEUMER stretch hood® S
Parameters Function Note
140 Starting position of hoist
142 Hoist carts - take film This parameter defines the position of
144 Starting position of the
146 Lowest position of hoist
148 Starting position of the
150 Clearance above the
152 Align pallet 1 This parameter defines the position of
154 Align pallet 2 This parameter defines the position of
carts
stretch carriages
carts
stretch sleds
package during stretching
Operation
The stretching process starts and ends
in this position. This position is to be
adjusted so as to avoid collisions of the
gripper arms with the stretch carriages
or stretch sleds. The value to be entered refers to the space between bottom edge of crimping bow and bottom
in mm.
the hoist carts for taking the film from
the gripper arms.
This value is used for setting the parameters for the stretch carriages and
must not be modified after commissioning. The parameters for the stretch
carriages are assigned on the basis of
the value set here after each stretching
process when the starting position has
been reached.
The parameter is used for adjusting the
maximum travel of the hoist carts. In
addition, this position is limited by a
proximity switch.
This value is used for setting the parameters for the stretch sleds and must
not be modified after commissioning.
The parameters for the stretch sleds
are assigned on the basis of the value
set here after each stretching process
when the starting position has been
reached.
The crimping bows are lowered to a
position above the package while the
film hood is being stretched. This position is calculated from the package
height plus the parameter value. The
crimping bows stop if they reach this
position before the film hood is
stretched completely.
the pallet slide plate for aligning the
pallet at right angles to the conveying
direction.
the pallet slide plate for aligning the
pallet at right angles to the conveying
direction.
BA-6090103-EN
19.08.09
79
Page 80
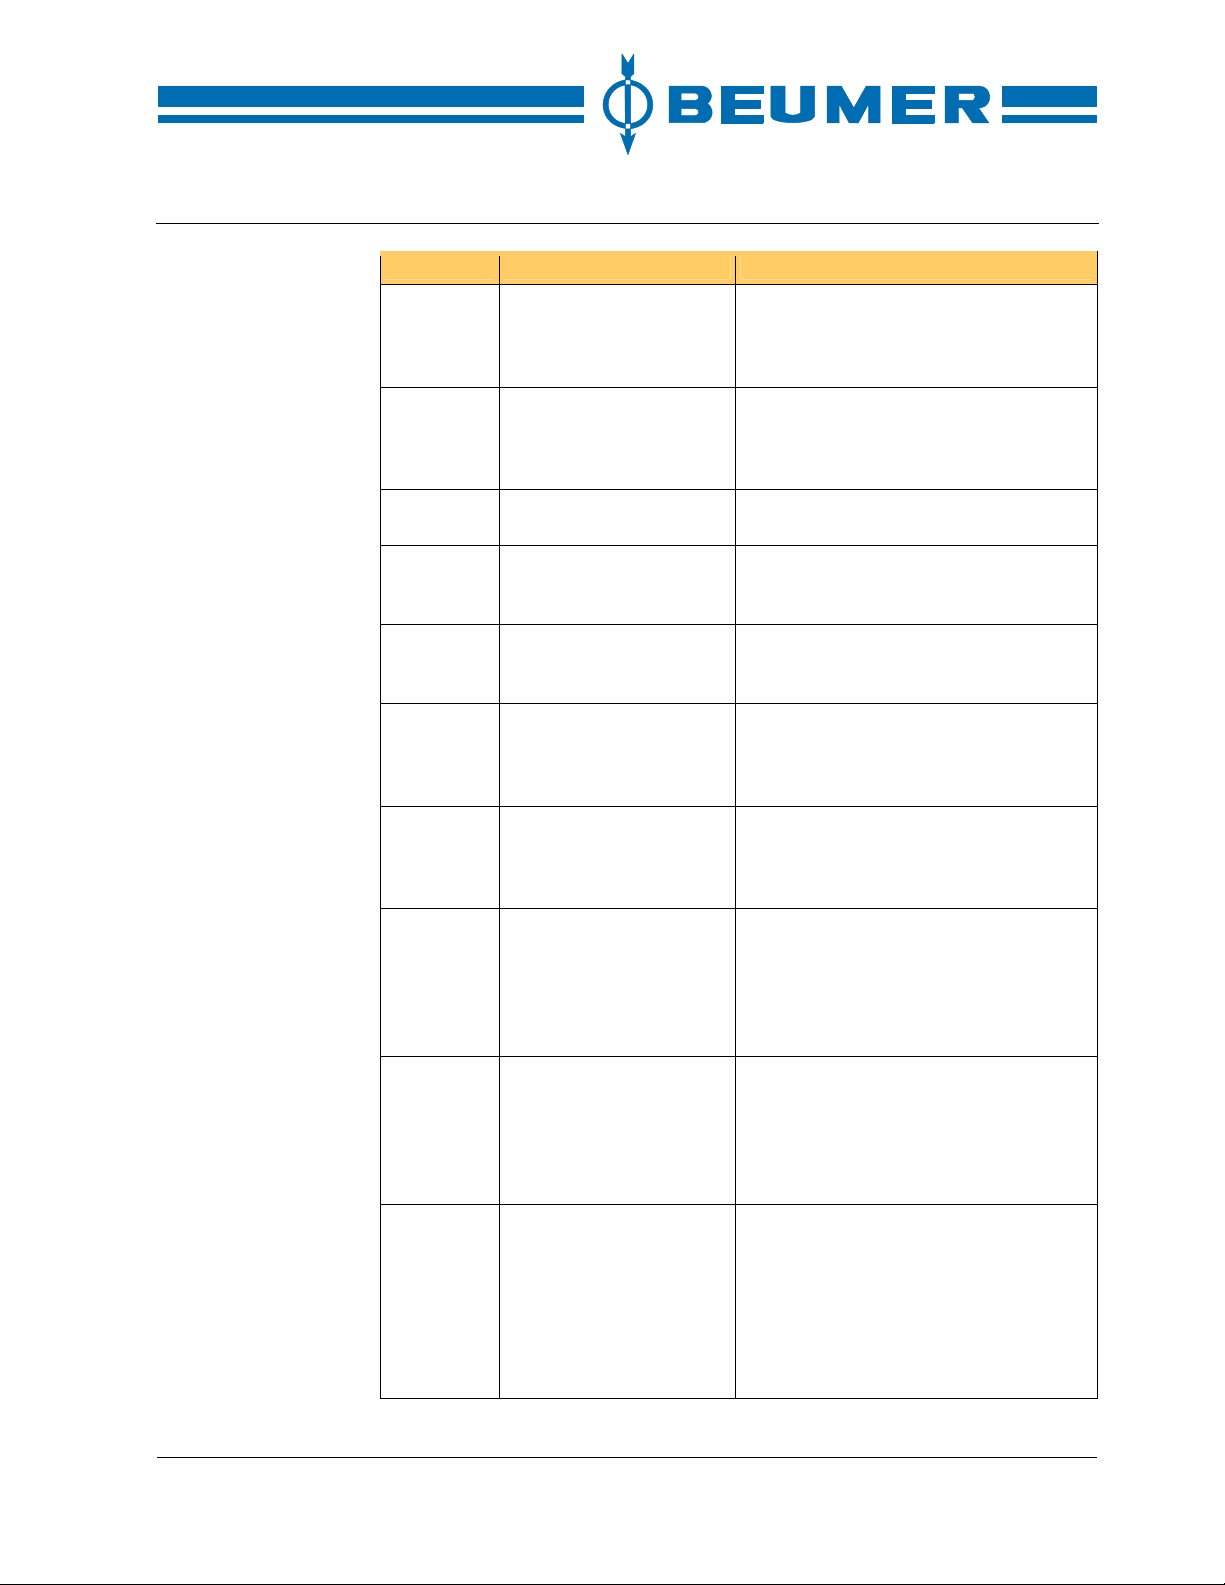
Operation
BEUMER stretch hood® S
Parameters Function Note
156 Align pallet 3 This parameter defines the position of
the pallet slide plate for aligning the
pallet at right angles to the conveying
direction.
158 Align pallet 4 This parameter defines the position of
the pallet slide plate for aligning the
pallet at right angles to the conveying
direction.
162 Speed of hoist carts in
manual operation
164 Speed of the stretch
carriages in manual operation
166 Speed of the stretch
sleds in manual operation
168 Hoist cart in set position A tolerance in mm for the position ap-
170 Stretch carriages and
stretch sleds in set position
174 Permissible braking dis-
tance of the hoist carts
176 Permissible braking dis-
tance of stretch carriages
and stretch sleds
178 Clearance of stretch
carriages
This parameter defines the speed of
the hoist carts for manual operation.
This parameter defines the speed of
the stretch carriages for manual operation.
This parameter defines the speed of
the stretch sleds for manual operation.
proached is preset for this motor. This
value should not be modified after
commissioning of the motor.
A tolerance in mm for the position approached is preset for this motor. This
value should not be modified after
commissioning of the motor.
The difference between the actual
value of the drive motors and the set
position is compared with the parameter value. If the difference is greater
than the set value, the machine/system
stops and a fault message is displayed.
The difference between the actual
value of the drive motors and the set
position is compared with the parameter value. If the difference is greater
than the set value, the machine/system
stops and a fault message is displayed.
The manual operation is limited to protect the stretch carriages. When the
stretch carriages are on a level with the
roller conveyor, they must only be
moved to a certain position in manual
operation. If the actual value of the
drive motors falls below the parameter
value, the drive motors are stopped.
80 BA-6090103-EN
19.08.09
Page 81
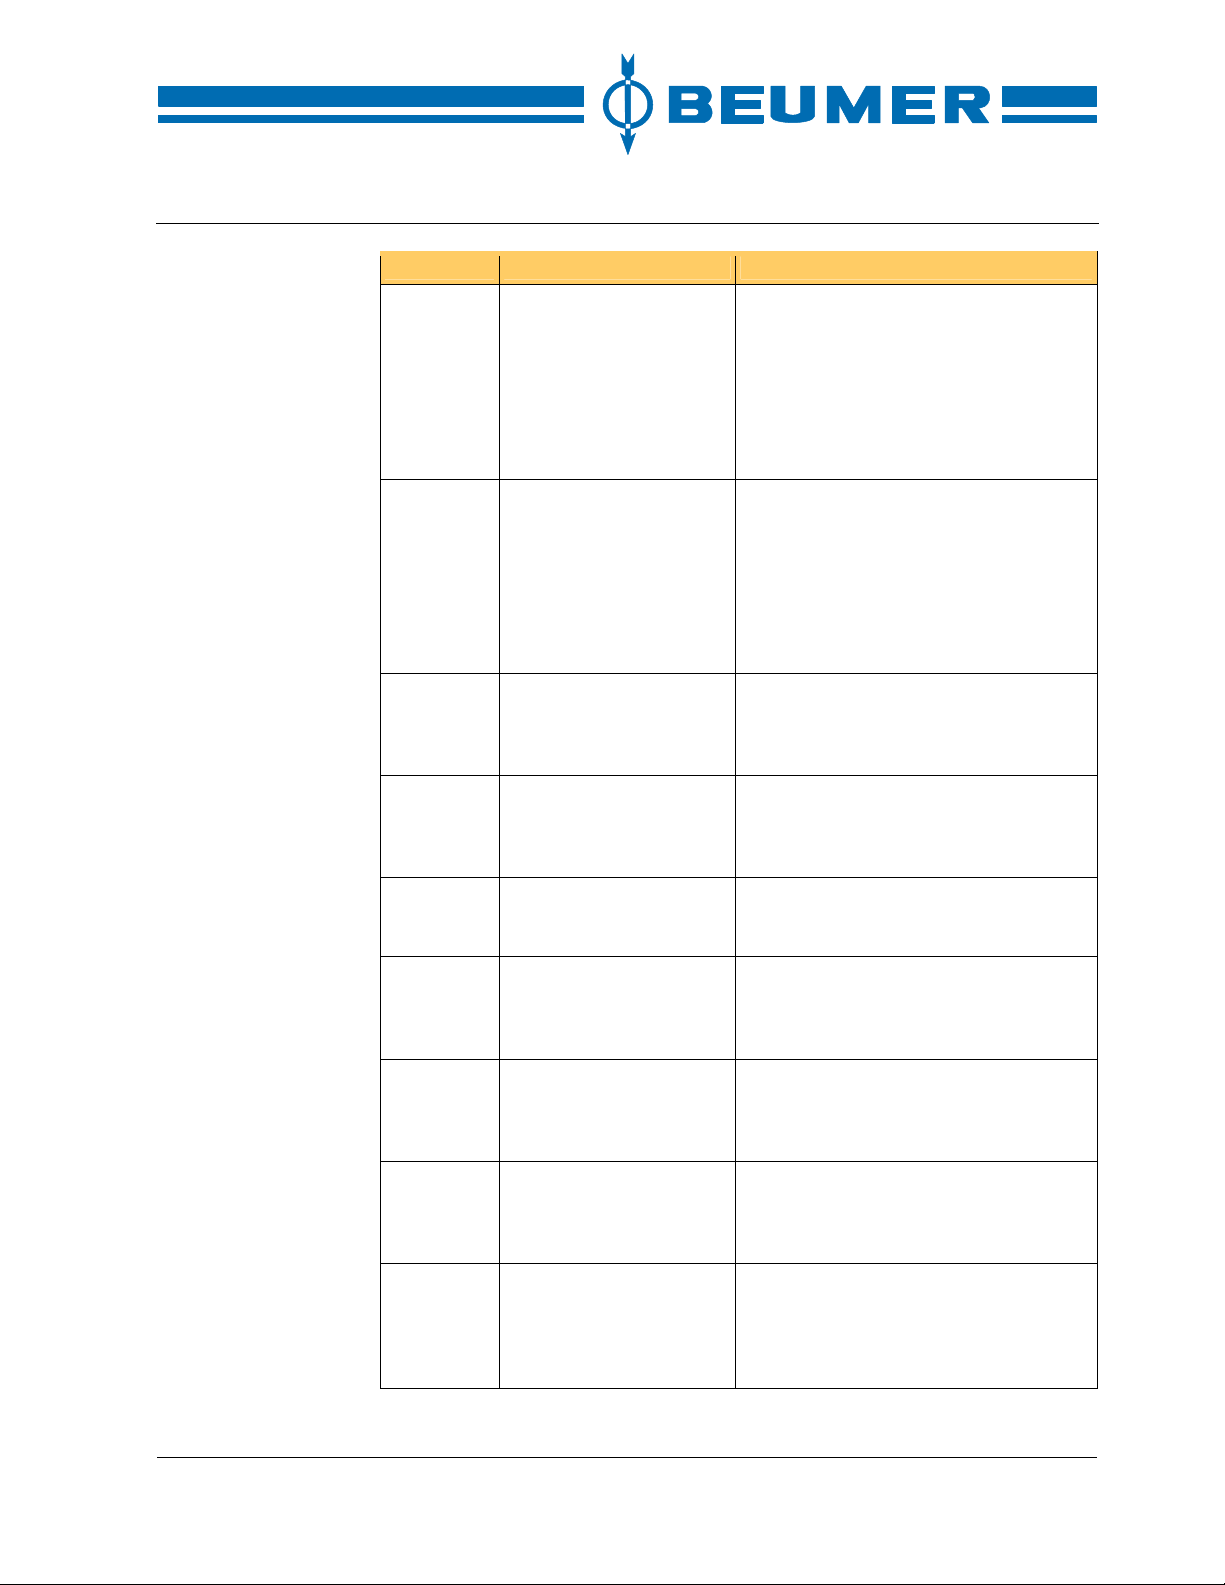
BEUMER stretch hood® S
Parameters Function Note
180 Clearance of stretch
182 Clearance of hoist carts The manual operation is limited to pro-
184 Hoist carts in the range
186 Stretch carriages in the
188 Height of conveyor under
190 Stretch sleds in the
276 Distance between the
394 Delay time after pallet
396 Delay time after taking
sleds
of the set position
range of the set position
stretch hood
range of the set position
ultrasonic sensor and the
lower edge of the crimping bow
feed
away the pallet
Operation
The manual operation is limited to protect the stretch sleds. When the stretch
sleds are on a level with the roller conveyor, they must only be moved to a
certain position in manual operation. If
the actual value of the drive motors
falls below the parameter value, the
drive motors are stopped.
tect the hoist carts. When the hoist
carts are on a level with the roller conveyor, they must only be moved to a
certain position in manual operation. If
the actual value of the drive motors
falls below the parameter value, the
drive motors are stopped.
A tolerance in mm for the position approached is preset for this motor. This
value should not be modified after
commissioning of the motor.
A tolerance in mm for the position approached is preset for this motor. This
value should not be modified after
commissioning of the motor.
The height of the roller conveyor under
the stretch hood is defined in this parameter.
A tolerance in mm for the position approached is preset for this motor. This
value should not be modified after
commissioning of the motor.
The distance between the ultrasonic
sensor and the lower edge of the
crimping bow is measured and entered
in mm.
If a value is entered and a pallet is fed
from the side, the feed of the pallet is
delayed by the time entered if the photocell has been occupied by a pallet.
If a value is entered in seconds and a
pallet has been taken off at the end of
the pallet roller conveyor, the next pallets are only transported onwards after
expiration of this time.
BA-6090103-EN
19.08.09
81
Page 82
Operation
BEUMER stretch hood® S
Parameters Function Note
520 Centre the pallet This values determines the distance for
half a revolution of the motor. If the
motor moves by one pulse (half a revolution of the motor), the value multiplied
by 0.1 is entered.
524 Stretch carriage This values determines the distance for
half a revolution of the motor. If the
motor moves by one pulse (half a revolution of the motor), the value multiplied
by 0.1 is entered.
526 Stretch sled This values determines the distance for
half a revolution of the motor. If the
motor moves by one pulse (half a revolution of the motor), the value multiplied
by 0.1 is entered.
532 Conveyor under stretch
hood
534 Crimping This values determines the distance for
This values determines the dis tance for
half a revolution of the motor. If the
motor moves by one pulse (half a revolution of the motor), the value multiplied
by 0.1 is entered.
half a revolution of the motor. If the
motor moves by one pulse (half a revolution of the motor), the value multiplied
by 0.1 is entered.
Status display
The control status of the inputs, outputs, flags and data can be displayed with
the help of the status display.
The words to be displayed are entered in the input fields for inputs, outputs and
flags. Then the status of the respective word is displayed in binary form in the
display field. The bits of the corresponding word are displayed from the right to
the left. The smallest bit is on the right.
The data are entered as words. The status is displayed in a decimal and binary
form.
82 BA-6090103-EN
19.08.09
Page 83
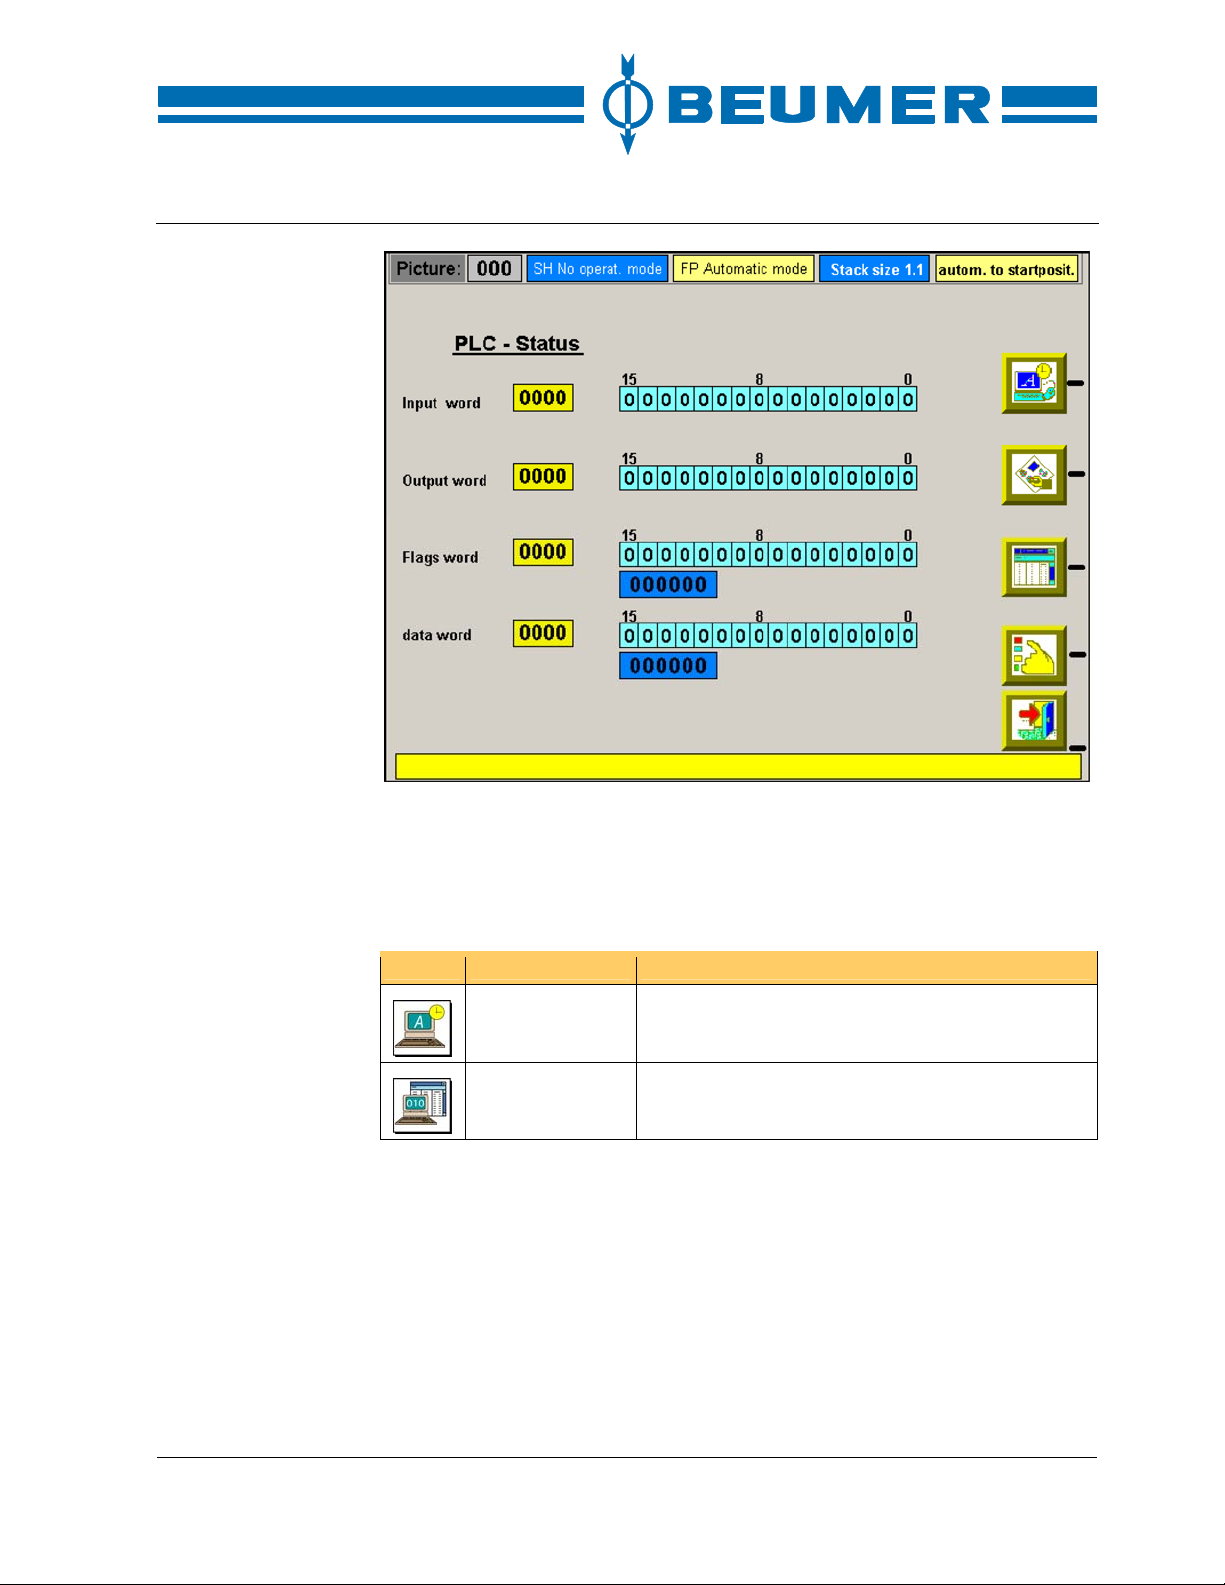
BEUMER stretch hood® S
Operation
How to display status
variables
1. Press the key for the "system settings" in the basic screen.
2. Press the key for the "Status display".
3. Select the desired input field with the tab keys.
4. Enter the corresponding word and confirm it with "ENTER".
Icon Function Note
System settings Call up the user interface for setting the system
Status display The window for the status display is displayed.
Display of operation sequences
The working steps are carried out in a fixed order. The display of operation sequences indicates the current working step.
How to display the
operation sequence
1. Press the "EXIT" key to return to the basic screen.
2. Press the key for the "display of operation sequences" in the basic screen.
3. Press the "Scroll up" and "Scroll down" keys for longer operation sequences.
The icons at the beginning of the line show whether the particular working step is
active. If the working step is active, the icon is shown in black. If the working step
is not active, the icon is white.
parameters.
BA-6090103-EN
19.08.09
83
Page 84
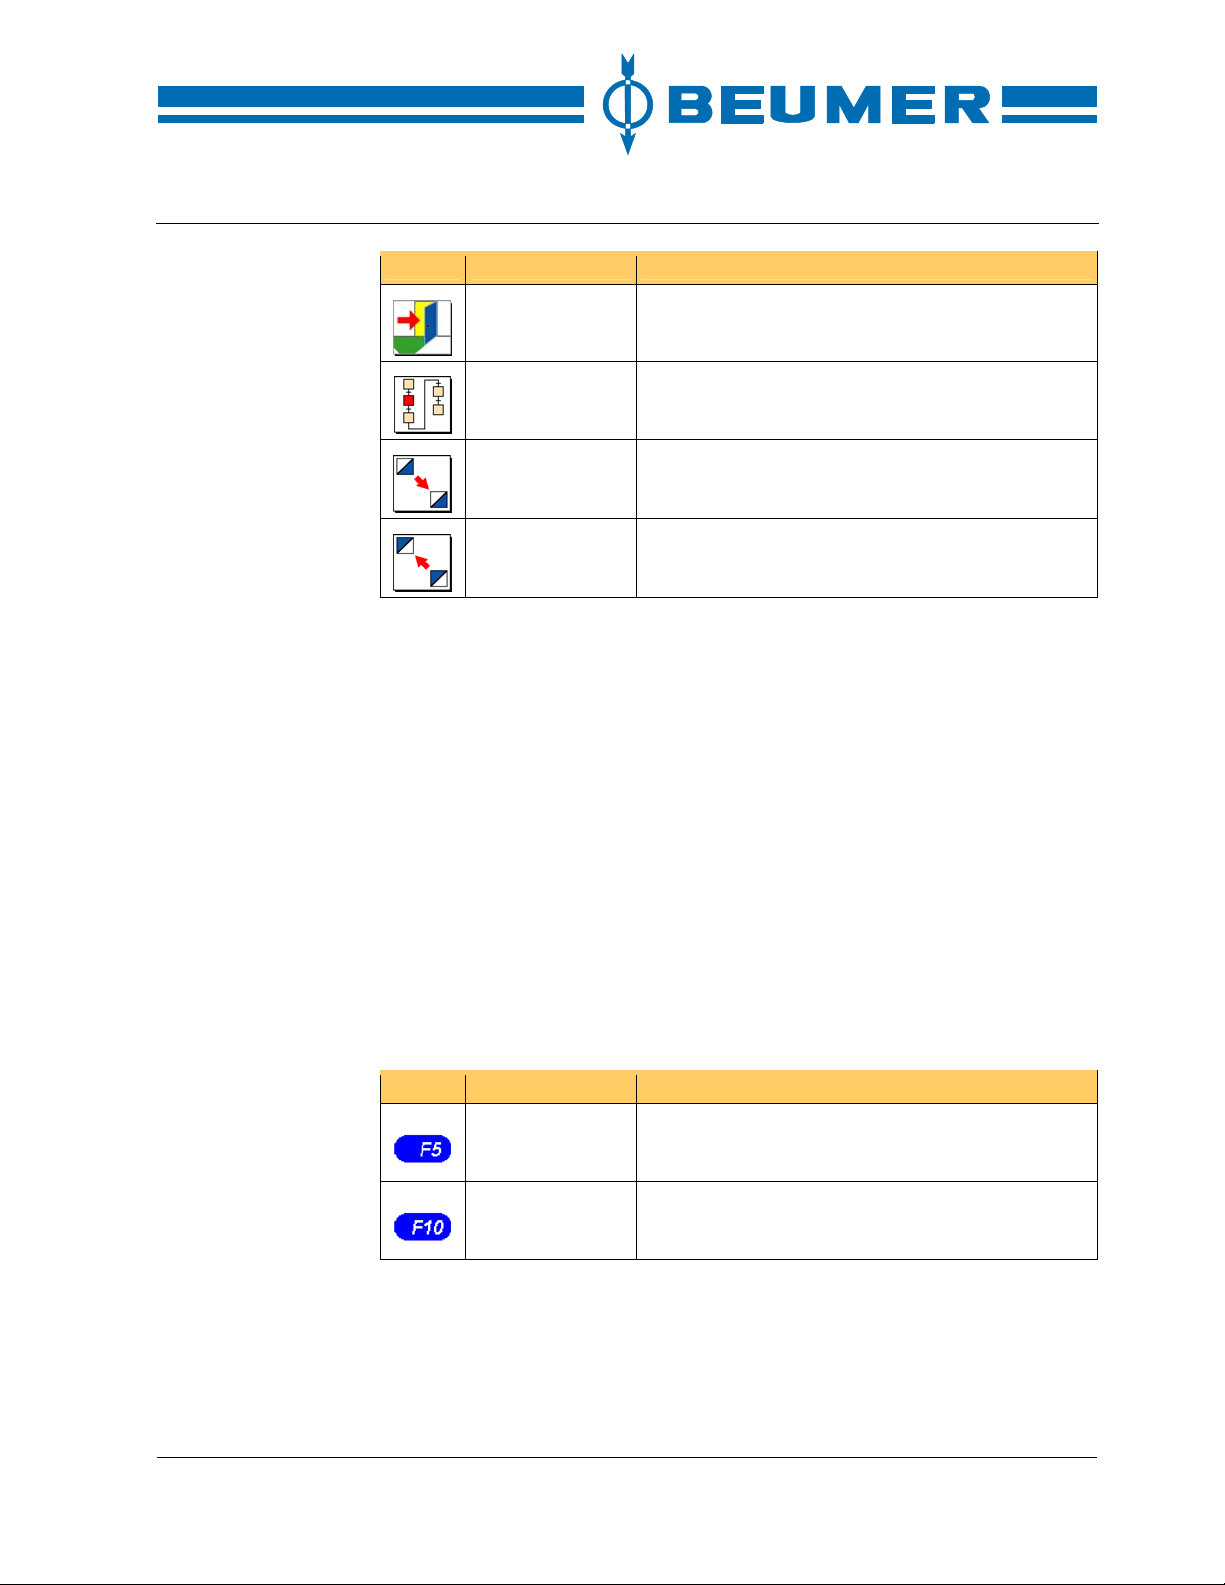
Operation
Error messages
BEUMER stretch hood® S
Icon Function Note
EXIT Return to the basic screen.
Display of operation sequences
Scroll down Switch over to the next display.
Scroll up Switch over to the previous display.
There are two kinds of error messages: fault messages and system messages.
Fault messages are triggered by the user programme. These messages inform
the operator about maloperation or faults in the machine/system.
System messages are triggered by the visual display system. These messages
inform the operator about maloperation or faults in communication.
Open the display of operation sequences.
Fault messages
Faults are indicated in a message line in the lower third of the display and are
stored in a fault buffer. By pressing the F5 key a window showing the current
malfunctions can be opened. A fault message consists of a message text and
the fault number.
Fault messages must be reset by the operator. For this, the F10 key is to be
pressed.
A fault message can only be reset after the cause of the malfunction has been
eliminated.
Icon Function Note
Display fault
messages
Reset key Reset fault messages.
Display a list with the fault messages.
84 BA-6090103-EN
19.08.09
Page 85
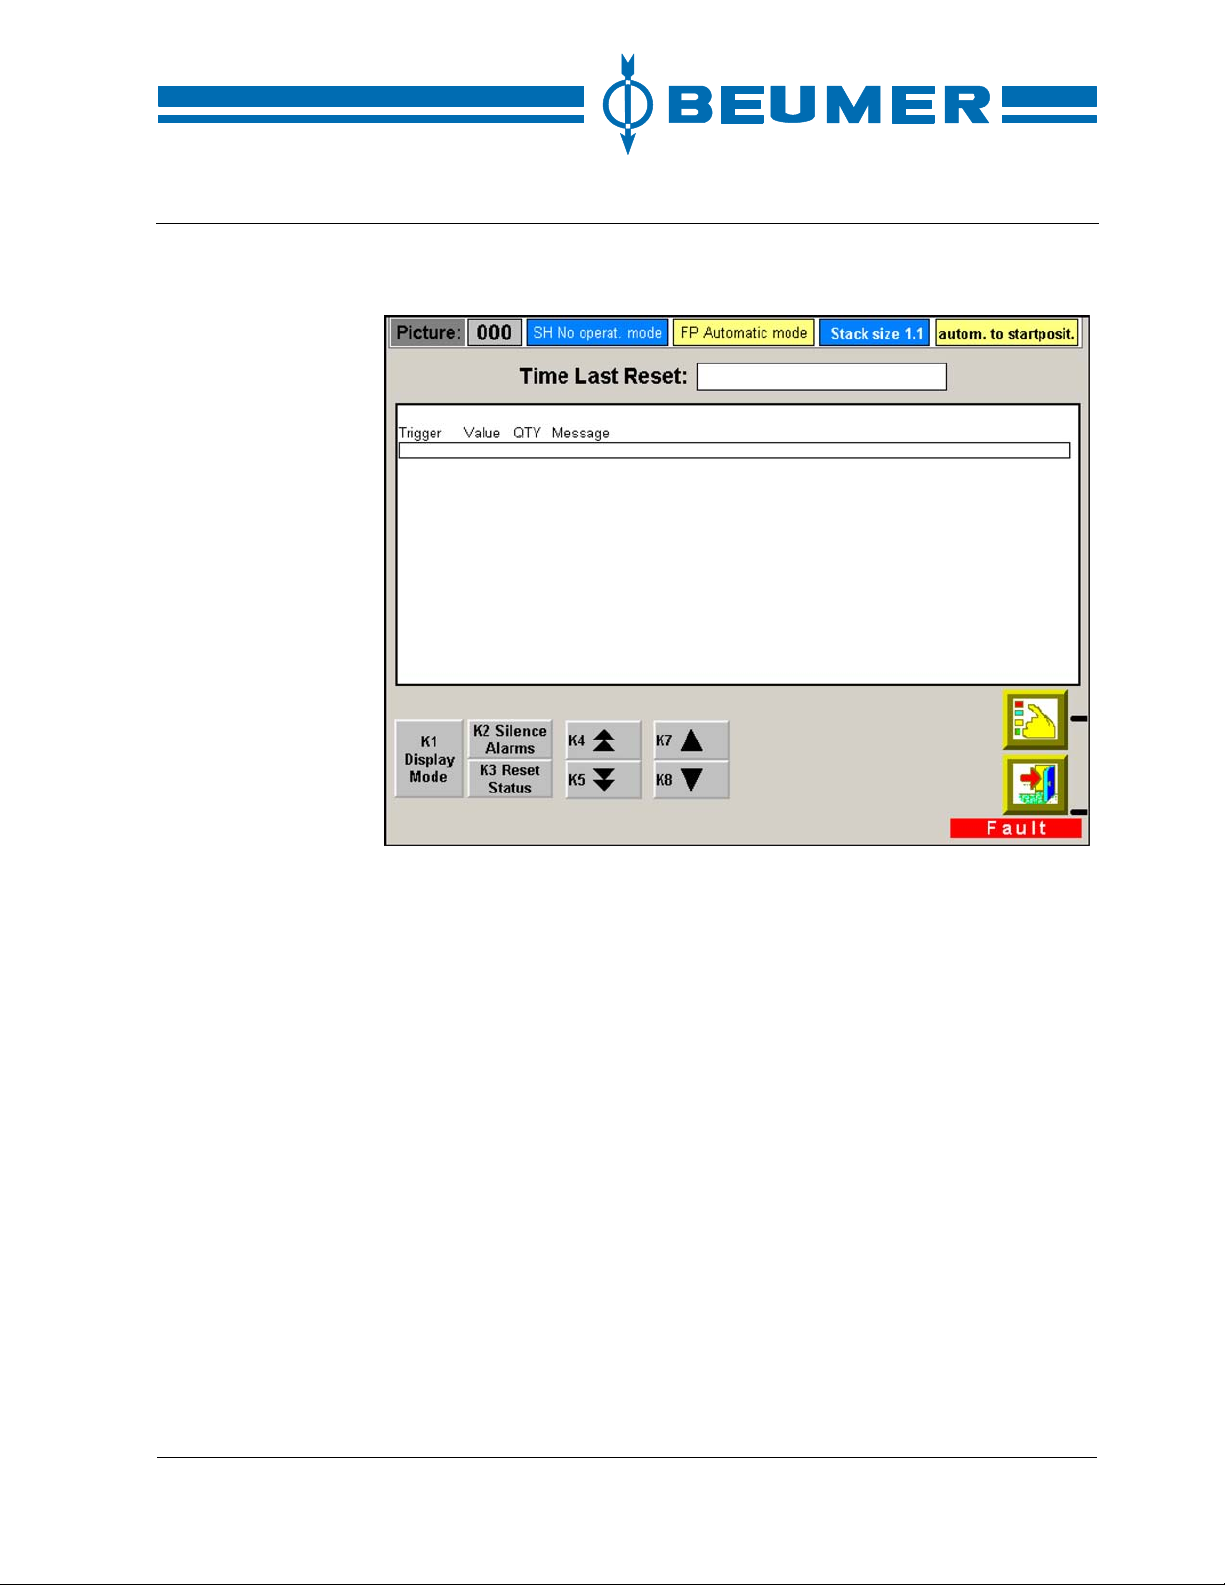
BEUMER stretch hood® S
Example:
Operation
How to display fault
messages
Fault buffer
How to display the
fault buffer
1. Press the F5 key.
2. A window with a list of the current fault messages is opened.
3. Page up and down in the list with the cursor keys.
4. Close the window with the list by pressing the "Close" key.
Should you need assistance from the BEUMER service personnel to eliminate
malfunctions, please inform us about the fault number and the message text. A
quick analysis of the malfunction is only possible on the basis of this fault number.
All fault messages are stored in the fault buffer in chronological order. Each fault
message stored there contains the following information:
• Fault number
• Moment of malfunction with date and time
• State of the malfunction
• Text of message
Proceed as follows to display the fault buffer:
1. Press the F5 key.
2. Press the key for the "Display Mode".
3. The fault buffer is opened.
BA-6090103-EN
19.08.09
85
Page 86
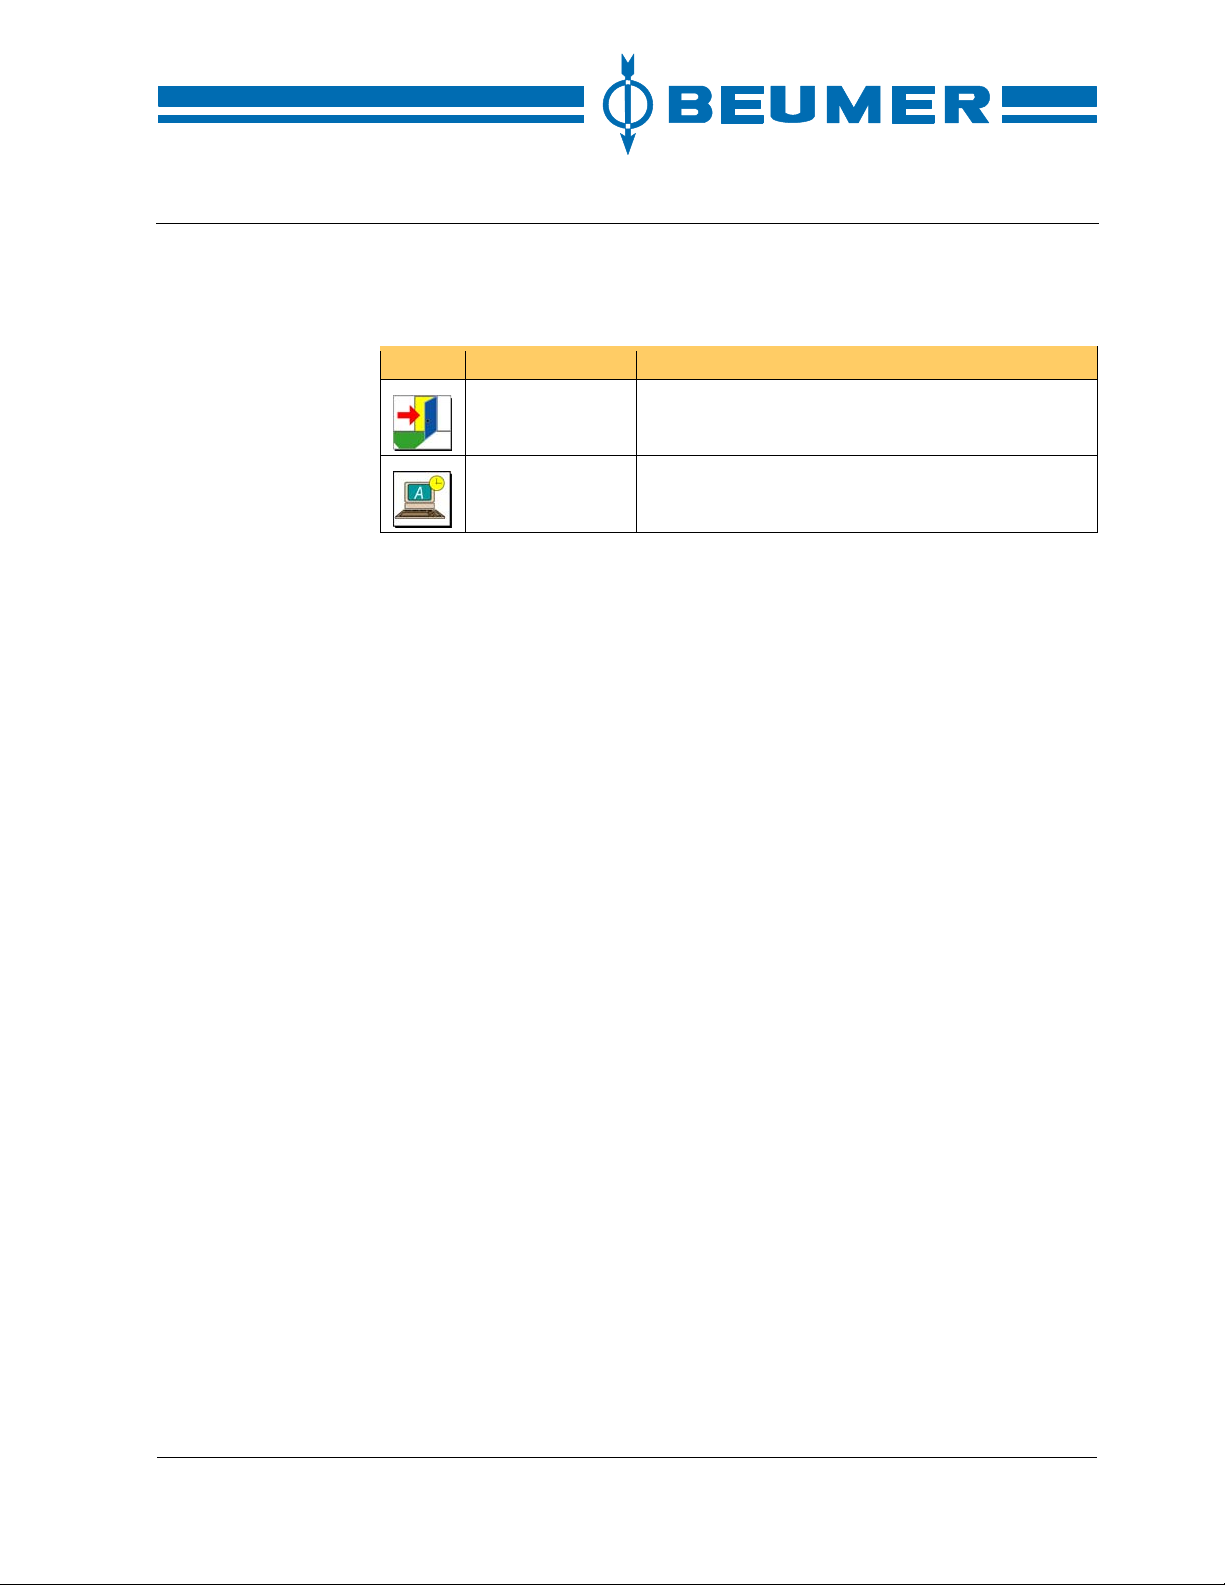
Operation
Reset of fault buffer
BEUMER stretch hood® S
4. Page up and down in the list with the cursor keys.
5. Close the window with the list by pressing the "EXIT" key.
Icon Function Note
EXIT Return to the basic screen.
System settings Call up the user interface for setting the system
parameters.
As soon as the fault buffer is complete, the oldest fault message is deleted each
time a new fault message comes in.
Entries in the fault buffer can also be deleted manually to enable a better overview of the faults.
Delete fault buffer
System messages
1. Press the F5 key.
2. Press the key for the "Display Mode".
3. The fault buffer is opened.
4. Press the "Reset status" key.
System messages are divided into serious and non-serious messages. A serious system message is based on a fault which can only be eliminated by restarting the visual display system. All other faults produce non-serious system messages. System messages are always displayed in a message window. In case of
non-serious system messages, it is possible to close these message windows
by pressing the "Close" key.
A system message consists of a message number and a message text.
86 BA-6090103-EN
19.08.09
Page 87
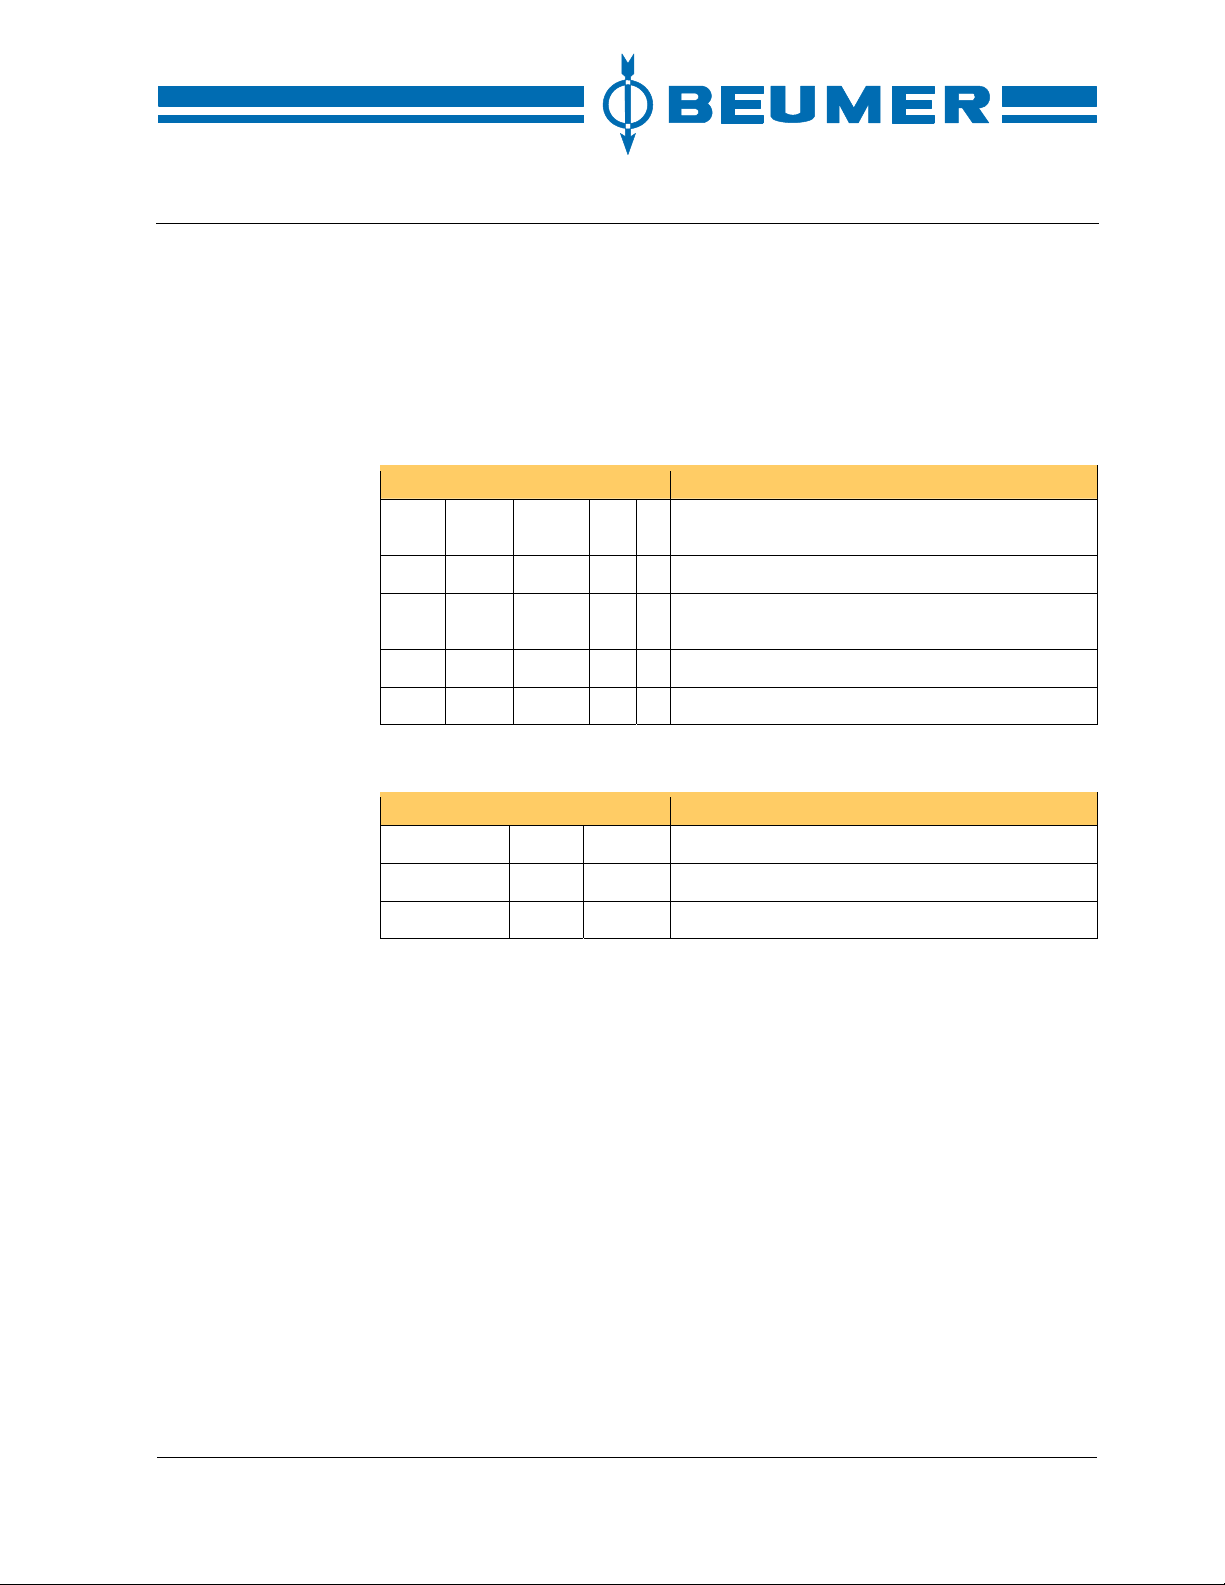
BEUMER stretch hood® S
A
Identifier system
Equipment identifier
Operation
All control cabinets, terminal boxes and equipment are identified individually.
All pieces of equipment are provided with an equipment identifier. The structure
of the equipment identifier is explained in the table, taking a photocell as an example.
Equipment identifier Note
=.D
805
The letter indicates the group identifier in the
circuit diagram.
Numbering of the group of drive units.
+TR
-B
bbreviation for the functional area in which
the group of drive units is used.
The letter identifies the type of equipment.
1 Serial number in the group of drive units.
Numbering of the terminal boxes/terminal strips
Equipment identifier Note
+TR
-X
11 Serial number of the terminal strip.
Abbreviation for the functional area.
The letter identifies the terminal strip.
BA-6090103-EN
19.08.09
87
Page 88

Page 89
BEUMER stretch hood® S
8 Trouble shooting
Safety instructions
Warning!
Instruct the operating personnel before starting maintenance work !
Trouble shooting
Malfunctions
Secure the machine against unintentional re-start! Lock the principal control
elements and remove the key! Attach a warning sign!
Close the access to the working area of the machine/system to unauthorised persons before starting maintenance work! Put up or attach a reference plate pointing to the maintenance work!
Electrical equipment
Work on the electrical equipment of the machine/system is to be carried
out only by skilled electricians in accordance with electrical engineering
rules and regulations.
Warning!
Starting the machine/system without protective devices may result in injury.
Operate the machine/system only if all protective and safety devices are in
place and fully functional!
If the machine/system is operated within the limits of its intended use and the
inspection and maintenance intervals are observed, there will, as a rule, not be
any malfunctions during its operation. If the malfunctions cannot be eliminated,
inform the Technical After-Sales Service.
BA-6090103-EN
19.08.09
For a prompt assistance, the Technical After-Sales Service needs some information.
• Machine number (to be found at the bottom of each page of the operating
instructions)
• When did the malfunction occur?
• Extent of malfunction
• Possible cause of malfunction
89
Page 90
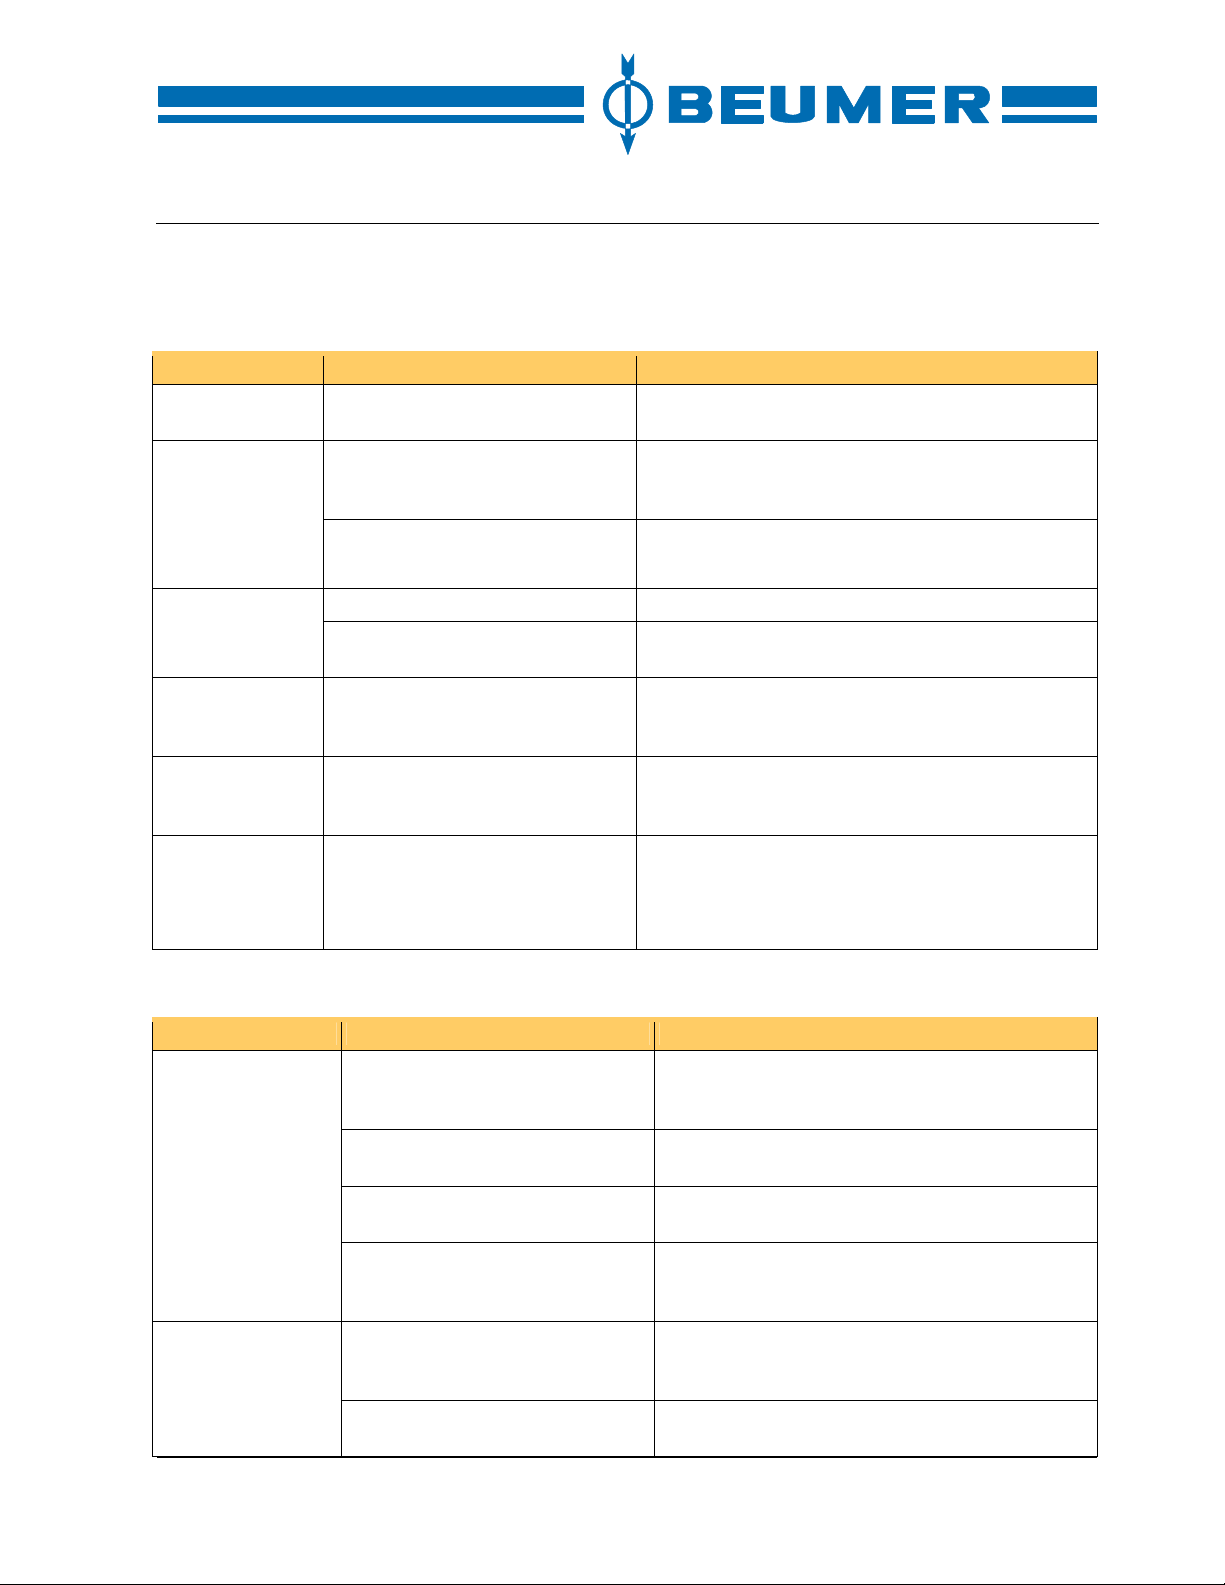
Trouble shooting
A
What to do if ...
Before start-up
Problem Possible cause Trouble-shooting
The stretch hood
does not start
Maintenance
platform not in
position
Local mode selector switch
Disconnector The local disconnector for the
PB address/DP
slave have failed
The stretch hood is not in starting
position.
The maintenance platform is not
in the correct position.
The position of the maintenance
platform is not detected.
The repair mode is selected. De-select the repair mode. Repair mode
The dummy plug has not been
plugged in.
The local mode selector switch for
the drive motor is not in the
Automatic position.
drive motor has been switched
off.
There is no connection to the
client of the Profibus.
Move the system in starting position by the "Starting position" key. Start system.
Push the maintenance platform in the correct position. Check the operating distance and function of
the proximity switch.
• Check the proximity switch.
• Check the wiring.
Insert the dummy plug in its intended place.
Set the local mode selector switch to Automatic.
Switch on the disconnector.
• Check the wiring, function and addressing of
the client.
• Check the settings with the help of the circuit
diagram.
BEUMER stretch hood® S
Failures
Problem Possible cause Trouble-shooting
Emergency stop
Operation stop
90 BA-6090103-EN
The key-operated switch of the
safety doors has been switched
off.
n emergency stop switch has
been activated.
The maintenance switch has
been switched off.
The emergency stop relay in the
control cabinet has been switched
off.
The key-operated switch of the
safety doors has been switched
off.
An operation stop switch has
been activated.
Switch on the key-operated switch again.
Determine the location of the activated emergency stop switch. Eliminate the cause.
Switch on the maintenance switch again.
Press the "Reset emergency stop" key.
Switch on the key-operated switch again.
Determine the location of the activated operation
stop switch. Eliminate the cause.
19.08.09
Page 91
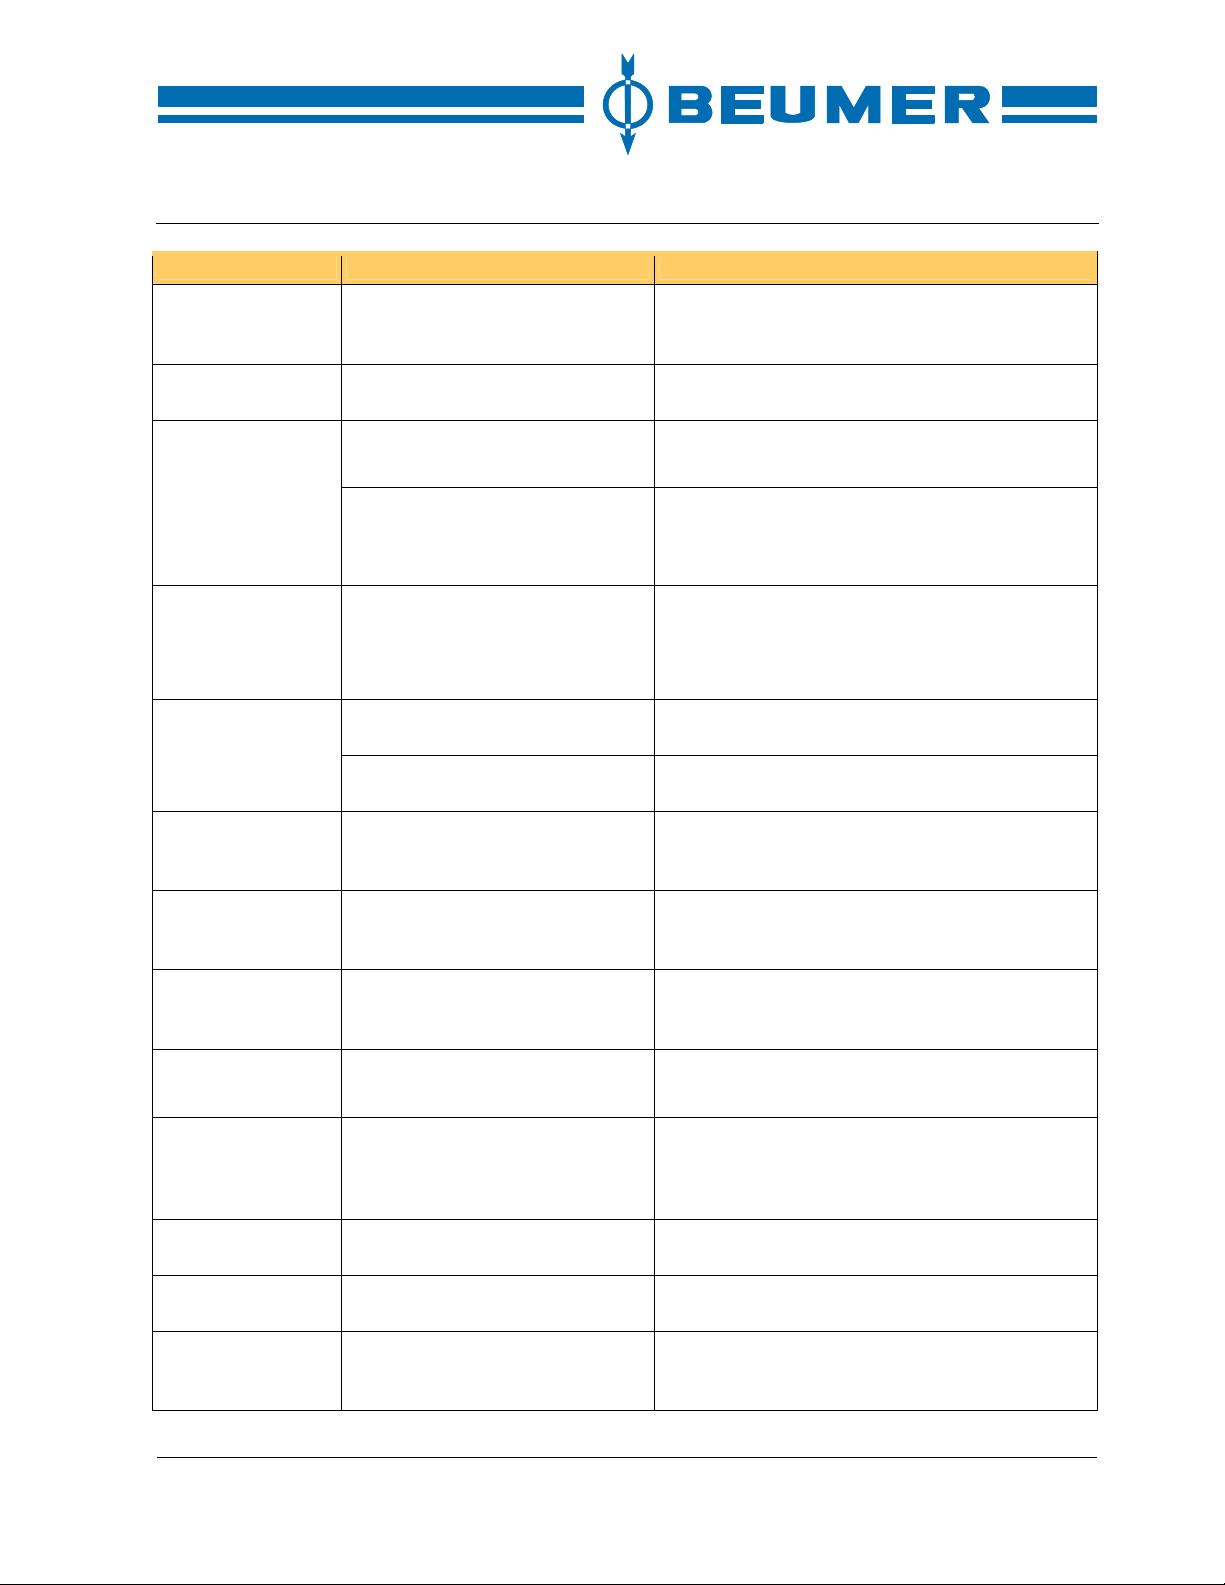
BEUMER stretch hood® S
A
Problem Possible cause Trouble-shooting
The operation stop relay in the
control cabinet has been switched
off.
Maintenance switch The maintenance switch has
been switched off.
The safety photocell
(SLS) has been
tripped.
Muting error of the
safety photocell
Safety bolt of the
stretch frame
Control voltage 230
V not existing
Control voltage 24
V not existing
Compressed air
below 4 bar
Communication
OP-AG has failed
Package not in
position
Film tends to fall
down
Film has torn The film has torn during the
There is still film on
the crimping bow
The ray of the safety photocell
has been interrupted.
The safety photocell is out of
function.
The safety photocell was disabled
for more than 10 minutes.
One safety bolt of the stretch
frame has not moved back.
The limit position of a safety bolt
has not been detected.
The automatic circuit breaker for
the control voltage of 230 V has
failed.
The automatic circuit breaker for
the control voltage of 24 V has
failed.
The air pressure has fallen below
4 bar.
The connection between control
and control terminal is interrupted.
The package is not centrally below the stretch hood.
Film has moved back too far. Insert the film once again (see How to insert the
stretching process.
diffuse scan has still detected
film on the crimping bows before
lifting the stretch frame.
Press the "Reset operation stop" key.
Switch on the maintenance switch again.
Activate the reset key on the evaluator.
Ensure that nobody is in the safety area.
• Readjust the safety photocell.
• Check the wiring.
• Activate the reset key on the evaluator.
• Take any foreign matters out of the safety
area.
• Check and adjust the disabling photocells
(see the Safety chapter).
Check the pneumatic cylinder for sluggish
movement.
Check the proximity switches.
Find out the cause of the overload and eliminate
it. Then switch on the automatic circuit breaker
again.
Find out the cause of the overload and eliminate
it. Then switch on the automatic circuit breaker
again.
Check the air pressure and set the correct pressure. Check the pressure switch and set it, if
required.
• Check the wiring.
• Check the plug-in connectors.
Position the package centrally under the stretch
hood by hand. The photocells on the conveyor
used for checking the position of the pallet must
be occupied.
film).
Start the "Starting position" function, remove the
torn film and repeat the stretching process.
Remove the film from the crimping bows. Reset
the fault and start the machine/system once
again.
Trouble shooting
BA-6090103-EN
19.08.09
91
Page 92
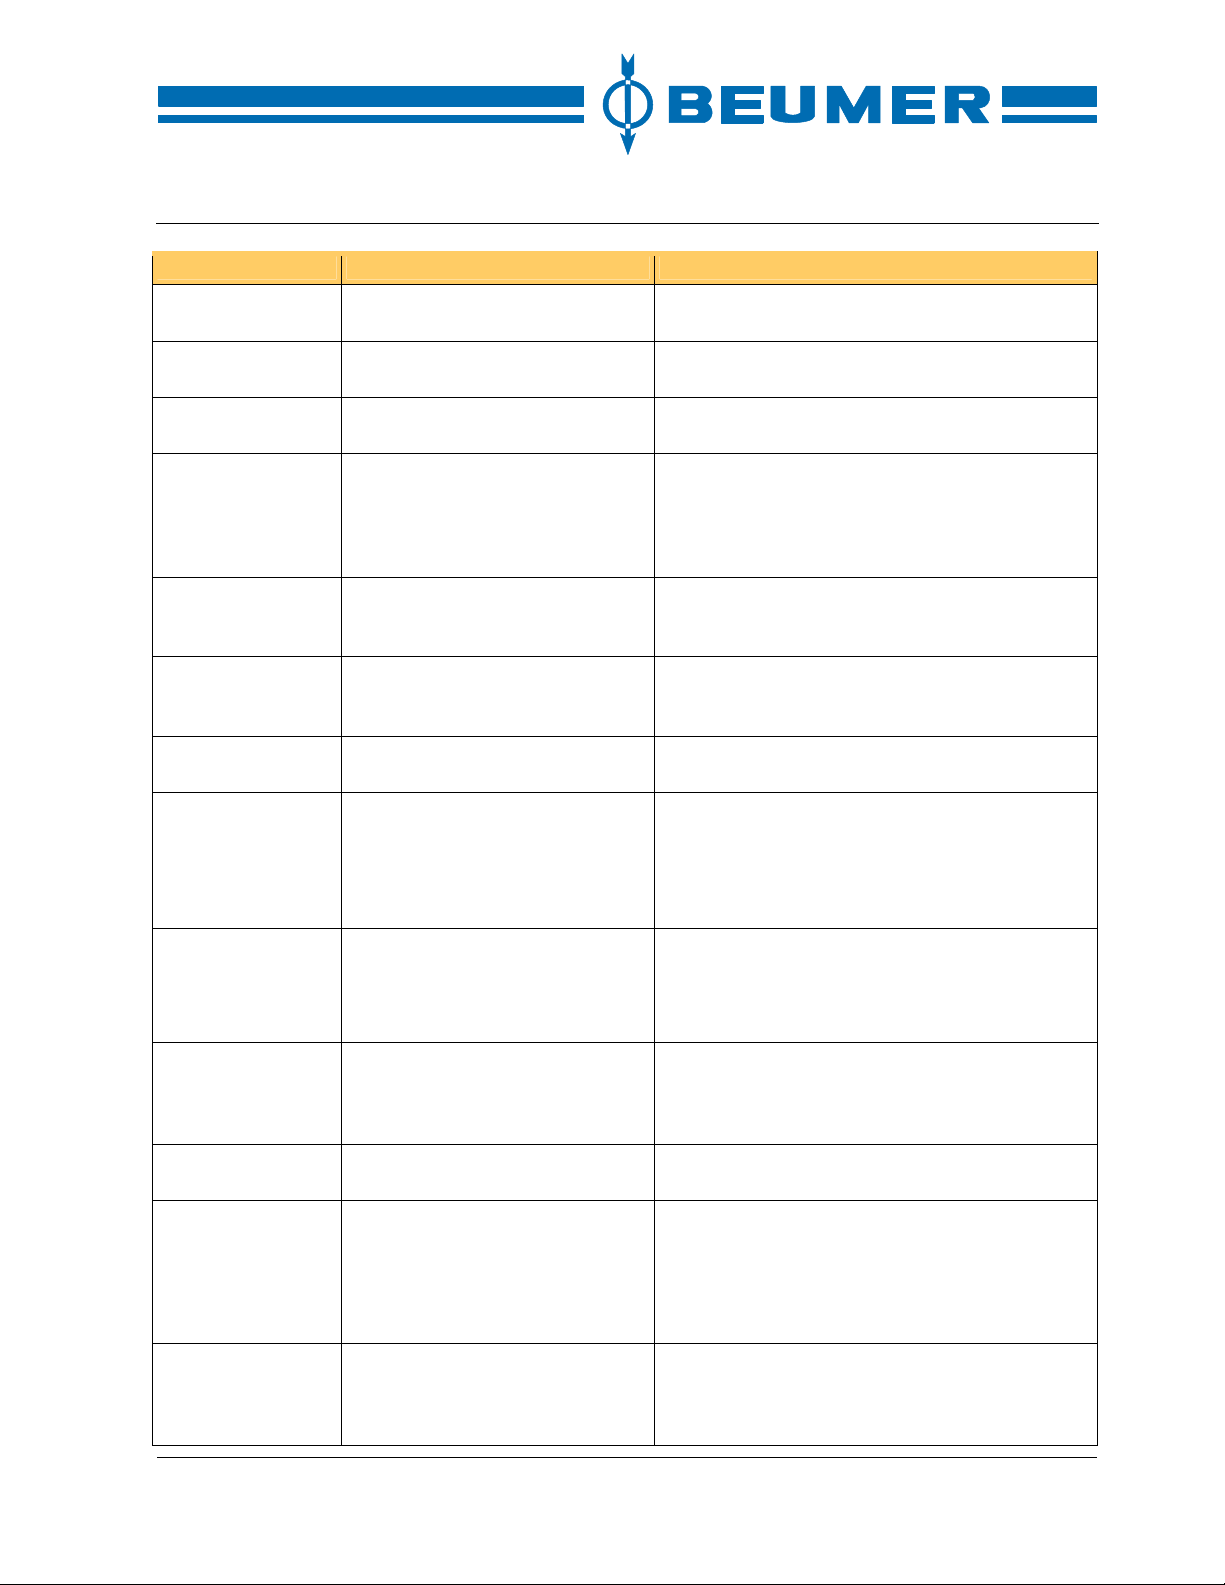
Trouble shooting
BEUMER stretch hood® S
Problem Possible cause Trouble-shooting
The film roll drive
runs too long
The film roll is
empty
Thermistor protection
Thermostat of the
sealing rail
Ultrasonic sensor
for height measuring
Stretching heads
have set down
Motor protection A drive motor is overloa de d. Find out the cause of the overload and eliminate
Malfunction of a
frequency converter
The film roll drive is not disconnected.
There is no film on the film roll. Insert a new film roll (see How to insert the film).
A drive motor has overheated. Find out the cause of the overheating and elimi-
The thermostat of the sealing rail
has failed.
The ultrasonic sensor for height
measuring is not ready for operation.
One of the spring bar limit
switches on the stretching heads
has been activated.
The frequency converter is not
ready for operation.
Check the function of the film monitoring switch
and the proximity switch.
nate it. Reset the fault at the tripping unit.
• Check the Teflon fabric belt of the sealing
rail.
• Check the cables for wire breakage.
(See the manufacturer's documents.)
Check the functioning of the ultrasonic sensor.
Find out the cause and eliminate it.
it. Switch on the motor protecting switch again.
Read the reason for the fault on the display of
the frequency converter.
AS-i transmitters
(proximity
switches/photocells)
Transmitters (proximity
switches/photocells
without AS-i)
Running time monitoring
Error of pulse train The function of one of the prox-
Pulse counting
(proximity switch)
The proximity switch/photocell is
not ready for operation.
One of the proximity
switches/photocells is defectiv e.
The module does not reach the
position required.
imity switches is faulty.
The drive motor has been connected, and the proximity switch
has not received any impulses
within the preset time.
Further information on the fault occurred and its
elimination is indicated in the manufacturer's
manual.
Check the function of the transmitter, its setting
and wiring.
When replacing the AS-i transmitter, observe
the addressing in any case.
Check the function of the transmitters, their setting and wiring.
Check the function of the cylinder and the valves
as well as the setting of the reed contacts.
• Check the function of both proximity
switches.
• Check the sense of rotation of the dr ive motor.
• Ensure that the cable sets are not mixed up.
Check the drive motor for sluggish movement.
Check the contactors, the wiring or the proximity
switch, if required. The operating distance is to
be set to about 1 mm.
92 BA-6090103-EN
19.08.09
Page 93
BEUMER stretch hood® S
Problem Possible cause Trouble-shooting
Pulse counting
(angle transmitter)
Wrong sense of
rotation
Overtravel time The brake power of the brake is
The drive motor has been connected, and the angle transmitter
has not received any impulses
within the preset time.
The drive motor rotates in the
wrong direction.
too low.
Check the drive motor for sluggish movement.
Check the contactors, the wiring or the angle
transmitter, if required.
Check the sense of rotation and function of the
transmitter.
Check the function of the brake of the drive unit
and correct its adjustment, if required.
Malfunctions
Problem Possible cause Trouble-shooting
The stretch hood
has failed without
fault message.
No film hood is
drawn over the
package.
The pallet transport system has
been disconnected.
The stretch hood is not in starting
position.
A storage post is not occupied. Check the photocells for dirt and correct setting.
The "without stretching" option
has been selected for the pallet
transport system.
• Switch on the pallet transport system.
• Take the pallets from the take-away post.
Move the system in starting position by the "Start-
ing position" key.
Check the wiring, if required.
• Switch to "with film" in the "Programme preselection" window.
• De-select the "without stretching" option in the
"Preselection" window.
Trouble shooting
BA-6090103-EN
19.08.09
93
Page 94

Page 95
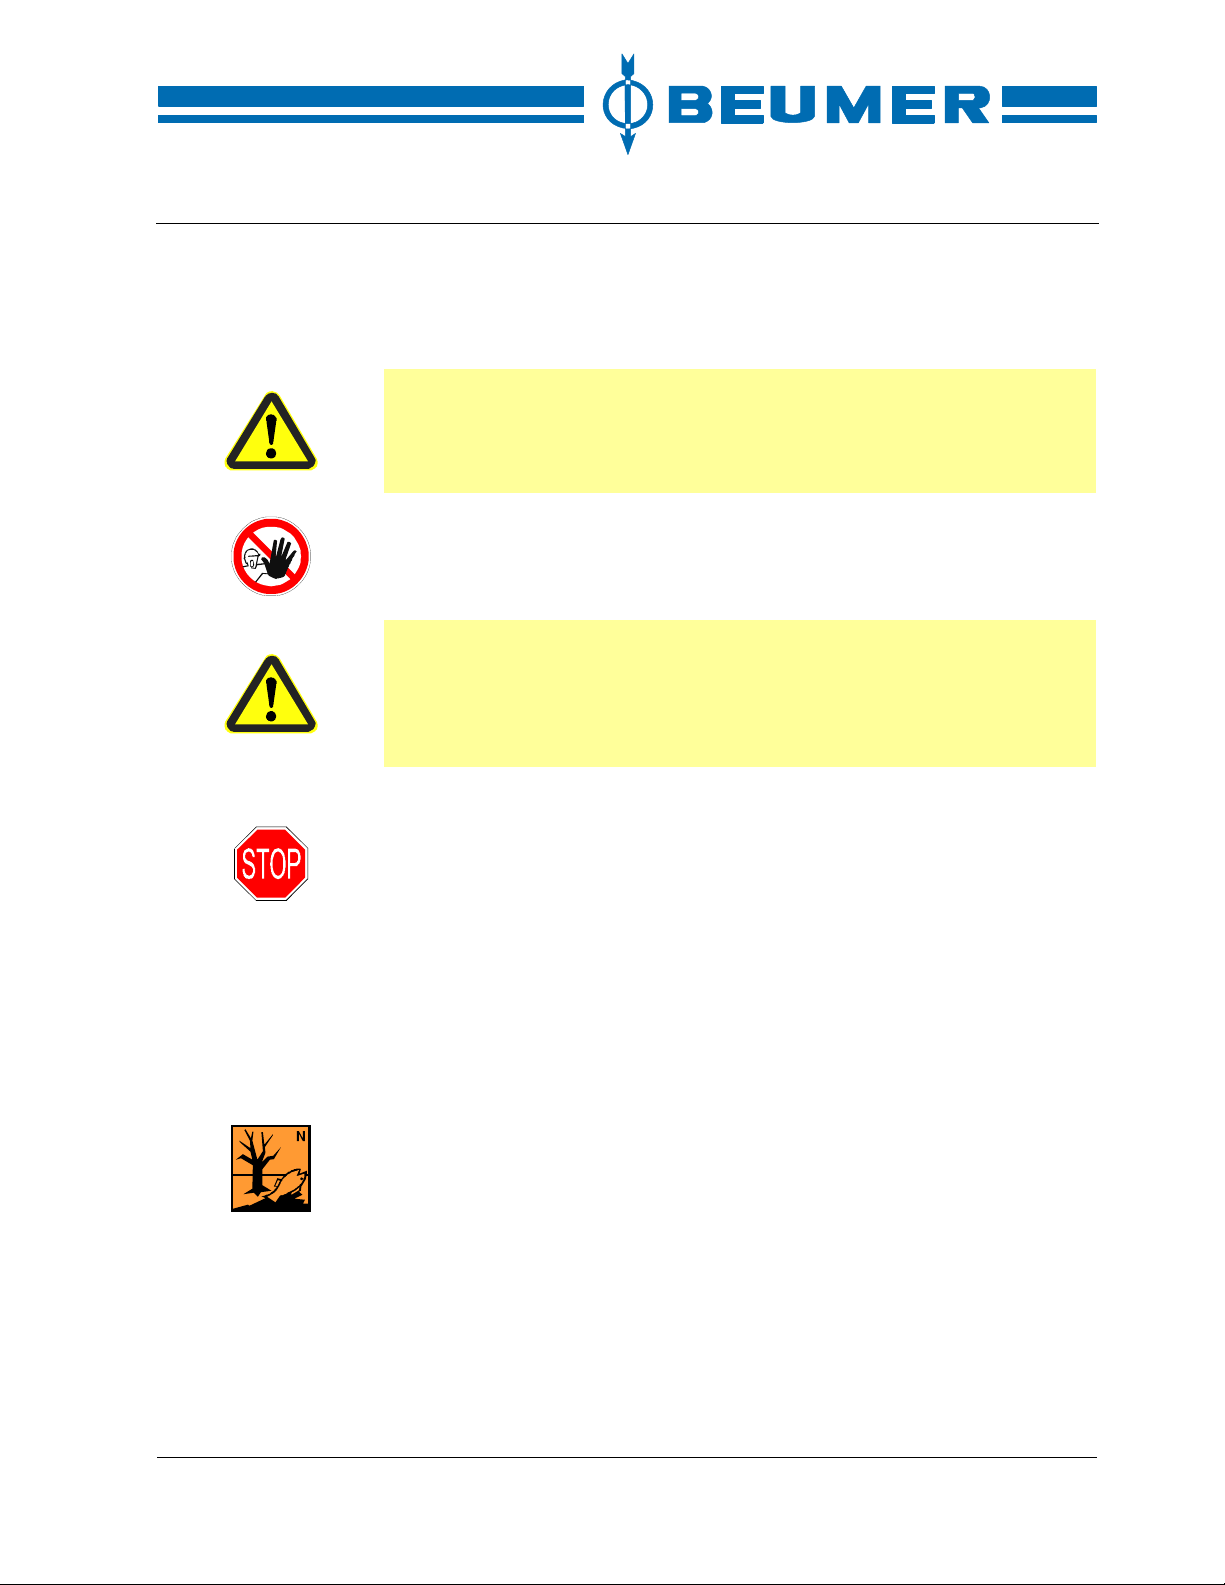
BEUMER stretch hood® S
9 Maintenance
Safety instructions
Warning!
Instruct the operating personnel before starting maintenance work !
Maintenance
Secure the machine against unintentional re-start! Lock the principal control
elements and remove the key! Attach a warning sign!
Close the access to the working area of the machine/system to unauthorised persons before starting maintenance work! Put up or attach a reference plate pointing to the maintenance work!
Warning!
Compressed-air systems which have not been ventilated may lead to serious physical injury during maintenance work on the machine/system!
Before starting maintenance work, ensure that the pneumatic and hydraulic
equipment of the machine/system is depressurised!
Electrical equipment
Work on the electrical equipment of the machine/system is only to be car-
ried out by skilled electricians in accordance with electrical engineering
rules and regulations.
Important notes:
• Check the electrical equipment at regular intervals!
• Re-fasten loosened connections!
• Exchange damaged lines and cables immediately!
• Always keep the control cabinet closed!
BA-6090103-EN
19.08.09
Always adhere to the legal regulations for a correct disposal of operating
resources when carrying out work! In particular, substances such as
grease, oil, hydraulic oil and cleaning agents containing a solvent jeopardise the ground water. These substances must not penetrate into the soil or
the sewerage system.
Collect, store, transport and dispose of ecologically harmful substances in suitable containers!
95
Page 96

Maintenance
BEUMER stretch hood® S
Inspection
Inspection list
Interval Subassembly Work / checks to be carried out
Annually Frames, steel structures and
machine parts
Every six months Pedestal bearing units and
flanged bearing units
Every six months Connecting elements Check:
Quarterly Idlers
Quarterly Crimping and stretching un it
Visual check:
• Signs of corrosion
• Deformation of subassemblies
• Welding seams for cracks
• Repair the coat of paint, if required.
Bearing units without grease nipple are provided
with permanent lubrication.
• Check the fastening.
• Unusual noise during operation? Replace the
complete bearing unit.
• Check the nut locks for completeness and
function.
• Check the dynamically loaded screws for interference fit.
• Do all idlers rotate?
Replace the idlers which do not rotate.
• Have the idlers been correctly aligned and
fastened?
• Can the rollers on the crimping bow be turned
easily?
• Are the touch-down switches deformed?
• Can wear and tear be detected on the crimping
and stretching unit?
Monthly Sealing bar Visual check:
• Is the film cut evenly? If not, the knife must be
replaced.
• Does the Teflon fabric belt show burnt spots,
caking or holes? If so, the Teflon fabric belt
must be replaced.
• Is the sealing seam regular? An irregular sealing seam or points which are not sealed point
to a defective strip heater.
The Teflon fabric belt, the strip heater and
the rubber strip must always be replaced
together.
96 BA-6090103-EN
19.08.09
Page 97

BEUMER stretch hood® S
Maintenance
Inspection list
Interval Subassembly Work / checks to be carried out
Monthly Pneumatic components Air service unit:
• Are the connections tight?
• Has the correct operating pressure been set?
• Check the condensate level and drain off the
condensate.
Cylinder:
• Are the connections tight?
• Are the proximity switches correctly fastened
and functional?
Monthly Toothed gears and rack The following parameters are to be checked:
• Fastening
• Damage to the toothed gears
• Ensure that the lubricating film on the teeth is
sufficient. Use grease for open gear drives according to OGPF 0 N-20, i.e. adhesive lubricants without bitumen of the NLGL class 0.
Monthly Photocells The following parameters are to be checked:
• Have the photocell supports been correctly
fastened? Retighten loose screw and bolt connections.
• Do the photocells function? Replace defective
photocells.
• Are the photocells dirty? Eliminate any dirt on
the photocells.
Monthly Proximity switch The following parameters are to be checked:
• Operating distance
• Function
• Fastening
At the beginning
of the shift
Depending on
the application;
brake motors at
least every 3000
hours
Emergency stop switch/start-up
warning
Geared motors
Observe the manufacturer's op-
erating instructions!
Check:
• Is there an acoustic start-up warning?
• Is an easy access to all emergency stop controls ensured?
Gear unit:
• Are there oil stains under the gear unit? If so,
seal the leakage and correct the oil level.
• Check fastening and alignment.
• Unusual noise during operation? Check the
bearings.
BA-6090103-EN
19.08.09
97
Page 98

Maintenance
BEUMER stretch hood® S
Inspection list
Interval Subassembly Work / checks to be carried out
Motor:
• Check the cable entries and the temperature.
• Unusual noise during operation? Check the
bearings.
• Clean the cooling fins and air inlet openings.
• Clean the brake and check the working air gap.
Every 700 operating hours
or monthly
Chain drive
Information on the work to be
carried out in the Maintenance
and Lubrication chapters.
Visual check:
• Does the chain run straight?
• Does the chain sag by more than 1 to 2 % of
the centre distance?
• Can wear and tear be detected on the sprocket
wheels and the chain?
• Is the chain excessively dirty?
• Is the lubricant on the chain sufficient?
98 BA-6090103-EN
19.08.09
Page 99
BEUMER stretch hood® S
Maintenance
General maintenance instructions
The basic requirement for a safe operation of the machine/system is its regular
maintenance. The work set out in the inspection lists must be carried out and the
indicated maintenance intervals must be kept. Maintenance also includes a
regular cleaning according to the operating conditions.
Maintenance
Maintenance work must be carried out by skilled personnel only.
How to maintain motors
Motors have to be maintained according to the manufacturer's instructions. The
documents are included in the annex to these operating instructions.
How to maintain gear units
Gear units have to be maintained according to the manufacturer's instructions.
The documents are included in the annex to these operating instructions.
How to order spare parts
The spare parts list and spare parts drawings are included in a separate chapter
at the end of the operating instructions. The spare parts list includes the data of
the order so as to ensure a correct attribution of the spare parts.
In case of inquiries or orders, please send a copy of the spare parts list including
information on the spare parts required to our spare parts department. You will
find the address in the introduction at the beginning of the operating instructions.
Chain drive
In order to achieve an efficient power transmission and the usual service life of
the chain, the correct chain tension and the indicated lubrication intervals must
be kept. The elongation of new chain drives is especially strong at the beginning
of their operating time. Therefore, the chain tension is to be checked more often
within this time. When the chain is taken up, the chain sag must be about 1 to 2
% of the centre distance. An excessive tension of the chain drive reduces the
service life of the drive components.
BA-6090103-EN
19.08.09
the chain drive is taken up.
Warning!
Risk of crushing between sprocket wheel and chain!
The sprocket wheels must be aligned and the shafts must remain parallel when
Work must be carried out only by skilled personnel when the machine is disconnected! Re-mount all safety covers after having completed the work!
99
Page 100
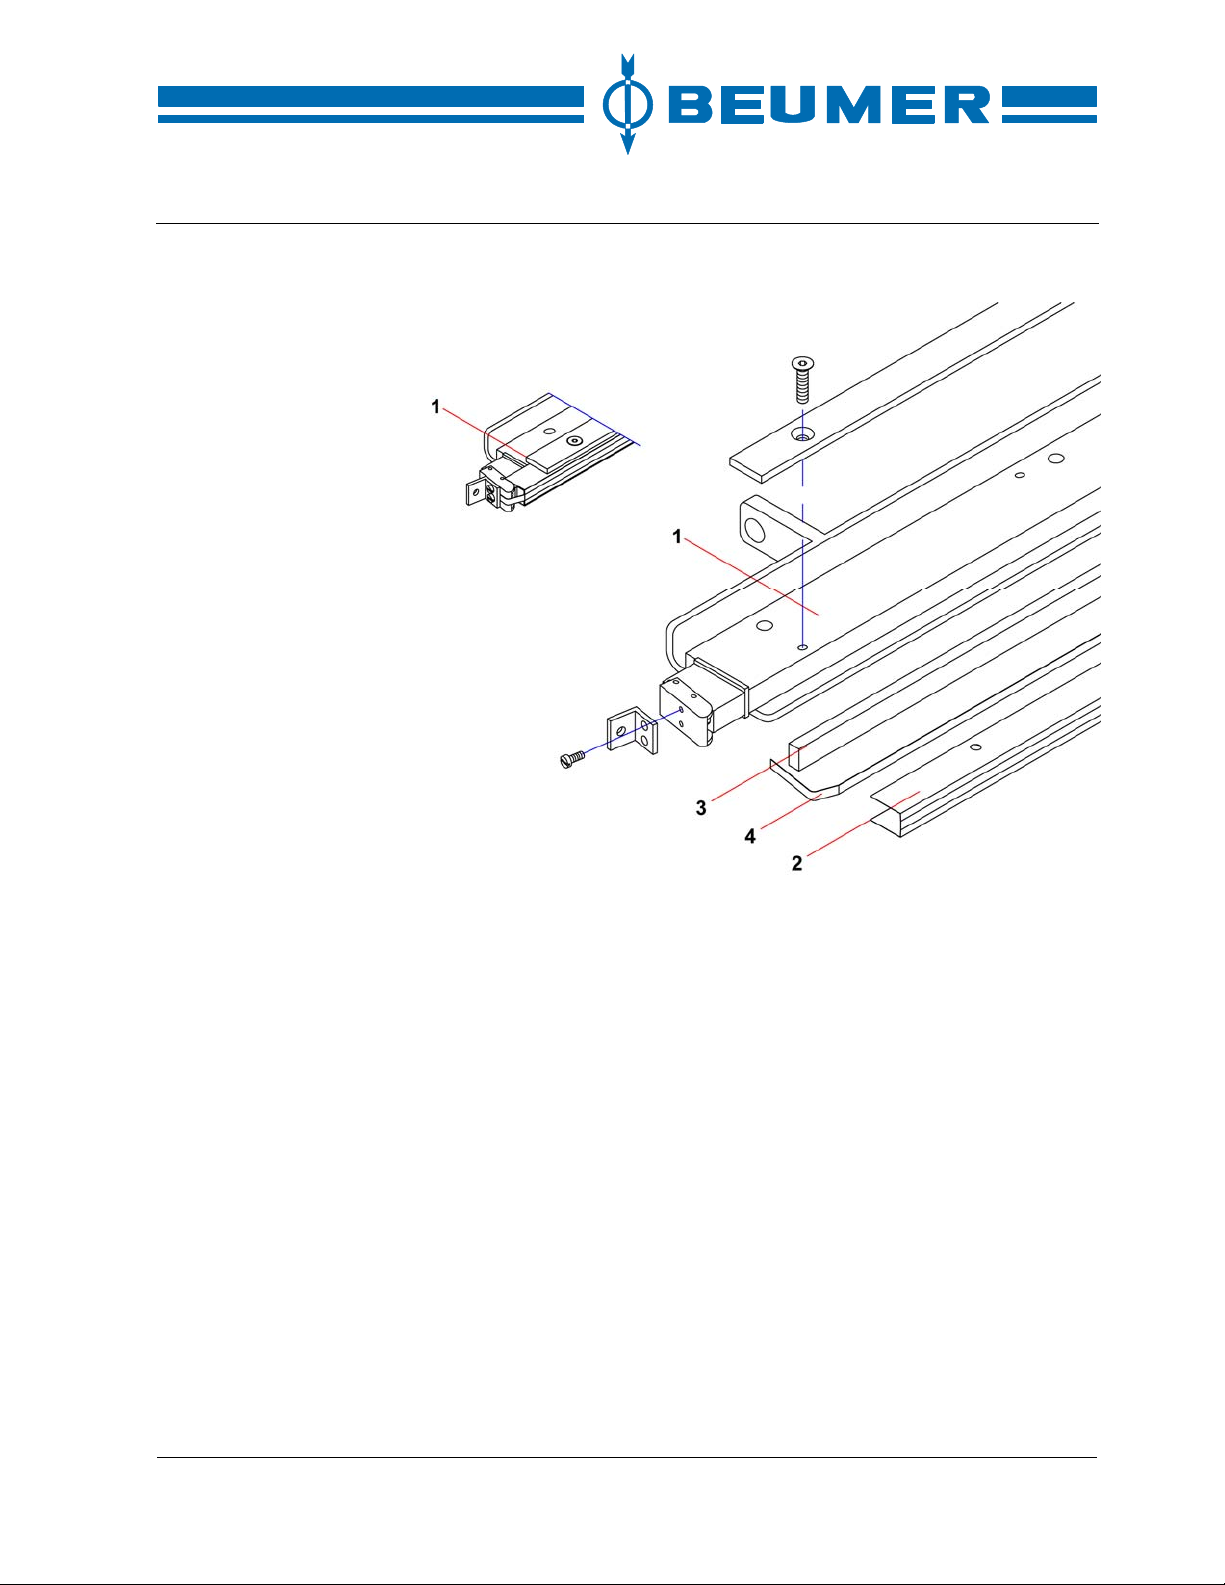
Maintenance
How to maintain the sealing rail
BEUMER stretch hood® S
How to proceed
1 Sealing rail
2 Teflon fabric belt
3 Silicone rubber
4 Strip heater
The Teflon fabric belt is to be checked for damage after about 80 operating
hours. In case of burnt spots or holes, the Teflon fabric belt must be replaced. If
the Teflon fabric belt must be replaced, the strip heater must also be checked. If
any pressure marks, cracks, mechanical damage, kinks or blue-colored patches
can be detected, the strip heater must be exchanged as well. If the silicone rubber between strip heater and sealing rail is defective, it must be replaced. For
this, the complete sealing rail must be dismounted.
1. Loosen the wiring on both sides and lift the sealing bar out of the machine.
2. Remove the clamping plate and the Teflon fabric belt.
3. Loosen both clamping angles.
4. Remove the strip heater and the silicone rubber.
5. Place the new silicone rubber on the sealing rail.
6. Fasten the strip heater with the clamping angles. The rounded edges of the
strip heater must point towards the Teflon fabric belt. The strip heater must be
stretched tightly.
100 BA-6090103-EN
19.08.09
 Loading...