

Page 1
U
A
Q
L
P
I
T
Y
O
T
SUMMER BREEZE
G
E
U
E
T
A
R
N
A
220
240
Volts
Bedienungsanleitung
Mode d’emploi
Handleiding
DE
FR
NL
50
Watts
50
Hz
INSTRUCTION MANUAL
EN
Instruction manual
Istruzioni per l’uso
IT
Manual del usuario
ES
DHB42W
Page 2

Page 3

DE
HERZLICHEN GLÜCKWUNSCH!
Herzlichen Glückwunsch zum Erwerb dieses Bestron-Produktes.
In dieser Gebrauchsanweisung erläutern wir die Funktion und die
Benutzung. Lesen Sie somit diese Gebrauchsanweisung aufmerksam
durch, bevor Sie das Gerät benutzen. Verwenden Sie das Gerät nur
so, wie es in der Gebrauchsanweisung beschrieben ist. Bewahren Sie
die Gebrauchsanweisung danach sorgfältig auf.
Bei einem Defekt:
Sollte das Gerät unverhofft einen Defekt aufweisen, versuchen Sie
dann nie, die Reparatur selbst vorzunehmen. Lassen Sie Reparaturen
immer von einem qualifizierten Mechaniker ausführen.
Benutzung durch Kinder:
• Dieses Gerät darf von Kinder älter als 8 Jahren und Personen mit
vermindertem körperlichen, sinnlichen oder geistigen Vermögen
oder Mangel an Erfahrung und Kenntnis benutzt werden, aber nur
unter Beaufsichtigung oder wenn sie über die sichere Benutzung
des Gerätes aufgeklärt wurden und dessen mögliche Gefahren
verstehen.
• Die Reinigung und Wartung dürfen nicht von Kindern durchgeführt
werden, außer wenn sie älter als 8 Jahre sind und beaufsichtigt
werden.
• Halten Sie das Gerät und das Kabel außerhalb der Reichweite von
Kindern bis 8 Jahren.
• Kinder müssen im Auge behalten werden, um sich dessen sicher
zu sein, dass sie nicht mit dem Gerät spielen.
WAS SIE ÜBER ELEKTROGERÄTE WISSEN MÜSSEN
• Kontrollieren Sie, ob die Netzspannung der auf dem Typenschild
eines Elektrogerätes angegebenen Netzspannung entspricht, bevor
Sie es benutzen.
• Kontrollieren Sie, ob die Steckdose, an die Sie ein Elektrogerät
anschließen, geerdet ist.
• Stellen Sie Elektrogeräte immer an einer Stelle auf, an der sie nicht
fallen können, und auf einen stabilen und ebenen Untergrund.
• Bestimmte Teile eines Elektrogerätes können warm oder manchmal
heiß werden. Berühren Sie diese nicht, um Verbrennungen zu
vermeiden.
• Sorgen Sie dafür, dass Ihre Hände trocken sind, wenn Sie ein
Elektrogerät, ein Kabel oder einen Stecker berühren.
• Elektrogeräte müssen zur Vermeidung einer Feuergefahr ihre
Wärme abgeben können. Sorgen Sie somit dafür, dass das Gerät
3
Page 4

DE
ausreichend frei ist und nicht mit brennbarem Material in Kontakt
kommen kann. Elektrogeräte dürfen nie bedeckt werden.
• Sorgen Sie dafür, dass Elektrogeräte, Kabel oder Stecker nicht mit
Wasser in Berührung kommen.
• Tauchen Sie Elektrogeräte, Kabel oder Stecker nie in Wasser oder
eine andere Flüssigkeit.
• Fassen Sie Elektrogeräte nie an, wenn sie ins Wasser gefallen
sind. Ziehen Sie direkt den Stecker aus der Steckdose. Benutzen
Sie das Gerät nicht mehr.
• Sorgen Sie dafür, dass Elektrogeräte, Kabel und Stecker nicht mit
Hitzequellen, wie zum Beispiel eine heiße Kochplatte oder offenes
Feuer, in Berührung kommen.
• Lassen Sie Kabel nie über den Rand der Anrichte, Arbeitsplatte
oder einen Tisch hängen.
• Ziehen Sie den Stecker immer aus der Steckdose, wenn Sie das
Elektrogerät nicht benutzen.
• Wenn Sie den Stecker aus der Steckdose ziehen, ziehen Sie dann
am Stecker selbst und nicht am Kabel.
• Kontrollieren Sie regelmäßig, ob das Kabel des Elektrogerätes
noch intakt ist. Benutzen Sie das Gerät nicht, wenn das Kabel
Beschädigungen aufweist. Wenn das Kabel beschädigt ist, muss
es vom Hersteller, einem technischen Kundendienst oder einer
Person mit einer ähnlichen Qualifikation ersetzt werden, um jede
Gefahr zu vermeiden.
• Das Gerät darf nicht mittels eines externen Zeitschalters oder
durch ein separates System mit Fernbedienung eingeschaltet
werden.
WAS SIE ÜBER DIESES GERÄT WISSEN MÜSSEN
• Seien Sie vorsichtig, wenn Sie das Gerät im Freien benutzen.
• Benutzen Sie das Gerät nie in feuchten Räumen.
• Reinigen Sie das Gerät nach der Benutzung gründlich (siehe
Reinigung und Wartung).
• Unser Rat: lassen sie die Installation von einem qualifizierten
Elektriker vornehmen, der die Stärke der Tragenden Deckenglieder
messen und den richtigen elektrischen Anschluss herstellen kann.
• Um das Verletzungsrisiko zu verringern, verwenden sie nur die
beiden Stahlschrauben (sowie den Sicherungsring), die zur
Montage mitgeliefert wurden.
• Um das Verletzungsrisiko zu verringern, biegen sie die Flügelhalter
nicht, wenn sie sie installieren, die Flügel ausgleichen oder den
Ventilator reinigen. Zwischen die rotierenden Ventilatorflügel dürfen
keine Fremdkörper gelangen.
4
Page 5
DE
UMWELT
• Werfen Sie Verpackungsmaterial, wie zum Beispiel Plastik
und Karton, in die dazu bestimmten Container.
• Dieses Produkt am Ende der Nutzungsdauer nicht als
normalen Haushaltabfall entsorgen, sondern bei einer
Sammelstelle zur Wiederverwendung von elektrischem und
elektronischem Gerät. Achten Sie auf das Symbol auf dem
Produkt, der Gebrauchsanweisung oder Verpackung.
• Die Materialien können wie angegeben wiederverwendet
werden. Durch Ihre Hilfe bei der Wiederverwendung, der
Verarbeitung der Materialien oder anderen Formen der
Nutzung des alten Gerätes leisten Sie einen wichtigen
Beitrag zum Schutz unserer Umwelt.
• Informieren Sie sich bei der Gemeinde nach der richtigen
Sammelstelle bei Ihnen in der Nähe.
CE-KONFORMITÄTSERKLÄRUNG
Dieses Produkt erfüllt die Anforderungen gemäß den Europäischen
Richtlinien.
R. Neyman
Quality control
5
Page 6
DE
FUNKTION - Allgemein
1 2 3
5
11
7
8
9
10
4
6
Das Gerät ist nur für den Hausgebrauch vorgesehen und nicht für die professionelle Verwendung.
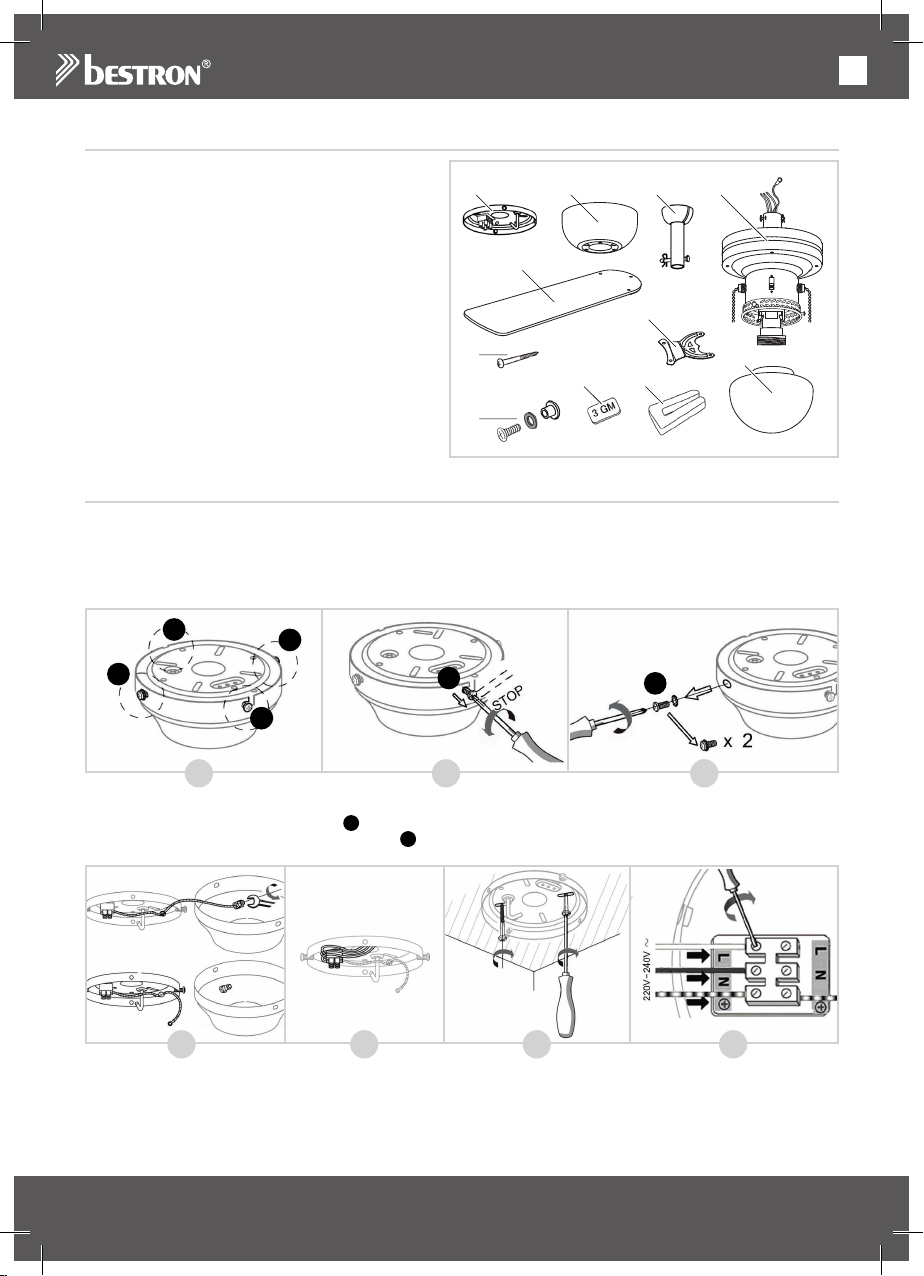
1. Montageplatte
2. Zierkappe
3. Stab
4. Motor
5. Lüfterflügel (4x)
6. Flügelhalter (4x)
7. Schrauben montageplatte (2x)
8. Schrauben-Satz Flügel (12x)
9. Ausgleichsgewichte (2x)
10. Ausgleichsklemme
11. Glaskugel
MONTAGE - Installieren der Montageplatte
ACHTUNG:
• VERGEWISSERN SIE SICH, DASS DER HAUPTSTROM IMMER ABGESCHALTET IST, BEVOR
SIE MIT DER INSTALLATION DES DECKENVENTILATORS BEGINNEN.
• Stellen Sie sicher, dass der Lüfter an einem Platz hängt, wo der Abstand zwischen den Lüfterflügel und
dem Fußboden mindestens 2,30m beträgt.
1
2
1. In der Verpackung ist die Montageplatte an der Zierkappe mit 4 Schrauben montiert (siehe Abbildung A).
2. Schrauben Sie die 2 Schrauben 1 halb los (B).
3. Schrauben Sie danach die 2 Schrauben 2 ganz los und trennen Sie die beiden (C).
D E F G
4. Entfernen Sie die Montageplatte und den Erde-Draht (gelb-grün) von der Zierkappe (D).
5. Stecken Sie danach die Drähte von der Zimmerdecke durch die Öffnung der Montageplatte (E).
6. Montieren Sie die Montageplatte an der Zimmerdecke (F). Stellen Sie sicher, dass die Montageplatte
robust genug montiert ist, um ein Gewicht von mindestens 23 kg zu tragen.
2
1
1
A
B C
2
6
Page 7
DE
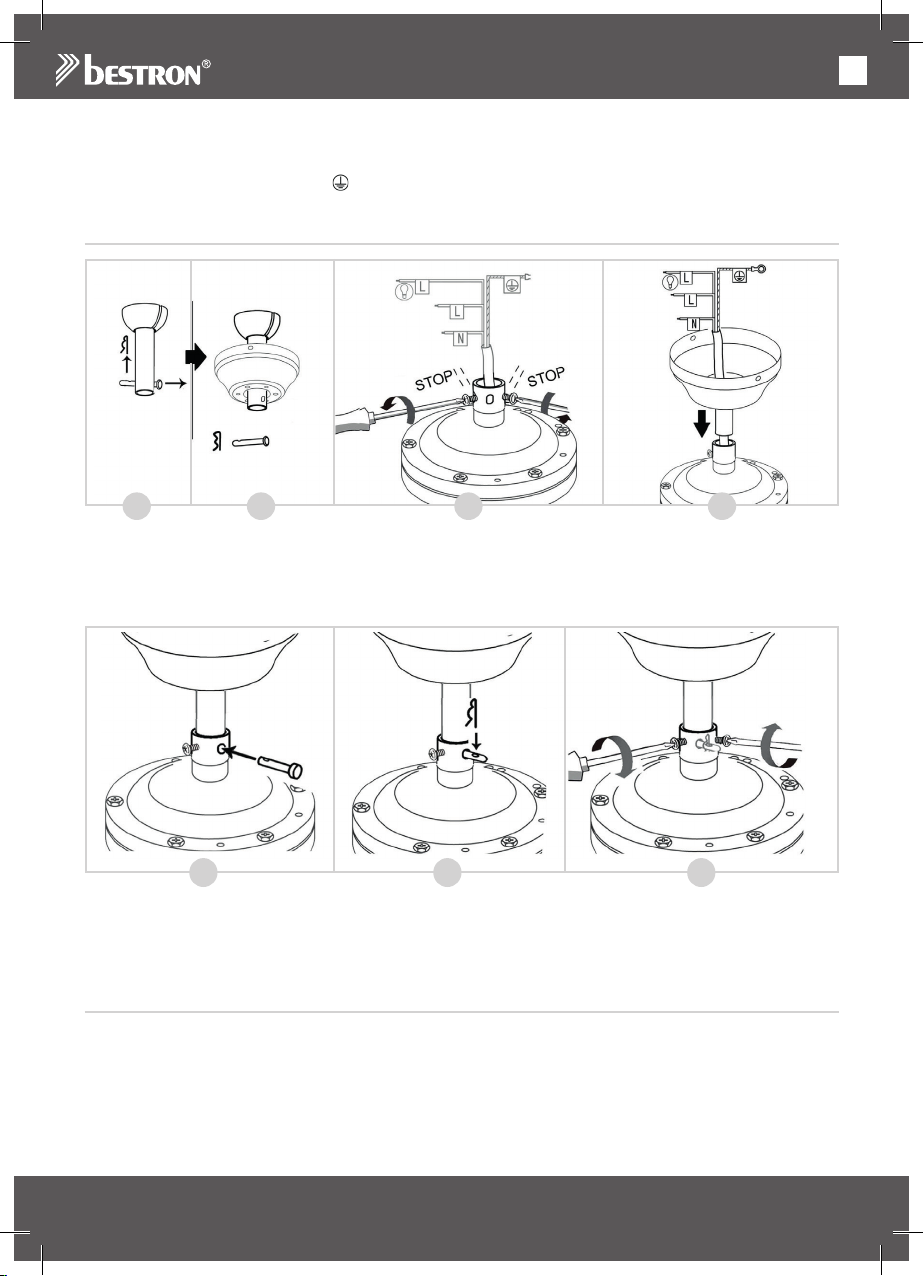
7. Schrauben Sie nun die Drähte auf dem richtigen Weg gut in die Lüsterklemme (G):
• BlauerDraht→N
• BrauneoderschwarzeDraht→L
• Erde-Draht(gelb-grün)→
MONTAGE - Montieren der Stab am Motor
H J KI
1. Entfernen Sie den Splint und Bolzen vom Stab (siehe Abbildung H).
2. Stecken Sie den Stab durch die Zierkappe (I).
3. Schrauben Sie die 2 Schrauben vom Motor los (J).
4. Entfernen Sie den Kabelbinder von den Drähten und stecken Sie die Drähte vom Motor durch den Stab
(K). Stellen Sie sicher, dass die Kabel nicht beschädigt werden.
L
5. Stecken Sie nun der Bolzen in den Stab (L) und fixieren Sie ihn mit dem Splint (M).
6. Drehen Sie danach die 2 Schrauben im Motor wieder fest (N).
Der Stab ist nun richtig am Motor montiert.
M
N
MONTAGE - Montieren der Flügelhalter am Lüfterflügel
Die Lüfterflügel dieses Deckenventilators könnten sowohl mit den weißen sowie mit der Holz-farbigen Seite
nach unten montiert werden.
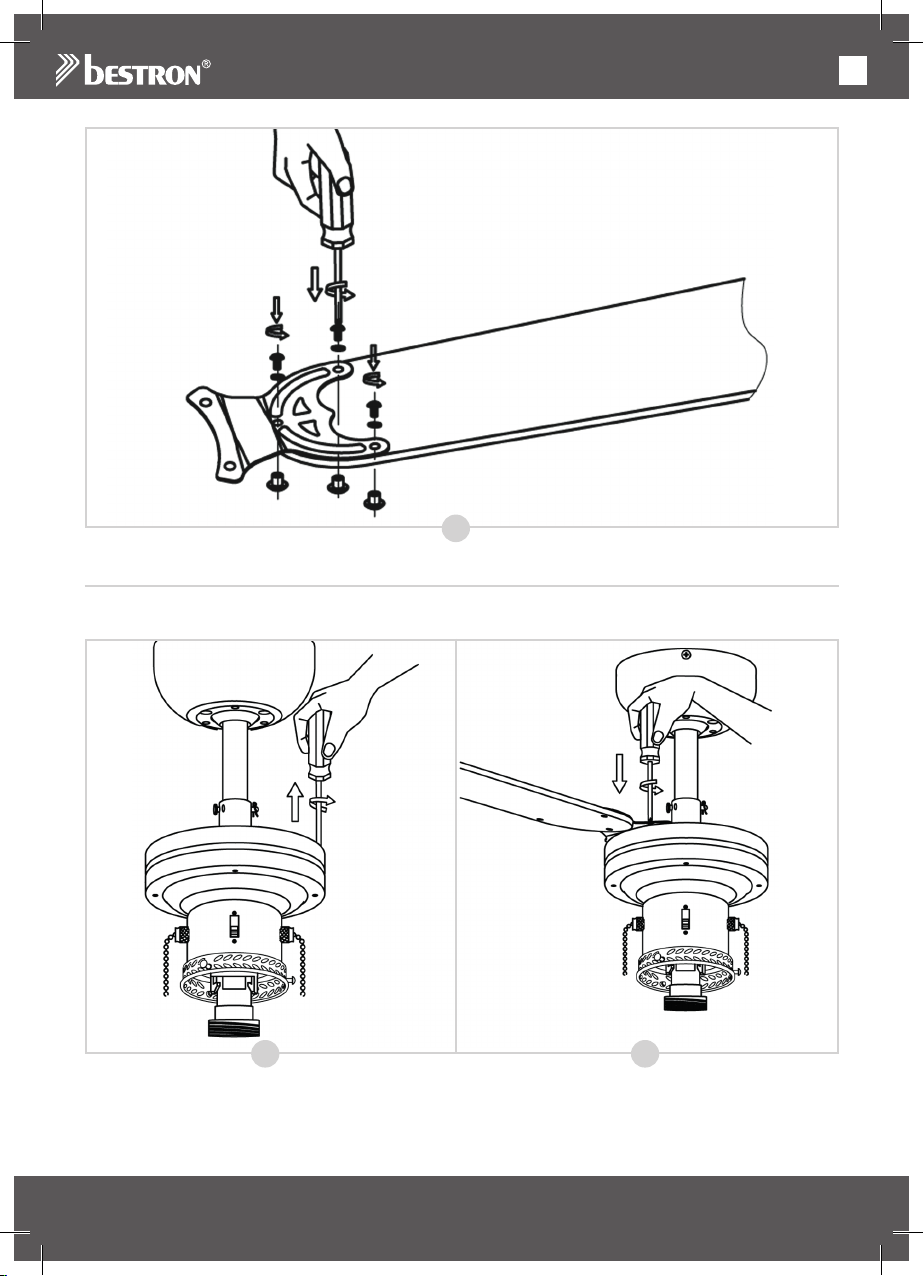
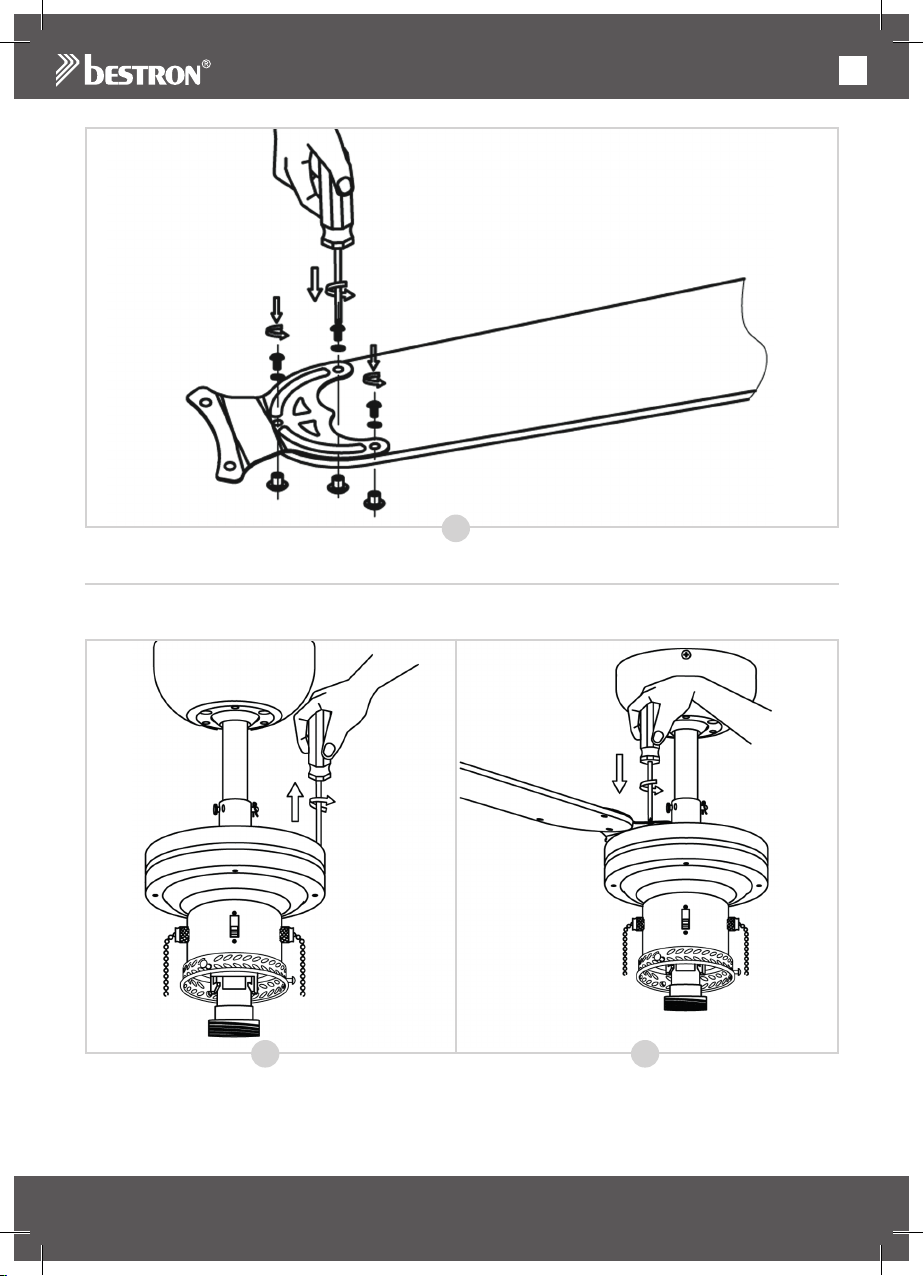
1. Legen Sie ein Flügelhalter auf einen Lüfterflügel, wie in Abbildung O dargestellt.
2. Stecken Sie ein Schraube mit roten Ring durch den Flügelhalter und den Lüfterflügel.
3. Stecken Sie eine Hutmutter an der Unterseite des Lüfterflügels durch und schrauben Sie danach die
Schraube in der Hutmutter fest.
7
Page 8
DE
O
MONTAGE - Montieren der Lüfterflügel am Motor
1. Die Schrauben für die Montage der Lüfterflügel sind schon in dem Motorgehäuse montiert. Schrauben
Sie ihn los und entfernen Sie ihn aus dem Motorgehäuse (siehe Abbildung P).
P Q
2. Legen Sie einen Lüfterflügel mit Flügelhalter auf das Motorgehäuse und schrauben Sie ihn fest mit zwei
Schrauben (Q).
3. Wiederholen Sie diesen Vorgang für die anderen drei Lüfterflügel.
Die Lüfterflügel sind nun richtig am Motor montiert.
8
Page 9
DE
MONTAGE - Montieren der Ventilator am Montageplatte
R
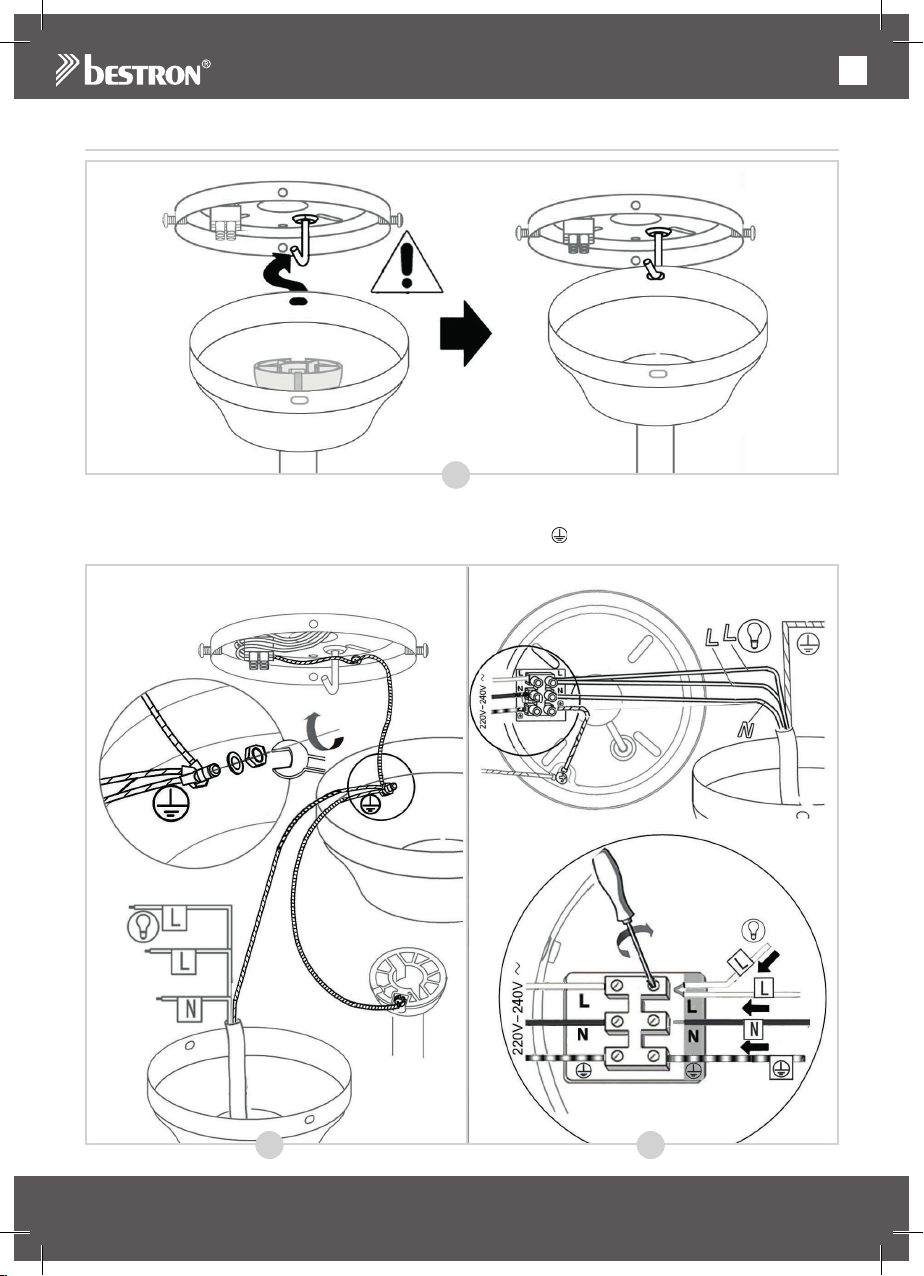
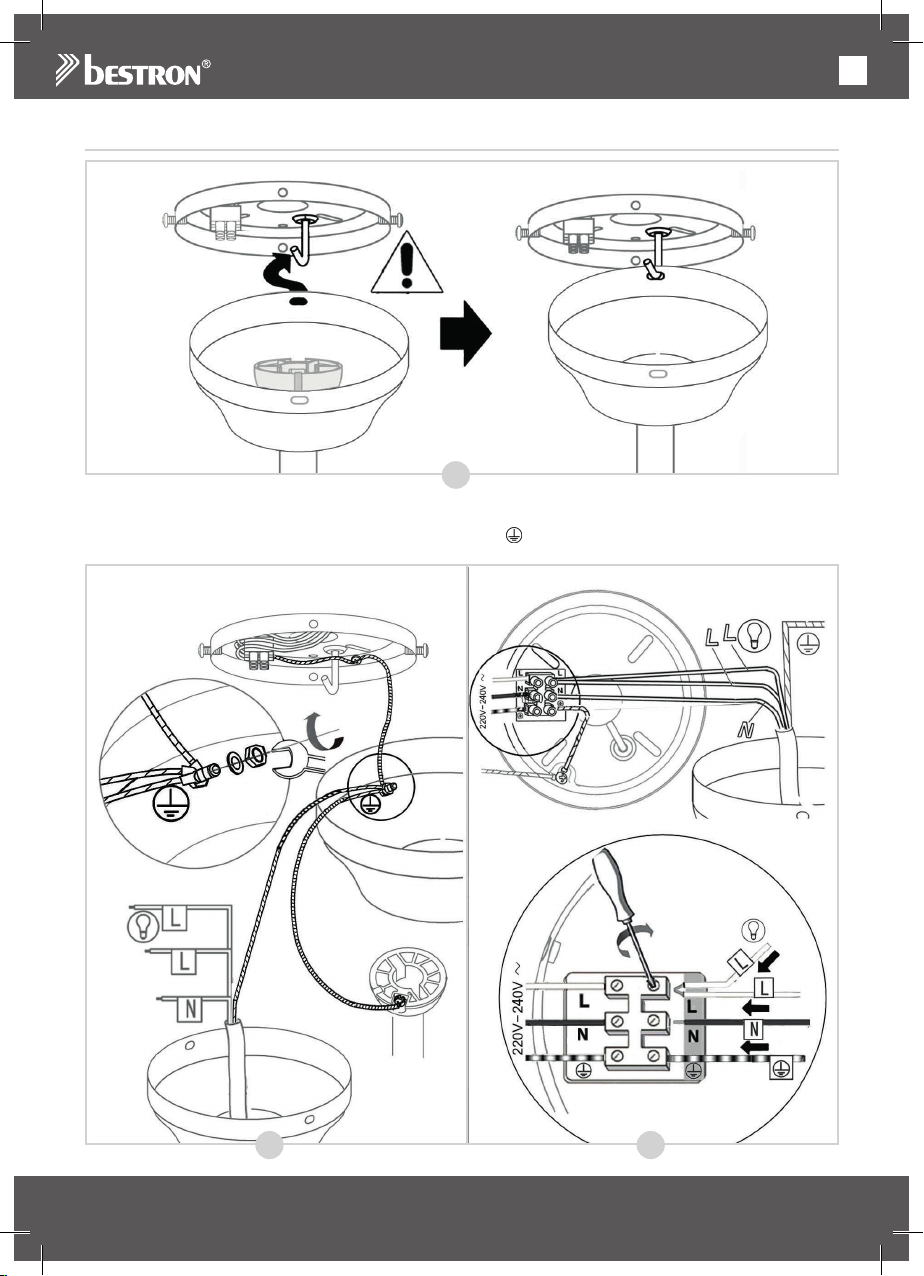
1. Heben Sie den Ventilator auf und stecken Sie ihn in den “J-Haken” auf der Montageplatte durch die
Öffnung der Zierkappe (siehe Abbildung R). Sie haben nun beide Hände frei für die Montage der Drähte.
2. Montieren Sie alle Erde-Drähte (gelb-grün) an der Sierkappe ( , S).
S T
9
Page 10
DE
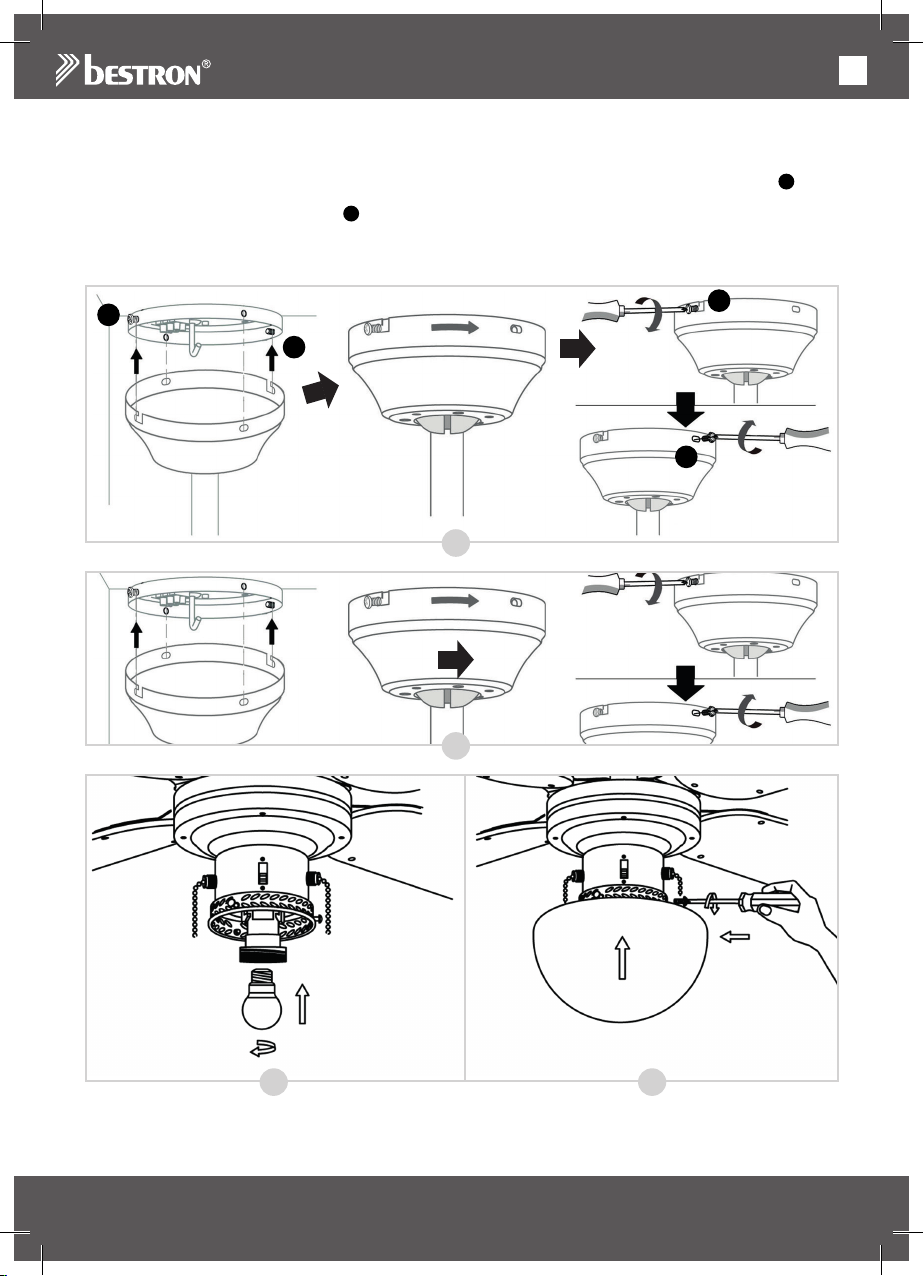
3. Schrauben Sie nun die Drähte vom Stab auf dem richtigen Weg gut in die Lüsterklemme (T):
• BlauerDraht→N
• BrauneundschwarzeDrähte→L
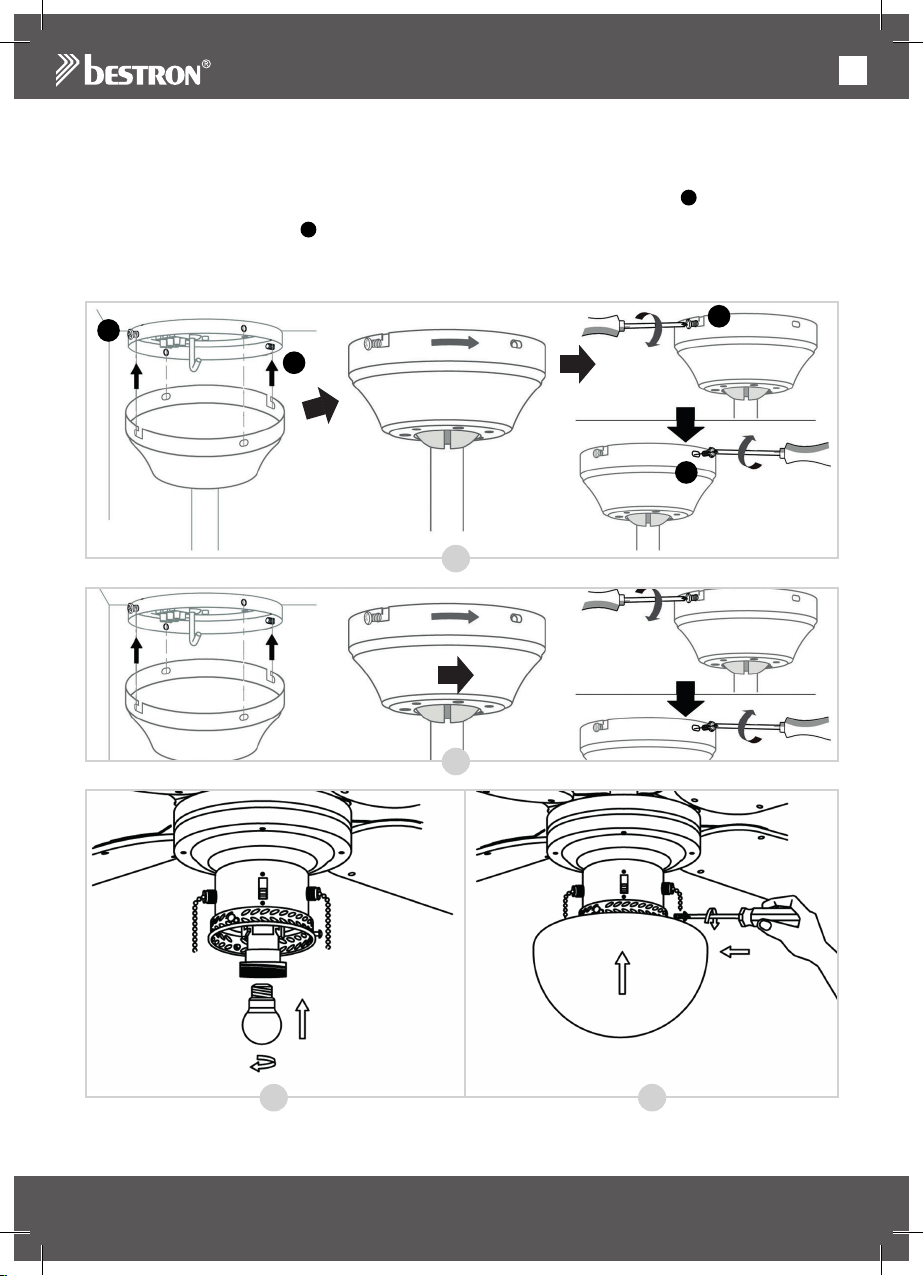
4. Entfernen Sie den Ventilator vom “J-Haken”, befestigen den Ventilator über die 2 Schrauben 1 in die
Montageplatte und drehen die Schrauben fest (U).
5. Schrauben Sie die 2 Schrauben 2 züruck in die Montageplatte und drehen Sie auch fest (U).
6. Fixieren Sie den Stab wie dargestellt in Abbildung V.
7. Drehen Sie nun eine Lampe Typ E27 (Max. 60 Watt) in die Fassung (W).
8. Fixieren Sie den Glaskugel nun vorsichtig mit die 3 Schrauben (schon in dem Motorgehäuse montiert) (X).
1
1
U
V
1
2
W X
Der Ventilator ist nun richtig montiert.
Sie können jetzt der Hauptstrom zurück einschalten.
10
Page 11
BENUTZUNG - Kontrolle
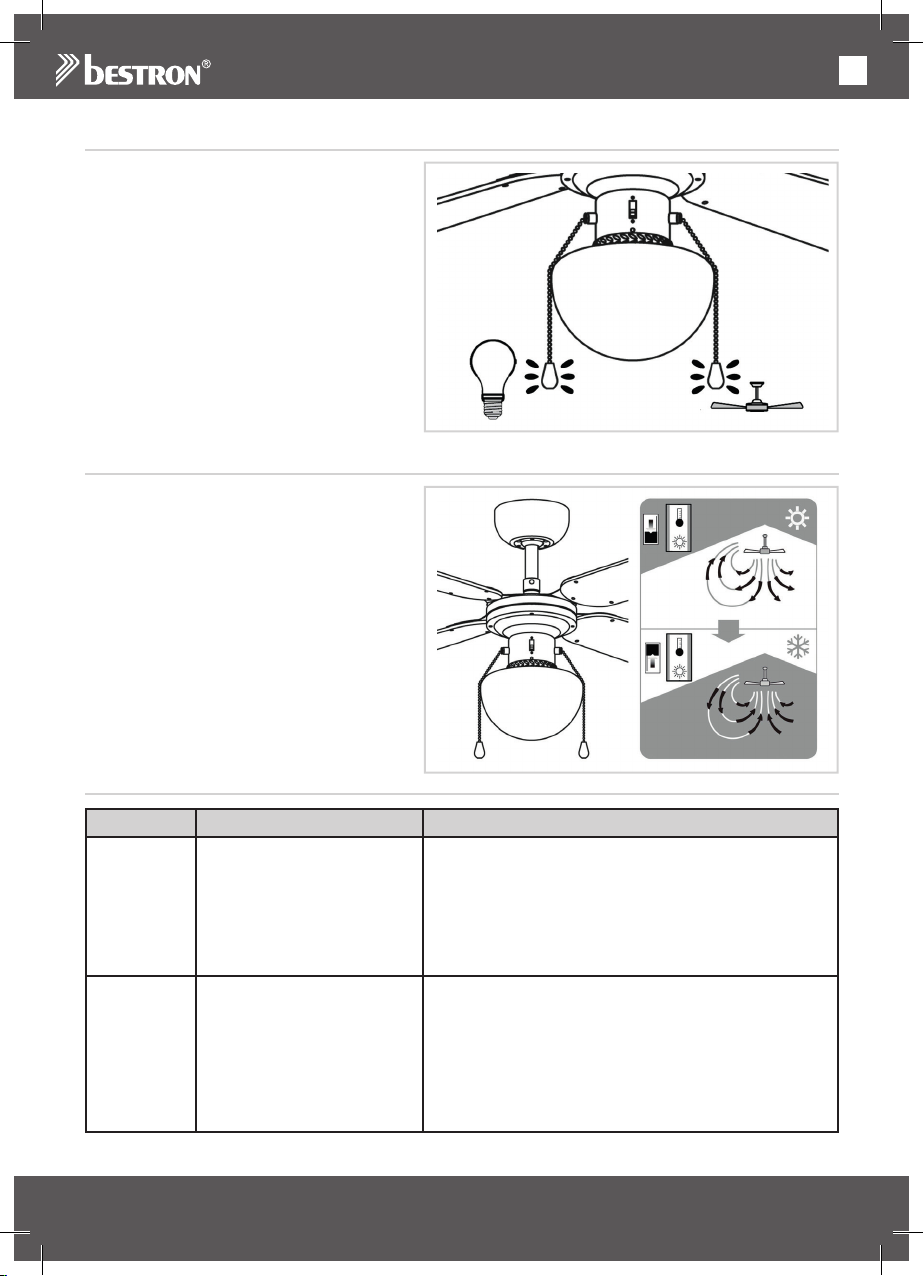
Der Ventilator hat 3 Geschwindigkeiten:
Schnell, Mittel und Langsam.
1. Ziehen Sie der Zugkette.
Der Ventilator schaltet sich in die höchste
Geschwindigkeit.
2. Ziehen Sie der Zugkette noch einmal. Der
Ventilator schaltet sich nach Mittel.
3. Ziehen Sie der Zugkette noch einmal. Der
Ventilator schaltet sich nach Langsam.
4. Ziehen Sie der Zugkette noch einmal. Der
Ventilator schaltet sich aus.
BENUTZUNG - Sommer/Winter-Modus
Der Ventilator ist mit einem Sommer- und
Winter-Umschaltung ausgestattet. Im SommerModus, bläst der Ventilator Luft direkt nach
unten für eine kühle Brise. Im Winter-Modus
zirkuliert der Ventilator die Luft durch den
Raum, zum Beispiel um die Wärme von Ihrer
Heizung zu verbreiten.
1. Schalten Sie den Schiebeschalter nach
unten für den Sommer-Modus.
2. Schalten Sie den Schiebeschalter nach
oben für den Winter-Modus.
DE
FEHLERBEHEBUNG
Problem Wahrscheinliche Ursache Empfohlene Maßnahme zur Behebung
Ventilator
dreht sich
nicht
Der
Ventilator
macht Krach
Der
Ventilator
wackelt
oder zittert
übermäßig
1. Ventilator ist verbunden mit
ein Lichtschalter, welche
ausgeschaltet ist.
2. Hauptstrom ist nicht zurück
eingeschaltet oder ist
ausgefallen.
3. Stromleitungsverbindung
zum Ventilator lose.
1. Montageplatte ist nicht
richtig montiert.
2. Stab ist nicht richtig fixiert.
1. Prüfen Sie die Lichtschalter.
2. Prüfen Sie die Hauptstromschalter.
3. Prüfen Sie die Verbindungen des Leitungsdrahtes
zum Ventilator.
ACHTUNG: Gewährleisten Sie, dass der Hauptstrom
abgeschaltet ist, vor öffnen des
Deckenventilators!
1. Prüfen Sie ob der Montageplatte richtig montiert ist.
Siehe ‘Montage - Installieren der Montageplatte’.
2. Prüfen Sie ob der Stab richtig fixiert ist. Siehe
‘Montage - Montieren der Stab am Motor’.
11
Page 12
DE
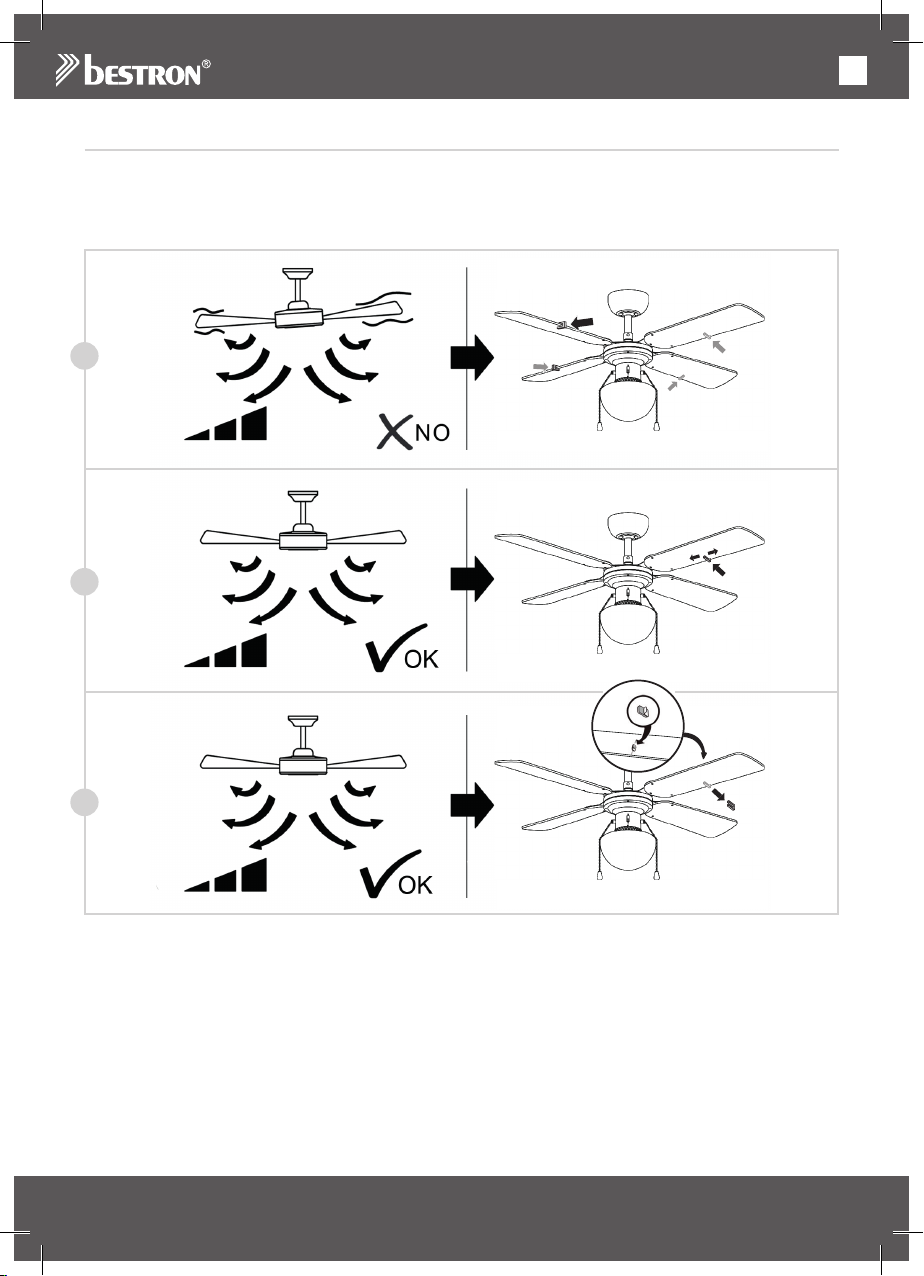
FEHLERBEHEBUNG - Die Lüfterflügel ausgleichen
Die Qualität des Ventilators wird durch uns aufmerksam überwacht, aber es ist immer möglich dass er aus
dem Gleichgewicht kommt. Sollte der Ventilator instabil sein oder übermäßig zittern, beachten Sie zuerst die
Schritte unter ‘FEHLERBEHEBUNG’. Wenn der Ventilator danach noch instabil ist, versuchen Sie gegenüberliegende Lüterflügel miteinander auszuwechseln. Danach schalten Sie den Ventilator ein. Wenn der
Ventilator danach immer noch instabil läuft, verwenden Sie bitte den Gleichgewicht-Satz:
A
B
C
1. Schalten Sie den Ventilator ein in der Geschwindigkeit wo das Schütteln am höchsten ist. Schalten Sie
den Ventilator aus.
2. Wählen Sie einen der Lüfterflügel und legen Sie die Ausgleichsklemme auf halbem Weg der geraden
Seite des Lüfterflügels (Abb. A). Schalten Sie den Ventilator wieder ein in der Geschwindigkeit wo das
Schütteln am höchsten ist. Prüfen Sie, ob das Schütteln weniger wird. Schalten Sie den Ventilator aus
3. Wiederholen Sie diesen Vorgang mit jedem Lüfterflügel und überprüfen Sie, welcher Flügel Ihnen die
größte Verbesserung anzeigt.
4. Legen Sie die Ausgleichsklemme noch einmal auf der Lüfterflügel wo Sie die größte Verbesserung
feststellen und schieben Sie die Klemme nach innen oder nach außen auf dem Flügel (B). Schalten Sie
den Ventilator wieder ein in der Geschwindigkeit wo das Schütteln am höchsten ist. Prüfen Sie, ob das
Schütteln weniger wird. Schalten Sie den Ventilator aus.
5. Wiederholen Sie diesen Vorgang und uberprüfen Sie, welche Position der Ausgleichsklemme die größte
Verbesserung anzeigt.
12
Page 13
DE
6. Entfernen Sie die Ausgleichsklemme und kleben Sie eines der beiden Ausgleichsgewichte auf den Lüfterflügel wo die größte Verbesserung festgestellt ist, genau dort, wo sich die Ausgleichsklemme befand (C).
Bitte beachten Sie, dass alle Deckenventilatoren weiterhin leicht schütteln können.
GARANTIEBESTIMMUNGEN
Bestron handhabt unter den folgenden Bedingungen eine Garantie von 60 Monaten ab Kaufdatum gegen
Defekte, die durch Herstellungs- und/oder Materialfehler entstanden sind.
1. Im genannten Garantiezeitraum werden keine Kosten für Arbeitslohn und Material berechnet.
2. Die unter der Garantie ausgeführte Reparatur verlängert nicht die Garantiefrist.
3. Defekte Zubehörteile oder bei Umtausch die defekten Geräte selbst werden automatisch Eigentum
von Bestron.
4. Die Garantie gilt ausschließlich für den ersten Käufer und ist nicht übertragbar.
5. Die Garantie gilt nicht für einen Schaden, der entstanden ist durch:
• Unfälle
• falsche Benutzung
• Verschleiß
• Verwahrlosung
• Fehlerhafte Installation
• Anschluss an eine andere Netzspannung als die, die auf dem Typenschild genannt ist
• Unautorisierte Veränderung
• Von nicht qualifizierten Dritten ausgeführte Reparaturen
• Benutzung entgegen den geltenden gesetzlichen, technischen oder Sicherheitsnormen
• Unsorgfältigen Transport ohne geeignete Verpackung oder anderen Schutz
6. Ein Anspruch auf Garantie kann nicht erhoben werden bei:
• Einem Schaden während des Transports
• Der Entfernung oder Änderung der Seriennummer des Gerätes
7. Von der Garantie ausgenommen sind:
• Kabel
• Lampen
• Zubehörteile aus Glas
8. Die Garantie berechtigt neben dem Ersatz beziehungsweise der Reparatur der defekten Zubehörteile
nicht zu irgendeiner Erstattung eines eventuellen Schadens. Bestron kann nie für einen eventuellen
Folgeschaden oder irgendwelche andere Konsequenzen, die durch oder in Bezug auf das von ihr
gelieferte Gerät entstanden sind, haftbar gemacht werden.
9. Der Garantieanspruch kann nur bei Ihrem (Web-)Händler oder direkt beim Bestron Kundendienst
geltend gemacht werden. Senden Sie ein Gerät nicht ohne vorherige Rücksprache zurück. Das
Paket kann dann abgelehnt werden und eventuelle Kosten gehen zu Ihren Lasten. Nehmen Sie
erst für Anweisungen, wie Sie das Gerät einpacken und versenden müssen, Kontakt auf. Jedem
Garantieanspruch muss der Kaufbeleg beigefügt werden.
SERVICE
Sollte sich unverhofft eine Störung ergeben, dann können Sie mit dem BESTRON-Kundendienst Kontakt
aufnehmen: www.bestron.com/service
13
Page 14

FR
FÉLICITATIONS !
Nous vous félicitons pour l’achat de votre produit Bestron. Dans le
présent manuel d’utilisation, nous vous expliquons comment celui
fonctionne et comment vous devez l’utiliser. Nous vous invitons
par conséquent à lire attentivement les instructions d’utilisation
avant d’utiliser l’appareil. Lorsque vous l’utilisez, prenez soin de
suivre parfaitement les instructions d’utilisation. Conserver-les
précautionneusement.
En cas de dysfonctionnement :
Si l’appareil devait malencontreusement ne plus fonctionner, n’essayez
jamais de le réparer vous-même. Vous devez laisser le soin de le faire
à un réparateur/technicien qualifié.
Utilisation par des enfants :
• Le présent appareil peut être utilisé par des enfants de plus de 8
ans et par des personnes dont les facultés physiques, sensorielles
ou psychiques sont diminuées ou des personnes n’ayant ni
l’expérience ni les connaissances requises, à condition toutefois
qu’une personne s’assure qu’ils/elles ont pris connaissance des
instructions permettant de l’utiliser en toute sécurité et qu’ils/elles
ont conscience des dangers potentiels.
• Le nettoyage et l’entretien ne peuvent être effectués par des
enfants de moins de 8 ans. Les enfants de plus de 8 ans doivent
être sous la surveillance d’un adulte.
• Conservez l’appareil et le câble hors de portée des enfants de
moins de 8 ans.
• Veillez à toujours surveiller les enfants de sorte à vous assurer
qu’ils ne jouent pas avec l’appareil.
CE QUE VOUS DEVEZ SAVOIR AU SUJET DES APPAREILS
ÉLECTRIQUES
• Avant toute utilisation, vérifiez que la tension électrique du
réseau correspond à la tension électrique indiquée sur la plaque
signalétique de l’appareil concerné.
• Contrôlez que la prise à laquelle vous raccordez l’appareil
électrique est reliée à la terre.
• Veillez toujours à placer les appareils électriques sur une surface
stable et plane et à un endroit où celui-ci ne peut pas tomber.
• Certains éléments d’un appareil électrique peuvent devenir chauds
ou parfois même brûlants. Prenez soin de ne pas les toucher afin
d’éviter de vous brûler.
• Assurez-vous que vos mains sont sèches lorsque vous touchez un
appareil électrique, un fil/câble ou une prise.
14
Page 15
FR
• Les appareils électriques doivent pouvoir libérer la chaleur qu’ils
produisent de sorte à éviter tout risque d’incendie. Vérifiez par conséquent s’il y a suffisamment d’espace autour de l’appareil et faites en
sorte que celui-ci ne puisse entrer en contact avec du matériel inflammable. Les appareils électriques ne doivent jamais être couverts.
• Assurez-vous que les appareils électriques, les fils/câbles ou les
prises n’entrent pas en contact avec de l’eau.
• N’immergez jamais des appareils électriques, des fils/câbles ou
prises dans de l’eau ou dans un autre liquide.
• Ne saisissez jamais un appareil électrique lorsque celui-ci est tom-
bé dans l’eau. Débranchez-le immédiatement et ne l’utilisez plus.
• Assurez-vous que les appareils électriques, les fils/câbles ou
les prises n’entrent pas en contact avec des sources de chaleur
comme une plaque de cuisson brûlante ou avec du feu.
• Ne laissez pas pendre des fils/câbles sur le rebord d’un évier, d’un
plan de travail ou d’une table.
• Débranchez toujours l’appareil de la prise de contact lorsque vous
ne l’utilisez pas.
• Lorsque vous débranchez l’appareil de la prise de contact, prenez
soin de tirer en saisissant la partie dure de la prise mâle et non pas
en tirant sur le fil/câble.
• Contrôlez régulièrement si le fil/câble de l’appareil électrique est
encore intact. N’utilisez pas l’appareil si le fil/câble présente des
signes d’endommagement. Si le fil/câble est endommagé, celui-ci
doit être remplacé par le fabricant, par un service technique ou par
une personne ayant une compétence/qualification similaire, ceci
afin d’éviter tout danger.
• L’appareil ne peut être mis en marche en ayant recours à une
minuterie externe ou à un système séparé avec télécommande.
CE QUE VOUS DEVEZ SAVOIR AU SUJET DE CET APPAREIL
• Soyez prudent lorsque vous utilisez l’appareil à l’extérieur.
• N’utilisez jamais l’appareil dans des pièces humides.
• Après utilisation, nettoyez soigneusement l’appareil (voir Nettoyage
et entretien).
• Il est recommande que l’installation soit effectuée par un électricien
qualifie pour que celui-ci puisse vérifier la résistance des éléments
de soutien du plafond et effectuer un raccordement électrique
correct.
• Afin de réduire le risque de blessures, utilisez seulement les deux
vis en acier (et la rondelle d’arrêt) fournies pour le montage.
• Afin de réduire le risque de blessures, ne pliez pas les supports de
pale lors de l’installation des supports, de l’équilibrage des pales ou
du nettoyage du ventilateur. N’introduisez pas d’objets étrangers
entre les pales de ventilateur en rotation.
15
Page 16
FR
ENVIRONNEMENT
• Débarrassez-vous du matériel d’emballage comme le plastique et les boîtes dans les containers destinés à cet effet.
• À la fin de sa durée de vie, ne jetez pas ce produit comme
un simple déchet ménager mais remettez-le à un centre
de collecte de recyclage des produits électriques et
électroniques. Consultez le symbole sur le produit, le mode
d’emploi ou l’emballage.
• Les matériels/matériaux peuvent être réutilisés comme
indiqué. En apportant votre aide au recyclage et au
traitement des matériels/matériaux ou à tout autre forme
de réutilisation d’anciens appareils, vous contribuez à la
protection de l’environnement.
• Informez-vous auprès de votre commune pour obtenir la liste
des points de collecte à proximité de chez vous.
DÉCLARATION DE CONFORMITÉ CE
Ce produit répond aux exigences des directives Européennes.
R. Neyman
Contrôle qualit
16
Page 17
FR
1 2 3
5
11
7
8
9
10
4
6
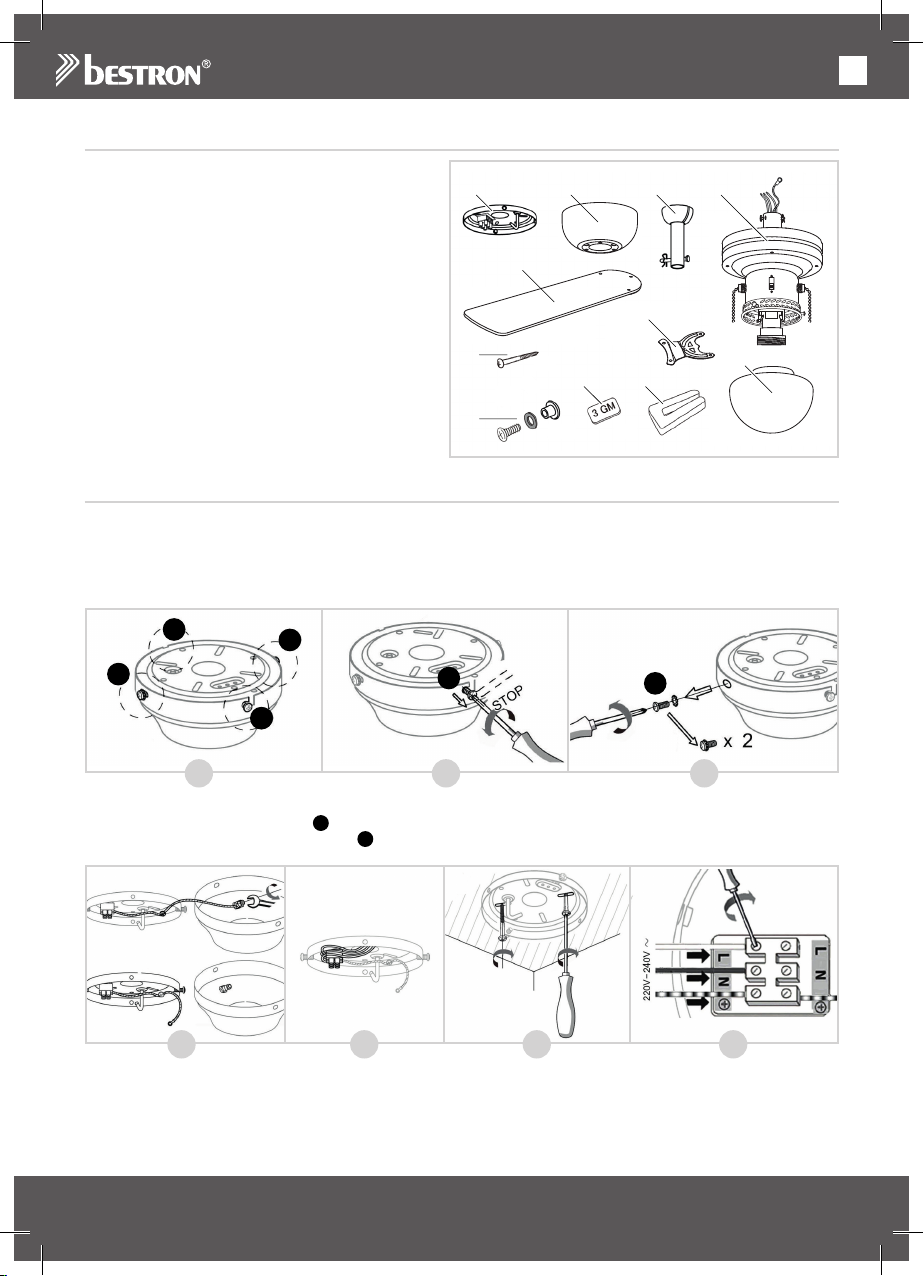
FONCTIONNEMENT - Généralités
Cet appareil est destiné uniquement à l’utilisation
domestique, et non à l’usage professionnel.
1. Plaque de montage
2. Couvercle décoratif
3. Tige descendante
4. Moteur
5. Pales du ventilateur (4x)
6. Supports des pales (4x)
7. Vis de la plaque de montage (2x)
8. Jeu de vis des pales (12x)
9. Poids d’équilibrage (2x)
10. Pince d’équilibrage
11. Couvercle de verre de la lampe
MONTAGE - Installer la plaque de montage
ATTENTION:
• TOUJOURS COUPER LE COURANT PRINCIPAL AVANT D’INSTALLER OU D’EFFECTUER
TOUT TRAVAIL SUR LE VENTILATEUR DE PLAFOND.
• S’assurer d’accrocher le ventilateur à une place ou la distance entre les pales du ventilateur et le sol
serait d’au moins 2,30m.
1
2
1. Dans l’emballage, la plaque de montage est assemblée sur le couvercle décoratif à l’aide de 4 vis (A).
2. Desserrez à moitié les 2 vis 1 (B).
3. Desserrez complètement les 2 vis 2 et déposez les (C).
D E F G
4. Enlevez la plaque de montage et dévissez le fil de terre (jaune et vert) du couvercle décoratif (D).
5. Guidez le câblage émergent du plafond au travers de l’ouverture dans la plaque de montage (E).
6. Vissez la plaque de montage au plafond (F). Assurez-vous que la plaque de montage soit suffisamment
bien fixé pour pouvoir supporter un poids minimum de 23 kg.
2
1
1
A
B C
2
17
Page 18
FR
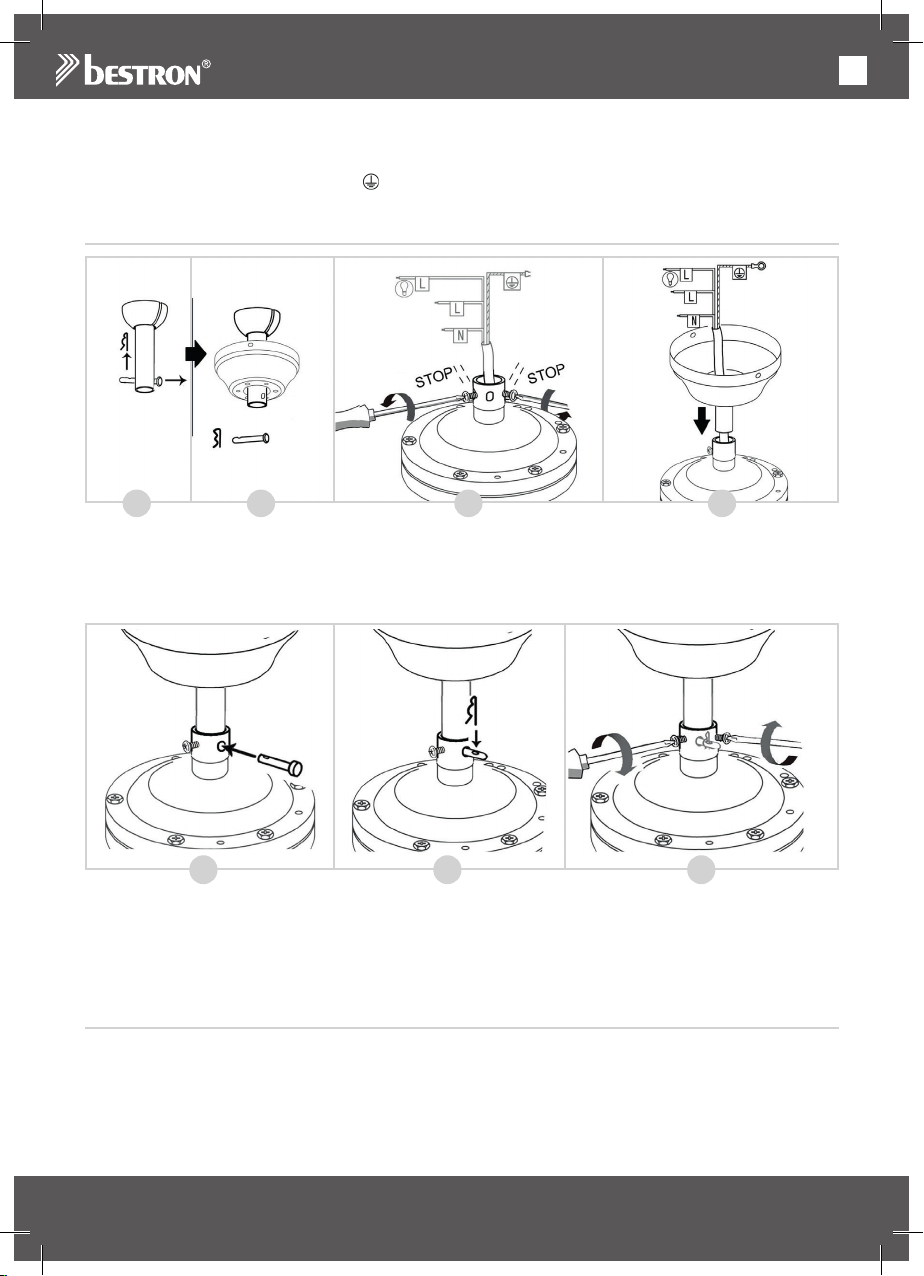
7. Raccordez le câblage sur le bornier de la plaque de montage, de la manière suivante (G):
• Lefilbleu→N
• Lefilbrunounoir→L
• Lefildeterre(jauneetvert)→
MONTAGE - Installer la tige descendante au moteur
H J KI
1. Retirez la goupille fendue et la broche métallique de la tige descendante (voir la figure H).
2. Guidez la tige descendante au travers du couvercle décoratif (I).
3. Desserrez les 2 vis du moteur (J).
4. Enlevez la protection autour du câblage et guidez le câblage au travers de la tige descendante (K).
Vérifiez à ne pas endommager le câblage durant ce processus.
L NM
5. Remettre en place la goupille fendue dans la tige descendante (L) et la sécuriser en remettant la broche
métallique (M).
6. Reserrez les vis sur le moteur (N).
La tige descendante est maintenant correctement installée.
MONTAGE - Installer les supports de pales sur les pales du ventilateur
Les pales du ventilateur peuvent être installées de deux manières avec le côté blanc ou le côté boisé pointé
vers le bas.
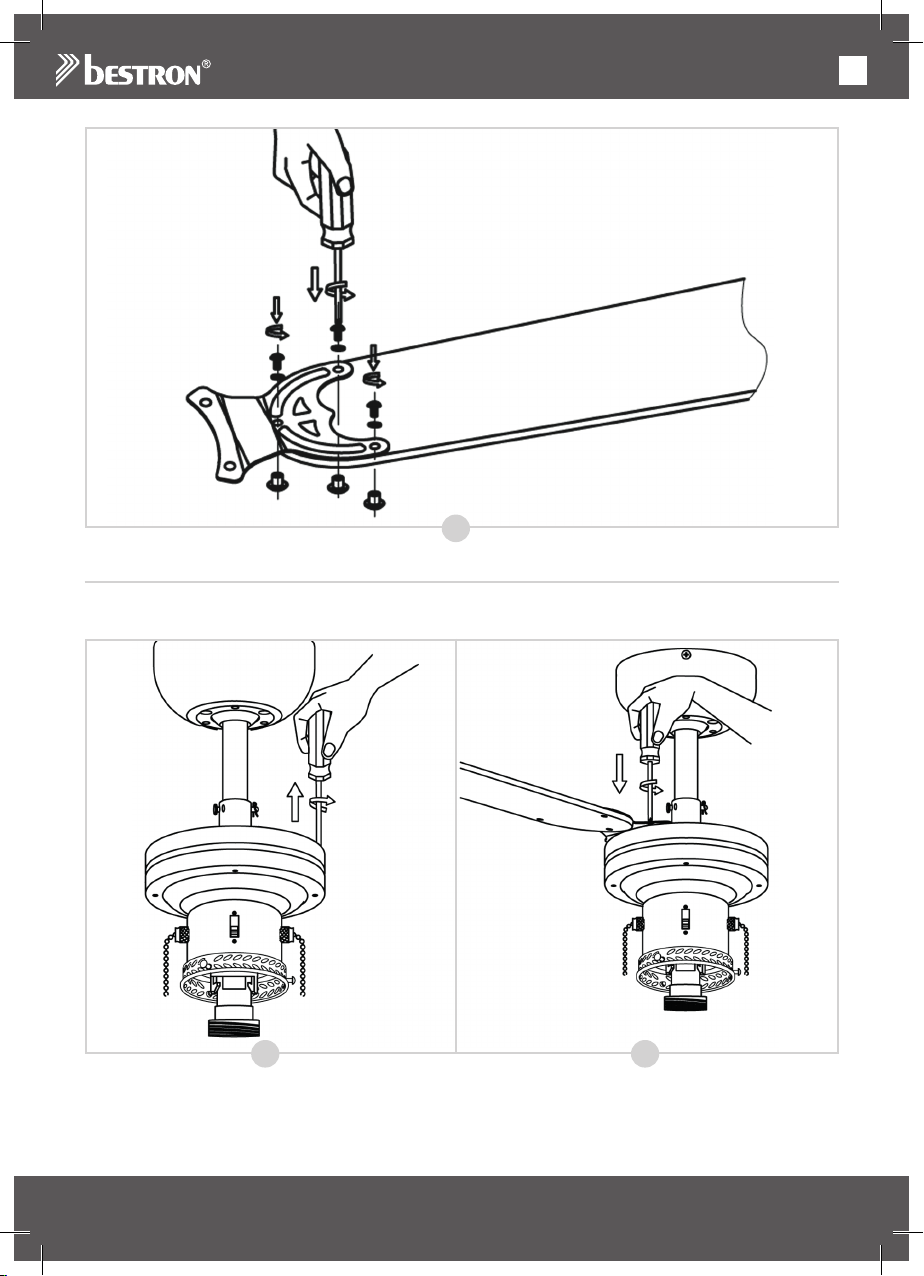
1. Prenez un support de pale et placez-le sur la pale du ventilateur comme indiqué dans la figure O.
2. Insérez la vis incluant l’anneau rouge dans le support de pale et la pale du ventilateur.
3. Placez un écrou borgne sur le bas de la pale du ventilateur, puis vissez la vis dans l’écrou borgne.
18
Page 19
FR
O
MONTAGE - Installer les pales du ventilateur au moteur
1. Les vis de montage des pales du ventilateur sont déjà montées dans le boîtier du moteur. Dévissez et
retirez-les du boîtier du moteur (voir figure P).
P Q
2. Ensuite, prenez une pale du ventilateur avec un support de pale et vissez-les sur le boîtier du moteur en
utilisant deux vis (Q).
3. Répétez ce processus pour les cinq autres pales du ventilateur.
Les pales du ventilateur sont maintenant correctement installées.
19
Page 20
FR
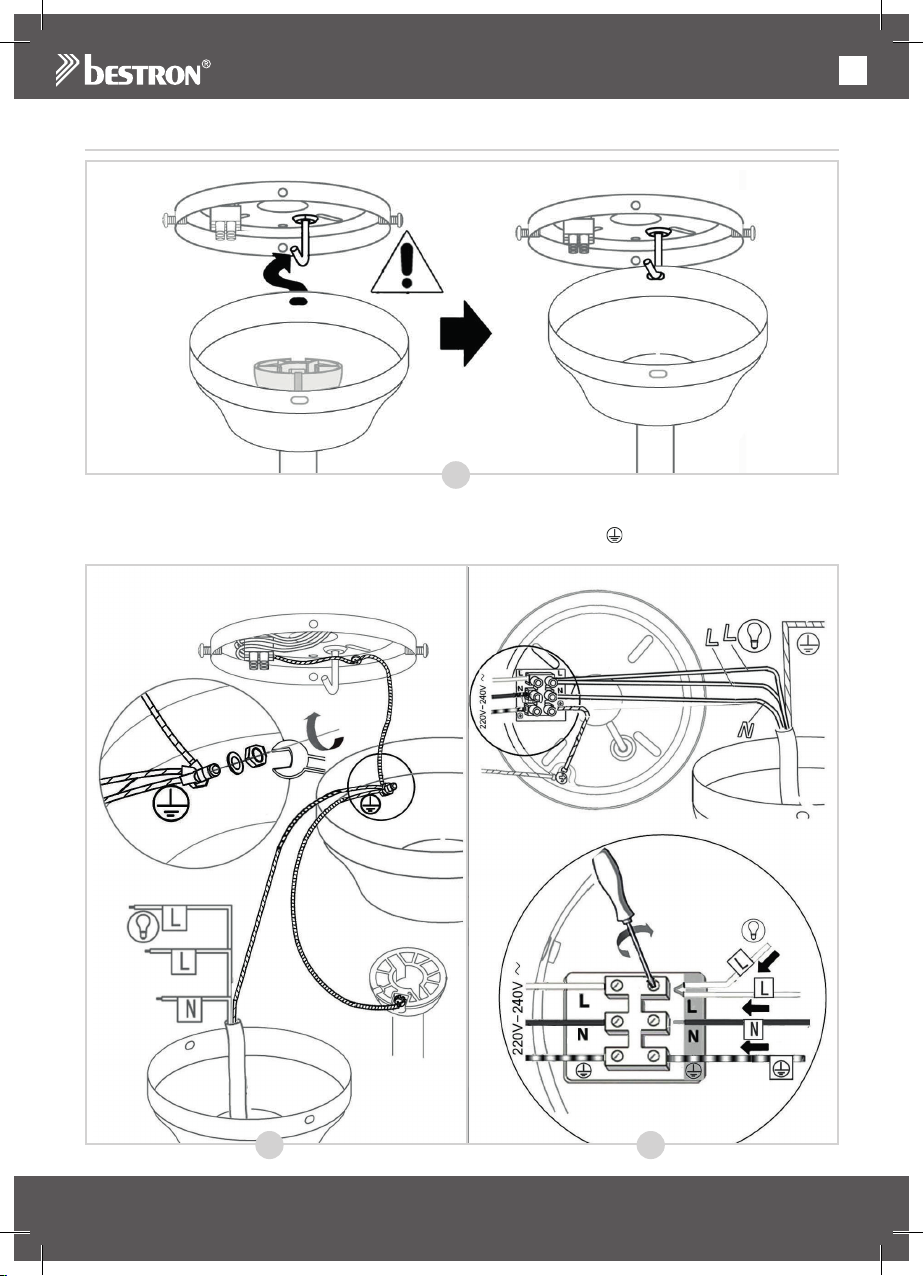
MONTAGE - Installer le ventilateur sur la plaque de montage
R
1. Soulevez le ventilateur et insérer le “crochet J” sur la plaque de montage au travers d’une des ouvertures
dans le couvercle décoratif (figure R). Cela vous permet d’avoir les mains libres pour connecter le câblage.
2. Raccordez tous les fils de terre (jaune et vert) au couvercle décoratif ( , S).
S T
20
Page 21
FR
3. Raccordez le câblage émergent de la tige descendante sur le bornier de la plaque de montage, de la
manière suivante (T):
• Lefilbleu→N
• Lesfilsbrunetnoir→L
4. Maintenant retirez le ventilateur du “crochet J”, placez le ventilateur au-dessus des deux vis 1 dans la
plaque de montage et serrez les vis fermement (U).
5. Insérez les deux vis 2 dans la plaque de montage et serrez-les fermement (U).
6. Positionnez la tige descendante comme indiqué dans la figure V.
7. Installez maintenant une lampe de type E27 (60 watts maximum) dans la douille (W).
8. Montez délicatement le couvercle en verre de la lampe avec les vis déjà montées dans le boîtier (X).
1
1
U
V
1
2
W X
Le ventilateur est maintenant correctement monté.
Vous pouvez maintenant remettre le courant.
21
Page 22
FONCTIONNEMENT - Utilisation
Le ventilateur de plafond a trois vitesses :
rapide, médium et lent.
1. Tirez la chaînette.
Le ventilateur démarre en vitesse rapide.
2. Tirez à nouveau sur la chaînette.
Le ventilateur passe en vitesse médium.
3. Tirez à nouveau sur la chaînette.
Le ventilateur passe en vitesse lente.
4. Tirez à nouveau sur la chaînette.
Le ventilateur s’arrête.
FONCTIONNEMENT - Mode été / hiver
Le ventilateur est équipé d’un mode été et d’un
mode hiver: en mode été, le ventilateur souffle
l’air directement vers le bas, créant une brise
fraîche, alors qu’en mode hiver le ventilateur
fera circuler l’air chauffé par votre chauffage,
au travers de la pièce.
1. Positionnez l’interrupteur vers le bas pour
activer le mode été.
2. Positionnez l’interrupteur vers le haut pour
activer le mode hiver.
FR
SOLUTIONS AUX PROBLÈMES
Problème Cause possible Solution possible
Le
ventilateur
ne démarre
pas.
Le
ventilateur
est bruyant.
Le
ventilateur
oscille ou
bouge de
manière
excessive.
1. Le ventilateur est connecté
à un interrupteur qui n’est
pas activé.
2. Fusible ou disjoncteur
principal désactivé.
3. Défaut de connection vers
le ventilateur.
1. La plaque de montage
n’a pas été correctement
installée.
2. La tige descendante n’est
pas fixée correctement.
1. Vérifiez si l’interrupteur est activé.
2. Vérifiez si l’alimentation principale est enclenché.
3. Vérifiez le câblage électrique du ventilateur
ATTENTION: Assurez-vous que le courant est coupé,
avant de contrôler le câblage!
1. Vérifiez que la plaque de montage est (encore) bien
fixé au plafond. Voir ‘Montage - Installer la plaque de
montage’.
2. Vérifiez la fixation de la tige descendante. Voir
‘Montage - Installer la tige descendante au moteur’.
22
Page 23
FR
SOLUTIONS AUX PROBLÈMES - Équilibrer les pales du ventilateur
Nous portons une attention particulière au fait que votre ventilateur est de la plus haute qualité. Néanmoins,
il peut parfois être en déséquilibre. Si le ventilateur est instable ou tremble excessivement, suivez d’abord
les étapes de ‘SOLUTIONS AUX PROBLÈMES’. Si le ventilateur persiste à trembler excessivement,
essayez d’intervertir deux pales de ventilateur opposées et rallumez le ventilateur. Si après cet opération le
ventilateur persiste à trembler, utilisez le kit d’équilibrage:
A
B
C
1. Faites tourner le ventilateur et trouvez à quelle vitesse le tremblement est le plus important. Éteignez le
ventilateur.
2. Sélectionnez une des pales du ventilateur et placez la pince d’équilibrage à mi-chemin du côté droit
de la pale (voir figure A). Rallumez le ventilateur à la vitesse à laquelle le tremblement était le plus
important. Vérifiez que le tremblement a diminué. Éteignez le ventilateur.
3. Répétez cette procédure avec chaque pale restante et vérifiez quelle pale montre le plus d’amélioration.
4. Replacez la pince d’équilibrage sur la pale de ventilateur ayant amené la meilleurs amélioration et
poussez la pince à l’intérieur ou à l’extérieur sur la pale (B). Rallumez le ventilateur à la vitesse à laquelle
le tremblement était le plus important. Vérifiez que le tremblement a diminué. Éteignez le ventilateur.
5. Répétez cette procédure et vérifiez quelle position de la pince d’équilibrage montre le plus d’amélioration.
6. Enlevez la pince d’équilibrage et collez un des poids d’équilibrage sur la pale du ventilateur où vous avez
constaté le plus d’amélioration, exactement à l’endroit où la pince d’équilibrage était placé (C).
Notez que tout ventilateur de plafond peut continuer à trembler très légèrement.
23
Page 24
FR
DISPOSITIONS CONCERNANT LA GARANTIE
Le présent produit Bestron bénéficie – aux conditions ci-après – d’une garantie de 60 mois suivant la date
d’achat et couvrant toute panne résultant d’un défaut/vice de fabrication et/ou de fonctionnement.
1. Pendant la période de garantie précitée, aucun frais ne sera facturé au titre des coûts de maind’œuvre et de matériel.
2. Les réparations effectuées au cours de la période de garantie n’entraînent pas de prolongation du
délai de garantie.
3. Les éléments/composantes défectueux – ou l’appareil lui-même en cas d’échange de l’appareil –
deviennent automatiquement la propriété de Bestron.
4. La garantie profite exclusivement au premier acheteur et n’est pas transmissible.
5. La garantie ne joue pas pour les dommages résultant :
• D’accidents
• D’une utilisation inappropriée
• De l’usure
• D’une manipulation négligente
• D’une installation erronée
• Du raccordement à un réseau électrique autre que celui indiqué sur la plaque signalétique
• De modifications non autorisées apportées à l’appareil
• De réparations effectuées par des personnes non qualifiées
• D’une utilisation contraire aux normes légales, techniques ou de sécurité s’appliquant
• D’un transport négligent sans utiliser un emballage adéquat ou une autre protection
6. Il n’est pas possible de mettre en œuvre la garantie en cas de :
• Dommages apparus pendant le transport
• Suppression ou modification du numéro de série de l’appareil
7. Ne bénéficient pas de la garantie :
• Les fils/câbles
• Les lampes
• Les parties/composantes en verre
8. La garantie ne donne pas droit à l’indemnisation d’éventuels dommages en sus du remplacement ou
de la réparation des parties/composantes défectueuses. La responsabilité de Bestron ne peut jamais
être engagée pour les éventuels dommages consécutifs ou pour toute autre conséquence causés
l’appareil livré par Bestron ou en relation avec celui-ci.
9. Pour faire jouer la garantie, il convient de s’adresser au vendeur (sur Internet) ou directement au
Service assistance de Bestron. N’envoyez jamais un article de votre propre initiative. Le paquet peut
être en effet refusé et les éventuels frais seront à votre charge. Contactez d’abord le vendeur ou
le Service assistance de Bestron qui vous indiqueront comment vous devez emballer l’appareil et
comment l’expédier. Toute demande de mise en œuvre de la garantie doit être accompagnée d’une
preuve d’achat.
SERVICE
En cas de panne ou de dysfonctionnement de votre appareil, contactez le service assistance de
BESTRON : www.bestron.com/service
24
Page 25
NL
PROFICIAT!
Proficiat met de aankoop van dit Bestron-product. In deze
gebruiksaanwijzing leggen we de werking en het gebruik uit. Lees
de gebruiksaanwijzing dus aandachtig door vóór u het apparaat
gaat gebruiken. Gebruik het apparaat alleen zoals beschreven in de
gebruiksaanwijzing. Bewaar de gebruiksaanwijzing daarna zorgvuldig.
Bij een defect:
Mocht het apparaat onverhoopt defect raken, probeer dan nooit zélf
de reparatie uit te voeren. Laat reparaties altijd uitvoeren door een
gekwalificeerde monteur.
Gebruik door kinderen:
• Dit apparaat mag worden gebruikt door kinderen ouder dan 8
jaar en personen met verminderde lichamelijke, zintuiglijke of
geestelijke vermogens of gebrek aan ervaring en kennis, maar
alleen onder toezicht of als ze instructie hebben gekregen over
het veilig gebruik van het apparaat en de mogelijke gevaren ervan
begrijpen.
• Reiniging en onderhoud moeten niet worden gedaan door kinderen,
behalve als zij ouder dan 8 jaar zijn en onder toezicht staan.
• Houd het toestel en de kabel buiten bereik van kinderen tot 8 jaar oud.
• Kinderen moeten in de gaten gehouden worden om er zeker van te
zijn dat ze niet met het apparaat spelen.
WAT U MOET WETEN OVER ELEKTRISCHE APPARATEN
• Controleer of de netspanning overeenkomt met de aangegeven
netspanning op het typeplaatje van een elektrisch apparaat,
voordat u het gebruikt.
• Controleer of het stopcontact waarop u een elektrisch apparaat
aansluit, geaard is.
• Plaats elektrische apparaten altijd op een stabiele en vlakke
ondergrond, op een plaats waar het niet kan vallen.
• Bepaalde delen van een elektrisch apparaat kunnen warm of soms
heet worden. Raak deze niet aan om te voorkomen dat u zich
verbrandt.
• Zorg ervoor dat uw handen droog zijn als u een elektrisch
apparaat, een snoer of een stekker aanraakt.
• Elektrische apparaten moeten hun warmte kwijt kunnen om
brandgevaar te voorkomen. Zorg er dus voor dat het apparaat
voldoende vrij is en niet in contact kan komen met brandbaar
materiaal. Elektrische apparaten mogen nooit worden bedekt.
25
Page 26

NL
• Zorg ervoor dat elektrische apparaten, snoeren of stekkers niet in
aanraking komen met water.
• Dompel elektrische apparaten, snoeren of stekkers nooit onder in
water of een andere vloeistof.
• Pak elektrische apparaten niet op wanneer ze in het water zijn
gevallen. Trek direct de stekker uit het stopcontact. Gebruik het
apparaat niet meer.
• Zorg ervoor dat elektrische apparaten, snoeren en stekkers niet in
aanraking komen met hittebronnen, zoals een hete kookplaat of
open vuur.
• Laat snoeren niet over de rand van het aanrecht, werkblad of een
tafel hangen.
• Haal stekkers altijd uit het stopcontact wanneer u het elektrisch
apparaat niet gebruikt.
• Als u de stekker uit het stopcontact neemt, trek dan aan de stekker
zelf en niet aan het snoer.
• Controleer regelmatig of het snoer van het elektrisch apparaat nog
intact is. Gebruik het apparaat niet als het snoer beschadigingen
vertoont. Als het snoer beschadigd is, moet het vervangen worden
door de fabrikant, een technische servicedienst of een persoon met
een gelijkaardige kwalificatie, om elk gevaar te vermijden.
• Het apparaat mag niet in werking worden gesteld door middel van
een externe tijdschakelaar, of door een afzonderlijk systeem met
afstandsbediening.
WAT U MOET WETEN OVER DIT APPARAAT
• Wees voorzichtig wanneer u het apparaat buitenshuis gebruikt.
• Gebruik het apparaat nooit in vochtige ruimten.
• Maak het apparaat na gebruik grondig schoon (zie Reiniging en
onderhoud).
• Het wordt aangeraden de installatie uit te laten voeren door een
daartoe bevoegde elektricien die de sterkte van de ondersteunende
plafonddelen kan beoordelen en een goede elektrische aansluiting
kan maken.
• Gebruik om gevaarlijke situaties te voorkomen alleen de twee
stalen schroeven (en borgring) die voor montage zijn meegeleverd.
• Voorkom gevaarlijke situaties en zorg ervoor dat de bladhouders
niet verbogen worden bij het installeren van de houders, het
afstellen van de bladen of het reinigen van de ventilator. Steek
geen andere objecten tussen de draaiende ventilatorbladen.
26
Page 27
NL
MILIEU
• Werp verpakkingsmateriaal zoals plastic en dozen in de
daarvoor bestemde containers.
• Dit product aan het eind van de gebruiksduur niet inleveren
als normaal huishoudelijk afval, maar bij een inzamelpunt
voor hergebruik van elektrische en elektronische apparatuur.
Let op het symbool op het product, de gebruiksaanwijzing of
de verpakking.
• De materialen kunnen hergebruikt worden zoals aangegeven.
Door uw hulp bij hergebruik, de verwerking van de materialen
of ander vormen van de benutting van oude apparatuur levert
u een belangrijke bijdrage aan de bescherming van ons
milieu.
• Informeer bij de gemeente naar het juiste inzamelpunt bij u in
de buurt.
EU-CONFORMITEITSVERKLARING
Dit product voldoet aan de eisen volgens de Europese richtlijnen.
R. Neyman
Quality control
27
Page 28
NL
1 2 3
5
11
7
8
9
10
4
6
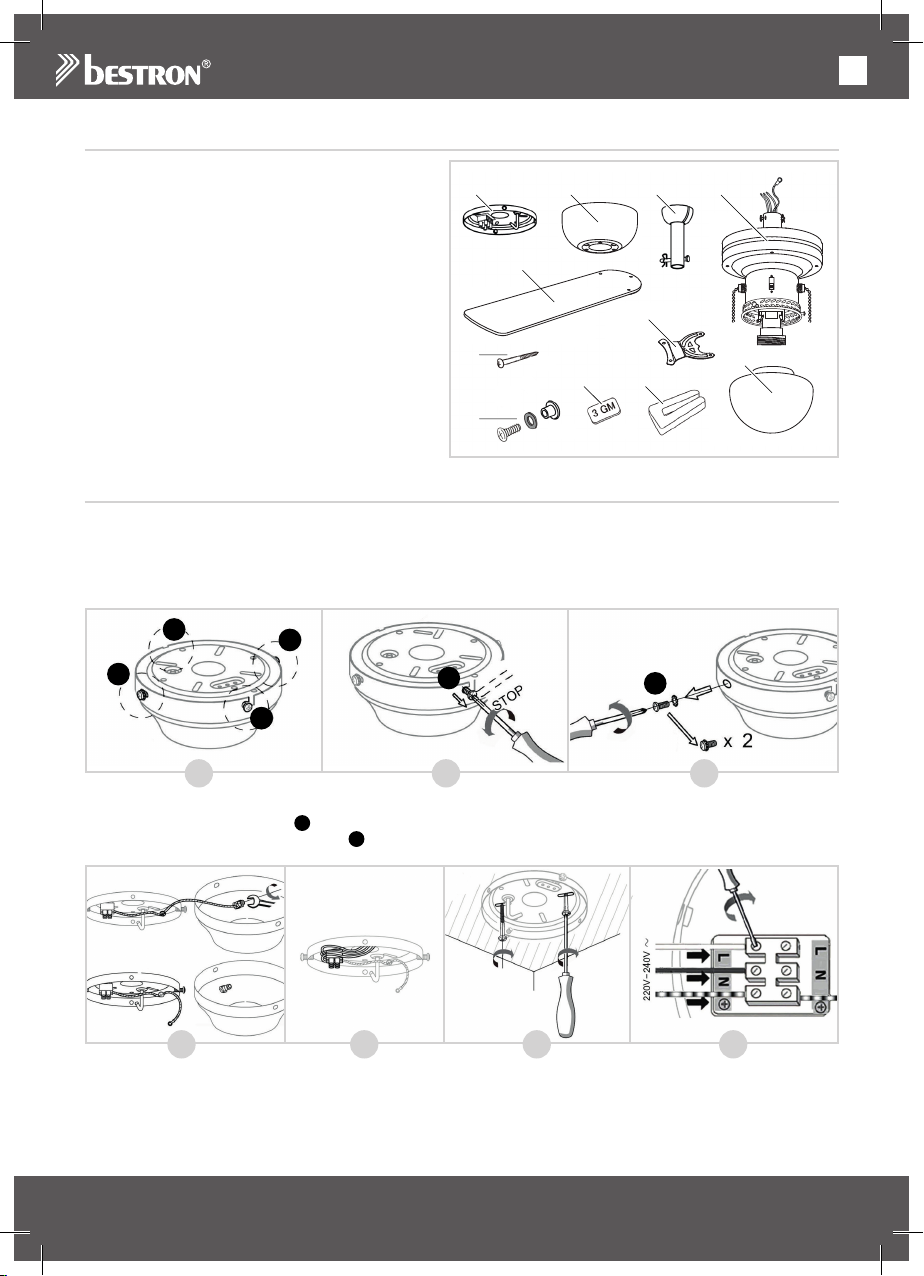
WERKING - Algemeen
Het apparaat is alleen bedoeld voor huishoudelijke
doeleinden, niet voor professioneel gebruik.
1. Montageplaat
2. Sierkap
3. Neerwaartse stang
4. Motor
5. Ventilatorbladen (4x)
6. Bladbeugels (4x)
7. Schroeven montageplaat (2x)
8. Schroevenset bladen (12x)
9. Balansgewicht (2x)
10. Balansklem
11. Glasbol
MONTAGE - Het installeren van de montageplaat
LET OP:
• SCHAKEL ALTIJD IN UW METERKAST DE STROOM AF, VOOR U BEGINT MET DE MONTAGE VAN
DE PLAFONDVENTILATOR.
• Zorg dat u de ventilator hangt op een plaats waar de afstand tussen ventilatorbladen en de vloer
tenminste 2,30m zal zijn.
1
2
1. In de verpakking zit de montageplaat d.m.v. vier schroeven gemonteerd aan de sierkap (zie figuur A).
2. Draai de twee schroeven 1 een halve slag los (B).
3. Draai daarna de twee schroeven 2 helemaal los en verwijder ze (C).
D E F G
4. Verwijder de montageplaat van de sierkap en draai de aardedraad (groen/geel) los van de sierkap (D).
5. Steek vervolgens de bedrading die uit het plafond komt door de opening van de montageplaat (E).
6. Monteer de montageplaat stevig aan het plafond (F). Zorg ervoor dat de montageplaat stevig genoeg
gemonteerd is om een gewicht van minimaal 23 kg te kunnen dragen.
2
1
1
A
B C
2
28
Page 29
NL
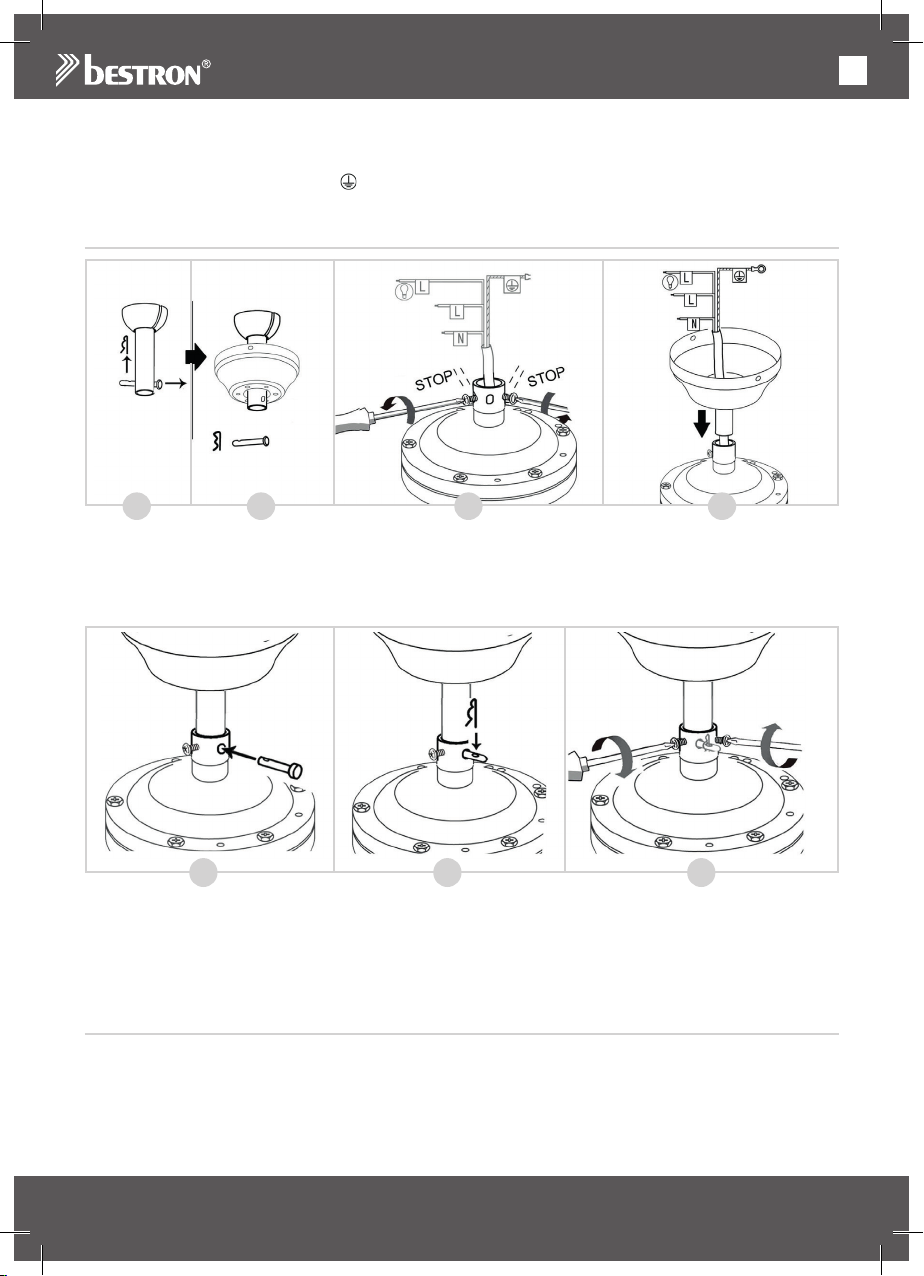
7. Schroef nu de bedradingen op de juiste manier goed in het aansluitblokje vast (G):
• Blauwedraad→N
• Bruineofzwartedraad→L
• Aardedraad(groen/geel)→
MONTAGE - Het monteren van de neerwaartse stang aan het motorhuis
H J KI
1. Verwijder de splitpen en metalen pin uit de neerwaartse stang (zie figuur H).
2. Steek vervolgens de neerwaartse stang door de sierkap (I).
3. Draai de twee schroeven los van het motorhuis (J).
4. Knip de kabelbinder die om de bedrading zit door en steek de bedrading door de neerwaartse stang (K).
Let erop dat u de bedrading hierbij niet beschadigt.
L
5. Plaats vervolgens de metalen pin terug in de neerwaartse stang (L) en borg deze door de splitpen door
de metalen pin te plaatsen (M).
6. Draai de schroeven weer stevig vast op het motorhuis (N).
De neerwaartse stang is nu op de juiste manier gemonteerd.
M
N
MONTAGE - Het monteren van de bladbeugels aan de ventilatorbladen
De ventilatorbladen zijn zowel met de witte als de houtkleurige kant naar beneden gericht te monteren.
1. Neem een bladbeugel en plaats deze op het ventilatorblad zoals aangegeven in figuur O.
2. Steek de schroef inclusief het rode ringetje door de bladbeugel en het ventilatorblad.
3. Plaats een dopmoer aan de onderkant van het ventilatorblad en schroef vervolgens de schroef vast in
de dopmoer.
29
Page 30
NL
O
MONTAGE - Het monteren van de ventilatorbladen aan het motorhuis
1. De schroeven t.b.v. het monteren van de ventilatorbladen zitten al gemonteerd in het motorhuis. Schroef
deze los en verwijder ze van het motorhuis (zie figuur P).
P Q
2. Plaats vervolgens een ventilatorblad met beugel en schroef deze vast met twee schroeven (Q).
3. Herhaal voor de andere drie ventilatorbladen.
De ventilatorbladen zijn nu op de juiste manier gemonteerd.
30
Page 31
NL
MONTAGE - Het monteren van de ventilator aan de montageplaat
R
1. Til de ventilator op en steek de “J-haak” op de montageplaat door een opening van de sierkap (zie figuur
R). U heeft nu uw handen vrij om de bedrading van de ventilator te monteren.
2. Monteer alle aardedraden (groen/geel) aan de sierkap ( , S).
S T
31
Page 32
NL
3. Schroef vervolgens de bedradingen die uit de neerwaartse stang komen op de juiste manier goed in het
aansluitblokje vast (T):
• Blauwedraad→N
• Zwarteenbruinedraden→L
4. Haal de ventilator van de “J-haak”, plaats de ventilator over de twee schroeven 1 in de montageplaat
en draai de schroeven stevig vast (U).
5. Plaats de twee schroeven 2 terug in de montageplaat en draai ook deze stevig vast (U).
6. Borg de neerwaartse stang zoals aangegeven in figuur V.
7. Plaats nu een lamp type E27 (max. 60 Watt) in de fitting (W).
8. Bevestig de glasbol voorzichtig door middel van de al in het motorhuis gemonteerde drie schroeven (X).
1
1
U
V
1
2
W X
De ventilator is nu op de juiste manier gemonteerd.
U kunt nu in uw meterkast de stroom weer inschakelen.
32
Page 33
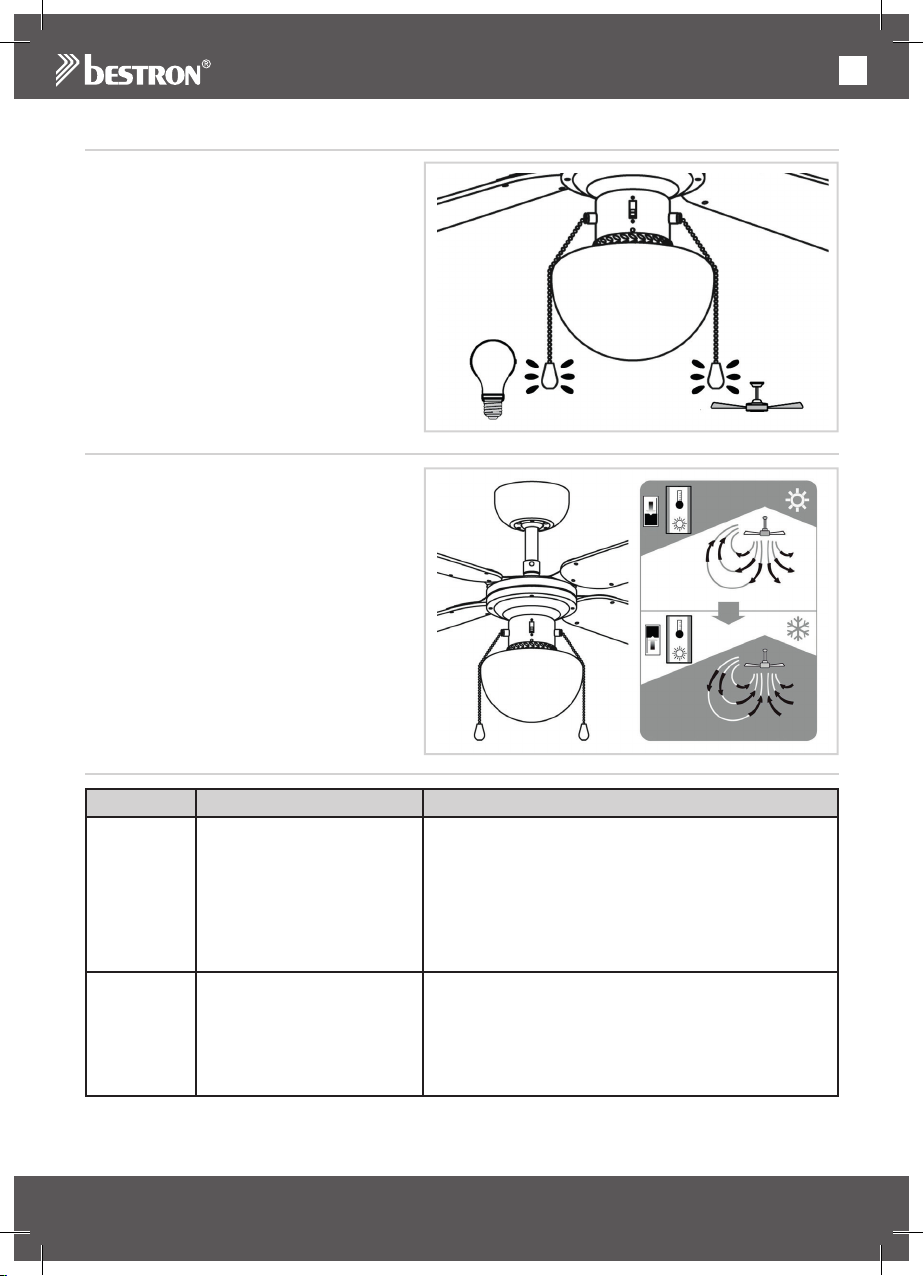
GEBRUIK - Bediening
De ventilator heeft 3 snelheden:
snel, gemiddeld en langzaam.
1. Trek aan het koord.
De ventilator start in de hoogste snelheid.
2. Trek nogmaals aan het koord.
De ventilator zal overgaan naar gemiddeld.
3. Trek nogmaals aan het koord.
De ventilator zal overgaan naar langzaam.
4. Trek nogmaals aan het koord.
De ventilator zal stoppen.
Trek aan het andere koord om de lamp in en
uit te schakelen.
GEBRUIK - Zomer- en winterstand
De ventilator is uitgerust met een zomer- en
winterstand: in de zomerstand blaast de ventilator lucht direct naar beneden voor een koele
bries, terwijl lucht in de winterstand door de
ruimte wordt gecirculeerd, bijvoorbeeld om de
warmte van uw verwarming door de ruimte te
verspreiden.
1. Schakel de schakelaar naar beneden om
de zomerstand in te schakelen.
2. Schakel de schakelaar omhoog om de
winterstand in te schakelen.
NL
PROBLEMEN OPLOSSEN
Probleem Mogelijke oorzaak Aangeraden oplossing
Ventilator
start niet
Ventilator
maakt lawaai
Ventilator
wiebelt
of schudt
overmatig.
1. De ventilator is aangesloten op een wand-lichtschakelaar en deze is niet
ingeschakeld.
2. Stroom in de meterkast is
niet terug ingeschakeld of
is uitgevallen.
3. Er zitten draden naar de
ventilator los.
1. De montageplaat is niet
goed gemonteerd.
2. De neerwaartse stang is
niet goed geborgd.
1. Controlleer of de lichtschakelaar is ingeschakeld.
2. Controleer of de hoofdstroomtoevoer in de meterkast
is ingeschakeld.
3. Controleer of er draden los zitten in de bedrading
naar de ventilator.
LET OP: zorg ervoor dat de hoofdstroomtoevoer
is uitgeschakeld, voordat u de bedrading
controleert!
1. Controleer of de montageplaat (nog) goed vastzit aan
het plafond. Zie ‘Montage - Het installeren van de
montageplaat’.
2. Controleer of de neerwaartse stang goed geborgd
is. Zie ‘Montage - Het installeren van de neerwaartse
stang aan het motorhuis’.
33
Page 34
NL
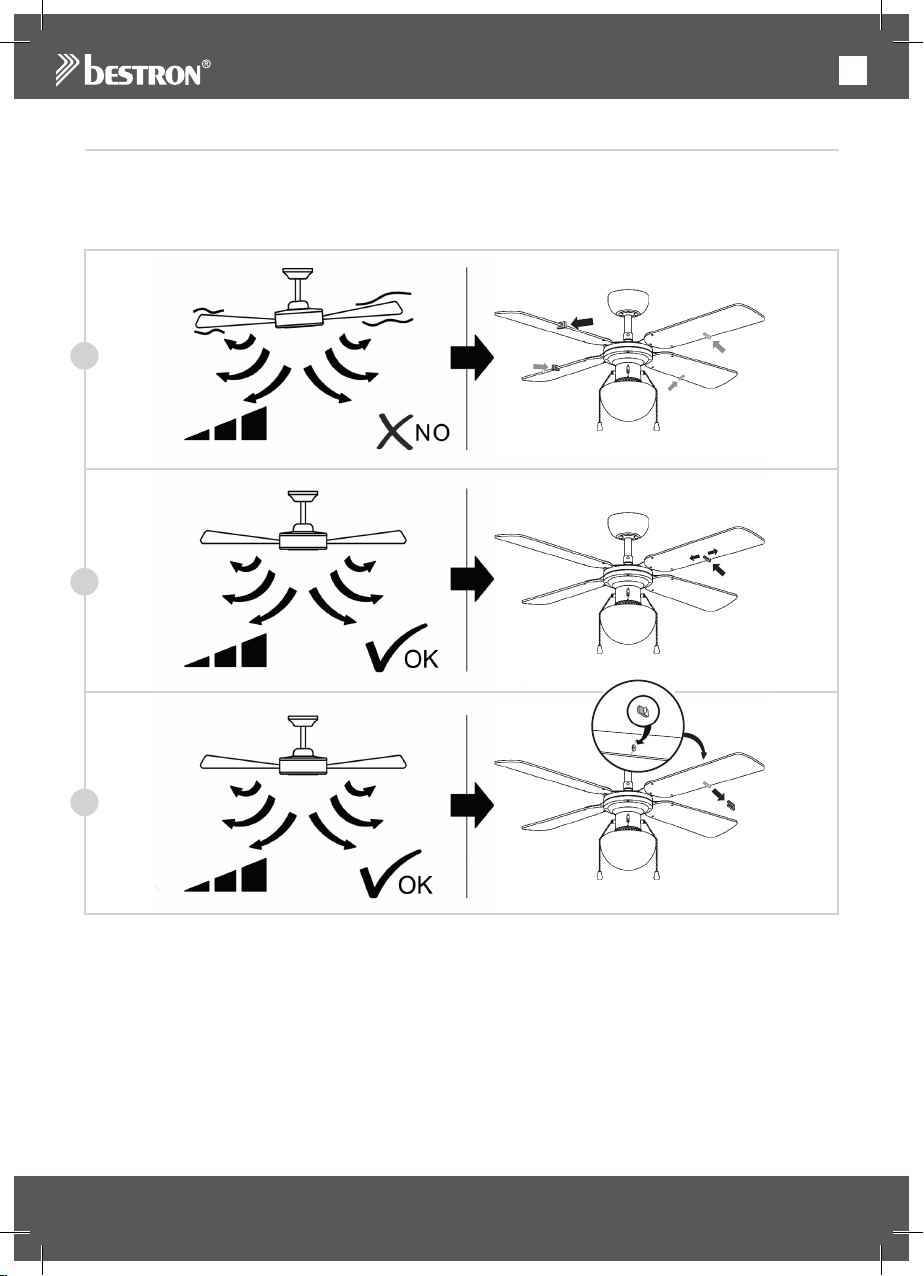
PROBLEMEN OPLOSSEN - De ventilatorbladen in evenwicht brengen
Wij letten er nauwlettend op dat uw ventilator beantwoordt aan de hoogste kwaliteit, maar soms kan hij toch
uit evenwicht zijn. Mocht de ventilator instabiel zijn of overmatig schudden, volg dan eerst de stappen in
‘PROBLEMEN OPLOSSEN’. Mocht de ventilator daarna nog overmatig schudden, probeer dan om twee
tegenover elkaar bevestigde ventilatorbladen met elkaar te verwisselen en zet de ventilator aan. Mocht na
deze handeling de ventilator nog overmatig schudden, gebruik dan de balanceerset:
A
B
C
1. Zet de ventilator aan in de snelheid waar het schudden het hoogst is. Zet de ventilator uit.
2. Kies één van de ventilatorbladen en plaats de balansklem halverwege de rechte kant van het blad (zie
figuur A). Zet de ventilator weer aan in de snelheid waar het schudden het hoogst is. Controleer of het
schudden minder wordt. Zet de ventilator uit.
3. Herhaal deze procedure bij elk resterend blad en kijk bij welk blad u de meeste verbetering ziet.
4. Plaats de balansklem opnieuw op het ventilatorblad waar u de meeste verbetering ziet en verschuif de
klem verder naar buiten of naar binnen op het blad (B). Zet de ventilator weer aan in de snelheid waar
het schudden het hoogst is. Controleer of het schudden minder wordt. Zet de ventilator uit.
5. Herhaal deze procedure en kijk op welke positie van de balansklem u de meeste verbetering ziet.
6. Verwijder de balansklem en plak één van de twee balansgewichten op de bovenkant van het blad waar
u de meeste verbetering heeft geconstateerd, exact op de plek waar de balansklem heeft gezeten (C).
Houdt u er rekening mee dat alle plafondventilatoren zeer lichtjes kunnen blijven schudden.
34
Page 35

NL
GARANTIEBEPALINGEN
Bestron hanteert onder de volgende voorwaarden 60 maanden na aankoopdatum garantie op deze apparatuur tegen defecten die zijn ontstaan door fabricage- en/of materiaalfouten.
1. In de genoemde garantieperiode zullen geen kosten worden berekend voor arbeidsloon en materiaal.
2. De onder garantie uitgevoerde reparatie verlengt de garantietermijn niet.
3. Defecte onderdelen of bij omruiling de defecte apparaten zelf, worden automatisch eigendom van
Bestron.
4. De garantie is uitsluitend geldig voor de eerste koper en niet overdraagbaar.
5. De garantie is niet geldig voor schade die is ontstaan door:
• Ongevallen
• Verkeerd gebruik
• Slijtage
• Verwaarlozing
• Foutieve installatie
• Aansluiting op een andere netspanning dan die op het typeplaatje is vermeld
• Ongeautoriseerde wijziging
• Reparaties uitgevoerd door niet-gekwalificeerde derden
• Gebruik in strijd met de geldende wettelijke, technische of veiligheidsnormen
• Onzorgvuldig transport zonder geschikte verpakking of andere bescherming
6. Aanspraak op garantie kan niet worden gedaan bij:
• Schade tijdens het transport
• Het verwijderen of wijzigen van het serienummer van het apparaat.
7. Uitgezonderd van garantie zijn:
• Snoeren
• Lampen
• Glazen onderdelen
8. De garantie geeft geen enkel recht op vergoeding van eventuele schade, buiten de vervanging
respectievelijk reparatie van de defecte onderdelen. Bestron kan nooit aansprakelijk gesteld worden
voor eventuele vervolgschade of enigerlei andere consequenties die door of in relatie met de door
hem geleverde apparatuur zijn ontstaan.
9. Aanspraak op garantie kan alleen bij uw (web-)winkelier of rechtstreeks bij de Bestron Service Dienst.
Stuur echter nooit zomaar iets op. Het pakket kan dan namelijk geweigerd worden en eventuele
kosten zijn voor uw rekening. Neem eerst contact op voor aanwijzingen hoe u het apparaat moet
inpakken en verzenden. Elke aanspraak op garantie dient vergezeld te gaan van het aankoopbewijs.
SERVICE
Mocht zich onverhoopt een storing voordoen, dan kunt u contact opnemen met de BESTRON-servicedienst: www.bestron.com/service
35
Page 36
EN
CONGRATULATIONS!
Congratulations with the purchase of this Bestron product. These
instructions tell you how the product works and how to use it. Read the
instructions carefully before you start using the appliance. Only use
the appliance in the manner described in the instructions. Keep these
instructions in a safe place for future reference.
Defects:
If the appliance is defective, do not try to repair it yourself. Always have
a qualified mechanic carry out any repairs.
Children:
• This appliance may be used by children over the age of 8 years old
and persons with reduced physical, sensory or mental capabilities
or lack of experience and know-how, but only if supervised or if
they have been instructed on how to use the appliance safely and
are aware of its potential dangers.
• Children are not allowed to clean and maintain the appliance,
except if they are over the age of 8 years old and supervised.
• Keep the appliance and the cable out of reach of children under the
age of 8 years old.
• Keep an eye on children to ensure that they do not play with the
appliance.
WHAT YOU SHOULD KNOW ABOUT ELECTRICAL APPLIANCES
• Check that the mains voltage corresponds with that shown on the
rating plate of an electrical appliance before you use it.
• Check that the socket to which you connect the electrical appliance
is earthed.
• Always install electrical appliances on a stable and level surface
where it cannot fall over.
• Certain parts of an electrical appliance may become warm or
sometimes hot. Do not touch them as you may burn yourself.
• Make sure your hands are dry when you touch an electrical
appliance, a cord or a plug.
• Electrical appliances must be able to lose their heat to avoid fire
hazards. Therefore, make sure that the appliance has sufficient
clearance around it and that it does not come into contact with
flammable materials. Electrical appliances must never be covered.
• Make sure that electrical appliances, cords or plugs do not come
into contact with water.
36
Page 37
EN
• Never immerse electrical appliances, cords or plugs in water or any
other liquid.
• Do not touch electrical appliances if they have fallen in the
water. Immediately pull the plug out of the socket. Stop using the
appliance.
• Make sure that electrical appliances, cords and plugs do not come
into contact with heat sources, such as a hot hob or open fire.
• Never let cords hang over the edge of the sink, a worktop or a
table.
• Always remove plug from the socket when you are not using the
electrical appliance.
• Remove the plug from the socket by pulling the plug itself and not
the cord.
• Regularly check if the cord of the electrical appliance is not
damaged. Do not use the electrical appliance if the cord shows
signs of damage. If the cord is damaged, it should be replaced by
the manufacturer, a technical service provider or a person with an
equivalent qualification, to avoid any danger.
• The appliance may not be switched on with the aid of an external
time switch, or by a separate system with remote control.
WHAT YOU SHOULD KNOW ABOUT THIS APPLIANCE
• Be careful when using the appliance outdoors.
• Never use the appliance in damp or wet locations.
• Thoroughly clean the appliance after use (see Cleaning and
Maintenance).
• We recommend the installation be performed by a qualified
electrician who can check the strength of the supportive ceiling
members and make proper electrical connection.
• To reduce the risk of personal injury, use only the two steel screws
(and lock washer) provided for mounting.
• To reduce the risk of personal injury, do not bend the blade holders
when installing the holders, balancing the blades or cleaning the
fan.
37
Page 38
EN
ENVIRONMENT
• Dispose of packaging material such as plastic and cardboard
boxes in the designated containers.
• Do not dispose of this product as normal domestic waste
at the end of its life, but hand it in at a collection point for
the reuse of electric and electronic equipment. Look for the
symbol on the product, the user instructions or the packaging
showing the type of waste.
• The materials can be used as indicated. By helping us
reuse and process the materials or otherwise recycle the
old equipment, you will be making an important contribution
towards the protection of the environment.
• Your municipality can tell you where to find the designated
waste collection point in your neighbourhood.
CE DECLARATION OF CONFORMITY
This product meets the requirements of European guidelines.
R. Neyman
Quality control
38
Page 39
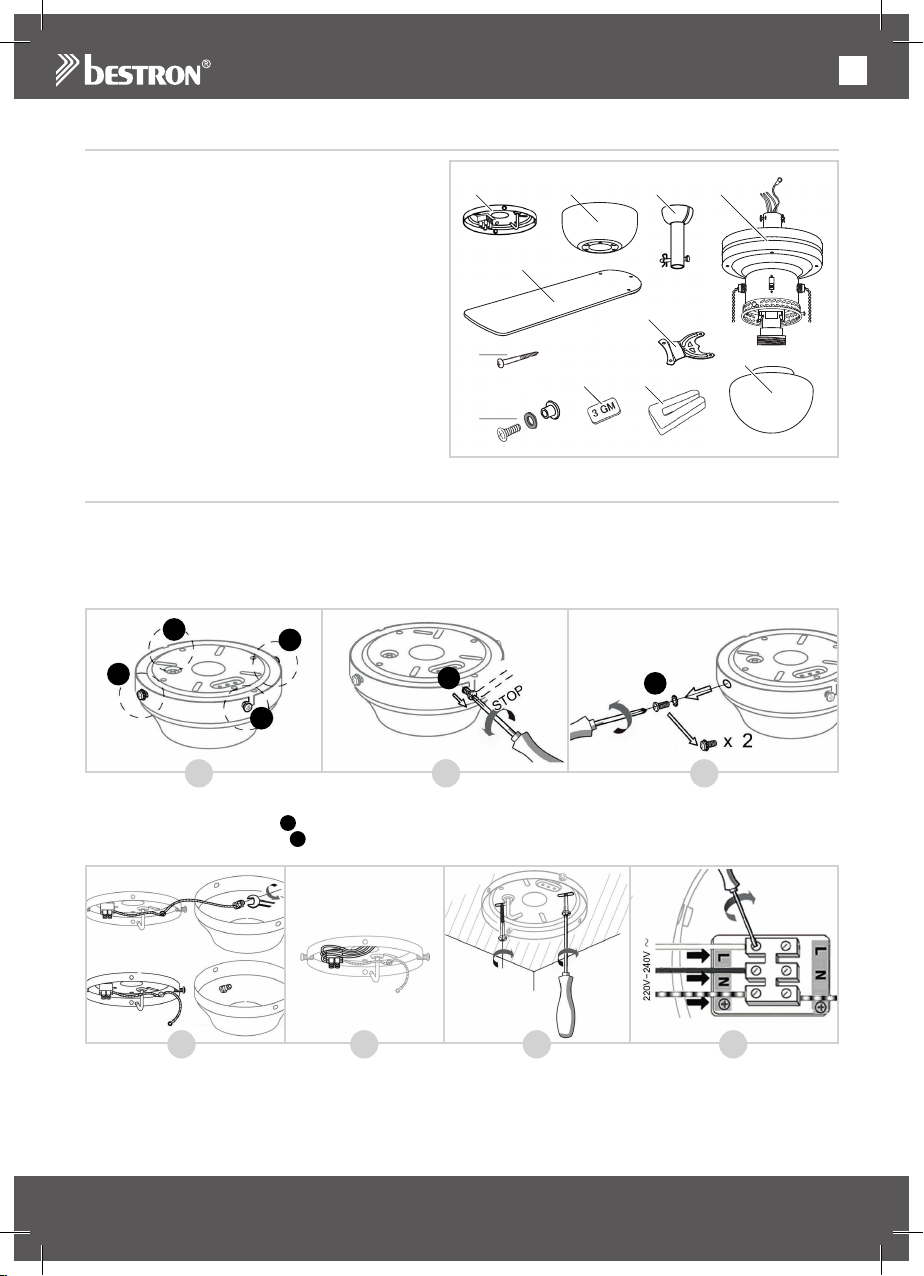
EN
OPERATION - General
1 2 3
5
11
7
8
9
10
4
6
The appliance is intended only for domestic use,
not for professional use.
1. Mounting plate
2. Canopy
3. Down rod
4. Motor
5. Fan blades (4x)
6. Fan blade holder (4x)
7. Screws mounting plate (2x)
8. Screw set fan blades (12x)
9. Balance weight (2x)
10. Balance clamp
11. Glass lamp cover
MONTAGE - Installing the mouting plate
WARNING:
• ALWAYS SWITCH OFF THE MAINS POWER BEFORE INSTALLING OR CARYING OUT ANY WORK
ON THE CEILING FAN.
• Be sure to hang the fan in a place where the distance between the fan blades and the floor will be at
least 2.30m.
1
2
1. In the packaging the mounting plate is already assembled to the canopy by four screws (see figure A).
2. Loosen the two screws 1 halfway (B).
3. Unscrew the two screws 2 completely and remove them (C).
D E F G
4. Remove the mounting plate from the canopy and unscrew the yellow-green earth wire from the canopy (D).
5. Lead the wires emerging from your ceiling through the opening in the mounting plate (E).
6. Screw the mounting plate to the ceiling (F). Make sure the mounting plate is mounted firmly enough to
hold a minimum weight of 23 kg (51 lb).
2
1
1
A
B C
2
39
Page 40
EN
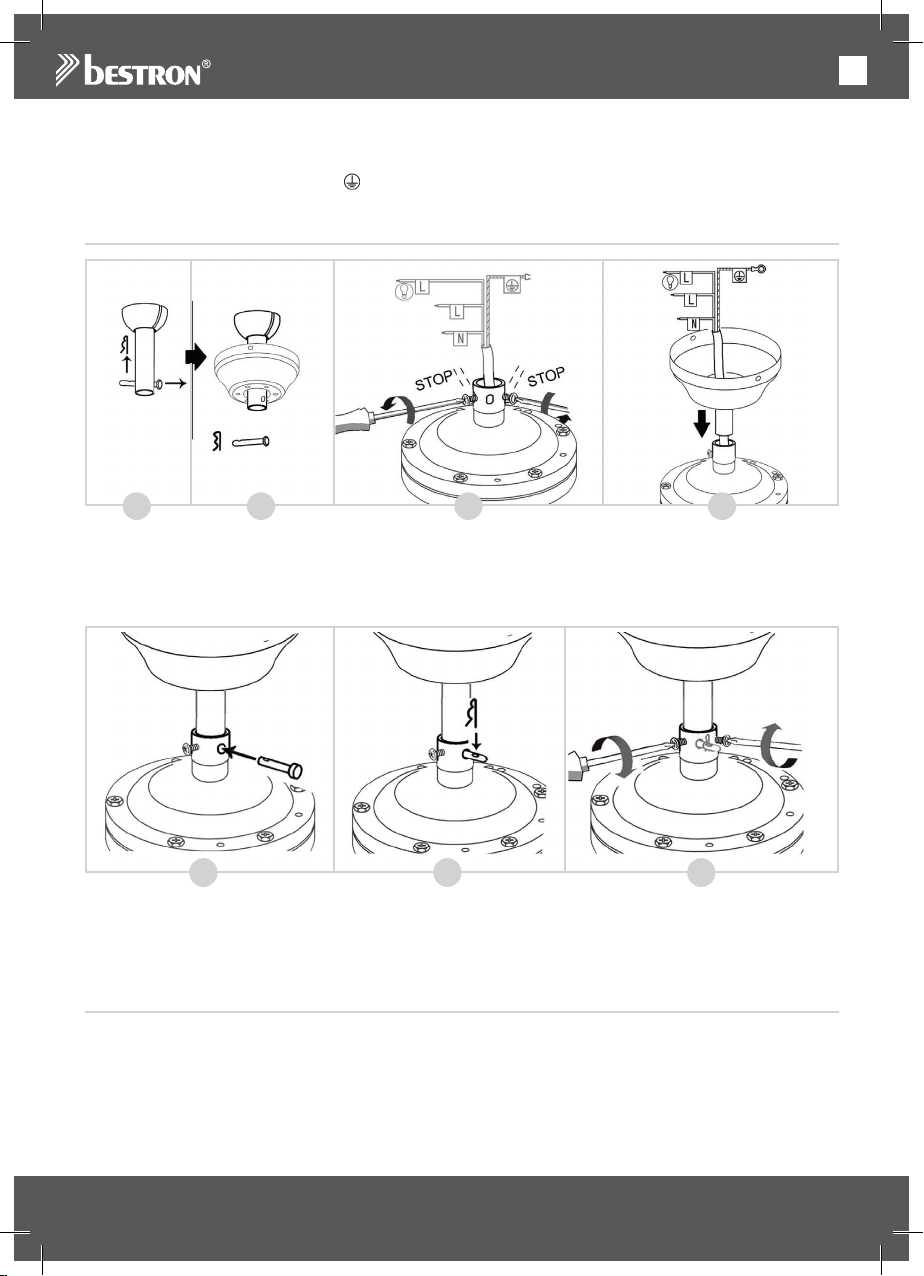
7. Now connect the wires to the terminal block on the mounting plate in the following way (G):
• Bluewire→N
• Brownorblackwire→L
• Earthwire(yellow-green)→
MONTAGE - Installing the down rod onto the motor
H J KI
1. Remove the cotter pin and metal pin from the down rod (see figure H).
2. Lead the down rod through the canopy (I).
3. Untighten the two screws on the motor (J).
4. Remove the cable binder from around the wiring and lead the wires through the down rod (K). Make sure
not to damage the wiring in the process.
L
5. Reinstall the metal pin into the down rod (L) en secure it by reinsterting the cottor pin (M).
6. Tighten the two screws on the motor (N).
The down rod has now been installed correctly.
M
N
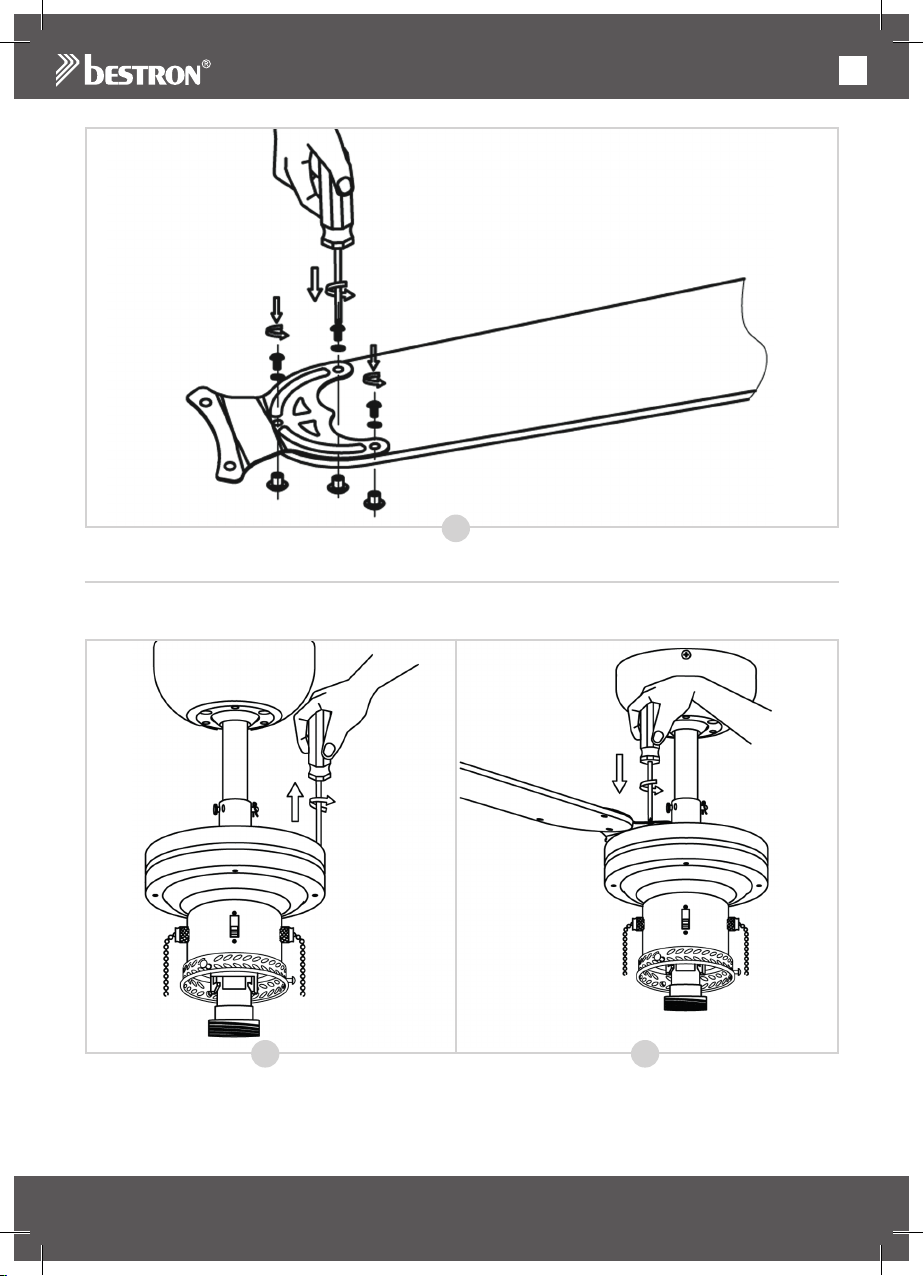
MONTAGE - Installing the fan blade holders onto the fan blades
The fan blades of this ceiling fan can be installed both with the white as the wood-colored side pointed
downwards.
1. Take a fan blade holder and place it onto a fan blade as shown in figure O.
2. Insert a screw with a red ring through the fan blade holder and fan blade.
3. Place a cap nut under the fan blade, then tighten the screw into the cup nut.
40
Page 41
EN
O
MONTAGE - Installing the fan blades onto the motor
1. The screws for installing the fan blades have already been screwed into the motor housing. Unscrew
them and remove them from the motor housing (see figure P).
P Q
2. Take a fan blade with fan blade holder and screw it to the motor housing using two screws (Q).
3. Repeat the process for the other five fan blades.
The fan blades have now been installed correctly.
41
Page 42
EN
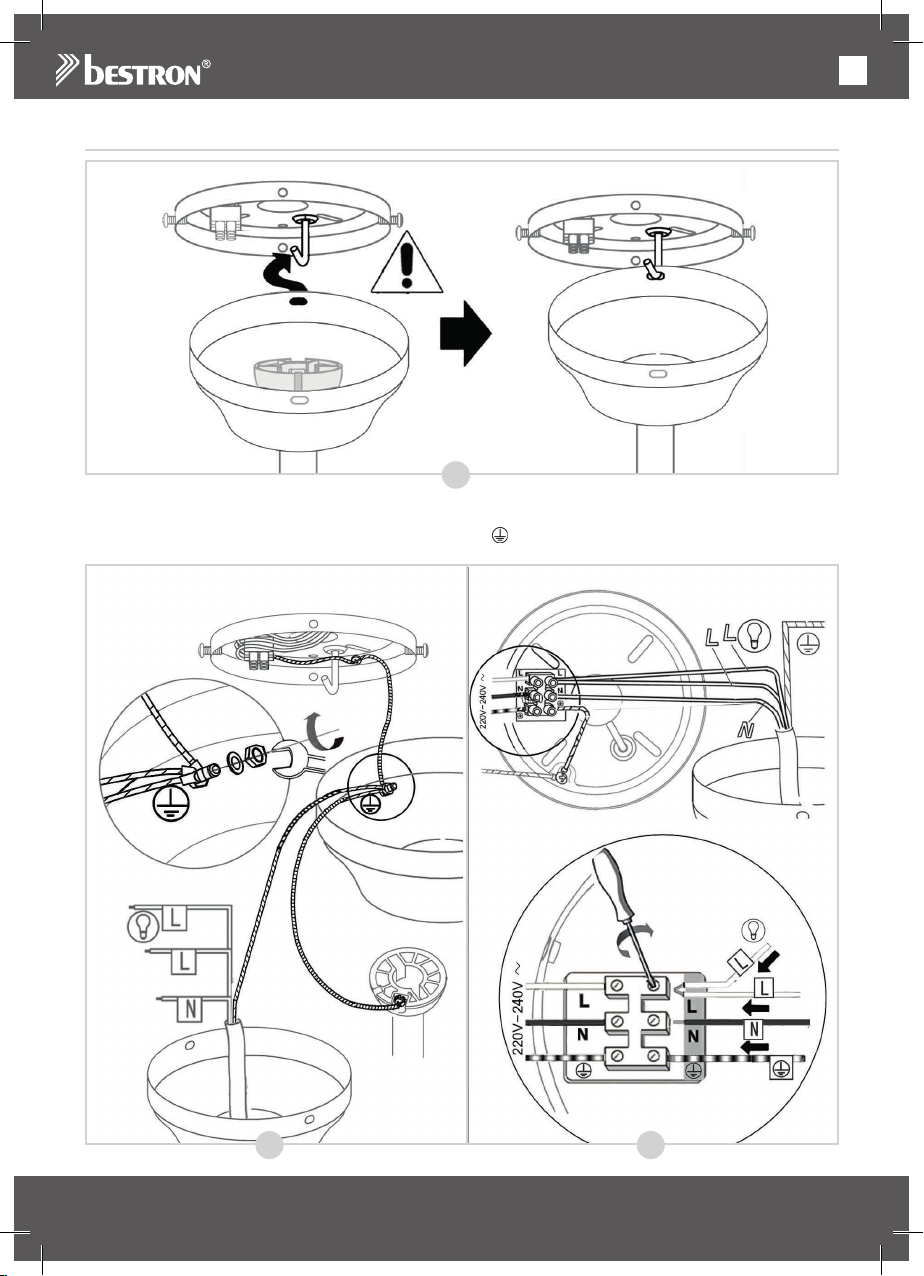
MONTAGE - Installing the fan to the mounting plate
R
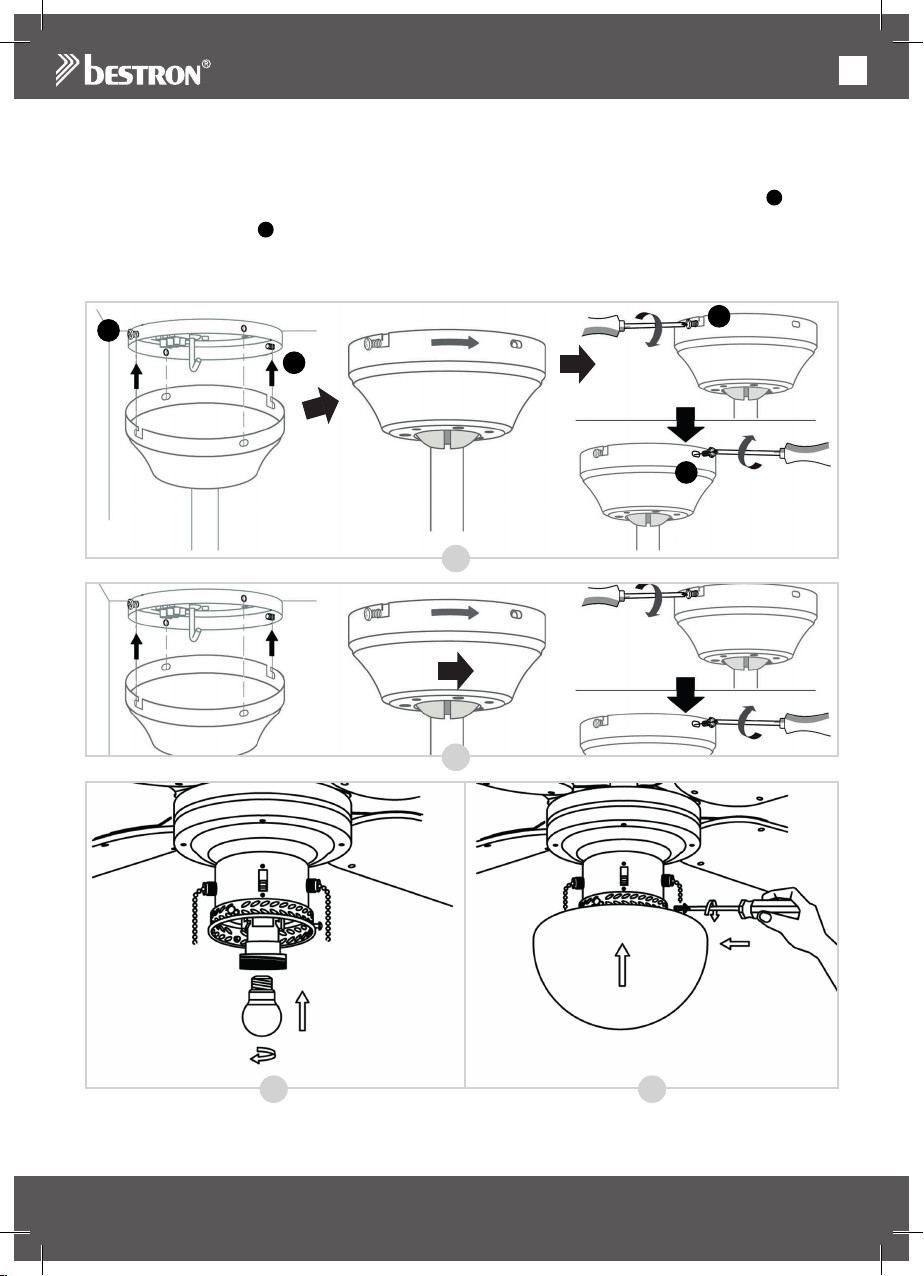
1. Lift up the fan and insert the “J-hook” on the mounting plate through one of the openings in the canopy
(see figure R). This will leave your hands free for connecting the fan’s wiring.
2. Connect all earth wires (yellow-green) to the canopy ( , S).
S T
42
Page 43
EN
3. Connect the wiring coming from the down rod to the terminal block on the mounting plate in the following
way (T):
• Bluewire→N
• Brownandblackwires→L
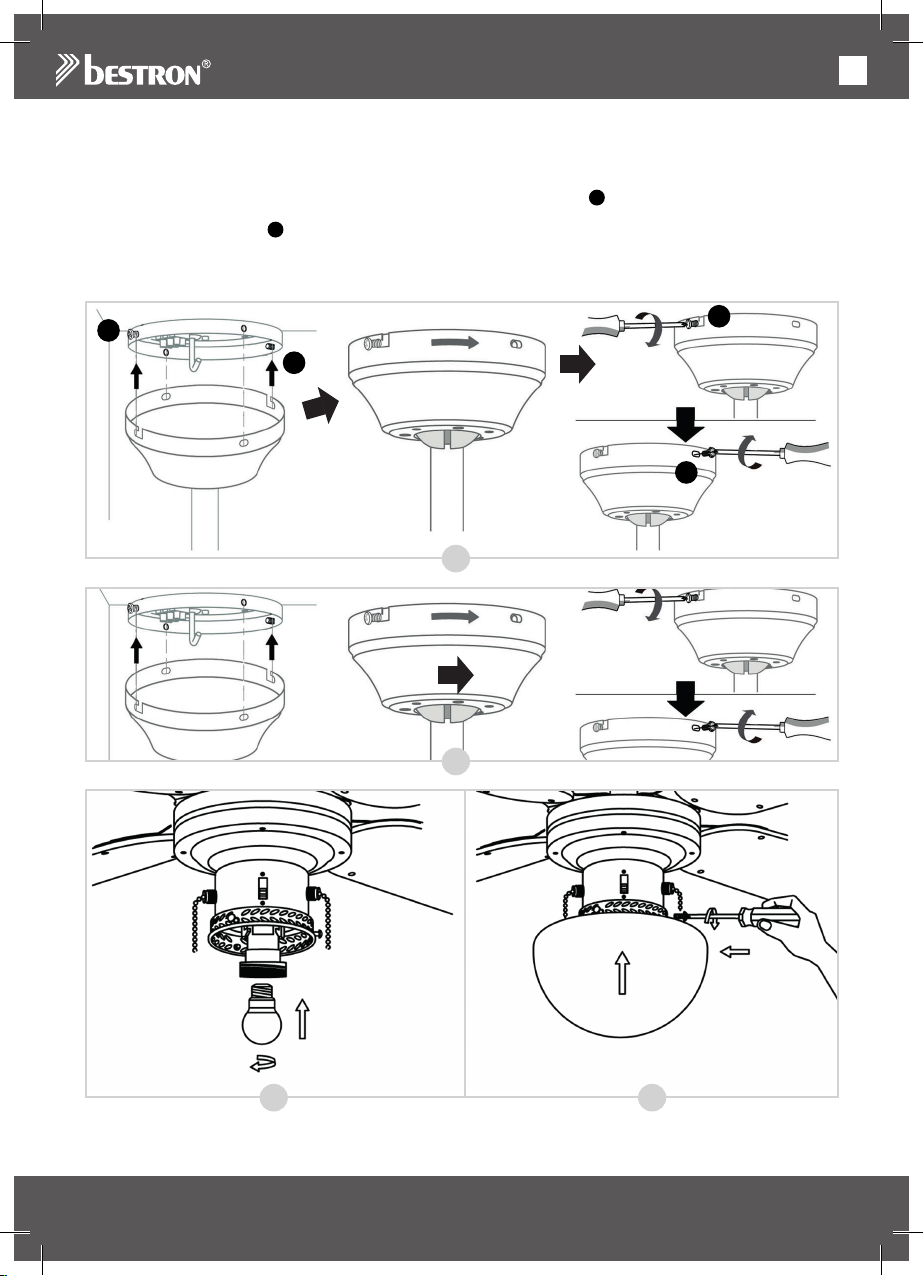
4. Now lift the fan from the “J-hook”, place the fan over the two screws 1 in the mounting plate and tighten
the screws firmly (U).
5. Insert the two screws 2 into the mounting plate and tighten them firmly as well (U).
6. Secure the down rod as depicted in figure V.
7. Now, place a lamp type E27 (60 Watts max.) in the lamp socket (W).
8.
Carefully attach the glass lamp cover using the three screws already screwed into the motor housing (X).
1
1
U
V
1
2
W X
The fan has now been installed correctly.
You can now switch the mains power back on.
43
Page 44
OPERATION - Controls
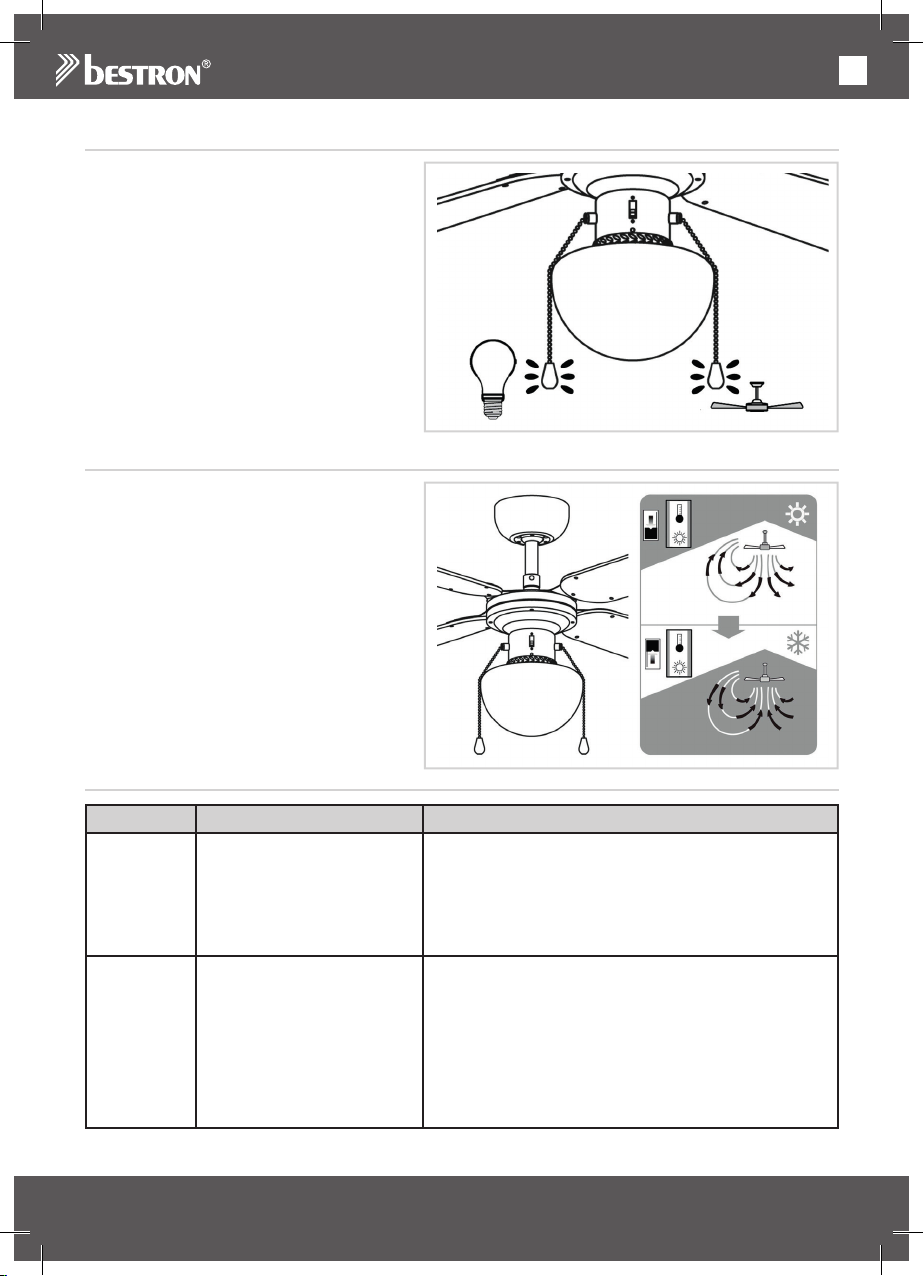
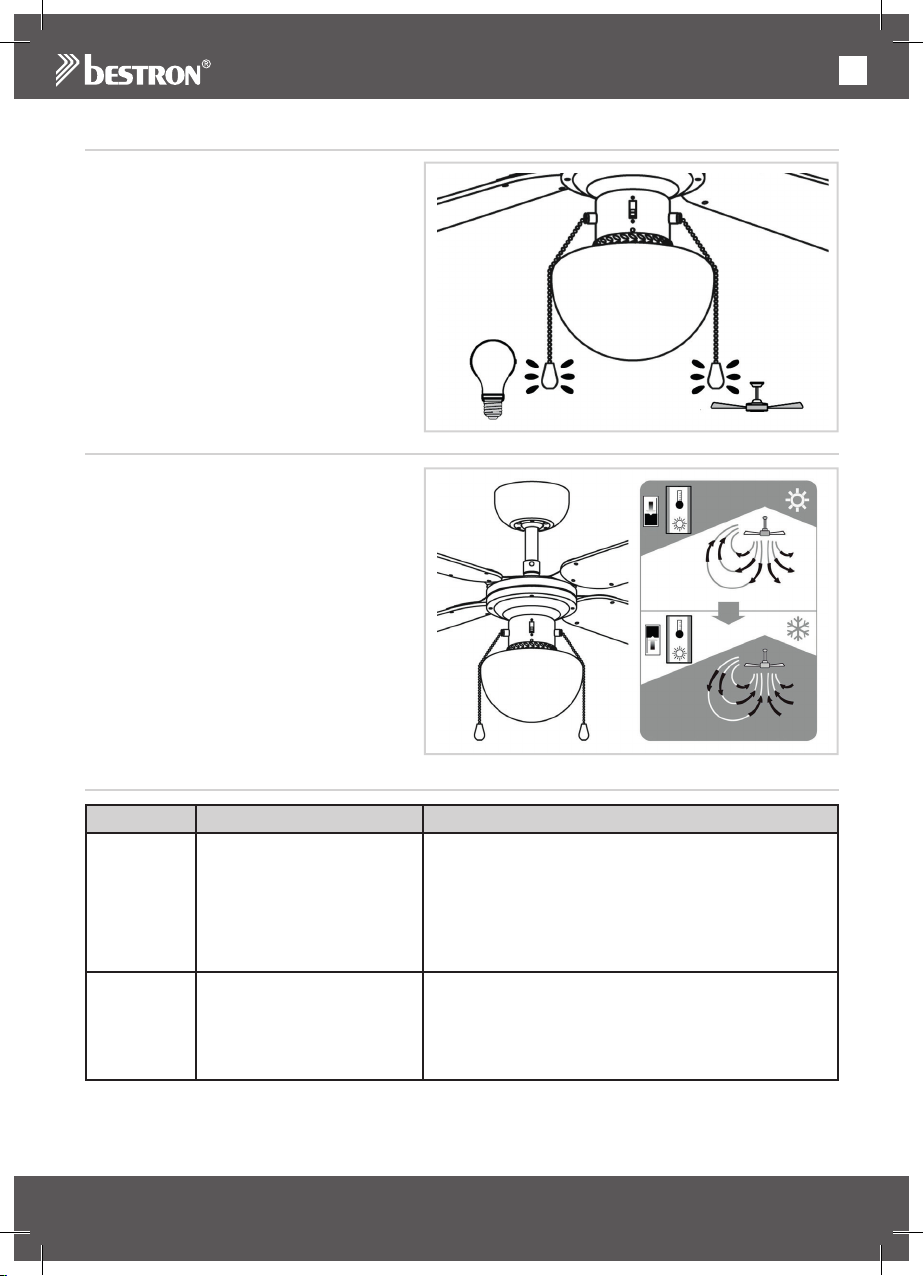
The ceiling fan has 3 speeds:
fast, medium and slow.
1. Pull the pull chain.
The fan will start at fast speed.
2. Pull the pull chain again.
The fan speed will change to medium.
3. Pull the pull chain again.
The fan speed will change to slow.
4. Pull the pull chain again.
The fan will shut off.
OPERATION - Summer/winter mode
The ceiling fan is equipped with a summer
mode and a winter mode: in summer mode
the fan will blow air directly down, creating
a cool breeze, while in winter mode the fan
will circulate the air warmed by your heating
system through the room.
1. Switch the mode switch down to use the
summer mode.
2. Switch the mode switch up to use the
winter mode.
EN
TROUBLESHOOTING
Trouble Probable Cause Suggested Remedy
Fan will not
start
Fan sounds
noisy.
Fan wobbles
or shakes
excessively.
1. The fan is connected to
a light switch which has
been turned off.
2. Fuse or circuit breaker
blown or mains power not
switched back on.
3. Loose power line
connections to the fan.
1. Mounting plate hasn’t been
installed correctly.
2. The down rod hasn’t been
secured properly.
1. Check whether the light switch has been turned on.
2. Check whether the mains power has been switched
on.
3. Check line wire connections to fan and switch wire
connections in switch housing.
CAUTION: Make sure main power is turned off.
1. Check to make sure the mounting plate is (still) firmly
attached to the ceiling. See ‘Montage - Installing the
mouting plate’.
2. Check to make sure the down rod has been secured
properly. See ‘Montage - Installing the down rod to
the motor’.
44
Page 45
EN
TROUBLESHOOTING - Balancing the fan blades
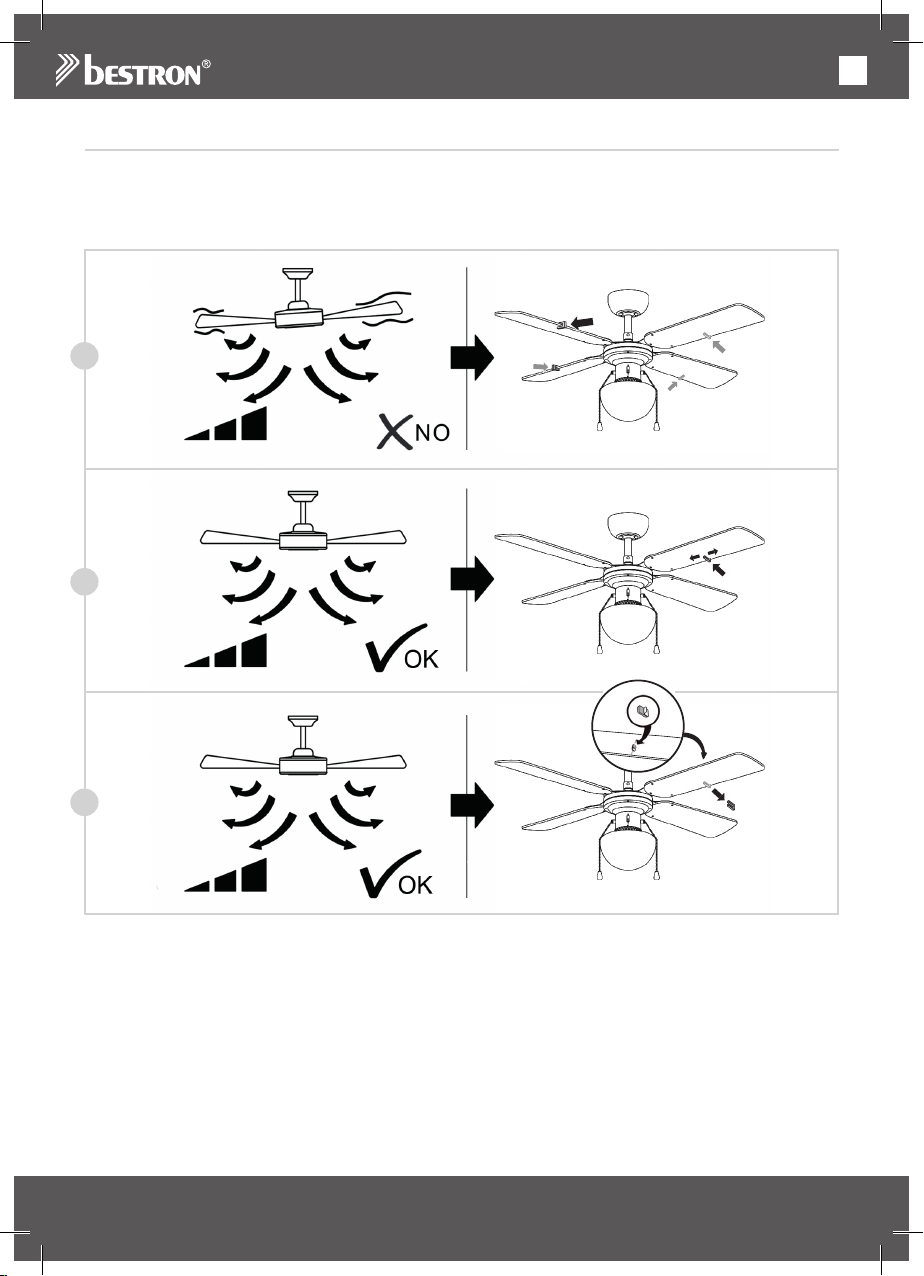
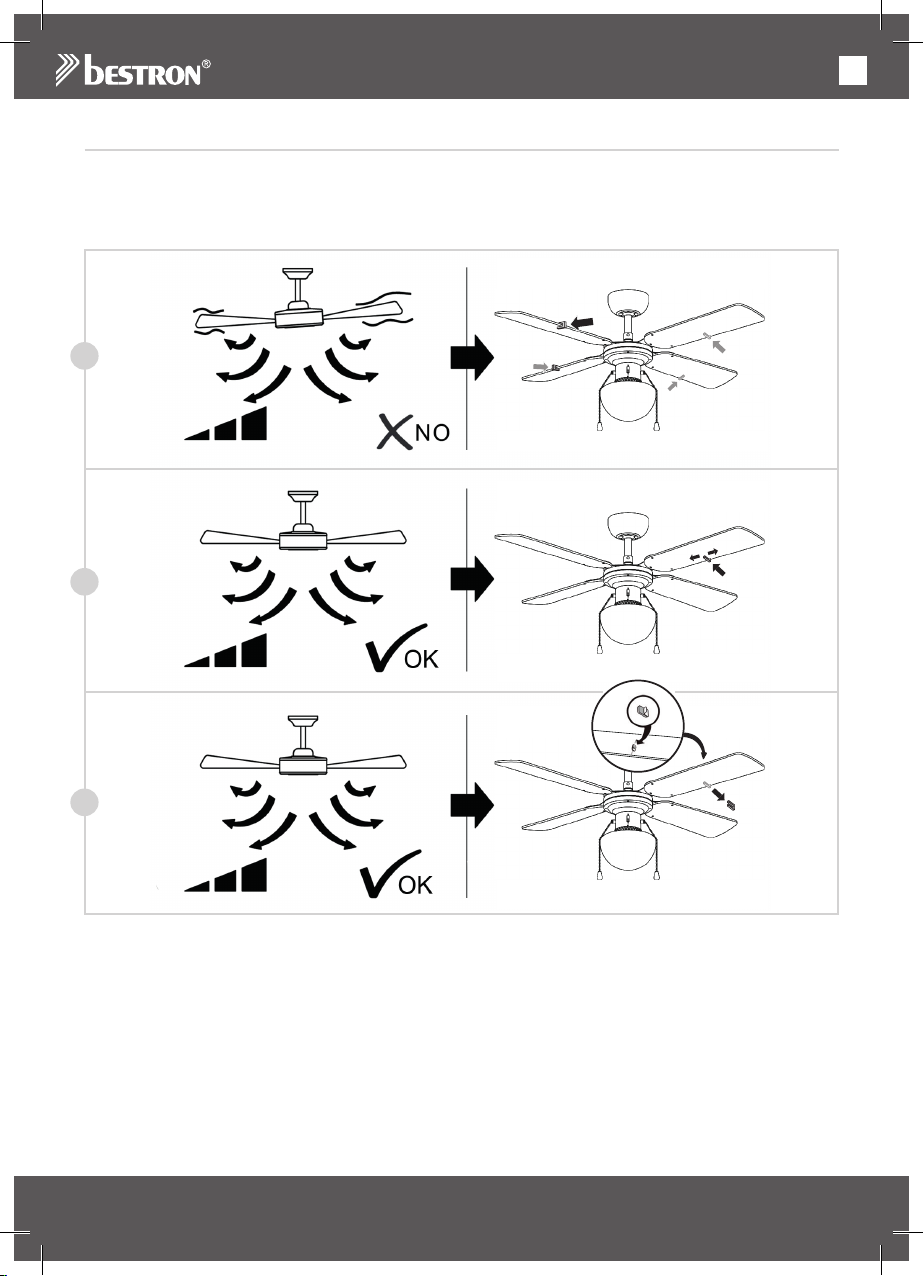
We do our utmost to ensure that your fan is of the highest quality. Nevertheless, it may sometimes be out of
balance. If the fan is unstable or shaking excessively, first follow the steps under ‘TROUBLESHOOTING’. If
the fan persists to shake excessively, try to exchange two opposing fan blades and turn on the fan. If after
this operation the fan still persists to shake, please use the balancing set:
A
B
C
1. Turn on the fan and find the speed at which the shaking is the worst. Turn off the fan.
2. Select one of the fan blades and place the balancing clamp halfway the straight side of the blade (see
figure A). Turn the fan back to the speed at which the shaking was the worst. Check whether the shaking
has become less. Turn off the fan.
3. Repeat this procedure with each remaining blade and check which blade shows the most improvement.
4. Place the balancing clamp on the fan blade where you found the most improvement once more and
push the clamp inward or outward onto the blade (B). Turn the fan back to the speed at which the
shaking was the worst. Check whether the shaking has become less. Turn off the fan.
5. Repeat this procedure and check at which position of the balance clamp you see the most improvement.
6. Remove the balancing clamp and paste one of the two balance weights on the upper side of the blade
where you found most improvement, exactly on the spot where the balancing clamp was located (C).
Please note that all ceiling fans can continue to shake very lightly.
45
Page 46
EN
WARRANTY CONDITIONS
Bestron offers a 60-month warranty on this equipment against defects resulting from manufacturing and/or
material errors, subject to the following conditions.
1. No labour or material costs will be charged during this warranty period.
2. Any repairs carried out under the warranty will not extend the warranty period.
3. Faulty parts, or in the event of exchange, the faulty equipment itself, will automatically become the property of Bestron.
4. The warranty is valid for the first buyer only and is non-transferable.
5. The warranty is not valid for damage caused by:
• Accidents
• Improper use
• Wear and tear
• Neglect
• Faulty installation
• Connection to a different mains voltage than indicated on the type plate
• Unauthorised changes
• Repairs carried out by unqualified third parties
• Use in violation with the applicable statutory, technical or safety standards
• Careless transport without suitable packaging or other protection
6. Warranty cannot be claimed:
• For damage during transport
• If the serial number of the appliance is removed or changed
7. Items excluded from warranty are:
• Cords
• Lamps
• Glass parts
8. The warranty does not entitle the purchaser to compensation for any damage other than replacement
or repair of the faulty parts. Bestron cannot in any event be held liable for any indirect or consequential
losses caused by or in relation to the equipment it has provided.
9. Claims under a warranty may only be submitted to your (online) retailer or directly to the Bestron Service Department. Never send items without being asked to. We may refuse the parcel and you will be
liable for the costs. Contact us first and we tell you how the appliance should be packaged and sent.
Each claim under a warranty must be accompanied by the relevant receipt.
SERVICE
If an unexpected problem occurs, please contact the BESTRON service department:
www.bestron.com/service
46
Page 47

IT
COMPLIMENTI!
Congratulazioni per l’acquisto di questo prodotto Bestron. Nelle
presenti istruzioni per l’uso viene spiegato il funzionamento e l’impiego
dell’apparecchio. Pertanto, prima di utilizzarlo, leggerle attentamente.
Utilizzare l’apparecchio esclusivamente come di seguito descritto.
Conservare queste istruzioni in luogo sicuro.
In caso di guasto:
Nel caso indesiderato in cui l’unità dovesse guastarsi, non tentare mai di
ripararla da soli. Far sempre eseguire le riparazioni da un tecnico qualificato.
Utilizzo da parte dei bambini:
• Questo apparecchio può essere utilizzato da bambini di età
superiore agli 8 anni e da persone con capacità fisiche, sensoriali
o mentali ridotte o con scarsa esperienza e conoscenza, ma
esclusivamente sotto la supervisione di un adulto o se hanno
ricevuto tutte le istruzioni necessarie per l’utilizzo sicuro
dell’apparecchio e ne hanno compreso i possibili pericoli.
• Pulizia e manutenzione non devono essere effettuate dai bambini, a
meno che non abbiano più di 8 anni e sotto la supervisione di un adulto.
• Mantenere l’unità e il cavo di alimentazione fuori dalla portata dei
bambini di età inferiore agli 8 anni.
• I bambini devono essere costantemente sorvegliati per assicurarsi
che non giochino con il dispositivo.
COSA È NECESSARIO SAPERE SUI DISPOSITIVI ELETTRICI
• Prima di utilizzare un dispositivo elettrico, assicurarsi che la
tensione di rete corrisponda alla tensione di rete indicata sulla sua
targhetta d’identificazione.
• Assicurarsi che la presa elettrica a cui si intende collegare un
dispositivo elettrico sia collegata a terra.
• Collocare sempre gli apparecchi elettrici su una superficie stabile e
piana, in modo che non possano cadere.
• Alcune parti di un dispositivo elettrico possono riscaldarsi o, a volte,
surriscaldarsi. Per evitare le ustioni, evitare di toccarle.
• Quando si tocca un apparecchio elettrico, un cavo o una spina,
assicurarsi che le mani siano asciutte.
• Le apparecchiature elettriche devono poter dissipare il calore
prodotto al fine di evitare il rischio di incendio. Pertanto, assicurarsi
che l’unità sia sufficientemente libera da ingombri e che non possa
venire a contatto con materiale combustibile. Non coprire mai gli
apparecchi elettrici.
• Evitare il contatto di apparecchi, cavi o spine elettriche con l’acqua.
47
Page 48
IT
• Mai immergere apparecchi elettrici, cavi o spine in acqua o in altri
liquidi.
• Se gli apparecchi elettrici dovessero cadere in acqua, mai tentare
di raccoglierli. Scollegare immediatamente la spina dalla presa
elettrica e non riutilizzare l’apparecchio.
• Assicurarsi che gli apparecchi elettrici, i cavi e le spine non entrino
in contatto con fonti di calore, come piastre calde o fiamme libere.
• Non lasciare i cavi appesi sopra il bordo del lavandino, del piano di
lavoro o del tavolo.
• Quando il dispositivo non è in uso, scollegare sempre il cavo di
alimentazione.
• Nello scollegare il cavo di alimentazione dalla spina elettrica,
assicurarsi di tirare la spina stessa e non il cavo.
• Controllare regolarmente che il cavo del dispositivo elettrico sia
intatto. Non utilizzare l’unità se il cavo risulta essere danneggiato.
Se il cavo è danneggiato, per evitare qualsiasi rischio, è necessario
che venga sostituito dal produttore, da un servizio di assistenza
tecnica o da una persona qualificata.
• L’apparecchio non deve essere azionato da un timer esterno o da
un sistema separato dotato di telecomando.
COSA È NECESSARIO SAPERE SU QUESTO DISPOSITIVO
• Fare attenzione quando si utilizza il dispositivo all’aperto.
• Non utilizzare mai l’apparecchio in ambienti umidi.
• Pulire accuratamente l’unità dopo l’uso (vedere la sezione Pulizia e
manutenzione).
• Si consiglia di eseguire l’installazione da un elettricista qualificato
in grado di verificare la resistenza degli elementi di supporto del
soffitto e di effettuare una connessione elettrica adeguata.
• Per ridurre il rischio di lesioni personali, utilizzare solo le due viti in
acciaio (e la rondella di sicurezza) fornite per il montaggio.
• Per ridurre il rischio di lesioni personali, non piegare i portalama
durante l’installazione dei supporti, il bilanciamento delle pale o la
pulizia della ventola.
48
Page 49
IT
DISPOSIZIONI AMBIENTALI
• Smaltire i materiali di imballaggio, come plastica e scatole di
cartone, negli appositi contenitori.
• Al termine della sua vita utile, non smaltire il prodotto come
un normale rifiuto domestico, ma conferire presso un punto
di raccolta per il riciclaggio di apparecchiature elettriche
ed elettroniche. Osservare il relativo simbolo apposto sul
prodotto, contenuto nelle istruzioni per l’uso o stampato
sull’imballaggio.
• I materiali possono essere riutilizzati come indicato. Con il
vostro aiuto per il riutilizzo, l’elaborazione dei materiali o altre
forme di riciclaggio di vecchi apparecchi, contribuite in modo
importante alla protezione dell’ambiente.
• Chiedete al vostro comune di residenza dove è ubicato il
punto di raccolta appropriato.
DICHIARAZIONE DI CONFORMITÀ CE
Questo prodotto soddisfa i requisiti delle linee guida Europee.
R. Neyman
Controllo qualità
49
Page 50
IT
FUNZIONAMENTO - Generale
1 2 3
5
11
7
8
9
10
4
6
Questo apparecchio è destinato esclusivamente a
uso domestico, non a uso professionale.
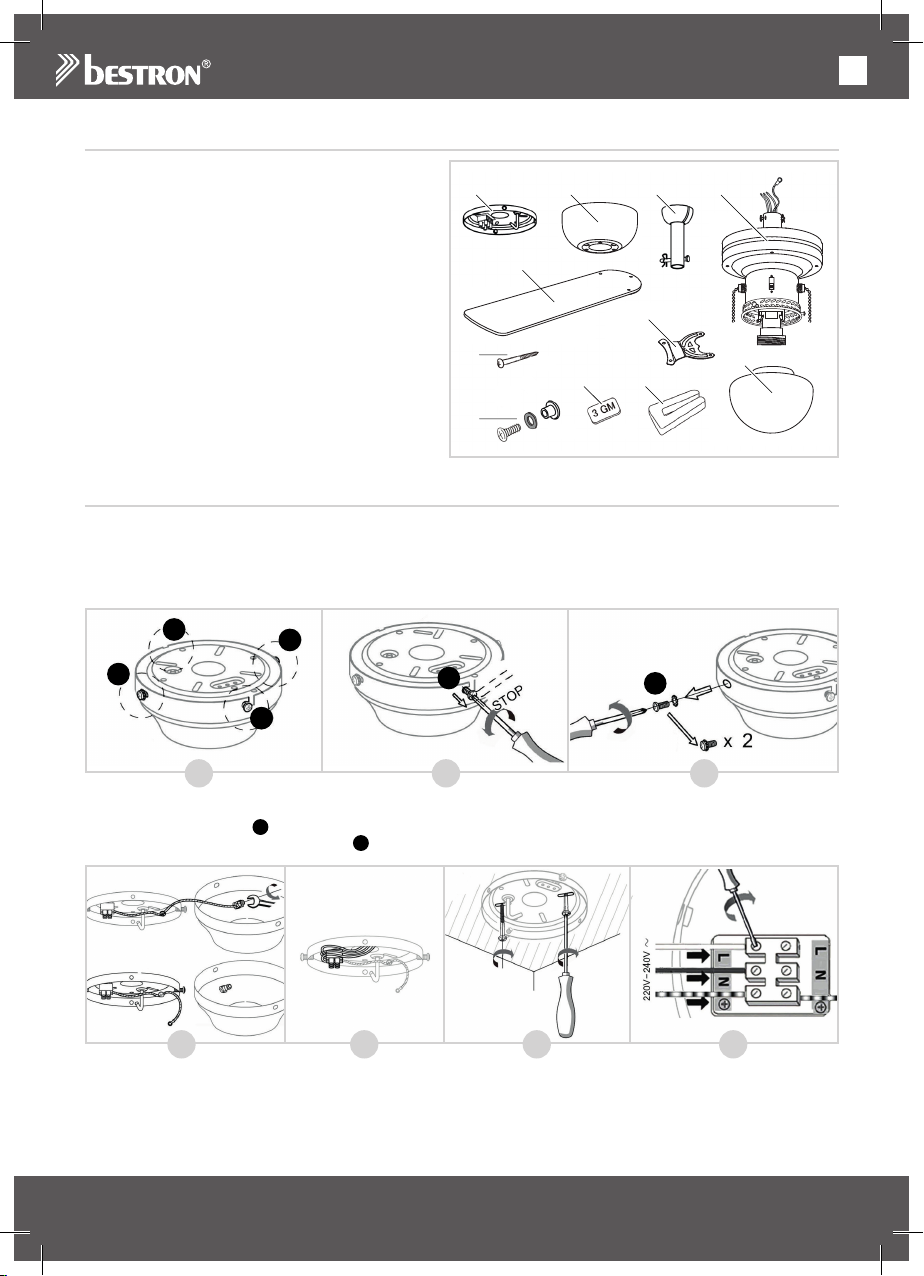
1. Piastra di sostegno
2. Calotta superiore
3. Asta di sostegno
4. Motore
5. Eliche del ventilatore (x4)
6. Fermi delle eliche del ventilatore (x4)
7. Viti della piastra di sostegno (x2)
8. Viti di fissaggio delle eliche del ventilatore
(x12)
9. Pesi di equilibratura (x2)
10. Morsetto di bilanciamento
11. Paralume in vetro
MONTAGGIO - Installazione della piastra di sostegno
ATTENZIONE:
• SPEGNERE SEMPRE L’INTERRUTTORE GENERALE DELLA CORRENTE PRIMA DI INSTALLARE
O EFFETTUARE QUALSIASI INTERVENTO SUL VENTILATORE DA SOFFITTO.
• Installare il ventilatore in un ambiente in cui la distanza tra le eliche e il pavimento sia di almeno 2,30
metri.
1
2
1. Nell’imballaggio la piastra di sostegno è già fissata alla calotta superiore da quattro viti (vedi figura A).
2. Allentare le due viti 1 (figura B).
3. Svitare completamente le due viti 2 e rimuoverle (figura C).
D E F G
4. Rimuovere la piastra di sostegno dalla calotta superiore ed estrarre il cavo di messa a terra di colore
giallo-verde dalla calotta superiore (figura D).
5. Far passare i cavi che pendono dal soffitto attraverso l’apertura presente nella piastra di sostegno (figura E).
6. Avvitare la piastra di sostegno al soffitto (figura F). Accertarsi che la piastra di sostegno sia ancorata
saldamente al soffitto per poter sostenere un peso di almeno 23 kg (51 libbre)
2
1
1
A
B C
2
50
Page 51
IT
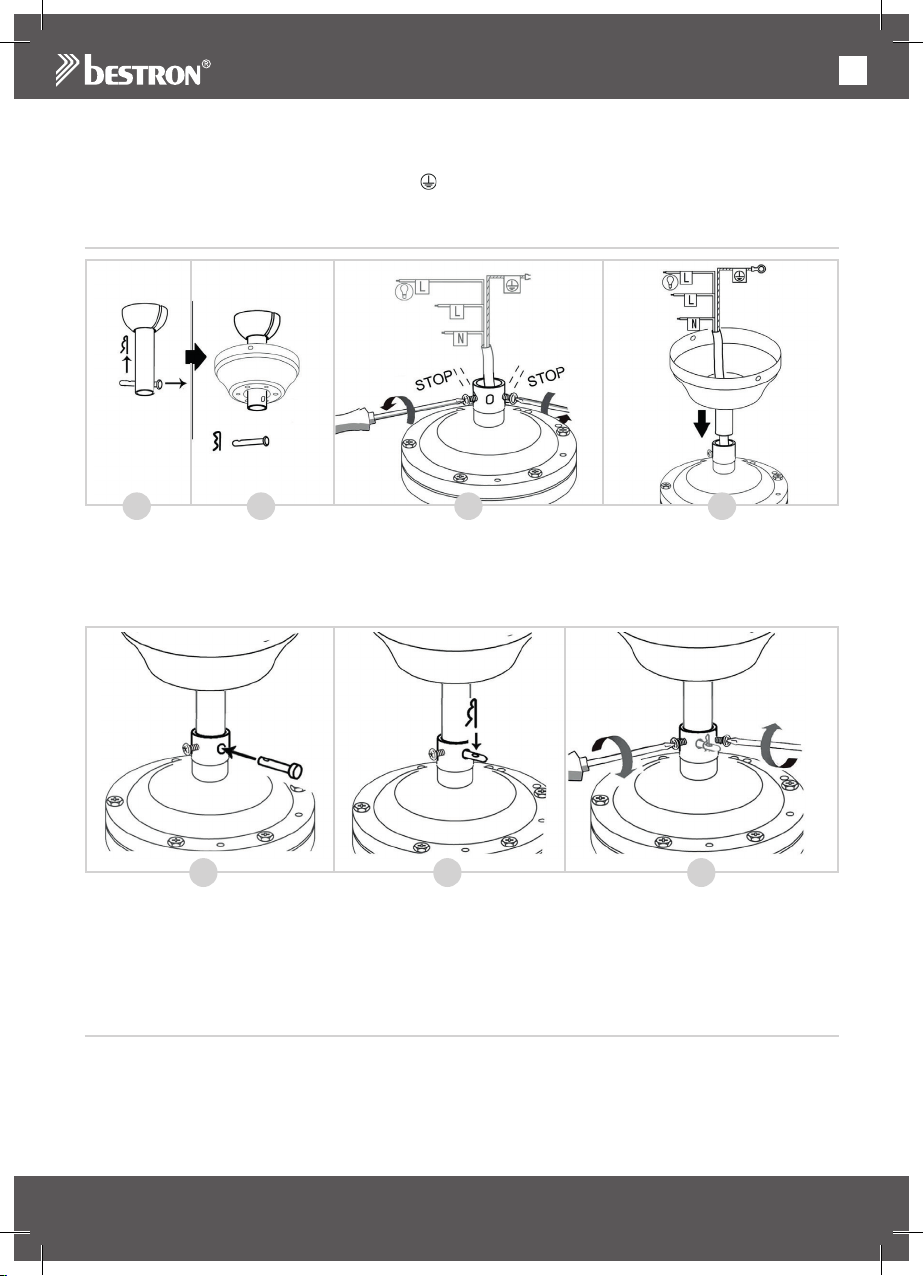
7. Collegare i cavi alla morsettiera presente sulla piastra di sostegno nel modo che segue (figura G):
• Cavoblu→N
• Cavomarroneonero→L
• Cavodimessaaterra(giallo-verde)→
MONTAGGIO - Inserimento dell’asta nel motore
H J KI
1. Rimuovere la coppiglia e il perno metallico di fissaggio dall’asta (vedere figura H).
2. Far passare l’asta attraverso la calotta superiore (figura I).
3. Allentare le due viti presenti sul motore (figura J).
4. Rimuovere la fascetta e far passare i cavi attraverso l’asta (figura K). Assicurarsi di non danneggiare i
cavi durante l’operazione.
L
5. Inserire nuovamente il perno metallico di fissaggio nell’asta (figura L) e stringerlo riposizionando la
coppiglia (figura M).
6. Stringere le due viti sul motore (figura N).
L’asta è ora montata correttamente.
M
N
MONTAGGIO - Installazione dei fermi sulle eliche del ventilatore
Le eliche del ventilatore da soffitto possono essere indifferentemente montate o con il lato bianco o con il
lato in legno rivolto verso il basso.
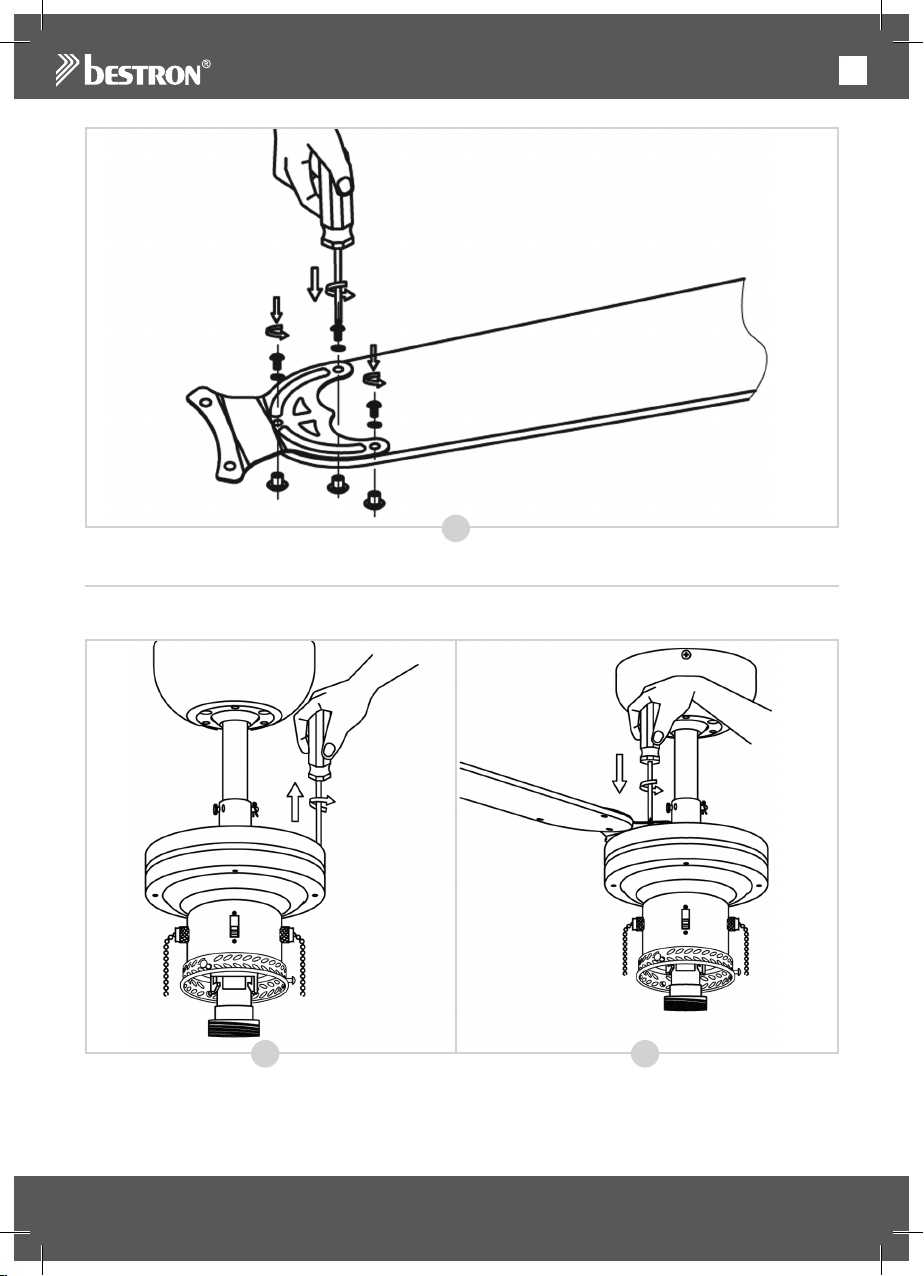
1. Prendere un fermo e posizionarlo su una delle eliche del ventilatore come mostrato nella figura O.
2. Inserire una delle viti con la rosetta rossa tra il fermo dell’elica e l’elica stessa del ventilatore.
3. Posizionare un dado sotto il ventilatore, quindi stringere la vite nel dado.
51
Page 52
IT
O
MONTAGGIO - Installazione delle eliche del ventilatore sul motore
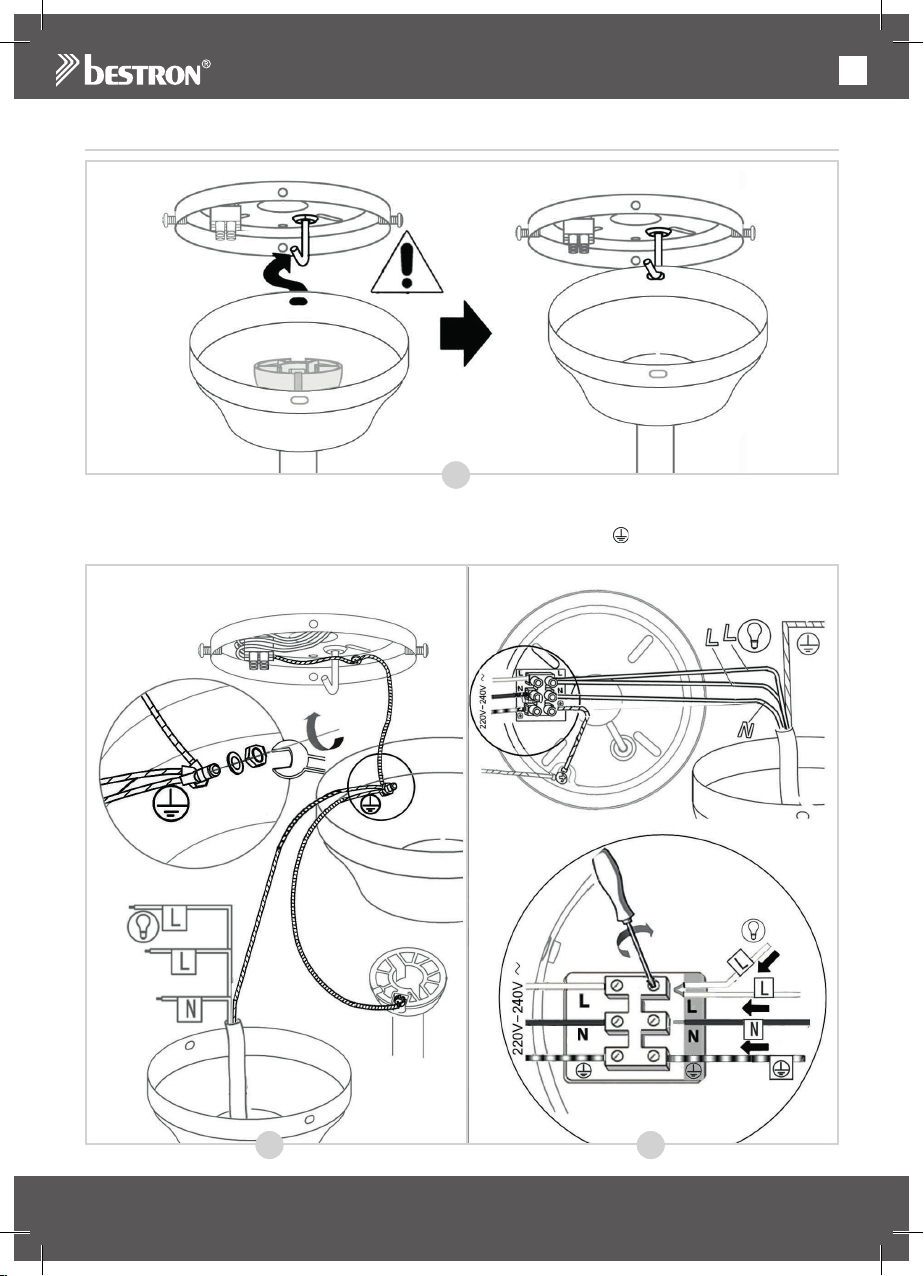
1. Le viti per montare le eliche sono già avvitate nell’alloggiamento del motore. Svitarle e rimuoverle (figura
P).
P Q
2. Prendere una delle eliche bloccate con il relativo fermo e avvitarla nell’alloggiamento del motore
utilizzando due viti (figura Q).
3. Ripetere la procedura per tutte le altre eliche del ventilatore.
Le eliche del ventilatore sono ora montate correttamente.
52
Page 53
IT
MONTAGGIO - Installazione del ventilatore sulla piastra di sostegno
R
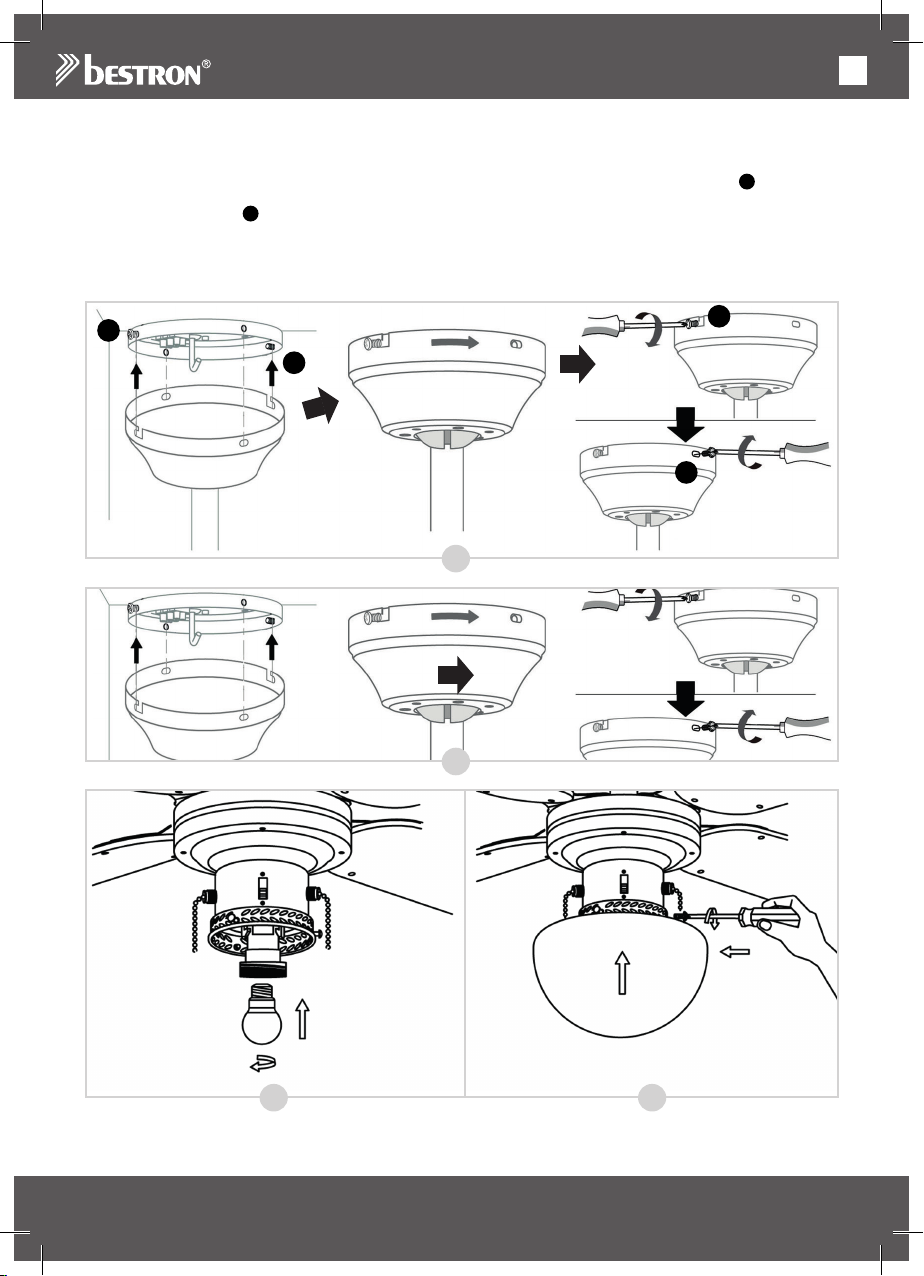
1. Sollevare il ventilatore e inserire il gancio sulla piastra di sostegno attraverso una delle aperture nella
calotta superiore (figura R). In questo modo si avranno le mani libere per collegare i cavi del ventilatore.
2. Collegare tutti i fili di messa a terra (giallo-verdi) alla calotta superiore ( , figura S).
S T
53
Page 54
IT
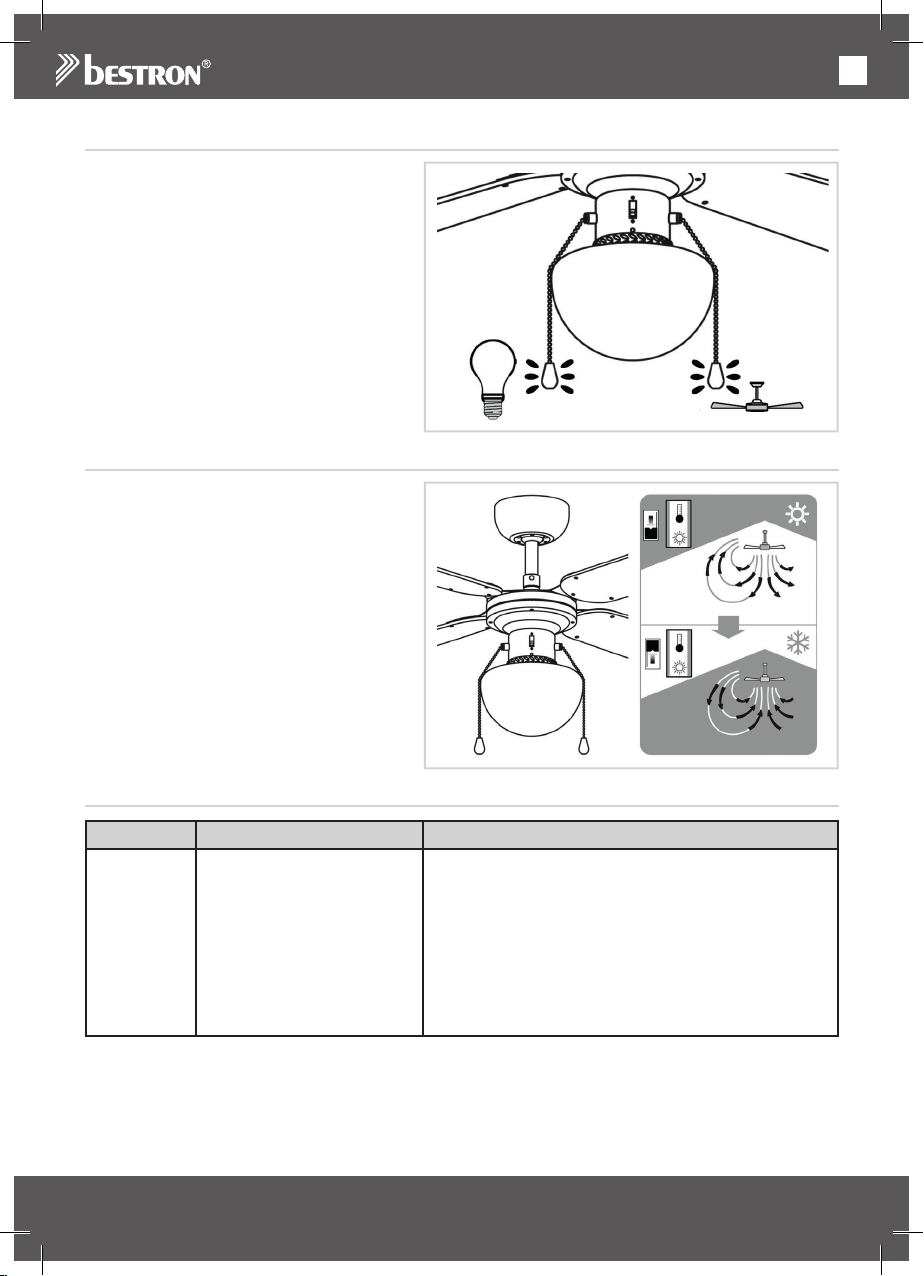
3.
Collegare i cavi che fuoriescono dall’asta alla morsettiera sulla piastra di sostegno nel modo che segue (figura T):
• Cavoblu→N
• Cavimarronieneri→L
4. Rimuovere il ventilatore dal gancio, posizionarlo in corrispondenza dei fori delle due viti 1 posti sopra
la piastra di sostegno e avvitare le viti (figura U).
5. Inserire le due viti 2 nella piastra di sostegno e stringerle (figura U).
6. Fissare l’asta come illustrato nella figura V.
7. Avvitare una lampadina di tipo E27 (massimo 60 Watt) nell’apposito alloggiamento (figura W).
8. Fissare con cautela il paralume di vetro utilizzando le tre viti che erano precedentemente avvitate
nell’alloggiamento del motore (figura X).
1
1
U
V
1
2
W X
Il ventilatore ora è montato correttamente.
Adesso l’interruttore principale di corrente può essere riacceso.
54
Page 55
FUNZIONAMENTO - Comandi
Il ventilatore da soffitto ha 3 regolazioni:
massima, media e minima.
1. Tirare il cordino di commutazione. Il
ventilatore inizierà a muoversi alla
massima velocità.
2. Tirare nuovamente il cordino di
commutazione. Il ventilatore passerà alla
velocità media.
3. Tirare nuovamente il cordino di
commutazione. Il ventilatore passerà alla
velocità minima.
4. Tirare nuovamente il cordino di
commutazione. Il ventilatore si spegnerà.
FUNZIONAMENTO - Modalità estate/inverno
Il ventilatore può essere impostato sulla modalità estiva o invernale: in modalità estiva il ventilatore soffia aria direttamente verso il basso
creando una fresca brezza, mentre in quella
invernale il ventilatore farà circolare in tutta la
stanza l’aria calda generata dall’impianto di
riscaldamento.
1. Spostare il selettore di modalità verso il
basso per utilizzare la modalità estiva.
2. Spostare il selettore di modalità verso l’alto
per utilizzare la modalità invernale.
IT
RISOLUZIONE DEI PROBLEMI
Guasto Probabile causa Soluzione suggerita
Il ventilatore
non si
accende
1. Il ventilatore è collegato a
un interruttore di corrente
spento.
2. È saltato un fusibile o
l’interruttore generale
di corrente, oppure
l’interruttore generale di
corrente è spento.
3. Connessioni lente tra
ventilatore e presa di
corrente.
1. Controllare che l’interruttore della luce sia acceso.
2. Controllare che l’interruttore generale di corrente sia
ac ceso.
3. Controllare che i cavi siano collegatati al ventilatore
e scambiarli di posizione nell’alloggiamento
dell’interruttore.
ATTENZIONE:
Assicurarsi che, durante queste operazioni, l’interruttore
principale di corrente sia sempre spento.
55
Page 56
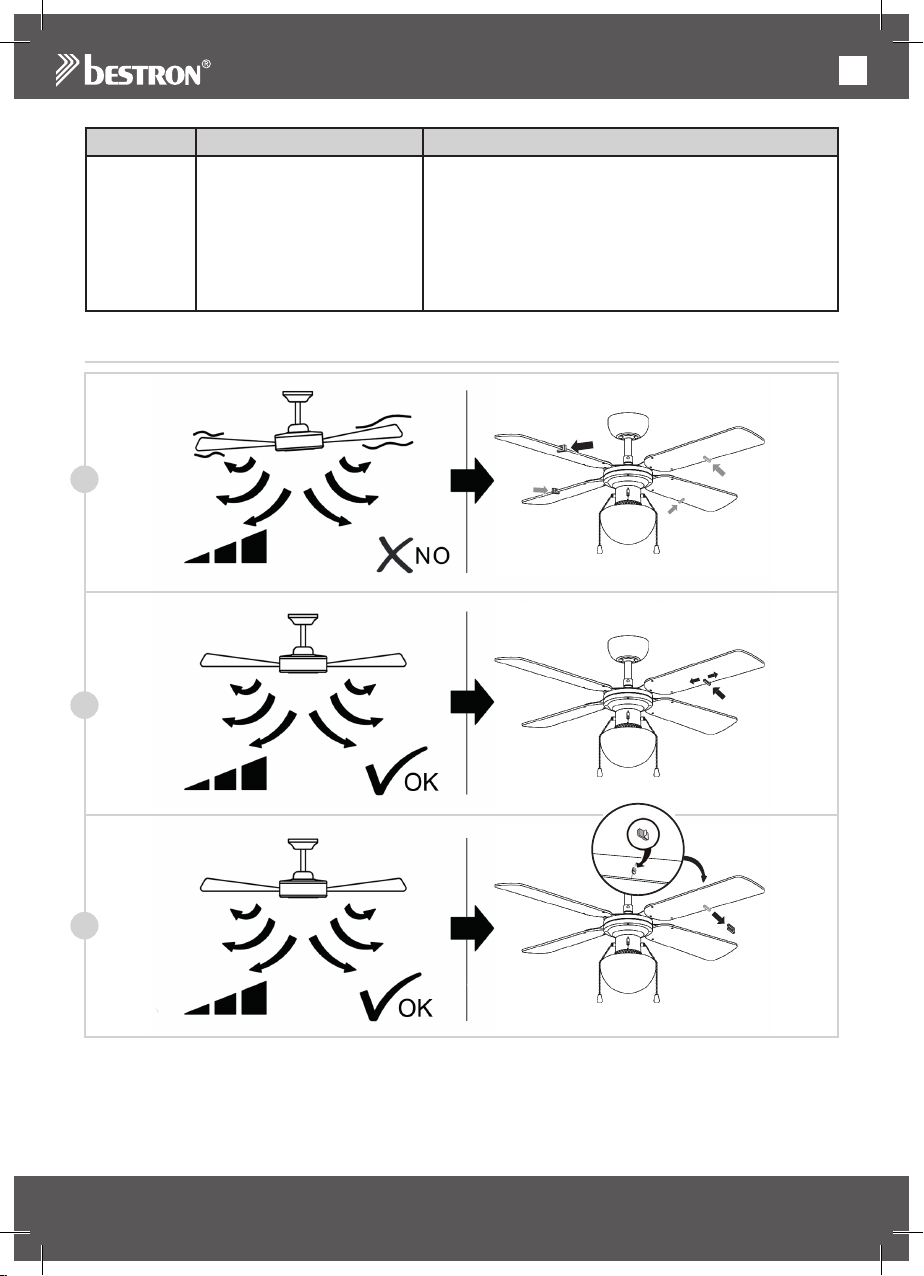
IT
Guasto Probabile causa Soluzione suggerita
Il ventilatore
risulta
rumoroso.
Il ventilatore
oscilla
o vibra
essivamente.
1. La piastra di sostegno non
è montata correttamente.
2. L’asta non è fissata
correttamente.
1. Verificare che la piastra di sostegno sia (ancora)
saldamente ancorata al soffitto. Vedere il paragrafo
“Montaggio - Installazione della piastra di sostegno”.
2. Verificare che l’asta sia stata montata correttamente.
Vedi paragrafo “Montaggio - Inserimento dell’asta nel
motore”.
RISOLUZIONE DEI PROBLEMI - Bilanciamento delle eliche del ventilatore
A
B
C
Facciamo del nostro meglio per garantire la massima qualità del vostro ventilatore. Tuttavia, a volte può accadere che l’apparecchio non sia bilanciato. Se il ventilatore non è stabile o vibra eccessivamente, fare anzitutto riferimento a quanto descritto nel paragrafo ‘RISOLUZIONE DEI PROBLEMI’. Se il ventilatore continua
a vibrare in modo eccessivo, provare a scambiare due delle eliche del ventilatore e accendere nuovamente
l’apparecchio. Se dopo questa operazione il ventilatore continua a vibrare, utilizzare il set di bilanciamento:
56
Page 57
IT
1. Accendere il ventilatore e verificare a quale velocità la vibrazione è maggiore. Spegnere il ventilatore.
2. Scegliere una delle eliche del ventilatore e posizionare il morsetto di bilanciamento alla metà esatta
della parte dritta dell’elica (vedere la figura A). Riaccendere il ventilatore selezionando la velocità alla
quale la vibrazione era maggiore. Verificare se la vibrazione è diminuita. Spegnere il ventilatore.
3. Ripetere l’operazione su ciascuna delle altre eliche per verificare quale di esse fa registrare il
miglioramento più significativo.
4. Posizionare il morsetto di bilanciamento sull’elica che ha fatto riscontrare il miglioramento più significativo
e muovere il morsetto verso l’interno o verso l’esterno dell’elica (figura B). Riaccendere il ventilatore
selezionando la velocità alla quale la vibrazione era maggiore. Verificare se la vibrazione è diminuita.
Spegnere il ventilatore.
5. Ripetere questa operazione e verificare in corrispondenza di quale posizione del morsetto si ottiene il
massimo miglioramento.
6. Rimuovere ora il morsetto di bilanciamento e incollare uno dei pesi di equilibratura sul lato superiore
dell’elica che ha determinato il miglioramento più significativo, esattamente nel punto in cui si trovava
prima il morsetto (figura C).
Si consideri che è normale che i ventilatori a soffitto vibrino leggermente.
DISPOSIZIONI DI GARANZIA
In base alle seguenti condizioni, Bestron garantisce questo apparecchio per la durata di 60 mesi dalla data
di acquisto contro i guasti causati da difetti di fabbricazione e/o del materiale.
1. Durante il periodo di garanzia non verranno addebitati costi di manodopera e per i materiali necessari.
2. La riparazione effettuata in garanzia non prolunga il periodo di garanzia.
3. Al momento della sostituzione, le parti difettose o gli stessi apparecchi guasti, torneranno automaticamente a essere proprietà di Bestron.
4. La garanzia è valida solo per l’acquirente originale e non è trasferibile.
5. La garanzia non è valida in caso di danni causati da:
• Incidenti ed infortuni
• Uso improprio
• Usura
• Negligenza
• Installazione errata
• Collegamento a una tensione di rete diversa da quella indicata sulla targhetta di identificazione del
dispositivo
• Modifiche non autorizzate
• Riparazioni effettuate da terzi non qualificati
• Utilizzo in violazione delle norme giuridiche, tecniche o di sicurezza applicabili
• Trasporto incauto senza idoneo imballaggio o altre protezioni
6. Non sono ammesse richieste di risarcimento in garanzia in caso di:
• Danni subiti durante il trasporto
• Rimozione o modifica del numero di serie del dispositivo
7. Quanto segue è escluso dalla garanzia:
• Cavi
• Lampade
• Parti in vetro
8. La garanzia non dà diritto ad alcun risarcimento per danni diversi dalla sostituzione o dalla riparazione
delle parti difettose. Bestron non può essere in nessun caso ritenuta responsabile per danni consequenziali o altre conseguenze derivanti da o in relazione alle apparecchiature da essa fornite.
9. I reclami in garanzia possono essere inoltrati solo al vostro rivenditore/rivenditore web o direttamente
al servizio assistenza Bestron. Non limitarsi a inviare un oggetto senza preavviso. Il pacchetto può
essere rifiutato e gli eventuali costi saranno a carico del mittente. In primo luogo, contattateci per ricevere le istruzioni su come imballare e spedire il dispositivo. Qualsiasi reclamo in garanzia deve essere
accompagnato dalla prova di acquisto.
SERVIZIO ASSISTENZA
Nell’indesiderata eventualità di un malfunzionamento, contattare il servizio assistenza BESTRON visitando
il seguente sito: www.bestron.com/service
57
Page 58
ES
¡FELICIDADES!
Felicidades por la compra de este producto Bestron. En estas
instrucciones le explicamos su funcionamiento y cómo usarlo. Antes
de usar el aparato, lea bien el manual de instrucciones. Utilice
el aparato únicamente tal y como se describe en el manual de
instrucciones. Guarde las instrucciones como referencia en el futuro.
En el caso de una avería:
Si el aparato se averiara inesperadamente, nunca intente arreglarlo
usted mismo. Deje que las reparaciones las haga un mecánico
cualificado.
Uso por niños:
• Este aparato lo pueden usar niños menores de 8 años y personas
con una limitación física, sensorial o mental o una falta de
experiencia y conocimiento, pero siempre bajo la supervisión o
siguiendo las instrucciones de un adulto sobre su uso seguro y
comprendiendo los posibles peligros correspondientes.
• La limpieza y mantenimiento no las pueden realizar niños, excepto
si son mayores de 8 años y están bajo la supervisión de un adulto.
• Mantenga el equipo y el cable alejados del alcance de los niños de
8 años.
• Hay que vigilar a los niños para asegurarse de que no jueguen con
el aparato.
QUÉ DEBE SABER SOBRE LOS APARATOS ELÉCTRICOS
• Antes de usar un aparato eléctrico, compruebe que la tensión
coincida con la tensión indicada en su placa descriptiva.
• Compruebe que el enchufe que vaya a utilizar para un aparato
eléctrico tenga contacto a tierra.
• Coloque los aparatos eléctricos siempre sobre una superficie
estable y plana, en un un sitio donde no se puedan caer.
• Algunas partes de un aparato eléctrico pueden calentarse
ligeramente o mucho. Para evitar quemaduras, no las toque.
• Procure que sus manos estén siempre secas cuando toque un
aparato eléctrico, un cable o un enchufe.
• Los aparatos eléctricos tienen que poder eliminar su calor para
evitar el riesgo de incendios. Procure que el aparato tenga
suficiente espacio alrededor y no pueda estar en contacto con
material inflamable. No cubra nunca los aparatos eléctricos.
• Procure que los aparatos eléctricos, cables o enchufes no entren
en contacto con el agua.
58
Page 59

ES
• Nunca sumerja los aparatos eléctricos, cables o enchufes en agua
ni en ningún otro líquido.
• No toque los aparatos eléctricos si se han caído al agua.
Desenchúfelo inmediatamente de la toma de corriente. No vuelva a
usar el aparato.
• Procure que los aparatos eléctricos, cables o enchufes no entren
en contacto con fuentes de calor, como una plancha caliente o una
llama.
• No deje los cables sobre el borde de la encimera, tabla de cortar o
una mesa.
• Desenchufe siempre los aparatos eléctricos si no los está
utilizando.
• Al desenchufarlo, no tire del cable sino del enchufe.
• Compruebe con regularidad si el cable del aparato eléctrico está
todavía en buen estado. No vuelva a usar el aparato si el cable
está un poco dañado. Si el cable está dañado, el fabricante, un
servicio técnico o una persona con una cualificación similar lo tiene
que sustituir, para evitar cualquier riesgo.
• No se puede poner el aparato en funcionamiento por medio de
un interruptor externo o con un sistema especial con mandos a
distancia.
QUÉ NECESITA SABER SOBRE ESTE APARATO
• Tenga cuidado al usar el dispositivo en el exterior.
• No use nunca el aparato en espacios húmedos.
• Limpie bien el aparato después de su uso, véase «Limpieza y
mantenimiento».
• Recomendamos que la instalación sea realizada por un electricista
calificado que pueda verificar la resistencia de los miembros de
techo de apoyo y hacer la conexión eléctrica adecuada.
• Para reducir el riesgo de lesiones personales, use solo los dos
tornillos de acero (y la arandela de seguridad) provistos para el
montaje.
• Para reducir el riesgo de lesiones personales, no doble los
soportes de las cuchillas cuando instale los soportes, equilibre las
cuchillas o limpie el ventilador.
59
Page 60
ES
MEDIO AMBIENTE
• Tire el material de embalaje, como plástico y cajas, en el
contenedor apropiado.
• Al final de su vida útil, no se desprenda de este producto
como un residuo normal. Llévelo a un punto blanco de su
ciudad para el reciclaje de aparatos eléctricos y electrónicos.
Preste atención al símbolo en el producto, las instrucciones o
el embalaje.
• Los materiales se pueden reutilizar tal y como se indica.
Reciclando, procesando los materiales o aprovechando
antiguos equipos de otra forma, hace una gran aportación a
la protección del medio ambiente.
• Infórmese en su municipio del punto blanco correcto cerca de
usted.
DICHIARAZIONE DI CONFORMITÀ CE
Este producto cumple con los requisitos de las directrices Europeas.
R. Neyman
Controllo qualità
60
Page 61
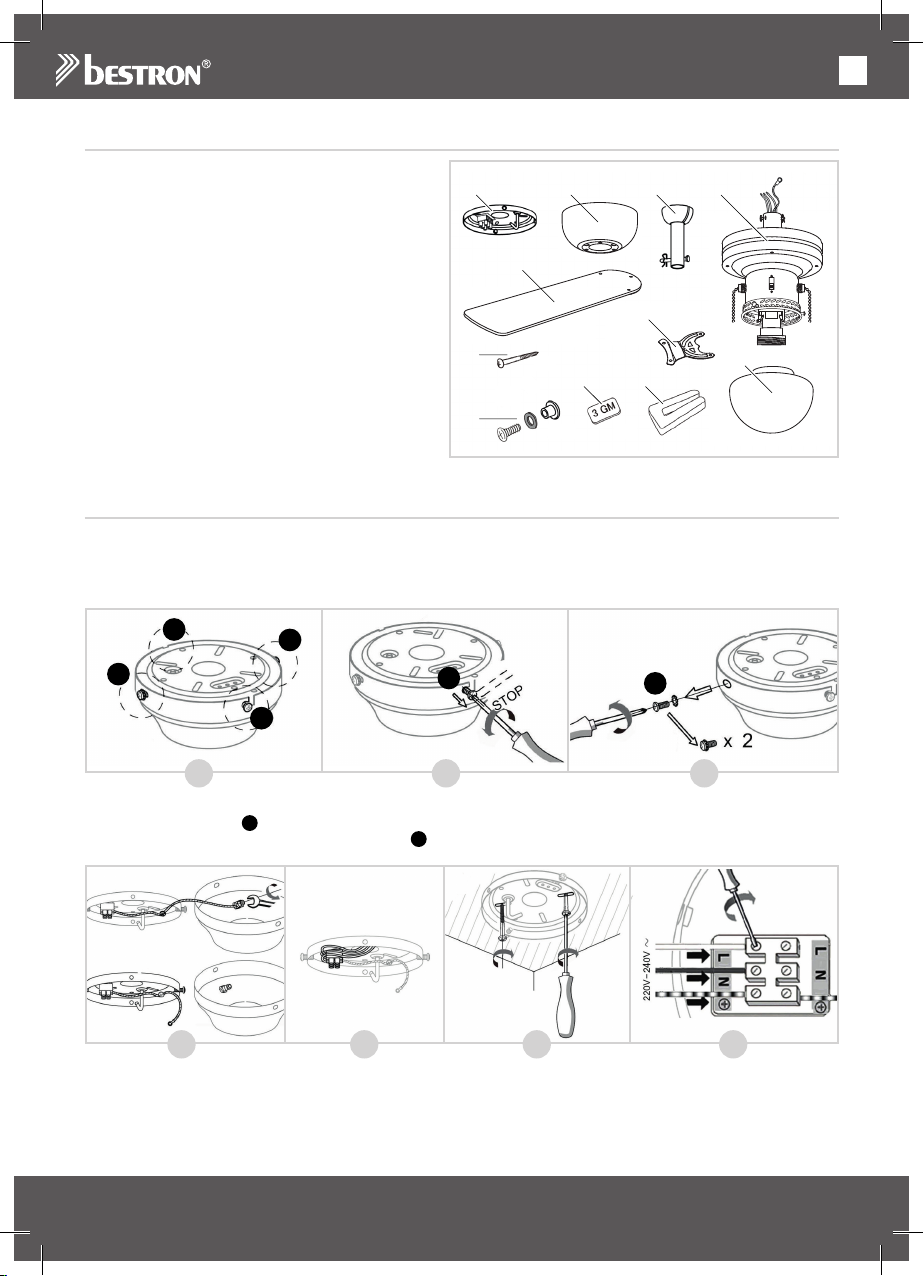
ES
1 2 3
5
11
7
8
9
10
4
6
USO - General
El aparato está destinado únicamente para uso
doméstico, no para uso profesional.
1. Placa de montaje
2. Cubierta
3. Barra de suspensión
4. Motor
5. Aspas (4x)
6. Soporte de las aspas (4x)
7. Tornillos de la placa de montaje (2x)
8. Juego de tornillos de las aspas (12x)
9. Contrapesos de equilibrado (2x)
10. Abrazadera de equilibrado
11. Cubierta de cristal de la bombilla
MONTAJE - Instalación de la placa de montaje
ATENCIÓN:
• DESCONECTE SIEMPRE LA CORRIENTE ELÉCTRICA ANTES DE INSTALAR O REALIZAR
CUALQUIER TRABAJO EN EL VENTILADOR DE TECHO.
• Asegúrese de colgar el ventilador en un lugar donde haya una distancia de al menos 2,30 m entre las
aspas y el suelo.
1
2
2
1.
En el embalaje, la placa de montaje ya está montada en la cubierta mediante cuatro tornillos (véase la figura A).
2. Afloje los tornillos 1 hasta la mitad (B).
3. Desenrosque completamente los tornillos 2 y quítelos (C).
D E F G
4. Retire la placa de montaje de la cubierta y desenrosque el cable de tierra amarillo-verde de la cubierta (D).
5. Introduzca los cables que salen del techo a través de la abertura de la placa de montaje (E).
6. Atornille la placa de montaje en el techo (F). Asegúrese de que esté instalada firmemente como para
resistir un peso mínimo de 23 kg (51 lb).
1
1
A
B C
2
61
Page 62
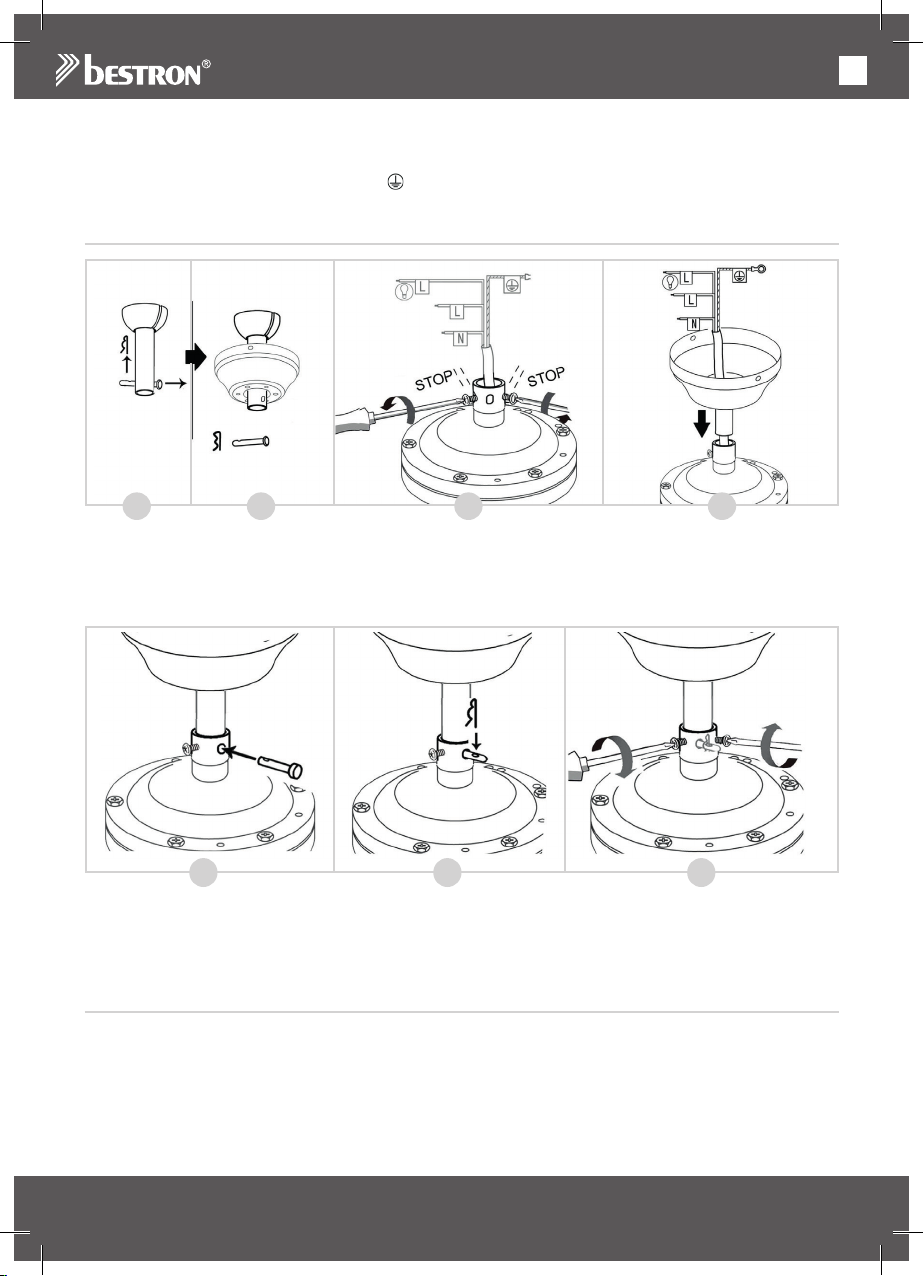
ES
7. Ahora conecte los cables a la terminal de la placa de montaje de la siguiente forma (G):
• Cableazul→N
• Cablemarrónonegro→L
• Cabledetierra(amarillo-verde)→
MONTAJE - Instalación de la barra de suspensión en el motor
H J KI
1. Quite la clavija y el perno de metal de la barra de suspensión (ver figura H).
2. Introduzca la barra de suspensión a través de la cubierta (I).
3. Afloje los dos tornillos del motor (J).
4. Retire la abrazadera de plástico que rodea a los cables, e introdúzcalos a través de la barra de
suspensión (K). Asegúrese de no dañar los cables al hacerlo.
L
5. Vuelva a instalar el perno de metal en la barra de suspensión (L) y asegúrelo con la clavija (M).
6. Apriete los dos tornillos del motor (N).
La barra de suspensión ya está instalada correctamente.
M
N
MONTAJE - Instalación de los soportes de las aspas
Las aspas de este ventilador de techo pueden instalarse tanto con el lado blanco como con el lado de color
madera apuntando hacia abajo.
1. Coja uno de los soportes y colóquelo en una de las aspas, tal como muestra la figura O.
2. Inserte un tornillo con anillo rojo a través del soporte y del aspa.
3. Coloque una tuerca de presión debajo del aspa, y luego apriete el tornillo dentro de ella.
62
Page 63
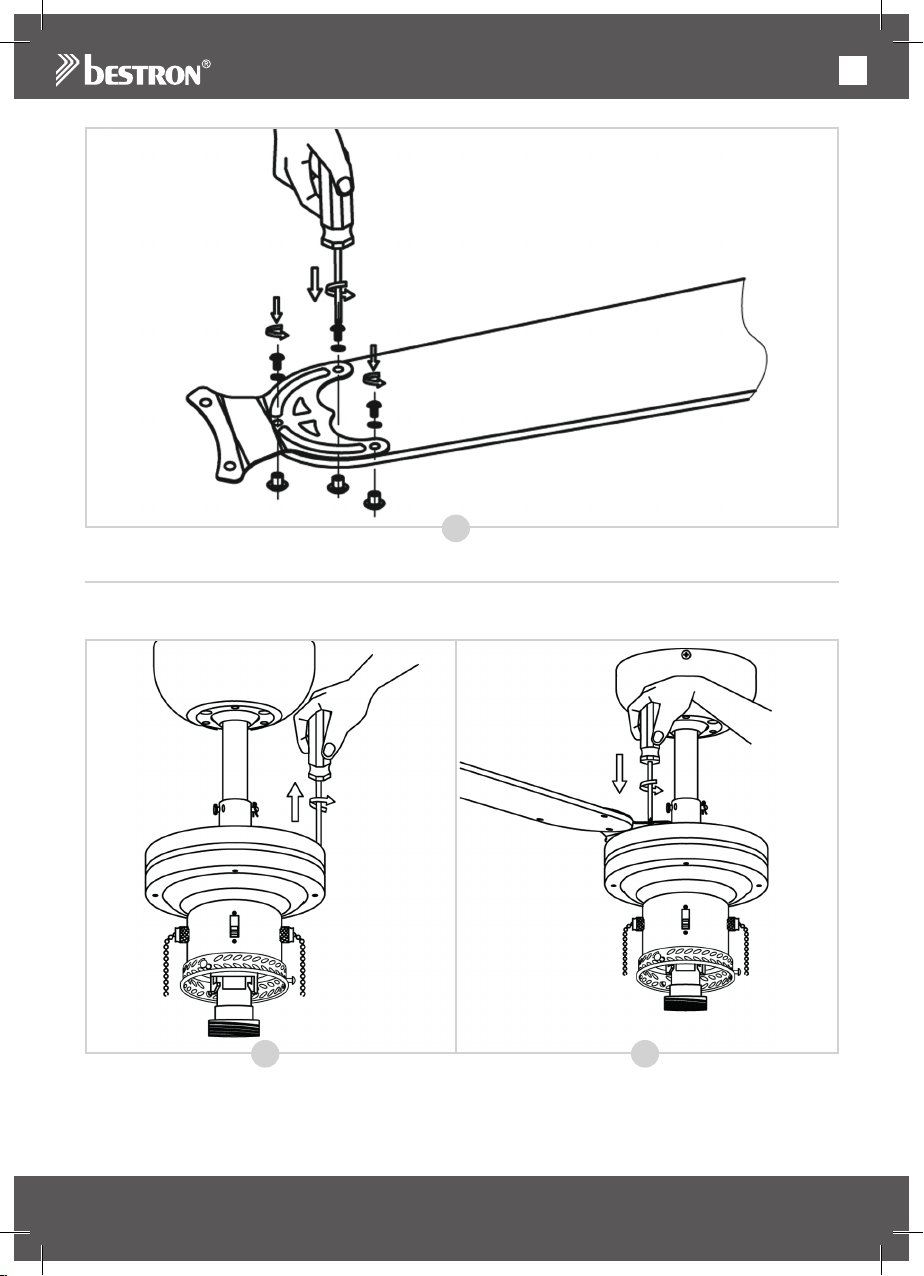
ES
O
MONTAJE - Instalación de las aspas en el motor
1. Los tornillos para instalar las aspas ya están atornillados en la carcasa del motor. Desenrósquelos y
quítelos de la caja del motor (véase la figura P).
P Q
2. Coja una de las aspas con su soporte y atorníllela a la caja del motor con dos tornillos (Q).
3. Repita el proceso con las otras cinco aspas.
Las aspas han sido instaladas correctamente.
63
Page 64
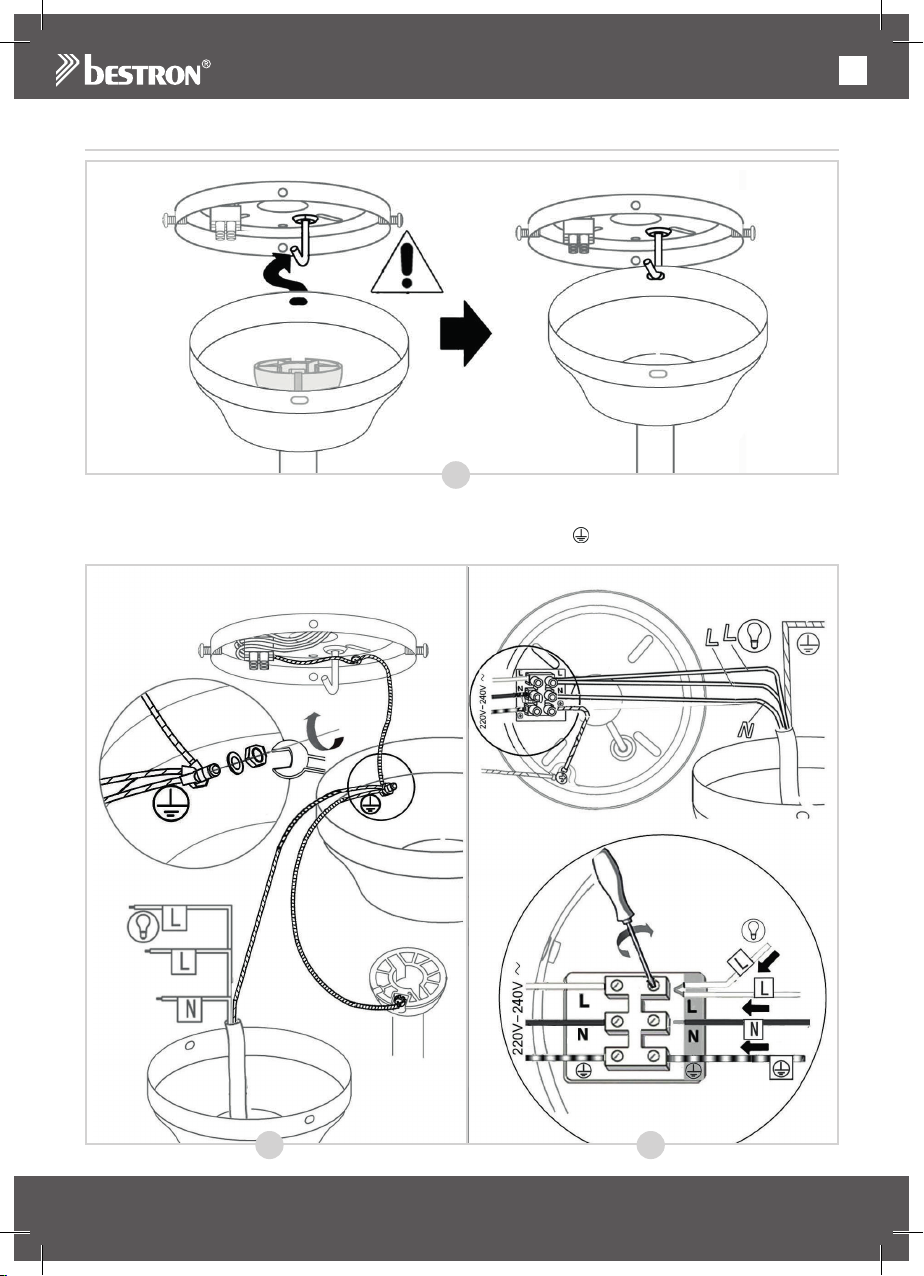
ES
MONTAJE - Instalación del ventilador en la placa de montaje
R
1.
Levante el ventilador e inserte el “gancho en forma de J” en la placa de montaje a través de una de las
aberturas de la cubierta (véase la figura R). Esto le permitirá tener las manos libres para conectar el cableado.
2. Conecte todos los cables de tierra (amarillo-verde) a la cubierta ( , S).
S T
64
Page 65
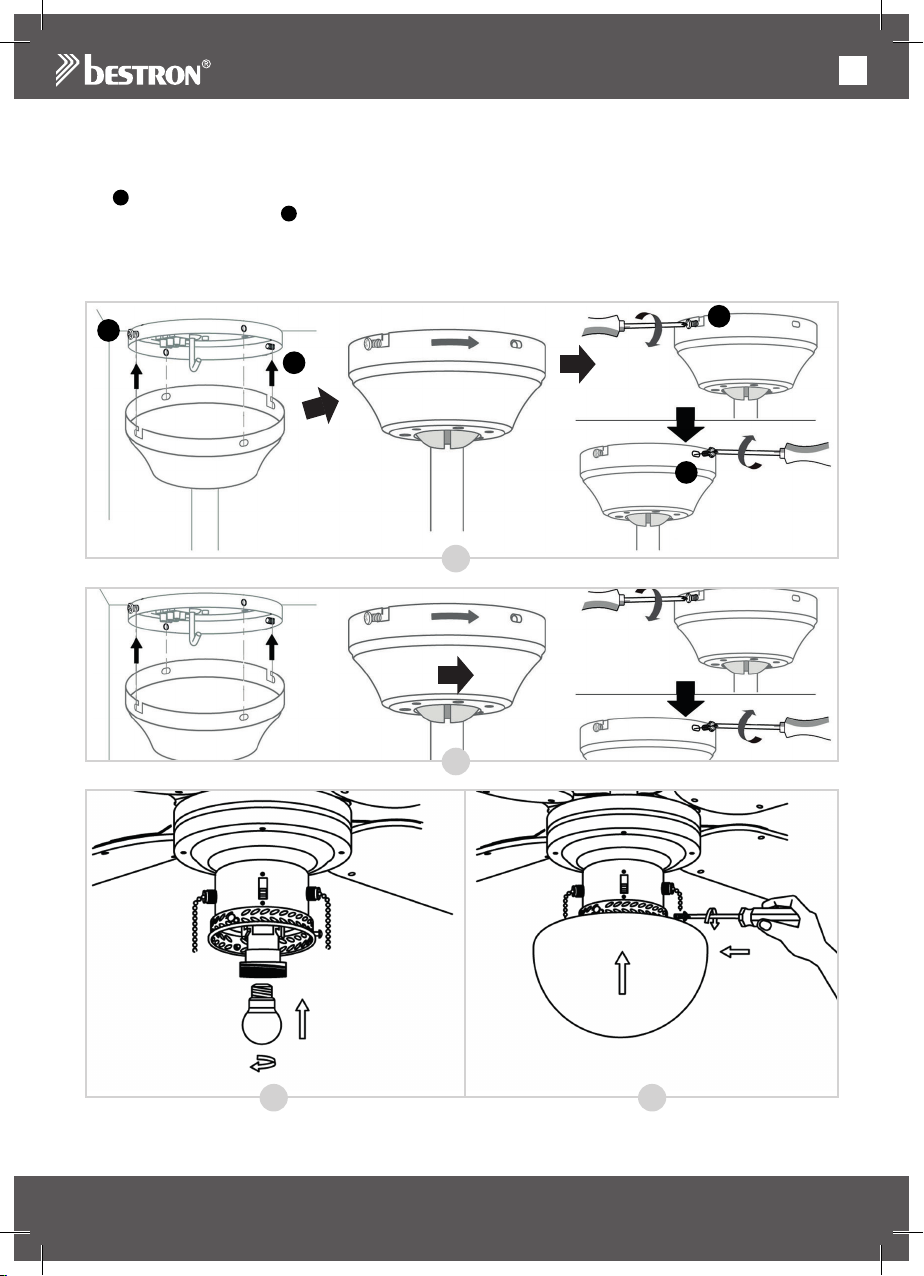
ES
3.
Conecte los cables que vienen de la barra de suspensión al terminal de la placa de montaje de la siguiente forma (T):
• Cableazul→N
• Cablesmarronesynegros→L
4. Ahora levante el ventilador por el “gancho en forma de J”, coloque el ventilador sobre los dos tornillos
1
en la placa de montaje y apriételos firmemente (U).
5. Inserte los dos tornillos 2 en la placa de montaje y apriételos firmemente también (U).
6. Fije la barra de suspensión como se muestra en la figura V.
7. Ahora, coloque una bombilla tipo E27 (máximo 60 Vatios) en el casquillo (W).
8. Coloque con cuidado la cubierta de cristal de la bombilla usando los tres tornillos que ya están
atornillados en la carcasa del motor (X).
1
1
1
2
U
V
W X
El ventilador ya está instalado correctamente.
Ya puede volver a conectar la alimentación eléctrica.
65
Page 66
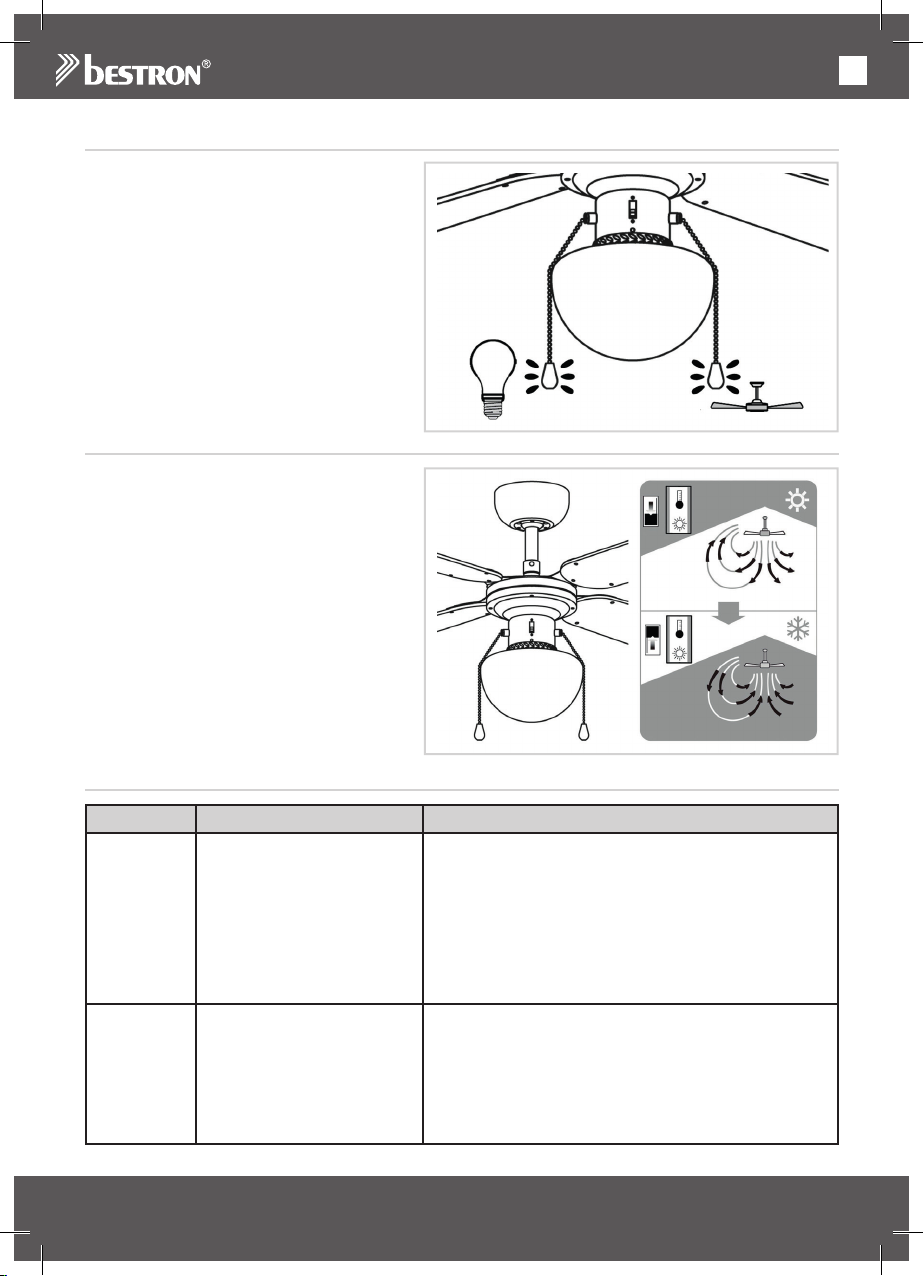
USO - Controles
El ventilador de techo tiene 3 velocidades:
rápida, media y lenta.
1. Tire del interruptor de cadena. El ventilador
se iniciará a la velocidad máxima.
2. Vuelva a tirar del interruptor de cadena. La
velocidad del ventilador cambiará a media.
3. Vuelva a tirar del interruptor de cadena. La
velocidad del ventilador cambiará a lenta.
4. Vuelva a tirar del interruptor de cadena. El
ventilador se detendrá.
USO - Modo verano/invierno
El ventilador de techo está equipado con un
modo de verano y un modo de invierno. En el
modo de verano, el ventilador soplará el aire
directamente hacia abajo, creando una brisa
fresca, mientras que, en el modo de invierno,
el ventilador hará circular el aire calentado por
su sistema de calefacción por la habitación.
1. Mueva el interruptor hacia abajo para
utilizar el modo de verano.
2. Mueva el interruptor hacia arriba para
utilizar el modo de invierno.
ES
SOLUCIÓN DE PROBLEMAS
Problema Causa probable Reparación sugerida
El ventilador
no enciende
El ventilador
hace ruido.
El ventilador
se tambalea
o sacude
excesivamente.
1. El ventilador está
conectado a un interruptor
de luz que está apagado.
2. El fusible o el interruptor
de circuito están fundidos
o no se ha vuelto a
conectar la alimentación
eléctrica.
3. Las conexiones eléctricas
del ventilador están flojas.
1. La placa de montaje
no se ha instalado
correctamente.
2. La barra de suspensión
no se ha fijado
adecuadamente.
1. Compruebe si el interruptor de la luz está encendido.
2. Compruebe si la alimentación eléctrica está
conectada.
3. Revise las conexiones del ventilador y de los
interruptores de la carcasa.
ATENCIÓN: Asegúrese de que la alimentación eléctrica
esté desconectada.
1. Asegúrese de que la placa de montaje siga estando
firmemente sujeta al techo. Consulte el apartado de
“Montaje: instalación de la placa de montaje”.
2. Asegúrese de que la barra de suspensión se haya
fijado apropiadamente. Consulte el apartado de
“Montaje: instalación de la barra de suspensión en el
motor”.
66
Page 67
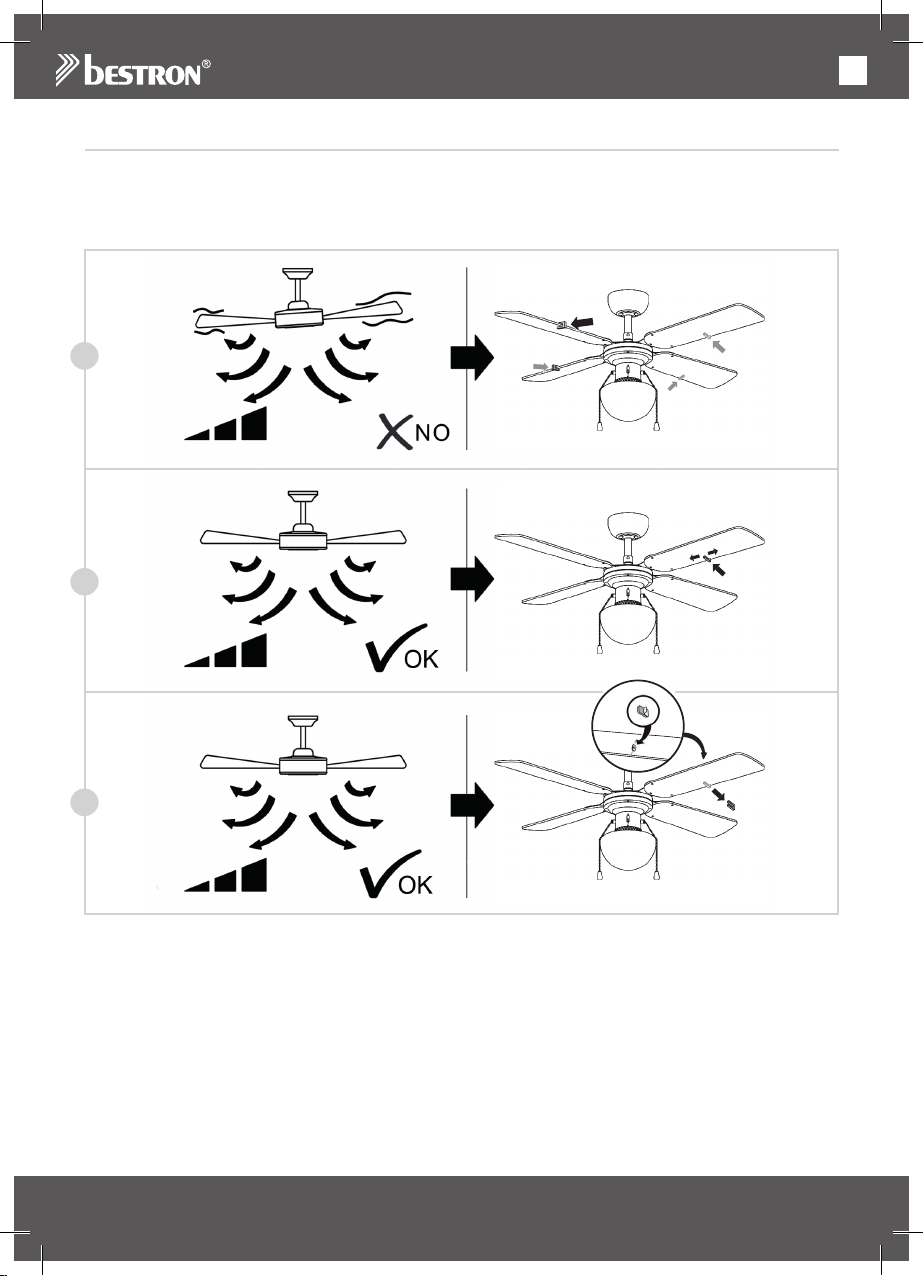
ES
SOLUCIÓN DE PROBLEMAS - Equilibrado de las aspas
Hacemos todo lo posible para ofrecerle un ventilador de la más alta calidad. Sin embargo, a veces podría
perder un poco de estabilidad. Si el ventilador es inestable o se tambalea excesivamente, siga primero los
pasos descritos en el apartado de “SOLUCIÓN DE PROBLEMAS”. Si el ventilador siguiese sacudiéndose
excesivamente, intente cambiar dos aspas opuestas y encienda el ventilador. Si después de esta operación,
el problema continúa, use el juego de equilibrado:
A
B
C
1. Encienda el ventilador y fíjese a qué velocidad se tambalea más. Apáguelo.
2. Seleccione una de las aspas y coloque la abrazadera de equilibrado a la mitad del lado recto del aspa
(véase la figura A). Vuelva a encender el ventilador y colóquelo en la velocidad donde se tambaleaba
más. Fíjese si el tambaleo se ha reducido. Apáguelo.
3. Repita el procedimiento con todas las aspas restantes y verifique cuál es la que muestra la mayor
mejora.
4. Coloque la abrazadera de equilibrado en el aspa que haya mostrado la mayor mejoría y empuje la
abrazadera hacia adentro o hacia afuera sobre el aspa (B). Vuelva a encender el ventilador y colóquelo
en la velocidad donde se tambaleaba más. Fíjese si el tambaleo se ha reducido. Apáguelo.
5. Repita el procedimiento y verifique en qué posición de la abrazadera de equilibrado se observa una
mayor mejoría.
6. Quite la abrazadera de equilibrado y adhiera uno de los dos contrapesos de equilibrado en la parte
67
Page 68
ES
superior del aspa que mostró mayor mejoría, exactamente en el mismo lugar donde estaba ubicada la
abrazadera (C).
Tenga en cuenta que todos los ventiladores de techo pueden seguir tambaleándose muy levemente.
CONDICIONES DE GARANTÍA
Bestron ofrece 60 meses de garantía después de la fecha de compra de este equipo. La garantía cubre
las averías por errores de fabricación y/o material y se atiene a las siguientes condiciones.
1. La garantía no cubre ningún gasto por mano de obra ni material.
2. La reparación que se realice durante el plazo de la garantía no implica una prórroga de dicho plazo.
3. Cualquier pieza defectuosa o aparatos averiados y devueltos se convierten automáticamente en
propiedad de Bestron.
4. La garantía es únicamente válida para el primer comprador y no es transferible.
5. La garantía no cubre los daños por:
• Accidentes
• Uso equivocado
• Desgaste
• Descuido
• Mala instalación
• Conexión a otra tensión que la que se especifica en la placa de modelo.
• Modificación no autorizada
• Reparaciones realizadas por terceros no cualificados
• Uso incumpliendo las normas vigentes legales, técnicas y de seguridad.
• Descuidos en el transporte, sin embalaje adecuado o sin otra protección
6. No se puede reclamar la garantía en el caso de:
• Daños durante el transporte
• Quitar o modificar el número de serie del aparato.
7. La garantía no cubre:
• Los cables
• Las bombillas
• Las piezas de cristal
8. La garantía no le concede el derecho a una compensación por un posible daño, aparte de sustituir o
reparar las piezas defectuosas. Bestron no puede hacerse responsable de cualquier posible daño o
de cualquier tipo de consecuencia que surgieran o estuvieran relacionadas con el aparato entregado.
9. Solo puede reclamar la garantía a su empresa de venta (en línea) o directamente al Servicio de atención Bestron. Sin embargo, no nos envíe ninguna pieza sin preguntar antes. Puede que rechacemos
el paquete y esto podría suponer unos gastos para usted. Póngase primero en contacto con nosotros
para que le expliquemos cómo tiene que embalar el aparato y mandárnoslo. Cualquier reclamación
sobre la garantía debe ir acompañada de una prueba de compra.
SERVICIO DE ATENCIÓN
Si hubiera una avería inesperada, póngase en contacto con el servicio de atención BESTRON:
www.bestron.com/service
68
Page 69

Page 70
v200130-03
NEED HELP? CHAT WITH US!
WHATSAPP CUSTOMER SERVICE
BESTRON.COM/WHATSAPP
 Loading...