

Page 1
Installation, Service and User Instructions
FREESTANDING GAS RANGES
BERTAZZONI
DIMENSIONS: 24’’ (605 mm)(W) x 25
MODEL
X244GGVX [MLS0GTU4X(2 or 5)A]
1/8
’’ (640 mm)(D) x36’’ (911 mm)(H)
310287
Page 2
IMPORTANT - PLEASE READ AND FOLLOW
-Before beginning installation, please read these instructions completely and carefully.
-Do not remove permanently affixed labels, warnings, or plates from the product. This may void the warranty.
-Please observe all local and national codes and ordinances.
-Please ensure that this product is properly grounded.
-The installer should leave these instructions with the consumer who should retain for local inspector's use
and for future reference.
-The electrical plug should always be accessible.
Installation must conform with local codes or in the absence of codes, the National Fuel Gas Code
NSIZ223.1-latest edition. Electrical installation must be in accordance with the National Electrical Code,
ANIS/NFPA70 - latest edition and/or local codes. IN CANADA: Installation must be in accordance with the
current CAN/CGA-B149.1 National Gas Installation Code or CAN/CGA-B 149.2, Propane Installation Code
and/or local codes. Electrical installation must be in accordance with the current CSA C22.1 Canadian
Electrical Codes Part 1 and/or local codes.
Installation of any gas-fired equipment should be made by a licensed plumber. A manual gas shut-off valve
must be installed in the gas supply line ahead of the oven in the gas flow for safety and ease of service.
Warning!
- This range can tip. Injury to persons could result.
- Install anti-tip device shipped with range.
-See Installation Instructions
IMPORTANT: SAVE FOR LOCAL ELECTRICAL INSPECTOR’S USE.
READ AND SAVE THESE INSTRUCTIONS FOR FUTURE REFERENCE.
OBSERVE ALL GOVERNING CODES AND ORDINANCES.
WARNING: If the information in this manual is not followed exactly, a
fire or explosion may result causing property damage, personal injury
or death.
Do not store or use gasoline or other flammable vapors and liquids in
the vicinity of this or any other appliance.
WHAT TO DO IF YOU SMELL GAS
- Do not light any appliance.
- Do not touch any electrical switch.
- Do not use any phone in your building.
- Immediately call your gas supplier from a neighbor’s phone. Follow
the gas supplier’s instructions.
- If you cannot reach your gas suppliers, call the fire department.
Installation and service must be performed by a qualified installer,
service agency or the gas supplier.
2
Page 3

WARNING
Read this instruction booklet before installing and using the appliance.
The manufacturer will not be responsible for any damage to property or to persons caused by
incorrect installation or improper use of the appliance.
The manufacturer reserves the right to make changes to its products when considered necessary and useful,
without affecting the essential safety and operating characteristics.
This appliance has been designed for non-professional, domestic use only.
Warning: do not use this appliance to heat a room.
Warning: do not place any pot or pan on the open oven door. The door is made of glass and it can
break if loaded with a weight.
Warning: this appliance must be used only with base feet properly installed. See installation
instruction for details.
Installation instructions
This appliance shall only be installed by an authorized person. This appliance shall be installed in
accordance with the manufacturer’s installation instructions, IMPORTANT: this appliance must be
installed in accordance with the norms & standards of the country where it will be installed.
The installation of this appliance must conform to local codes and ordinances. In the absence of
local codes, Installations must conforms to American National Standards, National Fuel Gas Code
ANSI Z223.1 – latest edition** or B149.1.
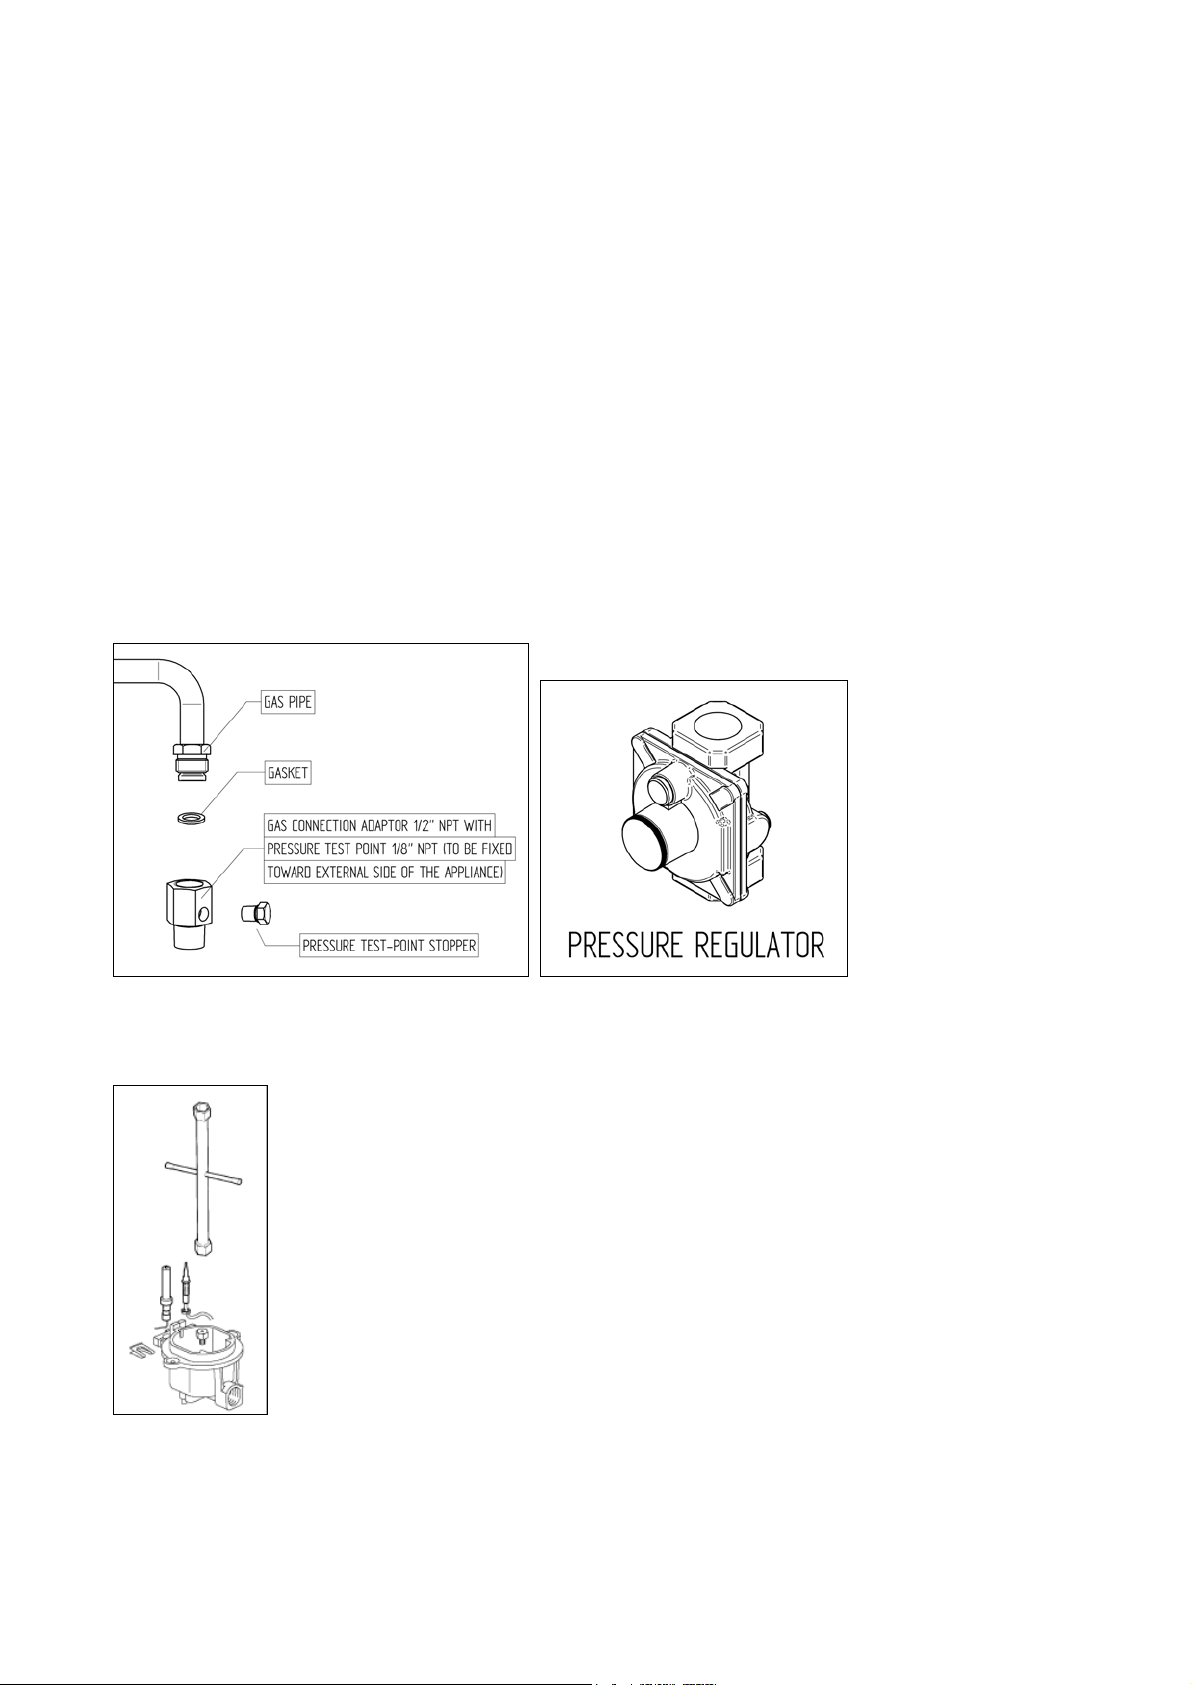
If local codes permit, a flexible metal appliance connection with the new AGA or CGA certified
design, max. 5 feet (1,5 m) long, ½” I.D. is recommended for connecting this appliance to the gas
supply line. Do not bend or damage the flexible connector when moving the appliance. The pressure
regulator has ½” female pipe thread. The appropriate fitting must be determined based on the size of
your gas supply line, the flexible metal connector and the shutoff valve.
The appliance, when installed, must be electrically grounded in accordance with local codes or, in
the absence of local codes, with the National Electrical Code, ANSI/NFPA 70.
The appliance must be isolated from the gas supply piping system by closing its individual manual
shutoff valve during any pressure testing of the gas supply piping system at test pressures equal
to or less than ½ psi (3.5 kPa).
For use with a pressure regulator. The regulator supplied must be used with this appliance; it shall
be properly installed in order to be accessible when appliance is installed in its final location.
The gas appliance pressure regulator must be set for the gas with which the appliance is used.
This appliance can be used with Natural Gas and LP Gas. It is shipped from the factory adjusted for
use with Natural Gas: CONVERSION FIXED ORIFICES ARE LOCATED IN THE LITERATURE PACK
SUPPLIED WITH THE UNIT.
A gas nozzle kit for the change of type of gas are contained inside the package together with the
gas appliance installation kit and instruction booklet.
The maximum inlet gas supply pressure incoming to the gas appliance pressure regulator is 20’’
water column (5 kPa) .
The minimum gas supply pressure for checking the regulator setting shall be at least 1“ w.c. (249 Pa)
above the inlet specified manifold pressure to the appliance (this operating pressure is 4” w.c.
(1.00 kPa) for Natural Gas and 11” w.c. (2.75 kPa for LP Gas).
All opening and holes in the wall and floor, back and under the appliance shall be sealed before
installation of the appliance.
It’s always compulsory to install the riser even for an island installation
3
Page 4
ATTENTION: A manual valve shall be installed in an accessible location in the gas line external to the
appliance for the purpose of turning on or shutting off gas to the appliance
WARNING: Do not use aerosol sprays in the vicinity of this appliance while it is in operation
Requirements
Room ventilation – Location and venting.
ATTENTION: An exhaust fan may be used with the appliance; in each case it shall be installed in
conformity with the appropriate national and local standards.
ATTENTION: Exhaust hood operation may affect other vented appliances; in each case it shall be
installed in conformity with the appropriate national and local standards.
INSTALLATION MANUAL
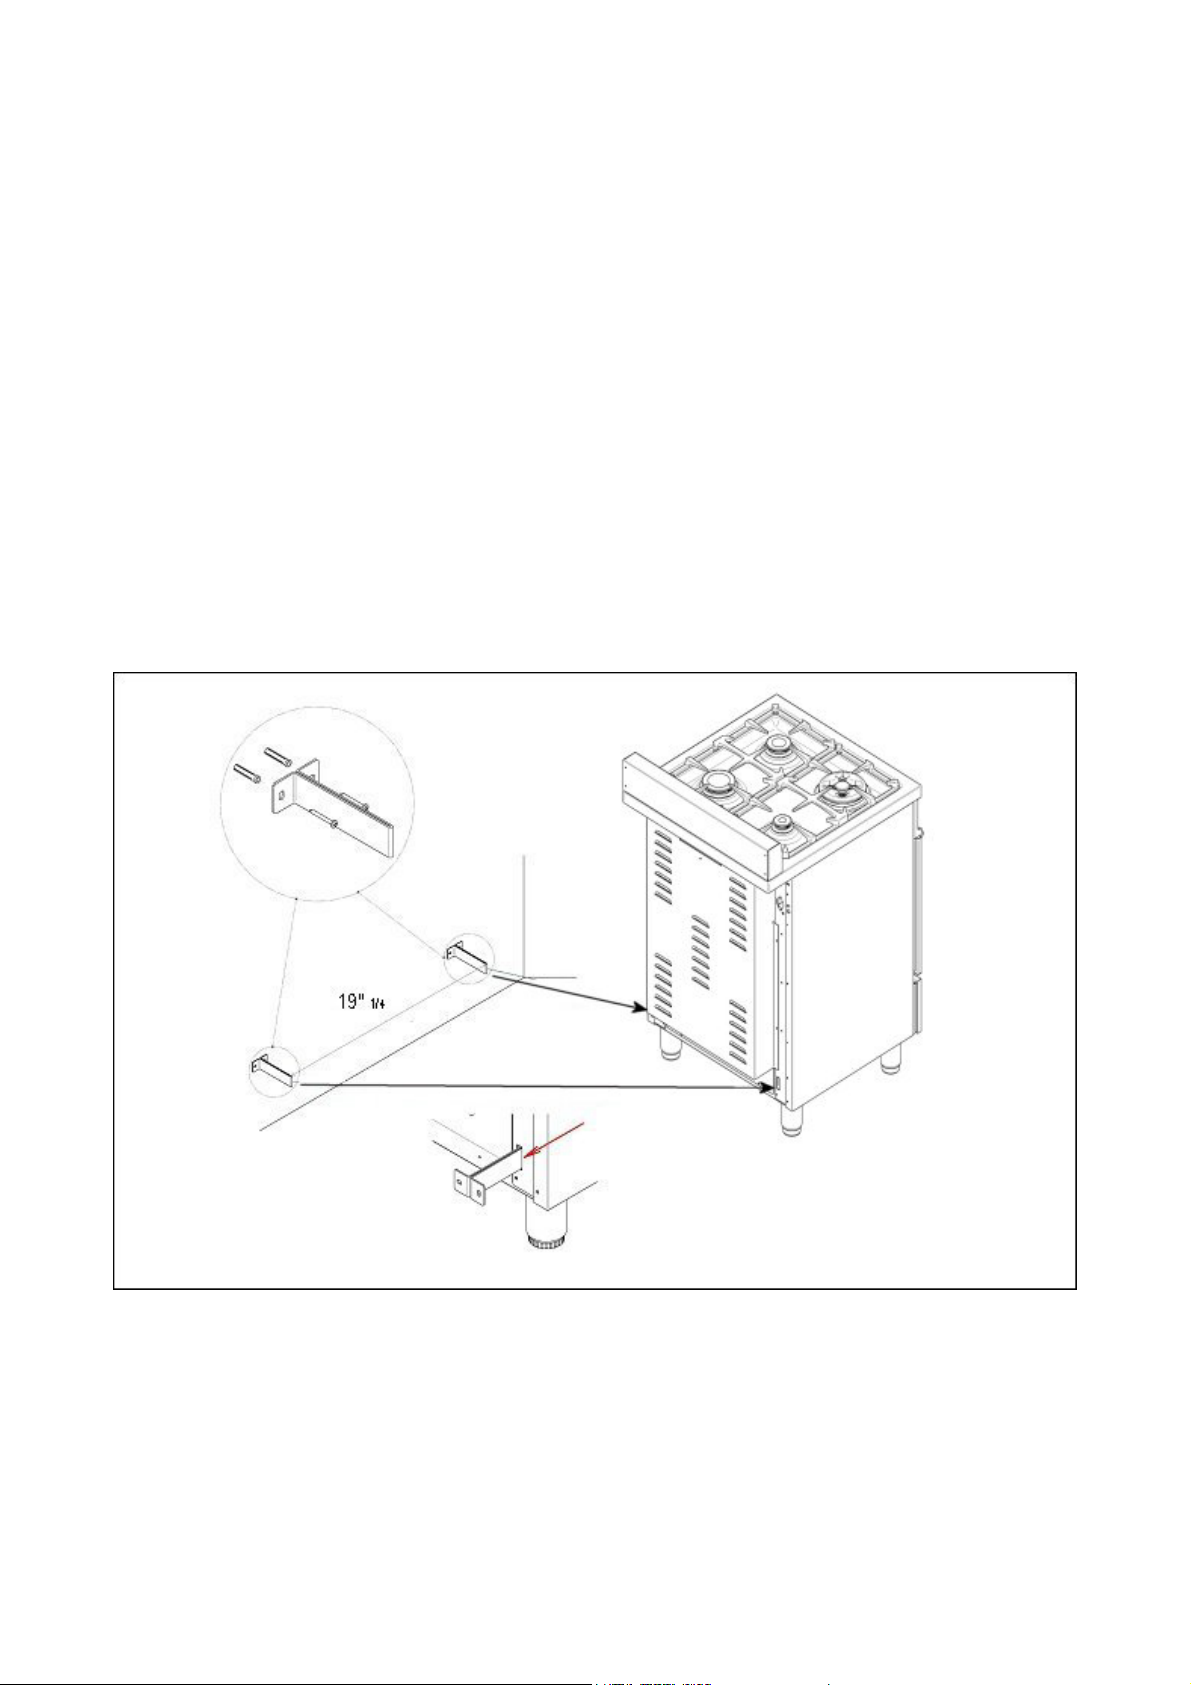
ANTI-TIP STABILlTY DEVICE INSTALLATION INSTRUCTIONS
1. The anti-tip bracket have to be installed to the rear wall as shown. The height for the bracket location from
the floor has to be determined after the range legs have been adjusted to the proper installation height - as
shown in the installation instructions – and after the range has been leveled.
2. Measure from the floor to the bottom of the anti-tip bracket location on the back of the range.
3. Position the two anti-tip brackets on the wall at the measured dimension plus 1/8" (0.32 cm). The brackets
have to be placed at 2”5/16 (6,0 cm) from the side of the range. The distance between the two bracket is
19”1/4 (48,8 cm) clearance. Secure with suitable inserts.
4. Slide the range against the wall until the brackets are fully inserted into the holes on the backside of the
range..
4
Page 5
Height adjustable legs:
1. Legs are packed in the top box.
2. Legs should be installed with the appliance being near the location of final installation, they are not secure
for long transport. After unpacking the range, raise it about a foot to insert the legs in their bases assembled
on the lower part of the cooker and lower the range gently to keep any undue strain from legs and mounting
hardware. It is recommended to use a pallet or lift jack instead of tilting the unit.
BACKGUARD INSTALLATION INSTRUCTION
It’s always compulsory to installa the riser even for an island installation
1) Remove n°2 screws fixing worktop as shown in fig.1
2) Place front part of the backguard and attach it from bottom side with the two removed screws (point 2) as shown in
fig .2
3) Fix the front part of the backguard with the screws supplied with the backguard kit (fig.3)
4) Assemble back part with front part of the backguard and fix them with a screws supplied with the backguard kit
(fig.4)
1
2
3
4
5
Page 6

WORKTOP FRONTGUARD INSTALLATION INSTRUCTIONS
In order to increase the clearance between front edge of the worktop and the burners for your safety it is
recomended to install the worktop frontguard supplied with the appliance. For installation instructions follow
the instructions indicated in the following figures
6
Page 7
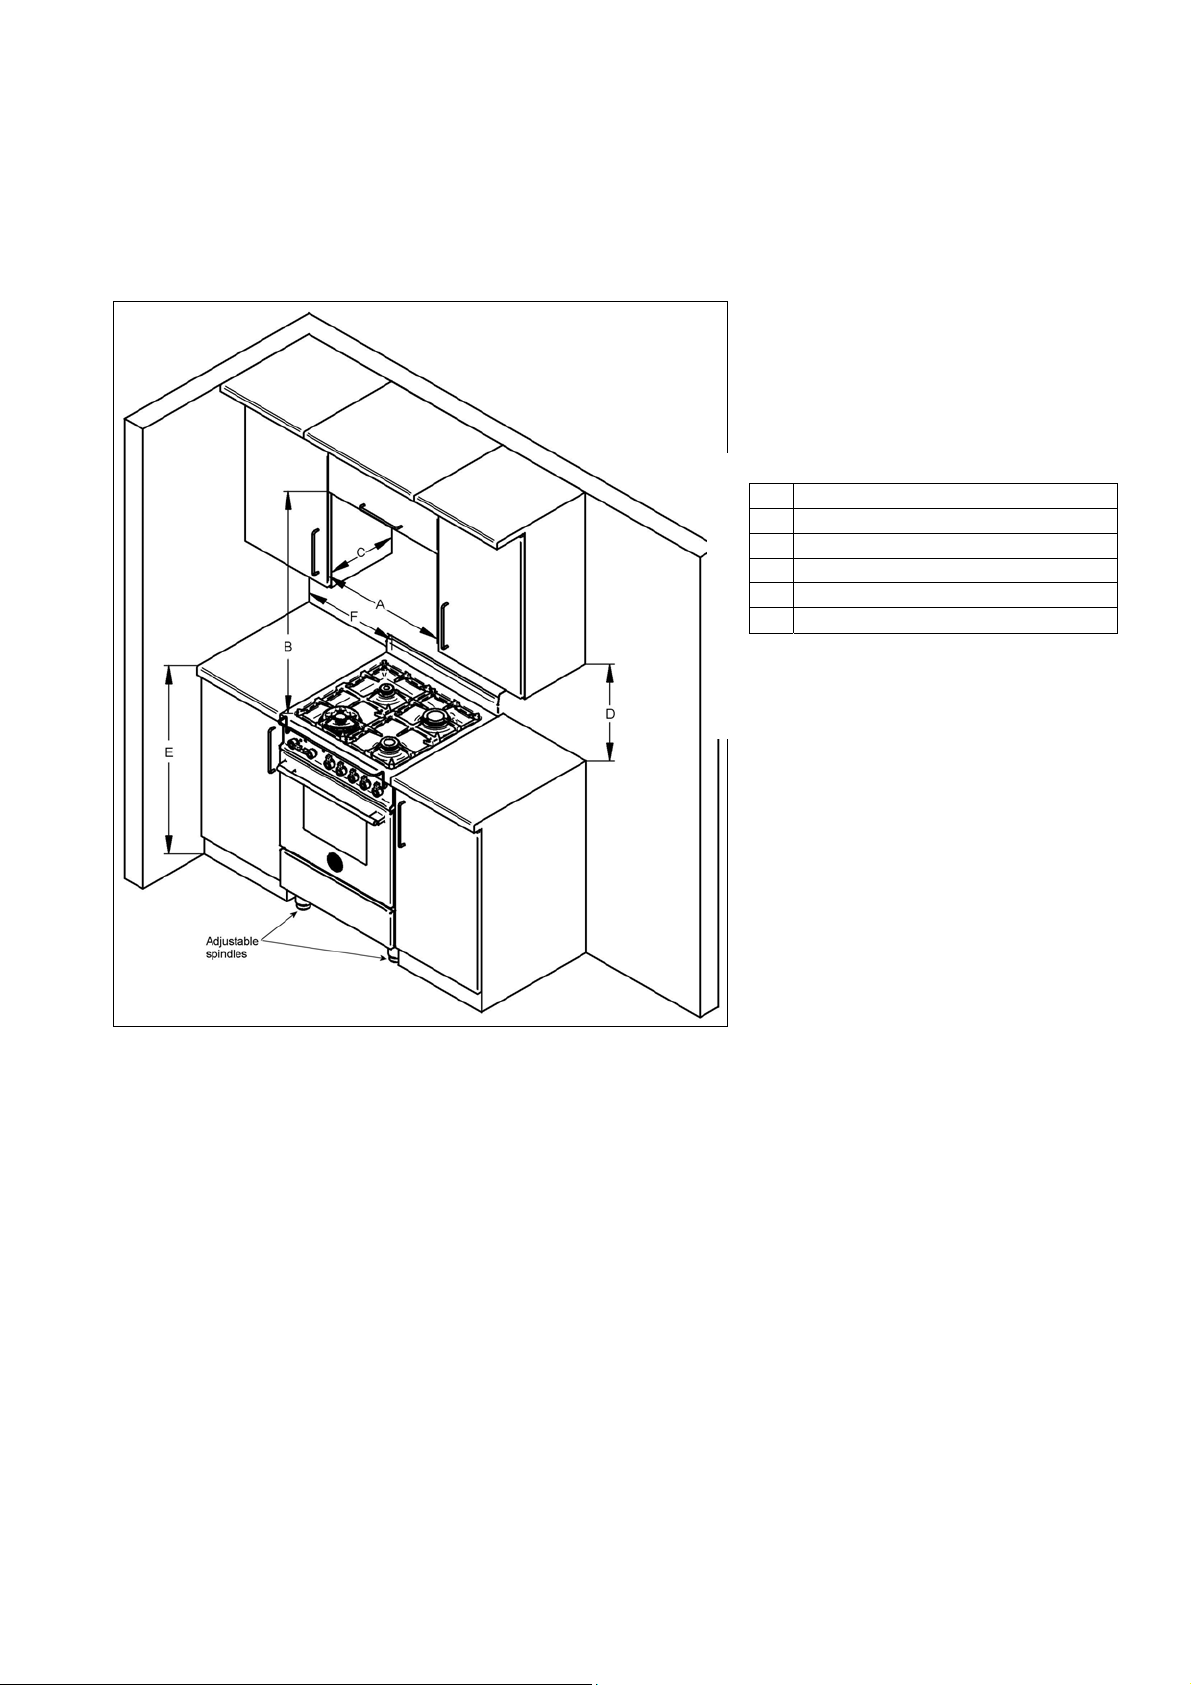
INSTALLATION SIDE-BY-SIDE TO KITCHEN CABINET
1. This range may be installed directly adjacent to existing 36" (91.5 cm) high cabinets. IMPORTANT: The
top border of the worktop should be at the same level of the adjacent
accomplished by raising the unit using the adjustment spindles on the legs.
2. The range CANNOT be installed directly adjacent to sidewalls, tall cabinets, tall appliances, or other vertical
above
3. Within the side clearance to combustible vertical surfaces above 36" (91.5 cm) , the maximum wall cabinet depth must
be 13" (33.0 cm) and wall cabinets within this side clearance must be 18" (45.7
countertop hightness shall be from
36" (91.4 cm) high. There
must be a
minimum of 6" (15.2 cm) side clearance.
35”1/2(90,2 cm) to
37” ¼ (94,6 cm)
cabinet countertop. This can be
cm) above countertop level and
.
A 24” (61 cm)
B 36” (91,5 cm)
C 13” (33,0 cm)
D 18” (45,7 cm)
E 35”1/2(90,2 cm) /
F 6” (15,2 cm)
37” ¼ (94,6 cm)
surfaces
7
Page 8
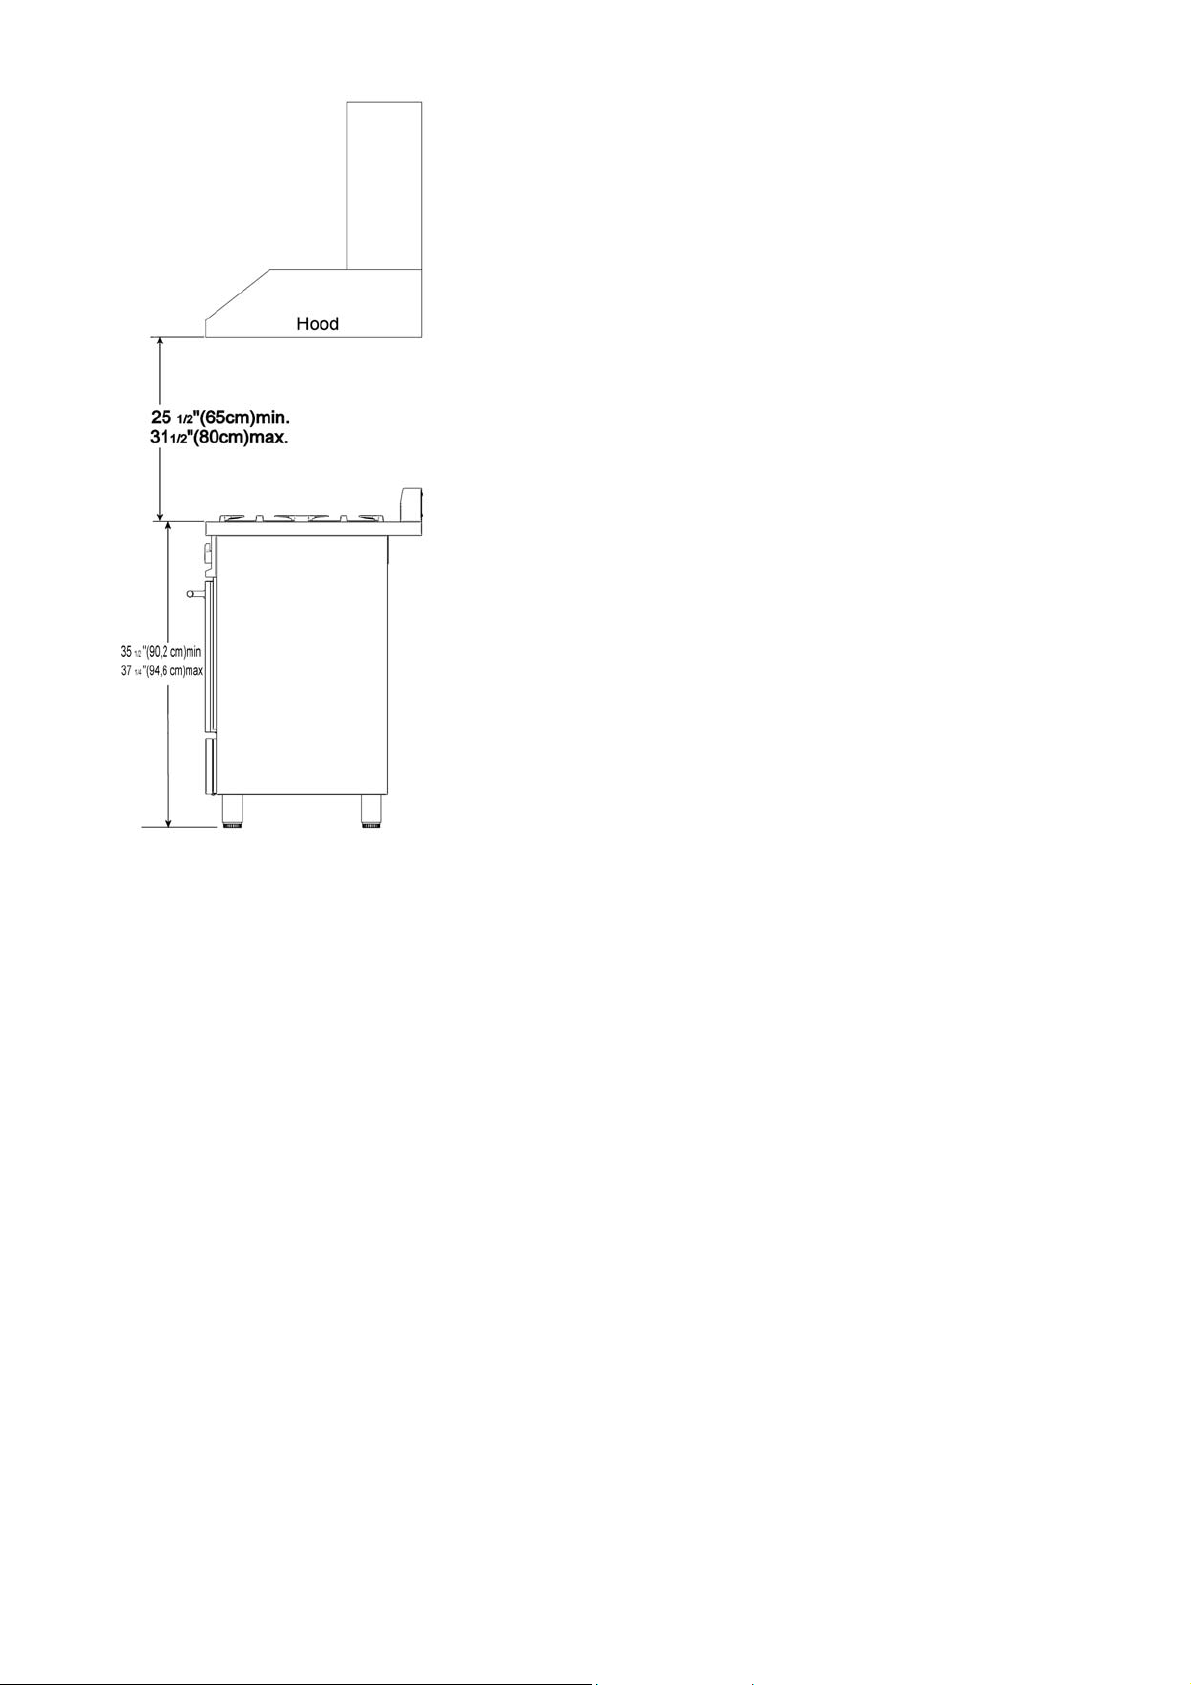
COOKER HOOD INSTALLATION
1/2
The bottom of the hood should be 25
typically result in the bottom of the hood being 61
for other minimum clearance requirements mandated by specific local or regional installation codes. Refer to
the rangehood installation instructions for additional information. These dimensions provide for safe and
efficient operation of the hood.
" (65 cm) min. to 31
1/2
" (156.2 cm) to 67
1/2
" (80 cm) above the countertop. This would
1/2
" (171.5 cm) above the floor. Check
ELECTRICAL CONNECTION
This unit is manufactured for a polarized, grounded 120 volt/60 Hz, 16 amp system. Electric power
consumption is about 150 W. The minimum of 102 VAC is required for proper operation of gas ignition
systems. This circuit must be grounded and properly polarized. The unit is equipped witth a SJT power cord.
In case of replacement, the cable shall be replaced with one of the same type, size and length.
WARNING
Cooling fan failure.
In case of a cooling fan failure the frontal red indicator "Fan Failure" will light up. If this happens, please turn
off the appliance immediately, call the nearest after sale assistance service center and do not use the
appliance until the cooling fan system of the appliance has been properly repaired by a qualified technician.
WARNING
Electrical Grounding Instructions
This appliance is equipped with a three-prong plug for your protection against shock hazard and should be
plugged directly into a properly grounded socket. Do not cut or remove the grounding prong from this plug.
WARNING
ELECTRICAL SHOCK HAZARD
• Disconnect electrical power at the circuit breaker box or fuse box before installing the gas cooker
• Electrically ground gas cooker
•
Use copper conductors only. Failure to follow these instructions could resul in serious injury or death
8
Page 9
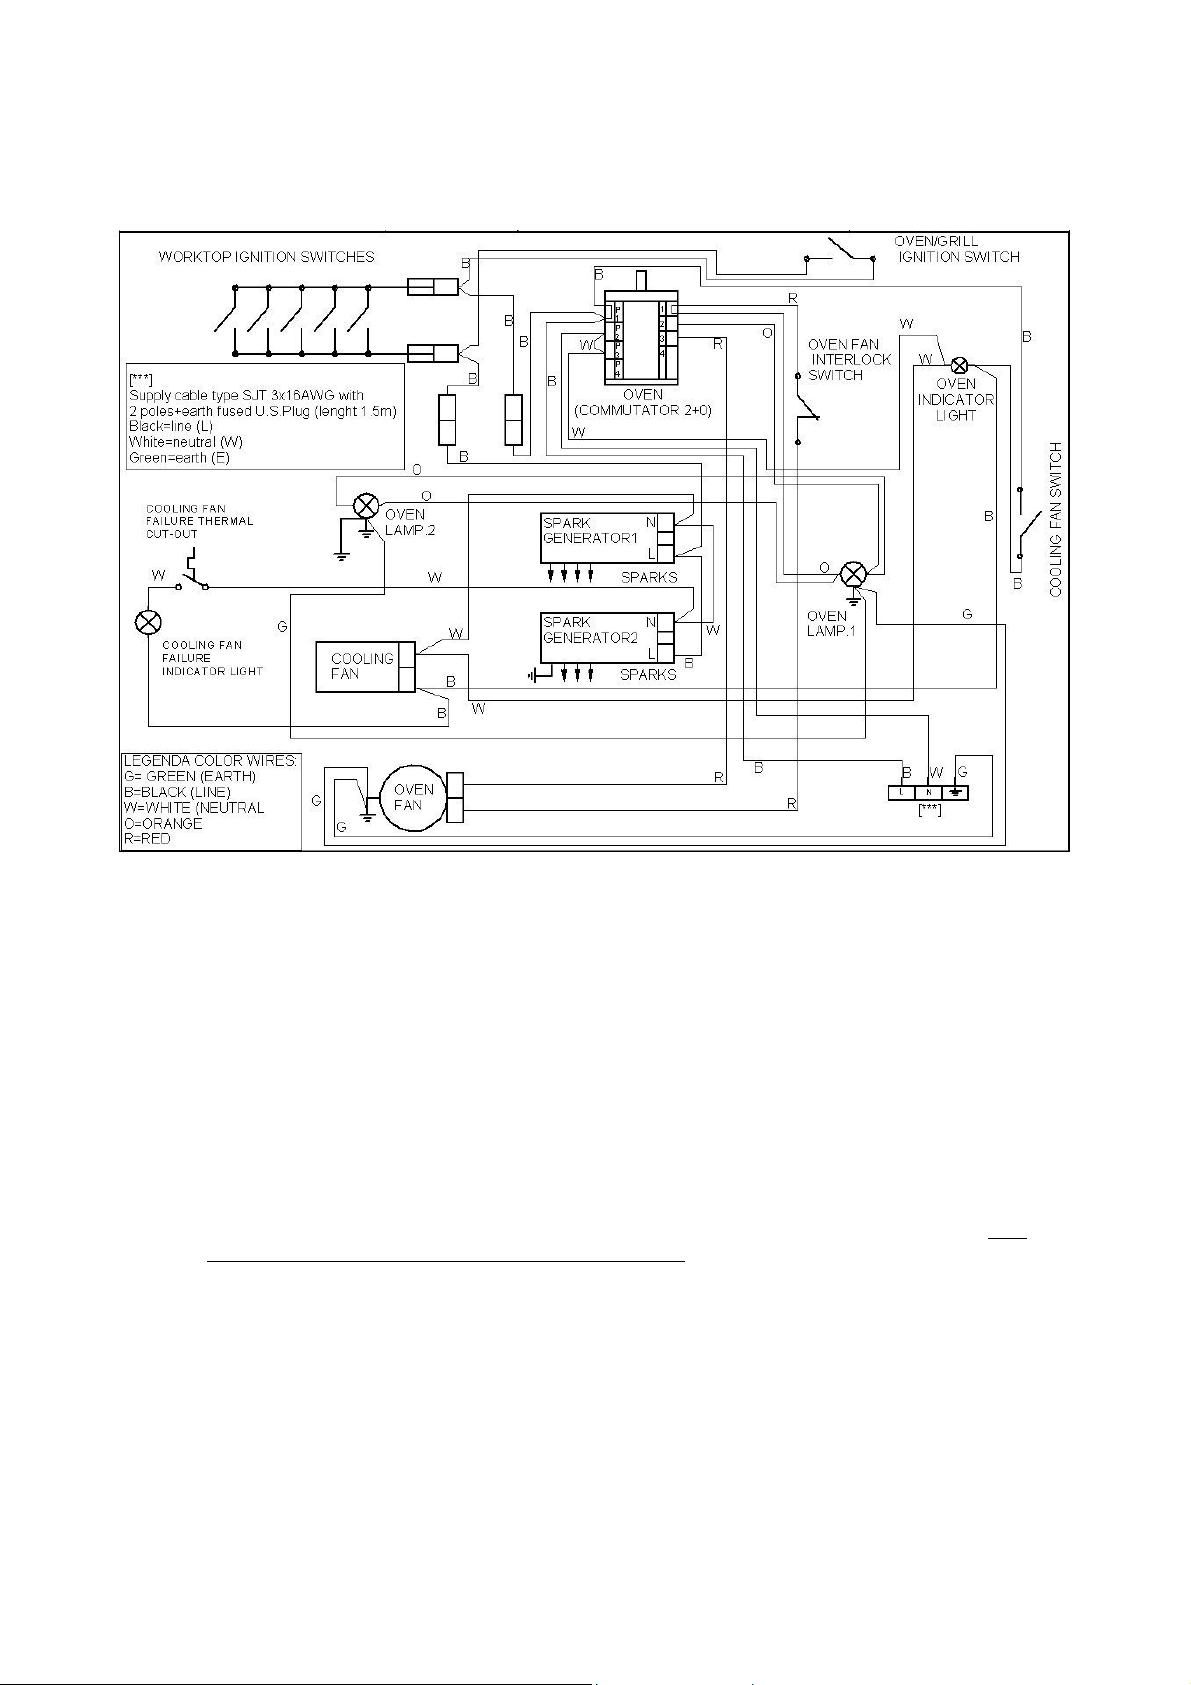
Wiring diagram
For freestanding gas range model X244GGV MLS0GTU4X(2 or 5)A
CAUTION: label all wires prior to disconnection when servicing controls. Wiring errors can cause
improper and dangerous operation.
Verify proper operation after servicing.
GAS CONNECTION
All gas connections must be made according to national and local codes. The gas supply (service) line must be the same
size or greater than the inlet line of the appliance. This range uses a 1/2" NPT inlet (see fig. in this chapter for details of
gas connections installations).On all pipe joints use sealant resistant to LP gas.
1. Manual Shut-off Valve:
This installer-supplied valve must be installed in the gas service line ahead of the appliance in the gas flow and in a
position where it can be reached quickly in the event of an emergency. The manual shut-off valve shall be installed
properly in order to be accessible when the appliance is installed
2. Pressure Regulator(see fig. in this chapter)
a) All cooking equipment must have a pressure regulator on the incoming service line for safe and efficient
operation, since service pressure may fluctuate with local demand. The pressure regulator is supplied
separately with the appliance; regulator has two female threads ½” NPT; it shall be installed properly in order
to be accessible when appliance is installed in final position.
b) Any conversion required must be performed by your dealer or a qualified licensed plumber or gas service
company. Please provide the service person with this manual before work is started on the range. (Gas
conversions are the responsibility of the dealer or end user.)
c) This range can be used with Natural or LP/Propane gas. It is shipped from the factory adjusted for use with
natural gas.
d) Manifold pressure should be checked with a manometer, natural gas requires 4.0" W.c.P. and LP/Propane
requires 11.0" W.C.P. Incoming line pressure upstream from the regulator must be 1" W.c.P. higher than the
manifold pressure in order to check the regulator. The regulator used on this range can withstand a
maximum input pressure of 1/2 PSI (14.0" W.c.P.) If the line pressure is in excess of that amount, a step-
down regulator will be required.
e) The appliance, its individuai shut-off valve, and pressure regulator must be disconnected from the gas
supply piping system during any pressure testing of that system at pressures in excess of 1/2 psig (3.45
kPa).
f) The appliance must be isolated from the gas supply piping system by closing its individuai manual shut-off
valve during any pressure testing of the gas supply piping system at test pressures equal to or less than 1/2
psig (3.45 kPa).
9
Page 10
3. Flexible Connections:
a) If the unit is to be installed with flexible couplings and/or quick disconnect fittings, the installer must use a
heavy-duty, AGA design-certified commerciai flexible connector of at least 1/2" (1.3 cm) ID NPT (with
suitable strain reliefs) in compliance with ANSI Z21.41 and Z21.69 standards.
b) In Canada: CAN 1-6.10-88 metal connectors for gas appliances and CAN 1-6.9 M79 quick disconnect
device for use with gas fuel.
CAUTlON: Leak testing of the appliance shall be conducted according to the manufacturer's instructions. Before placing
the oven into operation, always check for leaks with a soapy water solution or other acceptable method. DO NOT USE
AN
OPEN
FLAME TO CHECK FOR LEAKS!
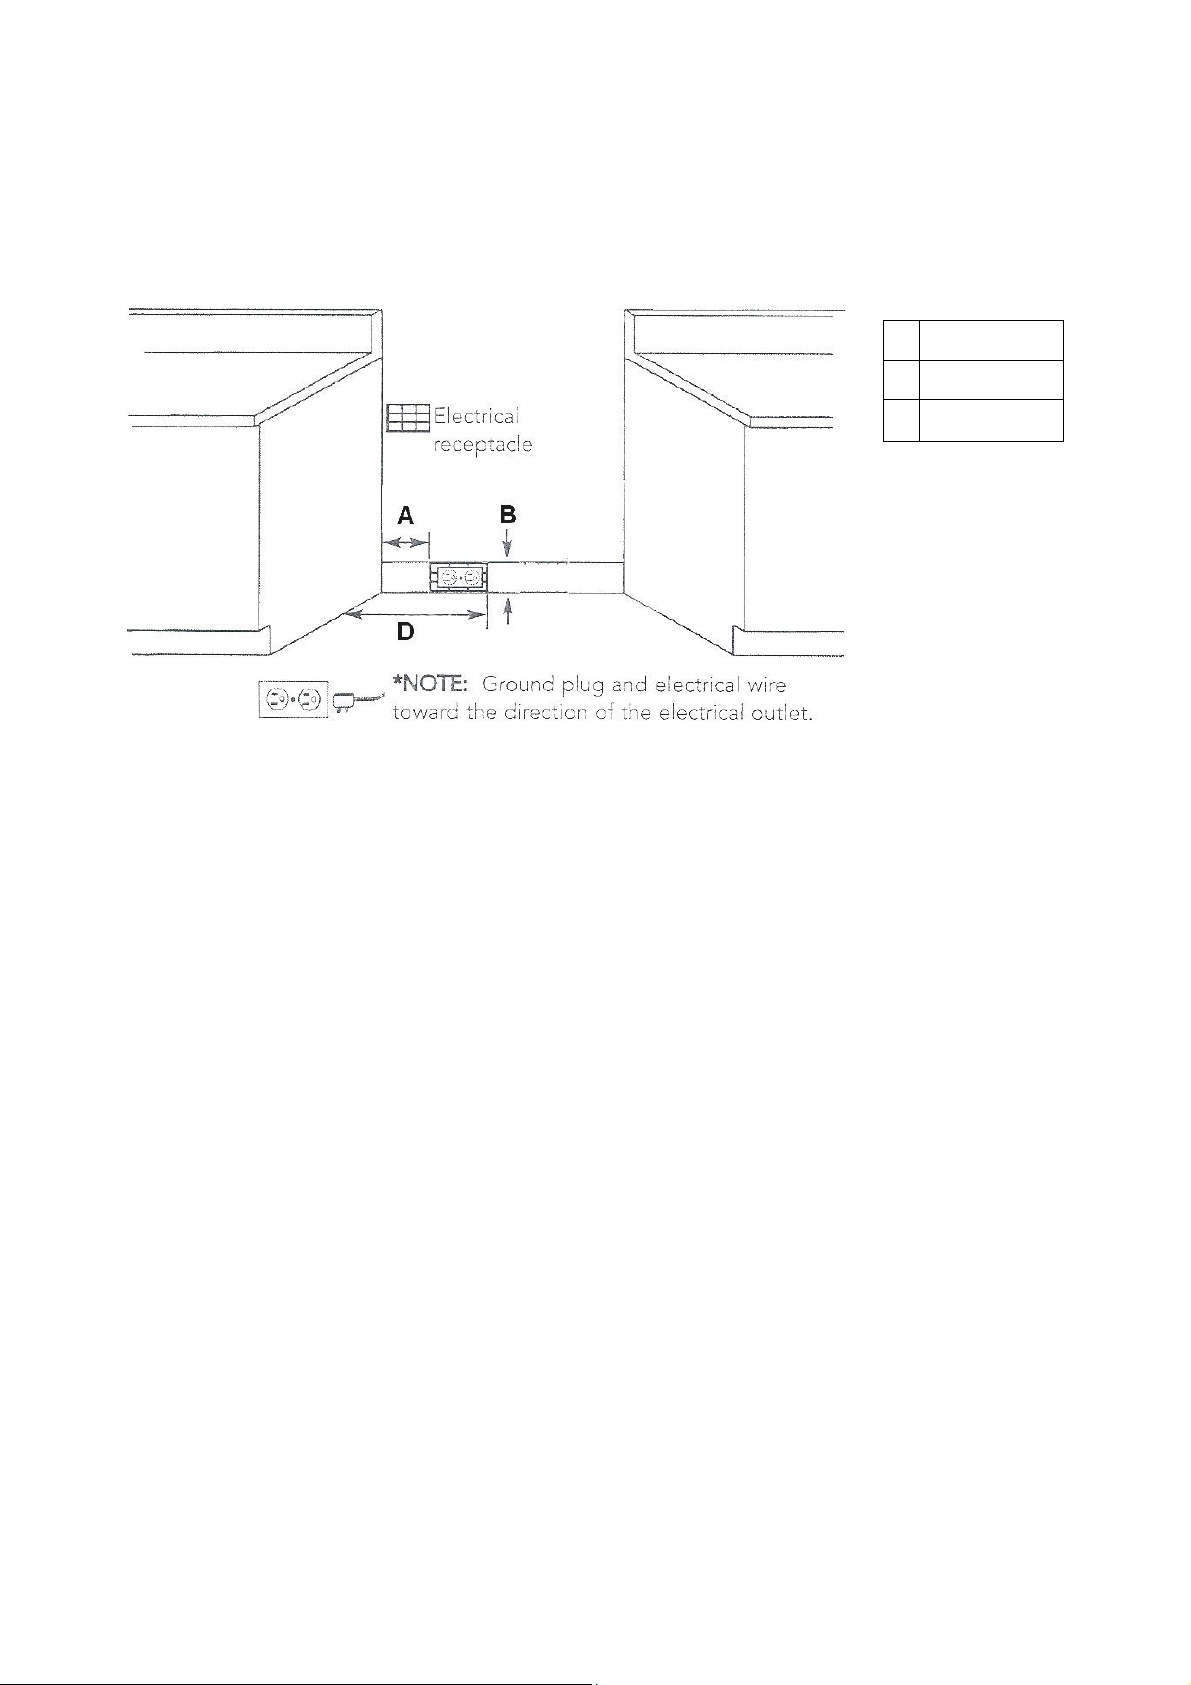
A 2”( 5 cm)
B 3”(7,6 cm)
D 8”(20,3 cm)
A properly-grounded horizontally- mounted electrical receptacle should be installed no higher than 3" (7.6 cm) above the
floor, no less than
requirements.
An agency-approved, properly-sized manual shut-off valve should be installed no higher than 3" (7.6 cm) above the floor
and no less than
shut-off valve and regulator, use agency-approved, properly sized flexible or rigid pipe. Check all local code
requirements.
2”( 5 cm)
2”( 5 cm)
PERFORMANCE CHECKLlST
All burners are tested before leaving the factory. There are no adjustments for the burners if connected according to the
information on the rating plate. Check each burner for proper operations. Flames should be blue in all settings. If service
is required, contact your dealer for the name of their authorized service agency. Gas conversions and initial installation
are not the responsibility of the manufacturer.
The installer should carry out the following performance checks. Refer to instructions below.
1. Check surface burner ignition.
2. Check air shutter adjustment (only for oven and broiler burner)- sharp blue flame, no yellow tipping, sooting or flame
lifting
3. Check low flame adjustment
4. Check broiler and oven ignition - all burner ports.
5. Check for gas leaks (odors) at all gas connections.
6. Check oven bake and convection bake function.
FINAL PREPARATION
1. Some stainless steel parts may have a plastic protective wrap which must be removed. The interior of the oven
should be washed thoroughly with hot soapy water to remove film residues and any installation dust or debris
before using it for food preparation, then rinsed and wiped dry. Solutions stronger than soap and water are rarely
needed.
2. All stainless steel body parts should be wiped with hot, soapy water and with a liquid cleaner recommended for
use with stainless steel If buildup occurs, do not use steel wool, abrasive cloths, cleaners, or powders! If it is
necessary to scrape stainless steel to remove encrusted materials, soak with hot, wet cloths to loosen the
material, then use a wood or nylon scraper. Do not use a metal knife, spatula, or any other metal tool to scrape
stainless steel! Scratches are almost impossible to remove.
NOTE: These installation instructions should remain with the unit for future reference. The electrical diagram is located in
the backside or the appliance.
and no more than
and no more than
8”(20,3 cm)
8”(20,3 cm)
from the right side (facing product). Check all local code
from the left side (facing product). To connect gas between
10
Page 11
REPLACEMENT PARTS
Only authorized replacement parts may be used in performing service on the appliance. Replacement parts are available
from factory authorized parts distributors.
Conversion to different types of gas
Before carrying out any maintenance work, disconnect the appliance from the gas and electric
supply. For Natural Gas fit regulator assembly described in Fig.
Adaptation of the pressure regulator for use with different type of gas
The pressure regulator supplied with the appliance is a convertible type pressure regulator for use with Natural Gas at a
nominal outlet pressure of 4” w.c. or LP gas at a nominal outlet pressure of 11” w.c. and it is pre-arranged from the
factory to operate with one of these gas/pressure as indicated in the labels affixed on the appliance, package and
Instruction booklet.
To convert the regulator for use with other types of gas follow these instructions:
1) Unscrew by hand the upper metal stopper of the regulator.
2) Unscrew by hand the white plastic piece screwed under the above mentioned metal stopper, afterward screw it again
in opposite way under the metal stopper (for gas reference see the written “LP” and “NAT” with relative indicating arrows
on the white piece).
3) Screw again by hand the metal stopper in the original position on the regulator.
Following these exact instructions the gas regulator is converted for use with the other gas/pressure.
It is essential that the gasket and the pressure test point stopper are properly installed to avoid gas leakage
- CHANGING THE NOZZLES FOR USE WITH OTHER TYPES OF GAS:
To change the nozzles of the burners use the following procedure:
Lift up the burners and unscrew the nozzles ( Fig.) using an adjustable spanner of 7 mm and change the nozzles with
those designed for the new gas supply according to the information given in TABLE shown below.
11
Page 12
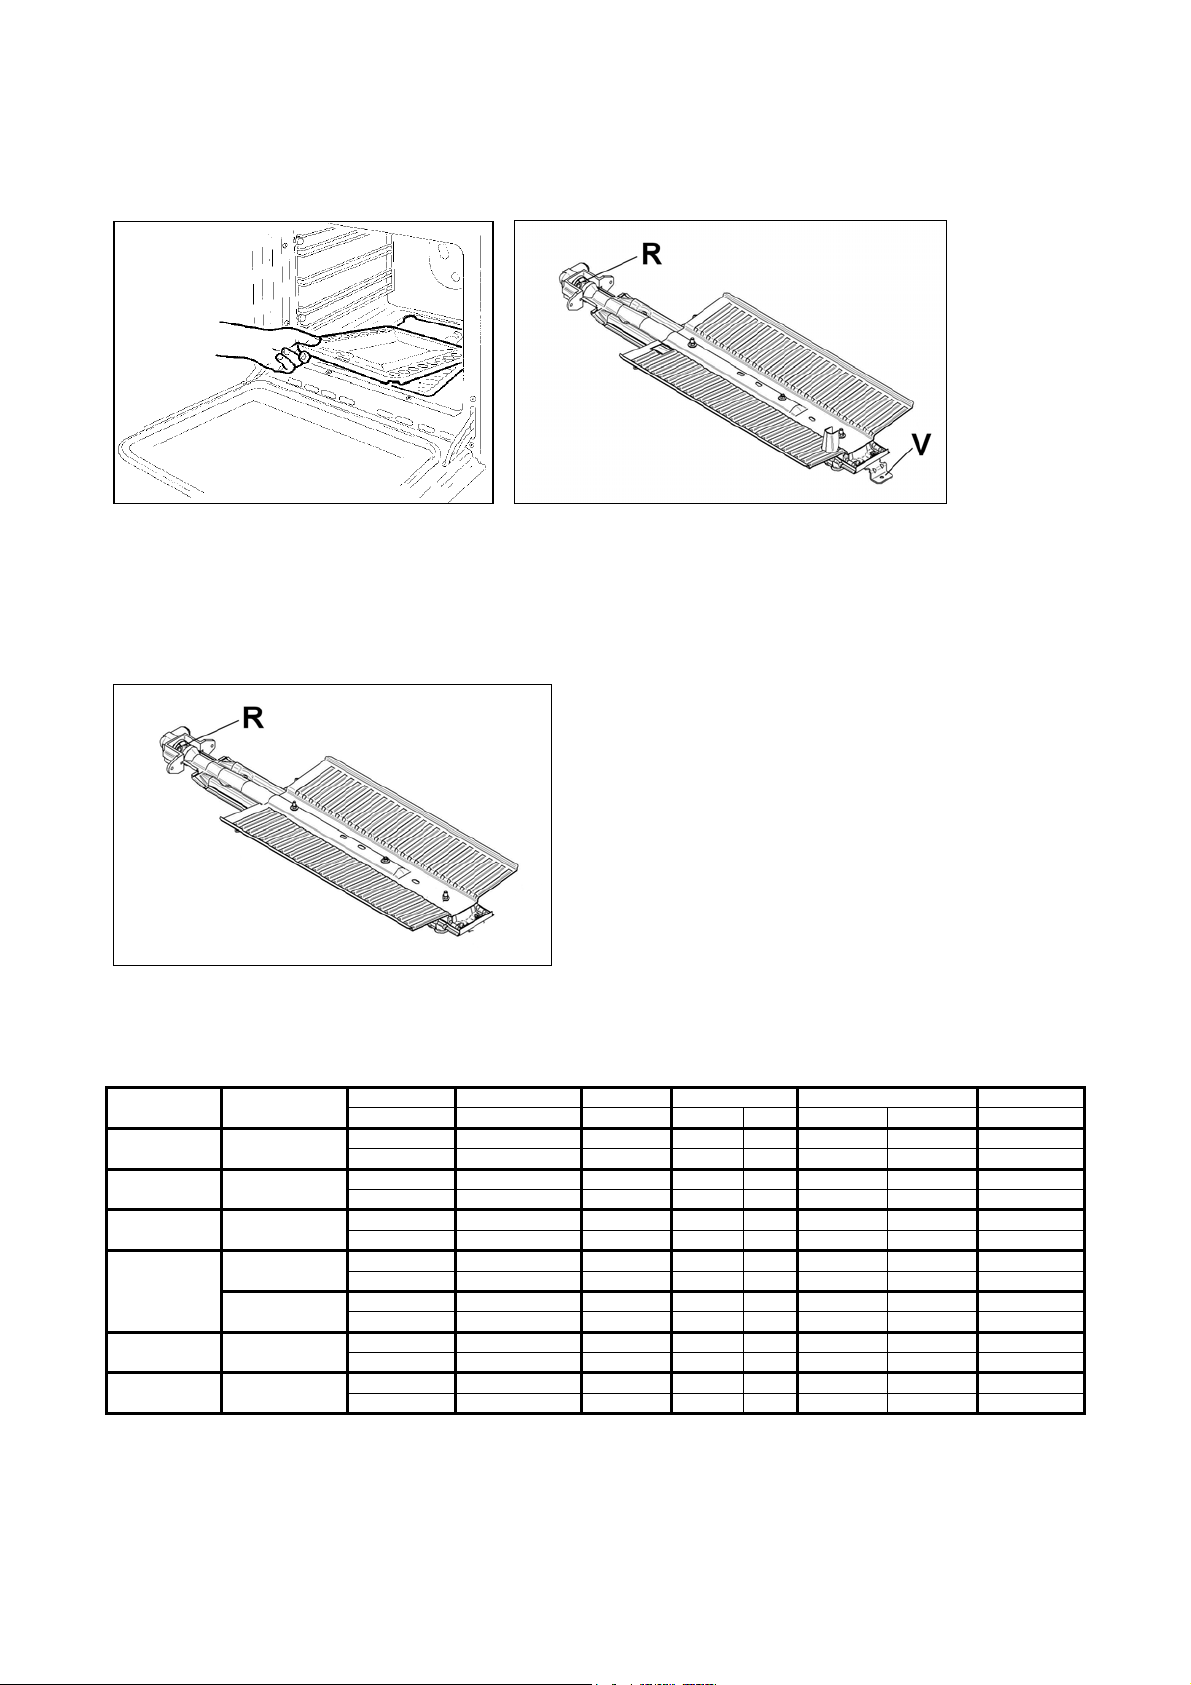
Follow the instructions below to change the oven burner nozzle:
1) Remove the oven level (Fig. 9).
2) Loosen the screw V and pull out the burner from the support being careful not to damage the ignition plug and the
thermocouple (Fig. 10).
3) Unscrew the nozzle R (Fig. 10) using a 7 mm spanner and replace it with the nozzle needed for the new type of gas
according to what is indicated in Table below
4) Re-install all the parts in revers sequence from 3 to 1
(Fig. 9) (Fig. 10)
Follow the instructions below to change the broiler burner nozzle:
1) Loosen the screw and pull out the burner from the support being careful not to damage the ignition plug and the
thermocouple (Fig. 11).
2) Unscrew the nozzle R (Fig. 11) using a 7 mm spanner and replace it with the nozzle needed for the new type of gas
according to what is indicated in Table below.
Models X244GGVX [MLS0GTU4X(2 or 5)A]
Adapting to different types of gas
Burner Position Injector Gas Pressure Max Rate Min Rate By-pass
diam. [mm.] Type [i.w.c.] [BTU/h] [W] [BTU/h] [W] diam. [mm]
Auxiliary Rear L 0,90 NG 4” 3400 996 900 264 Regulated
0,54 LP (Propane) 11” 3400 996 900 264 0,29
Semi-Rapid Front R 1,18 NG 4” 6100 1787 1500 439 Regulated
0,70 LP (Propane) 11” 6100 1787 1500 439 0,36
Rapid Rear R 1,55 NG 4” 10400 3047 2500 732 Regulated
0,92 LP (Propane) 11” 10400 3047 2500 732 0,47
Front L Inner 0,80 NG 4” 2800 820 900 264 Regulated
Dual Burner 0,49 LP (Propane) 11” 2800 820 900 264 0,29
Front L Outer N°2 x 1,15 NG 4” 12000 3516 4500 1318 Regulated
N°2 x 0,70 LP (Propane) 11” 12000 3516 4500 1318 0,65
Oven Oven 1,60 NG 4” 11000 3223 2400 703 Regulated
downside 0,95 LP (Propane) 11” 11000 3223 2400 703 0,48
Broiler Oven 1,50 NG 4” 10000 2930 Only Max Only Max No by-pass
upside 0,90 LP (Propane) 11” 10000 2930 Only Max Only Max No by-pass
CAUTION: save the orifices removed from the appliance for future use
12
Page 13
REGULATION OF BURNERS
Work surface burner adjustment: follow the instructions below to adjust the work surface burner minimum:
1) Light the burner and set the knob to the MINIMUM position (small flame).
2) Remove the knob of the valve that is press fit on the rod of that valve.
3) The cooker is equipped with safety valves, use a small slotted screwdriver the choke valve located on the valve body
and turn the choke screw to the right or left until the burner flame is adjusted to minimum
4) Make sure that the flame does not go out when switching quickly from the MAXIMUM to the MINIMUM position.
Oven burner adjustment: follow the instructions below to adjust the minimum:
1) Light the burner setting the knob to the MAXIMUM position.
2) Close the oven door and operate the oven for at least 10 minutes.
3) Set the knob to the MINIMUM position (corresponding to 250°F/120°C) and then remove it.
4) With a slotted screwdriver turn the choking screw (by-pass screw at the left side of the thermostat bar) and, while
observing the flame at the same time through the cooker porthole, evaluate the consistency of the flame so it remains on
when switching quickly from the MINIMUM to the MAXIMUM position.
WARNING: The above-mentioned adjustment should be made only for natural gas, while for operation with
liquid gas the screw must be locked at the end in a clockwise direction. The broiler burner always
operates at maximum and therefore no minimum adjustment is required.
SERVICE & MAINTENANCE INSTRUCTIONS
Service and maintenance only to be carried out by an authorised person
To replace parts such as burners, valves and electric components, the appliance must be open removing the worktop.
Note: if the valves must be replaced, first disassemble the ignitions switches wires.
It is recommended to replace the valve gaskets each time the valve is replaced, thus ensuring a perfect seal between the
body and the gas train.
WARNING: After first installation of the appliance or after any service intervention concerning main gas parts of
the appliance, make the leak test using water with soap on the gas connections in order to verify the correct
installation. Do not use fire for gas leak testing.
To replace the oven bulb, just unscrew the protection cap that projects out inside the oven. (Fig.19) WARNING:
Disconnect power before servicing unit.
In order to remove the oven door make sure to block the ihinges with a screw driver.
Call an autorised service person for this operation that can be dangerous
13
Page 14
USER MANUAL
WARNINGS:
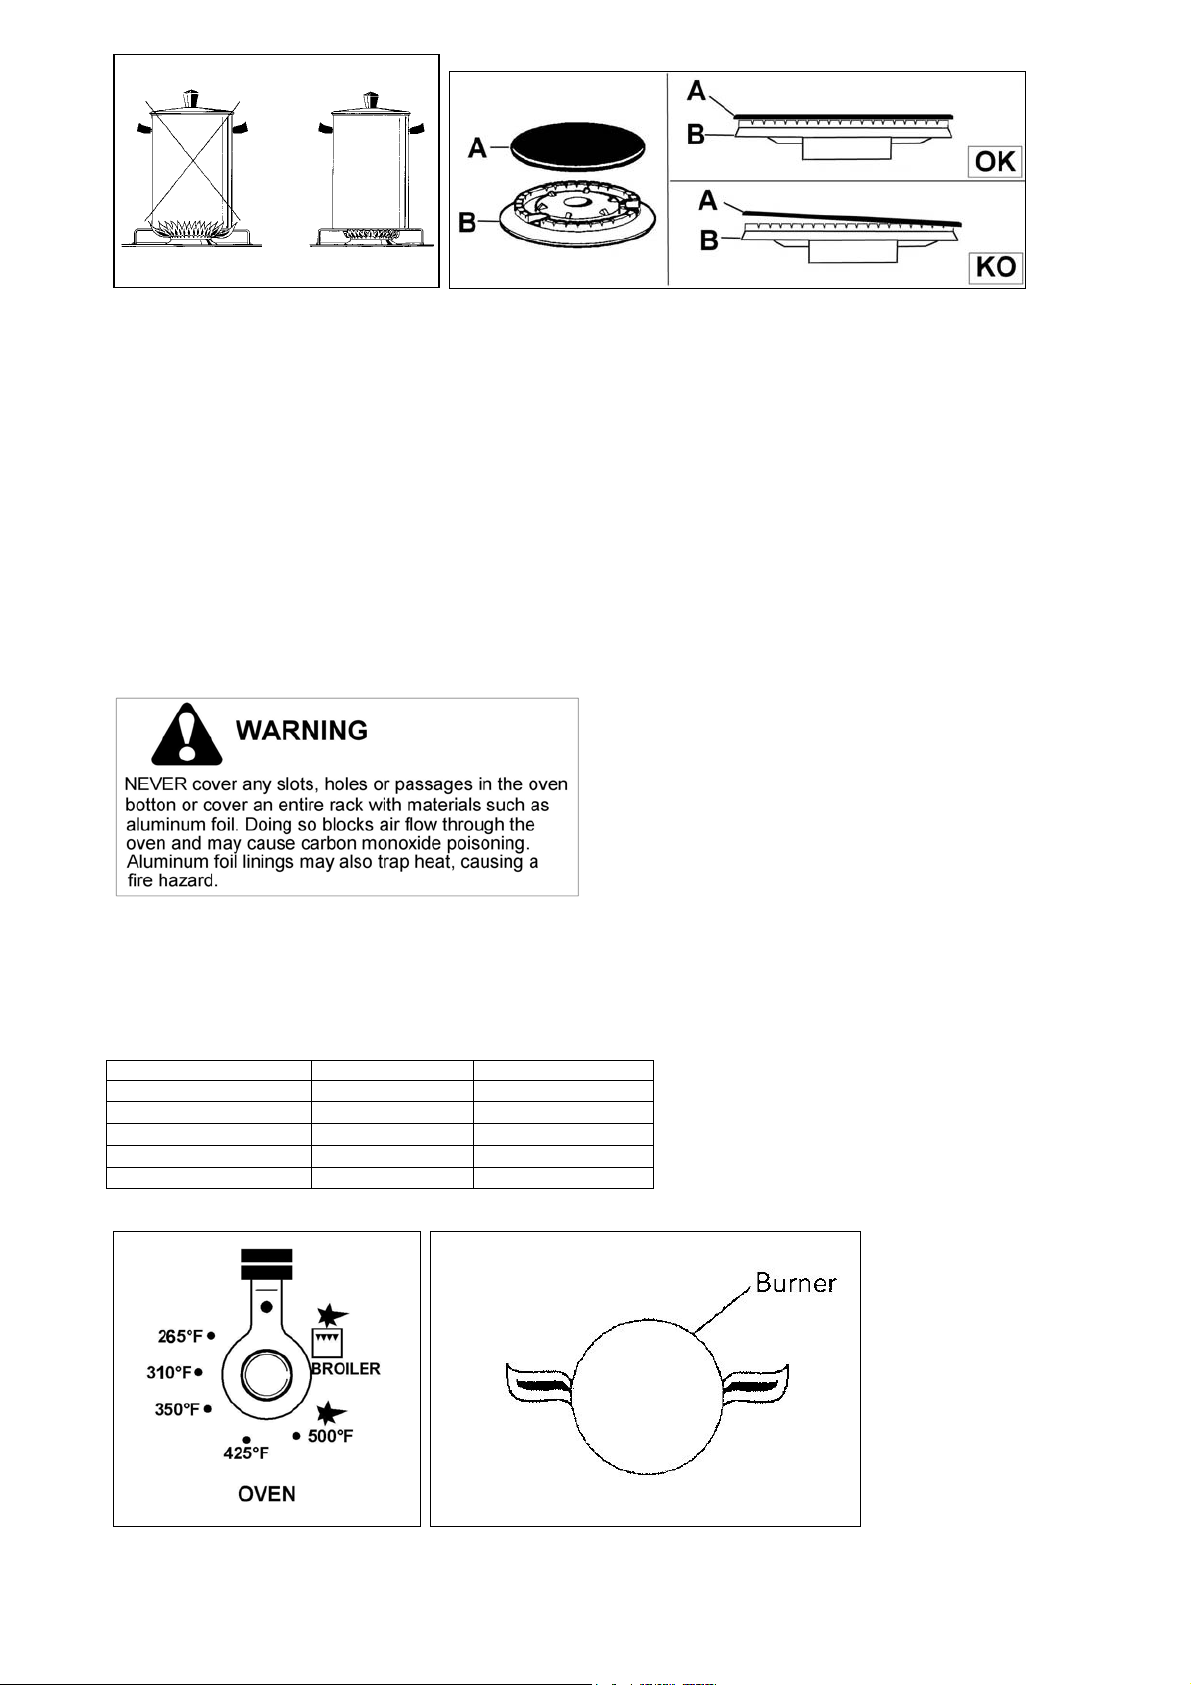
Do not to cover the holes inside the oven with aluminium paper
Do not to cover the burners of cooktop with aluminium paper
Do not store any flammable objects or objects under pressure in the storage compartment
Keeping appliance area clear and free from combustible materials, gasoline and other flammable
vapors and liquid.
Do not store dangerous or flammable material in the cabinet areas above appliance; store them in a
safe place in order to avoid potential hazards.
For safe use of appliance, do not use it for space heating.
Do not use aerosol sprays in the vicinity of this appliance while it is in operation
Do not use oven doors as support or for sit-down.
Do not use oven cavity as storage compartment.
DESCRIPTIONS
14
Page 15

CONTROL PANEL DESCRIPTION
On the control panel, small symbols show the function of each knob or key. Here as follows are the several controls that
a cooker can have:
the symbol shows the disposition of burners on the worktop, the full dot identifies the burner in object (in this
case the front burner on the right).
the symbol shows the running of oven or broiler
the symbol
the symbol
shows the swicth for the oven light
shows the swicth for the oven fan and oven light
USING BURNERS
A diagram is etched on the control panel above each knob which indicates which burner corresponds to that
knob.
(flame)
Manual ignition:
Manual ignition is always possible even when the power is cut off or in the event of prolonged power failure.
Turn the knob that corresponds to the burner selected counterclockwise to the MAXIMUM position at the etched star
(large flame) and place a lit match up to the burner.
Automatic electric ignition:
Turn the knob that corresponds to the burner selected anticlockwise direction to the MAXIMUM position at the etched
star (large flame) and then press the knob down to activate the spark ignition. Once ignited, keep pressing the knob for
about 10 seconds to allow the flame to heat the thermocouple. If the burner does not remain alight after releasing the
knob repeat the above procedure,
Note: It is recommended not to try to ignite the burner if the relative flame cap is not in the correct position
Note: Dual burner is composed by two burner (inside and outside); each one operates under the relative gas valve
indipendently from the other one.
Instructions for the ignition of the dual wok burner: turn on the central burner first, then turn on the external ring.
Tips for using burners correctly:
WARNING: During use of each gas burner(s) adjust the burner flame size properly so it does not extend beyond
the edge of the cooking utensil. This is an instruction based on safety considerations
- Use suitable pots for each burner (see Fig. and Table )
- When the liquid is boiling, turn down the knob to the MINIMUM position.
- Always use pots with a cover.
Correct flame aspect: verify that aspect flame of the worktop burners be completely blue and with an aspect as
indicated in figure(flame)
Table
Burner Recommended pan diameters inches (mm)
Small 3½”-5
Medium 5
Large 7
Dual burner 8
1/2
1/8
2/3
”- 10
”- 10
”-10
1/2
”(90 – 140)
1/4
”(140 – 260)
1/4
” (180 – 260)
1/4
” (220 – 260)
15
Page 16
WARNING: check the position of the burner caps before operation.
Correct usage of pans:
- Dry the bottom of the pan before placing it on the hotplate.
- Use pots with a flat, thick bottom, except for wok cooking.
- When using the burners, ensure that the handles of the pans are correctly positioned. Keep children away from the
appliance.
- When cooking foods with oil and fat, which are very flammable, the user should not leave the appliance unattended.
WOK PAN: To use the wok pan, please utilize a suitable wok adaptor grid; wok pan external diameter shall not be less
than 10” (25cm) and not more than 16”(40cm).
WARNING: If the power is cut off, the burners can be lit with matches.
The burners equipped with a safety thermocouple can only be lit when the knob is in the MAXIMUM position (large flame
etching).
USING THE GAS OVEN
All the gas oven cookers are equipped with a thermostat and safety device to adjust the cooking temperature. The oven
temperature is set by turning the knob counterclockwise to match the indicator with the temperature selected. The gas
oven is combined with a gas broiler. See the specific pages for use information.
WARNING: If the burner flames are extinguished accidentally, turn off the control knob and do not try to relight
the oven until after at least 1 minute.
TABLE N°7
THERMOSTAT SETTING TEMPERATURE °F TEMPERATURE °C
MIN.
MED-LOW
MED.
MED-HI
MAX.
265 130
310 155
350 175
425 220
500 260
16
Page 17
The oven burner can be ignited in different ways:
- Manual lighting (it is always possible even when the power is cut off):
To light the oven, open the oven door and turn the knob at maximum position . At the same time put a lit match next to
the ignition tube that is visible on the oven level . Then press the thermostat knob (this makes the gas start to flow) and
keep it pressed, after the burner has been completely lit, for 10 seconds. Release the knob and make sure that the
burner remains on, otherwise repeat the operation.
- Electric ignition
In this case, first open the oven door, then turn the knob to the maximum temperature setting. Then press the thermostat
knob to start the gas flow and the ignition spark. Wait about 10 seconds after the burner has been completely lit and then
release the knob. Make sure that the burner remains on, otherwise repeat the operation.
The ignition device should not be used for more than 15 seconds. If after that period the burner still has not
been lit, do not use the device and open the door of the room or wait at least 60 seconds before trying to light
the oven again.
WARNING: when trying to light the oven, the door must always be open.
The gas oven operation is indicated by a blue light
Verify that aspect flame of the oven burner be completely blue and with an aspect as indicated in figure
NOTICE: when using the oven for the first time it should be operated for 15-30 minutes at a temperature of
about 500°F/260°C without cooking anything inside in order to eliminate any moisture and odours from the
internal insulation.
During normal oven use, after lighting the burner and setting the desired temperature, wait about 15 minutes before
putting in any food to preheat the oven.
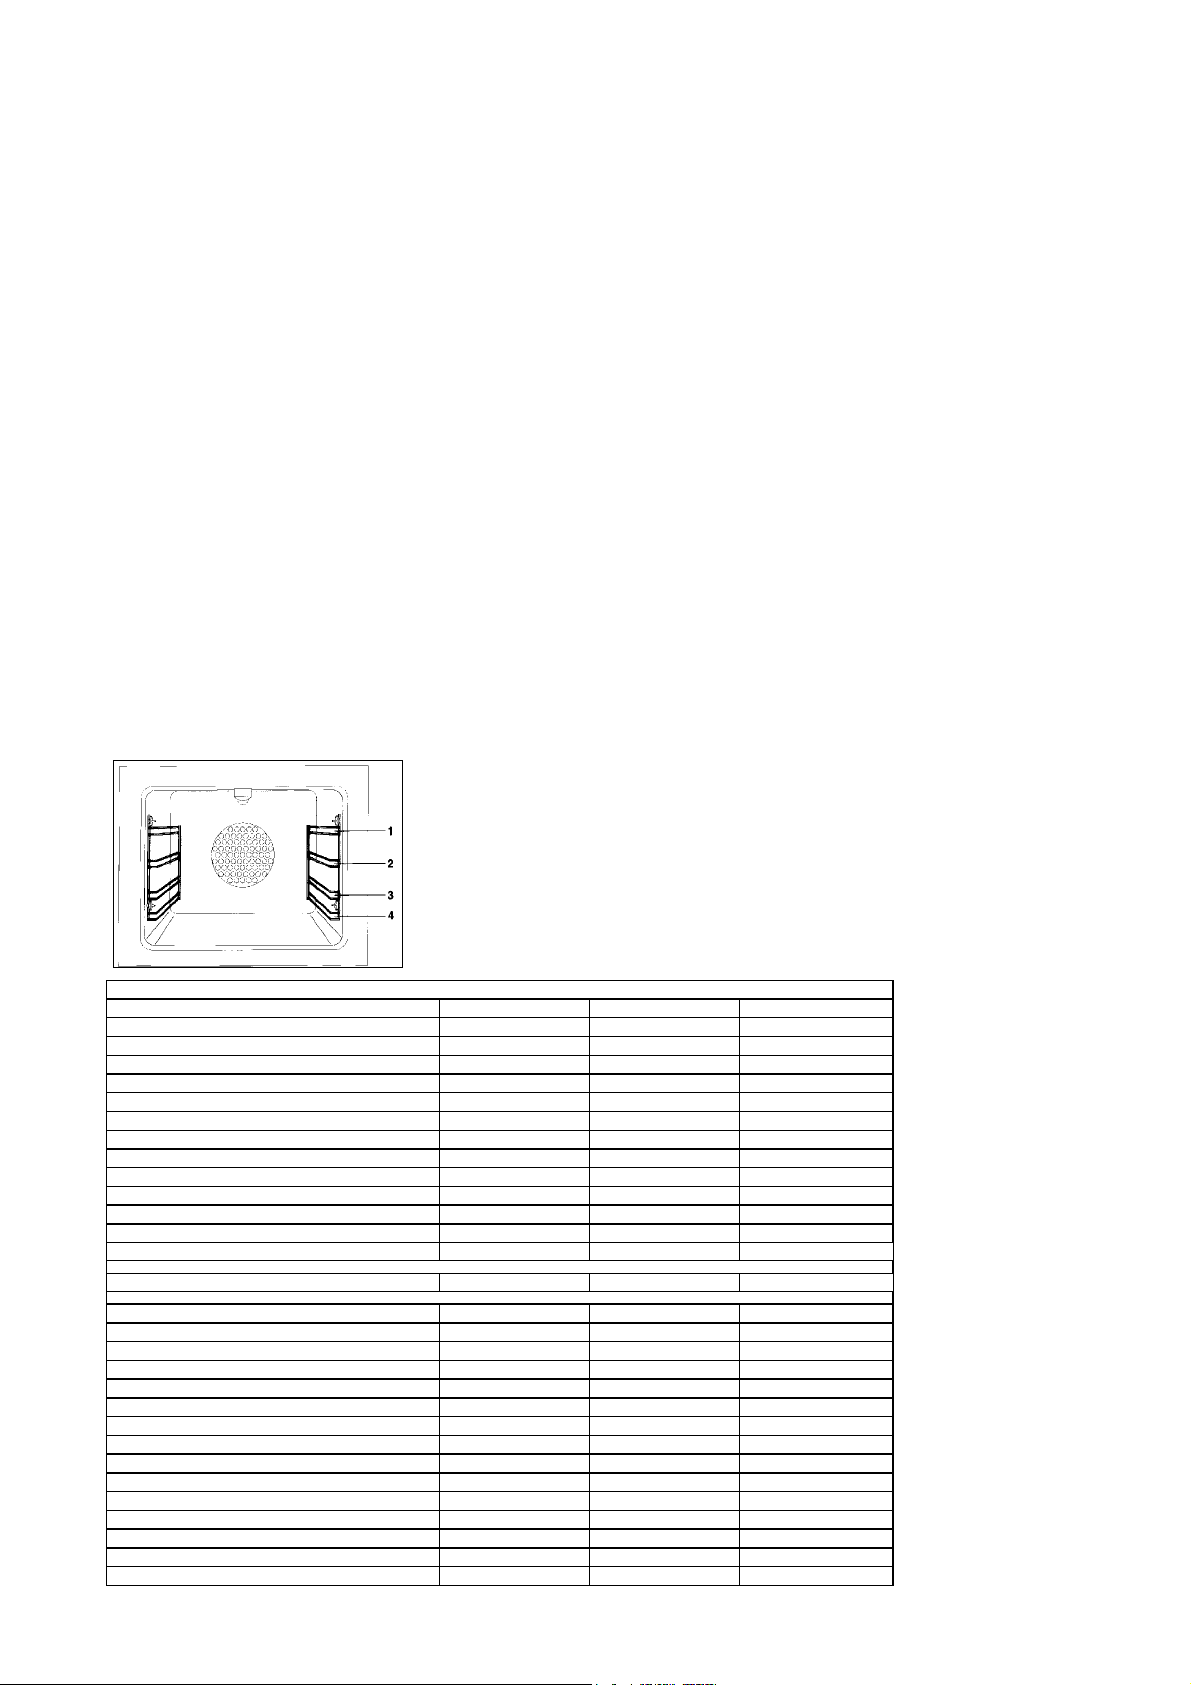
The oven is equipped with 4 guides at different heights level which can be used to insert shelves or the tray. To keep the
oven as clean as possible it is recommended to cook meat on the tray or on the shelf that has been inserted inside the
tray. The table below lists the general cooking times and the position of the tray for different types of foods. Personal
experience will help to determine any variations in the values reported in the table. In any case, it is recommended to
follow the instructions of the specific recipe being used.
This type of oven is equipped with a fan. The fan convection creates forced-air circulation in the horizontal direction.
Thanks to this type of operation, the ventilated oven can be used for different types of cooking at the same time, without
changing the taste of each food. Hot-air circulation guarantees a uniform distribution of heat. Pre-heating the oven is not
necessary, but for very delicate pastries, it is recommended to heat the oven before inserting the trays.
The convection system partially changes the various notions about traditional cooking. Meat no longer needs to be
turned while it is cooking and the rotisserie is no longer needed to cook a roast on the spit. Just put the meat directly on
the shelf.
GAS OVEN COOKING TABLE
MEAT
PORK ROAST 430/220 4 60-70
BEEF ROAST (YOUNG STEER) 480/250 4 50-60
BEEF ROAST 465/240 4 60-70
VEAL ROAST 430/220 4 60-70
LAMB ROAST 430/220 4 45-55
ROAST BEEF 445/230 4 55-65
ROAST HARE 450/235 4 40-50
ROAST RABBIT 430/220 4 50-60
ROAST TURKEY 450/235 4 50-60
ROAST GOOSE 450/225 4 60-70
ROAST DUCK 450/235 4 45-60
ROAST CHICKEN 450/235 4 40-45
FISH
PASTRY
FRUIT PIE 390/200 3 35-40
TEA CAKE 375/190 3 50-55
BRIOCHES 345/175 3 25-30
SPONGE CAKE 450/235 3 20
RING CAKE 375/190 3 30-40
SWEET PUFF PASTRIES 430/220 3 20
RAISIN LOAF 430/220 3 15-20
STRUDEL 355/180 3 15-20
SAVOIA COOKIES 375/190 3 15
APPLE FRITTERS 430/220 3 20
SAZOIARDI SANDWICH 430/220 3 20-30
TOAST SANDWICH 480/250 4 5
BREAD 430/220 3 30
PIZZA 430/220 3 20
TEMP °F/ °C HEIGHT MINUTES
390-440/200-225 3 15-25
17
Page 18
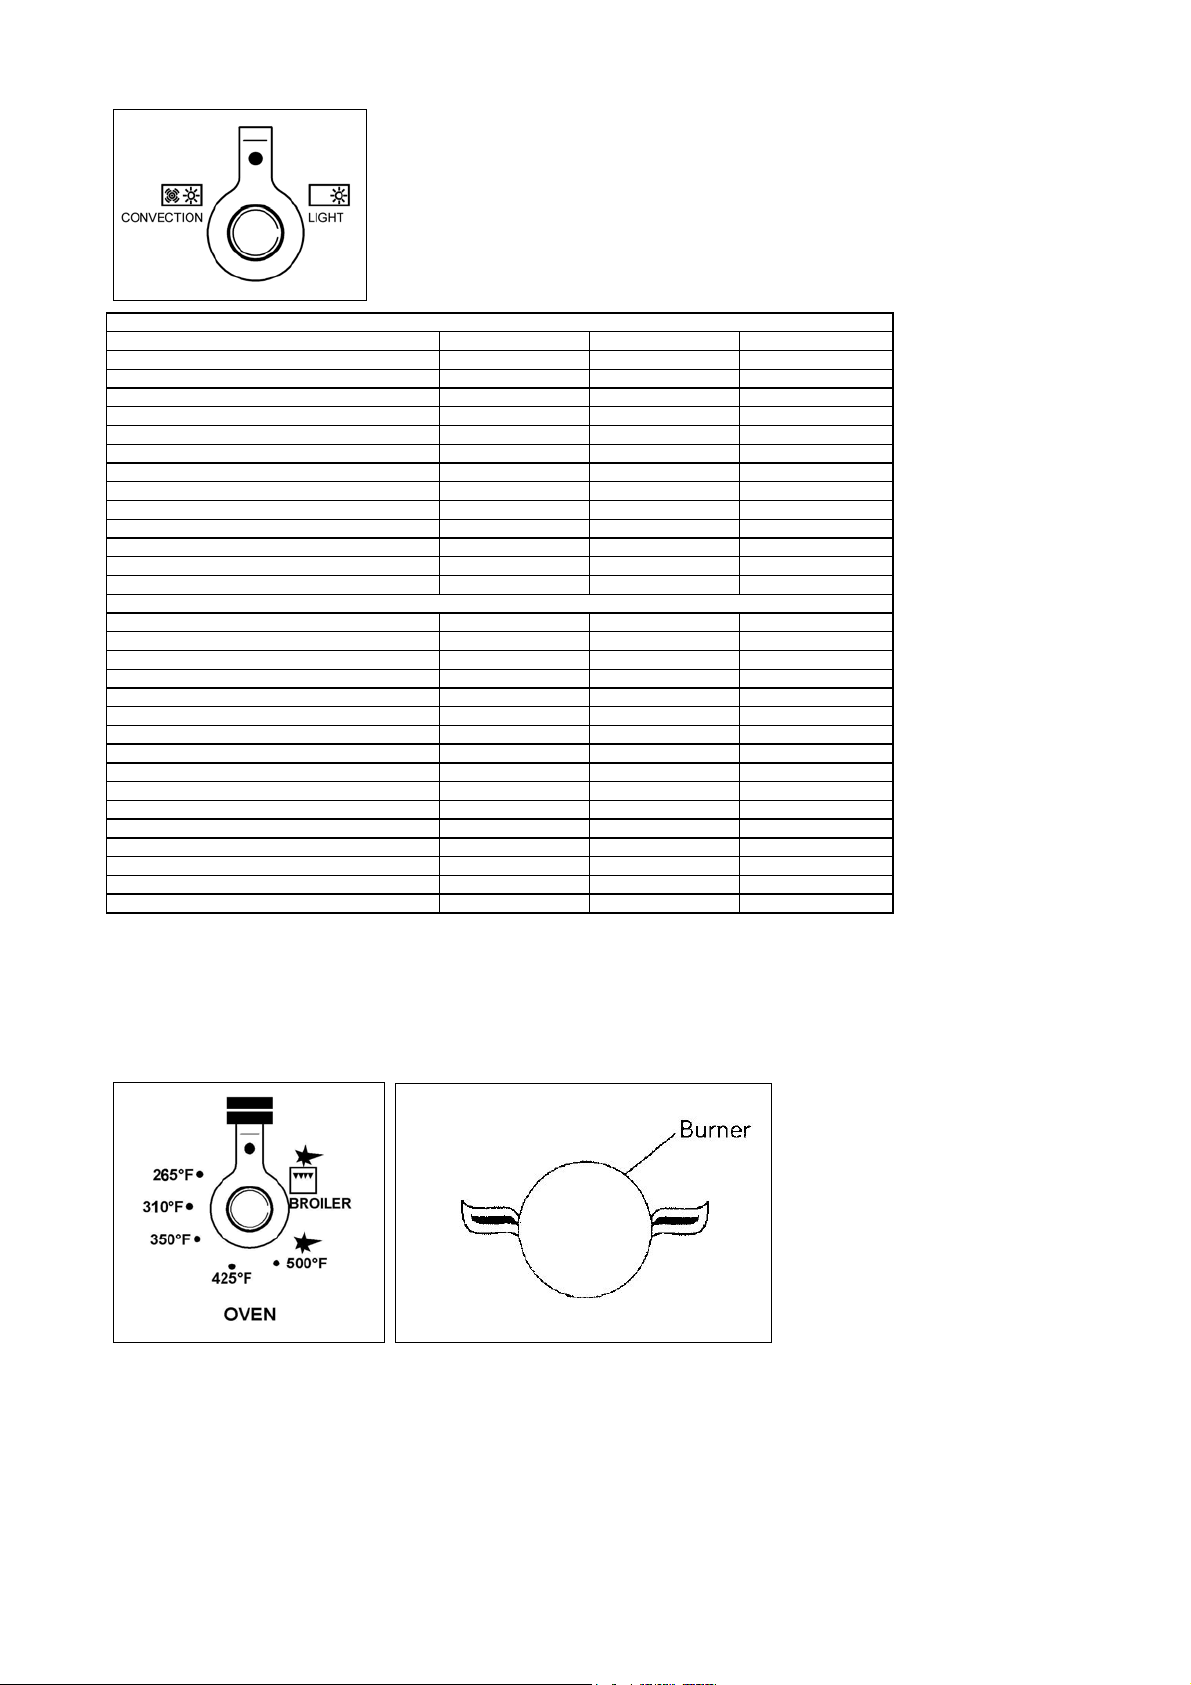
To activate the convection fan use the selector placed on control panel.
Turn the knob anti clockwise for activation of the convection fan +light
Turn the knob clockwise to turn on the oven light.
CONVECTION GAS OVEN COOKING TABLE
MEAT
PORK ROAST 320-340/160-170 3 70-100
BEEF ROAST (YOUNG STEER) 340-355/170-180 3 65-90
BEEF ROAST 340-375/170-190 3 40-60
VEAL ROAST 320-355/160-180 3 65-90
LAMB ROAST 285-320/140-160 3 100-130
ROAST BEEF 355-375/180-190 3 40-45
ROAST HARE 340-355/170-180 3 30-40
ROAST RABBIT 320-340/160-170 3 80-100
ROAST TURKEY 320-340/160-170 3 160-240
ROAST GOOSE 320-355/160-180 3 120-160
ROAST DUCK 340-355/170-180 3 100-160
ROAST CHICKEN 355/180 3 70-90
FISH
PASTRY
FRUIT PIE 355-390/180-200 3 40-50
TEA CAKE 390-430/200-220 3 40-45
BRIOCHES 340-355/170-180 3 40-60
SPONGE CAKE 390-445/200-230 3 25-35
RING CAKE 320-355/160-180 3 35-45
SWEET PUFF PASTRIES 355-390/180-200 3 20-30
RAISIN LOAF 445-480/230-250 3 30-40
STRUDEL 320/160 3 25-35
SAVOIA COOKIES 300-355/150-180 3 50-60
APPLE FRITTERS 355-390/180-200 3 18-25
SAZOIARDI SANDWICH 340-355/170-180 3 30-40
TOAST SANDWICH 445-480/230-250 4 7
BREAD 390-430/200-220 4 40
PIZZA 390-430/200-220 3 20
TEMP °F/ °C HEIGHT MINUTES
320-355/160-180 3 / 4
USING THE GAS BROILER
The gas broiler is controlled with the same gas oven knob, but turning it clockwise instead of counterclockwise (see the
gas oven use instructions), matching the symbol with the indicator. The broiler burner always operates at maximum and
therefore there is no minimum position. In addition, it is equipped with a safety device to prevent the flame from going
out. The gas broiler can also be ignited in different ways:
- Manual lighting: Just completely open the oven door, turn the knob so that the relative symbol matches the indicator,
while pressing the knob, and, at the same time, put a lit match next to the burner. Make sure that the burner is
completely lit and after about 10 seconds release the knob. Make sure that the burner remains on, otherwise repeat the
operation.
- Electric ignition: In this case, completely open the oven door, turn the knob so that the relative symbol matches the
indicator and, while keeping the knob pressed, press the knob with the spark symbol. Wait about 10 seconds after the
burner has been completely lit and then release the knob. Make sure that the burner remains on, otherwise repeat the
operation.
ATTENTION: To use broiler please utilize the proper broiler grid installed inside the grid enamelled tray supplied
with the appliance; broiler tray shall be supported by oven grid.
18
Page 19

WARNING: As with the oven, the broiler must be lit with the door completely open.
The gas broiler can be used to broil foods on the oven shelf .
The gas broiler operation is indicated by a blue light
IMPORTANT: when broiling food keep the door closed..
Verify that aspect flame of the broiler burner be completely blue and with an aspect as indicated in figure
Note: The use of a gas cooking appliance produces heat and humidity in the room where it is installed. Therefore, proper
ventilation in the room is needed and natural ventilation openings must remain unobstructed and activating the
mechanical exhaust fan/range hood. Intensive and continuous use of the appliance may require additional ventilation, for
example by opening a window, or increasing the power of the mechanical exhaust fan/range hood, if installed.
Note: the cooker is equipped with the cooling fan that starts operation each time the oven knob is on a position different
from 0 (zero). The fan circulates the air between the control panel and the oven door and also allows the control panel
and the oven door stay at a warm temperature during the appliance operation in any condition.
CLEANING THE APPLIANCE:
Never use abrasive cleaners
Before cleaning the appliance it should be disconnected from the power supply.
Cleaning the work surface: periodically clean the burner heads, the cast iron pan supports and the burner caps using
warm water.
Any spillage must always be removed as soon as possible using a rag.
If it become difficult to open or close a valve, do not force it, but immediately request the assistance of the
technical service personnel.
Cleaning the enamelled parts: Enamelled parts should be cleaned frequently with soapy water. Never use abrasive
powder. Do not leave acidi or alkaline substances on the enamelled parts (such as vinegar, lemon juice, salt, tomato
sauce, etc.) and do not wash the enamelled parts while they are still hot.
Cleaning the stainless steel parts: Clean the parts with soapy water and dry them with a soft cloth. The shine is
maintained by periodically using specific stainless steel cream cleaner. Never use abrasive powders. Use specific
stainless steel cream cleaner to eliminate the glue remains afther the elimination of the blue plastic protection film on the
worktop after installation.
Cleaning the burner caps: Lift the burner caps from the burner heads and wash them in soapy water and dry
thoroughly. Before replacement on the burner head ensure that the holes are not clogged.
Cleaning the inner glass door: Clean the glass with warm soapy water using a sponge. A spatula can be used to
remove burner fat if used gently.
ATTENTION: while cleaning the door make sure to avoid any spillage in the venting holes on the top part of the door. To
clean inside the door it is necessary to disassemble the door through a service engineer.
ATTENTION: for further details about cleaning of the appliance, please contact your applliance retailer.
AFTER SALE SERVICE:
Please note here below details for after save service.
Refer to warranty certificate for warranty condiftions
Dealer /Importer: Name, address, phone
SERVICE CENTERS
Name
Phone
MANUFACTURER:
BERTAZZONI SPA
VIA PALAZZINA, 8 – 42016 – GUASTALLA (REGGIO E.) ITALY
Tel. +39 0522/226411 – telefax +39 0522/226440 – http://www.bertazzoni-italia.com
19
Page 20

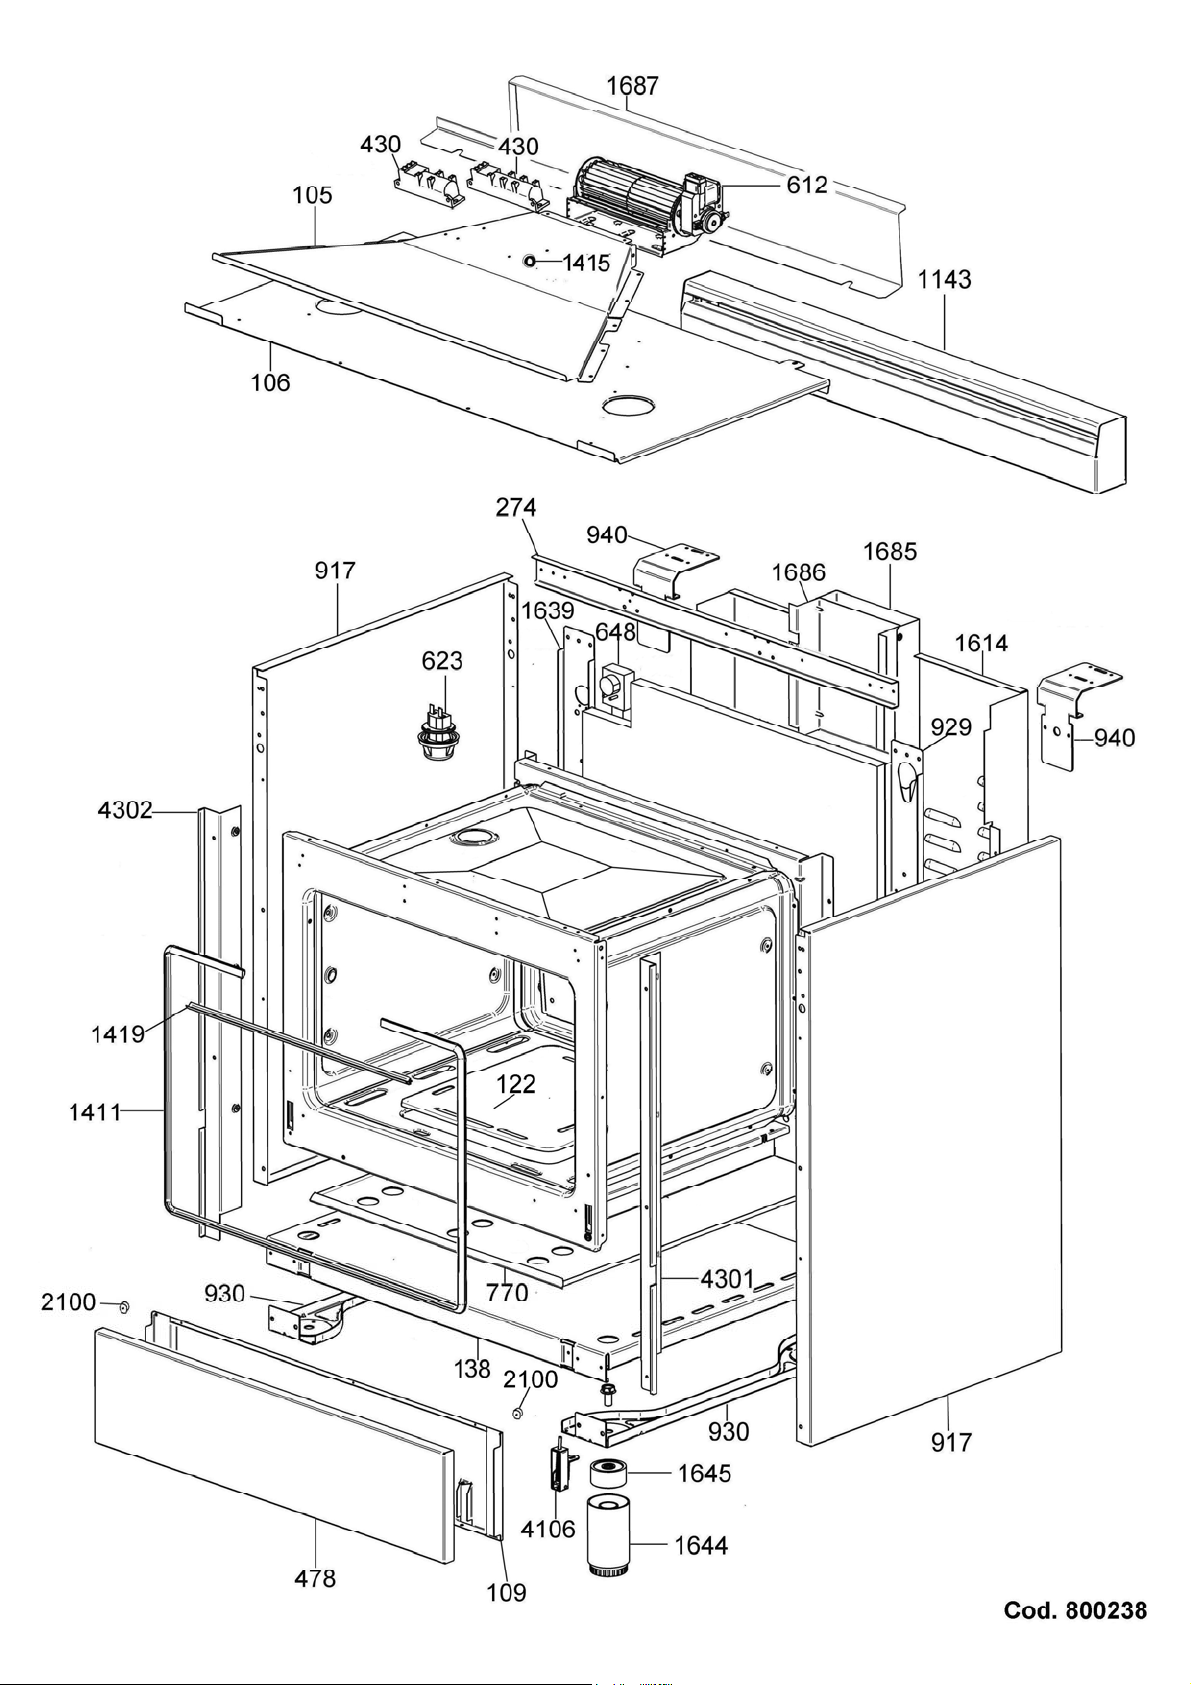
SPARE PARTS LIST
NUMBER COMPONENT DESCRIPTION QUANTITY
X24 4 GGV X - GAS COOKER
11 202387 BURNERS FLASK 1
18 202432 PART FOR DUAL WOK AND SEMI RAPID BURNERS 1
38 306003 THERMOSTAT CLIP 2
55 404229 WORKTOP FRONTGUARD 1
80 504160 COVER FOR SMALL FLAME SPREADER 1
81 504161 COVER FOR MEDIUM BURNER 1
82 504162 COVER FOR RAPID BURNER 1
85 504187 COVER IN FOR DUAL BURNER FLAME SPREADER 1
86 504186 COVER OUT FOR DUAL BURNER FLAME SPREADER 1
105 202509 UP SUPPORT FOR AXIAL COOLIN FAN 1
106 202487 DOWN SUPPORT FOR AXIAL COOLIN FAN 1
109 202491 INSIDE FLAP DOOR 1
117 101374 PROTECTION FOR VENTILATED OVEN 1
120 101048 BLACK OVEN DRIP TRAY 1
122 101098 GRILL TRAY 1
138 202492 DISHWARMER BOTTOM 1
160 202262 BRIDLE FOR FIXING GAS VALVES 1
205 410572 PROFILE FOR GLASS DOOR 1
206 410571 PROFILE FOR GLASS DOOR 1
207 308038 BUMPER 2
274 202486 HORIZONTAL VENT 1
311 309010 RING FOR GRID SUPPORT 4
329 309141 INSIDE DOOR SPACER 2
385 306024 SPRING FOR SPARK PLUG 5
424 415071 SPARK PLUG FOR DUAL BURNER 2
425 415054 SPARK PLUG 350MM 3
427 415074 SPARK PLUG FOR OVEN 1
429 415072 SPARK PLUG FOR GRILL 1
430 415064 ACCUMULATOR 4U 2
441 404217 GRID FOR OVEN 1
442 404216 SHELF OVEN 2
443 404497 GRID FOR TRAY 1
444 202407 FLASK HINGE 2
446 405082 OVEN DOOR HINGE 2
447 404218 GRID FOR OVEN 1
473 408069 SIMMER PLATE 1
478 410631 FLAP DOOR 1
544 504203 OVEN BURNER + SPARK PLUG + THERMOC. 1
546 505059 SUPPORT FOR GRILL BURNER NOZZLE 1
561 508025 THERMOCOUPLE MM300 1
562 508021 THERMOCOUPLE MM600 2
564 508036 THERMOCOUPLE 1
566 508034 THERMOCOUPLE ULTRA-RAPID BURNER 2
567 508035 THERMOCOUPLE 1
611 603020 OVEN CONVECTION FAN 1
612 603022 COOLING FAN 1
620 602039 COMMUTATOR 1
623 608046 OVEN BULB WITH HOLDER 1
648 601991 TERMINAL SEPARATOR 1
649 608047 SMALL WARNING LIGHT 1
649 608047 SMALL WARNING LIGHT 1
667 503128 THERMOSTAT 1
670 504128 SMALL FLAME SPREADER 1
671 504129 MEDIUM FLAME SPREADER 1
672 504130 RAPID FLAME SPREADER 1
675 504189 ULTRA RAPID FLAME SPREADER 1
702 408058 ADAPTER FOR WOK BURNER PAN SUPPORT 1
715 604070 DASYCHAIN SWITCH 1
760 510507 SMALL BURNER 1
761 510508 SEMI RAPID BURNER 1
762 510509 RAPID BURNER 1
764 510511 DUAL BURNER 1
Page 21

770 202490 WARMER DROWER UPPERSIDE PROTECTION PANEL 1
881 502148 GAS VALVE BY PASS 036 SEMI-RAPID 1
883 502150 GAS VALVE BY PASS 065 DUAL OUTER 1
884 502179 GAS VALVE BY PASS 029 SMALL/DUAL INNER 2
886 502180 GAS VALVE BY PASS 047 RAPID 1
917 200327 STAINLESS STEEL SIDE 2
929 202493 RIGHT VERTICAL VENT 1
930 202214 FEET SUPPORT 2
940 201168 FIXING FOR WORK TABLE 2
943 308031 BUMPER FOR C.I. GRIDS AND DISHWARMER 4
947 403449 HANDLE TERMINAL 2
965 408063 CAST IRON PAN SUPPORT 2 BURNERS 2
972 202360 WORK TABLE FIXING 4
1041 401904 GAS VALVE KNOB 3
1043 401905 GAS THERMOSTAT KNOB 1
1044 401906 ELECTRIC KNOB 1
1046 401961 DUAL IN KNOB 1
1047 401962 DUAL OUT KNOB 1
1143 910730 UPSTAND KIT 1
1406 403453 OVEN DOOR HANDLE 1
1407 406409 OVEN DOOR GLASS 2
1411 411103 GASKET FOR OVEN FRONT 4 SIDE 1
1415 602044 THERMOSWITCH FOR COOLING FAN 1
1419 411104 GASKET FOR OVEN FRONT ONE SIDE 1
1421 406410 INNER OVEN GLASS 1
1508 410629 STAINLESS STEEL OVEN DOOR 1
1602 210620 CONTROL PANEL 1
1603 309119 BRIDLE FOR FIXING GAS VALVES/THERMOSTAT 1
1608 501778 ALL.TUBE FOR OVEN BURNER 1
1609 505056 SUPPORT FOR OVEN BURNER NOZZLE 1
1614 201182 BACK PANEL 1
1615 202477 CONTROL SUPPORT 1
1617 608045 SMALL BLUE BUD 1
1622 608025 SMALL RED BUD 1
1624 200371 WORK TABLE 1
1627 501777 GAS COLLECTOR 1
1628 501784 TUBE FOR RIGHT FRONT BURNER 1
1631 501785 TUBE FOR RIGHT BACK BURNER 1
1639 202494 LEFT VERTICAL VENT 1
1644 414048 S.STEEL LEG 4
1645 414031 BASE FOR LEGS 4
1646 501779 GRILL THERMOSTAT TUBE 1
1661 202495 OVEN BURNER COMPARTMENT BOTTOM 1
1671 101147 GAS OVEN PANEL M6D2 1
1673 101404 BACK OVEN BODY 1
1674 101406 OVEN TOP PANEL BLACK 1
1677 101405 FRONT PANEL BLACK 1
1679 101190 SIDE PANEL FOR OVEN 2
1685 201175 BACK VENT STACK 1
1686 201176 FRONT VENT STACK 1
1687 202489 BACK ENCLOSURE METAL PANEL 1
1705 410630 OVEN GLASS SUPPORT 1
1801 501783 TUBE FOR LEFT BACK BURNER 1
1803 501787 TUBE FOR EXTERNAL DUAL BURNER 1
1804 501786 TUBE FOR INTERNAL DUAL BURNER 1
2100 308036 BUMPER 2
4106 405078 HINGE FOR FLAP DOOR 2
4301 200376 SIDE PROFILE 1
4302 200377 SIDE PROFILE 1
5140 504202 GRILL BURNER + SPARK PLUG + THERMOC. 1
Page 22

Page 23

Page 24

Page 25

Page 26
Page 27

Page 28

Page 29
Installation, Service and User Instructions
(instruction en francais page 12)
Built-in gas hotplates
DIMENSIONS: 23
Models P24 4 00 X
IMPORTANT: SAVE FOR LOCAL ELECTRICAL INSPECTOR’S USE.
READ AND SAVE THESE INSTRUCTIONS FOR FUTURE REFERENCE.
OBSERVE ALL GOVERNING CODES AND ORDINANCES.
In Massachusetts: All gas products must be installed by a "Massachusetts" license
plumber or gasfitter. A "T" handle type manual gas valve must be installed in the gas
supply line to this appliance.
WARNING: If the information in this manual is not followed exactly, a fire or
explosion may result causing property damage, personal injury or death.
1/4
’’
[P680..T4X5D]
BERTAZZONI
(590 mm)
(W) x 19
2/3
’’
(500 mm)
(D)
Do not store or use gasoline or other flammable vapors and liquid in the vicinity of
this or any other appliance.
WHAT TO DO IF YOU SMELL GAS
- Do not try to light any appliance.
- Do not touch any electrical switch.
- Do not use any phone in your building.
- Immediately call your gas supplier from a neighbor’s phone. Follow
the gas supplier’s instructions.
- If you cannot reach your gas suppliers, call the fire department.
Installation and service must be performed by a qualified installer, service agency
or the gas supplier.
Read this instruction booklet before installing and using the appliance.
The manufacturer will not be responsible for any damage to property or to persons caused by
incorrect installation or improper use of the appliance.
The manufacturer reserves the right to make changes to its products when considered necessary and useful,
without affecting the essential safety and operating characteristics.
This appliance has been designed for non-professional, domestic use only.
310295
Page 30

INDEX:
Installation manual……………………………………..……………………………..pag.2
Inserting the hotplate……………………………………………..…………………..pag.3
Requirements……………………………………..……………………………….…..pag.3-4
Attaching the hotplate……………………………………..………………………….pag.4
Gas connection……………………………………..…………………………………pag.4-5-6
Electrical connection……………………………………..……………………….…..pag.6
Wiring diagrams……………………………………..…………………………….…..pag.6
Instructions for assembly of load bearing bottom protection.…………………….pag.6-7
Room ventilation…………………………………….…………………………………pag.7
Location and venting…………………………………….…………………………….pag.7
Replacement of nozzles……………………………………..………………………..pag.7
Regulation of burners……………………………………………...………………….pag.8
Service & maintenance instructions……………………………..…………………..pag.8
User instructions……………………………………………..……………………….. pag.9
Descriptions…………………………………………………………………………….pag.9
Using burners……………………………………………………..……………………pag.9-10
Cleaning the appliance……………………………………………..…………………pag.10
Installation manual
This appliance shall only be installed by an authorized person. This appliance shall be installed in
accordance with the manufacturers installation instructions, IMPORTANT: this appliance must be
installed in accordance with the norms in force of the country concerned.
The installation of this appliance must conform to local codes and ordinances. In the absence of
local codes, Installations must conforms to American National Standards, National Fuel Gas Code
ANSI Z223.1 – latest edition** or B149.1.
If local codes permit, a flexible metal appliance connection with the new AGA or CGA certified
design, max. 5 feet (1,5 m) long, ½” I.D. recommended for connecting this cooktop to the gas supply
line. Do not bend or damage the flexible connector when moving the cooktop. The pressure regulator
has ½” female pipe thread. You will need to determine the fitting required, depending on the size of
your gas supply line, the flexible metal connector and the shutoff valve.
The appliance, when installed, must be electrically grounded in accordance with local codes or, in
the absence of local codes, with the National Electrical Code, ANSI/NFPA 70.
The appliance and its individual shutoff valve must be disconnected from the gas supply piping
system any pressure testing of that system at test pressure in excess of ½ psi (3,5 kPa).
The appliance must be isolated from the gas supply piping system by closing its individual manual
shutoff valve during any pressure testing of the gas supply piping system at test pressures equal
to or less than ½ psi (3.5 kPa).
For use with a pressure regulator. The regulator supplied must be used with this appliance.
The gas appliance pressure regulator must be set for the gas with which the appliance is used.
This appliance can be used with Natural Gas and LP Gas. It is shipped from the factory adjusted for
use with Natural Gas: CONVERSION FIXED ORIFICES ARE LOCATEDIN THE LITERATURE PACK
SUPPLIED WITH THE UNIT.
Injectors kit for the change of type of gas are contained inside the package jointly with the hob
installation kit and Instruction booklet.
The maximum inlet gas supply pressure incoming to the gas appliance pressure regulator is 20’’
water column (5 kPa) .
The minimum gas supply pressure for checking the regulator setting shall be at least 1“ w.c. (249 Pa)
above the inlet specified manifold pressure to the appliance (this operating pressure is 4” w.c.
(1.00 kPa) for Natural Gas and 11” w.c. (2.75 kPa) for LP Gas).
ATTENTION: A manual valve shall be installed in an accessible location in the gas line external to the
appliance for the purpose of turning on or shutting off gas to the appliance
WARNING: Do not use aerosol sprays in the vicinity of this appliance while it is in operation
2
Page 31
Inserting the hotplate
After having removed the various loose parts from the internal and external packing, make sure that the
hotplate in not damaged and is suitable for the specific gas usage. The gas type label is on the underside of
the hotplate base.
In case of doubt, do not use the appliance and contact skilled personnel.
Keep all the packing parts (polystyrene foam, cardboard, staples, etc.) away from children.
Consider the critical dimensions of the appliance, before making an opening in the top surface of the bench
top. (relative measurements as per Fig 1- 2).
fig.1
fig. 2
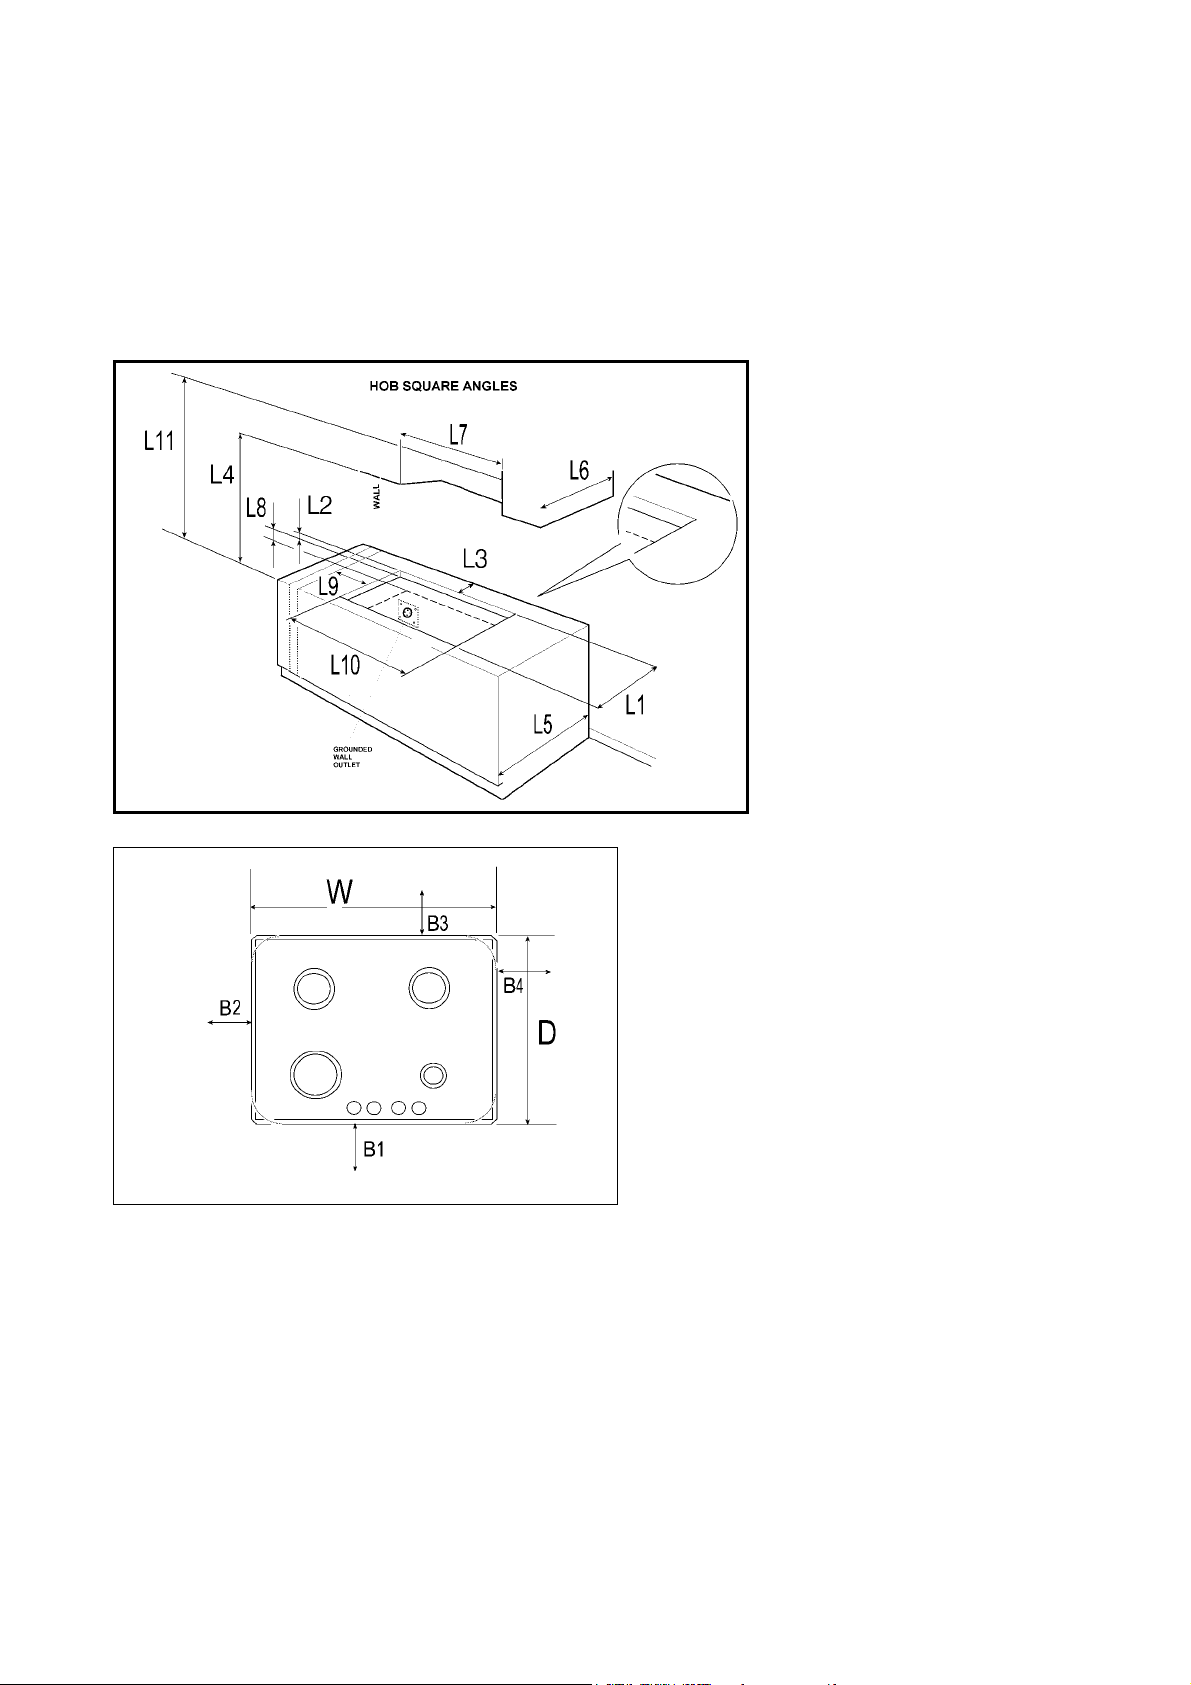
Requirements
1. Overhead clearances (Minimum values)
The minimum overhead clearances shall be in accordance with the minimum values indicated in the table
n.1 and are shown and in the fig. 1- 2
Range hoods and exhaust fans shall be installed in accordance with the manufacturer’s instructions.
However, in no case shall the clearance between the top of the highest burner of the cooking appliance and
the range hood be less than 30”( 762mm). See Fig. 1- 2.
Any other downward facing combustible surface less than 600mm above the top of the highest burner shall
be protected for the full width and depth of the cooking surface area.
However, in no case shall this clearance to any surface be less than 17
Maximum depth for the overheads cabinet is 13” (330mm)
3/4
”(450mm.)
3
Page 32

2. Side clearances (Minimum values)
The different side clearances shall be in accordance with the minimum values indicated in the table n.1 and
are shown and in the fig. 1
The cooking surface area is defined as that part of the appliance where cooking normally takes place and
does not include those parts of the appliance containing control knobs.
Table n.1
Min. Clearances inches (mm) Min. Clearances inches (mm)
18
7/8”
L1
L2
L3
1
3
(480)
9/16
“ (40)
3/8
“ (86)
L10
L11
W
22 1/2“ (570)
32“ (813)
23
1/4
“ (590)
L4
L5
L6
L7
L8
L9
18” (457)
24” (610)
13” (330)
23
1/4
“ (590)
3/4
“ (20)
3
15/16
” (100)
D
B1 (*)
B2 (*)
B3 (*)
B4 (*)
R
19
2/3
“ (500)
1
3/8
“ (35)
3
1/2
“ (90)
3” (76)
3 1/2“ (90)
5
1/8
“(135)
(*) Note:
-B1 is the min. clearance between the front edge of the appliance and the front edge of the cabinet.
-B2 and B4 are the min. clearance between the left/right side edge of the appliance and the side wall (if
present).
-B3 is the min. clearance between the back edge of the appliance and the back wall.
Attaching the hotplate
To prevent liquids from leaking accidentally into the underlying storage space, the appliance is equipped with
a special gasket. To apply this gasket, carefully follow the instructions in Fig. 3. Lay out the protective sealing
strips along the edges of the opening in the bench top and carefully overlap the strip end. (See Fig. 3). insert
the hotplate into the bench top opening. With a screwdriver assemble the brackets A to the hotplate bottom
by means of the screws B. (See Fig. 4). Slide the hooks into position and secure them with the screws.
Trim the part of the sealing strips which extend beyond the hotplate base
fig.3 fig.4
Gas connection
Before connecting the appliance to the gas supply, first remove the plastic plug on which is pressfitted into the gas inlet union; to remove, just pull it off.
1. Check the ‘gas type’ sticker attached to the hotplate. Details of the injector sizes used are recorded on the
data plate located on the base of the appliance.
2. This appliance shall be installed in accordance with installation requirements of the local gas authority of
the appropriate installation code.
3. Before installing the hotplate consider the location of the gas supply and routing the gas line.(Refer fig.5B)
4
Page 33

4. For LPG models the gas supply is connected to the regulator which is supplied loose. The inlet connection
has a 1/2” B.S.P. male thread. IT IS ESSENTIAL THAT THE ELBOW ON THE APPLIANCE BE HELD
FIRMLY WITH A SPANNER WHEN CONNECTING THE SUPPLY. DO NOT OVER TIGHTEN. The
regulated pressure For LPG is 11” w.c. (See Fig. 5A).
5. For NG models the gas supply is connected to the regulator which is supplied loose. The inlet connection
has a 1/2” B.S.P. male thread. IT IS ESSENTIAL THAT THE ELBOW ON THE APPLIANCE BE HELD
FIRMLY WITH A SPANNER WHEN CONNECTING THE SUPPLY. DO NOT OVER TIGHTEN. The
regulated pressure For NG is 4” w.c. (See Fig. 5A).
6. For gas inlet position of appliance refer Fig 5A and 5B. After installing the gas supply and making all
connections check thoroughly for possible leaks. Turn all control knobs on the unit to ‘OFF’ position. Open
the valve on the gas supply. Using a soap and water solution check each gas connection one at the time, by
brushing the solution over the connection. Presence of bubbles will indicate a leak. Tighten the fitting and recheck for leaks. If it is not possible to correct the leak, replace fitting. Under no circumstances use matches
or flame for checking leaks.
It is essential that the gasket and the pressure test point stopper are properly installed to avoid gas leakage
Fig.5B
A
B
C
D
Fig.5A
7.To checking inlet pressure at the appliance operate as follow:
8. Turn on appliance control cock and light each burner. Check for a clear blue flame without yellow tipping.
If burners show any abnormalities check that they are located properly and in line with the injector nipple.
a) Disconnect electric power before pressure checking be carried out.
b) Take off one of the gas burner cap and the relative flame spreader in order to get access to the
burner injector.
c) Put in position the pressure detector directly on the burner injector afterward open the relative burner
knob at maximum position keeping it pressed, then measure the outlet pressure from the burner
injector.
d) Once the pressure checking has been carried out, replace the burner cap and flame spreader in the
correct and original position and re-connect electric power to the appliance.
Inches mm
1
9/16
” 45
8 ¼” 210
8 ½” 215
1/8
” 22
5
Page 34

9. Sometimes the burners will not ignite immediately and seem to ‘blow’ slightly when they do ignite. This
usually due to air in the gas lines, which will clear itself within seconds.
10. If after following the instructions given, satisfactory performance cannot be obtained, contact the local
gas authority for advice and assistance.
Electrical connection
The connection of the hobs to mains is effected via the flex and the three pin plug located underneath the
hotplate. The appliance operate at a main voltage of 120V a.c., frequency 60Hz. Electric power absorption is
about 1W.
WARNING: Electrical Grounding Instructions: This appliance is equipped with a (three-prong)
grounding plug for your protection against shock hazard and should be plugged directly into a
properly grounded receptable. Do not cut or remove the grounding prong from this plug.
Wiring diagrams
Wiring diagram description
1. Cable terminal
2. Spark generator
3. Ignition spark
L. Black
N. White
T. Green (earth)
Instructions for assembly of load bearing bottom protection
1 SCREW M5
2 LOAD BEARING
BOTTOM PROTECTION
3 RIVET M5
4 LOAD BEARING
BOTTOM
5 WORK TABLE
After the installation of the hob (5) proceed with the assembly of the load bearing bottom protection (2)
placing it in the position showed in picture and fixing it with screws supplied (1) with inserts (3) present on
the load bearing bottom (4).
6
Page 35

SECTION VIEW OF THE RIGHT ASSEMBLY
Room ventilation – Location and venting.
ATTENTION: An exhaust fan may be used with the appliance; in each case it shall be installed in
conformity with the national standards in force.
ATTENTION: Exhaust hood operation may affect other vented appliances; in each case it shall be
installed in conformity with the national standards in force.
Conversion to different types of gas
Before carrying out any maintenance work, disconnect the appliance from the gas and electric
supply. For Natural Gas fit regulator assembly described in Fig. 5A. For LP Gas fit assembly
described in fig. 5A.
- CHANGING THE NOZZLES FOR USE WITH OTHER TYPES OF GAS:
To change the nozzles of the burners use the following procedure:
Lift up the burners and unscrew the nozzles ( Fig. 6) using an adjustable spanner of 7 mm and change the
nozzles with those designed for the new gas supply according to the information given in TABLE A shown
below.
fig.6 fig.7
TABLE A: Adapting to different types of gas
Gas NATURAL (A) LP (E)
Burner Pressure Inj. size Input Rate Simmer Rate Pressure Inj. size Input Rate Simmer Rate By-pass size
Type [i.w.c.] 1/100mm [BTU/h] [BTU/h] [i.w.c.] 1/100mm [BTU/h] [BTU/h] [1/100mm]
Auxiliary 0,90 3400 900 0,54 3400 900 29
Semi-Rapid 4" 1,18 6100 1500 11" 0,70 6100 1500 37
Triple Ring 1,65 11900 5300 1,02 12300 5300 73
CAUTION: save the orifices removed from the appliance for future use
7
Page 36

Regulation of burners
Regulation of the "MINIMUM" on the burners
To regulate the minimum on the burners carry out the following procedure indicated below:
1) Turn on the burner and put the knob onto position MINIMUM ( small flame ).
2) Remove the knob ( Fig. 7) of the tap which is set for standard pressure. The knob is found on the bar of
the tap itself.
3) Beside the tap bar on the work top, insert a small slotted screwdriver into the hole on the vale rod (Fig. 7)
and turn the choke screw to the right or left until the flame of the burner is regulated in the most suitable way
to MINIMUM.
4) Make sure that that the flame does not go out when changing the position quickly from MAXIMUM to the
MINIMUM position.
ATTENTION: The regulation described above can be carried out only with burners using natural gas,
while with burners using propane gas the screw must be fully screwed in, in a clockwise direction.
Adaptation of the pressure regulator for use with different type of gas
The pressure regulator supplied with the appliance is a convertible type pressure regulator for use with
Natural Gas at a nominal outlet pressure of 4” w.c. or LP gas at a nominal outlet pressure of 11” w.c. and it is
pre-arranged from the factory to operate with one of these gas/pressure as indicated in the pre-arranging
labels affixed on the appliance, package and Instruction booklet.
To convert the regulator for use with the other gas different from which one it is pre-arranged it is enough
perform the following operations:
1) Unscrew by hand the upper metal stopper of the regulator (Fig. 5A).
2) Unscrew by hand the white plastic piece screwed under the above mentioned metal stopper, afterward
screw it again in opposite way under the metal stopper (for gas reference see the written “LP” and “NAT” with
relative indicating arrows on the white piece).
3) Screw again by hand the metal stopper in the original position on the regulator.
Operating in this way the gas regulator is converted for use with the other gas/pressure.
Service & maintenance instructions
Service and maintenance only to be carried out by an authorised person
To replace parts such as burners, valves and electric components, the hotplate must be removed from the
bench top by releasing the attachment hooks, loosening the attachment screws of each burner, unscrewing
the hotplate attachments nuts which are visible at the bottom of the surface, removing the hotplate top and
finally replacing the defective parts.
Note: if the valves must be replaced, first disassemble the ignitions switches wires.
It is recommended to replace the valve gaskets each time the valve is replaced, thus ensuring a perfect seal
between the body and the gas train.
WARNING: Disconnect power before servicing unit.
For the location of the wall receptable for the connection of the three-pin earthed plug of the
appliance, see indications given in Fig. 1- 2
WARNING: After first installation of the appliance or after any service intervention concerning main
gas parts of the appliance, make the leak test using water with soap on the gas connections in order
to verify the correct installation. Do not use fire for gas leak testing.
8
Page 37

User instructions
WARNINGS:
Keeping appliance area clear and free from combustible materials, gasoline and other flammable
vapors and liquid.
Do not store dangerous or flammable material in the cabinet areas above appliance; store them in a
safe place in order to avoid potential hazards.
For safe use of appliance, do not use it for space heating.
Do not use aerosol sprays in the vicinity of this appliance while it is in operation
For description of hotplates refer to installation instructions.
Descriptions
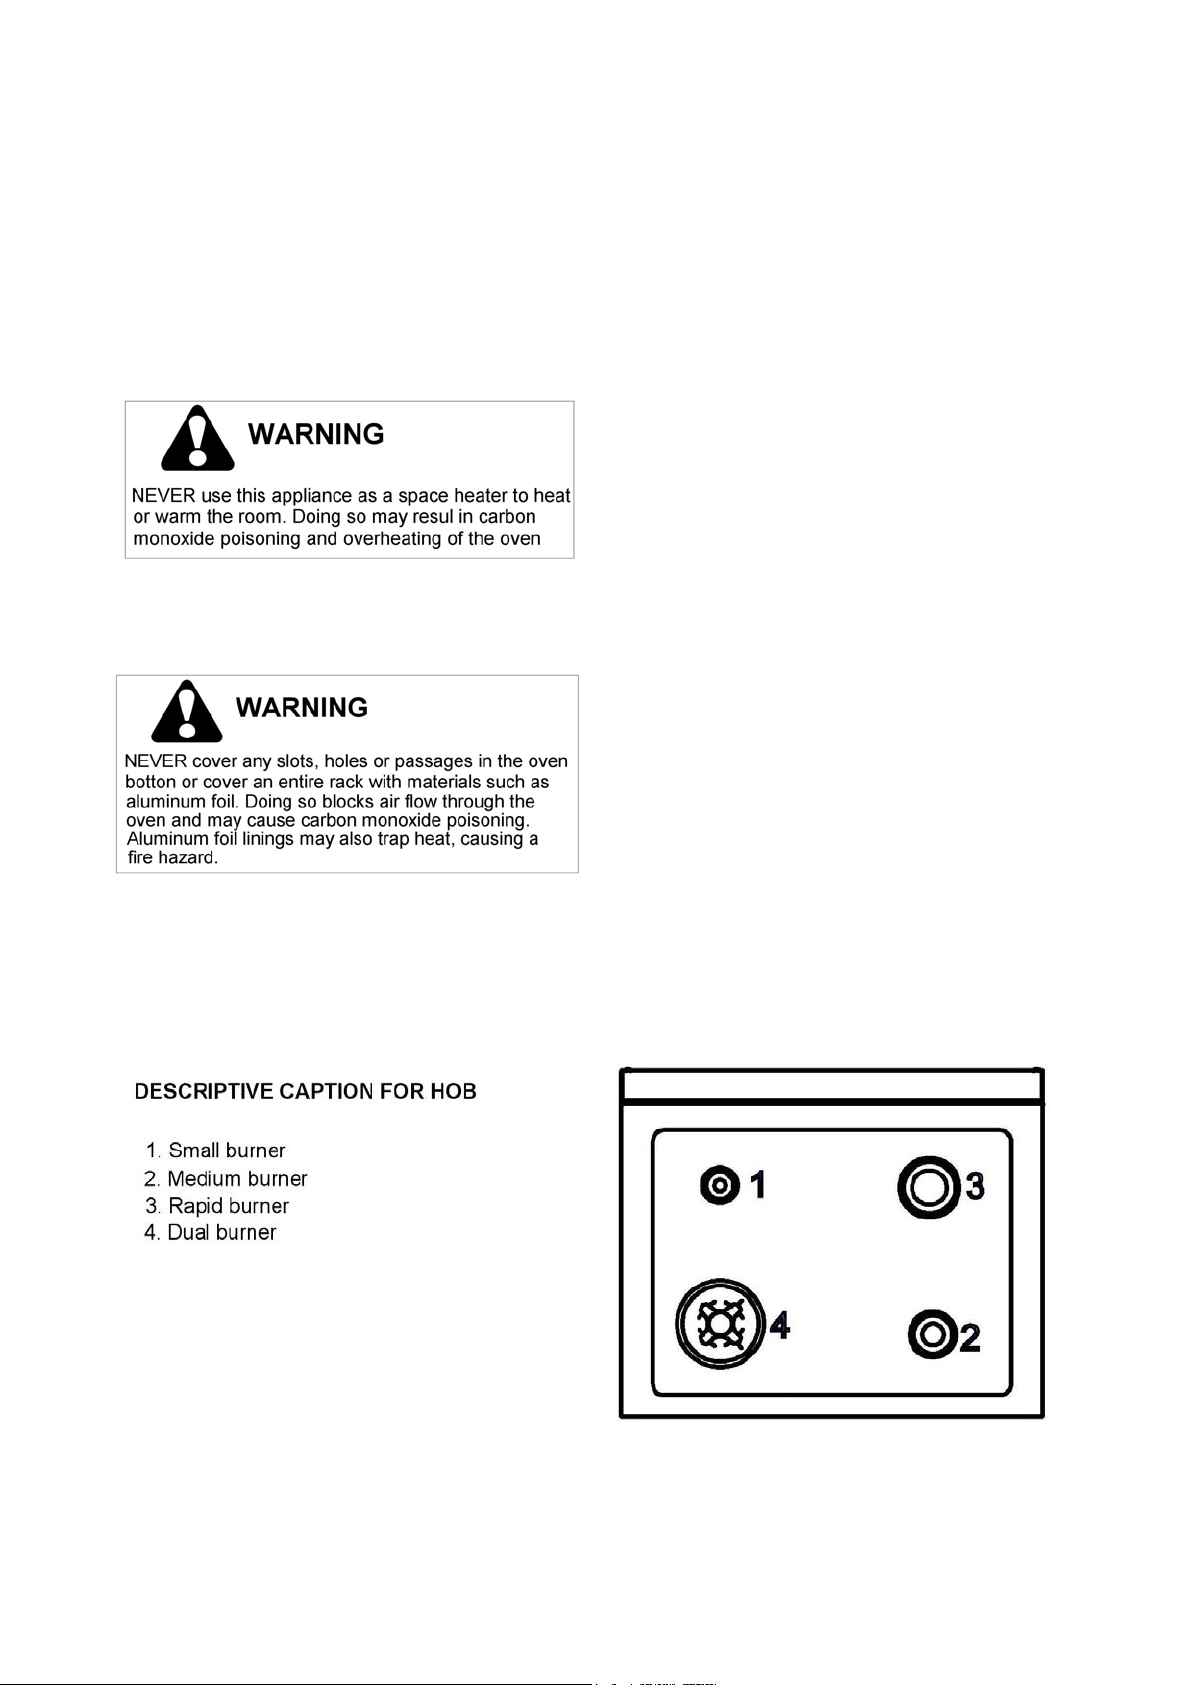
DESCRIPTIVE CAPTION FOR HOB
1. Small Burner
2. Medium burner
3. Double ring (wok) burner
4. Front left side burner control knob
5. Back left side burner control knob
6. Back right side burner control knob
7. Front right side burner control knob
Using burners
A diagram is etched on the control panel above each knob which indicates which burner corresponds to that
knob.
Manual ignition:
Manual ignition is always possible even when the power is cut off or in the event of prolonged power failure.
Turn the knob that corresponds to the burner selected counterclockwise to the MAXIMUM position at the
etched star (large flame) and place a lit match up to the burner.
Automatic electric ignition:
Turn the knob that corresponds to the burner selected counterclockwise to the MAXIMUM position at the
etched star (large flame) and then press the knob down to activate the spark ignition. Once ignited, keep
pressing the knob for about 10 seconds to allow the flame to heat the thermocouple. If the burner does not
remain alight after releasing the knob repeat the above procedure,
Note: It is recommended not to try to ignite the burner if the relative flame cap is not in the correct position
Tips for using burners correctly:
WARNING: During use of each gas burner(s) adjust the burner flame size properly so it does not
extend beyond the edge of the cooking utensil. This is an instruction based on safety considerations
- Use suitable pots for each burner (see Fig. 16 and Table B)
- When the liquid is boiling, turn down the knob to the MINIMUM position.
- Always use pots with a cover.
9
Page 38

Fig.16
Table B
Burner Recommended pan diameters inches (mm)
Small 35½”-55
Medium 55
Double ring (wok) 86
1/8
2/3
”- 102
”-102
1/8
”(90 – 140)
3/8
”(140 – 260)
3/8
” (220 – 260)
Correct usage of pans:
- Dry the bottom of the pan before placing it on the hotplate.
- Use pots with a flat, thick bottom, except for wok cooking.
- When using the burners, ensure that the handles of the pans are correctly positioned. Keep children away
from the appliance.
- When cooking foods with oil and fat, which are very flammable, do not leave the appliance unattended.
WARNING: If the power is cut off, the burners can be lit with matches.
The burners equipped with a safety thermocouple can only be lit when the knob is in the MAXIMUM position
(large flame etching).
Note: The use of a gas cooking appliance produces heat and humidity in the room where it is installed.
Therefore, proper ventilation in the room is needed and natural ventilation openings must remain
unobstructed and activating the mechanical exhaust fan/range hood. Intensive and continuous use of the
appliance may require additional ventilation, for example by opening a window, or increasing the power of
the mechanical exhaust fan/range hood, if installed.
Cleaning the appliance:
Never use abrasive cleaners
Before cleaning the appliance it should be disconnected from the power supply.
Cleaning the work surface: periodically clean the burner heads, the cast iron pan supports and the burner caps using
warm water.
Any spillage must always be removed as soon as possible using a rag.
If it become difficult to open or close a valve, do not force it, but immediately request the assistance of the
technical service personnel.
Cleaning the enamelled parts: Enamelled parts should be cleaned frequently with soapy water. Never use abrasive
powder. Do not leave acidi or alkaline substances on the enamelled parts (such as vinegar, lemon juice, salt, tomato
sauce, etc.) and do not wash the enamelled parts while they are still hot.
Cleaning the stainless steel parts: Clean the parts with soapy water and dry them with a soft cloth. The shine is
maintained by periodically using specific stainless steel cream cleaner. Never use abrasive powders. Use specific
stainless steel cream cleaner to eliminate the glue remains afther the elimination of the blue plastic protection film on the
worktop after installation.
Cleaning the burner caps: Lift the burner caps from the burner heads and wash them in soapy water and dry
thoroughly. Before replacement on the burner head ensure that the holes are not clogged.
ATTENTION: for further details about cleaning of the appliance, please contact your applliance retailer.
10
Page 39

AFTER SALE SERVICE:
Please note here below details for after save service.
Refer to warranty certificate for warranty condiftions
Dealer /Importer: Name, address, phone
SERVICE CENTERS
Name
Phone
MANUFACTURER:
BERTAZZONI SPA
VIA PALAZZINA, 8 – 42016 – GUASTALLA (REGGIO E.) ITALY
Tel. 0522/226411 – telefax 0522/226440 – http://www.bertazzoni-italia.com
11
Page 40

Installation, Service et Instructions pour l’Utilisateur
Tables de cuisson gaz à encastrer
DIMENSIONS: 23
Modèles P24 4 00 X
IMPORTANT: A CONSERVER POUR L’UTILISATION DE L’INSPECTEUR ELECTRIQUE
LOCAL.
LIRE ET CONSERVER CES INSTRUCTIONS POUR LES REFERENCES FUTURES.
OBSERVER TOUS LES CODES ET LES ORDONNANCES PRINCIPAUX.
Dans Le Massachusetts : Tous les produits à gaz doivent être installés par un plombier
ou un préposé au gaz autorisé du "Massachusetts". Un clapet à gaz de poignée à "T"
manuel doit être installé dans la canalisation d'alimentation de gaz à cet appareil.
ATTENTION: Au cas où les informations dans ce manuel ne seraient pas suivies
avec précision, un incendie ou une explosion peuvent se produire en provoquant
des dommages matériels, des blessures ou la mort.
1/4
’’
(590 mm)
BERTAZZONI
(W) x 19
2/3
’’
(500 mm)
[P680..T4X5D]
(D)
Ne pas stocker ou utiliser d’essence, d’autres vapeurs ou liquides inflammables à
proximité de celui-ci ou de n’importe quel autre appareil.
CE QU’ON DOIT FAIRE EN CAS D’ODEUR DE GAZ
- N’essayez d’allumer aucun appareil.
- Ne touchez aucun interrupteur électrique.
- N’utilisez aucun téléphone dans votre établissement.
- Appelez immédiatement votre fournisseur de gaz par le téléphone d’un voisin.
Suivez les instructions du fournisseur de gaz.
- Si vous ne pouvez pas atteindre vos fournisseurs de gaz, appelez les pompiers.
L’installation et le service doivent être exécutés par un installateur qualifié, une
agence de service ou par le fournisseur du gaz.
Lisez ce livret d’instructions avant d’installer ou employer l’appareil.
Le fabricant ne sera responsable d’aucun dommage à la propriété ou aux personnes provoqué par
l’installation incorrecte ou l’utilisation inexacte de l’appareil.
Le fabricant se réserve le droit d’apporter des modifications à ses produits au cas où il le jugerait nécessaire
ou utile, sans influencer les caractéristiques essentielles de sécurité et de fonctionnement.
Cet appareil a été uniquement conçu pour une utilisation non-professionnelle et domestique.
12
Page 41

INDEX:
Manuel pour l’installation..…………………………………..………………………...page 13-14
Insertion de la table de cuisson..………………………………..………………….. .page 14
Exigences…..……………………………………..……………………………….….. page 14
Fixation de la table de cuisson….………………………..………………………….. page 15
Branchement du gaz………………………………..………………………………….page 16
Branchement électrique…………………………………..……………………….…..page 17
Schéma de câblage..………………………………..…………………………….…...page 17
Instructions de montage de la protection du fond portant …..…………….………page 18
Ventilation du local……………………………………………………………… ……page 18
Positionnement et dégazage…………………………….……………………………page 18
Remplacement des becs….…………………………………..………………………page 19
Réglage des brûleurs…. …………………………………………...…………………page 19-20
Instructions de service et d’entretien………………………………..……………....page 20
Instructions pour l’utilisateur……………………………………………..………… . page 20
Descriptions…………………………………………………………………………….page 21
Utilisation des brûleurs…………………………………………..……………………page 21-22
Nettoyage de l’appareil……………………………………………..…………………page 22
Manuel pour l’installation
Cet appareil devra uniquement être installé par une personne autorisée. Il devra être installé selon
les instructions d’installation des fabricants. IMPORTANT: cet appareil doit être installé selon les
normes en vigueur du pays concerné.
L’installation de cet appareil doit se conformer aux codes et aux ordonnances locaux. En l’absence
de codes locaux, l’installation de cet appareil doit se conformer aux Normes Nationales Américaines,
‘’National Fuel Gas Code’’ ANSI Z223.1 – dernière édition** ou B149.1.
Au cas où les codes locaux le permettraient, utilisez un dispositif de raccordement en métal flexible
avec le nouveau dessin certifié AGA ou CGA, de 1,5 mètres de longueur maximum, ½” I.D.
recommandé pour le branchement de cette table de cuisson au conduit d’amenée des gaz. Ne pliez
pas ou n’endommagez pas le connecteur flexible en déplaçant la table de cuisson. Le régulateur de
pression a un filetage au pas du gaz femelle de ½”. Vous devrez déterminer le raccordement
demandé, selon la dimension du conduit d’amenée des gaz, du connecteur en métal flexible et du
robinet d’arrêt.
L’appareil, lorsqu’il est installé, doit être mis à la terre selon les codes locaux ou, en l’absence de
ceux-ci, avec le ‘’National Electrical Code’’, ANSI/NFPA 70.
L’appareil et son robinet d’arrêt individuel doivent être débranchés du système du conduit d’amenée
des gaz pendant tous les essais sous pression de ce système à une pression d’essai supérieure à ½
psi (3,5 kPa).
L’appareil doit être isolé du système du conduit d’amenée des gaz, en fermant son robinet d’arrêt
individuel pendant tous les essais sous pression de celui-ci à une pression égale ou inférieure à ½
psi (3.5 kPa).
Pour l’utilisation avec un régulateur de pression. Le régulateur fourni doit être employé avec cet
appareil.
Le dispositif de réglage de pression doit être prédisposé pour le gaz avec lequel l’appareil est
employé.
Cet appareil peut être utilisé avec Gaz Naturel ou Gaz LP. Il est livré par l’usine et réglé pour
l’utilisation avec Gaz Naturel: LES INJECTEURS FIXE POUR LA CONVERSION DU GAZ SONT PLACE’
DANS L’EMBALLAGE IN DOTATION AVEC L’APPAREIL.
Le kit d’injecteurs pour le changement du type de gaz est contenu dans l’emballage avec le kit
d’installation de la table et le livret d’instructions.
13
Page 42

La pression d’alimentation maximum du gaz en entrée dans le régulateur de pression de l’appareil à
gaz est de 20’’ colonne d’eau (w.c.) (5 kPa)
La pression d’alimentation minimum du gaz pour le contrôle du réglage du régulateur doit être au
moins de 1“ colonne d’eau (w.c.) (249 Pa) au-dessus de la pression du collecteur d’admission à
l’appareil spécifiée (cette pression de fonctionnement est de 4” colonne d’eau (1.00 kPa) pour le Gaz
Naturel et 11” colonne d’eau (2.75 kPa) pour le Gaz LP).
ATTENTION: Une valve manuelle doit être installée dans une position accessible dans la ligne du gaz
externe à l’appareil afin d’ouvrir ou d’arrêter le gaz à l’appareil.
AVERSTISSEMENT: Ne pas utiliser de pulvérisateurs d’aérosol à proximité de cet appareil lorsqu’il
est en fonction.
Insertion de la table de cuisson
Après avoir enlevé les différentes parties libres à l’intérieur et à l’extérieur de l’emballage, assurez-vous que
la table de cuisson ne soit pas endommagée et qu’elle soit appropriée pour l’utilisation du gaz spécifique.
L’étiquette du type de gaz se trouve en dessous de la base de la table de cuisson.
En cas de doute, n’employez pas l’appareil et contactez le personnel préposé.
Gardez toutes les pièces de l’emballage (mousse de polystyrène, carton, agrafes, etc.) loin des enfants.
Considérez les dimensions critiques de l’appareil, avant d’effectuer une ouverture dans la surface supérieure
du banc de travail. (mesures relatives selon la Fig 1- 2).
fig.1
fig. 2
14
Page 43
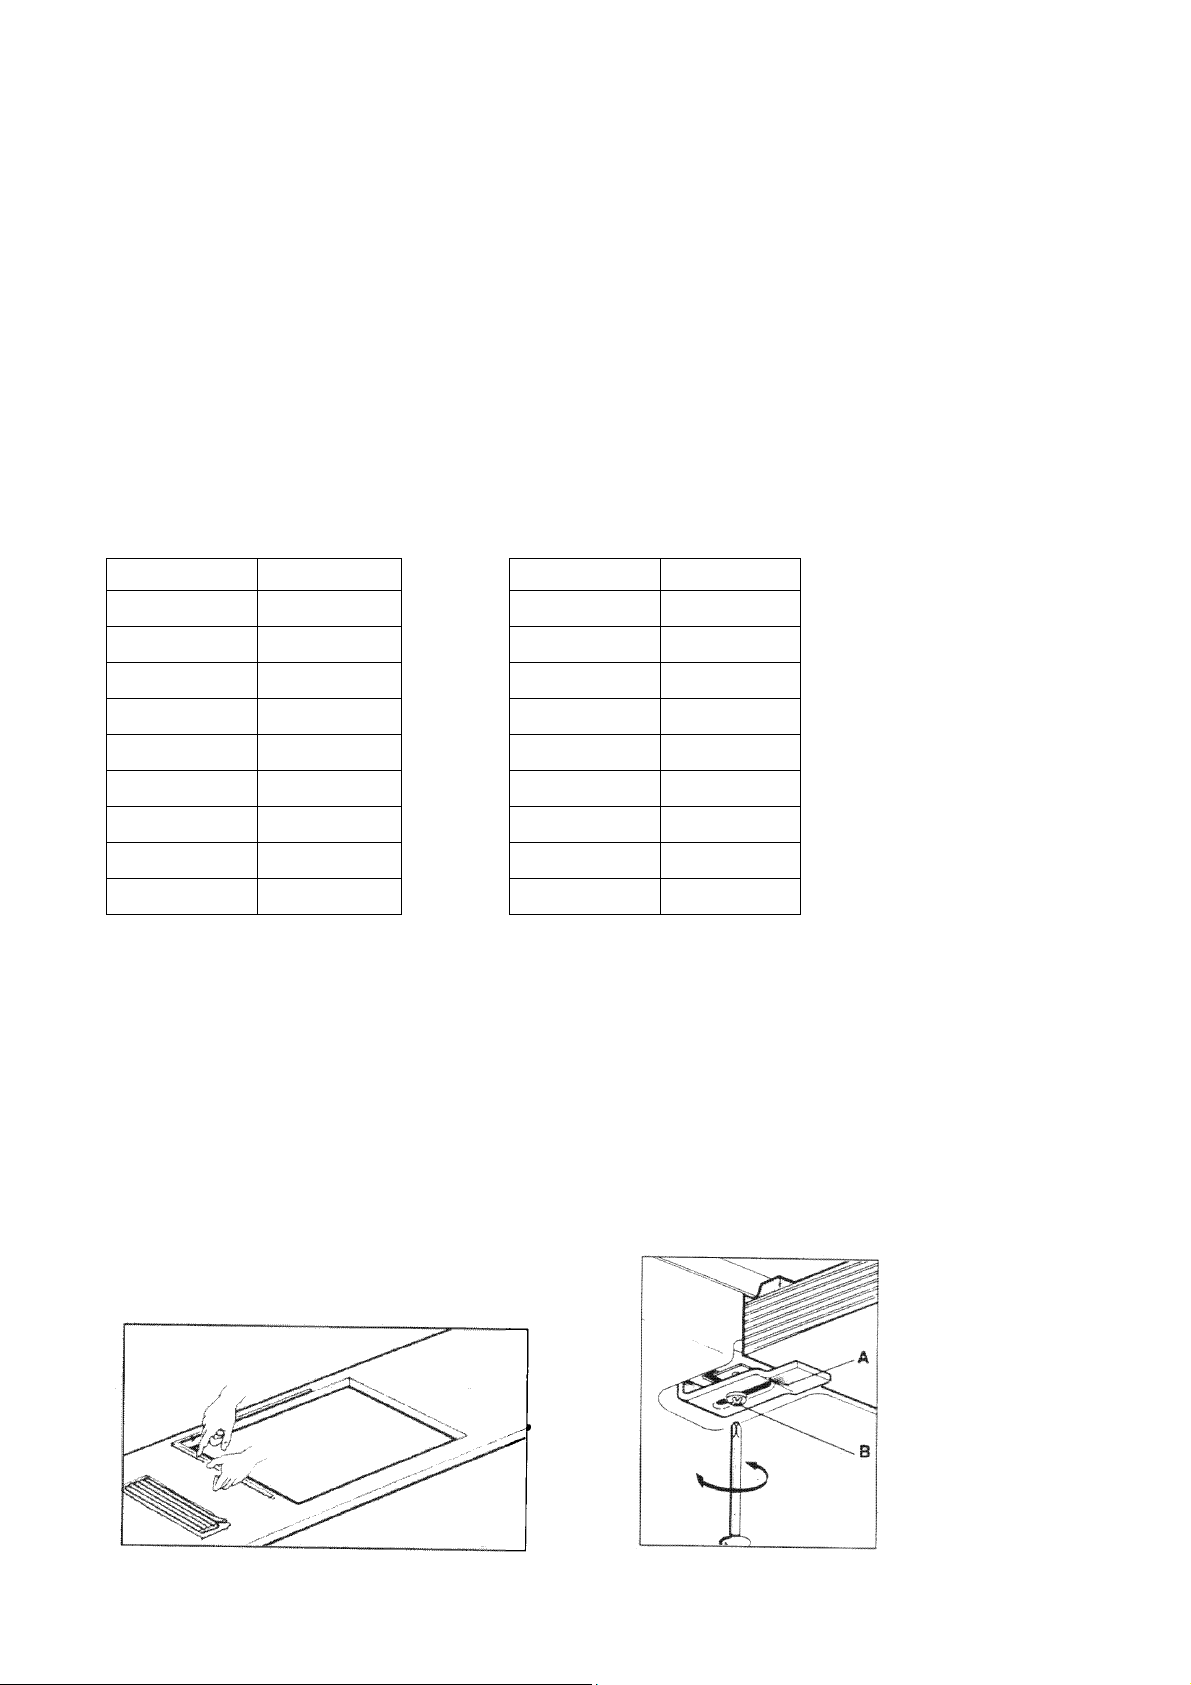
Exigences
1. Distances des meubles suspendus (Valeurs minimum)
Les distances minimum devront être conformes aux valeurs minimum indiquées dans la table n.1 et sont
illustrées dans la fig. 1- 2
Les hottes de cuisine et les ventilateurs aspirant doivent être installés selon les instructions du fabricant.
Cependant, dans aucun cas, la distance entre la partie supérieure du brûleur le plus haut de l’appareil de
cuisson et la hotte d’aspiration devra être inférieure au 30”( 762mm). Voir la Fig. 1- 2.
N’importe quelle autre surface combustible orientée vers le bas à moins de 600mm vers la partie supérieure
du brûleur le plus haut devra être protégée pour sa largeur complète et profondeur de la zone à cuire.
Cependant, dans aucun cas cette distance à n’importe quelle surface, devra être inférieure à 17
3/4
”(450mm.)
La profondeur maximum des armoires suspendues est de 13” (330mm)
2. Distances latérales (Valeurs minimum)
Les différentes distances latérales devront être conformes aux valeurs minimum indiquées dans la table n.1
et illustrées dans la fig. 1- 2 La zone de la surface à cuire est définie comme la partie de l’appareil où on fait
normalement la cuisson, et n’inclut pas les parties de l’appareil qui contiennent les boutons de contrôle.
Table n.1
Distances Min. pouches (mm) Distances Min. pouches (mm)
18
7/8”
L1
L2
L3
1
3
(480)
9/16
“ (40)
3/8
“ (86)
L10
L11
W
22
1/2
“ (570)
32“ (813)
23
1/4
“ (590)
L4
L5
L6
L7
L8
L9
18” (457)
24” (610)
13” (330)
23
1/4
“ (590)
3/4
“ (20)
3
15/16
” (100)
D
B1 (*)
B2 (*)
B3 (*)
B4 (*)
R
19
2/3
“ (500)
1
3/8
“ (35)
3
1/2
“ (90)
3” (76)
3 1/2“ (90)
5
1/8
“(135)
(*) Notes:
-B1 est la distance min. entre le bord frontal de l’appareil et le bord frontal de l’armoire.
-B2 et B4 sont les distances minimum entre le bord latéral droit/gauche de l’appareil et le mur latéral (si
présent).
-B3 est la distance minimum entre le bord arrière de l’appareil et le mur arrière.
Fixation de la table de cuisson
Pour empêcher aux liquides de fuir accidentellement dans l’espace de stockage sous-jacent, l’appareil est
équipé d’une garniture spéciale. Pour appliquer cette garniture, suivez attentivement les instructions dans la
Fig. 3. Disposez les bandes d’étanchéité protectrices le long des bords de l’ouverture du banc de travail et
couvrez soigneusement l’extrémité de la bande. (Voir Fig. 3). Insérez la table de cuisson dans l’ouverture du
banc de travail. A l’aide d’un tournevis assemblez les supports A en dessous de la table de cuisson au
moyen des vis B. (Voir Fig. 4). Positionnez les crochets dans la position et fixez-les avec les vis.
Recoupez la partie des bandes protectrices qui s’étendent au-delà de la base de la table de cuisson.
fig.3 fig.4
15
Page 44

Branchement du gaz
Avant de brancher l’appareil à l’alimentation gaz, enlevez d’abord le bouchon en plastique qui est
monté en force dans le raccord d’admission du gaz; pour l’enlever, le tirer simplement.
1. Vérifiez l’étiquette du ‘’type de gaz’’ attachée à la table de cuisson. Les détails concernant les dimensions
des injecteurs utilisés sont indiqués sur la plaquette des données située sur la base de l’appareil.
2. Cet appareil devra être installé selon les conditions d’installation de l’autorité locale du gaz du code
d’installation approprié.
3. Avant d’installer la table de cuisson considérez la position de l’alimentation gaz et l’itinéraire de la ligne du
gaz.( Se référer à la fig.5B)
4. Pour les modèles LPG la ligne de distribution de gaz est connectée au régulateur qui est fourni
séparément. Le branchement d’entrée a un filetage mâle de 1/2” B.S.P ( filetage Whitworth pour tuyaux). IL
EST ESSENTIEL QUE LE COUDE SUR L’APPAREIL SOIT FERMEMENT RETENU AVEC UNE CLE
LORSQU’ON BRANCHE L’ALIMENTATION. NE PAS SERRER. La pression réglée pour LPG est de 11”
colonne d’eau. (Voir Fig. 5A).
5. Pour les modèles GN (gaz naturel) la ligne de distribution de gaz est connectée au régulateur qui est
fourni séparément. Le branchement d’entrée a un filetage mâle de 1/2” B.S.P. ( filetage Whitworth pour
tuyaux). IL EST ESSENTIEL QUE LE COUDE SUR L’APPAREIL SOIT FERMEMENT RETENU AVEC UNE
CLE LORSQU’ON BRANCHE L’ALIMENTATION. NE PAS SERRER. La pression réglée pour GN est de 4”
colonne d’eau (Voir Fig. 5A).
6. Pour la position d’entrée du gaz de l’appareil, référez-vous à la Fig 5A et 5B. Après avoir installé
l’alimentation du gaz et après avoir effectué tous les branchements, contrôlez soigneusement les
éventuelles fuites. Tournez tous les boutons de commande de l’unité sur la position ‘OFF’. Ouvrez la valve
sur l’alimentation du gaz. En utilisant une solution avec du savon et de l’eau contrôlez tous les
branchements du gaz, un après l’autre, en frottant la solution sur le raccord. La présence de bulles indiquera
une fuite. Serrer le raccordement et recontrôlez les fuites. Au cas où il ne serait pas possible de corriger la
fuite, remplacez le raccord. Pour n’importe quelle circonstance utilisez des allumettes ou des flammes pour
vérifier les fuites.
Il est essentiel que la garniture et la fermeture du point d’essai de la pression soient correctement installés
pour éviter la fuite de gaz
Fig.5A
Fig.5B
A
B
C
D
Inches mm
1
9/16
” 45
8 ¼” 210
8 ½” 215
1/8
” 22
16
Page 45

7. Pour vérifier l'itroduction de pression dans l'appareil il faut agir comme il suit:
a) Disjoindre la courent électrique avant de vérifier la pression.
b) Enlever un des chapeaux de brûleurs et la relative tete bruleur au fin d'accéder au injector du brûleur.
c) Mettre en position le détecteur de pression directement sur l'injector du brûleur ensuite ouvrir la relative
manette en la gardant poussée à la position maxima, aprés mesurez la sortie de pression par l'injector du
brûleur.
d) Quand on a terminé le contrôle de la pression, remettre le chapeau du brûleur et la tete bruleur dans la
position originale et correcte et rejoindre la courente électrique à l'appareil.
8. Ouvrez le robinet de commande sur l’appareil et allumez chaque brûleur. Vérifiez une flamme bleu-clair
sans formation de pointes jaunes. Si les brûleurs montrent quelques anomalies, vérifier qu’ils soient
positionnés correctement et en ligne avec la tête d’injecteur à filetage mâle.
9. Parfois les brûleurs ne s’enflamment pas immédiatement et semblent ‘souffler’ légèrement quand ils
s’allument. Cela est dû à l’air dans les canalisations de gaz, qui disparaîtra dans peu de secondes.
10. Si après les instructions données, une performance satisfaisante n’a pas été obtenue, contactez
l’autorité locale du gaz pour demander conseil et assistance.
Branchement électrique
Le branchement de la table de cuisson au réseau est effectué par le fil électrique et la fiche tripolaire
positionnée sous la table de cuisson. L’appareil fonctionne à une tension du réseau de 120V c.a., fréquence
60Hz. L’absorption d’énergie électrique est d’environ 1W.
AVERTISSEMENT: Instructions pour la mise à terre électrique: L’appareil est équipé d’une bonde de
mise à terre (trois pôles) pour votre protection contre le risque de choc et devra être branché
directement à une prise correctement mise à terre. Ne coupez pas ou n’enlevez pas les pôles de cette
bonde.
Schémas de câblage
Description du schéma de câblage
1. Cosse de câble
2. Générateur d’étincelles
3. Etincelle d’allumage
L. Noir
N. Blanc
T. Vert (terre)
17
Page 46

Instructions de montage de la protection du fond portant
1 VIS M5
2 PROTECTION DU
FOND PORTANT
3 RIVET M5
4 FOND PORTANT
5 PLAN DE TRAVAIL
Après avoir enstallé la table cuisson (5) proceder avec le montage de la protection du fond portant (2) en le
plaçant comme indiqué en figure et en le fixant avec les vis en dotation (1) avec les accessoires (3) presents
sur le fond portant (4).
VUE EN SECTION DU CORRECT MONTAGE
Ventilation du local – Positionnement et dégazage
NOTE : Un ventilateur extracteur qui aide l’evacuation des produits de la combustion peut etre utilisé
dans le local où se trouve l’appareil ; en chaque cas il doit etre eventuellement installé
conformement aux normes nationals en vigueur.
NOTE : Le fonctionnement d’une hotte d’aspiration peut avoir influence sur les autres appareils a gaz
qui functionnent dans le meme local ; en chaque cas elle doit etre eventuellement installée
conformement aux normes nationals en vigueur.
Conversion à différents types de gaz
Avant d’effectuer n’importe quel travail d’entretien, débranchez l’appareil de l’alimentation gaz et
électrique. Pour le Gaz Naturel utilisez le régulateur illustré en Fig. 5A. Pour LP Gaz utilisez celui
illustré en Fig. 5A.
18
Page 47

- REMPLACEMENT DES BECS POUR L’UTILISATION AVEC D’AUTRES TYPES DE GAZ:
Pour changer les becs des brûleurs, suivez le procédé suivant:
Soulevez les brûleurs et dévissez les becs ( Fig. 6) en employant une clé réglable de 7 mm et changez les
becs avec ceux conçus pour la nouvelle alimentation de gaz, selon les informations fournies dans le
TABLEAU A ci-dessous.
fig.6 fig.7
TABLEAU A: Adaptation aux différents types de gaz
Gaz NATUREL (A) LP (E)
Brûleur Pression Diam inj.
[i.w.c.] [1/100mm.] [BTU/h] [BTU/h] [i.w.c.] [1/100mm.] [BTU/h] [BTU/h]
Auxiliaire 0,9 3400 900 0,54 3400 900 29
Semi-Rapide 4" 1,18 6100 1500 11" 0,7 6100 1500 37
Triple couronne 1,65 11900 5300 1,02 12300 5300 73
Dèbit
nom.
Dèbit
reduit
Pression Diam inj.
Dèbit
nom.
Dèbit
reduit
Diam.
bypass
[1/100mm.]
ATTENTION: gardez les orifices enlevés de l’appareil pour une utilisation future
Réglage des brûleurs
Réglage du "MINIMUM" sur les brûleurs
Pour régler le minimum sur les brûleurs suivez le procédé indiqué ci-dessous:
1) Allumez le brûleur et mettez le bouton sur la position de MINIMUM ( petite flamme ).
2) Enlevez le bouton ( Fig. 7) du robinet qui est réglé pour la pression standard. Le bouton se trouve sur la
barre du robinet-même.
3) Près de la barre du robinet sur le top de travail, insérez un petit tournevis a encoches dans la tige de
soupape (Fig. 7) et tournez la vis du réducteur de pression à droite ou à gauche jusqu’à ce que la flamme du
brûleur soit réglée de la manière la plus appropriée au MINIMUM.
4) S’assurer que la flamme ne sorte pas en changeant rapidement la position du MAXIMUM en position de
MINIMUM.
ATTENTION: Le réglage décrit ci-dessus peut être seulement effectué avec des brûleurs qui
emploient le gaz naturel, tandis qu’avec les brûleurs qui emploient le gaz propane, la vis doit être
complètement vissée, dans le sens des aiguilles d’une montre.
Adaptation du régulateur de pression pour l’utilisation avec des différents types de
gaz
Le régulateur de pression fourni avec l’appareil est un régulateur de pression du type convertible pour
l’utilisation avec Gaz Naturel à une pression de sortie nominale de 4” w.c. (colonne d’eau) ou LP gaz à une
pression de sortie nominale de 11” w.c. (colonne d’eau) et il est prédisposé par l’usine pour fonctionner avec
un de ces gaz/pression, comme indiqué sur les étiquettes de réglage apposées sur l’appareil, l’emballage et
le livret d’instructions.
Pour convertir le régulateur pour l’utilisation avec un gaz différent de celui qui a été arrangé il suffit
d’effectuer les opérations suivantes:
19
Page 48
1) Dévisser à la main le bouchon en plastique supérieur du régulateur (Fig. 5A).
2) Dévisser à la main la pièce en plastique blanche vissée sous le bouchon en métal susmentionné, ensuite
le visser encore dans le sens opposé sous le bouchon en métal (pour la référence du gaz voir l’écriture “LP”
et “NAT” avec les flèches relatives sur la partie blanche).
3) Visser encore à la main le bouchon en métal dans la position originale sur le régulateur.
En opérant de cette façon, le régulateur est transformé pour l’utilisation avec l’autre gaz/pression.
Instructions de service et d’entretien
Le service et l’entretien doivent seulement être exécutés par une personne autorisée
Pour remplacer les parties telles que les brûleurs, les valves et les composants électriques, la table de
cuisson doit être enlevée du banc de travail en libérant les crochets de fixage, desserrant les vis de fixage
de chaque brûleur, dévissant les écrous de fixage crochets de fixation de la table de cuisson qui sont
visibles au fond de la surface, enlevant la partie supérieure de la table de cuisson et remplaçant ensuite les
pièces défectueuses.
Avertissement: si les valves doivent être remplacées, désassemblez d’abord les câbles des interrupteurs
d’allumage.
Il est recommandé de remplacer les joints de la valve chaque fois que la valve est remplacée, assurant, de
cette façon, l’étanchéité parfaite entre le corps et le train de gaz.
ATTENTION: Débranchez l’alimentation avant l’entretien de l’unité.
Pour le positionnement de la prise au mur pour le branchement de la bonde de mise à terre à trois
pôles de l’appareil, voir les indications illustrées en Fig. 1- 2
ATTENTION: Après la première installation de l’appareil ou après n’importe quelle intervention
d’entretien concernant les parties principales du gaz de l’appareil, effectuez le test de fuite en
utilisant de l’eau avec du savon sur les raccordements de gaz pour vérifier l’installation correcte.
N’utilisez pas de feu pour le test de fuite du gaz.
Instructions pour l’utilisateur
ATTENTION:
Maintenir la zone de l’appareil propre et libre des matériaux combustibles, de l’essence et d’autres
vapeurs et liquides inflammables.
Ne stockez aucun matériel dangereux ou inflammable dans les meubles suspendus sur l’appareil;
stockez-les dans un lieu sûr pour éviter les risques potentiels.
Pour une utilisation sûre de l’appareil, ne l’employez pas pour le chauffage des locaux.
N’utilisez pas de pulvérisateurs d’aérosol à proximité de cet appareil lorsqu’il est en fonction
Pour la description des tables de cuisson, référez-vous aux instructions d’installation.
20
Page 49

Descriptions
LEGENDE DESCRIPTIVE POUR LES
TABLES DE CUISSON
1. Brûleur petit
2. Brûleur moyen
3. Brûleur double couronne (poêle chinoise)
4. Bouton de commande du brûleur frontal à gauche
5. Bouton de commande du brûleur arrière à gauche
6. Bouton de commande du brûleur arrière à droite
7. Bouton de commande du brûleur frontal à droite
Utilisation des brûleurs
Un diagramme est gravé sur le tableau de commande sur chaque bouton qui indique quel brûleur
correspond à ce bouton.
Allumage manuel:
L’allumage manuel est toujours possible même lorsque l’alimentation est débranchée ou en cas de panne de
courant prolongée.
Tournez le bouton qui correspond au brûleur choisi dans le sens contraire des aiguilles d’une montre dans la
position de MAXIMUM à l’étoile gravée (flamme large) et mettez une allumette allumée sur le brûleur.
Allumage électrique automatique:
Tournez le bouton qui correspond au brûleur choisi dans le sens contraire des aiguilles d’une montre à la
position de MAXIMUM à l’étoile gravée (flamme large) et puis appuyez sur le bouton pour activer l’allumage
par étincelle. Une fois qu’il est allumé, continuez à appuyer sur le bouton pendant 10 secondes environ, pour
permettre à la flamme de chauffer le thermocouple. Si le brûleur ne reste pas allumé après avoir relâché le
bouton, répétez le procédé ci-dessus.
Avertissement: Il est recommandé de ne pas essayer d’allumer le brûleur si le chapeau de la flamme
relative, n’est pas en position correcte.
Suggestions pour une utilisation correcte des brûleurs:
ATTENTION: Pendant l’utilisation de chaque brûleur réglez la dimension de la flamme du brûleur
correctement de façon à ce qu’elle ne se prolonge pas au-delà du bord des ustensiles de cuisine.
C’est une instruction basée sur des considérations de sécurité
- Utilisez les casseroles appropriées pour chaque brûleur (voir la Fig. 16 et le Tableau B)
- Quand le liquide bout, tournez le bouton vers le bas à la position de MINIMUM.
- Utilisez toujours des casseroles avec un couvercle.
Tableau B
Brûleur Diamètres recommandés en
pouces pour les casseroles (mm)
Petit 35½”-55
Moyen 55
Double couronne
86
1/8
2/3
”- 102
”-102
1/8
”(90 – 140)
3/8
”(140 – 260)
3/8
” (220 – 260)
(poêle chinoise)
Fig.16
Utilisation correcte des casseroles:
- Essuyez le fond de la casserole avant de la positionner sur la plaque de cuisson.
- Utilisez les pots avec un fond plat et épais, à l’exception de la cuisson avec poêles chinoises.
- Quand vous utilisez les brûleurs, assurez-vous d’avoir positionné correctement les manches des
casseroles. Tenir les enfants loin de l’appareil.
- Quand vous cuisinez des mets avec de l’huile ou de la graisse, qui sont très inflammables, l’utilisateur ne
devra pas laisser l’appareil sans surveillance.
21
Page 50

ATTENTION: Si l’alimentation est découpée, les brûleurs peuvent être allumés avec des allumettes.
Les brûleurs équipés d’un thermocouple de sécurité peuvent seulement être allumés lorsque le bouton est
en position de MAXIMUM (gravure de flamme large).
Avertissement: L’utilisation d’un appareil de cuisson à gaz produit de la chaleur et de l’humidité dans la
chambre où il est installé. Par conséquent, une ventilation appropriée dans la chambre est nécessaire ainsi
que les ouvertures normales de ventilation qui doivent être sans obstructions et doivent activer les
ventilateurs à tirage d’air/hottes d’aspiration. Une utilisation intensive et continue de l’appareil peut exiger
une ventilation additionnelle, par exemple en ouvrant une fenêtre, ou en augmentant la puissance du
ventilateur à tirage d’air/hotte d’aspiration, si installés.
Nettoyage de l’appareil:
N’utilisez jamais de produits à nettoyer abrasifs
Avant le nettoyage de l’appareil, il faut le débrancher du réseau électrique.
Nettoyage de la surface de travail: nettoyez périodiquement les têtes des brûleurs, les grilles en fonte et les
chapeaux des brûleurs en utilisant de l’eau chaude.
Tous les débordements qui se vérifient doivent être enlevé aussitôt que possible en utilisant un
chiffon.
S’il devienne difficile d’ouvrir ou fermer une valve, ne la forcez pas, mais demandez immédiatement
l’assistance du personnel du service technique.
Nettoyage des parties émaillées: Les parties émaillées devront être nettoyées fréquemment avec de l’eau
savonneuse. N’utilisez jamais de poudres abrasives. Ne laissez pas de substances acides ou alcalines sur
les parties émaillées (comme par exemple du vinaigre, jus de citron, sel, sauce de tomate, etc.) et ne lavez
pas les parties émaillées lorsqu’elles sont encore chaudes.
Nettoyage des parties en acier inox: Nettoyez les parties avec de l’eau savonneuse et séchez-les en utilisant
un chiffon mou. La brillance est maintenue en utilisant périodiquement des produits spécifiques pour
nettoyage d’acier inox. N’employez jamais de poudres abrasives. Utilisez le même produit spécifique pour
éliminer la colle qui reste après l’enlèvement de la pellicule bleu de protection du table travail.
Nettoyage des chapeaux des brûleurs: Soulevez les chapeaux des brûleurs des têtes des brûleurs, lavezles dans l’eau savonneuse et séchez-les soigneusement. Avant le replacement sur la tête du brûleur,
assurez-vous que les trous ne soient pas obstrués.
ATTENTION : pour tous autres informations sur le nettoyage de l’appareil, contactez détaillant où vous avez
acheté l’appareil.
Service après vente:
Voir les informations ci-dessous pour le service après-vente.
Se référer au certificat de garantie pour les conditions de la garantie.
Revendeur /Importateur: Nom, adresse, téléphone
CENTRES DE SERVICE
Nom
FABRICANT:
Téléphone
BERTAZZONI SPA
VIA PALAZZINA, 8 – 42016 – GUASTALLA (REGGIO E.) ITALY
Tél. +39 0522/226411 – fax +39 0522/226440 – http://www.bertazzoni-italia.com
22
Page 51

SPARE PARTS LIST
NUMBER
22 202366 LOAD BEARING BOTTOM FOND PORTEFAIX 1
23 202358 DOUBLE CARTER P6 PROTECTION DU FOND PORTANT 1
36 202271 FIXING HOOK CROCHET DE FIXAGE 4
80 504160 COVER FOR SMALL FLAME SPREADER COUVERCLE PETIT AVD 1
81 504161 COVER FOR MEDIUM BURNER COUVERCLE MOYEN ARD ARG 2
83 504158 COVER OUT FOR ULTRA RAPID FLAME SPREADER COUVERCLE COURONNE AVG 1
84 504159 COVER IN FOR ULTRA RAPID FLAME SPREADER COUVERCLE COURONNE AVG 1
160 309130 BRIDLE FOR FIXING GAS VALVES CLAMEAUX FIXAGE ROBINETS 4
385 306024 SPRING FOR SPARK PLUG RESSORT DE FIXATION BOUGIE 4
425 415054 SPARK PLUG 350MM BOUGIE ALLUMAGE FIL 350MM 3
428 415066 SPARK PLUG FOR ULTRA RAPID BURNER BOUGIE ALLUMAGE BRULEUR COURONNE AVG 1
430 415064 ACCUMULATOR 4U ALLUMAGE 4U 1
473 408069 SIMMER PLATE GRILLE DE REDUCTION 1
561 508025 TERMOCOUPLE MM300 THERMOCOUPLE BRUL. 300MM 1
562 508021 TERMOCOUPLE MM600 THERMOCOUPLE BRUL. 600MM 2
568 508031 TERMOCOUPLE THERMOUCOPLE 1
648 601990 TERMINAL SEPARATOR BOITE A BORNES 1
670 504128 SMALL FLAME SPREADER TETE BRULEUR PETIT 1
671 504129 MEDIUM FLAME SPREADER TETE BRULEUR MOYEN 2
676 504108 ULTRA RAPID FLAME SPREADER TETE BRULEUR COURONNE 1
702 408058 ADAPTER FOR WOK BURNER PAN SUPPORT ADAPTATEUR COURONNE 1
723 411070 GASKET GARNTURE 4
760 510507 SMALL BURNER COUPE BRULEUR PETIT 1
761 510508 SEMI RAPID BURNER COUPE BRULEUR MOYEN 2
769 510506 ULTRA RAPID BURNER COUPE BRULEUR CORONNE 1
884 502174 GAS VALVE BY-PASS029 +MICRO FOR IGNITION ROBINET BP029 1
885 502175 GAS VALVE BY-PASS037 +MICRO FOR IGNITION ROBINET BP037 2
887 502178 GAS VALVE BY-PASS073 +MICRO FOR IGNITION ROBINET BP073 1
943 308031 BUMPER FOR C.I. GRIDS AND DISHWARMER BOUCHON EN CAOUTCHOUC 4
969 408065 CAST IRON PAN SUPPORT 2 BURNERS GRILLE EN FONTE 1
970 408066 CAST IRON GRID P6D4 GRILLE EN FONTE 2 BRULEURS 1
1045 401861 KNOB POIGNEE 4
1624 210199 WORK TABLE PLAN DE TRAVAIL 1
1627 501396 GAS COLLECTOR P640/P680 TUYAU ALIMENTATION 4 FEUX 1
1628 501481 TUBE FOR SMALL BURNER TUYAU POUR BRULEUR PETIT 1
1629 501490 TUBE FOR WOK BURNER TUYAU BRULEUR 1
1630 501449 TUBE FOR SEMI-RAPID BURNER TUYAU BRULEUR MOYEN DROITE 1
1631 501470 TUBE FOR LEFT BACK BURNER TUYAU BRULEUR MOYEN GAUCHE 1
COMPONENT
DESCRIPTION COMPOSANT
P24400X - BUILT-IN HOB
QUANTITY
Page 52

 Loading...