

Page 1

MY
BERNINA
BERNINA Q SERIES WORKBOOK
BERNINA Q SERIES ON FRAME AND TABLE
MASTERY MASTERY
BOOK BOOK
SERIESSERIES
©2020 BERNINA of America. Permission granted to copy and distribute in original form only. Content may not be altered or used in any other form or under any other branding.
05152020
Page 2

My BERNINA
TABLE OF CONTENTS
BERNINA Q SERIES WORKBOOK
INTRODUCTION ................................................ 3
GETTING STARTED WITH THE Q SERIES .......... 4
INTRODUCTION TO THE TOUCH SCREEN .. 4
TOUCH SCREEN NAVIGATION .................... 4
SETTING USER PROFILES ............................. 5
PROGRAMMING THE FOOT CONTROL ...... 5
PROGRAMMING THE HANDLES ................. 6
ADJUSTABLE HANDLE POSITION ............... 6
CLEANING AND OILING .............................. 7
PREPARING TO STITCH ..................................... 8
LOADING THE FRAME ................................ 8
WINDING AND INSERTING THE BOBBIN .... 9
SETTING THE BOBBIN TENSION
USING THE BOBBIN TENSION GAUGE ..... 10
LOADING THE BOBBIN ............................. 10
SETTING THE BOBBIN LEVEL .................... 11
THREADING THE MACHINE ..................... 11
REMOVING THREAD ................................. 12
CHANGING THE NEEDLE .......................... 12
QUILTING WITH THE FRAME .......................... 13
START, STOP, SECURE ................................ 13
SET THE STITCH LENGTH .......................... 13
BSR MODES AND MANUAL STITCHING ... 14
BSR3 (BASTING) ........................................ 14
BSR2 .......................................................... 14
BSR1 .......................................................... 15
MANUAL MODE ....................................... 15
STRAIGHT LINE QUILTING WITH
CHANNEL LOCKS ...................................... 16
ADVANCING THE QUILT ........................... 16
QUILTING ON THE TABLE ............................... 17
START, STOP, SECURE ................................ 17
SET THE STITCH LENGTH .......................... 17
START/STOP FUNCTION ............................ 18
BSR MODES AND MANUAL STITCHING ... 19
BSR3 (BASTING) ........................................ 19
BSR2 .......................................................... 19
BSR1 .......................................................... 20
MANUAL MODE ....................................... 20
STRAIGHT LINE QUILTING ........................ 21
REFERENCE: BATTING ..................................... 22
TYPES OF BATTINGS ................................. 22
REFERENCE: THREADS .................................... 23
THINGS TO CONSIDER WHEN
CHOOSING A THREAD .............................. 23
GUIDELINES FOR RECOMMENDED
THREAD FOR QUILTING ............................ 23
TYPES OF THREAD .................................... 23
BOBBIN THREAD ....................................... 23
TIPS ON THREAD ...................................... 23
WHEN THREAD BREAKS ........................... 23
REFERENCE: NEEDLES ..................................... 24
REFERENCE: NEEDLE INFORMATION ............. 25
REFERENCE: MACHINE NEEDLE CHART ......... 26
QUILT PATTERNS TO TRY ............................... 27
STIPPLING .................................................. 27
PEBBLES ..................................................... 27
BACK AND FORTH SASHING .................... 27
PAISLEY ..................................................... 28
LEAVES ...................................................... 28
RIBBON SASHING ...................................... 28
HEARTS...................................................... 29
SWIRLS ...................................................... 29
2
Page 3
My BERNINA
INTRODUCTION
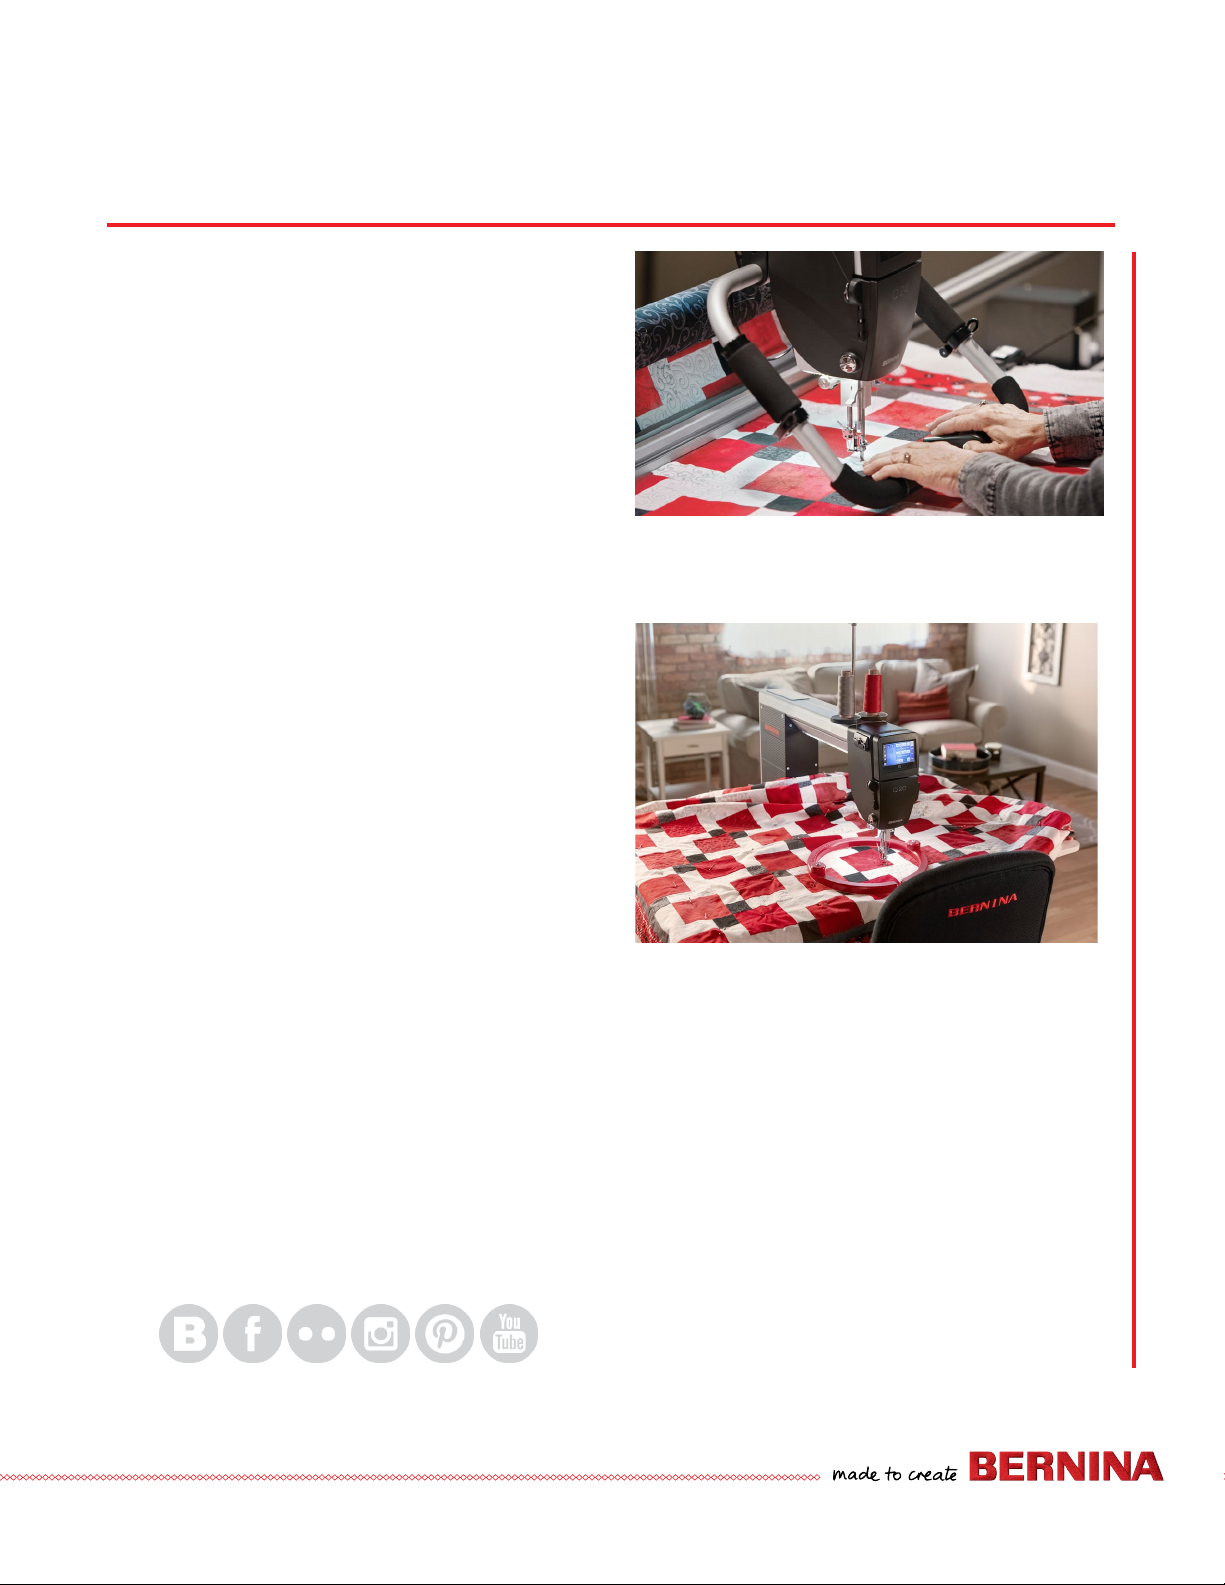
Welcome! Learning to use and maintain your new BERNINA
Longarm will enable you to enjoy your machine for many
years.
Whether quilting on the frame or table, understanding
your machine's features and navigation is the basis for your
creative journey. Along with your machine's manual, this
workbook is designed for you to experience your machine’s
capabilities through a series of introductory exercises.
Once completed, the workbook can serve as a technique
reference guide. You will nd additional resource materials
in the back of this workbook. While this may be the
beginning of your educational journey, there are other
opportunities to grow creatively.
BERNINA of America strives to provide quality quilting,
sewing and embroidery machines while offering the best
educational experience available. Your BERNINA dealer
may offer additional educational programs and is a great
resource for support.
BERNINA Q SERIES WORKBOOK
Instructional video tutorials are available on bernina.com
and the BERNINA YouTube channel. You will also nd
inspiring quilting projects on the BERNINA website at
bernina.com.
www.bernina.com
ww w.weallsew.com
3
Page 4
My BERNINA
BERNINA Q SERIES WORKBOOK
GETTING STARTED WITH THE Q SERIES
INTRODUCTION TO THE TOUCH SCREEN
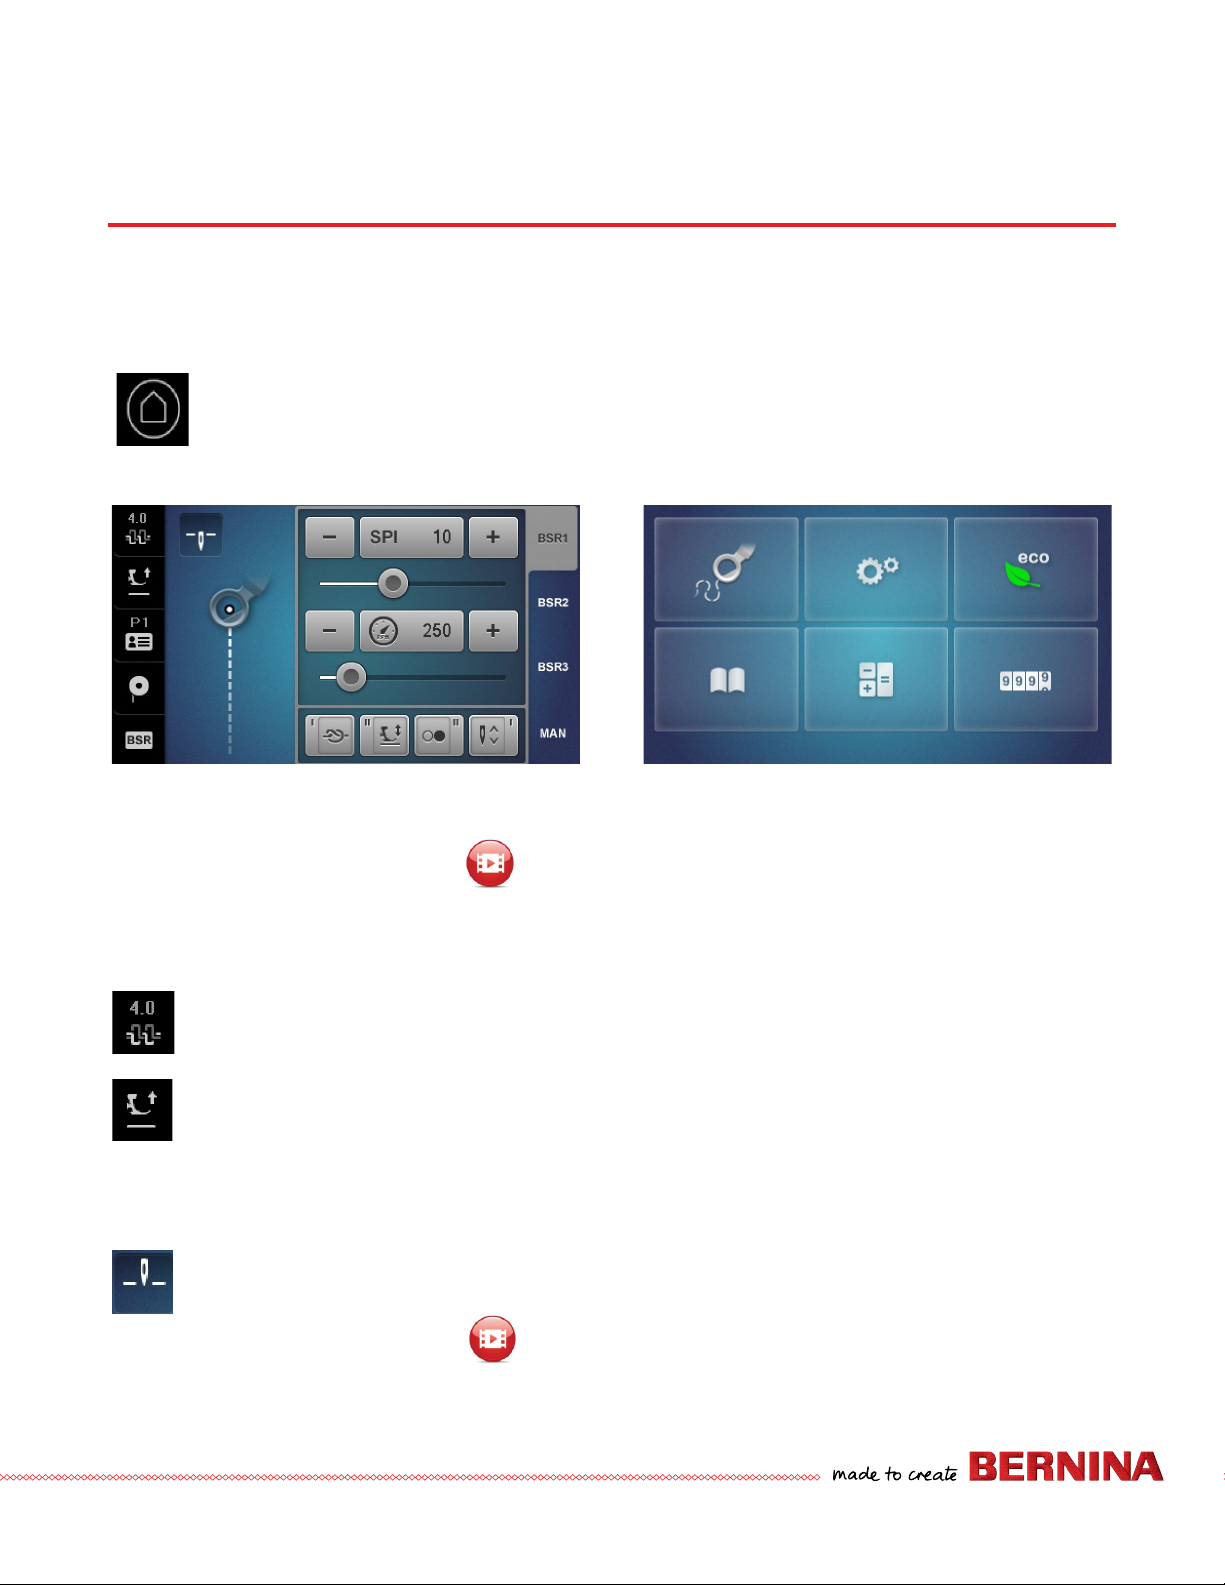
• When the Q Series powers on, it displays the Sewing Menu.
• The Home icon toggles between the Selection Menu and Sewing Menu.
Selection Menu Sewing Menu
Sewing Menu
• For Help, double-tap the Home icon and select an on-screen icon for more information.
Click here for video:
Introduction to the Touch Screen
Setup Program Eco
TOUCH SCREEN NAVIGATION
Top Tension – ne tune upper thread tension setting. Numerical tension displayed means less trial and error.
Tension settings for frequently used thread combinations can be stored long term in User Proles.
There are multiple ways to raise/lower the presser foot:
Select the icon in the status bar.
Touch the presser foot in the sewing area of the screen (Stitch Altering Area).
On the frame, use one of the programmed buttons on the handles.
On the table, program the foot control to raise/lower the foot.
Stitch CounterCalculatorTutorial
To set Needle Stop Up/Down, select the icon; it alternates between the two settings.
Click here for video:
Touch Screen Navigation
4
Page 5
My BERNINA
BERNINA Q SERIES WORKBOOK
GETTING STARTED WITH THE Q SERIES
SETTING USER PROFILES
P1 is the factory default prole and cannot be overwritten.
Four additional proles may be named and created.
Set preferences for different types of quilting.
Click here for video:
Setting User Profiles
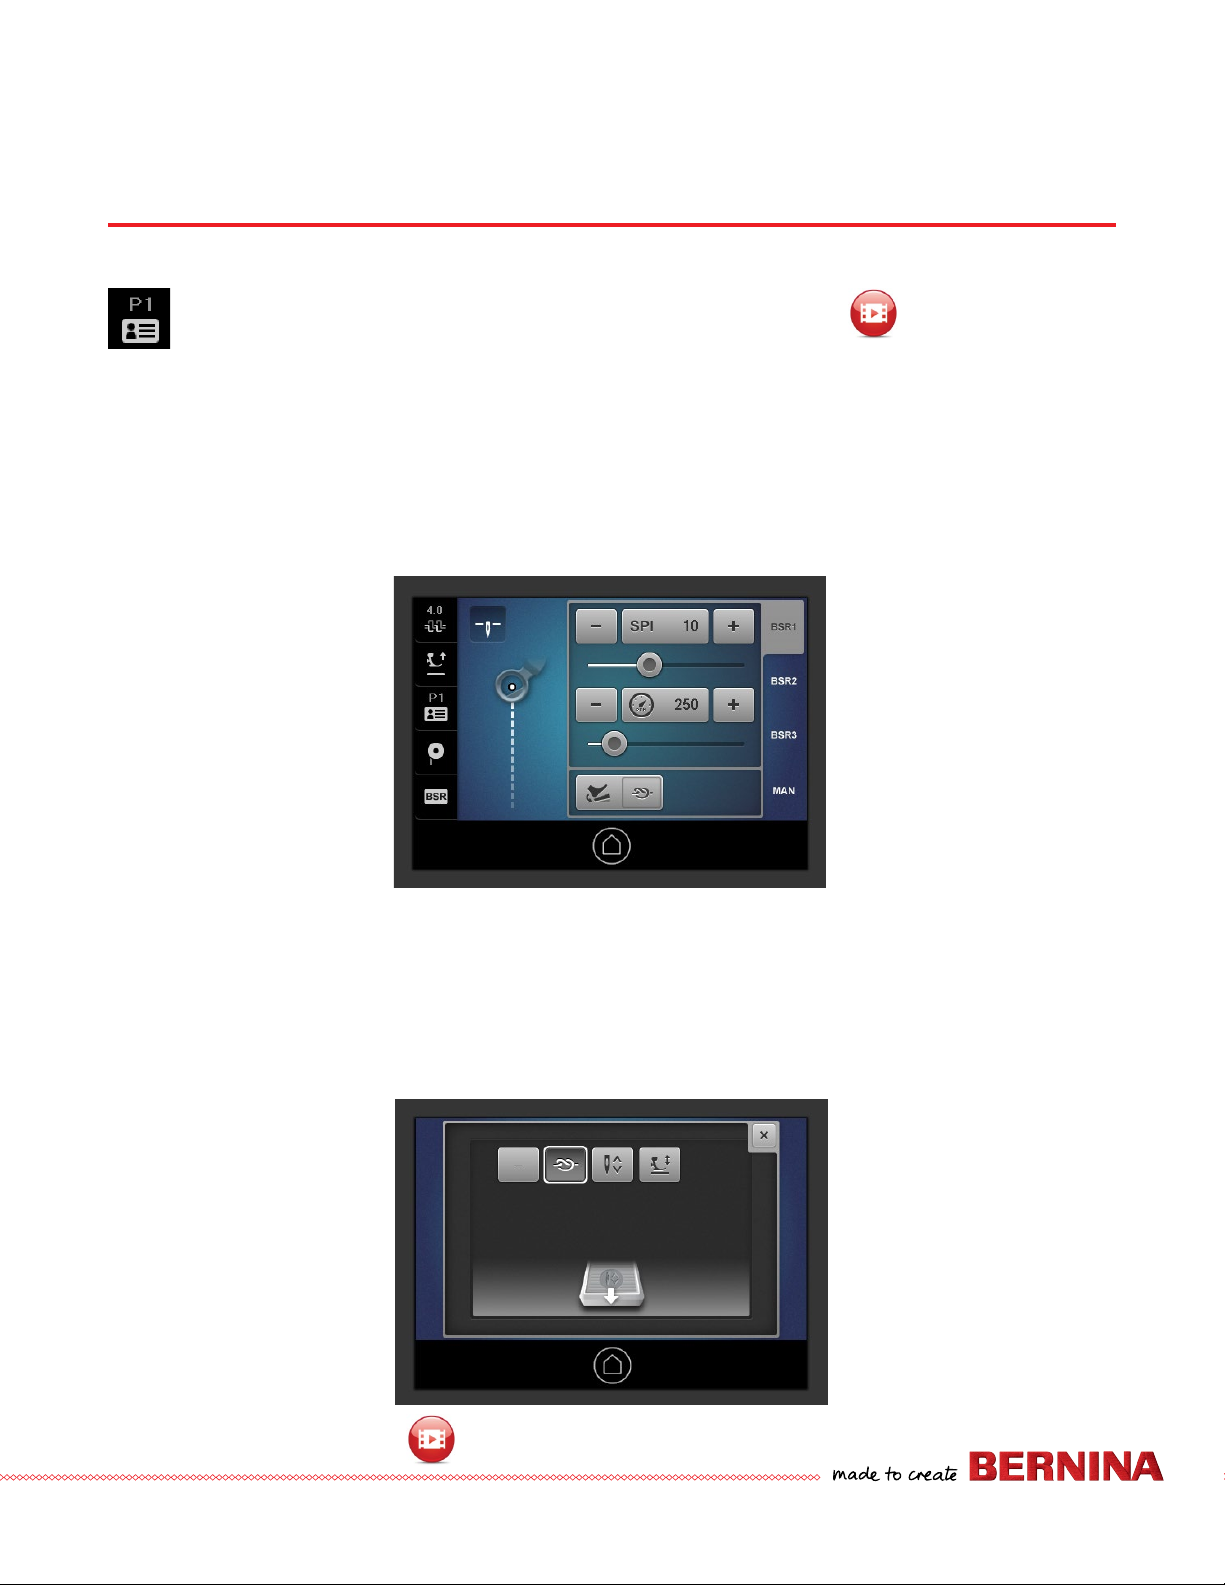
PROGRAMMING THE FOOT CONTROL
For the table model, the back-kick of the foot control can be programmed with one function. Select the function most
frequently used and one that will be easily remembered.
The main screen shows the programmed setting for the foot control.
To program the foot control:
1. Select the foot control icon.
2. The selected option will have a white outline.
3. Select from the following: No Function, Securing Stitch, Needle Up/Down or Presser Foot Up/Down.
4. The window closes when the function is selected.
Click here for video:
Programming the Foot Control
5
Page 6
My BERNINA
BERNINA Q SERIES WORKBOOK
GETTING STARTED WITH THE Q SERIES
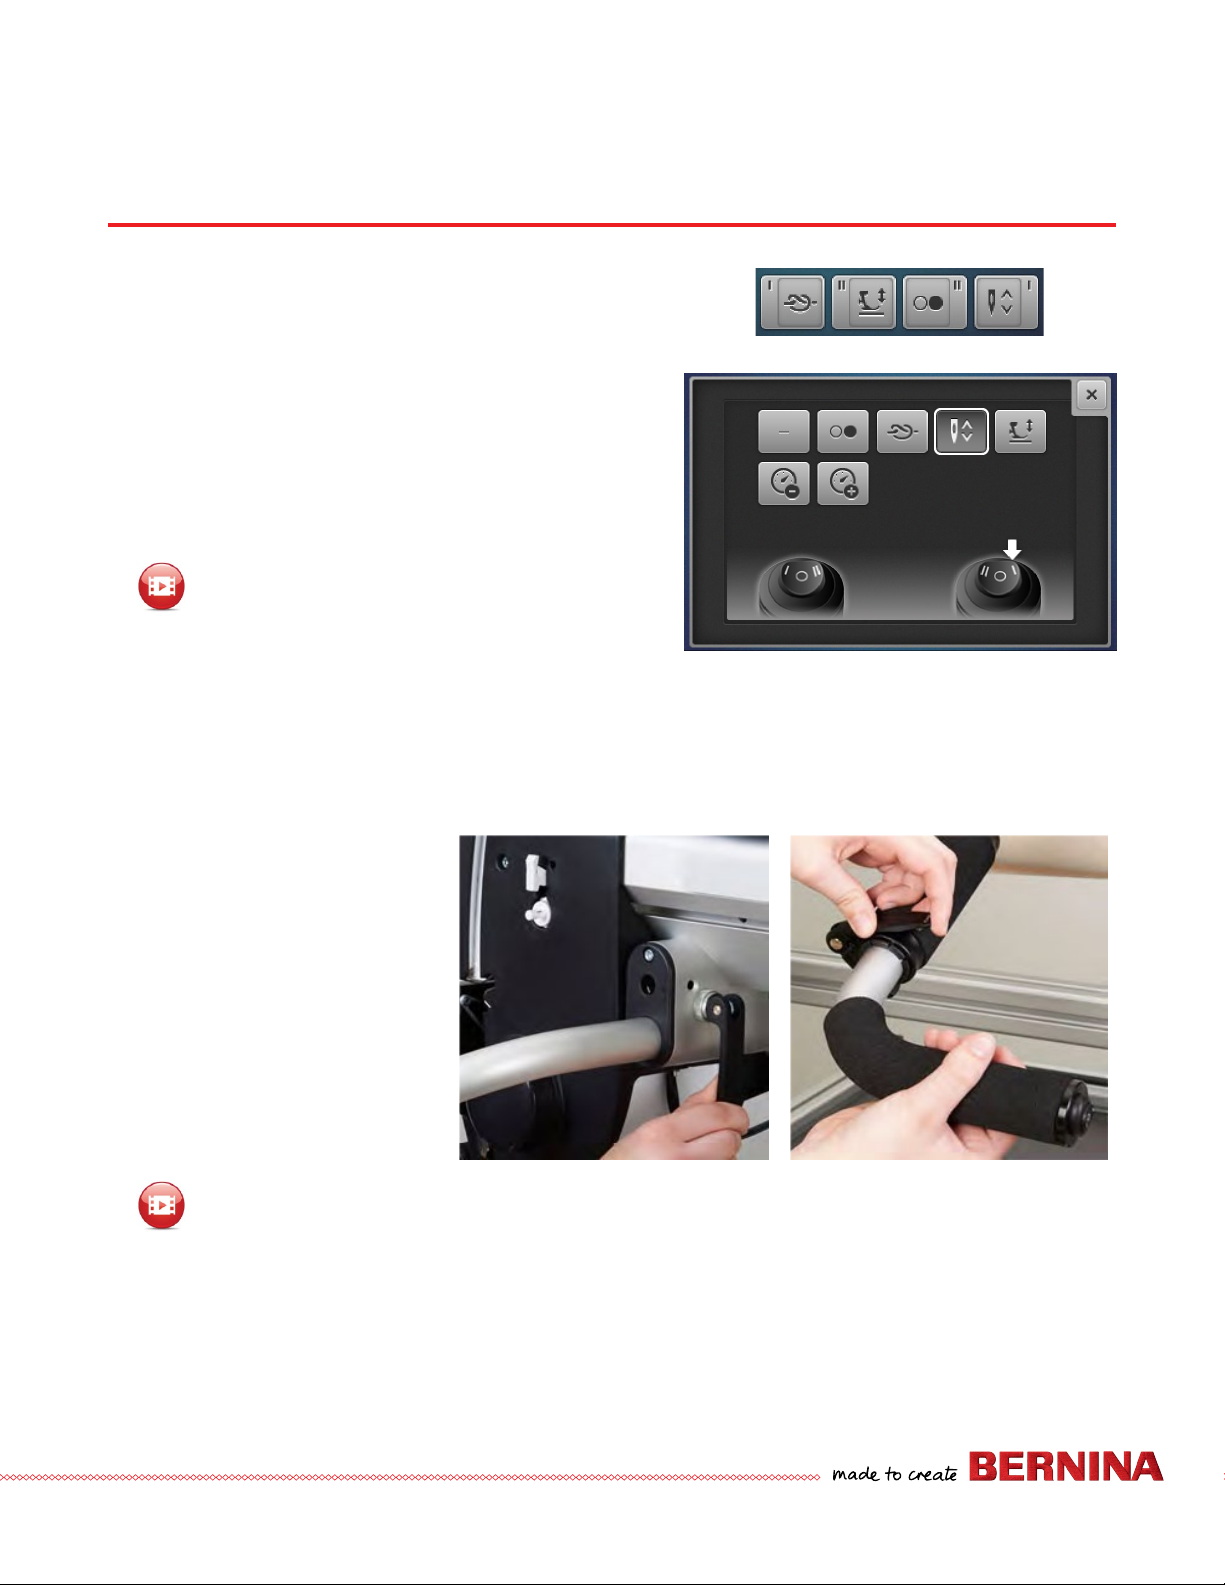
PROGRAMMING THE HANDLES
The front handles on the frame model machines enable each button to be
programmed with the functions you need at your ngertips.
Options include: No Function, Start/Stop, Securing Stitch, Needle
Up/Down, Presser Foot Up/Down, Decrease Speed and Increase
Speed.
• Select the toggle from the Sewing Menu, then assign from the
list and close.
• Repeat for each toggle.
Click here for video:
Programming the Handles
ADJUSTABLE HANDLE POSITION
Locking lever handles allow the adjustment of handle position and length. Change the handle position to avoid fatique, for
better visibility or for certain techniques, such as rulerwork. The range of articulation eliminates the need for micro handles.
1. Open locking lever to adjust the
width and height of the handles
or to adjust to a different position.
Lock in place and stitch.
2. Open locking lever on the handgrip
of the handles and adjust to a
different position; lock in place and
stitch.
Click here for video:
Adjustable Handle Position
6
Page 7
My BERNINA
BERNINA Q SERIES WORKBOOK
GETTING STARTED WITH THE Q SERIES
CLEANING AND OILING
Clean and oil your machine at the beginning of each project. If it is a lengthy project, the machine may need to be cleaned
periodically during the project.
1. Remove the stitch plate and bobbin case.
2. Brush the lint from the machine using a soft brush.
3. Check the bobbin case for lint and brush gently to remove.
4. Rotate the handwheel to expose the hook race and place a drop of oil on the hook.
5. Turn the handwheel to distribute the oil.
6. Replace the bobbin case and stitch plate.
7. Check the track where the wheels glide to be sure it is free of threads and lint.
8. Use a soft cloth to clean the wheels.
To access the Built-in Tutorial on cleaning and oiling, select Home>Maintenance>Cleaning the
machine>Lubricating the machine.
Note the breadcrumb path at the top of the screen. Touching any of the icons in the
breadcrumb path will take you back to that particular menu. This is a time saver when changing
multiple settings within a menu.
Click here for video:
Cleaning and Oiling
7
Page 8
My BERNINA
BERNINA Q SERIES WORKBOOK
PREPARING TO STITCH
LOADING THE FRAME
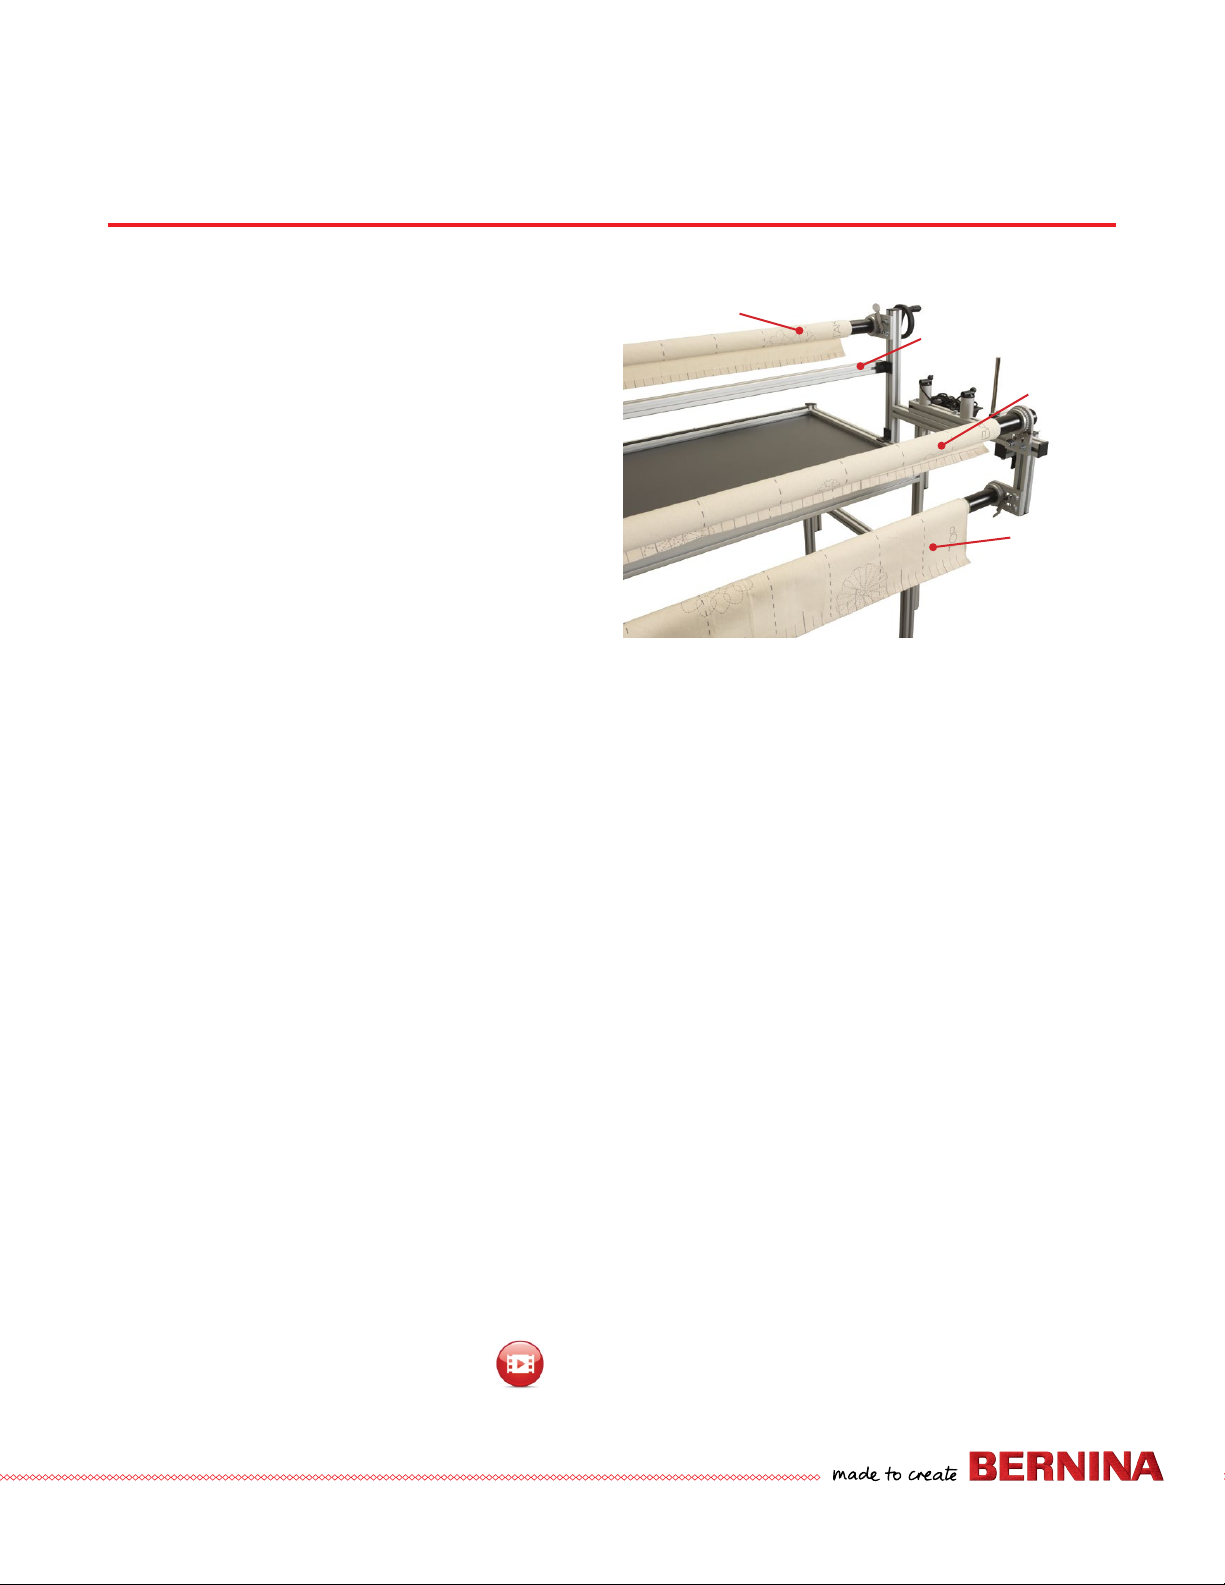
Load the frame with the backing facing wrong side up. The
batting lays on top of the backing, and the quilt top is loaded
right side up. All three layers will eventually roll up onto the
Take-up Rail.
1. Backing and top should be straight and squared up.
2. Backing should be 4 inches wider than the top on all
sides
3. Load the Backing Rail.
• Center the backing on the rail. Mark the center of the
backing on the top and bottom edges to match to
the center of the leaders. The backing goes under the
De ad Bar.
• Pin to the leaders starting in the middle and work to the outside edges being careful not to stretch the backing when
pinning.
• Complete pinning and roll onto the Backing Rail.
• Pin the other end to the Take-up Rail Leader, ensuring it passes under the Dead Bar in a like manner.
4. Attach the quilt top.
Take-Up
Dead Bar
Backing
Top
• Put the quilt top over the rails right side up.
• Find the center of the top and match to the center of the leader. Pin to the Top Rail Leader from center out.
• Roll top onto the Top Rail.
5. Position the batting on the backing with the right side of the batting up. If using needlepunched batting, it is placed
on the quilt backing with the holes/dimple side up so that the stitches are quilted the same way as it was punched. The
holes/dimples indicate the right side and placed up; the smooth side is the wrong side and placed down.
6. Use BSR3 to baste the batting to the backing; use the Channel Locks (optional accessory) to create a straight line.
7. Pull up the quilt top over the batting and align with the basting line.
8. Use BSR3 to baste the quilt top; use the Channel Locks to create a straight line across the top.
Tips:
• When pinning, make sure not to stretch the quilt top or backing.
• Using Zippered Leaders can be a quick way to change out quilts.
• Use the optional Channel Locks for basting and to stitch a straight line to position the quilt top.
Click here for video:
Loading the Frame
8
Page 9
My BERNINA
BERNINA Q SERIES WORKBOOK
PREPARING TO STITCH
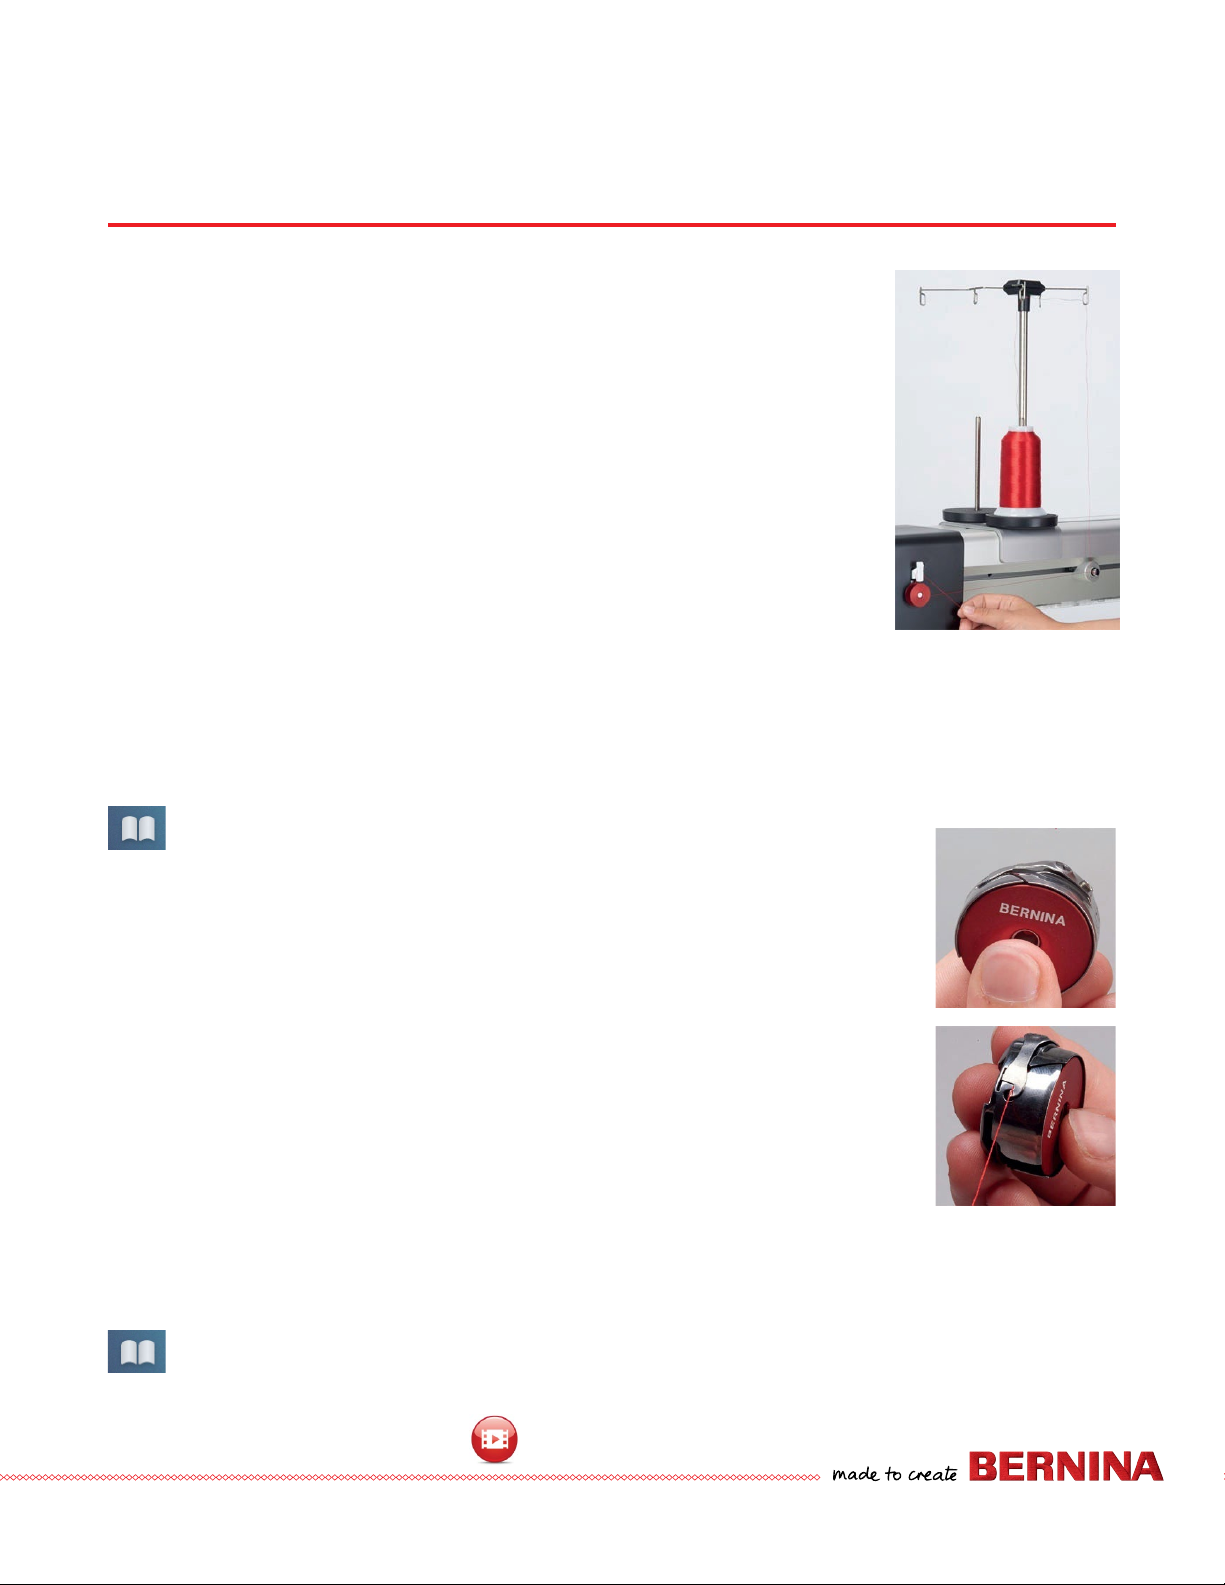
WINDING AND INSERTING THE BOBBIN
1. Place empty bobbin on the bobbin winder pin with the word BERNINA facing the
machine.
2. Place the thread spool on the right thread spool pin.
3. Hook the thread into both corresponding guides of the thread guide bar.
4. Lead the thread counter clockwise around the bobbin pretension.
5. Following the direction of the arrow, wind the thread 3 or 4 times around the empty
bobbin.
6. Pull the remaining thread over the thread cutter at the engaging lever and cut.
7. Push the engaging lever against the bobbin.
8. The machine winds and the display for the winding appears.
9. Adjust the winding speed with the icons - / + or by moving the on-screen slider.
10. When the bobbin is full, the winding process stops automatically.
11. Remove the bobbin and cut the thread using the thread cutter at the engaging lever.
To access the built-in tutorial, select Home>Tutorials>Threading>Winding the bobbin.
Inserting the Bobbin into Bobbin Case
1. Open bobbin door.
2. Remove bobbin case (hold the latch to prevent the bobbin from falling out).
3. Remove bobbin.
4. Insert full bobbin so that BERNINA faces outward and is visible.
5. Pull thread into slot of the bobbin case from the right.
6. When looking at the bobbin in the bobbin case, the bobbin should turn clockwise.
7. Pull thread to the left, below the spring and into the opening at the end of the spring.
8. Pull thread to check that the bobbin rotates clockwise.
If using pre-wound bobbins, insert so that the bobbin spins clockwise as above. Be sure to test and
set the tension using the Bobbin Tension Gauge.
If using magnetic core pre-wound bobbins, the tension spring inside the bobbin case should be removed.
To access the built-in tutorial, select Home>Tutorials>Threading>Threading the bobbin thread.
Click here for video:
Winding the Bobbin
9
Page 10

My BERNINA
BERNINA Q SERIES WORKBOOK
PREPARING TO STITCH
SETTING THE BOBBIN TENSION USING THE BOBBIN TENSION GAUGE
The Bobbin Tension Gauge is used to set the tension of the thread in the bobbin
case. Bobbin tension is measured in millinewton (mN). The recommended bobbin
thread tension is 220 mN.
Bobbin tension should be checked if you change thread brands, weights, or type,
including purchased pre-wound bobbins.
1. Place a full bobbin in the bobbin case with the word BERNINA facing out.
2. When the thread is pulled, the bobbin should turn clockwise.
3. Thread the gauge as pictured.
• Lock the bobbin in.
• Pull the thread UNDER the rst pulley and OVER the second pulley.
• Pull the thread under the hook below the pulleys and straight back .
4. Set the bobbin gauge on a at surface and pull the thread rmly and at a
steady pace.
5. As the thread is pulled, the tension should read 220 mN.
6. If it does not, adjust the larger of the two screws on the bobbin case while still
in Bobbin Tension Gauge and test again. Repeat until tension reads 220 nM.
7. Cut the thread by pulling straight down over the end of the gauge.
8. Remove the bobbin case with bobbin from the gauge using the bobbin case latch.
LOADING THE BOBBIN
1. Hold bobbin case by its latch.
2. Insert and push to engage into the machine.
Click here for video:
Bobbin Tension Gauge
3. Pull thread tail over cutter and cut.
4. Close bobbin door.
To access the built-in tutorial Select Home>Tutorials>Threading>Inserting and removing the bobbin case.
Click here for video:
Loading the Bobbin
10
Page 11

My BERNINA
BERNINA Q SERIES WORKBOOK
PREPARING TO STITCH
SETTING THE BOBBIN LEVEL
1. Touch bobbin icon in the Status Bar to check bobbin ll level.
2. The number of yards on a bobbin can be entered; the machine will count
down by percentage and by yards.
3. When 25% is reached, the Check Fill Level of Bobbin icon
appears.
Tip: Most pre-wound bobbins will have the information on how many yards of
thread are on the bobbin, so you may use this for your guide.
For a wound bobbin, you could start with 500 the rst time and use the count
down for your reference later. This also varies by thread weight.
In the Q Series User Manual on page 83-84, there is an Amount of Bobbin Thread chart to use as a reference when setting
the number of yards on a bobbin.
THREADING THE MACHINE
1. Raise the Presser Foot.
Click here for video:
Setting the Bobbin Level
2. Place thread on left spool pin.
3. Pull the thread straight up from the spool through the thread guide on the thread guide bar
directly above the spool. Pull the thread forward and through the front guide on the thread
guide bar.
• For double needles, place one thread in each guide.
• When working on projects that include adhesives (spray or a fusible product, for example), bring the thread through
the left guide rst, then through the silicone case and through the right guide and nally pull the thread in direction
of the arrow through the lower thread guide.
4. Take the thread through the left upper guide or the right upper guide. Either one may be used..
5. Pull the thread down and in the direction of the arrow on the lower thread guide.
6. Bring thread up to the Take-up Lever, threading from back to front.
7. Pull thread down along edge of door.
8. Bring thread through the back guide just below the front cover. Use the two holes on the front of this
thread guide for double needle threading.
9. Thread the guide at the needle bar from the right.
10. Use the Needle Threader to complete the threading process.
11. Use the Thread Cutter on the left side of the machine head to cut the length of the thread the correct
length for pulling the bobbin thread to the top of the quilt prior to stitching.
To access the built-in tutorial Select Home>Tutorials>Threading>Threading the upper thread.
Click here for video:
Threading the Machine
11
Page 12

My BERNINA
BERNINA Q SERIES WORKBOOK
PREPARING TO STITCH
REMOVING THREAD
1. Always cut the thread near the spool and pull the thread at the needle area and through the machine as it would
normally travel.
2. This helps prevent damage to the machine. If the thread is pulled backwards through the machine, it may catch on
something or drag lint or adhesive particles through the machine.
CHANGING THE NEEDLE
The BERNINA Q Series machine uses domestic 130/705H system needles. These needles have a
at back and are inserted with the at side to the back, just like a domestic sewing machine. See
Reference: Needles on Pages 23 through 25.
• Needles should be changed at the beginning of every project.
• Use the included T6 screwdriver to loosen and tighten the needle set screw.
• Because the Q Series uses domestic needles, there is quite a range of needles that can be used,
including metallic needles for quilting with metallic threads.
Click here for video:
Changing the Needle
12
Page 13

My BERNINA
BERNINA Q SERIES WORKBOOK
QUILTING WITH THE FRAME
To stitch the exercises on the frame, you’ll need:
• A quilt top or practice fabric at least 45” x 45” loaded on the frame
• Batting and backing at least four inches larger on all four sides than quilt top
• Standard Longarm Foot #9
• Thread for top and bobbin (same thread for both)
• Needle: Quilting needle size 90
Basting the quilt on the frame is a good practice.
1. Baste a striaght line across the top of the batting.
2. After attaching the quilt top to the Top Rail, pull up over the batting, aligning the top edge of the quilt top to the
basting line.
3. Baste quilt across the top edge.
4. Baste the sides.
START, STOP, SECURE
1. Program one of the toggles (buttons on the handles) with the Securing Stitch.
2. Click once on programmed toggle quickly. The foot will lower, the machine stitches one stitch and the presser foot
raises.
3. Pull the top thread to bring the bobbin thread up. Hold both the bobbin thread and the needle thread.
4. Click and hold the securing stitch toggle to stitch the securing stitches.
5. Use Start/Stop toggle on handles to begin stitching. When convenient, cut the threads and begin to stitch again.
6. To secure, stop stitching:
• Hold the Securing Stitch on the toggle to secure the stitches at the end.
• Use the Securing Stitch to pull up bobbin thread and cut thread.
Click here for video:
Start, Stop, Secure Frame Model
SET THE STITCH LENGTH
• Adjust stitches per inch with + or – or by using the slide bar.
• Note that changes are indicated by a yellow box around the altered
length setting.
• To clear the setting, touch the yellow bounded SPI box.
• Can be set for BSR1 and BSR2.
Click here for video:
Setting the Stitch Length
13
Page 14

My BERNINA
BERNINA Q SERIES WORKBOOK
QUILTING WITH THE FRAME
BSR MODES AND MANUAL STITCHING
• BSR1: Constant needle movement once the Start /Stop is active.
• BSR2: When Start/Stop is active, needle will move when the machine is moved.
• BSR3: Basting mode.
• Manual: Operator regulates stitch length.
The BSR indicator will turn green when the machine is active (Start engaged). This is especially helpful when
using BSR2 or BSR3 as the needle will pause its movement when the machine movement is paused.
BSR3 (BASTING)
BSR3 is used for basting. It has three programmed stitch lengths.
• Select BSR3 and select the basting length of choice. SPI 4 is recommended for basting.
SPI 1: 1 stitch per inch
SPI 2: 2 stitches per inch – stitches are ½”
SPI 4: 4 stitches per inch – stitches are ¼”
Click here for video:
BSR3
• Baste across the top and sides of the quilt to secure the layers.
• Basting is not only for basting the top and sides of the quilt. You can baste any area of the quilt that you desire.
• In an area where compact quilting is planned, basting the area rst may prevent distortion.
BSR2
In Mode 2, the machine doesn’t stitch until the machine is moved on the frame. The needle stops stitching when the machine
stops moving. There is no build up of stitches when stopped or when stitching very slowly when deciding where to stitch
next.
BSR2 is good for curves and motifs without sharp points such as wavy lines, stippling and pebbles. It is also great for rulerwork
(optional accessory).
1. From the Sewing Menu, select BSR2.
2. Set the Stitch Length as desired. This will depend on the motif size, thread size and personal preference.
3. Bring the bobbin thread up using the toggle on handle.
4. Begin stitching a gentle wavy line vertically about 7-8 inches long. Stitch horizontally to the start of the next line. The
next line may echo the rst or have a random curve. Continue stitching lines with variable spacing. Stitch about 5-6
lines.
5. Add horizontal lines to form a ‘wavy plaid’. Again, random curves and spacing will make the pattern more interesting.
If this were on an actual quilt, the travel lines would be in the ditch.
6. Once familiar with moving the machine horizontally and vertically, try an all-over quilt design, like large stippling.
7. When the machine stops moving, the BSR is still on but the needle stops and waits in a raised position until the
machine is moved again, or the BSR is turned off.
Click here for video:
BSR2
14
Page 15

My BERNINA
BERNINA Q SERIES WORKBOOK
QUILTING WITH THE FRAME
BSR1
The needle is in constant motion, even when the machine is not being moved. The faster the machine is moved, the higher
the speed of the machine. BSR1 allows for precise work when doing corners or any work that has sharp points such as swirls,
leaf points, paisley patterns, and hearts.
1. From the Sewing Menu, select BSR1.
2. Set the Stitch Length (SPI) as desired. This may depend on the motif size, thread size and personal preference. Use the
slide bar or the + or - icons.
3. To clear the stitch length, select the yellow-bounded SPI box.
4. BSR1 has a programmed basic speed often referred to as the idle speed of the needle. In BSR1, the idle speed of the
needle can be changed. Work with the idle speed to nd a comfortable setting. As more experience is gained, a faster
idle speed may be desired.
5. Practice swirls, then move on to leaves. The pause at the point of the swirl and leaves allows a second stitch to form
a point. Don’t hesitate too long because the needle is always moving and a thread knot/build-up could form on the
project.
Click here for video:
BSR1
MANUAL MODE
1. Select Manual Mode.
2. Program the handles with one toggle set for increasing the speed and another toggle set to decrease speed. Set speed
at a comfortable starting speed.
3. Use Manual Mode when stitching small things, such as micro stippling or small pebbles, or if you are comfortable
regulating the stitch length.
As you try the different stitching modes, stitch your own patterns or try some of the recommended patterns on pages 26-28
of this Workbook.
Click here for video:
Manual Mode
15
Page 16

My BERNINA
BERNINA Q SERIES WORKBOOK
QUILTING WITH THE FRAME
STRAIGHT LINE QUILTING WITH CHANNEL LOCKS
Channel Locks are an optional accessory. They lock the X and Y axis and
make it easy to stitch straight lines. Engage the Channel Locks for basting
and straight line quilting.
Channel Locks can be locked on a horizontal plane, a vertical plane or both.
To stitch horizontal lines, lock the vertical Channel Lock and stitch. To stitch
evenly spaced rows, unlock the Channel Lock and move the machine the
desired spacing for the next row.
Click here for video:
Straight Line Quilting with Channel Locks
ADVANCING THE QUILT
1. When the quilting is nished, detach the clamps on both sides.
2. Unlatch the Backing Rail and the Top Rail.
3. Roll the Take-up Rail until the previously quilted area is several inches away from the Dead Bar.
4. Latch the Backing Rail and the Top Rail.
5. Tighten the Backing Rail and smooth the quilt.
6. Tighten the Top Rail and smooth the quilt.
7. If the batting has become distorted or a dark thread is under the quilt top, the Top Rail may be raised.
• Lift the Top Rail holding the bar in the middle and raise.
• Make the adjustments needed.
• Lower the Top Rail holding the bar in the middle and latch the Top Rail.
Click here for video:
Advancing the Quilt
16
Page 17

My BERNINA
BERNINA Q SERIES WORKBOOK
QUILTING ON THE TABLE
To stitch the exercises on the table, you’ll need:
• A quilt top or practice fabrics at least 36” x 36” basted together with batting and backing at least four inches longer than
the quilt top fabric
• Standard Longarm Foot #9
• Thread for top and bobbin, recommend same thread for both
• Needle: Quilting needle size 90
START, STOP, SECURE
1. Program the foot control with the Securing Stitch.
2. Use the back-kick (heel portion of the foot control) to initiate the rst part of the secure function. The foot will lower,
the machine stitches one stitch and the presser foot raises.
3. Pull the top thread to bring the bobbin thread up and hold.
4. Use the foot control for securing again to stitch the securing stitches. Press and hold the back-kick until the stitching
stops.
5. Quilt.
6. To secure at the completion of quilting, stop stitching.
7. Use the back-kick to secure and the securing stitches will stitch. Press and hold the back-kick until the stitching stops.
8. Use the back-kick again to pull the bobbin thread and cut the threads.
Click here for video:
Start, Stop, Secure
SET THE STITCH LENGTH
• Adjust stitches per inch with + or – icons or by using the slide bar.
• Note that changes are indicated by a yellow box around the altered
setting.
• To clear the setting, touch the yellow-bounded SPI box.
• SPI can be set for BSR1 and BSR2.
Click here for video:
Set the Stitch Length
17
Page 18

My BERNINA
BERNINA Q SERIES WORKBOOK
QUILTING ON THE TABLE
START/STOP FUNCTION
The Q20 Table Model machine has a Start/Stop function located in the
Function Bar of the Sewing Menu screen. Use this function when not wanting
to operate the machine with constant pressure on the foot control.
Open the Start/Stop function by touching it on the screen.
The screen opens to the Start/Stop Screen. The stitching screen displays the
selected stitch mode. To start the machine tap on the back kick of the foot
control with your heel. Once the machine starts stitching, your foot may be
removed from the foot control. When ready to stop press on the back kick of
the foot control with your foot. Select Exit to exit the Start/Stop Screen and
return to the sewing menu. Or If you press on the front of the foot control,
the machine will stop and exit the function.
Click here for video:
Start/Stop Function
18
Page 19

My BERNINA
BERNINA Q SERIES WORKBOOK
QUILTING ON THE TABLE
BSR MODES AND MANUAL STITCHING
• BSR1: Constant needle movement once the start/stop is active
• BSR2: When start/stop is active, needle will move once the fabric is moved
• BSR3: Basting mode
• Manual: Operator regulates stitch length
The BSR indicator will turn green when the machine is active (Start engaged). This is especially helpful when
using BSR2 or BSR3 as the needle will pause its movement when the fabric movement is paused, but the
machine is still active..
BSR3 (BASTING)
BSR3 is used for basting. On the table, pinning or spray basting may be done before BSR3 basting to ensure the layers stay
together.
• Select BSR3 and select the basting length of choice.
SPI 1: 1 stitch per inch
SPI 2: 2 stitches per inch – stitches are ½”
SPI 4: 4 stitches per inch – stitches are ¼”
• The speed the fabric is moved may need to be increased to accommodate the SPI settings. When the SPI=1 is selected,
move the fabric fast enough for stitches to form 1” apart.
• Baste across the top and sides of the quilt to secure the layers.
• Basting is not only for basting the top and sides of the quilt. You can baste any area of the quilt that you desire.
• In an area where compact quilting is planned, basting the area rst may prevent distortion.
Click here for video:
BSR3 (Basting)
BSR2
In Mode 2, the machine doesn’t stitch until the fabric is moved. The faster the fabric is moved, the higher the speed of the
machine. The needle stops stitching when the fabric is not moved under the needle. There is no build up of stitches when
stopped or stitching slowly when deciding where to stitch next.
BSR2 is good for curves and motifs without sharp points such as wavy lines, stippling and pebbles. It is also great for rulerwork
(optional accessory).
1. From the Sewing Menu, select BSR2.
2. Set the stitch length as desired. This may depend on the motif size, thread size and personal preference.
3. Bring the bobbin thread up using the foot control if programmed for securing.
4. Begin stitching a gentle wavy line vertically about 7-8 inches long. Stitch horizontally to the start of the next line. The
next line may echo the rst or have a random curve. Continue stitching lines with variable spacing. Stitch about 5-6 lines.
5. Add horizontal lines to form a ‘wavy plaid’, but do not rotate the quilt. Again, random curves and spacing will make
the pattern more interesting. If this were on an actual quilt, the travel lines would be in the ditch.
6. Once familiar with moving the fabric horizontally and vertically, try an all-over quilt design, such as loose stippling.
7. When the fabric stops moving, the BSR is still on but the needle stops and waits in a raised position until the fabric is
moved again, or the BSR is turned off.
Click here for video:
BSR2 Table Model
19
Page 20

My BERNINA
BERNINA Q SERIES WORKBOOK
QUILTING ON THE TABLE
BSR1
In this mode, the needle is in constant motion even when the machine is not being moved. The faster the fabric is moved,
the higher the speed of the machine. BSR1 allows for precise work when doing corners or any work that has sharp points
such as swirls, leaf points, paisley patterns, and hearts.
1. From the Sewing Screen, select BSR1.
2. Set the Stitch Length (SPI) as desired. This may depend on the motif size, thread size and personal preference. Use the
slide bar or the +/-.icons.
3. To clear the stitch length, select the yellow-bounded SPI box.
4. In BSR1, the idle speed of the needle can be changed. This occurs during a pause or when the fabric stops moving.
Work with the idle speed to nd a comfortable setting. As more experience is gained, a faster idle speed may be
desired.
5. Practice swirls, then move on to leaves. The pause at the point of the swirl and leaves allows a second stitch to form a
point. Don’t hesitate too long because the needle is always moving and a thread knot/lump could form on the project.
Click here for video:
BSR1
MANUAL MODE
1. Select Manual Mode.
2. Set the speed between 100 – 2200 stitches per minute. The stitch length will be determined by the movement of the
fabric.
3. Set speed at 2200 stitches per minute and use the foot control to regulate the speed.
4. Use Manual Mode when stitching small things, such as micro stippling or small pebbles.
Click here for video:
Manual Mode
20
Page 21

My BERNINA
BERNINA Q SERIES WORKBOOK
QUILTING ON THE TABLE
STRAIGHT LINE QUILTING
Quilting perfectly straight lines will be more successful with the use of a quilting ruler and a rulerwork foot (both are optional
accessories).
1. Attach a Ruler Foot #96 to the machine.
2. Select BSR2.
3. Set the needle to stop down.
4. Lower the foot and lower the needle in the fabric.
5. Place the ruler edge next to the foot. Move the ruler along the side of the foot to stitch a straight line. The ruler and
fabric should move as one.
6. For a longer line, stop and reposition the ruler to begin again. Always begin with the foot down and needle down
before placing the ruler next to the foot.
7. Avoid pressing too hard on the ruler or too hard against the foot; both will make moving the fabric difcult.
Click here for video:
Straight Line Quilting
21
Page 22

My BERNINA
BERNINA Q SERIES WORKBOOK
REFERENCE: BATTING
Batting is the lining or lling that goes in between the quilt top and the quilt backing. The batting is key to the way the
quilt will feel when it is completed. Some battings are needle punched, where needles punch through the batting and felt
it together, and some are bonded together with a glue-type bonding agent. Some may even be both. Each different type of
batting comes with a recommendation of how much space should be left between the stitches of the quilting. Some battings
will shrink after washing so you may want to wash them rst, or if you like the look you may want to wait until the quilt is
complete. Note: Always check the packaging of the product you will be using.
Selecting a batting is a personal choice. Some things to consider are washability, how much quilting will be done, the nished
look and the desired warmth.
TYPES OF BATTINGS
100% Cotton:
• Low loft
• Drapes nicely
• Softens with use
• Shrinks 3-5%
• Usually needle punched
• Quilting space 4-8 inches apart (see packaging)
• Great for bedding
• Great for garments
Cotton Blends:
• More loft than 100% cotton
• A little more breathable than polyester
• Shrinks less than 100% cotton
• Blend of cotton and polyester, most common
• Quilting space 2-4 inches apart (see packaging)
• Sometimes comes in black for dark fabrics
• Good for garments, bedding, wall quilts and a variety of
quilted projects
Polyester:
• Loftier, used for a puffy look to the quilt
• Available in different lofts
• Quilting space (see packaging)
• Lighter weight than cotton
• Mostly non-allergenic
• Does not breath like a natural ber would
• Little to no shrinking
• Use for garments, table runners and wall quilts
Wool:
• Lightweight
• Soft
• Warm
• Recovers nicely after being compressed by folds
and storage
• May cause an allergic reaction in sensitive
individuals
• Must be protected from moths
• Quilting space up to 8 inches apart (see
packaging)
• Shrinks very little
• Great for bedding because of the warmth
Silk
• Lightweight
• Soft
• Warm
• Wonderful for quilted garments
• Shrinks more than other battings
• Quilting space around 3 inches apart (see
packaging)
Bamboo
• Environmentally friendly, as the plant grows very
fast
• Breathable and drapes well
• Sometimes blended with other natural bers
• Sometimes a little more costly than others
• Quilting space up to 8 inches apart (see
packaging)
22
Page 23

My BERNINA
BERNINA Q SERIES WORKBOOK
REFERENCE: THREADS
THINGS TO CONSIDER WHEN CHOOSING A THREAD
• Weight - The higher the number the thinner the thread
• Ply - The number of strands twisted together to make up the thread
Cotton bers twisted together are strong
Polyester bers twisted together have some stretch
Polyester wrapped cotton has the strength and the stretch
• Fiber Content
This information is found on the end of the spool
GUIDELINES FOR RECOMMENDED THREAD FOR QUILTING
• There are none! Check them all out-experiment with all kinds. Have fun with them. See how the thread can change the
look of your quilt. Be bold. Be brave!
TYPES OF THREAD
• Quilting Thread
• Cotton
• Polyester
• Monolament
• Embroidery Thread
• Rayon
• Polyester
• Silk Thread
• Bobbin Thread
BOBBIN THREAD
• Using the same thread top and bottom will result in less tension adjustment.
• Prewound bobbins may be used.
• Be sure to test and set the bobbin tension using the Bobbin Tension Gauge.
• When using two different weights of thread, begin making tension adjustments on the top thread. If the desired tension
can not be attained then make adjustments to the bobbin tension.
TIPS ON THREAD
• The heavier the thread, the more the quilting will show on the quilt.
• Thin thread is recommended for micro stitching or work that blends into the background.
• Using similar thread on top and in the bobbin will most likely give you the best tension.
• When using two different weights of thread, you may need to adjust the tension.
WHEN THREAD BREAKS
• Slow down.
• Higher speeds and some threads don’t mix.
• Rethread the machine.
• Change the needle. Are you using the proper size? If the needle is too small it will shred medium and heavy weight
threads. Try a topstitch needle if you are having this issue.
• Lower your tension. When the top thread loops on the bottom, the tension is too lose.
• Change to another brand of thread.
23
Page 24

My BERNINA
BERNINA Q SERIES WORKBOOK
REFERENCE: NEEDLES
The same needles used in BERNINA home sewing machines are used in BERNINA Longarm machines. Select BERNINA branded
or Schmetz needles using the 130/705H system.
Longarm quilting wears the point of needles quickly. Begin each project with a new needle. Needles are inserted the same
way (at side to the back) as they are for home machines. Because the BERNINA longarm uses domestic needles, a wider
range of threads requiring specialty needles can be used successfully. Using a double needle is also possible with the addition
of the double needle stitch plate (optional accessory).
Select the needle type and size according to thread used. Additonal needle considerations should be the bulk of the project.
• Light Weight 80/12
• Medium Weight 90/14
• Medium to Heavy Weight 100/16
• Heavy Weight 110 /18
It is important that the needle is the correct size for the thread.
24
Page 25

My BERNINA
BERNINA Q SERIES WORKBOOK
REFERENCE: NEEDLE INFORMATION
Needle “Secret” Code
• DRI = Triple
• E = Embroidery
• J = Jeans
• L, LL, R = Leather
• M = Microtex
• MET = Metallic
• N = Topstitching/
Cordonnet
• Q = Quilting
• S = Stretch
• SUK = Fine Ball Point
• SES = Medium Ball Point
• ZWI = Double
• ZWI = Double
Needle Size Conversion
Regardless of the system,
the greater the number,
the larger the diameter of
the needle.
General Information
Along with thread, needles are very important to stitch formation. Many “mechanical”
problems and damage to fabrics can be traced to a bent, damaged, or incorrect size or
type needle.
When selecting the correct needle, consider the following:
• Needle system – 130/705H
• Needle point – assures proper stitch formation; avoids fabric damage
• Needle size – smaller for lightweight fabrics; larger for heavier fabrics
If the needle is:
• Too small – the thread can’t stay in the groove to form a loop to be picked up by the
hook point
• Bent – the thread loop forms too far away from hook point and the hook can’t enter
the loop to form a stitch
• Blunt – the needle won’t pierce fabric, so no thread loop forms to make a stitch
Need to Know
• Needles should be changed before the start of every project, or earlier if stitches are
looking bad. The needle is the most inexpensive part in your longarm machine, but it
is crucial for getting good results and keeping your machine running well.
• The selected thread should t in the groove on the front of the needle. If it isn’t
protected by the groove, a needle with a larger groove should be used.
European vs. Domestic
60=8 90=14
70 =10 100 =16
75 =11 110 =18
80=12 120=19
• Always make sure needles are fully inserted as high as possible, with the at side to
the back.
25
Page 26

My BERNINA
BERNINA Q SERIES WORKBOOK
REFERENCE: MACHINE NEEDLE CHART
TYPE SIZES DESCRIPTION
Ballpoint 80 – 100 Has a rounded point. 90 for t-shirt quilts; 90-100 for sweatshirt
eece quilting.
Stretch 80 – 90 A Stretch needle has a more rounded point than a Ballpoint,
and a blue anti-cling coating which helps to prevent skipped
stitches in knits like t-shirts. Sometimes used on Ultrasuede,
vinyl, and plastic.
Universal 80 – 120 A compromise between a Sharp and a Ballpoint; used on both
wovens and knits.
Double 2.0/90 – 4.0/100 Two needles attached to one shank. For stitching two lines
at one time. Great for ribbon candy stitching. Available in
Universal, Stretch, Jeans, Metallic, and Embroidery needles.
Triple 2.5/90 – 3.0/90 Three needles attached to one shank. Stitches three lines at one
time.
Jeans 80 – 110 Has a sharp point and a shaft that is less prone to ex. The
sharpness of the needle is better for use in cotton battings or
heavier fabrics.
Leather 80 – 100 Point is a sharp cutting wedge. Used for leather only. Not for
vinyl or simulated leathers.
Microtex / Sharp 80 – 90 Sharp point; thin shaft. Specially designed for microber fabrics.
Quilting 75 and 90 Thin, tapered point eliminates potential damage to fabric when
seaming and cross-seaming or quilting.
Topstitch 70 – 100 A sharp point with a large eye and deep groove. For use with
heavier fabrics – the large groove cradles heavier threads.
Embroidery 75 and 90 Light ballpoint needle with large eye and groove; has a coating
and a larger scarf. Prevents shredding of rayon or metallic
threads. Two threads may be used through the eye.
Metal 80 Similar to Embroidery needle with large eye and deep groove.
Made of a heat-resistant alloy with a friction-reducing coating.
Suitable for manufactured bers such as polyester, acrylic, and
nylon.
Metallic 70 – 100 Designed for metallic threads; has a large eye and deep groove.
26
Page 27

My BERNINA
BERNINA Q SERIES WORKBOOK
QUILT PATTERNS TO TRY
STIPPLING
Stippling or meandering is great to ll space. It can be small or large. Great for
Edge to Edge quilting.
Good stippling changes direction frequently so that you don’t end up with long
lines. This is a very forgiving design that can be used at any scale. When done at
a small scale, it can make other areas of your quilt pop!
1. Bring up the bobbin thread and secure to start.
2. Select Manual Mode and quilt.
3. Select BSR2 and quilt to note the difference and which mode you prefer.
4. Finish stitching by tying off.
PEBBLES
The trick to stitching pebbles is changing direction. Stitch one clockwise and
the next counter-clockwise etc. You will travel over your existing lines a short
distance to get from one pebble to another.
It is recommended to travel up the edge of the block to the second circle just
to ll the little space and then reverse directions starting with the third circle.
You are creating a texture and any little discrepancies are not as noticeable if
you are using matching thread.
1. Bring up the bobbin thread and secure to start.
2. Select BSR2.
3. Quilt design.
4. Finish stitching by tying off.
BACK AND FORTH SASHING
A simple up and down or back and forth motion can be very effective. You can
use the foot as a guide if you want the lines close together. Make it your aim to
come about 1/8” from the edge of the sashing, rather than touching the edge.
1. Bring up the bobbin thread and secure to start.
2. Select BSR2.
3. Quilt design.
4. Finish stitching by tying off.
27
Page 28

My BERNINA
BERNINA Q SERIES WORKBOOK
QUILT PATTERNS TO TRY
PAISLEY
The trick to the Paisley is changing the directions. If you don’t change directions
you will start to develop a spine. To change direction, bounce off the paisley
shapes and start in a new place. Pause for good points.
1. Bring up the bobbin thread and secure to start.
2. Select BSR1.
3. Quilt design.
4. Finish stitching by tying off.
LEAVES
Leaves are so fun to play with because they are forgiving. As in nature, each
leaf is different.
1. Bring up the bobbin thread and secure to start.
2. Select BSR1.
3. Quilt design.
4. Finish stitching by tying off.
RIBBON SASHING
This design is quick to execute and you end up back where you started. Follow
one ribbon down and echo it going back up. This design is very forgiving and it
doesn’t matter if the width of your “ribbon” varies.
1. Bring up the bobbin thread and secure to start.
2. Select BSR2.
3. Quilt design.
4. Finish stitching by tying off.
28
Page 29

My BERNINA
BERNINA Q SERIES WORKBOOK
QUILT PATTERNS TO TRY
HEARTS
Add an extra curve to the paisley design and you have hearts. Pause for good
points.
1. Bring up the bobbin thread and secure to start.
2. Select BSR1 or BSR2.
3. Quilt design.
4. Finish stitching by tying off.
SWIRLS
When quilting swirls, travel into the center of the swirl making sure to leave
room to travel out. To start the next swirl, backtrack along already stitched
lines.
1. Bring up the bobbin thread and secure to start.
2. Select BSR1 or BSR2.
3. Quilt design.
4. Finish stitching by tying off.
29
 Loading...