

Page 1

Page 2

Page 3

Table of Contents
Table of Contents
Tabl e of Cont ents
Introduction .............................................................................. 4
Machine Parts ....................................................................................................5
Display and Selection keys............................................................................6
Select Mode Arrows ....................................................................................7
Align Mode Arrows .....................................................................................7
Sewing Mode Arrows .................................................................................7
Accessories .........................................................................................................9
Optional Tools ................................................................................................. 10
Operation ..................................................................................11
Preparing to Embroider .............................................................................. 11
Bobbin Winding ........................................................................................ 11
Installing the Bobbin ............................................................................... 14
Threading the Machine .......................................................................... 15
Thread the Needle Using the Needle Threader ............................. 16
Hooping ....................................................................................................... 18
Using the Template .................................................................................. 19
Attaching the Hoop to the Machine .................................................. 23
Selecting a Design ........................................................................................ 24
Selecting a Design from Internal Memory ...................................... 24
Selecting a Design from a Memory Card ......................................... 25
Align Design .................................................................................................... 26
Sewing the Design ........................................................................................ 27
Trace the Design ....................................................................................... 27
Sew the Design .......................................................................................... 28
Thread Tension adjustment ....................................................................... 30
Adjust Upper Thread Tension ............................................................... 30
Bobbin Tension Adjustment ................................................................. 31
Changing a Needle ....................................................................................... 33
Thread Breaks ................................................................................................. 35
Bobbin Thread Breaks .................................................................................. 36
Removing Hoop from Machine ................................................................ 37
Table of Contents
Machine Cleaning and Oiling ..........................................37
Error Codes and Troubleshooting ................................. 39
Error Codes ...................................................................................................... 39
Troubleshooting ............................................................................................ 41
H79_Manual.indd 3H79_Manual.indd 3 10/6/2008 4:28:53 PM10/6/2008 4:28:53 PM
Model H79
3
Page 4

Introduction
Introduc t ion
Introduction
®
bernette
for
Introduction
Welcome to the exciting and fun world of machine embroidery.
Your Model H79 Embroidery Machine should give you many,
many hours of fun and creativity. To familiarize yourself with
the machine and how it works, it is recommended that you read
through this manual. Your experience will be much more fun if
you are familiar with the parts of the machine, what each one does
and where to reference it again when you need more information.
Use supplies recommended for use with embroidery. Many
products look the same but are not made especially for machine
embroidery. Needles, threads and stabilizers are the main
products you will want to keep on hand to make your embroidery
experience easier. When you have the products handy and ready
to use, you’ll be more apt to use your machine more often. It will
be great for gifts for family and friends. They’ll be so impressed
with your new talent when you make special gifts for them.
Enhance your home décor with pillows, towels, even wall hangings
and quilts. Use your machine for scrap-booking or card making.
Your cards will be extra special! There is no limit to your creativity!
Best of all, you’ll have many hours of relaxation and fun!
Every e ort has been made to make your Model H79 User’s Guide accurate and as easy to understand as possible. Bernina, Inc. is not
responsible for any errors or ommissions.
4
H79_Manual.indd 4H79_Manual.indd 4 10/6/2008 4:29:01 PM10/6/2008 4:29:01 PM
Model H79
Page 5
Know your machine
Intr o duct i on
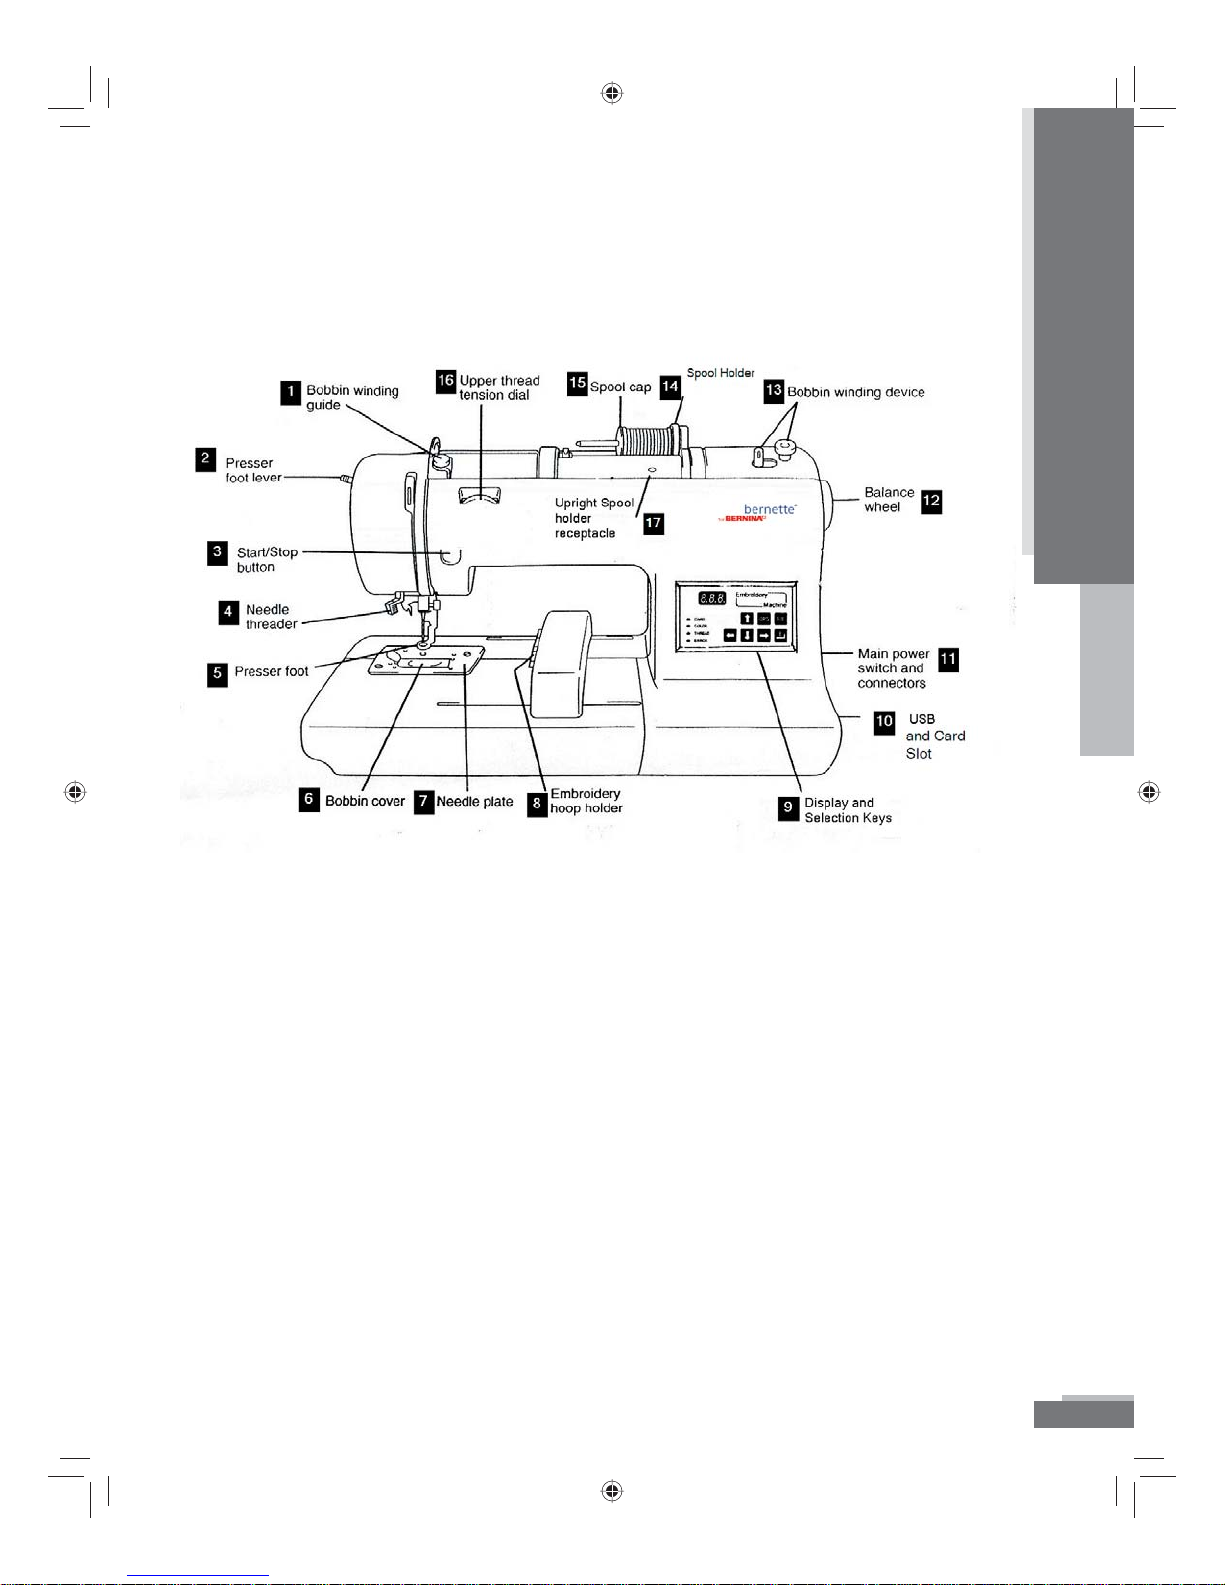
Machine Parts
Introduction
1. Bobbin Winding Guide 10. USB Outlet and Card Slot
2. Presser Foot Lever 11. Main Power Switch and Connectors
3. Start/Stop Button 12. Balance Wheel
4. Needle Threader 13. Bobbin Winding Device
5. Presser Foot 14. Spool Holder
6. Bobbin Cover 15. Spool Cap
7. Needle Plate 16. Upper Thread Tension Dial
8. Embroidery Hoop Holder 17. Upright Spool Holder Receptacle
9. Display and Selection Keys
Model H79
5
H79_Manual.indd 5H79_Manual.indd 5 10/6/2008 4:29:02 PM10/6/2008 4:29:02 PM
Page 6
Intr o duct i on
Introduction
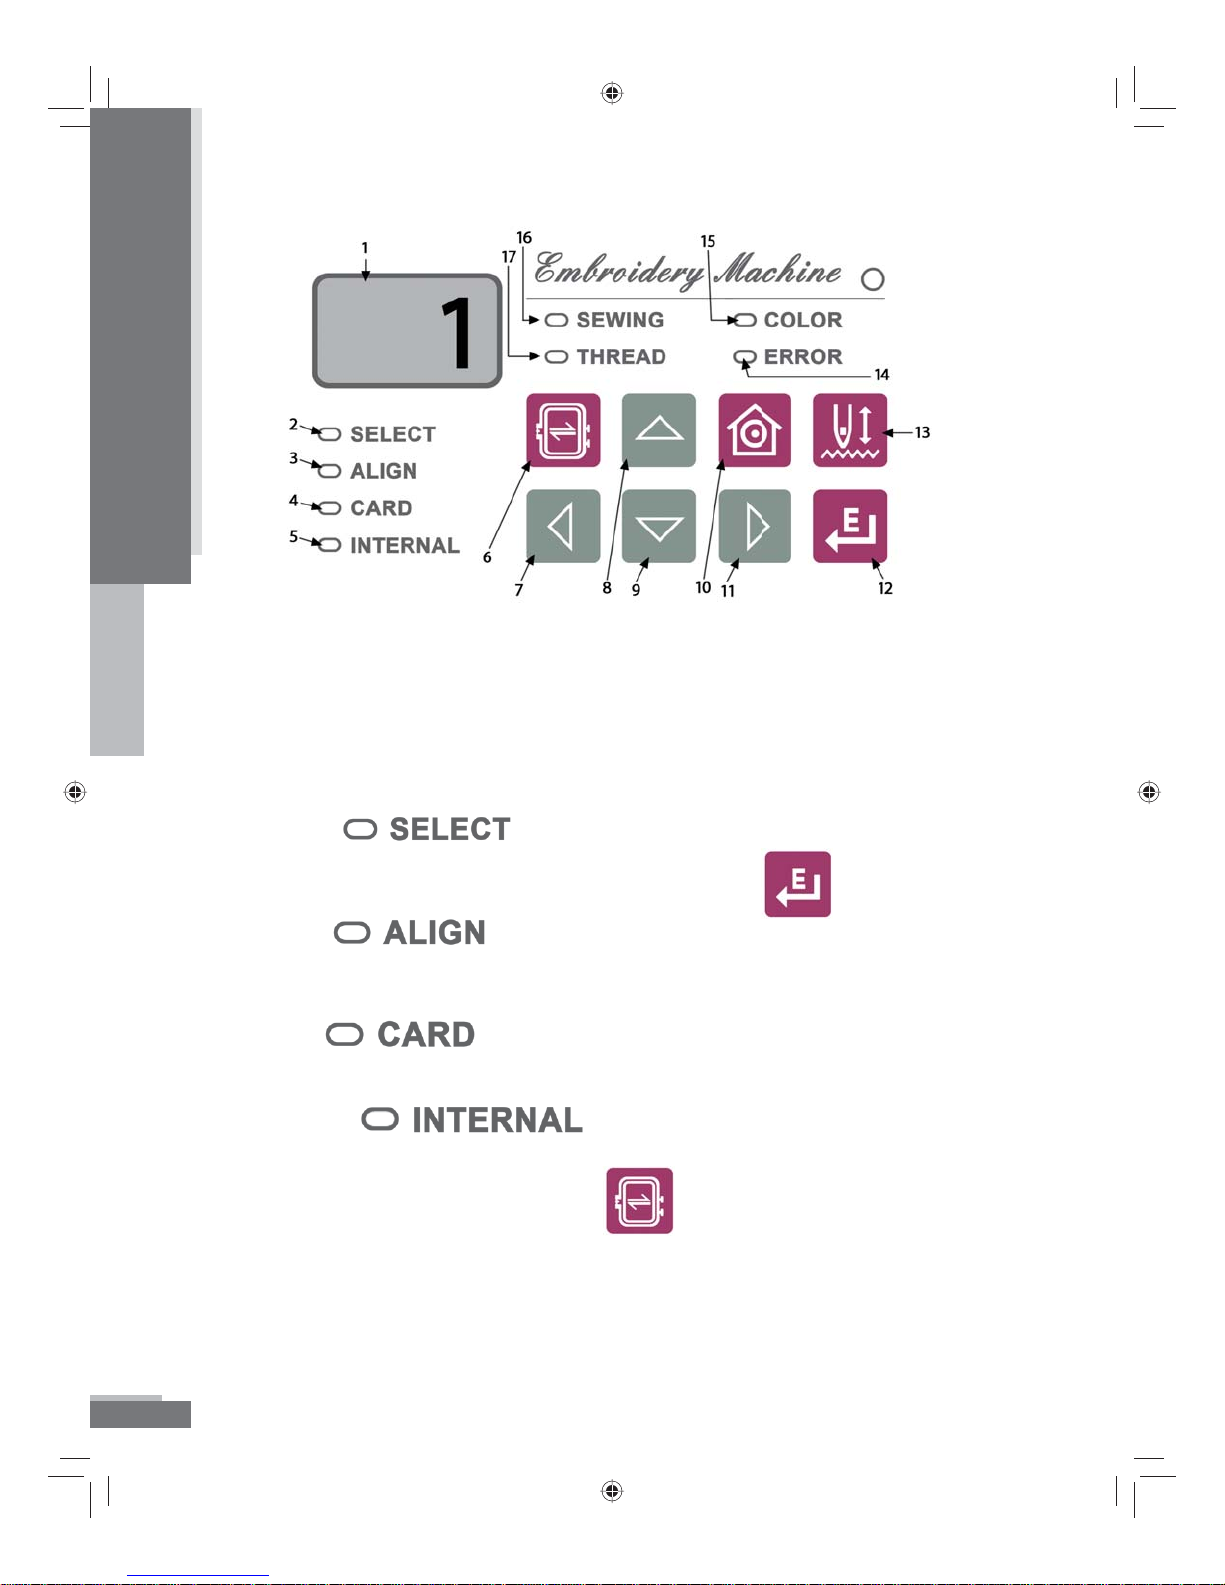
Display and Selection Keys
1. LED Screen – Displays functions
a. Design Number (## for design from Internal Memory or C##
for design on Memory Card)
b. Color Number (i.e. c01, c02)
c. Error message codes—see Error codes, p. 39 - 40.
2. Select is lit when you are in the process of selecting
a design. To make your selection press the
button.
3. Align lights after you have selected a design.
Design can now be embroidered or needle position moved in the
hoop.
4. Card lights to indicate you are accessing designs
from a Memory Card.
5. Internal lights to indicate you are accessing
designs from the Internal Memory of the machine.
6. Only available in align mode, traces the four corners of the
perimeter of the design in the hoop.
7. The arrow keys perform di erent functions depending on which
mode has been accessed.
6
Model H79
H79_Manual.indd 6H79_Manual.indd 6 10/6/2008 4:29:02 PM10/6/2008 4:29:02 PM
Page 7
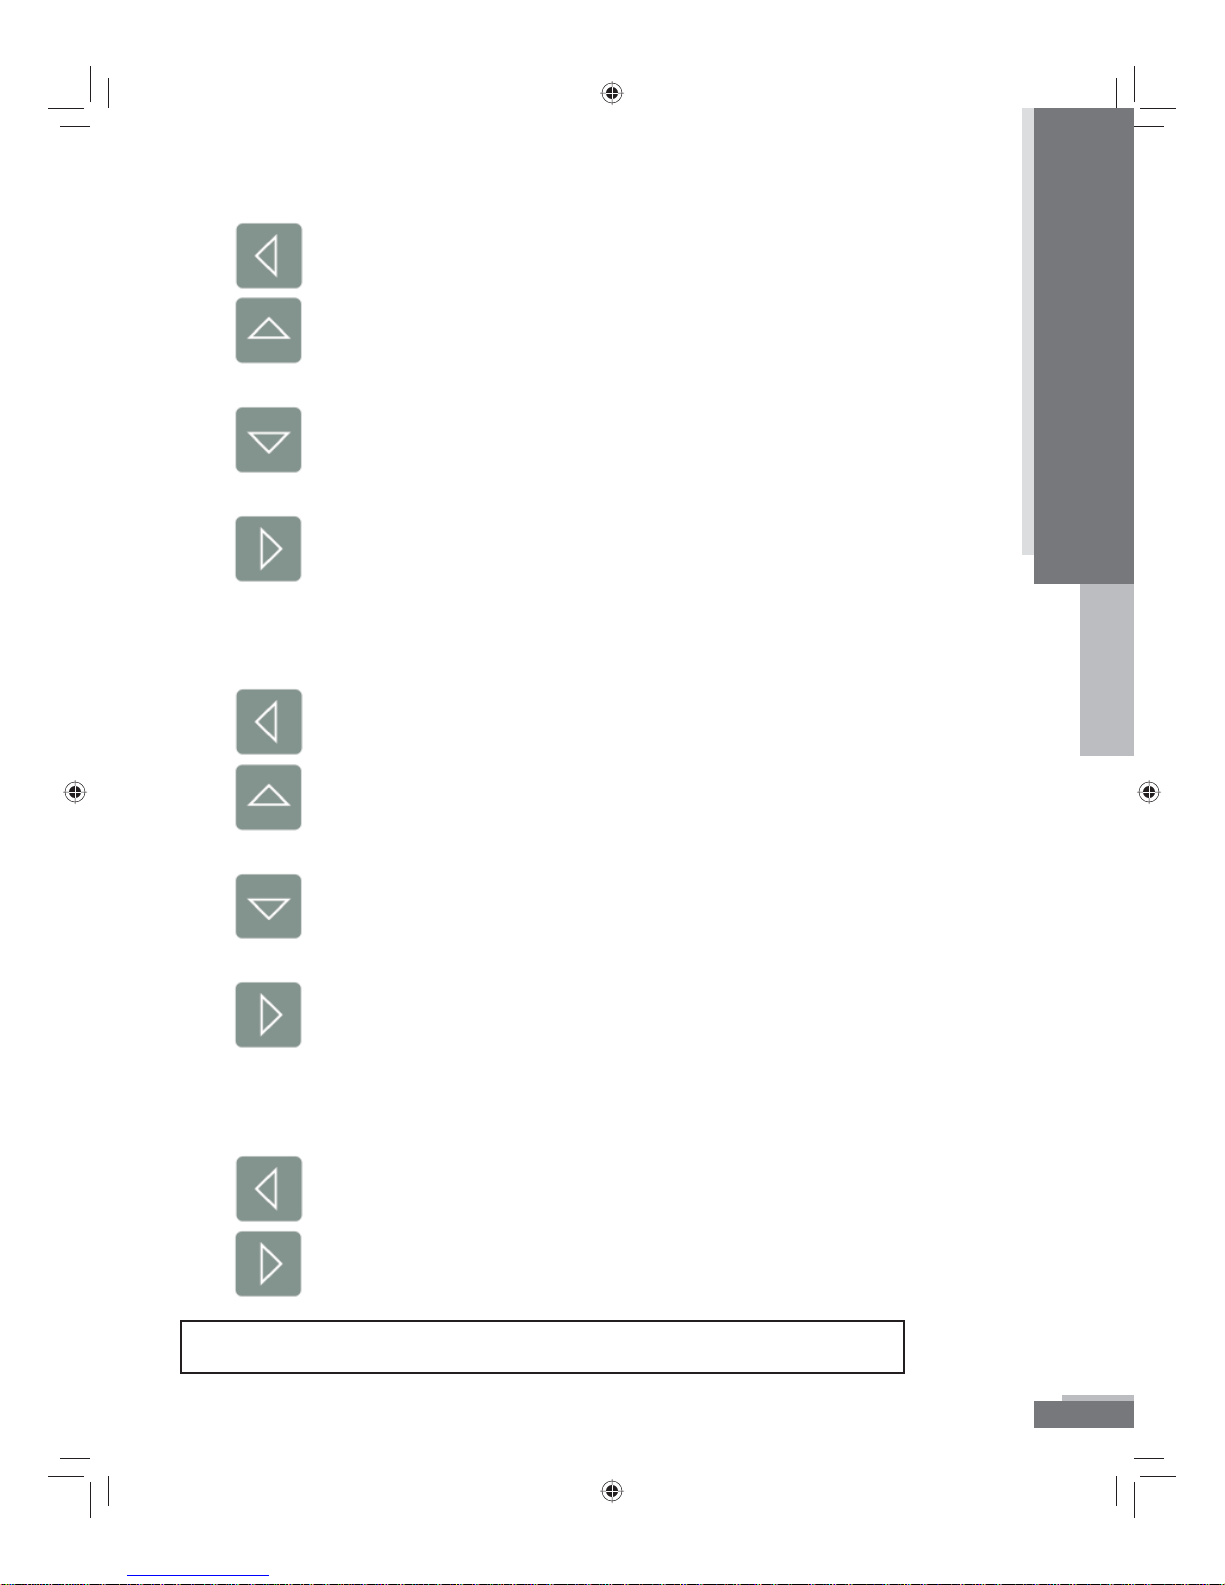
Select Mode Arrows
Intr o duct i on
Goes backward through the list of designs one design at a time.
Introduction
Card Memory.
or Card Memory.
Advances 10 designs at a time in the Internal Memory or
Goes backward 10 designs at a time in the Internal Memory
Goes forward through the list one design at a time.
Align Mode Arrows
Moves needle position closer to the left of the hoop.
Moves needle position closer to the top of the hoop (toward
the back of the machine).
Moves needle position closer to the bottom of the hoop
(toward the front of the machine).
Moves needle position closer to the right of the hoop.
Sewing Mode Arrows
Moves backward through the design one stitch at a time.
NOTE: The Up and Down arrows are not functional in Sewing Mode.
H79_Manual.indd 7H79_Manual.indd 7 10/6/2008 4:29:03 PM10/6/2008 4:29:03 PM
Moves forward through the design one stitch at a time.
Model H79
7
Page 8
Intr o duct i on
Introduction
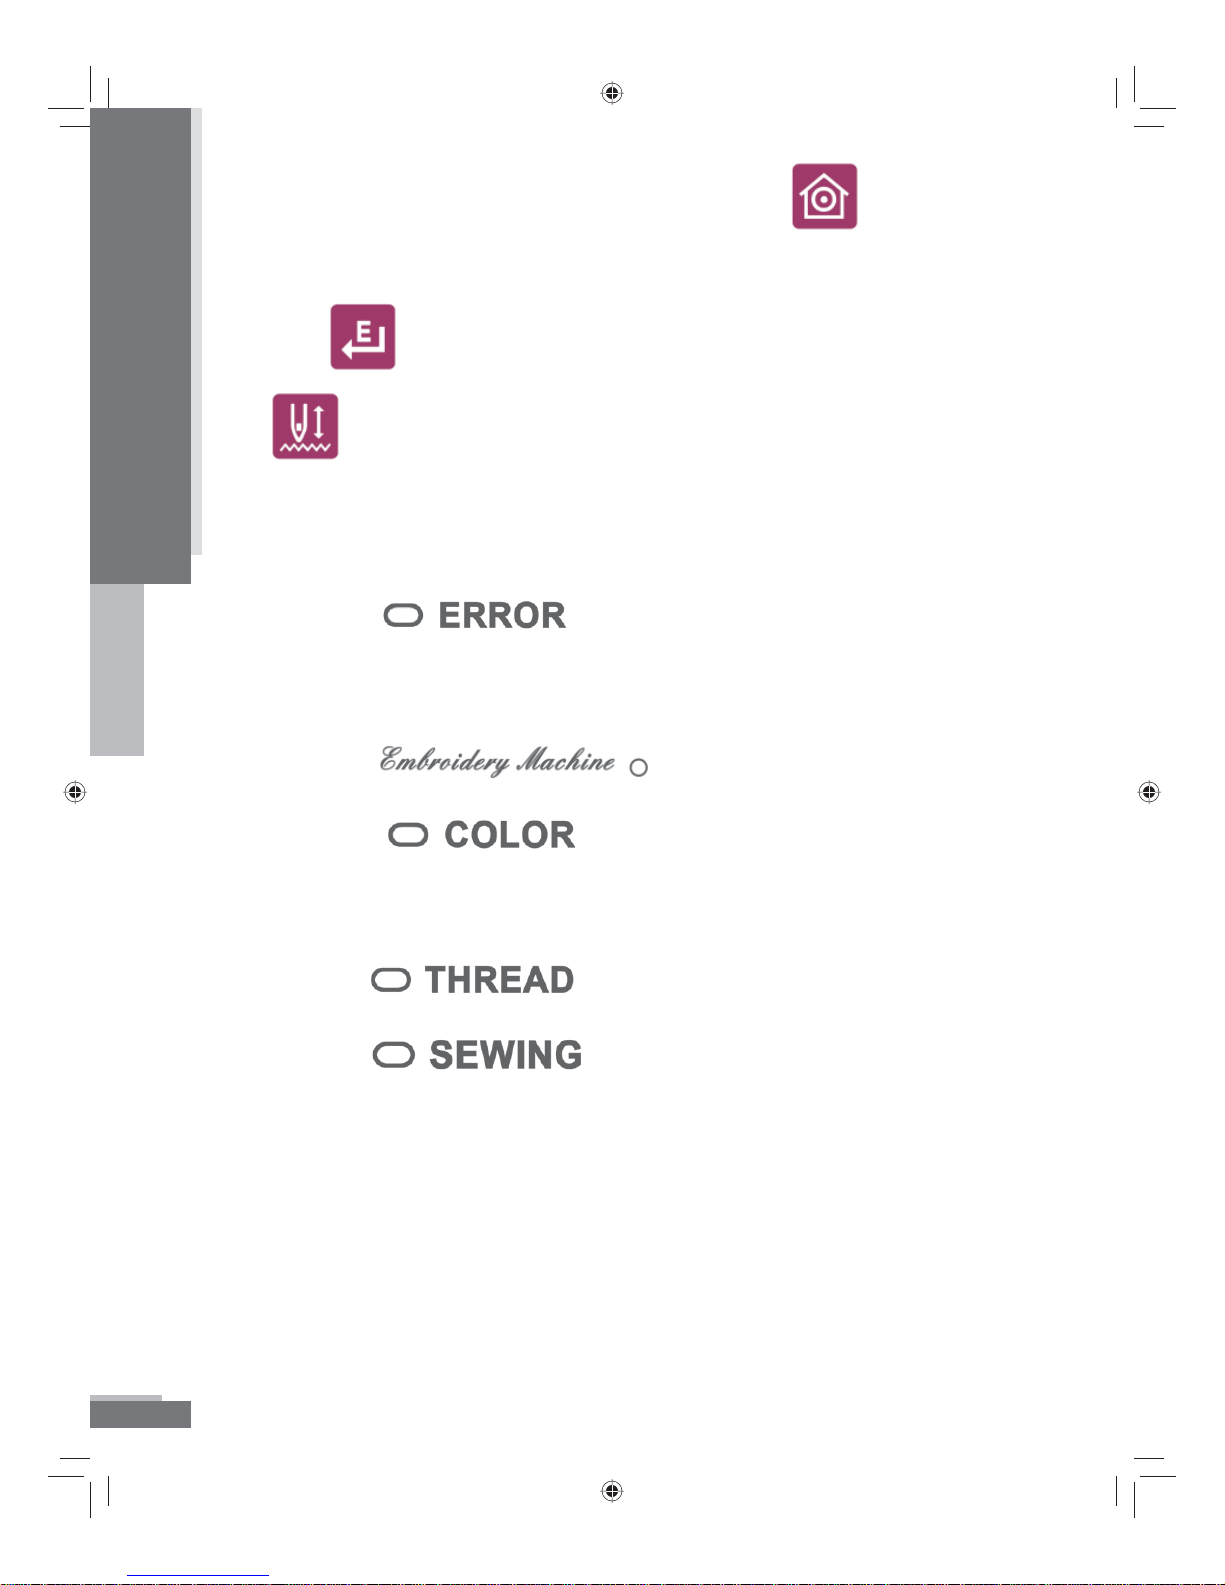
8. To center a selected design in the hoop press .
9. To enter or accept a design number shown in the LED window
press
.
10. Toggles between Internal memory and a Memory Card.
## will be displayed on the LED when the Internal memory of
the machine is accessed. C## signi es Card Memory has been
accessed.
11. When lit, indicates an error—see LED for error
number. In some cases you may have to press the START/STOP
button to see which error has occurred.
12. When lit, indicates machine power is on.
13. When lit, indicates a color change—see LED
for color change number. This will be displayed as a lower case “c”
followed by the number of the sequence of the color.
14. When lit, indicates thread break.
15. When lit, indicates machine is in sewing mode.
8
H79_Manual.indd 8H79_Manual.indd 8 10/6/2008 4:29:04 PM10/6/2008 4:29:04 PM
Model H79
Page 9
Accessories
Intr o duct i on
Introduction
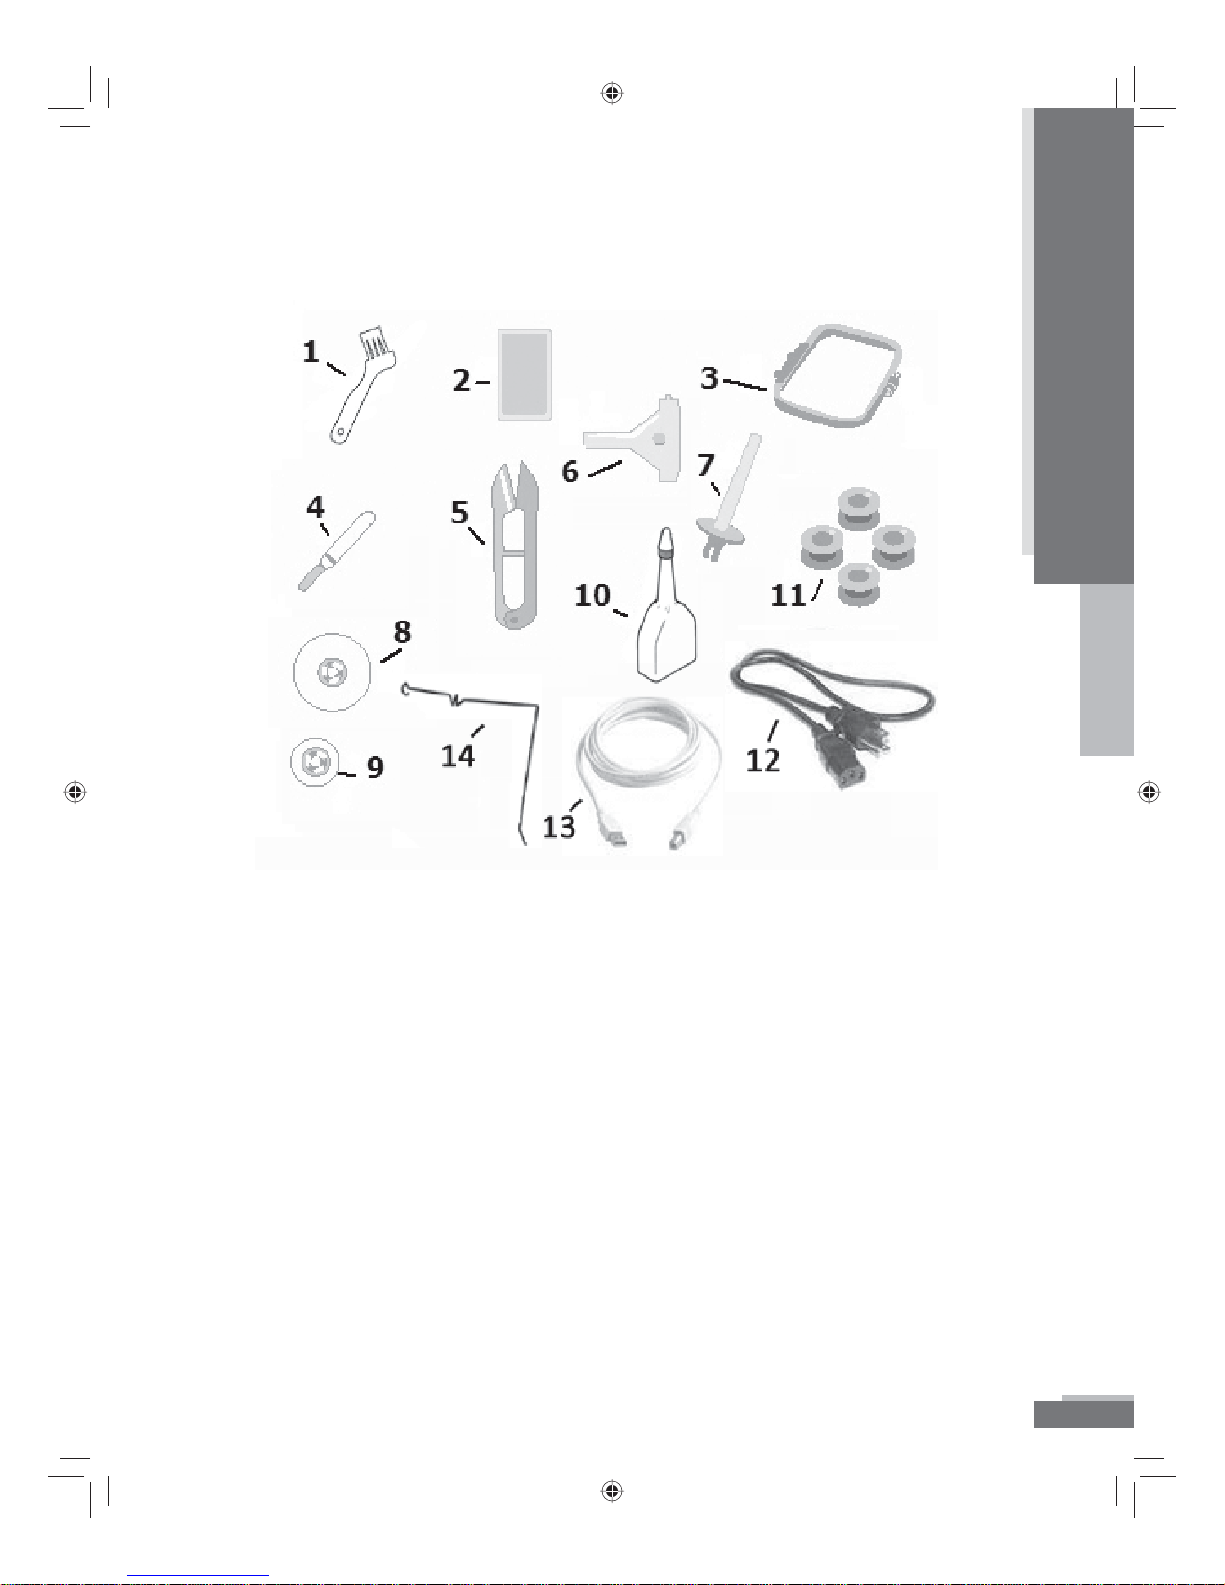
1. Cleaning Brush 8. Large Spool Cap
2. Needle Pack 9. Small Spool Cap
3. Hoop 10. Oiler
4. Seam Ripper 11. Bobbins (4)
5. Thread Nippers 12. Power Cord
6. 3-Way Screwdriver Tool 13. USB - AB Cable
7. Upright Spool Holder 14. Thread Hook
H79_Manual.indd 9H79_Manual.indd 9 10/6/2008 4:29:04 PM10/6/2008 4:29:04 PM
Model H79
9
Page 10

Intr o duct i on
Introduction
Optional Tools
To get the most from your Model H79 Embroidery Machine you
will want to connect it to a Personal Computer. By using the
eXplorations Lite software, you can add more designs to your
collection as well as many other great features. The software gives
you the ability to connect to the Internet and get more designs,
ideas for projects, and new information about your machine.
You do not need to be connected to the internet to use the software.
With the eXplorations Lite software you can see your design before you
sew it. You can size, rotate and mirror image the design as well
as add lettering to personalize your projects. Changing colors of
the design is simple. Using the eXplorations Lite software simply
changes the color of the design on the screen and sees what the
design will look like with the new colors, without having to sew out
the design.
Note:
With the included Navigator, you can see the design sew on the
computer screen as it is sewing on the machine. This is really
helpful if you happen to want to skip part of the design. Simply
stop the machine from the Navigator software, go forward through
the design and then tell the machine to move to that point. If your
machine has a problem you can also back up through the design
using the Navigator. This can be a real time saver as well as being
much easier than backing up with the arrow keys on the machine.
(See Quick Start Guide for more information).
The eXplorations Lite software is very powerful, fun and easy to
use. You can even get more from your machine by upgrading
your eXplorations Lite software to eXplorations Basic software
or eXplorations Galaxy. You can create new designs as well as
edit pre-digitized designs plus have many more features at your
ngertips.
10
H79_Manual.indd 10H79_Manual.indd 10 10/6/2008 4:29:05 PM10/6/2008 4:29:05 PM
Model H79
Page 11
Operation
Operat i on
Operation
Operation
The operation of the Model H79 Embroidery Machine is simple.
However, there are some guidelines to follow to make your
embroidery experience a good one. To prepare to sew your rst
design, there are a few steps you’ll need to take.
Preparing to Embroider
Bobbin Winding
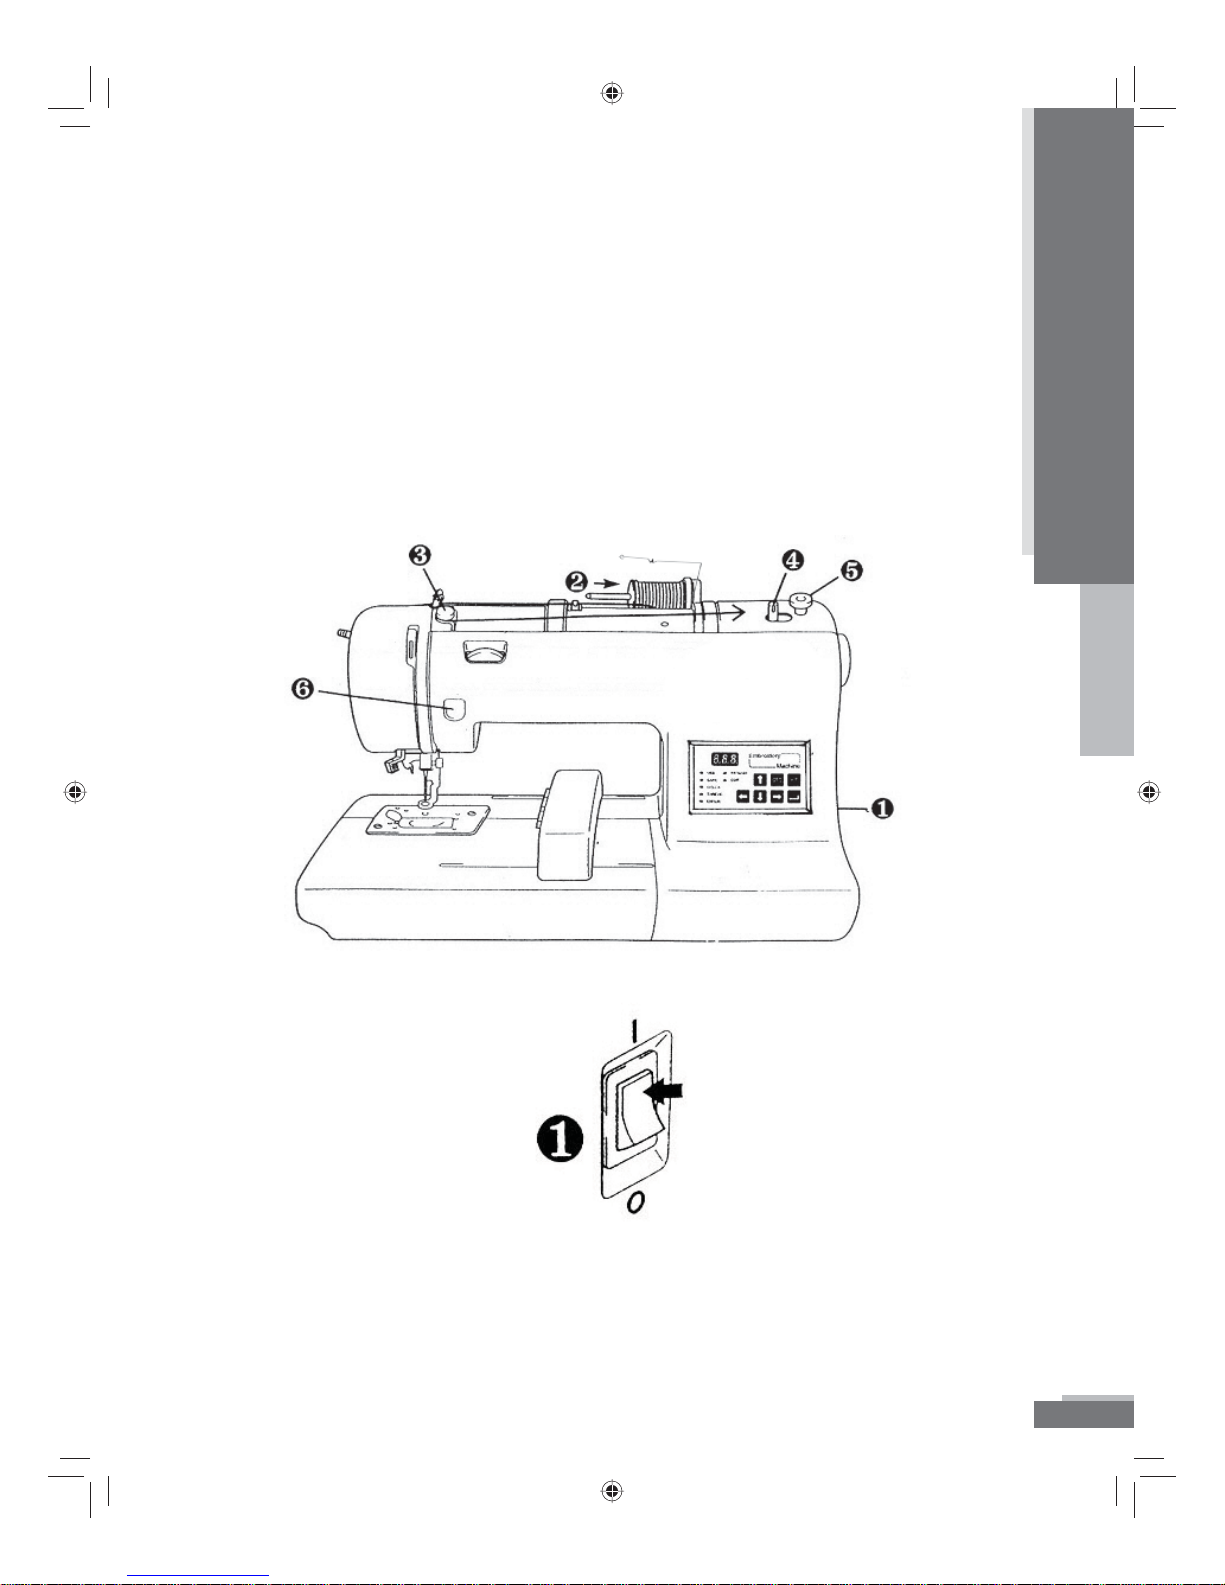
1. Connect the machine to the power supply and turn on the main
power.
H79_Manual.indd 11H79_Manual.indd 11 10/6/2008 4:29:05 PM10/6/2008 4:29:05 PM
Model H79
11
Page 12
Operat i on
Operation
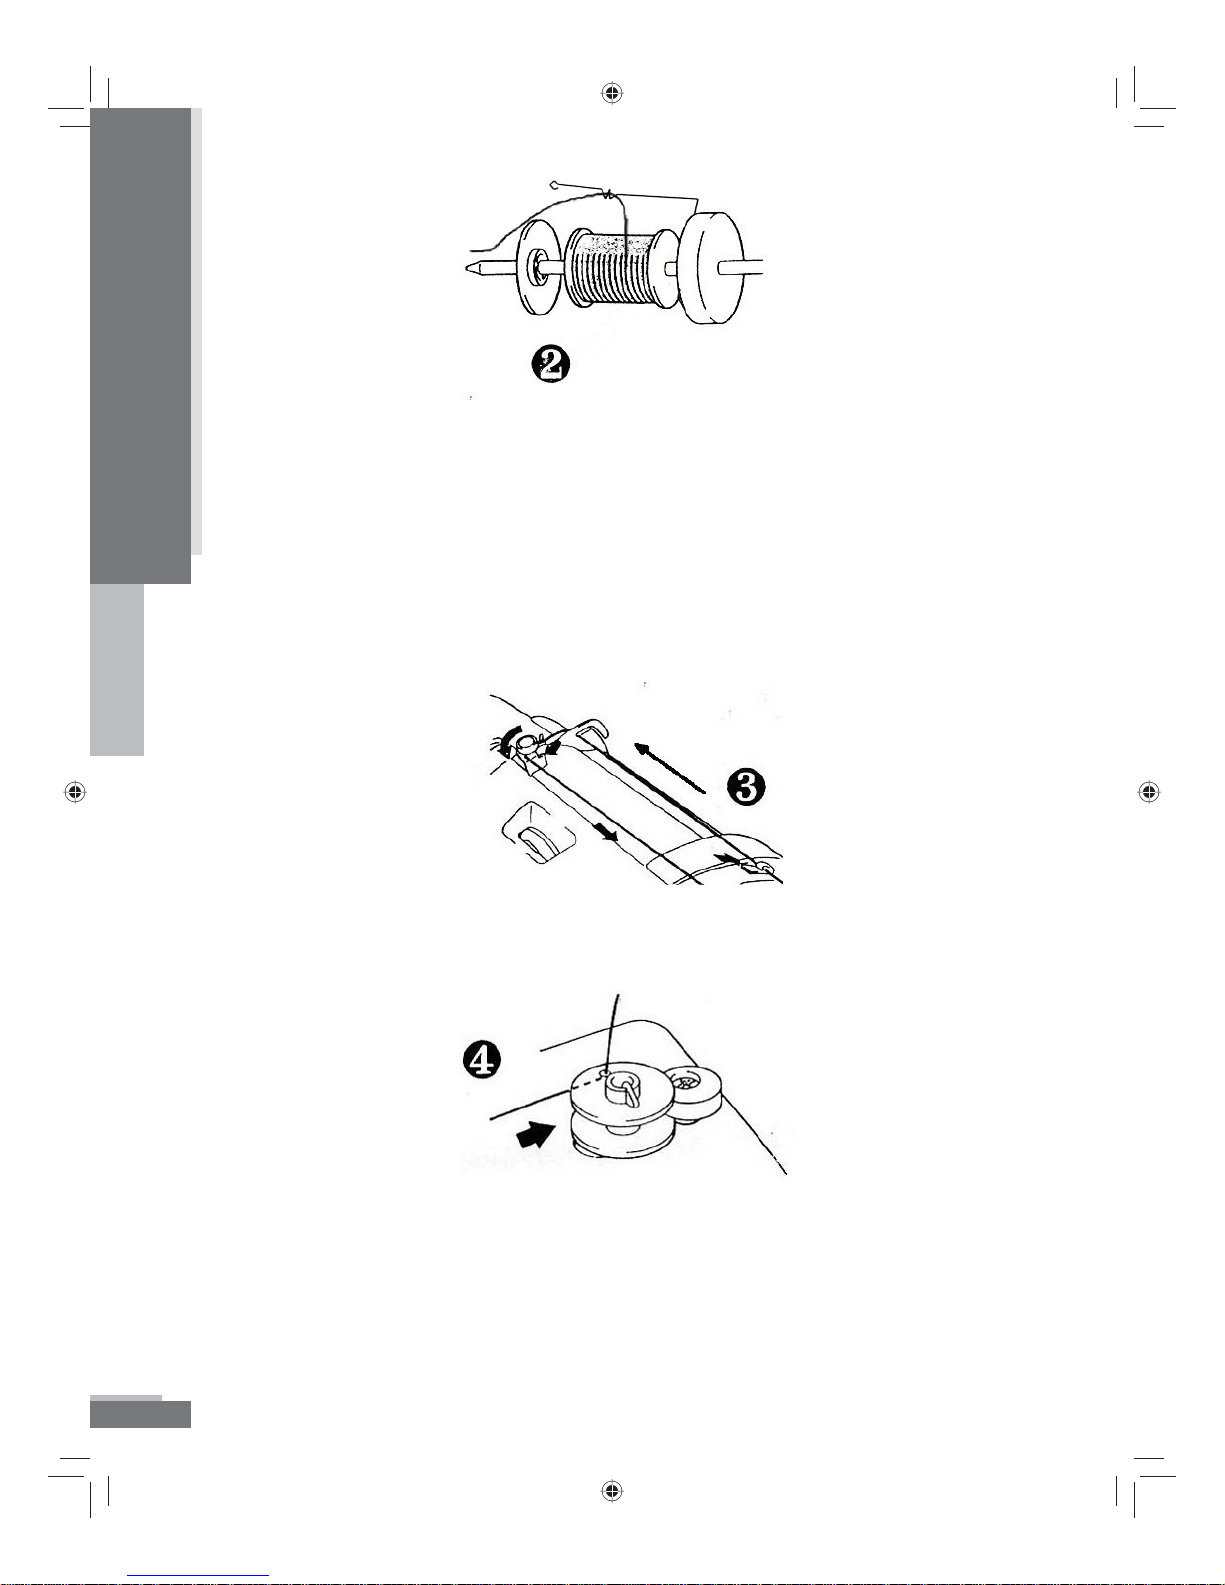
2. Place the spool of thread, the suitable spool cap and the wire
thread guide on spool pin. To attach the thread guide, clamp it
onto the spool pin prior to sliding on the spool of thread. NOTE:
Bobbin thread should always be used for normal embroidery.
Bobbin thread is thread speci cally made for embroidery and
usually comes in white or black. An exception is when stand alone
lace is embroidered. Use the same thread in the bobbin as is
threaded on top when embroidering stand alone lace.
3. Bring the thread through the guides and around the bobbin
winder guide. (Follow thread path illustration on top of machine).
4. Place an empty bobbin on the bobbin spindle. Put the thread
through the small hole in the side of the bobbin from the inside.
Match the groove of the bobbin with the spring on the shaft and
press the bobbin onto the shaft. Push the bobbin winder shaft to
the right. The word “bob” will be displayed in the LED screen. This
tells you when the bobbin winder is engaged.
12
H79_Manual.indd 12H79_Manual.indd 12 10/6/2008 4:29:05 PM10/6/2008 4:29:05 PM
Model H79
Page 13
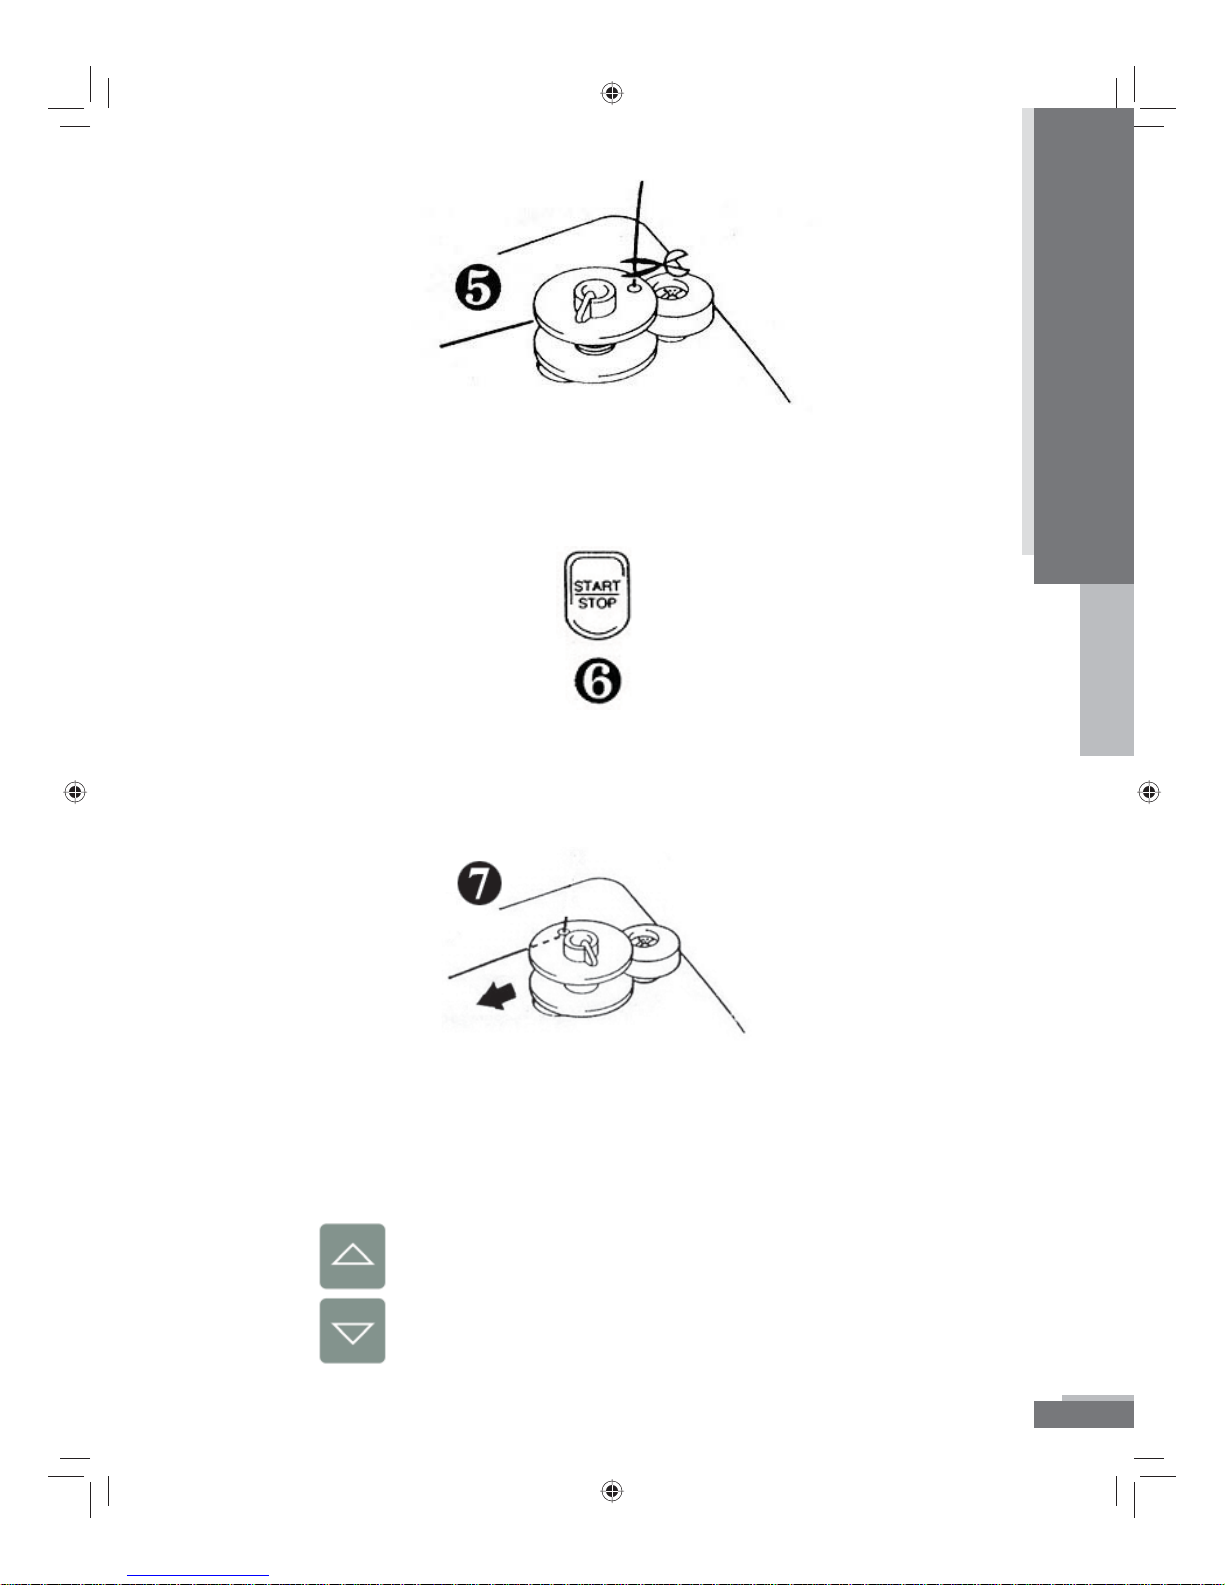
5. Holding the thread end, press the START/STOP button. After the
Operat i on
thread has wound a few times, press the START/STOP button to
stop the machine. Trim thread from top of bobbin.
Operation
6. Press START/STOP button to nish winding bobbin. Winding will
stop automatically when the bobbin is full. Press the START/STOP
button to stop the machine.
7. Push the bobbin shaft to the left and remove the bobbin by lifting
it up from the spindle. Clip the thread. NOTE: The machine will not
embroider until the shaft is returned to the left.
8. The winder speed can be increased and decreased by pushing
either buttons.
H79_Manual.indd 13H79_Manual.indd 13 10/6/2008 4:29:05 PM10/6/2008 4:29:05 PM
Model H79
13
Page 14

Operat i on
Operation
Installing the Bobbin
To put the bobbin in the machine, follow these steps:
1. Slide open the bobbin cover by sliding the small black slide bar to
the right. Remove the plastic cover. If the clear plastic cover does
not ip up, slide it to the right a bit.
2. Insert the bobbin into the shuttle with the thread direction as
noted in the etching under the bobbin cover.
3. Guide the thread around the nger of the machine through the
channel toward the back, and then pull the thread toward you to
cut the thread end. The thread will be cut at the end of the channel
and be ready for use.
14
H79_Manual.indd 14H79_Manual.indd 14 10/6/2008 4:29:06 PM10/6/2008 4:29:06 PM
Model H79
Page 15

4. Replace the bobbin cover by placing the left end in place and
Operat i on
pressing down lightly on the right end to snap in place.
NOTE: There is no need to pull up the lower thread, as it is done automatically.
TIP: It’s a good idea to have several full bobbins before starting a new project.
Threading the Machine
Operation
1. Raise the presser foot lever. (If the presser foot is not raised, the upper
thread cannot be threaded properly)
2. Turn the balance wheel toward you to raise the needle to its
highest position.
3. Guide the thread through the thread path, following the arrows
and number sequence on the machine. (See dotted line in
illustration).
4. Lower the presser foot.
5. Thread the needle using the needle threader or thread manually.
CAUTION: Always be sure to raise the presser foot before removing upper thread
to prevent damage to the thread tension system.
H79_Manual.indd 15H79_Manual.indd 15 10/6/2008 4:29:06 PM10/6/2008 4:29:06 PM
Model H79
15
Page 16

Operat i on
Operation
Thread the Needle Using the Needle Threader
1. Lower the presser foot at this time. Lower the needle threader lever
until it stops. Hook the thread into the threader guide and pull the
thread to the right.
2. Push the needle thread lever toward the back to swing threader
into place.
3. Check to be sure that the hook has passed through the eye of the
needle and route the thread through the metal guides and under
the hook. Pull the thread toward you and check that it is being
held by the thread hook.
16
H79_Manual.indd 16H79_Manual.indd 16 10/6/2008 4:29:06 PM10/6/2008 4:29:06 PM
Model H79
Page 17

4. While gently holding the thread, pull the needle threader lever
Operat i on
forward.
Operation
5. Release the thread from the needle threader lever.
6. Pull the upper thread through the needle eye from front to back
toward the rear of the machine.
NOTE: Replace the needle often. Discard used needles, do not reuse.
H79_Manual.indd 17H79_Manual.indd 17 10/6/2008 4:29:07 PM10/6/2008 4:29:07 PM
Model H79
17
Page 18

Operat i on
Operation
Hooping
Inner Hoop
Fabric
Stabilizer
Outer Hoop
Make sure fabric, threads and stabilizer are compatible for laundering.
1. Place stabilizer on the wrong side of the fabric in the area to be
embroidered.
2. Loosen the adjusting screw on the outer hoop, place the stabilizer
(must be larger than the hoop) and fabric on top of the outer hoop
with the right side of the fabric up. Always put stabilizer in the
hoop with the fabric. Stabilizer must be larger that the hoop to
adequately stabilize the fabric.
18
3. Place the inner hoop into the outer hoop to clamp the fabric and
stabilizer. Fabric and stabilizer should be smooth in the hoop, but
do not stretch or distort it. Smooth the fabric but do not stretch it.
Push the inner hoop into the outer hoop. Clamp securely so that
the edges of the outer hoop and inner hoop are even.
4. Firmly tighten the adjusting screw.
NOTE: Stabilizer provides body and control to fabric and aids in ensuring that stitches go
where they should go. Stabilizers can be bonded fabric, liquid, or water soluble and can be
sewn on, applied with spray adhesive or ironed on. Di erent blends of fabric react di erently
when water or heat is applied or when tearing or cutting stabilizer away from your nished
design. Always have an assortment of stabilizer on hand to match with various fabrics.
Always stitch a test design on actual fabric and stabilizer. Remove stabilizer gently and
carefully to avoid distorting your design.
Model H79
H79_Manual.indd 18H79_Manual.indd 18 10/6/2008 4:29:07 PM10/6/2008 4:29:07 PM
Page 19

Using the Template
Operat i on
In order to hoop a garment straight, you may need to make some marks
on the garment. Draw a + sign in the center where you want the
design to be with chalk, a water soluble, air soluble or temporary
marker that will wash out easily.
On the inner hoop there are four arrows, at the top and bottom and
both sides. By lining up the marked center with the arrows at the
top, bottom and sides, you will get a straight embroidery that is
lined up with your markings.
Operation
To make this process much easier, a duplicatable
template has been included in this manual on
page 22.
You may print as many templates as you need.
Print the template on clear transparency lm,
such as that used for overhead projectors,
to create a reusable template. If you do not
have a printer and want to make copies, take this entire book
to the copy shop. This will inform the copy shop that you have
permission to make copies of the template.
H79_Manual.indd 19H79_Manual.indd 19 10/6/2008 4:29:07 PM10/6/2008 4:29:07 PM
Model H79
19
Page 20

Operat i on
Operation
The template is ruled in 1 inch squares with the sewing eld of the
machine subdivided by ¼” squares. Cut out the template along
the outside edge of the diamond shape. You may want to use a
hole punch to punch out the circles. To get to the center circle, just
barely fold the template so you can punch it. Or you can use a craft
knife and make cross cuts at each circle. These will indicate the
outside edge of the sewing eld and the center where the design
will start. You may also want to make a small notch in the top,
bottom and both sides to denote the horizontal and vertical center
lines. These horizontal and vertical center lines correspond with
the arrows of the hoop.
NOTE: The sewing eld of your Model H79 Embroidery Machine is 100mm x 100mm or 3.93
inches. The template is marked in inches, therefore the design will always t within this area.
Mark the horizontal and vertical lines for the center of the design on the
garment to be embroidered. Use the template to make sure the
centers are lined up with the center of the sewing eld.
20
H79_Manual.indd 20H79_Manual.indd 20 10/6/2008 4:29:07 PM10/6/2008 4:29:07 PM
Model H79
Page 21

You can use the template to mark the placement of the design on fabric
Operat i on
or a garment.
Operation
1. Place the template over the section of the garment where you
want the design to be. With an erasable marker, chalk, air dry
marker, or water soluble marker, mark the four corner holes and the
center. You may also want to mark the vertical and horizontal lines
at the edge of the template.
2. Remove the hoop and connect the lines with your erasable marker.
3. Place the outer hoop under the garment and the stabilizer
and place the inner hoop in the area you have marked for the
placement of the design.
4. Place the template in the inner hoop. The small ledges of the inner
hoop should hold the template in place. The lines on the template
should line up with the arrows on the inner hoop.
5. Adjust the inner hoop on the garment to get it placed according to
your markings. (This is why the transparency lm is a good choice).
When using a paper template, cut along the lines and fold back to
see the markings you have made on the fabric.
6. Once the inner hoop is lined up, adjust the outer hoop to t. Press
the inner hoop into the outer hoop and check the template again
for proper placement.
Proceed with the hooping instructions on page 18.
H79_Manual.indd 21H79_Manual.indd 21 10/6/2008 4:29:08 PM10/6/2008 4:29:08 PM
Model H79
21
Page 22

Operat i on
Operation
©Bernina of America, Inc. You have permission to make as many copies of this template as needed.
22
H79_Manual.indd 22H79_Manual.indd 22 10/6/2008 4:29:08 PM10/6/2008 4:29:08 PM
Model H79
Page 23

Operat i on
Attaching the Hoop to the Machine
Operation
1. Raise the presser foot to its highest position.
2. Pass the embroidery hoop under the presser foot with the
mounting pins on the right side and the fabric right side up. NOTE:
It is easier to slide the embroidery hoop under the presser foot if
you lift the presser foot all the way to its highest position with your
left hand as you slide the hoop under the presser foot with your
right hand.
3. Align the two pins on the embroidery hoop and rmly press
straight down into the hoop holder until a soft click is heard.
NOTE: Do not push too hard as you attach the hoop. Use caution
so as not to move the hoop holder in any direction as you attach
the hoop.
NOTE: Be sure to insert both pins. If only one pin is inserted, the result may be poor
quality embroidery.
Model H79
H79_Manual.indd 23H79_Manual.indd 23 10/6/2008 4:29:08 PM10/6/2008 4:29:08 PM
23
Page 24

Operat i on
Operation
Selecting a Design
In the Model H79 Embroidery Machine you have Internal Memory as
well as Card Memory. Designs can be accessed from both places.
Selecting a Design from Internal Memory
In order to use the Internal Memory of the Model H79 Embroidery
Machine to its fullest, you must have it connected to a Personal
Computer with the software installed. This allows you to save
designs to the Internal Memory of the machine. The Internal
Memory will hold up to 99 designs or one million stitches,
whichever comes rst. You must use the eXplorations Lite software
and the Navigator to view, save or delete designs in the internal
memory.
To select a design from Internal Memory you must use the
on the keypad. This button toggles back and forth from Internal
Memory (designs that show as ## in the LED screen) to Card
Memory (designs that show as C## in the LED screen). When you
have Internal Memory selected, the light next to “Internal” will be
illuminated.
To move through the selections in the Internal Memory you will use the
arrow buttons on the keypad.
The Right Arrow button will take you forward through the list of
designs (higher numbers) one design at a time.
button
The Left Arrow button
(lower numbers) one design at a time.
The Up Arrow button
The Down Arrow button will take you backwards 10 designs at a time.
24
H79_Manual.indd 24H79_Manual.indd 24 10/6/2008 4:29:09 PM10/6/2008 4:29:09 PM
will take you backward through the list
will advance 10 designs at a time.
Model H79
Page 25

Once you have the design you wish to sew selected, press the Enter
Operat i on
button .
Selecting a Design from a Memory Card
Card Memory (designs that show as C## in the LED screen) are designs
that are on a pre-programmed Memory Card. The search features
are the same as above for Internal Memory.
To select a design from a Memory Card you must rst have a card
inserted.
Operation
To insert the Memory Card into the machine simply insert the card in
the card slot until it softly clicks. It should go in easily. Do not force
the card. If it does not go in easily, you may have the card reversed.
Forcing the card into the slot could bend the connector pins inside
the machine.
Use the
button on the keypad to access the Memory Card designs.
This button toggles back and forth from Internal Memory (designs
that show as ## in the LED screen) to Card Memory (designs that
show as C## in the LED screen). When you have a Memory Card
selected, the light next to “Card” will be illuminated.
When you nd the design you want to select, press the Enter button
.
H79_Manual.indd 25H79_Manual.indd 25 10/6/2008 4:29:09 PM10/6/2008 4:29:09 PM
Model H79
25
Page 26

Operat i on
Operation
Align Design
Designs, in most cases, start and stop at the center of the design. The
Model H79 Embroidery Machine is programmed to start and stop
in the center unless you specify otherwise in eXplorations Lite
software. When hooping your fabric to be embroidered you will
need to mark where you want the center of the design to start.
If you don’t get the fabric centered exactly in the hoop, you can
reposition the needle in the hoop to some degree depending on
the size of the design.
Once you have selected your design, you will see that the illumination
has changed on the keypad from Select to Align allowing you to
use the arrow keys to move the needle position of the start of the
design around in the hoop. You must have the presser foot lever in
the upper position to move the needle position. (E15 will appear
in the LED screen if the presser foot lever is in the lower position.
Raise the presser foot and Press the arrow button again).
26
To center the design in the center of the hoop, use the Home button .
This positions the hoop so that the needle is in the center of the
hoop.
To move the needle position to the left in the hoop, use the Left Arrow
If you try to move too far, you will get an error (E25). This means
that the machine cannot sew the design any further to the left. If
the design needs to start closer to the left, you will need to re-hoop
the fabric.
To move the needle position to the right in the hoop, use the Right
Arrow
This means that the machine cannot sew the designs any further
to the right. If the design needs to start closer to the right, you will
need to re-hoop the fabric.
. If you try to move too far, you will get an error (E26).
Model H79
.
H79_Manual.indd 26H79_Manual.indd 26 10/6/2008 4:29:10 PM10/6/2008 4:29:10 PM
Page 27

To move the needle position to the bottom of the hoop, use the Down
Operat i on
Operation
Arrow
This means that the machine cannot sew the design any further to
the bottom. If the design needs to start closer to the bottom, you
will need to re-hoop the fabric.
To move the needle position to the top of the hoop, use the Up Arrow
If you try to move too far, you will get an error (E28). This means
that the machine cannot sew the design any further to the top.
If the design needs to start closer to the top, you will need to rehoop the fabric.
. If you try to move too far, you will get an error (E27).
Sewing the Design
Trace the Design
After selecting the design you wish to sew, it is always advisable to
trace the design. Make sure you are in the Align Mode by checking
to see that Align is illuminated.
.
OR
Make sure the presser foot is in the up position. Press the Trace button
. The hoop will begin to move to all four corners of the outer
perimeter of the design and then back to the center. You can still
reposition the needle if necessary. If you move the hoop, you
should trace the design again.
Model H79
H79_Manual.indd 27H79_Manual.indd 27 10/6/2008 4:29:10 PM10/6/2008 4:29:10 PM
27
Page 28

Operat i on
Operation
Sew the Design
Now that you have the hoop positioned where you want the design to
start you are ready to sew the design.
1. After threading the needle, place the thread through the hole in
the presser foot from top to bottom and gently pull the end of the
thread (See gure 1 above).
2. Lower the presser foot and hold the thread in your left hand. If you
do not hold the thread taut, you may get a thread break error (E13).
Press the START/STOP button to start the machine. After sewing
5-6 stitches, stop the machine by pressing the START/STOP button
and raise the presser foot again. Clip the beginning thread tail
close to the fabric. Do this when starting each color.
TIP: Make sure you are trimming the thread tail and not the sewing thread closest to the needle.
28
H79_Manual.indd 28H79_Manual.indd 28 10/6/2008 4:29:10 PM10/6/2008 4:29:10 PM
Model H79
Page 29

3. After trimming, lower the presser foot and press the START/STOP
Operat i on
button again to start the machine. The machine will stop when
it completes all the stitching with this thread color. During the
sewing process, the display will read =## signifying the percentage
of completion of the design. For example, =22 is displayed in the
LED means that the design is 22% complete.
4. When the color is complete, the LED screen will display c## (c02
for the second color in the design, c03 for third color in the design,
etc). depending on the sequence of the color. This lets you know
which color to change to according to the code sheet of the
design.
5. To change the color of the upper thread, raise the presser foot and
clip the upper thread close to the embroidery AND at the thread
spool. Pull the upper thread from the needle to remove and
discard it.
6. Thread the machine with the new color.
Operation
7. Lower the presser foot. While holding the thread tail, press START/
STOP to sew the next color section.
8. Repeat until the design is completed. The LED will show 100 to
represent 100% completion when the design is complete.
Model H79
29
H79_Manual.indd 29H79_Manual.indd 29 10/6/2008 4:29:10 PM10/6/2008 4:29:10 PM
Page 30

Operat i on
Operation
Thread Tension Adjustment
Thread tension can be adjusted from either the top thread tension
adjustment or the bobbin case screw adjustment. If you see
bobbin thread on top, you may need to adjust the tension.
However, before you adjust anything, check to see if the thread
may be caught and not feeding properly. Next, check to see if the
machine is threaded correctly. Change the needle. This could also
a ect the tension. Adjust the tension only if these suggestions do
not correct the problem.
Adjust Upper Thread Tension
When making tension adjustments, always start with the top thread. If
bobbin thread is showing on the top of the design, this means that
the tension on the top thread is too tight or the bobbin adjustment
is too loose. To loosen the top thread tension, rotate the Thread
Tension knob to the left (to a lower number).
If the stitches are not setting properly in the fabric or if loops appear,
you may need to adjust the tension so that it is tighter. First check
to see if the machine is threaded correctly before making any
adjustments. If threading is correct, turn the Thread Tension knob
to the right (to a higher number).
The standard position of the tension should be between 4 and 6 as
noted in the dark area of the Thread Tension knob.
30
H79_Manual.indd 30H79_Manual.indd 30 10/6/2008 4:29:10 PM10/6/2008 4:29:10 PM
Model H79
Page 31

To check to see if your machine has proper tension, look at the wrong
Operat i on
side of the embroidery. Proper tension should be where the
bobbin thread is covering the middle 3rd of the back of the
embroidery. The image below shows di erent tensions from
the wrong side of the embroidery stitches. You should see
approximately 1/3 of the top thread on either side of the bobbin
thread. The column on the far left shows proper bobbin and top
thread tension. The column in the middle shows the bobbin
tension too tight and/or the top thread too loose. Sometimes
the bobbin thread is barely showing. If this happens it is very
likely that the bobbin thread may break during wear and tear
and the embroidery will come loose. The column on the right
shows the bobbin tension too loose and/or the top tension too
tight. The bobbin thread could be showing on the right side of
the embroidery in some places and it is very likely that the stitches
could become loose during wearing.
Proper Tension
Top too loose
and/or bobbin
too tight
Operation
Top too tight
and/or bobbin
too loose
Bobbin Tension Adjustment
Adjusting the bobbin is a little more di cult. Only adjust the bobbin if
you cannot achieve a proper tension with the adjustments to the
top thread tension.
Remove the bobbin cover from the machine.
Using the 3-Way Screwdriver Tool provided in the accessory pouch,
remove the two screws from the stitch plate and lift up the stitch
plate.
Model H79
H79_Manual.indd 31H79_Manual.indd 31 10/6/2008 4:29:11 PM10/6/2008 4:29:11 PM
31
Page 32

Operat i on
Operation
Remove the bobbin and the bobbin case.
If too much bobbin thread is showing on top of the embroidery, the
bobbin tension needs to be tightened. On the side of the bobbin
case there is a tiny screw (bobbin tension adjustment screw).
Using the small end of the 3-way screwdriver tool, rotate the screw ¼
turn to the right to tighten the tension.
32
H79_Manual.indd 32H79_Manual.indd 32 10/6/2008 4:29:11 PM10/6/2008 4:29:11 PM
Model H79
Page 33

If not enough bobbin thread is showing on the wrong side of the
Operat i on
embroidery, turn the screw ¼ turn to the left to loosen the tension.
Replace the bobbin case. The Hook Tab should be to the left of the
Hook with the fuzzy part under the bar. Replace the stitch plate.
Make sure the screws are in as far as they will go. Tighten hand
tight. Do not use any mechanical devices to screw in the screws.
Put the bobbin back in the bobbin case according to the image on the
bobbin case and replace the plastic cover onto the stitch plate.
Test the embroidery again to see if further adjustments are needed.
Never adjust more than ¼ turn at a time.
Changing a Needle
If you break a needle while sewing, stop the machine immediately.
Change the needle according to the instructions below.
Operation
Use embroidery needles with your Model H79 Embroidery Machine.
Embroidery needles are made for the higher speeds of embroidery
machines. Regular sewing needles are not recommended, but
will not damage your machine. We recommend Organ Brand
embroidery needles, which are included with the machine.
Changing the needle should also be done at regular intervals to keep
your Model H79 Embroidery Machine running well and your
embroidery looking good. A good time to change the needle
is when you start a new project. Needles should be changed at
intervals no longer than four to six hours of sewing time. (You can
gure your sewing time by dividing the number of stitches by 500.
This will give you the number of approximate minutes it will take
the machine to sew out the design, i.e. 5000 stitches divided by 500
is 10. The design will take approximately 10 minutes to sew out).
To change the needle in your Model H79 Embroidery Machine, you will
need the 3-way screwdriver tool that came with your machine or a
short at blade screwdriver.
Model H79
33
H79_Manual.indd 33H79_Manual.indd 33 10/6/2008 4:29:11 PM10/6/2008 4:29:11 PM
Page 34

Operat i on
Operation
1. It is a good idea to turn o the power if you are not in the middle
of an embroidery design. If you have to change the needle in the
middle of a design, be very careful not to push the START/STOP
button during the process of changing the needle.
2. Lower the presser foot to its lowest position and raise the needle to
its highest position by turning the balance wheel toward you. This
will facilitate the removal and replacement of the needle.
3. With the 3- way screwdriver tool provided in the accessory kit,
loosen the needle screw (counterclockwise) until the needle can be
removed from the machine.
34
H79_Manual.indd 34H79_Manual.indd 34 10/6/2008 4:29:11 PM10/6/2008 4:29:11 PM
Model H79
Page 35

4. Remove the needle by pulling straight down. Once the needle is
Operat i on
free from the machine, discard it. Do not reuse old needles.
5. Insert a new needle into the machine with the at side of the
needle away from you and toward the back of the machine. Push
the needle up as far as it will go. Tighten the screw as tight as you
can (clockwise).
NOTE: Use only Embroidery needles. These are made for the high speeds of embroidery
machines. Use sharp point needles for woven fabrics and ball point needles for knit fabrics.
TIP: Titanium needles will last much longer than standard steel needles which make them a
good value.
Operation
Thread Breaks
In the event of a thread break, the machine will stop. When the
machine stops, you may have to push the START/STOP key to see
which error has occurred. Check the needle to see if the thread is
broken. If the thread is not broken at the needle, the thread has
either gotten out of one of the guides or is caught on something. If
the thread is broken, re-thread the machine and the needle.
Using the Left Arrow key
the design until you reach the point at which the thread broke. By
pressing the
you need to back up quite a bit hold the button down, it will then
start backing up in larger increments. If you only need to back up
a few stitches, press the
it again. This will allow you to keep backing up 1 stitch at a time.
Press the START/STOP key to restart the embroidery. Remember
to hold on to the thread to keep the thread taut until ve or six
key, it will start backing up 1 stitch at a time. If
on the key pad, you can back up through
key and then lift your nger and press
Model H79
35
H79_Manual.indd 35H79_Manual.indd 35 10/6/2008 4:29:12 PM10/6/2008 4:29:12 PM
Page 36

Operat i on
Operation
stitches are sewn. Stop the machine and trim the thread tail close
to the fabric.
When the machine is backed up to the point of the thread break, the
display shows the percent that has been completed. When START/
STOP is pushed, it will change to the percent of completion where
the thread break occurred.
Thread breaks happen occasionally but are not necessarily a warning
sign that something is wrong unless they are frequent. If thread
breaks occur very often, change the needle. Many times the
needle can become dull or have a spur or just be a tiny bit bent.
Replacing the needle is the easiest x.
If changing the needle does not eliminate the frequent thread breaks
there may be a small piece of thread in the bobbin case. Clean the
bobbin case thoroughly using a small soft brush.
Old sewing thread is not recommended for use with your machine. Use
good quality embroidery thread such as Isacord or Poly Sheen.
Some specialty threads will work with your machine but may have
frequent thread breaks.
Bobbin Thread Breaks
Rarely does the bobbin thread break. But if it does break, carefully
remove the hoop from the machine. Check the bobbin to see if
there is thread on the bobbin. An empty bobbin can register a
thread break. Replace with a lled bobbin.
In the unlikely event that the bobbin thread is broken, remove the
bobbin and reinsert it or put in a full bobbin following the diagram
on the bobbin case.
36
H79_Manual.indd 36H79_Manual.indd 36 10/6/2008 4:29:12 PM10/6/2008 4:29:12 PM
Model H79
Page 37

Removing Hoop from Machine
Machine Cleaning and Oiling
Operat i on / Cle a ning and Oili n g
1. Raise the presser foot.
2. Remove the embroidery hoop from the machine by gently pushing
the Hoop release lever to the right.
3. Raise the presser foot to its highest position to slide the hoop
under it to remove it from the machine.
4. When cutting the lower thread, leave about 10 cm. (4 inches)
of bobbin thread outside the needle hole in the needle plate.
(Cutting o the thread at the edge of the machine should be
adequate).
Operation / Cleaning and Oiling
Machine Cleaning and Oiling
**Always unplug machine prior to performing any maintenance**
Machine cleaning, oiling and maintenance is very important to ensure a
long lasting, enjoyable machine. Keep dirt and dust away from the
machine as much as possible. Small bits of thread can cause huge
problems. Keep the bobbin case free of dust and thread pieces.
Remove the needle plate and bobbin case and clean entire area
(pg. 32).
To keep your machine running smoothly you will want to do regular
cleaning followed by oiling (use sewing machine oil only). The
following graphic shows the points at which you should add one
drop of oil each time you clean your machine. A clean machine
is a happy machine. And a well oiled machine is a well running
machine. Approximately once a week, or after approximately 20
hours of sewing you should take the machine head cover o by
loosening the screw just to the right of the presser foot lifter. Take
o the plastic cover to expose the inner workings of the machine.
Model H79
37
H79_Manual.indd 37H79_Manual.indd 37 10/6/2008 4:29:12 PM10/6/2008 4:29:12 PM
Page 38

Clea n ing a nd O ilin g
Cleaning and Oiling
Clean the areas shown on the diagram with a clean soft brush.
Follow by adding one drop of oil at each location on the diagram.
Replace the plastic cover and the screw. Sew out a design on a scrap
piece of fabric to test the machine and work in the oil. This will also
remove any excess oil.
38
H79_Manual.indd 38H79_Manual.indd 38 10/6/2008 4:29:13 PM10/6/2008 4:29:13 PM
Model H79
Page 39

Error Codes and Troubleshooting
Error Codes and Troubleshooting
Erro r Co d es a n d Troub l esho otin g
Error Codes and Troubleshooting
Error Codes
Error
11
12
13
14
Problem
Needle is in the fabric and
the hoop cannot move.
Card was removed.
Upper thread broken.
Presser foot needs to be
lowered.
Solution
Turn the Balance Wheel until
the needle is at its highest
point.
Do not remove the card
while the machine is on.
Re-thread the needle or
check to see if the thread is
not in all the tensioners. If
this happens at the beginning of the design, hold the
thread taut when you press
the START/STOP button.
Lower the presser foot with
the presser foot lever
15
16
22 & 23
25
bob
Presser foot needs to be up.
Bobbin Winder is engaged.
Design is too large to sew.
-X limit reached.
Bobbin winder engaged.
Model H79
Raise the presser foot with
the presser foot lever.
Push the Bobbin winder to
the left to disengage it.
Choose another design or
make the design smaller using the software.
Start design in center of
hoop and trace to make sure
design will t and restart
design.
Move bobbin winder to the
left to disengage it.
continued on next page
39
H79_Manual.indd 39H79_Manual.indd 39 10/6/2008 4:29:13 PM10/6/2008 4:29:13 PM
Page 40

Erro r Co d es a n d Troub l esho otin g
Error Codes and Troubleshooting
Error Problem Solution
26
+X limit reached.
Start design in center of
hoop and trace to make sure
design will t and restart
design.
27
28
36
40
53
-Y limit reached.
+Y limit reached.
No design selected.
The main motor has stalled.
Not enough available free
space.
Start design in center of
hoop and trace to make sure
design will t and restart
design.
Start design in center of
hoop and trace to make sure
design will t and restart
design.
Select a design.
Check for obstructions or
thread nests.
Delete some designs in the
internal memory using Navigator.
40
H79_Manual.indd 40H79_Manual.indd 40 10/6/2008 4:29:13 PM10/6/2008 4:29:13 PM
Model H79
Page 41

Troubleshooting
Erro r Co d es a n d Troub l esho otin g
If you are having di culty with a certain part of the embroidery process,
review that section of the manual to make sure you are performing the
task properly. Some common problems that you might encounter are:
Error Codes and Troubleshooting
Common Problem
Thread breaks.
Bobbin thread
breaks.
Possible Cause and Solution
1. Check the thread to see if it is properly
threaded in all the guides.
2. Make sure you are using embroidery
thread recommended by the manufacturer
of the machine.
3. Change the needle.
4. Check to see if the bobbin thread has run
out.
5. Check the needle to see that it has been
inserted properly.
1. Check to see if the correct bobbin thread
is being used. Use bobbin thread recommended by the manufacturer. Use spun
Poly or continuous lament bobbin thread.
2. Bobbin thread has not been wound properly. Review the bobbin winding section of
the manual.
3. Bobbin has not been inserted properly.
Take out the bobbin and reinsert it following the guidelines in the manual and the
image on the stitch plate.
(Isacord Polyester or Poly Sheen)
Puckered fabric
around embroidery
design.
H79_Manual.indd 41H79_Manual.indd 41 10/6/2008 4:29:13 PM10/6/2008 4:29:13 PM
1. Review the Hooping section of the manual
to see if you are following all the instructions.
2. Improper stabilizer used.
3. Improper thread tension.
4. Screw on hoop was not tight enough to
hold fabric.
continued on next page
Model H79
41
Page 42

Erro r Co d es a n d Troub l esho otin g
Error Codes and Troubleshooting
Common Problem
Bobbin thread is
showing on the top
of the design.
Possible Cause and Solution
1. Check the top thread to see if it has gotten
caught and not feeding properly.
2. Re-thread the machine and pull the thread
with one hand at the spool and one at the
needle at the same time to make sure all
the guides have been threaded properly.
3. Adjust tension on the bobbin case by tightening the screw one quarter turn at a time.
(See the section on adjusting the bobbin
tension).
Thread loops on
top.
Thread break errors
when starting a
new color.
Outline of design is
o .
1. Adjust the tension tighter on the top
thread.
2. Change the needle.
3. Re-thread the machine and pull the thread
with one hand at the spool and one at the
needle at the same time to make sure all
the guides have been threaded properly.
1. Hold onto the thread tail as you start the
machine. The thread needs to be taut to
avoid registering a thread break.
1. Make sure you have attached the hoop to
the machine properly. If the hoop is not
attached at both pins, the design could be
distorted.
2. Follow all hooping instructions in the
Hooping section of the manual.
3. The inner hoop may not have been pushed
all the way into the outer hoop.
Skipped stitches
or machine not
sewing.
42
H79_Manual.indd 42H79_Manual.indd 42 10/6/2008 4:29:13 PM10/6/2008 4:29:13 PM
1. Probably a bent or improperly inserted
needle. Make sure the needle isn’t bent by
laying it on a at surface with the at side
down and make sure it is straight.
2. Needle may have been inserted backwards. Take the needle out and reinsert it.
3. Needle may be dull. Replace with a new
needle.
Model H79
Page 43

 Loading...