

Page 1
my
my
city
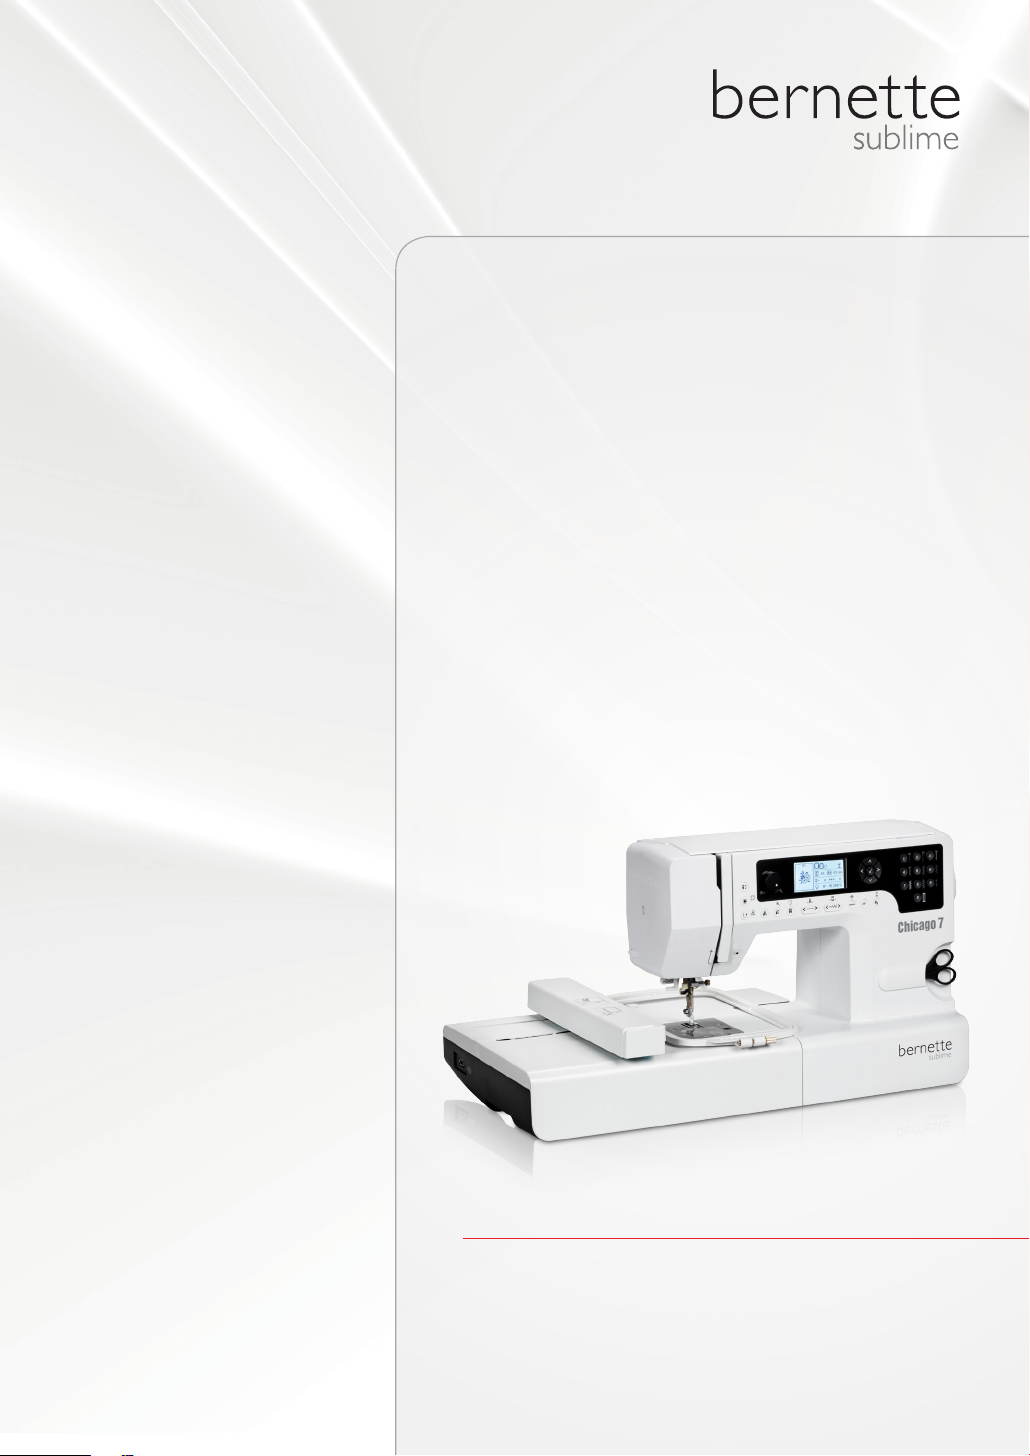
bernette
Chicago 7
Instruction Manual
Page 2

502020.83.11_2013_06_bernette chicago 7_EN
Page 3

Contents
502020.83.11_2013_06_bernette chicago 7_EN
Safety Instructions 3
All rights reserved 4
Machine Overview 5
Details of the sewing machine 5
Accessories 6
– Optional 6
Machine Setup 7
Connecting the Machine 7
– Polarized plug information 7
Foot Control 7
Sewing Table 8
Winding the Bobbin 9
Inserting the Bobbin 11
Threading the Upper Thread 12
Needle Threader 14
Replacing the Needle 15
Thread Cutter 15
Thread Tension 16
Altering Presser Foot Pressure 17
Raising or Dropping the Feed dog 17
Changing the Presser Foot 18
Two-Step Presser Foot 18
Important Sewing Information 19
Needle, Fabric, Thread Selection Guide 19
Presser Foot Application Chart 21
Display Explanation & Operating Functions 22
Buttons Explanation 22
Information on the LCD Display 23
– Normal Mode 23
– Memory Mode 24
– Embroidery Mode 25
Function Buttons 26
– Start/Stop button 26
– Reverse/Exit button 26
– Auto-Lock/Trace button 26
– Needle up/down button 27
– Speed Dial 27
– Arrow buttons 28
– OK button 28
– Direct pattern selection 28
– Number buttons 28
– Mirror image button 29
– Elongation/Resize button 29
– Double needle/Rotate button 29
– Stitch length adjustment/ Stitch forward/backward button
30
– Stitch width adjustment/ Colour forward/backward button
30
– Memory/Setup button 31
– Clear/Return button 31
– Pattern group selection/Colour setup button 31
How to select a stitch 32
Stitches Overview 33
Stitches 33
Basic Sewing Procedures 36
Reverse 36
Free arm 36
Sewing corners 36
Sewing on the heavy fabric 37
Straight Stitches and Needle Position 38
– Changing the needle position 38
– Altering the stitch length 38
Zig-zag Stitches 38
– Altering the stitch width 38
– Altering the stitch length 38
Triple Straight Stretch Stitch 39
Overlock Stitches 40
Using the All- purpose foot 40
Blind Hem 41
Button Sewing-on 42
Buttonhole Stitching 43
– Buttonholes on stretch fabrics 47
– Bartack stitch 48
Eyelet Stitch 49
Darning Stitch 50
Zipper Insertion* 52
– Inserting a centered zipper 52
– Inserting a side zipper 53
– Invisible zipper insertion 54
Narrow Hemming 55
Cording 56
– Single cording 56
– Triple cording 56
Satin Stitch Sewing 57
Quilting 58
– Patchwork stitching 58
– Hand look quilting 59
– Blanket (Quilting Applique) 59
– Patchwork stitching 59
Fagoting 60
Scallop Stitch 60
Gathering 61
– Gathered fabric 61
– To gather and attach gathered fabric in one step 61
– Smoking 62
Free Motion Darning, Embroidery and Monogramming 63
– Darning 63
– Embroidery 64
– Monogramming 64
Walking Foot 65
1
Page 4

Contents
502020.83.11_2013_06_bernette chicago 7_EN
Special Functions 66
Mirror image stitch pattern 66
Elongation 67
Double Needle Sewing 68
Memory 70
Overview Memory Enter Mode 71
– Enter a sequence of stitch patterns in Memory Enter
Mode 71
Overview Memory Review/Edit Mode 74
– Review stored stitches 74
Switch from Memory Mode to the Normal Mode 76
– Sew memorized patterns 76
Memory Editing functions - Add a sequence of stitches 77
Memory Editing functions - Change a stored stitch or its
parameters 79
Memory Editing functions - Insert an additional stitch 80
Memory Editing functions - Delete a stored stitch 82
Memory Editing functions - Delete ALL 83
Embroidery 84
Important Embroidery information 85
– Embroidery threads 85
– Lower threads 86
Embroidery Setup 87
Details of Embroidery module 87
Attaching the embroidery foot 88
Connecting the embroidery module 89
Removing the embroidery unit 90
Embroidery hoop 91
– Hooping the fabric 92
– Using embroidery templates 93
Attaching the embroidery hoop 94
Removing the embroidery hoop 94
Stabilizer 95
– Tear-away stabilizers 95
– Cut-away stabilizers 95
Adhesive Spray 96
– Spray starch for additional stiffening 96
Iron-on interfacing 97
– Paper-backed adhesive stabilizer 97
– Water soluble stabilizer 97
Embroidery Selection 98
Embroidery Design types 98
– Built-in Embroidery Designs 99
– Built-in Embroidery Letters 100
– Designs from USB stick 101
Starting to embroider 102
Editing the Embroidery Design 104
– Basic setting 104
– Embroidery hoop 104
– Mirroring the Design 104
– Resizing the Design 105
– Rotating the Design 106
– Single/ Multi color 106
– Advanced settings 107
– CutWork Tool 107
– Inch/mm options 107
– Embroidery maximum speed 107
– Software version information 107
– Acoustic signal 108
– Embroidery arm return 108
Load a Design after interruption 109
BERNINA CutWork Tool* 111
– Preparation 111
– Switch from Embroidery Mode to Cutting Mode 112
– Start to Cut 113
Warnings 114
Warning functions 114
– Warning message 114
– Warning display 114
– Warning sound 119
Maintenance 120
Cleaning the display 120
Cleaning the sewing machine surface 120
Cleaning the hook 120
Environmental protection 121
Trouble Shooting 122
Trouble shooting guide 122
Stitches Overview 127
A - Group Stitches 127
B - Group Stitches 130
Embroidery Design Overview 133
Start Screen 133
Seasons 134
Sports 138
Decoration 140
Flowers 142
Children 145
Animals 148
2
Page 5

Safety Instructions
502020.83.11_2013_06_bernette chicago 7_EN
IMPORTANT
When using an electrical appliance, basic
safety precautions should always be followed,
including the following:
Read all instructions before using this sewing
machine. Keep the instruction at a suitable
place close to the machine, and hand it over if
you give the machine to a third party.
When the sewing-/embroidery machine is
not in use, it should be disconnected from
the electricity supply by removing the plug
from the outlet.
WARNING!
To reduce the risk of burns, fire, electric shock
or injury to persons:
1. This appliance is not intended for use by
persons (including children) with reduced
physical, sensory or mental capabilities,
or lack of experience and knowledge,
unless they have been given supervision
or instruction concerning use of the appliance by a person responsible for their
safety.
2. Do not allow this machine to be used as a
toy. Close attention is necessary when
this appliance is used by or near children
and infirm persons.
3. Use this appliance only for its intended
use as described in this manual. Use only
attachments recommended by the manufacturer as contained in this manual.
4. Children should be supervised to ensure
that they do not play with the appliance.
5. Never operate this appliance if it has a
damaged cord or plug, if it is not working
properly, if it has been dropped or damaged, or dropped into water. Return the
appliance to the nearest authorized dealer
or service center for examination, repair,
electrical or mechanical adjustment.
6. Never operate the appliance with any air
openings blocked. Keep ventilation open-
DANGER!
To reduce the risk of electric shock:
1. An appliance should never be left unattended when plugged in.
2. Always unplug this appliance from the
electric outlet immediately after using and
before cleaning.
3. LED RADIATION: Do not view directly with
optical instruments Class
ings of the sewing machine and foot control free from accumulation of lint, dust,
and loose cloth.
7. Keep fingers away from all moving parts.
Special care is required around the sewing machine needle.
8. Always use the proper Stitch plate. The
wrong plate can cause the needle to
break.
9. Do not use bent needles.
10. Do not pull or push fabric while stitching.
It may deflect the needle causing it to
break.
11. Switch the sewing machine off («O») when
making any adjustments in the needle
area, such as threading needle, changing
needle, threading bobbin, or changing
presser foot, and the like.
12. Always unplug sewing machine from the
electrical outlet when removing covers,
lubricating, or when making any other
user servicing adjustments mentioned in
the instruction manual (pull power plug).
13. Never drop or insert any object into any
opening.
14. Do not use outdoors.
15. Do not operate where aerosol spray products are being used or where oxygen is
being administered.
3
Page 6

Safety Instruction
502020.83.11_2013_06_bernette chicago 7_EN
16. To disconnect, turn all controls to the off
(«O») position, then remove plug from outlet.
17. Do not unplug by pulling on cord. To
unplug, grasp the plug, not the cord.
18. If the supply cord fixed with foot controller
is damaged, it must be replaced by the
manufacturer or its service agent or a
similar qualified person in order to avoid a
hazard.
19. Never place anything on the foot control.
20. This sewing machine is provided with
double insulation (except U.S.A/Canada).
Use only identical replacement parts. See
instructions for Servicing of double-insulated products.
SERVICING OF DOUBLEINSULATED PRODUCTS
In a double-insulated product, two systems of
insulation are provided instead of grounding.
No grounding means is provided on a doubleinsulated product nor should a means for
grounding be added to the product. Servicing
a double-insulated product requires extreme
care and knowledge of the system and should
only be done by qualified service personnel.
Replacement parts for a double-insulated product must be identical to those parts in the
product. A double insulated product is marked with the words «DOUBLE INSULATION»
or «DOUBLE INSULATED».
The symbol
product.
may also be marked on the
SAVE THESE INSTRUCTIONS!
AtteNtioN!
This sewing machine is intended for household use only. If
used intensively or commercially, regular cleaning and
especially attentive care is required.
Signs of wear and tear owing to intensive or commercial use
are not covered automatically, even if they occur within the
warranty period. The decision on how to deal with any such
cases rests with the local authorised servicing staff.
If the sewing machine is stored in a cold room, it should be
brought to a warm room about one hour before use.
All rights reserved
For technical and product improvement reasons, the sewing computer‘s features, parts and accessory are subject to unannounced changes and alterations at any time. The accessory included can differ from country to country.
Note
4
Page 7
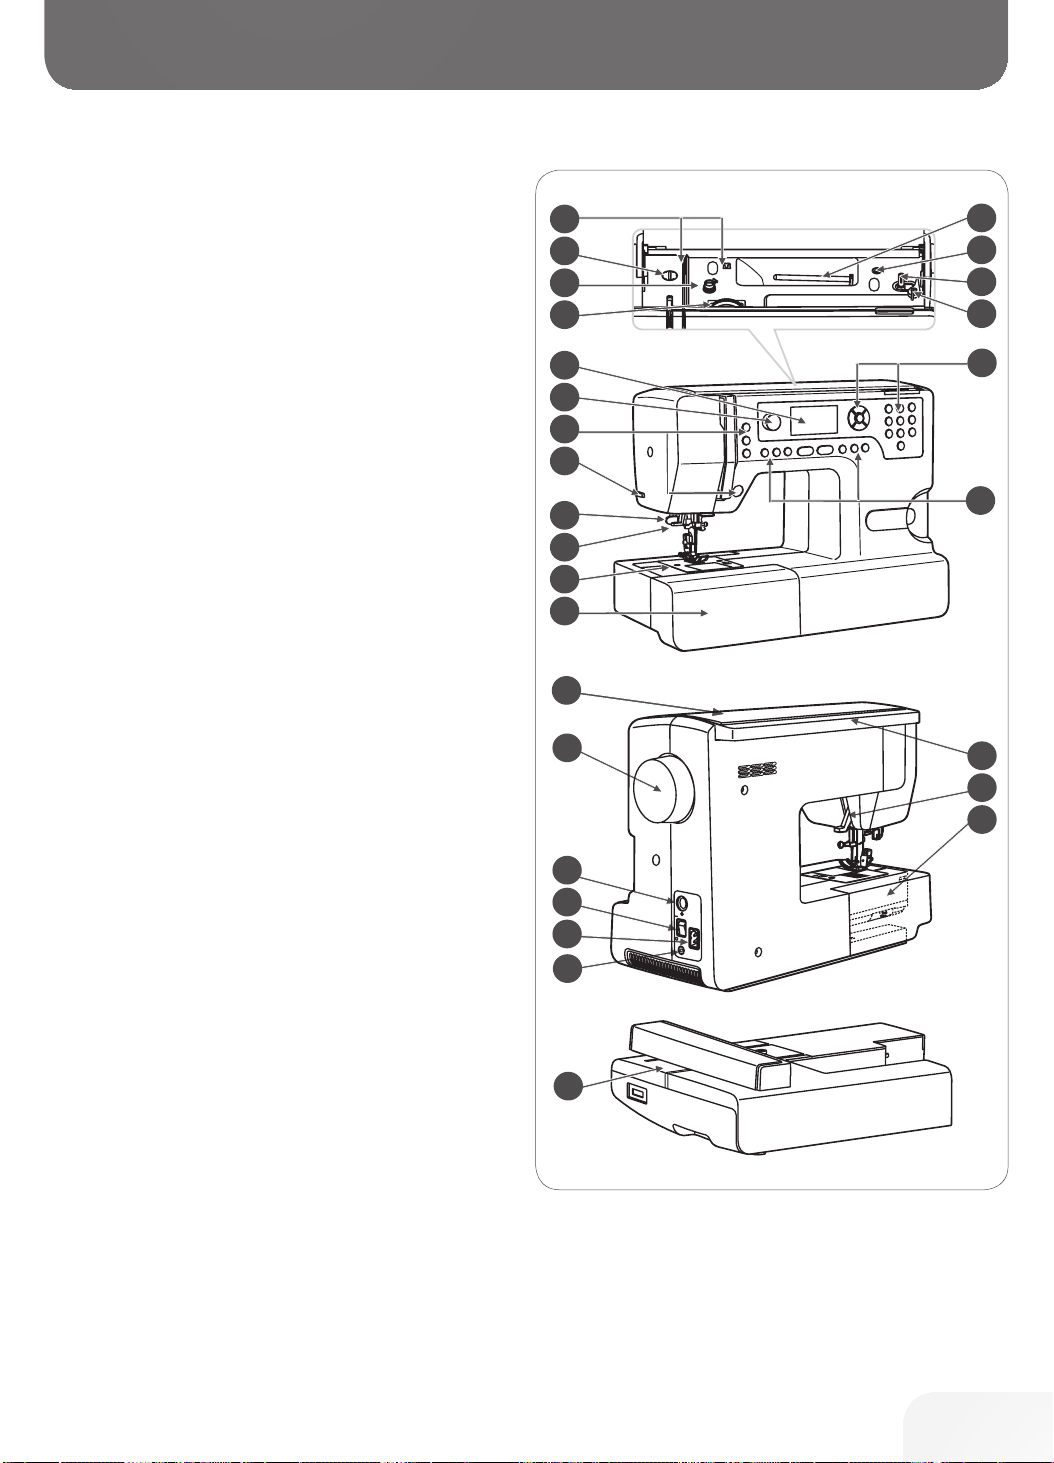
Details of the sewing machine
1
3
4
2
9
11
12
10
13
15
16
14
20
19
28
22
23
24
21
25
27
26
5
6
7
8
17
18
502020.83.11_2013_06_bernette chicago 7_EN
1 Thread guide
2 Presser foot pressure
3 Bobbin winder pre-tension
4 Thread tension dial
5 Spool pin
6 Hole for second spool pin
7 Bobbin winder spindle
8 Bobbin winder stopper
9 LCD display
10 Speed dial
11 Operation buttons
12 Thread cutter
13 One-step buttonhole lever
14 Needle threader
15 Stitch plate cover
16 Sewing table and accessory box
17 Selection buttons
18 Function buttons
19 Top cover
20 Handwheel
21 Embroidery module connector
22 Power switch
23 Power cord
24 Foot control connector
25 Handle
26 Presser foot lever
27 Feed dog lever
28 Embroidery module
(for details refer to separate section on page 87)
Machine Overview
5
Page 8
Machine Overview
502020.83.11_2013_06_bernette chicago 7_EN
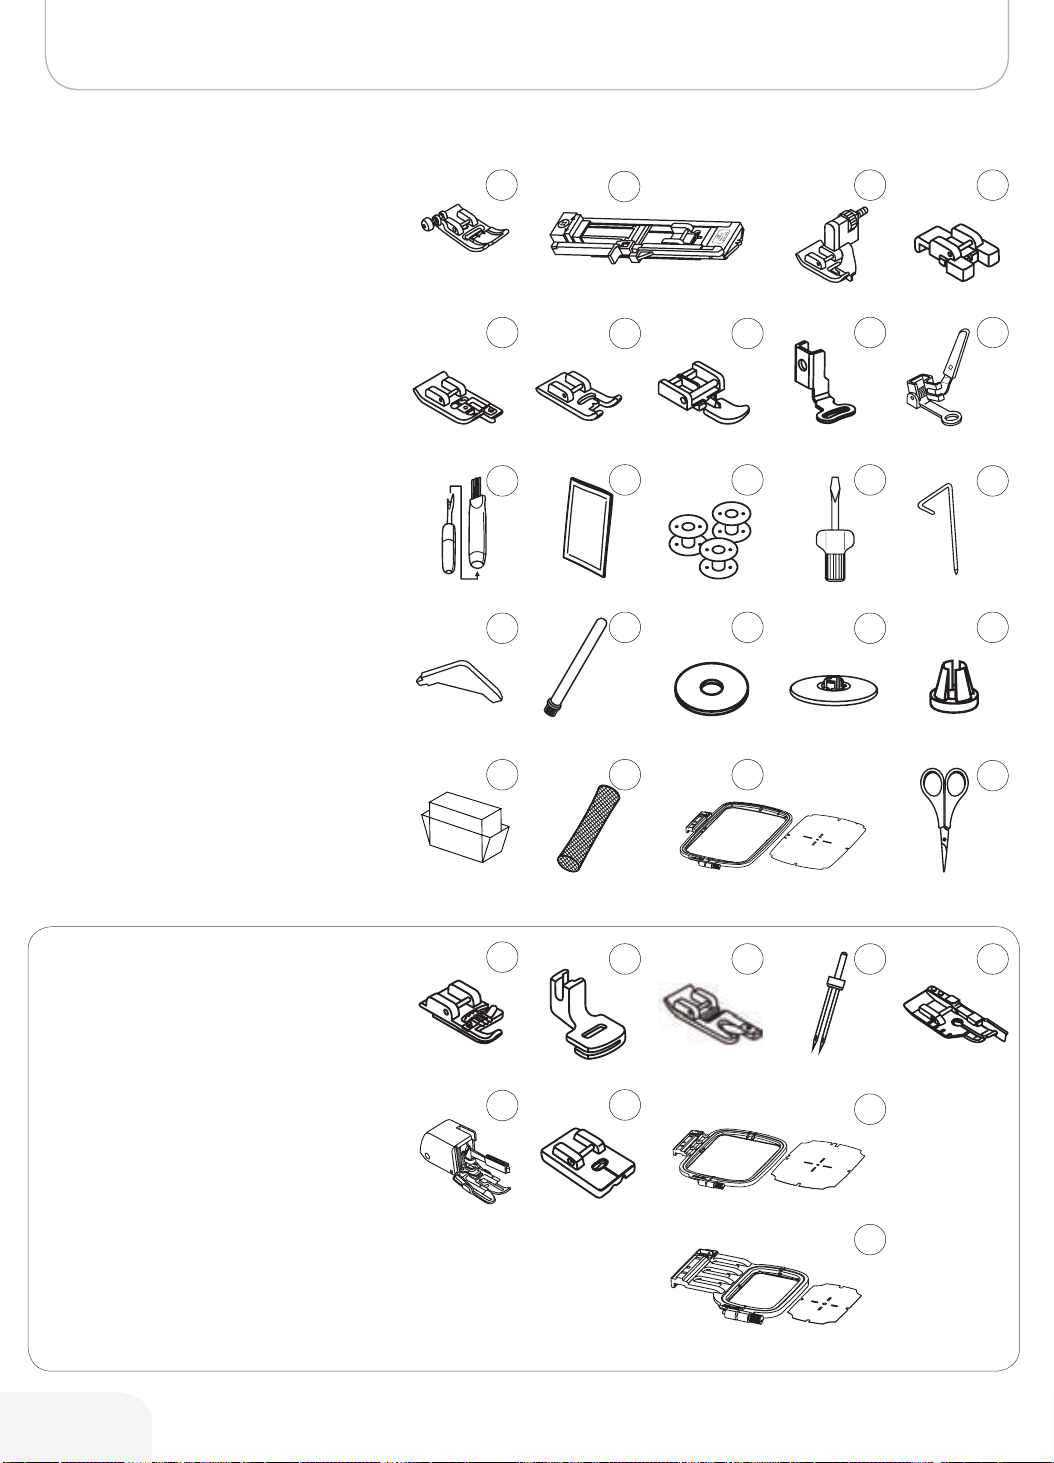
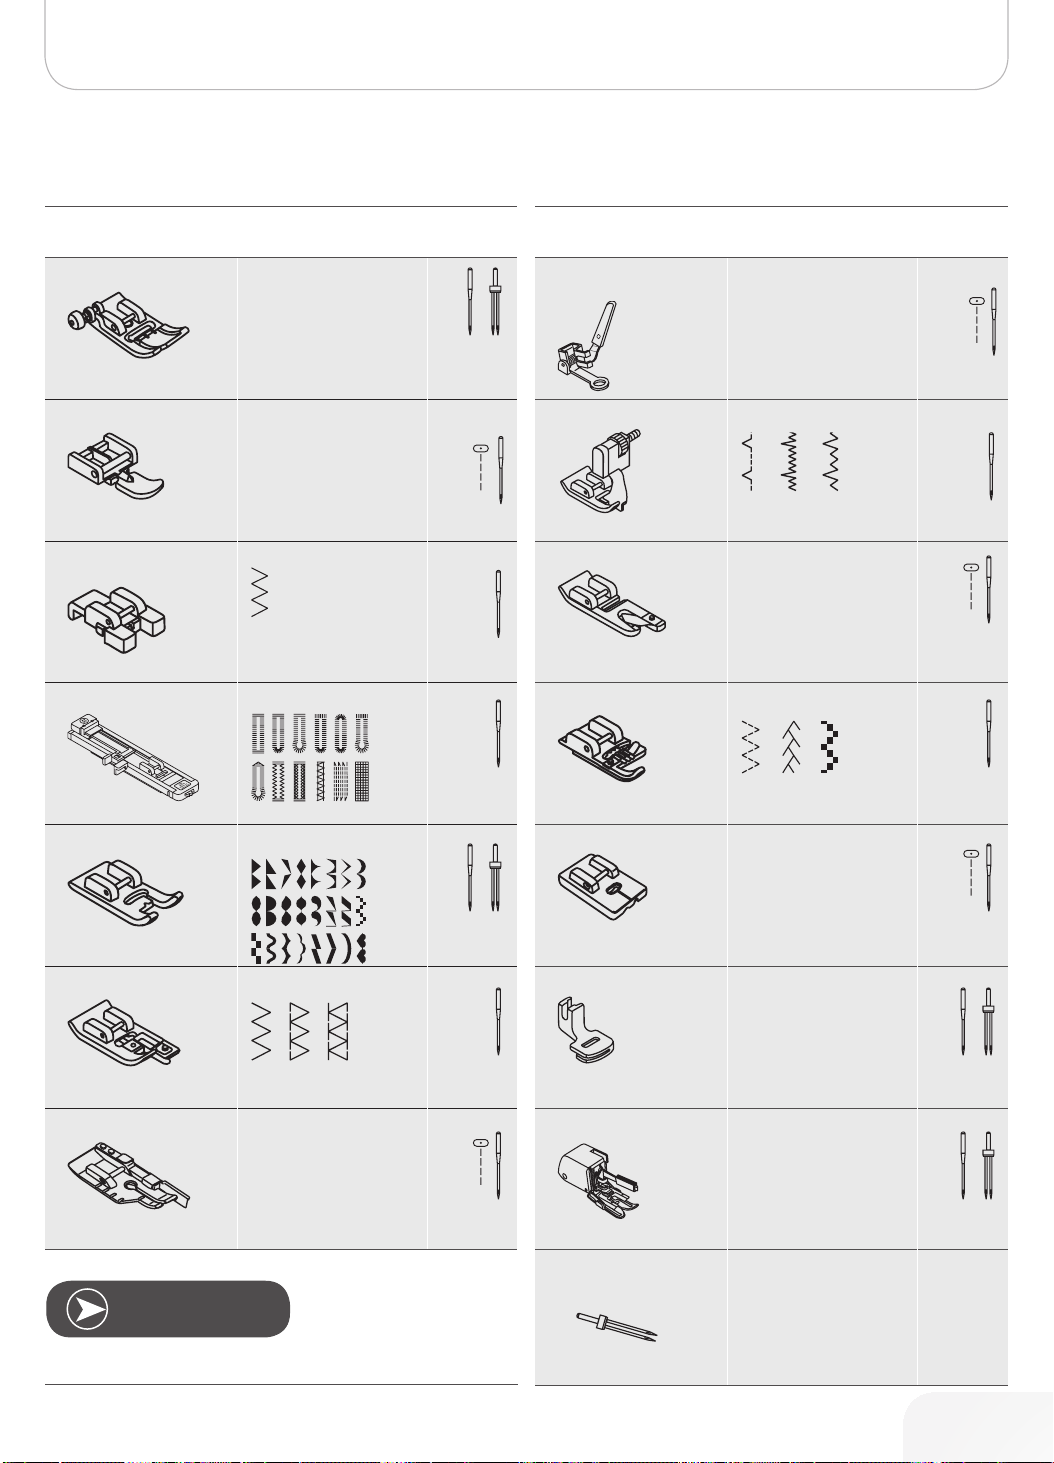
Accessories
1 All-purpose foot (T)
2 Buttonhole foot (D)
3 Blind hem foot (F)
4 Button sewing foot (H)
5 Overcasting foot (E)
6 Satin stitch foot (A)
7 Zipper foot (I)
8 Simple embroidery foot
9 Darning/Embroidery foot
10 Brush & Seam ripper
11 Needle Set (3 pcs)
12 Bobbin
13 Screwdriver
14 Seam guide/Quilting bar
15 L – Screw driver
16 Spool pin long (V)
17 Spool pin felt
18 Spool holder (large)
19 Spool holder (small)
20 Dust Cover
21 Spool net
22 Embroidery hoop (L-110x170mm)
23 Scissors
502020.69.03
502020.73.08
502020.59.21
502020.59.20
1 4
502020.70.20
5 9
502020.60.06
10 14
502020.74.87
15
502020.76.49
20
2
6
11
16
21
502020.59.99
502020.81.81
502020.70.90
502020.60.09
7
502020.81.80
12
502020.76.53
17
502020.76.50
22
3
502020.59.98
8
502020.80.84
13
502020.59.24
18
502020.59.27
19
23
Optional
24 Cording foot (M)
25 Gathering foot
26 Hemmer foot (K)
27 Double needle
28 ¼“ Quilting foot (P)
29 Walking foot
30 Invisible Zipper foot
31 Embroidery hoop (M-100x100mm)
32 Embroidery hoop (S-40x40mm)
6
502020.81.82
502020.60.05
502020.70.65
24
29
502020.79.37
502020.60.01
502020.70.53
25
30
502020.79.37
502020.60.10
502020.81.84
502020.81.85
26
502020.62.91 502020.70.52
27
31
32
502020.83.23
28
Page 9
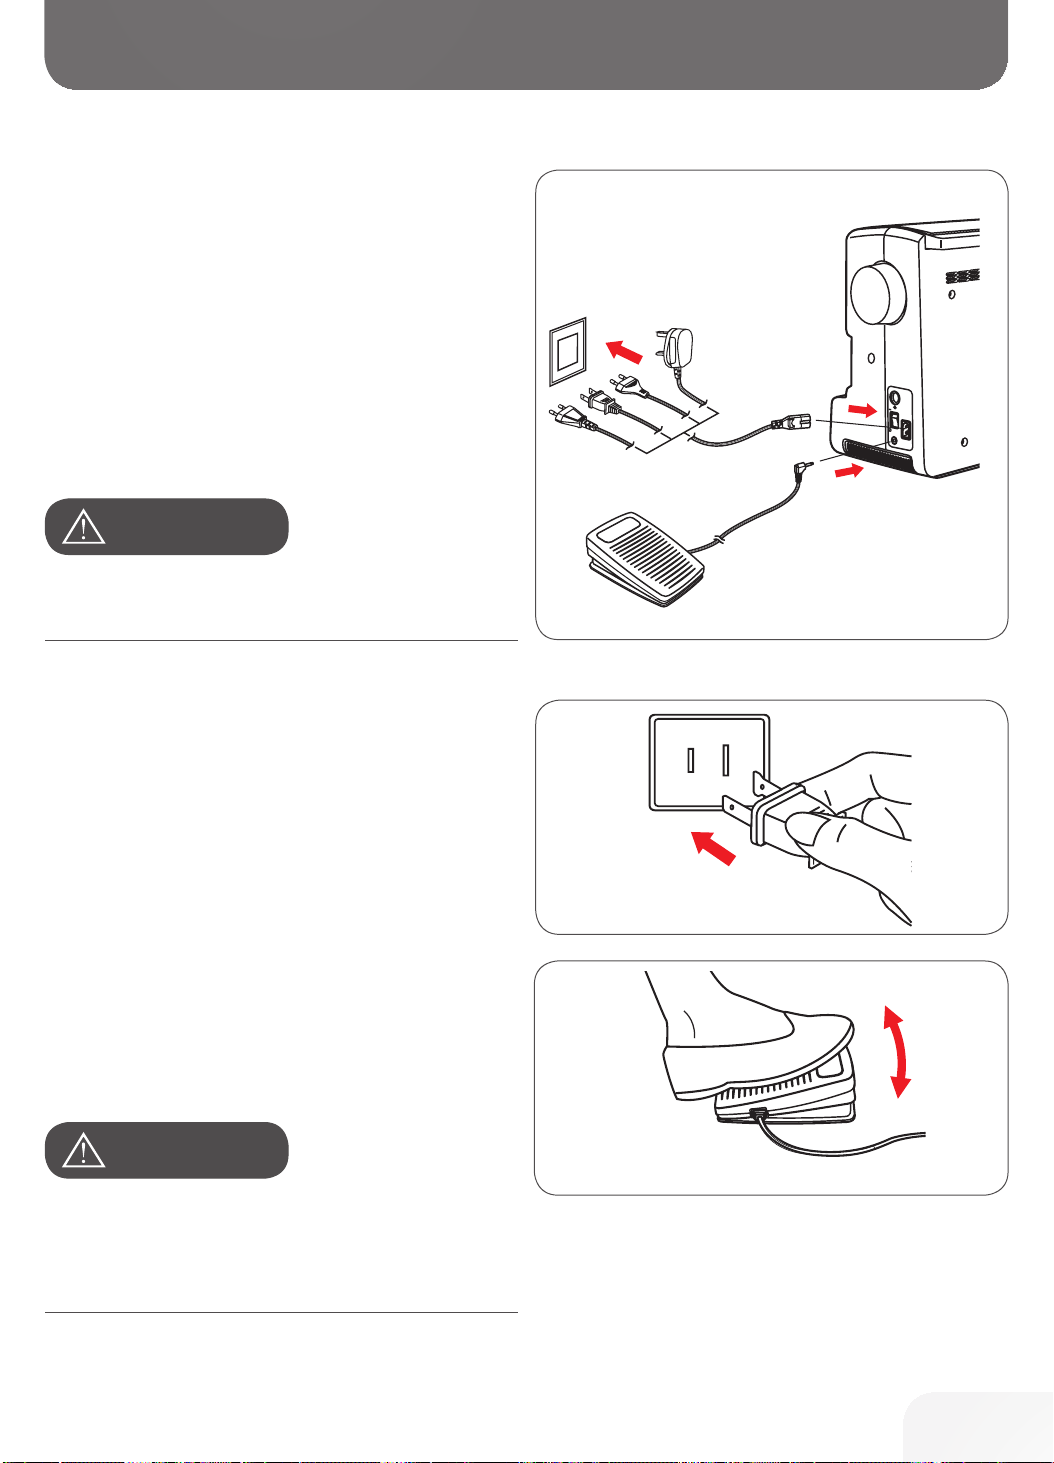
Connecting the Machine
502020.83.11_2013_06_bernette chicago 7_EN
Before connecting the power supply, make sure that the voltage and frequency shown on the rating plate is conforming
with your mains power.
• Place the machine on a stable table.
• Connect the power line cord to the machine by insert-
ing the 2-hole plug into the mains plug socket.
• Connect the power line plug to the wall outlet.
• Turn on the power switch.
– The sewing lamp will light up when the switch is
turned on.
AtteNtioN!
Always make sure that the machine is unplugged from
power source and the main switch is on «O». When the
machine is not in use and before inserting or removing parts.
Machine Setup
Polarized plug information
This appliance has a polarized plug (one blade wider than the
other), to reduce the risk of electrical shock; this plug will fit in
a polarized outlet only one way. If the plug does not fit fully in
the outlet, reverse the plug. If it still does not fit, contact a
qualified electrician to install the proper outlet. Do not modify
the plug in any way.
Foot Control
With the sewing machine turned off, insert the foot control
plug into its connector on the sewing machine.
• Turn on the sewing machine, and then slowly depress
the foot control to start sewing.
• Release the foot control to stop the sewing machine.
AtteNtioN!
Consult a qualified electrician if in doubt as how to connect
the machine to the power source. Unplug the power cord
when the machine is not in use. Use only foot control type
C-9000 manufactured by CHIEN HUNG TAIWAN., LTD. with
sewing machine.
7
Page 10

Machine Setup
502020.83.11_2013_06_bernette chicago 7_EN
Sewing Table
• Keep the snap-in sewing table horizontal, and pull it in
the direction of the arrow.
The inside of the snap-in sewing table is used as an accessory box.
•
8
Page 11
1
2
3
4
5 -
11
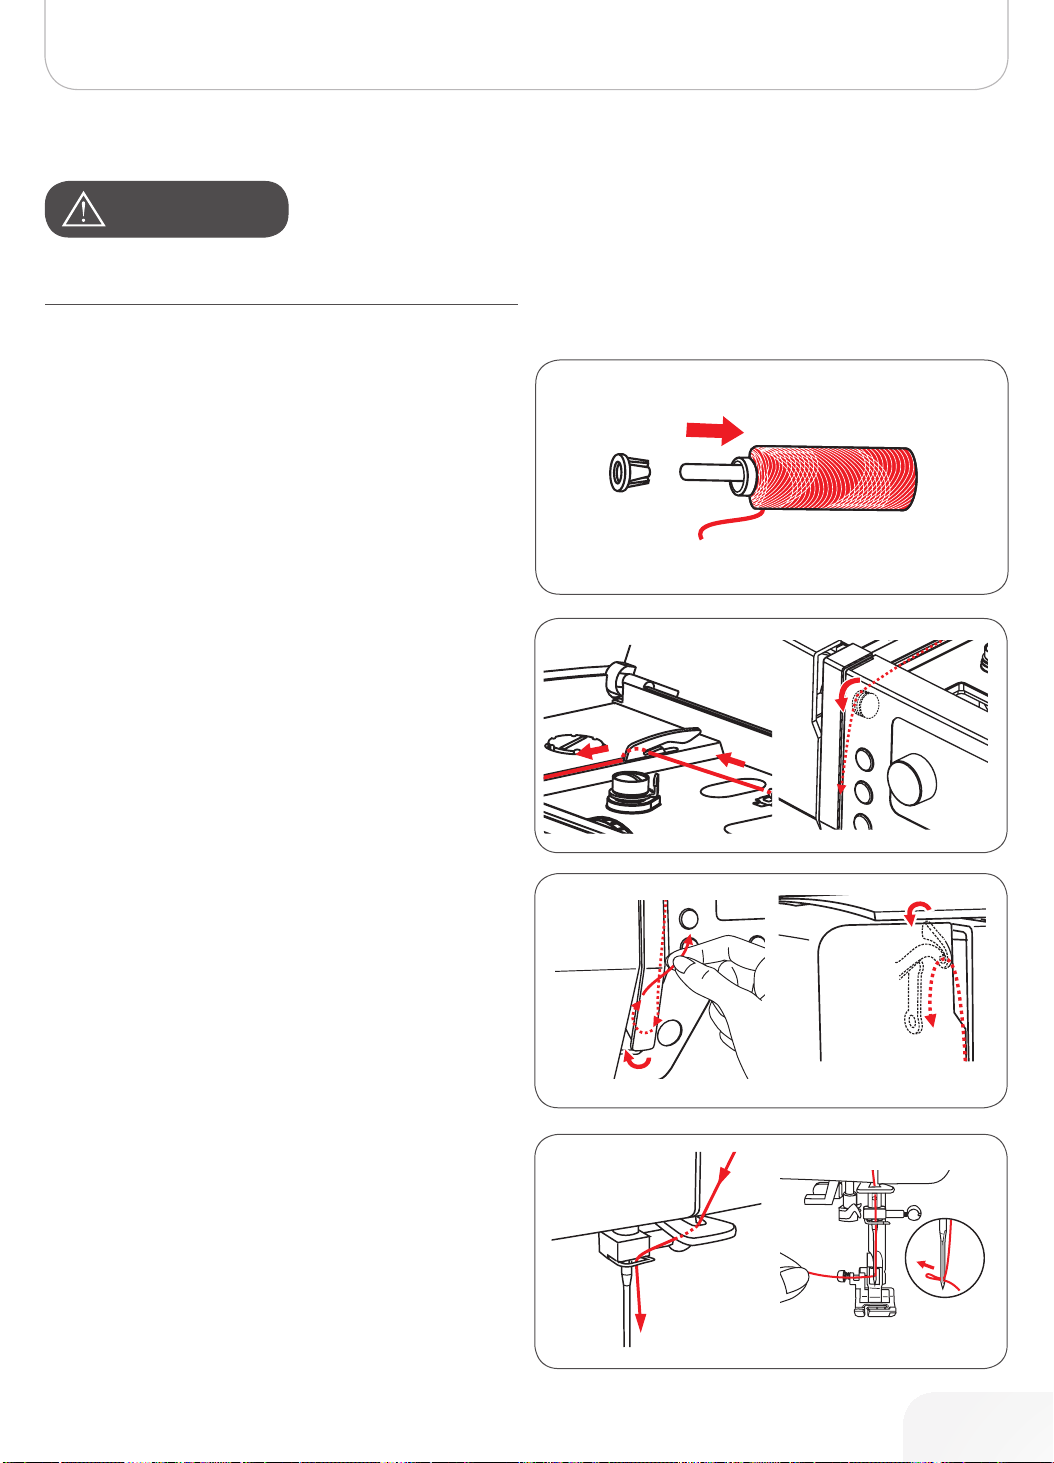
502020.83.11_2013_06_bernette chicago 7_EN
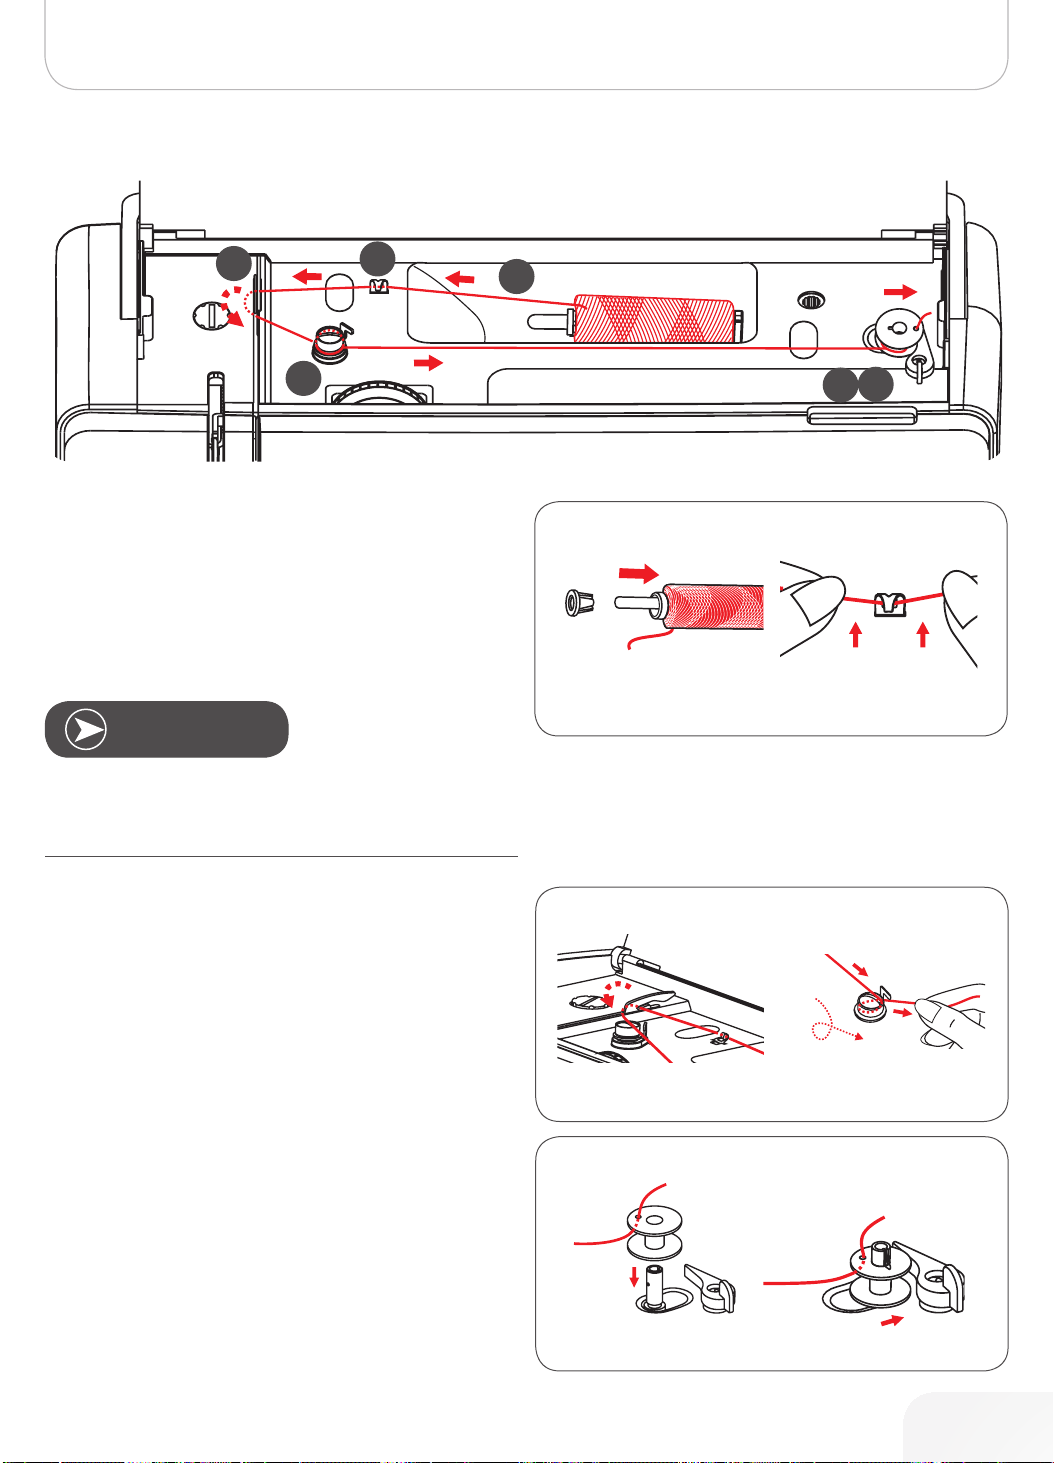
Winding the Bobbin
• Place the thread and spool holder onto the spool pin.
For smaller spools of thread use the small spool holder.
• Snap the thread into the upper thread guide.
Machine Setup
Note
If using special thread which winds quickly off the spool
attach a net to the spool before using and use the larger
spool holder. Reduce the thread tension if necessary.
• Wind the thread clockwise around the bobbin winder
tension disc.
• Insert the thread end through one of the inner holes in
the bobbin as illustrated and place the empty bobbin
on the spindle.
• Push the bobbin to right.
9
Page 12
Machine Setup
502020.83.11_2013_06_bernette chicago 7_EN
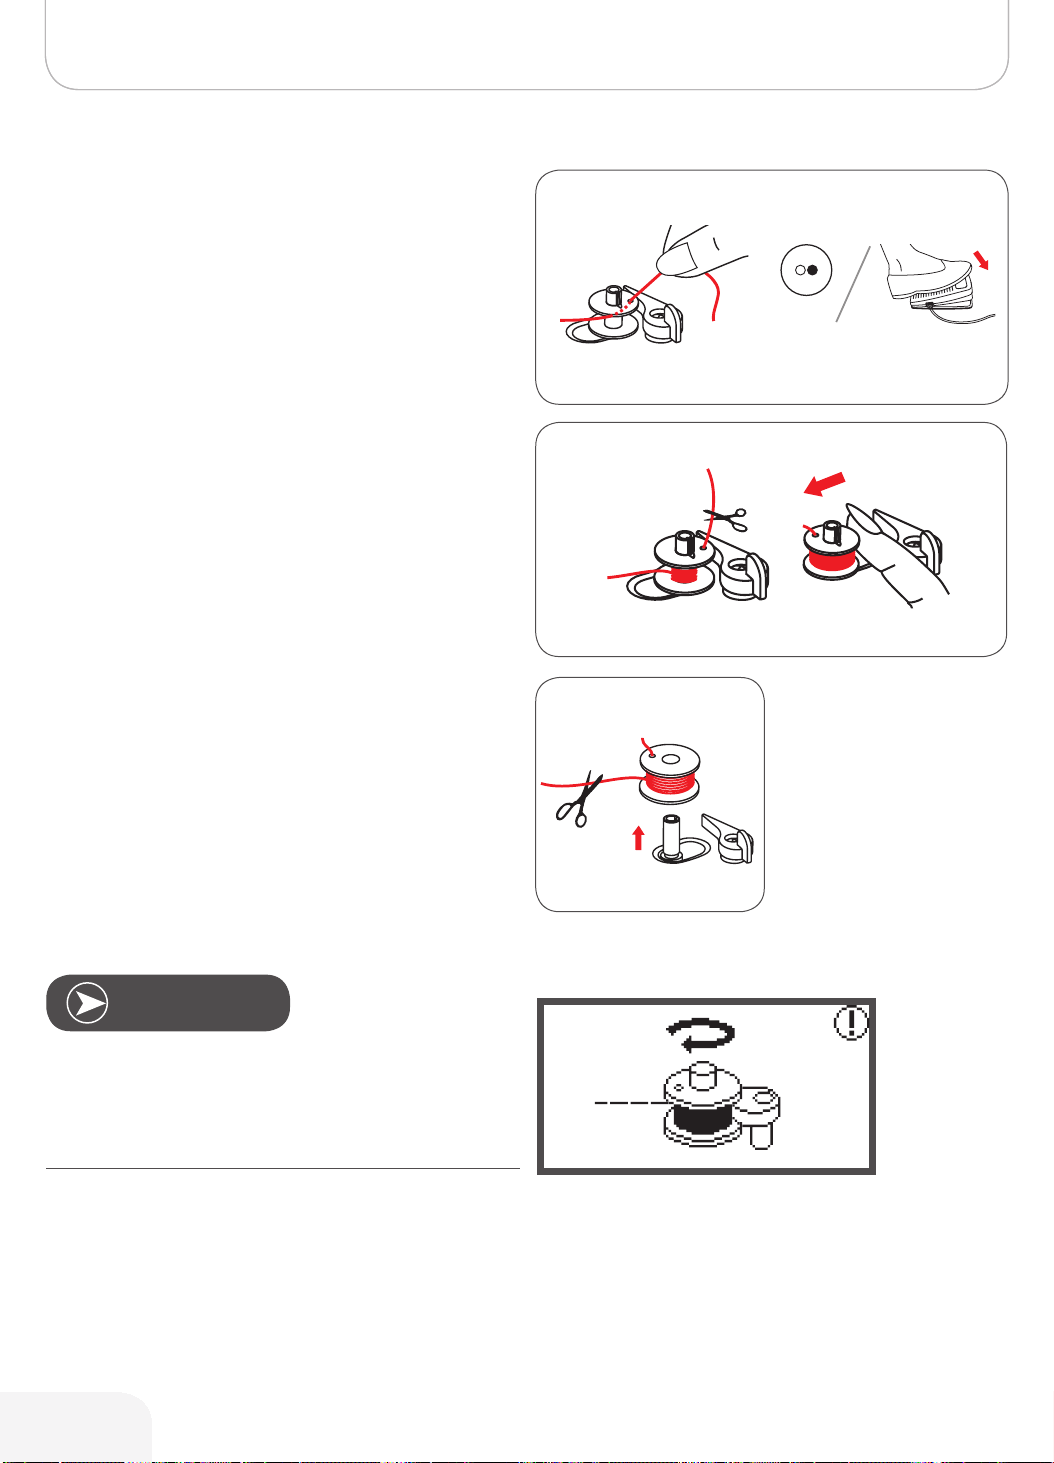
• Hold the thread tail securely in one hand.
• Press on the foot control or the Start/Stop button to
start winding the bobbin.
– After the bobbin has wound a few turns, stop the
machine.
• Cut the thread near the hole of the bobbin.
• Continue filling the bobbin until it is full.
– The motor stops automatically when the bobbin is
full.
• Press the Start/Stop button or release the foot control
to stop the machine.
• Push the bobbin winder spindle to left.
• Cut the thread and then remove the bobbin.
Note
When the bobbin winder spindle is pushed to the right
(bobbin winding position), this message is shown on the
LCD display. It will disappear from the LCD display when the
bobbin winder spindle is pushed back to the left into the
sewing position.
10
Page 13
Inserting the Bobbin
A
1
2
A
B
C
B
502020.83.11_2013_06_bernette chicago 7_EN
AtteNtioN!
AtteNtioN!
Turn power switch to «O» before threading or unthreading
the machine.
The thread take-up lever must be in the highest position
when threading. Incorrect threading can cause damages to
the machine!
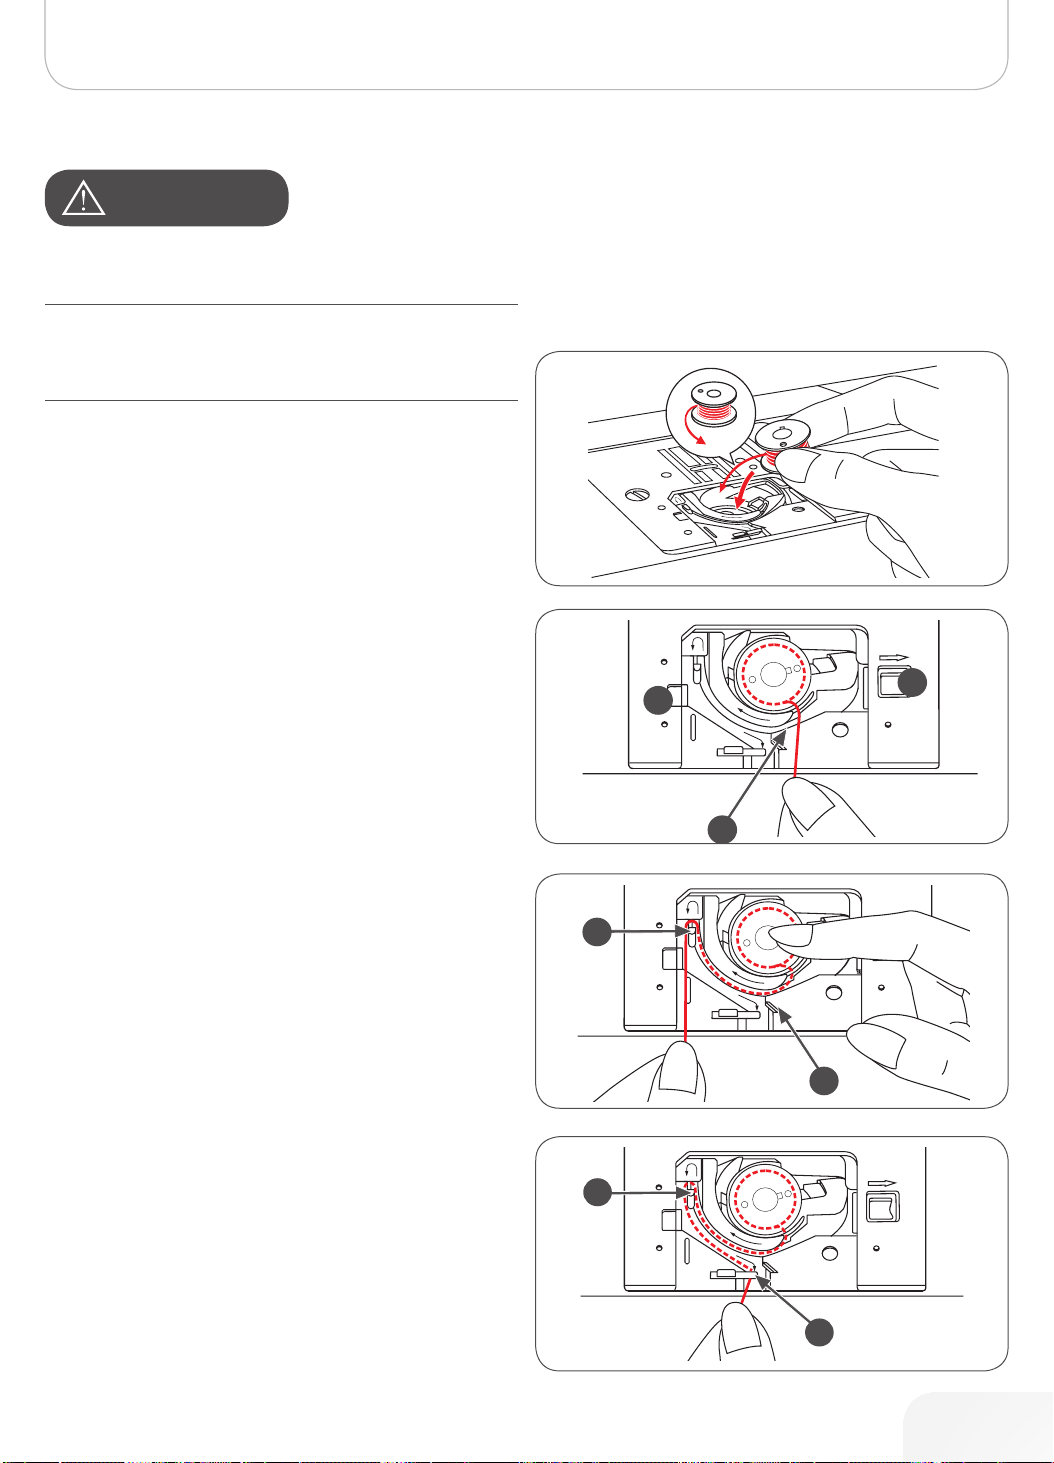
• When pushing the locking knob (1), the bobbin cover
opens.
• The bobbin cover can be pulled out of the guide (2).
• Inserting the bobbin in the bobbin holder with the
thread running in counter-clockwise direction.
• Pull the thread along the arrow marking through the slit
under the finger (A) as far as the pulley (B).
Machine Setup
• To make sure that the thread is pulled into the tension
spring of the bobbin holder, press a finger slightly onto
the bobbin while pulling. As a check you must feel a
resistance in the thread feed.
• Pull the thread at the arrow markings into the stitch
plate thread guide from (B) to (C).
– To cut off excess thread pull the thread back over
the cutting-off blade at point (C).
– When closing, insert the lid in the guide (2) on the
left. Afterwards press down on the right until the
locking knob (1) engages.
11
Page 14
Machine Setup
1
2
3
4
6
5
7
502020.83.11_2013_06_bernette chicago 7_EN
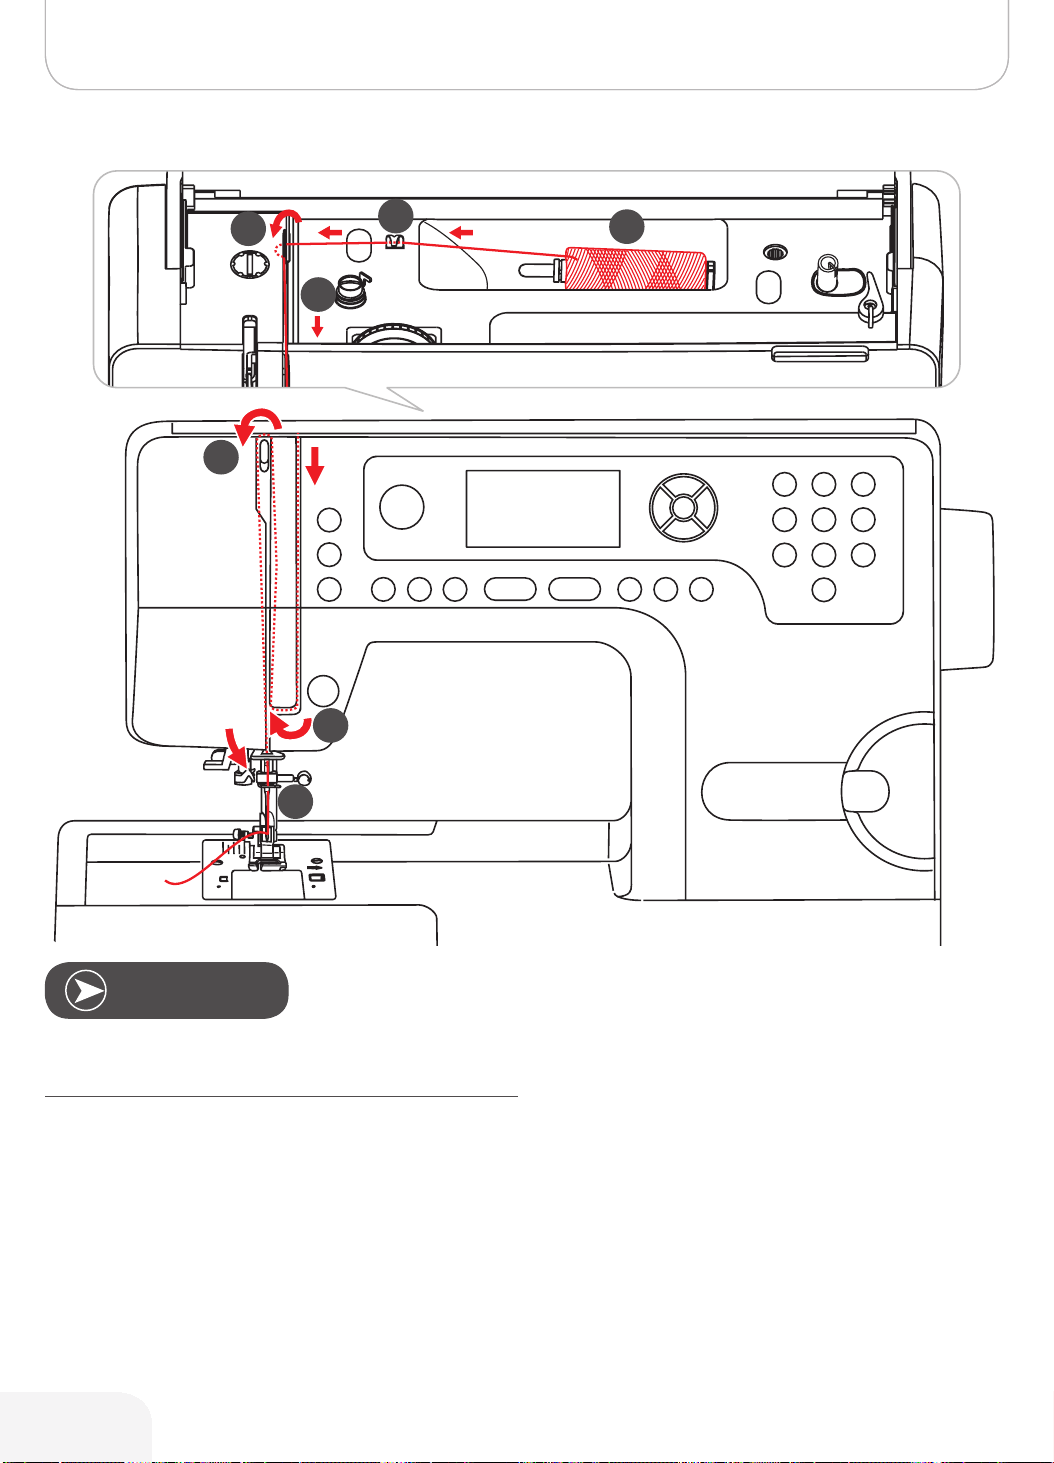
Threading the Upper Thread
Note
It is important to carry out the threading correctly as by not
doing so several sewing problems can occur.
12
Page 15
502020.83.11_2013_06_bernette chicago 7_EN
AtteNtioN!
Start by raising the needle to its highest point, and also raise
the presser foot to release the tension discs.
• Place the thread spool on the spool pin so that the
thread comes from the front of the spool, then place
the spool cap at the end of the spool pin.
• Pull the thread from the spool through the upper thread
guide.
• Guide the thread around the thread guide pulling the
thread through the pre-tension spring as illustrated
Machine Setup
• Then lead it further down and around the bottom part
of the take-up lever cover.
• Pull it up and insert the thread from the right to the left
through the slotted eye of the take-up lever and then
take it downwards again.
• Guide the thread through the wire loop.
• Pull the end of the thread through the needle from the
front to the rear, and pull out about 10 cm of thread.
• Use the face plate thread cutter to cut excess needle
thread.
• Use the needle threader to thread the needle (refer to
next page for instruction).
13
Page 16

Machine Setup
502020.83.11_2013_06_bernette chicago 7_EN
Needle Threader
AtteNtioN!
AtteNtioN!
Raise the needle to its highest position and lower the
presser foot.
Turn power switch to the off position «O»!
• Lower the needle threader lever slowly and pull the
thread through the thread guide as illustrated and then
to the right.
• The needle threader automatically turns to the thread-
ing position and the hook pin passes through the
needle eye.
• Pull the thread to the right, guiding it to the front of the
needle
• Hold the thread loosely and release the lever slowly.
– The hook will turn and pass the thread through the
needle eye forming a loop.
– Pull the thread through the needle eye.
14
Page 17
502020.83.11_2013_06_bernette chicago 7_EN
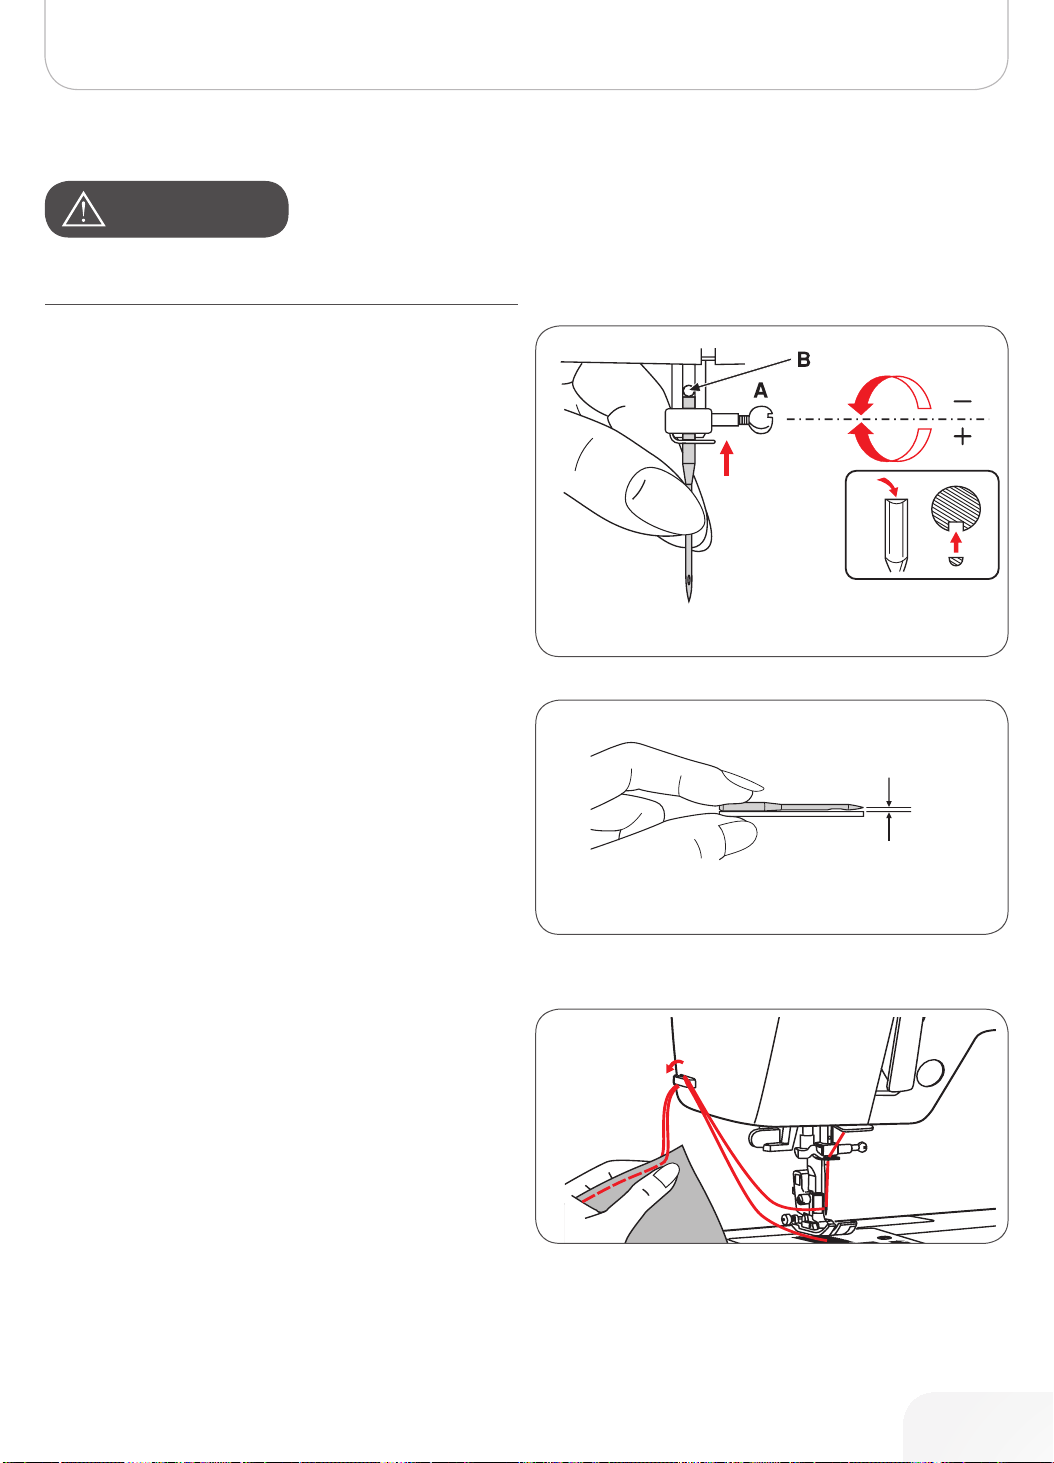
Replacing the Needle
AtteNtioN!
Turn power switch to off («O») when carrying out the
following operation!
Change the needle regularly, especially if it is showing signs of
wear and tear or of it is causing problems.
Insert the needle following the illustrated instructions.
A Loosen the needle clamp screw and tighten it again
after inserting the new needle. The flat side of the shaft
must be at the back.
B Insert the needle as far up as it will go.
Machine Setup
Needles must be in perfect condition
Problems can occur with:
– Bent needles
– Blunt needles
– Damaged points
Thread Cutter
The thread cutter serves two purposes:
1. Cut the thread after threading the needle
2. Cut the thread after finishing a seam.
• To cut the thread after completing your work raise the
presser foot.
• Remove the fabric, draw the threads to the left side of
the face cover and cut using the thread cutter.
• The threads are cut at the proper length to start the
next seam.
15
Page 18
Machine Setup
502020.83.11_2013_06_bernette chicago 7_EN
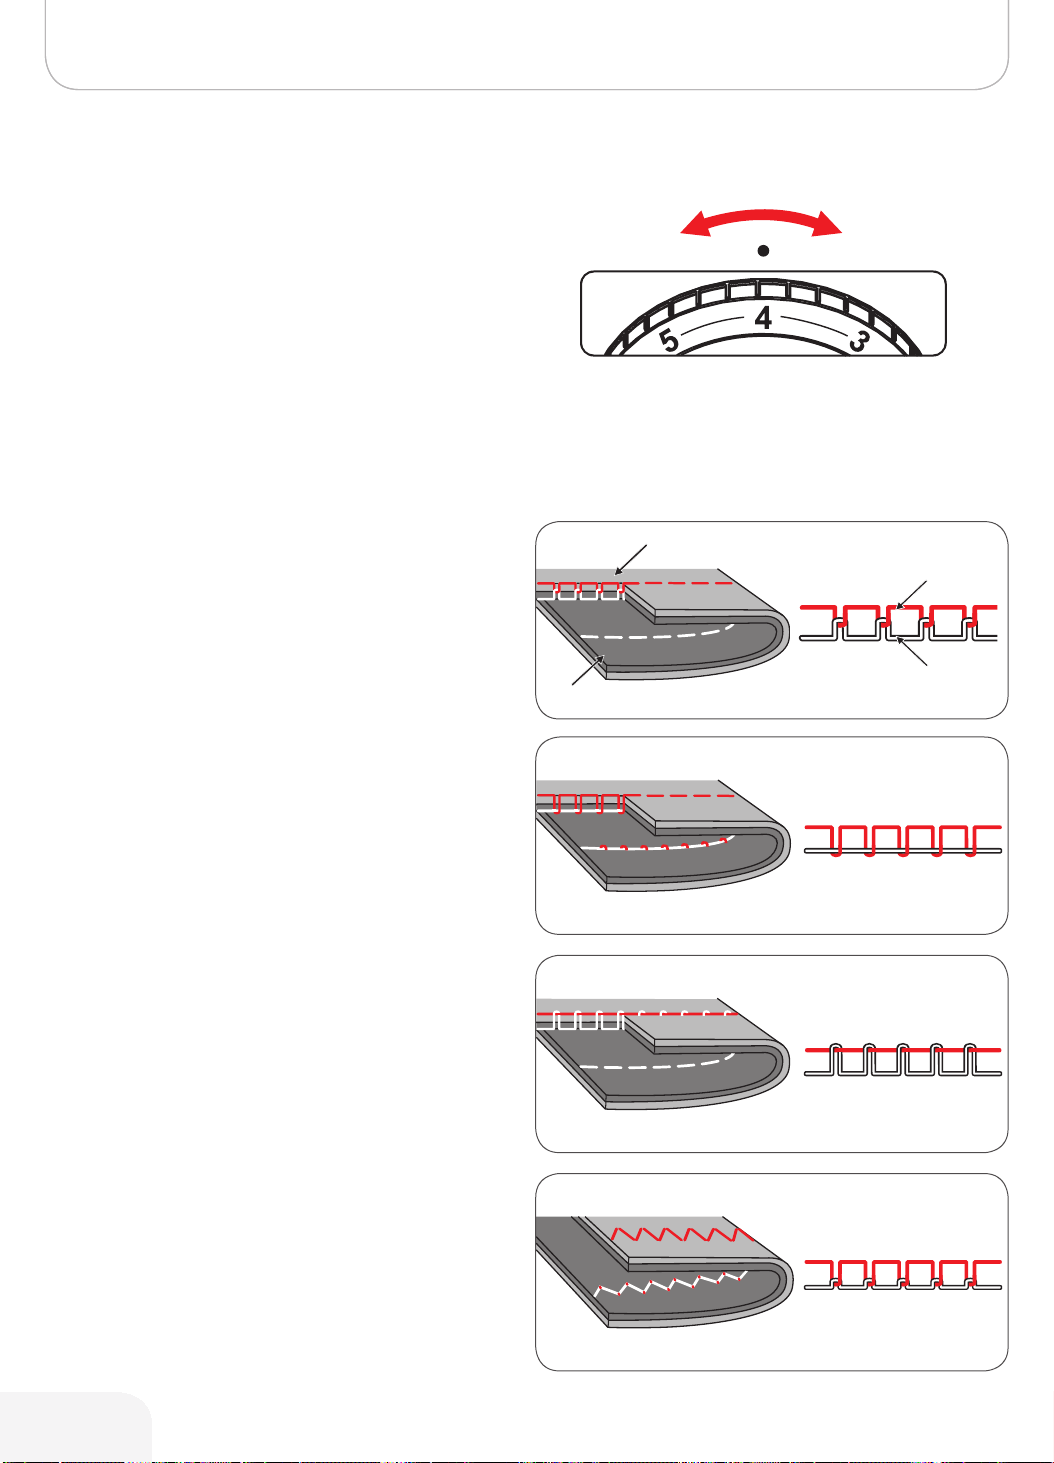
Thread Tension
Basic thread tension setting: «4»
• To increase the tension, turn the dial to the next num-
ber up.
• To reduce the tension, turn the dial to the next number
down.
Appropriate setting of tension is important to good sewing.
With any decorative sewing you will always obtain a nicer
stitch formation and less fabric puckering when the upper
thread appears on the wrong side of your fabric.
tight
loose
Normal thread tension for straight stitch sewing.
Thread tension is too loose for straight stitch sewing.
• Turn dial to higher number.
Thread tension is too tight for straight stitch sewing.
• Turn dial to lower number.
Surface
Reverse side
Upper thread
Bobbin thread
Normal thread tension for zig-zag and decorative sewing.
16
Page 19
b
a
b
a
502020.83.11_2013_06_bernette chicago 7_EN
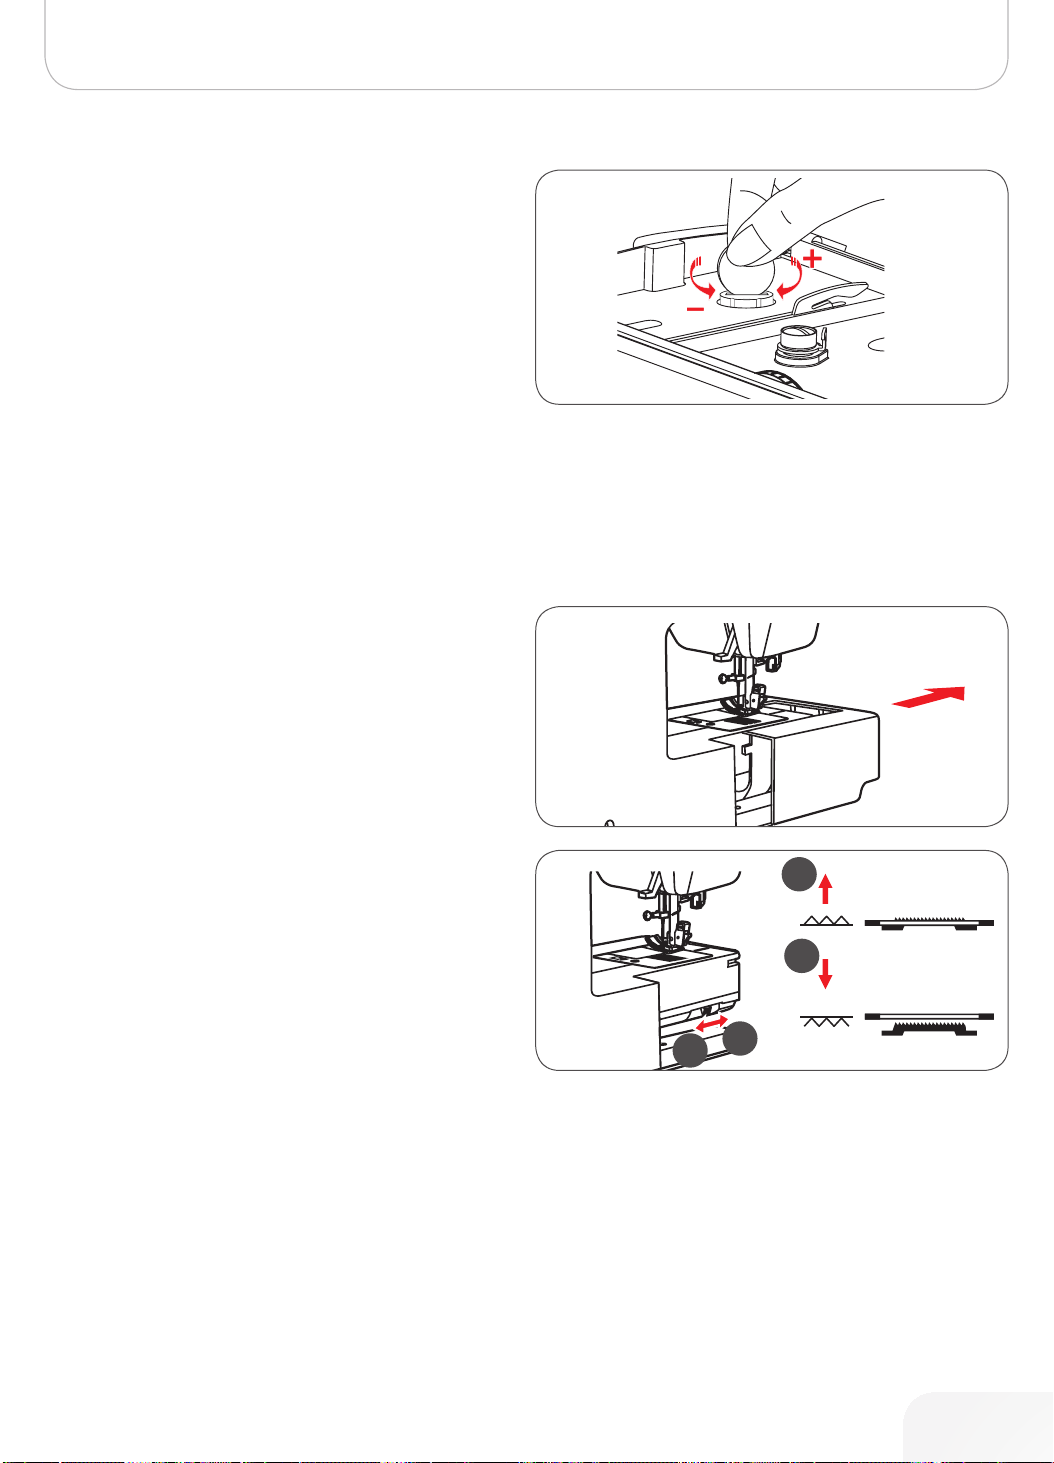
Altering Presser Foot Pressure
The presser foot pressure of the machine has been pre-set
and requires no particular re-adjustment according to the type
of fabric (light-or-heavy weight).
However, if you need to alter the presser foot pressure, turn
the presser foot pressure adjusting screw using a coin.
• For sewing very thin fabric, loosen the pressure by
turning the screw counter-clockwise, and for heavy
fabric, tighten by turning it clockwise.
• To return to initial pressure foot setting turn the presser
foot pressure adjusting screw to become flush with the
face cover.
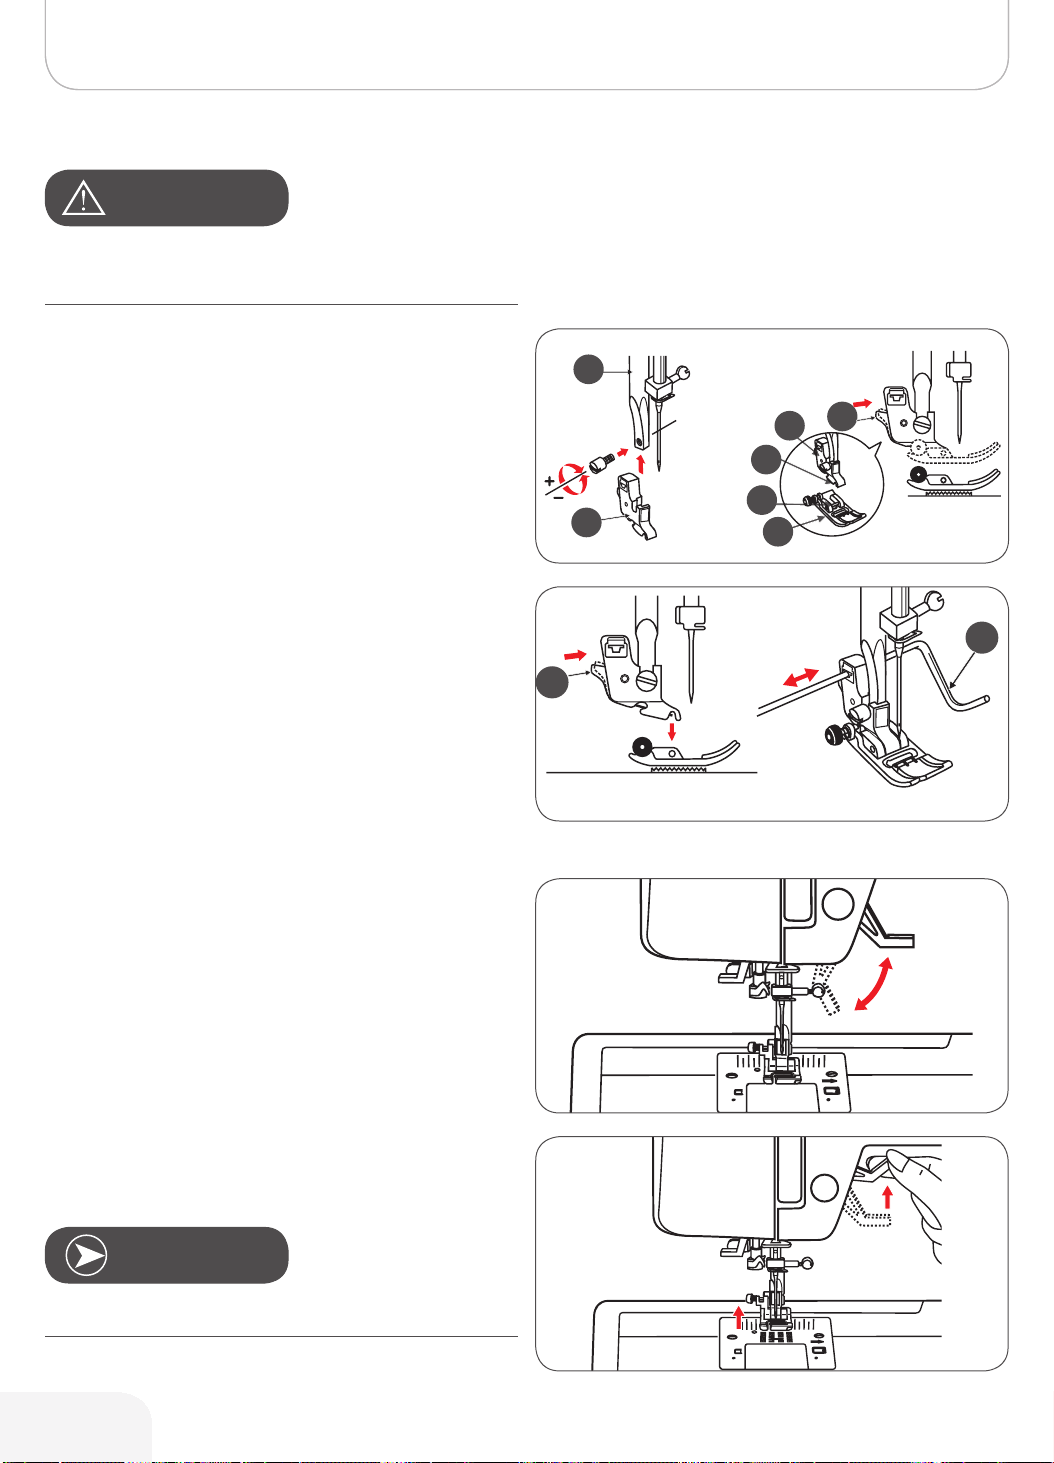
Raising or Dropping the Feed dog
With the sewing table detached, the feed dog lever can be
located on the back of the free arm.
Machine Setup
Sliding the lever to position (b) will lower the feed dog, for
example during button sewing or freehand embroidery.
• If you wish to continue sewing normally, slide the lever
to position (a) in order to raise the feed dog.
• The feed dog will not be raised if you do not turn the
handwheel, even if the lever is slid to the right.
• Make a complete turn to raise the feed dog.
17
Page 20
Machine Setup
b
d
c
f
e
a
b
e
g
502020.83.11_2013_06_bernette chicago 7_EN
Changing the Presser Foot
AtteNtioN!
Turn power switch to off («O») when carrying out any of the
following operations!
Attaching the presser foot holder
• Raise the presser foot bar (a).
• Attach the presser foot holder (b) as illustrated.
Attaching the presser foot
• Lower the presser foot holder (b) until the cut-out (c) is
directly above the pin (d).
• Press the black lever (e).
• Lower the presser foot holder (b) and the presser foot
(f) will engage automatically.
Removing the presser foot
• Raise the presser foot.
• Press the black lever (e) and the foot will disengages.
Attaching the edge/quilting guide
• Attach the edge/quilting guide (g) in the slot as illus-
trated.
• Adjust according to the need for hems, pleats, etc.
Two-Step Presser Foot
There are two raising levels of the presser foot. Lifting the foot
up to the first level is used to place the fabric under the foot
for sewing.
The second level is only used in embroidery mode to remove
the hoop easily.
Note
The needle must always be at the highest position.
18
Page 21

Important Sewing Information
502020.83.11_2013_06_bernette chicago 7_EN
Needle, Fabric, Thread Selection Guide
Note
The thread is chosen according to the purpose. For a perfect sewing result, thread and fabric quality play an important role.
It is recommended to use quality brands.Care must be taken when choosing needle and thread. The correct needle size
depends on the selected thread and fabric. The fabric weight and type determine the thread weight, needle size and point
form.
Needle size Fabrics Thread
9-11/65-75
12/80 Medium-weight fabrics such as cotton, satin,
14/90 Medium-weight fabrics-cotton duck, woolen,
16/100 Heavy-weight fabrics such as canvas,
18/110 Heavy woolens, overcoat fabrics, upholstery
Light-weight fabrics such as thin cottons,
voile, serge, silk, muslin, Qiana, interlocks,
cotton knits, tricots, jerseys, crepes, woven
polyester, shirt & blouse fabrics.
kettleclote, sailcloth, double knits, lightweight
woolens.
heavier knits, toweling, denims.
woolens, outdoor tent and quilted fabrics,
denims, upholstery material (light to medium).
fabrics, some leathers and vinyls.
Light-weight thread in cotton, nylon or
polyester.
Most threads sold are medium size and
suitable for these fabrics and needle
sizes.
Use polyester threads on synthetic
materials and cotton on natural woven
fabrics for best results.
Always use the same thread for upper
and lower thread.
Heavy-weight thread, carpet thread. (Use
heavy foot pressure with large numbers.)
19
Page 22

Important Sewing Information
502020.83.11_2013_06_bernette chicago 7_EN
Note
Double needles can be purchased for utility and decorative work. European needles show sizes 65, 70, 80 etc. American
and Japanese needles show size 9, 11, 12 etc.Replace needle regularly (approximately after every second garment ) and/or
when thread breakage or skipped stitches occur.
Needles Explanation Type of fabric
HA x 1
15 x 1
15 x 1/130/ 705H
15 x 1/ 130/705H (SUK)
130PCL/705H-LR/LL
Standard sharp needles.
Sizes range thin to large.
9 (65) to 18 (110)
Semi-ball point needle, large eye.
9 (65) to 18 (110)
Full ball point needle.
9 (65) to 18 (110)
Leather needles.
12 (80) to 18 (110)
Natural woven fabrics-wool, cotton, silk,
etc. Qiana. Not recommended for double
knits.
Natural and synthetic woven fabrics,
polyester blends. Knits-polyesters,
interlocks, tricot, single and double knits.
Can be used instead of 15 x 1 for sewing
all fabrics.
Sweater knits, Lycra, swimsuit fabric,
elastic.
Leather, vinyl, upholstery. (Leaves smaller
hole than standard large needle.
20
Page 23
502020.83.11_2013_06_bernette chicago 7_EN
Presser Foot Application Chart
The double needle is being suggested with certain stitches for more creativity
Important Sewing Information
Presser Foot Application Needle
All-purpose foot (T)
Zipper foot (I) Inserting zippers
Button sewing-on
foot
Buttonhole foot (D) Buttonhole sewing
General sewing,
Patchwork stitches,
Decorative stitching,
Smoking, Fagoting,
etc.
Button sewing-on
Presser Foot Application Needle
Darning/Embroidery
foot
Blind hem foot (F) Blind hem stitching
Hemmer foot (K)*
Cording foot (M)*
Darning, Free
embroidery Monogramming
Narrow hemming
Cording
Satin stitch foot (A) Satin stitch sewing
Overlcasting foot (E) Overcasting
1/4“ Quilting foot* Quilting and Patch-
work sewing
Note
* Available as optional accessories
Invisible Zipper foot*
Gathering foot*
Walking foot*
Double needle*
Inserting invisible
zippers
Gathering
This foot helps to
prevent uneven
feeding with very
delicate fabrics
21
Page 24
Display Explanation & Operating Functions
502020.83.11_2013_06_bernette chicago 7_EN
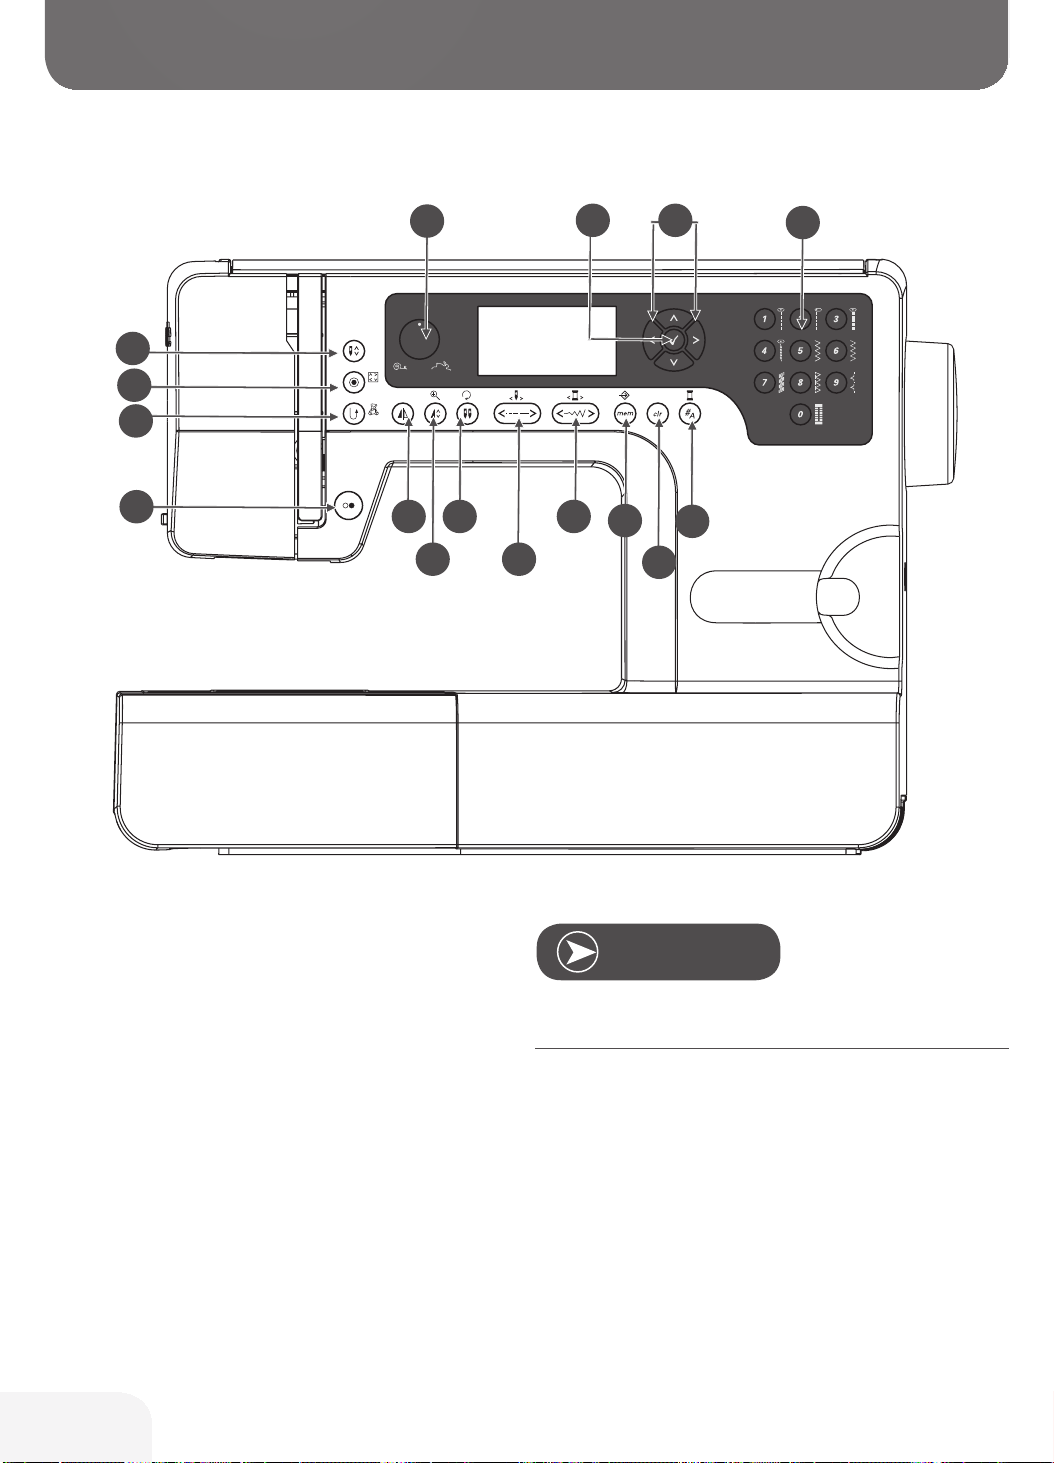
Buttons Explanation
5
6
7
8
4
3
2
1
9
11 13
10
12
14
16
15
1 Start/Stop button
2 Reverse/Exit button
3 Auto-lock/Trace button
4 Needle up/down button
5 Speed dial
6 OK button
7 Arrow buttons
8 Direct pattern selection and Number buttons
9 Mirror image button
10 Elongation/Resize button
11 Double needle/Rotate button
12 Stitch length adjustment/Stitch forward/back button
13 Stitch width adjustment/Colour forward/back button
14 Memory/Setup button
15 Clear/Return button
16 Pattern group selection/Colour setup button
22
Note
The icon on the button is for sewing mode, and the icon on
the side of the button is for embroidery mode.
Page 25
1
21
20
18
19
2
4
8
15
22
5
11
7
10
6
9
3
17
16
1413
12
24
23
502020.83.11_2013_06_bernette chicago 7_EN
Information on the LCD Display
Normal Mode
Normal mode display
1 Pattern
2 Pattern number
3 Reverse
4 Auto-lock
5 Recommended presser foot
6 Recommended tension
7 Pattern group
8 Needle up position
9 Stitch length
10 Needle position
11 Sound on
12 Auto-stop
13 Mirror image
14 Double needle
15 Needle down position
16 Stitch width
17 Sound off
18 Alphabet number
19 Alphabet
Display Explanation & Operating Functions
Normal Mode display - pattern browser display
20 Pattern
21 Pattern number
22 Pattern group
23 Current page
24 Total page
23
Page 26

Display Explanation & Operating Functions
13
14
15
18
17
9
11
19
10
4
2
12
16
7
8
6
5
21
22
20
1
3
502020.83.11_2013_06_bernette chicago 7_EN
Memory Mode
Memory mode display
1 Selected memory (framed)
2 Memory containing stitches
3 Empty memory
4 Current memory
5 Pattern number and pattern
6 Auto-stop
7 Mirror image
8 Needle up position
9 Sound on
10 Elongation
11 Stitch width
12 Stitch length
13 Pattern group
14 Current memory unit
15 Total of memory units
16 Memory cursor
Memory Mode display - pattern browser display
17 Pattern
18 Pattern number
19 Memory model
20 Pattern group
21 Current page
22 Total page
24
Page 27
1 2 3
6
7
4
18
20
5
13
9
8
12
11
10
19
17
16
15
14
502020.83.11_2013_06_bernette chicago 7_EN
Embroidery Mode
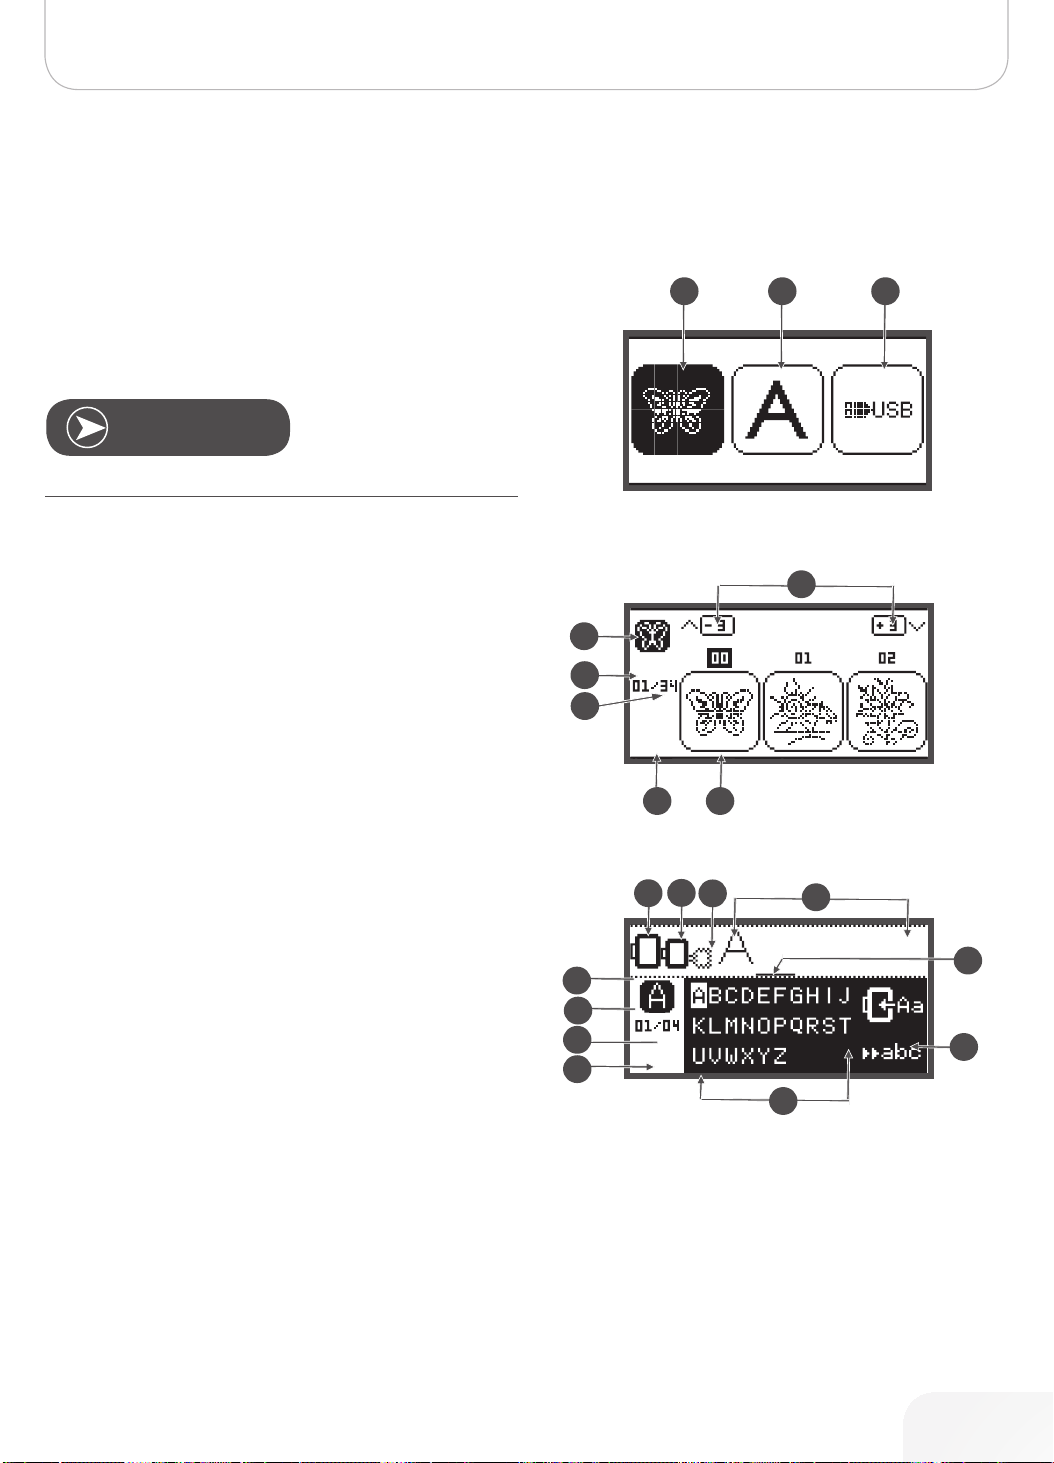
Embroidery mode display - type selection display
1 Built-in Embroidery Designs
2 Built-in Embroidery Letters
3 Designs from USB
Note
This embroidery machine reads .exp format only
Embroidery mode display - type selection display
4 Type mode
5 Indication - select page up/down
6 Current design
7 Total design
8 Operation indication
9 Embroidery design number and design
Display Explanation & Operating Functions
Embroidery mode display - Built-in Embroidery letters
10 Embroidery hoop size L-110*170mm
11 Embroidery hoop size M-100*100mm
12 Embroidery hoop size S-40*40mm* While the hoop
icon is flashing the is adjusting the size or the current
size will change.
13 Editing area
14 Cursor
15
16 Current page
17 Total page
18 Operation indication
19 Embroidery letters
20 Letter type font
25
Page 28
Display Explanation & Operating Functions
502020.83.11_2013_06_bernette chicago 7_EN
Function Buttons
Start/Stop button
• Press the Start/Stop button to start the machine. Press
again to stop it. The machine will move slowly at the
start of sewing.
– This way you may operate the machine without foot
control.
Reverse/Exit button
Reverse is pressed to sew in reverse.
The icon «Reverse» on the LCD indicates reverse sewing.
Only the Direct Group Patterns 1 – 5 and A Group Patterns
00 can be sewn in reverse.
• If you press the Reverse/Exit button before starting to
sew
– the machine will permanently sew in reverse. Press
the button again to sew forward.
• If you press the reverse button during sewing
– it will sew in reverse as long as the reverse buttons
is pressed.
In Embroidery Mode press this button to return to the type
selection display, the selected pattern is canceled.
Auto-Lock/Trace button
When the Direct Group Patterns 0 and A Group Patterns
13-26 are selected, the machine will immediately sew 3
securing stitches when the Auto-Lock button is pressed, then
it will stop automatically.
1 The LCD display shows the symbol until the machine is
stopped.
Except for Direct Group Pattern 0 and A Group Patterns
13-26, press the Auto-Lock button, the machine will sew 3
securing stitches at the end of the current pattern and then
stop automatically.
2 The LCD display shows the symbol until the machine is
stopped.
The function will be cancelled if you press the button once
again or select another pattern.
1
2
26
Page 29
Display Explanation & Operating Functions
502020.83.11_2013_06_bernette chicago 7_EN
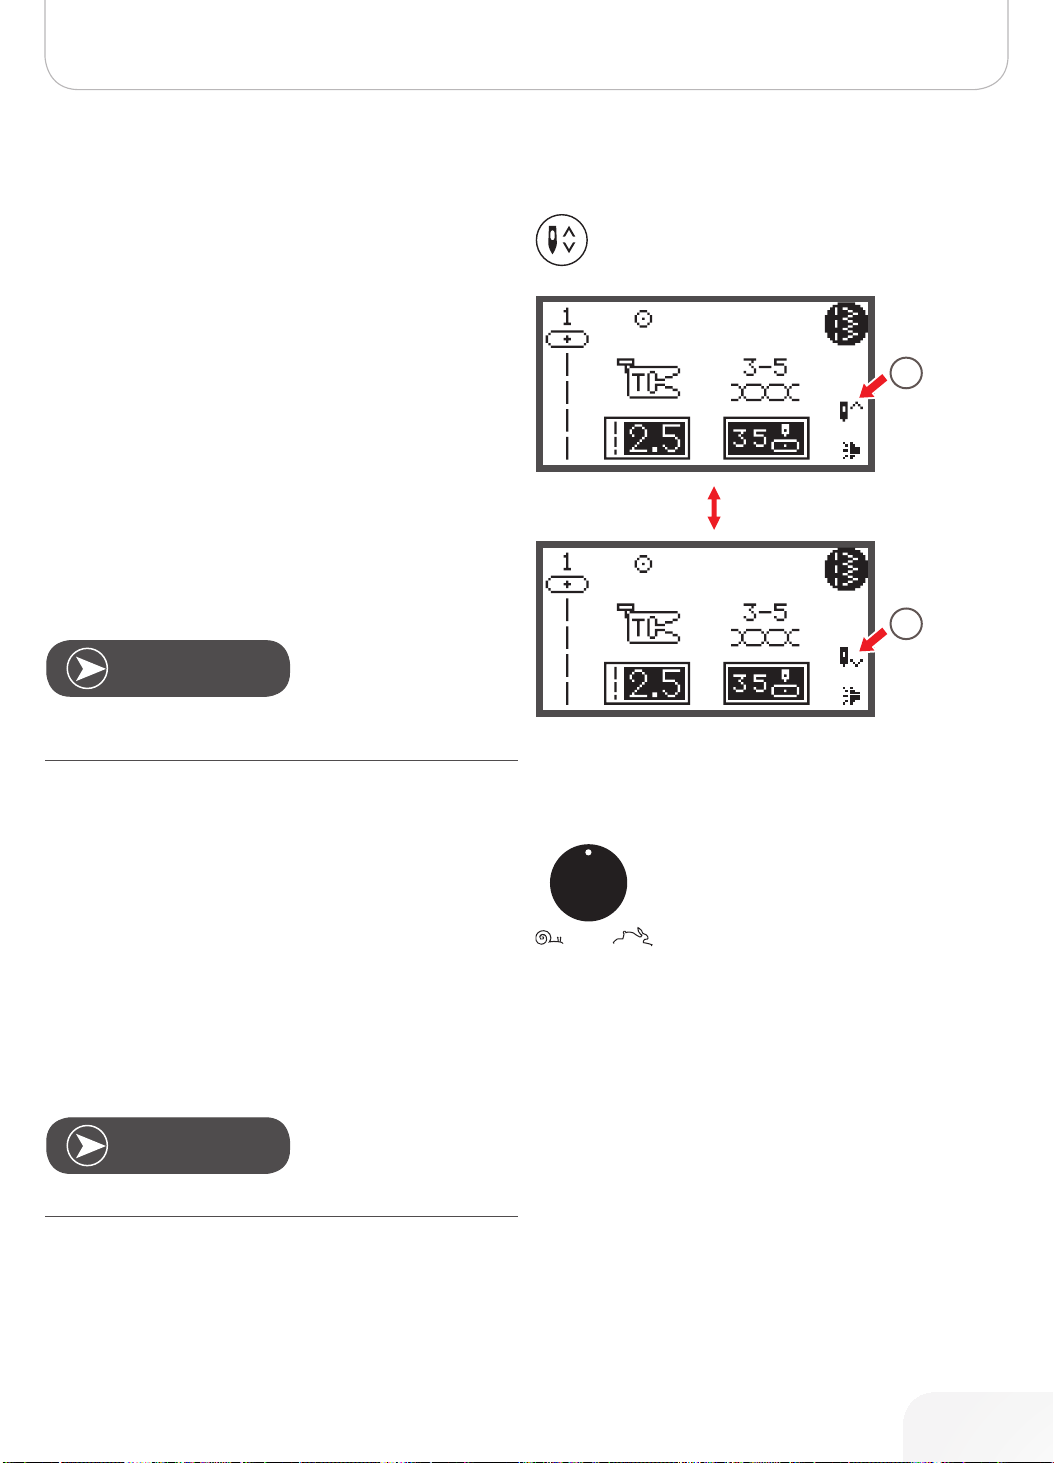
Needle up/down button
• By pressing the needle up/down button
– the needle will either stop in the up position or in the
material when stop sewing.
1 Press the button so the arrow on the LCD points
upward
– the needle moves to the highest position and will
stop there after sewing.
2 Press the button so the arrow on the LCD points
downwards
– the needle moves to the lowest position and will
stop there after sewing.
1
2
Note
During sewing, press the needle up/down button, the
machine will stop automatically.
Speed Dial
• By adjusting the position of the speed dial
– the top speed during sewing may be limited.
The position of the speed dial defines the sewing speed when
the foot control is pressed down completely.
• For higher speed: Turn the dial clockwise
• For slower speed: Tu r n the dial counter-clockwise
When the machine is run via the Start/Stop button the position of the speed dial defines the actual sewing speed.
Note
Speed setting is applied exclusively in sewing mode.
27
Page 30
Display Explanation & Operating Functions
502020.83.11_2013_06_bernette chicago 7_EN
Arrow buttons
Use the buttons to select desired pattern, function… etc.
OK button
• Press this button to confirm the selection.
– In the Normal Mode press the button to enter the
pattern browser.
– In the Memory Mode press the button to enter the
pattern browser.
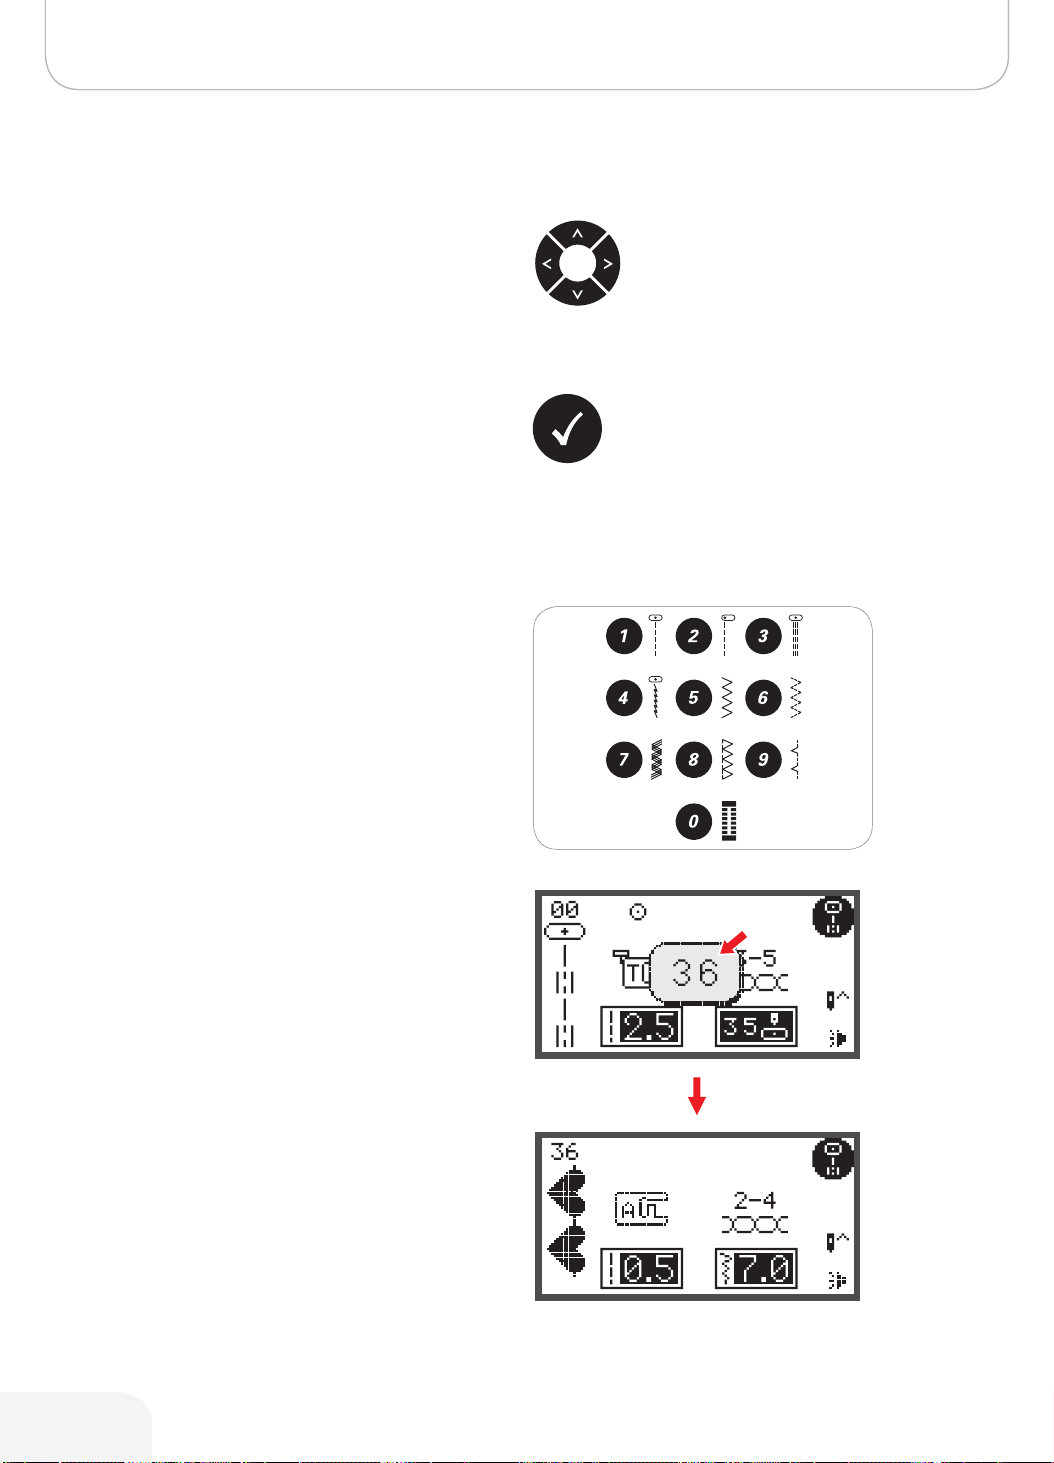
Direct pattern selection
• Press the buttons to select the practical stitch patterns
shown beside the numbers when the Direct Mode is
set.
Number buttons
• Press the buttons to select the practical stitch patterns
at set Pattern Group directly.
28
Page 31

Display Explanation & Operating Functions
B
A
502020.83.11_2013_06_bernette chicago 7_EN
Mirror image button
• Except for Direct Group Pattern 0 and the A Group
patterns 86-99, the other patterns can be mirrorimaged by pressing the mirror immage button.
– The machine will continue to sew the mirrored pat-
tern until the mirror button is pressed again.
– The mirror function will also be canceled if the pat-
tern is changed.
A Normal pattern
B Mirror-imaged pattern
Elongation/Resize button
• A Group Patterns 13-36 can be elongated up to five
times its normal length by pressing the elongation but-
ton.
When the width or length of the stitch is changed, a greater
variety of patterns is available.
• In Embroidery Mode, press this button to open the
resize display.
Double needle/Rotate button
Except for the Direct Group Patterns 0 and the A Group patterns 86-99, the patterns can be sewn in two parallel lines of
the same stitch using the double needle.
• Press the double needle button and the machine auto-
matically reduces the maximum width for double needle sewing.
• Press the button again to return to single needle sew-
ing.
• In Embroidery Mode, press this button to rotate the
embroidery design.
29
Page 32

Display Explanation & Operating Functions
502020.83.11_2013_06_bernette chicago 7_EN
Stitch length adjustment/ Stitch forward/backward button
When you select a stitch, the machine will automatically set
the recommended stitch length which will be indicated by
numbers on the LCD display.
• The stitch length can be altered by pressing the stitch
length adjustment button.
• To shorten the stitch length, press the «-» button (left).
For a longer stitch length, press the «+» button (right).
The stitch length can be altered from «0.0 to 4.5». Certain stitches have a limited stitch length.
• In Embroidery Mode, press this button to move forward
or backward within the design stitch by stitch.
Stitch width adjustment/ Colour forward/backward button
When selecting a stitch, the machine will automatically set the
recommended stitch width, which will be indicated by numbers on the LCD display.
• The stitch width can be regulated by pressing the stitch
width adjustment button.
• For a narrower stitch, press the button left.
• For a wider stitch, press the button right.
– The stitch width can be altered from «0.0 to 7.0».
Certain stiches have a limited stitch width.
When Direct Patterns 1-4 and A Group Pattern 00 are
selected, the needle position is regulated by the stitch width
adjustment buttons.
• Press the button left and the needle moves to the left.
• Press the button right and the needle moves to the
right.
– The number will be changed from left position «0.0»
to extreme right position «7.0».
– The pre-set center needle position will be indicated
as «3.5».
• In Embroidery Mode, press this button to move forward
or backward in the colour part.
30
Page 33

Display Explanation & Operating Functions
502020.83.11_2013_06_bernette chicago 7_EN
Memory/Setup button
• Press the memory button to enter the Memory Mode
and program the combinations of characters or decorative stitches.
– The Direct Group Patterns and the A Group pat-
terns 86-99 can’t be programed.
• In Embroidery Mode, press this button to enter the set-
ting program.
Clear/Return button
• If an incorrect pattern or memory file is selected, press
this button to clear it or to return to the previous display.
Pattern group selection/Colour setup button
The LCD display shows the Direct Group Patterns when you
turn on the machine.
• Press the pattern group selection button, the LCD dis-
play enters the pattern group selection display automatically. Use the arrow buttons to select the desired
group of stitches.
• In Embroidery Mode, press this button to set the single
or multi colour for embroidery designs.
– Direct Group Patterns
– A Group Patterns
– B Group Patterns
– C1 Group Patterns: Block Style Alphabet
– C2 Group Patterns: Script Style Alphabet
31
Page 34

Display Explanation & Operating Functions
502020.83.11_2013_06_bernette chicago 7_EN
How to select a stitch
The LCD display shows the Direct Group Patterns when
switching on the machine.
• Press number buttons to select a pattern shown next
to the number buttons or press the pattern group
selection button to select the desired pattern group.
• Use the arrow buttons to select the desired pattern
group and press the OK button.
• Use either the arrow buttons or the number buttons to
select the desired pattern.
• When using the arrow buttons, press the OK button
after the desired stitch was selected to go back to
Sewing Mode.
• When using the number buttons, the machine will
automatically set the stitch and go back to Sewing
Mode.
32
Page 35

Stitches
134 5678902
37 38
41
43 44 45
51 52 53
54 55
46
47
48 49 50
58 59
72
62
63 64
65
66
67 68
69
70 71
60 61
75
74
73
78 79 80 81 82 83 4867
77
85
90 91 92 9386 87 88 89
94
502020.83.11_2013_06_bernette chicago 7_EN
Direct Patterns
A - Group Patterns
Utility stitches
00 02 03 04 05 06 07 08 09 10
01 12
Stitches Overview
11
Satin stitches
Decorative Satin
stitches
Cross stitches
Quilt stitches
Decorative stitches
Buttonhole stitches
13
14
56 57
16 17 18
15
39 40
19 20 21 22 23 24 25 26
42
29 30 31 32 33 34 35 362827
Bar tack stitches
33
Page 36

Stitches Overview
9989
502020.83.11_2013_06_bernette chicago 7_EN
A - Group Patterns
Eyelet stitches
Button sewing
stitches
Darning stitches
B - Group Patterns
Decorative stitches
6959
79
00 02 03 04 05 06 07 08 09 10
01
12 13 14 15 16 17 18 19 20 21 22 23 24
11
25
30 32
3126 27 28 29
52 54 55 56 57 58 5953
78 79 80 81 82 83 84
33 34 35 36 37 38 39
60 62 63 64 65 66 67 68 69 70
61
85
86 87 88 89
41 42 43 44 45 46 47 48 49 50 51
40
73 74 75 76 77
72
71
92 93 94 95 96 97 98 99
9190
34
Page 37

502020.83.11_2013_06_bernette chicago 7_EN
C - Group Patterns
C1 Group Patterns:
Block Style Alphabet
C2 Group Patterns:
Script Style Alphabet
Stitches Overview
35
Page 38

Basic Sewing Procedures
1
2
3
4
5
502020.83.11_2013_06_bernette chicago 7_EN
Reverse
Reverse stitching is used to secure the threads at the beginning and at the end of a seam.
• Press the reverse button and sew 4-5 stitches.
– The machine will sew forward when the button is
released.
Free arm
Free-arm sewing is convenient for sewing tubular areas such
as pant hems and cuffs.
Sewing corners
1 Stop the sewing machine when you reach a corner.
2 Lower the needle into the fabric manually or by press-
ing the needle up/ down button once.
3 Raise the presser foot.
4 Use the needle as a pivot and turn the fabric.
5 Lower the presser foot and resume sewing.
36
Page 39

A
502020.83.11_2013_06_bernette chicago 7_EN
Sewing on the heavy fabric
The black button on the left side of the presser foot will lock
the presser foot in a horizontal position if you push it in before
lowering the presser foot. This ensures even feeding at the
beginning of a seam and helps when sewing multiple layers of
fabric such as sewing over seams when hemming jeans.
When you reach the point of an increased thickness, lower
the needle and raise the presser foot.
• Press the toe of the foot and push in the black button,
then lower the foot and continue sewing.
The black button releases automatically after sewing few
stitches.
You can also place another piece of fabric with the same
thickness at the back of the seam. Or support the presser
foot while feeding by hand and sewing towards the folded
side.
Basic Sewing Procedures
A Cardboard or thick fabric
37
Page 40

Basic Sewing Procedures
4 A-0012
3
4 A-0012
3
4 A-0012
3
56
7
502020.83.11_2013_06_bernette chicago 7_EN
Straight Stitches and Needle Position
Changing the needle position
These settings apply to the Direct Group Pattern 1-4 and the
A Group Pattern 00 only.
The pre-set position is «3.5», center position.
• Press the stitch width button to enter the stitch width
adjustment mode.
• When you turn the selector wheel counter-clock-
wise, the needle position will move to the left.
• When you turn the selector wheel clockwise, the
needle position will move to the right.
Altering the stitch length
• Press the stitch length button to enter the stitch length
adjustment mode.
• To shorten the stitch length, turn the selector
wheel counter-clockwise.
• For a longer stitch length, turn the selector wheel
clockwise.
In general, the thicker the fabric, thread and needle, the longer
the stitch should be.
Zig-zag Stitches
3
4 A-0012
Altering the stitch width
The maximum zig-zag stitch width for zig-zag stitching is
«7.0»; however, the width can be reduced with any patterns.
• Press the stitch width button to enter the stitch width
adjustment mode,
– the stitch width can be altered from «0.0 to
7.0mm».
Altering the stitch length
The density of zig-zag stitches increase- as the setting of
stitch length approaches «0.3».
Neat zig-zag stitches are usually achieved at «1.0-2.5».
Closed up zig-zag stitches (close together) look like satin
stitches.
56
7
38
Page 41

1
2
34
7
1
2
34
7
1
2
34
7
502020.83.11_2013_06_bernette chicago 7_EN
Triple Straight Stretch Stitch
Basic Sewing Procedures
The triple straight stretch stitch is strong and flexible and
ensures a durable seam without breaking.
Suitable for highly elastic and knit fabrics but also for heavy
fabrics such as denim.
These stitches can also be used as a decorative top stitching.
The triple straight stretch stitch is used to add triple reinforcement to stretch and hardwearing seams.
1 Triple straight stretch stitch
2 Straight stitch
The triple zig-zag stretch stitch is suitable for firm fabrics like
denim, poplin, duck, etc.
34
7
39
Page 42

Basic Sewing Procedures
2.5~4.52.0-3.0
6 A-02
2.5~4.52.0-3.0
6 A-02
2.5~4.52.0-3.0
502020.83.11_2013_06_bernette chicago 7_EN
Overlock Stitches
Change the presser foot to the overlock foot (E).
Sew the fabric with the fabric edge against the guide of the
overlock foot.
AtteNtioN!
The overlock foot should be used to sew with Direct Group
Patterns 5 and 8 only. Do not set the stitch width narrower
than «5.0». It is possible that the needle could hit the presser
foot and break when sewing other patterns and width.
Using the All- purpose foot
Change the presser foot to the All-purpose foot (T).
When sewing the overlock using the All-purpose foot, sew
along the edge of the fabric so that the needle drops over the
edge of the fabric on the right side.
6 A-02
2.5~4.52.0-3.0
40
Page 43

A
B
A
a
b
B
A
a
b
B
A
a
b
B
502020.83.11_2013_06_bernette chicago 7_EN
Blind Hem
9 : Blind hem/ lingerie for firm fabrics
A-03 : Blind hem for stretch fabrics
A-04 : Blind hem for stretch fabrics
Fold the fabric as illustrated with the wrong side up.
First perform an overlock stitch as shown in left picture.
Note
It takes practice to sew blind hem. Always sew a test
sample first.
Basic Sewing Procedures
• Place the fabric under the foot.
• Turn the handwheel forward manually until the needle
swings fully to the left.
– It should just pierce the fold of the fabric.
• If it does not, adjust the stitch width accordingly.
• Adjust the guide (b) by turning the knob (a) so that the
guide just rests against the fold.
• Sew slowly, guiding the fabric carefully along the edge
of the guide.
A Wrong side of the fabric
B Right side of the fabric
• Sew slowly, guiding the fabric carefully along the edge
of the guide.
• Turn over the fabric.
41
Page 44

Basic Sewing Procedures
b
b
a
a
b
b
a
a
b
b
a
a
b
a
b
a
502020.83.11_2013_06_bernette chicago 7_EN
Button Sewing-on
Change the presser foot to the button sewing-on foot.
• Move the feed dog control to lower the feed dog (b).
• Position the work under the foot.
• Place the button in the desired position, lower the foot.
• Select zig-zag pattern.
• Adjust the stitch width to «2.5-4.5» according to the
distance between the two holes of the button.
• Turn the handwheel to check that the needle goes
cleanly into the left and right holes of the button.
• Before sewing, press the Auto-lock button to sew
securing stitches automatically at the beginning and at
the end of the stitch.
• If a shank is required, place a darning needle on top of
the button and sew.
• For buttons with 4 holes, sew the front two holes first,
push the work forward and then sew the back two
holes.
Note
After having finished the work
42
Page 45

0
A-87
A-91
A-92
A-93
A-90
A-86
A-88
A-89
2.5~7.00.3~1.0
2.5~5.5
5.5~7.0
3.0~7.01.0~2.0
3.0~7.01.0~3.0
0.3~1.0
0.3~1.0
DD
0
A-87
A-91
A-92
A-93
A-90
A-86
A-88
A-89
2.5~7.00.3~1.0
2.5~5.5
5.5~7.0
3.0~7.01.0~2.0
3.0~7.01.0~3.0
0.3~1.0
0.3~1.0
DD
0
A-87
A-91
A-92
A-93
A-90
A-86
A-88
A-89
2.5~7.00.3~1.0
2.5~5.5
5.5~7.0
3.0~7.01.0~2.0
3.0~7.01.0~3.0
0.3~1.0
0.3~1.0
DD
A
502020.83.11_2013_06_bernette chicago 7_EN
Buttonhole Stitching
Basic Sewing Procedures
0 : For thin or medium fabric
A-86 : For thin or medium fabric
A-87 : For suits or overcoats
A-88 : For horizontal buttonholes on thick fabrics
A-89 : For thin or medium fabric
A-90 : For thick coats
A-91 : For jeans or trousers
A-92 : For jeans or stretch fabric with a coarse weave
Note
Before sewing a buttonhole on your project, practice on a
scrap piece of the same type of fabric.
• Mark the positions of the buttonhole on the fabric.
The maximum buttonhole length is 3cm (1 3/16 inch). (Total of
diameter + thickness of button.)
A-86
A-87
A-92
A-93
0
DD
A-88
A-90
A-89
0.3~1.0
A-91
0.3~1.0
2.5~7.00.3~1.0
2.5~5.5
5.5~7.0
3.0~7.01.0~2.0
3.0~7.01.0~3.0
• Attach the buttonhole foot, then pull out the button
• The size of the buttonhole is determined by the button
• The thread should be passed through the hole in the
• Select the buttonhole stitch.
• Adjust the stitch width and the stitch length to the
A Starting point
holder plate and insert the button.
inserted in the button plate.
presser foot, then be placed under the foot.
desired width and density.
43
Page 46

Basic Sewing Procedures
A-87
A-91
A-90
A-92 A-93
A-86 A-88 A-89
0
502020.83.11_2013_06_bernette chicago 7_EN
• Position the fabric under the presser foot so that the
centerline‘s mark is aligned with the center of the buttonhole foot.
• Lower the buttonhole lever.
Note
The buttonhole stitch was selected and the Start/Stop
button was pressed while the buttonhole lever is raised, the
LCD will display the warning massage to remind you to
lower the buttonhole lever.
• Hold the upper thread slightly and start sewing.
Note
Gently feed the fabric by hand. Before stopping, the
machine will automatically sew a securing stitch after the
buttonhole is sewn.
44
Page 47

502020.83.11_2013_06_bernette chicago 7_EN
0
A-86 A-88 A-89
Basic Sewing Procedures
A-87
A-90
A-92 A-93
A-91
Buttonholes are sewn from the front of the presser foot to the back, as shown.
45
Page 48

Basic Sewing Procedures
A-87
A-91
A-90
A-92 A-93
A-86 A-88 A-89
0
A-87
A-91
A-90
A-92 A-93
A-86 A-88 A-89
0
502020.83.11_2013_06_bernette chicago 7_EN
• Raise the presser foot and cut the thread.
• To sew over same buttonhole, raise the presser foot (it
will return to original position).
• After sewing the buttonhole, raise the buttonhole lever
until it stops.
Note
When having finishing and another stitch is selected (other
than the buttonhole, bartack or darning stitch) and the Start/
Stop button is pressed while the buttonhole lever is lowered,
the LCD will display the warning message which reminds
you to raise the buttonhole lever.
• Cut the slit of the buttonhole being careful not to cut
any stitches on either side.
• Use a pin as a stopper at the bartack so you do not cut
too much.
46
Page 49

502020.83.11_2013_06_bernette chicago 7_EN
Buttonholes on stretch fabrics
When sewing buttonholes on stretch fabric, hook a heavy
thread or a cord under the buttonhole foot.
• Attach the buttonhole foot and hook the cord at the
back of the presser foot.
• Bring the two cord ends to the front of the foot and
insert them in the grooves, then temporarily tie them
there. Lower the presser foot and start sewing.
• Set the stitch width to match the diameter of the cord.
• Once the sewing is completed, pull the cord gently to
remove any loose parts, then trim off any excess.
Basic Sewing Procedures
Note
It is recommended to use stabilizer on the backside of the
fabric.
47
Page 50

Basic Sewing Procedures
1.0~3.00.4~1.0
A-94
D
1.0~3.00.4~1.0
A-94
D
A
1.0~3.00.4~1.0
A-94
D
A
1.0~3.00.4~1.0
A-94
D
A
502020.83.11_2013_06_bernette chicago 7_EN
Bartack stitch
A-94
• Extend the button guide plate and set to the desire
bartack length.
• Adjust the stitch width and stitch length to personalize
the stitches.
• Position the fabric so that the needle is 2mm (1/16
inch) in front of the pocket opening and then lower the
presser foot lever.
A Starting point
• Lead the upper thread down through the hole in the
presser foot.
• Pull down the buttonhole lever and position it behind
the bracket on the buttonhole foot.
• Gently hold the end of the upper thread in your left
hand and start sewing.
D
1.0~3.00.4~1.0
Sewing procedure for bartack is illustrated.
This is an example of sewn bartacks at pocket corners.
48
Page 51

A B
C
A
A-95 A-96
A B
C
A
A-95 A-96
A B
C
A
A-95 A-96
502020.83.11_2013_06_bernette chicago 7_EN
Eyelet Stitch
Basic Sewing Procedures
* The eyelet punch tool is not included with the machine.
Select pattern 60 to obtain the eyelet stitch.
Attach the satin stitch foot (A).
• Press the «-» or «+» stitch width adjustment button to
select the eyelet size.
Size of eyelet:
A Small: 5.0mm (3/16 inch)
B Medium: 6.0mm (15/64 inch)
C Large: 7.0mm (1/4 inch)
• Position the needle in the fabric at the beginning of the
stitching, and then lower the presser foot lever.
– Once the sewing is completed, the machine sews
the securing stitches automatically, then stopps.
A-95 A-96
A
• Make a hole at the center using an eyelet punch tool.
Note
If thin thread is used, the stitching may be too loose. If this
occurs, sew the eyelet twice one on top of the other.
49
Page 52

Basic Sewing Procedures
A-98
A-99
E
A-98
A-99
E
A
B
C
D
D
A-98
A-99
E
502020.83.11_2013_06_bernette chicago 7_EN
Darning Stitch
A-98: Simple darning stitch in thin and medium fabrics
A-99: Reinforced darning stitch in heavy fabrics
• Select the A Group Patterns 98 or 99 to obtain the
darning stitch.
• Change to the buttonhole foot.
Baste the upper fabric and the under fabric together.
• Select the needle position.
• Lower the presser foot over the center of the tear.
• Pull the button holder to rear.
• Adjust the button guide plate on the buttonhole foot to
the desired length.
A-98
A-99
E
The size of one darning sequence is variable.
However, the maximum sewing length is 2.6cm (1 inch) and
the maximum sewing width is 7mm (9/32 inch).
A The length of sewing.
B The width of sewing.
C Start
D Stop
50
Page 53

A
B
C
D
D
A-98
A-99
E
502020.83.11_2013_06_bernette chicago 7_EN
Position the fabric so that the needle is 2mm (1/16 inch) in
front of the area to be darned, and then lower the presser
foot.
When lowering the presser foot, do not push the front of the
presser foot, otherwise the darning will not be sewn in the
correct size.
Note
• Lead the upper thread down through the hole in the
presser foot.
• Pull down the buttonhole lever.
• The buttonhole lever is positioned behind the bracket
on the buttonhole foot.
• Gently hold the end of the upper thread in your left
hand, and then start sewing.
Basic Sewing Procedures
Darning stitches are sewn from the front of the presser foot to
the back, as shown.
• If the sewing range is too big to sew,
– then we recommend to sew the area several times
(or cross sew) to get better sewing result.
51
Page 54

Basic Sewing Procedures
502020.83.11_2013_06_bernette chicago 7_EN
Zipper Insertion*
AtteNtioN!
The zipper foot should be used for sewing with center
needle position, straight stitch only. It is possible that the
needle could hit the presser foot and break when sewing
other patterns.
Inserting a centered zipper
Baste the zipper opening on the garment.
• Press open the seam allowance.
• Place the zipper face down on the seam allowance
with the coils against the seam line.
• Baste the zipper tape.
• Attach the zipper foot.
• Attach the right side of the presser foot pin to the
holder when sewing the left side of the zipper.
• Attach the left side of the presser foot pin to the
presser foot holder when sewing the right side of the
zipper.
Stitch the left side of the zipper from top to bottom.
• Stitch across the lower end and right side of the zipper.
• Remove the basting and close the zipper.
52
Page 55

502020.83.11_2013_06_bernette chicago 7_EN
Inserting a side zipper
Baste the zipper opening on the garment.
• Fold seam allowance back to the left.
• Form a 3mm-fold of the right seam allowance.
• Attach the zipper foot.
• Attach the right side of the presser foot pin to the
holder when sewing the left side of the zipper.
• Attach the left side of the presser foot pin to the
presser foot holder when sewing the right side of the
zipper.
Basic Sewing Procedures
Stitch the left side of zipper from the bottom to the top.
• Turn the fabric right side out, stitch across the lower
end and right side of zipper.
• Stop about 5cm (2 inches) from the top of zipper.
• Remove the basting and open the zipper.
• Stitch the remaining seam.
53
Page 56

Basic Sewing Procedures
1.0~3.0 3.5
1
A
1.0~3.0 3.5
1
A
B
A
502020.83.11_2013_06_bernette chicago 7_EN
Invisible zipper insertion
* The invisible zipper foot accessory is optional. It is not included with this machine.
This foot is used to insert invisible zippers so that they are
covered by the seam, and therefore hidden.
• Attach the invisible zipper foot to the machine.
• Adjust needle center position and select the straight
stitch.
– The stitch length depends on the fabric.
• Vary from 1,0 to 3,0mm.
• Place the open zipper face - down on right side of
fabric as shown in the picture.
• Align the fabric edge with the 5/8 inch marking line on
the stitch plate.
• Place the zipper 6mm (1/4 inch) below raw edge of
garment.
• With right-hand groove of the foot over the zipper coils,
sew along the zipper until the foot hits the zipper pull.
• Remove the garment from the machine.
To attach the other half of the zipper, align the fabric edge with
the 5/8 inch marking line on the stitch plate as shown in the
picture.
With the left-hand groove of the foot over the zipper coils, sew
along the zipper until the foot hits the zipper pull.
• Close zipper.
• Fold the fabric that the zipper is on the right hand side
out of the way as shown in the picture.
• Use a pin to fix the fabric.
• Change to the regular sewing foot and sew along the
zipper as closely as possible using straight stitch.
• At last secure with some forward and reverse stitches.
1
1.0~3.0 3.5
A Right side of the fabric
B Wrong side of the fabric
54
Page 57

502020.83.11_2013_06_bernette chicago 7_EN
Narrow Hemming
* The hemmer foot accessory is optional. It is not included with this machine.
• Fold the edge of the fabric over about 3mm, then fold
it over again 3mm for about 5cm along the edge of the
fabric.
• Position the needle in the fold by turning the handwheel
towards you, and lower the presser foot.
• Sew several stitches and raise the presser foot.
• Insert the fabric fold into the spiral opening of the hem-
mer foot.
• Move the fabric back and forth until the fold forms a
scroll shape.
Basic Sewing Procedures
• Lower the presser foot and start sewing slowly guiding
the raw edge of the fabric in front of the hemmer foot
evenly into the opening of the foot.
55
Page 58

Basic Sewing Procedures
N
5
N
5
6 A-09 A-28
N
5
6 A-09 A-28
502020.83.11_2013_06_bernette chicago 7_EN
Cording
* The cording foot accessory is optional. It is not included with this machine.
Sew over one strand of cording to create a pretty swirled
design on a jacket or vest or sew over three strands of cording for border trims. Pearl cotton, knitting yarn, embroidery
floss, lace thread, fine wool or lily yarn can be used for cording.
Single cording
• Mark the design on the fabric. Insert the cord in the
center groove of the cording foot from the right side
opening.
• Pull the cord about 5cm (2 inches) behind the foot.
• The grooves under the foot will hold the length of the
cord in place while the stitches are being formed over
the cord.
• Select the stitch and adjust the stitch width so that the
stitches just cover the cord.
• Lower the foot and sew slowly, guiding the cord over
the design.
5
N
6 A-09 A-28
Triple cording
• Push the sewing thread to the left and insert three
cords into the grooves of the foot and pull about 5cm
(2 inches) of the cords behind the foot.
• Select the desired pattern and adjust the stitch width
so that the stitches just cover the cords. Lower the foot
and sew slowly guiding the cords.
56
Page 59

0.3~2.0
A-15 A-16 A-17 A-18 A-19 A-20 A-21 A-22 A-23 A-24
A-25 A-26 A-27 A-28 A-29
A-30 A31
A-32
A-33
A-34 A-35 A-36
31 - A41 -A
2.5~7.0
5
502020.83.11_2013_06_bernette chicago 7_EN
Satin Stitch Sewing
Basic Sewing Procedures
5
A-15 A-16 A-17 A-18 A-19 A-20 A-21 A-22 A-23 A-24
31 - A41-A
A-25 A-26 A-27 A-28 A-29
A-30 A31
A-32
A-33
A-34 A-35 A-36
Use the satin stitch foot for satin stitching and sewing decorative stitches. This foot has a full indentation on the sole which
allows both easy sewing over the thickness of the stitches
formed by closely spaced zig-zag stitches and even feeding
of the fabric.
• To tailor the satin or decorative stitch pattern, you may
adjust the length and width of the pattern by pressing
the stitch length and width adjustment buttons.
– Experiment with fabric scraps until you get the
desired length and width.
Note
When working with thin fabrics it is recommended to
reinforce the wrong side using a stabilizer.
0.3~2.0
2.5~7.0
57
Page 60

Basic Sewing Procedures
502020.83.11_2013_06_bernette chicago 7_EN
Quilting
* The 1/4“ quilting foot accessory is optional. It is not included with this machine.
Patchwork stitching
Align the edges of the fabric with the inside edge of the guide
on the side of the foot for accurate 1/4“ piercing of the needle.
Note
Only the straight stitch in center position can be used.
The inside of the toes provides an accurate 1/8“ seaming
guide.
The foot has 1/4“ markings both behind the needle and in
front of the needle for accurate pivoting of corners.
Using the edge/quilting guide
• Insert the edge/quilting in the presser foot holder as
illustrated and set the space as you desire.
• Sew the first row and move over the fabric to sew sub-
sequent rows with the guide riding along the previous
row of stitching.
58
Page 61

502020.83.11_2013_06_bernette chicago 7_EN
Hand look quilting
You can imitate the look of a hand look quilt stitch by using
monofilament thread in the needle, 30 or 40 weight cotton
thread in the bobbin, and by increasing the thread tension.
The thread tension depends on the thickness of your batting.
Blanket (Quilting Applique)
For all fabrics and all types of work.
Basic Sewing Procedures
Patchwork stitching
• Place the two pieces of fabric with the right side
together and sew with the straight stitch.
• Open the seam allowance and press it flat.
• Place the center of the presser foot on the seam line of
the joined pieces of fabric and sew over the seam.
59
Page 62

Basic Sewing Procedures
A-11
A
B
A-07
A-11
A-11
502020.83.11_2013_06_bernette chicago 7_EN
Fagoting
Separate the folded edges of the fabric pieces with a gap of
4mm (1/8 inch) and baste them onto a piece of thin paper or
water-soluble stabilizer sheet.
Align the center of the presser foot with the center of the two
pieces of fabric and begin sewing.
After sewing, remove the paper.
A Thin paper
B Basting
Scallop Stitch
• Stitch along the edge of the fabric, making sure not to
sew directly on the edge of the fabric.
– For better results, apply spray starch onto the fabric
• Trim along the stitches.
• Be careful not to cut the stitches.
and press with a hot iron before it is sewn.
A-07
A-11
60
Page 63

3.54.5
1
3.54.5
1
3.54.5
1
502020.83.11_2013_06_bernette chicago 7_EN
Gathering
Basic Sewing Procedures
* The gathering foot accessory is optional. It is not included
with this machine.
Gathered fabric
• Remove the presser foot holder and attach the gather-
ing foot, lowering the tension setting to below 2.
• Place the fabric to be thered under presser foot to the
right of the presser foot.
• Sew a row of stitches, keeping the raw edge of fabric
aligned with the right edge of the foot.
– The stitches make the fabric gather automatically.
– Suitable for light to medium weight fabrics.
To gather and attach gathered fabric in one
step
Look closely at the gathering foot to see a slot on the bottom.
When using the slot, you can gather the bottom layer of the
fabric while attaching it to a flat top layer, such as the waistband on a dress bodice.
• Remove the presser foot holder and attach the gather-
ing foot.
• Place the fabric to be gathered with the right side up
under the foot.
• Place the top layer of the fabric with the right side down
in the slot.
• Guide the two layers as illustrated.
1
3.54.5
Note
When testing the machine for adjustments to achieve
desired density, work with an extra 10“ allowance of the
fabric, trims or elastic.This makes it easier to determine the
necessary adjustments and how much change is needed for
your project. Always test on your project fabric and on the
same grainline which will be used in your finished project.
Using the crossgrain of the fabric will make prettier pleats
than the straight of grain.Sew at slow to medium speed for
better fabric control.
61
Page 64

Basic Sewing Procedures
502020.83.11_2013_06_bernette chicago 7_EN
Smoking
• Adjust the stitch length to 4mm and loosen the thread
tension.
• Use the All-purpose foot to sew straight lines 1cm (3/8
inch) apart from each other, across the area to be
smoked.
• Knot the threads along one edge.
• Pull the bobbin thread and spread the pleats evenly.
Secure the threads at the other end.
• Reduce the tension, if necessary and sew decorative
pattern stitches between the straight seams.
• Pull out the gathering stitches.
62
Page 65

b
b
c
b
a
a
a
b
b
c
b
a
a
a
b
a
b
a
502020.83.11_2013_06_bernette chicago 7_EN
Free Motion Darning, Embroidery and Monogramming
• Move the feed dog control to lower the feed dog (b).
Basic Sewing Procedures
• Remove the presser foot holder, and attach the darning
foot to the presser foot holder bar.
• The lever (a) should be behind the needle clamp screw
(b). Press the darning foot on firmly from behind with
your index finger and tighten the screw (c).
Darning
• First sew around the edges of the hole (to secure the
threads).
• Working from left to right, sew over the hole in a con-
stant and continuous movement.
• Turn the work by 1/4 (90°) and sew over the first stitch-
ing moving the work slowly over the hole to separate
the rows and to avoid big gaps between them.
Note
Free motion darning is accomplished without the internal
feed system of the sewing machine. The movement of the
fabric is controlled by the operator. It is necessary to
coordinate sewing speed and movement of fabric.
63
Page 66

Basic Sewing Procedures
502020.83.11_2013_06_bernette chicago 7_EN
* The embroider hoop is not included with the machine.
Embroidery
• Select the zig-zag stitch pattern and alter the stitch
width as desired.
• Stitch along the outline of the pattern by moving the
embroidery hoop.
– Make sure to maintain a constant speed.
• Fill in the pattern working from the outline towards the
inside.
– Keep the stitches close together.
You will get longer stitches by moving the hoop faster and
shorter stitches by moving the hoop slower.
• Finish with securing stitches at the end by pressing the
Auto-lock button.
Monogramming
• Select the zig-zag stitch pattern and alter the stitch
width as desired.
• Sew at a constant speed, moving the hoop slowly
along the lettering.
• When the letter is finished, finish with securing stitches
at the end by pressing the Auto-lock button.
64
Page 67

a
b
c
a
b
c
502020.83.11_2013_06_bernette chicago 7_EN
Walking Foot
* The walking foot accessory is optional. It is not included with
this machine.
Always try to sew without the walking foot accessory first
as it should be used only when necessary.
It is easier to guide the fabric and you have a better view of
the seam when using the standard, regular foot on your
machine.
Your sewing machine offers excellent stitch quality on a wide
range of fabrics from delicate chiffons to multiple layers of
denim.
The Walking foot accessory equalizes the feeding of the upper
and lower layers of fabric and improves the matching of
plaids, stripes and patterns. It also helps to prevent uneven
feeding of very delicate fabrics.
• Lift the presser foot lifter to raise the presser foot bar.
• Remove the presser foot holder by unscrewing the
presser foot bar attaching screw counter-clockwise.
Basic Sewing Procedures
Attach the Walking foot to the machine as follows:
• The arm (a) should fit into the needle attaching screw
and clamp (b) above.
• Slide the plastic attaching head (c) from the left to the
right so that it fits into the presser foot bar.
• Lower the presser foot bar.
• Replace and tighten (clockwise) the presser bar attach-
ing screw.
• Make sure both the needle attaching screw and the
presser foot bar attaching screw are tightly fixed.
• Draw the bobbin thread up and place both the bobbin
thread and the needle thread behind the walking foot
attachment.
65
Page 68

Special Functions
A
B
502020.83.11_2013_06_bernette chicago 7_EN
Mirror image stitch pattern
Note
Direct Group Pattern 0 and A Group Patterns 86-99 can’t
be mirrored.
Mirrored patterns can also be combined with other patterns.
• Select the desired pattern.
• Press the mirror image button.
– The symbol for mirroring appears on the LCD dis-
play.
The machine will continue to sew the displayed pattern mirrored until the mirror image button is pressed again or the
pattern is changed.
A Normal pattern sewing
B Mirror pattern sewing
66
Page 69

A-15 A-16 A-17 A-18 A-19 A-20 A-21 A-22 A-23 A-24
A-30
A-31
A-32
A-33
A-34 A-35 A-36
31 - A41 -A
A-15 A-16 A-17 A-18 A-19 A-20 A-21 A-22 A-23 A-24
A-30
A-31
A-32
A-33
A-34 A-35 A-36
31 - A41 -A
502020.83.11_2013_06_bernette chicago 7_EN
Elongation
A-15 A-16 A-17 A-18 A-19 A-20 A-21 A-22 A-23 A-24
31 - A41-A
A-31
A-25 A-26A27 A-28 A-29
A-30
A-32
A-33
A-34 A-35 A-36
The stitch can be elongated up to five times its normal length
by pressing the elongation button.
• Select the desired pattern.
• Press the elongation button.
– The symbol for elongation appears on the LCD
display.
• Press the elongation button several times to adjust the
elongation as desired.
• The machine will continue to sew the displayed pattern
until the elongation button is pressed again or the pattern is changed.
Special Functions
When the width or length of the stitch is changed, a larger
variety of patterns are available.
Note
A Group Patterns 13-36 can be elongated and mirrored
simultaneously.
67
Page 70

Special Functions
502020.83.11_2013_06_bernette chicago 7_EN
Double Needle Sewing
Note
Double needles must be purchased separately. They are not
include with this machine.
• Insert the double needle.
AtteNtioN!
When using double needles, use the All- purpose foot.
• Use only double needle assemblies with max. 2mm
needle distance Follow the instructions for singleneedle threading using the horizontal spool pin.
• Thread through the left needle.
• Insert the spool pin (included with the accessories) in
the hole on the top of the machine.
• Thread along the same path, and make sure NOT to
omit the thread guide above the needle and pass
thread through the right needle.
• Thread each needle separately.
Note
Make sure that the two threads used to thread the double
needle are of the same weight.You can use one or two
colors.
• Select a pattern. (E.g. A Groupe Pattern 13)
• All stitch patterns can be used with Twin Needle except
for Direct Group Patterns 0 and A Group Patterns
86-99.
68
Page 71

502020.83.11_2013_06_bernette chicago 7_EN
• Press the double needle button.
– The LCD display shows the double needle symbol
(1) and the machine reduces the maximum stitch
width for double needle sewing to 2mm automatically.
• Start to sew and two lines of stitches are sewn parallel
to each other.
Note
When sewing with the double needle, always proceed slowly
and make sure to maintain a low speed to ensure a good
stitch formation.
Special Functions
1
When double needle sewing has been selected, it will remain
active even the stitch pattern is changed. To deactivate
double needle sewing press the double needle button again.
69
Page 72

Special Functions
502020.83.11_2013_06_bernette chicago 7_EN
Memory
Several stitch patterns can be combined in one sewing
sequence using the memory function.
– These pattern sequences can be stored for later
use.
– Even when the sewing machine is switched off the
memory contents are retained.
Note
Multiple patterns selecting from pattern groups can be combined together.
A Group Patterns
B Group Patterns
Block Style Alphabet (C1-Group Patterns)
Script Style Alphabet (C2-Group Patterns)
Direct Group Patterns and A Group Patterns 86-99 can’t be
stored in the memory.
This machine has 4 memories and each of them can store
up to 20 stitches.
All the units in the memory can be edited in their functions
such as stitch length, stitch width, elongation, mirror image
and Auto-Lock, except when sewing with the double needle.
70
Page 73

502020.83.11_2013_06_bernette chicago 7_EN
Overview Memory Enter Mode
Mem
Enter Mode
Enter a sequence of stitch
patterns & sew memorized patterns
Enter a sequence of stitch patterns in Memory Enter Mode
Special Functions
Note
Requirement: Empty Memory (see page 83 to clear
Memory).
• Press the memory button to enter the Memory Enter
Mode.
• Use the arrow buttons to select the number of the
Memory file.
71
Page 74

Special Functions
502020.83.11_2013_06_bernette chicago 7_EN
• Press the OK button to enter the selected Memory
Module. The cursor is at first memory position for the
first pattern to be programmed.
The upper left corner of LCD display shows the number of the
Memory file.
• Press the pattern group selection button to enter the
pattern group selection display.
• Select the desired pattern group. (E.g. for A Group Pat-
terns)
• Press the OK button to enter the pattern browser and
the various stitches in the selected pattern group
appear.
72
Page 75

502020.83.11_2013_06_bernette chicago 7_EN
• Press the desired pattern number or use the arrow but-
tons to select the desired pattern.
• When using the arrow buttons, press the OK button to
store the selected stitch.
– The selected pattern appear on the LCD display
and the cursor moves to the next position.
• When pressing the number buttons the machine will
automatically store the selected stitch which appears
on the LCD display and the cursor moves to next position.
• Repeat the steps for more patterns to be stored in the
memory.
After 20 patterns have been selected, the memory is full. If
another pattern is selected when the memory is already full
the machine will beep to make you aware of it.
Special Functions
To sew the memorized patterns press Start/Stop button or
touch the foot control.
Note
The selected pattern will be cleared from the Memory file
when the machine ist turned off without having pressed the
memory button again after the completed selection.
73
Page 76

Special Functions
502020.83.11_2013_06_bernette chicago 7_EN
Overview Memory Review/Edit Mode
Mem
Review/Edit Mode
Review stored stitches
page 74
Switch to Normal Mode &
Sew memorized patterns
page 76
Editing functions page
77-83
Add a sequence of
stitches (Switch to Mem
Enter Mode) page 77
Change a stored stitch
or its parameters see
page 79
Insert an additional
stitch page 80-81
Delete a stored stitch
page 82
Delete ALL page 83
Review stored stitches
Note
Requirement: with existing patterns in Memory.
• Press the memory button to enter the Memory Mode.
74
Page 77

• Use the arrow buttons to choose the desired Memory
502020.83.11_2013_06_bernette chicago 7_EN
file.
• Press OK button to enter the selected Memory file. The
cursor stays at the first position.
Special Functions
• Use the arrow buttons to move from position to posi-
tion.
Note
Press Start/Stop button or touch the foot control to start the
continuous sewing from the current position in the memory.
75
Page 78

Special Functions
502020.83.11_2013_06_bernette chicago 7_EN
Switch from Memory Mode to the Normal Mode
When Memory Mode is active.
• Press the memory button to leave the Memory Mode
and return to the Normal Mode.
Sew memorized patterns
• Press the memory button to enter the Memory Mode.
• Use the arrow buttons to choose the desired Memory
file.
• Press OK button to enter the selected Memory file.
– The cursor stays at the first position.
• Press the Start/Stop button or touch the foot control to
sew the stored stitches.
76
Page 79

Memory Editing functions - Add a sequence of stitches
502020.83.11_2013_06_bernette chicago 7_EN
• Press the memory button to enter the Memory Mode.
• Use the arrow buttons to select the number of the
Memory file (e.g. M3).
Special Functions
• Press the OK button to enter the selected Memory file
and the cursor stays at the first position.
77
Page 80

Special Functions
502020.83.11_2013_06_bernette chicago 7_EN
• Use the arrow buttons to move the cursor to next
empty position.
• Press the pattern group selection button to enter the
pattern group selection display.
• Proceed according to page 73 to add multiple new
stitches.
78
Page 81

Special Functions
502020.83.11_2013_06_bernette chicago 7_EN
Memory Editing functions - Change a stored stitch or its parameters
Note
Requirement: with existing patterns in Memory.
• Press the memory button to enter the Memory Mode.
• Use the arrow buttons to choose the desired Memory
file.
• Press the OK button to enter the selected Memory file.
– The cursor stays at the first position.
• Use the arrow buttons to select the stitch that should
be replaced or have its parameters changed.
• To change the stitch press the clr button and then
press the pattern group selection button to choose a
new stitch.
• To change its parameters press the stitch length, stitch
width, mirror image, double needle or elongation button.
79
Page 82

Special Functions
502020.83.11_2013_06_bernette chicago 7_EN
Memory Editing functions - Insert an additional stitch
Note
Requirement: with existing patterns in Memory.
• Press the memory button to enter the Memory Mode.
• Use the arrow buttons to choose the desired Memory
file.
• Press the OK button to enter the selected Memory file.
– The cursor stays at the first position.
80
Page 83

• Use the arrow buttons to move the cursor to the posi-
502020.83.11_2013_06_bernette chicago 7_EN
tion where you want to insert a new stitch.
• Press the pattern group selection button to enter the
pattern group selection browser and choose a new
stitch.
Special Functions
Note
The parameters of the selected stitch, such as stich length,
stitch width, mirror image, double needle and elongation can
be altered by pressing the respective button.
81
Page 84

Special Functions
502020.83.11_2013_06_bernette chicago 7_EN
Memory Editing functions - Delete a stored stitch
• Press the memory button to enter the Memory Mode.
• Use the arrow buttons to choose desired Memory file.
• Press the OK button to enter the selected Memory file.
– The cursor stays at the first position.
• Use the arrow buttons to select the stitch that should
be deleted.
• Press the clr button to delete the pattern and all pat-
terns that come next will move one position forward.
82
Page 85

Memory Editing functions - Delete ALL
502020.83.11_2013_06_bernette chicago 7_EN
• Repeat steps from «Delete a stored stitch».
• When pressing the clr button keep it pressed for a few
seconds until the machine asks again if everything
should be deleted.
Special Functions
• Press the OK button if all patterns should be deleted
and the machine returns to the previous Memory file
which is empty now.
• Press the clr button if they shouldn’t be deleted and the
machine returns to the previous Memory file with all
stored patterns.
83
Page 86

Embroidery
502020.83.11_2013_06_bernette chicago 7_EN
84
Page 87

502020.83.11_2013_06_bernette chicago 7_EN
Important Embroidery information
Embroidery threads
A good quality thread is essential for embroidery to avoid poor
stitch formation, thread breakage, etc.
Embroidery is particularly effective if you use 40wt glossy
rayon or polyester embroidery threads as upper threads. They
are available in a wide range of colors for beautiful embroidery.
Polyester threads
Polyester with a brilliant sheen is a hard wearing colorfast
thread and has a high tensile strength which is suitable for all
types of embroidery.
Rayon threads
Rayon is a soft viscose fiber with a brilliant sheen and suitable
for fine, delicate embroidery, or items that will not receive
excessive wear and tear.
Embroidery
Metallic threads
Metallic thread is a light- to medium weight thread suitable for
special effects in embroidery.
Reduce the speed and the upper thread tension when
embroidering with metallic threads.
Embroidery needle
• Correct size thread must correspond with correct size
needle.
• Replace the needle regularly.
Note
Use the vertical spool pin and attach the supplemental
thread guide (optional accessory) when using metallic or
specialty threads. A Metafil 130/705H-MET need is recommended for embroidering with metallic threads. Adjust upper
thread tension and reduce the embroidery speed.
85
Page 88

Embroidery
502020.83.11_2013_06_bernette chicago 7_EN
Lower threads
Bobbin Fill (special bobbin thread)
Bobbin Fill is an especially soft and light polyester thread suitable for bobbin thread. This special bobbin thread ensures a
steady thread tension and an optimal intertwining of the upper
and bobbin thread.
Darning and embroidery thread
Fine mercerized cotton thread which is suitable for embroidering on cotton.
Note
In most cases, bobbin thread for embroidery is either white
or black. Some special cases require the same thread in top
and bobbin.
86
Page 89

Details of Embroidery module
502020.83.11_2013_06_bernette chicago 7_EN
1 Embroider
2 Embroidery arm
3 USB port
4 Embroidery module release lever
5 Embroidery hoop attachment brackets
6 Hoop-securing lever
7 Embroidery module connection
8 Embroidery module connector plug
Embroidery Setup
Note
Do not touch the embroidery arm. The connector could be
damaged, and it may cause malfunctions.
Do not lift up on the embroidery arm, and do not forcefully
move it. It may cause malfunctions.
Do not carry the embroidery module by holding it at the
release button area.
The foot control is disabled as long as the embroidery
module is connected.
87
Page 90

Embroidery Setup
502020.83.11_2013_06_bernette chicago 7_EN
Attaching the embroidery foot
AtteNtioN!
Turn power switch to off («O») when carrying out any of the
following operations!
• Raise the presser foot.
• Press the black lever (a) and the foot will disengage.
• Remove the presser foot holder (c) by unscrewing
(counter-clockwise) the presser foot bar attaching
screw (b).
• Attach the embroidery foot to the presser foot holder
bar.
• Press the embroidery foot on firmly from behind with
your index finger and tighten the screw.
Note
To achieve a better sewing result when using thick material,
insert the darning/embroidery foot. Adjust the thread tension
if necessary. (Refer to page 63 for presser foot attachment.)
88
Page 91

b
a
b
a
502020.83.11_2013_06_bernette chicago 7_EN
Connecting the embroidery module
AtteNtioN!
Turn power switch to off («O») when carrying out any of the
following operations!
• Remove the sewing table to the left side.
• Move the feed dog control to lower the feed dog (b).
Embroidery Setup
• Insert the embroidery module connection into the
machine connection port.
• Push lightly until the module clicks into place.
• Insert the plug into the embroidery module connector
of the machine.
AtteNtioN!
Align the arrow on the plug (a) with the arrow on the
machine (b).
89
Page 92

Embroidery Setup
b
a
b
a
502020.83.11_2013_06_bernette chicago 7_EN
Removing the embroidery unit
AtteNtioN!
Turn power switch to off («O») when carrying out any of the
following operations!
• Remove the embroidery module connector plug.
• Press the embroidery module release button on the
left, underneath the embroidery module and slide the
module to the left to remove it.
Note
When you finish the work, move the feed dog control to
raise the feed dog (a).
90
Page 93

Embroidery hoop
502020.83.11_2013_06_bernette chicago 7_EN
1 Inner hoop
2 Centering ribs for embroidery template
3 Center mark
4 Outer hoop
5 Embroidery hoop connector
6 Hoop size
7 Adjustment screw
Embroidery Setup
91
Page 94

Embroidery Setup
502020.83.11_2013_06_bernette chicago 7_EN
Hooping the fabric
• Loosen the embroidery hoop adjustment screw on the
outer hoop.
• Separate the inner and outer hoop by removing the
inner hoop upward.
• The fabric is hooped with the right side up.
• Place the fabric with the stabilizer material on top of the
outer hoop.
• Press the inner hoop down.
• Push down firmly until the inner hoop fits securely into
the outer hoop.
• Align the fabric with the inner hoop (a) and the outer
hoop (b).
• Tighten the adjustment screw to secure the fabric.
• Tighten the fabric by hand.
• After tightening the fabric, make sure that the fabric is
stretched tautly in the hoop.
92
Page 95

Using embroidery templates
502020.83.11_2013_06_bernette chicago 7_EN
• Mark the center position of the design to be embroi-
dered using a chalk pen.
• Place the embroidery template on the inner frame.
Embroidery Setup
• Align the fabric with the base line of the embroidery
template.
• Place the inner frame over the fabric on the outer frame
and stretch the fabric.
• Remove the embroidery template.
93
Page 96

Embroidery Setup
502020.83.11_2013_06_bernette chicago 7_EN
Attaching the embroidery hoop
• Raise the presser foot.
• Place the embroidery hoop under the presser foot.
• Attach the embroidery hoop, plug the embroidery hoop
connector into the hoop securing lever from the front to
the back until it clicks.
Removing the embroidery hoop
• Raise the presser foot.
• Press the snap on the embroidery hoop holder down.
• Pull the hoop towards you smoothly and carefully.
94
Page 97

502020.83.11_2013_06_bernette chicago 7_EN
Stabilizer
Tear-away stabilizers
• Excess is easily torn away.
• One or more layers can be used.
• Available in different weights.
• For more stability, apply to the wrong side of the mate-
rial with temporary adhesive spray before hooping.
• Carefully tear away excess stabilizer from the back of
the embroidery after stitching.
• Designs are not skewed.
• Stabilizer will remain under larger embroidered areas.
Application
– For all woven materials and materials without
stretch.
Cut-away stabilizers
• One or more layers can be used.
• Available in different weights.
• For more stability, apply to the wrong side of the mate-
rial with temporary adhesive spray before hooping.
• Carefully cut away from the back of the embroidery
after stitching.
• Designs are not skewed.
• Stabilizer will remain under larger embroidered areas.
Embroidery Setup
Application
– For all elastic materials.
95
Page 98

Embroidery Setup
502020.83.11_2013_06_bernette chicago 7_EN
Adhesive Spray
Avoid using spray adhesive next to your embroidery system.
• At a distance of 25-30 cm use adhesive spray carefully.
• Spray the stabilizer and adhere to the wrong side of the
material carefully smoothing material so that there are
no puckers.
Application
– Stretch and knitted material: to retain shape.
– Smooth material: to avoid slipping of material lay-
ers.
– Appliqués can be exactly positioned.
– Material pieces: position material pieces on stabi-
lizer, e.g.pocket flaps.
– Napped materials (i.e. velvet) that should not be
clamped in the hoop to avoid getting hoop marks.
– To fix the parts to be embroidered.
Spray starch for additional stiffening
Spray starch is ideal for additional stiffening of fine, soft or
loosely woven materials.
• Spray the area to be embroidered
• Let dry; or press gently with a warm iron if necessary
• Always use an additional stabilizer such as water solu-
ble stabilizer on the wrong side of the material.
Application
– Ideal for fine, loosely woven materials, e.g. batiste,
fine linen, etc.
96
Page 99

502020.83.11_2013_06_bernette chicago 7_EN
Iron-on interfacing
Iron-on interfacings are available in a variety of weights. Ironon interfacings should be selected to suit the material being
used. Use an iron-on interfacing which is easily removable
from the material.
• Iron-on interfacings are pressed (fused) to the wrong
side of the material
Application:
– To provide body and shape for the materials onto
which designs will be placed, use the appropriate
stabilizer.
Embroidery Setup
Paper-backed adhesive stabilizer
• Place stabilizer in hoop, paper side up.
• Use a pointed object (e.g. scissors) to score the paper.
• Remove paper to reveal the self-adhesive surface.
– The self-adhesive surface reveals.
• Position the material to be embroidered on the stabi-
lizer and smoothen the area.
Application:
– Intended for delicate materials such as jersey or silk
etc.
– For hard-to-hoop parts and materials.
Water soluble stabilizer
Water soluble stabilizers look like plastic wrap. Dissolve stabilizer in warm water when the embroidery is complete. Water
soluble stabilizers are ideal protection for materials with a
thick or looped pile such as toweling. This prevents the
threads from sinking into the material and prevents the material from showing through the embroidery stitches.
• Place on top of the material.
• Place all the layers together into the embroidery hoop.
• Use adhesive spray to fix stabilizer if necessary.
• For material with a pile, reinforce with additional, suit-
able stabilizer on the wrong side.
• After dissolving lay the design down flat and let dry.
Note
Make sure that the adhesive residue on needle, stitch plate
and hook area is removed.
Note
For lace embroidery place one or two layers of water soluble
stabilizer in hoop (as the design is not embroidered on any
material, only the thread embroidered design is left). Embroidery designs must be combined with short stitches otherwise the individual designs may fall out.
Application:
– Ideal for toweling, velvet, bouclé etc.
– Ideal for fine, sheer materials such as organdy,
batiste, etc.
– For lace embroidery.
97
Page 100

Embroidery Selection
502020.83.11_2013_06_bernette chicago 7_EN
Embroidery Design types
An embroidery design can be selected from the following
types available.
– Built-in Embroidery Designs
– Built-in Embroidery Letters
– Designs from USB stick
• Use the right/ left arrow buttons to select and press the
OK button.
• Select and press the OK button to enter the selected
Embroidery design Group.
Built-in Embroidery Designs
There is a total of 100 designs.
The designs are embroidered by changing the upper thread
according to the instructions shown on the displayed.
Built-in Embroidery Letters
Choose from upper case/ lower case/special character/ number & symbol.
Designs from USB stick
To sew the designs from the USB stick.
98
 Loading...