

Bernette b79, b77 User Manual


Table of Contents
Table of Contents
IMPORTANT SAFETY INSTRUCTIONS.............................................................................................. 8
Important information .................................................................................................................... 10
1 My bernette ..................................................................................................................................... 11
1.1 Overview Machine ................................................................................................................ 11
Overview front controls ..................................................................................................... 11
Overview front .................................................................................................................. 14
Overview top..................................................................................................................... 15
Overview back................................................................................................................... 16
1.2 Accessory.............................................................................................................................. 17
Included accessories .......................................................................................................... 17
Overview presser feet ........................................................................................................ 18
1.3 Overview User Interface ........................................................................................................ 19
Overview System settings .................................................................................................. 19
Overview functions/visual information ............................................................................... 20
Overview Functions and Views........................................................................................... 20
1.4 Needle, Thread, Fabric........................................................................................................... 22
Overview Needles .............................................................................................................. 22
Example for needle description .......................................................................................... 24
Thread selection ................................................................................................................ 24
Needle/thread combination ............................................................................................... 24
2 Sewing preparation......................................................................................................................... 25
2.1 Connection and Switching on ............................................................................................... 25
Connecting the machine ................................................................................................... 25
Use of the power cable (only USA/Canada)........................................................................ 25
Connecting the foot control .............................................................................................. 25
Attaching the knee lifter of the Free Hand System ............................................................. 25
Switching the machine on ................................................................................................. 26
Fixing the touchscreen pen ................................................................................................ 26
Regulating the speed via the foot control .......................................................................... 26
Raising/Lowering the needle .............................................................................................. 27
Programming the foot control individually ......................................................................... 27
2.2 Spool pin .............................................................................................................................. 27
Horizontal spool pin .......................................................................................................... 27
Second spool pin ............................................................................................................... 28
2.3 Free arm ............................................................................................................................... 28
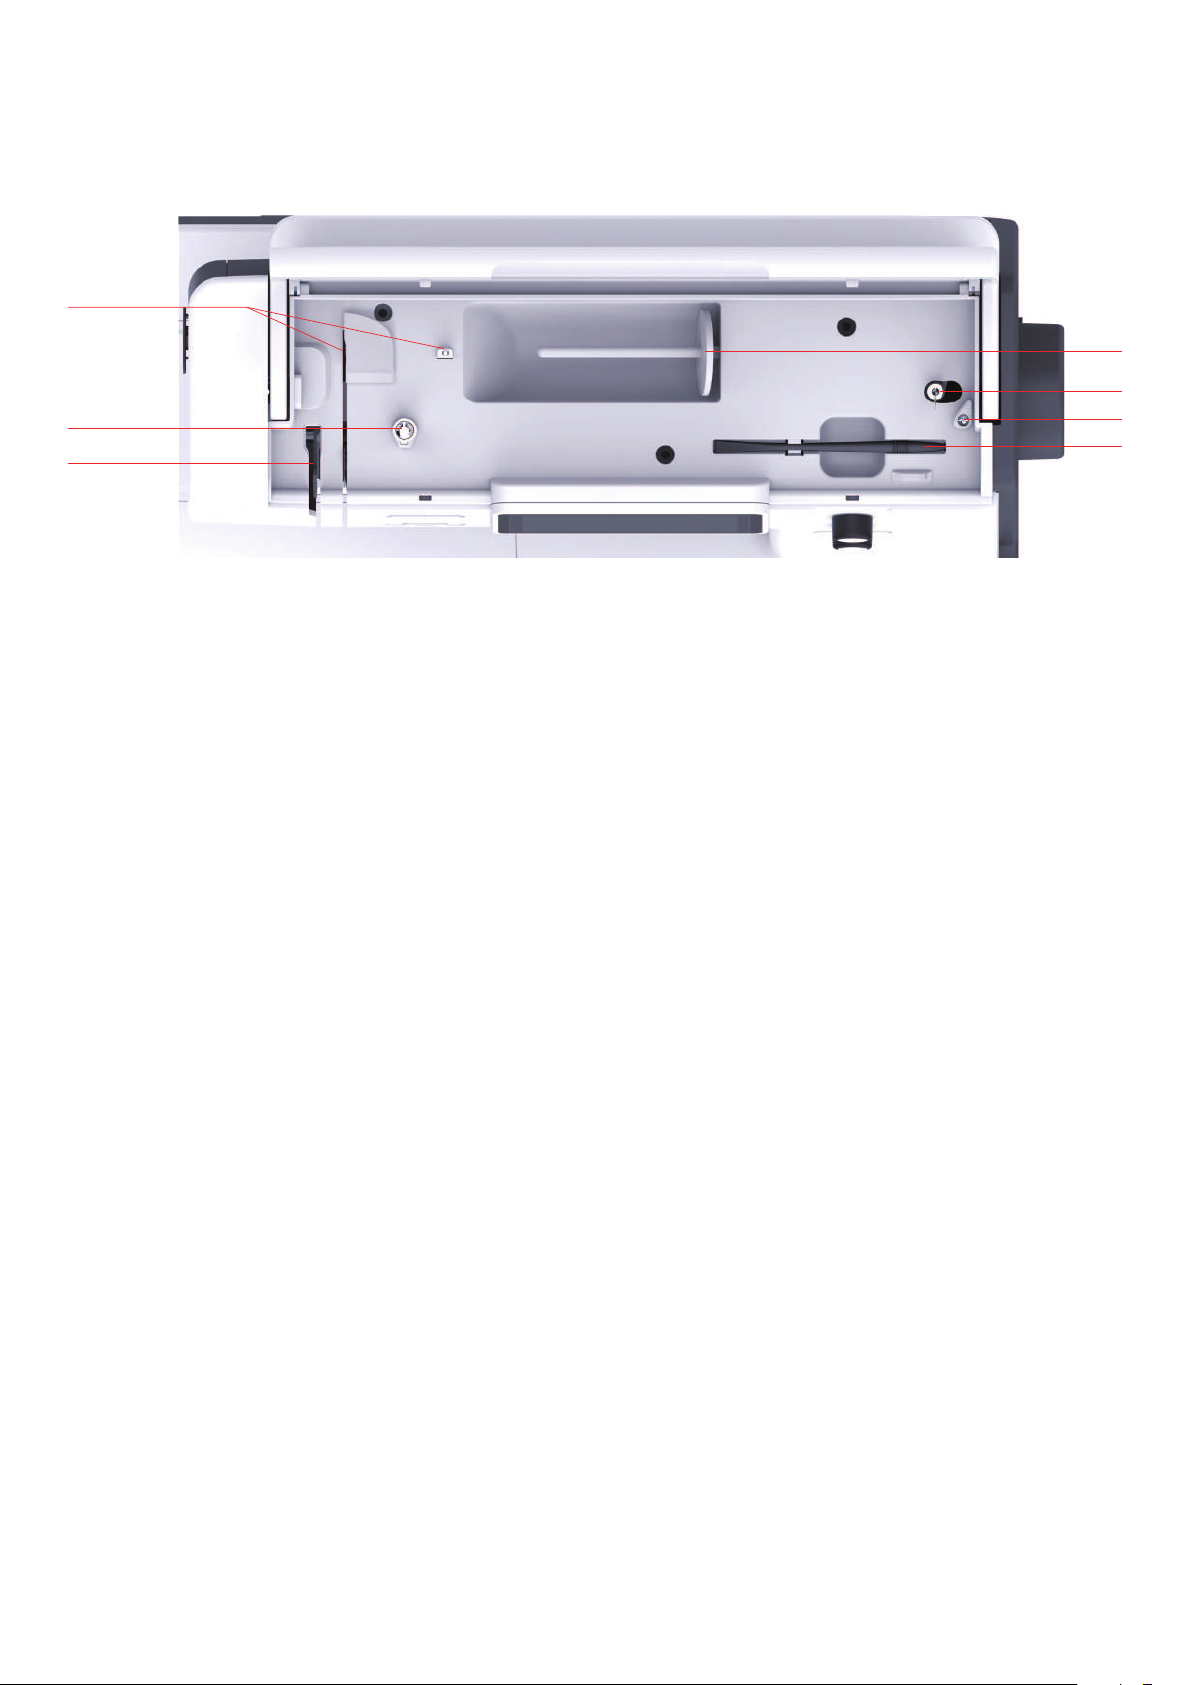
2.4 Sewing table and accessory box ............................................................................................ 29
2019-02 EN 5020079.00A.04
2.5 Raising or Lowering the Feed dog ......................................................................................... 29
2.6 Using the slide-on table......................................................................................................... 29
2.7 Presser foot........................................................................................................................... 30
Adjusting the presser position via the knee lifter of the Free Hand System ......................... 30
Changing the presser foot sole .......................................................................................... 30
Having the presser foot sole displayed in the user interface................................................ 32
Adjusting the presser foot pressure.................................................................................... 32
1

Table of Contents
2.8 Needle and stitch plate.......................................................................................................... 32
Changing the needle ......................................................................................................... 32
Selecting the needle in the User Interface .......................................................................... 33
Needle stop up/down (permanent) .................................................................................... 33
Changing the stitch plate .................................................................................................. 34
Checking the stitch plate in the user interface ................................................................... 34
2.9 Threading ............................................................................................................................. 35
Threading preparation ....................................................................................................... 35
Threading the upper thread............................................................................................... 35
Threading the double needle ............................................................................................. 39
Winding the bobbin thread ............................................................................................... 40
Threading the bobbin thread ............................................................................................. 41
3 Setup Program ................................................................................................................................. 43
3.1 Sewing settings..................................................................................................................... 43
Adjusting the upper thread tension ................................................................................... 43
Adjusting the maximum sewing speed............................................................................... 43
Programming the securing stitches .................................................................................... 43
Adjusting the hovering height of the presser foot .............................................................. 44
Programming the button «Securing»................................................................................. 44
Programming the button «Thread cutter» ......................................................................... 45
Adjusting the presser foot position with needle stop down................................................ 45
Programming the button «Quick reverse» ......................................................................... 46
Programming the foot control individually ......................................................................... 46
Fabric thickness measurement ........................................................................................... 47
3.2 Embroidery settings............................................................................................................... 47
Adjusting the upper thread tension ................................................................................... 47
Adjusting the maximum embroidering speed..................................................................... 47
Calibrating the embroidery hoop ....................................................................................... 48
Deactivating securing stitches ............................................................................................ 48
Adjusting the thread cut.................................................................................................... 49
Adjusting the height of the embroidery presser foot .......................................................... 49
3.3 Selecting personal settings .................................................................................................... 50
3.4 Monitoring functions ............................................................................................................ 50
Activating the upper thread indicator ................................................................................ 50
Activating the bobbin thread indicator............................................................................... 50
3.5 Sound on/off......................................................................................................................... 50
3.6 Machine settings................................................................................................................... 51
Adjusting the brightness of the display .............................................................................. 51
Adjusting the sewing light ................................................................................................. 51
Calibrating the display ....................................................................................................... 51
Back to default setting....................................................................................................... 52
Updating the machine Firmware........................................................................................ 52
Checking the firmware version .......................................................................................... 53
Reviewing the total number of stitches .............................................................................. 53
Selecting a language ......................................................................................................... 53
4 System settings................................................................................................................................ 54
4.1 Calling up the Tutorial........................................................................................................... 54
4.2 Using eco mode .................................................................................................................... 54
4.3 Calling up the Creative Consultant........................................................................................ 54
4.4 Cancelling any alterations with «clr» ..................................................................................... 56
2
2019-02 EN 5020079.00A.04

Table of Contents
5 Creative sewing ............................................................................................................................... 57
5.1 Overview selection menu sewing........................................................................................... 57
Selecting a stitch pattern ................................................................................................... 57
5.2 Dual Feed (DF)....................................................................................................................... 58
Application of the Dual Feed ............................................................................................. 58
Use the Dual Feed ............................................................................................................. 58
5.3 Regulating the speed ............................................................................................................ 59
5.4 Adjusting the upper thread tension ....................................................................................... 59
5.5 Editing stitch patterns ........................................................................................................... 59
Changing the stitch width ................................................................................................. 59
Changing the stitch length ................................................................................................ 60
Correcting the balance ...................................................................................................... 60
Programming pattern repeat ............................................................................................. 61
Mirror image of stitch patterns .......................................................................................... 61
Editing stitch pattern length .............................................................................................. 61
Permanent Quick reverse ................................................................................................... 62
Backstepping..................................................................................................................... 62
5.6 Combining stitch patterns ..................................................................................................... 62
Overview Combi mode ...................................................................................................... 62
Creating Stitch pattern combinations................................................................................. 63
Editing a single stitch pattern............................................................................................. 63
Deleting a single stitch pattern .......................................................................................... 64
Adding a single stitch pattern ............................................................................................ 64
Mirroring a stitch pattern combination .............................................................................. 65
Programming pattern repeat ............................................................................................. 65
Securing a stitch pattern combination................................................................................ 66
Saving a stitch pattern combination................................................................................... 66
Loading a stitch pattern combination................................................................................. 66
Overwriting a stitch pattern combination........................................................................... 66
Deleting a stitch pattern combination ................................................................................ 67
5.7 Administering stitch patterns................................................................................................. 67
Saving stitch patterns in personal memory ......................................................................... 67
Overwriting stitch patterns from the personal memory ...................................................... 67
Loading stitch patterns from the personal memory ............................................................ 68
Deleting stitch patterns from the personal memory............................................................ 68
6 Practical stitches .............................................................................................................................. 69
6.1 Overview Practical stitches..................................................................................................... 69
6.2 Sewing straight stitch............................................................................................................ 71
6.3 Securing with the automatic Securing Program ..................................................................... 71
6.4 Sewing in the zipper ............................................................................................................. 72
6.5 Sewing Triple straight stitch .................................................................................................. 73
6.6 Sewing Triple zigzag ............................................................................................................. 73
6.7 Manual darning .................................................................................................................... 74
6.8 Automatic darning and Reinforced darning ........................................................................... 74
6.9 Finishing edges ..................................................................................................................... 76
6.10 Sewing Double overlock........................................................................................................ 76
6.11 Sewing Vari overlock............................................................................................................. 77
2019-02 EN 5020079.00A.04
3

Table of Contents
6.12 Edgestitching using the seam guide ...................................................................................... 77
6.13 Sewing narrow hemming ...................................................................................................... 78
6.14 Sewing blind hems................................................................................................................ 78
6.15 Sewing visible hems .............................................................................................................. 80
6.16 Sewing basting stitches ......................................................................................................... 80
6.17 Sew thick areas ..................................................................................................................... 80
6.18 Sewing Corners..................................................................................................................... 81
7 Decorative stitches .......................................................................................................................... 82
7.1 Overview Decorative Stitches................................................................................................. 82
7.2 Altering the stitch density...................................................................................................... 83
7.3 Sewing cross stitches............................................................................................................. 83
8 Alphabets ......................................................................................................................................... 84
8.1 Overview Alphabet................................................................................................................ 84
8.2 Creating lettering.................................................................................................................. 84
9 Buttonholes...................................................................................................................................... 86
9.1 Overview Buttonholes ........................................................................................................... 86
9.2 Marking buttonholes............................................................................................................. 87
9.3 Sewing a buttonhole automatically ....................................................................................... 88
9.4 Reinforce buttonhole ............................................................................................................ 90
9.5 Sewing on buttons................................................................................................................ 90
9.6 Sewing eyelets ...................................................................................................................... 92
10 Quilting ............................................................................................................................................ 93
10.1 Overview Quilt Stitches ......................................................................................................... 93
10.2 Quilting, Securing Program ................................................................................................... 94
10.3 Sewing handlook quilt stitches .............................................................................................. 94
10.4 Guiding the quilt work freely................................................................................................. 95
11 Stitch Designer................................................................................................................................. 96
11.1 Overview Stitch Designer....................................................................................................... 96
11.2 Creating your own stitch pattern........................................................................................... 96
Creating stitch designs using screen dots........................................................................... 97
Free hand drawing ............................................................................................................ 97
11.3 Editing the view .................................................................................................................... 97
11.4 Inserting points ..................................................................................................................... 97
11.5 Relocating the points ............................................................................................................ 98
11.6 Duplicating points ................................................................................................................. 98
11.7 Deleting points...................................................................................................................... 98
11.8 Activating the triple stitch ..................................................................................................... 99
4
2019-02 EN 5020079.00A.04

Table of Contents
12 My bernette Embroidery................................................................................................................. 100
12.1 Overview Embroidery module................................................................................................ 100
12.2 Overview User Interface ........................................................................................................ 101
Overview functions/visual information ............................................................................... 101
Overview System settings .................................................................................................. 101
Overview Selection menu embroidery ................................................................................ 102
12.3 Important Embroidery information ........................................................................................ 102
Upper thread..................................................................................................................... 102
Bobbin thread ................................................................................................................... 102
Choosing the embroidery motif ......................................................................................... 103
Embroidery test ................................................................................................................. 103
Embroidering motifs by third-party providers ..................................................................... 103
Underlay stitches ............................................................................................................... 103
The size of the embroidery motif ....................................................................................... 104
Satin or Leaf stich .............................................................................................................. 104
Step stitch ......................................................................................................................... 104
Connecting stitches ........................................................................................................... 105
13 Embroidering preparation .............................................................................................................. 106
13.1 Attaching the Module ........................................................................................................... 106
13.2 Embroidery foot .................................................................................................................... 106
Attaching the embroidery foot .......................................................................................... 106
13.3 Needle and stitch plate.......................................................................................................... 108
Inserting the embroidery needle ........................................................................................ 108
Attaching the stitch plate (CutWork/Straight) .................................................................... 108
13.4 Selecting the embroidery motif ............................................................................................. 109
13.5 Embroidery hoop .................................................................................................................. 110
Overview embroidery hoop selection ................................................................................. 110
Selecting the embroidery hoop .......................................................................................... 110
Tear-away stabilizers.......................................................................................................... 110
Cut-away stabilizers........................................................................................................... 110
Using adhesive spray ......................................................................................................... 111
Using spray starch ............................................................................................................. 111
Using iron-on interfacing ................................................................................................... 111
Using paper-backed adhesive stabilizer .............................................................................. 111
Using water-soluble stabilizer ............................................................................................ 111
Preparing the embroidery hoop ......................................................................................... 112
Attaching the hoop ........................................................................................................... 113
Overview Embroidery functions ......................................................................................... 114
Locating the center of the embroidery motif...................................................................... 114
Center the needle to the embroidery hoop ........................................................................ 115
Embroidery arm return ...................................................................................................... 115
Grid on/off ........................................................................................................................ 115
2019-02 EN 5020079.00A.04
14 Creative embroidering .................................................................................................................... 116
14.1 Overview embroidering ......................................................................................................... 116
14.2 Selecting and changing the embroidery motif ....................................................................... 116
14.3 Checking the embroidery time and the embroidery motif size ............................................... 116
14.4 Regulating the speed ............................................................................................................ 116
5

Table of Contents
14.5 Editing the embroidery motif................................................................................................. 117
Overview Editing embroidery motif.................................................................................... 117
Scaling up the embroidery motif view................................................................................ 117
Downsizing the embroidery motif...................................................................................... 117
Moving the embroidery motif view .................................................................................... 118
Moving the embroidery motif in enlarged view.................................................................. 118
Moving the embroidery motif ............................................................................................ 118
Rotating motif ................................................................................................................... 119
Altering the embroidery motif size proportionally .............................................................. 119
Mirroring embroidery motifs.............................................................................................. 119
Checking the size and the position of the embroidery motif .............................................. 120
Deleting an embroidery motif ............................................................................................ 120
14.6 Creating lettering.................................................................................................................. 121
Overview embroidery alphabets......................................................................................... 121
Creating words/sentences.................................................................................................. 121
Editing words/sentences .................................................................................................... 122
Bending the text................................................................................................................ 123
Altering the stitch density .................................................................................................. 123
14.7 Combining embroidery motifs............................................................................................... 124
Combining embroidery motifs ........................................................................................... 124
Deleting a single embroidery motif .................................................................................... 124
14.8 Changing the colors of the embroidery motif ........................................................................ 125
Overview changing the color ............................................................................................. 125
Changing the colors .......................................................................................................... 125
Changing the thread brand ............................................................................................... 126
14.9 Embroidering the embroidery motif....................................................................................... 126
Overview Embroidery menu............................................................................................... 126
Adding basting stitches ..................................................................................................... 127
Moving the hoop............................................................................................................... 127
Embroidery sequence control when thread breaks ............................................................. 127
Cutting connecting stitches ............................................................................................... 128
Multi-colored embroidery motif on/off............................................................................... 128
Color indication................................................................................................................. 129
14.10 Administering embroidery motifs .......................................................................................... 129
Administering embroidery motifs....................................................................................... 129
Saving embroidery motifs in the personal memory............................................................. 129
Saving the embroidery motif on the USB stick.................................................................... 130
Overwriting the embroidery motif in the personal memory ................................................ 130
Loading an embroidery motif from the personal memory................................................... 130
Loading an embroidery motif from the USB stick ............................................................... 130
Deleting an embroidery motif from the personal memory .................................................. 131
Deleting an embroidery motif from the USB stick............................................................... 131
15 Embroidery....................................................................................................................................... 132
15.1 Embroidering via the button «Start/Stop» ............................................................................. 132
15.2 Adjusting the upper thread tension ....................................................................................... 132
16 BERNINA CutWork Tool................................................................................................................... 134
16.1 Changing the CutWork Tool ................................................................................................. 134
16.2 Start to cut............................................................................................................................ 135
6
2019-02 EN 5020079.00A.04

Table of Contents
17 Attachment ...................................................................................................................................... 136
17.1 Maintencance and cleaning................................................................................................... 136
Cleaning the display .......................................................................................................... 136
Cleaning the feed dog....................................................................................................... 136
Cleaning the hook............................................................................................................. 137
Oiling the needle bar ......................................................................................................... 138
17.2 Troubleshooting.................................................................................................................... 139
17.3 Error messages...................................................................................................................... 142
17.4 Storage and disposal ............................................................................................................. 146
Storing the machine .......................................................................................................... 146
Dispose of the machine ..................................................................................................... 146
17.5 Technical data....................................................................................................................... 147
18 Overview stitch patterns ................................................................................................................ 148
18.1 Overview Stitch patterns ....................................................................................................... 148
Practical stitches ................................................................................................................ 148
Buttonholes....................................................................................................................... 148
Decorative stitches............................................................................................................. 148
Quilt stitches ..................................................................................................................... 150
18.2 Overview Embroidery motifs.................................................................................................. 151
Editing the embroidery motif ............................................................................................. 151
Embellishment................................................................................................................... 151
Quilt motifs ....................................................................................................................... 153
Borders and Lace ............................................................................................................... 155
Children ............................................................................................................................ 156
Flowers.............................................................................................................................. 157
Seasons ............................................................................................................................. 159
Asia................................................................................................................................... 161
Sport/Hobby ...................................................................................................................... 162
Animals ............................................................................................................................. 164
Cutwork............................................................................................................................ 166
Campaign ......................................................................................................................... 167
Index................................................................................................................................................. 168
2019-02 EN 5020079.00A.04
7

IMPORTANT SAFETY INSTRUCTIONS
IMPORTANT SAFETY INSTRUCTIONS
Please be aware of the following basic safety instructions when using your
machine. Before using this machine, read instruction manual carefully.
DANGER!
To reduce the risk of electrical shock:
• Never leave the machine unattended as long as it is plugged in.
• Always unplug the machine from the electrical outlet immediately after
Protection against LED radiation:
• Do not view the LED light directly with optical instruments (e.g. magnifier).
using.
The LED light corresponds with protection class 1M.
• When the LED light is damaged or defective, contact your bernette specialist
dealer.
WARNING
To reduce the risk of burns, fire, electric shock or injury to persons:
• To operate the machine always use the supplied power cable. USA and
Canada only: Do not connect power plug NEMA 1-15 to circuits exceeding
150 volt-to-ground.
• Use this machine only for purposes as described in this manual.
• Only use the machine in dry rooms.
• Do not use the machine in a damp condition or in a damp environment.
• Do not use this machine as a toy. Close attention is necessary when this
machine is used by or near children.
• The machine can be used by children older than 8 or by people with reduced
physical, sensory or mental capabilities or if there is a lack of experience and
knowledge how to operate the machine as long as they are supervised or
have been given instruction concerning the responsible use of the appliance
and are aware of the involved risks.
• Children are not allowed to play with this machine.
• Cleaning and maintencance work must not be carried out by children unless
they are supervised.
• Never operate this machine if it has a damaged cord or plug, if it is not
working properly, if it has been dropped or damaged, or dropped into
water. Contact the nearest authorized bernette dealer to arrange further
details.
8
2019-02 EN 5020079.00A.04

IMPORTANT SAFETY INSTRUCTIONS
• Only use accessory recommended by the manufacturer.
• Don't use this machine when the ventilation openings are blocked. Keep the
ventilation openings and the foot control free from the accumulation of lint,
dust and loose cloth.
• Never insert any objects into any openings of the machine.
• Do not place any objects on the foot control.
• Always use the machine with a foot control of this type FC-210.
• Do not operate the machine where aerosol products (sprays) or oxygen are
being used.
• Keep fingers away from all moving parts. Special care is required around the
needle.
• Neither pull nor push the fabric while sewing. This can cause needle
breakage.
• When making any adjustments in the needle area – such as such as
threading the needle, changing the needle, threading the hook or changing
the presser foot – turn power switch to «0».
• Do not use bent needles.
• Always use the original bernette stitch plate.The wrong stitch plate can
cause needle breakage.
• To disconnect, turn power switch to «0» and then remove the plug from the
outlet. Do not unplug by pulling the cord, instead grasp the plug to pull it
from the outlet.
• Always disconnect the power plug from the electrical outlet when the covers
are removed or opened, when the machine is lubricated or during any other
maintenance adjustments mentioned in the instruction manual.
• This machine is provided with double insulation (except USA, Canada and
Japan). Use only identical replacement parts. See instructions for Servicing of
double-insulated products.
• The sound pressure level is lower than 70dB(A) under normal conditions.
2019-02 EN 5020079.00A.04
9

Important information
Important information
Availability of the digital instruction manual
The instruction manual of the machine are provided exclusively as a PDF.
> «www.mybernette.com» in the Internet Browser.
> Select desired machine model.
> Download the instruction manual under «Download».
Appropriate use
Your bernette machine is conceived and designed for private household use. It answers the purpose to quilt
fabrics as it is decribed in this instruction manual. Any other use is not considered appropriate.bernette
assumes no liability concerning consequences resulting from an inappropriate usage.
Servicing of double-insulated products
In a double-insulated product two systems of insulation are provided instead of groanding. No groanding
means is provided on a doubleinsulated product, nor should a means for groanding be added to the
product. Servicing a double-insulated product requires extreme care and knowledge of the system and
should be done only by qualified service personnel. Replacement parts for a double-insulated product must
be identical to the original parts in the product. A double-insulated product is marked with the words:
«Double insulation» or «double-insulated».
The symbol may also be marked on the product.
Environmental Protection
BERNINA is committed to the protection of the environment. We strive to minimize the environmental impact
of our products by continuously improving product design and our technology of manufacturing.
The machine is labeled with the symbol of the crossed-out wastebin. This means that the machine must not
be disposed of with the household waste when the machine is no longer needed. Improper disposal can
result in dangerous substances getting into the groundwater and thus into our food chain, damaging our
health.
The machine must be returned free of charge to a nearby collection point for waste electrical and electronic
equipment or to a collection point for the reuse of the machine. Information on the collection points can be
obtained from your local administration. When purchasing a new machine, the dealer is obliged to take back
the old machine free of charge and dispose of it properly.
If the machine contains personal data, you are responsible for deleting the data yourself before returning the
machine.
10
2019-02 EN 5020079.00A.04
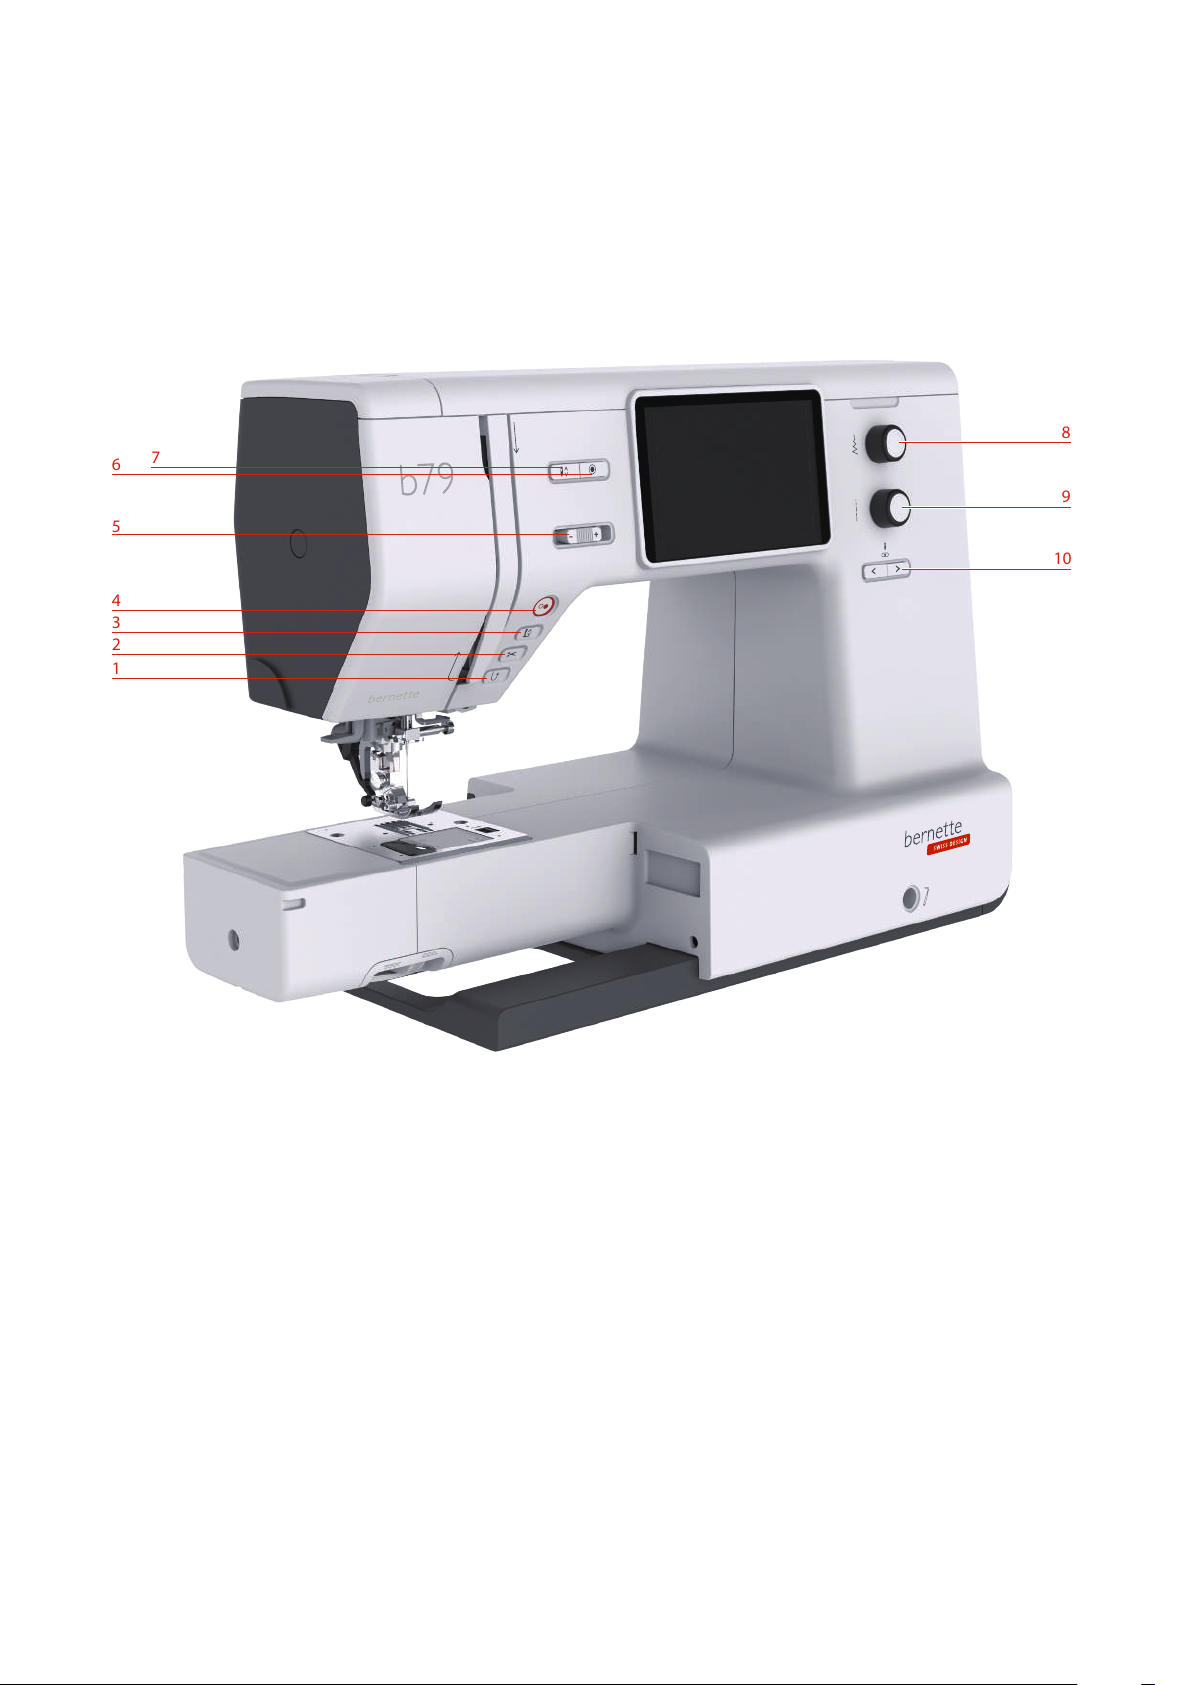
1 My bernette
1
2
3
4
6
7
8
9
10
5
1.1 Overview Machine
Overview front controls
My bernette
1 Quick reverse 6 Securing
2 Thread cutter 7 Needle up/down
3 Presser foot up/down 8 Upper Multifunctional knob
4 Start/Stop 9 Lower Multifunctional knob
5 Slide speed control 10 Needle left/right
2019-02 EN 5020079.00A.04
11
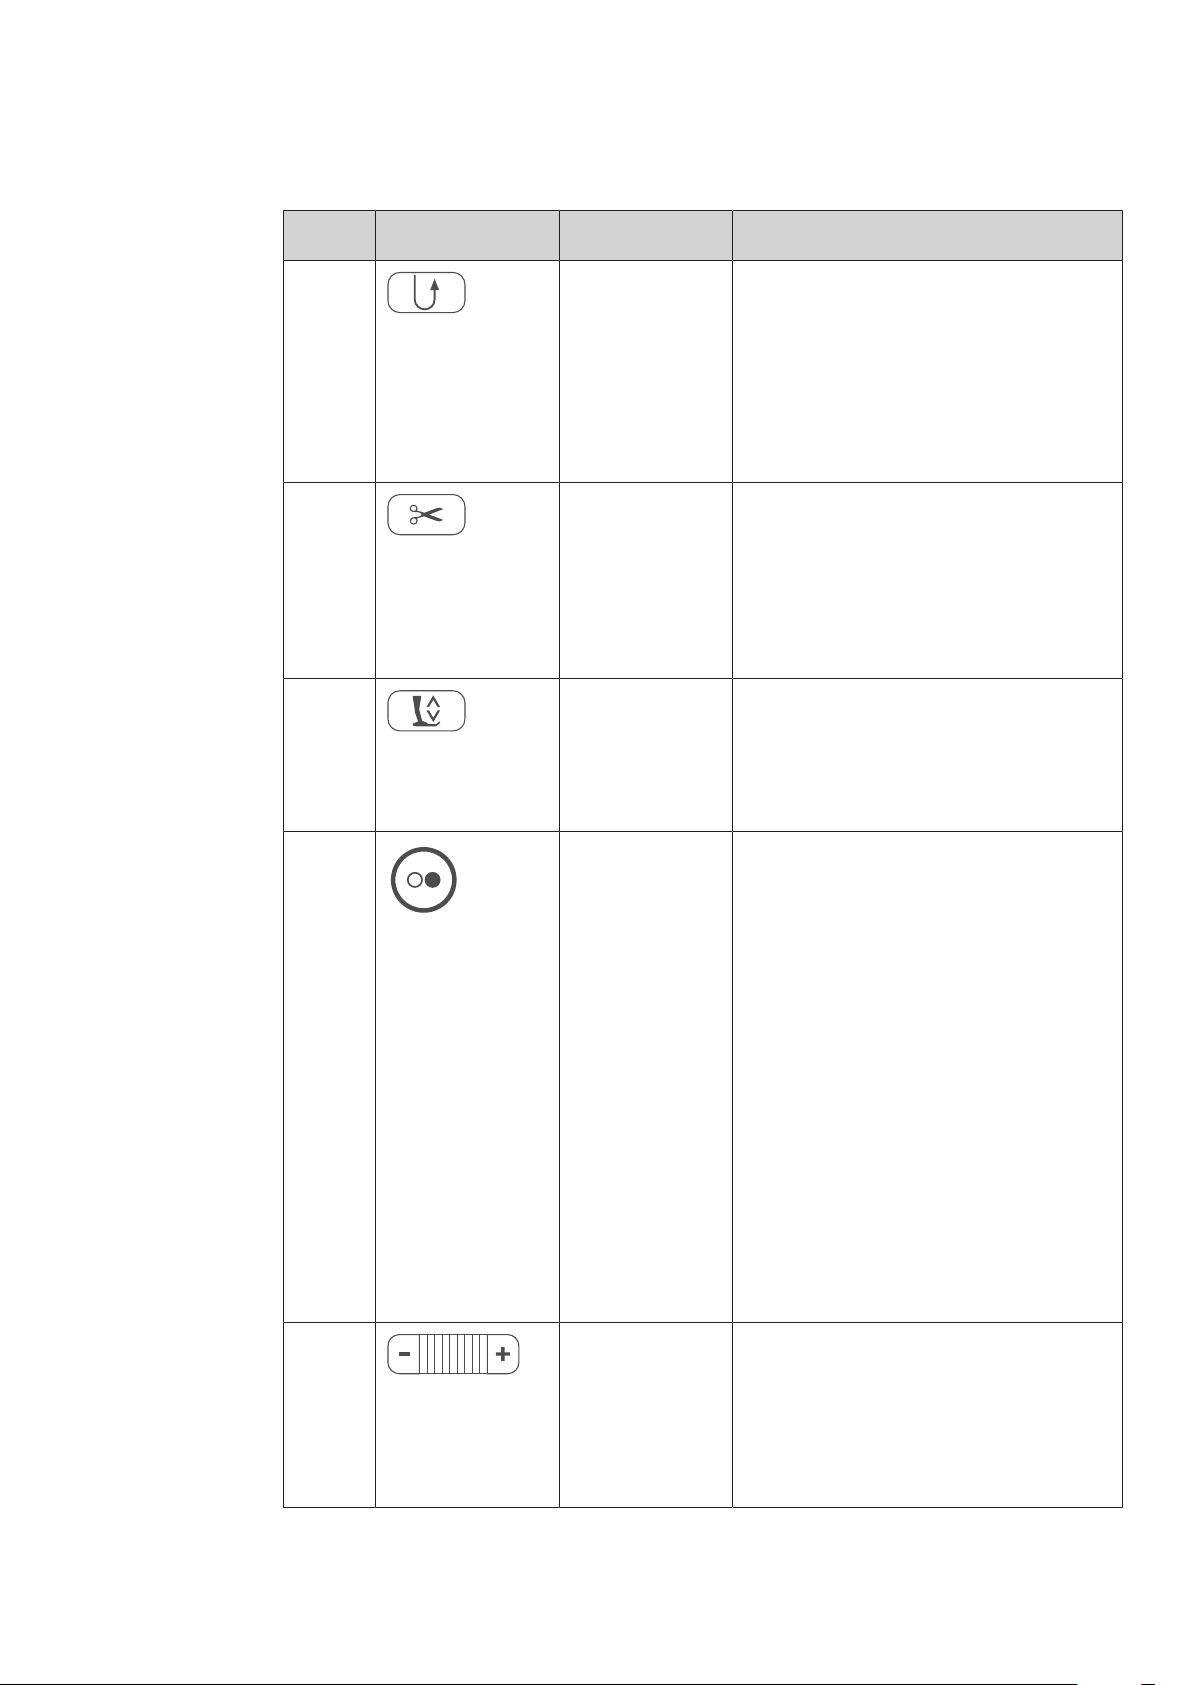
My bernette
Operation buttons
Number Buttons Name Purpose
1 Quick reverse > «Keep Quick reverse »pressed to sew in
reverse.
> Touch the icon «Quick reverse» to sew
permanently in reverse.
«Quick reverse» doesn't work with the stitch
patterns 22-24 and with the buttonhole
patterns 51-71.
2 Thread cutter > Press the «Thread cutter» button in order
to cut the upper and lower threads
automatically.
2-6 securing stitches can be programmed in
the Setup-Program. These are sewn before the
thread is cut.
3 Presser foot up/
down
> Press the button «Presser foot up/down »to
raise the presser foot into hovering
position.
> Push the button «Presser foot up/down» to
raise the presser foot.
4 Start/Stop The button «Start/Stop» serves the purpose to
change the presser foot position and to start
the machine.
> To start the machine, keep the button
«Start/Stop» pressed for 2seconds.
Sewing mode
> Press the button «Presser foot up/down» to
raise the presser foot into hovering
position.
Embroidery mode
> To bring the presser foot to its highest
position, quickly press «Start/Stop» in the
embroidery mode.
> Press the button «Presser foot up/down»
again to move the presser foot into
hovering position.
12
5 Slide speed control The sewing speed can be adjusted infinitely
variable with the slide.
> Move the slide to the left to reduce the
sewing speed.
> Move the slide to the right to increase the
sewing speed.
2019-02 EN 5020079.00A.04
My bernette
Number Buttons Name Purpose
6 Securing The function «Securing at sewing start» is
activated in the Setup by default and can be
deactivated by pressing the button «Securing».
When the function «Securing at sewing start»
is not activated in the Setup, it can be
programmed by pressing the button
«Securing».
A securing icon which appears on the display
during sewing indicates that the function is
activated.
The number of securing stitches can be
programmed in the Setup-Program.
> To sew the securing stitches first, press the
button «Securing» before you start sewing.
> To sew the securing stitches at the pattern
end, press the button «Securing» while
sewing.
> To sew securing stitches within a stitch
pattern combination, press the button
«Securing».
– The selected pattern of the combination
is secured according to the setting.
7 Needle up/down > Push the button «Needle up/down» to
lower the needle.
> Push the «Needle up/down» button again
to raise the needle.
8 Upper
Multifunctional
knob
9 Lower
Multifunctional
knob
With the «Upper Multifunction knob» setting
values can be changed in the sewing, the
embroidering and the Setup Program.
With the «Lower Multifunction knob» setting
values can be changed in the sewing, the
embroidering and the Setup Program.
10 Needle left/right There is a total of 15 needle positions. The
needle position is indicated by the needle
position number in the display.
> Press the «Needle left» button to move the
needle to the left.
> Press the «Needle right» button to move
the needle to the right.
2019-02 EN 5020079.00A.04
13
My bernette
3
1
4
5
7
9
8
10
13
12
11
2
6
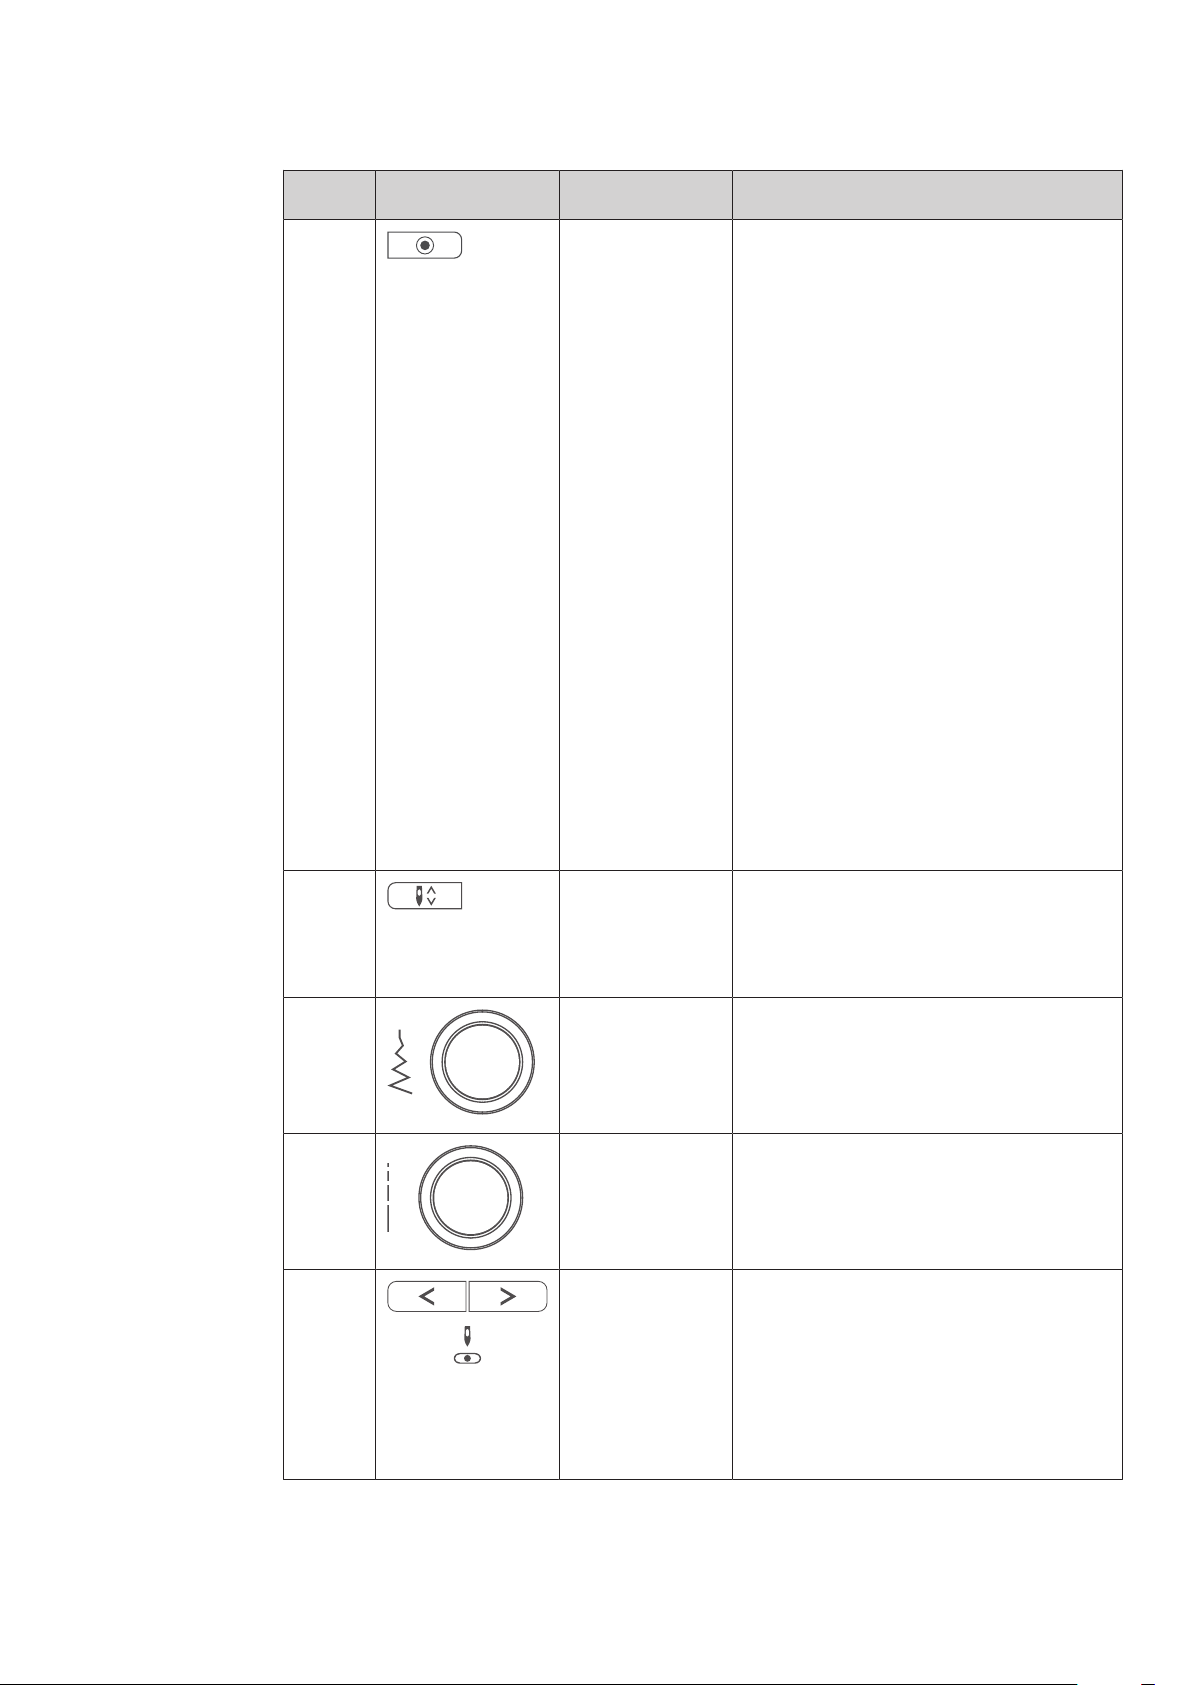
Overview front
1 Feed dog lever 8 Buttonhole lever
2 Connection for embroidery module 9 Thread cutter
3 Stitch plate cover 10 Thread take-up lever
4 Stitch plate 11 Top cover
5 Presser foot 12 LCD Display
6 Sewing light 13 Connection for Free Hand System
7 Needle threader 14 Sewing table and accessory box
14
2019-02 EN 5020079.00A.04
My bernette
3
2
1
4
5
7
6
Overview top
1 Thread take-up lever 5 Bobbin winding unit and holder for second
spoolpin
2 Thread pretension 6 Bobbin winding stopper
3 Thread guide 7 Touchscreen pen
4 Spool holder
2019-02 EN 5020079.00A.04
15
My bernette
1
2
3
4
5
6
7
8
9
10
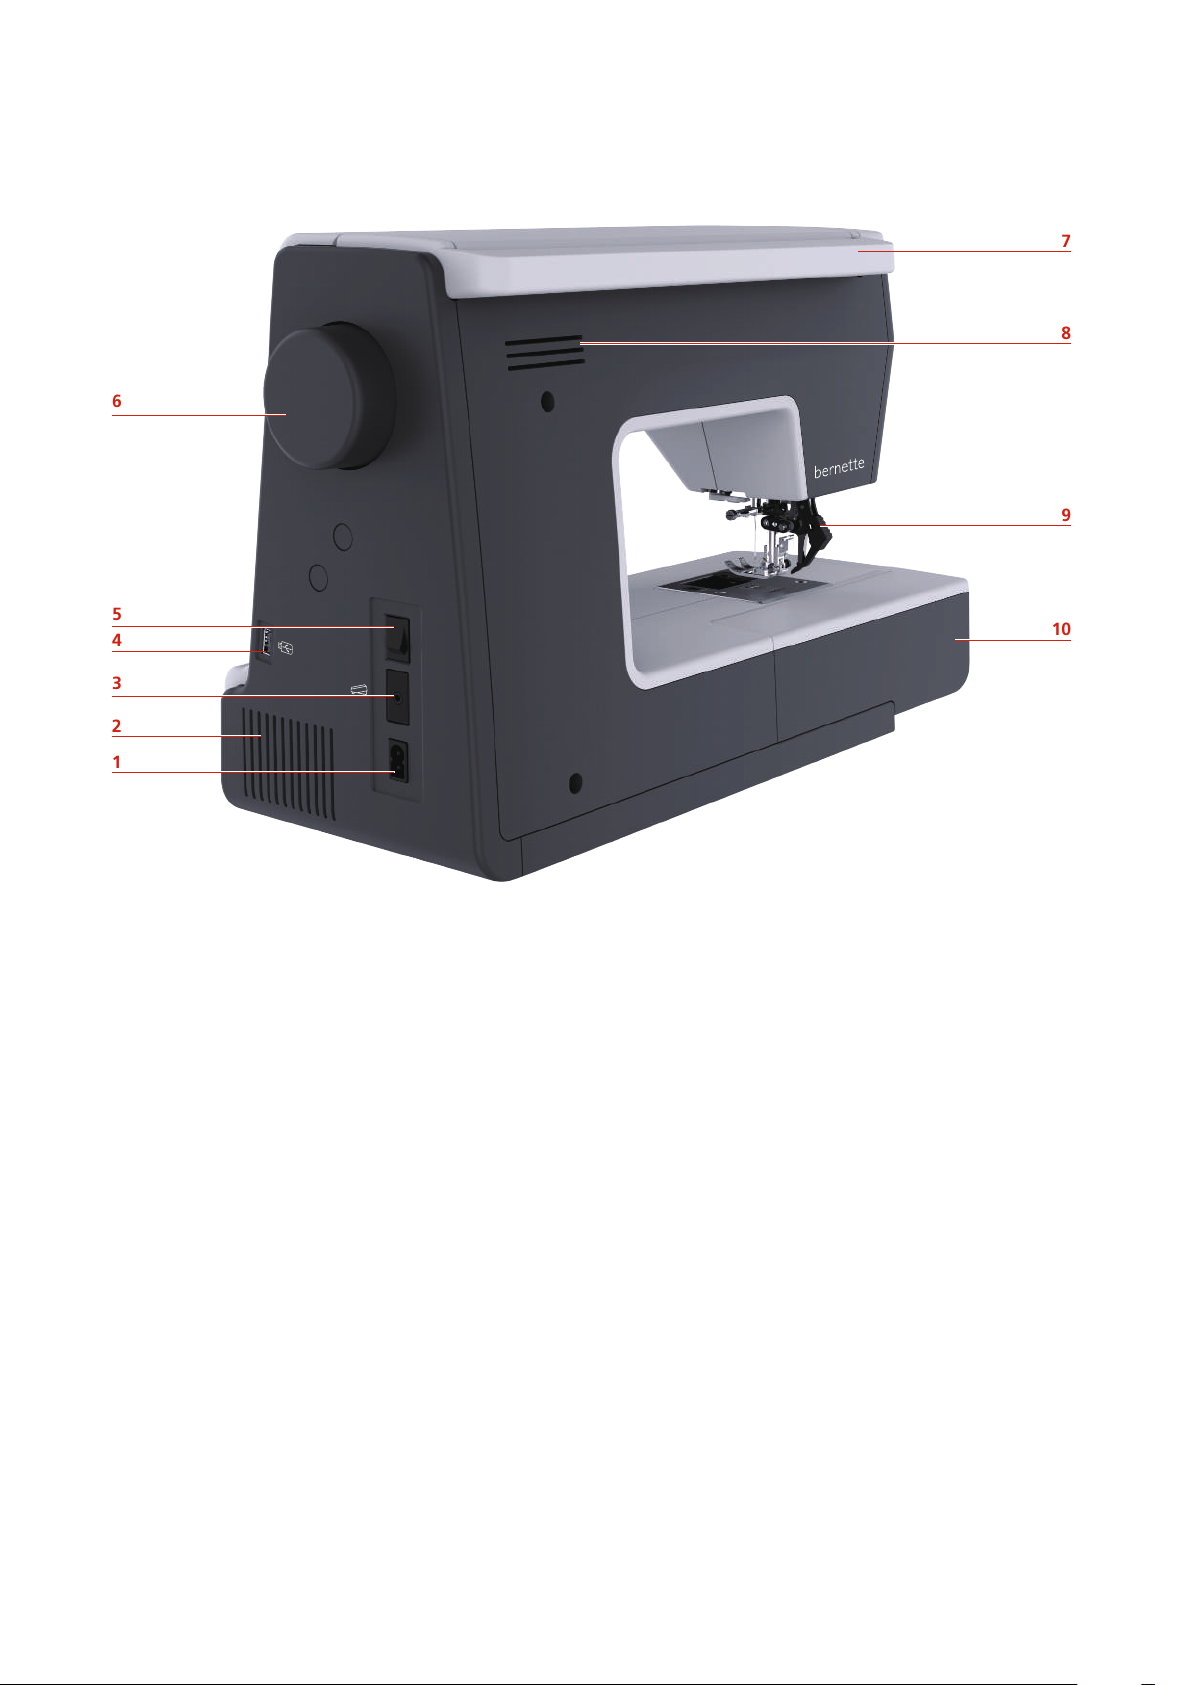
Overview back
1 Connection for power cable 6 Handwheel
2 Air vents 7 Carrying handle
3 Connection for foot control 8 Air vents
4 USB port 9 Dual Feed
5 Power switch 10 Sewing table and accessory box
16
2019-02 EN 5020079.00A.04
My bernette
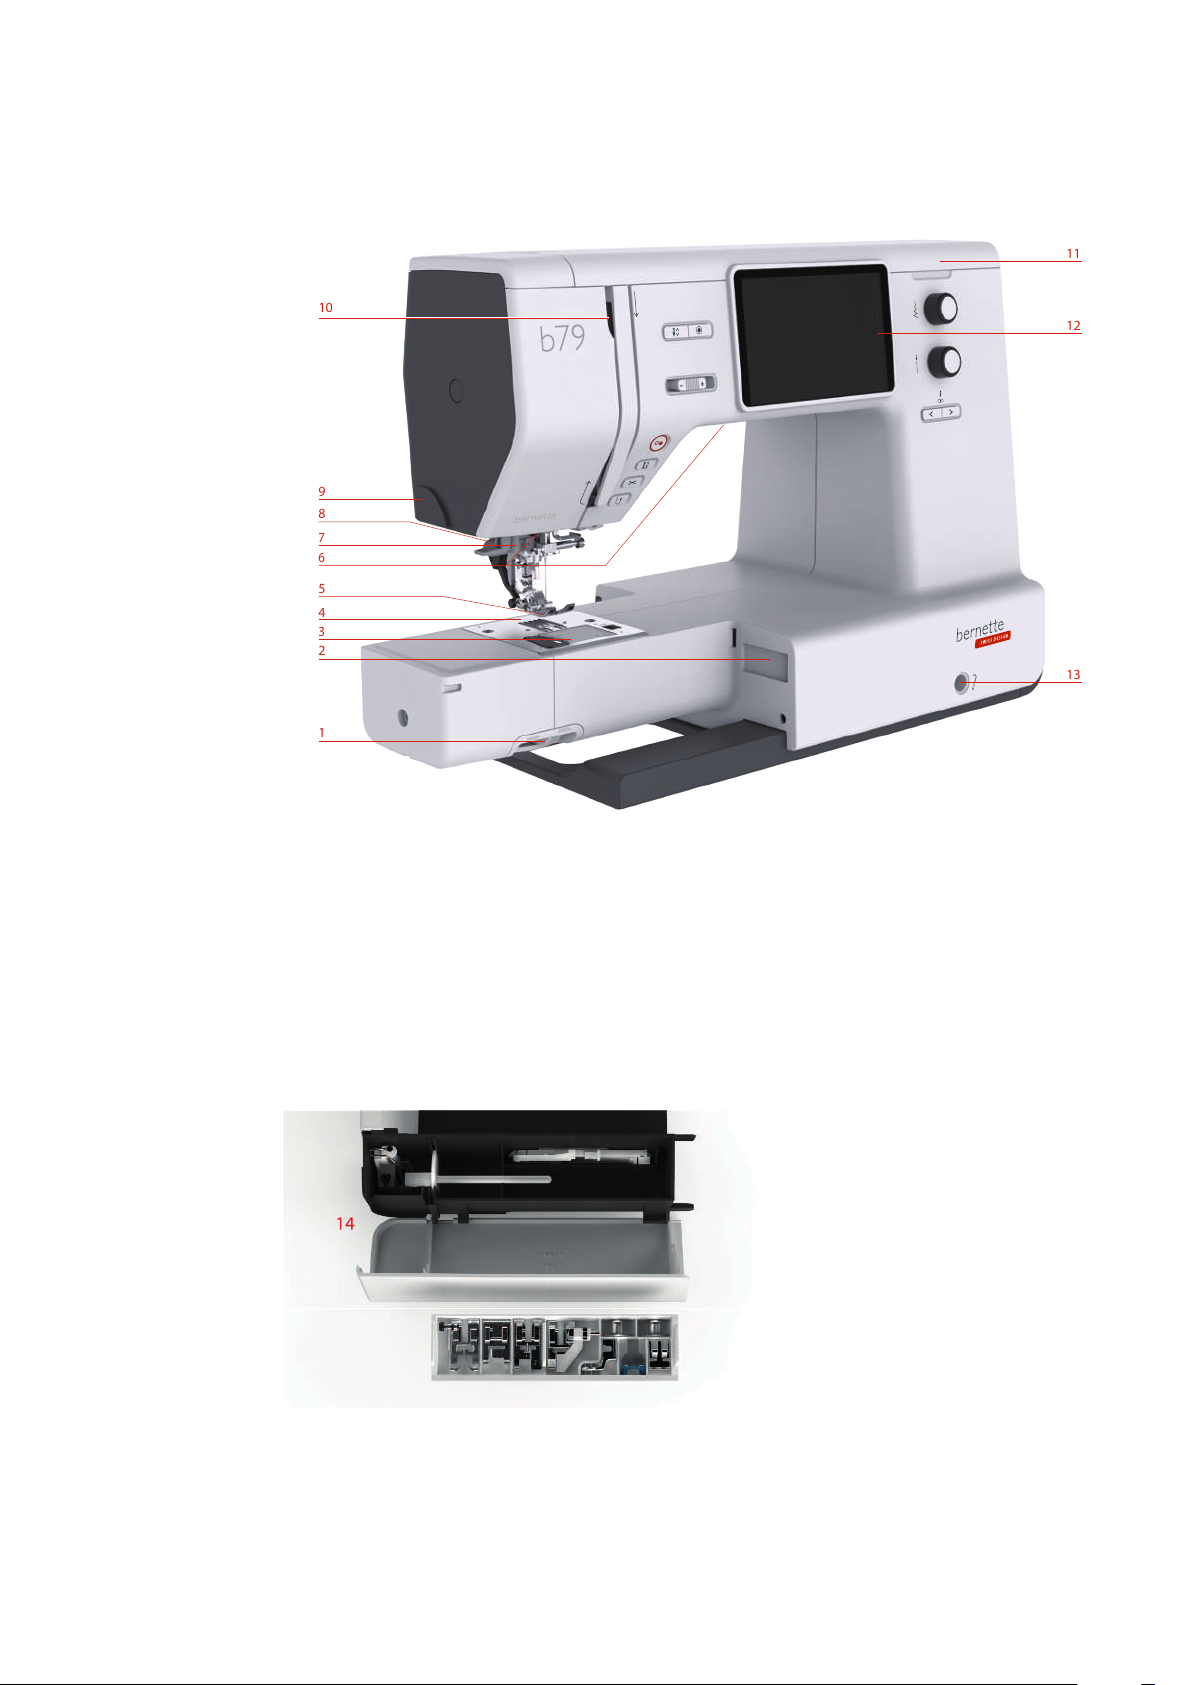
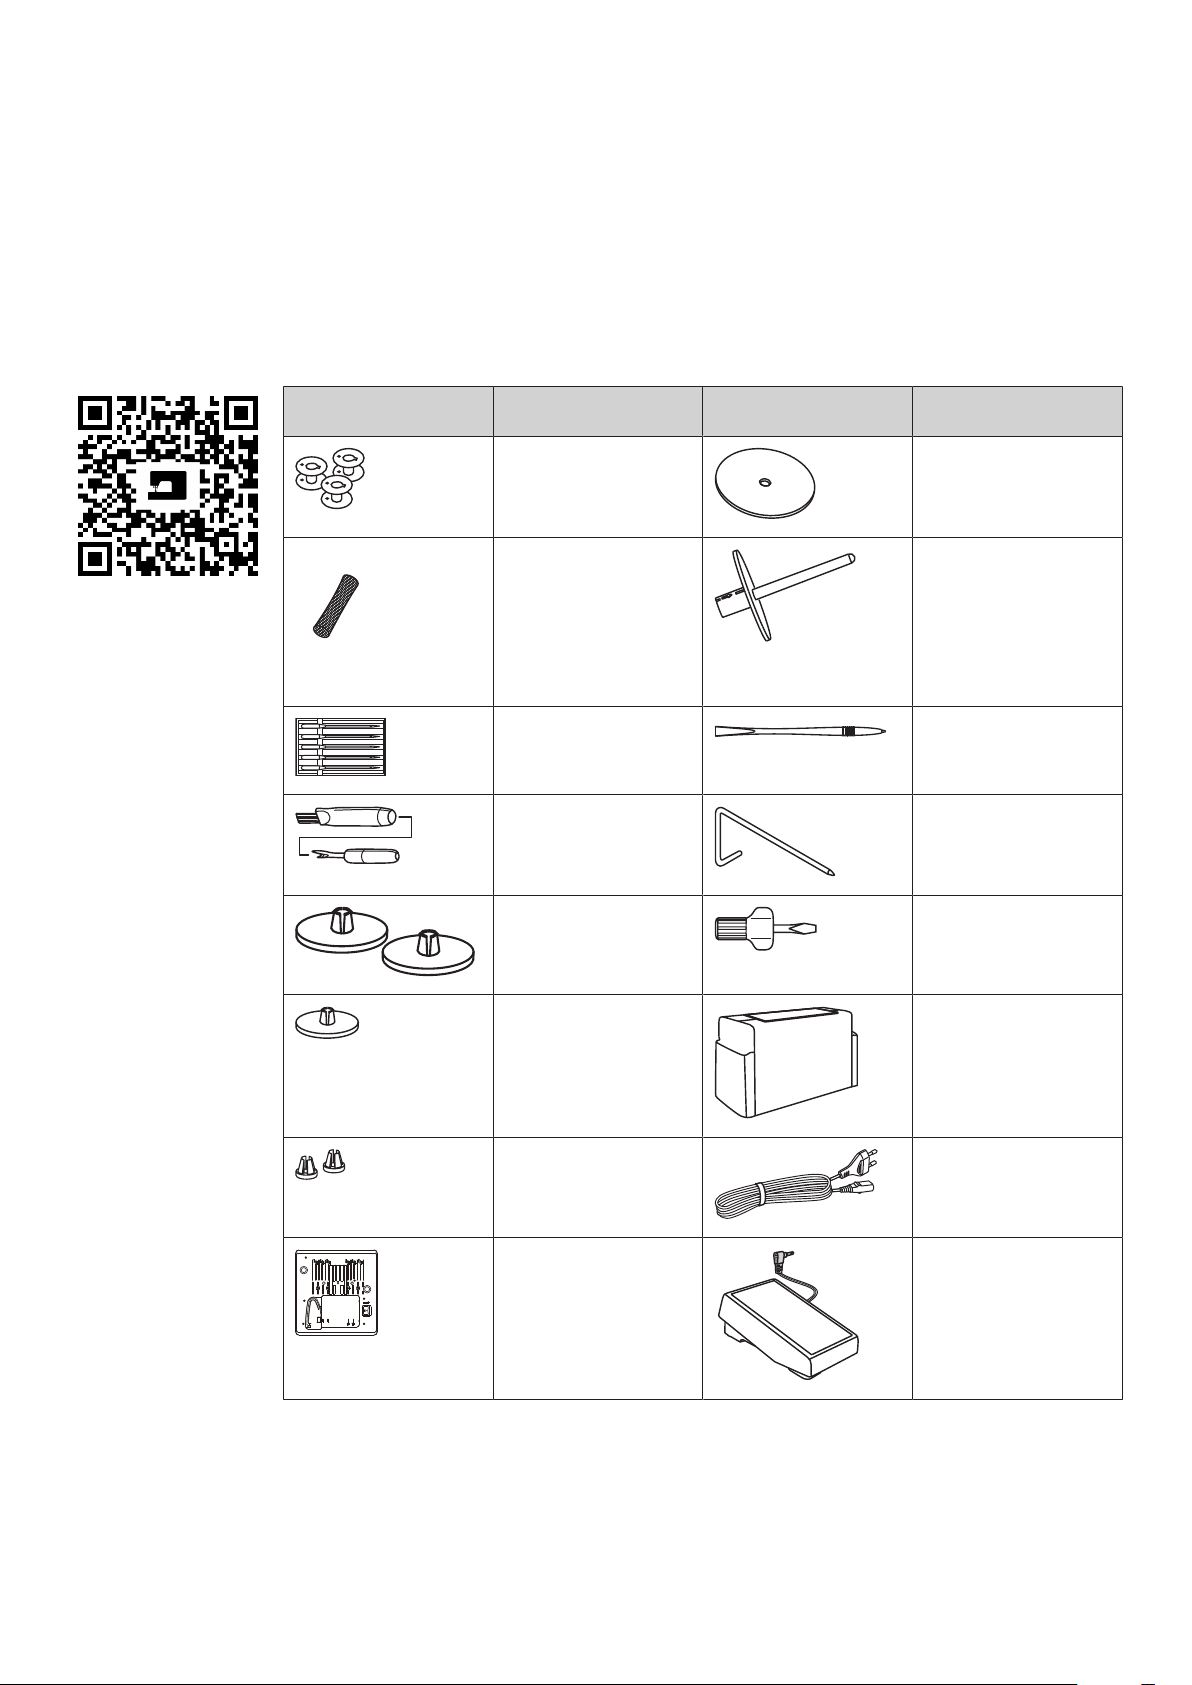
1.2 Accessory
All rights reserved: For technical reasons and for the purpose of product improvements, changes
concerning the features of the machine can be made at any time and without advance notice. The supplied
accessory can vary depending on the country of delivery.
Included accessories
Visit www.mybernette.com/accessories for more accessory information.
Illustration Name Illustration Name
Bobbin (3x) Felt disc
Spool net Second spool pin
Selection of needles (2x) Touchscreen pen
Brush/ Seam ripper Seam guide
Spool discs large (2x) Screwdriver
Spool disc middle (1x) Dust cover
Spool discs small (2x) Power cable
Straight/Cutwork stitch
plate
Foot control
2019-02 EN 5020079.00A.04
17
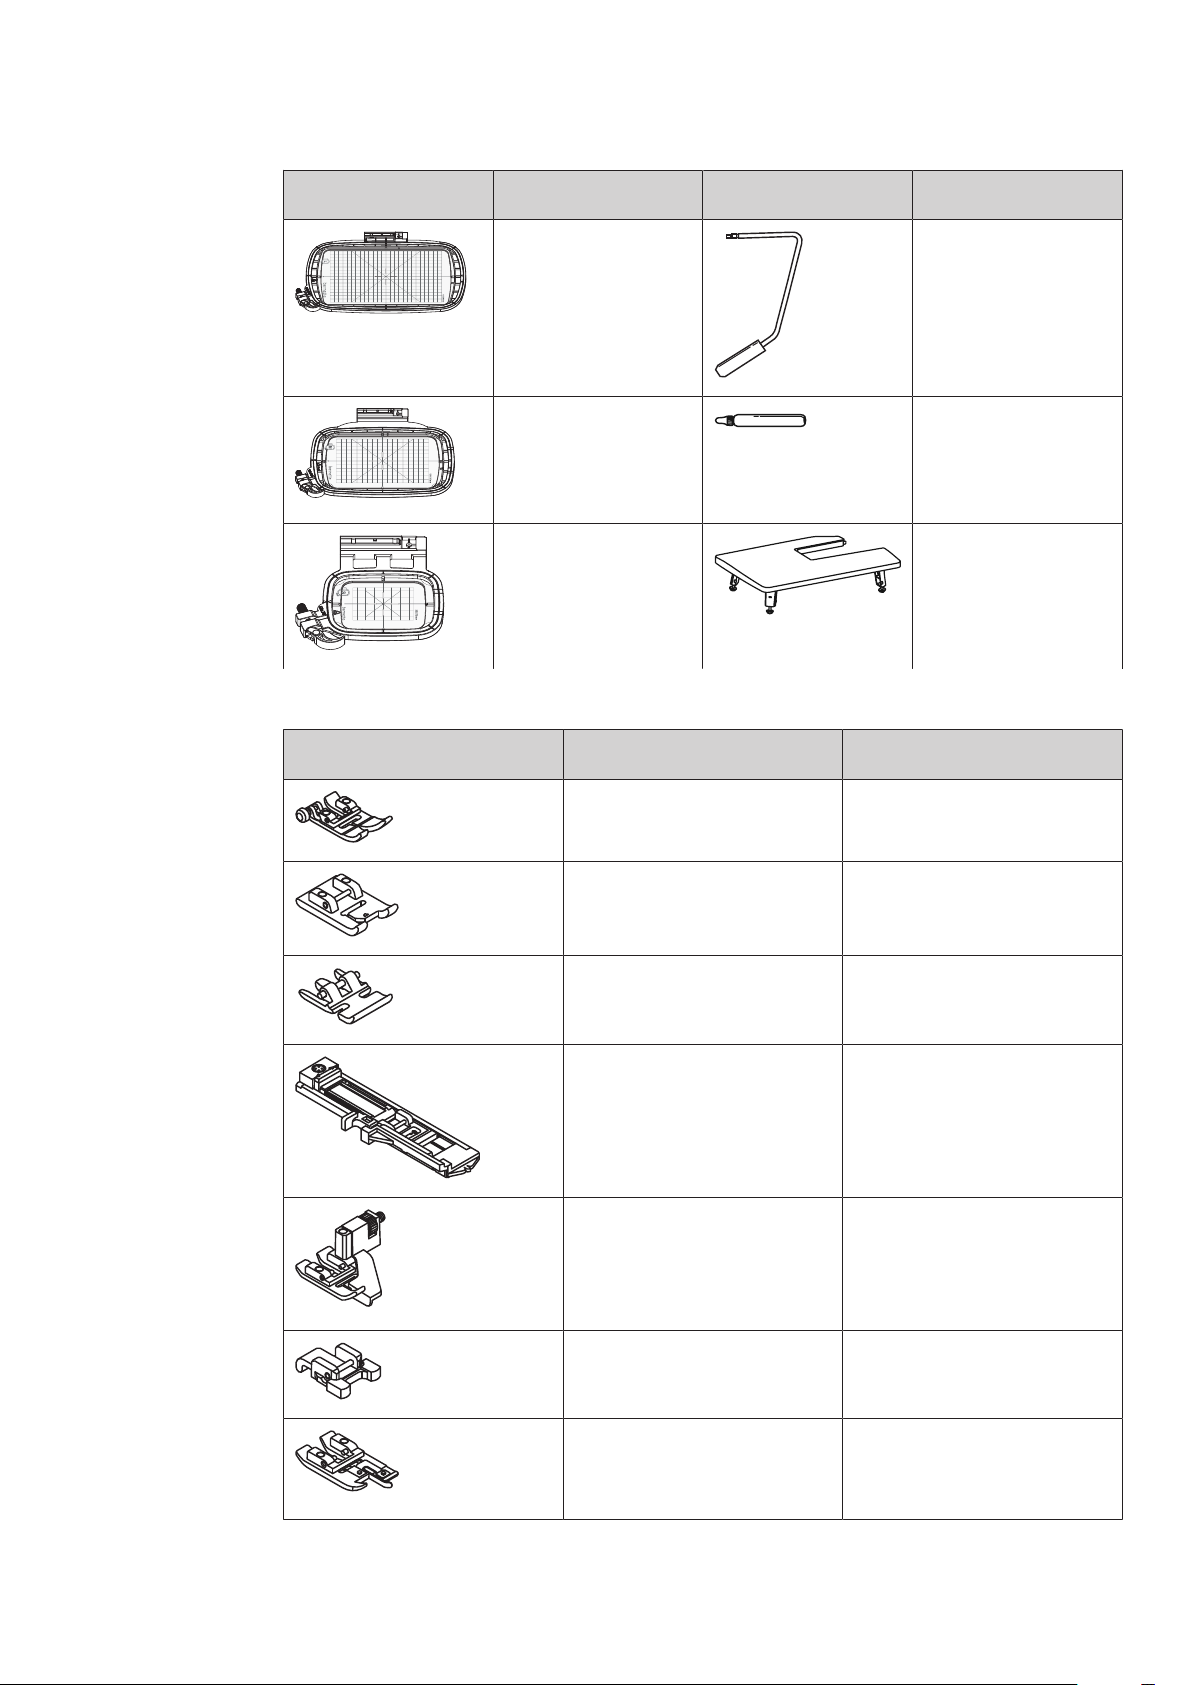
My bernette
Illustration Name Illustration Name
Embroidery hoop large,
160 x 260 mm with
embroidery template
Embroidery hoop
medium, 120 x 180 mm
with embroider
template
Embroidery hoop small,
50x70 mm with
embroidery template
Overview presser feet
Illustration Name Purpose
Zigzag foot (DA) To sew practical, decorative
stitches and hems.
Free Hand System
Lubricator
Slide-on table
Embroidery foot (JK) To sew buttonholes, appliqués
and decorative stitches.
Zipper foot (JB) Used to sew with dual feed. To
sew in zippers.
Buttonhole foot with slide (RJ) To sew buttonholes.
Blindstitch foot (DM) To sew blind-stitch hems with
Dual Feed.
Button-sew-on foot (RC) To sew on button.
Overlock foot (DI) Used to sew with dual feed.
Overlock stitches over the fabric
edge.
18
2019-02 EN 5020079.00A.04
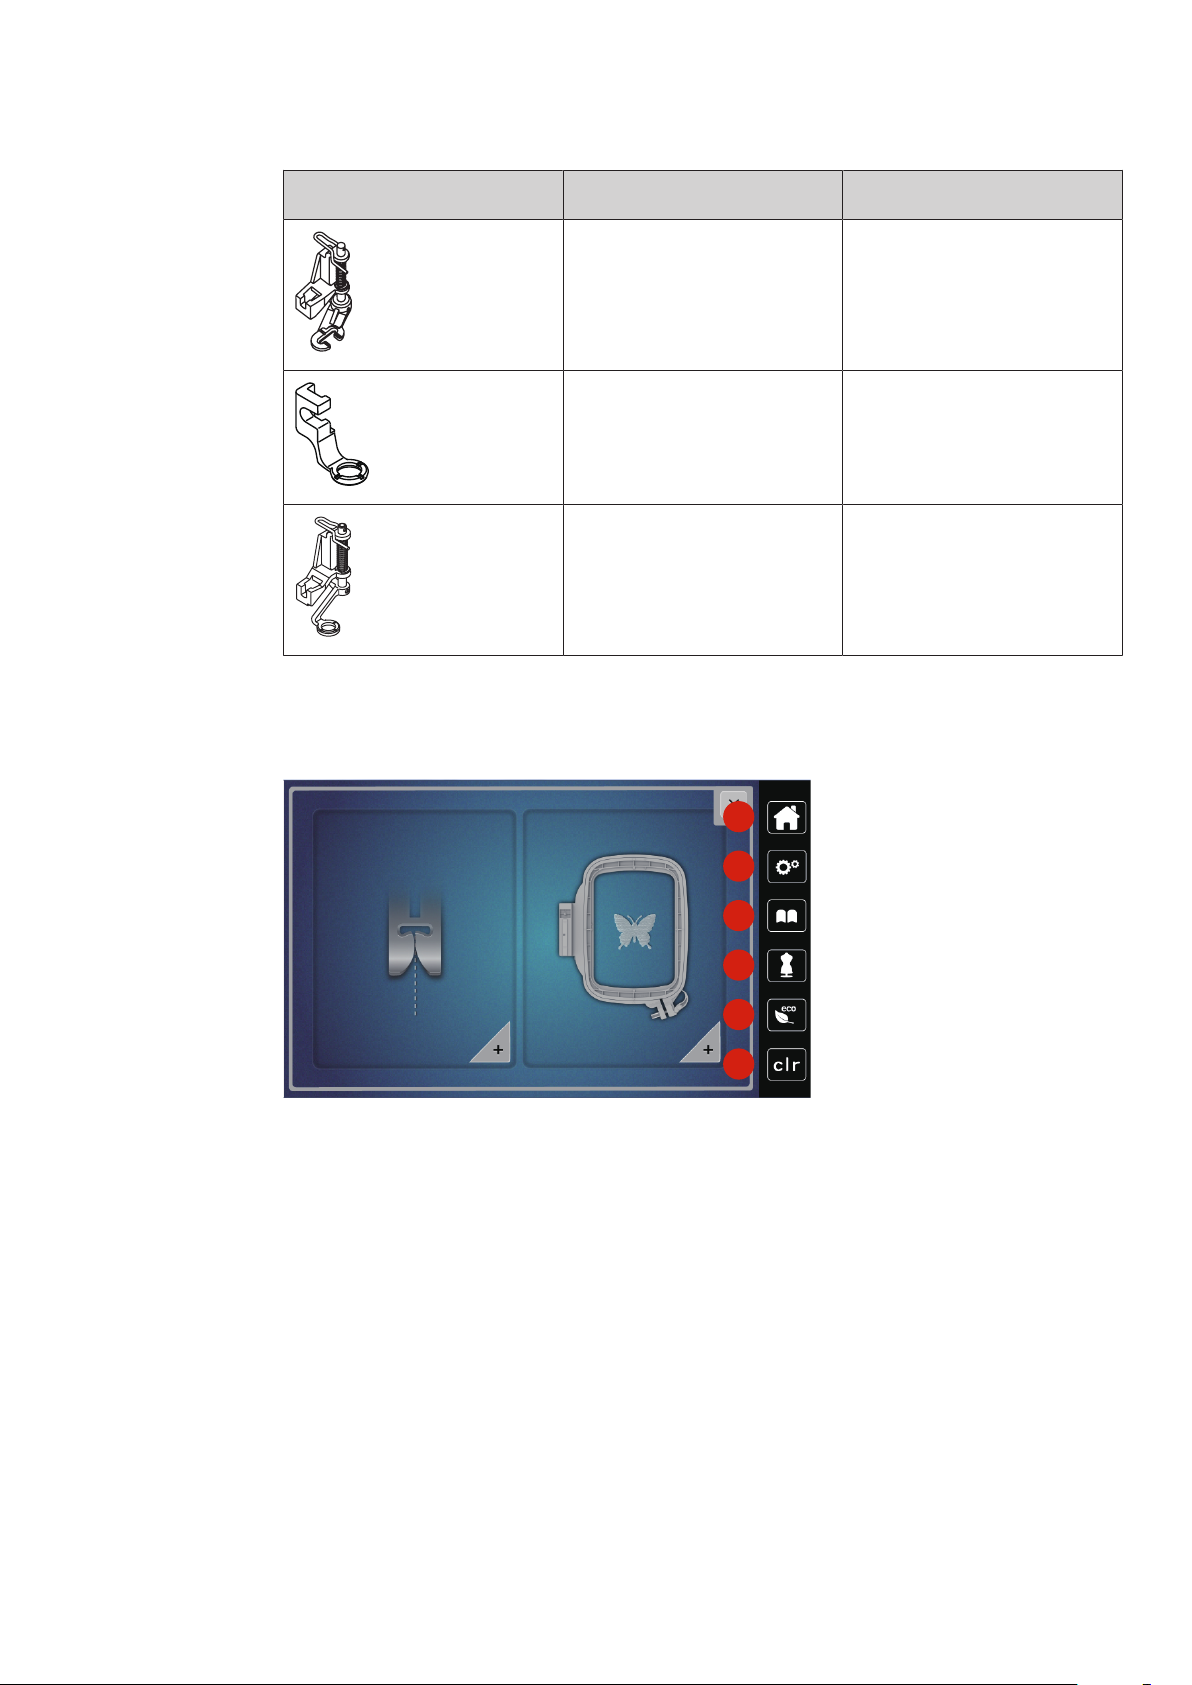
Illustration Name Purpose
1
2
3
4
5
6
Free motion foot (RX) For embroidering, darning and
free motion quilting.
Embroidery foot (JL) For embroidering, darning and
free-motion quilting.
Hopper embroidery foot (JX) For embroidering, darning and
free-motion quilting.
My bernette
1.3 Overview User Interface
Overview System settings
1 Home 4 Creative Sewing Consultant
2 Setup Program 5 eco mode
3 Tutorial 6 Back to default setting
2019-02 EN 5020079.00A.04
19
My bernette
1
2
3
4
5
Overview functions/visual information
1 Upper thread tension 4 Presser foot pressure
2 Needle selection 5 Stitch plate selection
3 Presser foot display/Presser foot selection
Overview Functions and Views
Illustration Name Purpose
Close The display is closed and the
previously made adjustments are
saved.
Icons «-/+» By touching the icons «-» and
«+» the setting values are
changed.
Confirm Confirms the previously adjusted
alterations. The display is closed.
Cancel The process is canceled. The
display is closed and the
previously made adjustments are
not saved.
Slide By moving the slide the setting
values are changed.
20
Switch Activates or deactivates
functions.
2019-02 EN 5020079.00A.04
Illustration Name Purpose
Process navigation With the process navigation, you
can return from any display to
the previous the display.
Machine To load or save motifs on the
machine.
USB stick To load or save embroidery
motifs on the USB stick.
USB storage space The percentage of used USB
storage (%) will be displayed in
the green bar icon.
Swipe function By swiping the display using the
touchscreen pen or the finger
upwards or downwards, further
functions can be displayed.
My bernette
Yellow-framed icon Touch the yellow-framed icon to
reset the alterations to default
setting.
2019-02 EN 5020079.00A.04
21

My bernette
1.4 Needle, Thread, Fabric
In the course of time a needle wears out. Therefore, the needle should be replaced regularly. Only a perfect
point results in a good stitching result. In general it can be said: the thinner the thread, the finer the needle.
The illustrated needles are either standard or optional accessory, depending on the machine.
• Needle sizes 70, 75: for light-weight fabrics.
• Needle sizes 80, 90: for medium fabrics.
• Needle sizes 100: for heavy fabrics.
Overview Needles
Illustration Needle name Needle description Purpose
Universal needle
130/705 H 60-120
Stretch needle
130/705 H-S 75, 90
Jersey/Embroidery
needle
130/705 H SUK 60-100
Jeans needle
130/705 H-J 80-110
Leather needle
130/705 H LR 90, 100
Microtex needle
130/705 H-M 60-110
Slightly rounded point For nearly all natural
and synthetic fabrics
(woven and knitted).
Mid-sized ball point,
special eye shape and
needle scarf
Mid-sized ball point For knitware, knitted
Point, narrow point,
reinforced shaft
With cutting point
(LR=special point to
sew leather)
Especially sharp, narrow
point
For jersey, tricot, knit
and stretch fabrics.
good.
For embroidering.
For heavy-weight
fabrics such as jeans or
canvas.
For all types of leather,
synthetic leather,
plastic, sheeting.
For mircro fiber fabrics
and silk.
22
Quilting needle
130/705 H-Q 75, 90
Embroidery needle
130/705 H-E 75, 90
Fine-material needle
130/705 H SES 70, 90
Slightly rounded fine
point
Small ball point,
especially wide needle
eye and wide thread
groove
Small ball point For fine knitware and
For straight and
topstitching.
For embroidery on all
natural and synthetic
fabrics.
knitted materials.
For embroidery on fine,
delicate fabrics.
2019-02 EN 5020079.00A.04
Illustration Needle name Needle description Purpose
My bernette
Metafil needle
130/705 H METAFIL 80
Cordonnet needle (to
patch embroidery)
130/705 H-N 70-100
Felt needle
PUNCH
Hemstitch needle
130/705 H WING
100-120
Universal double
needle
130/705 H ZWI 70-100
Stretch double needle
130/705 H-S ZWI 75
Long needle eye (2 mm)
in all needle sizes
For sewing or
embroidering with
metallic threads.
Long needle eye (2 mm)
in all needle sizes
Needle with barbed
Topstitching with thick
thread.
For felt work.
hook
Wing-like widened
To sew blind stitches.
needle shaft (wing)
Needle distance:
1.0/1.6/2.0/2.5/
3.0/4.0/6.0/8.0
For visible hems in
stretch fabrics, pintucks,
decorative sewing.
Needle distance: 2.5/4.0 For visible hems in
stretch fabrics, pintucks,
decorative sewing.
Hemstitch double
needle
130/705 H ZWIHO 100
Universal triple
needle
130/705 H DRI 80
Needle distance: 2.5 For special effects with
hemstitch embroidery.
Needle distance: 3.0 For visible hems in
stretch fabrics,
decorative sewing.
2019-02 EN 5020079.00A.04
23
My bernette
2
1
5
3
4
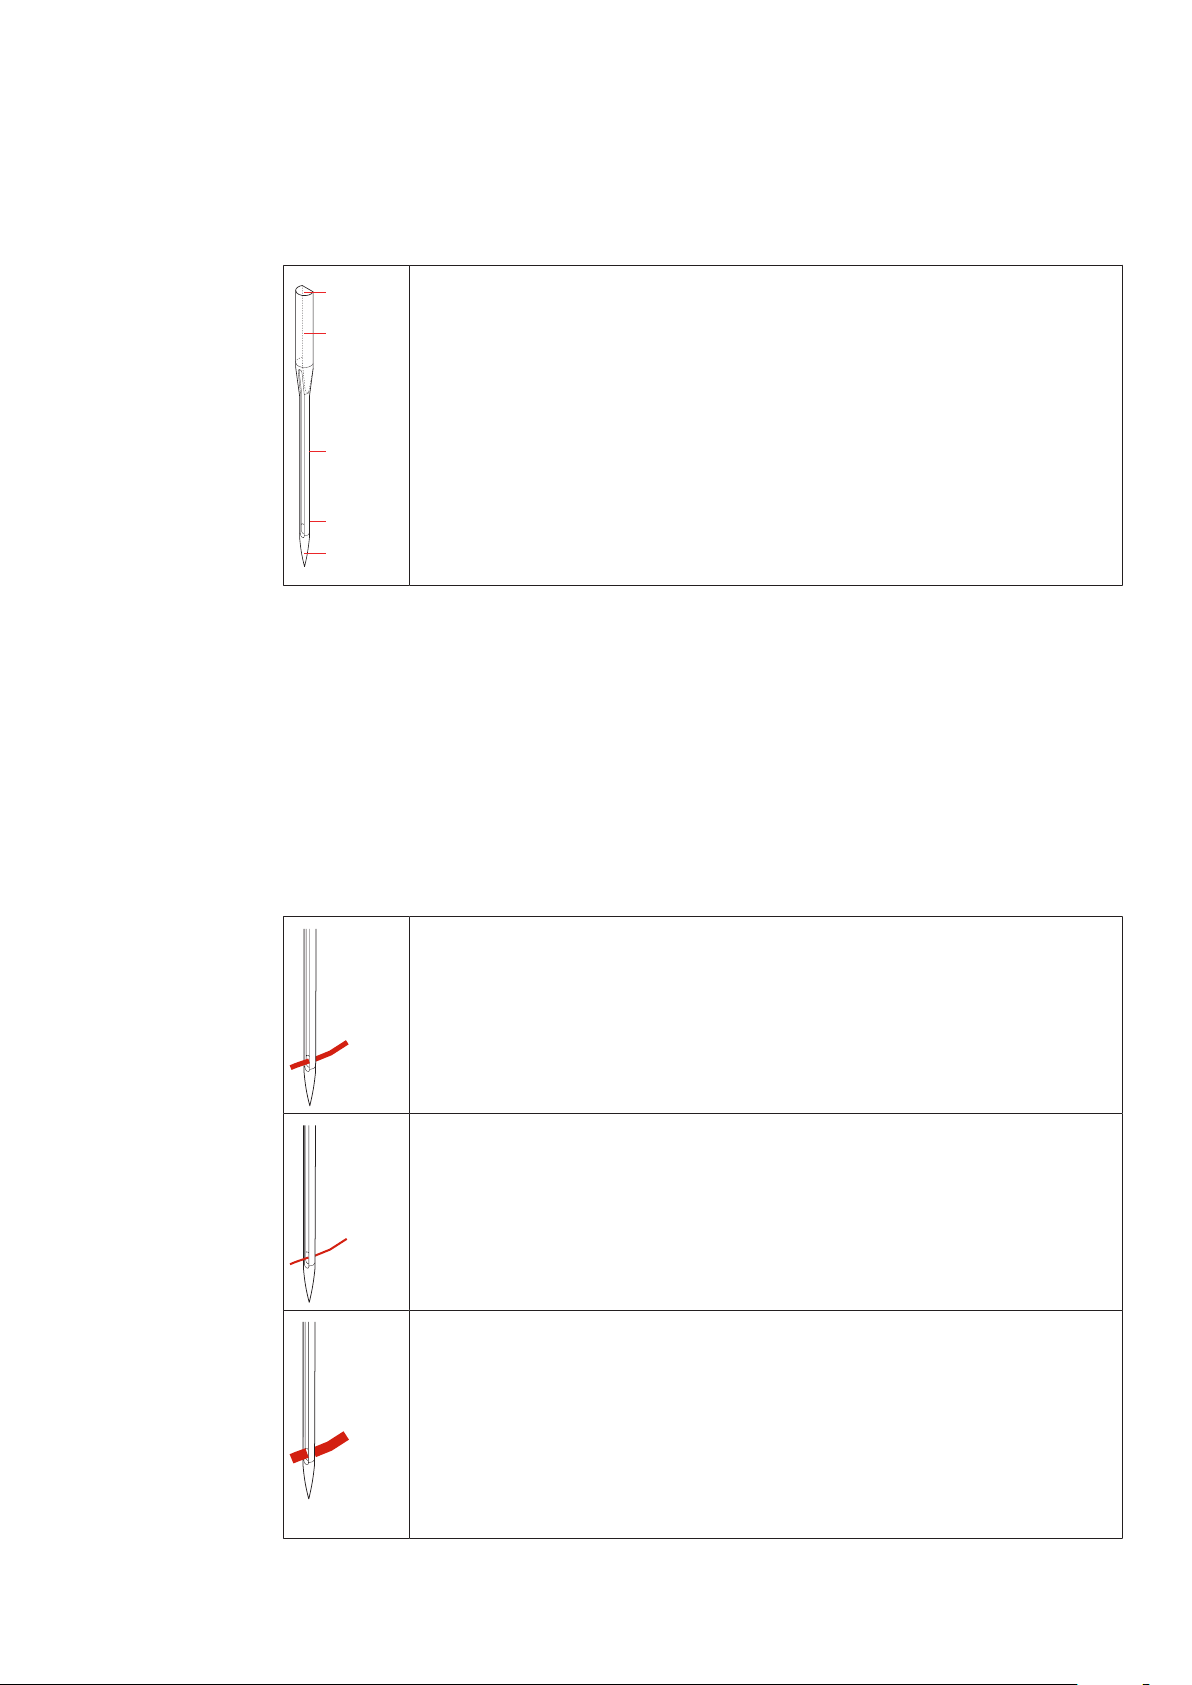
Example for needle description
The 130/705 system, which is the most common for household machines, is explained by the following
picture of a Jersey/Stretch needle.
130/705 H-S/70
130 = Shank length (1)
705 = Flat shank (2)
H = Needle scarf (3)
S = Needle point (here medium ball point) (4)
70 = Needle size 0.7 mm (5)
Thread selection
For a perfect sewing result, thread and fabric quality play an important role.
We recommend purchasing quality threads to achieve good sewing results.
• Cotton threads have the advantage of being a natural fiber and therefore are especially suitable for
sewing cotton fabrics.
• Mercerized cotton threads have a slight sheen that is not lost with washing.
• Polyester threads have a high tensile strength and is particularly colorfast.
• Polyester threads are more flexible and are recommended where a strong and elastic seam is required.
• Rayon threads are made of natural fibers and have a brilliant sheen.
• Rayon threads are suitable for decorative stitches and achieve a more beautiful effect.
Needle/thread combination
The needle/thread combination is correct, when the thread fits perfectly into the long
groove and goes easily through the needle eye. The thread can be optimally sewn.
The thread can break and cause skipped stitches if there is too much play in the long
groove or eye of the needle.
The thread can break and become jammed if it frays on the edges of the long groove and
is not guided optimally through the eye of the needle.
24
2019-02 EN 5020079.00A.04
Sewing preparation
2 Sewing preparation
2.1 Connection and Switching on
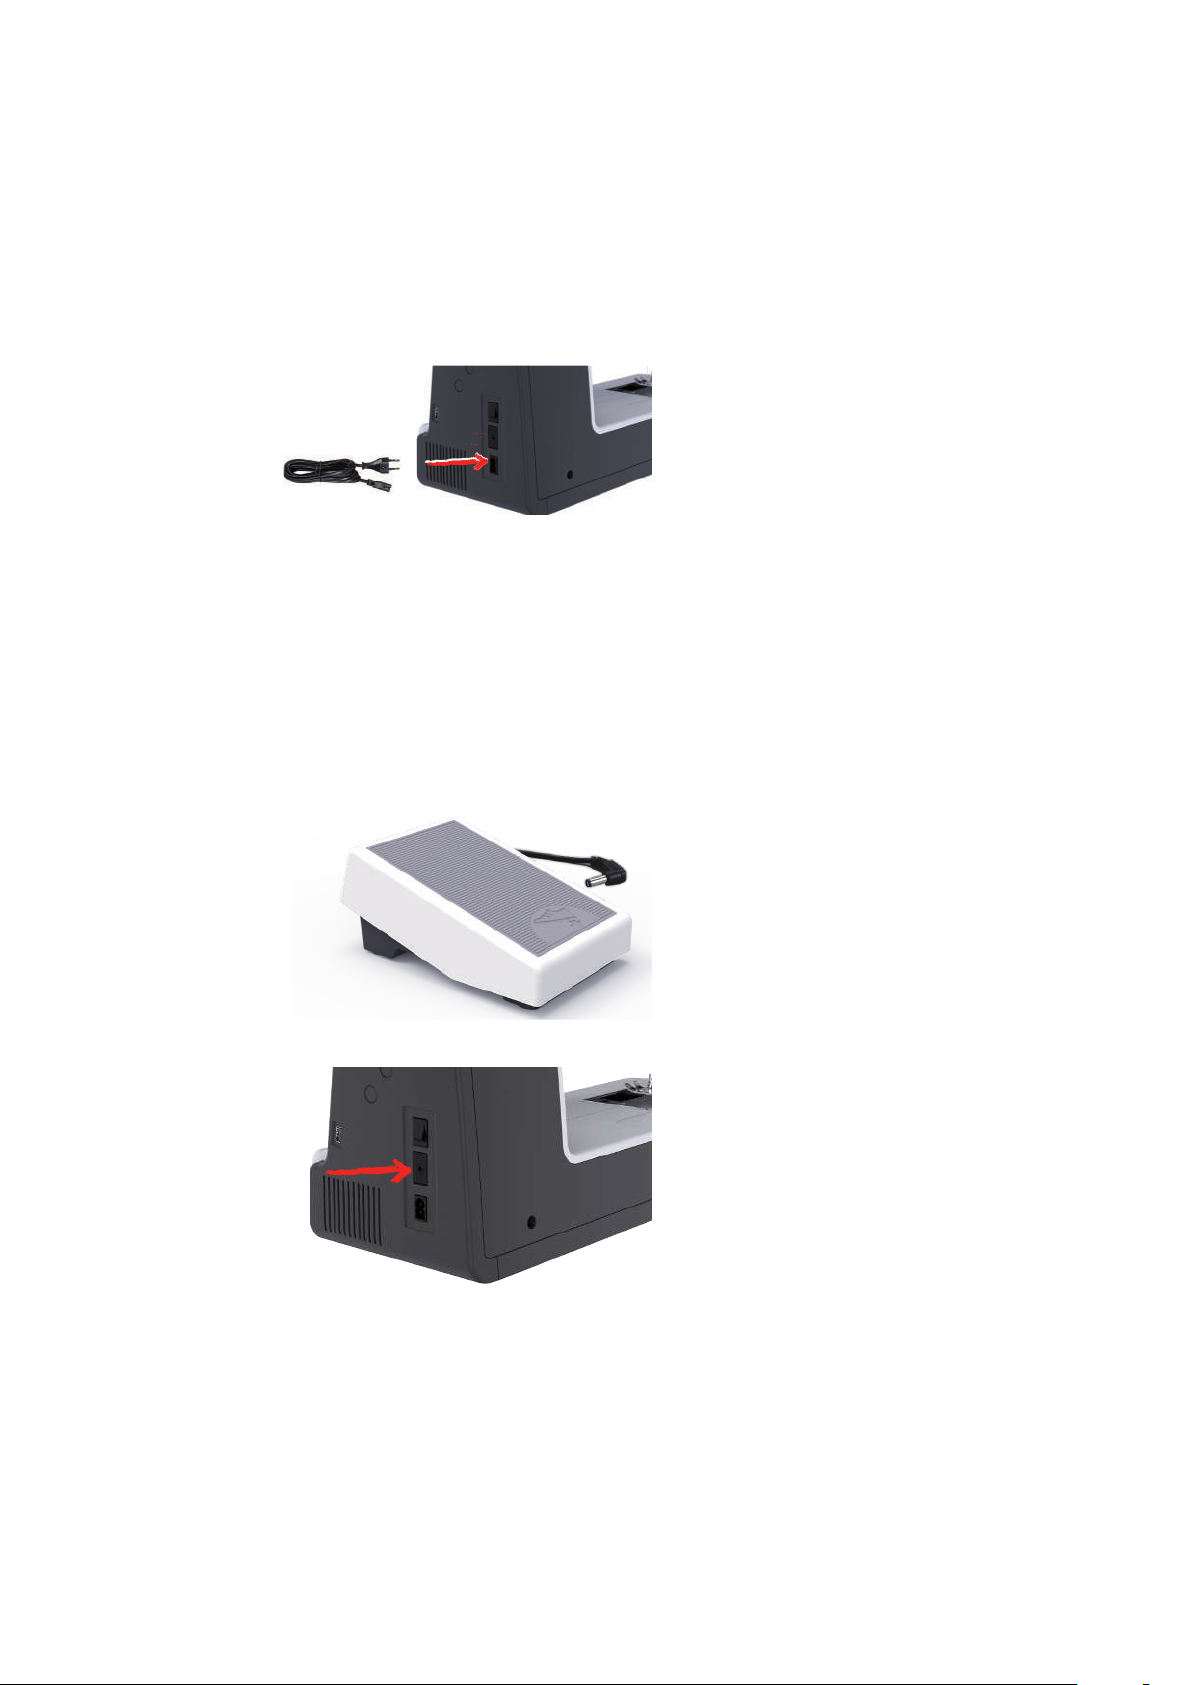
Connecting the machine
> Insert the power cable into the power cord connection.
> Insert the power cable into the power cord connection.
Use of the power cable (only USA/Canada)
The machine has a polarized plug (one blade wider than the other). To reduce the risk of electrical shock, this
plug is intended to fit in a polarized outlet only one way. If the plug does not fit fully in the outlet, reverse
the plug. If it still does not fit, contact a qualified electrician to install the proper outlet. Do not modify the
plug in any way!
Connecting the foot control
> Unwind the cable of the foot control to the desired length.
> Insert the cable of the foot control into the foot control connection.
Attaching the knee lifter of the Free Hand System
2019-02 EN 5020079.00A.04
The presser foot may be raised and lowered with the Free Hand System. The knee lifter is extremely helpful
when sewing appliqué, patchwork and quilting since it allows you to handle the fabric while your knee
controls the presser foot.
> Insert the knee lifter into the opening at the front side of the machine.
25
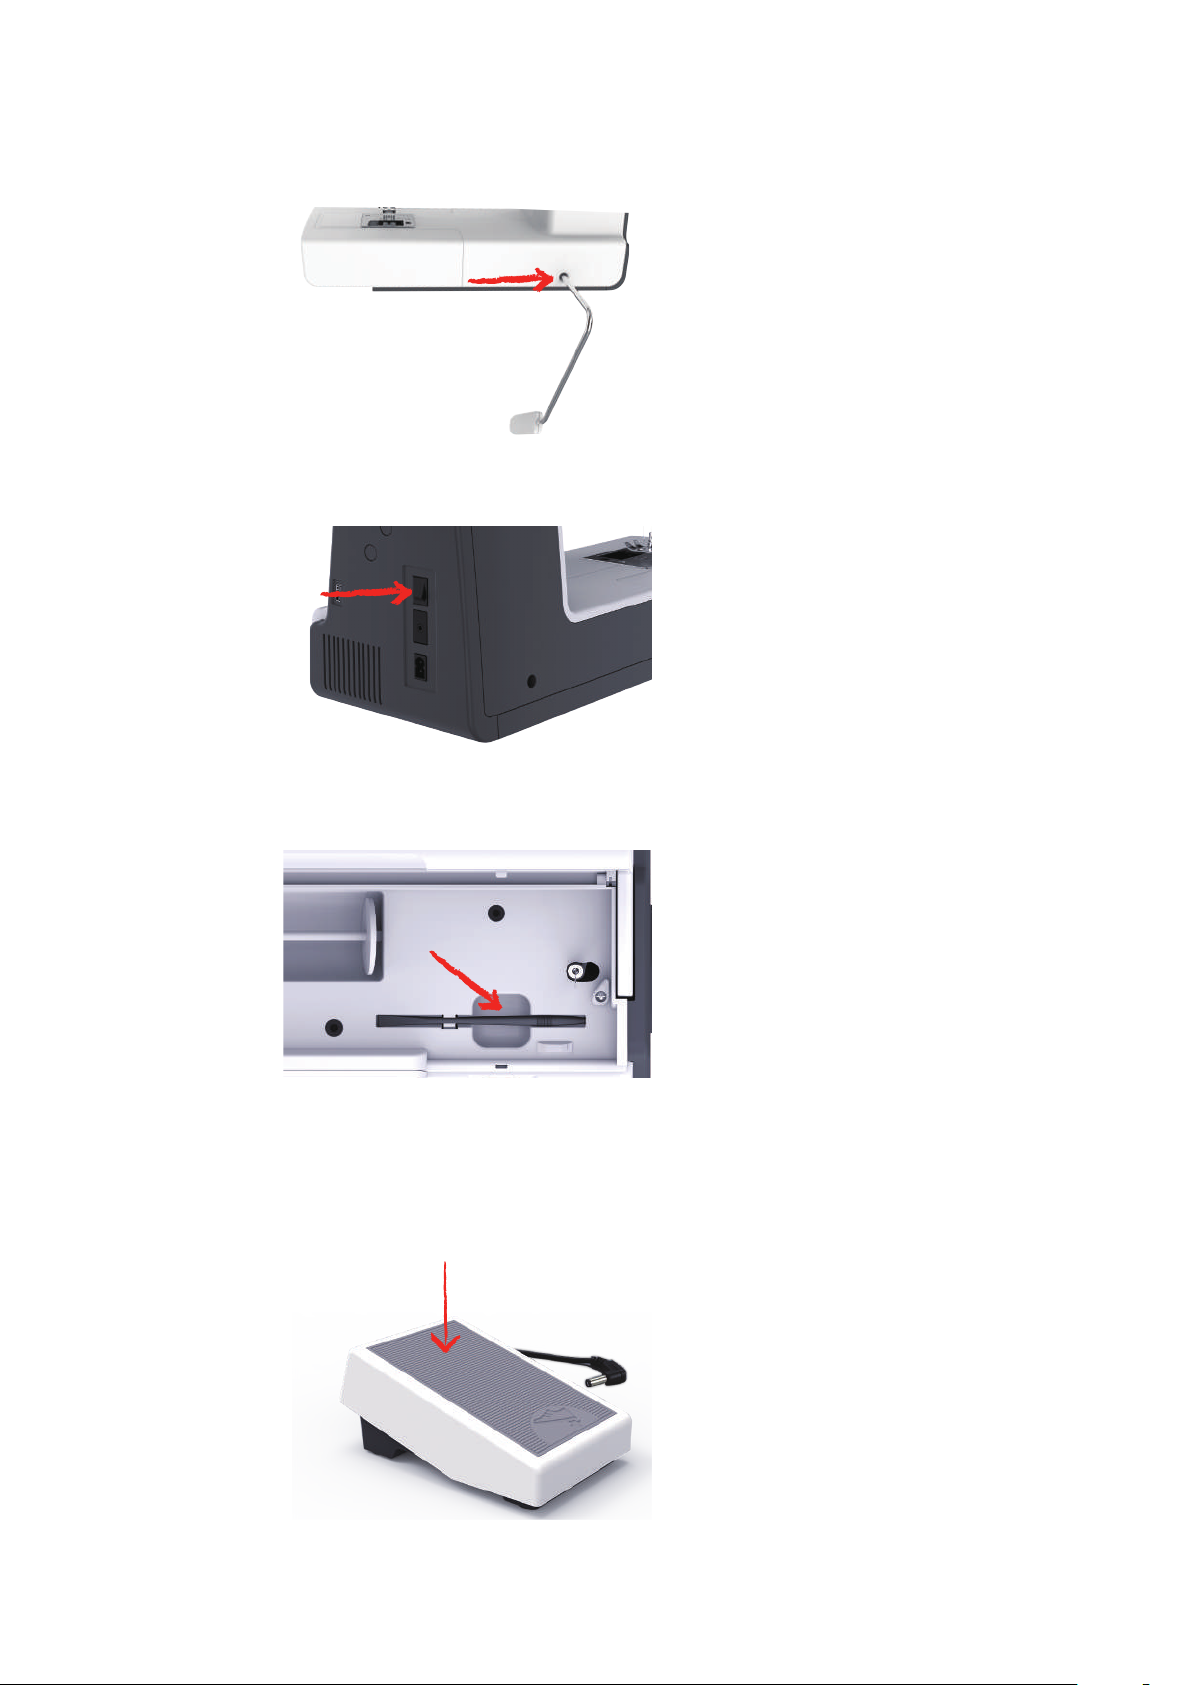
Sewing preparation
> Adjust the sitting height so that the knee lifter can be operated with the knee.
Switching the machine on
> Switch on the machine at the main switch to «I».
Fixing the touchscreen pen
> Store the touchscreen pen on the top holder.
Regulating the speed via the foot control
Via the foot control the speed can be adjusted infinitely variable.
> Press the foot control down carefully to start the machine.
> To sew faster, press the foot control harder.
> Release the foot control to stop the machine.
26
2019-02 EN 5020079.00A.04
Raising/Lowering the needle
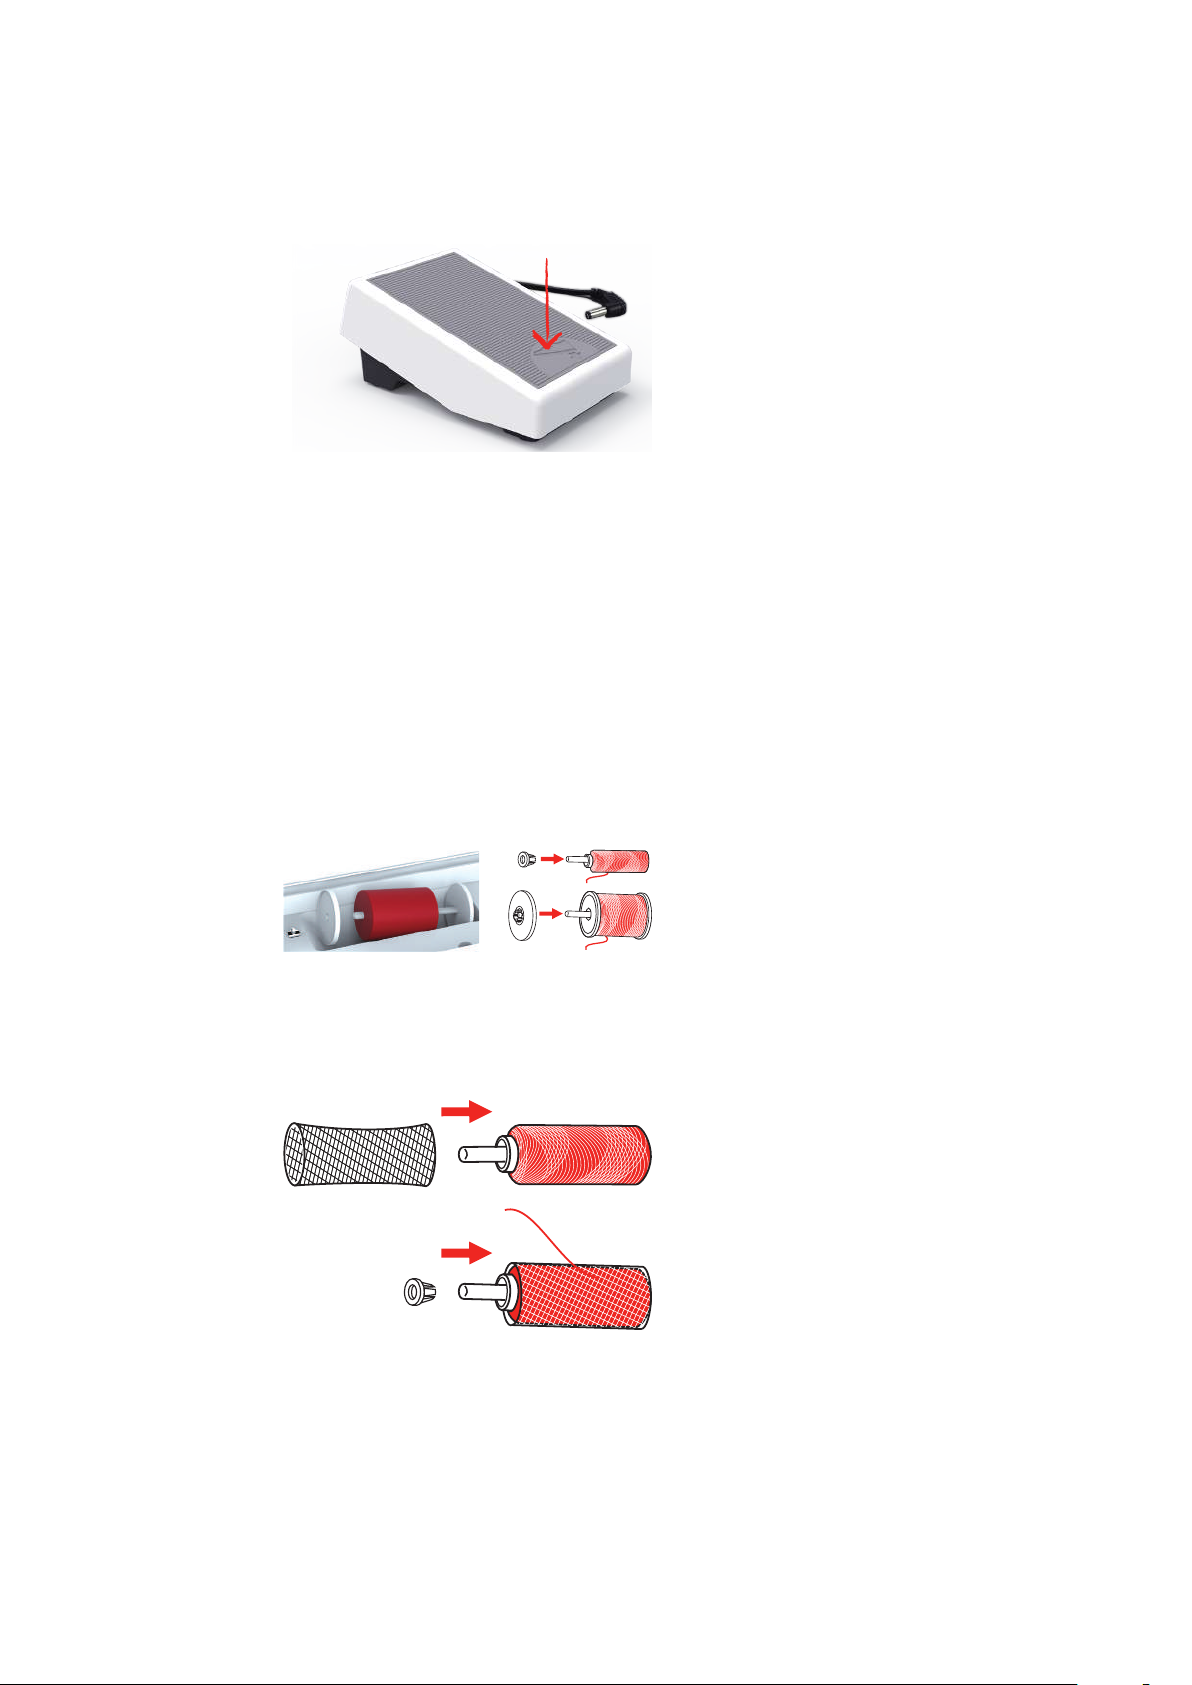
> Sink the heel back on the foot control to raise/lower the needle.
Programming the foot control individually
The foot control can be programmed individually.
2.2 Spool pin
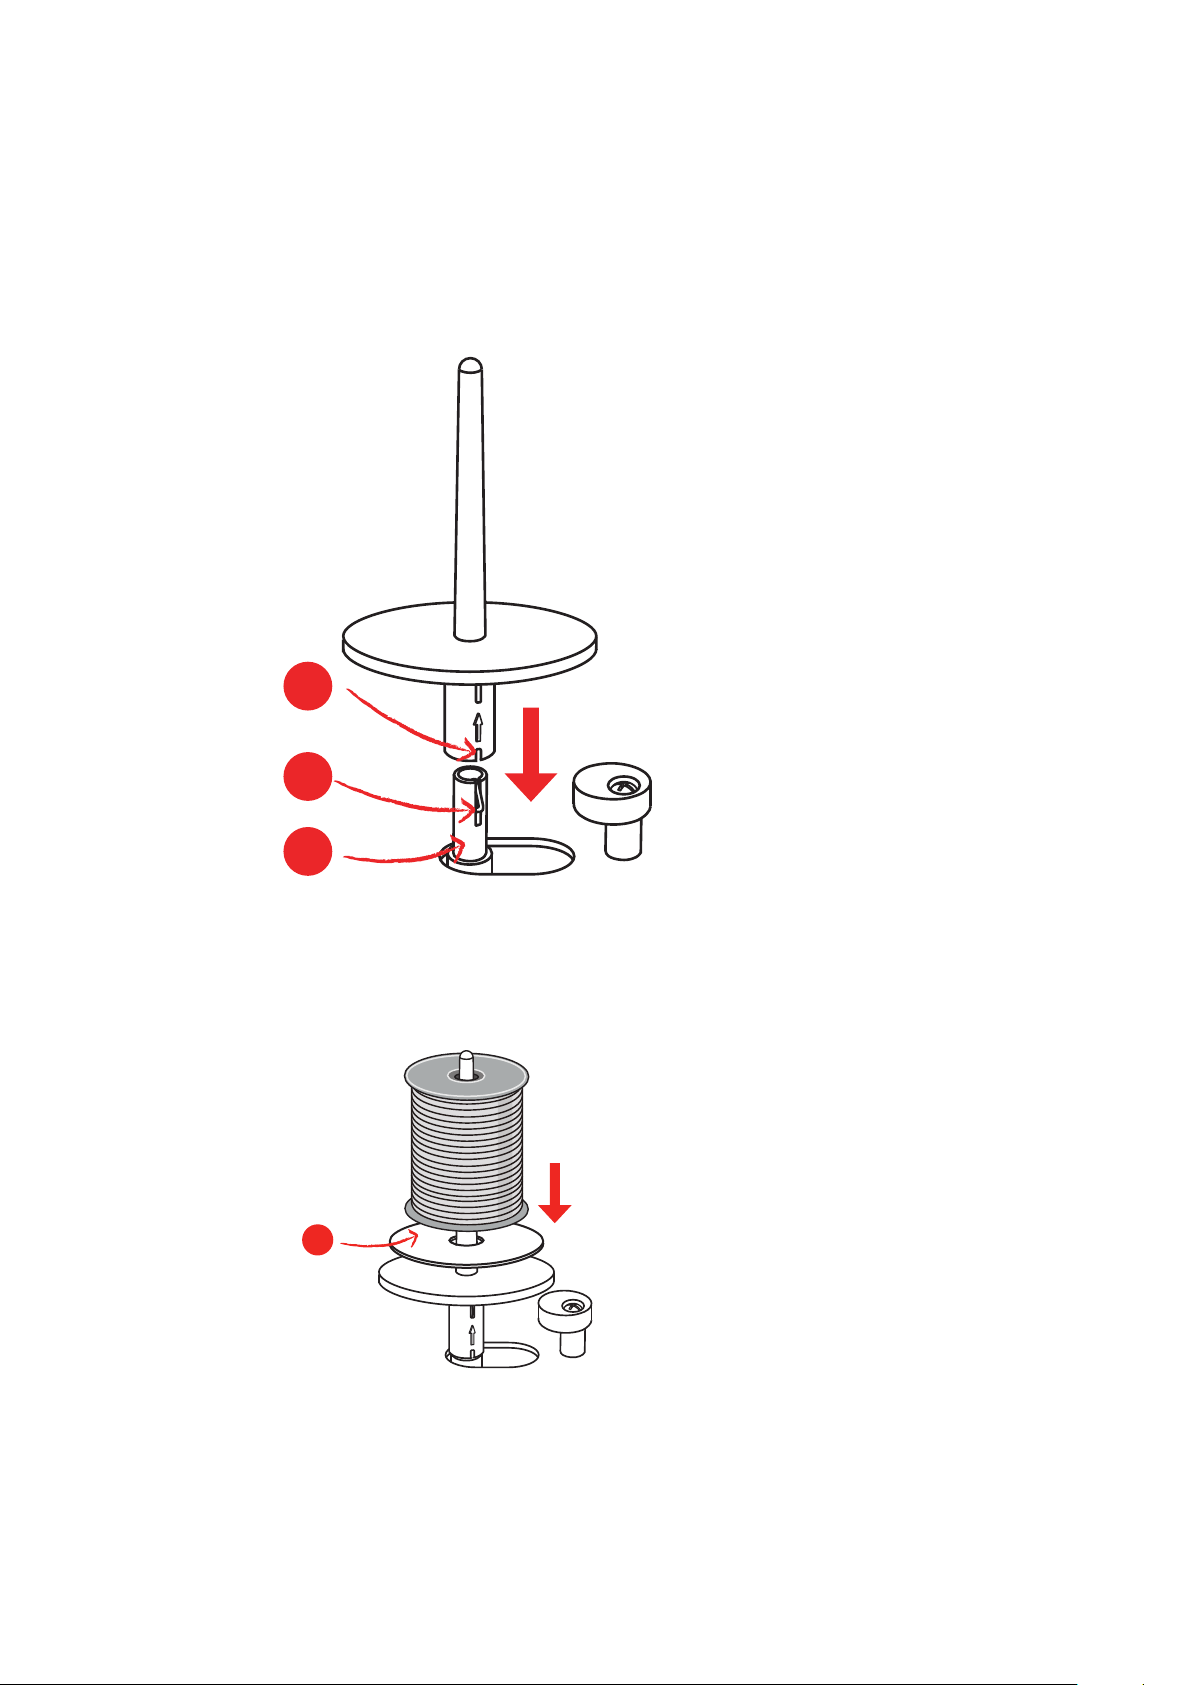
Horizontal spool pin
Sewing preparation
Placing the thread spool and the thread disc
Spool discs hold the thread spool in place for proper release of thread from the spool. The thread disc is only
used with the horizontal spool holder.
> Place the thread spool on the spool holder.
> Position the appropriate spool disc on the spool holder so that there is no space between the spool disc
and the thread spool.
Using a spool net
The spool net provides an even unwinding of the thread from the thread spool and prevents the thread from
knotting and breaking. The spool net is only used with the horizontal spool holder.
> Pull the spool net over the thread spool.
2019-02 EN 5020079.00A.04
27
Sewing preparation
1
2
3
1
Second spool pin
Installing the second spool pin
The second spool pin is necessary when several threads are sewn.
> Insert the second spool pin onto the end of the bobbin winding unit(1).
> Align the notch (2) with the spring (3) on the bobbin winding unit.
Inserting thread spool
The felt disc prevents the thread from getting hooked at the second spool pin.
> Place the felt disc (1) on the second spool pin.
> Place the thread spool on the second spool pin.
2.3 Free arm
The bernette b79 provides a solidly designed free arm which offers a lot of space for large project on the
right of the needle.
28
2019-02 EN 5020079.00A.04
Sewing preparation
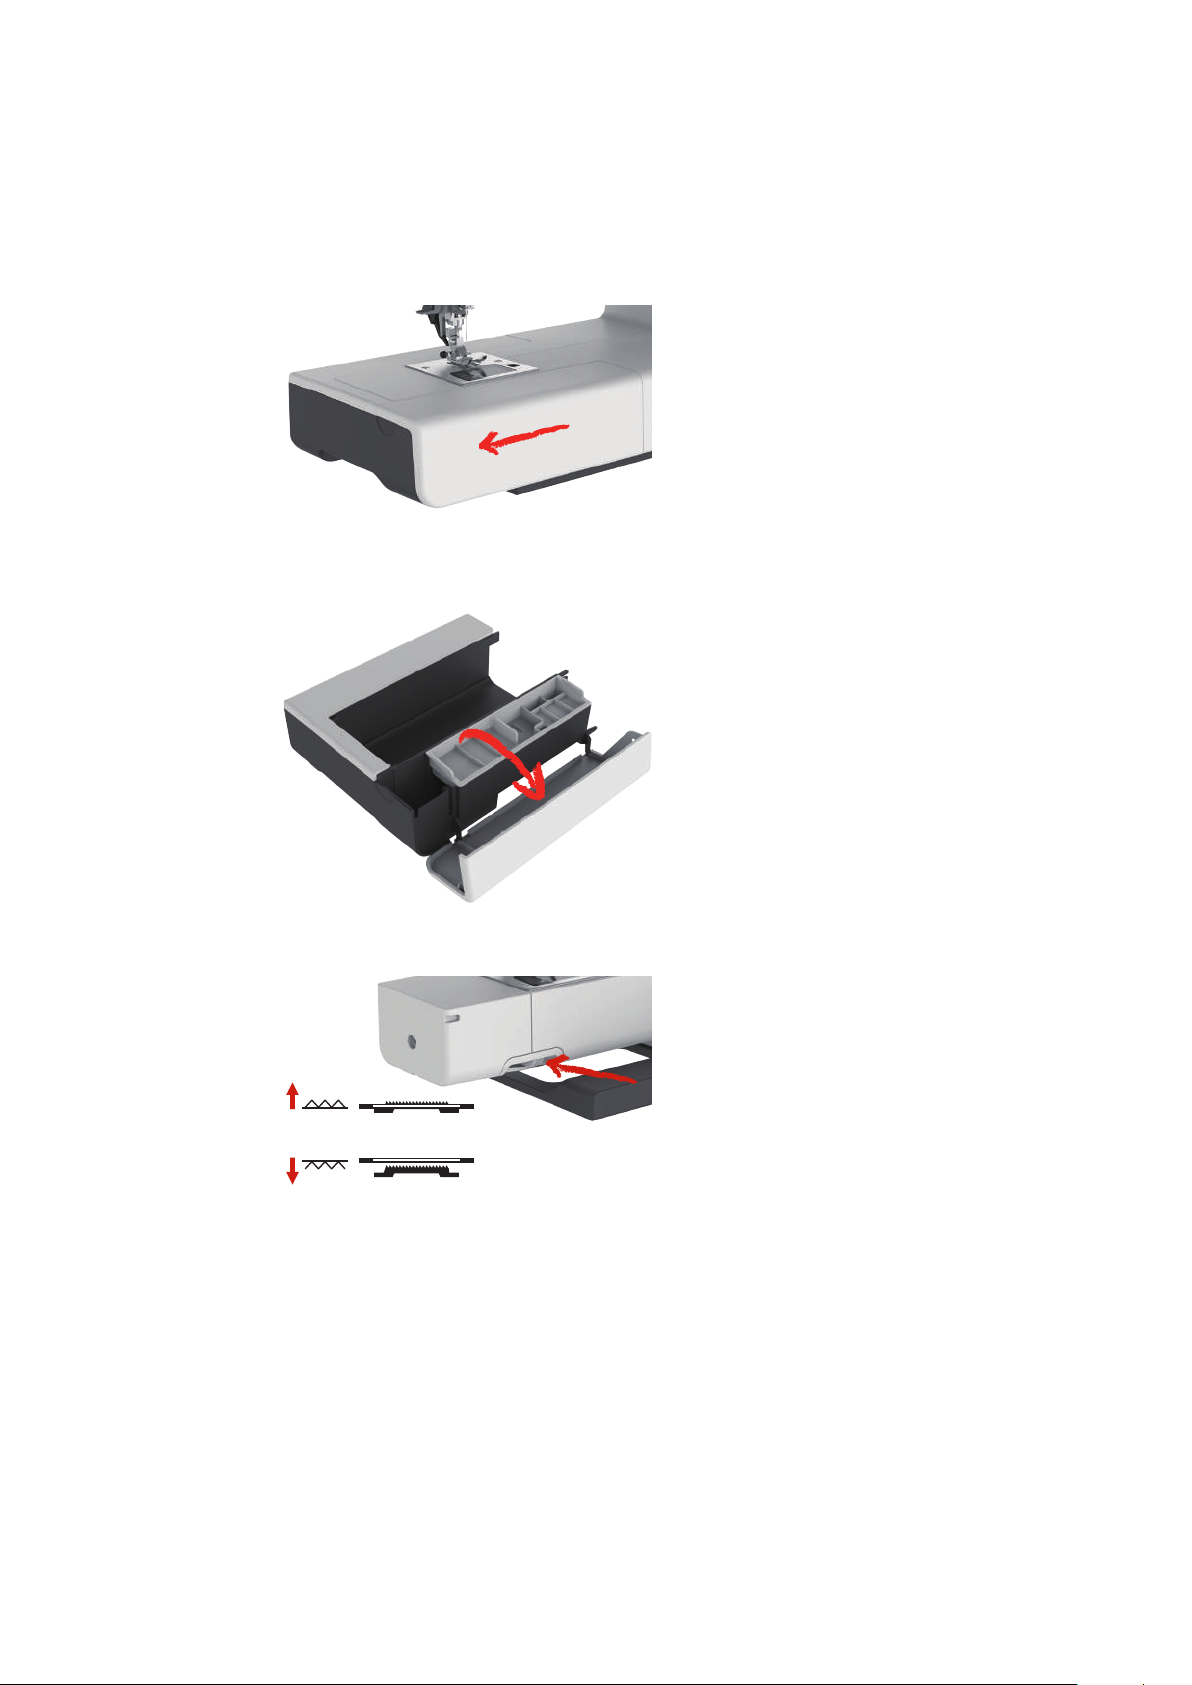
2.4 Sewing table and accessory box
The sewing table is used as an accessory box.
> To remove the sewing table, hold the sewing table by the handle on the left and pull in the direction of
the arrow.
> To open the accessory box, tilt the cover towards you.
> To close the accessory box, tilt the cover backwards until it clicks into place.
2.5 Raising or Lowering the Feed dog
> Slide the «Feed dog lever» right to raise the feed dog.
– The feed dog is raised when the first stitch is sewn.
> Slide the Feed dog lever left to lower the feed dog.
– The feed dog is lowered.
2.6 Using the slide-on table
When attached to the free arm, it expands the already existing sewing area.
> Raise the needle.
> Raise the presser foot.
> Switch the machine off and disconnect it from the power supply system.
2019-02 EN 5020079.00A.04
29
 Loading...