

Page 1

WIN
Behind-the-ear hearing instruments
INSTRUCTIONS
FOR USE
Page 2

Page 3

Summary
Operating Instructions for
BTE (Behind-the-Ear) Hearing Instruments
Features 3
Inserting Earmold 4
Positioning Instrument 6
Removing Earmold & Instrument 6
ON/OFF 7
Volume Control 8
Push Button 9
Telecoil 10
Directionality 11
Battery Replacement 12
Battery Indicator 13
Battery Information 14
FM and Direct Audio Input adapter 16
Safety Guidelines 18
International Warranty 20
Push Button Configuration 21
Page 4
2
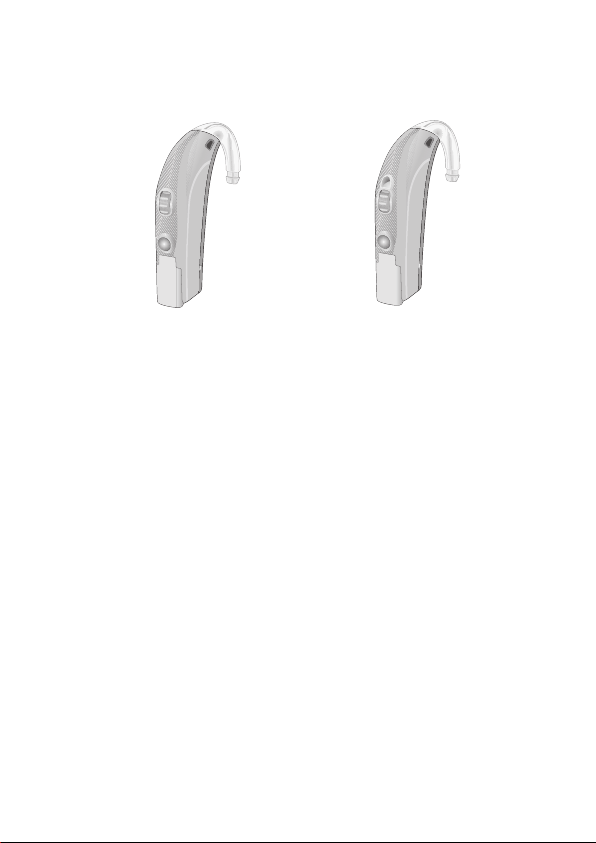
The following hearing instruments are
covered in these operating instructions
Win 102/112 Win 105 DM
Congratulations on the purchase of your new hearing
instruments. These advanced devices are fully digital,
and have been adjusted by your hearing care
professional with the aid of a computer and specially
developed software.
Please follow these instructions when using and caring
for your new hearing instruments. These guidelines
will help you to achieve the best possible results from
your instruments and to once again enjoy the sounds
of life…your family, friends and environment.
Important
Please read the entire content of these instructions
as well as the attached “Guide for Better Hearing”
before using your hearing instruments.
Page 5
3
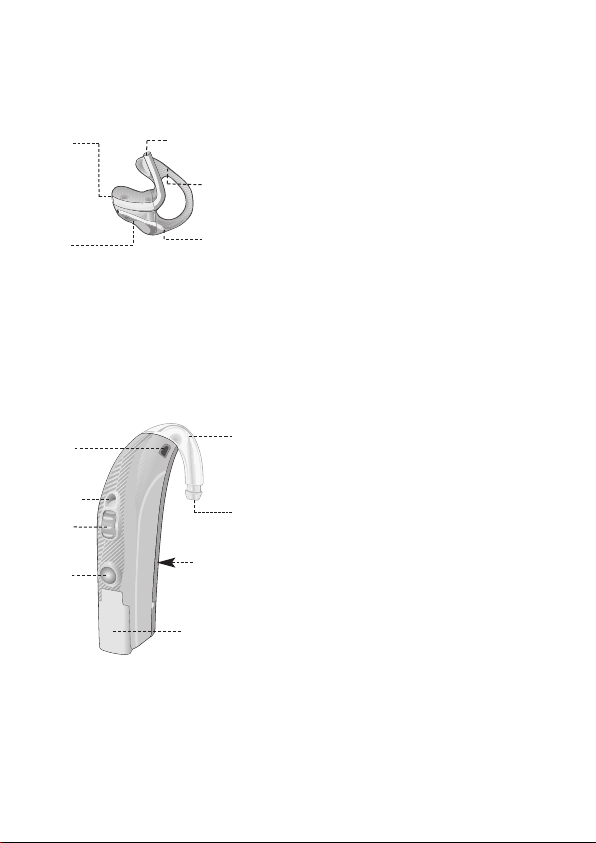
Description of features
Earmold
1 Canal
2 Sound outlet
3 Tubing
4 Helix
5 Vent
Win 102/112/105
1 Push button
2 Microphone
2a Second microphone
(105 only)
3 Earhook
4 Sound outlet
5 Battery drawer
6 Direct audio input
7 Programming port
8 Volume control
4
5
1
2
3
1
4
3
2
5
6/7
2a
8
Page 6
4
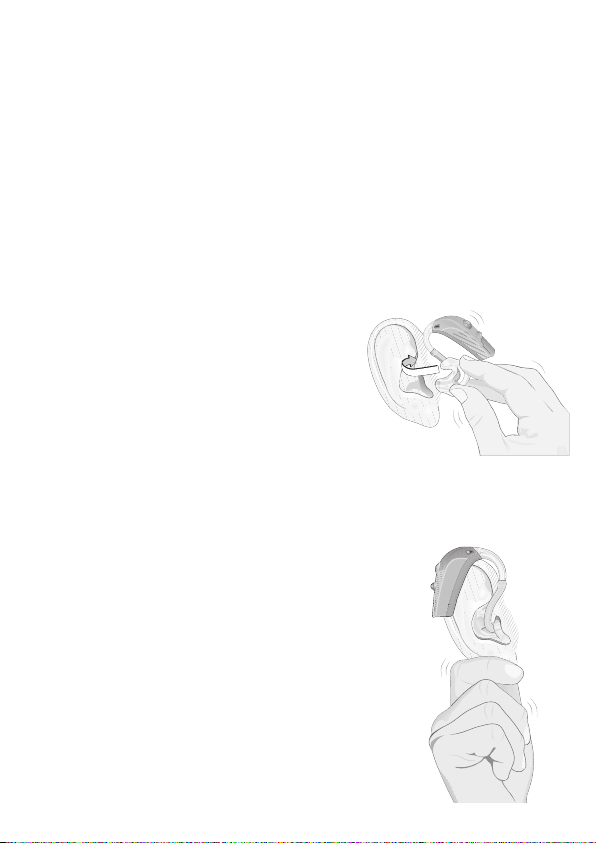
Inserting your earmold
Inserting your earmold correctly every time, takes
practice, patience and perseverance.
If you are having difficulty inserting your earmolds, please consult
your hearing care professional.
Insert your earmold first, then position the hearing
instrument over your ear.
• Grasp the earmold tubing
between your thumb and index
finger. The thumb should be
just behind the tubing where it
enters the earmold. The top
part of the earmold needs to be
pointing straight up. The canal
part of the earmold should be
pointing towards the ear canal
entrance.
• If you have difficulty inserting the
earmold, pull the ear lobe down
with the other hand, or pull the top
of the ear back and up.
Page 7

•
Lift the earmold up to your ear.
Push the canal part
of the earmold into the ear canal opening twisting
slightly to ease the helix portion into position. The
helix part should be pointing straight up and should
slip into position.
• If your ear is becoming sore from trying to insert
the earmold, spread a small amount of Vaseline
around the outer edges of the earmold to help it slip
into position easily. Be careful not to get any
Vaseline into the sound outlet.
If your ear remains
sore please
consult your hearing care professional.
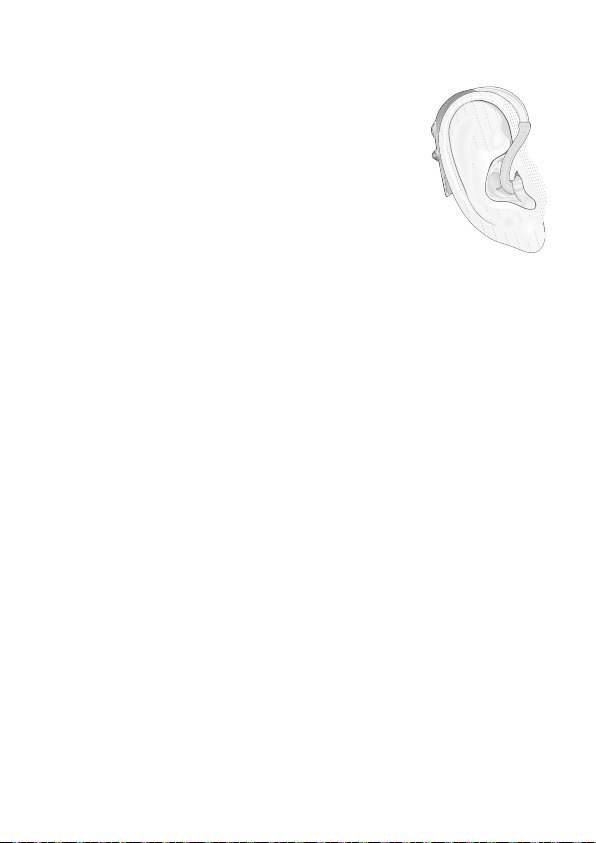
Look in a mirror. If the helix part of the earmold is
visible, it is not inserted correctly.
Run your index finger down the skin just in front of
your ear. If you can touch the helix part of the earmold,
it is not inserted correctly. Use your index finger to
push the helix part of your earmold back behind the
flap of skin. It may help to gently pull this flap of
skin forward with the other hand at the same time.
5
Helix
Page 8
6
To position the hearing instrument
• Once the earmold is inserted correctly, lift the hearing instrument up
and position it behind the ear. Take
care not to twist the tubing of the
hearing instrument.
Removing your earmold and hearing instrument
• Lift the hearing instrument up and over from behind
the ear.
• Using your index finger, pry out the helix part of the
earmold.
• Grasp the helix part.
• Twist the helix part forward.
• Gently pull the earmold straight out of the ear,
holding on to the helix part of the mold.
Important
Do not take the earmold out of the ear by pulling the
hearing instrument. This might disconnect the
instrument from the earmold or damage the tubing.
Page 9
7
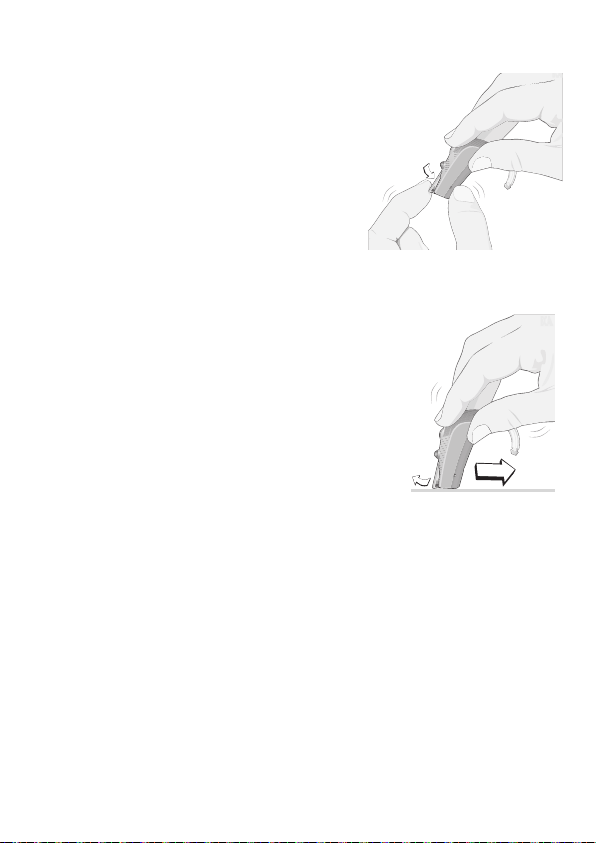
ON/OFF function Win 102/112/105
Turn on your hearing instruments
by closing the battery doors completely. They will make a beep.
Turn off your hearing instruments
by opening the battery doors
slightly until a click is felt.
It is also possible to turn off the
hearing instruments by placing the
base on a flat surface and then gently pressing and dragging the hearing instrument as illustrated. This
action will open the battery door
slightly and turn the hearing instrument off.
Note: Never force the battery drawer open or closed.
Page 10

8
Volume Control
To increase the volume:
Turn the volume control up
To decrease the volume:
Turn the volume control down
The volume control has no mechanical stop. This means
that you can continue to turn it, but the loudness will
only be altered between the programmed minimum
and maximum.
Note: The instrument loudness level will reset when
the battery is low, the battery drawer is opened
or if
the mode is changed.
If the instrument resets, it will
automatically default to the preset loudness level.
Your hearing care professional can program the
Volume Control to remain at a fixed level, if desired.
Note: If you find that you are frequently turning the
volume control up or frequently turning the volume
control down in most listening situations then consult
your hearing care professional for a possible adjustment of the hearing instrument settings.
Louder
Softer
Page 11

Push button function
Use the push button to change between modes.
When the hearing instrument is turned on it
will automatically be in microphone mode.
If the telecoil is activated press the push button once to
change to the telecoil mode. You will hear two short beeps.
For hearing instruments equipped with a directional
microphone system (105 only), press the push button once
to change to directional mode. You will hear two short
beeps. Press the push button once again to change to the
telecoil mode (if activated). You will hear three short beeps.
If you wish to return to the microphone mode then press
the push button again. You will hear one short beep.
To see how your hearing instrument push button operates
with an FM system or a Direct Audio Input adapter, see
page 16. To see how your hearing instruments are programmed see page 21.
Mute function
Press the push button and hold for 2 to 3 seconds to mute
the hearing instrument. Give a short press to the push button
to unmute. The hearing instrument will revert to its current
mode and will beep to tell you which mode you are in.
9
Page 12

10
Telecoil function Win 102/105/112
The telecoil enables you to hear better when using a
telephone or in places where inductive loop systems are
installed (places of worship, churches, theaters, etc.).
When the telecoil is active, you will hear directly through
the inductive loop or telephone. To access the telecoil
mode press the push button until you hear two short
beeps (three beeps if 105).
Typically, the microphone is automatically switched off
when the telecoil is activated to reduce any background
noise. Your hearing care professional can program the
telecoil to function in combination with the microphone.
Your instrument has been programmed for:
❑ Microphone and telecoil (M+T)
❑ Telecoil only (T)
Note: Not all telephones are hearing instrument
compatible.
This symbol or a similar sign should be
displayed wherever a permanent loop has
been installed. Please ask your hearing
care professional for further information.
Page 13

1111
Directionality (Win 105 only)
Omni mode
This mode will provide clear sound from all directions
in normal listening situations when on the street, listening to music or in quiet situations. This mode is for
everyday, typical use.
Directional mode
The directional mode can help you to hear better in a
noisy environment like a loud restaurant or a social
gathering. The directional microphone focuses on
speech and sound coming from directly in front of
you. Background sounds and other disturbing noises
from the sides or from the back will be reduced, making it easier for you to focus on your conversation.
Note: When using the directional mode you may
not hear important sounds from behind. Use is not
recommended in situations where sound from all
directions is needed (e.g. traffic).
Page 14

12
Battery replacement
•
Your hearing instrument uses a size 13 battery.
To insert a new battery
• Use your fingernail to gently swing the battery drawer
fully open, but do not force it.
• Take out the used battery.
• Remove colored sticker from new battery
(if applicable).
• Place battery into the drawer with flat, smooth side
facing up (+ sign) as shown in the drawing.
The battery must fit flush into the drawer.
• Close battery drawer securely.
Page 15

13
Battery Indicator
When the battery is about to run out the instrument
will beep at regular intervals. This warning indicates
that the battery should be replaced immediately.
Optional tamper-resistant battery drawer
This is recommended for small children.
With the hearing instrument in the off
position, insert the end of a ballpoint pen
into the small recess as shown. Press
gently while opening the battery drawer
with the other hand.
Note: Do not force the battery drawer open or closed,
excessive strain may deform it.
Page 16

14
Battery information
• Battery life will vary with conditions of use. See
your hearing care professional for more information.
• Always keep spare batteries on hand. These are
available from your hearing care professional.
• A used battery should be replaced immediately.
• If you are not going to use your hearing instruments
for a few days, remove the batteries.
• Only use batteries recommended by your hearing
care professional, since poor quality batteries can
produce a harmful substance.
• At bedtime, or at times when you are not wearing
your hearing instrument, fully open the battery
drawer. This may help to conserve battery power
and reduce the impact of moisture.
• Any moisture found on a battery should be wiped
off immediately, with a soft cloth.
Page 17

15
• Used batteries should be returned to your battery
supplier or hearing care professional for disposal.
• Never dispose of batteries by burning them. There is
a risk that they may explode and cause injury.
•
Never dispose of batteries with household waste.
They cause environmental pollution.
Note: Always remove zinc-air-batteries before drying
your hearing instrument with the help
of a drying kit.
Drying out zinc-air batteries
shortens their life time.
Page 18

16
FM or Direct Audio Input (DAI) adapter
FM
An FM receiver enables the hearing instrument to
receive signals directly from an external wireless
transmitter.
Direct Audio Input (DAI)
Direct Audio Input (DAI) enables the hearing instrument
to receive signals directly from external sources such as
a T.V., personal stereo, etc.
Mounting of the FM or DAI adapter
Click the FM or DAI adapter onto the hearing instrument as shown. To release the adapter, click the grey
button and pull back. Once the adapter is on the hearing instrument it is possible to connect either the FM
receiver or the DAI cords.
FMA 3 DAI 3
Page 19

The hearing instrument will mix the signals from the
adapter with the microphone so that you can listen to
both sources. The hearing instrument will beep twice
in this mode: one lower frequency beep followed by a
higher frequency beep.
It is possible to switch from this combined setting by
pressing the push button so that the hearing instrument
is only amplifying the signal from the FM or DAI
adapter. The hearing instrument will beep three times
in this mode: one lower frequency beep followed by
two higher frequency beeps.
If the push button is pressed again, only the sound from
the hearing instrument microphone will be amplified.
The hearing instrument will beep once in this mode.
Note: The telecoil or directional microphone system
(105 only) will not function with the FM or DAI adapter
in place. To access these functions remove the FM or
DAI adapter from the hearing instrument.
Note: The safety of hearing instruments with DAI
(Direct Audio Input) is determined by the external
signal source. When the DAI is connected to an electrically powered device, the equipment must comply
with EN 60601-1-1, EN 60065 or equivalent safety standards.
17
Page 20

18
Safety guidelines
Hearing instruments and batteries can be dangerous if
swallowed or improperly used. Such actions can result
in severe injury, permanent hearing loss or even fatality.
Familiarize yourself completely with the following
general warnings and the full contents of this booklet
before using your hearing instruments.
• Hearing instruments should be used only as directed
and adjusted by your trained hearing care professional.
Misuse or improper adjustments can result in sudden
and permanent hearing loss.
•
Never allow others to wear your hearing instruments,
because they are adjusted for your hearing requirements and may permanently damage another person’s
hearing.
•
A slap to your ear while wearing the instrument could
be harmful. Avoid wearing your hearing instrument
while playing contact sports (e.g rugby, football etc.).
•
Hearing instruments, their parts and batteries should
be kept out of reach of anyone who might swallow
these items or otherwise cause themselves injury.
• Discard batteries out of reach of infants, small
children, pets or persons of mental incapacity.
Page 21

1919
•
Clean your hearing instruments and their parts on a
regular basis only with products that are recommended
by your hearing care professional. Microorganisms
from unclean instruments may cause skin irritations.
• Be careful with leaking battery liquid, as it is a
hazardous substance.
• Never try to recharge non-rechargeable batteries.
• Never change the battery or adjust the controls of
the hearing instrument in front of infants, small
children and persons of mental incapacity.
• Never put your hearing instrument or batteries in
your mouth, they could easily be swallowed.
• Keep batteries away from medications. Batteries are
easily mistaken for pills.
• In case a battery or hearing instrument is swallowed,
see a doctor immediately.
• Be aware of the possibility that your instruments
may stop functioning without notice. Keep this in
mind while you circulate in traffic or otherwise
depend on warning sounds.
• Never insert cleaning tools into the sound outlet or
microphone inlet. This could damage the hearing
instruments.
Page 22

20
International warranty
Your hearing instruments are covered by a limited
warranty, covering defects in materials and workmanship.
This warranty covers the hearing instruments
themselves, but not accessories such as batteries,
tubing, earmolds, etc.
This warranty is void if a defect is the result of misuse
or mistreatment.
The warranty is also void if the hearing instruments
have been repaired by nonauthorized service personnel.
Please review your warranty with your hearing care
professional and make sure that your warranty card
is completed correctly.
Environmental protection
Help to protect the environment by not disposing of
your hearing instruments or batteries with your
unsorted household waste. Please recycle your hearing instruments and batteries or return them to your
hearing care professional for disposal. Contact your
hearing care professional for more information.
Page 23

Push button configuration
Your hearing instruments are programmed in the following way:
❑
Omni Directional Hearing Instruments (Win ______)
Mode Beeps Function
M 1 Microphone mode
T2 ❑ Telecoil mode
❑
Telecoil with microphone mode
❑
Directional Hearing Instruments (Win 105 ______)
Mode Beeps Function
M 1 Omni mode
DM 2 Directional mode
T 3 ❑ Telecoil mode
❑ Telecoil with microphone mode
If your hearing instrument is connected to a
Direct Audio Input (DAI) or an FM system:
Mode Beeps Function
DAI/FM+M
2 DAI/FM system and
hearing
instrument microphone
DAI/FM
3 DAI/FM system
only
M 1 Hearing instrument
microphone only
21
(1 low + 1 high)
(1 low + 2 high)
Page 24

22
Notes
Page 25

23
Notes
Page 26

24
Notes
Page 27

Page 28

Bernafon Australia Pty. Ltd.
Unit 12/97 Castlemaine Street
Milton QLD 4064
Australia
Freecall 1800 809 111
Phone +61 7 3250 0300
Fax +61 7 3250 0372
www.bernafon.com.au
Bernafon Canada Ltd.
500 Trillium Drive Unit 15
Kitchener, Ontario N2R 1A7
Canada
Toll free 1 800 265 8250
Phone +1 519 748 6669
Fax +1 519 748 9158
www.bernafon.ca
Bernafon, LLC
200 Cottontail Lane, Bldg. B
Somerset, NJ 08873
USA
Phone +1 888-941-4203
Fax +1 732-560-4877
www.bernafon-us.com
Manufacturer:
Bernafon AG
Morgenstrasse 131
3018 Bern
Switzerland
Phone +41 31 998 15 15
Fax +41 31 998 15 90
www.bernafon.com
Bernafon UK
Cadzow Industrial Estate
Low Waters Road
Hamilton
ML3 7QE Scotland
Phone +44 1698 285 968
Fax +44 1698 421 456
www.bernafon.co.uk
Bernafon New Zealand Ltd.
Level 1, Building F
27-29 William Pickering Drive
Albany, Auckland 0632
New Zealand
Freecall 0800 442 257
Phone +64 9 920 42 40
Fax +64 9 920 42 43
www.bernafon.co.nz
www.hear-it.org
For more information about
hearing and hearing loss
11.08/ BAG/956-74-710-00 /subject to change
 Loading...