

Bernafon VERITE 7, VERITE 5, VERITE 9 Fittings Manual
FITTING GUIDE
VÉRITÉ 9 | 7 | 5
Hearing systems
www.bernafon.com

2

BERNAFON VÉRITÉ
Table of contents
Vérité – Overview 5
Selection chart for acoustic options 6
Fitting ranges 7
Selecting speaker unit length 8
Attaching speaker unit to Vérité 8
Detaching speaker unit from Vérité 9
Selecting correct dome size 10
M-speaker unit in detail 11
Changing the domes 11
Changing the NoWax guard in the M-speaker unit 11
Attaching the Ear Grip to the M-speaker 12
Custom Molds for the M-speaker 13
P-speaker unit for power fittings 17
Using the measurement gauge 17
Instant fit with Power Dome 18
Custom fit with the Power Mold 19
Changing from Power Dome to Power Mold 22
Changing from Power Mold to Power Dome 23
Wax protection 24
Wearing Vérité 25
Adjusting length and shape of the speaker unit wire 26
Vérité program selector, remote control and SoundGate 27
Fitting Vérité 9 | 7 | 5 with Oasis 28
Client 30
Hearing instrument 32
Fitting 33
End Session 36
Vérité – Customization 37
Colors 37
Changing the shells, battery drawer and wind filter 38
Ordering information 40
Color sets and tools 40
M-speaker parts for instant fit 41
M-speaker parts for custom fit 42
P-speaker parts for instant fit 43
P-speaker parts for custom fit 44
Vérité Fitting Guide

1
2
3
4
5
6
7
8
9
10
11
12
5
BERNAFON VÉRITÉ
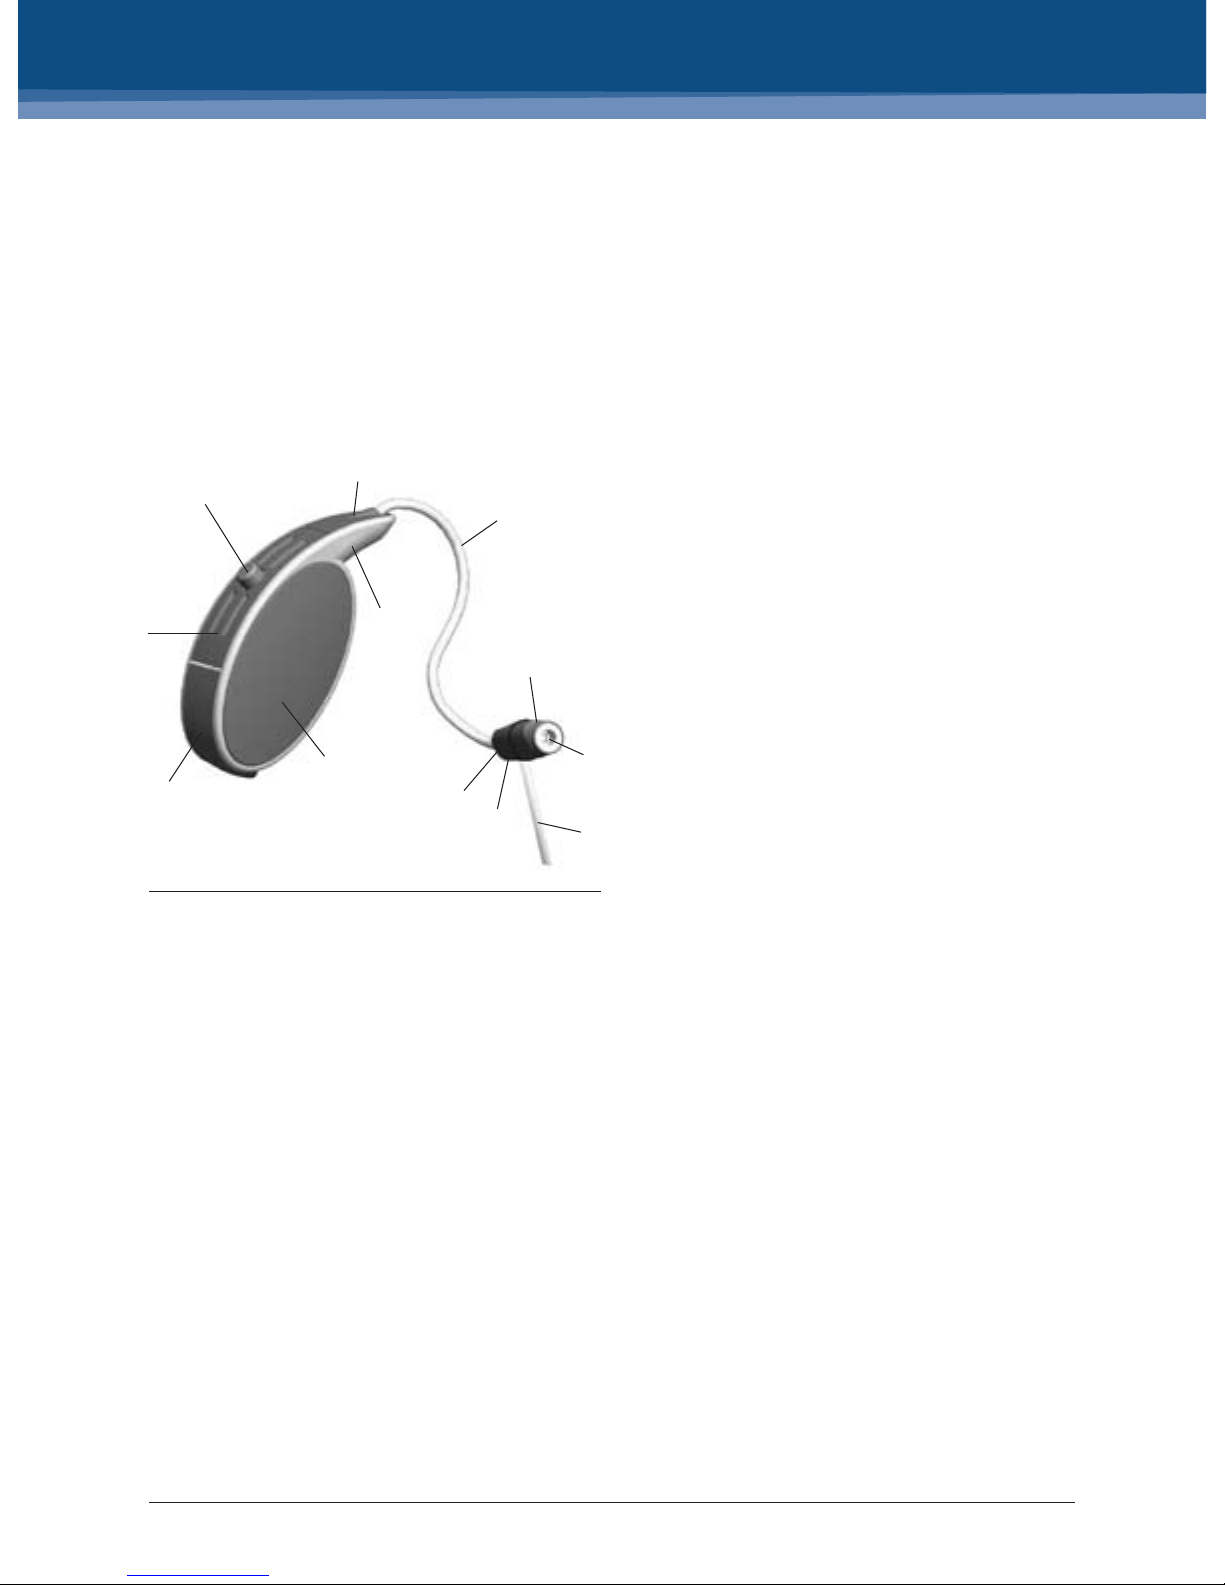
Vérité is a premium receiver-in-the-ear instrument
that delivers unmatched client benets thanks to
its outstanding ChannelFree™ signal processing,
binaural coordination, unique design and wireless
connectivity. This guide is designed to help you t
and manage Vérité hearing systems.
1 Program selector
2 Connector plug
3 Speaker wire
4 Left/right indicator
5 Speaker
6 Size indicator
7 Shell
8 Battery drawer
9 Wind lter
10 Housing
11 Ear Grip
12 NoWax lter
Vérité – Overview
6
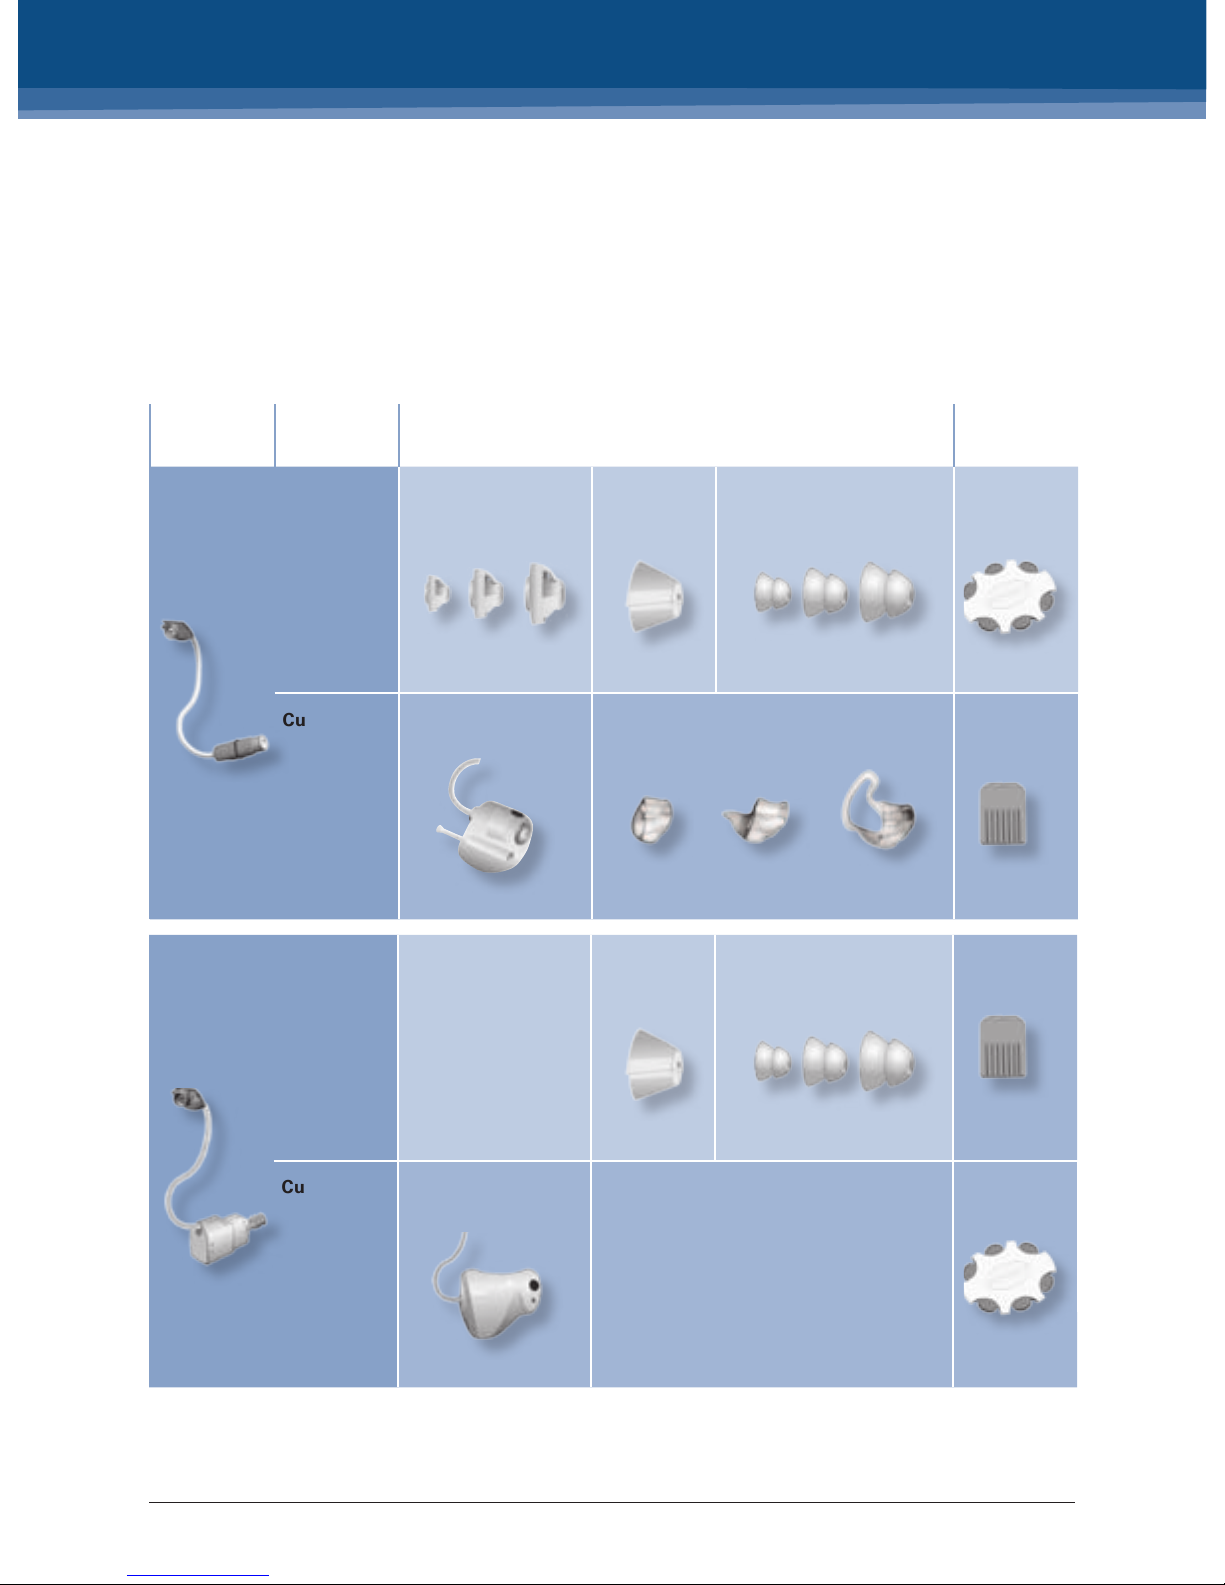
Selection chart for acoustic options
P-speaker Instant Tulip Dome Power Domes ( 8, 10, 12) WaxStop
Custom Power Mold
NoWax
Speaker unit Fitting type Ear pieces
Wax
protection
M-speaker Instant Open Domes
( 6, 8, 10 )
Tulip Dome Power Domes ( 8, 10, 12) NoWax
Custom Micro Mold Canal Mold Canal Lock Skeleton WaxStop
250 500 1.000 2.000 4.0 00 10.000
0
20
40
60
80
100
120
250 500 1.000 2.000 4.0 00 10.000
0
20
40
60
80
100
120
250 500 1.000 2.000 4.0 00 10.000
0
20
40
60
80
100
120
250 500 1.000 2.000 4.0 00 10.000
0
20
40
60
80
100
120
250 500 1.000 2.000 4.0 00 10.000
0
20
40
60
80
100
120
7
BERNAFON VÉRITÉ
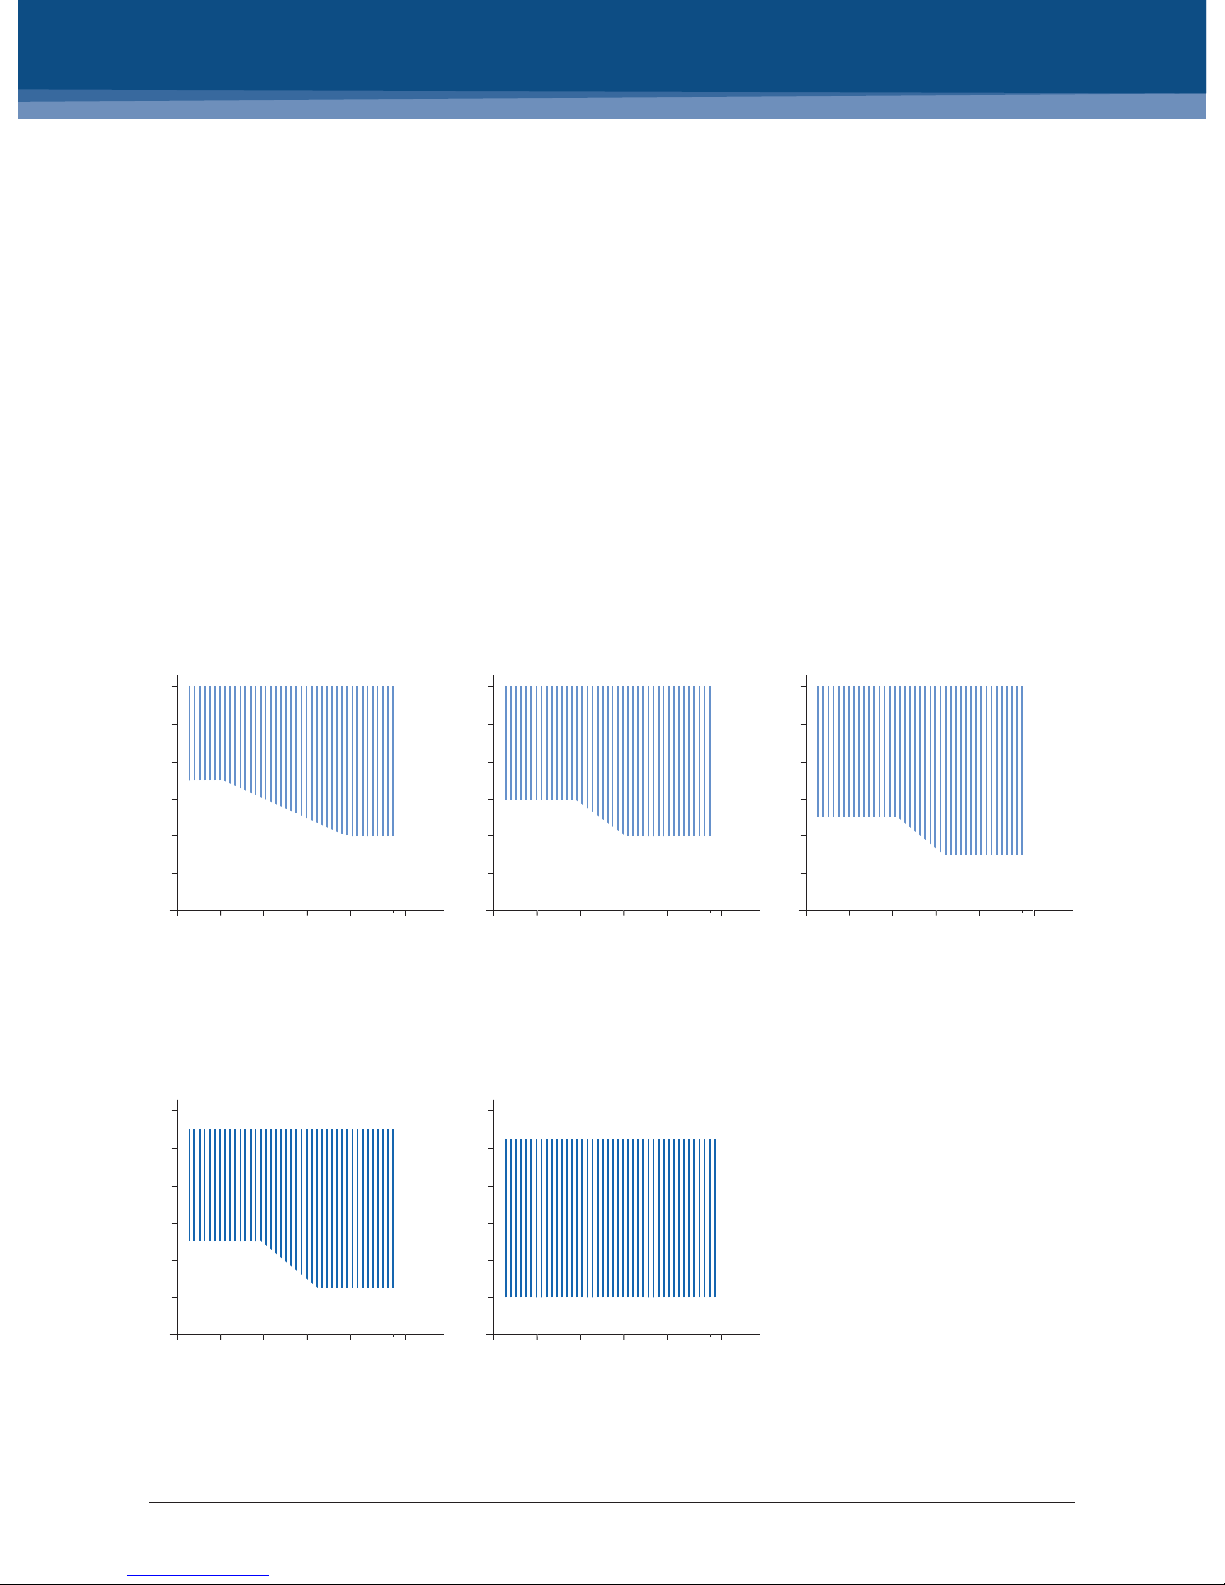
Fitting ranges
M-speaker unit
P-speaker unit
Vérité offers two speaker units: the M-speaker
is appropriate for mild to moderate losses, while
the P-speaker provides additional power for
severe hearing loss. Expected tting ranges with
different ear pieces are shown below.
Open Dome
Tulip Dome
Custom Mold/Power Dome
Tulip Dome Power Mold/Power Dome
dB H L
dB H L
dB H L
dB H L
dB H L
Hz Hz Hz
Hz Hz
8
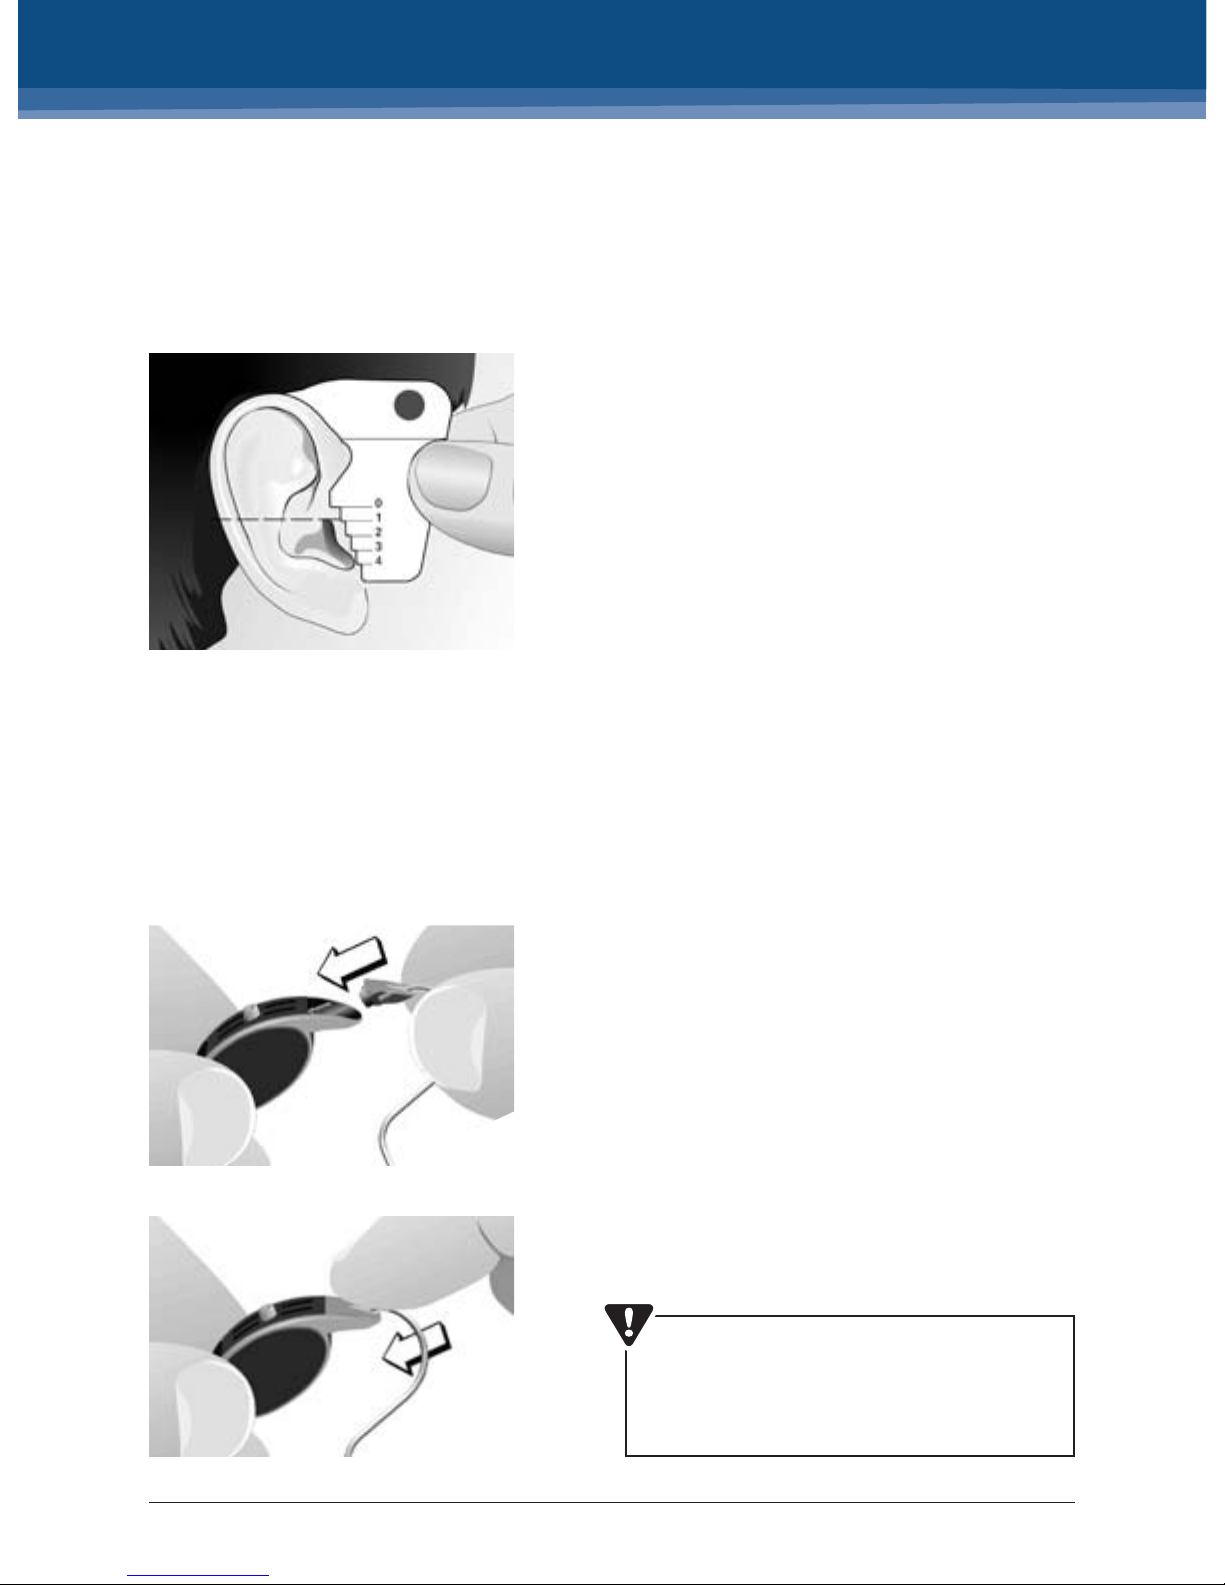
Before tting Vérité it is necessary to determine
the correct speaker unit length. The measurement
procedure is the same for both the M-speaker
and P-speaker. Place the Bernafon measuring tool
over the ear, keeping the top line horizontal. With
your eyes at the same level as the ear, determine
which mark is closest to an imaginary line running
over the top of the ear canal. In this example, the
correct choice is size 1.
Power Molds will have a better t if you choose a
slightly longer wire length than you would when
tting a Power Dome. If the top of the ear canal
falls between two numbers on the gauge, choose
the higher number.
Correct speaker unit attachment is imperative.
Slide the connector plug into the connector socket of the instrument, taking care to align the pins
in the connector plug with the socket. When the
connector plug is in place, push rmly until there
is no visible gap between the end of the connector plug and the wind lter.
To test the attachment, pull gently on the speaker
wire. If the speaker unit comes off, it was not attached properly.
Selecting speaker unit length
Attaching speaker unit to Vérité
Speaker units can easily sustain internal
damage if dropped. Before you attach the
speaker unit, please place a dome on the
speaker to protect it. (See page 11.)

9
BERNAFON VÉRITÉ
Detaching speaker unit from Vérité
To detach the speaker unit, rst open the battery
drawer slightly and remove the wind lter with
your ngernails, lifting the bottom end next to the
battery drawer. You may need to gently twist the
top of the wind lter until it comes loose.
Hold the instrument rmly and place an index
ngernail behind the connector plug to detach the
speaker unit by pulling.
Do not attempt to detach the speaker
unit by pulling up on the wire. This could
damage the wire and the connector.
10
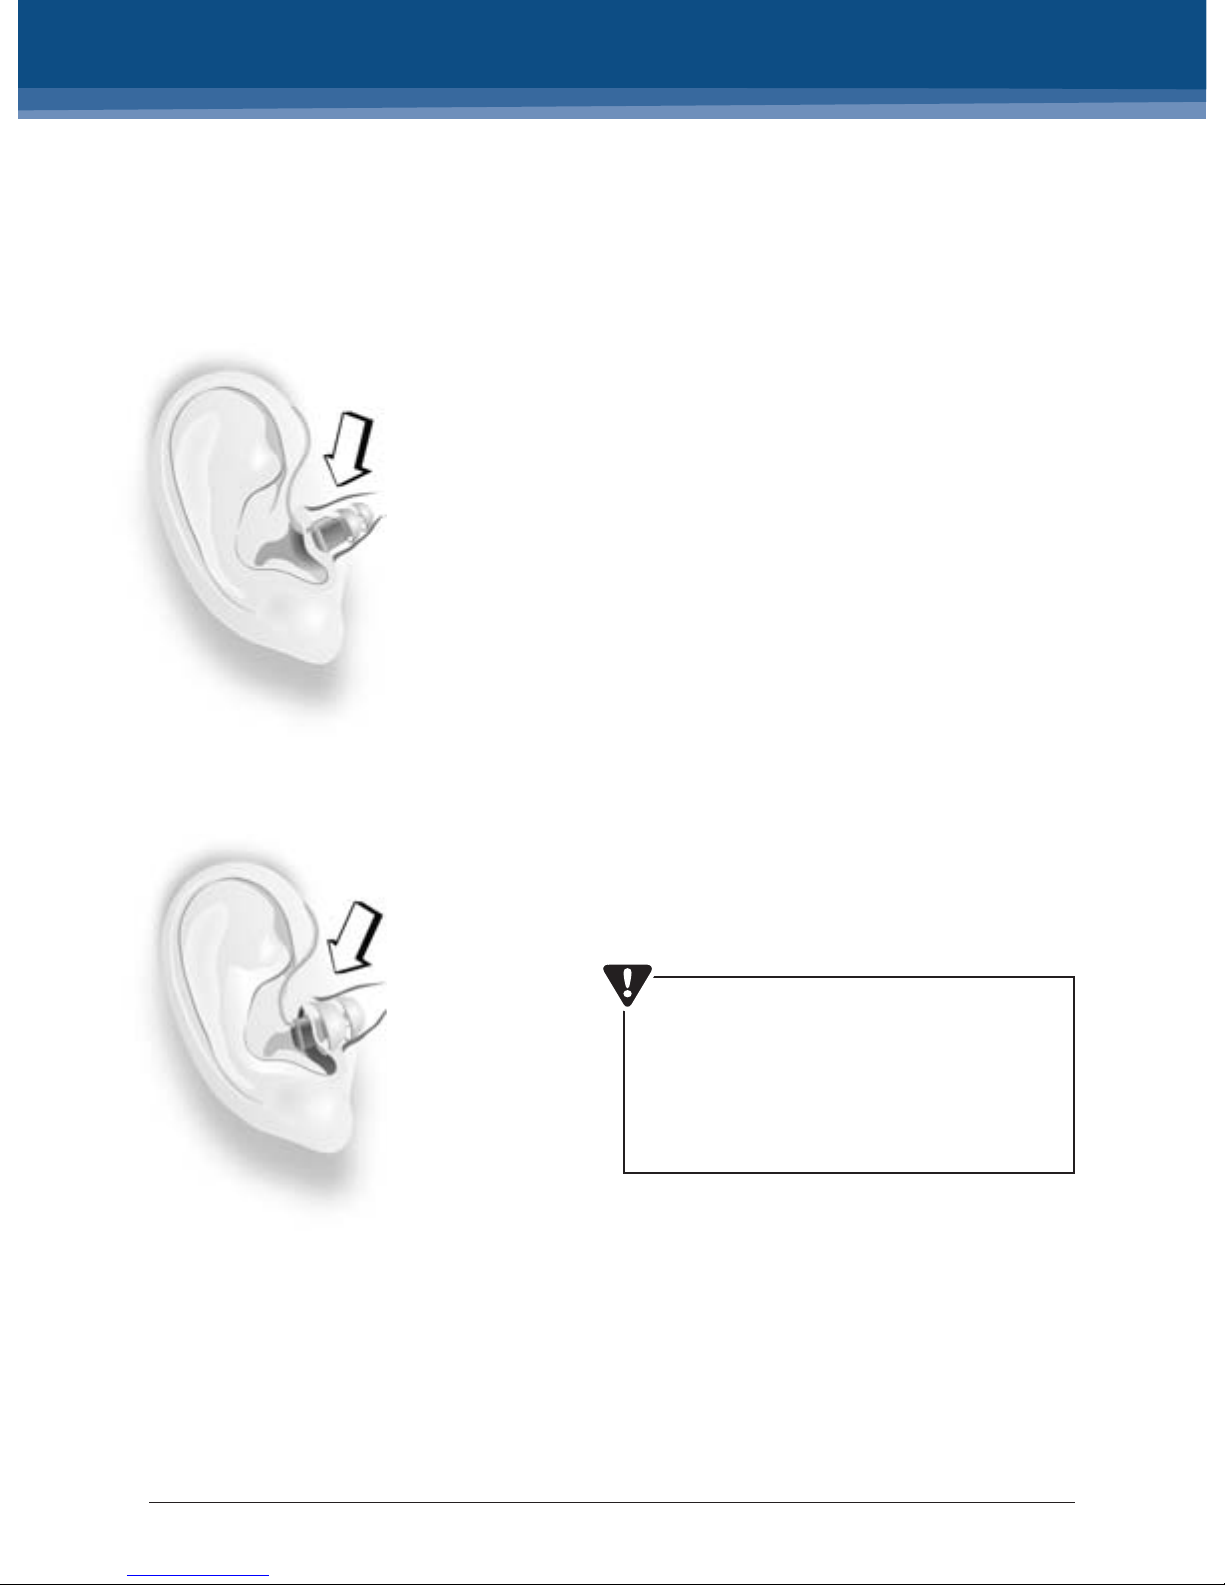
Selecting correct dome size
Check the ear canal and choose between “small”,
“medium” or “large” for the dome.
The dome should stay in the ear canal without
movement while wearing, talking or eating.
The correct dome size is very important for
optimal performance and comfort. If the dome
is too big, your client may experience occlusion.
If the dome is too small, the speaker may start
moving in the ear or even fall out of the ear canal.
Ears with excessive cerumen production may
have more problems with domes coming off.
In this case, a power mold would be a better
solution.
Dome too small
Dome too big
Push the dome rmly onto the speaker
as far as it will go to make sure that it is
properly mounted. Failure to do so could
cause the dome to fall off in the ear canal.
Hands must be clean and dry before
mounting the dome.
11
BERNAFON VÉRITÉ
M-speaker unit in detail
Pull the used dome from the speaker and
throw it away. Clean the speaker of any earwax
by wiping with a dry cloth before mounting a
new dome. Earwax between the speaker and
dome may cause the dome to slip off. Inspect the
NoWax guard and change it, if needed.
Push the new dome on to the speaker as far
as it will go.
Changing the domes
Changing the NoWax guard in the M-speaker unit
The M-speaker unit is suitable for mild to
moderately severe losses and comes in four
lengths. It can be used for both instant and
custom ttings.
The hands must be clean and dry before
replacing the dome. Never remount a used
dome on the speaker. A remounted dome
is more likely to fall off in the ear canal.
The soft domes are intended to be disposable. The client should be instructed to
change the dome every time the battery is
changed (about every 10 days). The client
should be provided with spare domes and
shown how to change them.
Visually inspect the NoWax in the end of the
speaker. If it is clogged or there is no sound
coming from the device, replace the
NoWax lter.
ò
ò
ò
ò
A B
12
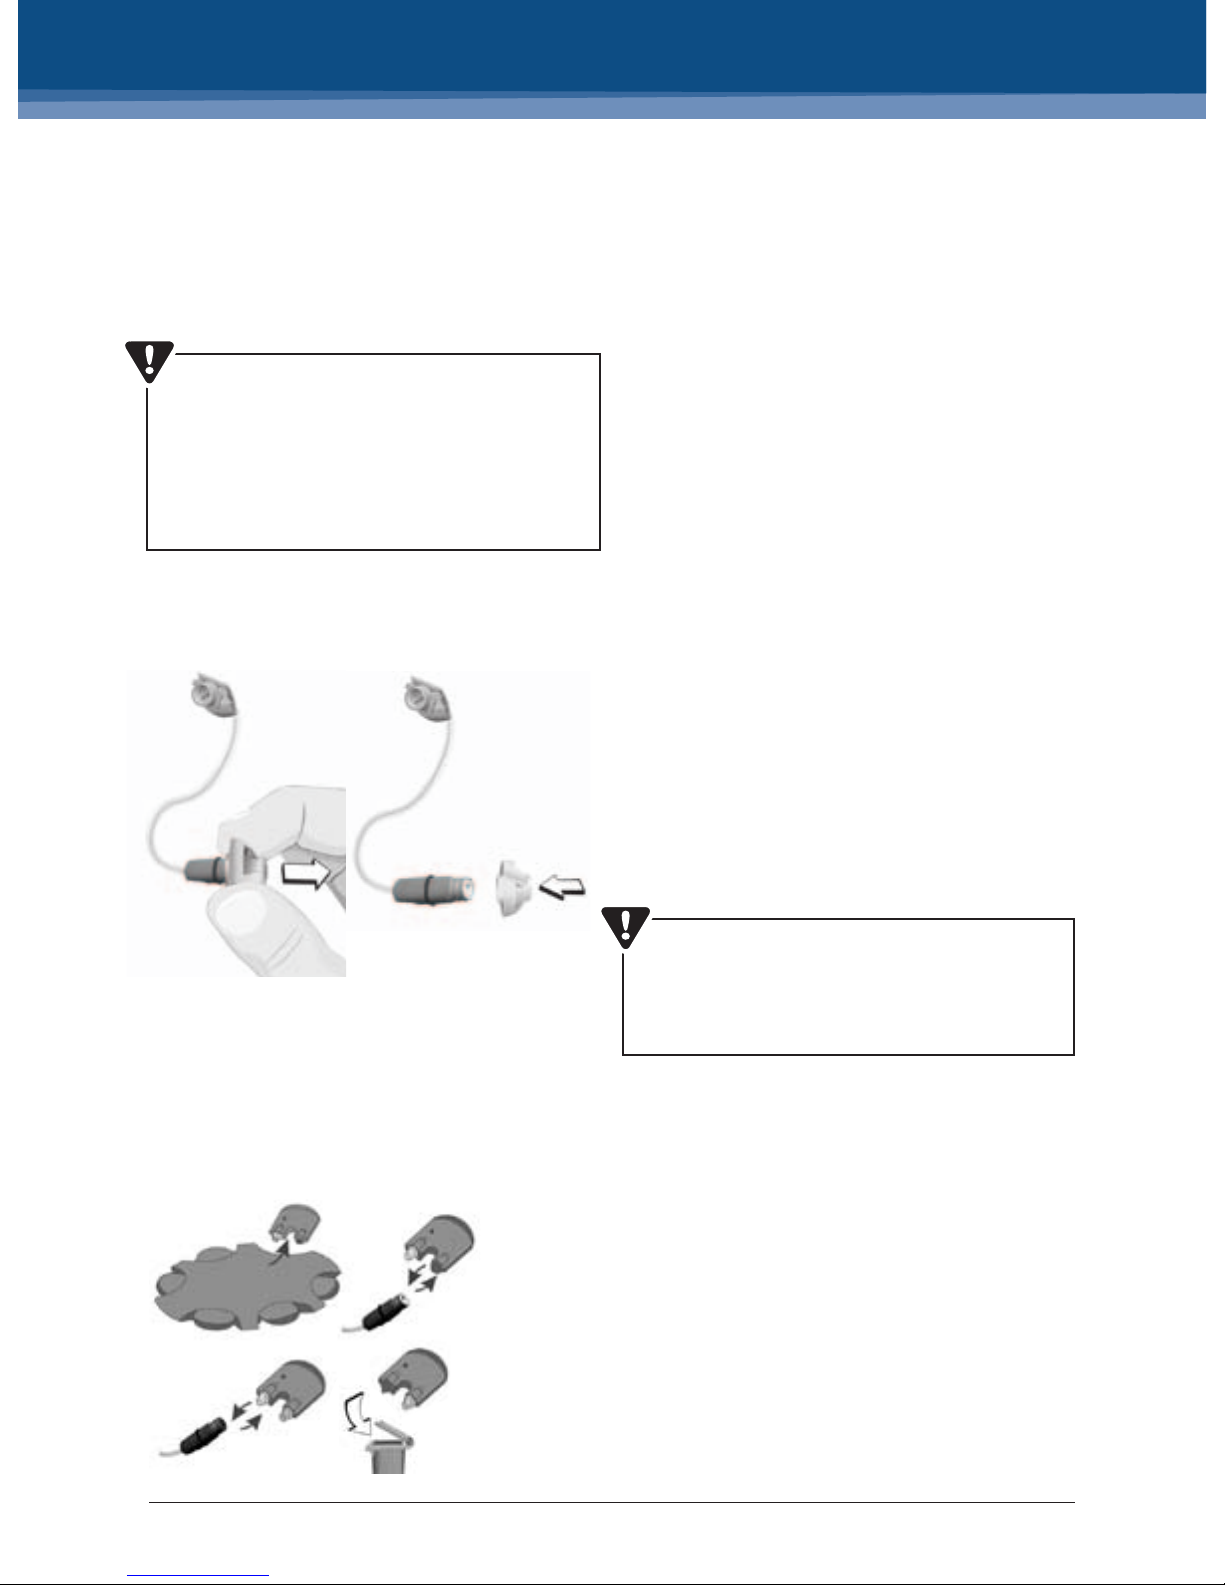
Attaching the Ear Grip to the M-speaker
The Ear Grip should be used to obtain a more
secure hold in the ear canal. One version works
for both left and right ears. Insert the Ear Grip
in the slot in the receiver as shown, noting the
orientation.
If the Ear Grip seems too long it may be trimmed
to the desired length. Be careful not to leave a
sharp end when cutting since this could cause
irritation in the ear.
To remove the Ear Grip, push it in the opposite
direction.
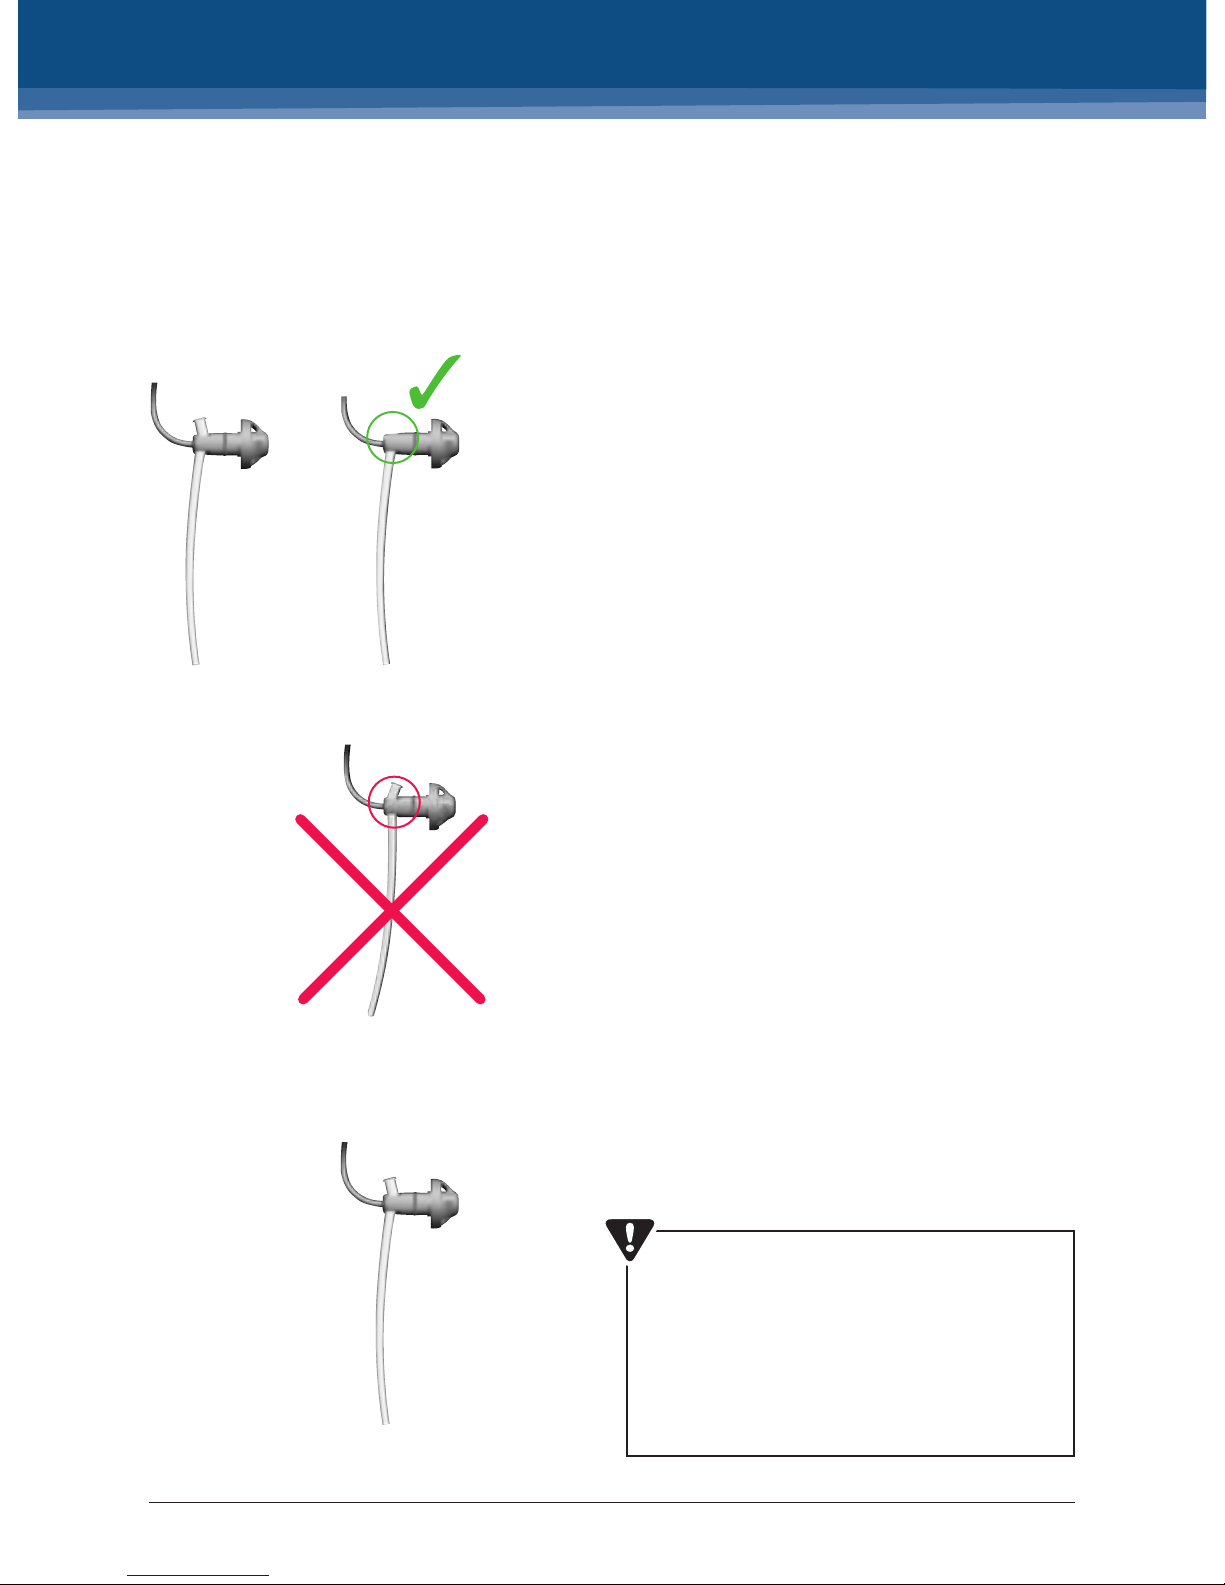
During insertion, the top of the Ear Grip
should point toward the speaker wire as
illustrated. Pull the Ear Grip down until
the top disappears into the slot.
If inserted in the wrong direction, the Ear
Grip will not be oriented properly to place
in the concha.
1 2 3
13
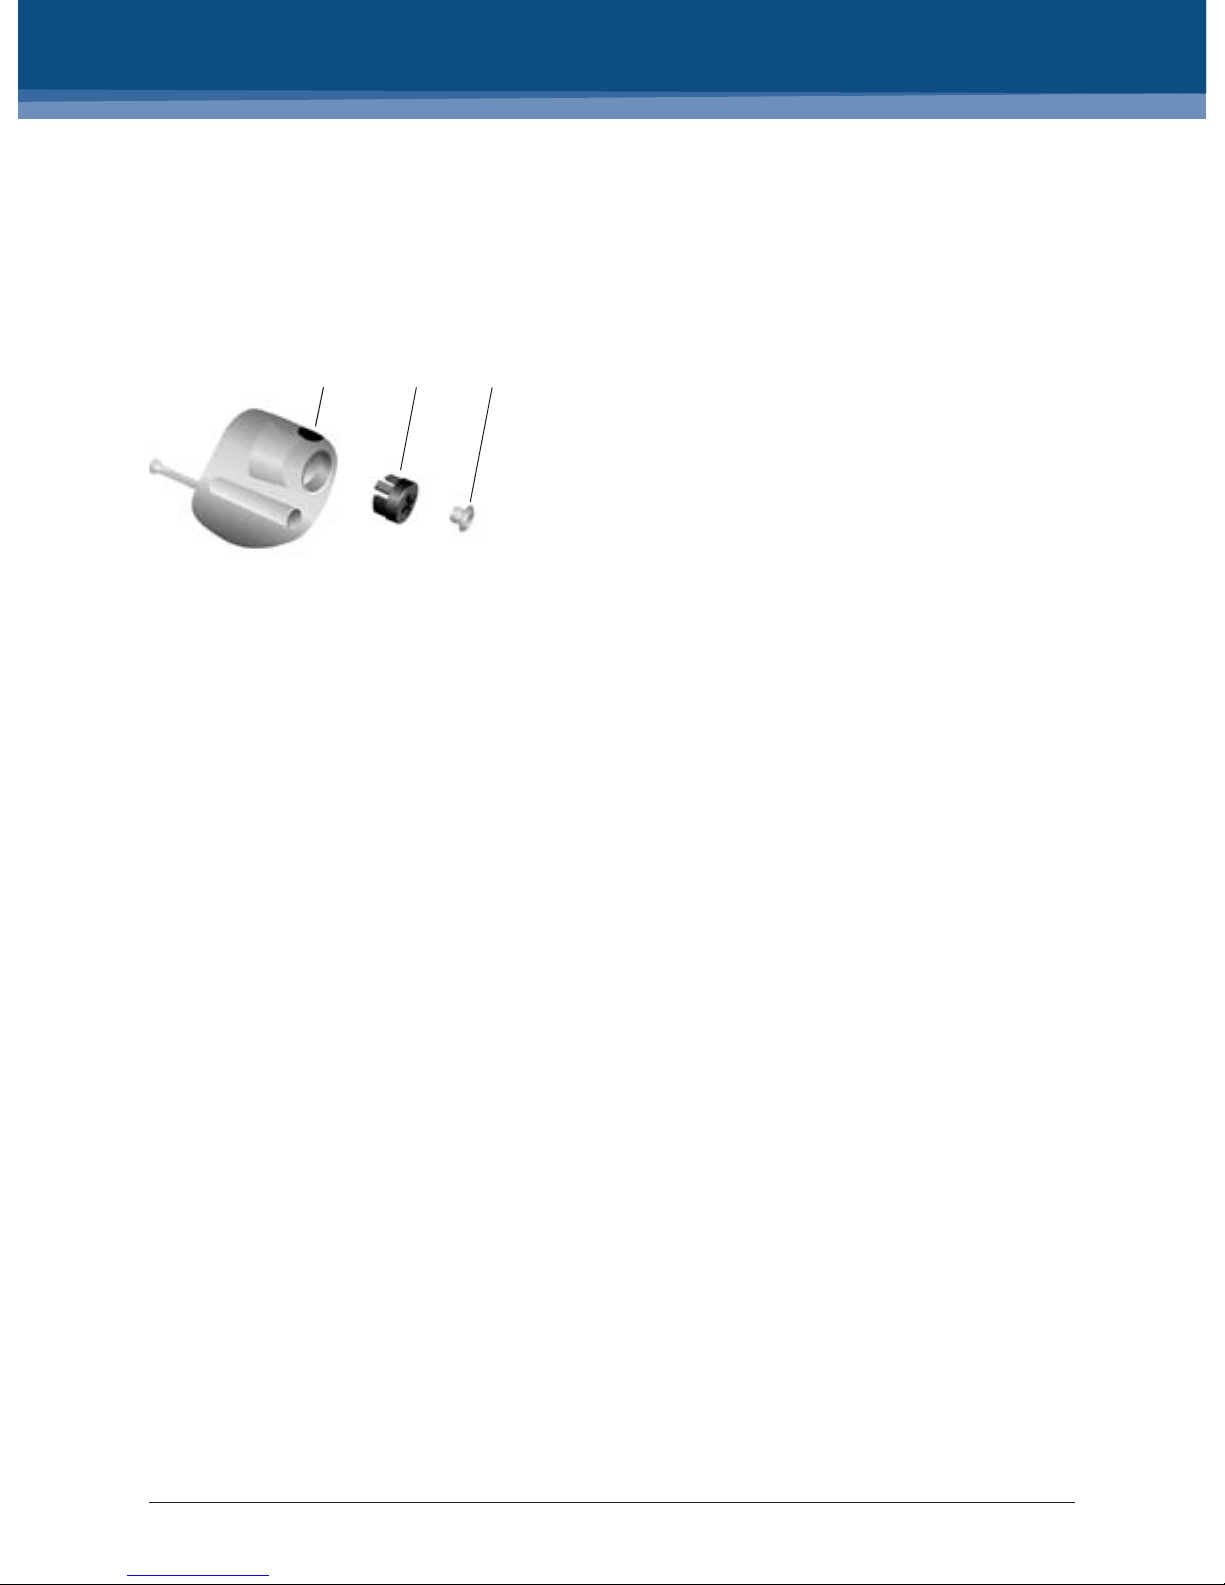
BERNAFON VÉRITÉ
Custom Molds for the M-speaker
Custom Molds are acrylic ear pieces in a variety
of styles that provide a customized tting solution. They have a rmer t in the ear canal and
may be used for more signicant hearing losses.
Custom Molds are produced from a deep ear
impression, similar to a CIC.
Custom Molds come with an adapter already
inserted, colored red (right) or blue (left) to
indicate which ear. The color dot on the top
of the Custom Mold indicates the front and
top position in the ear canal. The example on
the left shows the Micro Mold style.
Custom Mold venting
Custom Mold vents look like traditional parallel
vents, but since the length is about half that of
standard vents, they signicantly reduce occlusion. The vent size is automatically prescribed
when a Custom Mold is selected based on the
required performance. Custom Molds are recommended for moderate-to-severe hearing losses,
where extra gain is necessary, or for mild to
moderate high frequency hearing losses, where
Open Domes may be insufcient to provide the
gain necessary without feedback. Custom Molds
are benecial if problems arise with insertion
or retention. Custom Molds with large vents are
open t solutions, and an alternative to Open
Domes.
1 Front-Top indicator
2 Micro Mold Adapter
3 WaxStop Filter
ò
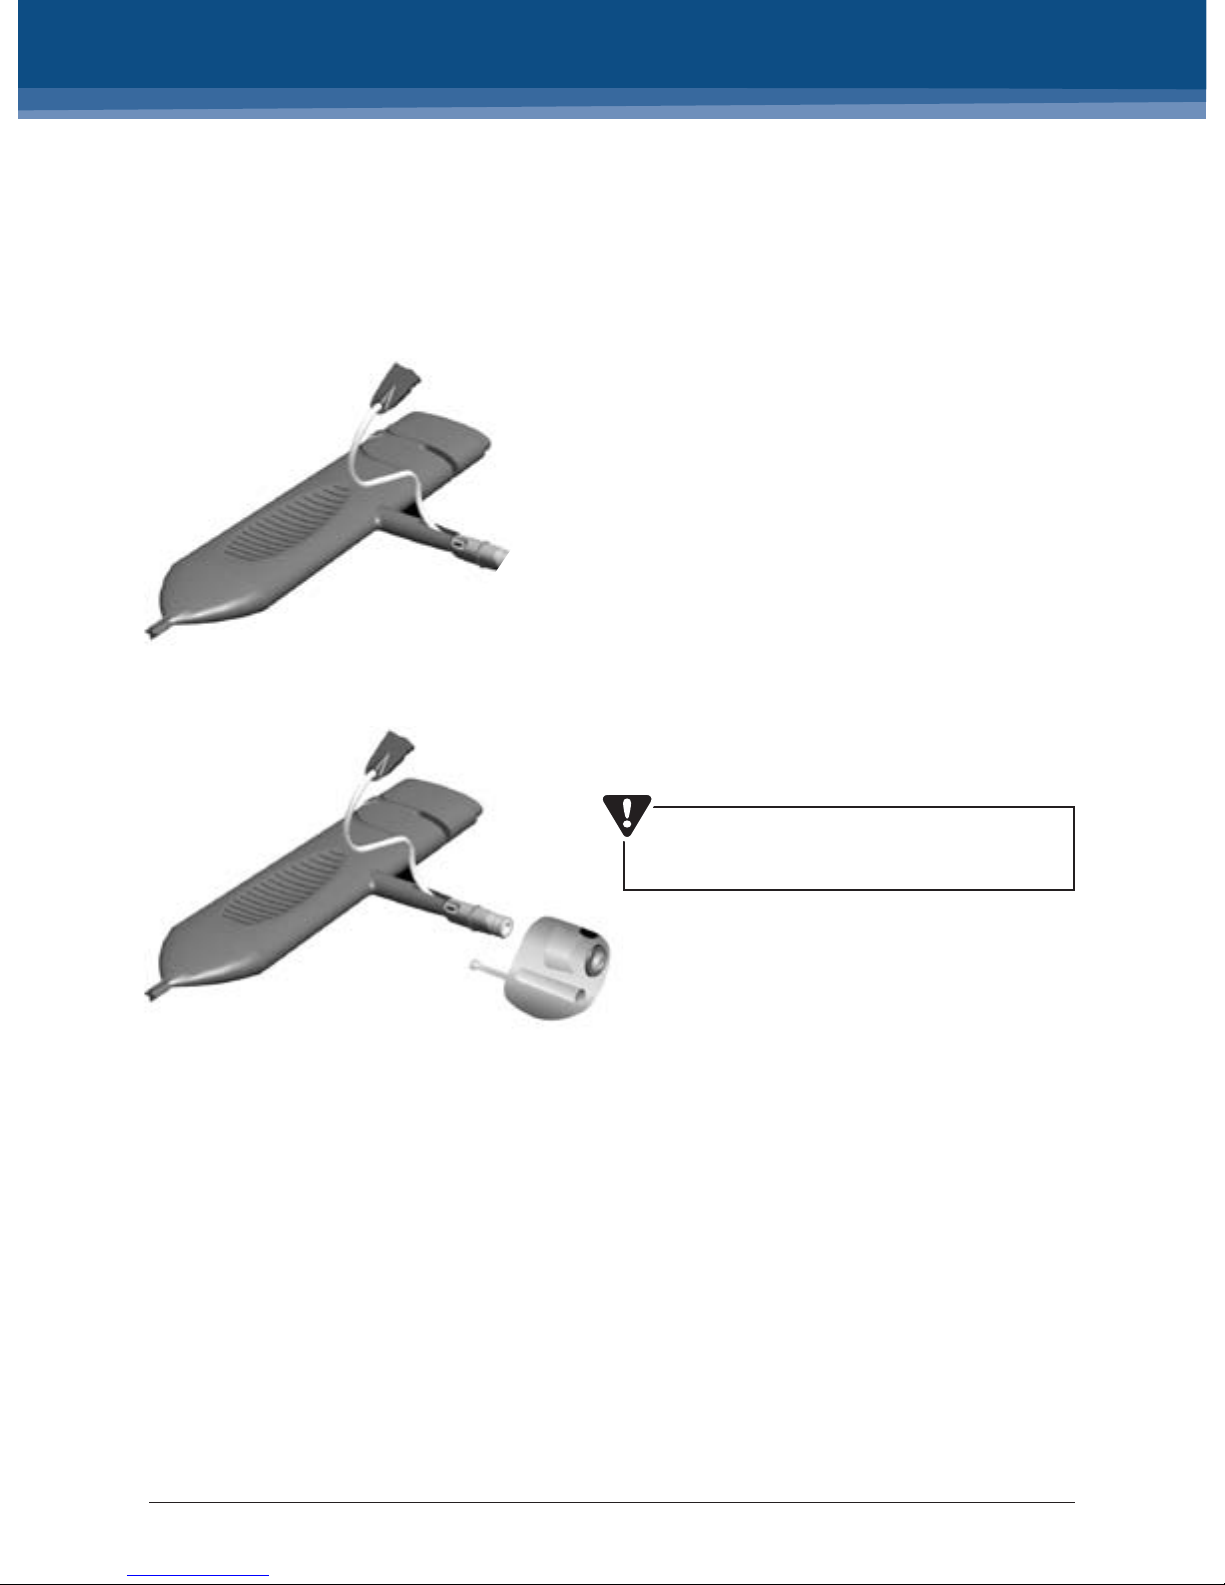
14
Measure and select the correct M-speaker
unit length. Place the speaker wire into the slot
in the extended part of the Custom Mold tool
as shown.
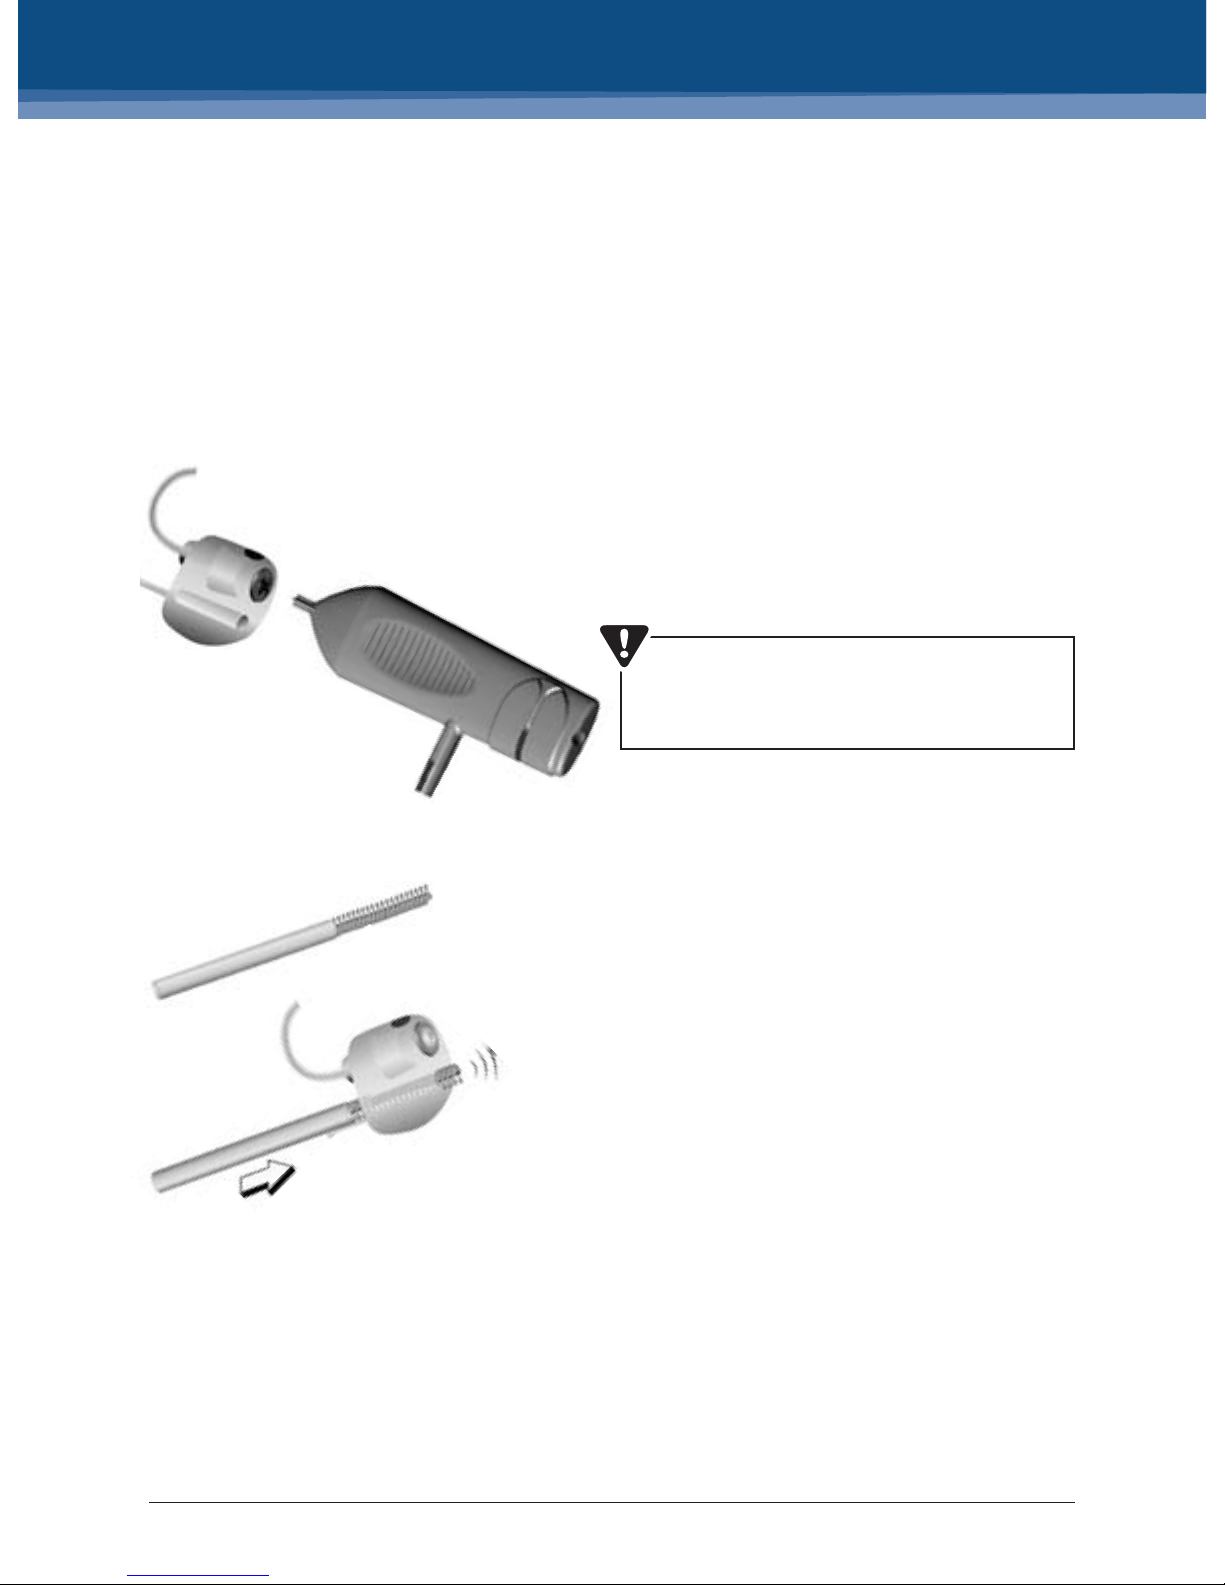
Align and rmly insert the speaker unit into the
Custom Mold until it clicks into place. The Custom
Mold can turn freely around the M-speaker unit.
Place a WaxStop in the Custom Mold adapter
(see page 16). When placing the Custom Mold in
the ear, the top indicator dot must face upwards
toward the top of the ear canal.
Attaching the Custom Mold to the M-speaker unit
The Ear Grip cannot be used with a
Custom Mold.
15
BERNAFON VÉRITÉ
1 Remove the WaxStop. (See page 16)
2 Insert the tool into the Custom Mold adapter,
making sure to align with the cross as
illustrated.
3 Push the tool into the Custom Mold.
The Custom Mold will disengage with a click.
Cleaning the Custom Mold
The Custom Mold should be cleaned after every
use by wiping it with a dry cloth. If the vent is
blocked, use the cleaning tool to remove cerumen
by pushing through the vent, beginning from the
side where the wire is attached to the speaker.
Detaching the Custom Mold from the M-speaker
It is not possible to detach the Custom
Mold from the M-speaker without the
Custom Mold tool.
 Loading...