

Page 1

Instructions for Use
SOUNDCLIP-A
Page 2

Page 3

Introduction to this booklet
This booklet guides you on how to use and
maintain your new SoundClip-A. Please read the
booklet carefully, including the Warnings section.
This will help you to get the most out of your new
SoundClip-A.
If you have additional questions about the use of
your SoundClip-A, please contact your hearing
care professional.
Page 4

Intended use
The SoundClip-A is intended as a wireless receiver
and transmitter of sound between hearing aids and
the surrounding environment, including speech
and wireless electronic audio devices. The
SoundClip-A furthermore assists users of wireless
hearing aids to control the functionality provided by
their hearing solution.
The SoundClip-A is intended to be used by
children (> 36 months) and adults together with
their hearing solution.
IMPORTANT NOTICE
Please familiarize yourself with the entire
contents of this booklet before using
your SoundClip-A. It contains instructions and
important information about the use and
handling of your SoundClip-A.
Page 5
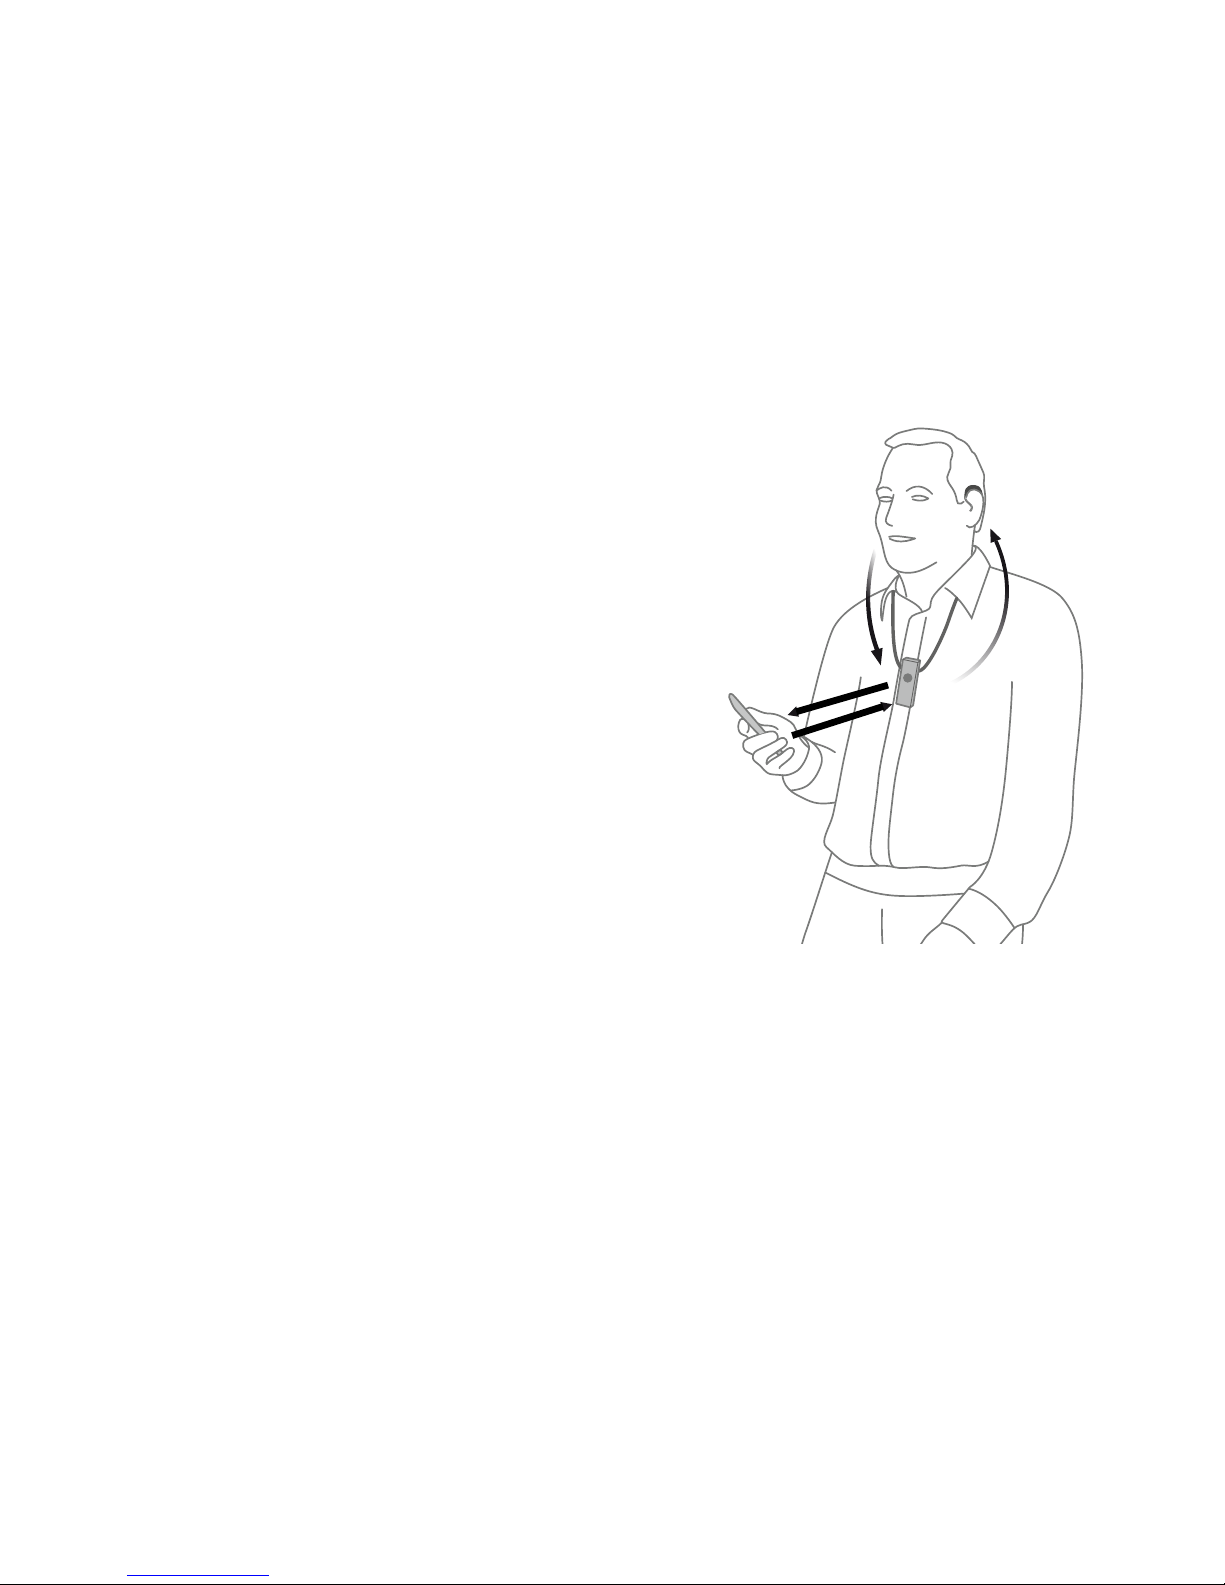
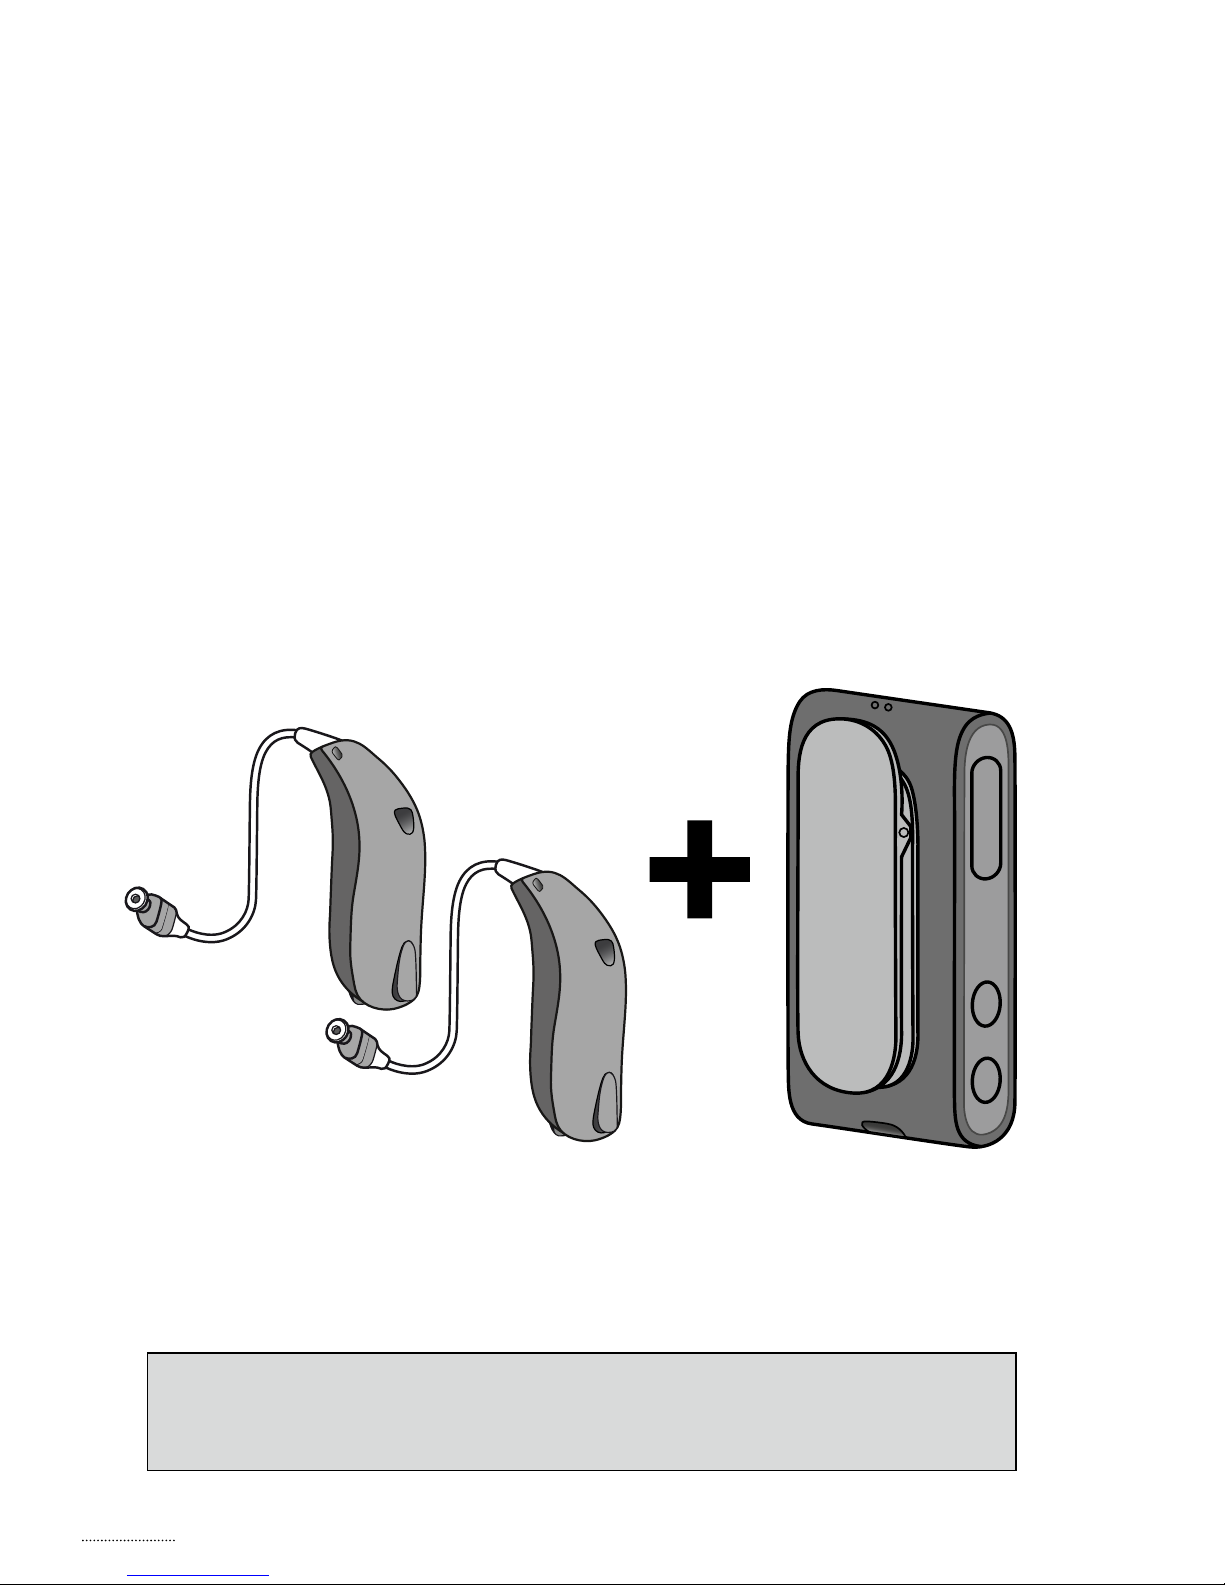
Introduction
The SoundClip-A can be used both as a wireless
headset for mobile phones and as a
remote microphone/partner microphone.
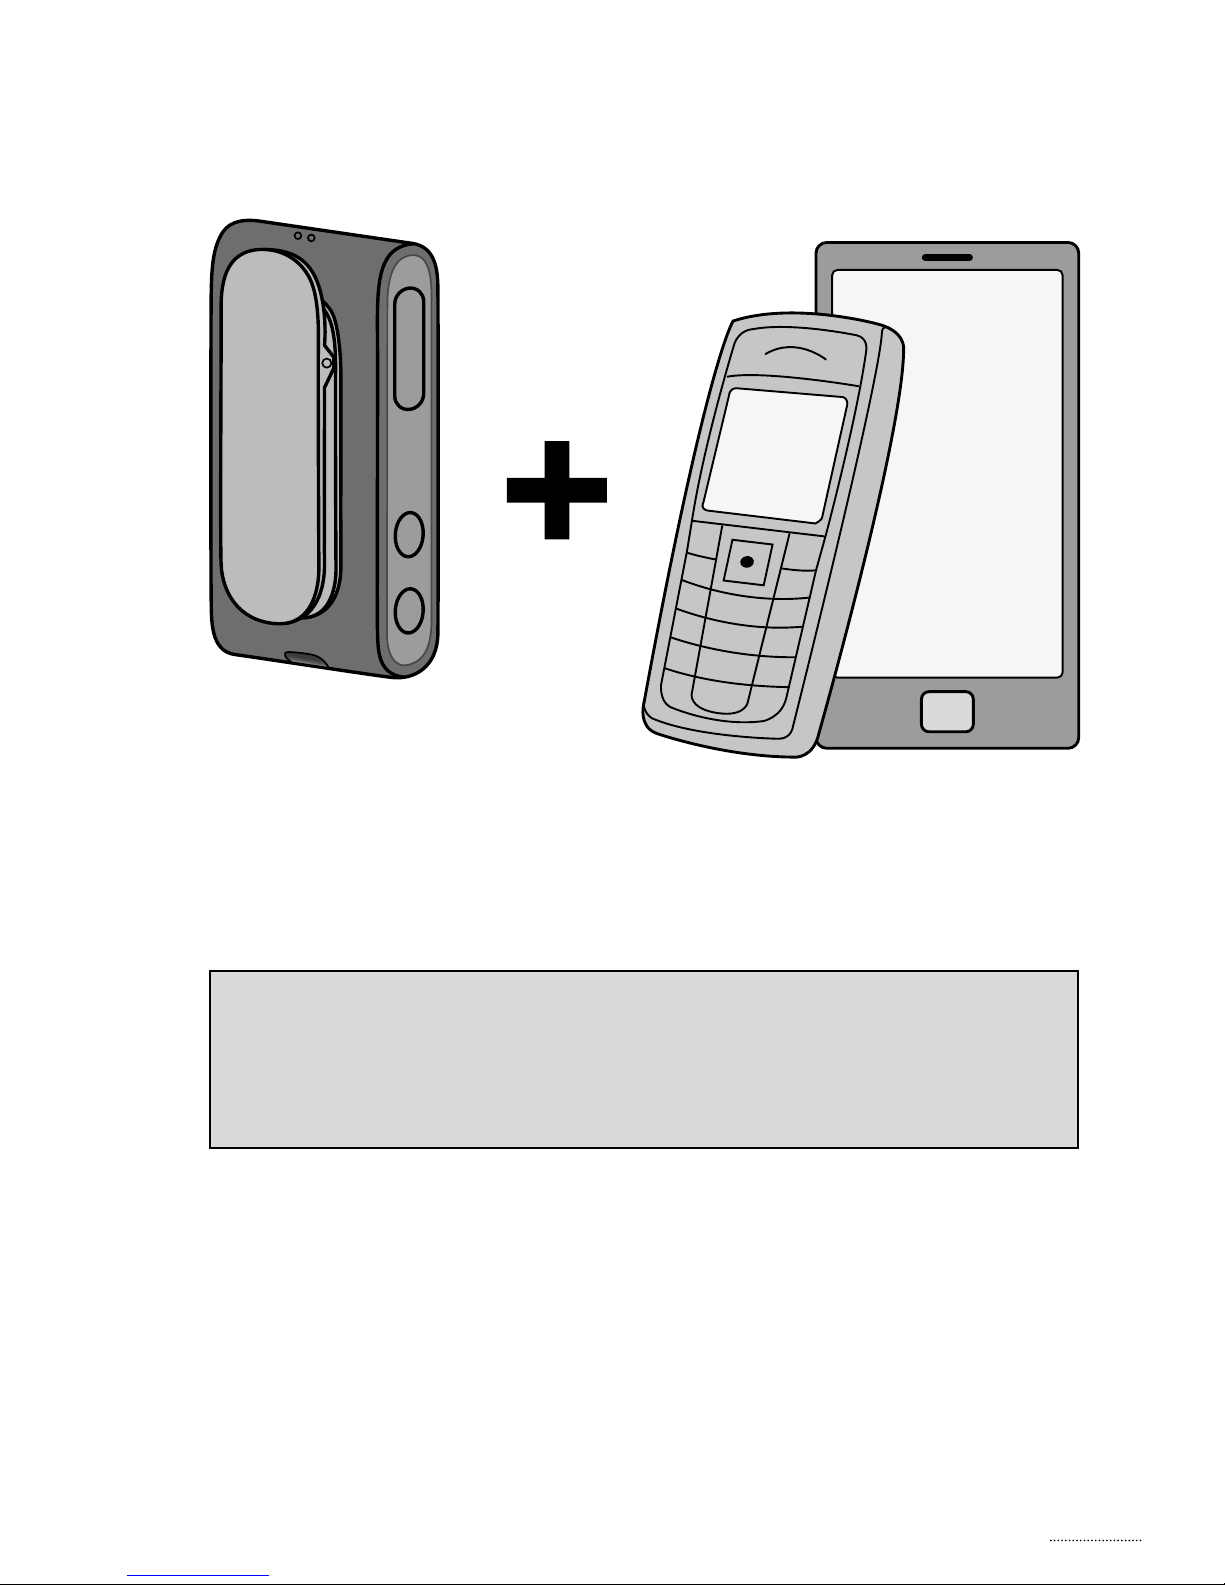
1. Headset with mobile phone
Sounds from your phone
will be streamed to your
hearing aids through the
SoundClip-A (A). Your voice
is picked up by the
SoundClip-A and sent to
the mobile phone (B).
A
B
Page 6

2. Remote/partner-microphone
The voice of a chosen speaker will be
transmitted wirelessly from the SoundClip-A
to your hearing aids.
Up to 20 m
Page 7

Table of contents
Package content 9
Overview – main functions 10
Overview – product indicators 12
Getting started 14
Daily
use: On/Off 20
Daily use: Charging 21
Using SoundClip-A with a mobile phone 22
Ensuring SoundClip-A is connected
to the phone 23
Receiving calls 24
Making calls 26
Advanced headset features 27
Listening to music 28
Using SoundClip-A as remote microphone 30
Selecting microphone mode 31
Starting/stopping sound from remote
microphone 32
Regulating level from remote microphone 33
Starting/stopping sound from remote
microphone using your hearing aids 34
Page 8

Using SoundClip-A as remote control for
hearing aids 35
Other features and functions 36
Cleaning the SoundClip-A 37
Warnings 38
Technical information 44
International warranty 47
Page 9
9
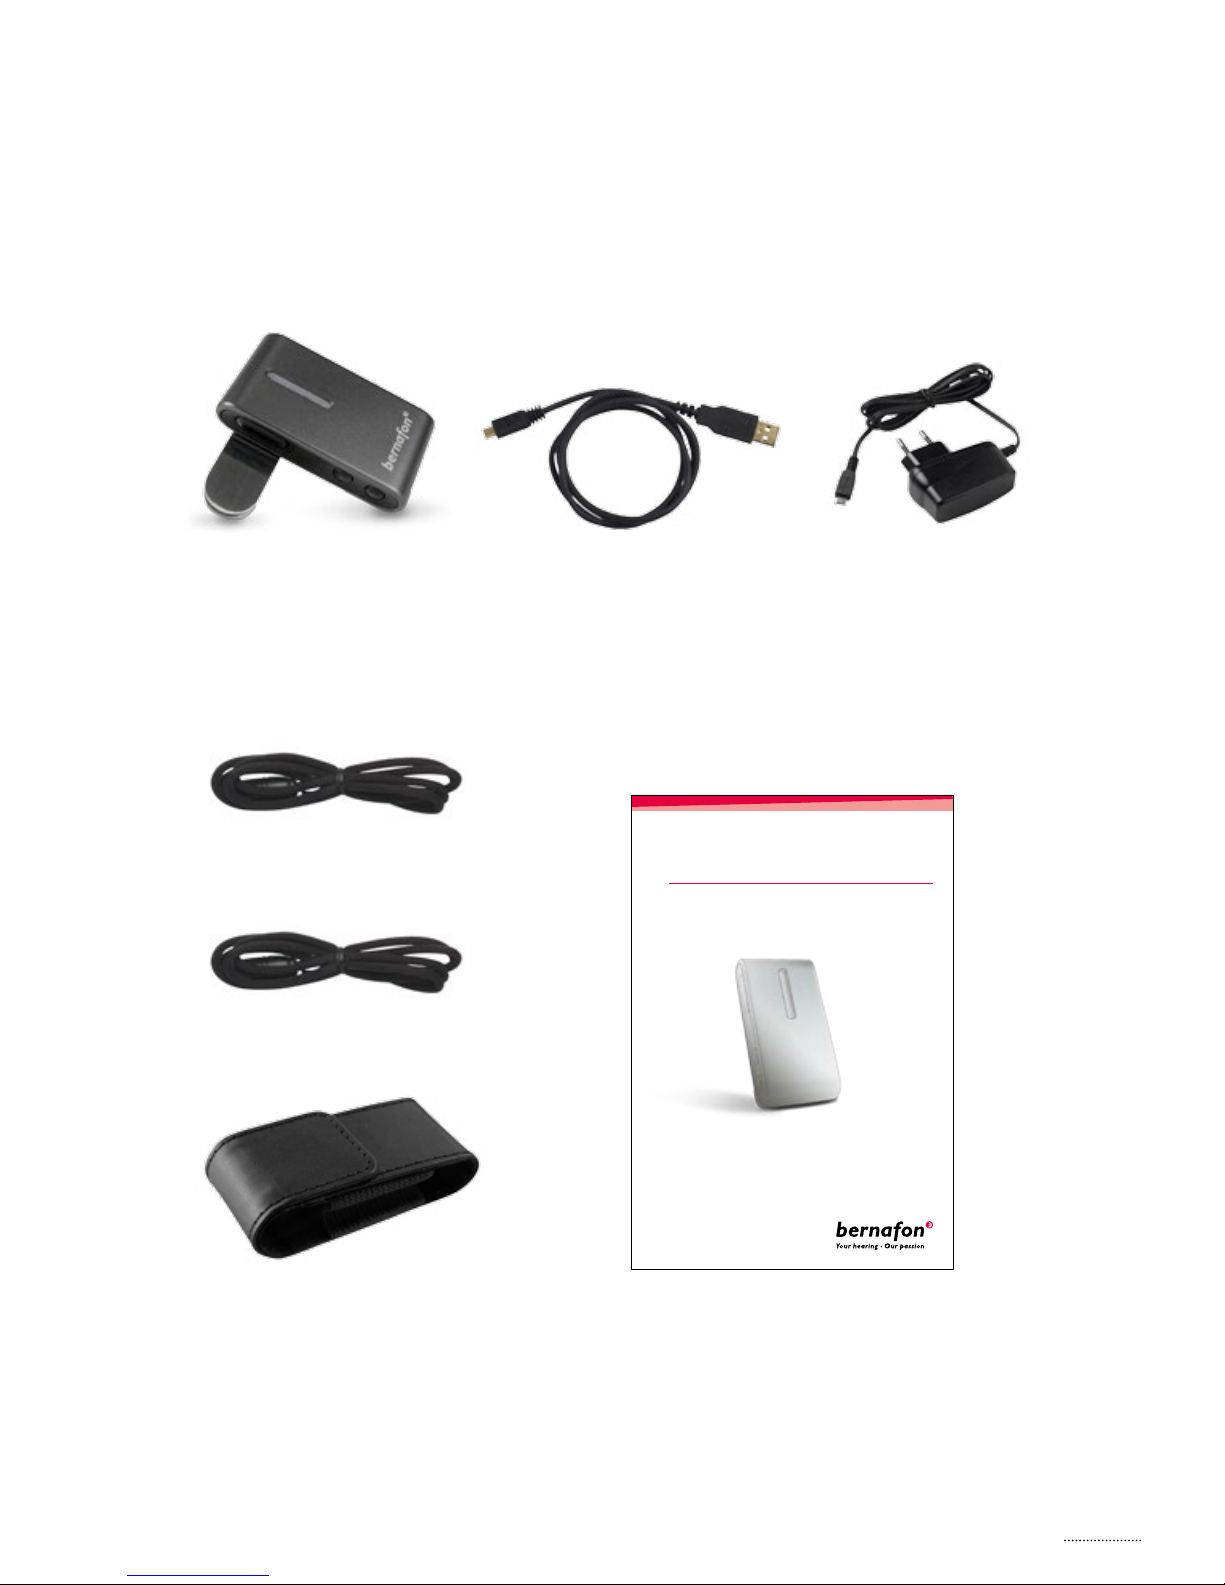
Package content
The SoundClip-A box consists of the following
elements:
SoundClip-A Wall charger
(will vary from
country to country)
Lanyard – long
USB charger
cable
This booklet
(Instructions for Use)
Pouch
Lanyard – regular
Instructions for Use
S OUNDCLIP-A
Page 10

Overview – main functions
Microphones
Front
Back
Multi button
· On/off
· Answer phone
· Mode selector
Volume
· Up
· Down
Page 11
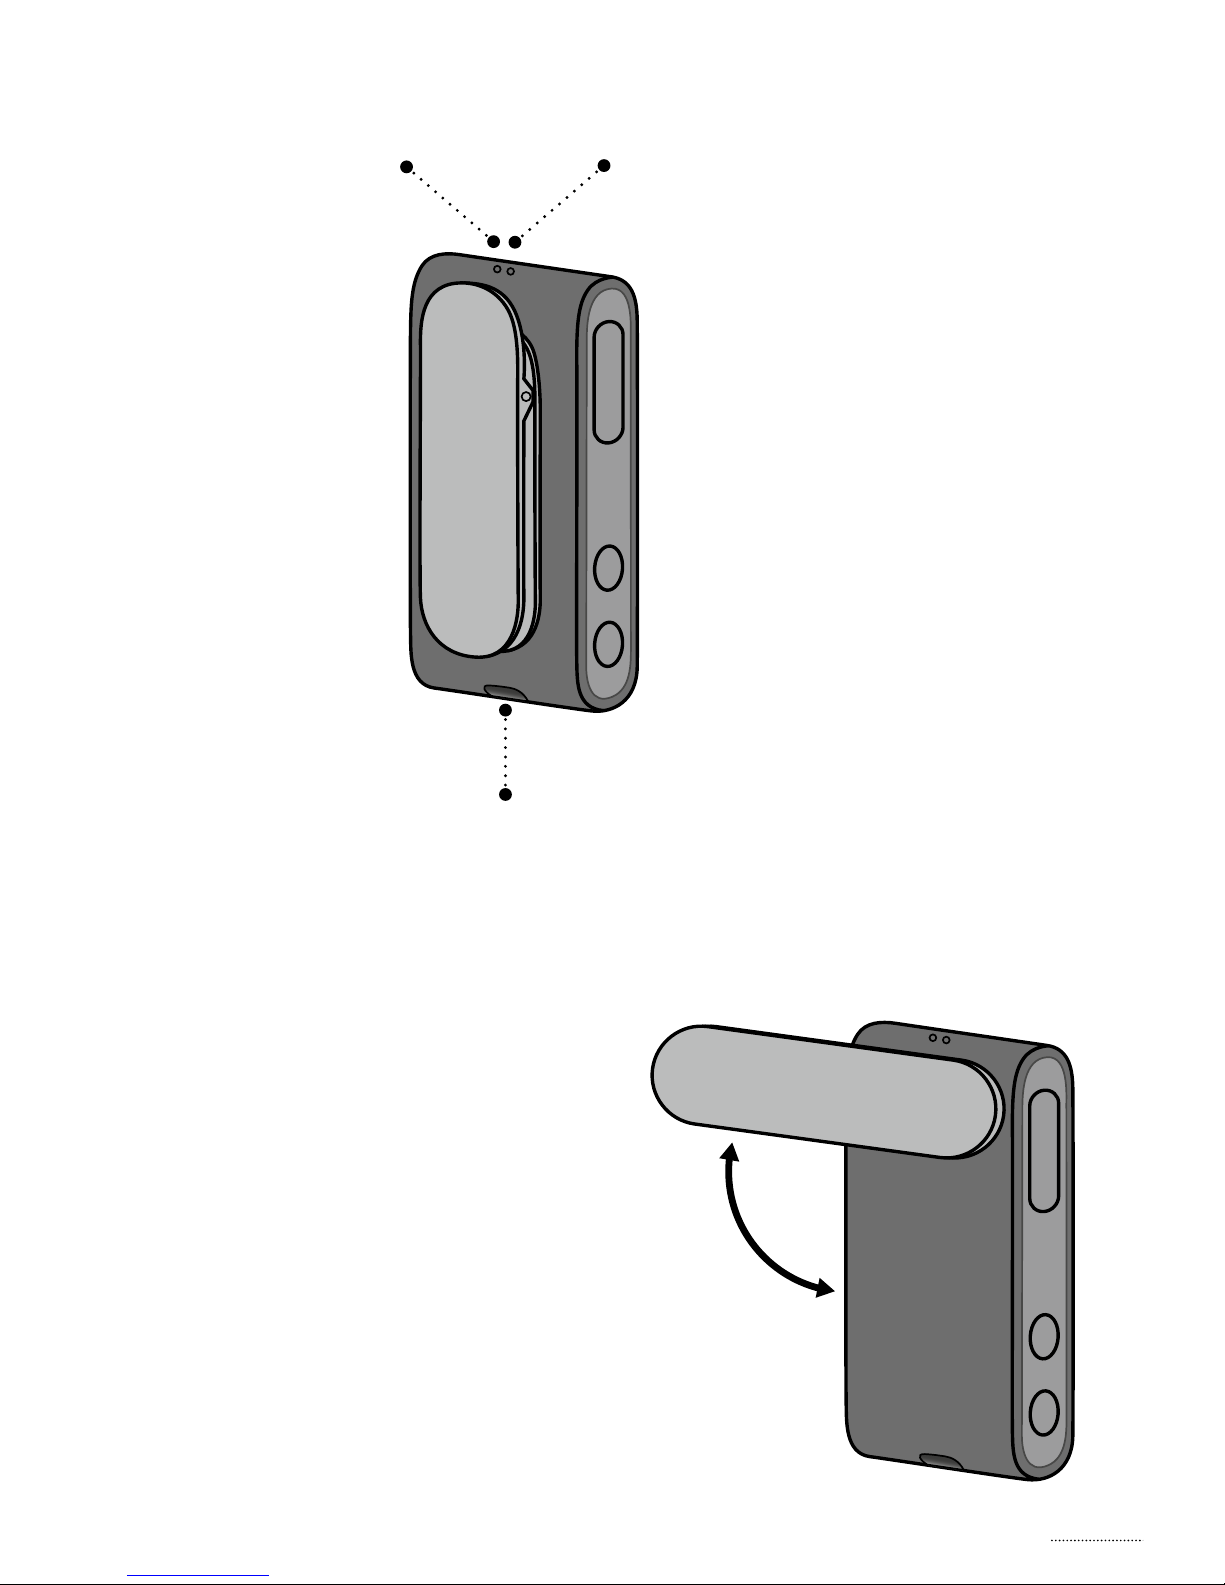
11
Status indicator Power indicator
Charging socket (Micro USB)
Clip (rotating) for wearing
the SoundClip-A
Page 12
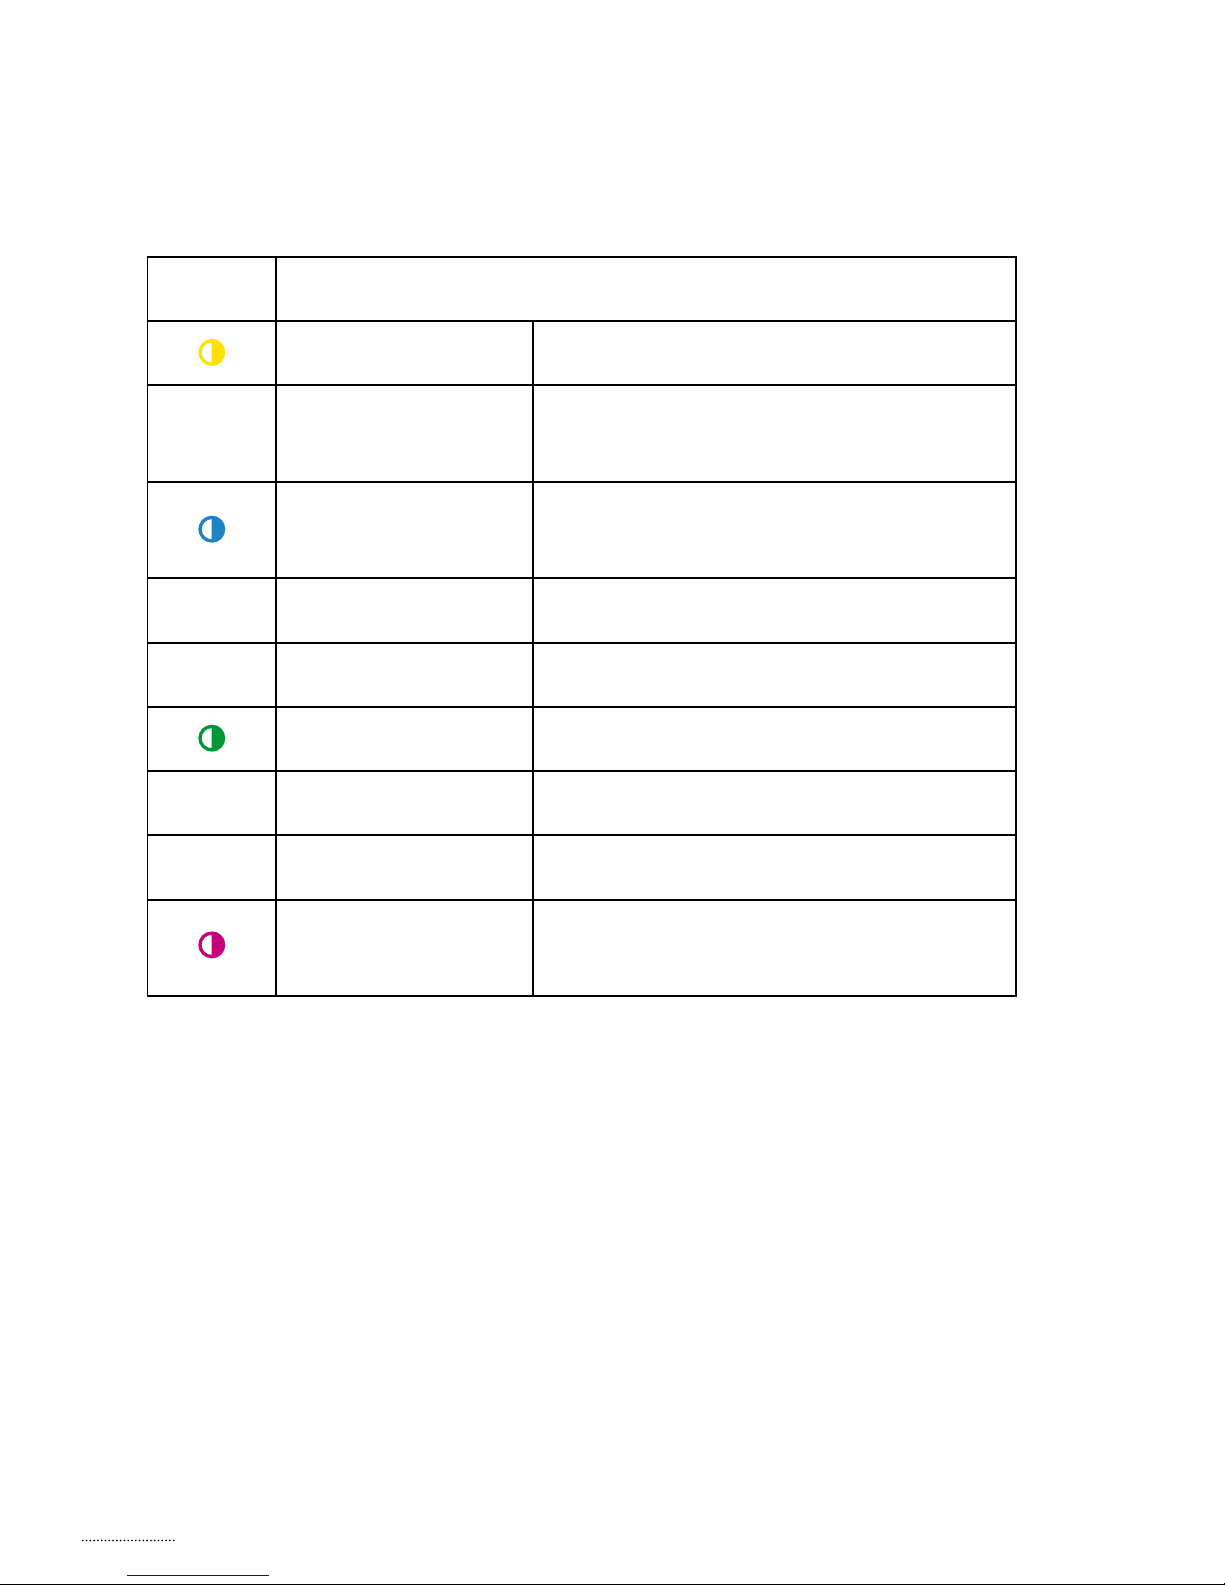
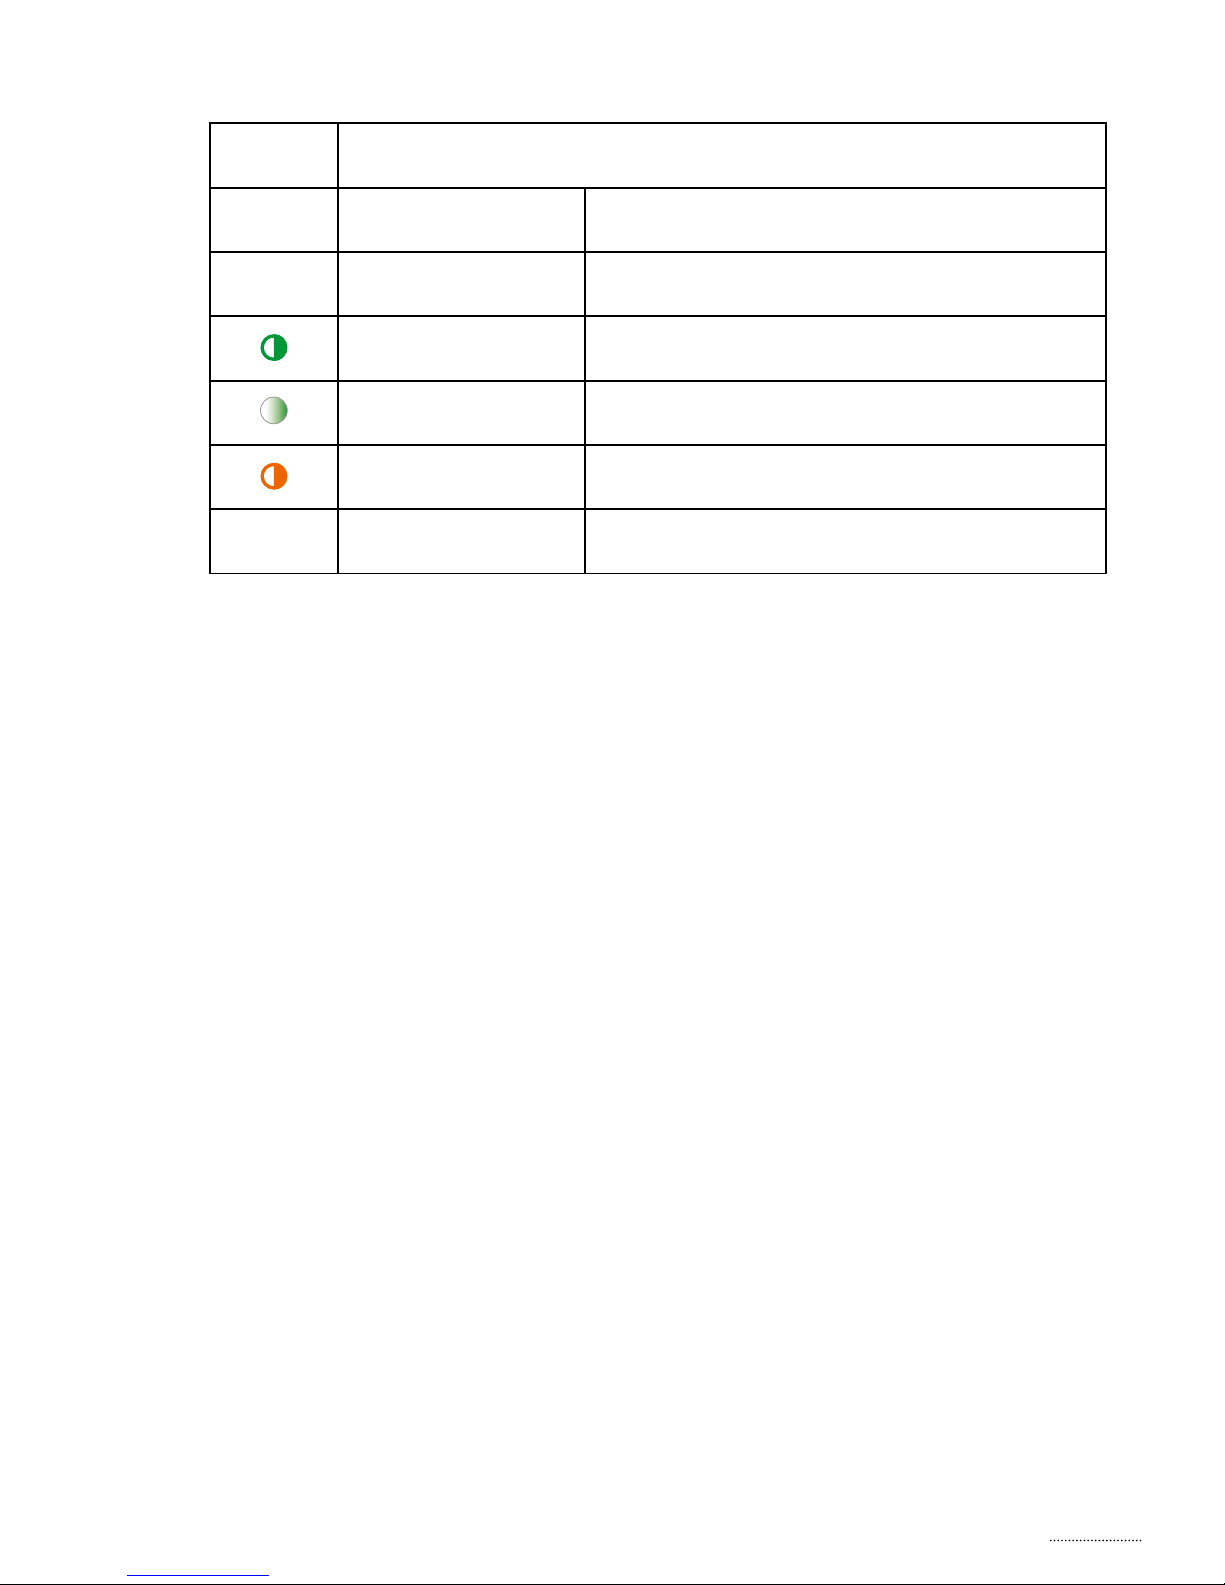
Overview – product indicators
Status Description
Blinking yellow Searching for hearing aids
•
Steady yellow
Idle. Hearing aids connected,
not connected to a phone.
Blinking blue
Searching for a mobile phone
(pairing)
•
Steady blue Connected to a mobile phone
•
Steady green In a call
Blinking green Incoming call
•
Steady orange Streaming music
•
Steady magenta Remote microphone mode
Blinking magenta
Remote microphone
reconnecting
Page 13
13
Power Description
•
Steady red Battery low
•
Steady green Turned on – not charging
Blinking green Turned on – charging
Fading green Turned on – charging complete
Blinking orange Turned off – charging
•
Steady orange Turned off – charging complete
Page 14
Getting started
Before you can use the SoundClip-A with your
hearing aids, both the hearing aids and the
SoundClip-A need to be paired/connected. Using
the SoundClip-A with a mobile phone also requires
the SoundClip-A to be paired with/connected to
your mobile phone.
A. Pairing hearing aids and SoundClip-A
See page 16 for detailed instructions about
pairing a SoundClip-A with your hearing aids
Page 15
15
B. Pairing SoundClip-A and mobile phone
See page 18 for detailed instructions
about pairing a SoundClip-A with your
mobile phone
Page 16
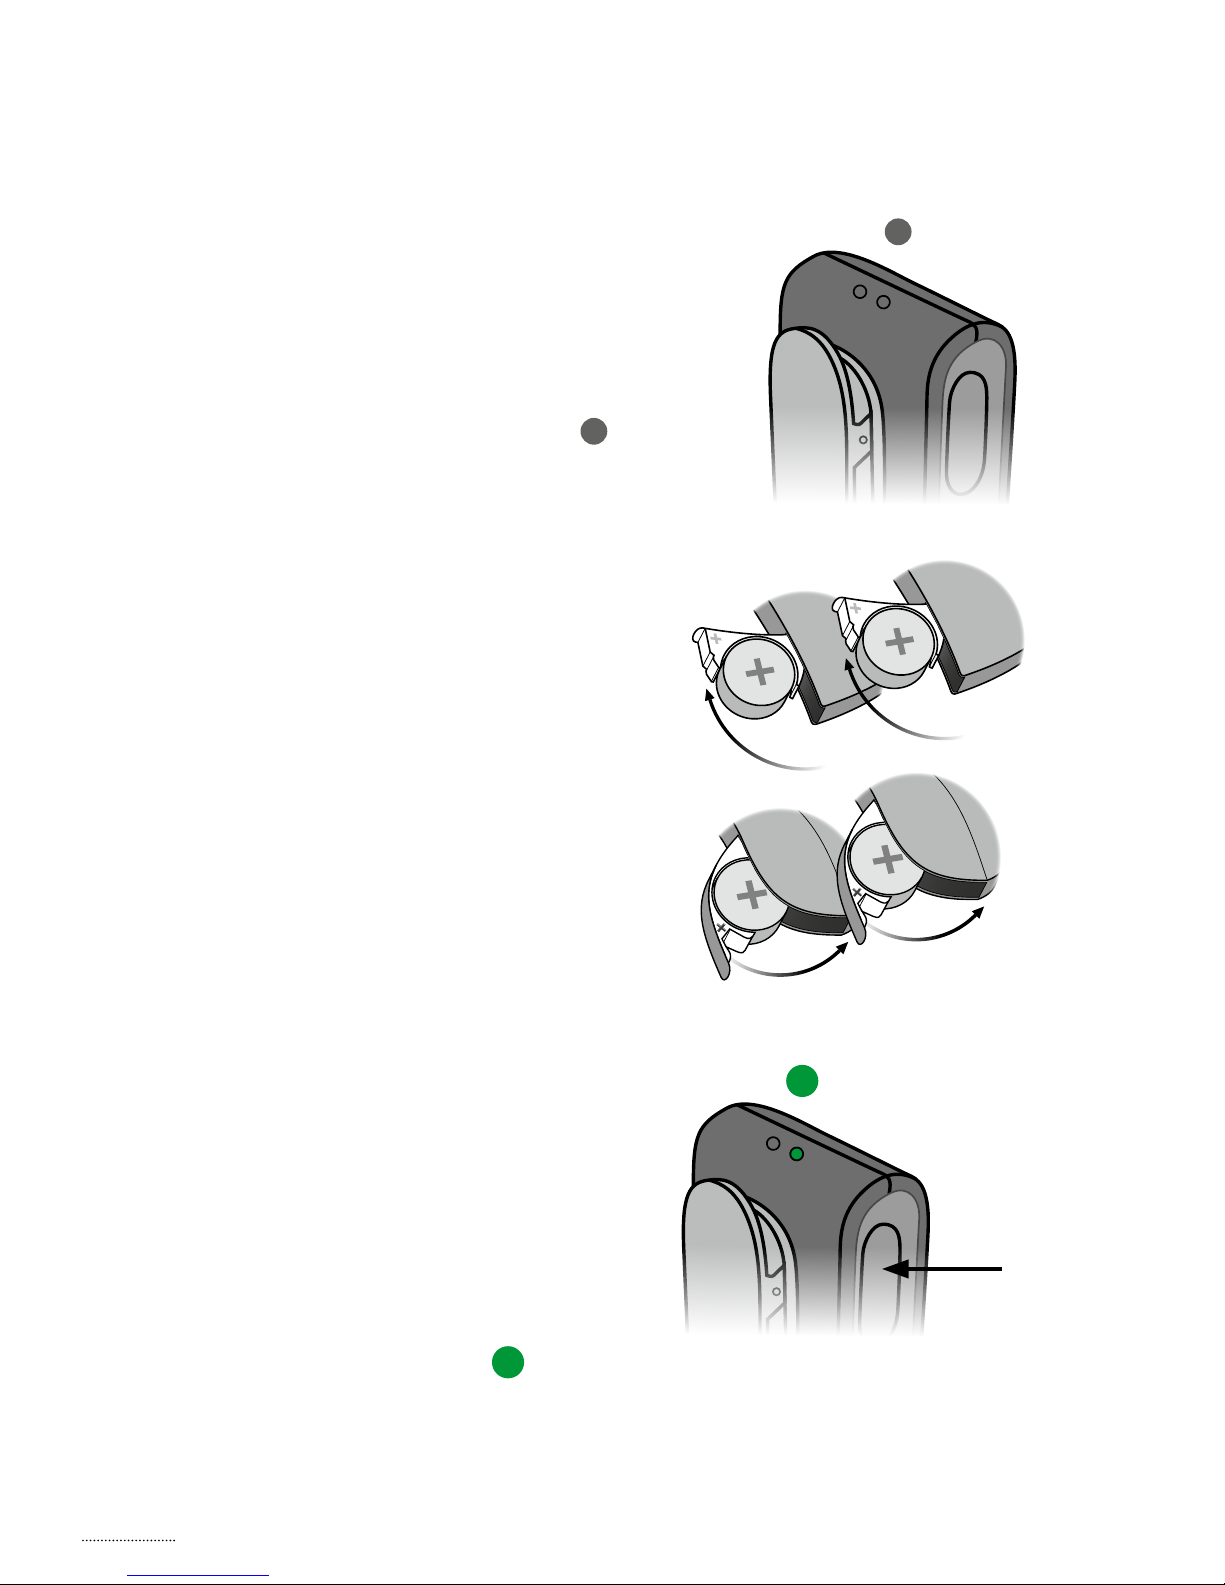
A. Pairing hearing aids with the SoundClip-A
1. Ensure SoundClip-A is
powered off
Press and hold multi button for
approx. 6 seconds until the
power indicator is OFF .
2. Turn both hearing aids OFF
(open battery drawer)
3. Turn both hearing aids ON
(close battery drawer)
The hearing aids will now
be ready for rst time
connection with the
SoundClip-A. You now
have 3 minutes to
complete the pairing.
4. Turn ON SoundClip-A
Press and hold multi
button for approx.
3 seconds until power
indicator shows
STEADY GREEN .
Page 17

17
5. SoundClip-A will now search
for your hearing aids
Status indicator will be
BLINKING YELLOW .
6. Place SoundClip-A and both hearing aids
close to each other
(max. distance 20 cm)
7. Connection established
with hearing aid(s)
is indicated by status indicator
STEADY YELLOW .
20 cm
Page 18

B. Pairing mobile phone with the SoundClip-A
1. Place SoundClip-A in pairing mode
Press and hold the multi button AND volume up
button for about 6 seconds (A) until status
indicator BLINKS BLUE .
2. The SoundClip-A will be in pairing mode for
about 3 minutes
A
Page 19

19
5. Pairing complete
Pairing complete with mobile
phone is indicated by status
indicator STEADY BLUE .
3. Enable pairing on mobile phone
Turn on Bluetooth
®
. Search for and connect to/pair
with SoundClip-A.
This is normally in the settings –> Bluetooth®
section of your phone.
4. Enter pin code
If your phone requests a
pin code, enter 0000
(four zeros).
Page 20

Daily use: On/O
ON
Press and hold multi button
for approx. 3 seconds until
power indicator shows
STEADY GREEN .
OFF
Press and hold multi button
for approx. 6 seconds until
power indicator is OFF .
Page 21

21
Daily use: Charging
Battery low
With about 30 minutes
remaining streaming time,
the power indicator turns
RED .
Charging
Connect the enclosed
charger through the micro
USB connector in the
bottom of the SoundClip-A.
The power indicator
BLINKS GREEN or
ORANGE .
Charging indicators Status
Blinking Charging
SoundClip-A ON
Fading Charging complete
Blinking Charging
SoundClip-A OFF
Steady Charging complete
Page 22

IMPORTANT NOTICE
The SoundClip-A should be worn as indicated for
best possible performance. It is important that
the microphone in the SoundClip-A is pointing
towards your mouth(A), and that the
SoundClip-A is not covered by clothes etc.
Maximum distance between SoundClip-A and
mobile phone is 10 meters.
Using SoundClip-A with a mobile phone
A
Page 23

23
Ensuring SoundClip-A is connected
to the phone
Select phone mode
Press and hold multi button for
approx. 3 seconds to change
mode. Mode change is conrmed
by an audible indication in your
hearing aids. The status indicator
is STEADY BLUE .
Status Description
•
The SoundClip-A is in idle mode, i.e. not connected
to mobile phone. Connected to hearing aids.
•
Connected to mobile phone
•
The SoundClip-A is in remote/partner
microphone mode
Page 24

Receiving calls
Phone connected
When the SoundClip-A is turned
on and in range of your mobile
phone it will automatically connect
to the mobile phone.
The status indicator is
STEADY BLUE .
Phone ringing
When the phone rings you will
hear a ring indicator (and if
available, the ring-tone from your
phone) in your hearing aids.
The status indicator will
BLINK GREEN
.
Page 25

25
A
A
Answer call
Either click the multi button
(A) shortly – or answer the
call from your mobile phone.
Once the call is connected,
the status indicator will
change to
STEADY GREEN .
End call
Either click the multi button
(A) shortly – or hang up the
call from your mobile phone.
Status indicator is
STEADY BLUE .
Page 26

Making calls
To make a call you only have to use the mobile
phone. The call will automatically be connected to
the SoundClip-A.
Once the call is connected the
status indicator will change to
STEADY GREEN .
Page 27

27
Advanced headset features
Voice dialing / voice command
When connected to a mobile phone, double press
on the multi button activates voice dialing if
supported by the phone.
Reject call
A long press on the volume down button, while the
phone is ringing, rejects the call.
Mute hearing aid microphones
Press and hold volume down for about 3 seconds
to mute the hearing aid microphones.
Short press volume up or down will unmute
hearing aids.
Page 28

Listening to music
Wireless audio (A2DP)
If connected to a mobile phone, or other device,
through Bluetooth®, the music played on the
phone/device will automatically be played in your
hearing aids.
Status indicator is STEADY ORANGE .
You do not need to operate anything on the
SoundClip-A.
Status Description
•
The SoundClip-A is streaming music
from the phone
Page 29

29
Adjusting volume
While listening to music, the level of the streamed
signal can be adjusted using the volume up/down
buttons.
Stopping sound from phone
Short press on the multi button will stop sound.
Use the controls on the phone to start the sound.
Volume up
Volume down
Stop sound
Page 30

Using SoundClip-A as remote
microphone
Remote microphone
In this mode speech from the person wearing the
SoundClip-A will be streamed directly to your
hearing aids.
IMPORTANT NOTICE
Ensure that the microphone is pointing to the
speaker’s mouth and that it is not covered by
clothes etc.
Up to 20 m
Page 31

31
Selecting microphone mode
Select microphone mode
Press and hold multi button for
approx. 3 seconds to change
mode.
Mode change is conrmed by an
audible indication in your hearing
aids.
Status indicator is
STEADY MAGENTA .
Status Description
•
The SoundClip-A is in idle mode, i.e. not connected
to mobile phone. Connected to hearing aids.
•
Connected to mobile phone
•
The SoundClip-A is in remote/partner
microphone mode
Page 32

Starting/stopping sound from remote
microphone
Stop sound from
microphone
Press and hold multi button (A)
for approx. 3 seconds to stop
the signal from the microphone
to the hearing aids and switch
the hearing aids back to their
normal program.
The status indicator will change
to STEADY YELLOW or
STEADY BLUE .
A
Page 33

33
Regulating level from remote
microphone
Volume up or volume down
The streamed signal can be adjusted using the
volume up/down buttons.
Mute hearing aid microphones
(only sound from the remote microphone)
Press and hold volume down for about 3 seconds
to mute the hearing aid microphones.
Short press volume up or down will unmute
hearing aids.
Volume up
Volume down
Page 34

Starting/stopping sound from remote
microphone using your hearing aids
P1 –> P2 –> TV –> Microphone
A press on the hearing aid
button will toggle to the next
program in the hearing aids.
Once you reach the remote
microphone program you will
hear the remote microphone
program indicator.
To stop remote microphone sound simply toggle
back to wanted hearing aid program.
IMPORTANT NOTICE
Please refer to your hearing aids instructions for
use for details on the functionality of your
specic hearing aid solution.
Page 35

35
Using SoundClip-A as remote control
for hearing aids
When SoundClip-A is not streaming
sound it doubles as a remote
control for your hearing aids.
IMPORTANT NOTICE
Maximum distance between SoundClip-A and
hearing aids is 2 meters.
Volume up
· Short press
Volume down
· Short press
Next program
· Press and hold for 3 seconds for
next program
Mute hearing aid microphones –
long press
· Short press on volume up or down
will unmute
Page 36

Other features and functions
One connection at a time
When paired with several devices (up to eight), the
SoundClip-A will only connect to the rst phone
available/in range.
No calls when used as microphone
When using the SoundClip-A as partner/remote
microphone, there will be no connection to the
mobile phone.
Timeout (out of range) when in microphone
mode
If the SoundClip-A is out of range of the hearing
aids, the hearing aids will return to their initial
program after 90 seconds.
Clear Bluetooth® pairings
Press and hold multi button, volume up and
volume down for 10 seconds to clear all Bluetooth®
pairings. Clearing completed is indicated by status
indicator BLINKING RED .
Page 37

37
Cleaning the SoundClip-A
Use a soft, dry cloth to clean the SoundClip-A.
It must never be washed or immersed in water or
other liquids.
Page 38

Warnings
You should familiarize yourself fully with the
following general warnings and the entire contents
of this booklet before using your SoundClip-A to
ensure personal safety and correct use. Consult
your hearing care professional if you experience
unexpected operations or events with your
SoundClip-A.
Choking hazards and risk of swallowing
small parts
SoundClip-A and its parts should be kept out of
reach of children and anyone who might swallow
these items or otherwise cause injury to
themselves. If a small part is swallowed, see a
doctor immediately.
Explosives
The power source in your SoundClip-A has
insufcient energy to cause re in normal usage
conditions. The SoundClip-A has not been tested
for compliance with international standards
concerning explosive environments. We
recommend you do not use your SoundClip-A in
areas where there is a danger of explosion.
Page 39

39
X-ray/CT/MR/PET scanning, electrotherapy
and surgery
Remove your SoundClip-A before X-ray/CT/MR/PET
scans, electrotherapy, surgery, etc. as your
SoundClip-A may be damaged when exposed to
strong elds.
Heat and chemicals
The SoundClip-A must never be exposed to
extreme heat e.g. left inside a parked car in the sun.
The SoundClip-A must not be dried in microwave
ovens or other ovens. The chemicals in cosmetics,
hairspray, perfume, aftershave lotion, suntan lotion
and insect repellent can damage the SoundClip-A.
Always remove your SoundClip-A before applying
such products and allow time to dry before use.
Interference
The SoundClip-A has been thoroughly tested for
interference according to the most stringent
international standards. However, interference
between the SoundClip-A and other devices (e.g.
some mobile telephones, citizens band devices,
shop alarm systems and other wireless devices)
may occur. If this occurs, increase the distance
between the SoundClip-A and the interfering
device.
Page 40

Use in trafc
Using the SoundClip-A can distract you. Be aware
of your surroundings while using the SoundClip-A.
Please refer to national trafc laws regarding the
use of communication devices while in trafc.
Use on aircraft
Your SoundClip-A contains Bluetooth®. The
SoundClip-A should not be used on board an
aircraft, unless specically permitted by the ight
personnel.
Active implants
Caution must be taken with active implants. If you
have an active brain implant, please contact the
manufacturer of your implanted device for
information about the risk of disturbance.
Rechargeable battery
Do not attempt to open the SoundClip-A, as this
may damage the battery.
Warnings
Page 41

41
Never attempt to replace the battery. If battery
replacement is needed, please return device to the
supplier. The service guarantee is void if there are
signs of tampering.
The safety of recharging batteries using a USB
connector is determined by the external
equipment. When the USB connector is connected
to equipment plugged into a wall outlet, this
equipment should be UL approved or comply with
IEC-60065, IEC-60950 or other equivalent safety
standards.
Connection to external equipment
The safety of the use of SoundClip-A when
connected to external equipment (via auxiliary
input cable, via USB cable, or directly), is
determined by the external equipment. When
connected to external equipment plugged into a
wall outlet, this equipment must comply with
IEC-60065, IEC-60950 or equivalent safety
standards.
Page 42

Cross control
Your SoundClip-A should be kept out of reach of
children or anyone who might take control of the
functionality, to ensure your personal safety and
avoid incorrect use.
Use of lanyard
If by accident the lanyard is caught on something
while wearing it, the lanyard is designed to break
automatically. Therefore, never try to shorten or
modify the lanyard in an unauthorized way. The
lanyard should not be used by children under
36 months of age.
Possible side effects
The otherwise non-allergenic materials used in
your SoundClip-A may in rare cases cause a skin
irritation or other side effects. Please consult a
doctor if these conditions occur.
Warnings
Page 43

43
Mobile phone compatibility
Please refer to
www.bernafon.com/products/accessories
for a list of mobile phones that have been tested
comprehensively by Bernafon, and have been
found to full the minimum requirements for
compatibility at the time of testing. However,
Bernafon takes no responsibility for such
compatibility in general. Specically, Bernafon shall
not be responsible for incompatibility resulting
from future updates of the mobile phones, nor
from events of incompatibility not covered by
and/or found in these tests. Bernafon takes no
nancial responsibility in terms of reimbursements
of mobile phones that do not work as expected.
Before purchasing a new mobile phone, you are
advised to consult the list mentioned above.
Page 44

Technical information
Conditions of Use
Operating humidity: 15 % to 93 % relative
humidity, non-condensing.
Operating temperature: 5 – 40 °C
Storage and transportation: –20 – 60 °C
The SoundClip-A contains a radio transceiver using
Bluetooth® EDR, Bluetooth® Low Energy (BLE) and
a proprietary short range radio technology all
working at 2.4 GHz. The 2.4 GHz radio transmitter
is weak and always below 17 dBm e.i.r.p. in total
radiated power.
The SoundClip-A complies with international
standards concerning radio transmitters, electromagnetic compatibility and human exposure.
Due to the limited space available on the
SoundClip-A, relevant approval markings can be
found in this booklet.
Page 45

45
USA and Canada
This device contains a radio module with the
following certication ID numbers:
FCC ID: 2ACAHAC01
IC: 119 3 6 A - AC01
The device complies with Part 15 of the FCC Rules
and with Industry Canada’s licence-exempt RSSs.
Operation is subject to the following two
conditions:
1. this device may not cause harmful interference,
and
2. this device must accept any interference
received, including interference that may cause
undesired operation.
Changes or modications not expressly approved
by the party responsible for compliance could void
the user’s authority to operate the equipment.
This Class B digital apparatus complies with
Canadian ICES-003.
Page 46

Note: This equipment has been tested and found
to comply with the limits for a Class B digital
device, pursuant to part 15 of the FCC Rules.
These limits are designed to provide reasonable
protection against harmful interference in a
residential installation. This equipment generates,
uses and can radiate radio frequency energy and, if
not installed and used in accordance with the
instructions, may cause harmful interference to
radio communications. However, there is no
guarantee that interference will not occur in a
particular installation. If this equipment does cause
harmful interference to radio or television
reception, which can be determined by turning the
equipment off and on, the user is encouraged to
try to correct the interference by one or more of
the following measures:
· Redirect or relocate the receiving antenna.
· Increase the separation between the equipment
and receiver.
· Connect the equipment into an outlet on a circuit
different from that to which the receiver is
connected.
· Consult the manufacturer or an experienced
radio/TV technician for help.
Page 47

47
International warranty
Your SoundClip-A is covered by an international
limited warranty issued by the manufacturer for a
period of 12 months from the date of delivery.
This limited warranty covers manufacturing and
material defects in the device itself, but not in
accessories such as batteries, cables, power
supplies, etc. Problems arising from improper/
incorrect handling or care, excessive use,
accidents, repairs made by an unauthorized party,
exposure to corrosive conditions, damage due to
foreign objects entering the device or incorrect
adjustments are NOT covered by the limited
warranty and may void it. The above warranty
does not affect any legal rights that you might
have under applicable national legislation
governing sale of consumer goods. Your hearing
care professional may have issued a warranty that
goes beyond the clauses of this limited warranty.
Please consult him/her for further information.
Page 48

Date: Model:
Warranty period:
Serial no.:
Hearing Center
If you need service
Take your SoundClip-A to your hearing care
professional, who may be able to sort out minor
problems and adjustments immediately.
Page 49

49
The manufacturer declares that this SoundClip-A
(AC1A) is in compliance with the essential
requirements and other relevant provisions of
Directive 2014/53/EU. The Declaration of
Conformity is available from the manufacturer.
SBO Hearing A/S
Kongebakken 9
DK-2765 Smørum
Denmark
www.sbohearing.com
Waste from electronic
equipment must be
handled according to
local regulations.
Page 50

Notes
186717/ UK
Page 51

< 15 mm >
< >
8,15 m m
< >
9.0 mm
< 19 mm >
Placeholder
for FSC logo
Page 52

SBO Hearing A/S
Kongebakken 9
DK-2765 Smørum
Denmark
www.sbohearing.com
0000186717000001
2017-11-29/186717/UK/subject to change
 Loading...