

Page 1
RC-A
Remote Control
Instructions for Use
Page 2

Page 3
3
Introduction to this booklet
This booklet guides you on how to use and
maintain your new RC-A. Please read the booklet
carefully including the warning section. This will
help you get the most out of your new remote
control.
If you have further questions about using your
remote control, please contact your hearing care
professional.
Page 4

Intended use
RC-A is intended to assist users of wireless hearing aids
to control functionality provided by their hearing solution.
RC-A is intended to be used by children (> 36 months)
and adults together with their hearing solution.
Page 5

Table of contents
Package contents 7
Product overview 8
Battery insertion and removal 9
Pairing the remote control with your hearing aids 14
Remove the pairing between
the remote control and hearing aids 20
Operating range 22
Confirmations 24
Change programs 26
Adjust volume 28
Mute 30
Lock/unlock the RC-A buttons 32
Page 6

Strap holes 34
Taking care of your remote control 35
Warnings 36
International warranty 46
Technical information 50
Page 7
7
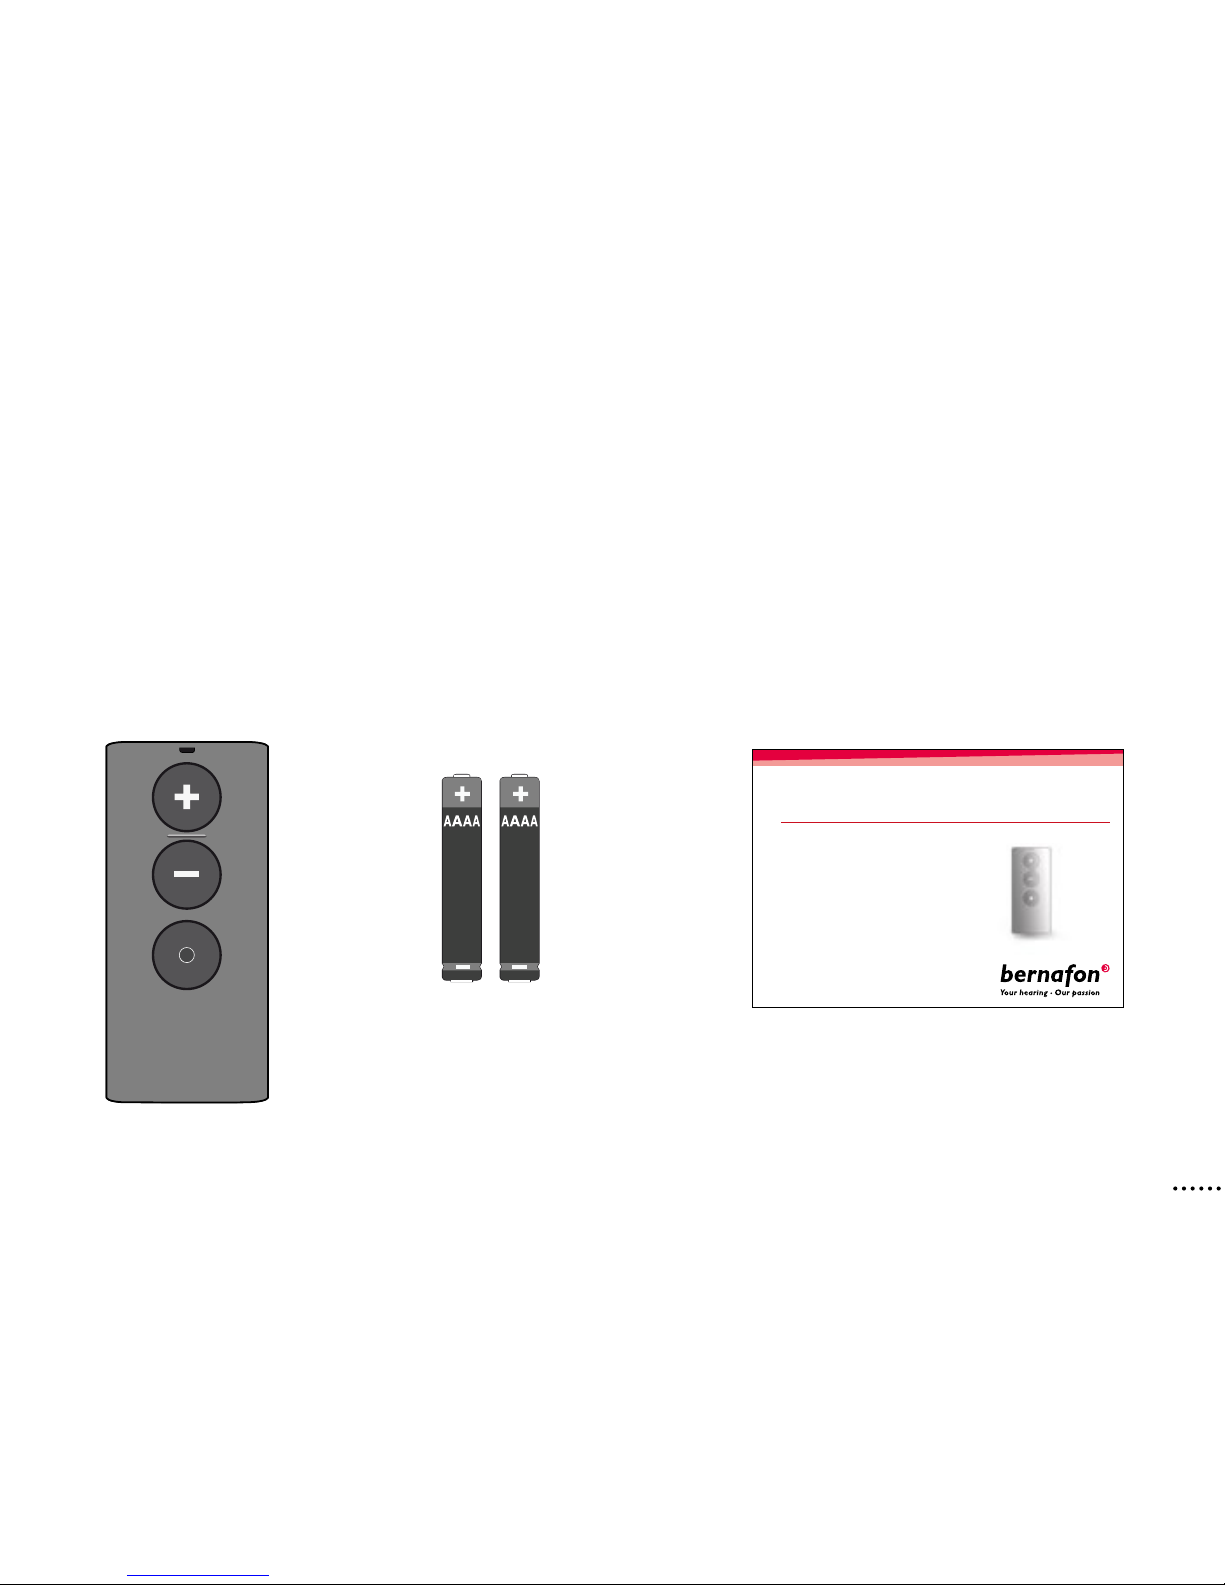
Package contents
You will nd the following items in the package:
2x AAAA
batteries
RC-A
RC-A
Remote Control
Instructions for Use
This booklet
Page 8
8
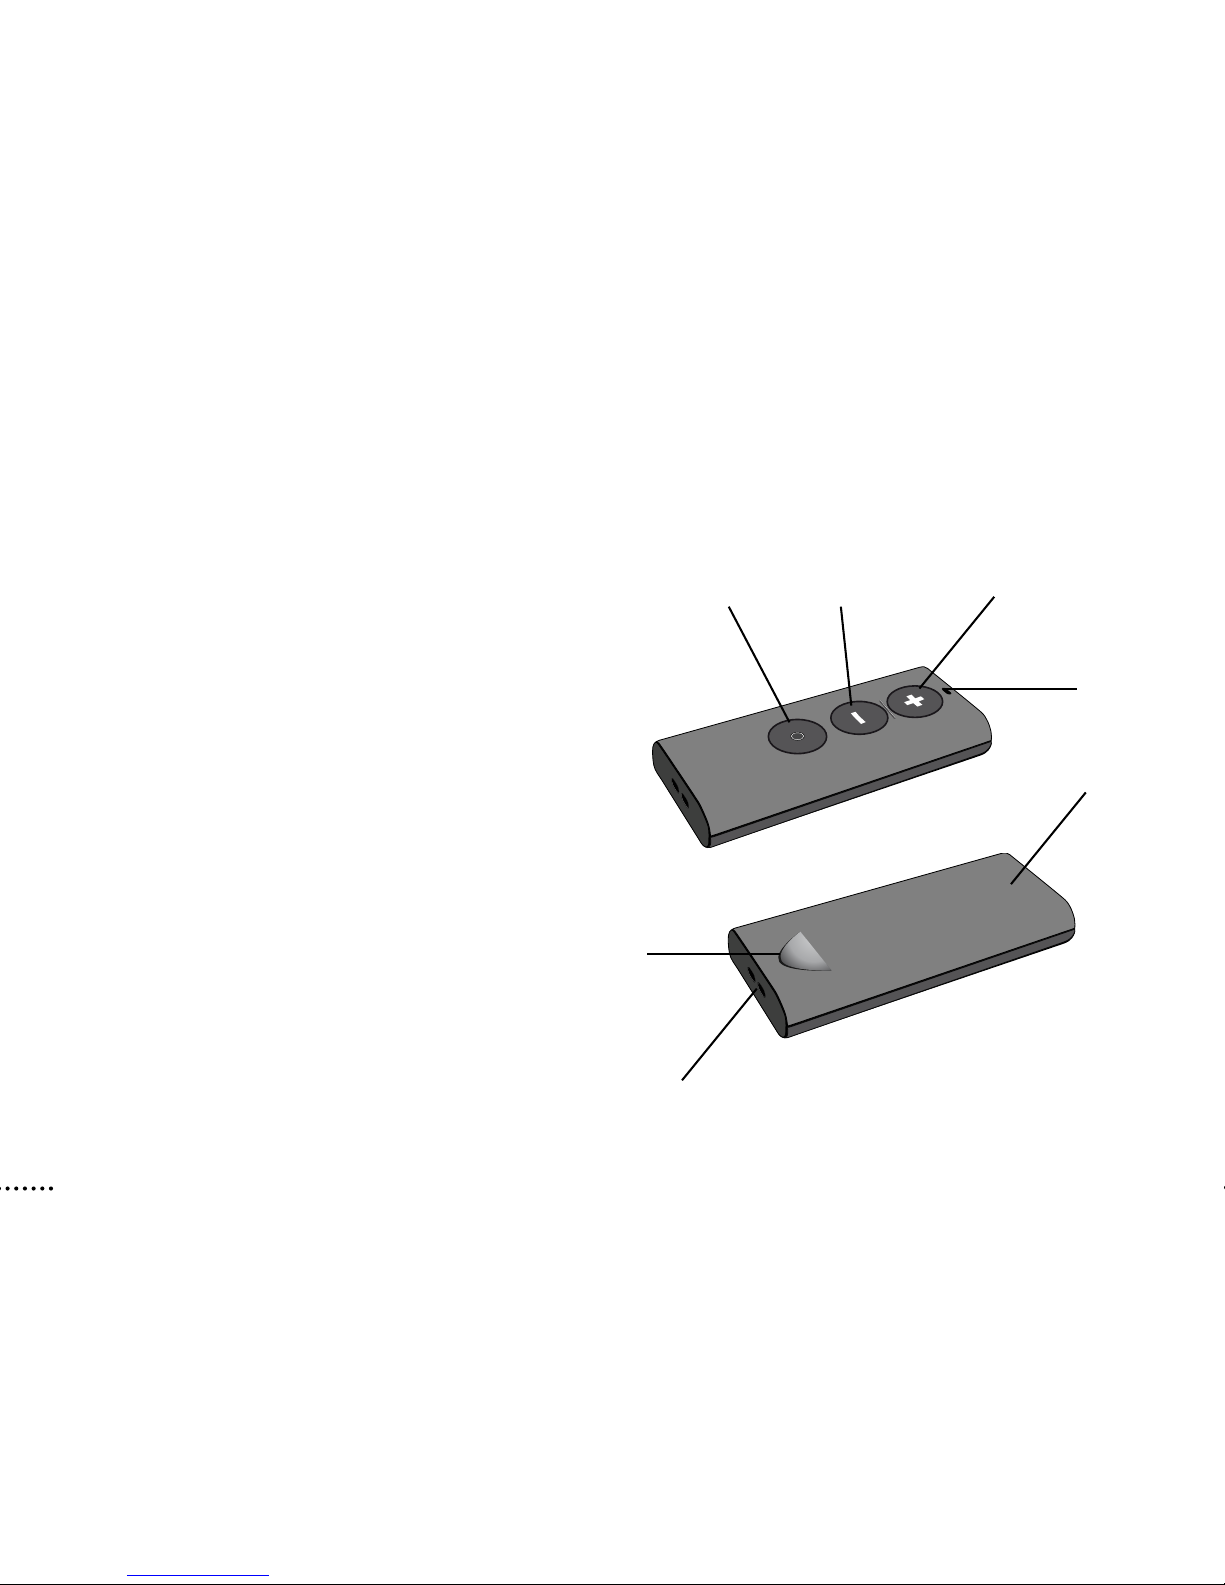
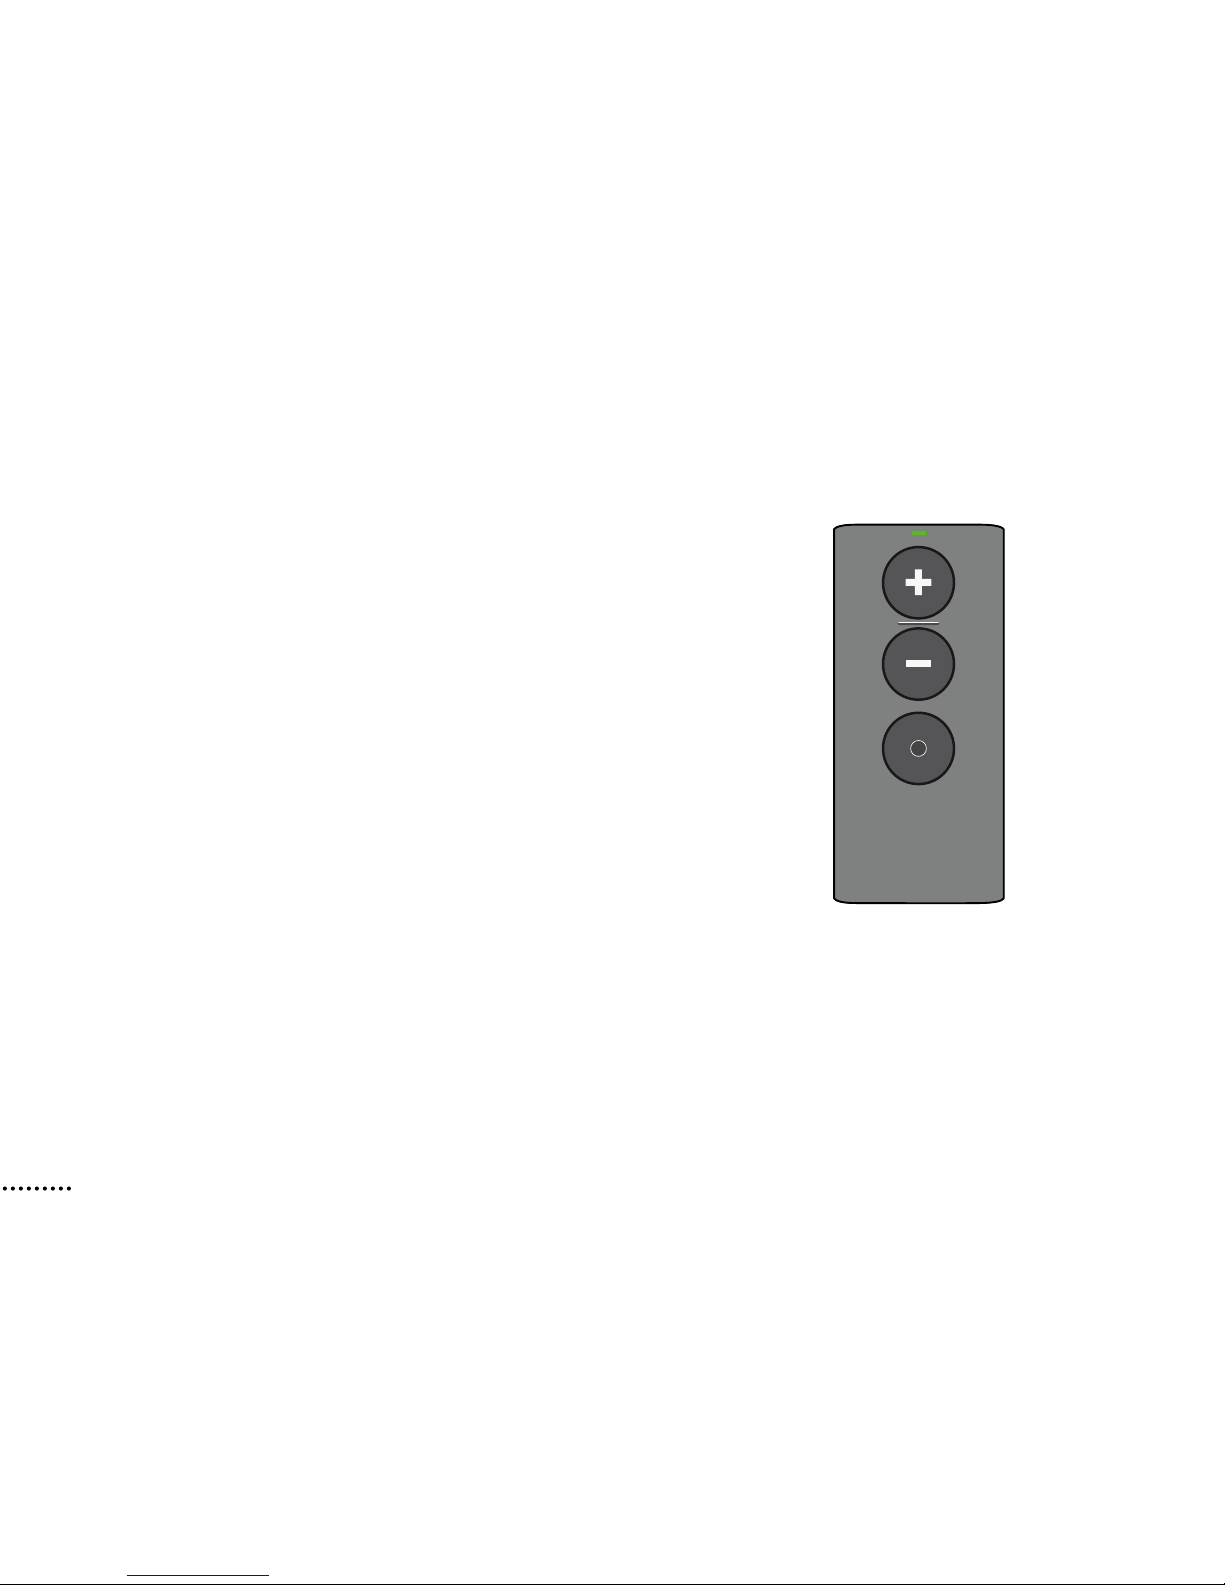
Product overview
1 Volume control up
2 Volume control down
3 Program change
4 Status light
5 Battery cover
6 Finger grip
7 Strap holes
1
23
5
1
4
6
7
Page 9

9
Battery insertion and removal
The RC-A uses two alkaline AAAA batteries. Please
follow these instructions to insert new batteries.
Battery life will vary depending on the condition of use.
Standard use requires battery replacement approximately
once a year. Remove any used batteries and discard
them according to local regulation.
Page 10

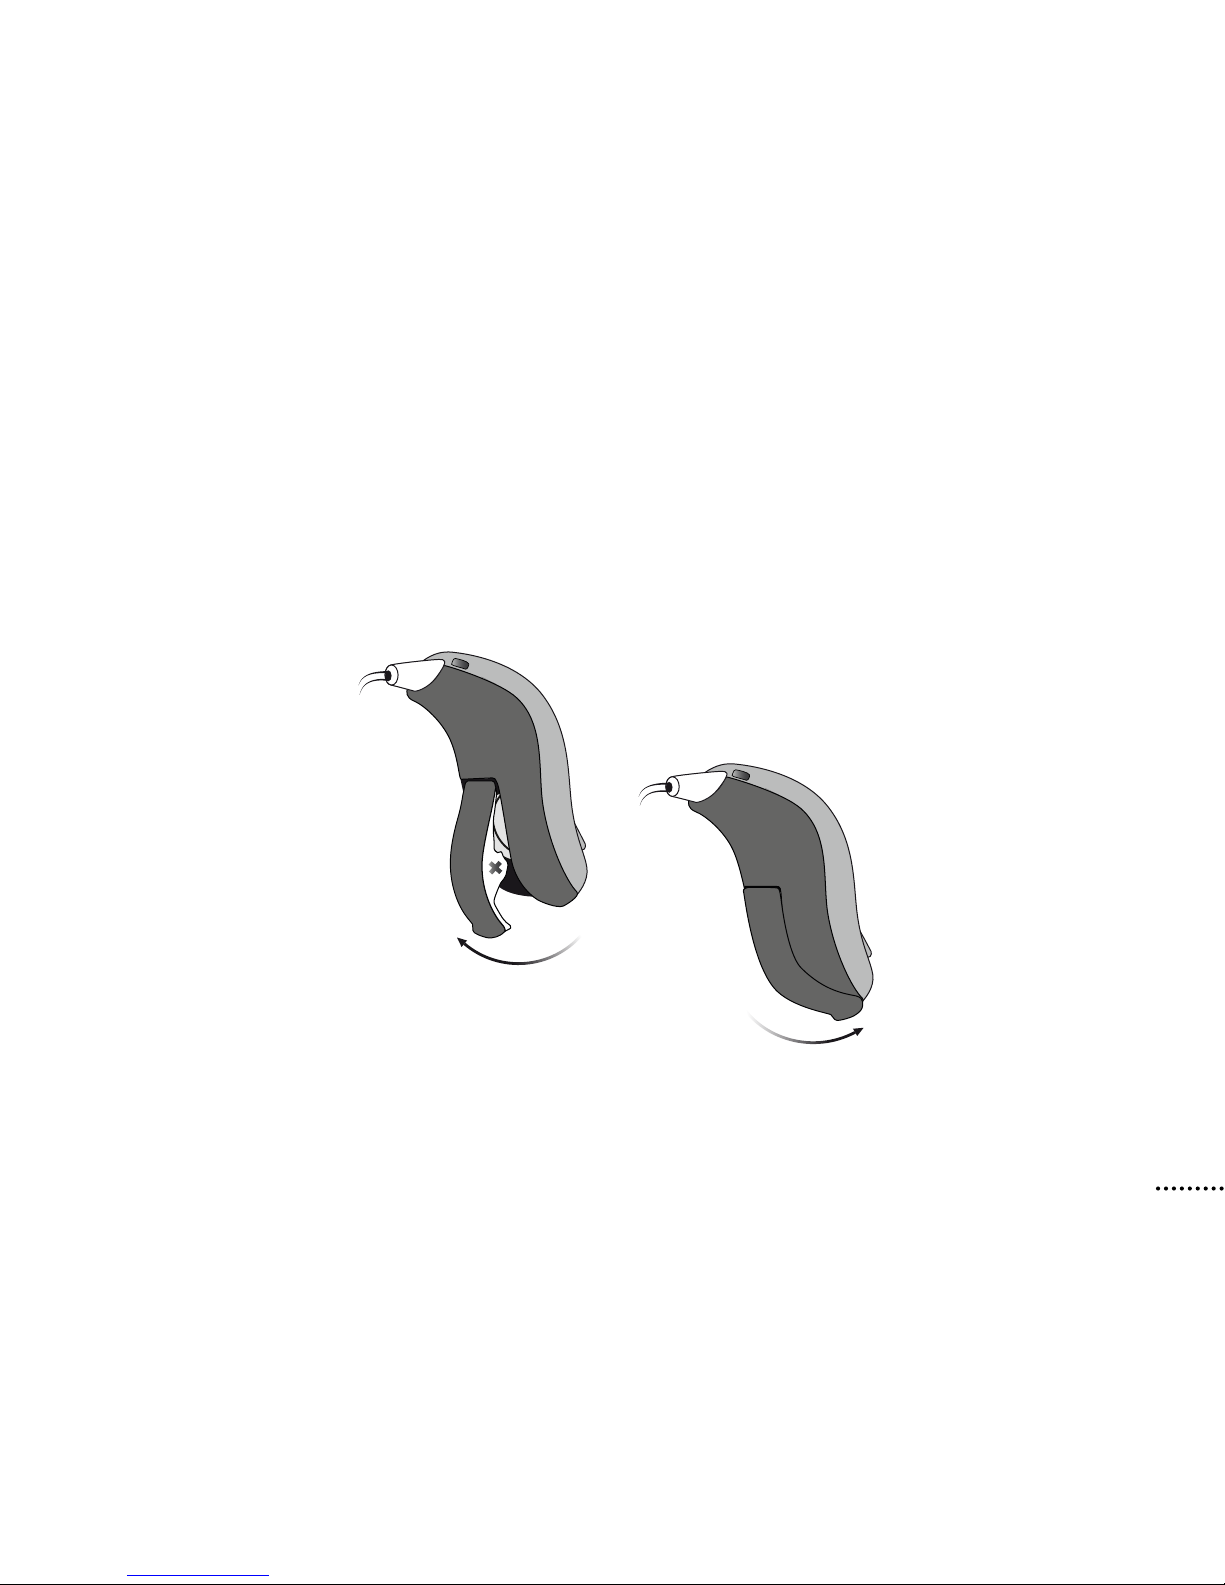
10
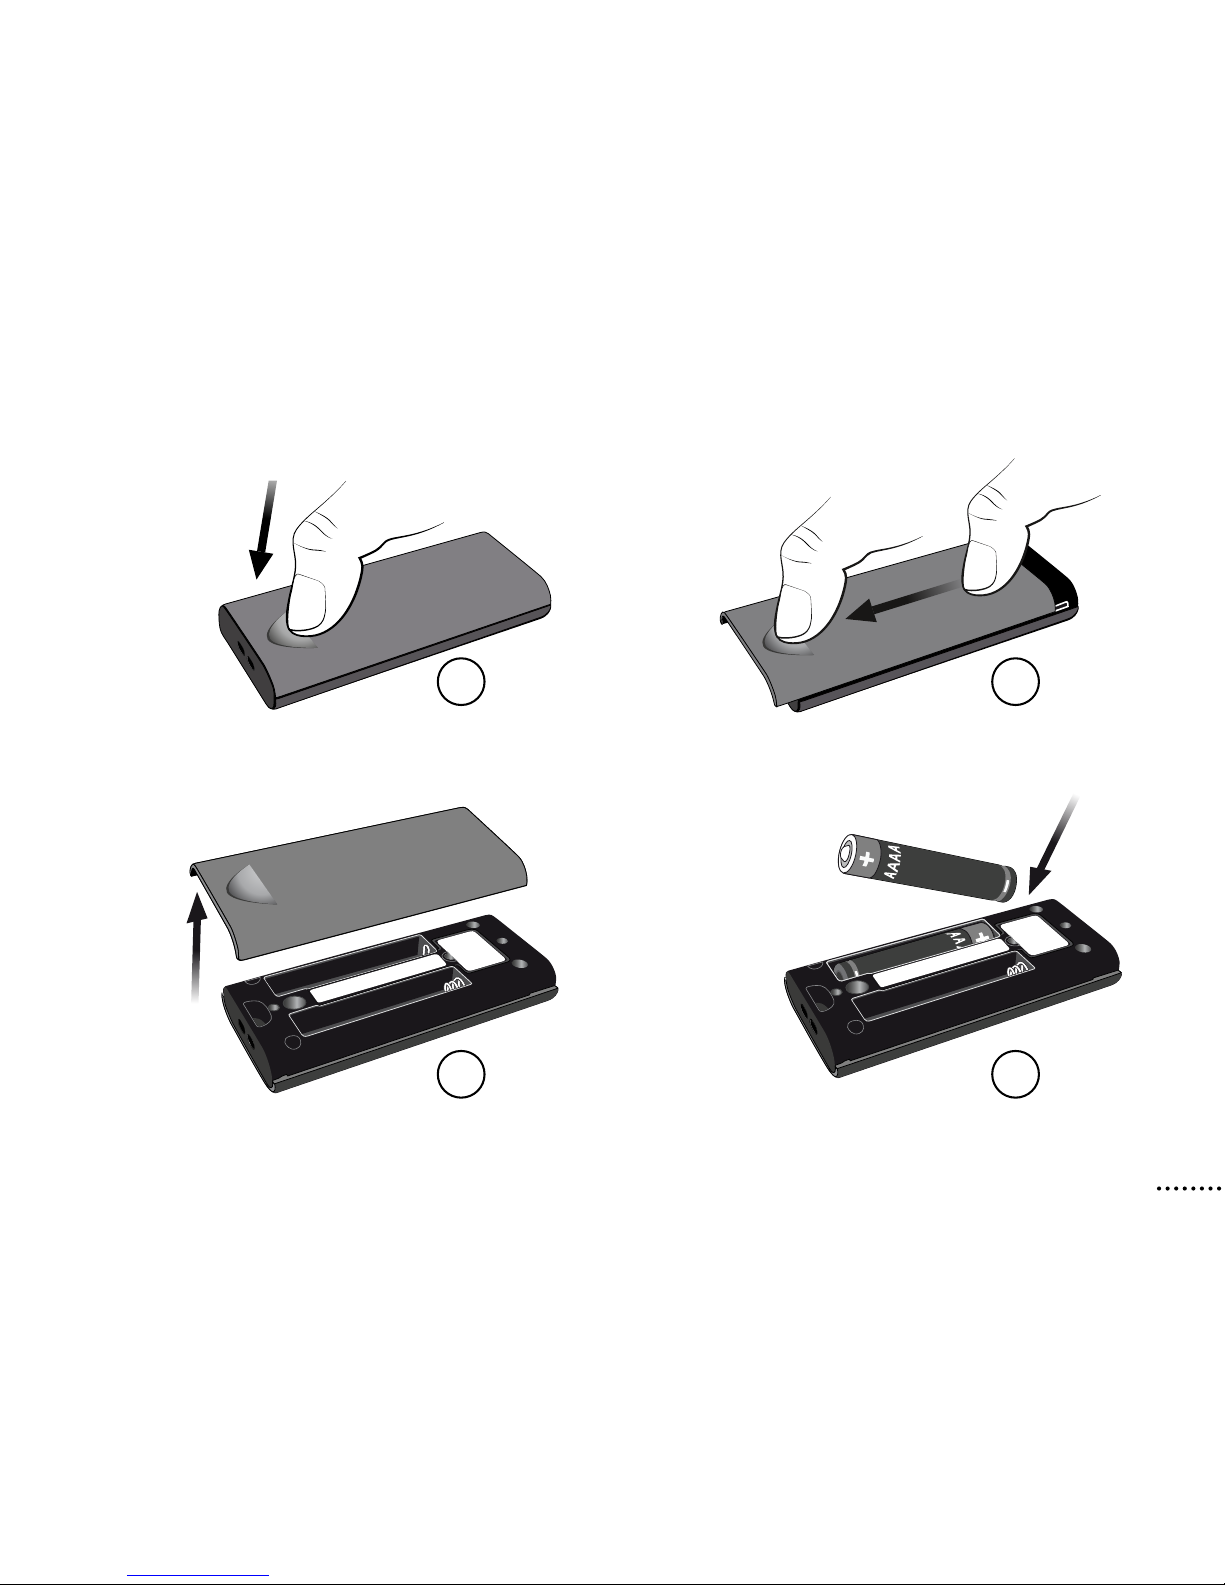
Remove the battery cover
1. Using your thumb, push down on the nger grip.
2. From the opposite end of the battery cover, push in
the direction of the nger grip with your other thumb.
3. Lift the battery cover off completely.
4. Insert the batteries into the battery compartment
making sure that the “+” sign on the battery matches
with the “+” sign in the battery compartment.
Page 11
11
1
2
3
4
Page 12
12
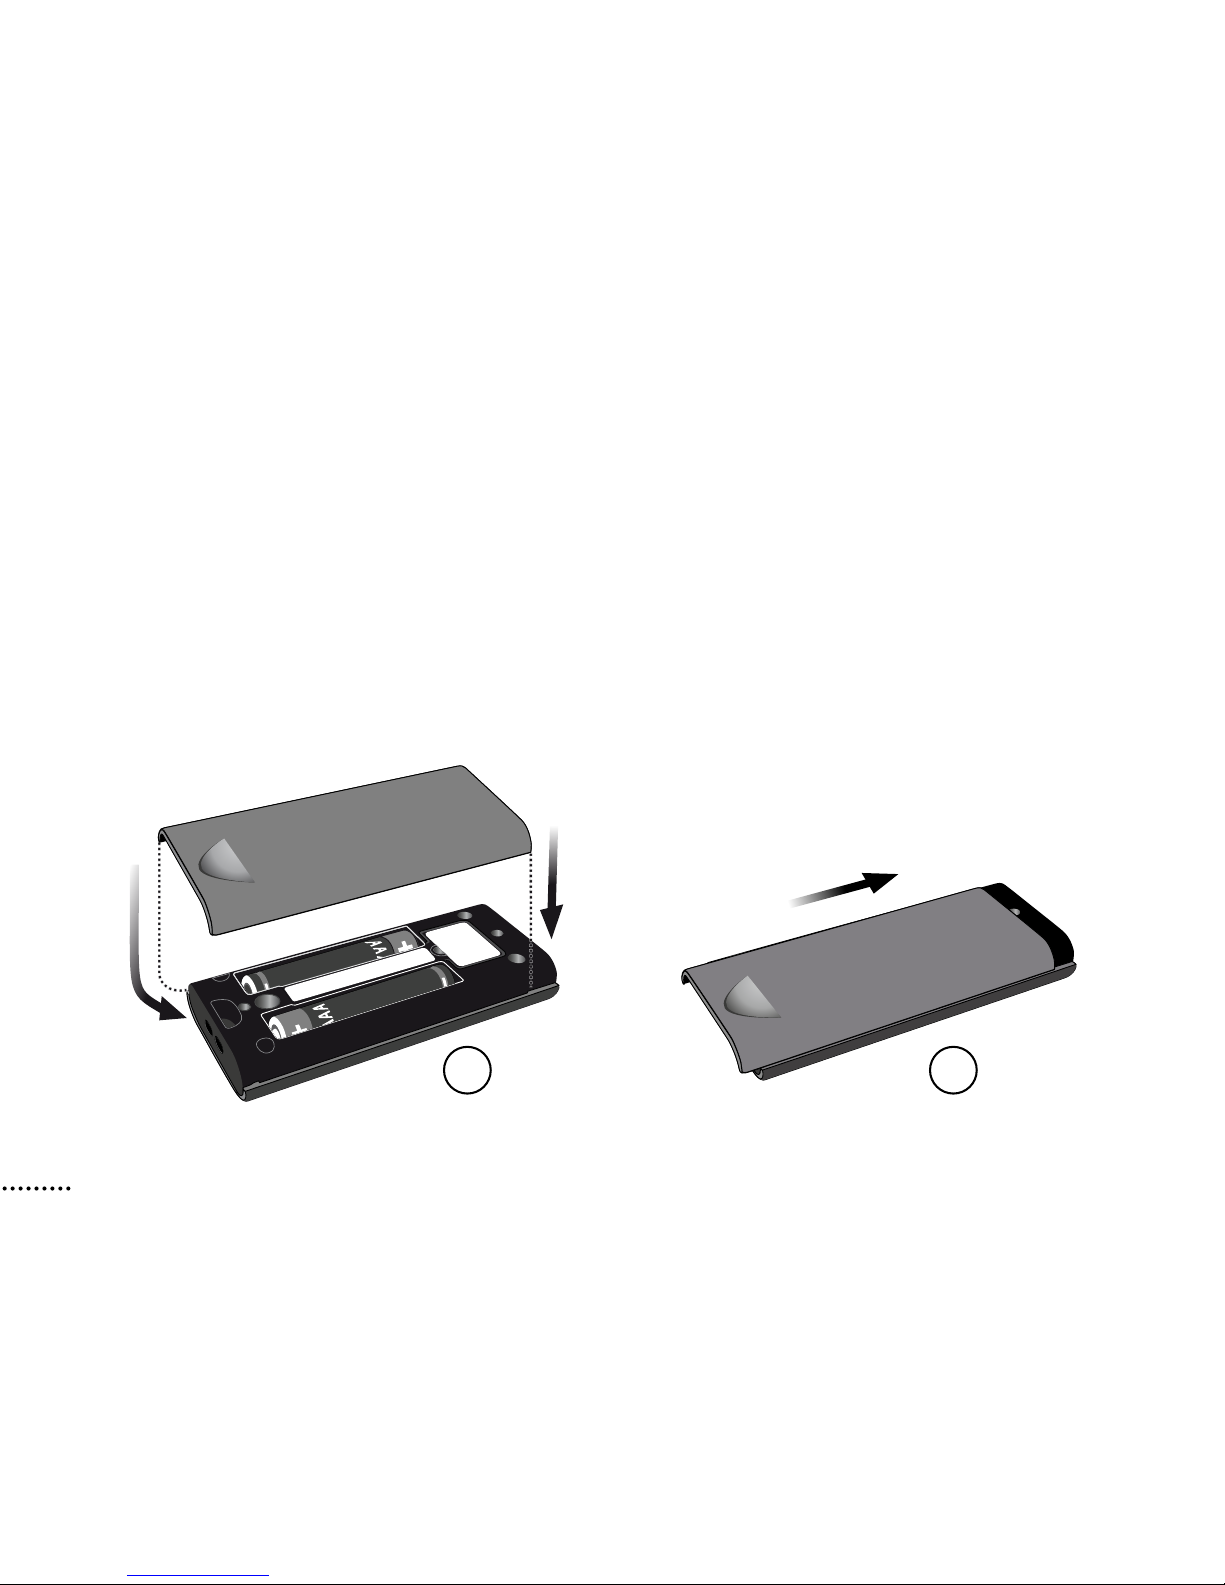
Replace the battery cover
1. Replace the battery cover approximately 6 mm
down from the top of the RC-A.
2. Slide the battery cover as shown, until it clicks.
1
2
Page 13
13
IMPORTANT NOTICE
The battery cover should never be forced. If force is
required to replace the cover, check the alignment and
reposition it so that it clicks easily into place.
Page 14
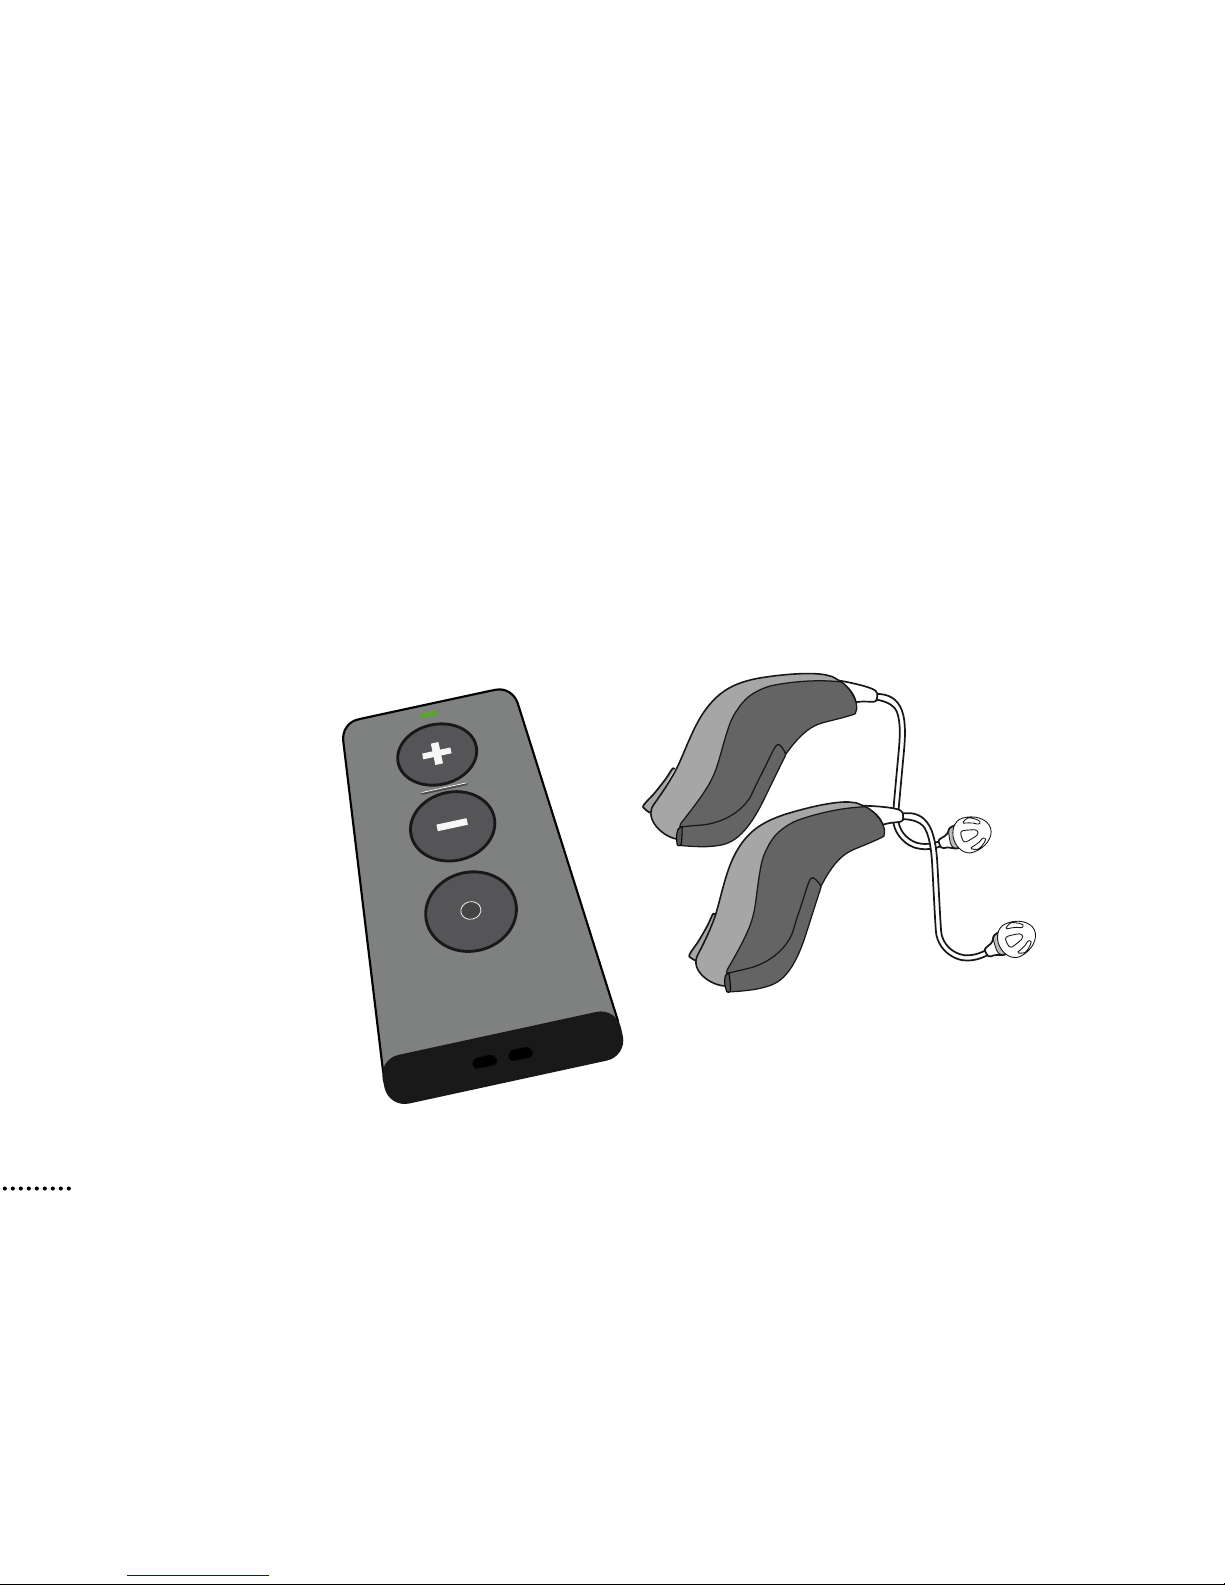
14
Pairing the remote control
with your hearing aids
The remote control is a personal device intended to be
used with one set of hearing aids. The remote control
can operate up to two hearing aids at a time after pairing.
Before the remote control can be used with your hearing
aids, the devices need to be paired.
Page 15

15
You can choose to pair the remote control with either
two hearing aids at the same time or with one hearing
aid at a time. You need to repeat the pairing process if
you choose to pair your hearing aids one at a time.
In the following instructions, a set of hearing aids is
being paired with the remote control.
Page 16
16
Remote control ready
1. Check that the remote control has
working batteries by pressing any
button. With working batteries, the
RC-A status light will illuminate for
as long as the button is held down.
Page 17
17
Hearing aids ready
2. Open and close the battery drawer on both of your
hearing aids.
Page 18
18
In range
3. Place both of your hearing aids within range of the
remote control (i.e. within 20 cm).
Page 19

19
Pairing
4. Press any button on the remote control and it will
automatically pair with the hearing aids in range.
When the status light on the remote
control lights up steady green for
10 seconds, the devices have been
paired successfully.
Page 20

20
Remove the pairing between
the remote control and hearing aids
The remote control can be paired to a set of hearing
aids at once. If you need to pair your remote control to
another set of hearing aids, rst you have to remove
the current pairing.
Page 21

21
When the status light on the remote control lights up
steady green for 10 seconds, the pairing has been
cleared successfully.
Your remote control is ready to be paired again with
your hearing aids (see page 14).
Press for
approximately
5 seconds to remove
the current pairing
To clear the current
pairing, press and
hold the three buttons
together for 5 seconds.
Page 22

22
Operating range
With the remote control you can operate your hearing
aids from a distance of up to 1.8 meters (3.3 feet).
A direct line of sight between the remote control and
your hearing aids is not required.
If you have paired two hearing aids to the remote control,
both will be adjusted at the same time.
Page 23

23
Up to 1.8 m (3.3 ft)
Page 24

24
Confirmations
Visible indications
The status light on the remote control will light up when
a button is pressed.
Audible indications
You will hear a sound in your
hearing aids which conrms
the action performed.
Page 25

25
Battery low
If the batteries are running low, the status light will
blink rapidly whenever a button is pressed. In this case,
replace the batteries at your earliest convenience.
Page 26

26
Change programs
The remote control can be used to change programs if
your hearing care professional has made more than one
program available in your hearing aids.
Simply press the program button on the remote control
to go through the hearing aid programs. Each press will
advance the hearing aids to the next program in the cycle.
Page 27

27
Press to change program
IMPORTANT NOTICE
Please refer to your hearing aid’s “Instructions for
Use” for details on the functionality of your specic
hearing aid solution.
Page 28

28
Adjust volume
With the remote control, you can adjust the volume of
your hearing aids by using the volume control buttons.
You will hear a short conrmation in your hearing aids
when you turn the volume up or down.
Press the volume up button to increase the volume of
your hearing aid.
Press the volume down button to decrease the volume
of your hearing aid.
Page 29

29
Press “+”
to increase volume
(louder sound)
Press “–”
to decrease volume
(softer sound)
Page 30

30
Mute
Use the mute function if you need to silence the hearing
aids while wearing them. Press and hold the volume
down button for approximately 2 seconds until the status
light turns off, to mute the hearing aids.
Unmute
Briey press any button on the remote control to unmute
your hearing aids.
Page 31

31
Press for approximately
2 seconds to mute
IMPORTANT NOTICE
Please refer to your hearing aid’s “Instructions for
Use” for details on the functionality of your specic
hearing aid solution.
Page 32

32
Lock/unlock the RC-A buttons
To prevent accidental button presses when the RC-A
is in your pocket, you may wish to lock the buttons.
Locking the remote control buttons
1. Press and hold the
volume down and
program buttons together
for 3–4 seconds.
Press for
approximately
3– 4 seconds
to lock
Page 33

33
2. The status light will blink two times when the buttons
are locked.
To conrm the buttons are locked, press any key. The
status light will blink three times to conrm.
Unlocking the remote control buttons
1. Press and hold again the volume down and program
buttons together for 3–4 seconds.
2. The status light will be steadily illuminated until the
keys are unlocked.
Page 34

34
Strap holes
For your convenience, the RC-A has a strap hole,
allowing you to attach a small strap for carrying and
securing your RC-A more easily.
1. Remove the battery cover
(see pages 10 and 11).
2. Thread a small strap
through the strap holes.
Page 35

35
Taking care of your remote control
When changing the batteries or cleaning the remote
control, hold it over a soft surface to avoid damage if
you drop it.
IMPORTANT NOTICE
Use a soft, dry cloth to clean the remote control.
It must never be washed or immersed in water or
other liquids.
Page 36

36
Warnings
You should familiarize yourself fully with the following
general warnings and the entire contents of this booklet
before using your remote control to ensure personal
safety and correct use. Consult your hearing care
professional if you experience unexpected operations or
events with your remote control.
Page 37

37
Choking hazards and risk of swallowing batteries
or other small parts
· Your remote control, its parts and batteries should be
kept out of reach of children and anyone who might
swallow these items or otherwise cause injury to
themselves.
If a battery or other small parts are swallowed,
see a doctor immediately.
Page 38

38
Warnings
Cross control
· Your remote control should be kept out of reach of
children or anyone who might take control of the
functionality, to ensure your personal safety and avoid
incorrect use.
Use of straps
· If a hand strap is used, make sure it is designed and
suitable for the purpose. Never use a lanyard due to
the risk of strangulation.
Page 39

39
Battery use
· Always use batteries recommended by your hearing
care professional. Batteries of low quality may leak
and cause bodily harm.
· Never attempt to recharge your batteries and never
dispose of batteries by burning them. There is a risk
that the batteries will explode.
Page 40

40
Warnings
Active implants
· Caution must be taken with active implants.
· If you have an active brain implant, please contact the
manufacturer of your implantable device for information
about the risk of disturbance.
X-ray/CT/MR/PET scanning, electrotherapy
and surgery
· Remove your remote control before X-ray/CT/MR/PET
scanning, electrotherapy, surgery etc., as the remote
control may be damaged when exposed to strong
elds.
Page 41

41
Possible side effects
· The otherwise non-allergenic materials used in your
remote control may in rare cases cause skin irritation or
other side effects.
Please seek consultation with a physician if these
conditions occur.
Page 42

42
Warnings
Heat and chemicals
· Your remote control must never be exposed to extreme
heat e.g. left inside a parked car in the sun.
· Your remote control must not be dried in microwave
ovens or other ovens.
· The chemicals in cosmetics, hair spray, perfume,
aftershave lotion, suntan lotion and insect repellent
can damage your remote control. Always remove your
remote control before applying such products and allow
time to dry before use.
Page 43

43
Use in trafc
· Using the remote control while driving can distract you.
Please refer to national trafc laws regarding the use of
communication devices while in trafc.
Use on aircraft
· Your remote control contains Bluetooth
®
.
The remote
control should not be used on board of an aircraft
unless specically permitted by the ight personnel.
Page 44

44
Warnings
Interference
· Your remote control has been thoroughly tested
for interference according to the most stringent
international standards. However, interference
between your remote control and other devices (e.g.
some mobile telephones, citizens band devices, shop
alarm systems and other wireless devices) may occur.
If this occurs, increase the distance between the
remote control and the interfering device.
Page 45

45
Explosives
· The power source in your remote control has
insufcient energy to cause re in normal conditions
of use. The remote control has not been tested for
compliance with international standards concerning
explosive environments. We recommend not to use
your remote control in areas where there is a danger
of explosions.
Page 46

46
The RC-A remote control is covered by an international
limited warranty issued by the manufacturer for a period
of 12 months from the date of delivery.
This limited warranty covers manufacturing and material
defects in the device itself, but not in accessories such as
batteries, cables, power supplies, etc. Problems arising
from improper/incorrect handling or care, excessive
use, accidents, repairs made by an unauthorized party,
exposure to corrosive conditions, damage due to foreign
objects entering the device or incorrect adjustments are
NOT covered by the limited warranty and may void it.
International warranty
Page 47

47
The above warranty does not affect any legal rights
that you might have under applicable national legislation
governing sale of consumer goods. Your hearing care
professional may have issued a warranty that goes
beyond the clauses of this limited warranty.
Please consult him/her for further information.
Page 48

48
If you need service
Take your remote control to your hearing care
professional, who may be able to sort out minor
problems and adjustments immediately.
Page 49

49
Date: Model:
Warranty period:
Serial no.:
Hearing Center
Page 50

50
Technical information
Model RC-3B
Operating
conditions
Temperature: 5°C – 40°C
Humidity: 15% – 93%,
non-condensing
Operating atmospheric pressure:
700hPa to 1060hPa
Storage and
transportation
conditions
Temperature: –25°C – 70°C
Humidity: 15% – 93%,
non-condensing
Mechanical
dimensions
75.3 x 35 x 11.8 mm;
weight 32.7 g (incl. batteries)
Page 51

51
Compatibility Bernafon hearing aids
with 2.4GHz radio technology
Battery type 2 x AAAA
Battery life
at normal use
12 months
Typical transmission
range
Up to 1.8 m
Status indicator Green LED
Page 52

52
Transceiver:
Operating
frequency
2.402 GHz – 2.480 GHz
(ISM Band)
Number of channels 39
Output power <10 dBm EIRP
Channel of bandwidth 1 MHz
Type of modulation GFSK
ITU designator F7D
Page 53

53
The RC-A contains a radio transceiver using Bluetooth®
Low Energy (BLE) and a proprietary short range radio
technology both working at 2.4 GHz. The 2.4 GHz radio
transmitter is weak and always below 10 dBm EIRP in
total radiated power. The remote control complies with
international standards concerning electromagnetic
compatibility and human exposure.
Due to the limited space available on the remote control,
relevant approval markings can be found in this booklet.
Page 54

54
USA and Canada
This device is certied under:
FCC ID: 2ACAHREMCTR03
IC: 11936A-REMCTR03
This device complies with Part 15 of the FCC Rules and
with Industry Canada’s licence-exempt RSSs.
Page 55

55
Operation is subject to the following two conditions:
1. This device may not cause harmful interference, and
2. This device must accept any interference received,
including interference that may cause undesired
operation.
Changes or modications not expressly approved by the
party responsible for compliance could void the user’s
authority to operate the equipment.
Page 56

56
This Class B digital apparatus complies with Canadian
ICES-003.
Note: This equipment has been tested and found to
comply with the limits for a Class B digital device,
pursuant to part 15 of the FCC Rules. These limits
are designed to provide reasonable protection against
harmful interference in a residential installation. This
equipment generates, uses and can radiate radio
frequency energy and, if not installed and used in
accordance with the instructions, may cause harmful
interference to radio communications. However, there
is no guarantee that interference will not occur in a
particular installation. If this equipment does cause
Page 57

57
harmful interference to radio or television reception,
which can be determined by turning the equipment
off and on, the user is encouraged to try to correct the
interference by one or more of the following measures:
· Reorient or relocate the receiving antenna.
· Increase the separation between the equipment and
receiver.
· Connect the equipment into an outlet on a circuit
different from that to which the receiver is connected.
· Consult the manufacturer or an experienced radio/TV
technician for help.
Page 58

58
SBO Hearing A/S
Kongebakken 9
DK-2765 Smørum
Denmark
www.sbohearing.com
UK - 19.01.2017 aoho
176776/UK
The manufacturer declares that this remote control is in
compliance with the essential requirements and other
relevant provisions of Directive 1999/5/EC.
Declaration of conformity is available from the
manufacturer:
Page 59

59
< 15 mm >
< >
8,15 mm
< >
9.0 mm
< 19 mm >
Placeholder
for FSC logo
Page 60

2017-01-30/176776/UK/subject to change
E2105
0682
Waste from electronic
equipment must be
handled according to
local regulations.
SBO Hearing A/S
Kongebakken 9
DK-2765 Smørum
Denmark
www.sbohearing.com
UK - 19.01.2017 aoho
0000176776000001
 Loading...