


(W)
C\ls
.-
C\I ~
.
O
I ~ CDen
. 1:.-
a:
<C
CD
0
en0.
..~~
- 0
... ~
0.1:
.- 0
0'"
.- u
N ~
~.:::
...
en
'1nI:
- -
~
Beretta
mod. 70/.223 weapons system
AR . Fucile d'assalto / Assault rifle
SC . Carabina per truppe speciaIi / Carbine for special units
AR. 70/.223
SC. 70/.223

Indice
I GENERALIT A: dati e descrizione
II COMANDI
III CARICATORE
IV PREPARAZIONE PER IL TIRO
V LANCIO DEllA GRANATA
VI BAIONETTA
VII RAFFORZATORE DI RINCULO
VIII SMONTAGGIO ELEMENTARE PER PULIZIA
A astlna
B lanciagranate
C cllindro presa gas
tubo asta armamento
"0
E come aprlre iI fucile
F tl retto
G gruppo otturatore
H carrello otturatore
I asta armamento
IX PULIZIA
X INCONVENIENTI E RIMEDI
. DISEGNO ESPLOSO - NOMENCLA TORE
XI SMONTAGGIO PARTICOLAREGGIATO DELL'ARMA:
FORI DI RIFERIMENTO
SEOUENZA OJ SMONTAGGIO
1 perno cerniera
2 calclo
3 impugnatura
4 portamolla cane
5 selettore -sicura
6 perno leva rattica
7 perno del cane
8 perno grilJetlo
9 molla grilletto
10 perno ganclo caricatore
11 awiso serbatoio vuoto
12 mirino
13 gruppo alzo
14 valvola lancia-granate
15 estrattore
XII SEOUENZA RIMONTAGGIO
XIII GRUCCIA
XIV BIPIEDE
XV COLLIMATORE
pagina
13
17
18
21
23
24
25
35a
26
27
28
29
30
31
32
33
34
35
36
41
3
8
39
43
45
47
49
51
53
55
56
57
58
59
61
62
63
65
66
67
Table of contents
r GENERAL: Data" and description
II CONTROLS
III MAGAZINE
IV PREPARATION FOR FIRING
V LAUNCHING THE GRENADE
VI BAYONET.
VII BLANK AMMUNITION FIRING ATTACHMENT
VIII ELEMENTARY STRIPPING. FOR CLEANING
A handgua.rd
B grenade-launcher
G bolt assembly
C gas cylinder
D operating rod tube
E to break the rifle open
F charging handle
H bolt carrier
I operating rod
IX CLEANING
X TROUBLESHOOTING
.
. EXPLODED DRAWING - NOMENCLATURE
XI ADVANCED STRIPPING OF THE WEAPON:
REFERENCE HOLES
STRIPPING SEQUENCE
1 hinge pin
2 buttstock
3 pistol" grip
4 hammer spring guide
5 selector - safety
6 automatic fire lever pin
7 hammer .pin
8 trigger pin
9 trigger spring
10 magazine latch
11 bolt hold open
12 front sight.
13 rear sight group
14 spindle valve
15 extractor
XII REASSEMBLY SEQUENCE
XIII FOLDING BUTT
XIV BIPOD
XV RIFLE SCOPE
2
.
page.
3
8
13.
17
18
21
23
24
25
26
31
27
28
29
30
32
33
34
35
35a
36
39
41
43
45
47
49
51
53
55
56
57
58
59
61
62
64
65
66
67

Generalita
37
87
SC 70/.223
I
General
92
91
I
Fig 1
Fig. 2
SC 70/.223
Fig. 3
lanciagranate
leva valvola lanciagranate
avviso serbatoio vuoto
selettore - sicura
diottra
cinghia per AR. 70
caricatore
gancio caricaJore
grilletto
sportello culatta
tiretto
bipiede
gruccia
cinghia per SC 70
Le denominazioni ed i numeri de! particolari usati in questo
libretto si riferiscono al disegno esploso ed a! suo nomenclatore.
The technical terms and part numbers used in this booklet refer to
the exploded drawing and its nomenclature.
3
4
91
37
29
40
68
14
87
84
55
61
22
90
92
grenade launcher
spindle valve lever
bolt hold open
selector -
aperture sight
sling for AR 70
magazine latch
8
charging handle
folding stock
sling for SC 70
safety
magazine
trigger
dust cover
bipod

Dati numerici
Peso
Modello AR 70/.223 senza caricatore e senza cinghia
Modello SC 70/.223 senza carica tore e senza cinghia
Cinghia
Caricatore vuoto (30 colpi)
Caricatore pieno (30 colpl)
Modello AR 70/.223 con cinghia e caricatore pieno
(30 colpi)
Modello SC 70/.223 con cinghia e caricatore pieno
(30 colpi)
Baionetta
Lunghezza
Caratteristiche meccaniche
Principio di funzionamento: a presa di gas
Tipo del\'otturatore: rotante
Alimentazione: a caricatore
Raffreddamento: ad aria
Munizionamento: calibro 5.56 mm. (.223)
Caratteristiche di tiro
Portata massima
Portata massima utile
Tipo di granata
-
Modello AR 70/.223
Canna
Canna con lanciagranate
Modello SC 70/.223 con grucc)a stesa
Modello SC 70/.223 con gruccia piegata
Baionetta senza fodero
Modello AR 70/.223 con baionetta
Rigatura, destrorsa, 4 righe (0 6) un giro in 304 mm.
Tipo: a palla, tracciante, a salve ed inerte
Velocita iniziale (circa)
Energia alia bocca
Pressione nella camera (mass.)
Ritmo di tiro
kg. 3.500
,. 3.550
0,120
0.260
0.600
4.220
»
4.270
0.283
mm.
3.700 kg. per cm.2
MECAR 40 mm.
955
450
480
960
730
»
)I
290
1.100
960 m.js.
163 kgm.
700 circa
2.600 mt.
500 mt.
5
Weight
Model AR 70/.223 without magazine and sling
Model SC 70/.223 without magazine and sling
Sling
Empty magazine (30 rd)
Loaded magazine (30 rd)
Model AR 70/.223 with sling and loaded magazine (30 rd)
Model SC 70/.223 with sling and loaded magazine (30 rd)
Bayonet
Length
Model AR 70/.223
Barrel
Barrel with grenade launcher
Model SC 70/.223 with extended butt
Model SC 70/.223 with folded butt
Bayonet knife
Model AR 70/.223 with bayonet
Mechanical features
Rifling, KH. 4 grooves (or 6 grooves) 1 turn in 12 in
Method of actuation: gas
Type of breech mechanism: rotating
Method of feeding: magazine
Cooling: air'
Ammunition: caliber 5.56 mm. (.223)
Type: ball, tracer, blank and dummy
Firingcbaracteristics
Muzzle velocity (approx)
Muzzle energy
Chamber pressure (max)
Cyclic rate of fire
Max.imum range
Maximum effective range
Grenade type
6
Tabulated data
7.7 lb
7.82 lb
4.25 oz
9.17 oz
1.315 lb
9.3 lb
9.42 lb
10 oz
37.6 in
17.8 in
19 in
37.8 in
28.8 in
11.4 in
43.3 in
3150 f./ si
1168 ft-lb
52.000 psi
approx. 700
approx. 2600 meters
500 meters
Mecar 40 mm.

Descrizione
\I fucile AR 70/ .223e un'arma teggera, raffreddata ad aria, a
presa di gas, alimentata con caricatore e prevista per il tiro a
colpo singolo od a raffica al ritmo di circa 700 colpi al minuto.
II fucile spara cartucce 5.56 mm (.223) ed e alimentato
caricatore da 30 colpi.
L'AR 70/.223 e dotato di lanciagranate con funzione di spegni-
fiamma.
II traguardo puntamento granata fa parte del gruppo diottra.
Per iI tiro a salve e previsto iI rafforzatore di rinculo.
con.
Accessori:
baionetta con fodero
-
rafforzatore di rinculo
-
bipiede
-
- cinghia
Description
Comandi
selettore - sicura
grilletto
avvlso serbatoio vuoto
tiretto
diottra
sportellino
gancio caricatore
II
- 68-
- 61-
- 40-
- 22-
-14 -
-8-
- 55-
Controls.
selector -
bolt hold open
charging handle
aperture sight
magaxine latch
safety
trigger
dust cover
The AR 70/.223 rifle 's a light weight; air cooled, gas operated,
magazine fed, shoulder weapon, designed for semiautomatic or full
automatic fire at the cyclic rate of c. 700 rounds per minute.
The rifle is chambered for 5.56 mm (.223) cartridges and is designed
to accomodate a 3D-round magazine.
The rifle is fitted with a grenade launcher acting as flash suppressor.
The grenade launcher sight is part of the aperture sight assembly.
For training purposes, a blank ammunition firing attachment may
be used.
Ac:cessory equipment:
- bayonet with scubbard
- blank ammunition firing device
bipod
-
- sling
Fig. 4 Fig. 5 Fig. 6
Selettore . Sicura - 68 - Selector. Safety
(Fig. 4)
(Fig. 5)
(Fig. 6)
7
8
s
colpo singolo
A
automatic fire
slcura
safety
single shot
raffica

Grilletto
Per if tiro semiautomatico, premere e rilasciare il grilletto per
ogni colpo.
Per if tiro a raffica. mantenere if grifletto premuto.
-61-
Trigger
Tiretto
II tiretto e posizionato sui lato destro della culatta.
-22-
Cocking handle
For semiautomatic fire, squeeze and release trigger for each round
For automatic firing, squeeze trigger and hold.
Avviso serbatoio
-40-
Bolt hold open
vuoto
Quando il caricatore e vuoto, I'elevatore agisce sull'awiso ser-
batoio vuoto per trattenere I'otturatore in posizione aperta.
Quando if caricatore vuoto viene tolto ed inserito un caricatore
carico, premere la parte superiore zigrinata dell'awiso serba-
toio vuoto per liberare I'otturatore (oppure arretrare il tiretto
e liberarlo).
Per bloccare iI gruppo otturatore in posizione aperta, arretrare
I'otturatore agendo sui tiretto, tirare verso I'esterno la parte
superiore (0 premere la parte inferiore) dell'awiso serbatoio
vuoto. Premere per liberare I'otturatore.
When the magazine is empty, the magazine follower will actuate
the bolt hold open to hold the bolt assembly to the rear.
When the empty magazine is removed and a loaded magazine is
installed in the gun, to feed a cartridge into the chamber press
upper tang to release bolt (or pull the charging handle slightly to
the rear and release it).
To hold bolt assembly in open position, retract bolt assembly
acting on the cocking handle, pull out upper tang of bolt hold open
(or press lower tang). To release bolt act as above.
II fucile viene armato manual mente agendo sui tiretto.
Per armare il fucile manualmente, arretrare a fondo il tiretto
e lasciarlo. Cia permette alia .forza della molla del caricatore
di posizionare la cartuccia superiore sui cammino dell'ottura-
tore.
Quando I'otturatore, sotto I'azione della molla di ricupero avan-
za, la sua parte anteriore inferiore s'impegna nel fondello della
cartuccia, la spinge in avanti inserendola in camera e bloccan-
dola nella canna.
The cocking handle is located on the right-hand side of receiver.
The rifle is cocked and operated manually by use of this handle.
To cock and operate manually, move cocking handle to rear position
and release. This permits the force of the magazine spring to
position the top round in path of the bolt. As the bolt moves
forward under the action of the recoil spring, the bottom face
of the bolt engages the base of the cartridge, ramming it forward,
feeding, chambering, and locking it in the barrel.
9
10

Diottra
-14-
Aperture sight
Sportello culatta
-8~
Dust cover
II gruppo
(Su ordinazione: diottre con tarature diverse).
II fucile viene consegnato tarato, per 10 spostamento.
Volendo regolare ulteriormente 10 spostamento, usare il fon-
dello dell'impugnatura per avvitare in senso orario od antiora-
rio la testa della vite di scostamento posizionata sulla destra
dell'alzo.
II fucile viene consegnato can mirino tarato (il mirino potra
essere svitato solo in officina).
alzo
ha due diottre:
- la prima, tarata fino a 150 metri (fig. 7)
la seconda, tarata fino a 300 metri (fig. 8)
-
Lo sportello culatta (fig. 2) ha la funzione d'impedire "entrata di
carpi estranei nella culatta.
E' consigliabile chiudere 10 sportello quando J'arma non e in
uso.
La sportello si apre automaticamente in fase di armamento 0
di sparo.
The dust cover (figure 2) is designed to prevent foreign substances
from entering into the receiver.
It is advisable to close the dust cover when the rifle is not in use.
The dust cover opens automatically when firing or when the charging
. handle is pulled back.
Fig. 7
The rear sight assembly features two apertures:
the first aperture is ad;usted for a distance of 150 meters
-
(see figure 7)
the second aperture is ad;usted for a distance of 300
-
meters (see figure 8)
(Aperture ad;usted for different distances on request).
The rifle is supplied with ad;usted windage; however the windage
may be further ad;usted by rotating the head of the windage screw
located on the right side of the rear sight with the bottom plate
of the pistol grip.
The front sight is set (only hiJ!.her echelon may unscrew it).
Fig. 8
11
Gancio caricatore - 55 -
Magazine latch
II ganclo caricatore trattiene iI caricatore nel fucile.
The magazine latch is designed to hold the magazine in the magazine
housing.
12

Caricatore
III
Magazine
Per riempire iI caricatore
\I caricatore ha una capacita di 30 colpi.
Premere Ie cartucce come indicato nelle fig. 9 e 10.
Per inserire iI caricatore nel fucile
II caricatore puo essere inserito con otturatore chiuso 0 aperto.
Afferrare con una mana f'impugnatura, dirigere fa bocc1;l del-
l'arma in una direzione sicura, inserire con I'altra iI caricatore
nell'arma spingendolo e ruotandolo verso f'alto come indicato
nella fig. 11 fino a quando si sente che if gancio caricatore ha.
impegnato e trattiene if caricatore.
Fig. 9
Fig. 10
Loading the magazine
Tbe magazine bar a capacity of tbirty rounds.
Press cartridges into the magazine as shown in figures 9 and 10.
13
/
Fig. 11
Installation of the magazine
The magazine may be inserted with the bolt opened or closed.
Grasp the pistol grip, point the muzzle in a safe direction, and
insert and rotate the loaded magazine into the magazine housing.
Push upward and rotate as shown in figure 11 until the magazine
latch engages and holds the magazine.
14

Per togliere ilcaricatore
Per scaricare I'arma
Afferrare il caricatore posizionando iI pollice sui gancio cari-
catore e premerlo; spingere II caricatore in avanti ed in basso
per liberarlo dal gancio. togliere iI caricatore come indicato
nella fig. 12.
Arretrare il tiretto per estrarre ed espellere l'eventuale car-
tuccia dalla camera di cartuccia.
~
Smontaggio del caricatore
Con .Ia punta
e spmge.rla all.mdletro per togJierla come indicato nella fig. 13.
Nello sfllar.e II f~ndello dal corpo caricatore fare attenzione
alia molla In tenslone.
Fig. (14) Parti componenti:
-
- elevatore
~i ~na cartuccia, alzare la linguetta del fondello
corpo caricatore
molla caricatore
-
- fondello caricatore
~
s:
...
Fig. 12
Removal of the magazine
Unloading of the rifle
Grasp magazine, placing the thumb on the magazine latch and
squeezing the latch,' push the magazine forward and downward to
disengage it from the latch and remove the magazine from the
magazine well, as shown in figure 12.
Pull charging handle rearward to extract and e;ect a possibile cham-
bered round.
15
Fig. 13
Magazine disassembly
With .the .nose of a cartridge lift tang of magazine bottom plate and
push It rearward to remove it, as shown in figure 13.
\Vh
en sliding pla.te f~om magazine body, control the spring with
h
an to prevent It flymg free.
d
(Figure 14) Component parts:
16
magazine body
-
- follower
-. magazine spring
- magazine bottom plate
Fig. 14
Preparazione per iI tiro
IV
Preparation for firing
asslcurarsi che I'arma sia scarica,
-
- esamlnare la canna per accertare I'assenza di residul di com-
bustione e di corpi estranei,
controllare che la leva valvola lanciagranate sia in posizione
-
orizzontale (vedasi fig. 15),
- armare il fucile e spostare il selettore sulla posizione di
sicura.
inserire nell'arma un caricatore carico,
-
- alimentare la cartuccia In camera di cartuccia,
posizionare iI selettore per iI tiro a colpo singolo od a raffica.
-
- mirare e premere iI grilletto.
Per Impedire 1'..autoaccensione" di una cartuccia introdotta in
un'arma molto surriscaldata e consigliabile sparare subito od
estrarre la cartuccia.
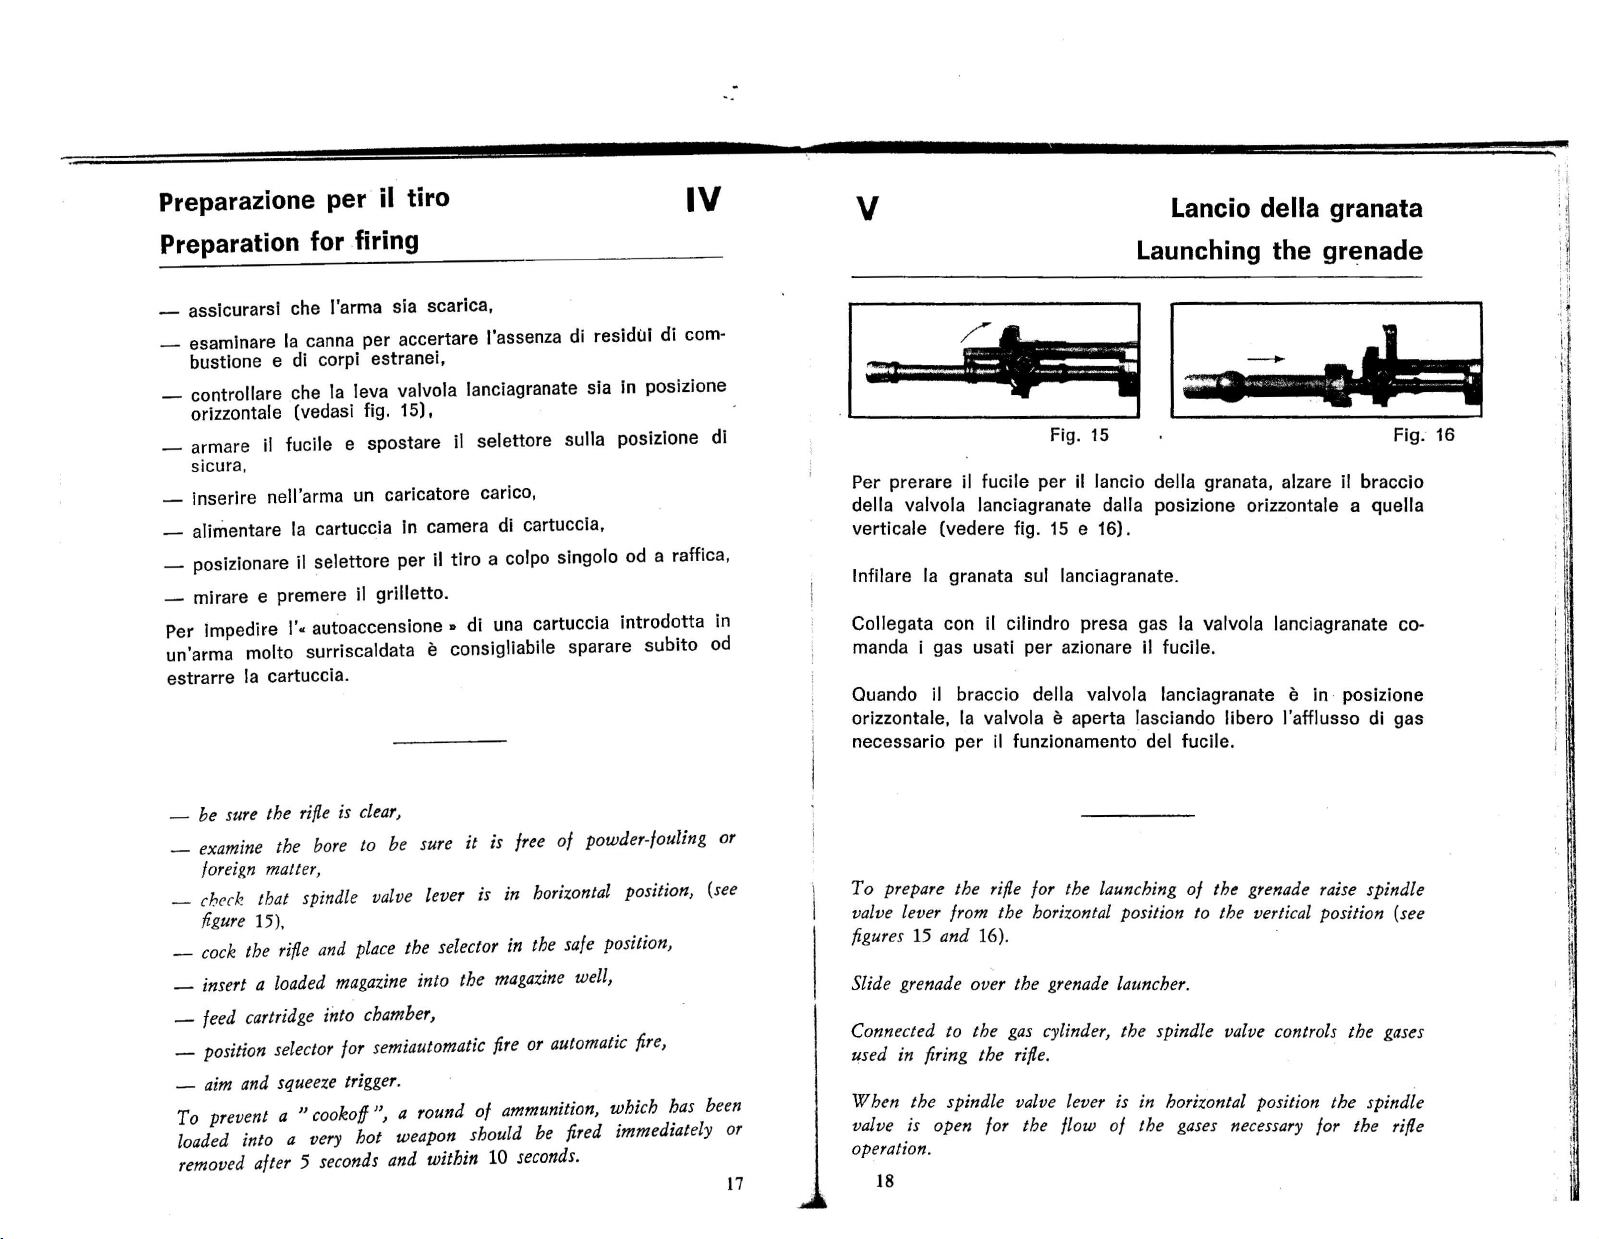
V
Lancio della granata
Launching the grenade
.~
Per pre rare iI fucile per iI lancio della granata, alzare iI braccio
della valvola lanciagranate dalla posizione orizzontale a quella
verticale (vedere fig. 15 e 16).
Infilare la granata suI lanciagranate.
Collegata con iI cilindro presa gas la valvola lanciagranate co-
manda i gas usati per azionare il fucile.
Ouando il braccio della valvola lanciagranate €I in. posizione
orizzontale. la valvola €I aperta lasciando libero I'afflusso di gas
necessario per iI funzionamento del fucile.
~
Fig. 15 Fig. 16
I~
- be sure the
examine the bore to be sure it is free of powder-fouling or
-
foreign matter,
ch('d~ that spindle valve lever is in horizontal position, (see
-
figure 15),
rifle
is clear,
- cock the rifle and place the selector in the safe position,
- insert a loaded magazineinto the magazinewell,
- feed cartridge into chamber,
position selector for semiautomatic fire or automatic fire,
-
- aim and squeeze trigger.
To prevent a "cookoff ", a round of ammunition, which has been
loaded into a very hot weapon should be fired immediately or
removed after 5 secondsand within
10
seconds.
17
To prepare the rifle for the launching of thl!: grenade raise spindle
valve lever from the horizontal position to the vertical position (see
figures 15 and 16).
Slide grenade over the grenade launcher.
Connected to the gas cylinder, the spindle valve controls the gases
used in firing the rifle.
W hen the spindle valve lever is in horizontal position the spindle
valve is open for the flow of the gases necessary for the rifle
operation.
18
.

II braccio della valvola lanciagranate In posizione orizzontale
impedisce I'inserimento della granata sui lanciagranate.
Quando il braccio della valvola lanciagranate e in posizione ver.
ticale la valvola risulta chi usa. In tal modo viene utilizzata tutta
la potenza dei gas della cartuccia speciale per lanciare la gra-
nata (MECAR 40 mm) impedendo ai gas di filtrare nel cilindro
presa gas.
........
Fig.17
Alzare II traguardo per if lancio della granata che fa parte iflte-
grante dell'alzo; mirare, a secondo della distanza, come indi-
cato nella fig. 18.
Usare la cartuccia speciale per iI Jancio della granata (fig. 17).
A~poggiare il calcio in modo molto fermo contra la spalla.
mlrare, premere iI grilletto.
100mI'
75
50 m
""
Granata - MECAR 40 mm. - Grenade
Cartuccia speciale - Special cartridge
The gas spindle valve lever in horizontal position prevents from
placing the grenade on the grenade launcher.
When the spindle valve lever is in vertical position, the spindle
valve is closed.
Thus the gases of the special cartridge propel the rifle grenade
(MECAR 40 mm) without any by-pass of gas into the gas cylinder.
19
Fig. 18
~aise grenade launcher sight positioned at the back of the rear
szght assembly. Aim depending on the distance (see figure 18).
Use speci7f! cartridge for the launching of the grenade (figure 17).
Place the. butt of the stock firmly into the socket of the right
shoulder, aim, press the trigger.
20
Baionetta con fodero
VI
Bayonet knife with scabbard
La baionetta viene impiegata per il combattimento ravvicinato,
per il servizio di guardia ai prigionieri, nel servizio d'ordine.
ecc. La baionetta pub essere pure usata come coltello per vari
usi.
Montaggio
Inserire la scanalatura del manico della baionetta sui tenone
posto sulla parte inferiore del cilindro presa gas del fucile e
I'anello sui lanciagranate, far scorrere la baionetta fino ache i
due ganci di tenuta risultino impegnati suI tenone (fig. 20).
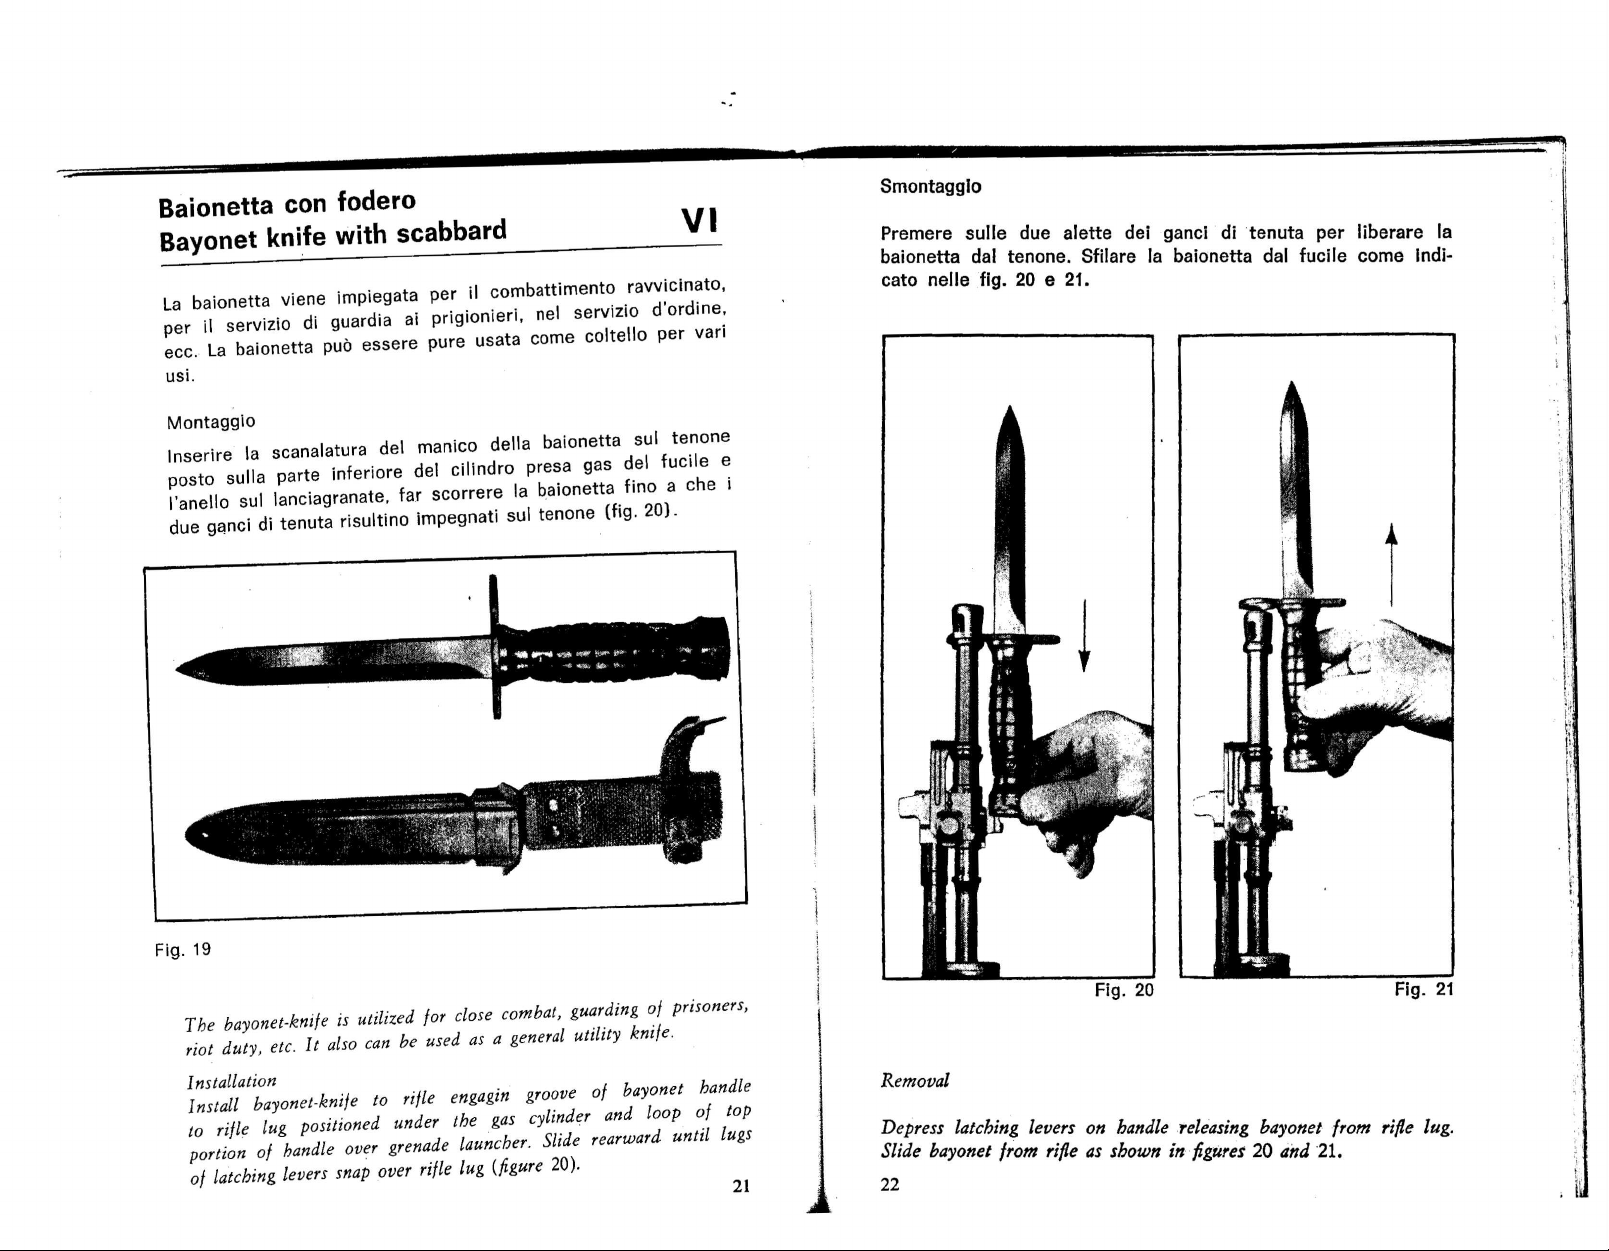
Smontagglo
Premere sulle due alette dei ganci ditenuta per liberare la
baionetta dal tenone. Sfilare la baionetta dal fucile come Indi-
cato nelle fig. 20 e 21.
Fig. 19
The bayonet-knife is utilized for close combat, guarding of
riot duty, etc. It also can be used as a general utility knife.
Installation
Install bayonet.knife to rifle engagin groove of bayonet handle
to rifle lug positioned under the gas cylinder and loop of top
portion of handle over grenade launcher. Slide rearward until lugs
of latching levers snap over rifle lug (figure 20).
prisoners,
21
Fig. 20
Removal
Depress latching levers on handle releasing bayonet from rifle lug.
Fig. 21
Slide bayonet from rifle as showninfigures 20 and 21.
22

Rafforzatore di rinculo
Blank ammunition firing attachment
II rafforzatore di rinculo e previsto per scopi di allenamento e
vlene usato solo con cartucce a salve, vedere fig. 22.
Montaggio
- svitare iI pistone dalla sua base. estrarlo completamente
(fig. 23).
- inserire iI rafforzatore di rinculo di lato sui lanciagranate; in-
serire iI pistone nella bocca delle spegnitiamma, avvitare
iI pistone a tondo in senso orario (fig. 24).
Smontaggio
- svltare II pistone in senso antiorario,
togliere iI rafforzatore dal lato aperto.
-
~L ii
.
VII
Smontaggio elementaro
per pulizia
Elementary stripping for cleaning
.
a
...~
.
-
VIII
I
...
Fig. 22
Fig. 23
The blank ammunition firing attachment is designed for the rifle
for training purposes and is used with blank cartridges only, see
figure 22.
Installation .
unscrew the piston from its base, pull it out (figure 23),
-
slide attachment over grenade launcher sideways,
-
insert piston in muzzle opening of flash suppressor, screw piston
-
tightly, turning it clockwise. (figure 24).
Removal
unscrew piston counter-clockwise,
-
remove attachment from the side.
-
.
Fig. 24
23
,
It
Fig. 25
Prima dello smontaggio assicurarsi che /'arma sia scarica e
togliere fa cinghia se montata. L'arma pub essere smontata con
cane abbattuto 0 cane armato.
Esempio di sequenza oi smontaggio nelle pagine seguenti.
before stripping, ensure that the weapon is not loaded and remove
sling if /itted. The rifle may be disassembledwith hammer cocked
or uncocked.
Example of the sequence of disassembly on the following pages:'
24

Smontaggio gruppo astina
Afferrare I'astina nella parte superiore, strapparla all'indietro
per sganciarla dal tuba asta armamento ruotandola verso il
basso come indicato nelle fig, 26 e 27, sganciarla dal perno
cerniera come mostrato nella fig, 28.
Rimontare procedendo in senso inverso, inserendo fermamente
la linguetta sui perno cerniera (fig. 28).
Smontaggio lanciagranate
Alzare e ruotare la leva valvola lanciagranate in posizione
verticale come indicato nelle fig. 29 e 30.
Premere il fermo del lanciagranate come indicato nella fig. 31
per liberare Ie scanalature dello stesso, svitare il lanciagra-
'
nate in senso antiorario, sfilarlo dalla canna come visibiJe nella
fig. 32.
Rimontarein senso inverso; se necessario a fine, corsa girare
leggermente il lanciagranate in senso antiorario per permet-
tere al fermo d'impegnarsi in una scanalatura dello stesso.
'"
Fig. 26
Fig, 27
Removal of handguard assembly
Grasp handguard in the upper part, pull rearward to clear spring
tangs from the operating-rod tube, rotate it rearward as shown in
figure 26 and 27, remove from hinge pin as shown in figur(! 28.
Assemble in reverse order; firmly engage lower tang with hinge pin
(figure 28).
25
Fig. 28
Fig. 29
Fig. 30
t
Fig. 31
Removal of grenade launcher
Lift and rotate spindle valve lever into horizontal position, as shown
in figure 29 and 30.
Press grenade launcher latch to clear its grooves as shown in
figure 31. .
Unscrew grenade launcher counter-clockwise, remove it from the
muzzle as shown in figure 32.
Assemble in reverse order; if necessary, slightly unscrew grenade
launcher counter-clockwise to let the latch click into the groove of
the grenade launcher.
26
Fig. 32

Smontaggio gruppo cilindro
Afferrare iI grupo cilindro e sfilarlo dalla canna come Indicato
nelle fig. 33 e 34.
Smontaggio tubo asta armamento
Togliere iI tubo asta armamento come indicato nelle fig. 35 e 36.
t
Fig. 33
Fig. 34
Removal of gas cylinder assembly
Grasp gas cylinder assembly and slide it from muzzle end of barrel
as shown in figures 33 and 34.
27
Fig. 35
Removal of operating rod tube
Remove operating-rod tube as shown in figures 35 and 36.
28
Fig. 36

Come aprire il fucile
Smontaggio del tiretto
Usando la punta di una cartuccia sfilare la spina tenuta culatta
dalla sua sede nella scatola scatto procedendo da sinistra a
destra come indicato nelle fig. 37 e 38, ultimando I'estraz!one
a mano. (La spina rimane attaccata alia scatola scatto).
!
Usando la punta di una cartuccia spingere all'indietro il fermo
del tiretto come indicato nella fig. 39, estrarre iI. tiretto con
forza.
Fig. 37
Fig. 38
To break the rifle open
Using the nose of a cartridge push out from left to right the receiver
retaining pin located in the trigger housing as shown in figure 37
and 38, pull it completely out with the hand. (The receiver retaining
pin cannot get lost as it remains attached to the receiver).
29
Fig. 39
Removal of charging handle
Using t/;Je nose of a cartridge push back charging handle latch as
shown in figure 39, pull out charging handle.
30

Per togliere il gruppo otturatore
Quando iI fucile e aperto, metterlo in verticale per fare usclre
dalla culatta II gruppo otturatore procedendo come indicato
nella fig. 40.
Per rimettera il gruppo otturatore nella culatta tenere iI fucile
in posizione verticale; afferrare il carrello e lasciar fuoruscire
I'otturatore in modo che Ie sue alette risultlno allineate aile
guide, come indicato nella fig. 41.
Smontaggio
carrello' otturatore
Bolt carrier
disassembly
1
Fig. 41
Removal of bolt assembly
Once the rifle is open, hold it in a vertical position to let the bolt
assembly slide out of the receiver, procading as shown in figure 40.
To install the bolt assembly into receiver, hold rifle in a vertical
position,- grasp bolt slide and let the holt protrude so that its
locking lugs are aligned with the slide dnd. the guides as shown
in figure 41.
31
j
. afferrare if carrello cr. . Fig. 42
I'otturatore in asse alo~a~:JJ~no,:'?!stra,
orario circa 900 e completare I'~str
.
grasP
b
0 t as Sown' fi 42 h'
90. to remove
~~~~~~i:~f\~~e~~~~~~~,~~ses:r~
bolt-carrier with the left hand' with the ri
I
h
bOlt,gure
. to withdraw firing pi t" .
of a cartridge to push th
and remove.
!
t
!
I
I
I
t
32
':::~~"T~"~'.
con la .destra. estrarre
':,e corsa glrare In senso
aZlone.
g
ht
hand
; at t e end of the stroke, turn clockwise
d:r~f~\~t~ti~gde;:tr~O~o~~a
n
mmg
r~ a
e m rom e t to rzght as shown in figure 43,
P
f
.
! ';
'.JI--
'"'
m ro;n bolt-carrier use the tip
P
f
I
f
-.
.~
.,:r--
. WI raw
---
thd
'
1
43
if~~~
FIg.44

)
Smontaggio gruppo
asta armamento
Afferrare iI gruppo asta arma-
mento come indicato nella fig.
45, spingere in basso I'assieme
per un poll ice circa, ruotarlo a
sinistra od a destra di 180' per
liberarlo dalla culatta; estrarre
I'assieme come mostrato nella
fig. 46.
Pulizia IX
L'AR (od il SC) 70/223 e un fucile semplice e robusto e richiede
solo una certa cura ragionevole di pulizia. Tenere I'arma pulita
ed ingrassata.
Scovolino, cordicella con pesetto ed oliatore sono sistemati al-
I'interno dell'impugnatura.
Con la punta di una cartuccia, sollevare la linguetta del fon-
dello dell'impugnatura, spingere 10 stesso all'indietro come indi-
cato nella fig. 47.
Per pulire I'anima della canna con' 10 scovolino inserire il pesetta
in culatta e quindi nella canna come indicato nella fig. 48.
Cleaning
t
t
Fig. 46
Rimontare k1 senso inverso. La
tacca sulla parte inferiore del-
I'asta d'armamento, come visi-
bile nella fig. 46 deve risul-
tare parallela alia canna e verso
"esterno, inserire, ruotare di
180'.
Removal of operating rod assembly
Grasp
the operating rod assembly as shown in figure 45, push it
down about one inch, rotate it 180' left or right to clear it from the
receiver, pull the assembly out as shown in figure 46.
Assemble in reverse order. The notch on the lower part of the
operating rod, as visible in figure 46 must be on the outside, parallel
to the barrel. Insert, rotate 180'.
33
~I
Fig. 47
The AR (or SC) 70/.223 is a simple and sturdy rifle and requIres
only a reasonable amount of care.
Keep it clean and lubricated throughout.
Wire-brush, string with weight and rifle oil container are stowed
away in the pistol grip.
Using the nose of a cartridge lift tang of pistol grip bottom plate
and push il out as indicated in figure 47.
To clean bore with the wire brush let weight slide through receiver
and barrel as shown in figure 48, pull brush through bore.
. Rimontare i particolari procedendo all'inverso.
Fig. 48
. Assemble In the reverse order of stripping.
34

Inconvenienti e rimedi
x
Troubleshooting
I NCONVEN I ENTI
d ifetto
di alimentazione
scatto a vuoto
mancata estrazione
mancata ch iusura
PROBABILI CAUSE
caricatore difettoso
-
cartucce sporche
-
0 corrose
arma sporca
-
0 non lubrificata
caricatore
-
non ben inserito
otturatore non
-
in perfetta chiusura
percussore
-
rotto
cartuccia difettosa
-
camera di cartuccia
-
sporca
m,unizioni sporche
-
foro .presa gas
-
sporchi od ostruito
testata dell 'otturatore
-
sporca
RIMEDI
sostituire II caricatore
sostituire cartucce
e pulire caricatore
pulire e lubrificare
I'arma
ripetere
introduzione
arretrare iJ ti retto
e rilasciare
sostitu ire
iI percussore
sostituire
pulire
pulire
pulire
pulire
Per tutti gli altri inconvenienti che possono risultare da parti
rotte od usurate, inviare I'arma alia riparazione.
MALFUNCTIONS
PROBABLE CAUSE CORRECTIVE
ACTION
failure
to feed
failure
to fire
failure
to extract
failure
to lock
defective
-
magazine
dirty or corroded
ammunition
lack of cleanliness clean and
-
or lubrication lubricate
magazine not seated repeat
-
properly operation
- holt fails pull back
to lock cocking handle
damaged
-
firing pin
faulty cartridge
-
-dirty cartridge
chamber
dirty ammunition
-
dirty or obstructed
-
gas vent
dirt on bolt face
-
replace
same
remove ammunition
from magazine
and clean same
release
replace
replace
clean chamber
clean
clean
clean
For all other malfunctions which may depend on broken or
worn parts turn in rifle to a maintenance facility for repair.
35
)

e :)

._._.._-~.-
~g@1
-~,
~@~
Nomenclatore
canna
asta armamento
molla ricupero
tubo asta armamento
spina elastica (3 pezzi) 5
culatta
perno sportello 7 dust cover pin scatola scatto
sportello culatta 8 receiver dust cover
molla sportello 9 dust cover spring
spina elastica vite diottra 10 aperture sight
rosetta diottra
molla vite regolaz. diottra
traguardo puntam. granata 13
diottra
vite regolazione
~,
,
I
t
,
m(>lIa diottra 16
estrattore
piolo' estrattore 18 extractor pin
molla estrattore 19
otturatore
carrello otturatore 21
tiretto
chiavistello tiretto 23
molla chiavistello tiretto 24
anello spina percussore
spina t~nuta percussore
percussore
mirino 28
leva valvola lanciagtanate 29 spindle valve lever
leva arresto lanciagranate 30 grenade launcher latch
perno leva arresto
lanciagranate 31 stop lever pin
molla lE:va lanciagranate 32 grenade launcher
cilindro presa gas 33
molla valvola lanciagranate 34 spindle valve spring
valvola lanciagranate 35
anello ritegno granata 36
mnciagranate
pemo cerniera
anello perno cerniera 39
avviso serbatoio vuoto 40
piolo avviso serb. vuoto
tnolla avviso serb. vuoto
leva raffica
bussola cane 44
cane 45
Nomenclature
1
2
3
4 operating rod tube
6 receiver
11
aperture sight washer
operating rod
split pin (3 pieces) spina tenuta culatta
screw split pin
12 aperture sight bussola grilletto
adjusting screw spring spina elast. molla nottolino
diottra 15 aperture sight
14 aperture sight
17
20
22 charging handle
25
26
27 firing pin
37
38 hinge pin
41
42
43
grenade launcher sight
adjusting 'screw
aperture sight spring
extractor spring
charging handle latch
charging handle latch. spring
firing pin retaining pin ring
firing pin retaining pin
grenade launcher
stop lever spring
spindle valve
grenade retaining ring
grenade launcher
hinge pin ring (2 pieces)
bolt hold open
bolt hold open pin
bolt hold open spring
automatic fire lever
hammer bushing
ba"el
recoil spring
extractor
bolt
bolt carrier
front sight
gas cylinder
hammer
perno cane
spina molla cane
portamolla cane
molla cane 49
molla spina ten uta culatta 51 receiver retaining pin spring
molla gancio caricatore
perno ganclo caricatore
gancio caricatore
nottollna
perno grilletto
46
47
48 hammer spring guide
50 receiver retaining pin
52
53
54 magazine latch pin
55 magazine latch
56
57
hammer spring pin
magazine latch spring
hammer pin
hammer spring
trigger housing
pawl
trigger pin
58 trigger bushing
molla nottolino
grilletto
dente raffica
molla grilletto
spina elast. molla grilletto
moll a leva raffica
perno leva raffica
piastrina ten uta perni
selettore - sicura
fondello Impugnatura
impugnatura
ponti cello tlrante
rosetta
rosetta
vite impugnatura
rosetta elastica
elastica
(2
pezzO
vite tirante
maglietta calcio
calcio
distanziale calcio
calciolo
rosetta elastica
vite
' calciolo 82
astina
caricatore
oliatore
pesetto - cordicella -
scovolino
cinghia per AR 70
baionetta
rafforzatore
bipiede
gruccla
cinghia per SC 70
calciolo
di rinculo
59
60
61
62
63
64
65
66
67
68
69 pistol grip bottom
70 pistol grip
71
72 spring washer
73
74
75
76
77
78
79
80
81
83
84
85
86
87
88
89
90
91
92 sling for SC 70
pawl spring split pin
pawl spring
automatic fire lever tooth
trigger spring split pin
,
automatic fire lever spring
automatic fire lever pin
pins' retaining plate
selector - safety
pistol grip cotter
washer (2 pieces)
pistol grip screw
spring washer
trigger
trigger pin
tie rod
stock swivel
stock
stock spacer
butt plate spring washer
string and weight
blank ammunition
butt plate
butt plate screw
hand guard
magazine
rifle oil container
wire-brush
sling for AR 70
bayonet
firing attachment
bipod
folding stock

Smontaggio
particolareggiato
Nota: esso dovrebbe essere effettuato solo da un armaiolo qua-
lificato. quando si rende necessaria la sostituzione di un
particolare usurato 0 rotto, 0 da un istruttore qualificato
per illustrare il meccanismo ed il funzionamento dell'arma.
Iniziare effettuando 10 smontaggio elementare.
Note: This should only be carried out by a qualified armourer when
it is required to replace worn or broken parts, or by a qualified
instructor when it is required to give instruction on the
mechanism and operation of the weapon. Commence by
carrying out elementary sd'ipping.
XI
f
Advanced stripping
101
102
.
~~3
104
105
106
.;.
,
107
108
109
110
111
-
~~.
;~ ;;;:':,;:~ ;''ii
~~
~~~"
.
--+
fn'
Fig. 49
Utensili necessari per 10 smontaggio particolareggiato dell'arma
e relativo rimontaggio.
To.?ls for the advanced stripping and assembly.
36
112
113

Seguenza
di smontaggio
Stripping
sequenCE!!
A
foro A
PERNO
CERNIERA
CALCIO
IMPUGNATURA
PORTAMOLLA CANE
foro H
SELETTORE
foro G
PERNO LEVA RAFFICA
foro E
CANE
foro F
GRILLETTO
foro D
MOLLA GRILLETTO
foro B
GANCIO CARICATORE
foro C
AVVISO SERBATOIO
VUOTO
MIRINO
GRU?PO ALZO
VALVOLA
LANCIA-GRANA TE
SMONTAGGIO
ESTRATTORE
-1-
-2-
-3-
-4-
-
-6-
---'7-
-8-
--9 -
10
-
11
-
12
-
13
-
- 14
- 15
5 -
A hole
HINGE PIN
BUTTSTOCK
PISTOL GRIP
HAMMER SPRING
GUIDE
H hole
SELECTOR
G hole
AUTOMATIC FIRE
TRIGGER SPRING
-
-
-
-
-
-
MAGAZINE LATCH
BOLT HOLD OPEN
REAR SIGHT GROUP
LEVER PIN
E hole
HAMMER
F hole
TRIGGER
D hole
B hole
C hole
FRONT SIGHT
SPINDLE VALVE
ElECTOR
DISASSEMBLY
37
La sequenza dal 4 al 9 compreso e tassativa.
Only the steps 4 to 9 included must be carried out in the above
sequence.
38

1
1
Smontaggio
perno cerniera
II perno cerniera pub essere tolto da destra 0 da sinistra.
Con pinza 103 aprire un anello elastico per liberare II perno.
afferrare il perno dalla parte opposta e toglierlo (fig. 51 e 52).
The hinge pin may be removed either from the right or th~ left
hand side'-
With pliers 103 open one snap ring to free the pin, grasp pin from
the opposite side and remove it (figures 51 and 52).
Hinge pin
removal
culatta
scatola scatto
perno cerniera
anello elastico
Fig. 52
recelVer
trigger housing
hinge pin
hinge pin retaining pin
Fig. 51
39
40
1
Fig. 53

Smontaggio calcio
2
2
Buttstock removal
1. can cacciavite 108 svitare vite calciala (fig. 54).
Tagliere la vite.
1. using screwdriver 108 unscrew butt plate screw (figure 54).
Remove screw.
Fig. 54
La fig. 55 mastra i particalari liberati da questa aperaziane:
Figure 55 shows the parts released by this operation:
maglietta calcia
distanziale
calciala
vite can rasetta
screw with washer
stock swivel
spacer
butt plate
2. can chiave 101 svitare vite tira~te per separare il calcia
dalla scatala scatta (fig. 56).
2. using key 101 unscrew tie rod to remove buttstock from trigger
housing (figure 56).
Fig. 56
vite ti rante can rosette
calcia
scatala scatta
tie rod with washers
buttstock
trigger housing
Fig. 55
~
41
42
~
------
~ft
Fig. 57

3
3
Smontaggio
Pistol grip
impugnatura
Togliere la vite impugnatura con chiave 102 (fig. 58).
Separare I'impugnatura dalla scatola scatto.
Using key 102 unscrew pistol grip (figure 58), remove it.
removal
la fig. 59 mostra i vari particolari:
Figure 59 shows the various parts:
vite impugnatura con rosette
ponticello tirante
impugnatura
scatola scatto
-
grip retaining screw
with washers
grip cotter
pistol grip
trigger housing
Fig.58
43
44
-
~
Fig.59

4
4
Smontaggio portamolla cane
Nota: il cane deve essere disarmato.
Con attrezzo 107 spingere indietro iI portamolJa per sganciarlo
dall'accoppiamento con la spina alJoggiata nel cane; (fig. 60) al.
zarlo e sfilarlo. Le frecce della fig. 45 mostrano i due movimenti
da effettuare.
La fig. 61 mostra:
dettaglio dell'attrezzo 107
-
portamolJa cane con molla
-
scatola scatto.
-
Hammer spring guide removal
Note: hammer must be uncocked.
Using tool 107 push back hammer spring guide to disengage it from
the pin fitted in the hammer, lift it out, remove it, as shown by
the arrows (figure 60).
Figure 61 shows:
detail of tool 107
-
hammer spring guide wit,h spring
-
trigger housing.
-
Fig. 60
45
~'~rIJ.~
Fig. 61
46

5
5
Smontaggio selettore
Nota: riarmare II cane.
Posizionare iI selettore su «1» (colpo singolo).
Con attrezzo 104 disimpegnare il terminale posteriore della
molla leva raffica- dalla scanalatura del selettore per liberarlo.
Afferrare la testa Jel selettore e sfilarlo dal foro H della scatola
scatto da destra a sinistra. come indicato dalla freccia (fig. 62).
La fig. 63 mostra il foro « H- nella scatola scatto ed if selettore
sfilato.
.
Selector removal
Note: cock hammer.
Set selector to "1" (single shot).
Using tool 104 push out rear end of the automatic fire lever spring
from selector groove to free selector.
Grasp selector head and remove it from hole
arrow, i.e. from right to left (figure 62).
Figure 63 shows
selector removed.
)JH)J
hole in the trigger housing and the fire control
)J
H)J
as shown by
Fig. 62
...
47
l
Fig.63
48

6
6
Smontaggio perno leva raffica
Nota: disarmare il cane.
1. Disimpegnare. a mano la piastrina tenuta p~rni (visibile in
fig. 67) dalla scanalatura del perno leva raffica per liberare
10 stesso.
2. can utensile 105 sfilare il perno leva raffica dal foro G pro-
cedendo da sinistra a destra (fig. 64, vedere freccia).
Lo smontaggio del perno leva raffica libera la molla leva
raffica. (La leva raffica rimane trattenuta dal perno del
cane) .
La fig. 65 mostra:
~ foro « G » nella. scatola scatto
perno leva raffica
-
- molla leva raffica
~
Automatic fire lever pin removal
Note: uncock hammer.
1. with the hand disengage the pins' retaining plate (shown in
figure 67) from the fire lever pin groove to free same.
2. with tool 105 push out the automatic fire lever pin from" G
hole, from left to right (figure 64 see arrow).
The removal of the automatic fire lever pin releases the
automatic fire lever spring.
(The fire lever remams assembled on the hammer pin).
Figure 65 schows:
- "G" hole in the trigger housing
automatic fire lever pin
-
automatic fire lever spring.
-
,
Q
"
Fig. 64
49
Fig.65
50

7
Smontaggio perno del cane
1. Disimpegnare a mana la piastrina tenuta perni dalla scanala-
tura sui perno del cane per liberare il perno stesso.
2. can utensile 105 sfilare iI perno del cane dal foro « E » nella
scatola scatto procedendo da sinistra a destra (fig. 66).
.
La fig. 67 mostra i particolari liberati dallo sfilamento del
perno del cane:
perno del cane
-
piastrina tenuta perni
-
gruppo cane (il gruppo cane pub essere scomposto
-
nei suoi particolari; come visibile nel disegno esploso)
leva raffica
-
7
Hammer pin removal
1. disengage by hand pins' retaining plate from hammer pin groove
to free the pin itself.
2. with tool 105 push out hammer pin from" E" hole in trigger
housing proceeding from left to right (figure 66).
Grasp hammer pin, withdraw it.
Figure 67 shows the components released by the removal of the
hammer pin: '
hammer pin
-
pins' retaining plate
-
hammer group
-
automatic fire lever
-
Fig. 66
.
--
..
.w,.,~-
I
-
..
51
52
Fig.67

8
8
Smontaggio perno grilletto
Con attrezzo 105 sfilare il perno grilletto dal foro" F» nella
scatola scatto procedendo da sinistra a destra (fig. 68). Togliere
il perno.
La fig. 69 mostra Ie partr componenti sganciate dallo smontaggio
del perno grilletto:
perno grilletto
-
gruppo grilletto 01 gruppo grilletto pub essere smon-
-
tato nei. suoi particolari come visibile nel disegno
esploso)
dente raffica
-
Trigger pin removal
With tool 105push out trigger pin from
proceeding from left to right (figure 68).
Withdraw pin.
Figure 69 shows the components which are freed by the trigger pin
removal:
trigger pin
-
)JF)J
hole in trigger housing,
- trigger group (the trigger group may be disassembled in
its components as shown on the exploded drawing)
automatic fire lever
-
1
Fig. 68
..
53
iiiiiU
Fig. 69
54

9
Smontaggio
molla grilletto
Con gll attrezzi 105 e 111 sfilare dal foro «D» nella scatola
scatto la spina elastica per liberare la molla del grilletto.
With tools 105 and 111 push out from
housing the split pin to release the trigger spring.
Trigger spring
removal
JJDJJ
hole in the trigger
10
Smontaggio
perno gancio caricatore
Con gli attrezzi 105 e 111 ~filare dal foro" B B nella scatola
scatto II perno del gancio caricatore come vislbile nella fig. 72.
With tools 105 and 111 push out from
housing the magazine latch pin as shown in figure 72.
Magazine latch pin
removal
JJ
JJ
B
hole in the trigger
Fig. 70
Fig. 71
I
~
55
foro «B B
nella scatoIa scatto
gancio caricatore
perno gancio carlcatore
molla gancio caricatore
56
t~
JJBJJ
hole in the trigger
magazine latch
magazine latch pin
magazine latch spring
Fig. 72
housing
Fig73

11
Smontaggio
avviso serbatoio vuoto
Con attrezzi 105 e 111 sfilare dal foro « C
la spina elastica come visibile in fig. 74.
With tools 105 and 111 push out from" C
housing the split pin as shown in figure
Fig. 74
spina elastica
piolo avviso
serbatoio vuoto con molla
avvito serbatoio vuoto
Bolt hold open
removal
nella scatola scatto
"
11
hole in the trigger
74.
bolt hold open pin
and spring
bolt hold open
split pin
12
Smontaggio del mirino
Regolazione in elevazione del mirino
Le due operazioni so no da farsi con
I'attrezzo
110.
Fig. 75
t j-
57
Fig. 76
Removal of the front sight
Adjustment of front sight elevation
Both operations are carried out with tool 110.
58

13
13
Smontaggio
gruppo alzo
Rear sight group
disassembly
1. con gli utensili 106 e 111 sfilare fa spina elastica dal foro
dell a vite diottra (fig. 77).
2. con attrezzo 108 svitare in senso antiorario fa vite diottra
(fig. 78)
1. with tools 106 and 111 drive out split pin from the hole in
the aperture sight adjusting screw (figure 77).
2. with tool 108 unscrew anticlockwise the aperture sight and
remove it (figure 78).
,00
spina elastica vite diottra
rosetta diottra
molla vite regolazione
diottra
traguardo puntamento
granata
diottra
molla diottra
vite regolazione diottra
Fig 18
aperl:Jre sight screw split pin
aperture sight washer
aperture sight
adjusting screw spring
grenade launcher sight
aperture sight
aperture sight spring
aperture sight
adjusting screw
Fig. 77
59
0
101
.. ..rJ.
1
Fig.79
60

14
Smontaggio
valvola lancia.granate
Con gli attrezzi 105 e 111 sfilare la spina elastica dal foro dell a
valvola come visibile in fig. 80.
With the tools 105 and 111 drive out the split pin from the spindle
valtJe hole (figure 80). Remove spindle valve from the cylinder.
Disassembly of
spindle valve
15
Smontaggio Extractor
estrattore disassembly
1. Introdurre la punta dell'attrezzo combinato 109 tra I'estrattore
ed II piolo estrattore, freccia n. 1 fig. 82.
2. Ruotare I'attrezzo combinato come indicato nella fig. 82, free.
cia n. 2, per agganciare "estrattore e smuoverlo dalla sua
sede (estrazione parziale), togliere I'attrezzo combinato.
3. Inserire iI cacciavite dell'attrezzo combinato fra I'otturatore
e "estrattore per rimuovere I'estrattore. Tenere sotto controllo
il piolo e la molla.
Fig. 80
valvola lanciagranate
spina elastica
molla valvola lanciagranate
leva valvola lanciagranate
1
-
0
spindle valve
split pin
spindle valve spring
spindle valve lever
Fig. 81
61
~
1. Insert tip of combination tool 109 between the extractor
the. extractor pin as shown by arrow n° 1 in figure 82,
2. rotate the combination tool as shown by arrow n° 2, figure 82,
to hook the extractor and move it from its seating (partial
removal).
Withdraw combination tool.
3. Insert screwdriver tip of combination tool between the bolt
and the extractor to remove the extractor. .
With hand control extractor pin and extractor spring to prevent
them flying free.
..
I"'~
---
62
Fig.83

Sequenza di rimontaggio
XII
XII
Reassembly sequence
1. valvola lancia-granate,
2. gruppo alzo,
3. mirino,
4. avviso serbatoio vuoto,
5. gancio caricatore.
6. moll a grilletto,
7. gruppo grilletto, allineare con punteruolo 113, foro F,
8. con attrezzo 104 (munito di biforcazione in punta) posizionare
il terminale della molla grilletto sotto iI grilletto,
9. gruppo cane, leva raffica, piastrina tenuta perni e perno cane
(pag. 51); allineare con punteruolo 112 nel foro E.
10. molla e perno leva raffica,
Nota: armare il cane,
11. selettore;
per poter inserire compietamente il selettore nel foro H inse-
rire prima la piastrina tenuta perni nella scanalatura del perno
cane, perno leva raffica e perno grilletto.
Nota: disarmare iI cane,
12. portamolla cane,
13. impugnatura,
14. calcio,
15. perno cerniera.
1. spindle valve,
2. rear sight group,
3. front sight,
4. bolt hold open,
5. magazine latch,
6. trigger spring,
7. trigger group, line up with drift 113, F hole,
8. with tool 104 (with forked tip) position trigger spring under
the trigger,
9. hammer group, automatic fire lever, pins' retaining plate and
hammer pin (page 51). Line up with drift 112, hole E.
10. automatic fire lever spring and pin,
Note: cock hammer,
11. selector,.
to position the selector into its seating
the pins' retaining plate into the groove of the hammer pin,
-
hole H
first insert
-
automatic fire lever pin and trigger pin,
Note: uncock hammer,-
12. hammer spring guide
13. pistol grip
14. buttstock
15. hinge pin.
La sequenza dal 6 al 12 inclusa e tassativa.
63
Only the steps 6 to 12 included must be carried out ,ft ,he above
sequence.
64

Gniccia
XIII
Folding butt
Bipiede XIV
Bipod
~..
0....
.
A
/ \
T
0
~
Fig. 82
65
Fig.83
66

Collimatore
xv
Rifle scope
Fig. 84
67

2:
(f)
LJ.J
LJ.J
f-
f-
0
0
2:
FABBRICA
O'ARMI
25063
PIETRO
GAROONE
(BRESCIA)
BERETTA
VALTROMPIA
S.P.A.
ITALY

Fabbrlcs d'Arml Pietro Beretta S.p.A.
Vis Pietro Beretta, 18 . 25063 GARDONE VAL TROMPIA (Brescia) Italla i
Tel. (030) 837261 . Telex 301523 PB BS I
:
 Loading...