

Page 1
berbel
headroom hood BKH 90/120 CB
Air extraction and recirculated air mode
Operating Instructions
11/2009
English version of original German instructions
Page 2
These instructions help you to use our product
properly, safely and economically. In the following
text, our berbel headroom hood BKH 90/120 CB
product is briefly referred to as device.
These instructions are intended for the following
persons:
• Persons who use the device
• Persons who clean the device
• Persons who dispose of the device.
Each of these persons must have read and
understood the contents of these instructions.
Compliance with these instructions helps to avoid
dangers and to increase the reliability and service
life of the device.
Structural features in the text
Defined structural features are assigned to the
elements contained in these instructions. A
distinction can therefore be easily made between
the following elements:
Normal text
Cross references
• Lists or
¾ Action steps.
Tips contain special information on the
economical use of the device.
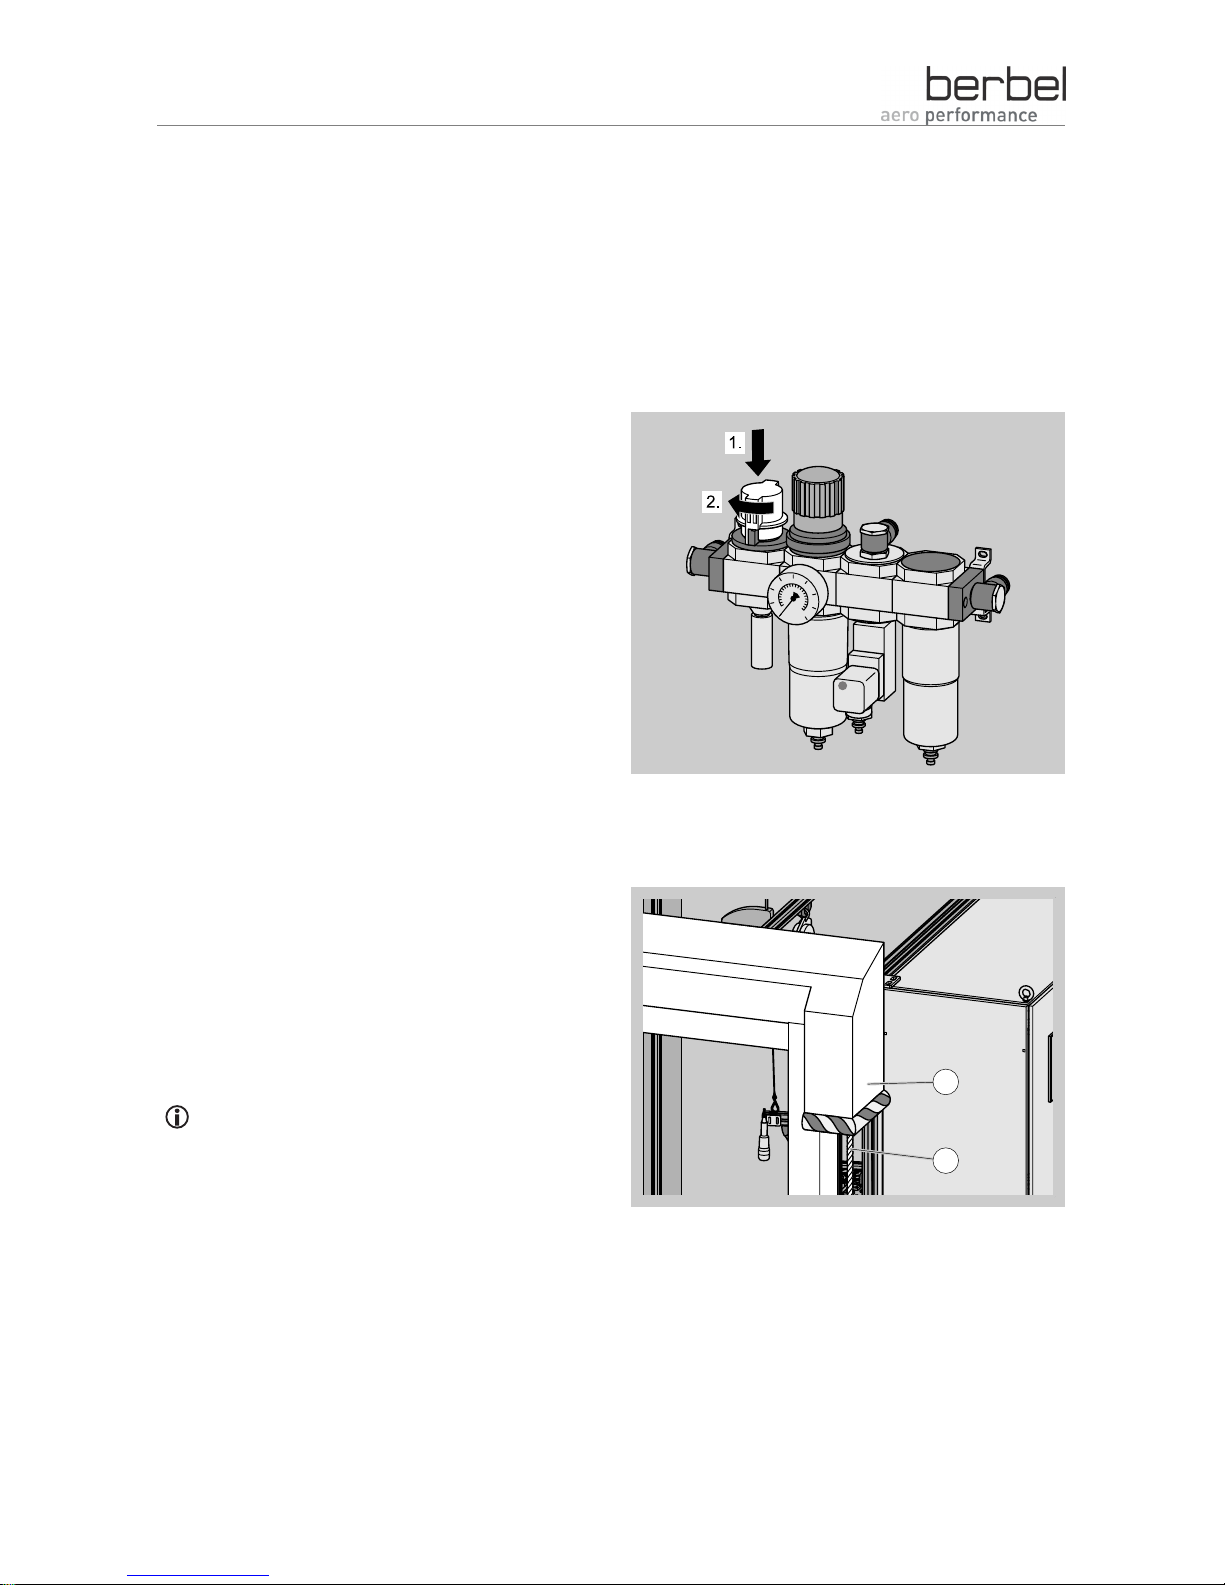
Structural features in illustrations
The illustrations contain portrayals in various grey
scales. Movements which are to be carried out are
made clear using movement or direction arrows. If
several action steps are portrayed in one
illustration, the sequence is made clear using
numbers (1., 2., ...):
If reference is made to elements in a legend or in
the body text, these are provided with an item
number (2):
2
1
Page 3

3
Table of contents
Safety ..............................................................................................................................................................4
Proper use ..........................................................................................................................................................4
Ban on independent conversions and modifications ..........................................................................................4
Basic safety instructions .....................................................................................................................................4
Structural features of the information on dangers ..............................................................................................6
Structural features of notices regarding material or environmental damage......................................................6
Description.......................................................................................................................................................7
Air extraction mode.............................................................................................................................................7
Recirculated air mode.........................................................................................................................................8
Operation.........................................................................................................................................................9
Switching on the ventilation function ..................................................................................................................9
Changing the output level.................................................................................................................................10
Switching off the ventilation function ................................................................................................................10
Switching on the run-on function ......................................................................................................................10
Switching the lighting on and off.......................................................................................................................11
Cleaning and care..........................................................................................................................................12
Cleaning intervals .............................................................................................................................................12
Cleaning in the case of normal soiling..............................................................................................................12
Cleaning in the case of severe soiling ..............................................................................................................13
Cleaning surfaces .............................................................................................................................................14
Cleaning the rotary knob ..................................................................................................................................14
Replacing the recirculating air filter filling .........................................................................................................15
Maintenance ..................................................................................................................................................19
Maintaining the device......................................................................................................................................19
Maintaining the lighting.....................................................................................................................................19
Rectifying malfunctions..................................................................................................................................20
Disposal.........................................................................................................................................................21
Disposing of packaging.....................................................................................................................................21
deviceDisposal..................................................................................................................................................21
Technical data ...............................................................................................................................................22
Model plate .......................................................................................................................................................22
BKH 90 CB .......................................................................................................................................................22
BKH 120 CB .....................................................................................................................................................22
Contacting the manufacturer..........................................................................................................................23
Page 4

Safety
4
Safety
Read through this chapter carefully before installing,
using or cleaning the device.
¾ Observe all information on dangers during all
activities on the device.
¾ Enclose these instructions if you pass the device
on.
Proper use
The device can be used to extract cooking vapours
during cooking.
The device is exclusively intended for this purpose
and must only be put to this use. The device must
only be used in the manner described in these
instructions.
Any other use or modification of the device is
regarded as improper and may lead to damage.
The manufacturer accepts no liability for damage
caused as a result of improper use, incorrect
installation or incorrect operation. The device is not
intended for commercial use. Use the device in
private kitchens only.
Ban on independent conversions and
modifications
• Do not undertake any independent conversions or
modifications on the device. Conversions or
modifications without the approval of berbel
Ablufttechnik GmbH are impermissible.
• Never bridge or bypass the protective facilities
available on the device.
Basic safety instructions
This section contains basic safety instructions for
handling the device. Additional safety instructions
which affect certain actions and procedures can be
found in the relevant chapters.
• Heed all of the safety instructions and information
on dangers in these instructions.
• Check the device and all parts for visible damage.
In the event of damage, contact your specialist
dealer or the berbel customer service. The device
must only be used in flawless condition.
• Always have repair and maintenance work carried
out by qualified, specialist personnel. Otherwise,
you endanger yourself and others.
• Install the device with the enclosed brackets
exclusively on load-bearing parts of buildings
(solid construction).
• In the case of other mountings, use
correspondingly suitable mounting techniques. If
in doubt, ask your specialist dealer. Otherwise,
you endanger yourself and others.
• Use the device in private kitchens only.
Avoiding dangers due to electric shock
• Have work on the voltage supply carried out by a
qualified, trained specialist electrician only.
At the very least, the specialist electrician must
have the following knowledge and skills:
− Basics of electrical engineering
− Knowledge of the country-specific regulations
and standards (in Germany e.g.
DIN 57100/VDE 0100, Part 701)
− Knowledge of the relevant safety regulations
− Knowledge of the relevant legal regulations for
gas installations (in Germany e.g. the technical
regulations for gas installations TRGI).
Page 5

Safety
5
• Only use the device if it is connected and fused
according to the technical data.
• Do not kink or crush the mains cable.
• Do not operate the device with a damaged
electrical connection cable.
• Disconnect the device from the current supply in
the event of malfunctions.
• The mains plug must be freely accessible so that
the device can be easily and quickly disconnected
from the mains power supply in an emergency. If
the mains plug is inaccessible following
installation, an all-pole isolating device with a
contact opening of at least 3 mm must be
provided in the installation.
• If the device is brought into a warm environment
from a cold environment, moisture may form
inside the device. In this case, wait for
approximately two to three hours before starting
up the device.
• Avoid exposing the device to dripping or splashing
water. Never place objects filled with fluids, such
as e.g. vases, on the device.
• Keep the device dry.
• If fluid nevertheless enters the device:
− Immediately shut off the current supply by
removing the fuse.
− Make sure that the device's current supply
cannot be unintentionally reactivated. E.g.
designate a person to prevent the fuse from
being switched on.
− Allow the device to dry.
− Have the device checked and repaired by
trained, specialist personnel before using the
device again.
Avoiding risk of explosion
• Do not operate the device in an explosive
environment.
Avoiding fire hazard
• Make sure that the cooker top has cooled down
before covering it.
A soiled device may cause fire hazards.
• Keep the device in flawless condition and check it
regularly.
• Regularly remove any grease residues which are
present. Grease residues pose a fire hazard.
• Do not flambé beneath the device. Naked flames
may e.g. damage neighbouring cupboards.
• Only have repair work on the device carried out
by personnel trained for this purpose.
In recirculated air mode:
• A covered or sealed ventilation outlet may cause
fire hazards. Do not place any objects such as
e.g. cloths or plates on or in front of the device's
ventilation slits. In the case of recirculated air
devices, outflowing air must be able to escape
back into the kitchen through the ventilation slits
without impediments.
• No objects which may impede the air flow may be
installed above the device. Make sure that the
outflowing air is able to flow into the kitchen
without impediments.
The device may only be installed above a fireplace
for solid fuels (e.g. coal-fired stove) if:
• the fireplace has a sealed cover which cannot be
removed. Otherwise, e.g. there is an increased
fire hazard due to flying sparks.
• the legal and country-specific regulations are
adhered to.
Avoiding risks of injury
• In order to prevent the risk of falling, use a stable
stepladder for all work on the device, such as e.g.
replacing the filter, installing and cleaning the
device.
• In order to prevent risks of injury due to falling
parts, use suitable mounting material.
• In order to prevent cuts due to broken glass, use
suitable protective gloves.
Avoiding the risk of suffocation
If the device and an open fireplace which is
dependent on the room air are operated
Page 6
Safety
6
simultaneously, gases or waste gases may be
drawn into the room.
• Make sure that all of the permits required for
operation in your country are available (e.g. those
of the master chimney sweep).
• Make sure that all standards and guidelines for
operating the device in your country are observed.
• Ensure an adequate fresh air supply in the
dwelling.
• Do not allow children to play with film or other
parts of the packaging.
• Store film or other parts of the packaging in a
location which is inaccessible to children.
Preventing the risk of collapse
• The necessary wall passage must be created by a
specialist company. Wall passages influence the
building's statics. Improperly created wall
passages may lead to the collapse of the building.
Avoiding environmental damage
• Dispose of the device and its accessories
according to the legal regulations.
Structural features of the information on
dangers
The following categories of information on dangers
are contained in these instructions:
DANGER
Notices containing the word DANGER
warn of a hazardous situation which
leads to death or severe injuries.
WARNING
Notices containing the word
WARNING warn of a hazardous
situation which may lead to death or
severe injuries.
CAUTION
Notices containing the word CAUTION
warn of a situation which may lead to
slight or moderate injuries.
Structural features of notices regarding
material or environmental damage
ATTENTION
These notices warn of a situation
which leads to material or
environmental damage.
Page 7
Description
7
Description
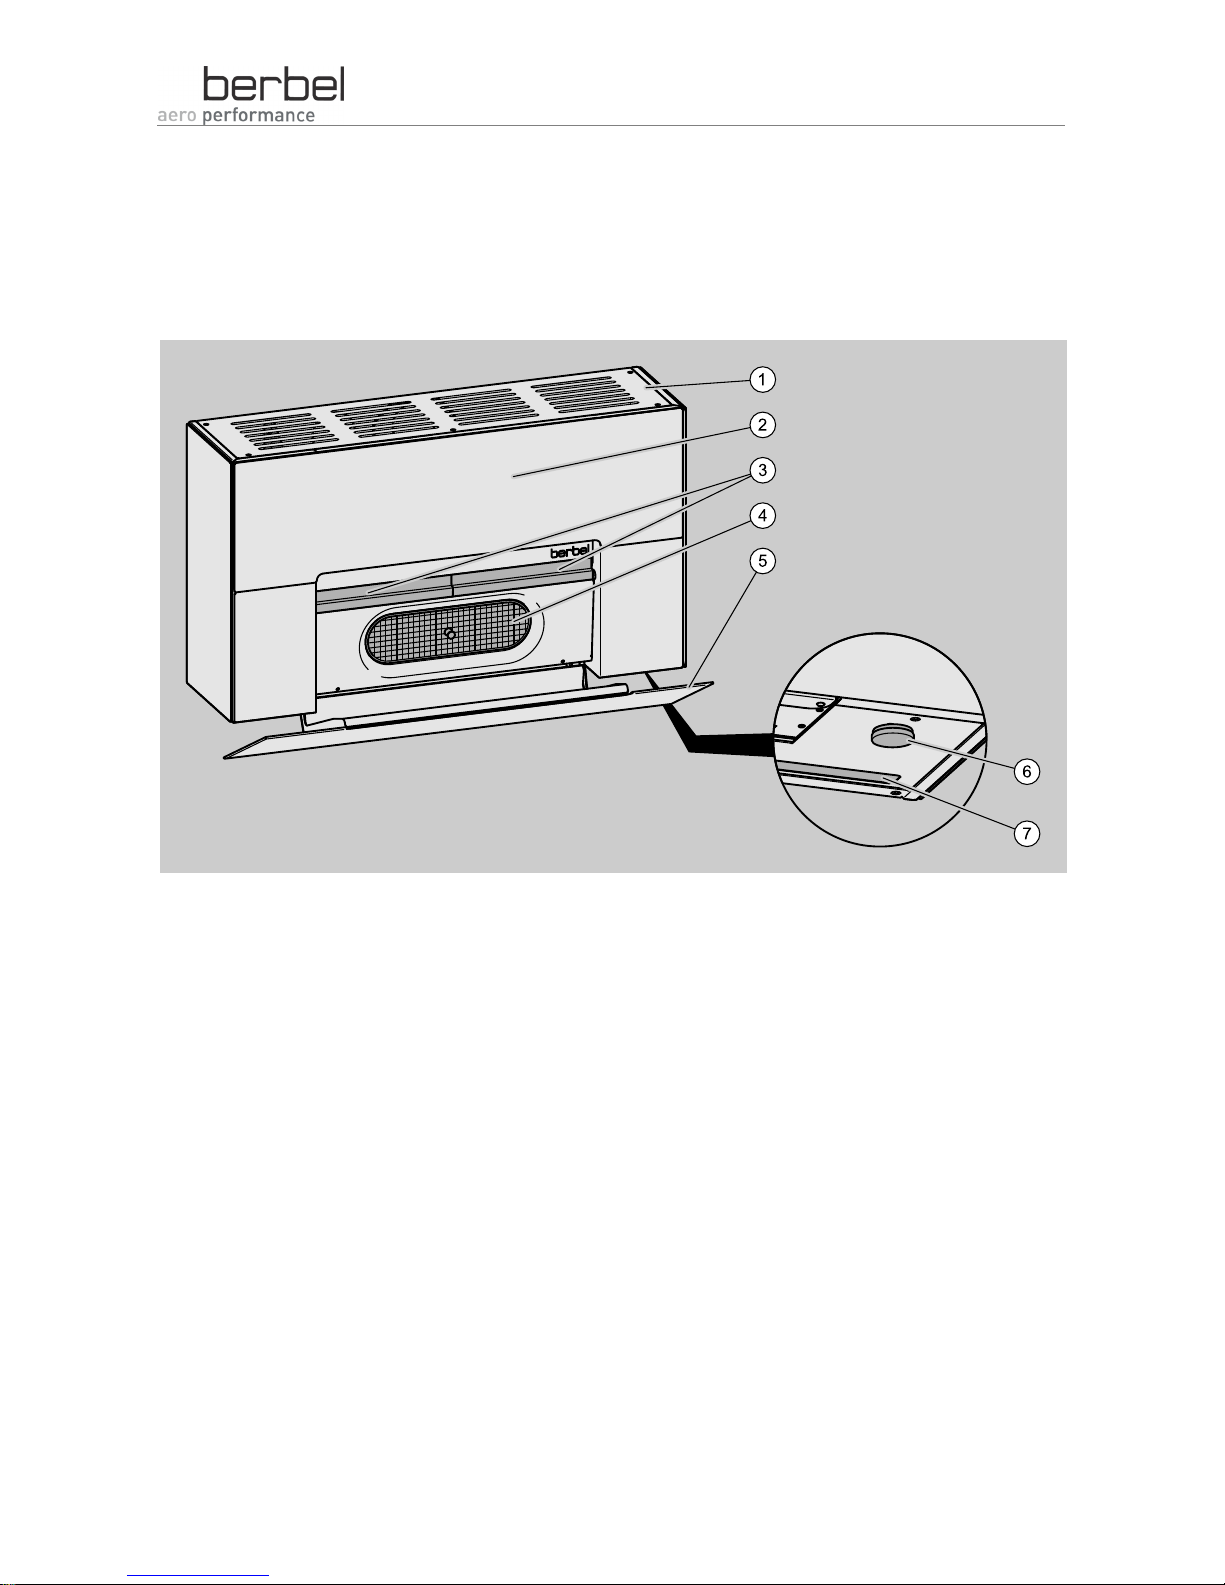
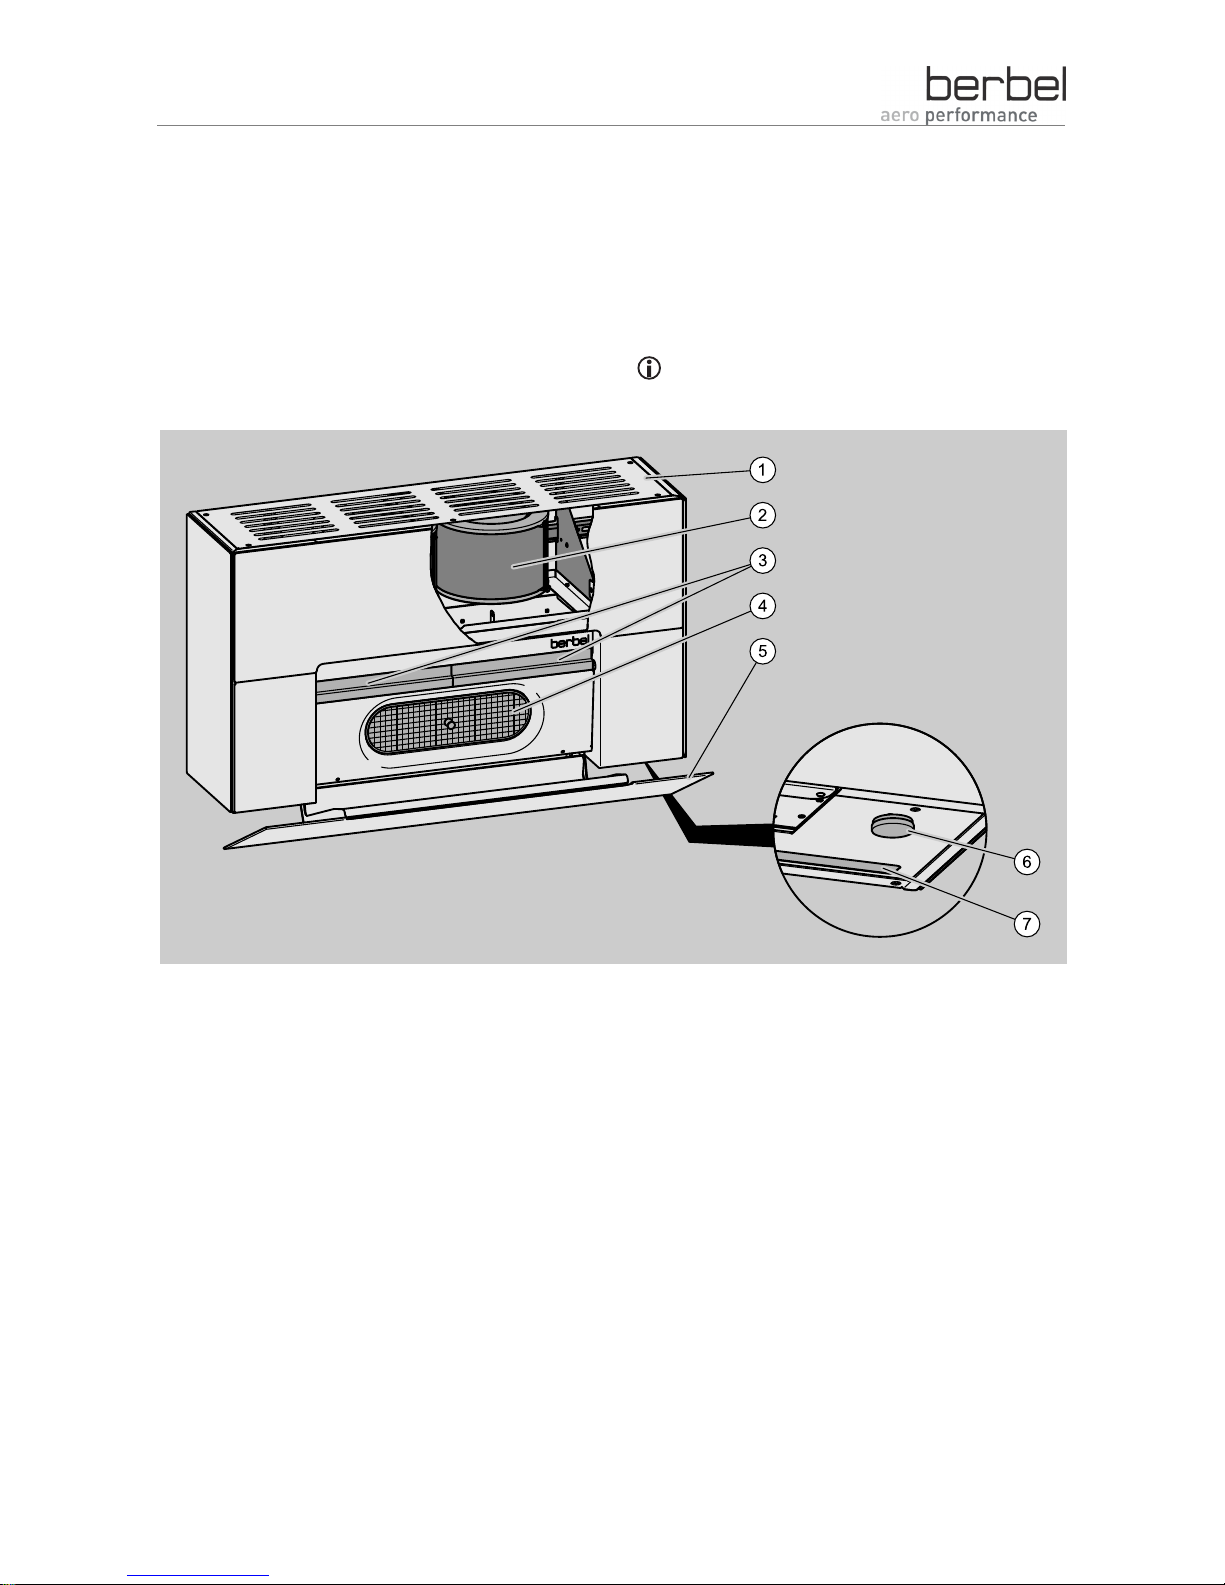
Air extraction mode
The device intakes room air, filters the room air and
conducts the cleaned room air outside. Cleaning is
carried out in several cleaning stages. The first
cleaning stage removes e.g. grease and air
particles from the intaken room air. The next
cleaning stage filters light, flying particles (e.g. fluff)
from the intaken room air. The cleaned room air is
conducted into the open air.
Ventilation cover Lower front flap with grease tray
Device Rotary knob (switching on and off)
Dirt strips LED light strip
Fluff screen
Page 8
Description
8
Recirculated air mode
The device intakes room air, filters the room air and
returns the cleaned room air into the room.
Cleaning is carried out in several cleaning stages.
The first cleaning stage removes e.g. grease and
air particles from the intaken room air. The next
cleaning stage filters light, flying particles (e.g. fluff)
from the intaken room air. The filter filling in the
recirculating air filter neutralises existing odour
contents. The odour-free, cleaned room air is
returned into the room.
berbel extractor hoods are developed according to
the state-of-the-art. They meet the prescribed safety
regulations and are intended for domestic use.
The filter filling must be replaced at regular
intervals.
Ventilation cover Lower front flap with grease tray
Recirculating air filter Rotary knob (switching on and off)
Dirt strips LED light strip
Fluff screen
Page 9
Operation
9
Operation
The following information on dangers applies to air
extraction mode only.
WARNING
Danger of suffocation due to a lack of
oxygen on operation of the device.
¾ Ensure an adequate fresh air supply
in the dwelling.
¾ Make sure that the device is
connected to a window contact
switch to ensure hazard-free
operation.
¾ Make sure that the country-specific,
legally prescribed regulations (in
Germany e.g. the requirements of
your Federal state's regulations
pertaining to fireplaces (FeuV)) are
adhered to.
The device is equipped with a rotary knob
(ThinCoder) for operation.
The rotary knob is located on the lower side of the
device.
The following sections provide information on how
to control the functions of the device using the
rotary knob.
Switching on the ventilation function
WARNING
Danger of burning due to flambéing
beneath the device.
Naked flames may e.g. cause burns
on the skin.
¾ Do not flambé beneath the device.
ATTENTION
Fire hazard due to flambéing beneath
the device.
Naked flames may e.g. damage
neighbouring cupboards.
¾ Do not flambé beneath the device.
The following tip applies to recirculated air mode
only.
¾ Replace the filter's filling if you switch the
device on and determine an unpleasant
odour.
See Cleaning and care from page 12.
Clean the device if you switch the device on and
determine increased fan noise.
See Cleaning and care from page 12.
After six hours of continuous operation without
the actuation of any controls, the device
automatically shuts ventilation mode off.
¾ If necessary, switch the device on again.
Cooking vapours are best eradicated if you
• switch the device on at the start of cooking
• switch the device's run-on function on at the end
of cooking.
The device can be operated at four different output
levels.
Page 10
Operation
10
Proceed as follows to switch on the device:
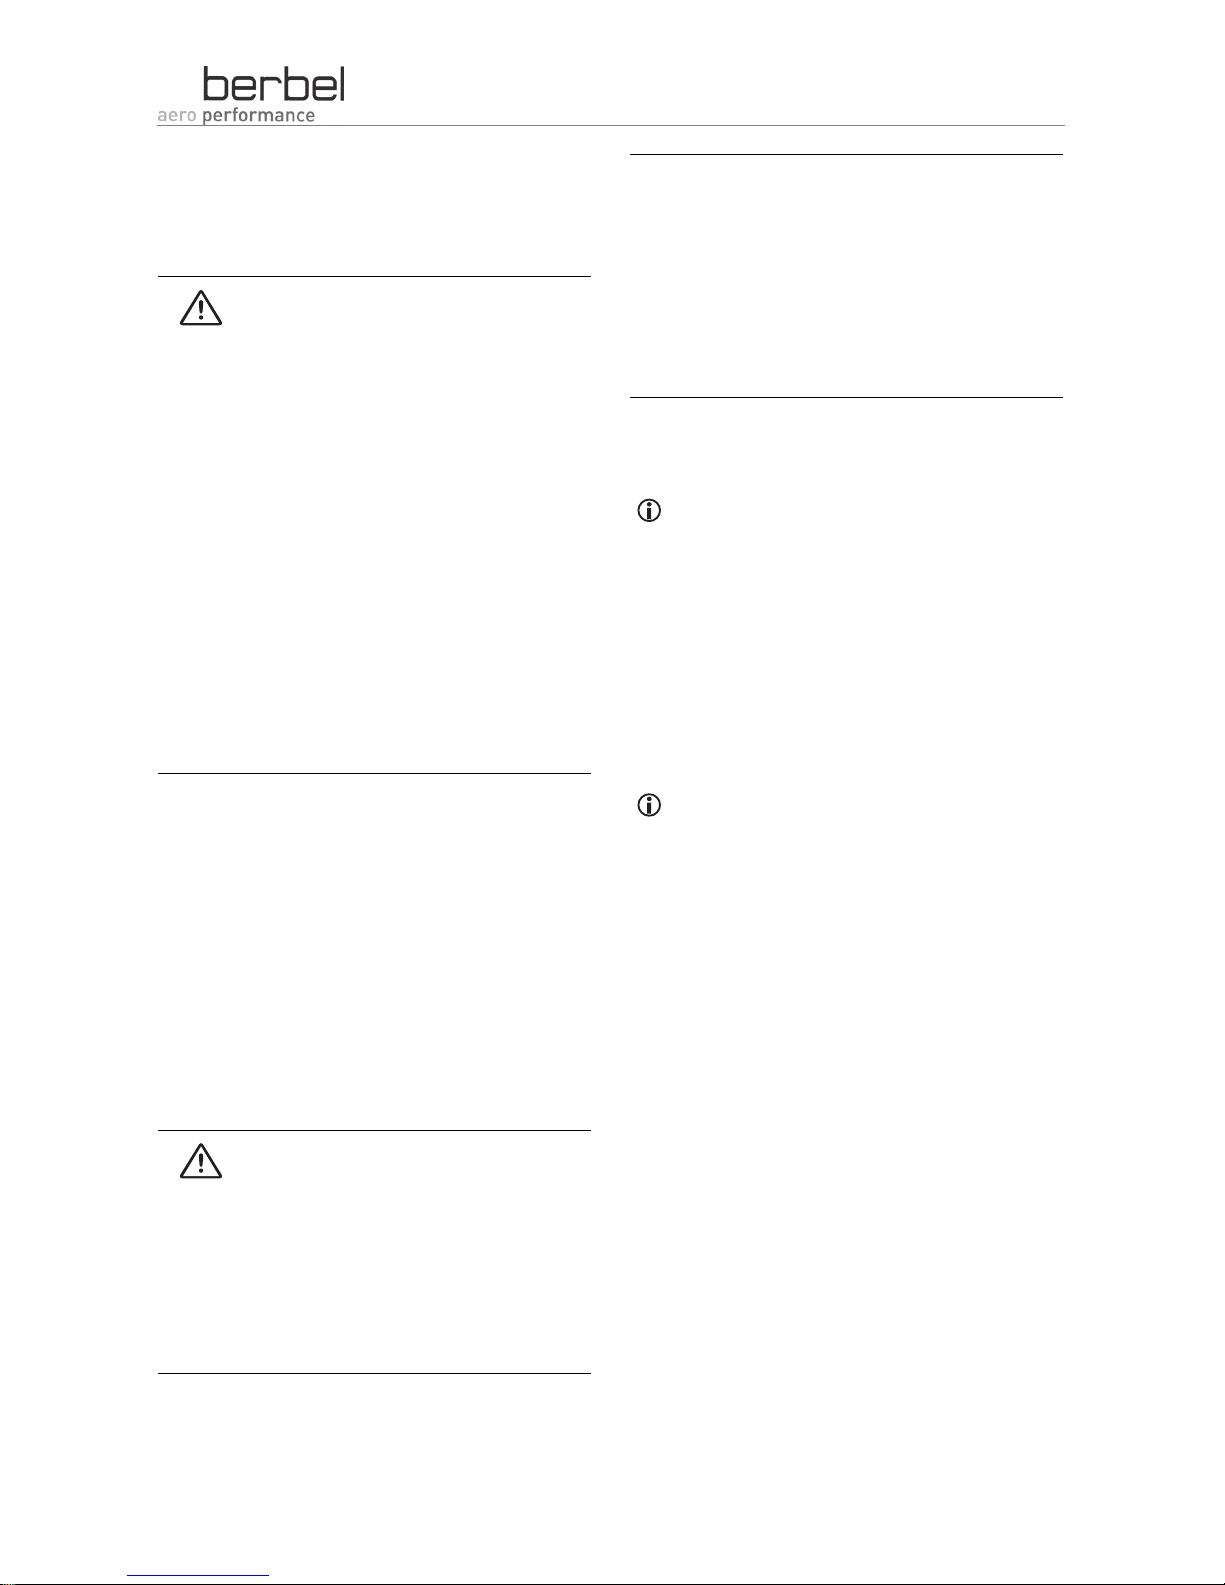
¾ Turn the rotary knob clockwise from level "0" to
the desired output level.
The rotary knob engages at each output level.
The device immediately operates at the selected
output level.
Changing the output level
During operation, the device can be switched to
another output level at any time.
¾ Turn the rotary knob from the current position to
the position of the desired output level.
The rotary knob engages at each output level.
The device operates at the selected output level.
After six hours of continuous operation without
the actuation of any controls, the device
automatically shuts ventilation mode off.
¾ If necessary, switch the device on again.
Switching off the ventilation function
Proceed as follows to switch off the ventilation
function:
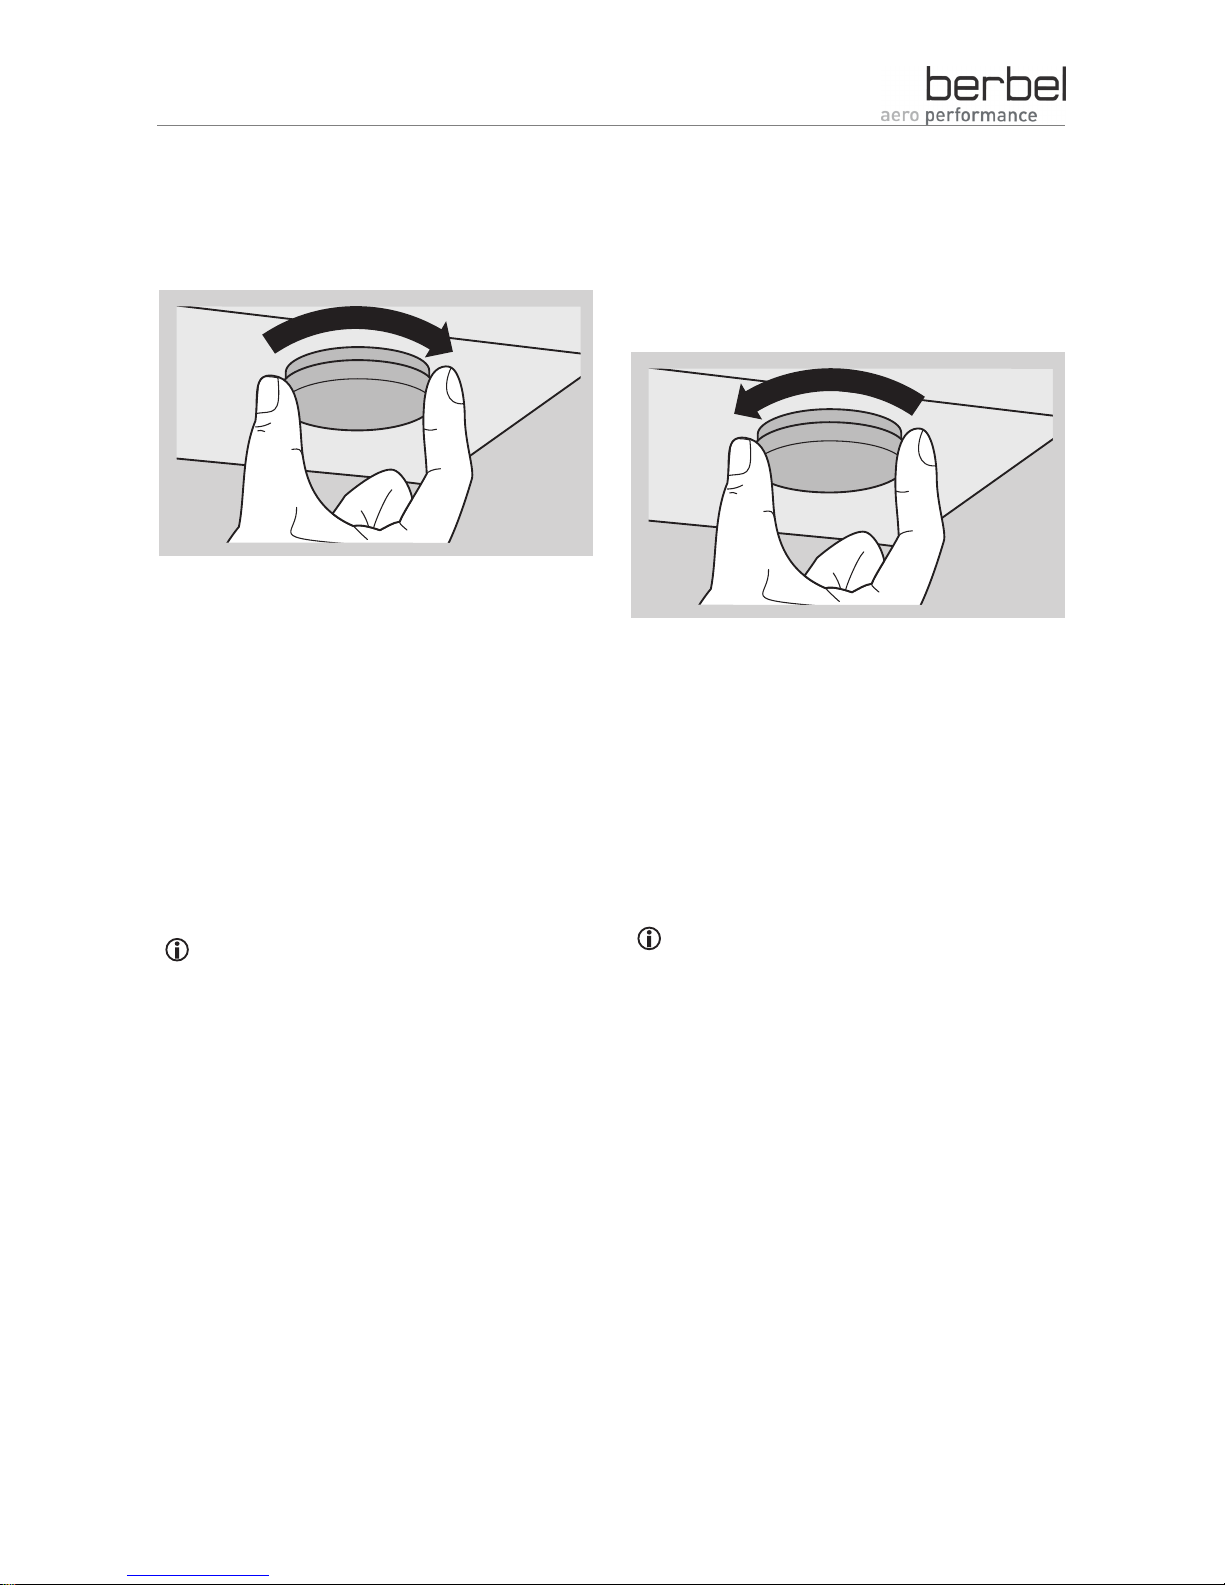
¾ Turn the rotary knob counter-clockwise to the "0"
position.
The rotary knob engages at each output level.
The device switches the ventilation function off.
Switching on the run-on function
The device is equipped with a run-on function.
When this function is used, the device continues to
operate at the current output level for ten minutes
after being switched off and then switches the
ventilation function off automatically.
The run-on function can only be switched on if
the device has previously been switched on for
at least one minute in ventilation mode.
Proceed as follows to switch on the run-on function:
¾ Turn the rotary knob from the current output level
to the "0" level.
The rotary knob engages at each output level.
¾ Turn the rotary knob clockwise back to output
level "1".
¾ Turn the rotary knob to level "0".
The run-on function is switched on.
Example:
You have prepared your dish and would like to have
the air in the kitchen cleaned for a further ten
minutes. You have used the device at the desired
Page 11
Operation
11
output level for at least one minute.
Carry out the following activities in direct
succession:
¾ Turn the rotary knob from the current position to
the "0" level.
The rotary knob engages at each output level.
¾ Turn the rotary knob to level "1".
¾ Turn the rotary knob to level "0".
The device operates at the output level last selected
and switches off after ten minutes.
Switching the lighting on and off
In order to illuminate the cooker top, the device is
equipped with energy-saving LED lighting.
The lighting can be used independently from the
fan.
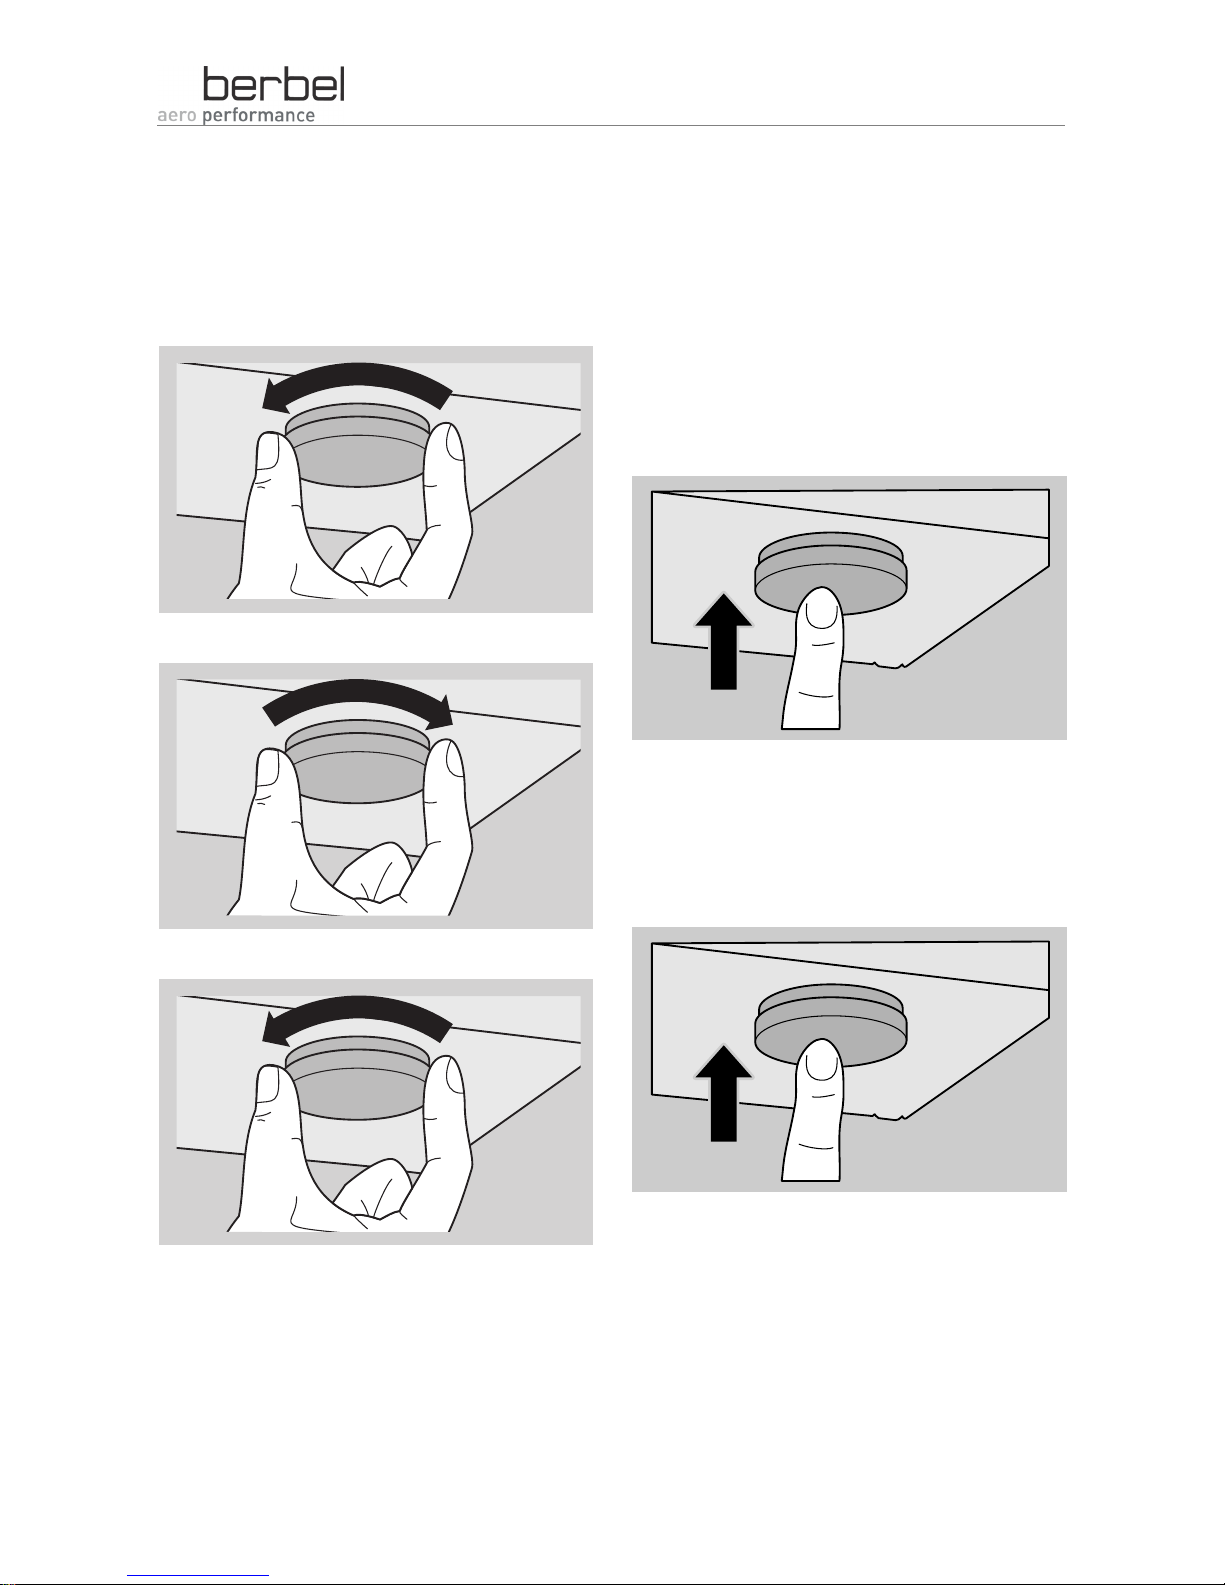
Switching on the lighting
Proceed as follows to switch on the lighting:
¾ Press gently on the rotary knob with one finger.
The lighting is switched on.
Switching off the lighting
Proceed as follows to switch off the lighting:
¾ Press gently on the rotary knob with one finger.
The lighting is switched off.
Page 12
Cleaning and care
12
Cleaning and care
DANGER
Fatal electric shock due to fluids which
enter the device.
¾ Never pour fluids into the device.
WARNING
Fire hazard due to grease residues in
and on the device.
¾ Clean the device regularly.
ATTENTION
Damage to surfaces due to sharpedged objects or aggressive cleaning
agents.
¾ Never use sharp-edged objects,
scouring agents or aggressive
cleaning agents.
¾ Use a soft, moist cloth.
Cleaning intervals
Usage
behaviour
Time period
Little or
occasional
use.
Each time after cooking.
See Cleaning in the case of normal
soiling on page 12.
Daily or
extensive
use.
After 3 weeks at the latest.
See Cleaning in the case of severe
soiling on page 13.
Cleaning in the case of normal soiling
The device is designed in such a way that the
foreign particles contained in the intaken air are
collected at the dirt strip and the grease trays.
Proceed as follows to clean the device in the case
of normal soiling:
¾ Switch the device off.
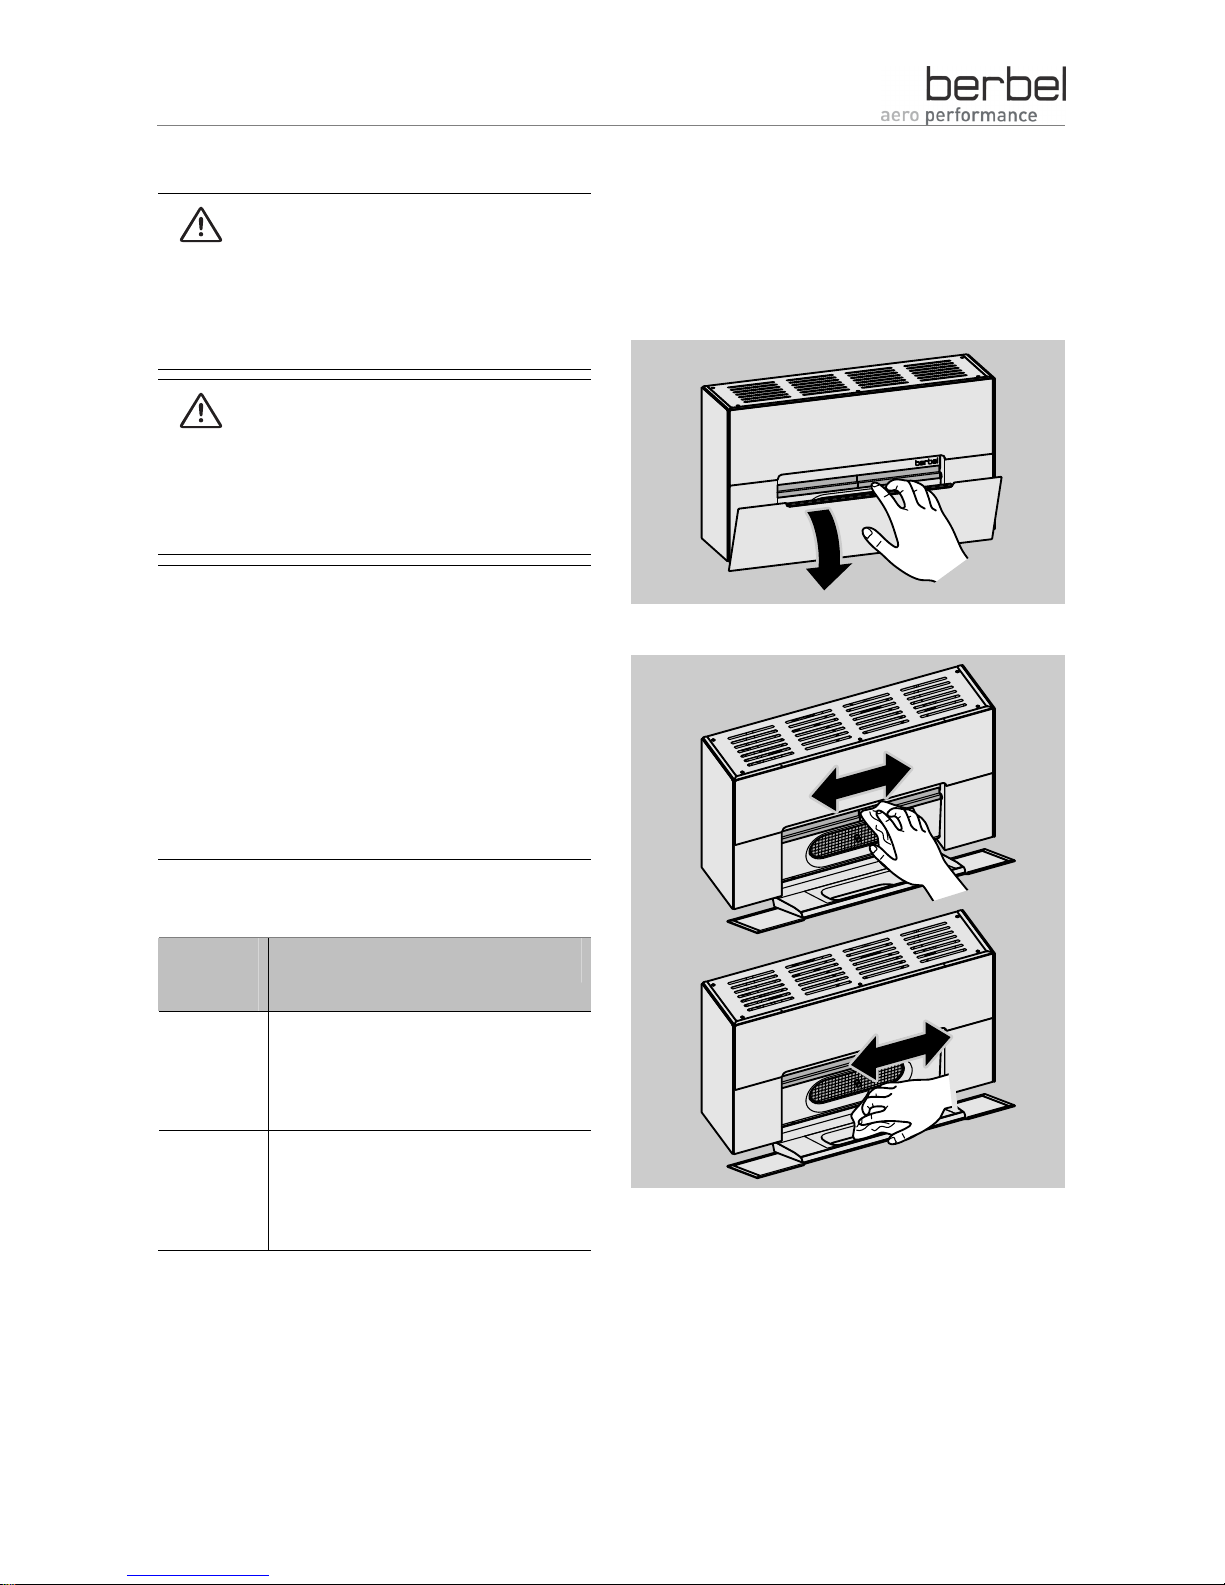
¾ Open the lower front flap by pulling on the
rounded upper edge of the lower front flap.
¾ Wipe the dirt strips and the grease tray down.
Page 13
Cleaning and care
13
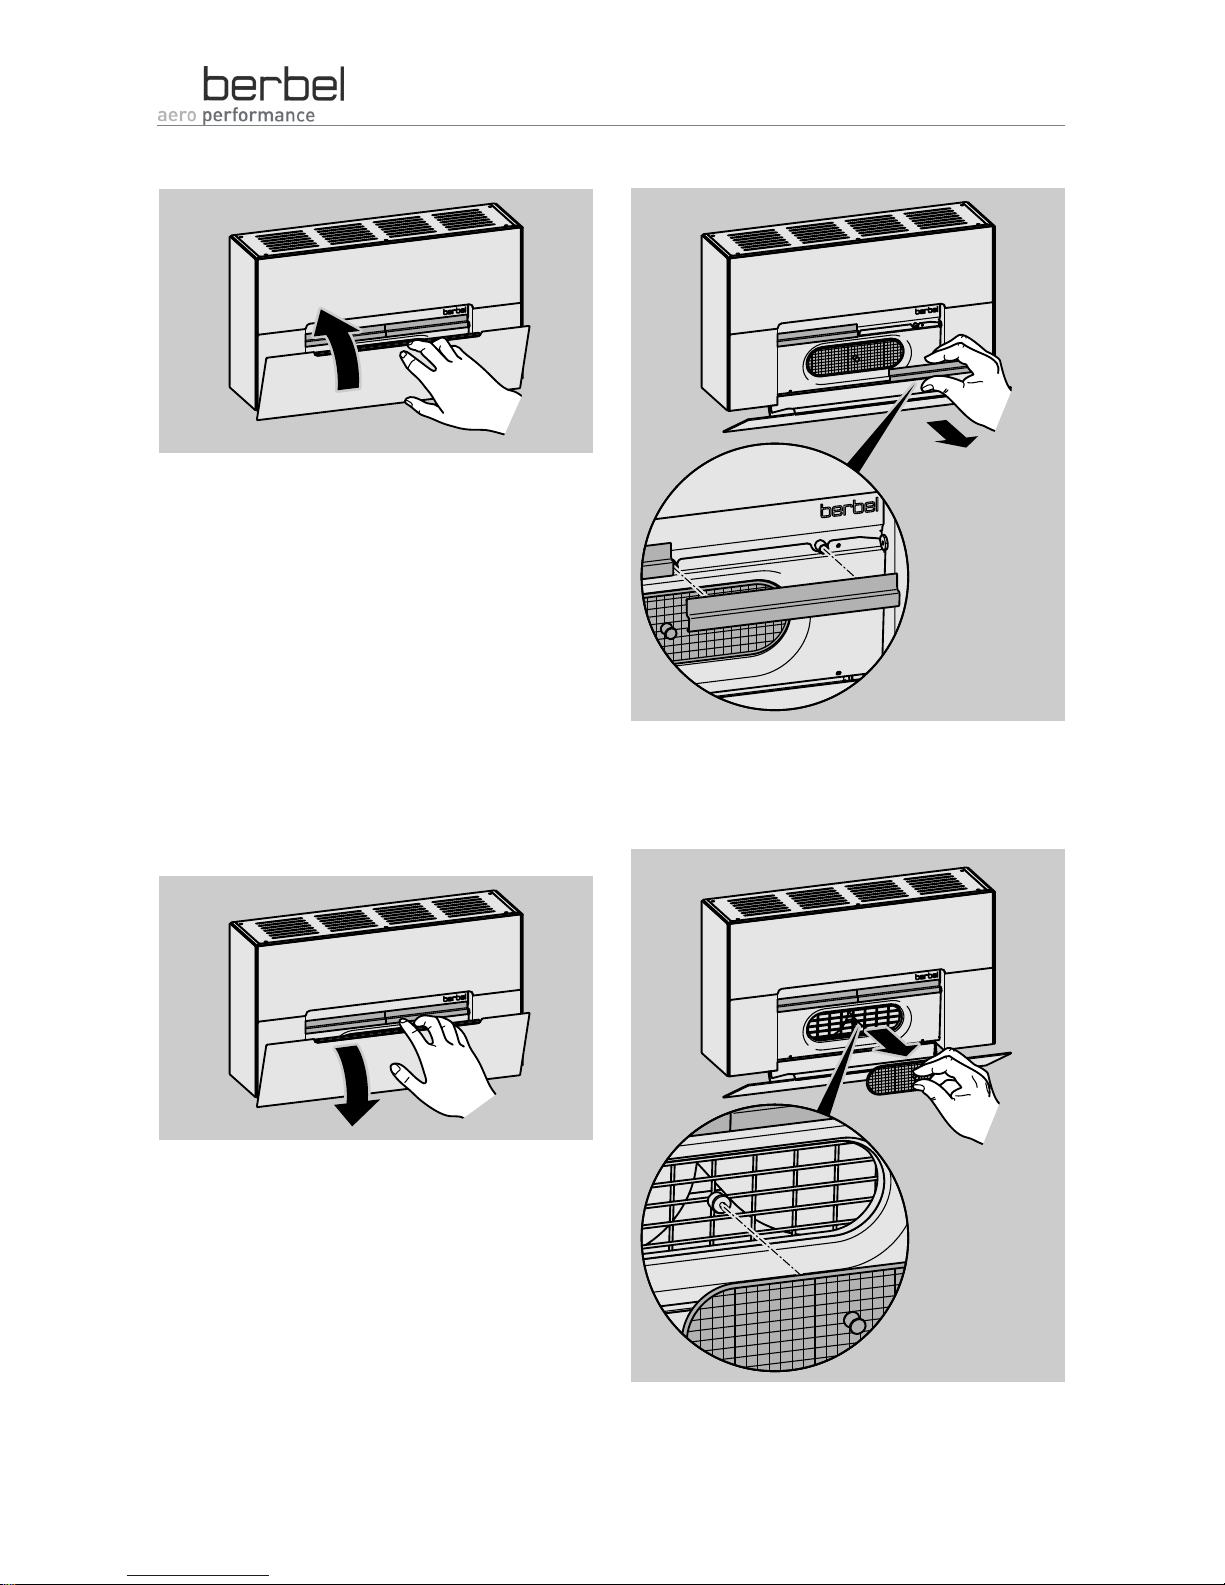
¾ Close the lower front flap.
Cleaning in the case of severe soiling
If the device is severely soiled, the dirt strips and
the fluff screen must be removed. The stainless
steel parts are held magnetically. These parts can
be easily removed and installed and can be reused
after cleaning.
Proceed as follows to clean the device in the case
of severe soiling:
¾ Switch the device off.
¾ Open the lower front flap by pulling on the
rounded upper edge of the lower front flap.
Use a soft, moist cloth or paper for cleaning.
¾ Wipe the parts off.
¾ Pull both dirt strips off forwards by hand.
¾ Grip the fluff screen by the knob in the centre of
the screen.
¾ Pull the fluff screen off forwards.
¾ Clean all parts, e.g. in the dishwasher.
Page 14
Cleaning and care
14
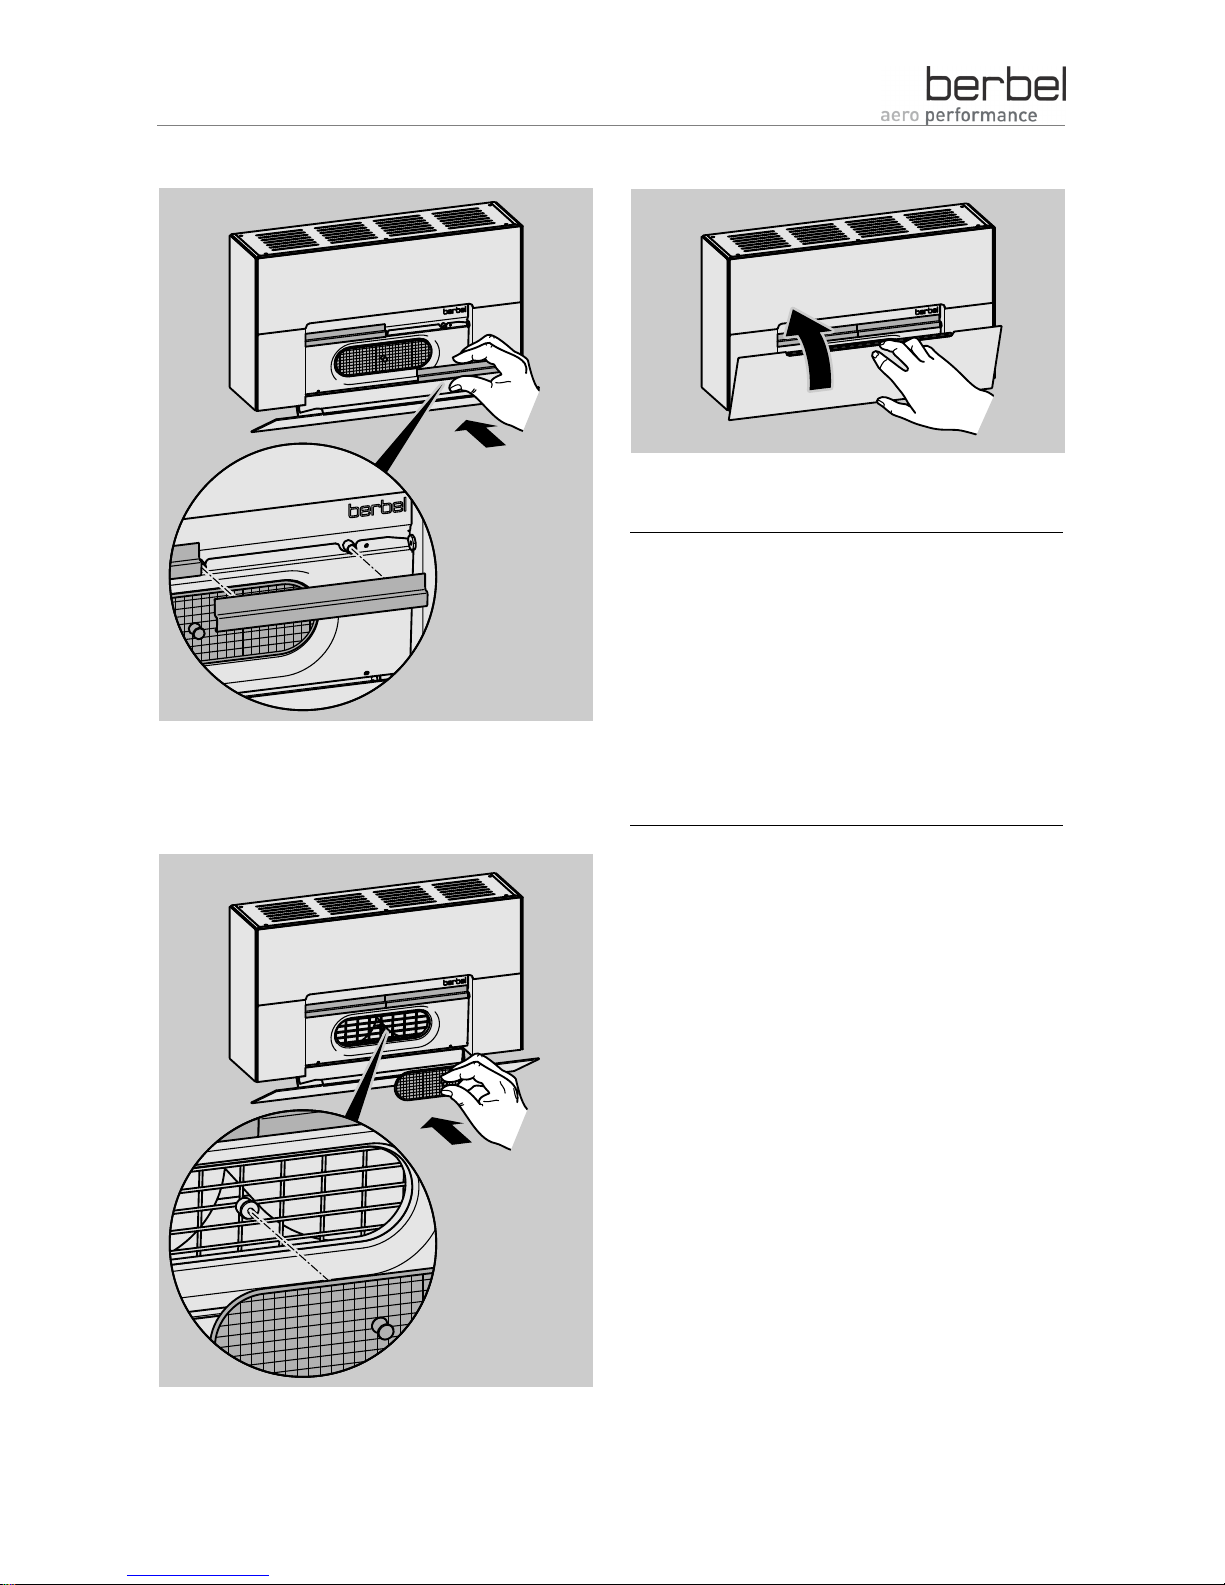
¾ Insert the dirt strips into the device again.
Make sure that the fluff screen is completely dry
prior to use.
¾ Insert the fluff screen into the device.
¾ Close the lower front flap.
Cleaning surfaces
ATTENTION
Damage to surfaces due to sharpedged objects or aggressive cleaning
agents.
¾ Never use sharp-edged objects,
scouring agents or aggressive
cleaning agents.
¾ Use a soft, moist cloth.
¾ Clean surfaces with a soft, moist cloth and a mild
household cleaning agent.
Cleaning the rotary knob
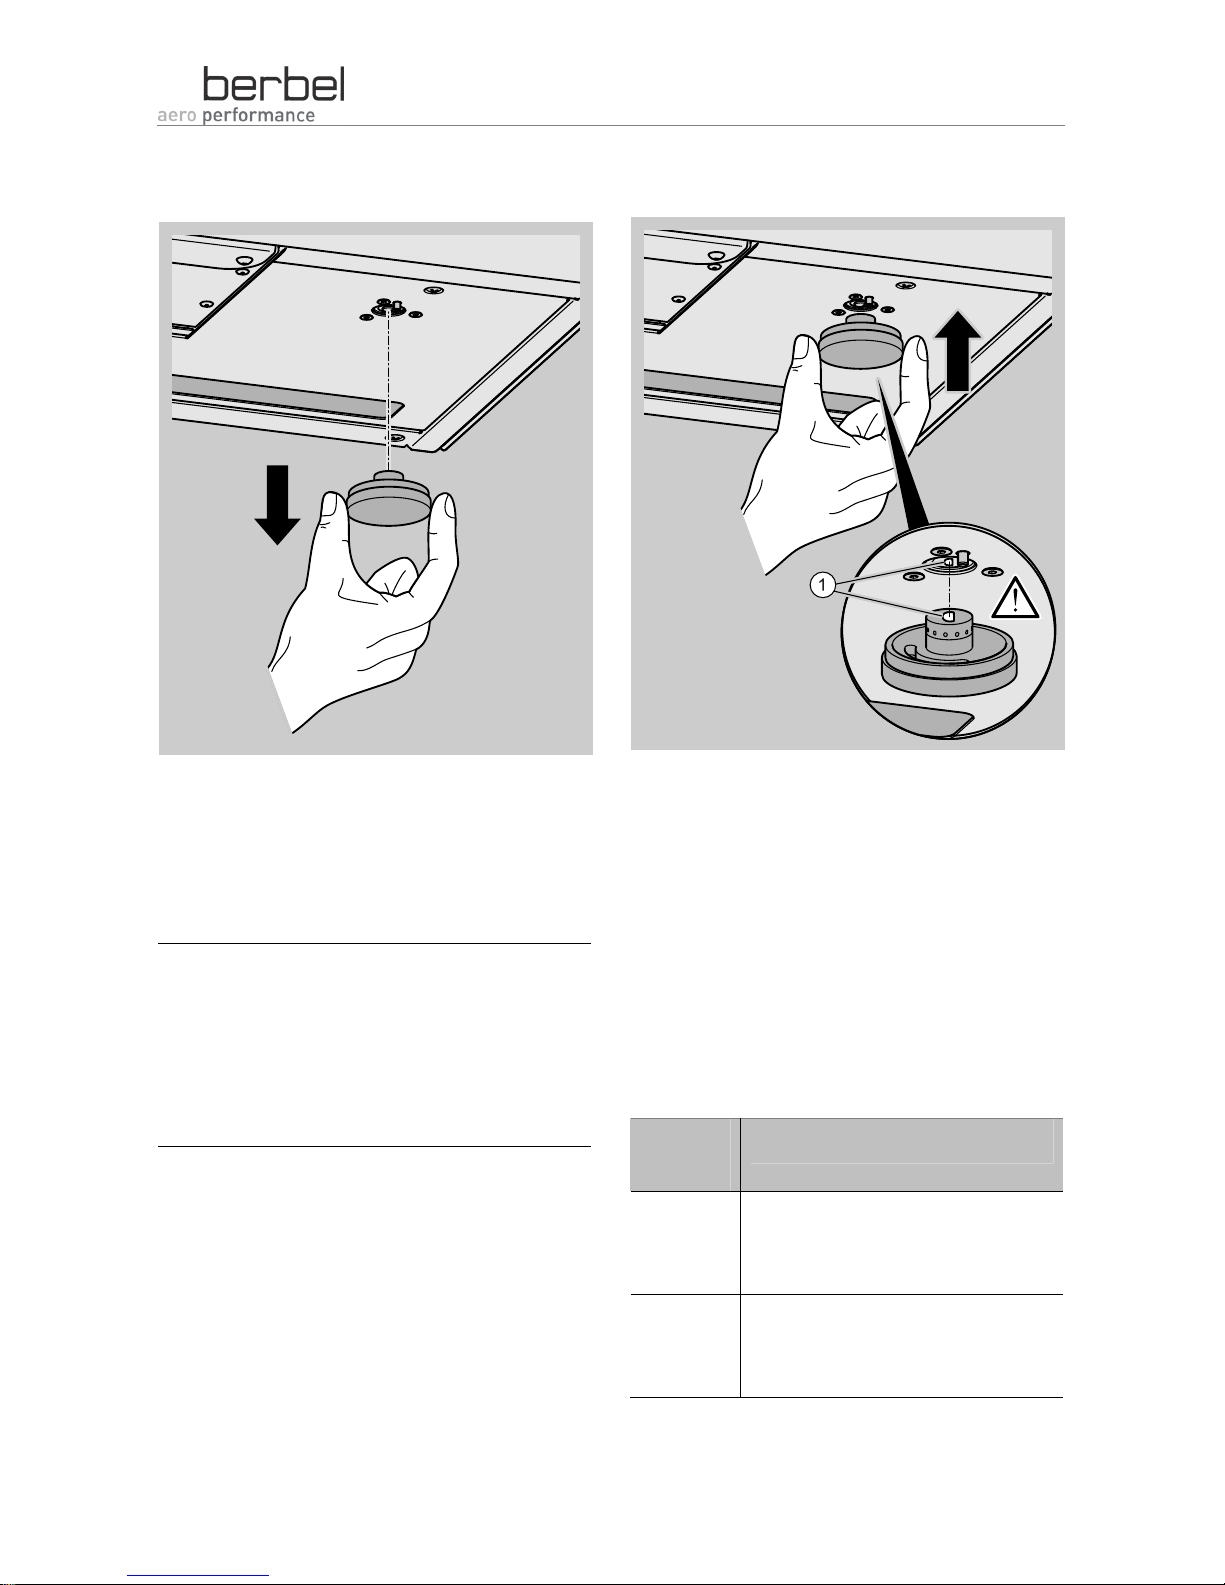
The rotary knob is mounted on an axle on the
device. The axle is milled on one side. The lower
side of the rotary knob has an appropriate opening
as a mating element. The rotary knob can only be
installed when the milled sides are positioned flush
above each other.
Page 15
Cleaning and care
15
Removing the rotary knob
¾ Pull the rotary knob off.
Cleaning the rotary knob
¾ Clean the rotary knob in the dishwasher or using
a moist cloth.
Installing the rotary knob
ATTENTION
Damage to the rotary knob in the case
of incorrect alignment.
¾ Turn the rotary knob to the correct
installation position.
¾ Install the rotary knob by pressing the rotary knob
upwards into the correct installation position (1).
The following chapter applies to recirculated air
mode only.
Replacing the recirculating air filter
filling
Replace the recirculating air filter filling in
accordance with the specifications in the following
table:
Usage
behaviour
Time period
Little or
occasional
use
In the case of odours in the
outgoing air, after 24 months at the
latest
Daily or
extensive
use
In the case of odours in the
outgoing air, after 12 months at the
latest
Page 16
Cleaning and care
16
WARNING
Risk of falling when replacing filter.
¾ Use a stable stepladder.
WARNING
Risk of injury due to falling parts.
¾ Make sure that nobody is standing
beneath the working area during
work.
ATTENTION
Damage due to falling parts.
¾ Protect surfaces and devices
(e.g. cooled cooker top) beneath
your working area from damage,
e.g. with thick cardboard.
Nothing may be installed above the extractor
hood, as replacement of the filter filling is
otherwise impossible.
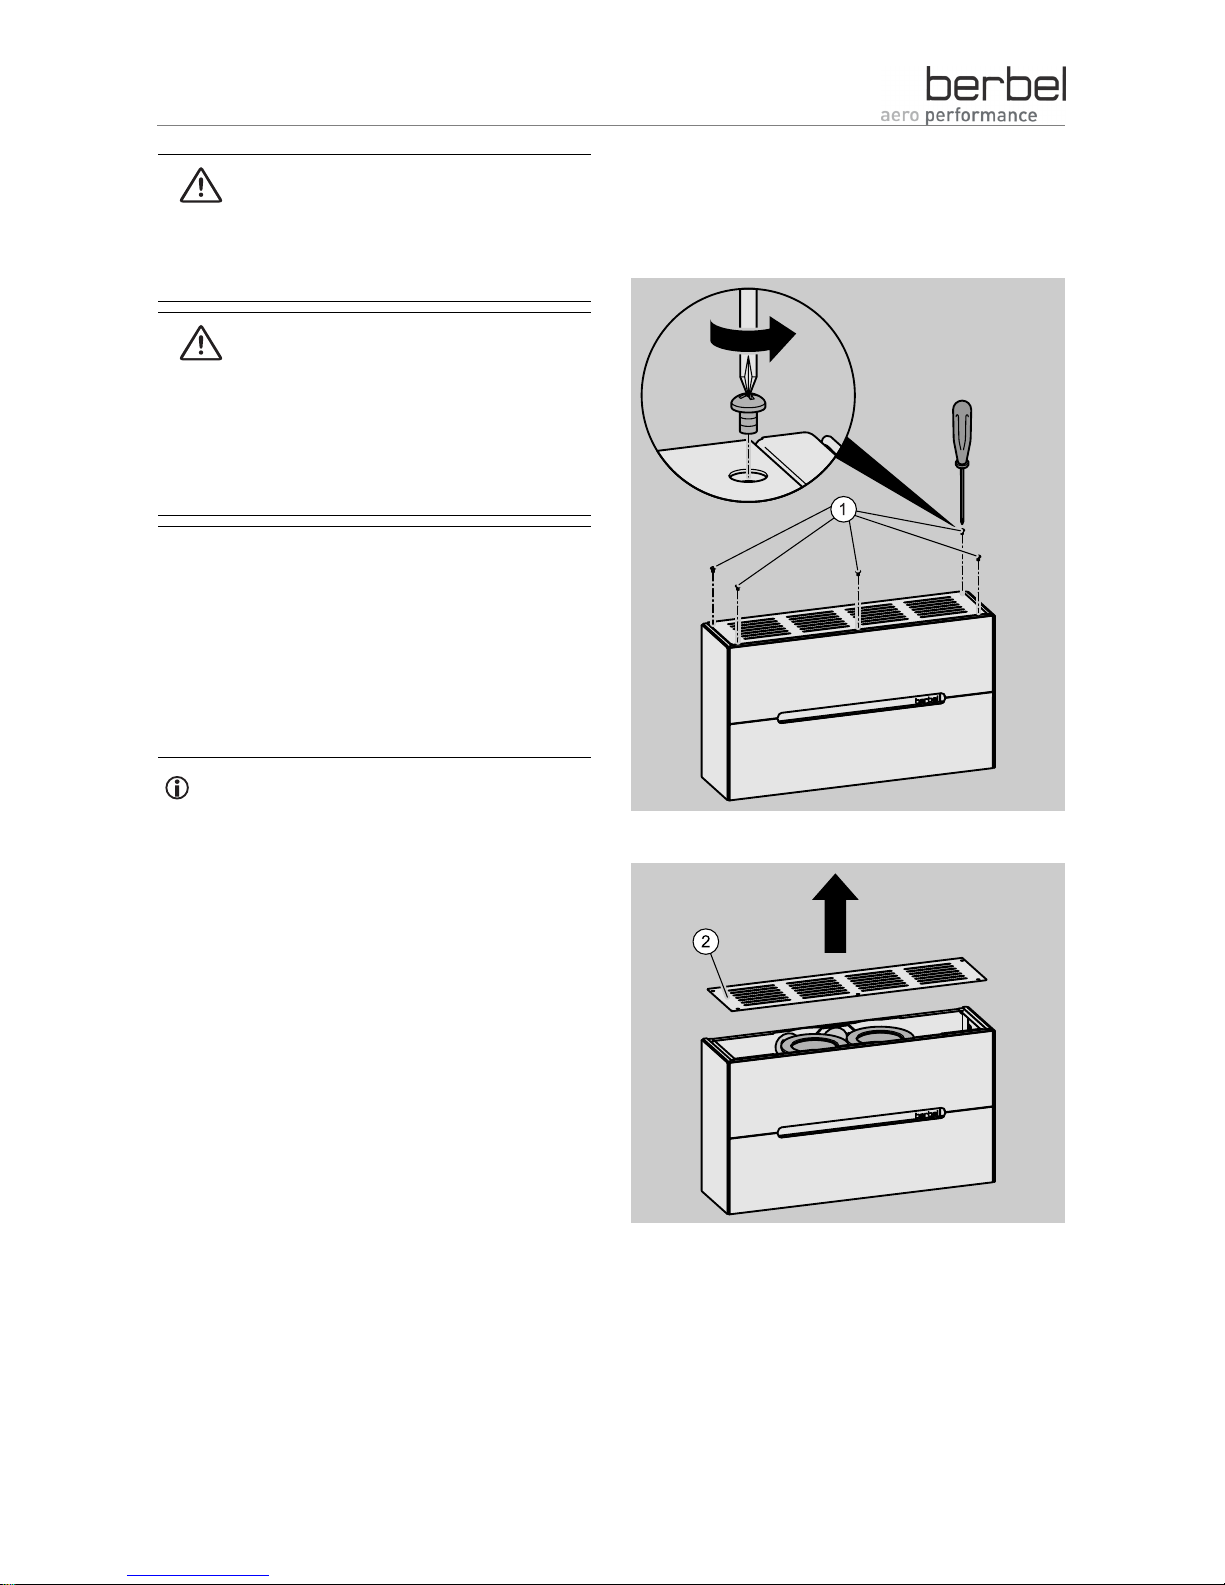
A Phillips screwdriver is required for this step.
Proceed as follows to replace the recirculating air
filter filling:
¾ Remove the five screws (1) for the upper
ventilation cover.
¾ Remove the ventilation cover (2).
Page 17
Cleaning and care
17
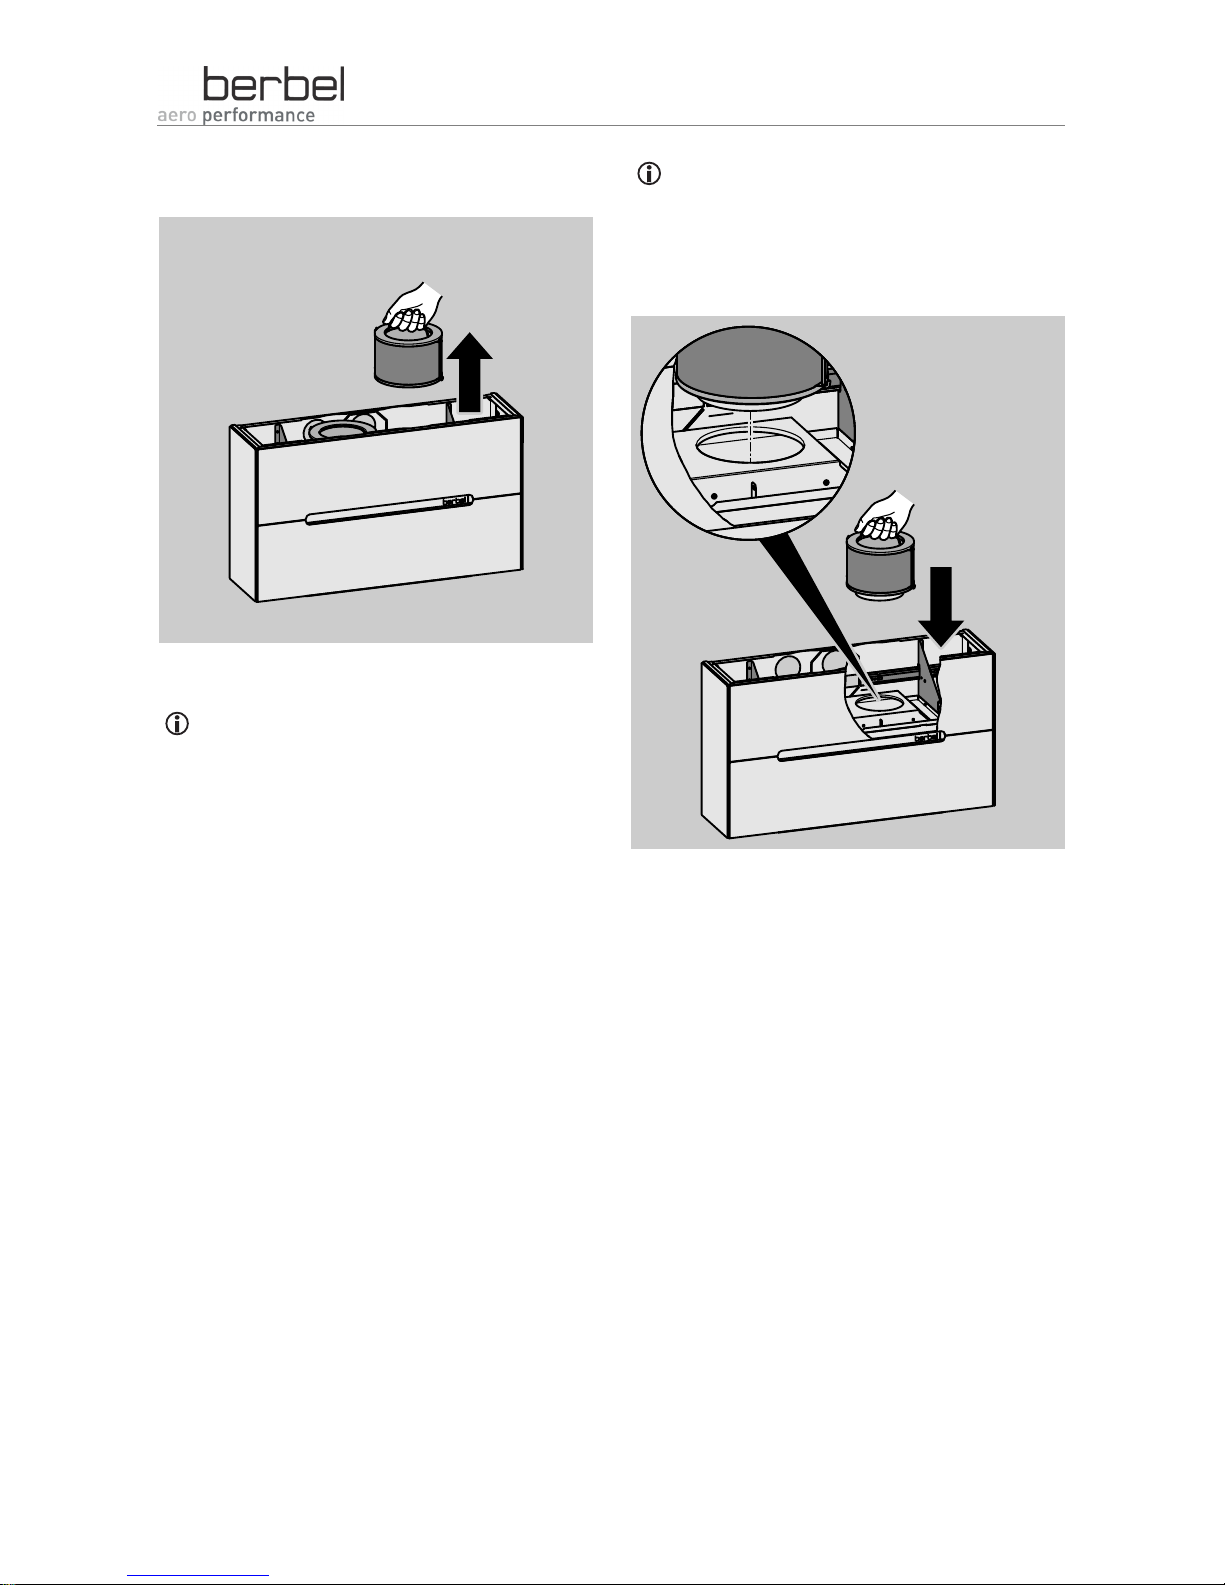
¾ Pull both recirculating air filters out upwards in
succession using the folding handle.
¾ Replace the filter filling.
Replacement of the filter filling is described
separately in the operating instructions for the
filter filling.
To ensure that the recirculating air filter is
installed correctly, an approx. two centimetrehigh guide aid is installed on the filter.
¾ Insert the recirculating air filters into the device
from above using the folding handle.
The recirculating air filters are inserted correctly
when the upper edge does not project out of the
extractor hood.
Page 18
Cleaning and care
18
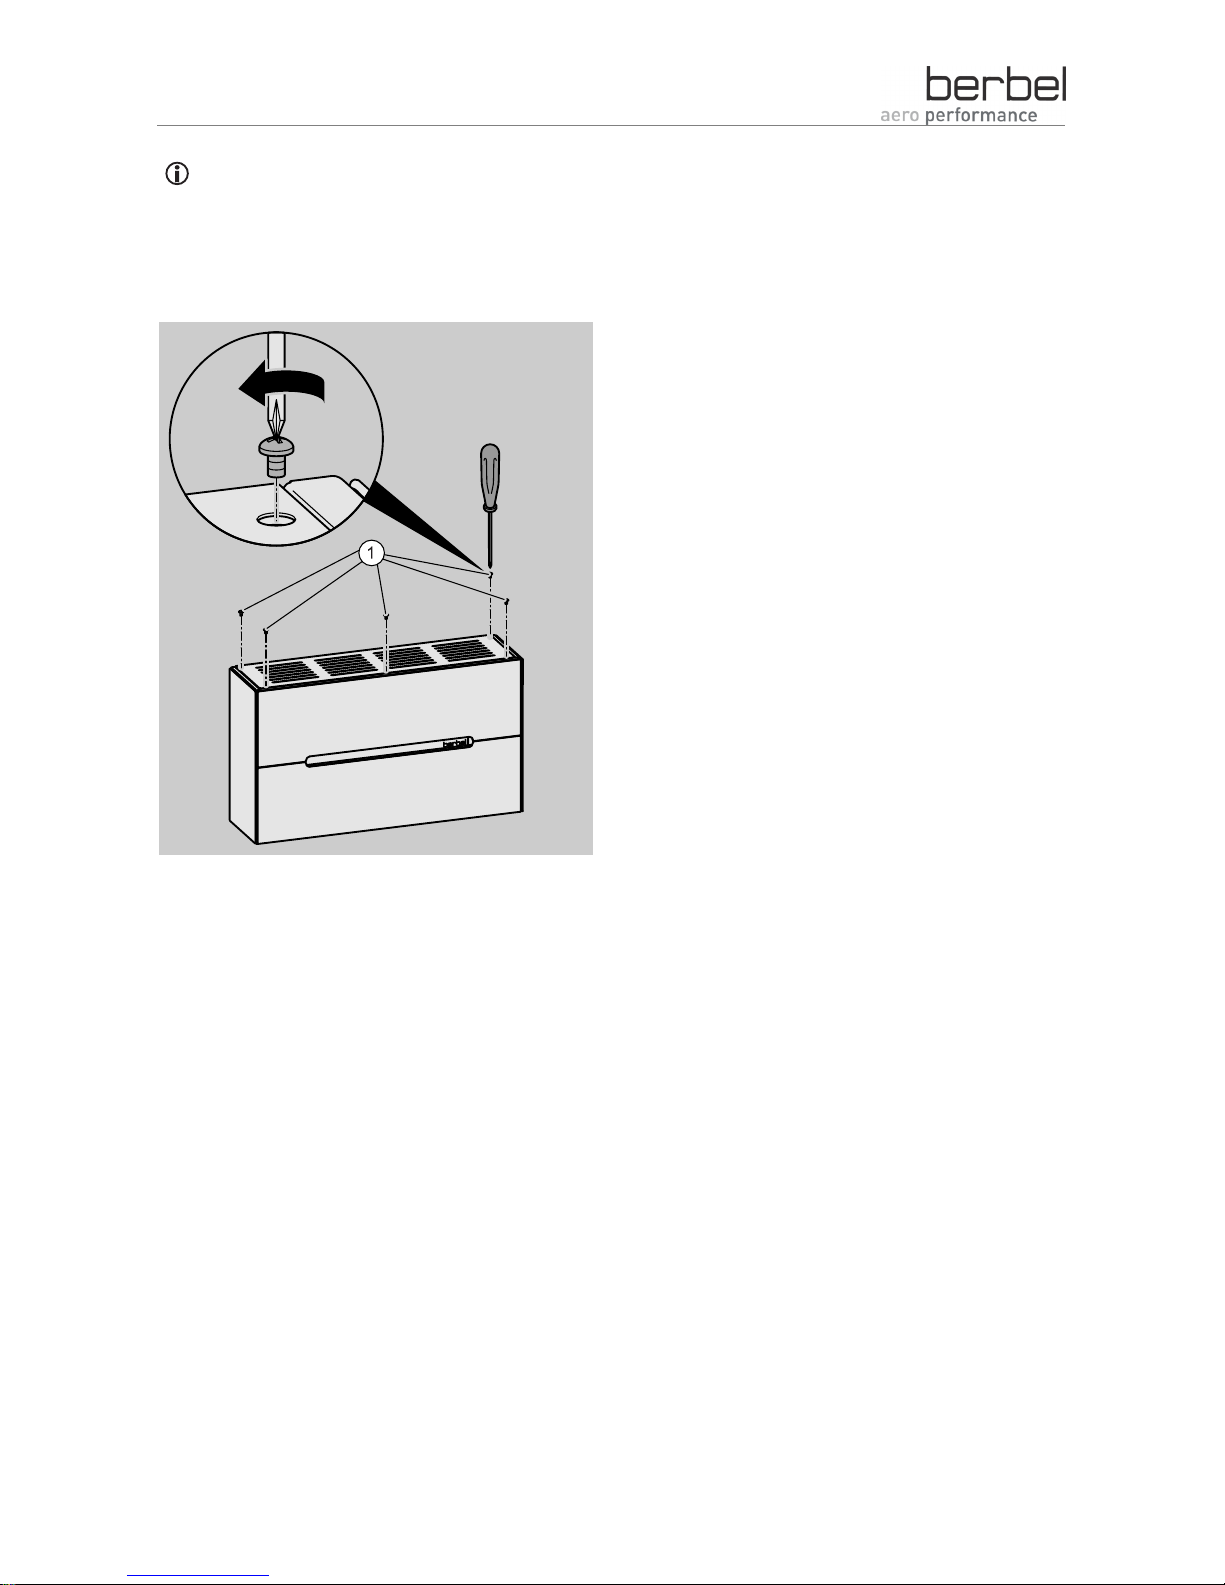
The ventilation cover can only be installed when
the recirculating air filters are installed correctly.
¾ Place the ventilation cover (2) onto the extractor
hood.
¾ Insert the five screws (1) and tighten them.
Page 19

Maintenance
19
Maintenance
Maintaining the device
The device is maintenance-free.
Maintaining the lighting
The device is equipped with LED lighting. The bulbs
have a service life of approx. 50,000 hours of
operation.
Maintenance is not required.
¾ Contact your specialist berbel dealer or the berbel
customer service in the event of malfunctions.
Page 20
Rectifying malfunctions
20
Rectifying malfunctions
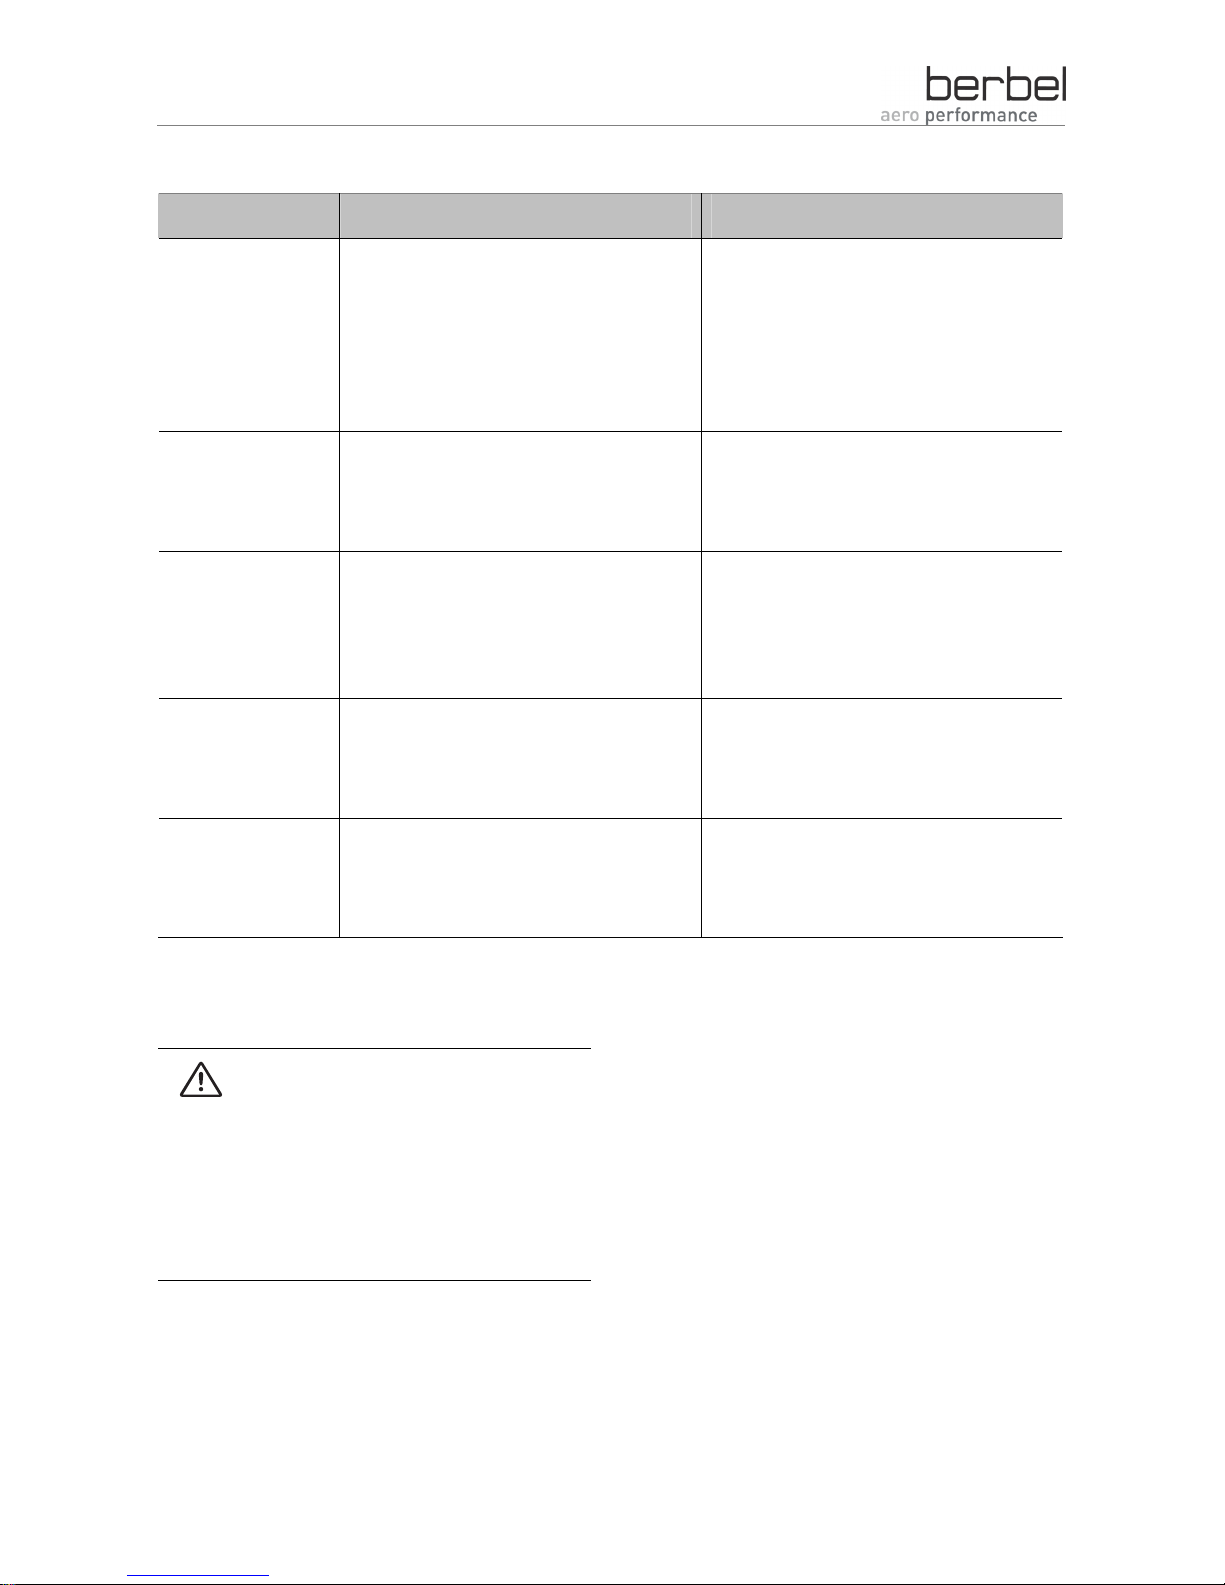
Malfunction Possible cause Remedy
Blower and lighting
do not function.
No current supply. Check whether the fuse has triggered.
If you have a power circuit breaker,
switch the power circuit breaker on.
Contact a specialist electrician in the
case of other fuse types.
Blower does not
function.
The device is not switched on. Check all four possible output levels.
See Switching on the ventilation function
on page 9.
Lighting does not
function.
The light strip is defective. Switch the lighting on and off several
times.
If the lighting still does not function,
contact your specialist berbel dealer.
Increased noise
development
during operation.
The fluff screen is soiled. Clean the fluff screen.
See Cleaning in the case of severe
soiling on page 13.
Odour formation
during operation.
The recirculating air filter filling is spent. Replace the recirculating air filter filling.
See Replacing the recirculating air filter
filling on page 15.
¾ If a malfunction cannot be rectified, contact your
specialist berbel dealer or the berbel customer
service.
DANGER
Fatal electric shock due to improperly
carried out repairs.
¾ Make sure that repairs are carried
out exclusively by the manufacturer
or authorised specialists.
Page 21
Disposal
21
Disposal
Disposing of packaging
DANGER
Danger of suffocation due to parts of
the packaging (e.g. films and
polystyrene).
¾ Store film or other parts of the
packaging in a location which is
inaccessible to children.
ATTENTION
Environmental damage due to
improper disposal of the packaging.
¾ Never dispose of the packaging in
the normal domestic refuse.
¾ Have the packaging properly
recycled in an environmentallyfriendly manner.
The packaging offers protection against
transportation damage.
Only the original packaging guarantees adequate
protection during transportation.
¾ Retain the packaging during the warranty period.
The packaging materials have been selected
according to environmental compatibility aspects
and are manufactured from recyclable materials.
After use, the packaging materials can be recycled.
Valuable raw materials can therefore be saved.
• The exterior packaging consists of cardboard.
• The filler material and the inserts consist of
cardboard or polystyrene.
• The protective films and bags consist of
polyethylene (PE).
¾ Dispose of the packaging according to material
segregation and in an environmentally-friendly
manner.
deviceDisposal
ATTENTION
Environmental damage due to
improper disposal of electronic
components.
¾ Never dispose of the device in the
normal domestic refuse at the end of
its useful life.
¾ Ask your municipal or local
administration about options for
recycling or disposing of the device
in a proper and environmentallyfriendly manner.
¾ Dispose of the device according to the legal
regulations via a specialist disposal company.
Page 22
Technical data
22
Technical data
Model plate
The model plate can be found inside the device
behind the device flap beneath the dirt strips.
The model plate contains the following information:
• Manufacturer
• Manufacturer's address
• Device type
• Voltage
• Total output
• Serial number
• Year of construction
• Symbols of the legal regulations to which the
device adheres and test symbols.
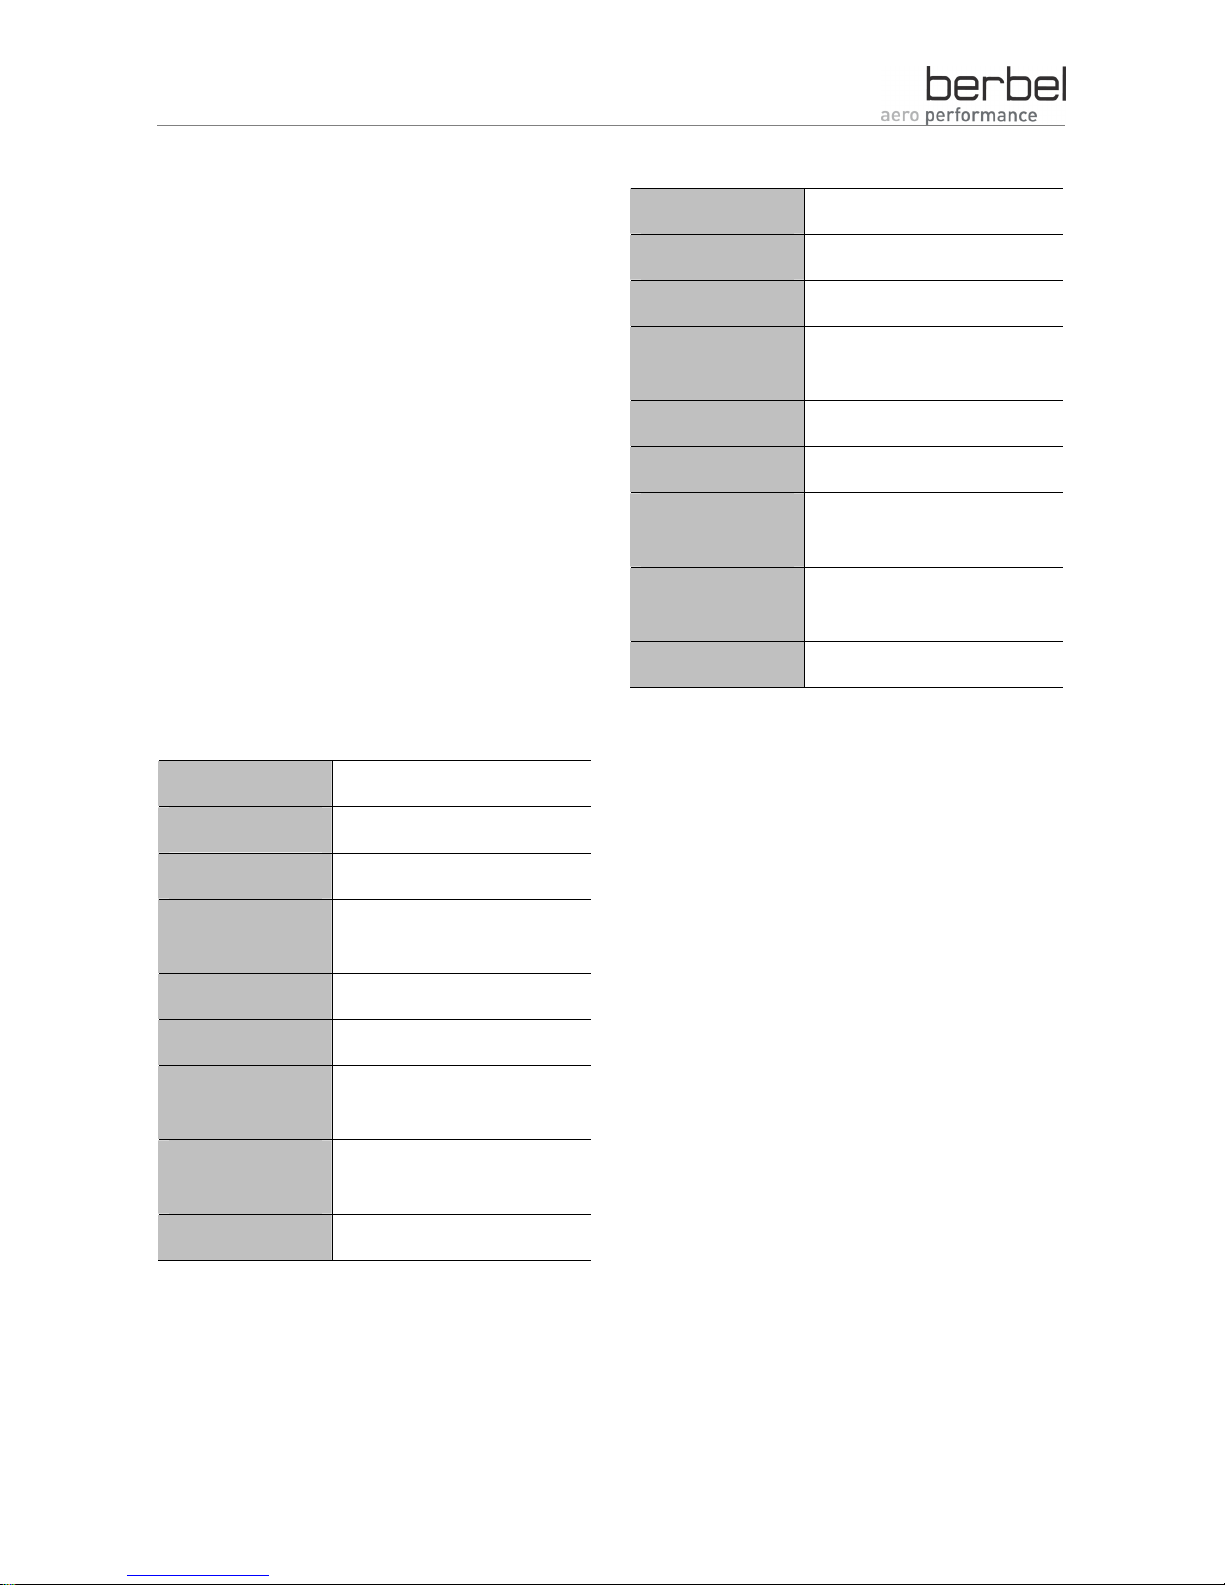
BKH 90 CB
Width 900 mm
Depth 245 mm
Height 520 mm
Max. fan output,
free-blowing
2 fans, each with 615 m³/h
Weight Approx. 40 kg
Current supply 230 V/50 Hz ~
Power
consumption
330 W
at output level "4"
Current
consumption
1.28 A
LED bulb 24 V/24 W
BKH 120 CB
Width 1200 mm
Depth 245 mm
Height 520 mm
Max. fan output,
free-blowing
2 fans, each with 615 m³/h
Weight Approx. 48 kg
Current supply 230 V/50 Hz ~
Power
consumption
330 W
at output level "4"
Current
consumption
1.28 A
LED bulb 24 V/24 W
The device has been manufactured under
adherence to the regulations of VDE 60335-2-31
and complies with the following directives and laws:
• EMC Directive (EU Directive 2004/108/EEC)
• Low-voltage Directive (2006/95/EU).
We reserve the right to implement technical
changes.
Page 23

Contacting the manufacture
r
23
Contacting the manufacturer
If you have any questions which are not answered
by these instructions, contact:
berbel Ablufttechnik GmbH
Sandkampstraße 100
D-48432 Rheine
Telephone +49 (0)800/56 06 06-0*
Fax +49 (0)800/56 06 06-1*
Internet www.berbel.de
*) Free from the German land line
Page 24

24
© KONTECXT GmbH Technische Dokumentation
D-45145 Essen
www.technische-dokumentation.de
Printed in Germany
 Loading...