

Page 1
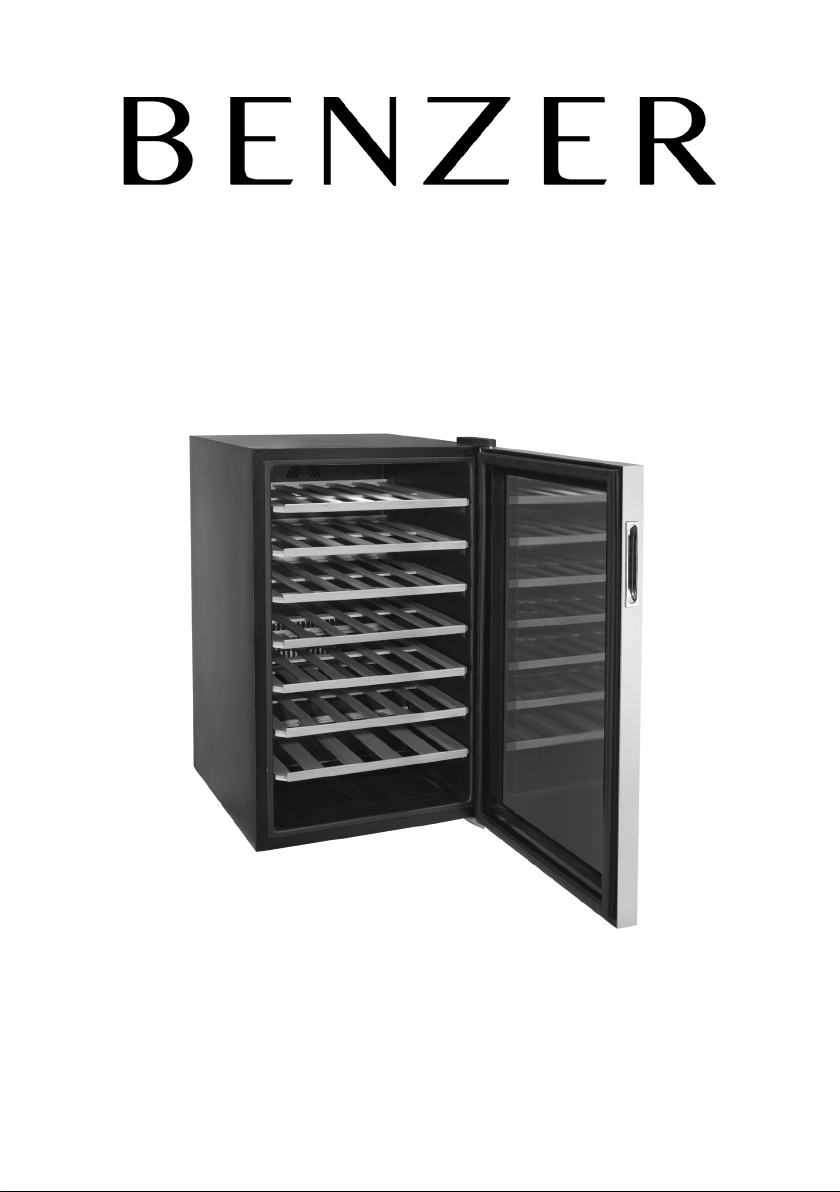
46 Bottle Wine Cooler
User Manual
Model No.: JC128
Item No.: 900875
Rev 1
Note: The specifications and/or components of this appliance are subject to change without prior notice.
Page 2

1 Safety Instructions ......................................................................... 3
2 Levelling the Appliance ................................................................ 5
3 Instructions For Use ...................................................................... 5
3.1 Setting the Temperature Control .................................................................. 6
3.2 Temperature Guide ......................................................................................... 7
4 Operation Guide ............................................................................. 7
5 Troubleshooting ............................................................................. 8
6 Care and Cleaning .......................................................................... 8
7 Warranty Against Defect ............................................................... 9
Page 2 of 9
Page 3

1 Safety Instructions
When using electrical appliances, basic safety precautions should always be followed, including
the following:
• Carefully read this instruction manual before using appliance.
• Keep appliance out of reach of young children.
• This appliance is not intended for use by persons (including children) with reduced physical,
sensory or mental capabilities, or lack of experience and knowledge, unless they have been
given supervision or instruction concerning use of the appliance by a person responsible for
their safety.
• Children should be supervised to ensure that they do not play with the appliance.
• Ensure children and babies do not play with plastic bags or any packaging materials.
• VERY IMPORTANT:
Ensure that appliance does not get wet (water splashes etc.).
Do not use appliance with wet hands.
Do not immerse appliance in water or other liquids or use near sinks, baths or showers.
• Always operate the appliance from a power source of the same voltage, frequency and rating
as indicated on the product identification plate.
• Position the power supply lead properly so that they will not be walked on or pinched by items
placed on or against them.
• Use appliance only for its intended use. Appliance is intended for household use only and not
for commercial or industrial use. Commercial use will void the warranty.
• Do not use appliance if it has been dropped or any part of appliance (including cord or plug)
has been damaged. Take appliance to your nearest authorised service centre or qualified
dealer for inspection or repair.
• Use only accessories recommended or supplied by an authorised service centre or qualified
dealer. The use of accessories not intended for use with this appliance may cause injuries to
the user or damage to the appliance.
• Do not install the unit on other appliances, on uneven surfaces or where it could be subject to:
heat sources (e.g. radiators or stoves), direct sunlight, excessive dust or mechanical
vibrations.
• Appliance should not be used outdoors, placed near a hot gas or electrical burner or placed in
a heated oven.
• Do not install near any heat sources such as radiators, heat registers, stoves, or other
apparatus that produce heat.
• Do not operate appliance underneath or near flammable or combustible materials (e.g.
curtains). Keep at least 300mm clearance around sides, back, front and top.
• Unplug this apparatus during lightning storms or when unused for long periods of time.
• This appliance is NOT designed to be installed inside of a cabinet where the front is covered
by any type of door.
Page 3 of 9
Page 4

• When positioning the wine cooler, ensure that there is at least a 5cm clearance at the sides
and a 10cm clearance at the back of the cooler as this is the main outlet for heat. This will
allow for adequate ventilation.
not be recessed or built-in.
• Turn off and unplug before cleaning or storing.
• Any type of servicing, apart from ordinary cleaning, must be carried out by an authorised
service centre or qualified dealer. There are no user serviceable parts in this appliance.
• If this appliance is used by a third party, please supply the instruction manual with it.
• Do not misuse the cord. Never carry the appliance by the cord or pull to disconnect it from the
outlet. Instead, grasp the plug and pull to disconnect.
• To fix stably, the appliance must be placed on a flat and solid surface. It should not be laid on
any soft material.
• Turn off and unplug the unit before moving.
• When positioned or if moving the appliance ensure that it is not set horizontally or declined
less than 45° or turned upside down.
• Do not use the unit in very hot or humid places, such as kitchens, bathrooms or under direct
sunlight.
• This cooler is designed to store wine bottles only. This appliance must not be used to store
food.
• Do not place hot bottles of wine into the wine cooler. Let it cool down to room temperature
first.
• Close the cooler door immediately after putting in any items so the inside temperature will not
rise dramatically.
• It is not recommended to use this wine cooler with an extension cord or power board.
• Do not place any other appliance on top of the wine cooler.
• Do not plug into the power socket before set up is completed.
• Please ensure that the appliance is plugged directly into the electrical outlet.
• An empty cooler can be a dangerous attraction to children. If disposing of the cooler remove
gaskets, latches, lids or the entire door from your unused appliance, or take other action to
ensure the cooler is harmless.
• No liability can be accepted for any damage caused by non-compliance with these
instructions or any other improper use or mishandling of appliance.
• After plugging the appliance into a wall outlet, allow the unit to cool down for 2-3 hours before
placing bottles in the APPLIANCE compartment.
This appliance is designed to be free standing only, and should
Read and Save These Instructions
Page 4 of 9
Page 5

2 Levelling the Appliance
Before using the cooler, it is important that the appliance is level.
The appliance door must be parallel with the side of the cooler, but also, the appliance must tilt
backward a couple of degrees so that the door will automatically close if left open.
To level the door with the side of the cabinet, first close the door.
Ensure the appliance is standing in its final position.
Check to see if the door is parallel with the side of the appliance. If not, adjust the front feet one at
a time by screwing in or out until the door is level with the side. (note: the rear feet are not
adjustable)
Once level, open the door approximately 45º and release the door.
If the door slowly but surely closes by itself, there is nothing more to do.
If the door continues to open further by itself, or the door does not close, then the appliance needs
to be tilted backward slightly.
To do this, first ensure the door is parallel to the side of the appliance, then equally adjust both
front feet by unscrewing both feet the same amount (to raise the front of the appliance).
Keep adjusting and stop when you find the door will now close by itself if the door is left open at
approx. 45º.
3 Instructions For Use
Please note that this appliance is a wine cooler and must not
be used as a refrigerator to store food.
After installing the Cooler as per the notes in the Safety Instructions section, ensure the unit is
level. If levelling is required, adjust the feet up or down on the bottom of the cooler.
Plug into an Earth Power point and switch on.
Page 5 of 9
Page 6
3.1 Setting the Temperature Control
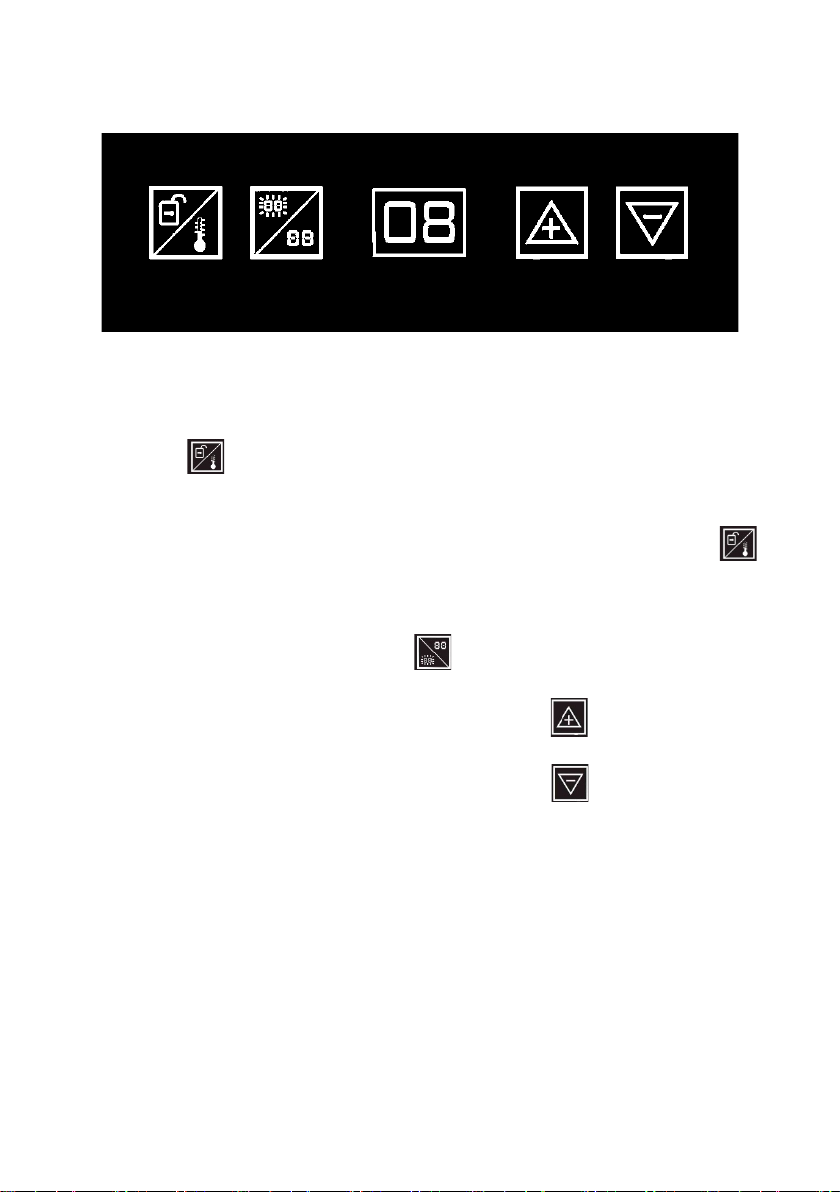
Your Wine cooler has been equipped with an “automatic” control panel lock, that will activate 12
seconds after the last time a button has been touched.
Push button simultaneously for 3 seconds to unlock the control panel.
You will hear a “BEEP” sound to alert you that the control is now active.
You can select either Fahrenheit or Celsius temperature display setting by pushing button for
1 second. The degrees will appear in blue colour LED temperature display window.
NOTE: The default display is shown in Celsius.
When the control panel is active, push button and the LED temperature display will turn off.
You have to push the button again and the LED temperature display will turn back on.
You can set the temperature as you desire by pushing button . The temperature will
increase 1ºF or 1ºC (depending on your setting) if you push the button once.
You can set the temperature as you desire by pushing button . The temperature will
decrease 1ºF or 1ºC (depending on your setting) if you push the button once.
The temperature inside the wine cooler is dependent on the ambient room temperature outside the
wine cooler.
PLEASE NOTE THAT THIS APPLIANCE IS A WINE COOLER
ONLY AND MUST NOT BE USED AS A REFRIGERATOR TO
STORE FOOD.
Page 6 of 9
Page 7
3.2 Temperature Guide
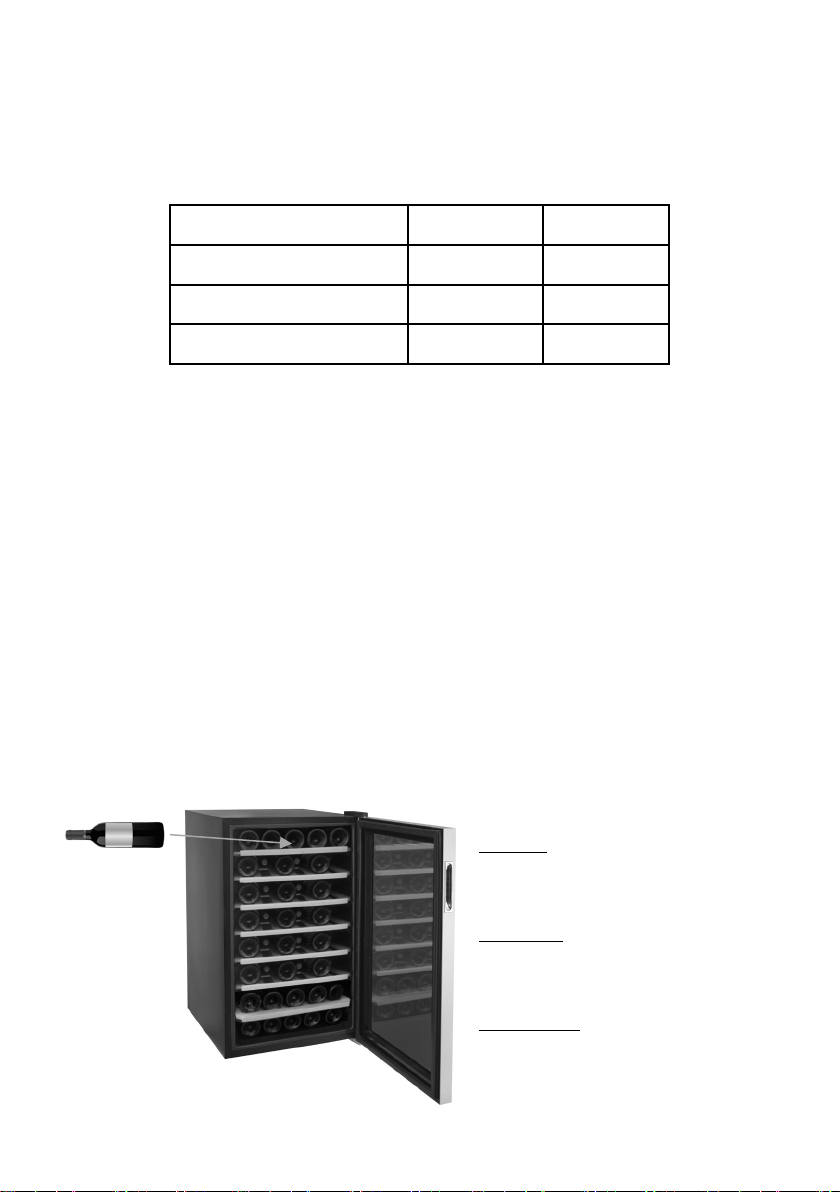
The cooler temperature can range between approximately 5 ~ 18C°.
This is a guide to what temperature settings should be selected for types of wine. You may
however, adjust the temperatures to suit your own requirements.
Red Wines 14º - 18ºC 57 – 65ºF
Dry / White Wines 9º - 14ºC 48 – 57ºF
Rose Wines 10º - 11ºC 50 – 52ºF
Sparkling Wines 5º - 9ºC 41 – 48ºF
4 Operation Guide
After setting the required Temperature:
Allow the empty wine cooler to operate for approximately 2 - 3 hours before placing anything
inside.
This will allow the wine cooler to reach the desired temperature.
Fill the wine cooler with your choice of wine bottles.
Allow approximately 24 hours of operation before the bottles reach the desired temperature.
To Stack 46 Standard size 750ml wine bottles, please follow these steps:
NOTE: The actual quantity of bottles that can be stored in the cooler depends on the bottle size
and shape.
Top Row:
Place 5 bottles with neck towards back and
then place one bottle at the front, sideways.
Rows 2 – 6:
Place 6 bottles alternating from neck towards
the back and neck towards the front.
Rows 7 and 8:
Place 5 bottles with neck towards back
Page 7 of 9
Page 8
5 Troubleshooting
tripped
The cooler is placed too close to a heat
Keep the cooler away from sunshine
damaged or twisted
Too much humidity.
The ambient temperature is too low
The rattling noise may come from the flow of the refrigerant, which is normal.
Allow the appliance to rest for 2 – 3 hours before turning on after moving.
The room temperature is too hot.
clearances
Try to cool the room
per the instructions in this manual
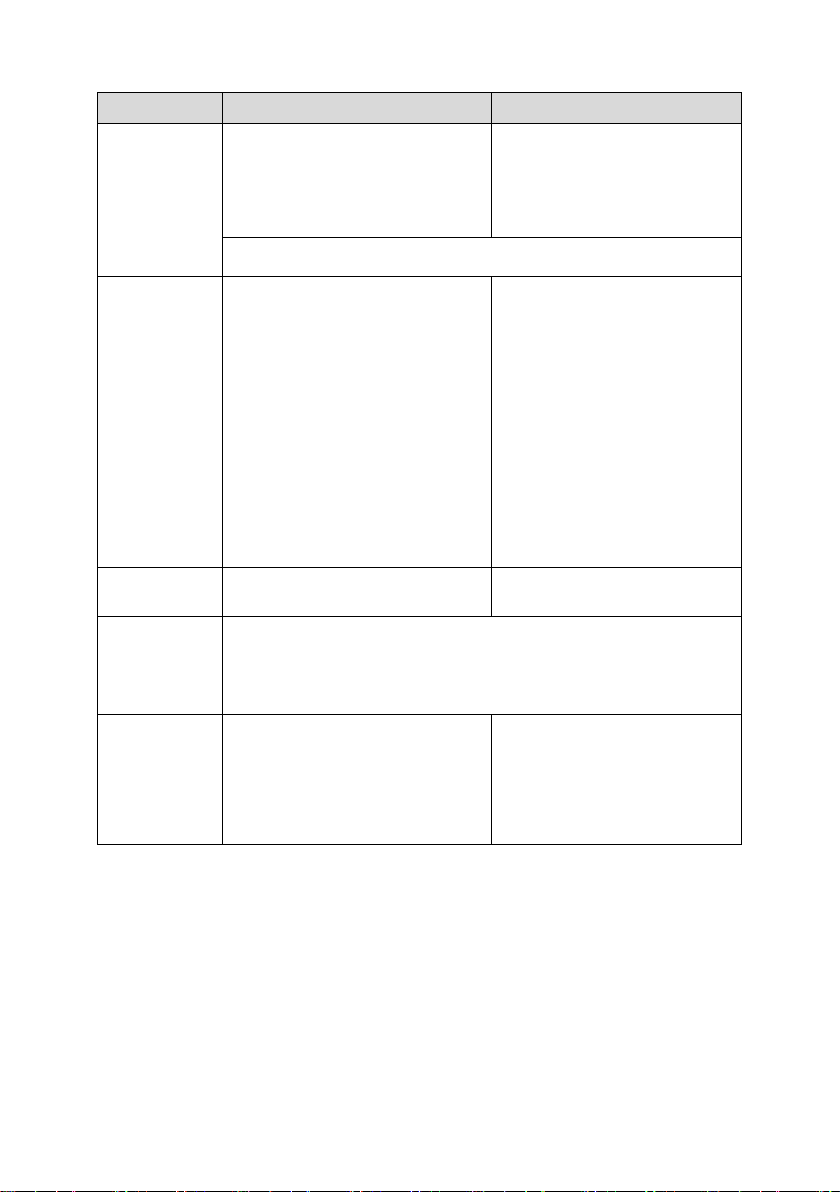
Symptoms Possible cause Solutions
There is a power failure.
The wine cooler
does not work.
A house fuse has blown, circuit
breakers tripped or Safety Switch has
Note: if the fuse, circuit breaker or safety switch continues to activate, call an
electrician immediately.
Ensure the cooler is plugged in and
the power socket is turned on.
Replace the broken fuse in your
meter box, reset the circuit breaker
or reset the safety switch.
Wine cooler is
not reaching the
desired
temperature
Frost forming in
the wine cooler
Noisy
Turns on and off
frequently
source
Not sufficient ventilation
The door is opened too frequently or for
a long period of time
The Door is not closing properly
As each cycle ends, you may hear gurgling sounds caused by the flow of
refrigerant in your unit.
Contraction and expansion of the inside walls may cause popping and crackling
noises.
The door is opened too often.
The door is not closed completely.
The temperature control is not set
correctly.
The door gasket does not seal properly.
The unit does not have the correct
or other heat sources.
Place the wine cooler in good
ventilation and keep any items away
from the fans.
Close the door tightly and do not
open the door too frequently or for a
long period of time.
Ensure the appliance is levelled
correctly and that there are no
objects preventing the door from
closing properly.
Ensure the door seal is not
Unplug to defrost, plug in again after
the frost thaws.
Try not to open the door so often
Check to ensure the door can close
properly
Set the temperature correctly
Check the door seal fro damage
Ensure the appliance is installed as
6 Care and Cleaning
• Turn off and unplug the unit prior to cleaning.
• Use a soft damp cloth or rag and mild detergent for cleaning and wipe dry.
• Never spray with liquids or submerge the unit in water or any other liquid.
• Do not use flammable liquids, chemicals, abrasive creams, steel wool or scouring
pads for cleaning.
Read and Save These Instructions
Page 8 of 9
Page 9

7 Warranty Against Defect
(where permitted under law) expressly
WHAT IS NOT COVERED?
WHAT WE WILL DO
5.5 These terms and conditions supersede and
exclude all prior and other discussions,
free call 1800 079 124 or via email
WHAT’S COVERED?
1.1 H.E. Group Pty Ltd (“us” “we” or “our”)
warrants this good for a full replacement or
refund for a period of twelve months from
the date of purchase.
1.2 This warranty covers materials and
workmanship defects only.
2.1 This good is for household use only and if
used in any way other than as detailed in
the instruction manual will void this
warranty.
2.2 This warranty does not apply to defects
arising from abuse, alteration, unauthorised
or unreasonable use of the good, nor does
it cover general deterioration due to usage.
2.3 This warranty does not apply to accessories
3.1 We will replace the good or provide a
WARRANTY COSTS
4.1 Once we have received the goods and you
4.2 No responsibility will be taken for goods
GENERAL
Address:
Phone No:
Email:
due to general deterioration or acts beyond
human control.
refund to the value of the purchase price, if
a defect is discovered in the good during
the warranty period of twelve months
subject to verification of defect or
malfunction and the date and proof of
purchase and purchase price.
have complied with the warranty, our costs
associated with the warranty claim will be
borne by us.
lost, mislaid or damaged whilst in transit.
5.1 The benefits of this warranty are additional
to any other rights and remedi es you may
have under law.
HE Group Pty Ltd, 47 Stephenson Street, Cremorne, Victoria 3121
1800 079 124 (free call)
[email protected]
5.2 Our goods come with guarantees that cannot be
excluded under Australian Consumer Law. You
are entitled to a replacement or refund for a
major failure and compensation for any other
reasonably foreseeable loss or damage.
You are also entitled to have the goods repaired
or replaced if the goods fail to be of acceptable
quality and the failure does not amount to a
major failure.
5.3 Notwithstanding 5.1, except as provided for in
this warranty, all express and implied warranties
and conditions under statute or general law as
to the merchantability, description, quality,
suitability or fitness of the goods for any
purpose, or as to design, assembly, installation,
materials or workmanship or otherwise are
excluded.
5.4 To the extent permitted by law, our total liability
for loss or damage of every kind related to the
good in any way whatsoever is limited to the
amount paid to the retailer by you for the good
or the value of the good.
representations (contractual or otherwise) and
arrangements relating to the supply of the goods
or any part of the goods. This includes
representations not made by us relating to the
performance of the goods or any part of the
goods or the results that ought to be expected
from using the good.
CUSTOMER CARE
6.1 To claim under this warranty, you must first
contact our friendly customer service team on
[email protected] and explain the basis of
your claim. Our customer service team will then
provide you with directions on how to make your
claim under this warranty.
6.2 This warranty is valid with the presentation of the
original proof of purchase receipt or tax invoice
originating from the store of purchase for the
product showing the retailer’s name, date of
purchase and amount paid, by you, for the
good.
April 2011
Edition
Page 9 of 9
 Loading...