

Page 1

InstaShow™ S
User Manual
WDC20
V 1.00
Page 2
Copyright
Copyright © 2019 by BenQ Corporation. All rights reserved. No part of this publication may be
reproduced, transmitted, transcribed, stored in a retrieval system or translated into any language or
computer language, in any form or by any means, electronic, mechanical, magnetic, optical, chemical,
manual or otherwise, without the prior written permission of BenQ Corporation.
Disclaimer
BenQ Corporation makes no representations or warranties, either expressed or implied, with
respect to the contents hereof and specifically disclaims any warranties, merchantability or fitness for
any particular purpose. Further, BenQ Corporation reserves the right to revise this publication and
to make changes from time to time in the contents hereof without obligation of BenQ Corporation
to notify any person of such revision or changes.
This user manual aims to provide the most updated and accurate information to customers, and thus
all contents may be modified from time to time without prior notice. Please visit www.benq.com for
the latest version of this manual.
The illustrations and the images in this guide are for your reference.
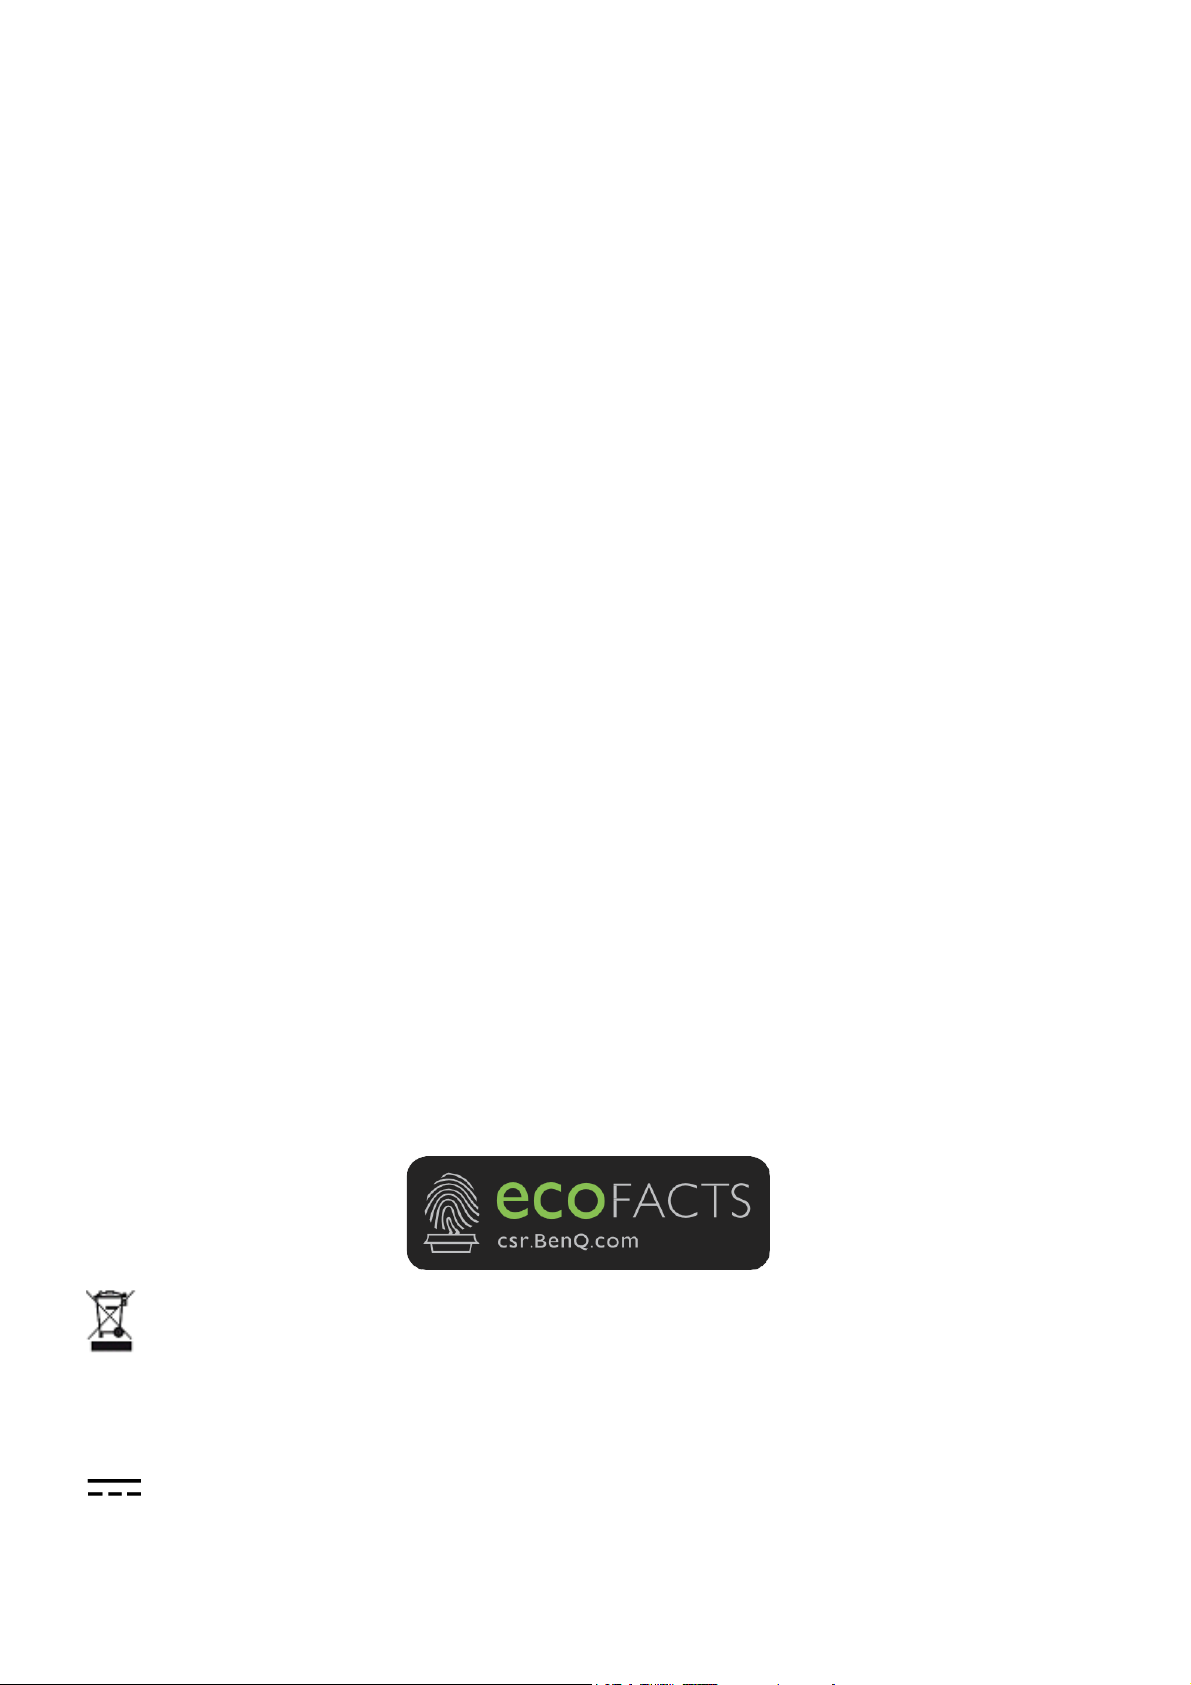
BenQ ecoFACTS
BenQ has been dedicated to the design and development of greener product as part of its aspiration
to realize the ideal of the “Bringing Enjoyment 'N Quality to Life” corporate vision with the ultimate
goal to achieve a low-carbon society. Besides meeting international regulatory requirement and
standards pertaining to environmental management, BenQ has spared no efforts in pushing our
initiatives further to incorporate life cycle design in the aspects of material selection, manufacturing,
packaging, transportation, using and disposal of the products. BenQ ecoFACTS label lists key ecofriendly design highlights of each product, hoping to ensure that consumers make informed green
choices at purchase. Check out BenQ's CSR Website at http://csr.BenQ.com/ for more details on
BenQ's environmental commitments and achievements.
RECYCLING
This product bears the selective sorting symbol for Waste electrical and electronic equipment (WEEE). This means that
this product must be handled pursuant to European directive 2012/19/EU in order to be recycled or dismantled to
minimize its impact on the environment. User has the choice to give his product to a competent recycling organization or
to the retailer when he buys a new electrical or electronic equipment.
This symbol indicates DC voltage
1
Page 3

Table of contents
Copyright ...................................................................................................................................... 1
Disclaimer ..................................................................................................................................... 1
BenQ ecoFACTS ......................................................................................................................... 1
Introduction .................................................................................................................................. 3
Product features .............................................................................................................................................. 3
Package content ............................................................................................................................................... 4
Product specification ....................................................................................................................................... 5
Overview ........................................................................................................................................................... 7
Button .............................................................................................................................................................................................. 7
Host ................................................................................................................................................................................................. 7
LED indicators of the Button and Host ................................................................................................................................... 8
Installation ..................................................................................................................................... 9
Environment check ....................................................................................................................................................................... 9
Assembling the Host .....................................................................................................................................10
Setting up the Host .......................................................................................................................................10
Attaching the Host to the ceiling ............................................................................................................................................10
Attaching the Host to a ceiling mount................................................................................................................................... 11
Placing the Host on a table ....................................................................................................................................................... 11
Installing the Host on the wall or trolley .............................................................................................................................. 13
Positioning the Host antennas ....................................................................................................................14
For ceiling installation ................................................................................................................................................................14
For ceiling mount installation ................................................................................................................................................... 14
For table placement ................................................................................................................................................................... 15
Connecting the HDMI cable and power ..................................................................................................15
Assembling the adapter ............................................................................................................................................................. 16
Connecting the HDMI cable..................................................................................................................................................... 17
Power supply via a power adapter .........................................................................................................................................17
LAN connection .......................................................................................................................................................................... 18
Setting up and powering a Button .............................................................................................................18
Using Cable USB A(F) to USB A(M) .........................................................................................................20
Pairing a Button and Host ............................................................................................................................21
When the Host is placed on a table .......................................................................................................................................21
Storing Buttons and USB cable in the cradle ..........................................................................................23
Resetting an Host ..........................................................................................................................................23
Resetting a Button .........................................................................................................................................24
Starting and stopping presentations ......................................................................................26
Getting ready ..................................................................................................................................................26
Starting presentation .....................................................................................................................................26
Idle presentation ............................................................................................................................................ 27
Split screen presentations ............................................................................................................................28
Starting a split screen presentation ........................................................................................................................................28
Switching from a split screen to a full screen presentation .............................................................................................. 29
Presenting with mobile devices ..................................................................................................................29
Controlling presentations ............................................................................................................................30
Troubleshooting ........................................................................................................................31
3/6/19
2
Page 4
Introduction
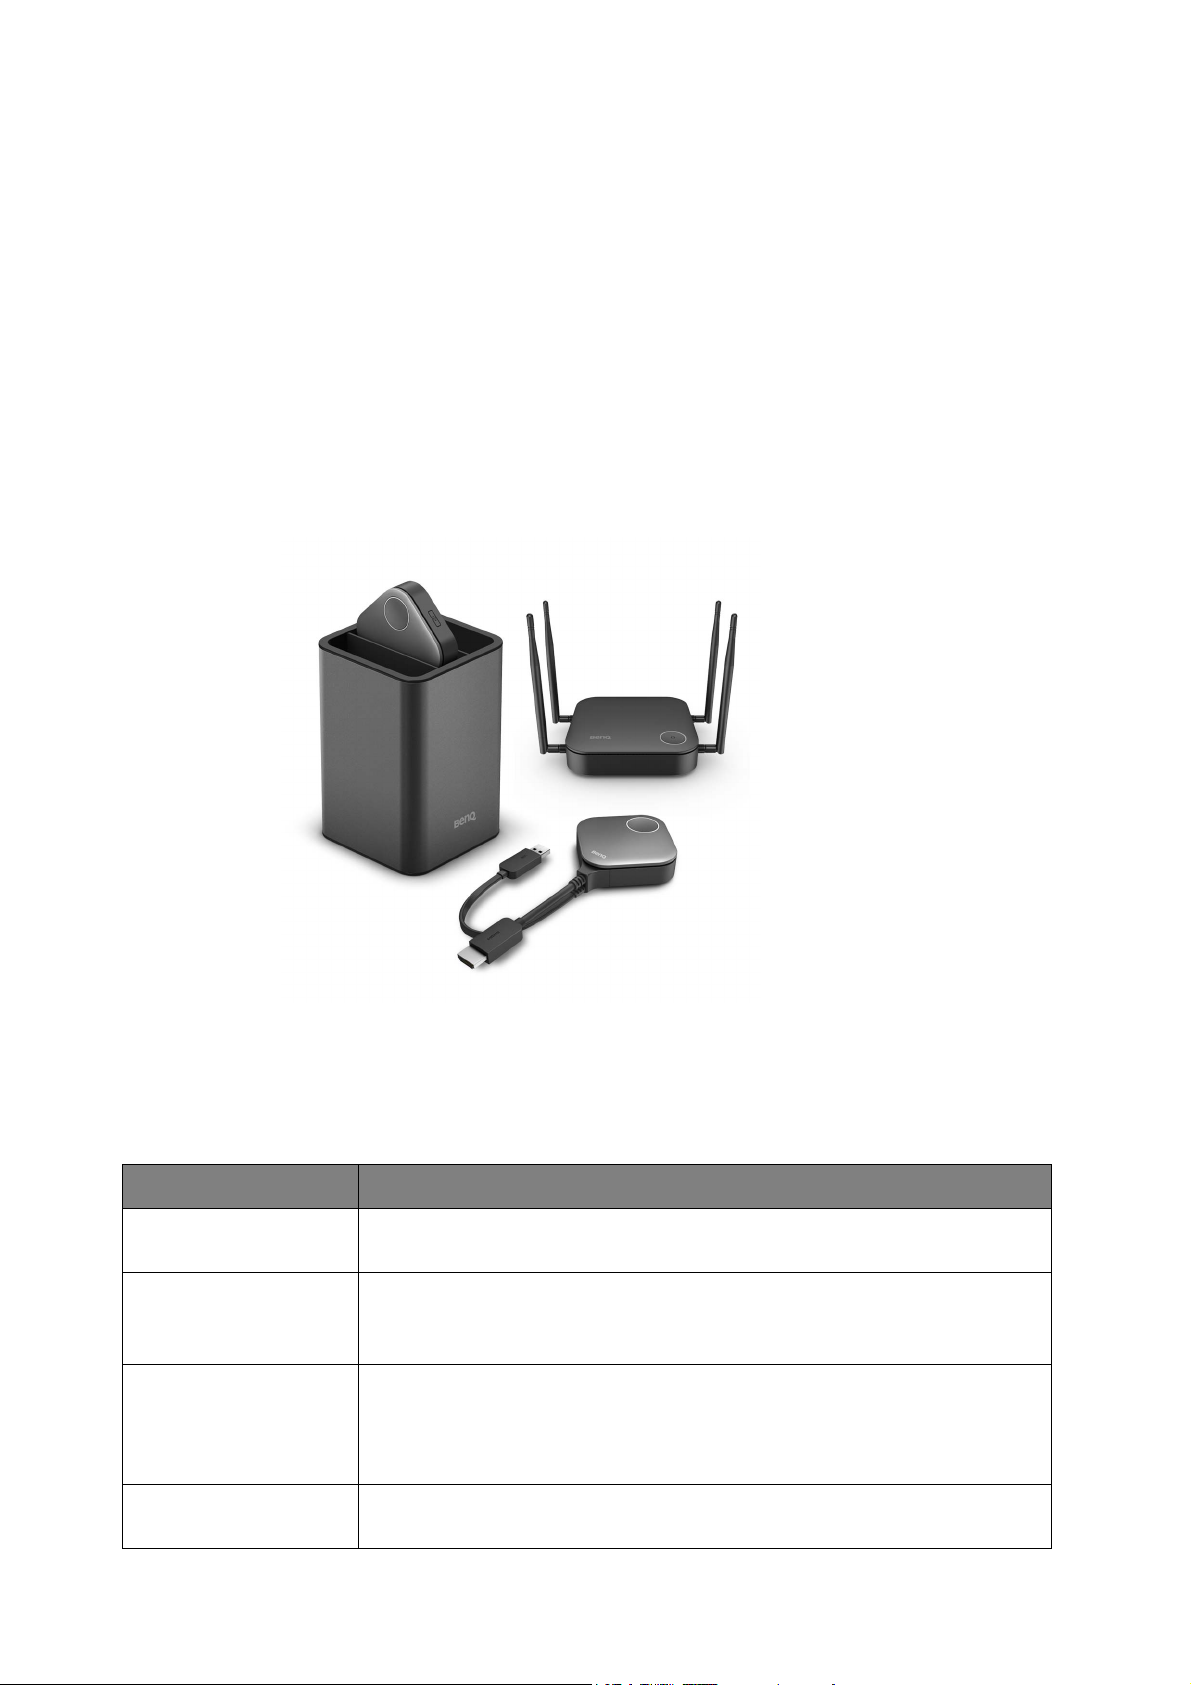
InstaShow™ S (shortened as the “Product” in this document) is a wireless device for corporate
meeting rooms. Users expect devices to respond instantly, apps to launch and to control at their
fingertips, and information to be available on demand. The product bypasses the complicated steps of
IP addresses, driver installation, app execution, setting selection, etc. to quickly deliver professional,
stable visual quality for teams to collaborate freely and confidently. The product is an unique allhardware solution without software issues for universal compatibility and display flexibility.
A standard product set consists of an InstaShow™ S Host (shortened as “Host” in this document)
and two InstaShow™ S Buttons (shortened as “Button” or “Buttons” in this document). Depending
on the location where you buy the product, the software of the base unit can be different. You can
buy additional Button kit if needed.
Product features
The product is equipped with the following features:
Features Description
True Plug & Play
No Software
Split Screen
Presentations
Auto Channel
Selection
3 Introduction
Simply connect the product into your USB and HDMI ports, then
push the button to start presenting immediately.
The product doesn't need any software installation or execution.
There's no setup, configuration, or waiting for pop-ups to launch. Just
plug into your PC or Mac and start presenting immediately.
Up to four users can simultaneoulsy project their screen via the
product in a dual-screen, 3-way or 4-way split screen configuration, so
that you can view and reference multiple documents/videos at the
same time during your presentation.
The product automatically selects the best wireless channel upon
boot-up, ensuring smooth presentations in any environment.
Page 5
Features Description
Touch back
When the Host is connected to a touchscreen display via its USB
ports, you can use the touchscreen to control the screen of the PC
that is presenting, allowing you to actively engage with the content
that is being presented.
Screen Casting for
Mobile Devices
Wireless 802.11ac/n
Project your mobile device’s screen wirelessly by connecting your
mobile device to the Host via the InstaShare app (for both Android
and iOS devices).
The latest 802.11ac/n Wi-Fi guarantees extremely smooth wireless
streaming without lag or buffering.
The product's HDMI output supports up to 60Hz Full HD 1080p
Video and Audio
video and stereo sound without cable clutter or complicated driver
selection.
Assured Performance
Peace of mind for consistent wireless presentation performance
without relying on your PC.
Keep your presenter view, notes, and backup data on your laptop
Extended Desktop
screen while presenting to the wireless screen with extended desktop
in both Windows and OS X.
• Touch back via USB port is only supported for PCs. Macs and mobile devices cannot be controlled via touch
screens.
• Transmission distance depends on actual environment. Stated distance is based on line-of-sight measurement.
Structures constructed of steel, wood, concrete, or brick may decrease transmission distance.
• According to regulatory restrictions in different regions of the world, Wi-Fi channels cannot be used in
countries outside the purchased region.
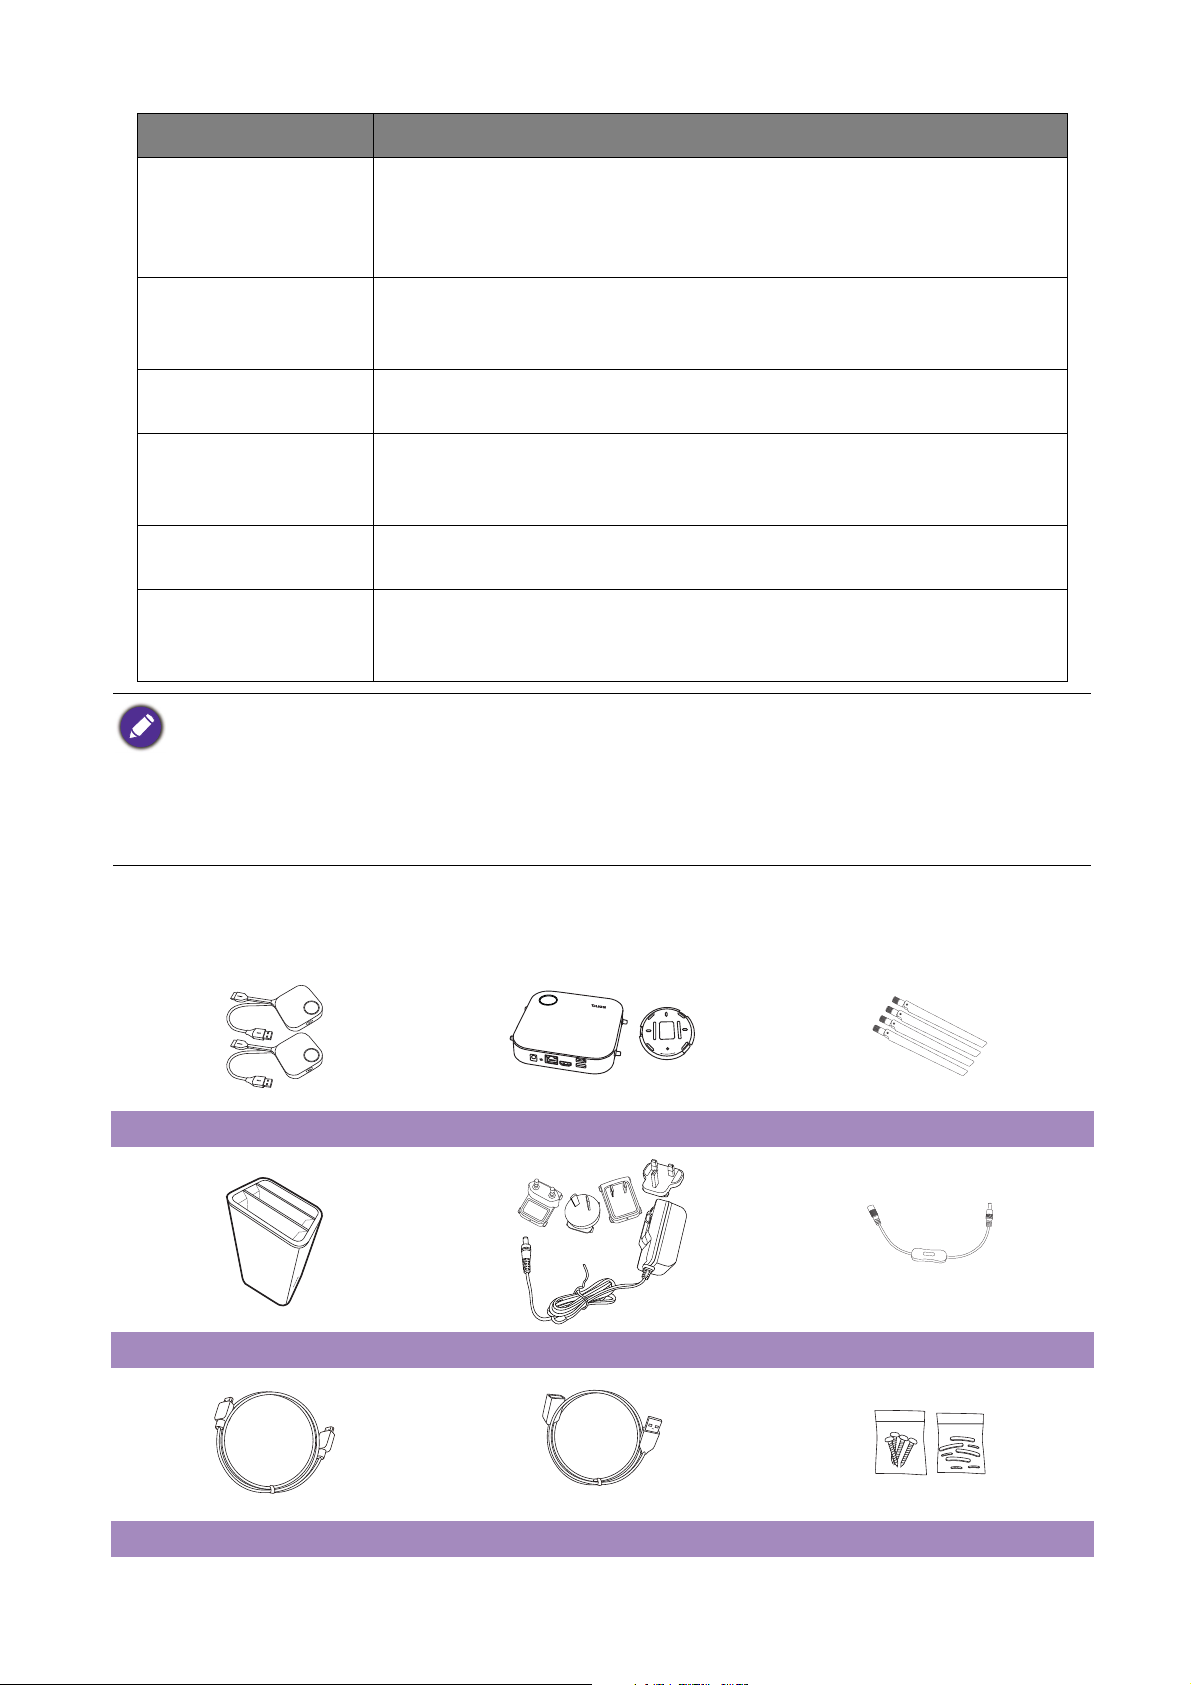
Package content
LOCK
OPEN
InstaShow™ S Buttons InstaShow™ S Host and Lid 4 Antennas
Cradle Adapter & Plugs Extender Power Cable
Cable: HDMI A(M) to A(M) Cable: USB A(F) to USB A(M) Screws & Rubber Foot
4 Introduction
Page 6
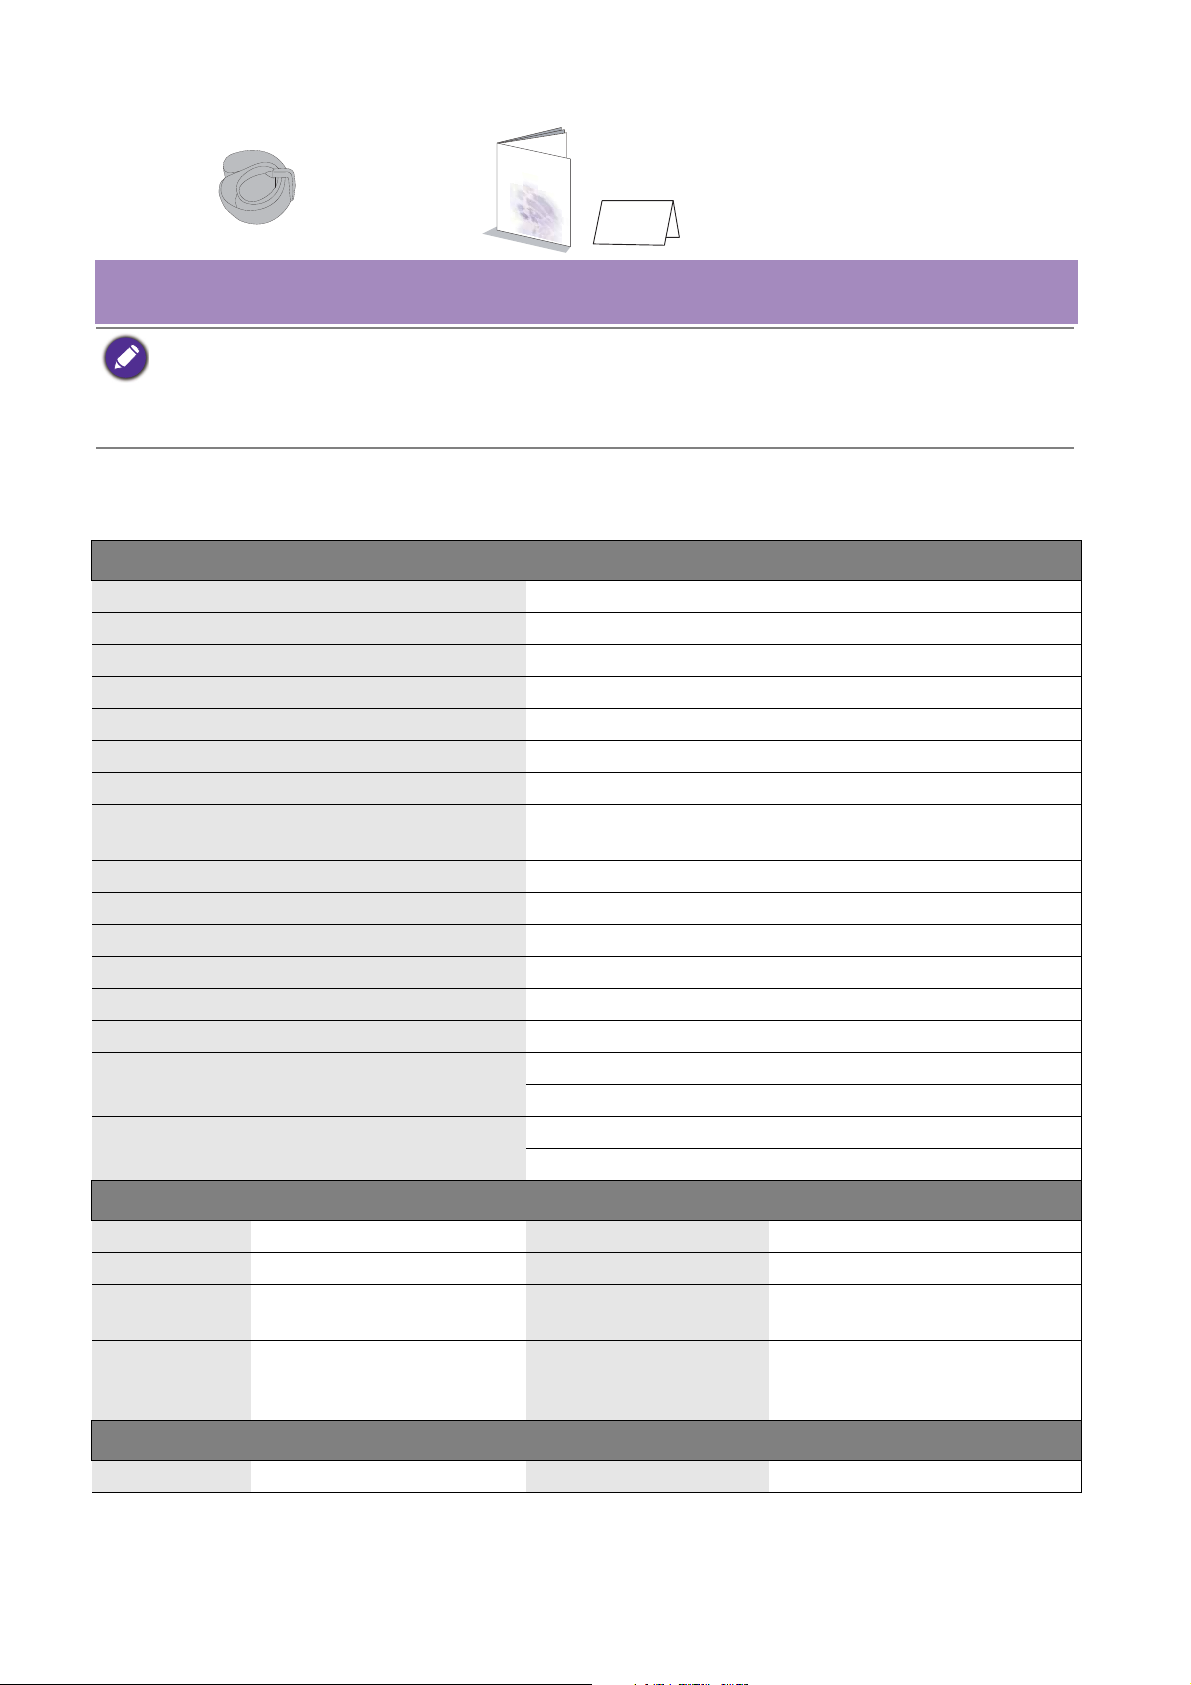
Velcro Strap Quick Start Guide & Safety
Statement
• Available accessories and the pictures shown here may differ from the actual contents and the product
supplied for your region.
• Use original accessories to ensure compatibility.
• Always keep the product and accessories out of reach of children.
Product specification
Feature
Color Black
Video outputs HDMI 1.4, comply with HDCP
Frame Rate Up to 60fps depending on environment
Output resolution 720x568, 1280x720 (720P), 1920x1080 (1080p)
Input resolution Up to 1920x1080
Number of simultaneous connections 32 pcs
Audio Stereo, Radio quality 16bits 48KHz
Wireless transmission protocol
Data rate wireless Up to 867 + 300Mbps
Frequency Band 2.4GHz, 5GHz
Authentication protocol WPA2 (WPAS-PSK (Pre-Shared key) / WPA2-Enterprise)
Security (encryption) AES 128 bit
Support platform Windows, MAC, Chrome. Any OS supporting HDMI standard 1.4
Reach Max. 15M between the Button and the Host
Temperature range
Humidity
IEEE 802.11ac, 5GHz, 2T2R
IEEE 802.11n, 2.4GHz, 2T2R
Operating: 0°C to +40°C (+32°F to +104°F)
Storage: -10°C to +60°C (+14°F to +140°F)
Storage: 5% to 90% relative humidity, non-condensing
Operation: 10% to 80% relative humidity, non-condensing
InstaShow™ S Button
Cable USB Type A, HDMI Cable Power supply DC 5V±10%, 0.5A
Reset button x1 Power consumption Normal: 2.5W
Spllit screen key x1 Dimension
Red (error), Green
LED
InstaShow™ S Host
Standby button x1 Power supply DC 12V±10%, 2A
5 Introduction
(Wi-Fi connected), Blue
(presenting)
Weight 81g
With cable: 81x291x24.2mm
Without cable: 67x67x24.2mm
Page 7

Feature
Pairing key x1
Power consumption Normal: 24WWAN x1
Video output x1 HDMI 1.4 (video and audio)
DC Power Jack x1
LED
Red (error), Green (ready for
connection), Blue (presenting)
Dimension (WxHxD)
(not including rubber feet)
Weight (include antenna) 330g
With antennas: 200x140x150mm
Without antennas: 154x140x34mm
Cradle
Dimension 100.4x92.6x152mm Weight 550g
6 Introduction
Page 8
Overview
4
3
1
2
Bottom of Button
5
8
6 5 4 32
1
1
1
1
7
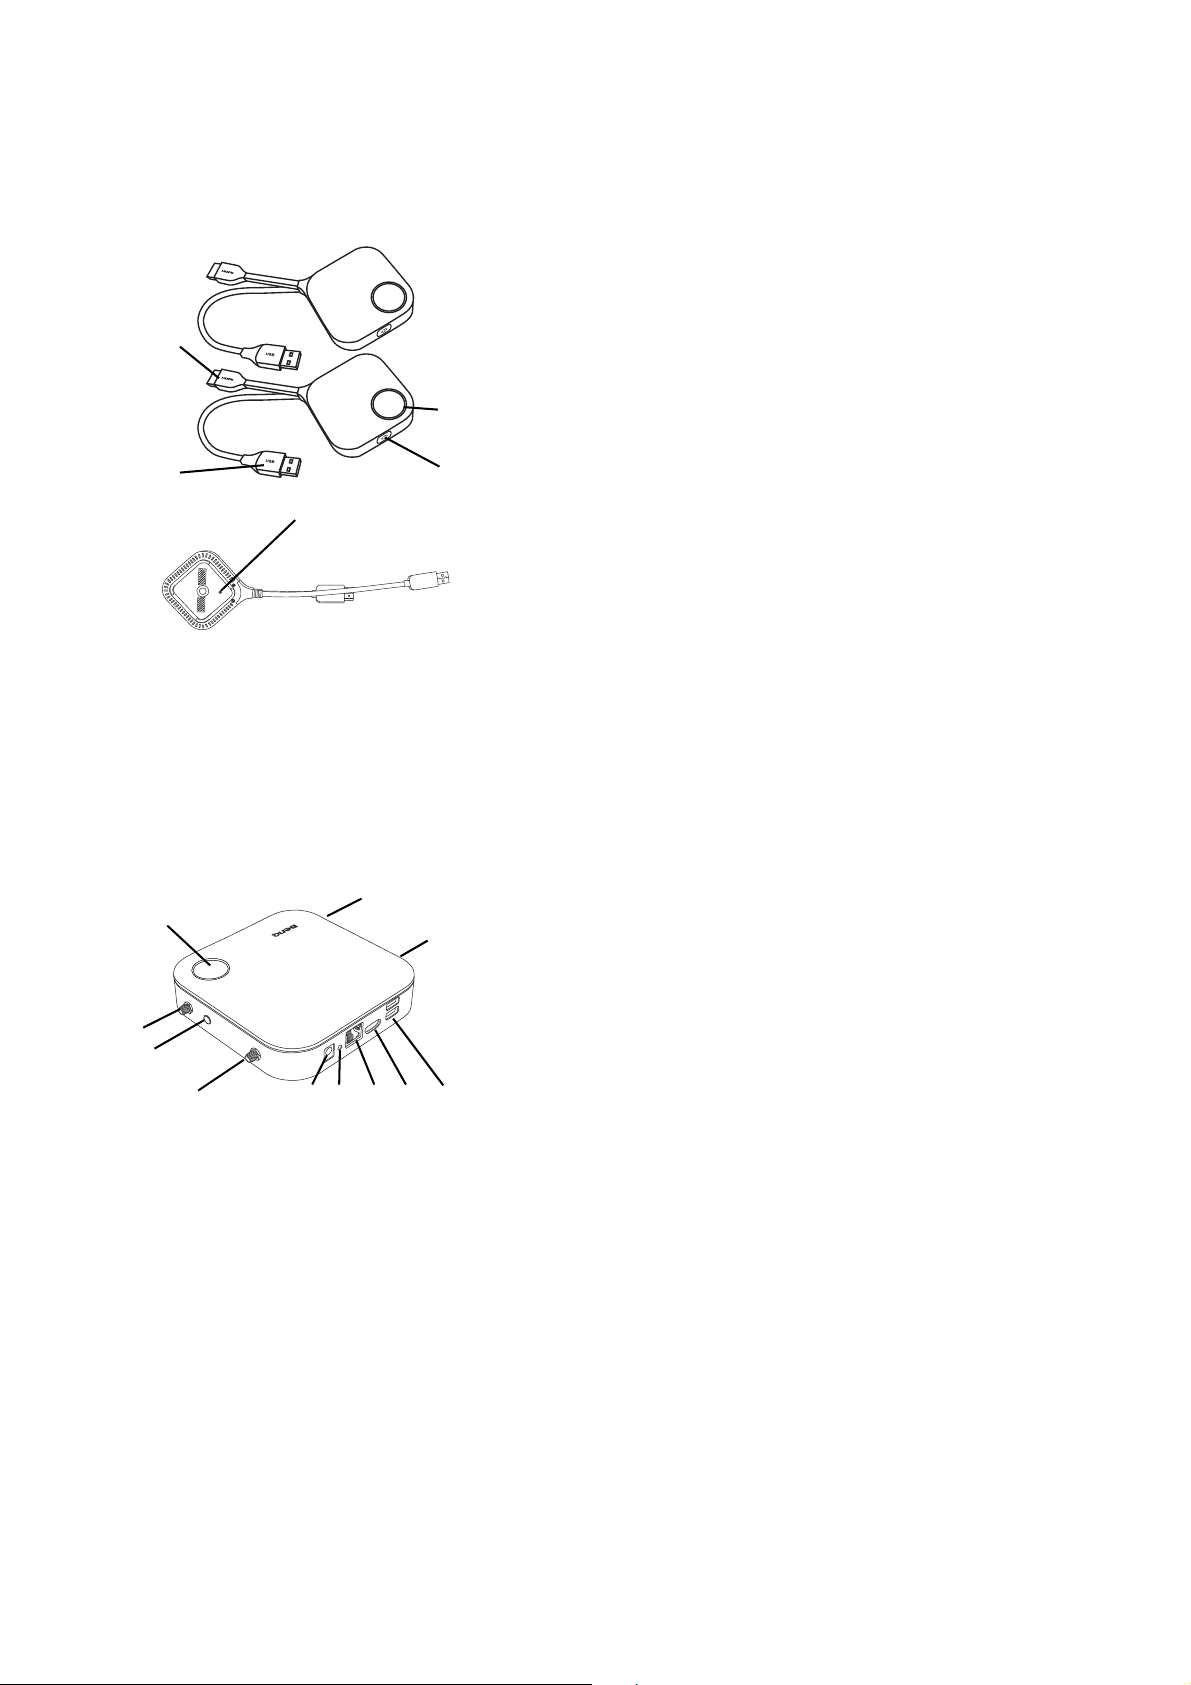
Button
1. Present key with LED indicator
Press to start or stop presenting.
2. Split screen key
Press to enable split screen presentations.
3.
USB 3.0 connector
Connect to a computer or laptop.
4. HDMI 1.4 connector
Connect to a computer or laptop.
5. RESET
Poke the RESET hole to reset the device if the
device stops responding. Refer to Resetting an Host
on page 23 for more information.
Host
1. Fixture parts for the Antennas
Refer to Assembling the Host on page 10 for more
information.
2. USB-A Ports
Connect to a touchscreen display, mouse, or
keyboard, to control the projected screen.
3. HDMI port
Connect to a display using a Cable HDMI A(M) to
A(M).
4. LAN port
Allows users access to the web management
interface through a direct or network connection.
5. RESET
Poke the RESET hole to reset the device if the
device stops responding. Refer to Resetting a
Button on page 24 for more information.
6. DC 2A port
Connect to the supplied adapter extender power
cable and adapter to power the Host.
7. PAIRING key
7 Introduction
Press to pair with a Button.
8. Standby button with LED indicator
Press to turn the Host on and off.
Page 9
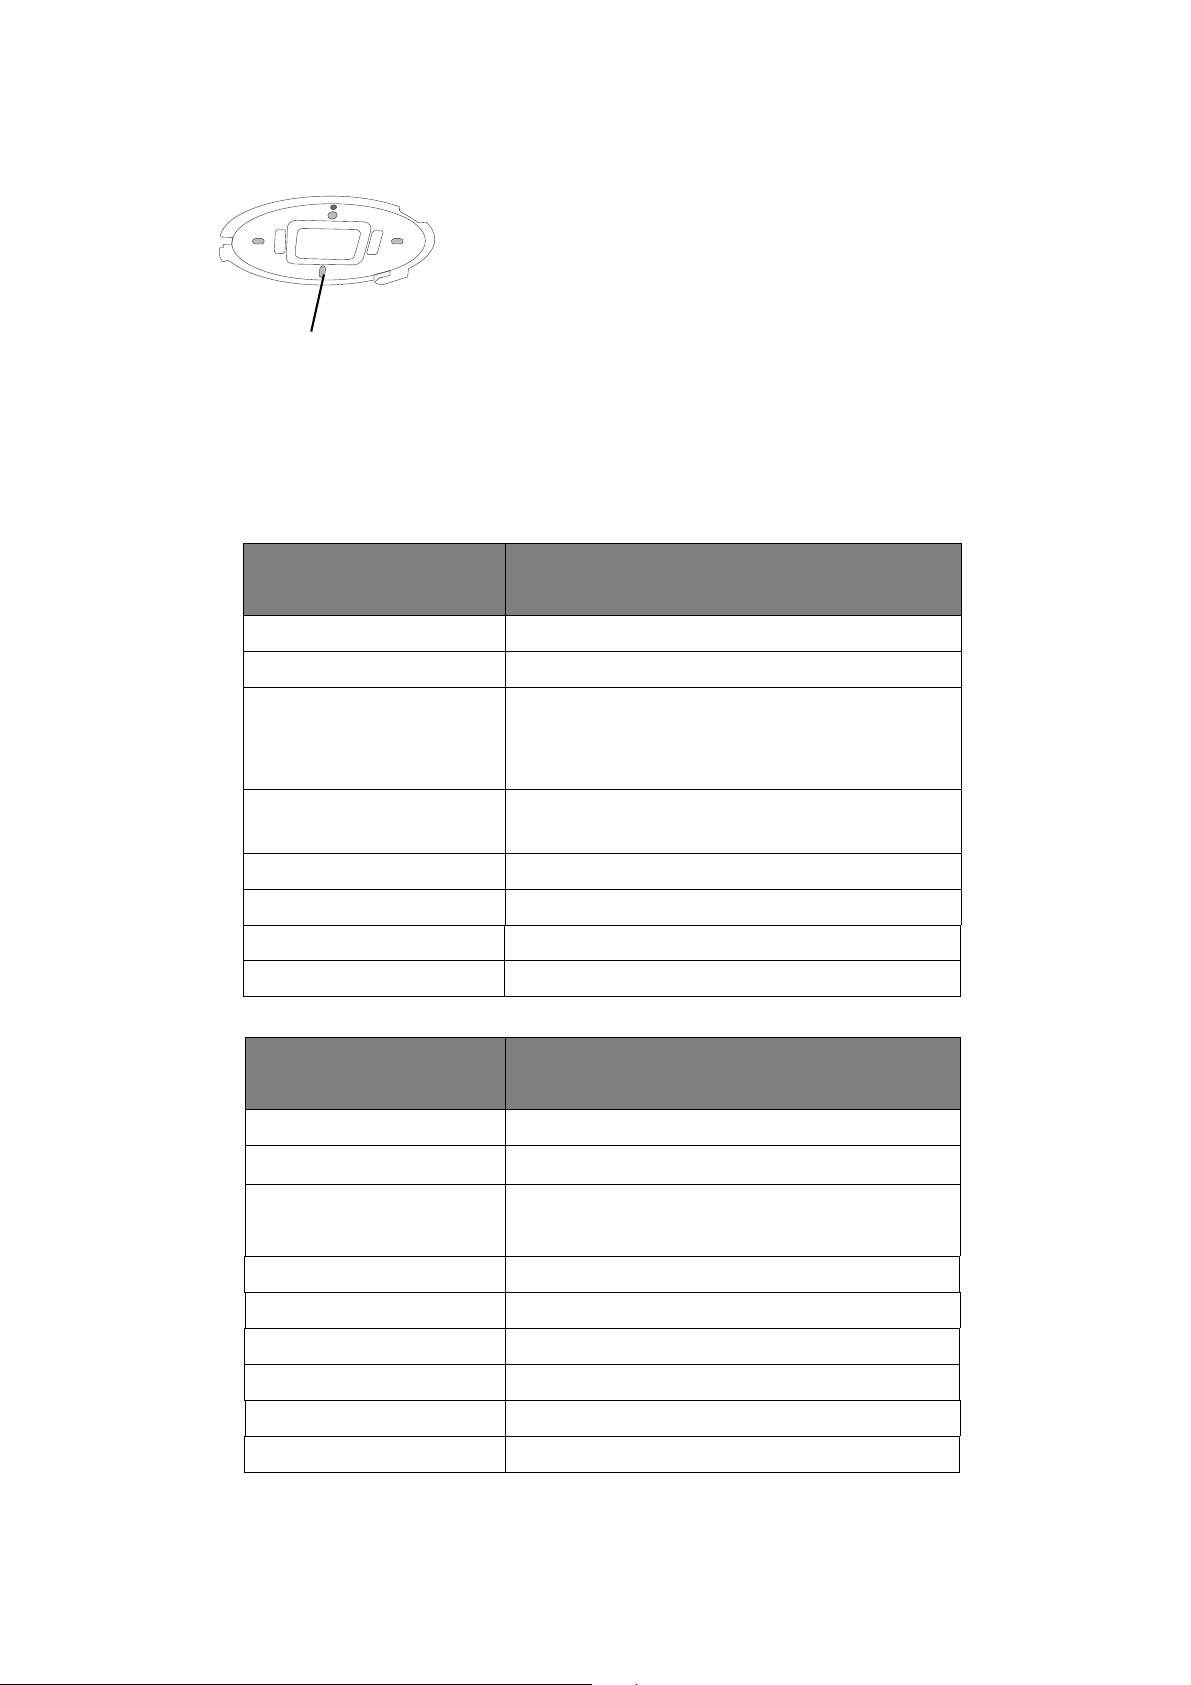
9. Lid
Alignment hole
Lid of Host
9
Refer to Attaching the Host to the ceiling on page
10 for more information.
LED indicators of the Button and Host
Please refer to the tables below for detailed indicator and status descriptions for the Button and
Host.
LED indicator on the
Button
Status Description
Static blue The device is presenting.
Flashing blue The device is in the process of pairing
• The device is starting up and connecting to
Flashing green
the host.
• The device is upgrading the firmware.
Static green
The device is connected and working
normally.
Flashing red The device is unable to connect to a host.
Off The device is powered off.
Static red The device is resetting.
Quick flashing red The reset process is triggered.
LED indicator on the
Host
Status Description
Static blue Connected device is presenting.
Flashing blue
Flashing green
50% static green The device is in network standby mode.
Static green The device is on and ready for connection.
Flashing red The device is encountering a problem.
Static red The device is resetting.
Off The device is powered off.
Quick flashing red The reset process is triggered.
The device is in the process of pairing.
• The device is starting up.
• The device is upgrading the firmware.
8 Introduction
Page 10

Installation
This section will guide you on how to prepare the unit before its initial use.
Environment check
Before installing the product, check the environmental conditions.
1. Do not install the device near heat sources like radiators or direct sunlight, or in a site with
excessive dust or humidity.
2. Ambient temperature conditions are listed as below. Maximum ambient temperature should be
+40°C or 104°F. Minimum ambient temperature should be +0°C or 32°F. Storage temperature
should be -10°C to +60°C (14°F to 140°F).
3. Humidity conditions are listed as below. For storage, the relative humidity should be 5% to 90%
(non-condensing). For operation, the relative humidity should be10% to 80% (non-condensing).
As the product works with different displays, the steps required to complete the installation may vary
according to the actual environment and your display specifications. Follow the procedures below and
refer to the specified sections for details.
1. Assemble the Host with the antennas. See Assembling the Host on page 10 for details.
2. Connect the Host to the display and power properly. See Connecting the HDMI cable and
power on page 15 for details. Four installation methods are provided.
• Attaching the Host to the ceiling
• Attaching the Host to a ceiling mount
• Placing the Host on a table
• Installing the Host on the wall or trolley
3. Connect the Button to the desired devices and power properly. See Setting up and powering a
Button on page 18 for details.
4. Make sure that all the connected devices have been powered on. Press the source button of the
display and make sure that the HDMI source has been transmitted. See Pairing a Button and
Host on page 21 for details.
9 Installation
Page 11
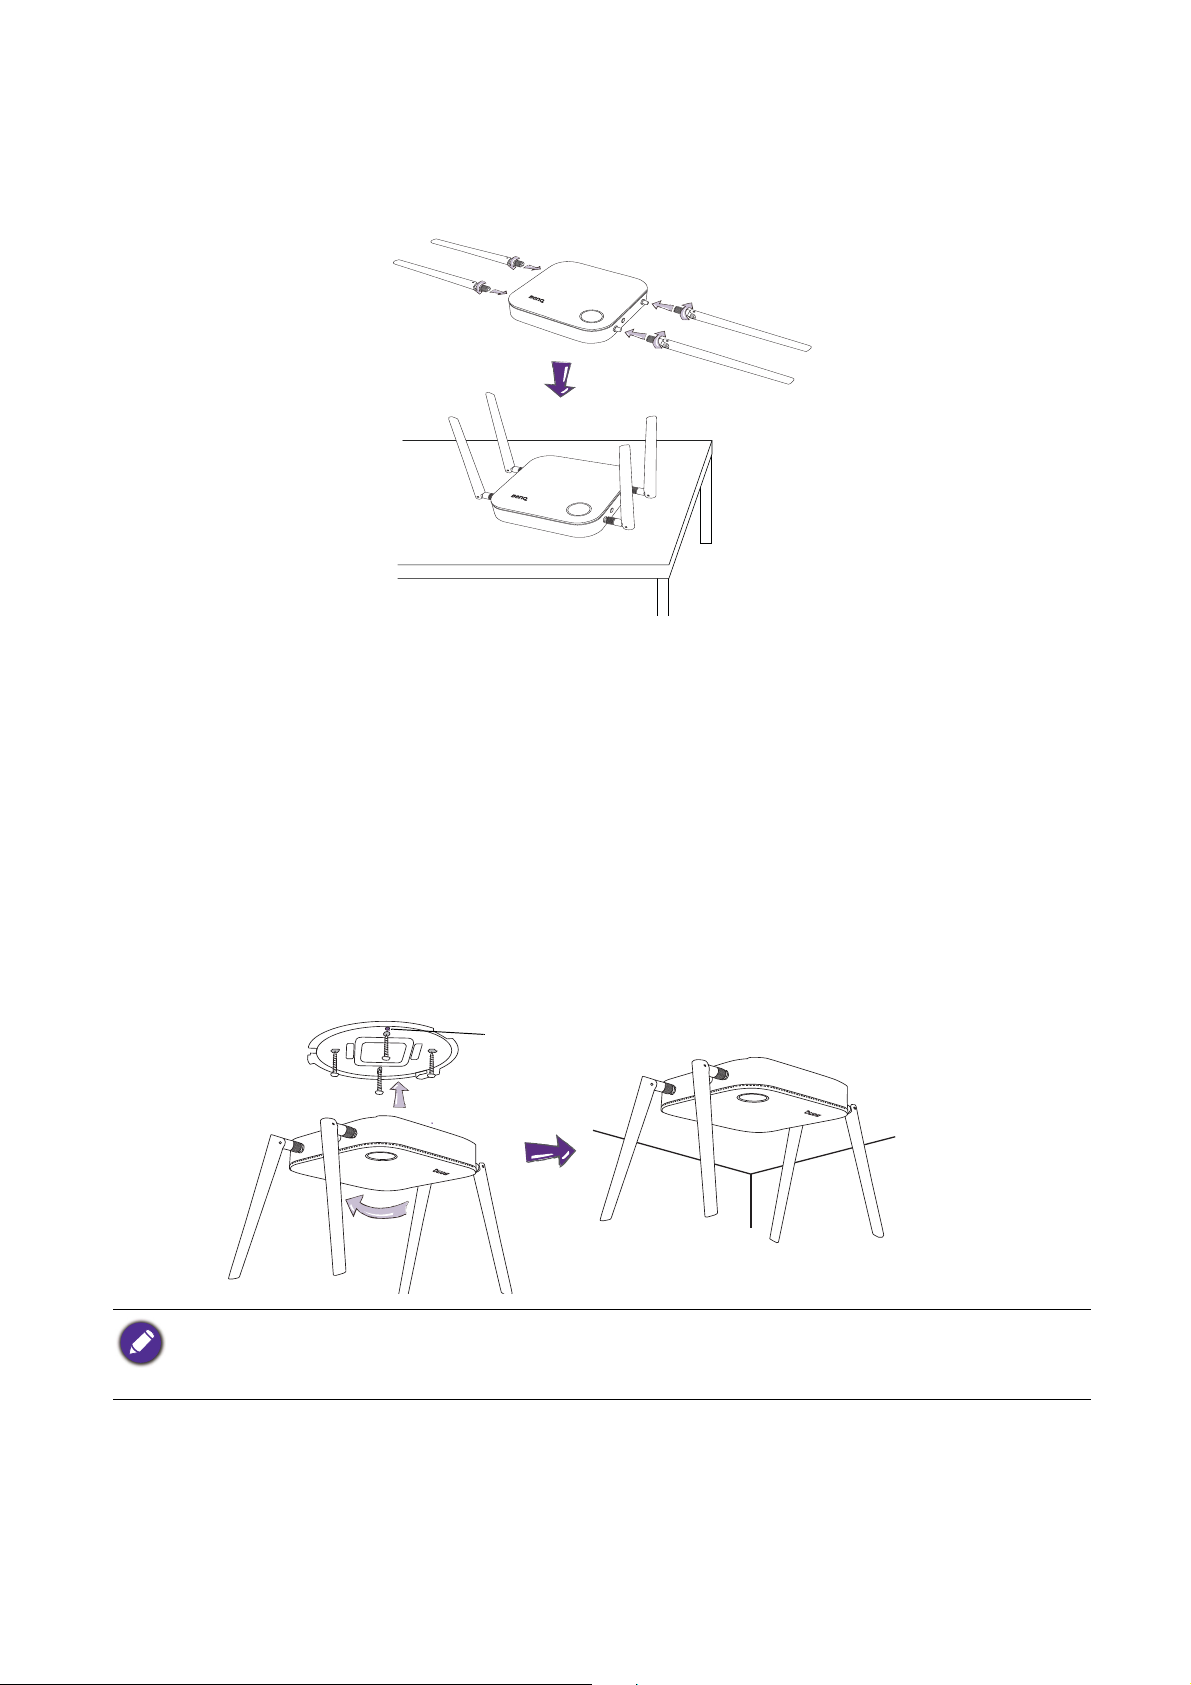
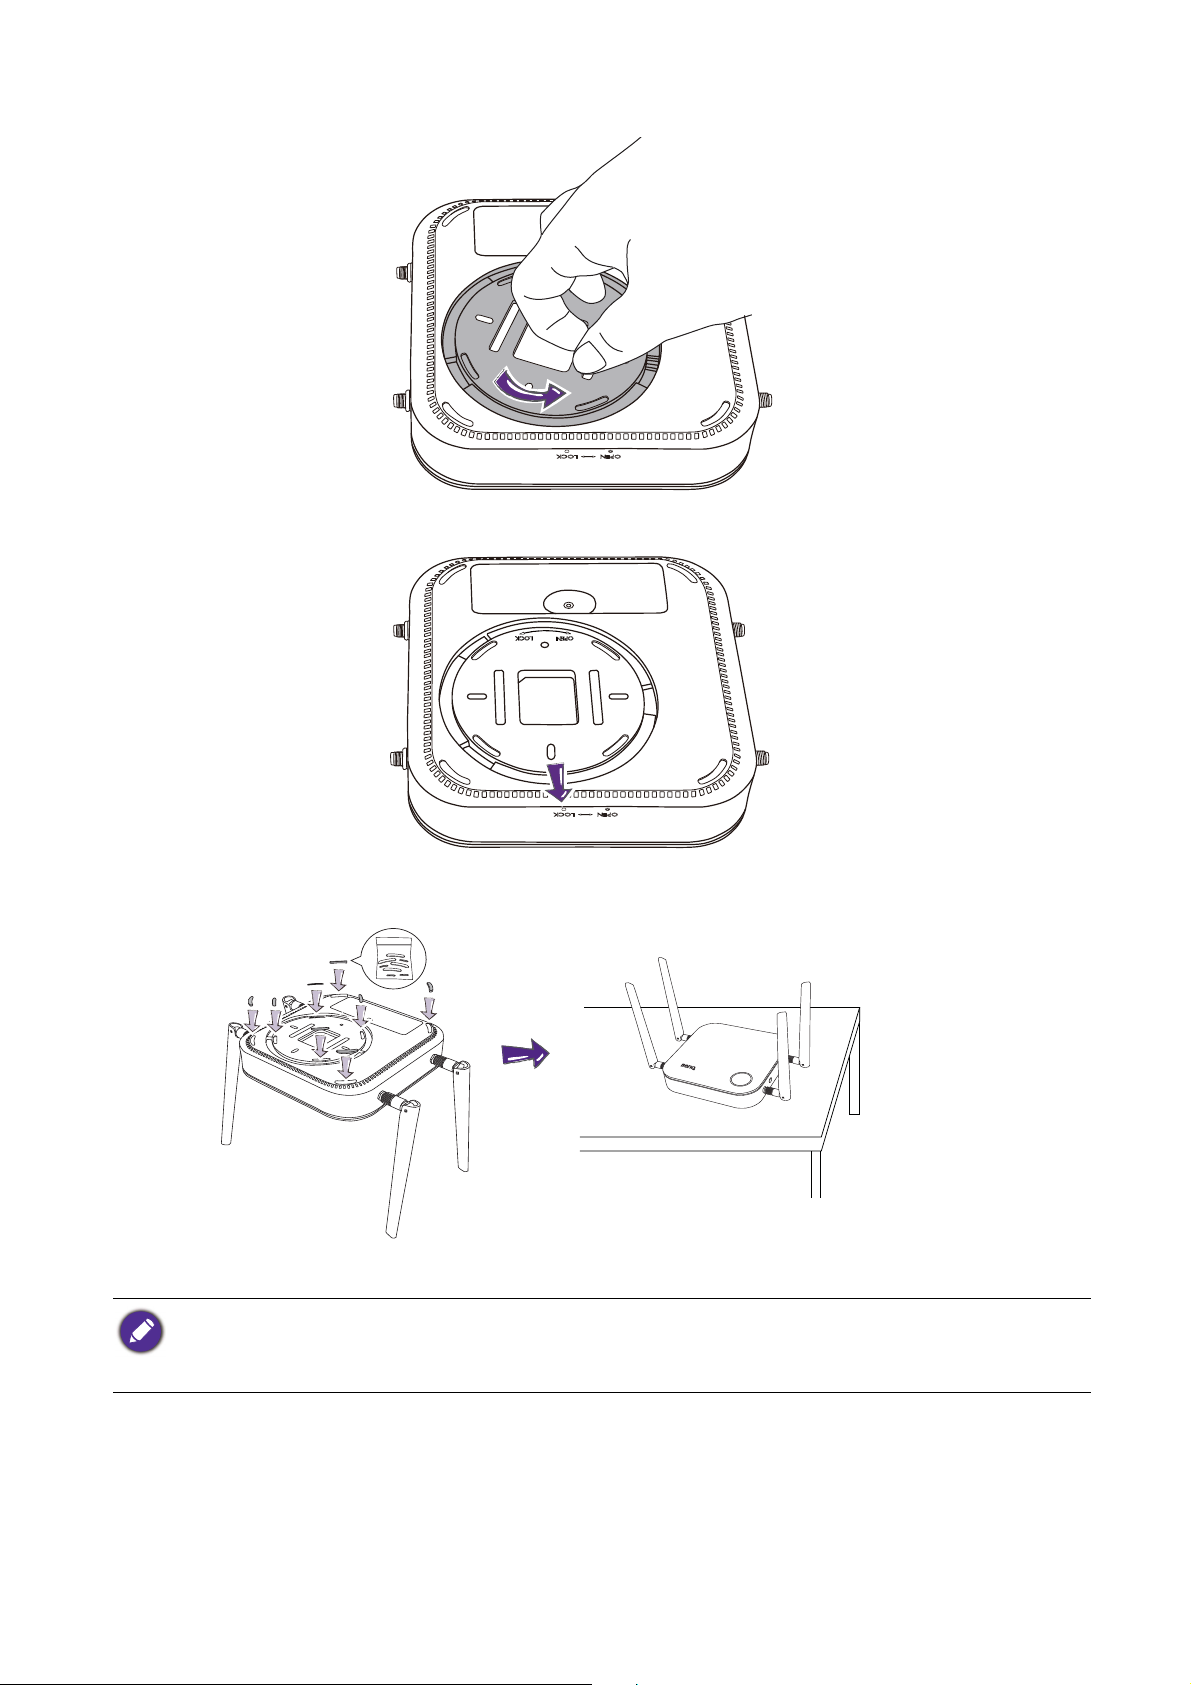
Assembling the Host
1
2
34
Alignment hole
Assemble the Host with four antennas by turning the antennas clockwise (right) and
counterclockwise (left) to fasten them tightly.
Setting up the Host
You are provided with four different ways to position the Host. The total weight of the Host Unit is
330g.
Attaching the Host to the ceiling
1. Place the lid on the ceiling and locate the alignment hole.
2. Use the screws provided to lock the lid to the ceiling.
3. Lock the first hole (1).
4. Follow the instruction in the illustration below to lock the other holes (2-4).
5. Rotate the Host counterclockwise to affix the Host to the lid..
• Please only use the screws (M3*16 tapping screw) provided with the kit to mount the Host to the ceiling.
• Please see Positioning the Host antennas on page 14 for guidelines on positioning the antenna to maximize
signal reception.
10 Installation
Page 12
Attaching the Host to a ceiling mount
If the display is mounted on the ceiling:
1. Attach the Host to the ceiling mount using the provided velcro strap.
2. Fix the Host to the mounting holder.
3. Use the supplied velcro to fix the mounting holder and the Host to the ceiling mount as shown
in the illustration.
• Please only use the velcro strap (300(L)mm*25(W)mm) provided with the kit to mount the Host to a ceiling
mount.
• Please see Positioning the Host antennas on page 14 for guidelines on positioning the antenna to maximize
signal reception.
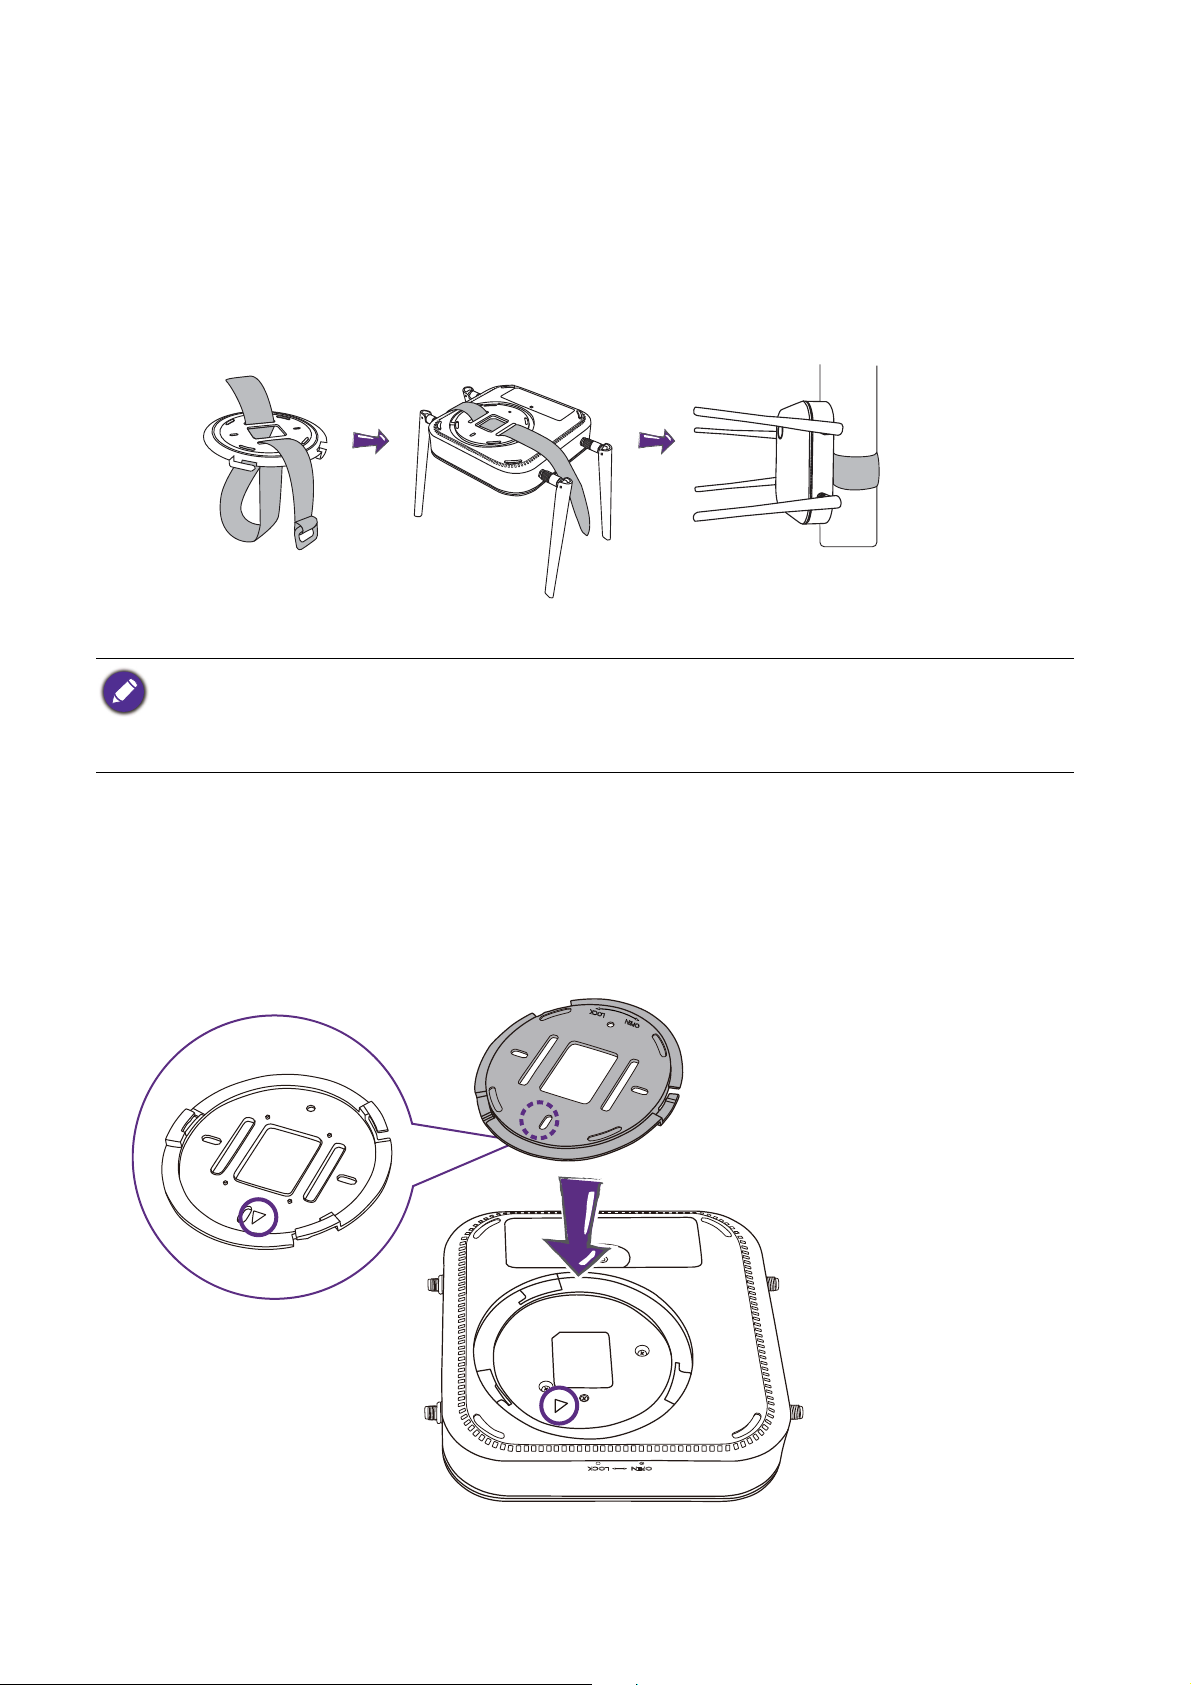
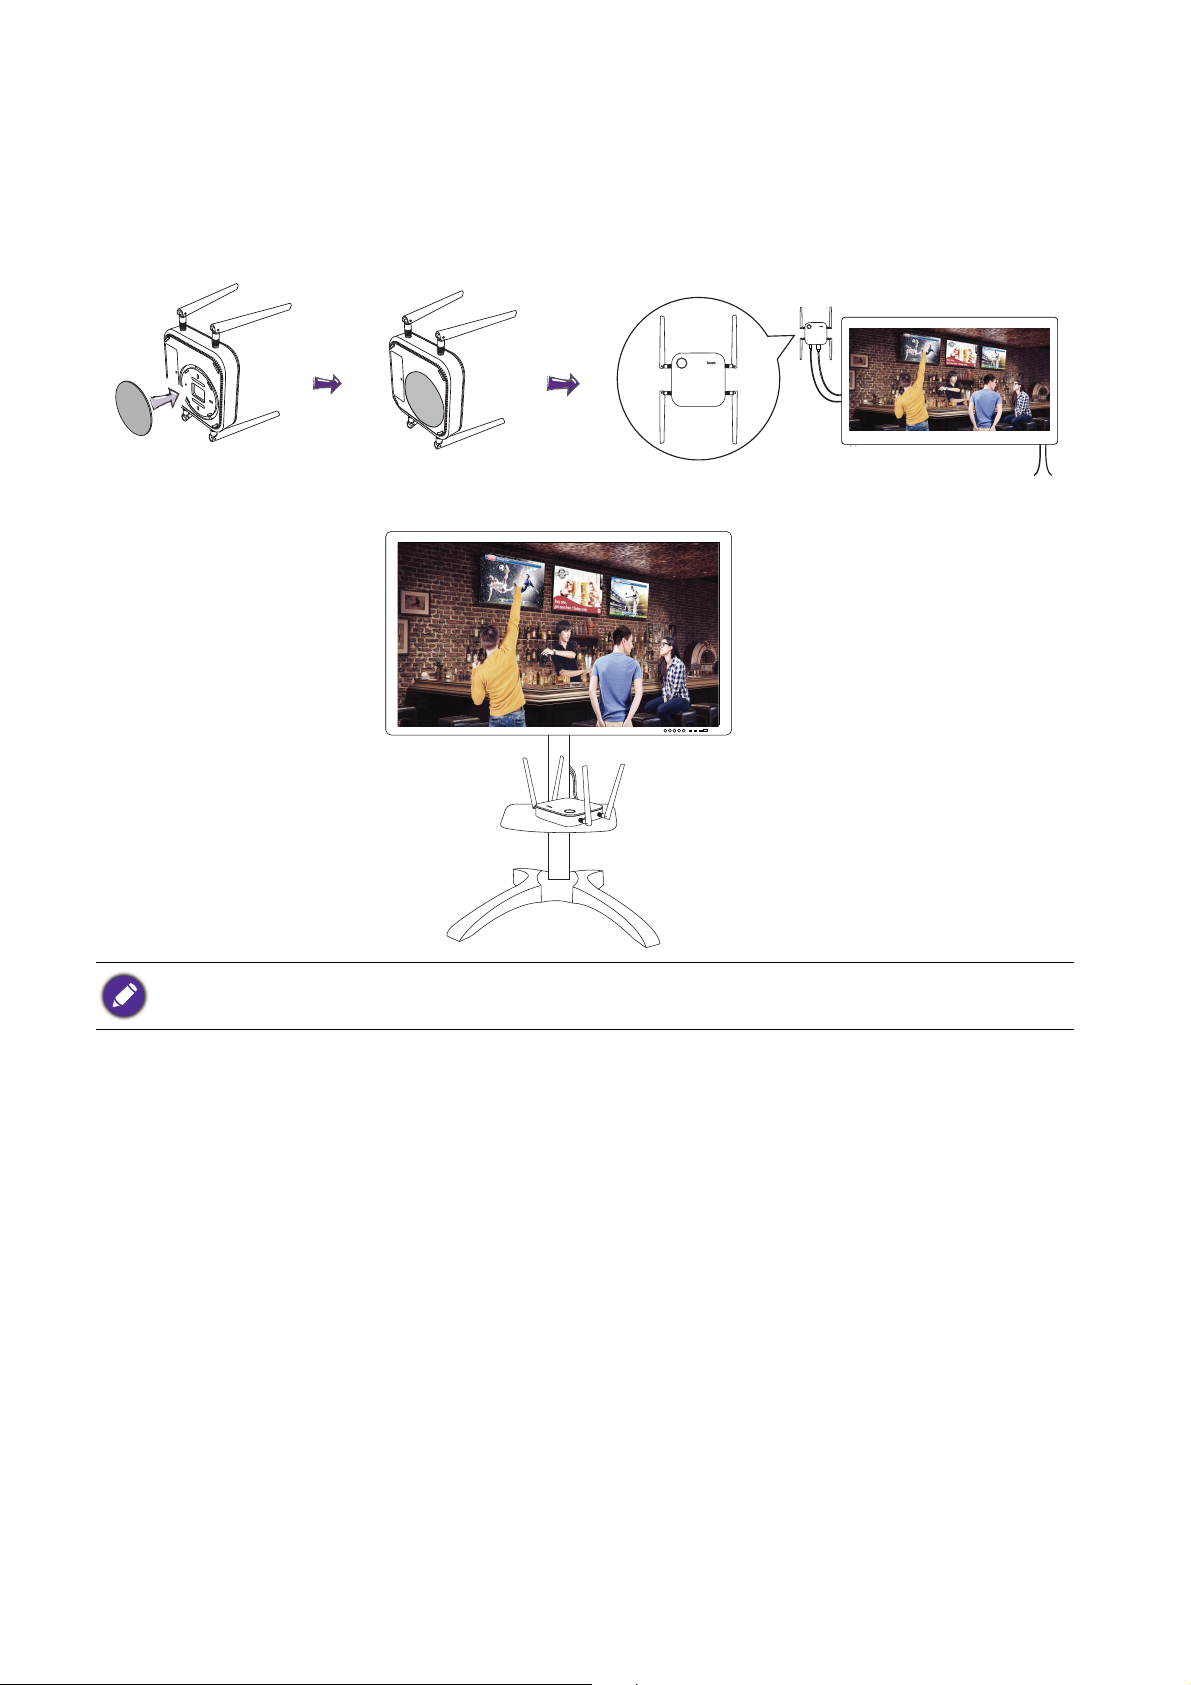
Placing the Host on a table
If your display is placed on a table, first attach the lid of to the Host in the following the process
described below:
1. Align the lid over the bottom of Host so that the triangle on the bottom side of the lid is aligned
to the triangle in the lid compartment, then insert the lid into the lid compartment.
11 Installation
Page 13
2. Turn the lid counter-clockwise until it clicks into place.
3. When the lid is correctly installed on the Host the alignment hole on the lid should be pointed
to the LOCK print at the front side of the Host.
4. Attach the rubber feet to the recesses on the lid and put the Host right next to the display.
• Please only use the rubber foot provided with the kit to attach to the Host.
• Please see Positioning the Host antennas on page 14 for guidelines on positioning the antenna to maximize
signal reception.
12 Installation
Page 14
Installing the Host on the wall or trolley
If you need to install the Host near a display:
1. Stick double-sided tape to the lid of the Host.
2. Affix the Host on the wall near the display.
3. Keep the antennas away from any signal obstructions.
You can also place the Host on a mobile display trolley. See the illustration.
• Please only use double-sided sponge tape on the lid of the Host.
• Please wait 24 hours after you attach the double-sided sponge tape to the lid of the Host.
13 Installation
Page 15
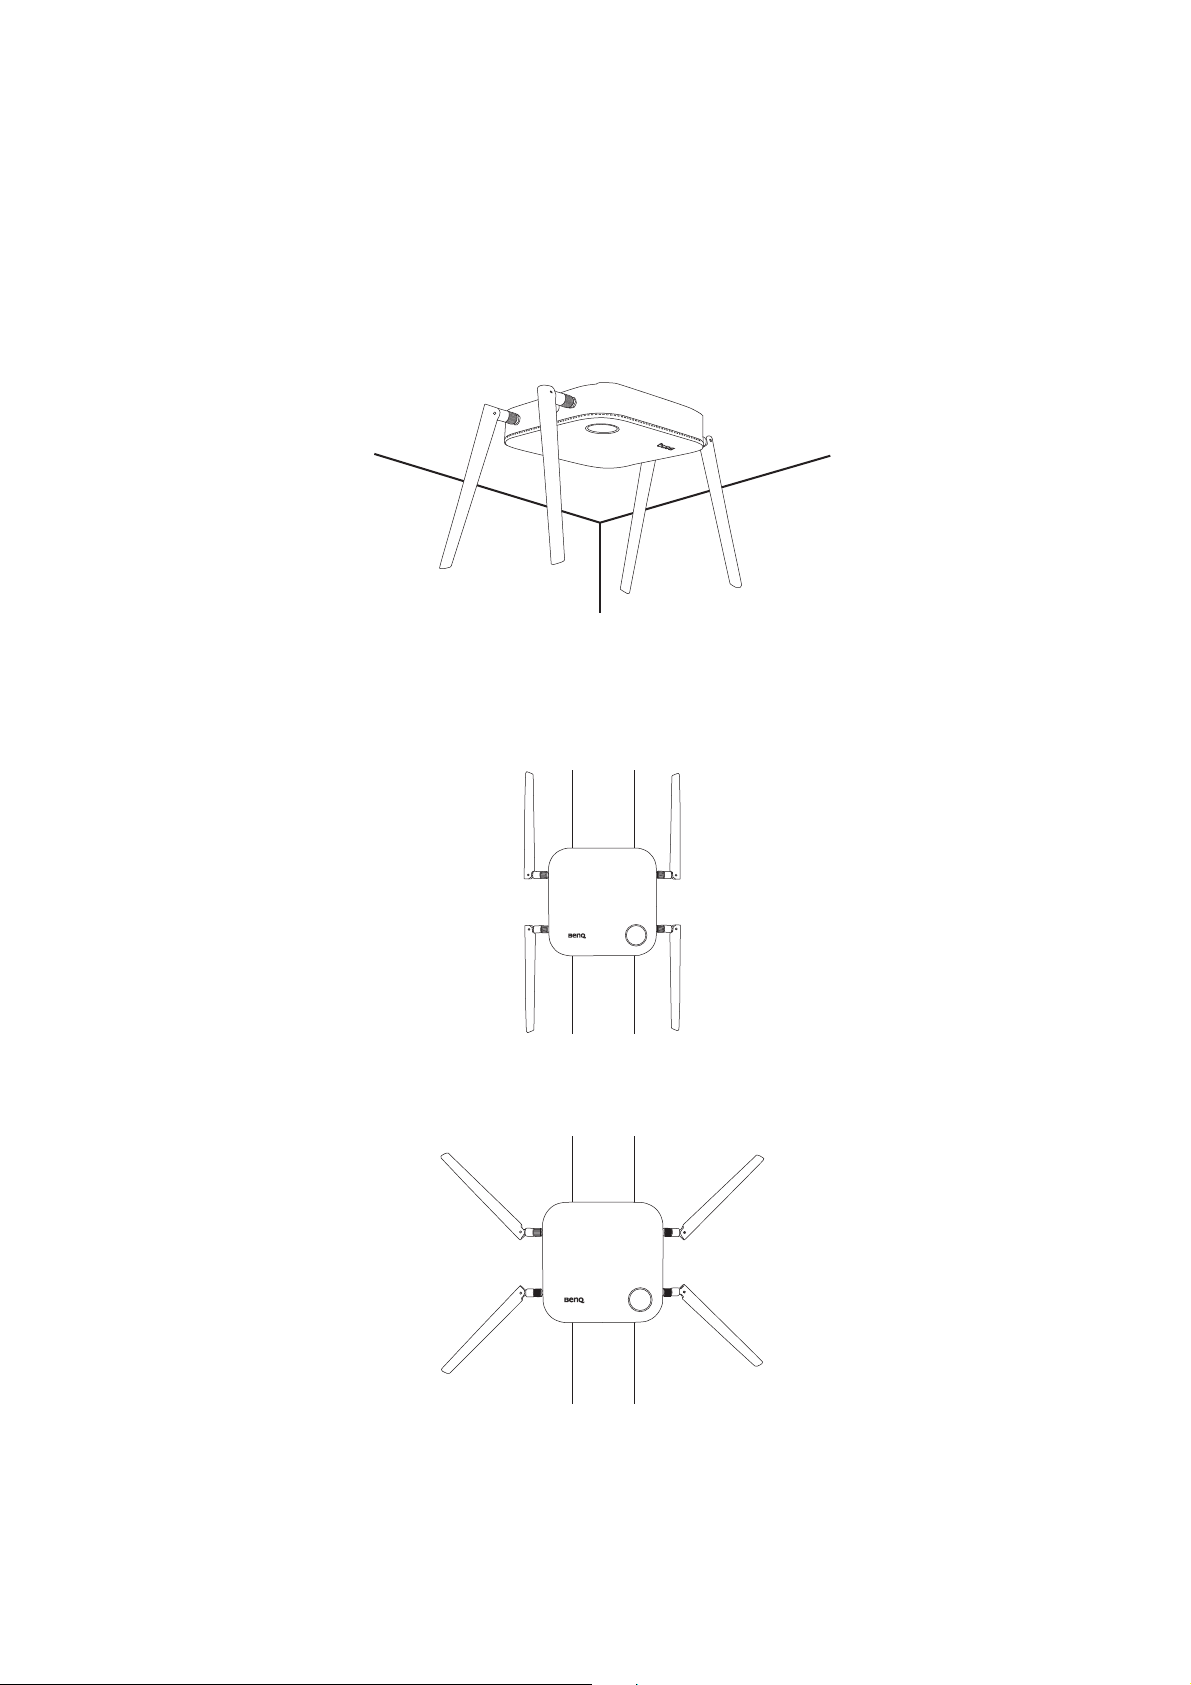
Positioning the Host antennas
Once you have properly installed the Host, follow the guidelines below to position the antennas to
maximize signal reception:
For ceiling installation
Position the antennas so that they are both pointed downwards at an angle roughly perpendicular to
the ceiling:
For ceiling mount installation
• Position the antennas so that they are both point either upwards or downwards roughly parallel to
the ceiling mount:
• If you encounter bad signal reception after initial use of the Host you can manually adjust the
antennas so that they tilt at a slight angle to maximize signal reception. When doing so, avoid tilting
the antennas toward the ceiling mount:
14 Installation
Page 16
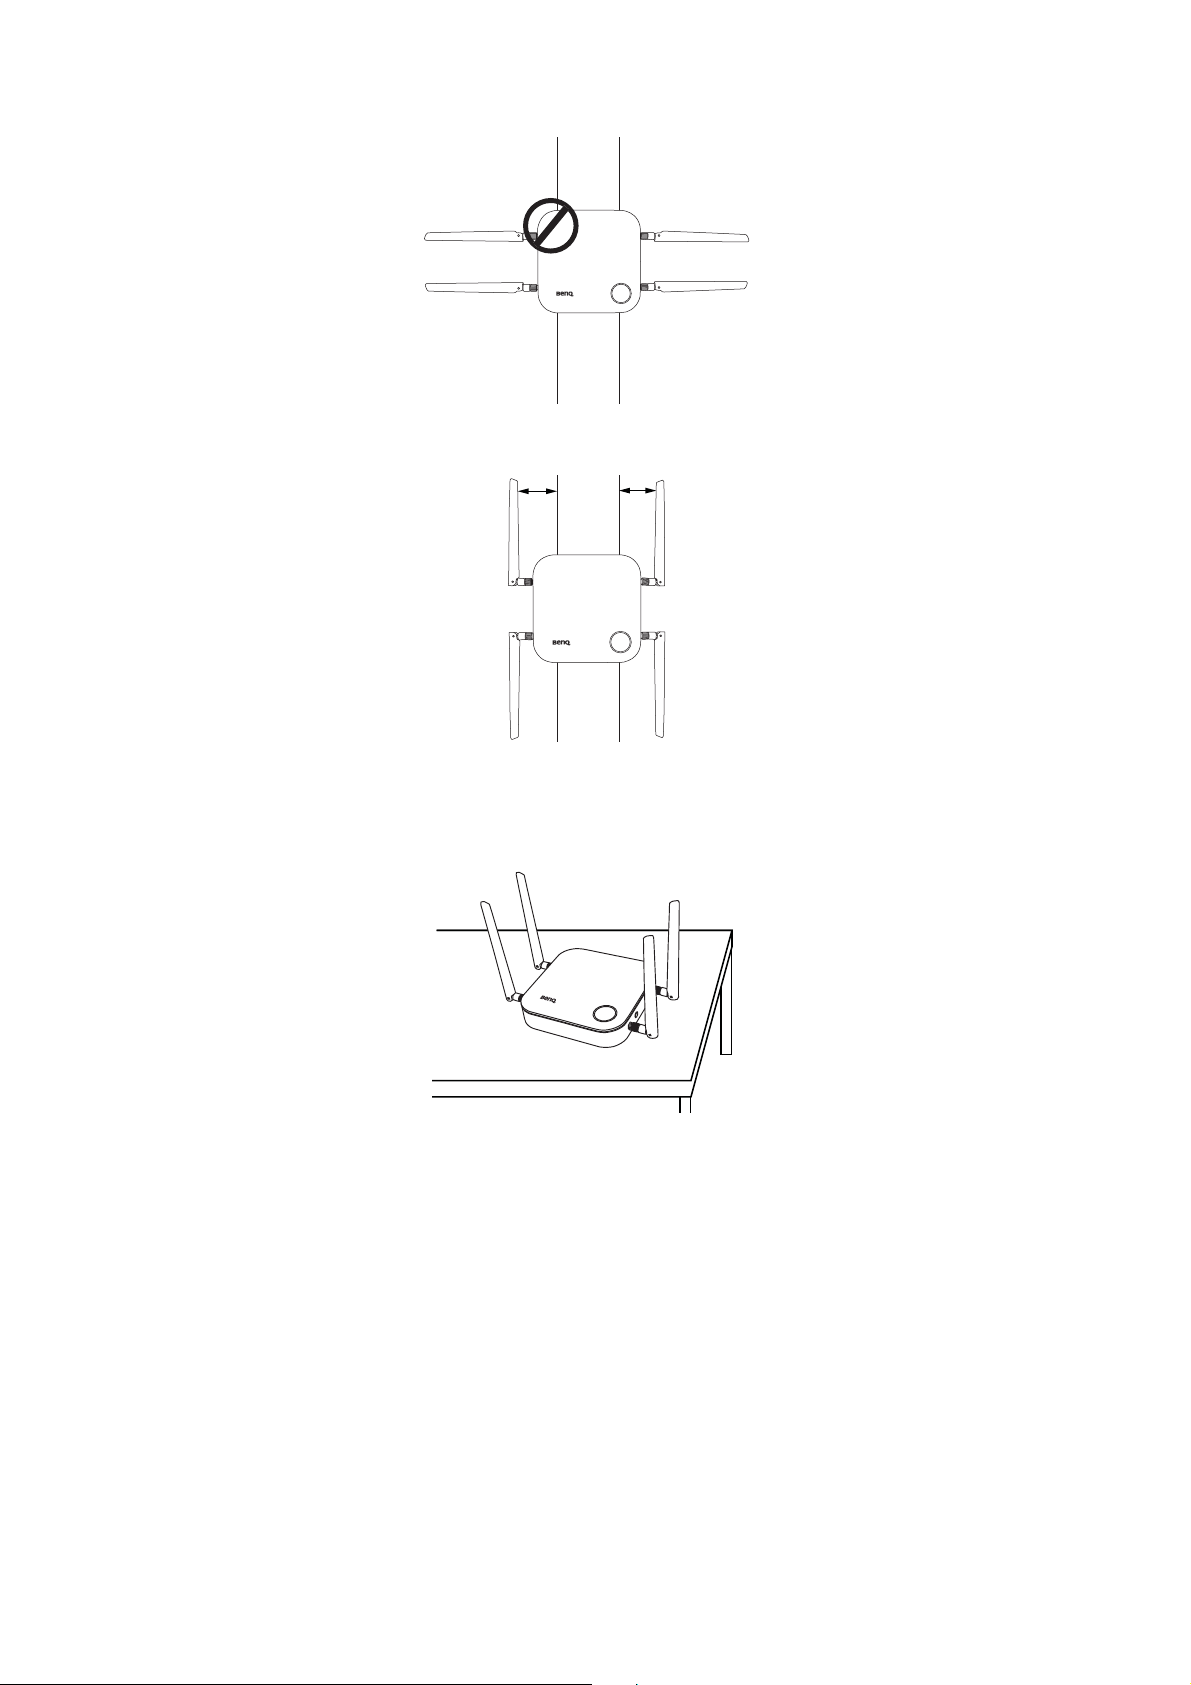
• Avoid positioning the antennas in a horizontal manner, this may result in a weak signal reception:
• If the Host is attached to a metallic ceiling mount ensure that the antennas are at least 3 cm away
from the metal portion of the ceiling mount:
3 cm
3 cm
For table placement
Position the antennas so that they are both pointed upwards roughly perpendicular to the table:
Connecting the HDMI cable and power
Once the Host has been positioned properly near the display, connect the HDMI cable and power to
ensure signal transmission.
15 Installation
Page 17

Assembling the adapter
Standard EuropeanStandard American Standard Australian Standard UK
1
2
Every adapter provided in the box includes a plug socket and plugs based on the region in which you
purchased the product. Below are images of the standard American, standard European, standard
Australian, and standard UK plugs:
To connect the plug of your choice, follow the steps below.
1. Align and insert the plug into the adapter.
2. Push the plug all the way in until it clips into place.
To disconnect the plug, follow the steps below.
1
2
1. Push the latch in the middle.
2. Detach the plug by pushing it outward and remove the plug.
16 Installation
Page 18

Connecting the HDMI cable
HDMI
HDMI
HDMI
POWER
HDMI
Connect the HDMI cable to the HDMI out jack of the Host and the HDMI input jack of the projector.
Power supply via a power adapter
Connect the male connector of the extender power cable to the power jack of the Host, then
connect the supplied power adapter to the female connector of the extender power cable, and then
plug the other end of the power adapter into a wall socket. Once the connection is set up press the
power switch on the extender power cable to supply power to the Host, the LED indicator on the
standby button of the Host lights up static green when the power is supplied.
For BenQ IFP (Interactive Flat Panel) products, please have power supplied via a power adapter.
17 Installation
Page 19

LAN connection
The Host can be connected to a local network or directly to a laptop. The LAN connection can be
used to configure the product and update the software. Insert a network cable with RJ-45
connectors into the LAN port and connect the other side to a LAN.
Setting up and powering a Button
1. Connect the Button’s HDMI and USB jacks to the corresponding inputs of a laptop. See the illustration.
HDMI
1.4
USB
3.0
2. The LED indicator of the Button will flash green while the Button is starting up.
3. When the button is ready to present, the LED indicator will turn solid green. Press the Present
key when the LED indicator turns green.
• If the button encounters problems while pairing with the Host during startup the LED indicator will flash red.
Repeat the previous the process again until the LED turns solid green. See LED indicators of the Button and
Host on page 8 for more information on LED behavior.
• Handle the Button cable with care. Rough handling might cause defects.
• Pull/Push the plug instead of the cable when inserting or removing Buttons.
18 Installation
Page 20

If you purchase an additional Button (via an Kit), please follow the process described below:
1. Follow the pairing instructions described in Pairing a Button and Host on page 21.
2. Connect the Button’s HDMI and USB jacks to the corresponding inputs of a laptop. See the
illustration.
HDMI
1.4
USB
3.0
3. The LED indicator of the Button will flash green while the Button is starting up.
4. When the Button is ready to present, the LED indicator will turn solid green. Press the Present
key when the LED indicator turns green. .
• Handle the Button cable with care. Rough handling might cause defects.
• Pull/Push the plug instead of the cable when inserting or removing Buttons.
19 Installation
Page 21

Using Cable USB A(F) to USB A(M)
HDMI
USB
Cable USB A(F) to
USB A(M)
A USB cable is provided for MacBook and Windows laptop users.
1. Insert the HDMI cable of the Button to the HDMI converter of your laptop.
2. Connect the cable USB A(F) to your laptop.
3. Connect the Button’s USB jack to the Cable USB A(M).
Make sure your own HDMI converter is workable.
20 Installation
Page 22

Pairing a Button and Host
USB
3.0
HDMI
1.4
The product includes an Host and two Buttons, which are paired before shipment. In such a case, you
don’t need to pair them again. However, if you buy two or more sets of InstaShow™ S, and you want
to pair a Button with a different Host, you need to follow the instruction below. If you buy an
additional Button Kit, and you want to pair the new Buttons with your Host, you need to follow the
instruction below as well.
When the Host is placed on a table
1. Make sure your Host is ready with power supply. Connect the Button’s HDMI and USB jacks to
the corresponding inputs of a laptop.
2. When the Button is connected to the laptop, the LED indicator of the Button will flash red. The
Button is in pairing mode, waiting to pair with your Host.
If a Button nearby has been paired with a Host before, it will turn static green.
21 Installation
Page 23

3. Press the PAIRING key of the Host for five seconds, the LED indicator of the Host will blink
00:00:00
00:00:05
00:00:00
00:00:05
blue for two minutes, waiting to pair with a Button.
4. Press the split screen key on the side of the Button for five seconds. The LED indicator of the
Button will blink blue for about 10 seconds. The pairing process is ongoing. The “Pairing in
progress” message will be shown on the screen.
Pairing in progress
The images are for reference only. Each product has different serial number.
22 Installation
Page 24

5. The LED indicator of the Button turns static green and a “Pairing complete” message will be
Pairing complete
1
2
shown when the Host and Button are successfully paired.
The maximum number of Buttons you can pair with one Host is 32.
Storing Buttons and USB cable in the cradle
You are provided with two different ways to store the Buttons in the cradle. Place the Buttons in the
cradle vertically (1) or horizontally (2). See the illustrations.
Resetting an Host
Resetting an Host allows you to return the Host to its original factory settings.
Reset the Host using the following steps:
23 Installation
Page 25

1. Connect the power port on the Host to a power source and wait for at least 30 seconds.
After the Host has been connected to a power source for at least 30 seconds, the Host LED may indicate any one
of the statuses described in LED indicators of the Button and Host. As long as the Host
power source for at least 30 seconds, you may proceed to the next step of the resetting process regardless of the
status of the Host
LED.
has been connected to a
2. Poke the RESET hole at the rear of the Host with a pin for at least 2 seconds.
3. The Host LED will begin quick flashing red (flash red twice every second) for 10 seconds, then
light up static red for 15 to 20 seconds, indicating that the Host is resetting.
4. Once the Host LED lights up static green the resetting process is complete.
Do not disconnect the Host from its power source at any time during the resetting process.
Resetting a Button
Resetting a Button allows you to return the Button to its original factory settings. You may want to
reset a Button because of either one of the following conditions:
• You purchased an additional Button (via a Button Kit) which has not been paired to a Host.
• A Button that was included in the original package has been paired to a different Host (one which
was not originally included with the Button in the package), and you want to quickly pair it back to
its original Host.
• A Button that was included in the original package has been paired to a different Host (one which
was not originally included with the Button in the package), and you want to re-pair the Button to
its original Host while the Host is not powered on.
Reset a Button using the following steps:
1. If the original Host is powered on, place the Button within range of the original Host and ensure
the LED on the Host is static green.
24 Installation
Page 26

2. Connect the USB 3.0 connector on the Button to a powered on laptop and wait for at least 30
seconds.
After the Button has been connected to a powered on laptop for at least 30 seconds, the Button LED may
indicate any one of the statuses described in LED indicators of the Button and Host. As long as the Button
been connected to a powered on laptop for at least 30 seconds, you may proceed to the next step of the
resetting process regardless of the status of the Button
LED.
has
3. Poke the RESET hole at the bottom of the Button with a pin for at least 2 seconds.
4. The Button LED will begin quick flashing red (flash red twice every second) for 10 seconds, then
light up static red for 15 to 20 seconds, indicating that the Button is resetting.
5. Once the Button LED lights up static green the resetting process is complete.
Do not disconnect the Button from its power source at any time during the resetting process.
25 Installation
Page 27

Starting and stopping presentations
This section will guide you on how to start and stop a presentation using the product.
Getting ready
Make sure that all the connected devices have been powered on and ready for the presentation.
As the product could work with different projectors, IFPs, TVs, or monitors with standard HDMI
ports, the steps required to start a presentation may vary according to the actual environment and
your display specifications. Follow the procedures below and refer to the specified sections for
details.
1. To start a presentation, see Starting presentation on page 26 for details.
2. To stop a presentation, see Idle presentation on page 27 for details.
3. To start a split-screen presentation, see Split screen presentations on page 28 for details.
4. To start a presentation with a mobile device, see Presenting with mobile devices on page 29 for
details.
5. To control presentations via a touchscreen displays or mouse/keyboard see Controlling
presentations on page 30 for details.
Starting presentation
1. Make sure power is supplied to the Host. See Connecting the HDMI cable and power on page 15
for more information.
2. Choose the HDMI source corresponding to the Host on the display. You will see the Guide
screen.
Guide
Screen
3. Please follow the instruction on the Guide screen to supply power to the Button. You can also
see Setting up and powering a Button on page 18 for more information. The LED indicator on
the Button is static green when the Button is connected and working properly.
4. To start a presentation, press the Present key.
26 Starting and stopping presentations
Page 28

5. The device starts presenting, and the LED indicator of the Button turns static blue.
Present
key
Present
key
• Make sure the transmission distance between the Button and Host is within 15M and with no obstacles.
• The product supports MacBooks and Windows laptops to mirror an extended desktop.
Idle presentation
1. To stop a presentation, press the Present key.
2. The device stops presenting, and the LED indicator of the Button turns green.
3. Users can press the Present key to return to the presentation.
27 Starting and stopping presentations
Page 29

Split screen presentations
The product allows up to 4 users to present simultaneously in a split screen orientation.
Starting a split screen presentation
1. Connect a Button to each computer that will be presenting in the split screen presentation. See
Setting up and powering a Button on page 18 for more information.
Make sure that all Buttons have already been paired to the Host projecting the presentation. See Pairing a Button
and Host on page 21 for more information.
2. Start a normal presentation using one of the Host buttons. See Starting presentation on page 26
for more information.
3. Press the split screen button on the Host that started the presentation to enable split screen
presentations.
4. Once a notification appears on-screen indicating that the split screen function has been enabled,
press the Present key on the Button of the second computer that wants to join the split screen
presentation.
5. Repeat step 4 for all other users that want to join the split screen presentation.
• Only up to 4 users are simultaneously supported in a split screen presentation.
• The layout of the split screen presentation will be dictated by the amount of users in the presentation.
• If split screen is not enabled by the initial Button, all subsequent connections by other Buttons will be full
screen presentations.
28 Starting and stopping presentations
Page 30

Switching from a split screen to a full screen presentation
Once in a split screen presentation you can switch to a full screen presentation of any of the
participant’s screen by pressing the split screen button on the Button of the computer that wants to
present in a full screen.
To return to a split screen presentation repeat the steps in Starting a split screen presentation on
page 28.
Presenting with mobile devices
Users with mobile devices can connect their mobile devices to the Host and make a presentation via
the InstaShare app by following the steps below:
1. Install the InstaShare app on your mobile device using the QR code located on the guide screen.
2. In your mobile device’s Wi-Fi menu, connect to the SSID indicated in the guide screen.
3. Use the InstaShare app to project your screen.
29 Starting and stopping presentations
Page 31

Controlling presentations
USB 2
USB 1
WAN
RESET HDMI
When a Host is connected to a touchscreen display and a PC is presenting via a Button, you can use
a USB Type-A cable to connect any of the USB ports located at the rear of the Host to the touch
input USB port of the display to control the interface of the PC remotely via touch gestures on the
display.
• The product only supports touch control for Windows-based PCs. The product does not support touch
control for MacBooks or smartphones connected via the InstaShare app.
For presentations that do not feature a touchscreen display, you can connect a USB mouse and/or
USB keyboard to any of the USB ports located at the rear of the Host to control the interface of the
presenting computer and input text remotely via the mouse/keyboard.
RESET HDMI
WAN
USB 1
USB 2
30 Starting and stopping presentations
Page 32

Troubleshooting
Category Problem Cause Solution
Yo ur s c re en
Yo ur s c re e n i s no t
appearing on the
display when
pressing the Button.
The screen turns
blank or flickers
when the Host is
presenting.
The screen lags
seriously and the
audio breaks up
sometimes.
The Button is
connecting to
another Host.
Pressing time is not
enough.
Insufficient power
supply
Insufficient power
supply for the Button.
An laptop with USB
2.0 port may be used
as the power supply
for the Button.
Wi-Fi interference or
signal attenuation
The Button should be paired
again with the Host.
Press the Present key until the
LED indicator turns from green
to blue.
Change power supply of the
Host to a power adapter.
Make sure you use USB 3.0 as
the power supply for the
Button.
• Make sure the transmission
distance is within 15M and
with no obstacles.
• Restart the Host in order to
rescan the Wi-Fi 5G channel.
Yo ur s c re en
The message, "No
Signal", from the
Host is shown on
the display when the
Button is
presenting, or your
screen is blank gray.
Yo ur s c re e n i s
shown, but your
audio is not playing
on the audio system
of the meeting
room.
The HDMI
connection between
your laptop and the
Button is loose.
Your laptop cannot
detect the second
monitor.
The audio signal on
your laptop is muted.
The audio output of
the laptop hasn’t
been set to the
second screen (BenQ
InstaShow™ S) from
the EDID of the
Button.
Reconnect the HDMI cable of
the Button.
• Reconnect the USB cable of
the Button.
• Reboot your laptop.
Right click on the speaker icon
and switch off the mute.
Change the default audio output
to the second screen (BenQ
InstaShow™ S) on the laptop.
31 Troubleshooting
Page 33

Category Problem Cause Solution
1. The Host will restore the
Wi-Fi connection
Your content is
removed from the
display and the LED
indicator of your
Button is blinking
The wireless
connection is lost
between the Button
and Host.
automatically.
2. If this fails, the LED indicator
of your Button starts blinking
red.
3. Unplug the Button from your
laptop and try again.
red.
Make sure the transmission
distance is within 15M and with
no obstacles.
Make sure Host is turned on.
The Host should pair with the
Button again.
Make sure the transmission
distance is within 15M and with
no obstacles.
The Button
The LED indicator
of the Button is
blinking red when
the power is on.
Wi-Fi interference or
signal attenuation
The Host has not
been turned on.
The Host has not
paired with a Button.
Wi-Fi interference or
signal attenuation
The Button
The LED indicator
of the Button is
always off.
The Button
automatically
restarts sometimes.
The LED indicator
on the Button
remains static red
even after it has
been powered on
for 30 seconds.
The pairing function
cannot be executed
via the MODE key
while the Button is
powered on and the
LED starts flashing
red.
There is no power
supply.
Insufficient power
supply.
The Button has not
been properly
powered off during
the resetting process
Check the USB port of your
laptop. If the port fails to
function, try other USB ports.
Make sure you use USB 3.0 as
the power supply for the
Button.
Reset the Button.
32 Troubleshooting
Page 34

Category Problem Cause Solution
The Host
The Host
Nothing is shown
on the display at all.
Nothing is shown
on the display at all.
The display is
switched off.
The wrong input is
selected.
The display cable is
not connected
properly.
The display fails to
show the Host’s
output resolution at
720p in "Guide
Screen" or "Idle
Screen".
The Host is in
Network Standby
Mode when network
standby function is
enabled.
The Host is in HDMI
Standby Mode
when HDMI standby
function is enabled.
The Host is powered
off.
Insufficient power
supply
Switch on the display.
Select the correct input.
Insert the HDMI cable between
the Host and the display device
again.
Replace the display with a new
one that supports output
resolution at 720p.
Press the Present key of the
Button to start presentation.
Briefly press the standby button
on the Host or power on the
display (connected to the Host
with an HDMI cable). The Host
will wake up automatically.
Briefly press the standby button
on the Host.
Change power supply of Host
to a power adapter.
EDID
The LED indicator
on the Host
remains static red
even after it has
been powered on
for 30 seconds.
After connecting
the Button to your
laptop, the second
screen
(InstaShow™ S)
cannot be detected.
The Host has not
been properly
powered off during
Reset the Host.
the resetting process
The HDMI
connection between
your laptop and the
Reconnect the HDMI cable of
the Button.
Button is loose.
Laptop problem Reboot your laptop.
The Button is
shutdown.
Reconnect the USB cable of the
Button.
33 Troubleshooting
Page 35

Category Problem Cause Solution
Pairing
Windows
Software
The message,
"Pairing failed", from
the Host is shown
on the display when
the Host is pairing
with the Button.
When presenting a
video file via Gom
Media Player, the
full-screen image is
cut into upper and
lower halves.
Wi-Fi interference or
signal attenuation
The Button has not
entered the pairing
mode in time.
Media player
Make sure the transmission
distance is within 15M and with
no obstacles.
When the Host enters pairing
mode, the Button should also
enter pairing mode within two
minutes.
Use other media players to play
video files, such as Windows
Media Player.
34 Troubleshooting
Page 36

Regulatory Statements V1.1
2019-03-08
CE DoC
DECLARATION OF CONFORMITY English
The device complies with the requirements set out in the Council Directives relevant Union harmonisation
legislation:
RED Directive (2014/53/EU)
RoHS Directive 2011/65/EU & (EU) 2015/863
Ecodesign Directive 2009/125/EC
Turkish ErP (Decision 2010/643)
Turkish EEE Directive
DÉCLARATION DE CONFORMITÉ Français
L'appareil est conforme aux exigences définies dans les directives du Conseil relatives à la législation
d'harmonisation de l'Union :
Directive RED (2014/53/UE)
Directive RoHS 2011/65/UE et (UE) 2015/863
Directive sur l'écoconception 2009/125/CE
ErP turque (décision 2010/643)
Directive EEE turque
DECLARACIÓN DE CONFORMIDAD Español
El dispositivo cumple los requisitos impuestos en las directivas del Consejo relativas a la legislación de
armonización de la Unión Europea:
Directiva sobre equipos radioeléctricos (2014/53/UE)
Directiva sobre sustancias peligrosas 2011/65/UE y (UE) 2015/863
Directiva sobre diseño ecológico 2009/125/CE
ErP de Turquía (Decisión 2010/643)
Directiva EEE de Turquía
DECLARAÇÃO DE CONFORMIDADE Português
O dispositivo está conforme aos requisitos das Diretivas do Conselho e relevante legislação de
harmonização da União Europeia:
Diretiva RED (2014/53/UE)
Diretiva RoHS 2011/65/UE & (UE) 2015/863
Diretiva Ecodesign 2009/125/CE
ErP Turca (Decisão 2010/643)
Diretiva EEE Turca
DICHIARAZIONE DI CONFORMITÀ Italiano
Il dispositivo è conforme con i requisiti definiti nelle Direttive del Consiglio relative alla Norma
sull'armonizzazione dell'Unione:
Direttiva RED (2014/53/UE)
Direttiva RoHS 2011/65/UE e (UE) 2015/863
Direttiva Ecodesign 2009/125/CE
ErP turca (Decisione 2010/643)
Direttiva EEE turca
1
Page 37

KONFORMITÄTSERKLÄRUNG Deutsch
Das Gerät entspricht den Anforderungen der entsprechenden EU-Harmonisierungsrichtlinien des Rates:
RED-Richtlinie (2014/53/EU)
RoHS-Richtlinie 2011/65/EU & (EU) 2015/863
Ökodesign-Richtlinie 2009/125/EG
Türkische ErP (Beschluss 2010/643)
Türkische EEE-Richtlinie
ЗАЯВЛЕНИЕ О СООТВЕТСТВИИ Pyccкий
Это устройство отвечает требованиям, изложенным в Директивах Совета о гармонизации
соответствующих законов государств, входящих в состав Европейского союза (EU):
Директива о радиооборудовании (2014/53/EU)
Директива 2011/65/EU и (EU) 2015/863 об ограничении использования определенных видов опасных
веществ в электрическом и электронном оборудовании (RoHS)
Директива 2009/125/EC, устанавливающая требования к экологическому проектированию продукции
Турецкая Директива по энергоэффективности (Решение 2010/643)
Турецкая Директива об электрическом и электронном оборудовании
Oświadczenie zgodności Polski
Urządzenie jest zgodne z wymaganiami określonymi w odpowiednich unijnych Dyrektywach
harmonizacyjnych Rady:
Dyrektywa RED (2014/53/UE)
Dyrektywa RoHS 2011/65/UE i (UE) 2015/863
Dyrektywa w sprawie ekoprojektu 2009/125/WE
Turecka dyrektywa ErP (decyzja 2010/643)
Turecka dyrektywa EEE
UYUM BEYANI Türkçe
Aygıt, Konsey Yönergeleri ile ilgili Birlik uyum mevzuatında belirtilen şartlara uygundur:
RED Yönergesi (2014/53/EU)
RoHS Yönergesi 2011/65/EU & (EU) 2015/863
Eko-tasarım Yönergesi 2009/125/EC
Türkçe ErP (Karar 2010/643)
Türkçe EEE Yönergesi
OVERENSSTEMMELSESERKLÆ RING Dansk
Enheden er i overensstemmelse med kravene i Rådets direktiv, relevant til EU's lovgivning om harmonisering:
RED-direktiv (2014/53/EU)
RoHS-direktiv 2011/65/EU og (EU) 2015/863
Erp-direktiv 2009/125/EF
Tyrkisk ErP (beslutning 2010/643)
Tyrkisk EEE-direktiv
VAATIMUSTENMUKAISUUSVAKUUTUS Suomi
Laite on Euroopan neuvoston direktiivien olennaisen unionin harmonisointilainsäädännön vaatimusten
mukainen:
RED-direktiivi (2014/53/EU)
RoHS-direktiivi 2011/65/EU & (EU) 2015/863
Ecodesign-direktiivi 2009/125/EY
Turkin ErP (Päätös 2010/643)
Turkin EEE-direktiivi
2
Page 38

SAMSVARSERKLÆ RING Norsk
Enheten overholder kravene i EU-rådets harmoniseringsdirektiver:
RED-direktiv (2014/53/EU)
RoHS-direktiv 2011/65/EU & (EU) 2015/863
Ecodesign-direktiv 2009/125/EC
Tyrkisk ErP (beslutning 2010/643)
Tyrkisk EEE-direktiv
KONFORMITETSDEKLARATION Svenska
Enheten uppfyller kraven som anges i Rådets direktivs relevanta harmoniseringslagstiftning för Europeiska
unionen:
RED-direktivet (2014/53/EU)
RoHS-direktiv 2011/65/EU & (EU) 2015/863
Direktivet om ekodesign 2009/125/EG
Turkiska ErP (beslut 2010/643)
Turkiska EEE-direktivet
DECLARAŢIE DE CONFORMITATE Română
Dispozitivul respectă cerinţele menţionate în Directivele Consiliului şi în legislaţia armonizată relevantă la
nivelul Uniunii:
Directiva privind echipamentele radio (2014/53/UE)
Directiva RoHS 2011/65/UE şi (UE) 2015/863
Directiva privind proiectarea ecologică 2009/125/CE
ErP Turcia (Decizia 2010/643)
Directiva privind echipamentele electrice şi electronice pentru Turcia
PROHLÁŠENÍ O SHODĚ Čeština
Zařízení odpovídá požadavkům stanoveným ve směrnicích Rady podle příslušných harmonizačních právních
předpisů Unie:
Směrnice o rádiových zařízeních (2014/53/EU)
Směrnice o RoHS 2011/65/EU a (EU) 2015/863
Směrnice o ekodesignu 2009/125/ES
Turecká ErP (rozhodnutí 2010/643)
Turecká směrnice EEE
VERKLARING VAN OVEREENSTEMMING Nederlands
Het apparaat voldoet aan de vereisten van de relevante richtlijnen van de Raad met betrekking tot
harmonisatiewetgeving in de Unie:
RED-richtlijn (2014/53/EU)
RoHS-richtlijn 2011/65/EU & (EU) 2015/863
Richtlijn inzake ecologisch ontwerp 2009/125/EG
Turkse ErP (Besluit 2010/643)
Turkse EEE-richtlijn
MEGFELELŐSÉGI NYILATKOZAT Magyar
Az eszköz megfelelő a Tanács irányelvek releváns uniós harmonizálási rendelkezései által felállított
követelményeknek:
RED-irányelv (2014/53/EU)
2011/65/EU és (EU) 2015/863 RoHS-irányelv
2009/125/EK Ecodesign-irányelv
Török ErP (2010/643-es határozat)
Török EEE-irányelv
3
Page 39

ДЕКЛАРАЦИЯ ЗА СЪОТВЕТСТВИЕ Български
Устройството отговаря на изискванията на уместното законодателство на Съюза за хармонизация на
директивите на Съвета:
RED директива (2014/53/ЕС)
RoHS директива 2011/65/ЕС & (ЕС) 2015/863
Директивата за екодизайн 2009/125/ЕО
ErP на Турция (Решение 2010/643)
EEE директива на Турция
DEKLARACIJA O USKLAĐENOSTI Hrvatski
Ovaj uređaj sukladan je s odredbama postavljenim u direktivama Vijeća vezanim uz relevantne
harmonizacijske zakone Unije:
RED Direktiva (2014/53/EU)
RoHS Direktiva 2011/65/EU & (EU) 2015/863
Direktiva o ekološkom dizajnu 2009/125/EZ
Turski ErP (Odluka 2010/643)
Turska EEE direktiva
ΔΗΛΩΣΗ ΣΥΜΜΟΡΦΩΣΗΣ Ελληνικά
Η συσκευή συμμορφώνεται με τις απαιτήσεις που καθορίζονται στις Οδηγίες του Ευρωπαϊκού Συμβουλίου και
σχετίζονται με τη νομοθεσία περί εναρμόνισης της Ένωσης:
Οδηγία περί RED (2014/53/ΕΕ)
Οδηγία περί RoHS 2011/65/ΕΕ & (ΕΕ) 2015/863
Οδηγία περί Ecodesign 2009/125/ΕΚ
Τουρκικό ErP (Απόφαση 2010/643)
Τουρκική Οδηγία περί EEE
4
Page 40

For EU
WDC20R
WDC20TH
WDC20R
RF Output Power & Transmit
Power Control (TPC)
5.15 ~ 5.25GHz 10.82 dBm
5.25 ~ 5.35GHz 10.94 dBm
5.47 ~ 5.725GHz 10 dBm
5.15 ~ 5.25GHz 11.29 dBm
5.25 ~ 5.35GHz 12.1 dBm m
5.47 ~ 5.725GHz 10 dBm
Hereby, BenQ Corporation, declares that this WDC20 is in compliance with the essential requirements and
other relevant provisions of Directive 2014/53/EU.
The full test of the EU declaration of conformity is available at the following internet address:
https://www.benq.eu/en-eu/index.html
This equipment should be installed and operated with a minimum distance of 20 centimeters between the
radiator and your body
Hardware Version:
RKC180508_V1.02 (WDC2OTH) ; RKG180424_A_V1.03&RKG180424_B_V1.01 (WDC20TH);
Softwarw Version: WDC20(R)_1.00.20/1.2.8(WDC20R); WDC20(T)_1.00.20(WDC20TH);
Frequency band: 2.4G
RF Output Power 2400 ~ 2483.5MHz 12 dBm
Frequency Band: 5G
5
Page 41

RoHS Statement
This product is compliant to implemented RoHS (Restriction of Hazardous Substances) type regulations
worldwide, including but not limited to China, India, Japan, Korea and European Union.
Turkey RoHS
EEE Yönetmeliğine Uygundur Elektrikli Ve Elektronik Eşyalarda Bazi Zararli Maddelerin Kullaniminin
Sinirlandirilmasina Dair Yönetmelik
Ukraine RoHS
України ТЕХНІЧНИЙ РЕГЛАМЕНТ обмеження використання деяких небезпечних речовин в
електричному та електронному обладнанні (від 3 грудня 2008 р. N 1057): Обладнання
відповідає вимогам Технічного регламенту обмеження використання деяких небезпечних
речовин в електричному та електронному обладнанні
India RoHS
Restriction on Hazardous Substances statement (India)
This product complies with the "India" E-waste Rule 2016" and prohibits use of lead, mercury,
hexavalent chromium, polybrominated biphenyls or PolyBrominated Diphenyl Ethers in
concentrations exceeding 0.1 weight% and 0.01 weight for cadmium except for exemptions set in
Schedule 2 of the Rule.
Vietnam RoHS
Công ty BenQ tuyên bố rằng tất cả các sản phẩm mang nhãn hiệu BenQ được thiết kế và sản xuất
phù hợp với Thông tư 30/2011/TT-BCT của Việt Nam về việc hạn chế các chất độc hại và nồng độ tối
đa của chất độc cho phép trong các vật liệu đồng nhất (ngoại trừ các trường hợp miễn trừ được liệt
kê trong Thông tư này).
6
Page 42

WEEE directive
Disposal of Waste Electrical and Electronic Equipment and/or Battery by users in private
households in the European Union.
This symbol on the product or on the packaging indicates that this can not be disposed of as
household waste. You must dispose of your waste equipment and/or battery by handling it over
to the applicable take-back scheme for the recycling of electrical and electronic equipment
and/or battery. For more information about recycling of this equipment and/or battery, please
contact your city office, the shop where you purchased the equipment or your household waste
disposal service. The recycling of materials will help to conserve natural resources and ensure
that it is recycled in a manner that protects human health and environment.
Recycling information: See http://www.benq.com/support/recycle for details.
Mise au rebut des déchets d’équipements électriques et électroniques et/ou des piles
par les particuliers dans l’Union Européenne.
Ce symbole figurant sur le produit ou l’emballage signifie que celui-ci ne peut pas être jeté
avec les ordures ménagères. Vous devez mettre vos déchets d’équipements et/ou piles au
rebut en le déposant dans un point de collecte prévu à cet effet afin que les équipements
électroniques et électriques et/ou piles soient recyclés. Pour de plus amples informations sur
le recyclage de ce produit et/ou cette pile, veuillez prendre contact avec l’organisme local
compétent, le service d’élimination des déchets ménagers ou le point de vente du produit.Le
recyclage des matériaux aidera à conserver les ressources naturelles et à s’assurer qu’ils
seront recyclés d’une façon que cela protège la santé humaine et l’environnement.
Recycling information: See http://www.benq.com/support/recycle for details.
WEEE directive English
WEEE
Battery
Directive DEEE Français
WEEE
Pile
7
Page 43

Directiva WEEE Español
Residuos de aparatos eléctricos y electrónicos y/o batería por parte de los usuarios
domésticos privados en la Unión Europea.
El símbolo que muestra el producto o el embalaje indica que no puede ser desechado como
residuo doméstico. Para desechar el equipo siga las directrices aplicables para el reciclaje de
equipo eléctrico y electrónico y/o batería.
Para obtener más información sobre el reciclaje de este equipo y/o batería, póngase en
contacto con el ayuntamiento, la tienda donde adquirió el equipo o el servicio de recogida de
basuras. Al reciclar materiales ayudamos a conservar el medio natural y a garantizar el
reciclaje de manera que proteja la salud y el medioambiente.
Recycling information: See http://www.benq.com/support/recycle for details.
Entsorgung von Elektro- und Elektronikgeräten bzw. Batterien in Privathaushalten der
Europäischen Union.
Das Symbol auf der Produktverpackung zeigt an, dass dieses Gerät nicht mit dem normalen
Hausmüll entsorgt werden darf. Sie sind verpflichtet, Ihre Altgeräte bzw. Batterien
entsprechend der geltenden Bestimmungen für die Wiederverwertung von Elektro- und
Elektronik-Altgeräten bzw. Batterien zu entsorgen. Weitere Informationen über das Recycling
dieses Geräts bzw. Batterie erhalten Sie von Ihren örtlichen Behörden, Ihrem Fachhändler
oder der lokalen Rücknahmestelle. Fachgerechtes Wertstoffrecycling spart nicht nur wertvolle
Ressourcen, sondern schützt auch Umwelt und Gesundheit.
Recycling information: See http://www.benq.com/support/recycle for details.
Smaltimento di apparecchi elettrici ed elettronici e/o batterie nell'Unione Europea da
parte di utenti privati.
Questo simbolo sul prodotto o sulla confezione indica che l'articolo non può essere smaltito
come i normali rifiuti domestici. È necessario smaltire le apparecchiature e/o batterie secondo
quanto previsto dagli schemi di recupero per il riciclaggio di apparecchiature elettriche e
elettroniche e/o batterie. Per ulteriori informazioni sul riciclaggio di questo apparecchio e/o
batteria, contattare l’ente della propria città, il negozio dove è stato acquistato l’apparecchio o
il proprio servizio di smaltimento rifiuti domestici. Il riciclaggio dei materiali contribuisce a
ridurre il consumo di risorse naturali e assicura che i materiali siano riciclati tutelando la salute
umana e l'ambiente.
Recycling information: See http://www.benq.com/support/recycle for details.
Утилизация электрического и электронного оборудования и/или аккумуляторов
населением в Европейском союзе.
Данный символ на изделии или на упаковке означает, что данное изделие запрещается
утилизировать наравне с бытовыми отходами. Вы должны сдавать все пришедшие в
негодность устройства и/или аккумуляторы для утилизации на специальный пункт
сбора электрических или электронных устройств и/или аккумуляторов. Для получения
подробных сведений о переработке этого оборудования и/или аккумуляторов
обратитесь в местные органы управления, магазин, в котором был приобретен
продукт, млм службу по сбору бытовых отходов. Переработка материалов поможет
сохранить природные ресурсы и обеспечит безопасность для здоровья людей и
окружающей среды.
Recycling information: See http://www.benq.com/support/recycle for details.
WEEE
Batería
WEEE-Richtlinie Deutsch
WEEE
Batterie
Direttiva WEEE Italiano
WEEE
Batteria
Директива WEEE Pyccкий
WEEE
Аккумулятор
8
Page 44

WEEE-direktiv Svenska
Riktlinjer för kassering av avfall som utgörs av eller innehåller elektriska eller
elektroniska produkter och/eller batteri, gällande hushåll i EU.
Den här symbolen kan finnas på produkten eller på förpackningen och betyder att produkten
inte kan kasseras som vanligt hushållsavfall. När du vill kassera produkten och/eller batteri
måste du lämna in den på det ställe som avses för återvinning av elektriska eller
elektroniska produkter och/eller batteri. Om du vill ha mer information om återvinning av den
här typen av utrustning och/eller batteri kan du vända dig till din kommun, ditt inköpsställe
eller till den lokala sophämtningen. Genom att återvinna materialet i produkten kan vi spara
på naturtillgångarna och försäkra oss om att produkten återvinns på ett sätt som skyddar
människors hälsa och miljön.
Recycling information: See http://www.benq.com/support/recycle for details.
Wegwerpen van elektrische en elektronische apparatuur en/of accu's door
huishoudens in de Europese Unie.
Dit symbool geeft aan dat het product niet met het huishoudelijke afval kan worden
aangeboden. U moet afgedankte apparatuur en/of acccu's wegwerpen door ze in te leveren
op de inzamelpunten voor elektrische en elektronische apparatuur en/of accu's. Voor meer
informatie over het hergebruik van deze apparatuur en/of de accu neemt u contact op met
uw gemeente, de winkel waar u de apparatuur hebt gekocht of de milieudienst van de
gemeente. Door het recyclen van de materialen worden natuurlijke hulpbronnen behouden
en helpt u de natuur en de volksgezondheid te beschermen.
Recycling information: See http://www.benq.com/support/recycle for details.
Utylizacja odpadów z urządzeń elektrycznych i elektronicznych lub baterii przez
użytkowników prywatnych w Unii Europejskiej.
Ten symbol na urządzeniu lub opakowaniu oznacza, że nie może być ono utylizowane
razem z odpadami domowymi. Zużyty sprzęt lub baterie należy przekazać do
odpowiedniego punktu zwrotu sprzętu elektrycznego i elektronicznego w celu wtórnego
przetworzenia. Szczegółowe informacje dotyczące wtórnego przetwarzania tych urządzeń
lub baterii można uzyskać, kontaktując się z lokalną administracją, sprzedawcą lub lokalnym
przedsiębiorstwem oczyszczania. Przetwarzanie wtórne materiałów pomaga w zachowaniu
surowców naturalnych i utylizacji w sposób przyjazny dla ludzkiego zdrowia i środowiska.
Recycling information: See http://www.benq.com/support/recycle for details.
Likvidace vyřazených elektrických a elektronických zařízení anebo baterií v
domácnostech uživatelů v Evropské unii.
Tento symbol na výrobku nebo na jeho obalu znamená, že dané zařízení nelze vyhodit do
běžného domovního odpadu. Vyřazené elektrické nebo elektronické zařízení anebo baterii je
nutno zlikvidovat odevzdáním k recyklaci v souladu s platným plánem recyklace elektrických a
elektronických zařízení anebo baterií. Další informace o recyklaci tohoto zařízení anebo
baterií získáte u místních úřadů, v obchodě, kde jste výrobek zakoupili nebo u společnosti,
která se zabývá likvidací domovního odpadu.
Recyklace materiálů pomáháchránit přírodní zdroje a zaručuje likvidaci výrobku způsobem,
kterýješetrný klidskému zdraví a životnímu prostředí.
Recycling information: See http://www.benq.com/support/recycle for details.
WEEE
Batteri
WEEE-richtlijn Nederlands
WEEE
Accu
Dyrektywa WEEE Polski
WEEE
Bateria
Směrnice WEEE Čeština
WEEE
Baterie
9
Page 45

WEEE direktifi Türkçe
Avrupa Birliği ülkelerinde özel ev eşyası kullanıcıları tarafından Elektrikli ve Elektronik
Cihazların ve/veya Pillerin Atılması.
Ürün yada ambalaj üzerindeki bu sembol, bunun evsel atık olarak işlem görmemesi
gerektiğini ifade etmektedir. Atık cihazınızı ve/veya pilleri, elektrikli ve elektronik cihazların
ve/veya pillerin geri dönüşümü için uygulanabilir geri alma şemasına göre ele alarak
atmalısınız. Bu cihazın ve/veya pillerin geri dönüşümü hakkında daha fazla bilgi edinmek için
lütfen cihazı satın aldığınız yerel bayiye veya dükkana yada ev eşyası uzaklaştırma servisine
başvurun. Materyallerin geri dönüşümü, doğal kaynakların korunmasını ve insan sağlığına ve
çevreye zarar verilmeksizin geri dönüştürülmesini güvence etmektedir.
Recycling information: See http://www.benq.com/support/recycle for details.
Eliminação de Resíduos de Equipamentos Eléctricos e Electrónicos e/ou Baterias por
particulares na União Europeia.
Este símbolo no produto ou na embalagem indica que não pode ser eliminado como lixo
doméstico. Deverá eliminar os resíduos dos seus equipamentos e/ou baterias entregando-os
nos pontos de recolha aplicáveis para reciclagem de equipamentos de equipamentos
eléctricos e electrónicos e/ou baterias. Para mais informações sobre a reciclagem destes
equipamentos e/ou baterias, contacte a sua câmara municipal, a loja onde adquiriu o
equipamento ou serviço de recolha de lixo doméstico. A reciclagem de materiais contribuirá
para a conservação dos recursos naturais e assegura que são reciclados de forma a proteger
a saúde humana e o ambiente.
Recycling information: See http://www.benq.com/support/recycle for details.
Az Európai Unióban a háztartások elektromos és elektronikus hulladékainak és/vagy
az akkumulátorok kezeléséről szóló irányelv.
A terméken vagy a csomagoláson ez a szimbólum azt jelzi, azt aháztartásihulladékoktól
külön kell kezelni. A készüléket és/vagy az akkumulátorokat az elektronikus és elektromos
hulladékokra és/vagy az akkumulátorokra érvényes újrahasznosítási rendszer keretein belül
kell leadni újrahasznosításra. A készülék és/vagy akkumulátorok újrahasznosítás céljára való
begyűjtéséről bővebb információt kaphat a helyi önkormányzatnál, a vásárlás helyén vagy a
háztartási hulladékot elszállító szolgáltatójánál. Azanyagok újrahasznosításra való
begyűjtése hozzájárul a természeti erőforrások megőrzéséhez és biztosítja, hogy a
hulladékok szelektálása azemberi egészséget és a környezetet védő módon történjék.
Recycling information: See http://www.benq.com/support/recycle for details.
Изхвърляне на отпадъчно електрическо и електронно оборудване и/или батерии
от потребители в частни домакинства в Европейския съюз.
Този символ върху продукт или неговата опаковка указва, че не може да бъде
изхвърлян заедно с останалите домакински отпадъци. Трябва да изхвърлите
отпадъчното оборудване и/или батерии, като го предадете в подходящ пункт за
събиране и рециклиране на електрическо и електронно оборудване и/или батерии. За
повече информация относно рециклирането на този уред и/или батерии, моля,
свържете се със съответния офис във Вашия град, с магазина, от който сте закупили
продукта или с местната служба за събиране на битови отпадъци. Рециклирането на
материалите ще спомогне за запазване на природните ресурси и ще осигури
рециклиране по запазващ човешкото здраве иоколната среда начин.
Recycling information: See http://www.benq.com/support/recycle for details.
WEEE
Pil
Directiva REE Português
WEEE
Bateria
WEEE irányelv Magyar
WEEE
Akkumulátor
Директива WEEE Български
WEEE
Батерия
10
Page 46

WEEE direktiva Hrvatski
Odlaganje u otpad električnih i elektroničkih uređaja i/ili baterija iz kućanstava u
Europskoj uniji.
Ovaj simbol na proizvodu ili pakiranju naznačuje da se ovaj proizvod ne može odbaciti s
kućnim otpadom. Uređaje za otpad i/ili baterije trebate odložiti u otpad u skladu s pravilima
povrata, zbrinjavanja i reciklaže električnih i elektroničkih uređaja i/ili baterija. Više
informacija o recikliranju ovog uređaja i/ili baeterije, potražite u vašem mjesnom uredu, u
trgovini gdje ste kupili proizvod ili u službi koja prikuplja vaš kućni otpad. Recikliranje
materijala pomoći će očuvanju prirodnih resursa i osigurati recikliranje na način koji štiti
ljudsko zdravlje i prirodni okoliš.
Recycling information: See http://www.benq.com/support/recycle for details.
Evacuarea deşeurilor echipamentelor electrice şi electronice şi/sau bateriilor de către
utilizatorii casnici din Uniunea Europeană.
Acest simbol de pe produs sau de pe ambalaj indică că acest produs nupoate fi evacuat ca
deşeu casnic. Trebuie să evacuaţi deşeurile de echipamente şi/sau bateria prin predarea
conform schemei de preluare pentru reciclare a componentelor electrice şi electronice şi/sau
a bateriilor. Pentru informaţii suplimentare privind reciclarea acestui echipament şi/sau a
bateriei, contactaţi primăria oraşului dvs., magazinul de unde aţi achiziţionat echipamentul
sau serviciul de salubritate pentru deşeuri menajere. Reciclarea acestor materiale va ajuta
la păstrarea resurselor naturale şi asigură că sunt reciclate într-o modalitate care protejează
viaţa şi mediul oamenilor.
Recycling information: See http://www.benq.com/support/recycle for details.
Απόρριψη άχρηστου ηλεκτρολογικού και ηλεκτρονικού εξοπλισμού ή/και μπαταριών
από χρήστες σε νοικοκυριά εντός της Ευρωπαϊκής Ένωσης.
Το παρόν σύμβολο στο προϊόν ή τη συσκευασία υποδηλώνει ότι αυτό δεν μπορεί να
απορριφθεί με τα οικιακά απορρίμματα. Πρέπει να φροντίζετε για την απόρριψη του
άχρηστου εξοπλισμού σας ή/και μπαταριών, παραδίδοντάς τα σε αρμόδιο φορέα
παραλαβής με σκοπό την ανακύκλωση ηλεκτρολογικού και ηλεκτρονικού εξοπλισμού ή/και
μπαταριών. Για περισσότερες πληροφορίες σχετικά με την ανακύκλωση του παρόντος
εξοπλισμού ή/και μπαταριών, παρακαλούμε απευθυνθείτε στο αρμόδιο γραφείο του δήμου,
στο κατάστημα όπου αγοράσατε τον εξοπλισμό ή στην υπηρεσία αποκομιδής οικιακών
απορριμμάτων. Η ανακύκλωση των υλικών θα βοηθήσει την εξοικονόμηση φυσικών πόρων
και θα διασφαλίσει ότι αυτά ανακυκλώνονται με τρόπο που προστατεύει την ανθρώπινη
υγεία και το περιβάλλον.
Recycling information: See http://www.benq.com/support/recycle for details.
Bortskaffelse af elektrisk og elektronisk affald og/eller batterier, anvendt i
husholdningen i EU.
Dette symbol på produktet eller på emballagen angiver, at det ikke kan bortskaffes som
husholdningsaffald. Du skal bortskaffe affald (udstyr) og/eller batterier ved at levere det/dem
til relevante genbrugscentre for elektrisk og elektronisk udstyr og/eller batterier. For
yderligere oplysninger om genbrug af dette udstyr og/eller batterier skal du kontakte
kommunen, butikken hvor du købte udstyret eller dit affaldsselskab. Genbrugsmaterialer
hjælper med at bevare naturlige ressourcer og sikre, at det det genbruges på en måde, der
beskytter sundheden og miljøet.
Oplysninger om genbrug: Se http://www.benq.com/support/recycle for yderligere oplysninger.
WEEE
Baterija
Directiva WEEE Română
WEEE
Baterie
Οδηγία WEEE Ελληνικά
WEEE
Μπαταρία
WEEE-direktiv Dansk
WEEE
Batteri
WEEE-direktiivi Suomi
11
Page 47

Sähkö- ja elektroniikkaromun ja/tai akkujen hävittäminen yksityisissä kotitalouksissa
Euroopan unionin alueella.
Tämä merkintä tuotteessa tai sen pakkauksessa osoittaa, että tuotetta ei voida hävittää
kotitalousjätteenä. Romulaitteet ja/tai akut tulee hävittää viemällä ne erilliskeräyspaikkaan
sähkö- ja elektroniikkaromun ja/tai akkujen kierrätystä varten. Saat lisätietoja tämän laitteen
ja/tai akun kierrättämisestä ottamalla yhteyttä alueesi jätehuoltoon, kotitalousjätteen
kierrätyskeskukseen tai laitteen ostopaikkaan. Materiaalien kierrätys auttaa säilyttämään
luonnonvaroja ja varmistamaan, että jätteet kierrätetään tavalla, joka suojelee ihmisten
terveyttä ja ympäristöä.
Kierrätystiedot: Lisätietoja http://www.benq.com/support/recycle.
Kassering av elektrisk og elektronisk utstyr og/eller batterier for brukere i private
husholdninger i EU.
Dette symbolet på produktet eller på innpakningen angir at det ikke kan kasseres sammen
med vanlig husholdningsavfall. Du må kaste utstyret og/eller batteriet ved å overlevere det til
det aktuelle retursenteret for resirkulering av elektrisk og elektronisk utstyr og/eller batteriet.
Hvis du vil ha mer informasjon om resirkulering og/eller batteriet, vennligst kontakt lokale
myndigheter, butikken der du kjøpte utstyret eller en resirkuleringsstasjon. Resirkulering av
materialer vil bidra til å bevare naturlige ressurser og sikre at det resirkuleres på en måte
som beskytter menneskers helse og miljø.
Resirkuleringsinformasjon: Se http://www.benq.com/support/recycle hvis du vil ha detaljer.
WEEE
Akku
WEEE-direktiv Norwegian
WEEE
Batteri
12
Page 48

FCC statement (for the United States only)
Radiation Exposure Statement
Model Name: WDC20TH
FCC ID:JVPWDC20TH
Model Name: WDC20R
FCC ID:JVPWDC20R
This equipment should be installed and operated with minimum distance
20cm between the radiator & your body.
Federal Communication Commission Interference Statement
This equipment has been tested and found to comply with the limits for a Class B digital device, pursuant to Part 15 of the
FCC Rules. These limits are designed to provide reasonable protection against harmful interference in a residential
installation. This equipment generates, uses and can radiate radio frequency energy and, if not installed and used in
accordance with the instructions, may cause harmful interference to radio communications. However, there is no
guarantee that interference will not occur in a particular installation. If this equipment does cause harmful interference to
radio or television reception, which can be determined by turning the equipment off and on, the user is encouraged to try to
correct the interference by one of the following measures:
- Reorient or relocate the receiving antenna.
- Increase the separation between the equipment and receiver.
- Connect the equipment into an outlet on a circuit different from that to which the receiver is connected.
- Consult the dealer or an experienced radio/TV technician for help.
This device complies with Part 15 of the FCC Rules. Operation is subject to the following two conditions: (1) This device
may not cause harmful interference, and (2) this device must accept any interference received, including interference that
may cause undesired operation.
FCC Caution: Any changes or modifications not expressly approved by the party responsible for compliance could void
the user's authority to operate this equipment.
FCC RF exposure information (SAR)
SAR compliance has been established in typical laptop computer(s) with USB
slot, and product could be used in typical laptop computer with USB slot.
Other application like handheld PC or similar device has not been verified and
may not compliance with related RF exposure rule and such use shall be
prohibited.
Caution:
(i) the device for operation in the band 5150 - 5250 MHz is only for indoor use to reduce the
potential for harmful interference to co-channel mobile satellite systems; (ii) the maximum
antenna gain permitted for devices in the bands 5250 - 5350 MHz and 5470 - 5725 MHz shall
comply with the e.i.r.p. limit.
(iv) Users should also be advised that high-power radars are allocated as primary users (i.e.
priority users) of the bands 5250 - 5350 MHz and 5650 - 5850 MHz and that these radars could
cause interference and/or damage to LE-LAN devices.
FCC SDoC: Visit www.benq.com/en-us the purchased model > the Support tab > the User Manual tab to access the
SDoC (Supplier’s Declaration of Conformity) document. You may not find your product’s SDoC document online as it was
not required at the time the product was manufactured. However, it does not change the fact that the product has been
tested to comply with FCC standards, as indicated by the FCC logo on the product or on the label.
13
Page 49

IC statement (for Canadian users)
Radiation Exposure Statement
Model Name: WDC20TH
IC: 6175A-WDC20TH
Model Name: WDC20R
IC: 6175A-WDC20R
Type
Manufacture
Gain
Connector
Dipole
Shenzhen Lejin radio frequency
technology Co., LTD
3dBi
IPX-I
This Class B digital apparatus complies with Canadian ICES-3 (B).
Cet appareil numérique de la classe A est conforme à la norme NMB-3(B) du Canada.
This device complies with Industry Canada license-exempt RSS standard(s). Operation is subject to the following two
conditions: (1) this device may not cause interference, and (2) this device must accept any interference, including
interference that may cause undesired operation of the device.
Le present appareil est conforme aux CNR d’Industrie Canada applicables aux appareils radio exempts de licence.
L’exploitation est autorisée aux deux conditions suivantes: (1) l’appareil ne doit pas produire de brouillage, et (2)
l’utilisateur de l’appareil doit accepter tout brouillage radioélectrique subi, même si le brouillage est susceptible d’en
compromettre le fonctionnement.
IMPORTANT NOTE:
This equipment should be installed and operated with minimum distance
20cm between the radiator & your body.
Cet équipement doit être installé et utilisé à distance minimum de 20cm entre
le radiateur et votre corps.
This equipment should be installed and operated with minimum distance
20cm between the radiator & your body.
Cet équipement doit être installé et utilisé à distance minimum de 20cm entre
le radiateur et votre corps.
This radio transmitter (IC: 6175A-WDC20TH) has been approved by Industry Canada to operate with
the antenna types listed below with the maximum permissible gain indicated. Antenna types not
included in this list, having a gain greater than the maximum gain indicated for that type, are strictly
prohibited for use with this device.
Le présent émetteur radio (IC: 6175A-WDC20TH) a été approuvé par Industrie Canada pour
fonctionner avec les types d'antenne énumérés ci-dessous et ayant un gain admissible maximal. Les
types d'antenne non inclus dans cette liste, et dont le gain est supérieur au gain maximal indiqué, sont
strictement interdits pour l'exploitation de l'émetteur.
(
WDC20R)
>
14
Page 50

(
Type
Manufacture
Gain
Connector
Dipole
Shenzhen Lejin radio frequency
technology Co., LTD
2dBi
SMT
WDC20TH)
>
15
Page 51

The device for operation in the band 5150-5250MHz is only for indoor use.
Le dispositif destiné à être utilisé dans la bande 5150-5250 MHz est réservé à une.
This equipment should be installed and operated with a minimum distance of 20 centimeters between
the radiator and your body.
Cet équipement doit être installé et utilisé avec une distance minimale de 20 centimètres entre le
radiateur et votre corps.
The maximum antenna gain permitted for devices in the bands 5250-5350 MHz and 5470-5725 MHz
shall be such that the equipment still complies with the e.i.r.p. limit;
le gain maximal d'antenne permis pour les dispositifs utilisant les bandes de 5250 à 5 350 MHz et de
5470 à 5725 MHz doit être conforme à la limite de la p.i.r.e;
The maximum antenna gain permitted for devices in the band 5725-5850 MHz shall be such that the
equipment still complies with the e.i.r.p. limits specified for point-to-point and non-point-to-point
operation as appropriate
le gain maximal d'antenne permis (pour les dispositifs utilisant la bande de 5 725 à 5 850 MHz) doit
être conforme à la limite de la p.i.r.e. spécifiée pour l'exploitation point à point et l’exploitation non point
à point, selon le cas
Exposure of humans to RF fields (RSS-102)
The computers employ low gain integral antennas that do not emit RF field in excess of Health
Canada limits for the general population; consult Safety Code 6, obtainable from Health Canada's
Web site at http://www.hc-sc.gc.ca/
The radiated energy from the antennas connected to the wireless adapters conforms to the IC limit of
the RF exposure requirement regarding IC RSS-102, Issue 5 clause 4. SAR tests are conducted using
recommended operating positions accepted by the FCC/ RSS with the device transmitting at its
highest certified power level in all tested frequency band without distance attaching away from the
body. Non-compliance with the above restrictions may result in violation of FCC RF exposure
guidelines.
Conformité des appareils de radiocommunication aux limites d'exposition humaine aux
radiofréquences (CNR-102)
L'ordinateur utilise des antennes intégrales à faible gain qui n'émettent pas un champ
électromagnétique supérieur aux normes imposées par Santé Canada pour la population. Consultez
le Code de sécurité 6 sur le site Internet de Santé Canada à l'adresse suivante :
http://www.hc-sc.gc.ca/ L'énergie émise par les antennes reliées aux cartes sans fil respecte la limite
d'exposition aux radiofréquences telle que définie par Industrie Canada dans la clause 4.1 du
document CNR-102, version 5. Tests DAS sont effectués en utilisant les positions recommandées par
la FCC/CNR avec le téléphone émet à la puissance certifiée maximale dans toutes les bandes de
fréquences testées sans distance attacher loin du corps. Non-respect des restrictions ci-dessus peut
entraîner une violation des directives de la FCC/CNR.
16
Page 52

日本専用です
VCCI (CLASS B)
この装置は、クラスB情報技術装置です。この装置は、家庭環境で使用することを目的としていますが、こ
の装置がラジオやテレビジョン受信機に近接して使用されると、受信障害を引き起こすことがあります。
取扱説明書に従って正しい取り扱いをしてください。
この装置は、現在設置されている場所で妨害波の測定がされた情報技術装置であり、VCCI 協会の基準に適合
しています。
従って、現在設置されている場所以外で使用する場合は、再び妨害波を測定し、VCCI に届け出をしなければ
なりません。
(RF モジュール付きの製品の場合)
電波法により 5GHz帯は屋内使用に限ります。
17
 Loading...