

Page 1

TL240C/TL321C
Transparent Display
User Manual
Page 2

Disclaimer
BenQ Corporation makes no representations or warranties, either expressed or
implied, with respect to the contents of this document. BenQ Corporation reserves the
right to revise this publication and to make changes from time to time in the contents
thereof without obligation to notify any person of such revision or changes.
Copyright
Copyright 2016 BenQ Corporation. All rights reserved. No part of this publication may
be reproduced, transmitted, transcribed, stored in a retrieval system or translated into
any language or computer language, in any form or by any means, electronic, mechanical,
magnetic, optical, chemical, manual or otherwise, without the prior written permission
of BenQ Corporation.
10/31/16
Page 3

Table of Contents 3
Table of Contents
Disclaimer.............................................................................. 2
Copyright............................................................................... 2
Important Safety Instructions ........................................... 5
Safety Precautions and Maintenance ........................................... 5
Introduction .......................................................................... 6
Functions and Features .................................................................. 6
Package Content.............................................................................. 6
Product Overview ............................................................... 7
Connections...................................................................................... 7
Control Panel ................................................................................... 9
Installation ........................................................................... 10
Install Remote Control Batteries.............................................. 10
Using the Remote Control.............................................. 11
The OSD Functions .......................................................... 13
Input Source................................................................................... 13
Picture ............................................................................................. 13
Audio............................................................................................... 15
Time Scheduling ............................................................................ 16
Setup................................................................................................ 17
USB .................................................................................................. 17
More Information .............................................................. 20
Supported Video and Photo....................................................... 20
Supported Timing Mode ............................................................. 20
Product Specification ........................................................ 21
Dimensions.......................................................................... 22
TL240C ........................................................................................... 22
TL321C ........................................................................................... 23
Other Notices.................................................................... 24
Appendix 1.......................................................................... 25
Timer Scheduling (Default Setting: Off) .................................. 25
Appendix 2.......................................................................... 27
USB .................................................................................................. 27
Page 4

Table of Contents4
Function Operation...................................................................... 28
Page 5

Important Safety Instructions 5
Important Safety Instructions
Safety Precautions and Maintenance
Use of control, adjustments, or procedures other than those specified in this
documentation may result in exposure to shock, electrical hazards and/or
mechanical hazards.
• Please read this user manual before operating this transparent cabinet. Keep this manual
in a safe place for future reference.
• Always place the transparent cabinet on a flat surface during operation.
• Do not place inflammables near the transparent cabinet
• Do not put any object on the transparent cabinet that might crash it.
• Do not place liquids near or on the cabinet. Liquids spilled into the transparent cabinet
will void your warranty.
• Do not wipe out the surface of transparent cabinet with any corrosive.
• Do not scratch the surface of transparent cabinet with any sharp objection.
• Avoid putting volatile matter nearby the cabinet.
• Do not tear down the cabinet without any authorized engineer.
• Always plug in the DC connector first, then plug in the AC connector.
Page 6
Introduction6
ENTER
CATV
MTS
C.C
EPG
SLEEP
RECORD
LIST
+
-
INFO
USB
1
2
3
4
5
6
78
9
_
0
FAV
MENU
EXIT
SO
UND
VOL
+
-
CH
PI
CTURE
Introduction
This manual will explain the operation of TL240C/TL321C, including functions, features,
and other important information. Before installing or operating your liquid crystal display,
please take time to read the manual, particularly the sections on safety.
Functions and Features
• 1366 x 768 image resolution
• 260 (TL240) / 217 (TL321C) nits brightness
• 3000:1 contrast ratio
• HDMI digital, high-definition multimedia interface
• VGA, Video Graphics Array
• DVI, Digital Visual Interface
• USB flash disk to auto-play videos
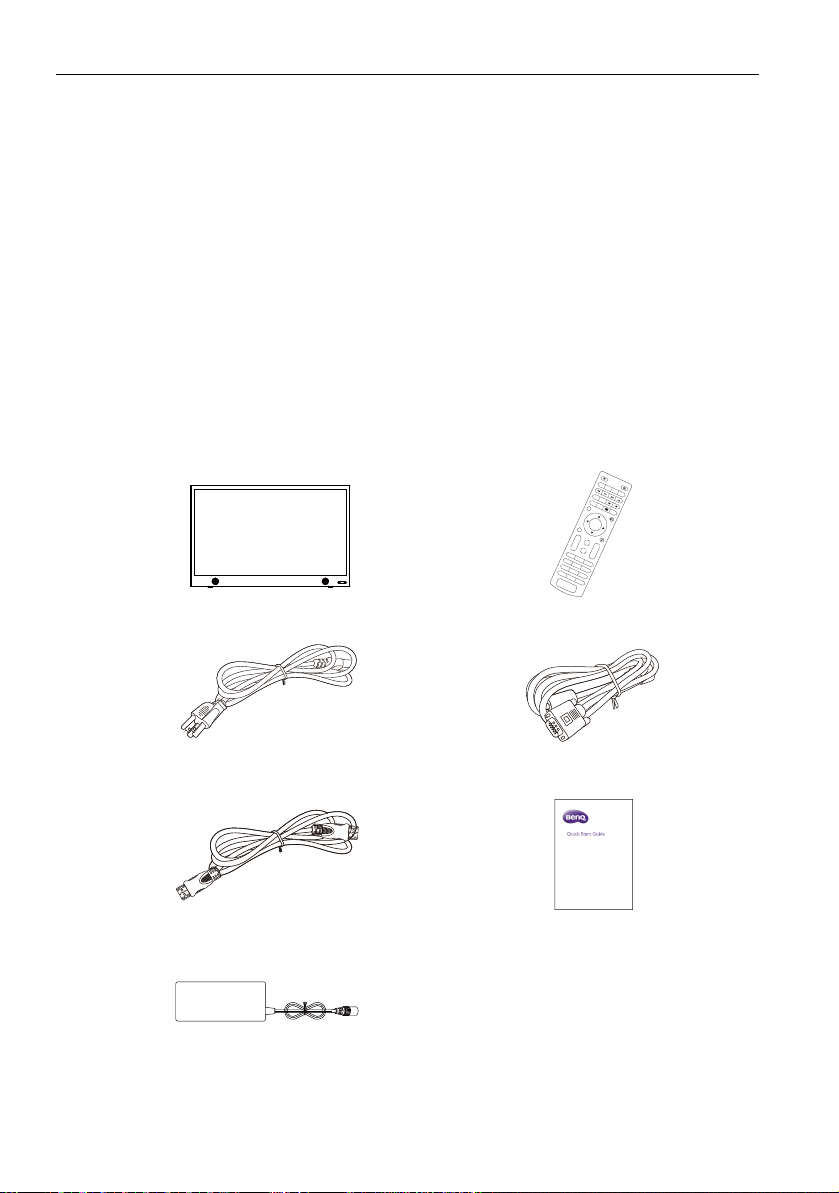
Package Content
LCD display x 1 Remote control x 1
Power cord x 1 (by region) D-Sub (15-pin) cable x 1
HDMI cable x 1 Quick start guide x 1
Adapter
Page 7
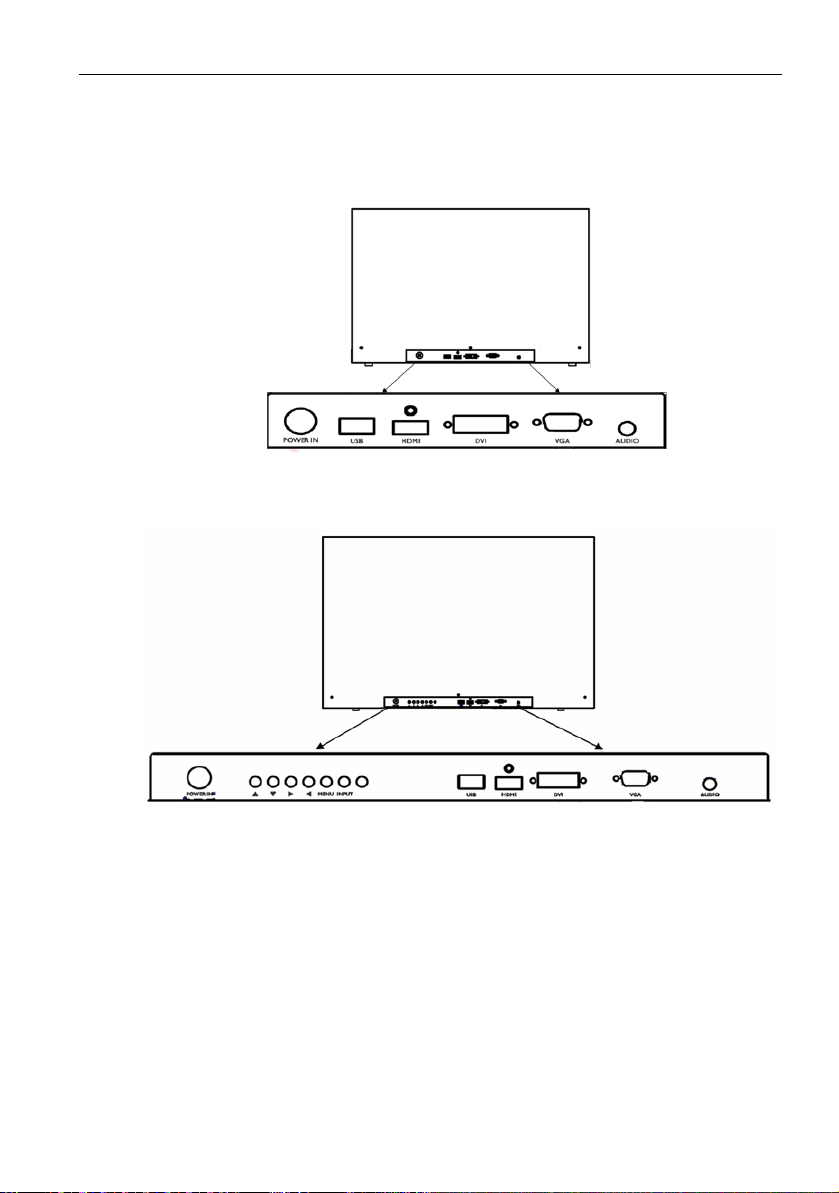
Product Overview
TL240C
TL321C
Connections
Product Overview 7
Insert USB Stick
You can select a USB stick and let the display signage box display the media files in the
USB stick.
Page 8
Product Overview8
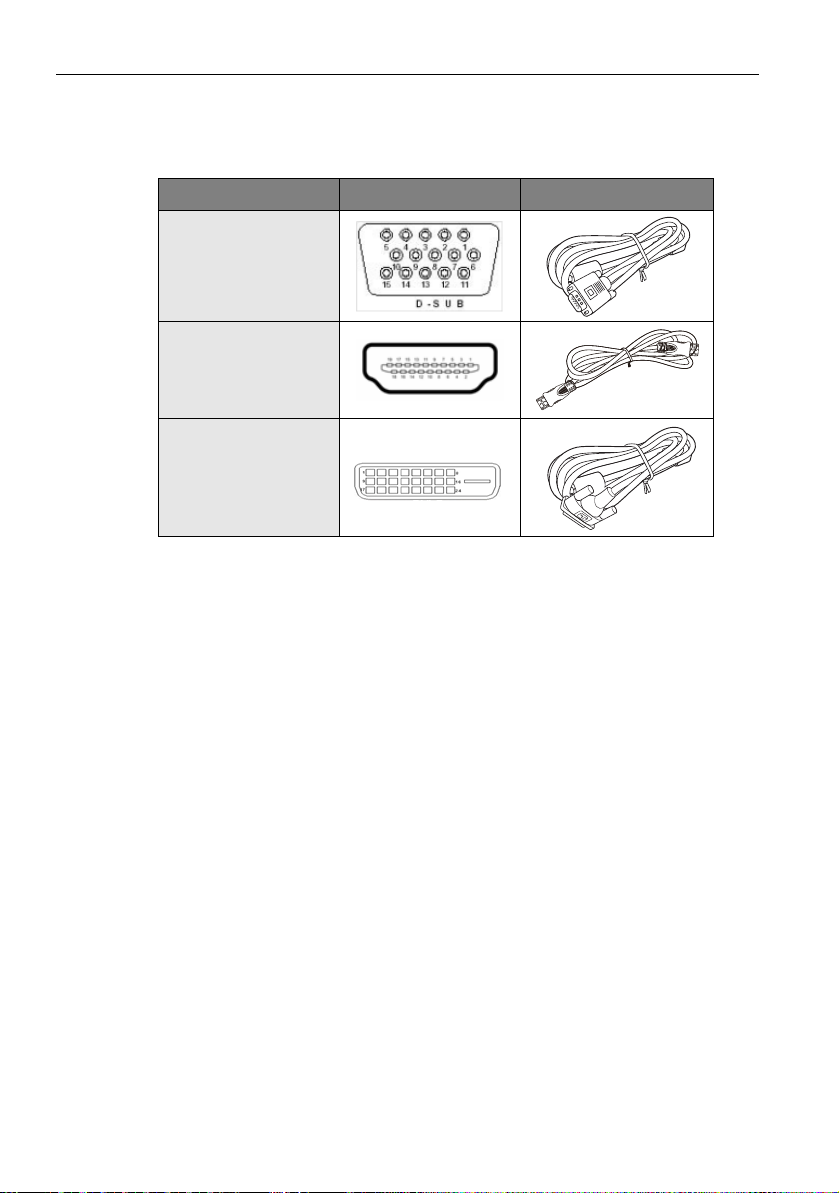
Connect Signal Cables
Three signal input ports are provided, and the connections between the signal source and
the display are:
Signal Source Description Connection Cable
VGA
HDMI
DVI
After you turn on the connected computer or the media player, it would be better to set
the output resolution to 1366 x 768 @ 60Hz.
Tu r n Po w e r O n
Press the power button on the right side of the LCD display or on the remote control to
turn on the display.
Page 9
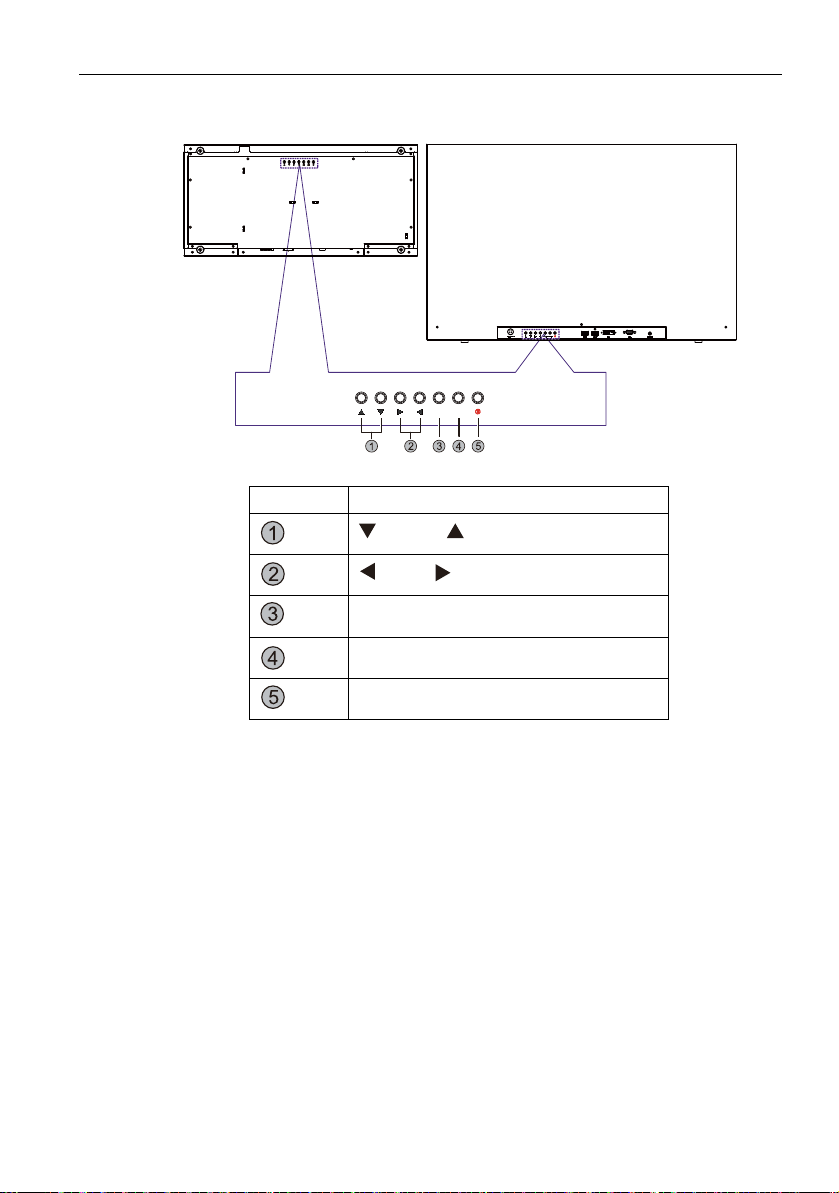
Control Panel
TL240C TL321C
MENU
INPUT
(Bottom)
(Back side)
Product Overview 9
Control Panel
(Down), (Up)
(Left), (Right)
MENU
ENTER/VIDEO SOURCE
Power On/Off
Page 10

Installation10
Installation
Install Remote Control Batteries
• Remove the battery cover.
CATV
• Insert a battery.
• Re-attach the battery support.
AAA Batteries need to be purchased by customers.
Caution
• Dispose of the battery in accordance with local laws and regulations.
• Keep the battery away from children and pets.
• When the remote control is not used for an extended period, remove the battery.
MTS
SLEEP
RECORD
INFO
LIST
MENU
ENTER
EXIT
+
VOL
-
12
45
7
_
S
O
UND
P
I
CT
U
RE
8
0
C.C
EPG
USB
+
CH
-
3
6
9
FAV
Page 11

Using the Remote Control
Using the Remote Control 11
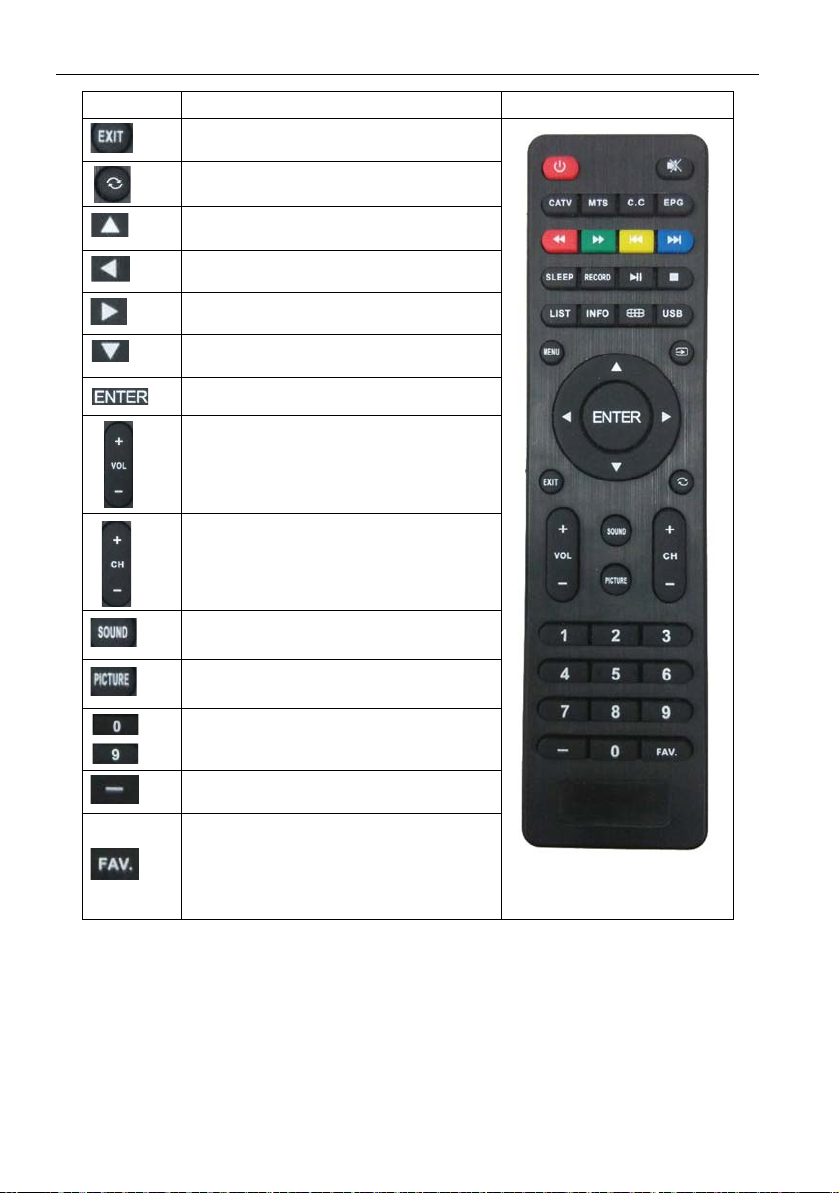
Keypad
Function Remote Control
Switch power on or power off
MUTE on or off
Not support
Not support
Not support
Not support
Fast backward
Fast forward
Previous
Next
Not support
Not support
Play and Pause
Stop
File list
Information
Zoom mode setting
Enter Media Player
Enter setup menu
Input source setting (only support for
HDMI/VGA/DVI)
Page 12
Using the Remote Control12
Keypad
Function Remote Control
Exit
Not support
Up
Left
Right
Down
Enter
Volume up or down
Not support
Sound mode setting (only support for
HDMI/VGA/DVI)
Image mode setting (only support for
HDMI/VGA/DVI)
Not support
Not support
Not support
Page 13
The OSD Functions
Input Source
Item Selection Description
Input Source VGA, HDMI, DVI To select the input signal source.
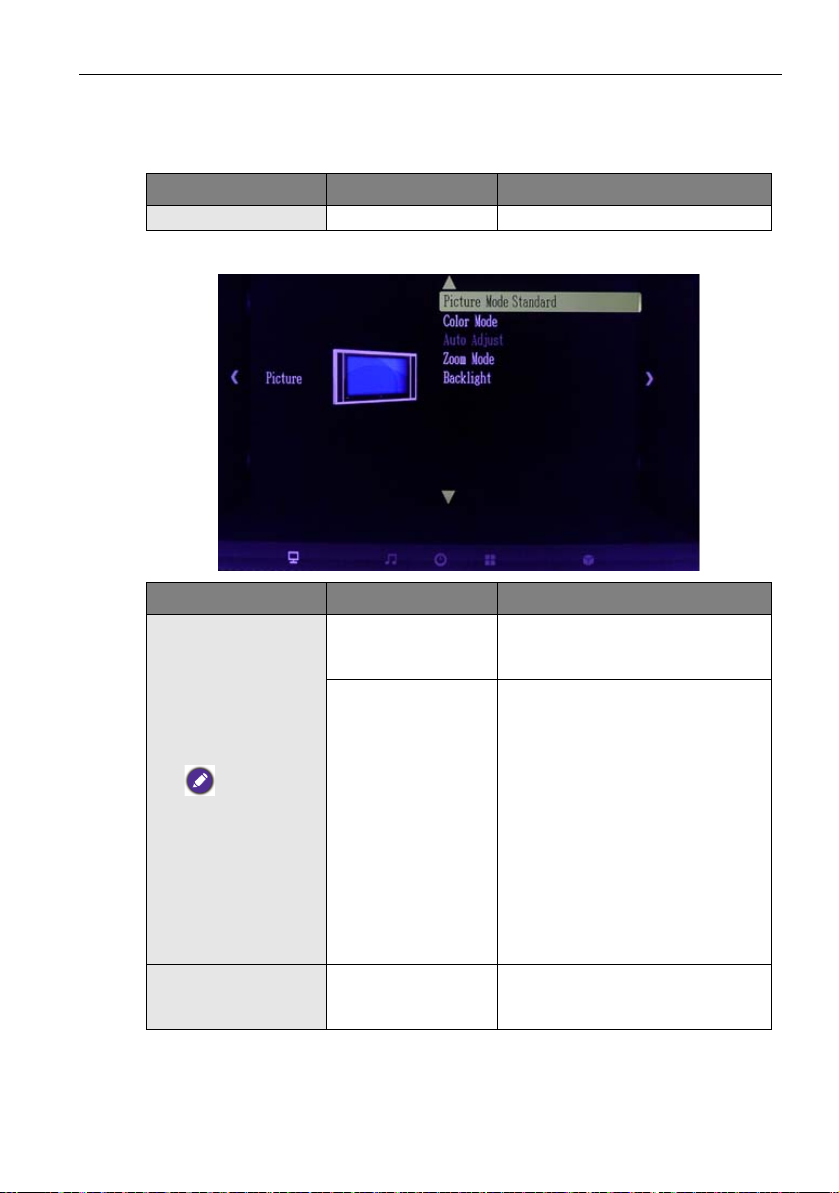
Picture
Item Selection Description
Picture Mode
(only support for
VGA/HDMI/DVI)
Sharpness,
Saturation & Hue and
Color can be selected
only for the video
signal.
Color Mode Cool, Normal, Warm
Standard, Dynamic,
Soft
Personal, Contrast,
Brightness,
Sharpness, Hue,
Saturation
The OSD Functions 13
To select the type of preset picture
mode that suit your personal
preference or viewing requirement.
• To manually configure the
following picture setting to suit
your personal preference or
viewing requirement.
• To adjust the contrast level of
picture.
• To adjust the brightness level of
picture.
• To adjust the edge definition of
picture.
• To adjust the color hue of picture.
• To adjust the color saturation of
picture.
For color temperature adjustment,
you can select Cool/Normal/Warm
mode.
Page 14

The OSD Functions14
Advanced (only for
input source set to
VGA)
Zoom Mode Full, 4:3, 16:9
Backlight 1~100
H-Pos., V-Pos., Clock,
Phase, Auto
• To manually adjust the position of
the display area left or right.
• To manually adjust the position of
the display area up or down.
• To manually adjust the width of
the display image.
• To manually sharpen the focus of
text or graphic with pixel
boundaries.
• To automatically adjust the
incoming VGA signal to the
optimal status for displaying.
• Set the picture to full screen.
• Set the picture to 4:3 format and
put black borders on the left and
right of the picture.
• Set the picture to 16: 9 format
and put black borders on the left
and right of picture.
To adjust the brightness of LED
backlight.
Page 15

Audio
Item Selection Description
Equalizer Standard
Surround Sound On, Off
Standard, Music,
Movie, Sports
Personal
120 Hz, 500 Hz,
1.5 KHz, 5 KHz,
10 KHz, Balance
The OSD Functions 15
To select the type of preset picture
mode that suit your personal
preference or viewing requirement.
• To manually configure the
following picture setting to suit
your personal preference or
viewing requirement.
• To adjust the contrast level of
picture.
• To adjust the brightness level of
picture.
• To adjust the edge definition of
picture.
• To adjust the color hue of picture.
• To adjust the color saturation of
picture.
• Adjust the loudness of 120 Hz
bandwidth.
• Adjust the loudness of 500 Hz
bandwidth.
• Adjust the loudness of 1.5 KHz
bandwidth.
• Adjust the loudness of 5 KHz
bandwidth.
• Adjust the loudness of 10 KHz
bandwidth.
• Adjust the balance between the
left and right speaker.
To enable virtual surround effect
through two speaker systems.
Page 16
The OSD Functions16
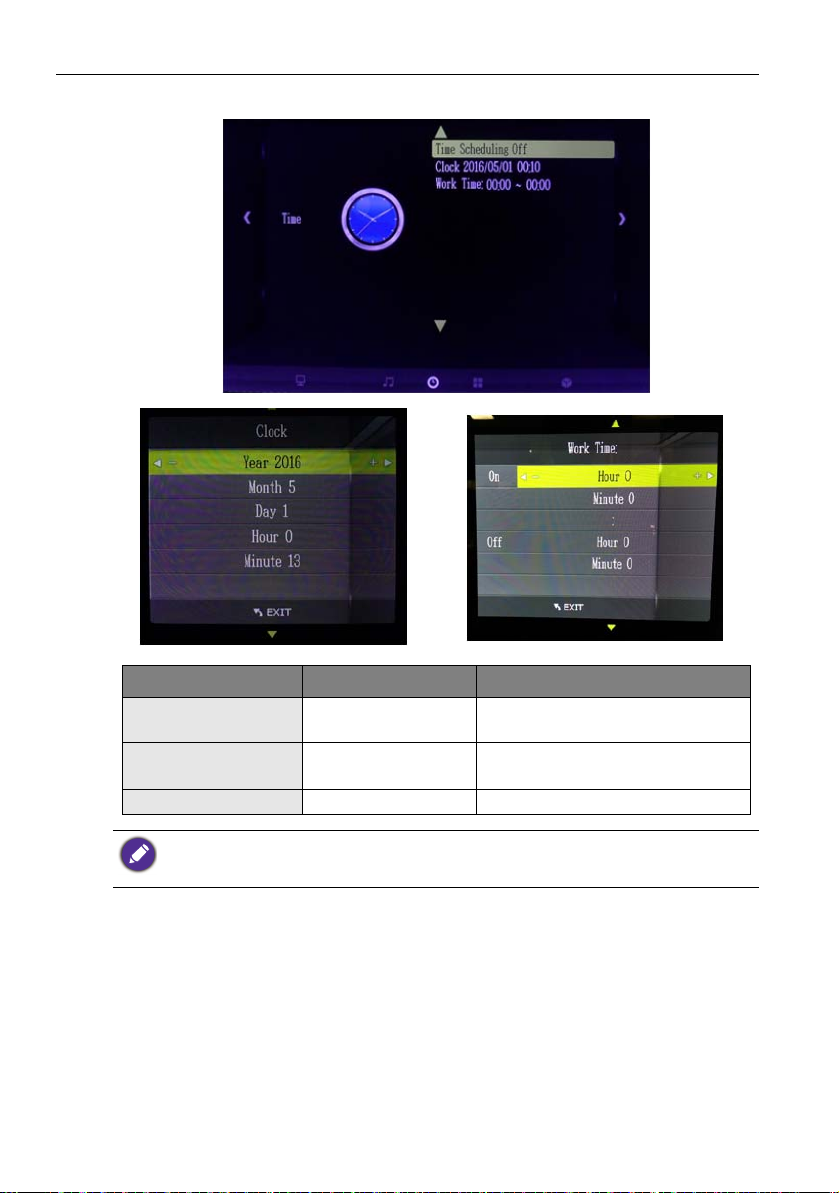
Time Scheduling
Item Selection Description
Time Scheduling On, Off
Clock
Year, Month, Day,
Hour, Minute
To enable Time Scheduling
Function.
To set the current time manually.
Work T i me Hour, Minute To set ON Time and Off Time.
• After Time scheduling function is activated, the transparent display will always turn on/off
based on your setting until you close the function.
• For further details about this option, please refer to Appendix 1.
Page 17
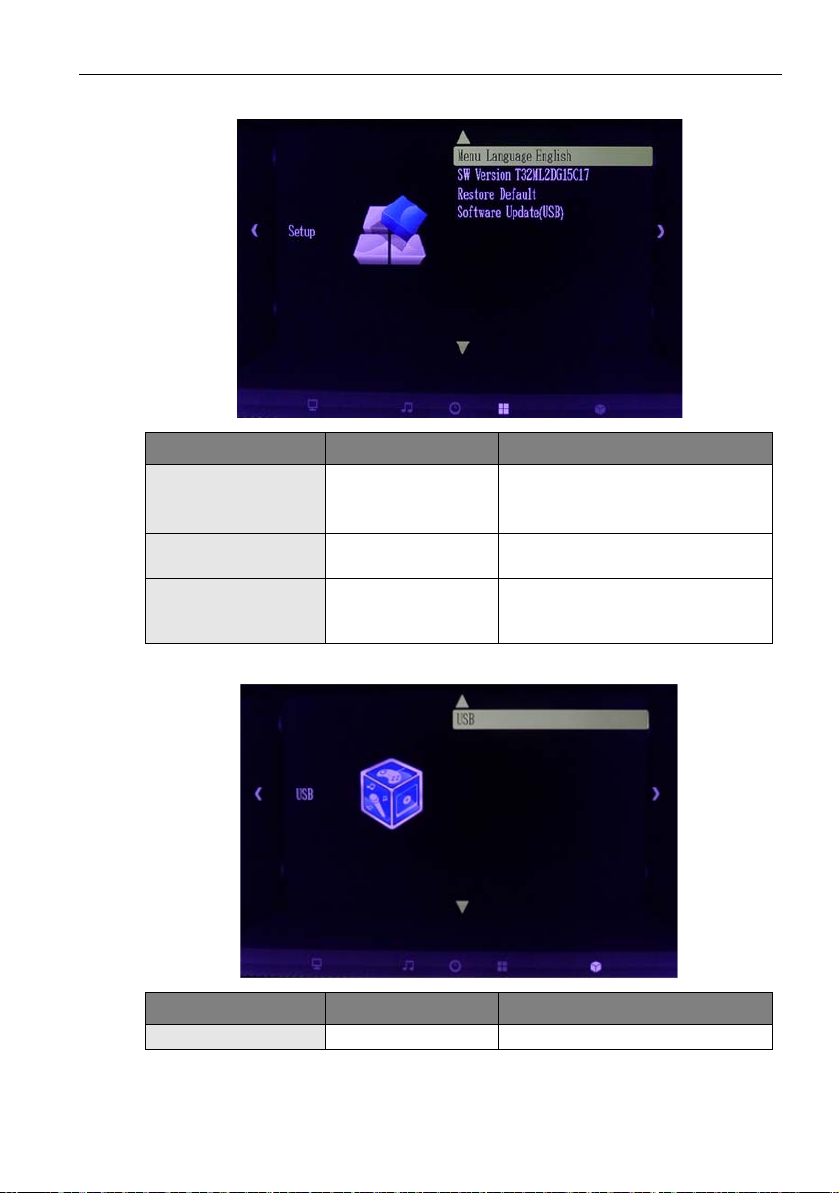
Setup
Item Selection Description
Menu Language
Restore Default Yes/No
Software Update
(USB)
English, Chinese
Traditional, Chinese
Simplified
Yes/No
The OSD Functions 17
To select menu displaying language.
To restore all setting of menu to
default factory setting.
To proceed software update via
USB driver (only available for
authorized technician).
USB
Item Selection Description
USB Enter to Media Player mode.
Page 18
The OSD Functions18
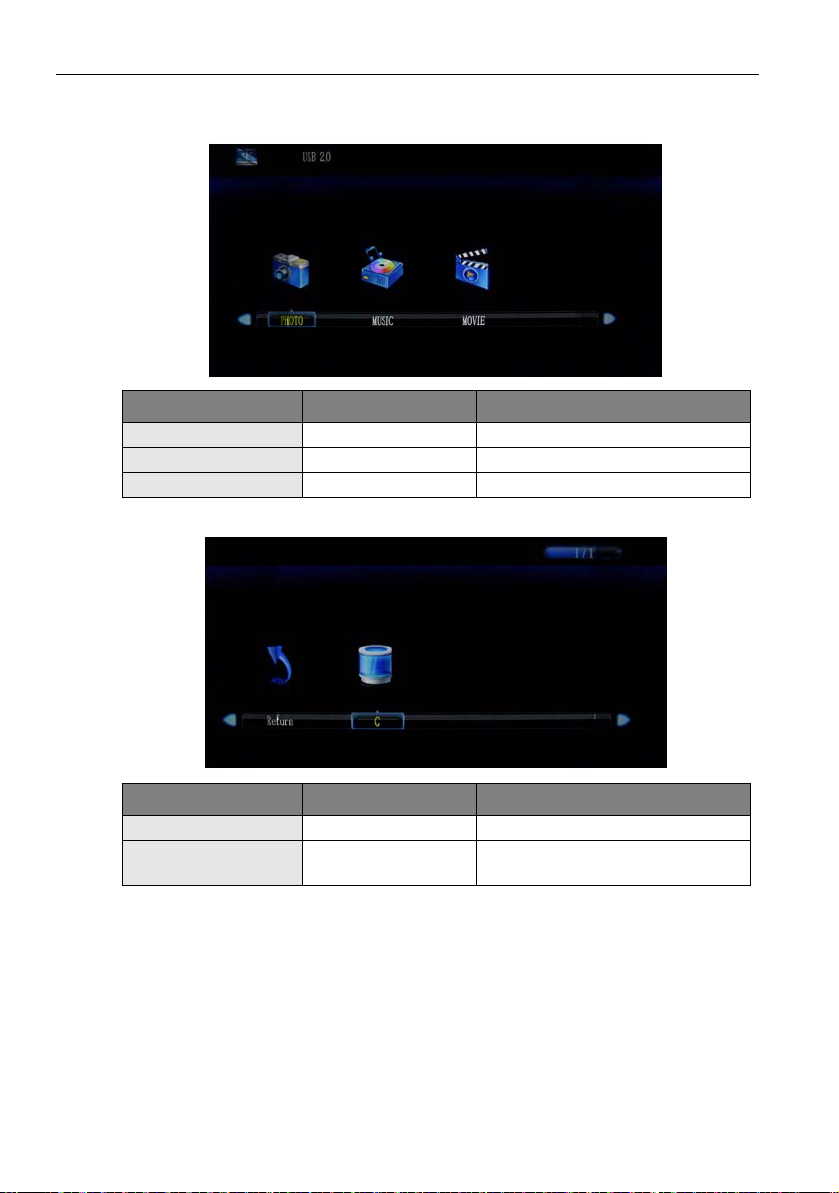
USB Functions
Media Type Select Page
Item Selection Description
PHOTO Select to show picture type.
MUSIC Select to show music type.
MOVIE Select to show movie type.
Device Select Page
Item Selection Description
Return Back to the top level.
ADATA
For USB device names, enter file
select page when selected.
Page 19

The OSD Functions 19
File Select Page
Item Selection Description
Return Back to the top level.
File name
• The transparent display is not able to read the files from the folder in the USB flash drive, so
save the files outside the folder.
• The order to play the files is based on the file name. You can rename the files (ex: 1, 2, 3…) to
have your preferred play list.
• For further information, please refer to Appendix 2.
To show the files of selected types,
select a file to play.
Page 20

More Information20
More Information
Supported Video and Photo
Media Type Format
Photo JPG, BMP, PNG
Audio MP3, AAC, WAV, WMA
Video MPEG, MP4
Supported Timing Mode
The supported timing modes for VGA signal / HDMI signal are:
Timing Mode Resolution
720x400@70Hz
640x480@60Hz
VGA
SVGA
XGA
Video
640x480@72Hz
640x480@75Hz
800x600@60Hz
800x600@72Hz
800x600@75Hz
1024x768@60Hz
1024x768@70Hz
1024x768@75Hz
1360x768@60Hz
720p
1080p
Page 21

Product Specification
Model TL240C/TL321C
TL240C: 23.6" color TFT active matrix, wide
Type
TL321C: 32" color TFT active matrix, wide LCD
LCD
Input
Speaker Amplifier 2W x 2
Connector
Power
Operation
Conditions
Dimensions (mm)
Internal space size (mm)
Weight Net
Package
Display Area
Optimum Resolution 1366 x 768
Light Source LED
Brightness
Video Input VGA/DVI/HDMI/USB 2.0 In
Control Input Remote Controller
Audio Input Line In(3.5 mm)
Analog VGA
Digital DVI/HDMI
Power 4 pin plug
Voltage
Consumption
Temperature 0 ~ 40°C
Humidity
Altitude 0~3000 m
Size (mm)
Weight
TL240C: 521.47(H) x 293.18(V)
TL321C: 697.68(H) x 392.26(V)
TL240C: 260 nits
TL321C: 217 nits
Input: AC 100-240V(universal), 50-60Hz
Output: DV 24V, 5A
TL240C: 67 W (Typ.)
TL321C: 90 W (Typ.)
TL240C: 20% ~ 90%
TL321C: 10% ~ 90%
TL240C: 554.0 (W) x362.0 (W) x264.6 (D)
TL321C: 733.8 (W) x464.0 (W) x352.5 (D)
TL240C: 535.0 (W) x243.0 (W) x305.2 (D)
TL321C: 680.0 (W) x420.0 (W) x300.0 (D)
TL240C: 9.3 Kg
TL321C: 14.9 Kg
TL240C: 721.3 (W) x536.0 (W) x360.0 (D)
TL321C: 947.1 (W) x693.8 (W) x481.9 (D)
TL240C: 13.5 Kg
TL321C: 23.5 Kg
Product Specification 21
LCD
Page 22

Dimensions22
Dimensions
TL240C
Page 23

TL321C
Dimensions 23
Page 24

Other Notices24
Other Notices
• Every time when it comes to AC reconnection, you need to turn on the transparent
display manually by the keypad or remote control.
• The transparent display is able to remember the last input source before it is turned off
by the remote control. Next time when you turn on the display, it will present the last
file via the last input directly. If the previous input source has been removed, you need
to switch to the new input source manually.
• If the transparent display does not detect any input sources in 600 seconds, it will enter
power save mode. You need to press Power on to wake it up again.
Page 25

Appendix 1 25
Appendix 1
Timer Scheduling (Default Setting: Off)
1. Go to the Setup page and select Restore Default, to set default value.
2. Go to the Time page, move to Timer Scheduling, and you can press Enter button
to set Timer Scheduling mode On/Off.
• If Timer scheduling mode is off, the transparent display has “remember last input source”
function.
• If Timer scheduling mode is on, the function “remember last input source” will be off.
Page 26
Appendix 126
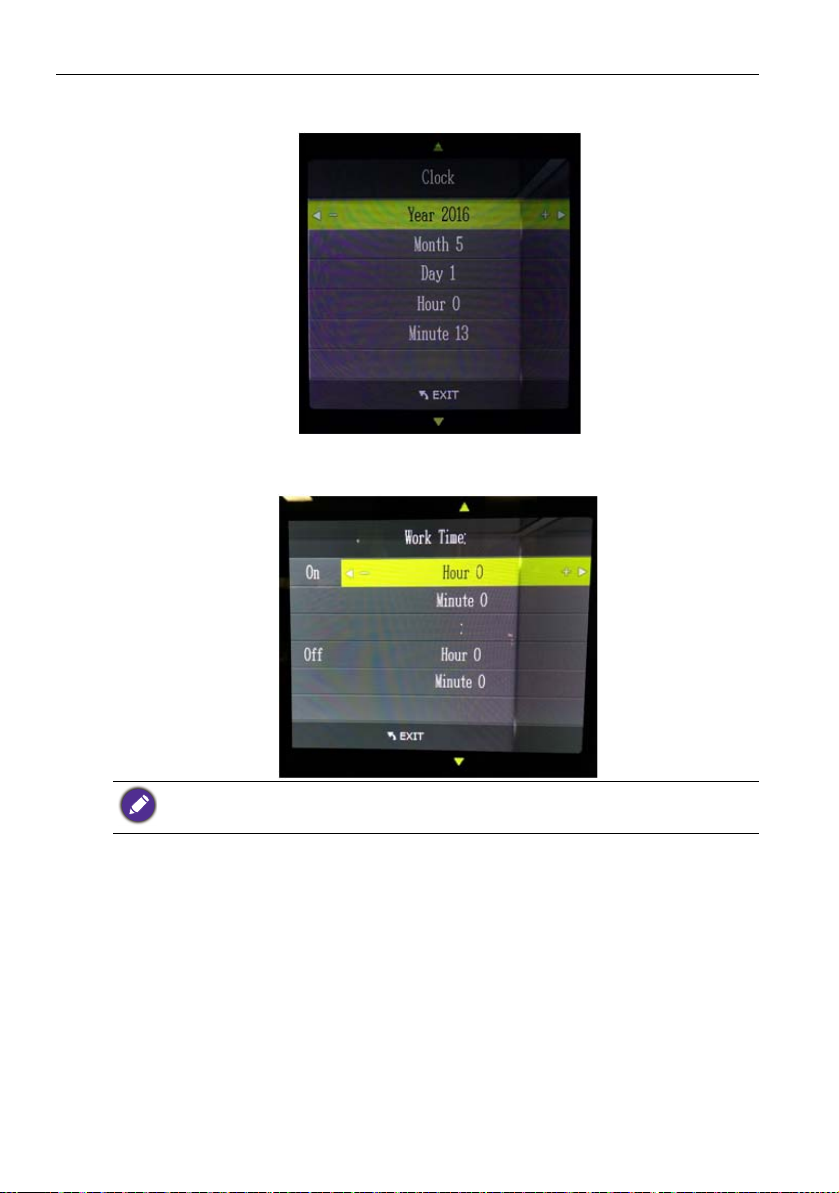
3. Go to Clock, press Enter button to set timer, and you can change Ye ar / M o n t h/
Day/Hour/Minute to set the timer.
4. Go to Wor k T i m e , press Enter button to set Timer Scheduling Timer
setting. On is monitor open time, Off is monitor close time.
If an interruption of power supply occurs, you need to reset clock to match the current time.
Page 27

Appendix 2
USB
EXIT
EXIT
EXIT
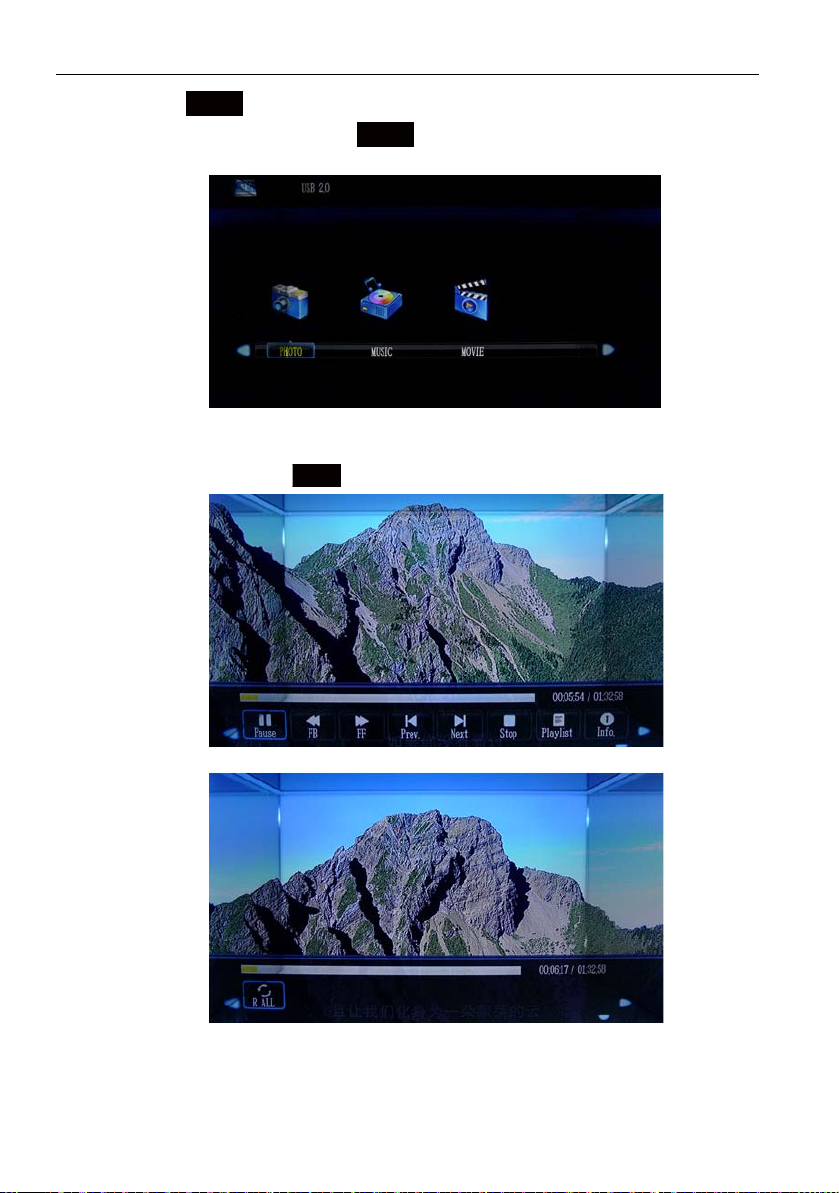
USB
1. Press key or select USB on the OSD menu page for auto playing (all files).
2. Press or to exit playing, and go to the file select page. On this page,
you can select which file you want to play. To be noted, default setting repeats all.
Appendix 2 27
3. Press
4. Press to go back to the media type select page.
to go to the device select page.
Page 28
Appendix 228
ENTER
ENTER
MENU
5. Press to choose Photo (only display photo) or Music, Movie to go to the
device select page, and press
to choose the device and go to file select
page.
Function Operation
1. To play media, press , and the function bar will be shown.
Page 29

Appendix 2 29
ENTER
Ⴃ
EXIT
LIST
EXIT
EXIT
2. You can use the function bar to operate functions. You can select the function and
press . If you want to close the function bar, press .
If you press , it will exit from playing mode to file select page.
3. Select Playlist or to go to the Playlist page. Select Cancel on the right
bottom to close the playlist page and go to the function bar page.
If you press , it will exit from playing mode to file select page.
4. Press Info. to go to file info page. Select Close to close file info page and go back to
the function bar page.
If you press , it will exit from playing mode to file select page.
5. R_ALL function (on the next page, please press to the next page) has three
sub-functions to choose from. R ALL, R ONE, R NONE. R ALL is “repeat all”, R
ONE is “repeat one file”, and R NONE is “all file repeat one time”. Press OK to
turn to different functions mentioned above.
 Loading...