

Page 1

T80
Smartphone
User Manual
Page 2

Page 3

3Table of contents
Safety precautions ............................ 7
Phone Overview .............................. 10
Front view .........................................10
Description of indicator .................12
Rear view ..........................................12
Startup ............................................ 13
Removing the back cover ...............13
Inserting the SIM card ....................13
Inserting the battery ........................13
Removing the battery ......................14
Installing the back cover .................14
Charging the battery .......................14
Icons in charging ............................14
microSD card ...................................15
Inserting the microSD card ...........15
Removing the microSD card .........15
Switching the phone on/off ............16
Switching the phone on ................. 16
Entering the PIN .............................16
First time startup ............................16
Signal strength ................................17
Quick list .........................................17
Sleep mode ......................................17
Keypad lock .....................................17
Master Reset ....................................18
Switching the phone off ................. 18
Navigating the menu ......................18
Home screen ................................... 19
Home screen icons .........................20
Input methods ................................ 21
Changing input methods ...............21
Text input without T9 ....................21
Text input with T9 ..........................22
Adding a new word to the T9
dictionary ........................................22
T9 settings .......................................22
Entering symbols and special
characters ........................................23
My Text ............................................ 23
Inserting My Text ........................... 23
Editing My Text .............................. 23
Phone settings ................................. 23
Phone ............................................... 24
Sounds .............................................. 24
Profiles ............................................. 24
Presentation Style ........................... 24
Clock & Alarm ................................ 25
Connections .................................... 25
Security ............................................ 25
Device Lock .....................................26
Disable/Enable SIM PIN ................26
Change SIM PIN ............................. 26
Change PIN2 ...................................26
Change Private Password ..............26
Private Folder .................................26
Private Contact ............................... 27
Certificates ......................................27
Encryption ......................................27
Remove Programs .......................... 27
Power Management ....................... 27
Accessibility ..................................... 27
Regional Settings ............................ 28
Owner Information ........................ 28
About ................................................ 28
Error Reporting .............................. 28
Customer Feedback ........................ 28
NFC Function Settings .................. 28
Using the Phone as Card Reader ... 28
Using the phone as smardcard ...... 28
Page 4

Table of contents4
Slider setting .....................................29
Windows update .............................29
Calling ............................................. 29
Making a call ....................................29
Dialling with number keys .............29
Dialling previous numbers ............29
Making a call from Contacts ..........29
Making a speed dial call ................. 29
Dialling using Speech Commander ...
30
Listening to voicemail ....................30
Setting connection alert ................. 30
Answering a call ..............................30
Rejecting a call .................................31
Muting a call ....................................31
Ending a call .....................................31
Adjusting the volume .....................31
Making a conference call ................31
Making an emergency call (SOS) ..31
Talking with speakerphone ............31
Talking with the handsfree headset ..
32
Using the programs ........................ 32
Programs ..........................................32
Phone .............................................. 34
Contacts ............................................34
Adding new contacts ......................35
Options menu for contacts ............35
Call History ......................................36
Speed Dial .........................................36
Setting a function shortcut ............36
Starting function/calling number
using shortcuts ...............................36
Voice Mail ........................................37
Messages ..........................................37
Messaging ........................................ 37
Text Messages .................................37
MMS ................................................ 38
E-mail ............................................... 39
Setting up an e-mail account ......... 39
Writing/sending an e-mail ............ 39
Receiving and viewing new messages
40
Options for viewing SMS/MMS/e-
mail messages ................................. 40
Message folders ..............................41
IM ..................................................... 41
Messenger ........................................ 41
Email Auto Setting ......................... 42
Entertainment .................................42
Windows Media® ............................ 42
Camera ............................................. 42
Taking pictures ...............................43
Recording videos ............................ 44
Settings for the image/video files .. 44
FM Radio ......................................... 45
Pictures & Videos ........................... 45
Browsing and opening image, video
or music files .................................. 46
Ringtone Editor .............................. 47
Bubble Breaker & Solitaire ............ 47
Internet Radio ................................. 47
Internet ...........................................48
Internet Explorer® ........................... 48
Windows Live™ ............................... 48
RSS .................................................... 49
Reading the feeds ........................... 49
Scheduling the feeds download ..... 49
Downloading the feeds manually . 50
Page 5

5Table of contents
STK ....................................................50
Organizer ........................................ 50
Alarm Clock .....................................50
Calendar ...........................................50
Audio Notes .....................................50
Tasks .................................................51
System ............................................. 51
Settings ..............................................51
Task Manager ..................................51
Ending a task ..................................51
CommManager ...............................51
Battery Storage Status .....................51
File Explorer .....................................51
Synchronisation .............................. 52
ActiveSync® ......................................52
Installing ActiveSync® on PC .........52
Setting up a sync relationship .......52
Synchronising information ...........53
Windows Mobile Device Center
(WMDC) ..........................................53
Installing WMDC ...........................53
Setting up a sync relationship .......53
Synchronising information ...........53
Adding programs ...........................54
Removing programs ....................... 55
Push Mail ........................................55
Connecting your phone and the
computer using Bluetooth
technology .......................................55
SimManager .....................................56
Speech Commander ........................56
Internet Sharing ...............................57
Master Reset .....................................57
Extras .............................................. 57
Calculator ........................................ 57
2D barcode ...................................... 58
Adding contacts using 2D barcode 58
Java™ ................................................. 58
Connectivity ....................................60
Beam ................................................. 60
Bluetooth® ......................................... 60
Turning Bluetooth® function on ... 60
Turning Bluetooth® function off .. 60
Making the phone visible .............. 60
Creating a Bluetooth connection .. 61
Using a Bluetooth stereo headset . 61
Sending a file by Bluetooth
technology ......................................61
Printing via Bluetooth
Changing the name of your phone 62
Operating files on other Bluetooth
devices ............................................. 62
Dial-up ............................................. 63
GPRS ................................................ 63
Proxy ................................................ 63
VPN .................................................. 63
Wi-Fi ................................................ 63
Turning Wi-Fi on ...........................64
Connecting to an existing wireless
network ........................................... 64
Adding a new wireless network .... 64
USB to PC ........................................ 64
Questions & Answers ...................... 65
Care and maintenance ....................69
Product data ....................................70
SAR ..................................................71
MICROSOFT
SOFTWARE LICENSE TERMS .....72
technology 62
Page 6

Table of contents6
License Agreement ......................... 76
Page 7

Safety precautions
Information for parents
Please read the operating instructions and safety precautions carefully before use.
Explain the content to your children and the hazards associated with using the phone.
Remember to comply with legal
requirements and local
restrictions when using the
phone. For example, in
aeroplanes, petrol stations,
hospitals or while driving.
Mobile phones can interfere with
the functioning of medical
devices such as hearing aids
or pacemakers. Keep at least 20
cm/9 inches b etween phone and
pacemaker. When using the
mobile phone hold it to the ear
which is furthest away from the
pacemaker. For more
information consult your doctor.
Always keep the phone and
accessories out of reach of small
children.
Small parts such as the SIM card,
as well as the microSD card can
be dismantled and swallowed by
small children.
Do not place the phone near to
electromagnetic data carriers
such as credit cards and floppy
disks. Information stored on
them could be lost.
Do not look directly into the LED
(e.g. flash LED) with optical
magnifiers because of radiation.
Permanent hearing loss may
occur if you use ear- or
headphones at high volume.You
can adapt over time to a higher
volume, which may sound
normal but can be damaging to
your hearing. Set your volume to
a safe level. If you experience
discomfort or buzzing in your
ears, reduce the volume or
discontinue use of your ear- or
headphones.
Ringtones, info tones and
handsfree talking are reprod uced
through the loudspeaker. Do not
hold the phone to the ear when it
rings or when you have switched
on the handsfree function.
Otherwise you risk serious
permanent damage to your
hearing.
The mains voltage (V) specified
on the power su pply unit must
not be exceeded. Otherwise the
charging device may be
damaged.
The power supply must be
plugged into an easily accessible
AC mains power socket when
charging the battery. The only
way to turn off the charging
device after charging the battery
is to unplug i t.
7Safety precautions
Page 8
Safety precautions8
You may only open the phone to
replace the battery and SIM card.
You must not open the battery
under any circumstances. All
other changes to this device are
strictly proh ibited and will
invalidate the guarantee.
• Only use original batteries and
charging devices. Otherwise
you risk serious damage to
health and property. The
battery could explode, for
instance.
• All batteries can cause property
dama ge, inju ry or burns if a
conductive material such as
jewelry, keys or beaded chains
touch exposed terminals. The
material may complete an
electrical circuit and become
quite hot. Exercise care in
handling any charged battery,
particularly when placing it
inside your pocket, purse or
other container with metal
objects. Your batteries are
supplied with a protective
cover. Please attach this cover
to your batteries when
detached from the phone and
not in use.
• Do not dispose of batteries in
fire as they may explode.
The phone may cause
interference in the vicinity of TV
sets, radios and PCs.
Use only original accessories.
This will avoid potential risks to
health or property and ensure
compliance with all relevant
regulations.
All electrical and electronic
products should be disposed of
separately from the municipal
waste stream via designated
collection facilities appointed by
the government or the local
authorities.
This crossed-out wheeled bin
symbol on the product means the
product is covered by the
European Directive 2002/96/EC.
The correct disposal and separate
collection of your old appliance
will help prevent potential
negative consequences for the
environment and human health.
It is a precondition for reuse and
recycling of used electrical and
electronic equipment.
For more detailed information
about disposal of your old
appliance, please contact your
city office, waste disposal service
or the shop where you purchased
the product.
Improper use will invalidate the
guarantee! These safety instructions also
apply to original accessories.
As mobile devices offer a range of
functions, they can be used in positions
other than the head, such as on the body.
In this case, at data transfer (GPRS) a
separation distance of 1.5 cm is required.
Page 9
9Safety precautions
Bluetooth® technology
Your phone has a Bluetooth® interface. This
makes it possible to establish a wireless
connection with your phone and a headset
of a car kit, or other Bluetooth-enabled
devices. This smart phone is also qualified
by Bluetooth SIG with QD ID: B013227.
In order to establish a secure link between
the devices and to prevent a third party
from having access to your phone, you
should observe the following points:
• The initial connection between two
devices, what is called "pairing", should
take place in familiar surroundings.
• Both devices must be able to identify
themselves one time by using a
password/PIN. To ensure sufficient
security, you should choose a 4-digit
number combination for a password that
would be difficult to guess (if a PIN has
not been assigned).
• An automatic connection acceptance
("connection without confirmation")
should only be used in exceptional cases.
• In general, only trustworthy devices
shou ld be lin ked in or der to minimize
security risks.
• You should restrict the "visibility" of your
phone if possible. This will make it much
more difficult for unknown devices to
establish a connection with your phone.
To do this, se e "Making the phone visibl e"
on page 60.
• The name of your phone is transmitted in
a Bluetooth connection. The factory
default name is "BenQ T 80". The first time
Bluetooth function is activated, or later in
the Bluetooth menu, you can change this
name. See Page 62.
•If Bluetooth function is not needed, this
function should be deactivated.
•Before using Bluetooth accessories, or a
mobile phone inside a vehicle, check the
vehicle user guide for any limitations on
the use of these products.
DRM
This phone features Digital Rights
Management (DRM) technology. DRM
allows copyright-protected audio/visual
content transm issions for playback in
computers, portable devices and network
devices, while protecting them from
unauthorised use.
• This user manual provides important
procedures and information to
familiarise yourself with the device.
Please keep this manual in a safe place
for future reference.
• Support for the CD content is provided
by BenQ. Instead of going to the
operator/dealer, contact your local
BenQ office for further assistance.
• Windows®, Windows Mobile® and the
Windows Flag logo are trademarks or
registered trademarks of Microsoft
Corportation in the United States
and/or other countries.
Page 10
Phone Overview10
Phone Overview
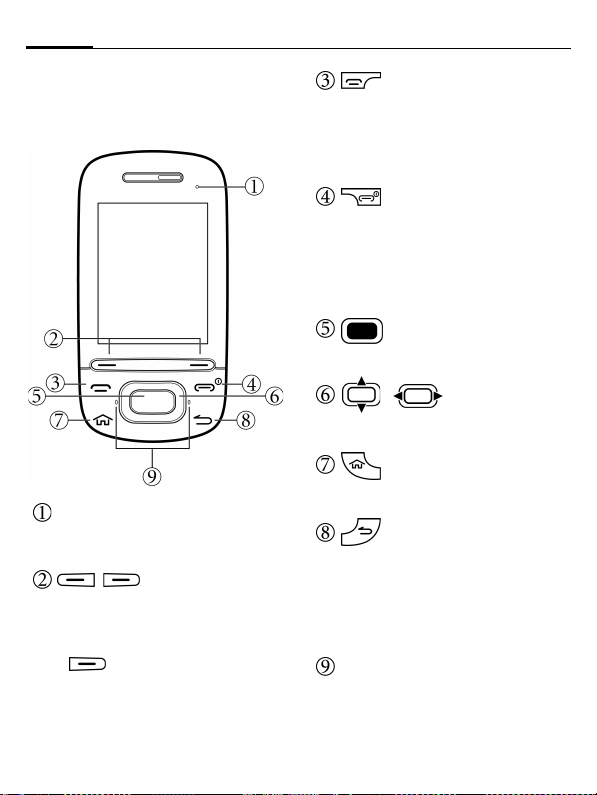
Front view
Power indicator
See "Description of indicator" on page
12 for more information.
/ Soft keys
• The current functions of these keys
are shown in the bottom line of the
display. Press to run a command as
instructed by the screen.
•: Press and hold to bring up
CommManager.
Send key (Call key)
• Press to pick up incoming calls.
• Pr ess to bring up t he Dial screen a nd
the call re cords.
• Press to make a call after dialling.
• Press to hold/unhold the call.
Power on/off/End key
• Press and hold to turn the phone
on/off.
• During a call, press to end a call.
• Press to reject an incoming call.
• Press to cancel dialling.
• Press to return to Home screen.
OK key
Press to start a function/confirm
selection.
/ Navigation keys
Scroll up, down, left and right to the
preferred item.
Home key
• Press to return to Home screen.
• Press and hold to enter Quick List.
Back/delete key
• Press to go back to the previous
screen.
• Press to delete the text/number just
entered.
• Press and hold to delete all the
entered texts quickly.
Front LED indicator
See "Description of indicator" on page
12 for more information.
Page 11
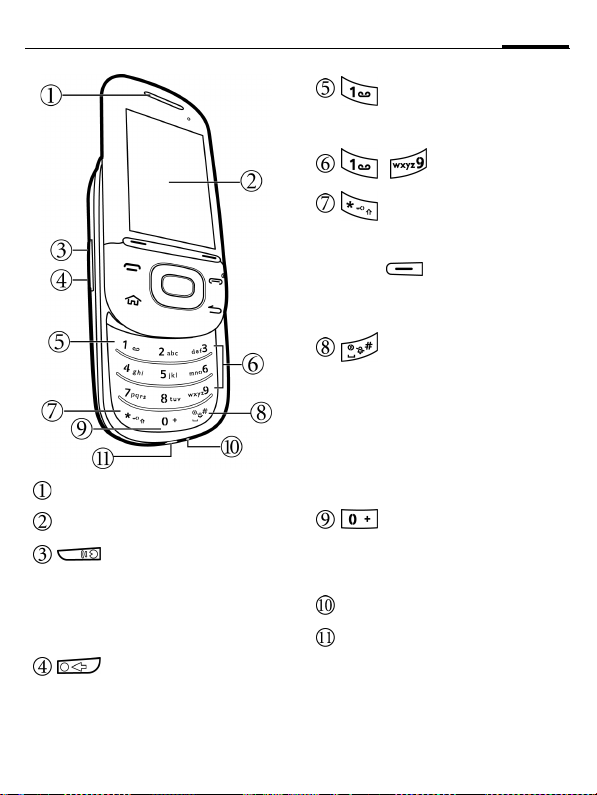
Earpiece
Display
Speech Commander /
Audio recorder key
• Press to activate Speech
Commander.
• Press and hold to activate Audio
Notes.
Shortcut key
• Press and hold to assign a function
shortcut to this side key.
• Press to activate your selected
function. (default: launch Camera
mode.)
Voicemail
In Home screen, press and hold to
access voicemail.
~ Number keys
Asterisk key
• Press to enter an asterisk (“*”).
• Press and hold this key and then
press (Yes) to activate the
keypad lock.
• Press to change input methods for
text input.
Pound key
• Press to enter "#".
• Press and hold to activate/deactivate
the Vibrate profile.
• Press to insert space for text input.
• Press and hold to open the symbol
table for text input.
• In dialling screen: press and hold to
switch between L1 and L2.
key
While dialling a number, press and
hold to make an international call
(entering "+").
Microphone
USB connection socket
For charger, headset, USB cable, etc.
11Phone Overview
Page 12
Phone Overview12
Description of indicator
Power indicator
Red Flash Indicates that there
Green On Charging is complete.
Front LED indicator
Red Flash Indicates that
are new misse d call(s),
or the battery power is
low (also indicated by
the appearance of
certain icons on the
title bar).
On Charging in progress.
charging is in
progress, or there are
new incoming call(s)
or message(s).
On Charging is complete
or when the slider is
open and screen is on.
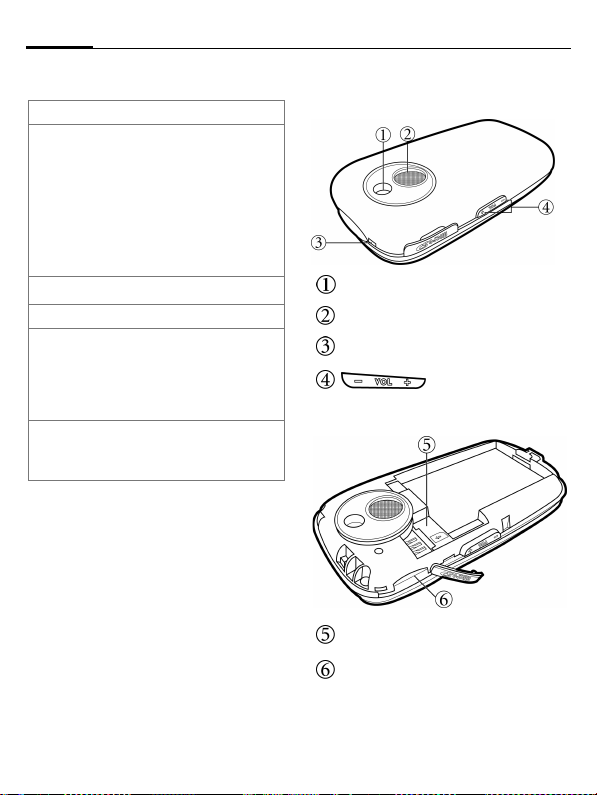
Rear view
Camera lens
Loudspeaker
Strap hole
Volume keys
Press to adjust volume.
SIM card holder
microSD card holder
Page 13
13Startup
Startup
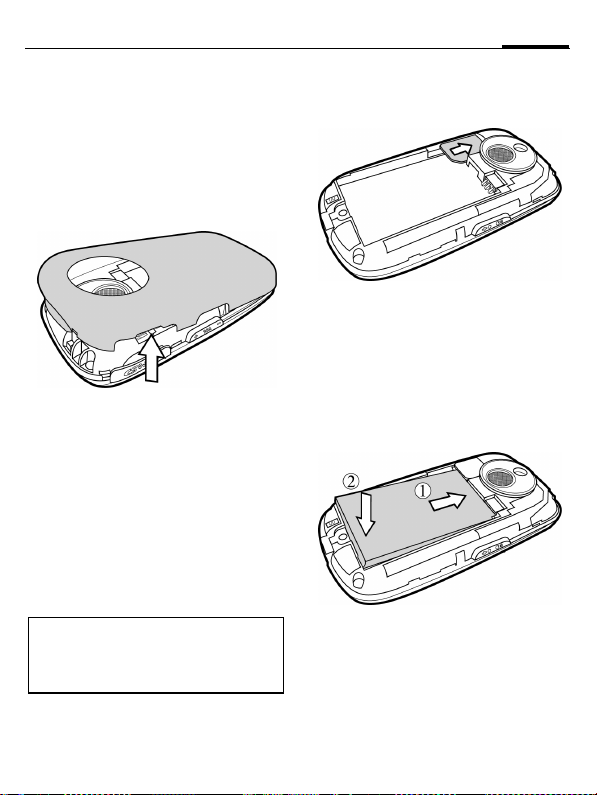
Removing the back cover
Use a thin object, such as your
fingernail, to press in at the groove
beside the microSD card holder and
then lift the cover off the phone.
Inserting the SIM card
You can obtain a SIM card from a
mobile phone service provider when
you sign on as a subscriber. When you
insert a SIM card into your smartphone,
you can begin using it to make and
receive phone calls. Follow the
instructions below to insert a SIM card
into the phone.
A SIM card can be easil y damaged if its
metal contacts become scratched.
Therefore, take sp ecial care when holding
or inserting it.
Slide the entire SIM card into the SIM
card holder, with the metal contacts of
the SIM card facing downward and the
cut corner at the down right as
illustrated.
Inserting the battery
1. Slide the top end of the battery down
into the top end of the battery bay.
2. Press the bottom end of the battery
down so that it locks in place.
Page 14
Startup14
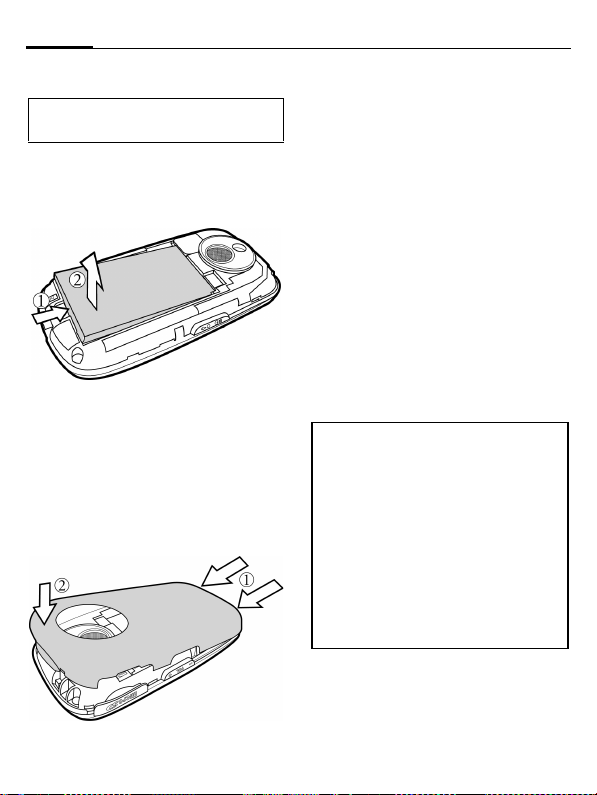
Removing the battery
Switch off your phone before removing
the battery.
1. Press upward against the battery on
the bottom edge of the battery bay.
2. Lift the battery off the phone.
Installing the back cover
1. Insert the tabs on the inside bottom
edge of the back cover into the slots
on the bottom edge of the phone.
2. Press the cover down onto the phone
to lock in place.
Charging the battery
The battery is not fully charged when
first unpacked and should be used up
completely before charging the battery
for the first time. While charging the
battery, charge it for eight hours for the
first time and afterwards at least two
hours (the battery is 90% charged in two
hours) each time.
Use the provided charger cable for
charging. Connect one end of the
charger cable into the phone and the
other end into a wall outlet to begin
charging.
You can also charge your phone using
the USB data cable while it is connected
to the PC as an altern ative to the charger
cable.
• Do not remove the battery while
charging to avoid possible damage.
• It takes at least one chargingdischarging cycle for the battery to
reach its peak performance.
• When the battery is discharged, the
charging may not start immediately
when you plug in the conne ctor. Wait 2
to 5 minutes for the phone to begin
charging.
• Charging is only possible within a
temperature range of 0 °C (+32 °F) to
+45 °C (+113 °F).
Icons in charging
Different messages and icons may
display while charging.
The phone may show the following
icons when it is switched off:
Page 15
15Startup
Charging is in progress.
Charging is complete.
Invalid battery. Please use a
genuine one.
Invalid charger. Please use a
genuine one.
Battery temperature is too high
and charging is terminated.
Please unplug the charger and
wait for the battery to cool down
before recharging.
Timeout of charging. Charging
is terminated. Please unplug the
charger, wait for 10 seconds and
then re-plug the charger.
Charging error may refer to
over-current protection for the
charger or ov er-voltage
protection for the battery. Try to
replace the charger or the
battery.
microSD card
The microSD card gives your phone a
very large memory capacity. This allows
you to save multimedia data, including
images, photos, MP3 audio files, ring
tones, and Java games. You can also use
this memory card to store any other
files.
• Your phone can support a microSD
card with capacity up to 2GB.
• Your phone supports a microSD card
using FAT32 file system only.
• You are strongly recommended to
transfer and store the newly added
programs on your external memory.
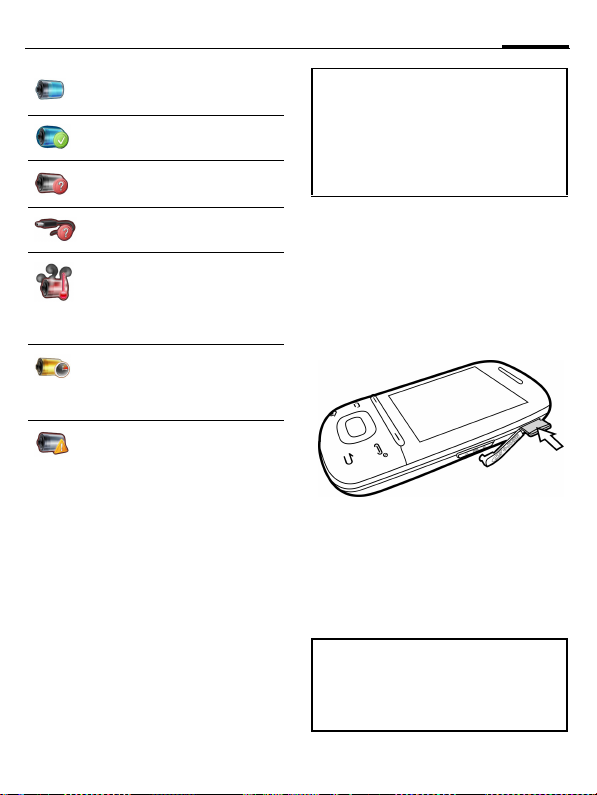
Inserting the microSD card
1. Swing the cover of the microSD card
slot out.
2. Insert the entire microSD card into
the card holder. Ensure that the card's
metal contacts face down.
3. Close the cover of the slot.
Removing the microSD card
1. Swing the cover of the slot out.
2. Press the microSD card to release it.
3. Close the cover of the slot.
The newly added programs cannot be
activated if the program files are stored
on the removed microSD card. Yet you
can still see the program access in the
menu of your smartphone.
Page 16
Startup16
Switching the phone on/off
Switching the phone on
After you have installed the battery and
finished charging it, you are ready to
switch on the phone. Press and hold
to switch the phone on.
You may be required to enter the PIN
code.
The first time you switch on the phone,
you will be guided through a series of
setup screens. See "F irst time startup" o n
page 16.
It may take a while to po wer on the phone
for the first time before it enters the setup
screen.
Entering the PIN
Enter your PIN using number keys and
confirm with .
The PIN (Personal Identification
Number) is the password provided by
your network operator. You need this
password in order to use the SIM card.
When the PIN code entered has been
accepted, the phone will automatically
search for the designated network. This
search process may take a few seconds.
• The SIM card can be protected with a 4to 8-digit PIN.
• The SIM card will be locked if you enter
the PIN incorrectly three times before
the correct one. You must now enter the
PUK (Personal Unbl ocking Key) for the
SIM card in order to unlock it. Please
contact your service provider to obtain
a PUK.
• To activate/deactivate/change PIN, see
"Change SI M PIN" on page 26 .
First time startup
After you have installed the battery and
finished charging it, you are ready to
power on the phone. The first time you
power on the phone, you will be guided
through a se ries of setup screens. F ollow
the on-screen instructions or the steps
below to start up your phone and
complete the initial setup.
1. With the battery and the SIM card
inserted, press and hold to
power on the phone.
2. Wait for the phone to boot up with
the BenQ screen. This may take a
moment.
3. If your SIM card is protected by the
PIN, you will be req uired to enter the
PIN when the phone is powered on.
Press (Done) or to
proceed.
4. Set up the time information,
including the time zone of your
location, the date and the time. Press
(Next).
Page 17
17Startup
Or you can set the time information
later while synchronising your phone
with a PC.
5. Press (Next) to enter a
password if you want to protect
access to your data and available
networks while using the phone. If
you do not need the password, press
(Skip).
6. Press (Next) to set an e-mail
account if you want to send and
receive e-mail messages on this
phone. Or press (Skip) to
complete the setup process.
Please note that your phone needs about 5
seconds to finish the booting procedure.
If you want to switch the power off after
you power it on, wait for 5 seconds to
power off the phone.
Signal strength
The signal strength is indicated in the
top right corner of the display. The
number of bars displayed indicates the
strength of the signal (the more bars the
stronger the signal).
Strong signal.
The signal stre ngth meter will show no
bars if the phone is not able to detect the
designated network or links to a network
that you are not authorised to use. You
will only be a ble to make emergency calls
in this case.
Quick list
Quick List provides quick access to
manage the phone status and switch
between different profiles.
When the slider is open, press and hold
to bring up Quick List.
Power off Switch phone off.
CommManager
All profiles are provided in Quick List as
well. For information on profiles, see
"Profiles" on page 24.
Control the connectivity of
the phone.
Sleep mode
The phone will automatically enter the
sleep mode if it is inactive for 1 minute
by default. During the sleep mode, the
screen shuts off and the system stands
by for incoming phone calls or user
input. To switch on the phone again,
press any key when the slider is open, or
press when the slider is closed.
You can customise the length of
inactivity before entering the sleep
mode. See "Power Management" on
page 27 for more on display time out
settings.
Keypad lock
Keypad lock prevents inadvertent
phone usage. However, you can still be
called and you can still make an
emergency call.
Page 18
Startup18
• By default, the keys are locked when the
slider is closed.
When the slider is open and in Home
screen, press and hold and then
press (Yes) to activate the keypad
lock.
Or, when the slider is closed, press and
hold to activate the keypad lock.
• To deactivate the keypad lock:
When the slider is open, press
(Unlock) and then .
Or, when the slider is closed, press
(Unlock) and then .
Master Reset
Master Reset restarts the smartphone by
erasing all data, programs as well as
system settings, and thus returns to its
factory default settings.
1. Select Start > System > Master Reset.
2. You will be required to enter a default
passkey 1234 to proceed. Press
(Yes) to confirm, or (No)
to exit.
Once confirmed, the phone will be powered
off and on automatically. You need to
proceed with the startup procedure again.
See " First time star tup" on p age 16.
Switching the phone off
• Press and hold to switch the
phone off.
• Press and hold and select
Power off.
Navigating the menu
The phone features various functions
and settings organised in menus and
submenus.
•Press (Start) in Home screen to
open the main menu.
• Scroll the menu by pressing ,
•If you find More... in your menu list,
• Confirm the selection with .
• Follow the on-screen commands and
, , and .
Alternatively, press the key
corresponding to the number shown
before an item, if available.
you can either press the number
shown before it, or press to
find out more options.
press the corresponding key to
complete/exit the configuration.
• Main menu can be organised in
different views: BenQ list, Microsoft
grid, and Microsoft list. The order and
levels of the item s in Main menu might
slightly be different according to the
menu style you choose. To change
menu view, go to Start > System >
Settings > Presentation Style > Menu
style.
• In this user man ual, the steps needed to
reach a function refer to the Main menu
in BenQ list style and are shown in
condensed form, for example: Start >
System > Settings.
Page 19

19Home screen
Home screen
You will enter Home screen after you
have completed the first-time startup
procedure. You can use Home screen to
view the following information:
• Date and time
• Name of network operator
• Most recently used programs
• Upcoming appointments
• Commonly used programs
(predefined)
• Current phone profile
• Phone locked/unlocked status
• On/Off for Phone carrier, Bluetooth
function and Wi-Fi
• Windows Live™ sign-in access
(depending on your setup)
Information shown on Home screen may
vary according to the Home screen layout
you select. To change the appearance of
Home screen, go to Start > System >
Settings > Presentation Style.
In addition, two soft keys are available at
the screen bottom as access to different
functions/menus depending on the
actual situation. For example, in Home
screen, you can see Start and Contacts.
As y ou switch to a different screen,
program, or when a new message is
received, names and commands for the
two soft keys may vary at the screen
bottom. To access the designated
functions, press and .
The below figures demonstrate some of
the various components shown on the
screen.
Default BenQ Home screen:
Windows Default Home screen:
Page 20
Home screen20
Title bar
Located at the top of the screen, the
title bar contains various system icons
showing the system status of the
phone. See"Home screen icons" on
page 20 for details.
Flash display
Flash animations as your screen
display available only when you select
BenQ HomeScreen to be your Home
Screen layout. See "Presentation Style"
on page 24 for details.
Launch bar (predefined)
Up to 6 commonly used programs will
be displayed as a quick access. See
"Presentation Style" on page 24 for
details.
Soft key bar
• The Start button: press to
bring up the main menu, which is an
access to all the programs and
utilities in this phone.
• : access the designated
function.
Recently used programs
10 recently used programs will be
displayed here as a quick access.
Personal information
management
Personal information such as the
upcoming appointments, your
currently selected profile, number(s)
of unread text message(s) and missed
call(s) will be displayed.
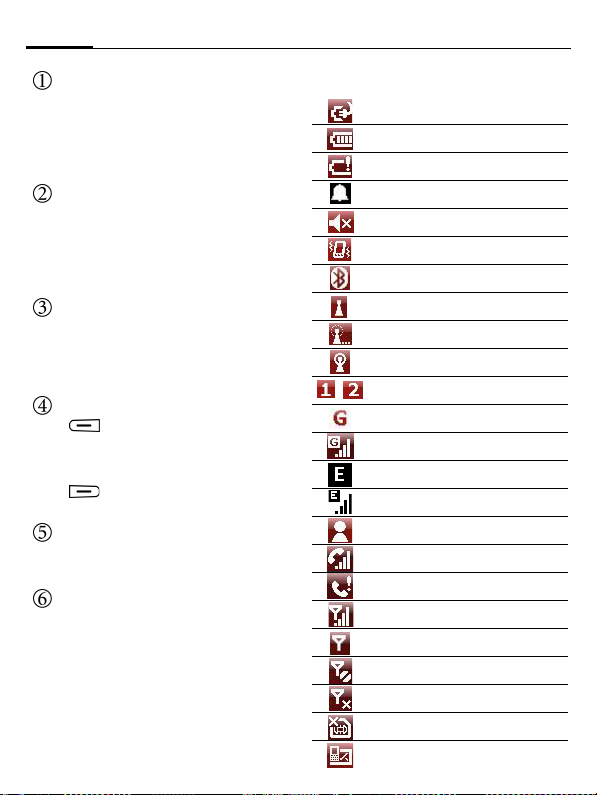
Home screen icons
Battery is charging
Battery status
Battery low
Alarm set
Silent profile active
Vibrate profile active
Bluetooth technology active
Wi-Fi active
Wi-Fi network searching
Wi-Fi connected
/
Line 1/2 in use
GPRS available
GPRS in use
EDGE available
EDGE connected
Instant message received
Call incoming
Phone call(s) missed
Signal strength
Searching for phone network
Phone service unavailable
Phone service off
SIM card not loaded
New message(s) received
Page 21
21Input methods
Available icons may vary depending on
the style of the h ome screen you are using,
the program you are running and the
service available in your area. For
example, a "G" icon is displayed if you
have subscribed to a GPRS service with
your SIM card and the GPRS signal is
available in the area where your phone is.
Input methods
When an editing screen is displayed, the
current text input method is indicated
in the upper right corner of the display.
Available text input methods may vary
depending on the language version of
the operating system. Change the
language in Start > System > Settings >
Regional Settings.
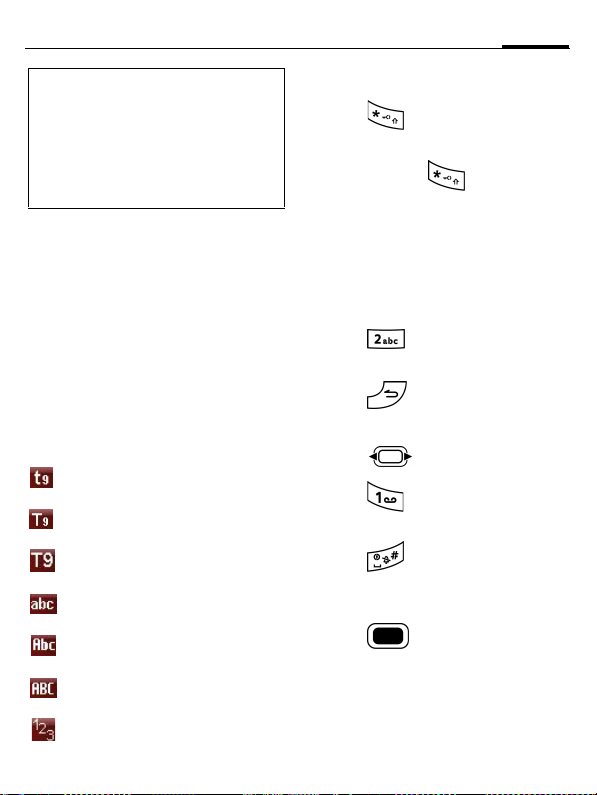
Following are some of the input
methods:
Lowercase text input with
T9.
Text input with T9 with the
first letter capitalised.
Uppercase text input with
T9.
Lowercase text input
without T9.
Text input without T9 with
the first letter capitalised.
Uppercase text input
without T9.
Numeric input.
Changing input methods
• Press repeatedly to select an
input method available in the same
language.
• Press and hold to select more
input methods and settings.
Text input without T9
• Press a number key repeatedly until
the required letter appears. After a
brief interval, the cursor will advance.
Example:
Press once to enter the letter
"a", twice to enter "b", etc.
Press and hold to write the number.
• Press to delete the letter left of
the cursor or marked text.
Press and hold to delete text quickly.
•Press to move the cursor
(forwards/back).
• Press once/repeatedly: . , - ? ! ’
@ / : 1.
Press and hold: insert 1.
•Press to insert a space.
Press and hold to open the symbol
table to select a symbol or a special
character.
• Press to insert a line feed.
Page 22

Input methods22
Text input with T9
T9 predicts the most probable word
from a sequence of keys you press.
1. Simply press the keys where the
relevant letter is located once.
2. If several options are found in the
dictionary for a key sequence (a
wo rd ), t he m os t pr ob abl e i s di spl ay ed
first.
3. If the first highlighted word is not the
word you want, press to
highlight the desired word.
4. Press or to enter the
highlighted word.
5. To end a word, press to move
the cursor to the right of the word.
• Press to insert space.
Press and hold to open the symbol
table to select a symbol or a special
character.
• Press / to move the
cursor.
• Press to insert a line feed.
• Press to delete the letter left of
the cursor or marked text.
Press and hold to delete text quickly.
Adding a new word to the T9 dictionary
If a desired word is not in the list of word
suggestions (as indicated by an Add
Word option in the list), the word is not
yet included in the T9 dictionary. You
can add the word to the dictionary.
1. Select Add Word at the end of the list
of word suggestions.
2. In the Add My Word field, enter the
new word.
3. Confirm with (Done).
The next time you ente r the word, it is in
the list of word suggestions.
To edit the new words you added to the
T9 dictionary, press and hold ,
and go to T9 Settings > My Words.
T9 settings
To setup your preferences for T9 text
input, press and hold , and select
T9 Settings.
Preferences Set whether you want the
My Words You can add/delete the
Help Online T9® Text Input user
About T9 Details on T9® Text Input.
list of word suggestions to
complete the predicted
word, and whether you
want to show the next word
prediction, and more.
words to/from the T9
dictionary. Note that the
predefined words cannot
be deleted.
guide.
Page 23

23Phone settings
T9® Text Input is licensed under one or
more of the following: U.S. Pat. Nos.
5,187,480, 5,818,437, 5,945,928,
5,953,541, 6,011,554, 6,286,064,
6,307,548, 6,307,549, and 6,636,162,
6,646,573, 6,970,599; Australia Pat. Nos.
727539, 746674, 747901; Austria Pat. Nos.
AT225534, AT221222; Brazil P.I. No.
9609807-4; Canada Pat. Nos. 1,331,057,
2,227,904, 2,278,549, 2,302,595; Japan
Pat. Nos. 3532780, 3492981; United
Kingdom Pat. No. 2238414B; Hong Kong
Standard Pat. No. HK1010924; Republic
of Singapore Pat. Nos. 51383, 66959,
71976; European Pat. Nos. 0 842 463
(96927260.8), 1 010 057 (98903671.0), 1
018 069 (98950708.2); Republic of Korea
Pat. Nos. KR201211B1, KR226206B1,
402252; People’s Republic of China Pat.
No. ZL96196739.0; Mexico Pat. Nos.
208141, 216023, 218409; Russian
Federation Pat. Nos. 2206118, 2214620,
2221268; and additional patents are
pending worldwide.
Entering symbols and special characters
1. Press and hold to open the
symbol table.
Alternatively, you can press and hold
and select Symbols.
2. Press / to navigate to
character.
3. Press (Next) to switch to next
page.
4. Press to insert character.
My Text
My Text refers to short excerpts of texts
to be inserted in your SMS or MMS
messages.
Inserting My Text
1. Press (Menu) in your text
editing screen.
2. Select My text and then use
scroll to the desired text template.
3. Press (Insert).
Editing My Text
1. When a te xt template is selected in My
Text, press (Menu) and select
Edit My Text.
2. Revise the text.
3. Press (Done) to save the new
text template.
Phone settings
Start > System > Settings
You can customise how your
smartphone looks and behaves by
changing its internal settings.
Page 24
Phone settings24
Phone
You can change settings like auto
answer, auto power on/off, auto SMS
reply, call barring, call forwarding,
related call options, call waiting, caller
ID, channels, connection alert, fixed
dialling, and showing your number, as
well as network related settings for
phone calls.
Sounds
System sounds provide an audio alert
when your attention is needed, whether
you have an upcoming appointment, an
incoming phone call, or someone has
sent you an instant message.
This option lets you enable sound for a
number of occasions. You can turn off
or turn on to select preferred ring tone
and other event sounds (sounds
produced by the operating system to
indicate errors, for example), program
sounds (sounds produced by software
you have downloaded) and their
notifications. You can also customise
the keypad tone/slider sound and set it
to be off, click or tone.
Profiles
A profile is a group of settings that
determine, for example, whether the
phone will alert you to incoming calls
through a ring tone or a vibrating alert,
and how ring tones in general are used
on the phone. These settings allow the
phone's operations to best suit the
environment you are in.
You can press and hold to
activate/deactivate Vibrate profile in
Home screen quickly. Alternatively,
you can press and hold for
access to other profiles.
Presentation Style
Aside from acting as the launch point
for most activities on your smartphone,
Home screen is a powerful canvas on
which you can customise to display
pertinent information and to better suit
you aesthetically.
Home screen layout/Color scheme
provide a listing of item/color
arrangement on your Home screen or
device available for your use. B y loading
a new layout/color scheme, you can
change the skin-color distribution,
adjust the Home screen height and font,
and arrange the way the appointments
and date to be displayed on Homescreen.
You also have the option of selecting a
JPG or BMP image as the Background
image for your device.
Homescreen theme provides a listing of
Home themes installed on your phone.
By loading a new theme, the
arrangement of color and background
image in the Start menu and sub-menus
will be changed in your favour; the
Page 25

25Phone settings
BenQ Homescreen will also display
different animations.
Launch bar provides up to 6 commonly
used programs which will be shown on
your Home screen as a quick access.
Check/uncheck each item to add/erase
the predefined programs shown on the
launch bar.
You also have the option of selecting the
way the Menu style will be presented,
while in the option of Messenger, you
can choose whether to show a dialogue
window whenever a SMS/MMS
message is received.
In the option of Time out, choose how
many minutes of inactivity will result in
returning to Home screen.
• Color Scheme/Background image are
not available when you select BenQ
HomeScreen as your Home screen
layout.
• Launch bar is available only when you
select BenQ HomeScreen as your
Home screen layout.
Clock & Alarm
This option lets you set the system clock
and alarms.
Set the time zone, date and time in Date
and Time; the information is then used
as your system clock.
Set the alarm time and switch the alarm
on in Alarm Clock. is displayed in
Home screen when the alarm is
switched on.
To set more alarms and for advanced
time options, go to Start > Organizer >
Alarm Clock onPage 50 .
Depending on the style of the Home
screen you select, the icon may not
be shown on the display.
Connections
You need to configure the connections
properly in order to connect to other
networks. Refer to "Connectivity" on
page 60.
Security
The phone and SIM card are protected
against misuse by several security codes.
Keep these confidential numbers in a
safe place where you can access them
again if required.
Device
Lock
PIN (Personal Identification
PIN2 This is needed to set the
Protect your phone from
unauthorised use.
Must be entered at the first
security setting.
Number) Protect your SIM
card from unauthorised
use.
charge detail display and to
access additional functions
on special SIM cards.
Page 26

Phone settings26
PUK (Personal Unblocking Key)
Used to unlock SIM cards
after the wrong PIN has
been entered three
consecutive times.
Device Lock
This option lets you enable a password
lock to your smartphone if it is left
unused for a certain time.
1. Check Prompt if device unused for
and scroll to select a time in minutes
or hours.
2. Enter a password in Password, and
then enter it again in Confirm
password.
3. Select (Done) to save the
setting.
• T he SIM card will be lo cked if you ente r
the PIN incorrectly three times before
the correct one. You have to enter the
PUK for the SIM card in order to u nlock
it. Please contact your network operator
to obtain a PUK.
• If the PUK has been lost, please contact
your network operator.
Disable/Enable SIM PIN
The PIN is the password provided by
your network operator and is usually
requested each time the phone is
switched on. You can deactivate this
feature but you then risk unauthorised
use of your SIM card. Some network
operators do not permit deactivating the
PIN control.
1. Select Disable/Enable SIM PIN.
2. Enter PIN and confirm with
(Done).
Change SIM PIN
You can change the PIN to any 4- to 8digit number you find easier to
remember.
1. Select Change SIM PIN (available
when SIM PIN is enabled).
2. Enter current PIN code in Old PIN.
3. Enter new PIN code in New PIN.
4. Re-enter new PIN code in Confirm
new PIN. Confirm with (Done).
Change PIN2
(Display only if PIN2 is available)
Proceed as described under Change
SIM PIN.
Change Private Password
You can change the private password
(default: 0123 ) set to protect your Private
Folder and Private Contact.
Proceed as described under Change
SIM PIN.
Private Folder
Entry of the private password (default:
0123) is required to access Private Folder.
You can select whether to protect access
to your private folder with private
password.
Page 27

27Phone settings
Private Contact
Entry of the private password (default:
0123) is required to access Private
Contact.
Check to activate Private Mode, protect
your SMS/Call logs and make
distinctions by using private messagelist/private contact icons. You can also
choose a period for password authority
timeout.
Certificates
Public key certificates let you establish
your identity wh en you are logging onto
a secure network. Certificates also aid in
establishing the identity of other
computers that you might want to
connect to. Using certificates helps
prevent unauthorised users from
accessing your device or data.There are
three types of certificates that can be
installed on your device, and they are
managed in the same way. Consult your
IT department for information on
certificates and device security.
Encryption
Check to encrypt the files stored on the
storage card so that the files are readable
only by your smartphone.
Remove Programs
This option lets you remove a program
from the smartphone.
1. Select a program, press (Menu)
and then select Remove.
2. Follow the on-screen instructions to
complete uninstallation.
• You can only remove programs you
have installed on the storage memory.
• Programs that came pre-installed on
your phone cannot be removed.
Power Management
This option lets you check how much
battery power is left, and determine the
backlight brightness and whether to
enable front LED. You can specify
respectively when the phone uses the
battery power and the AC power, the
duration of the display’s backlight and
how long the display and keypad
backlight remains on after the last key is
pressed.
Accessibility
Multipress
time out
Confirmation
time out
In-call alert
volume
Smartdial
Setting
Set the length of the
pause between key
presses.
Set the time elapsed
before an unconfirmed
action times out.
Set the volume of the
alert tone during a call.
Set the method for fast
search through contacts
and call history.
Page 28

Phone settings28
Regional Settings
This option lets you choose a language
for the operating system, and customise
how data appears on your smartphone,
such as currency, time, dates and
numbers.
Owner Information
Just as it is wise to label valuable assets
with your name or e-mail address, so is
it important to stamp your smartphone
with your information.
Fill in your identification and notes to
reflect your personal contact
information.
About
This option gives you technical details
about the software version of Windows
Mobile® powered smartphone running,
processor type and total available
internal memory. Copyrights
information reveals license being used
by your version of Windows Mobile®
smartphone.
To find out the expansion slot (storage
slot) usage, go to Start > System > Task
Manager > (Menu) > System
Information.
Error Reporting
When the smartphone detects an error,
a text error report - like the one in
Windows® XP - is generated and can be
sent to Microsoft if you choose to do so.
Customer Feedback
Enable this option to join the Microsoft
Customer Experience Improvement
Program by sending your feedback to
Microsoft.
NFC Function Settings
* Network support dependent.
Your phone provides NFC (Near Field
Communication) technology which
enables mobile payment, identification
and communication with other devices
within certain range. You can use your
phone as fare-paying device when
taking public transportation.
Using the Phone as Card Reader
You can use your phone as an NFC card
reader. To enable this function, check
RF-Tag detect funct ion. Simply move the
card to be identified towards your
phone. Once detected, your phone will
vibrate and perform the corresponding
service (the services provided should
vary according to the network service
providers).
Using the phone as smardcard
The SIM card you use must support NFC
function. For details on the supported
types of cards, please contact your
network provider.
If the type of the SIM card inserted is
correct, the screen will display its card
type in Certification resource. You can
then use your phone as fare-paying
Page 29

29Calling
device to pay ticket fare or to add value
to it.
Slider setting
This option provides further settings
about the use of the slider. You can also
set the Slider Key Lock to be disable,
prompt or enable.
Windows update
This option provides the latest updates
for Windows mobile®.
Calling
Making a call
Dialling with number keys
1. Enter the phone number by pressing
the number keys in Home screen.
2. Press or . The number
displayed is dialled.
To clear a wrong number, press .
Dialling previous numbers
1. Press to enter the Dial screen.
The call records are displayed in the
lower part of the screen.
Or you can go to Start > Phone > Call
History.
2. Press to select the number
you want to dial.
3. Press .
Entering international dialling codes:
Press and hold until “+” is
displayed. Enter country and area codes
then.
Making a call from Contacts
1. Open Contacts by either pressing the
corresponding key in Home screen or
going to Start > Phone > Contacts.
2. Scroll and press to select a
contact person.
3. Press or (Call) to dial.
Making a speed dial call
Speed dialling allows you to make a call
by pressing and holding the key
assigned for a contact.
You must assign a number as the
shortcut for a particular phone number
in order to use speed dial for that phone
number.
Adding a speed dial entry
1. Open Contacts by either pressing the
corresponding key in Home screen or
going to Start > Phone > Contacts.
2. Select a contact person and press
to open the contact
information.
3. Press (Menu) and select Add to
Speed Dial to create a speed dial entry
for this contact person.
4. Assign a key available for this speed
dial entry.
Page 30

Calling30
5. Press (Done) to save and exit.
The numbers you can use for speed dial
assignment are 2 to 99. The first speed
dial entry assigned for is
voicemail.
Making a speed dial call
Press and hold the number that is
designated for a contact person in
Home screen. The phone then starts
dialling automatically.
Alternatively, go to Start > Phone >
Speed Dial to view the list of shortcuts.
Scroll to the contact person, and then
press (Go) or select (Menu)
> Run.
• If the key number you press is
designated for a function instead of a
contact person, the phone will not dial
but activate the function.
• If the shortcut number is 2-digit, press
the first key and then press and hold the
second one.
Dialling using Speech Commander
Start > System > Speech Commander
Or
Press .
After hearing the prompt “Say
command”, follow the on-screen
instruction and say the predefined
commands for dialling.
• Call <Contact> at
<Home/Work/Mobile>: make a call
depending on how you saved these
numbers.
• Digit Dial/Redial/Callback: say the
number to dial.
Select Menu > Help for usages and
examples.
Listening to voicemail
Press and hold .
You will be asked to set the voicemail
number if it is not stored o n your SIM
card.
Setting connection alert
You can set the phone to vibrate or flash
the backlighting when the recipient of a
call has answered.
To setup connection alert, go to Start >
System > Settings > Phone > Connection
Alert.
Answering a call
Press or (Answer) to
answer a call.
Warning!
Please make sure you have a ccepted the
call before holding the phone to your ear.
This will avo id damag e to your hearin g
from loud ringtones.
Additional information
To answer the call by pressing any key, go
to Start > System > Settings > Phone >
Call Options, and check Any key answer.
Page 31

31Calling
Rejecting a call
Press or (Ignore) to reject
an incoming call.
Muting a call
Press to mute an
incoming call.
Ending a call
When you are finished with your phone
call, press to end the call.
Adjusting the volume
During a call, press to
adjust the volume.
Making a conference call
* Network support dependent.
You can create a three-way conference
call between yourself and two or more
parties. Call up multiple parties one by
one and link them together in a
multiparty call.
1. Make a call to the first person.
2. While the first call is active, press
(Menu) and select Hold. The
active call is put on hold.
3. Dial a second number to call the
second person.
4. While the second call is active, press
(Menu) and select Conference
to engage in a three-way conference
with the first and second parties.
5. If you want to speak to more people,
repeat steps 3 and 4.
Making an emergency call (SOS)
You can make an emergency call even if
your phone is locked or cannot access
your network, or if there is no SIM card
inserted, as long as your are within
range of a network of the type supported
by your phone.
1. Enter 112 (the international
emergency number).
2. Press .
Talking with speakerphone
Turn the speakerphone on and continue
your conversation while using other
phone functions. This is a great feature
for allowing your colleagues to
participate in your call.
1. First make a phone call.
2. Press (Menu) and select
Speakerphone On.
3. To turn off the speakerphone, press
(Menu) and select
Speakerphone Off.
To turn the speakerphone on/off, y ou can
also press and hold .
Page 32

Using the programs32
Talking with the handsfree headset
You can put the phone aside during a
call and hear the caller via the headset.
To activate handsfree talking, you need
to connect a handsfree headset to your
phone first.
To use a Bluetooth-enabled headset
during a call,
•select Menu > Turn Hands-free On to
activate the function, or
•select Menu > Turn Hands-free Off to
deactivate the function.
Warning!
Always switch off "handsfree talking"
before holding the phone to your ear.
Otherwise you will dam age your hearing.
Additional information
To set how quickly the incoming call is
answered during handsfree operation,
go to Start > System > Settings > Phone
> Auto Answer.
Using the programs
Many of the programs require network
connectivity. Make sure that the phone
connectivity is configured properly
before you activate these programs.
The different connectivity methods are
automatically used depending on the
surrounding network and your
provider. Depending on your provider
you may set which method to use.
Programs
Press (Start) in Home screen to
access the main menu, and then to all
the built-in programs and tools.
Icon Description Where
to find
Phone
Contacts
An electronic phone book
for managing y our contacts.
Call History
Records of the past phone
activity.
Speed Dial
A list of single or doubledigit numbers to access the
contacts/functions quickly.
Voice Mail
Access to your voicemail.
Page
34
Page
36
Page
36
Page
37
Page 33

33Using the programs
Icon Description Where
to find
Messages
Messaging
Send and receive e-mail,
SMS, MMS messages.
IM
An instant messaging
application that combines
multiple instant messaging
networks.
Messenger
Send and receive instant
MSN messages.
Email Auto Setting
Set your e-mail accounts
easily.
Entertainment
Windows Media
Audio/video file player.
Camera
Access to digital camera and
camcorder.
FM Radio
Access to FM radio stations.
Pictures & Videos
View digital photos or video
files.
Ringtone Editor
Edit a music file and assign
it as new ringtone.
Bubble Breaker
A pre-installed game.
Page
37
Page
41
Page
41
Page
42
Page
42
Page
42
Page
45
Page
45
Page
47
Page
47
Icon Description Where
to find
Solitaire
A pre-installed game.
Internet Radio
Access to internet radio
stations.
Internet
Internet Explorer
A Web browser for
browsing various on-line
contents on the Internet.
Windows Live
Access to a group of
Microsoft services.
RSS
Read the news headlines
distributed by the websites.
STK
Extra services provided by
your SIM card carrier.
Organizer
Alarm Clock
Set the alarm time.
Calendar
Schedule appointments.
Audio Notes
Voice recorder.
Tasks
Manage your to-do items.
Page
47
Page
47
Page
48
Page
48
Page
49
Page
50
Page
25
Page
50
Page
50
Page
51
Page 34

Phone34
Icon Description Where
to find
System
Settings
Set up custom settings for
your phone.
Task Manager
Manage the programs in
use.
CommManager
Control the connectivity of
your phone.
Battery Storage Status
View remaining capacity of
the battery and remaining
space in other storage.
File Explorer
View files and folders in the
phone.
ActiveSync
Synchronise data between
your smartphone and a PC
(or an Exchange Server).
SimManager
Copy the phone book data
from or to a SIM card.
Speech Commander
Use voice command to
control programs.
Internet Sharing
Set up modem link.
Page
23
Page
51
Page
51
Page
51
Page
51
Page
52
Page
56
Page
60
Page
57
Icon Description Where
to find
Master Reset
Delete all data on the phone
and restore it to the factory
settings.
Extras
Calculator
Electronic calculator.
2D barcode
Scan and decode the
barcode to show
information stored in it.
Java™
A Java manager that allows
you to download and run
Java programs.
Your newly installed programs will be
listed in Extras, while the newly installed
Java program s will be listed i n Extras >
Java.
Page
18
Page
57
Page
58
Page
58
Phone
Contacts
Start > Phone > Contacts
You can store contacts with a variety of
phone and fax numbers as well as
additional contact details. You can enter
both personal and business information
such as picture, ringtone and company
name.
Page 35

35Phone
• shows beside the contacts stored
in your phone memory;
• shows beside the contacts stored
on your SIM card.
• shows beside your Windows
Messenger contacts synchronised to the
phone.
• shows beside the inv alid Windows
Messenger contacts.
Adding new contacts
1. Press (New).
2. Select a save location: Outlook
Contact/SIM Contact.
3. Scroll to the desired data fields and
fill in the fields. Different fields will
be available depending on the save
location.
4. Press (Menu) for more options.
Different options will be offered
depending on the save location.
5. Save with (Done).
Options menu for contacts
Different functions are offered
depending on the current situation.
Edit Edit the entry.
Send
Contact
Copy
Contact
Send as
vCard
Send the contact
information by beam or
SMS.
Add new contact with
duplicate information.
Send the contact
information by MMS.
Send
MMS
Delete
Contact
Block
Contact
Privatize
Contact
View By A list is displayed with
Filter Apply different filter
Print via
Bluetooth
When viewing a contact only
View All
Calls
Save to
Contacts/
SIM
Send Text
Message
Add to
Speed
Dial
Send an MMS to the
contact person.
Delete the contact.
Block the contact.
Protect the contact with
Private Password.
contacts that contain the
chosen feature.
criteria to all contacts.
Send the contact
information to a Bluetooth
printer and print it out.
You need to create the
Bluetooth connection
between your phone and
the printer in advance.
View the call history of the
contact.
Copy the contact to
phone/SIM.
Send an SMS to the contact
person.
Assign a Speed Dial key for
this contact.
Page 36

Phone36
Privatize Contact i s available onl y when
Private Mode is activated. See "Private
Contact" on page 27 for details.
Call History
Start > Phone > Call History
The phone stores information about all
voice calls made to and from the phone
in a call log, which is named Call History
on your phone. In this view, you can see
at a glance the phone numbers of all
incoming, outgoing and missed calls
along with when the activity occurred.
• shows beside missed calls;
• shows beside dialled calls;
• s hows beside answered calls.
• Select an item and confirm with
, and a small dialogue will
show the exact time and duration of
the call.
• Press (Save) on an item and
you will be able to save the entry to
Contacts (so long as it is not already
in Contacts).
• Press (Menu) to find the
contact information, send a text
message or e-mail, delete one or all
items, view the summary of how
many minutes were used for one and
all calls in the log.
• Press (Menu) and select Filter to
show missed calls, incoming calls or
outgoing calls separately.
Speed Dial
Start > Phone > Speed Dial
You can assign one important
number/function to a single or doubledigit number from 2 to 99. These
numbers can then be used as shortcuts
to start functions/dial numbers (speeddial numbers).
For details about speed-dial, see
"Making a speed dial call" on page 29.
Setting a function shortcut
Before using this function, you have to
select Microsoft grid or Microsoft list in
Start > System > Settings >
Presentation Style > Menu Style first.
1. Scroll to a function.
2. Select Menu > Add Speed Dial.
3. Name the shortcut and assign a
number for this function.
4. Confirm with (Done).
is predefined as the speed dial key
for the voicemail number. You cannot
change its function.
Starting function/calling number using shortcuts
•Press and hold the corresponding key
to start the function/dialling.
•Go to Start > Phone > Speed Dial, and
then press (Go).
Page 37

37Messages
Voice Mail
Start > Phone > Voice Mail
Select to access your voicemail. You can
also enter it by speed-dialling . See
Page 30 for details.
Messages
Messaging
Start > Messages > Messaging
You can create and receive Internet email, multimedia and text messages in
Messaging.
Internet e-mail messages are sent by
using an address you receive from your
Internet Service Provider (ISP). Text
and multimedia messages are sent and
received through your mobile phone
service provider by using a phone
number as the message address. Before
sending a multimedia message, you
must complete the MMS settings first.
Text Messages
Long SMS messages you send are
automatically divided into concatenated
SMS messages.
Writing/sending an SMS
1. Select Menu > New in the editor
screen.
2. Press to switch to different
fields and then enter text/add items
(see SMS options).
3. Press Add Recipient in Menu to select
a contact person, or enter a number
manually in the To: field.
4. Press (Send).
SMS options
Different options will be offered
depending on the current field you are
about to fill in.
Add
Recipient
Check
Names
Insert Insert pictur es, voice notes,
My Text Insert pre-set template.
Save to
Drafts
Cancel
Message
Message
Options
Select a contact person
from Contacts list.
Display the recipient’s
name if the entered
recipient’s number is saved
in Contacts already.
and files.
Save the message in the
Drafts folder.
Discard the message.
Set if you want message
delivery notification.
Page 38

Messages38
MMS
The Multimedia Message Service
(MMS) enables you to send texts,
pictures/videos and sounds in a
combined message to another mobile
phone or to an e-mail address. All
elements of an MMS message are
merged into a “slide show”.
Ask your service provider whether this
service is available. You may need to
register separately for this service.
Writing/sending an MMS
1. Press (Menu) and select New in
the editor screen.
2. Press to switch to different
fields and then enter text/add items
(see MMS options).
3. Press Add Recipient from Menu to
select a contact person, or enter a
number/e-mail address manually in
the To: field.
4. Press (Send).
MMS options
Different options will be offered
depending on the current field you are
about to fill in.
Add/
Remove
Recipient
Check
Names
Template Set the current MMS
Insert Insert
Remove
Subject
Slides To insert/delete a slide, go
Options Set Background Color and
Preview Start playback of all slides.
Save to
Drafts
Cancel
Message
Select a contact person
from Contacts list.
To display the recipient’s
name if the entered
recipient’s number is s aved
in Contacts already.
message as a template or
import one from gallery.
picture/video/audio/short
text template/vCalender/
vCard or other file(s)
stored on the phone/the
loaded storage card.
Remove
picture/video/audio files
you have inserted.
to the next/previous slide,
move slides or set the slide
duration.
Send Options.
Save the message in the
Drafts folder.
Discard the message.
Page 39

39Messages
You can receive, view, compose and
send e-mail in HTML format.
To create new e-mails, you have to
configure at least one e-mail account.
A list of accounts is displayed if more
than one account is configured.
Before an e-mail can be read, it must be
retrieved from the server.
The files listed and the options menu
vary depending on the receive server
type of the selected account.
Exercise caution when o pening messages.
E-mail messages may contain malicious
software or otherwise be harmful to your
device or PC.
Setting up an e-mail account
You need to configure the Internet
settings in Connections.
1. Go to Start > Messages > Messaging
> New E-mail Account and fill in your
e-mail address.
2. Check Try to get e-mail settings
automatically from the Internet.
Alternatively, uncheck this option
and set up manually. You may need
to contact your e-mail service
provider for the settings in detail,
including the mail server type, the
mail server name, and account type.
3. Follow the on-screen instructions to
complete the setup.
You can also set up e-mail accounts easily
in Email Auto Setting. See Page 42.
Writing/sending an e-mail
1. Press (Menu) and select New in
the editor screen.
2. Press to switch to different
fields and then enter text/add items
(see E-mail options).
3. Press Add Recipient from Menu to
select a contact person, or enter a
number/e-mail address manually in
the To: field.
4. Press (Send).
E-mail options
Different options will be offered
depending on the current field you are
about to fill in.
Add/
Remove
Recipient
Check
Names
Insert Insert picture/voice
Select a contact person
from Contacts list.
Display the recipient’s
name if the entered
recipient’s number is s aved
in Contacts already.
note/file.
Page 40

Messages40
My Text Insert a text template.
Save to
Drafts
Cancel
Message
Message
Options
Save the message in the
Drafts folder.
Discard the message.
Set priority, security,
permission, and language.
Receiving and viewing new messages
When there are any new SMS/MMS/email messages received, you will be
notified by the message icon in the title
bar on the top of Home screen or the
flash message dialogue box appeared in
the center of your phone display. You
may also be inf ormed about the number
of new messages in Home screen,
depending on your region and the
software variant.
To view new messages, press
(Message).
Options for viewing SMS/MMS/e-mail messages
Different options will be offered
depending on the current situation.
New Start a new message.
Reply/Reply
All/Forward
Mark as
Unread/
Read
Move Move the current message
Folders Switch to different
Tools
Copy to
Phone/SIM
Send/
Receive
For MMS/e-mail only
Download
Message
For MMS only
MMS
Settings
Reply/reply all/forward the
current message.
Mark the current message
as unread/read.
to other message folders.
message folders. See Page
41.
• Switch Accounts: Switch
to different message
accounts.
• Empty Deleted Items:
Delete all messages stored
in Deleted Items.
• Options: Set up how
messages are displayed
and sent.
Copy the message to your
Phone/SIM.
To send/receive
message(s) manually.
To download the complete
message.
To set up MMS
connection.
Page 41

Message folders
By default, there are 5 different message
folders for SMS, MMS, and e-mail
respectively.
Inbox Incoming messages/e-
Deleted
Items
Drafts You can save a message/e-
Outbox Messages/e-mails failed to
Sent
Items
mails are saved here.
Messages/e-mails to be
deleted are saved here.
mail as a draft while
creating it.
be sent are saved here.
Messages/e-mails
successfully delivered are
saved here.
IM
Start > Messages > IM
Instant Messaging (IM) provides realtime communication service which lets
you connect to multiple IM networks
wirelessly.
You will be able to know if your friends
are available to chat online, and receive
instant messages from them from
different popular instant messaging
services on the Internet, including MSN,
Yahoo, Google Talk, AOL, Jabber, and
ICQ.
1. Select a service.
2. You will be required to enter your
account name and the password.
3. Press (Login).
Make sure you have configured the
Internet connection properly before
using IM service.
Messenger
Start > Messages > Messenger
This option provides the same chat
environment as Windows Live™ Messenger
on your PC. Us e it to see who is online, sen d
and receive instant messages, group chat,
tell contacts that you are unavailable, and
block contacts from seeing your status or
sending you messages.
You n eed to re gister a n MSN or Windows
Live™ Messenger account on the Intern et in
advance.
41Messages
Page 42

Entertainment42
1. When you launch this service for the
first time on your sm artphone, follow
the on-screen instructions to
complete Windows Live™ Setup.
2. You will be informed that your
Windows Live™ contacts are to be
added to your phone's address book.
Press (OK) to proceed.
3. Read the on-screen instructions and
refer to the websites as directed for
details about Terms of Use. Press
(Accept) to proceed.
4. Enter your e-mail address and the
password that you used for MSN or
Windows Live™ Messenger account
registration. Press (Next) to
proceed.
5. Check if you want to show Windows
Live™ services on Home screen and
access it quickly later on.
6. Select the types of data you want to
sync, i.e., Contacts and Messenger
and E-mail. The phone starts
synchronising the type(s) of data you
selected.
7. Once the synchronisation is
complete, your friends list in MSN or
Windows Live™ Messenger will be
displayed. Note that only friends
currently online are listed.
8. Scroll to a friend and press
(Send IM) to open a
conversation window to chat with
your friend.
Email Auto Setting
Start > Messages > Email Auto Setting
This option lets you set up e-mail
accounts easily. All you need to have is
the e-mail address, the user name, and
the password before setting up an e-mail
account.
Entertainment
Windows Media®
Start > Entertainment > Windows Media
You can use Windows Media® Player
Mobile to play digital audio and video
files stored on your device or a network
such as a website. For more setti ngs on the
media files, se e "Pictures & Videos" on page
45.
Supported file formats include M P3, AAC,
AAC+, AMR, WAV, WMA, WMV,
MPEG-4, 3GP, H.263, and H.264.
Camera
Start > Entertainment > Camera
Your phone supplies you with a digital
camera. You can access the camera and
the camcorder functions, which allow
you to take photographs and record
video clips. In addition, you can edit
your image files.
Page 43

43Entertainment
To switch between camera and
camcorder, press to go to
and .
Taking pictures
Mode status
Camera status
Brightness, shooting mode, white
balance, effects, save location and
zooming ratio.
The icons displayed depend on your
settings.
Resolution
Image size.
Numbers of remaining photos to
take
1. To enter the camera mode, go to
Start > Entertainment > camera, and
select .
2. Select Menu > Resolution to select an
image size.
3. Select Shooting Mode to select a
shooting mode from Single (one
shot), Timer (self timer), and Multi
(multiple shots).
4. Select Settings > Camera to select
where to save the pictures.
5. Customise options such as zoom
ratio, white balance, or effects.
6. The lens is located on the back of the
phone. When you are ready to snap a
picture, press (Take) or .
The picture just taken will be named
automatically by the phone.
While taking pictures, the smartphone
will automatically enter the Standby
mode to save power if it is idle for a while.
To resume, pres s any key.
Finger grease and dirt may be left on the
camera lens and will result in unclear
photos. Be sure to clean the camera lens
before taking photos.
Page 44

Entertainment44
Recording videos
Mode status
Camcorder status
Brightness, white balance, effects,
microphone status, save location and
zooming ratio.
The icons displayed depend on your
settings.
Resolution
Image size.
Remaining time for video
recording.
Fing er greas e may be l eft on the camera
lens and will result in unclear pictures. Be
sure to clean the camera lens before
recording videos.
1. To enter the camcorder, go to Start >
Entertainment > Camera, and then
press to scroll to .
2. Decide the time limit, the file format
and where to save the video file in
Menu > Settings > Camcorder.
3. Customise other options such as
zoom ratio, white balance or effects.
4. The lens is located on the back of the
phone. When you are ready to shoot
a video, press (Record) or
to start shooting.
5. To pause, press (Pause); to
resume, press (Resume). To
stop recording, press (Stop).
Settings for the image/video files
Settings available for each picture/video
may vary depending on the resolution.
Brightness Adjust the reflective
White
Balance
Effects Give an image/video a
Settings Set advanced settings
Resolution Set current image/video
About Show the program
quality of how bright/dark
an image/video appears.
Adjust the lighting
condition.
stylised look by adjusting
various options.
including backlight,
shutter sound, flicker,
contrast, standby time and
more.
size.
information.
Page 45

45Entertainment
Exit Exit the current mode.
For picture only
Shooting
Mode
For video only
Microphone Turn the microphone
• The higher the resolution you set, the
fewer pictures/video you can
take/record and save to the phone
memory or your storage card.
Select a preferred shooting
mode.
on/off.
FM Radio
Start > Entertainment > FM Radio
• This feature is only accessible when a
stereo headset without a built-in FM
receiver is connected to the phone.
• For accessories compatible with your
phone, contact local office to inquire
about availabilities and detailed
information.
1. Connect the stereo headset and the
FM radio is then turned on.
2. To locate a channel:
• Press to select a channel
previously saved in Favorites.
• Press to search for channels in
sequential order.
• Press and hold to rapidly scan
for channels with signals.
3. To adju st volume, press .
4. Press (Menu) to open the
options menu.
Record Record current channel.
Add to
favorites
Favorites Display your favorite
Set
frequency
Turn on/off
loudspeaker
Recordings Display radio recordings
More Advanced options to
Exit Close this application.
Add current channel to
your favorite list.
station list and select one
to play/edit its name.
Enter the frequency of a
channel to access it
directly.
Switch loudspeaker
on/o ff. If it is on, t he radio
will be heard over the
loudspeaker.
and select one to play.
autostore current channel,
turn on/off RDS and save
recordings to memory
card/phone.
Pictures & Videos
Start > Entertainment > Pictures &
Videos
Pictures & Videos is a program where
you can view image files such as BMP
and JPG or videos such as WMV and
3GP stored on your phone or a memory
card. You can then edit or send these
files, view a slideshow, or set a picture as
the background on Home screen.
Page 46

Entertainment46
Browsing and opening image, video or music files
By default, all pictures and videos you
have shot are stored in the My Pictures
and My Videos folders respectively in
Menu > Folders > My Device > My
Documents (the main memory). You
can use File Explorer, Pictures & Videos
or Windows Media (video and music files
only) to find the file you want.
Viewing images
1. Select an image to open from within
Pictures & Videos or File Explorer.
2. Press (Menu) and the n select an
option like Zoom or Play Slide Show
(for multiple image playback) as
needed.
3. Press to view the pr evious or
next image.
Menu options
Zoom Change the zoom ratio.
Play Slide
Show
Use as
Home
Screen
Beam
picture...
Edit Rotate or crop the image.
Save Save as an image ID for a
Play images as slide show.
Set the image as
background image in
Home screen.
Beam the picture to other
devices.
contact.
Properties Check the properties of
Options Advanced options for
Send to
your space
Print via
Bluetooth
Send
Image via
Bluetooth
Image
Processing
the image, including
name, file type,
dimension, file size,
created date, and whether
the image is protected.
You can also rename the
image here.
image setting, video
recording and slide show
playback.
Send the image to your
Windows Live™ Space.
Print via a Bluetooth
printer (available when
the printer is connected).
Send the image to other
Bluetooth devices
(available when Bluetooth
technology is active).
Advanced options to
process the image. You
can change brightness,
contrast, saturation,
sharpness, shadow boost,
and effect of the image.
You can also resize the
image, add text or a frame
to it.
Page 47

47Entertainment
Viewing videos or playing music
1. Select a video or music file to open
from within Windows Media or File
Explorer.
2. The selected file starts playing
automatically. Available controls are
similar to those in Windows Media®
Player on your PC or notebook
computer. Select Menu for options as
needed.
3. Select Menu > Library or return to File
Explorer to select another video or
music file for playback.
Menu options
Library Access to all the
Play/Pause Play or pause the
Stop Stop the playback.
Shuffle/
Repeat
Full Screen Enter full screen mode.
Options Define the behaviour of
Properties Information on the file,
About Details on the program
multimedia files.
playback.
Setup the shuffle and
repeat mode.
the playback and the look
of the player. You can also
assign keys to perform
playback quickly.
such as its length, title or
genre, and the save
location.
(Media Mobile).
Ringtone Editor
Start > Entertainment > Ringtone Editor
You can record, edit and save part of a
music file to be your ringtone.
1. Locate a music file and select to play.
2. When the file is being played, and
when you reach the s tart of a segment
you wish to save as a ringtone, press
(Start).
3. When the play reaches the end of the
segment you want to save as the
ringtone, press (Finish).
4. You can play, save or assign the
newly-recorded segment as the
ringtone of your phone. Or you can
re-edit the file.
Bubble Breaker & Solitaire
Start > Entertainment >
Bubble Breaker/Solitaire
You have two built-in games in your
phone: Bubble Breaker and Solitaire.
Internet Radio
Start > Entertainment > Internet Radio
This program enables you to listen to
Internet radio stations on your phone.
You can access them by dat a connection
as long as you are within your service
provider’s network or your phone has
integrated Wi-Fi.
Page 48

Internet48
1. Locate a station from the defaults. Or
select More Stations and pick one
station from your favored music
genre.
2. Press (Play) or to start
playback.
3. Press (Options) to open the
options menu.
Menu options
Change
User
Search
Schedule
Manage
Playlist
Proxy
Settings
About
Exit
Enter new username and its
password to s witch user.
Enter keyword of your desired
music categories or stations
and select one from the Search
Playlist.
• Scheduler: schedule the
begin/end time for your
selected station to be
recorded or listened to.
• Scheduled stations:
display infos for your
scheduled stations. Press
(Delete) to delete the
unwanted schedule(s).
Mana ge your p laylist by
logging on to
radio.mumdu.com. Press
(Menu) to open
options menu.
Set up your web proxy
settings if necessary.
Contact your ISP for
detailed info.
Details on the program.
Close the program.
• To perform Manage Playlist function
requires access to Internet Explorer.
• This program supports playing files in
*.mp3 and *.wma formats.
Internet
Internet Explorer®
Start > Internet > Internet Explorer
Internet Explorer® Mobile allows you to
view information on the W orld Wide Web
or on WAP pages. You can also bookmark
your favourite pages or save them for offline viewing.
Before using the Internet se rvices, you need
to configure the Internet connection. The
configuration is preloaded on the SIM card
by your network service provider. Your
phone detects the predefined settings on
the SIM card automatically before accessing
the Internet.
To setup an Internet account manually, go
to Start > System > Settings >
Connections. If you intend to use certain
WAP services, it might also be necessary to
set up a WAP account in Start > System >
Settings > Connections > GPRS.
Windows Live™
Start > Internet > Windows Live
Windows Live is a group of Microsoft
services, including Live Search™, Windows
Live™ Mail, Windows Live™ Messenger, and
Windows Live™ Spaces. To use Windows
Live services for the first time, follow the
on-screen instructions to complete signingin.
Page 49

49Internet
Windows Live options
Home
screen
options
Sync
options
Sync
schedule
Sync
status
E-mail Settings for e-mail
Messenger Settings for Windows
Set if you want to show the
Windows Live™ access in
Home screen.
Select the data type you
want to sync on your
smartphone.
Set the time to
synchronise.
Display the details of last
synchronisation.
retrieved from Windows
Live™ Mail (Hotmail).
Live™ Messenger,
including sound
notification and font size.
RSS
Start > Internet > RSS
Really simple syndication (RSS) re fers to
the news feeds that contain the
headlines of the new content. You can
use the intergrated RSS reader to read
RSS feeds provided by the website
owners. You can have the news
headlines, sports or shopping feeds
delivered directly to you as scheduled,
or get the feeds manually.
Reading the feeds
1. When you launch RSS reader for the
first time, you can download the
default channels and add them into
the subscription list. The phone will
get the feeds from the default
websites automatically.
To add a new channel, go to Menu >
Subscriptions > Add Channel....
2. The number in front of each category
signifies the number of unread feeds.
Scroll to read the headlines in
different categories; scroll to
read the headlines in the same
category.
3. Select one headline and confirm with
to read more or for advanced
options.
You will be charged extra when visiting
the website for the details of each news,
depending on the new data downloaded
to your phone.
Scheduling the feeds download
1. Go to Menu > Settings > Schedules....
2. Press to check and change the
settings.
Press again to uncheck and
disable the schedule.
3. Confirm with (Done).
Page 50

Organizer50
The phone connects to the Internet to get
the feeds automatically at the scheduled
time. The cost for the downloads varies
depending on the network service
available at the time.
Downloading the feeds manually
1. Go to Menu > Get news.
2. Select one or all of the saved
channels/categories in your favor.
The phone then starts ret rieving news
from the website(s).
3. Confirm with (Done).
STK
Start > Internet > STK
(Network-support-dependent)
Your service provider may offer special
applications, such as mobile banking,
share prices, etc. via the SIM card.
For further details, please contact your
service provider.
Organizer
Alarm Clock
Start > Organizer > Alarm Clock
Set the alarm time. is displayed in
Home screen when the alarm is
switched on.
Depending on the style of the Home
screen you select, the icon may not be
shown on the display.
Calendar
Start > Organizer > Calendar
Use Calendar to schedule appointmen ts,
including meetings and other events.
You can check your appointments in
one of several views (Week, Month, and
Agenda) and set Calendar to rem ind yo u
of appointments with sound or other
methods.
After you have scheduled a meeting and
send a notice to the attendees, you can
check the acceptance status of all
attendees in meeting view.
Your Calendar on the phone can be
synchronised with Microsoft® Office
Outlook® while connecting to your PC
using ActiveSync® (Windows® XP) or
Windows Mobile Device Center
(Windows Vista®).
Audio Notes
Start > Organizer > Audio Notes
This option helps to record short
memos and play them back. You can
select a preferred recording format and
save location. You can also set the
recording as ringtone as well.
For details, read Help in Menu.
Your phone does not support recording
calls.
Page 51

51System
Tasks
Start > Organizer > Tasks
Use Tasks to keep track of things you
need to do. You can use categories to
help you organise your tasks and set
reminders for them.
System
Settings
Start > System > Settings
Customise your phone by adjusting the
settings. See "Phone settings" on page
23.
Task Manager
Start > System > Task Manager
This option lets you check the programs
or processes that are running on your
phone. To improve the phone's
performance, you can select to end the
unnecessary programs or those that
have stopped responding.
Ending a task
1. Select a program. It may take a while
for Task Manager to detect all the
programs that are running.
2. Select Menu > End Task to end the
program.
3. Select Menu > Exit to exit.
CommManager
Start > System > CommManager
This program determines the
connectivity of your phone. You can
alternatively access it by:
•press and hold ;
• press and hold , and select
CommManager in Quick List.
Select an icon to activate/deactivate the
function it represents. You can
configure Phone, Bluetooth® function,
and Wi-Fi in Menu.
Constant connection may cause extra
loss of cost as well as battery power.
Battery Storage Status
Start > System > Battery Storage Status
Press repeatedly to let you check
the remaining pow er of the main battery
as well as the remaining space in other
storage, including phone memory,
phone storage, SIM Contact, SIM
Message and Storage Card.
File Explorer
Start > System > File Explorer
Use File Explorer to browse through the
files and folders that are in your phone.
Once you find a file you are interested
in, select it and open it up in its
associated program application.
Page 52

Synchronisation52
Synchronisation
Using Microsoft ActiveSync®
(Windows® XP) or Windows Mobile
Device Center (Windows Vista®), you
can synchronise the information on
your desktop computer with the
information on your device.
Synchronisation compares the data on
your device with your desktop
computer and updates both computers
with the most recent information. For
example:
• Keep Microsoft® Office Outlook®
Mobile data up-to-date by
synchronising your device with
Microsoft Outlook® data on your
desktop computer.
• Back up and restore your device data.
• Copy (rather than synchronise) files
between your device and desktop
computer.
• Control when synchronisation
occurs by selecting a synchronisation
mode. For example, you can
synchronise continually while
connected to your desktop computer
or only when you choose the
synchronise command.
• Select which information types are
synchronised and control how much
data is synchronised. For example,
you can choose how many weeks of
past appointments you want
synchronised.
System requirements:
• Windows® XP Service Pack 2 for
ActiveSync®.
•Windows Vista® for Windows Mobile
Device Center.
For Windows Vista® users, please visit
Microsoft Windows Mobile website
(http://www.microsoft.com/) for
details of Windows Mobile Device Center.
ActiveSync®
Start > System > ActiveSync
Installing ActiveSync® on PC
Insert the Companion CD containing
ActiveSync® into the optical drive of
your computer, and then follow the
instructions on the screen to complete
installation.
Setting up a sync relationship
After you have installed ActiveSync® on
your PC, you can begin to connect your
phone to the PC. Take the included data
cable and connect the mini-USB end to
your phone’s mini-USB socket and the
USB end to your computer’s USB
socket.
Once the data cable connects the phone
to the PC, a Synchronization Setup
Wizard will automatically pop up on the
PC side.
Page 53

53Synchronisation
Synchronising information
1. Decide if you want to synchronise
your information with a Microsoft
Exchanger Server, and then click
Next.
2. Select an information type (such as
Contacts and Calendar) to
synchronise, and then click Next.
3. Click Finish to close the wizard and
start synchronisation. During
synchronisation, ActiveSync®
examines each of the information
types you selected to be synchronised
and sees which records are not the
same on both the phone and the PC.
Once both the ph one and the PC have
the same information, all
information types will be listed as
synchronized.
After synchronisation, you can check
that the information you have stored in
Microsoft® Office Outlook® on your PC
has been copied to your smartphone
without having to type a word.
Disconnect your phone from your PC
and you are ready to go.
Once you have set up ActiveSync® and
completed the first synchronisation
process, you can start synchronisation
again anytime from your smartpho ne or
the PC. To do so, connect your phone to
the PC and then synchronisation will
automatically start. You can also select
Start > System > ActiveSync on your
smartphone, or click Synchronize from
within ActiveSync® on the PC.
Windows Mobile Device Center (WMDC)
Installing WMDC
Insert the Companion CD containing
W in do ws Mo bi le De vi ce Ce n ter in t o t he
optical drive of your computer. And
then follow the instructions on the
screen to complete installation.
Setting up a sync relationship
1. Connect your phone to your PC
using the included data cable. The
WMDC will appear on your
computer.
2. Select Set up your device to set your
phone for full synchronisation.
3. To synchronise with an Exchange
Server, enter the requested
information.
4. Select the information type you want
to synchronise, and then click Next.
5. Name the n ew partnership. And click
Set up to proceed. WMDC will guide
you to the WMDC main page.
Synchronising information
1. Connect your phone to your PC
using the included data cable.
WMDC starts automatically.
2. On your phone, go to Start > System>
ActiveSync, and select Sync.
Page 54

Synchronisation54
• If the connection between your phone
and the PC is not stable, go to Start >
System > Settings > Connections >
USB to PC and uncheck Enable
advanced network functionality. If the
problem still exists, disable the virus
protection program and/or the firewall
on the PC.
• While your smartphone and the PC are
connected, every time the data of an
information type is updated (for
example, a new e-mail is av ailable in the
Inbox), the same update will be
automatically synchronised to your
smartphone shortly afterwards.
Adding programs
If you want to install a new program to
your smartphone, you will need to
install it first on your PC.
1. Determine your smartphone’s
processor type so that you know
which version of the software to
install. To do so, go to Start > System
> Settings > About, and then make a
note of the information about the
processor.
2. Download the program to your PC
(or insert the CD or disk that
contains the program into your PC).
You may see a single *.xip, *.exe, or
*.zip file, a Setup.exe file, or several
versions of files for different device
types and processors. Be sure to select
the program designed for Windows
Mobile® powered smartphone and
your device processor type.
3. Read any installation instructions,
Read Me files, or documentation that
comes with the program. Many
programs provide special installation
instructions.
4. Connect your smartphone and PC.
5. Double-click the *.exe file.
If the file is an installer, the
installation wizard will begin. Follow
the on-screen directions. Once the
software has been installed on your
PC, the installer will automatically
transfer the software to your
smartphone.
If the file is not an installer, you will
see an error message stating that the
program is valid but is designed for a
different type of computer. You will
need to move this file to your
smartphone. If you cannot find any
installation instructions for the
program in the Read Me file or
documentation, use ActiveSync
Explore to copy the program file to
the Program Files folder on your
device. For more information on
copying files using ActiveSync® or
WMDC, see ActiveSync Help or
Windows Mobile Device Center
Help.
Once installation is complete, select
the program icon to switch to it.
You are strongly recommended to
transfer and store the newly added
programs on your external memory.
Page 55

55Synchronisation
Removing programs
1. Select Start > System > Settings >
Remove Programs.
2. Select the program you wish to
remove.
3. Select Menu > Remove, and then
follow the on-screen instructions to
complete uninstallation.
After removing a program from your
smartphone, the program might still exist
on the PC.
Push Mail
In addition to synchronising with a PC,
you can synchronise with the Exchange
Server 2003 Service Pack 2. By doing so,
without a data cab le, you can still receive
email on your smartphone as soon as
there are new ones available from your
mail server. This feature is often called
“Push Mail”. You can also synchronise
Contacts, Calendar, and Tasks.
Setting up Push Mail
1. Connect to an existing modem
connection such as GPRS.
2. Select Start > System > ActiveSync.
3. Select Menu > Add Server Source.
4. Enter the address of your Outlook
Web Access server and uncheck This
server requires an encrypted (SSL)
connection. Then select Next.
5. Enter your user name, password, and
domain name. Then select Next.
6. Choose the data types you want to
synchronise.
7. Synchronisation now starts. Wait for
a while to receive mails.
Select Menu > Schedule to customise
the synchronisation interval as needed.
Connecting your phone and the computer using Bluetooth technology
Without a data cable, you can still
connect your smar tphone to a computer
supporting Bluetooth® technology
(either built-in or with a Bluetooth®
dongle).
• The computer must use either
Windows® XP Service Pac k 2 or
Windows Vista®.
•If you are using a Bluetooth dongle, use
the default driver that comes with
Windows® XP.
1. On the computer, right-click the
Bluetooth icon on the Notification
area on your computer (or click Start
> Control Panel > Bluetooth Device) to
open the Bluetooth Device window.
2. On the Options tab, select Turn
discovery on and Allow Bluetooth
devices to connect to this computer
(Windows® XP), or check options in
Discovery and Connections
(Windows Vista®).
3. On the COM Ports tab, click Add.
4. Select Incoming (device initiates the
connection) and click OK.
Page 56

Synchronisation56
5. Record the number of the COM port
that was added. It is recommended
that the COM port number is less
than 10.
6. Click OK.
7. In Active Sync® on the computer, click
File > Connection Settings.
8. Check Allow connections to o ne of the
following, and then choose the COM
port you noted in Step 5.
9. Click OK.
10.On the smartphone, create a new
partnership with the computer.
11.The computer name is displayed.
Se le ct i t a nd m ak e su re A ct ive Sy nc® is
checked.
12.In ActiveSync® on the smartphone,
select Start > System > ActiveSync.
13.Select Menu > Connect via Bluetooth.
Media (music and video) files can be
synchronised only by using a cable
connection.
SimManager
Start > System > SimManager
You can copy the selected entries in
your phone book from a SIM card to
Contacts in your smartphone, or vice
versa.
1. Go to Menu > Switch to contacts
view/Switch to SIM view to view
contacts in your Phone/SIM.
2. Check the data you wish to copy and
then Select Menu > Copy to SIM/Copy
to contacts.
Speech Commander
Start > System > Speech Commander
This programs lets you use voice
commands to call contacts, find
contacts, dial digits, start applications
and have your appointments, e-mail or
SMS messages read to you.
Follow the on-screen instructions to say
the command and activate the function.
• Select Menu > Help for usages and
examples.
• T he lan gua ge o f t he c omm an ds c han ge s
depending on the language you set for
the operating system.
• For call-related functions, see also
"Dialling using Speech Commander" on
page 30.
Menu options
Menu > Settings > Menu
Contacts Show the contac ts available
Application Show applications
Music Show music files available
Digit
Training
in Speech Commander.
available in Speech
Commander.
in Speech Commander.
Help your smartphone
adapt to your voice and
thus increase the accuracy.
Page 57

57Extras
Digit
Settings
Advanced
Settings
Unselect Uncheck se lected items to
Voice Tag Build a c ustom voice tag by
Play Play the name of the
Set the length of phone
number.
Set the sensitivity to
Normal, Accurate or
Sensitive.
disable their Speech
Commander function.
recording your own voice,
and thus replace the default
voice tag.
selected item.
Internet Sharing
Start > System > Internet Sharing
This application makes your
smartphone a laptop’s high-speed
modem via USB or Bluetooth
connection.
1. Select to use either USB or Bluetooth
PAN for PC connection.
2. If USB is selected, connect your
computer with the phone using USB
data cable.
If Bluetooth PAN is selected, make
sure that the computer has paired
with the phone.
3. Select a network connection method
from the Network Connection dropdown list. For details on different
connection methods, contact your
ISP.
4. Press (Connect). If the status is
displayed as Connected, the
connection is made successfully. You
are able to browse the web pages in
your computer.
Press (Disconnect) to
disconnect.
You need to install ActiveSync®
(Windows® XP) or Windows Mobile
Devi ce Cente r (Windo ws Vista®) in
advance.
Master Reset
Restore your phone to factory setting.
For details, see Page 18.
Extras
Calculator
Start > Extras > Calculator
Just as there is a calculator on the PC,
you have this function on your
smartphone.
1. Enter amount to calculate.
Press to enter decimal points.
Press to add a minus before the
number.
2. Perform calculations using ,
and , as indicated on
the Calculator screen.
Page 58

Extras58
3. Press to delete numbers and
symbols entered.
Press (Clear) to delete all
numbers and symbols entered.
2D barcode
Start > Extras > 2D barcode
2D barcode is a 2-D barcode system
designed for mobile electronic devices
with camera module (such as camera
phones, PDA, smart phones, Webcams,
scanners and decoders). The system
provides encode, make code, decode
tools and also provides an application
service.
The pre-installed 2D barcode decoder
reads the 2-D barcodes scanned by the
built-in camera on your phone, showing
the data stored in it or importing the
data into your phone.
2D barcode supports decoding 2D
barcodes and QRcodes. You can generate
new barcodes in these formats at
http://www.quickmark.com.tw/En/basic
/index.asp.
1. Activate 2D barcode.
2. Aim the camera lens at the barcode.
Press to zoom in/out. Your
phone will decode the barcode
automatically.
3. If the barcod e is scanned successfully,
you will be notified by a sound.
Adding contacts using 2D barcode
You may get business cards with 2-D
barcodes printed on them. As a matter
of fact, all the contact information are
stored in these barcodes. You can scan
the barcodes to save the information
directly into your phone book without
any text input.
1. Activate 2D barcode.
2. Aim the camera lens at the barcode.
The contact information will be
decoded and displayed.
3. Press (Options) and select New
Contact. The new entry will be saved
to Contacts.
Java™
Start > Extras > Java
This is a Java environment on your
smartphone which allows you to
download and run Java programs. You
may either download the desired Java
files from the Internet or beam them in
Page 59

59Extras
from the PC via ActiveSync ® (Windows®
XP), Windows Mobile Device Center
(Windows Vista®) or Bluetooth®
function. Once the files are moved to
your phone, you can find them in your
File Explorer and procee d to install them
from there. The installation will in turn
move the installed Java program
application inside Java. So when you
want to l aunch a Java program, you
must first open up Java and launch it.
Below is a list of supported Java
Specification Requests (JSR):
JSR 30
JSR 139
JSR 37
JSR 118
JSR 75 PD A Optional Pac kages for
Connected Limited Device
Configuration (CLDC)
Mobile Information Device
Profile (MIDP)
the J2ME™ Platform
JSR 120 Wireless Messaging API
(WMA)
JSR 135 Mobile Media API
(MMAPI)
JSR 184 Mobile 3D Gr aphics A PI
for J2ME™
JSR 185 Java Technology for the
Wireless Industry (JTWI)
JSR 257 Contactless
Communication API
You can use the browser to download
applications (e.g. ringtones, games,
pictures, animations) from the Internet.
BenQ excludes all warranty and liability
claims in respect of or in connection with
any applications subsequently installed
by the customer and any software not
included in the original delivery package.
This also applies to functions enabled
subsequently at the customer's
instigation. The purchaser bears sole risk
for the loss of, damage to, and any defects
arising in, this device or the applications
and for any direct damage or
consequential dama ge of whatever nature
resulting from the use of this application.
For technical reasons, such applications
and subsequent enabling of certain
functions are lost in the event of the
device being replaced/re-supplied and
may b e lost if it is repaired. In such cases,
the buyer is required to download or
enable the application again. Please
ensure that your phone has Digital Rights
Management (DRM) so that downloaded
applications are protected from
unauthorised reproduction. These
applications are th en exclusively intended
for your phone and cannot be transferred
from this even to create a backup. BenQ
offers no warranty or guarantee nor does
it accept any liability for the customer's
ability to download or enable applications
again or to do so free of charge. We
recommend that you carry out a backup
from time to time of the applications on
your Windows® PC.
Page 60

Connectivity60
Connectivity
Start > System > Settings > Connections
With access to the Internet, you can use
e-mail and browse the web pages. Select
an option in this application to setup
Internet accounts depending on your
internet service provider and the type of
network you have access to. Contact
your internet service provider (ISP) for
details on the settings. Your ISP is
usually your SIM card provider.
Available connection methods for setting
up may vary depending on your ISP and
country/region.
Beam
Check this option to decide whether to
allow receiving data beamed from other
devices.
Bluetooth®
Your phone comes with built-in
Bluetooth® technology that lets you
communicate with other Bluetooth
devices over a maximum of
approximately 10 metres (30 feet).
You must activate the Bluetooth
function to establish a Bluetooth
connection between your phone and
other Bluetooth devices.
The Bluetooth® word mark and logos are
owned by the Bluetooth SIG, Inc. and any
use of such marks by BenQ Corp. is under
license. Other trad emarks and trade
names are those of their respective
owners.
Turning Bluetooth® function on
• Select in CommManager
to activate Bluetooth function and
turn on visibility.
•In Start > System > Settings >
Connections > Bluetooth, press
(Menu) and select Turn On
Bluetooth.
is displayed when Bluetooth
function is turned on.
Turning Bluetooth® function off
• Select in CommManager
to deactivate Bluetooth function.
•Press (Menu) in Bluetooth and
select Turn off Bluetooth.
Making the phone visible
To make the phone discoverable and
enable it to be found by other Bluetooth
devices, you need to set the visibility of
your phone.
Press (Menu) and then select Turn
On Visibility.
When your phone is set to be invisible,
your phone can still pair with other
Bluetooth devices but can’t be found by
them.
Page 61

61Connectivity
Creating a Bluetooth connection
1. Turn on Bluetooth function and set
the phone to be visible as instructed
in "Turning Bluetooth® function on"
on page 60.
2. Select Add new device... and confirm
with .
3. The phone then begins searching for
other Bluetooth devices.
Search again by pressing
(Menu) and select Refresh.
4. A list of available devices is displayed.
Select a device and confirm with
.
5. When asked for permission to
connect to the device, enter the
passcode for the device, both in the
phone and in the device that you are
connecting to.
6. When the passcode is accepted, the
device is paired. The Bluetooth
connection is established
automatically. The name of the
paired device is displayed. You can
rename it immediately or later in
Menu > Edit.
• The passcode is device-dependent.
Please refer to the docume ntation of the
Bluetooth device for the passcode.
• You can create a default passcode for
Bluetooth connection. Go to Start >
System > Settings > Connections >
Bluetooth Profiles > Security.
Using a Bluetooth stereo headset
Your phone supports Advanced Audio
Distribution Profile (A2DP) which
sends a stereo audio stream (such as
music) to a Bluetooth stereo headset.
1. Turn on your Bluetooth stereo
headset.
2. Pair th e headset with your phone (se e
"Creating a Blu etooth connection" on
page 61 for details). Follow the onscreen instructions to complete the
procedure.
• If you answer an incoming call from the
paired Bluetooth headset, the caller’s
voice is transmitted to the headset
directly. If you answer the incoming call
from your phone, an d decide to switch
to the headset, select Menu > Turn
Hands-free on.
• If the music is not transmitted to the
Bluetooth headset after pairing, go to
Start > System > Settings >
Connections > Bluetooth > Menu >
Set as Wireless Stereo to make the
connection again.
Sending a file by Bluetooth technology
You can use the Bluetooth connection
for sending files to another Bluetooth
device.
1. Turn on the Bluetooth function on
both your smartphone and the
remote device you are sendi ng the file
to.
Page 62

Connectivity62
2. Select Beam... from the menu options
of the file.
If you are sending an image file in
either *.jpeg, *.gif, *.png, or *.bmp
format, and the remote device
supports BIP (Basic Image Profile)
service, select Send Image via
Bluetooth. The imaging data will then
be transmitted and is possible to be
received and displayed as a
thumbnail if requested by the remote
device.
3. A list of the once conne cted devices is
displayed.
4. Select a device and confirm with
.
If you select Send Image via Bluetooth to
send the image file but the remote device
does not have BIP service, an error
message will pop up in your phone.
Printing via Bluetooth technology
Many of the files c an be printed out via a
Bluetooth printer.
1. Pair a Bluetooth printer with your
phone.
2. Check to select Basic Printing, and
confirm with (Done).
3. To configure the connection, go to
Start > System > Settings >
Connections > Bluetooth Profiles >
Printer.
4. Select Print via Bluetooth from the
menu options of the file you intend to
print.
Changing the name of your phone
The name of your phone will be
transmitted in a Bluetooth connection.
You can rename the phone in Start >
System > Settings > Connections >
Bluetooth Profiles > Blue tooth Optional >
Bluetooth Device Name.
Operating files on other Bluetooth devices
Your phone supports data transfer via
Bluetooth connection as well as file
operation between your phone and
another Bluetooth enabled device.
1. To enable file exchange service via
Bluetooth technology, select a paired
device from the Bluetooth device list
in Start > System > Settings >
Connections > Bluetooth.
2. Select (Next) to proceed if you
do not intend to change the name.
3. Check to select OBEX File Transfer,
and confirm with (Done).
4. Go to Start > System > File Explorer,
and select (Up).
5. Scroll to Bluetooth Neighbourhood
and select a paired Bluetooth device
that you want to explore.
Page 63

63Connectivity
6. You are now accessing the default
root directory on the selected
Bluetooth device for remote file
exchange service. Se lect (Up) to
go to the upper directory.
Browse different folders stored on the
selected device to locate the desired
file. You can view or edit the file from
your phone directly, or beam the
selected file to another Bluetooth
device. For more options, select
Menu.
•The remote Bluetooth device needs to
have FTP server service in order to
support remote file exchange service.
You can tell whether the selected
Bluetooth device has FTP server service
by the availability of OBEX File
Transfer in step 3.
• To change the root directory where the
remote device can access in your
smartphone for remote file exchange
service, change the path in Start >
System > Settings > Connections >
Bluetooth Profiles > File transfer.
Dial-up
Dial-up creates a modem-to-modem
link by using a modem to connect to the
computer and a telephone line to dial
into the ISP’s node. When using the
dial-up access for network connection,
you are charged for the length of time
that you are connected to the Internet.
Contact your ISP for details on the
settings.
GPRS
A General Packet Radio Service (GPRS)
offers high-speed data transfer. When
using a GPRS access, you are charged
for the amount of information you view,
download, or send when you are
connected to the Internet.
Contact your internet service provider
for details on the settings.
Proxy
If proxy server settings are needed,
contact your ISP or network
administrator for the proxy server
name, server type, port, type of Socks
protocol used, and your user name and
password.
VPN
With a Virtual Private Network (VPN)
connection, you can connect to a server
in your corporate network via the
Internet.
Contact your ne twork administrator for
details on the settings.
Wi-Fi
Wi-Fi lets your phone connect to the
Internet, your VPN, or another WLANenabled device via a wireless access
point.
Page 64

Connectivity64
Turning Wi-Fi on
• Select Start > System > Settings >
Connections > Wi-Fi > Menu > Turn
On Wi-Fi.
• Select in CommManager.
Your phone will automatically try to
detect what wireless networks are
available in the surrounding areas. If
any are found, a list of available
networks will be displayed.
Connecting to an existing wireless network
1. Turn your Wi-Fi on as instructed in
"Turning Wi-Fi on" on page 64.
2. Select the network you wish to
connect to in the list of available
networks.
3. Select whether the wireless network
connects to the Internet or your work
(office) network.
4. Press (Connect) (and follow
the instructions required by the
network) to complete connection.
• shows beside a network that
requires user ID, password, and
authentication.
• shows beside a free public
network.
• shows beside the network that is
unavailable temporarily.
• shows beside an ad-hoc
connection.
• shows beside an ad-hoc
connection that is unavailable
temporarily.
Adding a new wireless network
You can add a new wireless network to
the listbox.
1. Turn your Wi-Fi on as instructed in
"Turning Wi-Fi on" on page 64.
2. Select New in Wi-Fi.
3. Enter a name in Network name.
4. Select where this new network will
connect to (Internet or Private/Work
Network) in Network type.
5. If you want to connect to an ad-hoc
connection, check This is a device to
device (ad-hoc) connection. And then
press (Next) to proceed.
6. If authentication information is
needed, check with your network
administrator to obtain the setting
values for your specific network.
7. Contact your network administrator
to obtain the network key.
8. Complete the setting with
(Finish).
USB to PC
This option determines whether to
enable advanced network functionality
when connecting to a PC by ActiveSync®
(Windows® XP) or Windows Mobile
Device C enter (Windows Vista®).
Page 65

Questions & Answers
• If you encounter problems while using the phone, or if it performs erratically, you can
consult the information in the chart below. If your particular problem cann ot be resolved
using the information in the chart, contact the dealer where you purchased the phone.
• Do not attempt to disas semble the phone by yours elf. There are no user servic eable parts
inside.
Problem Possible causes Possible solution
Call-related problems
SIM card error. SIM card malfunction or
Poor reception. The network signal is too weak
You cannot make
outgoing calls.
damage.
SIM card inserted improperly. Insert the SIM card properly.
Dirt on the SIM card contacts. Use a soft, dry cloth to clean the SIM card
at your current location, for
example, in a basement or near
a tall building, because wireless
transmissions can not
effectivel y reach it.
The network is busy at the
current time (for example,
during peak times, there may be
too much network traffic to
handle additional calls).
You are too far away from a
base station for your service
provider.
The SIM card is not installed. Install a valid SIM card.
Poor signal. Move to an open space, or if you are inside a
Your phone mode is switched
off.
You have activated the Call
Barring feature.
You have activated the Fixed
Dialling feature.
Take the SIM card to your service provider for
testing.
contacts.
Move to a location where the network signal can
be properly received.
Avoid using the phone at such times, or try again
after waiting a short time.
You can request a service area map from your
service provider.
building, move closer to a window.
Activate th e phone mode in
See "CommManager" on page 51.
Start > System > Settings > Phone
Go to
Call Barring, and then set Block outgoing
>
calls
to Off.
Start > System > Settings > Phone
Go to
Fixed Dialing and uncheck Enable Fixed
>
Dialing
to turn this fe ature off.
CommManager.
65Questions & Answers
Page 66

Questions & Answers66
Problem Possible causes Possible solution
You cannot answer
incoming c alls.
Echo or noise. Poor network trunk quality on
Noises during a call. You may be near a strong
Echoes when using a
VoIP phone.
Unable to selec t
certain features.
PIN Code is blocked. You have entered an in correct
The SIM card is not installed. Install a valid SIM card.
Poor signal. Move to an open space, or if you are inside a
Your phone mode is switched
off.
You have activated the Call
Barring feature.
the part of your service
provider.
Poor local te lephone line
quality.
electromagnetic source (such as
a TC, a microwave oven, etc)
during a call.
Signal reception is not good. Try using VoIP in a more open space or with
Your service provider does not
support these features, or you
have not applied for services
that provide these features.
PIN code three consecutive
times.
building, move closer to a window.
Activate th e phone mode in
See "CommManager" on page 51.
Start > System > Settings > Phone
Go to
>
Call Barring, and then set Block incoming
to Off.
calls
Press and dial again. You may be
switched to a better-quality network trunk or
phone line.
Press and dial again. You may be
switched to a better-quality network trunk or
phone line.
Move to another location to reduce the
interferen ce effects.
earphones to get the best reception and qu ality.
Contact you r service provider .
Contact your service provider. If the service
provider provides the SIM card's PUK code, use
the PUK code to un lock the SIM card.
System problems
Battery will not
charge.
Unable to turn the
phone on.
Poor contact between the
battery and charger.
The phone's temperature is
below 0 °C or higher than 45 °C.
The battery or battery charger is
damaged.
Battery power has been
depleted.
Battery contact terminals are
not clean.
Check all connectors to make sure all connections
have been properly made.
Adjust the battery charging environment to avoid
extremes of temperature.
Contact the dealer.
Recharge the phone's battery.
Seek your dealer’s help to clean the terminals.
CommManager.
Page 67

Problem Possible causes Possible solution
Shortened standby
time.
The standby time is related to
your service provider system
configuration. The same phon e
used with different service
providers’ systems will not
provide exactly the same length
of standby time.
The battery is depleted. In hightemperature environments,
battery l ife will be shorten ed.
If you are not able to connect to
the network, the phone will
continue to send out signals as
it attempts to locate a base
station. Doin g so consumes
battery power and w ill
consequently shorten standby
time.
If you are located in an area where signalling is
weak, temporarily switch off the phone.
Use a new battery.
Change your location to one where the network is
accessible , or temporarily tu rn off your phone.
Message problems
Unable to send or
receive text
messages.
Unable to send or
receive multimedia
messages.
Unable to send or
receive e-mail.
Your phone mode is switched
off.
The signal strength is not
strong enough .
Your phone mode is switched
off.
No MMS service is available. S ubscribe to the MMS service from your network
Your MMS setting has not been
configured properly.
No enough space is left on your
phone memory.
The Internet connection or the
e-mail setting is not configured
properly.
Activate th e phone mode in CommManager.
See "CommManager" on page 51.
Try moving to a different locatio n to obtain better
signal reception.
Activate th e phone mode in
See "CommManager" on page 51.
service provider.
Check your network connection, and confirm
with your network service provider if your MMS
setting has been configured correctly.
Check if there is enough space on your phone
memory. Delete some files if necessary.
Check your network connection, and confirm
with your e-mail service provider if your e-mail
setting has been configured correctly.
67Questions & Answers
CommManager.
Page 68

Questions & Answers68
Problem Possible causes Possible solution
Internet problems
Unable to conn ect to
the network.
SIM card inv alid. Contact you r service provider , or see
You are not within the
network’s service area.
Poor signal. Move to an open space or if you are inside a
"Connect ivity" on page 60 .
Check the service area with your service provider.
building, move closer to a window.
Connection problems
Unable to connect
the smartphone to
PC using the data
cable.
The smartphone is not turned
on.
ActiveSync® is not installed. Use the Companion CD containing to install the
Data cable is damaged. Contact the de aler.
Turn on the phone. See "Switching the phone
on/off" on page 16.
program. See "Installing ActiveSyn c® on PC" on
page 52.
ActiveSync® Problems
Unable to run
ActiveSync® or
connection fail s.
Unable to
synchronise data.
ActiveSync ® (Windows® XP) or
Device Center (Windows
Vista®) is not installed properly.
Data cable is damaged. Contact the de aler.
PC System is not st able. Restart your PC system.
Connection is not stable. Go to
Windows Vista
Windows Mobile Device
Center.
No data type is selected. Make sure at least one data type is selected. For
The data cable is not connected
properly.
® requires
Make sure ActiveSync® is properly installed and
related settings are correct.
Start > System > Settings >
Connections > USB to PC and uncheck
Enable advanced network functionality.
Or disable the virus protection program and/or
the firewall on the PC.
Mak e s ure W ind ows Mob ile Dev ice Cen ter, whi ch
is available on your Companion CD, is properly
installed.
Windows® XP users, click
the computer. For Windows Vista
Mobile Device Settings > Change content
sync settings
Check the data cable connection, and if the dat a
cable is damaged.
on the computer.
Tools: Options on
® users, click
Page 69

69Care and maintenance
Care and maintenance
Your phone has been designed and
manufactured to the highest of standards
and should be treated with great care. The
suggestions below will help y ou to enjoy
your phone for many years.
• Protect your phone from moisture and
humidity. Precipitation, humidity and
liquids contain minerals that will corrode
electronic circuits. Once your phone
become wet, disconnect it immediately
from the power supply to avoid electric
shock. Do not place your phone (even to
dry it) on/in a source of heat such as a
microwave oven, oven or radiator. The
phone may become overheated and
possibly explode.
• Do not use or store the phone in dusty,
dirty areas. Its moving parts may be
damaged and the casing may become
deformed and discoloured.
• Do not store your phone in hot
environments (e.g. vehicle instrument
panel in the summer). H igh temperatures
can shorten the life of electronic devices,
damage batteries and warp or melt
certain plastics.
• Do not store your phone in cold
environments. When the phone warms
up again (to its normal ambient
temperature), moisture can form inside
the phone, which may damage electronic
circuit boards.
• Do not drop, knock or shake your phone.
Rough handling can damage internal
circuit boards.
• Do not use harsh chemicals, cleaning
solvents, or strong detergents to clean the
phone.
• The phone has better protection against
splashes, dust and knocks if the supplied
seals are used.
The suggestions given above apply equally
to your phone, battery, charger and all
accessories. If any of these parts is not
working properly, obtain fast and reliable
help at our service centres.
Battery quality statement
The capacity of your mobile phone battery
wi ll red uce e ach t ime it is ch arged /emp tied .
Storage at too high o r low temperatures will
also result in a gradual capacity loss. As a
result the operating time of your mobile
phone may be considerably reduced, even
after a full recharge of the battery.
Regardless of this, the battery has been
designed and manufactured so that it can be
recharged and used for six months after the
purchase of your mobile phone. After six
months, if the battery is clearly suffering
from loss of performance, we recommend
that you replace it. Please buy only original
batteries.
Display quality statement
For technological reasons, a few small dots
with differe nt colours may a ppear in the
display in exceptional cases.
Just remember that the appearance of
brighter or darker dots generally does not
mean that a fault has occurred.
Page 70

Product data70
Product data
Declaration of conformity
Hereby, BenQ Corporation, declares that
this T80 is in compliance with the essential
requirements and other relevant provisions
of Directive 1999/5/EC. The relevant
Declaration of Conformance (DoC) has
been signed. Please call the company
hotline or visit the BenQ regional website if
you require a copy of the original.
Lost phone
If you lose your phone or SIM card,
contact you r service provid er immediately
to prevent misuse.
Page 71

71SAR
SAR
European Union (R&TTE) and
international (ICNIRP)
INFORMATION ON RF EXPOSURE /
SPECIFIC ABSORPTION RATE (SAR)
THIS MODEL MEETS INTERNATIONAL
GUIDELINES FOR EXPOSURE TO RADIO
WAVES
Your mobile device is a radio transmitter
and receiver. It i s designed not to exceed the
limits for exposure to radio waves
recommended by international guidelines.
These guidelines were developed by the
independent scientific organization
ICNIRP and include safety margins
designed to assure the protection of all
persons, regardless of age and health.
The guidelines use a unit of measurement
known as the Specific Absorption Rate, or
SAR. The SAR limit for mobile devices is
2 W/kg and was adopted into the European
Standard EN 50360 and into other national
standards. The CE mark demonstrates that
the EU requirements are met.
The highest SAR value for this device when
tested at the ear was 0.485 W/kg
mobile devices offer a range of functions,
they can be used in positions other than the
head, such as on the body. In this case, a
separation distance of 1.5 cm is required.
As SAR is measured utilizing the device's
highest transmitting power, the actual SAR
of this device while operating is typically
below that indicated above. This is due to
automatic changes to the power level of the
devi ce to ens ure it only uses the minimum
level required to reach the network.
1 The tests are carried out in accordance with
international guidelines for testing.
1
. As
The World Health Organization has stated
that present sc ientific information does n ot
indicate the need for any special
precautions for the use of mobile devices.
They note that if you nevertheless want to
reduce your exposure then you can d o so by
limiting the length of calls or using a
'hands-free' device to keep the mobile
phone away from the head and body.
Additional Information can be f ound on the
website of the World Health Organization
(www.who.int/emf).
Page 72

MICROSOFT SOFTWARE LICENSE TERMS72
MICROSOFT SOFTWARE LICENSE TERMS
(FOR WINDOWS MOBILE
6 SOFTWARE)
These license terms are an agreement between
you and BenQ Corp oration ("BenQ"). Please
read them. They apply to the software included
on this device. The software also includes any
separate media on which you received the
software.
The software on this device includes software
licensed by BenQ from Microsoft Corporation
or its affiliate.
The terms also apply to any
•updates,
• supplements,
• Internet-based services, and
• support services
for this software, unless other terms
accompany those items. If so, those terms
apply.
As described below, using some features also
operates as your consent to the transmission of
certain standard computer information for
Internet-based services.
By using the software, including use on this
device, you accept these terms. If you do not
accept them, do not use the device or software.
Instead, contact BenQ to determine its return
policy for a refund or credit.
WARNING!
If the software contain s voice operated
technolog ies, then operatin g this software
requires user attention. Diverting attention
away from the road while driving can
possibly cause an accident or other serious
consequence. Even occasional, short
diversions of attentio n can be dangerous if
your attention is diverted away from your
driving tas k at a critical time. BenQ and
Microsoft make no representations,
warranties or other determinations that ANY
use o f this softwar e is leg al, saf e, or i n any
manner recommended o r intended while
driving or otherwise operatin g a motor
vehicle.
If you comply with these license terms, you
have the rights below.
1. USE RIGHTS. You may use the software
on the device with which you acquired the
software.
2. ADDITIONAL LICENSING
REQUIREMENTS AND/OR USE RIGHTS.
a. Spec ific Use . Ben Q des ign ed thi s de vice for a
specific use. You may on ly use the software for
that use.
b. Included Microsoft Programs and
Additional Required Licenses. Except as
provided below, these license terms apply to all
Microsoft programs included with the
software. If the license terms with any of those
programs give you other righ ts that do not
expressly conflict with these license terms, you
also have those rights.
This agreement does not grant you any rights
with respect to the Windows Mobile Device
Center, Microsoft ActiveSync or Microsoft
Outlook 2007 Trial whi ch are subject to the
licenses accompanying those items.
c. Speech Recognition. If the software i ncludes
speech rec ognition component( s), you
understand that speech recognition is an
Page 73

73MICROSOFT SOFTWARE LICENSE TERMS
inherently statistical process and that
recognition errors are inherent in the process.
Neither Be nQ nor Microsoft or th eir suppliers
shall be liable for any damages arising out of
errors in the speech recognition process.
d. Phone Functionality. If the devi ce software
includes phone functionality, all or certain
portions of the device software may be
inoperable if you do not have and maintain a
service account with a wireless
telecommunication carrier ("Mobile
Operator"), or if the Mobile Operator's
network is not operating or configured to
operate with the device.
3. SCOPE OF LICENSE. The software is
licensed, not sold. This agreement only gives
you some rights to use the software. BenQ and
Microsoft reserve all other rights. Unless
applicable law gives you more rights despite
this limitation, you may use the software only
as expressly permitted in this agreement. In
doing so, you must comply with any technical
limitations in the software that allow you to
use it only in certain ways. Yo u may not:
• wor k around any technical l imitations i n the
software;
• reverse engineer, decompile or disassemble
the software;
• make more copies of the software than
specified in this agreement;
• publish the software for others to copy;
• rent, lease or lend the software;
• use the software for commercial software
hosting services.
Except as expressly provided in this
agreement, rights to access the software on
this device do not give you any right to
implement Microsoft patents or other
Microsoft intellectual property in software or
devices that access this device.
You may use remote access technologies in the
software such as Remote Desktop Mobile to
access the software remotely from a computer
or server. You are responsible for obtaining
any licen ses required fo r use of the protocols to
access other software.
4. INTERNET-BASED SERVICES.
Microsoft provides Internet-based services
with the software. Microsoft may change or
cancel them at any time.
a. Consent for Internet-Based Services. The
software features described below connect to
Microsoft or service provider computer
systems over the Internet. In some cases, you
will not receive a separate notice when they
connect. You may switch off some of these
features or not use them. For more
information about these features, visit
http://go.microsoft.com/fwlink/?LinkId=8193
1.
By using these features, you consent to the
transmission of this information. Microsoft
does not use the information to identify or
contact you.
Device Information
use Internet protocols, which send to the
appropriate systems device information, such
as your Internet protocol address, the type of
operating system, browser and name and
version of the software you are using, and the
language code of the device where you
installed the software. Microsoft uses this
information to make the Internet-based
services available to you.
• Windows Mobile Update Feature. The
Windows M obile Update feature provides
you the ability to obtain and install
software updates on your device if updates
are available. You may choose not to use
this feature. Be nQ and/or your Mobile
Operator may not support this feature or
an update for your device.
• Windows Media Digital Rights
Management. Content owner s use
Windows Media digital rights
management technology (WMDRM) to
protect their intellectual property,
including copyrights. This s oftware and
third party software use WMDRM to play
. The following features
Page 74

MICROSOFT SOFTWARE LICENSE TERMS74
and copy WMDRM-protected content. If
the software fails to protect the content,
content owners may ask Microsoft to
revoke the software's ability t o use
WMDRM to play or copy protected
content. Revocation does not affect other
content. When you download licenses for
protected content, you agree that
Microsoft may include a revocation list
with the licenses. Content owners may
require you to upgrade WMDRM to access
their content. Microsoft software that
includes WMDRM will ask for your
consent prior to the upgrade. If you
decline an upgrade, you will not be able to
access content that requires the upgrade.
b. Misuse of Internet-based Services. You may
not use these services in any way that could
har m them o r impai r anyon e else' s use of
them. You may not use the services to try to
gain unauthorized access to any service, data,
account or network by any means.
5. NOTICES ABOUT THE MPEG-4
VISUAL STANDARD. The software may
include MPEG-4 visual decoding technology.
This technology is a format for data
compression of video information. MPEG LA,
L.L.C. requires this notice:
USE OF THIS PRODUCT IN ANY MANNER
THAT COMPLIES WITH THE MPEG 4
VISUAL STANDARD IS P ROHIBITED,
EXCEPT FOR USE DIRECTLY RELATED TO
(A) DATA OR INFORMATION (i)
GENERATED BY AND OBTAINED
WITHOUT CHARGE FROM A CONSUMER
NOT THEREBY ENGAGED IN A BUSINESS
ENTERPRISE, AND (ii) FOR PERSONAL USE
ONLY; AND (B) OTHER USES
SPECIFICALLY AND SEPA RATELY
LICENSED BY MPEG LA, L.L.C.
If you have questions about the MPEG-4 visual
standard, please contact MPEG LA, L.L.C., 250
Steele Street, Suite 300, Denver, CO 80206;
www.mpegla.com.
6. DIGITAL CERTIFICATES . The software
uses digi tal certificates in X.509 format. The se
digital certificates are used for authentication.
7. CONNECTIVITY SOFTWARE. Your
device package may include Windo ws Mobile
Device Center or Microsoft ActiveSync
software. If it is included, then you may install
and use it in accordance with the license terms
that are provided with it. If no license terms
are provided, then you may install and use
only one (1) copy of the sof tware on a single
computer.
8. NETWORK ACCESS. If you are using a
network, s uch as an employ er network, the
network administrator may limit features or
functionality on your device.
9. PRODUCT SUPPORT. Contact BenQ for
support options. Refer to the support number
provided with the device.
10. LINK S TO THIRD PARTY WEBSITES. If
the software provides links to third party
websites, those links are provided to you only
as a convenience, and the in clusion of any link
does not imply an endorsement of the third
party website by Microsoft.
11. BACKUP COPY. You may make one
backup copy of the software. You may u se it
only to reinstall the software on the device.
12. PROOF OF LICENSE. If you acquired the
software on the device, or on a disc or other
media, a genuine Certificate of Authenticity
lab el with a genui ne copy of the s oftwar e
identifies licensed software. To be valid, this
label must be affixed to the device, or inc luded
on or in BenQ software packaging. If you
receive the label separately, it is not valid. You
should k eep the label on th e device or
packaging to prove that you are licensed to use
the softwar e. To identify genuine Microsoft
software, see http://www.how totell.com.
13. TRANSFER TO A THIRD PARTY. You
may transfer the software only with the device,
the Certificate of Authenticity label, and these
Page 75

75MICROSOFT SOFTWARE LICENSE TERMS
license terms directly to a third party. Before
the transfer, that party must agree that these
license terms apply to the transfer and use of
the software. You may not retain any copies of
the softw are including the b ackup copy.
14. NOT FA ULT TOLERANT. The software
is not fault tolerant. BenQ installed the
software on the device and is responsible for
how it operates on the device.
15. RESTRICTED USE. The Microsoft
software was designed for systems that do not
require fail-safe performance. You may not
use the Microsoft software in any device or
system in wh ich a malfunction of th e software
would result in foreseeable risk of injury or
death to any person. This includes operation of
nuclear facilities, aircraft navigation or
communication systems and air traffic
control.
16. NO WARRANTIES FOR THE
SOFTWARE. The software is provided "as is".
You bear all risks of using it. Microsoft gives
no express warranties, guarantees or
conditions. Any wa rranties you receive
regarding the device or the software do not
originate from, and are not binding on,
Microsoft or its affiliates. When allowed by
your local laws, BenQ and Microsoft exclude
implied warranties of merchantability, fitness
for a particular purpose and noninfringement.
17. LIABILITY LIMITATIONS. You can
recover from Microsoft and its affiliates only
direct damages up to fifty U.S. Dollars (U.S.
$50.00), or equivalent in local currency. You
cannot recover any other damages, includ ing
consequential, lost profits, special, indirect or
incidental damages.
This limitation applies to:
• anything related to the software, services,
content (including code) on third party
internet sites, or third party programs, and
• claims for breach of contract, breach of
warranty, guarantee or condition, strict
liability, negligence, or oth er tort to the
extent permitted by applicable law.
It also applies even if Microsoft should have
been aware of the possibility of the damages.
The above limitation may not apply to you
because your country may not allow the
exclusion or limitation of incidental,
consequential or other damages.
18. EXPORT RESTRICTIONS. The software
is subject to United States export laws and
regulations. You must comply with all
domestic and international e xport laws and
regulations that apply to the software. These
laws includ e restrictions on destina tions, end
users and end use. For additional information,
see www.microsoft.com/exporting.
Page 76

License Agreement76
License Agreement
This License Agreement ("Agreement") is
between Yo u and BenQ Corporati on ("BenQ").
The Agreement authorizes You to use the
Licensed Software, specified in Clause 1 below,
which may be included in your phone, stored
on a CD-ROM, sent to You by electronic mail
or over the air, downloaded from BenQ Web
pages or servers or from other sources under
the terms and conditions set forth below.
Read this Agreement carefully before using
you r ph one. By u sing you r pho ne or ins tall ing ,
copying, and/or using the Licensed Software,
You acknowledge that You have read and
understood the Agreement and agree to be
bound by all of the terms a nd conditions stated
below. You further agree that if BenQ or any
licensor of BenQ ("Licensor") is required to
engage in any proceeding, legal or otherwise,
to enforce their rights under this Agreement,
BenQ and/or its Licensor shall be entitled to
recover from You, in addition to any other
sums due, reasonable attorney's fees, costs and
disbursements. If You do not agree to all of the
terms and conditions of this Agreement, do
not install or use the Licensed Software. This
Agreement governs any Updates, releases,
revisions, or enhancements to the Licensed
Software.
1. L ICENSED SOFTW ARE. As used in this
Agreement, the term "Licensed Software"
means collectively: all the software in Your
phone, all of the contents of the disk(s), C DROM(s), electronic mail and its file
attachments, or other media with which this
Agreement is provided and includes any
related Be nQ or third party softw are and
upgrades, modified versions, updates,
additions and copies of the Licensed Software,
if any, distributed over the air, downloaded
from BenQ W eb pages or server s or from other
sources.
2. COPYRIGHT. The Licensed Software and
all related rights, without limitation including
proprietary rights therein, are owned by BenQ,
its Licensors or affiliates and are protected by
international treaty provisions and all
applicable national laws. This Agreement does
not convey to You nor allow You to acquire
any title or ownership interest in the Licensed
Software or rights therein. The structure,
organization, data and code of the Licensed
Software are the valuable trade secrets and
confidential information of BenQ, its
Licensors or affiliates. You must reproduce
and include the copyright notices with any
permitted copies You make of the Licensed
Software.
3. LICENSE AND USE. BenQ grants to You
a non-exclusive, non-transferable end user
right to install the Licensed Software or use the
Licensed Software installed on the phone. The
Licensed Software is licensed with the phone
as a single in tegrated product a nd may be used
with the phone only as set forth in these
licensing terms.
4. LIMITATIONS ON LICENSE. You may
not copy, d istribute, or make derivative works
of the Licensed Software except as follows:
• You may make one copy of the Licensed
Software, excluding the documentation,
as an archival backup copy of the original.
Any other copies You make of the
Licensed Software are in violation of this
Agreement.
• You may not use, modify, or transfer the
right to use the Licensed Software other
than together with the accompanying
hardware or copy the Licensed Software
except as expressly provided in this
Agreement.
• You may not sublicense, rent or lease the
Licensed Software.
• You may not reverse engineer,
decompile, modify, or disassemble those
Licensed Software programs except and
only to the extent that such activity is
Page 77

77License Agreement
expressly permitted by applicable law
notwithstanding this limitation.
Parts of the Licensed Software may be supplied
by third parties and may be subject to separate
license terms. Such terms are set out within the
documentation.
5. MISUSE OF T HE LICENSED
SOFTWARE OR DATA GENERATED BY THE
LICENSED SOFTWARE IS STRICTLY
PROHIBITED BY BENQ , MAY VIOLATE U.S.
AND OTHER LAWS AND MAY SUBJECT
YOU TO SUBSTANTIAL LIA BILITY. You are
solely responsible for any misuse of the
Licensed Software under this Agreement and
for any li ability or damage r elated in any way
to your use of the Licensed Software in
violation of this Agreement. You are also
responsible for using the Licensed Software in
accordance with the limitations of this
Agreement.
6. TERMINATION. This Agreeme nt is
effective from the first date You install, copy or
otherwise use the Licensed Software. You may
terminate this license at any time by deleting
or destroying the Lice nsed Software, all back
up copies a nd all related ma terials provided to
You by BenQ. Your license rights terminate
automatically and immediately without notice
if You fail to comply with any provision of this
Agreement. The rights and obligations under
sections 2, 5, 6, 7, 9, 12 and 13 of this
Agreement shall survive the termination of
this Agreement.
7. YOU ACKNOWLEDGE THE LICENSED
SOFTWARE IS PROVIDE D "AS IS" AND
NEITHER BENQ NOR ANY OF ITS
LICENSORS MAKE ANY
REPRESENTATIONS OR WARRANTIES,
EXPRESS OR IMPLIED, INCLUDING BUT
NOT LIMITED TO THE WARRANTIES OF
MERCHANTABILITY OR FITNESS FOR A
PARTICULAR PURPOSE OR THAT THE
LICENSED SOFTWARE WILL NOT
INFRINGE ANY THIRD PARTY PATENTS,
COPYRIGHTS, TRADEMARKS OR OTHER
RIGHTS. THERE IS NO WARRANTY B Y
BENQ OR ITS LICENSORS OR BY ANY
OTHER PARTY THAT THE FUNCTIONS
CONTAINED IN THE LICENSED
SOFTWARE WILL MEET YOUR
REQUIREMENTS OR THAT THE
OPERATION OF THE LICENSED
SOFTWARE WILL BE UNINTERRUPTED OR
ERROR-FREE AND BENQ AND ITS
LICENSORS HEREBY DISCLAIM ANY AND
ALL LIABILITY ON ACCOUNT THEREOF.
NO ORAL OR WRITTEN INFORMATION OR
ADVICE G IVEN BY A BENQ
REPRESENTATIVE SHALL CREATE A
WARRANTY OR IN ANY WAY AFFECT THIS
DISCLAIMER. YOU AS SUME ALL
RESPONSIBILITY TO ACHIEVE YOUR
INTENDED RESULTS AND FOR THE
INSTALLATION, USE, AND RESULTS
OBTAINED FROM IT.
8. NO OTHER OBLIGATIONS. This
Agreement creates no obligations on the part
of BenQ other than as specifically set forth
herein.
9. LIMITATION OF LIABILITY. IN NO
EVENT SHALL BENQ, ITS EMPLOYEES,
LICENSORS, AFFILIATES OR AGENTS BE
LIABLE FOR ANY DIRECT DAMAGES, LOST
PROFITS, DATA OR BUSINESS, OR COSTS
OF PROCUREMENT OF SUBSTITUTE
GOODS OR SERVICES, PROPERTY
DAMAGE, INTERRUPTION OF BUSINESS
OR FOR ANY SPECIAL, INDIRECT,
INCIDENTAL, EXEMPLARY, ECONOMIC,
PUNITIVE OR CONSEQUENTIAL
DAMAGES, HOWEVER CAUSED, AND
WHETHER ARISING UNDER CONTRACT,
TORT, NEGLIGENCE, OR OTHER THEORY
OF LIABILITY, OR ARISING OUT OF THE
USE OF OR INABILITY TO USE THE
LICENSED SOFTWARE, EVEN IF BENQ IS
ADVISED OF THE POSSIBILITY OF SUCH
DAMAGES. THE LIMITATION OF
LIABILITY SHALL NOT APPLY IF AND TO
Page 78

License Agreement78
THE EXTENT BENQ´s LIABILITY IS
MANDATORY UNDER THE APPLICABLE
LAW E.G. ACCORDING TO PRODUCT
LIABILITY LAW OR IN TH E EVENT OF
INTENTIONAL MISCONDUCT, PERSONAL
INJURY OR DEATH.
10. TECHNICAL SUPPORT. BenQ and its
Licensors have no obligation to furnish You
with technical support unless separately
agreed in writing between You and BenQ or
the applicable Licensor.
BenQ and where applicable its Licensors in the
Licensed Software shall be free to use any
feedback received from You resulting from
your access to and use of the Licensed Software
for any purpos e including (without lim itation)
the manufacture, marketing and maintenance
or support of products and services.
11. EXPORT CONTROL. The Licensed
Software may include technical data and
cryptographic software and is subject to
European Union and U.S. export controls and
may be subject to import or export controls in
other countries. You agree to strictly comply
with all applicable import and export laws and
regulations. Specifically, You agree, to the
extent required by U.S. Export Administration
Regulations, that You shall not disclose or
otherwise export or re-export the Licensed
Software or any part thereof delivered under
this Agreement to (a) Cuba, Iran, Iraq, Libya,
North Korea, Sudan, Syria or any other
country (including a national or resident of
such country) to which the U.S. has restricted
or prohibited the export of goods or services.
12. APPLICABLE LAW AN D FORUM. The
laws of Taiwan govern this Agreement. No
choice of law rules of any jurisdiction will
apply. The courts in Taipei, T aiwan shall settle
any disputes arising out of or relating to this
Agreement provided you are a merchant.
13. MISC ELLANEOUS. This Agreement
represents the entire agreement between You
and BenQ relating to the Licensed Software
and (i) supersedes all prior or
contemporaneous o ral or written
communications, proposals, and
representations with respect to its subject
matter; and (ii) prevails over any conflicting or
additional terms of any acknowledgement or
similar com munication between the p arties
during the term of this License.
Notwithstanding the foregoing, some
products of B enQ may require You to agree to
additional terms through an on-line "clickwrap" license, and such terms shall
supplement this Agreement. If any provision
of this Agreement is held invalid, all other
provisions shall remain valid unless such
validity would frustrate the purpose of this
Agreement, and this Agreement shall be
enforced to the full extent allowable under
applicable law. No modification to this
Agreement is binding, unless in writing and
signed by a duly authorized representative of
each party. This Agreement shall be binding
on and shall inure to the benefit of the heirs,
successors, and assigns of the parties hereto.
The failure of either party to enforce any right
resulting from the breach of any provision of
this Agreement by the other party will not be
deemed a waiver of any right related to a
subsequent breach of such provision or any
other right h ereunder. Notwithstand ing
anything to the contrary in this Agreement,
BenQ and/or its licensors may enforce i ts
rights, including but not limited to copyright,
trademark or trade names, in accordance with
the rules of law in each country.
4J.09H01.001
 Loading...