

Page 1

T3300
Ultrasound System
Basic Operating Instructions
Page 2

T3300 Diagnostic Ultrasound System | 1 | B00601-010 4/10/17
Table of Contents
Chapter 1: Read This First..........................................................................................................................1
Intended Audience................................................................................................................................. 2
Intended Use ......................................................................................................................................... 2
Warnings................................................................................................................................................ 3
WEEE.................................................................................................................................................... 3
Discarding the Tablet and Batteries....................................................................................................... 3
Equipment List....................................................................................................................................... 4
Conventions........................................................................................................................................... 4
System Warranty................................................................................................................................... 5
Chapter 2: Safety Information .....................................................................................................................6
Symbols................................................................................................................................................. 8
System Label Icons.......................................................................................................................9
System Button...............................................................................................................................9
Shipping Label Icons...................................................................................................................10
Electrical Safety................................................................................................................................... 10
Battery Usage/Disposal...............................................................................................................11
Electrical Fast Transients (EFT)..................................................................................................11
Electromagnetic Interference (EMI).............................................................................................12
Surges to AC Power Mains.........................................................................................................15
Mechanical Safety ............................................................................................................................... 15
Equipment Protection .......................................................................................................................... 15
RF Safety............................................................................................................................................. 16
Biological Safety.................................................................................................................................. 16
Heating........................................................................................................................................17
Cavitation ....................................................................................................................................17
Safe Scanning Guideline.............................................................................................................17
Operator Safety ................................................................................................................................... 18
Infection Control..........................................................................................................................18
Disposable Drape........................................................................................................................18
Waterproof and Dustproof Ratings...................................................................................................... 19
Understanding the MI/TI Display ......................................................................................................... 19
TI.................................................................................................................................................21
MI ................................................................................................................................................21
Display and Report in Different Modes........................................................................................22
Operator Control Features ..........................................................................................................22
Transducer Surface Temperature Rise ............................................................................................... 22
Chapter 3: Overview..................................................................................................................................23
System Capabilities............................................................................................................................. 24
Imaging........................................................................................................................................24
Transducer Types .......................................................................................................................24
Measurements.............................................................................................................................24
Calculations.................................................................................................................................24
Image Acquisition and Review....................................................................................................24
Connectivity.................................................................................................................................25
System Overview................................................................................................................................. 26
Front and Side Views..................................................................................................................26
Rear and Top/Bottom Views .......................................................................................................28
Transducer Overview........................................................................................................................... 29
Clinical Applications and Transducers ........................................................................................29
Indications for Use and Supporting Transducers................................................................................. 29
Chapter 4: Preparing the System..............................................................................................................31
Inserting a microSD Card .......................................................................................................
............. 32
Using the
Stand................................................................................................................................... 33
Charging the System........................................................................................................................... 33
Installing the Transducer Holder.......................................................................................................... 34
Connecting the Transducer ................................................................................................................. 35
Removing the Transducer ................................................................................................................... 36
Using the System On The Go.............................................................................................................. 37
Page 3

T3300 Diagnostic Ultrasound System | 2 | B00601-010 4/10/17
Wall-mounting Your Tablet.................................................................................................................. 38
Outputting the System Display to an HDMI-Enabled TV or Monitor.................................................... 39
Chapter 5: Using the System ....................................................................................................................40
Turning On/Off the System.................................................................................................................. 41
Launching the Main Screen................................................................................................................. 41
Setting the System Time and Date...................................................................................................... 42
Controlling the System......................................................................................................................... 43
Gestures for Controlling the Real-time/Frozen Imaging Screens................................................44
Gestures for Controlling the Real-time Imaging Screen..............................................................44
Gestures for Controlling the Frozen Imaging Screen..................................................................45
Setting the System Language.............................................................................................................. 45
Identifying the Main Screen Layout ..................................................................................................... 45
System Menu Screen..................................................................................................................45
Imaging Screen (Real-time) ........................................................................................................46
Imaging Screen (Frozen).............................................................................................................48
Quick Setup.................................................................................................................................50
Virtual Keyboard..........................................................................................................................51
Scan Properties Display..............................................................................................................51
Switching the Control Panel Pages ..................................................................................................... 52
Managing the System Power............................................................................................................... 52
Battery Status Icons....................................................................................................................53
Sleep Mode.................................................................................................................................53
Managing Disk Space .......................................................................................................................... 53
Network Configuration......................................................................................................................... 54
Connecting the System to the Network by Ethernet....................................................................54
Connecting the System to the Wireless Network........................................................................54
Connecting the System to a Bluetooth Device............................................................................55
Unpair a Bluetooth Device...........................................................................................................55
DICOM Configuration .......................................................................................................................... 55
Adding Servers............................................................................................................................55
Local Host ...................................................................................................................................56
Managing Outgoing Queue.........................................................................................................56
Casting the System Screen to an External Display............................................................................. 57
Chapter 6: Performing an Exam................................................................................................................58
Starting a New Exam........................................................................................................................... 59
Adding a New Patient.......................................................................................................................... 59
Updating Patient Information.......................................................................................................59
Loading a Worklist............................................................................................................................... 60
Selecting a Preset................................................................................................................................ 60
Customizing a Preset..................................................................................................................61
Modifying a Preset.......................................................................................................................61
Managing Presets .......................................................................................................................61
Exporting and Importing Customized Presets.............................................................................61
Setting the Transducer Orientation...................................................................................................... 62
Selecting/Switching a Scan Mode ....................................................................................................... 62
Adjusting the Displayed Image............................................................................................................ 62
Enlarging an Area of the Image...................................................................................................63
Splitting the Imaging Screen .......................................................................................................63
Freezing an Image............................................................................................................................... 65
Adding Annotations.............................................................................................................................. 65
Arrow...........................................................................................................................................66
Annot...........................................................................................................................................66
Label............................................................................................................................................66
Body Mark...................................................................................................................................67
Adding Measurements......................................................................................................................... 68
Measurin
g in B/Color/Power Modes............................................................................................69
Measuring in M-Mode..................................................................................................................70
Measuring in Spectral Doppler Mode..........................................................................................71
Page 4

T3300 Diagnostic Ultrasound System | 3 | B00601-010 4/10/17
Saving and Printing the Image............................................................................................................. 72
Saving an Image Loop ................................................................................................................72
Saving an Image .........................................................................................................................72
Printing an Image........................................................................................................................72
Reviewing the Image........................................................................................................................... 72
Performing Multiple Selections....................................................................................................73
Comparing Images......................................................................................................................74
Generating a Report....................................................................................................................74
Exporting the Exam ............................................................................................................................. 75
Managing the Exam History................................................................................................................. 75
Resuming an Exam.....................................................................................................................76
Starting a New Exam...................................................................................................................76
Finishing Exams..........................................................................................................................76
Deleting Exams...........................................................................................................................76
Exporting Exams.........................................................................................................................77
Importing Exams .........................................................................................................................77
Ending the Exam ................................................................................................................................. 77
Chapter 7: Using Image Controls..............................................................................................................78
B-Mode Image Controls....................................................................................................................... 79
Overview .....................................................................................................................................79
Adjusting Gain.............................................................................................................................79
Adjusting Frequency....................................................................................................................79
Adjusting Time Gain Compensation (TGC).................................................................................79
Adjusting the Scan Depth............................................................................................................80
Adjusting the Focus Depth, Focal Zone and Focal span.............................................................80
Adjusting Dynamic Range...........................................................................................................80
Using Tissue Harmonic Imaging (THI)........................................................................................80
Adjusting Persistence..................................................................................................................80
Adjusting Sharpness and Smoothing..........................................................................................80
Adjusting Gray Map.....................................................................................................................80
Adjusting Chroma Map................................................................................................................80
Adjusting Steer Angle..................................................................................................................80
Adjusting the Sector Width and Position.....................................................................................81
Adjusting Power ..........................................................................................................................81
Using Trapezoidal Imaging..........................................................................................................81
Adjusting Density.........................................................................................................................81
Using Compound Imaging...........................................................................................................81
Using ENV (Enhanced Needle Visualization)..............................................................................81
Color/Power Mode Image Controls...................................................................................................... 82
Overview .....................................................................................................................................82
Adjusting Pulse Repetition Frequency (PRF)..............................................................................83
Inverting the Color Display..........................................................................................................83
Using Directional Power..............................................................................................................83
Selecting a Color Map.................................................................................................................83
Adjusting Wall Filter.....................................................................................................................83
Applying the Smoothing Filter .....................................................................................................83
Adjusting the Color Priority..........................................................................................................83
M-Mode Image Controls...................................................................................................................... 83
Overview .....................................................................................................................................83
Using Steer M..............................................................................................................................84
Adjusting Sweep Speed..............................................................................................................84
Selecting M Process....................................................................................................................84
Inverting the M-Mode Trace Display ...........................................................................................84
Spectral Doppler Mode Image Controls............................................................................................... 85
Overview .....................................................................................................................................85
Adjusting Baseline........................................................................................................... ............86
Adjusting Sample Volume (SV) Size...........................................................................................86
Ad
justing Correction Angle..................................................................................................... .....86
Updating the 2D Display..............................................................................................................86
Chapter 8: System Customization.............................................................................................................87
Page 5

T3300 Diagnostic Ultrasound System | 4 | B00601-010 4/10/17
Customizing Your System ................................................................................................................... 88
General........................................................................................................................................88
Preset..........................................................................................................................................88
Patient.........................................................................................................................................88
Exam...........................................................................................................................................88
Workflow......................................................................................................................................88
Imaging........................................................................................................................................89
Annotation...................................................................................................................................89
BDMK (Body Mark) .....................................................................................................................89
Measurement ..............................................................................................................................90
Report..........................................................................................................................................90
DICOM ........................................................................................................................................90
Networking ..................................................................................................................................90
Print.............................................................................................................................................90
Servicing your system.......................................................................................................................... 90
Reinstalling Software...................................................................................................................91
Checking the Software Version...................................................................................................91
Checking the Tablet’s Serial Number..........................................................................................91
Checking the License Status.......................................................................................................91
Resetting System Settings..........................................................................................................91
Backing Up System Settings and Patient Data...........................................................................92
Restoring System Settings and Patient Data..............................................................................92
Resetting Your System................................................................................................................92
Chapter 9: Transducer and System Maintenance .....................................................................................93
Transducer Maintenance..................................................................................................................... 94
Transducer Storage............................................................................................................................. 94
Storage for Transport..................................................................................................................94
Daily and Long-Term Storage.....................................................................................................94
Transducer Care.................................................................................................................................. 95
Transducer Care and Operator Safety........................................................................................95
Inspecting the Transducer................................................................................................................... 96
Transducer Care Method..................................................................................................................... 97
Transducer and Cable Cleaning.......................................................................................................... 97
Cleaning Instructions...................................................................................................................97
Ultrasound Transmission Gels............................................................................................................. 98
Compatible Disinfectants and Cleaning Solutions............................................................................... 99
System Maintenance........................................................................................................................... 99
Inspecting the System.................................................................................................................99
Cleaning the System...................................................................................................................99
Chapter 10: Troubleshooting...................................................................................................................103
Chapter 11: Appendices..........................................................................................................................107
Appendix A: Specifications................................................................................................................ 108
System ......................................................................................................................................108
Transducer................................................................................................................................109
Adapter......................................................................................................................................110
Battery.......................................................................................................................................110
Appendix B: Connectivity and Security.............................................................................................. 112
Introduction................................................................................................................................112
Specifications............................................................................................................................112
Appendix C: System Acoustic Output Default Tables........................................................................ 115
C62B Transducer......................................................................................................................115
L154BH Transducer..................................................................................................................117
P42B6 Transducer ....................................................................................................................118
Appendix D: Acoustic Output Reporting Tables for Track 3.............................................................. 119
Definition of Terms Used in Acoustic Output Tables.................................................................119
Acoustic Output Tables for T3300 Transducers........................................................................121
Appe
ndix E: FCC Statement.............................................................................................................. 155
Federal Communications Commission (FCC) Statement .........................................................155
Page 6

T3300 Diagnostic Ultrasound System | 1 | B00601-010 4/10/17
CHAPTER
1
Read This First
The T3300 Diagnostic Ultrasound System (hereinafter called “system”) is
an easy-to-use, portable ultrasound imaging instrument intended for use
by a qualified operator for ultrasound evaluation and clinical analysis.
The Basic Operating Instructions provides important procedures and
information on how to operate the system and service the system
correctly and safely. Before attempting to operate the system, read this
Basic Operating Instructions and strictly observe all warnings and
cautions. Pay extra attention to the information from "Chapter 2 Safety
Information".
Copyright
Copyright 2017 BenQ Medical Technology. All rights reserved. No part of
this publication may be reproduced, transmitted, transcribed, stored in a
retrieval system or translated into any language or computer language, in
any form or by any means, electronic, mechanical, magnetic, optical,
chemical, manual or otherwise, without the prior written permission of
BenQ Medical Technology.
All other logos, products, or company names mentioned in this Basic
Operating Instructions may be the registered trademarks or copyrights of
their respective companies, and are used for informational purposes only.
Disclaimer
BenQ Medical Technology makes no representations or warranties, either
expressed or implied, with respect to the contents hereof and specifically
disclaims any warranties, merchantability or fitness for any particular
purpose. Further, BenQ Medical Technology reserves the right to revise
this publication and to make changes from time to time in the contents
hereof without obligation of BenQ Medical Technology to notify any
person of such revision or changes.
This Basic Operating Instructions aims to provide the most updated and
accurate information to customers, and thus all contents may be modified
from time to time without prior notice. Please visit http://
BenQMedicalTech.com for the latest version of this operating instructions.
Page 7

Read This First
T3300 Diagnostic Ultrasound System | 2 | B00601-010 4/10/17
Contact Information
Pharma Company: BenQ Medical Technology Corporation
Address: 7th floor, No. 46, Zhou-Z Street, Nei-Hu, Taipei 114, Taiwan
Manufacturer: Qisda Corporation
Address: 1st, 5th, 7th Floors, No. 159, Shan-Ying Road, Taoyuan 333, Taiwan
Website: www.BenQMedicalTech.com
Customer Service e-mail: Service@BenQMedicalTech.com
Customer Service Hotline:
Taiwan: 0800-015-533
China: +86 21-6327-7161~3 Ext. 812
International: +886 2-8797-5080 Ext. 5932
1.1 Intended Audience
This document is intended for sonographers, physicians, and biomedical engineers who operate
and maintain the system and are familiar with ultrasound techniques.
1.2 Intended Use
The T3300 is a general-purpose ultrasonic imaging instrument intended for use by a qualified
physician for ultrasound evaluation/clinical analysis etc. It can be used in the following applications:
Abdomen, Cardiology, Gynecology, Obstetric, Breast, Thyroid, Musculoskeletal, Vascular (Carotid,
Venous, Arterial), Nerve, Renal, Urology and so on.
The clinical environments where the system can be used include clinics, hospit als, and clinical pointof-care for diagnosis of patients.
The system is intended to be installed, used, and operated only in accordance with the safety
procedures and operating instructions given in the system user information, and only for the
purposes for which it was designed.
The system should only be operated by someone who has received proper training in the use and
operation of an ultrasound system. This system produces images derived from sound echoes; those
images must be interpreted by a qualified medical professional. This system in no way interprets
these images or provides a medical diagnosis of the patient being examined.
WARNINGS
• Do not use the system for purposes other than those intended and expressly stated
above. Do not misuse the system, and do not use or operate the system incorrectly.
• Do not use the system in ophthalmology applications.
• Installation, use, and operation of the system are subject to the law in the jurisdictions in
which it is used. Install, use, and operate the system only in such ways that do not
conflict with applicable laws or regulations, which have the force of law. Use of the
system for purposes other than those intended and expressly stated here, as well as
incorrect use or operation, may relieve us or our agents from all or some responsibilities
for resultant noncompliance, damage, or injury.
• System users are responsible for image quality and diagnosis. Inspect the data that is
being used for the analysis and diagnosis, and ensure that the data is sufficient both
spatially and temporally for the measurement approach being used.
Page 8
Read This First
T3300 Diagnostic Ultrasound System | 3 | B00601-010 4/10/17
1.3 Warnings
Before using the system, read these warnings and "Chapter 2 Safety Information".
WARNINGS
• Do not attempt to disassemble or modify the system. There are no user serviceable parts
inside this system. Necessary modifications must be made only by the manufacturer or
its designated agents.
• Do not allow any liquid to get inside this system. Water and moisture may cause shortcircuit to the electronic components and lead to malfunctions.
• Do not drop or apply shock/vibration to this system. Strong impacts may damage the
components inside.
• Do not cut, bend, modify, place heavy objects, or step on the cable of the power adapter.
Otherwise the external insulation may be damaged and result in short-circuit or fire.
• Do not use this system near strong electromagnetic sources, such as a microwave oven.
The electromagnetic interference may cause this system to malfunction.
• To avoid electrical shock, use only supplied power cords and connect only to properly
grounded wall outlets.
• The system should not be used adjacent to or stacked with other equipment. If adjacent
or stacked use is necessary, the system should be observed to verify normal operation in
the configuration in which it will be used.
1.4 WEEE
Disposal of Waste Electrical and Electronic Equipment and/or Battery by users in private
households in the European Union.
This symbol on the product or on the packaging indicates that this can not be disposed of
as household waste. You must dispose of your waste equipment and/or battery by
handling it over to the applicable take-back scheme for the recycling of electrical and
electronic equipment and/or battery. For more information about recycling of this
equipment and/or battery, please contact your city office, the shop where you purchased
the equipment or your household waste disposal service. The recycling of materials will
help to conserve natural resources and ensure that it is recycled in a manner that protects
human health and environment.
Recycling information: See http://www.benq.com/support/recycle for details.
1.5 Discarding the Tablet and Batteries
The tablet and internal batteries should be discarded in an environmentally safe manner. Properly
dispose of batteries according to local regulations.
WARNINGS
• Do not disassemble, puncture, or incinerate batteries. Be careful not to short the battery
terminals, because that could result in a fire hazard.
• Use caution when handling, using, and testing the batteries. Do not short circuit, crush,
drop, mutilate, puncture, apply reverse polarity, expose to high temperatures, or
disassemble. Misuse or abuse could cause physical injury.
• If embedded electrolyte leakage occurs, wash your skin with large amounts of water to
prevent skin irritation and inflammation.
Page 9
Read This First
T3300 Diagnostic Ultrasound System | 4 | B00601-010 4/10/17
1.6 Equipment List
Check the sales package for the following items. If any item is missing or damaged, contact your
place of purchase immediately.
• BenQ Medical Technology Ultrasound System
• Medical grade AC/DC power adapter
• Warranty Card
• Basic Operating Instructions (this document)
• AC plugs
• One or more BenQ Medical Technology Transducers
WARNINGS
• AC plug types vary by country/region.
• Using accessories, transducers, or power supply units other than those specified may
cause the warranty to void and result in increased emissions, decreased EMI immunity of
the system, or even damages to the system and personal injuries.
• Use of other accessories results in non-compliance.
1.7 Conventions
The system uses certain conventions throughout the interface to make it easy for you to learn and
use:
• Refer to "Controlling the System" on page 43 to control the system using gestures.
• To adjust the parameter value of a function, touch the plus/minus buttons (+/-).
• To type texts into a text field, touch the field and use the virtual keyboard that appears. You can
also use a supported USB or Bluetooth keyboard for entering texts.
• To display a list, touch the down arrow . To display the options, touch the Menu icon .
• To select/deselect an item or to enable/disable a function, tap in the checkbox. For example,
check the exam ; uncheck the exam .
The Basic Operating Instructions uses certain conventions throughout the book to make it easier to
find the information you need.
• The on-screen menu steps needed to perform a function are shown in a condensed form. For
example, touch > Settings > DICOM.
• Refer to the following graphic symbols and numbering styles to alert you to important
information:
This icon marks NOTES; useful tips or additional information that help you get better
use of your product.
This icon marks CAUTIONS; notices describing actions or conditions that may damage
your product or cause injury , and consequently void your warranty or service contract or
lose the patient or system data.
This icon marks WARNINGS; instructions that must be followed. Failure to observe can
cause damages to your product, or result in personal injuries, or even death.
Page 10

Read This First
T3300 Diagnostic Ultrasound System | 5 | B00601-010 4/10/17
1.8 System Warranty
The warranty is
void if unauthorized personnel perform service or maintenance on the system. To
ensure correct system performance and to obtain warranty service, please contact technical
support. For more information, see "Contact Information" on page 2.
This Device is for medical care person use only.
Only Professionals can install it. To maintain the device operation during the line power off, the
device is battery included.
Page 11

T3300 Diagnostic Ultrasound System | 6 | B00601-010 4/10/17
CHAPTER
2
Safety Information
This chapter covers the following topics:
• "Symbols" on page 8
• "Electrical Safety" on page 10
• "Mechanical Safety" on page 15
• "Equipment Protection" on page 15
• "RF Safety" on page 16
• "Biological Safety" on page 16
• "Operator Safety" on page 18
• "Waterproof and Dustproof Ratings" on page 19
• "Understanding the MI/TI Display" on page 19
• "Transducer Surface Temperature Rise" on page 22
Page 12
Safety Information
T3300 Diagnostic Ultrasound System | 7 | B00601-010 4/10/17
WARNING
Follow the procedures carefully and ensure that the power/electrical/environmental
requirements are satisfied. Failure to observe the instructions or disregard the warnings may
result in damages to the system, personal injury, or even death of the operator or the patient.
Observe the following precautions carefully.
WARNINGS
• This system complies with Type BF general equipment and the EN60601-1 standard,
suitable for continuous operation when co nnected as a system to a medical grade AC/DC
power adapter or operated from the tablet battery.
• Use only medical grade peripherals in the patient environment.
• Do not block or otherwise obstruct access to the AC plug at the wall. Operators must be
able to quickly unplug the power cable at the wall in case of emergency.
• The system should only be used in a medical facility under the supervision of a trained
physician.
• Only an authorized service technician should perform maintenance.
• Be extremely cautious when placing or moving the system.
• Always position the system on a stable surface where it cannot fall on the patient.
• Do not lift the system by the power cable or the transducer. If either disconnects, the
system could fall on the patient.
• This system has been fully adjusted and tested prior to shipment from the factory.
Unauthorized modifications will void your warranty.
• If this system or the transducer connected displays any signs of malfunction, turn off the
system immediately, disconnect it from the wall outlet, then contact technical support
(See "Contact Information" on page 2)
• Do not use a power adapter other than the one supplied with the system. Connecting the
system to an unknown power adapter is very dangerous and may lead to fire or
explosion.
• Using cables, transducers, or accessories other than those specified for use with the
system may result in increased emissions or decreased immunity of the system.
• The power cable of the system should only be connected to a grounded power socket.
• Do not connect USB peripherals with an extended USB cable. Extended connection may
cause unexpected usage fault.
• Only devices that comply with the EN60601-1 standard, either electronically or
mechanically, can be connected to this system. Recheck the leakage current and other
safety performance indices of the entire system to avoid potential system damage
caused by leakage from a current superposition.
CAUTIONCAUTION
Using accessories, transducers, peripherals, or cables not supplied with the system or
recommended by BenQ Medical Technology can affect the system in the form of increased
emissions or decreased immunity to external EMI/EMC occurrences. Non-specified
peripherals, and cables in some cases, can also increase leakage current or compromise the
safety of the grounding scheme.
• This system does not incorporate any specialized protective measures in the event it is
configured with high-frequency operation devices. The operator should use with caution
in these types of applications.
• The system is in compliance with the Ingress Protection Marking ratings IP21.
Page 13

Safety Information
T3300 Diagnostic Ultrasound System | 8 | B00601-010 4/10/17
WARNINGS
• Do not use this system under direct sunlight, near heat sources or in the presence of
flammable substances, otherwise an explosion may occur.
• When using this system for ultrasound examinations, use only the qualified ultrasound
gel that complies with system standards.
• Do not continuously scan the same part of a patient or expose the patient to prolonged
scanning, otherwise it may harm the patient.
• Do not stay at the same position for too long without taking a break while scanning
patients to prevent harm or neck injury.
• Follow the instructions on "Chapter 4 Preparing the System" on page 31 in this Basic
Operating Instructions for complete instructions on the installation of the transducers,
power supply units and all peripheral devices to the system.
• Improper installation of peripherals to the system may cause damage to the system,
peripherals, or personal injury to the operator or the patient.
• Do not use the system for any application until you have read, understood, and know all
the safety information, safety procedures, and emergency procedures contained in this
chapter. Operating the system without a proper awareness of safe use could lead to fatal
or other serious personal injury.
• The system can contain environmentally hazardous materials such as, but not limited to:
heavy metals, general recyclable metals, and plastics. This product should be recycled
according to local and national guidelines for recycling electronic equipment.
• When using additional peripheral equipment powered from an electrical source other
than the ultrasound system, the combination is considered to be a medical system. It is
your responsibility to comply with IEC 60601-1 and test the system to those
requirements.
• Do not use non-medical peripherals, such as report printers, within 1.5 m (5 ft) of a
patient, unless the non-medical peripherals receive power from an isolation transformer
that meets medical safety standards, as defined by standard IEC 60601-1.
• Images printed on a report printer are intended only for reference and should not be used
for diagnostic purposes.
• For proper disposal of this system, contact your local BenQ Medical Technology
representative.
2.1 Symbols
The following symbols provide information about the system’s labels and regulatory compliance.
CAUTION
CAUTION
Do not use a brush on the system’s labels.
Page 14

Safety Information
T3300 Diagnostic Ultrasound System | 9 | B00601-010 4/10/17
2.1.1 System Label Icons
2.1.2 System Button
Table 1 System Label Icons
Symbols Descriptions
Product Model
Unique Device Identification
Manufacturer Mark
Manufacturer
Qisda Corporation manufactures the system.
Manufacture Date
EU/EC European Authorized Representative
CE Marking Certification with Notified Body Number 0120
Compliance to R&TTE Directive
Final Disposal of Your System
Final disposal is when you dispose of the system in such a way that
it can no longer be used for its intended purposes.
For more information, see "WEEE" on page 3.
Refer to the Basic Operating Instructions
Indicates that the user should read the Basic Operating Instructions
for information on using this equipment
Type BF Equipment Applied Part
The Ultrasound System provides protection against electric shock.
Include RF transmitters, apply RF electromagnetic energy for
diagnosis
Tablet IP Code, International Protection Marking
Table 2 System Button
Symbols Descriptions
Power button
Press and hold the Power button to turn on/off the system.
Page 15
Safety Information
T3300 Diagnostic Ultrasound System | 10 | B00601-010 4/10/17
2.1.3 Shipping Label Icons
2.2 Electrical Safety
Only trained medical personnel should operate this system. This system complies with the following
standards:
• Electrical:
– IEC 60601-1:2005+AMD1:2012/EN 60601-1:2006+A1:2013+A12:2014
– IEC 60601-2-37:2008+AM1:2011
•EMC/EMI:
– IEC 60601-1-2:2007/AC:2010, CISPR 11 Group I Class B
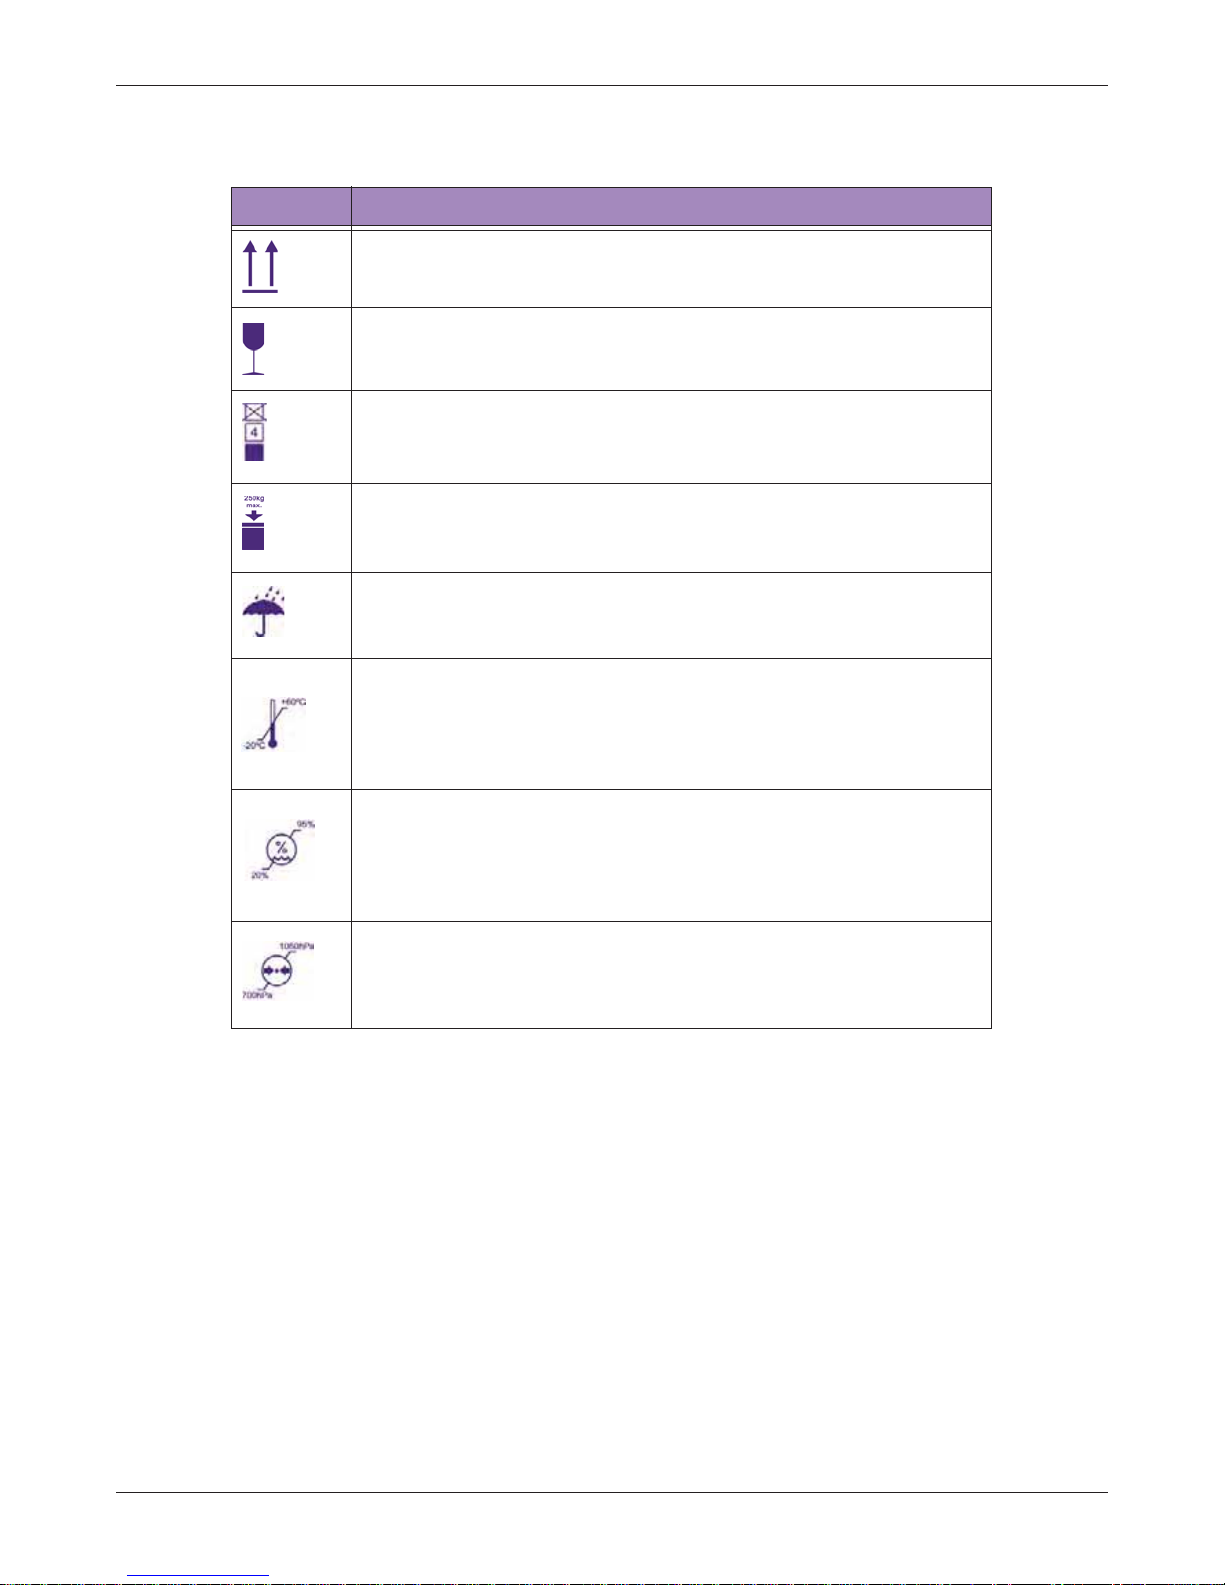
Table 3 Shipping Label Icons
Symbols Descriptions
This Side Up
Fragile
Maximum Stacking Height
Maximum Stacking Weight
Sun and Rain
Temperature
The system must be stored in the original shipping container in
environments between -20°C and 60°C (-13°F and 140°F). The
temperature while operating the system should be kept between
10°C and 40°C (32°F and 104°F).
Humidity
The system must be stored in the original shipping container in
environments with 20% to 95% relative humidity and noncondensing. The humidity while operating the system should be kept
between 20% to 85% relative humidity and non-condensing.
Air Pressure
The system must be stored in the original shipping container in
environments between 700 hPa (525 mmHg) and 1060 hPa (795
mmHg) air pressure.
Page 16

Safety Information
T3300 Diagnostic Ultrasound System | 11 | B00601-010 4/10/17
• Harmful liquid protection:
– For the main system: IP21 (without power adapter)
– For the transducer: IPx7
– For the power adapter: IP20
– For maximum safety, observe the following guidelines strictly:
WARNINGS
• The system and patient-applied parts meet the standard IEC 60601-1. Applied voltages
exceeding the standard, although unlikely, may result in electrical shock to the patient or
operator.
• Shock hazards exist if the power adapter is damaged or is not properly grounded. Use
only the supplied medical grade power adapter.
• Plug the system into a hospital-grade, three-hole outlet, and do not circumvent the power
cord.
• To avoid the risk of electric shock, connect the system only to properly grounded wall
outlets.
• Only authorized service technicians can make internal replacements of the system.
• Do not operate the system in the presence of flammable gases or anesthetics. Explosion
can result. The system is not compliant in AP/APG environments as defined by IEC
60601-1.
• Do not use a transducer if the transducer or cable is damaged. Contact technical support
for replacement of the damaged equipment (See "Contact Information" on page 2).
• All peripheral devices connected to the system must comply with IEC 60601 or IEC 60950 -
1.
• To avoid risk of electrical shock hazards, always inspect the transducer before use.
Check the face, housing, and cable before use. Do not use if the face is cracked, chipped,
or torn; the housing is damaged; or the cable is abraded.
• Transducer cables have strain reliefs at terminations. Inspect cables regularly to detect
damaged, frayed, or broken cables that might contact a patient.
2.2.1 Battery Usage/Disposal
WARNINGS
• Do not disassemble the system.
• Use only the supplied battery. Using an unapproved battery may cause the system to
explode and result in serious damage to your health or property.
• Do not replace, heat, crush, puncture, short external contacts, or incinerate the battery.
• Use only the supplied power adapter to charge the battery.
• Incorrect use of the battery may cause a leak of chemicals or explosion. The leak of
chemicals may harm the skin. If any chemicals leak from the device, use a dry cloth to
wipe it clean and contact your local BenQ Medical Technology representative for help.
CAUTION
CAUTION
Dispose of used batteries according to the instructions.
2.2.2 Electrical Fast Transients (EFT)
The system complies with the IEC 60601-1-2 3rd edition standard for susceptibility to electrical fast
transients (EFT) on the power line. However, if the system experiences EFT on the power line,
Page 17

Safety Information
T3300 Diagnostic Ultrasound System | 12 | B00601-010 4/10/17
artifacts (vertical lines, excessive noise in image, etc.) may appear on the ultrasound image. To
eliminate these artifacts caused by an EFT condition, the operator should either:
• Disconnect the system from the power source by unplugging the power cord from the tablet, and
run the system on its internal battery.
or
• Unplug the power cord from the wall and move to a different power source that is not
experiencing this condition.
2.2.3 Electromagnetic Interference (EMI)
Medical electrical equipment such as the system requires special precautions regarding
electromagnetic compatibility, and must be installed and put into service according to the following
electromagnetic tables.
2.2.3.1 All Equipment
The system is intended for use in the electromagnetic environment specified below . The customer or
operator of the T3300 Diagnostic Ultrasound System should ensure that it is used in such an
environment.
Guidance and Manufacturer’s Declaration - Electromagnetic Emissions - All Equipment
Guidance and Manufacturer’s Declaration - Electromagnetic Immunity - All Equipment
T able 4 Guidance and Manufacturer’s Declaration - Electromagnetic Emissions - All Equipment
Emissions test Compliance Electromagnetic environment - Guidance
RF Emissions CISPR 11 Group 1
The T3300 Diagnostic Ultrasound System uses RF
energy only for its internal function. Therefore, its
RF emissions are very low and are not likely to
cause any interference in nearby electronic
equipment.
RF Emissions CISPR 11 Class B The T3300 Diagnostic Ultrasound System is
suitable for use in all establishments, including
domestic, and those directly connected to the
public low-voltage power supply network that
supplies buildings used for domestic purposes.
Harmonics IEC 61000-3-2 Class A or B
Flicker IEC 61000-3-3 Complies
RF Emissions CISPR 14-1 Complies
The T3300 Diagnostic Ultrasound System is not
suitable for interconnection with other equipment.
RF Emissions CISPR 15 Complies
The T3300 Diagnostic Ultrasound System is not
suitable for interconnection with other equipment.
Table 5 Guidance and Manufacturer’s Declaration - Electromagnetic Immunity - All Equipment
Immunity test IEC 60601 test level Compliance level
Electromagnetic environment
- Guidance
ESD
IEC 61000-4-2
±6 kV Contact
±8 kV Air
As specified
Floors should be wood,
concrete or ceramic tile. If floors
are synthetic, the relative
humidity should be at least 30%.
EFT
IEC 61000-4-4
±2 kV Mains
± 1kV I/Os
As specified
Mains power quality should be
that of a typical commercial or
hospital environment.
Surge IEC
61000-4-5
±1 kV Differential
±2 kV Common
As specified
Page 18

Safety Information
T3300 Diagnostic Ultrasound System | 13 | B00601-010 4/10/17
Guidance and Manufacturer’s Declaration - Electromagnetic Immunity - Non-life-supporting
Equipment
Voltage dips/
Dropout IEC
61000-4-11
>95% dip for 0.5 cycle
60% dip for 5 cycles
30% dip for 25 cycles
>95% dip for 5 seconds
As specified
Mains power quality should be
that of a typical commercial or
hospital environment. If the user
of the T3300 Diagnostic
Ultrasound System requires
continued operation during
power mains interruptions, it is
recommended that the T3300
Diagnostic Ultrasound System
be powered from an
uninterruptible power supply or
battery.
Power
frequency 50/
60 Hz
Magnetic field
IEC 61000-4-8
3 A/m As specified
Power frequency magnetic
fields should be that of a typical
commercial or hospital
environment.
Table 6 Guidance and Manufacturer’s Declaration - Electromagnetic Immunity - Non-life-supporting
Equipment
Immunity test IEC 60601 test level Compliance level
Electromagnetic environment Guidance
Portable and mobile RF
communications equipment
should be used no closer to any
part of the T3300 Diagnostic
Ultrasound System, including
cables, than the recommended
separation distance calculated
from the equation applicable to
the frequency of the transmitter.
Recommended separation
distance
Conducted RF
IEC 61000-4-6
3 Vrms
150 KHz to 80 MHz
[V1] = 3 Vrms
Radiated RF
IEC 61000-4-3
3 V/m
80 MHz to 2.5 GHz
[E1] = 3 V/m
80 MHz to 800 MHz
800 MHz to 2.5 GHz
Table 5 Guidance and Manufacturer’s Declaration - Electromagnetic Immunity - All Equipment
Immunity test IEC 60601 test level Compliance level
Electromagnetic environment
- Guidance
d
3.5
V
--------- -
P=
d
3.5
E
2
--------- -
P=
d
7
E
2
------ -
P=
Page 19
Safety Information
T3300 Diagnostic Ultrasound System | 14 | B00601-010 4/10/17
To limit exposure to electromagnetic interference from nearby equipment that can degrade image
quality, you should operate the system under EMI conditions that minimize power supply transients,
mechanical interactions, vibration, and thermal, optical, and ionizing radiation.
WARNINGS
• Using cables, transducers, and accessories other than those specified for use with the
system may result in increased emissions from, or decreased immunity of, the system.
• ME equipment has been tested for radiated RF immunity only at selected frequencies.
2.2.3.2 Separation Distances
The T3300 Diagnostic Ultrasound System is intended for use in the electromagnetic environment in
which radiated disturbances are controlled. The customer or operator of the system can help
prevent electromagnetic interference by maintaining a minimum distance between portable and
Where P is the maximum output
power rating of the transmitter in
watts (W) according to the
transmitter manufacturer , and d is
the recommended separation
distance in meters (m).
Field strengths from fixed RF
transmitters, as determined by an
electromagnetic site survey
a
,
should be less than the
compliance level in each
frequency range
b
. Interference
may occur in the vicinity of
equipment marked with the
following symbol:
a Field strengths from fixed transmitters, such as base stations for radio (cellular/cordless)
telephones and land mobile radios, amateur radio, AM and FM radio broadcast and TV
broadcast cannot be predicted theoretically with accuracy.
To assess the electromagnetic environment due to fixed RF transmitters, an electromagnetic
site survey should be considered. If the measured field strength in the location in which the
T3300 Diagnostic Ultrasound System is used exceeds the applicable RF compliance level
above, the system should be observed to verify normal operation. If abnormal performance is
observed, additional measures may be necessary, such as reorienting or relocating the system.
b Over the frequency range 150 kHz to 80 MHz, field strengths should be less than 3 V/m.
Table 6 Guidance and Manufacturer’s Declaration - Electromagnetic Immunity - Non-life-supporting
Equipment
Immunity test IEC 60601 test level Compliance level
Electromagnetic environment Guidance
Page 20
Safety Information
T3300 Diagnostic Ultrasound System | 15 | B00601-010 4/10/17
mobile RF Communications Equipment and the system as recommended below, according to the
maximum output power of the communications equipment.
For transmitters rated at a maximum output power not listed above, the recommended separation
distance D in meters (m) can be estimated using the equation applicable to the frequency of the
transmitter, where P is the maximum output power rate of the transmitter in watts (W) according to
the transmitter manufacturer.
NOTES
• At 80 MHz and 800 MHz, the separation distance for the higher frequency range applies.
• These guidelines may not apply in all situations. Electromagnetic propagation is affected by
absorption and reflection from structures, objects and people.
WARNING
Operation of the equipment below that value may cause inaccurate results.
2.2.4 Surges to AC Power Mains
If the system is powered from AC mains that could experience surges above 1 kV (for example, from
extreme lightning conditions), additional surge suppression is recommended.
2.3 Mechanical Safety
Observe the following precautions when using the system for mechanical safety.
WARNINGS
• When attempting to overcome an obstacle, do not push the system from either side with
excessive force, which could cause the system to tip over.
• When positioning the system, move it carefully to avoid pinching hands or extremities
against other objects, such as a bed rail.
• Do not roll the system over transducer cables or power cords.
2.4 Equipment Protection
Observe the following precautions to protect your system.
Table 7 Separation distances
Maximum
Output Power
of Transmitter
Watts (W)
Separation Distance According to Frequency of Transmitter Meters (m)
150 kHz to 80 MHz
80 MHz to 800 MHz
800 MHz to 2.5 GHz
0.01 0.12 m 0.12 m 0.24 m
0.1 0.37 m 0.37 m 0.74 m
1 1.17 m 1.17 m 2.34 m
10 3.69 m 3.69 m 7.38 m
100 11.67 m 11.67 m 23.34 m
3.5 P
V
2
-------------------
D=
3.5 P
E
2
-------------------
D=
7 P
E
2
-------------
D=
Page 21

Safety Information
T3300 Diagnostic Ultrasound System | 16 | B00601-010 4/10/17
CAUTION
CAUTION
• Excessive bending or twisting of cables on patient-applied parts may cause failure or
intermittent operation of the system. Do not roll the system over cables, which may
damage them.
• Do not submerge the cables of patient-applied parts in solution. The cables are not liquidtight beyond the applied part/cable or cable/connector interfaces.
• Do not submerge the transducer connector in any liquid.
• For optimal performance, connect your system to a circuit dedicated solely for the
system. Do not connect life-support devices to the same circuit as the system.
• Improper cleaning or sterilization of a patient-applied part may cause permanent damage.
For cleaning and disinfection instructions, see "Transducer and System Maintenance" on
page 93.
2.5 RF Safety
The system should be operated in a location that is no closer than listed in “Non-Life-Supporting
Equipment” to any part of RF communications equipment that may disturb its functions. If abnormal
performance is observed, additional measures may be necessary, such as re-orienting or relocating
the equipment. The system should be separated by at least the distances specified in the table
referenced above.
The system is intended for use in an electromagnetic environment where radiated RF disturbances
are controlled. The customer or the user of the system can help prevent electromagnetic
interference by maintaining a minimum distance between portable and mobile RF communications
equipment (transmitters) and the system according to the maximum output power of the
communications equipment.
2.6 Biological Safety
This product, as with all ultrasound equipment, should be used only for valid reaso ns and should be
used both for the shortest period of time and at the lowest power settings necessary (ALARA - As
Low As Reasonably Achievable) to produce diagnostically acceptable images. The AIUM offers the
following guidelines:
Clinical Safety Quoted from AIUM
Approved March 26, 1997
Diagnostic ultrasound has been in use since the late 1950s. Given its known benefits
and recognized efficacy for medical diagnosis, including use during human
pregnancy, the American Institute of Ultrasound in Medicine herein addresses the
clinical safety of such use.
There are no confirmed biological effects on patients or instrument operators caused
by exposures from present diagnostic ultrasound instruments. Although the possibility
exists that such biological effects may be identified in the future, current data indicate
that the benefits to patients of the prudent use of diagnostic ultrasound outweigh the
risks, if any that may be present.
Page 22

Safety Information
T3300 Diagnostic Ultrasound System | 17 | B00601-010 4/10/17
2.6.1 Heating
Elevating tissue temperature during obstetrical examinations creates medical concerns. At the
embryo development stage, the rise in temperature and th e le ngth of time exposed to heat combine
to determine potential detrimental ef fects. Exercise caution, p articularly during Color ima ging exams.
The Thermal Index (TI) provides a statistical estimate of the potential temperature elevation (in
centigrade) of tissue temperature. Two forms of TI are available: TIS, for soft tissue exposures; and
TIB, for instances when bone lies near the beam focus.
2.6.2 Cavitation
Cavitation may occur when sound passes through an area that contains a cavity, such as a gas
bubble or air pocket (in the lung or intestine, for example). During the process of cavitation, the
sound wave may cause the bubble to contract or resonate. This oscillation may cause the bubbles
to explode and damage the tissue. The Mechanical Index (MI) has been created to help operators
accurately evaluate the likelihood of cavitation and the related adverse effects.
2.6.3 Safe Scanning Guideline
• Ultrasound should only be used for medical diagnosis and only by trained medical personnel.
WARNINGS
• Diagnostic ultrasound procedures should be done only by personnel fully trained in the
use of the system, in the interpretation of the results and images, and in the safe use of
ultrasound (including education as to potential hazards).
• Operators should understand the likely influence of the machine controls, the operating
mode (e.g. B-mode, Color or Spectral Doppler) and the transducer frequency on thermal
and cavitation hazards.
• Use a low output power default setting for each new patient. Output should only be increased
during the examination if penetration is still required to achieve a satisfactory result, and after the
Gain control has been adjusted to its maximum value.
• Maintain the shortest examination time necessary to produce a useful diagnostic result.
WARNINGS
• Take particular care to reduce output and minimize exposure time of an embryo or fetus
when the temperature of the mother is already elevated.
• Take particular care to reduce the risk of thermal hazard during diagnostic ultrasound
when exposing an embryo less than eight weeks after gestation, or the head, brain or
spine of any fetus or neonate.
• Although applicable to any transducer, take particular care during trans-vaginal exams
during the first eight weeks of gestation.
• During continuous operation, the system temperature may become too high. If the following
system message displays during a real-time scan, touch OK and the system displays frozen
imaging screen. To resume scanning, wait until the system cools down.
• Operators should continually monitor the on-screen thermal index (TI) and mechanical index
(MI) values and use control settings that keep these settings as low as possible while still
achieving diagnostically useful results. In obstetric examinations, TIS (soft tissue thermal index)
System temperature is high. Please cease
the current scan for a few minutes.
OK
Page 23

Safety Information
T3300 Diagnostic Ultrasound System | 18 | B00601-010 4/10/17
should be monitored during scans carried out in the first eight weeks after gestation, and TIB
(bone thermal index) thereafter.
– MI> 0.3 Minor damage is likely to happen to neonatal lung or intestine. If such exposure is
necessary, reduce the exposure time as much as possible.
– MI> 0.7 Risk of cavitation exists if an ultrasound contrast agent containing gas microspheres
is being used. There is a theoretical risk of cavitation without the presence of
ultrasound contrast agents. The risk increases with MI values above this threshold.
– TI> 0.7 The overall exposure time of an embryo or fetus should be restricted in accordance
with the following table as a reference.
• Diagnostic ultrasound has the potential for both false positive and false negative results.
Misdiagnosis is far more dangerous than any effect that might result from the ultrasound
exposure. Therefore, diagnostic ultrasound should be performed only by those with sufficient
training and education.
• Non-diagnostic use of ultrasound equipment is not generally recommended. Examples of nondiagnostic uses of ultrasound equipment include repeated scans for operator training,
equipment demonstration using normal subjects, and the production of souvenir pictures or
videos of a fetus. For equipment of which the safety indices are displayed over their full range of
values, the TI should always be less than 0.5 and the MI should always be less than 0.3. Avoid
frequent repeated exposure of any subject. Scans in the first trimester of pregnancy should not
be carried out for the sole purpose of producing souvenir videos or photographs, nor should their
production involve increasing the exposure levels or extending the scan times beyond those
needed for clinical purposes.
2.7 Operator Safety
The following issues and situations can affect operator safety when you are using an ultrasound
system.
2.7.1 Infection Control
Issues related to infection control affect the operator and the patient. Follow the infection-control
procedures established in your facility for the protection of both the staff and the patient.
2.7.2 Disposable Drape
If you believe contamination of the system might occur during an exam, it is recommended that you
take universal precautions and cover the system with a disposable drape. Consult your facility's
rules regarding equipment use in the presence of infectious disease.
Table 8 Maximum exposure time recommended for an embryo or fetus
TI Maximum exposure time (minutes)
0.7 60
1.0 30
1.5 15
2.0 4
2.5 1
Page 24
Safety Information
T3300 Diagnostic Ultrasound System | 19 | B00601-010 4/10/17
2.8 Waterproof and Dustproof Ratings
The system has a degree of protection from ingress of water and particulate matter, but the tablet is
not approved for use where it would be exposed to liquids. If it is used in environments where it
might be exposed to liquids, the tablet must be covered by a drape. These environments include, but
are not limited to, outpatient and private office procedures such as biopsies, office visits, and other
traditional, non-invasive scanning.
The following table lists the applied parts and their levels of protection.
2.9 Understanding the MI/TI Display
The system allows full software control of acoustic output. When powering on the system or creating
a new exam, scan parameters should be set to default preset. All of the default presets are
compliant with FDA requirements. TI/MI information are displayed in real-time in the scan properties
area.
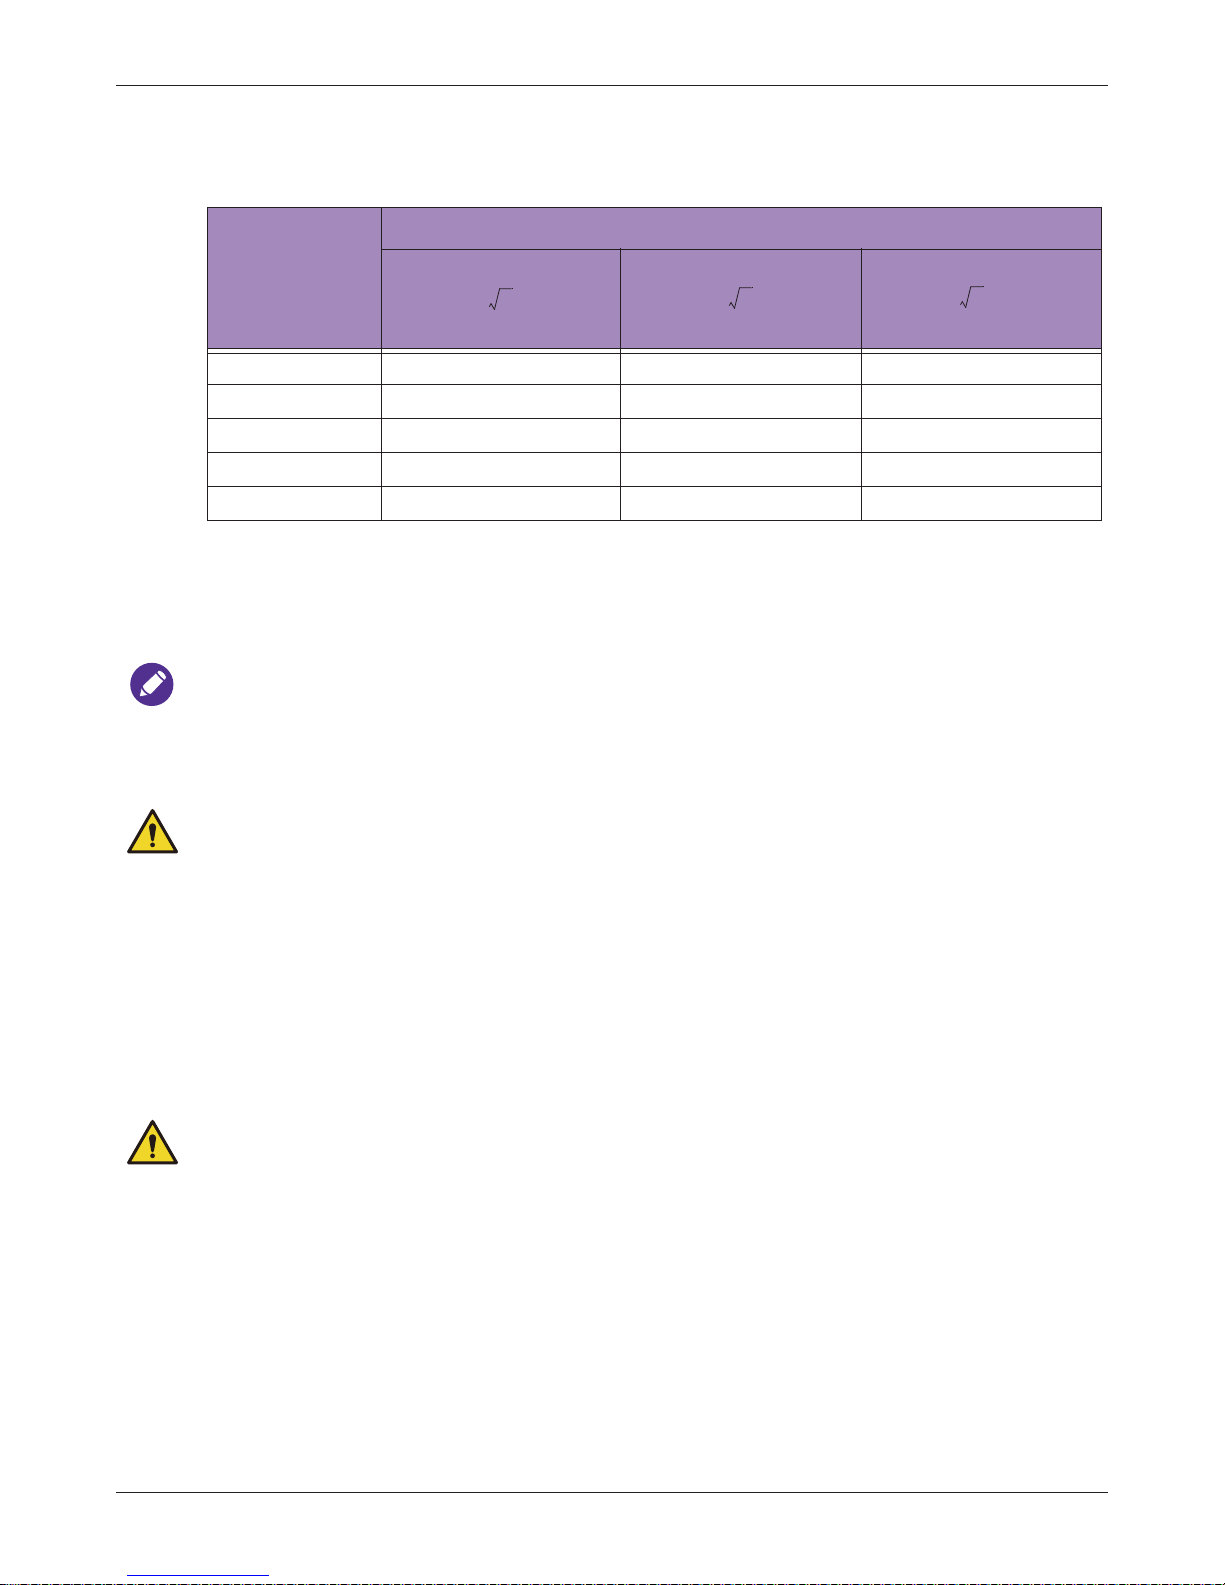
In the following table, the MI or TI index is equal or greater than 1.0 for transducer/mode
combinations marked “V”.
Table 9 Waterproof and dustproof ratings
Component Use IP level
Ultrasound System Ultrasound system IP21
P42B6 transducer Ultrasound transducer IPX7 (at transducer head)
C62B transducer Ultrasound transducer IPX7 (at transducer head)
L154BH transducer Ultrasound transducer IPX7 (at transducer head)
Table 10 MI/TI generating from applicable transducer/mode combinations
Mode /
Transducer
P42B6 Phased
Array 64 elements
2-4 MHz
C62B Curved
Linear Array 26 MHz
L154BH Linear
Array 4-12 MHz
BV
B+Color V V V
B+Power V V V
B+M-Mode V
PW Doppler V
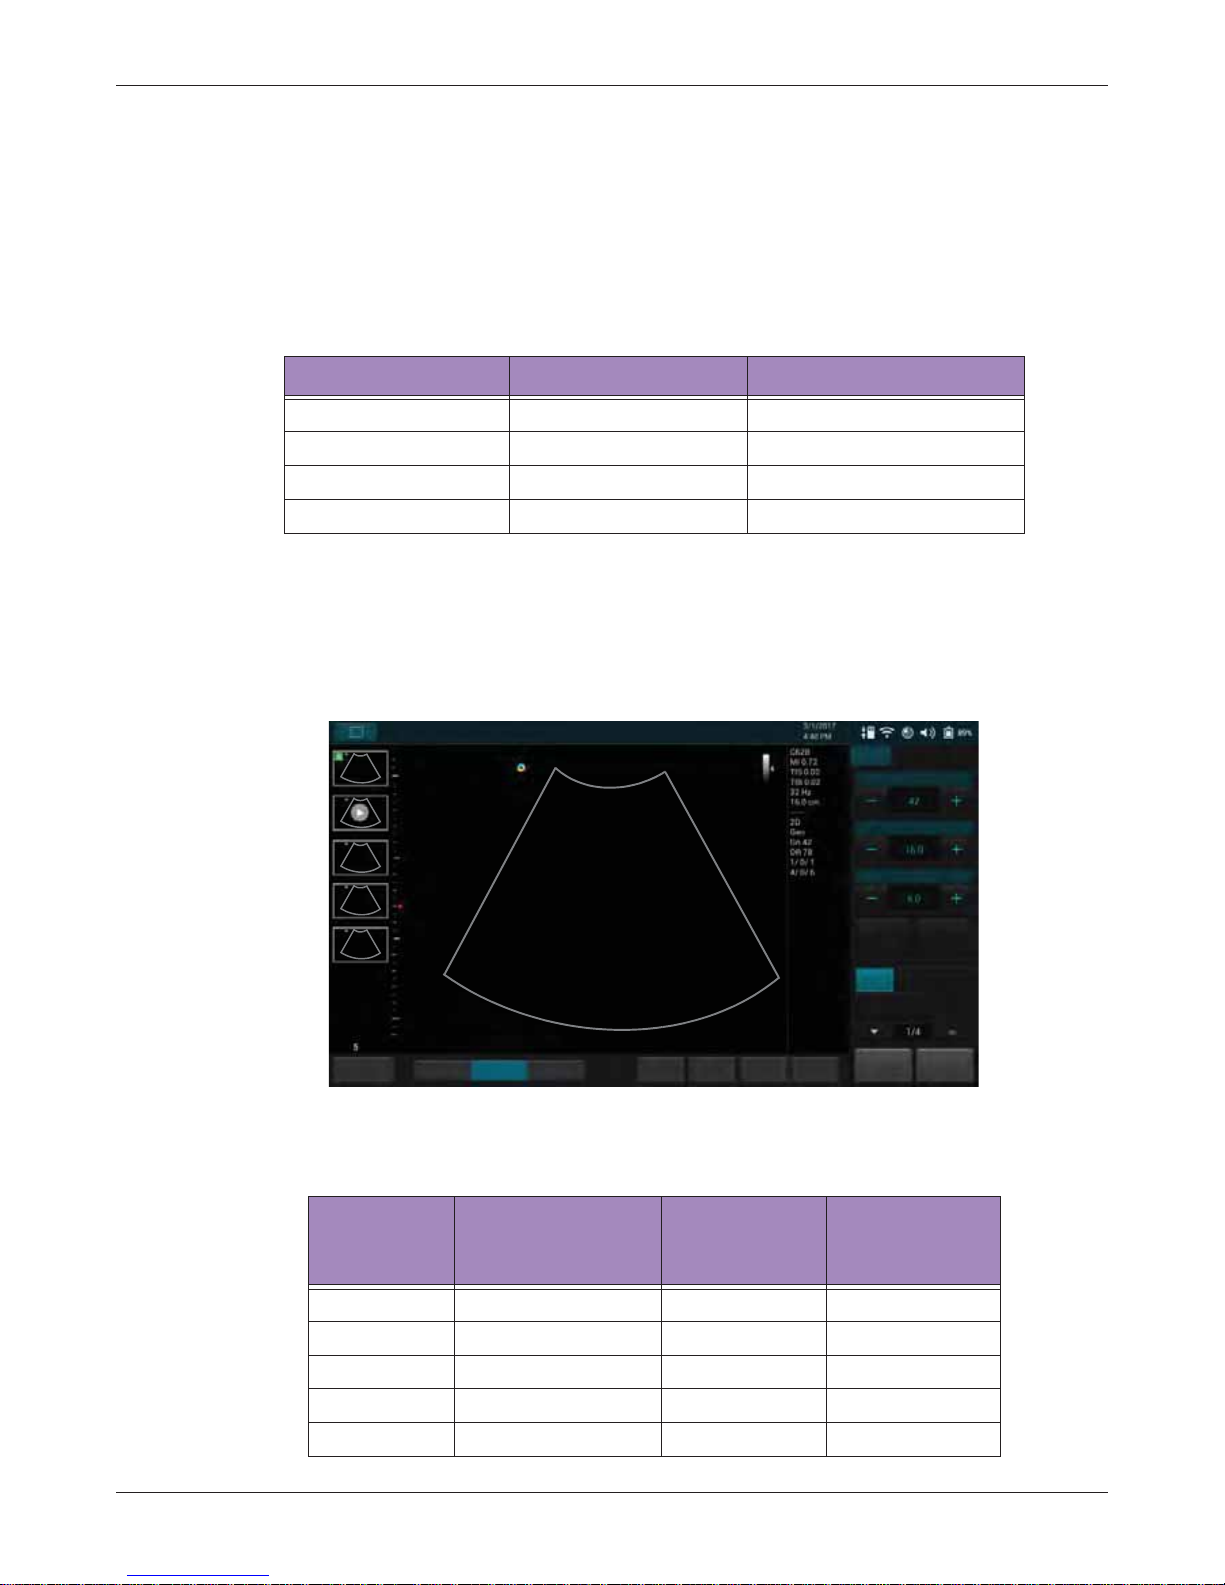
Save Freeze
HomeTGC
Tuning
ResolutionGeneralPenetration
End Exam
Abdomen
Gain
Depth
Focus
THI
Full Screen
B Color PW
M
Power
B
Fn Key
Page 25

Safety Information
T3300 Diagnostic Ultrasound System | 20 | B00601-010 4/10/17
Track-3 follows the Output Display Standard for systems which include fetal Doppler applications.
The acoustic output will not be evaluated on an application-specific basis, but the global maximum
de-rated I
spta
must be 720 mW/cm2and either the global maximum MI must be 1.9, or the global
maximum derated Isppa must be 190 W/cm
2
. An exception is for ophthalmic use, in which case
the TI=max (TIS) is not to exceed 1.0; I
spta
.3 50 mW/CM2, and MI 0.23. Track-3 gives the
operator the freedom to increase the output acoustic power for a specific exam, and still limit output
acoustic power within the global maximum de-rated I
spta
720 mW/cm2 under an Output Display
Standard.
The system design allows full software control of the acoustic output, entry of new patient
identification data or change from a non-foetal to a foetal application, and the system may switch to
an appropriate default setting upon powering on. These default setting levels are established before
shipping and may be reconfigured by the operator.
For any ultrasound systems, Track-3 provides an Output Indices Display Standard. The ultrasound
system and its Basic Operating Instructions contain the information regarding an ALARA (As Low As
Reasonably Achievable) education program from the clinical end-user and the acoustic output
indices, MI and TI. The MI describes the likelihood of cavitation, and the TI offers the predicted
maximum temperature rise in tissue as a result of the diagnostic examination. In general, a
temperature increase of 2.5°C must be present consistently at one spot for 2 hours to cause
possible fetal abnormalities. Avoiding a local temperature rise above 1°C should ensure that no
thermally induced biologic effect occurs. When referring to the TI for potential thermal effect, a TI
equal to 1 does not mean the temperature will rise 1°C. It only means an increased potential for
thermal effects can be expected as the TI increases. A high index does not mean that bioef fect s are
occurring, but only that the potential exists and there is no consideration in the TI for the scan
duration, so minimizing the overall scan time will reduce the potential for effects. These operator
control and display features move the safety responsibility from the manufacturer to the operator . So
it is very important to have the ultrasound systems display the acoustic output indices correctly and
the well-educated operator to interpret the value appropriately.
R
F
: De-rating factor
In Situ intensity and pressure cannot currently be measured. Therefore, the acoustic power
measurement is normally done in the water tank, and when soft tissue replaces water along the
ultrasound path, a decrease in intensity is expected. The fractional reduction in intensity caused by
attenuation is denoted by the derating factor (R
F
),
R
F
= 10
(-0.1 a.f.z)
Where a is the attenuation coefficient in dB cm-1MHz-1, f is the transducer center frequency, and z
is the distance along the beam axis between the source and the point of interest.
De-rating factor R
F
for the various distances and frequencies with attenuation coefficient 0.3 dB cm
-
1
MHz-1in homogeneous soft tissue is listed in the following t able. An example is if the operator uses
Triplex V V
CW Doppler
Table 10 MI/TI generating from applicable transducer/mode combinations
Mode /
Transducer
P42B6 Phased
Array 64 elements
2-4 MHz
C62B Curved
Linear Array 26 MHz
L154BH Linear
Array 4-12 MHz
Page 26

Safety Information
T3300 Diagnostic Ultrasound System | 21 | B00601-010 4/10/17
7.5 MHz frequency , the power will be attenuated by 0.0750 at 5 cm, or 0.3 x 7.5 x 5 = -11.25 dB. The
De-rated Intensity is also referred to as ‘.3’ at the end (e.g. I
spta.3
).
I’ = I * R
F Where I’ is the intensity in soft tissue, I is the time-averaged intensity measured in water.
2.9.1 TI
TI is defined as the ratio of the In Situ acoustic power (W.3) to the acoustic power required to raise
tissue temperature by 1°C (W
deg),
TI = W.3 / W
deg
Three TIs corresponding to soft tissue (TIS) for abdominal; bone (TIB) for fetal and neonatal
cephalic; and cranial bone (TIC) for pediatric and adult cephalic, have been developed for
applications in different exams. An estimate of the acoustic power in milliwatts necessary to produce
a 1°C temperature elevation in soft tissue is:
W
deg
= 210 / fc
For model 1 to 4, where fc is the center frequency in MHz.
W
deg
= 40 · K · D
For model 5 and 6, where K (beam shape factor) is 1.0, D is the apert ure diameter in cm at the depth
of interest.
2.9.2 MI
Cavitation is more likely to occur at high pressures and low frequencies in pulse ultrasound wave in
the tissue, which contains a bubble or air pocket (for instance, the lung, intestine, or scan with gas
contrast agents). The threshold under optimum conditions of pulsed ultrasound is predicted by the
ratio of the peak pressure to the square root of the frequency.
MI = Pr’ / sqrt(fc)
Pr’ is the de-rated (0.3) peak rare-fractional pressure in Mpa at the point where PII is the maximum,
and fc is the center frequency in MHz. PII is the Pulse Intensity Integral that the tot al ene rgy per unit
area carried by the wave during the time duration of the pulse. The peak rare-fractional pressure is
measured in hydrophone maximum negative voltage normalized by the hyd rophone calibration
parameter.
2.9.2.1 Display Guideline
Thermal Index (TI) consists of two indices: soft tissue (TIS) and bone (TIB). TIB is only displayed in
non-scanning modes, such as M-mode, PW mode and CW mode. TIS is displayed in all scan
Table 11
Distance (cm)
Frequency (MHz)
1 3 5 7.5
1 0.9332 0.8128 0.7080 0.5957
2 0.8710 0.6607 0.5012 0.3548
3 0.8128 0.5370 0.3548 0.2113
4 0.7586 0.4365 0.2512 0.1259
5 0.7080 0.3548 0.1778 0.0750
6 0.6607 0.2884 0.1259 0.0447
7 0.6166 0.2344 0.0891 0.0266
8 0.5754 0.1903 0.0631 0.0158
Page 27

Safety Information
T3300 Diagnostic Ultrasound System | 22 | B00601-010 4/10/17
modes. The index is continuously displayed over a range of 0.1 to 6.0 in increments of 0.01.
Mechanical Index (MI) is continuously displayed over a range of 0.1 to 1.9 in increments of 0.01.
2.9.3 Display and Report in Different Modes
2.9.3.1 For B-Mode
Display and report only MI and TIS
2.9.3.2 For Color Mode
Display and report only MI and TIS
2.9.3.3 For Doppler Mode
Display and report MI, TIS and TIB
Below is a simple guideline for the operator when TI exceeds one limit exposure time to 4
(6-TI)
minutes
based on the‘National Council on Radiation Protection. Exposure Criteria for Medical Diagnostic
Ultrasound: I. Criteria Based on Thermal Mechanisms. Report No.113 1992’.
2.9.4 Operator Control Features
The operator should be aware that certain operator controls may affect the acoustic output. It is
recommended to use the default (or lowest) output power setting and compensate using Gain
control to acquire an image. Other than the output power setting in the Soft Menu, which has the
most direct impact on the power; the PRF (Pulse Repetition Frequency), image sector size, frame
rate, depth, and focal position also slightly affect the output power. The default setting is normally
around 70%, occasionally 90%, of the allowable power, depending on the exam type.
2.10 Transducer Surface Temperature Rise
The table below lists the measured surface temperature rise from ambient (23°C ± 3°C) of
transducers used on the system. The temperatures were measured in accordance with EN 60601-237 cl.201.11 and cl.201.13 with controls and settings positioned to give maximum temperatures.
Table 12 Transducer surface temperature rise
Test External use (°C)
P42B6 C62B L154BH
Simulated use 1.4 1.5
Still air 3.6 7.3 6.5
Page 28

T3300 Diagnostic Ultrasound System | 23 | B00601-010 4/10/17
CHAPTER
3
Overview
Acquaint yourself with the system and its components in this chapter.
This chapter covers the following topics:
• "System Capabilities" on page 24
• "System Overview" on page 26
• "Transducer Overview" on page 29
• "Indications for Use and Supporting Transducers" on page 29
Page 29

Overview
T3300 Diagnostic Ultrasound System | 24 | B00601-010 4/10/17
3.1 System Capabilities
The T3300 Ultrasound System is intended for Obstetric imaging, Gynecology imaging, Cardiac
imaging, Vascular imaging, and general imaging purpose, and related analysis. The system can be
used for 2D grayscale (B-Mode), M-Mode, Color, Power, PW and CW imaging depending on the
transducer. The system also supports duplex, and triplex imaging. The system provides
measurement tools, analysis options, and DICOM network capabilities. Refer to the following
standard features.
3.1.1 Imaging
The following scan modes and features are available, if supported by the transducer for the
application:
• B-mode
•M-mode
• Color Doppler
• Power mode
• PW mode
• CW mode
• Tissue Harmonic Imaging (THI)
• QScan image processing
• SQBeam Real-time Compound Imaging
• FQBeam Real-time Compound Imaging
WARNING
The system does not support the biopsy guide function. Do not use nor assembl e any kind of
needle guide kits/brackets on the supported transducer to avoid transducer damage or
hurting the patient.
3.1.2 Transducer Types
The available transducer types are a curved linear array transducer, a linear array transducer and a
phased array transducer. Applications for specific transducers are listed in "Indications for Use and
Supporting Transducers" on page 29.
3.1.3 Measurements
The system provides tools and controls for measuring distance, ellipse, angle, trace and IMT. After
you perform measurements, the system makes the pertinent calculations and organizes the
measurements, calculations, and patient information, which can be added into a patient report.
3.1.4 Calculations
Calculations are organized by applications supported by the system. The system uses
measurement values to perform calculations which can then be added into a patient report.
3.1.5 Image Acquisition and Review
You can a cquire and review single images and cineloop sequences. Imag es and cineloop
sequences can be stored on USB devices, or sent over a wireless network to an archive server, or
printed out from supported external printers.
Page 30

Overview
T3300 Diagnostic Ultrasound System | 25 | B00601-010 4/10/17
3.1.6 Connectivity
The following features are standard:
• Patient Data and Settings export to removable media
• USB and Bluetooth connectivity to peripheral devices such as a Keyboard (not supplied with the
system)
• HDMI connectivity to secondary monitors
• Printing to local/network printers
• Wireless and Wired networking
• DICOM networking
• Patient data imported from MWL server
• Image export to network storage
Page 31

Overview
T3300 Diagnostic Ultrasound System | 26 | B00601-010 4/10/17
3.2 System Overview
3.2.1 Front and Side Views
Table 1 Front and Side Views
No. Component Function
Touch screen
Display system information and allow you to perform
operations using different gestures.
Speakers
Built-in speakers for playing sounds, which are
software-controlled.
Transducer connection
socket
Connect a transducer to the system. (See page 34)
Battery indicator
When the system is connected to power:
• If the system is turned off or enters sleep mode,
the battery indicator behaves in the following
lighting patterns:
– Steadily on orange when the battery is
charging.
– Steadily on green after the battery is charged.
• If the system is turned on, the battery indicator
lights off.
To monitor the battery level, see "Battery Status
Icons" on page 53.
Power indicator
Blink blue after the system enters Sleep mode. (See
page 52)
MicroSD card slot
Insert a microSD card into the microSD card slot to
exchange data from/to the system. (See page 32)
AUX port For use by authorized service personnel only
HDMI port
Connect the system to an HDMI (High-Definition
Multimedia Interface) device. (See page 39)
Page 32

Overview
T3300 Diagnostic Ultrasound System | 27 | B00601-010 4/10/17
NOTE
The system supports access to only one external storage device at a time. If you connect more than
one external storage device, they function in the following priority order: USB 3.0 > USB 2.0 >
microSD card.
Ethernet socket
Connect the system to an Ethernet-based network.
(See page 54)
USB 2.0 port
Connect the system to USB 2.0 devices, such as
keyboards, pointing devices, or portable storage
devices.
USB 3.0 port
Connect the system to USB 3.0 devices, such as
keyboards, pointing devices, or portable storage
devices.
Headphone jack
Connect the system to an audio device, such as
headphones or speakers.
Table 1 Front and Side Views
No. Component Function
Page 33

Overview
T3300 Diagnostic Ultrasound System | 28 | B00601-010 4/10/17
3.2.2 Rear and Top/Bottom Views
T able 2 Rear and Top/Bottom Views
No. Component Function
Ventilation slots
Release excessive heat during
operation to keep the system in a safe
operating temperature.
Power input socket
Used to connect the system to power.
(See "Charging the System" on
page 33)
Anti-theft lock slot
Used to lock the system securely to a
solid surface to protect it from theft.
System stand
• Lift the stand to sustain the system
on a flat surface. (See "Using the
Stand" on page 33)
• Can be used as a handle to carry the
system around. (See "Using the
System On The Go" on page 37)
Power button
Press and hold the Power button to turn
on/off the system.
Page 34

Overview
T3300 Diagnostic Ultrasound System | 29 | B00601-010 4/10/17
3.3 Transducer Overview
NOTE
Use only transducers that are approved by BenQ Medical Technology for use with the system.
3.3.1 Clinical Applications and Transducers
A clinical application, available for one or more transducers, optimizes the system for a specific
application. A clinical application consists of exam-specific presets, and the corresponding
measurement and calculation packages.
The clinical applications for each transducer available for the system are listed in the following table.
For more information, see "Indications for Use and Supporting Transducers" on page 29.
3.4 Indications for Use and Supporting Tr ansducers
The T3300 Diagnostic Ultrasound System is a general-purpose ultrasonic imaging instrument
intended for use by a qualified physician for evaluation of Abdomen, Cardiology, Gynecology,
Obstetric, Breast, Thyroid, Vascular (Carotid, Venous, Arterial), Nerve, Renal, Urology and so on.
Table 3 Transducer overview (Example transducer: C62B)
No. Component No. Component
Transducer handle Transducer cable
Transducer connector Release latch
Connector strain relief Transducer strain relief
Orientation marker Transducer lens
Table 4 Clinical Applications and Transducers
Transducer Clinical Applications
P42B6 Cardiac
C62B Abdomen, OB, Renal, Urology, GYN
L154BH Carotid, Arterial, Venous, Thyroid, Breast, MSK, Nerve
Page 35

Overview
T3300 Diagnostic Ultrasound System | 30 | B00601-010 4/10/17
The following table provides Diagnostic Ultrasound Indications for Use Forms for the transducers
offered with the T3300 Diagnostic Ultrasound System.
T able 5 Indications for Use and Supporting Transducers
Indications for Use Supporting Transducers
Cardiac Adult P42B6
Obstetric C62B
Musculoskeletal (Conventional) L154BH
Peripheral Vessel L154BH
Small Parts (Breast, Thyroid) L154BH
Urology C62B
Abdomen C62B
Page 36

T3300 Diagnostic Ultrasound System | 31 | B00601-010 4/10/17
CHAPTER
4
Preparing the System
Follow the information and procedures in this section to help you prepare
the system for use.
This chapter covers the following topics:
• "Inserting a microSD Card" on page 32
• "Using the Stand" on page 33
• "Charging the System" on page 33
• "Installing the Transducer Holder" on page 34
• "Connecting the Transducer" on page 35
• "Removing the Transducer" on page 36
• "Using the System On The Go" on page 37
• "Outputting the System Display to an HDMI-Enabled TV or Monitor"
on page 39
Page 37

Preparing the System
T3300 Diagnostic Ultrasound System | 32 | B00601-010 4/10/17
4.1 Inserting a microSD Card
Use the microSD card to import/export data to/from your system, such as patient information or user
settings.
NOTES
• Supported microSD card format: SDXC (up to 128GB); SDHC Class 10 (up to 32GB)
• The microSD card is not supplied with the system.
• You can also use external USB 2.0 or 3.0 flash drives to import/export data through USB ports.
Both the microSD card and the USB flash drives must be formatted in FAT32 format.
1. Flip the port cover open.
2. Align the microSD card with the mark next to the microSD card slot.
3. Fully insert the microSD card into the card slot until it clicks into place.
NOTES
• You can use the system’s service tools to back up system settings and patient data when the
system is connected to an external storage device. For more information, see "Backing Up
System Settings and Patient Data" on page 92.
• The system supports access to only one external storage device at a time. If you connect more
than one external storage device, they function in the following priority order: USB 3.0 > USB
2.0 > microSD card.
Page 38

Preparing the System
T3300 Diagnostic Ultrasound System | 33 | B00601-010 4/10/17
4.2 Using the Stand
Lift the stand to the degree that suits your preferred viewing angle.
4.3 Charging the System
The system is only partially charged when first unpacked. Charge the battery fully for 5 hours before
using the system for the first time.
WARNINGS
• Use only the supplied power adapter and AC plugs for charging.
• AC plug and electric outlet types vary by country/region .
• Do not try to repair or replace the battery or the power adapter. Any attempt to
disassemble the system and the supplied accessories may cause damage to the system
or result in personal injury.
1. Lift the protective rubber cover open.
2. Connect the power adapter’s connector into the system’s power input socket.
3. Insert the matching AC plug fully into the power adapter.
4. Plug the AC plug of your power adapter into an electric outlet to start charging. The battery
indicator lights up in solid orange.
WARNINGS
Page 39

Preparing the System
T3300 Diagnostic Ultrasound System | 34 | B00601-010 4/10/17
• Keep good ventilation during charging. Do not cover the power adapter with paper or
objects that will reduce cooling.
• Do not interrupt the connection during charging to avoid possible damage.
4.4 Installing the Transducer Holder
1. Use your fingertip to remove the protective rubber covers from the rear side of the system.
2. Align the hole on the transducer holder with the hole patterns of the system.
3. Rotate the screw clockwise through the upper hole of the transducer holder to tighten the
transducer holder to the system.
Page 40

Preparing the System
T3300 Diagnostic Ultrasound System | 35 | B00601-010 4/10/17
4.5 Connecting the Transducer
1. Flip the transducer cover open and insert the transducer carefully into the transducer
connection socket until it is locked in place.
2. Place the transducer in the transducer holder and ensure that the cable hangs down smoothly
from the opening of the transducer holder.
Page 41

Preparing the System
T3300 Diagnostic Ultrasound System | 36 | B00601-010 4/10/17
4.6 Removing the Transducer
Press and hold the release latch, and carefully pull out the transducer.
Page 42

Preparing the System
T3300 Diagnostic Ultrasound System | 37 | B00601-010 4/10/17
4.7 Using the System On The Go
1. Lift the stand by 180 degrees.
2. Use the stand as a handle to carry the system around.
3. To release the handle from 180 degrees, apply a pulling force to overcome the resistance in the
magnetic field.
Page 43

Preparing the System
T3300 Diagnostic Ultrasound System | 38 | B00601-010 4/10/17
4.8 Wall-mounting Your Tablet
The hole pattern on the rear side of the tablet is compliant with VESA (75mm x 75mm/100mm x
100mm) standard. Therefore, you can install your system on any VESA wall mounts or desktop
mounts.
1. Rotate the fixed screw clockwise on the rear side of the stand to fix the stand firmly onto the
tablet.
NOTE
To facilitate your operation without scratching the touch screen, lay the system face-down on a
cushioned surface before fixing the stand.
2. Position the system precisely to the front of the mount plate where the hole patterns on both the
back of the system and the plate meet.
Page 44

Preparing the System
T3300 Diagnostic Ultrasound System | 39 | B00601-010 4/10/17
3. Secure the system to the mounting plate by carefully tightening the four screws using a suitable
screwdriver.
NOTE
Wall-mounting is suggested to be operated by two people.
4.9 Outputting the System Display to an HDMI-Enabled TV or
Monitor
1. Insert one end of an HDMI cable to the system’s HDMI port. Ensure that the arrow side faces up.
2. Insert the other end of the HDMI cable to your HDMI-enabled TV’s or monitor’s HDMI port.
3. Connect the TV or monitor to power.
4. On the TV or monitor, select the proper input source.
NOTES
• We suggest using a monitor or TV which supports 1080p (1920x1080) resolution as an external
display for your system.
• See the documentation of your HDMI-enabled TV or monitor for detailed information on
connections and settings.
Page 45

T3300 Diagnostic Ultrasound System | 40 | B00601-010 4/10/17
CHAPTER
5
Using the System
Before performing an ultrasound exam, understand and learn the features
of the system.
This chapter covers the following topics:
• "Turning On/Off the System" on page 41
• "Launching the Main Screen" on page 41
• "Setting the System Time and Date" on page 42
• "Controlling the System" on page 43
• "Setting the System Language" on page 45
• "Identifying the Main Screen Layout" on page 45
• "Switching the Control Panel Pages" on page 52
• "Managing the System Power" on page 52
• "Managing Disk Space" on page 53
• "Network Configuration" on page 54
• "DICOM Configuration" on page 55
• "Casting the System Screen to an External Display" on page 57
Page 46

Using the System
T3300 Diagnostic Ultrasound System | 41 | B00601-010 4/10/17
5.1 Turning On/Off the System
Press and hold the Power button to turn on the system. The system enters the main screen after
system startup.
Press and hold the Power button until the Power off menu appears on the screen, then touch OK to
turn off the system.
NOTES
• If the system is turned off abnormally, powering on the system the next time will take longer than
usual for a system hardware check.
• If the system does not respond to any operations, press and hold the Power button to forcefully
turn off the system.
• As the number of files saved in the system storage increases, the time it takes to power on the
system will take longer than before. Consider backing up files and freeing up disk space
regularly or when you are informed to do so (See "Managing Disk Space" on page 53).
WARNING
If an error message occurs after system startup, follow the on-screen instructions to fix the
problem. If the problem persists, contact technical support (See "Contact Information" on
page 2)
5.2 Launching the Main Screen
After turning on the system, one of the following main screens appears.
• If no transducer is connected, the system enters the system menu screen.
No probe is connected
Patient
Worklist
Exam History
Report
Preset
Review
Settings
Page 47

Using the System
T3300 Diagnostic Ultrasound System | 42 | B00601-010 4/10/17
• If a transducer is connected, the system enters the real-time B-mode imaging screen (default).
NOTES
• If a transducer is connected and the system displays the message “No probe is connected”,
remove then re-connect the transducer. If the system still cannot detect the transducer, turn off
the system. Wait for a few seconds and restart the system.
• You can choose the screen to enter after starting and logging in the system (with the transducer
connected). Go to > Settings > Workflow > Screen after Enter Ultrasound.
5.3 Setting the System Time and Date
Managing pertinent patient data and scanning results require accurate system time and date. After
entering the system for the first time, set current time and date based on your location. The system
then maintains time and date settings even when the system is turned off and disconnected from
power.
1. Touch anywhere on the system toolbar to open the Quick Setup menu (See page50).
2. Touch the Time section > Set date/Set time.
– To set the date, scroll to select the date, month and year.
– To set the time, scroll to select the hours, minutes, and AM or PM.
3. Touch Done. Touch to leave the setting.
NOTE
Check and correct current system time and date based on your location every month to ensure the
accuracy.
End Exam
Penetration General Resolution
FreezeSave
Color PW
M
Power
B
THI Full Screen
Focus
Depth
Gain
B
Abdomen
Fn Key Tuning TGC Home
Page 48

Using the System
T3300 Diagnostic Ultrasound System | 43 | B00601-010 4/10/17
5.4 Controlling the System
The system requires operations with multi-touch controls by finger movements called gestures.
Alternatively, you can add pointing or input devices by connecting them to the USB ports on the
system.
Table 1 Gestures
Touch Touch and Hold Drag
Double-Tap Press and Tap Two-Finger Tap
Flick Pinch Spread
x2
Page 49

Using the System
T3300 Diagnostic Ultrasound System | 44 | B00601-010 4/10/17
5.4.1 Gestures for Controlling the Real-time/Frozen Imaging Screens
5.4.2 Gestures for Controlling the Real-time Imaging Screen
T able 2 Gestures for Controlling the Real-time/Frozen Imaging Screens
Action Gesture
Toggle between Real-time
and frozen imaging
screens
Double-tap on the scan area.
To use this gesture, go to > Settings > General >
(Enable freeze gesture) > Yes.
Save a single image/cine
loop
(Available in full screen mode only)
• Touch and hold on the scan area of the real-time/frozen imaging
screens to save a cine loop/single image.
• On the frozen imaging screen, two-finger tap on the scan area to
play an image loop, then touch and hold on the scan area to
save the image loop.
Zoom/unzoom Spread two fingers apart/pinch two fingers together.
Move the zoomed image
Touch and hold the zoomed image until the navigation button
appear, then drag to move the image.
Move and resize ROI
Touch inside the ROI and drag to move it. Touch on the four corners
of the ROI and drag to resize it.
Move the BDMK/
annotatioN/Arrow
indicators
Touch and hold the indicator, and drag to move it.
Scroll the thumbnail list
Flick vertically on the thumbnail area to scroll through the thumbnail
list.
Display the second control
panel page/Return to the
first control panel page
On the control panel area, flick up to display the next page, flick
down to return to the previous page (See "Switching the Control
Panel Pages" on page 52).
Table 3 Gestures for Controlling the Real-time Imaging Screen
Action Gesture
Adjust depth
Flick vertically on the scan area to increase (flick down) or decrease
(flick up) depth.
Adjust gain
Flick horizontally on the scan area/time series window to increase
(flick right) or decrease gain (flick left).
Adjust the sample volume
size
1. Touch and hold one finger on the Spectral Doppler cursor.
2. Flick another finger up or down.
Move the Spectral Doppler
cursor/sample volume
• Touch the Spectral Doppler cursor and drag it horizontally.
• Touch the sample volume and drag it vertically.
Adjust the PW/CW
correction angle
1. Touch and hold one finger on the Spectral Doppler cursor.
2. Flick another finger to the left or right.
Adjust the PW/CW baseline
1. Touch and hold on the baseline.
2. Flick vertically to change the baseline position.
Page 50

Using the System
T3300 Diagnostic Ultrasound System | 45 | B00601-010 4/10/17
5.4.3 Gestures for Controlling the Frozen Imaging Screen
5.5 Setting the System Language
To set the system language you are using, touch > Settings > General > Language. The
system reboots automatically to enable the new language.
NOTE
If you are unsure of a function displayed in localized languages, switch the system language back to
English, and check again the function you want to use. If the problem persists, contact technical
support (See "Contact Information" on page 2)
5.6 Identifying the Main Screen Layout
5.6.1 System Menu Screen
Touch to display the following system menu screen. Touch an icon to perform its function.
T able 4 Gestures for Controlling the Frozen Imaging Screen
Action Gesture
Play/pause image loops (Available in full screen mode only) Two-finger tap on the scan area.
Scroll frames
(Available in full screen mode only) Flick horizontally on the scan
area/time series window to scroll through the image frames/
waveforms.
Table 5 Function and Description of System Menu
NO. Function Description
Patient Edit current or add new patient information.
Worklist
Load the DICOM Modality Worklist (MWL) that contains patient
information as well as the requested procedure electronically via the
MWL query.
Patient
Worklist
Exam History
Report
Preset
Review
Settings
Page 51

Using the System
T3300 Diagnostic Ultrasound System | 46 | B00601-010 4/10/17
5.6.2 Imaging Screen (Real-time)
With the transducer connected correctly, the system enters the real-time imaging screen each time
after pressing the Home button.
Exam History
View a list of patients with their exam results. You can proceed with
unfinished exams/reviews, or export exams according to the selection
criteria all at once.
Report
Display exam information including patient data, exam type, study
specific data, comments and saved ultrasound images.
Preset
Select the predefined preset compatible with the connected transducer
for optimized image control settings.
Review
View, add annotations and measurements to, and export a saved
exam.
Settings
• Customize the system based on the operator’s habitual needs.
• Use the service tools to update software, backup/restore data or
examine the system functionality. (See "Servicing your system" on
page 90)
T able 5 Function and Description of System Menu
NO. Function Description
Table 6 Real-time Imaging
No. Function
System menu button
Enter the system menu screen.
Depth scale
Transducer
MI
TIS
End Exam
Penetration General Resolution
Freeze
Save
Fn Key Tuning TGC Home
Color PW
M
Power
B
THI
Full Screen
Focus
Depth
Gain
B
Page 52

Using the System
T3300 Diagnostic Ultrasound System | 47 | B00601-010 4/10/17
Patient name
Patient ID
Transducer orientation icon (See page 62)
Patient age/gender/DOB (date of birth)
Application name
Institution name
Grayscale/Color/Power wedge
Scan Properties Display
Display information about the current scan.
Current date and time
System toolbar
Display information about current battery level, volume, system storage, and network
connection status. Touch anywhere on the system toolbar to open the Quick Setup menu
for system configuration. (See page 50)
Scan mode (image control) buttons
When using duplex or triplex modes, touch the scan mode (image control) buttons here
to display and adjust its corresponding image control settings - .
Image control settings (See page 79)
Scan mode buttons
Open the next/previous page of the image control settings (See page 44).
Freeze button
Freeze the current scan.
Save button*
Save a default set of image frames as a loop to the system hard drive.
ROI (region of interest) area
Use the Zoom function to zoom in and pan across the current image.
Home button
Return to the real-time imaging screen in B-Mode.
TGC (Time Gain Compensation)
Slide any of the 8 TGC sliders to adjust the gain for the desired section of the 2D image.
Tuning button
Touch this button to enable optimizing the image quality during a real-time scan. To turn
it off, press and hold the button.
Fn Key button
Assign this button as a shortcut to perform a function.
Table 6 Real-time Imaging
No. Function
Page 53

Using the System
T3300 Diagnostic Ultrasound System | 48 | B00601-010 4/10/17
*The system does not allow acquiring images/loop s with n o patient name and ID. A patient name/ID
will be added automatically if you proceed with saving.
5.6.3 Imaging Screen (Frozen)
During an exam, touch Freeze to review all the ultrasound images stored in the cine buffer frame by
frame, or play back these frames in a continuous loop. You can also measure, calculate and add
annotations to the frozen images or loops.
Ultrasound imaging area
Display the 2D imaging window in all scan modes. By default, the top area is close to the
region located near the transducer surface (near field). When scanning in M-Mode/PW
Doppler/Triplex modes, the Time Series window displays under the 2D imaging window.
The time increases from left to right and re-starts from the left again. The imaging area
displays as common usage.
• Resolution (High Resolution): Touch this button to view a clearer yet superficial
image.
• General (General Resolution): Touch this button to view a general resolution image.
• Penetration (Deep Penetration): Touch this button to view a deeper yet less clear
image.
End Exam button
Close the current exam for the current patient, and start a new exam for the next patient.
All the value settings adjusted during this exam will be stored automatically.
Thumbnail area
Thumbnails of the scanned images/loops that are saved. Flick vertically to scroll through
the list.
Table 6 Real-time Imaging
No. Function
Control panelControl panel
Set start Set end
Play
BDMKArrow
LabelAnnot
IMT
CalcAngle
TraceEllipse
DepthDistance
Erase Annot
Erase
Measure
Transducer
MI
TIS
End Exam
Freeze
Save
Fn Key
Home
B
Page 54

Using the System
T3300 Diagnostic Ultrasound System | 49 | B00601-010 4/10/17
Table 7 Frozen Imaging
No. Function
Perform measurements and calculations on the current image.
Add annotations, including arrows, texts and body marks, to th e current image usin g the
Virtual Keyboard.
Play button
Review the image loop just scanned. Touch repeatedly to start/pause the playback.
Freeze button (Enabled)
Touch this button again to return to the realtime scan.
Save button
Save a frozen image from an image loop to the system hard drive.
Open the next/previous page of the image control settings. (See page 52)
Home button
Return to the real-time imaging screen.
Set End button
During playback of the image loop, touch this button to set the end point of the image
loop.
Set Start button
During playback of the image loop, touch this button to set the start point of the image
loop.
The progress bar
Used to track the frames (in a continuous image loop) just scanned and the number of
the current frame.
Image loop.
This image is added to a report.
Page 55

Using the System
T3300 Diagnostic Ultrasound System | 50 | B00601-010 4/10/17
5.6.4 Quick Setup
Touch anywhere on the system toolbar to open the Quick Setup menu. Touch an item to adjust its
setting.
Table 8 Quick Setup
No. Function
Manage the LAN connection. (See page 54)
• : LAN Disconnected
• : LAN Connected
Enable/disable the WiFi function. (See page 54)
Enable/disable the Bluetooth function. (See page 55)
Cast the system screen to an external display. (See page 57)
Display the percentage of the system storage used. (See page 53)
• : Storage usage empty
• : Storage usage full
Check and manage outgoing queues to the DICOM server. (See page 55)
• : DICOM Disconnected
• : DICOM Connected
Set current date and time. (See page 42)
Adjust the volume.
Adjust the brightness.
creen
PW
System
toolbar
LAN
Connected
Wifi OFF
Bluetooth
Cast Display
Storage Usage
DICOM
Time
OFF
OFF
89%
ON
4:40 PM
Quick Setup
End Exam
Penetration General Resolution
Freeze
Save
Fn Key
Tuning
TGC
Home
Abdomen
Page 56

Using the System
T3300 Diagnostic Ultrasound System | 51 | B00601-010 4/10/17
5.6.5 Virtual Keyboard
Whenever you need to enter text in a text field, simply touch the field, and a virtual keyboard appears
on the lower part of the screen. Touch a letter to enter text; when finishing inputs, touch anywhere on
the imaging area.
NOTE
To switch the keyboard input language, touch on the virtual keyboard and select your target
language.
5.6.6 Scan Properties Display
The imaging window includes a text display information about the current scan.
Table 9 Scan Properties Display
No. Function
Transducer type
Thermal index/Mechanical index
Depending on the transducer connected and the scan mode selected,
corresponding scan parameters are displayed. (See "Using Image Controls" on
page 78)
Color/Power wedge
Grayscale wedge
Page 57

Using the System
T3300 Diagnostic Ultrasound System | 52 | B00601-010 4/10/17
5.7 Switching the Control Panel Pages
Use the virtual buttons or gestures to switch the control panel pages.
NOTE
The functions available on the control panel vary, depending on the scan mode and the transducer
connected.
• Use button:
• Use gestures:
5.8 Managing the System Power
The system receives its power from the power adapter whenever it is connected to the system and
starts charging the battery, unless the battery is fully charged already. Battery remains charging
even when the system is turned off, as long as the adapter is connected to the system and to AC
power. The system can also operate on battery power. The battery status icon (See page 53) along
with the percentage of battery power remaining are shown on the system toolbar (See page 50) .
Always monitor the power level of the battery when you operate the system on battery power.
Touch to switch between control panel pages
Abdomen
End Exam
Penetration General Resolution
FreezeSave
Fn Key Tuning
TGC
Home
Color
PW
MPower
B
THI Full Screen
Focus
Depth
Gain
B
End Exam
Penetration
General
Resolution
Freeze
Save
Fn Key Tuning TGC
Home
Color PW
MPower
B
THI
Full Screen
Focus
Depth
Gain
B
Abdomen
Page 58

Using the System
T3300 Diagnostic Ultrasound System | 53 | B00601-010 4/10/17
5.8.1 Battery Status Icons
The battery level is indicated by icons shown on the system toolbar.
NOTE
When the battery level reaches a critically low state, the system shuts down automatically.
5.8.2 Sleep Mode
Sleep mode is a low-power mode that conserves battery power and allows quick startup of the
system.It should be used only for short periods of time, such as when you transport the system
between exam locations.
To enter/exit Sleep mode, press the Power button.
5.9 Managing Disk Space
Always beware of the amount of free space in the system storage. If the disk space on the system
drive is full, the system cannot acquire images. To check the system storage used, open the Quick
Setup menu and watch the number of percentage next to Storage Usage.
The system sends warning messages when its available disk space reaches any of the following
level:
• The image storage is low: The disk space available for storing images is low. Delete some
stored exams to ensure that there will be enough room for new images.
Table 10 Battery status
Battery
status icon
Meaning
The battery is fully charged.
The battery is 80% to 99% charged.
The battery is 60% to 79% charged.
The battery is 40% to 59% charged.
The battery is 20% to 39% charged.
The battery is critically low.
The battery is charging.
The battery cannot be identified.
Battery temperature is too high or too
low and the battery stops charging.
Page 59

Using the System
T3300 Diagnostic Ultrasound System | 54 | B00601-010 4/10/17
• The image storage extremely low: The disk space available for storing images is critically low.
Immediately delete some stored exams to free up your disk space.
• The image storage is full: No disk space is available and no images can be saved. You must
delete stored exams in order to have space for acquiring new images.
To free up storage space, go to > Settings > Exam, and delete stored exams before
selected number of weeks. Please back up required patient information before deletion. Deletion will
remove the information from the system.
5.10 Network Configuration
The system network is configured from the Quick Setup menu (See page 50). The configuration
information for the system includes the IP address, port number, and other attributes required for
transmitting images and other study data across a network. The system network must be configured
before you use either the standard network support or the capabilities available through the DICOM
networking options.
5.10.1 Connecting the System to the Network by Ethernet
1. Connect one end of the network connection cable to the wall receptacle for your network.
2. Connect the other end of the cable to the Ethernet socket on the system.
3. On the imaging screen, open the Quick Setup menu (See page 50).
4. Touch LAN to go to Ethernet settings.
5. Check Ethernet to enable the Ethernet function. If your system does not use Dynamic Host
Configuration Protocol (DHCP) to specify the addresses of domain name servers, continue to
the next step.
6. Touch Ethernet configuration. Touch Static IP and configure the DNS settings.
NOTE
Consult your network administrator about the appropriate settings.
7. Touch Save. Touch to leave the setting. If the connection is successful, appears on the
system toolbar.
5.10.2 Connecting the System to the Wireless Network
NOTES
• Wireless connection quality can be affected by many factors. The system may experience a
connection interruption while a network job is in progress. If this occurs, the job remains in the
job queue. When the connection is restored, the system resumes the job automatically.
• The system supports the following wireless security standard: WEP, WPA/WPA2 and WPS. It is
your responsibility to configure the wireless network security mechanisms that are compatible
with your network.
1. Perform either of the following operations to go to the wireless network settings:
– Touch > Settings > Networking > Wifi Configurations > ON.
– Open Quick Setup menu (See page 50). Touch Wifi to go to Wifi settings.
2. On the available network list, select an access point on an existing wireless network with your
DICOM server, and enter the required settings.
Page 60

Using the System
T3300 Diagnostic Ultrasound System | 55 | B00601-010 4/10/17
NOTE
Consult your network administrator about the appropriate settings.
3. Touch to leave the settings. If the connection is successful, appears on the system
toolbar indicating the network strength.
5.10.3 Connecting the System to a Bluetooth Device
You can connect the system to another pointing or input device via Bluetooth.
NOTES
• Using features requiring a Bluetooth connection may consume more battery power.
• To extend battery life between charges, turn off Bluetooth when not using it.
• Maximum distance between two connected Bluetooth devices cannot exceed 5 meters.
1. Open the Quick Setup menu (See page 50).
2. Touch Bluetooth to go to Bluetooth settings.
3. The system scans for and displays the IDs of available Bluetooth devices within range.
4. Touch the ID of the Bluetooth device to pair with it.
5. Confirm the passkey that appears and touch Pair. On the other Bluetooth device, accept the
identical passkey for pairing.
6. Touch to leave the settings. Once your system pairs with the device, appears on the
system toolbar, and they stay paired until you unpair them.
5.10.4 Unpair a Bluetooth Device
Touch beside the connected device you want to unpair, and touch Unpair.
5.11 DICOM Configuration
The system conforms to the Digital Imaging and Communications in Medicine (DICOM) standard.
DICOM format is used for patient studies that are transferred among PACS, which make up a
hospital information management system, and for studies that are accessed by physicians at re mote
viewing stations.
The DICOM networking option settings are usually obtained from a network administrator.
NOTE
Before DICOM configuration, ensure that the system is successfully connected to a wireless or
wired network.
To configure DICOM settings, touch > Settings > DICOM.
5.11.1 Adding Servers
1. Select a storage/worklist SCP (Service Class Provider) and touch Edit.
– Storage SCP: Used to take responsibility for and provide receipt of content sent by the
system.
– Worklist SCP: Contain scheduled patient procedure data and is used to imp ort the dat a into
the patient information form.
2. Assign a name to the server and enter it in the Name field.
Page 61

Using the System
T3300 Diagnostic Ultrasound System | 56 | B00601-010 4/10/17
3. Enter the IP Address, Port and AE Title specified by your network administrator in the
respective fields.
4. To test the server connection, touch Test in the Echo Test section. A verification message
confirms a successful connection within a few seconds.
NOTES
• To start exams by loading patient information in a worklist, you need to configure the worklist
SCP first.
• Consult your network administrator about the appropriate settings.
5.11.2 Local Host
In the Local Host section, touch Edit.
The system’s default Name and IP Address, if connected successfully to the network, display in the
respective fields.
In the AE Title field, enter the application entity title of your system, which identifies you as the
sender and must be unique on its network.
NOTE
Consult your network administrator about the appropriate settings.
5.11.3 Managing Outgoing Queue
When you export an exam or an image/video to the DICOM server, you can monitor its status on the
upper right side of the imaging screen or in the outgoing queue (from > Settings > DICOM
>(Outgoing Queue) > Edit). The system provides three ways of exporting the exam. For more
information, see "Exporting the Exam" on page 75.
*If you export the report to the DICOM server, the task status icon includes .
In the Outgoing Queue section, touch Edit.
• To re-send the task to the DICOM server, touch Retry.
• To cancel the ongoing task, touch Stop.
• To clear all tasks from the outgoing queue, touch Clear all history.
Table 11 Task status
Task status icon* Description
Upload is pending.
Upload is processing.
Upload is complete.
Upload failed.
Page 62

Using the System
T3300 Diagnostic Ultrasound System | 57 | B00601-010 4/10/17
5.12 Casting the System Screen to an External Display
You can cast your sy stem screen which allows you to mirror your system to a monitor or TV that
supports wireless display function.
1. On your system, open the Quick Setup menu (See page 50). Touch Wifi to enable the wireless
network function. Then touch Cast Display Off to go to its settings.
2. On the top right corner of the system screen, touch and check Enable wireless display
to see your available wireless display devices in a list. Touch the device to connect to.
3. On the display device, follow the on-screen instructions to give permission for connection from
and to the system.
4. If connected successfully, the device name on the system screen shows “Connected”. The
contents shown on the system screen are mirrored to the display device screen automatically.
NOTE
To disable the casting display function:
On the system, open the Quick Setup menu and touch Cast Display Off > the device name >
Forget.
Page 63

T3300 Diagnostic Ultrasound System | 58 | B00601-010 4/10/17
CHAPTER
6
Performing an Exam
To perform an exam, complete the general procedure:
1. Start an exam. It can be a new exam, or a previously saved/paused
exam.
– To start a new patient exam, add a new patient (See page 59).
– To load a work list (See page 60).
– To resume a previously saved/paused exam (See page 75).
2. Select an exam type and preset (See page 60).
3. Start real-time imaging (Imaging Screen (Real-time)).
4. Set the transducer orientation (See page 62).
5. Select a scan mode (See page 62) and adjust image controls (See
page 78).
6. When the desired anatomy is shown, freeze the image (Imaging
Screen (Frozen)).
7. Add annotations (See page 65) and measurements (See page 68).
8. Save or print the image (See page 72).
9. (Optional) Review the images (See page 72), generate a report and
export the exam (See page 75).
10.End the exam (See page 77).
Refer to the following sections for detailed instructions.
Page 64

Performing an Exam
T3300 Diagnostic Ultrasound System | 59 | B00601-010 4/10/17
6.1 Starting a New Exam
The system allows skipping entering patient information if you need to start the ultrasound exam
immediately. You can enter the Patient screen to complete the patient information during or after the
exam. However, once you touch Save to save images/cine loops, the system will add a last name/ID
to the patient automatically, and the last name/ID cannot be modified.
NOTE
To avoid confusion and to generate reports, define the patient within the system before scanning.
6.2 Adding a New Patient
1. On the imaging screen, touch > Patient.
2. Touch New Patient. Enter the patient information as much detailed as possible:
– Touch in a text entry field, and use the virtual keyboard to input contents.
–Touch Next on the keyboard to go to the next field.
–Touch Done on the keyboard. The patient information is saved automatically.
NOTE
To create a valid patient profile, at least the patient’s Last Name and ID number should be filled in.
3. To start scanning the patient, touch Start Exam.
6.2.1 Updating Patient Information
1. During real-time scanning, touch > Patient. Existing information of the current patient
displays on the Patient screen.
2. Enter the new information in the desired fields.
3. The patient information is saved automatically. Proceed with real-time scanning of this p atient by
touching Start Exam.
Patient
New Patient
Start Exam
Patient Information
Last Name
Middle Name
First Name
ID
Gender
DOB
Age
Abdomen Cardiology GYN OB Small Part Urology Vascular
Height Weight BSA
Exam Information
Heart Rate
bpm
kg
mmHgBlood Press
cm
m
2
Accession Institution Operator
Referring Physician Interpreting Physician
Description
Comment
Home Previous
End Exam
Page 65

Performing an Exam
T3300 Diagnostic Ultrasound System | 60 | B00601-010 4/10/17
6.3 Loading a Worklist
The system conforms with the Digital Imaging and Communications in Medicine (DICOM) standard,
which is the industrial standard for the communication and management of patient data between
devices in the hospital. You can load patient information in a worklist via the DICOM server.
NOTE
For more information on configuring DICOM settings, see "DICOM Configuration" on page 55.
1. On the imaging screen, touch > Worklist.
2. Select the number of patients to scan on the worklist from the drop-down menu.
3. Select a patient, then touch Start Exam to start scanning.
NOTE
To scan patients following a specific rule, enter the query criteria in any of the Name / ID /
Accession# fields, and touch Query to start the query. Patients matching the query criteria will be
listed on the screen.
6.4 Selecting a Preset
The system provides predefined presets for all supported transducers. Choosing an exam loads
optimized presets for image control settings, based on the anatomy to be scanned, the transducer
used, and the scan mode. The presets also specify the measurements appropriate for the exams.
20
Start Exam
Home
Previous
WorkList
Query Worklist
Name ID
Accession# Date
Query Clear
Worklist:
0
records
Name ID Accession# Gender DOB
Query
Page 66

Performing an Exam
T3300 Diagnostic Ultrasound System | 61 | B00601-010 4/10/17
You can directly use the optimized presets, or adjust any of the image control settings as necessary
for the specific patient and the specific exam.
1. On the imaging screen, touch > Preset. All the available presets compatible with the
connected transducer display on the Preset screen.
2. Touch the preset to scan, and you will be redirected automatically to the real-time imaging
screen.
6.4.1 Customizing a Preset
1. On the Preset screen, touch Create New.
2. Enter a name for the customized (currently used) preset and touch Save.
6.4.2 Modifying a Preset
If you have modified the parameters of an existing customized preset, go to the Preset screen and
touch Modify Current to save changes.
6.4.3 Managing Presets
1. On the Preset screen, touch Management.
• Touch Move, and drag to re-arrange the order of the presets.
• To set a frequently used preset as default, touch Set default > the desired preset.
• To hide an unwanted predefined preset, touch Hide & Show and touch Off on the preset.
• To further edit customized presets, touch Edit and touch on the preset to edit its name;
touch on the unwanted preset to delete it.
2. Touch Save to save changes.
6.4.4 Exporting and Importing Customized Presets
On the Preset screen, touch Export/Import to export/import customized presets to/from your
external storage.
GYN
Preset
Select Preset
Create New
Management
Export
Import
Abdomen OB Renal
Urology
Custom1 Custom2
Home
Previous
Default preset
Currently used preset
Predefined presets
Customized presets
Page 67

Performing an Exam
T3300 Diagnostic Ultrasound System | 62 | B00601-010 4/10/17
6.5 Setting the Transducer Orientation
Upon entering all scan modes, the orientation marker displays at the default location (usually at
the top left side of the image), and suggests you the direction of holding the transducer. The
orientation marker on the screen corresponds to the position of the orientation marking on the side
of the transducer.
You can change the left/right orientation of the image (real-time or frozen) in various imaging (single
or dual) without rotating the transducer head itself.
• To reverse left and right
On the imaging screen (real-time or frozen), touch > L/R.
• To reverse up and down
On the imaging screen (real-time or frozen), touch > U/D.
6.6 Selecting/Switching a Scan Mode
On the real-time imaging screen, directly touch the scan mode buttons on the control pan el to select/
switch the scan mode in use.
NOTE
To view a list of available scan modes, see "Imaging" on page 24.
6.7 Adjusting the Displayed Image
On the real-time imaging screen, touch the corresponding scan mode (image control) button to
select a scan mode. Use the image control settings to further optimize the image. (See "Using Image
Controls" on page 78)
You can also perform the following operations to adjust the contents of the imaging window.
Orientation marker
Page 68

Performing an Exam
T3300 Diagnostic Ultrasound System | 63 | B00601-010 4/10/17
6.7.1 Enlarging an Area of the Image
To further examine the anatomy by enlarging a region of the image (real-time or frozen), use the
zoom function.
1. On the real-time imaging screen, touch > Zoom, or on the frozen imaging screen, touch >
Zoom. The ROI (Region of Interest) box appears on the center of the image.
Touch and drag inside of the ROI box to move it to the area to enlarge. Touch on any of the box’s
four corners and drag to resize the ROI box.
2. Touch anywhere outside the ROI box to enlarge the selected area.
3. To move the enlarged area, touch and hold anywhere on the image until the navigation button
appear, then drag to move it.
6.7.2 Splitting the Imaging Screen
The system allows splitting the imaging screen into two sections to view two current scans for a
patient. You can acquire one scan for the patient, enable dual screen, th en acquire another scan
from a different angle, location or with a different scan mode. This function is only available in B,
B+Color and B+Power modes.
6.7.2.1 When in B-Mode:
On the real-time imaging screen, touch Dual. The system immediately freezes the current scan, and
copies the current settings for the image to the second screen. Two ye llow bars will be added to the
End Exam
Penetration General Resolution
Freeze
Save
Fn Key Tuning
TGC
Home
B
Dyn Range
Persist
QScan
Gray Map
Chroma
Dual
Toggle
L/R
U/D
Steering
Abdomen
Zoom
Density
High
ROI box
End Exam
Penetration General Resolution
FreezeSave
Fn Key Tuning TGC Home
B
Dyn Range
Persist
QScan
Gray Map
Chroma
Dual
Toggle
L/R
U/D
Steering
Zoom
Density
High
Abdomen
Zoom View :3.3X
Page 69

Performing an Exam
T3300 Diagnostic Ultrasound System | 64 | B00601-010 4/10/17
top/bottom of the currently active screen. To toggle between screens, touch Toggle. Only one
screen can be active at a time.
Y ou can comp are then apply any image control settings and use scan modes independently to either
screen. For example, you can acquire a 2D scan, activate dual screen, then acquire a Color scan in
the second screen.
6.7.2.2 When in B+Color or B+Power Mode:
On the real-time imaging screen, touch Dual. The system copies the current settings for the image
to the second screen in B-mode. Both screens are in real-time but you get a clearer view under the
ROI in B-mode.
Touching Dual again freezes the 2D real-time scan and turns it into a frozen B+Color or B+Power
mode image.
To leave the dual screen, touch Dual, or touch Home to return to the real-time B-mode.
NOTE
To enable dual screen when the scan is frozen, touch > Compare.
End Exam
Penetration General Resolution
FreezeSave
Fn Key Tuning
TGC
Home
B
Dyn Range
Persist
QScan
Gray Map
Chroma
Dual
Toggle
L/R
U/D
Steering
Zoom
Density
High
Abdomen
End Exam
Penetration General Resolution
Freeze
Save
Fn Key
Tuning TGC
Home
Color
Persist
Color Map
Wall Filter
Dual
Toggle
L/R
U/D
Zoom
Density
Med
Renal
B
Smoothing
Reject
Page 70

Performing an Exam
T3300 Diagnostic Ultrasound System | 65 | B00601-010 4/10/17
6.8 Freezing an Image
During a real-time scan, touch Freeze to freeze live ultrasound images recorded by frame and
stored temporarily in the cine buffer. Depending on the mode selected, a certain number of frames
are recorded.
• To play back saved images in a continuous cine loop, touch Play.
• To adjust the playback speed, touch > Loop Speed +/-.
• To view the stored images frame by frame or to find a specific frame, touch / or drag
the frame indicator horizontally.
NOTES
• To restart a new real-time scan, touch Freeze again.
• Restarting real-time scanning erases the frame data. Make sure any needed images are saved
or printed before acquiring new scan data.
• To change the screen to enter after you freeze the scan, on the system imaging screen, touch
> Settings > Workflow > (Status after Freeze) > select an option.
6.9 Adding Annotations
On the real-time or frozen imaging screen, touch Annot to add annotations to the ultrasound images
in order to explain the anatomy.
After you are done adding annotations, you can still move the annotated texts or arrows anytime by
touching and dragging them to your desired location.
NOTE
You can select whether to keep or erase the annotations added after you return to the live scan by
touching > Settings > Workflow > (Auto-clear Annotation after Unfreeze) > select an
option.
a
b
c
End Exam
Set home
Go home
Delete
Left Right
Upper Lower
Medial
Anterior
Lateral
Posterior
SAG TRANS
PROX MID
L T Kidney
L T Lobe
RT Kidney
RT Lobe
Aorta Liver
CBD IVC
Duodenum
Appendix
Fluid
Pancreas
Gallbladder
Caudate
Spleen
Bowel
Abdomen
Page 71

Performing an Exam
T3300 Diagnostic Ultrasound System | 66 | B00601-010 4/10/17
6.9.1 Arrow
Touch Arrow. An arrow appears at the text home position. Drag the arrow to the desired location,
and release it to place the arrow .
6.9.2 Annot
6.9.2.1 Text
1. Touch Annot. A virtual keyboard and a text cursor (I-beam) appear at the text home position.
2. Type the texts directly. Touch anywhere on the imaging area to finish inputs.
3. Drag the text cursor to where you want the new texts to be, and release it to place the texts .
6.9.2.2 Setting the Text Home Position
You can choose a specified position in the image display as the starting location, which is th e text
home position.
1. Drag a set of annotated texts to the desired text home position.
2. Touch the texts directly, then touch to close the keyboard.
3. Touch Set home.
6.9.3 Label
1. Touch Label. A predefined text menu appears at the control panel area , and a text cursor (Ibeam) appears at the text home position.
2. Select a text label to place it at the current cursor position, and touch Close.
3. Drag the label to where you want the texts to be, and release it to place the label.
NOTES
• The annotated texts or text labels are still editable. Touch a set of texts to display the virtual
keyboard, and start editing the texts. Touch anywhere on the imaging area to finish editing.
• To restore the annotated texts or text labels to the default text home position, simply touch a set
of texts, touch to close the keyboard, then touch Go home.
a
b
c
Page 72

Performing an Exam
T3300 Diagnostic Ultrasound System | 67 | B00601-010 4/10/17
6.9.4 Body Mark
1. Touch BDMK to display the body mark menu.
2. A pictogram of the default body mark with a transducer indicator displays on the image. If you
wish to change the body mark, select one from the BDMK menu that appears, then touch Close.
3. Touch anywhere on the image, and drag the transducer indicator to the desired location on the
body mark.
4. Touch anywhere on the image and move to rotate the transducer indicator.
5. Touch and hold the pictogram, and drag it to the desired location on the image.
NOTES
• You can change the default body mark by touching > Settings > BDMK >(Default
BDMK for Application) > Edit > select an option.
• To delete annotations, including texts and arrows, touch Erase Annot to erase the last
annotation added. Repeat this action, if needed, to continue erasing annotations.
• To directly erase all annotations, touch and hold Erase Annot.
• To delete the body mark added, touch BDMK > Erase.
Abdomen
End Exam
Set start Set end
Fn Key
Close
Erase
Home
FreezeSave
Transducer
indicator
Page 73

Performing an Exam
T3300 Diagnostic Ultrasound System | 68 | B00601-010 4/10/17
• To set whether to show all or the last annotations, or to hide them all, touch > Show Annot
+/-.
6.10 Adding Measurements
Measurements accompanying ultrasound images supplement other clinical procedures available to
the attending physician. You can perform as many measurements as needed.
On the real-time imaging screen, touch Freeze to display a set of measurement buttons based on
the scan mode selected. To perform a single type of measurement, touch the corresponding button.
To perform a set of predefined measurements from the Calculation Package, touch Calc (See
"Calculation Package" on page 70).
When you are measuring, the indicators/lines display in yellow, allowing you to adjust as many times
as needed. When you are done with measuring, use any of the following methods to complete the
measurement. The indicators/lines then turn green, and the final measured results (values) appear
on the top left side of the imaging screen.
• Two-finger tap on the scan area
• Proceed with the next measurement
•Touch Save to save the ultrasound image
NOTES
• To re-position the measured results to the imaging screen’s Left Top, Left Bottom, Right Top,
or Right Bottom side, touch > Result Pos +/-.
• To set whether to show all or the last measured results, or to hide them all, touch > Show
Result +/-.
• To delete measurements, touch Erase Measure to erase the last measurement added. Repeat
this action, if needed, to continue erasing measurements.
• To directly erase all measurements, touch and hold Erase Measure.
• You can select whether to keep or erase the measurements added after you return to the live
scan by touching > Settings > Workflow > (Auto-clear Measurement after Unfreeze)
> select an option.
1 Distance 85.51 mm
2 Depth 12.36 mm
3 Ellipse
Area 438.49 mm
2
Circ 124.71 mm
4 Trace
Area 1939.68 mm
2
Circ 142.66 mm
5 Angle 56.55 degree
6 IMT
Max 0.00 mm
Min 0.00 mm
Avg 0.00 mm
Std 0.00 mm
1
2
3
4
5
6
a
b
c
d
e
f
End Exam
Set start
Set end Fn Key Home
FreezeSave
B
Abdomen
Distance
Erase Annot
Depth
Ellipse
Trace
Angle Calc
Erase
Measure
Annot Label
Arrow BDMK
Play
IMT
Page 74

Performing an Exam
T3300 Diagnostic Ultrasound System | 69 | B00601-010 4/10/17
6.10.1 Measuring in B/Color/Power Modes
6.10.1.1 Distance
Measure a distance.
1. Touch Distance. A crosshair cursor appears on the image. Drag the target cursor to where you
want to start measuring and release it.
2. Drag the target cursor to where you want to finish measuring, then release it .
6.10.1.2 Depth
Measure depth.
Touch Depth. A crosshair cursor appears on the image. Drag the target cursor to where you want to
finish measuring the depth, then release it .
6.10.1.3 Ellipse
Measure a circumference.
1. Touch Ellipse. A crosshair cursor appears on the image. Drag the target cursor to one end of the
area you want to measure and release it to set the start point of measurement.
2. Drag the target cursor to the other end of the desired area, and release it to set the end point of
measurement.
3. Touch the center of the oval area and drag out to increase or drag in to decrease the size of the
circle .
6.10.1.4 Trace
Manually trace an irregular shape.
1. Touch Trace. A crosshair cursor appears on the image. Drag the cursor to where you want to
start measuring and release it.
2. Drag the cursor along the outline of the object to trace.
3. When the tracing is nearly done, release the cursor and the system completes the loop by
drawing a line from the current cursor position to the starting point .
6.10.1.5 Angle
Measure an angle.
1. Touch Angle. A crosshair cursor appears on the image. Drag the target cursor to the desired
location and release it to set the start point of measurement.
2. Drag the first target cursor along one side of the desired area, and release it to draw the first line.
3. Drag the second target cursor along the other side of the area, and release it to draw the second
line. The angle between the two lines is then formed .
a
b
c
d
e
Page 75

Performing an Exam
T3300 Diagnostic Ultrasound System | 70 | B00601-010 4/10/17
6.10.1.6 IMT
Measure IMT (Intima-Media Thickness) of the carotid artery, which is useful for detecting early signs
of arteriosclerosis.
1. Touch IMT. A crosshair cursor appears on the image. Drag the target cursor to the desired
location and release it to set the start point of measurement.
2. Drag the target cursor to the other end of the desired area, and release it to set the end point of
measurement. The automatic tracing of the IMT will be enclosed and measured within the
rectangle area marked by the four corners .
6.10.1.7 Calculation Package
Perform a set of predefined measurements based on the scan mode/calculation method you select.
1. Touch Calc to open the Calculation Package menu.
2. Touch a desired calculation method. The items to measure display in a list of order under the
selected method.
3. Touch the first item and the screen displays the corresponding cursor. Drag it to perform
measurement.
4. After you have finished with the measurement, touch the second item. The first item is checked
automatically with the measured result displayed beside it.
5. Repeat step 3-4 to perform the rest of the measurements on the list, then touch Close.
NOTES
For measurement accuracy and precision in 2D measurement:
• Linear distance measurement errors will be less than ±5%.
• Perimeter, and ellipse circumference measurement errors will be less than ±5%.
• Area measurement errors are related to the linear distance measurement and will be less than
±10%.
6.10.2 Measuring in M-Mode
6.10.2.1 Distance
Measure the length between two horizontal lines that lean on two cursors. The position of the vertical
time lines does not affect the distance measurement.
1. Touch Distance. A crosshair cursor with horizontal and vertical axes appears on the time series
window. Drag the cursor to a desired start point on the vertical axis and release it.
2. A second cursor appears. Drag it to the end point on the vertical axis then release it to complete
measurement.
6.10.2.2 Slope
Measure the length between the intersections of two cursors. Slope can be positive or negative and
measures the rate of change between the two points defined by the intersections of the cursors in
cm/sec.
1. Touch Slope. A crosshair cursor with horizontal and vertical axes appears on the time series
window. Drag the cursor to a desired start point and release it.
2. A second cursor appears. Drag it to the end point then release it to complete measurement.
f
Page 76

Performing an Exam
T3300 Diagnostic Ultrasound System | 71 | B00601-010 4/10/17
NOTE
The slope measurement is not restricted to either the horizontal or the vertical axis of the start
marker.
6.10.2.3 Time
Measure the length between two vertical time lines created by two cursors. The position of the
horizontal distance lines does not affect time measurements.
1. Touch Time. A crosshair cursor with horizontal and vertical axes appears on the time series
window. Drag the cursor to a desired start point on the horizontal axis and release it.
2. A second cursor appears. Drag it to the end point on the horizontal axis then release it to
complete measurement.
6.10.2.4 Heart Rate
Measure the length between two vertical lines created by two cursors in beat per minute (BPM). The
position of the horizontal distance lines does not affect the heart rate.
1. Touch Heart Rate. A crosshair cursor with horizontal and vertical axes appears on the time
series window. Drag the cursor to a desired start point on the horizontal axis and release it.
2. A second cursor appears. Drag it to the end point on the horizontal axis then release it to
complete measurement.
6.10.3 Measuring in Spectral Doppler Mode
NOTE
The measured results of performing Trace, Semi-Trace and Auto Trace vary depending on the
transducer connected.
6.10.3.1 Velocity
Measure the blood flow velocity.
Touch Velocity. A crosshair cursor with vertical axis appears on the time series window. Drag the
cursor to the measurement point, and release your finger to place it.
6.10.3.2 Trace
Manually trace the Doppler spectrum.
1. Touch Trace. A crosshair cursor with vertical axis appears on the time series window. Drag the
cursor to a desired peak of the graph and release it.
2. A second cursor appears. Drag the cursor along the waveform on the graph to end diastole then
release it.
3. A third cursor appears. Drag it to the second peak of the graph and release it to complete the
trace.
6.10.3.3 Auto Trace
Trace the spectrum of Doppler waveforms.
Touch Auto Trace. The trace for the Doppler spectrum will be performed automatically with
measurements calculated and displayed on the screen.
Page 77

Performing an Exam
T3300 Diagnostic Ultrasound System | 72 | B00601-010 4/10/17
6.10.3.4 Semi-Trace
Trace the Doppler spectrum with better accuracy in the measurement calculation.
1. Touch Semi Trace. A crosshair cursor with vertical axis appears on the time series window.
Drag the cursor to a desired peak of the graph and release it.
2. A second cursor appears. Drag it along the waveform to end diastole on the graph then release
it.
3. A third cursor appears. Drag it to the second peak of the graph and release it
4. Touch anywhere on the imaging area to complete the trace.
NOTE
To obtain an accurate auto-trace and measurement result, a high-quality Spectral Doppler image
with clean noise background is required.
6.10.3.5 2-Points Measurement
Used to perform a set of basic Spectral Doppler measurements which may include peak systolic
velocity, end diastole velocity, mean velocity, time, slope, pulsatility index, resistive index, systolic/
diastolic ratio, pressure half-time and maximum pressure gradient, depending on the transducer
connected and the application selected.
1. Touch 2 pt. Meas. A crosshair cursor with vertical axis appears on the time series window. Drag
the cursor to a desired peak of the graph and release it.
2. A second cursor appears. Drag it to end diastole on the graph and release it. The measured
results (values) appear on the screen.
NOTE
For measurement accuracy and precision in PW Doppler measurement:
Velocity measurement will be less than ±12%.
6.11 Saving and Printing the Image
After adding annotations/measurements to the image, you can save or print the image.
6.11.1 Saving an Image Loop
On the real-time imaging screen, touch Save to save a default set of frames as an image loop. The
saved image loop will be displayed in the thumbnail list.
6.11.2 Saving an Image
On the frozen imaging screen, touch Save to save the current frame as an image. The saved image
will be displayed in the thumbnail list.
6.11.3 Printing an Image
On the frozen imaging screen, touch Print to print out the current image.
6.12 Reviewing the Image
On the frozen imaging screen, flick vertically on the thumbnail list to view the thumbnails of all the
saved images/loops.
Page 78

Performing an Exam
T3300 Diagnostic Ultrasound System | 73 | B00601-010 4/10/17
To further examine one or a set of images/loops, touch the thumbnail of the desired image or image
loop to display the Review screen.
6.12.1 Performing Multiple Selections
You can perform actions to more than one image/loop at a time.
1. Touch Multi-Select +/-.
2. Flick vertically on the thumbnail window and touch to select multiple images/loops as expected.
– To quickly select all images, touch Select All.
– To cancel all selections, touch Deselect All.
3. Touch an action button. For example, touch Delete to delete all selected images/loops.
End Exam
Set start
Set end
Fn Key
Home
Freeze
Save
B
Add to
Report
Abdomen
Report
Multi-Select
Multi-Compare
Exam History
Print
Play
Export Exam Delete
Abdomen
3/1/2017
4.40 PM
Abdomen
3/1/2017
4.40 PM
Abdomen
3/1/2017
4.40 PM
Abdomen
3/1/2017
4.40 PM
Abdomen
3/1/2017
4.40 PM
Cardiac
3/1/2017
4.40 PM
Cardiac
3/1/2017
4.40 PM
Abdomen
3/1/2017
4.40 PM
Cardiac
3/1/2017
4.40 PM
R
R
1
2
3
End Exam
Select AllFn Key Home
Freeze
Save
Deselect All
B
Add to
Report
Report
Multi-Select
Multi-Compare
Exam History
Print
Play
Export Exam
Delete
Page 79

Performing an Exam
T3300 Diagnostic Ultrasound System | 74 | B00601-010 4/10/17
6.12.2 Comparing Images
You can compare the scanned images/loops by displaying selected ones on the screen.
1. Touch Multi-Compare +/-.
2. Flick vertically on the thumbnail list, and touch to select up to 4 images/loops to display for
comparison.
3. Touch an action button. For example, touch Delete to delete all selected images/loops.
6.12.3 Generating a Report
1. On the Review screen, touch the thumbnails of the desired images and touch Add to Report.
2. Touch Report to display the following screen.
3. Fill in information about the patient and the study, if not complete, and add comments using the
virtual keyboard.
4. Flick down to review the images added, and add comments to individual images, if needed.
NOTE
You can still add/remove images to/from the report without going back to the Review screen. Touch
Add Image to display the image editing screen. Check/uncheck the desired images and touch Add
to Report.
5. Touch Image Layout +/- to select the number of columns for placing the images on a report.
3
1
Abdomen
3/1/2017
4.40 PM
2
Fn Key
End Exam
Home
Freeze
Save
B
Add to
Report
Report
Multi-Select
Multi-Compare
Exam History
Print
Play
Export Exam Delete
Please press thumbnail to add to review list
Please press thumbnail to add to review list
Please press thumbnail to add to review list
Patient information
Study date: 3/1/2017 / Exam type: Abdomen
Previous
End Exam
Exam History
Export
Home
Exam information
Institution:
Referring:
Interpreting:
Signature:
Template
Name:
ID:
DOB:
Age:
Height cm Weight kg BSA
m
2
Heart Rate bpm
Blood Press mmHg
1 column
Abdomen
Report
Print
Print Preview
Image Layout
Add Image
Delete Image
Page 80

Performing an Exam
T3300 Diagnostic Ultrasound System | 75 | B00601-010 4/10/17
6. The system provides two ways of saving the report:
– Ensure an external storage device is connected to the system, then touch Export. Select the
file format and directory, enter the file name then touch Save as file.
– Touch Export and select to export the report to the DICOM server.
7. To print out the entire report with scanned images, first touch Print Preview to preview the
report, then touch Print.
NOTE
Use the buttons on the Print Preview screen to zoom in/out the report or select a preferred page
layout style to view the report.
To print out the report in texts only, touch One Page Report > Print.
6.13 Exporting the Exam
You can export exams and images to an external storage or the DICOM server. When exporting an
exam, an image or a cine loop, the system creates a uniquely named subdirectory for each exam,
image or loop.
1. The system provides two ways of exporting the exam:
– On the Review screen, touch Export Exam.
– On the Exam History screen, check the completed exams, and touch Export Exam.
2. Select to export the exam in DICOM file format to the DICOM server, external storage or
network, or to export with common media formats to external storage or network.
NOTES
• To enable exporting an exam to DICOM automatically after ending the exam, touch >
Settings > Workflow > (Export DICOM after End Exam) > Yes.
• To configure DICOM settings, see "DICOM Configuration" on page 55.
6.14 Managing the Exam History
You can check and update status of all the stored exams from the Exam History screen.
Page 81

Performing an Exam
T3300 Diagnostic Ultrasound System | 76 | B00601-010 4/10/17
On the imaging screen, touch > Exam History. Refer to the Status column to check the
status of each exam (See "Exam status" on page 76). To review images/video clips of an exam,
touch ( ).
Alternatively, you can enter the query in any of the Name/ID/Date fields, and touch Query () to
start the query. Patients matching the query will be listed on the screen. To clear all search criteria,
touch Clear ().
6.14.1 Resuming an Exam
To resume an exam, check the exam and touch Continue to enter real-time scanning.
6.14.2 Starting a New Exam
To start a new exam from a patient with an existing exam, check the exam and touch New
Exam.
6.14.3 Finishing Exams
To update the exam status as “Complete”, multi-check the exams and touch Complete.
6.14.4 Deleting Exams
Multi-check the exams and touch Delete Exam to delete exams.
Table 1 Exam status
Exam status Meaning
Complete Ended exam
Processing Ongoing exam
Pause
Proceed to the next exam while leaving the
currently ongoing exam not ended
Exam History
New Exam
Continue
Exam History
Name
Home Previous
Complete
Delete Exam
Export Exam
Import
ID
Date
Query Clear
Name ID Type Study Date Image Status
Processing
Pause
Complete
Exam Image & Clip
Search Exam
Page 82

Performing an Exam
T3300 Diagnostic Ultrasound System | 77 | B00601-010 4/10/17
6.14.5 Exporting Exams
To export exams, multi-check the exams , touch Export Exam and select an export method. If
you select to export to DICOM, the task status icons (See page 56) next to the checkboxes indicate
the uploaded results of the exams.
6.14.6 Importing Exams
To import exams from the connected external storage device, touch Import > select an import item.
6.15 Ending the Exam
An exam is not complete if you proceed with a new exam without ending the previous one. To end
the exam, touch End Exam on the imaging screen. The exam will then be exported in DICOM file
format to the DICOM server if you have enabled the Export DICOM after Exam feature (See
page 89). If this feature is disabled, you will enter the Patient or W orklist screen or a new scan st art s
automatically, based on your selection from > Settings > Workflow > (Screen after End
Exam).
After ending the exam, you can still save images/cine loops, add annotations, perform
measurements and modify the patient information within 24 hours, except the patient ID and the
patient’s last name. To do so, go to the Exam History screen, check the ended exam and touch
Continue.
NOTES
• To export exams to the DICOM server, you need to configure the DICOM settings first. (See
"DICOM Configuration" on page 55)
• To check the exam status, touch > Exam History. (See "Managing the Exam History"
on page 75)
Page 83

T3300 Diagnostic Ultrasound System | 78 | B00601-010 4/10/17
CHAPTER
7
Using Image Controls
This chapter covers the following topics:
• "B-Mode Image Controls" on page 79
• "Color/Power Mode Image Controls" on page 82
• "M-Mode Image Controls" on page 83
• "Spectral Doppler Mode Image Controls" on page 85
All of the information in this chapter pertains to real-time imaging. Many of
the controls and functions change when you freeze the scan. For
information on using functions when the scan is frozen, see "Adding
Annotations" on page 65 and "Adding Measurements" on page 68.
Page 84

Using Image Controls
T3300 Diagnostic Ultrasound System | 79 | B00601-010 4/10/17
On the real-time imaging window:
• Touch the scan mode (image control) buttons to select the scan mode (See "Imaging Screen
(Real-time)" on page 46).
• Touch / or use gestures to switch the control panel pages to go through the available
functions (See "Switching the Control Panel Pages" on page 52).
7.1 B-Mode Image Controls
7.1.1 Overview
The system delivers 2-dimensional digital imaging (B-mode) using 256-level gray map. This scan
mode delivers excellent image uniformity, tissue contrast resolution, and steering flexibility in
frequencies from 2 MHz to 15 MHz.
7.1.2 Adjusting Gain
Adjust amplification of the returning echoes, which adjusts the amount of echo information displayed
in an image. The overall brightness of the image can be elevated, but the “noise” may also be added
to the image with excessive increase in gain.
Touch Gain +/- or flick horizontally on the scan area to adjust the gain value.
7.1.3 Adjusting Frequency
Change the scan frequency to obtain higher resolution as frequency increases, or de eper
penetration as frequency decreases.
To increase the frequency, touch Resolution. To decrease the frequency, touch Penetration.
7.1.4 Adjusting Time Gain Compensation (TGC)
Adjust the gain which compensates for the attenuation (a reduction in sound amplitude) of the echo
signals in proportion to their depth (based on travel time).
Touch TGC to display the TGC sliders on the screen. To increase/decrease the gain at the desired
section (depth) of the image, drag the corresponding slider to the right/left.
Save Freeze
HomeTGCTuning
ResolutionGeneralPenetration
End Exam
Abdomen
Gain
Depth
Focus
THI
Full Screen
B Color PW
M
Power
B
2D mode
(B-mode)
image
information
Fn Key
Page 85

Using Image Controls
T3300 Diagnostic Ultrasound System | 80 | B00601-010 4/10/17
7.1.5 Adjusting the Scan Depth
Adjust the field of view. To view larger or deeper structures, increase the depth. To enlarge the
display of structures near the skin line, decrease the depth. The system automatically adjusts the
frame rate (FPS) and acoustic power indices (TI/MI) based on the scan depth.
Touch Depth +/- or flick vertically on the scan area to set the scan depth.
7.1.6 Adjusting the Focus Depth, Focal Zone and Focal span
Focus optimizes the image by increasing the resolution for a specific area and is displayed by a red
arrow marker indicated at the depth ruler. Depending on the transducer in use and the mode
selected, multiple focus depths can be added. Increasing the number of focal zones decreases the
frame rate. If the frame rate is not high enough, try decreasing the number of focal zones.
Touch Focus +/- to adjust the depth value. Touch Focal Zone +/- to select the desired number of
focal zones. Touch Focal Span +/- to adjust the distance between the focal zones.
7.1.7 Adjusting Dynamic Range
Control the range of acoustic levels displayed in the image, which affects the contrast of the image.
Touch Dyn Range +/- to adjust the amount of compression.
7.1.8 Using Tissue Harmonic Imaging (THI)
Reduce superficial artifact and provide better gray scale contrast by processing an integer multiple
of the fundamental frequency, a harmonic wave.
Touch THI to enable this function.
7.1.9 Adjusting Persistence
Adjust the amount of frame averaging from real-time images or loops. Higher persistence produces
less speckled and smoother image but reduces the temporal resolution.
Touch Persist +/- to adjust the value.
7.1.10 Adjusting Sharpness and Smoothing
Improve the sharpness of the image by enhancing the edge contrast and smoothening the tissue
speckle.
Touch QScan +/- to adjust the value.
7.1.11 Adjusting Gray Map
Change how the amplitude is converted to brightness.
Touch Gray Map +/- to adjust the value.
7.1.12 Adjusting Chroma Map
Adjust the chroma (color tone and saturation) value with different brightness.
Touch Chroma +/- to adjust the tone.
7.1.13 Adjusting Steer Angle
Optimize the viewing area by adjusting the steer angle. This function works only with linear array
transducers.
Touch Steering +/- to adjust the angle.
Page 86

Using Image Controls
T3300 Diagnostic Ultrasound System | 81 | B00601-010 4/10/17
7.1.14 Adjusting the Sector Width and Position
Adjust the ROI of the imaging area for image width and image position. A smaller sector width
increases the frame rate.
Touch Sector Width +/- to adjust the width. Touch Sector Pos +/- to adjust the position.
7.1.15 Adjusting Power
Adjust the acoustic output power value to the expected target.
Touch Power +/- to adjust the value.
7.1.16 Using Trapezoidal Imaging
Increase the range of view of the ultrasound image when using a linear transducer.
Touch Trap to enable trapezoidal imaging.
7.1.17 Adjusting Density
Adjust the density of the scan lines. Higher density obtains better horizontal resolution with lower
frame rate, while lower density obtains higher frame rate.
Touch Density repeatedly to select a desired line density.
7.1.18 Using Compound Imaging
Reduce speckles and improve contrast resolution.
• Frequency compounding: Combine multiple images acquired from different frequencies. Touch
FQBeam to enable frequency compounding.
• Spatial compounding: Combine multiple images acquired from different beam angles. Touch
SQBeam repeatedly to enable and adjust spatial compounding.
7.1.19 Using ENV (Enhanced Needle Visualization)
When performing a biopsy with the supported transducer, the system offers on-screen needle
assistance to further enhance imaging of the needle. Before using the ENV function, make sure the
following conditions are met:
• B-mode is selected
• An L154BH transducer is connected to the system
• A patient profile is selected
Touch ENV to enable this function.
A diverging dotted green line shows in the Imaging window. The point of the needle should be close
to vertical to the dotted line. The part of the needle image that goes beyond the limit will not be
brightened and can’t be seen. Tap ENV Angle +/-, if needed, to toggle between lines angled from
upper left to lower right and lines angled from upper right to lower left.
NOTE
The system does not support the biopsy guide function. Do not use nor assemble any kind of needle
guide kits/brackets on the transducer supported to avoid transducer damage or hurting the patient.
Page 87

Using Image Controls
T3300 Diagnostic Ultrasound System | 82 | B00601-010 4/10/17
7.2 Color/Power Mode Image Controls
7.2.1 Overview
Color mode is used to detect the presence, direction, and relative velocity of blood flow by assigning
color-coded information to these parameters. The color is depicted in a region of interest (ROI) that
is overlaid on the 2D image. Non-inverted flow towards the transducer is assigned shades of red,
and flow away from the transducer displays in shades of blue.
All forms of ultrasound-based imaging of red blood cells are derived from the received echo of the
transmitted signal. The primary characteristics of this echo signal are its frequency and its amplitude
(or power). The frequency shift is determined by the movement of the red blood cells relative to the
transducer – flow towards the transducer produces a higher-frequency signal and flow away from
the transducer produces a lower-frequency signal. Amplitude depends on the amount of moving
blood within the volume sampled by the ultrasound beam. Large frequency shift generated by rapid
flow is displayed in lighter colors, and smaller frequency shift in darker colors.
In Power (Doppler Power Image) mode, low flow rate in small vessels are clearly observed. Colors
are carried out only to demonstrate the blood flow, but contain no velocity information, thus, offer no
directional information.
Both Color and Power modes can work with other scan modes to form duplex and triplex modes.
Save Freeze
HomeTGCTuning
ResolutionGeneralPenetration
End Exam
Gain
Scale
Steering
Invert Full Screen
B Color PW
MPower
Color
Renal
B
Color mode
image
information
Fn Key
Touch to enable
Color mode image
controls
Save Freeze
HomeTGCTuning
ResolutionGeneralPenetration
End Exam
Gain
Scale
Steering
Directional Full Screen
B
Color PW
M
Power
Power
Renal
B
Power mode
image
information
Fn Key
Touch to enable
Power mode image
controls
Page 88

Using Image Controls
T3300 Diagnostic Ultrasound System | 83 | B00601-010 4/10/17
7.2.2 Adjusting Pulse Repetition Frequency (PRF)
Adjust the velocity range of the color flow display. The maximum velocity range depends on the
transducer in use and the location of the sample volume. Set the PRF high enough to prevent
aliasing, and low enough to provide adequate detection of slow blood flow. Upon adjusting the PRF
value, the velocity scale shown on the Color/Power wedge and the Wall Filter setting are changed
accordingly.
Touch Scale +/- to adjust the value.
7.2.3 Inverting the Color Display
Invert the color display in relation to the blood flow direction in Color mode. Normally, the color red is
assigned to positive frequency shifts (flow toward the transducer), and blue is assigned to negative
frequency shifts (flow away from the transducer). Use this function to reverse this color assignment
and invert the colors on the color wedge.
Touch Invert to invert the color scale.
7.2.4 Using Directional Power
Activate Directional Power in Power mode for use in applications where sensitivity and directional
information are both required.
Touch Directional to enable this function.
7.2.5 Selecting a Color Map
Select which of five color maps is used to show Color Doppler data. Some maps use more colors
than others, while some display in a smoother gradient than others.
Touch Color Map +/- to select a color map.
7.2.6 Adjusting Wall Filter
Reduce or eliminate unwanted low-frequency, high-intensity signals generated by movements of
blood vessel walls or by rapid movement of the transducer. Set the wall filter high enough to ensure
that the Color Doppler flash artifacts from tissue or wall motion are not displayed, but low enough to
display slow flow. The adjustable range of the Wall Filter value is related to the current PRF value.
Touch Wall Filter +/- to adjust the value.
7.2.7 Applying the Smoothing Filter
Reduce color noise by applying a smoothing filter to the image.
Touch Smoothing +/- to adjust the value.
7.2.8 Adjusting the Color Priority
Define the amount of color displayed over bright echoes, and help confine color within the vessel
walls.
Touch Reject +/- to adjust the value.
7.3 M-Mode Image Controls
7.3.1 Overview
M-Mode imaging is used simultaneously with 2-dimensional (B-mode) imaging to determine patterns
of motion for objects within the ultrasound beam. M-Mode displays scan data of the anatomy in the
Page 89

Using Image Controls
T3300 Diagnostic Ultrasound System | 84 | B00601-010 4/10/17
2D Imaging window , and the motion scan in the Time Series window . The M-Mode cursor line
(M-line) appears vertically in the central area of the active 2D image, indicatin g the position of the MMode beam. Typically, this mode is used for viewing motion patterns of the heart.
Drag the M-line to the target position to determine the presence of motion occurred along the
singular line.
Touch M to enable M-Mode image controls.
Touch to initiate the M-Mode trace which produces a scrolling display of movement (along
the vertical Y axis), plotted against time (along the horizontal X axis).
7.3.2 Using Steer M
Allow steering the sample volume to any angle you choose by adding multiple M-lines, rather than
sampling in a strict vertical position. This function is particularly useful in cardiology applications.
1. Touch Steer M +/-.
2. A crosshair cursor appears on the image. Drag the cursor to where you want to start sampling
and release it.
3. Drag the cursor to where you want to end sampling and release it.
4. Touch Steer M +/- to display a second crosshair cursor. Repeat step 2-3 to place the second
line. Up to 3 M-lines can be added.
7.3.3 Adjusting Sweep Speed
Adjust how fast the timeline is scanned across the Time Series window.
Touch Speed repeatedly to select a desired velocity.
7.3.4 Selecting M Process
Select the detection method processing the M-Mode trace display. The system provides retrieving
average or peak scan data from the M-Mode trace.
Touch M Process +/- to select a desired method.
7.3.5 Inverting the M-Mode Trace Display
Invert the M-Mode trace display in relation to brightness.
Touch Video Invert to swap the colors on the M-Mode trace display.
Save
Freeze
HomeTGC
ResolutionGeneralPenetration
Gain
Steer M
Full Screen
B Color PW
M Power
M
Cardiac
B
M- mode
image
information
Video Invert
Speed
1/2x
End Exam
Update
M line
1
2
Fn Key
1
2
Page 90

Using Image Controls
T3300 Diagnostic Ultrasound System | 85 | B00601-010 4/10/17
7.4 Spectral Doppler Mode Image Controls
7.4.1 Overview
Pulsed-Wave Doppler (PW) and Continuous Wave Doppler (CW) are collectively called Spectral
Doppler mode. A Spectral Doppler scan produces a series of pulses used to study the motion of
blood flow selectively in the region of interest. PW/CW modes display scan data of the anatomy in
the 2D Imaging window for monitoring the exact location of the sample volume, and display the PW/
CW data acquired in the Time Series window. The X axis of the graph represents time, and the Y
axis represents Doppler frequency shift. The shift in frequency between successive ultrasound
pulses, caused mainly by moving red blood cells, can be converted into velocity and flow if an
appropriate angle between the insonating beam and blood flow is known.
PW mode examines blood flow data selectively in a small region along a desired ultrasound cursor
(the Spectral Doppler cursor), called the sample volume or range gate. A short line across the
sample volume is called the Flow Direction cursor. This cursor line should be aligned to the blood
flow direction when measuring the flow velocity.
Drag the Spectral Doppler cursor horizontally and the sample volume vertically to the target position
to determine the presence of blood motion.
CW mode examines the flow data along the Spectral Doppler cursor rather than a small region.
Save
Freeze
HomeTGC
ResolutionGeneralPenetration
Gain
Steering
Angle
B Color PW
MPower
PW
Cardiac
B
PW mode
image
information
Invert
End Exam
Update
Spectral Doppler
Tuning
-60,0,60
SV Size
cursor
Flow direction
cursor
Fn Key
Save
Freeze
Home
TGC
Gain
Steering
Angle
B Color PW
MPower
CW
Cardiac
B
CW mode
image
information
Invert
End Exam
Update
Spectral Doppler
Tuning
-60,0,60
cursor
CW
CW cursor
Fn Key
Page 91

Using Image Controls
T3300 Diagnostic Ultrasound System | 86 | B00601-010 4/10/17
7.4.2 Adjusting Baseline
Adjust the zero baseline up or down in the Time Series window.
To adjust the baseline:
• Touch Baseline +/-.
• Touch and hold the baseline in Time Series window, then drag the baseline vertically to move it.
7.4.3 Adjusting Sample Volume (SV) Size
Adjust the SV size which controls the size of the Doppler region being examined in PW mode.
To adjust the SV size:
• Touch SV Size +/-.
• Touch and hold one finger on the Spectral Doppler cursor, then flick another finger up or down.
7.4.4 Adjusting Correction Angle
Adjust the correction angle to obtain accurate velocity. At angles greater than 70°, the error in the
velocity calculation is usually too large to use.
• To toggle the angle between -60° and 60°, touch Angle -60,0,60 repeatedly.
• Touch Angle +/- to adjust the angle to the desired number.
• To manually adjust the angle, touch and hold one finger on the Spectral Doppler cursor, then flick
another finger to the left or right.
7.4.5 Updating the 2D Display
Select whether or not to continue scanning the anatomy while acquiring PW Doppler scan data.
Touch Duplex or Triplex to enable/disable this function.
Page 92

T3300 Diagnostic Ultrasound System | 87 | B00601-010 4/10/17
CHAPTER
8
System Customization
You can customize your system to streamline your workflow and increase
efficiency. Use the setup tools to adjust sets of controls for defaults and
other settings.This chapter covers the following topics:
• "Customizing Your System" on page 88
• "Servicing your system" on page 90
Page 93

System Customization
T3300 Diagnostic Ultrasound System | 88 | B00601-010 4/10/17
8.1 Customizing Your System
On the system screen, touch > Settings. The setup tools are categorized into various
sections listed below. Touch each section to access the settings.
8.1.1 General
• Enable freeze gesture: Enable double-tapping the screen to freeze the real-time scan.
• Language: Set the system language, and the system restarts automatically.
• Export Settings/Import Settings: Insert an external storage, touch Export/Import and select
the storage directory.
8.1.2 Preset
• Default preset/Preset list: Touch Edit, set the default preset and re-arrange the preset list on
the Preset screen, then touch Save. (See "Managing Presets" on page 61)
• Export preset/Import preset: Export/import customized presets to/from your external storage.
(See "Exporting and Importing Customized Presets" on page 61)
8.1.3 Patient
• Auto-create Patient Name and ID: Enable creating a set of patient name and ID every time you
start a new exam.
• Show Study Information: If you want to protect user privacy, disable this function to conceal
user and institution information during real-time scanning.
• Patient Information Unit: Set the measurement unit for filling in patient information.
8.1.4 Exam
• Add logos and names for the institutions and operators.
• Delete exams before: The system will automatically delete exams performed a certain period of
time ago. Select the time period from the drop-down menu, then touch Delete > OK to delete
exams matching the selected time period.
8.1.5 Workflow
• Screen after Enter Ultrasound: Select th e screen to enter af ter st arting/lo gging into t he system.
• Auto-freeze after Minutes: Set the number of minutes of waiting before the scan is frozen
automatically.
• Status after Freeze: Assign the first action to perform after freezing the scan.
8.1.5.1 BDMK (Body mark)
• Auto-clear BDMK after Unfreeze: Enable clearing all the body marks added automatically after
returning to the real-time scan.
• Auto-add BDMK after Live Scan: Enable adding a body mark each time you start a new scan.
8.1.5.2 Annotation
• Auto-clear Annotation after Unfreeze: Enable clearing all the annotations added automatically
after returning to the real-time scan.
Page 94

System Customization
T3300 Diagnostic Ultrasound System | 89 | B00601-010 4/10/17
8.1.5.3 Measurement
• Auto-clear Measurement after Unfreeze: Enable clearing all the measurements added
automatically after returning to the real-time scan.
• Continue Next Measurement: Enable initiating a second measurement automatically after the
first one is complete.
8.1.5.4 Exam
• Screen after End Exam: Select the screen to enter after touching End Exam.
• Export DICOM after End Exam: Enable exporting the exam in DICOM file format to the DICOM
server automatically after touching End Exam.
8.1.5.5 Print
• Print while Save: Enable printing out the scanned image automatically after touching Save.
8.1.5.6 Function Key
The system provides a function (configurable) key for quick access to your frequently used action.
• Function Key Actions: Touch Edit, assign a desired action to the function key, then touch
Save.
• Function Key Display Name: Edit the name for the function key.
8.1.6 Imaging
• Auto Focus by following CROI: Enable re-positioning focus to the center of the ROI
automatically when moving the ROI on the image in real-time Color/Power modes.
• Auto CROI by following SV: Enable re-positioning ROI to keep the sample volume in the center
of the ROI when moving the sample volume on the image in real-time B+Color/Power+PW/CW
modes.
• Auto Zoom-in Image for PW/CW Mode/Auto Zoom-in Ratio: Enable zooming-in images
automatically with the assigned ratio upon entering PW/CW modes. To change the zoom ratio,
select a desired percentage.
• Image Format: Select the saved image format.
• Cine Loop Length in Seconds (Length may vary depending on frame rate): Set the cine
loop length for each recording.
• PW Output Unit/CW Output Unit: Set the velocity display unit in PW/CW modes.
8.1.6.1 Display Layout
• M Mode Display Format/PW Mode Display Format/CW Mode Display Format: Set the
aspect ratio between the 2D imaging window and the time series window on the imaging screen.
8.1.7 Annotation
• Annotation Font Size/Arrow Size: Select a desired size.
• Label List: Touch Edit, select an application and check/uncheck each label to re-arrange the
label list, then touch Save.
8.1.8 BDMK (Body Mark)
• Default BDMK for Application: Touch Edit, select an application and touch a desired body
mark to set it as default, then touch Save.
Page 95

System Customization
T3300 Diagnostic Ultrasound System | 90 | B00601-010 4/10/17
• BDMK List: Touch Edit, select an application and enable/disable each body mark to re-arrange
the body mark list, then touch Save.
8.1.9 Measurement
• Configuration of Calculation List: Touch Edit. Select a preset from the Calculation Package to
display available calculations below. To display/hide the calculation result after a set of
measurements are done, check/uncheck the calculation name. If you select OB, more than one
calculation method can be used in a calculation. Select the Author name to your desired
method/formula.
• Result Unit: Set the measurement unit.
• Caliper Size/Set Result Font Size: Select a desired size.
• Show Measure Line: Enable showing the measuring lines after performing a measurement.
• Result Position: Set the position of the measured results.
• Show Result: Set whether to show all or the last measured results, or to hide them all.
8.1.10 Report
• Default Report Template: Select an application and set its default report template based on the
preset selected, then touch Save.
• Built-in Prompt String/Built-in Finding String/Built-in Comment String: Touch Edit, edit or
add built-in strings used in the report, then touch Save.
• Report Display: Touch Edit, and select the display type of the Calculation Package in the report.
8.1.11 DICOM
Configure DICOM settings. For more information, see "DICOM Configuration" on page 55.
8.1.12 Networking
• Display the network connection status of the system in the Information window.
– Current Status: The IP address currently connected.
– Detailed Status: All IP addresses and MAC addresses.
• Configure the system network.
– Wifi Configurations: See "Connecting the System to the Wireless Network" on page 54.
– Ethernet Configurations: See "Connecting the System to the Network by Ethernet" on
page 54“.
8.1.13 Print
• Image Printer/Report Printer: Assign the printer for use when printing images/reports.
• Network Printing: Configure printer settings.
• Image Color Invert: Print out the image with colors inverted.
8.2 Servicing your system
If you encounter any problem using the system, need to update software, backup and restore data
or use the on board diagnostic tools, select the service tools. Some functionality may require access
keys and consultation available from technical support.
Page 96

System Customization
T3300 Diagnostic Ultrasound System | 91 | B00601-010 4/10/17
On the system screen, touch > Settings > Service. The service tools are categorized into
the following sections.
• Managing your system: Touch System Management. System information, software update,
backing up and restoring data can be found here.
• Testing your system: Touch Test & Utilities. Use the diagnostic tools here to test the system
functionality.
• Exporting system logs: Touch System Logs. Test results of the system functionality can be
found here.
• About your system: Touch About. The system’s main version and the tablet’s serial number
(default password for the first-time-logging-in) can be found here.
8.2.1 Reinstalling Software
This requires further assistance. Please contact technical support (See "Contact Information" on
page 2). An access key is required. Once the access key is provided, the installation will require a
USB flash drive with the software ZIP file. Please allow five t o ten minutes for installation. The
system will restart after completed. All settings and p atient data are preserved but it is good practice
to ensure recent backups have been performed.
Touch System Management > (Software Maintenance) > (Reinstall Software) > Update.
NOTE
Ensure regular backups of patient data and settings. It may be important in the event of a failure to
have current configuration data.
8.2.2 Checking the Software Version
This may be required when contacting Technical Support.
Touch System Management > (Software Maintenance) > (Software Version).
8.2.3 Checking the Tablet’s Serial Number
List the serial number of the tablet. This is assigned and cannot be changed.
To check your tablet’s serial number:
• Touch System Management > (System Information) > (Tablet Serial Number).
• Refer to the spec label on the back of your system.
8.2.4 Checking the License Status
List current licenses and options that are installed. It may need to be reinstalled with assist ance from
technical support when a replacement tablet is received and no licenses are installed.
Touch System Management > (System Information) > (License Status).
8.2.5 Resetting System Settings
Performing this action will reset all system settings of the current user and is irreversible. Consider
backing up your settings to an external storage device first.
Touch System Management > (System Configuration) > (Reset System Settings) > Reset.
Page 97

System Customization
T3300 Diagnostic Ultrasound System | 92 | B00601-010 4/10/17
8.2.6 Backing Up System Settings and Patient Data
CAUTION
CAUTION
In the event a system issue occurs and a replacement system is required all configuration
settings and patient data may be lost. It is your responsibility to back up data regularly!
NOTE
Before backing up system settings and patient data, ensure that the system is connected to an
external storage device.
1. Touch System Management > (System Configuration).
2. Touch Backup in the following fields:
– Backup System Settings & Patient Data: All the system settings, presets and exams are
saved to the external storage device. The following file naming convention is applied to the
backup file: Backup_YYYYMMDD_HHMMSS
– Backup Patient Data: All the exams are saved to the external storage device. The following
file naming convention is applied to the backup file:
Backup_PATIENT_YYYYMMDDHHMMSS
8.2.7 Restoring System Settings and Patient Data
NOTE
Before restoring system settings and patient data, ensure that the system is connected to an
external storage device containing stored system settings and patient data.
Touch System Management > (System Configuration).
Touch Restore in the following fields, and select a backup file:
• Restore System Settings & Patient Data: All the system settings, presets and exams are
restored to the system from the external storage device.
• Restore Patient Data: All the exams are restored to the system from the external storage
device.
8.2.8 Resetting Your System
NOTE
This action is irreversible. Consider backing up your up system settings and patient data to an
external storage device first.
Performing this action will restore your system to its factory state and erase all your user settings
and patient data from the system storage, except the tablet serial number.
Touch System Management > (System Configuration) > (Factory Reset) > Erase.
Page 98

T3300 Diagnostic Ultrasound System | 93 | B00601-010 4/10/17
CHAPTER
9
Transducer and System
Maintenance
The transducers and the system require proper care, cleaning, and
handling. This chapter contains information and instructions to help you
effectively clean, disinfect, and sterilize the transducers and the system.
This chapter covers the following topics:
• "Transducer Maintenance" on page 94
• "Transducer Storage" on page 94
• "Transducer Storage" on page 94
• "Transducer Care" on page 95
• "Inspecting the Transducer" on page 96
• "Transducer Care Method" on page 97
• "Transducer and Cable Cleaning" on page 97
• "Ultrasound Transmission Gels" on page 98
• "Compatible Disinfectants and Cleaning Solutions" on page 99
• "System Maintenance" on page 99
Page 99

Transducer and System Maintenance
T3300 Diagnostic Ultrasound System | 94 | B00601-010 4/10/17
The transducer is the most important factor in image quality. Optimal imaging cannot be obtained
without the correct transducer. The system is optimized for use based on your transducer selection.
9.1 Transducer Maintenance
Transducers are highly-sensitive instruments and require proper care, cleaning, and handling.
Reasonable care includes inspection, cleaning, and disinfection or sterilization, as necessary.
Inspect the transducer, cable, and lens before each use. Check for cracks or other damage that
jeopardizes the integrity of the transducer. Report any transducer damage to your BenQ Medical
Technology representative, and discontinue use of the transducer.
For all information on transducer cleaning and disinfection, see "Transducer Care" on page 95.
For all information about the use of acoustic coupling gels, see "Ultrasound Transmission Gels" on
page 98.
If you encounter poor image quality or transducer problems, see "Troubleshooting" on page 103“.
NOTE
Some ultrasound coupling gels, as well as some solutions for pre-cleaning, disinfecting, and
sterilizing can damage a transducer . Before using a gel or solution on a transducer, see "Ultrasound
Transmission Gels" on page 98 or "Transducer Care" on page 95“. You can also contact your local
BenQ Medical Technology representative. For contact information, see "Contact Information" on
page 2.
9.2 Transducer Storage
Use the appropriate guidelines for storing transducers for transport, and daily and long-term storage.
For information on temperature and humidity requirements, see "Appendix A: Specifications" on
page 108.
9.2.1 Storage for Transport
If a carrying case is provided with your transducer, always use the carrying case to transport the
transducer from one site to another. Follow these guidelines to properly store transducers for
transport:
• Make sure that the transducer is clean and disinfected before placing it in the case to avoid
contaminating the foam that lines the carrying case.
• Place the transducer in the case carefully to prevent kinking of the cable.
• Before closing the lid, make sure no part of the transducer is protruding from the case.
• Wrap the case in plastic material containing air-filled pockets (such as Bubble Wrap material),
and pack the wrapped case in a cardboard carton.
9.2.2 Daily and Long-Term Storage
Follow these guidelines to protect your transducer:
• Always store transducers in the transducer holders or on a securely mounted wall rack when you
are not using them.
• Ensure the transducer holders are clean before storing transducers.
• Avoid storing transducers in areas of temperature extremes or in direct sunlight.
• Store transducers separately from other instruments to avoid inadvertent transducer damage.
• Before storing transducers, make sure they are thoroughly dry.
Page 100

Transducer and System Maintenance
T3300 Diagnostic Ultrasound System | 95 | B00601-010 4/10/17
9.3 Transducer Care
Reasonable care includes inspection, cleaning, and disinfection or sterilization, as necessary.
Transducers must be cleaned after each use. Inspect all parts of the transducer carefully before
each use. Check for cracks or other damage that jeopardizes the integrity of the transducer.
9.3.1 Transducer Care and Operator Safety
Observe the following warnings and cautions during all cleaning, disinfection, and sterilization
procedures and when using disinfectants.
WARNING
Disinfectants are recommended because of their chemical compatibility with product
materials, not their biological effectiveness. For the biological effectiveness of a disinfectant,
see the guidelines and recommendations of the disinfect ant manufacturer, the U.S. Food and
Drug Administration, and the U.S. Centers for Disease Control.
WARNING
The level of disinfection required for a device is dictated by the type of tissue it will contact
during use. Ensure the disinfectant type is appropriate for the type of transducer and the
transducer application. For information on the levels of disinfection requirements, see
"Transducer Care" on page 95.
WARNINGS
• Do not drop the transducer on a hard surface, as this will damage the transducer
elements and compromise the electrical safety of the transducer.
• Do not allow sharp objects, such as scissors, scalpels, or cauterizing knives, to touch
transducers or cables.
• Do not use damaged or flawed transducers.
WARNINGS
• Use only the approved ultrasound coupling gels.
• Use only couplants specifically designed for ultrasound examinations. Do not use
mineral-oil or vegetable-based couplants, which can damage transducers.
WARNING
If a pre-mixed solution is used, be sure to observe the solution expiration date.
WARNINGS
• Transduce rs must be cleaned after each use. Cleaning the transducer is an essential step
before effective disinfection or sterilization. Be sure to follow the manufacturer’s
instructions when using disinfectants.
• When sterilizing a transducer, ensure that the sterilant solution’ s stren gth and duration o f
contact are appropriate for sterilization. Be sure to follow the manufacturer’s
instructions.
WARNING
Attempting to clean or disinfect a transducer, cable, or connector by using a method other
than the procedures provided here can damage the device and voids the warranty.
 Loading...