

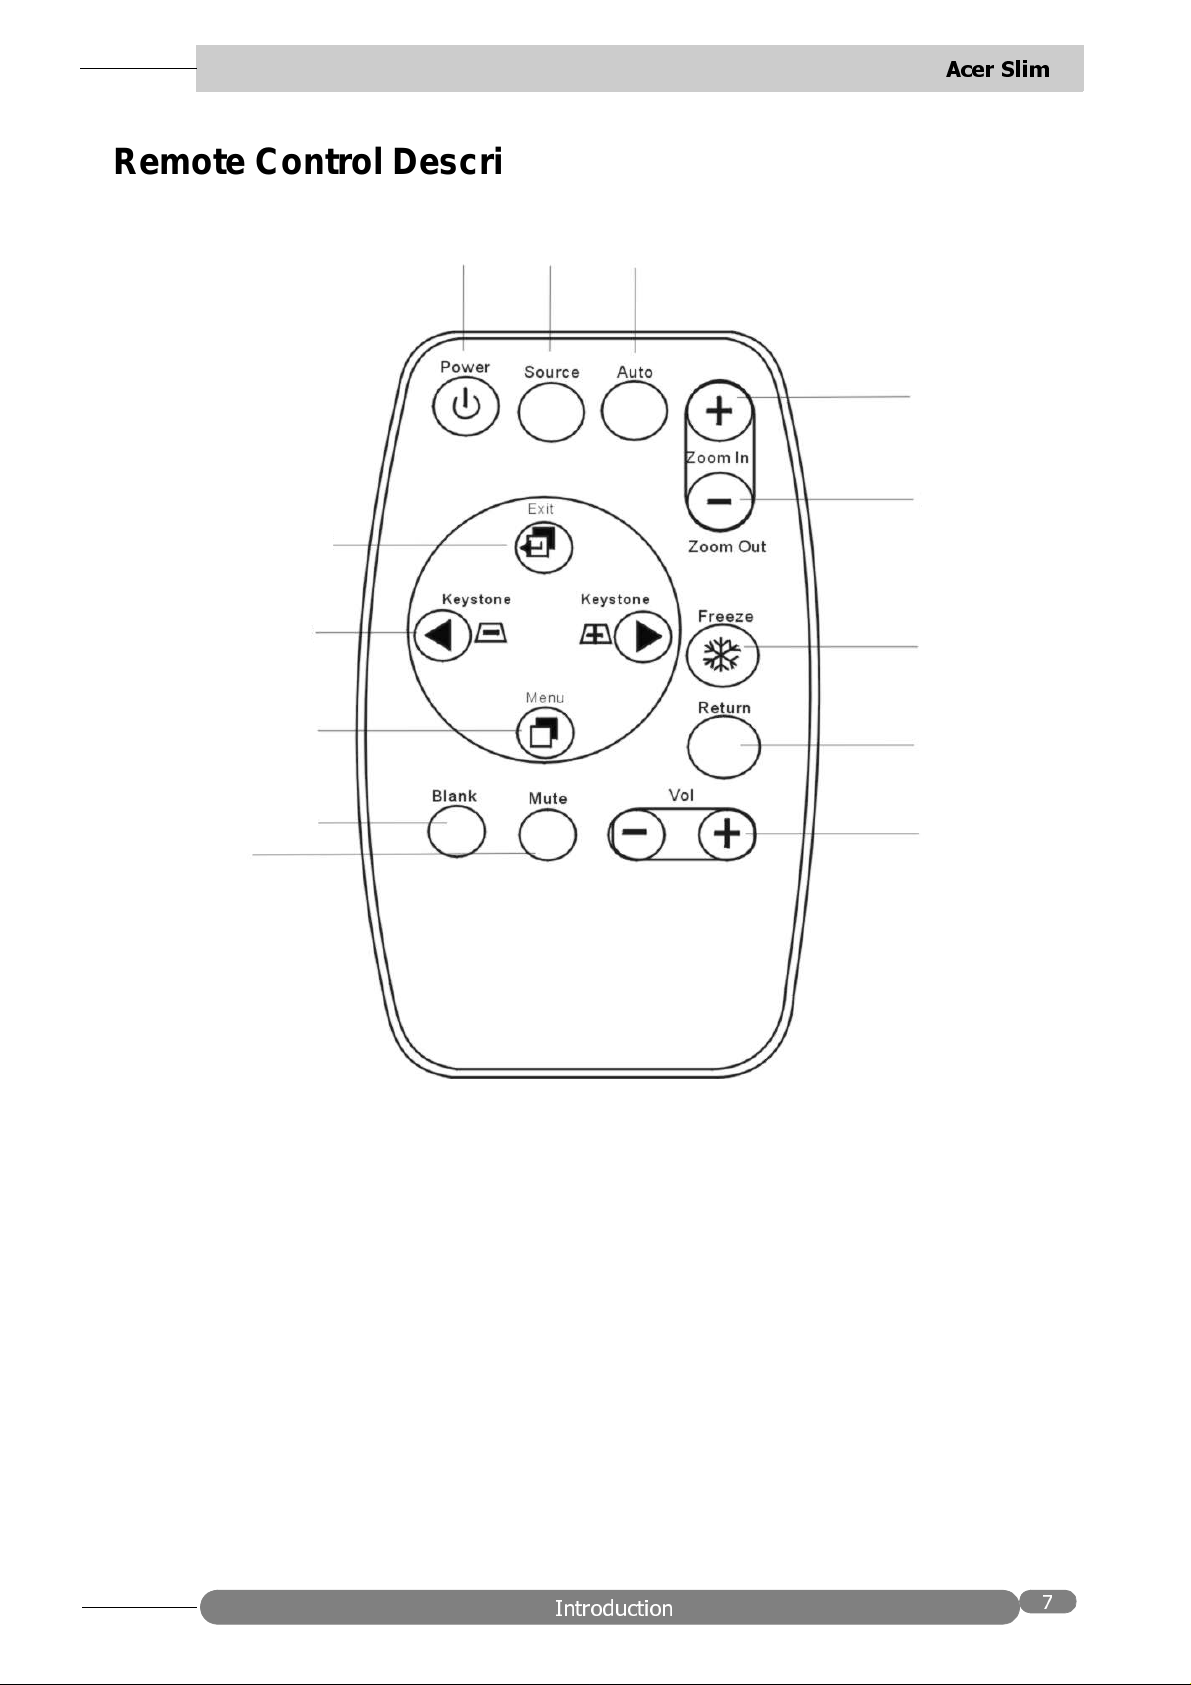
Remote Control Description
$FHU 6OLP
Mute
Keystone
Menu
Blank
Exit
Power
Source Auto
Zoom In
Zoom Out
Freeze
Return
Volume
Remote Control Features
The remote control sensors are located in the front/ back of the projector. The
distance between the sensor and the remote control should not excede 6 meters.
,QWURGXFWLRQ
$FHU 6OLP
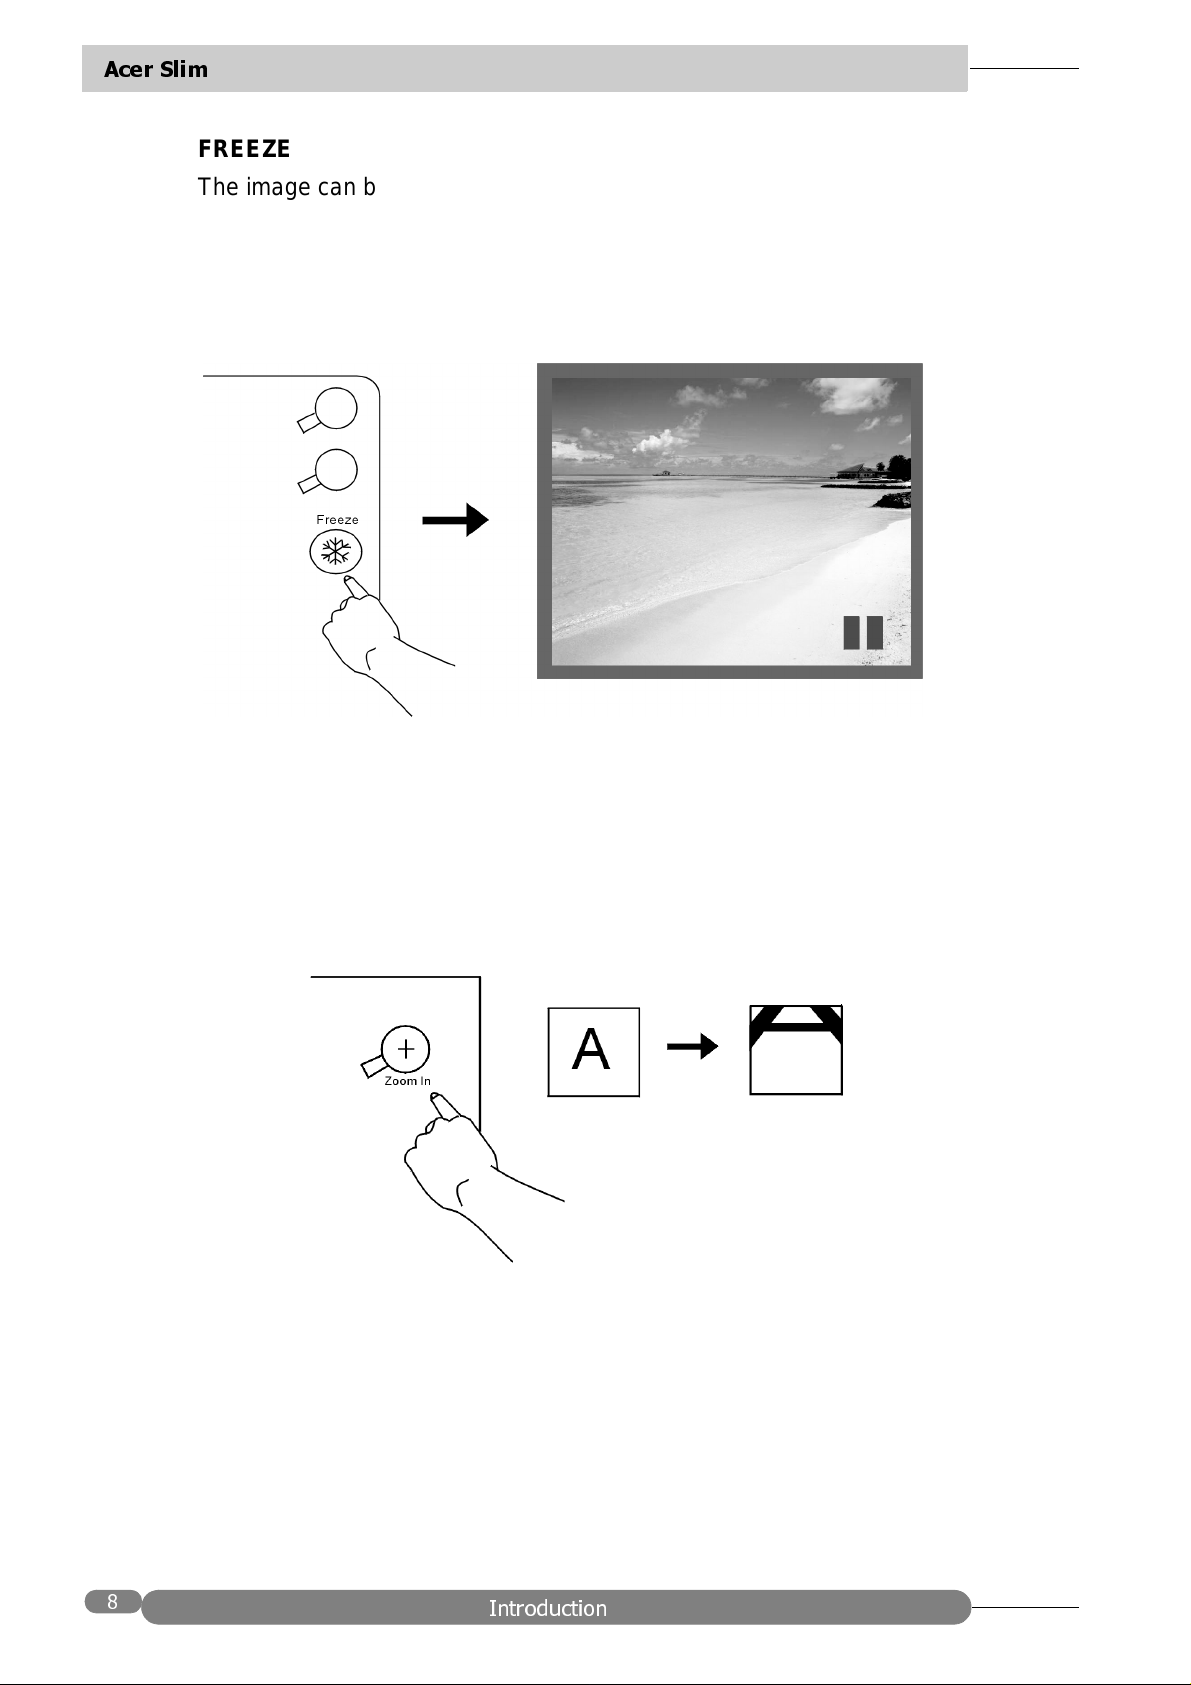
FREEZE
The image can be frozen when FREEZE is pressed. A “Pause” icon will appear in
the lower right corner of the screen for three seconds. To release the freeze
function, press the FREEZE button, RETURN button or SOURCE button (when the
input source is switched over during display). A “Play” icon will appear in the lower
right corner of the screen for three seconds when the freeze function is released. .
ZOOM IN/OUT
By pressing ZOOM IN +, the center of the picture can be magnified. When the +
button is pres sed again, the picture is further m agnified, up to four tim es the origi nal
size. By pressing ZOOM OUT -, the size of the image is re duced. When the - button
is pressed again, the picture is further reduced until it is restored to its original size.
To return to the normal display mode, press the RETURN butto n. (This function can
be used in combination with FREEZE. )
,QWURGXFWLRQ
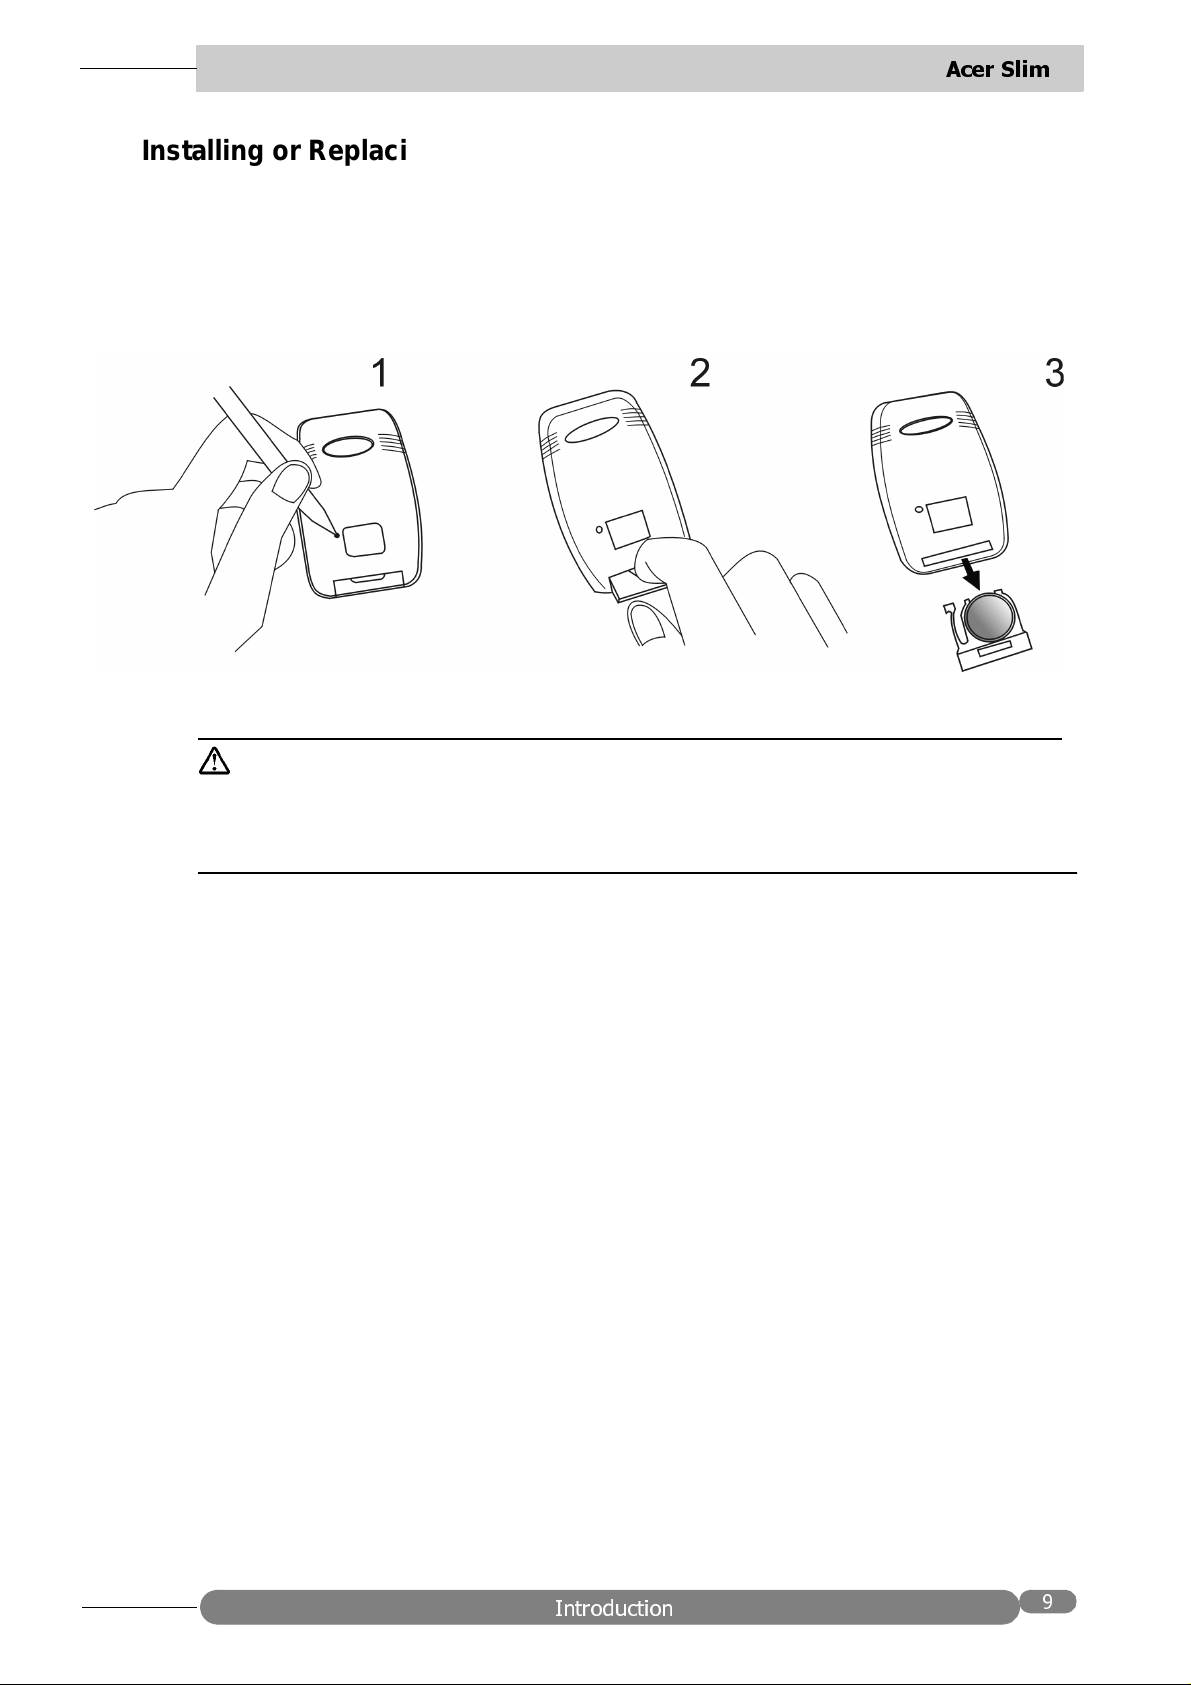
Installing or Replacing Batteries
• Push and slide the battery compartment lid in the direction shown.
• Install CR2025 as indicated by the diagram inside the compartment.
• Position the lid over the compartment and snap it back into place.
$FHU 6OLP
Caution
Avoid excessive heat and humidity. Danger of explosion if battery is incorrec tl y
replaced. Replace only with the same or equi valent typ e recommended by the manufacturer. Dispose of used batteries according to the manufacturer’s instructions.
,QWURGXFWLRQ
$FHU 6OLP
,167$//$7,21
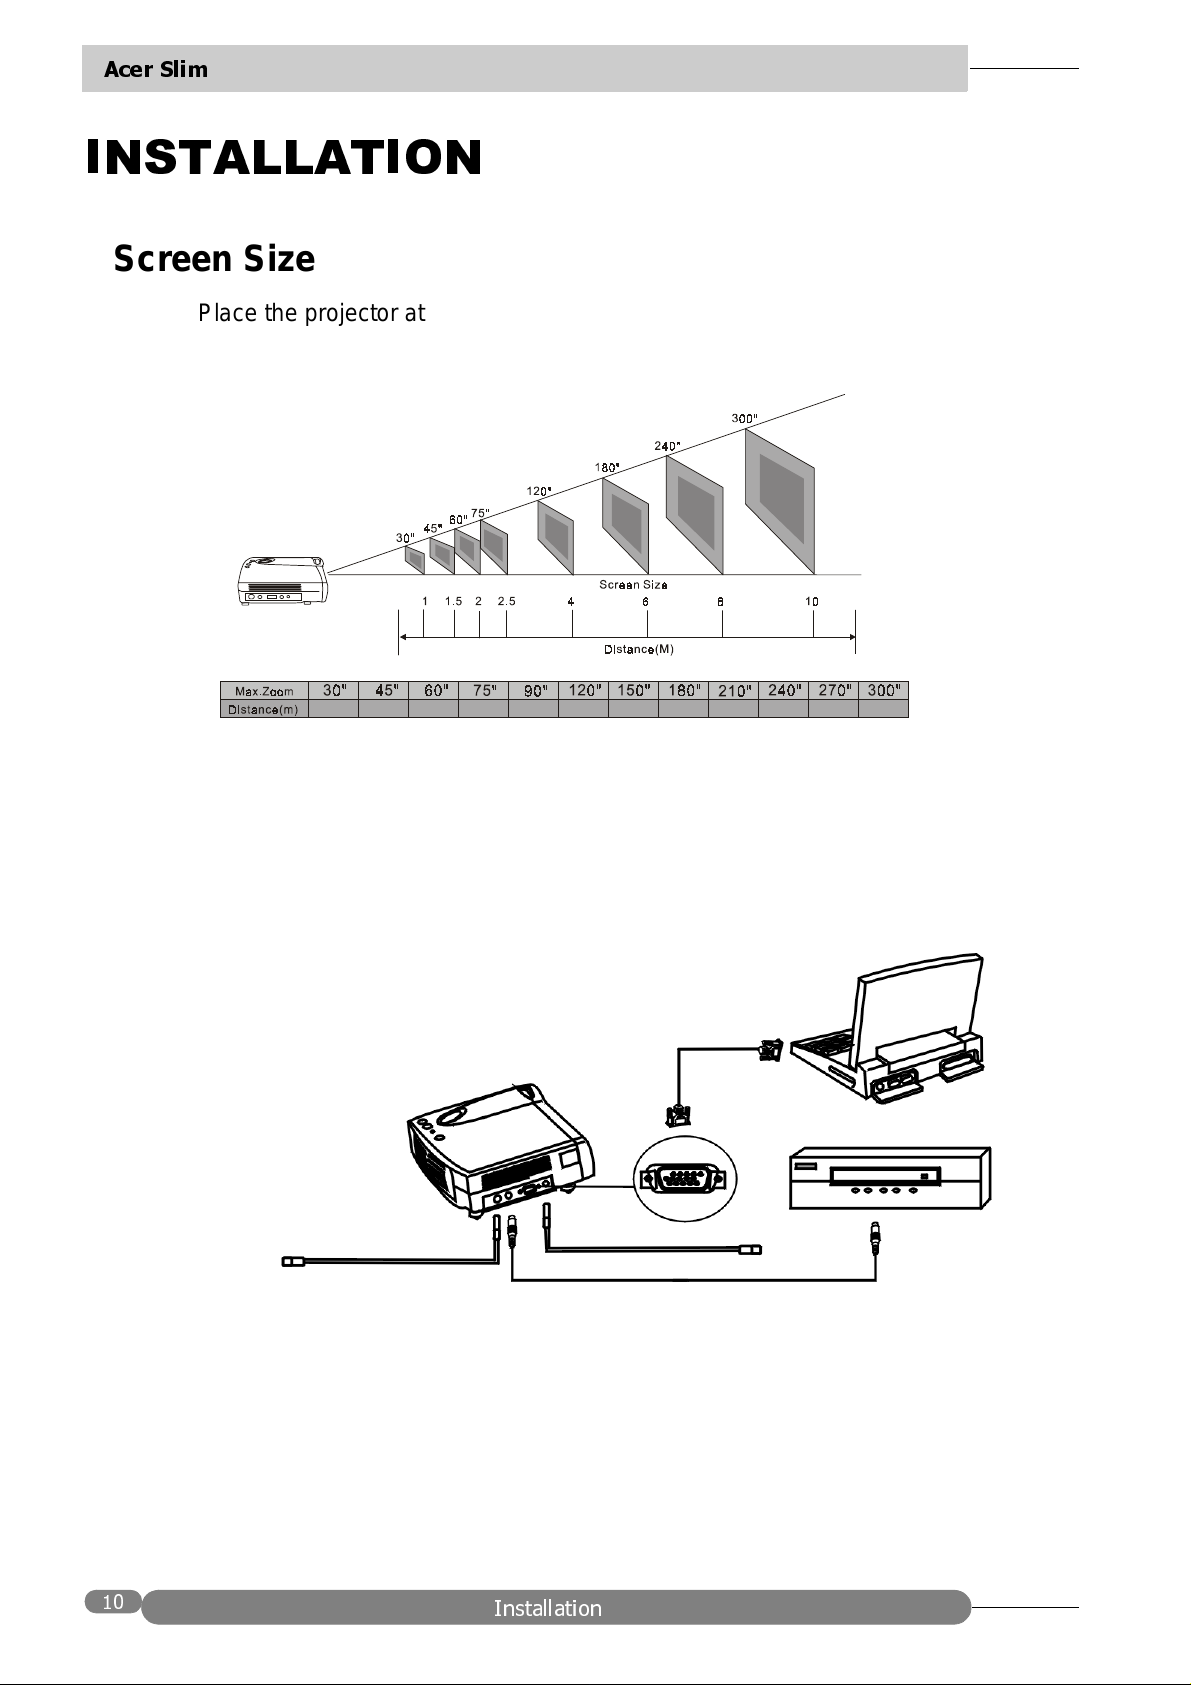
Screen Size
Place the proj ector at the required distance from the scr een according to the
desired picture size (see the table below).
1 1. 5 2
2. 5 3
4 5 6 7 8 9 10
Connecting to Various Equipment
It only takes a few seconds to connect your SL700 Series projector t o your
computer/notebook, VCR or other systems. However, a Mac adapter (an optional
accessory) is needed for connection for Macintosh users.
Computer
S-Video
RCA
VHS
Audio
,QVWDOODWLRQ

23(5$7,21
Start Up
1. Plug the power cord into a wall socket.
2. Press POWER for 1 second.
$FHU 6OLP
• The back-lit POWER key blinks green and stays green when the power is
turned on.
(When the power is turned off, there is a 60-second cooling period before the
projector can be re-started.)
3. Switch on all connected equipment.
2SHUDWLRQ
$FHU 6OLP
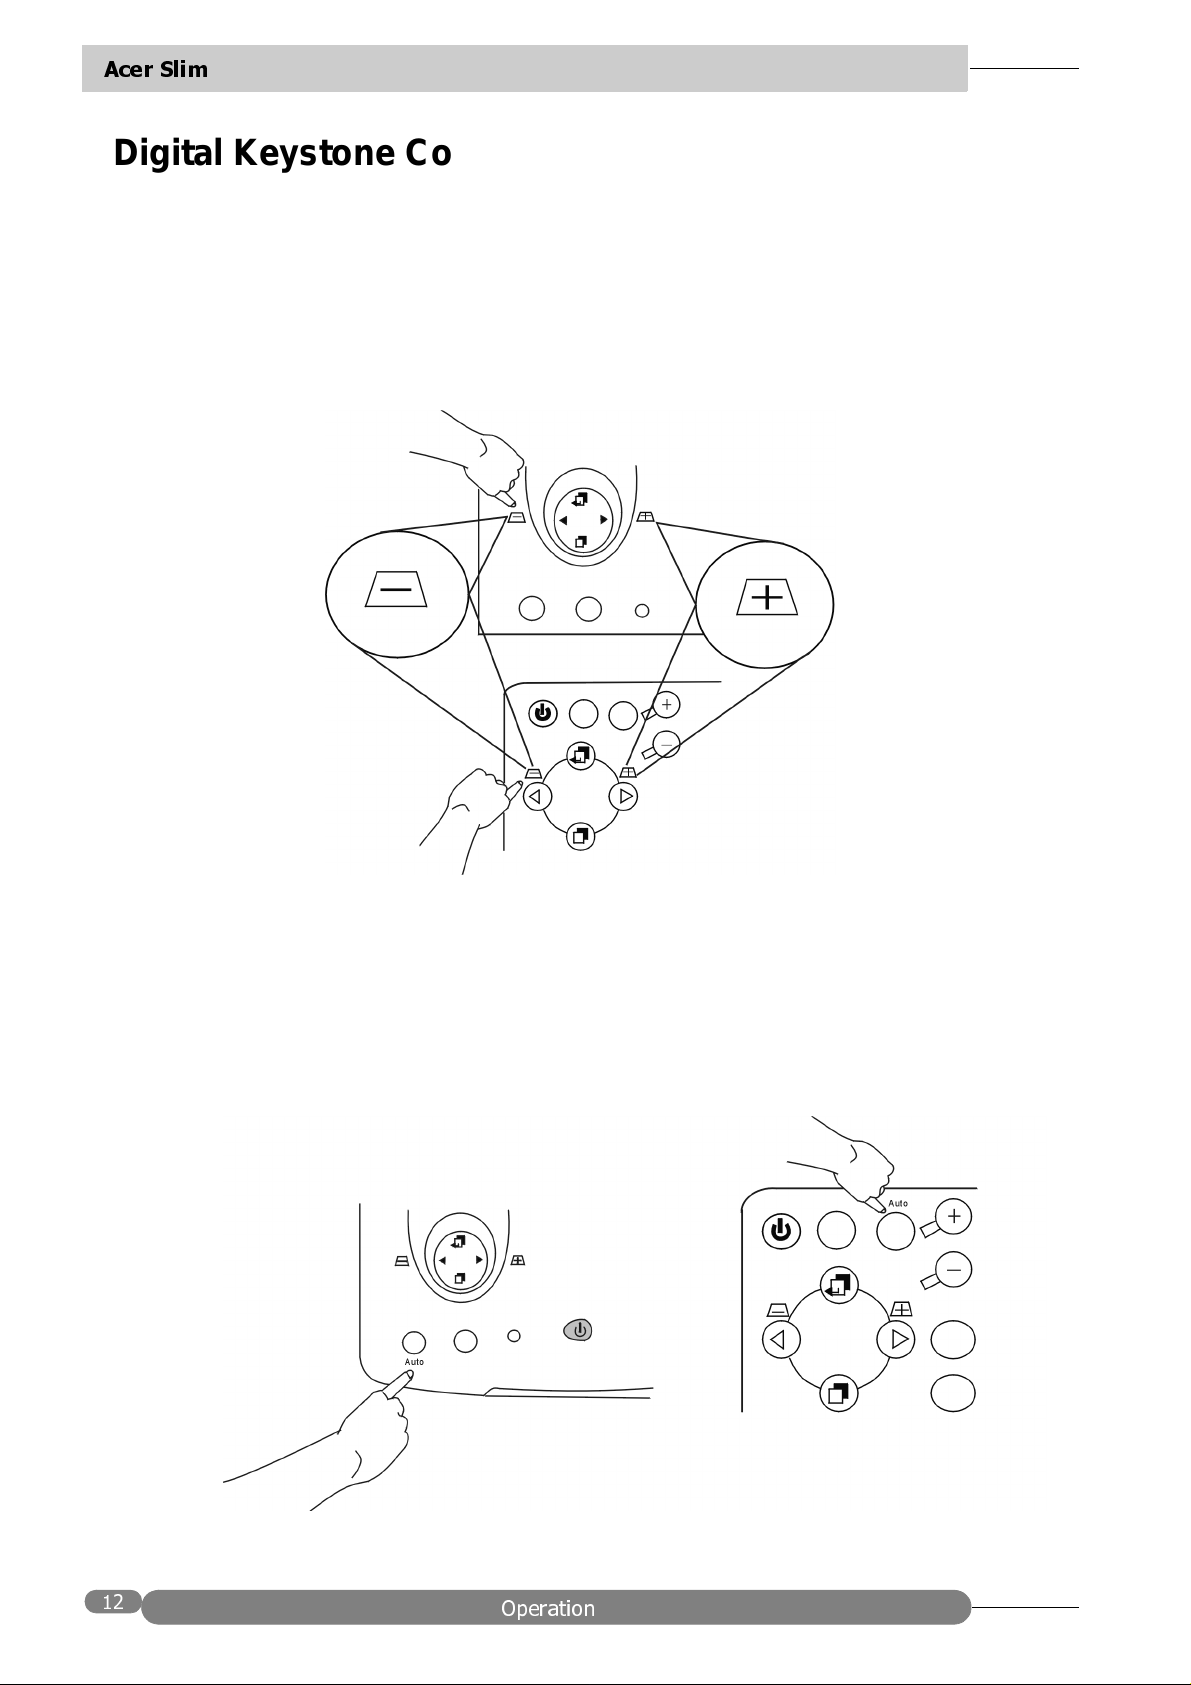
Digital Keystone Correction
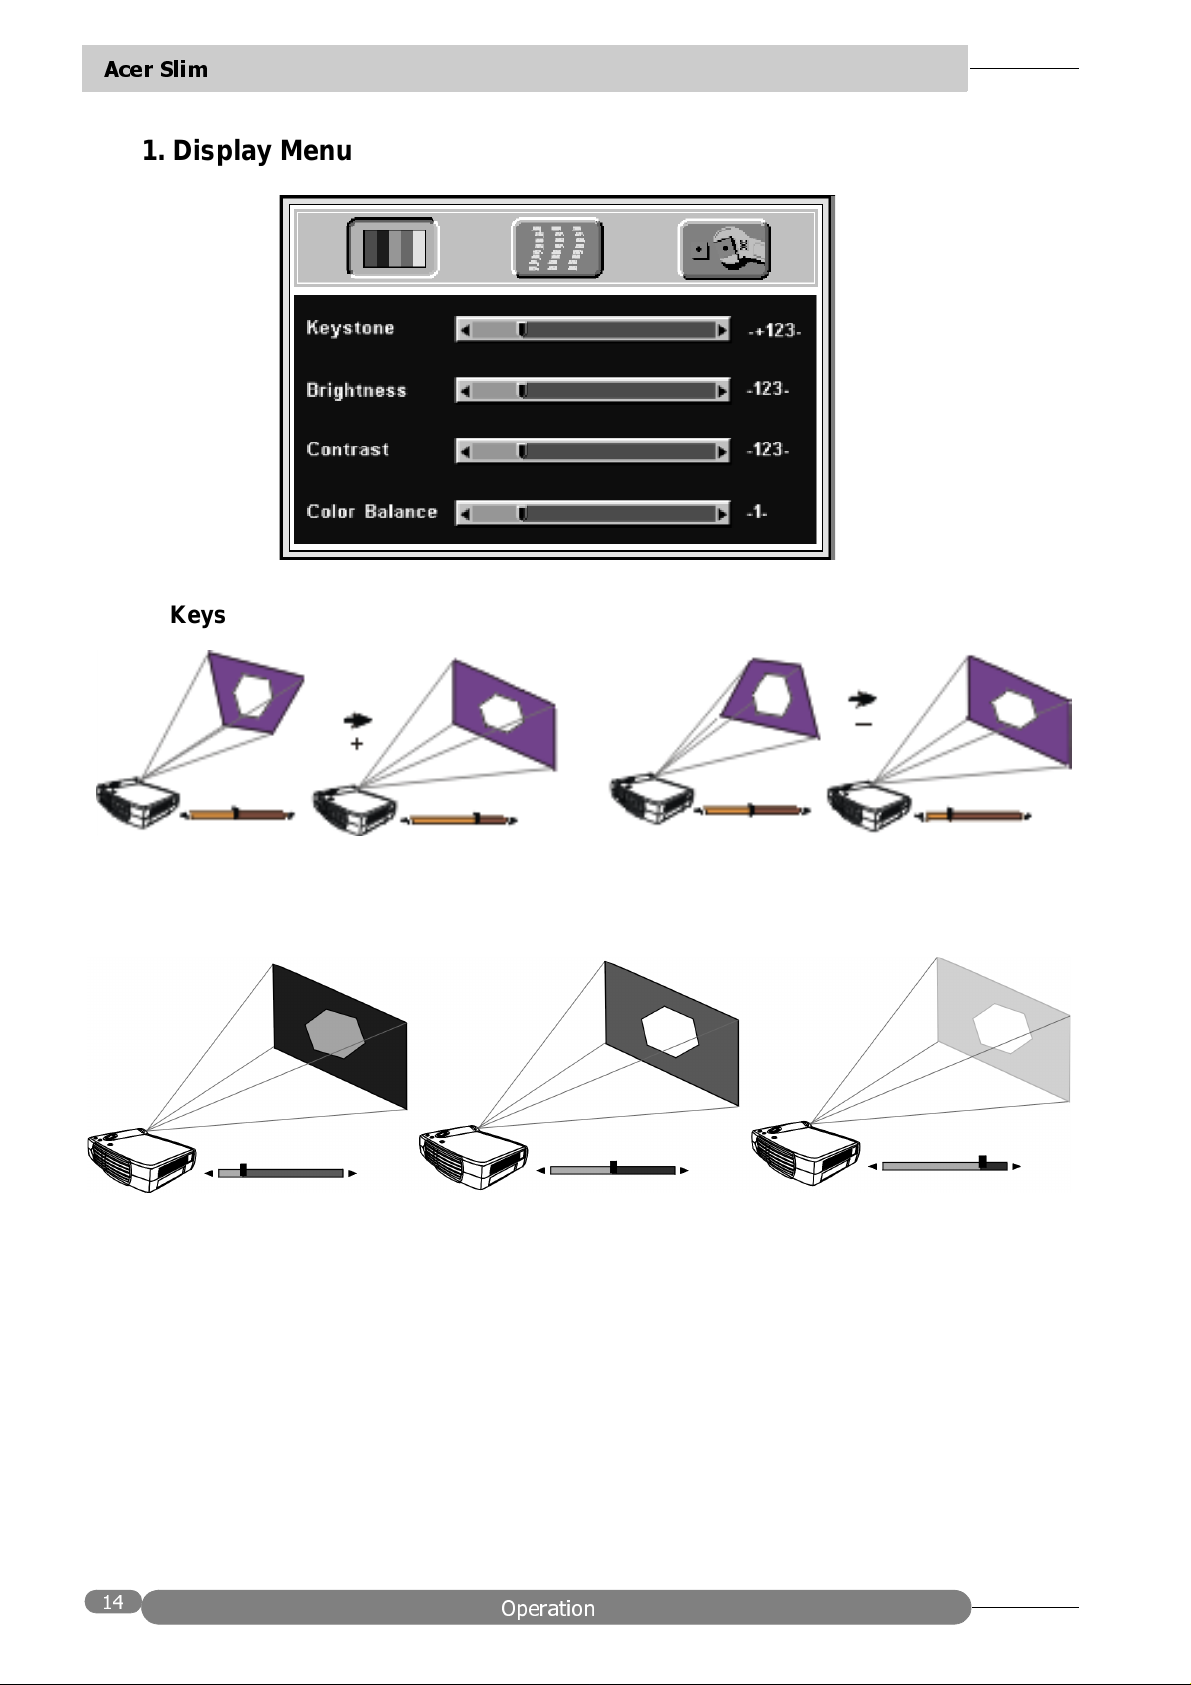
Keystoning is when the projected image is noticeably wider on either the top or
bottom. To correct this, press KEYSTONE +/- (hot key) on the control panel of the
projector or on the remote control, then adjust the sliding bar labeled Keystone, as
needed. Press + to correct keystoning at the top of the image. Press - to correct
keystoning at the bottom of the im age.
Projector
Auto Adjustment
In some cases, you may have to optimize the picture quality manually. To do this,
press the AUTO key on the control panel of the projector or on the remote control.
Within 3 seconds, the built-in Intelligent Auto Adjustment function of the Acer
SL700X/S Series will present you the best picture quality.
Projector
Remote control
Remote control
2SHUDWLRQ
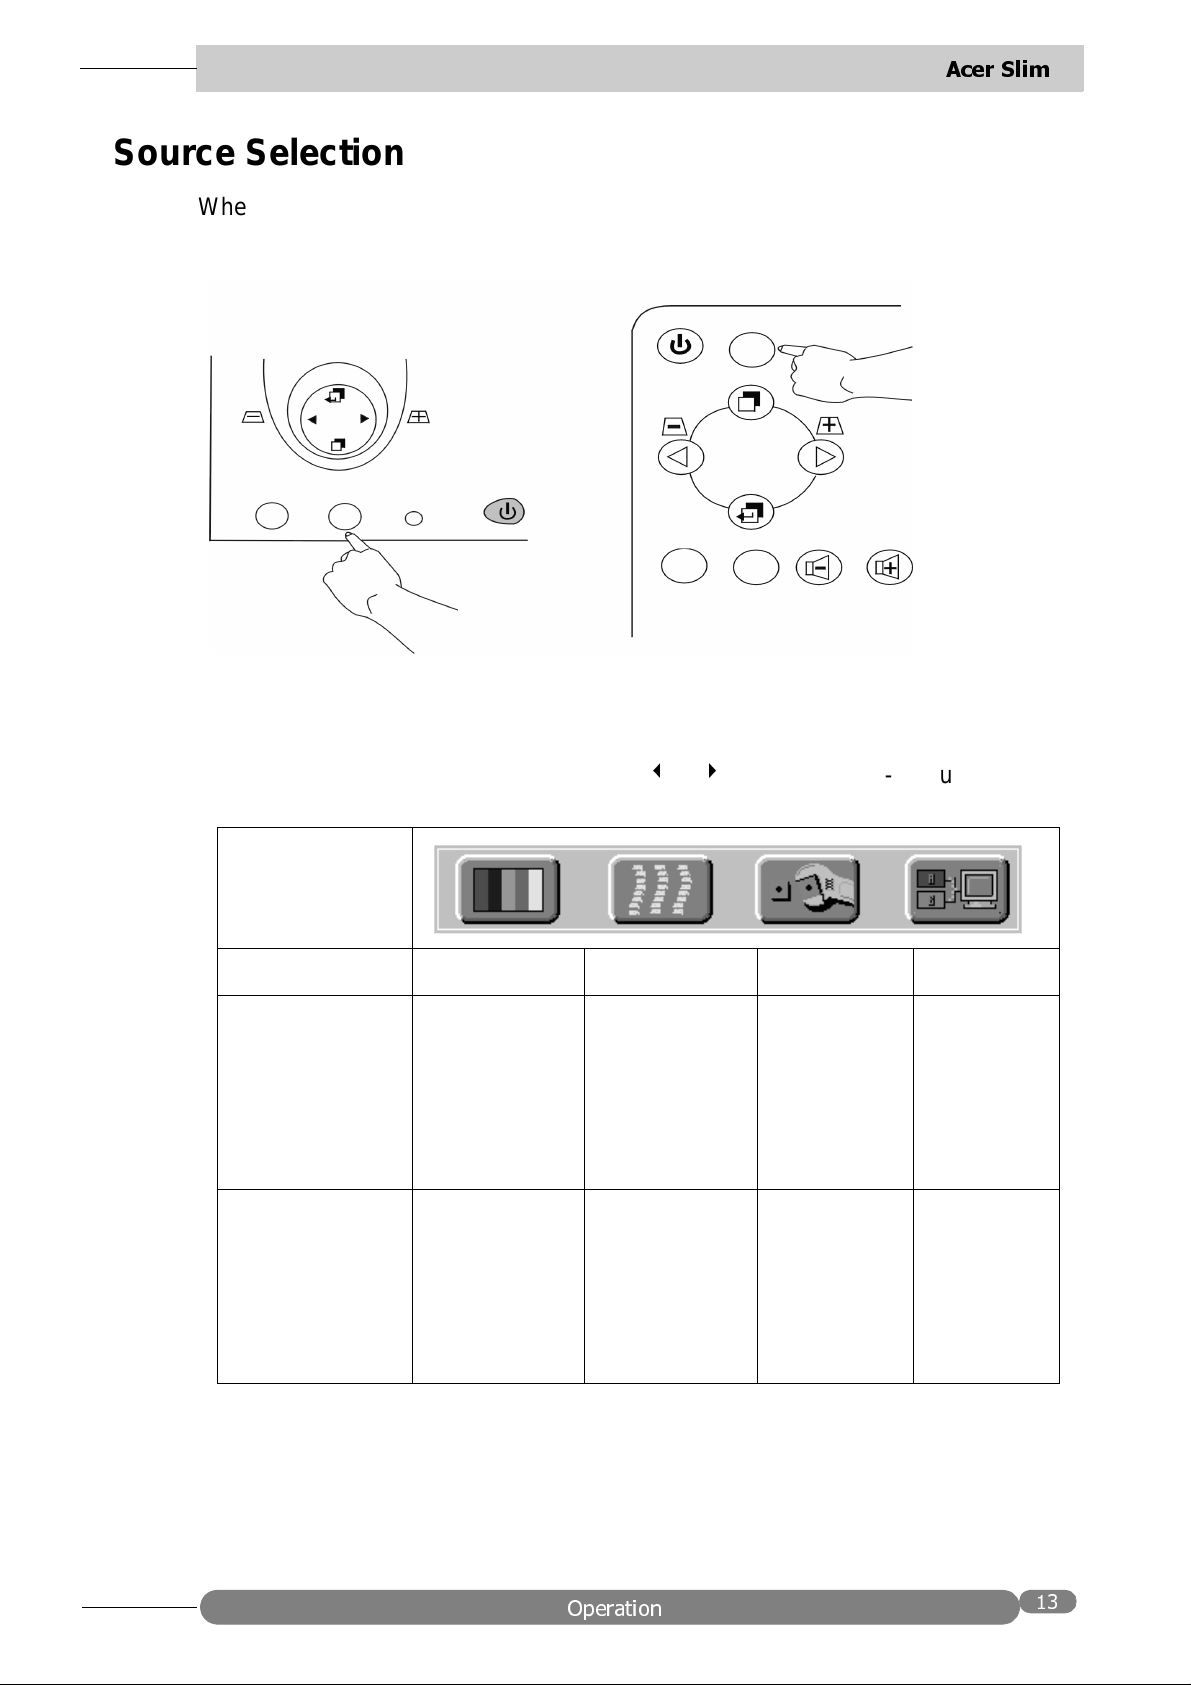
Source Selection
When several input sources are availabl e, press the SOURCE key to make a
selection from th e control panel of the projector or the remote contro l.
Projector
$FHU 6OLP
Remote control
Source
Auto
Source
Menu System
Press
Menu again to select items in the sub-menu.
Menu
for the main menu and press or to select a sub-menu. Press
Menu Bar
Sub-menu Display Image Control Source
PC input
without AV
Input
Keystone
Brightness
Contrast
Blank Mute
Auto resize
Phase
Frequency
Language
Mirror
Auto off
Source
Volume
Tremble
Color
Balance
Video Input Keystone
Brightness
Contrast
Sharpness
H-position
V-position
Image Ratio
System
Color
Tint
2SHUDWLRQ
Reset
Language
Mirror
Auto off
Reset
Bass
Mute
Source
Volume
Tremble
Bass
Mute
$FHU 6OLP
1. Display Menu
Keystone
Brightness
2SHUDWLRQ

Contrast
Color Balance
$FHU 6OLP
2. Image Menu
Auto resize
Press On and the Auto Resize function will automatica lly adjust the image to fit on
the screen.
2SHUDWLRQ

$FHU 6OLP
Phase
(Auto Resize OFF)
Frequency
(Auto Resize OFF)
H-position
V-position
2SHUDWLRQ

3. Sub-menu image with AV Input
This menu is only available when the input signal is from Video or S-Video.
Image Ratio
4:3 (Normal) 16:9 (Video)
$FHU 6OLP
System
Auto PAL-M PAL-N SECAM
Color
Less More
Tint
Red Green
2SHUDWLRQ

$FHU 6OLP
4. Control Menu
Language
English (En), French (Fr), German (De), Italian (It), Spanish (Es), Portuguese (Po),
Traditional Chinese (TC)
Mirror
Normal V-Inv (Vertically Inverted), H-Inv (Horizontally Inverted), H/V-Inv
(Horizontally and Vertically Inverted) will invert the image for proper display
according to the desired projector position.
2SHUDWLRQ

$FHU 6OLP
1. Default
3. Rear-screen projection
2. Ceiling-mounted projection
4. Ceiling-mounted and Rear screen
projection
Auto off
This will turn off the power after 60 minutes.
Reset
This will restore the projector to its factory default settings.
2SHUDWLRQ

$FHU 6OLP
5. Source Menu
Source
PC
Volume Treble
Bass Mute
Video
Off On
S-Video
2SHUDWLRQ

Shutdown
1. Press POWER and the lamp will shut down.
2. The fan will continue to run for approximately 60 seconds.
$FHU 6OLP
Projector Remote control
3. Disconnect the power cord from the wall socket.
Caution
Please do not unplug the power cord before POWER is shut down or during the
cooling process for 60 seconds.
2SHUDWLRQ

$FHU 6OLP
0$,17(1$1&(
Lamp Information
Use and Replacement of Lamp
The projector lamp lifetime normally is approximately 1200 to 1500 hours. During
the normal lamp life, pictures and colors are projected brightly and crisply. Past the
normal lamp life, colors and pictures may look faint.
An old lamp could cause a malfunction to the projector and may explode. When the
Lamp Indicator lights up red or a message displays to suggest the time of lamp
replacement, please change a new lamp or consult your dealer.
LED Status Indicators
Lamp Life Indicators
CHANGE THE LAMP, AND RESET
THE LAMP TIMER
CHANGE THE LAMP. THE POWER
WILL TURN OFF AFTER 20
HOURS
CHANGE THE LAMP!
Lamp is not properly attached
Temperature is too high
When this LED shows red con tinuously, it is
warning you th at the la mp li fe ha s excee ded
1500
hours. Replace the projection lamp
with a new one immedia tely.
The lamp has been in operation for 1200
hours. Change a new lamp for optimal
performance.
The lamp has been in operation for 1479
hours, and the power will turn off after 20
hours.
The lamp has been in operation for over
1500 hours, and the power will turn off
automatically in 10 minutes.
All of these messages will not display for
more than 3 minutes, but each message wil l
be displayed whenever you turn on the
projector.
LED blinks rapidly.
When the projector’s internal temperature is
too hot to operate safely, the LED blinks
slowly for one minute and the lamp turns off
automatically.
If the LED light is off, the projector’s lamp
and temperature are operating under
normal conditions.
Caution
The LAMP indicator will light if th e lamp becomes t oo hot. Turn off the power and let
the projector cool for 45 minutes. If the LAMP indicator is still red when turning the
power on, please contact your dealer.
0DLQWHQDQFH

Lamp Replacement
Caution
To reduce the risk of electrical shock, always turn off the projector and disconnect
the power cord before changing the lamp.
$FHU 6OLP
1. Press the
POWER
button to switch off the projector and disconnect the power
cord from the outlet.
2. Loosen the screw and remove the lamp cover. If the lamp is hot, avoid burns by
waiting 45 minutes until the lamp has cooled.
3. Loosen the 3 screws indicated by the arrows above. (It is strongly
recommended you use a magnetic-headed screwdriver, if possible. Pull the
handle to remove the lamp housing. If the screws ar e not loosened completely,
they could injure your fingers. Do not insert your hand into the box after the
lamp is removed. If you touch the optical parts inside, this could cause color
unevenness, etc.
4. Replace the lamp with the new one. Insert it in the projector, and tighten the
screws firmly . Loose screws may ca use a bad conne ction, which may result in a
malfunction.
5. Re-install th e lamp cov er and tighte n the screw.
the lamp cover removed.
Whenever the lamp is replaced, reset the tota l lamp
Do not turn on the power with
operation time. Do not reset if the lamp is not replaced as this could cause
breakage.
0DLQWHQDQFH

$FHU 6OLP
Caution
T o red uce the risk of severe burns, allow the pr ojector to cool for at least 45 minutes
before replacing the lamp.
To reduce the risk of injuries to fingers and damage to internal components, use
caution when removing lamp glass that has shattered into sharp pieces.
To reduce the risk of injuri es to fin gers and/or de creasi ng image quali ty by t ouching
the lens, do not touch the empty lamp compartment when the lamp is removed.
This lamp contains mercury. Consult your local hazardous waste regulations to dispose of this lamp in a proper manner.
Resetting Lamp Hours
If you replace the lamp after 1500 hours of operation, please proceed as follows
within 10 minutes of powering on.
OSD FUNCTION
Press the Exit button on the projector
for 3 seconds to display the total used
lamp time.
Press the MENU button on the
projector during the lamp hour
message. An adju stm ent m e ssage w ill
appear.
• Press W or X to select the setting.
To select the default setting, select
“Reset” (or “Cancel” to return to the
default setting).
• Press EXIT to leave.
0DLQWHQDQFH

Service Information
Accessories (Included in standard package)
Description Part Number
Power cord (EU) . . . . . . . . . . . . . . . . . . . . . . . . . . . . . . . . . . . . .27.01218.191
Power cord (US) . . . . . . . . . . . . . . . . . . . . . . . . . . . . . . . . . . . . .27.01118.131
Power cord (UK) . . . . . . . . . . . . . . . . . . . . . . . . . . . . . . . . . . . . .27.02718.201
Signal cable . . . . . . . . . . . . . . . . . . . . . . . . . . . . . . . . . . . . . . . .50.J0508.502
RCA cable . . . . . . . . . . . . . . . . . . . . . . . . . . . . . . . . . . . . . . . . . .50.J1303.501
S-Video cable . . . . . . . . . . . . . . . . . . . . . . . . . . . . . . . . . . . . . . .50.72920.011
PC - PC Audio cable . . . . . . . . . . . . . . . . . . . . . . . . . . . . . . . . . .50.T4405.501
Audio - PC Audio cable . . . . . . . . . . . . . . . . . . . . . . . . . . . . . . . .50.J0705.501
Soft carrying case . . . . . . . . . . . . . . . . . . . . . . . . . . . . . . . . . . . .98.J1302.001
$FHU 6OLP
Lens cover . . . . . . . . . . . . . . . . . . . . . . . . . . . . . . . . . . . . . . . . .42.J1345.001
Remote control. . . . . . . . . . . . . . . . . . . . . . . . . . . . . . . . . . . . . . .98.J1301.001
3-2 converter . . . . . . . . . . . . . . . . . . . . . . . . . . . . . . . . . . . . . . . .22.91007.001
Skin case . . . . . . . . . . . . . . . . . . . . . . . . . . . . . . . . . . . . . . . . . .98.J1904.001
Description of Part Number (Not Included in Standard Packet)
Description of parts Part number
Deluxe carry case (for projector and notebook) . . . . . . . . . . . . . .90.J0528.006
Mac Adapter (switchable) . . . . . . . . . . . . . . . . . . . . . . . . . . . . . .20.20118.A15
120W Lamp module . . . . . . . . . . . . . . . . . . . . . . . . . . . . . . . . . . 60.J1322.001
Ordering Parts o r Getting Information
For product informat io n, pr od uct assi sta nce, servi ce in for m at io n, or to orde r
accessories, please contact A cer Communications & Multimedia Inc. at http://
www.acerCM.com.
0DLQWHQDQFH

$FHU 6OLP
7528%/(6+227,1*
Common Problems & Solutions
PROBLEMS TRY THESE SOLUTIONS
NO POWER
NO PICTURE
TRAPEZOID IMAGE ON
THE SCREEN
POOR COLOR
BLURRED IMAGE
• Plug the power cord into the AC inlet.
• Plug the power cord into the power inlet.
• Wait two minutes after the projector is turned off before
turning the projector back on.
• Check for the proper input source.
• Ensure all cables are connected properly.
• Adjust the brightness and contrast.
• Remove the lens c ap.
• Reposition the unit to improve its angle on the screen.
• Use the
the projector or the remote con trol unit.
• Select the correct video system.
• Adjust brightness, contrast, or saturation.
• Press
remote control unit to get better picture quality.
Keystone
Auto
on the control panel of the projector or the
correction key on the con trol p anel of
REMOTE CONTROL
DOES NOT WORK
• Adjust the focus.
• Reposition the unit to improve its screen angle.
• Ensure the distance between the unit and screen is
within the adjustment range of the lens.
• Replace the battery with a new one.
• Make sure there is no obstacle between the remote
control and the unit.
• Stand within 4 meters (13 feet) of the unit.
• Make sure nothing blocks the receiver on the control
pad.
7URXEOHVKRRWLQJ

Status Messages
On Screen Messages Description
$FHU 6OLP
SEARCHING
INPUT SIGNAL DETECTED,
ACTIVATING AUTO IMAGE
SYNC IS OUT OF RANGE
CHANGE THE LAMP, AND
RESET THE LAMP TIMER
CHANGE THE LAMP, THE
POWER WILL TURN OFF
AFTER 20 HOURS
CHANGE THE LAMP!
Projector is searching for input.
Projector has identified the input signal and is
running the auto image adjustment function.
Input signal’s frequency exceeds the projector’s.
The lamp has been in operation for 1200 hour s.
Lamp replacement is recom m en ded .
The lamp has been in operation for 1479 hour s, and
the power will turn off after 20 more hours. Replace
the lamp as soon as possible.
The lamp has bee n in o per a t ion for over 1500 ho urs,
and the power will turn off automatically in 10
minutes. Replace the lamp immediately.
7URXEOHVKRRWLQJ

$FHU 6OLP
63(&,),&$7,216
Projector Specifications
Technical Specifications
Note: All specifications are subject to change without notice.
General
Product name Personal Projector
Model name SL700X (X-XGA) 1024X768 dpi XGA
SL700S (S-SVGA) 800X600 dpi SVGA
Optical
Display system 1-CHIP DMD
Lens F/Number F/2.6 Focal Length: F = 36 mm
Lamp 120W VIP lamp
Electrical
Power supply AC90 ~ 240V, 6.5A ~ 2.9A, 50/60 Hz (Automatic)
Power consumption 200 W (Max)
Mechanical
Dimensions 229 mm (W) x 53 mm (H) x 178 mm (D)
Operating
temperature range 0°C ~ 40°C
Weight 3 lbs
Input terminal
Computer Input
RGB input D-sub 15-pin (female)
Video Signal Input
S VIDEO Mini DIN 4-pin terminal
VIDEO RCA Jack terminal
Audio Signal Input
Mini Jack Mono Audio Terminal
Output
1 Watt speaker x 1
6SHFLILFDWLRQV

Timing Chart
Resolution H Sync (kHz) V Sync (kHz) Remark
640x350 31.5 70.1
640x400 37.9 85.1 VESA
720x400 31.5 70.0
720x400 37.9 85.1 VESA
640x480 31.5 60.0 VESA
640x480 37.9 72.8 VESA
640x480 35 66.7 Macintosh
640x480 43.3 85.0 VESA
$FHU 6OLP
800x600 35.2 56.3 VESA
800x600 37.9 60.3 VESA
800x600 46.9 75.0 VESA
800x600 48.1 72.2 VESA
800x600 53.7 85.1 VESA
832x624 49.7 74.5 Macintosh
1024x768 48.4 60.0 VESA
1024x768 56.5 70.1 VESA
1024x768 60.0 75.0 VESA
1024x768 68.7 85.0 VESA
1280x1024 64.0 60.0 VESA
6SHFLILFDWLRQV

$FHU 6OLP
',0(16,216
'LPHQVLRQV
 Loading...