

Page 1

SH940
Digital Projector
User Manual
Page 2

Table of contents
English
Important safety
instructions............................3
Overview................................6
Shipping contents...................................... 6
Remote control batteries....................... 7
Remote control operation..................... 7
Projector features .................................... 8
Projector exterior view.......................... 9
Controls and functions..........................10
Control panel ............................................... 10
Remote control............................................ 11
Positioning your projector.12
Choosing a location ...............................12
Obtaining a preferred projected image
size .............................................................13
Projection dimensions ................................ 14
Shifting the projection lens ........................ 16
Connecting with video
equipment ...........................17
Preparations.................................................. 17
Connecting HDMI devices......................... 17
Connecting component-video/RGB
devices............................................................ 18
Connecting video devices..........................18
Connecting a computer .............................19
Connecting a monitor ................................19
Using the projector ............20
Using the preset and user modes ...... 27
Fine-tuning the picture quality ............ 29
Advanced picture quality controls ..... 30
Selecting the aspect ratio..................... 33
Hiding the image..................................... 35
Freezing the image................................. 35
Adjusting the sound............................... 36
Controlling the projector through a Lan
environment............................................ 37
Operating in a high altitude
environment............................................ 39
Displaying more than one image source
simultaneously ........................................ 40
Turning the projector off..................... 41
On-Screen Display (OSD) menus...... 42
Additional information ...... 51
Care of the projector ........................... 51
Lamp information................................... 52
Getting to know the lamp hour ................52
Extending lamp life .......................................52
Timing of replacing the lamp .....................53
Replacing the lamp .......................................53
Indicators ................................................. 56
Troubleshooting..................................... 57
Specifications........................................... 58
Warranty and Copyright
information ......................... 62
Turning the projector on .....................20
Selecting an input source......................21
Using the menus .....................................22
Securing the projector ..........................22
Using a security cable lock ........................ 22
Utilizing the password function................ 23
Adjusting the projected image.............25
Adjusting the projection angle .................25
Auto-adjusting the image ........................... 25
Fine-tuning the image size and clarity ..... 25
Correcting picture distortion...................26
2 Table of contents
Page 3
Thank you for your purchase of this quality BenQ projector! It has been designed to provide you with an
4920-
9840
feet
enjoyable home theater viewing experience. For the best results, please read this manual through
carefully as it is your guide through the control menus and operation.
Important safety instructions
Your projector is designed and tested to meet the latest standards for safety of information technology
equipment. However, to ensure safe use of this product, it is important that you follow the instructions
mentioned in this manual and marked on the product.
English
1. Please read this user manual before you operate your
projector. Keep this manual in a safe place for future
reference.
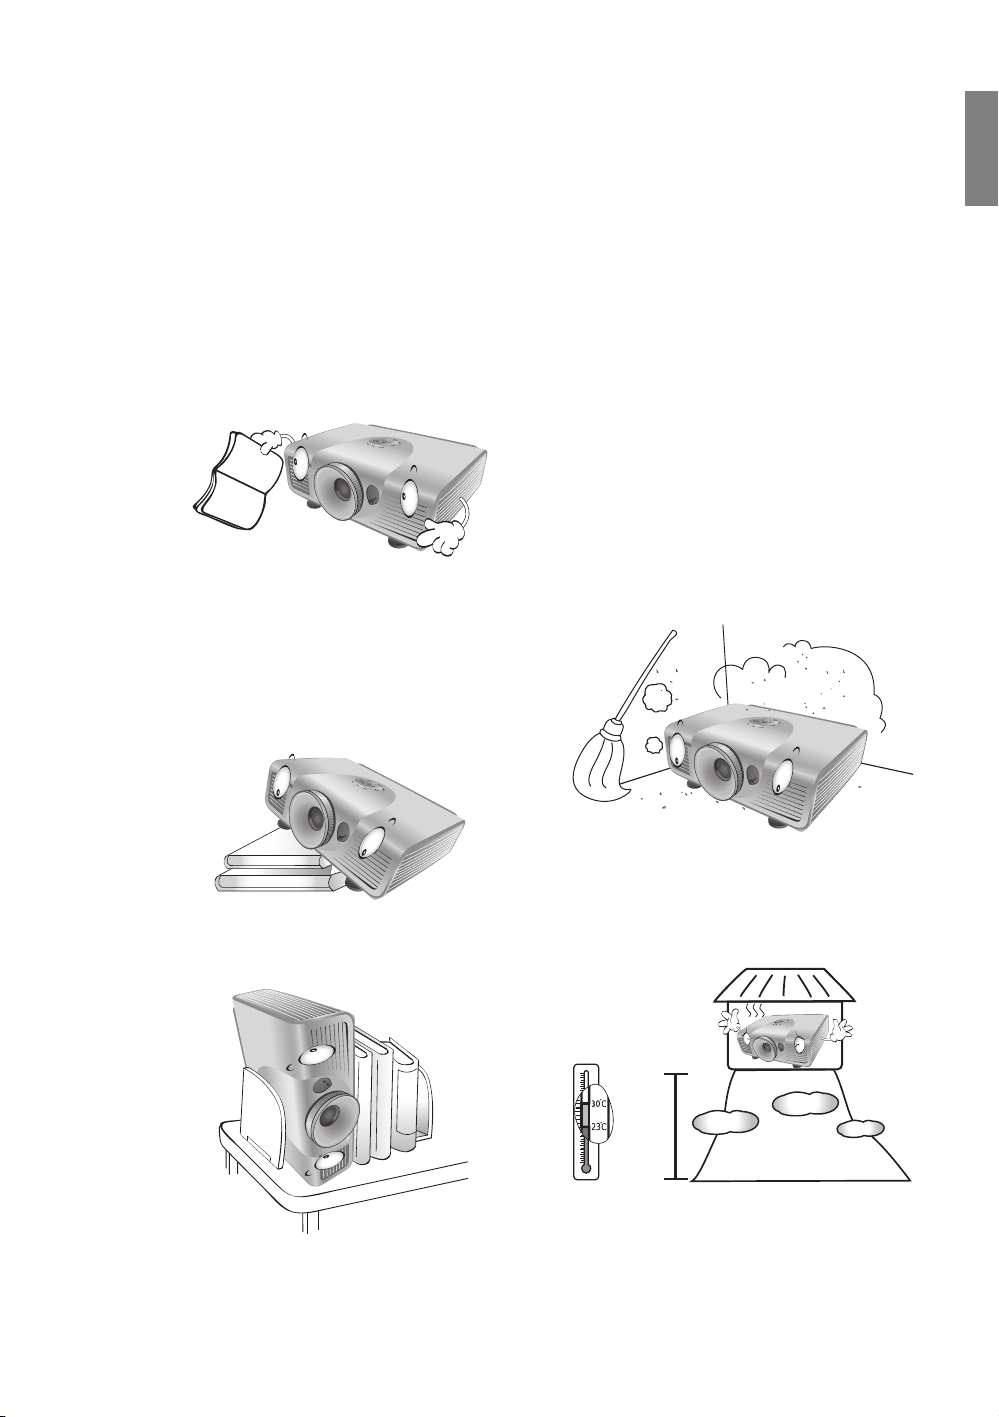
2. Always place the projector on a level, horizontal
surface during operation.
- Do not place the projector on an unstable cart,
stand, or table as it may fall and be damaged;
- Do not place inflammables near the projector;
- Do not use if tilted at an angle of more than 10
degrees left to right, nor at angle of more than 15
degrees front to back.
3. Do not store the projector on end vertically. Doing so
may cause the projector to fall over, causing injury or
resulting in damage.
4. Do not place the projector in any of the
following environments:
- space that is poorly ventilated or confined.
Allow at least 50 cm clearance from walls
and free flow of air around the projector;
- locations where temperatures may become
excessively high, such as the inside of a car
with all windows closed;
- locations where excessive humidity, dust,
or cigarette smoke may contaminate optical
components, shorten the projector’s
lifespan and darken the screen;
- locations near fire alarms;
- locations with an ambient temperature
above 35°C/95°F;
- locations where altitude is higher than 1500
meters/4920 feet above sea level.
Important safety instructions
3
Page 4

English
5. Do not block the vents holes while the projector
is on (even in standby mode):
- Do not cover the projector with any item;
- Do not place the projector on a blanket,
bedding or any other soft surface.
9. Do not look straight into the projector lens
during operation. It may harm your sight.
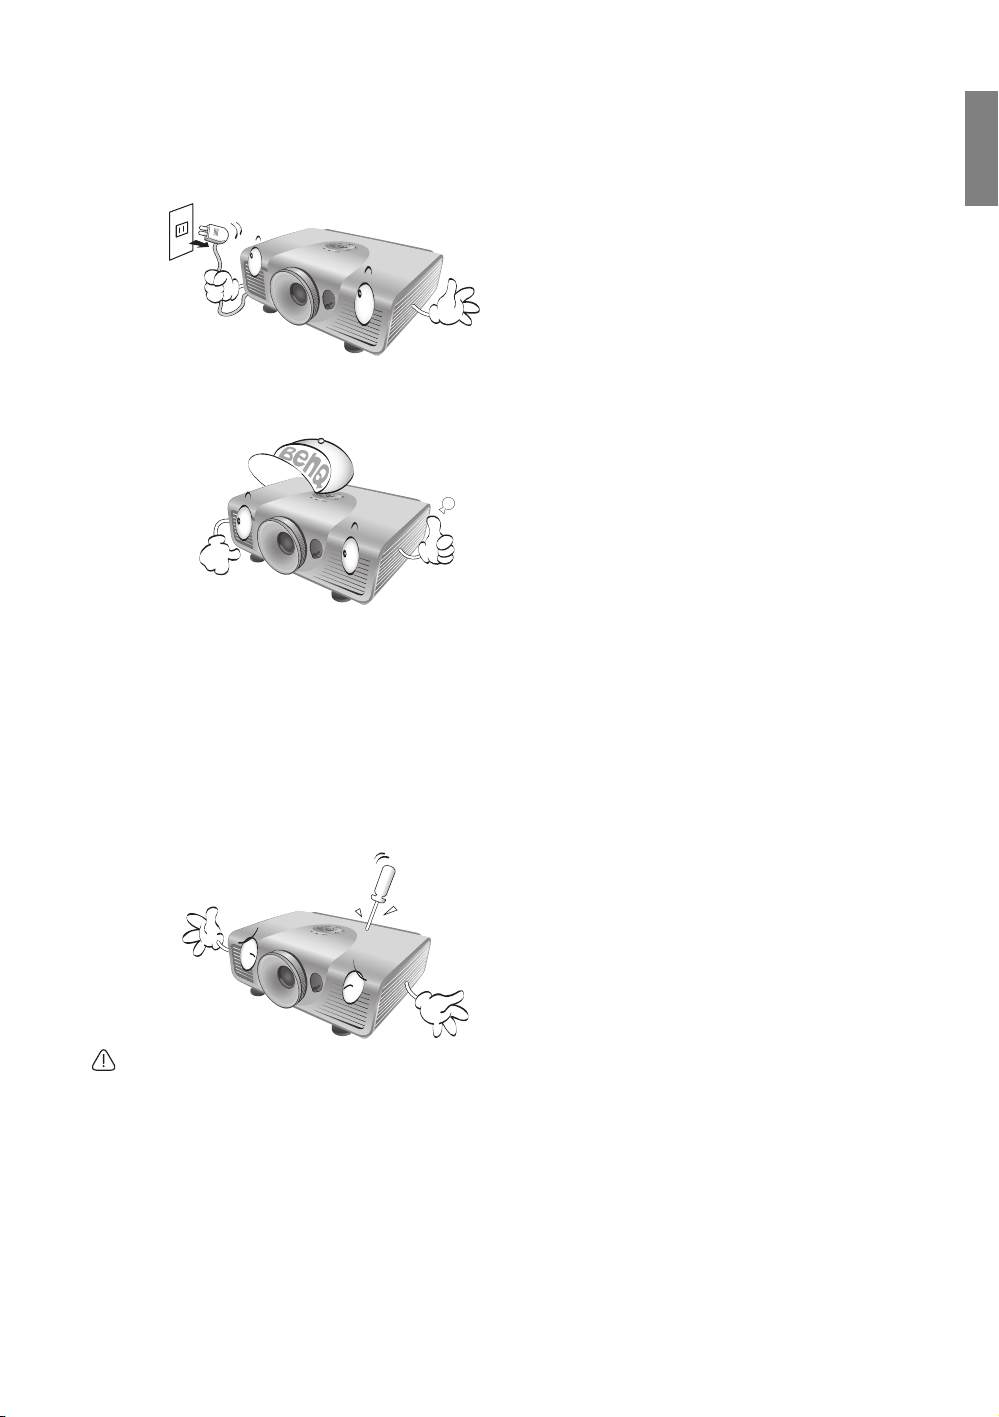
6. In areas where the mains power supply voltage
may fluctuate by ±10 volts, it is recommended
that you connect your projector through a power
stabilizer, surge protector or uninterruptible
power supply (UPS) as appropriate to your
situation.
7. Do not step on the projector or place any objects
upon it.
8. Do not place liquids near or on the projector.
Liquids spilled into the projector will void your
warranty. If the projector does become wet,
disconnect it from the power point and call BenQ
to have the projector repaired.
10. Do not operate the projector lamp beyond the
rated lamp life. Excessive operation of lamps
beyond the rated life could cause a lamp to break
on rare occasions.
11. The lamp becomes extremely hot during
operation. Allow the projector to cool for
approximately 45 minutes prior to removing the
lamp assembly for replacement.
12. This projector is capable of displaying inverted
images for ceiling mount installation. Use only
BenQ's Ceiling Mount Kit for mounting.
4
Important safety instructions
Page 5
13. Never attempt to replace the lamp assembly until
the projector has cooled down and is unplugged
from the power supply.
English
Moisture condensation
Never operate the projector immediately after
moving it from a cold location to a hot location.
When the projector is exposed to such a change
in temperature, moisture may condense on the
crucial internal parts. To prevent the projector
from possible damage, do not use the projector
for at least 2 hours when there is a sudden change
in temperature.
14. When you think service or repair is required,
take the projector only to a suitably qualified
technician.
15. Do not attempt to disassemble this projector.
There are dangerous high voltages inside which
may cause death if you should come into contact
with live parts. The only user serviceable part is
the lamp which has its own removable cover. See
page 53.
Under no circumstances should you ever
undo or remove any other covers. Refer
servicing only to suitably qualified
professional service personnel.
Avoid volatile liquids
Do not use volatile liquids, such as insecticide or
certain types of cleaner, near the projector. Do
not have rubber or plastic products touching the
projector for a long time. They will leave marks on
the finish. If cleaning with a chemically treated
cloth, be sure to follow the cleaning product’s
safety instructions.
Disposal
This product contains the following materials
which are harmful to human bodies and
environment.
• Lead, which is contained in solder.
• Mercury, which is used in the lamp.
To dispose of the product or used lamps, consult
your local environment authorities for regulations.
Notice
Please keep the original packing for possible future
shipment. If you need to pack your projector after
use, adjust the projection lens to an appropriate
position, put the lens cushion around the lens, and
fit the lens cushion and projector cushion together
to prevent damage during transportation.
Important safety instructions
5
Page 6
English
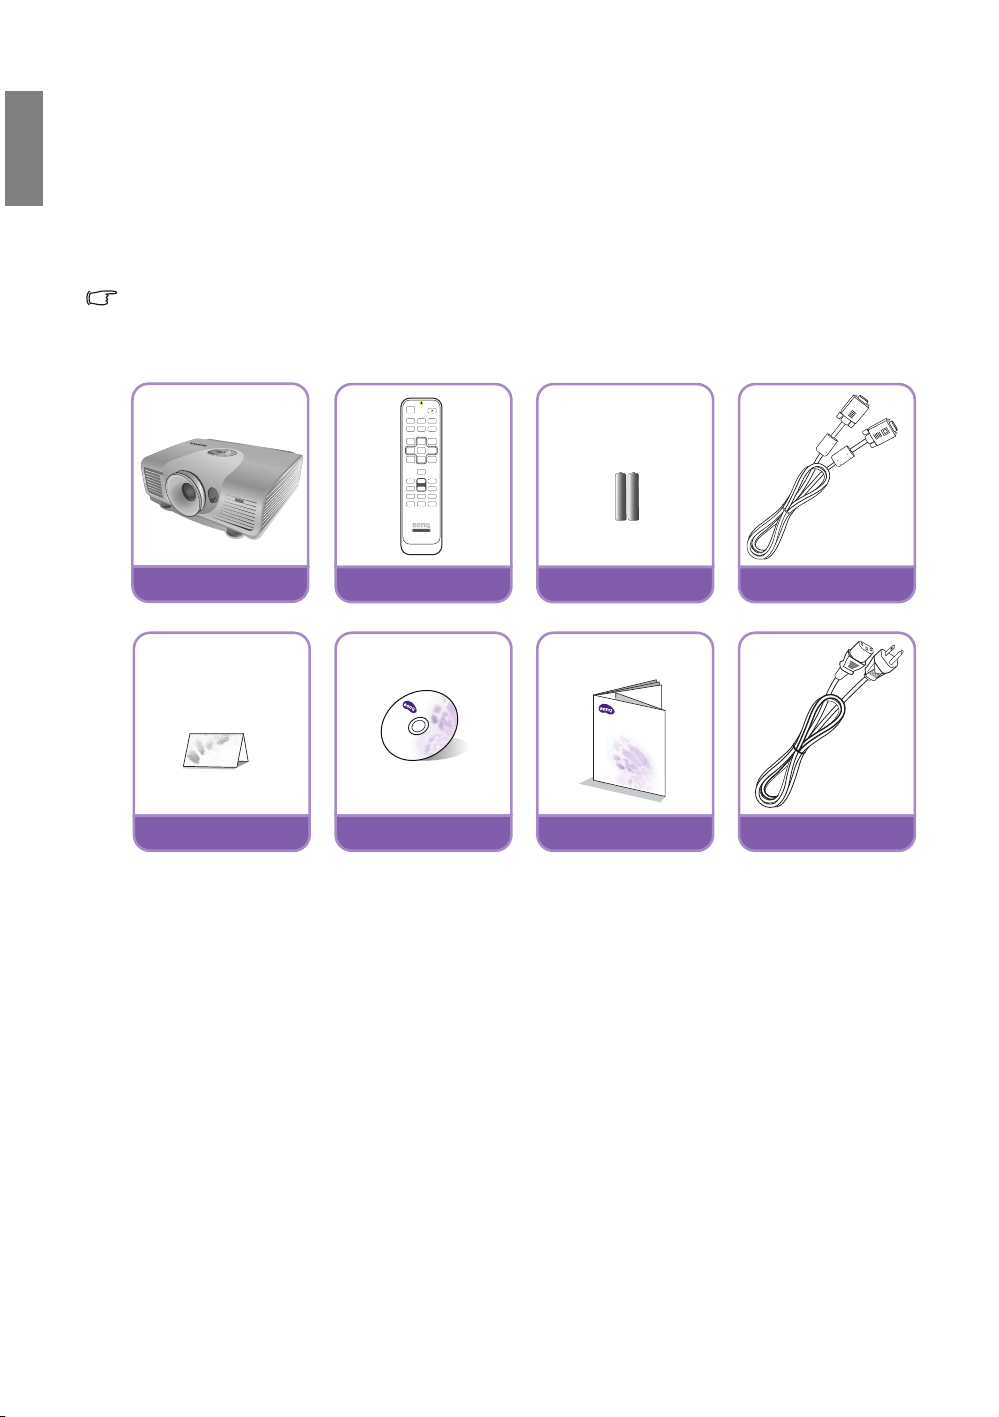
Projector
Remote control
Batteries
VGA c ab le
Warranty card
User manual CD
Digital Projector
Quick Start Guide
Quick start guide
Power cable
Overview
Shipping contents
Carefully unpack and verify that you have the items below. Some of the items may not be available
depending on your region of purchase. Please check with your place of purchase.
Some of the accessories may vary from region to region.
The warranty card is only supplied in some specific regions. Please consult your dealer for detailed
information.
6
Overview
Page 7

Remote control batteries
up to 8 m
1. To open the battery cover, turn the remote
control over to view its back, push on the
finger grip on the cover and slide it down in
the direction of the arrow as illustrated. The
cover will slide off.
2. Remove any existing batteries (if necessary)
and install two new AAA batteries observing
the battery polarities as indicated in the base of the battery compartment. Positive (+) goes to
positive and negative (-) goes to negative.
3. Refit the cover by aligning it with the case and sliding it back up into position. Stop when it clicks into
place.
Notes on handling batteries
• Do not mix old batteries with new ones, or mix different types of batteries.
• Avoid leaving the remote control and batteries in an excessive hot or humid environment like the
kitchen, bathroom, sauna, sunroom, or in a closed car.
• Dispose of used batteries according to the battery manufacturer’s instructions and local environment
regulations for your region.
• If the remote control will not be used for an extended period of time, remove the batteries to avoid
damage to the control from possible battery leakage.
Remote control operation
• Make sure that there is nothing positioned
between the remote control and the infrared (IR)
sensors on the projector that might obstruct the
IR beam from the remote control reaching the
projector.
• The effective range of the remote control is up to
8 meters, and at an angle within 30 degrees of the
IR beam. Always aim straight at the projector, however most screens will also reflect the IR beam to
the projector.
English
Ceiling mounting the projector
We want you to have a pleasant experience using your BenQ projector, so we need to bring this safety
matter to your attention to prevent damage to person and property.
If you intend to mount your projector on the ceiling, we strongly recommend that you use a proper
fitting BenQ projector ceiling mount kit and that you ensure it is securely and safely installed.
If you use a non-BenQ brand projector ceiling mount kit, there is a safety risk that the projector may fall
from the ceiling due to an improper attachment through the use of the wrong gauge or length screws.
You can purchase a BenQ projector ceiling mount kit from the place you purchased your BenQ projector.
BenQ recommends that you also purchase a separate Kensington lock compatible security cable and
attach it securely to both the Kensington lock slot on the projector and the base of the ceiling mount
bracket. This will perform the secondary role of restraining the projector should its attachment to the
mounting bracket become loose.
Overview
7
Page 8

English
Projector features
• Full HD compatible
The projector is compatible with Standard Definition TV (SDTV) 480i, 480p, 576i, 576p, and High
Definition TV (HDTV) 720p, 1080i and 1080p formats, with the 1080p format providing a true 1:1
image reproduction.
• High picture quality
The projector provides excellent picture quality due to its high resolution, excellent home theater
brightness, super high contrast ratio, vivid color and rich gray-scale reproduction.
• High brightness
The projector features super high brightness to achieve excellent picture quality in ambient light
conditions, outperforming ordinary projectors.
• Super-high contrast ratio
The projector features a dynamic black control to achieve a super-high contrast ratio.
• Vivid color reproduction
The projector features a 6-segment color wheel to produce realistic color depth and range
unattainable with lesser segment color wheels.
• Rich gray-scale
When viewed in a darkened environment, the automatic gamma control provides excellent gray-scale
display which reveals details in shadows and in night or darkened scenes.
• Intuitive lens shift
The intuitive control over lens shift lever provides flexibility in setting-up your projector.
• Wide variety of inputs and video formats
The projector supports a wide variety of inputs for connection to your video and PC equipment,
including component video, and composite video, as well as HDMI, PC, and an output trigger for
connection to automated screen and environment lighting systems.
• Professional calibration control
To reach a higher standard of performance, the projector incorporates Expert Mode settings in its
OSD menus, which requires professional calibration service from authorized installers.
• Panamorph lenses compatible
The projector is compatible with Panamorph lenses that allow you to convert 16:9 projectors to
2.35:1 aspect ratio.
8
Overview
Page 9
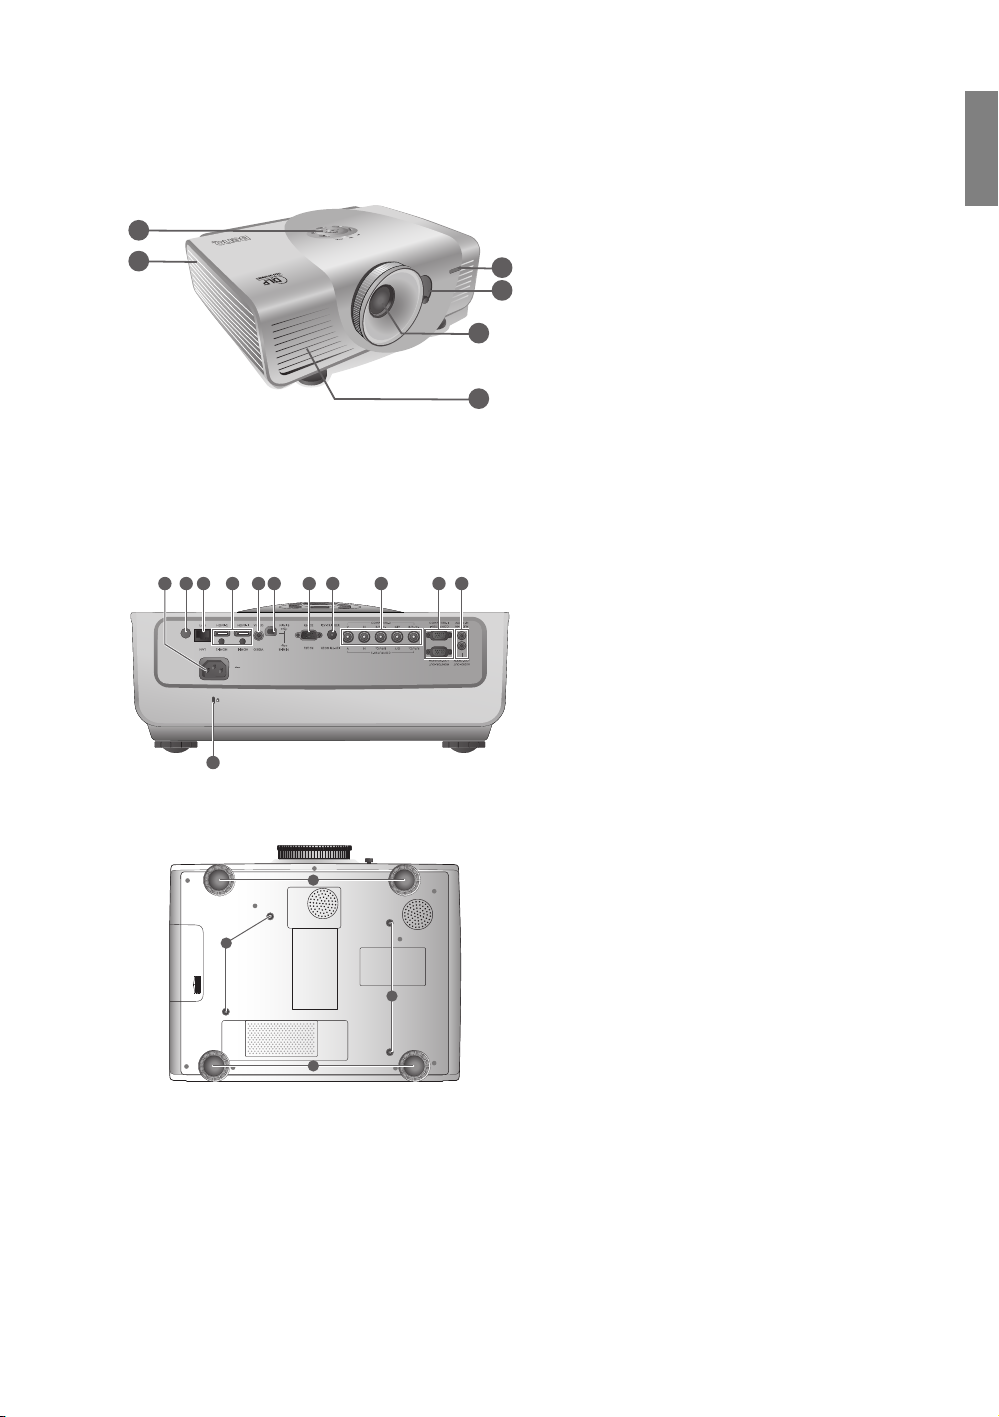
Projector exterior view
1
2
3
6
5
4
7 8 9 10 11 12 13 14 15 16 17
18
See "Connecting with video equipment" on
page 17 for connection details.
19
19
20
20
Front and upper side view
1. Control panel (See "Control panel" on
2. Lamp cover
3. Front IR sensor
4. Lens shift lever
5. Projection lens
6. Vent (heated air exhaust)
7. AC Power cable inlet
8. Rear IR sensor
9. RJ45 LAN input jack
10.HDMI port
Rear view
Under view
11.Composite Video input (RCA)
12.USB port
13.RS-232 control port
14.12VDC output terminal
15.Component Video inputs (BNC)/RGBHV
16.RGB (PC)/Component video (YPbPr/
17.Audio input jack
18.Kensington lock slot
19. Adjustable feet
20.Ceiling mount holes
English
page 10 for details.)
Used to interface with a PC or home
theater control/automation system.
Used to trigger external devices such as
an electric screen or light control, etc.
Consult your dealer for how to connect
these devices.
5 BNCs for connecting either RGB or
component (YPbPr), SD or HD video
signals.
YCbCr) signal input jack
RGB signal output jack
Audio output jack
Overview
9
Page 10

English
1
2
5
6
6
4
3
7
8
6
9
6
12
11
10
I
I
Controls and functions
Control panel
1. Focus ring
Adjusts the focus of the projected image.
2. Zoom ring
Adjusts the size of the projected image.
3. LAMP indicator light
Lights up or flashes when the projector lamp
has developed a problem.
4. TEMPerature warning light
Lights up or flashes if the projector's
temperature becomes too high.
5. POWER indicator light
Lights up or flashes when the projector is
operating.
6. Arrow/Keystone keys (Left / , Up /
, Right /, Down/)
Moves the current On-Screen Display (OSD)
menu selection in the direction of the arrow
being pressed when the OSD menu is
activated.
Manually corrects distorted pictures resulting
from an angled projection.
7. POWER
Performs the same action as POWER on the
remote control.
Toggles the projector between standby and on.
8. SOURCE
Performs the same action as the source
selection keys on the remote control.
Switches sequentially through input sources.
9. MENU
Toggles the On-Screen Display (OSD) menu on
and off.
10.PRESET MODE
Sequentially selects a predefined picture setting
available for each input.
11.EXIT
Goes back to previous OSD menus, exits and
saves any changes made using the On-Screen
Display (OSD) menu.
12.ENTER
Enacts the selected On-Screen Display (OSD)
menu item.
10
Overview
Page 11
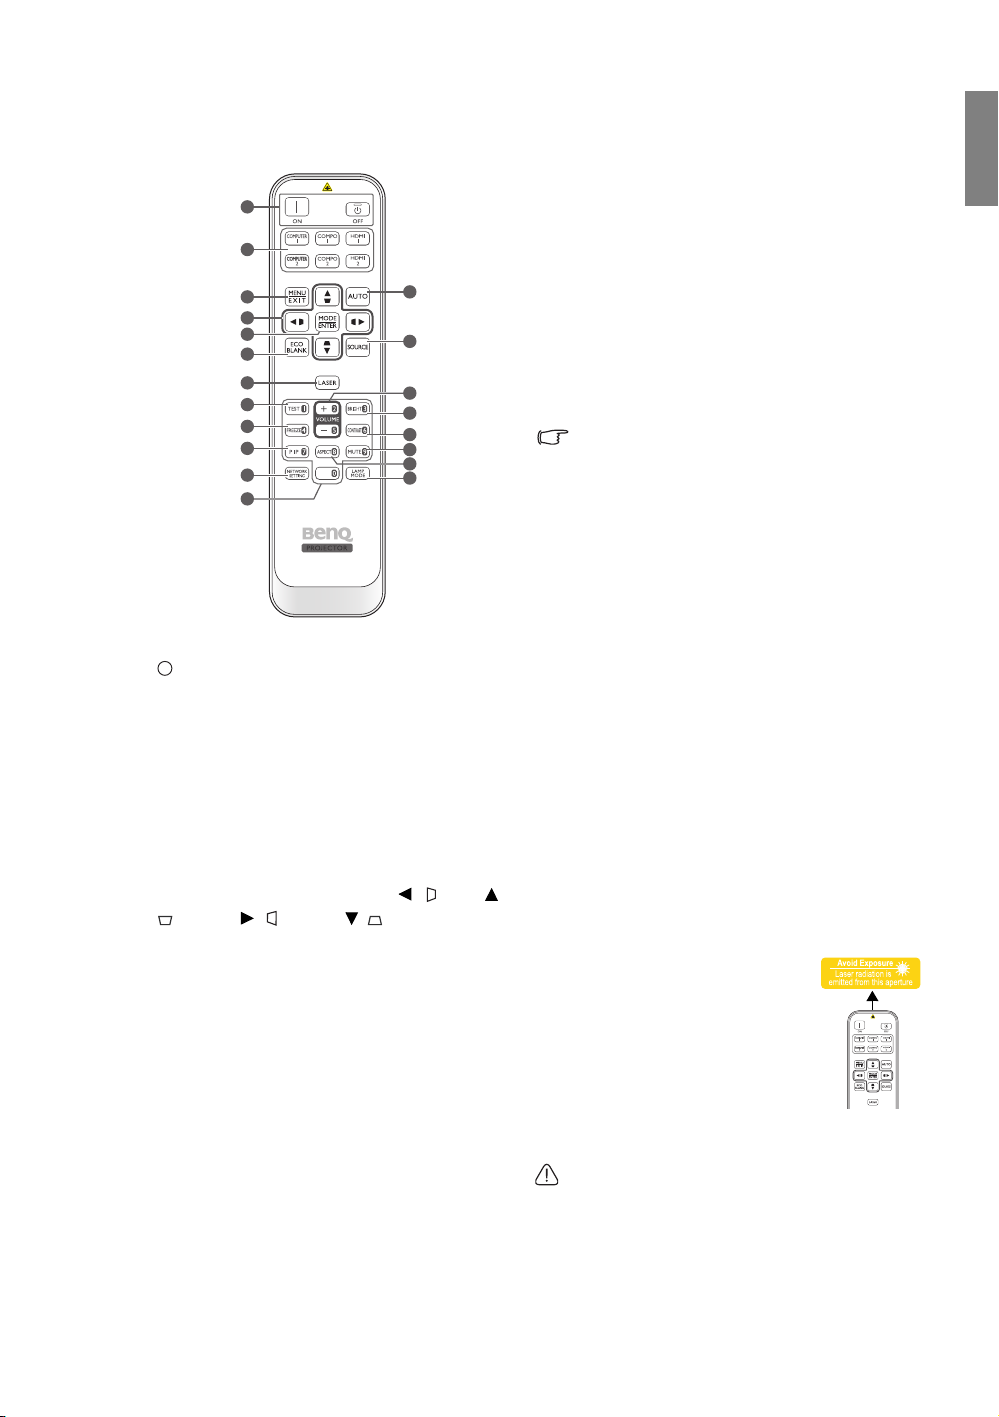
Remote control
I
I
1
2
3
4
5
6
7
8
9
10
11
12
1. Power ON/OFF
Toggles the projector between standby mode
and on.
2. Source selection keys
Selects an input source for display.
3. MENU/EXIT
Turns on the On-Screen Display (OSD) menu.
Goes back to previous OSD menu, exits and
saves menu settings.
4. Arrow/Keystone keys (Left / , Up /
, Right /, Down/)
Moves the current On-Screen Display (OSD)
menu selection in the direction of the arrow
being pressed when the OSD menu is activated.
Manually corrects distorted pictures resulting
from an angled projection.
5. MODE/ENTER
Activates the selected On-Screen Display (OSD)
menu item.
Depending upon the input signal in use, selects
an available picture mode.
6. ECO BLANK
Used to hide the screen image.
7. LASER
Emits visible laser pointer light for presentation
purposes.
13
14
15
16
17
18
19
20
English
8. TEST
Displays the test pattern.
9. FREEZE
Freezes the projected image.
10.PIP
Displays the Picture In Picture (PIP) windows.
11.NETWORK SETTING
Enters network settings directly.
12.Numeric buttons
Enters numbers in network settings.
Numeric buttons 1, 2, 3, 4 cannot be pressed
when asked to enter password.
13.AUTO
Automatically determines the best picture
timings for the displayed image.
14.SOURCE
Selects an input source for display.
15. VOLUME+/VOLUME-
Adjusts the sound level.
16.BRIGHTNESS
Adjusts brightness.
17.CONTRAST
Adjusts contrast.
18.MUTE
Toggles projector audio between on and off.
19.ASPECT
Selects the display aspect ratio.
20.LAMP MODE
Selects a preferred lamp mode.
Operating the LASER pointer
The Laser Pointer is a presentation
aid for professionals. It emits red
colored light when you press it and
the indicator lights up red.
The laser pointer is not a toy.
Parents should be mindful of the
dangers of laser energy and keep this
remote control out of the reach of children.
Do not look into the laser light window or shine
the laser light beam on yourself or others. See
the warning messages on the back of the
remote control prior to using it.
Overview
11
Page 12

English
Positioning your projector
Choosing a location
Your projector is designed to be installed in one of four possible installation locations.
Your room layout or personal preference will dictate which installation location you select. Take into
consideration the size and position of your screen, the location of a suitable power outlet, as well as the
location and distance between the projector and the rest of your equipment.
1. Floor Front:
Select this location with the projector placed near
the floor in front of the screen. This is the most
common way to position the projector for quick
setup and portability.
2. Ceiling Front:
Select this location with the projector suspended
from the ceiling in front of the screen.
Purchase the BenQ Projector Ceiling Mount Kit
from your dealer to mount your projector on the
ceiling.
*Set Ceiling Front after you turn the projector
on.
3. Floor Rear:
Select this location with the projector placed near
the floor behind the screen.
Note that a special rear projection screen is
required.
*Set Floor Rear after you turn the projector on.
4. Ceiling Rear:
Select this location with the projector suspended
from the ceiling behind the screen.
Note that a special rear projection screen and the
BenQ Projector Ceiling Mount Kit are required for
this installation location.
*Set Ceiling Rear after you turn the projector
on.
*To set the projector position:
1. Press MENU on the projector or MENU/EXIT on the remote control and then press / until the System Setup menu
is highlighted.
2. Press / to highlight Projector Position and press / until the correct position is selected.
12
Positioning your projector
Page 13

Obtaining a preferred projected image size
The distance from the projector lens to the screen, the zoom setting, and the video format each factors
in the projected image size.
This projector is equipped with a movable lens. See "Shifting the projection lens" on page 16 for details.
You can see the diagrams on pages 14 and 15 for the vertical offset values in the dimension tables that are
measured when the lens is shifted fully up or down.
If you are using a 120-inch, 4:3-aspect-ratio screen, please refer to "The screen aspect ratio is 4:3 and the
projected picture is 16:9". The average projection distance is 494 cm.
If you have a 16:9-aspect-ratio screen and your measured projection distance was 4.5 m (450 cm), please
refer to "The screen aspect ratio is 16:9 and the projected picture is 16:9". The closest match in the
"Average" column is 449 cm. Looking across this row shows that a 100-inch screen is required.
Checking the min and max projection distance values in the columns of "Projection distance <D> [cm]"
on page 14 indicates that the 4.5 m measured projection distance will also fit the 90 and 110-inch size
screens. The projector can be adjusted (using the zoom control) to display on these different screen sizes
at the projection distance. Be aware that these different screens have different vertical offset values.
If you place the projector in a different position (to that recommended), you will have to tilt it down or
up to center the image on the screen. In these situations, some image distortion will occur. Use the
Keystone function to correct the distortion. See "Correcting picture distortion" on page 26 for details.
English
Positioning your projector
13
Page 14
English
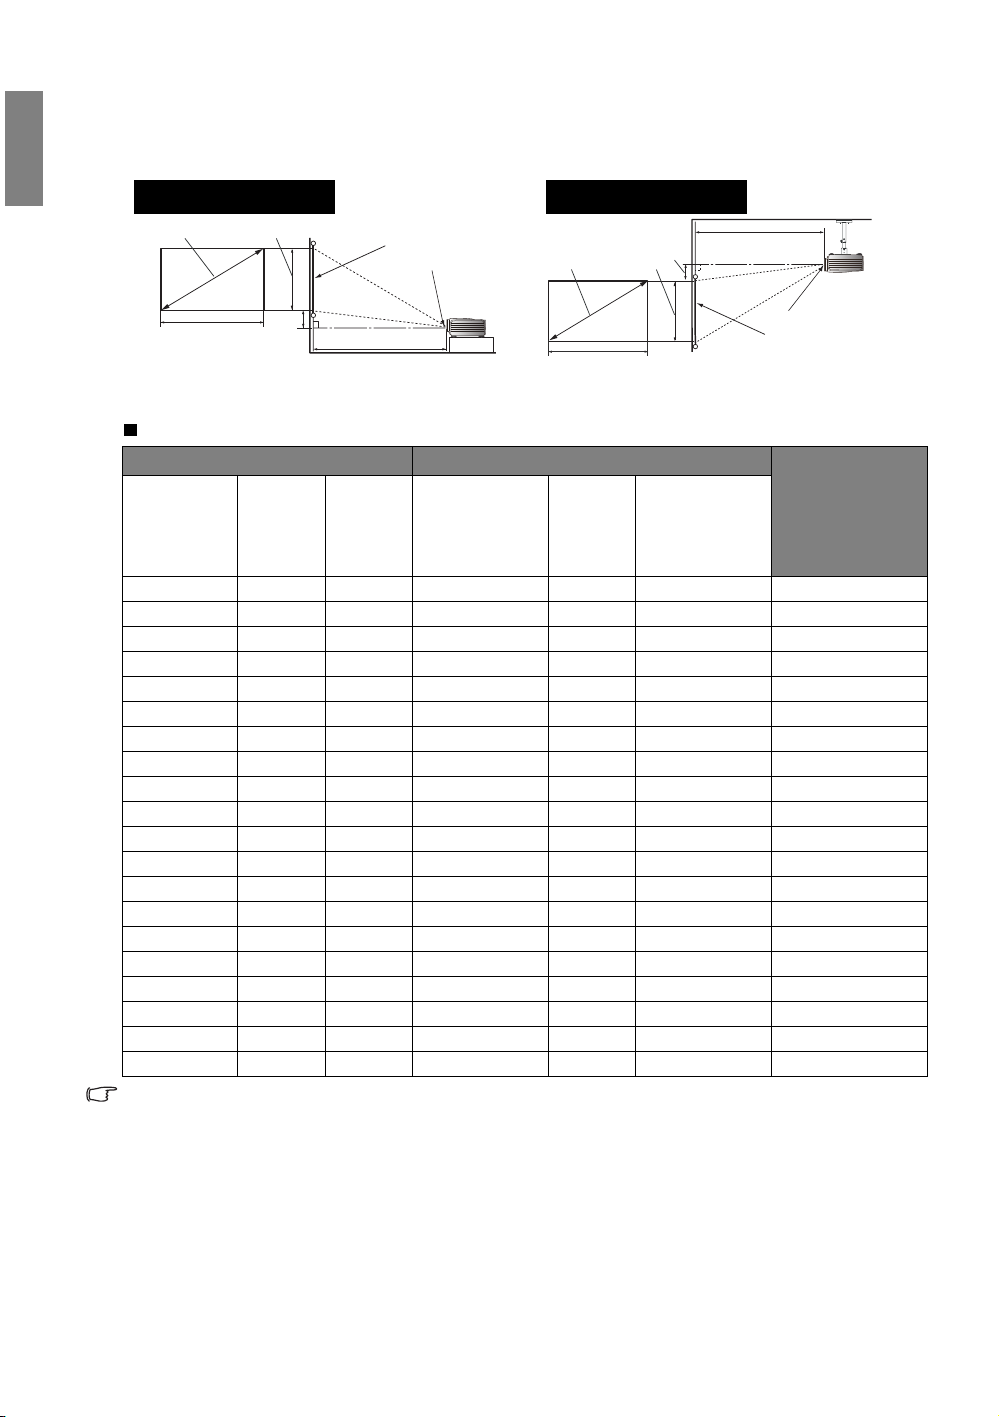
Floor Installation
<F>: Screen <G>: Center of lens
<B>
<A>
<C>
<F>
<G>
<D>
<E>
Ceiling Installation
<F>: Screen <G>: Center of lens
Projection dimensions
Installation for a 16:9 ratio screen
<A>
<C>
<B>
<E>
<F>
<G>
<D>
The screen aspect ratio is 16:9 and the projected picture is 16:9
Screen dimensions Projection distance <D> [cm]
Diagonal
<A>
[inch
(mm)]
30 (762) 37 66 108 135 162 4.7
40 (1016) 50 89 144 180 215 6
50 (1270) 62 111 180 224 269 8
60 (1524) 75 133 215 269 323 9
70 (1778) 87 155 251 314 377 11
80 (2032) 100 177 287 359 431 12
90 (2286) 112 199 323 404 485 14
100 (2540) 125 221 359 449 539 16
110 (2794) 137 243 395 494 592 17
120 (3048) 149 266 431 539 646 19
130 (3302) 162 288 467 583 700 20
140 (3556) 174 310 503 628 754 22
150 (3810) 187 332 539 673 808 23
160 (4064) 199 354 575 718 862 25
170 (4318) 212 376 610 763 916 26
180 (4572) 224 398 646 808 969 28
190 (4826) 237 421 682 853 1023 30
200 (5080) 249 443 718 898 1077 31
250 (6350) 311 553 898 1122 1346 39
300 (7620) 374 664 1077 1346 1616 47
The above numbers are approximate and may be slightly different from the actual measurements. Only the
recommended screen sizes are listed. If your screen size is not in the table above, please contact your dealer
for assistance.
Height
<B>
[cm]
Width
<C>
[cm]
Min distance
(with max
zoom)
Average
Max distance
(with min
zoom)
Lowest/Highest
lens position
<E> [cm]
Positioning your projector
14
Page 15

Installation for a 4:3 ratio screen
<A>
<B>
<H>
<C>
<E>
<D>
<F>
<G>
Floor Installation
<F>: Screen <G>: Center of lens
Ceiling Installation
<F>: Screen <G>: Center of lens
The illustrations and table below are provided for those users who already have 4:3 aspect ratio screens
or intend to purchase 4:3 aspect ratio screens to view 16:9 ratio projected images.
English
The screen aspect ratio is 4:3 and the projected picture is 16:9
Screen dimensions
Diagonal
<A>
[inch (mm)]
30 (762) 46 61 99 124 148 4.3 34.3
40 (1016) 61 81 132 165 198 5.7 45.7
50 (1270) 76 102 165 206 247 7.1 57.2
60 (1524) 91 122 198 247 297 8.6 68.6
70 (1778) 107 142 231 288 346 10.0 80.0
80 (2032) 122 163 264 330 395 11.4 91.4
90 (2286) 137 183 297 371 445 12.9 102.9
100 (2540) 152 203 330 412 494 14.3 114.3
110 (2794) 168 224 363 453 544 15.7 125.7
120 (3048) 183 244 395 494 593 17.1 137.2
130 (3302) 198 264 428 536 643 18.6 148.6
140 (3556) 213 284 461 577 692 20.0 160.0
150 (3810) 229 305 494 618 742 21.4 171.5
160 (4064) 244 325 527 659 791 22.9 182.9
170 (4318) 259 345 560 700 840 24.3 194.3
180 (4572) 274 366 593 742 890 25.7 205.7
190 (4826) 290 386 626 783 939 27.1 217.2
200 (5080) 305 406 659 824 989 28.6 228.6
250 (6350) 381 508 824 1030 1236 35.7 285.8
300 (7620) 457 610 989 1236 1483 42.9 342.9
The above numbers are approximate and may be slightly different from the actual measurements. Only the
recommended screen sizes are listed. If your screen size is not in the table above, please contact your dealer
for assistance.
Height
<B>
[cm]
Width
<C>
[cm]
<A>
<C>
Projection distance <D>
[cm]
Min
distance
(with
max
zoom)
Average
Max
distance
(with min
zoom)
<H>
<E>
<B>
<D>
<F>
Lowest/
Highest
lens
position
<E>
[cm]
<G>
Image
height <H>
[cm]
Positioning your projector
15
Page 16

English
Screen
Range of
placement
Center of lens
Projector
125%
125%
41.3% 41.3%
Shifting the projection lens
The lens shift control provides flexibility for installing your projector. It allows the projector to be
positioned off the center of the screen.
The lens shift is expressed as a percentage of the projected image height or width. It is measured as an
offset from the projected image’s vertical or horizontal center. You can use the lever to shift the
projection lens in any direction within the allowable range depending on your desired image position.
To use the lens shift lever:
1. Release the lever by turning it counterclockwise.
2. Move the lever to adjust the projected image position.
3. Lock the lever by turning it clockwise.
• When the screen position is fixed
• When the projector position is fixed
• Please do not over-tighten the lever.
• Lens shift adjustment will not result in a degraded picture quality. In the unlikely event that the image
distortion is produced, see "Adjusting the projected image" on page 25 for details.
16
Positioning your projector
Page 17

Connecting with video
PC
HDMI cable
HDMI device: DVD player, digital tuner, etc.
To make sure you select a correct input source
type for the HDMI signal, see "HDMI Settings" on
page 49 for details.
equipment
You can connect the projector to any type of video equipment, such as a VCR, DVD player, digital tuner,
cable or satellite decoder, video game console or digital camera. You can also connect it to a desktop or
laptop PC or Apple Macintosh system. You need only connect the projector to a source device using just
one of the connecting methods, however each provides a different level of video quality. The method you
choose will most likely depend upon the availability of matching terminals on both the projector and the
Video source device as described below:
English
Te r m i n a l
name
HDMI
Component
Video
Video
PC (D-SUB)
Terminal appearance Reference Picture quality
"Connecting HDMI devices" on
page 17
"Connecting component-video/RGB
devices" on page 18
"Connecting video devices" on page 18
"Connecting a computer" on page 19
Best
Better
Normal
Better
Preparations
When connecting a signal source to the projector, be sure to:
1. Turn off all equipment before making any connections.
2. Use only the correct type cables for each source with proper type plugs.
3. Ensure that all cable plugs are firmly fitted to the equipment jacks.
Note that all cables shown in the following connection diagrams may not be supplied with the projector (See
"Shipping contents" on page 6 for details). Most cables are commercially available from electronics stores.
Connecting HDMI devices
HDMI (High-Definition Multimedia Interface) supports uncompressed video data transmission between
compatible devices like DTV tuners, DVD players and displays over a single cable. It provides pure digital
viewing and listening experience. You should use an HDMI cable when making connection between the
projector and HDMI devices.
Connecting with video equipment
17
Page 18
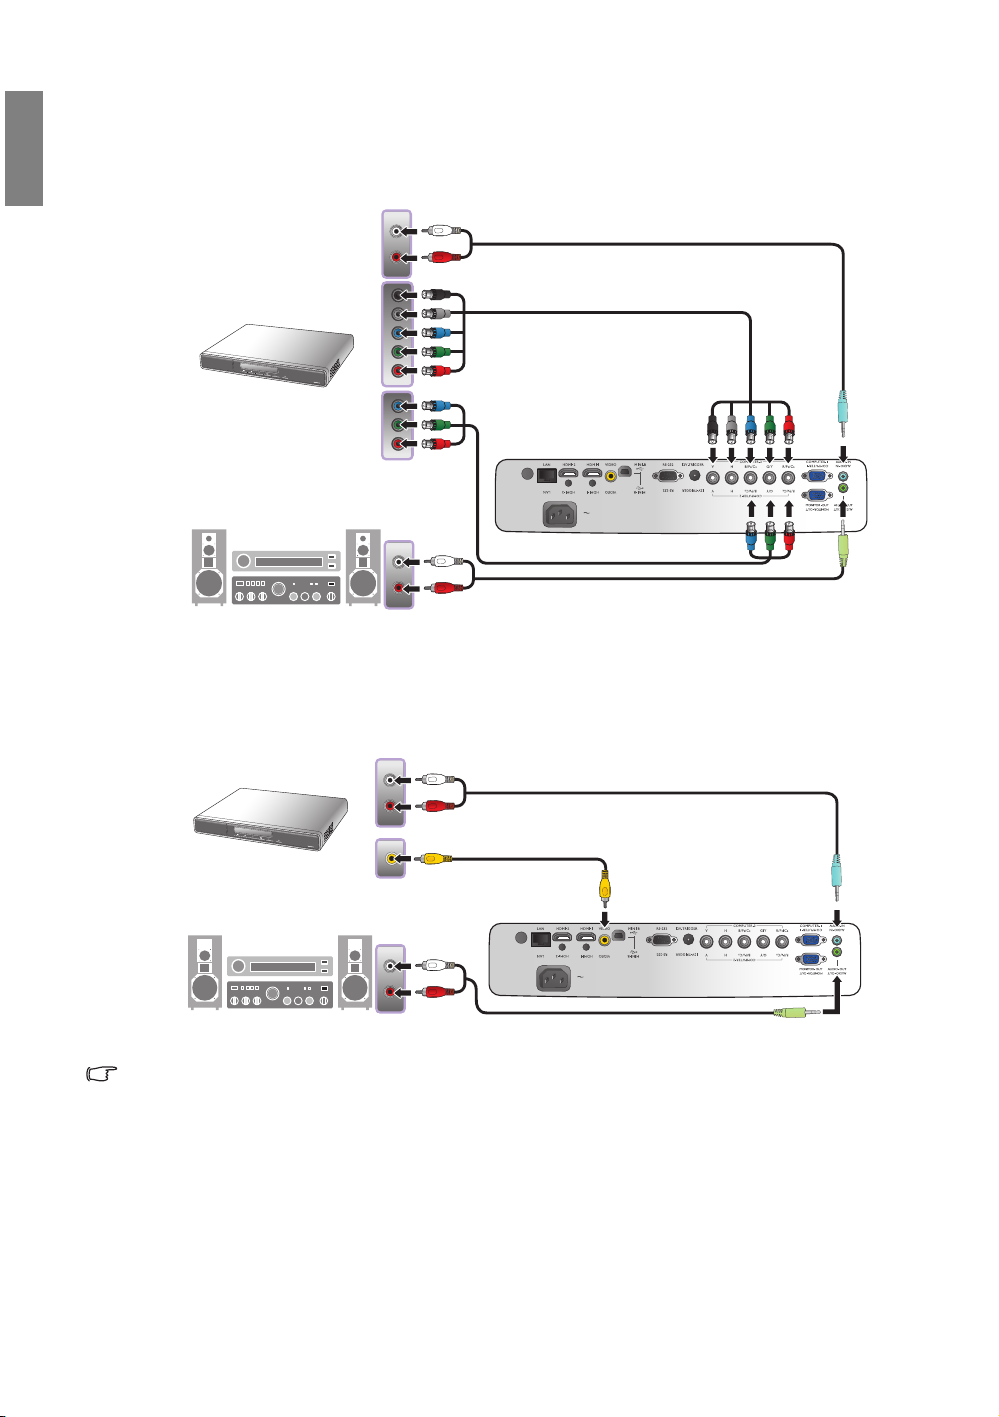
English
AV equipment: DVD player, digital
tuner, etc.
Component video cable
Speakers
Audio cable
Audio cable
RGBHV cable
Video cable
AV equipment
Speakers
Audio cable
Audio cable
Connecting component-video/RGB devices
Connect your RGB source (DVD player or HD set top box) to the RBGHV inputs. You can also use a
BNC- type component cable to connect your video devices. The audio connections are provided for
informational purposes only. You can also connect the separate audio cable to a suitable audio amplifier.
Connecting video devices
You need only connect a composite Video cable from the same device. The audio connections are
provided for informational purposes only. You can also connect the separate audio cable to a suitable
audio amplifier.
• If you have already made a Component Video connection between the projector and the video source
device, you need not connect to this device again using a composite Video connection as this makes an
unnecessary second connection of poorer picture quality. You need only connect using a composite
Video connection if Component Video is not supplied on the video source device (for example, with
some analog video cameras).
• If the selected video image is not displayed after the projector is turned on and the correct video source
has been selected, please check that the video source device is turned on and operating correctly. Also
check that the signal cables have been connected correctly.
18
Connecting with video equipment
Page 19

Connecting a computer
DB15HD-to-5 x BNC cable
Laptop or desktop
computer
Audio cable
Speakers
Audio cable
VGA cable
VGA to DVI cable
VGA cable
or
Connect the projector to a computer with a VGA cable or a DB15HD-to-5 x BNC cable.
Many laptops do not turn on their external video ports when connected to a projector. Usually a key
combination like Fn + F3 or CRT/LCD key turns the external display on/off. Locate a function key labeled
CRT/LCD or a function key with a monitor symbol on the laptop. Press Fn and the labeled function key
simultaneously. Refer to your laptop's documentation to discover your laptop's key combination.
Connecting a monitor
If you want to view your presentation close-up on a monitor as well as on the screen and the
MONITOR OUT jack is available on your projector, you can connect the MONITOR OUT signal
output jack on the projector.
English
• The MONITOR OUT only works when an appropriate D-Sub input is made to the PC jack.
• If you wish to use this connection method when the projector is in standby mode, make sure the Standby
Monitor Out function is turned on in the Advanced Setup menu. See "Standby Monitor Out" on page 48
for details.
Connecting with video equipment
19
Page 20

English
I
I
I
I
Using the projector
Preparations
1. Plug in and turn all of the connected equipment on.
2. If not already in, plug the supplied power cable into the AC inlet
on the rear of the projector.
3. Plug the power cable into a wall power outlet and turn the wall
switch on.
Please use the original accessories (e.g. power cable) only with the
device to avoid possible dangers such as electric shock and fire.
Turning the projector on
Follow the steps below.
1. Make sure the Power light is orange after power has been applied.
2. Press and hold POWER ( ) on the projector or ON on the
remote control to turn the projector on. As soon as the lamp
lights up, a "Powe r O n R i n g Ton e " will be heard.
To turn of the ring tone, see "Turning off the Power On/Off Ring
Tone" on page 36 for details.
3. The fans will start operating, and a start-up image will be displayed
on the screen for a few seconds while it warms up.
The projector will not respond to further commands while it is warming up.
4. If the projector is activated for the first time, select your OSD language following the on-screen
instructions.
5. If you are prompted for a password, press the arrow keys to enter a six-digit password. See "Utilizing
the password function" on page 23 for details.
6. Press one of the Source keys on the remote control, or press SOURCE on the projector repeatedly
until your desired signal is selected. See "Selecting an input source" on page 21 for details.
7. If the horizontal frequency of the input source exceeds the range of the projector, the message "No
Signal" will be displayed on the screen. This message will remain on-screen until you change the input
source to an appropriate one.
If you attempt to re-start the projector shortly after shutdown, the fans may run for a few minutes to cool
down. Press Power again to start the projector after the fans stop and the Power indicator light turns
orange.
20
Using the projector
Page 21

Selecting an input source
NOTE: When
automatically
searching for a valid
input source, the
projector cycles
through the available
signals following the
sequence from top to
bottom as the source
selection bar shows.
HDMI 1
HDMI 2
Component 1
Component 2
Computer 1
Video
Computer 2
The projector can be connected to multiple equipment at the same
time. When the projector is first turned on, it will attempt to
reconnect with the input source which was in use when the
projector was last shut down.
To select the video source:
• Using the remote control or projector
Press one of the Source keys on the remote control, or press
SOURCE on the projector repeatedly until your desired signal is
selected.
• Using the OSD menu
1. Press MENU on the projector or MENU/EXIT on the remote
control, and then press / until the System Setup menu is
highlighted.
2. Press to highlight Input Source and press ENTER. The
source selection bar is displayed.
3. Press / repeatedly until your desired signal is selected and
press ENTER.
Once detected, the selected source information will be displayed
on the screen for seconds. If there are multiple pieces of
equipment connected to the projector, you can go back to the
source selection bar again to search for other signals.
• If you want the projector to automatically search for the signals,
select On in the System Setup > Auto Source Search menu.
• If you want to use the PIP function, see "Displaying more than one image source simultaneously" on
page 40 for details.
English
Changing Color Space
In the unlikely event that you connect the projector to a DVD player via the projector's HDMI input and
the projected picture displays wrong colors, please change the color space to YUV.
1. Press MENU/EXIT and then press / until the Display menu is highlighted.
2. Press to highlight Color Space Conversion and press / to select a suitable color space.
This function is only available when the HDMI input port is in use.
Using the projector
21
Page 22

English
Picture Mode
Load Settings From
Brightness
Contrast
Tint
Sharpness
Reset Picture Settings
Rename User Mode
Picture -- Basic
+ 3
Video
Cinema
EXIT Back
Current input source
Main menu icon
Main menu
Sub-menu
Highlight
Press EXIT to go back to
the previous page or to
exit.
Status
+ 50
+ 50
+ 50
0
Color
Picture Mode
Load Settings From
Brightness
Contrast
Tint
Sharpness
Reset Picture Settings
Rename User Mode
Picture -- Basic
Video
Cinema
EXIT Back
Color
+ 3
+ 50
+ 50
+ 50
0
Language
Splash Screen
Projector Position
Background Color
Menu Settings
Input Source
System Setup
Video
English
BenQ
Auto Source Search
EXIT Back
Blue
Off
Floor Front
Closed Caption
Standby Monitor Out
Off
Operation Settings
Language
Splash Screen
Projector Position
Background Color
Menu Settings
Input Source
System Setup
Video
English
BenQ
Auto Source Search
EXIT Back
Blue
Off
Floor Front
Closed Caption
Standby Monitor Out
Off
Operation Settings
Using the menus
The projector is equipped with multilingual On-Screen Display (OSD) menus for making various
adjustments and settings.
Below is the overview of the OSD menu.
To use the OSD menus, please set the OSD menu to your familiar language.
Securing the projector
Using a security cable lock
The projector has to be installed in a safe place to prevent theft. Otherwise, purchase a lock, such as the
Kensington lock, to secure the projector. You can locate a Kensington lock slot on the projector. See item
18 on page 9 for details.
1. Press MENU on the projector or MENU/EXIT
on the remote control to turn the OSD menu on.
2. Use / to highlight the System Setup menu.
3. Press to highlight Language and press
/ to select a preferred language.
4. Press MENU once or EXIT twice* on
the projector or MENU/EXIT twice* on
the remote control to leave and save the
settings.
*The first press leads you back to the main
menu and the second press closes the OSD
menu.
22
A Kensington security cable lock is usually a combination of key(s) and the lock. Refer to the lock's
documentation for finding out how to use it.
Using the projector
Page 23

Utilizing the password function
Input Password
EXIT Clear
For security purposes and to help prevent unauthorized use, the projector includes an option for setting
up password security. The password can be set through the On-Screen Display (OSD) menu. Once the
password is set and this function is selected, the projector is password-protected. Users who do not
know the correct password can not use the projector.
You will be inconvenienced if you activate the password functionality and subsequently forget the password.
Print out this manual (if necessary) and write the password you used in this manual, and keep the manual in
a safe place for later recall.
Setting a password
Once a password has been set and activated, the projector cannot be used unless the correct password is
entered every time the projector is started.
1. Press MENU on the projector or MENU/EXIT on the remote control and then press / until
the Advanced Setup menu is highlighted.
2. Press to highlight Password and press ENTER. The Password page is displayed.
3. Highlight Password and press / to select On. The Input
Password page is displayed.
4. As the picture indicates, the four arrow keys ( , , , )
respectively represent 4 digits (1, 2, 3, 4). According to the password
you desire to set, press the arrow keys on the remote control or
projector to enter six digits for the password.
If the function is used for the first time, enter the default password
(1, 1, 1, 1, 1, 1) of the projector by pressing the arrow key six
times.
Once the password is set, the OSD menu returns to the Password page.
IMPORTANT: The digits being input will be displayed as asterisks on-screen. Write your selected
password down here in this manual in advance or right after the password is entered so that it is available
to you should you ever forget it.
Password: __ __ __ __ __ __
English
5. To leave the OSD menu, press MENU on the projector or MENU/EXIT on the remote control.
If you forget the password
If the password function is activated, you will be asked to enter the six-digit password every time you
turn on the projector. If you enter the wrong password, the password error message is displayed lasting
for three seconds, and the Input Password page follows. You can retry by entering another six-digit
password, or if you did not record the password in this manual, and you absolutely do not remember it,
you can use the password recall procedure. See "Entering the password recall procedure" on page 24 for
details.
If you enter an incorrect password 5 times in succession, the projector will automatically shut down in a
short time.
Using the projector
23
Page 24

English
Please write down the recall cod e,
and contact your nearest BenQ
Customer Center.
Recall cod e:
0 2 1 2
Recall Password
EXIT Back
Entering the password recall procedure
1. Make sure the Input Password page is displayed on screen. Press
and hold PRESET MODE on the projector or MODE/ENTER on
the remote control for 3 seconds. The projector will display a coded
number on the screen.
2. Write down the number and turn off your projector.
3. Seek help from the local BenQ service center to decode the number.
You may be required to provide proof of purchase documentation to
verify that you are an authorized user of the projector.
Changing the password
1. Press MENU on the projector or MENU/EXIT on the remote control and then press / until
the Advanced Setup menu is highlighted.
2. Press / to highlight Password and press ENTER. The Password page is displayed.
3. Highlight Change Password and press ENTER. The Input Current Password page is displayed.
4. Enter the old password.
• If the password is correct, the message "Input New Password" is displayed.
• If the password is incorrect, the password error message is displayed lasting for three seconds,
and the message "Input Current Password" is displayed for your retry. You can either press
MENU on the projector or MENU/EXIT on the remote control to cancel the change or try
another password.
5. Enter a new password.
IMPORTANT: The digits being input will be displayed as asterisks on-screen. Write your selected
password down here in this manual in advance or right after the password is entered so that it is available
to you should you ever forget it.
Password: __ __ __ __ __ __
Keep this manual in a safe place.
6. Confirm the new password by re-entering the new password.
7. You have successfully assigned a new password to the projector. Remember to enter the new
password next time the projector is started.
8. To leave the OSD menu, press MENU on the projector or MENU/EXIT on the remote control.
Disabling the password function
To disable password protection, go back to the Advanced Setup > Password > Password menu.
Highlight Password and select Off by pressing / . The message "Input Password" is displayed.
Enter the current password.
• If the password is correct, the OSD menu returns to the Password page with "Off" shown in
the row of Password. You will not have to enter the password next time when turning on the
projector.
• If the password is incorrect, the password error message is displayed lasting for three seconds,
and the message "Input Password" is displayed for your retry. You can either press MENU on
the projector or MENU/EXIT on the remote control to cancel the change or try another
password.
Note that though the password function is disabled, you need to keep the old password in hand should
you ever need to re-activate the password function by entering the old password.
24
Using the projector
Page 25

Adjusting the projected image
1. Adjust the projected picture to the size
that you need using the zoom ring.
2. Sharpen the picture by rotating the focus
ring.
Adjusting the projection angle
There are four adjuster feet on the bottom of the projector. These can be
used if necessary to change the projection angle. Screw the feet in or out
as appropriate to aim and level the projection angle.
If the screen and the projector are not perpendicular to each other, the
projected image becomes vertical trapezoidal. To correct this problem, see
"Correcting picture distortion" on page 26 for details.
Auto-adjusting the image
In some cases, you may need to optimize the picture quality. To do this,
press AUTO on the projector or remote control. Within 3 seconds, the
built-in Intelligent Auto Adjustment function will re-adjust the values of
Frequency and Clock to provide the best picture quality.
The current source information will be displayed in the corner of the
screen for 3 seconds.
• The screen will be blank while AUTO is functioning.
• This function is only available when a PC signal (analog RGB) is selected.
Fine-tuning the image size and clarity
English
Using the projector
25
Page 26

English
Two parallel sides
No parallel sides
Press
/.
Press
/.
Press
/.
Press /
.
Correcting picture distortion
Keystoning occurs when the projector is not perpendicular to the screen and is where the projected
picture displays visible as a trapezoid shape like either of the following:
• Two parallel sides (left and right, or top and bottom) but is noticeably wider on either side.
• No parallel sides.
To correct the picture’s shape, you can perform the following steps.
1. Adjust the projection angle. Move the projector to be in front of the center of the screen with the
center of the lens level with the screen.
2. If the picture is stilled distorted, or the projector is unable to be positioned as described above, you
will need to manually correct the picture.
• Using the remote control or projector
i. Press one of the Arrow/Keystone keys on the remote control
or projector (Left /, Up /, Right /, Down/) to
display the Keystone page.
ii. See step iv below for further operation.
• Using the OSD menu
i. Press MENU on the projector or MENU/EXIT on the
remote control, and then press / until the Display menu is
highlighted.
ii. Press to highlight Keystone and press ENTER. The Keystone page is displayed.
iii. Highlight 2D Keystone and press ENTER. The keystone correction page is displayed.
iv. Press the key whose keystone icon is opposite to the shape of the projected picture. Continue
pressing the same key or press the other keys until you are satisfied with the shape.
The values on the lower portion of the page change while pressing. When the values reach their
maximum or minimum with repeated key presses, the picture’s shape will stop changing. You will
not be able to change the picture further in that direction.
26
Using the projector
Page 27

Using the preset and user modes
Selecting a preset mode
The projector is preset with several pre-defined picture modes so that you can choose one to suit your
operating environment and input source picture type.
To select a picture mode that suits your need:
• Using the remote control
Press PRESET MODE on the projector or MODE/ENTER on the
remote control repeatedly until your desired mode is selected.
• Using the OSD menu
1. Press MENU on the projector or MENU/EXIT on the remote
control and then press / until the Picture -- Basic menu is
highlighted.
2. Press to highlight Picture Mode.
3. Press / until your desired mode is selected.
These modes consist of preset values suitable for various projection situations as described below:
• Cinema: Is appropriate for playing colorful movies, video clips from digital cameras or DVs through
the PC input for best viewing in a blackened (little light) environment.
• Dynamic: Maximizes the brightness of the projected image. This mode is suitable for environments
where extra-high brightness is required, such as using the projector in well lit rooms.
• Presentation: Is designed for presentations. The brightness is emphasized in this mode to match PC
and notebook coloring.
• sRGB: Maximizes the purity of RGB colors to provide true-to-life images regardless of brightness
setting. It is most suitable for viewing photos taken with an sRGB compatible and properly calibrated
camera, and for viewing PC graphic and drawing applications such as AutoCAD.
• User 1/User 2: Recalls the customized settings. See "Setting the User 1/User 2 mode" on page 28
for details.
English
Fine-tuning the selected picture mode
The pre-defined picture mode settings can be altered via the available items shown in the Picture -Basic and Picture -- Advanced menus.
To fine-tune the picture mode:
1. Press MENU on the projector or MENU/EXIT on the remote control, and then press / until
the Picture -- Basic or Picture -- Advanced menu is highlighted.
2. Press to highlight the item you want to adjust and press / to set your desired value. Your
selection is automatically stored in the projector and associated with that input source.
See "Fine-tuning the picture quality" on page 29 and "Advanced picture quality controls" on page 30
for details.
Each time you change the picture mode, the projector also changes the setting to the one which was last
set for that particular picture mode on that particular input. If you change the input source, the most
recently used picture mode and settings for that input and resolution will be restored.
Using the projector
27
Page 28

English
Setting the User 1/User 2 mode
There are two user-definable modes if the current available picture modes are not suitable for your need.
You can use one of the picture modes (except the selected User mode) as a starting point and customize
the settings.
1. In the Picture -- Basic menu, highlight Picture Mode and press / to select User 1 or User 2
mode.
2. Press to highlight Load Settings From.
This function is only available when User 1 or User 2 mode is selected up in the Picture Mode sub-
menu item.
3. Press ENTER to display the Load Settings From page.
4. Press to highlight a picture mode that is closest to your need and press ENTER and EXIT.
5. Press to select a sub-menu item to be changed and adjust the value with / . See "Fine-tuning
the picture quality" on page 29 and "Advanced picture quality controls" on page 30 for details.
6. When all settings have been done, press MENU on the projector or MENU/EXIT on the remote
control to save and leave the settings.
Renaming user modes
You can change User 1 and User 2 to the names easy to be identified or understood by the users of this
projector. The new name can be up to 12 characters including English letters (A-Z, a-z), digits (0-9), and
space (_).
To rename user modes:
1. In the Picture -- Basic menu, highlight Rename User Mode and press ENTER to display the
Rename User Mode page.
2. Press / to highlight the item you want to rename and press ENTER. The first letter will be
highlighted by a white box.
3. Press / to select the first character.
4. Press to move along until the new name is set and press ENTER to confirm.
5. Repeat steps 2-4 if you want to change the other names.
Resetting the picture mode
All of the adjustments you’ve done in the Picture -- Basic and Picture -- Advanced menus can be
returned to the factory preset values with a key press on the highlight of Reset.
To reset the picture mode to the preset factory values:
1. In the Picture -- Basic menu, highlight Picture Mode and press / to select the picture mode
(including User 1 or User 2) you want to reset.
2. Press to highlight Reset Picture Settings and press ENTER. The confirmation message is
displayed.
3. Press / to highlight Reset and press ENTER. The picture mode will return to the factory
preset settings.
4. Repeat steps 1-3 if you want to reset other picture modes.
Do not to be confused with the Reset Picture Settings function here with the Reset All Settings in the
Advanced Setup menu. The Reset All Settings function returns most of the settings to the factory preset
values system wide. See "Reset All Settings" on page 49 for details.
28
Using the projector
Page 29

Fine-tuning the picture quality
30 50
70
357
No matter what picture mode you have selected, you are able to fine-tune those settings to fit every
presentation purpose. Those adjustments will be saved to the preset mode you are at when you exit the
OSD menu.
Adjusting Brightness
Highlight Brightness in the Picture -- Basic menu and
adjust the values by pressing / on the projector or
remote control.
The higher the value, the brighter the picture. And the
lower the setting, the darker the picture. Adjust this
control so the black areas of the picture appear just as black and that detail in the dark areas is visible.
Adjusting Contrast
Highlight Contrast in the Picture -- Basic menu and
adjust the values by pressing / on the projector or
remote control.
The higher the value, the greater the contrast. Use this to
set the peak white level after you have previously adjusted
the Brightness setting to suit your selected input and viewing environment.
Adjusting Color
Highlight Color in the Picture -- Basic menu and adjust the values by pressing / on the projector
or remote control.
30 50 70
English
Lower setting produces less saturated colors; setting to the minimum value makes the image black and
white. If the setting is too high, colors on the image will be overpowering, which makes the image
unrealistic.
Adjusting Tint
Highlight Tint and adjust the values by pressing / on the projector or remote control.
The higher the value, the more reddish the picture becomes. The lower the value, the more greenish the
picture becomes.
Adjusting Sharpness
Highlight Sharpness and adjust the values by pressing /
on the projector or remote control.
The higher the value, the sharper the picture becomes. The
lower the value, the softer the picture becomes.
The Brightness, Contrast functions can also be accessible by pressing
BRIGHTNESS, CONTRAST on the remote control to display the
adjustment bar and then you can press / to adjust the values.
Using the projector
29
Page 30

English
Advanced picture quality controls
There are more advanced functions in the Picture -- Advanced menu to be adjusted to your
preference. To save the settings, just press MENU on the projector or MENU/EXIT on the remote
control to leave the OSD menu.
Setting Black Level
Highlight Black Level and press / on the projector or remote control to select 0 IRE or 7.5 IRE.
The grayscale video signal is measured in IRE units. In some areas which use NTSC TV standard, the
grayscale is measured from 7.5 IRE (black) to 100 IRE (white); however, in other areas where PAL
equipment or Japanese NTSC standards are used, the grayscale is measured from 0 IRE (black) to 100 IRE
(white). We suggest that you check the input source to see if it is with 0 IRE or 7.5 IRE, then select
accordingly.
Controlling image clarity
You may have static or noisy projected pictures.
To achieve better picture clarity:
1. Highlight Clarity Control and press ENTER on the projector or remote control to display the
Clarity Control page.
2. Press / to select the item you want to adjust and press / to set the desired value.
• Noise Reduction: Reduces electrical image noise caused by different media players. The higher
the setting, the less the noise.
• Detail Enhancement: Sharpens the image. The higher the setting, the more details the image
reveals.
• Luma Transmission (Luminance Transmission Improvement): Enhances picture brightness.
The higher the setting, the more distinct the effect.
• Chroma Transmission (Chroma Transmission Improvement): Reduces color smear. The
higher the setting, the more distinct the effect.
Selecting a color temperature*
Highlight Color Temperature and select a preferred setting by pressing / on the projector or
remote control.
There are several color temperature settings available.
1. Lamp Native: With the lamp’s original color temperature and higher brightness. This setting is
suitable for environments where high brightness is required, such as projecting pictures in well lit
rooms.
2. Warm: Makes pictures appear reddish white.
3. Normal: Maintains normal colorings for white.
4. Cool: Makes pictures appear bluish white.
5. User 1/User 2/User 3: Recalls the settings customized in the Color Temperature User_ Fine
Tuning menu. See "Setting a preferred color temperature" on page 31 for details.
*About color temperatures:
There are many different shades that are considered to be "white" for various purposes. One of the common methods of
representing white color is known as the “color temperature”. A white color with a low color temperature appears to be
reddish white. A white color with a high color temperature appears to have more blue in it.
30
Using the projector
Page 31

Setting a preferred color temperature
High Brightness
Low Contrast
Low Brightness
High Contrast
1
2 3 4 5 6 7 8
To set a preferred color temperature:
1. Highlight Color Temperature and select User 1, User 2, or User 3 by pressing / on the
projector or remote control.
2. Press to highlight Color Temperature User_ Fine Tuning and press ENTER. The Color
Temperature User_ Fine Tuning page is displayed.
The menu name "User_" corresponds with the setting selected in Color Temperature.
3. Press / to highlight the item you want to change and adjust the values by pressing / .
• Red Gain/Green Gain/Blue Gain: Adjusts the contrast levels of Red, Green, and Blue.
• Red Offset/Green Offset/Blue Offset: Adjusts the brightness levels of Red, Green, and Blue.
4. To save and leave the settings, press MENU on the projector or MENU/EXIT on the remote
control.
Selecting a Gamma setting
Highlight Gamma Selection and select a preferred setting by pressing / on the projector or
remote control.
Gamma refers to the relationship between input source and picture brightness.
• Gamma 1/2/3
Select these values according to your preference.
• Gamma 4
Increases the average brightness of the picture. Best for a lit environment, meeting room or family
room.
• Gamma 5/6
Best for viewing movies in a darkened environment.
• Gamma 7/8
Best for viewing movies which are mostly composed of dark scenes.
English
Adjusting Brilliant Color
This feature utilizes a new color-processing algorithm and system level enhancements to enable higher
brightness while providing truer, more vibrant colors in picture. When set to "Off", Brilliant Color is
disabled.
Using the projector
31
Page 32

English
Red
Yellow
Green
Cyan
Magenta
Blue
Color Management
In most installation situations, color management will not be necessary, such as in classroom, meeting
room, or lounge room situations where lights remain on, or where building external windows allow
daylight into the room.
Only in permanent installations with controlled lighting levels such as boardrooms, lecture theaters, or
home theaters, should color management be considered. Color management provides fine color control
adjustment to allow for more accurate color reproduction, should you require it.
Proper color management can only be achieved under controlled and reproducible viewing conditions.
You will need to use a colorimeter (color light meter), and provide a set of suitable source images to
measure color reproduction. These tools are not provided with the projector, however, your projector
supplier should be able to provide you with suitable guidance, or even an experienced professional
installer.
The Color Management provides six sets (RGBCMY) of colors to be adjusted to favorite colors.
When you select each color, you can independently adjust its color range and saturation according to
your preference.
To adjust and store the settings:
1. In the Picture -- Advanced menu, highlight Color Management and press ENTER. The Color
Management page is displayed.
2. Highlight Primary Color and press / to select a color from among Red, Ye l lo w , Green,
Cyan, Blue, and Magenta.
3. Press to highlight Range and press / to select the color range
you wish to make adjustment. The bigger the range, the more
proportions of its two adjacent colors the color contains.
Please refer to the illustration to the right for how the colors relate
to each other. For example, if you select Red and set its range at 0,
only pure red is selected. Increasing its range will include both the red
color close to yellow and red color close to magenta.
Press to highlight Saturation and adjust the color saturation level
by pressing / .
If you select Red and set its range at 0, only the saturation of the
pure red will be affected.
Saturation is the amount of that color in a video picture. Lower settings produce less saturated
colors; a setting of “0” removes that color from the image entirely. If the saturation is too high, that
color will be overpowering and unrealistic.
4. To leave and save the settings, press MENU on the projector or MENU/EXIT on the remote
control.
Setting Film Mode
This feature helps improve picture quality when projecting video image from a film-sourced DVD.
32
Using the projector
Page 33

Setting 3D Comb Filter
16:9 picture
4:3 picture
This feature separates composite signal to Y (brightness) signal and C (color) signal, and can help produce
clearer and sharper images with correct colors in place.
This function is only available when a Video signal is selected
Selecting the aspect ratio
The "aspect ratio" is the ratio of the image width to the image height. Digital TV is usually in 16:9 ratio,
which is the default for this projector, and most analog TV signals and DVDs are in 4:3 ratio.
With the advent of digital signal processing, digital display devices like this projector can dynamically
stretch and scale the image output to a different aspect than that of the image input source. Images can
be stretched in a linear manner so the whole of the image is stretched equally, or non-linearly, which
distorts the image.
To change the projected picture ratio (no matter what aspect
the source is):
• Using the remote control
1. Press ASPECT to show the current setting.
2. Press ASPECT repeatedly to select an aspect ratio to suit the
format of the video signal and your display requirements.
• Using the OSD menu
1. Press MENU on the projector or MENU/EXIT on the remote
control, and then press / until the Display menu is highlighted.
2. Press to highlight Aspect Ratio.
3. Press / to select an aspect ratio to suit the format of the video
signal and your display requirements.
English
About the aspect ratio
1. Anamorphic (ANA): Scales an image so that it is displayed in the
center of the screen with a 16:9 aspect ratio. This setting stretches and
resizes linearly, except that it treats the vertical and horizontal
dimensions independently. It stretches the height of the source image
until it reaches the full projected height, and stretches the width of the
source image until it reaches the full projected width. This may alter
the projected aspect, depending upon the original aspect of the source
image. Anamorphic is most suitable for images which are already in a
16:9 aspect, like high definition TV, as it displays them without aspect
alteration.
2. 4:3: Scales a picture so that it is displayed in the center of the screen
with a 4:3 aspect ratio. This is most suitable for 4:3 pictures like
computer monitors, standard definition TV and 4:3 aspect DVD
movies, as it displays them without aspect alteration.
Using the projector
33
Page 34

English
16:9 picture
Letter Box
format picture
4:3 picture
4:3 picture
2.35:1 aspect ratio
image
2.35:1 aspect ratio image
using the entire resolution
of the 16:9 display
2.35:1 aspect ratio image
in a 2.35:1 display area
Pressing LB on
the remote
control
Using Panamorph
lens
3. Letter Box (LB): Scales a picture to fit the projector’s native
resolution in its horizontal width and resize the picture’s height to the
3/4 of the projection width. This may produce a picture greater in
height than can be displayed, so part of the picture is lost (not
displayed) along the top and bottom edges of the projection. This is
suitable for the display of movies which are presented in letter box
format (with black bars on the top and bottom).
4. Wide: Stretches the picture horizontally in a non-linear manner, that
is, the edges of the picture are stretched more than the center of the
picture to prevent distortion of the central part of the picture. This is
suitable for occasions where you want to stretch the width of a 4:3
aspect picture to the width of a 16:9 aspect screen. It does not alter the
height. Some widescreen movies have been produced with their width
squashed down to the width of a 4:3 aspect, and are best viewed when
restretched back to their original width using this setting.
5. Real: This setting displays the image in a one-to-one pixel mapping
without alteration or resize in the center of the projection. This is most
suitable for use with PC source inputs.
• The black portions are inactive areas and the white portions are active
areas.
• OSD menus can be displayed on those unused black areas.
Using Panamorph lenses (optional)
Panamorph lenses allow you to convert 16:9 projectors to the full 2.35:1 aspect ratio of most motion
pictures, showing the best movies without letterbox bars at top and bottom of images while increasing
resolution by 33% and brightness by 20%.
34
You may need a 2.35:1 screen to display the 2.35:1 images. For more information, please go to
www.panamorph.com or contact the place you purchased the projector.
Using the projector
Page 35

Hiding the image
In order to draw the audience's full attention to the presenter, you can
use ECO BLANK on the remote control to hide the screen image. The
word "ECO BLANK" appears in the corner of the screen while the
image is hidden. When this function is activated with an audio input
connected, the audio can still be heard.
English
You can set the blank time in the
the projector return the image automatically after a period of time when
there is no action taken on the blank screen. The length of time can be
set from 5 to 30 minutes in 5-minute increments.
If the preset time spans are not suitable for your personation, select
Disable.
No matter
to restore the picture.
Once ECO BLANK is pressed, the projector lamp enters Economic mode automatically.
Blank Timer is activated or not, you can press any key on the projector or remote control
Display > Blank Timer menu to let
Freezing the image
Press FREEZE on the remote control to freeze the image. The word
"FREEZE" will be displayed in the upper left corner of the screen. To
release the function, press any key on the projector or remote control.
Even if an image is frozen on the screen, the pictures are running on the
video or other device. If the connected devices have active audio output,
you will still hear the audio even though the image is frozen onscreen.
Using the projector
35
Page 36

English
Adjusting the sound
The sound adjustments made as below will have an effect on the projector speaker(s). Be sure you have
made a correct connection to the projector audio input. See "Connecting with video equipment" on
page 17 for how the audio input is connected.
Muting the sound
To temporarily turn off the sound:
1. Press MENU on the projector or MENU/EXIT on the remote control to open the OSD menu and
press / to highlight the Advanced Setup menu.
2. Press to highlight Audio Settings and press ENTER. The Audio Settings page is displayed.
3. Highlight Mute and press / to select On.
Adjusting the sound quality
To adjust the sound level, press VOL U M E + /VOLUME- on the remote control, or:
1. Repeat steps 1-2 above.
2. Press to highlight Vol um e and press / to select a desired sound level.
To adjust the sound treble and bass:
1. Repeat steps 1-2 above.
2. Press to highlight Tr eb l e/Bass and press / to select a desired value.
To s e t t h e SRS:
1. Repeat steps 1-2 above.
2. Press to highlight SRS and press / to turn on/off the function.
Turning off the Power On/Off Ring Tone
To turn off the ring tone:
1. Repeat steps 1-2 above.
2. Press to highlight Power On/Off Ring Tone and press / to select Off.
The only way to change Power On/Off Ring Tone is setting On or Off here. Setting the sound mute or
changing the sound level will not affect the Power On/Off Ring Tone.
36
Using the projector
Page 37

Controlling the projector through a Lan environment
Lan Control Settings allow you to manage the projector from a computer using a web browser when the
computer and the projector are properly connected to the same local area network.
Configuring the Lan Control Settings
If you are in a DHCP environment:
1. Take a RJ45 cable and connect one end to the RJ45 LAN input jack of the projector and the other end
to the RJ45 port.
2. Press MENU on the projector or MENU/EXIT on the remote control and then press / until
the Advanced Setup menu is highlighted.
3. Press to highlight Lan Control Settings and press ENTER. The Lan Control Settings page is
displayed.
4. Press to highlight Control By and press / to select RJ45.
5. Press to highlight DHCP and press / to select On.
6. Press to highlight Apply and press ENTER.
7. Please wait for around 15 - 20 seconds, and then re-enter the Lan Control Settings page.
8. The
If the Projector IP Address still does not display, contact your ITS administrator.
Projector IP Address, Subnet Mask, Default Gateway, and DNS Server settings will be
displayed. Note down the IP address displayed in the Projector IP Address row.
English
If you are in a non-DHCP environment:
1. Repeat steps 1-4 above.
2. Press to highlight DHCP and press / to select Off.
3. Contact your ITS administrator for information on the Projector IP Address, Subnet Mask,
Default Gateway, and DNS Server settings.
4. Press to select the item you want to modify and press ENTER.
5. Press / to move the cursor and then press / to enter the value.
6. To save the setting, press ENTER. If you do not want to save the setting, press MENU/EXIT on the
remote control or EXIT on the projector.
7. Press to highlight Apply and press ENTER.
Controlling the projector remotely through a web browser
Once you have the correct IP address for the projector and the projector is on or in standby mode, you
can use any computer that is on the same local area network to control the projector.
1. Enter the address of the projector in the address bar of your browser and click Go.
Using the projector
37
Page 38

English
i
ii
i
ii
i
iv
iii
ii
v
2. The remote network operation page opens. This page allows you to operate the projector as if you
were using the remote control or control panel on the projector.
• Menu (Exit) • Blank
• Auto • Source
• ( ) • ( )
See "Remote control" on page 11 for details.
• ( )
• Enter
• ( )
Activates the selected On-Screen Display (OSD)
menu item.
To switch input source, click on your desired signal.
The source list varies according to the connectors available on the projector. ''Video 1''
stands for the Video signal.
The tools page allows you to manage the projector, configure the Lan control settings and secure access
of remote network operation on this projector.
i. You can name the projector, keep track of its location and the person in charge of it.
ii. You can adjust the Lan Control Settings.
iii. Once set, access to the remote network operation on this projector has been password-
iv. Once set, access to the tools page has been password-protected.
After making the adjustments, press the Send button and the data will be saved in the projector.
protected.
38
Using the projector
Page 39

v. Press Exit to go back to the remote network operation page.
Press Exit to go
back to the
remote network
operation page.
The info page displays the information and status of this projector.
For more information, visit http://www.crestron.com & www.crestron.com/getroomview.
Operating in a high altitude environment
We recommend that you activate High Altitude Mode when your environment is higher than 1500
meters (around 4920 feet) above sea level, or whenever the projector will be used for extended periods
of time (>10 hours) without shutdown.
To activate High Altitude Mode:
1. Press MENU on the projector or MENU/EXIT on the remote control, and then press / until
the Advanced Setup menu is highlighted.
2. Press to highlight High Altitude Mode.
3. Press / to select On. A confirmation message is displayed.
4. Highlight Yes and press ENTER.
Operation under High Altitude Mode may cause a higher decibel operating noise level because of
increased fan speed necessary to improve overall system cooling and performance.
English
If you use this projector under other extreme conditions excluding the above, it may display auto shutdown symptoms, which is designed to protect your projector from over-heating. In cases like this, you
should switch to High Altitude Mode to solve these symptoms. However, this is not to state that this
projector can operate under any and all harsh or extreme conditions.
Using the projector
39
Page 40

English
Displaying more than one image source simultaneously
Your projector is capable of displaying pictures simultaneously from two input sources, which can be used
to enhance your presentation in an interesting way. Ensure the signals you want to display are correctly
connected to the projector.
To display the PIP window:
1. Press MENU on the projector or MENU/EXIT on the remote control, and then press / until
the Display menu is highlighted.
2. Press to highlight PIP and press ENTER. The PIP page is displayed.
3. Highlight PIP and press / to select On.
The projector will select two currently active signals to display and the last viewed picture will be
displayed on the big screen as a main source.
The PIP function is effective at below source combinations.
Source 2
Source 1 CVBS
HDMI 1/2 V
Component 1/2 V
Computer 1/2 V
4. To change the Main Source or Second Source, press to highlight Main Source or Second
Source and press ENTER. The source selection bar is displayed.
5. Use / to highlight the source you want to display for the main (bigger) or second (smaller)
window, and press ENTER to save the setting and go back to the PIP page.
6. To make OSD settings to one of the two sources (main or second), highlight Active Window and
press / to select the source you want to make adjustments.
The settings made on the OSD menus will only take effect on the active window. The following
OSD menu function cannot work on the active windows for the PIP: Auto Source Search.
7. To change the position of the smaller picture, highlight Position and
press / repeatedly until a suitable position is selected.
8. To resize the small picture, highlight Size and press / to set the
PIP size among Small or Large.
9. To save the settings and leave the OSD menu, press MENU on the
projector or MENU/EXIT on the remote control.
40
Using the projector
Page 41

Turning the projector off
I
I
I
I
I
I
To turn the projector off, press POWER ( ) on the projector or
OFF on the remote control and a warning message appears. Press
POWER () or OFF again.
• The Power indicator light flashes orange and the fans run for
about two minutes to cool the lamp. The projector will not
respond to any commands until the cooling process is complete.
• Then, the Power indicator light is a steady orange once the
cooling process has finished and fans stop.
• If the projector will not be used for an extended period, unplug
the power cable from the power outlet.
• To protect the lamp, the projector will not respond to any
commands during the cooling process.
• Lamp life results will vary depending on environmental conditions
and usage.
• If you attempt to re-start the projector shortly after shutdown,
the fans may run for a few minutes to cool down. Press Power
again to start the projector after the fans stop and the Power
indicator light turns orange.
English
Using the projector
41
Page 42

English
On-Screen Display (OSD) menus
On-Screen Display (OSD) structure
Please note that the on-screen display (OSD) menus vary according to the signal type selected.
Main menu Sub-menu Options
Picture Mode Cinema/Dynamic/Presentation/sRGB/User 1/User 2
Load Settings From
Brightness 0–100
Picture -Basic
Picture -Advanced
Contrast 0–100
Color 0–100
Tint -20–+20
Sharpness 0–8
Reset Picture Settings
Rename User Mode
Black Level 0 IRE/7.5 IRE
Noise Reduction 0/1/2/3
Clarity Control
Color Temperature
Color Temperature
User_ Fine Tuning
Gamma Selection 1-8
Brilliant Color On/Off
Color Management
Film Mode On/Off
3D Comb Filter On/Off
Dynamic Black On/Off
Detail Enhancement 0-5
Luma Transmission 0/1/2
Chroma Transmission 0/1/2
Lamp Native/Warm/Normal/Cool/User 1/
User 2/User 3
Red Gain 0–100
Green Gain 0–100
Blue Gain 0–100
Red Offset 0–100
Green Offset 0–100
Blue Offset 0–100
Primary Color Red/Yellow/Green/Cyan/Blue/Magenta
Range 0–100
Saturation 0–100
42
Using the projector
Page 43

Main menu Sub-menu Options
Aspect Ratio Anamorphic/4:3/Letter Box/Wide/Real
Keyston e 2D Keyston e
Pos iti on
Overscan Adjustment 0/1/2/3
Color Space Conversion Auto/RGB/YUV
PIP On/Off
Display
System
Setup
Main Source
PIP
PC & Component
YPbPr Tuning
Blank Timer
Language
Splash Screen BenQ/Blue/Black
Projector Position
Background Color Black/Purple/Blue
Menu Settings
Operation Settings
Input Source
Auto Source Search On/Off
Closed Caption
Standby Monitor Out On/Off
Second Source
Active Window Main/PIP
Pos iti on
Size Large/Small
H. Size -15–+15
Phase -15–+15
Auto
Menu Display Time 5 sec/10 sec/15 sec/20 sec/25 sec/30 sec
Menu Position
Reminder Message On/Off
Direct Power On On/Off
Signal Power On On/Off
Auto Power Off
Sleep Timer
Closed Caption Enable On/Off
Caption Version CC1/CC2/CC3/CC4
HDMI 1/HDMI 2/Video/Component 1/
Component 2/Computer 1/Computer 2
Top-Right/Bottom-Left/Bottom-Right/TopLeft
Disable/5 min/10 min/15 min/20 min/25 min/
30 min
Floor Front/Ceiling Front/Floor Rear/Ceiling
Rear
Center/Top-Left/Top-Right/Bottom-Right/
Bottom-Left
Disable/5 min/10 min/15 min/20 min/25 min/
30 min
Disable/30 min/60 min/90 min/120 min/150
min/180 min
HDMI 1/HDMI 2/Video/Component 1/
Component 2/Computer 1/Computer 2
English
Using the projector
43
Page 44

English
Main menu Sub-menu Options
Lamp Power Normal/Economic
Advanced
Setup
Information
Lamp Settings
HDMI Settings HDMI Format
Baud Rate
Test Pattern
High Altitude Mode On/Off
Audio Settings
Password
Lan Control Settings
Reset All Settings
Expert Mode (inputs current password)
Source
Picture Mode
Resolution
Equivalent Lamp Hour
Firmware Version
Reset Lamp Timer
Equivalent Lamp Hour
Auto
PC Signal
Video Signal
2400/4800/9600/14400/19200/38400/57600/
115200
SRS On/Off
Mute On/Off
Volume 0-10
Treble 0-10
Bass 0-10
Power On/Off Ring Tone On/Off
Password On/Off
Change Password (inputs current password)
Control By RS232/RJ45
DHCP On/Off
Projector IP Address
Subnet Mask
Default Gateway
DNS Server
AMX Device Discovery On/Off
Apply Enter
Note that the menu items are available when the projector detects at least one valid signal. If there is no
equipment connected to the projector or no signal detected, limited menu items are accessible.
44
Using the projector
Page 45

Picture -- Basic menu
Function Description
Pre-defined picture modes are provided so you can optimize your projector
Picture Mode
Load Settings
From
Brightness
Contrast
Color
Tint
Sharpness
Reset Picture
Settings
Rename User
Mode
picture set-up to suit your program type. See "Selecting a preset mode" on
page 27 for details.
Selects a preset mode that most suits your need for the picture quality and
further fine-tune the picture based on the selections listed below. See "Setting
the User 1/User 2 mode" on page 28 for details.
Adjusts the brightness of the picture. See "Adjusting Brightness" on page 29 for
details.
Adjusts the degree of difference between dark and light in the picture. See
"Adjusting Contrast" on page 29 for details.
Adjusts the color saturation level -- the amount of each color in a video
picture. See "Adjusting Color" on page 29 for details.
Adjusts the red and green color tones of the picture. See "Adjusting Tint" on
page 29 for details.
Adjusts the picture to make it look sharper or softer. See "Adjusting Sharpness"
on page 29 for details.
Returns all settings in the Picture -- Basic and Picture -- Advanced menus
to the factory preset values. See "Resetting the picture mode" on page 28 for
details.
Renames User 1, User 2, or sRGB. See "Renaming user modes" on page 28
for details.
English
Picture -- Advanced menu
Function Description
Black Level
Clarity Control
Color
Temperature
Sets the picture grayscale as 0 IRE or 7.5 IRE. See "Setting Black Level" on
page 30 for details.
Adjusts the picture clarity. See "Controlling image clarity" on page 30 for
details.
There are several color temperature settings available. See "Selecting a color
temperature*" on page 30 for details.
Color
Temperature
See "Setting a preferred color temperature" on page 31 for details.
User_ Fine Tuning
Gamma Selection
Brilliant Color
Color
Management
Film Mode
3D Comb Filter
Dynamic Black
See "Selecting a Gamma setting" on page 31 for details.
See "Adjusting Brilliant Color" on page 31 for details.
See "Color Management" on page 32 for details.
See "Setting Film Mode" on page 32 for details.
See "Setting 3D Comb Filter" on page 33 for details.
Automatically changes the black level of the projected pictures to enhance the
effect of contrast ratio.
Using the projector
45
Page 46

English
Display menu
Function Description
Aspect Ratio
Keystone
Posit ion
Overscan
Adjustment
Color Space
Conversion
PIP
PC & Component
YPbPr Tuning
Blank Timer
There are several options to set the picture’s aspect ratio depending on your
input source. See "Selecting the aspect ratio" on page 33 for details.
Corrects any keystoning of the picture. See "Correcting picture distortion" on
page 26 for details.
Displays the position adjustment page. To move the projected picture, use the
directional arrow keys. The values shown on the lower position of the page
change with every key press you made until they reach their maximum or
minimum.
This function is only available when the Component 1, Component 2,
or Computer 1 signal is selected.
Conceals the poor picture quality in the four edges. You can also manually press
/ to decide how much to be concealed. Setting 0 means the picture is
100% displayed. The greater the value, the more portion of the picture is
concealed while the screen remains filled and geometrically accurate.
See "Changing Color Space" on page 21 for details.
Turns the PIP window on or off and makes related adjustments. See "Displaying
more than one image source simultaneously" on page 40 for details.
H. Size
Adjusts the horizontal width of the picture.
Phase
Adjusts the clock phase to reduce picture distortion.
Auto
Adjusts the phase, and frequency automatically
These functions are only available when the
Component 1, Component 2, or Computer 1 signal is selected.
Sets the image blank time when the Blank feature is activated, once elapsed the
image will return to the screen. See "Hiding the image" on page 35 for details.
46
Using the projector
Page 47

System Setup menu
I
I
Function Description
Language
Splash Screen
Projector Position
Background Color
Menu Settings
Operation
Settings
Input Source
Auto Source
Search
English
Sets the language for the On-Screen Display (OSD) menus. See "Using the
menus" on page 22 for details.
Allows you to select which logo screen will be displayed during projector startup. You can choose BenQ logo screen, Blue screen or Black screen.
The projector can be installed on a ceiling or behind a screen, or with one or
more mirrors. See "Choosing a location" on page 12 for details.
Allows you to choose the color of the background screen that will be displayed
when there is no input source detected.
Menu Display Time
Sets the length of time the OSD will remain active after your last key press. The
range is from 5 to 30 seconds in 5-second increments.
Menu Position
Sets the On-Screen Display (OSD) menu position.
Reminder Message
Sets whether to display the OSD messages about the status of detecting signals.
Direct Power On
Sets whether to turn the projector directly on without pressing the
POWER key on the projector or remote control when the projector is
plugged in.
Signal Power On
Sets whether to turn the projector directly on without pressing POWER or
ON when the projector is in standby mode and the signal is feed through the
VGA cable .
Auto Power Off
Prevents unnecessary projection when no signal is detected for a long time. See
"Setting Auto Power Off" on page 52 for details.
Sleep Timer
Sets the auto-shutdown timer. The timer can be set to a value between 30
minutes and 3 hours.
Selects an input source to be projected. See "Selecting an input source" on
page 21 for details.
Sets whether the projector searches automatically for input sources. If the
source scan is On, the projector will scan for input sources until it acquires a
signal. If the function is not activated, the projector selects the last used input
source.
Using the projector
47
Page 48

English
Closed Caption
Standby Monitor
Out
Closed Caption Enable
Activates the function by selecting On when the selected input signal carries
closed captions.
• Captions: An on-screen display of the dialogue, narration, and sound effects
of TV programs and videos that are closed captioned (usually marked as
"CC" in TV listings).
Caption Version
Selects a preferred closed captioning mode. To view captions, select CC1,
CC2, CC3, or CC4 (CC1 displays captions in the primary language in your
area).
These functions are only available when the Video signal is selected.
Selecting On enables the function. The projector can output a VGA signal
when it is in standby mode and the PC jack is correctly connected to devices.
See "Connecting a monitor" on page 19 for how to make the connection.
Enabling this function slightly increases the standby power consumption.
48
Using the projector
Page 49

Advanced Setup menu
Function Description
Lamp Power
Selects the projector lamp power between Normal and Economic modes.
Reset Lamp Timer
Lamp Settings
HDMI Settings
Baud Rate
Test Pattern
High Altitude
Mode
Once the lamp is renewed, select Reset to return the lamp timer to "0". See
"Resetting the lamp timer" on page 55 for details.
Equivalent Lamp Hour
Shows the lamp hour information. See "Getting to know the lamp hour" on
page 52 for details.
Selects an input source type for the HDMI signal. Auto is the default and
recommended setting. You can also manually select the source type. The
different source types carry different standards for the brightness level.
Selects a baud rate that is identical with your computer’s so that you can
connect the projector using a suitable RS-232 cable and update or download
the projector’s firmware. This function is intended for qualified service
personnel.
Press ENTER to display the grid test pattern. It helps you adjust the image size
and focus and check that the projected image is free of distortion.
A mode for operation in areas like high altitude or high temperature. See
"Operating in a high altitude environment" on page 39 for details.
English
This function is only available when the HDMI signal is selected.
The function is only available when the projector detects no input
signal.
Audio Settings
Password
Lan Control
Settings
Reset All Settings
Expert Mode
See "Adjusting the sound" on page 36 for details.
Password
Limits use of the projector to only those who know the correct password. See
"Utilizing the password function" on page 23 for details.
Change Password
You will be asked to enter the current password before changing to a new one.
See "Utilizing the password function" on page 23 for details.
See "Controlling the projector through a Lan environment" on page 37 for
details.
Returns all settings to the factory preset values.
The following settings will still remain: names of user modes,
Keystone, Language, Projector Position, High Altitude Mode,
Password, and Expert Mode.
The Expert Mode menu is password protected and only accessible by
authorized calibrators. The ISF (Imaging Science Foundation) has developed
carefully crafted, industry-recognized standards for optimal video performance
and has implemented a training program for technicians and installers to use
these standards to obtain optimal picture quality from BenQ video display
devices. Accordingly, we recommend that setup and calibration be performed
by an ISF certified installation technician.
For more information, please go to www.imagingscience.com or
contact the place you purchased the projector.
Using the projector
49
Page 50

English
Information menu
This menu shows you the current operating status of the projector.
Some picture adjustments are available only when certain input sources are in use. Unavailable adjustments
are not shown on the screen.
Function Description
Source
Shows the current signal source.
Picture Mode
Resolution
Equivalent Lamp
Hour
Firmware Version
Shows the selected mode in the Picture -- Basic > Picture Mode menu.
Shows the native resolution of the input source.
Shows the total lamp time used.
Shows the firmware version of your projector.
50
Using the projector
Page 51

Additional information
Care of the projector
Your projector needs little maintenance. The only thing you have to do on a regular basis is keep the lens
clean. Never remove any parts of the projector except the lamp. Contact your dealer or local customer
service center if the projector fails to operate as expected.
Cleaning the lens
Clean the lens whenever you notice dirt or dust on the surface. Before you attempt to clean the lens,
turn the projector off, unplug the power cable, and leave it several minutes to cool completely.
1. Use a canister of compressed air to remove dust. (Available from building hardware or photographic
suppliers.)
2. If there is stubborn dirt or smudge marks, use a proper photographic lens brush or moisten a clean
soft lens cloth with lens cleaner to gently wipe the lens surface.
3. Never use any type of abrasive pad, alkaline/acid cleaner, scouring powder, or volatile solvent, such as
alcohol, benzene, thinner or insecticide. Using such materials or maintaining prolonged contact with
rubber or vinyl materials may result in damage to the projector surface and cabinet material.
• Never touch the lens with your finger or rub the lens with abrasive materials. Even paper towels can
damage the lens coating. Only ever use a proper photographic lens brush, cloth, and cleaning solution.
Do not attempt to clean the lens while the projector is switched on or is still hot from previous use.
• Be sure to turn off the projector and let it cool down completely before cleaning the lens.
Cleaning the projector case
Before you attempt to clean the case, turn the projector off, unplug the power cable, and leave it several
minutes to cool completely.
English
1. To remove dirt or dust, wipe the case with a soft, dry, lint-free cloth.
2. To remove stubborn dirt or stains, moisten a soft cloth with water and a neutral detergent. Then
wipe the case.
Never use wax, alcohol, benzene, thinner or other chemical detergents. These can damage the case.
Storing the projector
If you need to store the projector for an extended time, please:
1. Make sure the temperature and humidity of the storage area are within the recommended range for
the projector. Please refer to the Spec. page in this manual or consult your dealer about the range.
2. Retract the adjuster feet.
3. Remove the batteries from the remote control.
4. Pack the projector in its original packing or equivalent.
Transporting the projector
It is recommended that you ship the projector with its original packing or equivalent.
Additional information
51
Page 52

English
Lamp information
Getting to know the lamp hour
When the projector is in operation, the duration (in hours) of lamp usage is automatically calculated by
the built-in timer. The method of calculating the equivalent lamp hour is as follows:
Equivalent lamp hour
= 1 (hours used in Economic mode) + 3/2 (hours used in Normal mode)
See "Setting Lamp Power as Economic" below for more information on Economic mode.
To obtain the lamp hour information:
1. Press MENU on the projector or MENU/EXIT on the remote control, and then press / until
the Advanced Setup menu is highlighted.
2. Press to highlight Lamp Settings and press ENTER. The Lamp Settings page is displayed.
3. The lamp hour information is shown in the row of Equivalent Lamp Hour.
4. To leave the menu, press MENU on the projector or MENU/EXIT on the remote control.
Extending lamp life
The projection lamp is a consumable item. To keep the lamp life as long as possible, you can do the
following settings via the OSD menu.
• Setting Lamp Power as Economic
Using Economic mode reduces system noise and power consumption. If the Economic mode is
selected, the light output will be reduced and result in darker projected pictures.
Setting the projector in Economic mode also extends the lamp life. To set Economic mode, go to the
Advanced Setup > Lamp Settings > Lamp Power menu and press / .
• Setting Auto Power Off
This function allows the projector to turn off automatically if no input source is detected after a set
period of time.
To s e t Auto Power Off, go to the System Setup > Operation Settings > Auto Power Off menu
and press / to select a time period. The time period can be set from 5 to 30 minutes in 5-minute
increments. If the preset time lengths are not suitable for your presentation, select Disable. The
projector will not automatically shut down in a certain time period.
52
Additional information
Page 53

Timing of replacing the lamp
OK
NOTICE: Order replacement lamp
Lamp > XXXX hrs
Order a new lamp at
lamp.benq.com
WARNING
OK
NOTICE: Replace lamp soon
Lamp > XXXX hrs
Order a new lamp at
lamp.benq.com
WARNING
NOTICE: Replace lamp now
Lamp > XXXX hrs
Lamp-usage time exceeded
Replace lamp (refer to User’s Manual)
then reset lamp timer.
Order a new lamp at
lamp.benq.com
OK
WARNING
When the Lamp indicator lights up red or a message appears suggesting it is time to replace the lamp,
please install a new lamp or consult your dealer. An old lamp may cause a malfunction in the projector
and in some instances the lamp may explode. Go to http://lamp.BenQ.com for a replacement lamp.
The Lamp indicator light and Temperature warning light will light up if the lamp becomes too hot. Turn
the power off and let the projector cool for 45 minutes. If the Lamp or Temp indicator still lights up after
turning the power back on, please contact your dealer. See "Indicators" on page 56 for details.
The following Lamp warning displays will remind you to change the lamp.
Status Message
Install a new lamp for optimal performance. If the projector is
normally run with Economic selected (See "Getting to know the
lamp hour" on page 52), you may continue to operate the projector
until the next hour lamp warning appears.
Press ENTER to dismiss the message.
It is strongly recommended that you replace the lamp at this age.
The lamp is a consumable item. The lamp brightness diminishes with
use. This is normal lamp behavior. You can replace the lamp
whenever you notice that the brightness level has significantly
diminished.
Press ENTER to dismiss the message.
English
The lamp MUST be replaced before the projector will operate
normally.
Press ENTER to dismiss the message.
"XXXX" shown in the above messages are numbers that vary depending on different models.
Replacing the lamp
• To reduce the risk of electrical shock, always turn the projector off and disconnect the power cable
before changing the lamp.
• To reduce the risk of severe burns, allow the projector to cool for at least 45 minutes before replacing the
lamp.
• To reduce the risk of injuries to fingers and damage to internal components, use caution when removing
lamp glass that has shattered into sharp pieces.
• To reduce the risk of injuries to fingers and/or compromising image quality by touching the lens, do not
touch the empty lamp compartment when the lamp is removed.
• This lamp contains mercury. Consult your local hazardous waste regulations to dispose of this lamp in a
proper manner.
Additional information
53
Page 54

English
1. Turn the power off and disconnect the
projector from the power outlet. Turn off all
connected equipment and disconnect all other
cables. See "Turning the projector off" on
page 41 for details.
2. Slightly lift the projector up. Loosen the
screws on the lamp cover.
3. Remove the lamp cover.
Notes
• Pulling it too quickly may cause the lamp to
break and scatter broken glass in the projector.
To reduce the risk of injuries to fingers and
damage to internal components, use caution
when removing lamp glass that has shattered.
• Do not place the lamp in locations where water
might splash on it, children can reach it, near or
above heat sources, or near flammable
materials.
• Do not insert your hand into the projector when
the lamp is removed. If you touch the optical
components inside, it could cause blurred
images.
6. Insert the replacement lamp. Make sure it is
pushed fully and firmly in place.
7. Tighten the screws securing the lamp box.
8. Ensure the handle is fully locked in place.
4. Loosen the screws that hold the lamp to the
projector. If the screws are not loosened
completely, they could injure your fingers.
5. Lift the handle so that it is perpendicular to
the lamp. Use the handle to slowly pull the
lamp out of the projector.
Notes
• Please be careful to not over-tighten the screws.
• Loose screws may cause a bad connection, which
could result in malfunction.
9. Re-install the lamp cover.
10. Tighten the screws on the lamp cover.
11. Reapply power and turn the projector back
on.
54
Additional information
Page 55

Resetting the lamp timer
Do not reset the lamp timer if the lamp has not been replaced as this could cause damage.
1. After the start-up logo, press MENU on the projector or MENU/EXIT on the remote control, and
then press / until the Advanced Setup menu is highlighted.
2. Press to highlight Lamp Settings and press ENTER. The Lamp Settings page is displayed.
3. Highlight Reset Lamp Timer and press ENTER. A warning message is displayed asking if you want
to reset the lamp timer. Highlight Reset and press ENTER. The lamp time will be reset to "0".
English
Additional information
55
Page 56

English
Indicators
There are three indicators which show the status of the projector. Check the following for information
about the indicator lights. If there is anything wrong, turn the projector off and contact your dealer.
Light Status & Description
POWER TEMP LAMP
Power eve n t s
Orange Off Off
Green
Flashing
Green Off Off
Orange
Flashing
Off Off
Off Off
Lamp events
Off Off Red
Orange Off Red
Thermal events
Off Red Off
Off Red Red
Off Red Green
Off Red Orange
Orange Red Red
Orange Red Green
Off Orange Red
Stand-by mode.
Powering up.
Normal operation.
Normal power-down cooling
Lamp error in normal operation
Lamp is not lit up
Fan 1 error (the actual fan speed is +25% outside the desired speed)
Fan 2 error (the actual fan speed is +25% outside the desired speed)
Fan 3 error (the actual fan speed is +25% outside the desired speed)
Fan 4 error (the actual fan speed is +25% outside the desired speed)
Temperature 1 error (over limited temperature)
Temperature 1 error (over limited temperature)
Fans do not rotate in the process of powering up
56
Additional information
Page 57

Troubleshooting
Problem Cause Remedy
Plug the power cable into the AC inlet on the
rear of the projector, and plug the power
cable into to the power outlet. If the power
outlet has a switch, make sure that it is
switched on. (See page 20.)
Wait until the cooling down process has
completed.
Correctly attach the lamp cover. (See page
53.)
Turn the video source on and check that the
signal cable is connected correctly. (See page
17.)
Check the connection. (See page 17.)
Select the correct input source with the
Source keys on the remote control or
SOURCE on the projector. (See page 21.)
Correctly connect the cables to the
appropriate terminals. (See page 17.)
Adjust the focus of the lens using the focus
ring. (See page 25.)
Adjust the projection angle and direction as
well as the height of this projector if
necessary. (See page 25.)
Replace both of the batteries with new ones.
(See page 7.)
Remove the obstacle. (See page 7.)
Stand within 8 meters (26.2 feet) of the
projector. (See page 7.)
The projector does
not turn on.
No picture.
Image is unstable.
Picture is blurred.
Remote control does
not work correctly.
There is no power from the power
cable.
Attempting to turn the projector on
again during the cooling process.
The lamp cover is not securely
attached.
The video source is not turned on or
connected correctly.
The projector is not correctly
connected to the input source device.
The input source has not been
correctly selected.
The connection cables are not
securely connected to the projector
or the signal source.
The projection lens is not correctly
focused.
The projector and the screen are not
aligned properly.
The batteries are out of power.
There is an obstacle between the
remote control and the projector.
You are too far away from the
projector.
English
Additional information
57
Page 58

English
Specifications
All specifications are subject to change without notice.
Optical
Projection system Single-chip DLP™ system.
DMD chip 0.65" DLP (1920 x 1080)
Lens F = 2.48 to 2.81, f = 24.1 to 36.15 mm
Projection screen size 30" to 300"
Lamp 300W
Electrical
Compatibility PC: 640 x 400 to 1920 x 1200
Video: NTSC, PAL, SECAM, YPbPr (480i/480p/576i/576p), HDTV
(720p/1080i/1080p)
DDC 2B
Color Space Typ. = 60% NTSC (Target Color Gamut = HDTV Rec. 709)
Te r m i n a l s
Input Analog RGB: D-Sub 15-pin (female) x 1
HDMI (V. 1.3) x 2
Component Video in 5BNC x 1
Component Video (Y/C
Composite Video x 1
PC Audio x 1
Output 12VDC (Max. 0.5 A)
Analog RGB: D-Sub 15-pin (female) x 1
PC Audio x 1
Speaker: 10W x 1
Control Serial Connector: RS232 9 pin (male)
Mini B type USB x 1
IR receiver x 2
LAN x 1
B/CR, Y/PB/PR) x 1 (shared with RGB input)
General characteristics
Projector weight < 7.2 kg (15.9 lbs)
Power VAC 100-240V, 5A, 50-60Hz (Automatic)
Power consumption Max. 470W; Standby < 0.5 W
Operating temperature 0 °C to 40 °C at sea level
Operating humidity 10% - 90% (without condensation)
Operating altitude 0-1499 m at 0°C-35°C
1500-3000 m at 0°C-30°C (with High Altitude Mode on)
Storage temperature -20°C- 60°C/-4°F to 140°F
Storage humidity 10% - 90%
58
Additional information
Page 59

Dimensions
Unit: mm
83.2
104 175
240
214.01
537.90
668.70
577.70
178.17
127.70
92.2
222.2
282.2
Ceiling mount screws:
M6 (Max. L = 25 mm;
Min. L= 20 mm)
Unit: mm
428 mm x 318 mm x 145 mm (W x D x H)
English
428
318
Ceiling mount installation
145
Additional information
59
Page 60

English
Timing chart
Supported timing for PC input
Format Resolution
640 x 480 640 x 480
720 x 400 720 x 400 70.087 31.469 28.3221
800 x 600 800 x 600
1024 x 768 1024 x 768
*1024 x 576 1024 x 576 60 35.82 46.996
*1024 x 600 1024 x 600 64.995 41.467 51.419
1152 x 864 1152 x 864 75 67.5 108
1280 x 720 1280 x 720 60 45.000 74.250
1280 x 768 1280 x 768
1280 x 800 1280 x 800
1280 x 1024 1280 x 1024
1280 x 960 1280 x 960
1360 x 768 1360 x 768 60.015 47.712 85.5
1440 x 900 1440 x 900
1400 x 1050 1400 x 1050 59.978 65.317 121.75
1600 x 1200 1600 x 1200 60 75 162
1680 x 1050 1680 x 1050 59.954 65.29 146.25
640 x 480@67Hz
(MAC13)
832 x 624@75Hz
(MAC16)
1024 x 768@75Hz
(MAC19)
1152 x 870@75Hz
(MAC21)
* Only for the PC (analog RGB) inputs
640 x 480@67Hz 66.667 35 30.24
832 x 624@75Hz 74.546 49.722 57.28
1024 x 768@75Hz 75.020 60.241 80
1152 x 870@75Hz 75.06 68.68 100
Refresh rate
(Hz)
59.94 31.469 25.175
72.809 37.861 31.5
75 37.5 31.5
85.008 43.269 36
60.317 37.879 40
72.188 48.077 50
75 46.875 49.5
85.061 53.674 56.25
60.004 48.363 65
70.069 56.476 75
75.029 60.023 78.75
84.997 68.667 94.5
60 47.396 68.25
59.87 47.776 79.5
59.81 49.702 83.5
74.934 62.795 106.5
84.88 71.554 122.5
60.02 63.981 108
75.025 79.976 135
85.024 91.146 157.5
60 60 108
85.002 85.938 148.5
60 55.469 88.75
59.887 55.935 106.5
H. Frequency
(KHz)
Pixel Frequency
(MHz)
60
Additional information
Page 61

Supported timing for HDMI (HDCP) input
Format Resolution Refresh rate (Hz) H. Freq. (KHz) Pixel Freq. (MHz)
480i 720 x 480 59.94 15.734 27
480p 720 x 480 59.94 31.469 27
576i 720 x 576 50 15.625 27
576p 720 x 576 50 31.25 27
720/50p 1280 x 720 50 37.5 74.25
720/60p 1280 x 720 60 45 74.25
1080/50i 1920 x 1080 50 28.125 74.25
1080/60i 1920 x 1080 60 33.75 74.25
1080/24P 1920 x 1080 24 27 74.25
1080/25P 1920 x 1080 25 28.125 74.25
1080/30P 1920 x 1080 30 33.75 74.25
1080/50P 1920 x 1080 50 56.25 148.5
1080/60P 1920 x 1080 60 67.5 148.5
Supported timing for EDTV and HDTV (via Component inputs)
Format Resolution Refresh rate (Hz) H. Freq. (KHz) Pixel Freq. (MHz)
480i 720 x 480 59.94 15.734 13.5
480p 720 x 480 59.94 31.469 27
576i 720 x 576 50 15.625 13.5
576p 720 x 576 50 31.25 27
720/50p 1280 x 720 50 37.5 74.25
720/60p 1280 x 720 60 45 74.25
1080/50i 1920 x 1080 50 28.125 74.25
1080/60i 1920 x 1080 60 33.75 74.25
1080/24P 1920 x 1080 24 27 74.25
1080/25P 1920 x 1080 25 28.125 74.25
1080/30P 1920 x 1080 30 33.75 74.25
1080/50P 1920 x 1080 50 56.25 148.5
1080/60P 1920 x 1080 60 67.5 148.5
English
Supported timing for Video input
Format Resolution
NTSC 3.58 - 60 15.734 3.58
NTSC 4.43 - 60 15.734 4.43
PAL-B/G - 50 15.625 4.43
PAL M - 60 15.734 3.58
PAL N - 50 15.625 3.58
PAL 60 - 60 15.734 4.43
SECAM - 50 15.625 4.25/4.43
Refresh rate
(Hz)
H. Freq. (KHz)
Additional information
Pixel Freq.
(MHz)
61
Page 62

English
Warranty and Copyright information
Warranty
BenQ warrants this product against any defects in material and workmanship, under normal usage and
storage.
Proof of purchase date will be required with any warranty claim. In the event this product is found to be
defective within the warranty period, BenQ’s only obligation and your exclusive remedy shall be
replacement of any defective parts (labor included). To obtain warranty service, immediately notify the
dealer from which you purchased the product of any defects.
Important: The above warranty shall be void if the customer fails to operate the product in accordance
with BenQ’s written instructions, especially the ambient humidity must be in-between 10% and 90%,
temperature in-between 0
a dusty environment
from country to country.
For other information, please visit www.BenQ.com.
. This warranty gives you specific legal rights, and you may have other rights which vary
Copyright
Copyright © 2012 by BenQ Corporation. All rights reserved. No part of this publication may be
reproduced, transmitted, transcribed, stored in a retrieval system or translated into any language or
computer language, in any form or by any means, electronic, mechanical, magnetic, optical, chemical,
manual or otherwise, without the prior written permission of BenQ Corporation.
°C and 35°C, altitude lower than 3000 meters, and avoiding to operate the projector in
All trademarks and registered trademarks are the property of their respective owners.
Disclaimer
BenQ Corporation makes no representations or warranties, either expressed or implied, with respect to
the contents hereof and specifically disclaims any warranties, merchantability or fitness for any particular
purpose. Further, BenQ Corporation reserves the right to revise this publication and to make changes
from time to time in the contents hereof without obligation of BenQ Corporation to notify any person of
such revision or changes.
is a trademark of SRS Labs, Inc. WOW HD technology is incorporated under license from SRS
Labs, Inc.
WOW HD™ significantly improves the playback quality of audio, delivering a dynamic 3D entertainment
experience with deep, rich bass and high frequency clarity for crisp detail.
62
Warranty and Copyright information
 Loading...