

Page 1

BenQ S650D
Mobile Phone User’s Manual
Page 2

Copyright
© 2002. xxx Corporation. All rights reserved. No part of this publication
may be reproduced, transmitted, transcribed, stored in a retrieval system
or translated into any language or computer language, in any form or by
any means, electronic, mechanical, magnetic, optical, chemical, manual or
otherwise, without the prior written permission of xxx Corporation.
* This publication includes images from CorelDRAW® 9 which are
protected by the copyright laws of the U.S., Canada and elsewhere.
Used under license.
Disclaimer
xxx Corporation makes no representations or warranties, either
expressed or implied, with respect to the contents hereof and
specifically disclaims any warranties, merchantability or fitness for any
particular purpose. Further, xxx Corporation reserves the right to revise
this publication and to make changes from time to time in the contents
hereof without obligation of xxx Corporation to notify any person of
such revision or changes.
Page 3

SAFETY INFORMATION
For your safety, please read the guidelines below
carefully before you use your phone:
Exposure to Radio Frequency Signals
Max. SAR measurement: GSM900: 0.874 W/KG; DCS1800: 0.339 W/
KG.
Your wireless handheld portable telephone is a low power transmitter
and receiver. When it is ON, it receives and also sends out radio
frequency (RF) signals.
European and international agencies have set standards and
recommendations for the protection of public exposure to RF
electromagnetic energy.
• International Commission on Non-Ionizing Radiation Protection
(ICNIRP) 1996
• Verband Deutscher Elektringenieure (VDE) DIN- 0848
• Directives of the European Community, Directorate General V in
Matters of Radio Frequency Electromagnetic Energy
• National Radiological Protection Board of the United Kingdom, GS 11,
1988
• American National Standards Institute (ANSI) IEEE. C95.1- 1992
• National Council on Radiation Protection and Measurements (NCRP).
Report 86
• Department of Health and Welfare Canada. Safety Code 6
These standards are based on extensive scientific review. For example,
over 120 scientists, engineers and physicians from universities,
government health agencies and industry reviewed the available body of
research to develop the updated ANSI Standard.
The design of your phone complies with these standards when used
normally.
Safety Information i
Page 4

Antenna Care
Use only the supplied or approved replacement antenna. Unauthorized
antennas, modifications or attachments may damage the phone and
violate FCC regulations.
Phone Operation
Normal Position: Hold the phone as you would any other telephone with
the antenna pointed up and over your shoulder.
For your phone to operate most efficiently, do not touch the antenna
unnecessarily when the phone is in use. Contact with the antenna affects
call quality and may cause the phone to operate at higher power level
than otherwise needed.
Batteries
All batteries can cause property damage, injury or burns if a conductive
material such as jewelry, keys or beaded chains touches exposed
terminals. The material may complete electrical circuit and become quite
hot. To protect against such unwanted current drain, exercise care in
handling any charged battery, particularly when placing it inside your
pocket, purse or other container with metal objects. When battery is
detached from the phone, your batteries are packed with a protective
battery cover; please use this cover for storing your batteries when not
in use.
Driving
Check the laws and regulations on the use of wireless telephones in the
areas where you drive. Always obey them. Also, if using your phone
while driving, please:
• Give full attention to driving--driving safety is your first responsibility.
• Use hands-free operation, if available.
• Pull off the road and park before making or answering a call if driving
conditions so require.
ii Safety Information
Page 5

Electronic Devices
Most modern electronic equipment is shielded from RF signals. However,
certain electronic equipment may not be shielded against the RF signals
from your wireless phone.
Pacemakers
The Health Industry Manufacturers Association recommends that a
minimum separation of six (6") inches be maintained between a handheld
wireless phone and a pacemaker to avoid potential interference with the
pacemaker. These recommendations are consistent with the
independent research by and recommendations of Wireless Technology
Research.
Persons with pacemakers:
• Should ALWAYS keep the phone more than six inches from their
pacemaker when the phone is turned ON.
• Should not carry the phone in a breast pocket.
• Should use the ear opposite the pacemaker to minimize the potential
for interference.
If you have any reason to suspect that the interference is taking place,
turn your phone OFF immediately.
Hearing Aids
Some digital wireless phones may interfere with some hearing aids. In the
event of such interference you may want to consult your hearing aid
manufacturer to discuss alternatives.
Other Medical Devices
If you use any other personal medical device, consult the manufacturer
of your device to determine if they are adequately shielded from external
RF energy. Your physician may be able to assist you in obtaining this
information.
Safety Information iii
Page 6

Tu r n y o u r p h o n e OFF in health care facilities when any regulations
posted in these areas instruct you to do so. Hospitals or health care
facilities may be using equipment that could be sensitive to external RF
energy.
Veh ic les
RF signals may affect improperly installed or inadequately shielded
electronic systems in motor vehicles. Check with the manufacturer or its
representative regarding your vehicle. You should also consult the
manufacturer of any equipment that has been added to your vehicle.
Posted Facilities
Tu r n y o u r p h o n e OFF in any facility where posted notice so require.
Aircraft
FCC regulations prohibit using your phone while in the air. Switch OFF
your phone before boarding an aircraft.
Blasting Areas
To avoid interfering with blasting operations, turn your phone OFF
when in a "blasting area" or in area posted "TURN OFF TWO-WAY
RADIO". Obey all signs and instructions.
Potentially Explosive Atmospheres
Tu r n y o u r p h o n e OFF and do not remove the battery when in any area
with a potentially explosive atmosphere and obey all signs and
instructions. Sparks, from your battery, in such areas could cause an
explosion or fire resulting in bodily injury or even death.
iv Safety Information
Page 7

Areas with a potentially explosive atmosphere are often, but not always
clearly marked. They include fueling areas such as gasoline stations;
below deck on boats; fuel or chemical transfer or storage facilities;
vehicles using liquefied petroleum gas (such as propane or butane); areas
where the air contains chemicals or particles, such as grain, dust, or
metal powders; and any other area where you would normally be
advised to turn off your vehicle engine.
For Vehicles Equipped with an Air Bag
An air bag inflates with great force. DO NOT place objects, including
both installed or portable wireless equipment, in the area over the air
bag or in the air bag deployment area. If in-vehicle wireless equipment is
improperly installed and the air bag inflates, serious injury could result.
Safety Information v
Page 8

vi Safety Information
Page 9

TABLE OF CONTENTS
SAFETY INFORMATION ................................................I
1. TOURING YOUR PHONE ......................................... 1
Active flip............................................................................................3
Status LED indicator ........................................................................ 3
Idle mode display ..............................................................................4
Idle display icons................................................................................ 4
Keypad Operations ..........................................................................6
2. PREPARING YOUR PHONE .....................................13
Your SIM card..................................................................................13
Inserting your SIM card..................................................................13
Removing your SIM card................................................................14
The battery.......................................................................................14
Fitting the battery............................................................................14
Removing the battery.....................................................................15
Charging the battery.......................................................................15
3. USING YOUR PHONE.............................................17
Turning on your phone .................................................................17
Making a phone call........................................................................18
Ending a phone call.........................................................................18
Answering a phone call .................................................................18
Rejecting a phone call ....................................................................19
Turning off the phone....................................................................19
Making a voice dial call ..................................................................19
Flash dialing ......................................................................................20
Listening to a voicemail.................................................................21
Making an international call..........................................................21
Making an emergency call .............................................................21
Dialing an extension number .......................................................22
vii Table of Contents
Page 10

Adding Phone Book entries in idle mode .................................22
Last missed, dialed, and received calls.......................................23
Making an abbreviated call............................................................24
Phone book directory shortcut...................................................26
Incoming call waiting......................................................................27
Holding a call ...................................................................................27
Call Options menu .........................................................................28
Adjusting the earpiece volume ....................................................30
Recording a phone call ..................................................................30
Secret recording .............................................................................30
Receiving a message.......................................................................31
Silence-vibration mode..................................................................32
Voice command ..............................................................................33
Choosing a profile using the external display ..........................33
4. INPUT MODES........................................................ 34
Selecting an input mode ................................................................35
T9 Smart Input (T9EN)..................................................................35
ABC Input (ABCD) .........................................................................39
T9 123 Input .....................................................................................40
Insert Symbol....................................................................................40
Select Dictionary .............................................................................40
5. QUICK ACCESS .....................................................41
Using the Quick Access menu.....................................................41
Programming the Quick Access menu ......................................42
6. MOBILE INTERNET ................................................45
Logging on to the Internet............................................................45
Surfing the Internet ........................................................................46
Logging off the Internet.................................................................46
Using browser menu......................................................................47
7. MENUS ..................................................................50
viii Table of Contents
Page 11

Navigating the menus.....................................................................50
Phone Book (1) ...............................................................................52
Find Record (1-1) ............................................................................52
Add Record (1-2) ............................................................................54
Delete (1-3) ......................................................................................54
Copy Record (1-4)..........................................................................55
Status (1-5)........................................................................................57
Memory (1-6) ...................................................................................57
Caller Group (1-7) ..........................................................................58
Own Number (1-8).........................................................................59
Flash Dial (1-9) .................................................................................60
Tools (2) ...........................................................................................61
Auto Time Zone (2-1)....................................................................61
Power On/Off (2-2) ........................................................................62
Hour Minder (2-3) ..........................................................................63
Calendar (2-4) ..................................................................................63
Set Alarm (2-5) ................................................................................65
Stopwatch (2-6) ...............................................................................66
Calculator (2-7)................................................................................67
Voice Memo (2-8) ...........................................................................68
Games (2-9) ......................................................................................69
Call RecS (3) ....................................................................................73
Missed Calls (3-1) ............................................................................73
Call List (3-2)....................................................................................73
Clear Call List (3-3) ........................................................................73
Time Cost Display (3-4) ................................................................73
Call Time (3-5).................................................................................74
Call Cost (3-6) .................................................................................74
Cost Limit (3-7) ...............................................................................75
Call Rate (3-8)..................................................................................75
Services (4).......................................................................................76
ix Table of Contents
Page 12

WAP (4-1).........................................................................................76
S.T.K. (4-2)........................................................................................77
Settings (5)........................................................................................78
Profiles (5-1) .....................................................................................78
Time And Date (5-2) ......................................................................81
Call Settings (5-3) ............................................................................82
Security (5-4)....................................................................................87
Phone Setting (5-5) .........................................................................91
Network (5-6)..................................................................................93
Voice Control (5-7) ........................................................................94
Quick Access (5-8)..........................................................................95
Restore (5-9) ....................................................................................95
Messages (6).....................................................................................96
Inbox (6-1) ........................................................................................96
New Message (6-2) ...................................................................... 100
SMS Chat (6-3).............................................................................. 100
Templates (6-4)............................................................................. 102
Outbox (6-5) ................................................................................. 102
Voice Mail (6-6)............................................................................. 104
Broadcast (6-7) ............................................................................. 104
Settings (6-8).................................................................................. 105
8. THE MENU TREE.................................................. 107
9. C
ARE AND MAINTENANCE .................................108
10. W
HAT TO DO IF... ............................................109
x Table of Contents
Page 13

1. TOURING YOUR PHONE
F
Appearance
ront
Active flip
Earpiece
Antenna
LCD display
Send/answer key
OK/WAP key
Scroll key
Status LED
Power on/off key
Clear key
External display
Alphanumeric keys
Microphone
1. Touring Your Phone 1
Page 14

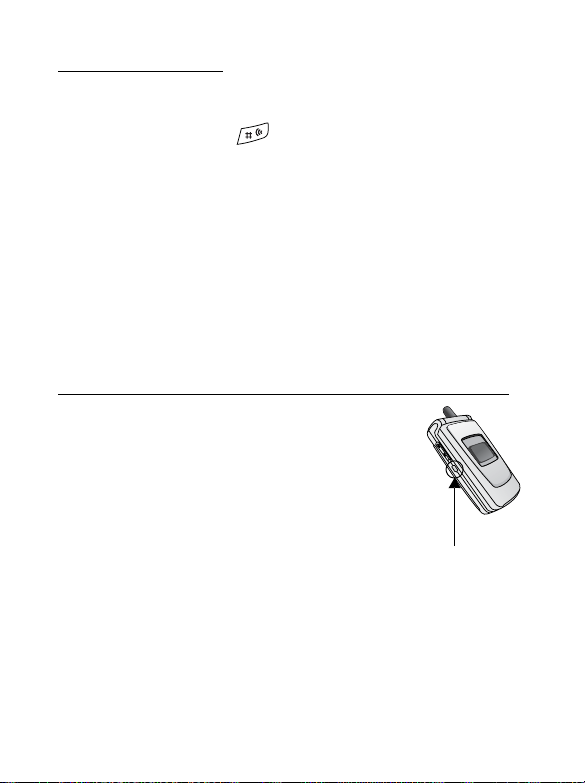
Sid
Bottom
e
Volu m e k e y s
Profile access key
Data transmission and
handsfree jack*
Charger port
Back
Lanyard hole
Battery latch
Battery
Battery compartment
SIM card slot
Battery contacts
*For connection to the optional data transmission kit and handsfree
headset.
2 1. Touring Your Phone
Page 15

Active flip
The active flip has the following functions when your phone is powered
on:
• The screen and backlight turn off automatically as you close the flip,
and wake up again as you open the flip.
• The status LED flashes when you close the flip, and stops flashing after
you open the flip.
• Opening the flip answers a call and closing it ends/rejects a call.
You can activate/deactivate the active flip feature described above.
/
Go to menu: Settings --> Phone Setting --> Active Flip. See
page 93. You cannot answer/disconnect calls by opening/closing
the flip once the active flip is deactivated.
Status LED indicator
• Blue flashes slowly--receiving network signals
successfully.
• Blue flashes rapidly--incoming call from a
number not stored in the phone book or not
belonging to any caller group.
Status LED
1. Touring Your Phone 3
Page 16

Idle mode display
Status icon
bar
Time and date
• You can have your name displayed on the idle screen. Go to
/
menu: Phone Book --> Own Number. See page 59.
• To customize the way the current time and date show on the
idle screen, go to menu: Settings --> Time And Date. See page
81.
• You can personalize the way the idle screen is displayed. Go to
menu: Settings --> Phone Setting --> Display. See page 92
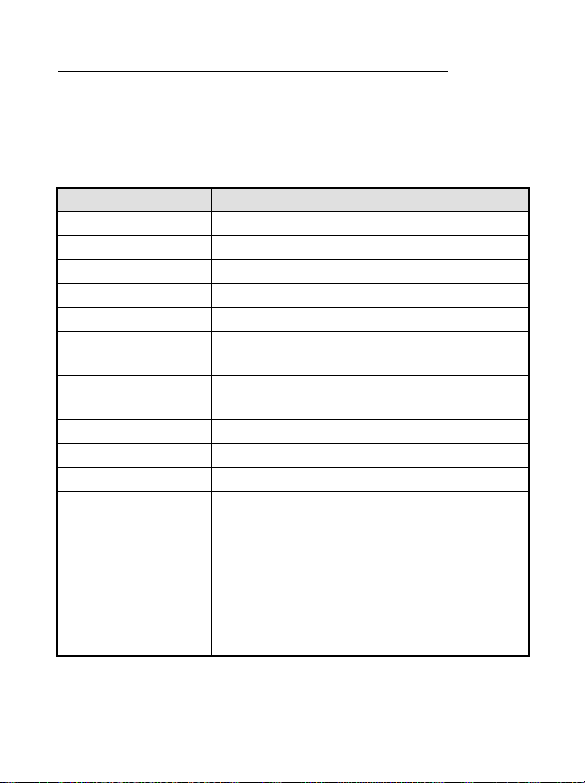
Idle display icons
Icons often shown on the idle display:
Icon Function Description
Signal strength of your designated
Signal Strength
Short message
Voice mail
waiting
Incoming call
diverted
network. The more bars displayed, the
stronger the signal.
Receiving a short text message or having
unread messages (see page 96).
You have a new voice mail (see page 104).
All incoming calls are diverted to your
voice mailbox or a designated phone
number (see page 83).
4 1. Touring Your Phone
Page 17

Icon Function Description
Line in use The current line in use (see page 86).
• When you long press in idle mode
to mute the ring volume and activate the
vibration feature, this icon appears. See
Ringing off
Battery status
During a call You are on a phone call.
Call duration
Roaming
page 32 for details.
• When you choose to turn off the ring
mode or mute the ring volume in the
menu option Profiles, this icon appears.
See page 79.
Battery power level, the more the bars,
the more the battery power. Four bars:
full. No bars: Recharging immediately. The
icon scrolls during charging until the
battery is full.
Appears on the left of the call time during
a call.
When your phone is not used on your
home network, this icon will appear.
1. Touring Your Phone 5
Page 18

Keypad Operations
• Pressing any key turns on the backlight after your phone is
/
powered on. To adjust the backlight duration, go to menu:
Settings --> Phone Setting --> Back Light. See page 91 for
details.
• Your phone beeps with any key press on the keypad. To activate/
deactivate the keypad tone, go to menu: Settings--> Profiles-->
select the active profile--> Customize--> Keypad Tone. See
page 80.
8 In this user guide, "long press" means "pressing and holding a key for
about 2 seconds", while "press" means "pressing and releasing a key
immediately".
8 The lists below include the most commonly used functions of each key.
Refer to the related sections of this user's manual for information on
other key commands.
In idle mode
Key Commands and functions
Power on/off key
Long press to switch your phone on/off.
•
•
Press to reject/cancel a call.
Send/Answer key
•
Press to send or answer a call.
•
Long press to redial the last call number.
•
Press to display last dialed/missed/received numbers.
OK/WAP key
•
Press to enter the main menu.
•
Long press to log on to the internet.
6 1. Touring Your Phone
Page 19

Key Commands and functions
Clear key
•
Press to access Quick Access menu.
•
Long press to mute ring volume and activate vibration
mode.
Scroll key
•
Press to enter the main menu.
Volume key
•
Press the volume key on the left side of the phone to
access the phone book directory.
•
With the flip closed, long press the upper volume key
to start secret recording; long press the lower volume
key to stop recording.
Asterisk key
•
Press to enter “*“.
•
Dialing an international call: long press until "+" is
displayed, and enter the recipient's national code, area
code and phone number.
Voicemail key
•
Press to enter “0“
•
Long press to dial the voice mail box number.
Voice control key
•
Press to enter “#“.
•
Long press to initiate a voice dial call/activate a voice
command.
•
Extension dial: After entering a phone number, long
press to enter "P", then enter the extension and press
.
1. Touring Your Phone 7
Page 20

Key Commands and functions
Alphanumeric keys
•
Press to enter phone number digits
•
~
Default flash dial key: long press to dial any of the first 9
phone numbers saved in the Phone Book.
•
Personalized flash dial key: long press to dial the phone
number it represents.
In the menus
Key Commands and functions
Power on/off key
Press to abort a selection/operation and return to the
•
previous menu or screen.
•
Long press to switch your phone off.
Send/Answer key
•
Press to select or activate an option.
OK/WAP key
•
Press to select or activate an option.
Clear key
•
Press to abort a selection/operation and return to the
previous menu or screen; long press to return to idle
mode directly.
Scroll key
•
Press to scroll the menus and options.
~
Alphanumeric keys
•
Press to select a corresponding option.
8 1. Touring Your Phone
Page 21

During a call
Key Commands and functions
Power on/off key
Press to end a call.
•
•
Press to end the recording of a telephone conversation.
•
Long press to switch your phone off.
Send/Answer key
•
Press to hold an active call/resume a held call.
•
Press to switch between active and held calls.
OK/WAP key
•
Press to access the
•
Long press to record a telephone conversation.
Clear key
•
Press to end the recording of a telephone conversation.
•
In the
Call Options
operation and return to the previous menu or screen;
long press to return to the in-call screen directly.
Scroll key
•
Press to access the
Volume key
•
Press to adjust the earpiece volume.
Call Options
menu, press to abort a selection/
Call Options
menu.
menu.
1. Touring Your Phone 9
Page 22

Input mode
Key Commands and functions
Power on/off key
Press to abort input and data entered and return to the
•
previous menu or screen.
•
Long press to switch your phone off.
Send/Answer key
•
Press to confirm text/data entered.
OK/WAP key
•
Press to confirm text/data entered.
Clear key
•
Press to clear one digit/character; long press to clear all
digits/characters.
Scroll key
•
Press once to move cursor to the next/last insertion
point; long press to move the cursor continuously.
Asterisk key
•
Press to access the input mode menu.
•
Long press to display the punctuation bar at the bottom
of the LCD screen.
•
Press to shift between upper case and lower case.
10 1. Touring Your Phone
Page 23

Alphanumeric keys
Following is a list of the alphanumeric keys and their corresponding
characters and symbols in idle mode and ABCD input:
<In idle mode>
Key Number Key Number/Symbol/Function
17
28
39
40
5
6
<ABCD Input>
Key Characters
* + (long press)
# P (long press after entering a
phone number)
¥
1. Touring Your Phone 11
Page 24

Key Characters
12 1. Touring Your Phone
Page 25

2. PREPARING YOUR PHONE
Yo u r S I M c a r d
To successfully use your phone, you must insert a SIM card (Subscriber
Identification Module) supplied by your network operator. Your SIM card
contains your PIN and phone number as well as a memory in which you
can store phone numbers, messages, etc. Please contact your operator
immediately if your SIM card is missing.
Inserting your SIM card
Scratches can easily damage the metal contacts of the SIM card.
,
Pay special attention to the SIM card as you handle and insert.
1. Locate the SIM card slot in the battery compartment of your phone.
2. Slide the entire SIM card into the slot in the direction of the arrow
shown on the compartment, with the metal contacts of the SIM card
facing down and its cut corner on the bottom left.
SIM card
SIM card slot
2. Preparing your phone 13
Page 26

Removing your SIM card
Slide the SIM card out of the slot and pick it up.
The battery
Do not remove the battery when your phone is on--you may lose
all your personal settings stored either in your SIM card or phone
,
memory.
Fitting the battery
1. Place the bottom end of the battery against the base of the battery
compartment.
2. Press the top of the battery downwards until it clicks into the
compartment.
14 2. Preparing your phone
Page 27

Removing the battery
1. Pull the battery latch.
2. Lift the battery off the compartment.
Charging the battery
1. Insert the travel charger connector into the charger port at the
bottom right of the phone. Be sure you insert the connector in the
right direction (the arrow sign on the top).
Charger port
Charger connector
2. Pull out the charger connector when charging is done.
2. Preparing your phone 15
Page 28

• It takes 24 hours for the travel charger to fully charge a new
/
battery. Recharging takes approximately 160 minutes each time.
• During charging, on the LCD will blink until the battery is
fully charged ( appears in the middle of the screen if the
battery is being charged when powered off). When the battery
is low, you will hear a warning tone and "Battery Low" will
appear on the LCD. When the battery is running out of power,
will appear to remind you to recharge immediately.
Then your phone will power off automatically.
• Use only approved batteries, charger and accessories to ensure
proper function of your phone and battery life. Any malfunction
or damage caused by the use of any third-party accessories will
result in warranty being void.
• If batteries need to be replaced or additional batteries are
requested, please make sure the same type of battery that was
,
included with your package is ordered.
• For safety concerns, when the temperature of the phone goes
over 45° C (113° F) or below 0° C (32° F), charging will come to
a halt. When the phone temperature returns to a normal range,
charging will resume.
16 2. Preparing your phone
Page 29

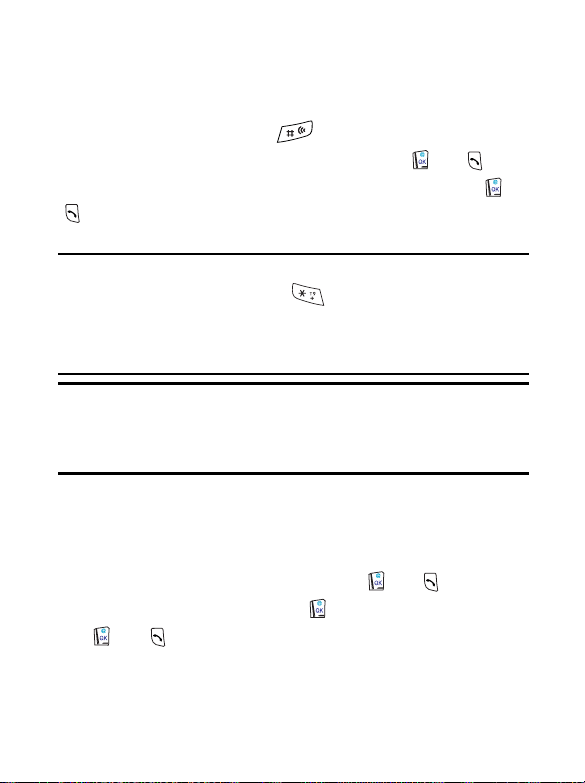
3. USING YOUR PHONE
Turning on your phone
1. Open up the flip of your phone.
2. Long press to turn your phone on.
3. When prompted, enter your PIN. If you type a wrong number while
entering your PIN, delete the wrong number by pressing . When
done, press to confirm.
What is PIN?
/
PIN (Personal Identification Number) is a password provided by
your network operator. With your PIN, you can use your SIM
card and access the services offered by your operator.
If you enter a wrong PIN three times in a row, your SIM card will
be blocked. To unblock the SIM card, you need to enter the PUK
,
(Personal Unblocking Key) of the card. Please call the operator,
and ask for PUK.
4. Once your PIN is accepted, the phone starts searching for your
designated network automatically, as indicates. This may take a
few seconds. When receiving network signals successfully, the phone
beeps twice with its LED changing from red to blue and screen
showing the network you connect to, then goes into idle mode.
8 If network service is not available, no signal level is displayed on the
screen and the LED remains red.
8 If connected to a network you do not have access to, the signal strength
will show on the screen. You can only make an emergency call, though.
3. Using your phone 17
Page 30

Making a phone call
Dial a desired number using the keys on the keypad. Press to delete
wrong digits. Press to send your call.
During a call, you can use the call options described on page 28.
/
Ending a phone call
When you finish a phone call, press or close the flip to hang up and
return to idle mode. Also press or close the flip if you want to drop
a call after dialing.
8 Closing the flip won’t disconnect a call if the active flip feature is
deactivated.
Answering a phone call
When a call comes in, your phone rings or vibrates with its LED flashing
rapidly (the color that the LED flashes depends on which caller group the
incoming call belongs to), and the screen displaying the name or the
phone number of the caller (Network support dependent). The name
displayed depends on the data in the Phone Book. Do either of the
following to answer the call:
1. Open the flip to answer if it is closed.
8 Opening the flip won’t answer a call if the active flip is deactivated.
2. Press to answer if the flip is open.
8 You can change the answering mode to pressing any key for an incoming
call. Go to menu: Settings --> Call Setting --> Any Key Ans.. See
page 85.
18 3. Using your phone
Page 31

Rejecting a phone call
Press or close the flip to reject an incoming call.
8 Closing the flip won’t reject a call if the active flip feature is deactivated.
Turning off the phone
Long press to turn your phone off.
Making a voice dial call
Your phone allows you to dial a phone number by saying its voice tag to
the microphone.
8 You must record a voice tag to a phonebook record and activate the
voice dial feature before you can make a voice dial call.
• When you add or find a phone number in the phone book, you
/
can record the number’s voice tag:
When you save a new phone number you type in idle mode,
or the number of a missed/dialed/received call that is
displayed on the screen, you can record the number’s voice
tag at the same time. See page 22 and 23.
You can utilize the features of abbreviated call and phone
book directory shortcut in the idle mode to record/
change the voice tag of a phone book entry that you find in
the phone book. See details on page 24 and 26.
You can also go to menu: Phone Book --> Find Record or
Add Record to do the voice tag setting. See page 52.
3. Using your phone 19
Page 32
To make a voice dial call, follow the steps below:
1. In idle mode, long press .
2. Say the voice tag of a desired phone number over the microphone
after tone.
8 For best results, make sure you say the voice tag in a clear voice with
minimal wind or background noise.
3. When your phone recognizes this voice tag, it repeats the voice tag
and displays the corresponding phonebook record asking for your
confirmation. Press or to make the call. You can also wait a
few seconds and your phone will dial the number automatically.
To activate/deactivate the voice dial feature, go to menu: Settings
/
--> Voi ce Co ntrol --> Voice Dia l. See page 94.
Flash dialing
You have 3 ways to do one-touch dialing:
1. Long press . The last number you dialed will be dialed again
automatically.
2. Default Flash dial keys: You can dial any of the first 9 phone numbers
stored in the Phone Book by long pressing the alphanumeric key that
corresponds to the number’s phone book location. If the number is
saved in the Phone Book at location 5, for example, long press
to make the call.
20 3. Using your phone
Page 33

3. Personalized flash dial keys: you can personalize to as a
flash dial key for any phone numbers saved in the Phone Book,
without having to consider their locations in the phone book. For
example, if has been specified as a flash dial key for a phone
number saved in location 15 in the Phone Book, long press to
dial the phone number.
8 For how to personalize flash dial keys, go to menu: Phone Book -->
Flash Dial. See page 60.
cannot be personalized.
is locked for voice mailbox dialing and
Listening to a voicemail
In idle mode, long press to call your operator's voice mail center
and listen to the voice mail left by a caller. You can also go to menu:
Messages --> Voice Mai l to make a voicemail call. See more details on
page 104.
8 Voicemail feature is network support and subscription dependent.
Making an international call
1. Enter the outgoing international code, or long press until "+" is
displayed.
2. Enter the recipient's national code, area code and phone number.
Send out your call by pressing .
Making an emergency call
Enter 112 (the international emergency number) and press . This
emergency call can be made without a SIM card inserted, so long as you
are within the coverage of the type of network used by your phone.
3. Using your phone 21
Page 34
Dialing an extension number
After you key in the telephone number, long press for a second
and "P" will display on the screen. Enter the extension number and press
to make the call.
Adding Phone Book entries in idle mode
Enter a phone number and press . Follow prompts to do the
following settings:
1. Enter the name for the phone number.
2. Confirm phone number and location number for the record, and
press or to save.
3. Add a voice tag to the record: Press or as "Add Voice Tag?"
pops up, and say the recipient's name loud and clear over the
microphone after tone. Your phone will replay the voice tag if
recording is successful. Then a special icon will appear at the top of
the record indicating the voice tag has been attached to this record.
The next time you display this phone book record your phone will
play its voice tag recording simultaneously. In idle mode you can dial
this number by saying its voice tag to the microphone.
8 For best results, make sure you record a voice tag in a clear, natural
voice with minimal wind or background noise.
To specify a caller group for a new phone number record, go to
/
menu: Phone Book --> Find Record
52 and 58 for details. In the idle mode you can also use the
abbreviated call and phone book directory shortcut features
to specify a caller group.
or Caller Group. See page
22 3. Using your phone
Page 35

Last missed, dialed, and received calls
There are two scenarios in which you can review the most recently
missed, answered and dialed phone numbers as well as the time and date
information associated with the calls:
1. If for any reason incoming calls were not answered, a message of
missed calls along with the number of call times will appear to remind
you of the calls you missed. Press or and the most recently
missed call is displayed first. Then use to display the missed call
you want.
2. In idle mode, you can press to access a list of missed, dialed and
received calls. The most recent is displayed first, then you can press
to scroll to the phone number you want.
When the phone number of a missed/dialed/received call appears on the
screen, you can do the following:
1. Press to redial the phone number. You can also press and
select Call from the menu and press or to dial.
2. Press and select Edit to edit the displayed phone number. When
done, you can:
Press to dial the modified number.
Press to save the modified number to your phone book.
Follow the prompts to enter the name and confirm the phone
number. Then specify location number and press or to
save. Finally record a voice tag for the newly saved phone number.
3. To store the phone number in your phone book, press and select
Edit or Save. Follow the prompts to enter the name and confirm the
phone number. Then specify location number and press or
to save. Finally record a voice tag for the newly saved phone number
record.
3. Using your phone 23
Page 36
4. To delete the displayed phone number record, press , select
Delete and press or .
To specify a caller group for a new phone number record, go to
/
menu: Phone Book --> Find Record
52 and 58 for details. In the idle mode you can also use the
abbreviated call and phone book directory shortcut features
to specify a caller group. See details below.
or Caller Group. See page
Making an abbreviated call
Type a location number of a desired phone book record and press
. When the phone number appears, you can do either of the
following:
• Press to dial the phone number.
• Press , and the following options appear:
Call: Dial the phone number.
Edit: Edit the phone number record.
Delete: Delete the phone number record from the phone book.
Move: Copy the record to another location. Choose to copy the
record to the SIM or phone memory, enter the location number,
and press or .
Vo ice D ial: Add a voice tag to the phone number record. "Add
Voice Tag?" pops up as you enter this option. Press or
and say the recipient's name loud and clear over the microphone
after tone. Your phone will replay the voice tag if recording is
successful. Then a special icon will appear at the top of the record
indicating the voice tag has been attached to this record. The next
24 3. Using your phone
Page 37

time you display this phonebook record your phone will play its
voice tag recording simultaneously. In idle mode you can dial this
number by saying its voice tag to the microphone.
8 For best results, make sure you record a voice tag in a clear, natural
voice with minimal wind or background noise.
8 if the phone number already has a voice tag attached, you can
choose to play (Playback), overwrite (Edit), or erase the existing
voice tag recording (Delete).
Caller Group: Add the phone book record to a preferred caller
group list. Select a caller group from the menu and press or
.
What is a caller group?
/
A caller group is a group of callers who share the same incomingcall settings, i.e. ring tone, image, LED color, etc. When a member
of a particular caller group phones you, your phone will make the
group's ring tone and display the image and LED color assigned to
the group, so you can tell immediately which group the caller
belongs to before you answer the call.
• Each name in the phonebook can belong to only one caller
/
group.
• To customize the settings of each caller group, go to menu:
Phone Book --> Caller Group. See page 58 for details.
• To activate/deactivate the Caller Group feature, go to menu:
Settings --> Phone Setting --> Caller Group. See page 93.
3. Using your phone 25
Page 38

Phone book directory shortcut
In idle mode, press the volume keys to access the Phone Book
directory.
• Once you access the Phone Book directory, press or to
browse the entries (listed in alphabetical order). appears at the
top left of the screen if the record you display is stored in the SIM card
memory, while shows up if the record is stored in the phone
memory.
• In the directory you can also find an entry by typing the first letter of
its name. For example, if you want to find a name that starts with "K",
press twice for "K". The names starting with "K" will appear first.
Use or to scroll the names until you find the one you want.
• When the desired phone number appears, you can:
• Press to dial the number.
• Press , and choose from the following:
Call: dial the phone number.
Edit: edit the phone number record.
Delete: delete the phone number record from the phone book.
Move: Copy the record to another location.
Vo ice D ial: Add a voice tag to the phone number record.
Caller Group: Add the phone book record to a preferred caller
group list.
8 The above settings are the same as those for the abbreviated
call feature.
26 3. Using your phone
Page 39

Incoming call waiting
If another call comes in while you are on the phone, you can:
• Press and to reject the waiting call.
• Press and to end the active call and connect the waiting call.
• Press and to hold the active call and connect to the waiting
call.
8 The call waiting feature is network and subscription dependent.
Holding a call
• When you are on a phone call and wish to dial another number, you
can place the current call on hold by pressing . After a call is put on
hold, " 1" will appear on the screen, and when the second call is
connected, " 1" will pop up.
• When you have an active call and a call that is on hold, you can press
to switch calls.
• When an active call ends, the call on hold will resume. You can also
make a call on hold active again by pressing if you have only a held
call.
8 The hold-call feature is network and subscription dependent.
8 The figure next to / (in the example above it is "1") indicates
the number of held/active calls.
3. Using your phone 27
Page 40

Call Options menu
When you are on a phone call, press or to access the Call
Options menu listed below. Use to scroll and press or to
access a highlighted option; press or to leave a selected option
and return to the previous menu. Long press to return to the in-call
screen directly.
8 The options marked "*" are network and subscription dependent.
Mute
Mute the microphone so the person you are speaking with cannot hear
your voice. appears when this mode is on.
Send tone
Your phone’s microphone will give out keypad tones when you dial
another number. Choose to enable or disable this feature.
Conference
The Conference menu has the following options:
8 The maximum number of par ties allowed during a conference (multi-
party) call varies, depending on the network you choose.
* End Call
During a multi-party call, you can end the call on one of the parties
by selecting this function.
* Swap
This function is available when you have both active and held calls.
Swap transfers the active call to hold and vice versa, so that you
may converse with the other party.
28 3. Using your phone
Page 41

* Hold
This function allows you to put a currently active call on hold, so
that you can initiate a new call.
* Unhold
Once you end the new call while holding an old call, the old call can
be made active again by selecting this function.
* Join Call
This function allows you to make a conference call.
* Private
Talk privately with one participant during a conference call.
* Transfer
This function allows you to end your own call and connect the active
and held calls, so the callers of the active and held calls can speak
with each other alone.
*Messages
You can read or write messages using this Messages menu. For details
on the Messages menu, see page 96.
Phone Book
You can access the Phone Book menu by selecting this item. For details
on the Phone Book menu, see page 52.
Call List
View dialed, received, and missed calls. When the desired phone number
appears, press and choose to call, edit, save, or delete the number.
3. Using your phone 29
Page 42

Adjusting the earpiece volume
When speaking on the phone, press to adjust the earpiece volume as
indicates on the screen.
Recording a phone call
During a phone call, you can long press to record the telephone
conversation. The maximal recording time is approximately 5 minutes
and 10 seconds, and you can make as many as 20 recordings until the
maximal time runs out.
8 To play or erase a recording, go to menu: Tools --> Vo ice M emo .
Please refer to page 68.
Secret recording
You can secretly record a person’s talk using your phone:
• When your phone is in idle mode with its flip closed, you can long
press the upper volume key to start recording. The start action is
accompanied by a beep.
• After recording starts, you can long press the lower volume key to quit
recording, which is indicated by a beep. Recording stops automatically
as you open the flip or when a call or short message comes in. The
maximal recording time is about 5 minutes and 10 seconds, and you
can make as many as 20 recordings until the maximal time runs out.
8 The secret recording feature must be activated in idle mode with the flip
closed. It can’t be turned on when you are in the middle of another
function or in the menus.
30 3. Using your phone
Page 43

8 If you turn off the keypad tone, your phone does not beep when long
pressing the upper/lower volume key to activate/deactivate the secret
recording feature. To activate/deactivate the keypad tone, go to menu:
Settings--> Profiles--> select the active profile--> Customize-->
Keypad Tone. See page 80.
8 To listen to or erase a secretly recorded conversation, go to menu: Tools
--> Voi ce M emo. Please refer to page 68.
Receiving a message
Your phone can receive three types of messages as follows:
• General short message: Your phone vibrates or makes an alert tone
as a new message comes in, with prompt "Read?" popping up with
in the middle and on the top of the screen. If the flip is
closed, you will see the on the external display. Press or
to read the message. Having read a message, press or and
choose to delete, edit, or reply to the message. See details on page
• To read a short message, you can also go to menu: Messages --
/
>Inbox. Please refer to page
• To write a new message, go to menu: Messages --> New
Message.
• You can customize the way your phone alerts you as it receives a
message. Go to menu: Settings -->Profiles, select a profile you
want, then go to Customize -->MsgS. Alert. See page 80.
96 for details.
96.
3. Using your phone 31
Page 44
• Chat message: When receiving a chat message, your phone shows the
sender’s nickname followed by the message as "nickname> message".
Press or to join the chat and follow the prompts to enter
your nickname and a chat message.
To start a chat session, you can also go to: Messages --> Inbox --
/
> Start Chat or Messages --> SMS Chat. For details on the
SMS Chat, see page 99 and 100.
• Ring tone: Upon receiving a ring tone, press or , and the
screen shows "Ring SMS". Then press or and choose to play,
save the ring tone to your phone, or forward it to another person.
Silence-vibration mode
In idle mode, long press to mute the ring volume and activate the
vibration mode for incoming calls (the ring volume and vibration settings
of the activated profile will then be temporarily disabled). After you long
press to switch on the silence-vibration mode, will appear on
the upper right of the idle screen. To turn off the silence-vibration mode
and return to the activated profile settings, simply long press again.
• The silence-vibration feature set in idle mode is temporary.
/
When you turn your phone on after turning it off, or if you
change the settings of the profile that is to be activated,
vibration and ring volume settings that your phone uses will be
the ones under the activated profile. See also Profiles on page
78.
• This feature is specially intended for fast silence settings of your
phone when you are in the middle of a meeting.
32 3. Using your phone
Page 45
Voi ce c o m ma nd
Your phone allows you to readily access a desired feature by saying its
voice command to the microphone:
1. In idle mode, long press .
2. Wait for the tone to finish and then say the voice command of a
desired feature over the microphone in a clear voice.
8 For best results, please use the voice command feature in a area with
minimal wind or background noise.
3. When your phone recognizes this voice tag, it repeats the voice tag
and brings you directly to the feature you want.
8 A feature that can be accessed by saying its voice command must have
a voice command recording. To record a voice command for a particular
feature, go to menu: Settings -->
Command. See details on page 94.
Choosing a profile using the external display
When the flip is closed, you can still adjust your
active profile using external display. By pressing the
profile access key, you will see General show up on
the screen. Use volume keys to scroll through the
profile list, and when the profile you want is shown
on the screen, press the profile access key to choose
it. The display would show Activated to confirm
your choice.
Voi ce Co ntrol --> Voice
Profile access key
3. Using your phone 33
Page 46

4. INPUT MODES
M
Your phone provides several input methods when you wish to:
• write short messages.
• enter names or numbers in the phone book.
• jot down notes in the calendar function, etc....*
8 For details on these features, see related sections of this user guide.
essage editor display
Cursor
Character count
information
Phone book editor display
Prompt for
current input
34 4. Input modes
Input mode
indicator
Te x t a r ea
Page 47

Selecting an input mode
On the editor screen, press to access the input mode menu. Scroll
the menu with and press or to select, or press a
corresponding number key( ~ ) directly to choose from the
following input modes.
8 The default input mode is T9 Smart Input (T9EN). You can set the
input mode that comes along with the editor screen. Go to menu:
Settings --> Phone Setting --> Input Mode. See page 93.
8 The input mode menu may vary from market to market.
T9 Smart Input (T9EN)
The Smart Input system analyzes letters as they are being typed to come
up with the right words, making text entry quick and easy. T9 Smart
Input is an efficient alternative to the traditional multi-tapping input,
which requires you to press a key several times for an appropriate letter.
Features of T9 Smart Input
• Just one key press per letter; no multi-pressing for entering letters.
• Comprehensive word database including common names.
• Widely used punctuation and symbols included.
4. Input modes 35
Page 48
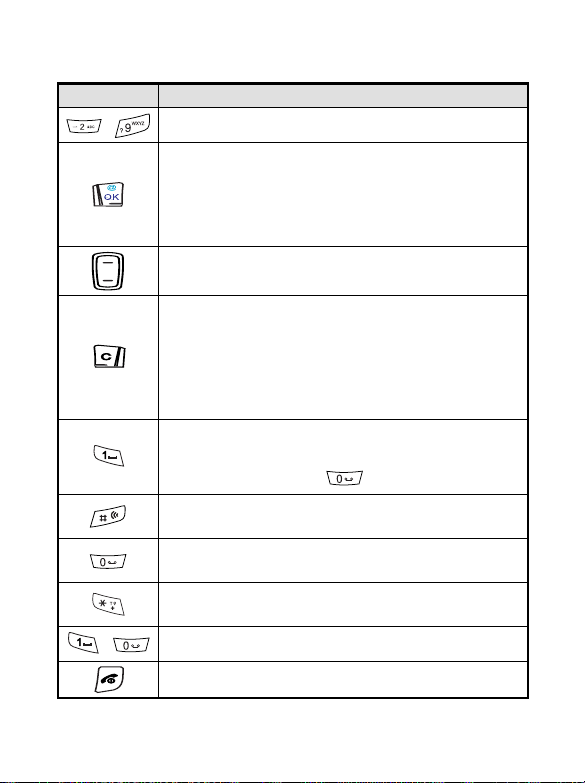
T9 Smart Input keypad mapping
key Commands and functions
~
~
Enter words.
• Confirm text entered.
• Enter a highlighted symbol from the punctuation &
symbol bar.
• Select a desired input mode from the input mode
menu.
• Move the cursor.
• Scroll the punctuation bar/input mode menu.
• Press to clear a letter.
• Long press to clear all text.
• (Provided that no message has been keyed in) press
to exit from editor screen and back to the previous
menu; long press to return to idle screen directly.
• Exit from the punctuation bar/input mode menu.
•
Enter space.
•
Stop the input of a word to proceed with smart
punctuation input using .
Switch between upper case/lower case/first letter
capitalized.
• For the next word candidate.
• For smart punctuation input.
• Access the input mode menu.
• Long press for the punctuation & symbol bar.
Select a corresponding input mode/
Back to the previous menu.
punctuation.
36 4. Input modes
Page 49

Tips on using T9 Smart Input
To enter words:
• Press an alphanumeric key only once for each desired letter without
having to consider the order of the alphabets printed on the keys.
• The word changes as you type letters--disregard what's on the screen
until you type an entire word.
• Press to shift among the following:
Uppercase (T9EN appears at bottom right).
Lowercase (t9en appears at bottom right).
The first letter of a sentence capitalized (T9En appears at
bottom right).
• If the word displayed is not the one you want after typing it completely,
press for other word candidates.
• When the desired one appears, press to leave a space for the
next word.
• Press once to move the cursor to the insertion point of the next/
previous character; long press to move the cursor continuously.
• Press to clear a single letter; long press to clear all text.
• Press or to confirm entered text.
To enter punctuation and symbols:
• After typing a word you want, press to stop character input, and
press to start smart punctuation input, which displays the
appropriate punctuation based on the word that immediately follows it.
For example, simply press for "'re". If the
punctuation automatically displayed isn't the one you want, press
a couple times till the desired one appears.
4. Input modes 37
Page 50
• You can also long press to display a bar of available punctuation
and symbols at the bottom of the screen. Press to scroll the
symbols one by one; long press to scroll page by page. Press
to enter a highlighted symbol, or press a corresponding number key for
a desired symbol directly ( ~ ).
• Press or to exit from the punctuation & symbol bar.
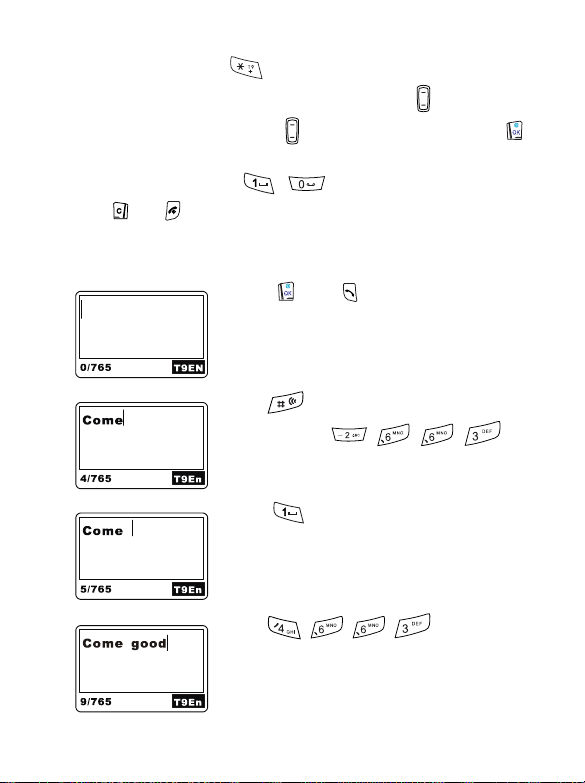
Demo of T9 Smart Input
To enter "Come home." on the message editor screen:
1.Press or to enter the message
editor screen. T9 Smart Input appears as the
default input mode.
2.Press twice to capitalize the first letter
only. Then press for
"C""o""m""e".
3.Press to leave a space for the next
word.
4.Press for "home".
38 4. Input modes
Page 51
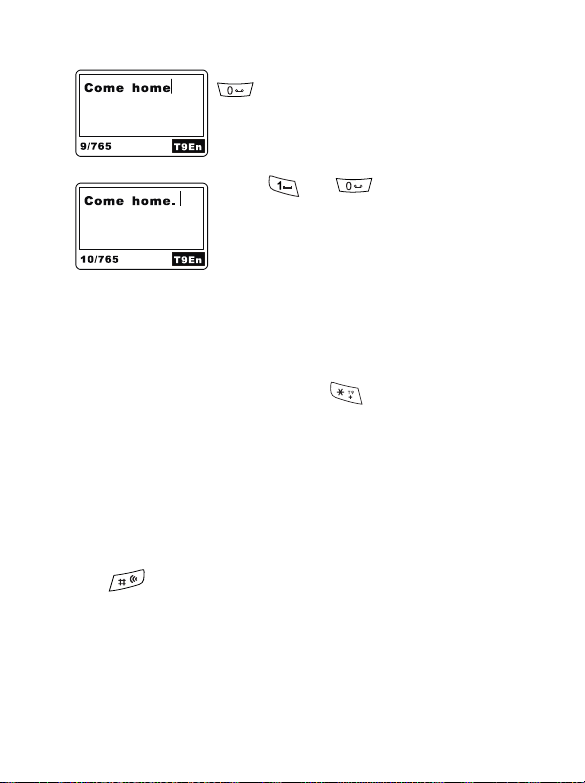
5."good" isn't the word you want, so press
for the next candidate "home".
6.Press and for "." and the message
is complete.
ABC Input (ABCD)
ABC Input is the factory default input mode that appears automatically
with the phone book editor screen. If T9 Smart Input doesn't provide
the word you want, you also can press for the input menu and
select ABC Input.
8 Please see Alphanumeric keys on page 11 for a listing of the alphabets
and symbols represented by each key in ABC Input.
Tips on using ABC Input:
• Follow the order of the alphabets shown on each key to enter data.
Press once for the first letter shown on a particular key, twice for the
second letter, and so on and so forth.
• Press to shift among the following:
Uppercase (ABCD appears at bottom right).
Lowercase (abcd appears at bottom right).
The first letter of a sentence capitalized (Abcd appears at
bottom right).
4. Input modes 39
Page 52

• When you have entered a letter and want to enter the next one, you
can wait for about two seconds until the cursor moves to the position
of the next letter, or simply press a key immediately to enter it.
• If you type a wrong letter or number, you can move the cursor to it by
pressing , then press to erase it.
For example, to enter "Love":
1. Press twice to capitalize the first letter only.
2. Press three times for "L".
3. Press three times for "o".
4. Press three times for "v".
5. Press twice for "e".
T9 123 Input
This input mode allows you to enter numbers using the alphanumeric
keys ~ . To enter punctuation, long press to display the
punctuation and select.
Insert Symbol
Displays the bar of punctuation and symbols. Use to scroll the bar
(long press to scroll page by page) and when the desired symbol is
highlighted, press to select. You can also press a corresponding
number key ( ~ ) for a desired symbol.
Select Dictionary
Select a dictionary database for the language that is currently used in T9
Smart Input. The default language is English.
8 The dictionary may vary from market to market.
40 4. Input modes
Page 53

5. QUICK ACCESS
Quick Access is a ready menu of 9 regularly used features. It provides
you with an efficient means to access these features directly and
minimizes the number of steps required for accessing via the main menu.
Using the Quick Access menu
• In idle mode, press to display the Quick Access menu. The default
menu items and their functions are as follows:
No. Option Functionality
1
2
3
4
5
6
7
8
9
General Activate the General profile settings.
Silent Activate the Silent profile settings.
Meeting Activate the Meeting profile settings.
Outdoors
Personal Activate the Personal profile settings.
Add Entry to SIM
Add Entry to Phone
New Message Write a new message.
Inbox Read messages stored in Inbox.
Activate the Outdoors profile
settings.
Add new phone book records to the
SIM card memory.
Add new phone book records to the
phone memory.
8 The default Quick Access menu may vary from market to market.
• Press to scroll through the menu and press or to access
an option. You can also press a corresponding number key to get to a
desired function directly. To exit from a Quick Access option or
operation, press or .
5. Quick Access 41
Page 54
Programming the Quick Access menu
You can set up a Quick Access menu of your own by choosing which
features you want readily available. To set up your quick access menu,
you must go to: Settings --> Quick Access (see page 95) and the screen
will display a configuration list of preset features as options for you to
add to the Quick Access menu:
Option Functionality
General Activate the General profile settings.
Silent Activate the Silent profile settings.
Meeting Activate the Meeting profile settings.
Outdoors Activate the Outdoors profile settings.
Personal Activate the Personal profile settings.
Add Entry to SIM
Add Entry to Phone
New Message Write a new message.
Inbox Read messages stored in Inbox.
Outbox Read outgoing or saved messages.
Vibrate On Off
Add new phone book records to the SIM card
memory.
Add new phone book records to the phone
memory.
Set the vibration mode for incoming calls. The
vibration mode set in this Quick Access option
is temporary. When you turn your phone on
after turning it off, or when you change the
settings of the profile that is to be activated,
the vibration mode that your phone uses will
be the one under the currently activated
profile.
42 5. Quick Access
Page 55

Option Functionality
Set the ring volume for incoming calls. The ring
volume set in this Quick Access option is
temporary. When you turn your phone on
Ring Volume
My Melodies Edit a melody.
Switch Line 1 2 Switch between Line 1 and Line 2.
Set Time Set the time displayed on the idle screen.
Set Date Set the date displayed on the idle screen.
Set Alarm Set the alarm clock feature.
Calculator Use the calculator feature.
Calendar Access the calendar.
Record Record a voice memo.
Playback
Games
after turning it off, or when you change the
settings of the profile that is to be activated,
the ring volume setting that your phone uses
will be the one under the currently activated
profile.
Play the recording of a voice memo or
telephone conversation.
Access the game menu to select a game you’d
like to play.
5. Quick Access 43
Page 56

When the configuration list appears, scroll the list using and press
or to select a highlighted item, or press a corresponding key
~ to select from item 1-9 directly. Then you will be
prompted to specify a location in the Quick Access menu for the
selected item. Enter a location number (1-9) and press or .
"Settings Saved" will appear indicating that the selected item has been
successfully added to the Quick Access menu.
• The Quick Access menu always has exactly nine options.
/
• Items that are already listed in the Quick Access menu will be
marked by a location number.
• You can replace any of the nine Quick Access options with a
different preset item listed in the configuration list.
• A preset item can be assigned to more than one location in the
Quick Access menu.
• You can press a corresponding number key to select any of the
first 9 preset items in the configuration list.
44 5. Quick Access
Page 57

6. MOBILE INTERNET
Your phone supports WAP (Wireless Application Protocol) technology.
It allows you to log on to the mobile Internet and browse on-line
services available from your service provider, for example, financial,
sport, travel, and entertainment information.
8 The mobile Internet is a network and subscription-dependent feature.
Contact your network operator for details about the mobile Internet
services based on the WAP technology they provide.
8 To successfully connect to the Internet you also need to do proper WAP
settings. Please go to menu: Services --> Wap --> Settings. See page
76.
Logging on to the Internet
There are two ways to launch your phone's browser and start a mobile
Internet session:
1. In idle mode, long press .
2. Go to menu: Services --> Wa p --> Home. See also page 76.
When you launch the browser, a browser greeting screen as shown
below will pop up and your phone will start dialing simultaneously.
6. Mobile Internet 45
Page 58

Surfing the Internet
After you log on successfully, the homepage you connect to will appear.
Use the following keys to navigate through the web pages:
• You can specify a homepage of your own. See page 48. Your
/
network service provider specifies the default homepage.
• The Internet service you connect to determines the layout and
information that appears on the display. Accordingly, actual ways
of navigating the Internet may differ from the following
scenarios.
• Press to scroll up and down the Web menu.
• Press or to link to the next web page.
• Press to return to the previous page.
• Press or to execute the command displayed at the bottom
left of the browser screen; press or to execute the command
displayed at the bottom right.
Logging off the Internet
To return to idle mode, long press to terminate your Internet
connection and close the browser. The phone will hang up
simultaneously.
46 6. Mobile Internet
Page 59

Using browser menu
When you browse web pages, press to access the browser menu,
which contains the options below. Scroll and press or , or press
a number key to select. To return from the current browser menu to the
previous screen or web content, press . You can also press or
to execute the commands displayed at bottom left of the browser
screen and press or for the commands shown at bottom right.
Long press to close the browser and return to idle screen.
1 Reload
Reload the current web page.
2 Home
Go back to the homepage. To specify a homepage, go to: 6 Advanced...
--> 2 Homepage.
3 Bookmarks
You can open the Bookmarks list to choose a web bookmark. (The
Bookmarks list is stored in the remote server. It can be used only when
you are connected to network.)
4 Mark Site
Bookmarks the current web site or web page to the list of your favorite
websites.
5 About Phone.com
You can read related information about the Phone.com, the browser
version and handset type.
6 Advanced...
You can enter this Advanced setting menu for the following:
6. Mobile Internet 47
Page 60

1 Show URL
Show the web address of the current page. It can be used to save the
current page as your homepage, which can quickly bring you to the
page without waiting next time you activate the browser from idle
mode.
2 Homepage
Specify a homepage. The homepage you specified is opened every
time you connect to the web main screen or select Home in the
browser menu. You can select this item to get to the editor screen
and specify a desired homepage by entering its web address.
(However, some network service providers do not allow the user to
specify the homepage).
3 Set Up. Link
Select the UP. Link servers. You can choose to connect to one
specific server. For details on the setting parameters, go to menu:
Services --> WAP --> Settings. See page 76.
4 Offline Services
Your phone saves the last browsed web pages in its temporary
memory (Cache). You can access a desired web page off-line by
selecting this item. If the web page you want is not stored in the
temporary memory, you will be prompted to connect to the web
service. If the temporary memory is cleared, all web content stored
in it will be erased. Please refer to: Services --> WAP --> Clear
Cache on page 77.
5 Outbox
Display outbox status screen. The unsent information (such as an
unsent Web-based e-mail) is stored here when you navigate the
Web. You can come here to see if there is any unsent information
and send it again the next time you link to the Web.
48 6. Mobile Internet
Page 61

6 Restart UP. Browser
Restart the browser.
7 Encryption
View the encryption information. This function is for security. There
is a security key stored in the browser. The key is used to encrypt
data when transmitting data between the handset and server. Press
or to show the following options:
Ver i f y Ke y
Verifies the checksum of the key.
New Key
Requests a new key from the server.
6. Mobile Internet 49
Page 62

7. MENUS
Your phone's menus cover a wide variety of
features. The main menu is made up of 6
animated images. Each represents a specific
main menu option consisting of related
submenus.
Navigating the menus
Normal access to an option
• In idle mode press or to access the main menu.
• Press to scroll the menus and options.
• Press or to select or activate an option.
• Press or to abort a selection/operation and return to the
previous menu or screen.
• Long press to abort a selection/operation and return to the idle
screen directly.
For example, when you want to change the language setting:
1. Press or to enter the main menu.
2. Press to scroll to Settings, and press or to access its
menu.
3. Press to scroll to Phone Setting, and press or to enter
its menu.
4. Press to scroll to Language and press or .
5. Press to scroll to a desired language, and press or to
confirm.
The main menu
50 7. Menus
Page 63

6. Long press or press or a couple times to return to the
idle screen.
Shortcut access to an option
In the main menu, type a corresponding function code listed behind each
option in the following sections. By means of the shortcut access you can
quickly reach a desired function.
For example, if you want to change the language setting (The function
code for the language setting is 5-5-1):
1. In idle mode, press or to access the main menu.
2. Press for Settings.
3. Press for Phone Setting.
4. Press for Language.
5. The options under the Language menu appear, press to highlight
a preferred language and press or to confirm, or press a
corresponding number key for a desired language directly. For
example, press to select English.
6. Long press or press or a couple times to get back to
the idle screen.
7. Menus 51
Page 64

Phone Book (1)
The Phone Book menu allows you to view the phone book you
create as well as add and delete entries.
Find Record (1-1)
This option allows you to access a phone number record saved in the
Phone Book. You will be prompted to enter the name of the desired
phone book record as you enter this option. And you can do either of
the following to access a phone book record:
1. Follow the prompt to enter the name. When done, press or
and the corresponding record's location, telephone number and name
appear. You can also find a Phone Book record by typing the first
letter of its name. For example, if the name starts with "K", enter "K"
and press or . The names starting with "K" will appear on
the screen. Scroll through the names using or until the one
you want appears on the screen.
2. If you are not sure about the name of the record you want, simply
press or to enter the Phone Book directory, and press
or to scroll to the desired record you want.
When the desired record is displayed, you can:
• Press to dial the displayed phone number.
• Press and select:
Call: Dial the displayed phone number.
Edit: Modify the phone number record. Change the name, phone
number and press or .
Delete: Delete the phone number record from the Phone Book.
52 7. Menus
Page 65

Move: Copy the record to another location. Choose to copy the
record to the SIM or phone memory, enter the location number,
and press or .
Vo ice D ial: Add a voice tag to the phone number record. "Add
Voice Tag?" pops up as you enter this option. Press or
and say the recipient's name loud and clear over the microphone
after tone. Your phone will replay the voice tag if recording is
successful. Then a special icon will appear at the top of the record
indicating the voice tag has been attached to this record. The next
time you display this phonebook record your phone will play its
voice tag recording simultaneously. In idle mode you can dial this
number by saying its voice tag to the microphone.
8 For best results, make sure you record a voice tag in a clear, natural
voice with minimal wind or background noise.
8 if the phone number already has a voice tag attached, you can
choose to play (Playback), overwrite (Edit), or erase the existing
voice tag recording (Delete).
Caller Group: Add the phone book record to a preferred caller
group list. Select a caller group from the menu and press or
.
• Each name in the phonebook can belong to only one caller
/
group.
• For how to customize the settings of each caller group, see
Caller Group (1-7) on page 58.
• To activate/deactivate the Caller Group feature, go to: Settings
(5) --> Phone Setting (5-5) --> Caller Group (5-5-8). See page
93.
7. Menus 53
Page 66
Add Record (1-2)
This function allows you to add new records to the Phone Book. Enter
the name and telephone number you wish to save. If you want to enter
an extension number, long press until "P" appears on the screen,
then type the extension number. When done, press or . Your
phone will assign a phone book location for this record. Press or
to save the record. Finally add a voice tag to this newly saved phone
number.
When you enter a new phone number, use the international
/
number format: Long press to display "+" and enter the
corresponding country code and the phone number. By doing so,
you do not have to change the records when you are roaming in
other countries.
To add a new phonebook record to a preferred caller group list,
/
go to Find Record (1-1) or Caller Group (1-7). In the idle mode
you can also use the abbreviated call and Phone Book
directory shortcut features to do so. See page 24 and 26.
Delete (1-3)
By name (1-3-1)
You can delete the records in the Phone Book by name.
Enter the name of the record and press or . The record
will display on the screen. Press to delete. You can also press
or to find the name to delete directly from the phone
book.
54 7. Menus
Page 67

Delete All (1-3-2)
Delete all records in the phonebook. You will be prompted to enter
the phone code before you delete all records (the factory default
phone code is 1234).
All Voice Tag (1-3-3)
Delete all voice tags from the records. You will be prompted to
enter the phone code before you delete all voice tags (the factory
default phone code is 1234).
Copy Record (1-4)
This function allows you to copy or move phonebook records between
the SIM and phone memories.
SIM->Phone (1-4-1)
Copy or move phonebook records from the SIM into the phone
memory.
Single (1-4-1-1)
Copy or move a single phonebook record from the SIM
memory into the phone memory.
Keep original (1-4-1-1-1)
Copy a single record from the SIM memory and paste it
into the phone memory, while the original record is kept in
the SIM memory. Scroll through the records stored in the
SIM memory. When the desired one appears, press
and the record will be copied into the phone memory.
Delete Original (1-4-1-1-2)
Remove a single record from the SIM memory and store it
in the phone memory. Scroll through the records stored in
the SIM memory. When the desired one appears, press
and the record will be moved into the phone memory.
7. Menus 55
Page 68

All (1-4-1-2)
Copy or move all records from the SIM card into the phone
memory.
Keep original (1-4-1-2-1)
Copy all of the records from the SIM memory into the
phone memory, while the original records remain in the
SIM memory. After entering this option, the screen will
show the total number of the records and ask if you want
to copy all the records. Press or and all the
records will be copied into the phone memory.
Delete Original (1-4-1-2-2)
Remove all the records from the SIM and paste them into
the phone memory.
Phone->SIM (1-4-2)
Copy or move phonebook records from the phone memory into
the SIM memory.
Single (1-4-2-1)
Copy or move a single phonebook record from the phone
memory into the SIM memory.
Keep original (1-4-2-1-1)
Copy a single record from the phone memory and paste it
into the SIM memory, while the original record is kept in
the phone memory. Scroll through the records stored in
the phone memory. When the desired one appears, press
and the record will be copied into the SIM memory.
56 7. Menus
Page 69

Delete Original (1-4-2-1-2)
Remove a single record from the phone memory and store
it in the SIM memory. Scroll through the records stored in
the phone memory. When the desired one appears, press
and the record will be moved into the SIM memory.
All (1-4-2-2)
Copy or move all records from the phone memory into the SIM
card.
Keep original (1-4-2-2-1)
Copy all of the records from the phone memory into the
SIM memory, while the original records remain in the
phone memory. After entering this option, the screen will
show the total number of the records and ask if you want
to copy all the records. Press or and all the
records will be copied into the SIM memory.
Delete Original (1-4-2-2-2)
Remove all the original records from the phone memory
and paste them into the SIM.
Status (1-5)
This menu option allows you to view the numbers of free and occupied
phonebook entries. The phone memory can store up to 100 phone book
records, while the number of available entries in the SIM memory varies,
depending on the network service you subscribe to.
The screen will show the numbers of available and occupied entries in
the SIM card. You can press to view the numbers of free and
occupied entries in the phone memory.
Memory (1-6)
You can select the memory where phone book records are stored:
7. Menus 57
Page 70

SIM (1-6-1)
Press or to select the memory in the SIM card: .
Phone (1-6-2)
Press or to select the memory in your phone: .
Caller Group (1-7)
You have the following caller groups to choose from: Family, Friends,
Colleagues,
particular caller group and define such settings as ring tone, image, etc.
for incoming calls from a specific group.
/
Settings for each group are as follows:
VIPs, Others. You can add any phone book records to a
• Incoming calls not belonging to any caller group will use the ring
tone of the currently active profile. See page 79 Profiles (5-1)
for details.
• To activate/deactivate the Caller Group feature, go to Caller
Group (5-5-8). See page 93.
View List
View the phonebook names stored in the selected caller group.
If no records were added, "No Records Add Record?" will appear.
Press or and select a name you want from the Phone
Book. Press again to add the displayed name to the group.
If the group already has names in it, you can scroll the names and
when the desired one appears, press to choose to add
another name to this group or delete the selected one.
Rename
Modify the title of the group.
58 7. Menus
Page 71

Ring Type
Define a ring tone for this group. Your phone will ring in the tone
you choose when there is an incoming call from this group.
View Image
Specify an image icon for this group.
The image icon you choose will appear when someone belonging to
this group phones you.
Own Number (1-8)
This feature allows you to save your name and SIM card phone number
in your SIM card memory. The name stored in the SIM card memory is
then displayed on the idle screen.
• If no own number records are saved in the memory, "No Records Add
Record?" will display on the screen. Press or and enter your
name and phone number. Then specify a location for this own number
record (1 or 2).
• If a record has already been stored in the SIM card memory, it will be
displayed after you choose this option. Press and choose to add a
new record, edit the current record, or delete the current record.
• The name stored in location 1 will be displayed on the idle
/
screen.
• As the name of the own number record is stored in the SIM
memory, the name displayed on the idle screen will change
accordingly if you insert a different SIM card into your phone.
7. Menus 59
Page 72

Flash Dial (1-9)
You can assign the number key ~ as a flash dial key for any
phone number stored in the Phone Book. A long press on a flash dial key
in idle mode will automatically dial the phone number that the key
represents. For example, if is set as a flash dial key, long press
to make the flash dial of the phone number which is linked to
.
• When you enter the Flash Dial option, the record of the phone
number that represents will appear. Press to scroll the
records of the phone numbers that the other flash dial keys
~ represent. If you have not assigned any flash dial keys yet,
number keys ~ will be the default flash dial keys for the first
9 numbers in Phone Book respectively. If any of the first 9 phone book
entries does not have a phone number record, "Empty" will appear in
the record of its corresponding number key.
• When the record of a desired flash dial key appears, press or
to enter its setting options. There are 2 scenarios:
1. If it is the record of a default flash dial key, press or and
select Modify. Enter the name of the phone number record you want
and press or to display the number. Press again and the
selected flash dial key will be used for the number.
60 7. Menus
Page 73

2. If it is the record of a flash dial key that you personally programmed,
press or and select "Modify" to change the phone number
that the key represents, or choose "Delete" to resume the key's
default flash dial setting that is based on the phone book location of
the key's corresponding phone number.
A phone number may have more than one flash dial key, but each
/
number key can be assigned to only one phone number.
To o l s ( 2 )
This submenu provides the following features to bring
enjoyment to your wireless life, such as the alarm, hour
minder, calendar, stopwatch, calculator, etc.
Auto Time Zone (2-1)
If you travel to a city in a different time zone, your operator will send
you a reminder of the city's local time zone asking you if you'd like to
reset the time shown on the screen of your phone, so your phone can
display the exact local time.
8 Network support dependent.
On (2-1-1)
The time displayed on your phone will be reset automatically
according to your operator's time zone reminder.
Confirm (2-1-2)
Your phone will ask for your confirmation before it resets its time
display.
Off (2-1-3)
Your phone will continue to display the local time of your home
country, ignoring the time zone reminder from your operator.
7. Menus 61
Page 74

Power On/Off (2- 2 )
This function allows you to have your phone automatically turned on and
off at specified times, helping you save battery life.
8 Be sure to turn off the power on/off feature when traveling on an
airplane or in other situations where the use of the mobile phone is
prohibited.
Power On Time (2-2-1)
Specify a time at which your phone is automatically turned on. To set
time, use to enter the hour, then press a number key and enter
the minute the same way. You can also press number keys to enter
time.
8 You can select the 12 hours or 24 hours format by going to:
Settings (5) --> Time And Date (5-2) --> Time Format (5-2-
2). If you select 12 hours format and set the hour from 01 to 12 in
this option, you will need to set AM or PM.
Power Off Time (2-2-2)
Specify a time at which your phone is automatically turned off. You
can set the power off time in the same way you set the power on
time.
Enable Always (2-2-3)
Enable this mode and your phone will be powered on and off daily at
specified times until you reconfigure this mode.
62 7. Menus
Page 75

Enable Once (2-2-4)
Enable this mode and your phone will perform only one cycle of
power on and power off. Your phone will remain in its present state
until otherwise instructed.
For example, if you set power-on time for 08:00 and power-off time
for 22:00 and select Enable Once at 12:00 while leaving your phone
on, the phone will be powered off at 22:00 and then powered on
again at 08:00 and remain on. If you select Enable Once at 06:00 and
then turn the phone off, the phone will be powered on at 08:00 and
powered off again at 22:00 and remain off until manually turned on
again. If you select Enable Once at 06:00 but keep the phone on, the
phone will remain on until 22:00. At 08:00 the next day, the phone
will be powered on and remain on until manually turned off.
Disable (2-2-5)
Disable all scheduled power on/off settings.
Hour Minder (2-3)
Set the hour minder. After you activate this feature, the phone beeps
once an hour like a digital watch.
Calendar (2-4)
When you enter this option, a calendar will be displayed on the screen,
and the current date will be highlighted. You can use and to
jump to the last or next month, and press to select date forward or
backward. When a date is selected, you can press or to enter
its options:
8 If you haven't set the current time and date yet, please do so in Set
Date (5-2-3). See page 82.
7. Menus 63
Page 76

View Day
View the notes for the selected date. After you finish reading a note,
you can press or and choose to erase, edit, or forward
the note to another date.
Make Note
First jot down the note, then press or to confirm. You
will be prompted to enter the date for this note. When finished,
"Set Alarm?" will display on the screen. If you want to enable the
alarm to remind you, you can press or and set the alarm
time. If you don't need the alarm, press or to save the
note.
Erase Notes
You can choose One By One and press to scroll to the date
you want and press or to erase it individually, or choose
All to erase all notes.
View All
You can press to scroll and view the list of all notes. When you
finished reading a note, you can press or and choose to
delete, edit the note or move the note to another date.
Select Date
Enter a date you want to highlight on the calendar. When the screen
highlights the date on the calendar, press or to display the
same menu of this Calendar feature.
64 7. Menus
Page 77

Set Alarm (2-5)
Set the alarm clock:
• When the alarm goes off, you can press or to shut off
/
the alarm temporarily (i.e. to activate the snooze mode). The
alarm will go off once again five minutes later.
• You can also press or to turn off the alarm as it goes
off. The alarm won’t go off again if shut off this way.
Alarm Period (2-5-1)
Daily (2-5-1-1)
Set the alarm to go off daily when the alarm time is reached,
even if the handset is powered off. To set time, use to enter
the hour, then press a number key and enter the minute the
same way. You can also press number keys to enter time. If you
want to clear numbers, press .
8 You can select the 12 hours or 24 hours format by going to:
Settings (5) --> Time And Date (5-2) --> Time Format
(5-2-2). If you select 12 hours format and set the hour from
01 to 12 in this option, you will need to set AM or PM.
Once (2-5-1-2)
Set the alarm to go off only once.
Off (2-5-1-3)
Turn off the alarm clock.
Alarm Type (2-5-2)
Vibrating (2-5-2-1)
You can set the vibration mode for the alarm:
On: Your phone vibrates as alarm time is reached.
7. Menus 65
Page 78

Vib. --> Ring: When alarm time is reached, your phone
vibrates 7 times before it rings.
Off: Your phone does not vibrate as alarm time is
reached.
Ringing (2-5-2-2)
You can select the ring tone for the alarm. Scroll the options
and wait for about 1 second to hear the highlighted ring tone
and press or to confirm your choice. You can also
turn off the ring tone so your phone doesn’t ring as alarm time
is reached.
8 If you turn off the ring tone and set the vibration mode as Vib.
--> Ring, your phone only vibrates 7 times when alarm time is
reached, without making a sound afterwards.
8 If you deactivate both vibration and ring tone, your phone
neither vibrates nor rings when alarm time is reached.
Ring Volume (2-5-2-3)
Press to adjust the ring volume level from to .
Stopwatch (2-6)
This option allows you to use your phone as a stopwatch. Press or
to start/stop the stopwatch. When the stopwatch is on, you can
press to save one record at a time, and the screen will show the
record number being saved. The stopwatch can store up to 9 records.
When the stopwatch stops, use to check the records. To reset,
press . To exit from the stopwatch feature, press .
66 7. Menus
Page 79

Calculator (2-7)
You can use your phone as a handy calculator. You can also use this
feature to convert currency values.
Using the calculator feature
In this option, a cursor will appear at the upper left of the screen. Follow
the chart below to enter numbers and arithmetic symbols.
Key Number Key Number/Symbol/Function
19
20
3+ - * /
4. ( )
5
6
7 Move the cursor.
8 Back to previous screen.
For example, to calculate the following formula:
123 x (456+34) / 4 -2
1. Press (3 times) (twice)
(3 times) (4 times)
(twice) .
2. Press or and select Equals to display the result.
()
Clear numbers or symbols/back to
previous screen.
Display result.
7. Menus 67
Page 80

Converting currency values
1. When the calculator screen appears, press or . Select
Exchange Rate and press or . Choose Local to Foreign or
Foreign to Local to set the exchange rate. If you set Local to
Foreign as "2", for example, the rate in Foreign to Local will become
"0.5" automatically, and vice versa.
2. When the rate is set, press or to return to the calculator
screen. Enter the sum you want to convert and press or .
Then choose To L o c a l or To F o r ei g n to see the converted figure.
According to the rate above, for example, if you enter "20" and
choose To L o c a l , the outcome will be 20*0.5=10. If you choose To
Foreign, the outcome will be 20*2=40.
Voice Memo (2-8)
This feature allows you to tape-record voice memos using your phone.
You can also listen to the telephone conversations previously recorded
during a call.
Record (2-8-1)
Record a voice memo. Maximal recording time is approximately 5
minutes and 10 seconds, and you can make as many as 20 recordings
before the maximal time runs out. To stop a recording, press or
.
Playback (2-8-2)
Play a voice memo. Enter the number of the recording you want and
press or .
Erase (2-8-3)
Erase all voice memos.
68 7. Menus
Page 81

Games (2-9)
Lottery (2-9-1)
Try your luck with lottery. Before you start the game, adjust the
Settings to suit your need:
• Tot al N o : decide the total numbers used in the lottery. The figure
must be between 8 and 99.
• Drawn No: decide how many numbers to be drawn out as the
winning numbers. The figure must be between 2 and 24, but it
cannot exceed the figure of total numbers.
• Bonus No: decide how many bonus numbers to be used. This
figure must be between 0 and 5.
After you finish adjusting the settings, choose New Game to start a
new game:
• Quick Pick: let the handset pick out the numbers for you. You can
first assign numbers you want (Requisite No), and numbers you
do not want (Invalid No). Then choose Pick Start to let the
handset pick the numbers. If you are not happy with the outcome,
you can press Pick Start again to have the handset choose
another set of numbers, or you can use Choose to change the
numbers manually.
• Choose: choose the numbers you want manually.
After the numbers are chosen, use Draw to draw the winning
numbers. You will first see how many numbers you have chosen are
matched to winning numbers, and use to scroll through the
detailed result.
7. Menus 69
Page 82

Snake (2-9-2)
Make the snake grow longer by feeding it with as many goodies as
possible. Use (up), (down), (right) and
(left), or (clockwise/counterclockwise) to direct the snake
to a goody. The longer the snake, the higher the score. You are not
allowed to stop the snake or make it go backwards. When the snake
hits its own tail or eggs, or the surrounding frame, a game is over.
Then the screen will show your score.
After you select this game, you will see the following:
Continue
Resume a paused game. This item appears only when a game
has been temporarily halted.
New Game
Start a new game. If you want to exit the game before it is over
(to halt a game), press or . To resume a halted game,
go to Continue.
Last View
Show the result of the last game you play.
Level
Set the difficulty level of the game. Use to set the level and
press or to confirm.
To p S c o r e
Show the top score of a game ever played.
Instructions
Read the instructions for the game.
70 7. Menus
Page 83

Numbers (2-9-3)
Rearrange the numbers in the correct order shown below. Use
(up), or (down), (right) and (left),
or (right and left) to move the numbers. While playing, the
screen will show the time and steps you take
123
456
78
8 The menu options in this game are the same as those in Snake
except there is no To p S co r e .
Hanoi (2-9-4)
To win the game you need to move all of the discs from the left peg
to the right one. Only one disc can be moved at a time. A disc must
be placed either on an empty peg or on top of a larger disc at all
times. Try to move all the discs using the least amount of time and
moves possible.
How to play: Pressing and then moves the top disc
from the left peg to the right one; pressing and then
moves the top disc from the left peg to the one in the middle, and so
on and so forth.
8 The menu options in this game are the same as those in Snake
except there is no To p S co r e .
Brick (2-9-5)
In this game you have to break an entire set of brick using a ball and
a racket. When you have broken all of the bricks, you go to the next
level with a new set of bricks to break.
7. Menus 71
Page 84

• Start a game by pressing or to fire the ball. The ball is
moving through the screen, bouncing in different directions after
hitting the frame or the bricks. When the ball hits a brick, the
brick disappears.
• Use or (left) and (right) to move the racket
horizontally at the screen bottom. You can also press-hold these
keys to move the racket without stopping. When the ball reaches
the bottom, you must hit it to make it bounce towards the bricks.
• You can change the direction in which the ball bounces by hitting
the ball in a particular angle.
• You have three credits for each game. If the ball goes past the
bottom, you lose one credit. The game ends if you lose all your
three credits.
• The more bricks you break, the more points you score.
• A falling object may appear as the ball hits the bricks. You can tell
what the object means by looking at the icon shown at the bottom
right of the screen, which helps you decide whether to catch or
dodge the object:
The skull warns you to dodge a deadly falling object. If the
object hits your racket, you lose one credit.
The key tells you to catch a falling object for access to the
next level directly.
"$" tells you to get a falling object for bonus.
The missile tells you that catching the object will make the
ball bounce faster.
indicates that catching the object will shorten the
racket narrower.
indicates that catching the object will lengthen the
racket.
8 The menu options in this game are the same as those in Snake.
72 7. Menus
Page 85

Call RecS (3)
This menu contains lists of the calls you missed, sent and
received, as well as records of call cost and duration.
Missed Calls (3-1)
Displays the last missed calls.
Press to browse the phone numbers of missed calls. When the
desired phone number appears, press to dial the number directly or
press and choose to call back, edit or save the number to Phone
Book, or delete the number.
8 Network support dependent.
Call List (3-2)
Displays the last missed, dialed and received calls. You can use this option
the same way you use Miss Calls (3-1).
8 Network support dependent.
Clear Call List (3-3)
Deletes all the records of missed, received, and dialed calls.
Time Cost Display (3-4)
Depending on your settings, your phone will display duration and cost
during a call or when you hang up.
8 Network support dependent.
In Call (3-4-1)
Displays duration and cost during a call. After this mode is activated,
will appear next to the call time during a call.
End Call (3-4-2)
Display duration and cost the moment you end a call.
7. Menus 73
Page 86

Call Time (3-5)
This function records the information of call duration.
Last Call (3-5-1)
Shows duration of the last call in hours, minutes & seconds.
All Calls (3-5-2)
Shows the total duration of all types of calls.
Outgoing Calls (3-5-3)
Shows the total duration of all outgoing calls.
Incoming Calls (3-5-4)
Shows the total duration of all incoming calls.
Clear Time (3-5-5)
Clear all duration data.
Call Cost (3-6)
This function records the information of call cost.
Last Call (3-6-1)
Shows the cost of the last call.
8 Network dependent.
All Calls (3-6-2)
Shows the total cost of all calls.
8 Network dependent.
74 7. Menus
Page 87

Clear Cost (3-6-3)
Clears all cost data.
8 PIN 2 is required.
What is PIN2?
/
• PIN2 is a second set of PIN that is mainly used to control limited
services such as call cost limitation and fixed dialing numbers.
• If entered incorrectly three times in a row, PIN2 will be locked
up. To unblock PIN2, you need to enter the PUK2 code. Please
call the operator, and ask for PUK2.
Cost Limit (3-7)
You can set limits to the total call cost. If the call cost goes beyond the
limit, the phone cannot be used to make a pay call. When this function is
activated, the remaining cost will appear on the screen.
On: Enable the cost limit function.
8 PIN2 is required.
Off: Disable this function.
Call Rate (3-8)
Currency (3-8-1)
This option allows you to enter a preferred currency base for
calculating the cost of your calls.
8 PIN2 is required.
Charge Unit (3-8-2)
This option allows you to enter the unit price for calculating the
cost.
8 PIN2 is required.
7. Menus 75
Page 88

Services (4)
In this menu, you can start a mobile Internet session using
your WAP-enabled phone and enjoy the on-line services
available from your operator or Internet Service Provider
(ISP). To successfully connect to the Internet you also need to
do proper WAP settings here.
Additionally, you can enjoy the value-added SIM Tool Kit
services offered by your operator.
WAP (4- 1 )
Home (4-1-1)
Launch your phone's mini-browser to log on to a designated home
page. In idle mode you can also long press to initiate an
Internet session.
8 For details on the mobile Internet, see chapter 6.
Settings (4-1-2)
Essential server settings for mobile Internet access are made under
this item. You have server 1 ~ 3 to choose from and each serve has
the following settings:
Activate
Set Server 1 as the default server that your phones connects
during an internet session.
Primary Data
This is the IP address of the gateway (ISP main server) through
which you access the mobile Internet. The IP address is in the
format 123.456.789.123. Enter the IP and port data given by
your service provider
76 7. Menus
Page 89

Secondary Data
Enter the backup IP if available. The backup IP will be used if the
main server does not respond during dial-up.
Data Parameters
Enter the following account information provided by your ISP
(Internet Service Provider).
Phone #: this is the number that your phone will dial to
access the Internet. Your ISP issues this number.
User: this is your user ID, given by your ISP.
Password: key in the password provided by your ISP.
Then set Baud Rate (i.e. data transmission rate) and Line Type:
Baud Rate: the default setting is 9600, which is the
standard data rate for GSM phones.
Line Type: this is the type of call you make to your ISP.
The default setting is ISDN.
Clear Cache (4-1-3)
The cache serves as a temporary memory that stores last browsed
web content. Clear the cache will erase all web content stored in it.
S.T.K. (4-2)
Your network operator provides this STK (SIM Tool Kit) menu.
Depending on your SIM card and the services provided, there will be
several extra options under this menu. However, if your network
operator does not offer STK services, this menu will not be displayed on
the screen. For details, please contact your operator.
7. Menus 77
Page 90

Settings (5)
This menu allows you to program the phone's various settings
as needed.
Profiles (5-1)
This feature allows you to customize such settings as ring tones,
vibration, ring volume, etc. to suit a variety of occasions. In this menu
you will see a list of profiles. You can customize the settings of each
profile and activate one of the profiles for a special event or situation.
You can also choose which profile to activate using the external
/
display. See page 33.
General (5-1-1)
Activate (5-1-1-1)
Activate settings of the General profile.
Customize (5-1-1-2)
This menu allows you to customize settings as needed:
Vibrating
On: Your phone vibrates as a call comes in.
Vib. --> Ring: When a call comes in, your phone vibrates
7 times first before it rings.
Off: Turn the vibration mode off.
78 7. Menus
Page 91
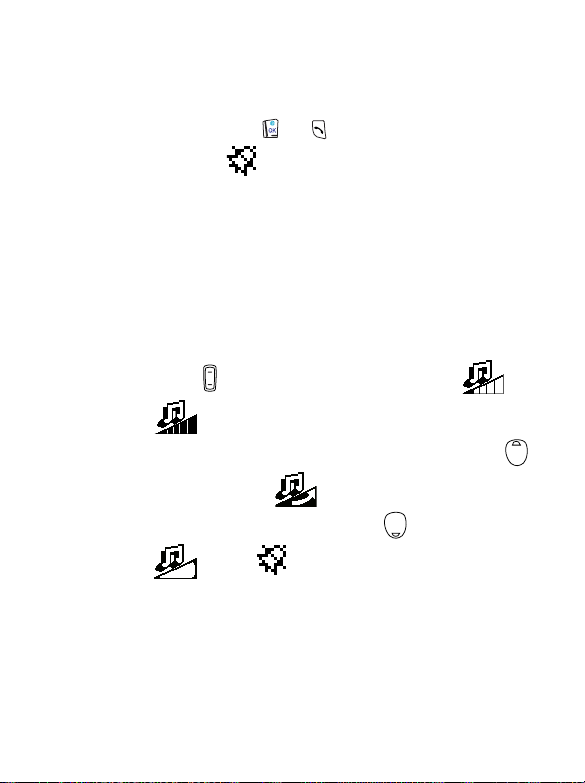
Ring Type
Select a ringing mode from a variety of melodies. Scroll the
options and wait for about 1 second to hear the highlighted
melody and press or to confirm your choice. If you
choose Off, will pop up on the upper right of the idle
screen.
8 If you turn off the ring tone and set vibration mode as
Vib. --> Ring, your phone only vibrates 7 times when a
call comes in, without making a sound afterwards.
8 If you deactivate both vibration and ring tone, your phone
neither vibrates nor rings when a call comes in.
Ring Volume
You have the following ring volume settings to choose from:
Press to adjust the volume level from to
.
Crescendo: Set the ring volume as a crescendo. Press
several times until shows.
Mute: Mute the ring volume. Press several times until
shows. appears on the upper right of the
idle screen as the ring volume is mute.
8 If you mute the ring tone and set vibration mode as Vib. -
-> Ring, your phone only vibrates 7 times when a call
comes in, without making a sound afterwards.
8 If you mute the ring tone and deactivate vibration, your
phone neither vibrates nor rings when a call comes in.
7. Menus 79
Page 92

MsgS. Alert
Your can choose the way your phone reminds you of a
short message that has just been received:
Beep Only: Your phone gives out a beep as a message
arrives.
Vibrate Only: Your phone only vibrates as a message
arrives.
Beep & Vib.: Your phone beeps and vibrates
simultaneously as a message arrives.
Off: Your phone only shows a message notice on the
screen without beeping or vibrating.
Keypa d Tone
This setting determines whether keypad tones will be
sounded by any key press. Choose On or Off.
Other Tones
This setting determines whether other tones will be made
for a variety of functions (e.g. network registration, battery
low). Choose On or Off.
Silent (5-1-2)
Settings are predefined for occasions where silence is required (e.g.
vibration on, ringer mode off, keypad tone off, etc.). You can adjust
the settings in the same way you adjust General (5-1-1).
Meeting (5-1-3)
Settings are predefined for the circumstances of a meeting. (e.g.
vibration on, ring volume off, etc.). You can adjust the settings in the
same way you adjust General.
Outdoors (5-1-4)
Settings are predefined for outdoor activities (e.g. ringer volume
high). You can adjust the settings the same way you adjust General.
80 7. Menus
Page 93

Headset (5-1-5)
Customize (5-1-5-1)
The other options in this item are the same as in General. You
can adjust the settings the same way you adjust General.
Auto Answer (5-1-5-1-7)
Set your phone to answer an incoming call after it rings
once. This mode is effective only when the hands-free kit is
connected to your phone. Choose On or Off.
In Car (5-1-6)
Customize (5-1-6-1)
The other options in this item are the same as in General. You
can adjust the settings the same way you adjust General.
Auto Answer (5-1-6-1-7)
Set your phone to answer an incoming call after it rings
once. This mode is effective only when the car kit is
connected to your phone. Choose On or Off.
Personal (5-1-7)
Options are the same as in General. You can adjust the settings the
same way you adjust General.
Time And Date (5-2)
This menu allows you to set time and date as well as customize the ways
they are displayed on the idle screen.
7. Menus 81
Page 94

Set Time (5-2-1)
Sets current time to be displayed on the idle screen. Once you are in
this item, an analog clock pops up showing the time that is also
displayed on the idle screen. To set current time, use or
alphanumeric keys to enter the hour and minute. If you want to
clear numbers, press . The pointer on the clock dial will point to
the scale consistent with the time you set.
8 If you select 12 hours format in Time Format (5-2-2) and set the
hour from 01 to 12 in this option, you will need to set AM or PM.
Time Format (5-2-2)
You can select the 12 hours or 24 hours format.
Set Date (5-2-3)
Set the current date to be displayed on the idle screen and calendar
feature. Use alphanumeric keys to enter the year, month and day,
and press or .
Display Setting (5-2-4)
Choose whether to display current time and date on the idle screen
or not.
Call Settings (5-3)
This menu provides several options to manage your calls.
Call Divert (5-3-1)
You can choose from the following call divert modes as needed.
8 The call diver t feature is network support and subscription
dependent.
Divert Voice (5-3-1-1)
You can send incoming voice calls to a designated phone
number.
82 7. Menus
Page 95

Activate
Enable the Divert Voice mode. You have the following to
choose from:
To Vo i c eM a i l: Divert incoming voice calls to your voice
mailbox. When this mode is activated, or will
appear on the idle screen, depending on which line you
divert. appears if you divert both line 1 and line 2.
To Nu m b e r : Divert voice calls to a designated phone
number. Enter the number to divert to and press or
. You can also press or twice when the
screen prompts you to enter a phone number, and select
a number to divert to from the Phone Book data. When
this mode is activated, or will appear on the
idle screen, depending on which line you divert.
appears if you divert both line 1 and line 2.
Cancel
Cancel this function.
Status
Show the status of this function.
When Busy (5-3-1-2)
Incoming calls are sent to a designated number when your
phone is busy. Settings are the same as for Divert Voice (5-3-1-
1).
If No Reply (5-3-1-3)
When an incoming call is not replied, it will be sent to a
designated phone number. Settings are the same as for Divert
Voi ce.
7. Menus 83
Page 96

Unreachable (5-3-1-4)
When the phone is off or located outside the network service
area, incoming calls will be sent to a designated number. Settings
are the same as for Divert Voice.
Divert Cond. (5-3-1-5)
Divert all voice calls to a designated number when your phone
is busy, unreachable or there is no reply from your phone. You
have the following to choose from:
Activate
Settings are the same as in Divert Voice.
Cancel
Cancel this function.
Divert Data (5-3-1-6)
Divert all data calls to the designated number.
Activate
Enable the Divert Data mode. You have the following to
choose from:
To Dat a B ox : Divert incoming data calls to your databox.
To Num b e r : Divert data calls to a designated phone
number. Enter the number to divert to and press or
.
Cancel
Cancel this function.
Status
Show the status of this function.
Divert Fax (5-3-1-7)
Divert all fax calls to the number designated.
84 7. Menus
Page 97

Activate
Enable the Divert Fax mode. You have the following to
choose from:
To Fa xM a i l: Divert incoming fax calls to your faxmail
box.
To Nu m b e r : Divert fax calls to a designated phone
number. Enter the number to divert to and press or
.
Cancel
Cancel this function.
Status
Show the status of this function.
Cancel All (5-3-1-8)
Cancel all call divert Settings.
Call Waiting (5-3-2)
When you are speaking over your phone and another call comes in,
an incoming call number and a call-waiting message will appear to
remind you. Choose to activate, cancel or check the status of this
function.
8 Network suppor t and subscription dependent.
Auto Redial (5-3-3)
If you make a call that is not answered, your phone will redial the
number continuously. Your phone will redial up to 10 times before
the call is answered. Choose On or Off.
Any Key Ans. (5-3-4)
Allows you to accept a call by pressing any key except , which is
used to reject a call.
7. Menus 85
Page 98

Line in Use (5-3-5)
This function allows you to use two different telephone numbers for
one single phone. You can designate the number used to make a call
and use both of these numbers simultaneously to receive calls
without having to use two phones to do so.
Please choose Line or Line 2. The number you selected ( : Line 1/
: Line 2) will appear on the idle screen.
Next Call (5-3-6)
Your phone can receive voice, data and fax calls. Depending on your
network operator, you may have to select among the voice, data and
fax calls under this option before you can receive them. This
scenario only applies to one-number scheme network service
providers (i.e., voice, data and fax calls are all transmitted via a single
telephone number).
Ask your network operator whether you need to do this setting.
Voice (5-3-6-1)
Set the next call as a voice call (This is the default setting).
Fax (5-3-6-2)
Set the next call as a fax call.
Data (5-3-6-3)
Set the next call as a data call.
8 After you receive a data or fax call, you need to change the
setting back to "Voice" in order to receive ordinary voice calls.
Show Number (5-3-7)
You can decide whether or not to show your number on the
receiver's phone when you make a call:
86 7. Menus
Page 99

Preset (5-3-7-1)
Whether or not the receiver's phone will display your number
depends on the default setting on the network side.
On (5-3-7-2)
The receiver's phone will show your number when you send a
call.
Off (5-3-7-3)
Your phone number will not appear.
Time Alert (5-3-8)
Your phone will beep every minute during a call.
Connect Alert (5-3-9)
This function allows your phone to ring, vibrate or flash its backlight
when a call you make is answered.
Call Deflect (5-3-10)
Activate this feature and incoming calls you rejected are diverted to
a designated phone number.
8 Network suppor t and subscription dependent.
Security (5-4)
This menu ensures the security of your phone by setting PIN check,
phone code, SIM lock etc., as well as limitations on particular outgoing
and incoming phone calls.
Call Barring (5-4-1)
If you wish to restrict outgoing or incoming calls, you can use the
Call Barring feature to set up limitations.
8 Network suppor t/subscription dependent.
All Outgoing (5-4-1-1)
Bar all outgoing calls. Options are as follows:
7. Menus 87
Page 100

Activate: Enter the password provided by your network
operator and press or .
Cancel: Cancel the function.
Status: Show the status of this function.
Int'l Out (5-4-1-2)
Bar all outgoing international calls. Settings are the same as
those for All Outgoing (5-4-1-1).
Int Exc Home (5-4-1-3)
Bar outgoing international calls except calls that are connected
to home country. Settings are the same as those for All
Outgoing.
All Incoming (5-4-1-4)
Bar all incoming calls. Settings are the same as those for All
Outgoing.
In When Roam (5-4-1-5)
Bar incoming calls when roaming (when you are traveling
abroad). Settings are the same as those for All Outgoing.
Cancel All (5-4-1-6)
Cancel all call barring settings.
Change Code (5-4-1-7)
Change the password for the Call Barring feature.
PIN Check (5-4-2)
Set Status (5-4-2-1)
Enable/Disable the PIN check function.
Select On or Off. When you change the PIN code status, you
will be prompted to enter PIN.
88 7. Menus
 Loading...