


BenQ.com
© 2009 BenQ Corporation.
All rights reserved. Rights of modification reserved.
Disclaimer
BenQ Corporation makes no representations or warranties,
either expressed or implied, with respect to the contents hereof
and specifically disclaims any warranties, merchantability or
fitness for any particular purpose. Further, BenQ Corporation
reserves the right to revise this publication and to make changes
from time to time in the contents hereof without obligation of
this company to notify any person of such revision or changes.
This quick start guide contains brief introduction to the
appearance and basic operations of your device. For details,
safety precautions, and more information, please refer to the
user manual.

FCC regulations
• This device complies with part 15 of the FCC Rules. Operation
is subject to the following two conditions: (1) This device may
not cause harmful interference, and (2) this device must accept
any interference received, including interference that may
cause undesired operation.
• This device has been tested and found to comply with the
limits for a Class B digital device, pursuant to Part 15 of the
FCC Rules. These limits are designed to provide reasonable
protection against harmful interference in a residential
installation. This equipment generates, uses and can radiated
radio frequency energy and, if not installed and used in
accordance with the instructions, may cause harmful
interference to radio communications. However, there is no
guarantee that interference will not occur in a particular
installation If this equipment does cause harmful interference
to radio or television reception, which can be determined by
turning the equipment off and on, the user is encouraged to try
to correct the interference by one or more of the following
measures:
- Reorient or relocate the receiving antenna.
- Increase the separation between the equipment and
receiver.
- Connect the equipment into an outlet on a circuit different
from that to which the receiver is connected.
- Consult the dealer or an experienced radio/TV technician
for help.
Changes or modifications not expressly approved by the party
responsible for compliance could void the user's authority to
operate the equipment.

• The antenna(s) used for this transmitter must not be co-
located or operating in conjunction with any other antenna or
transmitter.
This device is compliance with SAR for general population /
uncontrolled exposure limits in ANSI/IEEE C95.1-1999 and had
been tested in accordance with the measurement methods and
procedures specified in OET Bulletin 65 Supplement C.
RF Exposure Information (SAR)
This device meets the government's requirements for exposure
to radio waves.
This device is designed and manufactured not to exceed the
emission limits for exposure to radio frequency (RF) energy set
by the Federal Communications Commission of the U.S.
Government.
The exposure standard employs a unit of measurement known
as the Specific Absorption Rate, or SAR. The SAR limit set by the
FCC is 1.6W/kg. Tests for SAR are conducted using standard
operating positions accepted by the FCC with the EUT
transmitting at the specified power level in different channels.
The highest SAR value for the device as reported to the FCC is
0.239 W/kg when placed next to the body.
The FCC has granted an Equipment Authorization for this
device with all reported SAR levels evaluated as in compliance
with the FCC RF exposure guidelines. SAR information on this
device is on file with the FCC and can be found under the
Display Grant section of http://www.fcc.gov/oet/fccid after
searching on FCC ID: JVPS6.
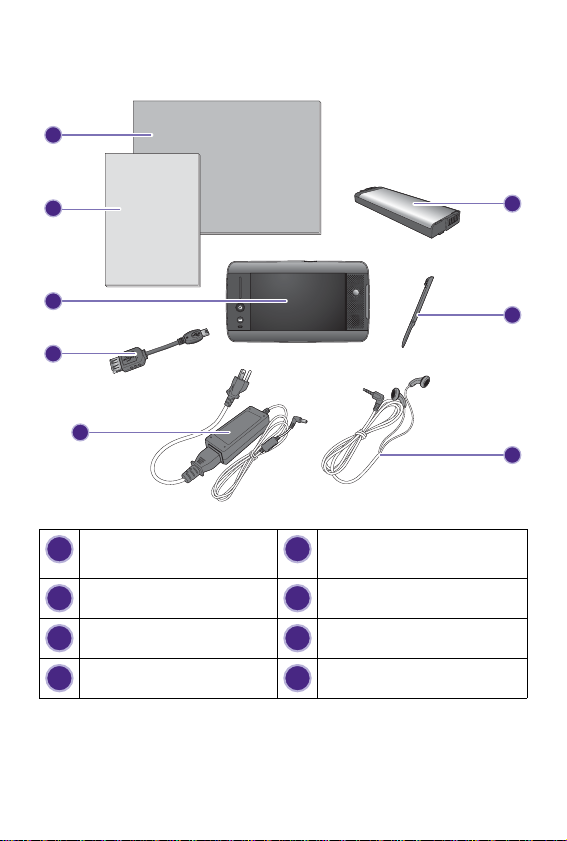
Package contents
3
4
5
6
7
8
1
2
1
5
2
6
3
7
4
8
User Manual Power adapter and
cable
Quick Start Guide Battery
Mobile Internet device Stylus (touch pen)
USB extension cable Earphones
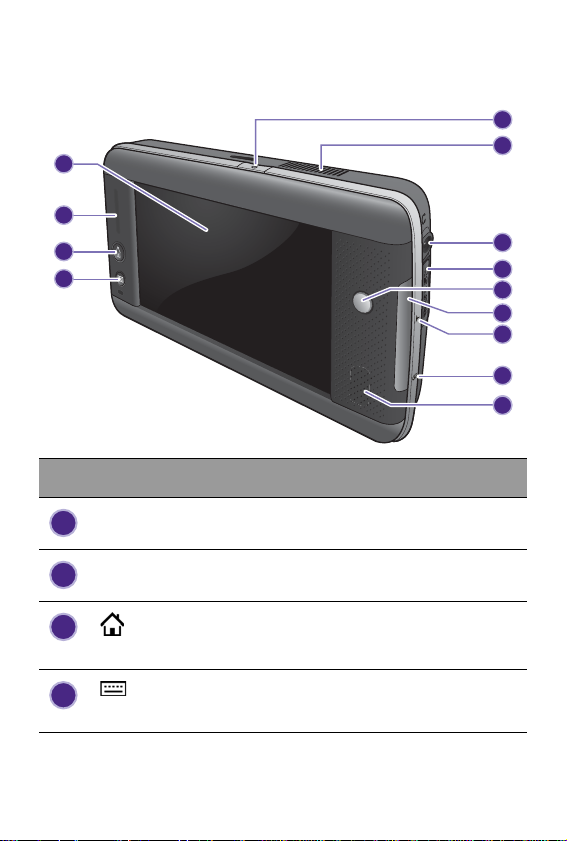
Front-right view
3
4
5
6
7
8
9
10
11
12
1
2
13
4
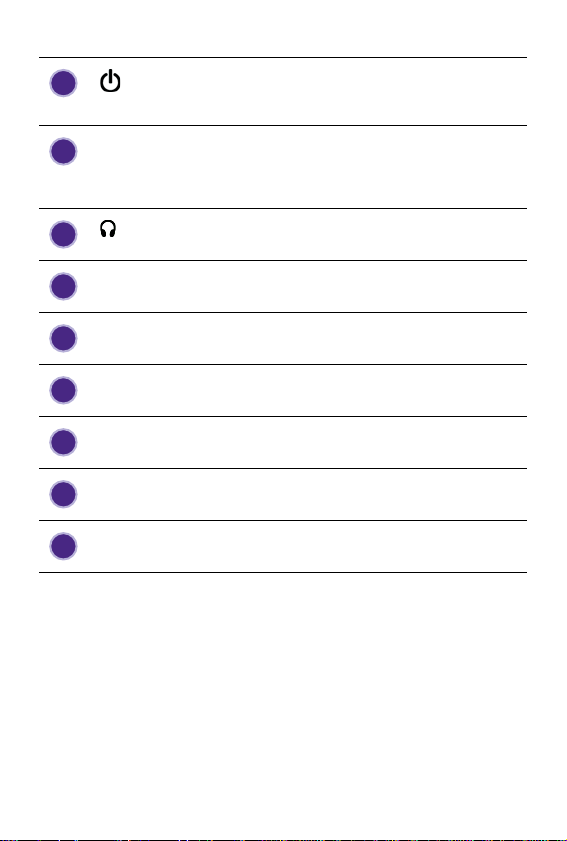
No. Front and right components
Touchscreen
1
Touch zone
2
3
Home button
Returns to Home screen.
Keypad button
Enables the keypad.
5
7
Power button
Turns your device on or off.
Ventilation holes
6
For dissipating heat and keeping your device at an
optimal temperature.
Headset jack
microSD slot
8
Ctrl key
9
System indicator
10
WLAN indicator
11
Power indicator
12
Speakers
13

Left side view
1
2
3
No. Left-side components
Stylus
1
Device for tapping the touch screen.
USB socket
2
For connecting peripherals such as mice,
keyboard or MP3 players that use the USB
interface.
Power socket
3
For connecting AC power supply to power the
device and charge the battery.

Rear view
2
No. Rear components
Stylus
1
Device for tapping the touch screen.
Ventilation holes
For dissipating heat and keeping your device at an
optimal temperature.
Battery cover
3
1
2
3

Installing the battery
1.
2.
3.
P/N:

4.
5.
6.

Charging the battery

Tur ning the dev ice on/ off
• To turn on the device, press and hold the power button .
• To turn off the device, press and hold .

Using the touchscreen
• Ta p: Tap the screen to open or select an option.
• Tap and hold: Tap and hold to bring up a function menu for
more options.

Using Touch zone
• Scroll up and down: The page is scrolled up or down following
your finger's movement.
Using the on-screen keypad
Whenever text entry is required, press the keypad button to
bring up the on-screen keypad.

Basic setup
Setting time
To setup the system clock, you need to set the time and the date
in Settings > Date & Time, and tap Setup.
Setting BenQUtility
The connectivity of your device is determined by BenQUtility.
1. To launch it you can go to Programs > BenQUtility.
2. Tap On in WLAN/Bluetooth.
Setup Internet accounts depending on your Internet service
provider (ISP) and the type of network you have access to.
Available connection methods may vary by your ISP or country/
region. Contact your ISP for details on the settings.
You m a y b e c ha rg ed fo r t he In te r n et services that require data
transmission, depending on the tariff you chose when you
subscribed to the network service from the ISP.
Using WLAN
Wireless Local Area Network (WLAN) lets your device connect
to the Internet via a wireless access point.
1. Tap and drag the scroll box of WLAN to On in BenQUtility.
2. Setup the WLAN access point according to the information
provided by your ISP. You may be requested to enter a
password. Contact the service provider for information
required to make the connection.
3. Confirm with OK to exit BenQUtility. When the WLAN
connection is made successfully, the WLAN indicator on the
right lights up in blue. And you are ready to activate
programs that require network connectivity.

Using the microSD card
You can copy files from a loaded microSD card to your device or
vice versa.
Inserting the microSD card
1. Open the microSD
card slot cover.
2. Push to insert the
microSD card into
the slot as
illustrated.
3. Close the cover.
Removing the microSD card
1. Open the microSD card slot cover.
2. Push to release the microSD card.
3. Close the cover.
USB connection
You can connect your
device to other devices that
come with the USB
interface, including digital
cameras, MP3 players, mass
storage devices, keyboards
or mice.
To m ak e a USB co nn ec t ion ,
you need to have the
provided USB extension
cable and purchase a USB connection cable of your own.

Connect the small end of the provided USB extension cable to
your device, and another end to the USB connection cable. And
then you are ready to connect your device to another USB
device.
Your device can also be connected to a computer and works as a
USB mass storage device. For details, refer to “USB Client” in the
user manual.
Connecting with a stereo headset
 Loading...