

Page 1
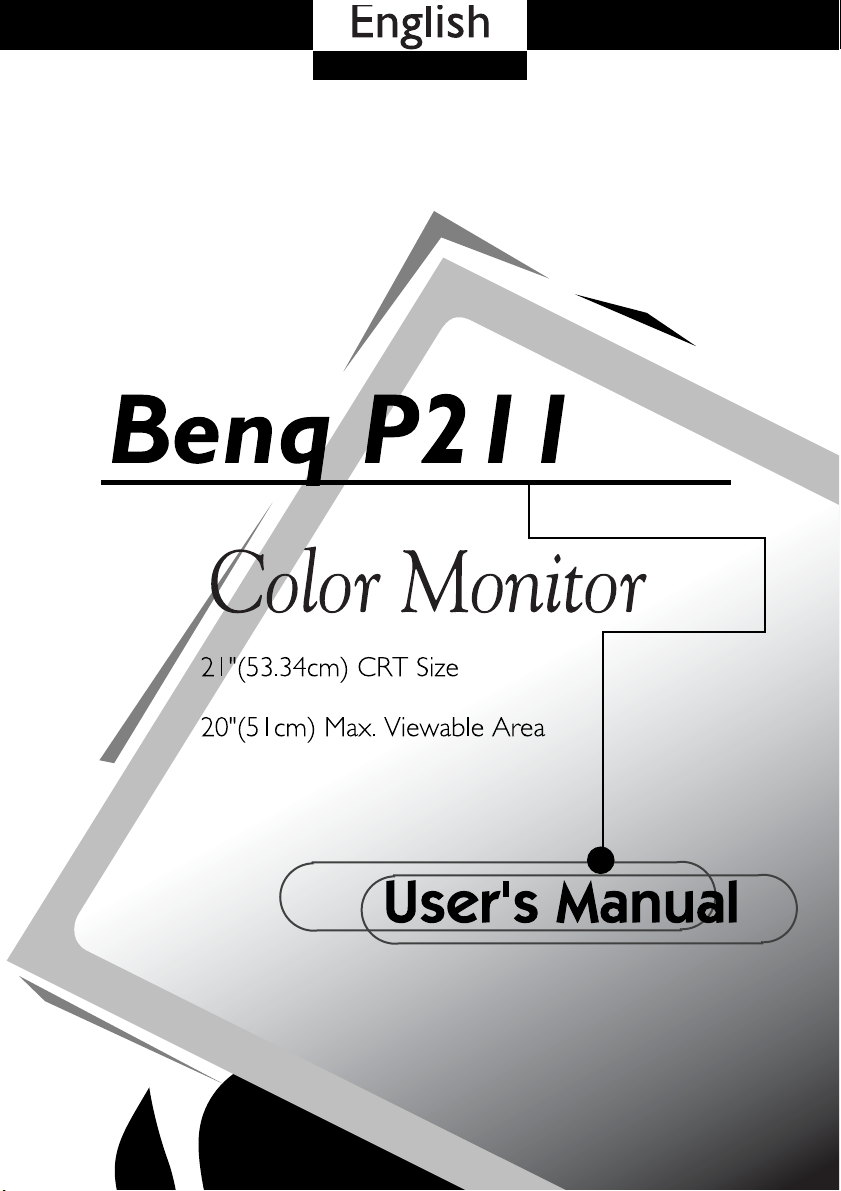
i
Page 2

Copyright
C o p y r i g h t
Copyright (c) 2002 by Benq Corporation. All rights reserved. No part of
this publication may be reproduced, transmitted, transcribed, stored in
a retrieval system or translated into any language or computer language,
in any form or by any means, electronic, mechanical, magnetic, optical,
chemical, manual or otherwise, without the prior written permission of
Benq Corporation.
Disclaimer
Benq Corporation makes no representations or warranties, either ex-
pressed or implied, with respect to the contents hereof and specifically
disclaims any warranties, merchantability or fitness for any particular
purpose. Further, Benq Corporation reserves the right to revise this
publication and to make changes from time to time in the contents
hereof without obligation of Benq Corporation to notify any person of
such revision or changes.
ii
Page 3
Reference
Fill in here!!
For the convenience of service, write following related information
of your monitor in the space below. The serial number is on the
back of the product.
Monitor Information
Product Name:
Serial Number:
Date of Purchase:
Dealer Information
Dealer:
Telephone:
Number:
Address:
iii
Page 4

Safety
Safety Instructions !
● The AC plug isolates this equipment from the AC supply.
● Unplug this product from the wall outlet before cleaning. Do not use
liquid cleaners or aerosol cleaners. Use a damp cloth for cleaning.
● Slots and openings in the cabinet and the back or bottom are provided
for ventilation. They must not be blocked or covered. This product
should never be placed near or over a radiator or heat register, or in a
built-in installation unless proper ventilation is provided.
● This product should be operated from the type of power indicated on the
marking label. If you are not sure of the type of power available, consult
your dealer or local power company.
● This product should be operated with a 3-wire grounding-type plug, a
plug having a third (grounding) pin. This plug will only fit into a ground-
ing-type power outlet. This is a safety feature. If you are unable to
insert the plug into the outlet, contact your electrician to make the nec-
essary outlet changes.
● Never push objects of any kind, or spill liquid of any kind into this product.
● Do not attempt to service this product yourself, as opening or removing
covers may expose you to dangerous voltages or other risks. If any
above mentioned misuse or other accident (dropping, mis-operations)
occurs, contact qualified service personnel for servicing.
● Use only the proper type of power supply cord set (provided in your PC
box) for this unit. It should be a detachable type: UL listed/CSA certified,
type SVT/SJT, VDE approved or its equivalent.
● The power supply cord serves as a power disconnect device for pluggable
equipment. The socket outlet shall be installed near the equipment and
shall be easily accessible.
iv
Page 5

TCO 99
G
O
Y
L
O
C
E
E
M
I
S
S
I
O
N
S
Congratulations! You have just purchased a TCO'99 approved and labelled
product! Your choice has provided you with a product developed for professional
use. Your purchase has also contributed to reducing the burden on the environment and also, to the further development of environmentally adapted electronics products.
Why do we have environmentally labelled computers?
In many countries, environmental labelling has become an established method
for encouraging the adaptation of goods and services to the environment. The
main problem, as far as computers and other electronics equipment are concerned,
is that environmentally harmful substances are used both in the products and
during the manufacturing. Since it has not been possible for the majority of
electronics equipment to be recycled in a satisfactory way, most of these potentially damaging substances sooner or later enter Nature.
There are also other characteristics of a computer, such as energy consumption
levels, that are important from the viewpoints of both the work (internal) and
natural (external) environments. Since all methods of conventional electricity
generation have a negative effect on the environment (acidic and climate-influencing emissions, radioactive waste, etc.), it is vital to conserve energy. Electronics equipment in offices consume an enormous amount of energy since they
are often left running continuously.
E
N
E
S
C
I
M
O
N
O
G
E
R
v
Page 6

TCO '99
What does labelling involve?
This product meets the requirements for the TCO'99 scheme which provides for
international and environmental labelling of personal computers. The labelling
scheme was developed as a joint effort by the TCO (The Swedish Confederation
of Professional Employees), Naturskyddsforeningen (The Swedish Society for
Nature Conservation) and NUTEK (The National Board for Industrial and Technical Development in Sweden).
The requirements cover a wide range of issues: environment, ergonomics,
usability, emission of electrical and magnetic fields, energy consumption and
electrical and fire safety.
The environmental demands concern restrictions on the presence and use of
heavy metals, brominated and chlorinated flame retardants, CFCs (freons) and
chlorinated solvents, among other things. The product must be prepared for
recycling and the manufacturer is obliged to have an environmental plan which
must be adhered to in each country where the company implements its operational policy.
The energy requirements include a demand that the computer and/or display,
after a certain period of inactivity, shall reduce its power consumption to a lower
level in one or more stages. The length of time to reactivate the computer shall
be reasonable for the user.
Labelled products must meet strict environmental demands, for example, in
respect of the reduction of electric and magnetic fields, physical and visual ergonomics and good usability.
On the back page of this folder, you will find a brief summary of the environmental requirements met by this product. The complete environmental criteria document may be ordered from:
TCO Development Unit
S-114 94 Stockholm
Sweden
Fax: +46 8 782 92 07
Email (Internet): development@tco.se
vi
Page 7

TCO '99
Current information regarding TCO'99 approved and labelled products may
also be obtained via the Internet, using the address:
http://www.tco-info.com/
TCO'99 is a co-operative project between
Environmental Requirements
Brominated flame retardants
Brominated flame retardants are present in printed circuit boards, cables, wires,
casings and housings. In turn, they delay the spread of fire. Up to thirty percent
of the plastic in a computer casing can consist of flame retardant substances.
These are related to another group of environmental toxins, PCBs, which are
suspected to give rise to similar harm, including reproductive damage in fisheating
birds and mammals, due to the bio-accumulative* processes. Flame retardants
have been found in human blood and researchers fear that disturbances in foetus development may occur.
TCO'99 demand requires that plastic components weighing more than 25 grams
must not contain organically bound chlorine and bromine.
Cadmium**
Cadmium is present in rechargeable batteries and in the colourgenerating layers
of certain computer displays. Cadmium damages the nervous system and is
toxic in high doses.
TCO'99 requirement states that batteries may not contain more than 25 ppm
(parts per million) of cadmium. The colour-generating layers of display screens
must not contain any cadmium.
Mercury**
Mercury is sometimes found in batteries, relays and switches. Mercury dam-
vii
Page 8

TCO '99
ages the nervous system and is toxic in high doses.
TCO'99 requirement states that batteries may not contain more than 25 ppm
(parts per million) of mercury. It also demands that no mercury is present in any
of the electrical or electronics components concerned with the display unit.
CFCs (freons)
CFCs (freons) are sometimes used for washing printed circuit boards and in the
manufacturing of expanded foam for packaging. CFCs break down ozone and
thereby damage the ozone layer in the stratosphere, causing increased reception on Earth of ultraviolet light with consequent increased risks of skin cancer
(malignant melanoma).
The relevant TCO'99 requirement: Neither CFCs nor HCFCs may be used during
the manufacturing of the product or its packaging.
Lead**
Lead can be found in picture tubes, display screens, solders and capacitors.
Lead damages the nervous system and in higher doses, causes lead poisoning.
TCO'99 requirement permits the inclusion of lead since no replacement has yet
been developed.
* Bio-accumulative is defined as substances which accumulate within living organ-
isms
** Lead, Cadmium and Mercury are heavy metals which are Bio-accumulative.
viii
Page 9

FCC
FCC Class B
Radio Frequency Interference
Statement
Note:
This equipment has been tested and found to comply with the limits for a
Class B digital device, pursuant to Part 15 of FCC Rules. These limits are
designed to provide reasonable protection against harmful interference in a
residential installation. This equipment generates, uses, and can radiate radio frequency energy and, if not installed and used in accordance with the
instructions, may cause harmful interference to radio communications.
However, there is no guarantee that interference will not occur in a particular
installation. If this equipment does cause harmful interference to radio or
television reception, which can be determined by turning the equipment off
and on, the user is encouraged to try to correct the interference by one or
more of the following measures:
1 Reorient or relocate the receiving antenna.
2 Increase the separation between the equipment and receiver.
3 Connect the equipment into an outlet on a circuit different from that to
which the receiver is connected.
4 Consult the dealer or an experienced radio/television technician for help.
Notice:
The changes or modifications not expressly approved by the party responsible for compliance could void the user's authority to operate the equipment.
Caution:
1 If you find some parts of the monitor display discolored due to magnetic
fields generated by electrical facilities or appliances, turn off the monitor
for at least 15 minutes. The degaussing circuit of the monitor will eliminate the discoloration.
2 Do not remove the monitor from its swivel base while the power is on to
prevent discoloration. If discoloration occurs, follow the above-mentioned
procedure for adjustment.
3 Shielded power cord and interface cable, if any, must be used in order to
comply with the emission limits of FCC Class B digital device.
ix
Page 10

CE Declaration
CE Declaration
This monitor complies with 72/23/EEC and 89/336/EEC modified by 92/31/ECC.
These directives refer to EMC.
Canadian Department of
Communications Regulatory Statement
This digital apparatus does not exceed Class B limits for radio noise emissions
from digital apparatus set out in the Radio Interference Regulations of the Cana-
dian Department of Communications.
x
Page 11

Table of Contents
Contents
Chapter 1 Unpacking the Package
Features
Power Management
Factory Preset Timeings
○○○○○○○○○○○○○○○○○○○○○○○○○○○○○○○○○○○
○○○○○○○○○○○○○○○○○○○○○○○○○○○○○
○○○○○○○○○○○○○○○○○○○○○○○○○○○
Chapter 2 Installing the Monitor
Connecting the Signal Cable
○○○○○○○○○○○○○○○○○○○○○○○○○○
○○○○○○○○○○○○○○○○○○○○
○○○○○○○○○○○○○○○○○○○○○○
Connecting through D-SUB signal Connector
Connecting to An Apple
○○○○○○○○○○○○○○○○○○○○○○○○
Connecting through BNC Signal Connector
Chapter 3 A Look at the Control Panel
Macking Adjustments
○○○○○○○○○○○○○○○○○○○○○○○○○○○○○○○○○○
i Key
Hot Key
OSD Operation
Main Menul 1 Display Control
Main Menul 2 Color Control
○○○○○○○○○○○○○○○○○○○○○○○○○○○○○
○○○○○○○○○○○○○○○○○○○○○○○○○○○○○○○○
○○○○○○○○○○○○○○○○○○○○○○○○○○○○
○○○○○○○○○○○○○○○○○○○
○○○○○○○○○○○○○○○○○○○○
Main Menul 3 Advanced Display Control
Timing Setting
Pin Assignments
D-SUB Connectors
BNC Connectors
Chapter 4 Troubleshooting
Maintenance
Need More Help
Chapter 5 Specifications
○○○○○○○○○○○○○○○○○○○○○○○○○○○○○○○○
○○○○○○○○○○○○○○○○○○○○○○○○○○○○○○○
○○○○○○○○○○○○○○○○○○○○○○○○○○○
○○○○○○○○○○○○○○○○○○○○○○○○○○○○
○○○○○○○○○○○○○○○○○○○○○○○○
○○○○○○○○○○○○○○○○○○○○○○○○○○○○○○○○○
○○○○○○○○○○○○○○○○○○○○○○○○○○○○○○
○○○○○○○○○○○○○○○○○○○○○○○○○
○○○○○○○○○○○○○○○
○○○○○○○○○○○○○○○
○○○○○○○○○○○○○○○○○○
○○○○○○○○○○○○○○
20
21
21
22
23
24
24
25
1
2
3
3
4
5
5
6
7
8
9
9
9
10
10
14
15
xi
Page 12
Unpacking the Package
Chapter 1
Unpacking the Package
Check following items. If they are missing or damaged, consult your place of
purchase immediately.
Benq P211 color monitor User’s manual
Power cord 15-pin D-SUB Macintosh adapter
signal cable (Optional)
Locate the model name and the serial number labeled on the back of
your monitor. Write down the related information of your
monitor and dealer in the space on page iii for future reference.
1
Page 13

Chapter 1
Features
Super-fine Dot Pitch With 0.25mm super-fine dot pitch and anti-
static coating, Benq P211color monitors offer
strikingly sharp and high resolution image up
to 1920 x 1440.
Wide Range AutoScan Horizontal frequency ranges from 30KHz to
115 KHz to support 1600 x 1200 @ 85Hz
resolution. Flicker-Free design for vertical
frequency of up to 160Hz.
i key Pressing the i key, the monitor will
(Fuzzy Auto calibrating) automatically adjust display’s size and position
to the optimum. No re-configuration or
adjustment is needed when a user changes
display mode.
Low radiation Benq P211 is not only in compliance with
MPRII, but also meets strictest low radiation
regulations of “MPRII” and “TCO’99”.
Users and Environment Benq P211 is produced by the ISO 14001
the global environmental labelling scheme TCO’99 which covers not only standards
regarding emissions, energy efficiency,
electrical and fire safety, but also ergonomic
qualities, and ecological concerns.
Plug’n Play Compatibility Supporting VESA DDC 2B™ standards, Benq
P211 is compatible with Plug’n Play feature of
Windows® XP/ ME/ 2000 / 98 / 95.
2
certified manufacturer, and in compliance with
Page 14

Unpacking the Package
Power Management
The Power management of this monitor complies with these VESA
power saving modes:
Mode Power Horizontal Vertical LED
Consumption Syne Sync
On < 150W Max. On On Green
Stand-by < 5 W Off On Amber
Suspend < 5 W On Off Amber
Off < 5 W Off Off Amber
Factory Preset Timings
Resolution Vertical Frequency Horizontal Frequency
(Hz) (KHz)
640 x 400 70 31.47
640 x 480 60 31.47
800 x 600 75 46.88
1024 x 768 75 60.02
1024 x 768 85 68.68
1280 x 1024 75 79.98
1280 x 1024 85 91.15
1600 x 1200 75 93.75
1600 x 1200 85 106.00
1920 x 1440 75 112.50
** All above timings are non-Interlace timings.
3
Page 15

Chapter 2
Chapter 2
Installing the Monitor
This monitor is equipped with an autosensing universal compatible power supply
for voltage ranges 100-120/200-240V AC, 50~60Hz.. Please confirm the line volt-
age designation at the rear panel of the monitor before connecting the machine.
1)
Make sure that the system power is turned off.
2) Please refer to the instructions below to connect the signal cable through D-SUB
or BNC.
3) Connect the power cord to the monitor and attach it to power source.
4) Turn on the computer and the monitor.
4
Page 16

Installing the Monitor
Connecting the Signal Cable
Your Benq P211 provides both D-SUB and BNC signal connectors. The D-SUB or
BNC signals can automatically be detected by its microprocessor.
✏ Connecting through D-SUB signal connector
1) Make sure that the system power is turned off.
2) Connect the computer end of the D-SUB cable to the 15-pin output connector
on the video board of your computer.
3) Connect the monitor end of the D-SUB cable to the D-SUB receptacle on the
back of the monitor.
5
Page 17

Chapter 2
✏Connecting to An Apple
If you connect the monitor to an Apple Macintosh through a D-Sub cable, you need
to add the Macintosh adapter to connect the video signal port of your computer
and the monitor signal cable. Before connecting the adapter please refer to the
user's guide of the adapter to set the switches of the adapter.
6
Page 18

Installing the Monitor
✏Connecting through BNC Signal Connector
1) Make sure that the system power is turned off.
2) Connect the computer end of the BNC cable to the output connector on the
video board of your computer.
3) Connect the monitor end of the BNC cable to the BNC receptacle on the back
of the monitor.
7
Page 19

Chapter 3
Chapter 3
A Look at the Control Panel
● Menu key : enters or changes Main menus. There are three main menus.
● Enter key : enters sub-menus or selects items.
● Exit key : goes back to main menus (auto save), or leaves OSD.
● & key : scrolls the light coloured bar up or down and represents
HOT KEY for brightness adjustment.
●
●
&
key : scrolls the light coloured bar left or right and represents
HOT KEY for contrast adjustment.
i keyi key
i key : is used for Fuzzy Automatic calibration adjustment.
i keyi key
8
Page 20

A Look at the Control Panel
Making Adjustments
i key (Fuzzy Auto Calibration )
Just push the i key, then the monitor will automatically adjust display's size and
position to the optimum. No re-configuration or adjustment is needed when a
user changes display mode.
The i key function is different from "Reset" function. "Reset" function for display's
geometry, size and position only works under the factory preset timings (please
see page 3). The i key function will work under "ANY" display timings which
Benq P211 can support.
Hot Keys
or
Press
key to adjust contrast directly.
Press
or
key to adjust brightness directly.
9
Page 21

Chapter 3
OSD Operation
1) Press Menu key to enter or change Main menus (there are three main
menus)
2) Press
or
keys to scroll light coloured bar to desired items.
3) Press Enter key to enter sub-menus.
4) Press
multiple items. Press
items. Then press
,
,
(
) key to do the adjustments. If the sub-menu contains
or
or
keys to scroll light coloured bar to desired
key to adjust as required.
5) Press Exit key to save and return to main menus.
6) Press Exit key to save and leave OSD
Reset to the factory default settings, please see General Settings
Reset and Color Temperature Reset.
Main Menu 1 Display Control
This main menu includes six items. Scroll the light coloured bar to desired items
and press Enter to sub-menus.
10
Page 22

Luminance
Contrast and Brightness adjustments
Contrast adjusts the difference between the light and dark areas.
Brightness adjusts the brightness of the display.
A Look at the Control Panel
Size & Position
Display size and position adjustment
11
Page 23

Chapter 3
Hor. Position adjusts the horizontal position of the display.
Hor. Size adjusts the width of the display.
Ver. Position adjusts the vertical position of the display.
Ver. Size adjusts the vertical height of the display.
Geometry
Advanced geometry adjustments
12
Pincushion controls the straightness of the vertical edges of the display.
Unbalance adjusts balance when the sides of display are bowed
towards left or right
Trapezoid makes the vertical edges of the display parallel.
Parallelogram corrects image leaning left or right.
Rotation corrects screen tilt.
Top Corner adjusts the edges on the top corners of the screen image.
Bottom Corner adjusts the edges on the bottom corners of the screen
image.
Page 24

OSD Position
OSD position adjustments
adjusts the OSD menu position up.
adjusts the OSD menu position down.
adjusts the OSD menu position left.
A Look at the Control Panel
adjusts the OSD menu position right.
Degauss
Manual Degauss. To eliminate color shading or impurity induced by magnetism,
press Enter to active Degauss function.
Reset to Default
Reset the monitor to the default factory settings including H/V position, H/V
size, Pincushion, Unbalance, Trapezoid, Parallelogram, Rotation, Corner, H/V
Convergence,H/V Moie and Moire. For preset timings, in order to reset to
factory default values, press Enter. To reset color Temperature, plsease see
page 15.
13
Page 25

Chapter 3
Main Menu 2 Color Control
This main menu is defined as color weight adjustment. C1 ~ C5 are color storage
areas, which are factory preset but can also be modified by user. The preset
information as follows :
Factory Default Color Temperature
C1 9300K
C2 6500K
C3 5500K
C4 7100K
C5 11500K
Scroll the light coloured bar to desired color temperature, then press Exit to save
the setting and leave OSD. Press Enter key to sub-menus and adjust RGB color
weight.
14
Page 26

A Look at the Control Panel
This sub-menu adjusts RGB (Red, Green, Blue) color weight. Press
to scroll light coloured bar to desired items then press
adjustments.
or keys
or key to do the
To reset to factory default values, scroll light coloured bar to item
“
Reset to Default”.
Main Menu 3 Advanced Display Control
This main menu includes six items, scroll light coloured bar to desired items.
Press Enter key to enter sub-menus.
15
Page 27

Chapter 3
Convergence
Horizontal & Vertical Convergence adjustment
Hor. Convergence: adjusts Horizontal Convergence
Ver. Convergence: adjusts Vertical Convergence
Convergence is the monitor's ability to precisely illuminate specific phos-
phors and line them up properly in order to produce pure color. Displayed characters and images may appear fuzzy or have tinges of red , green, or blue if the
electron beams do not converge correctly.
Benq P211 offers a convergence adjustment feature. To properly adjust convergence,
it is best to have an image that makes it easy to see any convergence error. A
black background with white letters or lines is recommended. When adjusting
convergence, look at the adjustment across the whole screen. When adjusting
horizontal convergence, look at the left and right edges of vertical lines or characters.
When adjusting vertical convergence, look at the top and bottom edges of horizontal lines or characters. The monitor is properly adjusted when the effects of
red and blue tinges are minimized.
The convergence adjustment adjusts the entire screen. It is not
possible to limit adjustment to specific screen areas.
Factory default setting values : 0
16
Page 28

A Look at the Control Panel
Moire
Horizontal & Vertical Moire adjustment
Horizontal Moire: adjusts horizontal Moire
Vertical Moire: adjusts vertical Moire
Moire refers to an interference pattern of dark wavy lines on the screen. It is an
interference phenomenon caused by the relationship between the phosphor layout and the imaging signal. In fact, it is often considered an indication of good
focus level.
It is especially noticeable when using a light-gray or every-other-
dot pattern. Moire cannot be eliminated. However, it can be reduced
with the moire reduction feature.
Moire can be reduced by adjusting the iscreen moire reduction function. Prior to
adjustment, set the screen to a full white pattern so that moire will be visible. After
this adjustment, make changes to a different screen background in order to reduce moire even further.
If the picture is unstable when you adjust the moire reduction setting,
over-adjustment has occured. Please lower the moire reduction setting
level. (Factory default setting value : 0).
17
Page 29

Chapter 3
Language Select
The sub-menu is defined as language selection and there are five languages to
choose from.
D-Sub BNC
Input connector select.
There are two kinds of input connectors for Benq P211. One is a BNC connector,
the other is a DB-15. The P211 is capable of automatically detecting the type of
connector used (either BNC or DB-15). If the two connectors are connected
simultaneously, the user can select the desired connector.
18
Page 30

A Look at the Control Panel
Purity
Colour purity adjustment
To adjust Purity, choose a full white picture and adjust to get a pure white
picture at the corner of the screen image.
Display Mode
Current resolution, horizontal and vertical frequency status presentation.
19
Page 31

Chapter 3
Timing Setting
By making adjustments to your video card settings, you can set the timing and the
refresh rate according to your preferences. The monitor will automatically save
the settings. Your monitor can accept a vertical frequency ranging from 50 Hz to
160 Hz and an horizontal frequency from 30 KHz to 115 KHz. However, due to
different video card and resolution settings, we recommend that you do not exceed the maximum refresh rate, 160 Hz for vertical frequency and 115KHz for
horizontal frequency to avoid possible damage to your monitor.
Resolution Recommended Maximum Vertical
Refresh Rate(Hz)
640 x 480 160
800 x 600 160
1024 x 768 143
1280 x 1024 108
1600 x 1200 92
1920 x 1440 77
To set the timing and the refresh rate, please see the user's guide of your
video card.
20
Page 32

A Look at the Control Panel
Pin Assignments
D-SUB Connectors
Signal
Pin No Separate Composite Sync-on-green
1 Red Red Red
2 Green Green Green + SYNC
3 Blue Blue Blue
4NC NC NC
5 GND GND GND
6 R-GND R-GND R-GND
7 G-GND G-GND G-GND
8 B-GND B-GND B-GND
9 PC5V(For DDC) PC5V(For DDC) PC5V(For DDC)
10 GND-SYNC GND-SYNC GND-SYNC
11 GND GND GND
12 DDC Data DDC Data DDC Data
13 H-SYNC H/V-SYNC Not Used
14 V-SYNC Not Used Not Used
15 DDC Clock DDC Clock DDC Clock
21
Page 33

Chapter 3
BNC Connectors
Pin Signal
Assignment separate composite sync-on-green
B Blue Blue Blue
G/SYNC Green Green Green + SYNC
R Red Red Red
H/H+V H-SYNC H/V-SYNC NC
22
V V-SYNC NC NC
Page 34

A Look at the Control Panel
Chapter 4
Troubleshooting
Make sure that your monitor is properly installed. If you have encountered any
trouble in using this product, for hardware installation problems, see Chapter 2,
Installing the Monitor. If the problems persist, check this chapter for possible
solutions. If you cannot find Benq P211on the Windows ® XP/ ME/ 2000 / 98 / 95
monitor list, you would have to update the Windows® XP/ ME/ 2000 / 98 / 95
setup information for Benq P211. You can download the update file from the Benq
Corporation web site (http://www.benq.com)
§ If there is no picture on the screen, check:
Power outlet type.
Video sync signal. The video sync signal must be specified for the monitor.
Power saving mode. Press any key & use the mouse to deactivate the mode.
Signal cable connector pins. If pins are bent or missing, consult your dealer.
§ If the picture is scrolling or unstable, check:
Signal connector pin assignments. Replace with a functional one if inoperative.
Signal cable connector pins. If pins are bent or missing, consult your dealer.
Graphics card. See if the settings are made properly.
Scanning frequency. Change the settings of your graphics card to acceptable
options
Remove magnetic objects near the monitor.
Over-adjusting moire reduction setting, please check the moire reduction
setting level. See Chapter 3, A Look at the Control Panel.
23
Page 35

Chapter 4
§ If the characters look dark, the picture is too small, too large or not centered
etc.
Adjust related settings. See Chapter 3, A Look at the Control Panel.
§ If colors are impure.
Check signal cable connector pins. If pins are bent or missing, consult your
dealer
Adjust the Purity setting. See Chapter 3, A Look at the Control Panel.
Maintenance
✗ Do not expose the monitor to direct sunlight or heat.
✗ Do not spill liquid on the monitor.
✗ Do not attempt to open the monitor. You may be hurt by electric shock. For
service, call your dealer.
✗ Do not use your monitor when magnets or electronic products are operat-
ing nearby.
✗ Do not use harsh chemicals or strong cleaning solvents to clean the monitor
screen. Wipe it with mild solution applied on clean and soft cloth.
✗ Do not place anything on your monitor. Bad ventilation may elevate tem-
perature within the monitor.
Need More Help?
If your problems remain after checking this manual, please contact your place of
purchase or e-mail us at: DPLservice@benq.com
24
Page 36

Specifications
Chapter 5
Specifications
Picture
Size 21”(53.34cm) diagonal
Dot Pitch 0.25mm dot pitch
Surface/Transmission AR,AS/semi-tinted
Maximum Viewable Size 20” (51cm) diagonal
Video Input 15-pin, mini D-SUB Connector/BNC Connector
Bandwidth 290MHz
Display Area 390mm(H) x 295mm(V) (Preset)
408mm(H) x 306mm(V) (Full Scan)
Power Supply(Universal)
Input voltage 100~120/200~240 VAC, 50~60 Hz
(Universal compatible)
Power consumption 150 Watts max./165 Watts max.(With USB)
External Controls Power switch, i key auto-calibration, Contrast,
Brightness, Horizontal Position, Horizontal Size,
Vertical Position, Vertical Size, Pincushion,
Unbalance, Trapezoid, arallelogram, Rotation,
Top Corner, Bottom Corner, Color Weight,
Degaussing, Horizontal Convergence,
Vertical Convergence, Horizontal Moire,
Vertical Moire, BNC and DB-15 Selection, Reset,
Language Select, Purity
Max. Resolution 1920 x 1440
25
Page 37

Chapter 5
Horizontal Frequency 30-115 KHz
Vertical Frequency 50-160 Hz
Dimensions (with stand) 508mm(W) x 515mm(H) x 512mm(D)
Weight 30Kg
Ambient Temperature
Operating +5°C ~ +40°C
Storage -20°C ~ +60°C
Humidity
Operating 20% ~ 90%
Storage 10% ~ 90%
X-Radiation DHHS, PTB
Regulatory Compliance FCC-B, UL, FTZ-B, CSA, BZT-B, CE, D.N.S.F,
TÜV-GS/Ergonomics, VCCI, ISO-9241-3,
ISO-9241-8, CNS 13438, C-tick, MPR-II, TCO99
26
 Loading...