


QSG_Installation_wel_en.fm Page 1 Tuesday, May 9, 2006 10:22 AM
FP91R
R Series-Professional LCD Monitor
Quick Guide for Hardware Installation
QSG_Installation_wel_en.fm Page 2 Tuesday, May 9, 2006 10:22 AM
Copyright
Copyright © 2006 by BenQ Corporation. All rights reserved. No part of this publication may be reproduced, transmitted, transcribed, stored in a retrieval system or translated into any language or computer language, in any form or by any means, electronic, mechanical, magnetic, optical, chemical,
manual or otherwise, without the prior written permission of this company.
Disclaimer
BenQ Corporation makes no representations or warranties, either expressed or implied, with respect to
the contents hereof and specifically disclaims any warranties, merchantability or fitness for any particular purpose. Further, BenQ Corporation reserves the right to revise this publication and to make
changes from time to time in the contents hereof without obligation of this company to notify any person of such revision or changes.
*Windows is a trademark of Microsoft Corporation. Others are copyrights of their respective
companies or organizations.
Table of Contents
Package contents................................................................................................................... 1
Assembling the monitor hardware...................................................................................... 2
Adjusting the screen resolution ........................................................................................... 6
QSG_Installation_en.fm Page 1 Tuesday, May 9, 2006 10:23 AM
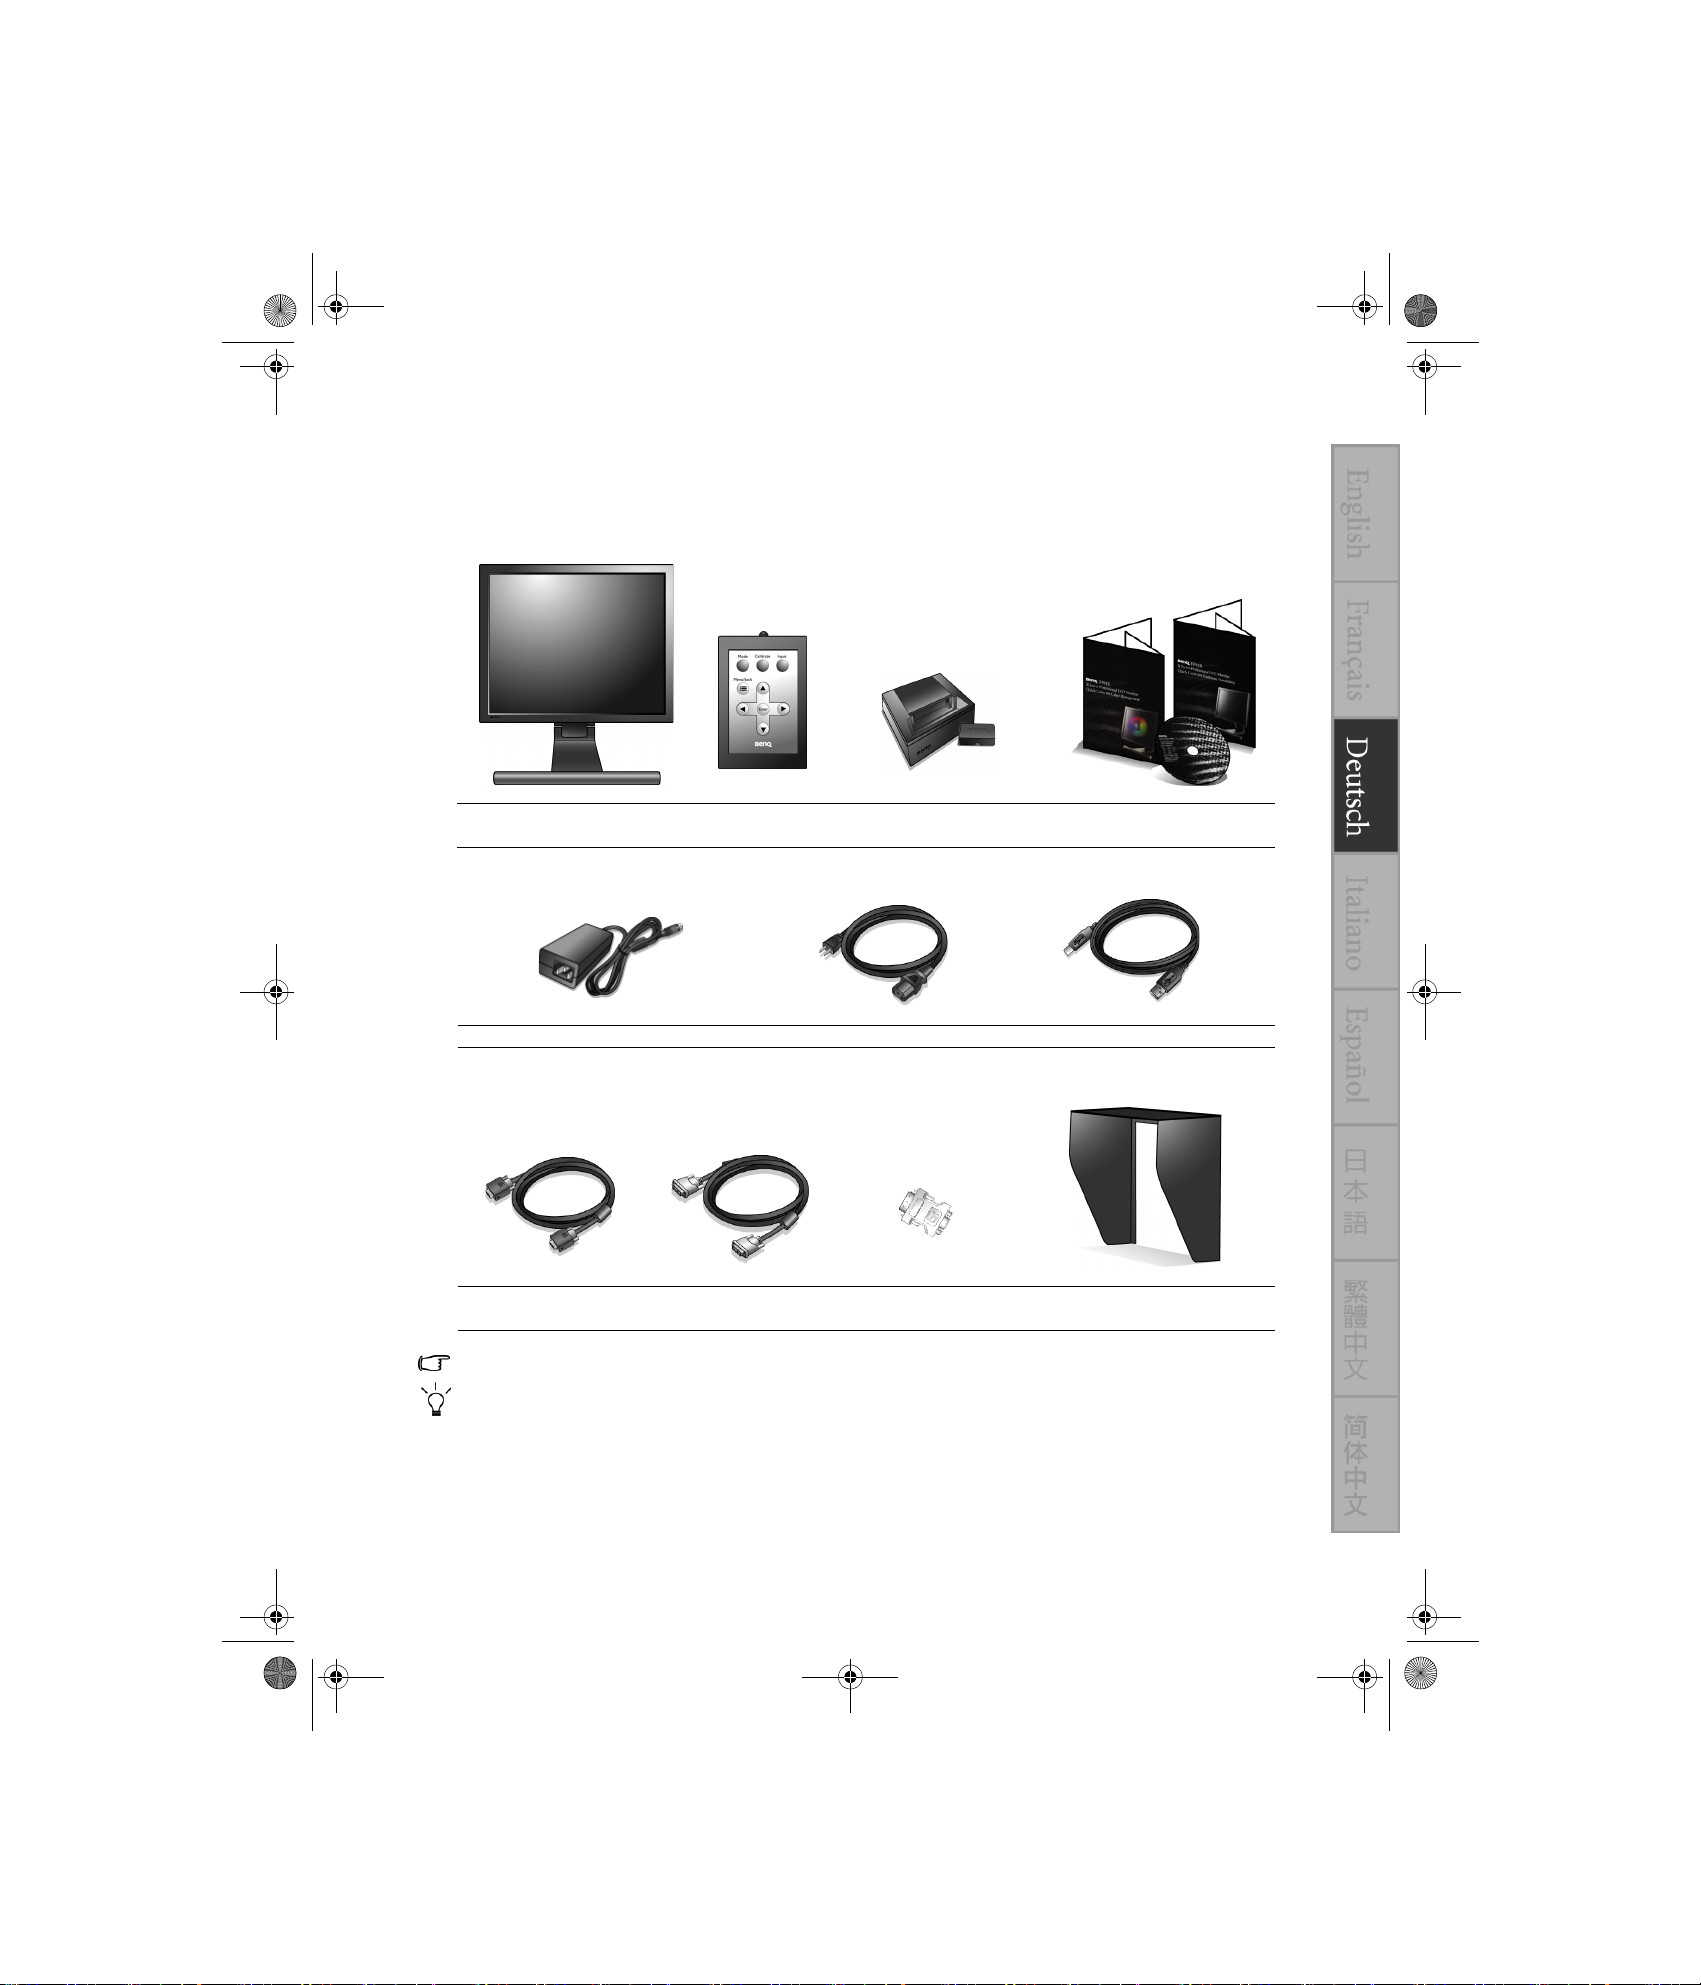
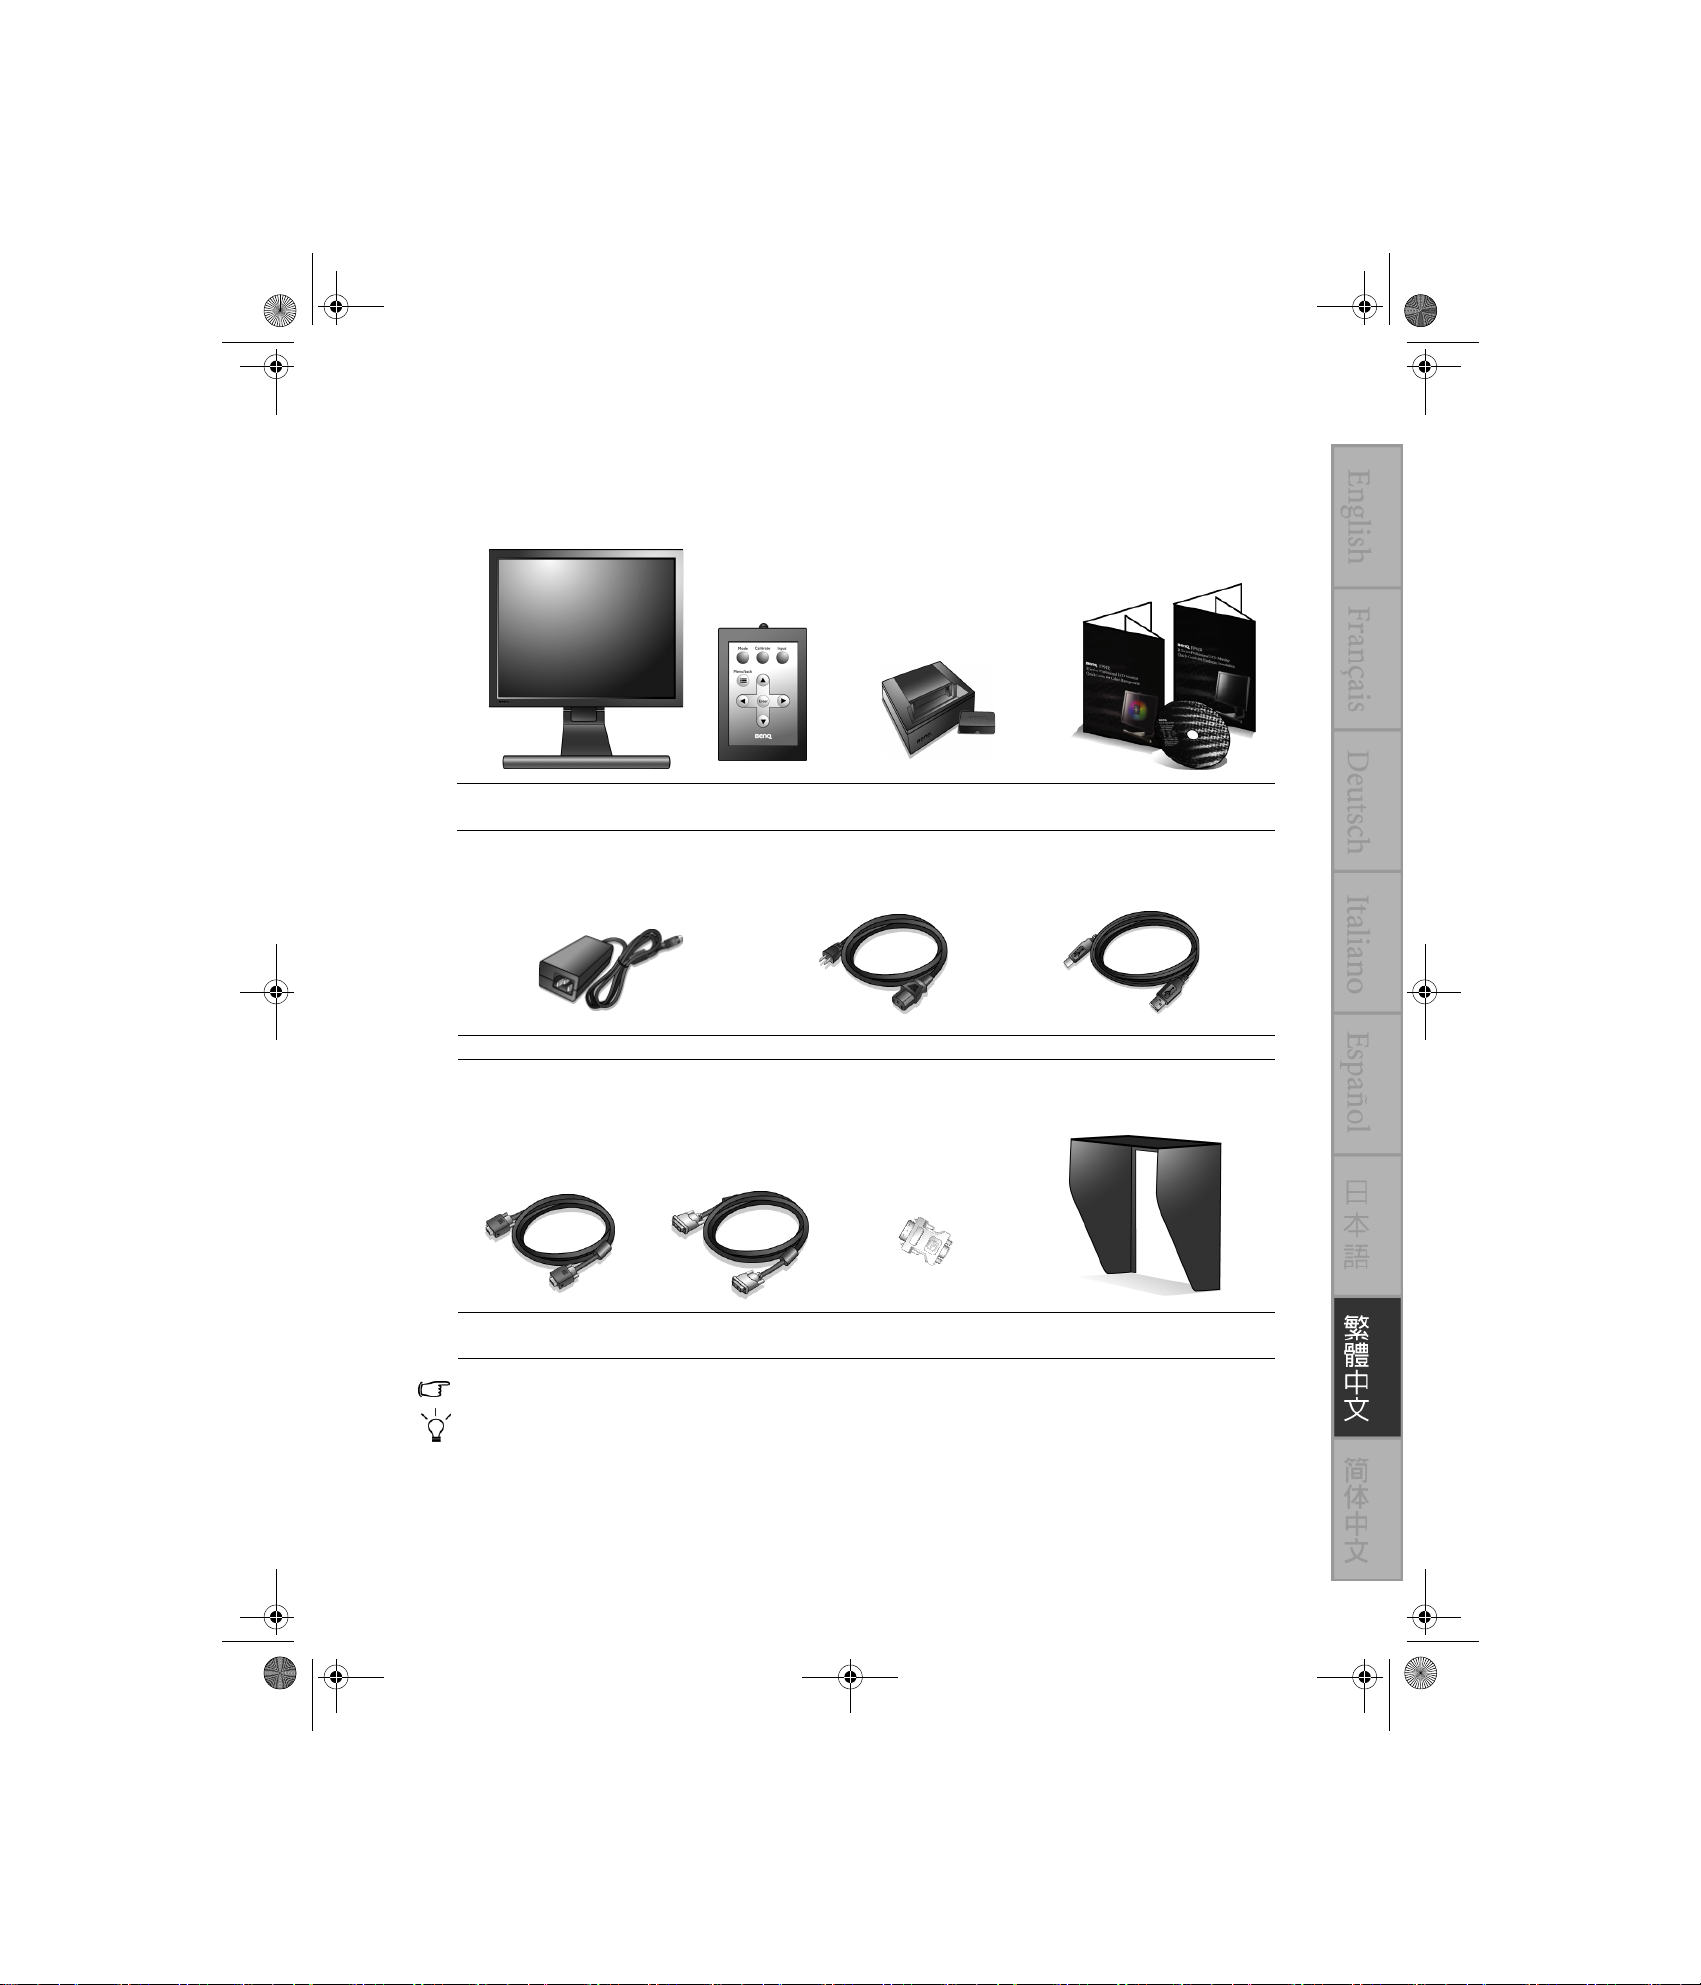
1. Package contents
When unpacking please check you have the following items. If any are missing or damaged, please contact the place of purchase for a replacement.
BenQ LCD Monitor
Power Adapter Power Cord USB Cable
Signal Cable: D-Sub
(optional)
Some of the accessories may vary from region to region.
Signal Cable: DVI-D DVI-I to D-Sub Adapter Ambient Light Shield (optional)
Monitor
Controller
(with a suction cap inside)
Controller Dock
Quick Guides
and CD-ROM
Consider keeping the box and packaging in storage for use in the future when you may need to transport the monitor. The fitted foam packing is ideal for protecting the monitor during transport.
For detailed information on the monitor, please refer to the User Manual in the enclosed CD.
Package contents 1

QSG_Installation_en.fm Page 2 Tuesday, May 9, 2006 10:23 AM
2. Assembling the monitor hardware
If the computer is turned on, you must turn it off before continuing. Do not plug-in or turn-on the
power to the monitor until instructed to do so.
1. Unpack the monitor and place the monitor on the desk
as illustrated.
Please be careful to prevent damage to the monitor. Placing
the screen surface on an object like a stapler or a mouse will
crack the glass or damage the LCD substrate voiding your
warranty. Sliding or scraping the monitor around on your desk
will scratch or damage the monitor surround and controls.
Protect the monitor and screen by clearing a flat open area on
your desk and placing a soft item like the monitor packaging
bag on the desk for padding.
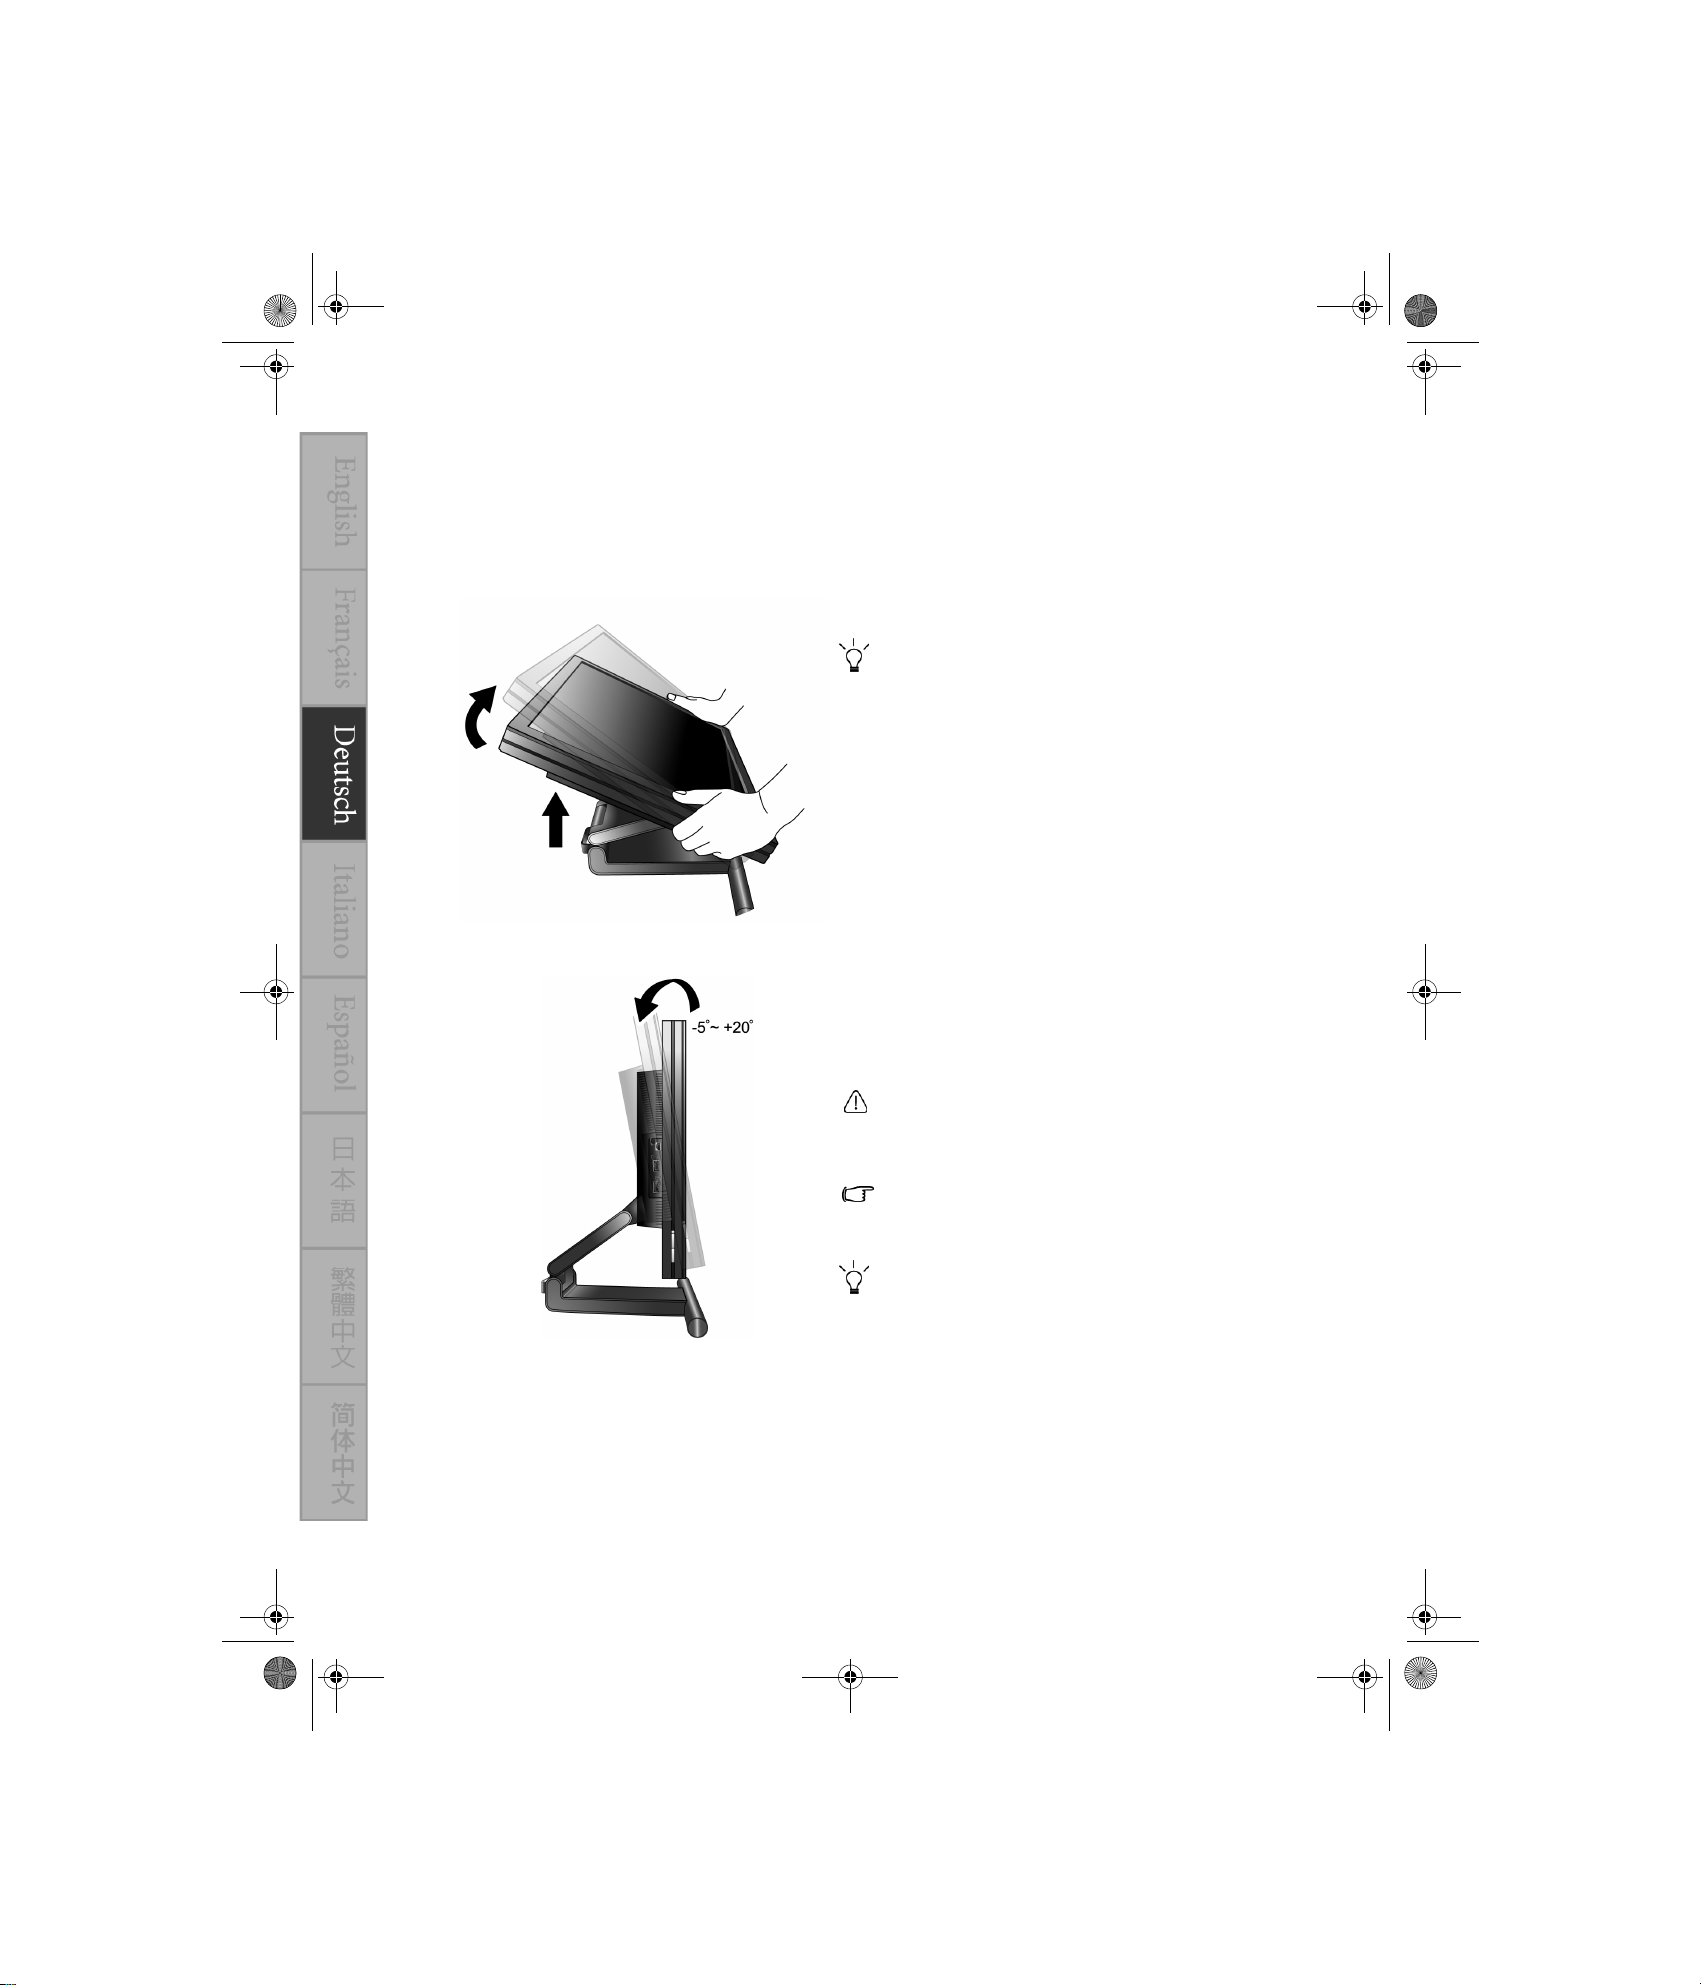
2. Adjust the angle and height of the monitor.
Lift the screen upward and then pull the screen forward until it
reaches your desired angle and height.
The maximum tilt angle of the monitor is -5 to +20
degrees. If you tilt the monitor over 20 degrees,
the monitor will lose its balance.
While angling the screen, watch the space between the
monitor and the stand plate to avoid any possible injury with
your fingers.
You should position the monitor and angle the screen to minimize unwanted reflections from other light sources.
2
Assembling the monitor hardware
QSG_Installation_en.fm Page 3 Tuesday, May 9, 2006 10:23 AM
or
3. Connect the signal cable.
Connect one end of the DVI-D cable to one of the monitor
DVI-I sockets and the other end to the DVI-I port on your
computer.
The DVI-D format is used for direct digital connection
between source video and digital LCD monitors or projectors.
The digital video signals produce a superior quality picture
than analog video signals.
If you don’t have an appropriate DVI-D port on your computer, you can attach the enclosed DVI-I to D-Sub adapter to
the standard video D-Sub cable (at the end with the ferrite filter), so that the analog video signals can be converted into digital video signals via the DVI-I interface. Then connect the
DVI-I to D-Sub adapter to the monitor DVI-D socket and the
other end of the D-Sub cable (at the end without the ferrite filter) to the computer video D-Sub socket.
Such a DVI-I-to-D-Sub input signal may not present the
superior quality picture as DVI-D input signal.
If you wish to switch between two input signals, you may connect two signal cables from two computers to the DVI-I sockets and use Input on the monitor controller to assign the input
signal without any time lag.
Tighten all finger screws to prevent the plugs from accidently
falling out during use.
Assembling the monitor hardware 3
QSG_Installation_en.fm Page 4 Tuesday, May 9, 2006 10:23 AM
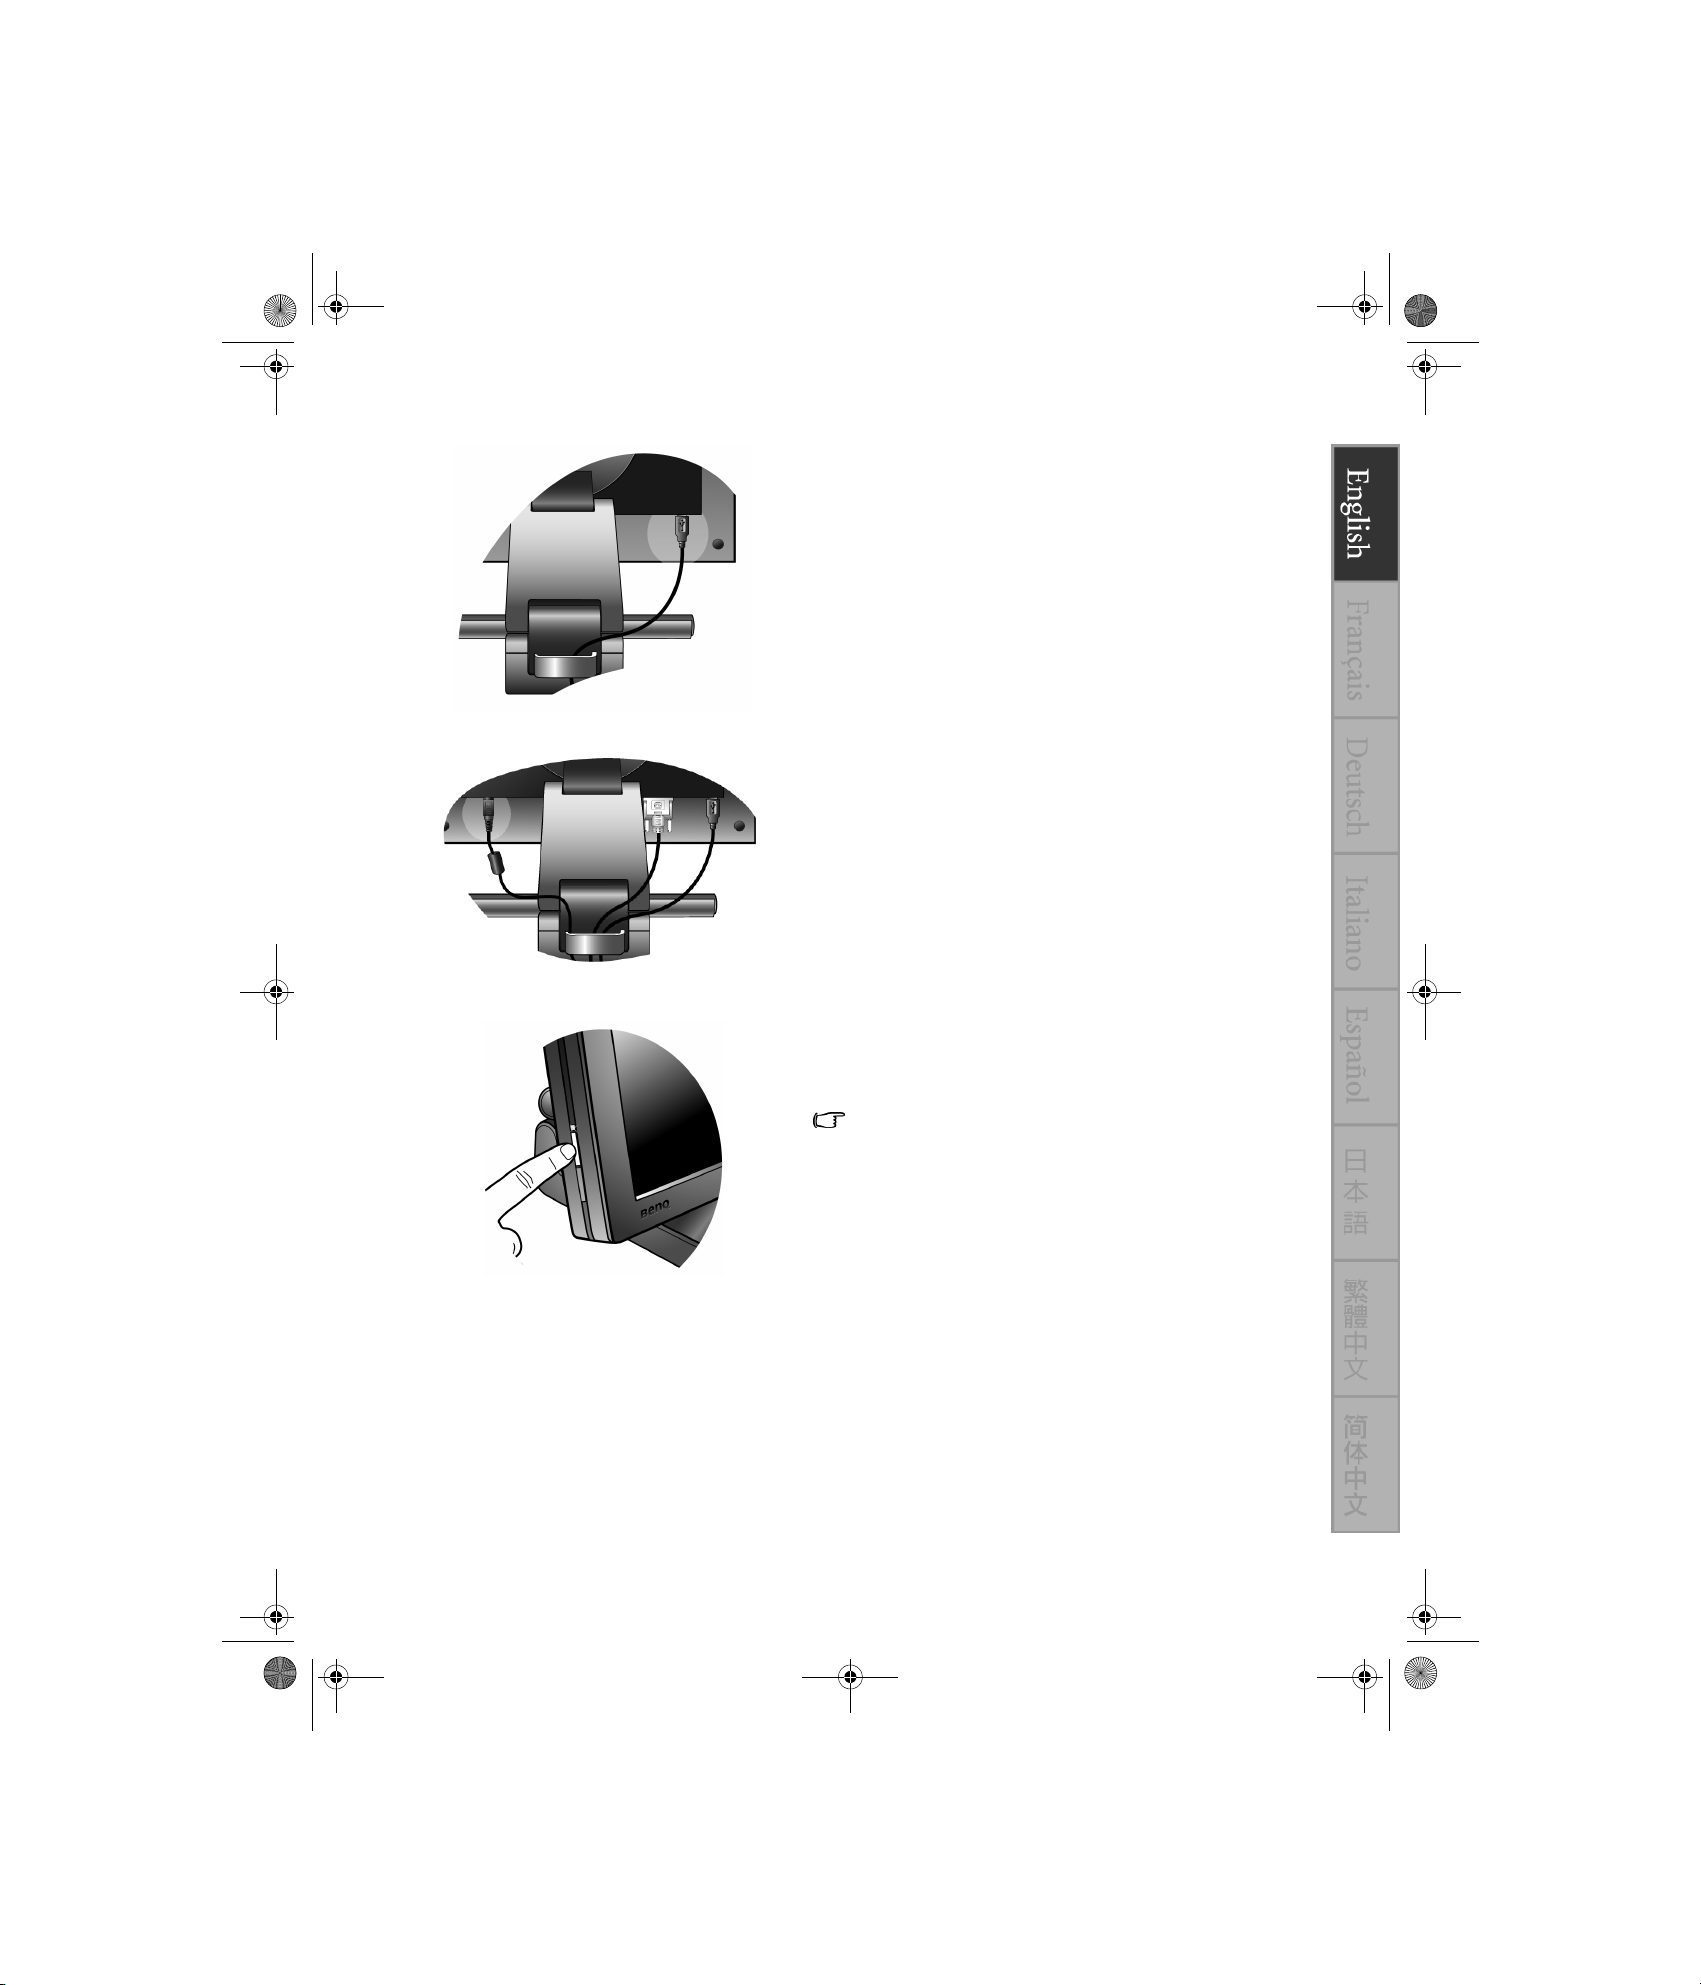
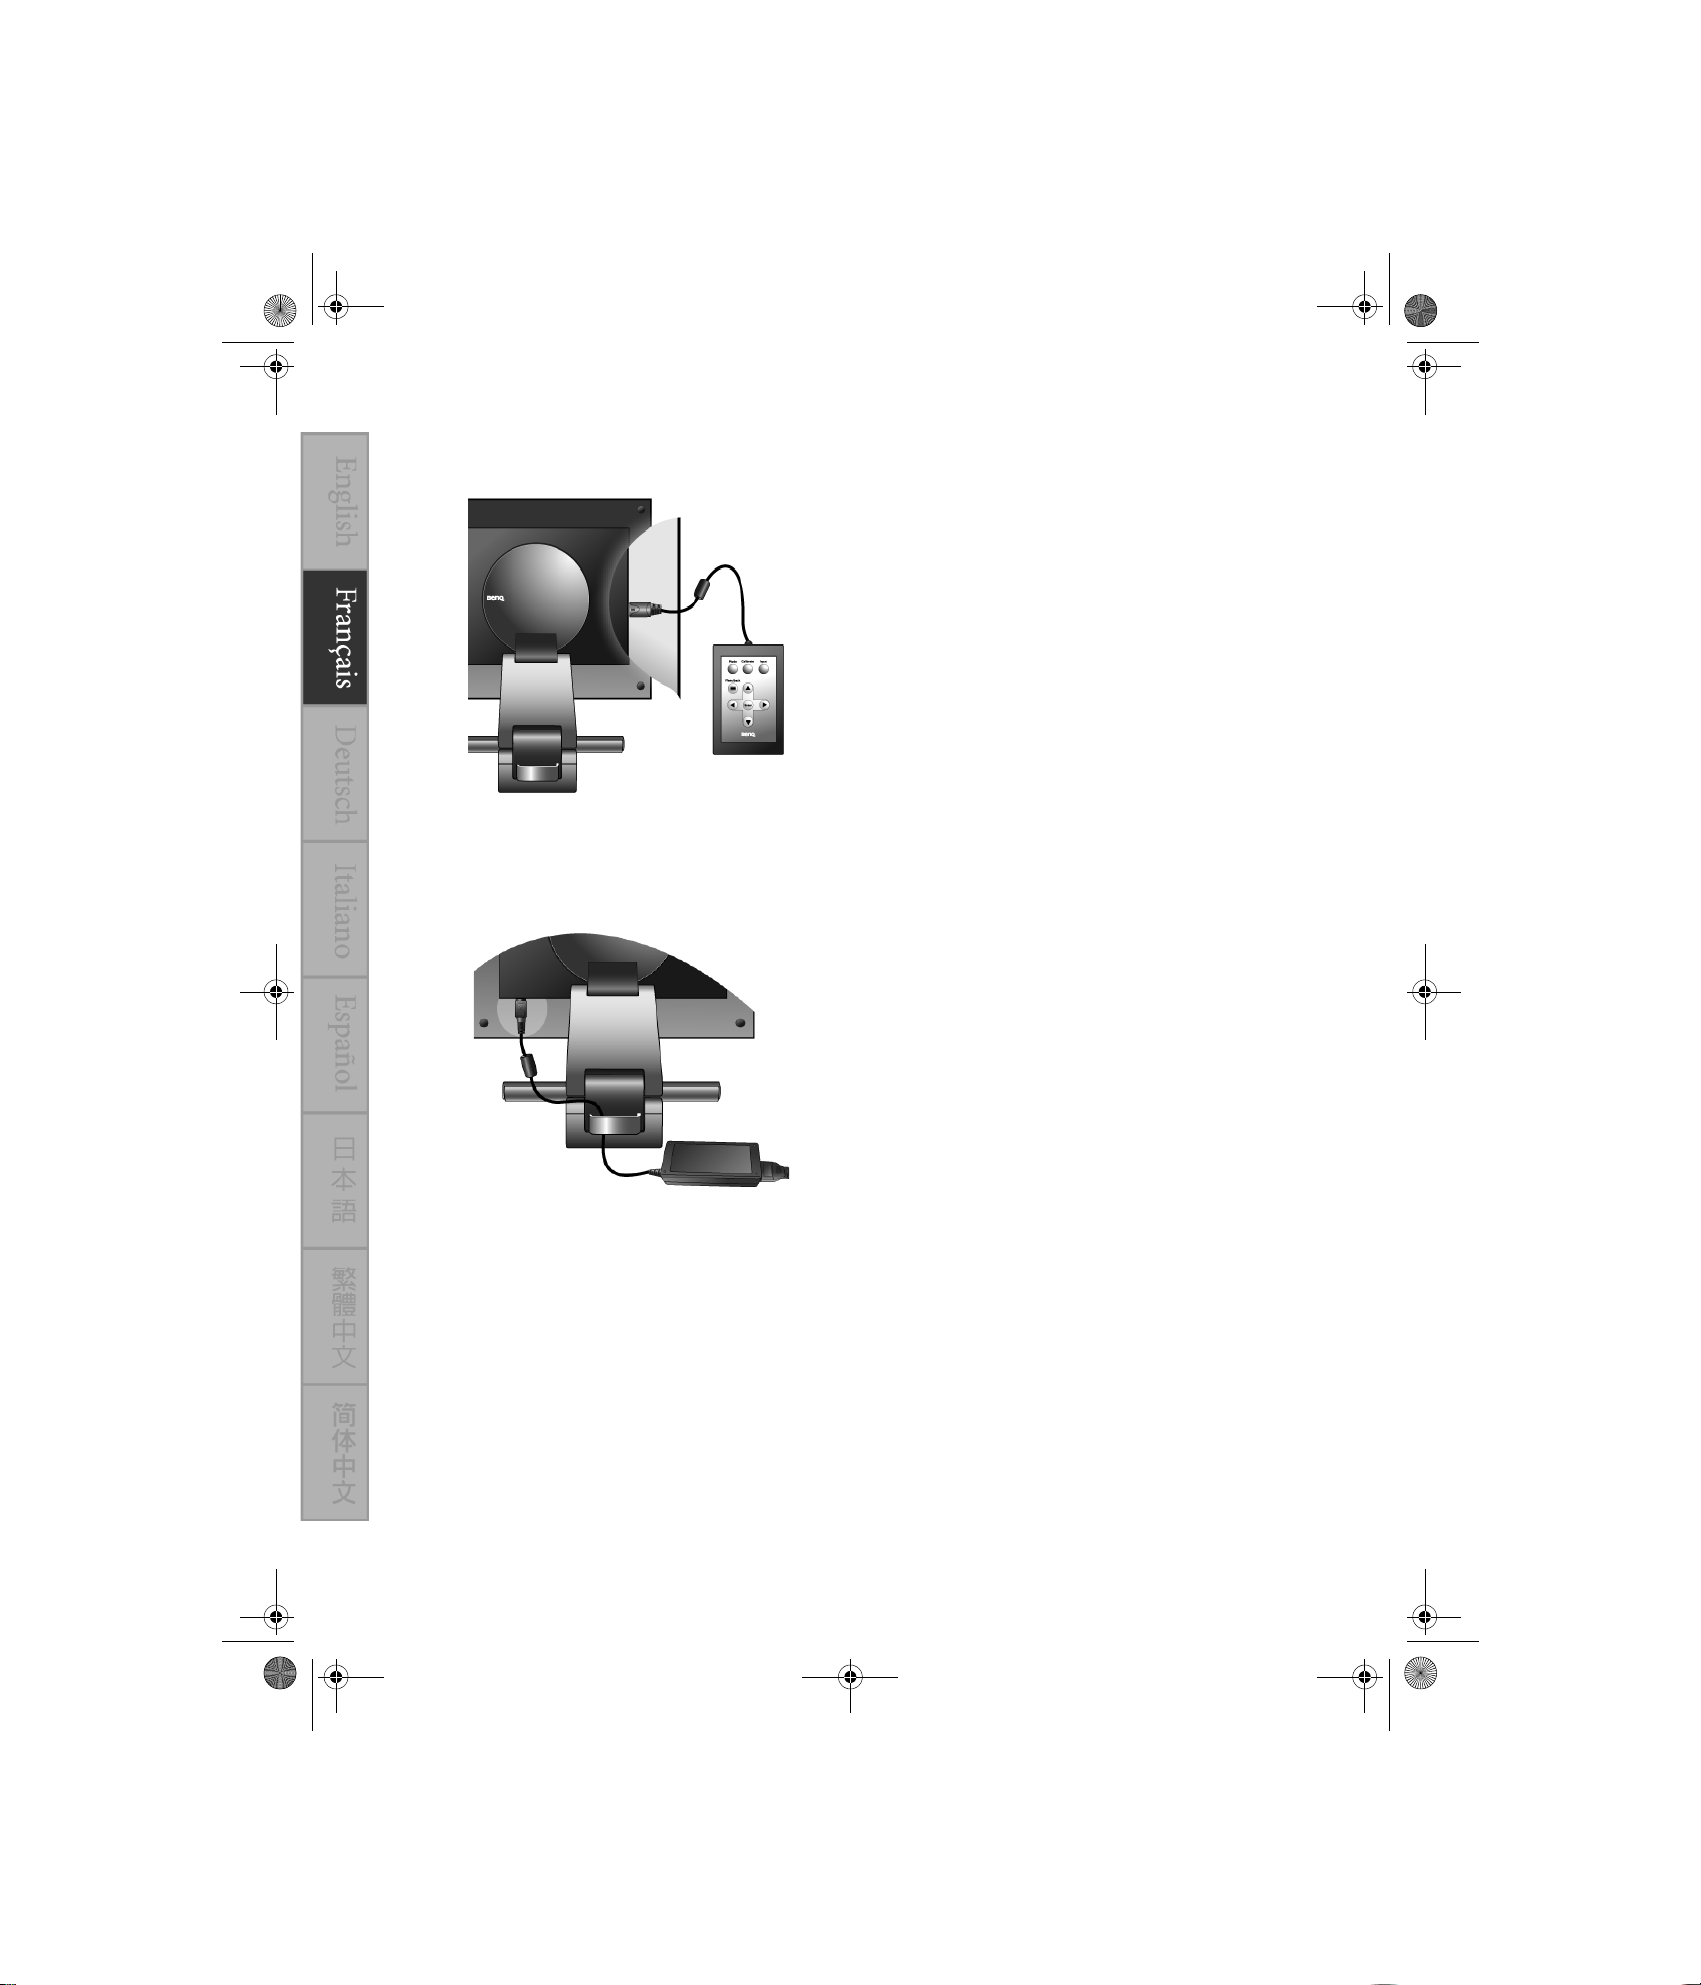
4. Connect the monitor controller to the monitor.
Connect the plug of the cable attached to the monitor controller to the controller jack on the rear of the monitor.
The On Screen Display (OSD) items are controlled by on the
monitor controller. You use the controller to adjust the display
settings according to your needs. The controller contains a
built-in luminance sensor, which is used to calibrate the monitor light output and compensate for any loss caused by backlight decay.
When not being used, you should store the monitor controller
in the supplied controller dock. It can be left connected to the
monitor for quick access to the monitor controls, or unplugged
and removed for storage.
For more information about accessing and adjusting the OSD,
see the User Manual in the enclosed CD.
5. Connect the 12VDC power adapter cable to the monitor.
Take the 12VDC power adaptor cable and plug the end into the
power socket on the rear of the monitor. Do not connect the
power adapter to a electric outlet just yet.
4
Assembling the monitor hardware
QSG_Installation_en.fm Page 5 Tuesday, May 9, 2006 10:23 AM
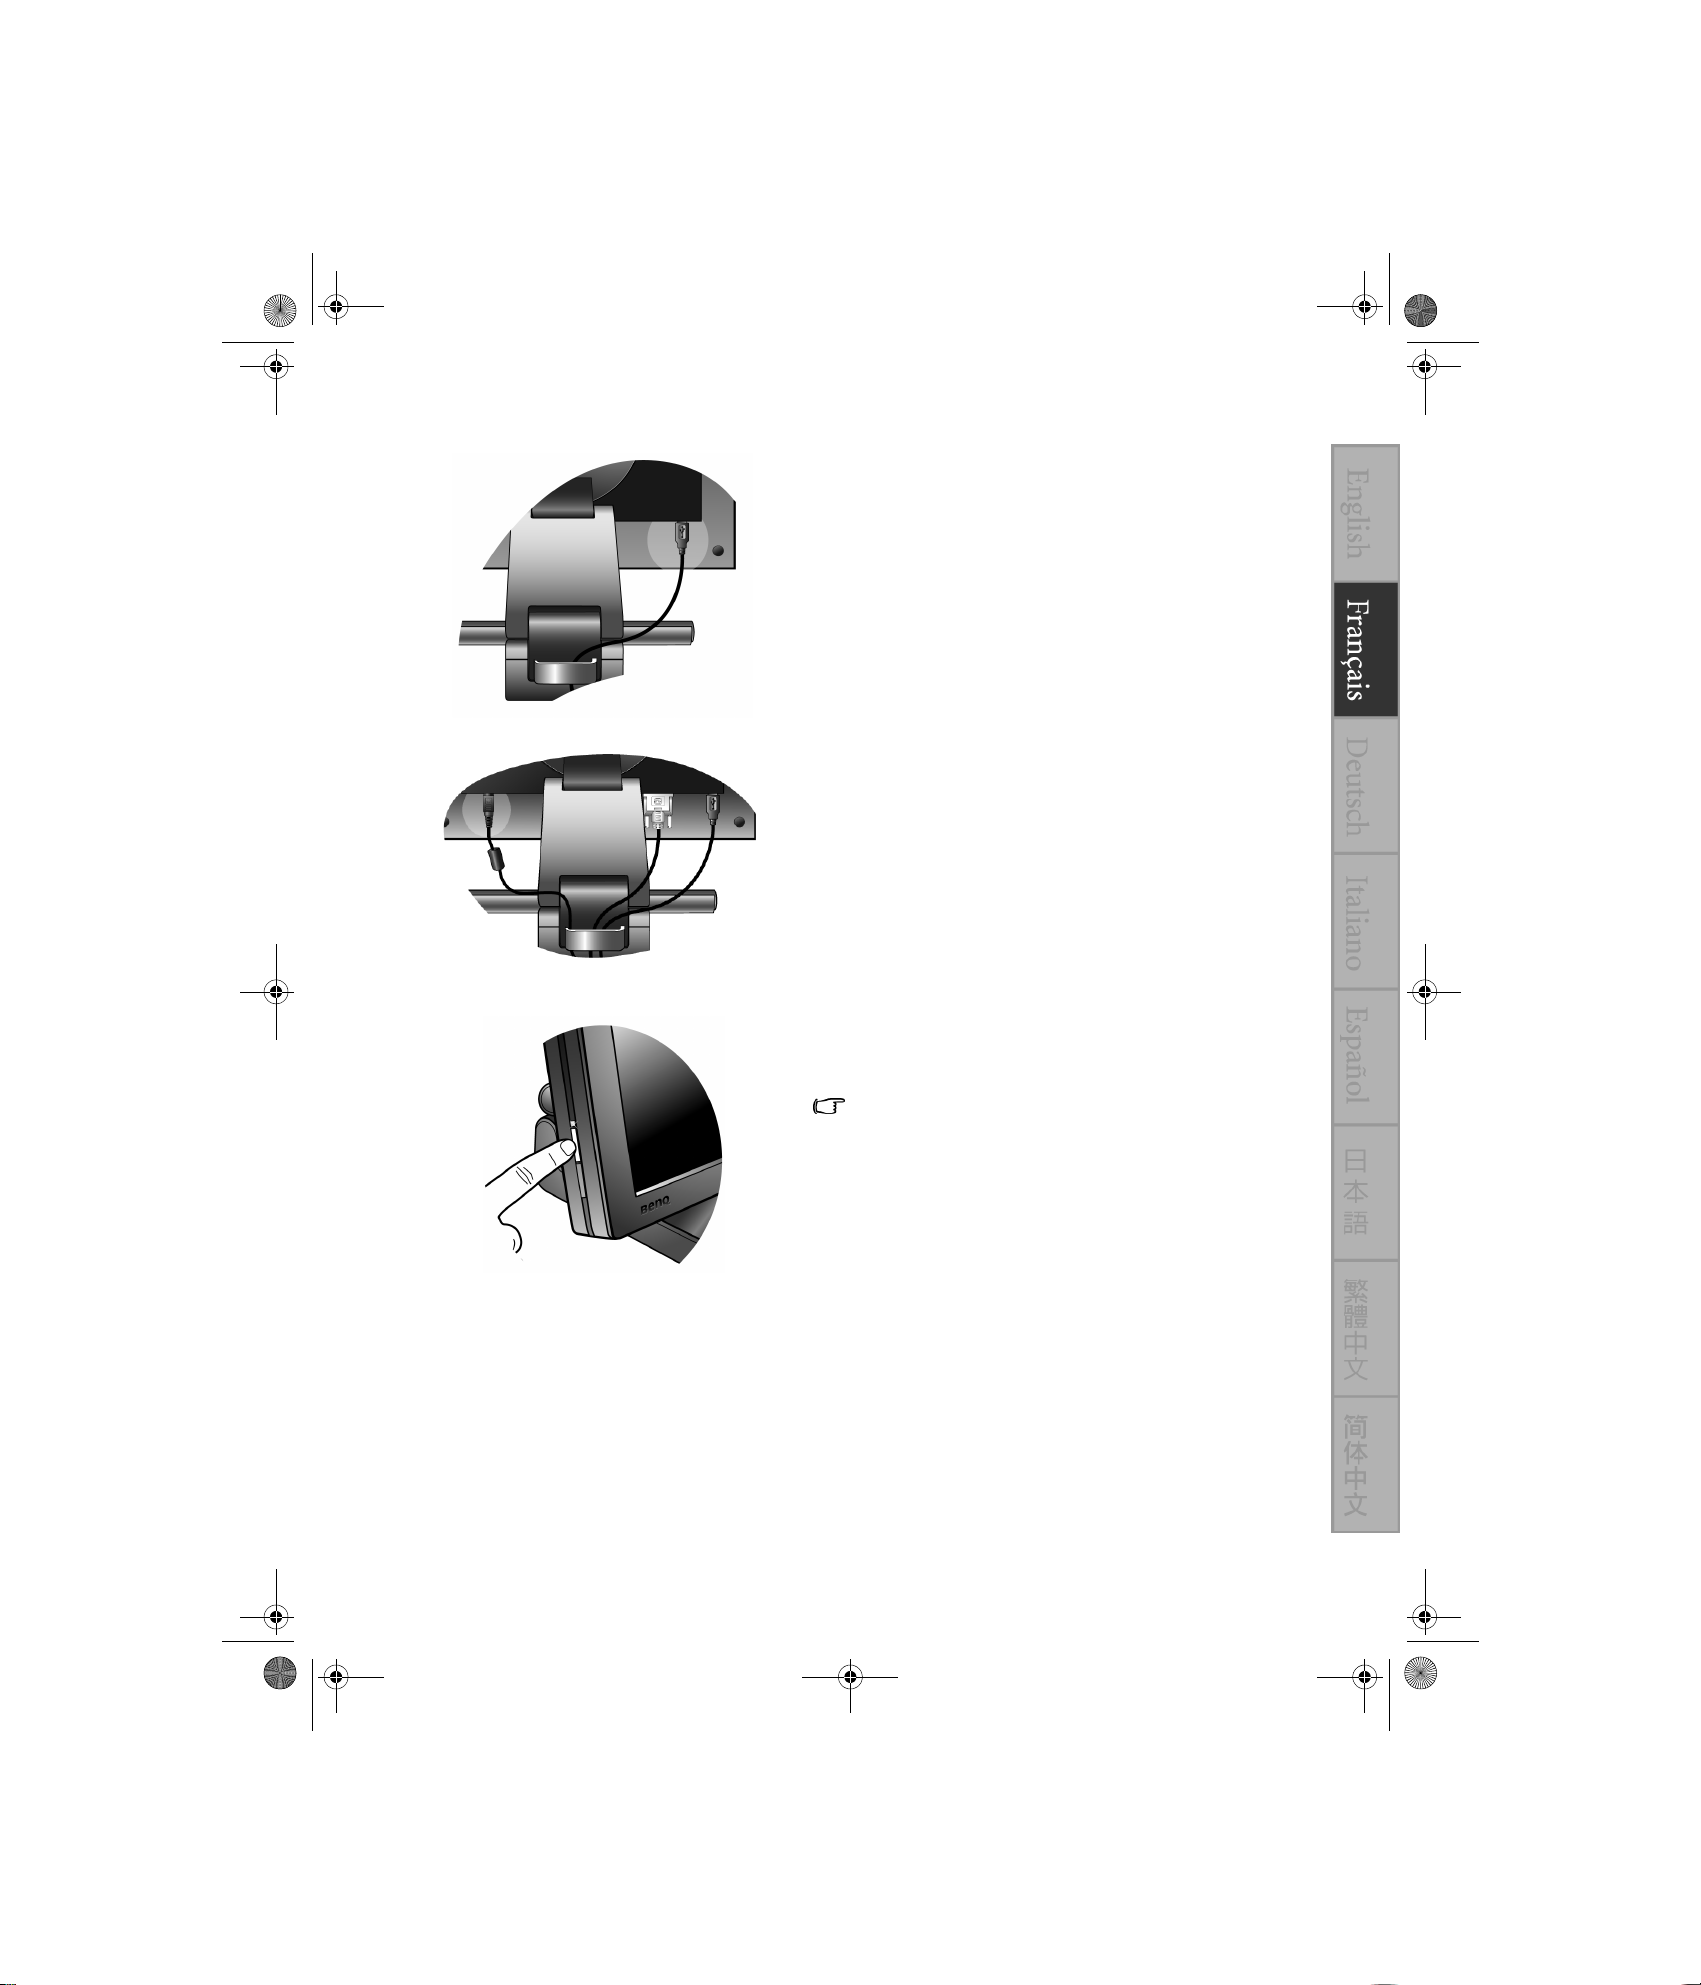
6. Connect the USB hub cable.
Connect the USB cable between the USB socket on the rear of
the monitor and a USB port on your computer.
7. Route the cables behind the monitor.
Retain the cables neatly and slide them through the slit to one
side of the cable holder on the back of the monitor stand to
keep your desk place clear.
8. Connect the power.
Plug the power cable into the power adaptor and into a electric
outlet and turn it on.
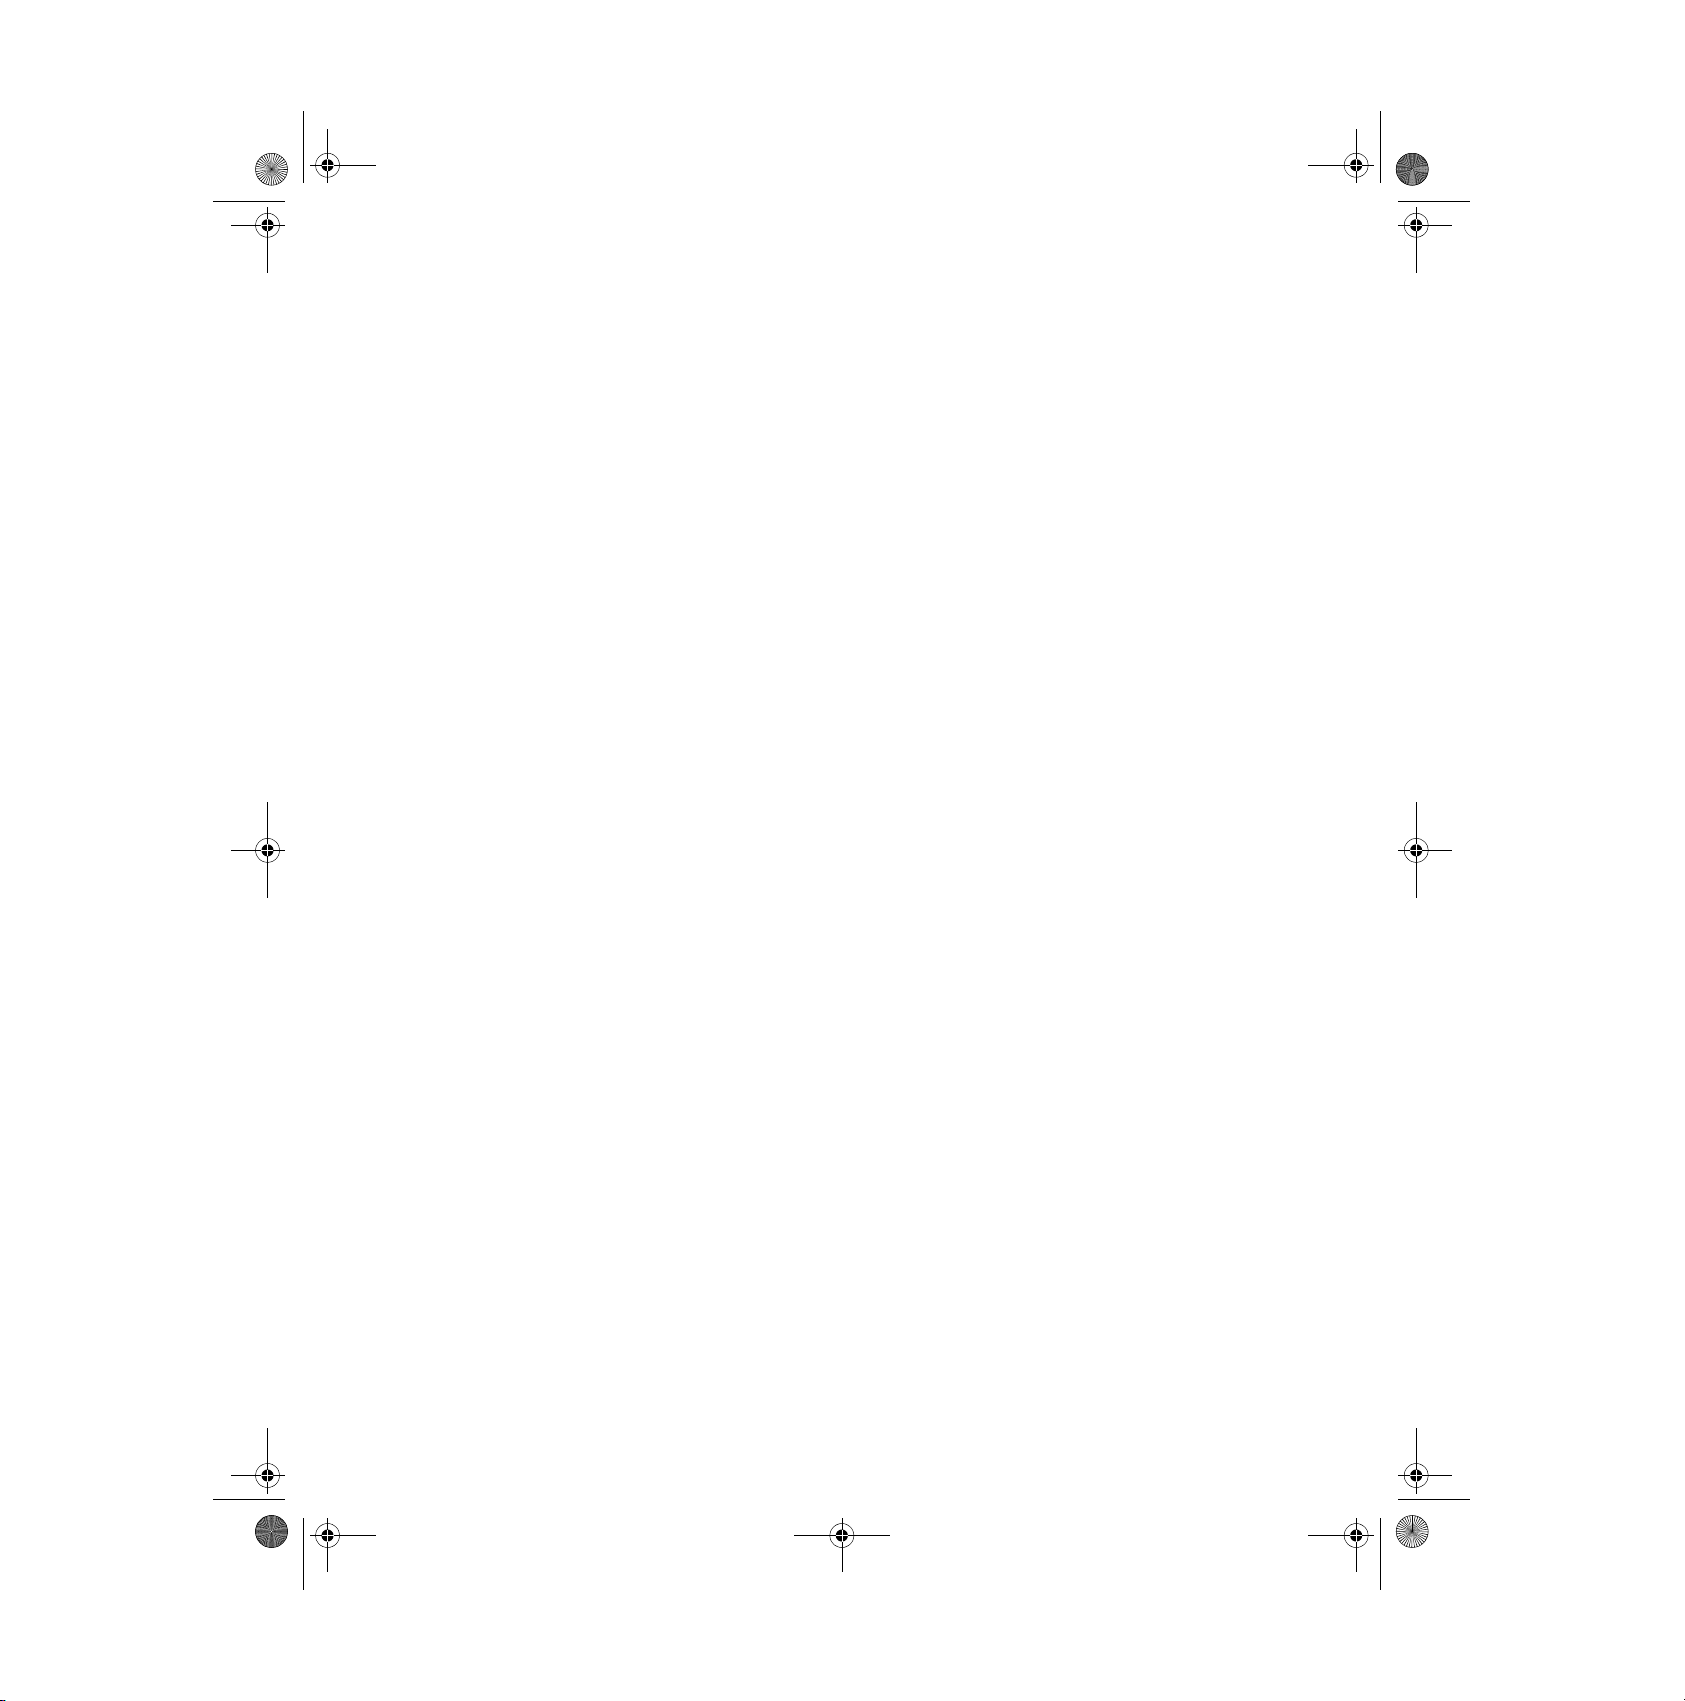
Picture may differ from product supplied for your region.
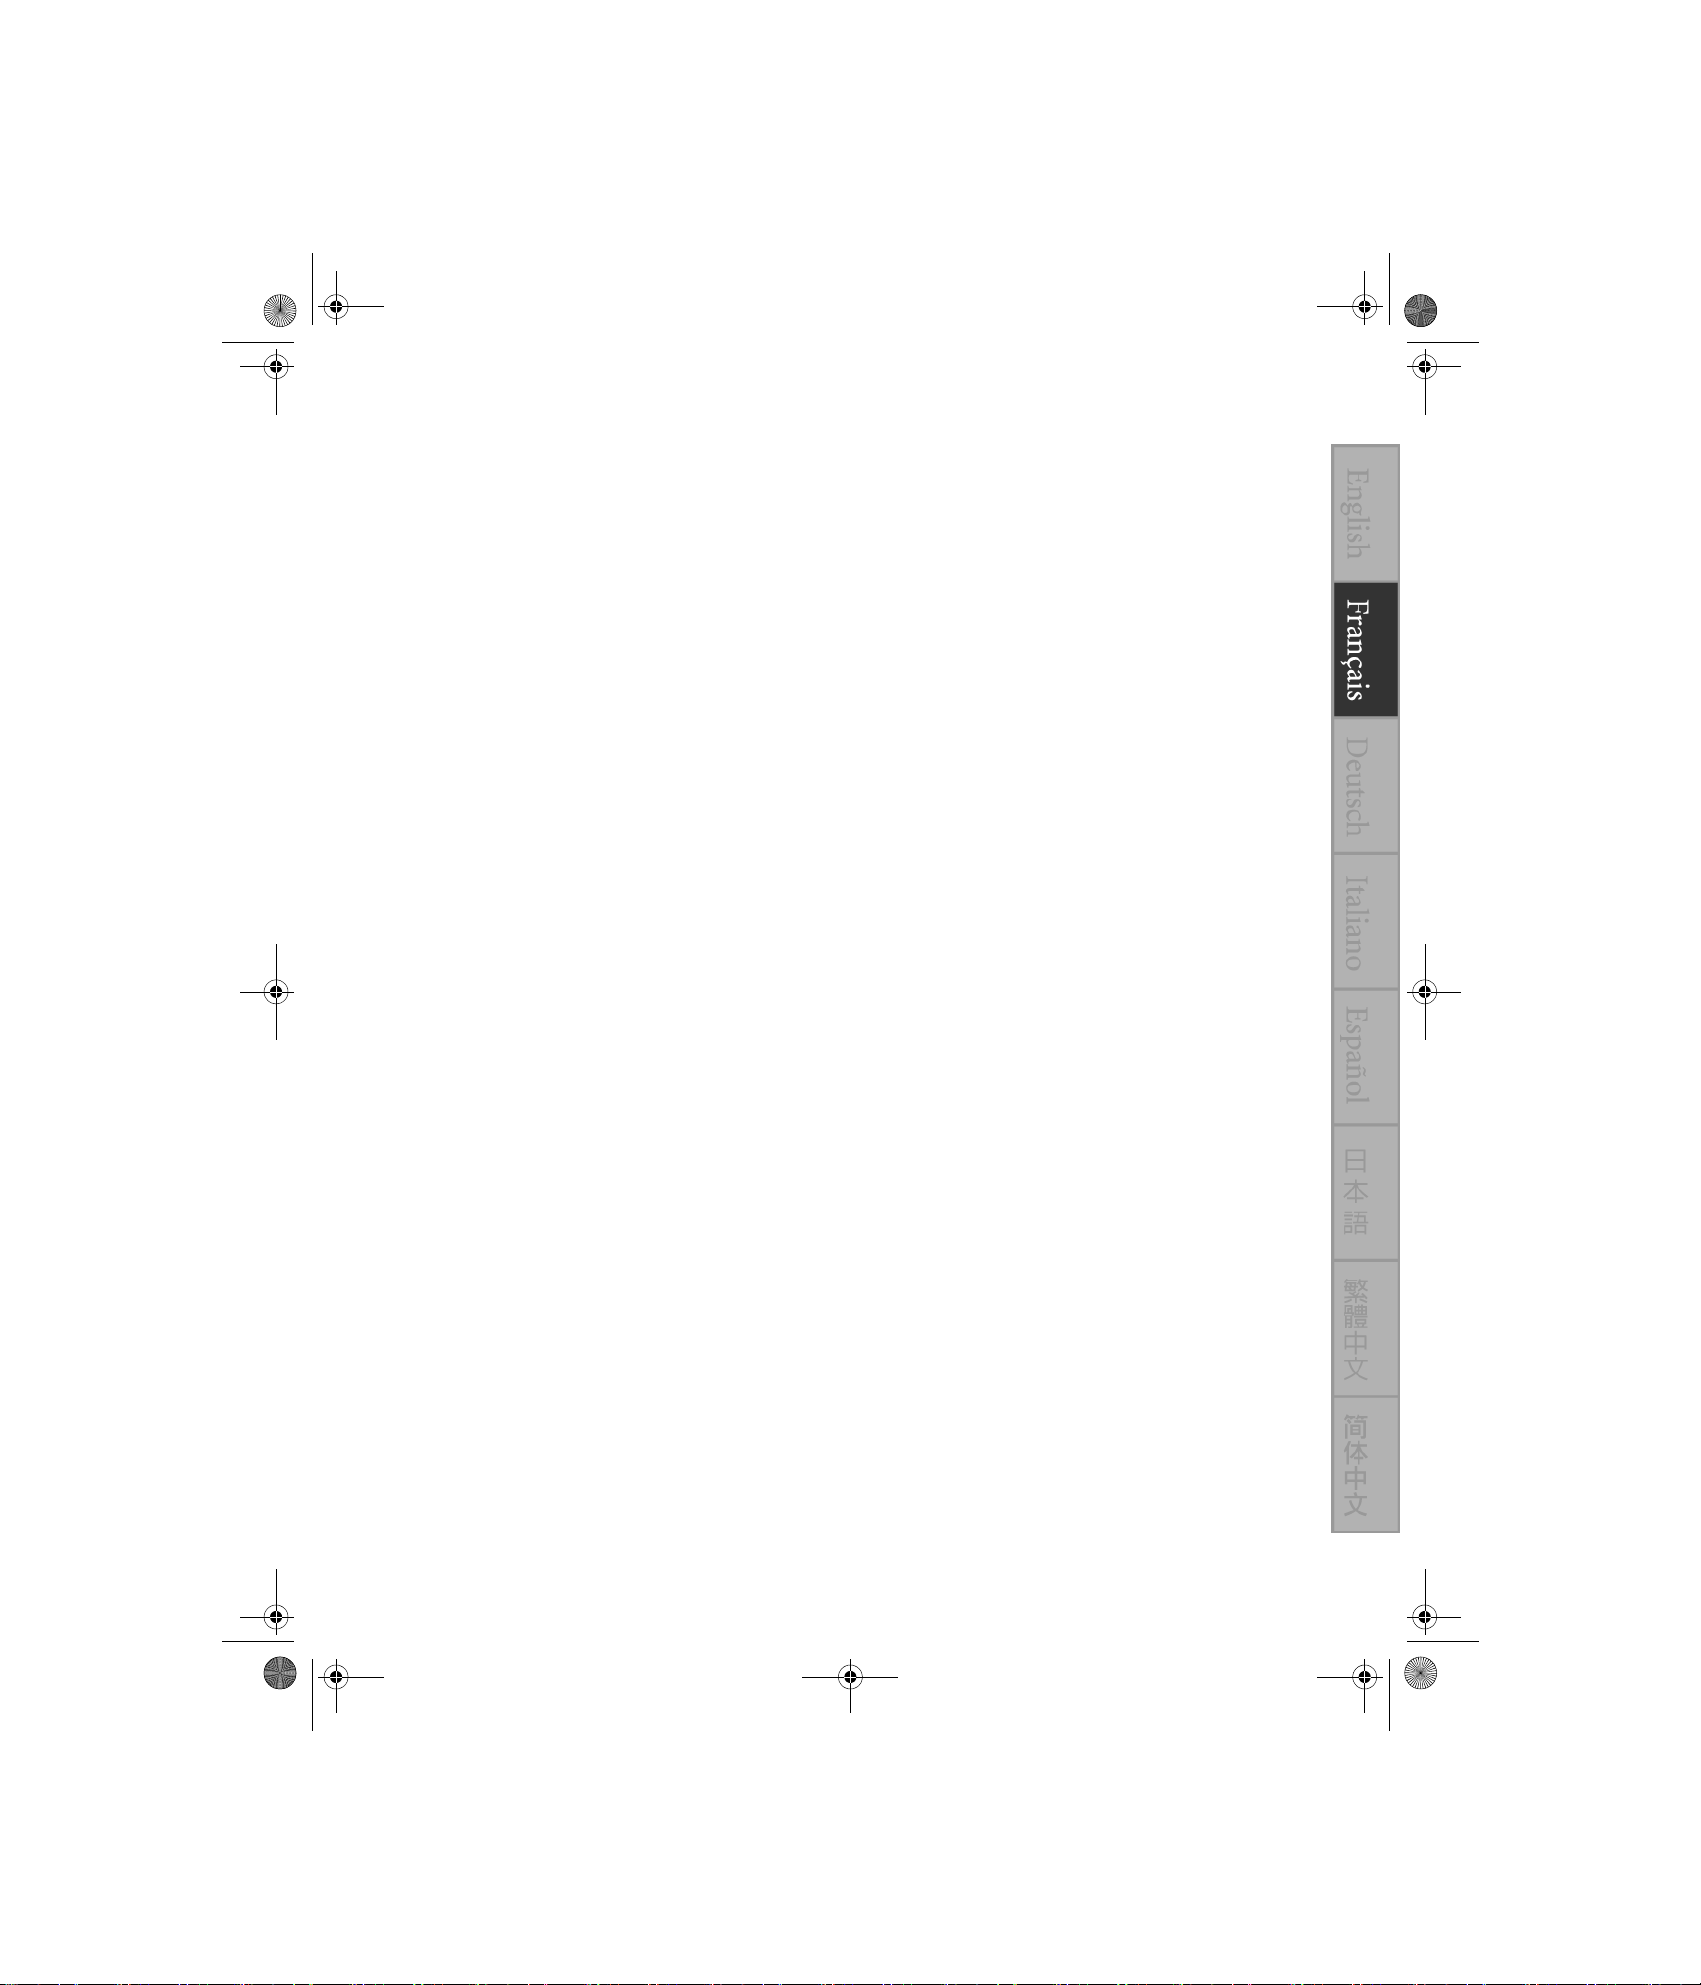
Turn on the monitor by pressing the power button on the left
side of the panel.
The monitor is now ready to display your computer images.
You should now turn on the computer too.
Assembling the monitor hardware 5

QSG_Installation_en.fm Page 6 Friday, May 12, 2006 10:17 AM
3. Adjusting the screen resolution
Due to the nature of liquid crystal display (LCD) technology, the screen resolution is always fixed. The
best possible picture for your FP91R is achieved with a resolution of 1280 x 1024. This is called “Native
Resolution” or maximal resolution – that is, the clearest picture. Lower resolutions are displayed on a
full screen through an interpolation circuit. Image blurring across pixel boundaries can occur with the
interpolated resolution depending upon the image type and its initial resolution.
To take full advantage of LCD technology you should select the native resolution setting of 1280 x 1024.
To start you will need to open the Windows Control Panel first.
1. Open Display Properties and select the Settings tab.
You can open Display Properties by right-clicking on the Windows desktop and selecting Properties from the
pop-up menu.
2. Use the slider in the ‘Screen area’ section to adjust the screen resolution.
Select the recommended resolution of 1280 x 1024 then click Apply.
If you select some other resolution, be aware that this other resolution is interpolated and may not accurately display
the screen image as well as it could do at the native resolution setting.
3. Click OK then Ye s .
4. Close the Display Properties window..
For detailed information on the monitor, please refer to the User Manual in the enclosed CD.
6
Adjusting the screen resolution
last_page.fm Page 1 Tuesday, May 9, 2006 10:21 AM
Thank you.
blank_page_left.fm Page 1 Monday, May 8, 2006 5:59 PM
QSG_Installation_wel_Fre.fm Page 1 Tuesday, May 9, 2006 2:44 PM
FP91R
Moniteur LCD professionnel gamme R
Guide rapide pour l’installation matérielle
QSG_Installation_wel_Fre.fm Page 2 Tuesday, May 9, 2006 2:44 PM
Copyright
Copyright © 2006 BenQ Corporation. Tous droits réservés. Aucune partie de cette
publication ne peut être reproduite, transmise, transcrite, stockée sur un système d'archivage ou
traduite dans une langue ou un langage informatique, sous aucune forme ou par aucun moyen
électronique, mécanique, magnétique, optique, chimique, manuel ou autre, sans l'autorisation écrite
préalable de BenQ Corporation.
Limitation de responsabilité
BenQ Corporation n'assure aucune représentation ou garantie, expresse ou implicite, quant au
contenu de cette publication et refuse en particulier toute garantie, aptitude à la commercialisation ou
adéquation à un usage particulier. Par ailleurs, BenQ Corporation se réserve le droit de réviser cette
publication et d’apporter de temps à autre des modifications au contenu de la présente publication
sans obligation de préavis envers quiconque.
*Windows est une marque de Microsoft Corporation. Les autres sont des droits d’auteur de leurs
sociétés ou organisations respectives.
Sommaire
Contenu de l’emballage ........................................................................................................ 1
Assemblage matériel du moniteur....................................................................................... 2
Ajuster la résolution de l’écran ............................................................................................ 6
QSG_Installation_Fre.fm Page 1 Tuesday, May 9, 2006 7:18 PM
1. Contenu de l’emballage
Lors du déballage, veuillez vérifier la présence des éléments suivants. En cas d’élément manquant ou
endommagé, veuillez contacter le lieu d’achat pour un remplacement.
Moniteur LCD BenQ
Adaptateur secteur Cordon d’alimentation Câble USB
Câble de signal : D-Sub
(en option)
Certains des accessoires peuvent varier selon les régions.
Contrôleur du
moniteur
Câble de signal : DVI-D
(contenant un couvercle à
Base du contrôleur
succion)
Adaptateur DVI-I à
D-Sub
Guides rapides
et CD-ROM
Pare-lumière (en option)
Il est conseillé de conserver le carton et les éléments de l’emballage pour une utilisation ultérieure si vous devez
transporter le moniteur. La garniture en mousse formatée est idéale pour protéger le moniteur pendant le transport.
Pour des informations détaillées sur le moniteur, veuillez vous reporter au Manuel d’utilisation sur le
CD fourni.
Contenu de l’emballage 1
QSG_Installation_Fre.fm Page 2 Tuesday, May 9, 2006 7:18 PM
2. Assemblage matériel du moniteur
Si l’ordinateur est sous tension, vous devez le mettre hors tension avant de continuer. Ne branchez pas
et ne mettez pas le moniteur sous tension avant d’y être invité.
1. Déballez le moniteur et placez-le sur le bureau comme
illustré.
Veuillez procéder avec soin pour éviter d’endommager le
moniteur. Placer la surface de l’écran sur un objet tel qu’une
agrafeuse ou une souris fêlerait le verre ou endommagerait le
substrat du LCD, annulant votre garantie. Faire glisser ou
frotter le moniteur sur votre bureau rayerait ou
endommagerait le cadre ou les commandes du moniteur.
Protégez le moniteur et l’écran en préparant une surface plane
et dégagée sur votre bureau et en plaçant quelque chose de
doux, comme le sac d’emballage du moniteur, sur le bureau
comme protection.
2. Ajustez l’angle et la hauteur du moniteur.
Soulevez l’écran vers le haut, puis tirez l’écran vers l’avant
jusqu’à votre angle et hauteur souhaités.
L’angle d’inclinaison maximal du moniteur est de
-5 à +20 degrés. Si vous inclinez le moniteur à
plus de 20 degrés, le moniteur perdra son
équilibre.
Lorsque vous ajustez l’angle de l’écran, faites attention à
l’espace entre le moniteur et la base du pied pour éviter des
blessures possible à vos doigts.
Le moniteur doit être positionné et l’angle de l’écran réglé de
manière à minimiser les réflexions indésirables d’autres
sources lumineuses.
2
Assemblage matériel du moniteur
QSG_Installation_Fre.fm Page 3 Tuesday, May 9, 2006 7:18 PM
ou
3. Connectez le câble signal.
Connectez une extrémité du câble DVI-D à l’une des prises
DVI-I du moniteur et l’autre extrémité au port DVI-I sur votre
ordinateur.
Le format DVI-D est utilisé pour la connexion numérique
directe entre la source vidéo et les moniteurs LCD ou les
projecteurs numériques. Les signaux vidéo numérique
produisent une image de qualité supérieure aux signaux
vidéo analogiques.
Si vous n’avez pas de port DVI-D approprié sur votre
ordinateur, vous pouvez assembler l’adaptateur DVI-I à D-Sub
fourni au câble vidéo D-Sub standard (à l’extrémité avec le
filtre ferrite), pour que les signaux vidéo analogiques soient
convertis en signaux vidéo numériques via l’interface DVI-I.
Puis connectez l’adaptateur DVI-I à D-Sub à la prise DVI-D du
moniteur et l’autre extrémité du câble D-Sub (l’extrémité sans
filtre ferrite) à la prise vidéo D-Sub de l’ordinateur.
Un tel signal d’entrée DVI-I à D-Sub peut ne pas présenter
l’image de qualité supérieure du signal d’entrée DVI-D.
Si vous souhaitez passer d’un signal d’entrée à un autre,
vous pouvez connecter deux câbles de signal de deux
ordinateurs aux prises DVI-I en utiliser Input (Entrée) sur le
contrôleur du moniteur pour affecter le signal d’entrée sans
aucune attente.
Serrez toutes les vis à serrage à main pour éviter aux prises de
se détacher accidentellement pendant l’utilisation.
Assemblage matériel du moniteur 3
QSG_Installation_Fre.fm Page 4 Tuesday, May 9, 2006 7:18 PM
4. Connectez le contrôleur du moniteur au moniteur.
Connectez la prise du câble assemblé au contrôleur du
moniteur à la prise du contrôleur sur l’arrière du moniteur.
Les éléments du menu OSD (affiché à l’écran) sont contrôlés
sur le contrôleur du moniteur. Utilisez le contrôleur pour
ajuster les paramètres d’affichage selon vos besoins. Le
contrôleur contient un capteur de luminescence intégré, qui est
utilisé pour calibrer la sortie lumineuse du moniteur et
compenser une perte éventuelle causée par une détérioration
du rétroéclairage.
Lorsqu’il n’est pas utilisé, placez le contrôleur du moniteur
dans la base du contrôleur fournie. Il peut rester connecté au
moniteur pour un accès rapide aux commandes du moniteur
ou débranché et retiré pour être rangé.
Pour plus d’informations sur l’accès et l’ajustement du menu
OSD, voir le Manuel d’utilisation sur le CD fourni.
5. Connectez le câble de l’adaptateur secteur 12V CC au
moniteur.
Prenez le câble de l’adaptateur d’alimentation 12 V CC et
branchez l’extrémité dans la prise d’alimentation à l’arrière du
moniteur. Ne connectez pas l’adaptateur d’alimentation à une
prise électrique pour l’instant.
4
Assemblage matériel du moniteur
QSG_Installation_Fre.fm Page 5 Tuesday, May 9, 2006 7:18 PM
6. Connectez le câble du hub USB.
Connectez le câble USB entre la prise USB sur l’arrière du
moniteur et un port USB sur votre ordinateur.
7. Organisez les câbles derrière le moniteur.
Groupez les câbles soigneusement et faites les glisser par la
fente sur un côté du support des câbles à l’arrière du pied du
moniteur pour une bonne organisation de votre bureau.
8. Connectez l’alimentation.
Branchez le câble d’alimentation dans l’adaptateur
d’alimentation et dans une prise électrique et mettez-le sous
tension.
L’image peut être différente du produit fourni dans votre
région.
Allumez le moniteur en appuyant le bouton d’alimentation sur
le côté gauche du panneau.
Le moniteur est maintenant prêt à afficher les images de votre
ordinateur. Mettez maintenant l’ordinateur également sous
tension.
Assemblage matériel du moniteur 5

QSG_Installation_Fre.fm Page 6 Tuesday, May 9, 2006 7:18 PM
3. Ajuster la résolution de l’écran
Du fait de la nature de la technologie d’affichage à cristaux liquides (LCD), la résolution de l’écran est
toujours fixe. La meilleure image possible pour votre FP91R est obtenue avec une résolution de 1280 x
1024. Ceci est appelé la « résolution native » ou résolution maximale, c’est à dire l’image la plus claire.
Des résolutions plus faibles sont affichées sur un écran complet via un circuit d’interpolation. Un flou
de l’image sur les limites entres les pixels peut se produire avec la résolution extrapolée selon le type
d’image et sa résolution initiale.
Pour tirer le meilleur parti de la technologie LCD, il est recommandé de sélectionner le paramètre de la résolution
native à 1280 x 1024.
Pour commencer, vous devez d’abord ouvrir le Panneau de configuration de Windows.
1.Ouvrez les Propriétés d’affichage et sélectionnez l’onglet Paramètres.
Vous pouvez ouvrir les Propriétés d’affichage en cliquant du bouton droit sur le bureau et en sélectionnant
Propriétés dans le menu auto.
2. Utilisez le curseur dans la section ‘Zone écran’ pour ajuster la résolution de l’écran.
Sélectionnez la résolution recommandée de 1280 x 1024, puis cliquez sur Appliquer.
Si vous sélectionnez une autre résolution, il faut savoir que cette autre résolution est interpolée et peut ne pas
afficher exactement l’image à l’écran aussi bien que le ferait le paramètre de résolution native.
3. Cliquez sur OK puis sur Oui.
4. Fermez la fenêtre Propriétés d’affichage.
Pour des informations détaillées sur le moniteur, veuillez vous reporter au Manuel d’utilisation sur le
CD fourni.
6
Ajuster la résolution de l’écran
last_page_Fre.fm Page 1 Tuesday, May 9, 2006 2:45 PM
Thank you.
last_page_Fre.fm Page 2 Tuesday, May 9, 2006 2:45 PM

QSG_Installation_wel_Ger.fm Page 1 Tuesday, May 9, 2006 3:09 PM
FP91R
Professioneller LCD-Monitor der R-Serie
Kurzanleitung für die Hardware-Installation

QSG_Installation_wel_Ger.fm Page 2 Tuesday, May 9, 2006 3:09 PM
Copyright
Copyright © 2006 BenQ Corporation. Alle Rechte vorbehalten. Diese Veröffentlichung darf nicht ohne
die vorherige schriftliche Genehmigung von BenQ Corporation in irgendeiner Form oder durch elektronische, mechanische, magnetische, optische, chemische, manuelle oder andere Mittel reproduziert,
übertragen, umgeschrieben, in einem Datenabfragesystem gespeichert oder in irgendeine Sprache oder
Computersprache übersetzt werden.
Ausschlusserklärung
BenQ Corporation übernimmt weder direkte noch indirekte Garantie für die Richtigkeit dieses Handbuchs und übernimmt insbesondere keine Gewährleistung hinsichtlich der Qualität oder der Eignung
zu einem bestimmten Zweck. Ferner behält sich die BenQ Corporation das Recht vor, diese Veröffentlichung ohne Vorankündigung zu überarbeiten und Änderungen des Inhalts vorzunehmen.
*Windows ist ein Warenzeichen von Microsoft Corporation. Andere Warenzeichen sind urheberrechtlich geschütztes Eigentum ihrer jeweiligen Unternehmen oder Organisationen.
Inhaltsverzeichnis
Packungsinhalt...................................................................................................................... 1
Zusammenbau der Monitor-Hardware .............................................................................. 2
Einstellung der Bildschirmauflösung.................................................................................. 6
QSG_Installation_Ger.fm Page 1 Friday, May 12, 2006 10:25 AM
1. Packungsinhalt
Prüfen Sie bitte beim Auspacken, ob folgende Teile vorhanden sind. Falls Teile fehlen oder beschädigt
sein sollten, wenden Sie sich bitte an Ihren Händler, um Ersatz zu erhalten.
BenQ LCD-Monitor
Netzteil Netzkabel USB Kabel
Signalkabel: D-Sub
(optional)
Das Zubehör kann sich je nach Kaufort unterscheiden.
Monitorbedien
ung
Signalkabel: DVI-D
Bedienungsständer
(mit Saugnapf innen)
DVI-I-zu-D-Sub-
Adapter
Kurzanleitungen
und CD-ROM
Umgebungslichtblende (optional)
Bewahren Sie den Karton und das Verpackungsmaterial für den Fall auf, dass Sie den Monitor in der Zukunft
transportieren müssen. Das Schaumstoffmaterial eignet sich ideal für den Schutz des Monitors während des
Transports.
Weitere Informationen über den Monitor finden Sie in der Bedienungsanleitung, die sich auf der
mitgelieferten CD befindet.
Packungsinhalt 1
QSG_Installation_Ger.fm Page 2 Friday, May 12, 2006 10:25 AM
2. Zusammenbau der Monitor-Hardware
Falls der Computer eingeschaltet ist, müssen Sie ihn ausschalten, bevor Sie fortfahren. Schließen Sie
das Netzkabel erst dann an, wenn Sie dazu aufgefordert werden. Dasselbe gilt auch für das Einschalten
des Monitors.
1. Packen Sie den Monitor aus, und stellen Sie ihn wie
gezeigt auf den Schreibtisch.
Gehen Sie dabei vorsichtig vor, um den Monitor nicht zu
beschädigen. Wenn Sie die Bildschirmoberfläche auf einen
Hefter, eine Maus oder ein anderes ähnliches Objekt legen,
kann das Glas brechen oder das LCD-Substrat beschädigt
werden. Die Produktgarantie wird dadurch ungültig. Schieben
Sie den Monitor nicht auf dem Schreibtisch hin und her, um
das Monitorgehäuse und die Bedienungstasten nicht zu
beschädigen.
Um den Monitor und seinen Bildschirm zu schützen, stellen
Sie auf Ihrem Schreibtisch eine flache, breite Fläche her, und
legen Sie eine weiche Unterlage, z.B. das Verpackungsmaterial
des Monitors, unter den Monitor.
2. Stellen Sie den Winkel und die Höhe des Monitors ein.
Heben Sie den Bildschirm nach oben an, und ziehen Sie ihn
dann nach vorne, bis Sie den gewünschten Winkel und die
gewünschte Höhe eingestellt haben.
Der maximale Neigungswinkel des Monitors ist -5
bis +20 Grad. Falls Sie den Monitor um mehr als
20 Grad neigen, verliert er das Gleichgewicht.
Wenn Sie den Winkel des Bildschirms einstellen, achten Sie
auf den Abstand zwischen Monitor und Ständerplatte, um zu
vermeiden, dass Ihre Finger engeklemmt werden.
Sie sollten die Position des Monitors und den Winkel des
Bildschirms so auswählen, dass Reflektionen von anderen
Lichtquellen minimiert werden.
2
Zusammenbau der Monitor-Hardware

QSG_Installation_Ger.fm Page 3 Friday, May 12, 2006 10:25 AM
oder
3. Anschließen des Signalkabels.
Schließen Sie das eine Ende des DVI-D-Kabels an den
Monitor-DVI-D-Anschluss an und das andere Ende an den
DVI-I-Anschluss Ihres Rechners.
Das DVI-D-Format wird für den direkten digitalen Anschluss
zwischen der Videoquelle und dem digitalen LCD Monitor
oder Projektor verwendet. Das digitale Videosignal ergibt eine
bessere Bildqualität im Vergleich zum analogen Videosignal.
Falls Sie keinen geeigneten DVI-D-Anschluss auf Ihrem
Rechner besitzen, können Sie den im Lieferumfang
enthaltenen DVI-I-zu-D-Sub-Adapter mit dem StandardVideo-D-Sub-Kabel (am Ende mit dem Ferrit-Filter)
verbinden, so dass die analogen Videosignale über den DVI-IAnschluss in digitale Videosignale umgewandelt werden
können. Schließen Sie dann den DVI-I-zu-D-Sub-Adapter an
den DVI-D-Anschluss des Monitors und das andere Ende des
D-Sub-Kabels (am Ende ohne den Ferrit-Filter) an den VideoD-Sub-Anschluss des Computers an.
Solch ein DVI-I-zu-D-Sub-Eingabesignal bietet u.U. eine
nicht so gute Bildqualität wie ein DVI-D-Eingabesignal.
Falls Sie zwischen den zwei Eingabesignalen wechseln
möchten, können Sie zwei Signalkabel von zwei Computern
an die DVI-I-Anschlüsse anschließen und Eingabe auf der
Monitorbedienung verwenden, um das Eingabesignal ohne
Zeitverzögerung zuzuweisen.
Ziehen Sie alle Schrauben an, um ein Herausfallen des Steckers
während des Gebrauchs zu verhindern.
Zusammenbau der Monitor-Hardware 3

QSG_Installation_Ger.fm Page 4 Friday, May 12, 2006 10:25 AM
4. Anschließen der Monitorbedienung an den Monitor.
Schließen Sie den Stecker des Kabels, das mit der
Monitorbedienung verbunden ist, an die Bedienungsbuchse
auf der Rückseite des Monitors an.
Die OSD (On Screen Display)-Elemente werden mit Hilfe der
Monitorbedienung verändert. Verwenden Sie die Bedienung,
um die Einstellungen ganz nach Ihren Bedürfnissen zu
verändern. Die Bedienung enthält einen Helligkeitssensor, der
verwendet wird, um die Lichtausgabe des Monitors zu
kalibrieren und Helligkeitsverlust durch schwache Beleuchtung
zu kompensieren.
Wenn Sie die Monitorbedienung nicht verwenden, sollten Sie
sie im Bedienungsständer verstauen. Sie können die
Verbindung zum Monitor bestehen lassen, um schnell auf die
Monitoreinstellungen zugreifen zu können, oder Sie können
das Kabel abtrennen und die Bedienung woanders
aufbewahren.
Weitere Informationen über den Zugriff auf das OSD und das
Vornehmen von Einstellungen finden Sie in der
Bedienungsanleitung, die sich auf der mitgelieferten CD
befindet.
4
Zusammenbau der Monitor-Hardware
5. Anschließen des 12VDC-Netzteilkabels an den Monitor.
Stecken Sie das Ende des 12V-DC-Netzteilkabels in den
Netzanschluss auf der Rückseite des Monitors. Schließen Sie
das Netzteilkabel zu diesem Zeitpunkt noch nicht an eine mit
Strom versorgte Steckdose an.

QSG_Installation_Ger.fm Page 5 Friday, May 12, 2006 10:25 AM
6. Schließen Sie das USB-Hub-Kabel an.
Schließen Sie das USB-Kabel zwischen an den USB-Anschluss
auf der Rückseite des Monitors und den USB-Ausgang an
Ihrem Computer an.
7. Verstauen Sie die Kabel hinter dem Monitor.
Verstauen Sie die Kabel sorgfältig, und führen Sie sie durch den
Schlitz auf einer Seite des Kabelhalters auf der Rückseite des
Monitorständers, so dass Ihr Schreibtisch frei von Kabel ist.
8. Anschließen ans Stromnetz.
Stecken Sie das Stromkabel in das Netzteil und in eine mit
Strom versorgte Steckdose, und schalten Sie das Gerät ein.
Das Bild kann sich von dem an Ihrem Ort ausgelieferten
Produkt unterscheiden.
Schalten Sie den Monitor ein, indem Sie auf die Ein/Aus-Taste
links auf dem Monitor drücken.
Der Monitor ist dann für die Anzeige Ihrer Computerbilder
bereit. Sie sollten dann auch den Computer einschalten.
Zusammenbau der Monitor-Hardware 5

QSG_Installation_Ger.fm Page 6 Friday, May 12, 2006 10:25 AM
3. Einstellung der Bildschirmauflösung
Bedingt durch seine Technologie liefert ein LCD-Bildschirm immer eine festgelegte
Bildschirmauflösung. Das bestmögliche Bild für Ihren FP91R wird mit einer Auflösung von 1280 x
1024 erzielt. Dies wird auch als „native Auflösung” oder maximale Auflösung, d.h. schärfstes Bild,
bezeichnet. Niedrigere Auflösungen werden über einen Interpolationsschaltkreis als Vollbild angezeigt.
Über Pixelränder verschwommene Bilder können bei interpolierter Auflösung auftreten, was vom
Bildtyp und seiner ursprünglichen Auflösung abhängt.
Wenn Sie also alle Vorzüge der LCD-Technologie genießen möchten, sollten Sie die native Auflösung von 1280 x
1024 Pixel verwenden.
Um zu beginnen, müssen Sie erst die Systemsteuerung von Windows öffnen.
1. Öffnen Sie das Fenster Eigenschaften von Anzeige, und wählen Sie dort die Registerkarte
Einstellungen aus.
Sie können das Dialogfeld Eigenschaften von Anzeige auch dadurch aufrufen, dass Sie auf das WindowsDesktop rechtsklicken und den Eintrag Eigenschaften im Kontextmenü auswählen.
2. Sie können die Auflösung mit dem Schieberegler im Abschnitt „Bildschirmbereich“ anpassen.
Wählen Sie die empfohlene Auflösung von 1280 x 1024, und klicken Sie dann auf Übernehmen.
Falls Sie eine andere Auflösung auswählen, denken Sie daran, dass diese Auflösung interpoliert ist und das Bild auf
dem Bildschirm nicht so genau wiedergeben kann wie die native Auflösung.
3. Klicken Sie auf OK und dann auf Ja.
4. Schließen Sie danach das Fenster Eigenschaften von Anzeige.
Weitere Informationen über den Monitor finden Sie in der Bedienungsanleitung, die sich auf der
mitgelieferten CD befindet.
6
Einstellung der Bildschirmauflösung

last_page_Ger.fm Page 1 Tuesday, May 9, 2006 3:09 PM
Thank you.

last_page_Ger.fm Page 2 Tuesday, May 9, 2006 3:09 PM

QSG_Installation_wel_Ita.fm Page 1 Tuesday, May 9, 2006 3:53 PM
FP91R
Monitor LCD professionale serie R
Guida rapida per l’installazione dell’hardware

QSG_Installation_wel_Ita.fm Page 2 Wednesday, May 10, 2006 9:05 AM
Copyright
Copyright © 2006 di BenQ Corporation. Tutti i diritti riservati. È severamente vietato riprodurre,
trasmettere, trascrivere, memorizzare in un sistema di recupero o tradurre in qualsiasi lingua o
linguaggio parti di questa pubblicazione, in qualsiasi forma o con qualsiasi mezzo, elettronico,
meccanico, magnetico, ottico, chimico, manuale o altro, senza previa autorizzazione scritta di BenQ
Corporation.
Disclaimer
BenQ Corporation declina qualsiasi responsabilità e non offre alcuna garanzia, implicita o esplicita,
sull'attendibilità della presente Guida o di garanzia, commerciabilità o idoneità a uno scopo specifico
di questo prodotto. BenQ Corporation si riserva il diritto di aggiornare la presente pubblicazione e di
apportarvi regolarmente modifiche, senza alcun obbligo di notifica di eventuali revisioni o modifiche.
*Windows è un marchio registrato di Microsoft Corporation. Gli altri sono marchi registrati di
proprietà delle società e organizzazioni che ne detengono i diritti.
Indice
Contenuto della confezione ................................................................................................. 1
Montaggio del monitor ........................................................................................................ 2
Regolazione della risoluzione dello schermo...................................................................... 6

QSG_Installation_Ita.fm Page 1 Friday, May 12, 2006 11:16 AM
1. Contenuto della confezione
All’apertura della confezione verificare che siano presenti i seguenti articoli. Qualora fossero mancanti
o danneggiati contattare il rivenditore per la sostituzione.
Monitor LCD BenQ
Alimentatore Cavo di alimentazione Cavo USB
Cavo segnale D-Sub
(opzionale)
Alcuni degli accessori potrebbero differire da regione a regione.
Te l e c o m a n d o
monitor
Cavo segnale DVI-D
Alloggiamento telecomando
(con ventosa all’interno)
Adattatore da DVI-I a
D-Sub
Guide rapide
e CD-ROM
Schermo paraluce ambiente
(opzionale)
Conservare la confezione e il materiale di imballaggio per poterlo utilizzare in caso fosse necessario trasportare il
monitor. Il materiale schiumoso di imballaggio è ideale per proteggere il monitor durante il trasporto.
Per avere informazioni dettagliate sul monitor, consultare il Manuale Utente fornito nel CD in
dotazione.
Contenuto della confezione 1

QSG_Installation_Ita.fm Page 2 Friday, May 12, 2006 11:16 AM
2. Montaggio del monitor
Se il computer è acceso, spegnerlo prima di continuare. Non inserite la spina e non accendete il
monitor fino a quando non è indicato nelle istruzioni.
1. Estrarre il monitor dall’imballaggio e posizionarlo sul
piano come illustrato.
Eseguire l’operazione con cautela per evitare di danneggiare
il monitor. Se la superficie dello schermo viene poggiata su
oggetti quali una spillatrice o un mouse, il vetro potrebbe
rompersi o si potrebbe danneggiare lo strato sottostante LCD,
rendendo nulla la garanzia. Se si struscia il monitor sul piano
si rischia di graffiare la cornice intorno al monitor e i comandi.
Proteggere il monitor e lo schermo liberano una superficie in
piano sulla scrivania e collocando qualcosa di morbido come
ad esempio la busta di imballaggio del monitor per
proteggerlo.
2. Regolare l’angolazione e l’altezza del monitor.
Sollevare lo schermo verso l’alto e tirarlo in avanti fino a
quando non arriva all’angolazione altezza volute.
L’angolazione massima del monitor va da -5 a +20
gradi. Se il monitor supera i 20 gradi, perde il
proprio equilibrio.
Durante la regolazione dell’angolazione dello schermo,
controllare lo spazio rimamente tra il monitor e la piastra del
supporto per evitare di ferirsi le dita.
Dovete posizionare il monitor e l’angolazione dello schermo
per minimizzare i riflessi indesiderati da altre fonti di luce.
2
Montaggio del monitor

QSG_Installation_Ita.fm Page 3 Friday, May 12, 2006 11:16 AM
o
3. Collegamento del cavo segnale.
Collegare una delle estremità del cavo DVI-D a uno degli
attacchi DVI-I del monitor e l’altra estremità alla porta DVI-I
del computer.
Il formato DVI-D è usato per il collegamento digitale diretto fra
la sorgente video e monitor LCD digitali o proiettori. I segnali
video digitali producono immagini di qualità superiore ai
segnali video analogici.
Se sul computer non è disponibile una porta DVI-D, è possibile
collegare il cavo DVI-I - D-Sub al cavo video standard D-Sub
(con filtro in ferrite su un’estremità), in modo che i segnali
video analogici possano essere convertiti in segnali video
digitali utilizzando l’interfaccia DVI-I. Quindi collegare
l’adattatore DVI-I – D-Sub all’attacco DVI-D sul monitor e
l’altra estremità del cavo D-Sub (l’estremità senza filtro in
ferrite) all‘attacco D-Sub del video su computer.
Il segnale in ingresso DVI-I – D-Sub potrebbe non offrire
immagini di qualità superiore come quelle che si ottengono
con il segnale in ingresso DVI-D.
Per cambiare da un tipo di segnale in ingresso all’altro, si
possono collegare due cavi segnale da due computer agli
attacchi DVI-I e utilizzare Input (Ingresso) sul telecomando
del monitor per cambiare segnale di ingresso senza
interruzione.
Serrare tutte le viti di bloccaggio per impedire che gli attacchi si
scolleghino fuori inavvertitamente durante l’uso.
Montaggio del monitor 3

QSG_Installation_Ita.fm Page 4 Friday, May 12, 2006 11:16 AM
4. Collegamento del telecomando al monitor.
Collegare lo spinotto del cavo attaccato al telecomando
all‘attacco del telecomando nella parte posteriore del monitor.
Le voci dell’OSD vengono controllate tramite il telecomando. Il
telecomando può essere utilizzato per modificare le
impostazionmi di visualizzazione in modo che rispondano alle
esigenze dell’utente. Il telecomando contiene un sensore di
luminanza integrato, che è utilizzato per calibrare la luminosità
del monitor e compensare eventuali perdite dovute all’usura
della retroilluminazione.
Quando non viene utilizzato, il telecomando deve essere
riposto nell’apposito alloggiamento. Può anche essere lasciato
collegato al monitor per accedere rapidamente ai controlli del
monitor, o staccato e tolto per essere riposto.
Per maggiori informazioni su come accedere e modificare
l’OSD, si veda il Manuale Utente nel CD allegato.
4
Montaggio del monitor
5. Collegamento del cavo dell’alimentatore a 12VCC al
monitor.
Prendere il cavo dell’alimentatore da 12VCC e inserite
l’estremità nella presa nel retro del monitor. Non collegare
ancora l’alimentatore a una presa di corrente.

QSG_Installation_Ita.fm Page 5 Friday, May 12, 2006 11:16 AM
6. Collegare il cavo dell’hub USB
Usare il cavo USB per collegare la USB nel retro del monitor e
una porta USB del vostro computer.
7. Passare i cavi dietro al monitor.
Per tenere il piano della scrivania sgombro dai cavi, unire
insieme i cavi e farli passare nella fessura del passacavi che si
trova nella parte posteriore del monitor.
8. Collegamento dell’alimentazione.
Inserite il cavo di alimentazione nell’alimentatore e in una
presa di corrente e accendere il dispositivo.
L'immagine potrebbe differire da quella del prodotto
distribuito nella vostra regione.
Accendere il monitor premendo il tasto power che si trova sul
lato sinistro del pannello.
Il monitor adesso è pronto a visualizzare le immagini del
computer. Adesso si deve accendere il computer.
Montaggio del monitor 5

QSG_Installation_Ita.fm Page 6 Friday, May 12, 2006 11:16 AM
3. Regolazione della risoluzione dello schermo
Vista la natura della tecnologia LCD, la risoluzione dello schermo è sempre fissa. Le immagini migliori
di FP91R sono ottenute con la risoluzione 1280 x 1024. Questa è denominata “Risoluzione nativa” o
risoluzione massima – ovvero, l’immagine più chiara. Le risoluzioni più basse sono mostrate su uno
schermo intero per mezzo di un circuito d’interpolazione. Potrebbero presentarsi immagini sfocate sui
limiti pixel in caso di risoluzione interpolata, in base al tipo di immagine e alla risoluzione iniziale.
Per godere di tutti i vantaggi derivanti dall’uso della tecnologia LCD, selezionare l’impostazione della risoluzione
nativa di 1280 x 1024.
Per iniziare, aprire innanzitutto il Control Panel (Pannello di controllo) di Windows.
1. Aprire Display Properties (Proprietà dello schermo) e selezionate la scheda Settings (Impostazioni).
È possibile aprire Display Properties (Proprietà dello schermo) facendo clic col destro sul desktop di Windows e
selezionando Properties (Proprietà) dal menu pop-up.
2. Usate lo slider nella sezione ’Screen area’ (Area dello schermo) per regolare la risoluzione dello
schermo.
Selezionare la risoluzione consigliata di 1280 x 1024, quindi fare clic su Apply (Applica).
Se si seleziona un’altra risoluzione, considerare che la risoluzione è interpolata e potrebbe determinare la
visualizzazione non accurata dell’immagine dello schermo, come avverrebbe invece in caso di impostazione della
risoluzione nativa.
3. Fare clic su OK e poi su Ye s ( Sì ).
4. Chiudere la finestra Display Properties (Proprietà dello schermo) .
Per avere informazioni dettagliate sul monitor, consultare il Manuale Utente fornito nel CD in
dotazione.
6
Regolazione della risoluzione dello schermo

last_page_Ita.fm Page 1 Tuesday, May 9, 2006 3:53 PM
Thank you.

last_page_Ita.fm Page 2 Tuesday, May 9, 2006 3:53 PM

QSG_Installation_wel_Spa.fm Page 1 Tuesday, May 9, 2006 3:35 PM
FP91R
Monitor LCD Profesional-Serie R.
Guía Rápida para Instalación de Hardware.

QSG_Installation_wel_Spa.fm Page 2 Tuesday, May 9, 2006 3:35 PM
Copyright
Copyright © 2006 de BenQ Corporation. Todos los derechos reservados. Ninguna parte de esta publicación se podrá reproducir, transmitir, transcribir, guardar en sistema de recuperación alguno ni traducir a ningún idioma o lenguaje informático de ninguna forma o mediante ningún medio, ya sea
electrónico, mecánico, magnético, óptico, químico, manual o de cualquier otro tipo, sin el consentimiento previo y por escrito de BenQ Corporation.
Renuncia de responsabilidad
BenQ Corporation no realizará aseveración ni garantía alguna, explícita ni implícita, con respecto al
contenido de la presente publicación y renuncia específicamente a toda garantía de comerciabilidad o
adecuación para un fin concreto. Además, BenQ Corporation se reserva el derecho de revisar esta publicación y efectuar cada cierto tiempo cambios en el contenido de la misma sin que exista la obligación
por parte de BenQ Corporation de notificar a ninguna persona dicha revisión ni cambios.
*Windows es una marca comercial de Microsoft Corporation. El resto son derechos de autor de sus
respectivas empresas u organizaciones.
Índice
Contenidos del paquete........................................................................................................ 1
Instalación del hardware del monitor ................................................................................. 2
Ajuste de la resolución de pantalla ...................................................................................... 6

QSG_Installation_Spa.fm Page 1 Friday, May 12, 2006 10:30 AM
1. Contenidos del paquete
Al abrir la unidad, por favor, compruebe que se incluyen las siguientes piezas. Si alguna no se incluye o
está dañada, por favor, contacte con el lugar de compra para una sustitución.
Monitor LCD BenQ
Adaptador de energía Cable de energía Cable USB
Cable de señal: D-Sub
(opcional)
Algunos de los accesorios pueden variar de una región a otra.
Controlador del
monitor
Cable de señal: DVI-D
Alojamiento del controlador
(con una tapa de succión hacia
Adaptador DVI-I a
el interior)
D-Sub
Guías rápidas
y CD-ROM
Protector de luz ambiente
(opcional)
Considere guardar la caja y embalaje para su uso en caso de transportar el monitor en un futuro. El relleno de
espuma que se adjunta es idóneo para proteger el monitor durante su transporte.
Para información detallada sobre el monitor, por favor, consulte el manual de usuario en el CD
adjunto.
Contenidos del paquete 1

QSG_Installation_Spa.fm Page 2 Friday, May 12, 2006 10:30 AM
2. Instalación del hardware del monitor
Si el ordenador está encendido, debe apagarlo antes de continuar. No conecte ni encienda el monitor
hasta que sea instruido para hacerlo.
1. Saque el monitor de su embalaje y colóquelo sobre una
mesa, tal y como se indica en la figura.
Por favor, tenga cuidado de no dañar el monitor. Si coloca la
superficie de la pantalla sobre un objeto como, por ejemplo,
una grapadora o el ratón, puede romper el cristal o dañar el
sustrato de la pantalla LCD invalidando su garantía. Al
deslizar o rozar el monitor con la mesa puede romper o dañar
éste, deteriorando el entorno de la unidad y sus mandos.
Proteja el monitor y la pantalla dejando su mesa libre de
obstáculos y colocando algún elemento, como la bolsa de
embalaje del monitor, para que haga de acolchado.
2. Ajuste del ángulo y altura del monitor.
Levante la pantalla y, después, mueve ésta hacia delante hasta
obtener el ángulo y altura deseados.
El ángulo máximo de oscilación del monitor es de
-5 a +20 grados. Si la oscilación de su monitor
excede los 20 grados, éste perderá el equilibrio.
Mientras ajusta el ángulo de la pantalla, controle el espacio
existente entre el monitor y el dispositivo de soporte a fin de
evitar posibles daños en sus dedos.
Deberá colocar el monitor y posicionar la pantalla de manera
que se reduzcan reflejos no deseados procedentes de otras
fuentes de luz.
2
Instalación del hardware del monitor

QSG_Installation_Spa.fm Page 3 Friday, May 12, 2006 10:30 AM
o
3. Conecte el cable de señal.
Conecte un extremo del cable DVI-D a una de las tomas DVI-I
del monitor y el otro extremo al puerto DVI-I de su ordenador.
El formato DVI-D se usa para conexión directa entre el vídeo
de origen y los monitores LCD digitales o proyectores. Las
señales de vídeo digitales producen una imagen de calidad
mejor que las señales de vídeo analógicas.
Si no dispone de un puerto DVI-D adecuado en su ordenador,
puede utilizar el adaptador DVI-I a D-Sub que se adjunta, y
acoplarlo al cable estándar del vídeo D-Sub (provisto de filtro
de ferrita en el extremo), de manera que las señales analógicas
de vídeo se puedan convertir en señales digitales de vídeo a
través de la interfaz DVI-I. Después, conecte el adaptador DVII a D-Sub a la toma DVI-D del monitor y el otro extremo del
cable D-Sub (sin filtro de ferrita en el extremo) a la toma DSub de vídeo del ordenador.
Dicha señal de entrada DVI-I-a-D-Sub puede que no
presente la calidad de imagen de la señal de entrada DVI-D.
Si quiere disponer de dos señales de entrada, debe conectar
dos cables de señal desde dos ordenadores a las tomas DVII y utilizar Input (Entrada) en el controlador del monitor para
asignar la señal de entrada sin ningún tiempo de retardo.
Apriete todos los tornillos para que los conectores no se suelten
accidentalmente durante el uso.
Instalación del hardware del monitor 3

QSG_Installation_Spa.fm Page 4 Friday, May 12, 2006 10:30 AM
4. Conecte el controlador del monitor al monitor.
Conecte el enchufe del cable, adjunto al controlador del
monitor, a la clavija del monitor situada en la parte posterior
del monitor.
Los elementos de presentación en pantalla (OSD) se controlan
a través del controlador del monitor. Utilice el controlador
para ajustar la configuración de pantalla según sus necesidades.
El controlador dispone de un sensor de luminancia, el cual se
utiliza para calibrar la salida de luz del monitor y compensar
cualquier pérdida ocasionada por la disminución de contraluz.
Cuando no se esté utilizando, se recomienda guardar el
controlador del monitor en su alojamiento. Puede dejarse
conectado al monitor para un acceso rápido a los mandos del
monitor o, bien, desenchufarse para poder guardarlo.
Para más información sobre el acceso y ajuste de OSD, consulte
el manual de usuario en el CD adjunto.
5. Conecte el adaptador de alimentación de 12 VCC al
monitor.
Conecte el extremo del cable del adaptador de alimentación de
12 VCC a la toma de energía situada en la parte posterior del
monitor. Aún no conecte el adaptador de alimentación a una
salida de corriente.
4
Instalación del hardware del monitor

QSG_Installation_Spa.fm Page 5 Friday, May 12, 2006 10:30 AM
6. Conecte el cable del concentrador USB.
Conecte el cable USB entre el enchufe USB en la parte posterior
del monitor y un puerto USB en el ordenador.
7. Coloque los cables detrás del monitor.
Con cuidado, pase los cables a través de la ranura situada en la
parte posterior del monitor de manera que éstos queden a un
lado del soporte del cable manteniendo la mesa libre.
8. Conecte la energía.
Conecte el cable de alimentación al adaptador de potencia y a
una salida de corriente y enciéndalo.
La imagen puede diferir dependiendo de la zona donde se
compre el producto.
Encienda el monitor pulsando el botón de alimentación
situado en el lado izquierdo del panel.
El monitor ahora está listo para visualizar las imágenes de su
ordenador. Ahora, debe apagar también el ordenador.
Instalación del hardware del monitor 5

QSG_Installation_Spa.fm Page 6 Friday, May 12, 2006 10:30 AM
3. Ajuste de la resolución de pantalla
Debido a la naturaleza de la tecnología de la pantalla de cristal líquido (LCD), la resolución de la
pantalla es siempre fija. La mejor imagen posible en el monitor FP91R se obtiene con una resolución de
1280 x 1024. Ésta se denomina "Resolución nativa" o resolución máxima, es decir, la imagen más
nítida posible. Las resoluciones inferiores se muestran en una pantalla completa mediante un circuito
de interpolación. El emborronamiento de una imagen en los límites de píxeles puede darse con la
resolución interpolada dependiendo del tipo de imagen y su resolución inicial.
Para beneficiarse de la tecnología LCD debe seleccionar la configuración de resolución nativa, siendo ésta de
1280 x 1024.
En primer lugar, para empezar es necesario abrir el Panel de Control de Windows.
1. Abra Propiedades de Pantalla y seleccione la ficha Configuración.
Puede abrir Propiedades de Pantalla haciendo clic con el botón secundario del ratón sobre el escritorio de
Windows y seleccionando Propiedades desde el menú emergente.
2. Utilice el control deslizante en la sección "Área de pantalla" para ajustar la resolución de la pantalla.
Seleccione la resolución recomendada de 1280 x 1024, después haga clic en Aplicar.
Si selecciona alguna otra resolución, tenga en cuenta que dicha elección está interpolada y que la imagen en
pantalla puede no ser tan precisa como la ofrecida por el ajuste de la resolución nativa.
3. Haga clic en Aceptar, después en Sí.
4. Cierre la ventana Propiedades de Pantalla.
Para información detallada sobre el monitor, por favor, consulte el manual de usuario en el CD
adjunto.
6
Ajuste de la resolución de pantalla

last_page_Spa.fm Page 1 Tuesday, May 9, 2006 3:37 PM
Thank you.

last_page_Spa.fm Page 2 Tuesday, May 9, 2006 3:37 PM

QSG_Installation_wel_Jap.fm Page 1 Tuesday, May 9, 2006 3:23 PM
FP91R
R シリーズ プロフェッショナル LCD モニタ
ハードウェア インストレーションのための
クイックガイド

QSG_Installation_wel_Jap.fm Page 2 Tuesday, May 9, 2006 3:23 PM
著作権
Copyright © 2006 by BenQ Corporation. All rights reserved. 本書のいかなる部分も、
BenQ Corporation の事前の書面による同意なく、電子的、機械的、磁気的、光学的、化学
的、手動その他の手段を問わず、複製、転載、改変、検索システムへの保存、他言語また
はコンピュータ言語への翻訳を行うことはできません。
免責
BenQ Corporation は、明示的または暗示的を問わず、本書の内容に関して、特に保証、商業
的可能性、特定目的への適合性に関しては、いかなる表明または保証もいたしません。ま
た、BenQ Corporation は、お客様に改訂または修正の通知を行う義務を負うことなく、本書
を改訂したり、本書の内容を随時修正する権利を有します。
*Windowsは米国マイクロソフト社の商標です。その他の製品の著作権は各社に帰属しま
す。
目次
パッケージ内容 ..................................................................................................................... 1
モニタハードウェアの組み立て........................................................................................ 2
画面の解像度の調整............................................................................................................. 6

QSG_Installation_Jap.fm Page 1 Friday, May 12, 2006 10:32 AM
1. パッケージ内容
パッケージの中に次のアイテムが揃っていることを確認してください。アイテムが不足し
ていたり、あるいは破損している場合は、購入された販売店へお問い合わせください。
BenQ LCD モニタ
電源アダプタ 電源コード
信号ケーブル:D-Sub
( オプション )
アクセサリのいくつかは、国によって異なる場合があります。
信号ケーブル:DVI-D
モニタ
コントローラ
コントローラドック
( 吸引キャップ内蔵 )
DVI-I to D-Sub
アダプタ
クイックガイド
および CD-ROM
USB ケーブル
環境照明シールド
( オプション )
梱包材料は、将来モニタを搬送する場合に備えて保管しておいてください。専用の発泡スチロールは、移動中にモ
ニタを保護するのに適しています。
モニタについての詳細は、付属の CD に保管されているユーザーガイドを参照してくださ
い。
パッケージ内容 1

QSG_Installation_Jap.fm Page 2 Friday, May 12, 2006 10:32 AM
2. モニタハードウェアの組み立て
コンピュータの電源がオンになっている場合は、モニタを設置する前にオフにしてくださ
い。コンピュータをオンにしたままモニタを接続したり、モニタの電源を入れたりしない
でください。
1. モニタを箱から取り出し、図に示す通りに机の上
に設置してください。
モニタを破損しないよう取り扱いには十分ご注意ください。
スクリーン上にホッチキスやマウスなどのモノを置くと、ガ
ラスにひびが入ったり、LCD 基板が破損したりします。こ
のような場合は、保証が受けられませんのでご注意くださ
い。机の上でモニタを滑らせたり、引きずったりすると、モ
ニタやコントロールにキズが付いたり、破損したりします。
モニタとスクリーンは何も物が置かれていない机の上
に、パッドとしてモニタのパッケージバッグなどの柔ら
かい物を置いた上に設置してください。
2
モニタハードウェアの組み立て
2. モニタの角度と高さを調整します。
適度な高さになるように、まずスクリーンを上に持ち上
げて、その後で適度な角度に倒してください。
モニタは -5 度から +20 度の範囲で傾斜させることが
できます。モニタを 20 度以上傾斜させると、バラン
スを失ってしまいます。
スクリーンの傾斜角度を調整するときには、モニタとスタ
ンドプレートの間に指を挟まないよう注意してください。
照明の反射を最小限に留めるために、モニタの位置とスク
リーンの角度を調整してください。

QSG_Installation_Jap.fm Page 3 Friday, May 12, 2006 10:32 AM
または
3. 信号ケーブルを接続します。
DVI-D ケーブルをモニタの DVI-I ソケットとコンピュー
タの DVI-I ポートに差し込んでください。
ソースビデオとデジタル LCD モニタやプロジェクタを直接
接続する場合は、DVI-D フォーマットを使用します。デジタ
ルビデオ信号は、アナログ信号よりも優れた品質を実現しま
す。
コンピュータに適切な DVI-D ポートがない場合は、同
梱されている DVI-I to D-Sub アダプタを標準のビデオ
D-Sub ケーブル ( フェライトフィルタが付いている方 )
に接続してください。このようにすると、DVI-I イン
ターフェースを介してアナログビデオ信号がデジタルビ
デオ信号に変換されます。次に、DVI-I to D-Sub アダプ
タをモニタの DVI-D ソケットに接続し、D-Sub ケーブ
ル ( フェライトフィルタが付いていない方 ) をコン
ピュータのビデオ D-Sub ソケットに接続します。
DVI-I-to-D-Sub 入力信号は、DVI-D 入力信号ほど高品質な
画像は表示できません。
2 つの入力信号を切り替えるには、2 台のコンピュータに繋
いだ 2 本の信号ケーブルを DVI-I ソケットに接続し、モニタ
コントローラの入力を使って入力信号を割り当ててくださ
い。
使用中にプラグが外れてしまわないように、すべてのネ
ジをしっかりと締めてください。
モニタハードウェアの組み立て 3

QSG_Installation_Jap.fm Page 4 Friday, May 12, 2006 10:32 AM
4. モニタコントローラをモニタに接続します。
モニタコントローラのケーブルのプラグをモニタ背面に
あるコントローラジャックに接続してください。
OSD アイテムはモニタコントローラを使って操作する
ことができます。必要であれば、コントローラで表示設
定を調整してください。コントローラには輝度センサー
が内蔵されており、モニタの出力光を調整し、バックラ
イト崩壊によるロスを補正します。
モニタコントローラを使用していないときには、付属の
コントローラドックに格納してください。モニタコント
ロールにすばやくアクセスできるようにモニタに繋いだ
ままにしておいても、また外して別の場所に保管してお
いてもかまいません。
OSD へのアクセスと調整方法については、付属の CD
に保管されているユーザーガイドを参照してください。
5. 12VDC 電源アダプタケーブルをモニタに接続しま
す。
12VDC 電源アダプタケーブルをモニタの背面にある電
源ソケットに差し込んでください。電源アダプタはまだ
コンセントに差し込まないでください。
4
モニタハードウェアの組み立て

QSG_Installation_Jap.fm Page 5 Friday, May 12, 2006 10:32 AM
6. USB ハブケーブルを接続します。
モニタの背面にある USB ソケットとコンピュータの
USB ポートを UBS ケーブルで繋ぎます。
7. ケーブルをモニタの背後に回します。
ケーブルをモニタスタンド背後にあるケーブルホルダー
にはめて、机の上をすっきりと片付けてください。
8. 電源を接続します。
電源ケーブルを電源アダプタとコンセントに繋ぎ、電源
を入れます。
購入された国によって製品毎に画像が異なります。
パネルの左側にある電源ボタンを押すとモニタの電源が
入ります。
この状態で、モニタはコンピュータ画像を表示する準備
ができています。 ここでコンピュータの電源も入れてく
ださい。
モニタハードウェアの組み立て 5

QSG_Installation_Jap.fm Page 6 Friday, May 12, 2006 10:32 AM
3. 画面の解像度の調整
LCD テクノロジーの特性により、画面の解像度が常に固定されています。 FP91R で画像を
最高の状態で表示するには、1280x1024 の解像度を使用してください。画像が最も鮮明に
表示されるこの解像度を、「ネイティブ解像度」または「最高解像度」と呼びます。最低解
像度は補間回路を介して全画面で表示されます。イメージタイプとその初期の解像度に
よっては、補間解像度でピクセルの境界部分がちらつく場合があります。
LCD テクノロジーの利点を生かすためには、ネイティブ解像度を 1280 x 1024 に設定してください。
まず Windows コントロールパネルを開く必要があります。
1. 画面のプロパティを開き、設定タブを選択します。
Windows デスクトップを右クリックしてポップアップメニューからプロパティを選択すると、画面
のプロパティを選択できます。
2. [ 画面 ] の領域茶 Z クションのスライダを使って解像度を調整してください。
推奨される解像度 1280 x 1024 を選択し、適用をクリックします。
他の解像度を選択すると、その解像度は補間され、最高解像度ほど忠実に画像を表示することはできませんのでご
注意ください。
3. OK の後、はいをクリックします。
4. 画面のプロパティを閉じます。
モニタについての詳細は、付属の CD に保管されているユーザーガイドを参照してくださ
い。
6
画面の解像度の調整

last_page_Jap.fm Page 7 Tuesday, May 9, 2006 3:25 PM
Thank you.

last_page_Jap.fm Page 8 Tuesday, May 9, 2006 3:25 PM

QSG_Installation_wel_tc.fm Page 1 Tuesday, May 9, 2006 3:41 PM
FP91R
R 系列 - 專業 LCD 顯示器
硬體安裝快速指南

QSG_Installation_wel_tc.fm Page 2 Tuesday, May 9, 2006 3:41 PM
著作權
著作權所有 © 2006 年,BenQ Corporation。所有權利均予保留。未經 BenQ Corporation 事前
書面之許可,本文的任何部分皆不可以任何形式或任何方法,包括電子、機械、磁性、光學、
化學、手寫或任何方式予以重製、傳輸、轉譯、儲存於檢索系統或翻譯成任何文字或電腦語
言。
免責聲明
對於本文之任何明示或暗示內容,BenQ Corporation 不做任何保證,亦拒絕對任何特殊目的之
商用性或適用性目的予以保證。此外,BenQ Corporation 保留修改或變更本文之權利,並且修
改或變更內容將不另行通知。
*Windows 是 Microsoft Corporation 的商標。 其他則是分別屬於各公司或組織的版權。
目錄
包裝內容物 ............................................................................................................................. 1
安裝顯示器硬體 ..................................................................................................................... 2
調整螢幕解析度 ..................................................................................................................... 6
QSG_Installation_tc.fm Page 1 Friday, May 12, 2006 10:34 AM
1. 包裝內容物
拆開包裝後,請檢查下列物品。 如果有任何物品遺失或損壞,請聯絡您購買的店家以作更換。
BenQ LCD 顯示器
電源變壓器 電源線
訊號線: D-Sub
(選購品)
顯示控制器
訊號線: DVI-D DVI-I 對 D-Sub 轉接頭
控制器放置台
(內有一吸附帽)
快速指南
和光碟
USB 纜線
遮光罩 (選購品)
在不同的地區可能會有不同的配備。
請將箱子和其他包裝盒子保留,可供未來搬運時放置用。 填充泡棉可在搬運時對顯示器提供良好的保護。
關於顯示器的詳細資訊,請參考光碟中的使用手冊。
包裝內容物 1

QSG_Installation_tc.fm Page 2 Friday, May 12, 2006 10:34 AM
2. 安裝顯示器硬體
如果電腦電源開啟,在繼續安裝步驟前,請先關閉電腦電源。 除非操作指示說明您可如此,
否則切勿插上或打開顯示器的電源。
1. 將顯示器取出,放在桌子上。
請小心,避免損壞顯示器。 如果將螢幕表面放置在如釘書機或
滑鼠等堅硬物品上,會使得 LCD 玻璃受到破碎或損壞,也會
使您的保固失效。 如果您在桌上滑動或移動顯示器,可能會刮
傷顯示器周圍和控制按鈕。
請將您的桌上清理出一個空間,並在桌上鋪上例如顯示器
包裝袋之柔軟墊子,以保護您的顯示器。
2
安裝顯示器硬體
2. 調整顯示器的角度和高度。
將螢幕向上提起,並向前拉出到您所需要的角度和高度。
顯示器最大的傾斜角度為 -5 至 +20 度。 如果您將顯示
器傾斜超過 20 度,顯示器會失去平衡。
在調整螢幕角度時,請注意螢幕和底座之間的空間,避免夾
到您的手指頭。
您必須調整好顯示器和螢幕間的角度和位置,以避免因其他光
線折射造成影像不清楚。

QSG_Installation_tc.fm Page 3 Friday, May 12, 2006 10:34 AM
或是
3. 連接訊號線
將 DVI-D 訊號線的一端連接到顯示器的 DVI-I 插槽,另一
端連接到電腦上的 DVI-I 連接埠。
DVI-D 格式使用於直接以數位方式連接視訊來源和數位 LCD
顯示器或投影機。 數位視訊訊號產生的訊號相較於類比視訊訊
號產生的訊號,其影像品質更為優良。
如果您的電腦上沒有適合的 DVI-D 連接埠,您可將內附
的 DVI-I 對 D-Sub 轉接頭接上標準視訊 D-Sub 訊號線
(有亞鐵鹽濾波器的那端),如此類比視訊訊號即可透過
DVI-I 介面而被轉換為數位視訊訊號。 然後將 DVI-I 對
D-Sub 轉接頭連接到顯示器的 DVI-D 插槽,D-Sub 訊號線
的另一端 (沒有亞鐵鹽濾波器的那端)連接到電腦的視
訊 D-Sub 插槽。
這種 DVI-I 對 D-Sub 輸入訊號無法像 DVI-D 輸入訊號一樣提
供高品質的影像。
如果您想要在兩個輸入訊號之間作切換,則可將兩台電腦的兩
條訊號線連接到 DVI-I 插槽,然後使用顯示控制器的 「Input
(輸入)」來指定輸入訊號,此方式切換時不會有時間差。
鎖緊所有的拇指螺絲以避免使用過程中,插頭不小心脫
落。
安裝顯示器硬體 3

QSG_Installation_tc.fm Page 4 Friday, May 12, 2006 10:34 AM
4. 將顯示控制器連接到顯示器上。
如圖所示,將顯示控制器上的訊號線接頭連接到顯示器上
的控制器插孔。
顯示控制器可控制 OSD 螢幕顯示項目。 您可以依照自己
的需求來調整顯示設定。 此控制器有一內建明亮度感應
器,可用來校正顯示器的光線輸出並補償由背光衰退所造
成的輸出損失。
不使用的時候,請將顯示控制器收藏在控制器放置台中。
您可將顯示控制器保持連接在顯示器上,以作快速取用,
或是將它拔下收藏好。
關於進入及調整 OSD 之更多資訊,請參閱光碟中的使用
手冊。
4
安裝顯示器硬體
5. 將 12VDC 的電源線連接到顯示器。
請將 12VDC 電源線插入顯示器背後的電源插孔中。 此
時,暫時先不要將變壓器連接至電源插座。

QSG_Installation_tc.fm Page 5 Friday, May 12, 2006 10:34 AM
6. 連接 USB 集線器纜線。
使用 USB 纜線連接顯示器背後的 USB 插孔和電腦上的
USB 連接埠。
7. 整理顯示器背後的纜線。
將纜線整理好,並穿過顯示器背後的纜線整理架,可保持
您的桌面之整潔。
8. 接上電源。
請將電源線一端插入變壓器,另一端插入電源插座並打開
電源。
廠商所提供給您的插頭不一定和圖示一樣。
按下面板左側的電源按鍵,開啟顯示器電源。
顯示器已準備好顯示您的電腦影像。 您現在也應該開啟電
腦。
安裝顯示器硬體 5

QSG_Installation_tc.fm Page 6 Friday, May 12, 2006 10:34 AM
3. 調整螢幕解析度
因為液晶顯示技術,因此螢幕的解析度是固定不變的。 FP91R 的最佳解析度為 1280x1024。我
們稱之為 「最佳解析度」或最高解析度,這就表示,影像顯示最清晰。 較低的解析度會透過
插補點循環的方式顯示於全螢幕中。 依照不同的影像型態和原始解析度,會產生插補點解析
度所引起的像素邊緣影像模糊。
要充分利用液晶顯示技術,您必須選擇 1280x1024 的最佳解析度設定值。
您需要先開啟 Windows 「控制台」。
1. 開啟 「顯示內容」並選擇 「設定值」標籤。
您可以藉由在 Windows 桌面上按下滑鼠右鍵並從快顯功能表中選擇 「內容」以開啟 「顯示內容」。
2. 請使用 「螢幕解析度」下方的滑桿來調整螢幕解析度。
選擇建議解析度 1280 x 1024,然後按下 「套用」。
如果您選取其他解析度,請注意其他解析度為插補點方式,無法像最佳解析度一樣正確顯示螢幕影像。
3. 按一下 「確定」接著按一下 「是」。
4. 關閉 「顯示內容」視窗。
關於顯示器的詳細資訊,請參考光碟上的使用手冊。
6
調整螢幕解析度

last_page.fm Page 1 Tuesday, May 9, 2006 3:41 PM
Thank you.

last_page.fm Page 2 Tuesday, May 9, 2006 3:41 PM

QSG_Installation_wel_sc.fm Page 1 Tuesday, May 9, 2006 3:30 PM
FP91R
R 系列专业 LCD 显示器
硬件安装快速指南

QSG_Installation_wel_sc.fm Page 2 Tuesday, May 9, 2006 3:30 PM
版权所有
版权所有 © 2006 BenQ Corporation。保留所有权利。未经 BenQ Corporation 事先书面许可,
不得以任何形式和电子、机械、磁性、光学、化学、手工以及其他任何方式复制、传播和转
录本出版物的任何部分,也不得将任何部分存储到检索系统中或翻译成任何语言或计算机语
言。
免责声明
BenQ Corporation 对于本文档的内容不提供任何明示或隐含的陈述或担保,特别是针对特殊目
的的适销性和适用性不提供任何担保。另外,BenQ Corporation 保留修订本出版物和随时修改
本文档内容而不需通知任何人的权利。
*Windows 是 Microsoft Corporation 的商标。 其它商标属于各自公司或组织版权所有。
目录
包装内含物 ............................................................................................................................. 1
装配显示器硬件 ..................................................................................................................... 2
调整屏幕分辨率 ..................................................................................................................... 6

QSG_Installation_sc.fm Page 1 Friday, May 12, 2006 10:36 AM
1. 包装内含物
打开包装时,请检查包装内有以下项目。如有缺少和损坏,请联系经销商进行更换。
BenQ LCD 显示器
电源适配器 电源线
信号线:D-Sub ( 可选 ) 信号线:DVI-D DVI-I 转 D-Sub 转接头 遮光罩 ( 可选 )
某些附件可能因地区不同而有所差异。
显示器控制器
控制器底座
( 带内置吸盘 )
快速指南
和 CD-ROM
USB 电缆
请妥善保留包装包材以供今后需运输显示器时使用。在运输中最好填充泡沫塑料以保护显示器。
有关显示器的详情,请参阅光盘中所附的 “用户手册”。
包装内含物
1

QSG_Installation_sc.fm Page 2 Friday, May 12, 2006 10:36 AM
2. 装配显示器硬件
如果电脑已打开,您必须在继续安装之前先关闭电脑。在看到确实指示之前切勿插入或打开
显示器电源。
1. 打开显示器的外包装并将显示器置于桌上,如图所
示。
请小心以防损坏显示器。将屏幕表面置于诸如订书机或鼠标等
物上,会使玻璃破碎或损坏 LCD 的底基,该损坏不属保修范
围。在书桌上滑动或刮擦显示器会乱伤或损坏显示器的包围物
和控制器。
在桌上清出一个平面区域并将诸如显示器包装袋等软性物
置于桌上作为填料以保护显示器和屏幕。
2
装配显示器硬件
2. 调整显示器的角度和高度。
抬高显示屏,然后将显示屏向前拉出直至它达到您理想的
角度和高度。
本显示器的最大倾斜角度为 -5 至 +20 度。如果您将显
示器倾斜超过 20 度,显示器会失去平衡。
转动屏幕过程中,查看显示器和底座之间的间隙以防手指夹
伤。
您应调整显示器位置和屏幕角度,以使来自其它光源不需要的
反射达到最小。

QSG_Installation_sc.fm Page 3 Friday, May 12, 2006 10:36 AM
或
3. 连接信号线。
将 DVI-D 电缆的一端连接到显示器 DVI-I 插口之一,然后
将另一端连接到电脑上的 DVI-I 端口。
DVI-D 格式用于视频源和数字 LCD 显示器或投影机之间的直
接数字连接。数字视频信号能够产生比模拟视频信号质量更高
的图像质量。
如果电脑上没有合适的 DVI-D 端口,您可将所附的 DVI-I
转 D-Sub 转接头连接到标准视频 D-Sub 缆线 ( 在有铁氧体
滤波器的一端 ),因此模拟视频信号可通过 DVI-I 接口被
转换为数据视频信号。然后将 DVI-I 转 D-Sub 转接头连接
到显示器 DVI-D 插口,将 D-Sub 缆线 ( 在没有铁氧体滤
波器的一端 ) 连接到电脑的视频 D-Sub 插口。
像这类由 DVI-I 转 D-Sub 的输入信号,其质量可能无法像
DVI-D 输入信号那样的好。
如果要在两个不同的信号之间切换,您可将两台电脑的两条信
号线连接到 DVI-I 插口,并使用显示器控制器上的 “输入”来
指定输入信号,此方式切换时不会有延时发生。
紧固所有的指状螺丝以防该插头在使用过程中意外落下。
装配显示器硬件
3

QSG_Installation_sc.fm Page 4 Friday, May 12, 2006 10:36 AM
4. 将显示器控制器连接到显示器。
将显示器控制器上的缆线插头连接到显示器后方的控制器
插孔。
屏显 (OSD) 菜单项目由显示器控制器来控制。您可根据
需要使用控制器来调整显示设置。控制器包含内置亮度传
感器,用于校准显示器光线输出并补偿因背光衰减而造成
的损失。
当不使用时,应将显示器控制器放置在提供的控制器底座
中。您可将显示控制器保持连接在显示器上,以作快速取
用,或是将它拔下收藏好。
有关进入和调整 OSD 的详情,请参阅所附光盘中的 “用
户手册”。
5. 连接 12VDC 电源线至显示器。
将 12VDC 电源适配器电缆的插头端接入显示器背后的电
源插口中。此时,请勿立即将电源适配器连接到电源插
座。
4
装配显示器硬件

QSG_Installation_sc.fm Page 5 Friday, May 12, 2006 10:36 AM
6. 连接 USB 集线器电缆。
用 USB 电缆将显示器背面的 USB 插口和电脑上的 USB 端
口连接起来。
7. 在显示器后布线。
整理缆线并通过开口滑入显示器背后缆线支架一侧,以保
持底座位置的清洁。
8. 连接电源。
将电源线插入电源适配器和电源插座并打开电源。
插头图像可能与您当地提供的产品不同。
按下面板左侧的电源按钮打开显示器。
显示器现在已就绪并可显示图像。您现在还要打开电脑。
装配显示器硬件
5

QSG_Installation_sc.fm Page 6 Friday, May 12, 2006 10:36 AM
3. 调整屏幕分辨率
由于液晶显示屏 (LCD) 技术的性质,屏幕分辨率始终是固定的。 FP91R 的最佳图像分辨率为
1280 x 1024。此分辨率称为又称 “最佳分辨率”或 “最大分辨率”,也就表示图像显示效果
最为清晰。较低的分辨率通过插值电路方式在全屏幕上显示。根据图像类型及其初始分辨率
的情况,插值分辨率会出现像素边缘图像模糊的现象。
要充分利用 LCD 技术,您应选择 1280 x 1024 的最佳分辩率设置。
要启动,需先打开 Windows 控制面板。
1. 打开 “显示属性”并选择 “设置”标签。
您可在 Windows 桌面上右击以打开 “显示属性”并从弹出式菜单中选择 “属性”。
2. 使用 “屏幕区域”中的滑块来调节屏幕分辨率。
选择建议的 1280 x 1024 分辨率并单击 “应用”。
如果您选择其它分辨率,请注意其它分辨率是以内插值替换的,可能无法像最佳解析度一样法准确显示屏幕图像。
3. 单击 “确定”然后单击 “是”。
4. 关闭 “显示属性”窗口。
有关显示器的详情,请参阅光盘中所附的 “用户手册”。
6
调整屏幕分辨率

last_page.fm Page 1 Tuesday, May 9, 2006 3:30 PM
Thank you.

last_page.fm Page 2 Tuesday, May 9, 2006 3:30 PM
 Loading...