

Page 1

DMS Cloud
User Manual
Page 2

Copyright2
Copyright
Copyright ©2021 BenQ Corporation. All rights reserved. No part of this publication may
be reproduced, transmitted, transcribed, stored in a retrieval system or translated into
any language or computer language, in any form or by any means, electronic, mechanical,
magnetic, optical, chemical, manual or otherwise, without the prior written permission
of BenQ Corporation.
All other logos, products, or company names mentioned in this manual may be the
registered trademarks or copyrights of their respective companies, and are used for
informational purposes only.
Disclaimer
BenQ Corporation makes no representations or warranties, either expressed or implied,
with respect to the contents hereof and specifically disclaims any warranties,
merchantability or fitness for any particular purpose. Further, BenQ Corporation
reserves the right to revise this publication and to make changes from time to time in the
contents hereof without obligation of BenQ Corporation to notify any person of such
revision or changes.
This user manual aims to provide the most updated and accurate information to
customers, and thus all contents may be modified from time to time without prior
notice. Please visit http://www. benq.com for the latest version of this manual.
The illustrations and the screens shown in this guide are for your reference. The actual
content and available functions may vary by the connected devices and the product
supplied for your region.
Page 3

Table of Contents 3
Table of Contents
Copyright....................................................................... 2
Introduction .................................................................. 5
System requirements ..............................................................................5
Initial Setup ................................................................... 6
Configuring Settings (For Projectors Only).......................................6
Using DMS Cloud ......................................................... 7
Logging in to DMS Cloud.......................................................................7
The DMS Cloud Main Page.................................................................... 8
Switching Companies ............................................................................10
Adding Devices.......................................................................................11
Uploading Device Information.......................................................11
Adding Devices in DMS Cloud......................................................11
Adding Devices via the BenQ DMS Tool App...........................13
Managing Your Devices.........................................................................14
Creating Groups...............................................................................14
Renaming a Device...........................................................................16
Deleting a Device .............................................................................16
Device Tree Icons ..................................................................................17
Status Icons ........................................................................................17
Monitoring Your Devices .....................................................................18
The Device Panel..............................................................................18
The Information Tab........................................................................20
Controlling Your Devices.....................................................................22
The Control Tab (Single BenQ Display) .....................................23
The Control Tab (Single BenQ Projector).................................24
The Control Tab (Single Non-BenQ Projector).......................25
The Control Tab (Multiple Devices)............................................25
Quick Settings ...................................................................................26
Direct Command Input (for Displays Only) ..............................27
Scheduling Your Device to Automatically Power On/Off.............31
Editing a Scheduled Power On/Off...............................................33
Page 4

Table of Contents4
3/25/21
Resetting (Deleting) a Scheduled Power On/Off ..................... 33
The App List Tab ................................................................................... 34
Viewing Installed Apps.................................................................... 34
Installing an App ............................................................................... 35
Uninstalling an App.......................................................................... 37
Updating the Android Operating System on your Device..... 38
Changing Your DMS Cloud Password.............................................. 39
Other Functions .................................................................................... 40
Viewing DMS Cloud Activity Logs............................................... 40
Viewing Usage Data for Devices.................................................. 40
Software Management.......................................................................... 42
Adding or Updating an App to the DMS Cloud Database..... 43
Deleting Apps from the DMS Cloud Database......................... 44
Installing Apps onto a Device from the App List ..................... 45
Editing App Descriptions ............................................................... 46
Accessing Older Versions of an App........................................... 46
About DMS Cloud ...................................................... 47
Troubleshooting.......................................................... 48
Network Whitelist................................................................................ 48
Page 5
Introduction 5
Introduction
DMS Cloud is a cloud-based tool for computers that enables remote and centralized
management of multiple digital projectors and/or displays by IT administrators/
technicians via the cloud. DMS Cloud’s management capabilities include the ability to
remotely monitor, control, and configure projectors/displays individually or as groups.
DMS Cloud is designed for use in settings where multiple devices are spread out across
various spaces and, as a result, needs a cloud-based portal to manage and monitor each
device remotely, for example a multi-floored office building or a school with multiple
classrooms.
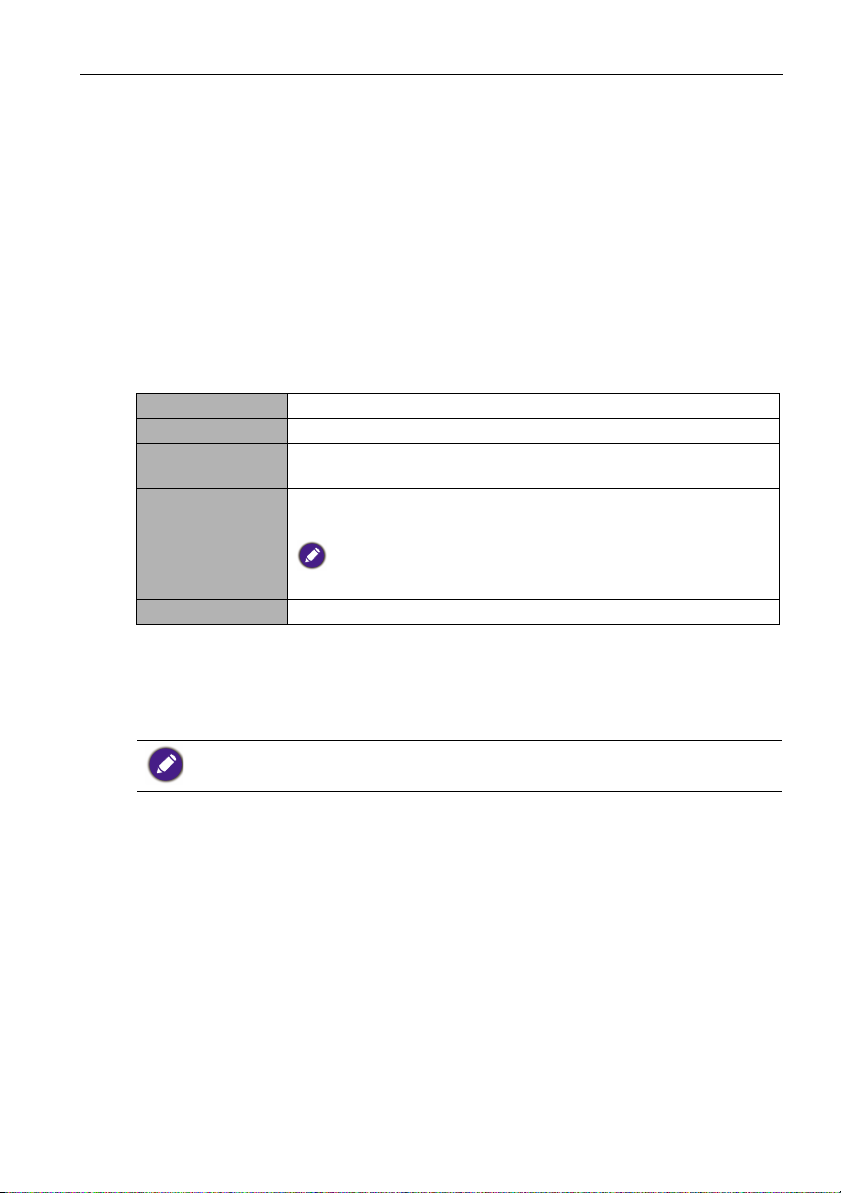
System requirements
To use DMS Cloud, a computer must meet the following minimum hardware and
software requirements.
CPU 1.8GHz
Free memory 8 GB
Display
Resolution
Browser • Chrome version 75.0.3770 or higher
Other Internet access
1024x768 or higher
• Firefox version 70.0
DMS Cloud does not support the use of Microsoft Internet Explorer,
Microsoft Edge or any other web browser.
For a device to support management via DMS Cloud, the device must feature the
following item:
• An RJ-45 Ethernet port with LAN control functionality
DMS Cloud also supports non-BenQ projectors that utilize the PJLink protocol.
Page 6

Initial Setup6
Computer
Hub, switch
or router
RJ-45 cables
Cloud
Initial Setup
Before you can properly use DMS Cloud to manage your device(s), the following setup
procedures must be completed:
• Connect the devices to a network with Internet access
• Ensure the computer using DMS Cloud is connected to a network with Internet access
• Configure device settings
• For details on the location of ports and connectors, please refer to the documentations for
the computer and devices.
• [For Projectors only]: Ensure that the IP address for each projector is properly set and that
the IP address is shown on the OSD menu of the projector. You may need to contact your
network administrator for assistance in setting the projectors’ IP addresses.
Configuring Settings (For Projectors Only)
For DMS Cloud to be able to access a projector while it is in standby mode, the settings
on the projector must be pre-configured by your IT administrator to ensure that the
Enable Network Standby Mode setting in the projector’s setting menu is set to On.
• For BenQ projectors, this setting can be found in either the System > Standby Settings
> Network or Advanced > Standby Settings > Network menu.
• For non-BenQ projectors, refer to the documentation for the device.
• For certain projectors, “Monitor Out” should be enabled in the standby settings menu to
ensure that the projector is accessible while in standby mode. Please refer to your projector’s
user manual for details.
Page 7
Using DMS Cloud 7
Using DMS Cloud
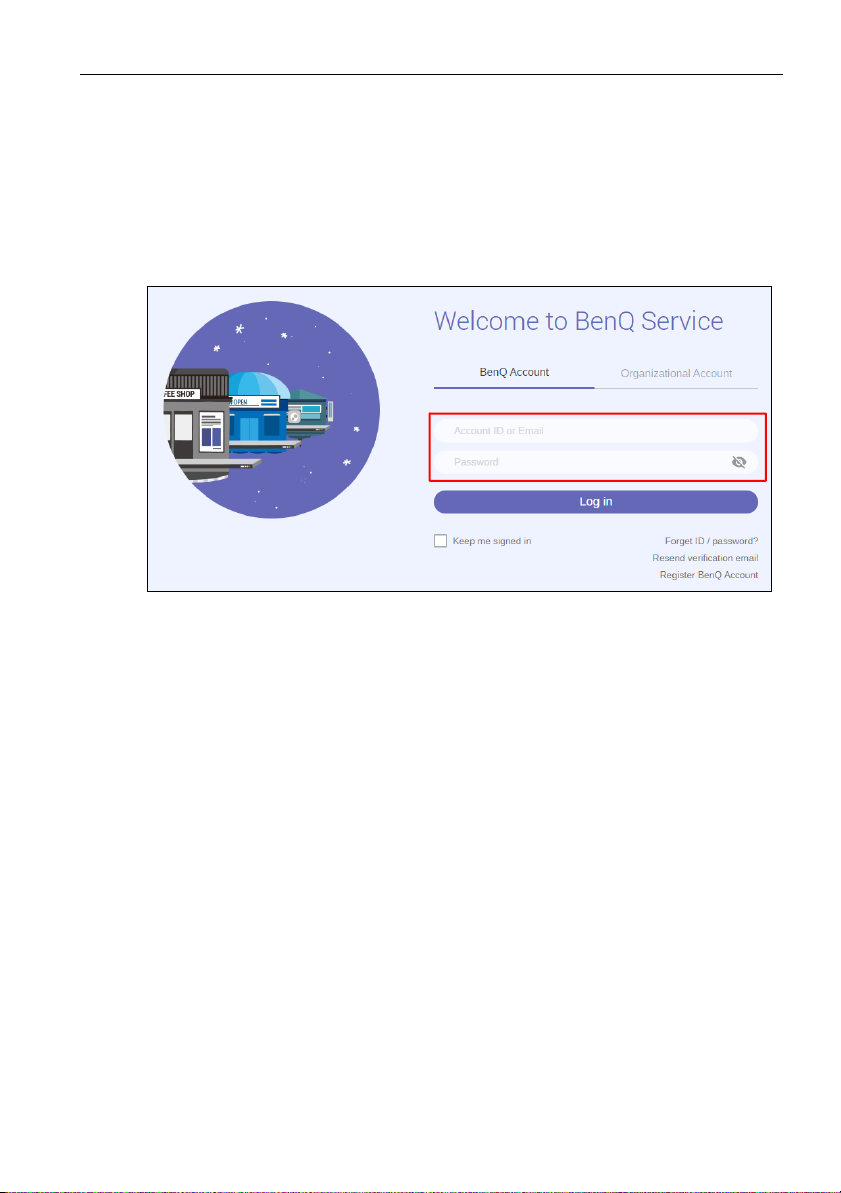
Logging in to DMS Cloud
Once you have completed the steps described in Initial Setup, you can begin using DMS
Cloud by opening the following URL in your browser:
http://dms.benq.com
After opening the DMS Cloud website, log in using the account ID/E-mail and password
provided by your system administrator.
Page 8
Using DMS Cloud8
1
2
3
5 6 7 84 9 10
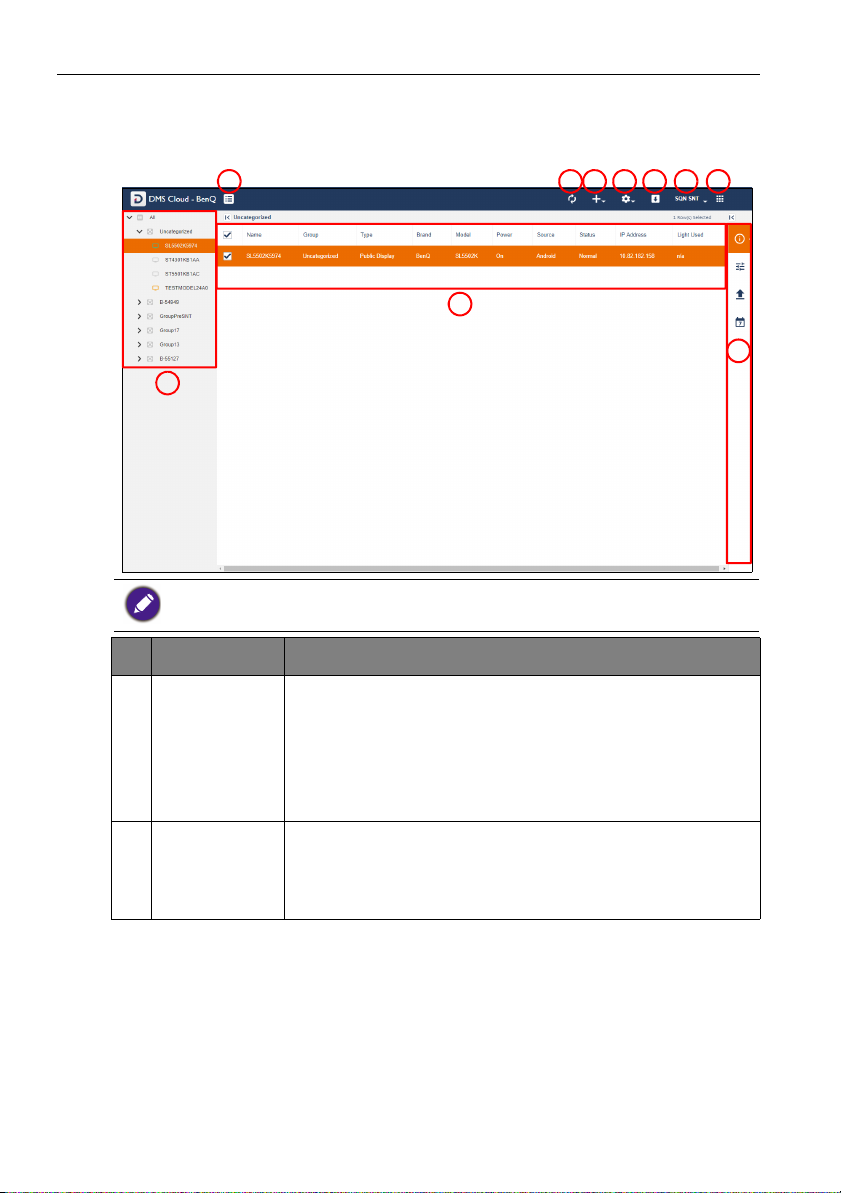
The DMS Cloud Main Page
Once you have logged in, the main page for DMS Cloud will be shown. The following
items are featured on the DMS Cloud main page.
The illustrations and the screens shown in this guide are for your reference. The actual content
and available functions may vary by the connected devices and the product supplied for your
region.
No. Item Description
Shows all the devices and device groups managed by DMS
Cloud in a tree-view structure.
1 Device Tree
2 Device Panel
See Adding Devices for more information on the adding devices
to the device tree.
See Device Tree Icons for more information on the status icons
shown in the device tree.
Shows status information for the device(s) or device groups
selected in the device tree.
See The Device Panel for more information on the various
fields featured in the device panel.
Page 9
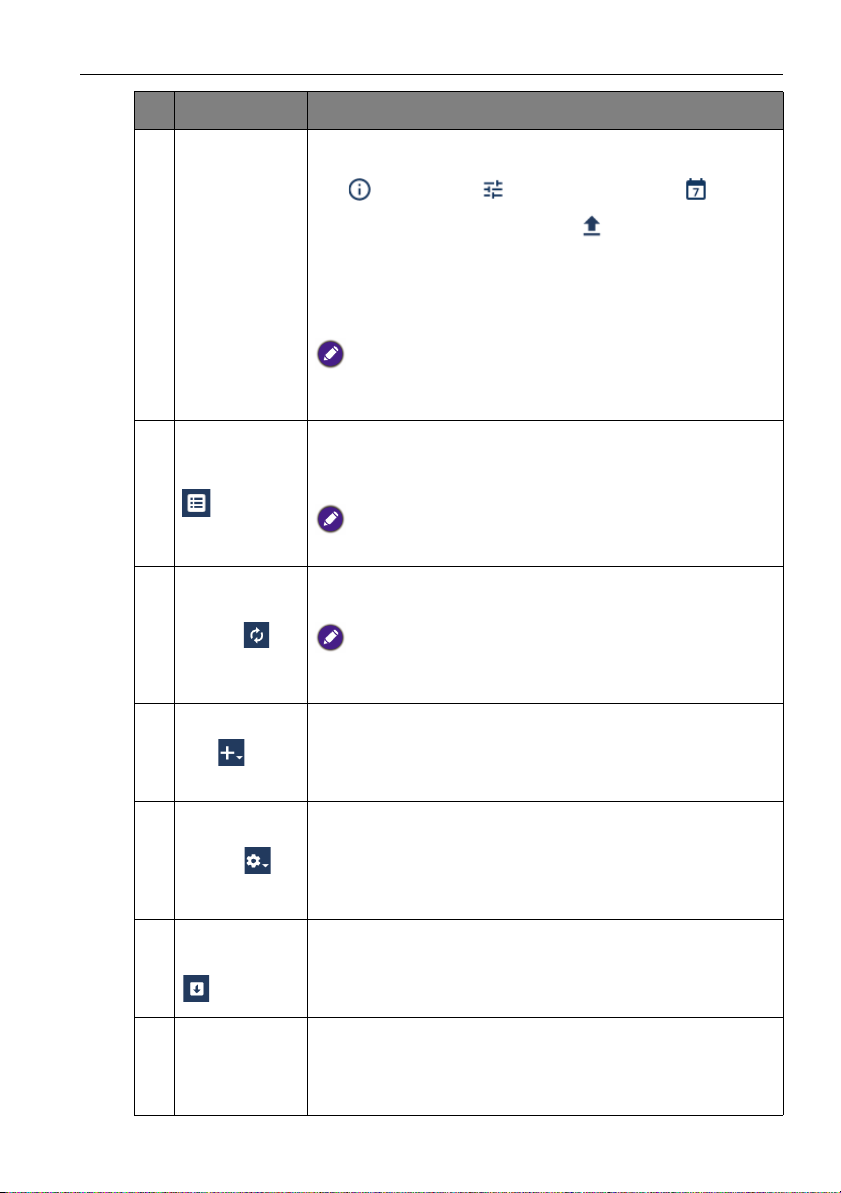
No. Item Description
Provides various tools that allow you to further manage/
monitor devices and device groups, including the information
tab ( ), control tab ( ), and the schedule tab ( ).
For certain devices, an apps list tab ( ) is also available in the
Action Panel.
3 Action Panel
See The Information Tab, Controlling Your Devices, Scheduling
Your Device to Automatically Power On/Off, or The App List
Ta b for more information on each tab in the Action Panel.
The action panel only appears when a device or device group is
selected in the device panel. The information tab only appears when a
single device is selected in the device panel.
Click to switch over to a different company’s set of devices to
be managed by the same DMS Cloud account.
Select Company
4
See Switching Companies for more information.
Only accounts which have activated multi-company functionality will be
able to access this feature.
Click to refresh the status of the devices shown on the main
page.
5
Refresh
DMS Cloud will automatically refresh the device status after a given
interval of time. The refresh button is to allow users to get the most
up-to-date information at any given time.
Click to add devices to the DMS Cloud management system, or
6
Add
to create groups for better organization in the device tree.
See Adding Devices for more information on adding devices and
device groups.
Click to access various system management functions for
administrators, such as viewing device status reports/logs, and
7
Settings
more.
See Other Functions for more information on the system
management functions available for the Settings button.
Software
Management
8
Click to open the Software Management interface to
manage the database of apps available in DMS Cloud.
See Software Management for more information on the
Software Management interface.
Click to edit selected account information and/or change your
9User
login password.
See Changing Your DMS Cloud Password for more information
on setting up a login password.
Using DMS Cloud 9
Page 10
Using DMS Cloud10
No. Item Description
Other Services
10
Click to switch to another BenQ cloud-based service.
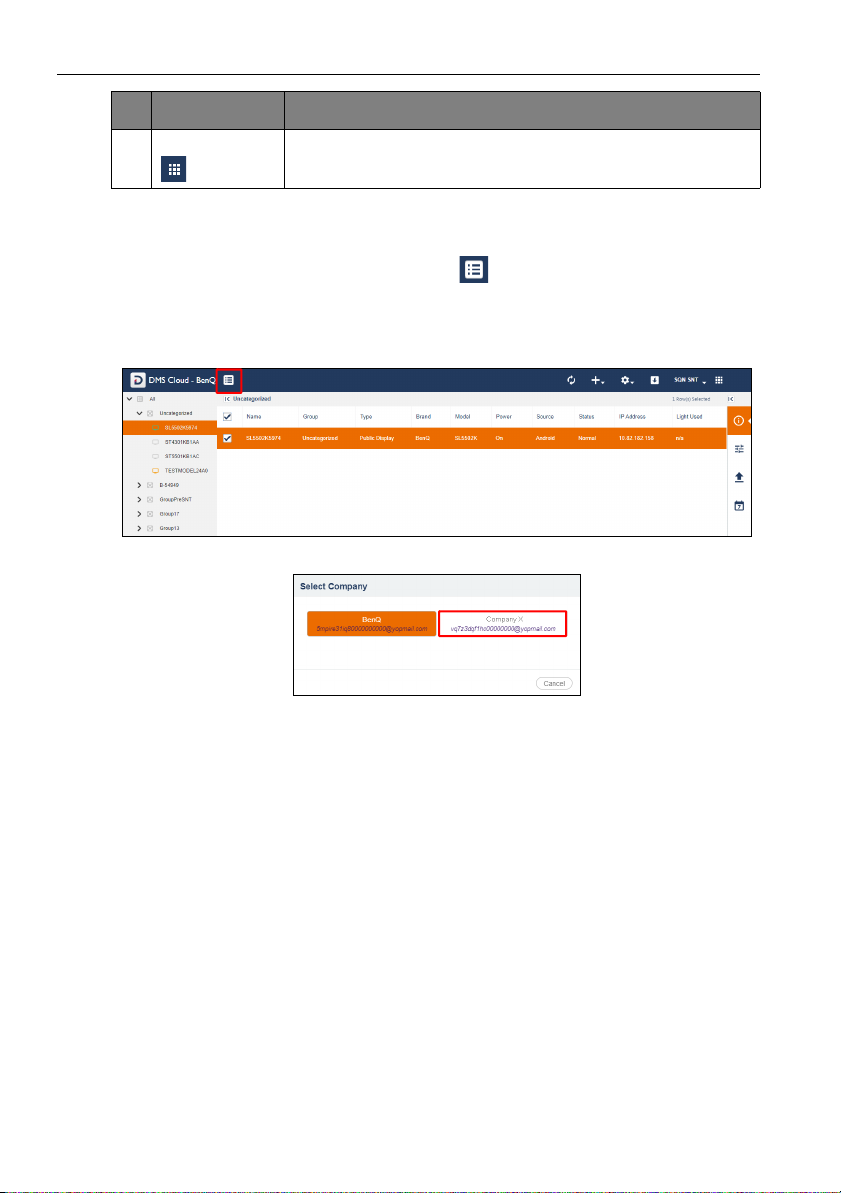
Switching Companies
For System Integrators (SI) who may be responsible for the operations of more than one
company’s system, the Select Company button on the top toolbar allows the user
to easily switch between the companies administered by the same login account.
To switch companies:
1. Click the Select Company button.
2. Select the company you want to switch to.
Page 11
Using DMS Cloud 11
Adding Devices
In order to manage a device via the DMS Cloud software, the device must first be added
into the DMS Cloud device tree. To add a device, you must first upload the device’s
information into DMS Cloud’s database of devices.
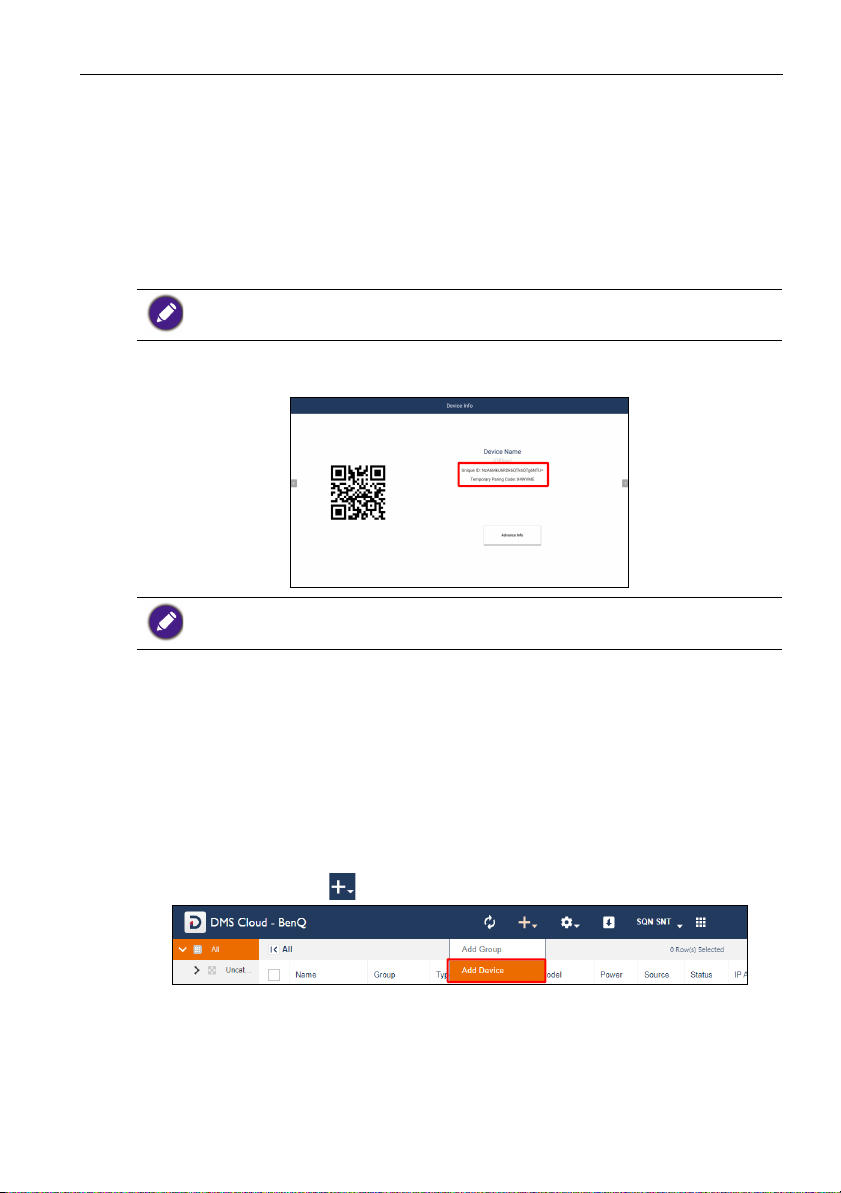
Uploading Device Information
You can upload a device’s information into the cloud using any one of the following
methods:
Ensure that your devices are connected to a network with Internet access, as described in
Configure device settings.
• Open the DMS Client app on the device you want to add, and then record the Unique
ID and/or Temporary Pairing Code shown on the screen.
Only select BenQ displays that support the DMS Client app. If your device does not feature the
DMS Client app, use either one of the other methods to upload the device’s information to the
cloud.
• Export the device listings from the DMS Local interface that manages the device(s) you
want to add. See the “Exporting Device Listings” section in the DMS Local user manual
for more information.
• Transfer the device listings via Agent Mode from the DMS Local interface that manages
the device(s) you want to add. See the “Transferring Device Listings to DMS Cloud via
Agent Mode” section in the DMS Local user manual for more information.
Adding Devices in DMS Cloud
Once the information for the device(s) you want to add has been uploaded to the cloud,
follow the steps below to add the devices in DMS Cloud:
1. Click the add button ( ) and then select Add Device.
Page 12
Using DMS Cloud12
a
b
c
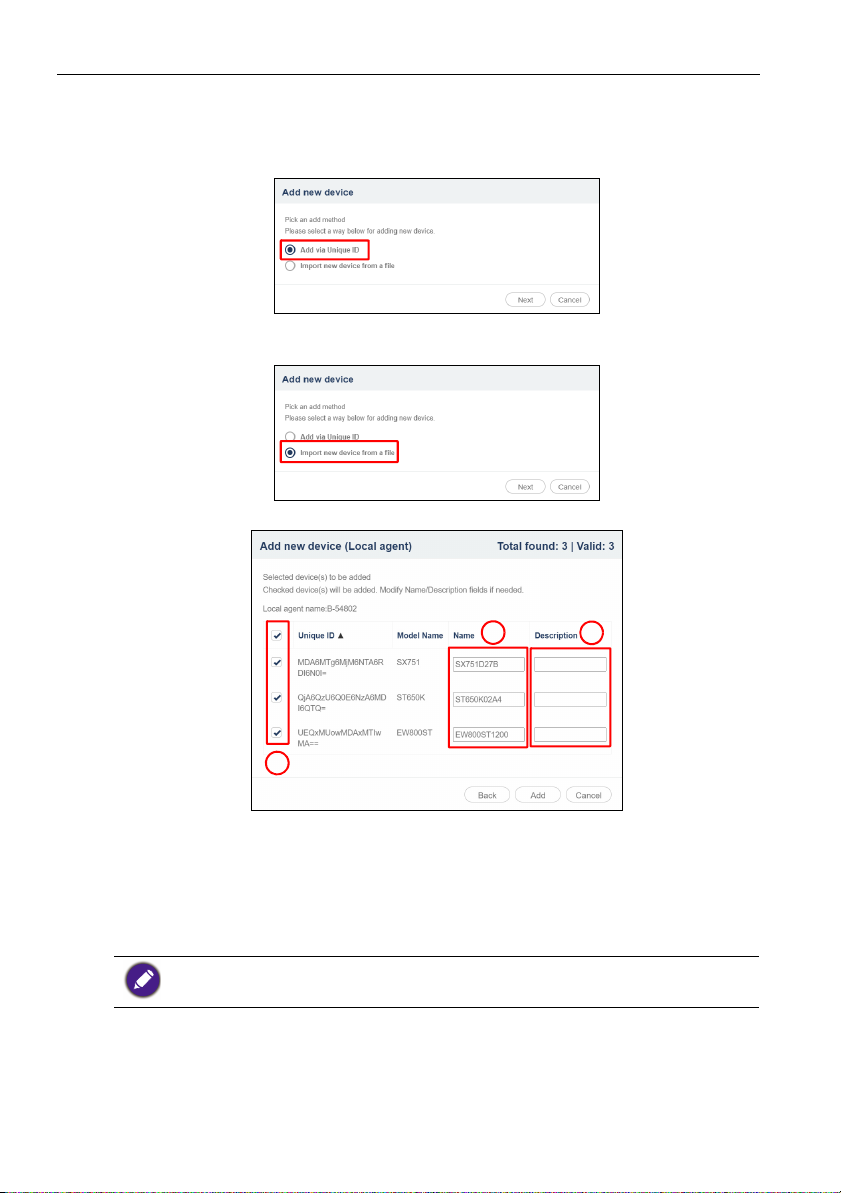
2. In the Add new device pop-up window, choose one of the following options:
- If you uploaded the device’s information using the DMS Client app or DMS Local’s
Agent Mode, select Add via Unique ID and then enter the Unique ID or
Temporary Pairing Code provided for the device.
- If you exported the device’s information in DMS Local, select Import new device
from a file and then select the exported file.
3. Once the list of devices appear, you can choose from the following options:
a. Check the box next to the device(s) you want to add or check the select all box to
select all the devices on the list.
b. Enter a name for the device in the Name field. If you do not enter a name in the
field, the default name for the device (the device’s full model name) will be used.
c. Enter a description for the display in the Description field to provide more
detailed information about the device to be viewed in the Information Tab.
The Name and Description used in DMS Local will not be carried over to DMS Cloud.
Page 13
Using DMS Cloud 13
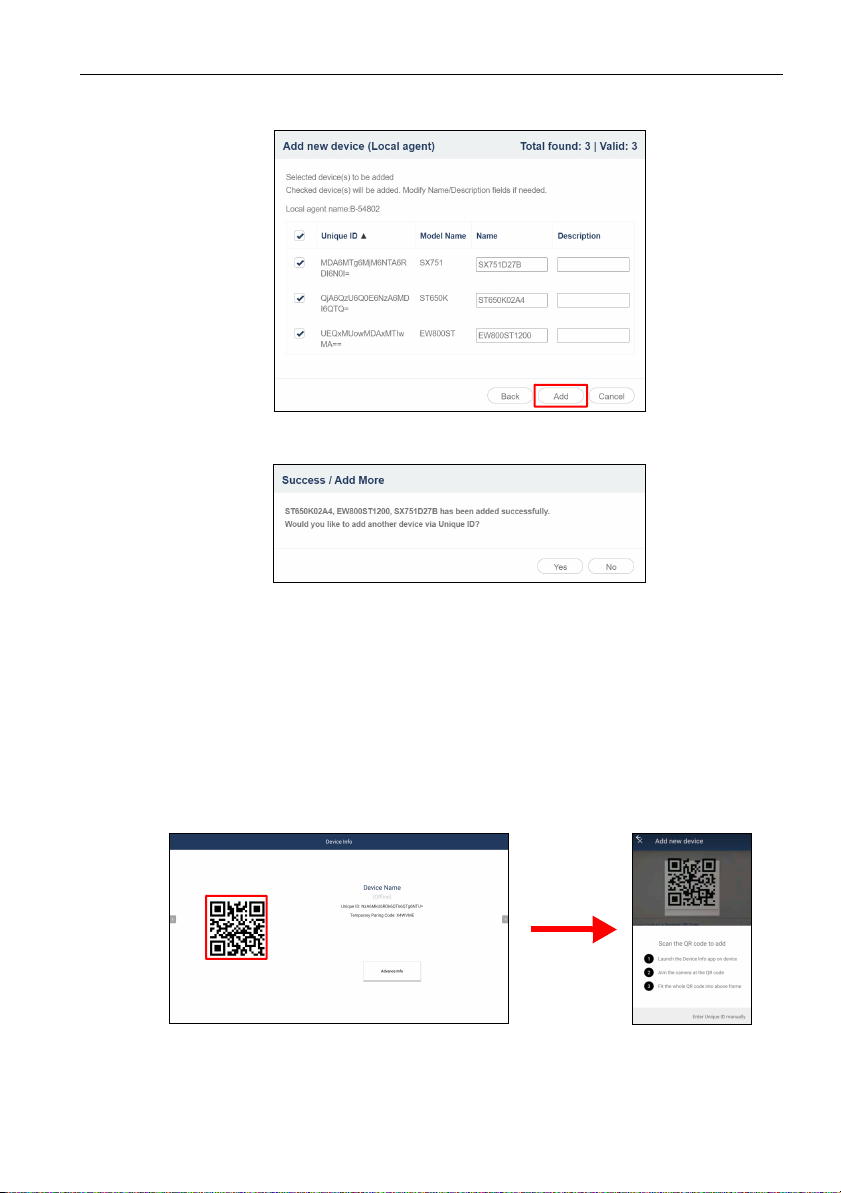
4. Once you have finished with the options described above, click Add to add the
selected devices.
5. Once you have finished adding the devices, a success message will appear. Select Ye s
to continue transferring device lists or No to finish the process.
Adding Devices via the BenQ DMS Tool App
You can also use BenQ’s DMS Tool mobile app to add a device to your DMS Cloud
account. To add a device via the DMS Tool App:
1. Search the iOS App Store or Google Play Store for “BenQ DMS Tool” and then
install the app on your mobile device.
2. Log into the BenQ DMS Tool app using the login and password of the DMS Cloud
account you want to add the device to.
3. Open the DMS Client app on the device you want to add.
4. Use the DMS Tool app to scan the QR Code that appears in the DMS Client app
window.
Page 14
Using DMS Cloud14
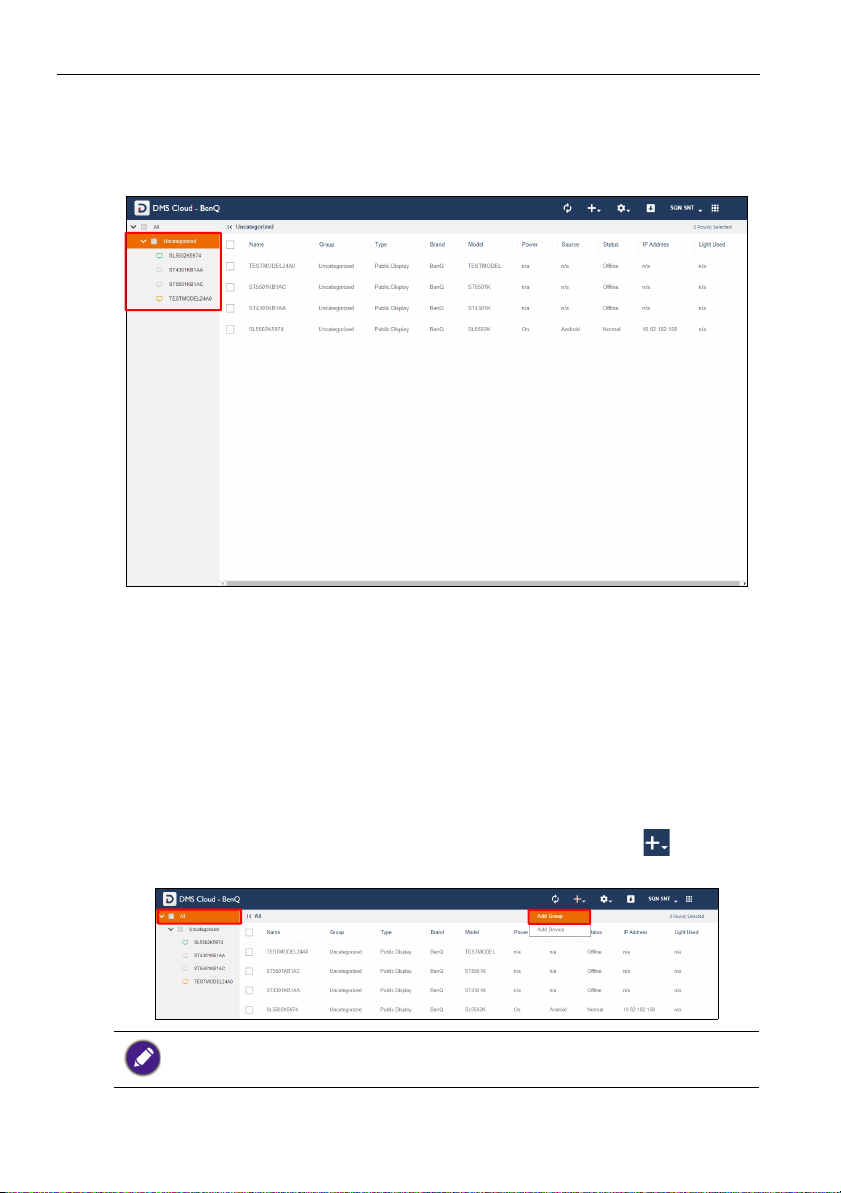
Managing Your Devices
Once you have added the device(s) into the DMS Cloud system, the devices will appear
in the device tree on the main page. Initially all newly added device will be listed in the
Uncategorized group of devices.
To help you better organize and identify your devices, DMS Cloud features the following
options:
• Create Device Groups
• Rename Devices
• Delete Devices
Creating Groups
In instances where DMS Cloud is used to manage a large number of devices spread out
over various spaces, organizing devices into groups may be useful to manage your
devices. To create a device group, follow the steps below:
1. Select the All category in the device tree, then click the add button ( ) and select
Add Group.
• To create a sub-group, select the group in the device tree that you want to create the subgroup in and then follow the steps in this section.
• A group cannot be created within the Uncategorized group in the device tree.
Page 15

Using DMS Cloud 15
2. In the Add New Group pop-up window, enter a name for the group and then click
Add.
3. Once the new group has been created, it will appear in the device tree. You can
begin adding devices to the group by selecting the respective device in the device
tree, dragging it into the group, and then confirming the addition.
A device can only be part of one group at a time.
4. To rename a group, right-click the group you want to rename and select Rename.
Page 16

Using DMS Cloud16
Renaming a Device
As described in Adding Devices, the Add new device menu allows you to rename a
device while adding it to DMS Cloud. In instances where a device is not renamed while it
is being added to DMS Cloud, the device will be added using its default name (the IP
address for the device followed by the device’s model number). You can then rename a
device to a more easily identifiable name at any time by following the steps below:
1. Right-click on the device you want to rename in the device tree, and then select
Rename.
2. In the Rename menu, enter the new name and then click Rename.
Deleting a Device
To delete a device from the device tree, right-click on the device you want to delete in
the device tree, and then select Delete.
Deleting a device not only removes the device from your device tree, but also deletes the device
listing from the entire DMS Cloud database, preventing other users from accessing the device.
Before deleting a device, ensure that the device is not used by any other user in your network.
Page 17

Using DMS Cloud 17
Device Tree Icons
As described earlier, the device tree lists all devices managed by DMS Cloud in a
hierarchical, tree-view structure. The device tree also shows various icons that allow you
to quickly view the current status of all devices and whether or not there are any errors
causing the device to malfunction.
Status Icons
Icons that indicate the current status of each device appears to the left of the device’s
name in the device tree. Icons that indicate errors for a device appears to the right of the
device’s name in the device tree. The table below provides descriptions of each icon.
Icon Status Description
Online The device is powered on.
Standby The device is in standby mode.
The device is undetected by DMS Cloud.
Offline
This status usually indicates a problem with the device’s
connection to the network or with the network itself, in such
instances it is suggested that you check the device’s
connection.
Page 18

Using DMS Cloud18
Monitoring Your Devices
Beyond the status icons shown in the device tree, DMS Cloud features the device panel
to monitor the status of your device and the information tab to view detailed information
for each device, both of which are described in the sections below.
The Device Panel
When either an individual device or a device group is selected in the device tree, the
device panel of the DMS Cloud main page will show in-depth status information for the
selected device or the devices in the selected group.
The table below describes the information featured in the device panel.
Item Description
Name Name of the device.
Group Group that the device belongs to.
Ty p e Type of device, projector, or public display.
Brand Brand of the device.
Model Model name for device.
Power
Source Current signal source for the device.
Status
IP Address IP address for the device.
Current power status of the device.
See Power for definitions of the various power statuses.
Current operating status of the device.
See Status for definitions of the various statuses.
Page 19

Using DMS Cloud 19
Item Description
Light Used* The cumulative hours the light has been used.
Light 2 Used* The cumulative hours the second light has been used.
*For projectors only
Power
The Power column in the device panel shows the current power status of the device(s).
The following table defines the various power statuses available in the device panel.
Power Status Description
On The device is powered on.
Standby The device is in standby mode.
The device is undetected by DMS Cloud.
N/A
This status usually indicates a problem with the device’s connection to
the network or with the network itself, in such instances it is suggested
that you check the device’s connection.
Status
The Status column in the device panel shows the current operating status of the
device(s). The following table defines the various statuses available in the device panel.
Status Description
Normal The device is operating normally.
• The device does not support the transmission of error messages over
N/A
the network.
• The device is in standby mode.
The device is undetected by DMS Cloud.
Offline
This status usually indicates a problem with the device’s connection to
the network or with the network itself, in such instances it is suggested
that you check the device’s connection.
Page 20

Using DMS Cloud20
The Information Tab
The information tab of DMS Cloud shows detailed information for a device and is only
accessible when a single device is selected in the device panel and the information button
in the action panel is clicked.
The table below describes the detailed information featured in the information tab.
Item Description
Name
Description
Group Group that the device belongs to.
Agent Agent ID for user that added the device via DMS Local Agent Mode.
1
Ty p e
Brand Brand of the device.
Model Name Model name for device.
IP Address IP address for the device.
MAC Address MAC address for the device.
Unique ID
S/N Serial number for the device.
Ver si on Indicates the firmware version installed on the display.
Name of the device. Click the edit button to change the device
name.
Brief description of the device. Click the edit button to change
the description.
Describes the type of device/display (e.g. public display or projector).
Unique ID number for the device added via the DMS Client app or
DMS Local Agent Mode.
Page 21

Item Description
Using DMS Cloud 21
Sys.
Wallpaper
Power
Click the edit button to select an image file as the pre-login
3
wallpaper for the device.
Current power status of the device.
See Power for definitions of the various power statuses.
Input Source Current signal source for the device.
Blank
2
Indicates whether the blank screen function for the device is on or
off.
Vol um e Current volume level for the device.
Mute Current mute status for the device.
Picture Mode Current picture mode setting for the device.
2
Light Mode
Current light mode setting for the projector.
Aspect Ratio Current aspect ratio for the device.
Device
Runtime
1
Remote Lock
Key Lock
Thermal
2
Level
Light Used
Light 2 Used
High Altitude
Filter Usage
Hardware Status
1
For displays only
2
For projectors only
3
For select models only
Current operating time for the display (in hours).
1
Current remote control lock status for the display.
1
Current keypad lock status for the display.
Current thermal level for the projector.
2
The cumulative hours the light has been used.
2
The cumulative hours the 2nd light has been used.
2
Indicates whether the high altitude configuration is on or off.
2
Current filter used for the projector.
Indicates the usage/performance levels for the device’s CPU,
memory, and network connection.
• The fields displayed in the information tab may vary depending on the model selected.
• If the projector does not support the transmission of a certain field’s information over the
network, the field will show “N/A”.
• For non-BenQ projectors, only the following fields will display information: Name, Group,
Brand, Model, Power , and IP Address. All other fields will show “N/A”
Page 22

Using DMS Cloud22
Controlling Your Devices
The control tab of DMS Cloud features a panel of functions that allows you to control an
individual device or an entire group when they are selected in the device panel and the
control button in the action panel is clicked. The control tab also allows users to enter
and save control command codes using the BenQ protocol (for BenQ devices), the
PJLink protocol or self-input via the protocol port (for non-BenQ projectors) to create
custom controls for the device.
When DMS Cloud detects a problem with the device’s connection to the network, all the
buttons and fields in the control tab will be greyed out.
The control tab will show different control items depending on what type of selection is
made in the device panel. The possible selections include the following:
• A single BenQ display
• A single BenQ projector
• A single non-BenQ projector
• Multiple projectors in a group
• Multiple displays in a group
The sections below describe the control panel for each of the items above.
Page 23

Using DMS Cloud 23
2
3
1
4
5
The Control Tab (Single BenQ Display)
When a single BenQ display is selected in the device panel, the control tab features the
following items:
No. Item Description
Powers on the display, puts it in standby mode, or powers off
(shuts down) the display.
1 Power
Quick
2
Settings
To power on the display via DMS Cloud, make sure that the WOL
(Wake-on-LAN) Settings on the display is enabled and that the
display is connected to the network via the LAN (RJ-45) port. Wakeon-LAN does not work over a Wi-Fi connection.
Features buttons and menus to control your display.
See Quick Settings for more information on the quick settings
controls.
Allows you to adjust image settings including Brightness,
Color
3
Management
Settings
Contrast, Sharpness, Color Temperature, Hue, and
Chroma.
Support for each image setting depends on model.
Page 24

Using DMS Cloud24
1
2
No. Item Description
Allows the display to be able to be powered-on remotely from
a shutdown state via the LAN port.
WOL (Wake-
4
on-LAN)
Settings
Direct
5
Command
Input
The WOL (Wake-on-LAN) Settings option is only available for
displays added to DMS Cloud via DMS Local’s Agent Mode.
The WOL (Wake-on-LAN) Settings function only works on
displays that are connected to the network via their LAN (RJ-45)
port and administered via DMS Local. Displays that are connected to
the network via a Wi-Fi connection will not be able to use the WOL
(Wake-on-LAN) Settings function.
Send or save custom control command codes for the display
using the BenQ protocol for display control.
See Direct Command Input (for Displays Only) for more
information on the basic controls.
The Control Tab (Single BenQ Projector)
When a single BenQ projector is selected in the projector panel, the control tab features
the following items:
No. Item Description
1 Power Powers on the projector or puts it in standby mode.
Quick
2
Settings
Features buttons and menus to control your projector.
See Quick Settings for more information on the quick settings
controls.
Page 25

Using DMS Cloud 25
1
1
2
The Control Tab (Single Non-BenQ Projector)
When a single non-BenQ projector is selected in the projector panel, the control tab
features the following items:
No. Item Description
1 Power
Powers on the projector or puts it in standby mode via the
PJLink protocol.
The Control Tab (Multiple Devices)
When multiple devices including both projectors and displays are selected in the device
panel, the control tab features the following items:
No. Item Description
Powers on the devices, puts them in standby mode, or powers
off (shuts down) the devices.
1 Power
Quick
2
Settings
To power on the display via DMS Cloud, make sure that the WOL
(Wake-on-LAN) Settings on the display is enabled and that the
display is connected to the network via the LAN (RJ-45) port. Wakeon-LAN does not work over a Wi-Fi connection.
Features buttons and menus to control your device.
See Quick Settings for more information on the quick settings
controls.
Only functions supported by all devices in the group will be
supported in the Quick Settings section. Functions that are not
supported by all displays will show an asterisk (*).
Page 26

Using DMS Cloud26
Quick Settings
The quick settings section of the control tab features the following buttons and menus
which help you control your device.
Button Description
Input Source Sets the input source for the device.
Vol um e* Adjusts the audio volume.
Blank
2
Toggles a blank screen for the projector on or off.
Light Mode Select the light mode settings for the device.
Mute Mutes or unmutes the audio output.
Aspect Ratio* Sets the image aspect ratio for the device.
Backlight
Brightness
1
Sets the brightness level of the backlight for the display.
*
2
Sets the brightness level for the projector.
*
Picture Mode* Sets the picture mode for the device.
1
Remote Lock
Key Lock
Network
1
2
*
Monitor Out
1
For displays only
2
For projectors only
*Not available for multiple devices.
• The fields displayed in the quick settings section may vary depending on the model selected.
• When the device is in standby mode, all fields in the quick settings section will be empty.
• When the device is powered on, the fields in the quick settings section will be set to the
current configurations of the device.
• When DMS Cloud detects a problem with the device’s connection to the network, the fields
in the quick settings section will be greyed out.
• When the quick settings section is opened for multiple devices, both control fields and
available options that are not supported by all devices will feature an asterisk (*).
Enables/Disables the remote control lock.
Enables/Disables the keypad lock.
Enables/Disables the network function in standby mode.
2
Enables/Disables outputting the signal via the Monitor Out port.
*
Page 27

Using DMS Cloud 27
Direct Command Input (for Displays Only)
The Direct Command Input section of the control tab allows you to create custom
controls for your device using direct commands. For instance, you can create a
command to have your device rotate its screen clockwise 90-degrees.
• Functions available to devices that support direct command controls and their corresponding
commands vary by model. Check the specifications and user manual for your device for
available functions and commands.
• Direct command controls can only be used on one device at a time.
The Direct Command Input section for a BenQ display is shown below:
The Direct Command Input section for a non-BenQ display is shown below:
Creating a One-Time-Only Direct Command
To create a one-time-only direct command, follow the steps below:
1. For BenQ displays - Enter the direct command code in the Direct Command
Input field.
Page 28

Using DMS Cloud28
For non-BenQ displays - Enter the direct command code in the Direct Command
Input field and the TCP port for the projector in the Por t field.
Commands for BenQ displays must be in ASCII format, while commands for non-BenQ displays
must be in hexadecimal format. For more information on creating direct commands, see Direct
Command Help.
2. Click Send and wait for a confirmation that the command has been executed
successfully.
To prevent quick changes to the device’s state, the Direct Command Input will be grayed out
while DMS Cloud is confirming whether the direct command is successful. Once the direct
command has been confirmed or the confirmation process has timed out, the field will return to
its normal state.
Saving a Custom Direct Command Button
To save a direct command as a custom button, follow the steps below:
1. Click the button you want to customize in the direct command control section.
The direct command control section for BenQ devices features three direct command buttons
available for customization, while the direct command control section for non-BenQ devices
features 16 direct command buttons available for customization.
2. In the Saved Func. window, click the options button ( ) and select Edit.
Page 29

Using DMS Cloud 29
3. For BenQ devices - In the Edit Saved Function window enter a name for the
button in the Name field and the direct command code in the Command field.
For non-BenQ projectors - In the Edit Saved Function window enter a name for
the button in the Name field, the direct command code in the Command field,
and the TCP port for the projector in the Port field.
Commands for BenQ projectors must be in ASCII format, while commands for non-BenQ
devices must be in hexadecimal format. For more information on creating direct commands, see
Direct Command Help.
4. Click Save in the Edit Saved Function, and your custom direct command button
will appear in the direct command control section of the control panel, which you
can click to send the command.
Page 30

Using DMS Cloud30
Direct Command Help
If you need help with creating direct commands in DMS Cloud, you can click the help
button located in the direct command control section for guidelines on creating
direct commands.
Page 31

Using DMS Cloud 31
Scheduling Your Device to Automatically Power On/Off
The schedule tab of DMS Cloud allows you to schedule a day and time for your device to
power on or off automatically.
The schedule tab is not available for groups or multiple devices.
To schedule a day and time for your device to power on or off automatically:
1. Select the device(s) you want to automatically power on/off in the device panel and
then click the schedule tab.
Page 32

Using DMS Cloud32
a
b
c
d
e
2. Choose one of the empty items in the schedule tab and click the Edit button .
The schedule tab is pre-configured with seven available schedule items for you to create
schedules with. If you have already created schedules using all seven slots, you must override
one of the existing items.
3. Configure the following items in the Edit on-device daily scheduling menu:
a. Check the box if you want your device to automatically power on at a given day
and time, and then set the time when you want the device to power on.
b. Check the box if you want your device to automatically power of at a given day
and time, and then set the time when you want the device to power off.
c. If you checked the Powe r O n box, select the input source you want the device
to power on to.
d. Select the frequency in which your device powers on/off. The available options are
Everyday, Wee kd ay, Weekend, or Custom day.
e. If Custom day is selected in the Repeat field, check the boxes next to the days
in which you want your device to power on/off.
4. Click the Save button to finish the scheduling process. By default the created task
will automatically be enabled.
Page 33

Using DMS Cloud 33
Editing a Scheduled Power On/Off
To edit a scheduled power on/off:
1. Click the edit button ( ) for the item you want to edit in the schedule tab for the
device.
2. Edit the items in the Edit on-device daily scheduling menu based on the
descriptions in step 3 above.
3. Click the Save button to finish editing the scheduled task. The edited task will
retain the enabled/disabled setting from before it was edited.
Resetting (Deleting) a Scheduled Power On/Off
To reset (delete) a scheduled power on/off, click the reset button ( ) for the item you
want to reset in the schedule tab for the device. The schedule item will clear itself of the
scheduling conditions and become disabled.
Page 34

Using DMS Cloud34
The App List Tab
For certain devices with compatible Android operating systems, the Action Panel
features an app list tab that allows you to view the apps installed on your devices, view
each app’s description, install and/or uninstall apps on your device, and update the
device’s Android operating system.
Support for the app list function depends on the version of the Android OS installed on your
device. Not all devices with the Android OS will support the app list function.
Viewing Installed Apps
After selecting the app list button ( ) in the Action Panel, the app list menu will appear
displaying a list of the apps installed on your device as well as information such as version
number, date modified, and file size for each app.
Page 35

Using DMS Cloud 35
To view a detailed description for each app, select the tag button ( ) to the right of the
app name.
Once selected, a window will pop up showing the app’s description.
Installing an App
The app list tab allows you to install apps stored either locally as an APK file or in the
DMS Cloud Software Management database onto your devices via DMS Cloud. See
Adding or Updating an App to the DMS Cloud Database for more information on
uploading apps into the Software Management database.
• DMS Cloud supports installing apps on devices that are currently offline. After you complete
the installation process described below for an offline device, DMS Cloud will install the app
once the device comes online. If the designated device does not come online within a span of
a week, DMS Cloud will cancel the installation process.
• Support for the app depends on the compatibility of the app with the version of Android OS
installed on your device. See Software Management for more information on managing and
accessing older versions of stored apps in the Software Management database.
To install an APK app installation file:
1. Click the install button ( ) in the app list.
Page 36

Using DMS Cloud36
2. Choose one of the following options:
- To install an app stored locally as an APK file: click Select From Local File, and
then navigate to the location of the APK file located on your computer.
- To install an app from the Software Management database: select the app you want
to install in the Available on server list, and then click the Install button.
3. Once the installation has successfully finished, the newly installed app will appear in
the app list for the device.
Page 37

Using DMS Cloud 37
If the installed app does not appear shortly after the installation process is complete,
select the refresh button ( ) in the DMS Cloud toolbar.
If the app in question does not appear in the app list even after refreshing DMS Cloud, there
may be support issues for the app that resulted in a failed installation process. Support for the
app depends on the compatibility of the app with the version of Android OS installed on your
device.
Uninstalling an App
To uninstall an app in the app list, right-click on the app you want to uninstall and then
select Uninstall Application.
Page 38

Using DMS Cloud38
Updating the Android Operating System on your Device
The app list tab also allows you to update the Android operating system installed on your
device via DMS Cloud using a locally stored installation file.
To update the operating system on your device:
1. Select Update Device Now in the app list screen.
2. Navigate to the location of the update file located on your computer and select the
file. The update process will begin.
The entire process will take some time, during this time you will not be able to use any
other DMS Cloud functions. Once the update is finished, your device will restart.
If the update file is corrupt or an error occurs during the update process, a Device Update
Failed message will appear. Check with the manufacturer of your device for more information
regarding the update file and its compatibility with your device.
Page 39

Using DMS Cloud 39
Changing Your DMS Cloud Password
To change your login password for DMS Cloud, follow the steps below:
1. Click the user button in the top toolbar and select View Personal Profile.
2. In the Profile menu, click Change password.
3. In the Change password menu, enter the current password in the Current
password field and then the new password you want in both the New password
and Confirm password fields.
4. Click Save to finish changing your password for DMS Cloud.
If you forget your login password for DMS Cloud, click the Forget ID / password? link at the
bottom of the login window and contact your local BenQ service team to provide them with
the password retrieval code shown in the Forget ID / password? prompt.
Page 40

Using DMS Cloud40
Other Functions
DMS Cloud also allows you to do the following functions to further help you manage
your devices:
• View DMS Cloud activity logs
• View usage/performance data for devices
Viewing DMS Cloud Activity Logs
DMS Cloud allows you to view a log of all the actions performed in DMS Cloud on the
devices in your device tree for the past 30 days. The log includes the date and time of
each action, the user who was responsible for the action, a description of the action, and
the status of the action.
To view an activity log for your devices:
1. Click the settings button ( ) in the top toolbar and select Status & Log.
2. Scroll up to view past items in the log.
Viewing Usage Data for Devices
DMS Cloud also allows you to view usage data for up to 30 devices. The data will include
various items such as hardware (e.g. CPU, memory, etc.) usage, performance levels (e.g.
carbon output), and other related items.
To view the usage data for your devices:
1. Click the settings button ( ) in the top toolbar and select Device Usage Data.
DMS Cloud will open a Device Usage Data page.
Page 41

Using DMS Cloud 41
2. Select one or more devices or groups in the device tree of the Device Usage
Data page, and then select Generate.
To select multiple items in the device tree, press and hold Ctrl on your keyboard and then select
an item.
3. Scroll down to see all the items in the usage data report.
Page 42

Using DMS Cloud42
1
2 3 564
Software Management
The Software Management page allows you to manage the apps stored in the DMS Cloud
database. To access the Software Management page, click the Software Management
button ( ) at the top toolbar in DMS Cloud.
Once you click the Software Management button ( ), the Software Management page
will be shown. The following items are featured on the Software Management page.
No. Item Description
Shows all the apps managed by the Software Management page.
Click the tag button ( ) next to each app name to see more
details regarding the app, including app name, description, and
1 Apps List
version.
Hover over the Actions column for an app for more app
related actions, including installing, editing, or deleting the app.
See Installing Apps onto a Device from the App List or Deleting
Apps from the DMS Cloud Database for more information on
installing or deleting an app on a device.
See Editing App Descriptions for more information on editing
an app’s details.
Click to refresh the apps list.
2
Refresh
The Software Management page will automatically refresh the apps list
after a given interval of time. The refresh button is to allow users to
get the most up-to-date information at any given time.
Page 43

No. Item Description
Using DMS Cloud 43
Add/Update
Applications
3
Status & Log
4
5User
Show Older
6
Ver si on
Click to add a new app to the Software Management page or
update an existing app to the newest version.
See Adding or Updating an App to the DMS Cloud Database for
more information on adding devices and device groups.
Click to view the DMS Cloud activity log.
See Viewing DMS Cloud Activity Logs for more information.
Click to edit selected account information and/or change your
login password.
See Changing Your DMS Cloud Password for more information
on setting up a login password.
Check this box to show older available versions of the apps in
the apps list.
See Accessing Older Versions of an App for more information
on viewing older versions of an app via the Software
Management page.
Adding or Updating an App to the DMS Cloud Database
To add an app or update an existing app to a newer version:
Added/Updated apps must be in the .apk file format.
1. Click the add/update applications button .
2. Navigate to and select the app file located in your local storage.
Page 44

Using DMS Cloud44
3. Enter a description for the app in the Description field of the Add Application
Info window that appears and/or select Continue.
Entering an app description is not a required step. To add/edit an app description at a later time,
see Editing App Descriptions.
4. Depending on the size of the app, the upload process may take some time. A
confirmation window will appear once you have successfully uploaded the app to the
DMS Cloud database. Click Close to finish the process.
Deleting Apps from the DMS Cloud Database
To delete an app from the DMS Cloud Database:
Deleting an app from the DMS Cloud database will not delete the respective app from devices
that it has already been installed on via DMS Cloud.
1. Use the cursor to hover over the Actions column for the app you want to delete,
and then click the delete button ( ).
2. Select Delete in the confirmation window that appears.
Page 45

Using DMS Cloud 45
Installing Apps onto a Device from the App List
To install an app located on the DMS Cloud database using the Software Management app
list:
1. Use the cursor to hover over the Actions column for the app you want to install
onto your device, and then click the install button ( ).
2. In the selection window, check the boxes for all the devices in the device tree you
want to install the app to, and then click Install.
3. Once the app has been successfully installed onto the device, a success message will
appear at the bottom of the Software Management page.
Page 46

Using DMS Cloud46
Editing App Descriptions
To edit the description for an app:
1. Use the cursor to hover over the Actions column for the app you want to edit the
description for, and then click the edit button ( ).
2. In the edit window, enter the description and click Save.
The description for the app can be viewed by clicking the tag button ( ) for the app in
the app list.
Accessing Older Versions of an App
The Software Management page allows you to access older versions of an app in the app
list that had been previously uploaded to edit or delete from a device.
To access older versions of an app, check the Show Older Version box.
Once the older versions appear in the app list, you can edit or delete a previous version
of an app using the same steps described in the corresponding sections above.
Page 47

About DMS Cloud 47
About DMS Cloud
For more information regarding DMS Cloud including version number, click the settings
button ( ) in the DMS Cloud top toolbar and select About.
Page 48

Troubleshooting48
Troubleshooting
If you encounter problems while using the DMS Cloud, please refer to the following
troubleshooting tips to try to solve the problems by yourself. If the problem persists,
please contact BenQ Customer Support for help.
Problem Solution
Check the following:
• Check the cable connection. Is the device correctly
Cannot connect to the
device(s) (The device is
showing offline in the device
list)
The device is showing that it
is online, but in DMS Cloud
it is listed as offline.
Cannot power on the device
via DMS Cloud
Cannot add a device into
DMS Cloud
connected to the network?
• Is the device turned on?
• Is the device network setting correct?
• Check if the device’s firmware version is up-to-date.
• Check if the DMS Client app is up-to-date.
• Check if a whitelist has been added for DMS Cloud
(see the table below).
• Check if the device’s firmware version is up-to-date.
• Check if the DMS Client app is up-to-date.
• Clear all cookies on your browser.
• Use Incognito mode on your browser and then launch
DMS Cloud.
• Check if a whitelist has been added for DMS Cloud
(see the table below).
• Ensure that WOL (Wake-on-LAN) Settin gs is
enabled on the device.
• Ensure that the device is connected to the network via
the LAN (RJ-45). Wake-on-LAN does not work over a
Wi-Fi connection.
Check if the device supports LAN control.
Network Whitelist
If your network is in a private environment, please add a whitelist for DMS Cloud using
the following URLs.
URL/DNS Description Port
https://dms.benq.com/ API URL (DMS Cloud & Local)
https://vod.benq.com/
http://staging2.benq.com
https://dms-relay.benq.com
https://
cmota.s3.amazonaws.com/
Get Device JSON files (DMS Cloud
& Local)
Get Device JSON files (v1.0.0.1)
(DMS Cloud Only)
MQTT Connection (DMS Cloud
Only)
MDA command data used by DMS >
(DMS Cloud & Local)
http(80 )/ https
(443)
Page 49

Troubleshooting 49
URL/DNS Description Port
https://benq-dms-eu.s3.eucentral-1.amazonaws.com
apexd90h2t5wg-ats.iot.eucentral-1.amazonaws.com
AWS IoT ser v i c e f o r M Q T T
Connection => (DMS Cloud &
Local)
http(80 )/ https
(443)
(443/8883 port)
 Loading...