

Page 1

English
DE325
DVD Recorder
Quick Start Guide
Welcome
Page 2
English
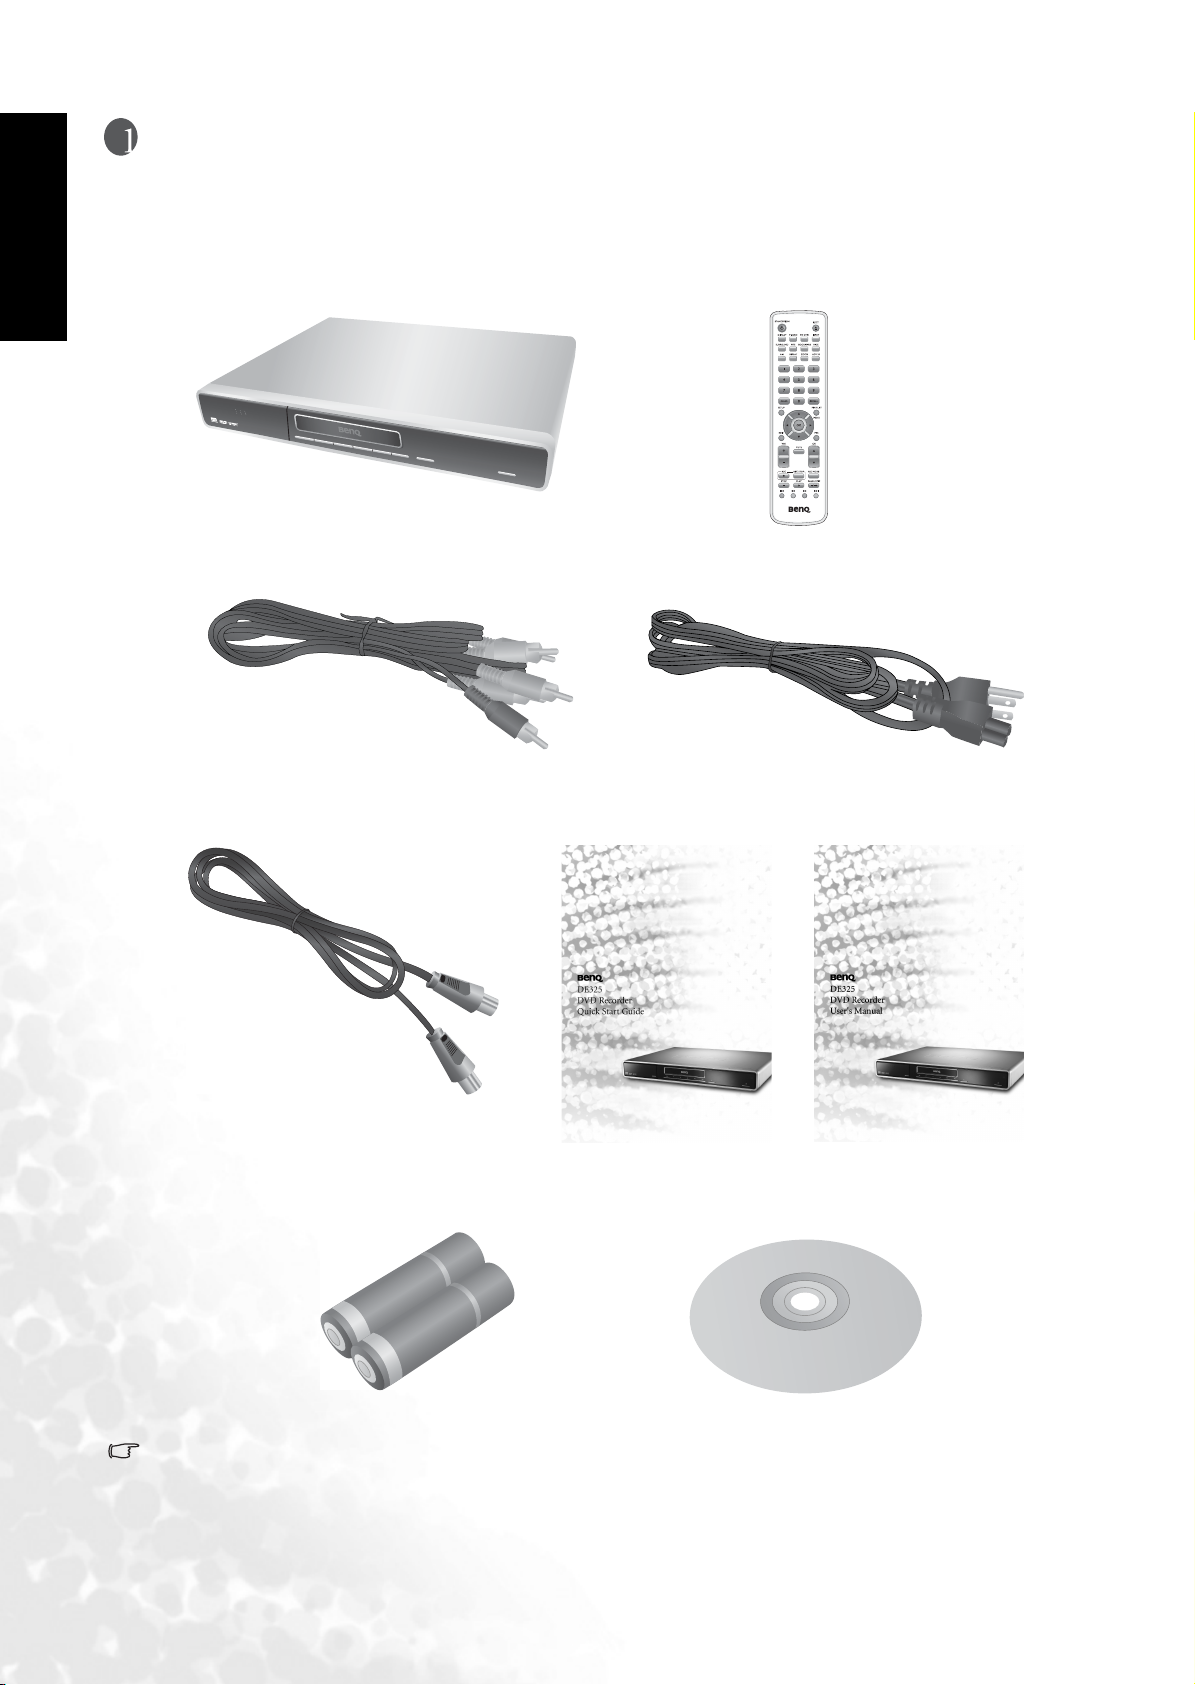
Package contents
Please check the contents of your DE325 sales package. Should any item be missing or damaged,
please contact your dealer immediately.
DE325 DVD Recorder x 1
Audio/Video (A/V) cable x 1 Power cord x 1
Antenna RF (fly-lead) cable x 1
Quick Start Guide x 1
Remote control x 1
User's Manual x 1
AA (UM3) batteries x 2
Different countries have different power cable types.
2 Package contents
DVD+RW disc x 1
Page 3

Select a suitable position for the DVD Recorder
• Place the DVD Recorder on a solid and flat surface or table.
• Leave at least 3cm clear space at all sides for ventilation.
• Leave at least 15cm clear space in front of the DVD Recorder to allow for disc tray operation.
• Do not place any objects on top of the DVD Recorder.
• Keep the DVD Recorder out of direct sunlight, rain, moisture and away from heat sources.
Connecting the DVD Recorder
Connecting to a display device (TV or projector)
The DVD Recorder needs to be connected to a display device so that you can view a DVD being
played, and so that you can use the DVD Recorder On-Screen Display (OSD) menus.
You can connect the DVD Recorder to a display device using one of these possible methods:
• Component video cable: (not provided)
See "Connecting the DVD Recorder to a TV using a component video cable" on page 4.
• S-Video cable: (not provided)
See "Connecting the DVD Recorder to a TV using an S-Video cable" on page 5.
• Audio/Video cable (composite video): (provided)
See "Connecting the DVD Recorder to a TV using an A/V cable" on page 6.
English
You need only connect the DVD Recorder to your display device using just one of the above
methods, as each provides a different level of video quality. The method you choose will most
likely depend upon the availability of terminals provided on the display device itself.
Please refer to the User's Manual for a full description of connection options and video quality.
Recording TV channels
The DVD Recorder also needs to be connected to the TV antenna cable so that it can record TV
signals onto DVD for you. The TV RF (fly-lead) cable allows you to select and view a TV channel
on the TV, even while the DVD Recorder is recording another channel, or is turned off. See
"Connecting the DVD Recorder to the TV antenna cable" on page 7.
Connecting to a sound system
You can connect the DVD Recorder to a digital or analog audio device (such as a sound system)
using an appropriate audio cable (not provided).
See "Connecting the DVD Recorder to your surround sound system" on page 8, or
see "Connecting the DVD Recorder to your stereo sound system" on page 10.
3 Select a suitable position for the DVD Recorder
Page 4
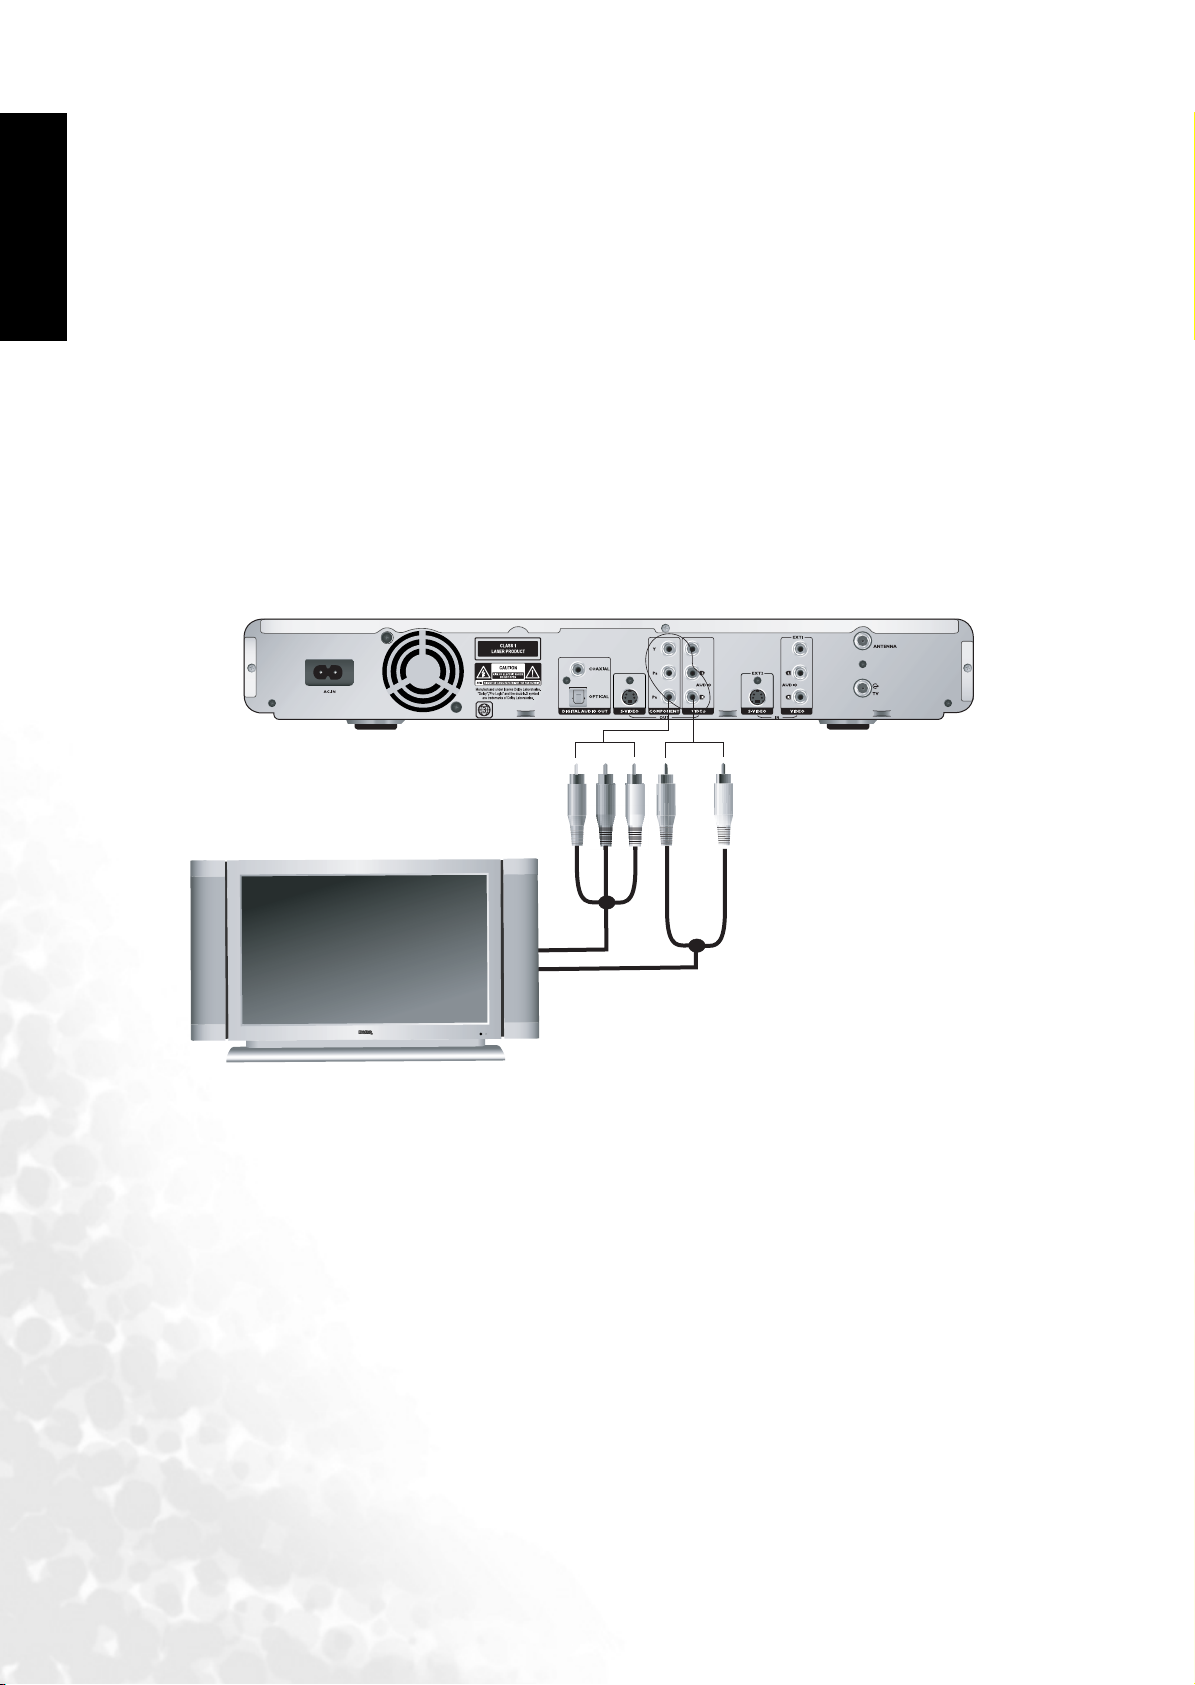
Connecting the DVD Recorder to a TV using a component video cable
English
Examine your TV to determine if it has unused component video sockets available:
- If so, you can continue with this procedure.
- If not, you will need to reassess which cables you can use to connect to the TV.
How to connect the DVD Recorder to a TV using a component video cable
1 Take a suitable component video cable (not provided) and connect one end to the OUT
terminals on the rear of the DVD Recorder labelled ’COMPONENT’.
2 Connect the other end of the component cable to the appropriate component video sockets on
the TV.
3 Take a suitable stereo audio cable (not provided) and connect one end to the OUT terminals
on the rear of the DVD Recorder labelled ’AUDIO’.
4 Connect the other end of the audio cable to the appropriate audio input sockets on the TV (or
sound system).
The final connection path should be like that shown in the following diagram:
Audio cable
Connect the audio cable to the audio
input terminals on the TV
Component video cable
Connect the component video
cable to the component video
input terminals on the TV
4 Connecting the DVD Recorder
Page 5
Connecting the DVD Recorder to a TV using an S-Video cable
Examine your TV to determine if it has an unused S-Video socket available:
- If so, you can continue with this procedure.
- If not, you will need to reassess which cables you can use to connect to the TV.
How to connect the DVD Recorder to a TV using an S-Video cable
1 Take an S-Video cable (not provided) and connect one end to the OUT terminal on the rear of
the DVD Recorder labelled ’S-VIDEO’.
2 Connect the other end of the S-Video cable to the appropriate S-Video socket on the TV.
3 Take a suitable stereo audio cable (not provided) and connect one end to the OUT terminals
on the rear of the DVD Recorder labelled ’AUDIO’.
4 Connect the other end of the audio cable to the appropriate audio input sockets on the TV (or
sound system).
The final connection path should be like that shown in the following diagram:
S-Video cable
Connect the S-Video cable to the S-Video
input terminal on the TV
Audio cable
Connect the audio cable
to the audio input
terminals on the TV
English
5 Connecting the DVD Recorder
Page 6
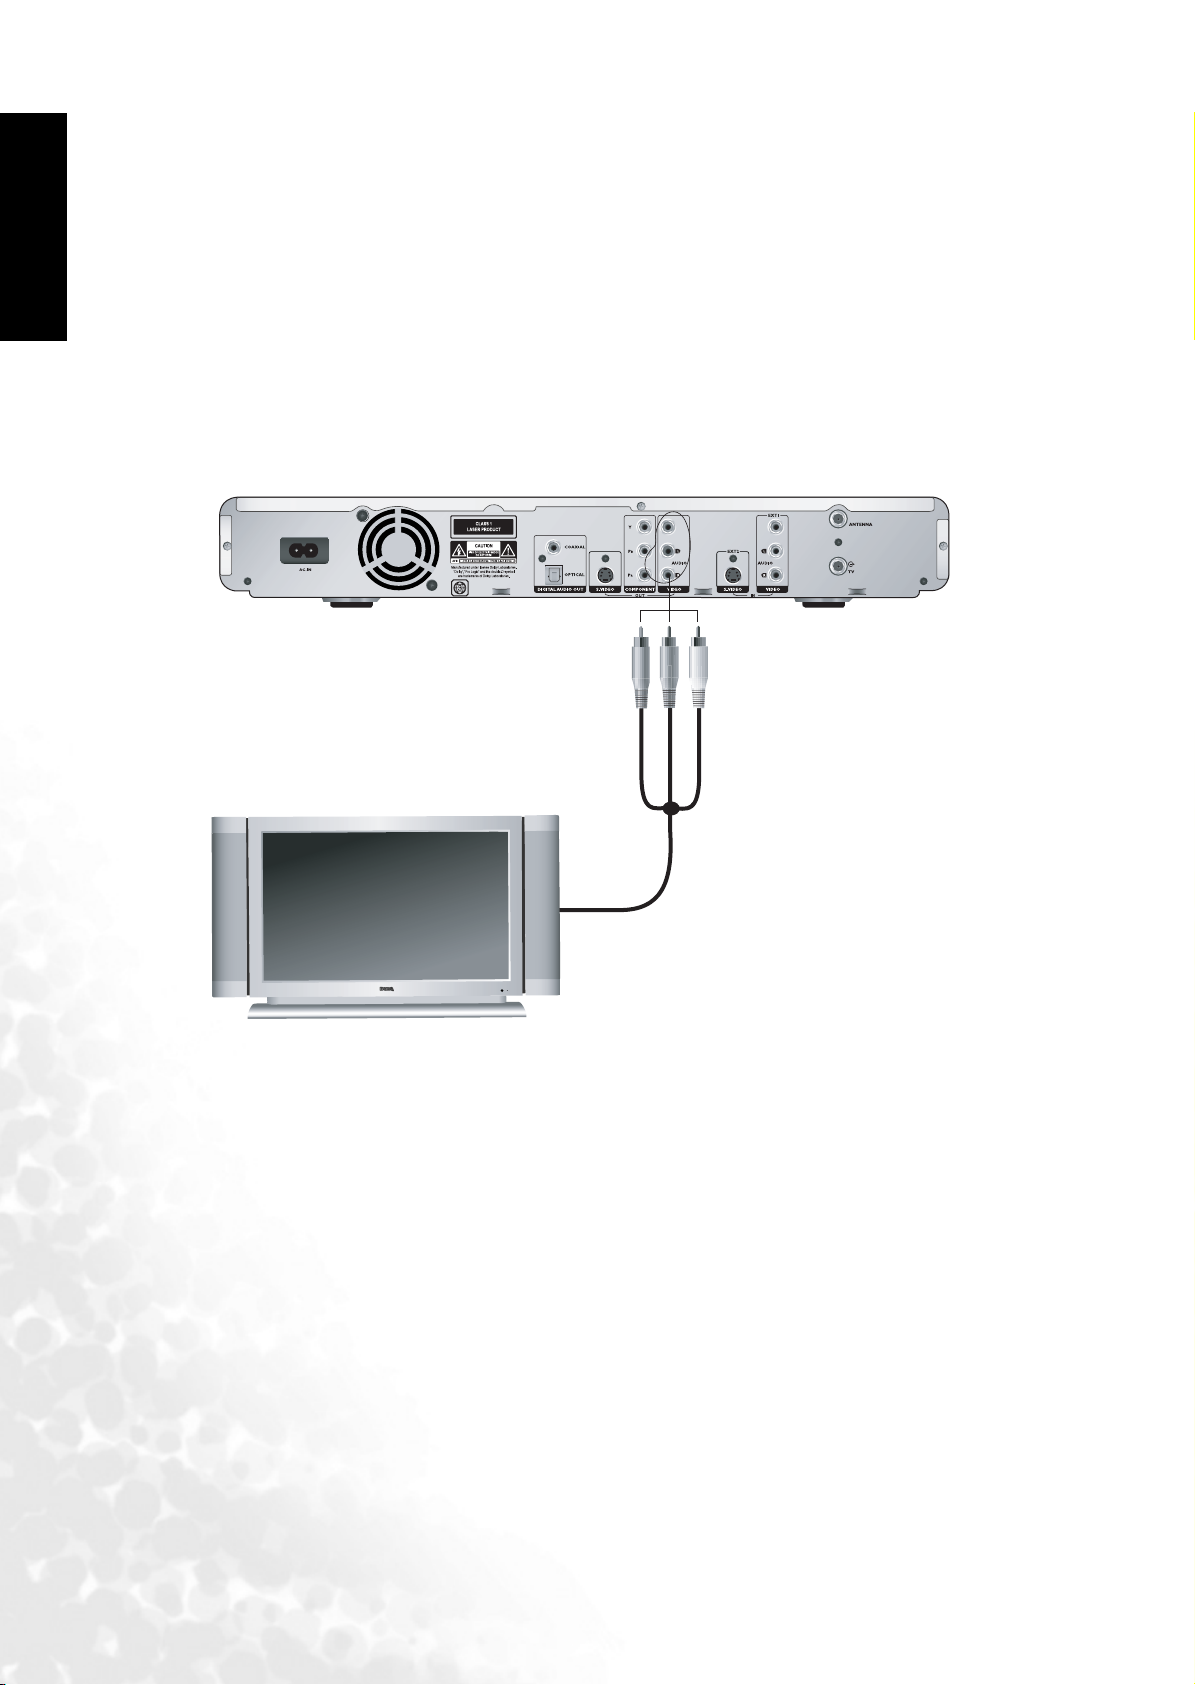
Connecting the DVD Recorder to a TV using an A/V cable
English
Examine your TV to determine if it has unused composite Video A/V sockets available:
- If so, you can continue with this procedure.
- If not, you will need to reassess how you can connect to the TV.
How to connect the DVD Recorder to a TV using the A/V cable
1 Take the provided A/V cable and connect one end to the OUT terminals on the rear of the
DVD Recorder labelled ’VIDEO’.
2 Connect the other end of the A/V cable to the appropriate composite Video A/V sockets on the
TV.
The final connection path should be like that shown in the following diagram:
A/V cable
Connect the A/V cable to the A/V
input terminals on the TV
6 Connecting the DVD Recorder
Page 7
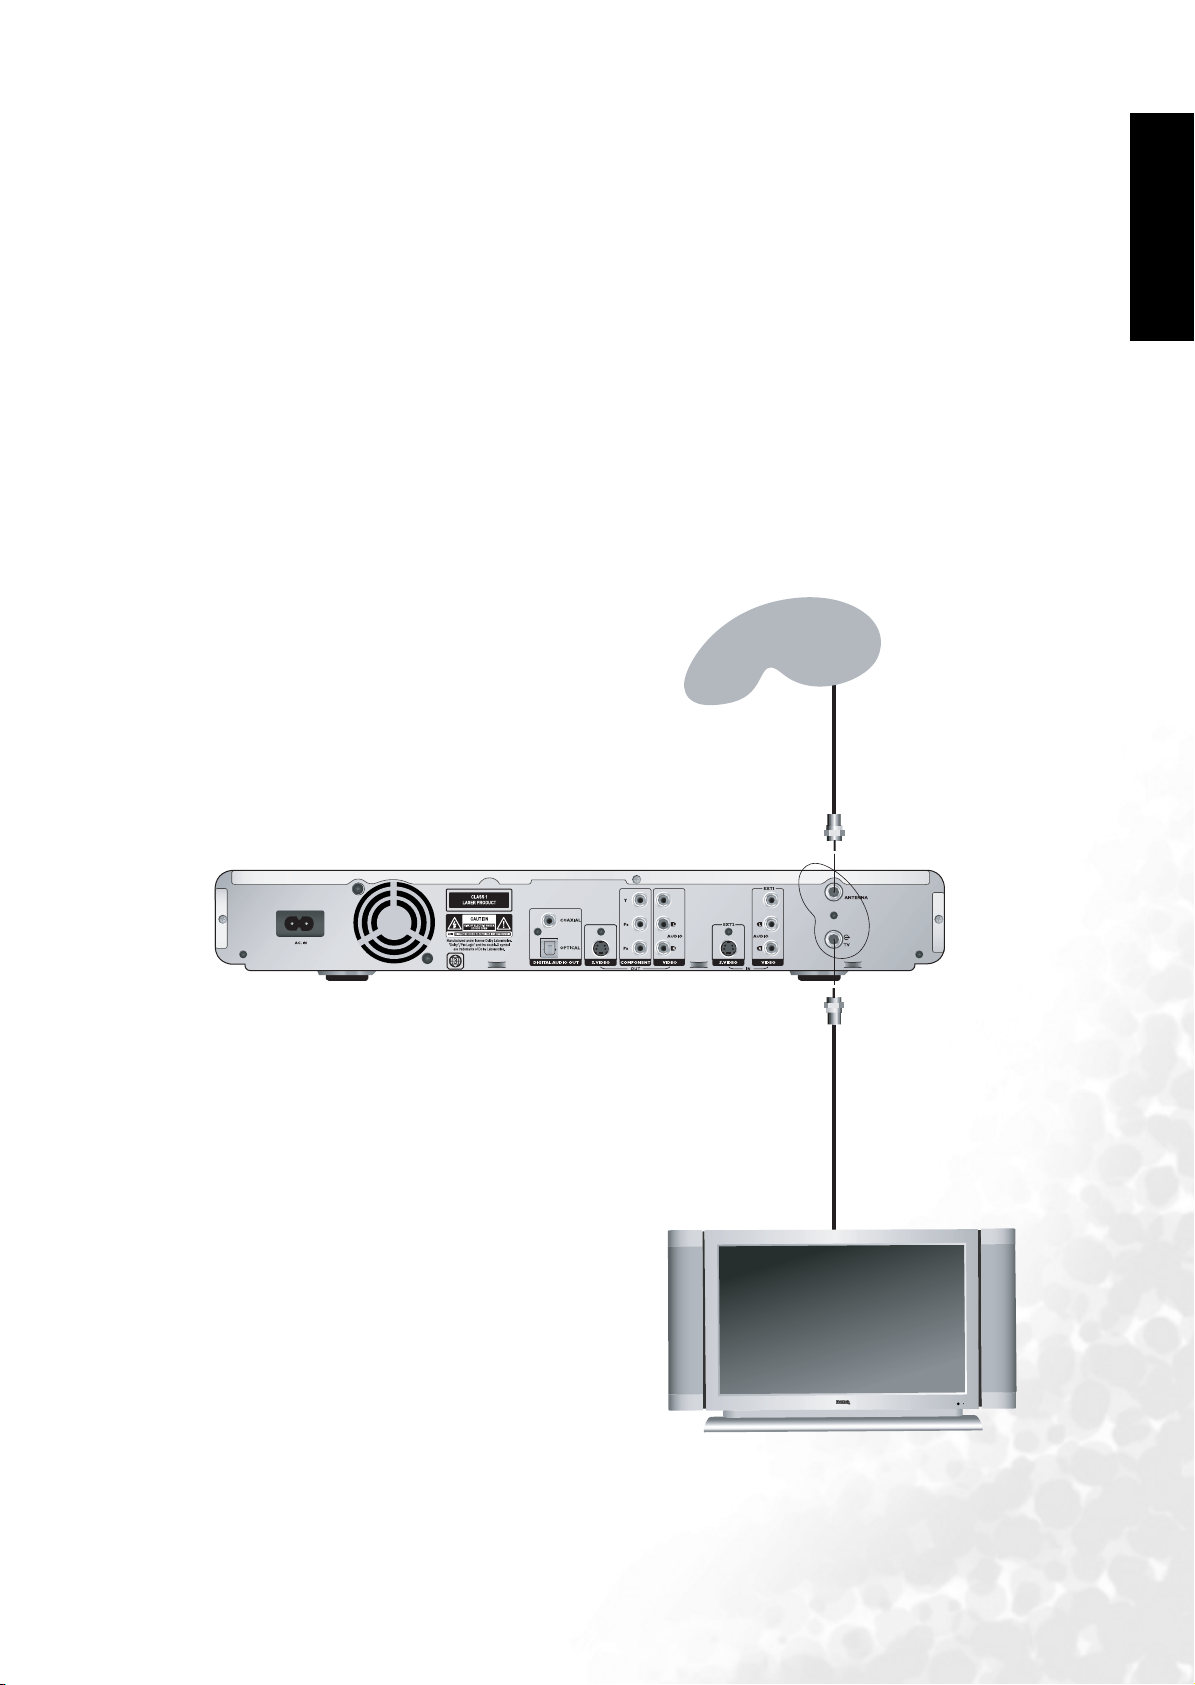
Connecting the DVD Recorder to the TV antenna cable
You should connect the DVD Recorder to the TV antenna cable between the antenna and the TV.
The DVD Recorder has an Antenna input socket and a TV output socket on the rear panel for this
purpose. This is a loop-through terminal, provided so that the DVD Recorder can record TV
signals onto DVD for you. This also allows you to select and view a TV channel on the TV, even
while the DVD Recorder is recording another channel, or is turned off.
How to connect the DVD Recorder to the TV antenna cable
1 Locate the TV antenna cable on the rear of the TV, and unplug it from the TV.
2 Plug this cable into the rear of the DVD Recorder in the socket labelled ’ANTENNA’.
3 Take the separate TV RF (fly-lead) cable (supplied), connect one end to the DVD Recorder in
the socket labelled ’TV’, and the other end into the appropriate socket on the rear of the TV
(where you removed the antenna cable from in step 1 above.
The final connection path should be like that shown in the following diagram:
Antenna
English
Antenna cable from antenna
TV RF (fly-lead) cable to TV
Connect the antenna fly-lead cable to the
antenna input terminal on the TV
7 Connecting the DVD Recorder
Page 8

Connecting the DVD Recorder to your surround sound system
English
You can connect the DVD Recorder to a digital audio multi-channel decoding device (such as an
amplifier or device equipped with MPEG2, Dolby Digital, DTS, or 2-channel PCM decoding
function) using the digital audio outlet. This requires a digital coaxial audio cable terminated with
an RCA connector (which is usually orange colored), or an optical digital TOSLINK type cable.
Digital audio will only be available when a DVD is being played which contains suitable digital
audio tracks.
How to connect to a digital audio decoding device using a coaxial digital cable
1 Take a suitable coaxial digital audio cable (not provided) and connect one end to the
COAXIAL terminal on the rear of the DVD Recorder labelled ’DIGITAL AUDIO OUT’.
2 Connect the other end of the digital coaxial audio cable to an appropriate audio input socket
on your surround sound system decoding device.
You will need to select this input on the sound system when playing DVDs.
The final connection path should be like that shown in the following diagram:
Digital coaxial audio cable
Connect the digital coaxial
audio cable to the digital audio
input socket on the digital
audio decoding device.
8 Connecting the DVD Recorder
Page 9

How to connect to a digital audio decoding device using a digital optical cable
1 Take a suitable optical digital audio cable (not provided) and connect one end to the OPTICAL
terminal on the rear of the DVD Recorder labelled ’DIGITAL AUDIO OUT’.
2 Connect the other end of the digital optical audio cable to an appropriate audio input socket
on your surround sound system decoding device.
You will need to select this input on the sound system when playing DVDs. The final connection
path should be like that shown in the following diagram:
Digital optical audio cable
Connect the digital optical
audio cable to the digital audio
input socket on the digital
audio decoding device.
English
9 Connecting the DVD Recorder
Page 10

Connecting the DVD Recorder to your stereo sound system
English
You can connect the DVD Recorder to an analog audio device (such as a stereo) using a stereo
audio cable.
How to connect to a stereo system using a stereo audio cable
1 Take a suitable stereo audio cable (not provided) and connect one end to the OUT terminals
on the rear of the DVD Recorder labelled ’AUDIO’.
2 Connect the other end of the audio cable to appropriate audio input sockets on the rear of your
stereo sound system.
You will need to select this input on the sound system when playing audio DVDs or CDs.
The final connection path should be like that shown in the following diagram:
Audio cable
Connect the audio cable to the
audio input terminals on the
analog audio device
10 Connecting the DVD Recorder
Page 11

Initializing the DVD Recorder
When you first connect power to the DVD Recorder, it will automatically display an initial setup
screen (virgin mode), and won't operate normally until it is setup. This startup behavior only ever
needs to take place once, as the DVD Recorder permanently remembers its settings once set. You
can use the system menus to alter these settings at any time in the future.
When in virgin mode, the DVD Recorder requires you to select the On-Screen Display (OSD)
language, set the built-in clock, and let it search for and store any TV channels it finds on the
antenna connection.
IMPORTANT
1 BEFORE you plug the power cord into the DVD Recorder or turn the power point on, you
should connect the display device (TV or projector) and turn that on so that you will be able to
view the OSD menu of the DVD Recorder when it first starts. See "Connecting the DVD
Recorder" on page 3.
2 If you intend to record TV programs onto DVDs using the DVD Recorder, you will also need
to connect the TV antenna cable to the DVD Recorder BEFORE proceeding any further. The
DVD Recorder initial startup will attempt to search for and store all TV channels it finds on the
antenna connection. You can sort and edit this list using the OSD ’Setup’ menu commands at
any later time that suits you. See "Connecting to a display device (TV or projector)" on page 3.
English
3 You will need to setup the remote control for use before you can make any initialization
selections. See "Remote control setup" on page 12.
4 See "Initial startup (virgin mode)" on page 14 for the initial setup instructions.
You can always manually readjust these initialization settings at any time in the future.
Manually resetting options
TV Channel Searching
If you wish to reset and re-search for TV channels, see ’Manually searching for TV channels’ in the
USer’s Manual.
Adding/deleting TV channels
If you wish to add/delete TV channels, see ’Adding/deleting TV channels’ in the User’s Manual.
Languages
If you wish to reset the language played and displayed, see ’Language settings’ in the User’s
Manual.
Date and Time
If you wish to manually readjust the clock, see ’Manual recording’ in the User’s Manual for details
11 Initializing the DVD Recorder
Page 12

English
Remote control setup
How to install the batteries in the remote control
1 Locate the two AA (UM3) batteries and the remote control unit.
2 Unpack the remote control and turn it over to expose its back side. Open the battery
compartment cover by sliding it as indicated in the following picture:
3 Unpack and install the batteries into the battery compartment, paying attention to the correct
alignment of polarities (+/-) as indicated in the battery compartment:
4 Refit the cover of the battery compartment by aligning the lugs and sliding it into position:
Tips for using the remote control
• Point the front end of the remote control directly towards the front panel of the DVD
Recorder, not the TV screen. If you can't see the front panel of the DVD Recorder, the remote
control will likely not work properly with it.
• Do not use the remote control when something (people, furniture, etc.) is blocking the direct
line-of-sight between the remote control and the front panel of the DVD Recorder. In cases like
this, either remove the obstruction or move the remote control to a clear line-of-sight position.
• For a full description of remote control functionality, see "The Remote Control" on page 19.
12 Initializing the DVD Recorder
Page 13

Connecting power
1 Locate the power cord from the package.
2 Connect the DVD Recorder to mains power using the power cord.
English
3 Press the power button on the front panel to turn on the DVD Recorder.
13 Initializing the DVD Recorder
Page 14

Initial startup (virgin mode)
English
This procedure is only required when the DVD Recorder is plugged in and powered up for the
first time ever. Before you proceed, you must have already connected the DVD Recorder to a
display device and turned that device on so that you can see the OSD ’Setup’ menu of the DVD
Recorder. You must also have connected the DVD Recorder to the TV antenna (if required), and
have assembled the remote control (i.e. fitted the batteries correctly). For details, see "Initializing
the DVD Recorder" on page 11, and "Remote control setup" on page 12.
1. The initial setup menu will display on-screen starting with
language setup. This is the language which will be displayed on
screen in the ’Setup’ menu by the DVD Recorder. The default is
’
English’.
If you wish to retain ’English’ as the OSD language, press the OK
button on the remote control.
Should you wish to change to another language, press the
or Up button on the remote control to select
Down
your desired language, then press the OK button to make
the selection.
2. You will then be asked to select a TV input source.
This step allows you to select the correct type of TV antenna
cable you have connected to the DVD Recorder.
If TV signal is connected to the DVD Recorder, press the
OK
button on the remote control. If CATV cable is connected
to the DVD Recorder, press the
Up or Down
button on the remote control to move the highlight bar to
CATV’ and then press the OK button to make the selection.
’
The DVD Recorder will automatically search for and store TV
or CATV Channel frequencies that it finds on the ’ANTENNA’
cable connection. Even if no antenna cable is connected, you
must proceed with this step so that the DVD Recorder can
complete initialization. You can always use the ’Setup’ menu to
search for TV channels at a later time.
If you wish to record TV programs onto DVDs using the DVD
Recorder, you should connect the antenna cable to the DVD
Recorder before continuing with the initialization process. See
"Connecting the DVD Recorder to the TV antenna cable" on
page 7 for details.
3. This may take several minutes because the DVD Recorder
searches all TV frequencies and tests for a station signal. The
progress is displayed on screen.
4. After the channels are scanned and stored, you will be asked to
perform time setup.
The time will be used by the DVD Recorder when it saves video files onto DVD, and for
determining timer functions. It is also displayed on the front panel when the DVD Recorder is in
standby mode after initialization.
14 Initializing the DVD Recorder
Page 15

How to set the Time
Set the Time automatically
If your local broadcasting system supports automatic time setup, you can let the DVD Recorder
set up current time automatically using the information broadcast from the system.
1. Select the ’Auto’ option by pressing the OK button on the remote control.
2. Press the numbered buttons on the remote control to enter the number of the channel that
transmits time information.
Tip:
Consult your local TV/CATV system service provider for more information about the channel that
transmits time information.
3. Press the Right button to highlight ’Start’ and then press the OK button.
Set the Time manually
Note:
The clock settings do not take effect until you select Save at the end of this procedure.
Press the Up or Down button on the remote control to move the highlight bar to
’Manual’ and then press the OK button. Now you are ready to set the Month.
English
How to set the Month
Press the numbered buttons to enter the month in 2 digit format, so enter a leading zero (0) for
the months 1 to 9.
Tip:
You can also use the Up
For example:
To enter the month of February, press ’0’ and ’2’.
or
Down
buttons to adjust the value.
How to set the Date
Press the Right button on the remote control to move the highlight bar to the ’D (Date)’ item,
and then press the numbered buttons to enter the date in 2 digit format, so enter a leading zero (0)
for the dates 1 to 9.
Tip:
You can also use the Up
For example:
To enter the date for the 9th of the month, press 0’ and ’9’.
To enter the date for the 25th of the month, press 2’ and ’5’.
or
Down
buttons to adjust the value.
How to set the Year
Press the Right button on the remote control to move the highlight bar to the ’Y (Year)’ item,
and then press the numbered buttons to enter the year in 2 digit format.
Tip:
You can also use the Up
or
Down
buttons to adjust the value.
15 Initializing the DVD Recorder
Page 16

English
For example:
To enter the year 2005, press ’0’ and ’5’.
How to set the Hour and Minute
Press the Right button on the remote control to move the highlight bar to the ’h (Hour)’ item,
and then press the numbered buttons to enter the hour in 24 hour format, so enter a leading zero
(0) for the hours 1 to 9.
Press the
Right button on the remote control to move the highlight bar to the ’m (Minute)’
item, and then press the numbered buttons to enter the minute, so enter a leading zero (0) for the
minutes 1 to 9.
Tip:
You can also use the Up
For example:
To enter the time 4:15, press ’0’, ’4’, ’1’ and ’5’.
To enter the time 12:34, press ’1’, ’2’, ’3’ and ’4’.
or
Down
buttons to adjust the value.
How to save the settings
Press the Right button to move the highlight bar to ’Save’ and then press the OK button
to store the time settings.
How to start using the DVD Recorder
To start using the DVD Recorder, either insert a DVD, or press the Input button to select a
suitable video input for viewing.
16 Initializing the DVD Recorder
Page 17

Manual recording
1. Place an unfinalized suitable DVD in the disc tray.
If a video source was being displayed, it will stop being displayed
while the DVD Recorder checks the newly inserted disc. The
message ’READING’ will show on the front display panel. When
read, the OSD (on screen display) will display, listing any previous
recordings on the disc.
Should any other messages display on-screen, the disc is unreadable,
unrecognized, unwritable, or is full. Refer to the ’Troubleshooting’
section in the User’s Manual for a possible solution.
English
2. Press the
Input button several times to select the video input
source you wish to record.
TUNER:
Selects the TV/CATV signal source connected to ANTENNA terminal on the
rear panel.
TUNER
If ’
button to select the channel you wish to record. You can also select a channel
directly by using the numeric keys (two digits: 01–99) on the remote control.
EXT1:
Selects the signal source from the device connected to the Composite input
terminals on the rear panel.
EXT2:
Selects the signal source from the device connected to the S-Video input
terminal on the rear panel.
Tips
Should you have multiple input devices connected using separate video
inputs (Composite Video or S-Video) you should switch on and use only the
video input source device you wish to have the DVD Recorder record onto
DVD, and turn off all other video input source devices not in use.
When both S-Video and Composite Video inputs are present, the DVD
Recorder will automatically select the S-Video input.
’ is selected as the input source, you can press the
Channel
CAM1:
Selects the signal source from the device connected to the Composite Video input terminals on the front
panel.
DV (CAM2):
Selects the signal source from the device connected to the DV input port on the front panel.
3. When you're ready to start recording, press either:
- the Record button on the remote control; or
- the button on the DVD Recorder.
The ’Record’ icon will display on-screen.
4. To stop recording, press the Record stop button on the remote control.
When you stop recording, the title is closed, and the file details are written to the medium.
The DVD Recorder creates the table of contents of the recording.
17 Manual recording
Page 18

English
Playing a recordable DVD
If a recordable DVD is protected against recording or has been finalized, the DVD Recorder will
play the disc automatically. If it doesn’t, you can manually start play. See below.
If a recordable DVD can be edited (it is either unprotected or not finalized), then the Picture
Index list will display. In that case, use the
Up or Down button on the remote
control to select the title you wish to play from the list.
How to start playing a DVD:
To start playing a stopped or paused disc, press either:
- the Play button on the remote control; or
- the Play button on the DVD Recorder.
The current title/chapter and playing time information will
display momentarily on screen.
How to stop playing a DVD:
To stop playing a disc, press either:
Stop button on the remote control; or
- the
- the Stop button on the DVD Recorder.
The current title/chapter and playing time information will
display on screen.
How to eject a disc:
To open the disc tray, press either:
Eject button on the remote control; or
- the
- the Eject button on the DVD Recorder.
Note:
To view disc information (title, chapter, play time) during playback,
press the
’Display’ menu, press the
Display
button on the remote control. To close the
Display
button again.
18 Playing a recordable DVD
Page 19

The Remote Control
Icon Button Description
English
Power on/
standby
Eject Press to open or close disc tray.
Display Press to display the current operation status.
P-SCAN When playing a DVD, press to switch DVD
DV control Press to toggle the DV control function on or
Input Press to switch between signal sources.
Surround Press to turn toggle surround sound effect on or
MTS Press to switch audio between Stereo, SAP,
Press to turn the DVD Recorder ON or OFF
(standby).
For example, when playing a DVD disc, press
this button to display current chapter, title and
time..., etc.
Recorder video output between progressive
scan and interlaced scan modes.
off.
off.
and Mono modes when viewing TV/CATV
programs.
~
Bookmark Press to insert a bookmark when viewing a
disc.
Hide Press to hide newly inserted chapter.
A-B repeat Press to access the A-B repeat function.
Repeat
mode
Zoom Press to zoom in on the video image.
30-second
advance
Numbered
buttons
Clear Press to clear settings in a menu.
Recall Press to toggle between the current and
Press to select a repeat mode.
Press to skip the media content 30 seconds
forward.
Use for numeric inputs.
previously viewed TV or CATV channels.
Setup Press to show/hide the ’Setup’ menu.
19 The Remote Control
Page 20

English
Icon Button Description
Play list/menu Press to show/hide the play list or menu screen.
Up Press to move the highlight bar upward in the
’Setup’ menu.
Down Press to move the highlight bar downward in the
’Setup’ menu.
Left Press to move the highlight bar to the left in the
’Setup’ menu.
Right Press to move the highlight bar to the right in the
’Setup’ menu.
OK Press to confirm a selected item in the ’Setup’
menu.
Edit Press to show/hide the ’Edit’ menu.
PBC Press to display the ’PBC’ disc menu of the VCD
that is being played.
Volume Press to increase or decrease audio volume.
Mute Press to turn off sound temporarily. Press again to
resume sound.
Channel Press to select the previous or next channel.
Record Press to start recording from the presently
selected input source.
Record stop Press to stop recording.
Record mode Press to select the recording mode. This affects
the video quality and possible recording length.
Stop Press to stop playing.
Play Press to start playing the disc or selected media
content.
20 The Remote Control
Pause/step Press to pause the currently playing content.
Press this button again to display the video image
frame by frame.
Page 21

Icon Button Description
Reverse Press to fast reverse the media content at different
rewind rates.
Forward Press to fast forward the media content at different
forward rates.
Previous Press to jump to the previous title/chapter while
playing a DVD.
Next Press to jump to the next title/chapter while playing a
DVD.
English
21 The Remote Control
Page 22

English
More information
For more details about how to use the DVD Recorder, please refer to the User's Manual.
22 More information
 Loading...