

Page 1

DC S40 Digital Camera
User’s Manual
Welcome
Page 2

Copyright
Copyright 2004 by BENQ Corporation. All rights reserved. No part of this publication may be reproduced, transmitted, transcribed, stored in a retrieval system or
translated into any language or computer language, in any form or by any means,
electronic, mechanical, magnetic, optical, chemical, manual or otherwise, without
the prior written permission of this company.
Disclaimer
BENQ Corporation makes no representations or warranties, either expressed or
implied, with respect to the contents hereof and specifically disclaims any warranties, merchantability or fitness for any particular purpose. Further, BENQ Corporation reserves the right to revise this publication and to make changes from time to
time in the contents hereof without obligation of this company to notify any person
of such revision or changes.
*Windows, Internet Explorer and Outlook Express are trademarks of Microsoft
Corporation. Others are copyrights of their respective companies or organizations.
Taking care of your camera
• Do not use your camera in the following environmental range: temperature below 0°C
or above 40°C.
• Do not use or store your camera in the environments listed below:
– Direct sunlight
– High humidity and dusty places
– Next to the air conditioner, electric heater or other heat sources
– In a closed car that is directly under the sun
– Unstable locations
• If your camera becomes wet, wipe it with dry cloth as soon as possible.
• Salt or seawater may cause severe camera damage.
• Do not use organic solvents, such as alcohol, etc., to clean your camera.
• If the lens or viewfinder is dirty, use a lens brush or soft cloth to clean the lens. Do not
touch the lens with your fingers.
• To prevent electrical shock, do not attempt to disassemble or repair your camera by
yourself.
• Water may cause a fire or electric shock. Therefore, store your camera in a dry place.
• Do not use your camera outdoors when it is raining or snowing.
• Do not use your camera in or near water.
• If a foreign substance or water gets in your camera, please turn the power off immediately and disconnect the batteries and the transformer. Remove the foreign substance or
water, and send it to the maintenance center.
• Transfer the data to the computer as soon as possible to avoid losing your image data.
Page 3

Table of Contents
BenQ DC 5330 Table of Contents
1. Touring your DC S40...........................................1
1.1 Checking the Package Contents ...........................1
1.2 DC S40 Components ........................................... 2
1.2.1 Front View .......................................................... 2
1.2.2 Rear View ............................................................ 2
1.2.3 Bottom View........................................................ 2
1.2.4 Button Functions.................................................. 3
1.2.5 Mode Dial ........................................................... 4
1.2.6 Viewfinder LED Indicator ......................................4
1.2.7 Rotating the LCD Panel .........................................4
2. Preparing Your DC S40 for Use........................ 5
2.1 Inserting the Battery.............................................. 5
2.2 Using an AC Power Adapter................................. 6
2.3 Charging the Battery ............................................. 6
2.4 Loading an SD Memory Card .............................. 7
2.5 Attaching the Strap................................................ 8
3. Using the DC S40 ..................................................9
3.1 Capture Mode ....................................................... 9
3.1.1 Composing Pictures ..............................................9
3.1.2 About the LCD Monitor Icons ................................ 9
3.1.3 Using the LCD Monitor in Manual Mode................. 10
3.1.4 LCD Monitor Display (Capture Mode) ....................10
3.1.5 Using the Optical Zoom................................................. 11
3.1.6 Using the Digital Zoom.................................................. 11
3.1.7 Using the Flash ............................................................... 12
3.1.8 Changing the Focus ........................................................ 13
English
Table of Contents
I
Page 4

Table of Contents
BenQ DC 5330 Table of Contents
3.1.9 Capture Mode Setup ...................................................... 14
English
3.1.9.1 Navigating in the Capture Setting Menus ...................14
3.1.9.2 Capture Mode ....................................................14
3.1.9.3 Resolution .........................................................15
3.1.9.4 Quality .............................................................15
3.1.9.5 Scene ...............................................................15
3.1.9.6 White Balance ....................................................16
3.1.9.7 Effect ...............................................................16
3.1.9.8 ISO ..................................................................17
3.1.9.9 Focusing ...........................................................17
3.1.9.10 Exposure Value ................................................. 18
3.1.9.11 Metering..........................................................19
3.1.9.12 Date Imprint..................................................... 19
3.2 Taking Videos........................................................ 20
3.2.1 Movie Mode ........................................................ 20
3.2.2 Movie Special Effect ..............................................21
3.3 Playing Back Images.............................................. 22
3.3.1 Playback Mode .....................................................22
3.3.2 Playing Back Movies.............................................. 23
3.3.3 Thumbnail Display ............................................... 24
3.3.4 Voice Memo Record .............................................24
3.3.5 Zoom Playback..................................................... 25
3.3.6 Erasing Images and Movies .................................... 25
3.3.7 Playback Mode Setup ............................................ 26
3.3.7.1 Erasing Files ...................................................... 26
3.3.8 Thumbnail Mode ................................................. 27
3.3.9 Protect Mode ...................................................... 27
3.3.10 SlideShow ......................................................... 28
3.3.11 Setting Startup Image ......................................... 28
3.4 Listening to Music................................................. 29
II
Table of Contents
Page 5

Table of Contents
BenQ DC 5330 Table of Contents
3.4.1 Transferring MP3 files to the Camera ...................... 29
3.4.2 Playing MP3 Files ................................................. 30
3.4.3 Playing FM Radio Files ..........................................30
3.5 SET-UP MODE ..................................................... 31
3.5.1 Memory ............................................................. 31
3.5.2 Number Reset .................................................... 32
3.5.3 Date/Time .......................................................... 32
3.5.4 Date Format ......................................................33
3.5.5 LCD Brightness ...................................................33
3.5.6 Beep .................................................................. 34
3.5.7 Startup Image .....................................................34
3.5.8 AV Out Format ................................................... 35
3.5.9 Power Saving ...................................................... 35
3.5.10 Language ......................................................... 36
3.5.11 Reset ............................................................... 36
3.5.12 SW Version ...................................................... 37
4. PC Dependent Features....................................... 38
4.1 Installing the Digital Camera Software ................ 38
4.2 Bundled Software .................................................. 39
4.3 Transferring Files with your PC ........................... 40
4.3.1 Transferring Images, Movies, and MP3 Files ............ 40
4.4 Viewing Images on TV.......................................... 41
5. Troubleshooting ....................................................42
5.1 Error Message Table.............................................. 42
6. Specifications .......................................................... 43
7. Service information ..............................................45
English
Table of Contents
III
Page 6

Table of Contents
BenQ DC 5330 Table of Contents
[Memo]
English
IV
Table of Contents
Page 7

BenQ DC 5530 User’s Manual
S40 Dig
tal C
mer
Us
M
BenQ
1 TOURING YOUR DC S40
1.1 Checking the Package Contents
The package includes the following items:
S40 Dig
DC
er’s M
1
2
3
4
5
6
1. User's manual
2. DC S40 digital camera
3. AV cable
4. USB cable
5. Lithium-ion battery (rechargeable)
6. Hand strap
7. DC S40 software CD-ROM
8. AC power adapter
9. Earphones
Us
We lc om e
English
7
a
amer
ital C
anual
8
9
If anything is missing or appears damaged, contact your dealer. Save the packaging in the
event you need to ship your camera for service.
Touring your DC S40
1
Page 8

BenQ DC 5530 User’s Manual
English
1.2 DC S40 Components
1.2.1 Front View
1. Speaker
2. Shutter button
3. Built-in flash
4. Optical viewfinder
5. Lens/lens cover
6. Self-timer/AF assist lamp
7. Microphone
8. Earphone and A/V OUT terminal
9. USB port
10. DC IN 5V terminal
1.2.2 Rear View
1. Shutter button
2. Flash/right navigation button
3. Zoom/volume adjust/menu
up & down navigation button
4. Macro/left navigation button
5. Viewfinder LED
6. Viewfinder
7. LCD panel
8. Quick View/delete button
9. Menu/cancel
10. LCD/SET
11. Mode dial
12. Strap attachment
1.2.3 Bottom View
1. Tripod socket
2. Battery cover open detector
Note: Do not touch this detector.
3. Lithium ion battery compartment
4. SD memory card slot
1
2
3
4
5
6
6
M
7
8
9
A
O-VIEW/DEL
MENU-C
LCD/SET
10 11 1212
7
8
9
10
12345
1 2 3 4
Notes
•
The LCD on the digital camera is manufactured with sophisticated technology.
However, the display may have some light spots or show unusual colors. This is
normal and does not indicate display malfunction, and will not affect the pictures
you take with the camera.
• The AF assist lamp is used to illuminate the focus subject in low light situations
where other camera’s autofocus will likely have failed.
2
Touring your DC S40
Page 9

BenQ DC 5530 User’s Manual
1.2.4 Button Functions
1. Macro
• Recording/Video Mode – press this button
to enable Macro mode.
• Playback Mode – press to select previous
file.
• Menu Mode – press to move left in the
menus.
• MP3 Mode – press to skip to the previous
track.
• FM Radio Mode – press to scan for a
previous channel.
2. Zoom
• Recording/Playback/Video Mode – press
up to zoom in; press down to zoom out.
• MP3/FM Radio Mode – press up to
increase the volume; press down to decrease
it.
• Thumbnail Mode – press up or down to navigate thumbnail images.
• Menu Mode – press up or down to change values.
3. Flash
• Manual Record Mode – press button to cycle through Flash modes.
• Playback Mode – press to select next file.
• MP3 Mode – press to skip to the next track.
• FM Radio Mode – press to scan for the next channel.
• Menu Mode – press to move right in the menus.
4. Mode Dial (refer to next page)
5. Q-View/Delete
• Recording Mode – press to view the last image that was taken.
• Playback Mode – press to delete current image or movie.
• MP3 Mode – press for less than two seconds to switch between playback modes
(repeat all, repeat one, standard play). Press for more than two seconds to lock
camera buttons; only the power button functions in this mode.
• FM Mode – press for two seconds to lock buttons; only the power button functions in
this mode. Press for less than two seconds to switch the audio output between the
earphone and speaker.
6. Menu/Cancel
• Recording/Playback/Video Modes – opens the menus.
• Menu Mode – cancels an operation or exits menu mode.
7. LCD/SET
• Recording/Video Mode – press to switch between display modes: OSD (on-screendisplay) full display, OSD display OFF, and LCD OFF.
• Playback Mode – press to switch between playback modes: standard image, image
only, and thumbnail mode.
•Menu Mode – press to confirm action.
• MP3 Mode – press to toggle between play and pause modes.
• FM Radio Mode – press for less than two seconds to switch FM radio stations. Press
for more than two seconds to save the current station to a channel; select the channel
to tune to the station.
Q-VIEW/DEL
MENU/C
LCD/SET
1
2
3
4
5
6
7
English
Touring your DC S40
3
Page 10

BenQ DC 5530 User’s Manual
1.2.5 Mode Dial
English
1. Manual Mode
2. Auto mode
3. Playback mode
1
2
3
4
4. Movie mode
5. Audio Mode
5
1.2.6 Viewfinder LED Indicator
Green Orange
1. Power on detected
2. Ready to use or AF action
ON
Blinking (slow)
Blinking (fast) Accessing mass storage Flash is charging
completed
3. USB connection
(non accessing)
Processing
1.2.7 Rotating the LCD Panel
The LCD panel can be rotated 180 degrees as shown,
enabling you to take pictures of yourself.
Battery charging in progress
1. Warning message
2. Power low
4
Touring your DC S40
Page 11

BenQ DC 5530 User’s Manual
2 PREPARING YOUR DC S40 FOR USE
The Lithium Ion battery enables you to capture images and video clips, and listen to music or
FM radio on the go. Use the AC adapter whenever possible to conserve battery power.
2.1 Inserting the Battery
1. Turn the camera off.
2. Slide the battery cover in the direction of the
arrow (A) and open the battery cover (B).
3. Push the battery latch in the direction of the
arrow (C) and insert the battery in the correct orientation as shown (D) with the
notches facing up.
4. Close the battery/SD Memory Card cover (E).
To remove the battery: Open the battery cover and
then push the battery latch. The battery pops out
slightly; pull the battery out.
Notches
Battery latch lever
M
A
Q
-VIEW/DEL
MEN
U-C
L
C
D
/S
E
T
B
O
V
I
E
W
MENU/C
L
C
D
/
S
E
T
Q
-V
IE
M
EN
U-C
L
C
D
/S
E
T
O
V
I
E
W
MENU/C
L
C
D
/S
E
T
English
A
D
E
L
A
M
A
W
/D
E
L
A
D
E
L
D
C
Notes
Use only the specified battery type (Lithium Ion).
•
• If you are not going to use the battery for an extended period of time, remove it
from the camera to prevent leakage or corrosion.
• Avoid using battery in extremely cold environments as low temperatures can
shorten the battery life and reduce camera performance.
Preparing Your DC S40 for Use
E
5
Page 12

BenQ DC 5530 User’s Manual
English
2.2 Using an AC Power Adapter
1. Make sure the camera power is off.
2. Connect one end of the AC power adapter to the
DC IN 5V terminal (A).
3. Connect the other end of the AC power adapter to
a power outlet (B).
B
A
Use only the AC power adapter specified for the camera. Damage caused by the use of
•
an incorrect adapter is not covered under the warranty.
• Use an AC power adapter while transferring images to your computer in order to pre-
vent data loss from unexpected automatic power off of the camera.
Notes
2.3 Charging the Battery
1. Insert the battery as described in 2.1“Inserting the Battery” on page 5.
2. Connect the AC power adapter as described in the previous section, or connect the USB
cable to your camera and a USB enabled device such as a notebook or PC.
The following describes the LED indicators:
• Orange LED: charging starts
• LED Off: charging is complete
Notes
Use only the AC power adapter specified for the camera. Damage caused by the
•
use of an incorrect adapter is not covered under the warranty.
• When using the USB cable to charge the camera, turn the camera off for better
charging performance.
• Avoid exposing the camera to hot temperatures. Use it at room temperature for
best results.
6
Preparing Your DC S40 for Use
Page 13
BenQ DC 5530 User’s Manual
LOCK
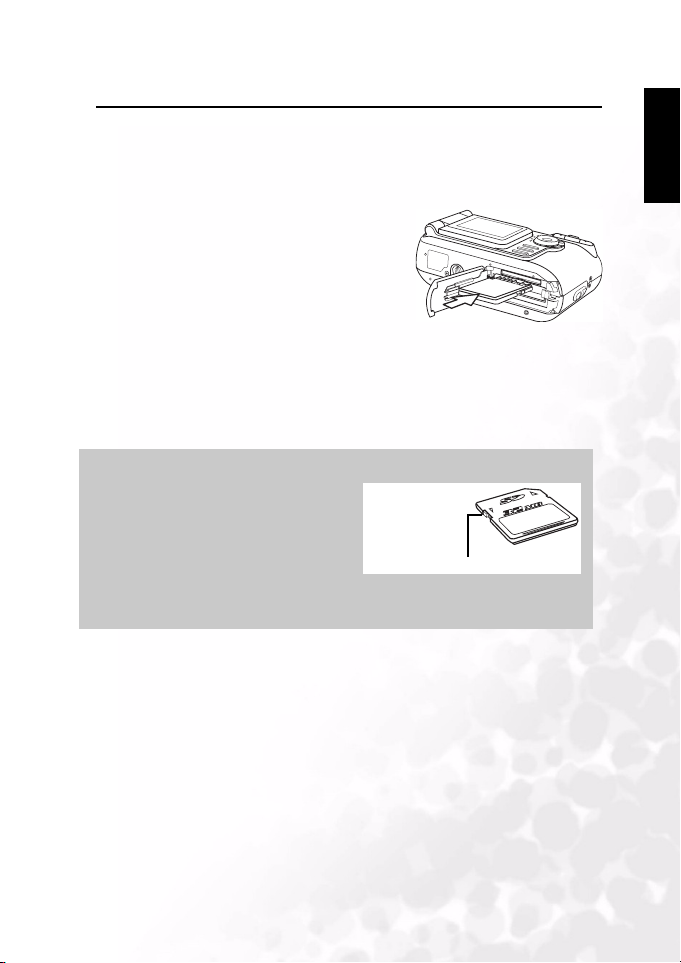
2.4 Loading an SD Memory Card
All images and video clips taken by the camera can be stored in an SD (Secure Digital)
Memory Card as well as the camera’s internal memory. Even if the camera’s power is OFF, the
images saved in the SD Memory Card are not erased.
1. Make sure the camera is off.
2. Slide the battery/SD Memory Card cover in the
direction of the arrow on the cover.
3. Insert an SD Memory Card:
• The front side of the memory card (printed
arrow) should face towards the front side of
the camera.
• If the card cannot be inserted, check the ori-
entation.
4. Close the battery/SD Memory Card cover.
To remove the SD Memory Card, make sure the camera is off. Open the battery/SD Memory
Card card cover. Press lightly on the edge of the memory card and it will eject.
Notes
To prevent valuable data from being
•
accidentally erased from an SD Memory
Card, slide the write-protect tab (on the
side of the SD Memory Card) to
"LOCK ".
Press the tab in the
direction of the arrow
on the card to write
protect the SD Memory
Card.
Write-protect tab
• To save, edit, or erase data on an SD
Memory Card, you must unlock the card.
• Format your SD Memory Card before use. Refer to 3.5.1“Memory” on page 31.
M
A
Q
V
I
E
W
/
D
E
L
M
E
N
U
-C
L
C
D
/
S
E
T
English
Preparing Your DC S40 for Use
7
Page 14

BenQ DC 5530 User’s Manual
English
2.5 Attaching the Strap
To prevent accidentally dropping the
camera when using your camera, always
use the strap.
1. Thread the small loop of the hand
strap through the strap eyelet on the
camera (A).
2. Pull the large loop through the small
loop until the strap is firmly secured (
A
B
).
B
8
Preparing Your DC S40 for Use
Page 15

BenQ DC 5530 User’s Manual
3 USING THE DC S40
This chapter describes the camera operating modes, and explains how to take pictures, make
movies, and listen to audio such as MP3 files or FM radio.
3.1 Capture Mode
Auto capture mode enables you to take pictures and allow the camera to set camera functions
such as the white balance and focus automatically. Manual mode enables you to make more
precise settings to accommodate different shooting conditions.
3.1.1 Composing Pictures
Your camera provides three capture mode options: single image capturing, continuous image
capturing, and self-timer capturing. It is equipped with both an optical viewfinder and a 1.5inch full color LTPS LCD monitor to compose images. Taking images using the optical
viewfinder conserves battery power. Using the LCD monitor helps you accurately compose
pictures and examine all details. However, the LCD consumes more battery power.
1. Turn the camera on by pressing the POWER button.
2. Set the mode dial to Auto or Manual mode .
3. Compose your shot in the viewfinder.
4. Press the shutter button down halfway to enable the autofocus
to get a clear image, and then press it down fully to capture the
image.
3.1.2 About the LCD Monitor Icons
The following icons are displayed in the LCD screen when Auto mode is selected.
Flash status
Self-timer
Scene
Effect
Picture size
Remaining number of
shots
English
Battery condition
Focus area
Using the DC S40
Zoom state
9
Page 16

BenQ DC 5530 User’s Manual
O
English
3.1.3 Using the LCD Monitor in Manual Mode
The following additional icons are displayed in the LCD screen when Manual
mode is selected.
ISO
Meterin gWhite balance
Macro mode
Exposure value
3.1.4 LCD Monitor Display (Capture Mode)
Press the LCD/SET button to
select the display format. In
"Still Image" or "Movie"
mode, preview image with full
OSD is displayed.
Q-VIEW/DEL
MENU/C
LCD/SET
The following illustration shows the LCD monitor display sequence.
OSD (on-screen-display) full display OSD display OFF LCD OFF monitor
LCD/SET button
Notes
The image in the LCD monitor darkens in strong sunlight or bright light. This is not a
•
malfunction.
• Using the LCD monitor for an extended period of time uses battery power and there-
fore decreases the number of images you can take. To conserve battery power, it is recommended to turn the LCD monitor off and use the viewfinder instead.
10
Using the DC S40
Page 17

BenQ DC 5530 User’s Manual
3.1.5 Using the Optical Zoom
The lens moves during zoom photography. Zoom photography allows you to take telephoto
and wide-angle shots. The subject appears closer by pressing the button and appears
farther away by pressing the button.
1. Set the mode dial to Manual mode , Auto
mode , or Movie mode .
2. Power on the camera.
3. Compose the picture in the LCD screen by
pressing zoom in or zoom out.
Zoom button
• Pressing the zoom button up zooms in on
the subject, and enlarges the subject in the
LCD monitor.
• Pressing the zoom button down provides a
wider angle picture.The lens position moves
according to the zoom button setting.
4. Press the shutter button down halfway to enable the autofocus to get a clear image, and
then press it down fully to capture the image.
3.1.6 Using the Digital Zoom
By using the digital zoom, images can be enlarged so that the subject appears closer. However,
the more the image is enlarged, the grainer the image will become. The digital zoom function
is only available when you set the LCD monitor and the digital zoom to ON. To capture a
digitally zoomed image, perform the following steps:
1. Set the mode dial to Manual mode , Auto
mode , or Movie mode .
2. Power on the camera.
3. Compose the picture in the LCD screen.
4. Press the zoom button up to zoom in on
the subject. When maximum optical zoom is
reached, continue pressing the zoom in
button to activate the digital zoom. The zoom
bar indicates the current digital zoom level.
Digital Zoom
Optical Zoom
English
Notes
• The camera has a 1.0X to 3.0X optical zoom and 1.0X to 4.0X digital zoom func-
tion.
• The digital zoom function is unavailable when you turn the LCD off.
Using the DC S40
11
Page 18

BenQ DC 5530 User’s Manual
English
3.1.7 Using the Flash
The flash is designed to function automatically when lighting conditions warrant the use of
flash. You can take an image using a suitable Flash mode to your circumstances. If you change
the Flash mode, the camera will retain that setting even if the camera is turned off.
1. Set the mode dial to Manual mode or Auto mode .
2. Power on the camera.
3. Press the button repeatedly to toggle the Flash modes. Available Flash modes are
displayed in the following order:
Auto Red-Eye Reduction
Flash off Forced Flash
4. Press the shutter button down halfway to enable the autofocus to get a clear image, and
then press it down fully to capture the image.
Note
After the flash fires, it takes approximately 5 to 10 seconds to be ready for the next
shot.
The camera has four Flash modes: Auto, Red-Eye Reduction, Forced Flash, and Flash Off.
The table below helps you to choose the appropriate Flash mode:
Icon Flash Mode Description
Auto Flash The flash fires automatically according to the ambient lighting conditions.
The flash fires automatically according to the ambient lighting conditions.
Red-Eye
Reduction
Forced Flash
Flash Off
Select this mode for general photography. The flash emits a precursor-flash
before the main flash fires. This causes the pupil in the human eyes to
contract, reducing the red-eye phenomenon. Select this mode when taking
images of people and animals in low-light conditions.
The flash fires regardless of the surrounding brightness. Select this mode to
record images with high cont rast (back lighting) and deep shadows.
The flash does not fire.Select this mode when taking images in a place where
flash photography is prohibited, or when the distance to the subject is beyond
the effective range of the flash.
Note
•
In Portrait mode, the flash setting is fixed to Red-Eye Reduction mode automatically.
• In Sports mode, the flash setting is fixed to .
• In Night scene mode, the flash setting is fixed to .
12
Using the DC S40
Page 19

BenQ DC 5530 User’s Manual
3.1.8 Changing the Focus
1. Set the mode dial to Manual mode or
Auto mode .
2. Power on the camera.
3. Press the macro button .
When Macro mode is enabled, the icon
is displayed on the LCD monitor.
[No Icon]: Normal Auto Focus
(50 cm to infinity). Use for far away
subjects and landscapes.
Macro Auto Focus (15 cm to 50
cm). This preset optimizes the camera
for taking close up shots of objects at a
distance of around 15 cm from the
camera. Close-up photos taken with
the Macro preset have betters results
than close up photos taken under other
presets.
Macro
icon
Macro button
Notes
When shooting a close-up in Macro mode, use the LCD monitor to compose your
•
shot, avoiding the off-center parallax phenomenon.
• There is not a distinct point (subject range) at which Normal mode is favored over
Macro mode; take an image in both optical modes and compare the results to decide
which mode is optimal in any given situation.
• After a Macro shot is taken DO NOT FORGET to reset the lens to the normal posi-
tion.
English
Using the DC S40
13
Page 20

BenQ DC 5530 User’s Manual
s
English
3.1.9 Capture Mode Setup
This menu is for setting the basic setting to be used for photography in Manual and
Auto capture modes. The Manual and Auto mode icons denote whether the setting is
available for that mode or not.
3.1.9.1 Navigating in the Capture Setting Menus
1. Set the mode dial to one of the
available modes.
2. Press the MENU/C button.
menu screen is displayed.
3. Press the zoom in and zoom out
but tons to go u p and d own i n the
menus.
4. Press the macro and flash buttons
to select and set the mode setting.
5. Press the zoom in or zoom out
buttons to select another mode.
Press the macro and flash buttons to select and set the mode setting as before.
6. Press MENU/C to exit the menus.
The
X Indicates currently selected mode item
Setup ModeCapture Mode
Setting Option
Current Setting
Note
When you select a setting for a mode, it is set—you don’t need to perform any other action.
3.1.9.2 Capture Mode
Sets the capture mode at which the image is to be recorded.
1
Single: 1 shot mode (default)
Continuous: In this mode, photographs
are taken continuously at a maximum speed of 0.5
second speed interval. The maximum number of
photographs that can be taken continuously is 2
photographs. If continuous mode is set, resolution
of 6M is disabled.
Self-timer: enables you to set the timer to
take a shot. When this mode is enabled, the picture
will be taken 10 seconds after the shutter button is pressed.
Notes
•
Use self-timer mode when you want to be included in the shot.
• Use a tripod for best results.
14
Using the DC S40
Page 21

BenQ DC 5530 User’s Manual
3.1.9.3 Resolution
Set the desired image size.
2848 x 2160 pixels (interpolated)
2304 x 1728 pixels (default)
1600 x 1200 pixels
1280 x 960 pixels
Notes
Larger image sizes use more memory.
•
• 6M (2848 x 2160) cannot be used with continuous mode or digital zoom.
3.1.9.4 Quality
Set the quality (compression ratio) sharpness at
which the image is to be recorded.
Fine: 1/8 compression (still image) (default)
Economy: 1/16 compression (still image)
3.1.9.5 Scene
Enables you to load preset settings for different
shooting conditions.
A
Auto: Select this mode to enable the camera
to make automatic adjustments. (default)
English
Portrait: Select this mode to make people
stand out with the background out-of-focus. Flash
setting is fixed to red-eye reduction mode
automatically.
Landscape: Select this mode when taking
pictures of landscape subjects. Flash photography is not possible.
Night Scene: Select this mode to take photographs at night. Flash setting is fixed to
Flash Off at a slower shutter speed.
Using the DC S40
15
Page 22

BenQ DC 5530 User’s Manual
Effect
English
Sport: Select this mode to take photographs of fast-moving subjects.
Back Light: Select this mode when the subject has a strong light source behind it.
3.1.9.6 White Balance
The camera determines the white balance by
averaging the various kinds of light that actually
enters the lens. You may set in advance the white
balance when taking photographs under specific
lighting conditions.
A
Auto: Auto white balance (default).
Automatically adjusts the white balance.
Daylight: Adjusts the white balance for bright
daylight conditions.
Cloudy: Adjusts the white balance for cloudy, twilight, or shady conditions.
Tungsten: Adjusts the white balance for subjects illuminated by tungsten light.
Fluorescent: Adjusts the white balance for subjects illuminated by fluorescent light.
3.1.9.7 Effect
Enables you to apply a tone or color to your images
to create an artistic effect.
RGB: Photographs using standard settings.
(default)
Effect
A
B&W: Pictures include no colors except black,
white and shades of gray. This is another easy way to
add distinctiveness to your pictures.
Sepia:
tone use sepia toning. The shadows remain black while the mid-tones of the image are adjusted
towards brown and orange colors. This produces warm, old-fashioned artistic style photographs.
16
Photographs to create a warmer print
Vivid: Photographs to bring out sharper and more vibrant colors.
Using the DC S40
Page 23

BenQ DC 5530 User’s Manual
ISO
00
00
A
Focusing
3.1.9.8 ISO
Set the photographic sensitivity at which the image
is to be recorded.
ISO
A
Auto: Automatically set between ISO 100 to
ISO 200. (default)
1
00
100: Equivalent to color ISO100. Use for
outdoor photography in bright sunlight.
200
200: High-sensitive photography equivalent
to color ISO200. Use for outdoor photography or brightly lit indoor photography.
3.1.9.9 Focusing
Enables you to change the focus. Select the region of
the subject seen in the LCD display that the digital
camera focuses on by setting the Auto focus window
position.
Central: In central auto focus window mode,
the camera focuses on the center region of the
framed shot. (default)
5 Area: In this mode, the camera displays five
focus points. To use this mode, press the shutter
button halfway. The five focus areas appear as
shown. The green square indicates the
recommended focus.
Focusing
A
English
Using the DC S40
17
Page 24

BenQ DC 5530 User’s Manual
Exposure
English
3.1.9.10 Exposure Value
This setting allows you to intentionally lighten or
darken the entire image. Use this setting when the
optimum brightness (exposure) cannot be obtained,
for example, when the brightness between the
subject and the background is not balanced or when
the subject to photograph occupies only an
extremely small part of the screen.
EV BIAS: Press the macro and flash
buttons to adjust the EV from -2.0 to +2.0.
Effective Subjects and Set Values
Positive (+) Compensation
Exposure
A
• Copying of printed text (black characters on white paper)
• Backlit portraits
• Very bright scenes (such as snowfields) and highly reflective subjects
• Shots made up predominantly of sky
Negative (-) Compensation
• Spotlit subjects, particularly against dark backgrounds
• Copying of printed text (white characters on black paper)
• Scenes with low reflectivity, such as shots of green or dark foliage
Notes
• In “Exposure compensation”, the default value is “0.0EV”. The setting range is as fol-
lows:
-2.0 / -1.6 / -1.3 / -1.0 /- 0.6 / -0.3 / 0 (default) / +0.3 / +0.6/ +1.0 / +1.3 / +1.6 / +2.0
• Exposure Compensation cannot be set in mode.
• The ideal brightness sometimes cannot be obtained even if a large exposure value is
set in dark photographic conditions. In this case, you can check the brightness in the
preview image directly (photographed still image).
18
Using the DC S40
Page 25

BenQ DC 5530 User’s Manual
Metering
DateStamp
3.1.9.11 Metering
The camera calculates the exposure level before a
photograph is taken.
Center-weighted Average: The camera
adjusts itself based on the average light
measurement over the center region of the
viewfinder. (default)
Spot: The exposure is measured in a very
small area at the center of the screen. It is possible to
calculate the exposure of a subject without being
affected by the surrounding environment.
Matrix: The camera adjusts itself based on the average light measurement over the
entire region of the viewfinder.
Metering
A
3.1.9.12 Date Imprint
Enables you to imprint a date mark on your printed
images.
On
On: The current date is imprinted on your
image.
Off
Off: Date imprinting is disabled. (default)
YMD
DateStamp
On Off
English
Using the DC S40
19
Page 26

BenQ DC 5530 User’s Manual
English
3.2 Taking Videos
Video mode enables you to record video clips. The video length depends on the capacity of
the inserted memory card or built-in memory.
Set the mode dial to take moving images with voice recording. The camera shows the
preview image on the LCD monitor.
Note
In mode, the LCD monitor cannot be turned off.
3.2.1 Movie Mode
Mode dial setting
Zoom state
Battery condition
Follow these instructions to take a movie.
1. Set the mode dial to .
Compose the picture, press the shutter button down halfway, and then press it down fully.
Photography begins. [REC] appears on the LCD
monitor.
2. To stop making movies, press the shutter button
down fully again.
If you do not do this, photography is automatically
stopped when there is no more free space on the SD
Memory Card or built-in memory.
00:00/15:57
REC (Shutter)
Avai lab le r ecor ding tim e
REC
REC
15:57 15:57
(Shutter)
20
Note
•
In mode, EV compensation cannot be set or activated.
• In mode, the Flash mode is automatically set to [OFF].
Using the DC S40
Page 27

BenQ DC 5530 User’s Manual
3.2.2 Movie Special Effect
Enables you to apply a tone or color to your video
clips to create an artistic effect.
RGB: Video clips using standard settings.
(default)
B&W: Video clips include no colors except
black, white and shades of gray. This is another easy
way to add distinctiveness to your video clips.
Sepia: Video clips to create a warmer print
tone use sepia toning. The shadows remain black while the mid-tones of the image are
adjusted towards brown and orange colors. This produces warm, old-fashioned artistic style
photographs.
Vivid: Video clips to bring out sharper and more vibrant colors.
English
Using the DC S40
21
Page 28

BenQ DC 5530 User’s Manual
English
3.3 Playing Back Images
Playback mode enables you to view your images or movies either one at a time or in
thumbnail mode.
1. Set the mode dial to and power on the camera.
The last recorded image or movie appears on the LCD monitor.
2. Press the button to advance to the next frame. Press the button to go back one
frame.
3.3.1 Playback Mode
The following illustration shows the movie and image playback screen in detailed mode.
Playback
image
(Shutter)
007/007
Voice memo record in dex
Image Playback Movie Playback
Press LCD/SET to switch between standard mode, image only mode, and
thumbnail mode.
Standard Image Only Thumbnail
File number
Playback
movie
Note
Zoom
level
Playback index
00:19/00:19
(Shutter)
003/007
Movie
length
Vol u m e
level
22
Using the DC S40
Page 29

BenQ DC 5530 User’s Manual
e
3.3.2 Playing Back Movies
Press the shutter button to play back movies that you have recorded. Press the shutter button
again to stop movie playback.
Pressing zoom in to increase the movie playback volume. Press zoom out to decrease
the volume. The volume indicator shows the volume setting.
The following illustration shows the movie playback screen in detailed mode.
Vol u m e
level
Movie l ength
Movie playback function and sp
English
Movie pl ayback fun ction
FF: Fast forward of video clip at 2X speed.
FR: Fast backward of video clip at 2X speed.
1/2X:
Press
Q-VIEW/DEL
1X: Press MENU/C button to restore to normal play speed.
Pause and play: Press LCD /SET button to pause and play video clips.
Movie Playback
button to play slow motion. Play video clip at 1/2X speed..
Using the DC S40
23
Page 30

BenQ DC 5530 User’s Manual
English
3.3.3 Thumbnail Display
This function allows you to view nine thumbnail
images on the LCD monitor simultaneously so that
you can quickly scan for a particular image.
1. Press the LCD/SET button until nine images are
displayed simultaneously.
2. Press zoom in and zoom out to move up
and down in thumbnail display. Press macro
and flash to move left and right.
3. Press the LCD/SET button to display the selected
image or movie on the full screen.
3.3.4 Voice Memo Record
Press the shutter button during image playback to
record a voice memo for the picture. When voice
memo recording is in process, the LCD displays the
recording time. Voice memos can be up to 20
seconds long and are saved in WAV and HTML
format.
Press the shutter button again to end the voice
recording.
If an image has a voice memo attached to it, press the
shutter button to listen to the voice memo.
00:11/00:20
Note
To replace a voice memo, delete the current voice memo first by pressing
MENU/C under Playback mode. Refer to 3.3.7.1“Erasing Files” on page 26.
(Shutter)
24
Using the DC S40
Page 31

BenQ DC 5530 User’s Manual
3.3.5 Zoom Playback
The camera has up to 4x playback digital zoom. While reviewing your images, you may
enlarge a selected portion of an image. This magnification allows you to view fine details.
Movies cannot be displayed using the zoom playback feature.
• Pressing zoom in enlarges the image.
• Press zoom out to return to normal magni-
fication.
• When zoomed in on an image, press LCD/SET.
Four arrows appear in the display. Press zoom
in and zoom out to pan up and down in
the zoomed image. Press macro and flash
to pan left and right in the image.
3.3.6 Erasing Images and Movies
Press Q-VIEW/DEL to delete an image or
movie during playback. You are prompted to
confirm the deletion as shown below.
Yes
No
Q-VIEW/DEL
MENU/C
LCD/SET
(Set)
English
Delete button
Press macro to select YES and then press LCD/SET to delete the image. If you decide you
do not want to delete the image, press flash to select NO and press LCD/SET.
Note
You can also delete images in Playback Mode Setup. Refer to the next section.
•
• You cannot delete images in Thumbnail mode.
Using the DC S40
25
Page 32

BenQ DC 5530 User’s Manual
English
3.3.7 Playback Mode Setup
This section describes the Playback mode Setup menus. Playback mode Setup enables you to
erase files, set thumbnail view mode, lock files, and set the slide show.
3.3.7.1 Erasing Files
1. In Playback Mode, press MENU/C.
2. Select Erase . The following options are
available.
Erase Single: erases a single image or
movie.
Erase All: erases all images and movies.
Erase Voice Memo: erases the voice
memo attached to the currently viewed image.
3. Make your selection and press LCD/SET to
delete the files. You are prompted to confirm the
deletion.
4. Select Yes and press LCD/SET to delete the files.
Yes
No
Note
Images cannot be erased when they are protected or the SD Memory Card is writeprotected.
26
Using the DC S40
Page 33

BenQ DC 5530 User’s Manual
3.3.8 Thumbnail Mode
1. In Playback Mode, press MENU/C.
2. Select Thumbnail .
3. Press LCD/SET. The LCD displays thumbnail
mode.
4. Select an image or movie and press LCD/SET to
display the image or movie in full screen mode.
3.3.9 Protect Mode
This function prevents an image from being erased.
1. In Playback Mode, press MENU/C.
2. Select Lock . The following options are
available:
Lock Single: locks the currently selected
image or movie
Unlock Single: unlocks the currently
selected image or movie
English
Lock All: locks all images and movies
Unlock All: unlocks all images and
movies
3. When you have made your selection, you are
prompted to confirm the action.
4. Select Yes, and press LCD/SET to complete the
action.
Yes
No
Using the DC S40
27
Page 34

BenQ DC 5530 User’s Manual
English
3.3.10 SlideShow
The slide show function enables you to play back your images automatically in sequential
order as a slide show. This is a very useful and entertaining feature for reviewing recorded
images and for presentations.
1. In Playback mode, press the MENU button.
2. Select SlideShow .
3. Press LCD/SET.
The slide show begins. The pictures are
displayed at 3 second intervals.
4. Press MENU/C to stop the slide show.
Note
The Auto Power Off function does not operate during the slide show.
3.3.11 Setting Startup Image
1. In Playback Mode, press MENU/C.
2. Select Startup Image .
3. Make your selection and press LCD/SET
to set the startup image. You are
prompted to confirm the selection.
4. Select Yes and press LCD/SET to set the
desired startup image.
Note
The startup image won’t disappear even if the original file is deleted. It is stored in
the built-in memory. However, it can not be retrieved.
28
Using the DC S40
Page 35

BenQ DC 5530 User’s Manual
3.4 Listening to Music
The camera features both MP3 and FM radio playback. Copy MP3 files from your PC to the
camera’s internal or external memory using the USB cable.
3.4.1 Transferring MP3 files to the Camera
1. Establish a connection between the camera and your computer.
2. There is a folder called ‘MP3’ on your camera’s memory card. Transfer the MP3 files from
your computer to the camera's MP3 folder.
Notes
• You can play MP3 music files through the camera's speaker or through the ear-
phones.
• If power saving is enabled, the LCD turns on normally, and after 1 minutes of
user inaction, the LCD screen enters suspend mode; press any button to awaken
the LCD screen from suspend mode. If power saving is not enabled, the LCD
screen does not turn off.
• When a warning message (such as battery power empty warning) occurs, the
MP3 playback stops and the camera emits warning sounds.
3.4.2 Playing MP3 Files
Follow these instructions to play MP3 files.
1. Power on the camera and select music mode . The music mode screen appears.
2. Select the MP3 player and press LCD/SET. The first MP3 track appears and begins
playing. The following explains how to control playback.
• Press Q-VIEW/DEL for less than two seconds to switch between playback modes: All
tracks repeat/one track repeats/normal playback. Press Q-VIEW/DEL for more than
two seconds to lock and unlock the camera. When locked, only the power button is
functional.
• Press LCD/SET to stop and start playback.
• Press zoom in and zoom out to raise and lower the volume.
• Press macro to play the previous track. Press flash to play the next track.
English
Using the DC S40
29
Page 36

BenQ DC 5530 User’s Manual
English
3.4.3 Playing FM Radio Files
1. Power on the camera and select music mode
. The music mode screen appears.
2. You must connect your earphones for the FM
radio to work (the earphone wire acts as an
antenna). Select the FM Radio and press
LCD/SET. The FM radio screen appears. The
following explains how to control playback.
• Press Q-VIEW/DEL for less than two sec-
onds to switch the audio output between
the earphone (default) and the camera
speaker. Press
Q-VIEW/DEL for more than two seconds to
lock and unlock the camera. When locked,
only the power button is functional.
• Press LCD/SET for less than two seconds to
switch between common stations. Press
LCD/SET for more than two seconds to save
the current station to a common channel.
Example: Press LCD/SET to select a channel
(e.g, 6). Scan to a frequency (e.g, 101.1). Press
LCD/SET for more than two seconds. 101.1 is
saved to channel 6.
• Press zoom in and zoom out to raise
and lower the volume.
• Press macro or flash for more than
two seconds to scan for the previous or next
available channel. Press macro or flash
for less than two seconds to adjust the
tuning to the previous/next frequency in 0.1
MHz steps.
MP3 Player
FM Radio
01 / 01 01 / 01
TRACK
00:37/03:32
Your camera supports the following
audio types:
• MPEG-1 Audio Layer-3
• Bitrates from 32 to 320 kbps
• Sampling frequencies: 32, 44.1,
48 kHz
MP3 Player
FM Radio
30
Using the DC S40
87 . 50
33445566778899
22
MH
Z
STEREO
10
Page 37

BenQ DC 5530 User’s Manual
Memory
3.5 SET-UP MODE
This feature allows you to set up the default settings for using your camera in addition to
image-related settings. Select your personal preferences for the camera with this mode.
English
3.5.1 Memory
This item enables you to format the SD Memory
Card or built-in memory in your camera. All images
and movies, including protected images are erased.
An SD Memory Card can’t be formatted if it is writeprotected. This item also lets you copy images and
movies on the internal memory to the SD Memory
Card.
1. In Manual, Auto, or Movie mode, press
MENU/C.
2. Press to navigate to the top of the menu, and
then press to select Setup mode .
3. Select Memory . The following options are available:
SD
Copy: copies the internal memory to the external flash card.
SD
Format: formats the memory.
4. Press LCD/SET when you have made your selection. You are prompted to confirm the
action.
5. Select Yes and press LCD/SET to complete the action. Otherwise, select No.
SD
SD
SD
SD
SD
Set
09 / 07 / 2018
YMD
YMD
Memory
Note
When copy to SD card function is activated, auto exposure (AE) function is fixed.
As a result, if you move from dark scene to bright scene, over exposure is possible
to happen and will recover soon once the copy process is finished.
Using the DC S40
31
Page 38

BenQ DC 5530 User’s Manual
3
NumReset
3
Date/Time
English
3.5.2 Number Reset
Enables you to reset file numbering in memory to
0001.
1. In Manual, Auto, or Movie mode, press
MENU/C.
2. Press to navigate to the top of the menu, and
then press to select Setup mode .
3. Select NumReset .
4. Press LCD/SET. You are prompted to confirm
the action.
5. Select Yes and press LCD/SET to complete the action. Otherwise, select No.
12
NumReset
SD
SD
Set
09 / 07 / 2018
YMD
12
YMD
3.5.3 Date/Time
Enables you to set the date and time.
1. In Manual, Auto, or Movie mode, press
MENU/C.
2. Press to navigate to the top of the menu, and
then press to select Setup mode .
3. Select Date/Time .
4. Select Edit and press LCD/SET.
Edit
YMD
SD
SD
Set
Edit
YMD
Date/Time
• Press macro and flash to select the
year, month, day, hour and minute fields.
• Press zoom in and zoom out to change the value for each field
5. Press LCD/SET to save the setting and exit the date time submenu. To exit without saving
the settings, press MENU/C.
32
Using the DC S40
Page 39

BenQ DC 5530 User’s Manual
Y
DateStyle
Y
Y
Y
LCDbright
3.5.4 Date Format
MD
Enables you to set the date format.
1. In Manual, Auto, or Movie mode, press
MENU/C.
2. Press to navigate to the top of the menu, and
then press to select Setup mode .
3. Select Date Style. The following options are
available:
MD
YY/MM/DD: year, month day
MD
MM/DD/YY: month, day, year
DM
DD/MM/YY: day, month, year
SD
YMD
DateStyle
SD
Set
09 / 07 / 2018
YMD
DMYMDY
4. Press LCD/SET to save the setting and exit the date time submenu. To exit without saving
the settings, press MENU/C.
3.5.5 LCD Brightness
Enables you to set the LCD brightness.
1. In Manual, Auto, or Movie mode, press
MENU/C.
2. Press to navigate to the top of the menu, and
then press to select Setup mode .
3. Select LCD Brightness .
4. Press macro and flash to raise and lower
the brightness.
: brighter
SD
YMD
LCDbright
SD
Set
09 / 07 / 2018
YMD
English
: normal (default)
5. After you have made your selection, press MENU/C to exit the Setup menu.
Using the DC S40
33
Page 40

BenQ DC 5530 User’s Manual
English
3.5.6 Beep
Enables you to enable and disable the status beep
sound, which alerts you when the camera is turned
on, or a button is pressed.
1. In Manual, Auto, or Movie mode, press
MENU/C.
2. Press to navigate to the top of the menu, and
then press to select Setup mode .
3. Select Beep .
4. Select Yes to enable the beep. Select No to
disable it. The default setting is No.
5. After you have made your selection, press MENU/C to exit the Setup menu.
3.5.7 Startup Image
Enables you to choose startup image from three
built-in images and one customized image. Please
refer to section 3.3.11 to set customized image.
1. In Manual and Auto mode, press MENU/C.
2. Press to navigate to the top of the menu, and
then press to select Setup mode .
3. Press LCD/SET to select startup image . The
following frame shows:
yellow asterisk
red frame
4. Use , , and buttons to move the red frame and choose your desired
startup image.
5. Press LCD/SET to set the desired startup image, then a yellow asterisk appears on the
startup image you set.
6. After you have made your selection, press MENU/C to exit the Setup menu.
34
Using the DC S40
Page 41

BenQ DC 5530 User’s Manual
3.5.8 AV Out Format
Enables you to set the AV out format for connecting
the camera to earphone or TV.
1. In Manual, Auto, or Movie mode, press
MENU/C.
2. Press to navigate to the top of the menu, and
then press to select Setup mode .
3. Select AV out Format . The following op tions
are available:
Earphone: The AV Out port will output
audio only. (default)
NTSC: The AV Out port will output video only and the format is NTSC.
PAL : The AV Out port will output video only and the format is PAL.
4. After you have made your selection, press MENU/C to exit the Setup menu.
Note
The default setting is Earphone and system will restore to earphone whenever the
camera is restarted.
z
3.5.9 Power Saving
Enables you to set the power saving mode.
1. In Manual, Auto, or Movie mode, press
MENU/C.
2. Press to navigate to the top of the menu, and
then press to select Setup mode .
3. Select PowerSave. The following options are
available.
On: when set to on, the camera enters sleep
mode in three minutes, and turns off after five
minutes. (default)
Off: disables power saving mode.
4. After you have made your selection, press MENU/C to exit the Setup menu.
z
English
Using the DC S40
35
Page 42

BenQ DC 5530 User’s Manual
Reset
23
eset
English
3.5.10Language
Enables you to set the display language.
1. In Manual, Auto, or Movie mode, press
MENU/C.
2. Press to navigate to the top of the menu, and
then press to select Setup mode .
3. Press macro and flash to select the
desired Language. The following options are
available.
• English
• French
• German
• Italian
• Spanish
• Portuguese
• Traditional Chinese
• Simple Chinese
4. After you have made your selection, press MENU/C to exit the Setup menu.
3.5.11 Reset
Enables you to reset the camera to factory defaults.
1. In Manual, Auto, or Movie mode, press
MENU/C.
2. Press to navigate to the top of the menu, and
then press to select Setup mode .
3. Select Reset .
4. Press LCD/SET. You are prompted to confirm
the action. Select Yes.
5. Press LCD/SET. The camera’s settings are
returned to the factory defaults.
6. Press MENU/C exit the Setup menu.
Reset
R
V10
Reset
36
Using the DC S40
Page 43

BenQ DC 5530 User’s Manual
Version
23
eset
3.5.12 SW Version
Displays the camera’s SW version.
1. In Manual, Auto, or Movie mode, press
MENU/C.
2. Press to navigate to the top of the menu, and
then press to select Setup mode .
3. Select Version. The version screen displays the
camera’s software version.
R
V10
English
Version
Using the DC S40
37
Page 44

BenQ DC 5530 User’s Manual
English
4 PC DEPENDENT FEATURES
To use the PC dependent functions, you need to install your digital camera software and
connect the camera to your PC.
4.1 Installing the Digital Camera Software
• If your operating system is Windows 98SE, set up the DC S40 driver first. If the oper-
ating system is Windows ME/2000/XP, then it's not necessary for you to set up the
driver in advance.
• It's recommended that you set up the driver and software before connecting the digi-
tal camera to your PC. Normally, a software installation menu appears automatically
after this installation CD is inserted into your CD-ROM drive. If the menu did not
appear, browse the CD and find a program file named “Autorun.exe” in the root
directory and double-click it. The menu will appear.
• Click each item to install the software program of your choice.
To browse the content of this CD and install software manually, refer to the descriptions of
the CD content in the next section.
38
PC Dependent Features
Page 45

BenQ DC 5530 User’s Manual
4.2 Bundled Software
Software Description
English
PhotoBase Arcsoft PhotoBase enables you to efficiently find and
organize your media-files. Use it to create slide shows,
Web albums, or video postcards, and share your mediafiles with your friends on the Internet.
PhotoImpression ArcSoft PhotoImpression is an easy-to-use photo editing
and creative design program. Edit and retouch your
photos, then add special effects or place them in cards,
calendars, frames and fantasy templates.
PhotoImpression also includes a wide variety of printing
options.
VideoImpression Arcsoft Video Impression lets you edit and combine
video files. New videos can be created by existing video,
animation, and image files. Quickly and easily create
desktop video presentations for use at home, business, or
on the Internet.
PhotoPrinter Pro. Arcsoft Photo Printer is a versatile printing utility that
lets you print out several different images on a single
sheet of paper. It's as simple as opening your image,
selecting from an assortment of templates and clicking
Print.
Microsoft DirectX Microsoft DirectX is an all-in-one and cross-platform
media tool.
Microsoft Media Player Microsoft Media Player is a Windows utility that plays
audio, video, and streaming formats as well as many
other popular audio and video formats, including MP3,
CD audio, and MIDI files.
Acrobat reader Adobe Acrobat Reader is a “must have” utility to read
files in the popular cross-platform PDF file format.
Q-link BenQ Q-link is a utility for your smart photo downloads,
and has printout and edit functions. Share via email with
others, for photos folders management and show slide
show photos on screen.
Q-music BenQ Q-Music lets you manage your music selections,
transfer MP3 files with your camera, create and manage
playlists, convert your CDs tracks into MP3s, apply
sound effects, and more.
PC Dependent Features
39
Page 46

BenQ DC 5530 User’s Manual
English
4.3 Transferring Files with your PC
This section explains how to transfer images, movies, and MP3 files with your PC using
Windows XP/ME/2000/98SE
4.3.1 Transferring Images, Movies, and MP3 Files
1. Turn on the PC.
2. Switch on the camera.
3. Connect the camera to the PC with the
included USB cable. Ensure that the
connection is secure.
When the USB cable is connected to the PC, a
hard disk is created in Windows Explorer
labeled “Removable Disk.”
Stored images or movies can be found in
Removable Disk\DCIM\100MEDIA.
MP3 files can be transferred to
Removable Disk\MP3
4. Copy, view, delete, and move images, movies
and MP3 files using standard Windows
Explorer commands.
USB
40
.
PC Dependent Features
Page 47

BenQ DC 5530 User’s Manual
4.4 Viewing Images on TV
1. Turn on the TV.
2. Switch on the camera.
3. Connect the camera to the TV
with the included AV cable as
shown.
4. Switch your TV channel to the
proper video mode for viewing
video in media. Consult your TV
users manual.
5. Playback images or movies as
described in 3.3“Playing Back
Images” on page 22.
English
AV
VIDEO
L
R
PC Dependent Features
41
Page 48

BenQ DC 5530 User’s Manual
English
5 TROUBLESHOOTING
5.1 Error Message Table
Symptoms Causes Solutions
The power won’t turn
on.
The power turns off
during use.
The battery power is
being used up too
quickly.
The camera does not
take pictures when the
shutter button is
pressed.
The close-up image is
blurred.
The flash does not fire. • The camera flash is turned off.
There is something
wrong with the color of
the captured image.
The picture is too bright
or too dark.
The LCD monitor is not
clear.
The camera cannot
download images to the
PC.
• The battery is out of power.
• The AC power adapter is not connected or is damaged.
• The battery is out of power.
• Auto power off is enabled.
• The b attery/SD ca rd cover is opene d
when in use.
• The adapter has not been connected
properly.
• The external temperature is too cold.
• The battery is not used for a long
time.
• The camera is not set at Recording
Mode.
• The battery is weak.
• The power has not been switched
on.
• Select the correct focus range. • If the subject is within 15 cm, select
• The light source is sufficient.
• White balance is not set properly. • Set the white balance to Auto mode
• There is excessive or inadequate
exposure.
• The LCD monitor plastic cover is
dirty.
• Cable is not connected properly.
• Camera is off.
• There are no battery or the adapter
is not well connected.
• OS is not Window 98SE
/2000/ME/XP or PC is not equipped
with USB port.
• USB driver is not installed.
• Use the AC power adapter to charge
the battery.
• Make sure the AC power is connected and it's not damaged.
• Use the AC power adapter to charge
the battery.
• Switch on the power.
• Do not open the battery/SD card
cover when the camera is in use.
• Connect the adapter correctly.
• Keep the camera away from extreme
temperatures.
• Recharge the battery with AC power
adapter.
• Set the Mode Dial to Capture Mode.
• Replace the battery.
• Switch on the power.
Macro mode.
• Set the flash mode to Auto Flash or
Forced Flash mode.
or other suitable mode.
• Reset exposure compensation.
• You should clean the LCD cover.
• Check the cable connec tion.
• Turn on the power.
• Load new battery or check the AC
power adapter connection.
• Install Windows 98SE/2000/ME/XP
and USB Port.
• Install USB Driver.
42
Tr ou b l es h o ot i n g
Page 49

BenQ DC 5530 User’s Manual
5 SPECIFICATIONS
Image Sensor Total 4.24 Megapixel CCD
Lens f=35-104 mm (film equivalent)
Digital Zoom Capture Mode:4x (continuous)&
Viewfinder Optical real image viewfinder
LCD Monitor 1.5-inch color LTPS LCD
Focusing TTL Auto Focus
Focusing Range Macro: 15 cm, Normal: 50 cm-infinity
Shutter Mechanical shutter and Electrical shutter
Shutter Speed 1/30 ~ 1/1000 sec. Mechanical shutter
Exposure Center-weighted Average, Spot, Matrix
ISO Equivalent Auto, 100, 200
White Balance Auto / Daylight / Cloudy / Tungsten / Fluorescent
Flash Auto / Red - eye reduction / Forced Flash / Flash off
Flash Range 0.5 ~ 2.5m
Still Image Mode Single image / Continuous (2 pic) / Self-timer (10 seconds
Movie Clips Size: 320x240with sound
Recording time: depending on memory
Storage Built-in memory: 14 MB
File Format Still Image: JPEG (EXIF 2.2), PIM
Image size 2848 x 2160 pixels (interpolated), 2304 x 1728 pixels
Image Play Single image / ASF play / Thumbnails / Slide show
Interface Digital output connector: USB 1.1
Power Source Specific rechargeable Lithium-ion battery / AC adapter /
Dimensions
(WxHxD)
Effective Pixels: 3.98 Megapixels
Maximum Recorded Pixels: 6.08 Megapixels
F2.8 / F4.8
Play Mode:4x (continuous)
Exposure compensation +
with LED indicator)
External memory: SD Card (8~256 MB) compatible.
Movie Clip: ASF format
1600 x 1200 pixels, 1280 x 960 pixels
DC power input connector: 5V
96 x 63 x 40 mm
2 EV (0.3 EV / step)
AV o u t pu t
USB cable
English
Specifications
43
Page 50

BenQ DC 5530 User’s Manual
English
Weight 180g (without battery)
Camera Driver PC Driver (Windows 98SE / 2000 /ME / XP)
Software Application Q-link
Q-music
PhotoBase
PhotoImpression
VideoImpression
PhotoPrinter
Acrobat Reader
DirectX
Media Player
System Requirements
FOR WINDOWS Pentium MMX class or higher CPU
64 MB RAM
CD-ROM drive
100 MB free hard disk space
Ava il able USB po rt
Windows XP/ME/2000/98SE
44
Specifications
Page 51

BenQ DC 5530 User’s Manual
5 SERVICE INFORMATION
Te chni c a l S uppo r t
If you encountered problems using DC S40 and the camera driver program, please send an E-mail
(containing detailed descriptions of the problem you came upon, the hardware and software
environment of your system) to the following addresses:
USA: support-sc@BenQ.com
Europe: service@BenQ-eu.com
Taiwan: service-tw@BenQ.com
China: service_china@BenQ.com
Asia and other countries: support@BenQ.com
For free driver program updates, product information and news release, please visit the
following web address:
http://www.BenQ.com.tw/global/
English
Service information
45
 Loading...