


Digital Camera 4500
User’s Manual

Copyright
Copyright (c) 2002 by BenQ Corporation. All rights reserved. No part of this publication may be reproduced, transmitted, transcribed, stored in a retrieval system or translated into any language or computer language, in any form or by any means, electronic,
mechanical, magnetic, optical, chemical, manual or otherwise, without prior written permission from BenQ Corporation.
Brands and product names are trademarks or registered trademarks of their respective
companies.
Disclaimer
BenQ makes no warranty of any kind with regard to this material, including, but not limited to, the implied warranties of merchantability and fitness for a particular purpose.
BenQ assumes no responsibility for any error that may appear in this document. BenQ
makes no commitment to update nor to keep current the information contained in this
document.
Taking care of your camera
• Do not use your camera over the following environmental range: temperature: OºC to
40ºC, relative humidity: 45% ~ 85%.
• Do not use or store your camera in environments listed below:
Direct sunlight.
High humidity and dusty places.
Next to the air conditioner, electric heater or the other heat sources.
In a closed car that is directly under the sun.
Avoid shaky places.
• If your camera becomes wet, wipe it with dry cloth as soon as possible.
• Salt of seawater may cause severe camera damage.
• Do not use organic solvents, such as alcohol, etc., to clean your camera.
• If the lens or viewfinder is dirty, please use the lens brush or soft cloth to clean the
lens. Do not touch the lens with your fingers.
• To prevent electrical shock, do not attempt to disassemble or repair your camera by
yourself.
• Water may cause a fire or electric shock. Therefore, please store your camera in a dry
place.
• Do not use your camera outdoors when it is raining or snowing.
• Do not use your camera in the water.
• If the foreign substance or water gets in your camera, please tum the power off immediately and disconnect the batteries and the transformer. Remove the foreign substance or water, and send it to the maintenance center.
• Transfer the data to the computer as soon as possible to avoid losing your image data.

BenQ DC 4500 User’s Manual
1. Touring your DC 4500 ...............................1
1.1. Checking package contents ............................................... 1
1.2. Parts of the DC 4500 and their names ........................... 1
1.2.1. Front View ............................................................................................... 1
1.2.2. Rear View ................................................................................................2
Viewfinder ........................................................................................................... 2
Inside viewfinder ................................................................................................ 2
1.2.3. Top View .................................................................................................. 2
1.2.4. Bottom View ...........................................................................................2
1.2.5. Mode Dial ................................................................................................3
1.2.6. LCD Status Display ................................................................................ 3
2. Preparing your DC 4500 for using ............4
2.1. Installing NiMH batteries ................................................... 4
2.2. Installing memory card ....................................................... 5
2.3. Turning on the power ........................................................ 6
2.4. Turning off the power ........................................................ 7
2.4.1. Power Save Mode ..................................................................................7
2.4.2. Auto Shut Down Mode ........................................................................7
3. Using the DC 4500 ......................................8
3.1. Still Mode ............................................................................... 8
3.1.1. Use Still Mode to take photos ............................................................ 8
3.1.2. Taking Photos .........................................................................................8
3.1.2.1. To take photos using the viewfinder ...........................................................8
3.1.2.2. To take photos using the LCD monitor .....................................................9
3.1.3. Hot Keys for taking photos .................................................................11
3.1.3.1. Hot key for selecting flash mode ..................................................................11
3.1.3.2. Hot key for zooming in or out on the object ...........................................11
3.1.3.3. Hot key for setting the macro mode ..........................................................12
............................................................................................................................................13
3.1.3.4. Hot key for setting the self-timer mode .....................................................13
3.1.3.5. Hot key for changing to playback mode .....................................................13
3.1.3.6. Hot key for LCD monitor icon display mode ...........................................14
3.1.4. The Still Mode Setting Menu on LCD screen .................................. 15
3.1.5. The Record Menu of Still Mode ......................................................... 16
3.1.5.1. Adjusting image quality (QUALITY) ............................................................16
3.1.5.2. Adjusting image resolution (RESOLUTION) .............................................17
3.1.5.3. Setting white balance (AWB) ........................................................................17
3.1.5.4. Setting date-imprinting modes (DATE) ......................................................18
3.1.5.5. Setting monochrome modes (MONOCHROME) ...................................19
I

BenQ DC 4500 User’s Manual
3.1.5.6. Setting metering modes (METERING) ........................................................19
3.1.5.7. Setting AE-Lock function (AE-LOCK) .........................................................20
3.1.5.8. Setting ISO value (ISO) ...................................................................................21
3.1.5.9. Setting Digital Zoom function (DIGITAL ZOOM) ..................................21
3.1.5.10. Setting exposure compensation value (EV) .............................................22
3.1.6. The Setup Menu of Still Mode ............................................................. 23
3.1.6.1. Setting beep sound (BEEP) .............................................................................23
3.1.6.2. Setting date and time (DATE/TIME) ............................................................23
3.1.6.3. Selecting OSD language system (LANGUAGE) ........................................24
3.1.6.4. Setting power save mode (POWER SAVE) ...............................................24
3.1.6.5. Setting LCD brightness (LCD BRIGHT) .....................................................25
3.1.6.6. Selecting TV format (TV FORMAT) ............................................................25
3.1.6.7. Formatting CF card (FORMAT) ...................................................................26
3.1.6.8. Reloading the default setting value (DEFAULT SETTING) ....................26
3.1.6.9. Software Version (VERSION) .......................................................................27
3.2. Burst Mode ............................................................................ 28
3.2.1. Use Burst Mode to take photos .........................................................28
3.2.2. The Burst Mode Setting Menu on LCD screen .............................. 28
3.2.3. The Record Menu of Burst Mode ......................................................30
3.2.3.1. Adjusting image resolution (RESOLUTION) .............................................30
3.2.3.2. Setting white balance (AWB) ........................................................................31
3.2.3.3. Setting date-imprinting modes (DATE) ......................................................31
3.2.3.4. Setting monochrome modes (MONOCHROME) ...................................31
3.2.3.5. Setting metering modes (METERING) ........................................................32
3.2.3.6. Setting ISO value (ISO) ...................................................................................32
3.2.3.7. Setting Digital Zoom function (DIGITAL ZOOM) ..................................33
3.2.3.8. Setting exposure compensation value (EV) ................................................33
3.2.4. The Setup Menu of Burst Mode ......................................................... 34
3.3. Night Scene Mode ............................................................... 35
3.3.1. Use Night Scene Mode to take photos ............................................ 35
3.3.2. The Night Scene Mode Setting Menu on LCD screen .................. 35
3.3.3. The Record Menu of Night Scene Mode .......................................... 37
3.3.4. The Setup Menu of Night Scene Mode .............................................37
3.4. Video Mode ........................................................................... 38
3.4.1. Use Video Mode to shoot videos ...................................................... 38
3.4.2. Shooting videos ...................................................................................... 38
3.4.3. Viewing videos ........................................................................................ 39
3.4.4. The Video Mode Setting Menu on LCD screen ............................. 40
3.4.5. The Record Menu of Video Mode ..................................................... 41
3.4.5.1. Setting white balance (AWB) ........................................................................41
3.4.5.2. Setting monochrome modes (MONOCHROME) ...................................42
3.4.5.3. Setting metering modes (METERING) ........................................................42
3.4.5.4. Setting exposure compensation value (EV) ................................................43
II

BenQ DC 4500 User’s Manual
3.4.6. The Setup Menu of Video Mode ........................................................ 43
3.5. Playback Mode .....................................................................44
3.5.1. Use Playback Mode on the LCD screen ......................................... 44
3.5.2. Viewing Photos or Images on the LCD screen ............................. 44
3.5.3. Viewing Videos on the LCD screen ................................................. 45
3.5.4. The Playback Mode Setting Menu on LCD screen ........................ 45
3.5.5. The Play Menu of Playback Mode ....................................................... 47
3.5.5.1. Deleting one image or video (DELETE ONE) ...........................................47
3.5.5.2. Deleting all images or videos (DELETE ALL) ............................................47
3.5.5.3. Locking and unlocking images (videos) .......................................................48
3.5.5.4. Viewing images (videos) in thumbnail mode (THUMBNAIL) ................49
3.5.5.5. Viewing images (videos) in slide show mode (Slide Show) ....................50
3.5.5.6. Setting Digital Print Order Format (DPOF) for Print Out Setting ......52
3.5.6. The Setup Menu of Playback Mode ................................................... 53
4. PC dependent features ..............................54
4.1. Preparations ..........................................................................54
4.1.1. Installing digital camera software ........................................................ 54
4.1.2. The Software of this Installation CD ................................................. 55
4.1.3. DC 4500 Driver installation instruction ........................................... 55
4.2. Connecting the DC 4500 to your PC .............................56
5. TV dependent features ..............................58
Preparations .................................................................................. 58
Connecting the DC 4500 to TV .............................................. 58
6. NiMH battery charger usage .....................60
Preparations .................................................................................. 60
Use Charger To Charge NiMH Battery ................................. 60
7. Troubleshooting .........................................61
8. Service information ....................................62
III

BenQ DC 4500 User’s Manual
<Memo>
IV
BenQ DC 4500 User’s Manual
1. T
OURING YOUR
DC 4500
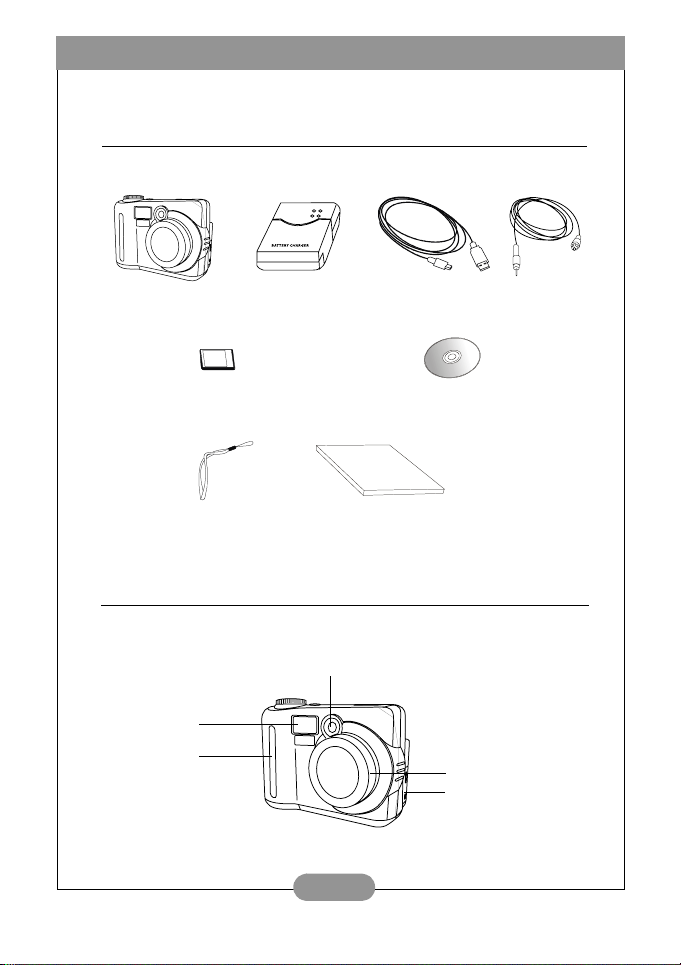
1.1. Checking package contents
The package should include the following items:
DC 4500 digital camera Battery charger
16MB Compact Flash memory card
Hand Strap
USB cable
DC 4500 software CD-ROM
User’s Manaul
1.2. Parts of the DC 4500 and their names
1.2.1. Front View
Viewfinder
TV cable
Strobe
Hand Stop
Lens
Cover (USB, Video-out)
1

BenQ DC 4500 User’s Manual
1.2.2. Rear View
Viewfinder
Zoom In/Out button
Color LCD monitor
Menu/ Cancel button
Disp/OK button
Strap Hitch
Memory Card Slot Cover
Navigation button
(Up/Down/Right/Left)
DC-jack Slot Cover
Viewfinder Inside viewfinder
Strobe charging LED
(red)
AF
Auto Focus LED
(green)
1.2.3. Top View
Status Display
MEGA
4.1
PIXELS
Power Button
S w i t c h ( V i d e o / N i g h t s c e n e / B u r s t /
Still/Play)
AF/Capture Button
1.2.4. Bottom View
Battery compartment cover
BATT
Close-up correction
marks
2
Tripod set

BenQ DC 4500 User’s Manual
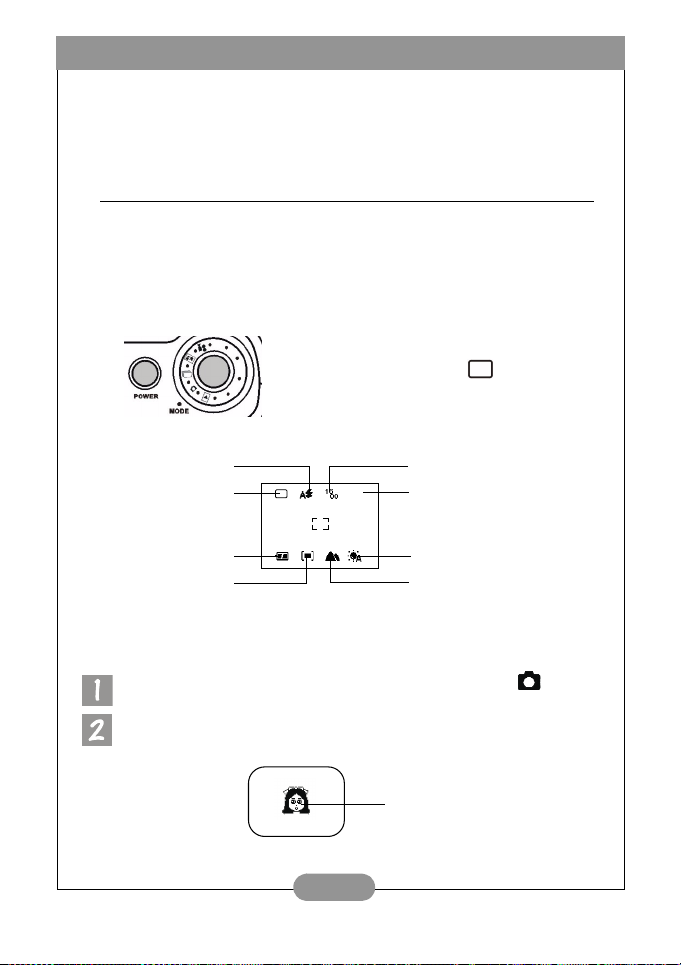
1.2.5. Mode Dial
Video Mode
Night Scene Mode
Burst Mode
Still Mode
Playback Mode
1.2.6. LCD Status Display
Macro Function
Flash Status
Self-timer
Function
Auto-exposure
Lock
Battery Status
Remaining number
of photos you can
take (It depends on
the image resolution,
compression and
image background. )
3

BenQ DC 4500 User’s Manual
2. P
REPARING YOUR
2.1. Installing NiMH batteries
Follow the steps below to install NiMH batteries.
DC 4500
BATT
Press the battery cover and then slide the
cover in the direction shown.
Open the cover in the direction shown.
Place NiMH batteries in the battery
compartment until it is totally inserted.
FOR USING
Close battery compartment cover and
slide the cover in the direction shown.
You will hear a click sound when the
cover is firmly closed.
4

BenQ DC 4500 User’s Manual
W
T
W
W
T
2.2. Installing memory card
Follow the steps below to install memory card.
Press down the memory card slot cover
open lever and then open the cover in
the direction shown.
Insert the memory card in the direction
shown.
This side out.
Fully insert the memory card in the
memory card slot until it is firmly
fixed.
Close memory card slot cover and slide
the cover in the direction shown.
You will hear a click sound when the cover
is firmly closed.
Note: 1. Please use the CFcards made by qualified manufacturers: SanDisk,
Lexar, Pretec and Abomen. We do not suggest you to use the CF
cards of other brand.
2. During the camera operation, if you open the CF card cover w hen CF
card is accessing data, the camera will buzz and finish it’s accessing,
then turn off automatically.
3. During the camera operation, if you open the CF card cover w hen CF
card is not accessing data, the camera will buzz and then turn off
automatically.
5

BenQ DC 4500 User’s Manual
2.3. Turning on the power
Press the Power button.
To turn on the power, you have to press the
Power button. The camera beeps once and the
status of camera will appear on the status
A
MEGA
4.1
PIXELS
The status of camera will appear on
the status display.
You will see the LCD monitor show
a frame of BenQ logo.
display. You will see the LCD monitor show a
frame of BenQ logo. Also, the LCD monitor will
be activated. Then this camera is ready to work.
Note: If the camera is turned on in camera
mode, the zoom lens will be activated at
the same time.
0001
The LCD monitor will be activated
and the icons will be displayed on the
LCD monitor.
Note: If no memory card is presented in the memory card slot, the
camera only offers preview function and you can not capture any
image. To insert the memory card, you have to turn the camera
power off first and then insert your card. After the card is inserted,
turn on the camera power for using.
6

BenQ DC 4500 User’s Manual
2.4. Turning off the power
To turn off the power, you have to press the
power button again. After pressing the power
button, the camera beep twice. The first beep
indicates that the camera starts to shut down
Press the Power button.
2.4.1. Power Save Mode
The DC 4500 supports power save function. If the DC 4500 doesn’t receive any
operation from the user for 3 minutes (This is the default value, you can set the
time limit from 1~ 10 minutes), it will enter power save mode automatically. In
addition, you can press any key to wake up the DC 4500 from power save mode.
2.4.2. Auto Shut Down Mode
The DC 4500 supports auto shut down function. If the DC 4500 doesn’t receive
any operation from the user for 3 minutes, it will enter auto shut down mode and
automatically shut down instantly. To wake up the DC 4500 from auto shut down
mode, you have to press the power button to turn on the power again.
and the second beep means the end of shut
down. Then, you will see the status display and
LCD monitor both turn blank. Then the power
is turned off.
7
BenQ DC 4500 User’s Manual
3. U
SING THE
BenQ Digital Camera 4500 provides 5 different operation modes: Still mode, Playback mode,
Burst mode, Night Scene mode, Video mode. With these modes, BenQ Digital Camera 4500
provides you the best quality when taking photos or shooting videos.
3.1. Still Mode
3.1.1. Use Still Mode to take photos
If the still mode is activated, you can take photos by pressing the capture button, the
camera will take one photo a time automatically by auto-focusing.
To activate the still mode:
DC 4500
Adjust the switch to still mode on the top of the
camera. Then the still mode will be activated. When
still mode is activated, the icon will appear on
the LCD screen.
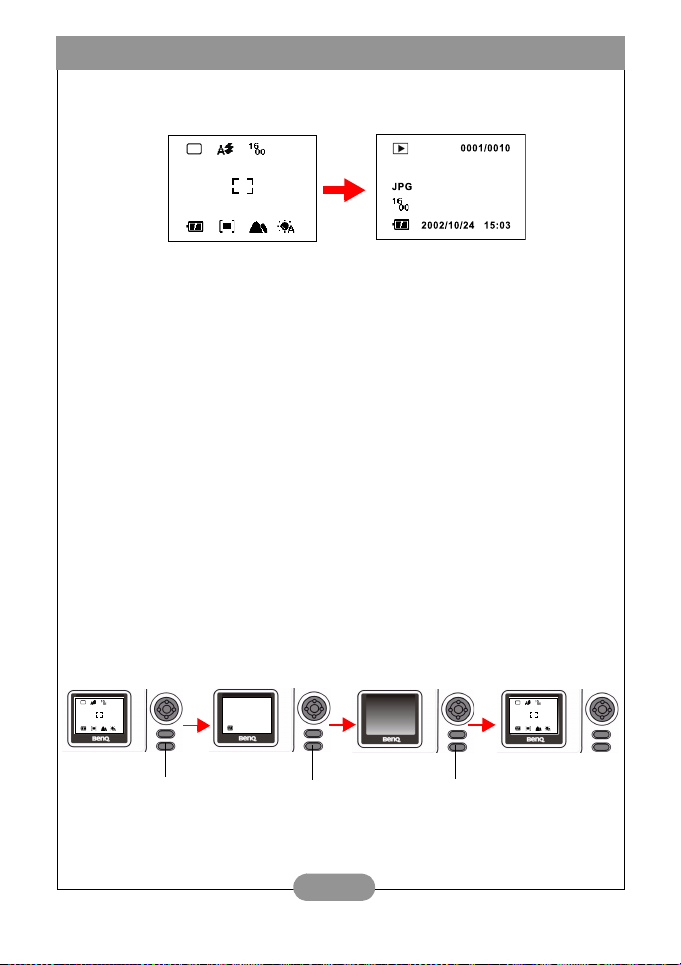
When the still Mode is activated, the LCD screen will show icons as follow:
Flash Status
Still Mode
0001
Image Resolution
Remaining number of photos
you can take
Battery Capacity
Metering
White Balance
Macro Function
3.1.2. Taking Photos
Make sure the mode selection dial has been turned to the position .
3.1.2.1. To take photos using the viewfinder
Point the camera to the object and make the object appear on the
center of the viewfinder.
Make the object appear on
the center of the viewfinder.
8

BenQ DC 4500 User’s Manual
3.1.2.2. To take photos using the LCD monitor
When the camera power is turned on, the LCD monitor will be turned on at the
same time. The camera beeps once and a BenQ logo appears on the LCD monitor.
Then the camera enters still mode, the icon and other related icons will also
appear on the LCD screen.
You will see a BenQ logo
frame appear on the
LCD monitor.
Auto-focus mark
The image will appear on the LCD monitor and you will see a white auto-focus
mark in the center of the LCD monitor. Move the camera until the image on the
LCD monitor is on the desired position.
Press the shutter release button halfway. The auto-focus function will operate as
follow steps show:
1. Before auto-focus operates:
AF mark on the LCD monitor is white.
2. When auto-focus operates:
the AF mark on the LCD monitor is white.
3. After auto-focus finishes:
viewfinder becomes steady green and the AF mark on the LCD monitor turns
green.
4. When auto-focus fails:
the AF mark on the LCD monitor is red.
The auto-focus function will lock on the subject and the auto-focus mark on the
LCD monitor will turn green. The auto-focus indicator will become steady green
when auto-focus is done. If you take photos with the LCD monitor, the result will
be shown simultaneously.
The AF indicator on the viewfinder is off and the
The AF indicator on the viewfinder blinks and
The camera beeps once and AF indicator on the
The AF indicator on the viewfinder blinks quickly and
The images will appear
on the LCD monitor.
9

BenQ DC 4500 User’s Manual
If you did not get a satisfactory result, move the position of camera and
press the shutter release button again until desired result is displayed.
Then press the shutter release button all the way down. The image will be captured
and saved to the memory card.
The remaining number of images you can take will appear on the LCD
screen.
Choose a subject and press the capture button
half way for auto-focus function, then press
down to capture the image. The captured
image will be saved to the memory card.
0001
Note: If the subject moves when auto-focus operates or the brightness and
complexity of the scene you take is not enough, the auto-focus function
will fail.
The remaining number of images you
can take will appear on the LCD screen.
10

BenQ DC 4500 User’s Manual
3.1.3. Hot Keys for taking photos
This section introduces six main hot keys for you to use when taking photos. You can
change these six settings by simply pressing these hotkeys without entering the sub
menu.
3.1.3.1. Hot key for selecting flash mode
You can turn on or off the flash light according to the environment where you take
photos. This is done by selecting the flash mode.
To select a flash mode:
Press the right key of the navigation button on the
rear part of the camera.
Press it several times and different flash modes will
scroll continuously on the LCD screen.
Automatic flash mode
The camera will detect the brightness of the environment
and the object, then use flash if necessary.
Anti Red-eye mode
Use this mode to prevent the red eye phenomenon that
often appears on people’s pupils.
Forced flash on mode
When this icon appears, the camera will use the flash
whenever you take photos, regardless of the environment
and condition of the object.
Flash off mode
When this mode is selected, the camera will not use the
flash even the environment and the object is dark.
Note: If the camera power is in a low level status, the flash will be forced to set
to “Off”.
3.1.3.2. Hot key for zooming in or out on the object
DC 4500 provides 3x Digital zoom function. Meanwhile, DC 4500 is fitted with a 3x
optical zoom lens and can optionally provide 3x digital zoom. The digital zoom
function allows you to zoom in or out on the object electronically before the photo is
taken. This function works when you take photos with the LCD screen and you can
simply zoom in or zoom out object by pressing the hot key.
To zoom in or zoom out:
To zoom in, press the “T” key on the Zoom in/out button.
To zoom out, press the “W” key on the Zoom in/out button.
11

BenQ DC 4500 User’s Manual
To zoom in on the object:
Press the “T” key on the Zoom in/out button, and the object will appear
larger on the LCD screen. The zoom status bar will appear on the LCD monitor as illustrated below.
To zoom out on the object:
Press the “W” key on the Zoom in/out button, and the object will return
normal on the LCD screen. The zoom status bar will appear on the LCD
monitor as illustrated below.
The zoom staus bar will appear
on the LCD screen.
This part shows optical
zoom status.
Note: Please note that this function does not work in “Video” Mode.
3.1.3.3. Hot key for setting the macro mode
The DC 4500 provides macro function that allows you to capture images at a close
range (8~40 cm). This function is only available when you take photos with the LCD
screen and you can set the macro mode on or off by simply pressing the hot key.
To set the macro mode:
Press the down key of the navigation button on the
rear part of the camera.
Press it to change macro setting between macro on
mode and macro off mode. The related icons will be
displayed on the LCD screen.
To set the macro mode on:
Press the down key of the navigation button and you will see the normal
mode icon on the LCD monitor become the macro mode icon .
This part shows digital zoom status.
To set the macro mode off:
Press the down key of the navigation button again and you will see the macro
mode icon on the LCD monitor return to the normal mode icon .
Press the down key of the navigation
button and you will see the macro
icon change on the LCD screen.
Note: Please note that this function doesn’t work in “Night Scene” Mode.
12

BenQ DC 4500 User’s Manual
3.1.3.4. Hot key for setting the self-timer mode
If the self-timer mode is activated in camera mode, 10 seconds after you press the
capture button, the camera will take photo automatically. To stop the self-timer
function, press the “Cancel” button while counting. Please note that this self-timer
mode can only be activated when the camera is in still mode.
To set the self-timer mode :
Press the up key of the navigation button on the rear
part of the camera.
Press it to change camera setting between still mode and
self-timer mode. The related icons will be displayed on
the LCD screen.
To set the self-timer mode on:
Press the up key of the navigation button and you will see the still mode icon
on the LCD monitor become the self-timer mode icon .
To set the self-timer mode off:
Press the up key of the navigation button again and you will see the self-timer
mode icon on the LCD monitor return to the still mode icon .
Press the up key of the navigation
button in still mode and you will see
the self-timer icon appear on the
LCD screen.
3.1.3.5. Hot key for changing to playback mode
This hot key allows you to change from any record mode to playback mode. With this
function, you can switch to playback mode whenever you want to view the results of
the photos you take or the videos you shoot. Howevevr, if you want to return to the
original mode, simply press the “Cancel” button.
To change to playback mode:
Press the left key of the navigation button on the rear
part of the camera.
Press it to change from any record mode to playback
mode. The shutter frame on the LCD screen will
become playback frame.
13
BenQ DC 4500 User’s Manual
Shutter Frame
0001
Press the left key of the navigation button on the rear part of the camera to
change from any record mode to playback mode. The shutter frame on the
LCD screen will become playback frame.
Playback Frame
3.1.3.6. Hot key for LCD monitor icon display mode
The DC 4500 provides LCD monitor icon display function that allows you to set the
LCD monitor icon display function on or off. This function works when you take photos
with the LCD monitor and you can set the LCD monitor icon display mode on or off by
simply pressing the hot key. The hotkey will operate in sequence as the following graphs
illustrate.
I. To set the LCD monitor icon display mode off:
Turn on the power of your DC 4500 and you will see all the icons on the LCD
monitor appear. To turn the LCD monitor icon display off, press the Disp/OK
button and the icons on the LCD monitor will disappear except the battery
icon.
II. To set the LCD monitor display mode off:
When the LCD monitor icon display mode is set to off, press the Disp/OK
button again and the LCD monotor display mode will be set to off. The LCD
monitor will become blank and enter suspend mode.
III. To set the LCD monitor (icon) display mode on:
When the LCD monitor display mode is set to off, you can press the Disp/OK
button and you can wake up the LCD monitor from suspend mode. You will
see all the icons on the LCD monitor appear again.
0001
Press Disp/OK button.
Press Disp/OK button.
0001
Press Disp/OK button.
14

BenQ DC 4500 User’s Manual
3.1.4. The Still Mode Setting Menu on LCD screen
When in still mode, the DC 4500 provides a setting menu that allows you to make
adjustments on various photo taking and image saving settings. This setting menu
contains two main parts: Record Menu and Setup Menu.
To enter the setting menu, press the “Menu” button and you can switch the LCD
screen frame from shutter menu to the main setting menu of the still mode.
Press this button to enter the setting
menu.
The menu frame appears on the center of the LCD screen. You can switch the menu
frame from Record menu to Setup menu by pressing the right key of the navigation
button.
Record Menu Icon
Record function Items
You can press t he
navigation button to
choose desired record
function items; up and
down to switch ite ms,
right and left to change
settings.
Record Menu
Page Number
This shows the current
page number of the
record menu.
Press the right key of the navigation
button to switch the menu frame
from record menu to setup menu.
Setup function Items
You can press t he
navigation button to
choose desired setup
function ite ms; up and
down to switch ite ms,
right and left to change
settings.
Setup Menu
15
Setup Menu Icon
Page Number
This shows the
current page
number of the
setup menu.
 Loading...