

Page 1

DC 2410
User’s Manual
Page 2

Copyright
Copyright (c) 2003 by BenQ Corporation. All rights reserved. No part of this publication may be reproduced, transmitted, transcribed, stored in a retrieval system or translated into any language or computer language, in any form or by any means, electronic,
mechanical, magnetic, optical, chemical, manual or otherwise, without prior written permission from BenQ Corporation.
Brands and product names are trademarks or registered trademarks of their respective
companies.
Disclaimer
BenQ makes no warranty of any kind with regard to this material, including, but not limited to, the implied warranties of merchantability and fitness for a particular purpose.
BenQ assumes no responsibility for any error that may appear in this document. BenQ
makes no commitment to update nor to keep current the information contained in this
document.
Taking care of your camera
• Do not use your camera over the following environmental range: temperature: O
to 40
C, relative humidity: 45% ~ 85%.
• Do not use or store your camera in environments listed below:
Direct sunlight.
High humidity and dusty places.
Next to the air conditioner, electric heater or the other heat sources.
In a closed car that is directly under the sun.
Avoid shaky places.
• If your camera becomes wet, wipe it with dry cloth as soon as possible.
• Salt of seawater may cause severe camera damage.
• Do not use organic solvents, such as alcohol, etc., to clean your camera.
• If the lens or viewfinder is dirty, please use the lens brush or soft cloth to clean the
lens. Do not touch the lens with your fingers.
• To prevent electrical shock, do not attempt to disassemble or repair your camera by
yourself.
• Water may cause a fire or electric shock. Therefore, please store your camera in a dry
place.
• Do not use your camera outdoors when it is raining or snowing.
• Do not use your camera in the water.
• If the foreign substance or water gets in your camera, please tum the power off imme-
diately and disconnect the batteries and the transformer. Remove the foreign substance or water, and send it to the maintenance center.
• Transfer the data to the computer as soon as possible to avoid losing your image data.
C
Page 3

BenQ DC 2410 User’s Manual
1. Touring your DC 2410 ................................. 1
1.1. Checking package contents ...............................1
1.2. Parts of the DC 2410 and their names ...........1
1.2.1. Front View ......................................................................1
1.2.2. Rear View ........................................................................2
1.2.3. Top View .........................................................................2
1.2.4. Bottom View ..................................................................2
1.2.5. Mode Dial and Focus Range .......................................2
2. Preparing your DC 2410 for using .............3
2.1. How to Switch On or Off The Camera .........3
2.2. Insert and Remove the SD Card ......................4
2.3. LCD Display Icon Definition .............................5
2.4. Icon Index ..............................................................5
3. Using the DC 2410 ........................................6
Working Mode .............................................................7
3.1. Recording Mode ...................................................7
3.2. Playback Mode ......................................................14
3.3. Video Mode (Preset :10 SEC) ...........................20
3.4. Set Up Mode .........................................................21
4. PC dependent features .................................25
4.1. Installing digital camera software .....................25
4.2. The Software of this Installation CD ..............26
4.3. Downloading the Image(s) .................................27
5. Troubleshooting (Error Message Table) ..28
6. Specifications ...................................................29
7. Service information ........................................31
I
Page 4

BenQ DC 2410 User’s Manual
1. T
OURING YOUR
DC 2410
1.1. Checking package contents
The package should include the following items:
DC 2410 digital camera
2 pcs of AA Battery
Camera pouch USB cable
DC 2410 software CD-ROM
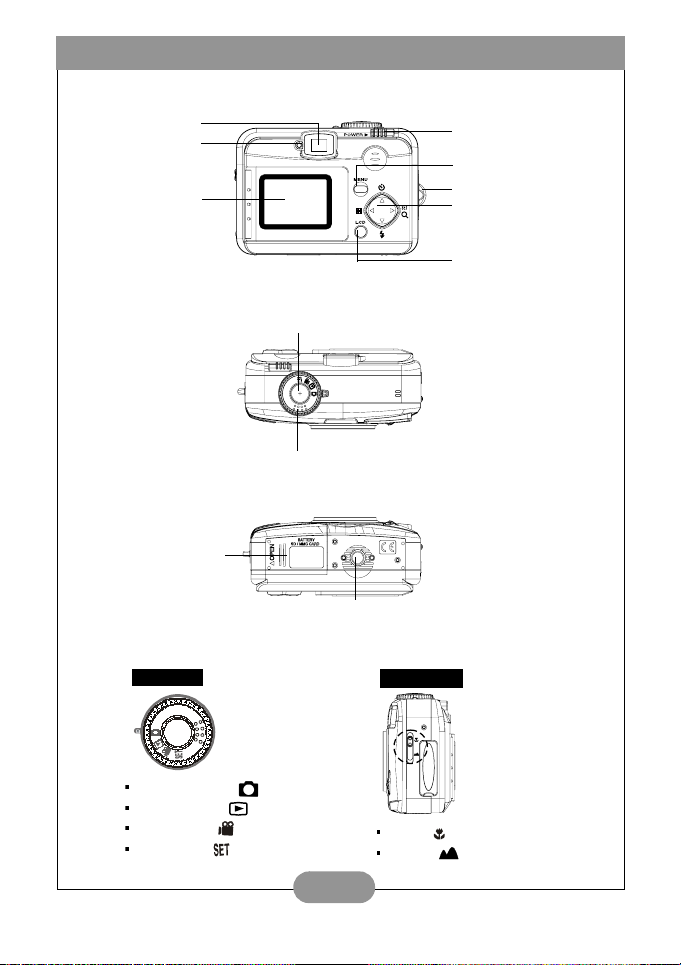
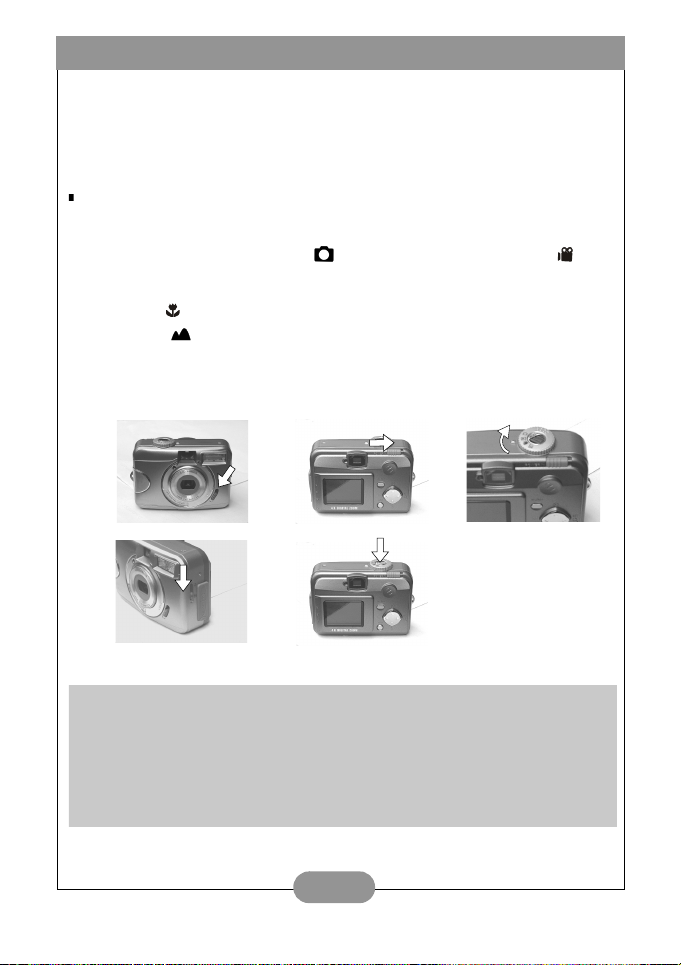
1.2. Parts of the DC 2410 and their names
1.2.1. Front View
Shutter Button
Mode Dial
Self-timer Indicator LED
Lens
Viewfinder
Hand Strap
User's
manual
User’s Manual
Flash
Focus Switch
USB Connector
DC In Connector
Lens Cover Switch
1
Page 5
BenQ DC 2410 User’s Manual
1.2.2. Rear View
Viewfinder
Indication LED
TFT LCD Monitor
1.2.3. Top View
Shutter Button
Mode Dial
1.2.4. Bottom View
Battery/ Memory
Card cover
Tripod mount
Power Switch
Menu/ Enter button
Strap Eyelet
Direction Button
(Up/Down/Rig ht/Left)
LCD Button
1.2.5. Mode Dial and Focus Range
Mode Dial
Recording Mode ( )
Playback Mode ( )
Video Mode ( )
Setup Mode ( )
2
Focus
Macro ( ) : 0.2 m
Normal ( ) : 0.8m~infinity
Page 6
BenQ DC 2410 User’s Manual
2. P
REPARING YOUR
DC 2410
FOR USING
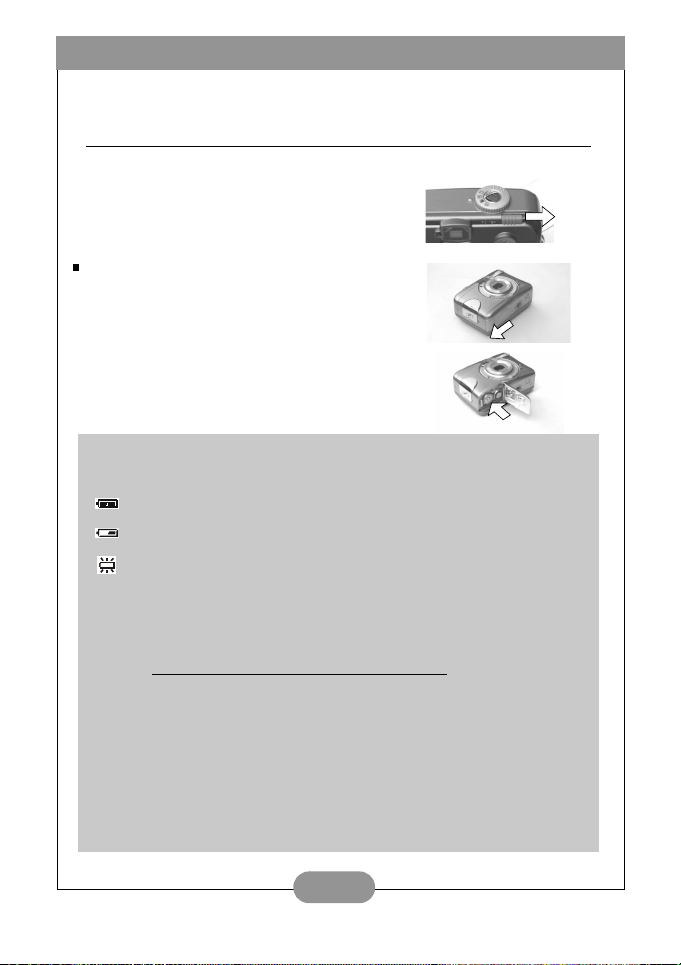
2.1. How to Switch On or Switch Off The Camera
Slide the "POWER" switch sideways and hold it a
while to switch on the camera. Repeat the action
above to switch off the camera.
Load the Batteries:
1. Check if the camera is switched off.
2. Slide the Battery / Memory Card Cover out to open it.
3. Load 2 x AA batteries into the battery chamber, following
the polarity indications.
4. Close the Battery / Memory Card Cover.
The below symbols are the indication of the battery status on the TFT LCD Monitor.
( ) Battery power is full.
( ) Battery power is half drained. Have new batteries ready.
( ) Battery power is drained. Replace the batteries you are using now.
Please use the below suggested battery to ensure that the battery is of acceptable
quality to support the camera's operation:
Brand Type
Duracell Ultra Alkaline
Note
Note
1. Batteries may lose power if kept inside the camera for a long time without using.
Please remove the batteries while the camera is not in use.
2. Do not use manganese batteries as they cannot supply sufficient power to support
the camera's operation.
3. Batteries may not work normally under 0ºC.
4. It's normal that the temperature of the camera body rises a little after being in use for
a long period.
3
Note
Page 7
BenQ DC 2410 User’s Manual
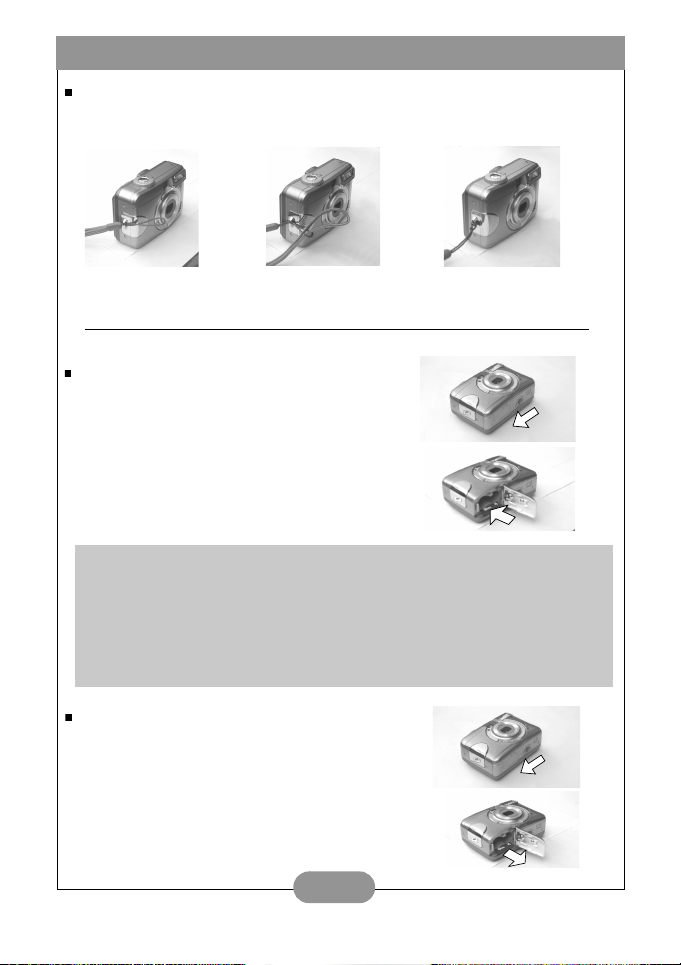
Attach the Hand Strap:
Please follow the illustrations.
1.
2.2. Insert and Remove the SD Card
Insert the SD Card
(1) S witch o ff th e cam era.
(2) Open the Battery / Memory Card Cover.
(3) Insert the SD card into the card slot
and press it down until you hear a click sound.
(4) Close the Battery / Memory Card Cover.
2.
3.
If a new SD card is used, you'll have to format it first. Please refer to page 16 for details.
Note
Note
This camera is equipped with a built-in flash memory. The image(s) can be stored in the
built-in memory or in a memory card if used. Please note that if a memory card is not
inserted, all operations will affect only the built-in flash memory. If the memory card is
inserted, all operations will affect only the memory card but not the built-in flash memory.
Remove the SD Card
(1) Make sure the camera is switched off.
(2) Open the Battery / Memory Card Cover.
(3) Press down the SD card and the card will jump
up.
(4) Take out the card and close the Battery / Memory
Card Cover.
4
Page 8
BenQ DC 2410 User’s Manual
2.3. LCD Display Icon Definition
Voice Memo
Working mode
Digital zoom
Focus Range
Battery status
( ) Battery power full
( ) Battery half drained
( ) Battery drained
Memory card inside
2.4. Icon Index
Exposure
Date stamp
Flash mode
( )Auto flash
( )Auto flash with
red-eye reduction
( )Slow sync
( )Fill-in flash
( )Flash off
White balance
()Auto
( )Daylight
( )Sunset
( )Fluorescent
( )Tungsten
Image size
( )2560x1920
( )2048x1536
( )1600x1200
( )1280x960
Image qualit y
( )Super fine
()Fine
()Normal
Working Modes
Icon Index
Focus Range
Flash Modes
Digital Zoom
Thumbnails
Self-timer
Movie Clips
Memory Card Inside
Battery Status
Image Size (Resolution)
Image Quality
White Balance
Exposure
Voice Memo
Protecting Images
Print (DPOF)
Darkness Warning
+
+
-
5
Page 9
BenQ DC 2410 User’s Manual
3. U
SING THE
The functions of DC 2410 are mainly composed of five modes: Recording mode, Playback
mode, Video Mode, and Setup Mode. In this chapter, we will introduce the functions of DC
2410 according to these four modes.
Basic Photography
1. Open the lens cover.
2. Switch on the power.
3. Set the Mode Dial at Shooting Mode ( ) for still image or Movie Clip Mode ( ) for
video recording.
4. The setting of the focus range for still image capture is required as follows:
Macro ( ) : 0.2m
Normal ( ): 0.8m~infinity
5. Refer to the next section -- “Working Mode” (page 7) to set up the features you prefer.
6. Hold still and press down the Shutter Button.
7. The LED Indicator starts blinking right after the Shutter Button is released.
8. Once the LED Indicator stops blinking, you are ready to take another shot.
1.
4.
DC 2410
2.
5.
3.
A message of "LENS COVER" blinking on the TFT LCD Monitor as a warning is to remind
you of opening the lens cover first.
Note
Note
The TFT LCD Monitor will show "Low Light!" as a warning to remind you that the image
which you are going to capture is in a low light environment. It is suggested to set the Flash
Mode at Auto Flash or Fill-in Flash for supplementary light to compose a good image.
6
Page 10

BenQ DC 2410 User’s Manual
Working Mode
3.1. Recording Mode
Please set the Mode Dial at Recording Mode ( ) before setting up
the below functions.
I. Set Up Focus Range
Before you take pictures, please make sure you set the Focus
Switch at the correct focus range or the image may not be clear.
a. Macro ( ): 0.2m.
b. Normal( ): 0.8m~infinity.
II. Turn On or Turn Off the LCD Display (Preset at On status)
You can change the icon display on the
TFT LCD Monitor, turn it off, and turn
it on again by pressing the LCD button
in order.
III. Set Up Flash Mode (Preset at Auto Flash mode)
You can change the flash mode shown
below according to the environment.
There are five flash modes as below:
a. Auto flash( ): The camera will judge the necessity of using the flash. If the
environment is too dark the flash will fire automatically.
7
Page 11
BenQ DC 2410 User’s Manual
b. Auto flash with red-eye reduction( ): The camera will judge the necessity of
using the flash and reduce the chance of red-eye reduction.
c. Slow sync ( ): The shutter speed will become slow in order to catch more
light to make good images in low light circumstances. Under this mode, it is
suggested to use a tripod to make sure the camera is held still while taking the
picture.
d. Fill-in-flash( ): The flash will fire in any light circumstances.
e. Flash off ( ): The flash will not fire in any light circumstances.
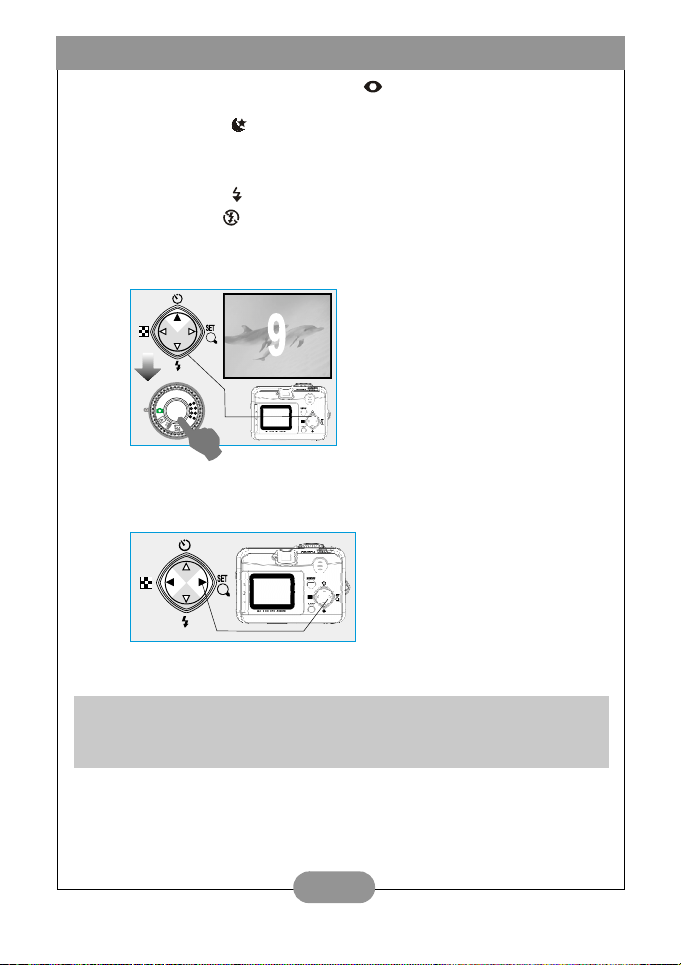
IV. Set Up Self-timer (Preset at no self-timer)
The self-timer starts with the countdown
for 10 seconds.
The self-timer will be automatically cancelled
once the shoot is done.
V. Set Up Digital Zoom (Preset at no digital zoom)
The zoom bar, appearing on the left on
the TFT LCD monitor, shows the
current digital zoom position.
It is normal that the image with digital zoom is not as sharp comparing to the image
without digital zoom.
8
Note
Page 12

BenQ DC 2410 User’s Manual
VI. Set Up Image Size (Preset at 1600 x 1200)
Step : To enter the setting mode. Step : To select and enter the option.
Step : To select and confirm the option. Step : To escape the setting.
Four resolutions provided can be selected as follows:
( ) 2560 x 1920 (XL)
( ) 2048 x 1536 (L)
( ) 1600 x 1200 (M)
( ) 1280 x 960 (S)
You can easily check whether the setting is changed or not by the resolution icon
display on the right side of the LCD screen. If not, please repeat the above steps.
9
Note
Page 13

BenQ DC 2410 User’s Manual
VII. Set Up Image Quality (Preset at Fine quality)
Step : To enter the setting mode. Step : To select and enter the option.
Step : To select and confirm the option. Step : To escape the setting.
Three levels of image quality can be selected as follows:
( ) Super Fine
( ) Fine
( ) Normal
The better the image quality is set, the less number of images can be stored in the builtin flash memory or the memory card.
Note
10
Page 14

BenQ DC 2410 User’s Manual
VIII. Set Up Voice Memo (Preset at 10 SEC)
Step : To enter the setting mode. Step : To select and enter the option.
Step : To select and confirm the option. Step : To escape the setting.
Note
With the Voice Memo, you can view the icon ( ) on the TFT LCD Monitor.
Note
With the Voice Memo, the audio is stored in WAV file format. So you can download
both of the images in JPG and the voice Memo in WAV on PC.
11
Page 15

BenQ DC 2410 User’s Manual
IX. Set Up Exposure (Preset at +0)
Step : To enter the setting mode. Step : To select and enter the option.
Step : To select and confirm the option. Step : To escape the setting.
The higher the value is, the brighter the image will be.
12
Note
Page 16

BenQ DC 2410 User’s Manual
X. Set Up White Balance (Preset at Auto White Balance)
Step : To enter the setting mode. Step : To select and enter the option.
Step : To select and confirm the option. Step : To escape the setting.
There are five modes can be selected which are:
( ) Auto White Balance: The camera will adjust the white balance by
( ) Daylight: For strong light environment.
( ) Sunset: For sunset light environment.
( ) Fluorescent: For fluorescent light environment.
( ) Tungsten: For tungsten light environment.
It is suggested to stay Auto mode for beginners.
itself. It is suggested that the user stay with this mode unless the light
environment is very different from normal.
Note
13
Page 17

BenQ DC 2410 User’s Manual
3.2. Playback Mode
I. Exploring An Image
Step : To enter the setting mode. Step : To select and enter the option.
Step : To select and confirm the option. Step : To escape the setting.
II. Displaying An Image Information
14
Press LCD button to get the
information of the image.
Page 18

BenQ DC 2410 User’s Manual
III. Playback of A Recorded Movie Clip
Press Up ( ) and Down( ) Direction Buttons to select a movie clip you
record and press Right Direction Button ( ) to play the movie clip.
Note
You can press Right Direction Button ( ) to pause the playback and repress it to cancel
the pause.
IV. Thumbnail Images (Small Images) Display
Press Up( ) and Down( ) Direction Buttons to select an image or movie
clip and press Right Direction Button( ) to enlarge the selected image or
movie clip.
Note
The appearance of icon of ( ) represents a movie clip, not a still image.
Note
The appearance of icon of ( ) represents a still image with voice memo.
15
Page 19

BenQ DC 2410 User’s Manual
V. To Delete Image(s)
S tep : To en te r t he set ti ng mo de .
Step : To select and enter the option.
Step : To select and enter the option.
Step : To s elect and c onfirm the option.
Step : To escape the setting.
VI. To Format a SD Card
Please insert a SD Card in advance.
Follow the above steps, selecting "FORMAT" in step 3, "YES" in step 4.
16
Page 20

BenQ DC 2410 User’s Manual
VII. Formatting the Built-in Flash Memory
Please make sure no memory card is inserted.
Refer to page 16 and follow the steps, selecting "FORMAT" in step 3 , "YES"
in step 4.
VIII. Set Up Slide Show (Preset at 1 second)
Step : To enter the setting mode. Step : To select and enter the option.
Step : To select and confirm the option. Step : To escape the setting.
17
Page 21

BenQ DC 2410 User’s Manual
IX. Setting Image Protection
Step : To enter the setting mode. Step : To select and enter the option.
Step : To select and confirm the option. Step : To escape the setting.
Note
After above steps are done, please check if the ( ) is shown on the right side of the
TFT LCD screen. If it is not shown, please repeat the above steps. For cancelling this
"PROTECT" function, please repeat the steps above and select "UNLOCK" in the step
3 instead.
18
Page 22

BenQ DC 2410 User’s Manual
X. Printing Out Images without a PC (Preset : X0)
Step : To enter the setting mode. Step : To select and enter the option.
Step : To select and confirm the option. Step : To escape the setting.
Note
After above steps are done, please check if the ( ) is shown on the left down corner.
If it is not shown, please repeat the steps.
Note
You cannot see the “PRINT” function on the TFT LCD Monitor if a memory card is not
inserted.
19
Page 23

BenQ DC 2410 User’s Manual
3.3. Video Mode (Preset :10 SEC)
Please set the Mode Dial at Video Mode ( ) .
Setting the Recording Time of a Movie Clip
Step : To enter the setting mode.
Step : To select and confirm the option.
Step : To escape the setting.
1. When 10, 20 or 30 seconds is selected, press the Shutter Button and the camera will
start the recording and stop automatically according to the set time.
2. When "Manual" is selected, press the Shutter Button to start the recording and press
the Shutter Button to stop the recording, the file length can be unlimited because it
depends on the media capacity.
Note
Note
The TFT LCD Monitor will show "Low Light!" as a warning to remind you that the video
which you are going to record is in a low light environment. It is suggested not to record
the video or to record it in a stronger light environment.
20
Page 24

BenQ DC 2410 User’s Manual
3.4. Set Up Mode
Please set the Mode Dial at Set Up Mode ( ).
I. Set Up Beep Sound (Preset at On)
St ep : To en te r t he s ett in g m od e.
Step : To select and enter the option.
Step : To select and confirm the option.
Step : To escape the setting.
II. Set Auto Power Off (Preset at 2 minutes)
S tep : To en te r t he set ti ng mo de .
Step : To select and enter the option.
Step : To select and confirm the option.
Step : To escape the setting.
21
Page 25

BenQ DC 2410 User’s Manual
III. Set Date Stamp (Preset On)
S tep : To en te r t he se tti ng mo de .
Step : To select and enter the option.
Step : To select and confirm the option.
Step : To escape the setting.
If this function is turned "ON", the date will be printed on the image.
IV. Set Date Type
Note
S tep : To en te r t he se tti ng mo de .
Step : To select and enter the option.
Step : To select and confirm the option.
Step : To escape the setting.
22
Page 26

BenQ DC 2410 User’s Manual
V. Date Set Up
S tep : To en te r t he set ti ng mo de .
Step : To select and enter the option.
Step : To set up the date.
Step : To escape the setting.
VI. Set Up Quick View (Preset at On)
St ep : To en te r t he s ett in g m od e.
Step : To select and enter the option.
Step : To select and confirm the option.
Step : To escape the setting.
Note
This can allow you to view the image on the TFT LCD Monitor right after you
take a picture.
23
Page 27

BenQ DC 2410 User’s Manual
VII. Set Up Language (Preset at English)
S tep : To en te r t he se tti ng mo de .
Step : To select and enter the option.
Step : To select and confirm the option.
Step : To escape the setting.
VIII. Reset to Default Setting
St ep : To en te r t he set ti ng mo de .
Step : To select and enter the option.
Step : To select and confirm the option.
Step : To escape the setting.
24
Page 28

BenQ DC 2410 User’s Manual
4. PC
DEPENDENT FEATURES
Preparations
To use the PC dependent functions, you need to install your digital camera software and connect the camera to your PC.
4.1. Installing digital camera software
• If your operation system is Windows 98, please setup the DC 2410 driver
first, if the operation system is Windows ME/2000/XP, then it's not necessary
for you to setup driver in advance.
• It's recommended that you setup driver and software before connecting digital
still camera to your PC for smooth installation. Normally, a software installation menu appears automatically after this installation CD is inserted into your
CD-ROM drive.
• Click on each item to start installing the software program of your choice. If
the menu did not appear, please browse the CD and find a program file named
"setup.exe" in the root directory and double-click on it. The menu will appear.
If you want to know the content of this CD and install software manually,
please refer to the descriptions of the CD content below.
25
Page 29

BenQ DC 2410 User’s Manual
4.2. The Software of this Installation CD
Software Description
1. PhotoBase Arcsoft PhotoBase, for you to find and
2. PhotoImpression ArcSoft PhotoImpression, it is an easy-to-use
3. VideoImpression Arcsoft Video Impression, for you to edit
4. PhotoPrinter Pro. Arcsoft Photo Printer this versatile
5. Microsoft DirectX Microsoft DirectX, an all-in-one and closs-
6. Acrobat reader Adobe Acrobat Reader, it's a "must have"
organize your media-files efficiently. You can
use it to creat a slide show, a web album, or a
video postcard, then sharing these media-files
with your friends through internet.
photo editing and creative design program.
You can edit and retouch your photos, then
add special effects or place them in cards,
calendars, frames and fantasy templates.
PhotoImpression also includes a wide variety
of printing options.
and combine the video files. New videos can
be created by existing video, animation, and
image files,quickly and easily create desktop
video presentations for use at home, business
or on the internet.
printing utility lets you print out casually, it
can be several different images on a single
sheet of paper. It's as simple as opening your
image, selecting from an assortment of
templates and clicking Print.
platform media tool.
utility to read files in the popular crossplatform file format "PDF".
26
Page 30

BenQ DC 2410 User’s Manual
4.3. Downloading the Image(s)
Under Windows Operating System (Windows 98/98SE/2000/ME/XP)
Downloading Image(s) From Removable Disk
1. Turn on the PC.
2. Switch on the camera.
3. Connect the camera to the PC with USB cable under any working mode.
Please make sure the USB cable is well connected to the PC and camera.
4. When the USB cable is connected to the PC, it will create a new hard disk named
Removable Disk .
5. The stored image(s) can be found in Removable Disk\Dcim\100media.
6. View the image with double-clicks.
27
Page 31

BenQ DC 2410 User’s Manual
5. T
ROUBLESHOOTING
(E
RROR MESSAGE TABLE
Message Cause Solution
CARD FULL There is insuffient card mem-
MEMORY FULL There is insuffient internal
CARD LOCKED (CARD
ICON is BLINKING)
LOCK The image can’t be deleted
NO IMAGE There is no image stored in
FILE ERROR The camera flash is turned
MEMORY ERROR Format the flash memory.
CARD ERROR Insert a new memory card.
USB ERROR USB connection erroor. Check USB cable connection.
LOW LIGHT! The environment is too dark
HAND SHAKE ICON The environment is too dark
ory capacity to store an
image.
memory capacity to store an
image.
The SD card is under protection.
under protection.
the memory card or built- in
flash memory.
off.
with “Flash Off” mode.
with “Flash Off” mode.
Delete the stored image(s) in
the memory card or insert a
new memory card.
Delete the stored image(s) in
the flash memory.
Set the card protection
switch at non- protection
position.
Unlock the protected image.
Delete this image and take
the picture again.
Set the flash modeat Auto
Flash or Fill-in Flash.
Set the flash modeat Auto
Flash or Fill-in Flash.
)
LENS COVER The lens cover is closed. Please open the lens cover
before taking pictures.
28
Page 32

BenQ DC 2410 User’s Manual
6. S
PECIFICATIONS
Image Sensor
Lens
Digital Zoom
Viewfinder
LCD Monitor
Focusing
Focusing Range
Shutter
Shutter Speed
Exposure
ISO Equivalent
White Balance
Flash
Flash Range
Self-timer
Movie Clips
Storage
1/2.7” CCD with 3.34 Mega pixels
f=5.1mm (35mm film equivalent : 34mm)
F2.9 / F8.0
1.1 to 4.0 (0.2/Step)
Optical virtual image viewfinder
1.6" color TFT LCD (80k pixels)
Fixed Focus with 2 steps manual adjustment
Macro: 0.2m, Normal: 0.8m-infinity
Mechanical shutter and Electrical shutter
1/4~ 1/1000 sec. Mechanical shutter
1/1000 sec. Electrical shutter
Program AE / Exposure compensation +
100,200 (Automatic)
Auto / Daylight / Fluorescent / Tungsten / Sunset
Auto / Fill-in flash / Flash off / Auto & Red - eye reduction /
Slow sync.
0.8 ~ 2.5m
10 seconds with LED indicator
Size : 320x240
Recording time : 10~30 sec. (10sec./step) and Manual
Internal memory: 16MB flash memory;
External memory: support SD Card
(unlimited length)
2EV (0.5EV / step)
File Format
Still Image: JPEG , EXIF, DCF, DPOF;
Movie Clip: AVI
29
Page 33

BenQ DC 2410 User’s Manual
Image size
Image Play
Interface
Power Source
Dimensions
(WxHxD)
Weight
FOR WINDOWS
Extra-Large: 2560x1920 (by interpolated),
Large: 2048x1536 pixels,
Medium: 1600x1200 pixels,
Small : 1280x960 pixels
Single image / AVI play / Thumbnails / Slide show
Digital output connector: USB 1.1
DC power input connector: 3.3V/ 2.0A
2 pcs of AA alkaline / 2 pcs of Ni-MH batteries.
AC adapter (Optional)
94 x 66 x 41 mm
145g (without batteries and card)
System Requirments
PC with processor better than MMX Pentium 233MHz
Windows 98/98SE/2000/ME/XP
Minimum 64MB RAM
100MB of available hard-disk space
USB port
CD-ROM drive
800x600 pixels,16-bit color display compatible monitor.
(24-bit color display recommended)
30
Page 34

BenQ DC 2410 User’s Manual
7. S
ERVICE INFORMATION
Technical support
If you encountered problems using DC 2410 and the camera driver program, please send an
E-mail (containing detailed descriptions of the problem you came upon, the hardware and
software environment of your system) to the following addresses:
USA: support-sc@BenQ.com
Europe: service@BenQ-eu.com
Taiwan: service-tw@BenQ.com
China: service_china@BenQ.com
Asia and other countries: support@BenQ.com
For free driver program updates, product information and news release, please visit the
following web address:
http://www.BenQ.com.tw/global/
31
Page 35

BenQ DC 2410 User’s Manual
<Memo>
32
 Loading...