

Page 1

DC C62 Digital Camera
DC C62 Digital Camera
DC C62 Digital CameraDC C62 Digital Camera
User’s Manual
User’s Manual
User’s ManualUser’s Manual
Welcome
Page 2

Copyright
Copyright 2004 by BenQ Corporation. All rights reserved. No part of this publication may be reproduced, transmitted, transcribed, stored in a retrieval system, or
translated into any language or computer language, in any form or by any means,
electronic, mechanical, magnetic, optical, chemical, manual, or otherwise, without
the prior written permission of this company.
Disclaimer
BenQ Corporation makes no representations or warranties, either expressed or
implied, with respect to the contents hereof and specifically disclaims any warranties, merchantability or fitness for any particular purpose. Further, BenQ Corporation reserves the right to revise this publication and to make changes from time to
time in the contents hereof without obligation of this company to notify any person
of such revision or changes.
*Windows, Internet Explorer and Outlook Express are trademarks of Microsoft
Corporation. Others are copyrights of their respective companies or organizations.
Taking Care of Your Camera
• Do not use your camera at temperatures below 0°C or above 40°C.
• Do not use or store your camera in the environments listed below:
– Direct sunlight
– High and dusty places
– Next to an air conditioner, electric heater or other heat sources
– In a closed car that is directly under the sun
– Unstable locations
• If your camera becomes wet, wipe it with dry cloth as soon as possible.
• Salt or seawater may cause severe camera damage.
• Do not use organic solvents, such as alcohol, etc., to clean your camera.
• If the lens or viewfinder is dirty, use a lens brush or soft cloth to clean the lens. Do not
touch the lens with your fingers.
• To prevent electrical shock, do not attempt to disassemble or repair your camera by
yourself.
• Water may cause a fire or electric shock. Therefore, store your camera in a dry place.
• Do not use your camera outdoors when it is raining or snowing.
• Do not use your camera in or near water.
• If a foreign substance or water gets in your camera, please turn the power off immediately and disconnect the batteries and the transformer. Remove the foreign substance
or water, and send it to the maintenance center.
• Transfer the data to the computer as soon as possible to avoid losing your image data.
Page 3

Table of Contents
OOOOUUUURRRRIIIINNNNGGGG
1111TTTT
1.1 Checking the Package Contents .......................................................................................... 1
1.2 DC C62 Components ...........................................................................................................1
1.3 Monitor Screen Contents .................................................................................................... 3
1.4 Attaching the Wrist Strap ....................................................................................................4
RRRREEEEPPPPAAAARRRRIIIINNNNGGGG
2222PPPP
2.1 Power Requirements ............................................................................................................ 5
2.2 Turning the Camera On and Off ......................................................................................... 6
2.3 Operating the Multi-controller ...........................................................................................7
2.4 Setting the Language ............................................................................................................ 8
2.5 Setting the Date and Time ...................................................................................................8
AAAASSSSIIIICCCC
3333BBBB
3.1 Recording an Image .............................................................................................................9
3.2 Using Zoom .......................................................................................................................... 9
3.3 Using the Flash ................................................................................................................... 10
3.4 Using the Self-timer ...........................................................................................................11
3.5 Specifying Image Size and Quality ....................................................................................12
TTTTHHHHEEEERRRR
4444OOOO
4.1 Selecting the Focus Mode .................................................................................................. 13
4.2 Exposure Compensation (EV Shift) .................................................................................. 15
4.3 Adjusting White Balance ...................................................................................................15
4.4 Using the NICESHOT Mode ............................................................................................. 16
4.5 Using the Movie Mode ...................................................................................................... 17
4.6 About the Histogram .........................................................................................................17
OOOOUUUURRRR
Y
Y
DC C62
DC C62 .............................................................................................
Y Y
1.2.1 Front View .................................................................................................................. 1
1.2.2 Rear View .................................................................................................................... 2
1.2.3 Bottom View .............................................................................................................. 2
1.3.1 Play mode ................................................................................................................... 3
1.3.2 Changing the Contents of the Monitor Screen ........................................................ 4
OOOOUUUURRRR
Y
Y
Y Y
2.1.1 Batteries ...................................................................................................................... 5
2.1.2 Inserting the Battery .................................................................................................. 5
2.1.3 Removing the Battery ................................................................................................ 6
2.1.4 Low Battery Indicator ................................................................................................6
2.2.1 To turn on the camera ...............................................................................................6
2.2.2 To turn off the camera ............................................................................................... 7
MMMMAAAAGGGGEEEE
EEEECCCCOOOORRRRDDDDIIIINNNNGGGG
I
I
R
R
I I
R R
3.2.1 Optical Zoom .............................................................................................................9
3.2.2 Digital Zoom ............................................................................................................10
3.5.1 To specify the image size ......................................................................................... 12
3.5.2 To specify the image quality ....................................................................................12
EEEECCCCOOOORRRRDDDDIIIINNNNGGGG
R
R
R R
4.1.1 Specifying the Auto Focus Area .............................................................................. 13
4.1.2 Using the Macro Mode ............................................................................................ 14
4.1.3 Using the Infinity Mode .......................................................................................... 14
4.1.4 Using Manual Focus ................................................................................................ 14
4.6.1 Histogram Examples ...............................................................................................17
4.6.2 Specifying ISO Sensitivity ........................................................................................ 18
4.6.3 Selecting the Metering Mode ................................................................................... 18
.............................................................................................1111
DC C62 DC C62
..........................................................................................................................................................................................
FFFFOOOORRRR
DC C62
DC C62
DC C62 DC C62
UUUUNNNNCCCCTTTTIIIIOOOONNNNSSSS
F
F
F F
SSSSEEEE
U
U
...........................................................................
........................................................................... 5555
U U
......................................................................................................................................................
...........................................................................................
...........................................................................................9999
......................................................................................................................................................................................
...............................................................................
............................................................................... 13
..............................................................................................................................................................
EE
En
E
nn
ng
gg
gl
ll
li
ii
is
ss
sh
hh
h
13
1313
Table of Contents i
Page 4

4.6.4 Using the Filter Function ......................................................................................... 19
4.6.5 Specifying Color Saturation .................................................................................... 19
4.6.6 Specifying Contrast .................................................................................................. 19
4.6.7 Specifying Outline Sharpness ..................................................................................19
hh
h
ss
sh
ii
is
ll
li
gg
gl
nn
ng
E
EE
En
4.6.8 Turning the On-screen Grid On and Off ............................................................... 20
4.6.9 Turning Image Review On and Off ......................................................................... 20
4.6.10Specifying Power On Default Settings .................................................................... 20
4.6.11Resetting the Camera ............................................................................................... 20
LLLLAAAAYYYYBBBBAAAACCCCKKKK
5555PPPP
5.1 Basic Playback Operation .................................................................................................. 21
5.2 Zooming the Display Image .............................................................................................. 21
5.3 Resizing an Image ............................................................................................................... 22
5.4 Cropping an Image ............................................................................................................ 22
5.5 Playing a Movie .................................................................................................................. 23
5.6 Viewing Pictures in Thumbnail Mode .............................................................................. 23
5.7 Rotating the Display Image ............................................................................................... 23
5.8 Deleting Files ...................................................................................................................... 24
5.9 File Management ................................................................................................................ 24
6666DPOF
DPOF ........................................................................................................................
DPOF DPOF
6.1 DPOF Setting ...................................................................................................................... 26
6.2 To configure print settings for a single image .................................................................. 26
6.3 To configure print settings for all images ......................................................................... 26
6.4 PRINT Image Matching II ................................................................................................. 27
6.5 Exif Print ............................................................................................................................. 27
6.6 Using USB DIRECT-PRINT .............................................................................................. 27
7777CCCC
7.1 Specifying the File Name Serial Number Generation Method ........................................28
7.2 Setting the Beep Sound ......................................................................................................28
7.3 Specifying an Image for the Startup Screen ......................................................................28
7.4 Formatting Built-in Memory ............................................................................................ 29
8888UUUU
8.1 Installing an SD Card ......................................................................................................... 30
8.2 To remove the SD card ...................................................................................................... 30
8.3 Formatting a Memory Card .............................................................................................. 31
8.4 Copying Files ...................................................................................................................... 31
9999CCCC
9.1 Installing the Digital Camera Software ............................................................................. 32
9.2 Bundled Software ............................................................................................................... 33
9.3 Transferring Files To/From a Computer ..........................................................................34
9.4 System Requirements .........................................................................................................34
10
10 TTTT
1010
11
11 SSSS
1111
12
12 SSSS
1212
..................................................................................................................
..................................................................................................................21
....................................................................................................................................................................................................................................
5.8.1 Deleting a Single File ................................................................................................ 24
5.8.2 Deleting a All Files ...................................................................................................24
5.9.1 Folders ...................................................................................................................... 24
5.9.2 Protecting Files ......................................................................................................... 25
........................................................................................................................26
................................................................................................................................................................................................................................................
AAAAMMMMEEEERRRRAAAA
EEEETTTTTTTTIIIINNNNGGGGSSSS
S
S
S S
SSSSIIIINNNNGGGG
A M
A M
A M A M
OOOONNNNNNNNEEEECCCCTTTTIIIINNNNGGGG
RRRROOOOUUUUBBBBLLLLEEEESSSSHHHHOOOOOOOOTTTTIIIINNNNGGGG
PPPPEEEECCCCIIIIFFFFIIIICCCCAAAATTTTIIIIOOOONNNNSSSS
EEEERRRRVVVVIIIICCCCEEEE
I
I
I I
.....................................................................................................
.....................................................................................................28
..........................................................................................................................................................................................................
EEEEMMMMOOOORRRRYYYY
AAAARRRRDDDD
C
C
..........................................................................................
..........................................................................................30
C C
....................................................................................................................................................................................
TTTTOOOO
AAAA
OOOOMMMMPPPPUUUUTTTTEEEERRRR
C
C
C C
...................................................................................................
...................................................................................................35
......................................................................................................................................................................................................
.........................................................................................................
.........................................................................................................36
..................................................................................................................................................................................................................
NNNNFFFFOOOORRRRMMMMAAAATTTTIIIIOOOONNNN
.................................................................................
................................................................................. 32
..................................................................................................................................................................
.............................................................................................
.............................................................................................36
..........................................................................................................................................................................................
21
2121
26
2626
28
2828
30
3030
32
3232
35
3535
36
3636
36
3636
Table of Contentsii
Page 5
BenQ DC 5530 User’s Manual
OOOOUUUURRRRIIIINNNNGGGG
1111 TTTT
1.1
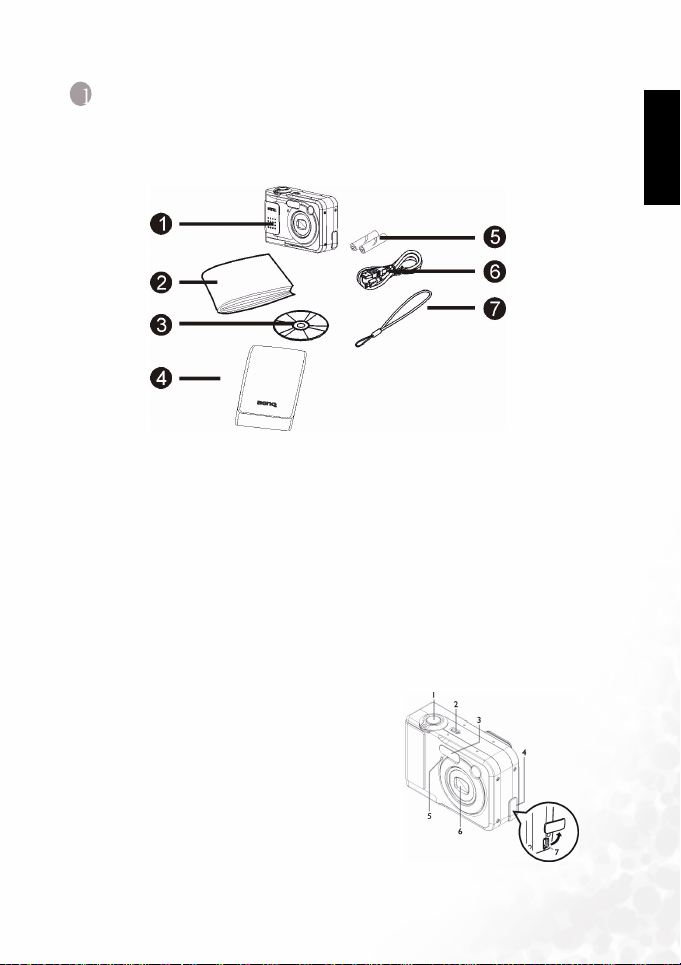
1.1 Checking the Package Contents
1.11.1
The package includes the following items:
1. DC C62 digital camera
2. User's manual
3. DC C62 software CD-ROM
4. Soft Case
5. 2 AA-size Alkaline batteries
6. USB cable
7. Strap
If anything is missing or appears damaged, contact your dealer. Save the packaging in the event
you need to ship your camera for service.
1.2
1.2 DC C62
1.21.2
1.2.1
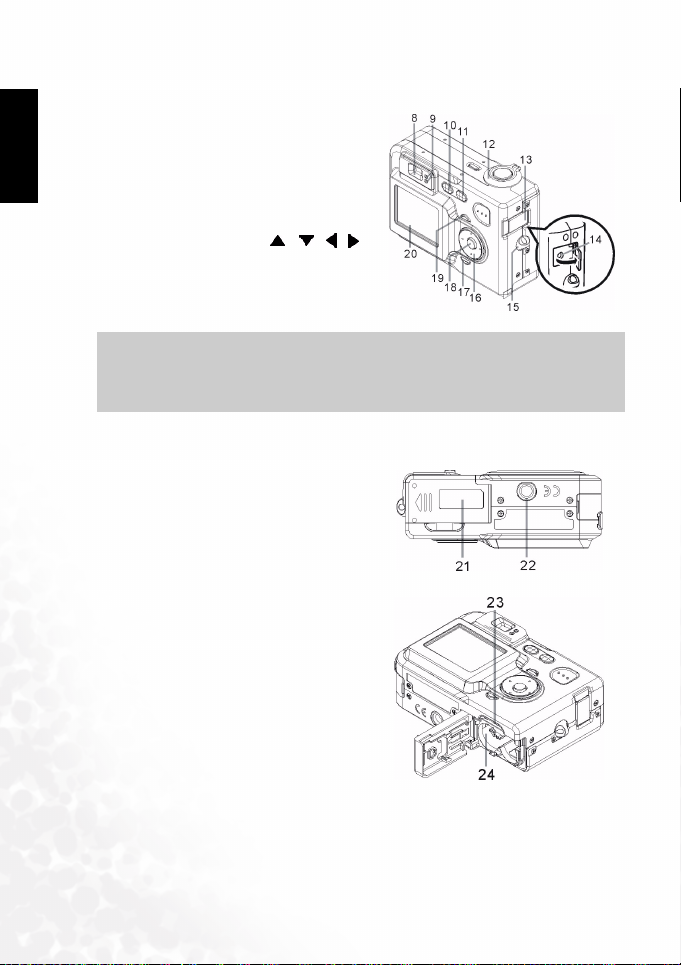
1.2.1 Front View
1.2.11.2.1
OOOOUUUURRRR
Y
Y
DC C62
DC C62
Y Y
DC C62 DC C62
Checking the Package Contents
Checking the Package ContentsChecking the Package Contents
DC C62 Components
DC C62DC C62
Front View
Front ViewFront View
1. Shutter release button
2. Power button
3. Flash
4. Terminal Cover
5. Self-timer lamp
6. Lens
7. [USB] port
Components
Components Components
EE
En
E
nn
ng
gg
gl
ll
li
ii
is
ss
sh
hh
h
Touring Your DC C62 1
Page 6
BenQ DC 5530 User’s Manual
1.2.2
1.2.2 Rear View
Rear View
1.2.21.2.2
Rear ViewRear View
8. Viewfinder
hh
h
ss
sh
ii
is
ll
li
gg
gl
nn
ng
E
EE
En
9. Operation lamp
10. (Play mode)
11. (REC mode)
12. Zoom controller
13. Terminal cover
14. [DC IN 3V] terminal
15. Strap ring
16. Multi-controller[ ][ ][ ][ ]
17. [DISP] button
18. [SET] button
19. [MENU] button
20. LCD Monitor
• The LCD on the digital camera is manufactured with sophisticated technology, however,
the display may have some light spots or show unusual colors. This is normal and does not
indicate display malfunction, nor will this affect the pictures you take with the camera.
1.2.3
1.2.3 Bottom View
Bottom View
1.2.31.2.3
Bottom ViewBottom View
21. Battery compartment cover
22. Tripod screw hole (Use this hole when attaching to a tripod.)
23. Memory card slot
24. Battery compartment
Note
Note
NoteNote
Touring Your DC C622
Page 7
BenQ DC 5530 User’s Manual
1.3
1.3 Monitor Screen Contents
Monitor Screen Contents
1.31.3
Monitor Screen ContentsMonitor Screen Contents
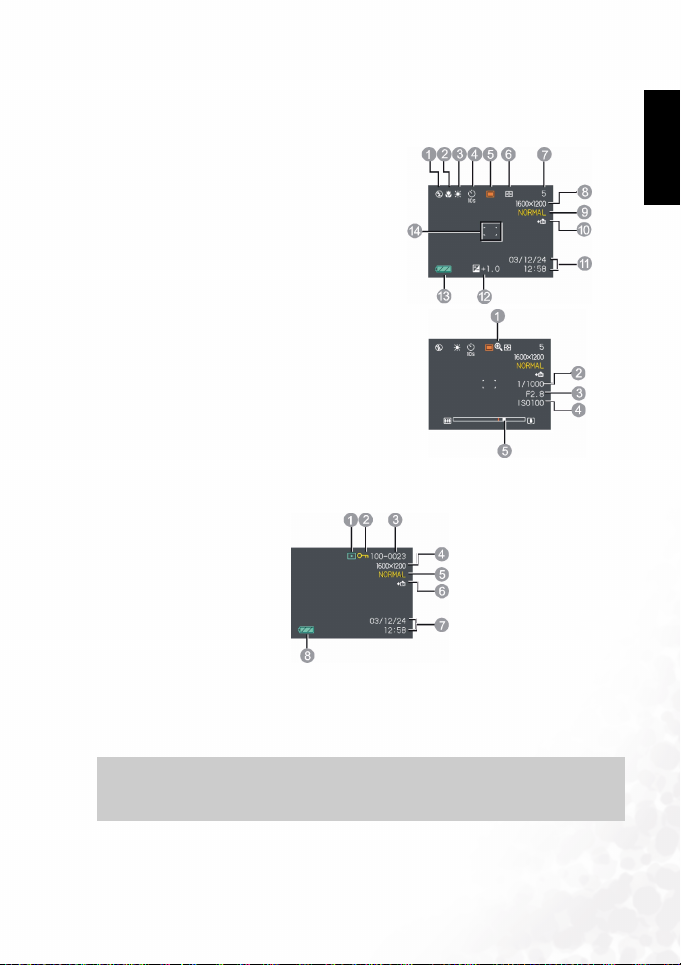
The monitor screen uses various indicators and icons to keep you informed of the camera
status.
1. Flash Mode indicator
2. Focus Mode indicator
3. White balance indicator
4. Self-timer
5. REC modes
6. Metering Mode
7. Memory capacity
8. Image size
9. Quality
10. Memory selected for data storage
11. Date and time
12. EV value
13. Battery capacity
14. Focus frame
1. Digital zoom indicator
2. Shutter speed value
3. Aperture value
4. ISO sensitivity
5. Zoom indicator
1.3.1
1.3.1 Play mode
Play mode
1.3.11.3.1
Play modePlay mode
EE
En
E
nn
ng
gg
gl
ll
li
ii
is
ss
sh
hh
h
1. PLAY mode file type (Snapshot, Movie)
2. Image protection indicator
3. Folder number/File number
4. Image size
5. Quality
6. Memory selected for data storage
7. Date and time
8. Battery capacity
Note
Note
NoteNote
• In play mode, if you press the [DISP] button, it will also show W/B, E.V., flash status,
AWB, metering and histogram information on the monitor screen.
Touring Your DC C62 3
Page 8

BenQ DC 5530 User’s Manual
1.3.2
1.3.2 Changing the Contents of the Monitor Screen
Changing the Contents of the Monitor Screen
1.3.21.3.2
Changing the Contents of the Monitor ScreenChanging the Contents of the Monitor Screen
hh
h
ss
sh
ii
is
ll
li
gg
gl
nn
ng
E
EE
En
Each press of the [DISP] button changes the contents of the monitor screen as shown below.
Indicators on Histogram on Indicators off LCD off
Important!
Important!
Important!Important!
• You cannot use the [DISP] button to change the contents of the monitor screen while a
movie is being recorded.
1.4
1.4 Attaching the Wrist Strap
Attaching the Wrist Strap
1.41.4
Attaching the Wrist StrapAttaching the Wrist Strap
The illustration shows how to attach the wrist strap to your camera.
Important!
Important!
Important!Important!
• Be sure to keep the strap around your wrist when using the camera to protect against
accidentally dropping it.
Don't swing the camera when carrying it by the wrist strap.
•
Touring Your DC C624
Page 9
BenQ DC 5530 User’s Manual
RRRREEEEPPPPAAAARRRRIIIINNNNGGGG
2222 PPPP
2.1
2.1 Power Requirements
Power Requirements
2.12.1
Power RequirementsPower Requirements
Your camera features a two-way power supply that lets you use either AA-size batteries or
household AC current. A set of AA-size Alkaline batteries is supplied with the camera. The
other items listed below are available separately.
2.1.1
2.1.1 Batteries
Batteries
2.1.12.1.1
BatteriesBatteries
• Two AA-size rechargeable nickel-metal hydride batteries
• Two AA-size lithium batteries: FR6
• Two AA-size alkaline batteries: LR6
• Proper operation cannot be guaranteed if you use any other type of battery other than that
noted above.
• When being powered by AA-size alkaline batteries (LR6), the camera may not operate at all
at temperatures of 5°C (41°F) or lower.
• The batteries are not charged when you purchase the camera. You need to charge batteries
before using the camera for the first time.
2.1.2
2.1.2 Inserting the Battery
Inserting the Battery
2.1.22.1.2
Inserting the BatteryInserting the Battery
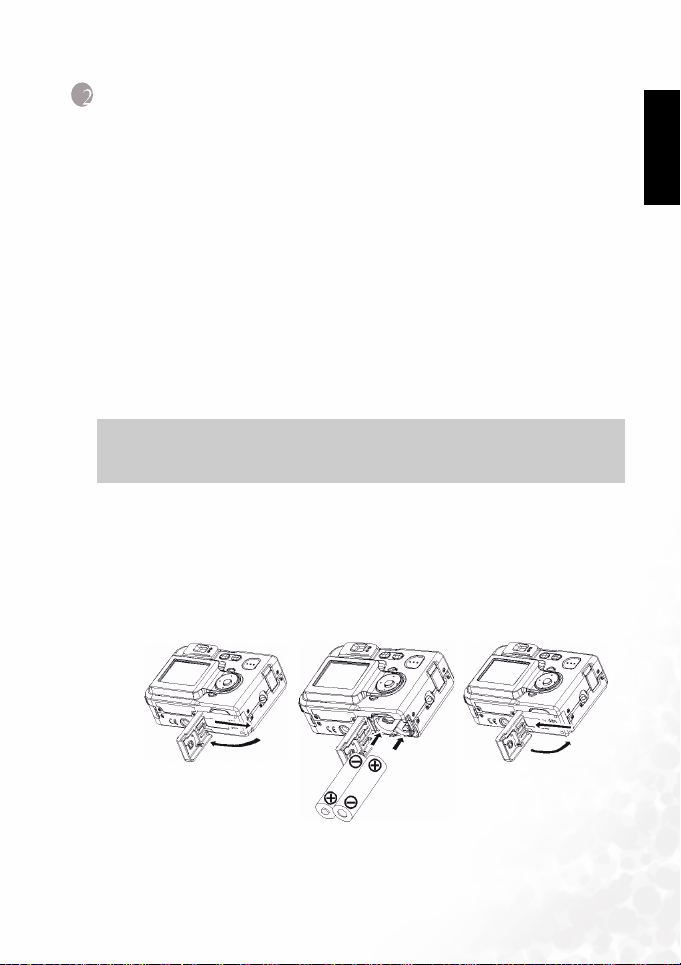
1. Turn off the camera.
2. Slide the battery compartment cover in the direction indicated by the arrow.
3. Load batteries as shown in the illustration.
4. While pressing down at the point indicated by the arrow in the illustration, slide the
battery compartment cover closed.
Y
Y
Y Y
OOOOUUUURRRR
DC C62
DC C62
DC C62 DC C62
FFFFOOOORRRR
SSSSEEEE
U
U
U U
Important!
Important!
Important!Important!
EE
En
E
nn
ng
gg
gl
ll
li
ii
is
ss
sh
hh
h
Preparing Your DC C62 for Use 5
Page 10

BenQ DC 5530 User’s Manual
2.1.3
2.1.3 Removing the Battery
Removing the Battery
2.1.32.1.3
Removing the BatteryRemoving the Battery
hh
h
ss
sh
ii
is
ll
li
gg
gl
nn
ng
E
EE
En
1. Slide the battery compartment cover on the bottom of the camera in the direction
indicated by the arrow and then swing it open.
2. Carefully tilt the camera until the batteries slide out.
• Take care to avoid dropping the batteries.
2.1.4
2.1.4 Low Battery Indicator
Low Battery Indicator
2.1.42.1.4
Low Battery IndicatorLow Battery Indicator
The following shows how the battery capaci ty indicator on the LCD monitor changes as battery
power is used. The indicator means that remaining battery power is low.
Note that you will not be able to record images while the battery indicator is .
Immediately replace or charge the batteries whenever either of these indicators appears.
Charge Level
Indicator
2.2
2.2 Turning the Camera On and Off
Turning the Camera On and Off
2.22.2
Turning the Camera On and OffTurning the Camera On and Off
2.2.1
2.2.1 To turn on the camera
To tur n o n t he ca me ra
2.2.12.2.1
To tur n o n t he ca me raTo t ur n o n t he c am er a
Press the power button, [ ] (REC) button, or [ ] (PLAY) button. This will cause the
green operation lamp to light momentarily, and then power will turn on. The mode the camera
enters depends on which button you pressed to turn it on.
To enter this mode at startup
REC
PLAY
High Low
Press this button to turn on the camera.
Power button or [ ] (REC) button.
[ ] (PLAY) button
Preparing Your DC C62 for Use6
Page 11
BenQ DC 5530 User’s Manual
1
23
1. Green operation lamp
2. [ ] (PLAY)
3. [ ] (REC)
4. Power button
Pressing [ ] (REC) to turn on the camera enters the REC mode, while pressing [ ]
•
(PLAY) enters the PLAY mode.
Pressing [ ] (PLAY) while in the REC mode switches to the PLAY mode. The lens
•
retracts about 10 seconds after switching modes.
If camera power is turned off by the Auto Power Off feature, press the power button,
•
[ ] (REC) or [ ] (PLAY) to turn it back on again.
2.2.2
2.2.2 To turn off the camera
To turn off the camera
2.2.22.2.2
To turn off the cameraTo turn off the camera
Press the power button to turn off the camera.
2.3
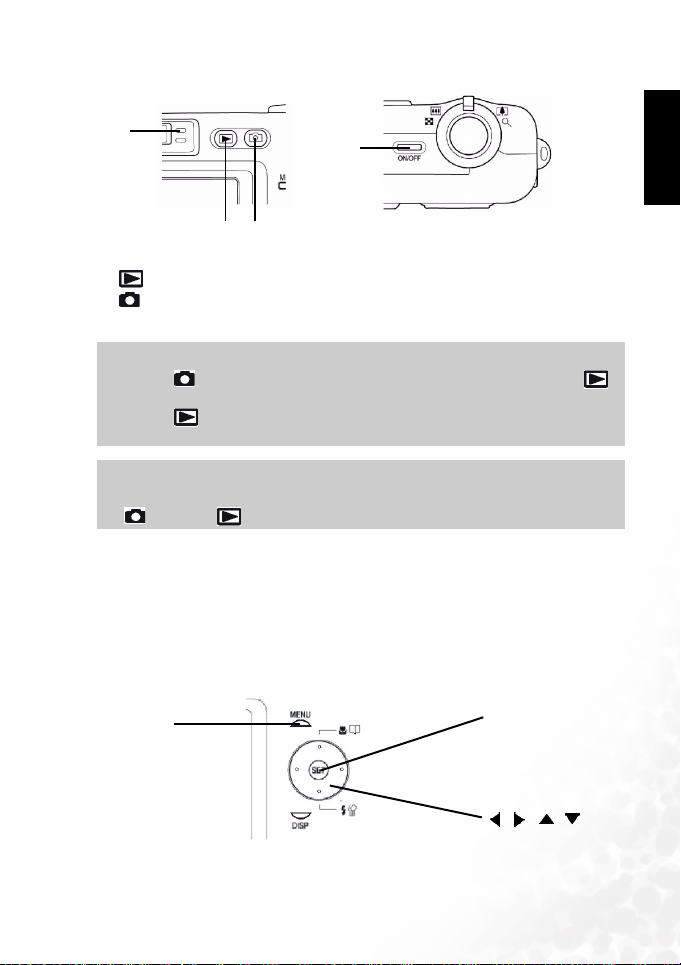
2.3 Operating the Multi-controller
Operating the Multi-controller
2.32.3
Operating the Multi-controllerOperating the Multi-controller
The multi-controller is used to select choices, images and menus on the LCD monitor and
confirm the selection. The following shows an example menu procedure in the REC mode.
4
Note
Note
NoteNote
Important!
Important!
Important!Important!
EE
En
E
nn
ng
gg
gl
ll
li
ii
is
ss
sh
hh
h
[SET]
[SET]
[MENU]
[MENU]
[MENU][MENU]
[SET][SET]
[][][ ][ ]
Preparing Your DC C62 for Use 7
Page 12
BenQ DC 5530 User’s Manual
1. Press the power button or the [ ] (REC) button.
2. Press [MENU].
hh
h
ss
sh
ii
is
ll
li
gg
gl
nn
ng
E
EE
En
3. Press [ ] or [ ] to select the tab you want, and then press
[SET] to move the selection cursor from the tab to the
settings.
4. Use [ ] and [ ] to select the feature whose setting you
want to configure, and then press [ ]. (Instead of pressing
[ ], you could also press [SET].)
5. Use [ ] and [ ] to change the currently selected setting.
6. Perform one of the following operations to apply the
setting you configured.
Apply the setting and exit the menu screen.
Apply the setting and return to feature selection in step 4.
Apply the setting and return to tab selection in step 3.
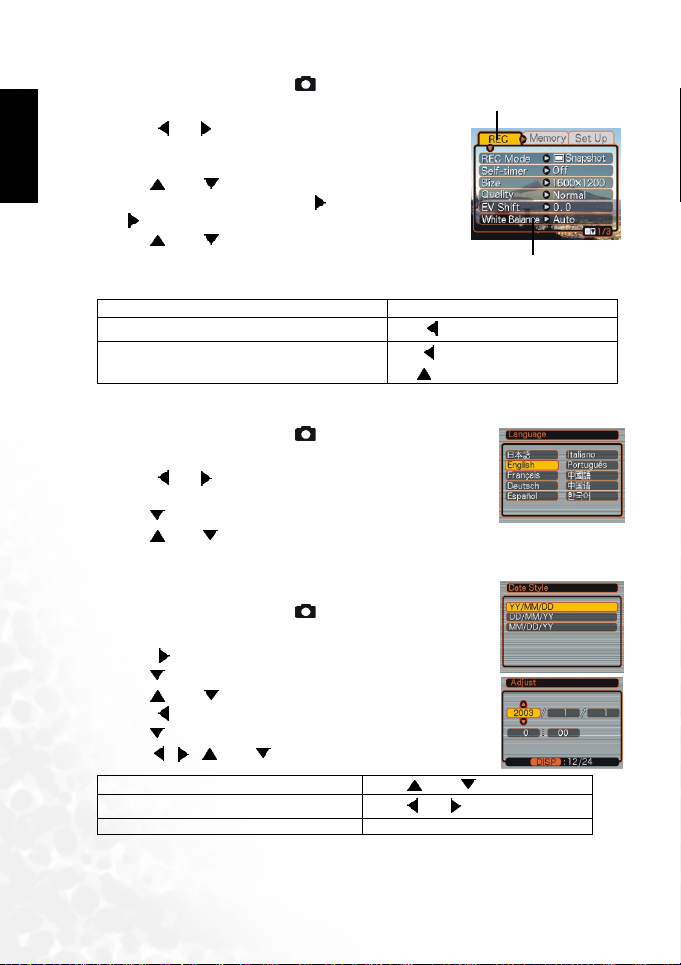
2.4
2.4 Setting the Language
Setting the Language
2.42.4
Setting the LanguageSetting the Language
1. Press the power button or the [ ] (REC) button.
2. Press [MENU].
3. Press [ ] or [ ] to select the [Set Up] tab, and then press [SET]
to move the selection cursor from the tab to the settings.
4. Use [ ] to select the Language, and then press [SET].
5. Use [ ] and [ ] to change the language setting, and then press
[SET].
2.5
2.5 Setting the Date and Time
Setting the Date and Time
2.52.5
Setting the Date and TimeSetting the Date and Time
1. Press the power button or the [ ] (REC) button.
2. Press [MENU].
3. Press [ ] to select the [Setup] tab, and then press [SET].
4. Use [ ] to select the Date Style, and then press [SET].
5. Use [ ] and [ ] to change the date format setting, and then
press [ ].
6. Use [ ] to select the Adjust, and then press [SET].
7. Use [ ][ ][ ] and [ ] to set the current date and time.
Change the setting
Move the cursor between settings Press
Toggle between 12-hour and 24-hour timekeeping Press [DISP].
8. Press [SET].
Press [SET].
Press []
Press
[]
Use
[] and []
Press
[] or []
Ta b
Settings(indicates the
currently selected item)
[]
to move back up to tab selection.
.
.
Preparing Your DC C62 for Use8
Page 13

BenQ DC 5530 User’s Manual
AAAASSSSIIIICCCC
3333 BBBB
3.1
3.1 Recording an Image
3.13.1
Your camera automatically adjusts shutter speed in accordance with the brightness of the
subject.
1. Press the power button or the [ ] (REC) button to turn on the
2. Compose the image on the monitor screen so the main subject is
3. Press the shutter release button half way to focus the image.
4. After making sure that the image is focused properly, press the
3.2
3.2 Using Zoom
3.23.2
Your camera is equipped with two types of zoom: optical
zoom and digital zoom.
3.2.1
3.2.1 Optical Zoom
3.2.13.2.1
The range of the optical zoom factor is shown below.
Factor Range: 1X to 3X
(1X to 1.2X in the Macro Mode)
1. In the REC mode, slide the zoom controller left or right to change the zoom factor.
2. Record the image.
MMMMAAAAGGGGEEEE
I
I
I I
Recording an Image
Recording an ImageRecording an Image
camera.
within the focus frame.
• The focusing range of the camera in the Auto Focus mode is
approximately 60cm (23.6”) to infinity ( ).
• The camera's Auto Focus feature automatically focuses the image,
one beep will sound when the camera has finished metering, and
the indicator beside the viewfinder will light green.
• The shutter speed and aperture value show on the LCD monitor.
• The green indicator will blink if the subject is difficult to focus on.
shutter release button the rest of the way down to record.
Using Zoom
Using ZoomUsing Zoom
Optical Zoom
Optical ZoomOptical Zoom
EEEECCCCOOOORRRRDDDDIIIINNNNGGGG
R
R
R R
Zoom Controller
EE
En
E
nn
ng
gg
gl
ll
li
ii
is
ss
sh
hh
h
Zoom out
Zoom in
Basic Image Recording 9
Page 14

BenQ DC 5530 User’s Manual
hh
h
ss
sh
ii
is
ll
li
gg
gl
nn
ng
E
EE
En
• The optical zoom factor also affects the lens aperture.
Use of a tripod is recommended to protect against hand movement when using the
•
telephoto setting (zoom in).
3.2.2
3.2.2 Digital Zoom
Digital Zoom
3.2.23.2.2
Digital ZoomDigital Zoom
Digital zoom is activated after you reach the maximum optical zoom factor (3X). It enlarges
the part of the image at the center of the image screen. The range of the digital zoom factor is
shown below.
• Digital Zoom Factor Range: 3X to 12X (in combination with optical zoom)
1. In the REC mode, press [MENU].
2. Use [ ] and [ ] to select the "REC" tab.
3. Use [ ] and [ ] to select "Digital Zoom", and then press [ ].
4. Use [ ] and [ ] to select "On", and then press [SET].
5. Slide the zoom controller towards (Telephoto)/ to change the zoom factor.
• The lens will zoom to the maximum optical telephoto setting and stop. Release the lever
and press it toward again to further zoom the image digitally. The zoom indicator shows
the current approximate zoom factor.
6. Record the image.
Important!
Important!
Important!Important!
• Digital zoom is disabled whenever the monitor screen is turned off.
Note
Note
NoteNote
3.3
3.3 Using the Flash
Using the Flash
3.33.3
Using the FlashUsing the Flash
Perform the following steps to select the flash mode you want to use.
1. In the REC mode, press [MENU].
2. Press [ ] to select the flash mode.
• Each press of [ ] cycles through the flash mode settings shown below on the LCD
monitor.
Basic Image Recording10
Page 15

BenQ DC 5530 User’s Manual
3. Record the image.
[]
EE
En
E
nn
ng
gg
gl
ll
li
ii
is
ss
sh
hh
h
None Auto
Force Off The flash does not fire.
Force On The flash always fires.
Red-eye reduction, Auto
The flash fire s automatically as required by the lightin g
level.
The flash fire s automatically as required by the lightin g
level, and the flash pre-strobes before shooting to reduce
red-eye phenomenon.
Important!
Important!
Important!Important!
• Image recording may not be performed if you press the shutter release button while the
red operation lamp is flashing.
You may not be able to achieve the desired results using a flash if the subject is too close or
•
too far away.
About Red-eye Reduction
About Red-eye Redu ction
About Red-eye Redu ctionAbout Red-eye Reduction
Using the flash to record at night or in a dimly lit room can cause red spots inside the eyes of
people who are in the image. This is caused when the light from the flash reflects off of the
retina of the eye. When red-eye reduction is selected as the flash mode, the camera performs
two pre-flash operations, one designed to cause the irises in the eyes of any people in the image
to close, and one for the Auto Focus operation. This is followed by another flash operation for
actual recording of the image.
3.4
3.4 Using the Self-timer
Using the Self-timer
3.43.4
Using the Self-timerUsing the Self-timer
The self-timer lets you select either a 2-second or 10-second delay of the shutter release after
you press the shutter button.
1. In the REC mode, press [MENU].
2. Use [ ] and [ ] to select the "REC" tab.
3. Use [ ] and [ ] to select "Self-timer", and then press [ ].
4. Use [ ] and [ ] to set the self-timer time, and then press [SET].
5. Record the image.
Basic Image Recording 11
Page 16

BenQ DC 5530 User’s Manual
• When you press the shutter button, the self-timer lamp flashes and the shutter releases
after the self-timer reaches the end of its countdown.
hh
h
ss
sh
ii
is
ll
li
gg
gl
nn
ng
E
EE
En
3.5
3.5 Specifying Image Size and Quality
Specifying Image Size and Quality
3.53.5
Specifying Image Size and QualitySpecifying Image Size and Quality
You can specify the image size and image quality to suit the type of image you are recording.
3.5.1
3.5.1 To specify the image size
To specify the image size
3.5.13.5.1
To specify the image sizeTo specify the image size
1. In the REC mode, press [MENU].
2. Use [ ] and [ ] to select the "REC" tab.
3. Use [ ] and [ ] to select "Size", and then press [ ].
4. Use [ ] and [ ] to select the setting you want, and then press [SET].
2816X2112 Print on large prints
2816X1872 3:2 Print large prints
2048X1536 Print on normal size paper
1600X1200 Print on small size paper
1280X960 Send images by e-mail
640X480 Shoot more images
3.5.2
3.5.2 To specify the image quality
3.5.23.5.2
1. In the REC mode, press [MENU].
2. Use [ ] and [ ] to select the "REC" tab.
3. Use [ ] and [ ] to select "Quality", and then press [ ].
4. Use [ ] and [ ] to select the setting you want, and then press [SET].
Fine Very high quality, but large file size
Normal Normal quality
Economy Small file size, but low quality
Size Purpose
To specify the image quality
To specify the image qualityTo specify the image quality
Quality Purpose
Basic Image Recording12
Page 17

BenQ DC 5530 User’s Manual
4444 OOOO
TTTTHHHHEEEERRRR
4.1
4.1 Selecting the Focus Mode
4.14.1
You can select one of four different focus modes: Auto Focus, Macro, Infinity, and Manual.
1. In the REC mode, press [ ] .
2. Each press of [ ] cycles thorough the focus
mode settings shown below on the LCD monitor.
None Auto Focus
MF Manual focus
4.1.1
4.1.1 Specifying the Auto Focus Area
4.1.14.1.1
You can use the following procedure to change the Auto Focus area used in the Auto Focus
Mode and the Macro Mode.
1. In the REC mode, press [MENU].
2. Use [ ] and [ ] to select the "REC" tab.
3. Use [ ] and [ ] to select "AF Area", and then press [ ].
4. Use [ ] and [ ] to select the auto focus area you want, and then press [SET].
EEEECCCCOOOORRRRDDDDIIIINNNNGGGG
R
R
R R
Selecting the Focus Mode
Selecting the Focus ModeSelecting the Focus Mode
Close-up focus (Macro)
Infinity focus
Specifying the Auto Focus Area
Specifying the Auto Focus AreaSpecifying the Auto Focus Area
UUUUNNNNCCCCTTTTIIIIOOOONNNNSSSS
F
F
F F
[]
EE
En
E
nn
ng
gg
gl
ll
li
ii
is
ss
sh
hh
h
Spot Very limited range in the center of the screen.
Multi Automatic selection of the focus area where the subject closest to the camera is located.
Other Recording Functions 13
Page 18

BenQ DC 5530 User’s Manual
4.1.2
4.1.2 Using the Macro Mode
Using the Macro Mode
4.1.24.1.2
Using the Macro ModeUsing the Macro Mode
hh
h
ss
sh
ii
is
ll
li
gg
gl
nn
ng
E
EE
En
Use the macro mode to shoot close-up of subjects. The following is the focus range in the
Macro mode.
1. In the REC mode, press [ ] .
2. Record the image.
Important!
Important!
Important!Important!
• In the Macro mode, the optical zoom range is 1X to 1.2X.
4.1.3
4.1.3 Using the Infinity Mode
Using the Infinity Mode
4.1.34.1.3
Using the Infinity ModeUsing the Infinity Mode
Use this mode when recording scenery and other faraway images.
1. Keep pressing [ ] until the focus mode indicator shows “ ”.
2. Record the image.
4.1.4
4.1.4 Using Manual Focus
Using Manual Focus
4.1.44.1.4
Using Manual FocusUsing Manual Focus
With the Manual Focus mode, you can adjust the focus of an image manually. The following
shows focus ranges in the Macro mode for two optical zoom factors.
Optical Zoom Factor Approximate Focus Range
1X
3X
Macro Mode 10cm (3.9") to 70cm (27.5")
1. Keep pressing [ ] until the focus mode
indicator shows "MF".
• At this point, a boundary also appears on the display,
indicating the part of the image that will be used for
manual focus.
2. While watching the image on the monitor screen, use
[] and [ ] to focus.
[]
Focus out on the subject.
Focus in on the subject.
[]
3. Record the image.
10cm (3.9”) to infinity ( )
60cm (23.6”) to infinity ( )
Boundary
Manual focus position
Other Recording Functions14
Page 19

BenQ DC 5530 User’s Manual
4.2
4.2 Exposure Compensation (EV Shift)
Exposure Compensation (EV Shift)
4.24.2
Exposure Compensation (EV Shift)Exposure Compensation (EV Shift)
Adjust the exposure compensation setting to compensate for certain light conditions
including: backlighting, indirect indoor lighting, and dark backgrounds.
1. In the REC mode, press [MENU].
2. Use [ ] and [ ] to select the "REC" tab.
3. Use [ ] and [ ] to select "EV Shift", and then press [ ].
4. Use [ ] and [ ] to change the exposure compensation
value, and then press [SET].
• To cancel EV Shift, adjust the value until it becomes 0.0.
• Performing an EV shift operation causes the metering mode
to switch automatically to center weighted metering.
Returning the EV shift value to 0.0 causes the metering
mode to change back to multi-pattern metering.
The settings can be adjusted in 1/3 steps in the range of -2EV to
+2EV.
4.3
4.3 Adjusting White Balance
Adjusting White Balance
4.34.3
Adjusting White BalanceAdjusting White Balance
When the white balance mode is set to match the light source, the camera reproduces colors
more accurately.
1. In the REC mode, press [MENU].
2. Use [ ] and [ ] to select the "REC" tab.
3. Use [ ] and [ ] to select "White Ba lance", and then pre ss
[].
4. Use [ ] and [ ] to change the white balance value, and
then press [SET].
Auto Auto Settings are automatically set by the camera
[]
Day light For recording outdoors on a bright day
Shade For recording under overcast, shady or twilight skies
[]
[]
Tungsten For recording under tungsten lightin g
Fluorescent For recording under fluorescen t lighting
[]
Manual Manual Difficult lighting that requires manual control B alance
EE
En
E
nn
ng
gg
gl
ll
li
ii
is
ss
sh
hh
h
Other Recording Functions 15
Page 20

BenQ DC 5530 User’s Manual
4.3.1
4.3.1 Adjusting White Balance Manually
Adjusting White Balance Manually
4.3.14.3.1
Adjusting White Balance ManuallyAdjusting White Balance Manually
hh
h
ss
sh
ii
is
ll
li
gg
gl
nn
ng
E
EE
En
You can set a custom white balance to obtain the optimal setting for the shooting conditions by
having the camera evaluate a subject such as a white piece of paper or cloth, or a photo-quality
gray card.
1. In the REC mode, press [MENU].
2. Use [ ] and [ ] to select the "REC" tab.
3. Use [ ] and [ ] to select "White Balance", and then press
[].
4. Use [ ] and [ ] to select "Manual".
5. Point the camera at a white piece of paper or similar object
under the lighting conditions for which you want to set the
white balance, and then press the shutter release button.
6. Press [SET].
4.4
4.4 Using the NICESHOT Mode
Using the NICESHOT Mode
4.44.4
Using the NICESHOT ModeUsing the NICESHOT Mode
Selecting one of the 19 NICESHOT scenes automatically sets up
the camera for recording a similar type of image.
4.4.1
4.4.1 Example Sample Scene
Example Sample Scene
4.4.14.4.1
Example Sample SceneExample Sample Scene
Port rait
1. In the REC mode, press [MENU].
2. Use [ ] and [ ] to select the "REC" tab.
3. Use [ ] and [ ] to select "REC Mode", and then press [ ].
4. Use [ ] and [ ] to select "NICE SHOT", and then press [SET].
• This enters the NICESHOT mode and displays a sample scene.
5. Use [ ] and [ ]to select the sample scene you want, and then press [SET].
6. Record the image.
Important!
Important!
Important!Important!
• Images recorded using a NICESHOT scene may not produce the results you expected due
to shooting conditions and other factors.
After selecting a NICESHOT scene, you can change to a different one by press [SET] and
•
using [ ] and [ ] to scroll through available scenes. When the one you want is displayed,
press [SET].
Pet
Scenery
Other Recording Functions16
Page 21

BenQ DC 5530 User’s Manual
Important!
Important!
Important!Important!
• You can change the camera settings that are made when you select a NICESHOT scene.
Note, however, that the NICESHOT settings revert to their defaults when you select
another NICESHOT scene, change the recording mode, or turn off the camera.
Noise reduction processing is performed automatically when you are recording a night
•
scene, fireworks, or other image that requires slow shutter speeds. Because of this, it takes
longer to record images at lower shutter speeds.
4.5
4.5 Using the Movie Mode
Using the Movie Mode
4.54.5
Using the Movie ModeUsing the Movie Mode
You can record movies up to 60 seconds long.
• Image Size: 320 x 240 pixels
• Maximum Movie Length - One Movie: 60 seconds
1. In the REC mode, press [MENU].
2. Use [ ] and [ ] to select the "REC" tab.
3. Use [ ] and [ ] to select "REC Mode", and then
press [ ].
4. Use [ ] and [ ] to select “ movie”, and then
press [SET].
5. Point the camera at the subject and then press the
shutter button.
• Movie recording continues for 60 seconds, or until you stop it by pressing the shutter button again.
• The remaining recording time value counts down on the monitor screen as you record.
4.6
4.6 About the Histogram
About the Histogram
4.64.6
About the HistogramAbout the Histogram
The histogram is a graph that allows you to judge the brightness of the recorded image. The
greater the bias toward the left in the graph, the darker the image. The greater the bias toward
to the right, the brighter the image. If the image is dark, adjust the exposure compensation to a
positive number. Similarly, adjust the exposure compensation to a negative number if the
image is bright.
EE
En
E
nn
ng
gg
gl
ll
li
ii
is
ss
sh
hh
h
4.6.1
4.6.1 Histogram Examples
Histogram Examples
4.6.14.6.1
Histogram Examples Histogram Examples
Other Recording Functions 17
Page 22

BenQ DC 5530 User’s Manual
4.6.2
4.6.2 Specifying ISO Sensitivity
Specifying ISO Sensitivity
4.6.24.6.2
Specifying ISO SensitivitySpecifying ISO Sensitivity
hh
h
ss
sh
ii
is
ll
li
gg
gl
nn
ng
E
EE
En
Use the following procedure to select the ISO sensitivity setting that suits the type of image you
are recording. You can choose from the following speeds: Auto, 64, 125, 250 and 500.
1. In the REC mode, press [MENU].
2. Select the "REC" tab, select "ISO", and then press [ ].
3. 3. Use [ ] and [ ] to select the setting you want, and then press [SET].
Important!
Important!
Important!Important!
Higher ISO speeds increase the image noise. To take clean images, use as low an ISO speed
•
as possible.
4.6.3
4.6.3 Selecting the Metering Mode
Selecting the Metering Mode
4.6.34.6.3
Selecting the Metering ModeSelecting the Metering Mode
Use the following procedure to specify multi-pattern metering, spot metering, or centerweighted metering as the metering mode.
1. In the REC mode, press [MENU].
2. Select the "REC" tab, select "Metering", and then press [ ].
3. Use [ ] and [ ] to select the setting you want, and then press [SET].
Multi (Multi-pattern):
Multi (Multi-pattern):
Multi (Multi-pattern):Multi (Multi-pattern):
Multi-pattern metering divides the image into sections and measures the
light in each section for a balanced exposure reading. The camera
automatically determines shooting conditions according to the measured
lighting pattern, and makes exposure settings accordingly. This type of
metering provides error-free exposure settings for a wide range of shooting
conditions.
Center weighted (Center-weighted):
Center weighted (Center-weighted):
Center weighted (Center-weighted):Center weighted (Center-weighted):
Center-weighted metering measures light concentrating on the center of
the focus area. Use this metering method when you want to exert some
control over exposure, without leaving settings totally up to the camera.
Spot (Spot):
Spot (Spot):
Spot (Spot):Spot (Spot):
Spot metering takes readings at a very small area. Use this metering method
when you want exposure to be set according to the brightness of a particular
subject, without it being affected by surrounding conditions.
Important!
Important!
Important!Important!
Changing the exposure compensation setting to a value other than 0.0 changes the
•
metering mode setting to "Center Weighted." The metering mode changes back to "Multi"
when you return the exposure compensation setting to 0.0.
Other Recording Functions18
Page 23

BenQ DC 5530 User’s Manual
4.6.4
4.6.4 Using the Filter Function
Using the Filter Function
4.6.44.6.4
Using the Filter FunctionUsing the Filter Function
The camera's filter function lets you alter the tint of an image when you record it.
1. In the REC mode, press [MENU].
2. Select the "REC" tab, select "Filter", and then press [ ].
3. Use [ ] and [ ] to select the setting you want, and then press [SET].
• Available filter settings are: Off, B/W, Sepia, Red, Green, Blue, Yellow, Pink, Purple
Important!
Important!
Important!Important!
• Using the camera's filter feature produces the same effect as attaching a color filter to the
lens.
4.6.5
4.6.5 Specifying Color Saturation
Specifying Color Saturation
4.6.54.6.5
Specifying Color SaturationSpecifying Color Saturation
Use the following procedure to control the intensity of the image you are recording.
1. In the REC mode, press [MENU].
2. Select the "REC" tab, select "Saturation", and then press [ ].
3. Use [ ] and [ ] to select the setting you want, and then press [SET].
4.6.6
4.6.6 Specifying Contrast
Specifying Contrast
4.6.64.6.6
Specifying ContrastSpecifying Contrast
Use this procedure to adjust the relative difference between the light areas and dark areas of the
image you are recording.
1. In the REC mode, press [MENU].
2. Select the "REC" tab, select "Contrast", and then press [ ].
3. Use [ ] and [ ] to select the setting you want, and then press [SET].
4.6.7
4.6.7 Specifying Outline Sharpness
Specifying Outline Sharpness
4.6.74.6.7
Specifying Outline SharpnessSpecifying Outline Sharpness
Use the following procedure to control the sharpness of image outlines.
1. In the REC mode, press [MENU].
2. Select the "REC" tab, select "Sharpness", and then press [ ].
3. Use [ ] and [ ] to select the setting you want, and then press [SET].
EE
En
E
nn
ng
gg
gl
ll
li
ii
is
ss
sh
hh
h
Other Recording Functions 19
Page 24

BenQ DC 5530 User’s Manual
4.6.8
4.6.8 Turning the On-screen Grid On and Off
Turning the On-screen Grid On and Off
4.6.84.6.8
Turning the On-screen Grid On and OffTurning the On-screen Grid On and Off
hh
h
ss
sh
ii
is
ll
li
gg
gl
nn
ng
E
EE
En
You can display gridlines on the monitor screen to help you compose images and ensure that
the camera is straight when recording.
1. In the REC mode, press [MENU].
2. Select the "REC" tab, select "Grid", and then press [ ].
3. Use [ ] and [ ] to select the setting you want, and then
press [SET].
4.6.9
4.6.9 Turning Image Review On and Off
Turning Image Review On and Off
4.6.94.6.9
Turning Image Review On and OffTurning Image Review On and Off
Image review displays an image on the monitor screen as soon as you record it. Use the
following procedure to turn image review on and off.
1. In the REC mode, press [MENU].
2. Select the "REC" tab, select "Review", and then press [ ].
3. Use [ ] and [ ] to select the setting you want, and then press [SET].
4.6.10
4.6.10 Specifying Power On Default Settings
Specifying Power On Default Settings
4.6.104.6.10
Specifying Power On Default SettingsSpecifying Power On Default Settings
The camera's "mode memory" feature lets you specify the power on default settings
individually for the REC mode, flash mode, focus mode, white balance mode, ISO sensitivity,
AF Area, metering mode, flash intensity, digital zoom mode, manual focus position. Turning
on mode memory for a mode tells the camera to remember the status of that mode when you
turn off the camera, and restore it the next time you turn the camera back on. When mode
memory is turned off, the camera automatically restores the initial factory default setting for
the applicable mode.
1. In the REC mode, press [MENU].
2. Use [ ] and [ ] to select the "Memory" tab.
3. Use [ ] and [ ] to select the item you want to change, and then press [ ].
4. Use [ ] and [ ] to select the setting you want, and then press [SET].
4.6.11
4.6.11 Resetting the Camera
Resetting the Camera
4.6.114.6.11
Resetting the CameraResetting the Camera
Use the following procedure to reset all of the camera's settings to their initial defaults as shown
under "Menu Reference".
1. In the REC mode or the PLAY mode, press [MENU].
2. Select the "Set Up" tab, select "Reset", and then press [ ].
3. Use [ ] and [ ] to select "Reset", and then press [SET].
• To cancel the procedure without resetting, select "Cancel" and press [SET].
Other Recording Functions20
Page 25

BenQ DC 5530 User’s Manual
LLLLAAAAYYYYBBBBAAAACCCCKKKK
5555 PPPP
You can use the camera's built-in monitor screen to view images after you record them.
5.1
5.1 Basic Playback Operation
Basic Playback Operation
5.15.1
Basic Playback OperationBasic Playback Operation
Use the following procedure to scroll through files stored in the camera's memory.
1. Press [ ] (PLAY) to turn on the camera.
• This enters the PLAY mode.
• This causes an image or a message to appear on the monitor screen.
2. Use [ ] (forward) or [ ] (back) to scroll through files on the monitor screen.
Note
Note
NoteNote
•
Holding down [ ] and [ ] scrolls images at high speed.
5.2
5.2 Zooming the Display Image
Zooming the Display Image
5.25.2
Zooming the Display ImageZooming the Display Image
Perform the following procedure to zoom the image currently on the monitor screen up to
four times its normal size.
1. In the PLAY mode, use [ ] and [ ] to display the
image you want.
2. Slide the zoom controller towards to enlarge the
image.
• This displays an indicator that shows the current
zoom factor.
• You can toggle between the zoomed image and normal
image by pressing [DISP].
3. Use [ ], [ ], [ ] and [ ]to shift the image up,
down, left, or right.
4. Press [MENU] to return the image to its original size.
Note
Note
NoteNote
•
When you set the image resolution to 2816x2112 or 2816x1872, you are not able to use the
digital zoom function.
Current zoom factor
EE
En
E
nn
ng
gg
gl
ll
li
ii
is
ss
sh
hh
h
Important!
Important!
Important!Important!
•
You cannot enlarge a movie image.
•
Depending on the original size of the recorded image, you may not be able to zoom a
display image the full four times its normal size.
Playback 21
Page 26

BenQ DC 5530 User’s Manual
5.3
5.3 Resizing an Image
Resizing an Image
5.35.3
Resizing an ImageResizing an Image
hh
h
ss
sh
ii
is
ll
li
gg
gl
nn
ng
E
EE
En
You can use the following procedure to change an image to one of the three sizes.
1. 1600 x1200-pixel UXGA size; 2. 1280 x 960-pixel SXGA size; 3. 640 x 480-pixel VGA size
• VGA is the optimum image size for attachment to e-mail messages or incorporation into
Web pa ges.
1. In the PLAY mode, press [MENU].
2. Select the "PLAY" tab, select "Resize", and then press [ ].
3. Use [ ] and [ ] to scroll through images and display the
one you want to resize.
4. Use [ ] and [ ] to select the setting you want, and then
press [SET].
Important!
Important!
Important!Important!
•
Resizing an image creates a new file that contains the image in the size you select. The file
with the original image also remains in memory.
•
An image recorded using the 2816 x 2112 or 2816 x 1872 (3:2) pixel size cannot be resized.
5.4
5.4 Cropping an Image
Cropping an Image
5.45.4
Cropping an ImageCropping an Image
Use the following procedure when you want to crop a portion of an enlarged image and use the
remaining part of the image as an e-mail attachment, Web page image, etc.
1. In the PLAY mode, use [ ] and [ ] to scroll through images
and display the one you want to crop.
2. Press [MENU].
3. Select the "PLAY" tab, select "Trimming", and then press [ ] .
• This causes a cropping boundary to appear.
4. Use the zoom controller to make the cropping boundary
larger or smaller.
• The size of the cropping boundary depends on the size of the image on the display.
5. Use [ ], [ ], [ ] and [ ] to move the cropping boundary up, down, left, or right until
the area of the image you want to extract is within the boundary.
6. Press [SET] to extract the part of the image enclosed in the cropping boundary.
• If you want to cancel the procedure at any point, press [MENU].
Important!
Important!
Important!Important!
•
Cropping an image creates a new file that contains the cropped image. The file with the
original image also remains in memory.
•
For a 640 x 480 size image, you cannot change the size of the cropping boundary at all.
•
An image recorded using the 2816x2112 or 2816 x 1872 (3:2) pixel size cannot be cropped.
Playback22
Page 27

BenQ DC 5530 User’s Manual
5.5
5.5 Playing a Movie
Playing a Movie
5.55.5
Playing a MoviePlaying a Movie
Use the following procedure to play back a movie that was recorded in the movie mode.
1. In the PLAY mode, use [ ] a nd [ ] to scroll through images
until the movie you want to play is displayed.
2. Press [SET].
• This starts playback of the movie.
• You can perform the following operations while a movie is
playing.
Fast forw ard or fast rev erse the movie
Pause movie playback Press [SET].
Skip forward or back one frame while paused
Cancel playback Press [MENU].
•
You cannot repeat play a movie. To play a movie more than once, repeat the steps of the
above procedure.
5.6
5.6 Viewing Pictures in Thumbnail Mode
Viewing Pictures in Thumbnail Mode
5.65.6
Viewing Pictures in Thumbnail ModeViewing Pictures in Thumbnail Mode
The Thumbnail mode allows you to view up to nine images at a time on the LCD monitor.
1. In the PLAY mode, slide the zoom controller left ( )
briefly, and then release it.
2. The selected image is highlighted.
3. Press the [ ], [ ], [ ] and [ ] to select an image.
4. Slide the zoom controller right ( ) to display the selected
image in full screen size.
Hold do wn
Press
Important!
Important!
Important!Important!
[] and []
[] and []
.
Selection boundary
.
EE
En
E
nn
ng
gg
gl
ll
li
ii
is
ss
sh
hh
h
5.7
5.7 Rotating the Display Image
Rotating the Display Image
5.75.7
Rotating the Display ImageRotating the Display Image
Use the following procedure to rotate the image 90 degrees and register the rotation
information along with the image. After you do this, the image is always displayed in its rotated
orientation.
1. In the PLAY mode, press [MENU].
2. Select the "PLAY" tab, select "Rotation", and then press [ ].
3. Use [ ] and [ ] to scroll through images until the one you
want to rotate is on the monitor screen.
4. Use [ ]and [ ] to select "Rotate", and then press [SET].
• This rotates the image 90 degrees to the right.
Playback 23
Page 28

BenQ DC 5530 User’s Manual
After you are finished configuring settings, press the [MENU] button to exit the setting
5.
screen.
hh
h
ss
sh
ii
is
ll
li
gg
gl
nn
ng
E
EE
En
You cannot rotate an image that is protected. To rotate such an image, first unprotect it.
•
You cannot rotate movie images.
•
5.8
5.8 Deleting Files
Deleting Files
5.85.8
Deleting FilesDeleting Files
You can delete a single file, or you can delete all files currently in memory.
5.8.1
5.8.1 Deleting a Single File
Deleting a Single File
5.8.15.8.1
Deleting a Single FileDeleting a Single File
Perform the following steps when you want to delete a single file.
In the PLAY mode, press [ ] .
1.
Use [ ] and [ ] to scroll through files and display the one
2.
you want to delete.
Use [ ]and [ ] to select "Delete".
3.
• To exit the file delete operation without deleting anything,
select "Cancel".
Press [SET] to delete the file.
4.
• Repeat steps 2 through 4 to delete other files, if you want.
Press [MENU] to exit the menu screen.
5.
Please note that deleted images can’t be recovered. Exercise caution before deleting a file.
•
A protected file cannot be deleted. To delete a protected file, unprotect it first.
•
5.8.2
5.8.2 Deleting a All Files
Deleting a All Files
5.8.25.8.2
Deleting a All FilesDeleting a All Files
The following procedure deletes all unprotected files currently in memory.
In the PLAY mode, press [ ] .
1.
Use [ ]and [ ] to select "All File Delete", and then press [SET].
2.
Use [ ]and [ ] to select "Yes".
3.
• To exit the file delete operation without deleting anything, select "No".
Press [SET] to delete all the files.
4.
Important!
Important!
Important!Important!
Important!
Important!
Important!Important!
5.9
5.9 File Management
File Management
5.95.9
File ManagementFile Management
The file management capabilities of the camera make it easy to keep track of images. You can
protect files against deletion, and even use its DPOF feature to specify images for printing.
5.9.1
5.9.1 Folders
Folders
5.9.15.9.1
FoldersFolders
Playback24
Page 29

BenQ DC 5530 User’s Manual
Your camera automatically creates a directory of image storage folders in its built-in Flash
memory or on the memory card.
5.9.1.1
5.9.1.1 Memory Folders and Files
5.9.1.15.9.1.1
An image you record is automatically stored in a folder, whose name is a serial number. You
can have up to 900 folders in memory at the same time. Folder names are generated as shown
below.
Example: Name of the 100th folder.
Example: Name of the 100th folder.
Example: Name of the 100th folder.Example: Name of the 100th folder.
Each folder can hold files numbered up to 9,999. Trying to store the 10,000th file in a folder
causes the next serially numbered folder to be created. Folder names are generated as shown
below.
Example: Name of the 26th file.
Example: Name of the 26th file.
Example: Name of the 26th file.Example: Name of the 26th file.
5.9.2
5.9.2 Protecting Files
5.9.25.9.2
Once you protect a file it cannot be deleted. You can protect files individually or you can
protect all files in memory with a single operation.
5.9.2.1
5.9.2.1 To protect a single file
5.9.2.15.9.2.1
1. In the PLAY mode, press [MENU].
2. Select the "PLAY" tab, select "Protect", and then press [ ].
3. Use [ ] and [ ] to scroll through files and display the one you
4. Use [ ]and [ ] to select "On", and then press [SET].
5. Press [MENU] to exit the menu screen.
5.9.2.2
5.9.2.2 To protect all files in memory
5.9.2.25.9.2.2
1. In the PLAY mode, press [MENU].
2. Select the "PLAY" tab, select "Protect", and then press [ ].
3. Use [ ] and [ ] to select "All Files : On", and then press [SET].
4. Press [MENU] to exit the menu screen.
Memory Folders and Files
Memory Folders and FilesMemory Folders and Files
DCPIC
100
Serial number (3 digits)
DSCI0026.JPG
Serial number (3 digits)
• The actual number of files you will be able to store on a memory card depends on the
image quality settings, capacity of the card, etc.
want to protect.
• A file that is protected is indicated by the mark.
• To unprotect a file, select "Off" in step 4, and then press [SET].
• To unprotect all files, press [SET] in step 3 so the setting shows "All Files : Off".
Extension
Protecting Files
Protecting FilesProtecting Files
To protect a single file
To protect a single fileTo protect a single file
To protect all files in memory
To protect all files in memoryTo protect all files in memory
EE
En
E
nn
ng
gg
gl
ll
li
ii
is
ss
sh
hh
h
Playback 25
Page 30

BenQ DC 5530 User’s Manual
6666 DPOF
DPOF
DPOFDPOF
hh
h
ss
sh
ii
is
ll
li
gg
gl
nn
ng
E
EE
En
The letters "DPOF" stand for "Digital Print Order Format", which is a format for
recording on a memory card or other medium which digital camera images should
be printed and how many copies of the image should be printed. Then you can
print on a DPOF-compatible printer or at a professional print service in
accordance with the file name and number of copies settings recorded on the card.
With this camera, you should always select images by viewing them on the monitor screen. Do
not specify images by file name without viewing the file contents.
6.1
6.1 DPOF Setting
DPOF Setting
6.16.1
DPOF SettingDPOF Setting
1. File Name
2. Number of copies
3. Date
6.2
6.2 To configure print settings for a single image
To configure print settings for a single image
6.26.2
To configure print settings for a single imageTo configure print settings for a single image
1. In the PLAY mode, press [MENU].
2. Select the "PLAY" tab, select "DPOF", and then press [ ].
3. Use [ ]and [ ] to select “Select Images”, and then press [ ].
4. Use [ ] and [ ]to display the image you want.
5. Use [ ]and [ ] to specify the number of copies.
• You can specify up to 99 for the number of copies. Specify 00 if
you do not want to have the image printed.
6. To turn on date stamping for the prints, press [DISP] so is
displayed.
• To turn off date stamping for the prints, press [DISP] so is
not displayed.
• Repeat steps 4 through 6 if you want to configure other images
for printing.
7. After all the settings are the way you want, press [SET] to apply them.
6.3
6.3 To configure print settings for all images
To configure print settings for all images
6.36.3
To configure print settings for all imagesTo configure print settings for all images
1. In the PLAY mode, press [MENU].
2. Select the "PLAY" tab, select "DPOF", and then press [ ].
3. Use [ ]and [ ] to select “All Images”, and then press [ ].
4. Use [ ] and [ ] to specify the number of copies.
• You can specify up to 99 for the number of copies. Specify 00 if
you do not want to have the image printed.
5. To turn on date stamping for the prints, press [DISP] so is displayed.
• To turn off date stamping for the prints, press [DISP] so is not displayed.
6. After all the settings are the way you want, press [SET] to apply them.
DPOF26
Page 31

BenQ DC 5530 User’s Manual
6.4
6.4 PRINT Image Matching II
PRINT Image Matching II
6.46.4
PRINT Image Matching IIPRINT Image Matching II
Images include PRINT Image Matching II data (mode setting and other camera
setup information). A printer that supports PRINT Image Matching II reads
this data and adjusts the printed image accordingly, so your images come out
just the way you intended when you recorded them.
• Seiko Epson Corporation holds the copyright for PRINT Image Matching
and PRINT Image Matching II.
6.5
6.5 Exif Print
Exif Print
6.56.5
Exif PrintExif Print
Exif Print is an internationally supported, open standard file format that
makes it possible to capture and display vibrant digital images with
accurate colors. With Exif 2.2, files include a wide range of shooting
condition information that can be interpreted by an Exif Print printer to
produce better looking prints.
6.6
6.6 Using USB DIRECT-PRINT
Using USB DIRECT-PRINT
6.66.6
Using USB DIRECT-PRINTUsing USB DIRECT-PRINT
Your camera supports USB DIRECT-PRINT. When connected directly to a
printer that supports USB DIRECT-PRINT, you can select images to be printed
and start the print operation directly from the camera.
• Use of the optional Alkaline batteries or a AC adaptor is recommended when
printing with USB DIRECTPRINT.
1. Use the DPOF procedure on page 31 to specify the
images in file memory that you want to print.
2. Load Alkaline batteries or connect the AC adaptor to the
camera.
3. Use the USB cable that comes with the camera to connect
it to a printer.
4. Turn on the printer.
5. Press the camera's power button.
• This displays the print menu on the camera's monitor
screen.
6. On the camera's monitor screen, select "Print", and then
press [SET].
• This automatically starts printing of the images you specified with the DPOF procedure.
• A message appears on the monitor screen, followed by the DPOF setting screen, if there are
no DPOF settings currently configured on the camera to control the printing operation. If
this happens, configure the required DPOF settings and then perform step 5 of the above
procedure again.
7. The camera will turn off automatically when printing is complete.
Important!
Important!
Important!Important!
• The camera's monitor screen will go blank after printing starts. A blank monitor screen
does not necessarily mean that printing is complete. Check the status of your printer to
find out if printing is complete.
EE
En
E
nn
ng
gg
gl
ll
li
ii
is
ss
sh
hh
h
DPOF 27
Page 32

BenQ DC 5530 User’s Manual
hh
h
ss
sh
ii
is
ll
li
gg
gl
nn
ng
E
EE
En
AAAAMMMMEEEERRRRAAAA
7777 CCCC
7.1
7.1 Specifying the File Name Serial Number Generation Method
7.17.1
Use the following procedure to specify the method for generating the serial number used for
file names.
1. In the REC mode or the PLAY mode, press [MENU].
2. Select the "Set Up" tab, select "File No.", and then press [ ].
3. Use [ ]and [ ] to change the setting, and then press [SET].
Continue
Reset Find the highest file number in the current folder and increment it.
7.2
7.2 Setting the Beep Sound
7.27.2
Use the following procedure to turn the beep sounds when you press a key on and off.
1. In the REC mode or the PLAY mode, press [MENU].
2. Select the "Set Up" tab, select "Beep", and then press [ ].
3. Use [ ]and [ ] to set beep sound on/off, and then press [SET].
7.3
7.3 Specifying an Image for the Startup Screen
7.37.3
You can specify an image you recorded as the startup screen image, which causes it to appear
on the monitor screen for about two seconds whenever you press the power button or [ ]
(REC) to turn on the camera. The startup screen image does not appear if you press [ ]
(PLAY) to turn on the camera.
EEEETTTTTTTTIIIINNNNGGGGSSSS
S
S
S S
Specifying the File Name Serial Number Generation Method
Specifying the File Name Serial Number Generation MethodSpecifying the File Name Serial Number Generation Method
Store the last file number used and increment it, regardless of whether files are deleted or
whether the memory card is replaced with a new one.
Setting the Beep Sound
Setting the Beep SoundSetting the Beep Sound
Specifying an Image for the Startup Screen
Specifying an Image for the Startup ScreenSpecifying an Image for the Startup Screen
1. In the REC mode or the PLAY mode, press [MENU].
2. Select the "Set Up" tab, select "Startup", and then press [ ].
3. Use [ ] and [ ] to display the image you want to use as the startup image.
• You can specify a snapshot image or a movie image that is two seconds (200KB) or less in
length.
Camera Settings28
Page 33

BenQ DC 5530 User’s Manual
4. Use [ ]and [ ] to change the setting, and then press [SET].
Important!
Important!
Important!Important!
• Selecting a new startup image overwrites anything that is already stored in startup image
memory. Because of this, if you want to return to a previous startup image, you need to
have a separate copy of that image in the camera's standard image memory.
7.4
7.4 Formatting Built-in Memory
Formatting Built-in Memory
7.47.4
Formatting Built-in MemoryFormatting Built-in Memory
Formatting built-in memory deletes any data stored in it.
Important!
Important!
Important!Important!
• Note that data deleted by a format operation cannot be recovered. Check to make sure you
do not need any of the data in memory before you format it.
Formatting built-in memory deletes all files, including protected files, the startup image.
•
1. Check to make sure there is no memory card loaded in the camera.
• If there is a memory card loaded in the camera, remove it.
2. In the REC mode or the PLAY mode, press [MENU].
3. Select the "Set Up" tab, select "Format", and then press [ ].
4. Use [ ]and [ ] to select "Format", and then press [SET].
• To exit the format operation without formatting, select "Cancel".
EE
En
E
nn
ng
gg
gl
ll
li
ii
is
ss
sh
hh
h
Camera Settings 29
Page 34

BenQ DC 5530 User’s Manual
hh
h
ss
sh
ii
is
ll
li
gg
gl
nn
ng
E
EE
En
8888 UUUU
SSSSIIIINNNNGGGG
You can expand the storage capabilities of your camera by using a
commercially available memory card (SD memory card or
MultiMediaCard). You can also copy files from built-in flash
memory to a memory card and from a memory card to flash memory.
• Normally, files are stored in built-in flash memory. When you insert a memory card, however, the camera automatically stores files to the card.
• Note that you cannot save files to built-in memory while a memory card is installed in the
camera.
• Use only an SD memory card or a MultiMediaCard with this camera. Proper operation is
not guaranteed when any other type of card is used.
• Certain types of cards can slow down processing speeds.
• SD memory cards have a write protect switch, which you can use to protect against accidental deletion of image data. Note, however, if you write protect an SD memory card, you
must remove write protection whenever you want to record to it, format it, or delete any of
its files.
8.1
8.1 Installing an SD Card
8.18.1
1. Turn off the camera.
2. Slide the SD card slot/battery cover in the direction of the arrow to
open the cover.
3. Positioning the memory card so its back is facing in the same
direction as the camera's monitor screen, carefully slide it into the
card slot and close the slot/battery cover.
EEEEMMMMOOOORRRRYYYY
A M
A M
A M A M
Installing an SD Card
Installing an SD CardInstalling an SD Card
C
C
C C
AAAARRRRDDDD
8.2
8.2 To remove the SD card
To remove the SD card
8.28.2
To remove the SD cardTo remove the SD card
1. Gently press on the edge of the SD card and release it.
2. Pull the card out and close the slot/battery cover.
Important!
Important!
Important!Important!
• Never remove a card from the camera while the operation lamp is flashing. Doing so can
cause the file save operation to fail, and even damage the memory card.
Using A Memory Card30
Page 35

BenQ DC 5530 User’s Manual
8.3
8.3 Formatting a Memory Card
Formatting a Memory Card
8.38.3
Formatting a Memory CardFormatting a Memory Card
Formatting a memory card deletes any data already stored on it.
1. Load the memory card into the camera.
2. Turn on the camera. Next, enter the REC mode or PLAY mode, and press [MENU].
3. Select the "Set Up" tab, select "Format", and then press [ ].
4. Use [ ]and [ ] to select "Format", and then press [SET].
• To exit the format operation without formatting, select "Cancel".
Memory Card Precautions!
Memory Card Precautions!
Memory Card Precautions!Memory Card Precautions!
• We recommend you format a memory card before using it for the first time after
purchasing it, or whenever the card seems to be the cause of abnormal images.
Before starting a format operation, check to make sure that the batteries are fully charged.
•
Power interruption during the format operation can result in improper formatting, and
even damage the memory card and make it unusable.
8.4
8.4 Copying Files
Copying Files
8.48.4
Copying FilesCopying Files
Use the procedures below to copy files between built-in memory and a memory card.
Important!
Important!
Important!Important!
Only snapshot and movie files recorded with this camera can be copied. Other files cannot
•
be copied.
8.4.1
8.4.1 To copy all the files in built-in memory to a memory card
To copy all the files in built-in memory to a memory card
8.4.18.4.1
To copy all the files in built-in memory to a memory cardTo copy all the files in built-in memory to a memory card
1. Load the memory card into the camera.
2. Turn on the camera. Next, enter the PLAY mode, and press
[MENU].
3. Select the "PLAY" tab, select "Copy", and then press [ ].
4. 4. Use [ ]and [ ] to select "Built-in Card", and then press
[SET].
• This starts the copy operation and displays the message "Busy....Please wait...".
• After the copy operation is complete, the monitor screen shows the last file in the folder.
8.4.2
8.4.2 To copy a file from a memory card to built-in memory
To copy a file from a memory card to built-in memory
8.4.28.4.2
To copy a file from a memory card to built-in memoryTo copy a file from a memory card to built-in memory
With this procedure you can copy one file at a time.
1. Perform steps 1 through 3 of the procedure under "To copy all the files in built-in memory
to a memory card".
2. Use [ ]and [ ] to select "Card Built-in", and then press [SET].
3. Use [ ] and [ ] to select the file you want to copy.
4. Use [ ]and [ ] to select "Copy", and then press [SET].
• Repeat steps 3 through 4 to copy other images, if you want.
5. Press [MENU] to exit the copy operation.
EE
En
E
nn
ng
gg
gl
ll
li
ii
is
ss
sh
hh
h
Using A Memory Card 31
Page 36

BenQ DC 5530 User’s Manual
hh
h
ss
sh
ii
is
ll
li
gg
gl
nn
ng
E
EE
En
OOOONNNNNNNNEEEECCCCTTTTIIIINNNNGGGG
9999 CCCC
Connecting the DC C62 to your computer enables you to perform the following functions:
• upload photos and movie clips to your computer for storage and organization
Before connecting to a computer running Microsoft Windows, you must first install the
software that is included on the software installation CD-ROM that came with the DC C62.
9.1
9.1 Installing the Digital Camera Software
Installing the Digital Camera Software
9.19.1
Installing the Digital Camera SoftwareInstalling the Digital Camera Software
• It's recommended that you set up the driver and software before connecting the digital
camera to your PC. Normally, a software installation menu appears automatically after this
installation CD is inserted into your CD-ROM drive. If the menu does not appear, browse
the CD with Windows Explorer, find a program file named “Autorun.exe” in the root
directory and double-click it. The setup menu appears.
TTTTOOOO
AAAA
C
C
C C
OOOOMMMMPPPPUUUUTTTTEEEERRRR
• Click each item to install the software program of your choice.
To browse the content of this CD and install software manually, refer to the descriptions of the
CD content in the next section.
Connecting to a Computer32
Page 37

BenQ DC 5530 User’s Manual
9.2
9.2 Bundled Software
Bundled Software
9.29.2
Bundled SoftwareBundled Software
The software installation CD-ROM included with the DC C62 includes the following software.
Please refer to the software’s help or electronic user manual for instructions.
Software
Software Description
Software Software
Description
DescriptionDescription
EE
En
E
nn
ng
gg
gl
ll
li
ii
is
ss
sh
hh
h
1. DC C62 Driver No matter which version of Windows you are using, before
2. Ulead Photo Express Ulead® Photo Express is a complete photo project software
3. Ulead Photo Explorer Ulead® Photo Explorer provides an efficient way to transfer,
4. Microsoft DirectX Microsoft DirectX, an all-in-one and closs-platform media
6. Acrobat reader Adobe Acrobat Reader, it's a "must have" utility to read files
7. Electronic User's manual Allows you to view the user’s manual on-line.
you connect the camera to your PC, please install the DC
C62 driver first.
for digital images. Acquire photos
effortlessly from digital cameras or scanners. Edit and
enhance images using easy-to-use editing tools and cool
photographic filters and effects. Assemble creative photo
projects and share results via e-mail and multiple print
options.
browse, modify and distribute digital media. It is the all-inone tool for owners of digital cameras, WebCams, DV
camcorders, scanners or anyone who strives to effectively
handle digital media.
tool.
in the popular cross-platform file format "PDF".
Connecting to a Computer 33
Page 38

BenQ DC 5530 User’s Manual
9.3
9.3 Transferring Files To/From a Computer
Transferring Files To/From a Computer
9.39.3
Transferring Files To/From a ComputerTransferring Files To/From a Computer
This section explains how to transfer images, movies between your camera and a PC using
hh
h
ss
sh
ii
is
ll
li
gg
gl
nn
ng
E
EE
En
Windows XP/ME/2000/98SE.
9.3.1
9.3.1 Transferring Photos, Movie Clips, and Music Files
Transferring Photos, Movie Clips, and Music Files
9.3.19.3.1
Transferring Photos, Movie Clips, and Music FilesTransferring Photos, Movie Clips, and Music Files
This section shows you how to use the Windows Explorer utility to manipulate files between
your camera and a PC.
1. Tur n o n the co mp ut er .
2. Turn on the camera.
3. Before connecting the camera C62
to your PC, please install the C62
driver first.
4. Connect the camera to the PC with
the included USB cable. Ensure that
the connection is secure.
5. A new disk appears in Windows
Explorer labelled “Removable Disk.”
(See note below).
6. Stored photos and movie clips can be found in the directory “Removable
Disk\DCIM\100DCPIC”.
Copy, view, delete, and move images, movie clips using standard drag and drop Windows
Explorer commands.
Photo files have the suffix “.jpg”
•
Movie clips have the suffix “.avi”
•
Refer to your computer’s Help for information on viewing or playing multimedia files on
•
your computer.
Note
Note
NoteNote
9.4
9.4 System Requirements
System Requirements
9.49.4
System RequirementsSystem Requirements
• Pentium 166 MHz MMX class or higher CPU
• 64 MB RAM
•CD-ROM drive
• 100 MB free hard disk space
• Available USB port
• Windows 98SE/2000/ME/XP
Connecting to a Computer34
Page 39

BenQ DC 5530 User’s Manual
10
10 TTTT
1010
RRRROOOOUUUUBBBBLLLLEEEESSSSHHHHOOOOOOOOTTTTIIIINNNNGGGG
Symptoms
Symptoms Causes
SymptomsSymptoms
Power does not turn on.
Power does not turn on. • Battery is inserted in the wrong
Power does not turn on.Power does not turn on.
Camera suddenly
Camera suddenly
Camera suddenly Camera suddenly
powers down.
powers down.
powers down.powers down.
The camera does not
The camera does not
The camera does not The camera does not
take pictures.
take pictures.
take pictures.take pictures.
Auto Focus does not
Auto Focus does not
Auto Focus does not Auto Focus does not
focus properly.
focus properly.
focus properly.focus properly.
The flash doesn't fire.
The flash doesn't fire. • Flash is set to OFF. • Set the flash to any mode except off.
The flash doesn't fire.The flash doesn't fire.
Image is blurry or out of
Image is blurry or out of
Image is blurry or out of Image is blurry or out of
focus.
focus.
focus.focus.
Image is no t displayed
Image is no t displayed
Image is no t displayed Image is not displayed
on the LCD monitor.
on the LCD monitor.
on the LCD monitor.on the LCD monitor.
Recorded images are not
Recorded images are not
Recorded images are not Recorded images are not
saved in memory.
saved in memory.
saved in memory.saved in memory.
Cannot transfer images
Cannot transfer images
Cannot transfer images Cannot transfer images
to a computer after
to a computer after
to a computer after to a computer after
connecting the USB
connecting the USB
connecting the USB connecting the USB
cable.
cable.
cable.cable.
Monitor screen is off.
Monitor screen i s off. • USB commu nication is in progress.
Monitor screen is off.Monitor screen is off.
All buttons and switches
All buttons and switches
All buttons and switches All buttons and switches
are disabled.
are disabled.
are disabled.are disabled.
direction.
• The batteries are dead.
• You are using the wrong type of AC
adaptor.
• Auto Power Off activated.
• The batteries are dead.
• The camera is in the PLAY mode.
• The flash is charging.
• Memory is full.
• SD card is not formatted correctly.
• The lens is dirty.
• The subject is not located in the
center of the focus frame when you
compose the image.
• The subject you are shooting is a type
that is not compatible with Auto
Focus operation.
• You are moving the camera.
• You are using the Manual Focus Mode
and have not focused the image.
• You are trying to use the Macro Mode
when shooting a scenery or portrait
shot.
• You are trying to use Auto Focus or
the Infinity Mode when shooting a
close-up shot.
• An SD Card with non-DCIF images
(recorded with another camera) is
loaded.
• Camera powers down before the save
operation is compl ete.
• Removing the memory card before
the save operation is complete.
• USB driver is not i nstalled. • Install the USB drive r before you
• The monitor screen is turned off (in
the REC mode).
• Circuit problem caused by
electrostatic charge, impact, etc. while
the camera was connected to another
device.
Causes Solutions
CausesCauses
• Reload battery in the correct
direction.
• Charge or replace the batteries.
• Use only the type of AC adaptor
specified for th is camera.
• Turn power back on.
• Charge or replace the batteries.
• Press (REC) to enter the REC mode.
• Wait for the flash to charge.
• Insert a new SD card.
• The card may be defective, use a new
card.
• Clean the lens.
• Make sure the subject is centered in
the focus frame when composing the
image.
• Use manual focus.
• Mount the camera on a tripod.
• Focus the image.
• Use Auto Focus for scenery and
portrait shots.
• Use the Macro Mode for close-ups.
• This camera cannot display nonDCIF images.
• When the battery indicator shows,
charge or replace the camera's
batteries.
• Do not remove the memory card
before the save operation is complete.
connect the camera to a computer /
turn the camera on.
• After confirming that the computer is
not accessing camera memory,
disconnect the USB cable.
• Press [DISP] to turn on the monitor
screen.
• Remove the batteries from the camera,
reinsert them, and then try again.
Solutions
SolutionsSolutions
EE
En
E
nn
ng
gg
gl
ll
li
ii
is
ss
sh
hh
h
Troubleshooting 35
Page 40

BenQ DC 5530 User’s Manual
hh
h
ss
sh
ii
is
ll
li
gg
gl
nn
ng
E
EE
En
11
11 SSSS
1111
PPPPEEEECCCCIIIIFFFFIIIICCCCAAAATTTTIIIIOOOONNNNSSSS
Image Sensor
Image Sensor 6.36 Mega Pixels CCD; Size : 1/1.8 inch
Image SensorImage Sensor
Lens
Lens 3X optical zoom; 4X digital zoom (12X with optical zoom)
LensLens
View Finder
View Finder Monitor screen and optical viewfinder
View FinderView Finder
LCD Monitor
LCD Monitor 1.6" TFT color LCD
LCD MonitorLCD Monitor
Focus Range
Focus Range Normal Mode : 60 cm ~ infinity; Macro Mode : 10 cm ~ 70 cm
Focus RangeFocus Range
Exposure Control
Exposure Control Program AE
Exposure ControlExposure Control
Exposure Compensation
Exposure Compensation -2EV to +2EV in 1/3 step
Exposure CompensationExposure Compensation
Exposure Meter
Exposure Meter Multi-pattern, center-weighted, spot by CCD
Exposure MeterExposure Meter
Shutter Speed
Shutter Speed CCD electronic shutter; mechanical shutter, 1/8 to 1/2000 second
Shutter SpeedShutter Speed
Apert ure
Aperture Wide-angle: F2.8/4.8, auto switching; Telephoto: F4.9/8.4, auto switching
Apert ureApert ure
Exposure
Exposure Metering: Spot, Center-Weighted Average, Average
ExposureExposure
ISO Equivalent
ISO Equivalent Auto, 64, 125, 250, 500
ISO EquivalentISO Equivalent
White Balance
White Balance Automatic, fixed (4 modes), manual switching
White BalanceWhite Balance
Flash Mode
Flash Mode AUTO, ON, OFF, Red eye reduction
Flash ModeFlash Mode
Flash Range
Flash Range Wide Angle Optical Zoom: 0.6 to 3.2 meters (2.0’ to 10.5’)
Flash RangeFlash Range
Self-Timer
Self-Timer 2 seconds, 10 seconds
Self-TimerSelf-Timer
Image Fil e Format
Image File Format JPEG (Exif Ver.2.2); DCF (Design rule for Camera File system) 1.0 stan-
Image Fil e FormatImage File Format
Movie Mode
Movie Mode 320 x 240, AVI (Motion JPEG)
Movie ModeMovie Mode
Image size
Image size 2816 x 2112, 2816 x 1872 (3:2), 2048 x 1536, 1600 x 1200,
Image sizeImage size
Picture Storage
Picture Storage Internal : 9.7 MB built-in Flash memory
Picture Storage Picture Storage
Power Source
Power Source Two AA-size rechargeable nickel-metal hydride batteries; DC IN 3V
Power SourcePowe r Source
Dimensions (WxHxD)
Dimensions (WxHxD) 88 x 60.5 x 32.7 mm
Dimensions (WxHxD) Dime nsions (WxHxD)
Wei g h t
Weight 168g (without battery)
Wei g h tWei g h t
Operating Temperature Range
Operating Temperature Range 0°C to 40°C (32°F to 104°F)
Operating Temperature RangeOperating Temperature Range
CD-ROM Contents
CD-ROM Contents DC C62 Driver; Ulead Photo Express; Ulead Photo Explorer
CD-ROM ContentsCD-ROM Contents
Manual Mode: Wide-angle 10 c m~ infinity; Telephoto: 60 cm ~ infinity
(Changes with rec ording mode and ISO sensitivity setting.)
Shutter speed is different for the following NICESHOT scenes.
Night Scene: 4 to 1/2000 second; Fireworks: 2 seconds (fixed)
Exposure compensation +2 EV (0.3 EV / step)
Telephoto Optical Zoom: 0.6 to 1.8 meters (2.0’ to 5.9’)
dard; DPOF compliant
1280 x 960, 640 x 480
External : SD Memory Card or MultiMediaCard
Two AA-size lithium batteries; Two AA-size alkaline batteries
Adobe Acrobat Reader; Microsoft DirectX; Electronic User’s Manual
12
12 SSSS
1212
EEEERRRRVVVVIIIICCCCEEEE
If you encountered problems using DC C62 and the camera driver program, please visit the
following website for technical support, answers to frequently asked questions and download
services:
For free driver program updates, product information and news release, please visit the
following web address:
NNNNFFFFOOOORRRRMMMMAAAATTTTIIIIOOOONNNN
I
I
I I
http://support.BenQ.com
http://support.BenQ.com
http://support.BenQ.comhttp://support.BenQ.com
http://www.BenQ.com
http://www.BenQ.com
http://www.BenQ.comhttp://www.BenQ.com
Specifications36
 Loading...