

Page 1

Premium wheel-end brake products
BBeennddiixx®®EEBB™™&& EESS™™AAiirr DDrruumm BBrraakkeess
SSeerrvviiccee MMaannuuaall
Page 2

General Information
Section 1: General Information
Foreword .......................................................................................................................................................................................................................4
Lining Material Warning .................................................................................................................................................................................................5
Model Coverage ............................................................................................................................................................................................................ 6
Parts Nomenclature .......................................................................................................................................................................................................8
Model ES-165-7 and EB-165-7 Interchangeability ..........................................................................................................................................12
EB
Section 2: Periodic Service
Brake Maintenance Preliminary Steps ........................................................................................................................................................................15
Brake Adjustment ........................................................................................................................................................................................................15
Brake Operation Check ............................................................................................................................................................................................... 17
Lubrication ...................................................................................................................................................................................................................17
Periodic Inspections ....................................................................................................................................................................................................18
Service Intervals ..........................................................................................................................................................................................................18
Section 3: Removal/Disassembly
Drum Removal .............................................................................................................................................................................................................19
Shoe Removal .............................................................................................................................................................................................................20
EB models (except EB-150-4L)/ES-165-5, 6, 7D, F, L/ES-150-8D, F/ES-150-6D ...........................................................................................21
ES-150-4L and EB-150-4L ...............................................................................................................................................................................23
ES-165-7M .......................................................................................................................................................................................................24
ES-165-7H ....................................................................................................................................................................................................... 26
Brake Adjuster Removal ..............................................................................................................................................................................................28
Camshaft Removal ......................................................................................................................................................................................................28
Air Chamber Bracket Removal ....................................................................................................................................................................................28
Spider Removal ...........................................................................................................................................................................................................29
Dustshield Removal .....................................................................................................................................................................................................29
Cleaning Brake Parts ...................................................................................................................................................................................................30
™
Roller and ES™ Cam Interchangeability ...................................................................................................................................................12
Section 4: Inspection
Drum Inspection ..........................................................................................................................................................................................................31
Shoe and Lining Inspection ......................................................................................................................................................................................... 32
Camshaft Radial Play Inspection .................................................................................................................................................................................34
Camshaft Inspection .................................................................................................................................................................................................... 34
Camshaft Bushing and Seal Inspection .......................................................................................................................................................................34
Spider Inspection ......................................................................................................................................................................................................... 35
Air Chamber Bracket Inspection .................................................................................................................................................................................. 35
Air Chamber Inspection ...............................................................................................................................................................................................36
Brake Adjuster Inspection ............................................................................................................................................................................................36
Section 5: Repair/Replacement
Camshaft Bushing/Grease Seal Replacement ............................................................................................................................................................37
Lining Replacement ..................................................................................................................................................................................................... 38
Section 6: Installation/Assembly
Spider Installation ........................................................................................................................................................................................................39
Dustshield Installation (Two Piece) ..............................................................................................................................................................................39
Dustshield Installation (One Piece) .............................................................................................................................................................................40
Air Chamber Bracket Installation .................................................................................................................................................................................41
Camshaft Installation ...................................................................................................................................................................................................42
Cam Head Washer Installation .................................................................................................................................................................................... 42
Brake Adjuster Installation ...........................................................................................................................................................................................43
Shoe and Lining Installation ........................................................................................................................................................................................44
Shoe Installation ..........................................................................................................................................................................................................46
ES-150-8D, F & 6D .......................................................................................................................................................................................... 46
All EB (except EB-150-4L) and ES-165-5, 6, 7D, F, L .....................................................................................................................................47
ES-165-7M .......................................................................................................................................................................................................49
ES-165-7H ....................................................................................................................................................................................................... 51
Specifi cation Chart ..................................................................................................................................................................................................57
1
Page 3

General Information
List of Illustrations and Tables
List of Illustrations
Figure 1. How to Use this Manual ................................................................................................................................................................................4
Figure 2. Bendix Brake Model Identifi cation .................................................................................................................................................................5
Figure 3. Brake Part Nomenclature, General ............................................................................................................................................................... 6
Figure 4. Brake Model Part Nomenclature ................................................................................................................................................................... 7
Figure 4. Brake Model Part Nomenclature, Continued ................................................................................................................................................. 8
Figure 5. EB™ Roller and ES™ Cam Contact Pattern .................................................................................................................................................. 12
Figure 6. Parts Identifi cation .......................................................................................................................................................................................13
Figure 6. Parts Identifi cation, Continued .................................................................................................................................................................... 14
Figure 7. Vehicle Maintenance Support ......................................................................................................................................................................15
Figure 8. Measurement, At Rest .................................................................................................................................................................................15
Figure 9. Measurement, 80 psi Applied ...................................................................................................................................................................... 16
Figure 10. Measurement, Brake Applied ....................................................................................................................................................................16
Figure 11. Brake Adjuster Adjustment ........................................................................................................................................................................16
Figure 12. Roller Retainer Removal ........................................................................................................................................................................... 21
Figure 13. Upper Cam Roller and Pin Removal ......................................................................................................................................................... 21
Figure 14. ES-165-7D, L, F Shoe Removal ................................................................................................................................................................ 22
Figure 15. Shoe Removal ........................................................................................................................................................................................... 22
Figure 16. Shoe Return Spring Removal ....................................................................................................................................................................23
Figure 17. Lower Shoe Removal ................................................................................................................................................................................23
Figure 18. Retainer Loop Removal .............................................................................................................................................................................24
Figure 19. Roller and Retainer Removal .................................................................................................................................................................... 24
Figure 20. Return Spring Removal .............................................................................................................................................................................24
Figure 21. Retaining Ring and Washer Removal ....................................................................................................................................................... 25
Figure 22. Cap Screw Removal ..................................................................................................................................................................................25
Figure 23. Anchor Pin Removal ..................................................................................................................................................................................25
Figure 24. Anchor Pin Bushing Removal ....................................................................................................................................................................25
Figure 25. Retaining Ring and Washer Removal ....................................................................................................................................................... 26
Figure 26. Cap Screw Removal ..................................................................................................................................................................................26
Figure 27. Anchor Pin Removal ..................................................................................................................................................................................26
Figure 28. Shoe Removal ........................................................................................................................................................................................... 26
Figure 29. Anchor Pin Bushing Removal ....................................................................................................................................................................27
Figure 30. Groove Pin Removal ................................................................................................................................................................................. 27
Figure 31. Brake Adjuster Removal ............................................................................................................................................................................28
Figure 32. Spider Mounting Hardware Removal ........................................................................................................................................................29
Figure 33. Dustshield Mounting Hardware Removal ..................................................................................................................................................29
Figure 34. Drum Inspection ........................................................................................................................................................................................ 31
Figure 35. Cam Roller Identifi cation ...........................................................................................................................................................................31
Figure 36. Shoe and Lining Inspection .......................................................................................................................................................................32
Figure 37. Brake and Lining Blocks ............................................................................................................................................................................ 33
Figure 38. Camshaft Radial Play Inspection ..............................................................................................................................................................34
Figure 39. Camshaft Inspection ..................................................................................................................................................................................34
Figure 40. Spider Inspection .......................................................................................................................................................................................35
Figure 41. Air Chamber Bracket Inspection ................................................................................................................................................................35
Figure 42. Air Chamber Inspection ............................................................................................................................................................................. 36
Figure 43. Brake Adjuster Inspection ..........................................................................................................................................................................36
Figure 44. Air Chamber Bracket Bushing Installation ................................................................................................................................................. 37
Figure 45. Camshaft Bushing Installation ................................................................................................................................................................... 37
Figure 46. Lining Rivet (or Bolt) Tightening Sequence ............................................................................................................................................... 38
Figure 47. Installing Spider Mounting Hardware ........................................................................................................................................................39
Figure 48. Dustshield Spacing ....................................................................................................................................................................................39
Figure 49. Designed Interference Fit ..........................................................................................................................................................................39
Figure 50. Attaching Screw Location .......................................................................................................................................................................... 40
Figure 51. Air Chamber Bracket Mounting Hardware ............................................................................................................................................... 41
Figure 52. Camshaft Installation ................................................................................................................................................................................. 42
Figure 53. Cam Head Washer Installation ..................................................................................................................................................................42
Figure 54. Shim Washer and Snap Ring Installation .................................................................................................................................................. 43
Figure 55. Brake Adjuster End Play Check ................................................................................................................................................................ 43
Figure 56. Brake Adjuster Lubrication and Adjustment ............................................................................................................................................... 43
Figure 57. Shoe Web Lubrication ...............................................................................................................................................................................45
Figure 58. Shoe Retaining Spring Installation ............................................................................................................................................................ 45
2
Page 4

General Information
List of Illustrations
Figure 59. Shoe Return Spring and Roller Installation ............................................................................................................................................... 45
Figure 60. Upper and Lower Shoe Positioning ........................................................................................................................................................... 46
Figure 61. Shoe Return Spring Installation .................................................................................................................................................................46
Figure 62. Upper and Lower Shoe Positioning ........................................................................................................................................................... 47
Figure 63. Shoe Return Spring Installation .................................................................................................................................................................47
Figure 64. Roller Retainer Installation ........................................................................................................................................................................ 48
Figure 65. Shoe Return Spring Installation .................................................................................................................................................................48
Figure 66. Retainer Installation ...................................................................................................................................................................................48
Figure 67. Anchor Pin Bushing Installation .................................................................................................................................................................49
Figure 68. Lower Shoe and Anchor Pin Installation ....................................................................................................................................................49
Figure 69. Upper Shoe and Anchor Pin Installation ....................................................................................................................................................49
Figure 70. Cap Screw Installation ...............................................................................................................................................................................49
Figure 71. Shoe Return Spring Installation .................................................................................................................................................................50
Figure 72. Roller Retainer Installation ........................................................................................................................................................................ 50
Figure 73. Roller and Retainer Installation ................................................................................................................................................................. 50
Figure 74. Retainer Installation ...................................................................................................................................................................................50
Figure 75. Groove Pin Installation .............................................................................................................................................................................. 51
Figure 76. Spider Anchor Pin Bushing Installation ..................................................................................................................................................... 51
Figure 77. Shoe Anchor Pin Bushing Installation ....................................................................................................................................................... 51
Figure 78. Lower Shoe Positioning .............................................................................................................................................................................52
Figure 79. Upper Shoe Positioning .............................................................................................................................................................................52
Figure 80. Upper Shoe Installation .............................................................................................................................................................................52
Figure 81. Lower Shoe and Anchor Pin Installation ....................................................................................................................................................52
List of Illustrations
and Tables
List of Tables
Table 1. Bendix Brake Models and Specifi cations .........................................................................................................................................................4
Table 2. Distance Range .............................................................................................................................................................................................15
Table 3. Stroke Values ................................................................................................................................................................................................. 16
Table 4. Lubrication Intervals ....................................................................................................................................................................................... 17
Table 5. Shoe Removal Procedure Index ....................................................................................................................................................................20
Table 6. Distance: Clevis Pin Hole Centerline to Air Chamber Face ...........................................................................................................................36
Table 7. Camshaft Bushing Installation Specifi cations ................................................................................................................................................37
Table 8. Shoe Installation Procedure Index .................................................................................................................................................................44
3
Page 5

General Information
Foreword/Lining Material Warning
Purpose of this Manual
This Bendix Spicer Foundation Brake LLC publication is
intended to act as a source of maintenance information
to those involved in servicing Bendix brakes.
How to Use this Manual
1. Arrangement. This manual is arranged in seven sections:
General Information, Periodic Service, Removal/Disassembly,
Inspection, Repair/Replacement, Installation/Assembly and
Specifi cations. General page layout, including section and
paragraph headings, indention levels, and Figure and Table
designator information, is shown in Figure 1.
2. Table of Contents. The Table of Contents lists all section
headings and primary paragraph headings in this
publication.
3. Illustrations and Tables. Illustrations and tables are included
to help make the text of this publication clear. See the List of
Illustrations and List of Tables following the Table of
Contents.
4. Specifi cation Chart. A tabulation of all measurement
specifi cations is provided at the back of this publication.
4
Page 6

General Information
!
DANGER
AVOID CREATING DUST
POSSIBLE CANCER AND LUNG DISEASE HAZARD
Material Warning
Foreword/Lining
While Bendix Spicer Foundation Brake LLC does not offer asbestos
brake linings, the long-term effects of some non-asbestos fi bers
have not been determined. Current OSHA Regulations cover
exposure levels to some components of non-asbestos linings but not
all. The following precautions must be used when handling these
materials.
1. AVOID CREATING DUST. Compressed air or dry brushing must
never be used for cleaning brake assemblies or the work area.
2. BENDIX SPICER FOUNDATION BRAKE LLC RECOMMENDS THAT
WORKERS DOING BRAKE WORK MUST TAKE STEPS TO MINIMIZE
EXPOSURE TO AIRBORNE BRAKE LINING PARTICLES. Proper
procedures to reduce exposure include working in a well ventilated
area, segregation of areas where brake work is done, use of local
fi ltered ventilation systems or use of enclosed cells with fi ltered
vacuums. Respirators approved by the Mine Safety and Health
Administration (MSHA) or National Institute for Occupational
Safety and Health (NIOSH) should be worn at all times during
brake servicing.
3. Workers must wash before eating, drinking or smoking; shower
after working, and should not wear work clothes home. Work
clothes should be vacuumed and laundered separately without
shaking.
4. Material safety data sheets on this product, as required by
OSHA, are available from Bendix Spicer Foundation Brake LLC.
5
Page 7

General Information
Model Coverage
The service procedures and specifi cations in this publication
cover the Bendix brake models listed in Table 1. The basic
instructions cover all 15", 16.5", and 18" brake types and sizes,
unless specifi ed otherwise. A breakdown of Bendix brake model
identifi cation is provided in Figure 2.
Brake
Model
Size
mmin.
Shoe Spider Anchor
Confi guration
Applications
EB-150-4L 15.0 x 4 381 x 102 Fabricated Fabricated SAP Steer Axles
EB-165-5D 16.5 x 5 419 x 127 Fabricated Cast SAP Steer or Drive Axles
EB-165-5L 16.5 x 5 419 x 127 Fabricated Fabricated SAP Steer or Drive Axles
EB-165-6D 16.5 x 6 419 x 152 Fabricated Cast SAP Steer or Drive Axles
EB-165-6L 16.5 x 6 419 x 152 Fabricated Fabricated SAP Steer or Drive Axles
EB-165-7D 16.5 x 7 419 x 178 Fabricated Cast SAP Steer or Drive Axles
EB-165-7F 16.5 x 7 419 x 178 Fabricated Forged SAP Trailer Axles
EB-165-7L 16.5 x 7 419 x 178 Fabricated Fabricated SAP Steer or Drive Axles
EB-165-8D 16.5 x 8.63 419 x 219 Fabricated Cast SAP Drive Axles
EB-165-8L 16.5 x 8.63 419 x 219 Fabricated Fabricated SAP Drive Axles
EB-180-7R 18.0 x 7 457 x 178 Cast Heavy Cast SAP On/Off Hwy. Drive Axles
ES-150-4L 15.0 x 4 381 x 102 Fabricated Fabricated SAP Steer Axles
ES-150-4D 15.0 x 4 381 x 102 Fabricated Cast SAP Steer Axles
ES-150-6D 15.0 x 6 381 x 152 Fabricated Cast SAP Steer or Drive Axles
ES-150-8D 15.0 x 8.63 381 x 219 Fabricated Cast SAP Drive Axles
ES-150-8F 15.0 x 8.63 381 x 219 Fabricated Forged SAP Trailer Axles
ES-165-5D 16.5 x 5 419 x 127 Fabricated Cast SAP Steer or Drive Axles
ES-165-5L 16.5 x 5 419 x 127 Fabricated Fabricated SAP Steer or Drive Axles
ES-165-6D 16.5 x 6 419 x 152 Fabricated Cast SAP Steer or Drive Axles
ES-165-6L 16.5 x 6 419 x 152 Fabricated Fabricated SAP Steer or Drive Axles
165 XL Cast 16.5 x 6 419 x 152 Cast Cast DAP Steer Axle Transit
ES-165-7D 16.5 x 7 419 x 178 Fabricated Cast SAP Steer or Drive Axles
ES-165-7F 16.5 x 7 419 x 178 Fabricated Forged SAP Trailer Axles
ES-165-7H 16.5 x 7 419 x 178 Cast Heavy Cast DAP On/Off Hwy. Drive Axles
ES-165-7L 16.5 x 7 419 x 178 Fabricated Fabricated SAP Steer or Drive Axles
ES-165-7M 16.5 x 7 419 x 178 Fabricated Heavy Cast DAP On/Off Hwy. Drive Axles
ES-165-8L 16.5 x 8.63 419 x 219 Fabricated Fabricated SAP Drive Axles
ES-165-8D 16.5 x 8.63 419 x 219 Fabricated Cast SAP Drive Axles
ES-165-8F 16.5 x 8.63 419 x 219 Fabricated Forged SAP Trailer Axles
ES-165-8L 16.5 x 8.63 419 x 219 Fabricated Forged SAP Trailer Axles
165 XL Cast 16.5 x 10 419 x 254 Cast Cast DAP Drive Transit
Table 1. Bendix Brake Models and Specifi cations
6
Page 8
Manufacturer
Bendix Spicer
Foundation Brake
Service
B - Standard Service
S - Extended Service
Drum Diameter
122 – 12.25" (311 mm)
150 – 15" (381 mm)
165 – 16.5" (419 mm)
180 – 18" (457 mm)
Shoe Size
04 - 4" – (102 mm)
05 - 5" – (127 mm)
06 - 6" – (152 mm)
07 - 7" – (178 mm)
07 - 7.5” – (191 mm)
08 - 8.63" – (219 mm)
10 - 10" – (254 mm)
General Information
E S - 1 5 0 - 0 8 D
Configurations
A - Fab Shoe Weld On Spider Self Contained Cam Bracket SAP
B - Fab Shoe Weld On Spider Self Contained Cam Bracket DAP
D - Fabricated Shoe/Cast Spider SAP
F - Fabricated Shoe Weld On Spider SAP (Non Self Contained)
H - Cast Shoe/Heavy Cast Spider DAP
L - Fabricated Shoe/Fabricated Spider SAP
M - Fabricated Shoe/Cast Spider (DAP Closed A/P)
P - Fabricated Shoe/Weld On Spider (DAP Closed A/P)
R - Cast Shoe/Heavy Cast Spider SAP
S - Reinforced Fabricated Shoe/Heavy Cast Spider (SAP)
T - Fabricated Shoe/Weld On Spider DAP (Non Self Contained)
Configuration
Example: L = Fabricated Shoe
Fabricated Spider
Single Anchor Pin (SAP)
Shoe Size
Example: (219mm)
8 = 8.63"
Model Coverage
Figure 2. Bendix Brake Model Identifi cation
SAP - Single Anchor Pin
DAP - Double Anchor Pin
7
Page 9

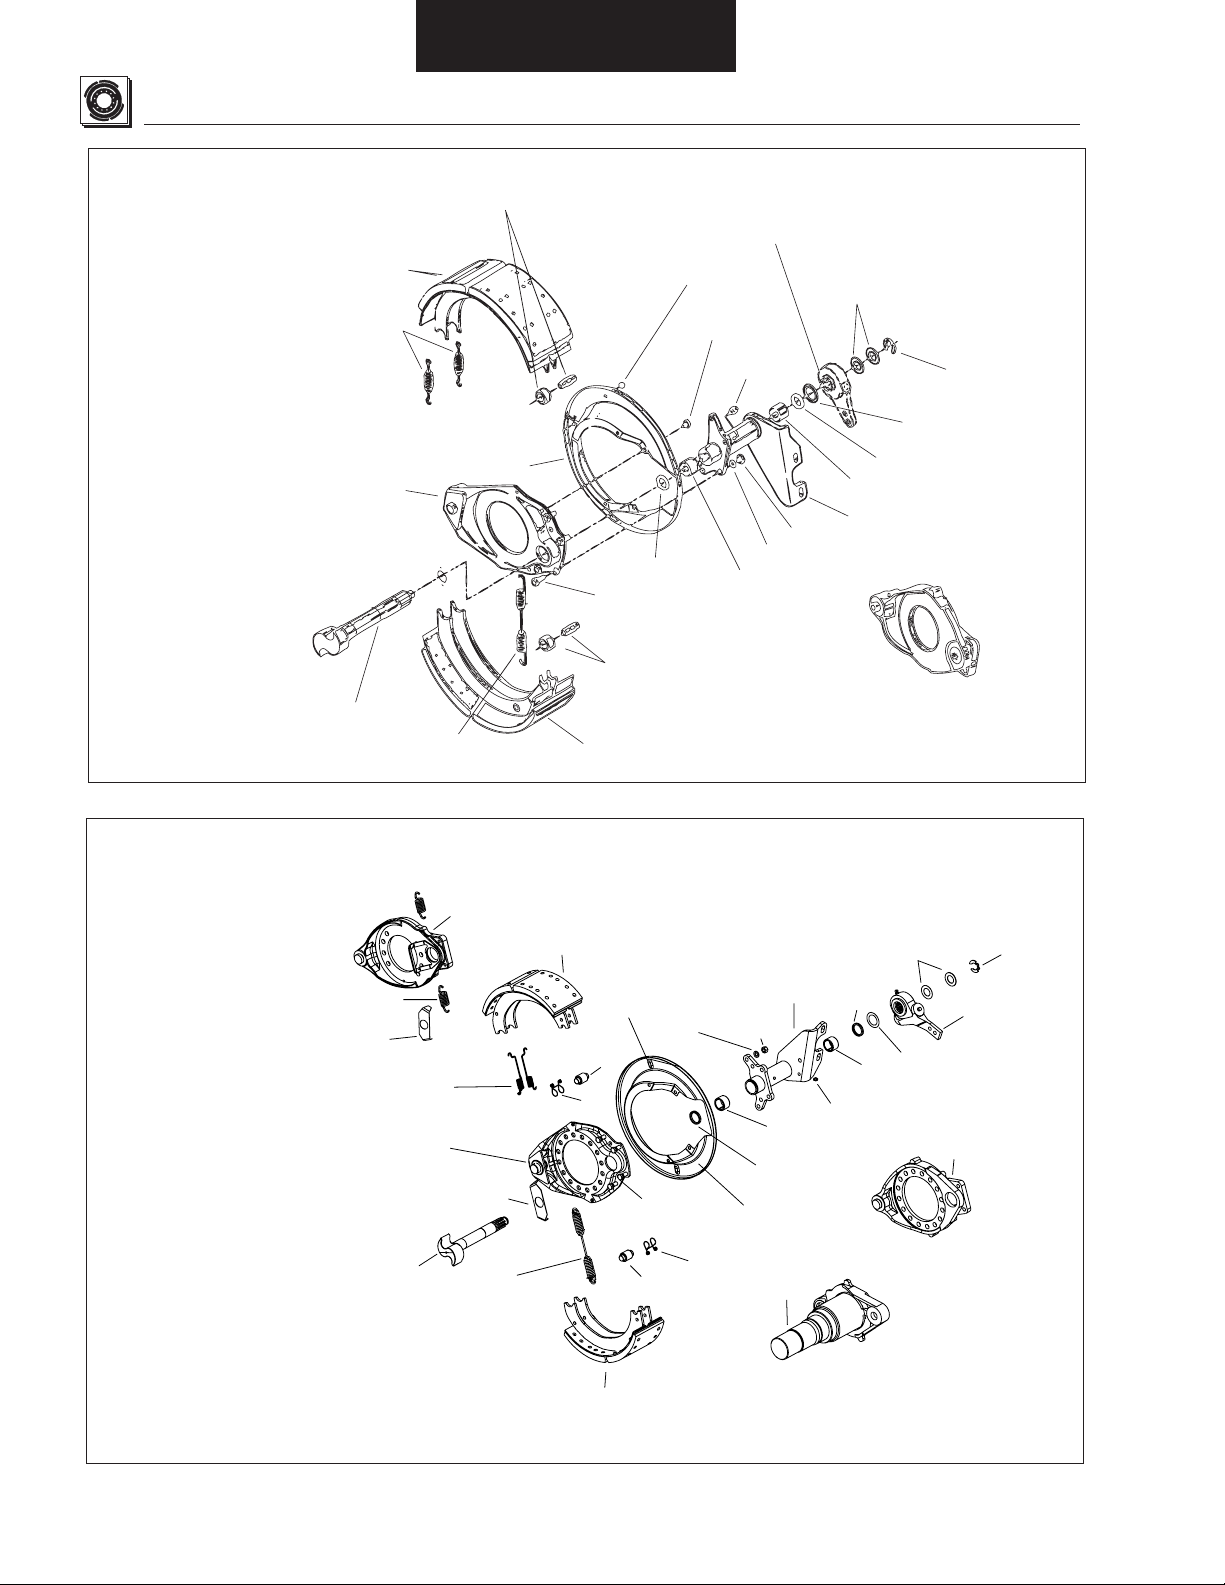
Parts Nomenclature
General Information
General parts nomenclature for Bendix brake models are identifi ed
in Figure 3. Variations in shoe hold-down springs and guides are
ES-150-4L Brake
Camshaft
Retainer
Snap Ring
Brake Adjuster
Inner Washer
Camshaft
Shim
Camshaft
Bushing
Washer
Brake
Adjuster
Grease
Seal
Dustshield Screw
Shoe Assembly
*Shoe Hold-Down Spring and Guide Variation
Stabilizer Nut
Bracket
Assembly
Camshaft
Bushing
Bolt
Cam Roller
Shoe Retainer
Spring
Color - Blue
also identifi ed. Specifi c parts nomenclature for specifi c Bendix brake
models are provided in Figure 4.
Shoe Hold-Down Spring and Guide Variation
New Style
Shoe Spacer Not Required
Shoe Assembly
Camshaft
Grease
Seal
Barrel Nut
Dustshield
Assembly*
Spider
Old Style
Shoe Hold-Down Spring
Shoe Return
Spring
Color - Blue
Nut
Washer
Shoe*
Hold-Down
Spring
Shoe
Spacer
Cam Roller
Bolt*
Standard Nut
(Must be Removed for New Style Hold-Down)
Shoe Guide and Shoe
Hold-Down Spring
ES-150-4D Brake
Shoe
Return Spring
Color - Red
Cast
Spider
Cam Head
Washer
Camshaft
Figure 3. Brake Part Nomenclature, General
8
Shoe Return
Color - Grey
Shoe Assembly
Retainer
Spring
Shoe Assembly
Inspection
Hole Plug
Roller
Bracket
Stud
Roller
Lock Washer
Dustshield
Retainer
Bracket
Assembly
Nut
Camshaft
Bushing
Grease
Seal
Grease
Camshaft
Bushing
Grease
Fitting
Seal
Camshaft
Shim
Washer
Brake Adjuster
Brake Adjuster
Inner Washer
Camshaft
Retainer
Snap Ring
Page 10

General Information
Parts Nomenclature
ES-150-6D
Steer Brake
Shoe
Retainer Springs
Color - Orange
(Stamped Steel)
Camshaft
Shoe Assembly
Retainer
Shoe Return
Spring
Color - Red
Spider
Cam Head Washer
Roller
Shoe Return
Camshaft
Bushing
Spring
Roller
Grease
Seal
Retainer
Bracket
Assembly
Brake
Adjuster
Camshaft
Bushing
Camshaft
Shim
Washer
Brake Adjuster
Inner Washer
Grease
Seal
Grease Fitting
Camshaft
Retainer
Snap Ring
ES-150-8D and
ES-150-8F
Drive & Trailer
Brake
Shoe
Retainer Springs
Color - Orange
Spider
(Stamped Steel)
Cam Head Washer
Camshaft
Shoe Assembly
Shoe Assembly
Roller
Retainer
Shoe Return
Spring
Color - White
Retainer
Roller
Bracket
Assembly
Camshaft
Bushing
Grease
Seal
Camshaft
Bushing
Grease
Grease Fitting
Brake Adjuster
Seal
Camshaft
Shim
Washer
Brake Adjuster
Inner Washer
Forged Spider
Camshaft
Retainer
Snap Ring
Figure 4. Brake Model Part Nomenclature
Shoe Assembly
9
Page 11
Parts Nomenclature
General Information
Brake Model
EB-165-5D
EB-165-5L
EB-165-6D
EB-165-6F
EB-165-7D
EB-165-7F
EB-165-7L
Cam Roller and Pin for
EB-165 and EB-180 Brakes
Two-Piece Roller and Pin
Shoe Assembly
Shoe Retainer
Springs
Color - Orange
(Stamped Steel)
Camshaft
Spider
Shoe Return Spring
Dustshield
Grease Seal
Bracket Stud
Cam Roller
and pin
Shoe Assembly
Inspection
Hole Plug
Dustshield
Screw
Grease
Fitting
Camshaft
Bushing
Brake Adjuster
Camshaft
Shim Washers
Nut
Lockwasher
Note: Cast spiders are tapped
and require 4 bolts and lock-
chamber bracket assembly.
Camshaft
Retainer
Snap Ring
Brake Adjuster
Inner Washer
Grease Seal
Camshaft Bushing
Bracket Assembly
Cast Spider
washers to attach air
Brake Model
ES-165-5D
ES-165-5L
ES-165-6D
ES-165-6F
ES-165-7D
ES-165-7F
ES-165-7L
Shoe
Retainer Springs
Color - Orange
Cam Head Washer
Cast Spider
With Horse
Shoe
Return Spring
Color - Red
Spider
(Stamped Steel)
Camshaft
Collar
Cam Head
Washer
Shoe Return
Color - Grey
Shoe Assembly
Retainer
Spring
Shoe Assembly
Inspection
Hole Plug
Roller
Bracket
Stud
Roller
Lock Washer
Dustshield
Retainer
Bracket
Assembly
Nut
Camshaft
Bushing
Grease
Seal
Forged
Spider
Grease
Camshaft
Bushing
Grease
Fitting
Seal
Camshaft
Shim
Wash er
Brake Adjuster
Brake Adjuster
Inner Washer
Cast
Spider
Camshaft
Retainer
Snap Ring
Figure 4. Brake Model Part Nomenclature, Continued
10
Page 12

y
General Information
ES-165-7M
Heavy-Duty
Brake
ES-165-7H
Severe Duty
Brake
Cast Shoe Return Spring
Color - Orange
Fabricated Shoe Assembly
Anchor Pin
Washer
Snap Ring
Anchor Pin
Bushings
Camshaft
Snap Ring
Nut
Washer
Snap Ring
Washer
Retainer
Roller
Cast
Spider
Washer
Washer
Anchor Pin
Fabricated Shoe Assembly
Inspection
Hole Plug
Snap Ring
Dustshield
Shoe Return
Spring
Color - llow
Retainer
Roller
Brake Adjuster
Bracket
Assembly
Bracket Lock Washer
Camshaft Bushing
Grease Seal
Camshaft
Retainer
Snap Ring
Camshaft
Shim Washer
Brake Adjuster Inner Washer
Grease Seal
Camshaft Bushing
Grease Fitting
Bolt
Cast Spider H version
Roller Dowel Pin
Camshaft Roller
and Pin
Bushing
Anchor Pin
Washer
Snap Ring
NO s are tapped
and require four bolts and lockwashers
to attach air chamber bracket assembl
Bushing
.
ES-180-7R
Brake
Shoe
Retainer Springs
Color - Orange
Spider
(Stamped Steel)
Shoe Assembly
Camshaft Roller
and pin
Camshaft
Camshaft Roller
and Pin
Inspection
Hole Plug
Assembly
Lock Washer
Shoe Return
Spring
Color - Green
Bracket
Bolt
Grease
Seal
Dustshield
Camshaft
Bushing
Camshaft
Bushing
Grease
Seal
Grease
Fitting
Camshaft
Washer
Brake Adjuster
Inner Washer
Bracket Bolt
Lock Washer
Shim
Camshaft
Retainer
Snap Ring
Brake Adjuster
Shoe Assembly
11
Page 13
Parts Nomenclature
Model ES-165 and EB-165 Interchangeability
General Information
Brake parts for the Extended Service Brake (Model ES-165) are unique
and must not be intermixed with Standard Brake parts (Model EB-165)
unless otherwise instructed. These parts consist of the camshaft,
camshaft washer, return spring, cam roller and shoe/lining assembly.
Any attempt to operate the brake with other than its intended parts may
result in unsatisfactory performance.
“On-Road” Repair: If a vehicle should need “On-Road” repair and
™
ES
Brake hardware is not available, it is possible to retrofi t the brake
with Standard Brake parts in order to return the vehicle to service.
These parts consist of the Standard shoe/lining assembly, cam roller,
pin and return spring. The retaining springs and camshaft with cam
washer will work in this situation and do not need to be replaced.
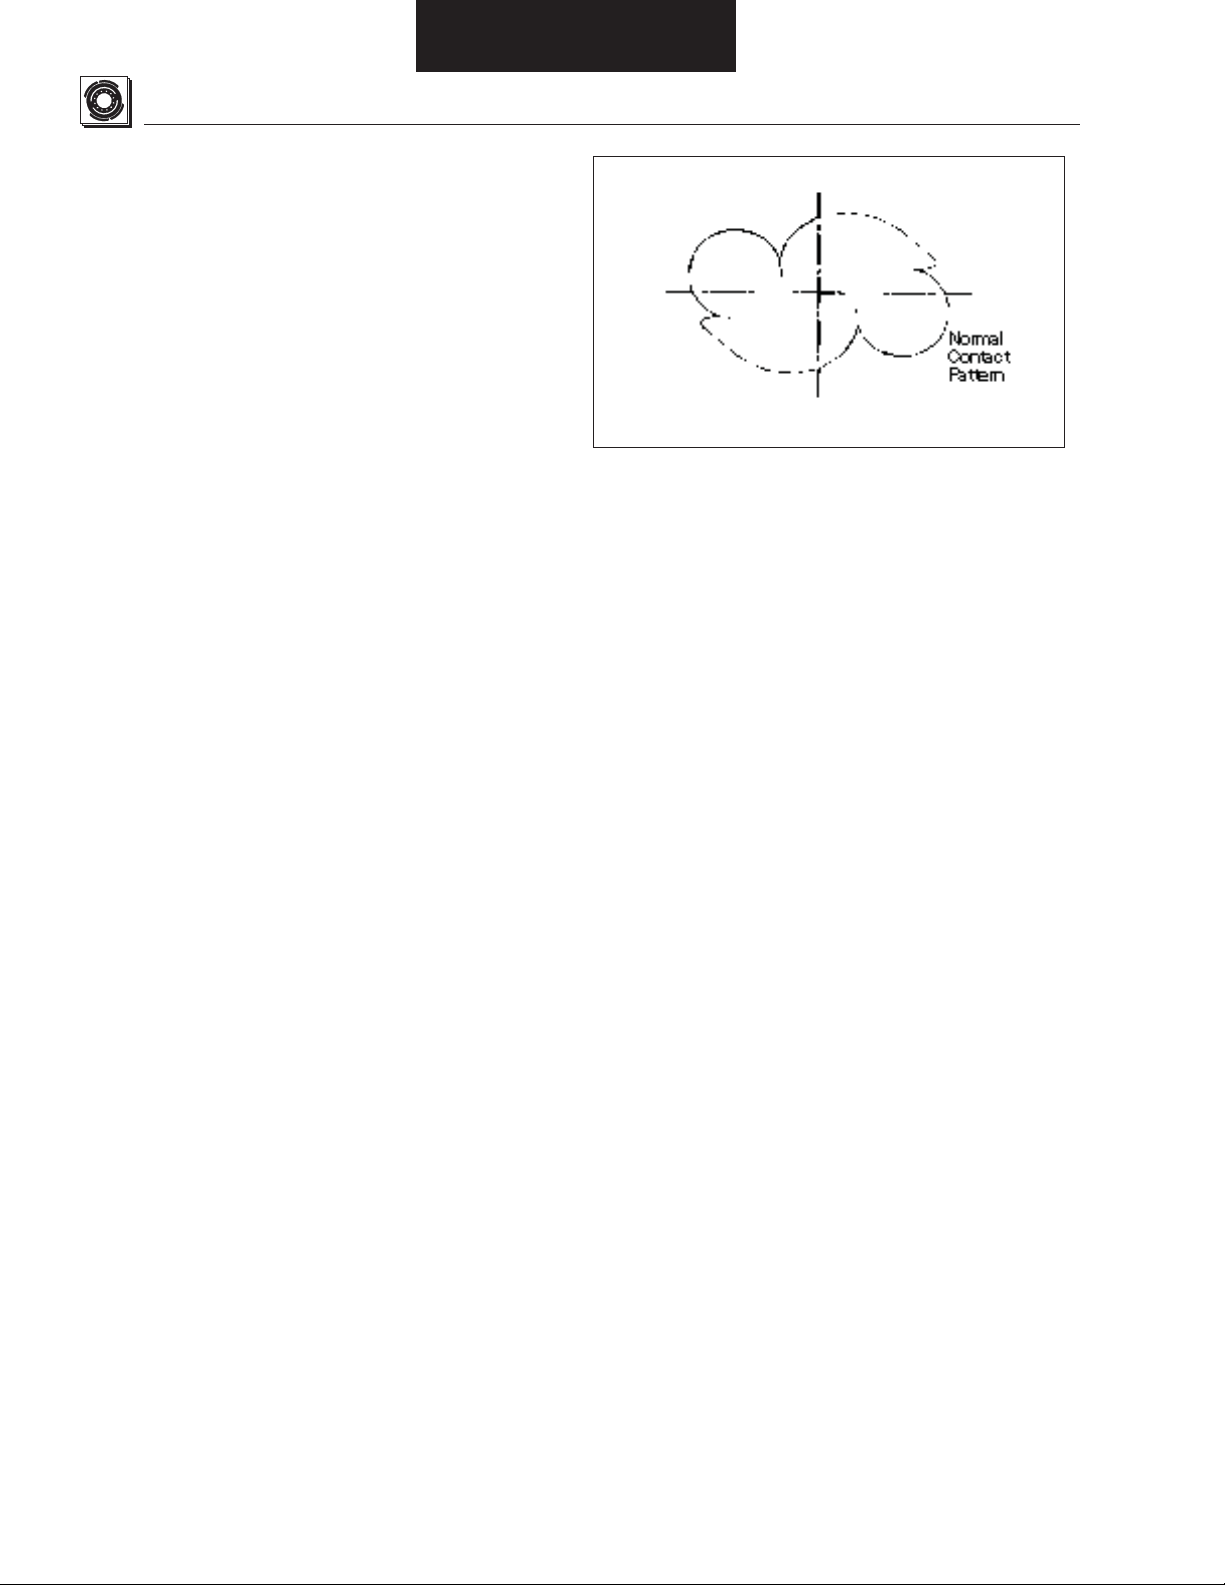
EB™ Roller and ES™ Cam Interchangeability
The EB™ Roller and the ES™ Cam are compatible and can be used
together. Figure 5 illustrates the proper fi t of an EB
™
ES
Cam. As shown, the contact pattern is at two points and the
two parts will function satisfactorily with this fi t.
NOTE: The ES
™
Roller and EB™ Cam are not compatible and should
not be used together.
™
Roller to an
EB™ Roller
Figure 5. EB
™
Roller and ES™ Cam Contact Pattern
ES
™
Cam
12
Page 14

General Information
Bendix brake model parts identifi cation for shoes, return springs,
spiders and camshafts are identifi ed in Figure 6.
Parts Nomenclature
ES-150-D,F
ES/EB 150-4L
Old
ES-165-D,L,F
New
Shoe without
Spring Attaching
Lugs
High and Low mount shoes
Figure 6. Parts Identifi cation
Shoe Return Spring
13
Page 15

Brake Spiders
General Information
Camshafts
Stamped Spider ES/EB-150-4L
Air Chamber
Brake Flange
shape for
ES/EB-150-4L
Figure 6. Parts Identifi cation, Continued
14
Page 16

Periodic Service
Parts Identifi cation
Maintenance and Adjustment
Due to the importance of a well-maintained brake system, the
inspections and maintenance listed below must be accomplished
by commercial vehicle operators at the intervals suggested.
Since driver technique and vehicle use affect the rate of brake
component wear, it may be appropriate to increase the frequency
of the following inspections to fi t individual needs based upon past
experience.
Brake Maintenance Preliminary Steps
Prior to performing any maintenance requiring removal of the tire
and wheel, the following preliminary steps must be taken to ensure
your safety. Refer to Figure 7.
Brake Adjustment - Manual Brake Adjuster
NOTE: An assistant is required to make a brake adjustment.
WARNING: Block all wheels before beginning this adjustment
!
procedure.
To determine whether Bendix Brakes require adjustment, applied
stroke is measured and compared to the maximum value for the air
chamber size in use on the vehicle.
1. Perform “Brake Maintenance Preliminary Steps” described earlier.
2. With air chamber pushrod fully retracted, measure distance from
face of air chamber to centerline of clevis pin hole. Refer to Figure 8.
If the measurement is not within ranges shown in Table 2, reposition
clevis. Remeasure the distance and repeat until within range. Record
exact measured distance as dimension “A”.
Distance: Clevis Pin Hole
Centerline to Air Chamber Face
All brakes (except 2-5/8" ± 1/16"
Mack and Trailer Axle) (66.7 ± 1.59 mm)
Figure 7. Vehicle Maintenance Support
1. Set parking brake and block wheels to prevent vehicle
movement.
2. Raise drive axle with a jack and support on suitable stands.
WARNING: Never work under a vehicle supported by a jack.
!
3. Cage spring-type brake chamber following vehicle
manufacturer’s instructions.
4-3/8" ± 1/16"
Mack brakes
(111.1 ± 1.59 mm)
Trailer Axle 6-1/2" ± 1/8"
brakes (165.1 ± 3.175 mm)
Table 2. Distance Range
Figure 8. Measurement, At Rest
15
Page 17

Maintenance and Adjustment
Periodic Service
3. Apply and hold an 80 psi brake application, and again measure
from face of air chamber to clevis pin centerline. Refer to Figure 9.
Record distance as dimension “B”.
Figure 9. Measurement, 80 psi Applied
4. Subtract dimension “A” from “B”. The difference is applied stroke.
Compare applied stroke to maximum value in Table 3. If applied
stroke equals or exceeds maximum applied stroke shown, adjust
brakes. If less than the maximum, no adjustment is required and you
may perform Brake Operation Check.
80 - 90 PSI
Air Chamber Maximum Desired
Size Applied Free
Stroke Stroke
Type 30" Long Stroke 2.5" 3/8" to 5/8"
Type 30" 2" (Without Drag)
Type 24" 1-3/4"
Type 24" (w/ 2-1/2" 2"
extended stroke)
Type 24 (w/3" extended stroke) 2.5"
Type 20" and 16" 1-3/4" 3/8" to 1/2"
Type 12" 1-3/8" 3/8" to 1/2"
Table 3. Stroke Values
NOTE: If adjustment is necessary, Bendix Brakes are adjusted to
achieve proper free stroke. The difference between free stroke and
applied stroke is merely the method used to move the brake adjuster
from rest. Applied stroke uses an 80 psi brake application; free
stroke is measured using a lever to move the brake adjuster until the
brake shoes contact the drum. If applied stroke exceeded the
maximum and adjustment is necessary, adjust the brakes as
described in steps 5 through 8 below.
16
5. Take “A” dimension exactly as before. Take “B” measurement
using a lever to move brake adjuster as shown until the shoes
contact drum. Refer to Figure 10. The result of “B” - “A” is brake
free stroke. Adjust free stroke to within range specifi ed in Table 3.
Figure 10. Measurement, Brake Applied
6. To adjust free stroke, depress locking sleeve on brake adjuster
adjustment nut and turn in direction required. Recheck free stroke
to verify it is within range. Make sure sleeve is “locked” when
adjustment is completed.
7. Verify that brakes are not dragging by spinning wheels by hand
or tapping drum lightly with a hammer and listening for a sharp
ringing sound.
8. Perform Brake Operation Check, to verify proper operation of
brakes before releasing vehicle for service.
Brake Adjustment - Automatic Slack Adjuster
NOTE: A properly working Automatic Slack Adjuster does not require
manual adjustment while in service. The manual adjuster hex is
intended for use during adjuster installation and brake overhaul.
WARNING: Automatic slack adjusters must never be repeatedly
adjusted to correct excessive in service pushrod stroke, because this
condition indicates that a problem exists with the automatic adjuster,
with the installation of the adjuster or with related foundation brake
components which manual adjustment will not correct.
1. Brake adjustment for automatic slack adjusters is the same as for
manual brake adjusters.
2. Refer to the Automatic Slack Adjuster Manufacturer's Instructions for
proper installation.
Page 18

Brake Operation Check
Periodic Service
NOTE: An assistant is required to make a thorough brake operation
check.
1. Apply brakes to 80 psi and hold. Check all air line fi ttings and air
chambers for leakage.
2. Apply and release brakes while observing operation of brake
adjusters on each axle. As brakes are applied and released, brake
adjusters should move in unison visually.
3. Investigate source and make corrections for any discrepancies
found in Steps 1 and 2.
4. Drive vehicle at low speeds in a safe area and make several brake
applications to verify safe operation and absence of pulling,
grabbing, or noise. If any of these are noted, investigate and repair
prior to releasing vehicle for service.
CAUTION: Never release a vehicle for service if any brake
!
discrepancy - no matter how minor - is evident.
Lubrication
When servicing brakes or replacing components, lubricate per guidelines listed in Lubrication Table below.
Lubricate the following components with grease specifi ed in table:
• One-piece Roller —lubricate shoe roller recess.
• Two-piece Roller—lubricate shoe roller I.D.
• Roller and anchor pin recesses of each shoe on ES & ED 150-4L models
Do Not Lubricate The Following:
Maintenance and Adjustment
• Cam head surface or related parts that contact cam head surface. For effi cient operation, the cam head surface must remain free of oil,
grease or other contaminants.
Note: When lubricating the camshaft bracket, lubricate until grease comes out at the brake adjuster end.
The seal is installed at this end with the air side in so that grease purges out.
CAUTION: Do not use moly-disulfi de loaded grease or oil because this may shorten service life.
!
Important: In no case should the lubrication interval exceed the published intervals in table below.
Component Lubrication Interval Type of Lubricant
Standard Every 50,000 miles or every 3 months Standard Chassis Grease
LMS-Low Lube Every 250,000 miles or once a year* Mobilith SHC-460 Synthetic
LMS-Lube Free None* Mobilith SHC-PM Synthetic
Table 4. Lubrication Intervals
Note: The Bendix LMS-Low Lube brake uses a special “button head” grease fi tting. This helps identify the system as an LMS Brake
Package and also indicates that system should be lubricated with a Bendix approved synthetic lubricant.
The Bendix LMS-Lube Free brake is lubricated at the factory with Mobilith SCH-PM synthetic grease and does not require lubrication at
service intervals. There is no grease fi tting on the LMS lube free components.
Brake Adjuster Lubrication: Pressure Iubricate according to manufacturer’s instructions.
17
Page 19

Periodic Service
Periodic Inspections
The component inspections discussed below are general in nature.
More detailed component inspections are normally done at overhaul.
For more specifi c guidelines, refer to the appropriate inspection
instructions in Brake Overhaul.
Service Intervals
Brake Reline
A brake reline should be done any time the lining thickness or
condition indicates the need.
Visual Inspection
A thorough visual inspection for brake wear, loose fasteners, broken
parts and/or obvious damage should be made each time the brake is
being serviced or the wheel and drum have been removed. In no case
should the visual inspection interval exceed 3 months of service.
Lining Inspection
A visual check of lining thickness and condition should be made each
time the vehicle is being serviced in the maintenance shop. In no case
should the lining thickness/condition inspection interval exceed 3
months of service.
Brake Adjustment
Brake Adjustment should be checked (and adjusted if necessary)
WEEKLY or any time applied stroke exceeds the maximums shown
in Periodic Maintenance: Brake Adjustment - Manual Brake
Adjuster.
Brake Operation Check
A complete operation check of the braking system should be made
following the instructions in Brake Operation Check, after any brake
service. In no case should the operation check interval exceed 3
months of service.
Camshaft Radial Play
Camshaft radial play should be checked with a dial indicator any
time the brake shoes have been removed from the vehicle to
assess the condition of the camshaft bushings. Refer to
Camshaft Inspection.
Camshaft Axial Play
Camshaft axial play should be checked any time the camshaft or
brake adjuster has been removed from the vehicle. Refer to the
axial play instructions in Brake Adjuster Installation, starting with
Step 6.
Brake Overhaul
A complete brake overhaul following the instructions in the
service manual should be accomplished at every third brake
reline.
Lubrication
See Periodic Service / Lubrication for detailed lube instructions
and intervals.
18
Page 20

Removal / Disassembly
A complete brake overhaul consists of:
• complete disassembly
• cleaning
• inspection
• repair and replacement of components
• assembly
• brake operation check
Detailed instructions for each of these steps are listed on the
following pages in the order in which they would normally be
encountered during a typical brake overhaul.
WARNING: The long-term effects of non-asbestos fi bers
!
have not been determined. Therefore, precautions should
be used when handling these materials.
See General Information / Lining Material Warning
Drum Removal
1. Perform “Brake Maintenance Preliminary Steps”.
2. While depressing locking sleeve, back off brake adjuster adjust-
ment nut on manual brake adjusters. Refer to Figure 11. Continue
turning until shoes are fully returned to released position and clear of
drum. On self adjusting brake adjusters, follow manufacturer’s
instructions.
NOTE: With outboard mounted drums go to step 6.
Check, Lubrication,
Inspection, Service
Figure 11. Brake Adjuster Adjustment
3. On drive axles, remove stud nuts and axle shafts. If used, remove
Iockwashers and taper dowels. If necessary, loosen dowels by holding
a brass drift in the center of the shaft head and striking it a sharp blow
with a hammer. On trailer and steer axles, remove hub cap.
WARNING: Do not strike the axle shaft fl ange with a hammer.
!
Do not use chisels or wedges to loosen shaft or dowels.
4. Remove axle spindle nut(s) and washer.
5. While rocking drum, pull outboard enough to allow removal of
outer wheel bearing.
6. Remove drum by pulling outboard while rocking from side to side.
If shoes are not clear of drum, return to Step 2 above.
CAUTION: If diffi culty is found on removal, do not force drum.
!
Excessive pulling force may damage brake components.
19
Page 21

Removal / Disassembly
Shoe Removal
Shoe Removal
Table 5 provides an index to the location of shoe removal procedures.
Locate the brake model under service and identify the page where the
appropriate shoe removal procedures are located.
Brake Model Page Number Brake Model Page Number
EB-150-4L
EB-165-5D 20 ES-150-4L 22
EB-165-5L 20 ES-150-6D 20
EB-165-6D 20 ES-150-8D 20
EB-165-6L 20 ES-150-8F 20
EB-165-7D 20 ES-165-5D 20
EB-165-7L 20 ES-165-5D 20
EB-165-7F 20 ES-165-5L 20
EB-165-8D 20 ES-165-6D 20
EB-165-8F 20 ES-165-6L 20
EB-165-8L 20 ES-165-7F 20
22 EB-180-7R 20
ES-165-7H 25
ES-165-7L 20
ES-165-7M 23
Table 5. Shoe Removal Procedure Index
20
Page 22

Removal / Disassembly
NOTE: The following procedures are divided into sections,
identifi ed by brake model numbers.
Shoe Removal
EB models (except EB-150-4L)/ES-165-5D,L /
ES-165-6D,L / ES-165-7D, F, L / ES-150-8D, F /
ES-150-4D/ES-150-6D/ES-165-8D,F,L
1. Perform steps in Removal/Disassembly: Drum Removal.
2. ES-165-5,6,7,8,D,L,F, ES-150-4D, ES-150-8D, F & 6D ONLY:
Pry roller retainer coiled loops out of both shoe web holes as
shown in Figure 12. Pivot roller retainer to swing loops clear of
shoe webs.
NOTE: EB models do not have roller retainers.
WARNING: The long term effects of non-asbestos fi bers have
!
not been determined. Therefore, precautions should be used
when handling these materials.
See General Information / Lining Material Warning
3. Using a large screwdriver or lever, lift upper shoe to stretch return
spring as shown in Figure 13.
Drum/Shoe Removal
Remove Roller and Pin, Then
Repeat for Lower Shoe.
™
For ES
Figure 13. Upper Cam Roller and Pin Removal
4. Remove upper cam roller and pin.
NOTE: ES-165-5,6,7,8D, L, F, ES-150-4D, ES-150-8D, F & 6D
ONLY: Remove roller and roller retainer as a unit.
5. Repeat Steps 2 through 4 to remove lower shoe roller and pin.
NOTE: Bendix recommends the use of a suitable brake tool when
removing rollers and return springs.
Brakes, See Note Below
Figure 12. Roller Retainer Removal
21
Page 23

Shoe Removal
Removal / Disassembly
6. Push cam end of both shoes toward cam and unhook shoe return
spring. Remove and discard spring.
NOTE: To remove return spring, position a lever or suitable tool with
notch to engage spring rod. Refer to Figure 14. Apply downward
force to stretch spring, allowing removal of upper spring hook.
Remove and discard spring.
7. Rotate both shoes around anchor pin and remove from vehicle.
Refer to Figure 15.
8. Clean and inspect remaining parts as outlined in removal/
disassembly section of this manual.
Figure 14. ES-165-7D, L, F Shoe Removal
NOTE: ES-165-5,6,7L,D/ES-150-6D steer axle brakes may use two
return springs with a horse collar or dual spring post. To remove
return springs, position a lever or suitable tool with notch to engage
spring. Return to Figure 14. Apply downward force to stretch upper
spring, allowing removal of upper spring hook. Remove and discard.
Repeat procedure for lower spring.
Figure 15. Shoe Removal
Cast Spider With
Horse Collar
22
Figure 15B. Cast Spider With Horse Collar
Page 24

Removal / Disassembly
ES-150-4L and EB-150-4L Brakes
1. Perform steps in removal/disassembly : drum removal
2. Using a large screwdriver or lever, lift upper shoe to stretch
return spring.
3. Remove upper roller.
4. Report steps 2 through 3 to remove lower roller.
5. Stretch shoe return spring and unhook it from upper shoe web.
Refer to Figure 16.
WARNING: The long term effects of non-asbestos fi bers, have
!
not been determined. Therefore, precautions should be used
when handling these materials.
See General Information / Lining Material Warning
Shoe Removal
Figure 16. Shoe Return Spring Removal
6. Rotate shoe downward and turn to allow disengagement of shoe
retaining spring from lower shoe web. Refer to Figure 17.
7. Rotate upper shoe upward and remove shoe and shoe retaining
spring.
8. Clean and inspect remaining brake parts as outlined in Removal/
Disassembly section of this manual.
Figure 17. Lower Shoe Removal
23
Page 25

Shoe Removal
Removal / Disassembly
ES-165-7M Heavy-Duty Brake
WARNING: The long term effects of non-asbestos fi bers, have
!
not been determined. Therefore, precautions should be used
when handling these materials.
See General Information / Lining Material Warning
1. Perform steps necessary for drum removal. See Removal /
Disassembly - Drum Removal.
2. Remove cap screws and dustshield, if applicable.
3. Pry roller retainer coiled loops out of both shoe web holes as
shown in Figure 18. Pivot roller retainer to swing loops clear of shoe
webs.
4. Using a lever or large screwdriver, lift upper shoe to remove
roller and retainer as a unit. Refer to Figure 19.
Figure 19. Roller and Retainer Removal
Figure 18. Retainer Loop Removal
5. Repeat Steps 3 and 4 to remove lower roller and retainer
assembly.
6. To remove return spring, position a lever or suitable tool with a
notch to engage spring rod. Refer to Figure 20. Apply downward
force to stretch spring, allowing removal of upper spring hook.
Remove and discard spring.
24
Figure 20. Return Spring Removal
Page 26

Removal / Disassembly
ES-165-7M Heavy-Duty Brake, Continued
7. Remove retaining ring and washer from drum side of both
anchor pins. Refer to Figure 21.
Figure 21. Retaining Ring and Washer Removal
8. To allow removal of anchor pins, cut lock wire and remove cap
screws from spider. Refer to Figure 22.
9. To remove upper and lower shoes, remove anchor pins with a brass
drift or a mallet. Refer to Figure 23.
Figure 23. Anchor Pin Removal
Shoe Removal
NOTE: Inspect anchor pin and bushings. If pin was seized or bushing
is grooved or worn beyond 0.031" (0.79mm), replace pin and
bushing. Always replace pins and bushings with brake reline.
10. If any noted conditions are found, drive out old anchor pin
bushings from spider. Refer to Figure 24.
Figure 22. Cap Screw Removal
Figure 24. Anchor Pin Bushing Removal
11. Clean and inspect remaining brake parts as outlined in Removal/
Disassembly section of this manual.
25
Page 27

Shoe Removal
Removal / Disassembly
ES-165-7H Severe Duty Brake
WARNING: The long term effects of non-asbestos fi bers have
not been determined. Therefore, precautions should be used
!
when handling these materials.
See General Information / Lining Material Warning
1. Perform steps necessary for drum removal, see Removal
Disassembly - Drum Removal.
2. Remove cap screws and dustshield, if applicable.
3. Remove retaining ring and washer from drum side of each anchor
pin. Refer to Figure 25.
5. Remove upper anchor pin with a brass drift or a mallet. Refer
to Figure 27.
Figure 27. Anchor Pin Removal
6. Rotate upper shoe around cam end, disengage roller end from
cam, then unhook return spring from shoe and remove upper shoe.
Refer to Figure 28. Discard return spring.
Figure 25. Retaining Ring and Washer Removal
4. To allow removal of anchor pin, cut lock wire and remove cap
screws from spider. Refer to Figure 26.
Figure 26. Cap Screw Removal
26
Figure 28. Shoe Removal
Page 28

Removal / Disassembly
7. Remove lower anchor pin to remove lower shoe.
NOTE: Inspect anchor pin and bushings. If pin was seized or
bushing is grooved or worn beyond 0.031" (0.79mm), replace pin
and bushing. Always replace pins and bushings with brake reline.
8. Drive out the old anchor pin bushings from brake shoe and
spider with a suitable driver. Refer to Figure 29.
9. Do not remove roller from the brake shoe, unless: the roller does
not roll freely, there are fl at spots on the roller, or there is more than
0.025" play between the roller and pin.
If removal of roller is necessary, use a steel punch to drive out the
groove pin, then push the pin out of the shoe. Discard roller and pin.
Refer to Figure 30.
Shoe Removal
Figure 30. Groove Pin Removal
Figure 29. Anchor Pin Bushing Removal
10. Clean and inspect remaining brake parts as outlined in Removal/
Disassembly section of this manual.
27
Page 29

Brake Adjuster Removal
Removal / Disassembly
1. Remove cotter pin and clevis pin from air chamber pushrod clevis.
2. While depressing locking sleeve, turn adjuster nut until brake
adjuster is clear of air chamber pushrod clevis. Refer to Figure 31.
NOTE: Follow manufacturer’s instructions for self adjusting brake
adjusters.
Rotate Adjuster
Until Brake
Adjuster is
Clear of Clevis
Figure 31. Brake Adjuster Removal
4. Note orientation of brake adjuster with reference to push rod
before removal to assure assembly is in proper orientation. Remove
brake adjuster with a suitable puller.
CAUTION: Do not hammer on brake adjuster to remove!
!
Damage to brake adjuster and/or camshaft splines may
result.
Camshaft Removal
1. Perform all steps for drum, shoe, and brake adjuster removal as
outlined in Removal / Disassembly section.
2. Grasp camshaft head and pull camshaft outboard to remove.
Air Chamber Bracket Removal
1. Perform all steps for drum, shoe, brake adjuster and camshaft
removal as outlined in Removal / Disassembly section.
2. Disconnect chamber air line.
3. Remove the attaching nuts (bolts on brakes with cast spider)
and pull the air chamber bracket away from the spider.
NOTE: On 16.5" diameter brakes with stamped spiders, the air
chamber bracket-to-spider studs are press fi t into the spider.
Their removal is not required to remove the air chamber bracket.
3. Remove snap ring and outer shim washer(s) from camshaft.
Bendix® ASA-5® Automatic Slack Adjuster
NOTE: On ES & EB 150-4L brake a stabilizing nut has to be
removed. The bracket-to-spider studs are pressed to fi t into the
air chamber bracket fl ange. Their removal is not required to
remove the air chamber bracket.
WARNING: To prevent personal injury, be sure to “cage”
!
spring before removing spring brake type air-chambers.
28
Page 30

Removal / Disassembly
Spider Removal
1. Perform all steps for drum and shoe removal as outlined in
Removal / Disassembly section.
2. Remove spider-to-axle attachment nuts and bolts. Refer to
Figure 32.
3. Remove spider.
Dustshield Removal
NOTE: On ES-165-7H, M Brakes, the dustshield is removed before
shoes and anchor pins are removed.
1. If applicable, remove screws and retaining clip. Remove all
screws attaching dustshield to spider (4-6 screws depending on
model). Refer to Figure 33.
2. Remove dustshield.
Camshaft/Bracket Removal
Shoe/Brake Adjuster/
Figure 32. Spider Mounting Hardware Removal
Figure 33. Dustshield Mounting Hardware Removal
T
For All 165-5,6,7,8L Models
29
Page 31

Cleaning Brake Parts
Removal / Disassembly
After removing the brake parts to be serviced, the following
cleaning procedures should be followed:
• Wire brush all parts exposed to mud, road dirt, and salt,
including spider, air chamber bracket, dustshields and exterior
of drum.
CAUTION: A layer of oxidation and dirt on the outside of a
!
brake drum acts as an insulator and may hinder normal
heat dissipation. Remove excessive deposits by wire
brushing.
• Use a vacuum cleaner to remove brake dust from drums. Wipe
interior of drums with a greaseless solvent to remove any
spilled oil.
WARNING: The long term effects of non-asbestos fi bers,
!
have not been determined. Therefore, precautions should
be used when handling these materials. Do not use
compressed air to blow from interior of drums. Brake lining
dust, when inhaled, can be injurious to health.
See General Information / Lining Material Warning
30
Page 32

Inspection
Drum Inspection
• Clean all remaining brake parts thoroughly with a suitable shop
solvent. Wipe dry with a clean, lint-free cloth.
NOTE: This information is general in nature. For specifi c brake
drum inspection guidelines, refer to the drum manufacturer’s
instructions.
1. Check for cracks, heat-checks, glazing, grooving, run-out and
out-of-round. Refer to Figure 34. Cracked drums must be
replaced. Drums which are glazed, grooved, out-of-round, etc.,
may be returned to service if they can be repaired without
exceeding manufacturer’s maximum diameter or run-out
specifi cations.
Drum Inspection
Bendix does not recommend the turning or reboring of
brake drums. The reduction of wall thickness reduces the
amount of thermal energy that can be absorbed by the
drum during braking. Also, the decrease in wall thickness
increases the amount of defl ection for the same input load.
Both of these are undesirable. If drums are refaced or
oversized, the new diameter MUST NOT exceed the
maximum diameter marked on the drum during its service
life.
Spider / Dustshield
and Cleaning
Figure 34. Drum Inspection
2. Check drum diameter. Replace drum if it exceeds maximum
diameter stamped in drum.
CAUTION: Under no circumstances should drum be used if
!
it exceeds manufacturer’s recommended maximum
diameter or run-out specifi cation.
31
Page 33

Inspection
Shoe and Lining Inspection
Inspection
1. Check shoes for bent or cracked webs, or table, broken welds,
loose rivets or elongated rivet holes. Refer to Figure 36. If any are
found, replace with Bendix OEM grade lining and shoe assemblies.
Figure 36. Shoe and Lining Inspection
2. Check anchor pin and cam roller contact areas in shoe webs for
elongation or wear. Replace shoe if diameter exceeds the following
specifi cations.
Brake Roller Anchor
Model End Pin End
All EB, All ES-165 0.836" 1.400"
ES-150-4D,
ES-150-8D, F & 6D
ES-165-7M 0.774" 1.280"
3. ES-165-7H severe duty brake only: Anchor pin bushings are
mounted in these brake shoes. Refer to Inspection-Spider
Inspection (Double Anchor Pin) for instructions.
NOTE: Two-piece roller and pin are mounted in brake shoes for 7H
model brake. Do not remove roller and roller pin unless: the roller
does not roll freely, there are fl at spots on the rollers or there is more
than 0.025" play between roller and pin. Replace roller and pin if
these conditions are found.
4. Check the linings and replace with Bendix OEM grade shoe and
lining assembly if contaminated, cracked, or worn to less than 1/4"
(6.4mm) thickness at any point (see instructions below) or 3/16"
(4.5mm) for EB/ES 150-4L brake.
NOTE: To eliminate premature Lining Replacement Bendix recommends the use of the Bendix Brake Lining Wear Gauge to accurately
measure lining thickness. This tool is available through Bendix as
BW7261.
Important: For use with air actuated cam brakes where minimum
allowable lining
thickness is 1/4 in.
(Note: Do not use for
strip linings on 15 x 4
brakes or similar
brakes.)
1. With the brake not
applied, place the tip of
the gauge between the
two lining blocks,
between the top of the shoe table and drum. Use the gauge to scrape
away any mud, rust, or other contaminants that could interfere with
proper lining measurement.
2. Remove the gauge from the brake.
3. With the vehicle’s brakes applied, try to put the gauge between the
two lining blocks and the top of the shoe table. Note “hook” of gauge
allows insertion around worn drum lip. If the tip of the gauge will not
fi t between the brake drum and the top of the shoe table, the lining is
worn below 5/16 inch
and will need to be
replaced.
4. If the tip of the gauge
fi ts between the brake
drum and the shoe
table, the lining is not
worn below 1/4 inch at
this time.
5. Because brake shoes can wear at different rates, check both shoes
on each brake and all brakes on the vehicle.
32
Page 34

Inspection
Shoe and Lining Inspection (cont’d)
Standard Production EB™ brakes use different shoe and lining
assemblies than those used for the ES models. Because of these part
differences, normal wear of either creates a unique lining wear
pattern.
™
• When the EB
ment due to normal wear, they will have a tapered shape as
shown below. The lining will be thinner at the center of shoe
than at the cam or anchor pin end.
Standard Production linings require replace-
WARNING: The long term effects of non-asbestos fi bers, have
!
not been determined. Therefore, precautions should be used
when handling these materials.
See General Information / Lining Material Warning
• When the ES™ Extended Service linings require replacement due to
normal wear, the lining thickness will be uniform all along its
length.
Lining Inspection
Drum / Shoe and
Figure 37. Brake and Lining Blocks
33
Page 35

Inspection
Inspection
Camshaft Radial Play Inspection
Camshaft radial play should be checked any time the brake shoes
have been removed from the vehicle. Refer to Figure 38.
1. Mount a suitable dial indicator with plunger referencing cam head
at roller contact area.
2. Zero dial indicator.
3. Move cam head up and down and note maximum reading.
Camshaft Inspection
1. Refer to Figure 39. Check spline end for cracks, worn or
deformed splines. Replace as necessary.
2. Check camshaft bushing journals for wear and corrosion.
Replace camshaft if it shows visible wear or if roughness is felt in
journal areas.
3. Inspect camshaft head for brinelling, cracking or fl at spots.
Replace camshaft if a ridge can be felt between worn areas and
cam head surface.
Figure 38. Camshaft Radial Play Inspection
4. If play exceeds 0.035" (0.91 mm), rebush air chamber bracket. See
Repair/Replacement - Camshaft Bushing and Grease Seal
Replacement.
NOTE: For Trailer Axle Brakes, rebush spider and/or replace support
bushing assembly at brake adjuster. See Repair/Replacement Camshaft Bushing and Grease Seal Replacement.
5. After rebushing, recheck radial play. If still excessive, replace
camshaft.
Figure 39. Camshaft Inspection
Camshaft Bushing and Seal Inspection
NOTE: Steer and drive axle camshaft bushings and seals are
mounted in the air chamber bracket assembly.
1. Check bushing for deterioration or wear. Inner surface must
be smooth. If surface is rough or abrasive, replace bushing, see
Repair/Replacement - Camshaft Bushing and Grease Seal
Replacement.
2. Inspect grease seals. Replace if seal lip is nicked, cut or
distorted. See Repair/Replacement - Camshaft Bushing and
Grease Seal Replacement.
34
Page 36

Inspection
Spider Inspection
Single Anchor Pin
1. Check visually for cracks around mounting bolt holes, in cam
area and around anchor pin. Refer to Figure 40. Replace spider if
any are found.
2. Check anchor pin. If loose or grooved more than 0.031"
(0.79mm) below original surface, replace spider assembly.
NOTE: Anchor pins are not replaceable on single anchor pin brake
spiders.
3. On EB/ES 150-4L brake check anchor pin retaining nut torque refer to
the last page of this manual for current torque values.
Air Chamber Bracket Inspection
1. Check for a bent, broken, or cracked arm and cracked welds.
Refer to Figure 41. Replace bracket if any are evident.
2. Check mounting studs (or bolts) for looseness, damaged threads,
or a bent condition. Replace mounting stud if any of these conditions
are evident.
Lightweight
Flange
Figure 40. Spider Inspection Figure 41. Air Chamber Bracket Inspection
SPECIAL NOTE: ES and ES-150-4L R.H. brakes use a R.H.
thread anchor pin retaining nut - L.H. brakes use a L.H. thread
nut. Ensure that nut is being turned in proper direction when
checking nut torque.
CAUTION: If anchor pin turns while checking retaining nut
!
torque, the spider assembly must be replaced.
Spider Inspection (Double Anchor Pin)
1. Check visually for cracks around mounting bolt holes and cam
and anchor pin areas. Replace spider if any are found.
2. Check anchor pin and bushings for wear, grooves and free
movement of pin. If pin is seized, or worn or grooved beyond
0.031" (0.79mm), replace pin and bushing. Refer to Shoe Removal
and Installation Sections for procedure.
NOTE: Replace pins and bushings at each brake reline.
& Camshaft Inspection
Shoe and Lining
35
Page 37

Inspection
Inspection
Air Chamber Inspection
WARNING: To prevent personal injury, be sure to “cage”
!
spring before removing spring-brake type air chamber.
NOTE: This information is general in nature. For specifi c air chamber
inspection guidelines, refer to the manufacturer’s instructions.
1. Check for air leaks, cracked housing, bent pushrod, loose clamp
ring, clogged vent holes or loose air fi tting. Repair or replace as
recommended by the manufacturer.
2. If air chamber is repaired or replaced, check distance from clevis
pin hole centerline-to-air chamber face. Refer to Figure 42 and
Table 6 for manual brake adjusters. For self adjusting brake adjusters
refer to manufacturers guidelines.
See
Table 6
Brake Adjuster Inspection
NOTE: This information is general in nature. For specifi c manual
or self adjusting brake adjuster inspection guidelines, refer to the
manufacturer’s instructions.
1. Check clevis pin bushing for cracks and wear. Refer to Figure
43. Replace as necessary.
Check Overall
for Cracks
Check for
Cracks or Worn
Splines
Check for
Worn Clevis
Pin Bushing
Figure 42. Air Chamber Inspection
Distance: Clevis Pin Hole
Centerline to Air Chamber Face
All brakes (except 2-5/8" ± 1/16"
Mack and Trailer Axle) (66.7 ± 1.59 mm)
4-3/8" ± 1/16"
Mack brakes
(111.1 ± 1.59 mm)
Trailer Axle 6-1/2" ± 1/8"
brakes (165.1 ± 3.175 mm)
Table 6. Distance: Clevis Pin Hole Centerline to Air Chamber Face
3. If a new air chamber is installed, ensure that cut-off pushrod does
not project too far into clevis. Minimum clearance: clevis centerline
to pushrod end should be 7/8" (22.2 mm).
4. Check clevis pin for cracks and wear.
Figure 43. Automatic Slack Adjuster Inspection
2. Check splines for chipped teeth and deformation. Replace brake
adjuster if necessary.
3. Depress locking sleeve and turn brake adjuster adjustment nut
with a wrench at least one turn in each direction. If binding is
present or if excessive force is required to rotate, replace the
brake adjuster.
CAUTION: If any of those conditions are found, the brake
!
adjuster should be replaced. Do not attempt to repair a faulty
brake adjuster!
36
Page 38

Repair / Replacement
Camshaft Bushing/Lining Replacement
Routinely replace lower-cost items such as springs, seals,
bushings, and heavily-worn but unbroken parts since the
damage caused, should these components fail, is far in excess
of their cost.
Camshaft Bushing/Grease Seal Replacement
1. Remove air chamber bracket, see Removal / Disassembly - Air
Chamber Bracket Removal.
2. Drive out old bushings and grease seals with a suitable driver.
3. Clean and inspect air chamber bracket, see Inspection - Air
Chamber Bracket Inspection.
4. Install new bushings in air chamber bracket (Drive and Steer
Axles) with a suitable piloted driver. For identifi cation and
installation specifi cations, refer to Figure 44 and Table 7.
Brake Model At Cam Head At Brake Adjuster
EB-150L
EB-165D, L, F and
ES-165D, L, F Non-metallic Non-metallic
ES-150L, D, F
ES-165M, H and
EB-180 Bronze Non-metallic
Installation Specs: Recessed 9/32" Recessed 22/32"
(All except Trailer (7.1mm) from (17.5mm) from
Axle) tube end. tube end.
Trailer Axle Flush with inner recess shoulder
Spider at each end of spider
Bushings (to allow space for the seals).
NOTE: Non-metallic bushings are labeled. Install these
bushings with labeled ends facing each other.
Table 7. Camshaft Bushing Installation Specifi cations
Note: The LMS Low Maintenance Systems uses a bronze bushing at
the cam head (with the exception of the LMS 15 x 4 brakes.)
5. Install new grease seals with a suitable piloted driver so seals
are fl ush with end of air chamber bracket tube. Refer to Figure
45.
At Brake Adjuster
End, Recess Bushing
22/32” (17.5 mm)
CAUTION: Seals must be installed as indicated so that
lip side (with spring) of both seals faces toward brake
!
adjuster end of bracket. Improperly oriented seals may
allow grease to exit camshaft head end of air chamber
bracket and contaminate lining material.
Brake Adjuster Inspection
Spider / Air Chamber &
Figure 44. Air Chamber Bracket Bushing Installation
Figure 45. Camshaft Bushing Installation
37
Page 39

Repair / Replacement
Lining Replacement
WARNING: The long-term effects of non-asbestos fi bers
!
have not been determined. Therefore, precautions should be
used when handling these materials.
See General Information / Lining Material Warning
NOTE: Reline brakes when inspection indicates replacement is
necessary, see Inspection - Shoe, and Lining Inspection. When
replacing lining only, make sure shoes are in good condition. For
replacement, use only Bendix OEM grade linings or shoe and lining
assemblies.
1. Remove shoe and lining assemblies.
2. Remove lining blocks.
• If blocks are riveted, use a suitable riveting mandrel to push out
rivets.
CAUTION: Drilling out rivets or cutting off upset head with a
!
chisel may cause rivet or bolt hole elongation.
•If blocks are bolted, remove using suitable tools. Discard
bolts.
•Inspect shoe to be sure it can be reused.
3. Clean shoe with solvent if necessary and wire brush shoe
table. Paint with rust inhibitive paint.
4. Install lining blocks.
NOTE: When installing linings or blocks, make sure they are
positioned properly to match rivet or bolt patterns. Refer to Figure
46.
For Riveted Linings: Assemble linings to shoes with rivets
shown below, installing them in sequence shown in Figure 46.
ES-150-6 & 8, ES-165: Bendix Part No. 813250.
EB/ES-150-4L, EB-165: Bendix Part No. 813250.
For Bolted Linings: Using machine screws provided in lining
kit (807933), assemble blocks to shoes in sequence shown in
the illustration for EB-180 brakes. Torque nuts as specifi ed on
installation note provided within the lining kit.
5. Check lining installation by trying to insert a .006" (.15 mm)
feeler gauge between lining and shoe table along edges. It should
not be possible to insert feeler gauge in this manner anywhere
along edge with exception of outside ends beyond last row of
rivets. A larger clearance may exist in these areas.
T
Positioning Lining Blocks
on ES
™
Brake Shoe
Figure 46. Lining Rivet (or Bolt) Tightening Sequence
38
Page 40

Installation / Assembly
Spider Installation
SPECIAL NOTE: For ES/EB-150-4L distinct right-hand and left-
hand spider assemblies are used on this brake. Although
similar in appearance, differences exist in anchor pin and
retaining nut threads - L.H. brake uses L.H. threads and R.H.
brake uses R.H. threads.
1. Verify the available spider is serviceable, see Inspection Spider Inspection.
2. Verify that available spider is correct part number for axle
being serviced.
3. Position spider on axle fl ange and install attaching bolts and
nuts.
NOTE: Use hardened washer under bolt heads.
4. Sequentially torque nuts according to manufacturer’s
specifi cations, Refer to Figure 47.
T
3. Reposition dustshield as required to allow a uniform space of
1/8" (3.2 mm) all along parallel mating edges. Refer to Figure 48.
4. Torque attaching screws to proper torque;
see Specifi cations chart.
Figure 48. Dustshield Spacing
T
Figure 47. Installing Spider Mounting Hardware
Dustshield Installation (Two Piece)
NOTE: On ES-165-7H, M Brakes, the dustshield is installed after
shoes and anchor pins are installed, see Installation / Assembly Shoe Installation.
SPECIAL NOTE: For EB/ES-150-4L brake, a designed interference
fi t at upper dustshield to air chamber bracket area may cause the
need to deform upper dustshield by hand slightly to allow upper
dustshield half to align properly with the lower half. Refer to
Figure 49.
Lining Replacement
Camshaft Bushing /
1. Place both dustshield into position against spider. Install all
attaching screws fi nger tight.
2. Install retaining clip and screws, if applicable.
Figure 49. Designed Interference Fit
39
Page 41

Installation / Assembly
Dustshield Installation (One Piece)
1. Position dustshield against spider and install screws fi nger tight.
2. Torque attaching screws to proper torque;
see Specifi cations Chart and Figure 50.
T
Figure 50. Attaching Screw Location
T
40
Page 42

Installation / Assembly
Air Chamber Bracket Installation
1. Verify that available air chamber bracket is serviceable, see
Inspection - Air Chamber Bracket Inspection.
2. On stamped steel spider, orient bracket to align mounting studs
with holes in bracket.
3. Position bracket against spider and install lockwashers and
nuts.
4. Torque stud nuts to proper torque; see Specifi cations chart.
5. On cast spider orient bracket to align bracket holes with tapped
holes in spider.
6. Position bracket against spider and install bolts and
lockwashers.
7. Torque bolts to proper torque; see Specifi cations chart.
8. If air chamber was removed, install chamber and tighten nuts to
correct torque; see Specifi cations chart.
T
T
Air Chamber Bracket Installation
EB/ES-150-4L Brake
1. Verify that available air chamber bracket is serviceable. Refer to
Removal/Disassembly - Air Chamber Bracket Removal.
2. Orient bracket to align stabilizing screw with slot in spider and
mounting studs with holes in spider.
3. Position bracket against spider and install lockwashers and
T
barrel (or standard) nuts on mounting bolts. Refer to Figure 51.
NOTE: Two brake shoe hold-down spring designs are used on the
Model 150 Brakes, see General Information - Parts Nomenclature.
CAUTION: Barrel nuts used in EB-150 brakes must be
!
retained. Failure to reinstall may cause shoe twist, excessive
noise or improper brake performance.
4. Torque barrel (or standard) nuts to proper torque, see Specifi cations
chart.
T
5. Install plain washer, lockwasher, and nut on stabilizing screw.
6. Torque nut to proper torque, see Specifi cations chart.
T
Figure 51. Air Chamber Bracket Mounting Hardware
Spider / Dustshield
Installation
41
Page 43

Installation / Assembly
Camshaft Installation
1. Verify that available camshaft is serviceable and is the correct part
for the application, see Inspection - Camshaft Inspection.
NOTE: Camshaft mounting and related parts vary with Brake Models.
Be sure to follow instructions for special parts when installing
camshafts.
CAUTION: Ensure the camshaft being installed is correct for
!
the application.
2. To ensure that camshaft being installed is correct for the
application, rotate camshaft in the direction of air chamber push rod
extension and check that the roller starts to ride up on the convex
side of the cam head. Refer to Figure 52.
3. Apply a thin fi lm of chassis grease on inside of camshaft bush
and seals, and on spline area of camshaft.
CAUTION: Do not grease cam head surface. For effi cient
!
operation, this surface must remain free of oil, grease or other
contaminants.
4. Carefully slip camshaft into mounting position.
SPECIAL NOTE: For ES-165-7M, H,F install fl at washer adjacent
to cam head before installing camshaft.
On ES-165-5/6/7,8D, L Brakes, camshafts use a special washer
between the cam head and spider. It is important that this washer
be installed correctly. Refer to Figure 53.
Figure 53. Cam Head Washer Installation
SPECIAL NOTE: For ES-165-5,6,7 DL steer axle brakes using the
horse collar spring retention system, position the cam headwash
with the “stamped spider” arrow pointing towards the center of the
spider. The horse collar should be placed over the cam tube fi rst
then the ES washer and fi nally the cam.
ES-165-5,6,7D,L
Rotate Camshaft
Toward Pushrod
Extension . . .
Figure 52. Camshaft Installation
42
. . . Roller Should
Ride Up on Convex
Side of Cam Head
Page 44

Installation / Assembly
SPECIAL NOTE: For ES-1 655,6,7D,L Steer axle brakes using the
horse collar spring retention system, position the cam head
washer with the “stamped spider” arrow pointing towards the
center of the spider. The horse collar should be placed over the
cam tube fi rst, then the ES washer & fi nally the cam.
Cam Head Washer Installation
Brake Adjuster Installation
1. Verify that brake adjuster is serviceable, see Inspection - Brake
Adjuster Inspection.
2. Install brake adjuster inner washer on camshaft. Washer is
identifi ed by its 0.060" thickness and larger hole (see Figure 54).
5. Install camshaft shim washers and snap ring. Refer to Figure 54.
Check and adjust camshaft axial play (see step 6).
NOTE: Camshaft axial play must be checked before camshaft
installation is complete. Follow instructions below.
6. Mount a suitable dial indicator with plunger referencing end of
cam head. Refer to Figure 55.
7. Pull inboard on brake adjuster end of cam to take up end play.
8. Zero dial indicator.
9. Push outboard on brake adjuster end of cam and note maximum
reading. If necessary, add or delete camshaft shim washers to obtain
end play between 0.005" - 0.025" (0.13 - .65 mm) with brake
adjuster centered between air chamber bracket and snap ring groove.
10. Pressure lubricate brake adjuster according to manufacturer’s
instructions. Pressure lubricate air chamber bracket until grease
fl ows out of brake adjuster end of tube. Refer to Figure 56.
CAUTION: Grease should not fl ow out end of tube toward cam
!
head. If it does, seal is defective and must be replaced.
Figure 54. Shim Washer and Snap Ring Installation
3. Apply a thin fi lm of chassis grease to brake adjuster splines.
4. Install brake adjuster on camshaft in the same position as noted
before removal.
CAUTION: Do not replace existing grease fi tting with a
!
pressure relief type. Only standard non-vented fi ttings are to
be used with spring loaded lip seals.
Rotate Adjuster Nut
Until Brake Adjuster is
Aligned With Clevis Hole
Figure 56. Brake Adjuster Lubrication and Adjustment
Bracket/Camshaft/Washer
Figure 55. Brake Adjuster End Play Check
Installation
43
Page 45

Shoe and Lining Installation
Installation / Assembly
Brake Model Page Number
EB-150-4L
44
EB-165-5D 46
EB-165-5L 46
EB-165-6D 46
EB-165-6L 46
EB-165-7D 46
EB-165-7L 46
EB-165-7F 46
EB-165-8D 46
EB-165-8F 46
EB-165-8L 46
EB-180-7R 46
ES-150-4L 44
11. Verify that air chamber face-to-clevis centerline dimension is
correct, see Inspection - Air Chamber Inspection. Ensure that clevis
lock nut is securely tightened.
12. While depressing locking sleeve, rotate adjusting nut as required
until appropriate hole in brake adjuster is aligned with hole in air.
Refer to Figure 56.
13. Install clevis pin and cotter pin.
ES-150-6D 45
ES-150-8D 45
ES-150-8F 45
ES-165-5D 46
ES-165-5L 46
ES-165-6D 46
ES-165-6L 46
ES-165-7D 46
ES-165-7F 46
ES-165-7H 50
ES-165-7L 46
ES-165-7M
Table 8. Shoe Installation Procedure Index
48
44
Page 46

Installation / Assembly
Shoe and Lining Installation
An index to the location of shoe installation procedures is provided
in Table 8. Locate the brake model under service to identify the
location of the appropriate shoe installation procedures.
EB/ES-150-4L Brake
1. Verify that spider, camshaft, air chamber bracket, and brake
adjuster are serviceable and properly installed.
Figure 58. Shoe Retaining Spring Installation
Figure 57. Shoe Web Lubrication
NOTE: See General Information - Parts Nomenclature for shoe
hold-down spring variations.
2. Apply a thin fi lm of grease to cam roller and anchor pin recesses
of each shoe web. Refer to Figure 57.
CAUTION: Use only grease conforming to NLGI grade #1,
!
high-temperature, waterproof.
6. Stretch spring to allow positioning of lower shoe web against
anchor pin.
7. Rotate lower shoe into position on spider.
8. Hook end of a new shoe return spring in lower shoe web hole.
Using a screwdriver for assistance, stretch shoe return spring to
hook it in upper shoe web hole. Refer to Figure 59.
9. Using a large screwdriver or lever with tip, stretch shoe return
spring to allow insertion of a new cam roller on upper shoe web.
10. Install a new cam roller on lower shoe web in same manner.
3. Position upper shoe and lining web on anchor pin and rotate
down. Continue rotation until shoe is held in place by shoe holddown spring.
4. Hook one end of a new shoe retaining spring into hole in upper
shoe web so coil lays across anchor pin. Refer to Figure 58.
5. Hook opposite end of spring into hole on lower shoe web.
Brake Adjuster/Shoe and
Lining Installation
Figure 59. Shoe Return Spring and Roller Installation
45
Page 47

Installation / Assembly
Shoe And Lining Installation
NOTE: The following procedures are divided into sections, identifi ed
by brake model numbers.
ES-150-8D, F&6D
1. See Inspection & Repair / Replacement to verify that spider
camshaft, bracket, and brake adjuster are serviceable and properly
installed.
2. During shoe installation, lubricate:
• Shoe roller recess - one-piece roller.
CAUTION: Use only grease conforming to NLGI grade #1,
high-temperature, waterproof.
!
Do Not Lubricate:
• Cam head surface. For effi cient operation, this surface must
remain free of oil, grease or other contaminants.
3. Position upper shoe on anchor pin and cam.
4. Install retaining springs by butting bottom shoe against anchor pin
and top shoe. Install spring hooks in holes on webs. (Be sure hooks
are fully engaged before rotating lower shoe around anchor pin.)
5. Position upper and lower shoes around anchor pin. Refer to
Figure 60.
Figure 60. Upper and Lower Shoe Positioning
CAUTION: When the retaining spring passes the anchor pin,
!
the shoes may close very rapidly.
WARNING: The long term effects of non-asbestos fi bers, have
not been determined. Therefore, precautions should be used
!
when handling these materials.
See General Information / Lining Material Warning
6. The shoes may close rapidly when the return spring hook passes
the center of the anchor pin (watch fi ngers.) Install a new shoe return
spring. On ES-150-6D steer brake install new return springs between
spring post and shoe with spring hooks towards the cam. Refer to
Figure 61.
NOTE: A lever or spring tool may be required to assist in hooking
shoe return spring.
Figure 61. Shoe Return Spring Installation
46
Page 48

Installation / Assembly
All EB (except EB-150-4L) and ES-165 5/6/7/8D,F,L
NOTE: The following procedures are divided into sections,
identifi ed by brake model numbers.
1. See Inspection & Repair / Replacement to verify that spider
camshaft, bracket, and brake adjuster are serviceable and properly
installed.
2. During shoe installation, lubricate:
• Shoe roller recess - one-piece roller.
• Roller I.D. - two-piece roller.
CAUTION: Use only grease conforming to NLGI grade #1,
!
high-temperature, waterproof.
Do Not Lubricate:
• Cam head surface. For effi cient operation, this surface must
remain free of oil, grease or other contaminants.
Figure 62. Upper and Lower Shoe Positioning
3. Hook ends of new retainer springs into holes in both shoe
tables, hooks pointing out.
4. Position upper and lower shoes around anchor pin. Refer to
Figure 62.
WARNING: The long term effects of non-asbestos fi bers,
!
have not been determined. Therefore, precautions should be
used when handling these materials.
See General Information / Lining Material Warning
5. Install a new shoe return spring. Refer to Figure 63.
NOTE: On ES-165-D, 1, F, a lever may be required to assist in
hooking shoe return spring.
Figure 63. Shoe Return Spring Installation
47
Shoe and Lining
Installation
Page 49

Shoe And Lining Installation
Installation / Assembly
6. For ES-165 5/6/7/8D, L, F, ES-150-4D, ES-150-8D, F & 6D only:
Assemble roller retainer on ends of roller as shown in Figure 64.
Figure 64. Roller Retainer Installation
8. For ES-165 5/6/7/8D, L, F, ES-150-4D, ES-150-8D, F & 6D only:
Position assembly in roller recess as shown. Squeeze loops and
swing retainer into position to snap loops into web holes. Refer to
Figure 66. Verify that both retainer loops are engaged in web
holes before proceeding.
7. Using a lever or large screwdriver, stretch shoe return spring to
allow insertion of new pin and roller, (or roller and retainer
assembly) on the lower shoe web. Refer to Figure 65.
NOTE: If drums are oversized, use oversize rollers, see InspectionDrum Inspection.
Figure 65. Shoe Return Spring Installation
Figure 66. Retainer Installation
9. Repeat process on upper shoe.
NOTE: For all EB Models a roller retainer is not used.
48
Page 50

Installation / Assembly
ES-165-7M Heavy Duty Brake
WARNING: The long term effects of non-asbestos fi bers,
!
have not been determined. Therefore, precautions should be
used when handling these materials.
See General Information / Lining Material Warning
1. See Inspection & Repair / Replacement to verify that spider
camshaft, bracket, and brake adjuster are serviceable and properly
installed.
2. During shoe installation, lubricate:
• Shoe roller recess.
• Anchor pin - light fi lm of grease.
CAUTION: Use only grease conforming to NLGI grade #1,
!
high-temperature, waterproof.
Do Not Lubricate:
• Cam head surface. For effi cient operation, this surface must remain
free of oil, grease or other contaminants.
3. After driving out old anchor pin bushings from spider, see
Removal/Disassembly - Shoe Removal, press new anchor pin
bushings in spider, aligning slot in bushing with tapped holes in
spider. Refer to Figure 67.
4. Lubricate anchor pins during installation (see step 2)
Figure 68. Lower Shoe and Anchor Pin Installation
6. Place upper shoe in mounting position on spider, and install upper
anchor pin, washers and retaining rings. Refer to Figure 69.
Figure 69. Upper Shoe and Anchor Pin Installation
7. Install cap screws in spider to secure anchor pins. Tighten to
proper torque (see Specifi cations chart), then lock wire.
Refer to Figure 70.
T
Figure 67. Anchor Pin Bushing Installation
5. Place the lower shoe in mounting position on spider, and
install lower anchor pin, washers and retaining rings. Refer to
Figure 68.
Shoe Installation
Figure 70. Cap Screw Installation
49
Page 51

Installation / Assembly
Shoe Installation
8. Install shoe return spring. Refer to Figure 71.
NOTE: A lever may be required to assist in hooking return spring.
Figure 71. Shoe Return Spring Installation
NOTE: If drums are oversized, see Inspection - Drum Inspection.
9. Assemble roller retainer on ends of roller as shown below. Refer
to Figure 72.
Figure 73. Roller and Retainer Installation
11. Position roller and retainer in shoe recess as shown in Figure
73. Squeeze loops and swing retainer into position to snap loops
in shoe web holes. Refer to Figure 74. Verify that both retainer
loops are engaged in web holes before proceeding.
12. Repeat process on upper shoe.
Figure 72. Roller Retainer Installation
10. Using a lever or large screwdriver, stretch shoe return spring to
allow installation of new roller and retainer assembly on lower shoe
web. Refer to Figure 73.
50
Figure 74. Retainer Installation
13. Install dustshield. Secure with cap screws, Tighten screws to
correct torque, see Specifi cations chart.
T
Page 52

Installation / Assembly
ES-165-7-H Severe Duty Brake
WARNING: The long term effects of non-asbestos fi bers,
have not been determined. Therefore, precautions should be
!
used when handling these materials.
See General Information/lining Material Warning
1. See Inspection & Repair / Replacement to verify that spider,
camshaft, bracket, and brake adjuster are serviceable and properly
installed.
2. During shoe installation, lubricate:
• Roller inside diameter.
• Anchor pin - light fi lm of grease.
CAUTION: Use only grease conforming to NLGI grade #1,
!
high-temperature, waterproof.
Figure 75. Groove Pin Installation
Do Not Lubricate:
• Cam head surface. For effi cient operation, this surface must
remain free of oil, grease or other contaminants.
NOTE: If rollers were removed, replace with new Bendix OEM rollers
and pins.
3. Lubricate roller inside diameter (see Step 2), prior to installa-
tion. Assemble roller and pin to shoe and secure with groove pin.
Stake casting area around groove pin. Refer to Figure 75.
4. After driving out old anchor pin bushings from spider, see
Removal/Disassembly - Shoe Removal, press new anchor pin
bushings in spider, aligning slots in bushing with tapered holes in
spider. Refer to Figure 76.
5. Press anchor pin bushings in brake shoes. Refer to Figure 77.
6. Lubricate anchor pin prior to installation (see Step 2).
7. Place the lower shoe in position on the spider, and install lower
anchor pin, washers and retaining rings. Refer to Figure 78.
Figure 76. Spider Anchor Pin Bushing Installation
Figure 77. Shoe Anchor Pin Bushing Installation
Shoe Installation
51
Page 53

Shoe Installation
Installation / Assembly
Figure 78. Lower Shoe Positioning
8. Connect a new return spring to lower shoe.
9. Position upper shoe for installation on spider (partially installed
with shoe end disengaged from cam), then connect return spring to
upper shoe. Refer to Figure 79.
Figure 80. Upper Shoe Installation
10. Complete the installation of upper shoe and install anchor pin,
washers and retaining rings. Refer to Figure 80.
11. Install cap screws in spider to secure anchor pins. Tighten
screws to proper torque, see Specifi cations chart, then
lock wire. Refer to Figure 81.
Figure 81. Lower Shoe and Anchor Pin Installation
T
Figure 79. Upper Shoe Positioning
52
12. Install dustshield. Secure with cap screws. Tighten screws to
correct torque, see Specifi cations chart.
T
Page 54

Specifi cations
Specifi cation Chart
Fastener Torque Specifi cations
All EB/ES 165, 150-4D, 150-8D, F & 6D
Fastener Torque
lbs./ft. – lbs./in. N.m
Dustshield Retaining Clip Screws 48-60 lbs./in. 5-7 N.m
Dustshield to Spider Screws 150-180 lbs./in. 16.9-20.3 N.m
Air Chamber Bracket to Steel Stamped Spider Nuts 65-85 lbs.-ft. 88-115 N.m
Air Chamber Bracket to Cast Spider Bolts 65-85 lbs.-ft. 88-115 N.m
Air Chamber Mounting Nuts (7/16"-20 Nuts) 35-40 lbs.-ft. 48-54 N.m
Air Chamber Mounting Nuts (5/8"-18 Nuts) 110-115 lbs.-ft. 149-156 N.m
Lining Bolts/Nuts For torque specs., refer to Installation Note in Lining Kit
Anchor Pin Cap Screw (ES-165-7H, 7M) 120-150 lbs./in. 13.6-16.9 N.m
EB/ES-150-4L
Fastener Torque
lbs./ft. – lbs./in. N.m
Dustshield Attaching Screws 11-16 lbs./ft. 15-22 N.m
Air Chamber Bracket Nuts 55-65 lbs./ft. 75-88 N.m
Stabilizing Screw Nut 23-27 lbs./ft. 31-37 N.m
Anchor Pin Reinforcement Nuts 35-40 lbs./ft. 47-54 N.m
Anchor Pin Retaining Nut 475-525 lbs./ft. 644-712 N.m
Shoe Hold-Down Spring Screws 6-9 lbs./ft. 8-12 N.m
Key Dimensional Specifi cations
Minimum Lining Thickness (see Shoe and Lining Inspection)
EB/ES-150-4L 3/16" (4.76mm) or 1/16" (1.59 mm) from rivet heads
EB/ES-165 1/4" (6.4 mm) or 1/16" (4.76 mm) from rivet heads
Camshaft End Play (Axial) .005" - .025" (.13 - .65 mm)
Camshaft Radial Play .035" (.91 mm) maximum
Air Chamber Face to Clevis Pin Centerline (Trailer Axle Brakes) 6-1/2" +¦– 1/8" (165.10 +¦– 3.175 mm)
Air Chamber Face to Clevis Pin Centerline (Drive Axle Brakes) 2-5/8" +¦– 1/16" (66.7 +¦– 1.59 mm)
Wheel Bearing End Play .001" - .005" (.025-.125 mm)
Air Chamber/Applied & Free Stroke
Maximum
Maximum Desired
Air Chamber Size Applied Stroke Free Stroke
30" (762.0 mm) 2" (50.8 mm) 3/8" to 5/8"
30" (762.0 mm) Long Stroke 2.5" (63.5 mm)
Adjustment/Lubrication
Wheel Bearing
53
Page 55

Specifi cations
54
Page 56

For more information, talk to your Bendix
representative, call 1-866-610-9709 or visit
www.foundationbrakes.com.
901 Cleveland Street • Elyria, Ohio 44035 • 1-866-610-9709 • www.foundationbrakes.com
BW
7258 ©2008 Bendix Spicer Foundation Brake LLC • 04/08 • All Rights Reserved • Printed in U.S.A.
 Loading...