

Beltronics BEL975R - BEL VECTOR LR Remote Radar/laser Detector, 975R Owner's Manual

975R
VECTOR
INSTALLED RADAR AND LAS ER DET ECTOR
OWNER ’S MANUAL
5442 West Chester Road
West Chester OH 45069
1-800-341-2288 USA
www.Beltronics.com
VECTOR 975 R is covered by one or more of the following patents:
U.S. Patents
7,098,844 6,83 6,238 6,779,765 6,693, 578 6,670,905
6,614,38 5 6,587,068 6,400,305 6,249,218 6,127,962
6,06 9,58 0 5,668,55 4 5,600,132 5,587,916 5,559,508
5,44 6,923 5,402,087 5,3 65,0 55 5,347,120 5,30 5,007
5,20 6,500 5,164,729 5,134,40 6 5,111,207 5,079,553
5,049,885 5,049,88 4 4,961,074 4, 954,828 4,952,937
4,952,936 4,939,521 4,896,8 55 4,887,753 4,862,175
4,750,215 4,686,499 4,631,5 42 4,630,0 54 4,625, 210
4,613,98 9 4,604,529 4,583,057 4,581,769 4,571,593
4,313,216 D314,178 D313,365 D310,167 D308,837
D296,771 D288,418 D253,752
Canadian Patents
2,337,077 2,330,9 64 1,295,715 1,295,714 1,187,602
1,187,586
European Patents
1,145,03 0 1,090,456
Other patents pending.
Beltronics, Fundamental Mixer Technology, FMT are registered
trademarks of BELTRONICS. VECTOR 975R,Total Tracking
Laser and TTL are trademarks of B ELTRONIC S.
Safety Warning S ystem and SWS are trademarks of Safet y Warning
System L .C.
Printed in Canada

INTRODUCTION
Thank you for purchasing a BELTRONICS Remote installation
Radar/Laser/Safety detector.
Your 975R Remote detector provides all the benefits of full
coverage Radar and laser detection as well as detection of the Safety
Warning System
™
—all in the discretion of a concealed installation.
To ensure maximum benefit from your new 975R Remote, please
read all operating instructions completely as well as the accompanying
installation instructions enclosed.
SHADOW TECHNOLOGY® II
975R REMOTE contains Shadow Technology II, making it
undetectable to the Interceptor VG-2 or any other Radar Detector
Detector (RDD). Only Shadow Technology II has been consistently
proven undetectable to the Interceptor VG-2.
SELECTABLE FEATURES
1. Auto-Mute On/Off
Select Auto-Mute ON for several X, K, Super Wideband Ka audio
alerts followed by a “clicking” tone to quietly inform you for the
duration of the signal. Auto-Mute OFF provides a continuous series
of X, K, Super Wideband Ka audio alerts. Factory setting is Auto Mute OFF. See page 9.
2. Safety Warning System (SWS
™
)
975R Remote detects encoded signals from SWS transmitters and
provides distinct alerts for: Highway Construction/Maintenance,
Highway Hazard Zones, Weather Related Hazards, Emergency/Slow
Moving Vehicles and Travel/Convenience Information. For a
complete description of SWS of audio and visual alerts, see page 17.
3. X/K /Ka Band On or Off
Select “X ON/X OFF”, “K ON/K OFF” or “Ka ON/Ka OFF”
depending upon your driving environment and selectivity
requirements. Factory setting is X/K/Ka ON. See page 10.
4. Four Ka Narrow Frequencies
Select Ka Narrow sweeps of 33.8 GHz, 34.3 GHz, 34.7 GHz or
35.5 GHz. Narrow Band Ka frequencies are especially useful in areas
where you know a specific Ka Narrow sweep is used. Factory setting
is Super Wideband Ka ON. See pages 10 and 11.
Table of Contents
Profile of Features ............................................................... 4
Description of Features ...................................................... 5
• Power-on Test Sequence .......................................... 5
• Tutorial Mode ............................................................ 6
• Memory Retention of Feature Selections ............... 6
• Low Voltage Warning ................................................ 6
• Loss of Antenna Connection .................................... 6
• Audio/Visual Alert for Instant-On/Pulsed Radar .. 7
• DRK (Dim/Dark) Button .......................................... 7
• AUD (Auto-Mute/Volume Control) Button ........... 7
• Adjusting the Audio Level ......................................... 7
• CTY (City/Highway) Button .................................... 8
• City X/K/Ka Mode ................................................... 8
• Reset to Factory Settings ......................................... 9
Selectable Features ............................................................ 9
• Entering Selectable Features Mode ......................... 11
Understanding Radar, Laser and SWS ............................. 12
Interpretation of Alerts ..................................................... 13
• Radar Alerts .............................................................. 13
• Typical False Alert ..................................................... 16
• Laser Alerts ............................................................... 16
• Safety Warning System (SWS) Alerts ..................... 17
Performance Verification ................................................... 18
Troubleshooting .................................................................. 19
Consumer Warranty ........................................................... 20
Service .................................................................................. 21
• Warranty Service ....................................................... 21
• Post-Warranty Service .............................................. 21
Specifications ...................................................................... 22
Accessories .......................................................................... 23
2 3
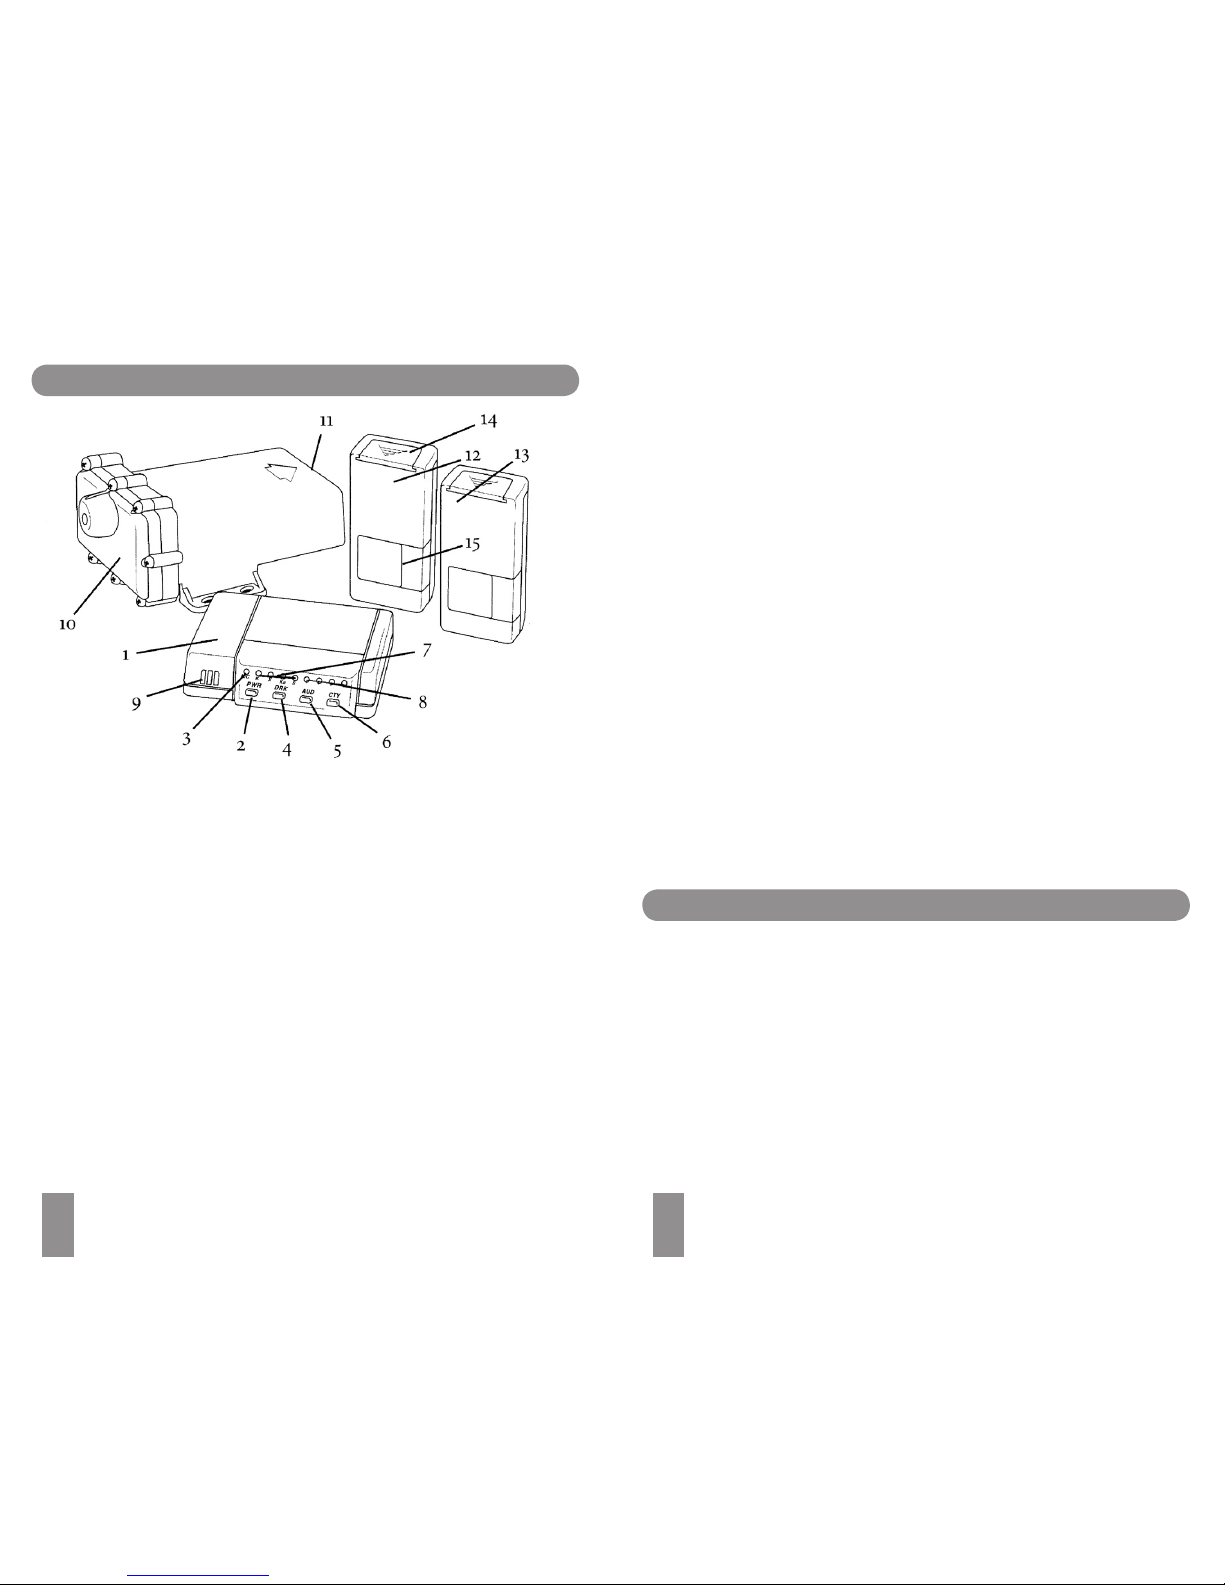
Profile of Features
7. X/K/Ka/SWS Band Visual Alerts: the alert received
is confirmed by the illumination of the appropriate
LED.
8. Four-LED Display: LEDs illuminate sequentially to
confirm signal strength of Radar signals. A different
alert pattern confirms detection of Laser and Safety
Warning System.
9. Audio Speaker: all audible alerts are emitted from
this location.
10. Antenna Sensor: contains the electronics which
detect police Radar. This antenna sensor installs
within the engine compartment of the vehicle.
11. Antenna Face: receiving portion of the antenna
sensor must have a clear, unobstructed view of the
road ahead.
12. Front Laser Sensor: with 11' cable mounts onto the
windshield using the supplied suction cup.
13. Rear Laser Sensor: with 17' cable mounts to rear
window of vehicle.
14. Windshield Accessory Cover: remove the cover to
insert the suction cup mount.
15. Optical Opening: Laser signals are received at this
side of the Laser sensor which must have a clear,
unobstructed view of the road ahead.
Description of Features
Power-on Test Sequence
Each time your unit is turned on, alerts for Laser, X, K,
Ka and Safety Warning System are presented briefly.
This is immediately followed by the status of the four
Selectable Features:
1. Auto Mute – a clicking tone confirms of feature is
engaged.
2. Safety Warning System – illumination if the green “S”
LED confirms if feature is engaged.
3. X/K/Ka Bands – illumination of the appropriate LED
confirms if band is activated. Full illumination of four
signal strength LEDs, coupled with the illumination of
the Ka LED confirms Super Wideband Ka mode.
4 5
1. Remote Control Panel Unit: compact design fits
discretely and easily in any vehicle.
2. PWR (Power) Button: pressing PWR briefly will turn
the unit ON. Pressing PWR a second time will cancel
the power-up test sequence.
3. H/C (Highway/City) Indicator: illuminates green for
highway mode, and amber for the City X mode. City
X/K/Ka is confirmed by the flashing green/amber LED,
followed by solid illuminator of the amber LED.
4. DRK (Bright/Dim/Dark) Button: provides dim or
dark settings of the LED display for discreet night
travel. Audio alerts are not affected by this mode.
5. AUD (Audio-Mute) Button: provides manual muting
of X, K, Super Wideband Ka Radar and SWS alerts.
Pressing and holding the AUD button will change the
audio level.
6. CTY (City/Highway) Button: minimizes unwanted X
band alerts without reducing sensitivity. City X/K/Ka
reduces falsing on all three bands.

6 7
4. Ka Narrow Bands – With Super Wideband Ka turned
OFF, any Ka narrow frequency which is engaged is
confirmed by rapid flashing of appropriate signal
strength LED (see page 10).
Pressing PWR anytime during the power up test sequence will
suspend the normal power up test sequence; your unit will be
ready for operation.
Tutorial Mode
The tutorial mode allows you to become more
familiar with all audible and visual alerts. To engage
this mode, press the AUD and the CTY buttons
simultaneously while the unit is ON. The audio/visual
alerts will be presented slowly in order of Laser, K, X,
Ka and SWS. The tutorial mode will cycle the
audio/visual alerts continuously. Press the PWR
button to exit. Two “beeps” confirm exiting from the
tutorial mode. Your unit is now ON and ready for
operation.
Set and Forget Memory
Any time 975R Remote is turned OFF all feature
settings you have selected are retained in the unit’s
memory. Set and Forget Memory eliminates the need
to reset your preferred feature settings each time
your unit is turned OFF and then back ON.
Low Voltage Warning
975R Remote continually checks voltage to ensure
proper performance. The unit’s operating range is
10.0 to 16.0 volts. If voltage falls below 10.0, the
highway (H) or city (C) indicator will flash, coupled
with a series of steady audible “beeps.”
Loss of Antenna Connection
In the event the control panel and Radar antenna are
not properly connected, the X/K/Ka band indicators
will flash, coupled with steady audible “beeps.”
Audio/Visual Alert for Instant-On/Pulsed Radar
This type of signal appears suddenly when a Radar
unit is “triggered.” The instant-on or pulsed alert
consists of an intense, three-second, X, K or Super
Wideband Ka audio “burst,” coupled with the flashing
of the four-LED display.
DRK (Bright/Dim/Dark) Button
The DRK button allows selection of a dim or dark
setting for all LEDS. To engage dim mode, press the
DRK button once. A single “beep” confirms your
selection. To completely cancel the illumination of all
LEDS, press DRK a second time. You’ll notice the city/
highway LED remains dim to confirm your unit is
receiving power. To return to a full bright setting,
press the DRK button a third time; two “beeps”
confirm this selection. Use of the DIM button does
not affect audio alerts.
Important—if you press the DRK button and do not receive
audible confirmation, the audio level has been set too low.
AUD (Audio Mute/Volume Control) Button
Manual Muting of Audio Alerts (Radar and SWS)
Whether Auto-Mute is selected ON or OFF in
Selectable Features, the audio alerts can be
completely muted by pressing the AUD button during
an alert. No audible alert will be heard for
approximately 12 seconds. If the signal is still present
after 12 seconds, the unit will remain in manual mute
mode.
Volume Control
Press and hold AUD button to engage the volume
control. Release the AUD button when you have
reached your desired audio setting. To reverse
direction of the volume, release and press AUD a
second time.
Note—because Laser alerts are not lengthy or sustained,
muting is not required (see page 17).
 Loading...