

Beltronics 936 Owner's Manual

P
R
O
T
E
C
T
I
O
N
P
R
O
T
E
C
T
I
O
N
360˚
TM
with 65 Digital Voice Messages and Digital Display
Operating
instructions
for model
E936CS

introduction
Thank you for purchasing an express 936
Radar/Laser/Safety detector. express 936 offers the most
advanced technology available for detecting all Radar and
Laser speed monitoring devices.In addition, express 936
features Digital Voice,Text Message Display and the Safety
War n in g Sys tem® with 60 Digital Voice messages.
To ensure maximum benefit from your new unit, please
read all instructions before operating your unit.
Remember, owning a Radar detector does not give you a
license to speed.Alerts from a Radar detector serve as an
effective reminder to check your speed. Laws vary
throughout North America governing the use of a Radar
detector. It is your responsibility to follow these laws.
selectable features
Safety Warning System® (sws™ )
express 936 detects encoded signals from sws
and provides 60 messages for:
HighwayConstruction/Maintenance, Highway Hazard Zones,
Weather Related Hazards,Travel Information/Convenience
and Emergency/Slow Moving Vehicles.For a complete
description of sws™audio and visual alerts,see page 18.
®
- Guard
Alert
express 936 features vg-2 Guard
®
, to detect signals from the
Interceptor vg-2 (Radar Detector Detector).
For a complete description of the vg-2 Guard®audio/visual
alert, see page .
Safety Warning System®with Digital Voice Messages
Choose between Digital Voice Messages with a unique sws
tone or sws™tone only (see page ).
Radar/Laser Digital Voice Prompts
Choose between Radar/Laser Digital Voice prompts followed
by “beeps”or “beeps” only (see page ).
™
transmitters
™

tab l e of content s
Profile of Features lpage 4
Description of Features
Power Up Test Sequencelpage 5
Tuto ri al Mo delpage 5
Memory Retention of Feature Selectionslpage 6
Adjusting the Audio Levellpage 6
drk (Dim/Dark) Button lpage 6
aud (Audio Mute) Button lpage 7
cty (City/Highway) Button lpage 8
Reset to Factory Settingslpage 8
Selectable Features lpage 9
Entering Selectable Features Modelpage 9
Installation lpage 10
General Guidelineslpage 10
Understanding Radar, Laser and sws
Interpretation of Alerts
Radar Alerts lpage 14
Instant-On/Pulsed Radar Alert lpage 16
Typical False Alert (Radar) lpage 16
Laser Alertslpage 17
Safety Warning System® (sws™ ) Alertslpage 17
Performance Verification lpage
Conditions That Affect Radar Alerts lpage
Conditions That Affect Laser Alerts lpage 19
Tro u b l e s h o ot i n g lpage 20
Consumer Warranty
Service
l
page 22
War r an t y S er vi c e lpage 22
Post-Warranty Servicelpage 22
Specifications lpage 23
Accessories
l
page 23
l
page 21
l
page 5
l
page 14
™
l
page 13
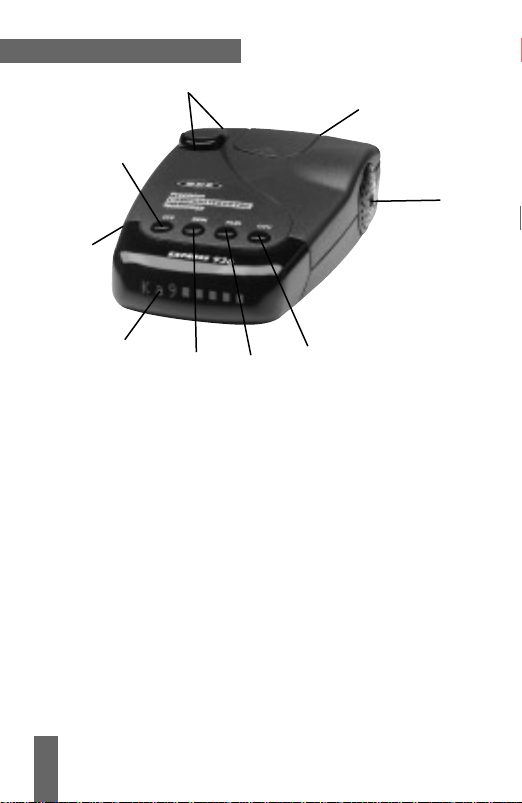
profile of features
7
1
9
6
8
2
3
5
4
1. p/v (Power/Volume) Button: pressing p/v briefly will turn
the unit on.Pressing p/v a second time will bypass the
power up test sequence. Pressing p/v and holding will change
the audio level.
2. Text Message Display: communicates all mode selections (i.e.
DIM, DARK, CITY,HIGHWAY, and AUTOMUTE)and confirms
Radar band and signal strength, presence of Laser and sws
™
messages received.
3. drk (Dim/Dark) Button: provides dim or dark settings of
the Text Display for discreet night travel.Audio alerts are not
affected.
4. aud (Audio Mute) Button: provides automatic and manual
muting of X, K,Super Wideband Ka Radar and manual
muting of sws
™
alerts.
5. cty (City/Highway) Button: minimizes unwanted X band
alerts without reducing sensitivity.
6. Antenna Opening: Radar and sws
patented diecast antenna with integrated transition to
microstrip mixer.
™
signals are received by a

7. Laser Optical Sensors: collect Laser signals from in front and
behind.
8. Audi o Al ert Spe aker : all audible alerts and Digital Voice
Messages are emitted from this location.
9. Power Jack: using the straight or coiled cord, express 936
operates in any vehicle with a 13.8 volt dc negative ground
system (10.5 volt to 16 volt range).
description of features
Power-Up Test Sequence
Each time your detector is turned on,audio and Text Messages
for Laser,Ka, K, X and Safety Warning System
presented. After this sequence, the status of Selectable
Features is displayed:“SWS o n ”,“SWS o f f”, “VG-2 o n ”,
“VG-2 o f f ”, “SWSvoice”,“SWS c l i c k ”;“VOICEo n ”,
“VOICEo f f ” (see page 9). If your unit displays information
other than this standard power-up test sequence,return it to
beltronics for servicing. To bypass the power-up test
sequence, press the p/v button during the Power up test
sequence.
Tutor ia l Mo de
The tutorial mode allows you to become more familiar with
all audible and visual alerts. To engage this mode, press and
hold cty,then press aud while the unit is off.The message
“
TUTORIAL” appears in the display followed by the audio and
corresponding Text Message for “LASER”,“Ka AUDIO”,“K
AUDIO”,“X AUDIO”,“VG-2 Al e r t ” sample Radar alert (K
band signal ramping from weak to strong) and “SAFETY
WARNING SYSTEM SAMPLE ALERTS”.Three samplesws
messages are then presented in the display along with the
corresponding Digital Voice Message:
Sample 1 “
ACCIDENT AHEAD”
Sample 2 “HIGHWAY WORKCREW AHEAD”
Sample 3 “POLICE IN PURSUIT”
Anytime during Tutorial Mode (except Safety Warning System
®
(sws™) are
™
®

sample alerts) press cty or aud to move forward or backward
through the alerts.During sws™ sample alerts press cty to
move forward in the sws™ message list.“MSG 1”will appear
initially in the display confirming your selecion.Pressing the
aud button allows you to listen to the sws™ message while
viewing it in the display. Press the cty button again to step to
the next message; press the aud button to review, and so on.
This allows you to review all 60 messages.
To e xi t Tut or ia l Mo de , p re ss th e p/v button and your unit
will be on and ready to receive signals.
Memory Retention of Feature Selections
Any time express 936 is turned off or unplugged from the
cigarette lighter socket, all feature settings are retained in the
unit’s memory. Memory retention eliminates the need to reset
your preferred feature settings each time your unit is turned
off and then back on.
Adjusting the Audio Level
Once your unit has completed the power up test sequence,the
audio level can be adjusted by holding the p/v button down.
As you hear the audio level change,the display will provide a
visual reference of the audio level.To reverse the direction in
which the audio level increases/decreases, briefly release, then
hold down the p/v button again.
drk (Dim/Dark) Button
The drk button allows selection of a dim or dark setting for the
display. To engage dim mode, press the drk button once. A single
“beep”coupled with the brief illumination of “
confirms your selection.To completely cancel the illumination of
the display during an alert,press drk a second time.A single
“beep”coupled with the brief illumination of “DARK”in the
display confirms your selection.While in dark mode,you will
notice an “H”(highway mode) or “C” (city mode) remains dim to
confirm your unit is receiving power. To return to a full bright
setting, press the drk button a third time; two “beeps”confirm
this selection. Use of the drk button does not affect audio alerts.
Important—if you press the the drk button and do not receive
audible confirmation, the audio level has been set too low.
DIM”on the display

aud (Audio Mute) Button
Continuous Audio Alert Pattern
Your unit has been preset at the factory to provide an X,K, Ka
or Laser audio alert and Digital Voice announcement of the
signal detected. Digital Voice prompts are provided once after
the initial audio alert.(Note:Digital Voice can be turned off,
see page ) This standard setting is often preferred when
background noise in a vehicle is loud.
Automatic Mute Alert Pattern (Radar)
To engage automatic muting,press the aud button once when the
unit is not alarming. A single “beep”and brief presentation of
“
AUTOMUTE” in the display confirms automatic mute mode has
been engaged. The alert pattern when this mode is activated
consists of several X,K, Super Wideband Ka audio alerts followed
by the Digital Voice announcement of the signal detected.After
the Digital Voice announcement,a “clicking”tone keeps you
quietly informed for as long as the signal is present.This
“clicking”becomes more rapid as the strength of the Radar signal
increases.With this mode engaged, the automatic muting will be
repeated each time a new signal is encountered. The automatic
mute mode enables you to conveniently monitor extended
encounters without having to manually mute or adjust the
volume setting.To return to the continuous audio alert pattern,
press the aud button a second time (while the unit is not
alerting). Two “beeps”and the message“AUTOo f f ”confirm you
have cancelled automatic mute mode.
Manual Muting of Audio Alerts (Radar and sws
™
)
Regardless of the au d mode selected (continuous or automatic
mute),the audio alerts can be completely muted by pressing
the aud button during an alert.Once the alert has passed, the
unit will revert to the previous aud setting.
Note—because Laser alerts are not lengthy or sustained,muting is not
required (see page ).

cty (City X/Highway) Button
The cty X mode has been designed to effectively reduce
unwanted audio alerts caused by intrusion alarms,door
openers, and other devices which share X band with police
Radar—without reducing sensitivity. Signals from non-police
Radar sources are frequently encountered in urban and suburban areas, making use of this mode ideal in these areas.
Pressing the cty button once engages the cty X mode which
is confirmed by “
CITY” in the display coupled with a single
audio “beep”. Pressing the cty twice returns you to highway
mode; “HIGHWAY” will appear in the display coupled with
two“beeps”.Once cty X mode is engaged, weak X band
signals encountered will produce no audible alert until the
signal strength reaches a preset level.However, visual alerts
are processed the instant an X band signal is detected,
keeping you quietly informed.Since most “false”X band
signals are weak,the use of the cty mode allows you to drive
out of their range before they reach the preset level and
trigger a full audio alert. In contrast, signals from X band
traffic Radar are generally stronger and will exceed the preset
level,causing a full X band audio alert. Activating the cty
mode will not change Super Wideband Ka,K or instant-on X
band Radar alert patterns.
Note—the cty mode does not change the presentation of alerts
for Laser sws
™
or - signals.
City ALL (X/K/Ka)
City ALL provides an alternated approach for improving X,
K and Ka band selectivity and is ideal for use in areas with a
high level of microwave transmissions which can cause
falsing on all three bands.To engage City ALL mode, press
cty until the Display shows “
CITY ALL”. Once engaged,weak
X, K or Super Wideband Ka signals encountered will provide
no audible alerts until the signal strength reaches a preset
level. Visual alerts are processed the instant an X,K or Super
Wideband Ka signal is detected, keeping you quietly
informed.
 Loading...