


ALLY

Instructions for use
Digital Receiver In-the-Ear (RIE)
Hearing Instruments
Legend and Ally

2
FCC ID: X26BRIE, IC: 6941C-BRIE, Type Designation: BRIE
FCC ID: X26VE312, IC: 6941C-VE312, Type Designation: VE312
FCC ID: X26MRIE, IC: 6941C-MRIE, Type Designator MRIE
This device operates in the frequency range of 2.4 GHz - 2.48 GHz. This device includes an RF
transmitter that operates in the range of 2.4 GHz - 2.48 GHz.
Statement:
This device complies with Part 15 of the FCC rules and ICES-003 of the IC rules.
Operation is subject to the following two conditions: (1) this device may not cause harmful interference,
and (2) this device must accept any interference received, including interference that may cause undesired
operation.

3
Note: This equipment has been tested and found to comply with the limits for a Class B digital device,
pursuant to part 15 of the FCC Rules and ICES-003 of the IC rules. These limits are designed to provide
reasonable protection against harmful interference in a residential installation. This equipment generates,
uses and can radiate radio frequency energy and, if not installed and used in accordance with the instructions, may cause harmful interference to radio communications. However, there is no guarantee that interference will not occur in a particular installation. If this equipment does cause harmful interference to radio or
television reception, which can be determined by turning the equipment off and on, the user is encouraged
to try to correct the interference by one or more of the following measures:
• Reorient or relocate the receiving antenna.
• Increase the separation between the equipment and receiver.
• Connect the equipment into an outlet on a circuit different from the one in which the receiver is connected.
• Consult the dealer or an experienced radio/TV technician for help.
Changes or modifi cations can void the user´s authority to operate the equipment
Intended use:
Generic air-conduction hearing instruments are wearable sound-amplifying devices intended to compensate
for impaired hearing. The fundamental operating principle of hearing instruments is to receive, amplify, and
transfer sound to the ear drum of a hearing impaired person.

4
Specifi cation of restrictions:
The products are in compliance with the following regulatory requirements:
• In EU: the device conforms to the Essential Requirements according to Annex I of Council Directive
93/42/EEC for medical devices (MDD) and essential requirements and other relevant provisions of Directive 1999/5/EC (R&TTE).
• The declaration of conformity may be consulted at www.beltone-hearing.com
• In US: FCC CFR 47 Part 15, subpart C.
• Other identifi ed applicable international regulatory requirements in countries outside EU and US. Please
refer to local country requirements for these areas.
• In Canada: these hearing instruments are certifi ed under the rules of IC.
• Japanese Radio Law and Japanese Telecommunications Business Law Compliance. This device
is granted pursuant to the Japanese Radio Law (電波法) and the Japanese Telecommunications
Business Law (電気通信事業法) This device should not be modifi ed (otherwise the granted designation
number will become invalid)
• Patents
US 7,593,537 US 8,00,849

5
Digital Receiver In-the-Ear (RIE) wireless hearing Instruments models (type BRIE) are available in the
following variants: LND1764-DRW, LND964-DRW, LND664-DRW
Digital Receiver In-the-Ear (RIE) wireless hearing instrument models (type VE312) are available in the
following variants: LND1763-DRW, LND963-DRW, LND663-DRW
Digital Receiver In-the-Ear (RIE) wireless hearing instrument models (type MRIE) are available in the
following variants:
AY3 64-D R W.

6
A new Beltone hearing instrument
Congratulations on your choice of a Beltone hearing instrument!
This is an important step towards clearer hearing and better understanding. We have used all of our experience with hearing instruments to help you communicate, lead an enjoyable social life and listen to the world
around you.
Your hearing instrument is a very advanced device. Your hearing care practitioner has tuned it to your individual needs. With a little devotion and patience, you will become familiar with it.
This booklet is a short guide to assist you in getting acquainted with your hearing instrument. Read it carefully and use it as a guideline.
We wish you happiness and pleasant listening with your new instrument.
Beltone

7
This booklet & your instrument
In this booklet you will fi nd instructions for inserting and controlling your new hearing instrument. You will
fi nd explanations on controlling your instrument, on daily handling and on its use. Furthermore, you can read
what to do if things do not live up to your expectations. We will give a few practical steps towards better
hearing.

8
Statement: .......................................................... 2
Intended use: ...................................................... 3
Specifi cation of restrictions: ................................ 4
A new Beltone hearing instrument .......................6
This booklet & your instrument ............................ 7
Contents .............................................................. 8
Warning to hearing care professional ................ 10
Your Hearing Instrument .................................... 12
On/Off function .................................................. 15
Delayed Activation ............................................. 15
Changing batteries ............................................. 16
Battery warning information ............................... 16
Inserting and removing the device ..................... 19
Inserting receiver domes: ................................... 20
Push button and Multi-Function button.............. 22
Telephone use .................................................... 26
Auto-Phone ........................................................ 26
Telecoil-program (64-DRW Only) ....................... 29
Using the telephone with telecoil programme .... 30
Audio input (64-DRW Only) ............................... 31
Hearing through an induction loop ..................... 32
Listening to radio or tv ...................................... 33
Using Beltone Hearing Instruments with iPhone®,
iPad®, and iPod touch
®
(Beltone Legend) ................................................ 33
Using Beltone hearing instruments with smart
phone apps ........................................................ 34
Cellular phones ................................................. 34
Flight mode ....................................................... 35
Daily maintenance .............................................. 36
The receiver tube ............................................... 37
Cleaning the receiver tube and the
receiver domes .................................................. 37
Cleaning the RIE or UP mold ............................. 38
The receiver domes ........................................... 38
Wax guard fi lters ................................................38
Tinnitus Sound Generator (TSG) module ........... 39
Prescription use of this TSG hearing
instr ument .......................................................... 39
Using TSG with smart phone apps .................... 42
Contents

9
The scientifi c concepts that form the
basis for the device ............................................ 42
TSG warning to hearing healthcare
profess io nal s ...................................................... 44
General precautions .......................................... 45
Hearing instrument expectations .......................46
General warnings .............................................. 47
Warning to hearing aid dispensers (US Only) ... 49
Important notice for prospective hearing
aid users (US Only)............................................. 50
Children with hearing loss (US Only) ................. 51
Eight steps towards better hearing .................... 51
TROUBLESHOOTING GUIDE ............................ 54
Technical Data ................................................... 58
Temperature test, transport and storage
inform ation ......................................................... 59
International warranty, service and repairs ......... 60
Your selected model .......................................... 61

10
Warning to hearing care professional i
A hearing care professional should advise a prospective user to consult promptly with a licensed physician (preferably an ear specialist) before setting the instrument if the hearing care professional determines
through inquiry, actual observation, or review of any other avail able information concerning the prospective
user that the prospective user has any of the following conditions:
(i) visible congenital or traumatic deformity of the ear;
(ii) history of active drainage from the ear within the previous 90 days;
(iii) history of sudden or rapidly progressive hearing loss within the previous 90 days;
(iv) acute or chronic dizziness;
(v) unilateral hearing loss of sudden or recent onset within the previous 90 days;
(vi) audiometric air-bone gap equal to or greater than 15dB at 500 Hz (hertz), 1000 Hz, and 2000 Hz;
(vii) visible evidence of signifi cant cerumen accumulation or a foreign body in the ear canal;
(viii) pain or discomfort in the ear.

11

12
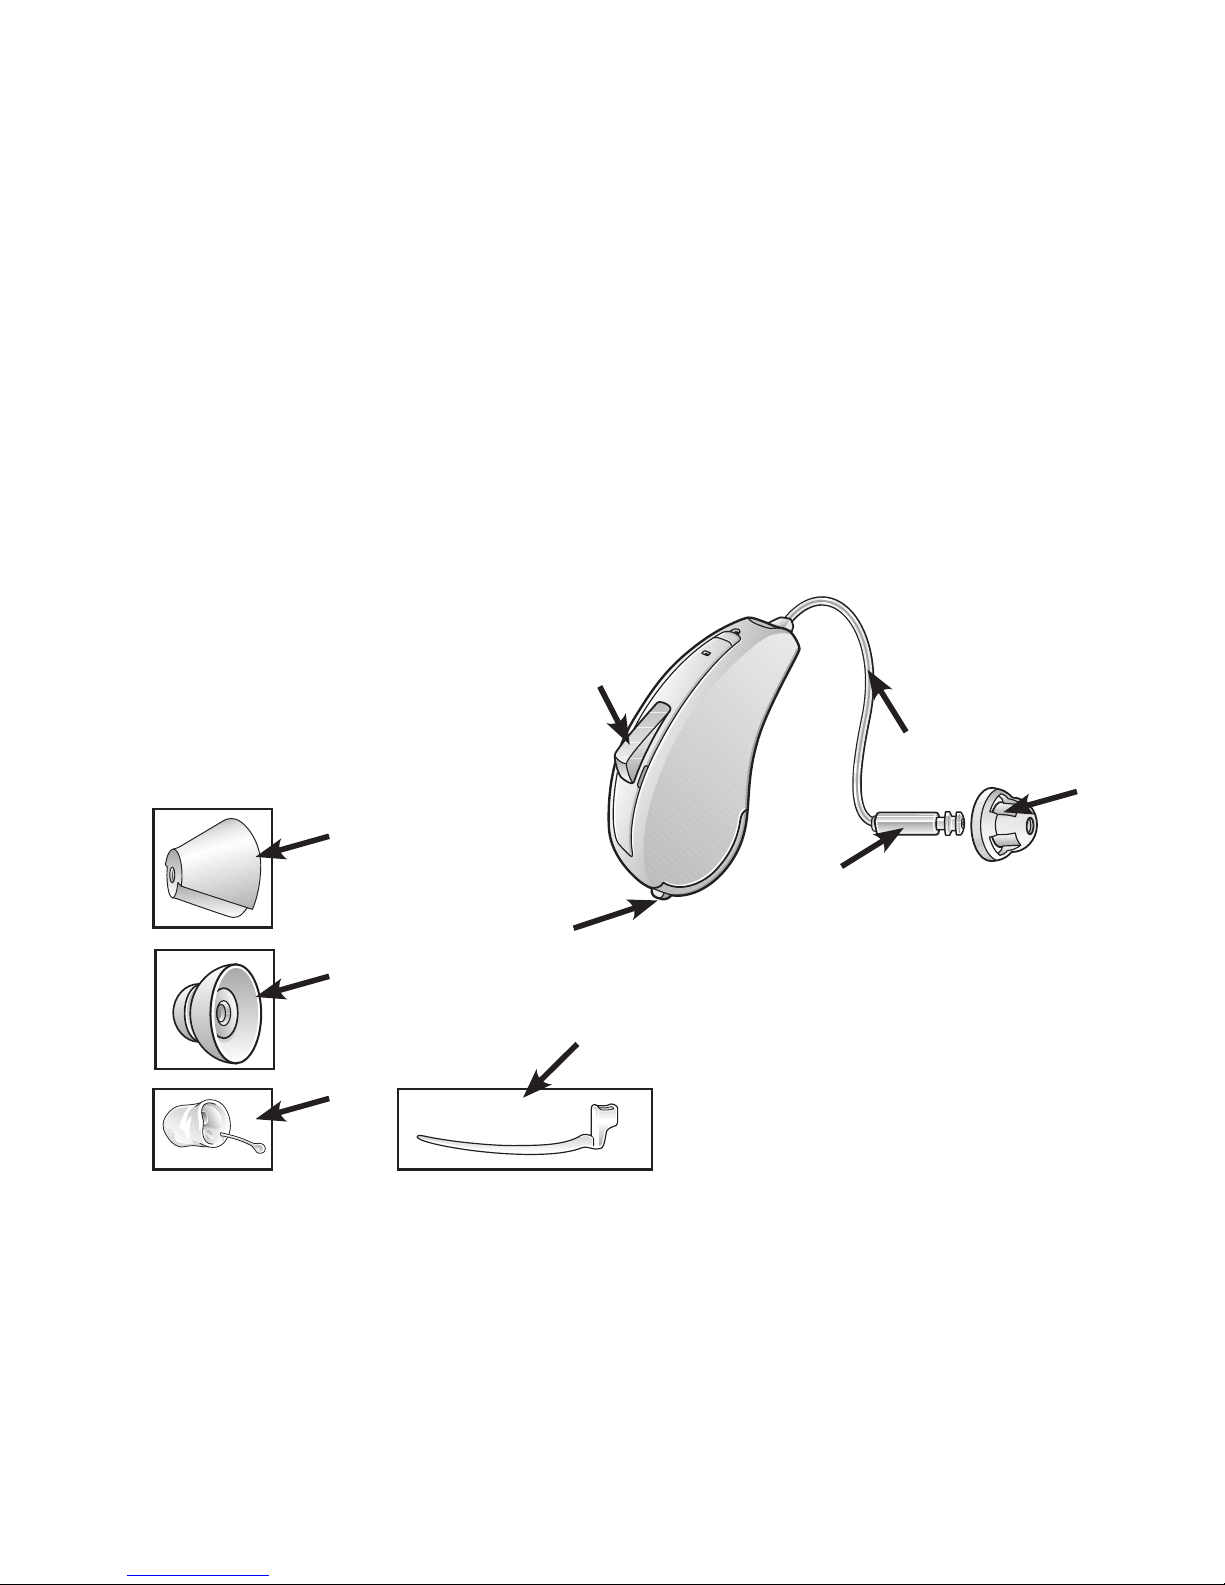
Your Hearing Instrument
(Please see page 61-62 for your selected model)
1. Rece iver tube
2a. Receiver Open Dome
2b. Receiver “Tulip” Dome
2c. Receiver Power Dome
2d. Receiver
3. Sports lock
4. Battery compartment
5. Receiver
6. Multi-function button
2d
2c
2b
3

13
64-DRW
Available Receiver Tube Models
4
6
1
5
2a
LP Receiver MP Receiver HP Receiver UP Receiver
63-DRW device
2d
2c
2b
3
2a
1
5
6
4
14
Your Hearing Instrument
(Please see page 61-62 for your selected model)
1. Rece iver tube
2a. Receiver Open Dome
2b. Receiver “Tulip” Dome
2c. Receiver Power Dome
2d. RIE mold
3. Sports lock
4. Battery compartment
5. Receiver
6. Push button

15
On/Off function
Your hearing instrument is equipped with an on/off
switch integrated into the battery compartment.
When the battery compartment is fully closed, the instrument is turned on. To turn the instrument off, grasp
the battery compartment door with your fi ngernail and
gently pull downwards. The power will switch off at the
point where you can feel a small click. Whenever you
are not wearing the instrument, remember to turn it off
to reduce battery consumption.
Delayed Activation
Your hearing care professional may have activated the Delayed Activation function in your hearing instrument. The Delayed Activation delays the switch-on time after closing the battery compartment. This is
indicated by beeps at one second intervals after closing the battery compartment.
If you wish, it can be deactivated by your hearing care professional.
On
Off

16
Changing batteries
(Please see “Your selected model” for the battery size of your hearing instrument)
Low battery indication
Your hearing care professional can set your hearing instrument to give an acoustical indication when the battery is reaching its end of life. The hearing instrument
will reduce amplifi cation and emit a melody if battery power gets too low. This signal will recur every 15 minutes until the hearing instrument automatically switches
off. It is recommended that you keep spare batteries on hand.
Low battery indicator (when paired with Direct Line accessories)
Active usage of Beltone Direct Line accessories (for example: Remote Control, TV Link, and Phone Link)
requires more battery power from the hearing instrument than when these are working on their own. When
the battery in the hearing instrument has depleted to a level at which use of the TV Link, and Phone Link or
Personal Audio Link cannot be supported, the hearing instrument will play two sets of descending tones.
At some point the battery level will not support the remote control either and you will once again hear the
descending tones. The hearing instrument will continue to work as usual. Once a new battery is inserted, full
operation of the wireless accessories will resume.

17
Replacing the battery
Open the battery compartment completely by using your fi ngernail. After removing the old battery (if present), insert the new one with the positive (+) side in the correct position. Please make sure that you have the
correct size battery for your hearing instrument. Gently close the battery door. Do not force it closed. If door
does not close easily, remove battery and try again.
i
For best performance, always use new Zinc-Air batteries that have a minimum remaining shelf life of
1 year.
i
Whenever the hearing instruments are not in use, remember to turn them off to avoid unnecessary
battery consumption.

18
Battery warning information i
Batteries contain dangerous substances and should be disposed of carefully in the interest of your safety
and for the environment.
• Keep batteries away from pets, children and mentally challenged persons.
• DO NOT place batteries in your mouth. Consult a physician immediately if a battery has been swallowed,
as they can be harmful to your health.
• In the event that a battery is swallowed call collect: The National Button Battery Ingestion Hotline
(202) 625-3333 for counsel or treatment.
• DO NOT burn the batteries, as they could explode.
• DO NOT attempt to recharge batteries (Zinc Air) which are not specifi cally designated rechargeable as
they may leak or explode.
• Replace spent batteries and do not leave them in the instrument for a prolonged period to prevent leakage.
• Used batteries are harmful to the environment. Please dispose of them according to local regulations or
return them to your hearing care practitioner.
• Remove the batteries to prevent leakage when the hearing instruments are not in use for an extended
period of time.

19
Inserting and removing the device
Inserting custom RIE and UP molds:
1. Hold the RIE mold between your thumb and index fi nger and position its
sound outlet in your ear canal.
2. Slide the RIE mold all the way into your ear with a gentle, twisting movement.
3. Move the RIE mold up and down and gently press to ensure it is positioned
correctly in the ear. Opening and closing your mouth can ease insertion.
4. Make sure the hearing instrument is seated behind the ear.

20
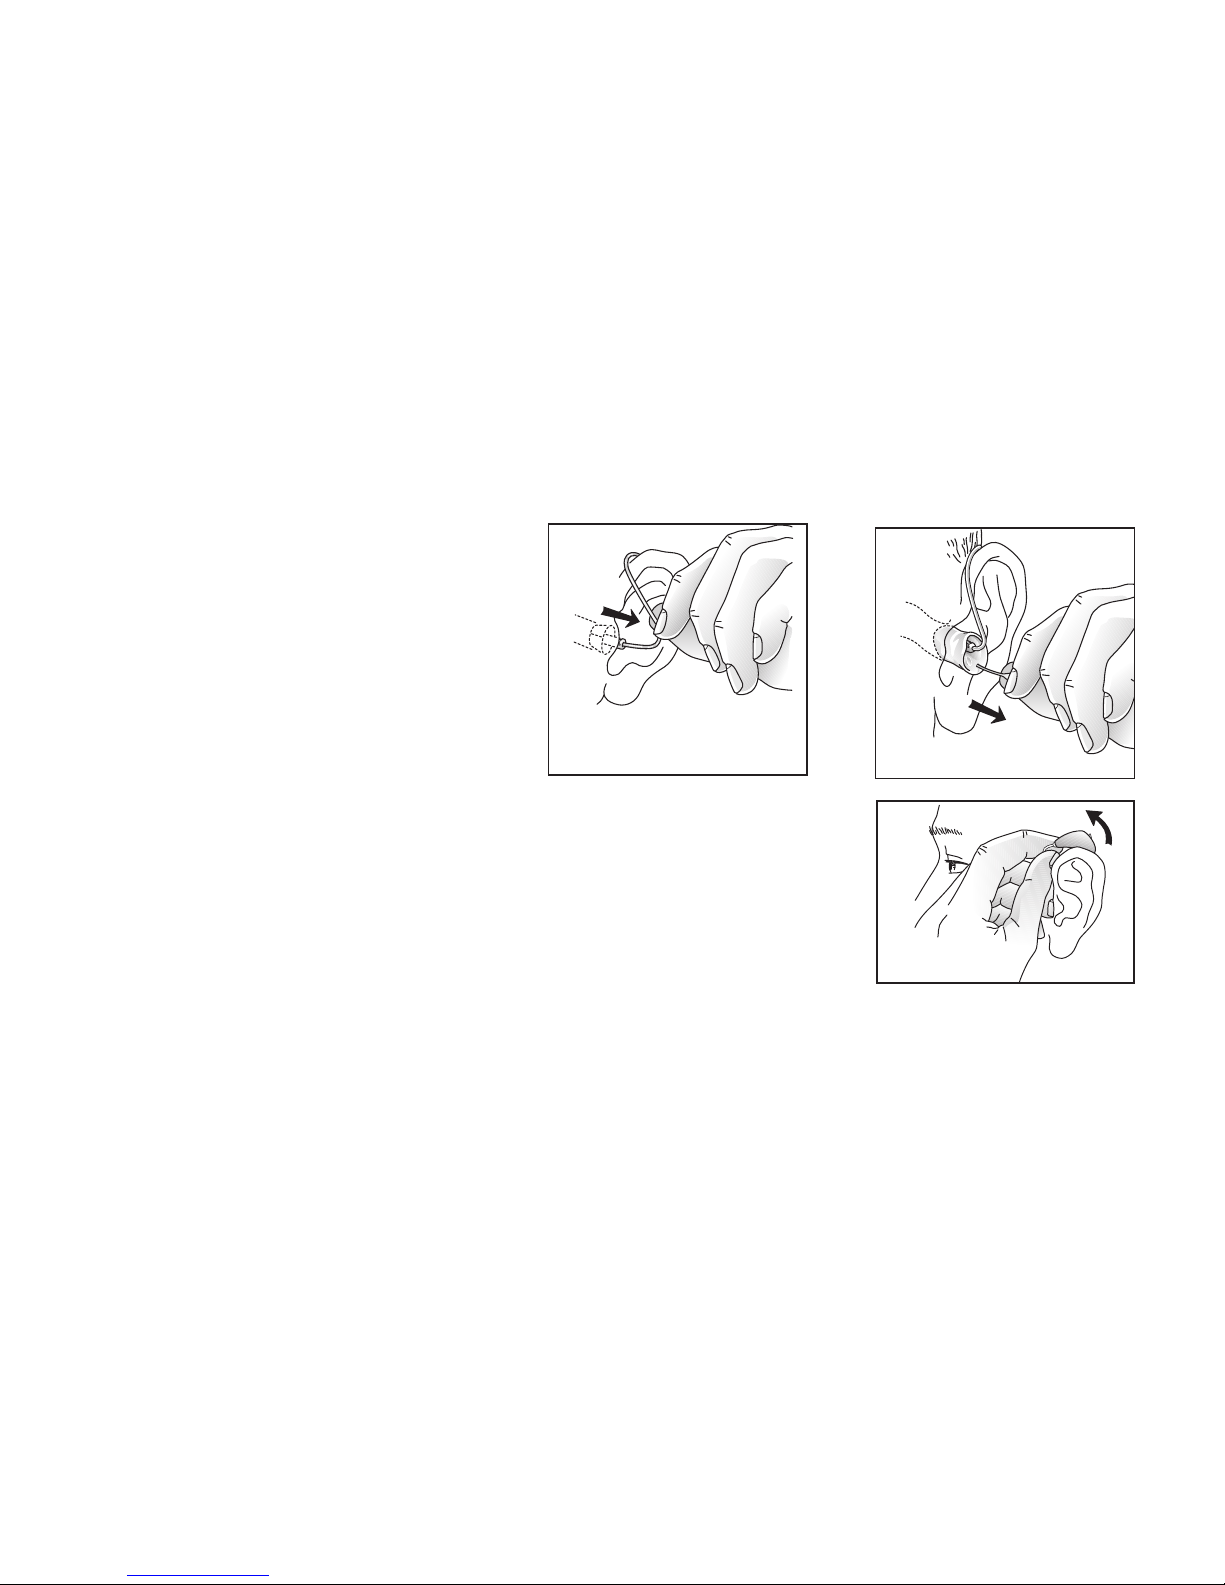
Inserting receiver domes:
1. Hang the instrument over the top of the ear.
2. Grasp the receiver tube where it bends and place the receiver dome in your ear canal. The receiver dome
should be placed far enough into the ear so that the receiver tube lies fl ush with your head.
3. If the hearing care professional has provided you with a sport lock on the receiver tube, make sure to
position it into the indentation above the earlobe.
4. When the receiver dome is placed appropriately, you should not see the receiver tube sticking out when
you look directly into a mirror.
5. If the device whistles, the most likely reason is that the receiver dome is not placed correctly in the ear
canal. Other reasons can be build-up of earwax in the ear canal. It is also possible that the instrument
settings are not optimal. To help you solve these issues it is recommended you contact your hearing care
professional.
21
Removing:
1. Grasp the receiver tube where it bends, or pull-out cord when using an RIE or UP mold, and pull the
receiver dome out of your ear canal.
2. Lift the hearing instrument of your ear.
i Note: You should never attempt to
bend or modify the shape of the hearing
instrument, RIE molds, or receiver tubing
yourself.

22
Push button
(63-DRW)
Multi-function button
(64-DRW)
Push button and Multi-Function button
If you have a hearing aid with a push button or multi-function button, this will allow you to use up to four different listening programs, each of them suitable for certain situations.
Your instrument has a fully automatic volume control.
Therefore, it should not be necessary to control the volume manually. However, in addition to controlling
listening programs, the multi-function button (64-DRW only) provides you with the ability to adjust the amplifi cation to your liking.
The multi-function button is designed to change the volume or listening programmes of the hearing instrument, based on different ways it is pressed. If necessary, your hearing care practitioner can change these
settings and fi ll in the following table to indicate the new settings:

23
Multi-function button action Default setting New setting
Short press up Increases volume
Short press down Decreases volume
Long press up (3 seconds) Changes programs
Long press down (3 seconds) Activates streaming*
*Wireless streaming only applicable when using Beltone Direct Line accessories.
Note: If you have two hearing instruments with the Ear to Ear Synchronization function enabled and you have
the Multifunction Button set for volume control functionality, volume adjustments to one instrument will automatically repeat in the second instrument. When a volume control adjustment is made in one instrument,
you will hear a confi rmation beep. A beep in the second instrument will follow.
 Loading...