

Page 1
®
Donut Robot
Mark I
Operator’s Manual
and
Technical Supplement
Belshaw Bros., Inc.
814 44th Street NW, Suite 103
Auburn, WA 98001 USA
Tel: (206) 322-5474
Fax: (206) 322-5425
Toll Free (US): 1-800-578-2547
E-mail: service@belshaw.com
www.belshaw.com
Page 2

Donut Robot
Mark I & Mark I GP
Operator’s Manual
Belshaw Bros., Inc.
814 44th Street NW, Suite 103
Auburn, WA 98001 USA
Phone: + -1-206-322-5474 Fax: + -1-206-322-5425
E-mail: service@belshaw.com http://www.belshaw.com
Page 3

Page 4

If you accept the machine from the shipping
company, you are, in effect, saying that the
machine is in good condition, and you must
pay for the machine. Belshaw cannot pay for
shipping damage, because the freight company
has accepted the machine from Belshaw in good
condition, and is responsible for its safe delivery.
For your protection, inspect the machine to see
that no parts are bent, scratched, or otherwise
damaged. If any damage has occurred in
shipping, file a freight claim with the shipping
company immediately.
To unpack the Donut Robot Mark I and
transport it to the work station:
1. Remove the foam and other packing
materials from the two boxes.
2. Carry the hopper, plunger, and column to the
work station.
3. Coil the cutter head power cord and carry
the cutter head to the work station.
4. Carry the conveyor assembly to the work
station.
5. Tilt the heater head back. Remove the kettle
from the fryer case and carry it to the work
station.
6. Tilt the heater head down.
7. Coil the main power cord and place it in the
fryer case.
8. Move the heater head and fryer case to the
work station.
EQUIPMENT RECORD
Please provide the information below when you correspond with us about your machine.
Purchased by _____________________________________________________________________
Installed by ______________________________________________________________________
Date of Installation ________________________________________________________________
Model number ___________________________________________________________________
Serial number
010808
MN-1002EN
Belshaw Bros., Inc.
th
814 44
Phone: + -1-206-322-5474 Fax: + -1-206-322-5425
Street NW, Suite 103
Auburn, WA 98001 USA
E-mail: service@belshaw.com http://www.belshaw.com
Page 5

Page 6
Contents
1 Operation 1
2 Cleaning 3
Cleaning the Hopper and the Plunger 3
Cleaning the Conveyor and the Kettle 4
3 Maintenance 9
Taking Care of the Plunger, Hopper, and Cylinder 9
Lubricating 9
4 Related Products 11
Roto Cooler 11
Icing Finishing Tree and Roto Cooler 13
Sugaring Tray and Roto Cooler 14
Filter Flo Siphon 15
Shortening Reserve Tank 18
5 Donut Making Helps 19
Tips on Making Quality Cake Donuts 19
Temperature Conversion 20
Calculating Correct Water Temperature 20
Ratios of Plunger Sizes to Donut Weights 20
Belshaw Bros., Inc. www.belshaw.com Phone 206-322-5474 Fax 206-322-5425
Donut Robot Mark I OM MN-1002EN iii
Page 7

Preface
The Donut Robot Mark I is designed to
automatically cut and fry cake donut products. It
can also be used to fry yeast-raised donuts.
It is meant to be used on a flat, stationary table or
countertop, with the operator standing opposite
the heater head of the machine. The operator
must work safely at all times and read this
manual and follow its instructions and warnings.
The Mark I uses electrical elements to heat
shortening in its kettle. In the European
Community, the machine is available with the
following electrical configurations:
220 volts, 1 phase, 50 hertz
240 volts, 1 phase, 50 hertz
The Donut Robot Mark I produces less than 70
dB(A) of equivalent continuous A-weighted
sound pressure at work stations. This has been
determined during a run of the machine with
shortening in the kettle, using a Bruel & Kjaer
sound level meter, type 2236.
To use the Mark I safely, heed the following
warnings and all other warnings that appear in
this manual:
Make sure the machine is secured to the
work surface. Doing so will prevent the
machine from moving or falling, which
could cause serious injury.
Do not overfill the kettle with
shortening. If shortening overflows the
kettle, it could cause serious burns or
could cause someone to slip on the floor
and be seriously injured.
Hot shortening can cause serious burns.
Make sure that the system and the
shortening are cool before attempting
any adjustment, repair, disassembly, or
cleaning.
To avoid electrocution or other injury,
unplug the machine before attempting
any adjustment, repair, disassembly, or
cleaning.
To avoid damaging the machine, never
use force to assemble, disassemble,
operate, clean, or maintain it.
Be careful never to get shortening,
water, or other materials on the floor. If
anything does get spilled on the floor,
mop it up immediately. Materials on the
floor can cause people to slip or fall,
resulting in serious injury or loss of life.
To prevent unintentional startup and
possible fire, unplug the machine if there
is a local power outage. When the
power is restored, it is safe to plug the
machine in again.
Never let water and hot shortening come
in contact with each other. Moisture
causes hot shortening to spatter, which
may cause serious burns.
Belshaw Bros., Inc. www.belshaw.com Phone 206-322-5474 Fax 206-322-5425
iv MN-1002EN Donut Robot Mark I OM
To avoid electrocution, make sure that
all electrical cords are not frayed or
cracked and that they do not pass
through any water or shortening.
Make sure that all electrical cords are
routed so that no one will trip over them.
Page 8

1 Operation
Read each step completely before following its
directions.
1. When the shortening reaches the correct
frying temperature, it should reach the
middle of the flight bars.
Shortening expands as it increases in
temperature. This means that unless the
shortening is at frying temperature when it is
put in the kettle, it should be added
gradually. Let the shortening in the kettle
heat up before adding more.
Put shortening in the kettle using one of
these methods:
Pre-melt shortening in a pan on the stove
and carefully pour it into the kettle.
Use the optional EZ Melt to melt
shortening and transfer it to the kettle.
See the EZ Melt manual.
WARNING
Do not touch hot shortening. It can cause
severe burns.
2. Turn the heating element on by turning the
thermostat knob to the desired temperature.
Two pilot lights will come on. The one on
top of the heater head indicates that the
heating element has been turned on (that the
thermostat is set above 200F/93C). The
one on the front of the heater head indicates
that the shortening has not yet reached the
desired temperature. This light will go out if
the high temperature limit control breaks the
circuit.
Note: If the high temperature limit control
does break the circuit, push the red reset
button on the back of the heater head.
3. Wait for the shortening to reach the desired
temperature. When it does, the pilot light on
the front of the heater head will go out. DO
NOT run the conveyor until all the
shortening has melted.
4. If using the optional Shortening Reserve
Tank, fill it with shortening. Then position
it on the conveyor side panels either ahead
of or behind the turner, but not above it.
The heat of the fryer will melt the shortening
in the tank.
Put solid shortening into the kettle,
packing it tightly around the elements
and bulbs.
5. Adjust the size selector dial on the cutter
head’s crankshaft assembly. This dial
regulates the donut weight. The higher the
setting, the larger the donuts will be. Adjust
the dial setting as follows:
WARNING
a. Unscrew the dial lock nut 1/2 turn.
Air spaces can cause the shortening to
overheat and catch on fire.
Belshaw Bros., Inc. www.belshaw.com Phone 206-322-5474 Fax 206-322-5425
Donut Robot Mark I OM MN-1002EN 1
b. Turn the dial to the desired position, as
indicated by the marks on the crank
plate.
c. Tighten the dial in place with the lock
nut. Tighten it using your fingers only.
Page 9

6. Adjust the machine to provide the
appropriate fry time for your product, as
follows:
a. Decide on the fry time you desired—
either 63, 70, 95, or 120 seconds.
Choose 63 seconds only if using the GP
model.
b. Locate the gear cover on the back of the
heater head.
c. Use the label on the gear cover to
determine which set of gears the gear
belt should be on to provide the correct
fry time.
d. Slide the gear cover up.
e. Move the belt to the appropriate set of
gears.
f. Slide the gear cover down, ensuring that
the belt tightener rests on the belt.
10. Continue adding shortening to the kettle to
maintain the proper shortening level (see
step 1). There are three ways to do this:
Melt some shortening in a pan on the
stove and carefully pour it into the kettle.
If you are using the optional EZ Melt,
transfer more shortening from it. See
your EZ Melt manual.
If you are using the optional Shortening
Reserve Tank, push open the supply
valve.
11. Continue adding dough to the hopper as
needed.
12. When filling the hopper for the last time, use
all of the dough in the hopper. To do so,
push the dough to the bottom of the hopper
using a rubber scraper or spatula. Be careful
not to jam the scraper in the donut cutter.
7. Put dough into the hopper.
8. Turn on the cutter using the power switch on
the cutter head.
9. Turn on the conveyor drive using the power
switch on the heater head.
Note: If the conveyor becomes jammed, a
warning buzzer will sound about a minute
later and stop when the conveyor is turned
off. The conveyor drive is impedanceprotected so it will not burn out due to
jamming.
WARNING
If the conveyor becomes jammed: 1. Turn
off the conveyor drive and the heating
element. 2. Allow the system to cool down.
HOT SHORTENING IS DANGEROUS.
3. Determine the cause of the jamming.
4. Clear it. 5. Restart the system.
WARNING
To avoid injury, never put your hand in or
under the hopper while the machine is on.
Belshaw Bros., Inc. www.belshaw.com Phone 206-322-5474 Fax 206-322-5425
2 MN-1002EN Donut Robot Mark I OM
Page 10

2 Cleaning
Read each step completely before following its
directions.
WARNING
Thoroughly clean and dry the floor if
shortening, water, or other materials are
spilled. Materials on the floor can cause
people to slip or fall, resulting in serious
injury or loss of life.
WARNING
To avoid electrocuting yourself or
damaging the machine, never allow water,
steam, shortening, cleaning solution, or any
other liquid to enter the heater head or
cutter head assemblies.
To clean the hopper and the plunger:
1. Unplug the cutter head power cord.
2. Remove the hopper.
On Standard Model
a. Push up on the hopper so the plunger
spring compresses.
b. Pull the hopper away from the hopper
resting pins.
On GP Model
a. Release the plunger by swinging up the
connecting rod.
b. Loosen the thumb nuts that hold the
hopper in place.
c. Pull the hopper away from the bearing
strut.
3. Remove the plunger from the hopper.
On Standard Model
a. Press down on the plunger head and lift
Cleaning the Hopper and
the Plunger
Follow these general guidelines:
Use household dishwashing detergent.
Do not use strong alkali cleaners such as
lye, soda ash, or trisodium phosphate, as
these discolor and corrode aluminum.
Wash, dry, and lubricate parts
thoroughly to prevent rusting.
When washing parts by hand, wash each
part separately; do not put any other
utensil or dish in the sink with the part
being washed.
Belshaw Bros., Inc. www.belshaw.com Phone 206-322-5474 Fax 206-322-5425
Donut Robot Mark I OM MN-1002EN 3
4. Pre-soak the hopper and the plunger, if
5. Wash the hopper and the plunger separately
the release tab.
b. Rotate the release tab 1/2 turn so the
square key slides into the slot in the bail.
c. Pull the plunger up and out of the
hopper, passing the center rod through
the slot.
On GP Model
Pull the plunger out of the hopper, passing
the center rod through the slot in the bail.
necessary, to loosen stubborn or dried-on
deposits.
in hot water and a detergent recommended
for aluminum. Use a non-scratching plastic
Page 11
scouring cloth to remove soil and restore
luster.
6. Rinse the hopper and the plunger separately
in clear, hot water (170-190F/77-88C).
7. Dry each part completely.
8. Dip the plunger and the hopper cylinder in
mineral oil or liquid shortening to prevent
rust and sticking.
9. Wipe the cutter head assembly with a soft
cloth dampened with hot water and an
appropriate cleaner. Wipe it with another
damp cloth to remove the cleaner. Wipe it
dry.
CAUTION
To avoid electrocuting yourself or
damaging the machine, never immerse the
cutter head.
4. Lift the cutter head and column out of the
column mounting bracket.
5. Remove the conveyor assembly as follows:
a. Obtain two pieces of wood, each at least
1” x 1” x 11” (2.5 x 2.5 x 28 cm).
b. Lift the conveyor assembly from the
conveyor locating pin and pull it away
from the heater head to disengage the
main drive shaft coupling from the
conveyor drive coupling.
c. Lift the outfeed end of the conveyor.
Slide one piece of wood under the
conveyor and lay it across the top of the
kettle. Lift the other end of the conveyor
and do the same with the other piece of
wood. The conveyor will now be resting
on the two pieces of wood. Let the
shortening drain off of the conveyor and
into the kettle. See Figure 3-1.
Cleaning the Conveyor and
the Kettle
There are four basic steps to cleaning the
conveyor and the fryer kettle: removing the
shortening, washing, rinsing, and drying. You
must perform all four steps and perform them in
the order listed.
Removing the Shortening
WARNING
To avoid burning or electrocuting yourself,
unplug the machine before cleaning the
fryer.
1. Disconnect the machine from the power
source.
2. Let the shortening cool to 100F/38C.
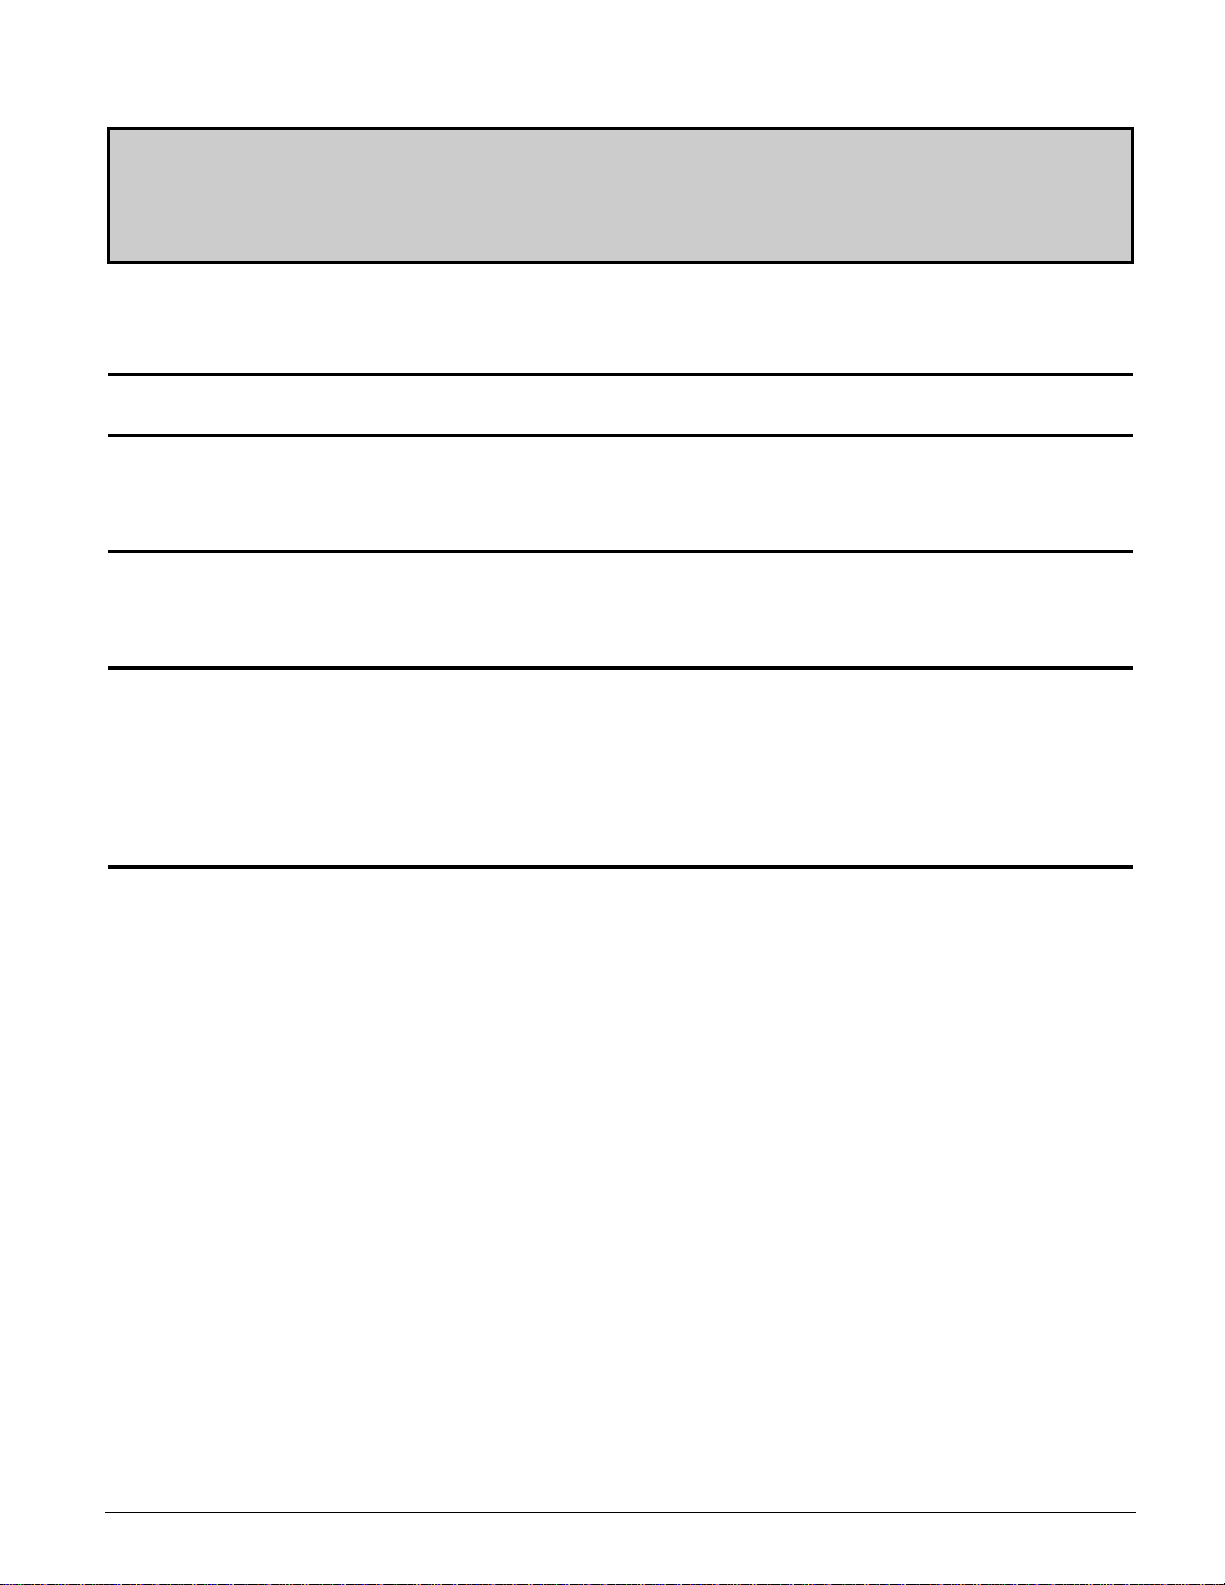
Figure 3-1. Draining the Shortening off of
the Conveyor.
6. After the shortening has drained off of the
conveyor assembly, turn the conveyor
assembly around and place it on the work
surface. Set aside the pieces of wood.
3. Unplug the cutter head power cord.
Belshaw Bros., Inc. www.belshaw.com Phone 206-322-5474 Fax 206-322-5425
4 MN-1002EN Donut Robot Mark I OM
Page 12
7. If you want to clean the turner assembly,
remove and clean it as follows:
a. Move the flight bars of the conveyor
until the turner is in the middle of a
flight pocket.
b. Swing the turner cam weight up out of
position.
c. Lift up and pull out on the turner cam
assembly. See Figure 3-2.
e. Wash the turner cam assembly and
turner assembly using mild detergent and
warm water.
f. Rinse the turner cam assembly and
turner assembly in clear water.
g. Dry these parts thoroughly.
WARNING
All parts must be dried thoroughly.
Moisture causes hot shortening to spatter,
which may cause serious injury.
8. If you want to clean the drop plate, remove
it by lifting its forward end and sliding it
toward the rear of the conveyor. (See Figure
3-4.) Wipe the drop plate with a damp cloth.
CAUTION
Figure 3-2. Removing the Turner Cam
Assembly.
d. Lift out the turner assembly. See Figure
3-3.
If thedrop plate is scratched, donuts will
stick to it. To prevent this from happening,
always wipe the drop plate in the direction
of the grain in the metal, which runs
parallel to the length of the conveyor, and
never use abrasive cleaners.
Figure 3-4. Removing the Drop Plate.
Figure 3-3. Removing the Turner Assembly.
Belshaw Bros., Inc. www.belshaw.com Phone 206-322-5474 Fax 206-322-5425
Donut Robot Mark I OM MN-1002EN 5
9. Check again to see that the shortening in the
kettle has cooled to 100F/38C.
Page 13

10. Remove the shortening from the kettle using
one of these methods:
Use an optional Filter Flo Siphon to
siphon the shortening into one or more
large metal buckets. (See the
instructions in Appendix A.) Be careful
not to disturb the sediment that has
accumulated in the bottom of the kettle.
Tilt the heater head assembly back,
raising the heating element out of the
kettle. Lift the kettle out of the fryer
case and carefully pour the shortening
into one or more large metal buckets. Be
careful not to disturb the sediment that
has accumulated in the bottom of the
kettle.
Using a small saucepan or a metal
pitcher, scoop as much of the shortening
as you can into one or more large metal
buckets. Then lift the kettle out of the
fryer case and carefully pour the rest of
the shortening into a metal bucket. Be
careful not to disturb the sediment that
has accumulated in the bottom of the
kettle.
WARNING
Thoroughly clean and dry the floor if
shortening is spilled. Shortening on the
floor can cause serious injury or loss of life.
11. Return the kettle to the fryer case, if you
have removed it, and tilt the heater head
assembly down.
12. Brush off any carbon that has accumulated
on the heating element. Accumulated
carbon can cause corrosion and ineffective
heating.
13. Tilt the heater head assembly back, raising
the heating element out of the kettle.
14. Lift the kettle out of the fryer case. Remove
and dispose of the remaining shortening and
the accumulated sediment. Dry the outside
of the kettle.
15. Put the kettle back in the fryer case.
16. Tilt the heater head assembly down.
17. Put the drop plate, turner cam assembly, and
turner assembly back on the conveyor
assembly.
WARNING
Do not use plastic buckets. If the
shortening is not cool enough, the buckets
will melt; possibly causing you to be
burned, and causing shortening to get on
the floor.
18. Install the conveyor assembly.
WARNING
Do not allow the shortening to overflow the
buckets. Shortening will get on the floor,
and if the shortening is not cool enough,
you may be burned.
Belshaw Bros., Inc. www.belshaw.com Phone 206-322-5474 Fax 206-322-5425
6 MN-1002EN Donut Robot Mark I OM
Page 14

Washing
1. Pour hot water into the kettle, up to the
normal level of the shortening. Add about 2
oz/59 ml of trisodium phosphate or other
appropriate cleaner.
2. Connect the machine to the power source.
Heat the solution to 200F/93C. Turn on
the conveyor. Keep the solution at this
temperature for 15-20 minutes.
3. Turn off the conveyor and scrub the soiled
parts while the solution is under heat. Do
not use any abrasive cleaners or scrapers.
4. Turn off the heater and disconnect the
machine from the power source. Allow the
cleaning solution to cool to 100F/38C.
5. Remove the conveyor and tilt the heater
head back as you did before.
6. Remove the cleaning solution from the
kettle using one of these methods:
WARNING
Do not use plastic buckets. If the cleaning
solution is not cool enough, the buckets will
melt; possibly causing you to be burned,
and causing cleaning solution to get on the
floor.
WARNING
Do not allow the cleaning solution to
overflow the buckets. Cleaning solution
will get on the floor, and if the solution is
not cool enough, you may be burned.
WARNING
If you have an optional Filter Flo
Siphon, remove its filter assembly. Then
use the Filter Flo to siphon the cleaning
solution into one or more large metal
buckets. (See the instructions in
Appendix A.) When the cleaning
solution has stopped draining, carefully
carry the buckets to the sink and slowly
pour the solution into the sink.
Lift the kettle out of the fryer case,
carefully carry it to the sink, and slowly
pour the cleaning solution into the sink.
Using a small saucepan or a metal
pitcher, scoop as much of the cleaning
solution as you can into one or more
large metal buckets. Then lift the kettle
out of the fryer case and carefully pour
the rest of the cleaning solution into a
metal bucket. Carefully carry the
buckets to the sink and slowly pour the
solution into the sink.
Thoroughly clean and dry the floor if
cleaning solution is spilled. Liquid on the
floor can cause serious injury or loss of life.
7. Lift the kettle out of the fryer case, if you
have not done so already.
8. Rinse the kettle thoroughly and dry it on the
outside.
9. Install the kettle, tilt the heater head
assembly down, and install the conveyor
assembly as before.
Rinsing
1. Pour clean water into the kettle, up to the
normal level of the shortening.
2. Connect the machine to the power source.
Heat the water to 200F/93C.
3. Run the conveyor for 5-10 minutes.
4. Turn off the heater and disconnect the
machine from the power source. Allow the
water to cool to 100F/38C.
Belshaw Bros., Inc. www.belshaw.com Phone 206-322-5474 Fax 206-322-5425
Donut Robot Mark I OM MN-1002EN 7
Page 15

5. Lift the conveyor assembly out of the fryer
case. Tilt the heater head assembly back.
6. Remove the water from the kettle using one
of these methods:
If you have an optional Filter Flo
Siphon, remove its filter assembly. Then
use the Filter Flo to siphon the water into
one or more large metal buckets. (See
the instructions in Appendix A.) When
the water has stopped draining, carefully
carry the buckets to the sink and slowly
pour the water into the sink.
Lift the kettle out of the fryer case,
carefully carry it to the sink, and slowly
pour the cleaning solution into the sink.
Using a small saucepan or a metal
pitcher, scoop as much of the water as
you can into one or more large metal
buckets. Then lift the kettle out of the
fryer case and carefully pour the rest of
the water into a metal bucket. Carefully
carry the buckets to the sink and slowly
pour the water into the sink.
WARNING
WARNING
Do not allow the water to overflow the
buckets. Water will get on the floor, and if
the water is not cool enough, you may be
burned.
WARNING
Thoroughly clean and dry the floor if water
is spilled. Water on the floor can cause
serious injury or loss of life.
Drying
1. Thoroughly dry all parts, including the
conveyor, the heating element, and the
inside of the kettle.
WARNING
All parts must be dried thoroughly.
Moisture causes hot shortening to spatter,
which may cause serious injury.
Do not use plastic buckets. If the water is
not cool enough, the buckets will melt;
possibly causing you to be burned, and
causing water to get on the floor.
Belshaw Bros., Inc. www.belshaw.com Phone 206-322-5474 Fax 206-322-5425
8 MN-1002EN Donut Robot Mark I OM
2. Assemble the Donut Robot as before.
Page 16
3 Maintenance
WARNING
To avoid being burned, electrocuted, or
otherwise injured, always unplug the
machine and allow it to cool down before
making adjustments, clearing obstructions,
lubricating, cleaning, or disassembling.
Taking Care of the Plunger,
Hopper, and Cylinder
The plunger, hopper, and cylinder of your Donut
Robot are precision instruments. If you take
good care of them, they will perform well for
years. Follow these guidelines:
Clean these parts only in the manner
explained in this manual.
Handle these parts with care. Avoid
dropping them on hard surfaces.
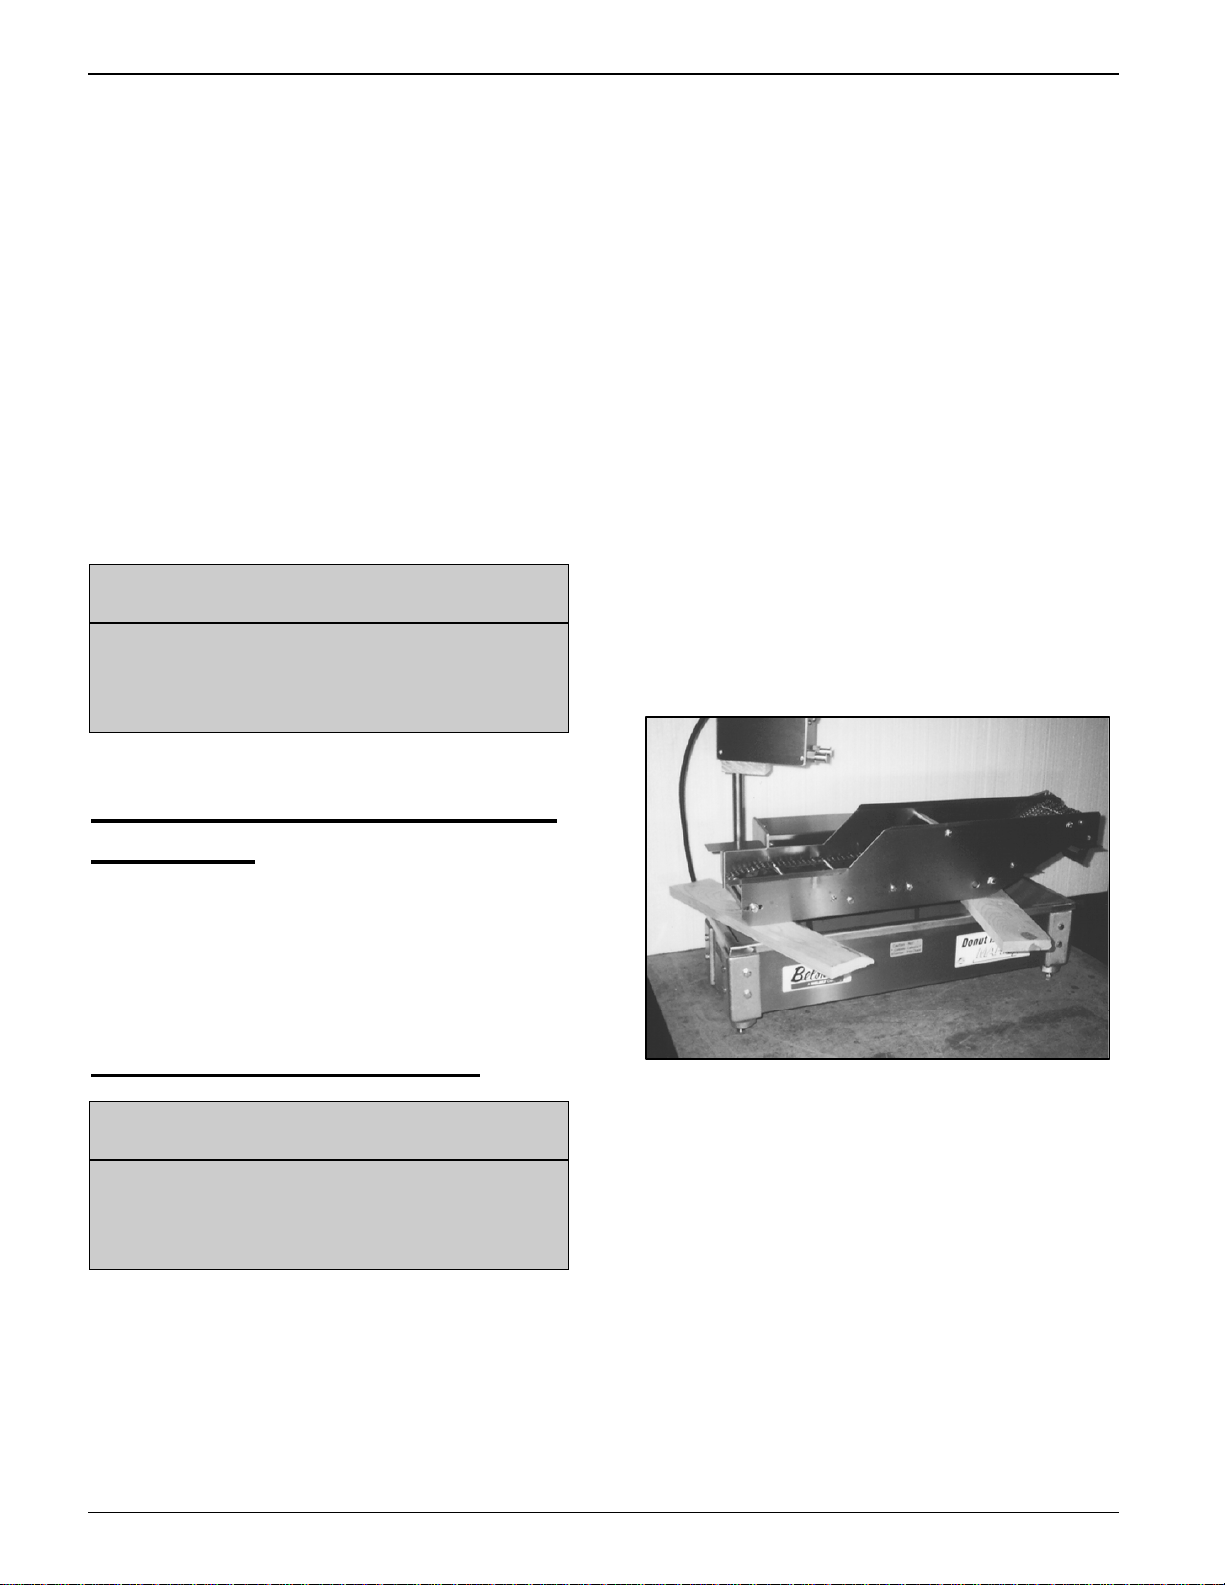
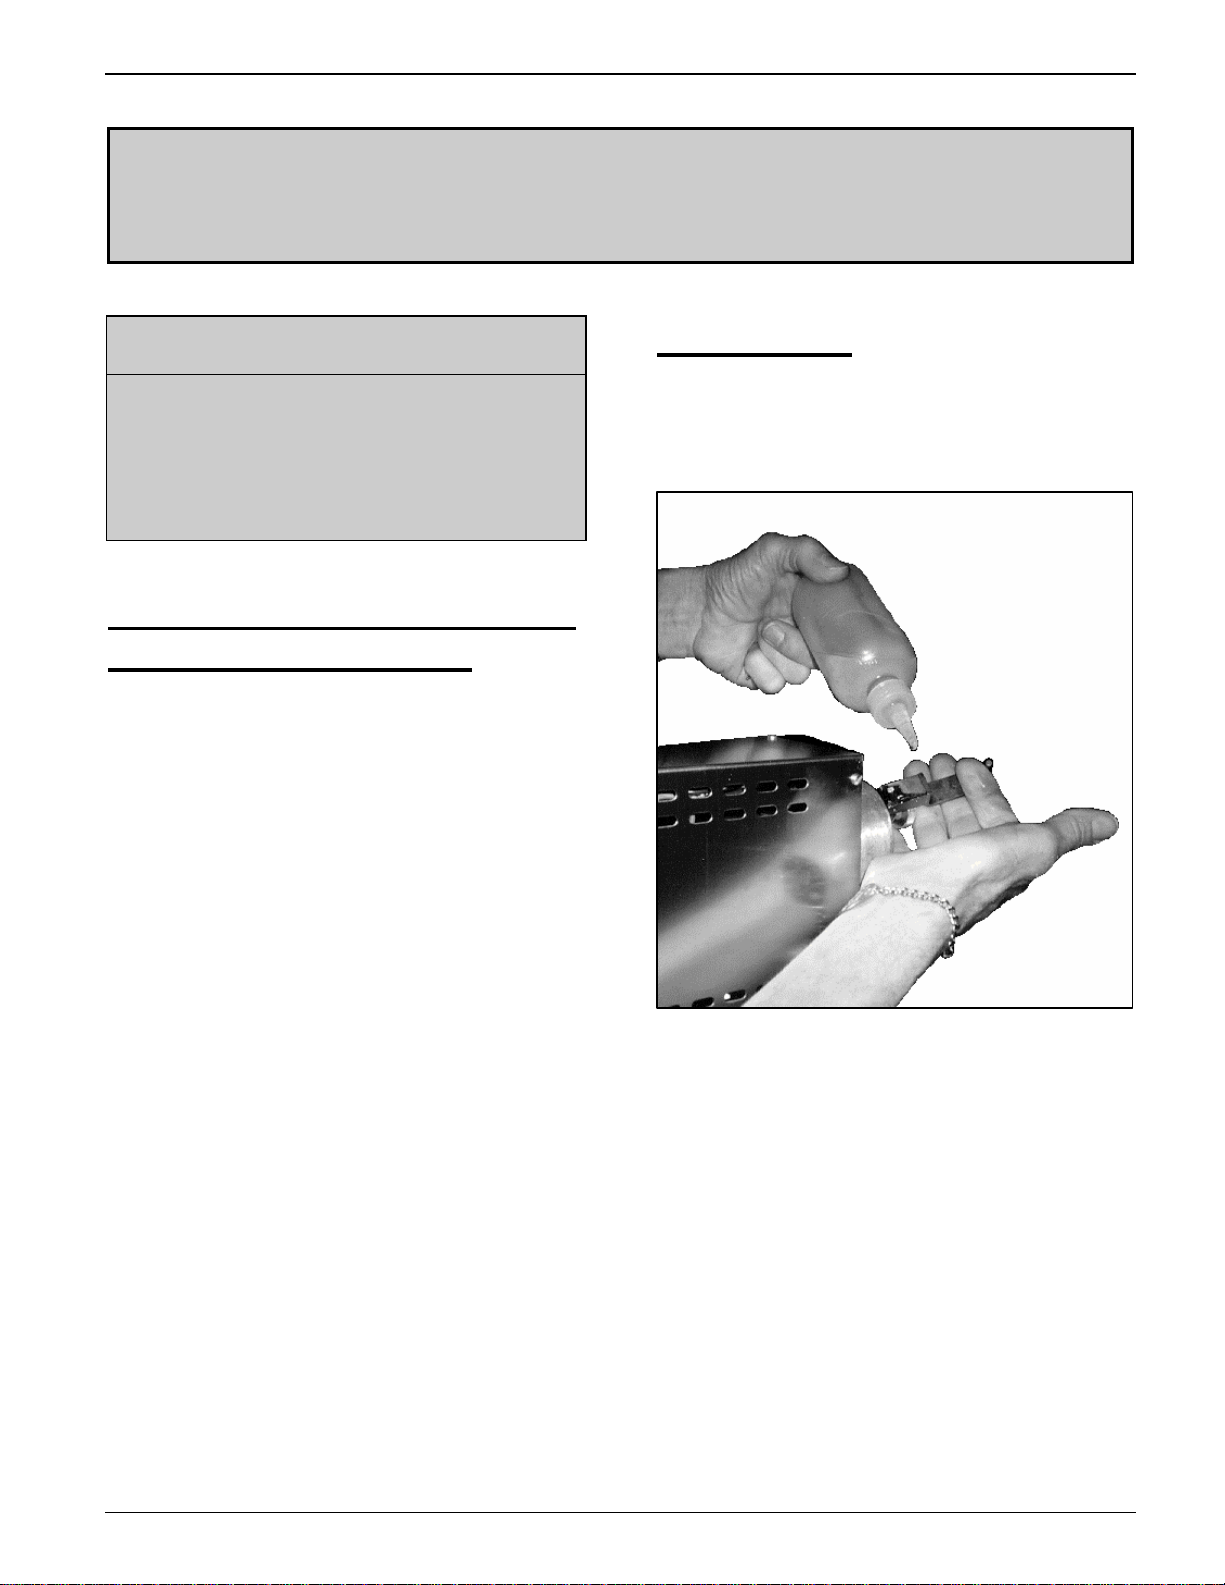
Lubricating
Before using the machine each day, apply ediblegrade mineral oil to the plunger connecting rod.
The oil should penetrate the ball lock and the
spring socket. See Figure 4-1.
Do not force the machine if it becomes
jammed. To avoid damaging the
plunger, disassemble the machine and
remove any obstructions.
Belshaw Bros., Inc. www.belshaw.com Phone 206-322-5474 Fax 206-322-5425
Donut Robot Mark I OM MN-1002EN 9
Figure 4-1. Lubricating the Connecting
Rod–GP Model.
Page 17

Page 18

4 Related Products
This appendix contains information about the
following products which you might use with
your Donut Robot:
Roto Cooler
Icing Finishing Tree and Roto Cooler
Sugaring Tray and Roto Cooler
Filter Flo Siphon
Shortening Reserve Tank
Roto Cooler
SPECIFICATIONS
Dimensions Shipping
Weight
Dia.=24”/61 cm
H=6-5/8”/17 cm
16 lb/7.3 kg 120 V
Electrical Data Construction Standard
Equipment
1 Phase
50 Hz
Basket: High-density
polyethylene. Base:
Spun, polished,
heavy-gauge
aluminum.
Basket and turntable
base with power cord
and motor.
Belshaw Bros., Inc. www.belshaw.com Phone 206-322-5474 Fax 206-322-5425
Donut Robot Mark I OM MN-1002EN 11
Page 19
The Roto Cooler is meant to be used on a flat,
stationary table or countertop. The operator is
expected to read and follow these instructions.
To use the Roto Cooler:
1. Place the Roto Cooler near the outfeed end
of the Donut Robot so donuts will fall into
it.
2. Connect the Roto Cooler power cord to the
120 V outlet on back of the Donut Robot’s
heater head.
3. Turn on the Roto Cooler. It will rotate and
receive donuts. Remove cooled donuts from
the Roto Cooler as needed.
4. When you are finished using the Roto
Cooler, turn it off and unplug it.
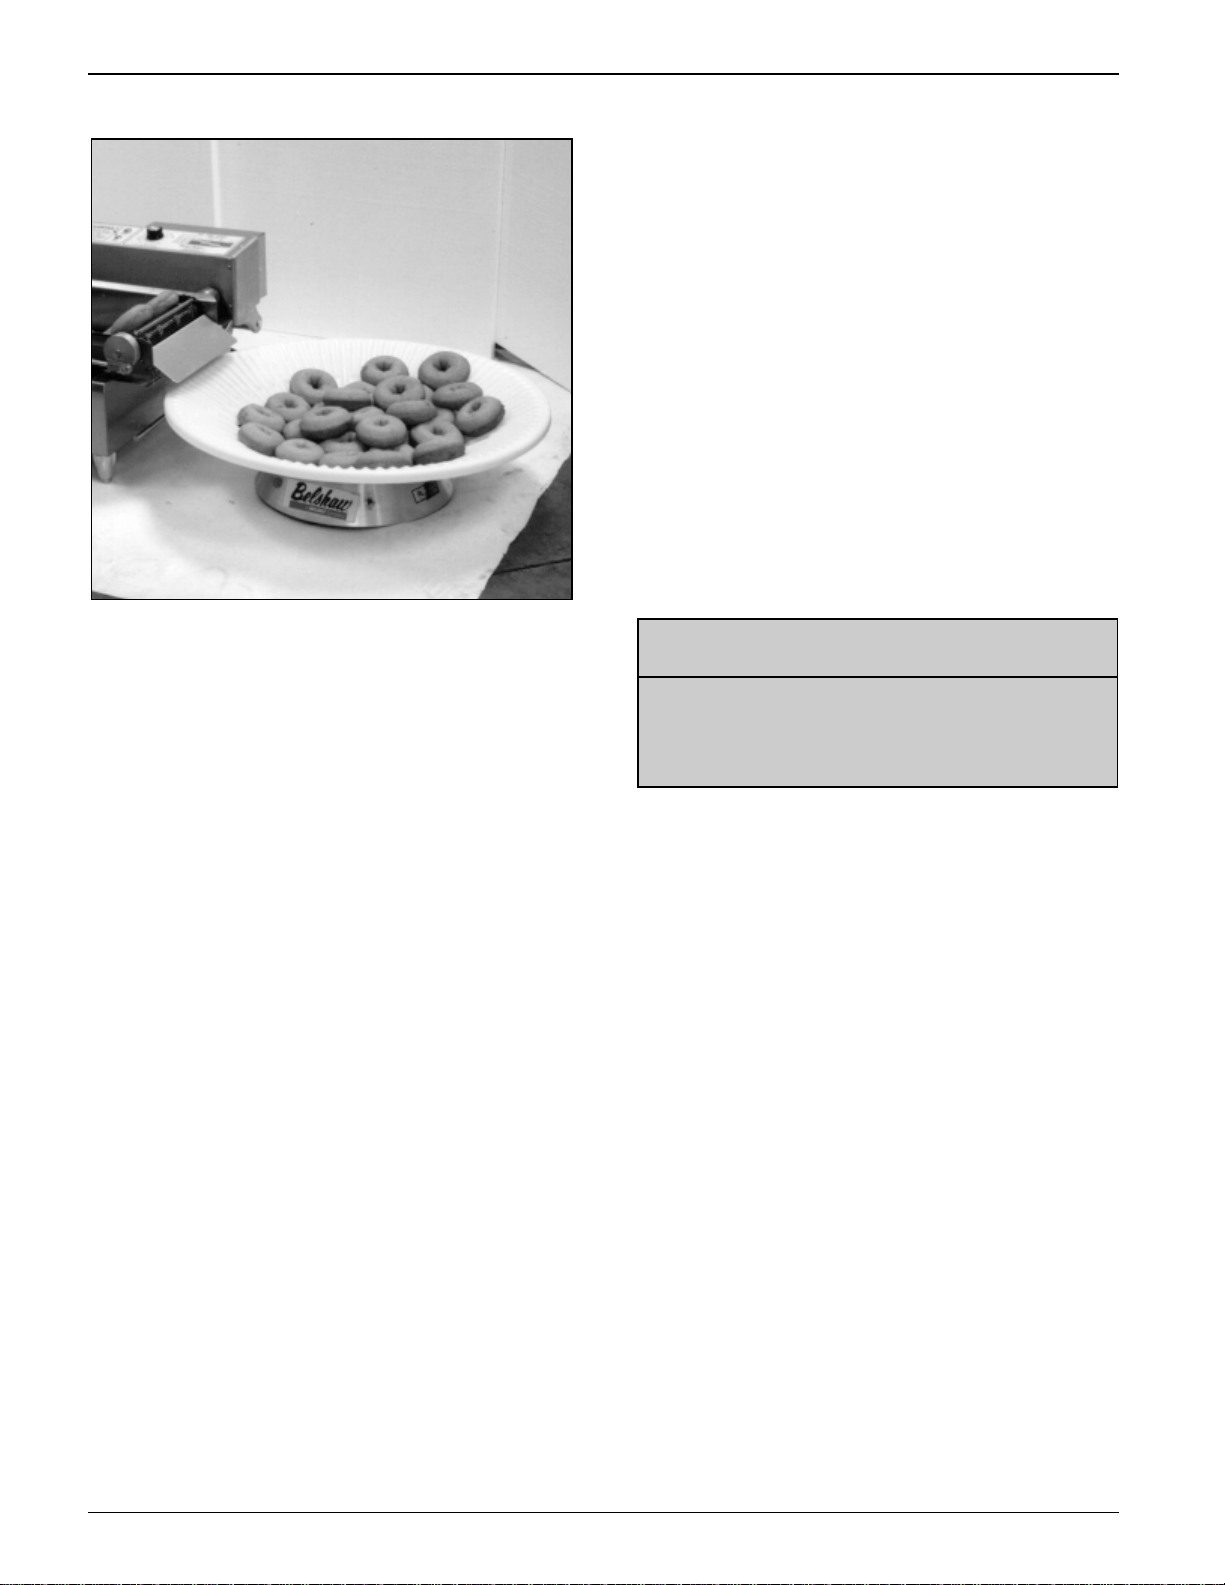
Figure A-1. Roto Cooler.
The Roto Cooler is designed to catch and cool
donuts as they drop from the outfeed end of the
Donut Robot.
The Roto Cooler produces less than 70 dB(A) of
equivalent continuous A-weighted sound
pressure at work stations. This has been
determined while running the machine, using a
Bruel & Kjaer sound level meter, type 2236.
WARNING
To avoid electrocuting yourself or
damaging the machine, never submerge the
base of the Roto Cooler.
5. Clean the Roto Cooler using soap and water
and a non-abrasive cloth or scrubber.
Belshaw Bros., Inc. www.belshaw.com Phone 206-322-5474 Fax 206-322-5425
12 MN-1002EN Donut Robot Mark I OM
Page 20
Icing Finishing Tree and Roto Cooler
SPECIFICATIONS
Dimensions Shipping
Weight
Dia.=24”/61 cm
H=32”/81 cm
28 lb/
12.7 kg
Electrical
Data
120 V
1 Phase
50 Hz
Construction Standard Equipment
Trays: Heavy-gauge
aluminum. Basket: Highdensity polyethylene.
Base: Spun, polished,
heavy-gauge aluminum.
The Roto Cooler is meant to be used on a flat,
stationary table or countertop.
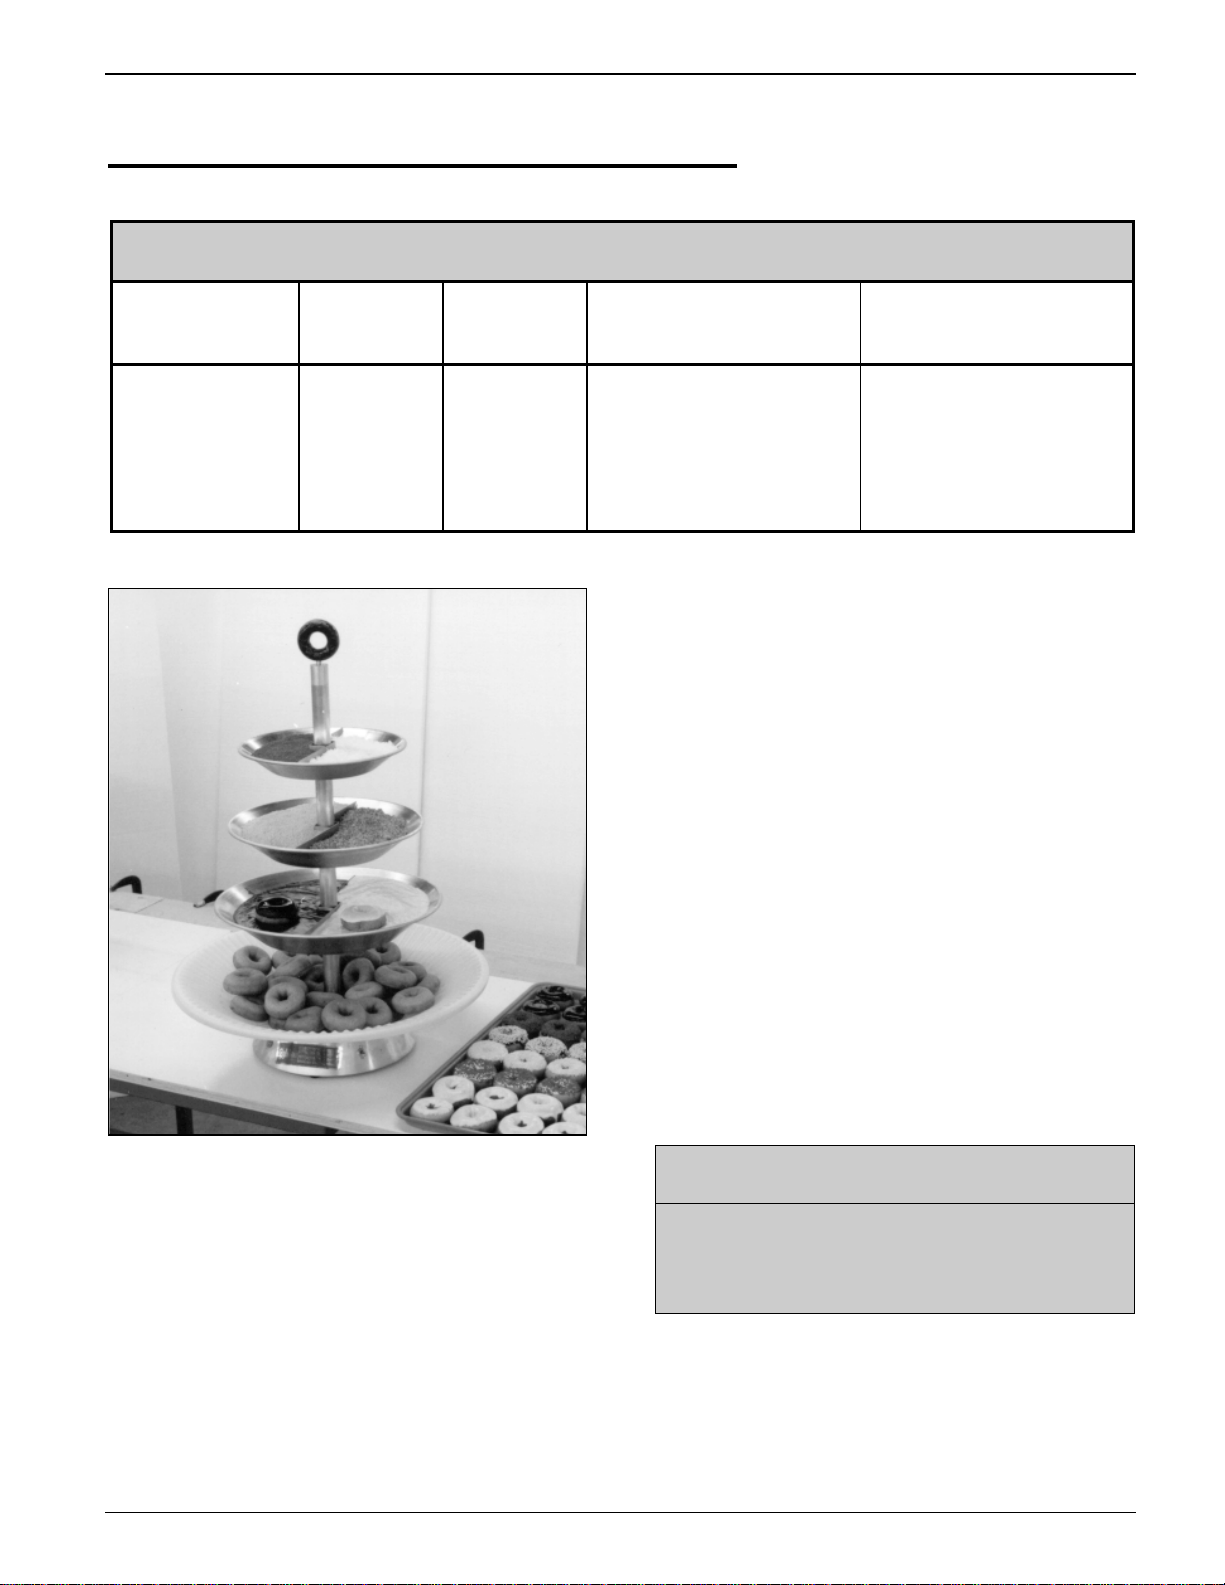
The Icing Finishing Tree, which mounts on the
Roto Cooler, is designed to hold toppings in
which donuts can be dipped. The operator is
expected to read and follow these instructions.
To use the Roto Cooler and the Icing Finishing
Tree:
1. Attach the Icing Finishing Tree to the Roto
Cooler. Fill the trays with toppings.
Power turntable and four
trays, three of which have
dividers.
2. Install and operate the Roto Cooler as
explained in the previous section.
3. Decorate the donuts with the toppings in the
trays.
4. When you are finished using the Roto
Cooler and the Icing Finishing Tree, turn off
the Roto Cooler and unplug it.
Figure A-2. Icing Finishing Tree and Roto
Cooler.
The Roto Cooler is designed to catch and cool
donuts as they drop from the outfeed end of the
Donut Robot. It produces less than 70 dB(A) of
equivalent continuous A-weighted sound
pressure at work stations. This has been
determined while running the machine, using a
Bruel & Kjaer sound level meter, type 2236.
Belshaw Bros., Inc. www.belshaw.com Phone 206-322-5474 Fax 206-322-5425
Donut Robot Mark I OM MN-1002EN 13
5. Clean the trays of the Roto Cooler and the
To avoid electrocuting yourself or
damaging the machine, never submerge the
Icing Finishing Tree using soap and water
and a non-abrasive cloth or scrubber.
WARNING
base of the Roto Cooler.
Page 21
Sugaring Tray and Roto Cooler
SPECIFICATIONS
Dimensions Shipping
Weight
Dia.=17-1/4”/
44 cm
H=6-5/8”/17 cm
16 lb/7.3 kg 120 V
Electrical Data Construction Standard
Equipment
1 Phase
50 Hz
Spun, polished,
heavy-gauge
aluminum.
To use the Sugaring Tray and Roto Cooler:
1. Put sugar, powdered sugar, or cinnamonsugar in the tray.
2. Place the Sugaring Tray and Roto Cooler
near the outfeed end of the Donut Robot so
donuts will fall into the tray.
3. Connect the Roto Cooler power cord to the
120 V outlet on back of the Donut Robot’s
heater head.
4. Turn on the Roto Cooler base. The Sugaring
Tray will rotate and receive donuts.
Power turntable with
sugar tray.
5. Coat the donuts with the topping in the tray.
Figure A-3. Sugaring Tray and Roto Cooler.
The Roto Cooler base makes the Sugaring Tray
rotate. It produces less than 70 dB(A) of
equivalent continuous A-weighted sound
pressure at work stations. This has been
determined while running the machine, using a
Bruel & Kjaer sound level meter, type 2236.
The Roto Cooler base is meant to be used on a
flat, stationary table or countertop.
The Sugaring Tray, which mounts on the Roto
Cooler base, is designed to catch donuts as they
drop from the outfeed end of the Donut Robot,
and to hold toppings in which donuts can be
dipped. The operator is expected to read and
follow these instructions.
Belshaw Bros., Inc. www.belshaw.com Phone 206-322-5474 Fax 206-322-5425
14 MN-1002EN Donut Robot Mark I OM
6. When you are finished using the Sugaring
Tray, turn off and unplug the Roto Cooler
base.
WARNING
To avoid electrocuting yourself or
damaging the machine, never submerge the
base of the Roto Cooler.
7. Clean the Sugaring Tray using soap and
water and a non-abrasive cloth or scrubber.
Page 22

Filter Flo Siphon
SPECIFICATIONS
Dimensions Shipping Weight Construction Standard Equipment
H=16”/41 cm
Dia.=6-1/4”/16
cm
3 lb/1.4 kg Siphon tube and valve: nickel-plated
steel. Handle: wood. Filter ring:
powder-coated. Filters: flannel.
Mounting brackets: aluminum alloy.
Siphon assembly
including valve, filter,
filter ring, and clamp.
bulb
The Filter Flo Siphon is designed to drain and
filter shortening from the kettle of the Donut
Robot. The operator is expected to read and
follow these instructions.
mounting bracket
Installation
1. Let the shortening cool to 100F/38C.
handle
siphon tube
filter mounting
bracket
valve
filter
Figure A-4. Filter Flo Siphon.
WARNING
Hot shortening can cause serious burns.
Never touch hot shortening. Never wear
shorts while using the Filter Flo Siphon.
2. Place the mounting bracket, with the siphon
tube in it, on the lip of the kettle. You may
place it on the infeed end of the kettle, or on
the front side of the kettle. If you place it on
the front side, you must disconnect the
swing connecting rod from the throw arm
and move it out of the way.
3. Position the opening of the siphon tube near
the bottom of the kettle.
4. Tighten the thumb screw in the mounting
bracket.
Belshaw Bros., Inc. www.belshaw.com Phone 206-322-5474 Fax 206-322-5425
Donut Robot Mark I OM MN-1002EN 15
Page 23

5. Attach the filter assembly to the lower part
of the siphon tube, as shown in Figure A-4.
To do this:
a. Slide the opening in the filter mounting
bracket around the siphon tube.
b. Adjust the filter mounting bracket
vertically to ensure that the filter does
not touch the valve assembly.
c. Tighten the screw that holds the filter
mounting bracket to the siphon tube.
d. Tighten the screw that holds the filter
retaining ring to the filter mounting
bracket.
WARNING
Make sure that both screw in the filter
assembly are tight. If they are not, the
filter assembly might slide off of the siphon
tube during operation, causing shortening
to splatter.
6. Place a five-gallon metal container under the
filter.
Operation
1. Compress the bulb quickly and release it
quickly. Do this only once. Shortening
should flow into the container.
CAUTION
Do not compress the bulb more than once.
Doing so could allow hot shortening to get
into the bulb, damaging your equipment.
2. Watch the container as the shortening flows
into it. If the shortening rises to within 2”/
5 cm of the top of the container, do the
following:
a. With one hand, hold the siphon by the
handle. With the other hand, loosen the
thumb screw that holds the siphon
assembly to the mounting bracket on the
lip of the kettle.
b. Slowly lift the siphon assembly so its
opening is above the shortening. Do not
remove it from the mounting bracket.
c. Tighten the thumb screw.
WARNING
Do not use a plastic container. Hot
shortening could melt the container,
possibly burning you and getting
shortening on the floor. Shortening on the
floor could cause you to slip or fall,
resulting in injury or even death.
d. When the shortening stops flowing and
the valve closes, move the container out
from under the filter.
e. Place another five-gallon metal container
under the filter.
f. With one hand, hold the siphon by the
handle. With the other hand, loosen the
thumb screw that holds the siphon
assembly to the mounting bracket on the
lip of the kettle.
g. Slowly lower the siphon assembly so its
opening is near the bottom of the kettle.
h. Tighten the thumb screw.
i. Restart the siphon, as explained in step
1.
j. Continue watching the container and
repeat the above procedure as needed.
Belshaw Bros., Inc. www.belshaw.com Phone 206-322-5474 Fax 206-322-5425
16 MN-1002EN Donut Robot Mark I OM
Page 24

WARNING
If you allow shortening to overflow the
container, the shortening could burn you,
and it will get on the floor, possibly causing
slips, falls, injury, or even death. If
shortening does get on the floor, thoroughly
clean and dry the floor right away.
3. When the shortening stops flowing, tilt up
the side of the kettle opposite the siphon.
Place a wedge under that side of the kettle to
hold it up. The remaining shortening will
now flow toward the siphon.
4. Set aside the container of shortening.
5. Remove the filter assembly.
6. Place a different container under the valve
assembly and start the siphon again. Drain
the remaining shortening and discard it; it
will be full of sediment.
Cleaning
1. Remove the siphon from the Donut Robot.
2. Carry the siphon to the sink. Hold the valve
over the sink.
3. Squeeze the bulb several times to expel
shortening from the siphon.
4. Wipe the siphon clean and hang it with the
bulb side up so any remaining shortening
will drain. Place a pan under the siphon to
collect the shortening.
5. Rinse the filter bag and hang it to dry. You
may launder it as needed.
WARNING
After washing, be sure the Filter Flo
Siphon is completely dry before using it
again. Moisture will cause hot shortening
to spatter, which may cause serious injury.
Belshaw Bros., Inc. www.belshaw.com Phone 206-322-5474 Fax 206-322-5425
Donut Robot Mark I OM MN-1002EN 17
Page 25

Shortening Reserve Tank
SPECIFICATIONS
Dimensions Shipping
Weight
L=6-1/2”/17 cm
W=4-3/16”/
11 cm
D=4”/10 cm
The Shortening Reserve Tank is designed to
supply melted shortening to the kettle of the
Donut Robot. The operator is expected to read
and follow these instructions.
To use the Shortening Reserve Tank:
1. Position the Shortening Reserve Tank on the
conveyor side panels. Make sure that you
do not position it above the donut turner.
1 lb 10 oz/
0.7 kg
Capacity Construction Standard
2 lb 8 oz/1.1 kg
shortening
WARNING
Be careful if you put hot shortening into
the tank. Hot shortening can cause serious
burns.
Equipment
Nickel-plated steel
tank; non-corrosive
self-closing valve.
2. Place shortening in the tank.
3. Turn on the Donut Robot. The heat of the
fryer will melt the shortening in the tank.
4. To supply shortening to the fryer, open the
valve by pushing down on the valve
assembly.
5. When you are done making donuts, drain the
remaining shortening into the fryer.
6. When the shortening and equipment have
cooled completely, remove the Shortening
Reserve Tank and wash it.
Shortening reserve
tank and valve
assembly.
Belshaw Bros., Inc. www.belshaw.com Phone 206-322-5474 Fax 206-322-5425
18 MN-1002EN Donut Robot Mark I OM
Page 26

5 Donut-Making Helps
Tips on Making Quality
Cake Donuts
Use the correct batter temperature.
In general, the correct batter temperature is
75-80F/24-27C. Check the mix
manufacturer’s instructions, as the
recommended temperature range may vary.
If the batter is too warm, the donuts will lack
volume and may “ring out” or be misshapen.
If the batter is too cold, the donuts will stay
under the shortening too long, fry too
slowly, and crack open or ball up. They
may also absorb excess shortening and lose
volume.
Use the correct floor time.
A floor time of 10 minutes between mixing
and cutting allows the baking powder to
react with the water. This helps the donuts
attain the proper volume and absorb the
proper amount of shortening.
If the floor time exceeds 30 minutes, the mix
will gas off, the donuts will lose volume and
shape and will absorb too much shortening.
If the shortening is too cold, the donuts will
spread too rapidly, will form large rings, will
tend to crack open, will be too light in
appearance, and will absorb too much
shortening.
Maintain the proper shortening level. We
recommend a distance of 1 1/4” between the
cutter and the shortening.
If the shortening is too deep, the donuts may
not turn over when they reach the turner,
causing them to cook unevenly.
If the shortening is too shallow (too far
below the cutter), the donuts may not drop
flat, may turn over while submerging and
surfacing, and may become irregular,
cracked, or rough-crusted.
Ensure that the donuts absorb the right
amount of shortening.
Donuts should absorb 1-1/2 to 3 oz/42 to
85 g of shortening per dozen, depending on
their weight. You can achieve proper
absorption by following tips 1-3.
If the donuts do not absorb enough
shortening, they will not keep well.
Use the correct frying temperature.
The correct shortening temperature for
frying is 370-380F/188-193C.
If the shortening is too hot, the donuts will
fry too quickly on the outside and will lose
volume. The donuts may also become dense
inside.
Belshaw Bros., Inc. 1750 22nd Ave. S. Seattle, WA 98144 Phone 206-322-5474 Fax 206-322-5425
Donut Robot Mark I OM MN-1002EN 19
If they absorb too much shortening, they
will lose volume and may become
misshapen. If this happens, follow tips 1-3,
mix the batter a little longer than usual, turn
the donuts as soon as they become golden
brown, and turn the donuts only once.
Page 27

Temperature Conversion
To convert temperatures from Fahrenheit to
Celsius:
Subtract 32 from F and divide the result by
1.8.
Example: 212F-32/1.8 = 100C
To convert temperatures from Celsius to
Fahrenheit:
Multiply C by 1.8 and add 32 to the result.
Example: (100C x 1.8) + 32 = 212F
F C F C
55 12.8 76 24.4
56 13.3 77 25.0
57 13.9 78 25.6
58 14.4 79 26.1
59 15.0 80 26.7
60 15.6 325 162.8
61 16.1 330 165.6
62 16.7 335 168.3
63 17.2 340 171.1
64 17.8 345 173.9
65 18.3 350 176.7
66 18.9 355 179.4
67 19.4 360 182.2
68 20.0 365 185.0
69 20.6 370 187.8
70 21.2 375 190.6
71 21.7 380 193.3
72 22.2 385 196.1
73 22.8 390 198.9
74 23.3 395 201.7
75 23.9 400 204.4
Calculating Correct Water
Temperature
The following is an example of how to calculate
the correct water temperature to use. You must
use your own room temperature, dry mix
temperature, and desired batter temperature.
F C
Room temperature 72 22.2
Dry mix temperature +70
Total A 142 43.3
Desired batter temperature 75 23.9
x3
Total B 225 71.7
Total B 225 71.7
-Total A -142 -43.3
Desired water temp. for 83F 28.4C
cake donuts
+21.1
x3
Ratios of Plunger Sizes to
Donut Weights
The weights given are for donuts without icings
or other toppings. They are provided for
reference only, as weights vary according to the
density of the batter.
PLUNGER SIZE DONUT WEIGHT
PER DOZEN
1” 5-8 oz/142-227 g
1 7/16” 10-17 oz/283-482 g
1 9/16” 14-21 oz/397-595 g
1 13/16” 19-23 oz/539-652 g
Belshaw Bros., Inc. 1750 22nd Ave. S. Seattle, WA 98144 Phone 206-322-5474 Fax 206-322-5425
20 MN-1002EN Donut Robot Mark I OM
Page 28

Donut Robot
Mark I & Mark I GP
Technical Supplement
Belshaw Bros., Inc.
814 44th Street NW, Suite 103
Auburn, WA 98001 USA
Phone: + -1-206-322-5474 Fax: + -1-206-322-5425
E-mail: service@belshaw.com http://www.belshaw.com
Page 29

Page 30

If you accept the machine from the shipping
company, you are, in effect, saying that the
machine is in good condition, and you must
pay for the machine. Belshaw cannot pay for
shipping damage, because the freight company
has accepted the machine from Belshaw in good
condition, and is responsible for its safe delivery.
For your protection, inspect the machine to see
that no parts are bent, scratched, or otherwise
damaged. If any damage has occurred in
shipping, file a freight claim with the shipping
company immediately.
To unpack the Donut Robot Mark I and
transport it to the work station:
1. Remove the foam and other packing
materials from the two boxes.
2. Carry the hopper, plunger, and column to the
work station.
3. Coil the cutter head power cord and carry
the cutter head to the work station.
4. Carry the conveyor assembly to the work
station.
5. Tilt the heater head back. Remove the kettle
from the fryer case and carry it to the work
station.
6. Tilt the heater head down.
7. Coil the main power cord and place it in the
fryer case.
8. Move the heater head and fryer case to the
work station.
EQUIPMENT RECORD
Please provide the information below when you correspond with us about your machine.
Purchased by _____________________________________________________________________
Installed by ______________________________________________________________________
Date of Installation ________________________________________________________________
Model number ___________________________________________________________________
Serial number
010808
MN-1003EN
Belshaw Bros., Inc.
th
814 44
Phone: + -1-206-322-5474 Fax: + -1-206-322-5425
Street NW, Suite 103
Auburn, WA 98001 USA
E-mail: service@belshaw.com http://www.belshaw.com
Page 31

Page 32

Contents
1 Installation 1
Unpacking the Fryer 2
Initial Cleaning 2
Assembling the Fryer 2
Assembling the Cutter 3
Adjusting the Hopper 6
Leveling and Securing the Fryer 7
Moving the Fryer 7
2 Maintenance 8
Lubricating 8
Checking the Thermostat 9
Taking Care of the Plunger, Hopper, and Cylinder 9
3 Troubleshooting 11
4 Assembly Figures 21
5 Electrical Components 31
Continuity Testing 31
6 Appendix 35
Parts List Drawing Insert Page Insert
Belshaw Bros., Inc. www.belshaw.com Phone 206-322-5474 Fax 206-322-5425
Donut Robot Mark I TS MN-1003EN iii
Page 33

Preface
This technical supplement to the Donut Robot
Mark I Operator’s Manual contains much
information that users and service persons may
find helpful:
Detailed maintenance and
troubleshooting guides
Parts lists and assembly drawings of the
Mark I
Instructions on the testing and
calibration of electrical components
Remember that this is a supplement, not the
official operator’s manual. You use this
supplement at your own risk. While we have
made every effort to inform you of how to
behave safely, Belshaw denies any liability for
the use of the information contained herein.
Belshaw Bros., Inc. www.belshaw.com Phone 206-322-5474 Fax 206-322-5425
iv MN-1003EN Donut Robot Mark I TS
Page 34

1 Installation
To help familiarize you with the major parts of
your Donut Robot Mark I, please study the
photograph below.
bearing strut
cutter head
plunger
hopper
conveyor heater head
column fryer
Figure 1-1. Donut Robot Mark I–GP Model.
Belshaw Bros., Inc. www.belshaw.com Phone 206-322-5474 Fax 206-322-5425
Donut Robot Mark I TS MN-1003EN 1
Page 35

Unpacking the Fryer
To unpack the Donut Robot Mark I and
transport it to the work station:
1. Remove the foam and other packing
materials from the two boxes.
2. Carry the hopper, plunger, and column to the
work station.
3. Coil the cutter head power cord and carry
the cutter head to the work station.
4. Carry the conveyor assembly to the work
station.
5. Tilt the heater head back. Remove the kettle
from the fryer case and carry it to the work
station.
6. Tilt the heater head down.
7. Coil the main power cord and place it in the
fryer case.
WARNING
Never let water and hot shortening come in
contact with each other. Moisture causes
hot shortening to spatter, which may cause
serious injury. Prior to use, make sure the
kettle and any other parts you have washed
are dry.
After cleaning, assemble the fryer and cutter as
explained below.
Assembling the Fryer
1. Place the fryer case on a flat, stationary
surface.
2. Screw the fryer’s legs in as far as they will
go.
3. Tilt the heater head assembly back.
8. Move the heater head and fryer case to the
work station.
Initial Cleaning
Thoroughly clean the Donut Robot Mark I before
using it. Refer to Section 3, “Cleaning,” for
cleaning instructions.
WARNING
To avoid electrocuting yourself or
damaging the machine, never allow water,
steam, cleaning solution, or other liquid to
enter the cutter head or heater head
assemblies.
4. Set the kettle into the fryer case. The end of
the kettle that has a sloping bottom must be
placed at the outfeed end of the fryer case.
The lip of the kettle should fit securely over
the edge of the case.
5. Lower the heater head assembly into
position so the thermostat bulb bracket rests
on or very near the bottom of the kettle.
6. Install the conveyor assembly as follows:
a. Hold the conveyor at the angle shown in
Figure 1-2 and slide the conveyor drive
coupling over the main drive shaft
coupling. The conveyor coupling has a
notch in it. Turn the conveyor coupling
until the head of the socket head screw
in the drive coupling can slide into this
notch. (See Figure 1-2.)
b. Lower the front side of the conveyor
assembly so the hole in the conveyor
flange fits over the locating pin on the
lip of the kettle.
Belshaw Bros., Inc. www.belshaw.com Phone 206-322-5474 Fax 206-322-5425
2 MN-1003EN Donut Robot Mark I TS
Page 36

Figure 1-2. Joining the Couplings.
7. Be sure your power source matches the
specifications on the data plate. Connect the
machine to the power source.
8. Turn the thermostat knob above 200º F
(93º C). Turn on the conveyor and check to
see that it operates smoothly. The power
switch for the conveyor drive is on the
heater head.
9. Turn off the conveyor and turn the
thermostat knob below 200º F (93º C).
Assembling the Cutter
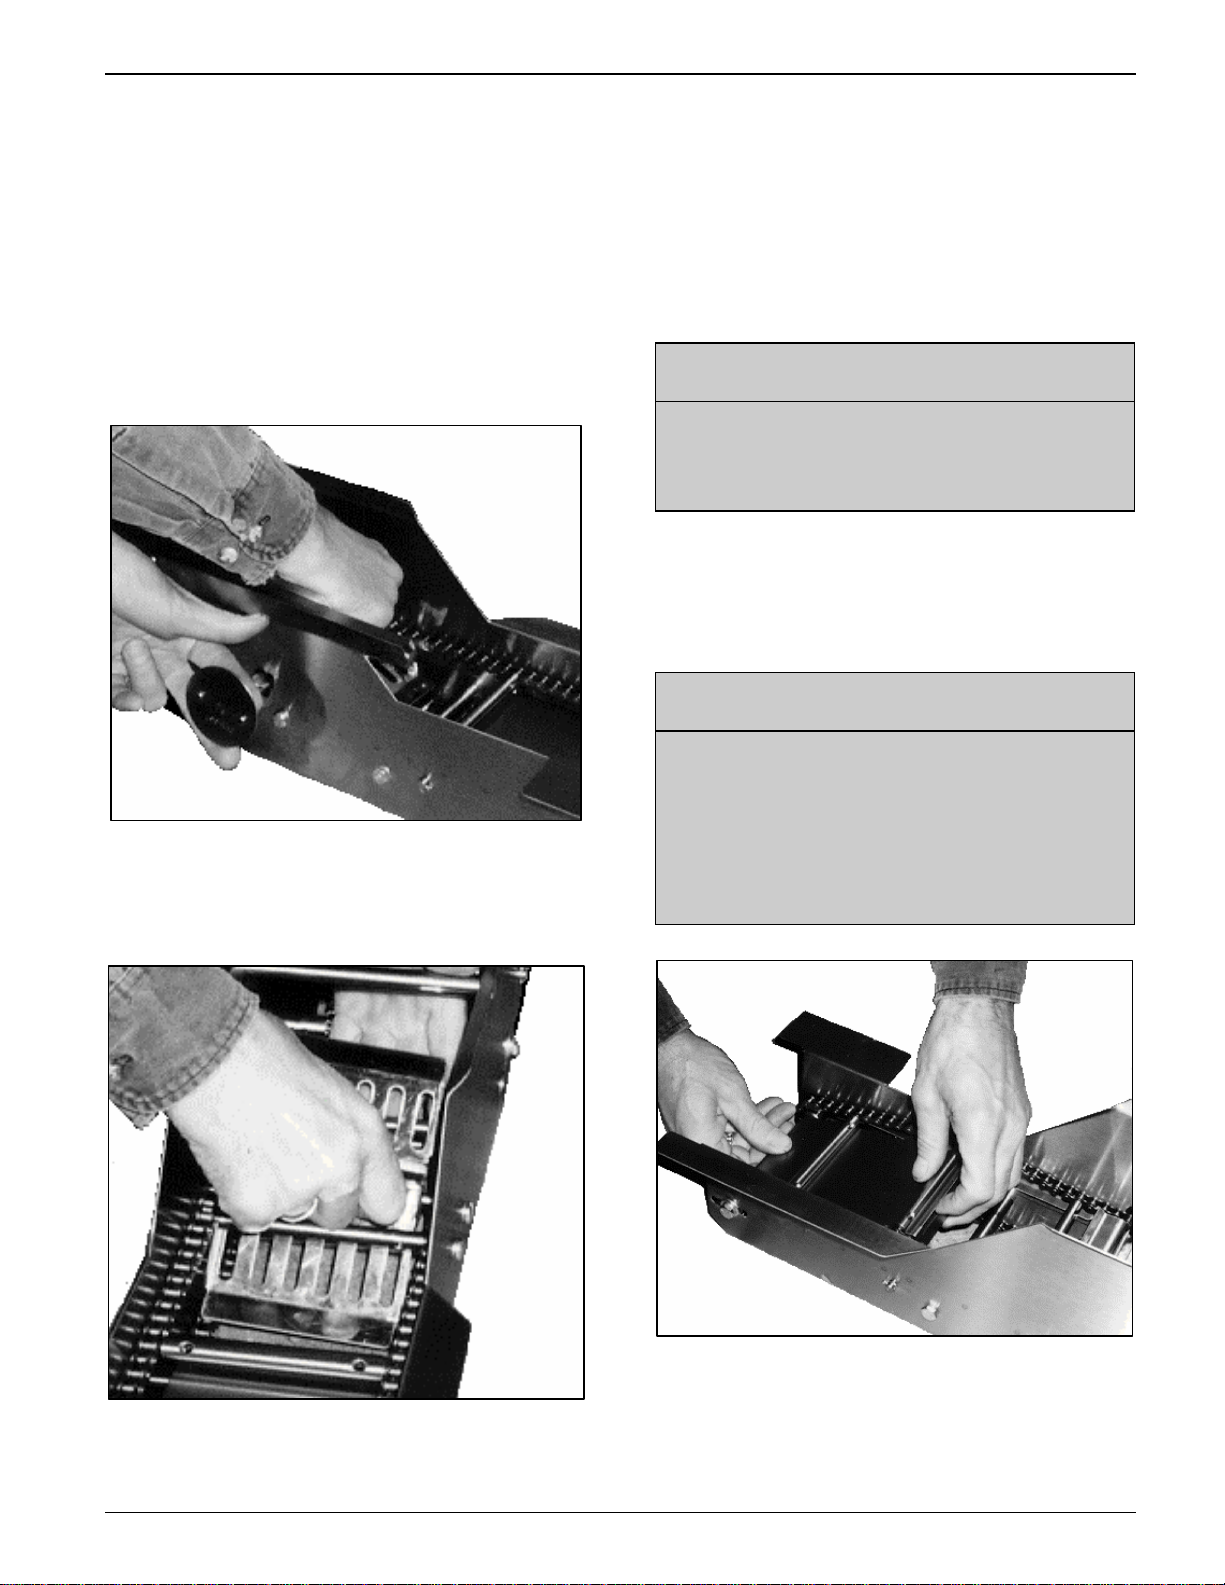
Install the column and the cutter head assembly
by sliding the column into the column mounting
bracket. See Figure 1-3.
Figure 1-3. Mounting the Cutter Head
Assembly–GP Model.
On Standard Model
1. Install the plunger as follows:
a. Put the narrow part of the plunger’s
center rod through the slot in the center
of the bail.
b. Lower the piston into the hopper
cylinder.
c. Guide the white square key into the slot
in the center of the bail. See Figure 1-4.
Belshaw Bros., Inc. www.belshaw.com Phone 206-322-5474 Fax 206-322-5425
Donut Robot Mark I TS MN-1003EN 3
Page 37

bail
square key
center rod
Figure 1-4. Positioning the Square Key–
Standard Model.
bail
peg key
center rod
release tab
Figure 1-5. Locking the Plunger in Place–
Standard Model.
2. Lock the plunger in place as follows:
a. While pressing down on the plunger
head and lifting up on the release tab,
rotate the square key 1/2 turn.
b. Lower the release tab so the peg key
locks into the slot in the bail. See Figure
1-5.
Belshaw Bros., Inc. www.belshaw.com Phone 206-322-5474 Fax 206-322-5425
3. Mount the hopper as follows:
a. Tilt the hopper and position the plunger
head under the cutter head roller.
b. Push up on the hopper so the plunger
spring compresses.
c. Place the bail on the hopper resting pins.
See Figure 1-6.
4 MN-1003EN Donut Robot Mark I TS
Page 38

On GP Model
1. Mount the hopper by sliding the two
mounting studs on the bail into the notches
on the bearing strut. Secure the hopper with
the thumb nuts. See Figure 1-7.
Figure 1-6. Mounting the Hopper–Standard
Model.
4. Plug the power cord from the cutter head
assembly into the outlet on the back of the
heater head.
5. Test the cutter head to ensure that it is
operating properly. To do this, first turn on
the conveyor; then turn on the cutter using
the power switch on the cutter head. Turn
off the cutter.
Figure 1-7. Mounting the Hopper–GP
Model.
2. Install the plunger as follows:
a. Pull the plunger connecting rod up and
out of the way.
b. Put the narrow part of the plunger’s
center rod through the slot in the center
of the bail.
c. Lower the plunger until the wider part at
the top of the center rod enters the round
opening in the bail and the plunger’s
piston just enters the hopper cylinder.
There is a small round hole in the spider
valve of the plunger. It must slide over
the plunger positioning pin in the
cylinder. See Figure 1-8.
Belshaw Bros., Inc. www.belshaw.com Phone 206-322-5474 Fax 206-322-5425
Donut Robot Mark I TS MN-1003EN 5
Page 39

Figure 1-9. Installing the Plunger–GP
Model.
Figure 1-8. Plunger Positioning Pin–GP
Model.
d. Lower the connecting rod and insert the
pin into the hole near the top of the
center rod. See Figure 1-9.
3. Plug the power cord from the cutter head
assembly into the outlet on the back of the
heater head.
4. Test the cutter head to ensure that it is
operating properly. To do this, turn on the
conveyor; then turn on the cutter using the
power switch on the cutter head. Turn off
the cutter.
Adjusting the Hopper
WARNING
To avoid electrocuting yourself, always
disconnect the machine from the power
source before making adjustments.
The bottom of the hopper should be 1”/2.5 cm
above the flight bars. To set the height of the
hopper:
1. Hold the cutter and the hopper from below.
2. Loosen the set screw in the lower set collar
on the column.
3. Raise or lower the column as needed.
4. Tighten the set screw.
Belshaw Bros., Inc. www.belshaw.com Phone 206-322-5474 Fax 206-322-5425
6 MN-1003EN Donut Robot Mark I TS
Page 40

Leveling and Securing the
Fryer
Check to see if the fryer is level. If it is not,
adjust the heights of the legs. Be sure that all six
legs rest on the work surface when the fryer is
level.
Bolt the fryer to the work surface as follows:
1. There are brackets on the ends of the fryer
case. Each has a hole in it. Mark the
locations of the holes on the work surface.
2. Drill holes through the work surface.
3. Insert bolts through the holes.
4. Tighten nuts onto the bolts to ensure that the
Donut Robot will not move.
Moving the Fryer
If you ever need to move the fryer to a different
work station, follow this procedure:
WARNING
Thoroughly clean and dry the floor if
shortening is spilled. Materials on the floor
can cause people to slip or fall, resulting in
serious injury or loss of life.
6. Set aside the conveyor.
7. Tilt back the heater head. Remove and set
aside the kettle.
8. Tilt the heater head down.
9. To prevent tripping, coil the power cord and
set it inside the fryer case. Move the heater
head and the fryer case to the new work
station.
10. Tilt back the heater head.
11. Move and install the kettle.
12. Tilt the heater head down.
13. Move and install the conveyor.
1. Turn off the machine and disconnect it from
the power source.
2. Allow the machine and the shortening to
cool.
WARNING
Do not touch hot shortening. It can cause
serious burns.
3. Remove and set aside the plunger, the
hopper, and the cutter head and column, in
that order.
4. Remove the shortening from the fryer as
explained in the Operator's Manual
5. To avoid dropping the machine or getting
shortening on the floor, wipe excess
shortening off of the fryer and the conveyor.
14. Move and install the column.
15. To prevent tripping, coil the cutter head
power cord. Move and install the cutter
head.
16. Move and install the hopper and the plunger.
17. Level and secure the fryer.
Belshaw Bros., Inc. www.belshaw.com Phone 206-322-5474 Fax 206-322-5425
Donut Robot Mark I TS MN-1003EN 7
Page 41

2 Maintenance
WARNING
To avoid being burned, electrocuted, or
otherwise injured, always disconnect the
machine from the power source and allow
it to cool down before making adjustments,
clearing obstructions, lubricating, cleaning,
or disassembling.
Lubricating
Every six months, lubricate the conveyor drive
motor:
1. Disconnect the machine from the power
source.
2. If you do not have an offset screwdriver or a
very short screwdriver, you will need to
remove the drive belt cover (item 12 in
Figure 4-3) before proceeding. To do this,
remove the two hex-head machine screws
that hold it in place, and then slide it up until
it comes off.
6. Locate the drive motor (item 25 in Figure
4-3) and its bearing cap. The bearing cap is
beneath the motor fan.
7. Apply 4 to 6 drops of SAE 30 machine oil
through the lubricating hole in the bearing
cap. See Figure 2-1.
3. Tilt back the heater head.
4. Remove the heater head skirt (item 22 in
Figure 4-3).
CAUTION
Figure 2-1. Lubricating the Conveyor Drive
Be gentle with all parts of the conveyor
drive motor. Damaging the parts could
stop production.
5. Remove the heater head bottom (item 21 in
Figure 4-3).
Belshaw Bros., Inc. www.belshaw.com Phone 206-322-5474 Fax 206-322-5425
8 MN-1003EN Donut Robot Mark I TS
8. Replace the heater head bottom and the
heater head skirt.
9. Return the heater head to its usual position.
10. If you removed the drive belt cover, replace
it.
Motor.
Page 42

Checking the Thermostat
If the quality of your product decreases, check
the accuracy of the thermostat. Heat some
shortening in the fryer, measure the temperature
of the shortening using a thermometer you know
to be accurate, and compare this reading to the
thermostat setting. It is important that you put
the thermometer in the top 1”/2.5 cm or so of
shortening, because this is where the donuts are
fried, and this is where the temperature should be
consistent. If you need to calibrate the
thermostat, consult Section 5, “Electrical
Components.”
To test the continuity of the thermostat or any of
the switches on your Donut Robot, refer to
Section 5, “Electrical Components.”
Taking Care of the Plunger,
Hopper, and Cylinder
The plunger, hopper, and cylinder of your Donut
Robot are precision instruments. If you take
good care of them, they will perform well for
years. Follow these guidelines:
Clean these parts only in the manner
explained in this manual.
Handle these parts with care. Avoid
dropping them on hard surfaces.
Do not force the machine if it becomes
jammed. To avoid damaging the
plunger, disassemble the machine and
remove any obstructions.
Belshaw Bros., Inc. www.belshaw.com Phone 206-322-5474 Fax 206-322-5425
Donut Robot Mark I TS MN-1003EN 9
Page 43

Page 44

3 Troubleshooting
This section is designed as an aid in
troubleshooting, not as a substitute for a
qualified technician. You may encounter a
problem with your machine that is not covered in
this section, or you may try the remedies
suggested here and find that they do not solve the
problem. If this happens, call your dealer or
another qualified technician. Also, call your
dealer if you need a replacement part.
If your dealer cannot help you, please call
Belshaw Bros. We will try to help you solve the
problem over the phone. When you call, please
specify the following:
The model name of the machine.
The serial number of the machine.
The voltage, phase, and cycle of the
machine.
To call Belshaw, first dial the appropriate
international access code, then 1-206-322-5474.
Ship your machine to:
Belshaw Bros., Inc.
814 44th Street NW, Suite 103
Auburn, WA 98001 USA
CAUTION
If you perform repairs yourself or have
them performed by anyone other than a
service technician authorized by Belshaw
Bros., you do so at your own risk.
Following is a troubleshooting chart to help you
identify and solve some basic problems. For
additional information regarding baking mixes,
temperature, and fry time, refer to “DonutMaking Helps” in the Operator's Manual.
WARNING
If your machine needs to be repaired, consult
your dealer or another local, qualified technician.
If they cannot repair your machine, Belshaw can
provide factory service. First call us for a return
goods authorization. Then send your machine to
us, freight prepaid, with your instructions for
service, your phone number, and the name of the
person for us to contact when we have made a
cost estimate. In most cases, the machine can be
shipped back, freight collect, within five days.
Belshaw Bros., Inc. www.belshaw.com Phone 206-322-5474 Fax 206-322-5425
Donut Robot Mark I TS MN-1003EN 11
To avoid being burned, electrocuted, or
otherwise injured, unplug the machine and
allow it to cool before disassembling,
repairing, or wiring.
Page 45

THE DONUTS BALL OR BLISTER.
Possible Causes What To Do
The dough is too cold. See “Donut-Making Helps” in the Operator's
Manual.
The shortening is too hot. Decrease the temperature setting.
The dough is over-mixed. Review the mixing procedure.
The donuts are too large. Adjust the dial on the cutter head to produce smaller
donuts.
The shortening is old or contaminated.
Replace the bad shortening with fresh shortening.
To avoid being burned or otherwise injured, turn
off the machine and allow the shortening to cool.
WARNING
THE DONUTS ARE SHAPED IMPERFECTLY.
Possible Causes What To Do
The shortening level is too low. Add shortening to reach the proper level.
The drop plate is out of position.
Reposition the drop plate.
The tip of the cylinder is dirty.
To avoid being burned or otherwise injured, turn
off the machine and allow the shortening to cool.
WARNING
WARNING
Clean the cylinder.
The tip of the cylinder is nicked. Replace the hopper.
The size-selection dial is not tightened. Tighten the thumb nut.
The dough is overmixed. Review the mixing procedure.
Belshaw Bros., Inc. www.belshaw.com Phone 206-322-5474 Fax 206-322-5425
12 MN-1003EN Donut Robot Mark I TS
To avoid injury, turn off the machine and remove
the hopper.
Page 46

THE DONUTS ARE UNDERCOOKED.
Possible Causes What To Do
The shortening is not hot enough. Increase the temperature setting.
The conveyor is moving too quickly. Decrease the speed of the conveyor, using the
method described in Section 2, “Operation,” of the
operator’s manual.
The dough is too cold. See “Donut-Making Helps” in the Operator's
Manual.
The dough has not had enough floor time. See “Donut-Making Helps” in the Operator's
Manual.
The thermostat reads inaccurately. Calibrate the thermostat.
THE DONUTS ARE OVERCOOKED.
Possible Causes What To Do
The shortening is too hot. Decrease the temperature setting. The temperature
setting should never exceed 375F/191C.
The conveyor is moving too slowly. Increase the speed of the conveyor, using the method
described in “Operation” in the Operator’s Manual.
The thermostat reads inaccurately. Calibrate the thermostat.
Belshaw Bros., Inc. www.belshaw.com Phone 206-322-5474 Fax 206-322-5425
Donut Robot Mark I TS MN-1003EN 13
Page 47

THE CONVEYOR BITES THE DONUTS.
Possible Causes What To Do
The donuts are not cooking enough. See “The donuts are undercooked” above.
The shortening level is too low. Add shortening to reach the proper level.
The turner is bent or packed with cooked food
particles.
The cam weight is sticking due to the
accumulation of varnish.
The fryer is not level. Level the fryer.
To avoid being burned or otherwise injured,
before doing any of the following, turn off the
machine and allow the shortening to cool.
Straighten and/or clean the turner.
Clean to remove the cooked-on varnish.
THE CUTTER OPERATES CONTINUOUSLY.
Possible Causes What To Do
To avoid being burned, electrocuted, or otherwise
injured, before doing any of the following, turn
off the machine, allow the shortening to cool, and
disconnect the machine from the power source.
WARNING
WARNING
One of the microswitches is defective. (There
are three microswitches in the conveyor drive
assembly and one microswitch in the cutter
head.)
Something is interfering with the nylon brake
dog in the cutter head.
The brake spring in the cutter head is weak or
broken.
Belshaw Bros., Inc. www.belshaw.com Phone 206-322-5474 Fax 206-322-5425
14 MN-1003EN Donut Robot Mark I TS
For help in testing the microswitches, refer to
Section 5, “Electrical Components.” Replace any
defective microswitches.
Clear away the cause of the interference.
Replace the spring.
Page 48

THE HEATING ELEMENT FAILS TO MAINTAIN THE PROPER
TEMPERATURE.
Possible Causes What To Do
The input voltage is incorrect. Supply the correct power as specified on the data
plate.
Sediment has accumulated around the
thermostat bulb.
Clean to remove the sediment. (You should clean
The thermostat has been calibrated incorrectly. Recalibrate the thermostat.
The thermostat is defective.
Replace the thermostat.
To avoid being burned or otherwise injured, turn
off the machine and allow the shortening to cool.
the Donut Robot regularly and thoroughly.)
To avoid being burned, electrocuted, or otherwise
injured, turn off the machine, allow the
shortening to cool, and disconnect the machine
from the power source.
WARNING
WARNING
THE MOTOR OVERHEATS.
Possible Causes What To Do
The power requirements of the machine do not
match the power source.
The motor is binding. Repair or replace the motor.
The motor is defective. Repair or replace the motor.
Belshaw Bros., Inc. www.belshaw.com Phone 206-322-5474 Fax 206-322-5425
Donut Robot Mark I TS MN-1003EN 15
Supply the correct power as specified on the data
plate.
WARNING
To avoid being burned, electrocuted, or otherwise
injured, before doing either of the following, turn
off the machine, allow the shortening to cool, and
disconnect the machine from the power source.
Page 49

THE CONVEYOR IS JAMMED.
Possible Causes What To Do
Cooked food particles are wedged between a
chain opening and a sprocket tooth.
The turner slot is packed with cooked food
particles.
The drop plate is out of position and is
interfering with the conveyor.
Something is interfering with the free movement
of the turner cam and cam weight.
The heating element is bent and is interfering
with the turner.
The turner is out of position and is catching on a
flight bar below.
WARNING
To avoid being burned or otherwise injured,
before doing any of the following, turn off the
machine and allow the shortening to cool.
Clean to remove the food particles. Clean the Donut
Robot regularly and thoroughly.
Clean to remove the food particles.
Reposition the drop plate.
Remove the obstruction.
Straighten the heating element.
Lift and move the outfeed end of the conveyor to
disengage the conveyor coupling from the conveyor
drive shaft. Turn the conveyor back 2-3 pockets.
The turner will return to the correct position.
The conveyor drive shaft and the drive motor
shaft are out of alignment.
Belshaw Bros., Inc. www.belshaw.com Phone 206-322-5474 Fax 206-322-5425
16 MN-1003EN Donut Robot Mark I TS
Remove the cover of the drive assembly. Loosen the
four mounting spacers so the drive assembly can be
moved. Align the motor shaft with the conveyor
shaft. When they are aligned, tighten the mounting
spacers. Replace the cover.
Page 50

THE CUTTER WILL NOT OPERATE, BUT THE CONVEYOR RUNS.
Possible Causes What To Do
The cutter head power cord is not plugged in to
the outlet on the back of the heater head.
The set screws in the cutter head cam are loose. Tighten the set screws.
The cutter head power cord is broken. Repair or replace the cutter head power cord.
The cutter motor is defective. Replace the cutter motor.
One of the microswitches is defective. (There
are three microswitches in the conveyor drive
assembly and one microswitch in the cutter
head.)
The cutter head power switch is defective. Replace the cutter head power switch.
Connect the cutter head power cord to the correct
outlet.
WARNING
To avoid being burned, electrocuted, or otherwise
injured, before doing any of the following, turn
off the machine, allow the shortening to cool, and
disconnect the machine from the power source.
For help in testing the microswitches, refer to
Section 5, “Electrical Components.” Replace any
defective microswitches.
The circuit breaker on the back of the heater
head is defective.
The cutter head assembly wiring harness is not
connected.
The cuts-per-pocket switch is defective. Replace the cuts-per-pocket switch.
Belshaw Bros., Inc. www.belshaw.com Phone 206-322-5474 Fax 206-322-5425
Donut Robot Mark I TS MN-1003EN 17
Replace the circuit breaker.
Check the connection between the pin housing in the
conveyor drive assembly and the socket housing in
the heater head. Also, make sure that the pins are
securely seated in the pin housing.
Page 51

THE ELEMENT WILL NOT HEAT, AND THE CONVEYOR WILL NOT RUN.
Possible Causes What To Do
The power cord is not plugged in, or the outlet
has no power.
The power cord is defective. Replace the power cord.
The transformer is defective. Replace the transformer.
The connections to the transformer are bad. Rewire the connections to the transformer.
Connect the machine to a good power source.
WARNING
To avoid being burned, electrocuted, or otherwise
injured, before doing any of the following, turn
off the machine, allow the shortening to cool, and
disconnect the machine from the power source.
THE ELEMENT WILL NOT HEAT, BUT THE CONVEYOR RUNS.
Possible Causes What To Do
The high temperature limit control switch has
been tripped.
Push the red reset button on the back panel of the
heater head.
The thermostat has been calibrated incorrectly. Recalibrate the thermostat.
The high temperature limit control is defective. Replace the high temperature limit control.
The thermostat is defective. Replace the thermostat.
The contactor for the transistor is defective. Replace the contactor.
The connections to the contactor are bad. Rewire the connections to the contactor.
Belshaw Bros., Inc. www.belshaw.com Phone 206-322-5474 Fax 206-322-5425
18 MN-1003EN Donut Robot Mark I TS
To avoid being burned, electrocuted, or otherwise
injured, before doing any of the following, turn
off the machine, allow the shortening to cool, and
disconnect the machine from the power source.
WARNING
Page 52
THE ELEMENT HEATS, BUT THE CONVEYOR WILL NOT RUN.
Possible Causes What To Do
The input voltage is incorrect. Supply the correct power as specified on the data
plate.
The circuit breaker has been tripped. Reset it by moving the white switch on the back of
the heater head to “off” and then to “on.” If the
conveyor still will not run, see that the power source
agrees with the specifications on the data plate. If
the problem persists, see below.
There is a short circuit. Find it and repair it. (First, see “The circuit breaker
The wiring harness in the conveyor drive
assembly is not connected.
The conveyor drive power switch is defective. Replace the switch.
The nylon brake dog is binding on the conveyor
brake motor.
The brake motor is defective. Replace the brake motor.
To avoid being burned, electrocuted, or otherwise
injured, before doing any of the following, turn
off the machine, allow the shortening to cool, and
disconnect the machine from the power source.
has been tripped” above.)
Check the connection of the pin connector from the
conveyor drive assembly to the socket connector in
the heater head enclosure. Make sure the pins in the
pin housing are securely seated in the housing.
If the brake dog is worn, replace it. If it is too tight,
loosen it. If the spring is weak or missing, replace it.
WARNING
An internal wire is interfering with the nylon
brake dog.
A fan blade is caught on a wire. Move the wire.
The conveyor is jammed. Clear the obstruction.
The couplings are not engaged. Engage the couplings.
The conveyor drive coupling is slipping. Tighten the two set screws.
Belshaw Bros., Inc. www.belshaw.com Phone 206-322-5474 Fax 206-322-5425
Donut Robot Mark I TS MN-1003EN 19
Move the wire.
Page 53

Page 54

4 Assembly Figures
The following pages contain lists of the parts that
make up the Donut Robot Mark I, the Roto
Cooler, and the Icing Finishing Tree. Each list
refers to an exploded-view assembly drawing.
Use the figures as reference guides only.
IMPORTANT
The assembly figures in this section are
meant as guides. See the Appendix for
more specific information.
Belshaw Bros., Inc. www.belshaw.com Phone 206-322-5474 Fax 206-322-5425
Donut Robot Mark I TS MN-1003EN 21
Page 55

FIGURE 4-1. MARK I MAIN ASSEMBLY–STANDARD.
Belshaw Bros., Inc. www.belshaw.com Phone 206-322-5474 Fax 206-322-5425
22 MN-1003EN Donut Robot Mark I TS
Page 56

FIGURE 4-2. MARK I MAIN ASSEMBLY–GP.
Belshaw Bros., Inc. www.belshaw.com Phone 206-322-5474 Fax 206-322-5425
Donut Robot Mark I TS MN-1003EN 23
Page 57
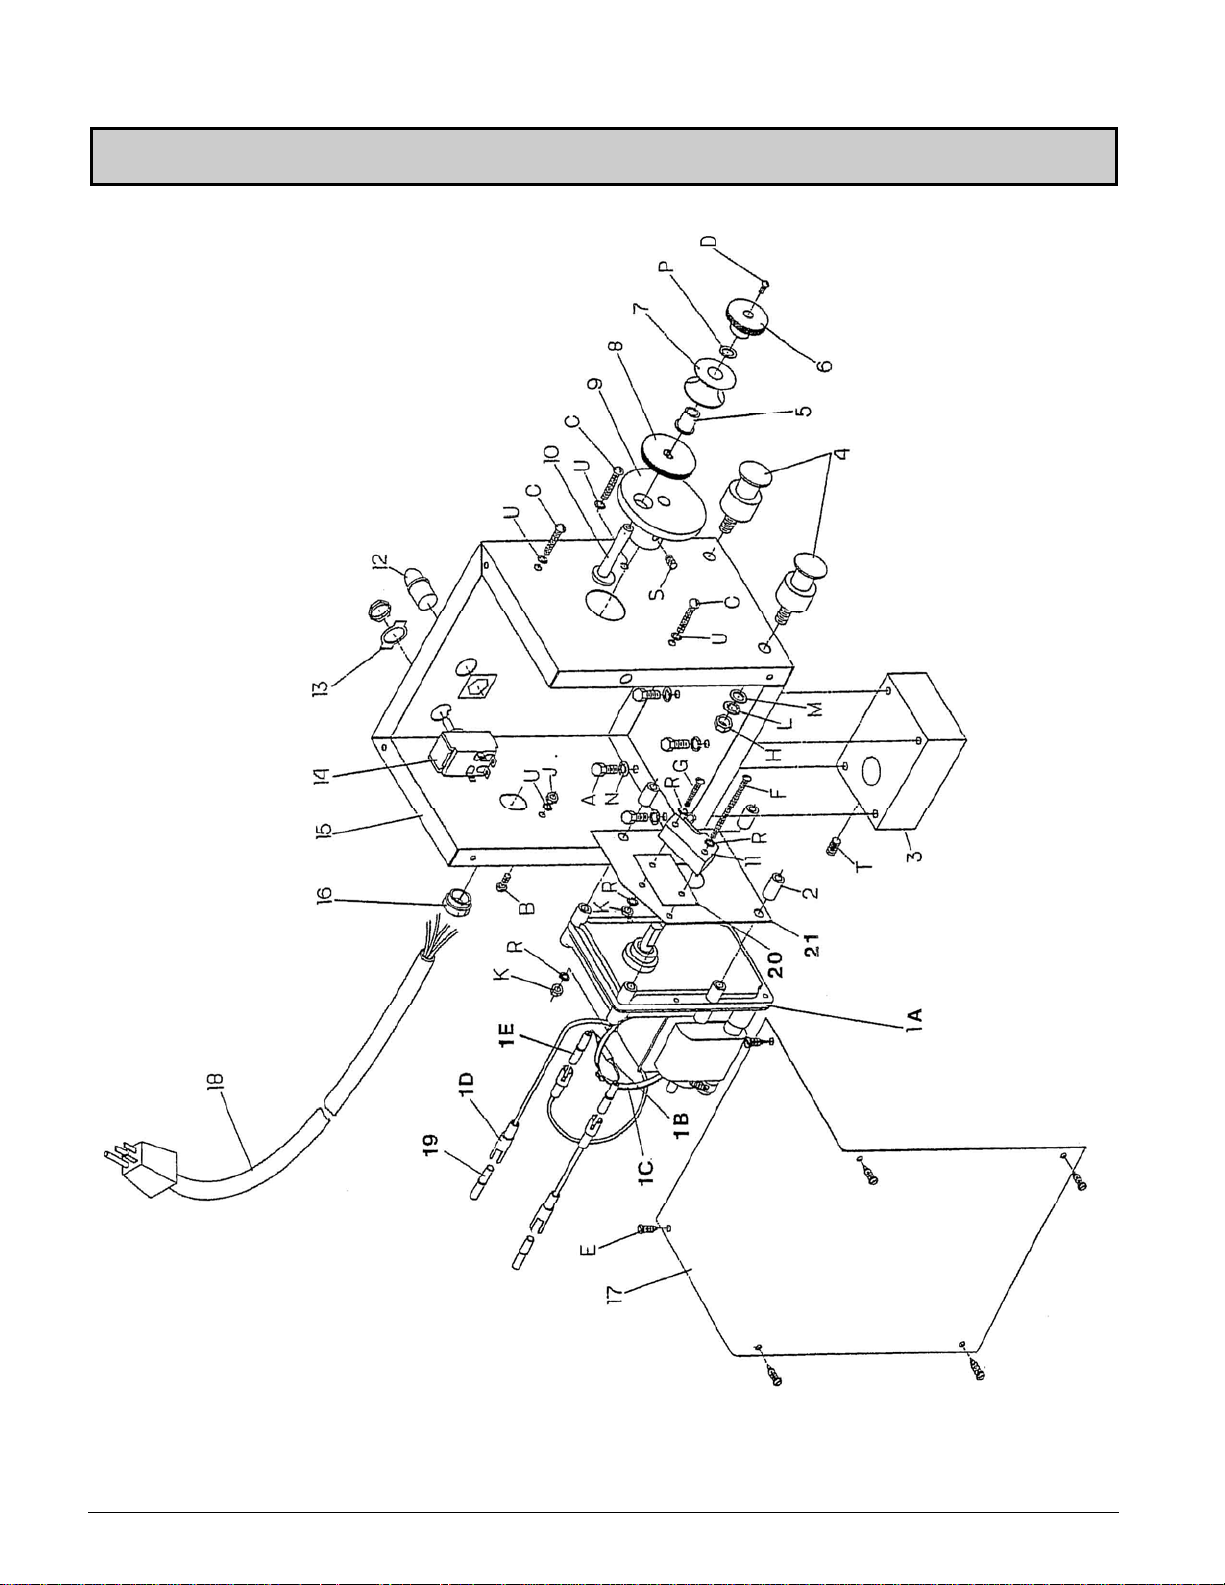
FIGURE 4-3. MARK I CUTTER HEAD ASSEMBLYSTANDARD.
Belshaw Bros., Inc. www.belshaw.com Phone 206-322-5474 Fax 206-322-5425
24 MN-1003EN Donut Robot Mark I TS
Page 58

FIGURE 4-4. MARK I CUTTER HEAD ASSEMBLYGP.
A
6
1
H
6
G
6
1
F
6
1
B
6
1
D
6
1
C
6
1
3
1
A
5
3
6
1
E
6
1
A
A
E
G
J
4
1
8
7
1
1
2
D
1
B
0
1
F
F
C
J
9
3
4
C
J
2
1
B
5
1
H
H
Belshaw Bros., Inc. www.belshaw.com Phone 206-322-5474 Fax 206-322-5425
Donut Robot Mark I TS MN-1003EN 25
Page 59

FIGURE 4-5. MARK I HEATER HEAD ASSEMBLY–STANDARD.
Belshaw Bros., Inc. www.belshaw.com Phone 206-322-5474 Fax 206-322-5425
26 MN-1003EN Donut Robot Mark I TS
Page 60

FIGURE 4-6. MARK I CONVEYOR ASSEMBLYSTANDARD.
Belshaw Bros., Inc. www.belshaw.com Phone 206-322-5474 Fax 206-322-5425
Donut Robot Mark I TS MN-1003EN 27
Page 61

FIGURE 4-7. MARK I CONVEYOR ASSEMBLYGP.
Belshaw Bros., Inc. www.belshaw.com Phone 206-322-5474 Fax 206-322-5425
28 MN-1003EN Donut Robot Mark I TS
Page 62

FIGURE 4-8. ROTO COOLER MAIN ASSEMBLY.
Belshaw Bros., Inc. www.belshaw.com Phone 206-322-5474 Fax 206-322-5425
Donut Robot Mark I TS MN-1003EN 29
Page 63

FIGURE 4-9. ICING FINISHING TREE MAIN ASSEMBLY.
Belshaw Bros., Inc. www.belshaw.com Phone 206-322-5474 Fax 206-322-5425
30 MN-1003EN Donut Robot Mark I TS
Page 64

5 Electrical Components
This section explains how to test the continuity
of electrical components in the Donut Robot
Mark I. These include the toggle switches, the
microswitches, and the thermostat.
The section also contains a document by the
Robertshaw Controls Company, the maker of the
thermostat we use in the Donut Robot Mark I. It
explains how to check, adjust, and recalibrate the
thermostat.
switch terminals
toggle switch
Continuity Testing
To test the continuity of a toggle switch:
WARNING
To avoid the possibility of electric shock,
disconnect the machine from the power
source before testing.
1. Disconnect the machine from the power
source.
2. Disconnect the terminal wires from the
switch.
3. Obtain a continuity tester or a volt-ohm
meter. If neither of these instruments is
available, make a continuity tester using a
battery and a bulb. (See Figure 5-1.)
4. Connect the wires of the continuity tester to
the switch terminals, as shown in Figure C1, and test the switch in the ON and OFF
positions. The switch should show
continuity only when in the ON position.
+
battery
_
Figure 5-1. Toggle Switch Continuity Test.
To test the continuity of a microswitch:
WARNING
To avoid the possibility of electric shock,
disconnect the machine from the power
source before testing.
1. Disconnect the machine from the power
supply.
2. Disconnect the terminal wires from the
switch.
3. Obtain a continuity tester or a volt-ohm
meter. If neither of these instruments is
Belshaw Bros., Inc. www.belshaw.com Phone 206-322-5474 Fax 206-322-5425
Donut Robot Mark I TS MN-1003EN 31
Page 65

available, make a continuity tester using a
battery and a bulb. (See Figure 5-2.)
4. Connect one wire of the continuity tester to
the microswitch’s common (COM) terminal
and the other wire to the normally open
(NO) terminal, as shown in Figure C-2. The
switch should show continuity only when
the microswitch actuator arm is depressed.
5. To test the normally closed (NC) terminal,
move the wire from the normally open (NO)
terminal to the normally closed terminal.
Now the switch should show continuity only
when the actuator arm is not depressed.
switch
terminals
NC NO
COM
microswitch
To test the continuity of the thermostat:
WARNING
To avoid the possibility of electric shock,
disconnect the machine from the power
source before testing.
1. Disconnect the machine from the power
supply.
2. Disconnect the terminal wires from the
thermostat.
3. Connect the continuity tester across the B
terminals indicated in Figure 5-3. This set
of contacts should be closed whenever the
thermostat is on. To test, start with the
thermostat in the OFF position. Then turn
the thermostat up until you hear a distinct
click (at about the 175F/79C setting). At
this time, there should be continuity across
the B terminals.
+
battery
Figure 5-2. Microswitch Continuity Test.
4. Connect the continuity tester across the A
terminals indicated in Figure C-3. Start with
the thermostat in the OFF position and turn
the thermostat up until you hear a distinct
click. If there is no continuity (the indicator
or light does not come on), proceed to
step 5.
5. With the continuity tester still connected,
turn the thermostat knob to OFF and remove
the knob. There is an adjusting screw in the
center of the knob stem. Turn it counterclockwise until there is continuity. If there
is no continuity (the indicator or light does
not come on), then the thermostat is
defective. If there is continuity, proceed to
step 6.
Belshaw Bros., Inc. www.belshaw.com Phone 206-322-5474 Fax 206-322-5425
32 MN-1003EN Donut Robot Mark I TS
Page 66

6. Immerse the thermostat sensing bulb in a
pan of boiling water and set the thermostat
at about 212F/100C. The continuity
tester’s indicator or light should go off. If
the indicator or light does not go off,
increase the temperature setting of the
thermostat until it does. Then recalibrate the
thermostat according to the manufacturer’s
instructions. If the indicator or light will not
go off at any setting or recalibration, then
the thermostat is defective.
“B” terminals
“A” terminals
Figure 5-3. Thermostat Terminals.
Belshaw Bros., Inc. www.belshaw.com Phone 206-322-5474 Fax 206-322-5425
Donut Robot Mark I TS MN-1003EN 33
Page 67

Page 68

6 Appendix
See Parts List Drawing Insert Page.
Belshaw Bros., Inc. www.belshaw.com Phone 206-322-5474 Fax 206-322-5425
Donut Robot Mark I TS MN-1003EN 35
 Loading...