

NocleL
....
}(
q
N_
f""
Sen-v-l.
o b
\\
r £ g o
lt
Built
in
oven
E-L£CTI(
tc..
o\JE-
r-J
INSTALLATION
AND
USER
INSTRUCTIONS
Model
: XOU69
MF
(belling)
Introduction ............................................................................................. : .............................. 4-
Installing Your Cooker ............................................................................................................ 5
Electrical connection ............................................................................................................... 6
For your own
safety-
Never .................................................................................................. ?
-Always ............................................................................................................... ?
Know Your Cooker ................................................................................................................ 8
Using the
limer
Operating the Minute Minder ................................................................................................. 9
5 Button Clock/Minute Minder ............................................................................................. 1 0
Using the Oven .................................................................................................................... 15
Using the Grill ..................................................................................................................... 16
Care and Cleaning
Trouble shooting ...................................................................................................................
21
Future transportation ............................................................................................................
21
Replacing the Oven Lamp ....................................................................................................
21
Service ........................................................ , ......................................................... Back Cover
This appliance conforms to the following EEC Directives:
Low Voltage Equipment
73/23/EEC
93/68/EEC
Electromagnetic Compatibility
89/336/EEC
92131/EEC
93/68/EEC
EN30
CE
3
Your Belling Thank you for purchasing a
new
Belling Cooker. Its stylish
Cooker and practical design will enhance your kitchen and make cooking a pleasure. It
features a fan oven or conventional oven, with a separate grill .
Some models feature a fully programmable clock/timer with a minute minder and
automatic oven switch on and off or a clock/minute minder.
Even if you have used an electric before, it is important that you read
these instructions thoroughly before starting to cook, paying particular
attention to the installation and safety instructions.
Getting Help If you have
any
problems with installing, operating, or cooking with
your Belling Cooker, please check through these instructions thoroughly
to make sure that you
have
not missed anything. If you still need help,
then please contact (including a daytime telephone number if possible):
Customer Care Centre
Belling Appliances.
Stoney Lane,
Prescot,
Merseyside.
L352XW
Telephone: 0870 444
9939
Please quote the cooker model and serial number with all enquiries.
This can be found on the rating plate on the plinth below the oven door.
WARNING! For your
own
safety, make sure that these
instructions on installation, use and maintenance are followed.
We advise you to keep these instructions
in
a safe place for future
reference.
If you sell
or
transfer ownership of this product, please pass on these
instructions to the new owner.
4
I
.J
..
-·
.
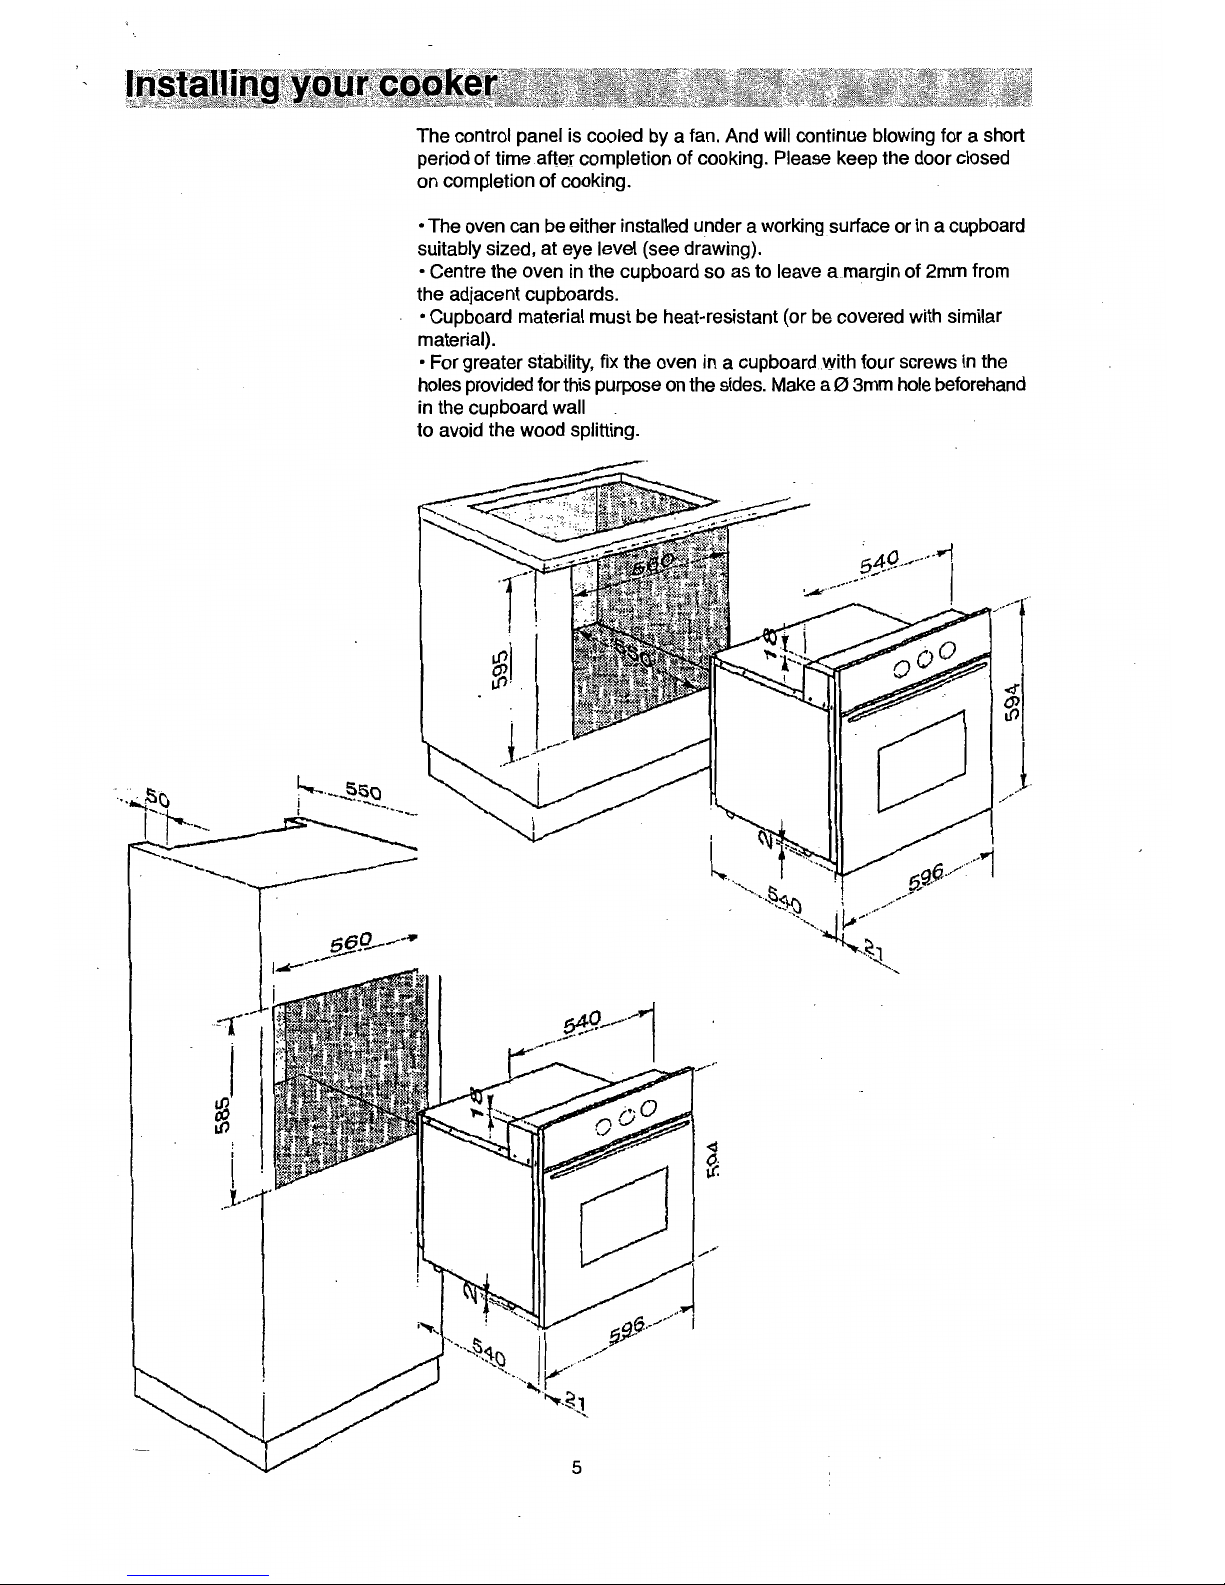
The
control panel is cooled by a fan. And will continue blowing for a short
period of time after completion of cooking. Please keep the door closed
on completion
of
cooking.
·The
oven can be either installed under a working surface or
in
a cupboard
suitably sized, at eye level (see drawing).
• Centre the oven in the cupboard
so
as to leave a margin of 2mm from
the adjacent cupboards.
·Cupboard
material must be heat-resistant (or be covered with similar
material).
• For greater stability, fix
the
oven in a cupboard with four screws in the
holes provided for this purpose on the sides. Make a 0 3mm hole beforehand
in the cupboard wall
to
avoid the wood splitting.
'
AO
..
.-1
(
.............
·--
Ln·.
Mains cable
routing
Important
• Do not connect the appliance to the electricity supply until all packing
and transit protectors have been removed.
1.
Before your appliance is connected to the mains electricity supply, check
to ensure that the voltage and frequency shown
on
the rating label corresponds
with your power supply.
You
can see the label below the cavity when you open
the oven door.
2. This product must only be installed by a qualified electrician, eg local
electricity company
or
a NICEIC registed contractor, to a suitable double-pole
control unit with a minimum contact clearance of 3
mm
in
all poles and with
a minimum rating
of
16 A which should be filted adjacent to ( but not above)
the appliance in accordance with lEE regulations. Failure to observe this
instruction may result in operational problems and invalidation
of
the product
warranty.
3.
This appliance must
be
earthed.
4.
The mains cable must pass through the cable clamp.
• If the supply cord is damaged, it must be replaced by a similarly qualified
person in order to avoid a hazard.
• The pable length should be 2m max for isolation safety.
The mains cable should be routed away from the appliance, the ventilation
slots and the vent outlet.
It should not
be
obstructed when pushed
in
to position between the appliance
and the wall or cabinet.
A cable
of
the correct size rating must be used.
Cable type
HOS
V V-F 3x1
.5
mm2
As the coloured wires in the mains lead for the appliance, may not correspond
with the coloured markings identifying the terminals in your spur box, proceed
as follows:
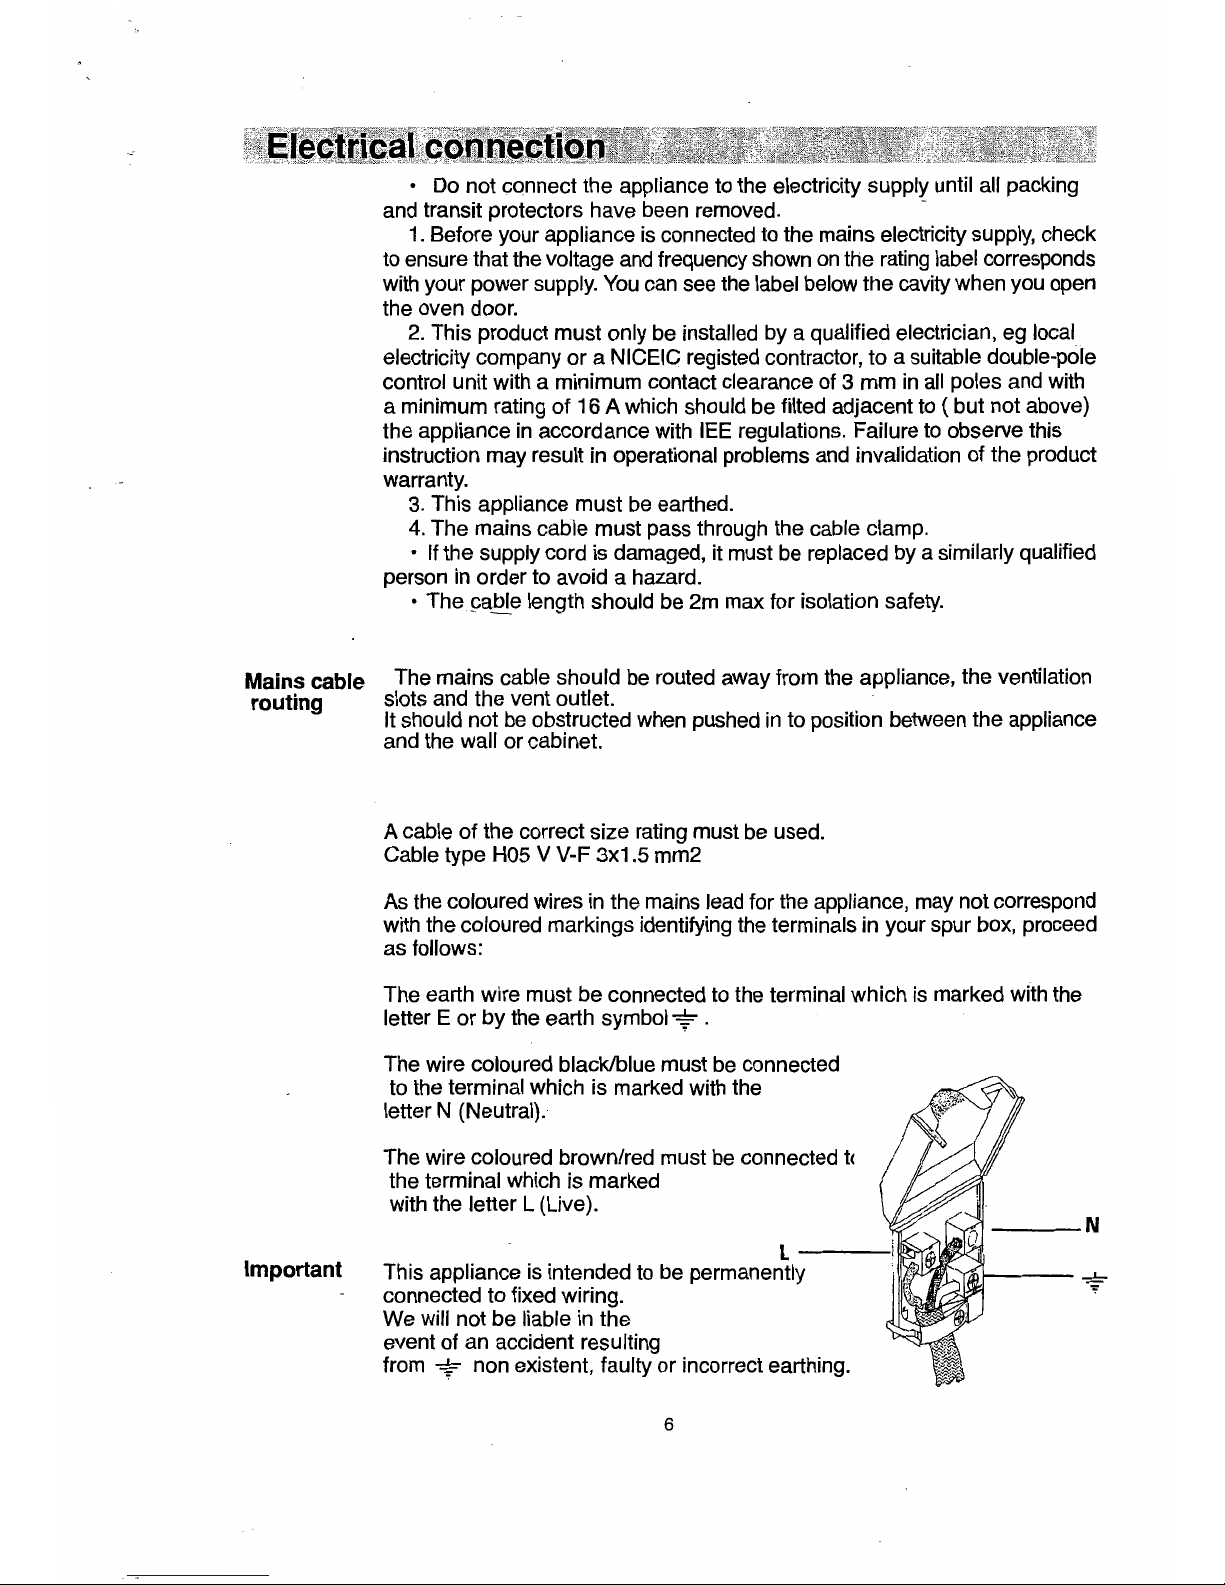
The earth wire must be connected to the terminal which
is
marked with the
letter E
or
by
the earth symbol .
The wire coloured black/blue must
be
connected
to the terminal which is marked with the
letter N (Neutral).
The wire coloured brown/red must
be
connected
t<
the terminal which is marked
with the letter L (Live).
L----
This appliance
is
intended to be permanently
connected to fixed wiring.
We will not be liable in the
event of an accident resulting
from
non existent, faulty or incorrect earthing.
6
----N
When used properly your XOU69MF is completely safe, but
as
with any electric appliance there are some
precautions you must take
in
its use.
Never
..
e Never allow anyone except
an
authorised Belling Service Agent to service
or
repair your cooker.
e Never remove any part
of
the cooker other than those intended
in
normal use,
or
attempt to modify
the cooker
in
any way.
e Never use the cooker for commercial catering.
It
is
designed for domestic use and for cooking food
only.
e Never allow young children to operate
or
play with the cooker, as
all
surfaces get
hot
while
in
use.
e Never allow children
to
sit
or
stand on any part
of
the appliance.
e Never store items above a cooker that children may attempt
to
reach.
e Never line the shelves, floor,
or
sides
of
the oven
or
grill, with aluminium foil
as
overheating and damage
may result.
e Never place materials which might catch fire, such
as
tea towels on the hob or elements, even when
the cooker
is
not
in
use.
e Never use
an
asbestos mat, trivet
or
rack
of
any kind under pans on the hob.
e Never store anything which might catch fire
in
the oven
or
grill.
e Never heat unopened containers.
e Never store flammable liquids, aerosols, etc. in adjacent cabinetry.
e Never operate ttie grill when the oven is set
to
cook automatically.
Always
..
• Always take care when touching any part
of
the cooker which may be hot. Use dry oven gloves
when removing
or
replacing food
or
dishes. Care should be taken to avoid touching the heating
elements inside the oven.
e Always stand back when opening the oven door
to
allow any build-up
of
heat or steam to disperse.
• Always keep the oven doors closed, when using as a grill. If grilling
is
performed with door open
heat damage
to
control panel, knobs and the side panels will be experienced.
Grill door must be closed during grilling.
e Always make sure that the roof, side and back panels, and shelves are fitted correctly before using
the oven or grill.
Always switch off at the mains supply and allow the cooker to cool before cleaning your cooker.
e Always supervise children and pets, particularly when grilling, as exposed parts
of
the cooker may
become hot.
e
Alwa¥S_make
sure that
all
the controls are switched off when you finish cooking.
• Always remember that your cooker may stay hot for a time even after you have finished cooking.
e Always keep ventilation slots clear
of
obstructions.
e Always keep children away from cooker when cleaning at maximum ven setting.
e Always adjust the timer during the first operation or after any interruptions of the electric supply.
Otherwise, your oven will not operate.
7
9
8
6
7
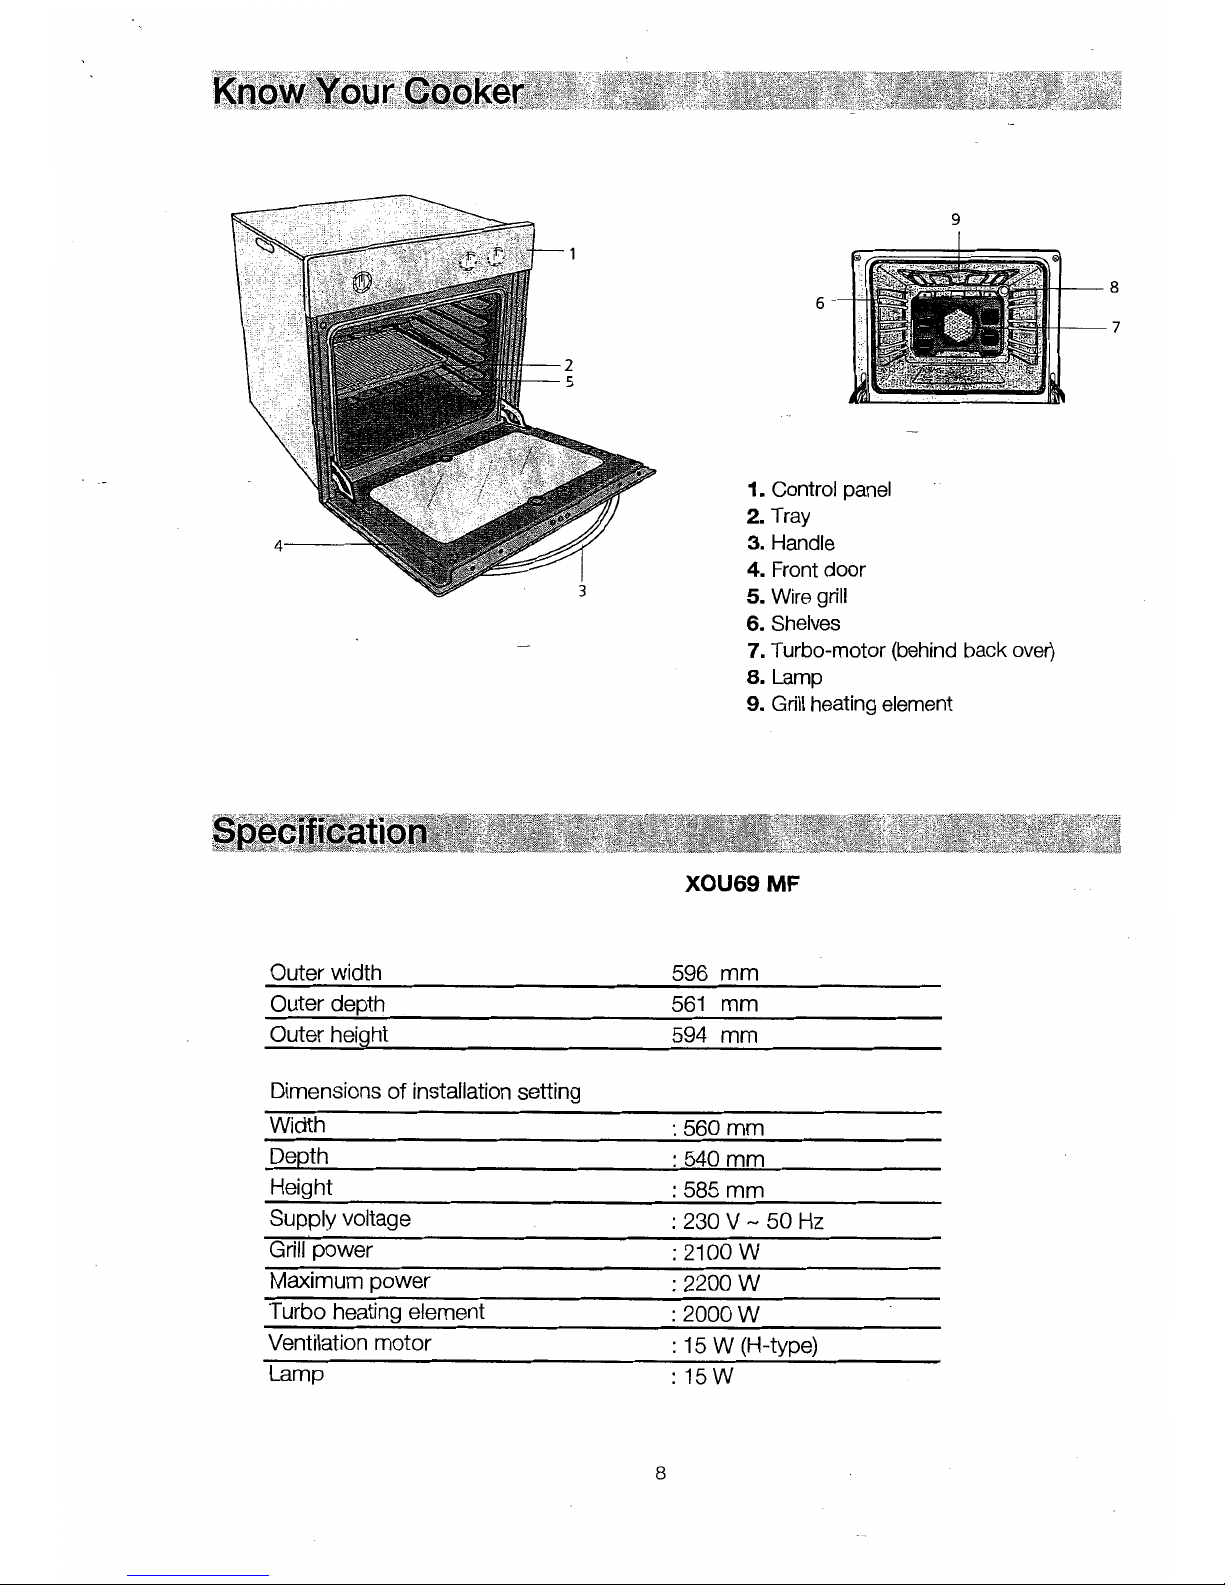
1. Control panel
2. Tray
3. Handle
4. Front
door
5.
Wire grill
6. Shelves
7. Turbo-motor (behind back
over)
8.
Lamp
9. Grill heating element
XOU69MF
Outer width
596 mm
Outer depth
561
mm
Outer height
594 mm
Dimensions of installation setting
Width
:560
mm
Depth
:
540mm
Height
:585
mm
Supply voltage
:230 V-50
Hz
Grill
power
:2100
w
Maximum power
:
2200W
Turbo heating element
:
2000W
Ventilation motor
:
15
W (H-type)
Lamp
:
15W
8
 Loading...