


2
CONTENTS
INTRODUCTION page 3
INSTRUCTIONS FOR THE INSTALLER pages 4-6
FOR YOUR OWN SAFETY page 7
DESCRIPTION OF THE APPLIANCE page 8
KNOW YOUR OVEN pages 9-10
AUTOMATIC OPERATION page 11
OVEN TIMER OPERATION pages 12-17
COOKING FUNTIONS pages 18-19
COOKERY NOTES page 20
FAN OVEN COOKING GUIDE page 21
CONVENTIONAL OVEN COOKING GUIDE page 22
GRILLING GUIDE page 23
COOKING GUIDE page 24
CLEANING AND MAINTENANCE page 25
IS THERE SOMETHING WRONG WITH YOUR OVEN? page 26
SERVICE page 27
G87

YOUR BELLING OVEN
Thank you for purchasing a new Belling electric built-in oven.
Its stylish and practical design will enhance your kitchen and make cooking a pleasure.
Your oven specification will vary depending on model. It features a large electric oven with a grill.
Some models feature a minute minder or clock/timer which features automatic oven switch on and
off feature.
Even if you have used an electric oven before, it is important that you read these instructions thoroughly
before starting to cook, as there may be many new features not featured on your previous oven. P ay
particular attention to the installation and safety instructions.
GETTING HELP
If you have any problems with installation, operating or cooking with your Belling oven please check
through these instructions thoroughly to make sure that you have not missed anything. If you still
need help, then please contact (including a daytime telephone number if possible):
Consumer Relations Department
Belling Appliances Ltd.,
Talbot Road,
Mexborough.
South Y orkshire.
S64 8AJ.
INTRODUCTION
3
G87
BELLING HELP LINE Tel: 01709 579902
Please quote the oven model and serial number with your enquiries. This can be found on the serial
number label beside the door seal or on the rating label, positioned on the right hand side panel of the
appliance.
WARNING! For your own safety, make sure that these instructions on installation, use and
maintenance are followed.
We advise you to keep these instructions in a safe place for future reference. If you sell or transfer
ownership of this product, please pass on these instructions to the new owner.
This appliance conforms to EN55014 regarding suppression of Radio and Television reception
interference.

4
INSTRUCTIONS FOR THE INSTALLER
TECHNICAL INFORMATION
• All installation and maintenance must only be
carried out by qualified personnel. The manufacturer
cannot be held responsible for any damage to
persons or property resulting from an incorrect
installation of the appliance.
• The safety and automatic adjustment devices of
the appliance may, during its life, only be modified
by the manufacturer or duly authorised supplier.
• In accordance with the electricity standard the
appliance is type Y.
• The walls adjacent to and surrounding the appliance must
be able to withstand a temperature rise of 65 K.
UNPACKING YOUR OVEN
• Remove all packaging before use and check to
make sure that the appliance is in perfect condition.
If you have any doubts do not use the appliance
and call your supplier for advice. Do not move the
appliance using the handles.
• Some parts on the appliance are protected by a
plastic film. This protective film must be removed
before the appliance is used. We recommend
carefully slitting the plastic film along the edges
with a sharp knife or pin. Our products use
environmentally friendly packaging, which can be
either recycled or disposed of in the appropriate
manner.
The packaging materials should carefully
discarded and not left within easy reach of
children as they are a potential safety hazard.
DISPOSAL OF YOUR PRODUCT
To minimise the risk of injury to children please dispose
of your product carefully and safely. Remove the mains
cable (where fitted) by cutting off flush with the appliance
and always ensure that no plug is left in a condition
where it could be connected to the electricity supply. To
help the environment, Local Authority instructions should
be followed for the disposal of your product.
GENERAL
This appliance is designed specifically for domestic
purposes and Belling Appliances Limited cannot accept
responsibility if used in any other type of installation.
All Belling oven units are suitable for installation under
Belling hob units.
This appliance must not be installed over any appliance
that generates heat.
IMPORTANT
For your own safety , we recommend that your appliance
is installed by a qualified electrician.
The oven should be installed in accordance with the
latest Edition of the IEE Regulations.
TECHNICAL DATA
TYPE XOU250/251/252/270/271
Dimensions for mounting H/W/D (mm) 570/560/540
Mains voltage AC 230 V
Operating voltage AC 230 V, 50 Hz
Upper element (kW) 0.7 (outer) + 1.8 (inner)
Lower element (kW) (XOU250/270/271 only) 1,6
Grill element (kW) 1,8
Fan element (kW) (XOU 251/252/270/271 only) 2,0
Fan only (W) (XOU 251/252/270/271 only) 25 - 29
Oven light (W) (n°2 XOU 270/271 only) 15W - E 14 - T300
Cooling fan (W) 18 - 22
G87
ELECTRICAL INSTALLATION
WARNING: THIS APPLIANCE MUST BE EARTHED!
This oven should be installed by a competent electrician
in accordance with the current edition of IEE Regulations.
This appliance must be earthed and connected to a
230volt, 50 Hz, single phase supply through a suitable
oven control unit with a fuse rating of 20 amps. The
control unit should incorporate a double pole switch
having a contact separation of at least 3 mm in all poles
and should be located adjacent to the oven to allow
easy access in case of an emergency.
We recommend that you use a rubber cable (type
H0 5RR-F) to connect the oven to the control unit or
other protective cables with similar type characteristics.
The minimum cable size is 3 x 1.5 mm
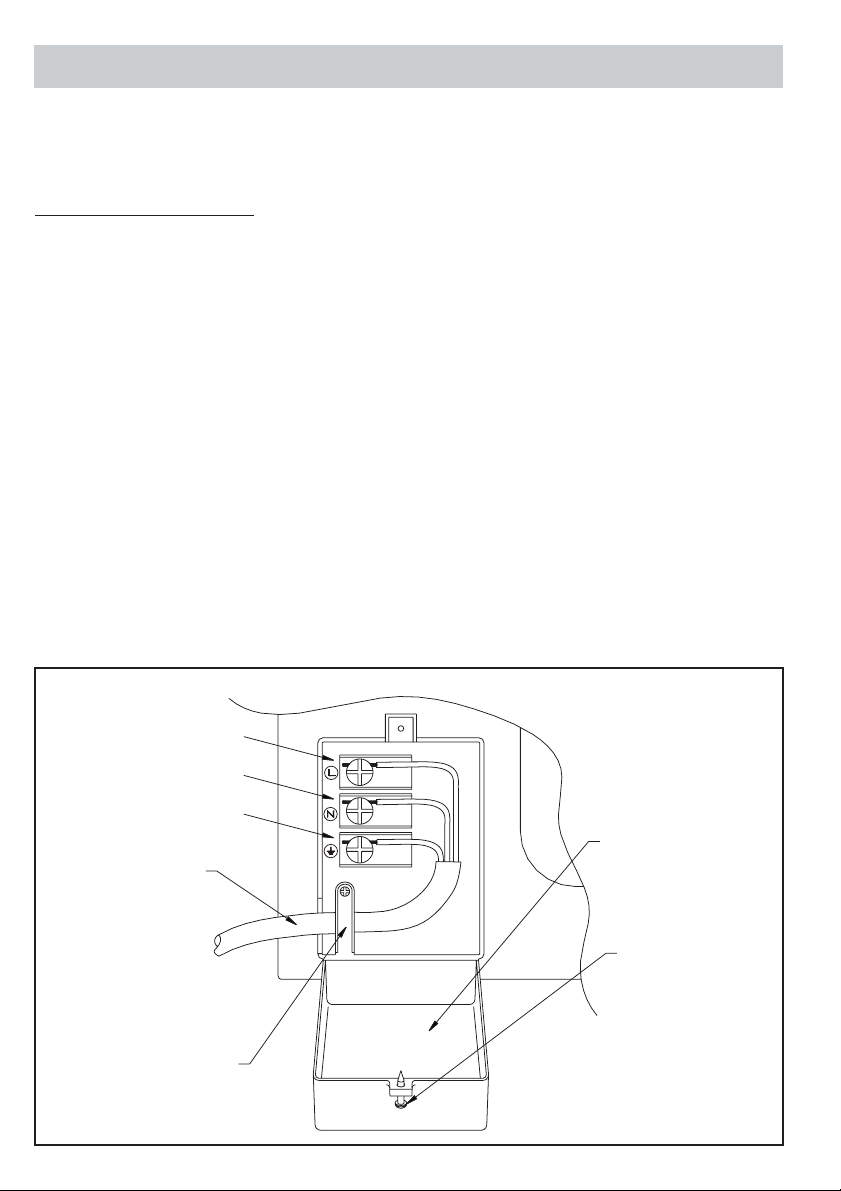
terminal block is located on the rear of the oven and
should be connected as shown in the diagram. Access
to the terminals is made possible by removing the screw
immediately above the black plastic terminal cover , and
hinging the cover downwards.
The power cable must be laid so that no parts of it ever
reach an over temperature of 75K.
2
. The oven mains
5
G87
Live Terminal
Neutral Terminal
Earth Terminal
Mains Cable
Cable Clamp
Terminal
Cover
Access Screw
6
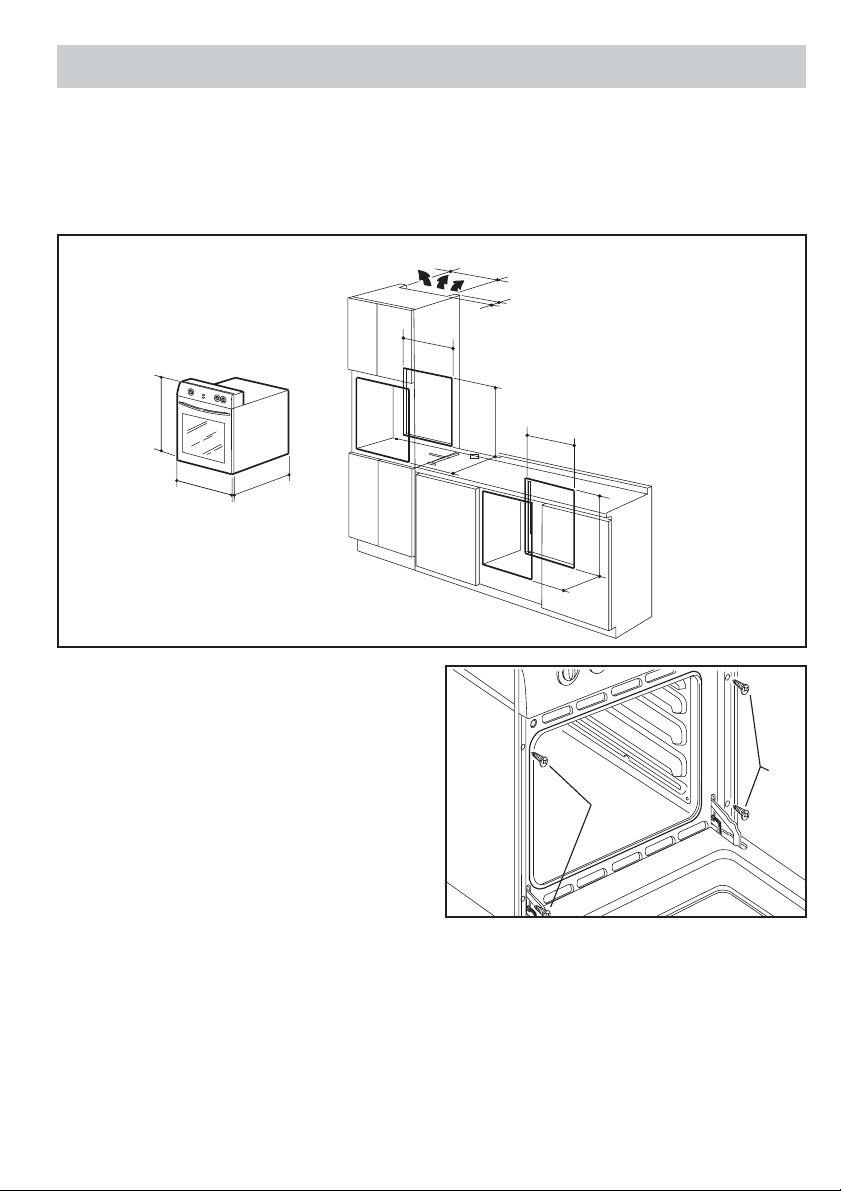
BUILDING-IN THE APPLIANCE
INSTALLATION DIMENSIONS
WARNING Always use the recommended measurements of the build-in opening, as shown in the table on page 5
and the diagrams below. To make sure the appliance is properly aerated, remove the rear panel of the base module
or make a hole (A), as shown in the figure below.
560
40
560
597
595
540
FIXING THE APPLIANCE
Push the appliance into the cabinet, open the oven door
and drill pilot holes 2mm x 5mm deep, through the holes
in the frame at the sides into the sides of the cabinet.
Fix the oven to the cabinet with the enclosed screws
(V).
Take care not to tighten the screws too much as this
may cause damage to the cabinet sides or the appliance
enamel
BEFORE COOKING
Before you cook for the first time, we recommend that
you switch on each element in turn to burn off any
odours remaining from manufacture. Simply operate the
grill on maximum for a few minutes, and the oven for
about 30 mins. Although the smell is harmless, we would
recommend that you open the window to allow fresh
air to circulate during this procedure.
A
550
570
560
A
570
550
V
V
G87

FOR YOUR OWN SAFETY
When used properly your Belling oven is completely safe but as with any electrical product there are
certain precautions that must be observed.
PLEASE READ THE PRECAUTIONS BELOW BEFORE USING YOUR APPLIANCE.
7
NEVER
• Never allow anyone except an authorised Belling
Service Agent to service or repair your oven.
• Never remove any part of the oven other than those
intended in normal use, or attempt to modify the
oven in any way.
• Never use the oven for commercial catering. It is
designed for domestic use and for cooking food only.
• Never allow young children to operate or play with
the oven.
• Never line the shelves, floor, or sides of the oven or
grill, with aluminium foil as overheating and damage
may result.
• Never store anything which might catch fire in the
oven or grill.
• Never heat unopened containers.
• Never dry clothes on the oven door.
• Never store flammable liquids, aerosols, etc. in
adjacent cabinets.
• Never wear garments with long flowing sleeves
whilst cooking.
ALWAYS
• Always take care when touching any part of the
oven which may be hot. Use dry , good quality, oven
gloves when removing or replacing food or dishes.
• Always stand back when opening the oven door to
allow any build-up of heat or steam to disperse.
• Always keep the oven door closed when not in use
to prevent accidents.
• Always keep your oven clean, as build-up of grease
or fat from cooking may be a fire hazard.
• Always switch off at the mains before cleaning your
oven.
• Always super vise children and pets, particularly
when grilling, as exposed parts of the grill may
become hot.
• Always make sure that all controls are switched off
when you have finished cooking.
• Always remember that your oven may stay hot for
a time even after you have finished cooking.
• Always keep ventilation slots clear of obstructions.
• Always keep children away from the oven when
cleaning at maximum setting.
G87
8
DESCRIPTION OF APPLIANCE
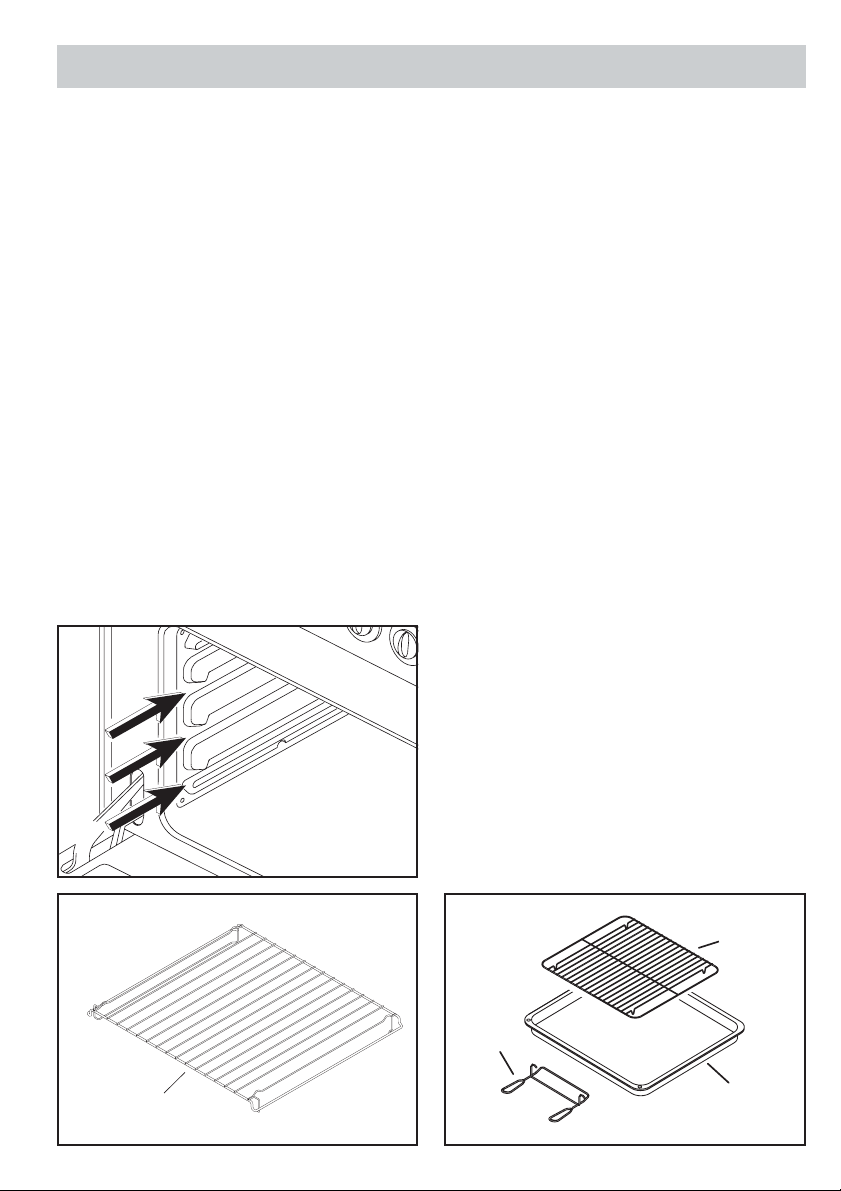
SHELF POSITIONS
Your oven features shelf supports formed into its cavity
sides, which offer the user 3 different cooking positions.
ACCESSORIES
The oven is supplied with 2 oven shelves (A) (see below),
which can be placed in any of the runners formed into
the sides of the oven walls. The shelf positions are
numbered from the bottom of each oven.
A grill pan (B), food support grid (C) and handle (D) is
also included (see below), which is placed on top of the
appropriate shelf. Use the grill pan (B) directly under a
shelf for grilling a large amount of food.
When removing the tray from the oven, always use the
handle (D) provided. Hook the handle to the edge of the
tray and pull it out, slightly lifting it as you do so.
During cooking, do not place the grill pan on the floor
of the oven, as damage to the appliance or adjacent
cabinet may occur, due to overheating.
3
2
1
A
C
D
B
G87
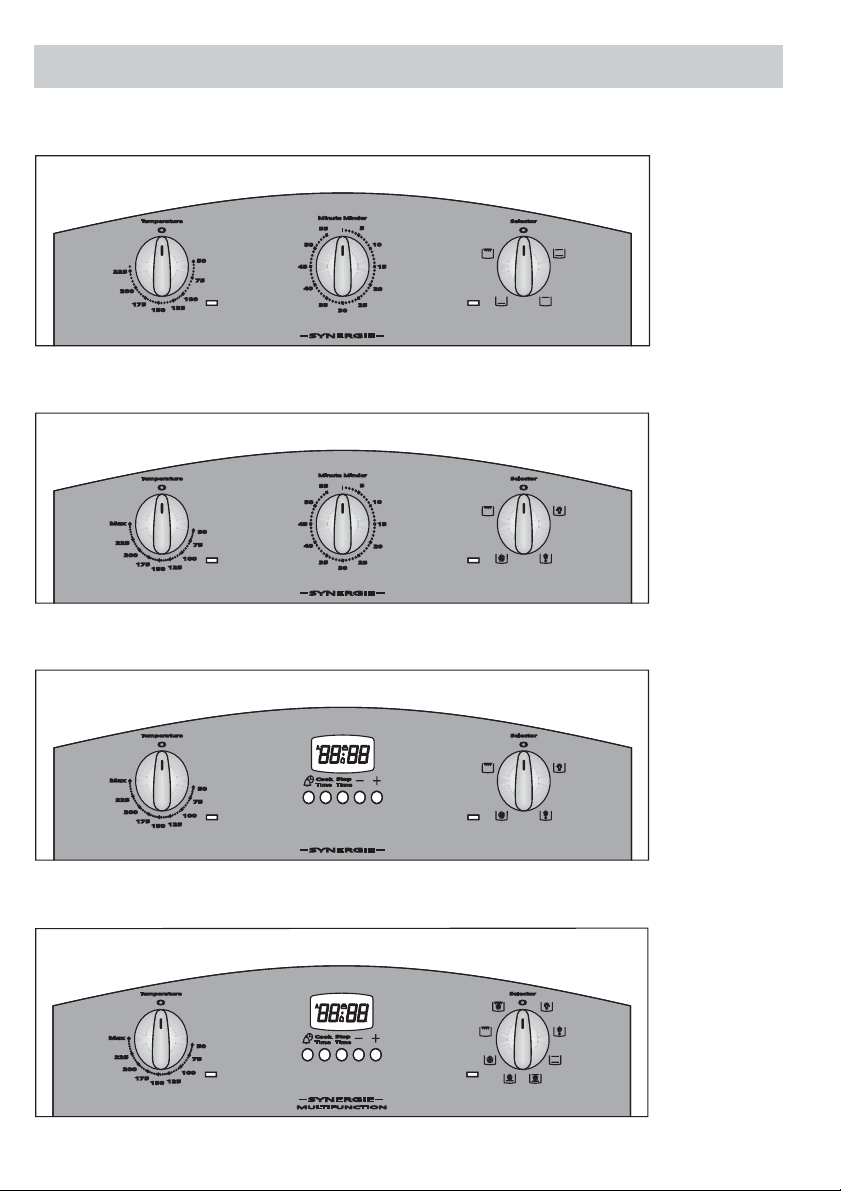
CONTROL PANEL
9
KNOW YOUR OVEN
XOU250
XOU251
G87
XOU252
XOU270/271
 Loading...