


INTRODUCTION
Thank you for buying this high quality appliance from us
We would like to congratulate you on choosing this
appliance, and hope you find it to be an attractive and
beneficial addition to your home.
This handbook is designed to help you through each step of
owning your new appliance,from installation, to use.
Please read through all of this guide carefully before you
start using your appliance, as we have endeavoured to
answer as many questions as possible,and provide you with
as much support as we can.
If,however,you should find something missing,or not
covered,please contact the Belling Customer Care team
who will be only too happy to assist you on:
INDEX
Introduction
General points on delivery
Guarantee
Safety Measures
Technical Data
Setting up and Installation
Control Description
CHAPTER
1
2
3
4
5
6
0871 22 22 503
In addition you could always try the website for frequently
asked questions and more Customer Care information.
Our policy is one of constant development and
improvement,therefore we cannot guarantee the strict
accuracy of all of our illustrations and specifications changes may have been made subsequent to publishing.
CUSTOMER CARE INFORMATION
If you should experience problems while operating the
appliance please refer to Chapter 15 – Faults search. If the
answer to the problem is not covered please call the
Customer Care Centre number listed above.
Your appliance is covered by a 12 month manufacturers
guarantee. If you experience problems within the first year
from the date of purchase a service engineer will be sent to
resolve the problem without charge. In order to prove the
age of the product please retain your purchase receipt.
Table of Programmes
Selection
Detergent drawer
The Product
Washing
Drying
Automatic washing/drying cycle
Cleaning and routine maintenance
Faults Search
7
8
9
10
11
12
13
14
15
2
3
CHAPTER 1
CHAPTER 2
GENERAL POINTS ON DELIVERY
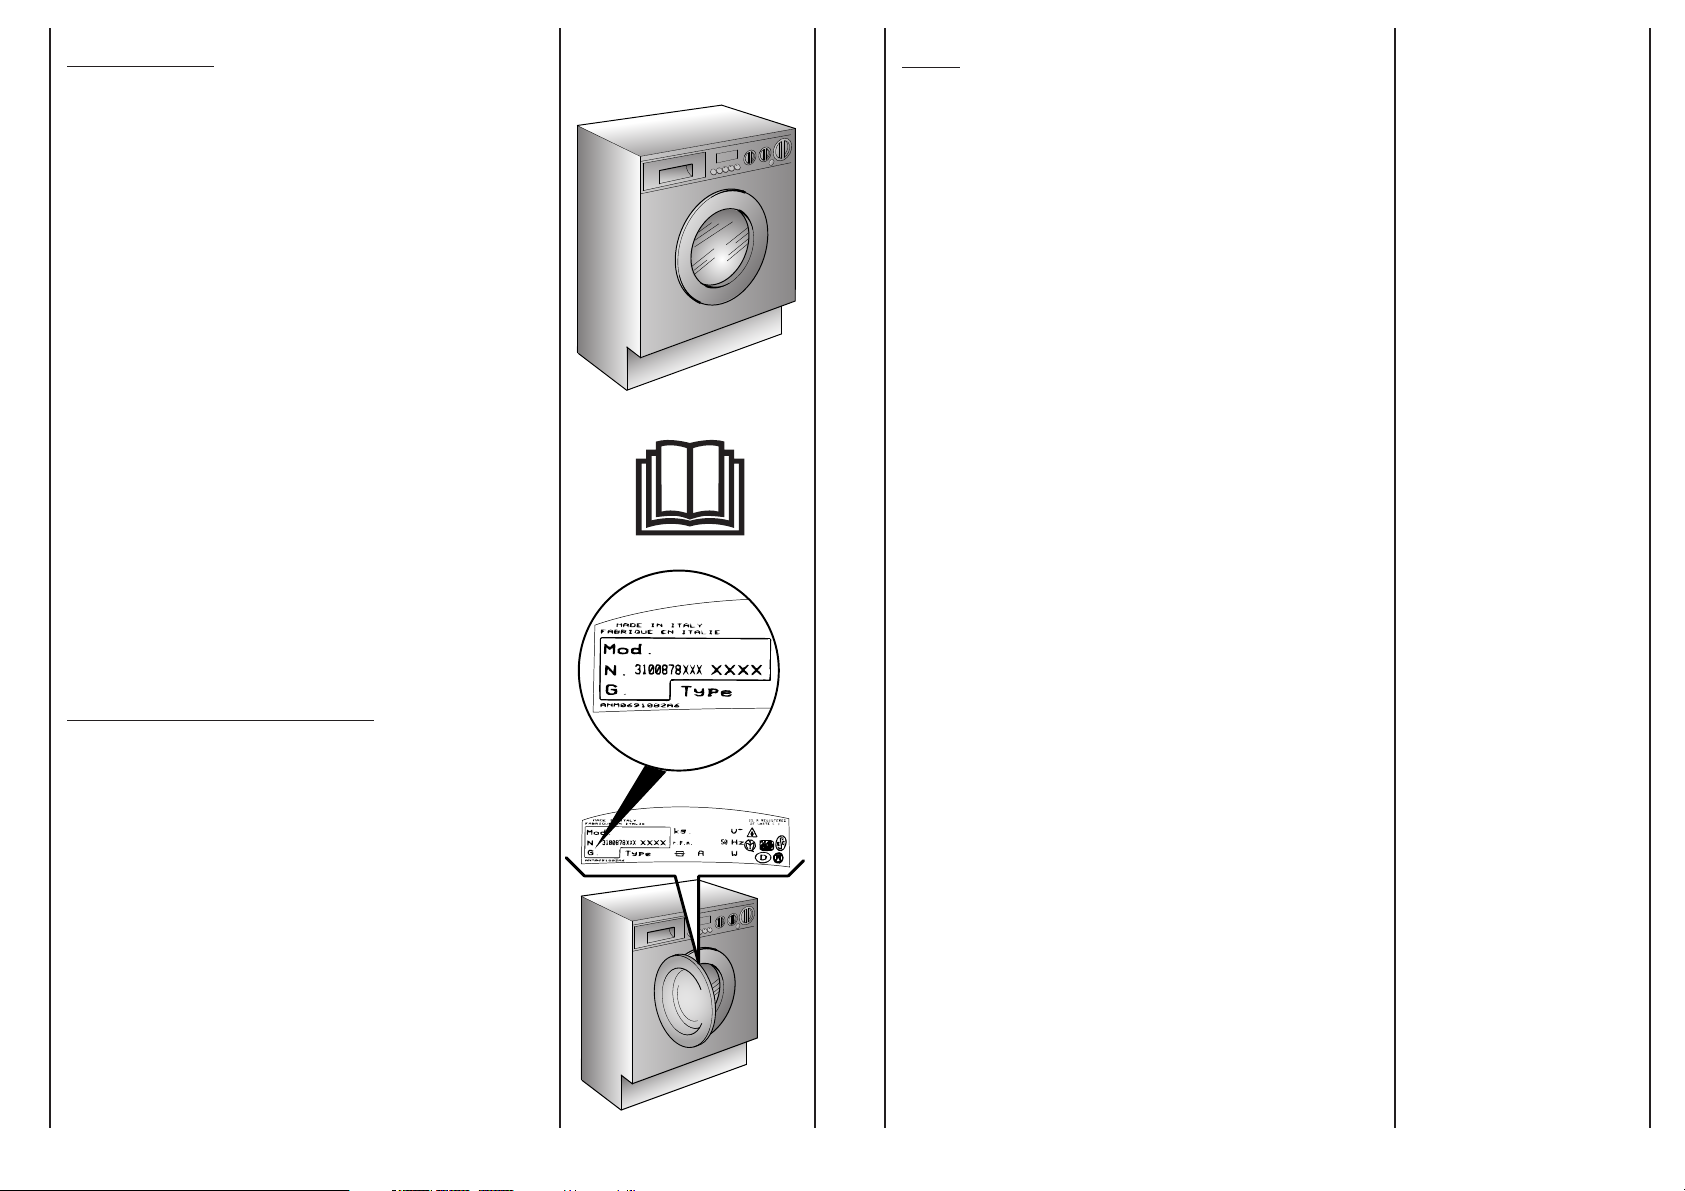
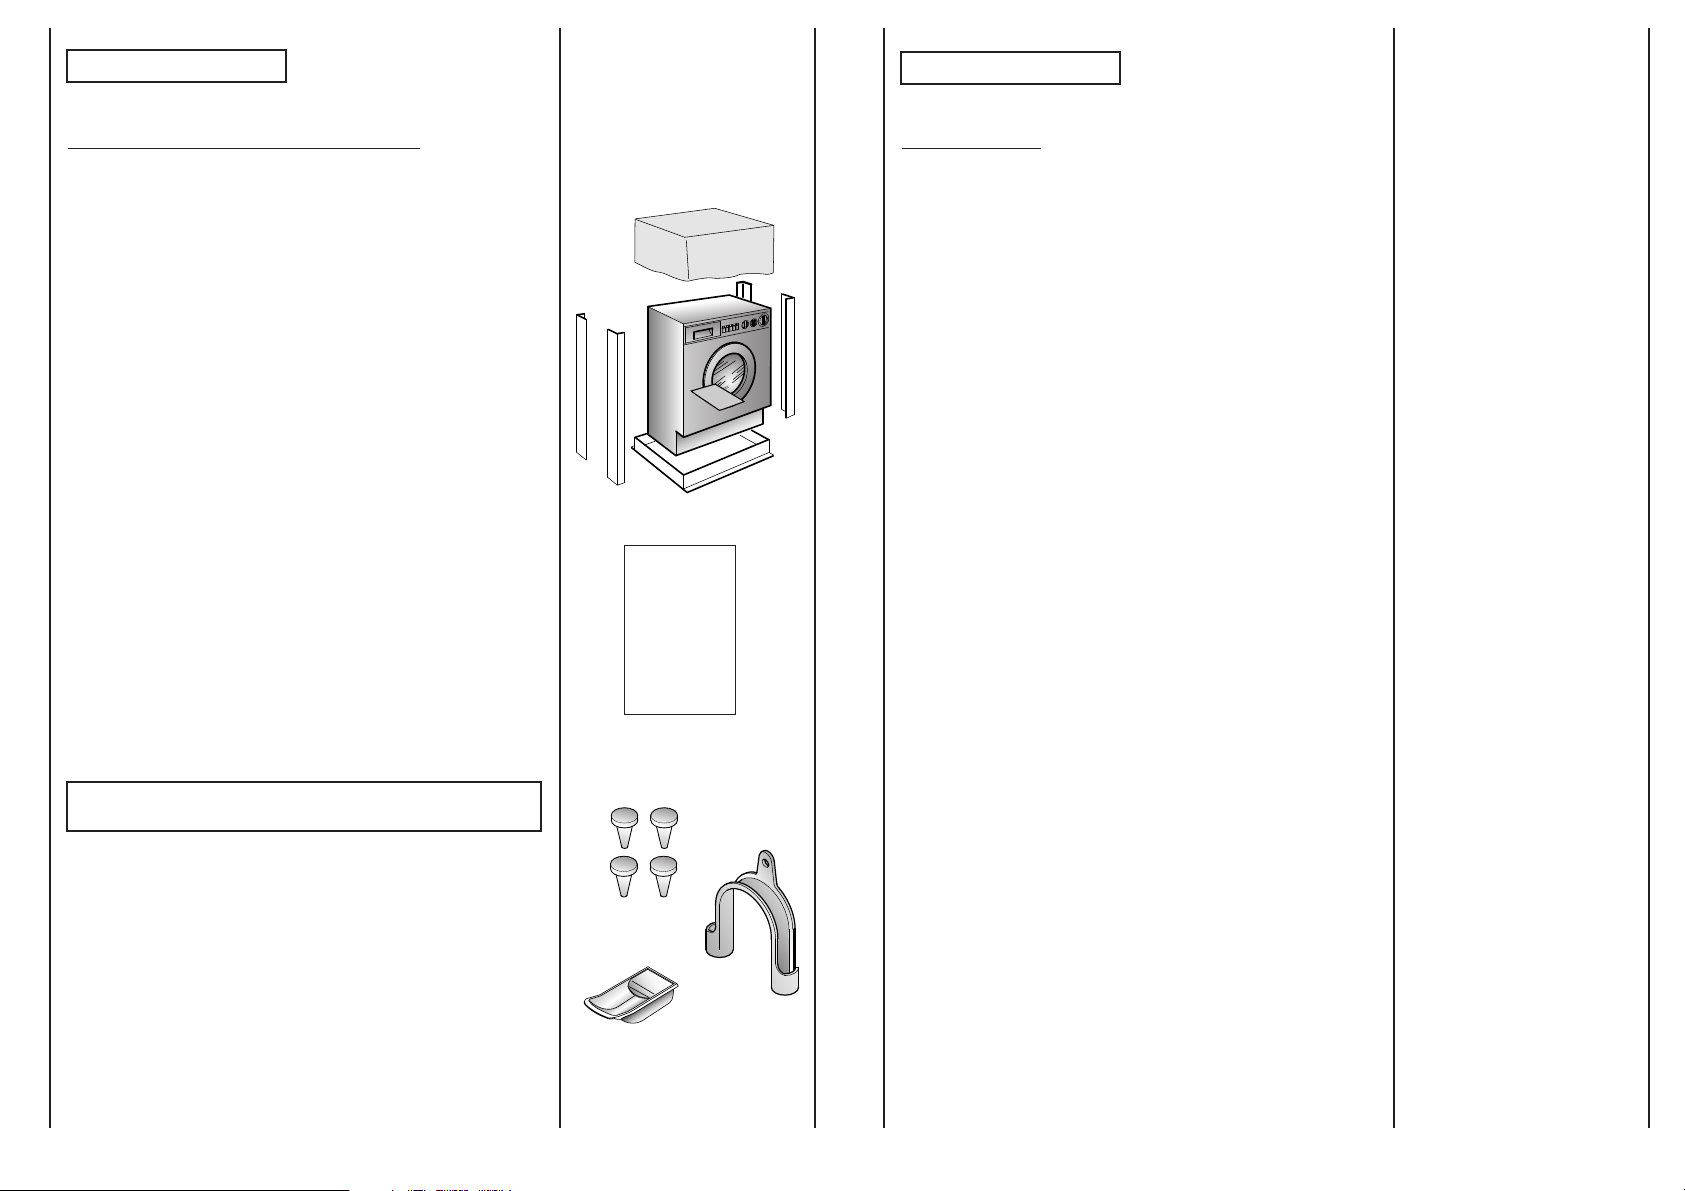
On delivery, check that the following are included with the
machine:
A) INSTRUCTION MANUAL
B) PLUGS
C) BEND FOR OUTLET TUBE
D) LIQUID DETERGENT OR LIQUID BLEACH
COMPARTMENT (CONTAINER)
GUARANTEE
The appliance is supplied with a manufacturers 12 month
guarantee. Please retain your purchase receipt.
This should be kept in a safe place and presented to the
engineer if a service call is required.
A
KEEP THEM IN A SAFE PLACE
Check that the machine has not incurred damage during
transport. If this is the case, contact your nearest Technical
Assistance Centre.
4
B
D
C
5
CHAPTER 3
SAFETY MEASURES
IMPORTANT:
FOR ALL CLEANING AND MAINTENANCE WORK
● Do not use extension leads or multiple plugs.
● This appliance is not intended for use by persons (including
children) with reduced physical,sensory or mental
capabilities, or lack of experience and knowledge,unless
they have been given supervision or instruction concerning
use of the appliance by a person responsible for their safety.
Children should be supervised to ensure that they do not
play with the appliance.
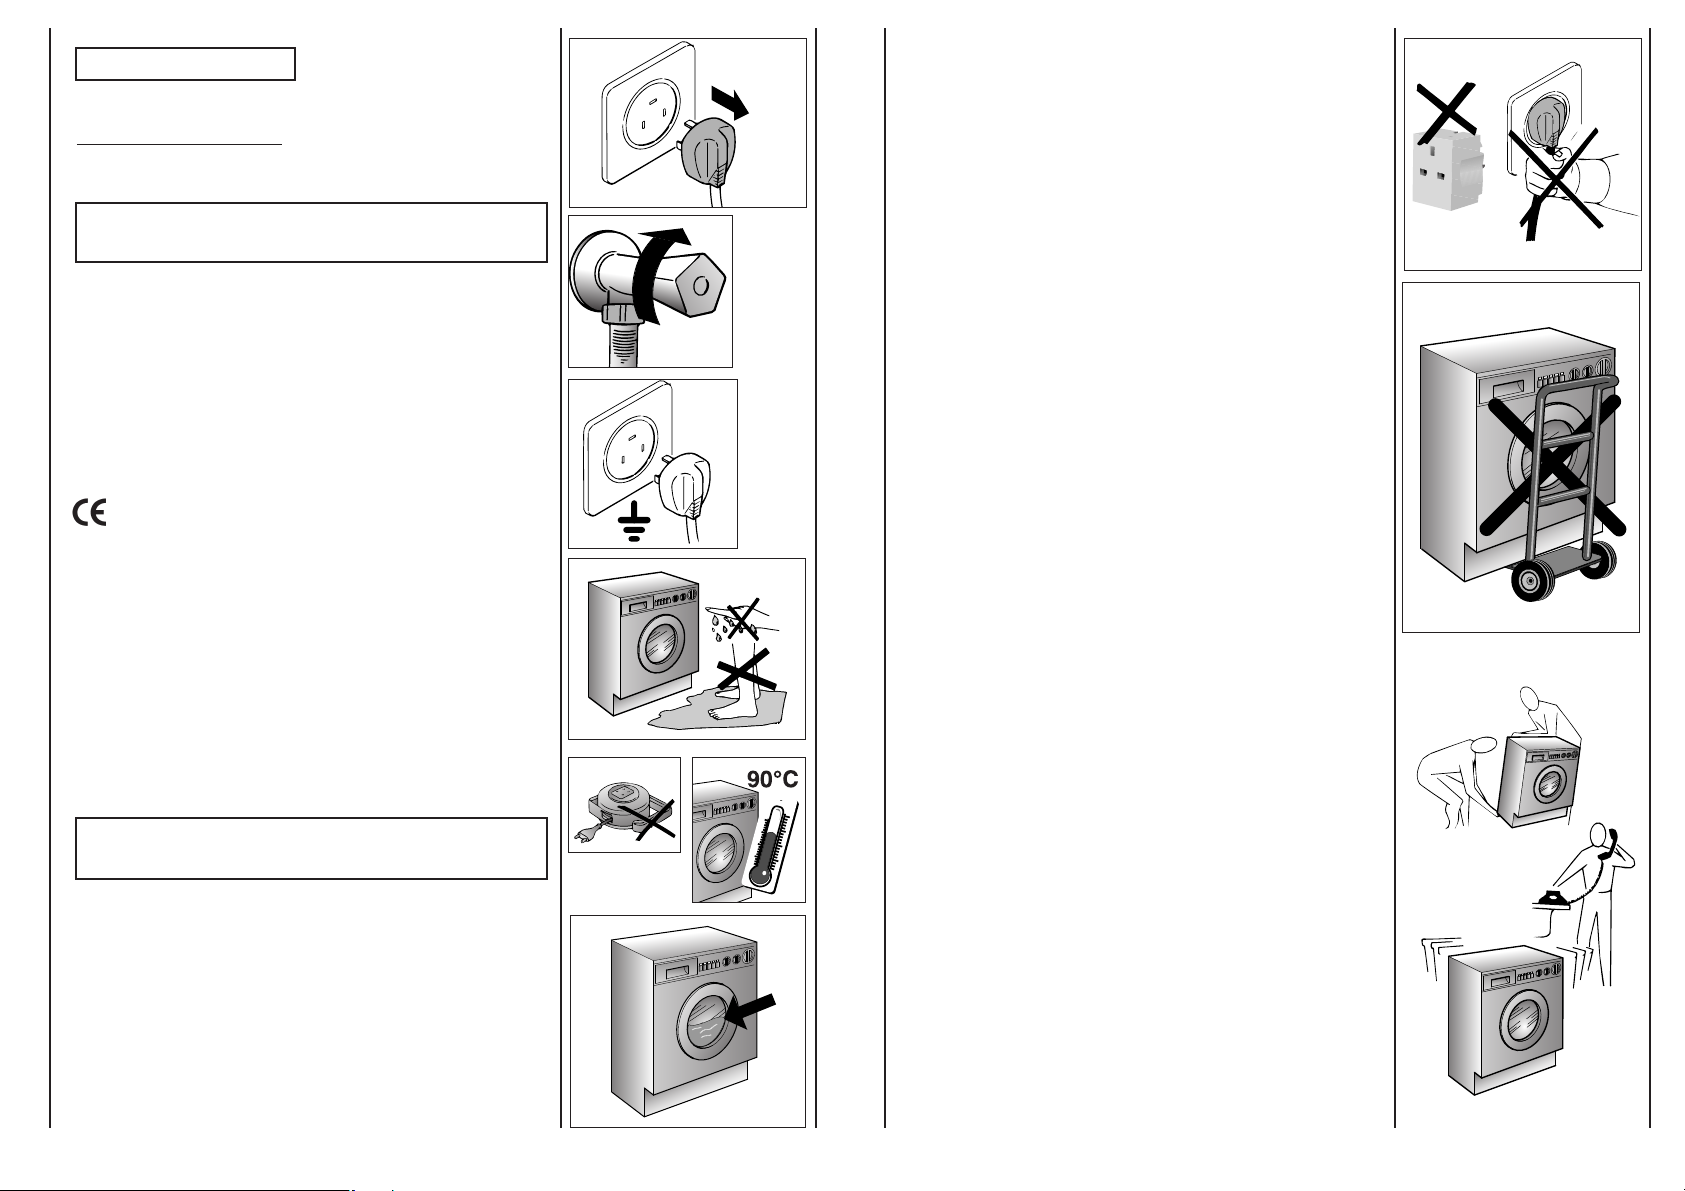
● Do not pull the mains lead or the appliance itself to
remove the plug from the socket.
● Remove the plug
● Turn off the water inlet tap.
● All Belling appliances are earthed. Ensure that the main
electricity circuit is earthed. Contact a qualified electrician if
this is not the case.
Appliance complies with European Directives
73/23/EEC and 89/336/EEC, replaced by 2006/95/EC and
2004/108/EC, and subsequent amendments.
● Do not touch the appliance with wet or damp hands or
feet.
WARNING: DURING THE WASHING CYCLE, THE WATER
CAN REACH A TEMPERATURE OF 90°C.
● Do not leave the appliance exposed to atmospheric
conditions (rain, sun etc.)
● In the case of removal,never lift the appliance by the
knobs or detergent drawer.
● During transportation do not lean the door against the
trolley.
Important!
When the appliance location is on carpet floors, attention
must be paid so as to ensure that there is no obstruction to
the bottom vents.
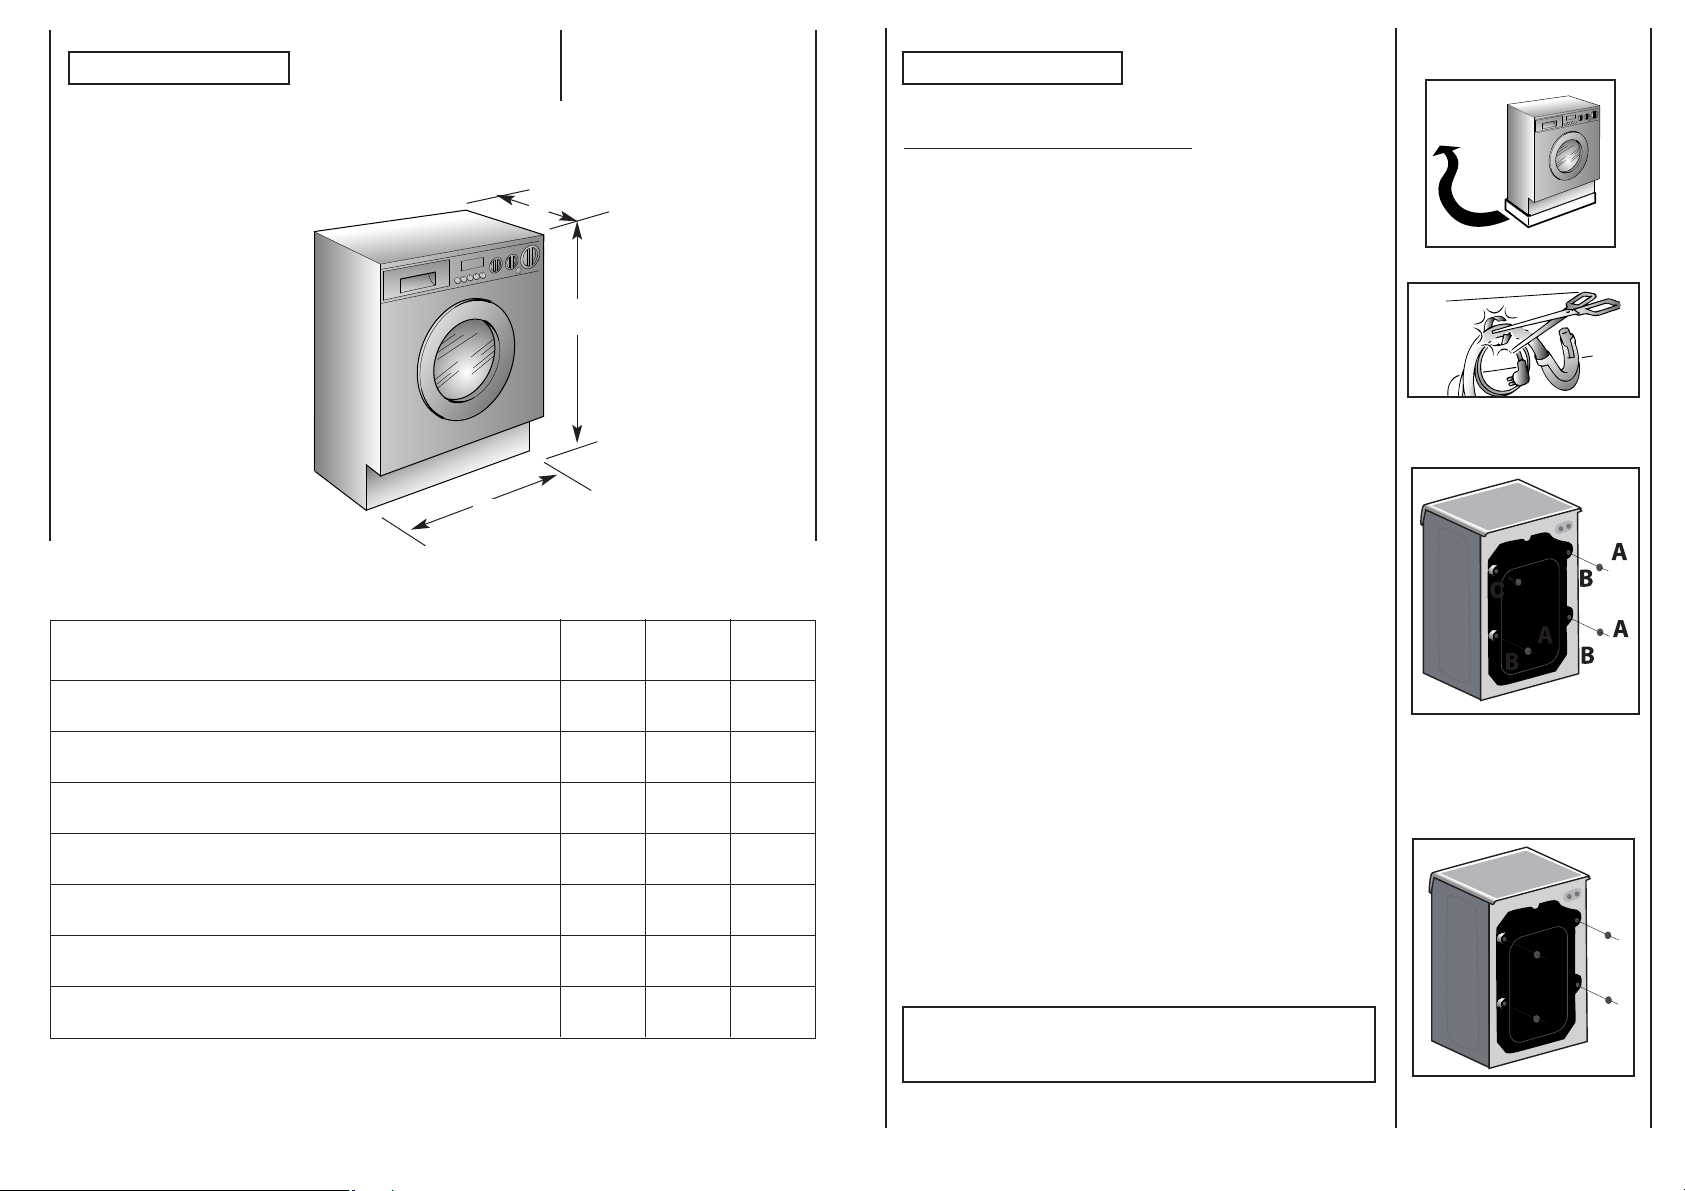
● Lift the appliance in pairs as illustrated in the diagram.
● In the case of failure and/or incorrect operation,turn the
washing machine off,close the water inlet tap and do not
tamper with the appliance. Contact a Technical Assistance
Centre for any repairs and ask for original spare parts.
Avoidance of these norms may compromise the safety of
the appliance.
● Before opening the washing machine door,ensure that
there is no water in the drum.
● Should the supply cord (mains cable) be damaged,this is
to be replaced by a specific cable available from the after
sales service centre.
76
CHAPTER 4
CHAPTER 5
SETTING UP INSTALLATION
TECHNICAL DATA
MAXIMUM WASH LOAD DRY
POWER INPUT
54 cm
60 cm
82 cm
kg
W
WASHING
64
2150
DRYING
Move the machine near its permanent position without the
packaging base.
Cut tube-holding straps.
Remove the 3 fixing screws marked (A) and remove the 3
spacers marked (B)
Remove the screw (C).
A spacer will fall inside the machine.
By tilting the machine, remove the above mentioned spacer.
ENERGY CONSUMPTION (PROG.90°C)
FUSE RATING
SPIN
WATER PRESSURE
SUPPLY VOLTAGE
kWh
A
r.p.m.
MPa
V
1,8
13
1400
min. 0,05
max. 0,8
230
Stop the holes using the plugs that you will find inside the
bag containing the instruction booklet.
WARNING:
DO NOT LEAVE THE PACKAGING IN THE REACH OF
CHILDREN AS IT IS A POTENTIAL SOURCE OF DANGER.
8
9

A
B
C
min 50 cm
max 85 cm
+2,6 mt max
max 100 cm
min 4 cm
Fix the sheet of corrugated material on the bottom as shown
in picture.
Connect the fill hose to the tap.
The appliance must be connected to the water mains using
new hose-sets.The old hose-sets should not be reused.
Use the 4 feet to level the machine with the floor:
a) Turn the nut clockwise to release the screw adjuster of the
foot.
b) Rotate foot to raise or lower it until it stands firmly on the
ground.
IMPORTANT:
DO NOT TURN THE TAP ON AT THIS TIME.
Position the washing machine next to the wall.Hook the
outlet tube to the edge of the sink paying attention that
there are no bends or restrictions along the tube.
It is better to connect the discharge hose to a fixed outlet of
a diameter greater than that of the outlet tube and at a
height of min. 50 cm. If is necessary to use the plastic sleeve
supplied.
The appliance must not be installed behind a lockable door,
a sliding door or a door with a hinge on the opposite side to
that of the washer dryer.
Please refer to diagrams below for various installation
options.
c) Lock the foot in position by turning the nut anti-clockwise
until it comes up against the bottom of the machine.
Ensure that the knob is on the “OFF” position and the load
door is closed
Insert the plug.
After installation, the appliance must be positioned so that
the plug is accessible.
10
11
REMO
If your appliance has a non-rewireable moulded plug and you should wish to re-route the
mains cable through partitions, units etc., please ensure that either:
the plug is replaced by a fused 13 ampere re-wireable plug bearing the BSI mark of approval.
or:
the mains cable is wired directly into a 13 amp cable outlet, controlled by a switch, (in
compliance with BS 5733) which is accessible without moving the appliance.
VING THE PLUG:
DISPOSING OF THE PLUG:
Ensure that before disposing of the plug itself, you make the pins unusable so that it cannot be
accidentally inserted into a socket.
CHAPTER 6
Q
D
C
E
MG
FB
INSTRUCTIONS FOR CONNECTING CABLE TO
AN ALTERNATIVE
PLUG:
Important: the wires in the mains lead are coloured in accordance with the following code:
Green & Yellow Earth
Blue Neutral
Brown Live
As the colours of the wires in the lead may not correspond with the coloured markings
identifyng the terminals in your plug, proceed as follows:
Connect Green & Yellow wire to terminal marked E or or coloured Green or Green &
Yellow. Connect Brown wire to terminal marked L or coloured Red.
Connect Blue wire to terminal marked N or coloured Black.
If a 13 amp plug (BS 1363) is used it must be fitted with a 13 amp fuse either in the plug or
adaptor or at the distribution board. If you are in any doubt the electrical supply to your
machine, consult a qualified electrician before use.
HOW TO CONNECT AN ALTERNATIVE PLUG:
The wires in this mains lead are coloured in accordance with the following code:
BLUE NEUTRAL(N)
BROWN LIVE(L)
GREEN&YELLOW EARTH(E)
DISPOSING OF THE APPLIANCE:
When disposing of the appliance please remove the plug by
cutting the mains cable as close as possible to the plug body
and dispose of it as described above.
H
R
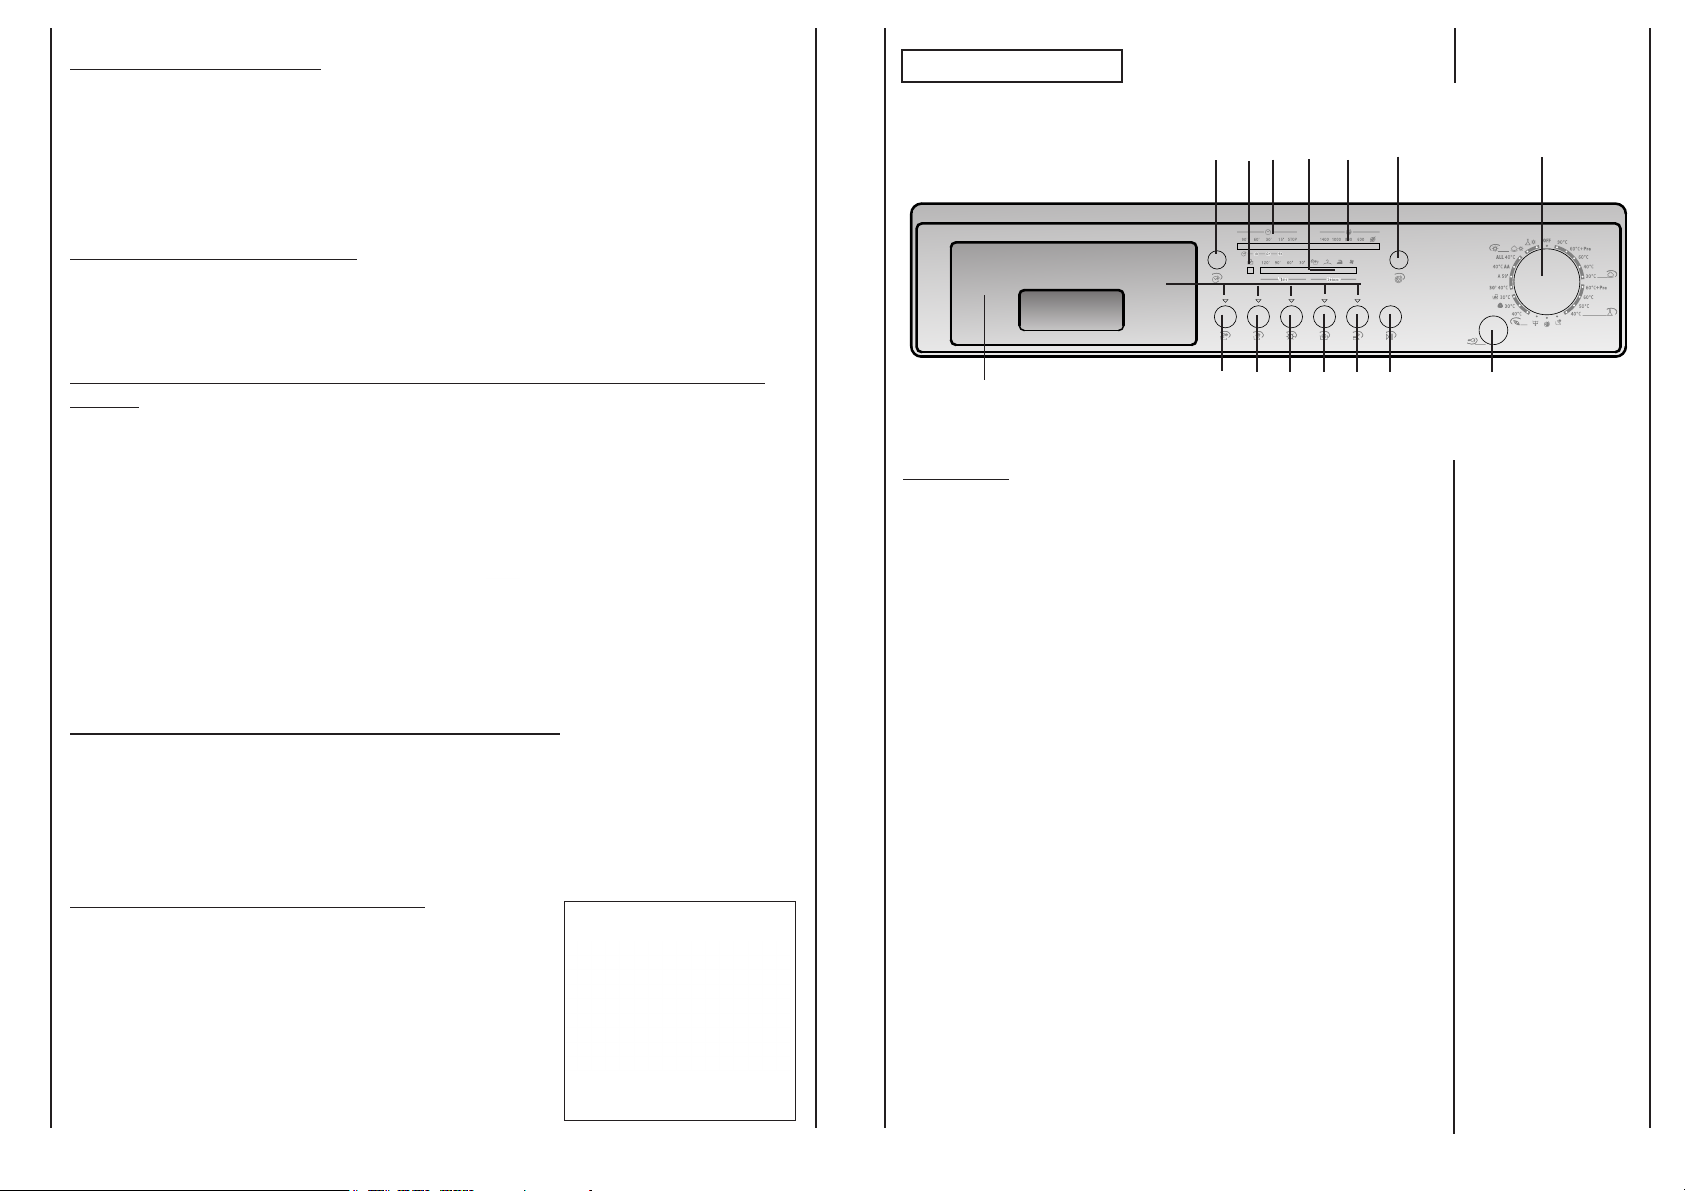
CONTROLS
Door open button
Programme selector with “OFF” position
"Door Security" indicator light
"Delay Start" button
"Time countdown system" and “Delay Start” indicator lights
"Spin Selection" button
Spin speed indicator light
"Super Rapid" button
"Extra Rinse" button
"Drying Selection" button
Drying programme indicators
"Cold Wash" button
“Crease Guard” button
"Start/Pause" button
Buttons indicator light
Detergent drawer
ILNOP A
A
B
C
D
E
F
G
H
I
L
M
N
O
P
Q
R
12
13
 Loading...