

Page 1
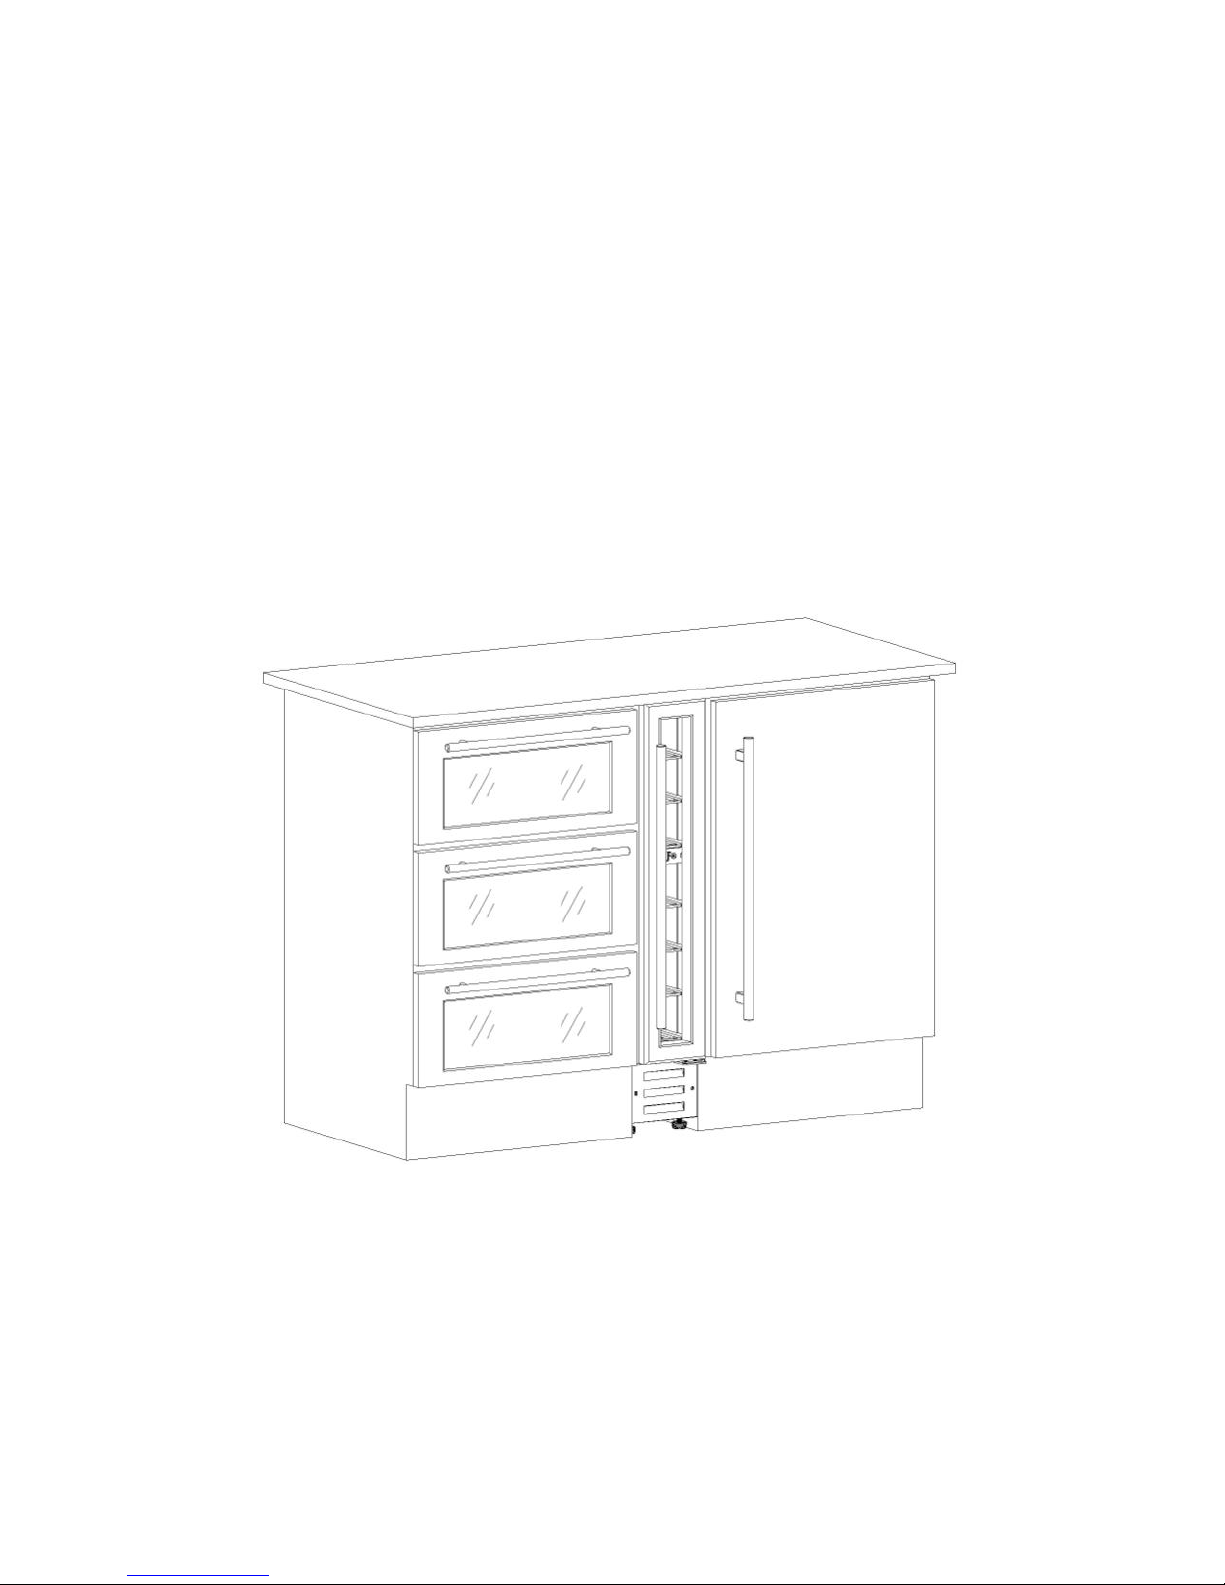
INSTRUCTION MANUAL
BUILT-IN WINE COOLER
Model No.: WC150
BEFORE USE, PLEASE READ AND FOLLOW ALL SAFETY RULES AND OPERATING
INSTRUCTIONS.
Page 2

Important Safeguards
When using an electrical appliance, basic
precautions should always be followed to
reduce the risk of fire, electric shock, and
injury to persons, including the following:
For Your Safety
Read all instructions carefully, even if you are
quite familiar with the appliance.
Use this appliance only as described in this
manual. Other uses not recommended may
cause fire, electric shock or personal injury.
This appliance is not intended for use by young
children or infirm persons unless they have been
adequately supervised by a responsible person
to ensure that they can use the appliance safely.
Young children should be supervised to ensure
that they do not play with the appliance.
To protect against the risk of electric shock, DO
NOT IMMERSE the unit, cord, or plug in water
or spray any other liquid.
Unplug the appliance from the plug socket when
not in use, when moving from one location to
another and before cleaning.
To disconnect the appliance, grip the plug and
pull it from the wall outlet. Never pull by the cord.
Do not operate the appliance in the presence of
explosive and/or flammable fumes.
Do not place the appliance or any of its part near
an open flame, cooking or other heating
appliance.
Do not operate the appliance with a damage
cord or plug, if the product malfunctions, or if it is
dropped or damaged in any manner.
The use of attachments not recommended by
the manufacturer may be hazardous.
Place the unit on a dry level surface.
Do not operate if the housing is removed or
damaged.
A loose fit between the AC outlet (receptacle)
and plug may cause overheating and a distortion
of the plug. Contact a qualified electrician to
replace loose or worn outlet.
Locate the unit away from direct sunlight and
sources of heat (stove, heater, radiator, etc.).
This appliance is CFC- and HFC-free.
Ensure that the ventilation openings to and from
a built-in appliance are never blocked or covered.
No liability will be accepted for any damage
incurred owing to misuse of the appliance or as
a result of repairs carried out by unqualified
personnel. In this case neither the guarantee nor
any other liability claims will apply.
WARNING: Do not operate any electrical
appliance inside the appliance.
Do not attempt to repair or replace any part of
your appliance unless it is specifically
recommended in this manual. All other servicing
should be referred to a qualified technician.
Replace all panels before operating.
Use two or more people to move and install the
appliance. Failure to do so can result in back or
other injury.
Never clean appliance parts with flammable
fluids. These fumes can create a fire hazard or
explosion. And do not store or use gasoline or
other flammable vapors and liquids in the vicinity
of this or any other appliance. The fumes can
create a fire hazard or explosion.
Do not connect or disconnect the electric plug
when your hands are wet.
It is recommended that a separate circuit,
serving only your appliance be provided. Use
receptacles that cannot be turned off by a switch
or pull chain.
INDOOR USE ONLY – this unit is not intended
for outdoor use.
Page 3

3
Save These Instructions
If you are experiencing problems, check the
Troubleshooting Guide at the back of this manual. It
lists causes of minor operating problems that you
can correct yourself.
Disposal of Old Appliance
Dispose of your appliance packaging properly.
Refrigeration equipment must be properly disposed
of in a way which protects the environment. This
applies to your old appliance and to your new unit
once it has reached the end of its service life.
WARNING: Please ensure that old, worn appliances
are rendered unusable before disposal by removing
the plug, cutting the network cable, and removing or
destroying any snap fastenings or bolts. You will
thus prevent children from locking themselves in the
appliance during play (risk of suffocation) or
endangering their lives in any other way.
Disposal instructions:
The appliance must not be disposed of in the
dustbin or with normal household rubbish.
The
symbol on the product or its packaging
indicates that this product is not to be handled
as normal household waste but is to be taken to
a recycling collection point for electrical and
electronic goods. By correctly disposing of this
product you are contributing to the protection of
the environment and to the health of your fellow
human beings. Improper disposal endangers
health and the environment. Further information
about the recycling of the product may be
obtained from your town hall, refuse collection
department or the store where you purchased
the product.
WARNING: To reduce the risk of fire,
electric shock or personal injury, unplug
or disconnect the appliance from the
power supply before servicing.
Page 4
4
Connection to the Mains
Supply
Check that the voltage marked on the product
corresponds with your supply voltage.
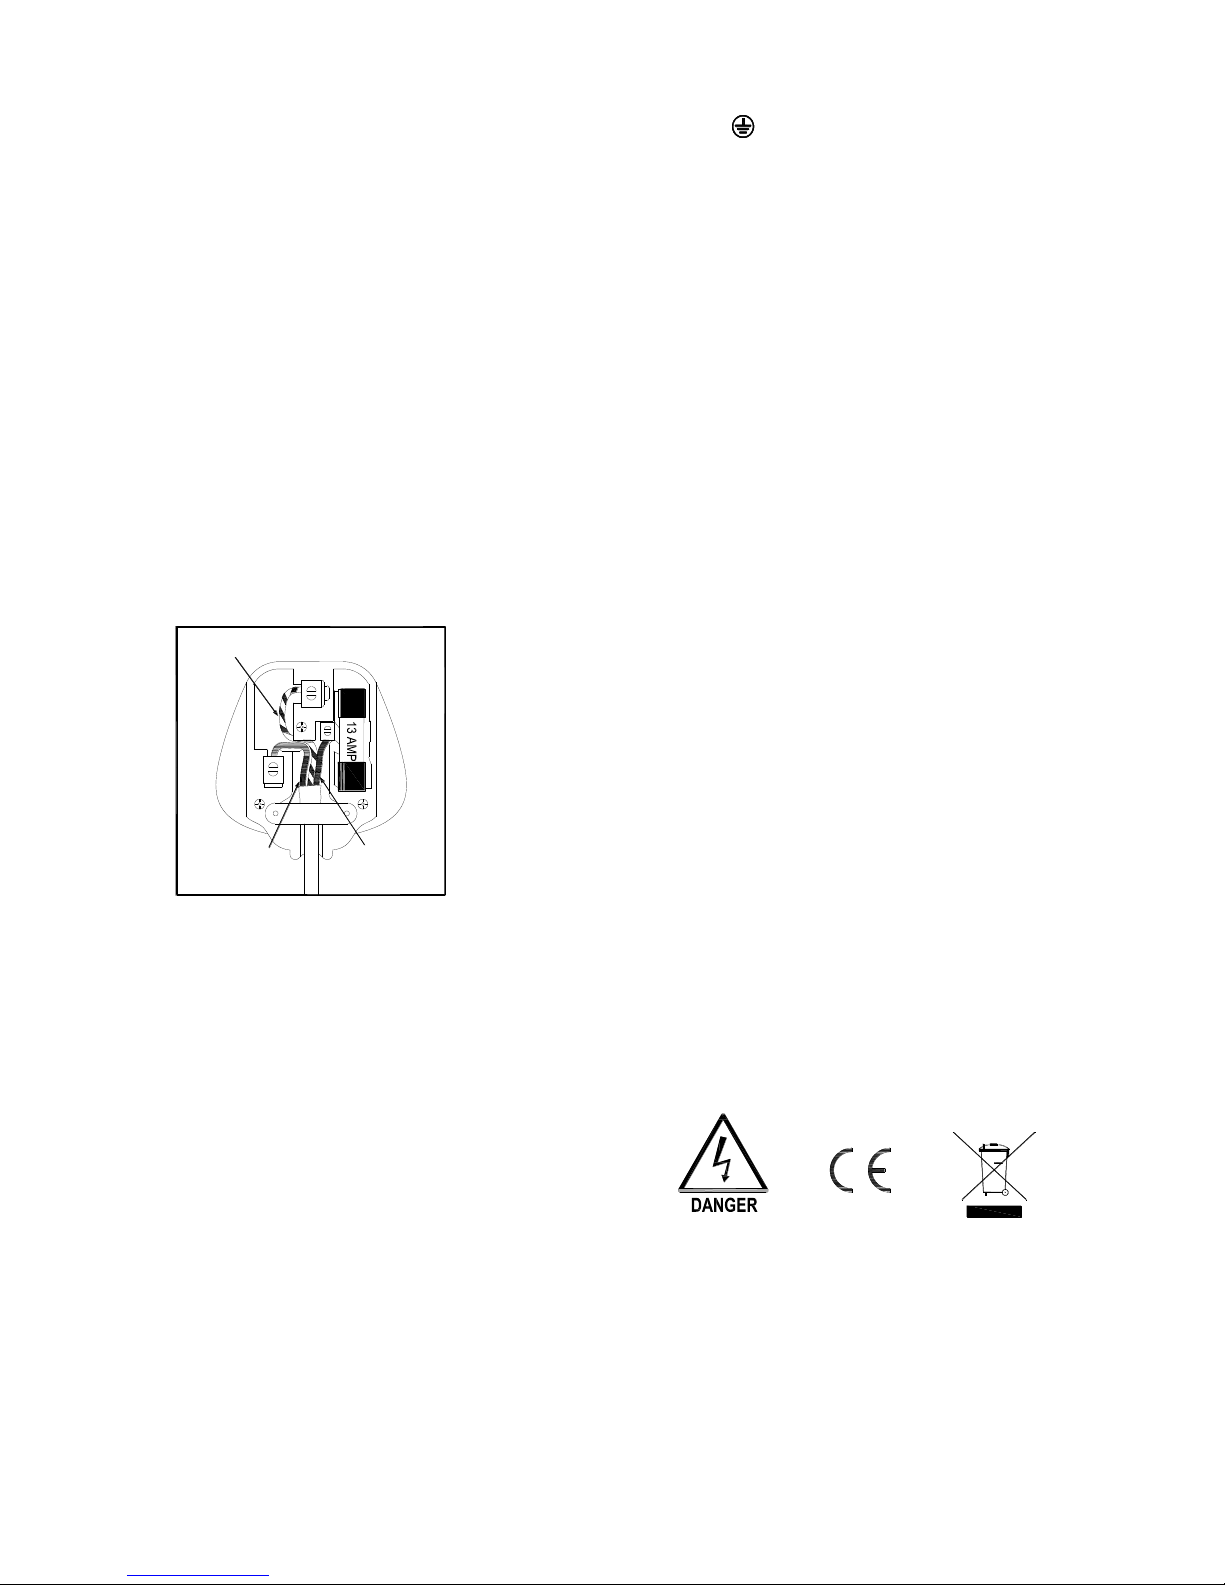
This product is fitted with a 13A plug complying with
BS1363. If this plug is unsuitable or needs to be
replaced, please note the following:
WARNING:
THIS APPLIANCE MUST BE EARTHED.
Important: The wires in the mains lead are coloured
in accordance with the following code:
GREEN/YELLOW - EARTH
BLUE - NEUTRAL
BROWN - LIVE
This appliance is equipped with a plug fitted with a
13 amp fuse. Should the fuse fail, then it must be
replaced with an ASTA approved fuse (conforming
to BS1362) of the same rating. If you need to
replace the plug or if the plug is of the incorrect type
for your socket, remove it and replace it with an
appropriate type. Dispose of the old plug safely.
As the colors of the wires in the mains lead of this
appliance may not correspond with the colored
markings identifying the terminals in your plug,
proceed as follows: The GREEN/YELLOW wire is
the EARTH and must be connected to the terminal
which is marked with the letter ‘E’ or by the earth
symbol or colored GREEN or
GREEN/YELLOW.
The BLUE wire is the NEUTRAL and must be
connected to the terminal which is marked with the
letter ‘N’ or colored BLACK.
The BROWN wire is the LIVE wire and must be
connected to the terminal which is marked with the
Letter „L’ or colored RED.
Always ensure that the plug cord grip is fastened
correctly.
If in doubt consult a qualified electrician who will be
pleased to do this for you. This product conforms to
EC Directive 92/31 /EEC with respect to
Electromagnetic Compatibility.
NON-REWIREABLE MAINS PLUG
If your appliance is supplied with a nonrewireable
plug fitted to the mains lead, you will find that it
incorporates a fuse, the value of which is indicated
either on the base of the plug or on the fuse carrier.
Should the fuse need replacing, you must use an
ASTA approved one (conforming to BS1362) of the
same rating.
If the fuse cover is lost, the plug must not be used
until a replacement is obtained from an electrical
supplier.
If you need to remove the plug, cut it from the mains
lead and immediately dispose of it. Never attempt to
re-use this plug or insert it into a socket outlet as
there is a very great risk of an electric shock.
Electric
Shock Risk
Neutral
(Blue)
Earth
(Green/Yellow)
Live
(Brown)
Page 5
5
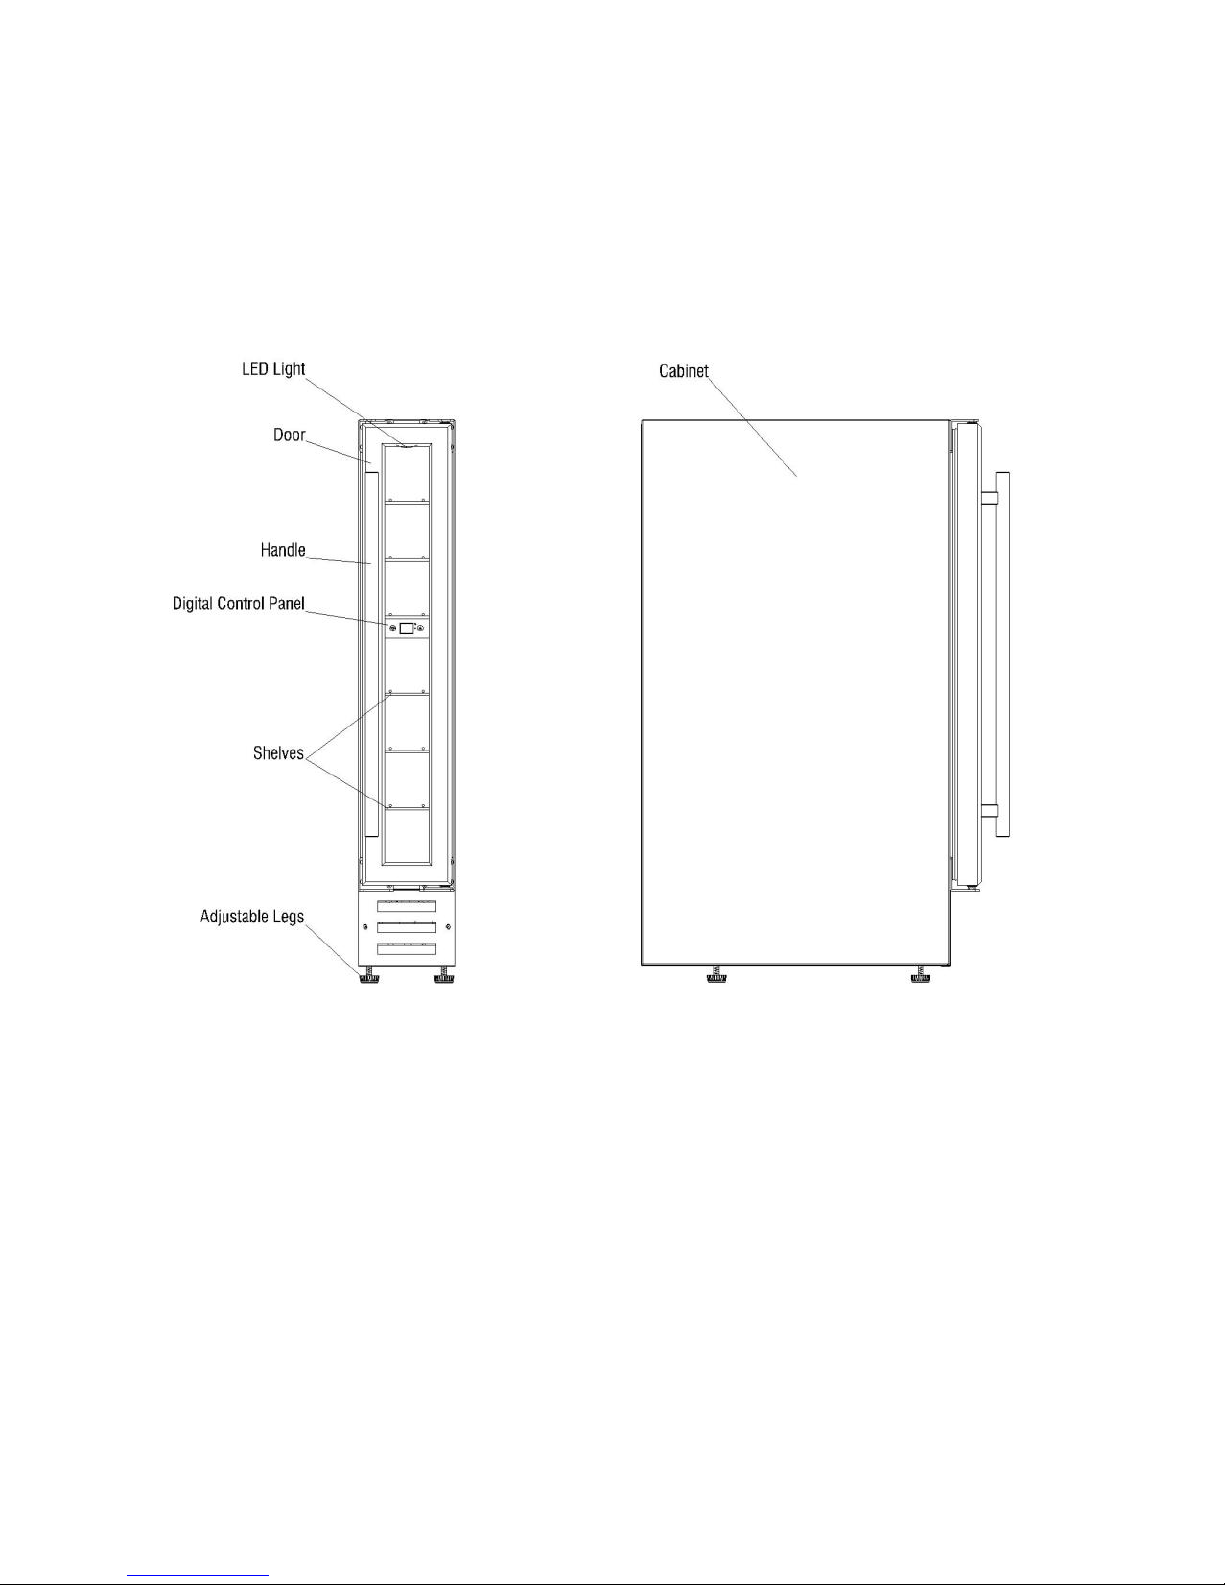
Features of Your Wine Cooler
Page 6
6
Installation Instructions
Before Using Your Wine Cooler
Remove all exterior and interior packing.
Clean the interior surface with lukewarm water
using a soft cloth.
The door on this appliance can be opened from
either the left or the right side. The unit is
delivered with the door opening on the left side.
Should you wish to open the door from the right,
follow the instructions „Reversing the door swing
of your appliance‟.
Installation of Your Wine Cooler
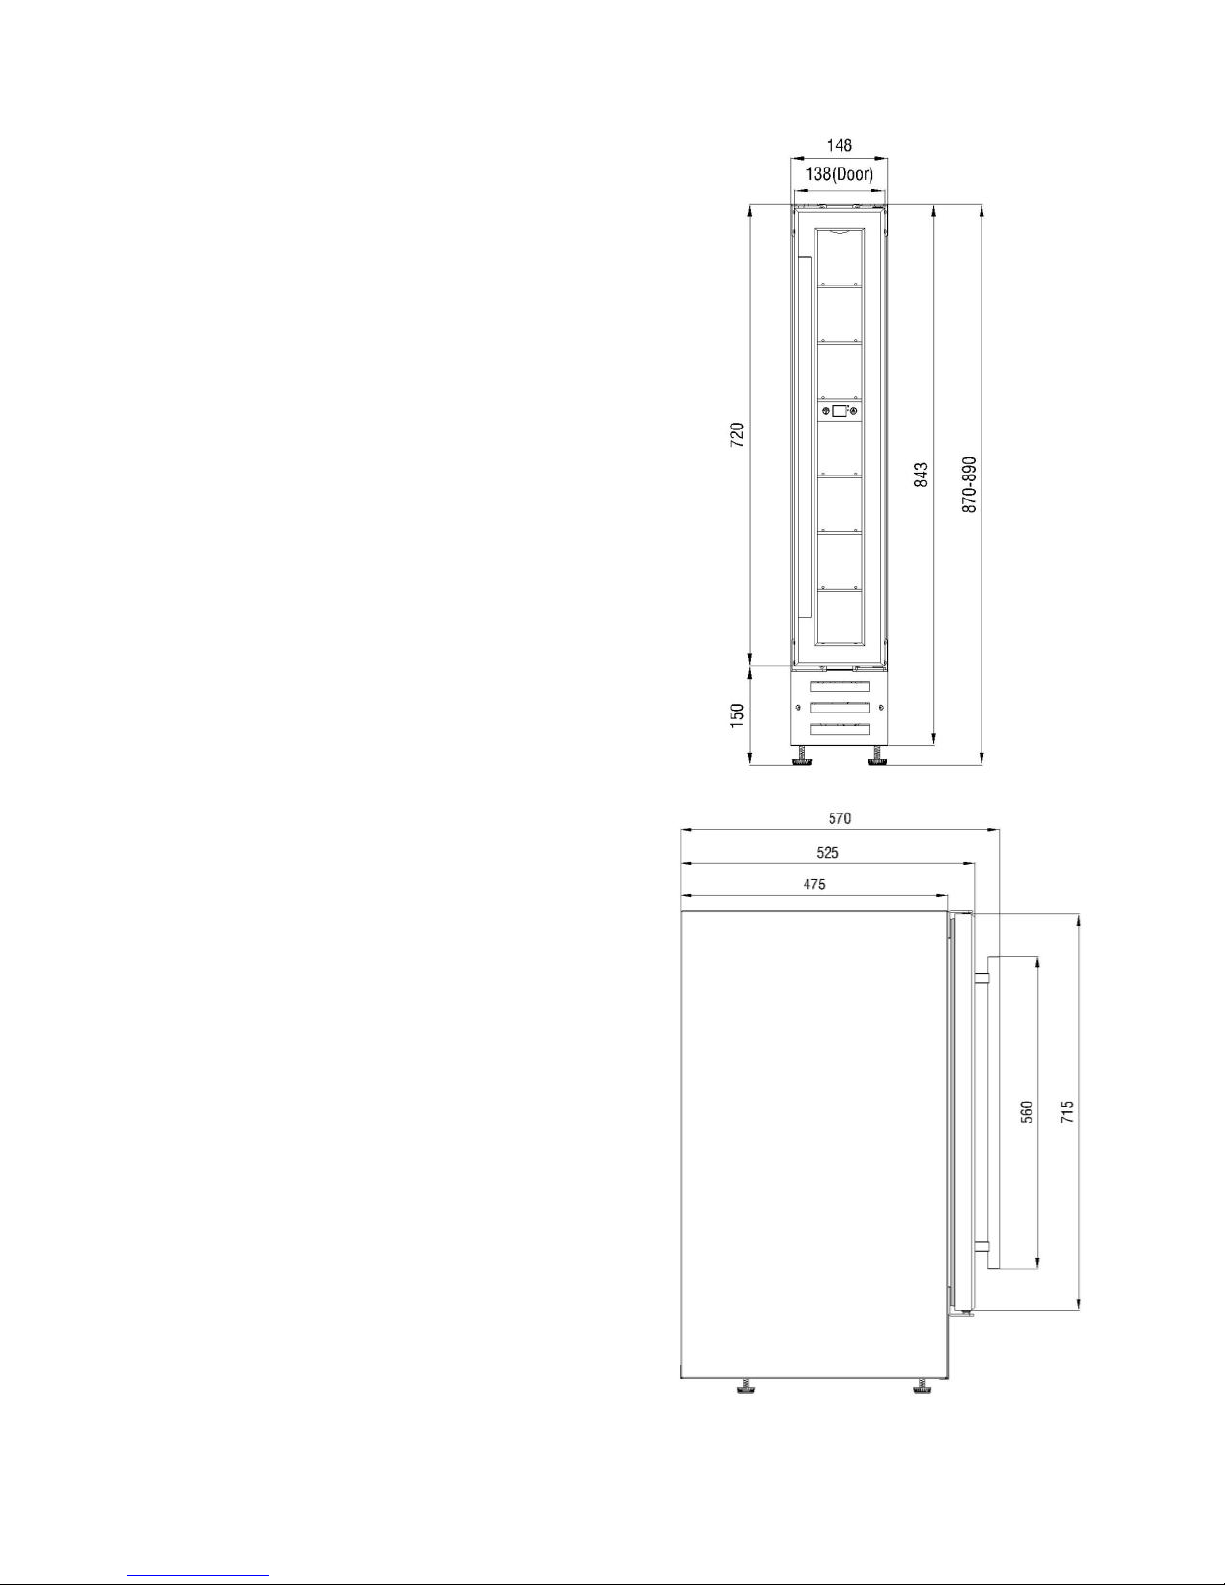
The appliance is designed to be built in between
kitchen cabinets and is supplied with adjustable
feet that can be altered to fit various worktop
heights. This wine cooler is fully compatible with
any 600mm deep kitchen unit.
Place your Wine Cooler on a floor that is strong
enough to support it when it is fully loaded. To
level your Wine Cooler, adjust the leveling leg at
the bottom of the Wine Cooler.
Locate the Wine Cooler away from direct
sunlight and sources of heat (stove, heater,
radiator, etc.). Direct sunlight may affect the
acrylic coating and heat sources may increase
electrical consumption. Extreme cold ambient
temperatures may also cause the unit not to
perform properly.
Avoid locating the unit in damp areas.
Plug the Wine Cooler into an exclusive, easily
accessible plug socket. Any questions
concerning power and/or earthing should be
directed towards a qualified electrician or an
authorized products service centre.
The air vent at the front of the appliance must
never be covered or blocked in any way.
The appliance must be installed to all electrical,
plumbing, water and drain connections in
accordance with state and local codes.
Page 7
7
Built-in Cabinet Instructions
This unit is designed for both built-in or free standing
installation. If you plan to use this unit in a built-in
application please follow the requirements shown to
the below.
Cabinet Opening Dimensions (min)
Width
15 cm
Depth
60 cm
Height
87 cm
Attention
Store wine in sealed bottles.
Do not overload the cabinet.
Do not open the door unless necessary.
Do not cover shelves with aluminum foil or any
other shelf material which may prevent air
circulation.
Should the wine cooler be left empty for long
periods it is suggested that the appliance is
unplugged, and after careful cleaning, leave the
door ajar to allow air to circulate inside the
cabinet in order to avoid possible condensation,
mold or odours forming.
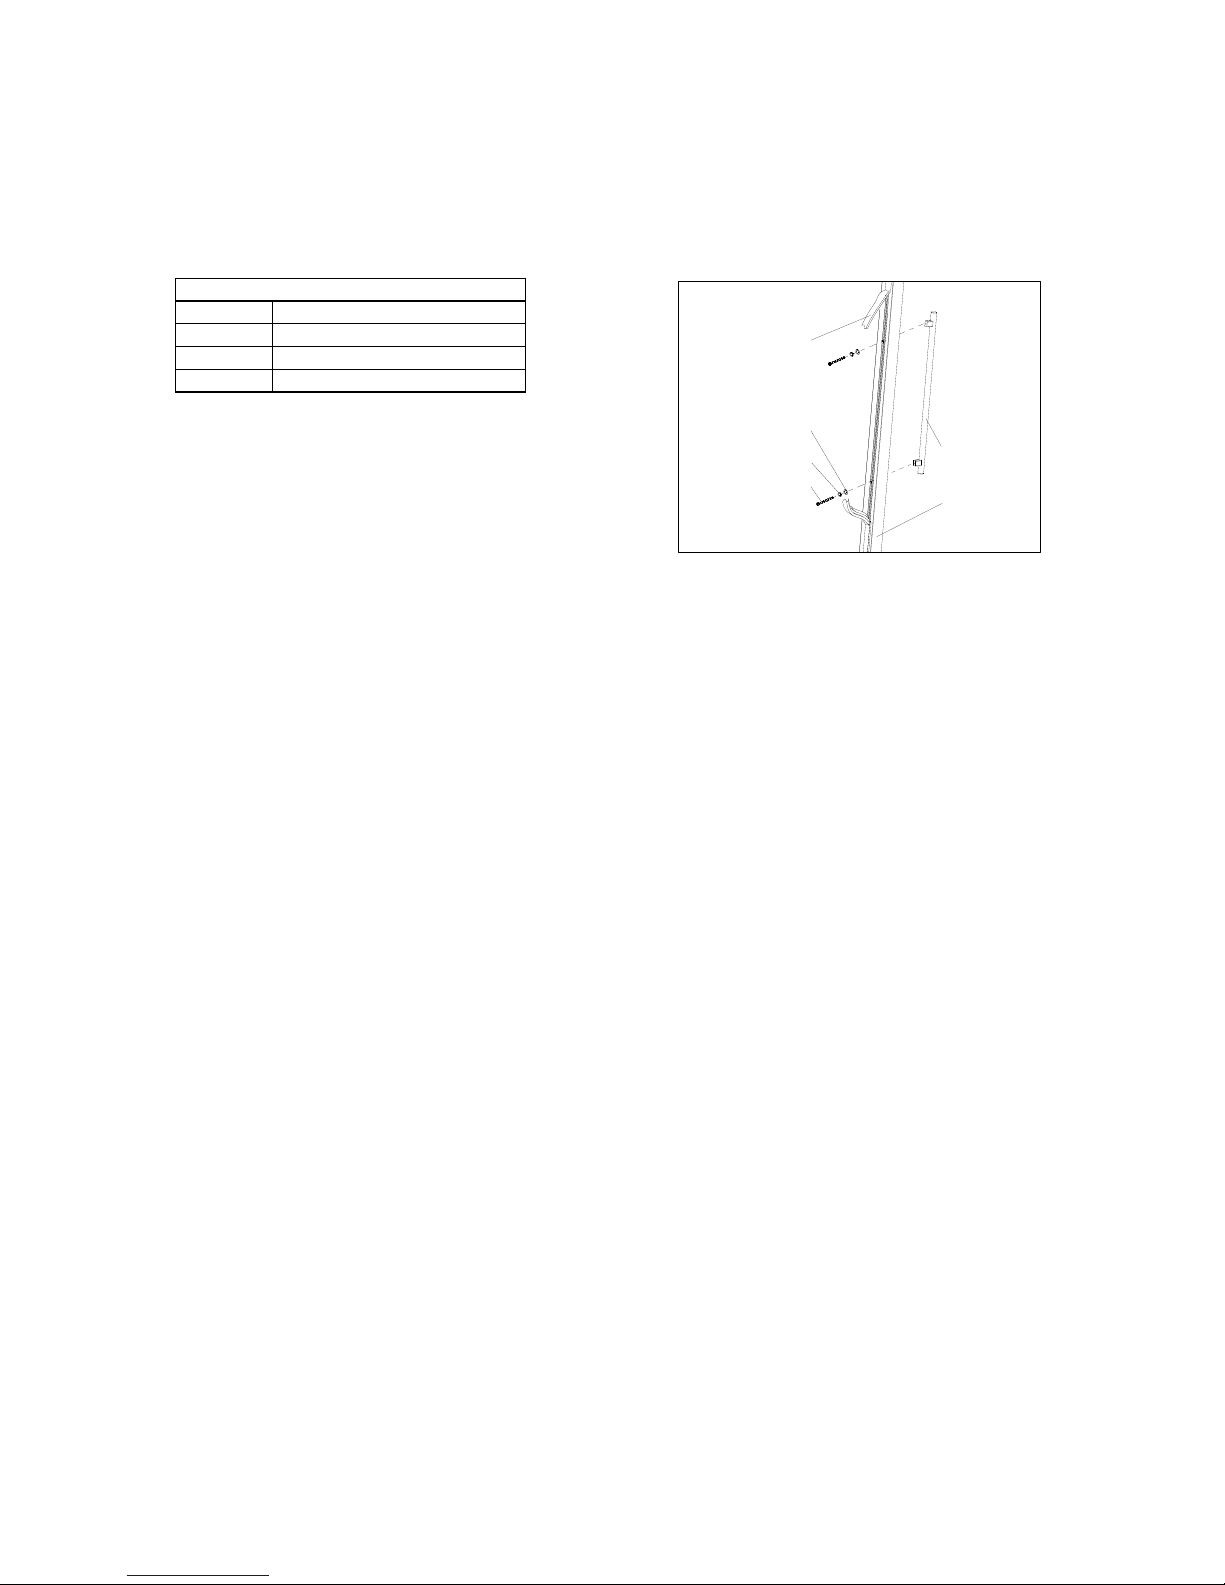
Installing the Handle
1. Remove the door gasket on the side you wish
to install the handle - you can see two
designated holes for handle installation.
2. Install the handle tightly as shown above with
two screws, lock washers and flat washers
provided.
3. Replace the door gasket.
Handle
Door Frame
Gasket
Screw
Lock Washer
Flat Washer
Page 8

8
Electrical Connection
Check that the voltage marked on the product
corresponds with your supply voltage.
WARNING: Improper use of the grounded plug
can result in the risk of electrical shock. If the power
cord is damaged, have it replaced by a qualified
electrician or an authorized service center.
This appliance should be properly grounded for your
safety. The power cord of this appliance is
equipped with a three pins plug which mates with
standard three pins wall outlets to minimize the
possibility of electrical shock.
Do not under any circumstances cut or remove the
third ground prong from the power cord supplied.
For personal safety, this appliance must be properly
grounded.
This appliance requires a standard 220-240 Volt AC
~50Hz electrical ground outlet with three pins. Have
the wall outlet and circuit checked by a qualified
electrician to make sure the outlet is properly
grounded. When a standard 2 pins wall outlet is
encountered, it is your responsibility and obligation
to have it replaced with a properly grounded 3 pins
wall outlet.
The cord should be secured behind the appliance
and not left exposed or dangling to prevent
accidental injury.
The appliance should always be plugged into its
own individual electrical outlet which has a voltage
rating that matches the rating label on the appliance.
This provides the best performance and also
prevent overloading house wiring circuits that could
cause a fire hazard from overheated. Never unplug
the appliance by pulling the power cord. Always
grip the plug firmly and pull straight out from the
receptacle. Repair or replace immediately all power
cords that have become frayed or otherwise
damaged. Do not use a cord that shows cracks or
abrasion damage along its length or at either end.
When moving the appliance, be careful not to
damage the power cord.
Electrical fuse protection of at least 10 amperes
must be provided. If the socket is no longer
accessible once the appliance has been built-in,
suitable measures must be taken during electrical
installation to ensure that the appliance can be
disconnected from the mains.
Do not use your appliance with an extension cord
unless this cord has been checked and tested by a
qualified technician or service person. The extension
cord must be a VED-Listed, 3-wire grounding
extension cord that has a grounding plug and outlet
and that the electrical rating of the cord is 220-240
volts and at least 10 amperes.
Page 9
9
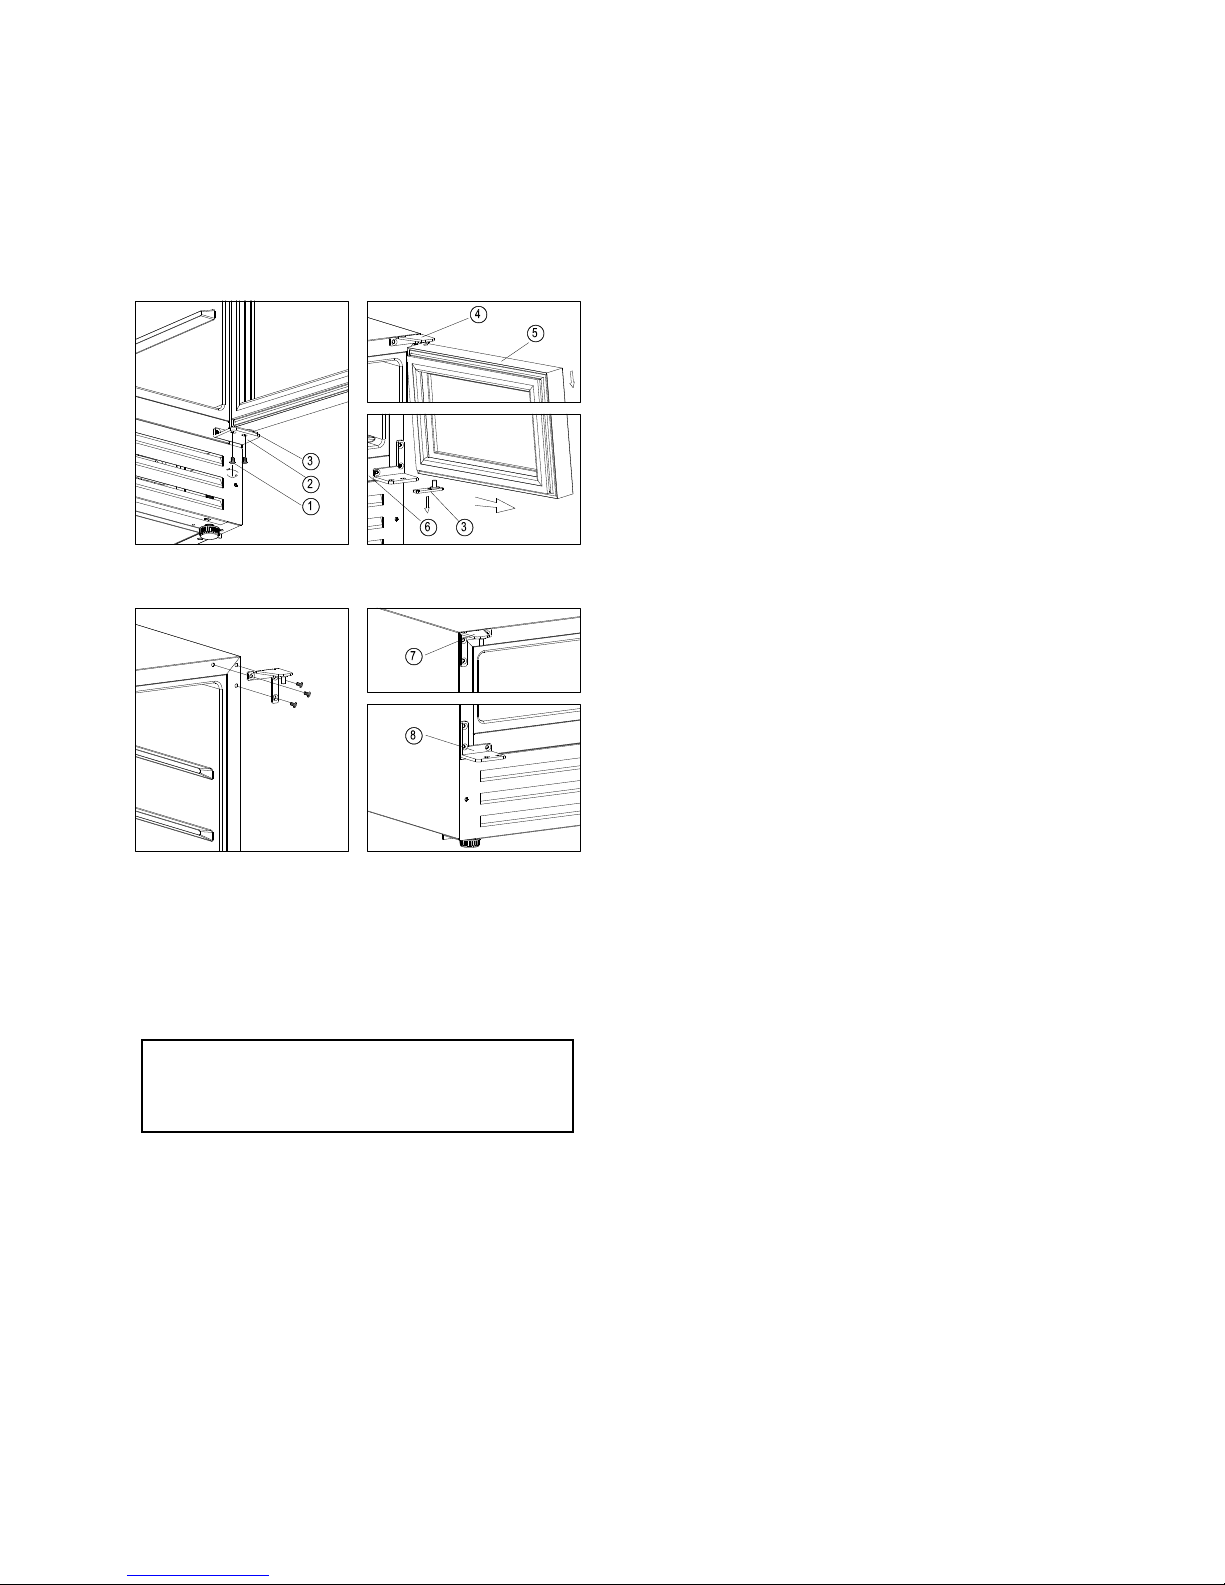
Reversing the Door Swing
of Your Appliance
Should you desire to reverse the opening direction, please
follow the instructions below.
1. Open the glass door and remove the two
screws under the right bottom corner of the
glass door that are used to hold the right lower
hinge to the door shaft assembly. Be careful to
support the glass door with hands to prevent it
dropping after removing the screws. (Figure 1)
2. Pull down to remove the glass door and place
it on a padded surface to prevent scratching it.
(Figure 2)
3. Remove the right top hinge and right lower
hinge. (Figure 3). Remove the left top hinge
and left lower hinge from the plastic bag that
includes the instruction manual then install
them at the designated positions at the left
side of cabinet. (Figure 4)
4. Turn around the glass door 180° and reinstall
it.
Figure 3 Figure 4
Figure 1 Figure 2
① Lock Screws
② Right Lower Hinge
③ Door Shaft Assembly
④ Right Top Hinge
⑤ Door
⑥ Cabinet
⑦ Left Top Hinge
⑧ Left Lower Hinge
Note: All parts removed must be
saved to do the reinstallation of door.
Page 10
10
Operating Your
Wine Cooler
The Wine Cooler should be placed in a position
where the ambient temperature is below 25°C. If the
ambient temperature is above the recommended
temperature, the performance of the unit may be
affected. For example, placing your unit in extreme
cold or hot conditions may cause interior
temperatures to fluctuate. The range of 8 -18°C may
not be reached.
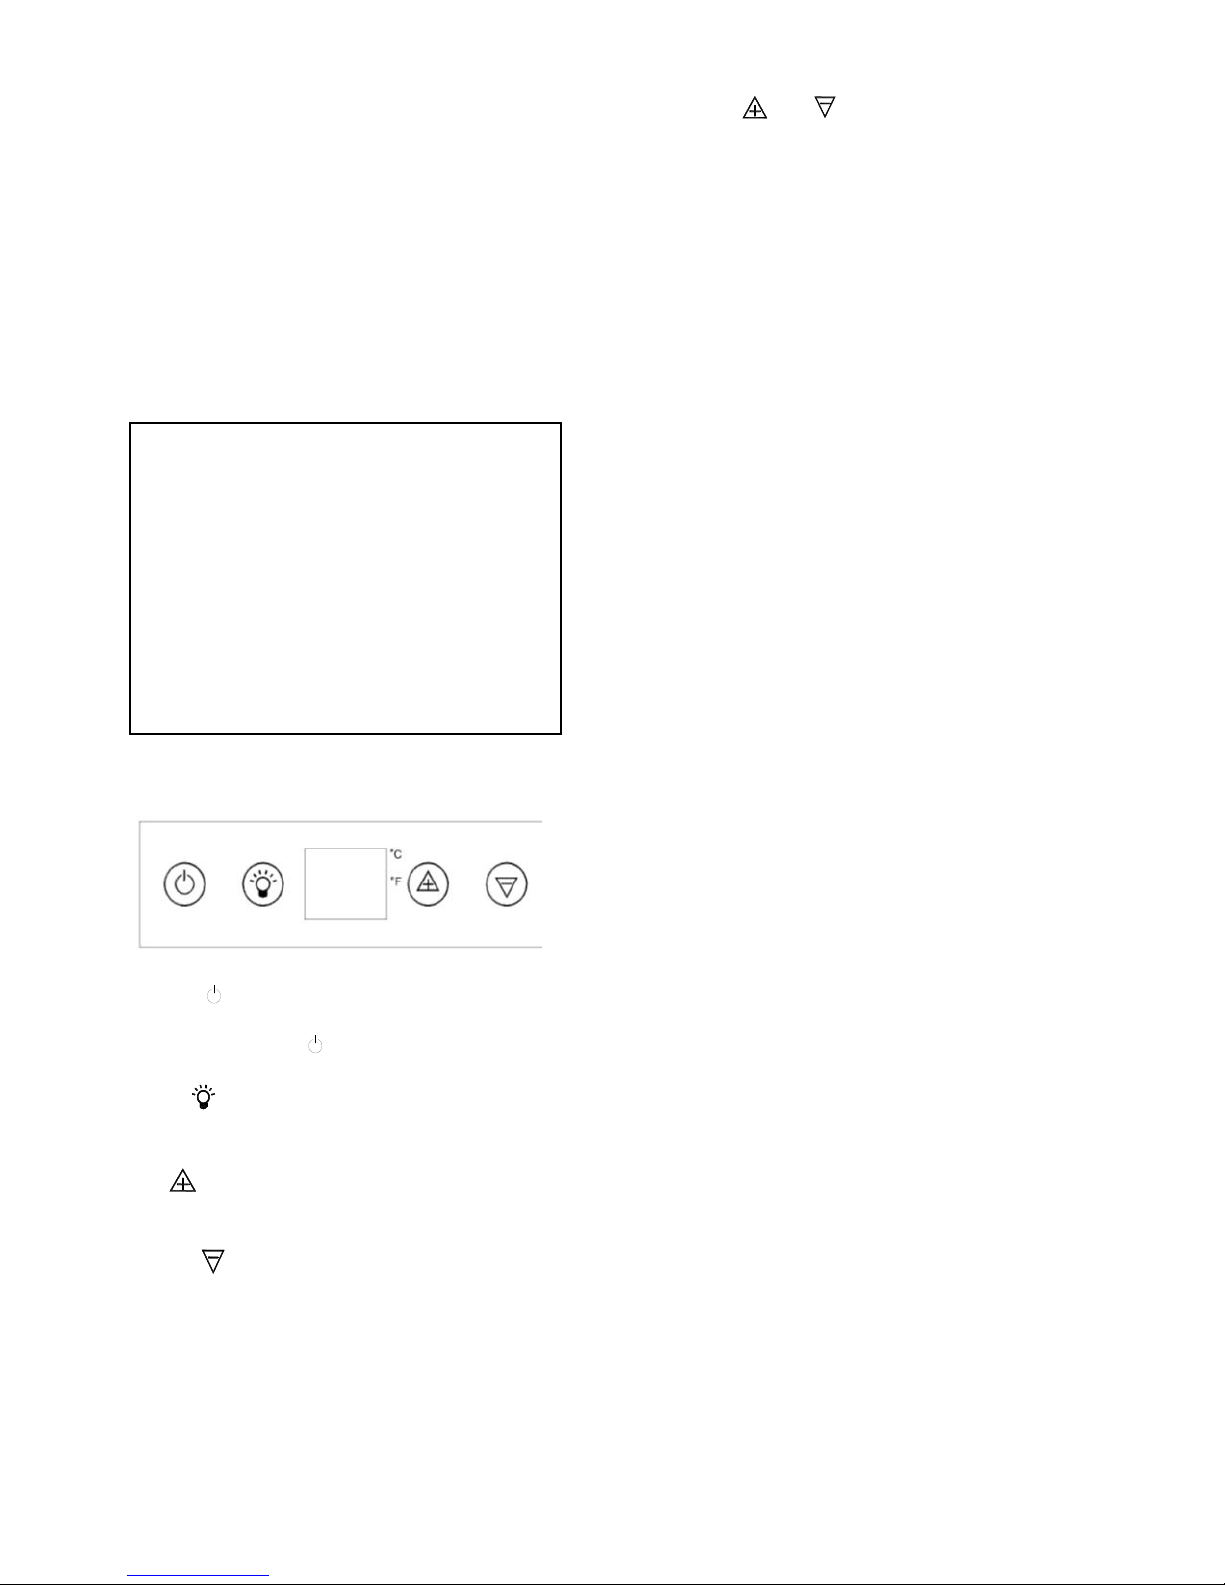
The Controls of Your Wine Cooler
POWER
To control this appliance turn on/off. To turn OFF the
appliance, touch the mark and hold 5 seconds.
LIGHT
To control the inner light turn on/off.
UP
Used to raise (warm) the set temperature by 1°C.
DOWN
Used to lower (cool) the set temperature by 1°C.
ºF/ºC Selector
Select the temperature display setting in Fahrenheit
or Celsius degree. To change the temperature from
Fahrenheit to Celsius or from Celsius to Fahrenheit,
touch the and marks at the same time for 5
seconds.
Setting the Temperature Control
You can set the temperature as required by
touching the UP or DOWN mark. When you
touch the two marks for the first time, the LED
readout will show the original temperature set
previously (the temperature preset at the factory
is 12°C).
The temperature will increase 1°C if you touch
the UP mark once, or the temperature will
decrease 1°C if you touch the DOWN mark once.
To view the “set” temperature at any time, touch
the UP or DOWN mark, the “set” temperature
will temporarily “flash” in the LED display for 5
seconds.
The internal storage temperature will appear in
blue color in the temperature display window.
Defrosting
The unit defrosts automatically.
Note:
When you use the Wine Cooler for the
first time or restart the Wine Cooler after
having been shut off for a long time,
there could be a few degrees variance
between the temperature you select and
the one indicated on the LED readout.
This is normal and it is due to the length
of the activation time. Once the Wine
Cooler is running for a few hours
everything will be back to normal.
Page 11

11
Care and Maintenance
Removing Shelves
To remove any of the shelves from the rail
compartment, make sure to open the door fully
to 180° position.
Cleaning Your Wine Cooler
Turn off the power, unplug the appliance, and
remove all items including shelves and rack.
Wash the inside surfaces with a warm water and
baking soda solution. The solution should be
about 2 tablespoons of baking soda to a pint of
water.
Wash the shelves with a mild detergent solution.
Wring excess water out of the sponge or cloth
when cleaning any area of the controls.
Wash the outside cabinet with warm water and
mild liquid detergent. Rinse well and wipe dry
with a clean soft cloth.
Power Failure
Most power failures are corrected within a few
hours and should not affect the temperature of
your appliance if you minimize the number of
times the door is opened. If the power is going to
be off for a longer period of time, you need to
take the proper steps to protect your contents.
Vacation Time
Short holidays: Leave the Wine Cooler in
operation for holidays of less than three weeks.
Long absences: If the appliance will not be
used for several months, remove all items, turn
off the appliance and unplug. Clean and dry the
interior thoroughly. To prevent odour and mold
growth, leave the door open slightly: blocking it
open if necessary.
Moving Your Wine Cooler
Remove all items.
Securely tape down all loose items (shelves)
inside your appliance.
Turn the adjustable leg up to the base to avoid
damage.
Tape the door shut.
Be sure the appliance stays secure in the upright
position during transportation. Also protect
outside of appliance with a blanket, or similar
item.
Energy Saving Tips
The Wine Cooler should be located in the
coolest area of the room, away from heat
producing appliances, and out of the direct
sunlight.
Ensure that the unit is adequately ventilated.
Never cover air vents.
Only open the door for as long as necessary.
One characteristic of thermoelectric units is the
length of time it requires to recover from having
the door opened and shut frequently. It may be
necessary to wait longer for the temperature to
return to its former level once the door has been
opened for too long. This is normal for the type
of unit.
Page 12
12
Problems with Your Wine Cooler
You can solve many common Wine Cooler problems easily, saving you the cost of a possible service call.
Try the suggestions below to see if you can solve the problem before calling customer service.
Troubleshooting Guide
PROBLEM
POSSIBLE CAUSE
Wine Cooler does not operate.
Not plugged in.
The appliance is turned off.
The circuit breaker tripped or a blown fuse.
Wine Cooler is not cold enough.
Check the temperature control setting.
External environment may require a higher setting.
The door is opened too often.
The door is not closed completely.
The door gasket does not seal properly.
The air ventilation may be covered or blocked.
Abnormal voltage.
The light does not work.
Not plugged in.
The circuit breaker tripped or a blown fuse.
The light switch is “OFF”.
Vibrations.
Check to assure that the Wine Cooler is level.
The door will not close properly.
The Wine Cooler is not level.
The door was reversed and not properly installed.
The gasket is dirty.
The shelves are out of position.
 Loading...