

Belling
SCBI60FP / SCBI90FP
Built-in Electric UK
082760900 10/01/2013
Users Guide & Installation
Handbook
1.365

3.010
CONTENTS & INTRODUCTION
CONTENTS
• SAFETY
• USING THE PRODUCT
• CLEANING
• INSTALLATION INSTRUCTIONS
• TECHNICAL DATA
• CUSTOMER CARE
INTRODUCTION
Thank you for buying this Britishbuilt appliance from us.
This guide book is designed to help you
through each step of owning your new
cooker, from installation to use. Please
read it carefully before you start using
your product, as we have endeavored to
answer as many questions as possible,
and provide you with as much support
as we can.
If, however, you should nd something
missing, or not covered, please contact
our Customer Care team. Their number is
located on the back page of this book.
For customers outside the UK and
Northern Ireland, please contact your
local supplier.
When you dial this number you will hear
a recorded message and be given a
number of options. This indicates that
your call has been accepted and is
being held in a queue. Calls are answered
in strict rotation as our Customer care
representatives become available.
Alternatively, general information, spares
and service information is
available from our website. The address
is located on the back page of this book.
WARRANTY
Your new appliance comes with our
12-month guarantee, protecting you
against electrical and mechanical
breakdown. To register your appliance
please call 0844 481 0182, complete
the registration form included or register
online at the web address located on the
back page of this book.
For full terms & conditions of the manufacturer’s guarantee, refer to the website
on the back of this book.
In addition, you may wish to purchase
an extended warranty. A leaet
explaining how to do this is included
with your appliance.
Our policy is one of constant
development and improvement,
therefore we cannot guarantee the strict
accuracy of all of our illustrations and
specications - changes may have been
made subsequent to publishing.

SAFETY
5.1
BEFORE USING THE PRODUCT
Make sure that you have removed all
packaging and wrapping. Some of the
items inside this appliance may have
additional wrapping.
Please note:- these safety warnings
cover both gas and electric products.
GENERAL
WARNING! - The
appliance and its
accessible parts become
hot during use. Care
should be taken to
avoid touching heating
elements. Children less
than 8 years of age shall
be kept away unless
continously supervised.
This appliance can
be used by children
aged from 8 years and
above and persons with
reduced physical sensory
or mental capabilities or
lack of experience and
knowledge if they have
been given supervision
or instruction concerning
the use of the appliance
in a safe way and
understand the hazards
involved. Children
shall not play with the
appliance. Cleaning and
user maintenance shall
not be made by children
without supervision.
WARNING! -
Unattended cooking on
a hob with fat or oil can
be dangerous and may
result in re.
NEVER try to extinguish
a re with water, but
switch off the appliance
and then cover the ame
with a lid or damp cloth.
WARNING! - Danger of
re: Do not store items
on the cooking surfaces.
WARNING! - Servicing
should be carried out
only by authorised
personnel.
• The appliance must
never be disconnected
from the mains
supply during use,
as this will seriously

SAFETY
5.1
affect the safety
and performance,
particularly in
relation to surface
temperatures
becoming hot and gas
operated parts not
working efciently.
The cooling fan (if
tted) is designed
to run on after the
control knob has been
switched off.
• Do not spray aerosols
in the vicinity of this
appliance while it is in
operation.
• Do not store or use
ammable liquids or
items in the vicinity of
this appliance.
• Do not modify this
appliance.
CAUTION: The use of
a gas cooking appliance
results in the production
of heat, moisture and
products of combustion
in the room in which it is
installed. Ensure that the
kitchen is well ventilated
especially when the
appliance is in use:
keep natural ventilation
holes open or install a
mechanical ventilation
device (mechanical
extractor hood).
Prolonged intensive use
of the appliance may call
for additional ventilation,
for example opening
of a window, or more
effective ventilation,
for example increasing
the level of mechanical
ventilation where
present.
WARNING! -
Do not operate the
appliance without the
glass panel correctly
tted.
WARNING! -
Never put items directly

SAFETY
5.1
on the base of the oven
or cover the oven base
with
foil, as this can cause the
base element
to overheat.
WARNING! -
The top element gets
extremely hot when in
use, so take extra care to
avoid touching it.
WARNING! -
Do not modify the outer
panels of this appliance
in any way.
WARNING! -
This appliance must be
earthed.
WARNING! -
There is a risk of electric
shock, so always make
sure you have turned
off and unplugged your
appliance before starting.
Always allow the product
to cool down before you
change a bulb.
WARNING! - Do not
use harsh abraisive
cleaners or sharp metal
scrapers to clean the
ovendoor glass since
they can scratch the
surface, which may well
result in shattering of the
glass.
CAUTION: This
appliance is for cooking
purposes only. It must
not be used for other
purposes, for example
room heating.
OVEN / GRILL
Do
• Always take care when removing food
from the oven as the area around the
cavity may be hot.
• Always use oven gloves when
handling any utensils that have been
in the oven as they will be hot.
• Always make sure that the oven
shelves are resting in the correct
position between two runners. Do
not place the oven shelves on top
of the highest runner, as this is not
stable and can lead to spillage or
injury.
• Always use the Minute Minder (if
tted) if you are leaving the oven
unattended - this reduces the risk of
food burning.

SAFETY
5.1
Do Not
• Never place items on the door while
it is open.
• Never wrap foil around the oven
shelves or allow foil to block the ue.
• Never drape tea towels near the oven
while it is on; this will cause a re
hazard.
• Never pull heavy items, such as
turkeys or large joints of meat, out
from the oven on the shelf, as they
may overbalance and fall.
Never use this appliance to heat anything
other than food items and do not use it
for heating the room.
USING THE GRILL - ELECTRIC
Caution: Accessible parts may be
hot when the grill is used - young
children should be kept away.
A grill pan handle can be purchased as an
optional extra from our spares department
quoting the part numbers below.
Handle - 082283705
Handle grip - 082469100
Complete grillpan pack - 012635666
Contact details can be found on the
customer care page.
If cleaning the grill pan when it is hot, use
oven gloves to move it.
Food for grilling should be positioned
centrally on the trivet.
Using the grill
Important: The grill door must be fully
open when the grill is used.
Open the grill door. Turn the control knob
to the required setting. For best cooking
results, we recommend that you preheat
the dual grill for 3 minutes and the single
grill for 5 minutes.
For grilling small quantities of food, the
centre (economy) grill can be used with
the grill trivet inverted. For large quantites of food, the full grill can be used.
Push the grill pan towards the back of the
shelf, to position it under the grill.
The speed of grilling can be controlled by
adjusting the grill setting or by selecting a
higher or lower shelf position. For toasting, and for grilling foods such as bacon,
sausages or steaks, use a higher shelf
position. For thicker foods such as chops
or chicken joint pieces, use a middle to
low shelf position.
The grill trivet, inside the grill pan, can be
inverted to give a high or low position, or
it may be removed.
To switch off, turn the control knob to the
off position.
Using aluminium foil
Using aluminium foil to cover the grill pan,
or putting items wrapped in foil under the
grill creates a re hazard.
The cooling fan
When the grill is switched on, the cooling fan comes on to keep the fascia and
control knobs cool during grilling. The fan
may continue to operate for a period after
the grill has been switched off.
During use the fan may cycle on and off,
this is normal.
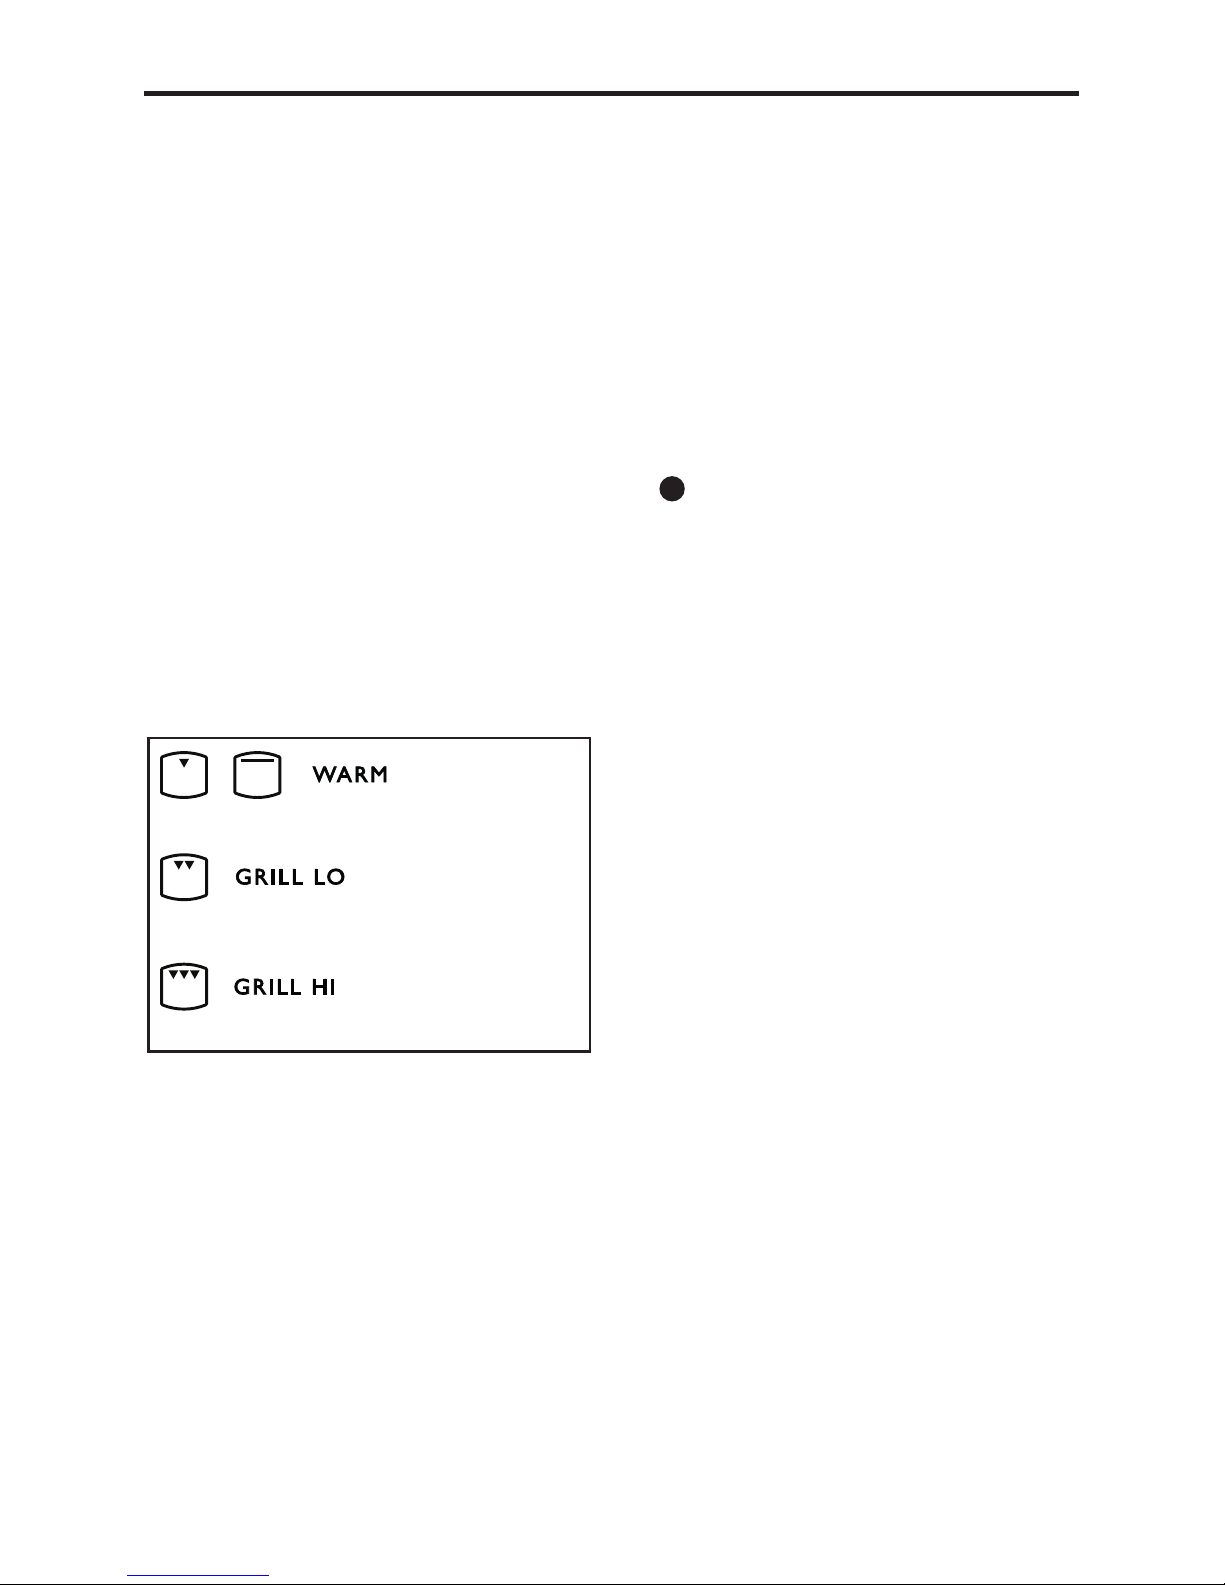
- Full grill at 1/4
power
- Centre grill at full
power
- Full grill area at
full power
OR OR
OR
OR
7.101

8.100
USING THE TOP OVEN - ELECTRIC (if tted)
When you are cooking keep children
away from the vicinity of the oven.
Caution: The top element gets
extremely hot when in use, so
take extra care to avoid touching it.
The top oven is a conventional oven.
Note: The top oven is not controlled by
the programmer (if tted).
To turn on the top oven
Turn the temperature control knob until
the required temperature is selected.
The red thermostat indicator will come on
until the selected temperature is reached,
and then go off; it will turn on and off
periodically as the thermostat operates to
maintain the selected temperature.
To switch off, return the top oven control
knob to the off position.
Important: Never put items directly on
the base of the oven, or cover the oven
base with foil, as this may cause the element to overheat. Always position items
on the shelf.
The cooling fan
When the top oven is switched on, you
will hear the cooling fan come on - this
keeps the fascia and control knobs of the
appliance cool during cooking. The fan
may continue to operate for a period after
the oven control has been switched off.
Preheating
The oven must be preheated when cooking frozen or chilled foods, and we recommend preheating for yeast mixtures,
batters, soufés, and whisked sponges.
Preheat the oven until the indicator light
switches off for the rst time, this will
take up to 15 minutes depending on the
temperature selected.
If you are not preheating the oven, the
cooking times in the following guide may
need to be extended, as they are based
on a preheated oven.
Shelf positions
There are either 3 or 4 shelf positions,
depending on which model you have
purchased. These are counted from the
bottom of the oven upwards, so shelf
position 1 is the lowest.
When cooking frozen or chilled food, use
the highest possible shelf position, while
allowing some clearance between the
food and the top element.
The oven shelf must be positioned with
the up-stand at the rear of the oven and
facing up. Position baking trays and roasting tins on the middle of the shelves, and
leave one clear shelf position between
shelves, to allow for circulation of heat.
When using the top oven
As part of the cooking process, hot air is
expelled through a vent at the top of the
oven(s). When opening the oven door,
care should be taken to avoid any possible
contact with potentially hot air, since this
may cause discomfort to people with sensitive skin. We recommend that you hold
the underneath of the oven door handle.
8.100
USING THE TOP OVEN - ELECTRIC (if tted)
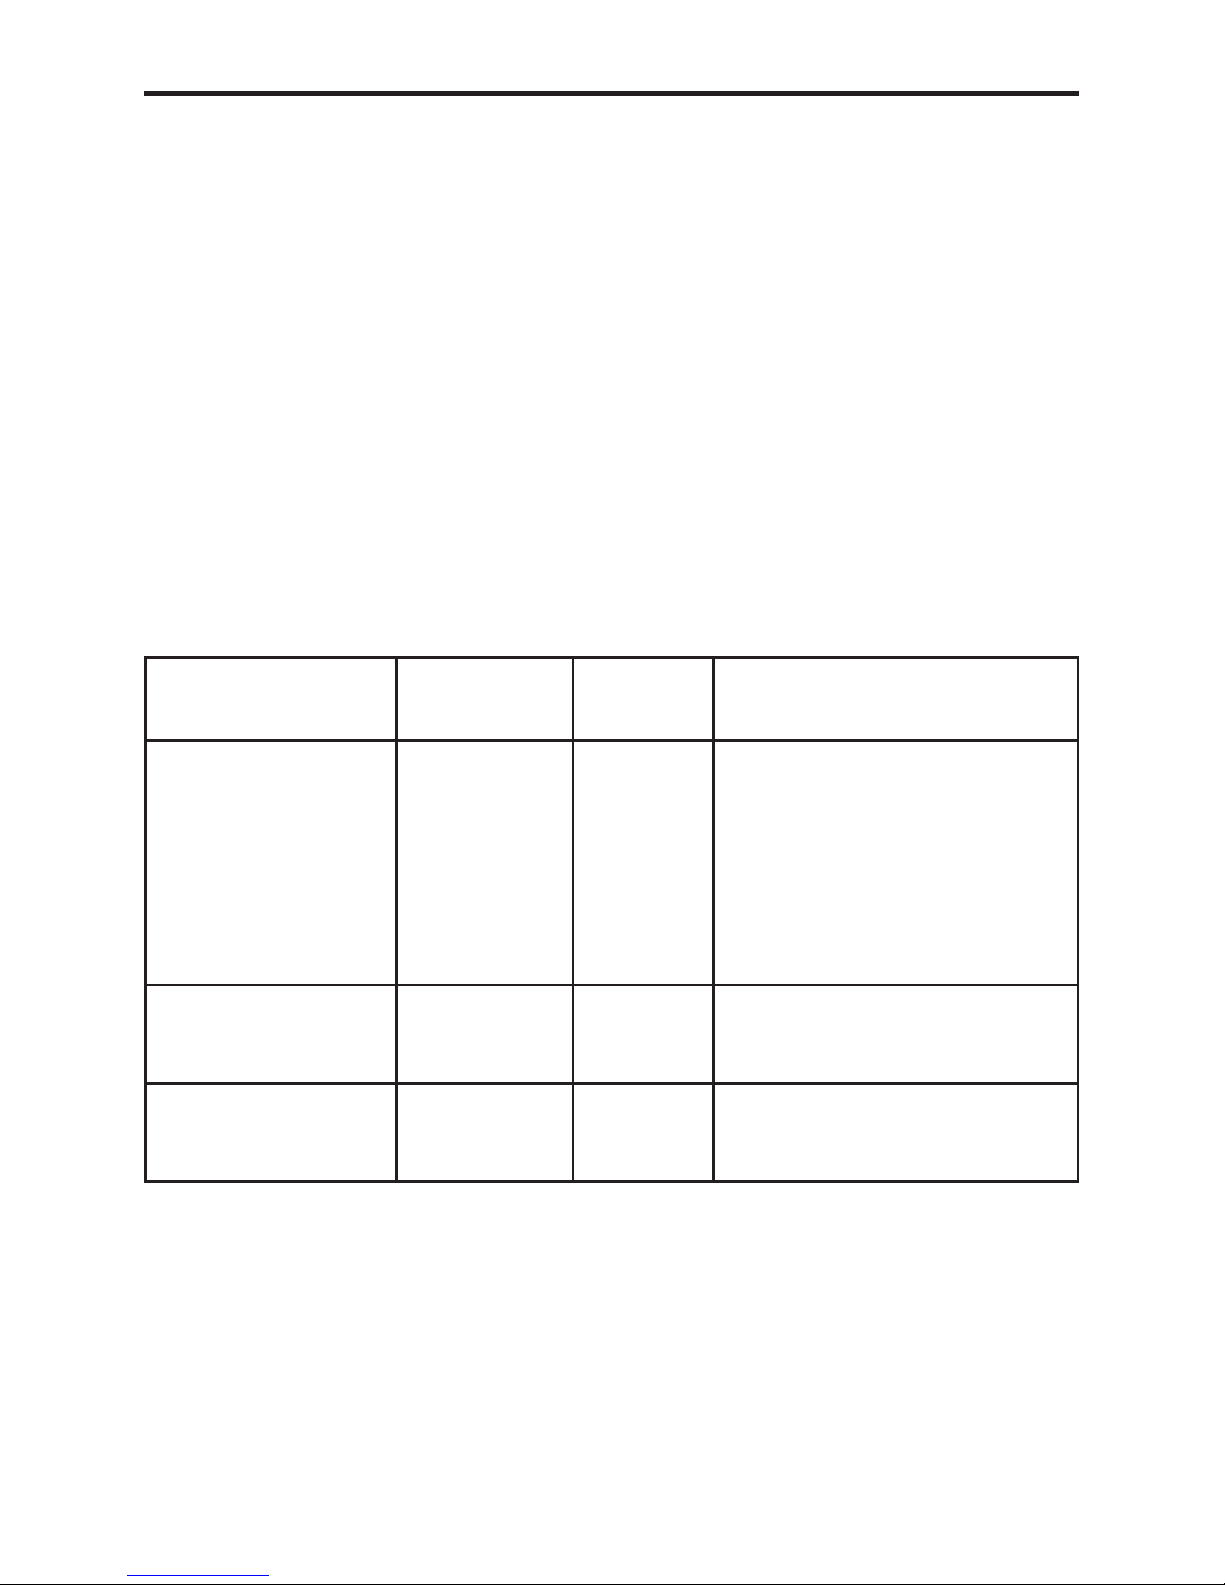
TOP OVEN BAKING GUIDE
Cooking times
These times are based on cooking in a
preheated oven.
These cooking times are approximate,
because the size and type of cooking dish
will inuence time as personal preferences.
Shelf positions
As a general guide, when cooking frozen
or chilled food, use the highest possible shelf position, while allowing some
clearance between the food and the top
element. Follow the instructions given on
packaging.
Item Temperature
(°C)
Shelf
Position
Approximate cooking time
Small cakes
Victoria sandwich
(2 x 180mm / 7”)
Swiss roll
Semi rich fruit cake
(180mm x 7”)
Scones
Meringues
180
160
200
140
215
90 - 100
1
1
1
1
1
1
15 - 20 mins
20 - 25 mins
8 - 12 mins
2¼ - 2¾ hours
10 - 15 mins
2 - 3 hours
Shortcrust pastry
Puff / aky pastry
Choux pasrty
200 - 210
200 - 210
200 - 210
1
1
1
Depends on size & type of cook-
ing dish & also the lling
Biscuits
Sponge pudding
Milk pudding
160 - 200
150
140
2
1
1
10 - 20 mins
30 - 45 mins
2 - 2½ hours
Cooking temperatures
The temperature settings and time given
in the Baking Guides are based on dishes
made with block margarine. If soft tub
margarine is used, it may be necessary
to reduce the temperature setting. If a
recipe gives a different temperature setting to that shown in the guide, the recipe
instruction should be followed.
Because the top oven is more compact,
it may be necessary to reduce cooking
temperatures specied in recipes by up to
20°C.
Use the baking guide as a reference for
determining which temperatures to use.

9.100
USING THE MAIN OVEN - ELECTRIC
Accessible parts may be
hot when the oven is used.
Young children should be
kept away.
To switch on the oven
Turn the oven control knob(s) to the
required setting.
The red thermostat indicator (if tted) will
come on until the selected temperature
is reached and then go off; it will turn
on and off periodically as the thermostat
operates to maintain the selected temperature.
To switch off, return the control knob to
the off position.
When using the oven
As part of the cooking process, hot air
is expelled through a vent in the oven.
When opening the oven door, care should
be taken to avoid any possible contact
with potentially hot air, since this may
cause discomfort to people with sensitive
skin. We recommend that you hold the
underneath of the oven door handle.
PREHEATING
Fanned oven
When cooking sensitive items such as
soufe and Yorkshire puddings or, when
cooking bread, we recommend that the
oven is preheated until the neon switches
off for the rst time. For any other types
of cooking, a preheat may not be required.
Conventional oven
Preheating is always required
Manual Operation (fanned only)
The programmer must be set to manual
operation before the main oven can be
used. If A (Auto) is on the programmer
display, return the oven to manual by
pressing the up and down buttons simultaneously Any programme which has been
set is cancelled.
The cooling fan
The cooling fan may operate when the
main oven is on and may continue to operate for a period after the oven has been
switched off.
OVEN FURNITURE
Oven shelves
The oven shelf must be positioned with
the upstand at the rear of the oven and
facing upwards.
Position baking trays and roasting tins on
the middle of the shelves.
Baking tray and roasting tins
For best cooked results and even browning, the recommended size baking trays
and roasting tins that should be used are
as follows;
Baking tray 350mm x 250mm
This size of baking tray will hold up to 12
small cakes.
Roasting tin 370mm x 320mm
We recommend that you use good quality
cookware. Poor quality trays and tins may
warp when heated, leading to uneven
baking results.

9.100
USING THE MAIN OVEN - ELECTRIC
Slow cooking ( Setting or 100°C)
• Make sure that frozen foods are thoroughly thawed before cooking.
• Do not slow cook joints of meat
or poultry weighing more than
2¼kg/4½lb.
• Preheat the oven to 170°C and cook
for 30 minutes, then adjust the oven
control to or 100°C (slow cook
setting) for the remainder of the
cooking time.
• Slow cooking times will be about 3
times as long as conventional cooking
times.
• Do not open the oven door unnecessarily during slow cooking, as this will
result in heat loss at low temperatures.
• Always use dishes with tightly tting
lids. To rectify badly tting lids, place
foil over the dish underneath the lid.
Aluminium foil
Use foil only to cover food or cooking
dishes, using foil to cover the shelves or
oven base creates a re hazard.
Cooking with a fanned oven
As this is a high efciency oven,
you may notice the emission of
steam from the oven when the door
is opened. Please take care when
opening the door.
If you are used to cooking with a conventional oven you will nd a number of differences to cooking with a fan oven which
will require a different approach:
There are no zones of heat in a fan oven
as the convection fan at the back of
the oven ensures an even temperature
throughout the oven.
This makes it ideal for batch baking - eg;
when planning a party as all the items will
be cooked within the same length of time.
Foods are cooked at a lower temperature
than a conventional oven, so conventional recipe temperature may have to be
reduced. Please refer to the conversion
chart.
Preheating is generally not necessary as a
fan oven warms up quickly.
There is no avour transference in a fan
oven, which means you can cook strong
smelling foods such as sh at the same
time as mild foods - eg; milk puddings.
When batch baking foods that will rise
during cooking - eg; bread - always
ensure that enough space has been left
between the shelves to allow for the rise.
Notes:
When 2 or more shelves are being used, it
may be necessary to increase the cooking
time slightly.
Because the 2 oven shelves are wider
than in many ovens, it is possible to cook
2 items per shelf - eg; 2 victoria sandwiches or 2 casseroles.
Although you need to keep in mind the
points ‘To help the air circulate freely’
with careful choice of dishes and tins, it
is possible to cook a complete meal, and
perhaps something else for the freezer, in
the oven at the same time.
When roasting meats, you will notice that
fat splashing is reduced, which is due in
part to the lower oven temperatures, and
will help keep cleaning of the oven to a
minimum.
Because a fan oven has an even temperature throughout the oven, there is no
need to follow the shelf positions given in
the baking guide.

9.100
USING THE MAIN OVEN - ELECTRIC
There is no need to interchange dishes
onto different shelves part way through
cooking, as with a conventional oven.
To help the air circulate freely
Position the shelves evenly within the
oven and maintain a clearance from the
oven roof and base.
If more than one cooking dish or baking tray is to be used on a shelf, leave a
gap of at least 25mm between the items
themselves and the oven interior.
Defrosting and cooling in the
main oven
To defrost frozen foods, turn the main
oven control to the defrost position, place
the food in the centre of the oven and
close the door.
To cool foods after cooking prior to refrigerating or freezing, turn the main oven
control to the defrost position and open
the door.
Defrosting times
Small or thin pieces of frozen sh or meat
- eg; sh lets, prawns & mince will take
approximately 1 - 2 hours.
Placing the food in a single layer will
reduce the thawing time.
A medium sized casserole or stew will
take approximately 3 - 4 hours.
A 1½kg/3lb oven ready chicken will take
approximately 5 hours, remove the giblets
as soon as possible.
Be safe
Do not defrost stuffed poultry using this
method.
Do not defrost larger joints of meat and
poultry over 2kg/4lb using this method.
Never place uncooked food for defrosting
next to cooked food which is to be cooled,
as this can lead to cross contamination.
Defrosting meat, poultry, and sh can be
accelerated using this method but make
sure they are completely thawed before
cooking thoroughly. Place meat and poultry on a trivet in a meat tin.
MAIN OVEN BAKING GUIDE
Cooking times & temperatures
The temperature settings and times given
in the baking guide are based on dishes
made with block margarine. If soft tub
margarine is used it may be necessary to
reduce the temperature setting.
Allow enough space between shelves for
food that will rise during cooking.
Do not place items on the oven base as
this will prevent air circulating freely.
 Loading...