

Belling Richmond, RICHMOND 1000DFT-AU, RICHMOND 1100DFT-AU, RICHMOND 900DFT-AU, Sterling DFT AU Users Manual & Installation Handbook

Users Guide
& Installation
Handbook
Belling Range
Richmond / Sterling DFT AU

our warranty
Should you need it . . . .
Inside the paperwork which has come with this appliance, there is a leaflet and card
explaining the terms of our extended warranty and guarantee. In order to apply for our
five year guarantee, simply fill in the details on the card and post it off, this will register
your appliance.
Should you wish to take out extended warranty, please fill in the details on the leaflet
and post this off to:
If your appliance is covered by the warranty and guarantee, you will not be billed for
work undertaken should your appliance be faulty, terms and conditions do apply, so
please read through the literature carefully.
Please ensure that you have available your appliances model number and serial
number, there is a space at the back of this book for recording that information.
Glen Dimplex Australia
Unit 2, 205 Abbotts Road
Dandenong South
Victoria 3175
Australia
Ph: 1300 556 816
Fx: 1800 058 900
Glen Dimplex New Zealand Pty
38 Harris Road, East Tamaki
Auckland
New Zealand
Ph: 09 274 8265
Fx: 09 274 8472
IMPortant notICE
Please note the cooling fan fitted to this appliance is an integral part of its safety
and functionality. When the appliance is installed care must be taken that the
cooling fans performance is not impeded by any objects coming into contact with
it. (Installation pipes, leads etc) Care must also be taken that there is sufficient air
flow at the rear of the appliance for the cooling fan to run at its optimum efficiency.
(Particularly Built In appliances) See clearance dimensions in the installation
section of the booklet. During use the Appliance must never be disconnected from
the Mains supply as this will seriously affect the safety and performance of the
appliance, particularly in relation to surface temperatures becoming hot and gas
operated parts not working efficiently. The cooling fan is designed to run on after
the control knob has been switched off to keep the front of the appliance and the
controls cool until the appliance has naturally cooled itself.

Contents
If you smell gas:
Do not
try to light any appliance. Do not touch any electrical switch.
Call
the Gas Emergency Helpline.
User’s Section . . . . . . . . . . . . . . . . . . . . . . . . . . . . . . . . . . . . . . . . . . . . . . . . . . . . . .
About your cooker . . . . . . . . . . . . . . . . . . . . . . . . . . . . . . . . . . . . . . . . . . . . . . . . . . .
Hob and cooker safety . . . . . . . . . . . . . . . . . . . . . . . . . . . . . . . . . . . . . . . . . . . . . . . .
Chip pan fires . . . . . . . . . . . . . . . . . . . . . . . . . . . . . . . . . . . . . . . . . . . . . . . . . . . . . .
Using the programmer / clock . . . . . . . . . . . . . . . . . . . . . . . . . . . . . . . . . . . . . . . . .
Using your gas hob . . . . . . . . . . . . . . . . . . . . . . . . . . . . . . . . . . . . . . . . . . . . . . . . . .
Using your griddle . . . . . . . . . . . . . . . . . . . . . . . . . . . . . . . . . . . . . . . . . . . . . . . . . . .
Using your top cavity grill . . . . . . . . . . . . . . . . . . . . . . . . . . . . . . . . . . . . . . . . . . . . . .. .
Grilling guide . . . . . . . . . . . . . . . . . . . . . . . . . . . . . . . . . . . . . . . . . . . . . . . . . . . . . .. .. .
Using your conventional top oven . . . . . . . . . . . . . . . . . . . . . . . . . . . . . . . . . . . . . . .. .. .
Conventional top oven cooking guide. . . . . . . . . . . . . . . . . . . . . . . . . . . . . . . . . . . . .. .. ..
Using your Multifunction oven . . . . . . . . . . . . . . . . . . . . . . . . . . . . . . . . . . . . . . . . . .. .. .
Using your fan oven (if fitted) . . . . . . . . . . . . . . . . . . . . . . . . . . . . . . . . . . . . . . . . . .. .. .
Oven and grill functions . . . . . . . . . . . . . . . . . . . . . . . . . . . . . . . . . . . . . . . . . . . . . .. .. .
Using your Multifunction oven grill . . . . . . . . . . . . . . . . . . . . . . . . . . . . . . . . . . . .. .. .. .. ..
Cooking guides . . . . . . . . . . . . . . . . . . . . . . . . . . . . . . . . . . . . . . . . . . . . . . . . . .. .. .. .. .
Cooling and defrosting function. . . . . . . . . . . . . . . . . . . . . . . . . . . . . . . . . . . . . . . . .. .. .
Using your slow cook oven (if fitted). . . . . . . . . . . . . . . . . . . . . . . . . . . . . . . . . . .. .. .. .. .
Plate rack (if fitted) . . . . . . . . . . . . . . . . . . . . . . . . . . . . . . . . . . . . . . . . . . . . . . . . .. .. .
Cleaning your gas hob . . . . . . . . . . . . . . . . . . . . . . . . . . . . . . . . . . . . . . . . . . . . . . .. .. .
Cleaning your cavities. . . . . . . . . . . . . . . . . . . . . . . . . . . . . . . . . . . . . . . . . . . . . . . .. .. .
Telescopic shelving system . . . . . . . . . . . . . . . . . . . . . . . . . . . . . . . . . . . . . . . . . . . .. .. .
Cleaning your appliance . . . . . . . . . . . . . . . . . . . . . . . . . . . . . . . . . . . . . . . . . . . . . .. .. .
Cook shop . . . . . . . . . . . . . . . . . . . . . . . . . . . . . . . . . . . . . . . . . . . . . . . . . . . . . . . .. .. .
Before you call. . . . . . . . . . . . . . . . . . . . . . . . . . . . . . . . . . . . . . . . . . . . . . . . . . . . .. .. .
Changing light bulbs. . . . . . . . . . . . . . . . . . . . . . . . . . . . . . . . . . . . . . . . . . . . . . . . .. .. .
Installing your cooker. . . . . . . . . . . . . . . . . . . . . . . . . . . . . . . . . . . . . . . . . . . . . . . .. .. .
Clearances. . . . . . . . . . . . . . . . . . . . . . . . . . . . . . . . . . . . . . . . . . . . . . . . . . . . . . . .. .. .
Requirements and regulations . . . . . . . . . . . . . . . . . . . . . . . . . . . . . . . . . . . . . . .. .. .. .. .
Installation instructions . . . . . . . . . . . . . . . . . . . . . . . . . . . . . . . . . . . . . . . . . . . .. .. .. .. .
Technical Data . . . . . . . . . . . . . . . . . . . . . . . . . . . . . . . . . . . . . . . . . . . . . . . . . . . .. .. .
Customer Care . . . . . . . . . . . . . . . . . . . . . . . . . . . . . . . . . . . . . . . . . . . . . . . . . . . .. .. .
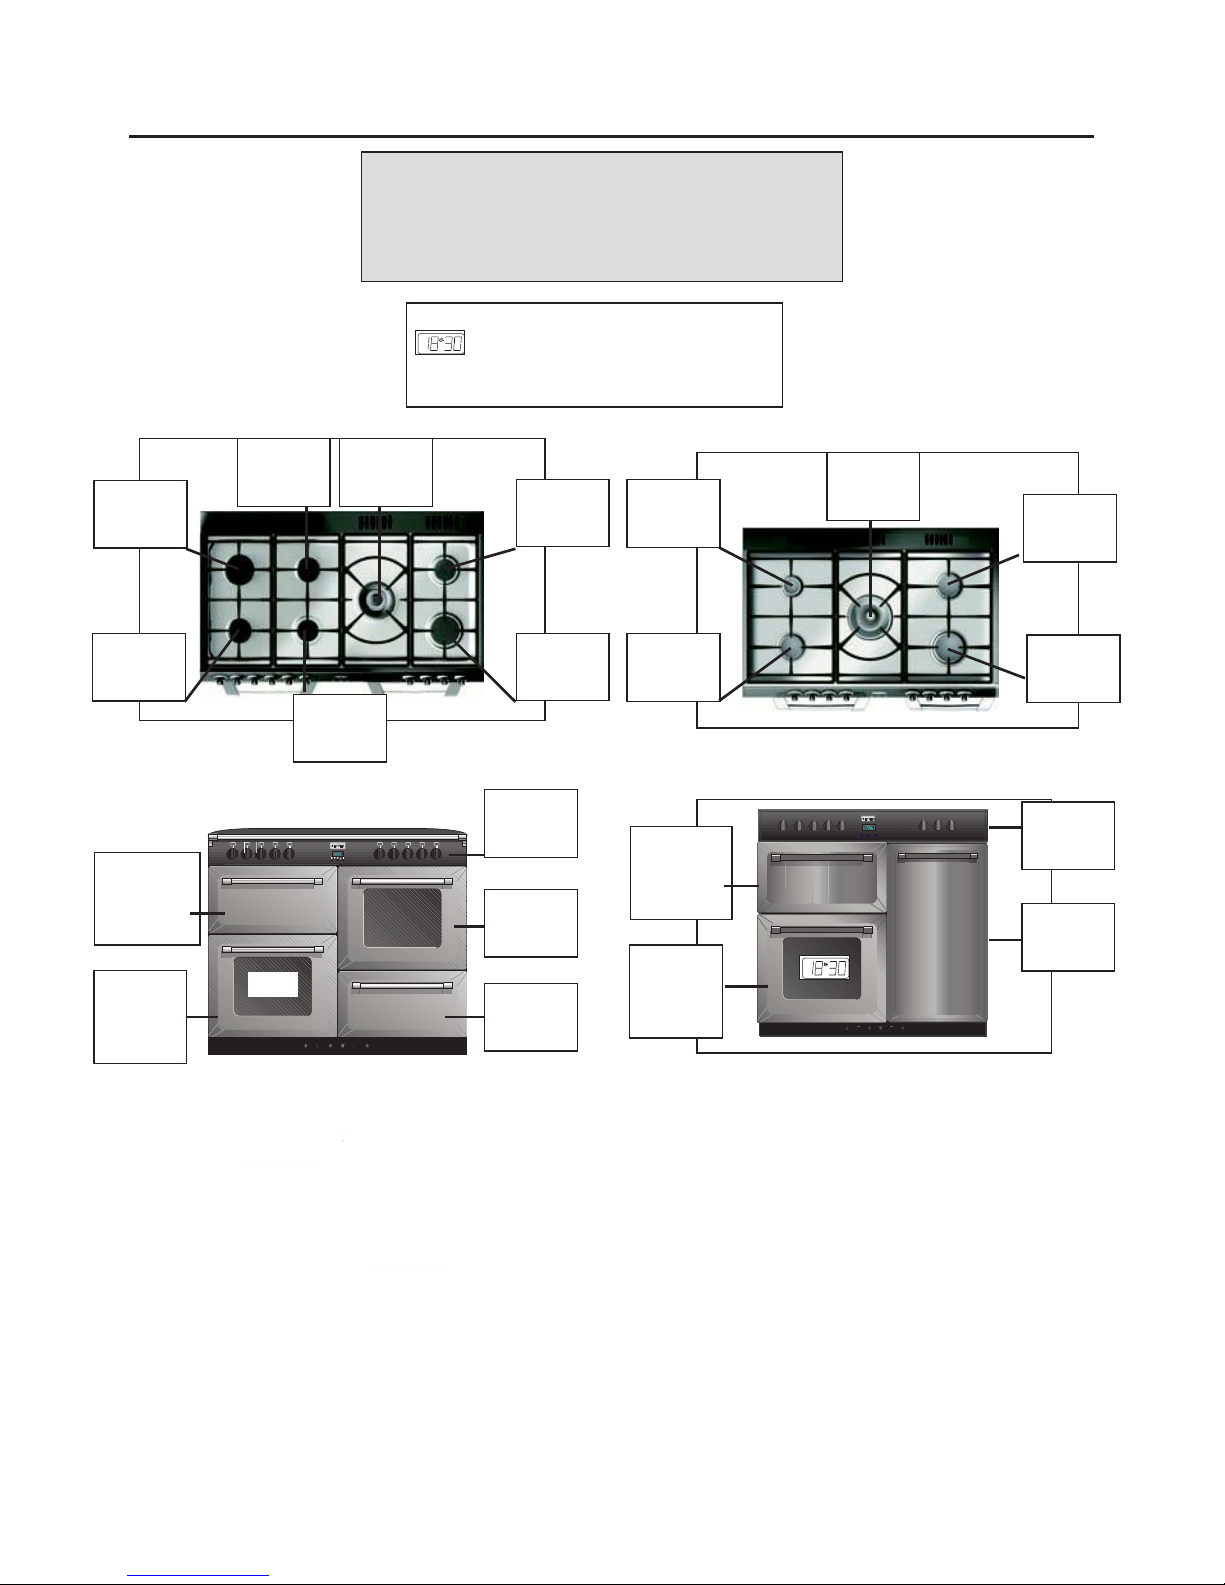
About Your Cooker
A
The illustrations below show the different
cavity and hob layouts available within
dual fuel ranges.
Fanned
oven
Multifunction
oven & grill
Slow cook
oven
Fascia
panel
Conventional
oven (if fitted)
& grill
Large
burner
Medium
burner
Wok
burner
Small
burner
Large
burner
Wok
burner
Small
burner
Medium
burner
Medium
burner
Medium
burner
Medium
burner
Small
burner
= Programmeable oven
(see timer section)
A
Fanned
oven
Fascia
panel
Multifunction
oven & grill
Conventional
oven (if fitted)
& grill

SAFETY
Caution: This appliance is for cooking
purposes only. It must not be used for
other purposes, for example room
heating.
GENERAL
WARNING! -Accesible parts may become
hot during use. To avoid burns, young
children should be kept away from the
appliance.
Children should be supervised to ensure
that they do not play with the appliance.
This appliance is not intended for use by
persons (including children with reduced
physical, sensory or mental capabilities,
or lack of experience and knowledge)
unless they have been given supervision or
instruction concerning use of the appliance
by a person responsible for their safety.
WARNING:- Servicing should be carried out
only by authorised personnel.
• The appliance must never be
disconnected from the mains supply
during use, as this will seriously affect the
safety and performance, particularly in
relation to surface temperatures becoming
hot and gas operated parts not working
efficiently. The cooling fan (if fitted) is
designed to run on after the control knob
has been switched off.
Do not spray aerosols in the vicinity of this
appliance while it is in operation.
Do not store or use flammable liquids or
items in the vicinity of this appliance.
Do not modify this appliance.
OVEN/GRILL
✓ Always take care when removing food
from the oven as the area around the
cavity may be hot.
✓ Always use oven gloves when handling
any utensils that have been in the oven as
they will be hot.
✓ Always make sure that the oven
shelves are resting in the correct position
between two runners. Do not place the
oven shelves on top of the highest runner,
as this is not stable and can lead to
spillage or injury.
✓ Always use the Minute Minder (if fitted)
if you are leaving the oven unattended
- this reduces the risk of food burning.
✗ Do not place items on the door while it
is open.
✗ Do not wrap foil around the oven
shelves or allow foil to block the flue.
✗ Do not drape tea towels near the oven
while it is on; this will cause a fire hazard.
✗ Do not pull heavy items, such as
turkeys or large joints of meat, out
from the oven on the shelf, as they may
overbalance and fall.
✗ Do not use this appliance to heat
anything other than food items and do not
use it for heating the room.
GAS HOB
✓ Always ensure that pan bases are dry
and flat before using them on the hob.
✓ Always position pans over the centre of
the heat zone, and turn the handles to a
safe position so they cannot be knocked or
grabbed.
✓ Always use pans which are no smaller
than 100mm (4”), or larger than 250mm
(10”).
✓ Always match the size of pan to the
size heat zone – do not use large pans on
small zones or vice versa.
✓ Always make sure that the burner
caps, rings and pansupports are correctly
placed. This will prevent pans becoming
unstable while in use and ensure an
uninterrupted gas flow.

Chip Pan Fires
What causes a chip pan fire?
Chip pan fires start when oil of fat overheats and catches fire,
or when oil or fat spills on to the cooker because the pan has
been filled too high.
They can also start when wet chips are put into hot oil,
making it bubble up and over flow.
Preventing a chip pan fire
Never fill the pan more than a third full with oil of fat.
Never leave the pan alone with the heat on - even for a few
seconds.
Dry chips before putting them in the pan.
Never put chips in the pan if the oil has started smoking.
Turn off the heat and leave the oil to cool down, or else it
could catch fire.
In the event of a chip pan fire
If your chip pan does catch fire - don’t panic, and don’t move
the pan. Serious burns are often caused by picking up the
pan and running outside with it.
If it is safe to do so, and you don’t have to reach across the
pan, turn off the heat.
Never throw water, or use a fire extinguisher.
If you can, drape a damp cloth or towel over the pan to
smother the flames.
Leave the pan to cool down for at least half an hour.
If you can’t control the fire yourself, close the door, get out
and tell everybody else to get out.
Call the fire brigade. Don’t go back inside whatever the
reason.
Through your programmer you will be able to set the time
of day, set the minute minder, and use the semi and fully
automatic cooking functions. The programmer is vital to
the working of your appliance, and reading this section will
make sure that you get the most out of your ovens.
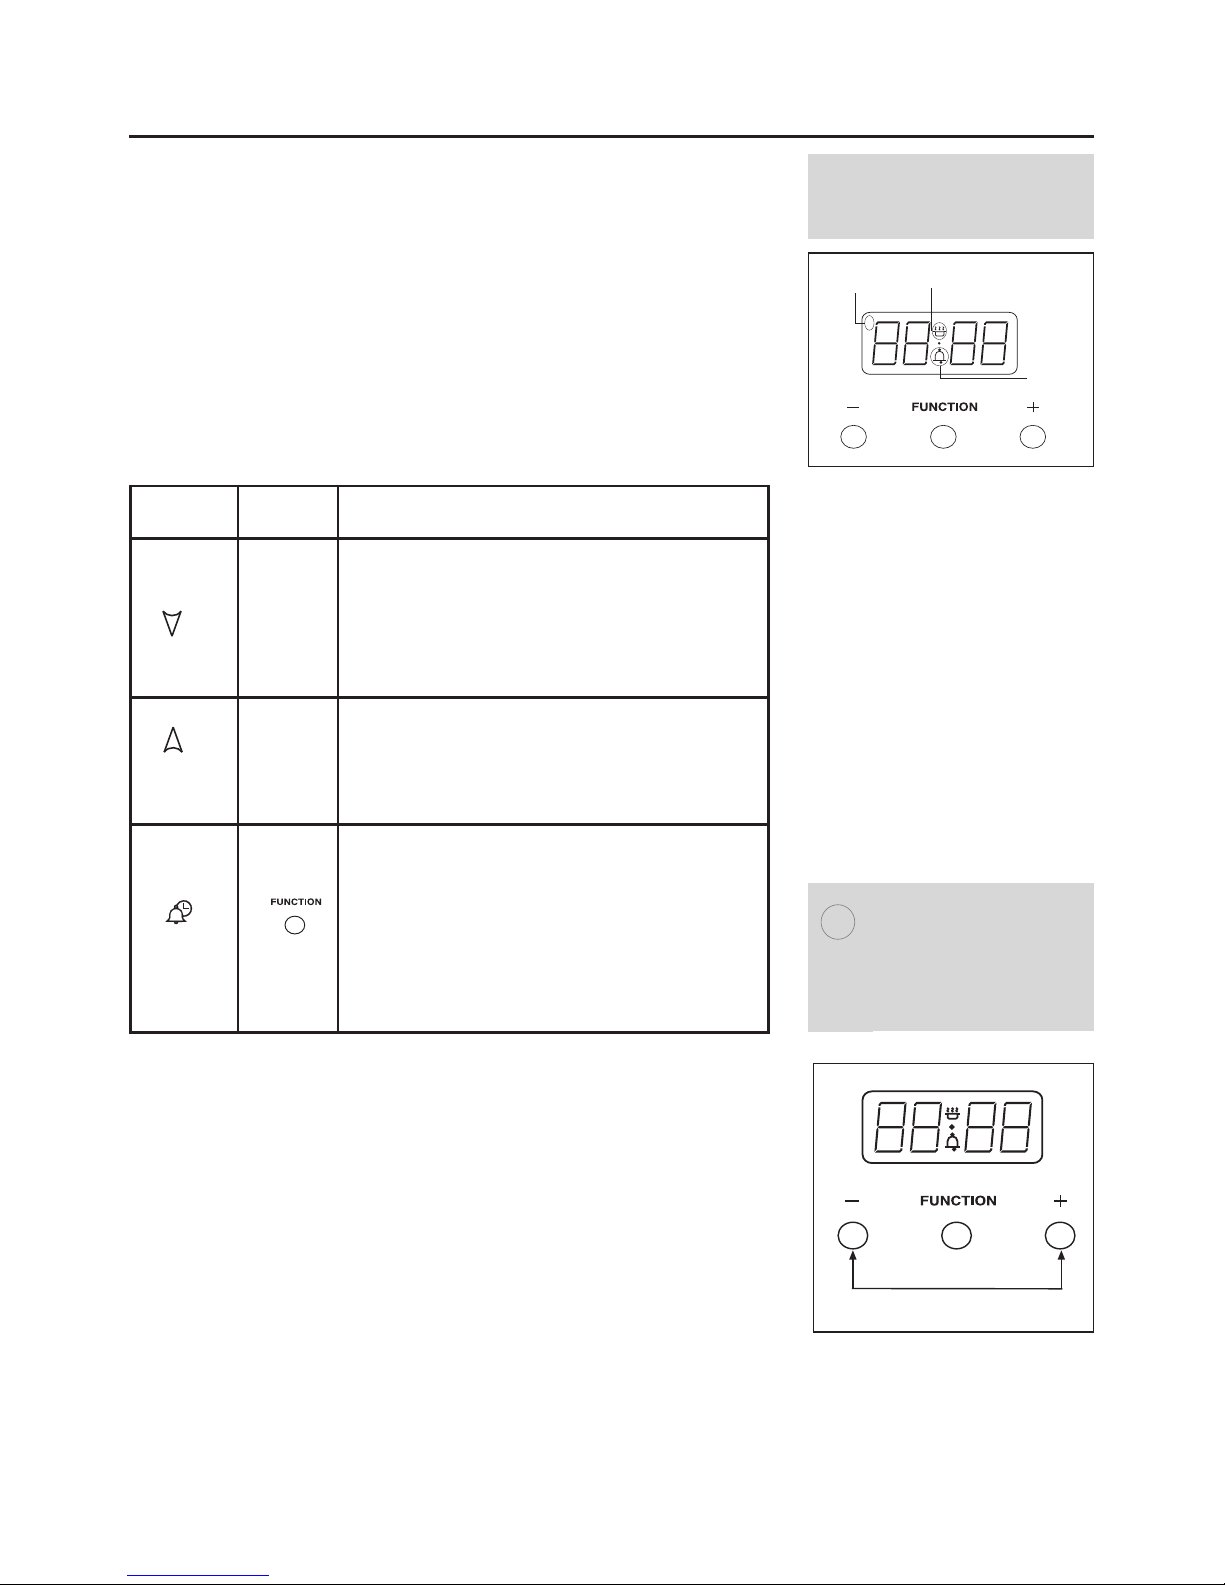
The programmer buttons
There are three buttons on this type of timer. The table
below shows you what their symbols look like, depending on
the model type, and what they do.
Setting the time of day
Press the Plus and Minus buttons together for a
few seconds and release.
Set the time of day using the Plus and Minus but-
tons. Press once for single digit increase, press and
hold for rapid increase..
Once the time of day has been set wait approx 10
seconds until the ‘’ stops flashing.
Use the appliance as normal.
Setting an alarm tone
There are three tones to choose from.
Press and release the minus button.
Once the minus button is released, the tone is selected.
Symbol Symbol What is it?
-
Down / Minus
Used to decrease cook / end time, remove
minutes from the minute minder and adjust
the time of day.
Also for listening to and setting the alarm
tone.
+
Up / Plus
Used to increase cook / end time, add minutes
to the minute minder and adjust the time of
day.
Function button
Used to select the functions available on this
timer.
Press once for: Minute Minder.
Press twice for: Cook time
Press three times for: End time.
How to use these functions is explained later
on in this section.
Using The Programmer/Clock
Automatic
symbol
Cook Pot
Minute Minder
symbol
This is a 24 hour clock.
Before you do anything
with your appliance you must set the correct time of day.
i
What your timer symbols
mean.
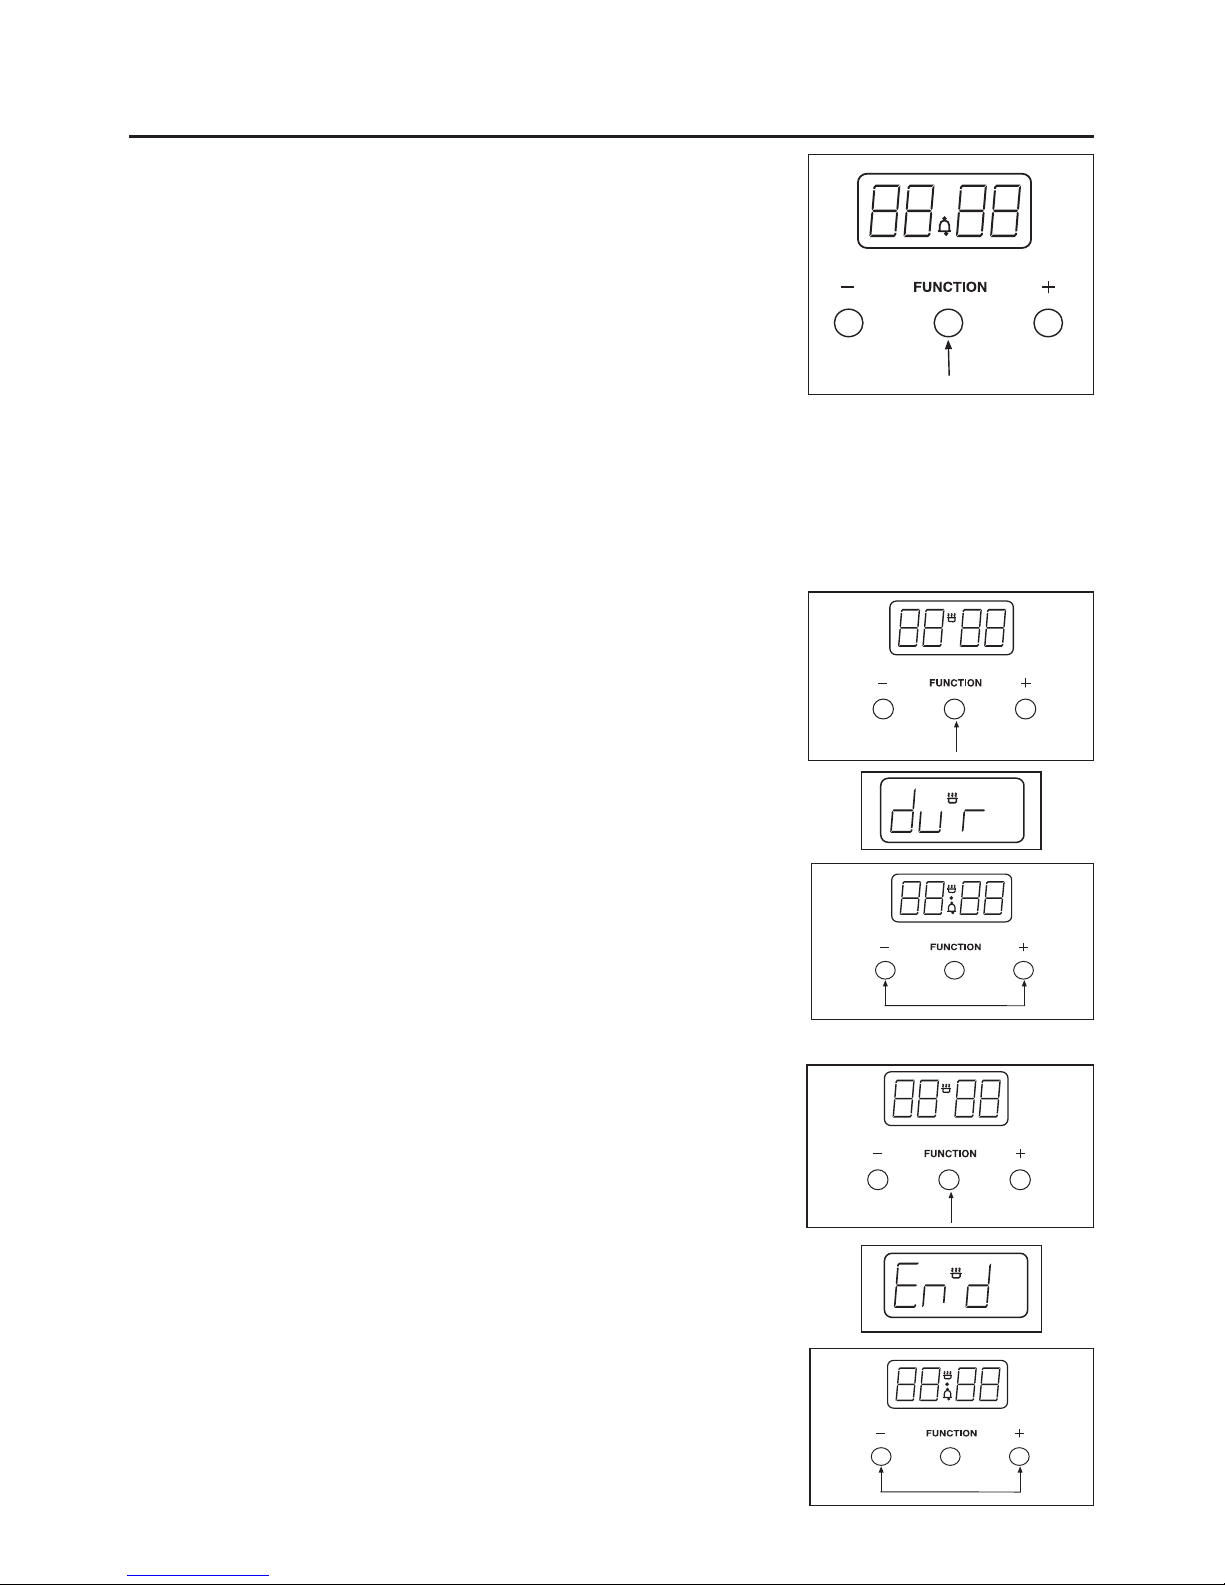
Setting the minute minder
To set the Minute Minder, press the Function button
once. The bell symbol will appear and start flashing.
The flashing only lasts for 5 seconds so the time must be
set within this time frame.
Use the Plus and Minus button to set the length of time
required. Once this has been done, the Minute Minder
is set.
When the desired length of time has counted down the
alarm will sound. To cancel the tone, press any of the
buttons.
To cancel the Minute Minder at any time, press the Plus
and Minus buttons together.
Semi - Automatic Cooking
The Duration method
Switch off after a set time period
Press the Function button twice, which will skip past the
Minute Minder.
The display will flash the word ‘dur’, and the ‘A’ will flash
on the left hand side of the display.
Use the Plus and Minus buttons to set the length of time
you want to cook for. This must be done within 5
seconds or the time of day will show again.
Once this is done the oven will automatically switch off
once the time has elapsed, and the alarm will sound. To
switch off the alarm, press any button.
To view any remaining time press the function button
twice.
The End Time method
Switch off at a set end time
Press the Function button three times, which will skip
past the Minute Minder and the Duration programmer.
The display will flash the word ‘End’ and the ‘A’ will flash
on the left hand side of the display.
Use the Plus and Minus buttons to select the time the
oven is required to turn off.
Once this is done the oven will turn itself off at the time
you have selected. To switch off the alarm, press any
button.
Using The Programmer/Clock
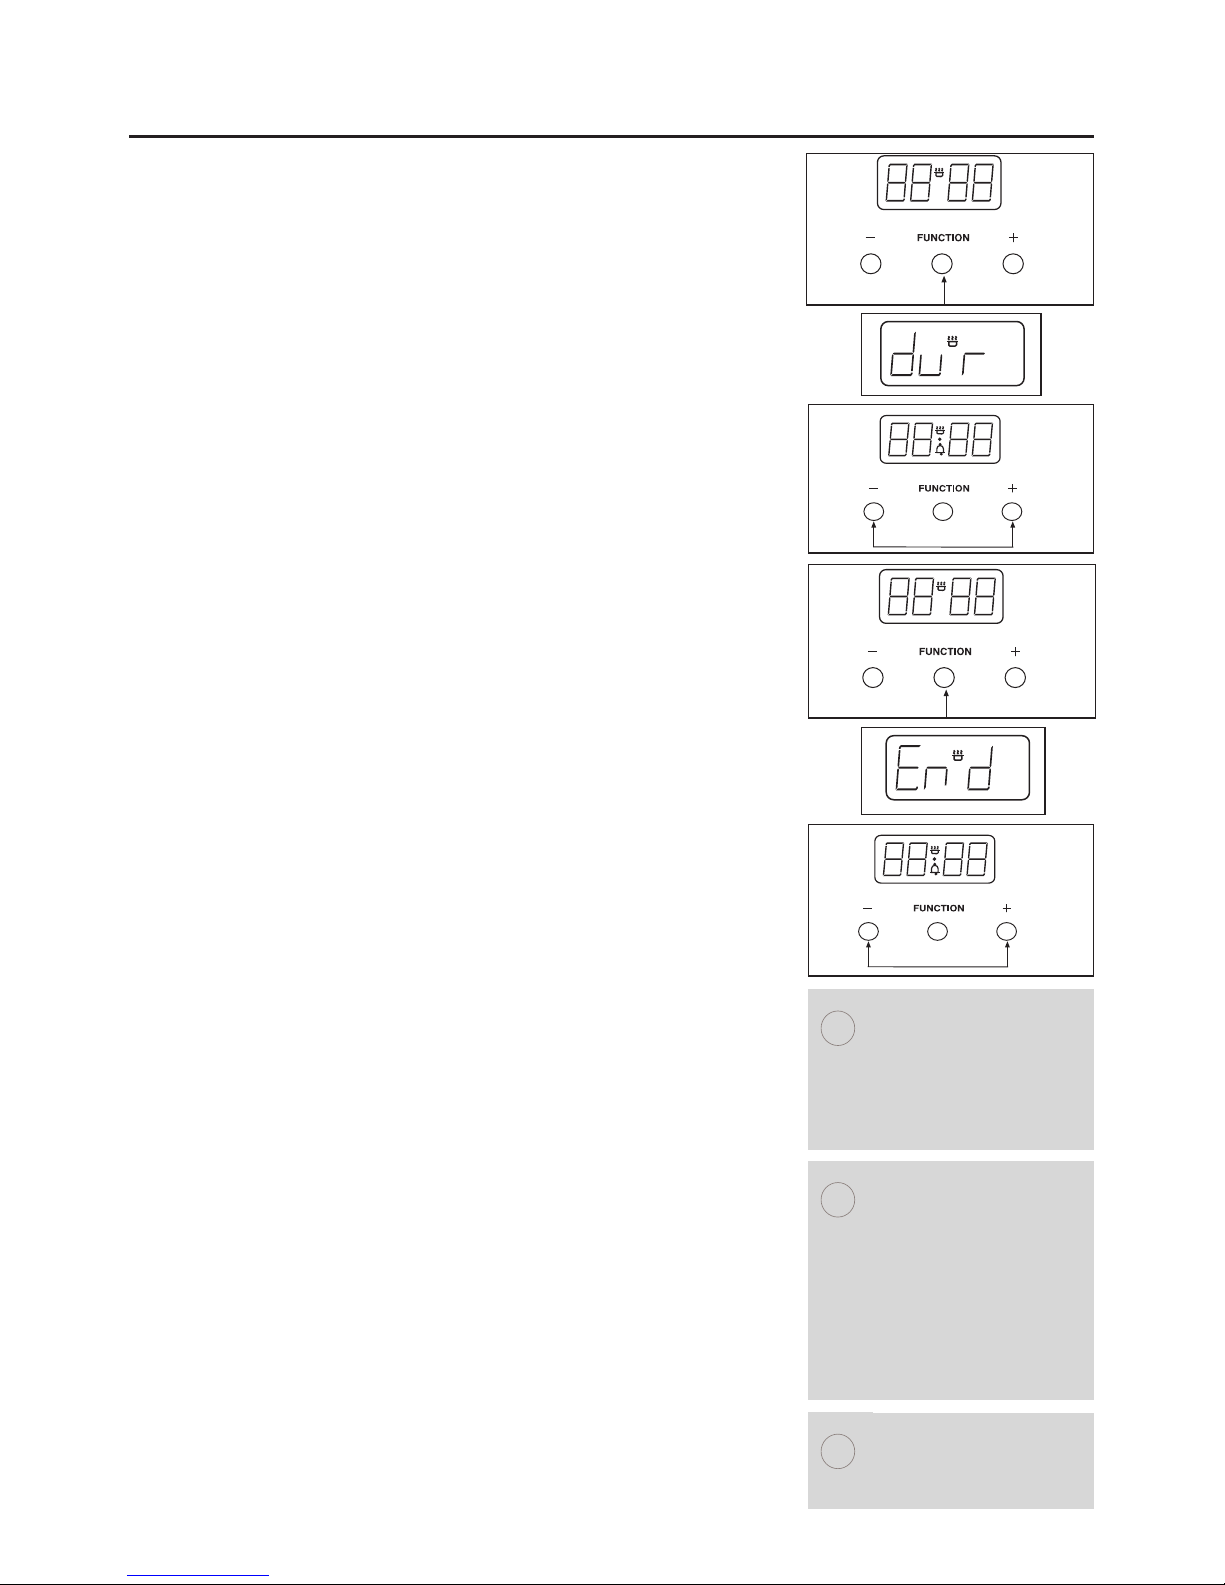
Setting the Programmer
Fully Automatic Cooking
Switch on and off automatically
This requires both the duration and the end time to be
entered. The timer will work out the start time and begin
cooking.
Press the Function button twice, which will skip past the
Minute Minder.
The display will flash the word ‘dur’, and the ‘A’ will flash
on the left hand side of the display.
Use the Plus and Minus buttons to set the length of time
you want to cook for. This must be done within 5 seconds or the time of day will show again.
Press the Function button three times, which will skip
past the Minute Minder and the Duration programmer.
The display will flash the word ‘End’ and the ‘A’ will flash
on the left hand side of the display.
Use the Plus and Minus buttons to select the time the
oven is required to turn off.
Once this is done the oven will turn itself off at the time
you have selected. To switch off the alarm, press any
button.
Set the temperature of the oven and place the
food inside.
The timer will calculate the appropriate start time.
When using the Programmer:
Do:
Familiarise yourself with the use of the programmer.
Select foods which are as fresh and as cold as possible
preferably straight from the refrigerator.
Choose foods which are suitable for cooking from a cold
start, as some dishes will be affected by being left
uncooked, at room temperature.
Make sure that meat, poultry and uncooked food are
thoroughly thawed before placing them in the oven.
Cover dishes with lids or foil.
Try to keep the end time as close to your return as
possible.
Do not:
Place warm food in the oven for delayed cooking foods
must be thoroughly cooled before placing in the oven,
the oven must also be cool before you start.
Cook dishes containing left over cooked meat or poultry,
or pastry dishes with wet fillings, they are not suitable!
Over-fill dishes containing liquids.
The automatic cooking
symbol will appear to
show that the oven is
no longer in manual
mode but in automatic
mode.
i
Important: Once the
oven has switched itself
off please make sure
you turn to oven controls to the ‘off’ position
and set the oven to
manual by pressing the
Cook Time and Ready
Time buttons together.
i
Important: Remove
food as soon as it is
cooked.
i
Using Your Gas Hob
Hob Ignition
Models without thermocouples:
To turn on, place your pan onto the pansupports above
the burner you wish to use.
Push in and turn the selected control knob
anticlockwise, to the full on symbol.
If your hob has an ignition button or switch on the
fascia, press it in until your burner lights.
If your hob has automatic ignition it will spark next to
the burner when you push in the control knob.
To simmer, turn the control knob to the small flame
symbol. This will ensure that the flame is just large
enough to gently heat the contents of the pan.
To turn off, turn the control knob clockwise to the ‘off’
position.
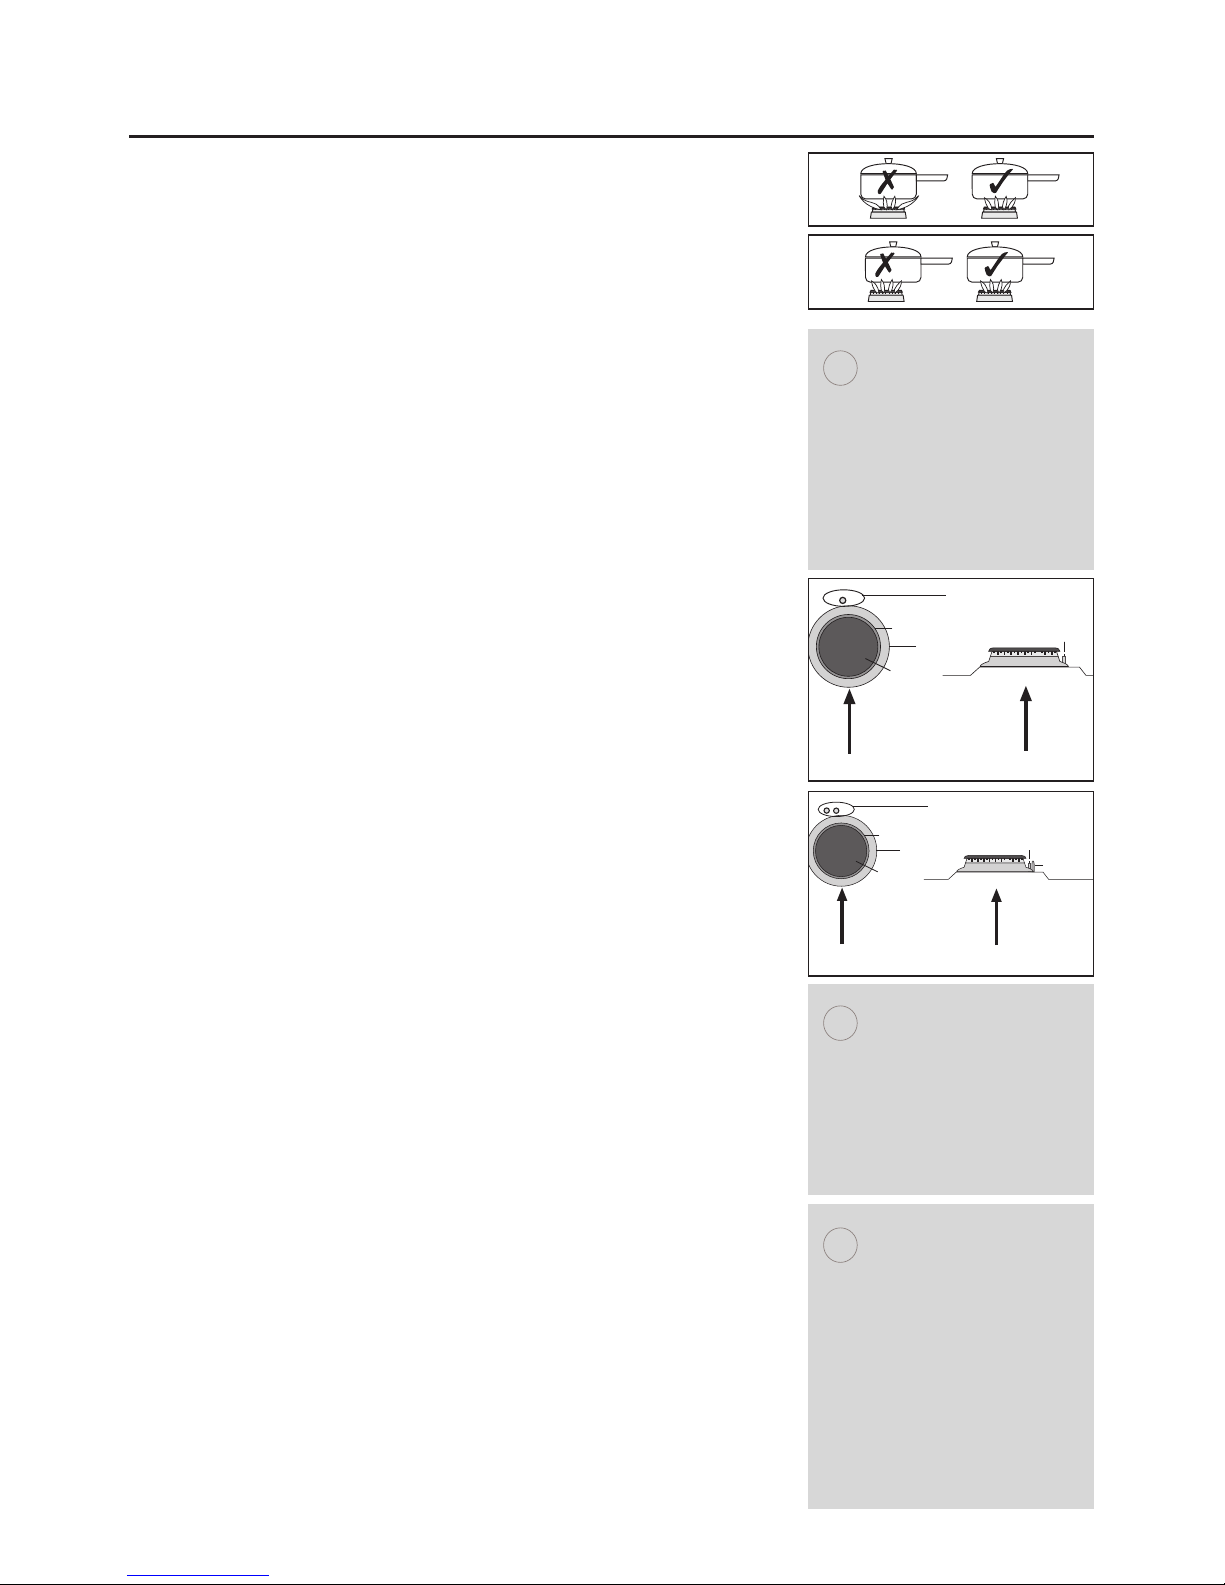
Always make sure that your pans are place correctly on
the burners as shown, and do not allow the flame to
extend over the base of the pan.
Models with thermocouples:
Igniton as above, but:
Hold the control knob in for 15 seconds. Do not hold
the control knob in for any longer than 15 seconds. If
the burner fails to light within this time, release the
control knob and wait one minute before attempting to
re-ignite.
Energy Saving
Position pans centrally over the elements.
Only heat the amount of liquid you need.
Once liquids have been brought to the boil, reduce the
heat setting to a simmer.
Consider using a pressure cooker if possible.
Vegetables in small pieces will cook quicker.
Use a pan which is a close match to your element size.
Smaller elements are ideal for simmering and stewing
in smaller pans, while the larger elements are ideal for
frying and boiling
Front
of the appliance.
Burner cap
Burner ring
Burner skirt
Electrode
Electrode
Viewed from the side
of the burner
Front
of the appliance.
Burner cap
Burner ring
Burner skirt
Thermocouple and electrode
Thermocouple
Electrode
Viewed from the side
of the burner
How can I tell if my hob
has thermocouples?
Picture A below:
shows a burner without
thermocouples.
Picture B below:
shows a burner with
thermocouples.
i
A
B
In the event of a power
failure, or the ignition
not working:
Push in and turn the
control knob to start the
gas, then hold a lighted
match or taper to the
burner until it lights.
i
Use flat based pans
which are the correct
size for your burners
and suitable for your
hob type.
We recommend the
following sizes:
100mm or 4” min.
250mm or 10” max.
Smaller or larger pan
sizes may lead to slower
cooking times.
i
Using Your Griddle
Only use the griddle which has been approved for use on
this appliance. Do not use any other griddle, as this
may be hazardous.
Please read these instructions thoroughly
before using the
griddle for the first time.
Before using the griddle for the first time
Wash the griddle thoroughly in hot soapy water. (see
“Cleaning” section).
Season sparingly with a minimum amount of cooking oil.
Heat the griddle on full rate for 3 minutes. The griddle
plate is now ready for use.
Using the griddle
The griddle should only be positioned front-to-back
over the burners indicated by the griddle symbol on the
fascia panel.
Do not
use the griddle over the large burners.
Place the griddle carefully on the pan support over the
burners, using the locating feet on the underside of the
griddle. Take care to avoid damage to the surface of the
pan supports.
Before cooking, preheat the griddle for 3 minutes on full
rate, which is indicated on the control knobs by a large
flame symbol.
After preheating, turn the control knobs to the small
flame symbol.
The griddle is now ready for cooking.
Do not use metal implements, as they may damage the
non-stick surface.
Always make sure that
children are supervised when they are
near to the appliance
when it is in use.
!!!
Seasoning the
griddle: see the
‘Cleaning’ section of this
handbook.
i
Always allow the griddle
to cool completely before
moving or cleaning.
!!!
About your griddle:
The griddle is made of
quality cast iron, and
has a non-stick cooking
surface.
Regular seasoning will
prolong the life of the
griddle and prevent
rusting. If the griddle
shows signs of rust,
wash and re-season.
i
Using Your Top Cavity Grill
Before you start grilling. . . .
Before you use the grill, make sure you have placed the
grill shelf in the position you need as once the grill is on
you may injure yourself if you try to move the shelf.
Do not close the door while the grill is in use.
To switch on the grill
Open the top oven/grill door.
Richmond models
Turn the top oven control knob to the required setting.
Turn the selector control knob to the grilling position
then select the heat setting you require.
Sterling Models
Turn the grill control knob to the required heat setting
To switch off, return the control knob to the ‘off’
position.
The cooling fan will come on during use, and may
continue to run for some time afterwards.
To adjust your results, you can turn the grid over, or
remove it altogether.
If your grill is a dual grill:
The dual grill uses all of the top element and is ideal for
grilling large quantities of food.
The single grill uses part of the element only, and is
better suited to grill smaller amounts of food.
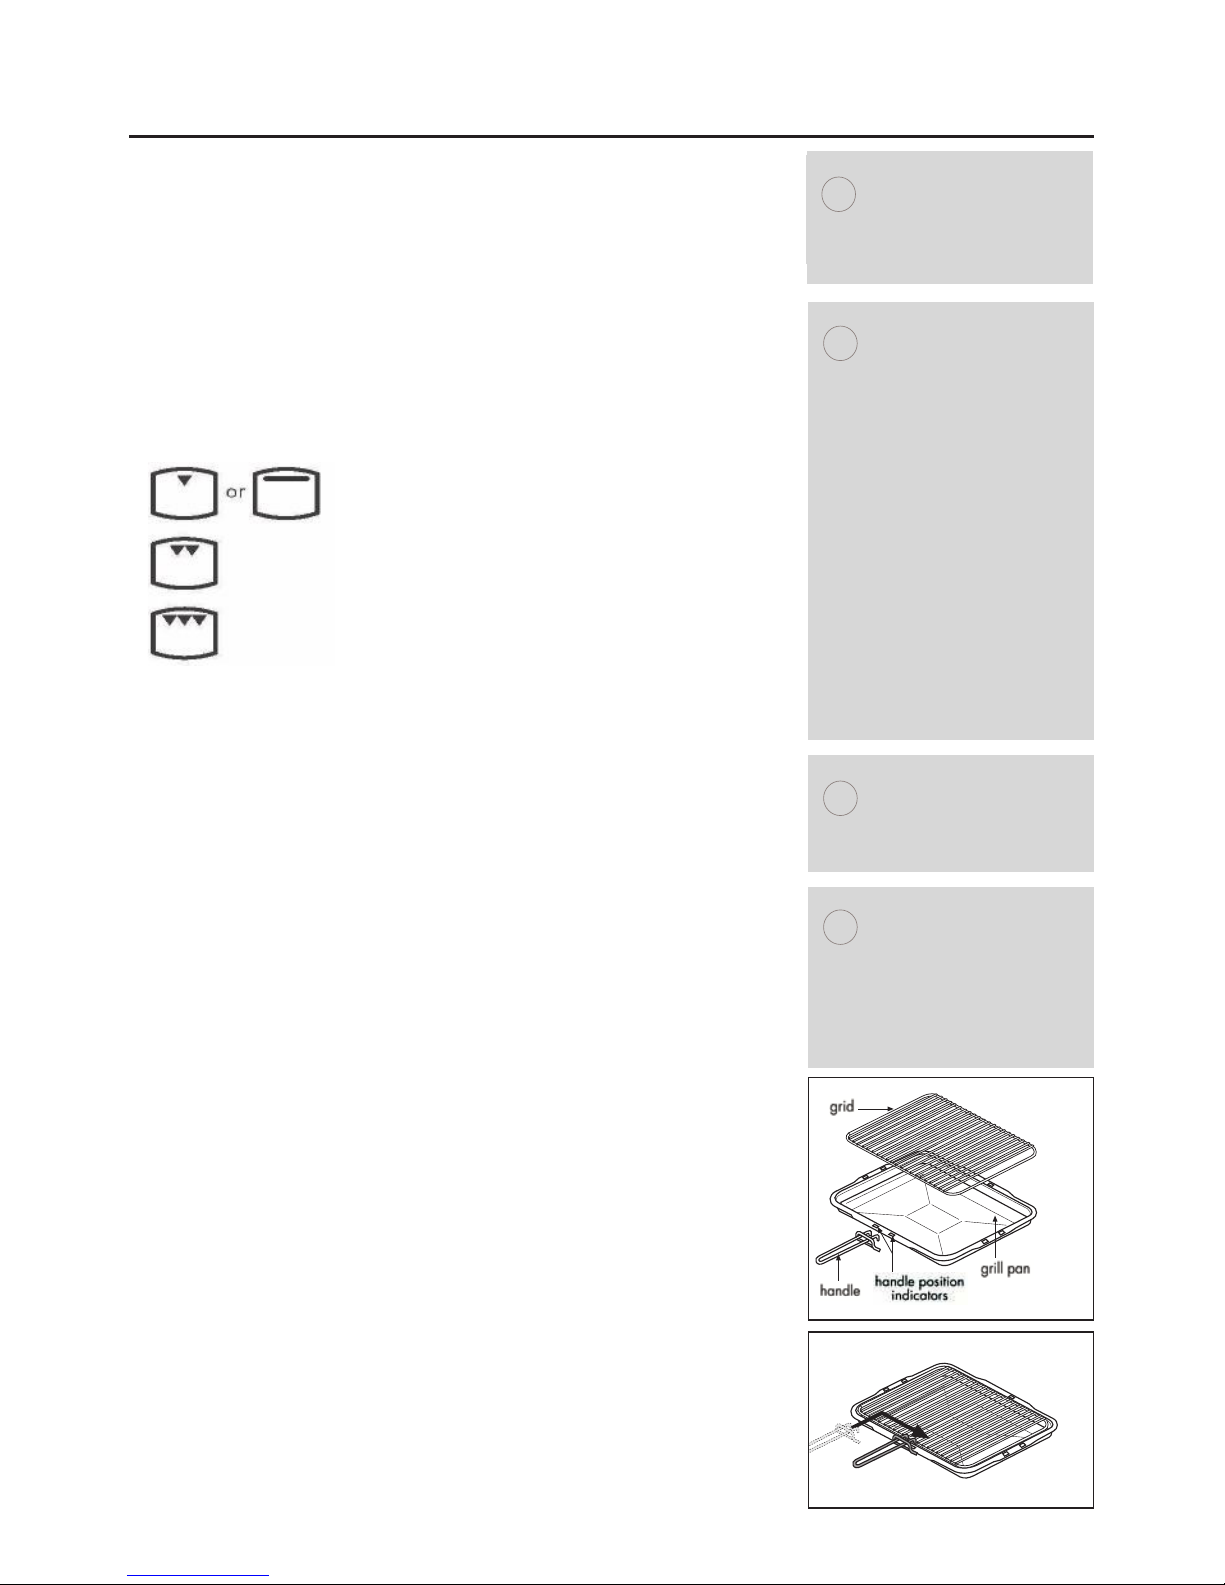
The grill pan
This appliance comes with a grill pan, grill pan handle and
a grid.
The handle of the grill pan is detachable to allow you to
remove it while the pan is in use, this stops it from
getting hot.
To attach the handle:
Place the handle over the narrow edge of the grill pan
and slide to the centre as shown in the diagrams.
Shelf & Grid adjustments
Speed of grilling can be adjusted by changing the shelf
position or the turning the grill pan grid.
High: For thin foods and toasting.
Low: For thicker meat pieces.
Aluminium Foil
Never cover the grill pan or grill trivet with foil, or allow fat
to build up in the grill pan, as this creates a fire hazard.
Warning: Accessible
parts may become hot
when the grill is in use.
Chidren should be kept
away.
Please note: the grill
pan handle is designed
for sliding the grill pan
into and out of the grill
cavity. It is not to be
used for lifted the pan.
Types of grill
Fixed rate grill: has a
full ‘on’ setting and ‘off’.
Variable rate grill: has
adjustable heat settings
1 (low) to 8 (high) or 5
(high) - depending on
the model.
Single grill: has one grill
element.
Dual grill: has two grill
elements which can be
used together, or as a
single grill.
i
i
i
For best results:
Pre-heat the grill for
about 3 minutes.
i
Full grill at 1/4
power.
Centre grill at full
power.
Full grill area at full
power
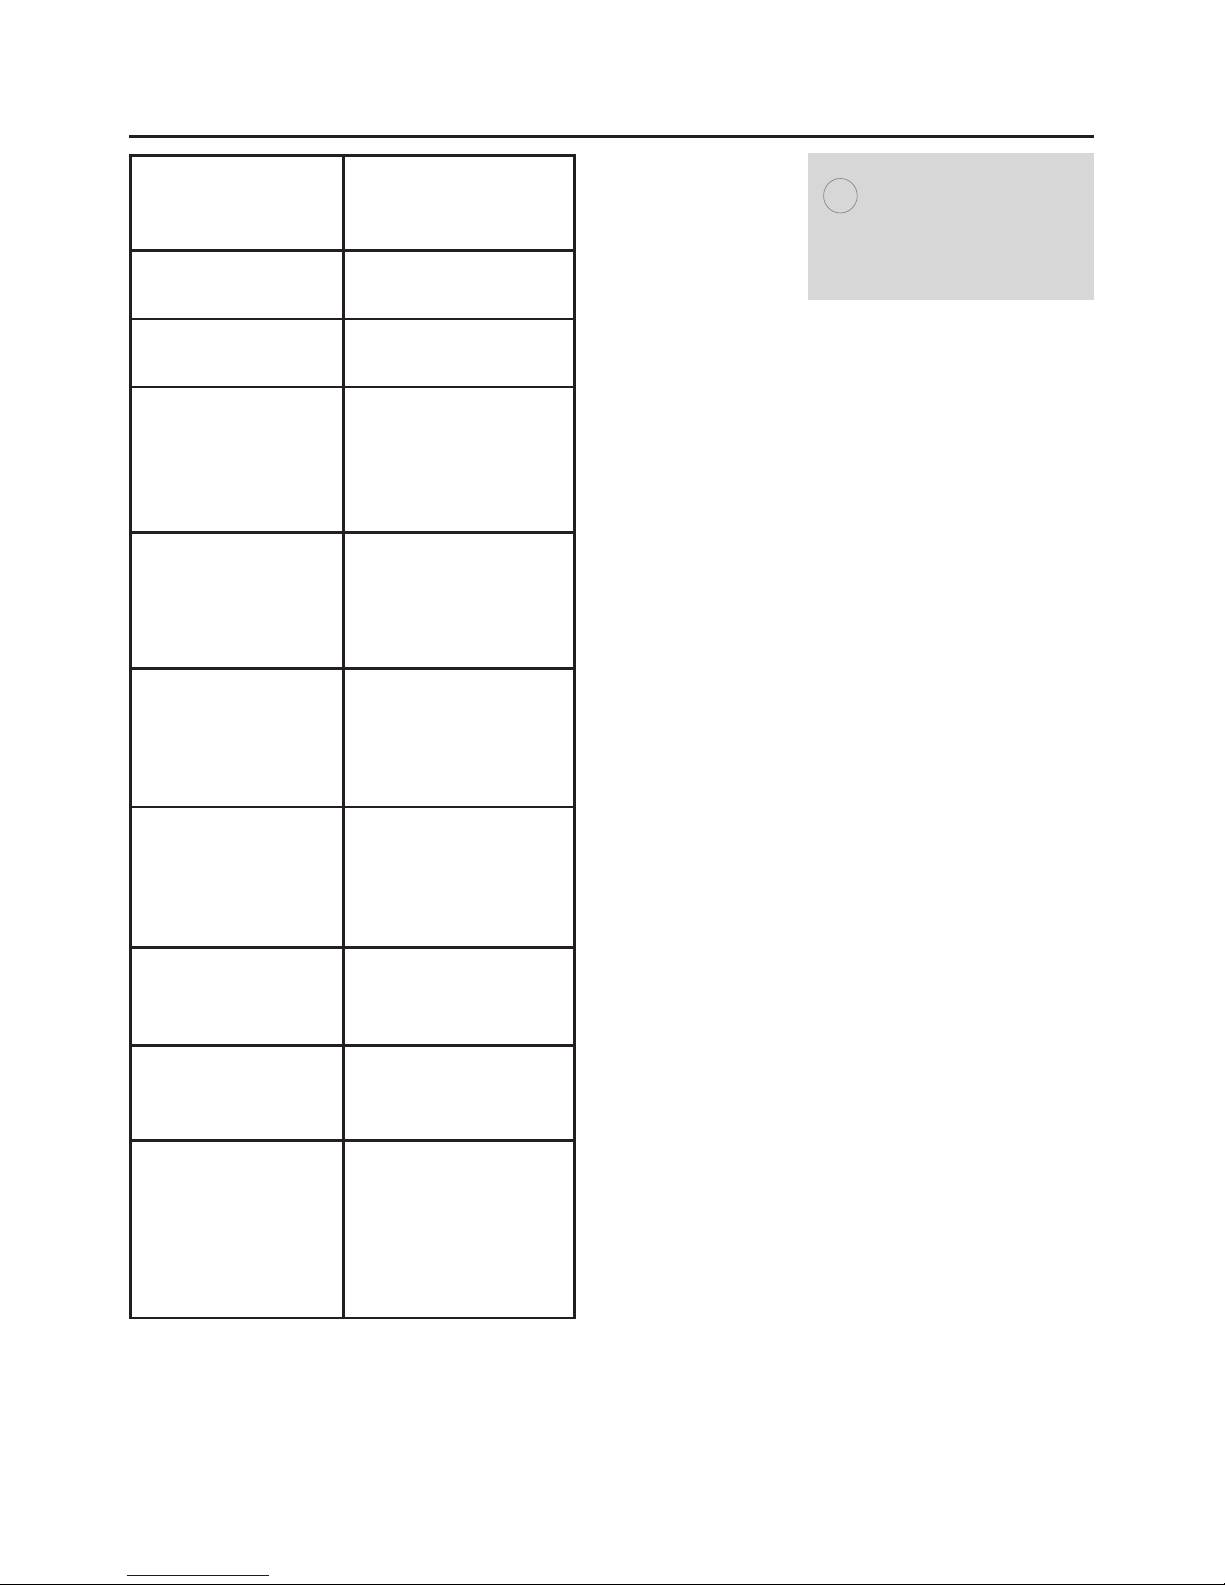
Grilling Guide
Food
Type
Time Approx
(mins)
Bacon 8 - 15
Sausages 12 - 15
Chops
Lamb
Pork
10 - 15
15 - 25
Toast
2 rounds
4 rounds
1 - 2 (per side)
1 - 2 (per side)
Bread products
Buns
Tea cakes
1 - 2 (per side)
1 - 2 (per side)
Cheese on toast
2 rounds
4 rounds
4 - 5
4 - 5
Fish:
fillets 10 - 15
Chicken:
fillets
20 - 30
Beef Steaks:
rare
medium
well done
Gammon Steaks
7 - 10
10 - 15
15 - 20
12 - 15
As with any cooking
guide, all times are
approximate and can be
adjusted to suit
personal taste.
i

Using Your Conventional Top Oven
Richmond models
Switching on the oven
Turn the control knob towards the conventional oven
settings.
Select the temperature you require.
The thermostat indicator will come on to show that the
oven is heating, and once the temperature is achieved,
it will go out.
Throughout the duration of your cooking the neon may
come on and off, this shows that the thermostat is
maintaining the chosen heat setting.
To switch off the top oven, simply turn the control
knob back to the ‘ ‘ position.
The cooling fan will come on during use, and may
continue to run for some time afterwards.
Important: Never
place food, or dishes on
the base of the main
oven - the element is
here and it will cause
over heating.
i
Note:
This is a secondary
oven - ideal for smaller
dishes.
i

Conventional Top Oven Cooking Guide
Item Temp
°C
Approx
Cooking
time
Small cakes
Victoria sandwich
(2x 180mm / 7”)
Swiss roll
Semi rich fruit cake
(2x 180mm / 7”)
Scones
Meringue
180
160
side by side
200
140
side by side
215
90 - 100
15 - 20 mins
20 - 25 mins
8 - 12 mins
2
1/2
- 3 hrs
10 - 15 mins
2 - 3 hrs
Short crust pastry
Puff / flaky pastry
Choux pastry
200 - 210
200 - 210
200 - 210
Depends on the
size, and type of
cooking dish, plus
the filling.
Biscuits
Sponge pudding
Milk pudding
160 - 200
150
140
10 - 20 mins
30 - 45 mins
2 - 2
1/2
hrs
As with any cooking
guide, all times are
approximate and can be
adjusted to suit
personal taste.
i
Because the top oven is
smaller - you might
need to reduce
times/temperatures in
recipies.
i
All times given in the
guide are based on a
pre-heated oven.
i

The multifunction oven may be controlled by the programmer (see The Programmer/Clock for details).
The programmer, if fitted must be set to manual before it
can be used, or programmed.
Switching on the multifunction oven
Use the function control knob to select the function you
wish to use - see the functions table for details.
Note: You can change function during cooking if you
wish, as long as the oven is in manual mode.
Turn the temperature control knob to the temperature
you wish to use.
The thermostat indicator will come on to show that the
oven is heating, and once the temperature is achieved,
it will go out.
To switch off the oven, simply turn the control knob
back to the ‘ ‘ position.
The cooling fan mayl come on during use, and may
continue to run for some time afterwards.
Using Your Multifunction Oven
Important: Never
place food, or dishes on
the base of the main
oven, the element is
here and it will cause
over heating.
i
 Loading...