

Page 1

1
Belling Cooker Hood
User Manual
Page 2

2
Contents
Introduction . . . . . . . . . . . . . . . . . . . . . . . . . . . . . . . . . . . . . . . . . . . . . . . . 3
Using the Hood . . . . . . . . . . . . . . . . . . . . . . . . . . . . . . . . . . . . . . . . . . . . . . 4
Care and Maintenance . . . . . . . . . . . . . . . . . . . . . . . . . . . . . . . . . . . . . . . . . 5
Installation . . . . . . . . . . . . . . . . . . . . . . . . . . . . . . . . . . . . . . . . . . . . . . . .. 6
Prepare for installation:.. . . . . . . . . . . . . . . . . . . . . . . . . . . . . . . . . . . . . . . . . 6
Installation (Vent outside) . . . . . . . . . . . . . . . . . . . . . . . .. . . . . . . . . . . . . . . 7
Installation (Vent inside). . . . . . . . . . . . . . . . . . . . . . . . . . . . . . . . . . . . . 11
Technical Data . . . . . . . . . . . . . . . . . . . . . . . . . . . . . . . . . . . . . . . . . . . . 12
Belling Customer Care. . . . . . . . . . . . . . . . . . .. . . . . . . .. . . . . . . . . . . . . 13
Please read this handbook carefully and keep it for future reference.
Page 3

3
Introduction
Thank you for buying this high quality
hood from Belling, we hope it makes
and attractive and useful addition to
your kitchen.
Our policy is one of constant
development and improvement. Strict
accuracy of illustrations and
specifications is not guaranteed.
Modification to design and materials
may be necessary subsequent to
publication.
Before using the appliance for the
first time, remove all packaging and
protective polythene film.
Your first year Guarantee
To fulfil the conditions of your
guarantee, this appliance must be
correctly installed and operated, in
accordance with these instructions, and
only be used for normal domestic
purposes.
Please refer to your guarantee card for
further details.
Please note that the guarantee, and
service availability, only apply to the
UK and Republic of Ireland.
Installation
This appliance has been designed for
use as an exhausting (air evacuation
to the outside) or filtering (indoor air
re-cycling) hood.
Note: This appliance does not come
supplied with a ducting kit, or carbon
filters. Details for ordering these parts
are at the back of the handbook.
Because of the complexity and weight
of the appliance, it is recommended
that the installation be carried out by
specialist personnel.
The manufacturer declines all
responsibility for damage caused by
improper installation.
Please read this handbook carefully
and keep it for future reference.
Page 4
4
Using the Hood
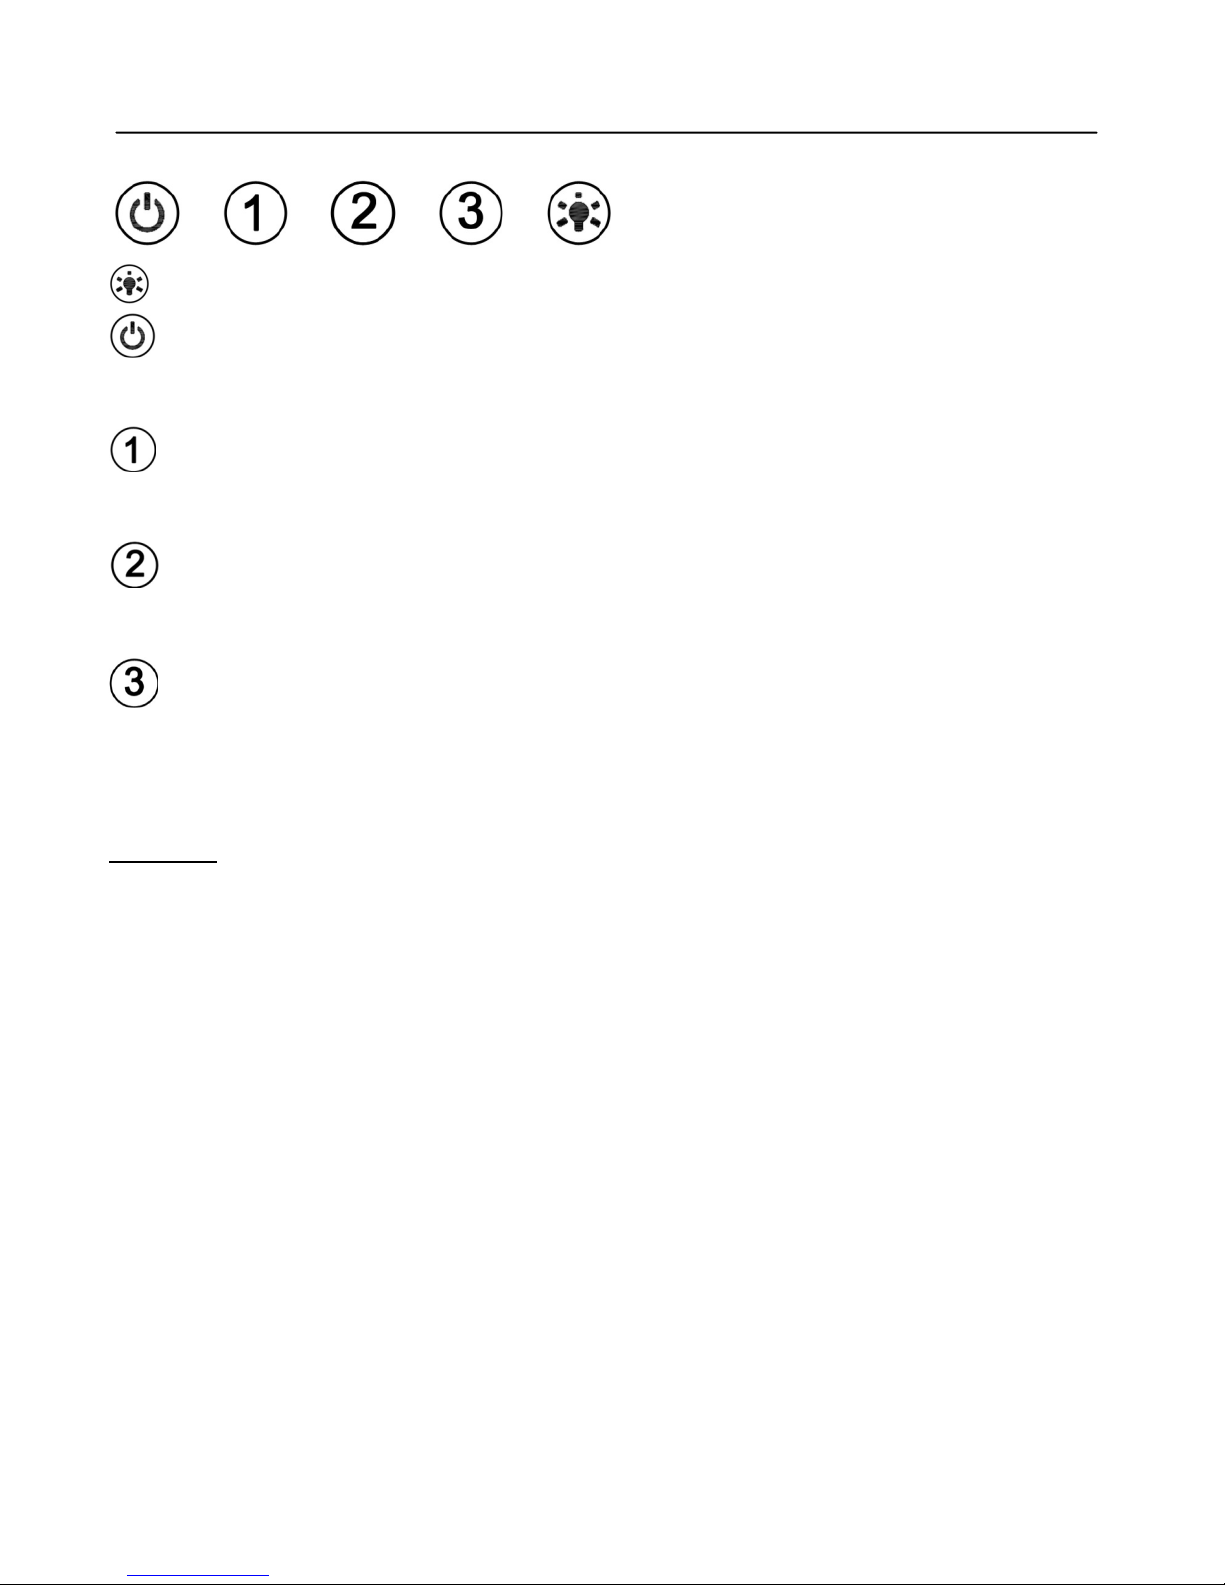
Lamp – Turn on/off light;
On/Off – Turn on/off unit
Speed –select speed to suit cooking
conditions
Low – light frying/boiling. Depress this
button to enter into low speed and again to
turn off motor.
Medium – frying/wok cooking/heavy
boiling. Depress this button to enter into
medium speed and again to turn off motor
High – grilling, intensive frying and wok
cooking. Depress this button to enter into
high speed and again to turn off motor
WARNING - Accessible parts may become hot
when used with cooking appliances.
To illuminate the cooking area underneath
the hood, push the light control
button in to the “on” position.
To
switch off,
press again to return to the
To operate the hood, press the button
for the required speed - select: 1 low,
2 medium, or 3 high speed. The
neon indicator light will light up to
show when the fan is operating.
To switch off
, press the “off” button.
Important safety notes
• Keep hob rings covered with pans
when switched on to avoid damaging
the hood. The use of an
unprotected flame can cause a fire
hazard.
•
Do not
flambé food underneath
the hood.
• When frying foods, take care to
avoid cooking oil flares.
• Wash the grease filters regularly refer to the cleaning section.
Do not
check
filters while the hood is in use.
•
Do not
touch the lamps after
prolonged use of the appliance.
Re-circulation method only:
• Keep the air ducting vents clear of
obstruction.
• Change the carbon filters every 4
months.
The appliance is not to be used by
children or persons with reduced physical,
sensory or mental capabilities, or
lack of experience and knowledge,
unless they have been given
supervision or instruction.
Page 5

5
Care & Cleaning
Before cleaning or maintenance,
switch off the electricity supply.
Replacing a light bulb
1. Switch the unit off and unplug the
appliance.
2. Pat the bulb down and replace the
bulb.
Outer casing
All external parts of the outer casing
can be safely cleaned with a clean
cloth wrung out in hot soapy water.
Do not use
caustic pastes, abrasive
cleaning powders, wire wool, hard
implements, or any products containing
chlorides as they will damage the
surfaces.
Stubborn marks can be removed using
a stainless steel cleaner. We recommend
that you clean the whole of the
stainless steel area to maintain a uniform
finish.
Sharp objects can mark the surface of
stainless steel, but marks will become
less noticeable with time.
To maintain the finish of the stainless
steel, or to remove any greasy marks,
wipe the stainless steel surface sparingly
with a
minimum
amount of Baby Oil
and kitchen paper.
Do not use cooking oils, as these may
contain salt, which can damage the
stainless steel surface.
Before cleaning or maintenance,
switch off the electricity supply.
To avoid any fire risk, the following
cleaning instructions must be followed:
Grease filters
The grease filters absorb grease and
dust from cooking fumes, which would
otherwise damage the inside of the hood.
The grease filters should be removed
and cleaned regularly - with normal
use, this should be every 2 months.
To clean use warm soapy water, or
wash in a dishwasher. The grease filters
may slightly change colour following
washing, however this does not
affect their performance.
Important:
Frequent washing is
essential to prevent a build up of
grease in the filters which could
become a fire hazard.
1. Remove the filters from the hood.
2. Carefully wash the grease filters in
hot soapy water and dry with a
clean towel.
3. Refit the clean filters.
Carbon filters
(models installed for
use with the re-circulation method only)
The carbon filters absorb cooking
odours and need renewing after about
4 months of normal use. Replacement
carbon filters can be obtained from
your supplier.
Saturation of the activated charcoal in
the filter will depend on how often the
hood is used, the type of kitchen and
the regularity of cleaning the grease filter.
The carbon filters cannot be
washed - renew every 4 months.
push in firmly .
Page 6
6
Installation
Prepare for installation:
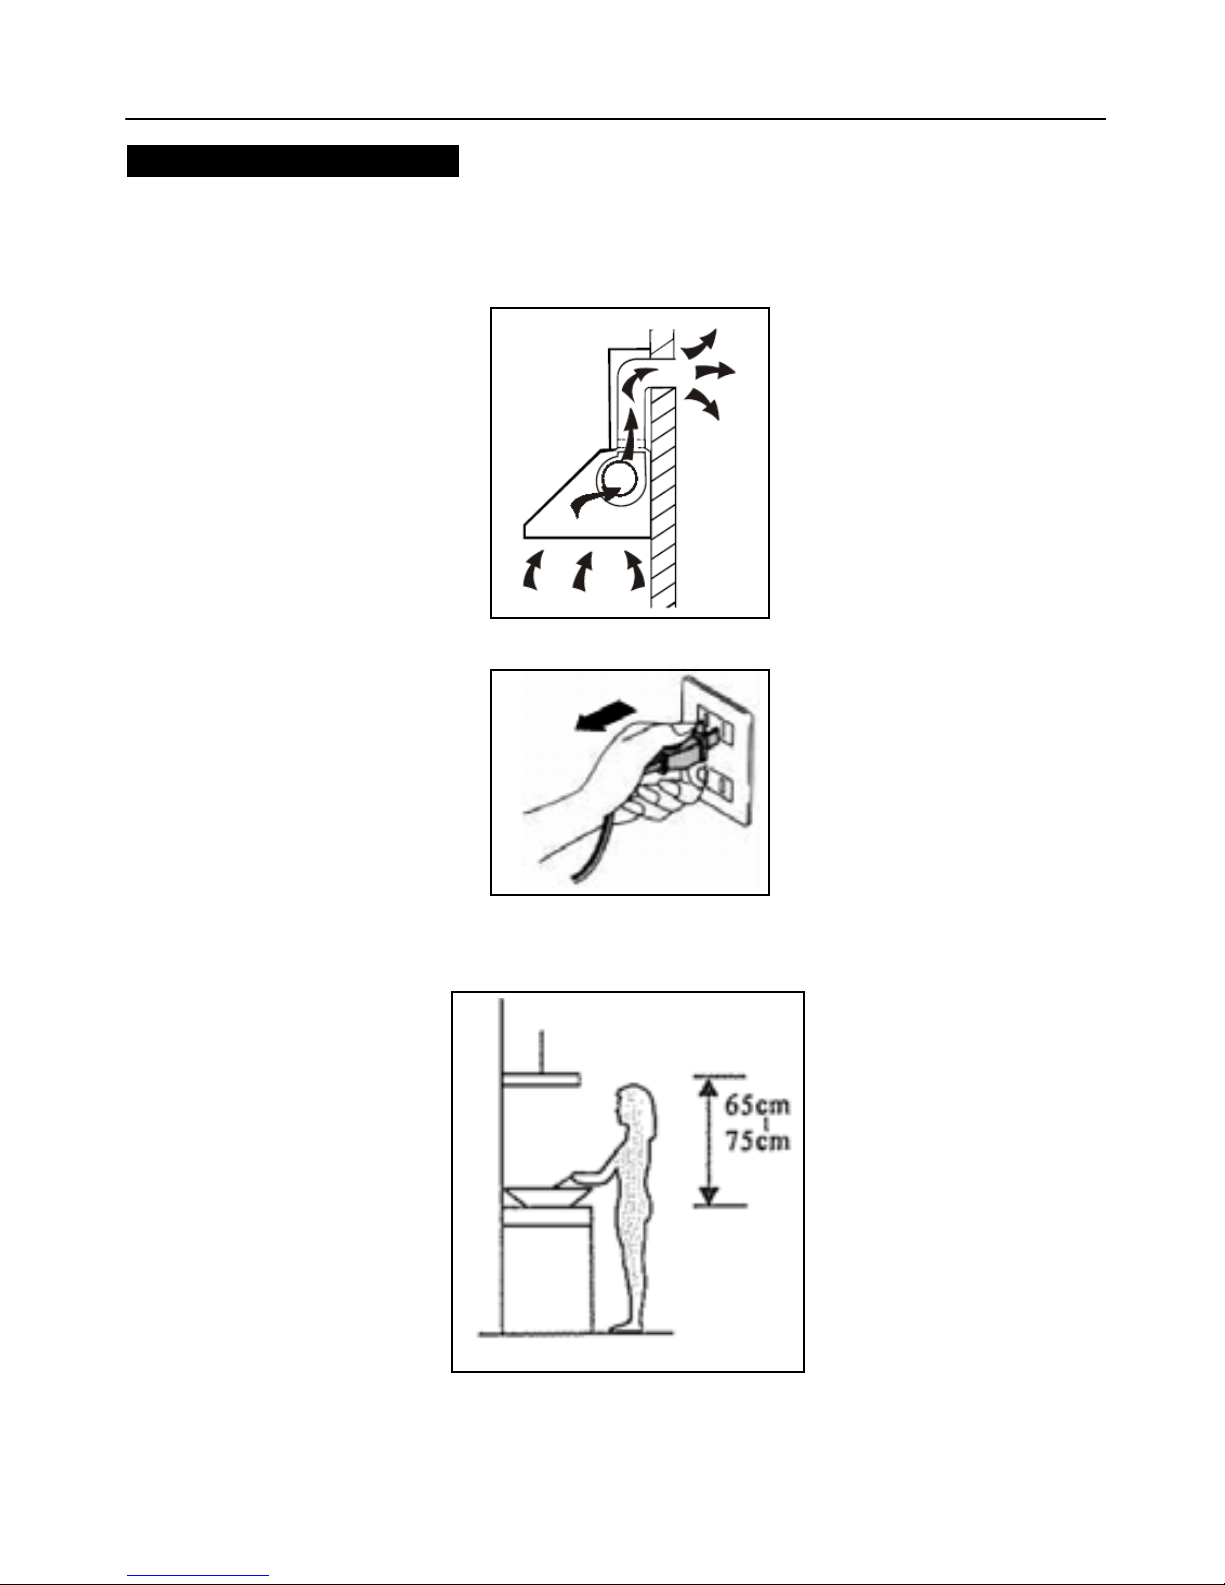
a. If you have an outlet to the outside, your cooker hood can be connected as below
picture by means of an extraction duct (enamel, aluminium, flexible pipe or
inflammable material with an interior diameter of 150mm)
b. Before installation, turn the unit off and unplug it from the outlet.
c. The cooker hood should be placed at a distance of 65~75cm above the cooking
plane for best effect.
Page 7
7
Installation
1 Installation (Vent outside):
Attention! Observe the warning in the instruction sheet concerning the
operation of the appliance when air is discharged from the room.
When the range hood and appliance supplied with energy other than
electricity are simultaneously in operation, the negative pressure in
the room must be not exceed 4 Pa (4×10⁻⁵ Bar)
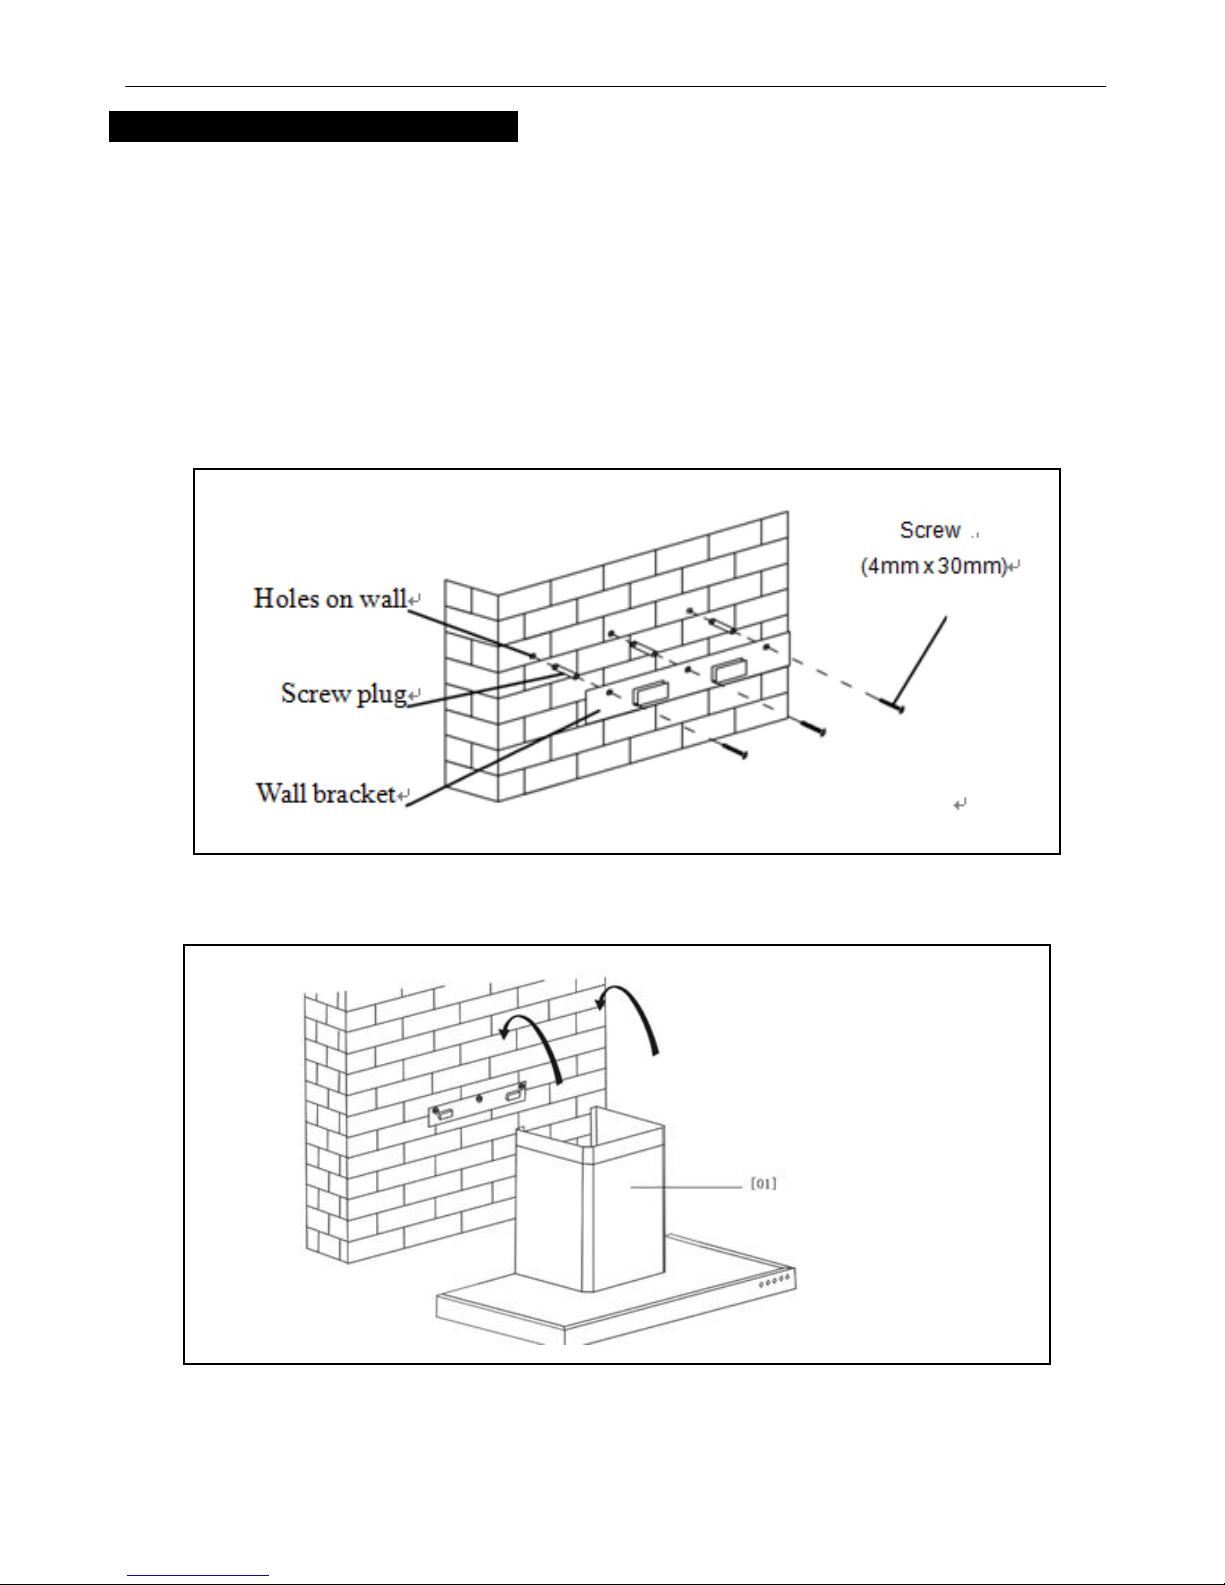
Drill 3 x 8mm holes to accommodate the bracket. Screw and tighten the
bracket onto the wall with the screws & screw plugs provided.
1. Offer up the cooker hood and hang onto the wall bracket hook.
Page 8
8
Installation
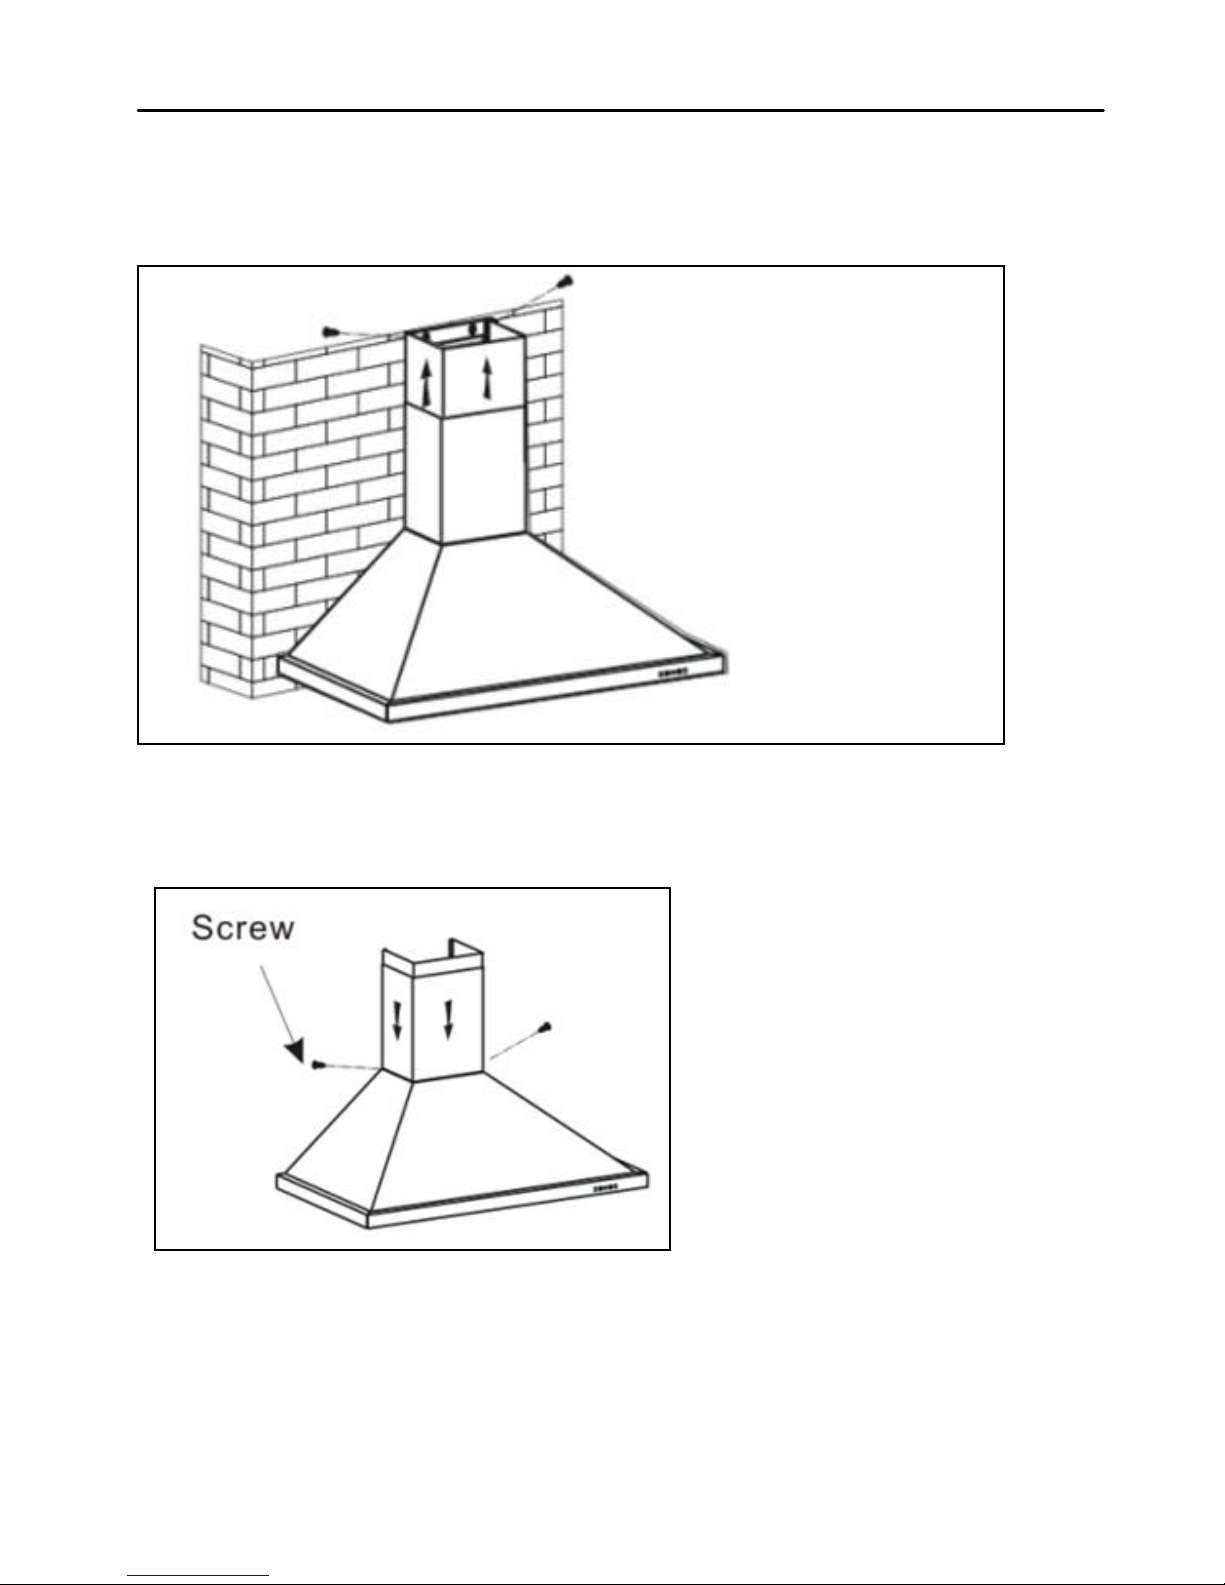
2. Chimney installation.
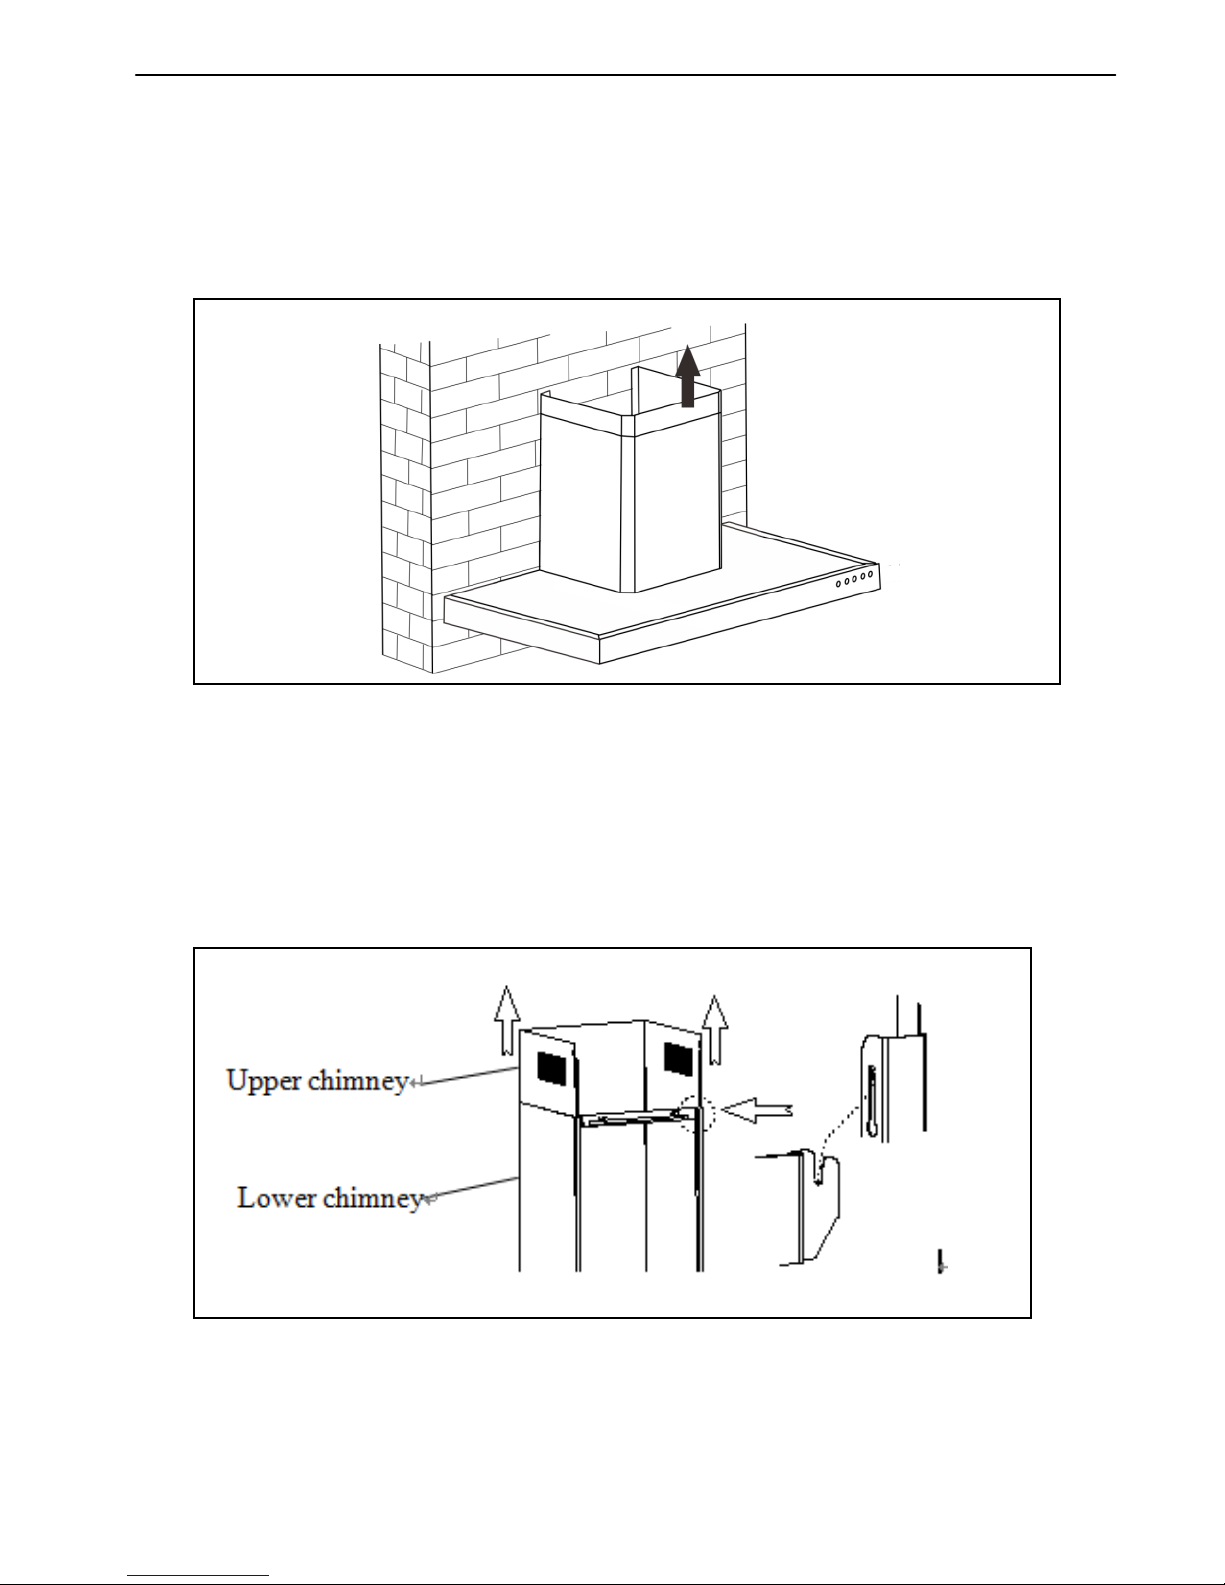
2.1 For Flat chimney,
Put the upper chimney into lower chimney .Then pulling out the upper
chimney upwards. Adjust to reach the height required.
Sliding the chimney to adjust the chimney height. When the height you
required is reached, then hang the fixing hole to the fixing screws as
showed in below pictures
Page 9
9
Installation
2.2 For chimney hood
By put the inner chimney into upper chimney. Then pulling out the
upper chimney upwards. Adjust to reach the height required.
Fix the lower chimney with 2 pcs of 4x8mm screws.
Page 10
10
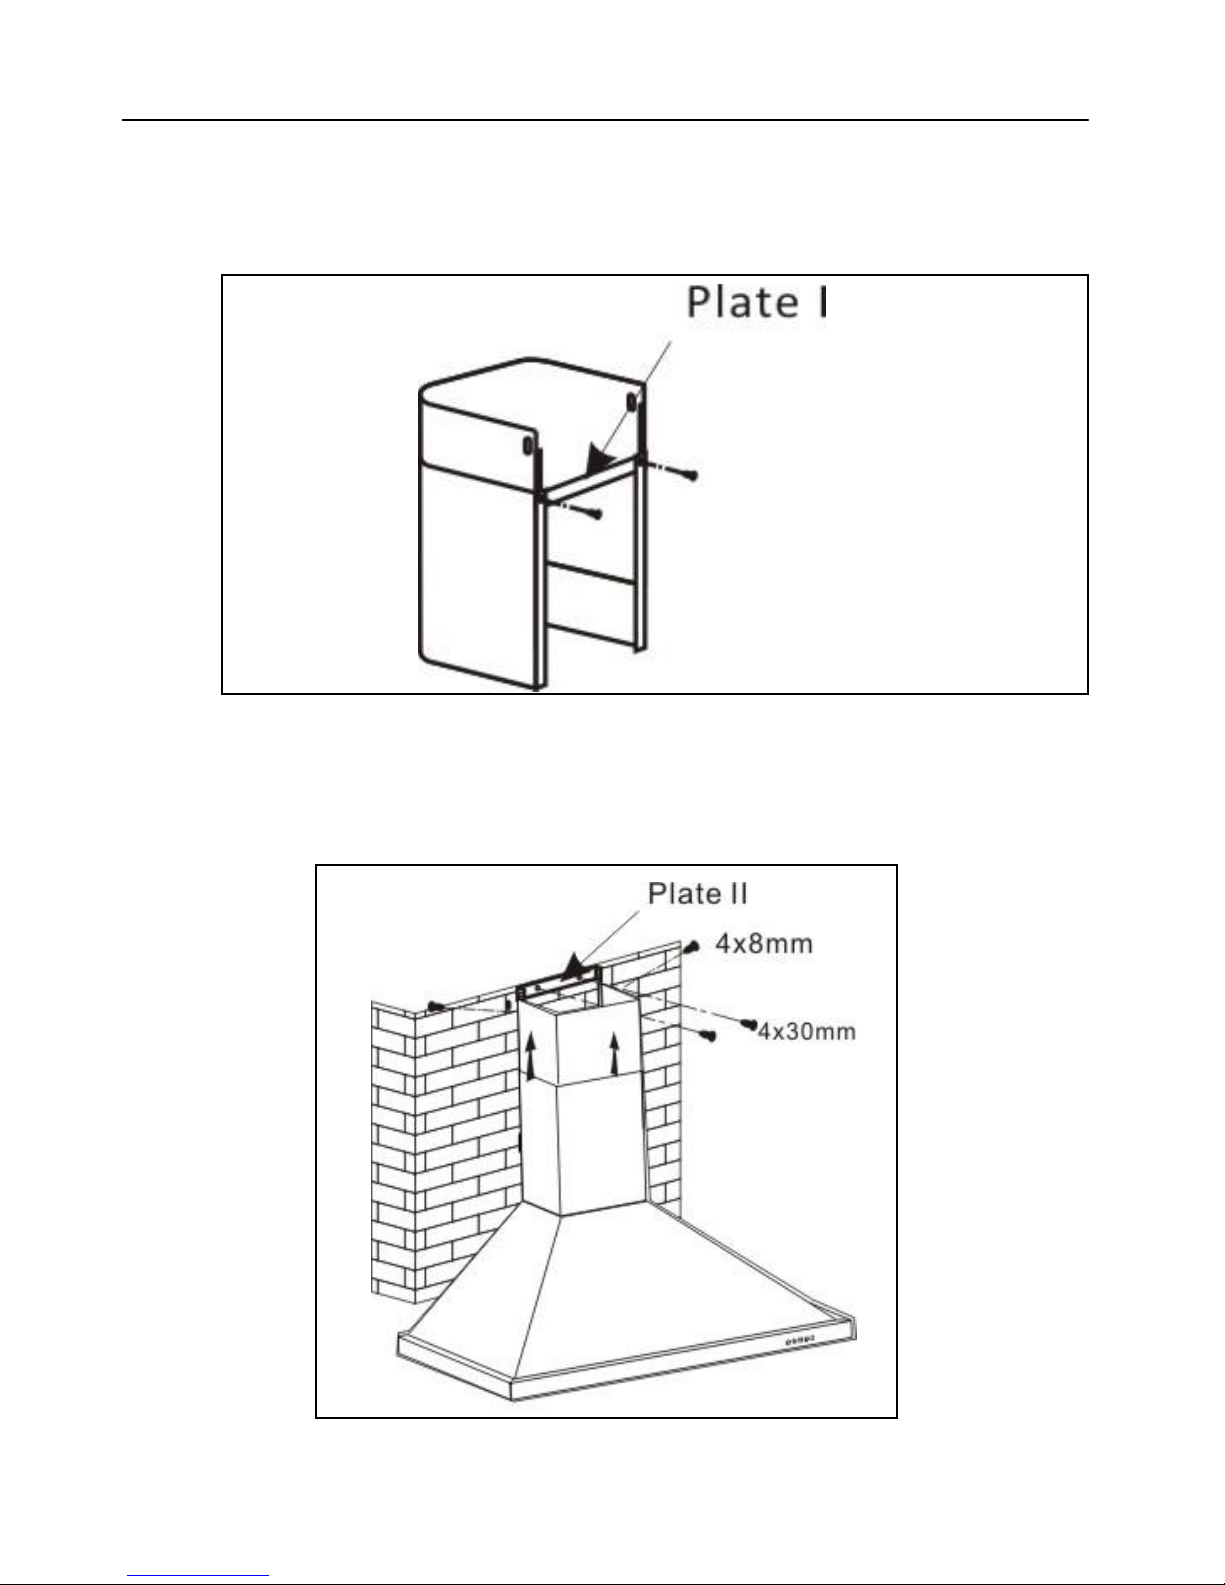
Installation
Sliding the chimney to adjust the chimney height. When the height you
required is reached, then fix 2 pcs of 4x8mm screws onto the hole fixing
with plate I as showed in below pictures.
Drill 2 x 8mm holes to accommodate the plate II. Screw and tighten the
plate II onto the wall with 2 screws provided.
Assemble the chimney onto the unit and fix it with 2 screws.
.
Page 11
11
Installation
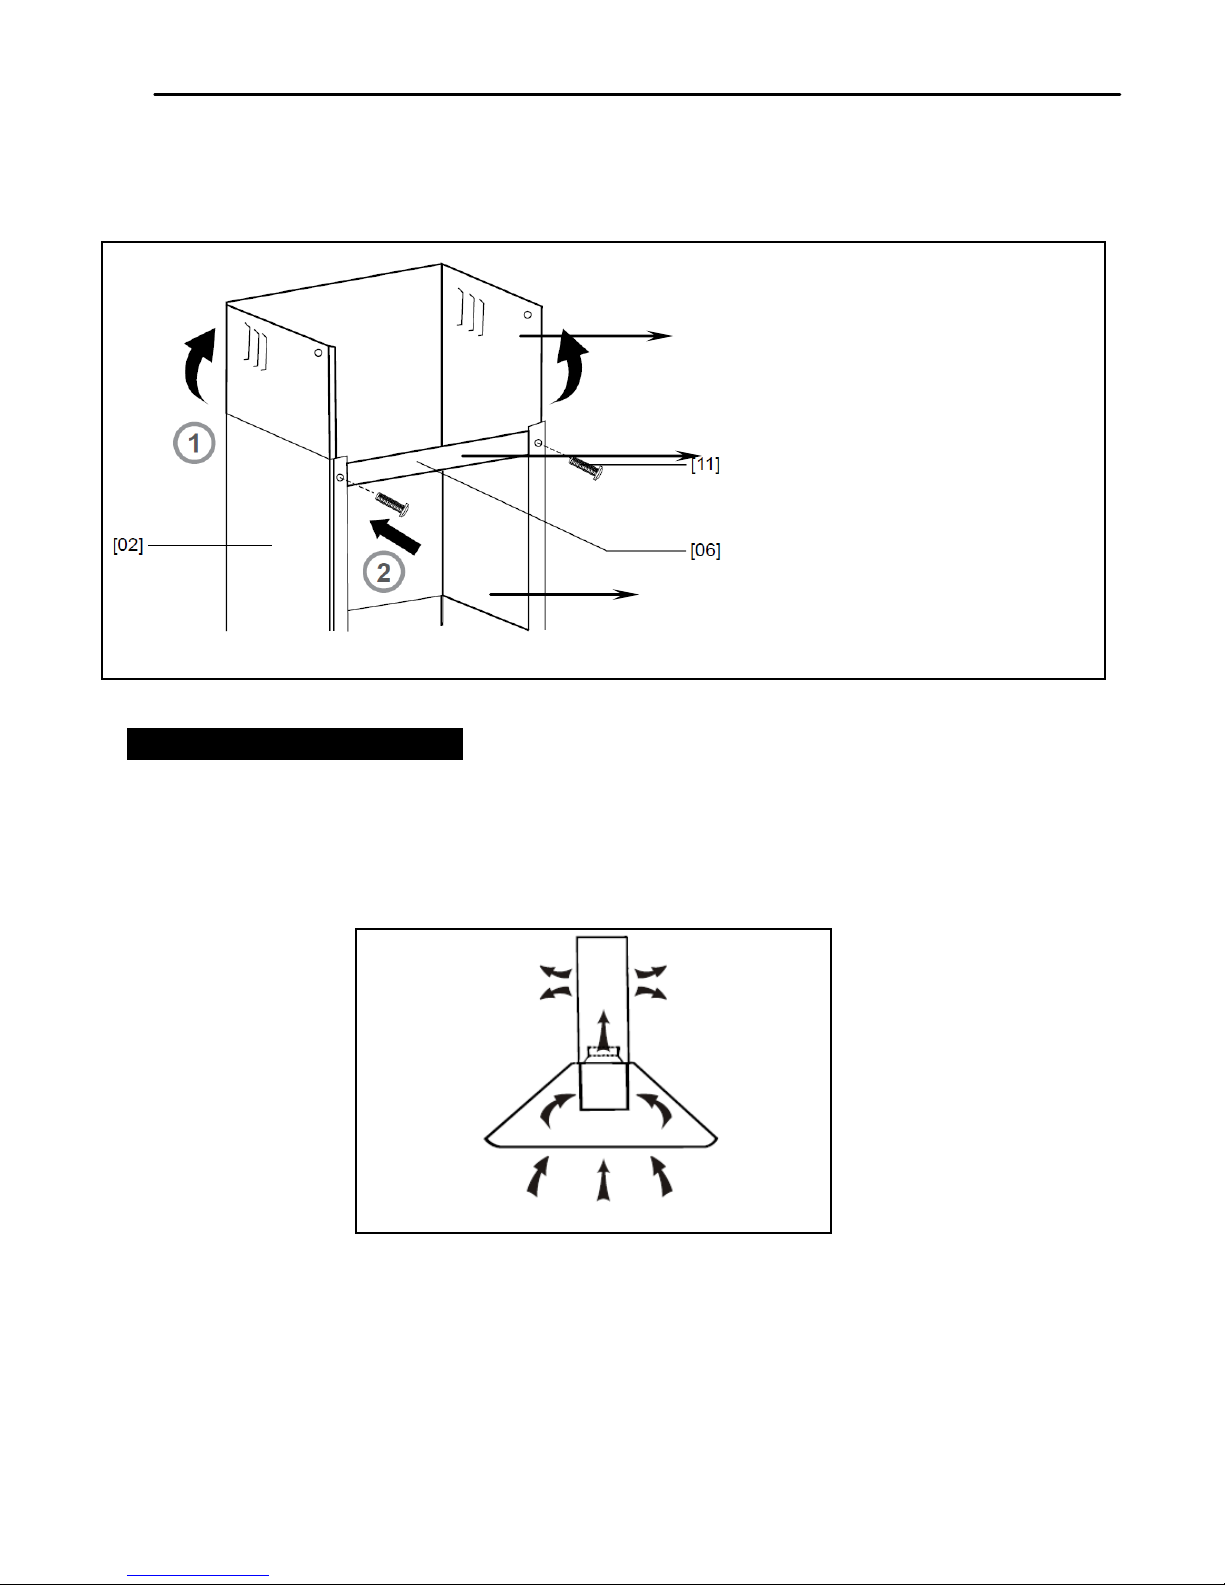
Use
2pcs ST4x8mm screws
to attach lower and upper chimney together, do
not fasten screws too much, make sure
upper decorative chimney
can be
telescopically adjusted after assembled.
Installation (Vent inside)
NOTE:
Carbon Filter not supplied, these can be purchased as an accessory
If you do not have an outlet to the outside, exhaust pipe is not required and the
installation is similar to the one show in section “Installation (Vent outside)”.
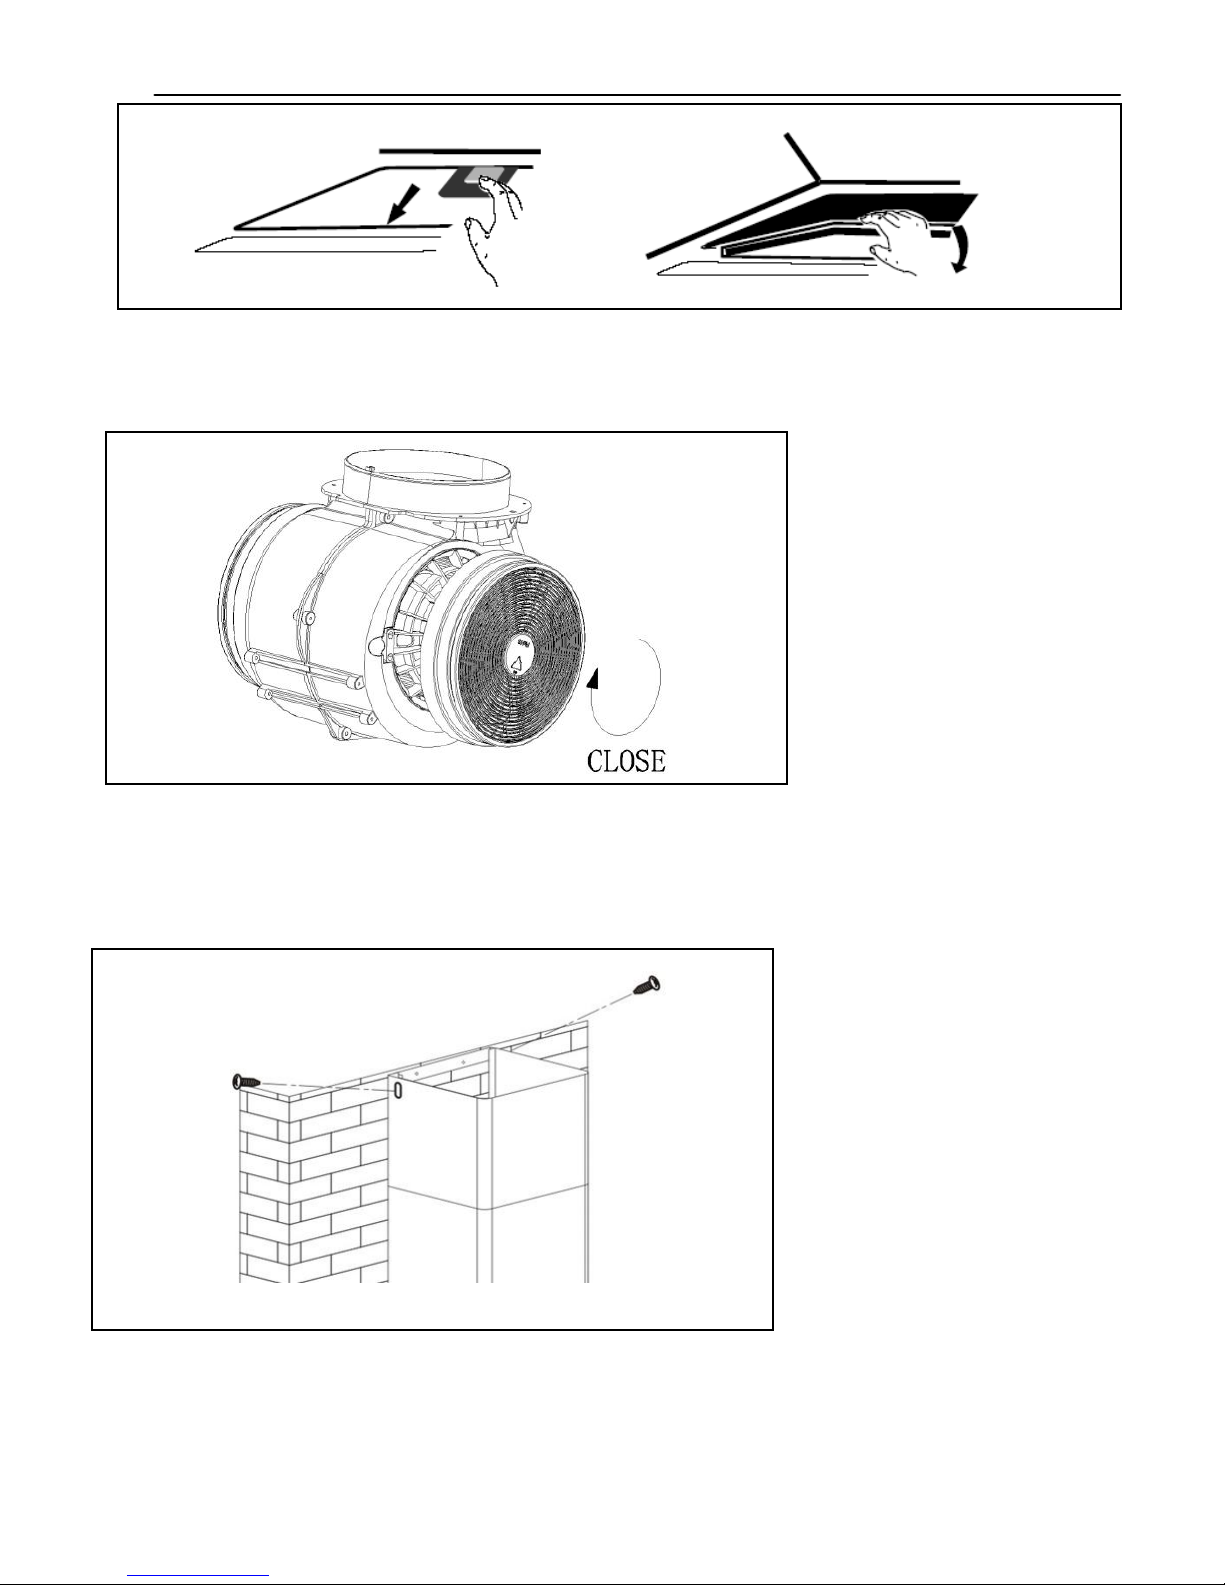
Activated carbon filter can be used to trap odours.
In order to install the activated carbon filter, the grease filter should be detached
first. Press the lock and pull it downward.
Upper decorative chimney
(Inner)
Lower Chimney bracket
Lower decorative chimney (Outer)
Page 12
12
Installation
Plug the activated carbon filter into the unit and turn it in clockwise direction.
Repeat the same on the other side.
NOTE:
o
Make sure the filter is securely locked. Otherwise, it would loosen and cause
dangerous.
When activated carbon filter attached, the suction power will be lower.
Remove all blue protective film on chimney and cooker hood, the installation is now
finished.
Page 13

13
Technical Data
Electricity supply
230 - 240V ~ 50Hz
Classification
class I
Noise level (External Venting)
Position 3 54 dBA
Position 2 47 dBA
Position 1 40 dBA
Light bulbs
2 x 1.5W LED
Please make sure you follow the instructions for replacing light bulbs carefully and
always make sure you use the correct bulb type.
Motor rating
100W
Carbon filters
x 2 - available as Spares
Grease filters
x 3 aluminium panel
Note:
After cleaning, grease filters may lose their colour slightly - this does not affect
their performance.
Extraction Rate (External)
Position 3 527m3/H
Position 2 440m3/H
Position 1 370m3/H
Page 14
14
Belling Customer Care
Please keep this handbook in a safe place.
Please fill in the model number
and serial number in the spaces provided below as they will assist us should you
need to call.
0844 815 3746
When you dial this number you will hear a recorded message and be given a
number of options. This indicates that your call has been accepted and is being
held in a queue. Calls are answered in strict rotation as our Customer Care
Representatives become available.
Enter appliance numbers here for future reference:
These numbers can be found on your appliances.
Outside the UK and Northern Ireland, refer to your local supplier.
Stoney Lane, Prescot, Merseyside, L35 2XW
Mo del No
Serial No
 Loading...