

Page 1
Format Freestanding
Gas Double Oven & Grill
INSTALLATION AND USER INSTRUCTIONS
Model: G754
You must read these instructions prior to using the
appliance and retain them for future reference.
Page 2
If you smell gas:
- Do not try to light any appliance.
- Do not touch any electrical switch.
- Call the Gas Emergency Helpline at TRANSCO on:
0800 111999
The Gas Consumer Council (GCC) is an independent organisation which protects the
interests of gas users. If you need advice, you will find the telephone number in your local
telephone directory under Gas.
The appliance must be installed (and serviced) by a Corgi registered approved
installer or a person competent to ensure that the installation is in accordance
with “The Gas Safety (Installation and Use) Regulations 1994”, and the “The
Gas Safety (Installation and Use) (Amendment) Regulations 1996”. Failure to
comply with these Regulations is a criminal offence.
Page 3

CONTENTS
User’s Section . . . . . . . . . . . . . . . . . . . . . . . . . . . . . . . . . . . . . 2 - 24
Introduction . . . . . . . . . . . . . . . . . . . . . . . . . . . . . . . . . . . . . . . . . . . . . . . . . 2
Be Safe - Not Sorry. . . . . . . . . . . . . . . . . . . . . . . . . . . . . . . . . . . . . . . . . . . . 5
Using the Hob . . . . . . . . . . . . . . . . . . . . . . . . . . . . . . . . . . . . . . . . . . . . . . . 6
Using the Grill . . . . . . . . . . . . . . . . . . . . . . . . . . . . . . . . . . . . . . . . . . . . . . . 8
Using the Ovens . . . . . . . . . . . . . . . . . . . . . . . . . . . . . . . . . . . . . . . . . . . . . 10
Ignition . . . . . . . . . . . . . . . . . . . . . . . . . . . . . . . . . . . . . . . . . . . . . . . . . . . 10
Oven furniture . . . . . . . . . . . . . . . . . . . . . . . . . . . . . . . . . . . . . . . . . . . . . . 12
Slow cooking . . . . . . . . . . . . . . . . . . . . . . . . . . . . . . . . . . . . . . . . . . . . . . . 12
Top oven baking guide . . . . . . . . . . . . . . . . . . . . . . . . . . . . . . . . . . . . . . . . 13
Main oven baking guide . . . . . . . . . . . . . . . . . . . . . . . . . . . . . . . . . . . . . . . 14
Traditional fruit cakes . . . . . . . . . . . . . . . . . . . . . . . . . . . . . . . . . . . . . . . . . 15
Roast turkey . . . . . . . . . . . . . . . . . . . . . . . . . . . . . . . . . . . . . . . . . . . . . . . . 15
Roasting guide . . . . . . . . . . . . . . . . . . . . . . . . . . . . . . . . . . . . . . . . . . . . . . 16
Using the Minute Minder . . . . . . . . . . . . . . . . . . . . . . . . . . . . . . . . . . . . . . . 17
Cleaning . . . . . . . . . . . . . . . . . . . . . . . . . . . . . . . . . . . . . . . . . . . . . . . . . . 18
Installation Instructions . . . . . . . . . . . . . . . . . . . . . . . . . . . . . 20 - 24
Technical Data . . . . . . . . . . . . . . . . . . . . . . . . . . . . . . . . . . . . . . . 25
Belling Customer Care. . . . . . . . . . . . . . . . . . . . . . . . . . . . . . . . . . 26
Please keep this handbook for future reference, or for anyone else
who may use the appliance.
1
Page 4

INTRODUCTION
Thank you for choosing a British
built appliance by Belling
We hope that the following information
will help you to familiarise yourself
with the features of the appliance, and
to use it successfully and safely.
Our policy is one of constant development
& improvement. Strict accuracy of
illustrations and specifications is not
guaranteed. Modification to design
and materials may be necessary
subsequent to publication.
This appliance must be installed in
accordance with the regulations in
force, and only in a well ventilated
space. Read the instructions before
Gas & Electrical connection
Please refer to installation instructions
for the Gas & Electrical Safety Regulations
and the Ventilation Requirements.
In your own interest, and that of safety,
it is the law that all gas appliances be
installed by competent persons, who
will e n s u r e that the installation is in
accordance with “The Gas Safety
(Installation & Use) Regulations 1994”,
and the “The Gas Safety (Installation
and Use) (Amendment) R e g u l a t i o n s
1996”. Failure to comply with these
Regulations is a criminal offence.
Corgi registered installers undertake to
work to satisfactory standards.
installing or using this appliance.
Your new appliance is designed to be
installed flush to base units.
Your 1st Year Guarantee
To fulfil the conditions of your guarantee,
this appliance must be correctly
installed and operated, in accordance
with these instructions, and only be
used for normal domestic purposes.
Please note that the guarantee, and
Service availability, only apply to the
UK and Republic of Ireland.
Stability bracket
If the cooker is to be fitted with a flexible
Disconnection of gas and electric
appliances should always be carried
out by competent persons.
Warning: This appliance must be
earthed.
Before using the appliance for
the first time, remove any protective
polythene film and wash the oven
shelves and furniture in hot soapy
water, to remove their protective
coating of oil. Even so, when you first
turn on the oven or grill you may
notice a smell and some smoke.
inlet connection, a stability bracket
should also be fitted to engage in the
back of the cooker. Make sure this is
re-engaged whenever you move the
cooker for cleaning.
2
Page 5

INTRODUCTION
Glass door panels
To meet the relevant Standards of
Domestic cooking appliances, all the
glass panels on this appliance are
toughened to meet the fragmentation
requirements of BS3193. This ensures
that, in the unlikely event that a panel
breaks, it does so into small fragments
to minimise the risk of injury.
Please take care when handling, using
or cleaning all glass panels as any
damage to the surfaces or edges may
result in the glass breaking without
warning or apparent cause at a later
date. Should any glass panel be
damaged, we strongly recommend
that it is replaced immediately.
Ventilation
The use of a gas cooking appliance
results in the production of heat and
moisture in the room in which it is
installed. Ensure that the kitchen is well
ventilated: keep natural ventilation
holes open or install a mechanical
ventilation device (mechanical extractor
hood). Prolonged intensive use of the
appliance may call for additional
ventilation, for example, opening of a
window, or more effective ventilation,
for example increasing the level of
mechanical ventilation where present.
If the ignition fails:
• Check there is a spark when the
The cooling fan
When the appliance is switched on,
you may hear the cooling fan come
on. This keeps the fascia and control
knobs cool during grilling / cooking
and will continue to operate for up to
15 minutes after the appliance has
been switched off.
During oven use the fan may cycle on
and off. Should any fault occur with the
cooling fan, the appliance will require
servicing. Contact Customer Support.
ignition button is depressed. If there
is no spark, check that the electricity
supply is switched on at the socket.
• Check that the gas supply is
switched on.
• Try another appliance in the socket,
if that works, replace the 3 amp
fuse in the cooker plug.
3
Page 6

INTRODUCTION
Moving the cooker
Do not attempt to move the cooker by
pulling on the doors or handles. Open
the door and grasp the frame of the
cooker, taking care that the door does
not shut on your fingers.
Take care to avoid damage to soft or
uneven floor coverings when moving
the appliance. Some cushioned vinyl
floor coverings may not be designed
to withstand sliding appliances without
marking or damage.
To replace a light bulb
Caution: Switch off the electricity
supply to the appliance, to remove the
risk of electric shock.
Wait until the oven /grill is cool before
removing the shelves.
Environmental Protection
Glen Dimplex Cooking is committed to
p r o t e c t i n g the environment and operates an Environmental Management
System which complies with BS EN
ISO 14001:1996.
Disposal of packaging
• All our packaging materials are
recyclable and environmentally
friendly.
• Please help us to protect our
environment by disposing of all
packaging in an environmentally
friendly manner.
• Please contact your local authority
for the nearest recycling centre.
Caution: Packaging materials can
pose a risk of suffocation - keep away
from children.
Gently unscrew the lamps glass cover,
at the rear of the oven cavity.
Unscrew the bulb and replace.
replace lens cover.
Please note that oven light bulbs are
not covered by guarantee.
4
Page 7

BE SAFE - NOT SORRY
When you are cooking, keep
children away from the vicinity
of the appliance.
This product is designed as a domestic
cooking appliance for the preparation
and cooking of domestic food
products, and should not be used for
any other purpose.
• Remove all packaging, protective
films and oils from the appliance
before using for the first time.
• Make sure you read and
understand the instructions before
using the appliance.
• Keep electrical leads short so they
do not drape over the appliance
• Do not use aluminium foil to cover
the grill pan, or put items wrapped
in foil under the grill as this creates
a fire hazard.
• Do not use the oven with the door
inner glass panel removed.
• Use oven gloves when removing
hot food / dishes from the oven or
grill. The oven / grill and utensils
will be very hot when in use.
• Do not use foil on oven shelves or
allow it to block the oven flue, as
this creates a fire hazard, and
prevents heat circulation.
• Switch off the electricity supply
before replacing the oven light bulb,
or the edge of the worktop.
• Keep all flammable materials (such
as curtains, furnishings & clothing)
away from the appliance.
• Parts of the appliance may be hot
during or immediately after use.
Allow sufficient time for the appliance
to cool after switching off.
• Never use the appliance for
heating a room.
• Do not drape tea towels over the
flue vents or door, as this creates a
fire hazard.
• When opening the appliance
door, take care to avoid skin
contact with any steam which may
to avoid the risk of electric shock.
• When cooking heavy items - eg;
turkeys - do not pull the oven shelf
out with the item still on the shelf.
Drop-down top oven door: Do not
place items on the door when open.
• When you have finished cooking
check that all controls are in the
“off” position.
All installation, servicing and
maintenance work should be carried
out by a competent person who will
comply with current Regulations,
Standards and Requirements.
As with all gas appliances, it is
recommended that your appliance is
escape from the cooking.
serviced regularly.
5
Page 8
USING THE HOB
Ignition
Push in and turn the selected control
knob anticlockwise to the ‘full on’ position
and press the ignition switch, or hold
a lighted match or taper to the burner,
until the burner lights. Turn the control
knob to the required setting.
Adjust the burner flame so that it does
not extend over the pan base.
To turn off, push in the control knob
and turn clockwise until the dot on the
Pans
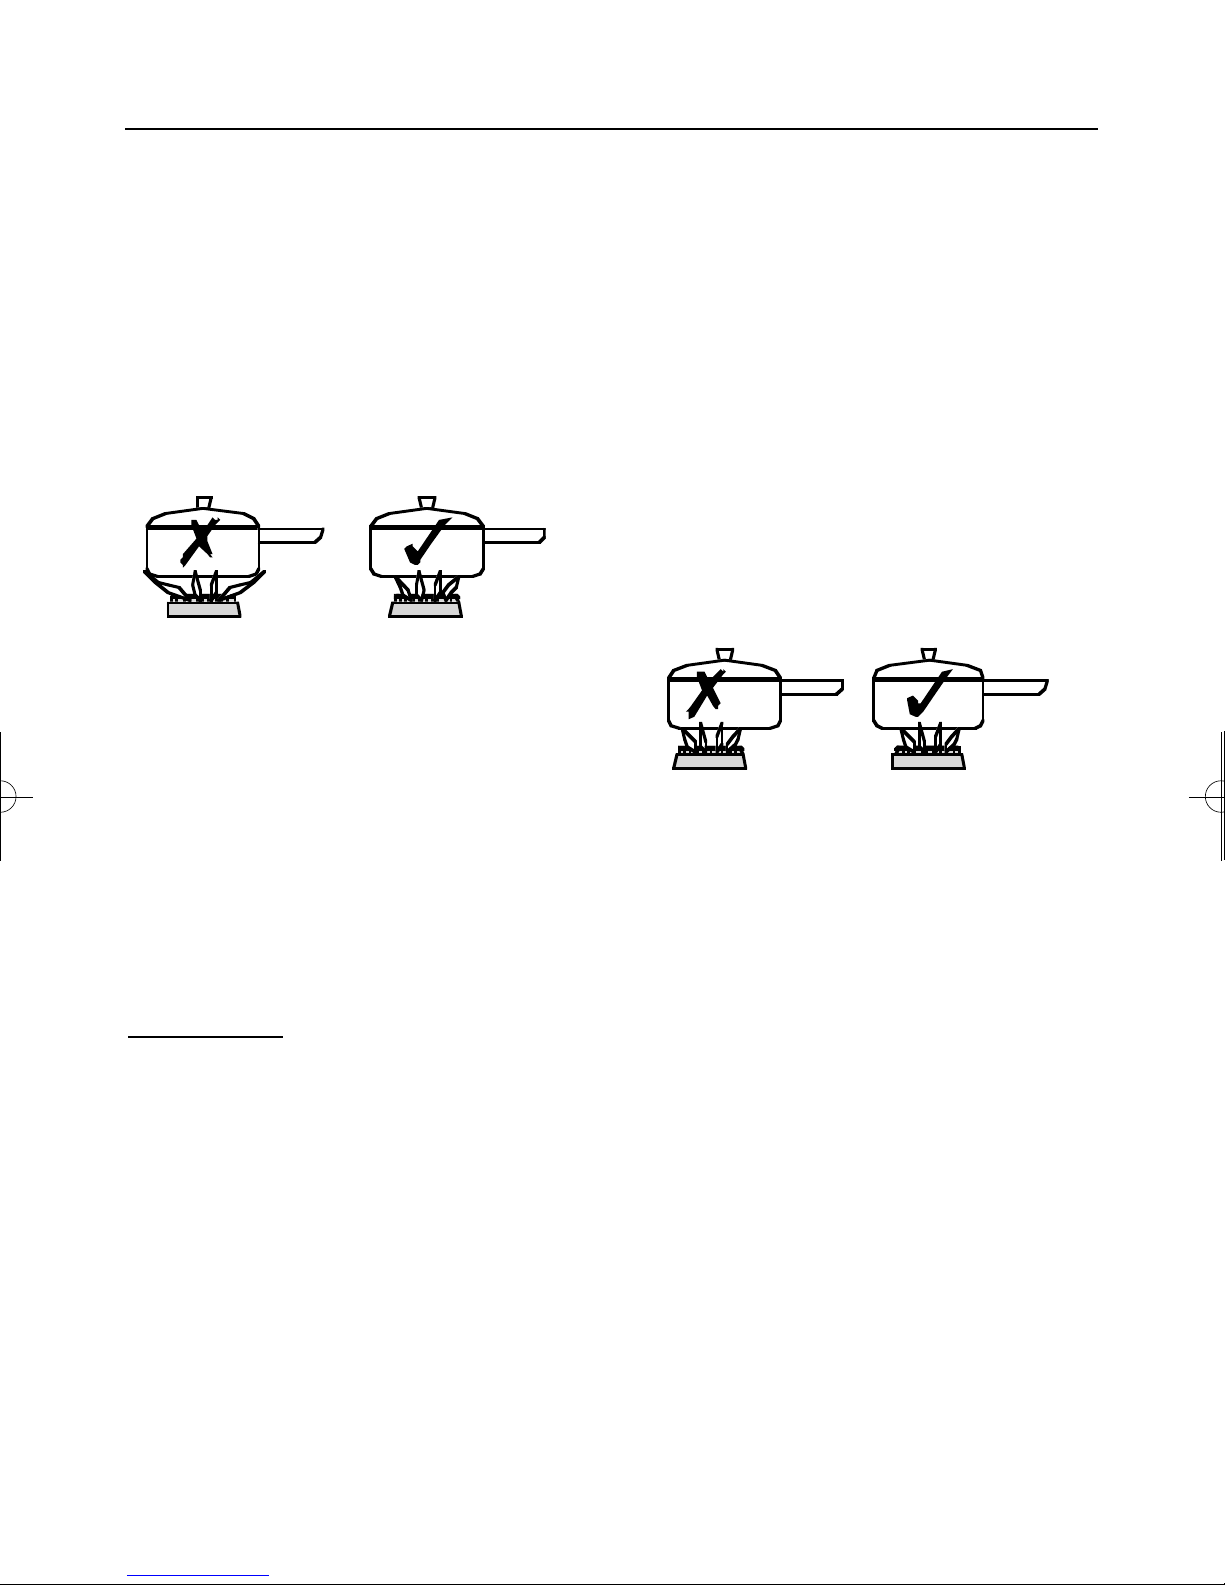
For optimum safety and performance, we
recommend the use of flat bottomed pans
with a base diameter of minimum 100mm
(4”) and maximum 250mm (10”).
Do not use double pans, rim based
pans, old misshapen pans or any pan
which is unstable when placed on a
flat surface.
Position pans over the centre of the
burners, resting on the pan supports.
If positioned off centre, smaller pans
may be unstable.
control knob is below the dot on the
facia panel.
To simmer
The simmer position is marked by the
small flame symbol.
Once lit turn the selected control knob
a n t i c l o c k w i s e past the large flame
symbol (
FULL ON
) to the small flame
symbol.
You may hear a slight popping noise
when the hob burners are operating
and this is quite normal, but if anything
about the cooker appears unusual,
such as change in flame appearance,
When cooking with fat or oil, never
leave unattended.
Turn pan handles to a safe position,
so they are out of reach of children,
not overhanging the appliance, and
cannot be caught accidentally.
Commercial simmering aids should
not be used as they create excessive
temperatures that can damage the
surface and may cause a hazard.
Pan supports
Always make sure the pan supports
are replaced correctly, and located in
or the operation of controls - seek
expert advice.
the hob spillage well.
6
Page 9

USING THE HOB
To save gas
• Use the size of pan most suited to
the size of the burner - ie; larger
pans on the larger burners, smaller
pans on the smaller burners.
• Adjust the flames so that they do
not lick up the sides of the pan.
• Put lids on saucepans and only heat
the amount of liquid you need.
• When liquids boil, reduce the control
setting to maintain a simmer.
• Consider the use of a pressure
cooker for the cooking of a
complete meal.
• Potatoes and vegetables will cook
quicker if chopped into smaller pieces.
The fold down lid
Caution: Glass lids may shatter when
heated. Turn off all the burners before
shutting the lid.
When opening and closing the lid, use
the cooler outer sides of the lid trim.
The lid must be opened fully, so there
is no danger of it closing while the hob
is being used.
The appliance is fitted with a switch-
back system, which will automatically
turn off the hotplate controls if they are
inadvertently left on as the lid is closed.
The lid is not intended to be used as a
work surface, as it becomes hot when
any part of the cooker is in use, and
the surface may be scratched if items
with rough or sharp surfaces are
placed on it.
7
Page 10

USING THE GRILL
Caution: Accessible parts may
be hot when the grill is used young children should be kept
away.
Important: The top oven / grill door
must be fully open when the grill is used.
Preheating
For best cooked results, we
recommend that you preheat the
grill for about 3 minutes.
Shelf positions
On a higher shelf position, the grill
gives coverage over the area directly
beneath the grill burner.
Use a higher shelf position for thinner
foods and faster grilling. These shelf
positions are suitable for toasting
bread.
Use the l o w e r shelf positions for
grilling thick portions of food, or for
slower grilling. The lower shelf
Ignition
Open the top oven / grill door. Push
in and turn the top oven / grill control
knob clockwise to the ‘
FULL ON
’ position
and press the ignition s w i t c h until the
burner lights.
In the event of the grill burner flames
being accidentally extinguished, turn
off the burner control and do not
attempt to re-ignite the oven burner for
at least one minute.
To switch off, push in the control knob
positions are suitable for grilling all
types of meat and fish.
Using aluminium foil
Using aluminium foil to cover the grill
pan, or putting items wrapped in foil
under the grill creates a fire hazard.
and turn anticlockwise to return it to
the off position.
8
Page 11
USING THE GRILL
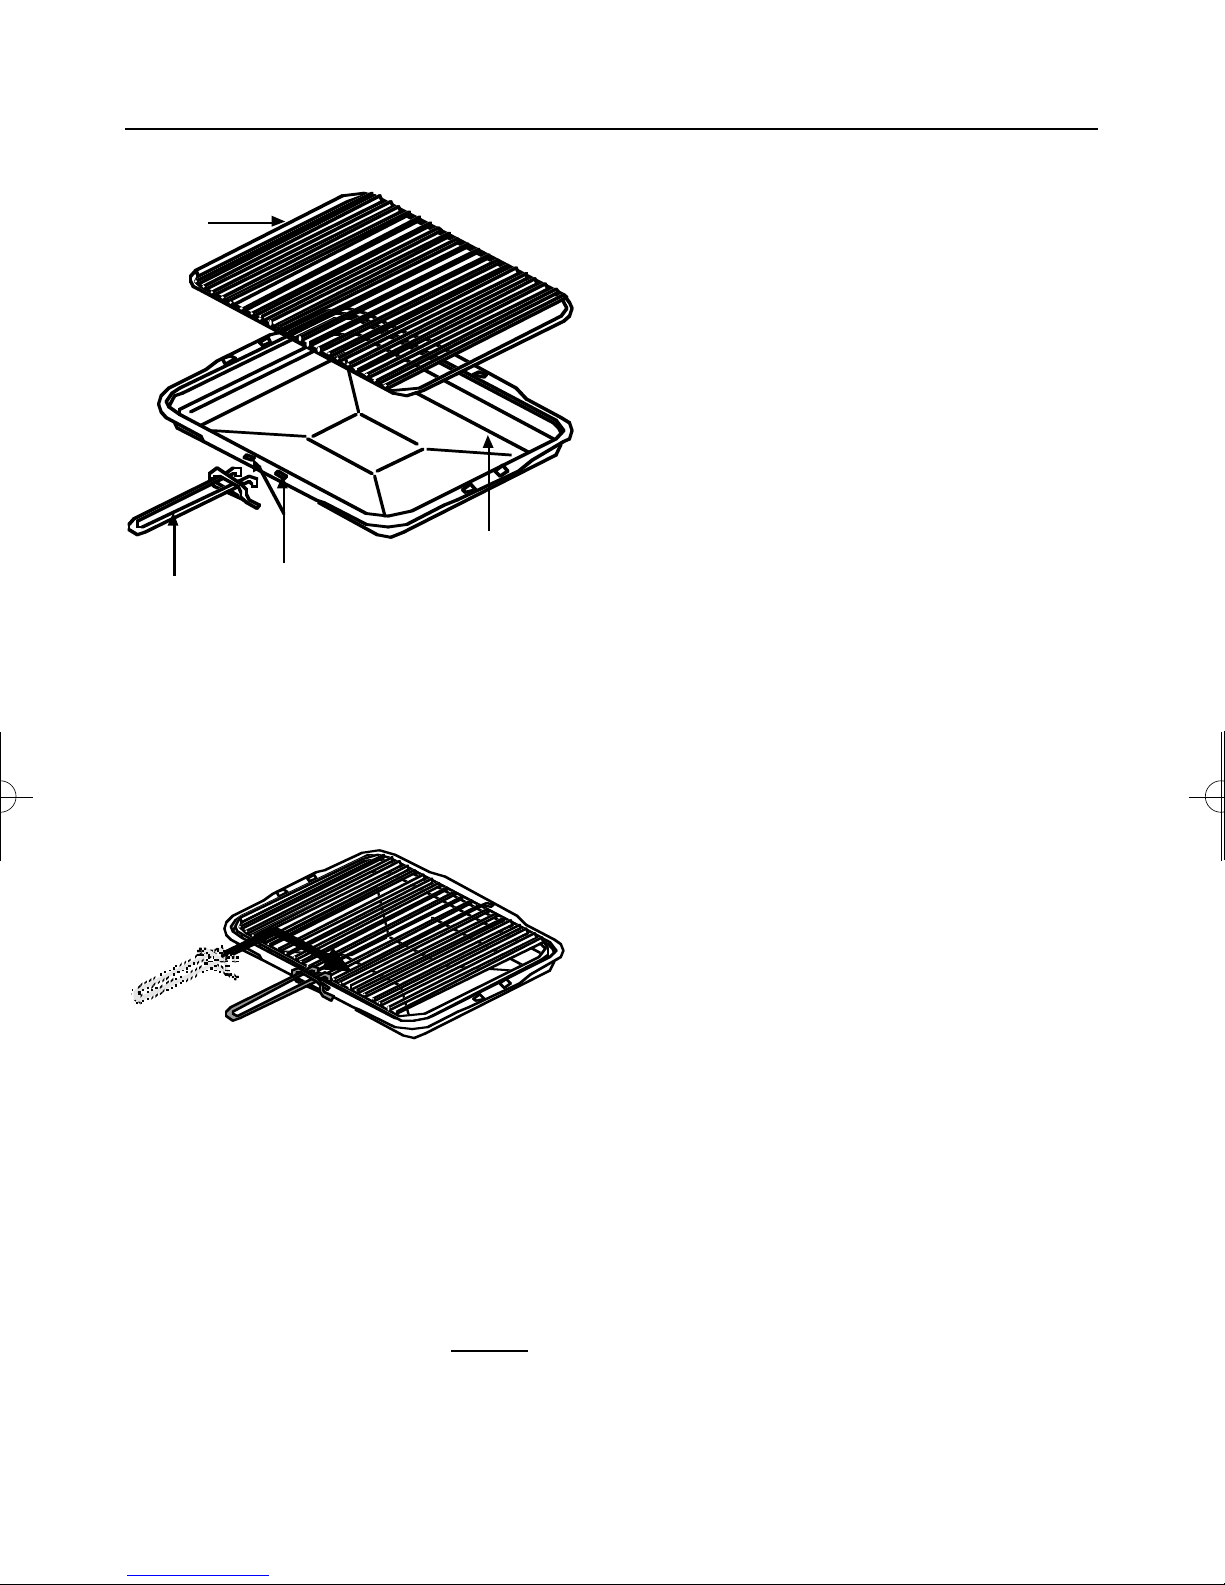
handle
grill pan
grid
handle position
indicators
Detachable grill pan handle
Place the handle over the edge of the
grill pan, at the narrow side edges.
Grill pan trivet
Food for grilling should be placed
within the area defined by the kinks in
the trivet wires.
The grill pan trivet - inside the grill pan
- can be inverted to give a high or low
position, or it may be removed
altogether to suit the type of food.
The base of the compartment can also
be used - for example; when cooking
whole fish, or when browning dishes
such as cauliflower cheese.
Slide the handle to the centre, and
locate between the handle position
indicators.
The handle should be removed from
the pan during grilling, to prevent
overheating.
The handle is designed for removing /
inserting the grill pan under the grill
when grilling.
If cleaning the grill pan when it is hot,
use oven gloves to move it. Do not use
the handle to pour hot fats from the
grill pan.
Food for grilling should be positioned
centrally on the trivet.
9
Page 12

USING THE OVENS
When you are cooking keep
children away from the vicinity
of the oven.
Notes:
As part of the cooking process, hot air
is expelled through a vent at the top of
the oven(s). When opening the oven
door, care should be taken to avoid
any possible contact with potentially
hot air, since this may cause discomfort to people with sensitive skin. We
recommend that you hold the underneath of the oven door handle.
If it is found, over a period of time, that
the oven becomes hotter when used at
a particular temperature, then the
thermostat may need to be replaced.
Using the top oven
Ignition
Push in and turn the top oven control
knob anticlockwise to the ‘
FULL ON
position - Gas Mark 9 - and press the
ignition switch until the burner lights.
Turn the control knob to the required
s e t t i n g .
It can take up to 60 seconds for the
oven burner to come on to the full rate.
In the event of the top oven burner
flames being accidentally extinguished,
turn off the burner control and do not
attempt to re-ignite the oven burner for
at least one minute.
To switch off, push in the control knob
and turn clockwise to return it to the off
’
Using the main oven
Ignition
Push in and turn the main oven control
knob anticlockwise to the ‘
FULL ON
position - Gas Mark 9 - and press the
ignition switch until the burner lights.
Turn the control knob to the required
s e t t i n g .
It can take up to 60 seconds for the
oven burner to come on to the full rate.
In the event of the burner flames being
accidentally extinguished, turn off the
burner control and do not attempt to
re-ignite the oven for at least one
m i n u t e .
To switch off, push in the control knob
position.
Using the top oven
’
The top oven can be used in the same
way as the main oven, to cook the full
range of dishes, but it is a
SECONDARY
oven and there are some differences.
Foods cooked in the top oven should
be in relation to the oven size. Larger
dishes, or food which may rise during
cooking, should be cooked in the
main oven.
Large items, wide tins and tall items
such as rich fruit cakes should be
cooked in the main oven to obtain
optimum results.
and turn clockwise to return it to the off
position.
10
Page 13

USING THE OVENS
Preheating
Always preheat the top oven f o r
15 minutes. However, if the main
oven is being used at the same time,
then preheating may not be necessary.
The cooking time may need to be
shortened slightly, or the cooking
temperature adjusted, to allow for
heat transfer from the main oven to
the top oven if both ovens are used
together.
Preheat the main oven for 15 minutes.
If you are not preheating the ovens,
the cooking times in the baking guides
may need to be extended, as they are
based on a preheated oven.
Zones of heat
The temperature at the centre of the
oven corresponds with the selected gas
mark and is slightly higher towards the
top of the oven and slightly lower
towards the oven base.
These zones of heat can be useful as
different dishes requiring different
temperatures can be cooked at the
same time, when more than one shelf
is used.
The temperature at the oven base is
suitable for cooking baked vegetables,
baked fruit, milk pudding etc, and for
warming bread rolls, soup, coffee, or
ovenproof plates and dishes.
The ovens must be preheated when
reheating frozen or chilled foods, and
we recommend preheating for yeast
mixtures, batters, soufflés and whisked
sponges.
Put the oven shelves in the position
required before preheating the oven.
Oven light
Press the light button on the facia panel.
If you find that over a period of time,
the oven becomes hotter when used at
a particular gas mark, the thermostat
may need to be replaced.
11
Page 14

USING THE OVENS
Oven furniture
Baking tray and roasting tins
For best cooked results and even
browning, the maximum size baking
trays and roasting tins that should be
used are as follows;
Baking tray 350mm x 330mm
Roasting tin 370mm x 320mm
Position baking trays and roasting tins
on the middle of the shelves, and leave
one clear shelf position between
shelves, to allow for circulation of heat.
Oven shelves
The oven shelf must be positioned with
the upstand at the rear of the oven and
facing upwards.
Extra shelves may be ordered from
your local supplier.
You will see that there are differences
between the oven shelves for the top
oven and the main oven.
The top oven shelf helps to ensure
even baking in the top oven. It has a
rear deflector fitted to it, and is not
intended for use in the main oven.
Baking guide hints
The gas mark settings and times given
in the top baking guides are based on
dishes made with block margarine. If tub
margarine is used, it may be necessary
to reduce the gas mark setting.
If a different gas mark setting to that
shown in our guide is given in a
recipe, the recipe instruction should be
followed.
The cooking times given in the baking
guides are based on a preheated
oven. If you do not preheat the oven,
cooking times should be extended.
Slow cooking
Make sure that frozen foods are
thoroughly
THAWED
before cooking.
Do not slow cook joints of meat or
1
poultry weighing more than 2
1
lb.
2
⁄
4
4
kg /
⁄
Always use the top half of the oven for
slow cooking.
For roasting joints of meat or poultry,
and for pot roasts preheat the oven to
gas mark 6 and cook for 30 minutes,
then adjust the oven control to the “S”
slow setting for the remainder of the
cooking time.
Slow cooking times will be about three
times as long as conventional cooking
times.
12
Page 15
USING THE OVENS
Top oven baking guide
Dish Recommended Suggested Approximate
gas mark shelf cooking time
position (preheated oven)
Scones 7 top - middle 10 - 15 mins
Meringues “S” slow setting bottom 2 - 3 hours
Cakes
Small cakes 5 middle 15 - 25 mins
Whisked sponge 5 middle 20 - 30 mins
Swiss roll 6 middle 10 - 12 mins
Victoria sandwich 4 middle 20 - 35 mins
(2 x 180mm / 7” per shelf) (side by side)
Genoese sponge 5 middle 25 - 30 mins
(2 x 180mm / 7” per shelf)
Pastry
Rough Puff 7 middle cooking time
Flaky / Puff 6 middle depends on
Shortcrust 6 middle recipe & type
Flan 6 middle of filling
Biscuits
Shortbread fingers 5 middle - top 20 - 30 mins
Nut brownies 5 middle 25 - 35 mins
Brandy snaps 4 middle - top 10 - 15 mins
Flapjacks 4 middle - top 25 - 40 mins
Ginger nuts 5 middle - top 15 - 20 mins
13
Page 16
USING THE OVENS
Main oven baking guide
Dish Recommended Suggested Approximate
gas mark shelf cooking time
position (preheated oven)
Scones 7 middle - top 8 - 15 mins
Meringues “S” slow set bottom 2 - 3 hours
Cakes
Small cakes 5 middle - top 15 - 25 mins
Whisked sponge 5 middle - top 20 - 25 mins
Swiss roll 6 middle - top 10 - 12 mins
Victoria sandwich 4 middle - top 20 - 30 mins
(2 x 180mm / 7”)
Genoese sponge 4 middle 20 -30 mins
Madeira (180mm / 7”) 3 middle 1 - 11⁄4hours
Gingerbread 3 middle 1 - 11⁄4hours
Semi rich fruit cake 2 or 3 middle - bottom 21⁄2- 3 hours
(205mm / 8”)
Christmas cake 1 or 2 bottom depending on
(205mm / 8”) recipe
Dundee cake (205mm / 8”) 3 middle - bottom 2- 21⁄2hour
Pastry
Rough Puff 7 middle - top cooking time
Flaky / Puff 6 middle - top depends on
Shortcrust 6 middle - top recipe & type
Flan 6 middle - top of filling
Biscuits
Nut brownies 5 middle - top 25 - 35 mins
Brandy snaps 4 middle - top 10 - 12 mins
Flapjacks 4 middle - top 20 - 25 mins
Ginger nuts 4 middle - top 10 - 20 mins
14
Page 17
USING THE OVENS
Traditional fruit cakes
It should be remembered that ovens
can vary over time, therefore cooking
times can vary, making it difficult to be
precise when baking fruit cakes.
It is necessary therefore, to test the
cake before removal from the oven.
Use a fine warmed skewer inserted
into the centre of the cake. If the
skewer comes out clean, then the cake
is cooked.
• Do not attempt to make Christmas
cakes larger than the oven can
cope with, you should allow at
least 25mm (1 inch) space
between the oven walls and the tin.
Roast turkey
Roasting turkey involves cooking two
different types of meat - the delicate
light breast meat, which must not be
allowed to dry out, and the darker leg
meat, which takes longer to cook.
The turkey must be roasted long
enough for the legs to cook, so
frequent basting is necessary. The
breast meat can be covered once
browned.
• Always make sure that the turkey
is completely thawed and that the
giblets are removed before cooking.
• Turkey should be roasted at gas
mark 5 for 20 minutes per 1lb,
• Always follow the temperatures
recommended in the recipe.
• To protect a very rich fruit cake
during cooking, tie 2 layers of
brown paper around the tin.
• We recommend that the cake tin is
not stood on layers of brown
paper, as this can hinder effective
circulation of air.
• Do not use soft tub margarine for
rich fruit cakes, unless specified in
the recipe.
• Always use the correct size and
shape of tin for the recipe quantities.
plus 20 minutes, unless packaging
advises otherwise.
• The turkey can be open roasted,
breast side down, for half of the
cook time, and then turned over for
the remainder of the cooking time.
• If the turkey is stuffed, add 5
minutes per lb to the cooking time.
• If roasting turkey covered with
foil, add 5 minutes per 1lb to the
cooking time.
To test if the turkey is cooked, push a
fine skewer into the thickest part of the
thigh. If the juices run clear, the turkey
is cooked. If the juices are still pink,
the turkey will need longer cooking.
15
Page 18
USING THE OVENS
Roasting guide
The times given in the roasting guide
are only approximate, because the
size and age of the bird will influence
cooking times as will the shape of a
joint and the proportion of the bone.
Frozen meat should be thoroughly
thawed before cooking. For large
joints it is advisable to thaw overnight.
Frozen poultry should be thoroughly
thawed before cooking. The time
required depends on the size of the
bird - eg; a large turkey may take up
to 48 hours to thaw.
Use of a trivet with a roasting tin will
reduce fat splashing and will help to keep
Notes:
• When cooking stuffed meat or
poultry calculate the cooking time
from the total weight of the meat
plus the stuffing.
• For joints cooked in foil or covered
roasters, and for lidded casseroles,
add 5 minutes per 450g (1lb) to
the calculated cooking time.
• Smaller joints weighing less than
1.25kg (2
1
lb) m a y require 5
2
⁄
minutes per 450g (1lb) extra
cooking time.
• Position the oven shelf so that the
meat or poultry is in the centre of
the oven.
the oven interior clean. Alternatively,
to help reduce fat splashing, potatoes
• It is recommended that the appliance
is cleaned after open roasting.
or other vegetables can be roasted
around the meat / poultry.
Cook in oven at Gas Mark 5 Approximate Cooking Time
(preheated oven)
Beef Rare 20 minutes per 450g (1lb), plus 20 minutes
Medium 25 minutes per 450g (1lb), plus 25 minutes
Well done 30 minutes per 450g (1lb), plus 30 minutes
Lamb Medium 25 minutes per 450g (1lb), plus 25 minutes
Well done 30 minutes per 450g (1lb), plus 30 minutes
Pork 35 minutes per 450g (1lb), plus 35 minutes
Poultry 20 minutes per 450g (1lb), plus 20 minutes
16
Page 19
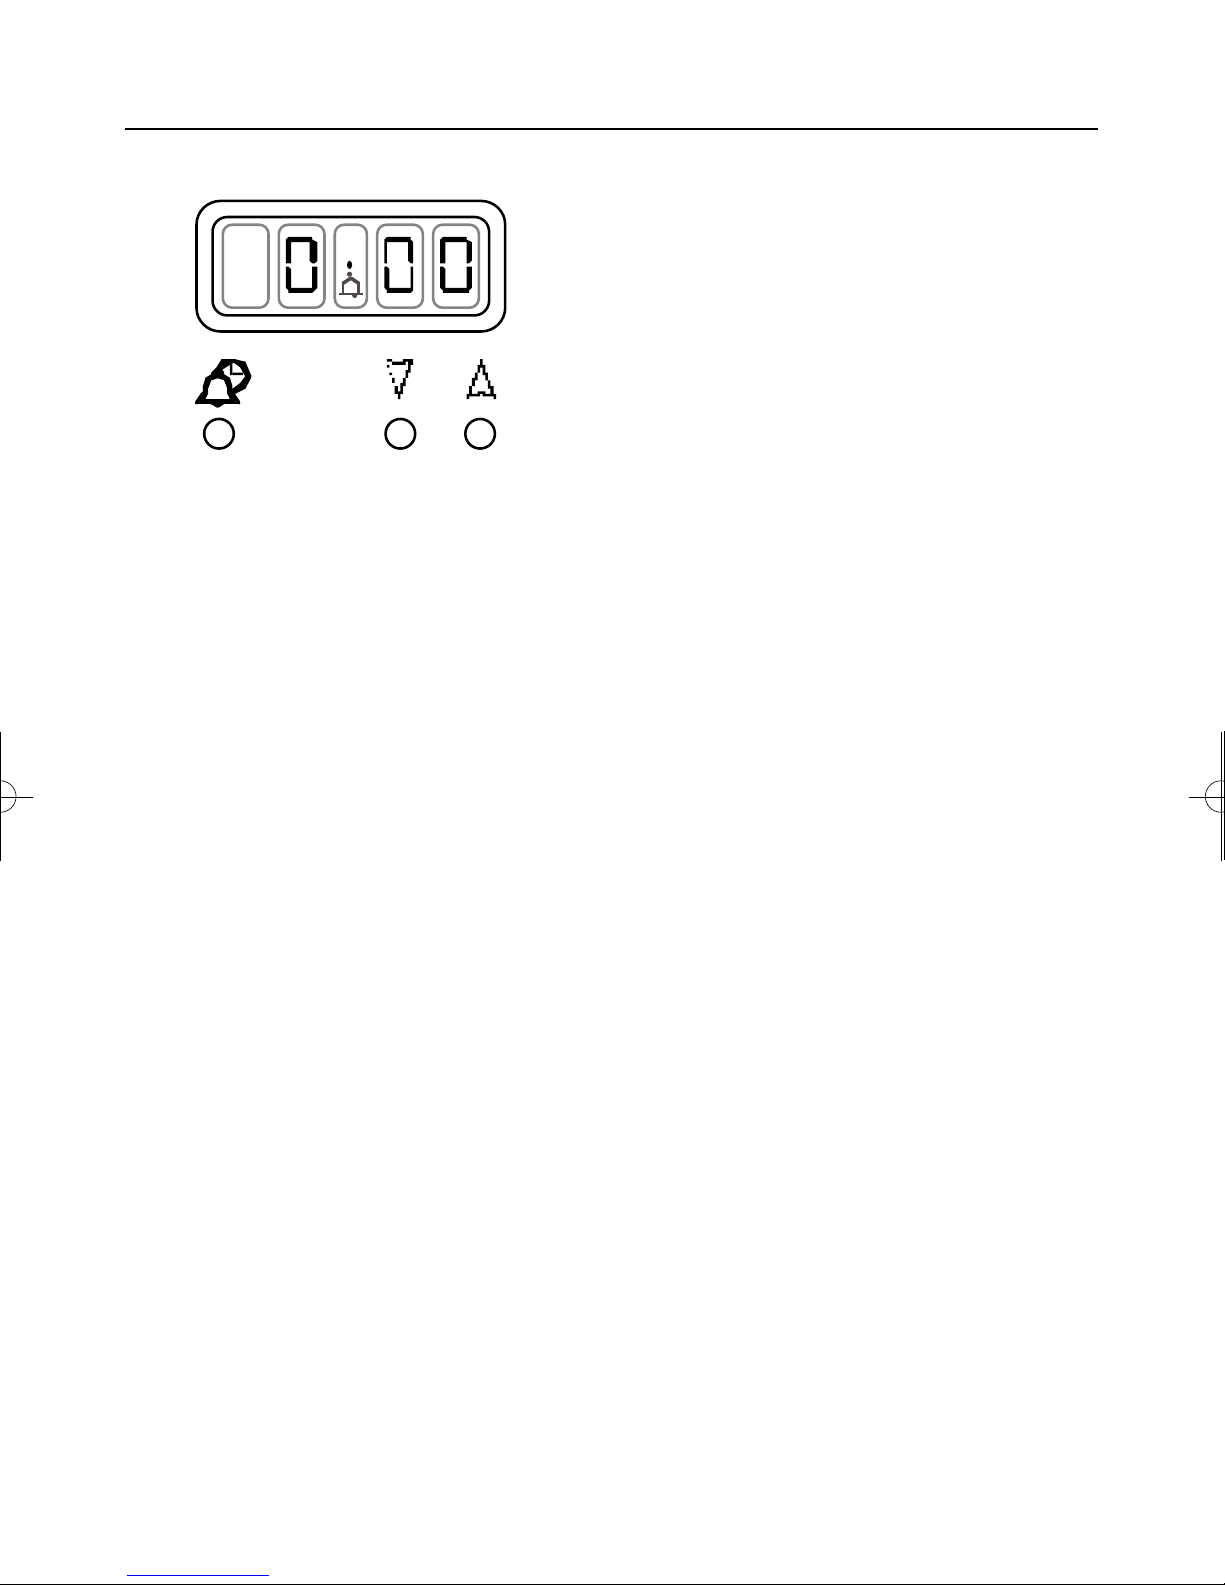
Minute Minder
Time of day
button
Minus
button
Plus
button
Initial display
The digital timer enables you to set the
time of day (24 hour clock) and the
minute minder alarm.
Setting the “Time of Day”
1. Switch on the electricity supply to
the appliance.
The display will flash.
2. Press and release the time of day
button.
Setting the minute minder
1. Press and release the plus button
to change the display from clock
to minute minder - the bell symbol
will light.
2. Use the plus and minus buttons to
set the length of time before the
alarm tone will sound. The display
will increase / decrease in units of
10 seconds up to 99 minutes 50
seconds, and in units of 1 minute
from 1 hour 40 minutes upwards.
The maximum period which may
be set is 10 hours.
The display format will change
after 99 minutes and 50 seconds
to 1 hour and 40 minutes.
During countdown, the minute
minder has priority on the display,
which will show (in minutes :
seconds, or hours : minutes) the
3. Set the time of day with the plus
and minus buttons.
4. The time will be set 7 seconds after
the last plus or minus operation.
Alarm tones
After setting the time of day, you can
select one of three alarm tones.
Press the minus button to listen to the
first tone, then release the minus button
and press it again to listen to the
second tone, etc.
Releasing the minus button after a tone
has sounded will automatically select
that tone.
time remaining.
When countdown is complete, the
tone will sound for 7 minutes, or it
can be reset with one touch of
any button.
To cancel the minute minder at
any other time, run down the set time
with the minus button.
The display will revert to show the
time of day.
17
Page 20
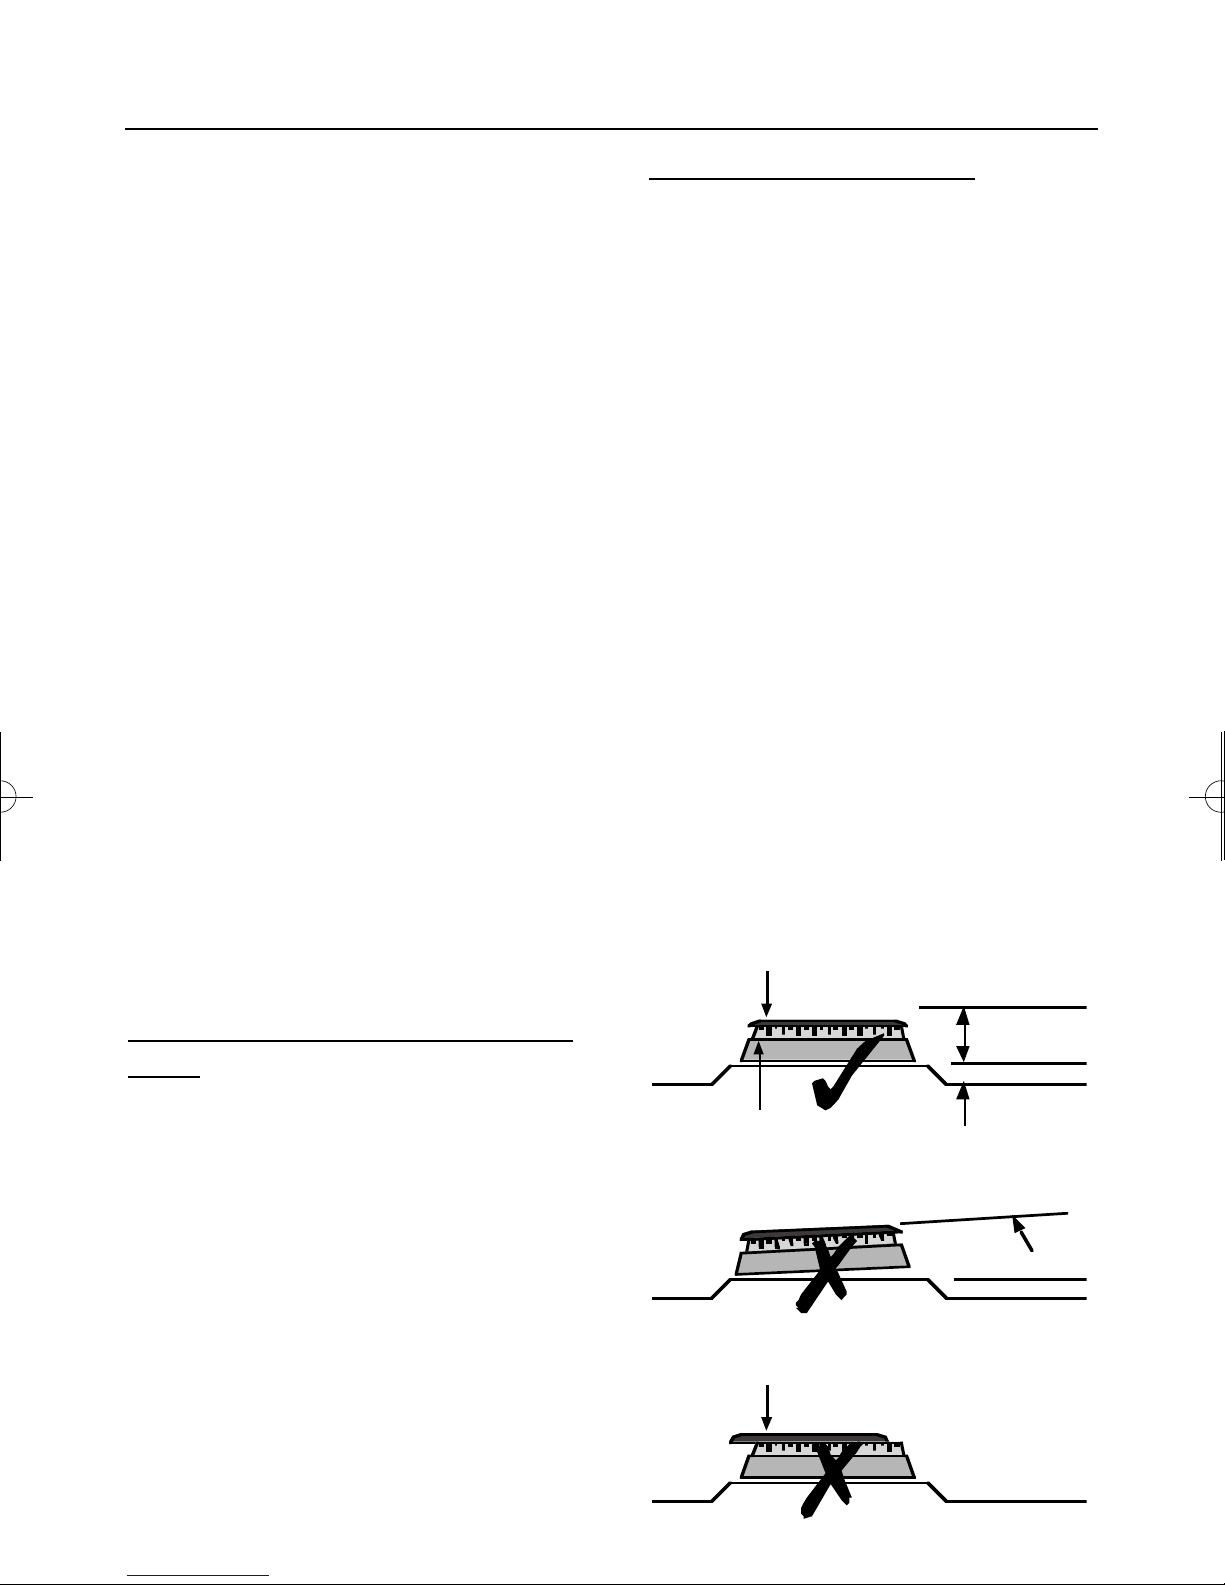
incorrect
burner cap not central
incorrect
angled
correct
parallel
burner cap
burner head
CLEANING
C a u t i o n : Any cleaning agent
used incorrectly may damage
the appliance.
Always let the cooker cool
before cleaning.
Some cooking operations generate
considerable amount of grease, this
combined with spillage can become a
hazard if allowed to accumulate on
the cooker through lack of cleaning.
In extreme cases this may amount to
misuse of the appliance and could
invalidate your guarantee.
It is recommended that the appliance
is cleaned after open roasting.
Do not use caustic pastes, abrasive
Burner caps and heads
Important: Allow burners to cool
before cleaning.
Caution: Hotplate burners can be
damaged by soaking, automatic
dishwashers (or dishwasher powders
/ liquids), caustic pastes, hard
implements, coarse wire wool, and
abrasive cleaning pastes.
Clean with a moist soapy pad - eg;
“Brillo”.
For the burners to work safely, the slots
in the burner head where the flames
burn need to be kept clear of deposit.
Clean with a nylon brush, rinse, and
dry thoroughly.
cleaning powders, coarse wire wool
or any hard implements, as they will
damage the surfaces.
All parts of the appliance can be safely
cleaned with a cloth wrung out in hot
soapy water.
Painted, plastic & metal finish
parts (where fitted)
OVEN DOOR FRAME
HANDLE,FACIA PANEL&CONTROL KNOBS
Only use a clean cloth wrung out in
hot soapy water.
HANDLE,GRILL PAN
&
Important: The burner caps and
heads must be repositioned correctly
so that they sit squarely onto the hob
as shown.
18
Page 21
CLEANING
Pull out to clean
Easy care surfaces
MAIN OVEN SIDES AND BACK
We recommend that the appliance is
cleaned after open roasting, and also
after roasting at temperatures higher
than gas mark 5, to help prevent a
build up of fats. Use of a trivet in a
roasting tin when roasting will help
reduce fat splashing.
Caution: Most types of cleaning
agent will damage these surfaces.
Only use a few drops of washing up
liquid in hot water. Wipe the surfaces
with a clean cloth wrung out in hot soapy
water - if larger splashes of fat do not
readily disappear, scrub the area with
a nylon brush or nylon pan scourer
and hot soapy water. Rinse well and
Glass parts
GLASS DOOR PANELS,LID GLASS
Do not use abrasives or polishes as
they will scratch and damage the glass.
Use a mild cream cleaner - eg; “Cif”.
Rinse away excess cleaner and dry
with a soft cloth.
W a r n i n g : Do not operate the appliance
without the glass panel correctly fitted.
I m p o r t a n t : the inner door glass
panel can be removed for cleaning but
it must be replaced the right way up
(so the reflective side - if fitted - faces
inwards), and pushed fully in to the
stop position. To remove the glass
panel, open the door wide, hold the
top and bottom edges and slide out.
heat the oven to dry the surfaces.
Vitreous Enamel parts
GRILL PAN,HOB TOP&PAN SUPPORTS,MAIN
OVEN C O M P A R T M E N T F L O O R, T O P O V E N
C O M P A R T M E N T
Use a mild cream cleaner - eg; “Cif”.
Stubborn marks may be removed with
a moistened “Brillo” pad.
The pan supports and grill pan may be
cleaned in a dishwasher, or with a
nylon brush in hot soapy water.
Chrome plated parts
OVEN SHELVES
GRILL PAN TRIVET
OVEN SHELF RUNNERS
&
Do not use abrasives or polishes, use
a moist soap pad - eg; “Brillo”.
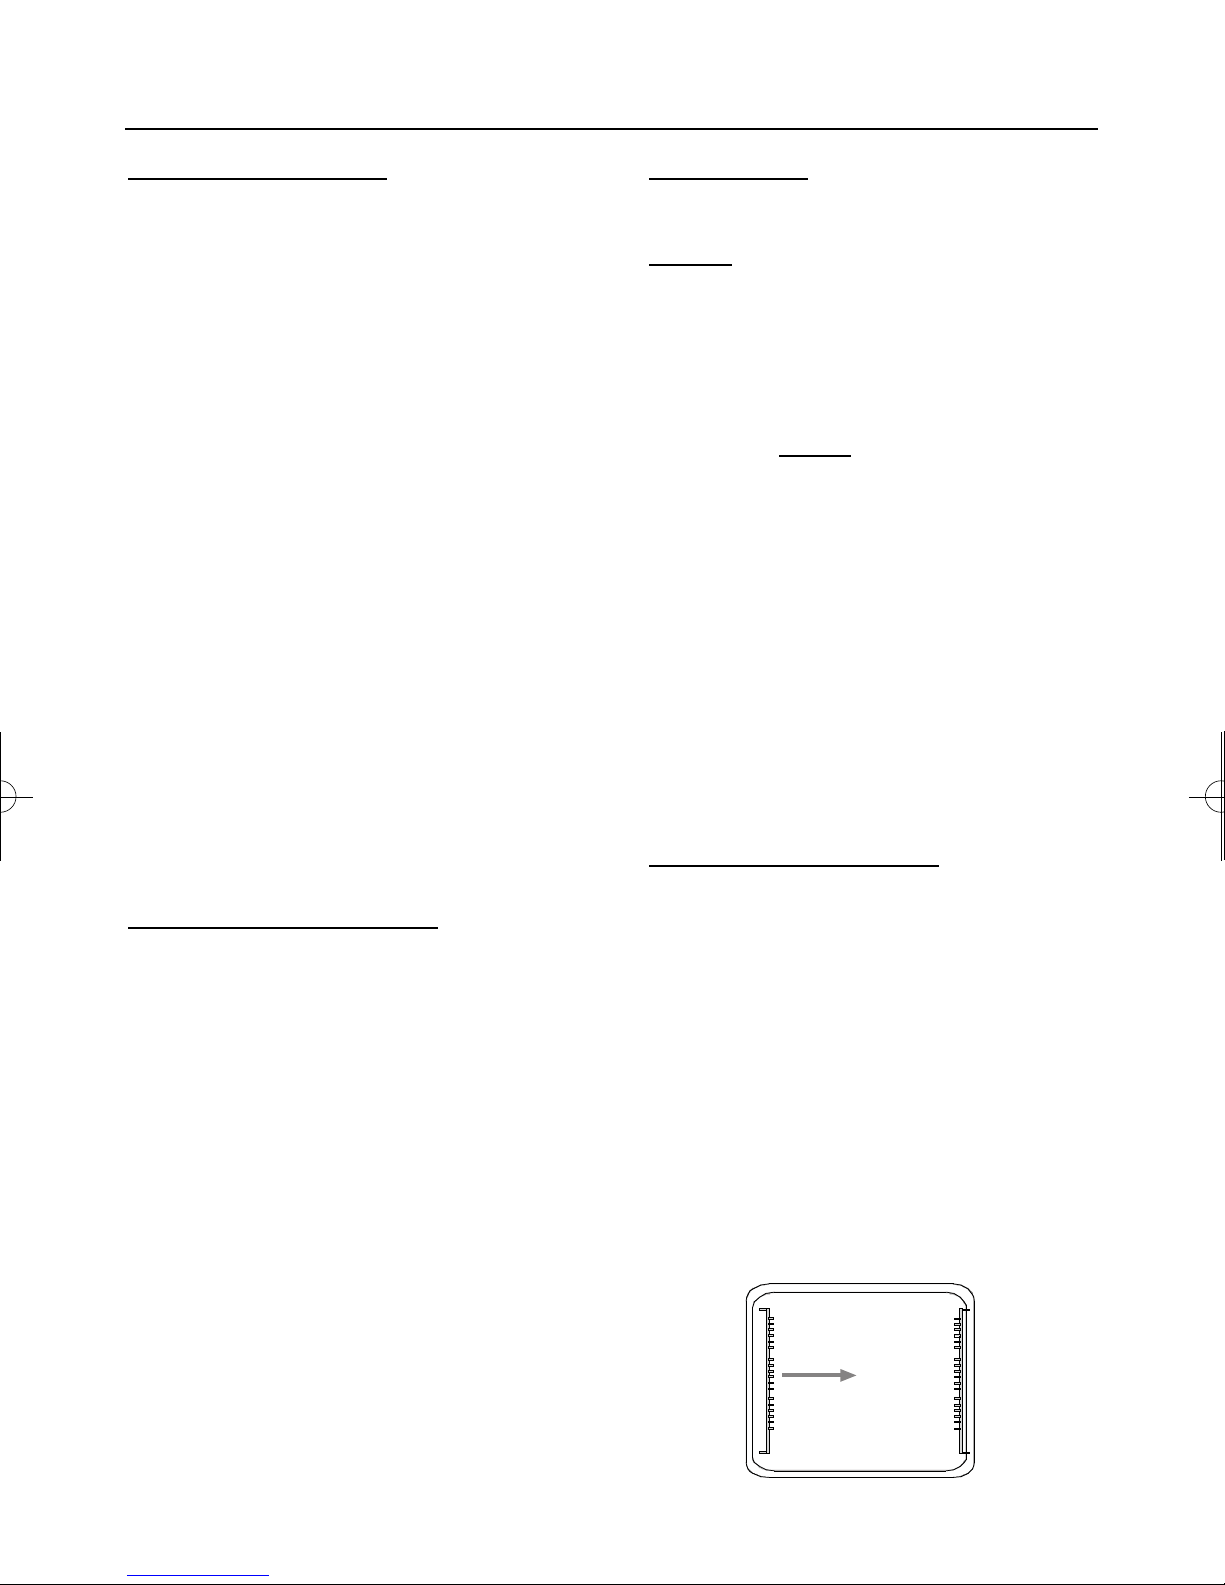
N o t e : Oven shelf runners can be
removed for cleaning. Grasp the
runners, and slide out of the hanging
holes as shown.
Note: These items may also be
cleaned in a dishwasher.
,
19
Page 22

INSTALLATION INSTRUCTIONS
Before you start: Please read the
instructions. Planning your installation will
save you time and effort.
Prior to installation, ensure that the local
distribution conditions (nature of the gas and
gas pressure) and the adjustment of the
appliance are compatible. The adjustment
conditions are stated on the data badge.
This appliance is not connected to a combustion
evacuation device. It shall be installed and
connected in accordance with current
installation regulation. Particular attention
shall be given to the relevant requirements
regarding ventilation.
In your own interest and that of safety, it is
the law that all gas appliances be installed
and serviced by competent persons.
CORGI registered installers undertake to
work to satisfactory standards.
Where regulations or standards have been
revised since this handbook was printed,
always use the latest edition.
In the UK the regulations and
standards are as follows:
1. Gas Safety Regulations 1996
(Installation and Use).
2. Building Regulations - Issued by the
Department of the Environment.
3. Building Standards (Scotland)
(Consolidated) - Issued by the Scottish
Development Department.
4. The current I.E.E. Wiring Regulations.
For installation in countries other than the
UK, the appliance must be connected in
accordance with all local gas and electri-
cal regulations.
Ventilation Requirements
The room containing the appliance should
have an air supply in accordance with
BS 5440: Part 2: 1989:
• All rooms require an openable window,
or equivalent, and some rooms will
require a permanent vent as well.
• For room volumes up to 5m3an air
vent of 100cm2is required.
• If the room has a door that opens
directly to the outside, or the room
exceeds 10m3, NO AIR VENT is
required.
• For room volumes between 5m3and
10m3an air vent of 50cm2is required.
• If there are other fuel burning appliances
in the same room, BS 5440: Part 2:
1989 should be consulted to determine
the air vent requirements.
• This appliance must not be installed in
a bed sitting room of less than 20m3or
in a bathroom or shower room.
Windows and permanent vents should
therefore not be blocked or removed without
first consulting a CORGI gas installer.
Failure to install appliances
correctly is dangerous and could
lead to prosecution.
5. Electricity at Work Regulations 1989.
6. BS 6172 Installation of Domestic Gas
cooking Appliances
7. Installation & Servicing Instructions for
this appliance.
20
Page 23
INSTALLATION INSTRUCTIONS
Whilst every care is taken to eliminate
burrs and raw edges from this product,
please take care when handling - we
recommend the use of protective
gloves during installation.
Moving the cooker
Please note that the weight of this
appliance is approximately 6 0 k g
(unpacked). Take care if the appliance
needs to be lifted during installation always use an appropriate method of
lifting.
Do not attempt to move the cooker by
pulling on the doors or handles. Open
the door and grasp the frame of the
cooker, taking care that the door does
not shut on your fingers.
Take care to avoid damage to soft or
uneven floor coverings when moving
the appliance. Some cushioned vinyl
floor coverings may not be designed
to withstand sliding appliances without
marking or damage.
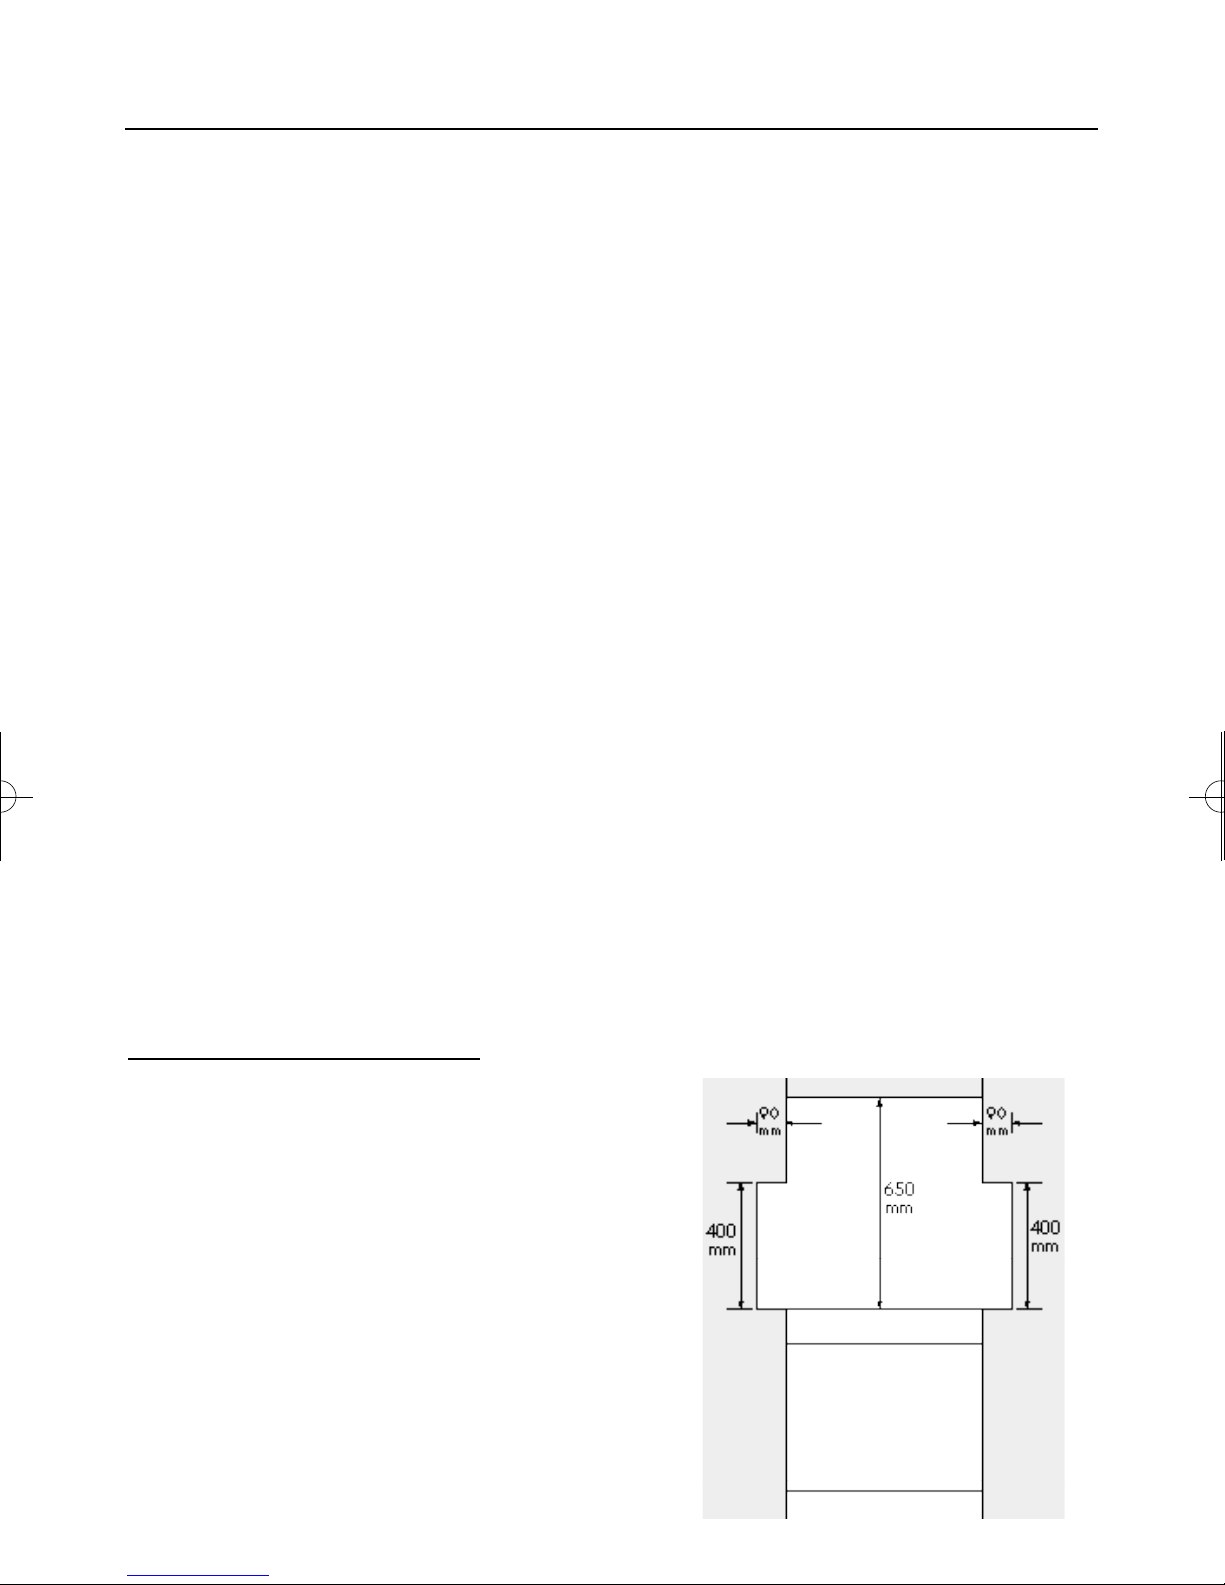
Clearances
No shelf or overhang or cooker hood
should be closer than a minimum of
650mm, but check with cooker hood
manufacturer’s recommendations.
The cooker must have a side
clearance above hob level of 90mm
up to a height of 400mm.
Check that there are no projections
in the rear wall which will prevent
the lid (where fitted) being raised to
the vertical position.
To avoid damage to surrounding units a 10mm gap should
be left between the appliance
and the units. If this is not possible, a kit (part number 01
25552 00) may be ordered
from Customer Care which will
protect the units.
For models with side opening doors,
we recommend a side clearance of
60mm between the cooker and any
Clearances & dimensions
Appliance dimensions
All sizes are nominal, and some
variation is to be expected. The
‘depth’ of the cooker, as given below,
is to the front of the door and
excluding knobs and handles.
depth: 600mm
width: 600mm
height (adjustable): 900 - 915mm
height with lid raised:1430 - 1445mm
side wall to allow the door to be
opened fully.
21
Page 24
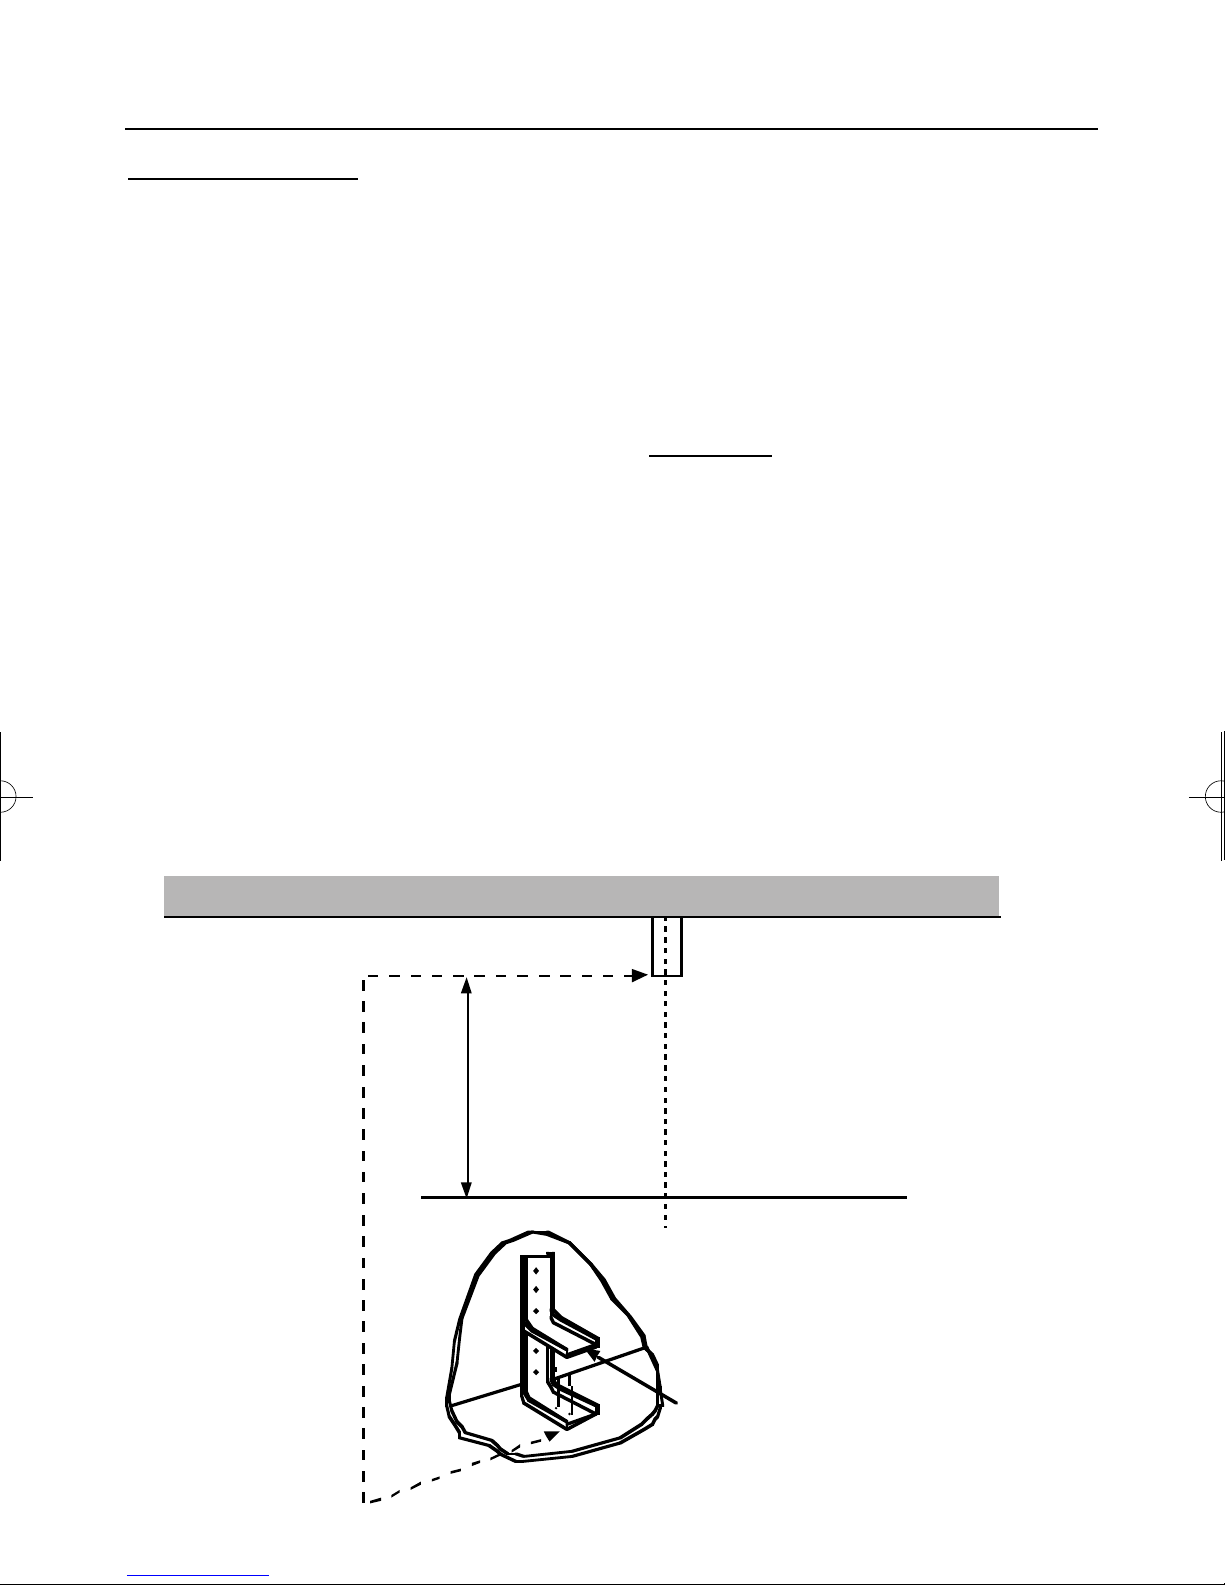
Stability bracket
1 Pencil line
on floor
2 Centre
line
3
450
mm
Front edge for
lower bracket
4
5 Underside of top bracket
slots into engagement
edge in back of cooker.
Rear wall
INSTALLATION INSTRUCTIONS
Stability bracket
If the cooker is fitted with a flexible
connection, a stability bracket should
be fitted to engage in the back of the
cooker. A stability bracket can be
bought from your local supplier.
A stability bracket can be fitted as
follows:
1. Place the cooker in position and
draw a
PENCIL LINE
level with the
front edge.
2. Mark the centre of the cooker to
give the
CENTRE LINE
for the bracket.
3. Remove the cooker and mark off
450mm from the
PENCIL LINE
to
locate the front edge of the lower
4. Fix the bracket to the floor.
Measure from
ENGAGEMENT EDGE
F L O O R L E V E L
in the back of
t o
the cooker and add 3mm.
5. Assemble the underside of the top
part of the bracket to this height.
Levelling
Place a spirit level on a baking sheet
onto an oven shelf.
The cooker is fitted with levelling feet
at the front and rear.
bracket.
22
Page 25
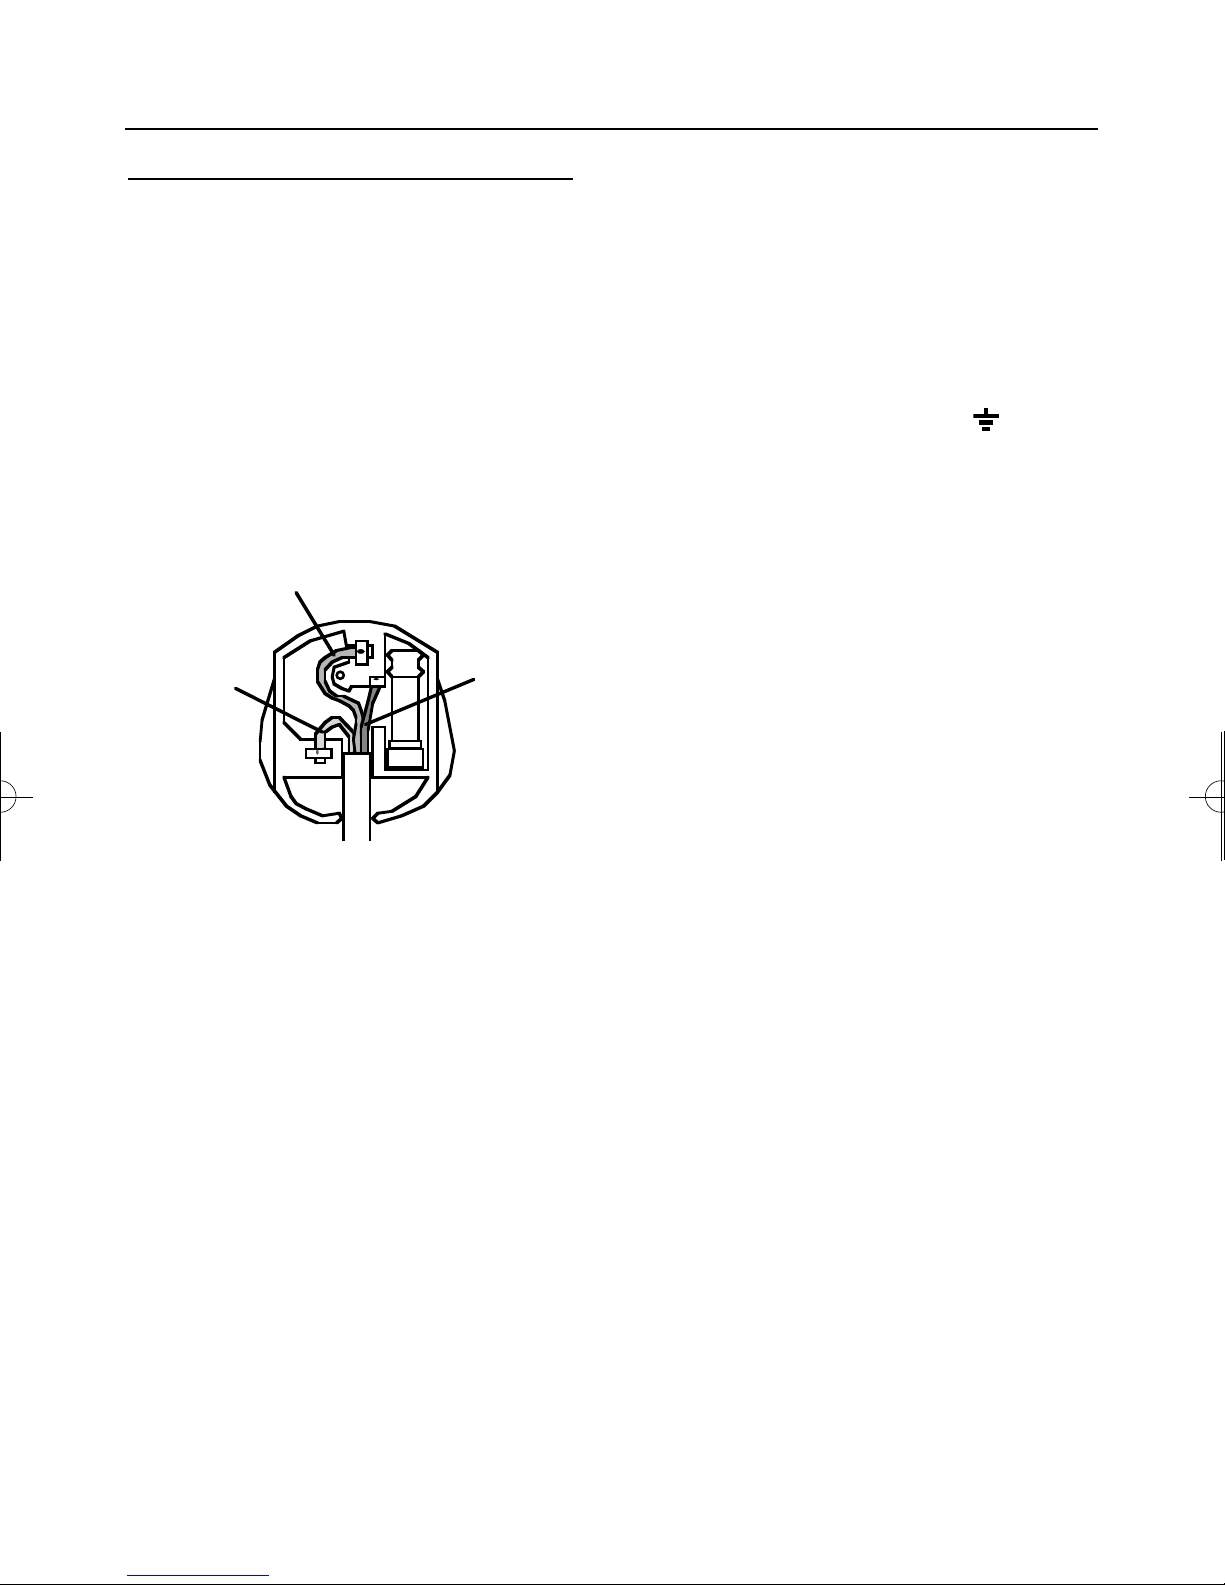
E (Earth)
GREEN / YELLOW
L (Live)
BROWN
N (Neutral)
BLUE
Use a 3 amp fuse
in a 13 amp plug.
INSTALLATION INSTRUCTIONS
Connect to the electricity supply
Warning: This appliance must be
earthed.
The flexible mains lead is supplied
connected to a BS 1363 fused plug,
having a fuse of 3 amp capacity.
If this plug does not fit the socket in
your home, it should be replaced with
a suitable plug as outlined below.
As the colours of the wires in the
mains lead for the appliance may
not correspond with the coloured
markings identifying the terminals in
your plug, proceed as follows:
1. The wire which is coloured green
and yellow must be connected to
the terminal marked E (Earth)
or coloured Green.
2. The wire which is coloured blue
must be connected to the terminal
marked N (Neutral), or coloured
Black.
3. The wire which is coloured brown
must be connected to the terminal
marked L (Live), or coloured Red.
The wires in the mains lead are
coloured in accordance with the
following code:
Green and yellow = Earth,
Blue = Neutral,
Brown = Live.
The plug and socket must be
accessible after installation.
Should the mains lead of the
appliance ever require replacing, we
recommend that this is carried out by
a qualified electrician who will
replace it with a lead of the same size
and temperature rating.
Important: - ensure that you route
all mains and electrical cables and
flexible tubing well clear of any
adjacent heat source.
23
Page 26

INSTALLATION INSTRUCTIONS
Connect to the gas supply
The inlet to the cooker is
1
” BSP
2
⁄
internal situated at the rear right corner.
Fit the bayonet connection. This should
be located so as to ensure that the
flexible connector hose does not kink.
Use a 900mm - 1125mm length of
flexible connector.
Ensure that all pipe work is of the correct
rating for both size and temperature.
Flexible connections should comply
with BS 669. Parts of the appliance
likely to come into contact with a
flexible connector have a temperature
rise of less than 70˚C.
After installation, make sure all
connections are gas sound.
Commissioning
Burner aeration
All burners have fixed aeration and no
adjustment is possible.
Pressure setting
G20 Natural Gas @ 20 mbar
Pressure test point
Use the oven injector.
Grill - Open the top compartment
door before igniting the grill. Push in
the control knob and turn clockwise to
the grill setting., wait a second before
pressing the ignition switch or holding
a lighted match or taper to the burner.
Hob - Turn the control knob to the
FULL
position, wait a second before
ON
pressing the ignition switch or holding
a lighted match or taper to the burner.
Ovens - Open the oven door. Turn
the control to the
F U L L O N
position and
p r e s s the ignition switch,or holding a
lighted match or taper to the burner. The
b u r n e r operates at a low rate for up to
60 seconds until the flame supervision
device opens & full gas rate is obtained.
Before leaving the installation
1. Place all the loose parts of the
cooker into position.
2. Show the customer how to operate
the cooker and give them this
handbook. Thank you.
24
Page 27
TECHNICAL DATA
Data badge - Lower part of front frame
Type of gas
This cooker must only be used with Natural
Gas only, as specified on the appliance
data badge.
Gas category
Natural Gas - I2H
Pressure setting
G20 Natural Gas @ 20 mbar
Pressure test point
Use the oven injector
Aeration
Fixed
Grill - Grill burner is surface combustion
type. Spark gaps 3 - 4mm.
Hob - Burners have burner heads and
caps which are removable for cleaning.
Concealed electrodes to each burner.
Ovens - Oven burners are sheet steel,
with pierced ports in stainless steel flame
strip. Spark Gap: 3 - 4mm. Flame super -
vision: Expansion type. Thermostat phial:
Front centre of oven roof.
Electrical supply
220 - 240V ~ 50Hz
Spark generator: Mains operated 7 outlet
controlled by a single push button switch at the
left hand side of the facia to individual
electrodes.
Warning: This cooker must be earthed.
Appliance class
Class 1, Freestanding
Countries of destination
GB - Great Britain, IE - Ireland
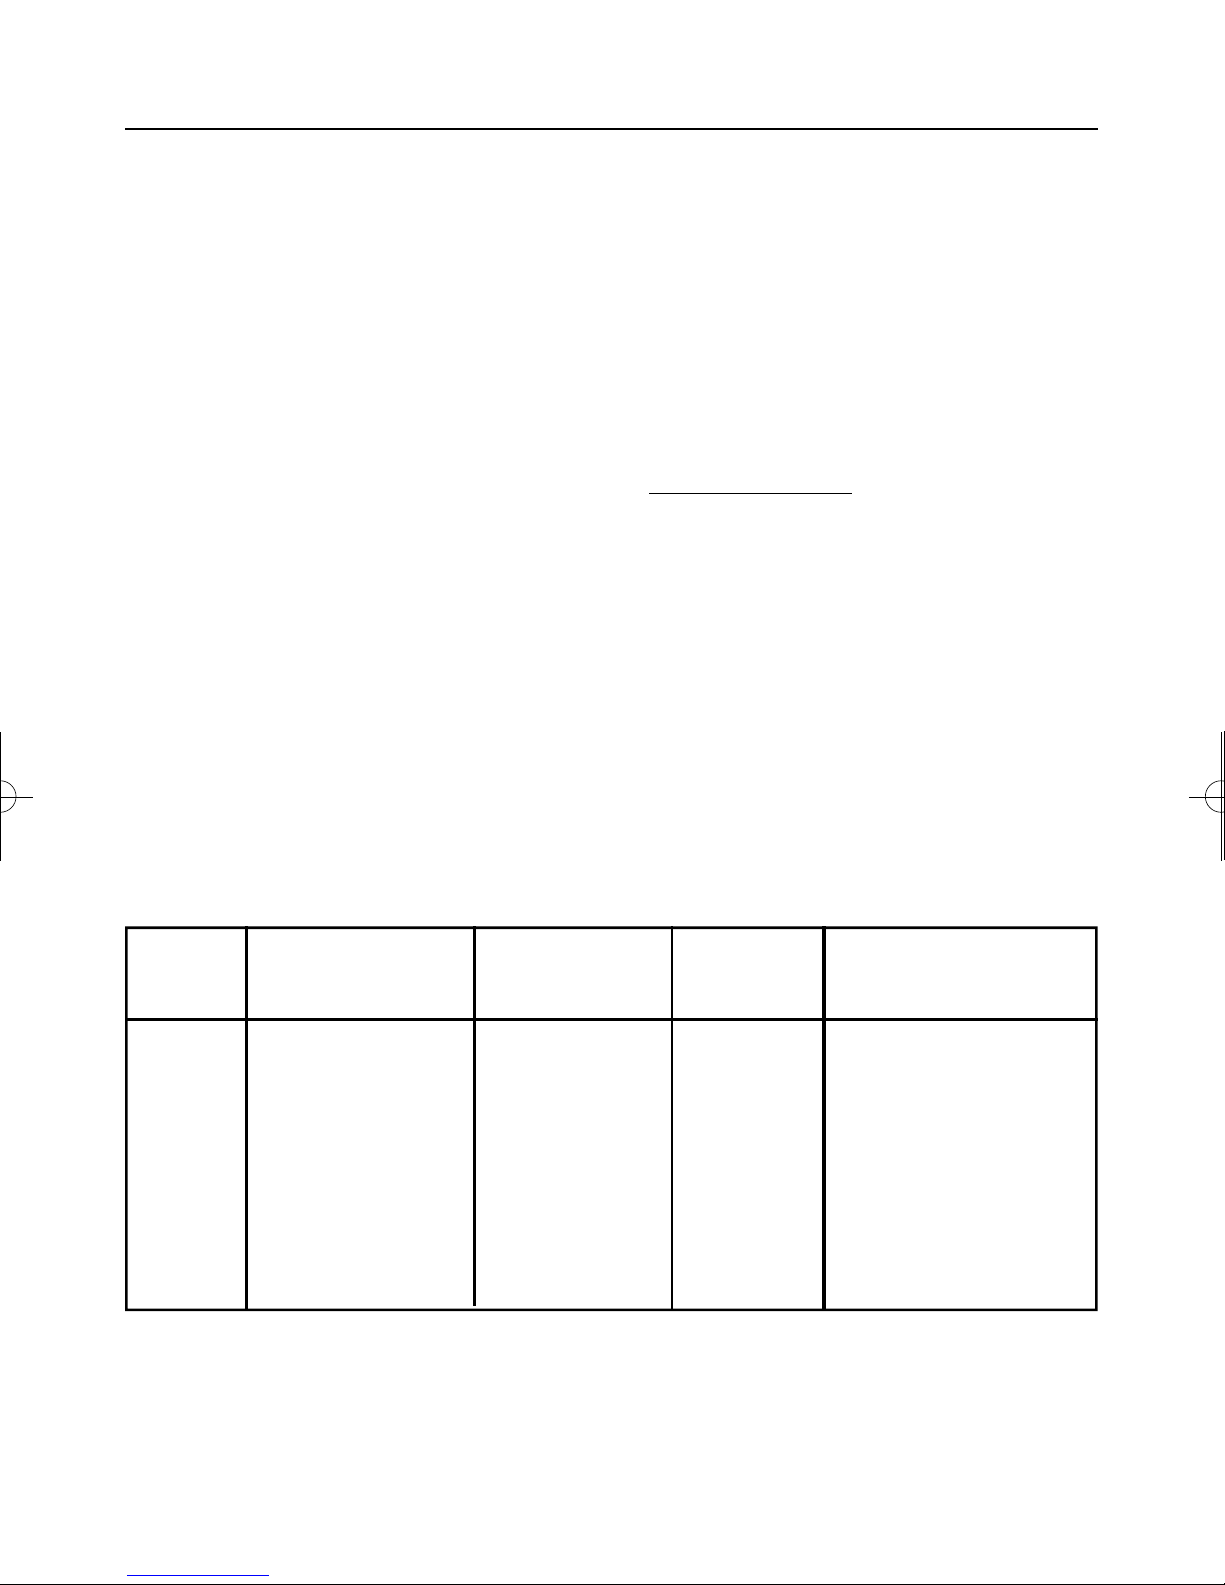
Gas Burner Nominal Injector
Rate Qn Size Butane Propane
Natural Grill 2.4kW 115 - Gas Hob - LHF 1.0kW 77 - -
Hob - LHR & RHR 2.0kW 104 - Hob - RHF 3.0kW 130 - Main Oven 2.5kW 180 Amal - Top Oven 1.75kW 110 Amal - -
Maximum heat input Qn 12.9kW - - -
Grammes per hour
25
Page 28

NOTES
Page 29

Page 30

Page 31
BELLING CUSTOMER CARE
In case of difficulty within the UK and Northern Ireland, please call
Belling Customer Care Centre Helpline on
0870 444 9939
When you dial this number you will hear a recorded message and be given a
number of options. This indicates that your call has been accepted and is being
held in a queue. Calls are answered in strict rotation as our Customer Care
Representatives become available.
Opening Hours for Customer Care Centre
Monday to Friday 8am - 8pm
Saturday 8.30am - 6pm
Sunday 10am - 4pm
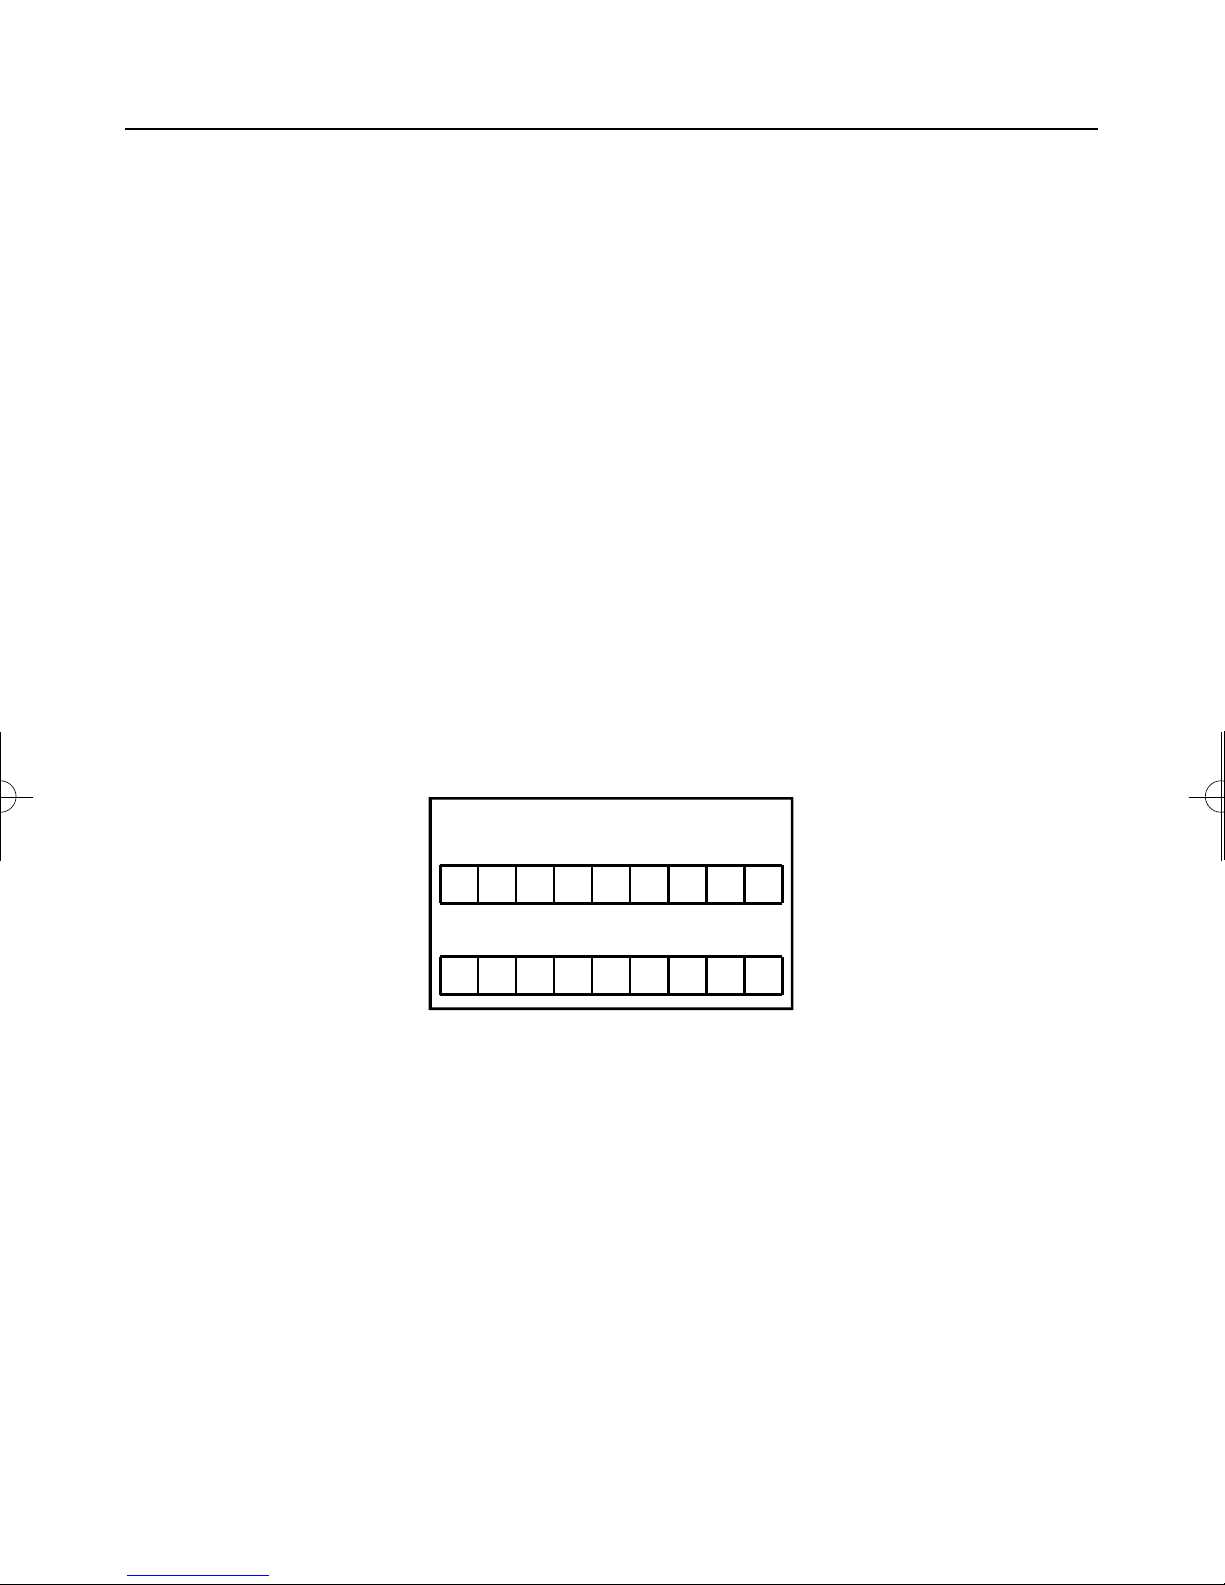
Enter appliance numbers here for future reference:
Model No
Serial No
Please ensure you have the above details (Model No and Serial No) to hand
when calling Belling Customer Care. They are essential to booking your call.
Outside the UK and Northern Ireland, refer to your local supplier.
STONEY LANE, PRESCOT, MERSEYSIDE L35 2XW
BELLING APPLIANCES
26
Page 32
08 25388 02 © 7.2005
d
Stoney Lane, Prescot, Merseyside, L35 2XW
 Loading...