

Page 1

Slot-in Gas Cooker
INST ALLATION AND USER
INSTRUCTIONS
Model Number
G706
G707
G708
G709
DB60
This appliance is supplied for use with Natural gas
G20 only and cannot be converted to any other gas.
Page 2

2
G141
CONTENTS
The appliance was designed and made in accordance with the European standards listed below:
• EN 30-1-1, EN 30-2-1 and EN 437 plus subsequent amendments (gas)
• EN 60 335-1 and EN 60 335-2-6 (electrical) plus relative amendments
The appliance complies with the prescriptions of the European Directives as below:
• 73/23 + 93/68 EC concerning electrical safety (BT).
• 89/336 + 92/31 + 93/68 EC concerning electromagnetic compatibility (EMC)
• 90/396 + 93/68 EC concerning gas safety.
Oven accessories that could come into contact with foodstuffs are made with materials that comply
with the provisions of the 89/109 EC directive dated 21/12/88.
INTRODUCTION page 3
INSTRUCTIONS FOR THE INSTALLER pages 4-10
FOR YOUR OWN SAFETY page 11
KNOW YOUR COOKER pages 12-13
USING THE GAS HOB page 14
USING THE GAS HOB - GENERAL NOTES page 15
GRILLING page 16
GRILLING - GENERAL NOTES page 17
USING THE MAIN OVEN page 18
MAIN OVEN COOKERY NOTES pages 19-20
USING THE TOP OVEN - DB60, G707 and G 708 only page 21
TOP OVEN COOKERY CHARTS - DB60, G707 and G 708 only page 22
CLEANING AND MAINTENANCE pages 23-24
IS THERE SOMETHING WRONG WITH YOUR COOKER? pages 25-26
SERVICE page 27
Page 3

3
G141
INTRODUCTION
Your Belling Cooker
Thank you for purchasing a new Belling gas Cooker . Its stylish and practical design will enhance your
kitchen and make cooking a pleasure. Dependant on model, it features a large main oven with a light,
a separate top oven (DB60, G707 and G708 only), grill and a gas hob, all with push button ignition.
Some models also feature a clock which features a minute minder and a toughened glass lid with
safety shut off valve.
Even if you have used a gas cooker before, it is important that you read these instructions thoroughly
before starting to cook, as there may be many new features not featured on your previous cooker.
Pay particular attention to the installation and safety instructions.
Getting Help
If you have any problems with installation, operating or cooking with your Belling cooker please
check through these instructions thoroughly to make sure that you have not missed anything. If you
still need help, then please contact (including a daytime telephone number if possible):
Customer Care Centre
Belling Appliances
Stoney Lane
Prescot
Merseyside
L35 2XW
Belling Customer Care Centre Tel: 0151 432 7999
Please quote the cooker model and serial number with your enquiries. This can be found on the rating
label, positioned on the rear panel of the cooker
WARNING! For your own safety, make sure that these instructions on installation, use and
maintenance are followed.
We advise you to keep these instructions in a safe place for future reference.
If you sell or transfer ownership of this product, please pass on these instructions to the new owner.
Note: the pictures shown in the figures in this handbook are purely indicative.
Page 4

4
G141
INSTRUCTIONS FOR THE INSTALLER
TECHNICAL INFORMATION
•All installation and maintenance must only be
carried out by qualified personnel. The manufacturer
cannot be held responsible for any damage to
persons or property resulting from an incorrect
installation of the appliance.
• The appliance must only be used for its original
purpose, that is, cooking for domestic use.
• The manufacturer cannot be held responsible for
any damage to persons or property resulting from
an incorrect installation, maintenance or use of the
appliance.
• The electrical safety of this appliance is only
guaranteed if it is correctly connected to a suitable
earth system, as prescribed by the electrical safety
standards. The manufacturer disclaims all
responsibility if these instructions are not followed.
Should you have any doubts, seek the assistance
of a qualified person.
• Before connecting the appliance ensure that the
rating plate data corresponds to that of the gas and
electricity supply .
• The safety and automatic adjustment devices of
the appliance may, during its life, only be modified
by the manufacturer or duly authorised supplier.
UNPACKING Y OUR COOKER
• Remove all packaging before use and check to
make sure that the appliance is in perfect condition.
If you have any doubts do not use the appliance
and call your supplier for advice.
• Do not move the appliance using the handles.
Some parts on the appliance are protected by a plastic
film. This protective film must be removed before the
appliance is used. We recommend carefully slitting the
plastic film along the edges with a sharp knife or pin.
The packaging materials should carefully
discarded and not left within easy reach of
children, as they are a potential safety hazard.
Page 5

5
G141
INSTRUCTIONS FOR THE INSTALLER
Prior to installation, ensure that the local distribution
conditions (nature of the gas and gas pressure) and the
adjustment conditions are compatible. The factory set
adjustment conditions for this appliance are stated on
the rating label, which is fitted to the back panel of the
appliance.
This appliance is not designed to be connected to a
combustion products evacuation device. It must be
installed and connected in accordance with current
installation regulations. Particular attention should be
given to the relevant requirements regarding ventilation.
This appliance is factory set to burn NATURAL GAS (G20),
category I2H+ (GB, IE) at 20mbar ONLY and cannot be
used on any other gas category.
GAS SAFETY (INSTALLATION & USE)
REGULATIONS
It is the law that all gas appliances are installed by
competent persons in accordance with the current
edition of the above regulations. It is in your interest
and that of safety to ensure compliance with the law.
In the UK, CORGI registered installers work to safe
standards of practice.
The cooker must also be installed in accordance with
BS 6172: 1990.
Failure to install the cooker correctly could invalidate
the warranty liability claims and could lead to
prosecution.
LOCATION
The cooker may be located in a kitchen, kitchen/diner
or a bed-sitting room, but not in a room containing a
bath or shower. The cooker must not be installed in a
bed-sitting room of less than 20 m
3
.
PROVISION FOR VENTILATION
The room containing the cooker should have an air
supply in accordance with BS 5440:Part 2: 1989.
The room must have an opening window or equivalent;
some rooms may also require a permanent vent. If the
room has a volume between 5 and 10 m
3
, it will require
an air vent of 50 cm
2
effective area unless it has a door
which opens directly to outside. If the room has a volume
of less than 5 m
3
, it will require an air vent of 100 cm
2
effective area. If there are other fuel burning appliances
in the same room, BS 5440: Part 2: 1989 should be
consulted to determine air vent requirements.
Page 6
6
G141
INSTRUCTIONS FOR THE INSTALLER
POSITION
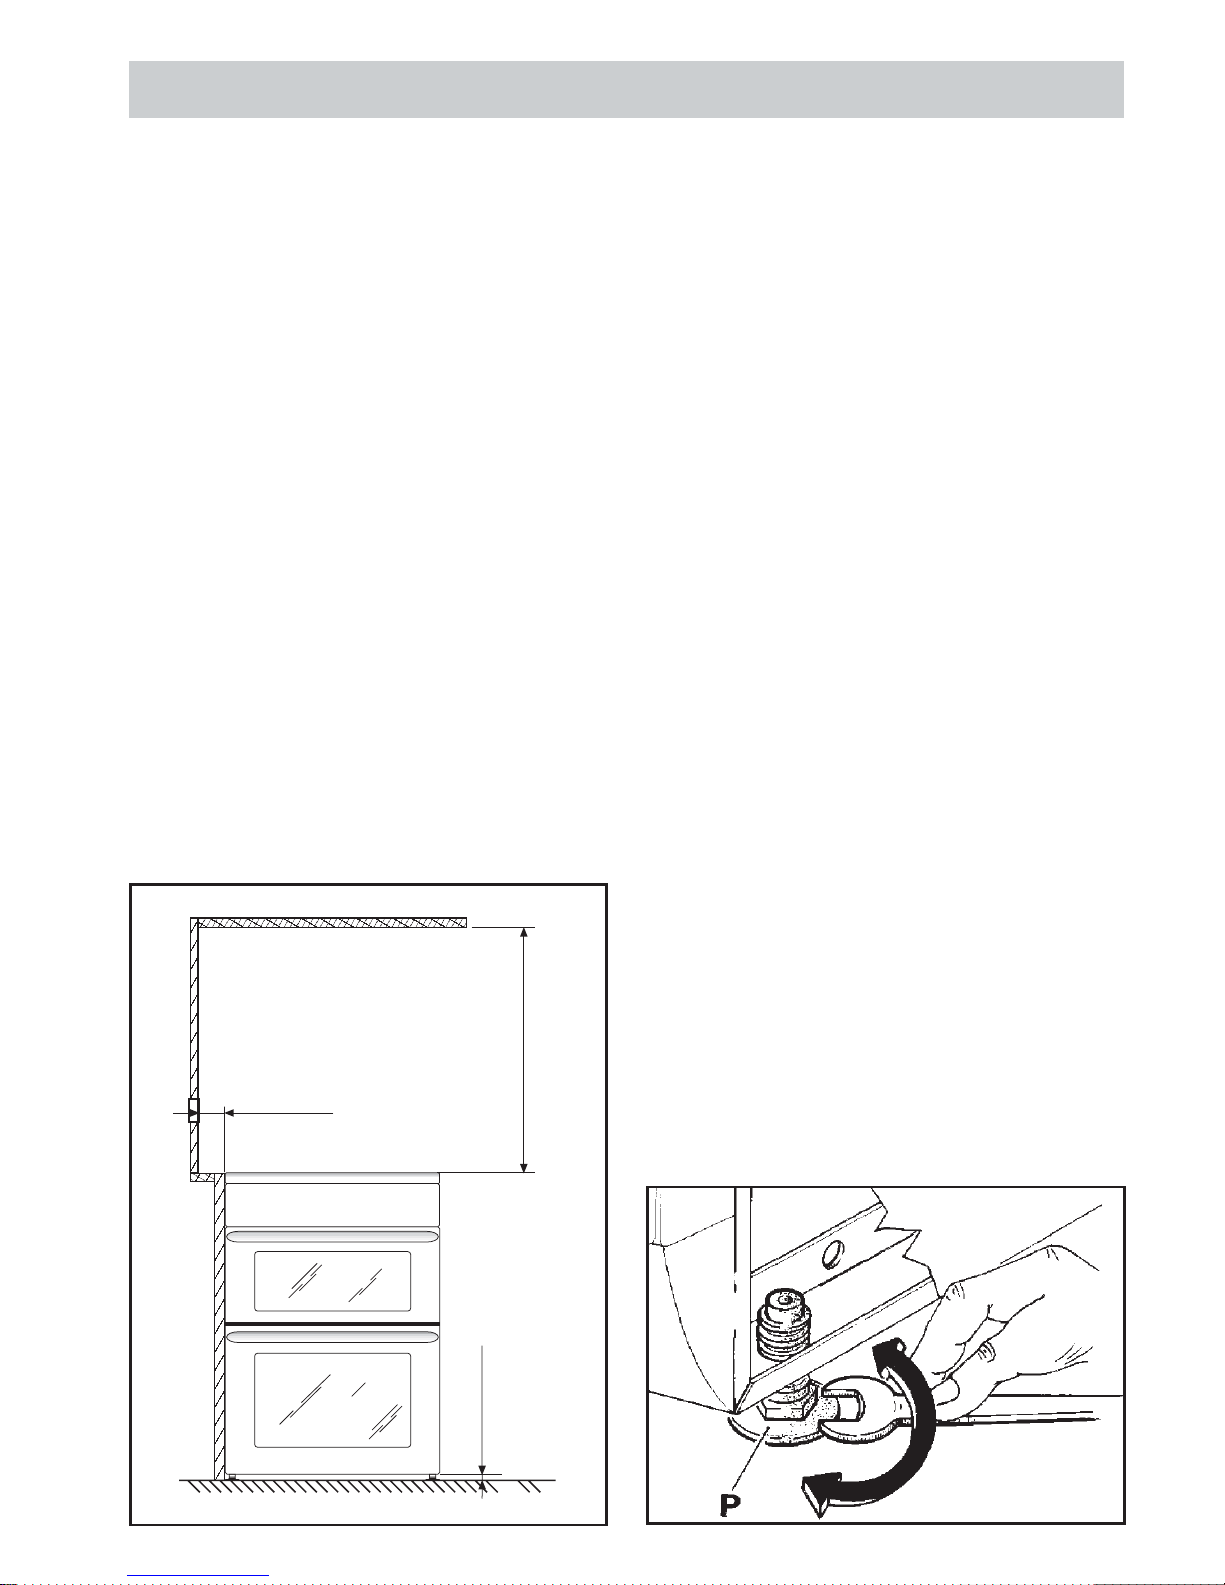
The appliance must not be installed on a compressible
floor covering, i.e. carpet or carpet tiles. Care must be
taken to ensure a minimum air gap of 10mm is
maintained between the floor and the underside of the
appliance.
The appliance should be positioned in good light and
free from draughts. Any shelf or cupboard of combustible
material should be at least 750mm above the hob top,
a greater clearance is desirable if discoloration is to be
avoided, otherwise the shelf etc. should be protected.
In accordance with the gas standards, the gas
appliances can be installed as “class 2 subclass 1”
(recessed) and, as such, must comply with the
clearances specified in figure.
The rear wall and surfaces adjacent to or surrounding
the appliance must be able to resist a temperature rise
of 65°C. We recommend fitting ceramic tiles to protect
the surrounding surfaces.
NOTE: When installing the appliance adequate space
must be provided to allow the glass lid (where fitted) to
be opened to its fullest extent.
LEVELLING THE COOKER
• It is important that the cooker is placed on a firm
level surface and that the feet, are adjusted to
ensure that the cooker is perfectly level. An
unlevelled cooker can affect the cooking results.
To level the cooker simply adjust the feet (P) (See
diagram below) screwing up or down as required.
By turning these feet you can align the cooker height
with the adjacent work surfaces.
• The cooker is fitted with two spacers placed at the
rear part of the hob top, which ensures a minimum
distance between the appliance and the rear wall.
They must not be removed.
NOTE: Under no circumstances must the feet be
removed.
50 mm
750 mm
Min. 10 mm
Page 7
7
G141
INSTRUCTIONS FOR THE INSTALLER
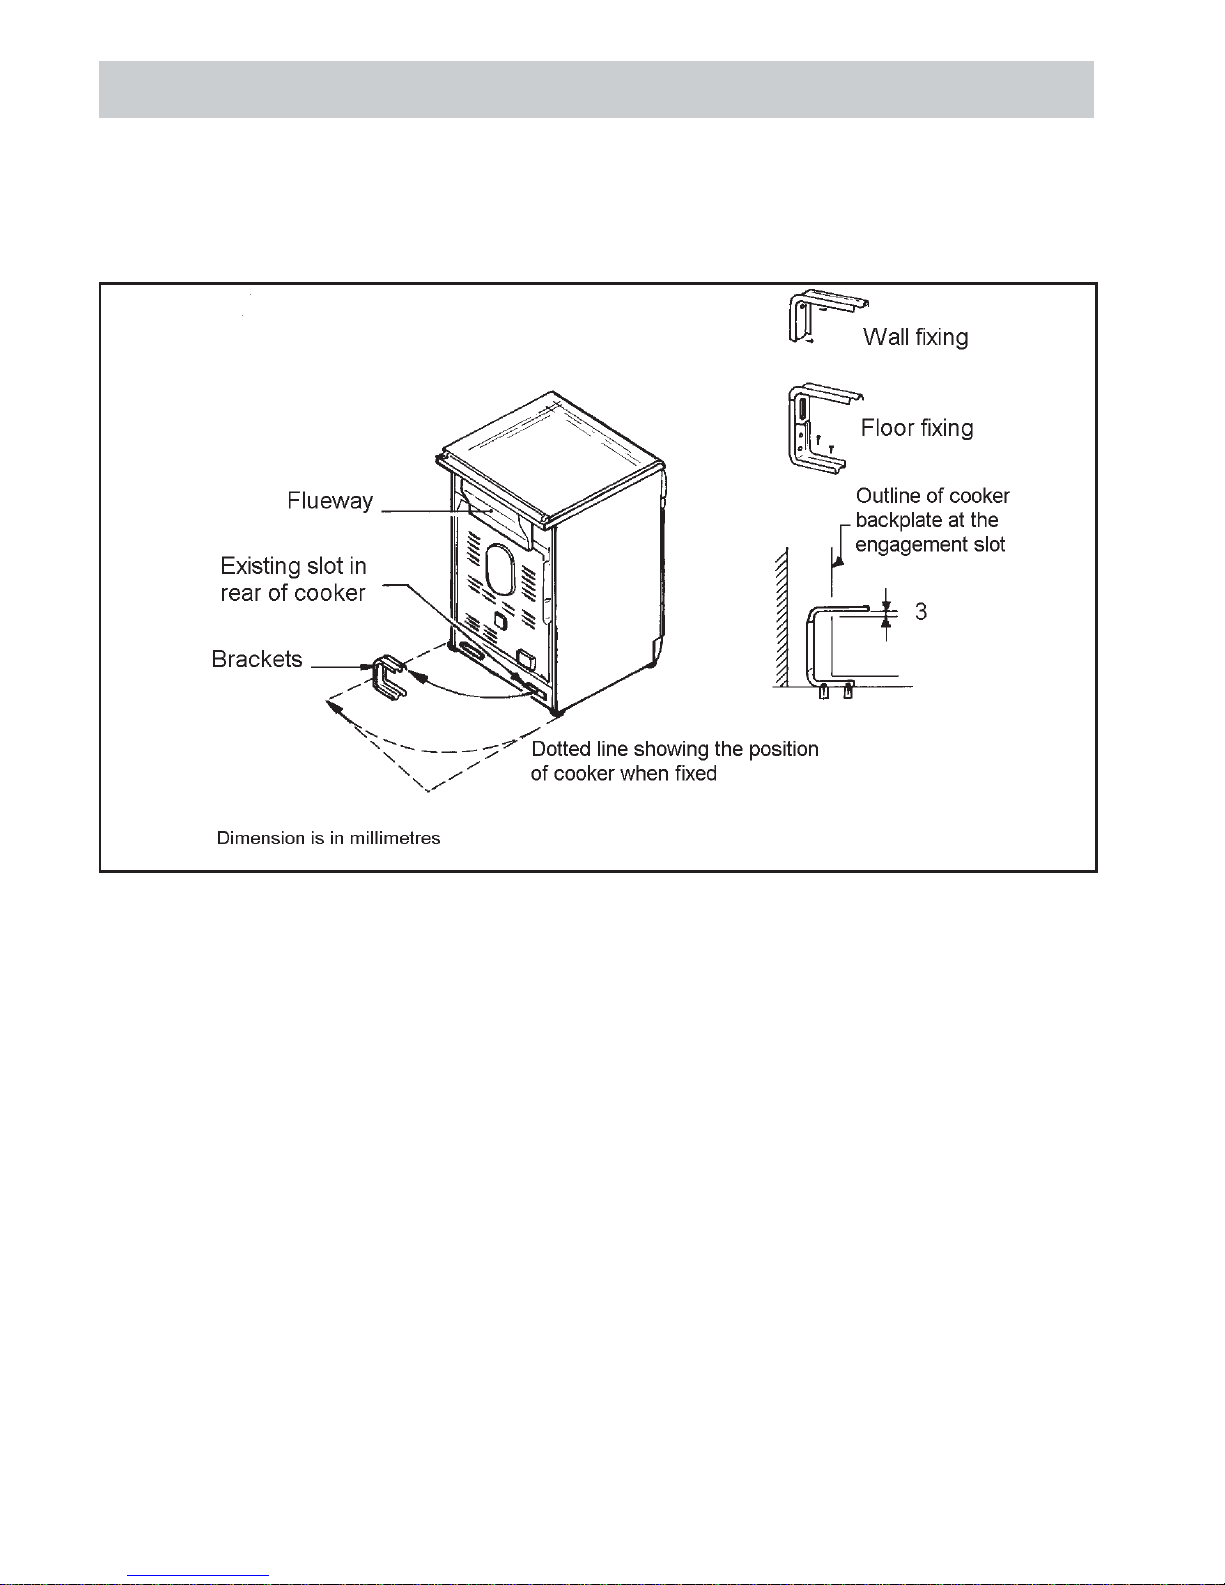
STABILITY BRACKET
We recommend a stability bracket is fitted to the cooker . The type shown in the diagram below can be purchased
from most plumbers merchants and DIY shops.
Note: The power supply cable must be positioned so that no part of the cable can come into contact with any
surface which could reach temperatures in excess of 75°C.
Page 8
8
G141
INSTRUCTIONS FOR THE INSTALLER
ELECTRICAL CONNECTION
The electrical connection must be carried out in
accordance with the current standards and laws
in force and by a qualified electrician.
WARNING!!: This appliance must be earthed.
This appliance operates from a 3 pin, 13 amp plug,
supplied fitted to the appliance. The voltage ra ting is
230 Volt and should be protected by a 5 amp fuse in the
plug. Should the fuse require replacement, it must be
replaced with a fuse rated at 5 amp approved to BS1362.
Should this plug not fit the socket outlet in your home it
should be cut off and replaced with a suitable plug as
outlined below.
NOTE: The removed plug cannot be used for any other
appliance and should therefore be properly disposed of
and not left where children might find it and plug it into
a supply socket - with the obvious consequent danger.
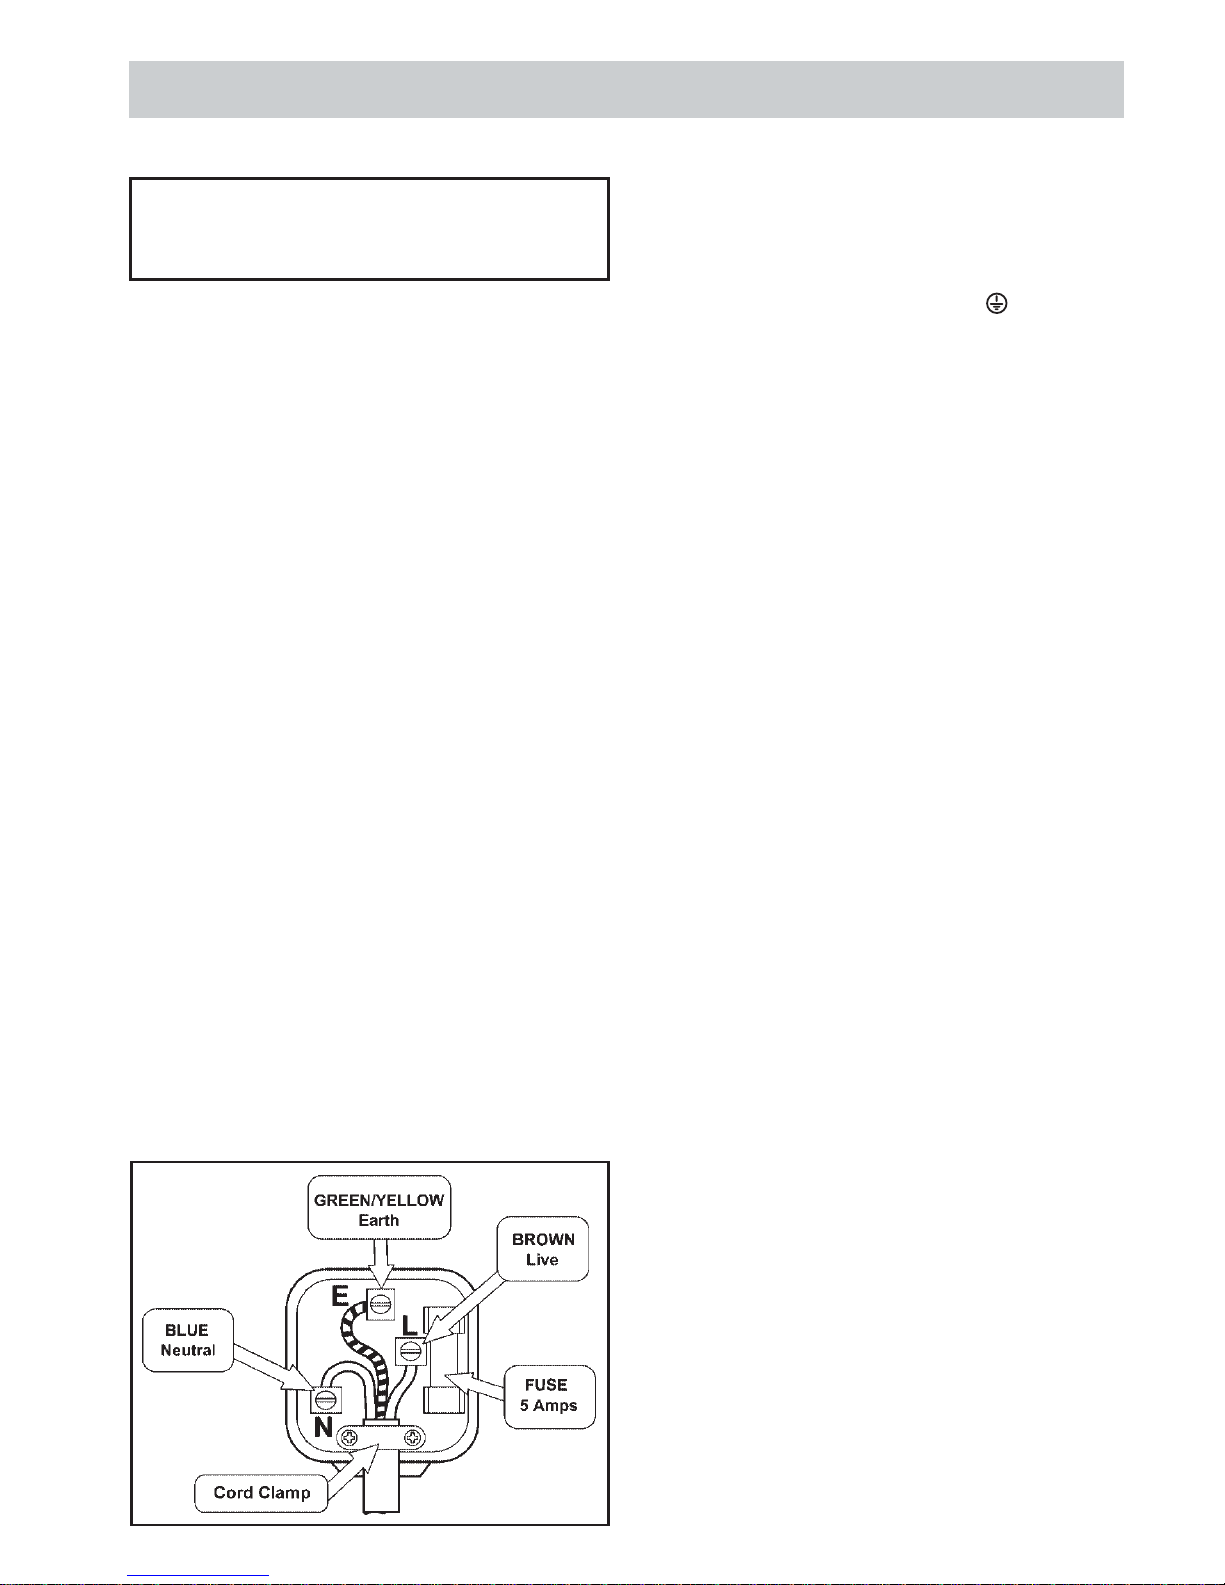
Important: The wires in the mains lead on this appliance
are coloured in accordance with the following code:
Green and Yellow = Earth
Blue = Neutral
Brown = Live
As the colours may not correspond with the markings
identifying the terminals in your plug, proceed as follows:
• The green and yellow wire must be connected to
the terminal in the plug, which is marked with the
letter E or with the earth symbol or coloured
green and yellow.
• The blue wire must be connected to the terminal
marked with the letter N or coloured black.
• The brown wire must be connected to the terminal
marked with the letter L or coloured red.
Page 9
9
G141
INSTRUCTIONS FOR THE INSTALLER
GAS CONNECTION
IMPORTANT! This appliance is supplied for use on
NATURAL GAS ONLY and cannot be converted for use
on any other gas.
CONNECTING TO GAS SUPPLY
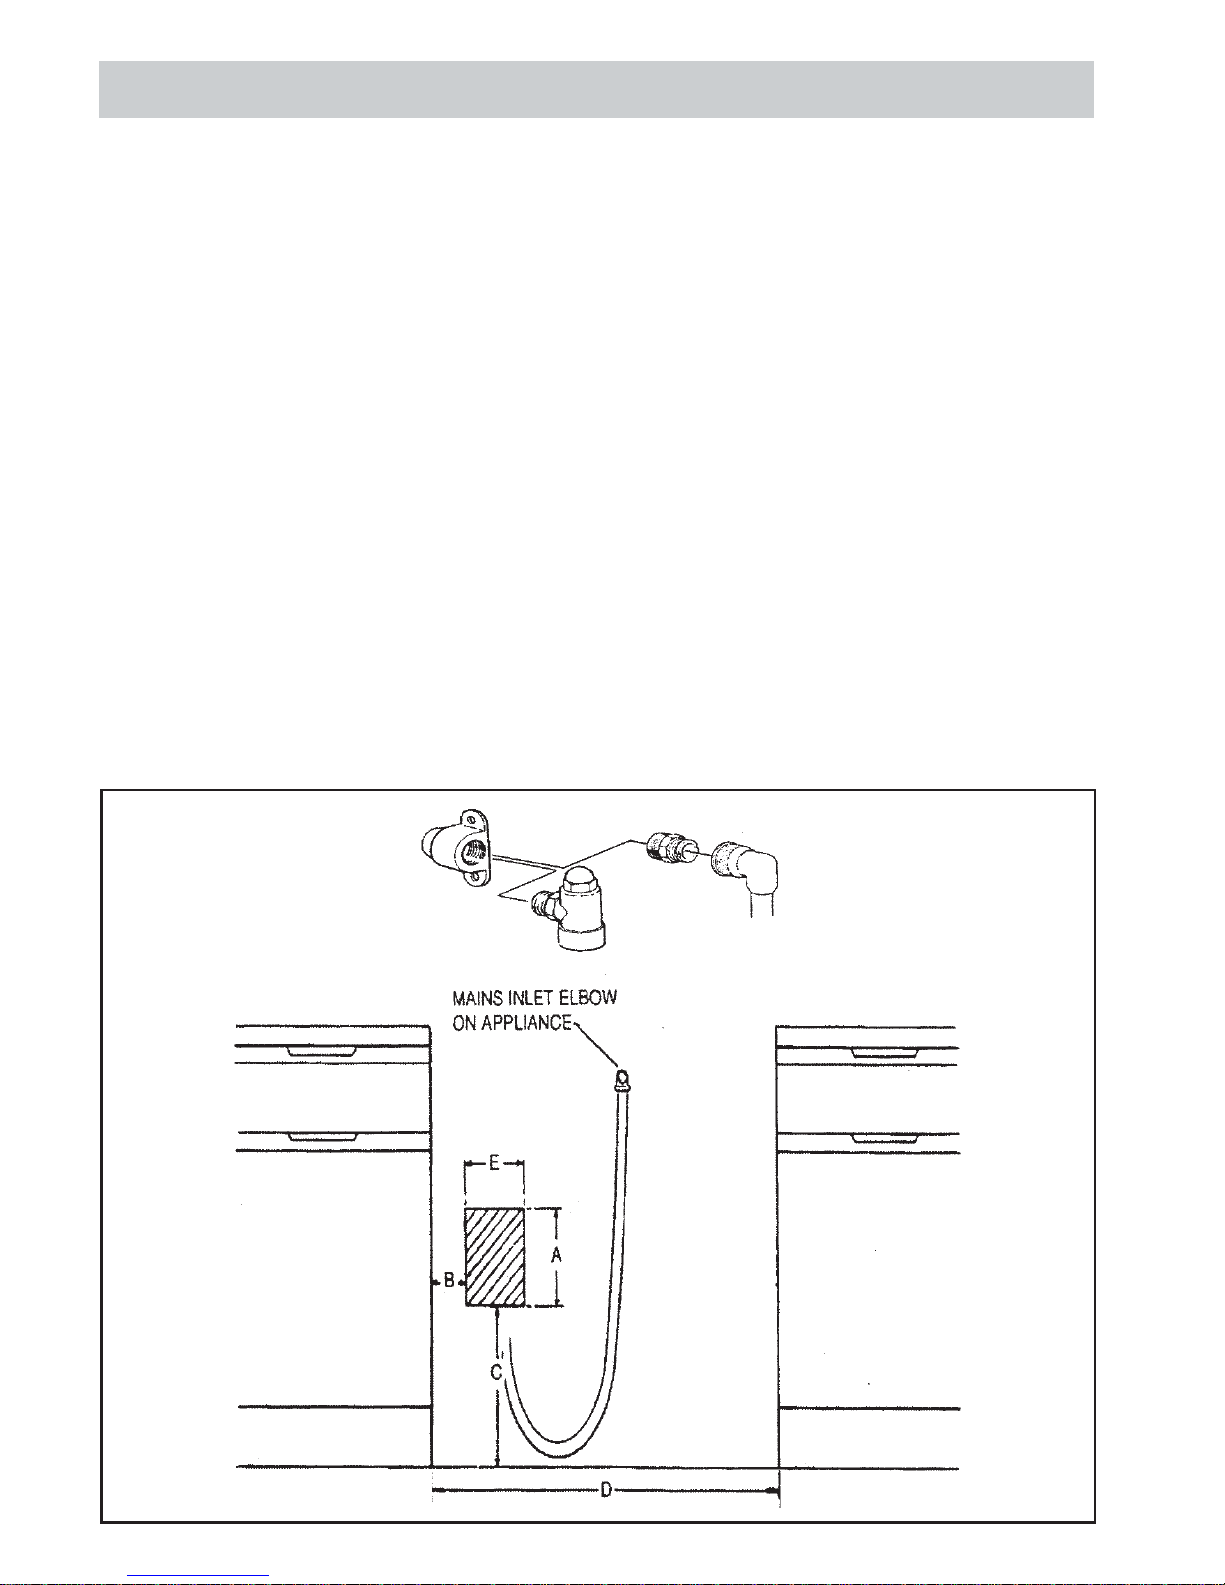
The cooker is designed to match the depth of standard
600mm worktops. An adaptor backplate should,
therefore, be fitted within the shaded area shown to
allow the cooker to be pushed fully to the wall.
Connection to the cooker should be made with an
approved appliance flexible connection to BS 669. A
length of 0.9 to 1.25 m is recommended. The length of
hose chosen should be such that when the cooker is in
situ, the hose does not touch the floor.
The temperature rise of areas at the rear of the cooker
that are likely to come in contact with the flexible hose
do not exceed 70ºC
A=200mm (7 /8”)
B=100mm (4”)
C=330mm (13”)
D=605mm (23
/4”)
E=150mm (6”)
7
3
Page 10
10
G141
INSTRUCTIONS FOR THE INSTALLER
TESTING FOR CORRECT PRESSURE OF GAS
Before attempting to light burners, it is necessary to
ascertain that the correct and desired pressure of gas
is arriving at the appliance.
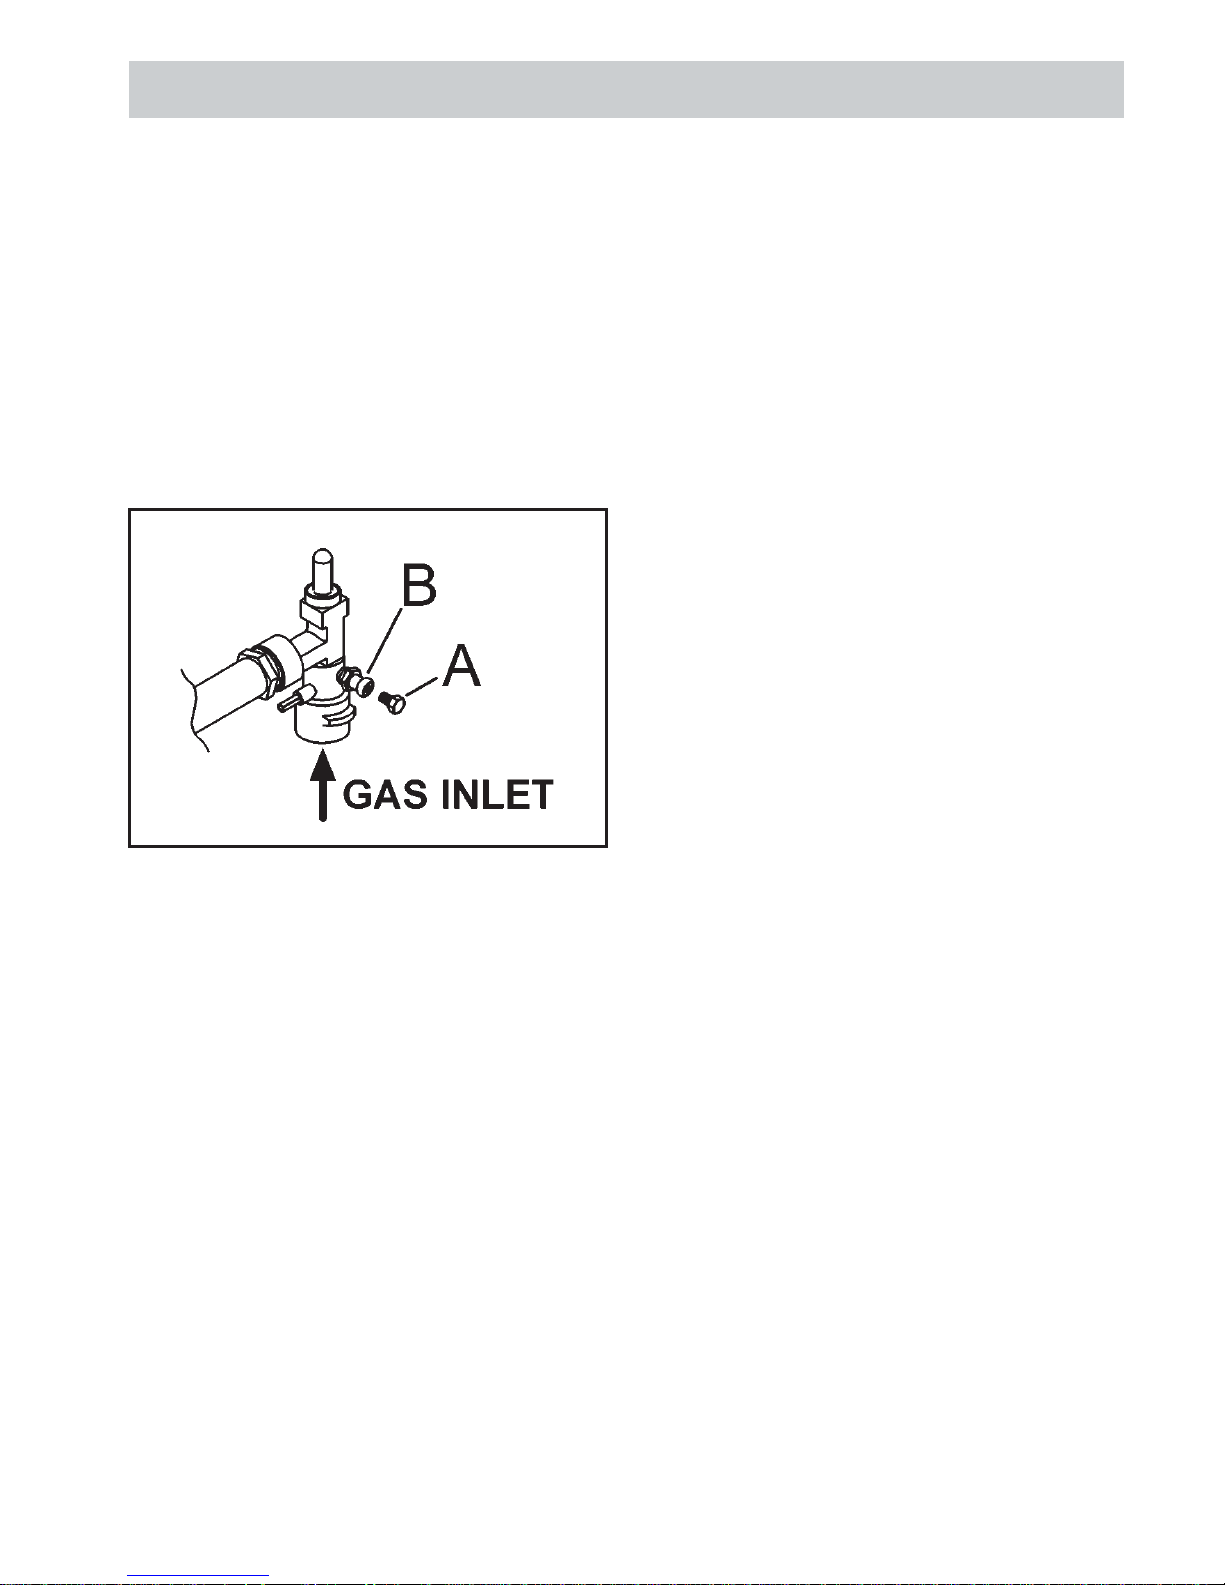
The test is carried out by removing screw (A) from the
test point (B) and attaching a water gauge tester by
rubber tube to the test point. Turn on the gas and
ascertain the pressure being received. Should the
pressure be lower or in excess of the desired pressure
then the installer should consult the Gas Board. Once
correct pressure has been ascertained, replace screw (A)
OPERATIONAL CHECKS
Fit the hotplate burner bodies and caps, pan supports
and shelf shield(s). Referring to the instructions for use
where necessary.
1. Check that the hotplate and grill burners ignite
correctly and burn with a steady flame. Check for a
steady flame on the low setting.
2. Check that with the main oven set to gas mark 9,
the burner lights and holds in after 15 seconds.
Leave the oven on with the door closed for 10
minutes and check that when the control is turned
to gas mark 1 that the flame reduces.
3. DB60, G707 AND G708 ONLY. Check that with the
top oven set to gas mark 9, the burner lights and
holds in after 15 seconds. Leave the oven on with
the door closed for 10 minutes and check that when
the control is turned to gas mark 1 that the flame
reduces.
4. Check the operation of the clock / minute minder
(where fitted).
Instruct the user on the operation of the cooker.
Page 11

11
G141
FOR YOUR SAFETY
When used properly your Belling cooker is completely
safe, but as with any electrical appliance there are some
precautions you must take in its use.
ALWAYS
ALWAYS make sure you understand the controls before
using the cooker.
ALWAYS check that all controls on the cooker are turned
off after use.
ALWAYS stand back when opening an oven door to allow
heat to disperse.
ALWAYS use dry, good quality oven gloves when
removing items from the oven.
ALWAYS take care when removing items from the grill
when the oven is on, as the contents may be hot.
ALWAYS keep the oven and grill doors closed when the
cooker is not in use.
ALWAYS place pans centrally over the hotplate burners
and position them so that the handles cannot
accidentally be caught or knocked or become heated
by other burners.
ALWAYS keep the cooker clean, as a build up of grease
or fat from cooking can cause a fire.
ALWAYS allow the cooker to cool before cleaning.
ALWAYS follo w the basic principles of food handling
and hygiene to prevent the possibility of bacterial growth.
ALWAYS keep ventilation slots clear of obstructions.
ALWAYS refer servicing to CORGI registered appliance
service engineers.
NEVER
NEVER leave children unsupervised where the cooker
is installed, as all surfaces will get hot during and after
use.
NEVER allow anyone to sit or stand on any part of the
cooker.
NEVER store items that children may attempt to reach
above the cooker.
NEVER heat up unopened food containers as pressure
can build up causing the container to burst.
NEVER store chemicals, food stuffs, pressurised
containers in or on the cooker , or in cabinet immediately
above or next to the cooker.
NEVER fill a deep fa t frying pan more than 1/3 full of
oil, or use a lid. DO NOT LEAVE UNATTENDED WHILE
COOKING.
NEVER place flammable or plastic items on or near the
hotplate.
NEVER use proprietary spillage collectors on the
hotplate.
NEVER use the cooker as a room heater.
NEVER dry clothes or place other items over or near to
the hotplate or oven/grill doors.
NEVER wear garments with long flowing sleeves whilst
cooking.
NEVER USE STEAM CLEANERS ON THIS APPLIANCE.
NOTE: The use of a gas cooking appliance results in the
production of heat and moisture in the room in which it
is installed. Always ensure that the kitchen is well
ventilated; keep natural ventilation holes open or install
a mechanical ventilation device (mechanical extractor
hood). In particular, when using the grill or more than
one hotplate burner, open a window if a mechanical
ventilation device is not operating.
Page 12
12
G141
KNOW YOUR COOKER
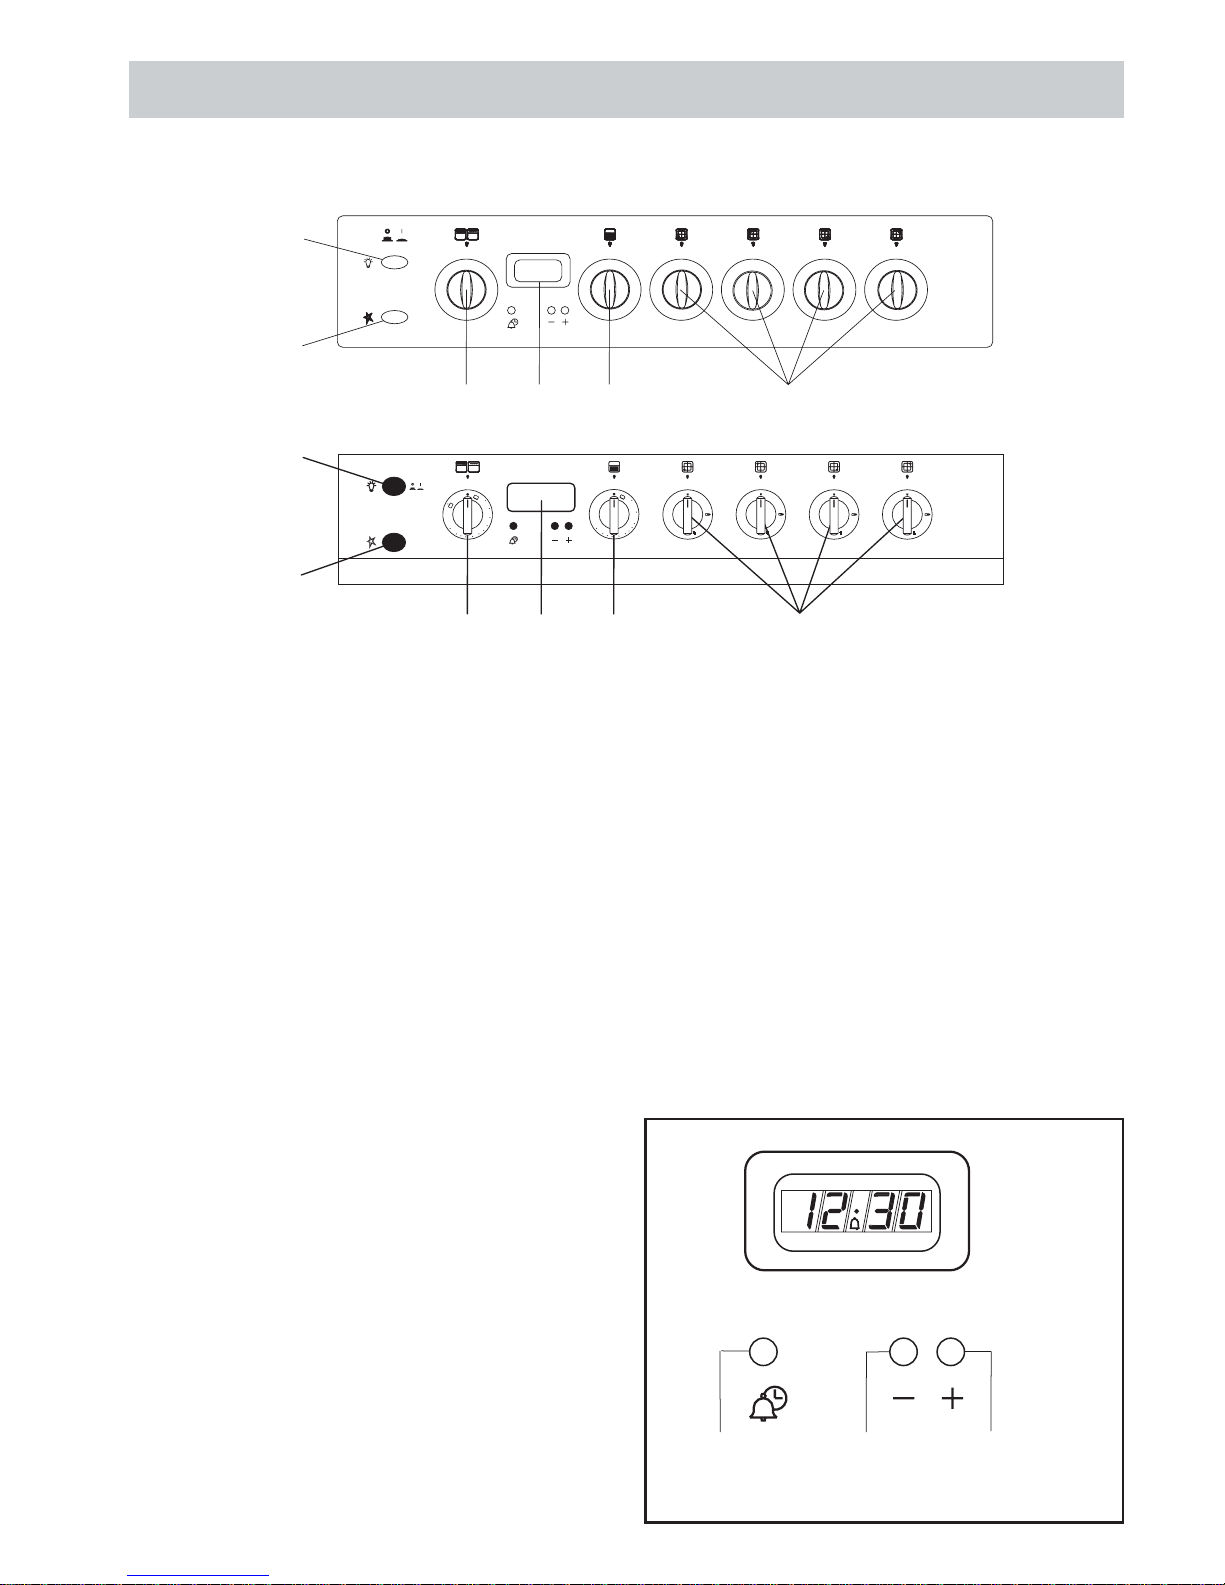
DIGIT AL TIMER AND CLOCK (where fitted)
This device performs the following modes:
• 24 hrs clock display
• countdown timer (up 99 minutes - 50 second)
To set the time of day
• Press button number 1 and release.
• Using the -/+ buttons (2 & 3) set the clock to the
required time.
Note: This function will remain activated 7 seconds after
the last -/+ operation.
To set the countdown timer
To set the required countdown duration adjusts the timer
display by using the -/+ buttons (2 & 3). Please note the
display reads in 10 second intervals and can be set to
maximum 99 minutes 50 seconds.
At the end of the countdown there will be a bleeping
noise, which continues for 7 minutes or until any button,
is pressed.
There are three different bleeping noises to select the
one you want press push button 2 when the time of day
is displayed.
CONTROL PANEL G707 & G708
4
1
3
2
6
5
2
5
7
9
M
A
X
1
3
4
6
8
1
3
5
7
9
M
A
X
2
4
6
8
4
1
3
2
6
5
1
23
1) Electronic clock / minute minder (where fitted)
2) Grill control knob / Top oven thermostat (DB60,
G707 and G708 only)
3) Bottom oven thermostat control knob
4) Control knobs for hob burners
5) Main oven light switch
6) Burner ignition button
CONTROL PANEL DB60
Page 13
13
G141
KNOW YOUR COOKER
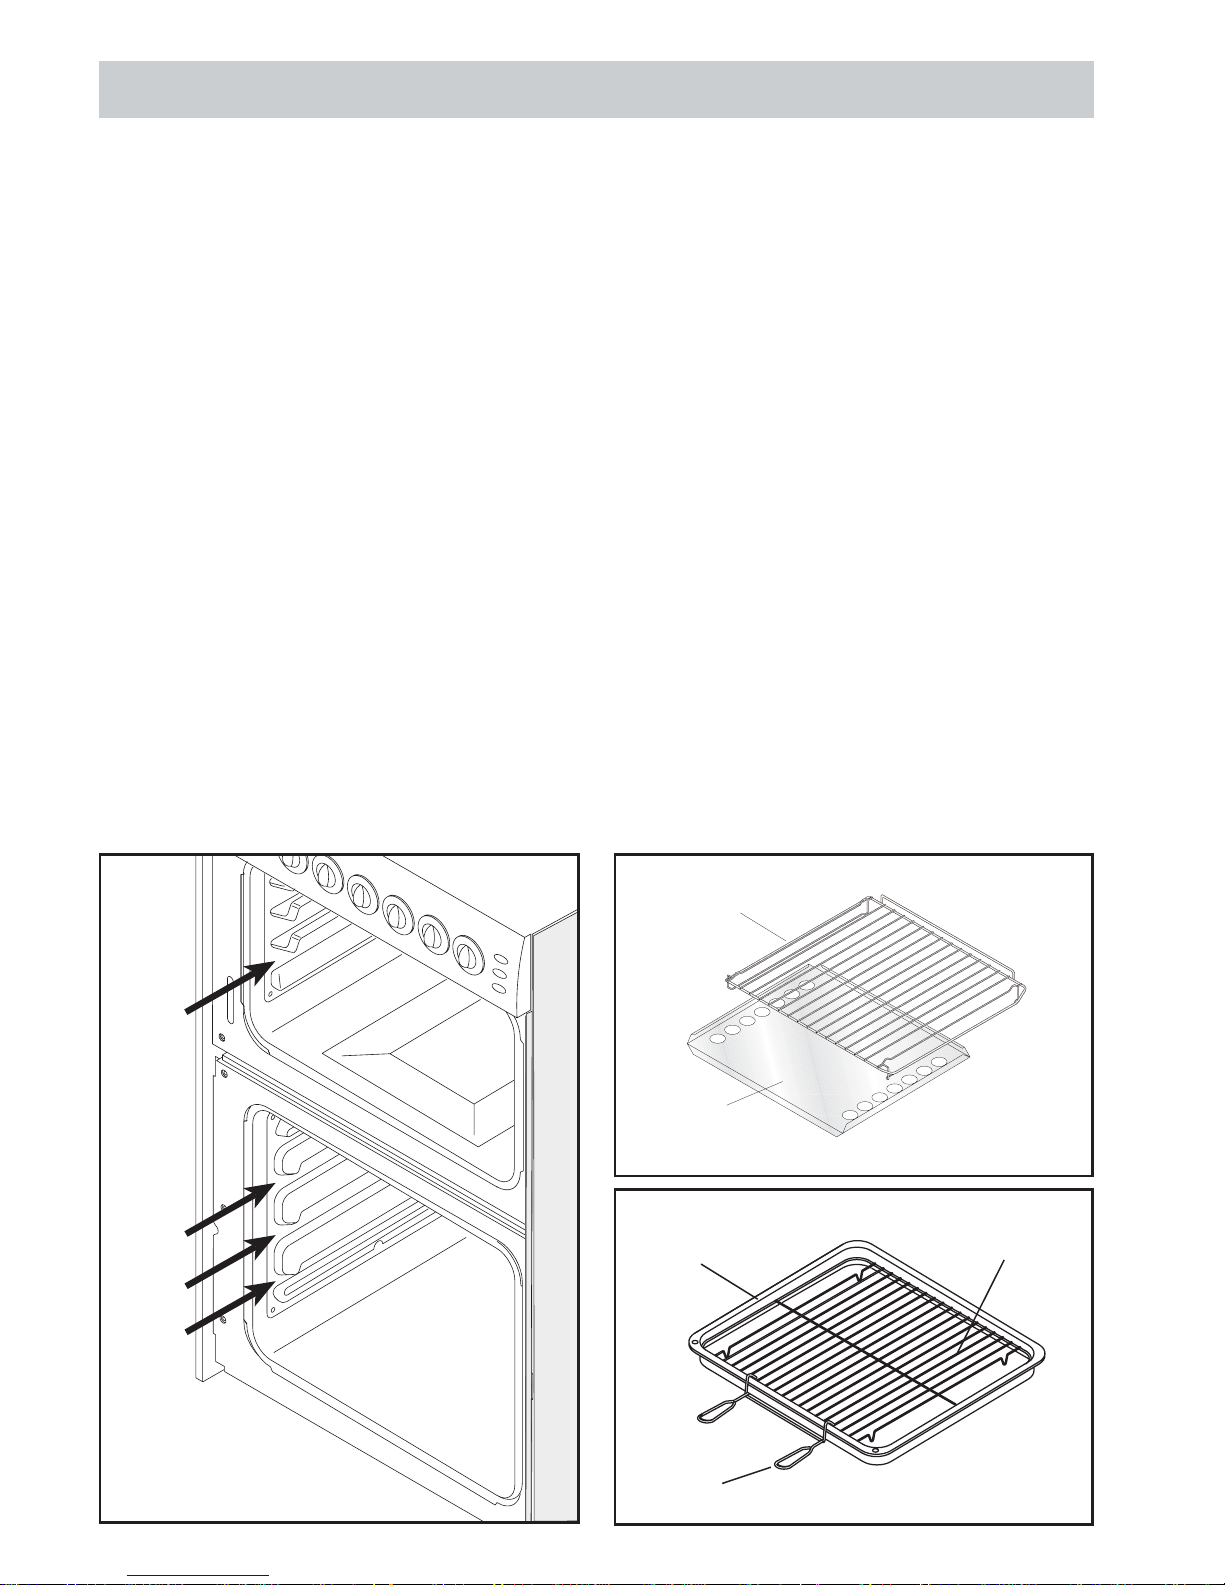
The cooker is supplied with 3 oven shelves (A), which
can be placed in any of the runners formed into the
sides of the oven walls. The shelf positions are numbered
from the bottom of each oven (see below).
The appliance is supplied with 1 or 2 (dependant
on model) oven deflector trays (B), for use in the
oven(s) to enhance cooking performance.
For best results, the deflector tray should be fitted
beneath the lowest shelf being cooked on in each oven,
pushed fully to the rear of its runner.
For added flexibility when grilling only, a shelf may also
be placed on the floor of the top cavity. A grill pan (C),
food support grid (D) and handle (E) is also included
(see below), which is placed on top of the appropriate
shelf
WHEN THE OVEN BURNER (S) ARE IN USE, SHELVES
MUST NOT BE PLACED ON THE FLOOR OF THE OVENS.
A
B
C
E
D
Before cooking for the first time heat the oven at
maximum temperature for 60 minutes, ensuring that
all packaging and accessories have been removed from
the oven(s). This will allow the protective coating on the
interior of the oven to be burnt off and dissipate the
associated odours remaining from manufacture. Ensure
adequate ventilation in the kitchen whilst burning off. It
is common for a small amount of smoke to occur during
this process.
1
1
2
3
Page 14
14
G141
USING THE GAS HOB
GENERAL NOTES ON SAFETY
• When the hob is in use do not leave unattended
and make sure there are no small children in the
vicinity. Check that pan handles are positioned
correctly and always keep an eye on the pan
whenever oils or fats are used, as they are easily
inflammable.
• Do not use spray cans near the appliance when it
is in use.
• Even after use surfaces retain heat for a long time
so do not put your hands or other objects on them.
• After you have used the appliance make sure that
all the controls are in the OFF position.
THE HOB GLASS LID (where fitted)
The hob glass lid on the cooker is toughened for your
protection and safety.
Before opening it remove any food deposits from its
surface. The glass lid is purely decorative and is not
intended as a work surface and should not be used for
this purpose. As with any glass surface care must be
taken to avoid scratches or damage, which may result
in the glass breaking. The glass lid incorporates a safety
valve that shuts off the supply of gas to ALL the cooker
burners, when the lid is lowered. Do not use this facility
as a means of controlling the burners. This device is
fitted in the interests of safety.
Warning: Always ensure that all the control knobs are
in the OFF position and the burners have cooled before
the hob lid is closed. Failure to do so could result in
damage to the lid and a risk of personnel injury.
LIGHTING THE HOB BURNERS
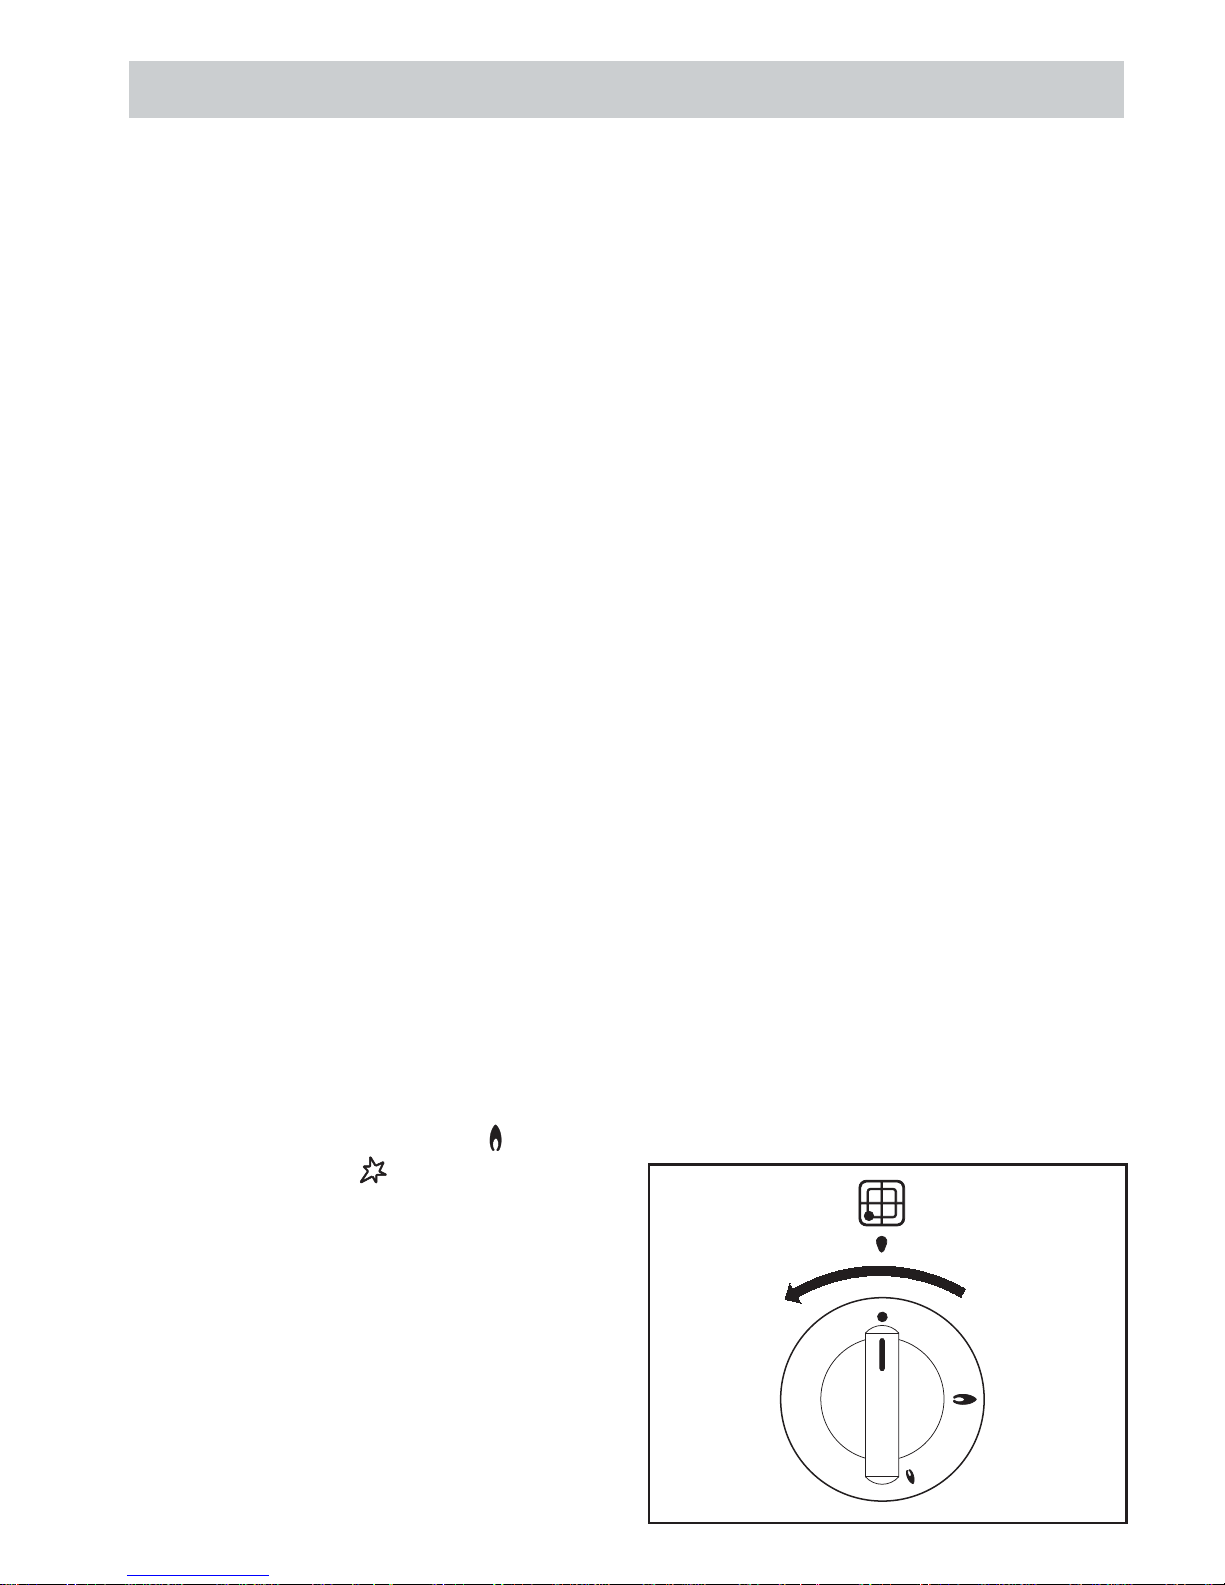
Push in and turn the appropriate control knob in an anti
clockwise direction to the full on position , press and
hold the ignition button
until the burner lights.
When the burner has lit release the ignition button
and turn the control knob to the required setting.
ADJUSTING THE HOB BURNERS
When the burner is lit, the flame can be adjusted by
turning the control knob to the required setting. The small
flame symbol marked on the control knob indicates the
simmer position and the large flame, the full position.
To turn the burner off, turn the appropriate knob fully
clockwise.
After use, always return controls to the off position.
Page 15

15
G141
USING THE GAS HOB - GENERAL NOTES
SAFETY REQUIREMENTS FOR DEEP FAT
FRYING
IMPORTANT - As with any cooking appliance there could
be some fire risk attached to the heating of oil,
particularly for deep fat frying, cooking utensils
containing oil must not be left unattended on or in
close proximity to the cooking zones. To minimise the
risks inherent with deep fat frying, we recommend the
following;
• Use a deep pan, large enough to completely cover
the appropriate heating area.
• Never fill the pan more than one-third full of fat or
oil.
• Never leave oil or fat unattended during the heating
or cooking period.
• Do not try to fry too much food at a time, especially
frozen food.
• This only lowers the temperature of the oil or fat
too much, resulting in greasy food.
•Always dry food thoroughly before frying, and lower
it slowly into the hot oil or fat. Frozen foods, in
particular , will cause frothing and spitting, if added
too quickly.
• Never heat fat, or fry, with a lid on the pan.
• Keep the outside of the pan, clean and free from
streaks of oil or fat.
In the unfortunate event of a chip pan fire
1. Switch Off the hob burner.
2. Smother flames with a fire blanket or damp cloth.
3. Leave the pan to cool for at least 60 minutes before
moving.
ECONOMY TIPS
In order to obtain the maximum efficiency with minimum
gas consumption, it is useful to remember:
• Do not use small pans on large burners.
• As soon as boiling point is reached, turn the control
knob to the low position.
•Always use pans with lids.
• Do not over fill pans, only boil the amount of liquid
required.
•Vegetables cut into smaller pieces take less time
to cook, therefore use less gas. Also more than one
vegetable can be cooked in the same pan, i.e.
carrots and peas.
Page 16
16
G141
GRILLING
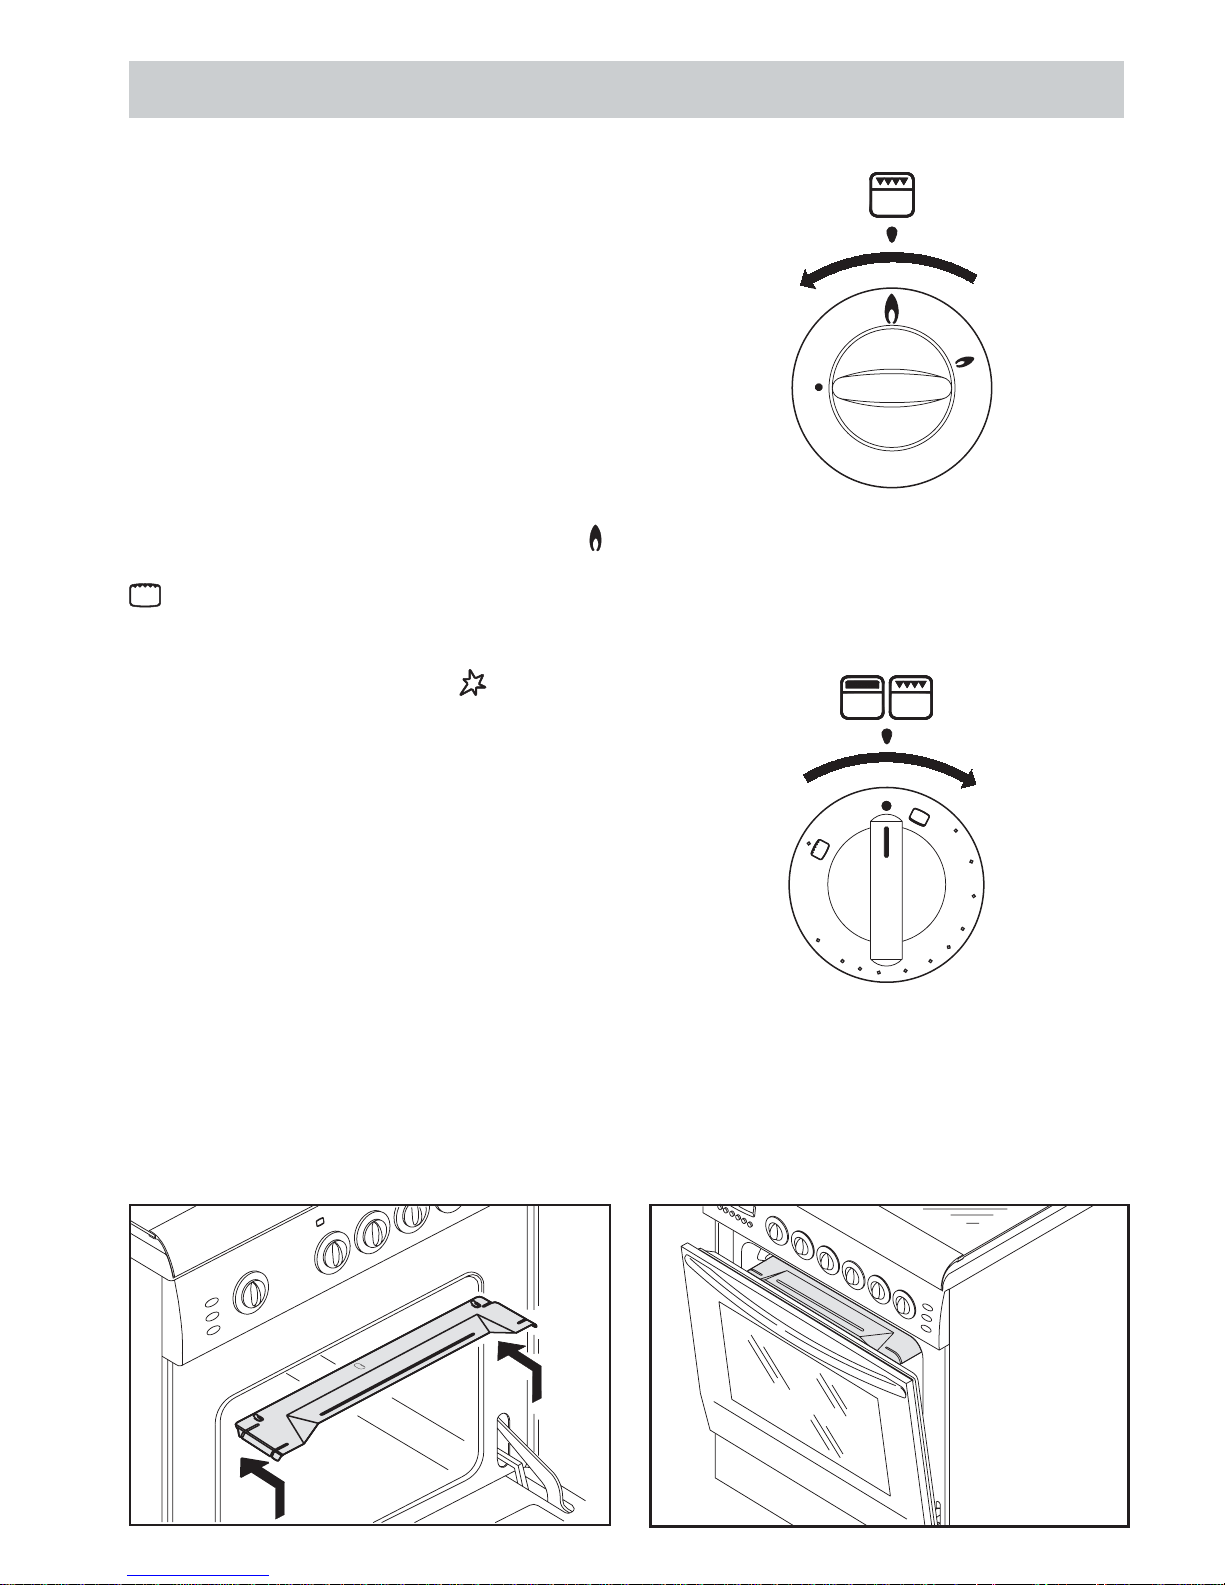
IMPORTANT! BEFORE GRILLING, ALWAYS FIT THE
PROTECTIVE HEAT SHEILD, AS SHOWN BELOW. THIS
WILL PREVENT DAMAGE TO THE CONTROLS AND
SURROUNDING FURNITURE. GRILLING SHOULD
NEVER BE UNDERT AKEN WITH THE GRILL/TOP OVEN
DOOR CLOSED
NEVER allow young children near the appliance when
the grill is in use as the surfaces get extremely hot.
LIGHTING THE GRILL
Ensure that the hob glass cover is in the raised position,
open the oven door, push in and turn the grill control
knob in an anti clockwise direction to the full on position n
(G706 and G709) or in clockwise direction to the symbol
(DB60, G707 and G708). Keeping the knob pushed
in, press and hold the ignition button until the burner
lights.
Release the ignition button and keep the grill knob
pressed for approximately 15 seconds to allow for the
flame failure device to energise. If the control knob is
released too soon the flame will go out.
Reduce the grill setting if necessary by turning the knob
anti clockwise (G706 only and G709).
When lighting the grill, the oven door must always be
kept open. If after approximately 15 seconds the burner
has not lit, release the knob and wait at least 1 minute
before trying to relight. If the grill burner extinguishes
accidentally, turn the knob to the off position and wait
at least 1 minute before attempting to relight.
The grill pan, food support grid and grill pan handle are
assembled as shown on page 13. The grill pan handle
is clipped onto the grill pan by tilting the handle upwards
and clipping over the edge of the grill pan. Do not leave
the handle clipped on the grill pan when grilling as it
will become extremely hot.
1
3
5
7
9
M
A
X
2
4
6
8
Page 17
17
G141
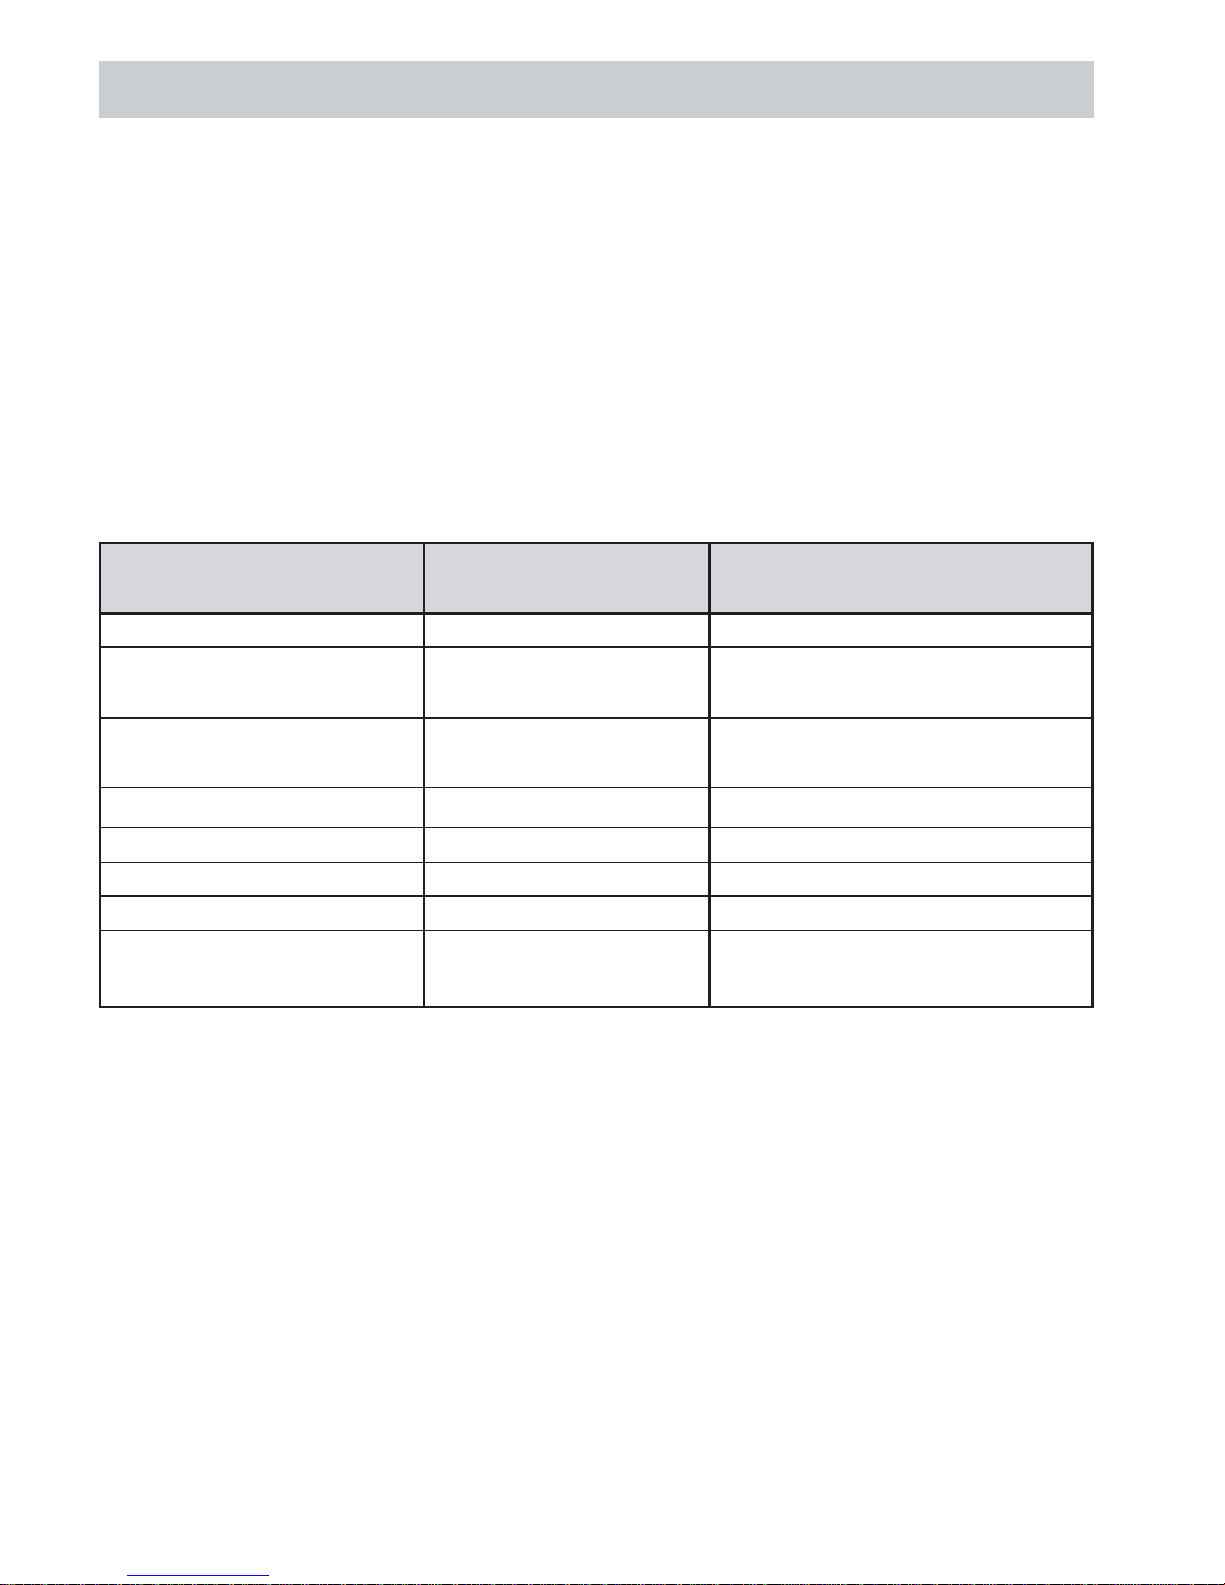
GRILLING - GENERAL NOTES
FOOD
SHELF POSITION FROM
BASE OF OVEN
APPROX. COOKING TIME
Toasting of bread products 1 2 - 4 mins
Small cuts of meat 1 8 - 12 mins (Depends on size and
Sausages, bacon thickness)
Chops, etc. 1 20 - 25 mins (Depends on size and
Gammon Steaks thickness)
Fish. Whole,Fillets 1 6 - 8 mins
Fish in breadcrumbs 1 10 - 15 mins
Pre-cooked potatoe 1 10 - 12 mins
Pizzas 1 10 - 12 mins
Browning of food 1 or base (dish placed 5 - 7 mins
directly on shelf)
After use, always return controls to the off position
CONTROLLING THE GRILLING TEMPERATURE
In order to vary the grilling temperature you may find the following guide useful:
•For grilling steak, chops, sausage, fish etc use the first position from the bottom (runner 1).
•For cooking very rare steak and to sear meat, use the first position from the bottom (runner 1) and preheat the
grill.
•To ensure that foods such as poultry, pork or veal are thoroughly cooked, grill on the first position and turn the
food regularly. To prevent the food sticking to the grill pan grid, brush lightly with oil before use.
•For browning foods such as lasagne, cauliflower cheese etc use the runner 1
The charts below serve as a guide for times and positioning for cooking with the grill.
Page 18
18
G141
USING THE MAIN OVEN
FOR YOUR SAFETY
The oven and grill burners are protected by a flame
failure safety device, which cuts off the supply of gas to
the burners in the event of the flames being extinguished
for any reason.
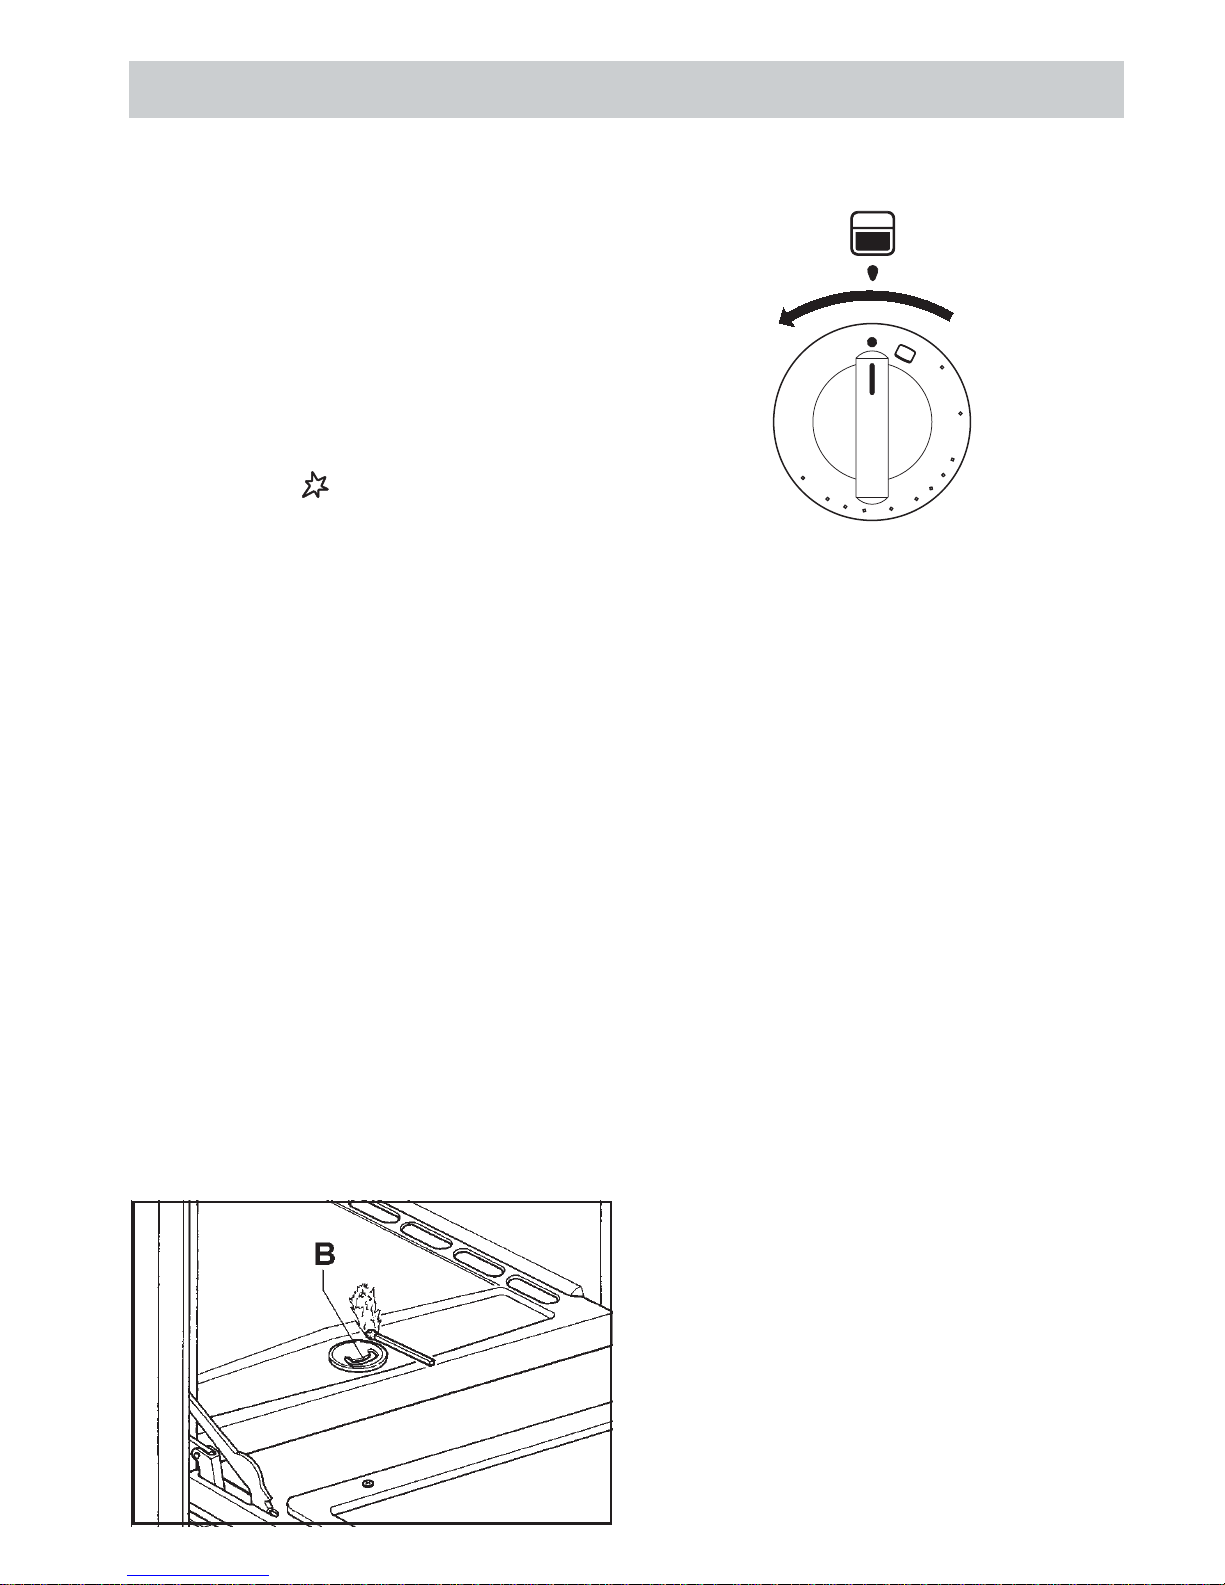
LIGHTING THE OVEN
• Ensure that the hob glass lid is in the raised position,
open the oven door, push in and turn the oven
control knob anti clockwise to MAX.
• Keeping the knob pushed in, press and hold the
ignition button until the burner lights. Release
the ignition button and keeping the oven control
knob pressed in for approximately 15 second to
allow the flame failure device to energise. If the
control knob is released too soon the flame will go
out.
• When the burner is lit close the oven door gently in
order to avoid extinguishing the flame.
• Set the oven control knob to the required
temperature and allow approximately 15 minutes
for the oven temperature to stabilise before
introducing any food. When the burner is lit the flame
can be seen through a viewing hole ( when the door
is open) in the oven base
When lighting the oven, the oven door must always be
kept open. If after approximately 15 seconds the burner
has not lit, release the knob and wait at least 1 minute
before trying to relight. If the oven burner extinguishes
accidentally, turn the knob to the off position and wait
at least 1 minute before attempting to relight.
The main oven features a light, which may be used at
any time to view the contents of the main oven, or left
on throughout the cooking period.
LIGHTING THE OVEN IN THE EVENT OF A
POWER FAILURE
In the event of a power failure or failure of the ignition
supply , the oven can be lit with a match by carrying out
the following procedure:
• Ensure that the hob glass cover is in the raised
position.
• Open the oven door , push and turn the oven control
knob to the maximum setting. Keeping the knob
pushed in, take a lighted match or lighted taper
and place near to the burner through the hole (see
below)
• When the burner is lit keep the oven control knob
pressed in for approximately 15 seconds to allow
the flame failure device to energise.
2
5
7
9
MAX
1
3
4
6
8
Page 19

19
G141
MAIN OVEN COOKERY NOTES
The charts on page 20 are a guide only, giving
approximate cooking temperatures and times. To suit
personal taste and requirements, it may be necessary
to increase or decrease temperatures by 1 gas mark.If
large quantities are being cooked it will be necessary
to increase the cooking time somewhat to compensate
for the extra oven load.
It should be noted that at the end of a cooking period
there may be a momentary puff of steam when the oven
door is opened, this will disperse in a few seconds and
is a perfectly normal characteristic of an oven with a
good door seal.
Oven Utensils
To ensure even circulation do not use meat pans larger
than 390 x 300mm (15ins x 12ins) and baking trays no
larger than 330 x 255mm (13ins x 10ins), these should
be positioned centrally on the oven shelf.
• Do not fit shelves upside down.
•Food or cooking utensils should not be placed on
the floor of the oven.
To avoid unnecessary cleaning, rod shelves, which are
not in use, should be removed from the oven.
To prepare Meat and Poultry for Roasting
in your Oven
(a) Wipe the meat or poultry, dry well and weigh it.
Meat, which has for been stored in a refrigerator,
should be allowed to come to room temperature
before cooking, and frozen meat or poultry must
be completely defrosted before placing in the oven.
(b) The weight of any stuffing used should be added
before calculating the cooking time.
(c) Place meat/poultry in a suitable meat pan. Small
joints weighing less than 1.75kg (31/2 lbs) should
be roasted in a smaller meat pan/tin - or they may
be ‘pot roasted’ - a small joint or a large meat pan
causes unnecessary oven splashing and
evaporation of meat juices.
(d) Additional fat should not be added, except for veal,
very lean meat or poultry which can either be
‘larded’ with fat bacon or brushed very sparingly
with cooking oil or melted fat.
(e) Beef, lamb, mutton and poultry may be dusted lightly
with seasoned flour to give a crisp outer surface.
The skin of duck and goose should be pricked to
release excess fat during cooking, and the rind of
pork should be scored, brushed lightly with oil, and
rubbed with salt to give crisp crackling.
(f) Meat and poultry wrapped in, or covered with a
tent of aluminium foil will be juicy and tender.
Roasting bags offer the same advantages. Al ways
follow the manufacturer’s pack instructions, and
remember to reduce the temperatures given for
conventional ovens by approximately 25°C and the
time by approximately 10 minutes per hour.
(g) Potatoes for roasting only require to be brushed with
cooking oil or melted fat.
Page 20
20
G141
MAIN OVEN COOKERY NOTES
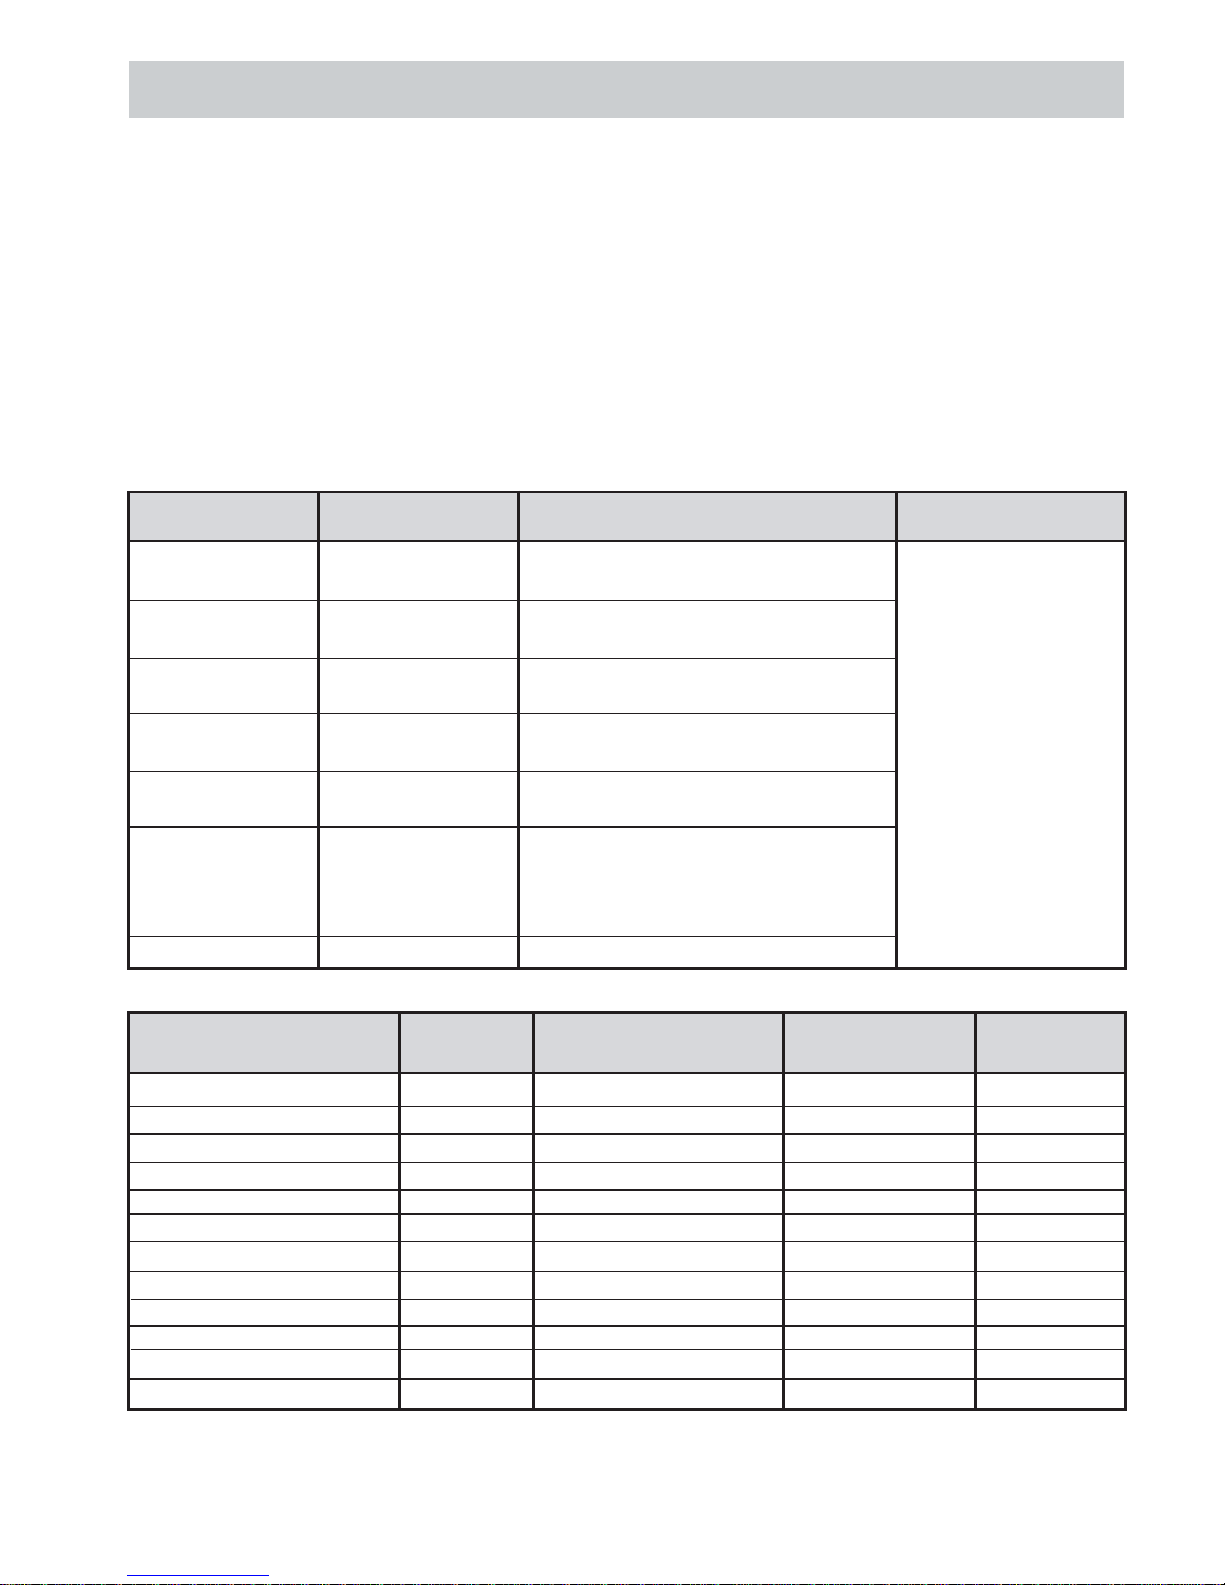
The charts below serve as a guide for times and temperatures for cooking in the main oven. Always allow
oven to preheat for 15 minutes prior to use, with deflector tray fitted if necessary (see page 13 – Know Your
Cooker). For best results place trays / tins centrally on the shelf.
Frozen Meat and Poultry
Joints of meat and whole birds should be defrosted slowly, preferably in a domestic refrigerator (allowing 5-6
hours per 450g, 1 lb), or at room temperature (allowing 2-3 hours per 450g, 1 lb).
Frozen meat or poultry must be completely defrosted before placing in the oven. It is essential to wash thoroughly
and cook meat and poultry immediately after defrosting.
The charts below serve as a guide for times and temperatures for cooking in the main oven. Always allow oven to
preheat for 15 minutes prior to use.
Beef 3 or 4 (160 / 180°C) 20-25mins per 450g (1 lb)
+ 20 mins over
Lamb 3 or 4 (160 / 180°C) 20-30 mins per 450g (1 lb)
+ 25 mins over)
Pork 3 or 4 (160 / 180°C) 25-30 mins per 450g (1 lb)
+ 25 mins over)
Veal 3 (160 / 170°C) 25-30 mins per 450g (1 lb)
+ 25 mins over)
Chicken / Turkey 3 or 4 (160 / 180°C) 18-20mins per 450g (1 lb)
Up to 4 kg (8lb) + 20 mins over
Turkey 4 to 5.5kg 2 or 3 (150 / 160°C) 12 - 14 mins per 450g (1 lb) at plus
(8 to 12 lb) 12 mins extra. For every 450g (1 lb)
over 5.5kg (12 lb) allow 10 mins per
450g (1lb) and roast at 150ºC
Casserole Cooking 1 or 2 (140 - 150°C) 11/2 - 2 hrs
Note: If soft tub margarine is used for cake making, we would recommend using the all in one method and to
reduce the temperature by 1 gas mark. Temperatures recommended in this chart refer to cakes made with block
margarine or butter only.
BAKING Gas Mark Time (approximate) Shelf Positions Deflector
in mins tray ?
Scones 7 15 - 20 2 and 3 up Yes
Small Cakes 5 23 - 28 2 and 3 up Yes
Victoria Sandwich 4 or 5 20 - 25 2 and 3 up Yes
Sponge Sandwich (fatless) 4 or 5 20 - 25 2 and 3 up Yes
Swiss Roll 5 12 - 15 2 and 3 up Yes
Semi-rich fruit cakes 2 or 3 75 – 90 (7” tin) 2 up Yes
Rich Fruit Cakes 2 or 3 Time dependant on size 2 up Yes
Shortcrust Pastry 6 or 7 Time dependant on recipe 3 up No
Puff Pastry 6 or 7 Time dependant on recipe 3 up No
Yorkshire Pudding 5 40 - 50 3 up Yes
Individual Yorkshire Puddings 5 20 - 25 3 up Yes
Baked Custard 2 35 - 45 2 up Yes
Runner 2 from bottom
of even
MEAT Gas Mark Time (approximate) Position in oven
Page 21
21
G141
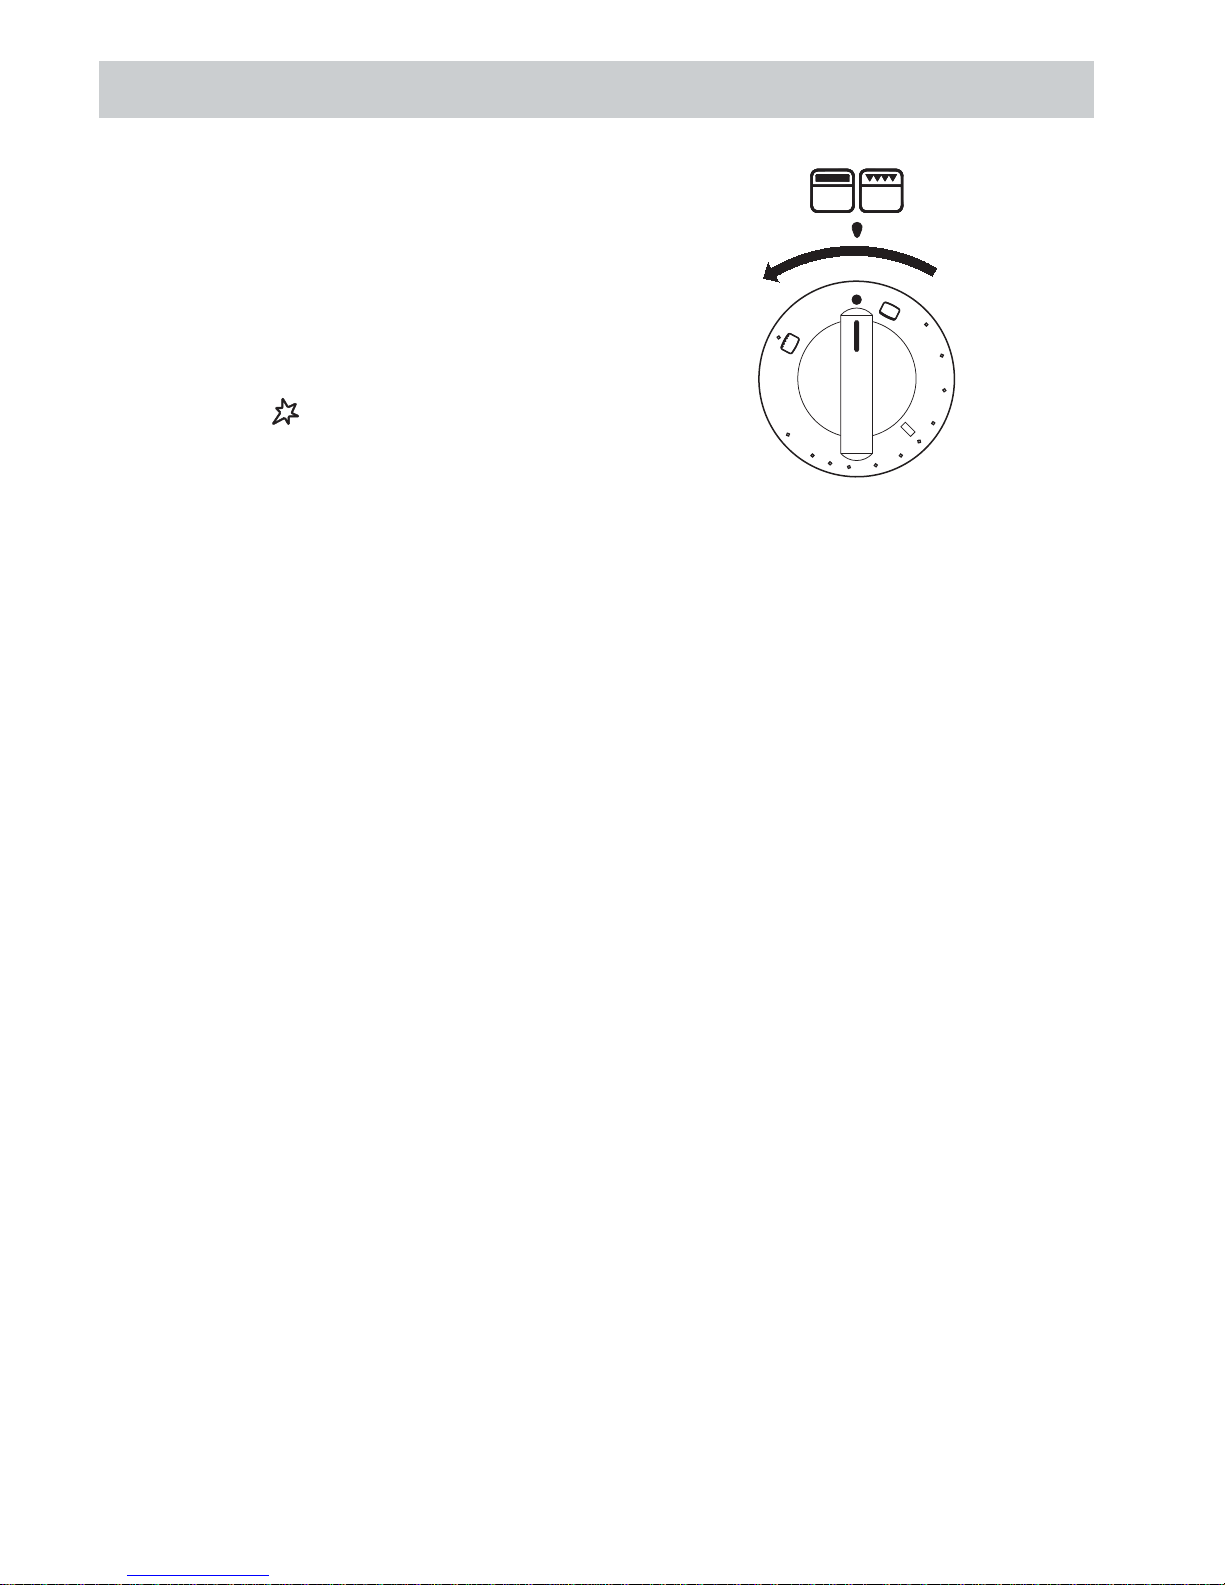
USING THE TOP OVEN - DB60, G707 AND G708 ONLY
LIGHTING THE TOP OVEN - DB60, G707 AND
G708 ONLY
The top oven is operated in exactly the same way as
the main oven, described on previous pages.
• Ensure that the hob glass lid is in the raised position,
open the oven door, push in and turn the oven
control knob anti clockwise to the maximum
temperature setting to MAX.
• Keeping the knob pushed in, press and hold the
ignition button until the burner lights. Release
the ignition button and keeping the oven control
knob pressed in for approximately 15 second to
allow the flame failure device to energise. If the
control knob is released too soon the flame will go
out.
• When the burner is lit close the oven door gently in
order to avoid extinguishing the flame.
• Set the oven control knob to the required
temperature and allow approximately 15 minutes
for the oven temperature to stabilise before
introducing any food. When the burner is lit the flame
can be seen through a viewing hole ( when the door
is open) in the oven base
The Top Oven is most useful for the longer slower
cooking required for cheaper cuts of meat - casserole
cooking, pot roasting, braising etc. Small joints of meat
up to 1.5kg (3 lbs) or poultry up to 3.6kg (8 lbs) in weight
can be roasted in a small meat pan in the Top Oven, but
should preferably be ‘slow roasted’ or covered with a
lid of aluminium foil (one or two incisions in the top of
the foil will allow the meat or poultry to brown). Always
ensure that there is at least 25mm (1in.) between the
top of the foil and the grill element. Do not use the grill
pan as a meat pan.
Larger joints of meat weighing more than 1.5kg (3 lbs)
or poultry weighing more than 3.6kg (8 lbs) should be
roasted in the Main Oven.
Top Oven as a Hot cupboard
Plates and dishes may be warmed in the top oven. Place
the plates and serving dishes on the rod shelf using the
bottom runner and turn the Top Oven control to
approximately gas mark 1. A maximum time of 10-12
minutes is all that is required to heat the plates and
dishes.
NEVER operate the grill control when using the T op Oven
as a hot cupboard.
Note: Utensils stored in top oven will get hot when main
oven is in use. Care should be taken when removing
them.
1
3
5
7
9
MAX
2
4
6
8
Page 22
22
G141
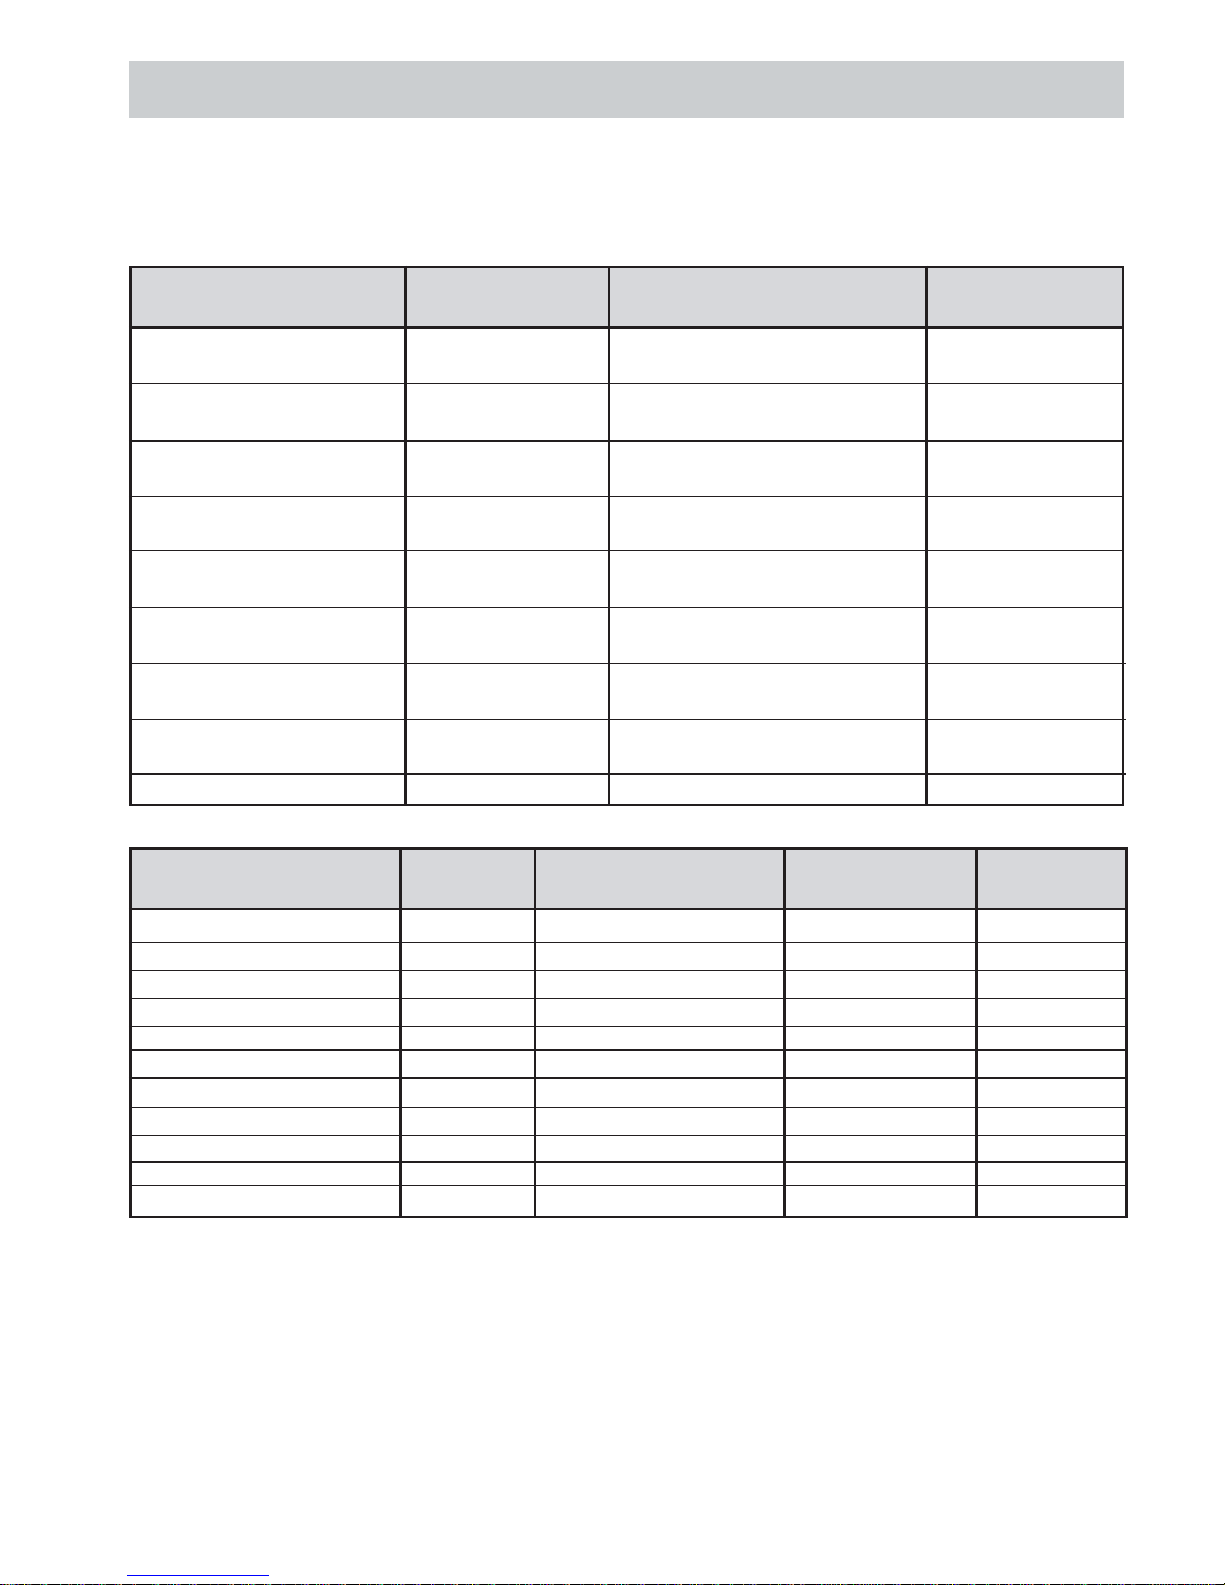
TOP OVEN COOKERY NOTES (DB60, G707 AND G708 ONLY)
MEAT Gas Mark Time (approximate) Position in Oven
(from bottom)
The charts on the following pages serve as a guide for positioning and temperature for cooking in the top oven.
Always preheat the oven for 15 minutes prior to use, with deflector tray fitted if necessary (see page 13 – Know
Your Cooker). For best results place trays / tins centrally on the shelf.
Beef / Lamb 4 (170 / 180°C) 35 mins per 450g (1 lb) 1
(slow roasting) + 35 mins over
Beef / Lamb 5 (190 / 200°C) 35-40 mins per 450g (1 lb) 1
(foil covered)
Pork 4 (170 / 180°C) 40 mins per 450g (1 lb) 1
(slow roasting) + 40 mins over
Pork 5 (190 / 200°C) 40 mins per 450g (1 lb) 1
(foil covered)
Veal 4 (170 / 180°C) 40-45 mins per 450g (1 lb) 1
(slow roasting) + 40 mins over
Veal 5 (190 / 200°C) 40-45 mins per 450g (1 lb) 1
(foil covered)
Poultry / Game 4 (170 / 180°C) 25-30 mins per 450g (1 lb) 1
(slow roasting) + 25 mins over
Poultry / Game 5 (190 / 200°C) 25-30 mins per 450g (1 lb) 1
(foil covered)
Casserole Cooking 2 (150°C) 2 - 21/2 hrs 1 or 2
Note: If soft tub margarine is used for cake making, we would recommend using the all in one method and to
reduce the temperature by 1 gas mark. Temperatures recommended in this chart refer to cakes made with block
margarine or butter only.
BAKING Gas Mark Time (approximate) Shelf Positions Deflector
in mins tray ?
Scones 7 15 - 20 1 Yes
Small Cakes 5 15 - 20 1 Yes
Victoria Sandwich 5 15 - 20 1 Yes
Sponge Sandwich(fatless) 5 15 - 20 1 Yes
Swiss Roll 7 10 - 15 1 Yes
Semi-rich fruit cakes 4 60 – 75 (7” tin) 1 Yes
Shortcrust Pastry 5 or 6 Time dependant on recipe 1 No
Puff Pastry 7 Time dependant on recipe 1 No
Yorkshire Pudding 7 25 - 30 1 Yes
Individual Yorkshire Puddings 7 20 - 30 1 Yes
Baked Custard 2 35 - 45 1 Yes
Page 23

23
G141
CLEANING AND MAINTENANCE
In the interests of both safety and hygiene your
Belling gas cooker needs to be kept clean. A buildup of grease or fat from cooking could cause a fire
hazard.
WARNING! For your own safety, always switch off
your cooker at the mains supply and allow to cool
before cleaning.
Never use excessive amounts of water to clean your
cooker, and remember that your cooker is heavy -
take care when pulling it out for access.
NEVER USE STEAM CLEANERS ON THIS APPLIANCE.
COOKER EXTERIOR
All the parts of the cooker exterior (stainless steel, side
panels, door glass) must be cleaned frequently with a
mild detergent and a little water and then dried with a
soft cloth.
On painted or stainless steel surfaces, do not use
aromatic or aliphatic solvents to remove spots or label
glue.
The pan support and burner caps can be cleaned with
warm soapy water . The aluminium burner caps can also
be cleaned in this way. Use a nylon brush to remove
any cleaning materials, water or dirt from the burner
ports. Do not wash the parts if they are still hot and
never use abrasive powders, pads or corrosive spray
products.
COOKER INTERIOR
The oven should be cleaned after each use to remove
cooking residuals and grease which, if burnt on when
the oven is used again, will form deposits or stains, as
well as unpleasant smells.
Do not leave vinegar, coffee, milk, salty wa ter or the
juice of lemon or tomato on enamelled surfaces for any
length of time. Always wash the accessories used.
The rod shelves, heat deflector shield and food support
grid can be cleaned using household cream cleanser
with a nylon pad or sponge. Heavier soiling may require
the use of a proprietary oven cleaner or steel wool pad,
but do not allow these to contact the door seals or plastic
parts of the cooker.
Only use oven cleaners, which carry the Vitreous Enamel
Development Council’s Approvals, symbol, and always
follow the manufacturer instructions for use.
The manufacturer cannot be held responsible for any
damages caused by incorrect cleaning.
Page 24
24
G141
CLEANING AND MAINTENANCE
OVEN DOOR SEAL
The oven door seal guarantees the correct functioning
of the oven. We recommend you:
•clean it with warm soapy water, avoiding abrasive
products.
• check its condition from time to time.
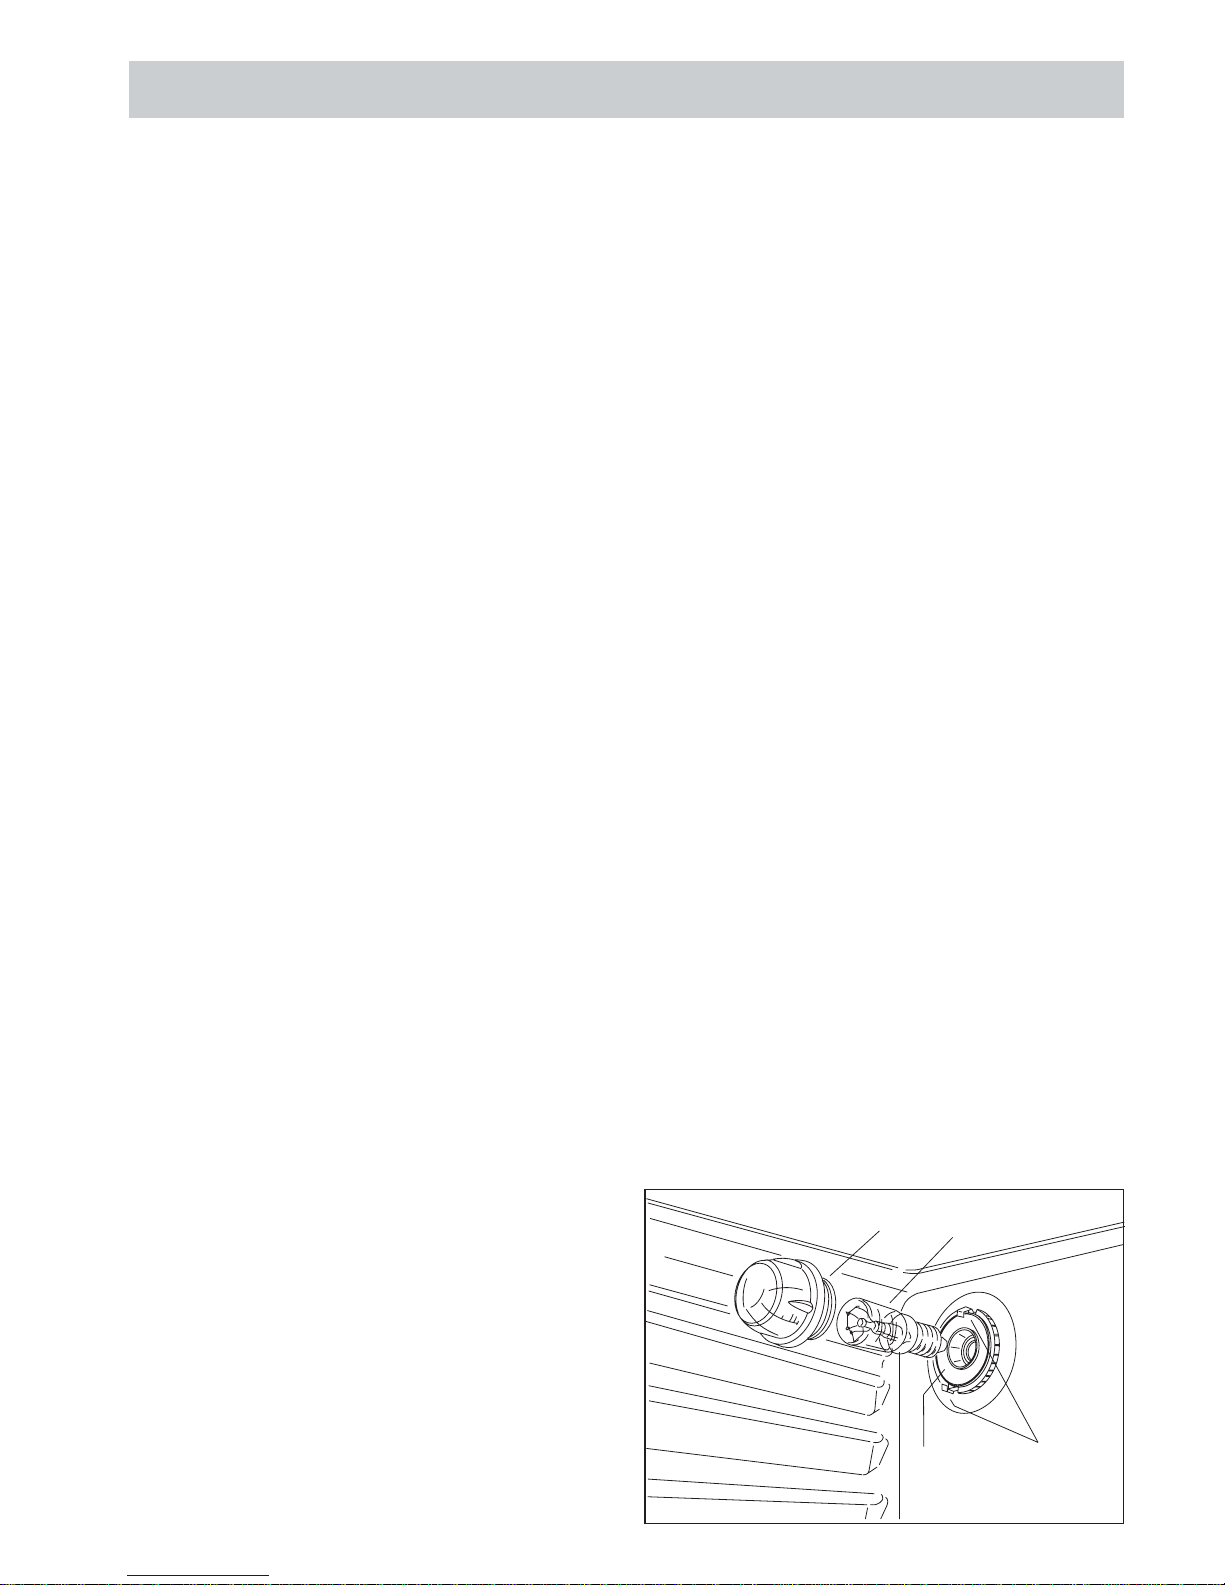
CHANGING THE OVEN LAMP - main oven only
WARNING: TURN OFF THE COOKER ELECTRICITY
SUPPLY BEFORE REPLACING LAMP.
Open the oven door and remove the rod shelves. Do
use a thick cloth to grip the light glass dome (C) and
bulb, unscrew anti-c lockwise and lift out.
Reach into the aperture, and carefully unscrew the faulty
lamp (L) anti-clockwise. Fit replacement lamp (15W
300°C SES), and refit dome. If necessary clean dome in
warm soapy water before drying completely.
NOTE: Oven bulb replacement is not covered by your
guarantee. Please telephone our Customer Care
Centre on 0151 432 7999.
DISPOSAL OF YOUR PRODUCT
To minimise the risk of injury to children please dispose
of your product carefully and safely. Remove all doors
and lids (where fitted). Remove the mains cable (where
fitted) by cutting off flush with the appliance and always
ensure that no plug is left in a condition where it could
be connected to the electricity supply.
To help the environment, Local Authority instructions
should be followed for the disposal of your product.
L
C
P
M
Page 25
25
G141
IS THERE SOMETHING WRONG WITH YOUR COOKER?
Before contacting your Service Centre or Installer, check the guide below, there may be nothing wrong with your
cooker.
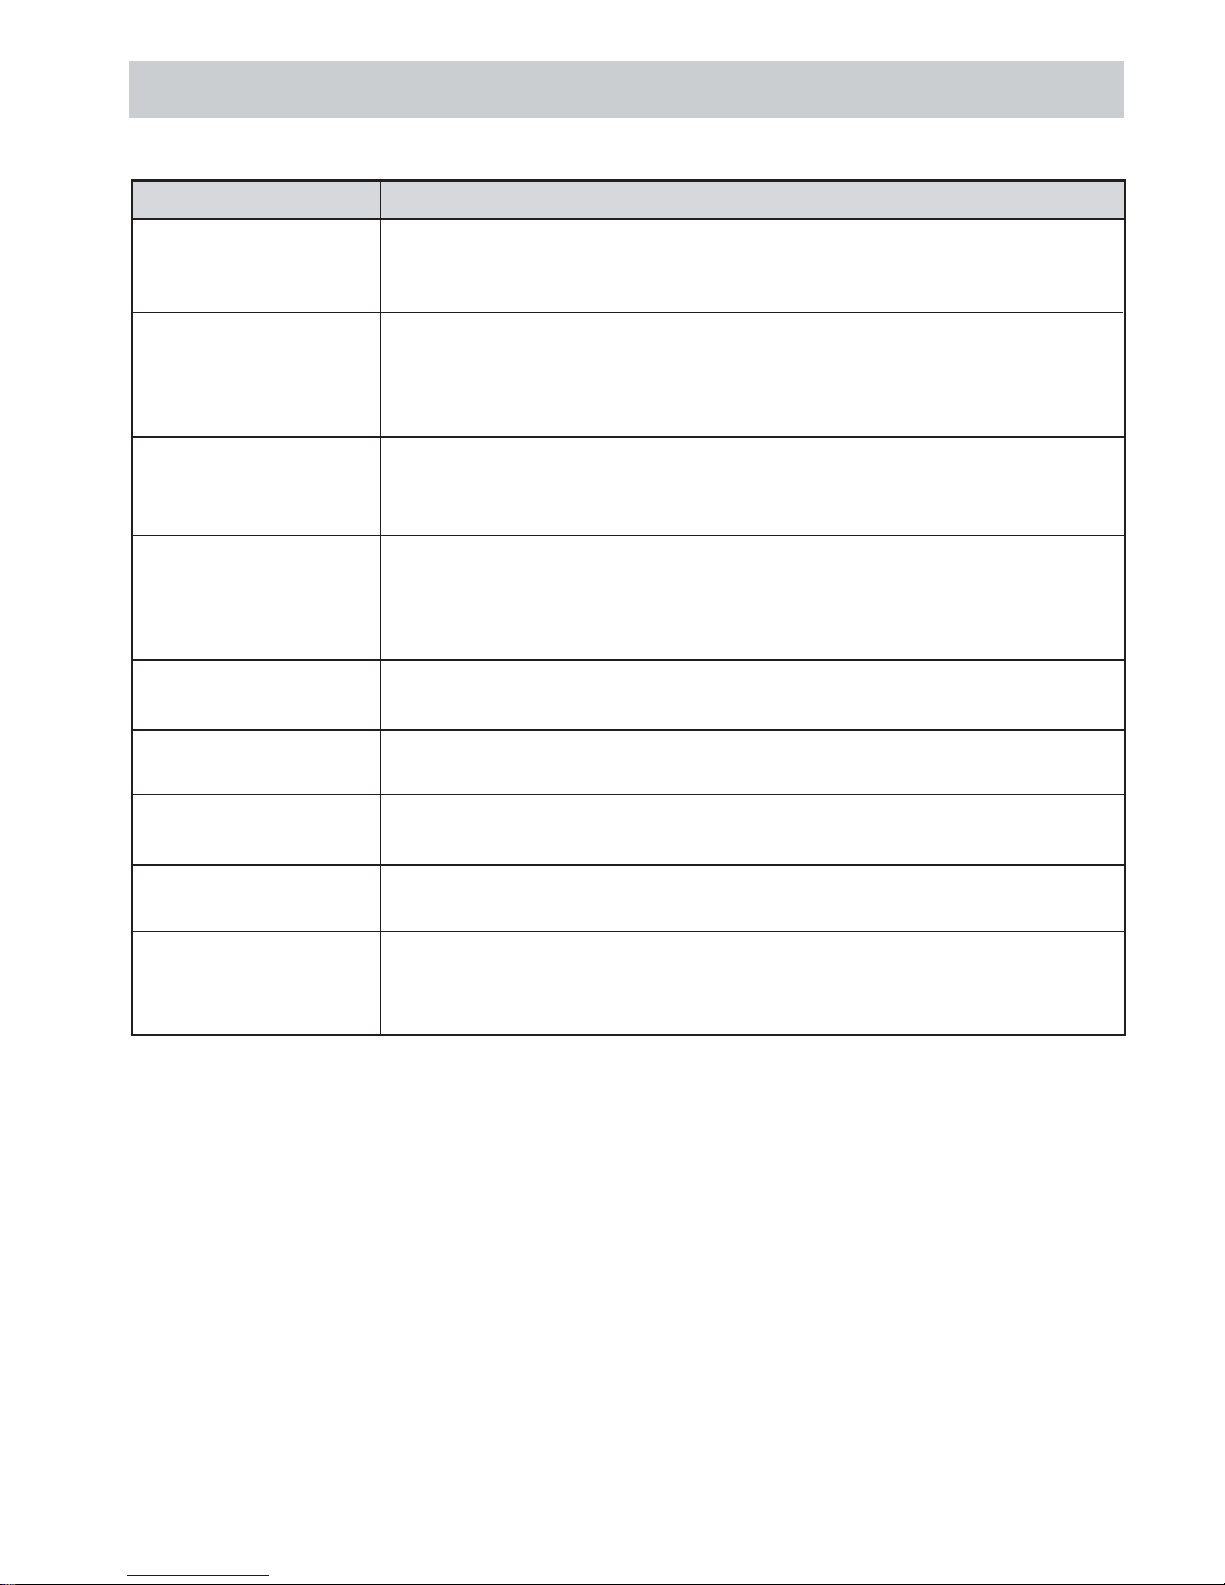
Problem Check
Ignition does not work. If all burners fail to ignite
Check that the electricity supply is turned on.
Check that sparks appear at all the burners; a clicking noise should be heard.
If the electricity supply has failed, the hob burners, grill and oven(s) can be lit with
a match.
If one burner fails to ignite
Check that the burner is dry and that spillage of food or cleaning fluid remains are
not affecting the ignitor or burner ports.
Clean away any debris with a dry nylon brush such as an old toothbrush. If a wire
wool pad has been used for cleaning around the burner ensure the ignitor is free
from any stray strands. Any water on the burner should be dried with a cloth
or kitchen towel.
Timer flashing The electricity supply to the cooker has been interrupted. The timer must be reset.
Timer bleeping Press timer button 1 to cancel.
Oven lamp does not work. The oven lamp is not covered by the guarantee. The part is easily changed - see
the section on Oven Lamp Replacement. A new lamp may be obtained from our
Customer Care Centre:- 0151 432 7999
Page 26
26
G141
IS THERE SOMETHING WRONG WITH YOUR COOKER?
Are cooking results not satisfactory?
Problem Check
Grilling
Uneven Cooking front Ensure that the grill is positioned centrally below the grill burner
to back
Baking - General
Uneven rising of cakes Ensure that the oven shelves are level by using a spirit level on the rod shelf and
adjusting the wheels/feet. The oven should be checked both left to right and front
to back.
Sinking of cakes The following may cause cakes to sink:
1. Cooking at too high a temperature.
2. Using normal creaming method with soft margarine.
Over/Under cooking Refer to the cooking times and temperatures given in the cooking charts provided,
Fast/Slow cooking however, it may be necessary to increase or decrease temperatures by 1 gas mark
to suit personal tastes. Do not use oven/meat tins greater than 56mm (21/4") in
height.
Top Oven Baking
(DB60, G707 and G708 only)
Uneven cooking front Ensure that any cooking utensils are positioned centrally below the grill element
to back
Uneven rising of cakes Ensure that the shelf is level (see above) and that the food is positioned centrally
on the shelf.
Overcooking Remember to reduce cooking temperatures by 1 gas mark from standard recipes
when using the Top Oven
Food is taking too long Ensure that any cooking utensil used in the top oven is not larger that 300 x225mm
to cook (12" by 9"), e.g. The main oven meat pan.
Only cook one item at a time to avoid overloading the oven.
Page 27
27
G141
SERVICE
Belling Appliances, Stoney Lane, Prescot, Merseyside L35 2XW
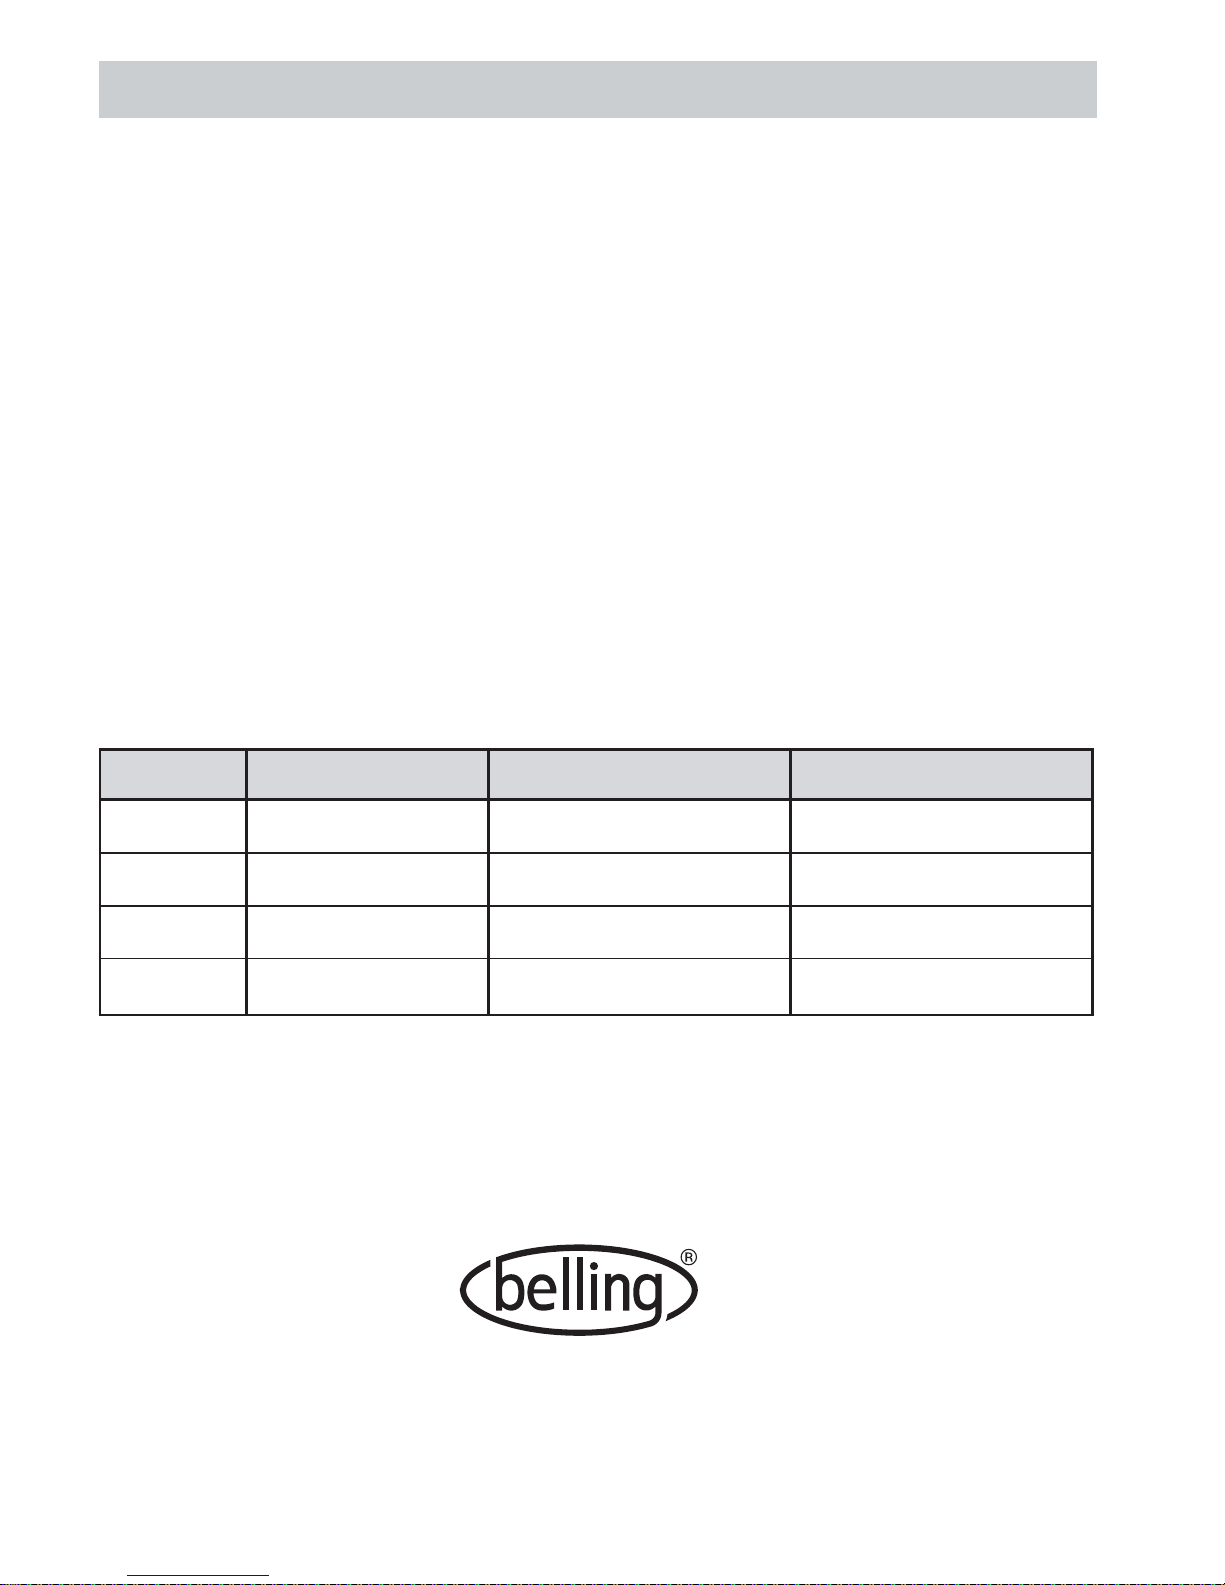
Date Nature of fault Parts Replaced or Repaired Authorised Stamp or Signature
Please check your guarantee card for who to contact for service. Remember that service agents may charge for
visits (even during the guarantee period) if nothing is found to be wrong with the appliance, so always check the
instructions to make sure you have not missed anything.
Belling Appliances Customer Care Centre (Service)
Tel: 0151 432 7999.
Before contacting a service agent, please note the following details about your cooker:
Model Number ..............................................
Serial Number ..............................................
Date of Purchase ..............................................
In order to provide a complete service history for your Belling product, please ask the service engineer to record the
appropriate details in the chart below.
IMPORT ANT NOTICE: - In line with our continuing policy of research and development, we reserve the right to alter
models and specifications without prior notice.
This instruction manual is accurate at the date of printing but will be superceded and should be disregarded if the
specifications are changed.
Page 28

461305197 19/01/2004 Stampa TLF G141/01
 Loading...